

Page 1
Get Started
Prise en main
Cover (Page 1)
Page 2
OFF
ONON
Eve Light Switch requires a neutral wire and replaces a single pole switch. Not
intended for use in 3-way installations where lights are controlled by more than
one switch. Only for use with copper or copper clad wire in dry, indoor locations.
If you are unsure or uncomfortable about installing Eve Light Switch, consult
a qualified electrician. To be installed and/or used in accordance with
appropriate electrical codes and regulations.
Max 18 00 W (resistive), 600 W (incandescent), 120 VAC
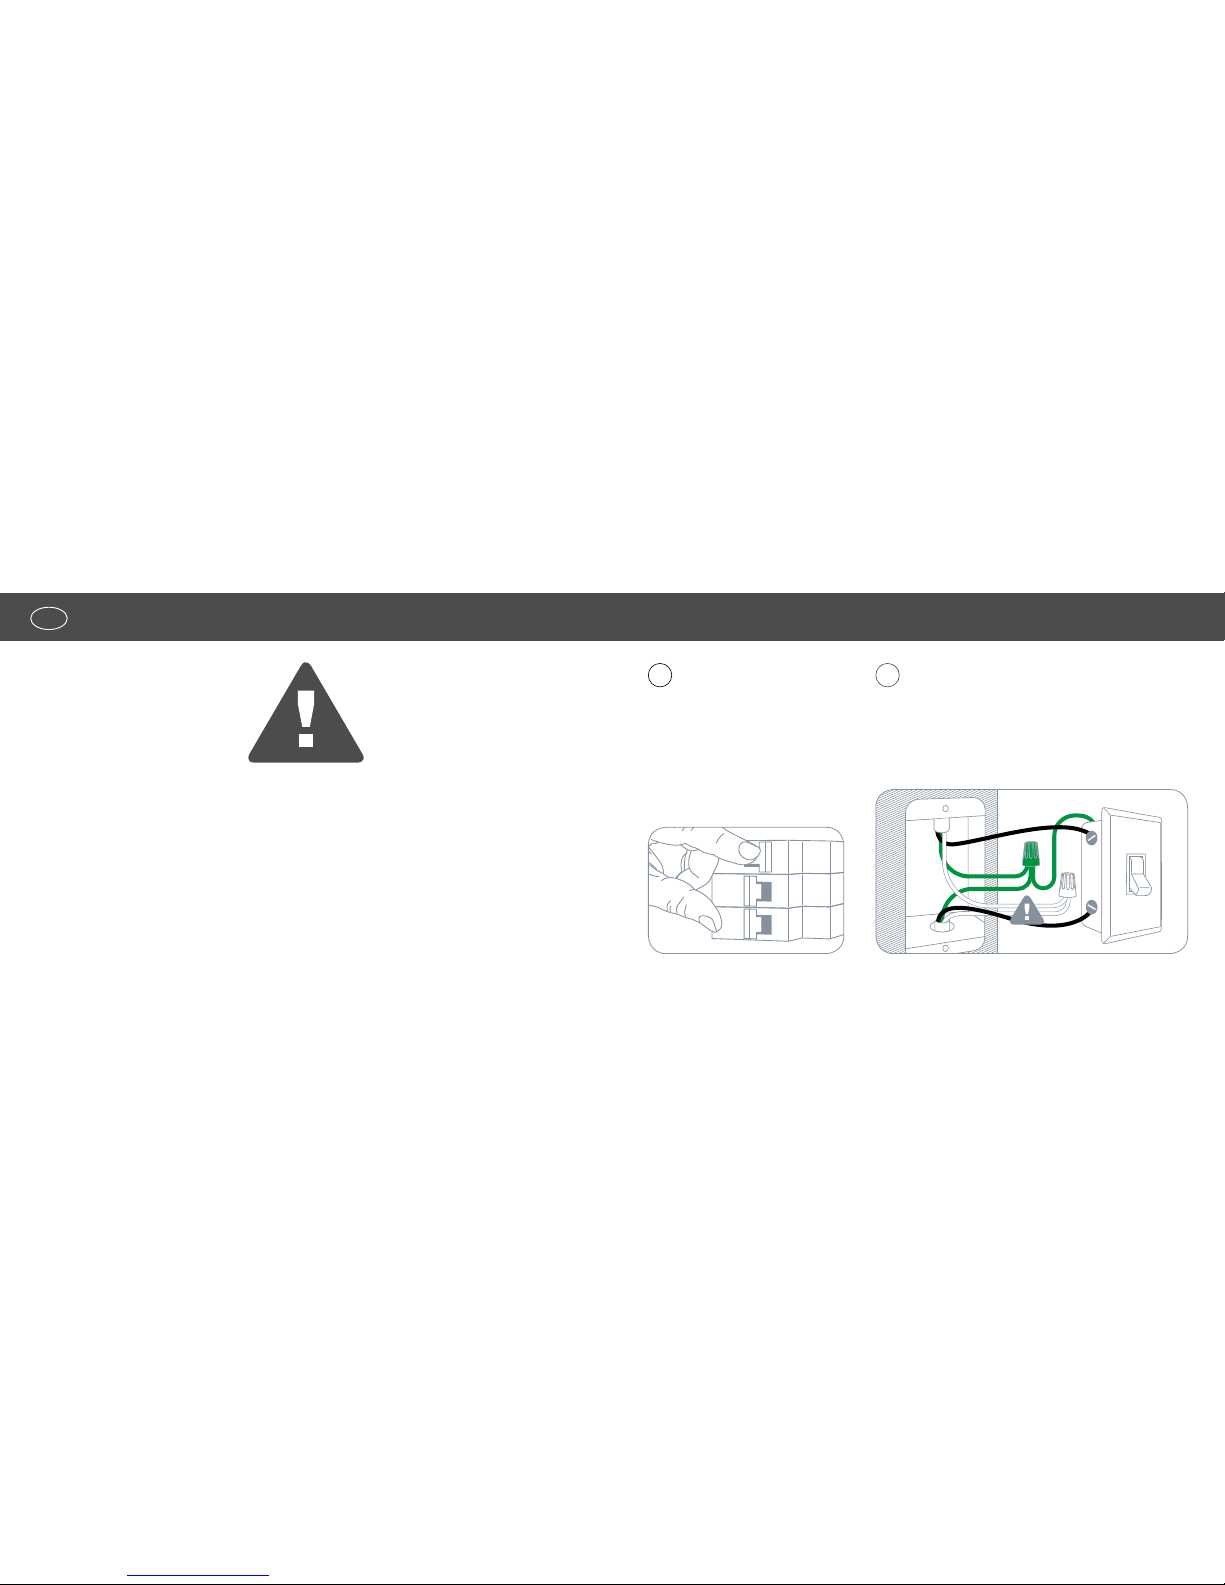
Remove your existing wall plate and light
switch. Only proceed with the installation if
there is a neutral wire (usually white) in the
switch box.
2
Turn off power at the circuit
breaker that controls the light
switch. Ensure power is off by
switching your existing light
switch on and off multiple
times.
1
Get Started
EN
(2) (3)
Page 3
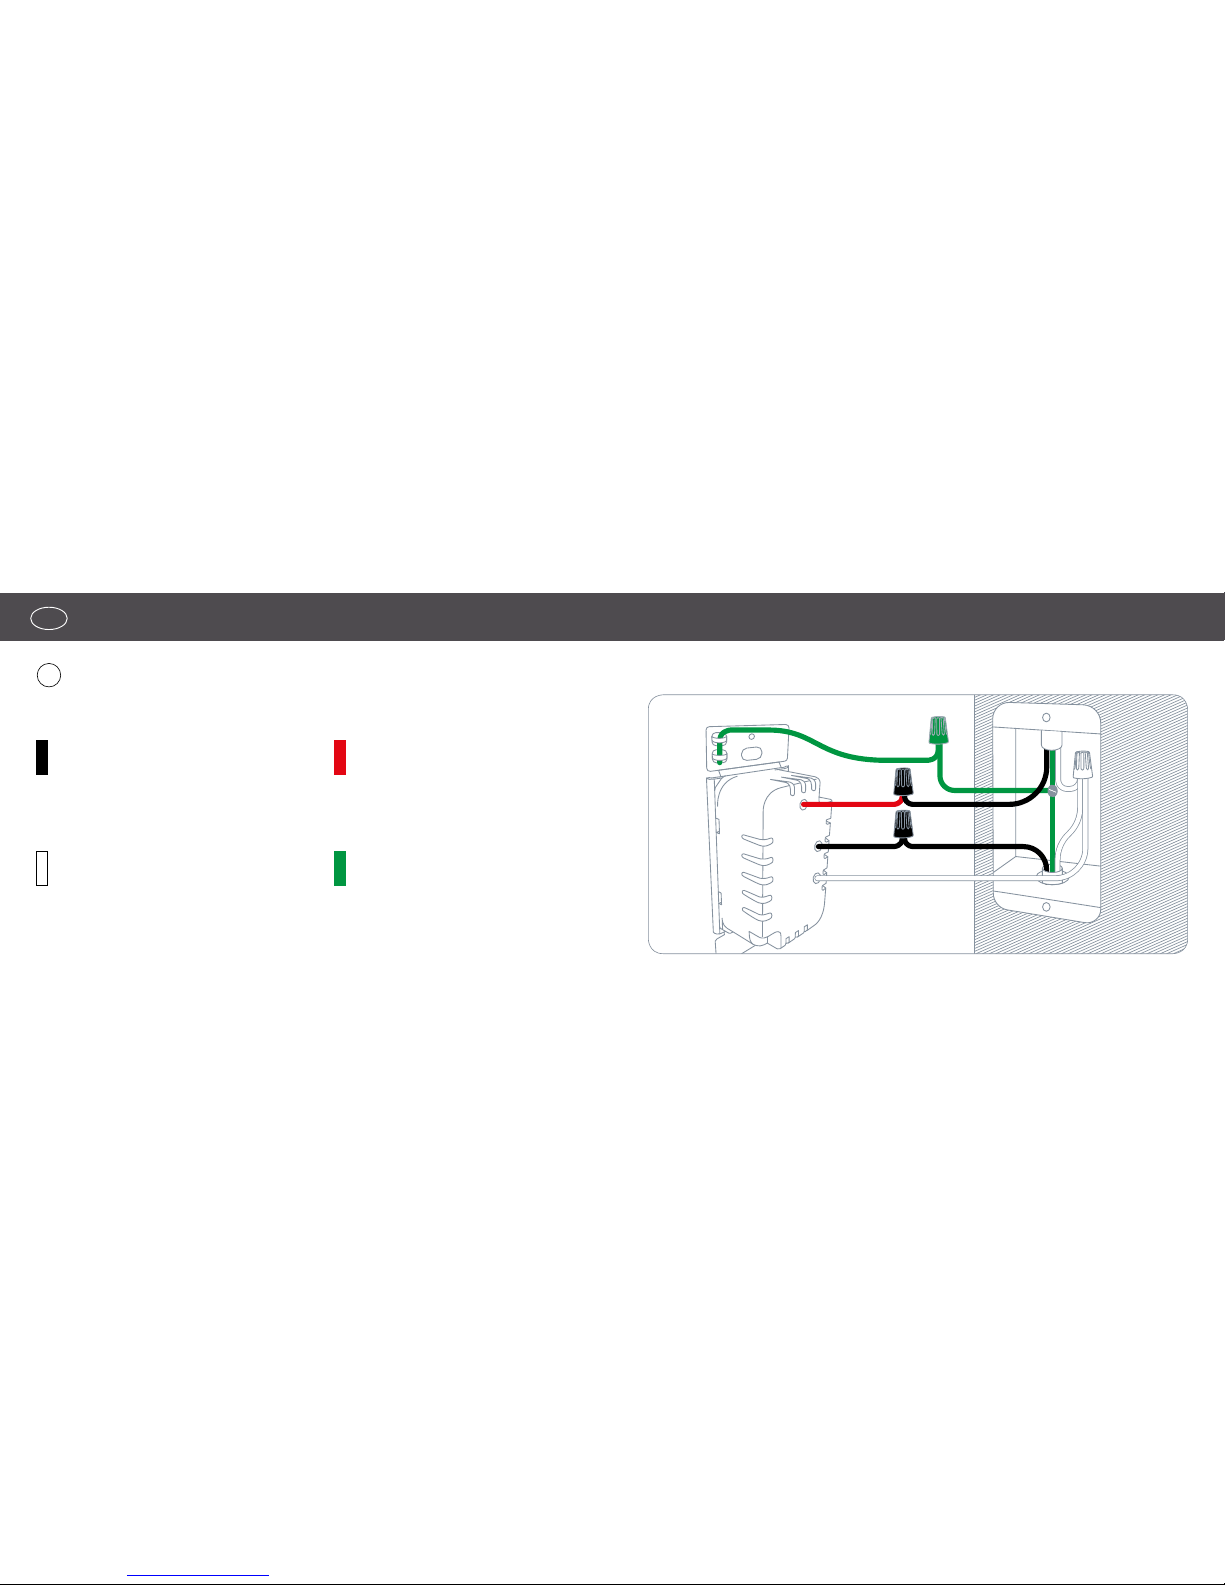
Connect Eve Light Switch using wire nuts:
Live wire, usually black, may
exit to the bot tom of your wall
Neutral wire, usually white, required,
but not always present
Ground wire, usually
green or bare, optional
Load wire, usually black, may
exit to the top of your wall
3
If you are not sure which of the two wires is live and which is load, simply try one
configuration. Swapping live and load will not cause any damage to Eve Light Switch.
If no neutral wire is present, Eve Light Switch
is not compatible at this location.
Get Started
EN
(4) (5)
Page 4
ON
ON
ON
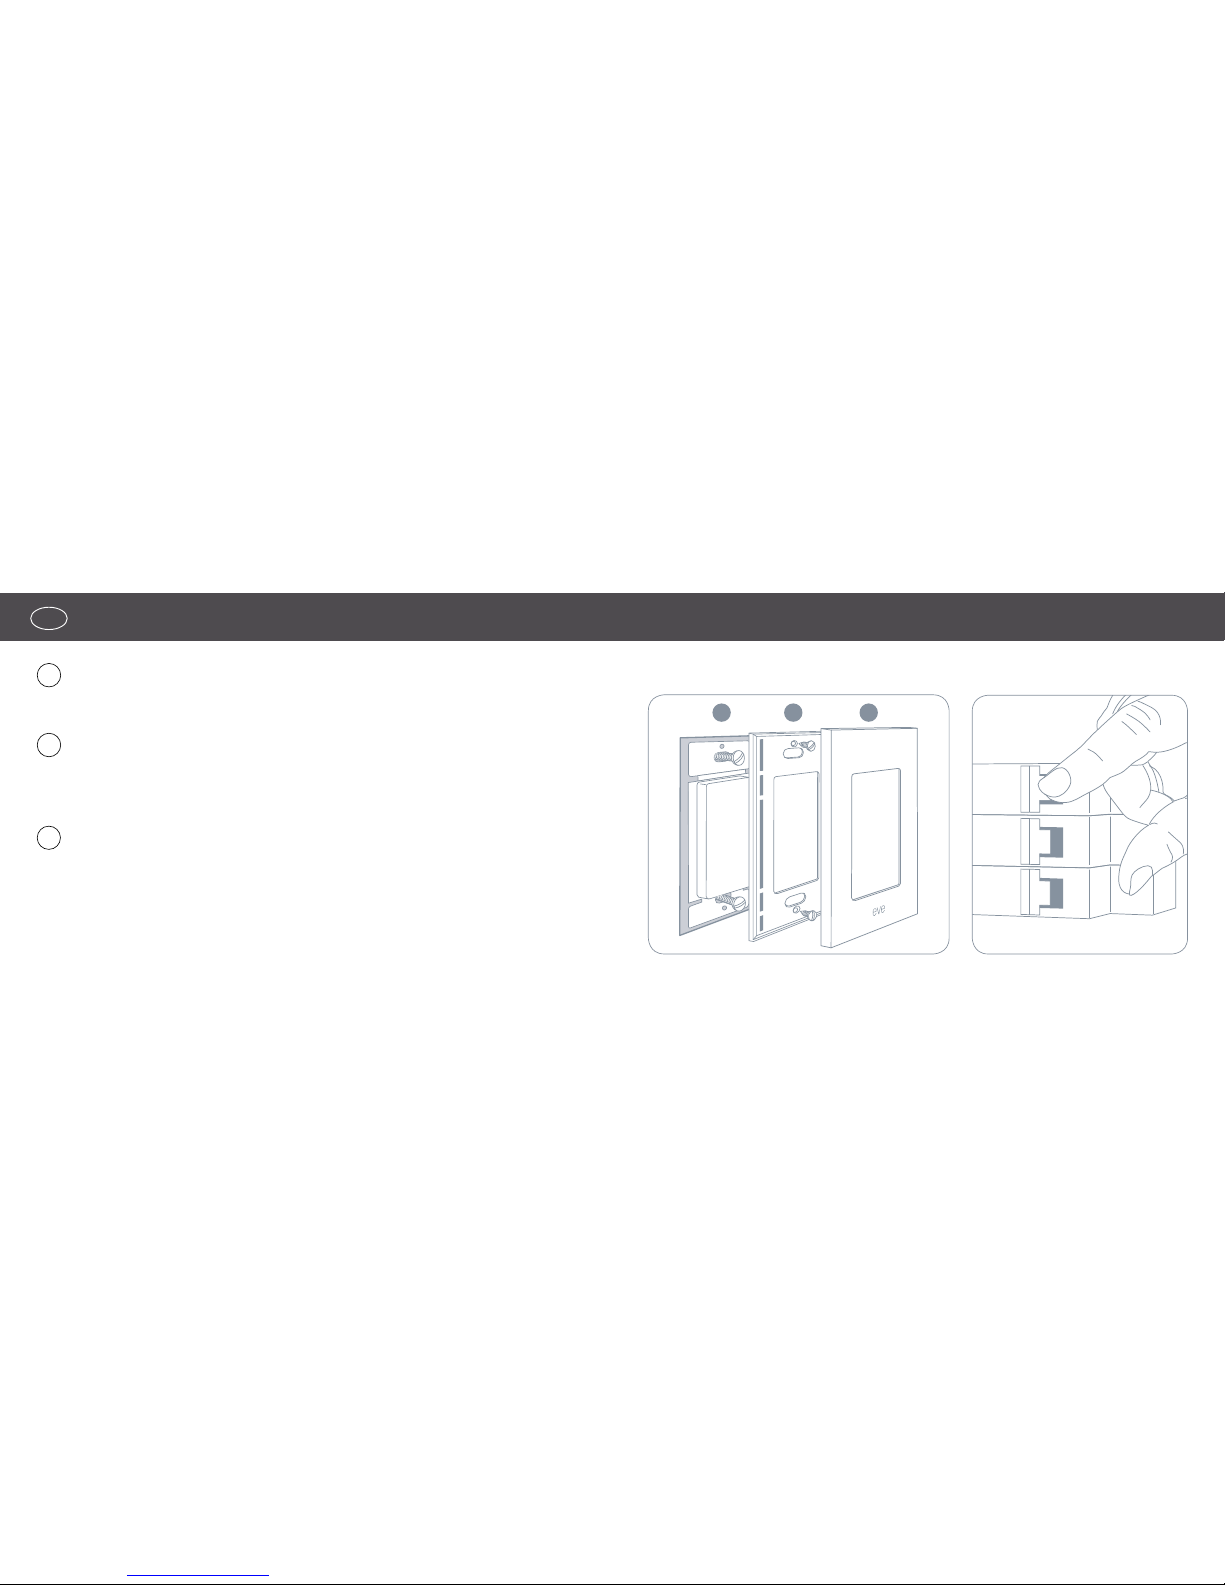
4 5a 5b
Get Started
EN
Mount Eve Light Switch into the wall.
Screw in the snap plate (5a) and push the face plate onto it (5b). Alternatively, use
your existing wall plate.
Turn on power at the circuit breaker that controls the light switch.
Tap Eve Light Switch - your lights should now turn on.
If your lights do not turn on, your live and load wires might be swapped. Turn off
power at the circuit breaker and try swapping them.
4
5
6
(6) (7)
Page 5

Download the Elgato Eve app from
the App Store.
7
Get Started
EN
Open the Elgato Eve app and tap
Add Accessory. Eve will now guide
you through the setup process.
8
If you have already set up another
accessory, go to the Eve settings to add
Eve Light Switch to your home.
Elgato Eve
(8) (9)
Page 6

Enjoy
Switch your lights on and off
from the app or using Siri.
You can also tap Eve Light Switch
to turn your lights on and off.
www.elgato.com/install-lightswitch
Get Help
EN
(10) (11)
Page 7

Démontez la plaque de finition existante ainsi
que l‘interrupteur. Ne poursuivez l‘installation
que si le boîtier de l‘interrupteur contient bien
un fil neutre (généralement blanc).
21
Eve Light Switch nécessite un fil neutre et remplace un interrupteur unipolaire.
Ce produit n‘est pas adapté aux installations à trois voies, dans lesquelles les
points lumineux sont commandés par plusieurs interrupteurs. Il ne doit être
utilisé qu‘avec des câbles en cuivre ou des câbles CCA (aluminium revêtu de
cuivre), dans des locaux secs et en intérieur.
En cas de doute ou de dif ficultés pour installer Eve Light Switch, renseignez-vous
auprès d‘un électricien qualifié. Ce produit doit être installé et/ou utilisé con-
formément aux normes et réglementations électriques applicables.
Max. 1800 W (charge résistive), 600 W (charge inductive), 120 VCA
Coupez l‘alimentation au niveau
du disjoncteur commandant
l‘interrupteur. Vérifiez que
l‘alimentation est coupée, en éteignant puis rallumant à plusieurs
reprises l‘interrupteur existant.
OFF
ONON
FR
Prise en main
(12) (13)
Page 8

Connectez Eve Light Switch en utilisant les capuchons de connexion :
Fil de phase, généralement noir ;
peut descendre vers le bas du mur.
Fil neutre, généralement blanc ; obligatoire, mais pas toujours présent.
Fil de terre, généralement vert
ou nu ; facultatif.
Fil de retour lampe, généralement
noir ; peut remonter vers le haut
du mur.
3
Si vous ne savez pas lequel des deux fils est le fil de phase et lequel est le fil de neutre,
essayez simplement l’un des deux branchements. L’interversion de ces deux fils ne risque
en aucun cas d’endommager Eve Light Switch.
En l‘absence de fil neutre, Eve Light Switch
n‘est pas compatible avec l‘ installation.
FR
Prise en main
(14) (15)
Page 9

ON
ON
ON
4 5a 5b
FR
Prise en main
Fixez Eve Light Switch au mur.
Vissez l‘enjoliveur (5a) et clipsez la plaque de finition (5b). Vous pouvez aussi
utiliser la plaque de finition existante.
Rétablissez le courant au niveau du disjoncteur qui commande l‘interrupteur.
Appuyez sur Eve Light Switch. En principe, le luminaire s‘allume.
Si la lumière ne s’allume pas, cela signifie que les fils sont peut-être inversés.
Dans ce cas, coupez l‘alimentation au niveau du disjoncteur, puis inversez-les.
4
5
6
(16) (17)
Page 10

FR
Prise en main
Téléchargez l‘app Elgato Eve sur
l‘A pp St ore.
7
Si vous avez déjà configuré un autre
accessoire, accédez aux réglages
d‘Eve pour ajouter Eve Light Switch à
votre domicile.
Ouvrez l‘app Elgato Eve et touchez
Ajouter un accessoire. Eve vous
guidera alors tout au long du processus de configuration.
8
Elgato Eve
(18) (19)
Page 11

Legal Information • Informations légales
This device complies with par t 15 of the FC C Rules and Industry Canada licence-exempt RSS standard(s).
Oper ation is subject to the following two conditions: (1) This device may not cause interference, and (2) this
device must ac cept any int erference received, in cluding interference that may cause undesired operation.
This equipment has been tested and found to compl y with the limits for a Class B digital device, pur suant
to par t 15 of the FCC Rules. These limits are designed to provide reasonable protection against h armful
interference in a residential installation. T his equipment generate s, uses and can radiate radio frequency
energy and, if not installed and used in accordance with the instr uctions, may cause harmful interference
to radio communications. However, there is no guarantee that interference will not occur in a particular
installation. If this equipment does cause harmful interfere nce to radio or tele vision reception, which can
be determined by turning the equipment off and on, you are encouraged to tr y to correct the interference
by one or more of the following measures: reorient or relocate the receiving antenna; increase the sep
aration bet ween the equipment and re ceiver; consult the dealer or an experienced radio/T V technician
for help.
This Class B digit al apparatus complies with Canadian ICE S-003.
This equipment complies with FCC RF and IC RSS-102 radiation exposure limits set for th for an uncon
trolled environment. This equipment should be installed and oper ated with a minimum distan ce of 0.5
centimeter s between the r adiator and your b ody. This transmitter must not be co-located or operating
in conjunction with any other antenna or t ransmitter. The antennas used for this transmit ter must be
installed to pr ovide a separation distance of at least 0.5 cm from all persons and must not be co-located
or operating in conjunc tion with any other antenna or transmitter.
Changes or modifications not expressly appr oved by Elgato Systems could void your authority to o perate
this device.
Le présent appareil est conforme aux CNR d’Industrie Canada applicables aux appareils radio exempts
de licence. L’exploitation e st autoris ée aux deux conditions suivantes : (1) l’app areil ne doit pas produire
de brouillage, et (2) l’utilisateur de l’appareil doit accepter tout brouillage radioélectrique subi, même si le
brouillage est susceptible d’en comprom ettre le fonctionnemen t. Cet appareil numérique de la classe B es t
conforme à la norme NMB -003 du Canada.
Cet équipement est conforme aux CNR-102 d’Industrie C anada. Cet équipement doit êtreinstallé et utilisé
avec une distance minimale de 0.5 ce ntimètres entre le radiat eur et votrecorps. Cet émetteur ne doit pas
être co-loc alisées ou op érant en conjonction avec au treantenne ou émetteur. Les antennes utilisées pour
cet émetteur doiven t être inst allés etfournir une distance de séparation d’au moins 0.5 centimètre de toute
pers onne et doit pas être co-située ni fonctionner en conjonction avec une autre an tenne ou émetteur.
Purpose of co ntrol: Operating control • Construction of the control: Independently wall mounted control
• Type 1 or Type 2 A ction: Type 1.B • Operating Time: Continuous • Control pollution degree: 2
For questions about Elgato pr oduct c ompliance with F CC regulations, ple ase contact:
Compliance Officer, Elgato Sy stems, 900 Kearny St. #750, San Francisco, CA 94133.
(20) (21)
Page 12

Reset • Réinitialisation
Please keep your HomeKit Setup Code in a safe place. You need it
to securely add Eve to your home, and nobody but you has a copy.
Conservez en lieu sûr votre code de configuration HomeKit. Ce code est
indispensable pour ajouter Eve au réseau de votre domicile, et personne
d‘autre que vous ne connaît ce code.
Product: 1EL104001000 • Model: 20EAH4101 • Part: 51EAH 4101
FCC ID: SNE-ELS-002 • IC: 11192A-ELS0 02
✁
(22) (23)
Page 13

Room • Pièce :
Notes • Remarques :
✁
BackCover with
Sticker Placement
(Page 24)
 Loading...