

Page 1

FM-298 Two Way Car Security
System with Remote Enginer Start
OWNER'S MANUAL
CONTENTS:
OPERATING INSTRUCTIONS
DESCRIPTION OF FUNCTIONS AND FEATURES
WIRE CONNECTION GUIDE
INSTALLATION GUIDE
Contents
www.elfinx.com
Page 2

Information to the User…..………………………………………………………………..…….. 1
Temporary Mute Mode…………………………………………………………………………..…
Remote Control Layout …………………………...………………………………………..……
Quick Reference Guide………………………………………………………………….…...…..
LCD Panel Layout………………………………………………………………………………..
2
3
4
Remote Control Operation……………………………………………………………………… 5
Active Pager Operations on Remote…………………………………………….…………………
Arming………………………………………………………………………….…………………
Disarming…………………………………………………………………………………………
Turning Off Alarm Sound……………………………………………………….…………………
Emergency Alert…………………………………………………………………………………..
5
5
5
5
5
Trunk Release……………………………………………………………………………………... 6
Silent Alarm Mode………………………………………………………………..……………… 6
Anti-Hijacking…………………………………………………………………………………… 6
7
Automatic Arming Mode (Optional)………………………………………………………….. … 7
Automatic Arming Mode ON/OFF Setting……………………………………………………...… 7
Remote Engine Start..……………………………………………………………………………
System Operation…………………………………………………………………………………
Arm Protection…………………………………………………………………………………………………
7
8
8
Automatic Re-arming……………………………………………………………………………… 8
Vehicle Intrusion Alert…………………………………………………………………………..… 8
Alarm Memory Mode…………………………………………………………………………..… 9
Memory Log Mode……………………………………………………………………………..… 10
Open Door Alert…………………………………………………………………………………… 10
Auto Central Lock………………………………………………………………………………… 10
Electronic/ Air Compressor Lock Interchange…………………………………………………..… 12
Remote Control Code Cancellation and Installation………………………………………… 13
Wire Connection Diagram.…………………………..……...…………………………………..
System Installation Guide……………………………….....…………………………..…..….....
14
15
Central Lock Installation Diagram…………………………….……………………………….. 16
Central Lock Installation Guide…………………………….……………………………….…. 17
Specifications…………………………………………………………………………………….. 18
Trouble shooting………………………………………………………………………………… 19
Trouble shooting………………………………………………………………………………… 20
Trouble shooting………………………………………………………………………………… 21
www.elfinx.com
Page 3
FINDING
RELEASE
Information to the user
This operation manual details the use of the device contained in the package.
It is recommended to look for an experienced technician for device installation.
Warning
Changes or modifications not expressly approved by the manufacturer will void the warranty and the
user’s authority to operate the device.
This device complies with Radio Frequency Rules in respective countries.
Operation is subject to the following two conditions:
1. This device may not cause harmful interference.
2. This device must accept any interference received, including interference that may cause
undesired operations.
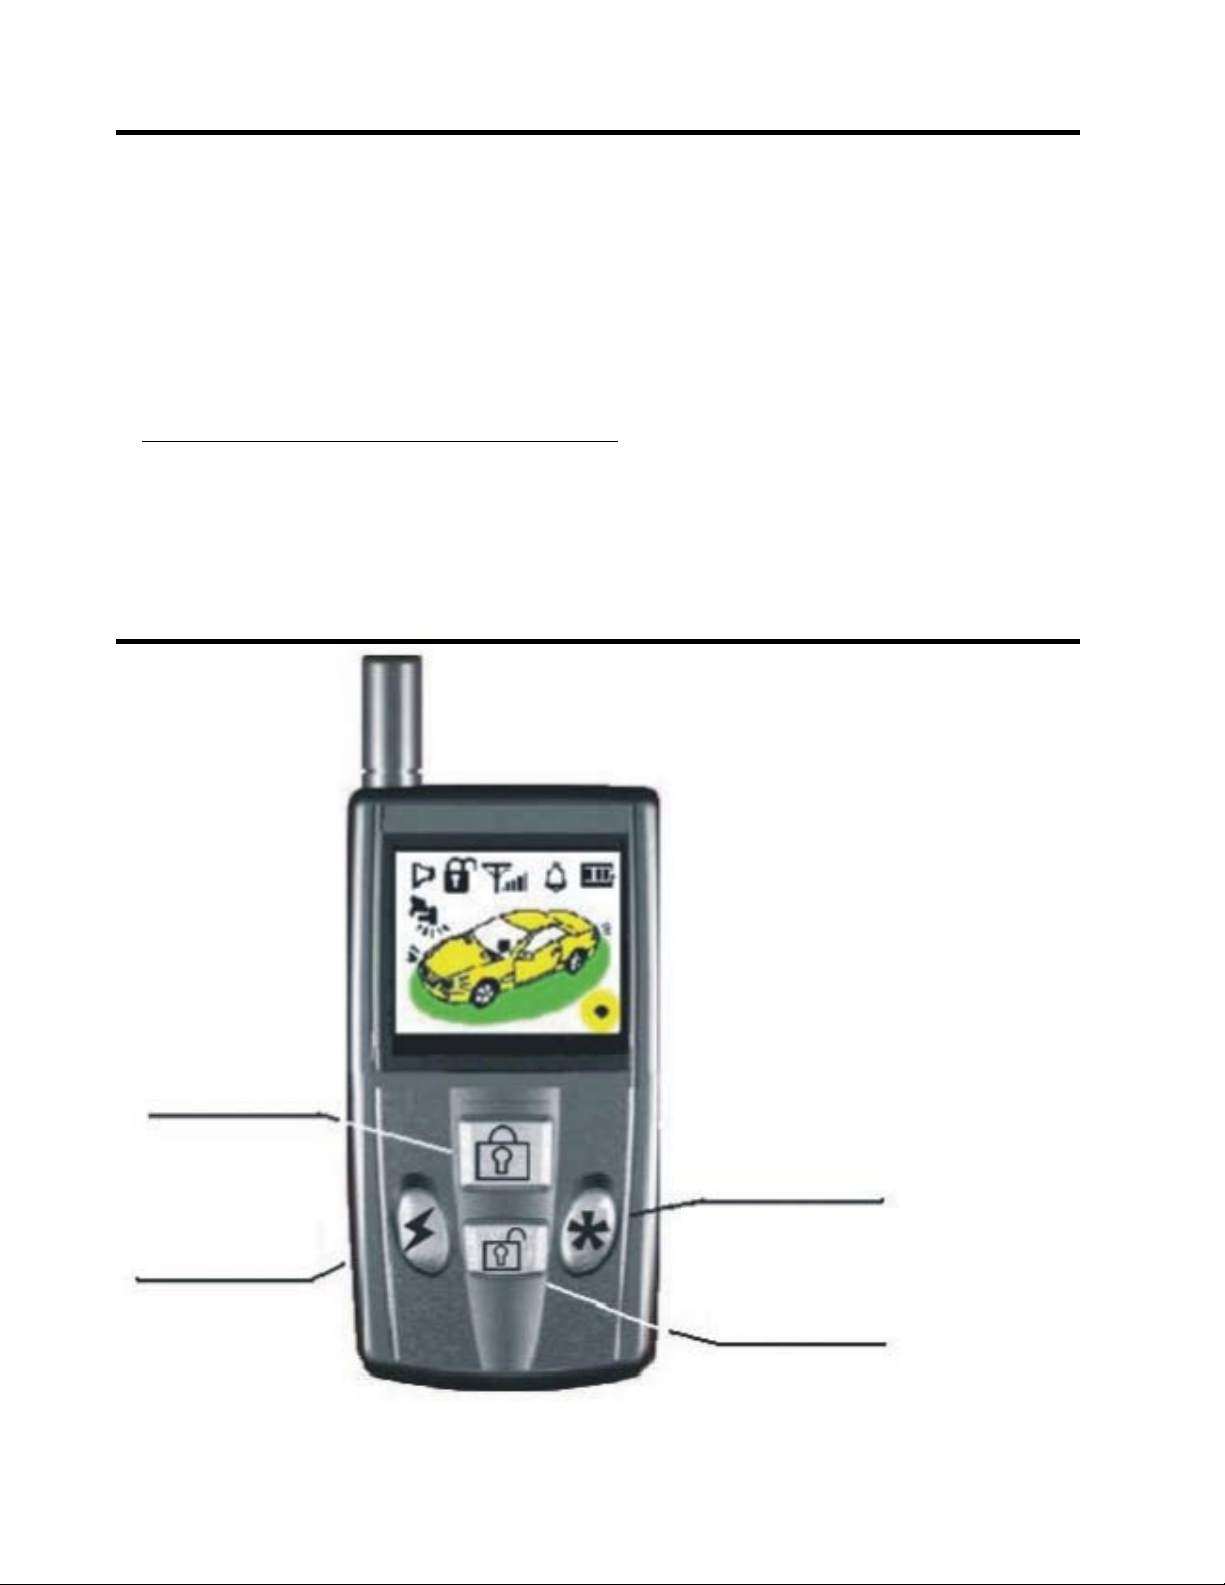
Remote Control Layout
ARMING
START
PANIC /
CAR
DISARMING /
TRUNK
2
www.elfinx.com
Page 4
Quick Reference Guide
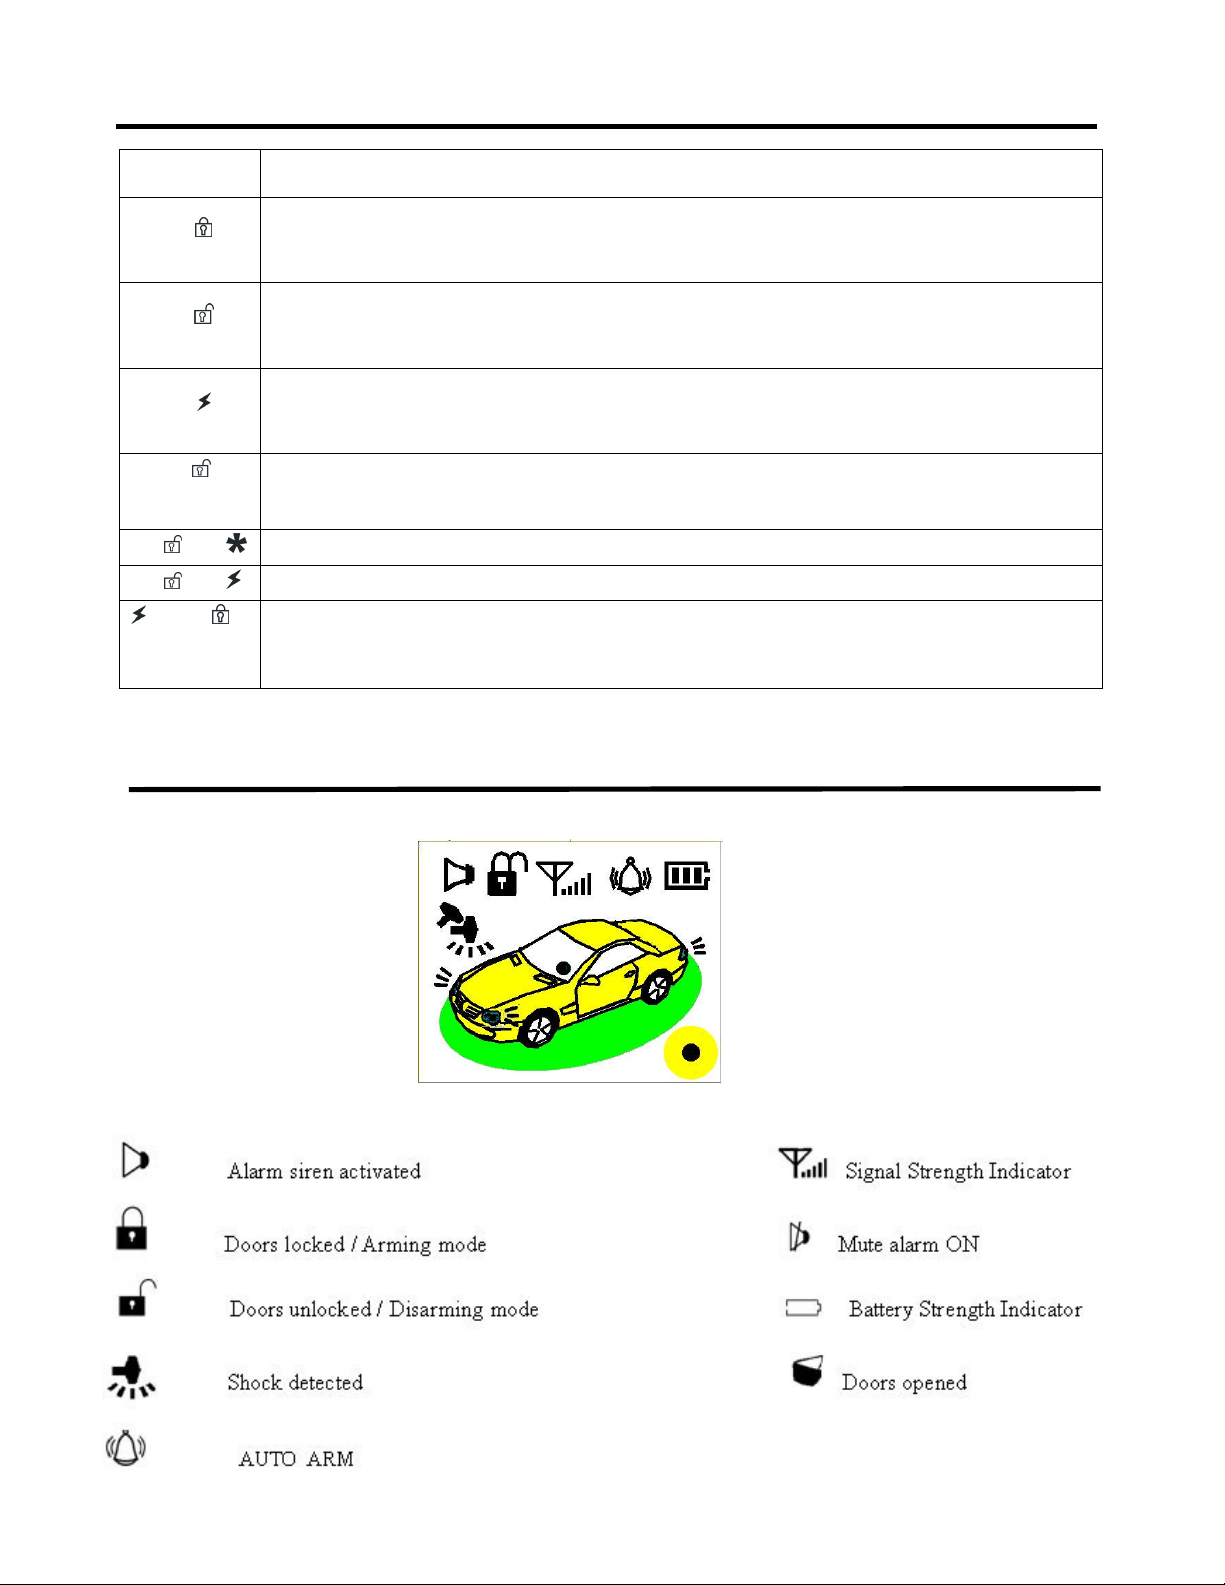
Button Function
Arming
Disarming
Panic
Trunk
Release
+
+
, then
twice
Press this button to lock the doors and enter arming mode.
During the arming mode, press this button to check the status of the vehicle.
During the arming mode, press this button to locate the vehicle with lights flashing.
Press this button to unlock the doors and enter disarming mode.
When the alarm is triggered, press this button to turn off the chirping sound from the
remote control and the siren sound from the vehicle. The vehicle is then disarmed.
Press this button to activate emergency panic alarm.
Press this button again to turn off the panic alarm.
Press this button for car finding with siren on and lights flashing
Press this button to open the trunk.
Silent Alarm mode ON/OFF
Automatic Arming mode ON/OFF
Anti-Hijacking
LCD Panel Layout
3
www.elfinx.com
Page 5
Remote Control Operation
Active Pager Operations on Remote
This DUAL-LINK paging remote keeps you in control with instant signals and actions in
response to events threatening your vehicle.
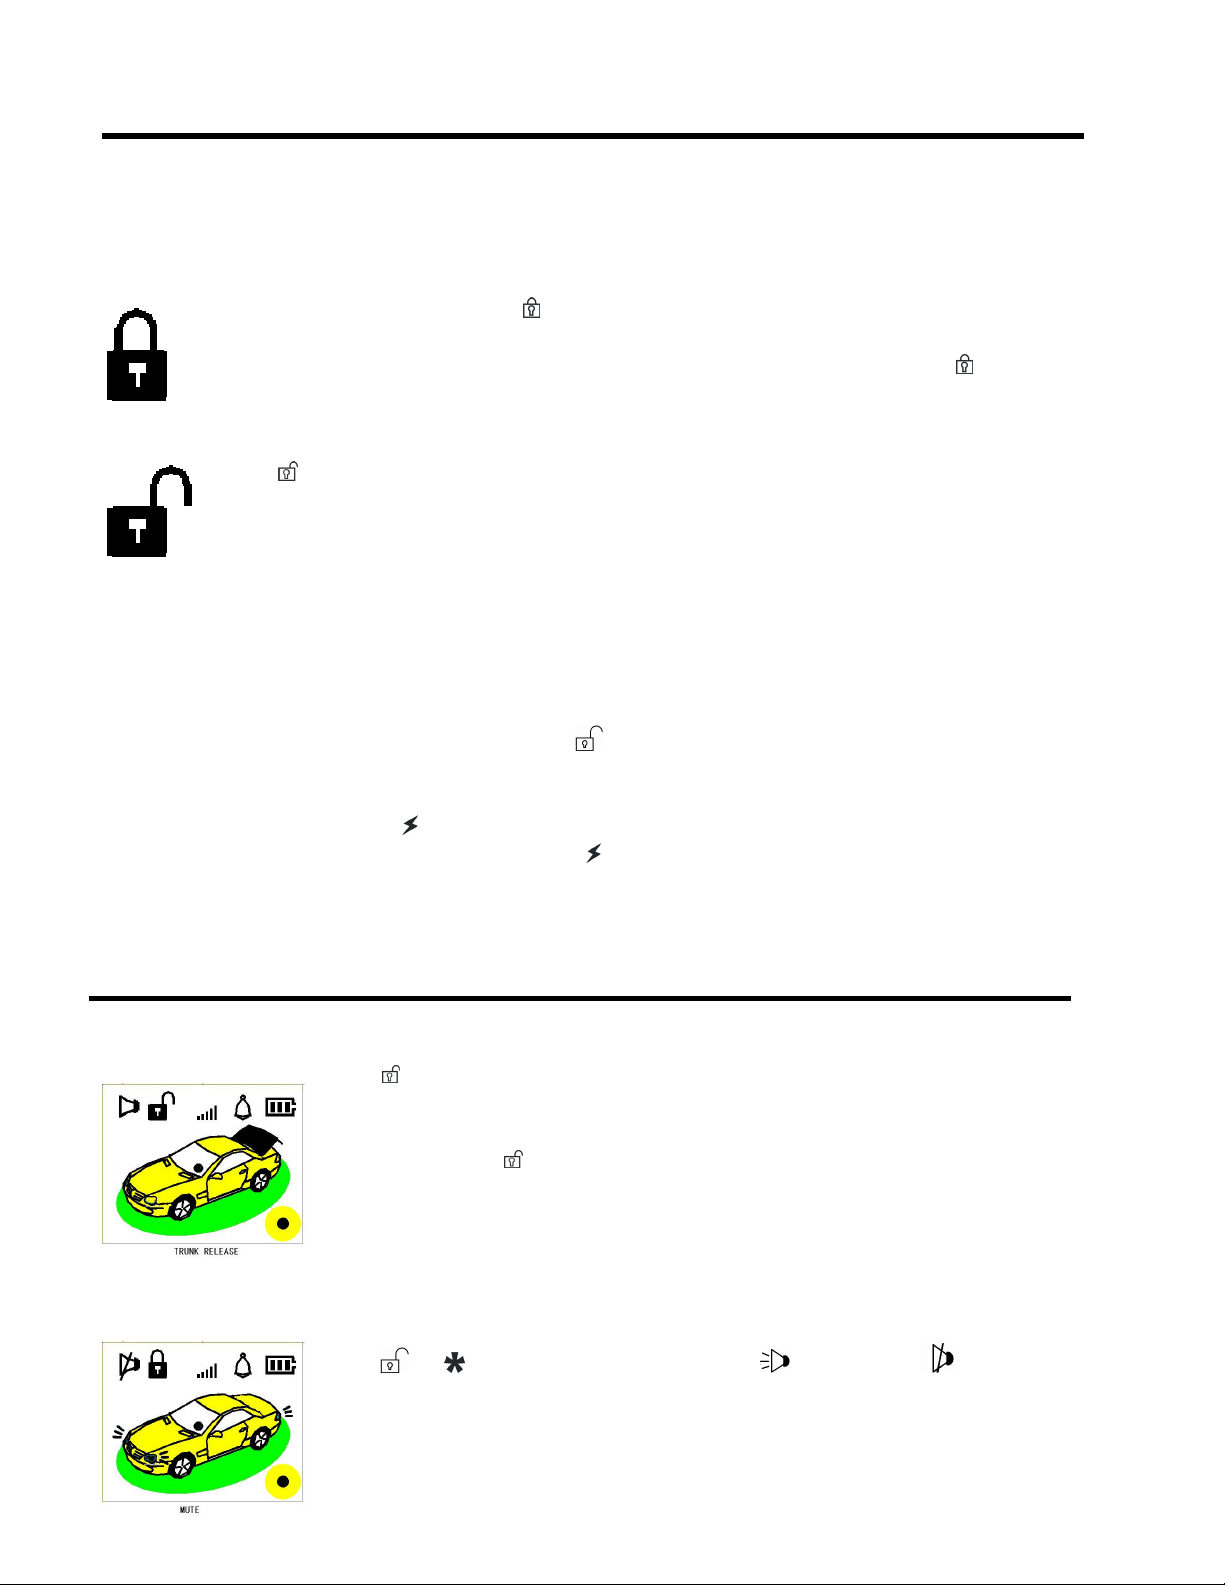
Arming
When all doors are closed, press button to arm the vehicle and lock the doors. The siren
then chirps once and the lights flash once. After about 8 seconds, the LED starts flashing.
NOTE: In the event that the vehicle is bumped within 3 seconds just after the button is
pressed, the system will delay entering into arming mode until the bumping disappears.
Disarming
Press button to disarm the vehicle and unlock the doors. The siren then chirps twice,
the lights flash twice, and the LED stops flashing.
NOTE: If the siren chirps more than 2 times, it indicates the system has been activated.
Please refer to section: System Operation - Alarm Memory Mode on for details.
NOTE: If no door is opened within approximately 25 seconds after disarming, the vehicle
will automatically return to arming mode again. Therefore, if you need to work for a longer
time while the vehicle is in disarming mode, it is suggested to open any of the doors after
disarming, thus suspend the auto re-arm function.
Turning Off Alarm Sound
When the system is triggered, press button to turn off the warning sound from the
remote control and the alarm sound from the vehicle.
Emergency Alert
At any time, press of the remote control, the siren then sounds and the lights flash for
about 25 seconds. To turn it off, press again.
NOTE: This function can be used for car finding in a large parking lot.
5
Remote Control Operation
Trunk Release
Press button to release trunk door. The lights flash once.
NOTE: This trunk release function is only applicable under the condition that
the trunk door is not connected with other doors
NOTE: Pressing button will also disarm the vehicle. If no door is opened
within approximately 25 seconds after disarming, the vehicle will automatically
return to arming mode again. Therefore, if you need to work for a longer time
while the vehicle is in disarming mode, it is suggested to open any of the doors
after opening the trunk, thus suspend the auto re-arm function.
Silent Alarm Mode
Turning ON the Silent Alarm Mode:
Press + for 1 second, the speaker icon is changed to . All chirp
sounds from normal operations as well as alarm sounds triggered by shock
sensing will be turned off. However, the alarm will still be active if any of the
doors is opened or engine is started illegally.
Turning OFF the Silent Alarm Mode:
www.elfinx.com
Page 6

Press + for 1 second again, the speaker icon returns.
Anti-Hijacking
If the vehicle is being hijacked, press once, the siren keeps on and lights keep flashing. Then press
within 8 seconds, the siren then off but the lights keep flashing. Finally, press again within 3
seconds, the lights stop flashing. The Anti-Hijacking function is then activated. After 15 seconds,
the engine power will be cut off, the siren will back on and lights will flash. To cancel the function,
press button.
NOTE: The wirings must be connected correctly to achieve the Anti-Hijacking function.
6
Remote Control Operation
Temporary Mute Mode
When the system is triggered or calling for emergency help, the siren will blare. By pressing or
or button, the siren can be turned off temporarily.
Automatic Arming Mode (Optional)
The system will remind the user to arm the vehicle by chirping the siren 5 times within 20 seconds.
After that period, the system will enter arming mode automatically without any remote operations.
INSTALLATION NOTE: The jumper (JP) in the main unit must be in short circuit to facilitate this
function. If the JP is in open circuit, the automatic arming mode will be suspended. The system will
then give reminders to the user only.
Automatic Arming Mode ON/OFF Setting
Press + for 1 second, the icon appears indicating that Automatic Arming Mode is ON. To
cancel, press + for 1 second again. The default setting is OFF.
Remote Engine Start
Press button for 1 second, the remote chirps once and has the engine icon at “STOP”. Press
button for 1 second again within 5 seconds, the engine begins to start after being proper heated. After
that, the system will check the vehicle status, the remote will then report the vehicle status with music
sounds and engine icon at “RUNNING”. From then, the light will flash once every 5 seconds. This
state will keep on for 15 minutes after the engine is being started. During this period, the engine will
be cut off automatically if the button is pressed for 1 second.
NOTE: After the engine is started, open any of the doors and from then the user has 30 seconds to
insert the key or apply the foot-brake. If the user fail to do so, the engine will be cut off automatically.
NOTE: Insert the key in the KEY ON position, not in the START-MOTOR position.
7
System Operation
Arming Protection
During the arming mode, the alarm will be triggered if any intrusive activity is detected. Any triggered
alarm status will be reported to the remote control for your instant action.
Automatic Re-Arming
If any of the doors is not opened within approximately 25 seconds after disarming, the doors will be
locked automatically and the vehicle returns to arming mode again.
www.elfinx.com
Page 7
Vehicle Intrusion Alert
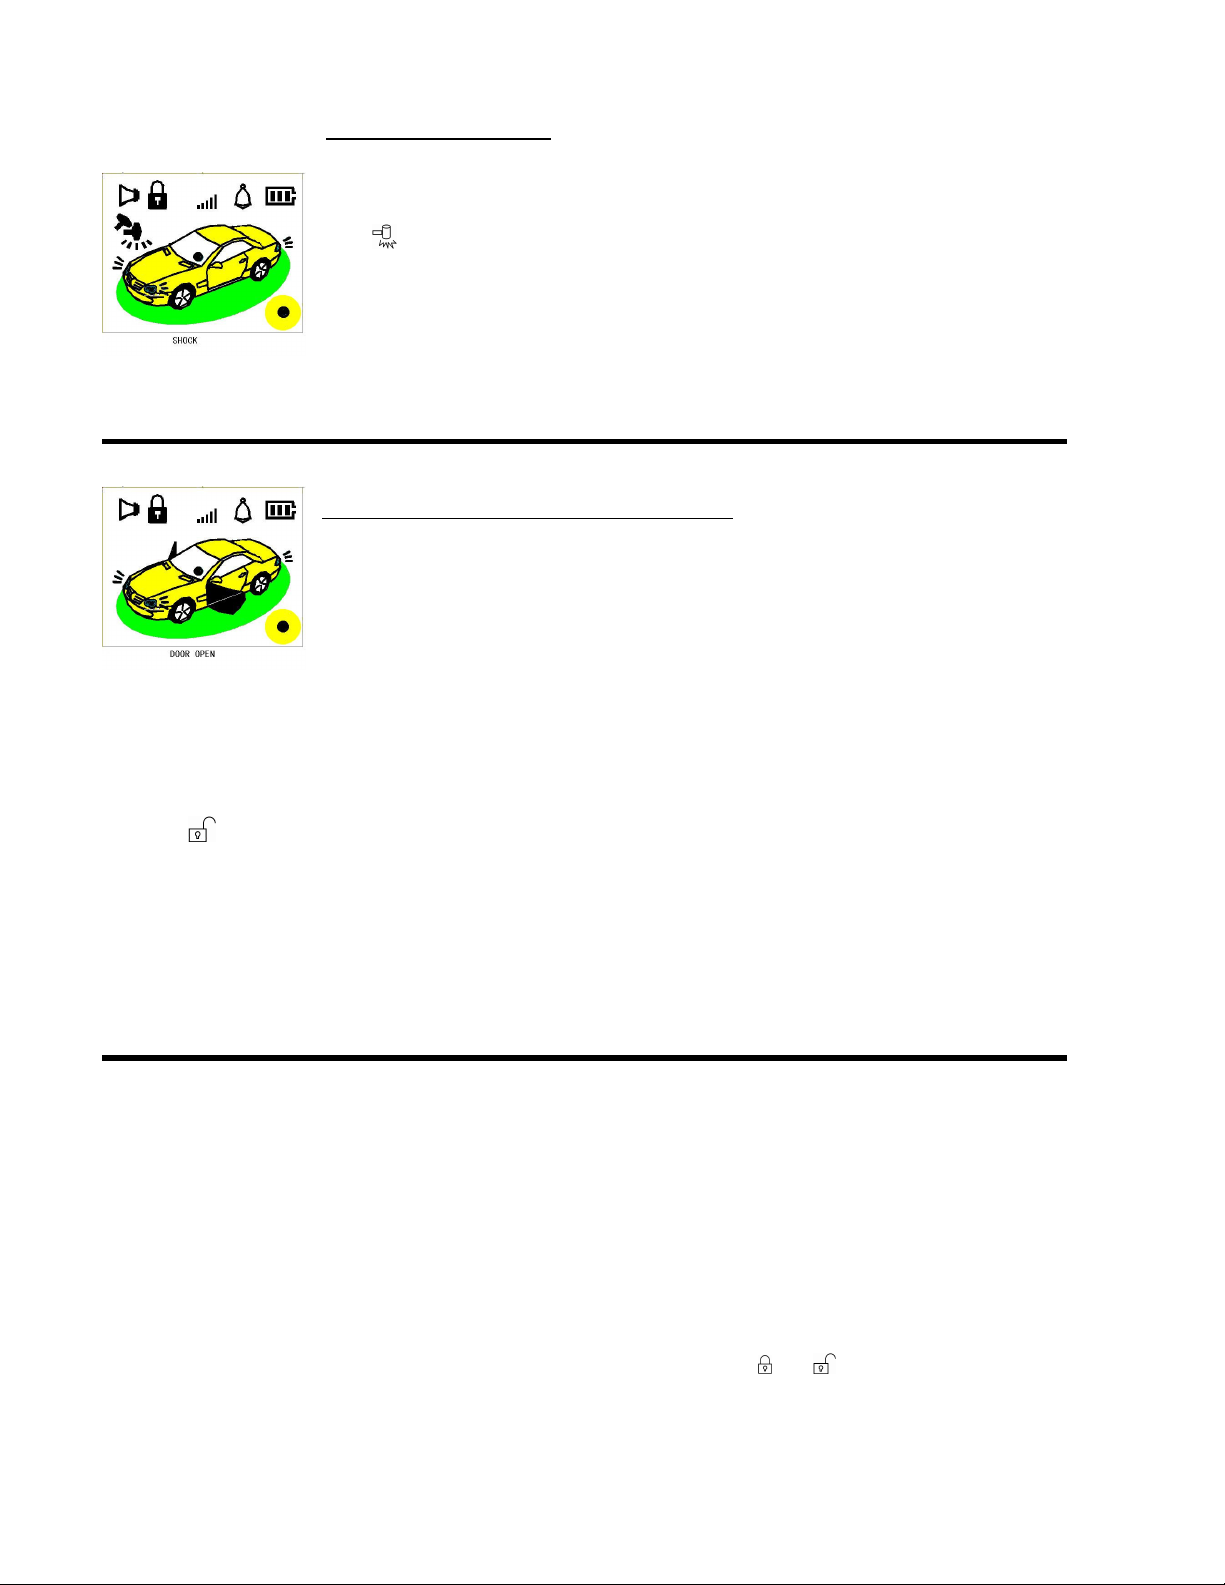
There are 2 kinds of alarm alert for vehicle intrusion during arming mode:
Alarm by Shock Sensing
If any external impact is applied to the body of the vehicle, the system will warn
with chirping sounds and flashing lights for about 15 seconds. The system will
also immediately report the triggered event to the remote control. The shock
icon then flashes and a warning beep sounds from the remote control.
NOTE: If silent alarm mode is on, the alarm siren will not be activated, only
the lights keep flashing.
8
System Operation
Alarm by Door Open or Engine Start Sensing
If any of the doors is opened without permission, or the vehicle engine is started
illegally, the siren will sound and the lights flash for about 25 seconds. The
system will immediately report the triggered event to the remote control. All
icons on the LCD panel flash and warning beep sounds from the remote control.
Alarm Memory Mode
If more than two chirps are heard or lights flash more than 2 times when disarming the system, it
indicates that the system was triggered in user's absence. The system will report the status as below:
3 chirp sounds and lights flash 3 times → indicate the shock sensor was triggered
4 chirp sounds and lights flash 4 times → indicate the doors were opened
Press once, the system will report the triggered memory status again. The triggered memory
status will be removed after any of the doors is opened.
NOTE: If silent alarm mode is on, only the lights will flash.
9
System Operation
Memory Log Mode
If the vehicle power is being shut off, the system current status will be logged. The system will return
to the current status once power supply is back to the vehicle.
Open Door Alert
If any of the doors is not closed completely while driving, when applying the foot brake, the siren will
chirp twice and the lights will flash twice for reminding the user.
Auto Central Lock
1. When in disarming mode and the ignition key is turned ON, press or button to lock or unlock
the doors. At this time, the system will not be activated.
2. When all the doors are closed and the key is turned ON, apply the foot brake after 15
seconds, the doors will be locked automatically. When the key is turned OFF, the
doors will be unlocked automatically
www.elfinx.com
Page 8

System Operation
Electronic / Air Compressor Lock Interchange
Press for 5 seconds, the siren sounds and lights flash. After that, the siren will stop chirping,
indicating that the interchange process has been completed successfully.
• The default setting is electronic lock. The lock time is 0.8 seconds.
• Air compressor lock time is 3.5 seconds.
10
Remote Control Code Cancellation and Installation
The security code stored in the remote and the main unit can be changed following the procedures
listed below:
Remote Control Code Cancellation
When in disarming mode, open a door and keep the door opened, then apply and keep on the brake.
Turn the ignition key from OFF to ON position 5 times. After the operation, the LED light turns off
and 1 long chirp sounds to indicate that the security code is cleared from the system.
Remote Control Code Installation
When in disarming mode, open a door and keep the door opened, then apply and keep on the brake.
Turn the ignition key from OFF to ON position 3 times. Then, 1 chirp sounds and the LED lights up
once. Press the button twice within 5 seconds. Two chirp sounds and the LED light turns off to
indicate a new security code is stored.
NOTE: This system is designed to store only 2 different security codes at any given time.
11
Wire Connection Diagram
See wiring diagram
12
System Installation Guide
Main Unit Installation
The main unit is placed under the vehicle control panel. After fixing the main unit in a suitable place,
start connecting all the wiring according to the Wire Connection Diagram. Before putting back all the
OEM parts, simply test the system functions first.
Shock Sensor Installation
Install the shock sensor after fixing the main unit. It is recommended to place the shock sensor near
the doors for easy detection of any intrusions. To adjust the sensitivity of the shock sensor, simply
use a screw to turn the knob on the shock sensor, turning right to set a higher sensitivity or vice verse.
Then test the sensitivity by triggering the shock sensor.
www.elfinx.com
Page 9

NOTE: Please do not hit the shock sensor directly.
Antenna Position
The ideal position for the antenna is in the top corner of the front windscreen right up of the wheel side.
Please keep the antenna free from any obstructions to prevent reception interference.
NOTE: If the vehicle is parked in urban area with many buildings around, or under a strong electric
field environment, the reception will be affected.
13
Central Lock Installation Diagram
See wiring diagram
14
Central Lock Installation Guide
This system can control several common central lock systems without any additional parts.
Type A:
For vehicles equipped with central lock, first recommendation (FIG. 1)
Type B:
For vehicles equipped with central lock but no motor on driver’s side, add a master motor and rod into
the driver side door. (FIG. 2)
This type of installation is applicable to vehicles equipped with factory central lock unit such as some
Ford, Mitsubishi, Mazda, and Nissan models.
* INSTALLATION NOTE: First, install the actuator near the door’s manual latch, and then fix the rod
of the actuator on the manual latch.
Type C:
For vehicles equipped with central lock and with motor on driver’s side. (FIG. 3)
Type D:
For vehicles equipped with electrical-activated vacuum-pump controlled door locks. (FIG. 4) The
timing of actuator mechanism can be set as 0.8 seconds or 3.5 seconds.
This type of installation is applicable for some Mercedes-Benz and Audi models.
Type E:
For some GM vehicles equipped with factory central lock unit. (FIG. 5)
Type F:
For some vehicles not mentioned above, please consult professional installers.
NOTE: Type B installation method (FIG. 2) is suitable for most vehicles.
15
www.elfinx.com
Page 10

Specifications
Main Unit
Output Current: Signal Lights 5A x 2, Siren 2A, Central Lock 10A
Coding: Learning code
Voltage: 12V +/- 2V
Static Current: <12mA (except indicator, sensor)
Indicator Current: 20mA
Shock Sensor Current: 4mA
Frequency: 433.92MHz
Remote Control
Voltage: 1.5V
Static Current: <0.8mA
Battery: 1 x AAA 1.5V (Alkaline)
Frequency: 433.92 MHz
16
Trouble Shooting
The alarm keeps sounding and cannot be stopped by the remote control.
Check the wiring connection.
Check if the fuse of the main unit is damaged.
Check if the main unit code match with the remote control code.
The alarm sounds 10 seconds after the vehicle is armed, same problem keeps happening again.
Check if the shock sensor is too sensitive.
Check if the door pin switches are damaged.
Check the wiring connection.
The alarm is easily triggered when a heavy vehicle is passing by.
Check if the shock sensor is too sensitive.
17
www.elfinx.com
Page 11

Trouble Shooting
The siren does not work when the vehicle is intruded.
Check the wiring connection between alarm and main unit.
Check if the vehicle power supply is cut off.
The remote control does not work.
Check the battery level in the remote control. (It is suggested to replace the alkaline battery each
month)
Check if the remote control has been damaged physically or by liquids.
If possible use another remote control for comparison. If both of them do not work, then check
the wiring connection. (Do not open the main unit for checking)
Check if the main unit code match with the remote control code.
The central lock does not work.
Check if the actuators are working.
Check the wiring connection.
Check if the fuse of the main unit is damaged.
18
Trouble Shooting
Short remote distance
Check the battery level in the remote control. (It is suggested to replace the alkaline battery each
month)
Anti-sunlight film can intercept radio signal that is used by the system. If anti-sunlight film is
used on the front windscreen the communication signal may be affected. It is necessary to
remove the film from the windscreen and install the antenna without any obstruction.
No display on the remote control.
Check the battery level in the remote control. (It is suggested to replace the alkaline battery each
month)
Take out the battery and re-install it into the remote control 1 minute later.
Only the door locking and unlocking function work normally. Other functions are inactive.
Check the wiring connection between ignition switch and foot brake with the main unit.
Should any problem persists, please contact your dealer, installer, and technician.
www.elfinx.com
 Loading...