

Page 1

ELESIGN VoIP GATEWAY
ESC2420(H.323 Version)
User Guide
Page 2

CAUTION: Changes or modifications not expressly approved by the manufacturer
responsible for compliance could void the user’s authority to operate the equipment
WARNING
This device complies with part 15 of the FCC Rules. Operation is subject to the
following two conditions: (1) This device may not cause harmful interference, and (2)
this device must accept any interference received, including interference that may cause
undesired operation.
INFORMATION T O USER:
This equipment has been tested and found to comply with the limit of a Class B digital
device, pursuant to Part 15 of the FCC Rules. These limits are designed to provide
reasonable protection against harmful interference in a residential installation. This
equipment generates, uses and can radiate radio frequency energy and, if not installed
and used in accordance with the instructions, may cause harmful interference to radio
communications. However, there is no guarantee that interference will not occur in a
particular installation; if this equipment does cause harmful interference to radio or
television reception, which can be determined by turning the equipment off and on, the
user is encouraged to try to correct the interference by one or more of the following
measures:
1. Reorient / Relocate the receiving antenna.
2. Increase the separation between the equipment and receiver.
3. Connect the equipment into an outlet on a circuit difference from that to which
the receiver is connected.
4. Consult the dealer or an experienced radio/TV technician for help
Page 3

ESC2420 User Guide version1.0
About This Manual
This Manual provides basic information on how to install and connect Elesign Gateway to the network. It also
includes features and functions of Elesign Gateway components, and how to use them.
Before Getting Started
Before you can connect ELESIGN GATEWAY to the network and use it, you must have a high-speed Internet
connection installed. A high-speed connection includes such environments as DSL, cable modem, and a leased
line.
Precaution
Elesign Inc. has copyright to this manual.
Any part of this manual cannot be reproduced or transferred electronically, mechanically, or acoustically without
permission of Elesign Inc.
The material of this manual could be changed for the purpose of the product enhancement.
Copyright Elesign Inc. All rights reserved
1
Page 4

ESC2420 User Guide version1.0
Contents
Chapter 1 Summary and Introduction………………...……….……..…..……….….4
I. Summary……………………………………………………………………5
II. Introduction………...………………………………………………………6
Chapter 2 Installation….………..……………………………………………...……..…..7
I. Installation and Procedure at a glance………..……………………..…….8
II. Status Checkup using LED……….………………………….…………...11
Chapter 3 PC Network Setup…….…..………………………………....……….…….12
I. Before Getting Started………...…………………………………...……..13
II. PC Network Setup………………….…..………………………...….……14
Chapter 4 Gateway Network Setup……………………………………..……………18
I. Before Getting Started…………….…….………………………………..19
II. Connect to Setup Page…………….…...………………….……………...20
III. Gateway Network Setup….…………….…..………………….………....21
Chapter 5 VoIP Setup
I. Before Getting Started……………………….……..……………………24
II. VoIP Setup…………....………………......……...……………….………25
III. Make a Call…………..……….……….………...…………….…………29
…………………………………………..………………..…...….23
Chapter 6 Advanced Setup…………………………….……………………..……...…30
I. Console Setup………………………………………..…………………….32
II. Volume Setup………...………..…………..……………….…....………....34
III. DHCP Setup……………….…….….………………..…..…..…….……...35
IV. Use NAT Function …………………..….………………………………...37
V. Phonebook Setup………………….……………………………....………39
VI. Firmware Upgrade ……………………………………..…….….……...42
2
Page 5

ESC2420 User Guide version1.0
Chapter 7 Other VoIP Setup Option……....…………………………..………...…...43
I. Using Media Gateway…….….………………………………………....…44
II. Direct Call….………………………...….…….....………………………..45
Chapter 8 Appendix……………………………..….…………………..…………..…....46
I. How to check MAC Address .……………………………..………....…47
II. Configuration and Installation with other equipments ……..…...…...48
3
Page 6

ESC2420 User Guide version1.0
Chapter 1 Summary and Introduction
I. Summary……………….……….……...……………..………………...………..5
II. Introduction………………..……………..……………………………………...6
1. Contents Checklist…………...…………………………………………………..6
2. Specifications………………..……………………………………………………6
4
Page 7

ESC2420 User Guide version1.0
I. Summary
ESC2420 is a 2-port VoIP gateway and it connects standard telephones and fax machines to IP-based networks. It
provides two FXS interfaces and one FXO interface that will enable more calls to be routed through the gateway
with or without using directly connected telephones to the gateway.
The gateway can be used with Internet connection such as ADSL modem, Cable Modem, and leased Line.
The gateway has NAT function, which allows connecting several PCs to use the Internet simultaneously.
The basic Internet calls with this gateway are service thru VoIP service provider. With PSTN back up allows to
receive a call thru PSTN and automatically switches to PSTN when power-out or problem in networking occurs.
5
Page 8

ESC2420 User Guide version1.0
II. Introduction
1. Contents Checklist
1) 1 Elesign Gateway (ESC2420)
2) 1 LAN Cable (Blue)
3) 1 Serial Cable (Green)
4) 2 Telephone Lines
5) 1 User Guide
6) 1 Adapter
2. Specifications
Item Specification
Adapter
(Input/output/frequency)
WAN RJ-45 for LAN (10/100baseT)
LAN RJ-45 for PC (10/100baseT)
Serial RJ-45 for Serial Connector
Port
Phone 2 RJ-11 for Telephone
Line 1 RJ-11 for PSTN
Reset Switch System Reset
Optional Features Use with PBX & Key phone, Fax Support
Power Consumption 2.8W / 3.6W
Operating Temperature 0~60℃
Relative Humidity 5~95%
Volume 160mm(W) x 200mm(L) x 33mm(H)
Weight 355g
220VA / 12VDC / 60Hz
6
Page 9

ESC2420 User Guide version1.0
Chapter 2 Installation
I. Installation and Procedure at a Glance………….………….…….……….8
1. Before Installation………………….……………..……..……………..….……..8
1) Check OS of PC used for Installation…….……....…….…………………………….…8
2) Check PC’s LAN Card………………………..……..……………………………….… 8
3) Check Calling Environment
……...…………….……………………………………8
2. Procedure at a Glance…………...……………..…….……………………….…9
3. Installation………………………….……………….…………………….……10
II. Status Checkup using LED..……………………….………..….…………....11
7
Page 10

ESC2420 User Guide version1.0
I. Installation and Procedure at a Glance
1. Before Installation
1) Check OS of PC used for Installation
You may install the gateway using PC thru Internet browser, Console, or Telnet. Please check OS of the
PC that will be used for Installation. (Win98, NT, Me, 2000, XP, Linux). There are minor differences in
setting up the network according to OS.
2) Check PC’s LAN Card
The PC that will be used to install the gateway must have LAN card. Please check if PC has LAN card
available.
3) Check Calling Environment
Before getting started, check calling environment about how many telephones you want to connect and if
you will use existing PSTN network. The telephones that can be directly connected to the gateway are
four. You may connect more than four telephones to use Internet call using PBX. You may connect the
gateway to PBX, and you can make Internet call from any telephone that is connected to PBX. But you
may only make four simultaneous Internet calls at once since the Gateway has only four FXS ports.
With PSTN back up allows to receive a call thru PSTN and automatically switches to PSTN when
power-out or problem in networking occurs
8
Page 11

ESC2420 User Guide version1.0
2. Procedure at a Glance
※ Please make sure to follow the procedure.
①
②
③
④
⑤
Components Check Up
Installation
LED Check Up
PC Set Up
Network Set Up
⑥
⑦
VoIP Set U p
Make a call
9
Page 12

ESC2420 User Guide version1.0
3. Installation (Step ② of the Procedure)
!! Caution: ADSL MODEM USERS, Please make sure to uninstall ADSL connecting program
before starting the installation.
1) Remove the phone line, which is connected from the wall jack to your existing analogue phone, and
connect it to ‘Line’ port.
※ Make sure to leave the handset ON HOOK※
2) Find a phone line in the box and connect between ‘VOIP1’ port or ‘VOIP2’ port and your existing
analogue phone
3) Remove from your PC the LAN cable for Internet connection and connect it to ‘WAN’ port.
Some of Modems use Cross LAN cable, so please make sure to use the cable that is connected between
your PC and modem to connect from modem to ‘LAN’ port of Elesign Gateway.
4) Find a LAN cable in the box and connect between ‘LAN’ port and your PC.
5) Connect an adapter in the box to ‘POWER’.
※ Make sure to use the adapter provided with the gateway in the box.
10
Page 13
ESC2420 User Guide version1.0
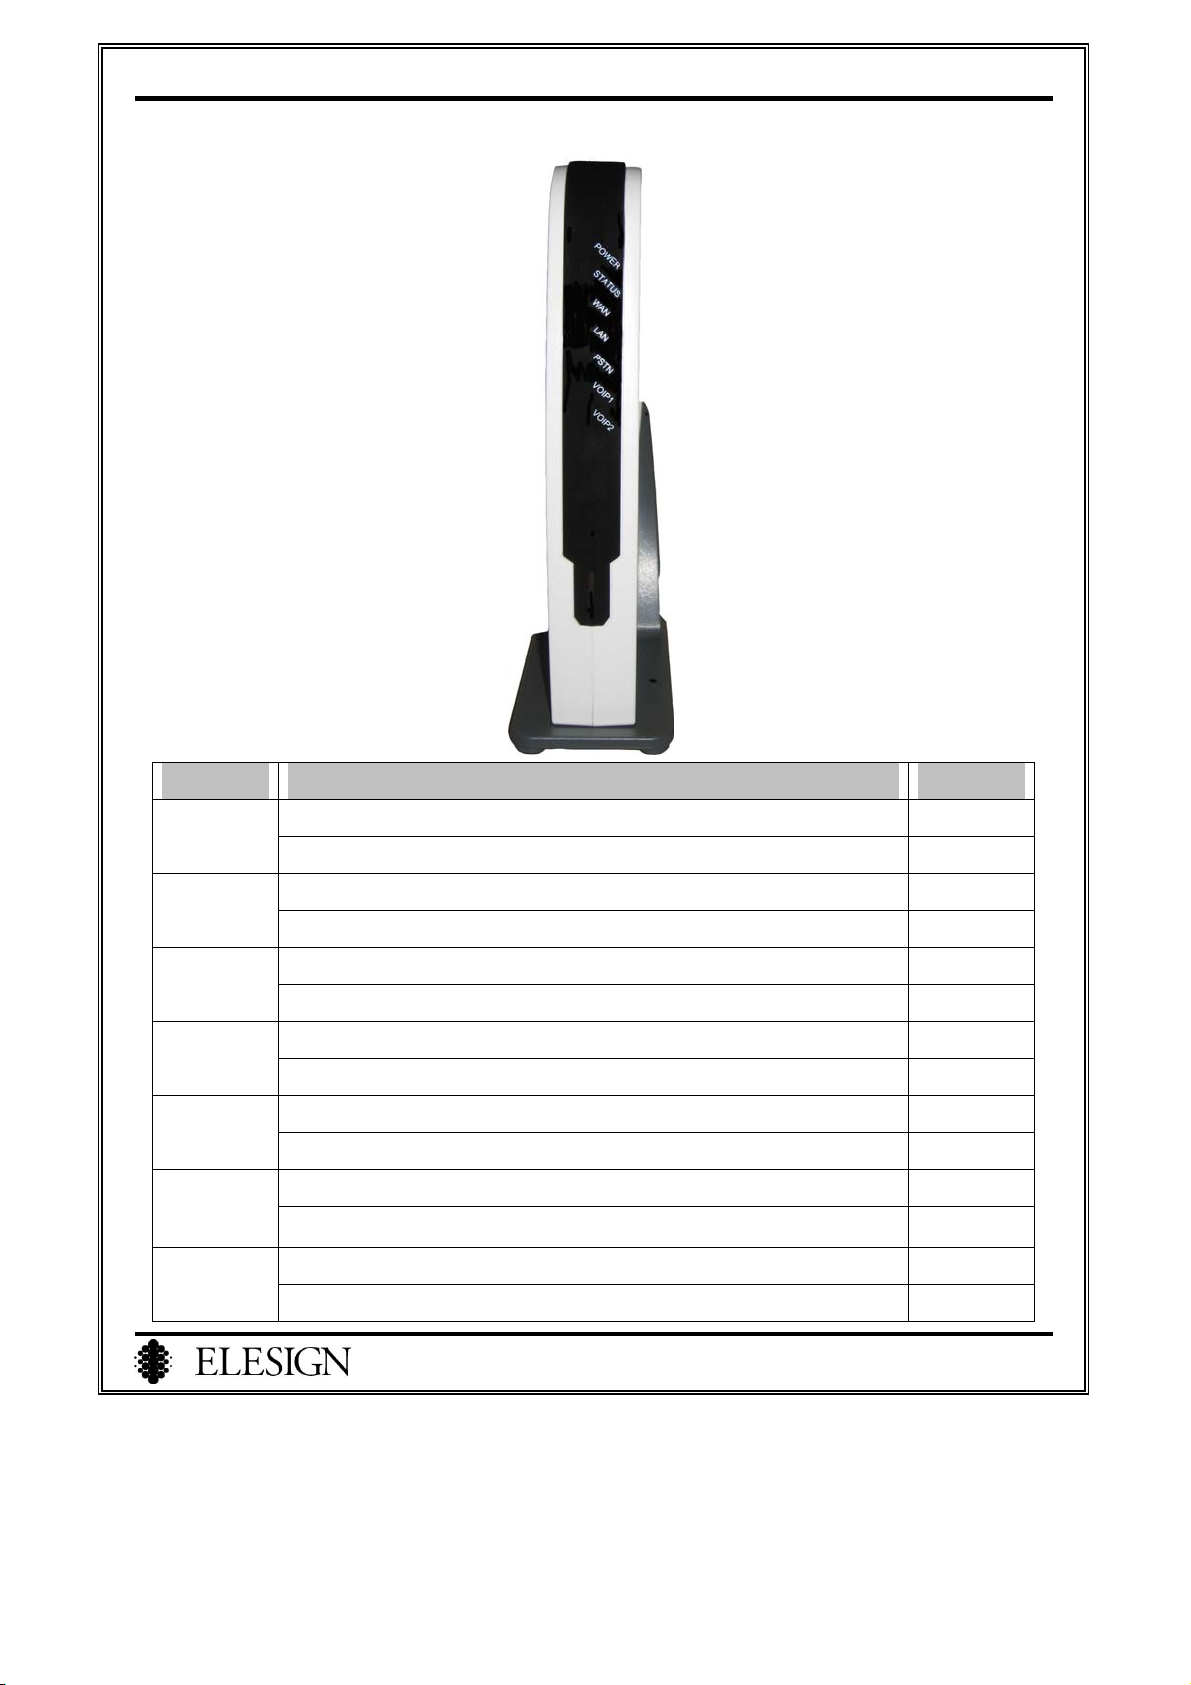
II. Status Checkup using LED (Step ③ of the Procedure)
LED Action LIGHT
POWER
STATUS
WAN
LAN
PSTN
VOIP1
VOIP2
Adapter is connected and system is initialized ON
Adapter is not connected OFF
The device is registered with a proxy server ON
The device is not registered with the proxy server OFF
When only ‘WAN’ is connected ON
When ‘WAN’ is not connected or internet service is error OFF
When only ‘LAN’ is connected ON
When ‘LAN’ is not connected OFF
PSTN call is coming or PSTN backup ON
VoIP call mode OFF
When the phone connected VOIP1 is off hook ON
When the phone connected VOIP1 is on hook
When the phone connected VOIP2 is off hook ON
When the phone connected VOIP2 is on hook OFF
OFF
11
Page 14

ESC2420 User Guide version1.0
Chapter 3 PC Network Setup
I. Before Getting Started…...…………………...………………….……….…13
1. LED Check……………………………………………..……..……...…………13
2. Check Internet Connection…………………….……….……..……...……….13
1) Leased Line– Static IP Users……………….……………….…….………..….…….13
2) ADSL Users……………………….…………………………..………….………….13
II. PC Network Setup
1. ADSL Modem Users………………….…………………………….………….14
2. VDSL Modem Users……………………………………………………….…..14
3. Cable Modem Users……….….…………………………………………..……14
4. Leased Line – Dynamic IP Users………….…………………………………..14
5. Lease Line – Static IP Users……………………..…….………………………14
1) Win98/WinMe Users………..……..……..………………………………….……….14
2) Win2000/WinXP Users………………………………...…...…………………….….16
6. Check PC’s IP address……………..….………………………………..……..17
…………………...……..……………...….………………14
12
Page 15

ESC2420 User Guide version1.0
To use the gateway, you need to setup the network of PC and the gateway. To connect PC and the gateway, you
need to confirm the PC’s network setup. After the confirmation, you need to setup the network of PC and the
gateway according to the Internet connection.
I. Before Getting Started
Before getting started, please confirm the matters below.
1. LED Check
Look into the page11 to check the installation. If the color doesn’t match with current installation, there
might be problems regarding the connection, PC, or PC’s LAN card. Please check the connection of the
modem, PC’s LAN card, or the gateway.
2. Check Internet Connection
You need to setup the network of PC and the gateway according to the current Internet connection. Please
confirm the current connection (ADSL, Cable, Lease line), and check the necessary information for setup.
1) Leased Line – Static IP Users
When setup the network of PC, write down the network information. (IP address, subnet mask, gateway,
DNS) They are necessary information for the network setup of the gateway.
2) ADSL users
① Please check the ID and password that is used in connecting to Internet. They are necessary
information for the network setup of the gateway.
② Before starting the network setup of PC, you need uninstall the ADSL connection program from PC.
13
Page 16
ESC2420 User Guide version1.0
II. PC Network Setup (Step ④ of the Procedure)
1.ADSL Modem Users
After the installation, restart PC. If the PC is turned off, simply start the PC.
2.VDSL Modem Users
After the installation, restart PC. If the PC is turned off, simply start the PC.
3.Cable Modem Users
After the installation, restart PC. If the PC is turned off, simply start the PC.
※ If you are using cable modem with static IP, go to ‘Leased line – static IP’ to setup network of PC.
4. Leased Line – Dynamic IP Users
After the installation, restart PC. If the PC is turned off, simply start the PC.
5. Lease Line – Static IP Users
1) WIN98/WinME Users
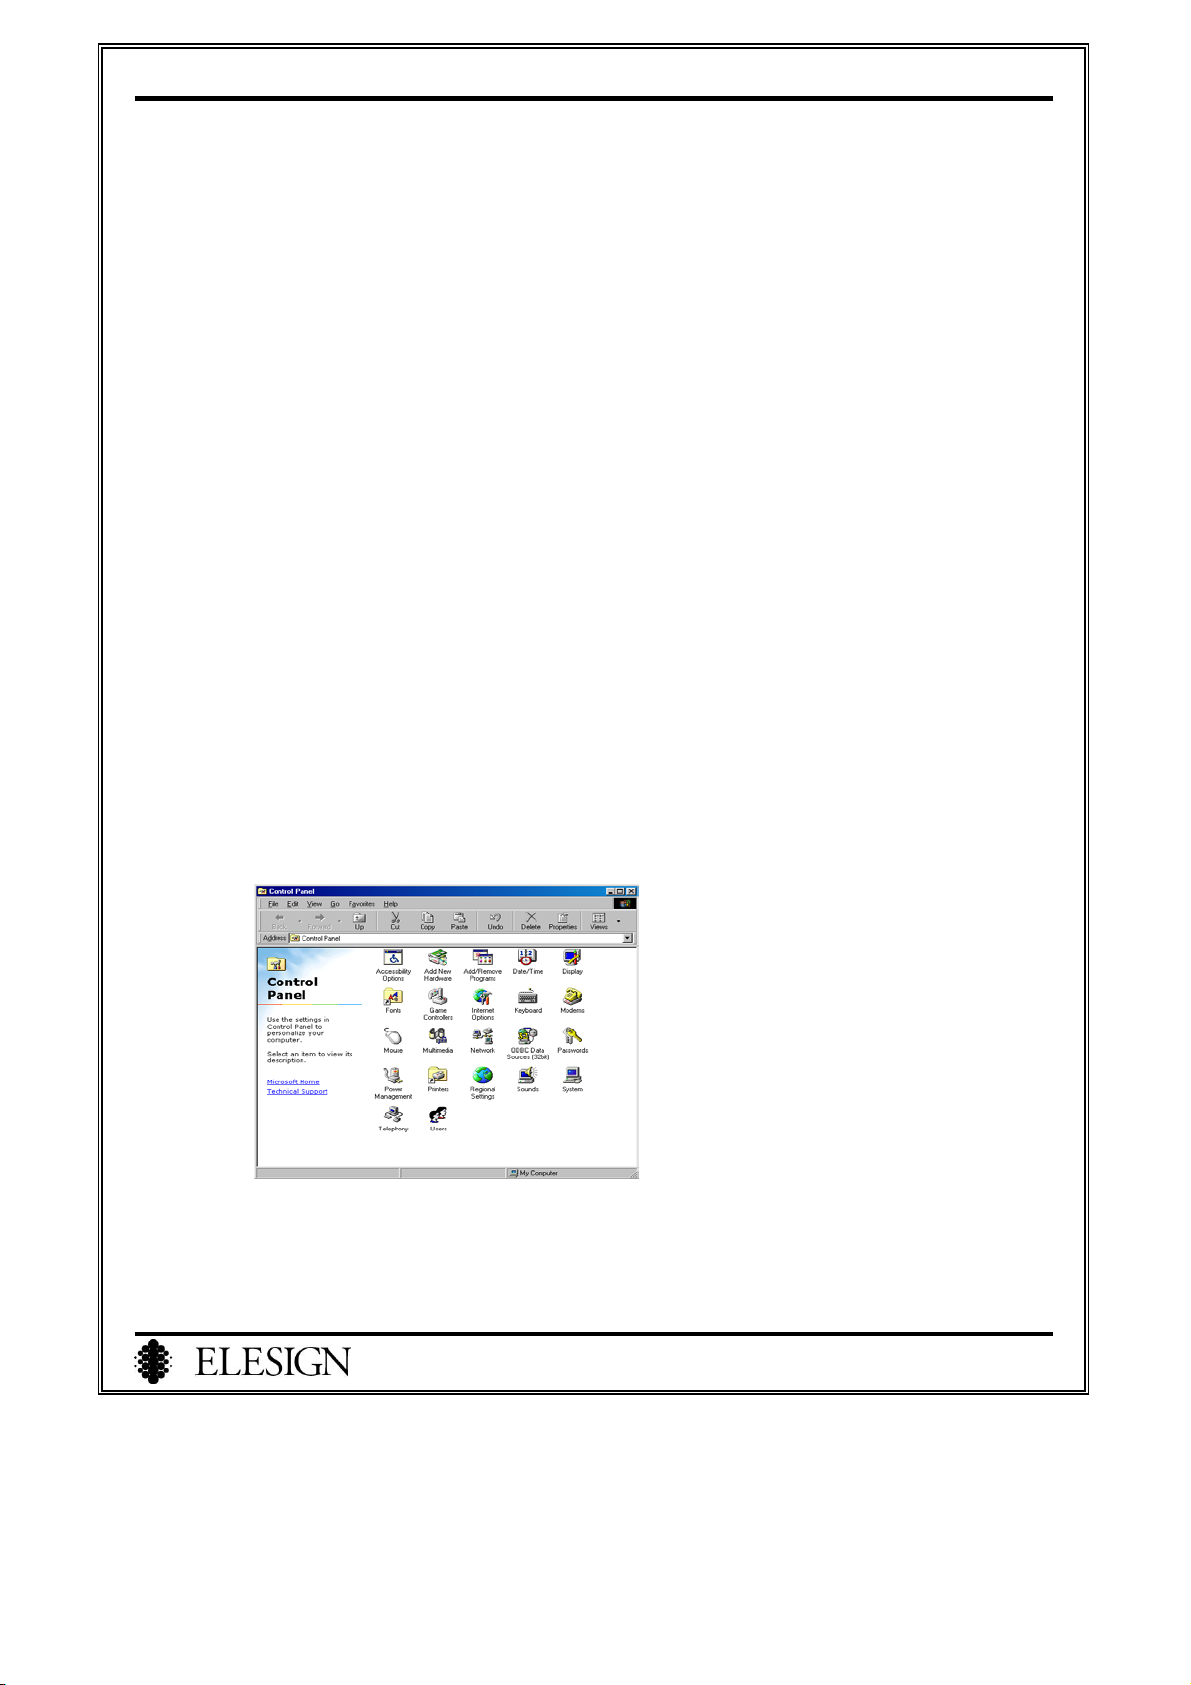
① Click on ‘Start’ button
② ‘Select ‘Control Panel’ from ‘setting’ of start menu.
③ Select ‘Network’ from control panel
14
Page 17
ESC2420 User Guide version1.0
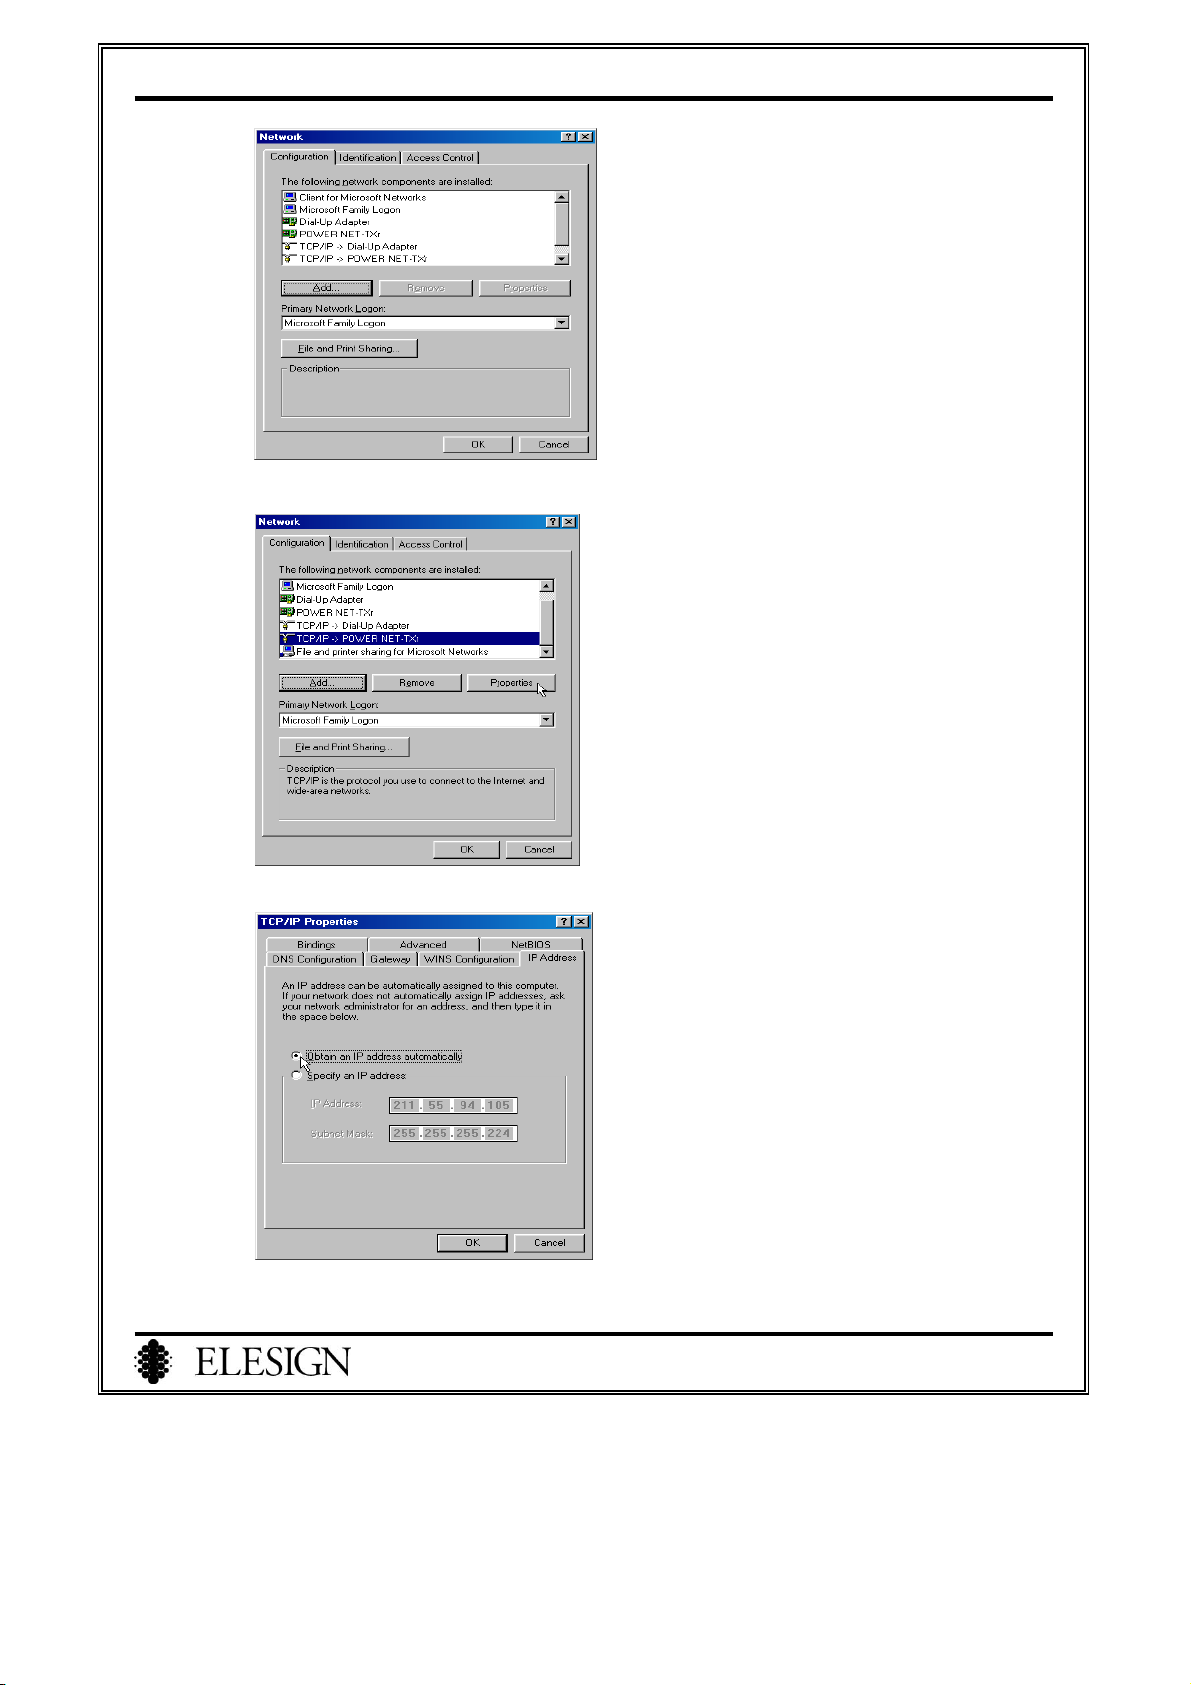
④ Select TCP/IP and click on ‘Property’ button
⑤ Select ‘Obtain an IP address automatically’ and click on ‘OK’ button
⑥ Popup window will appear to restart the computer, then restart the computer right away by
clicking on ‘OK’ button
15
Page 18

ESC2420 User Guide version1.0
2) Win2000/WinXP Users
① Click on ‘Start’ button
② Select ‘Control Panel’ from ‘Setting’ of start menu.
③ Select ‘Network’.
④ Select ‘Local Connection’
⑤ Click on ‘Properties’ button
⑥ Select ‘TCP/IP’ and click on ‘Property’ button.
⑦ Select ‘Obtain an IP address automatically’ and click on ‘OK’ button.
⑧ Click on ‘OK’ to close window.
16
Page 19
ESC2420 User Guide version1.0
6. Check PC’s IP address
This step is to make sure that PC for the installation and the gateway is connected. Before you connect to the
setup page using Web browser, check PC’s IP address for correct installation and PC network setup.
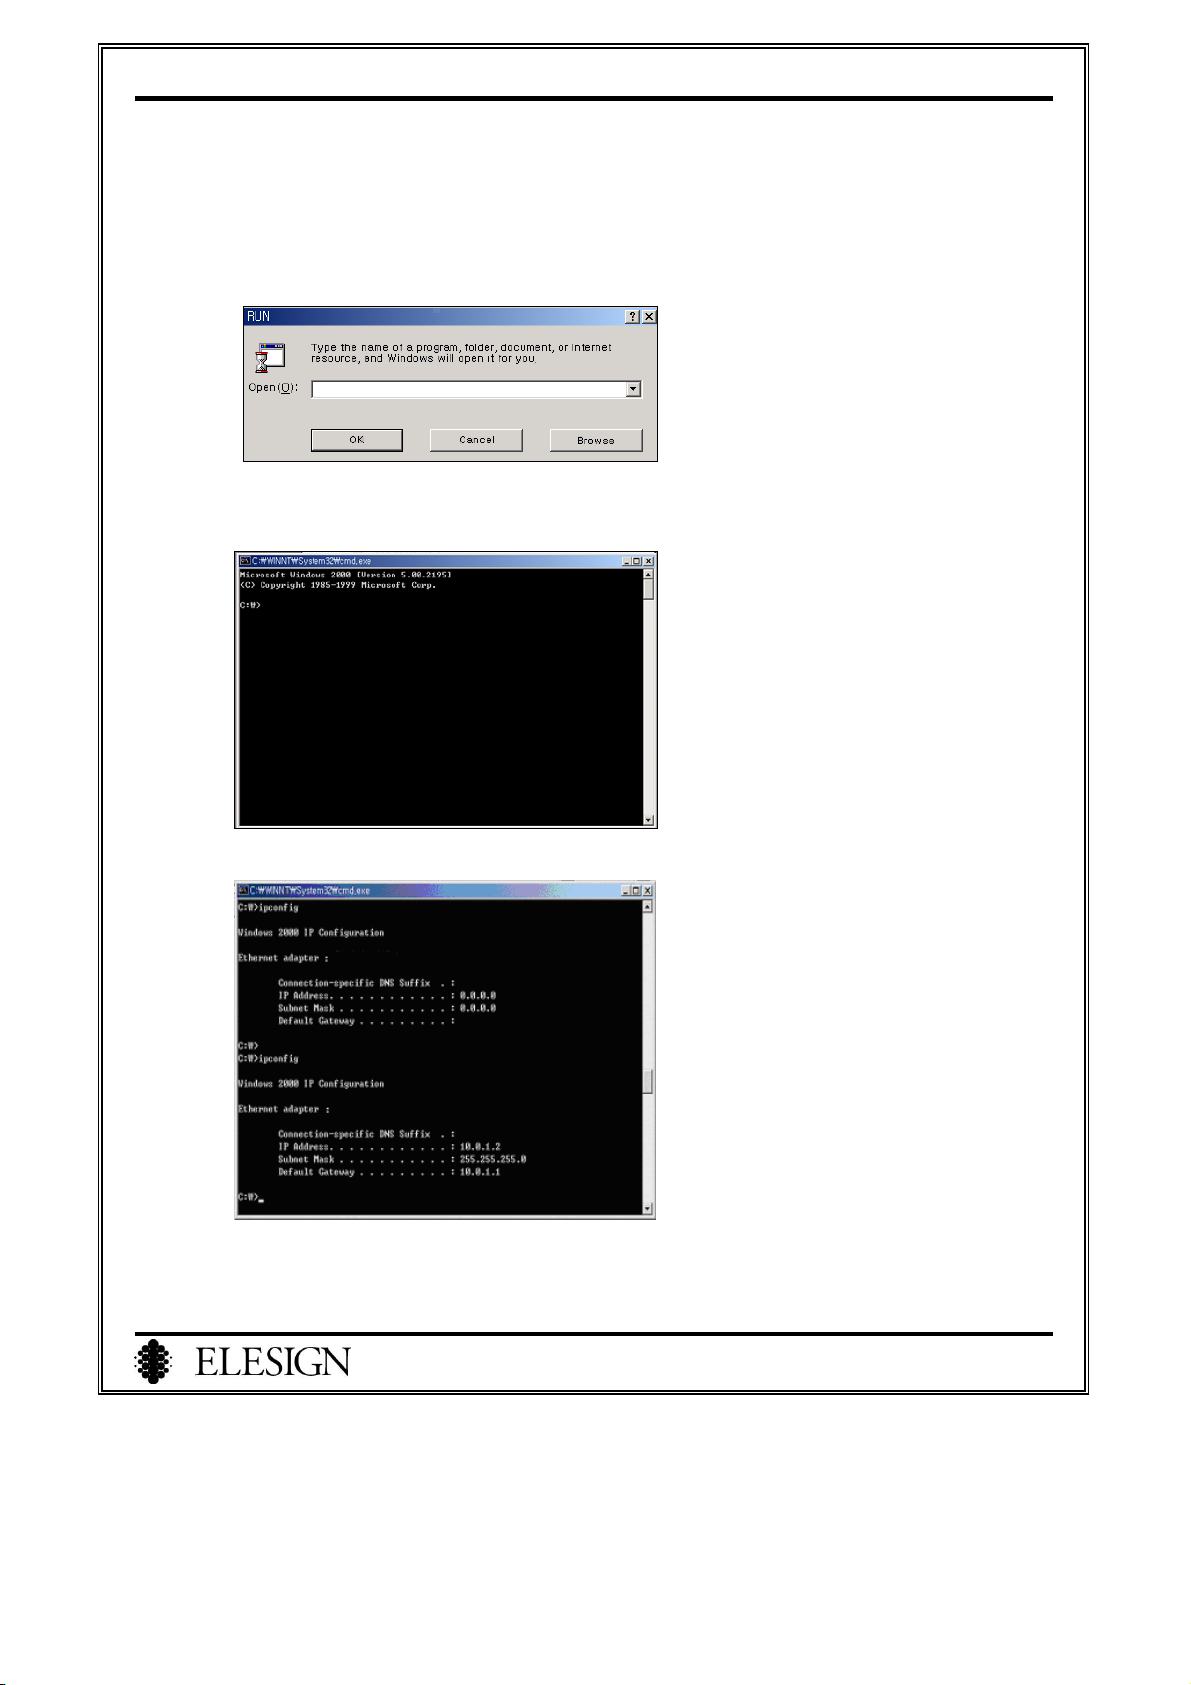
1) Click on ‘Start’ button and select ‘RUN’.
2) Enter ‘CMD’ (Win2000/WinXP Users) or ‘COMMAND’ (Win98/WinMe Users) and click on ‘OK’
button to see a window as below.
3) When there is a prompt ‘C:W>’, enter ‘ipconfig’ and hit ‘enter’ to see IP information.
4) If IP address is ’10.0.1.X’ and Default Gateway is ’10.0.1.1’ then the installation is correct and
network of PC is setup accordingly.
17
Page 20

ESC2420 User Guide version1.0
Chapter 4 Gateway Network Setup
I. Before Getting Started
1.Check Internet Connection……………………….……….……..……...……….19
1) Leased Line – Static IP Users……………………………….……………..…………...19
2) ADSL Users…………………….…………..…………….……….….……..………….19
II. Connect to Setup Page.………………..…………………….….……………..20
………………………….……..………………………19
III. Gateway Network Setup…...…..….………….…………………………....21
1. Connect to Network Setup Page………….…………….……..…………..…….21
2. Network Setup according to Internet Connection…………….………….……21
3. Confirmation of Setup…………………………………………..………….……22
4. When Failed to Setup………………………………………...…………….……22
18
Page 21

ESC2420 User Guide version1.0
After PC Network Setup, you need to setup the network of the gateway. You may setup according to your Internet
Connection.
I. Before Getting Started
Before getting started, please confirm the matters below.
1. Check Internet Connection
You need to setup the network of PC and the gateway according to the current Internet connection. Please
confirm the current connection (ADSL, Cable, Lease line), and check the necessary information for setup.
1) Leased Line –Static IP Users
When setup the network of PC, write down the network information. (IP address, subnet mask, gateway,
DNS) They are necessary information for the network setup of the gateway.
2) ADSL Users
Please check the ID and password that is used in connecting to Internet.
19
Page 22
ESC2420 User Guide version1.0
II. Connect to Setup Page
1
Start Internet browser in PC. (i.e. Click on explorer icon.)
2 Input ‘http://10.0.1.1’ in address box and hit ‘enter’.
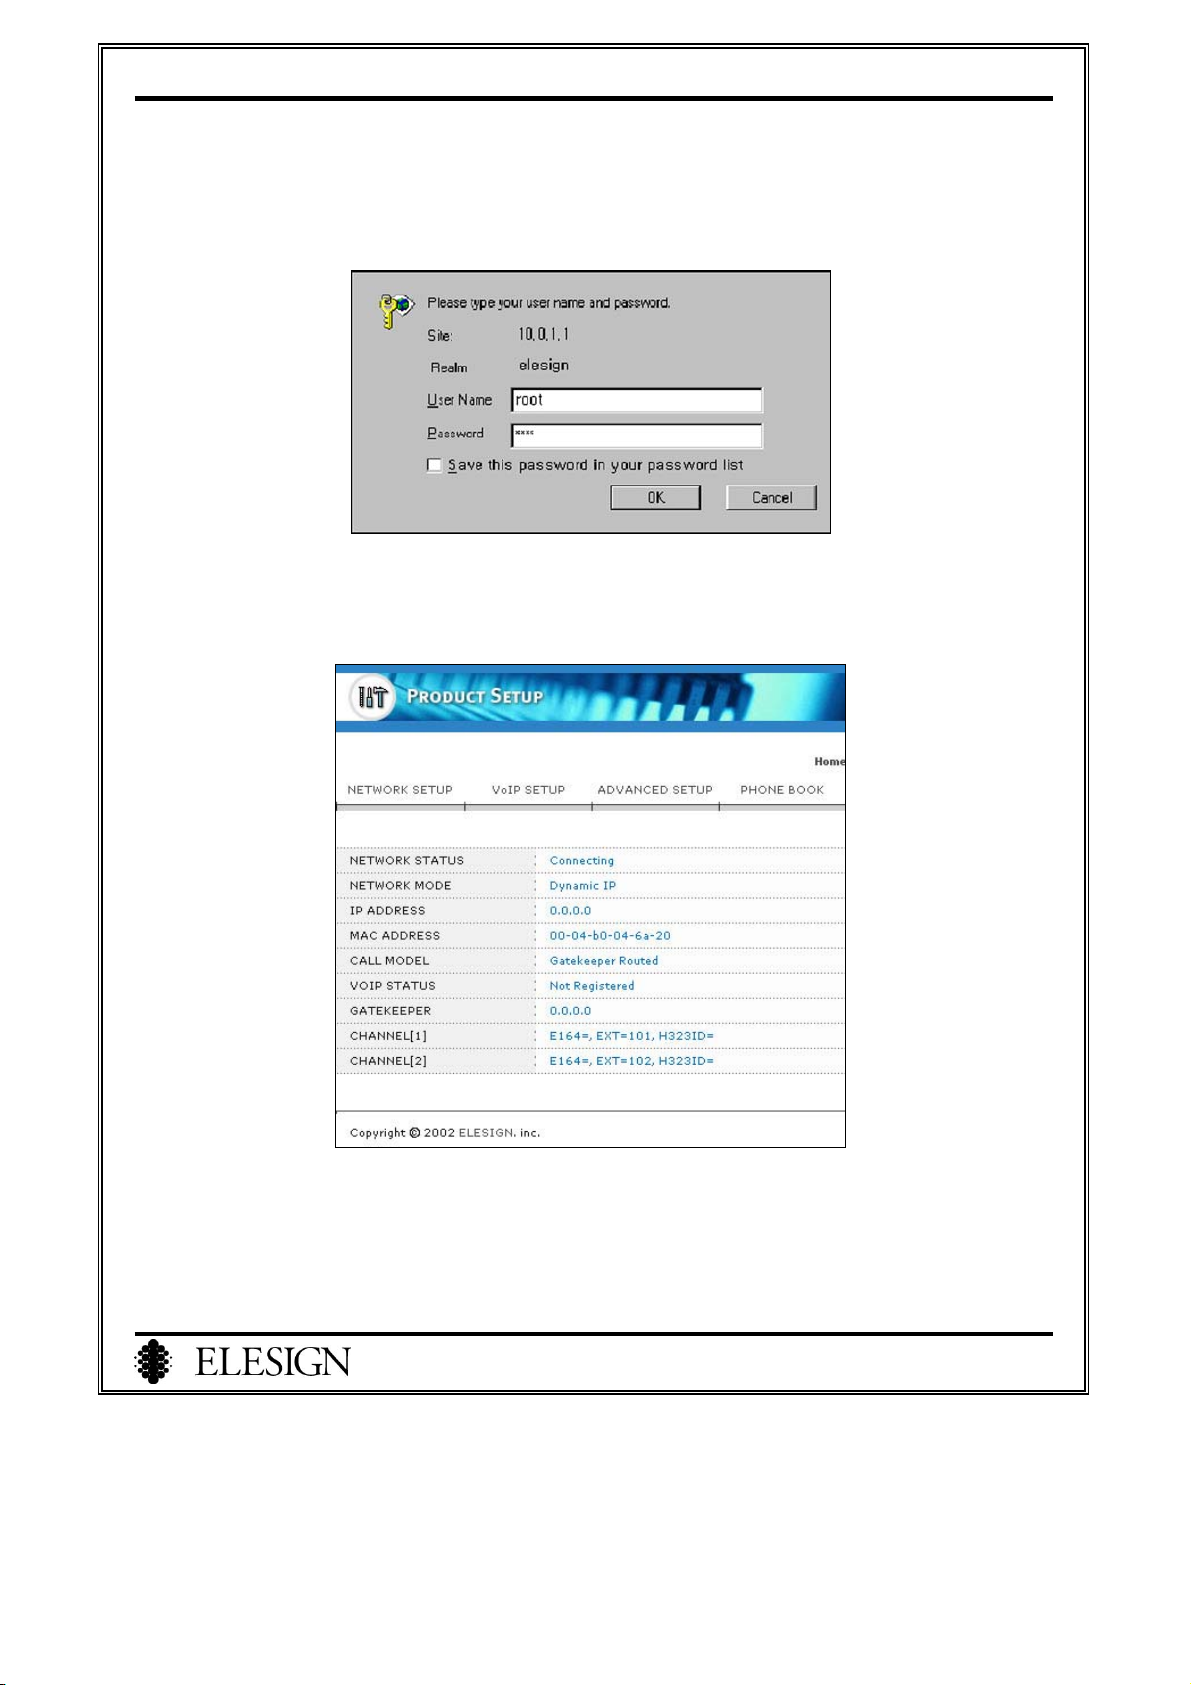
3 When window appears to input ID and password for network, input ‘root’ for ID and ‘root’ for
Password. Click on ‘OK’ to connect to the main page. You may change ID and password. (Refer to
page 31, ‘Console Setup’ for more information.)
4
When you see a window above, click on necessary setup item to go on setting up.
20
Page 23
ESC2420 User Guide version1.0
III. Gateway Network Setup (Step ⑤ of the Procedure)
1. Connect to Network Setup Page
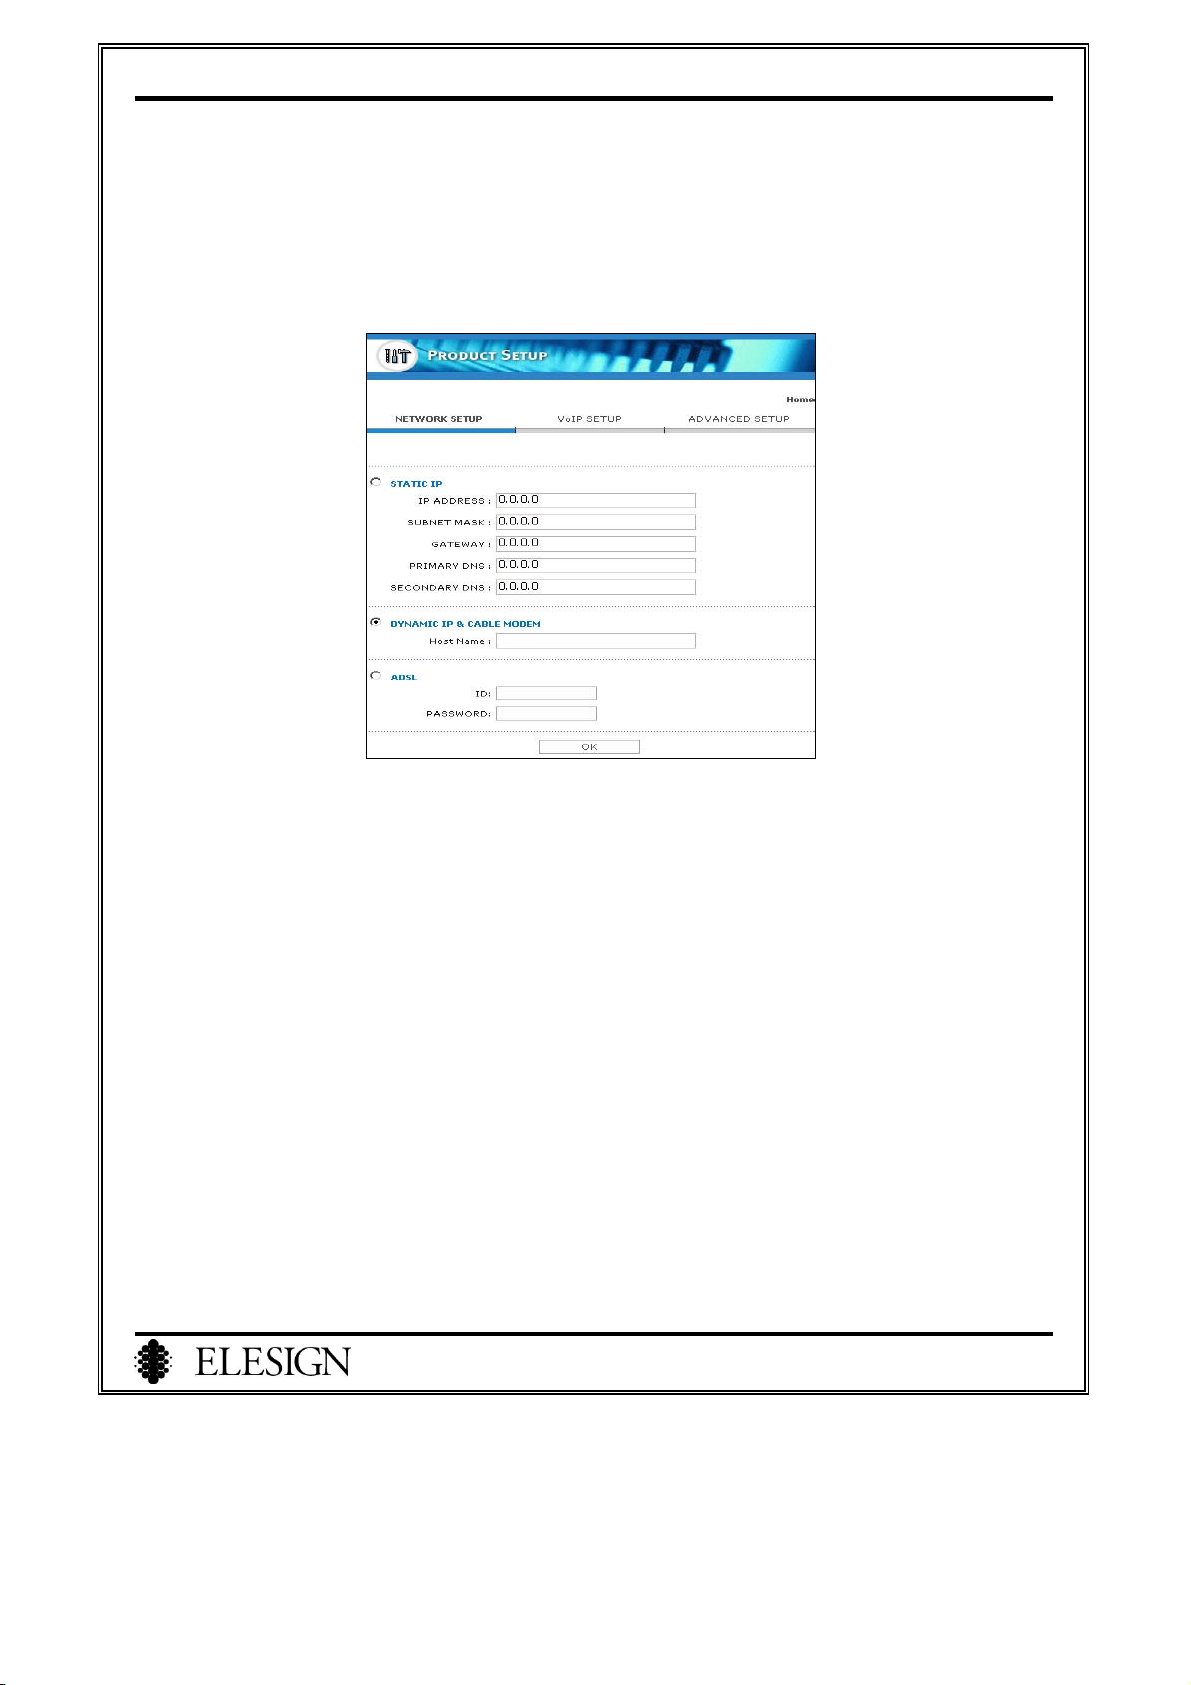
1)
From main page, select ‘Network setup’.
Select the network type according to the Internet connection and input necessary information.
2)
2. Network Setup according to Internet connection
1) ADSL Users
Check ‘ADSL’ and input ID and password that is used in connecting to Internet and click on ‘OK’
button.
2) VDSL Modem
Check ‘Dynamic IP & Cable Modem’ and click on ‘OK’ button.
3) Cable modem Users
Check ‘Dynamic IP & Cable Modem’ and click on ‘OK’ button.
※ Some of Cable service provider check on MAC address of PC’s LAN card. You might not be able to
connect to Internet if this is the case. Please contact you local cable service representative.
4) Leased Line – Dynamic IP Users
Check ‘Dynamic IP & Cable Modem’ and click on ‘OK’ button.
5) Lease Line – Static IP Users
Check ‘Static IP’ and input IP address, gateway, subnet mask and DNS. Click on ‘OK’ button.
21
Page 24
ESC2420 User Guide version1.0
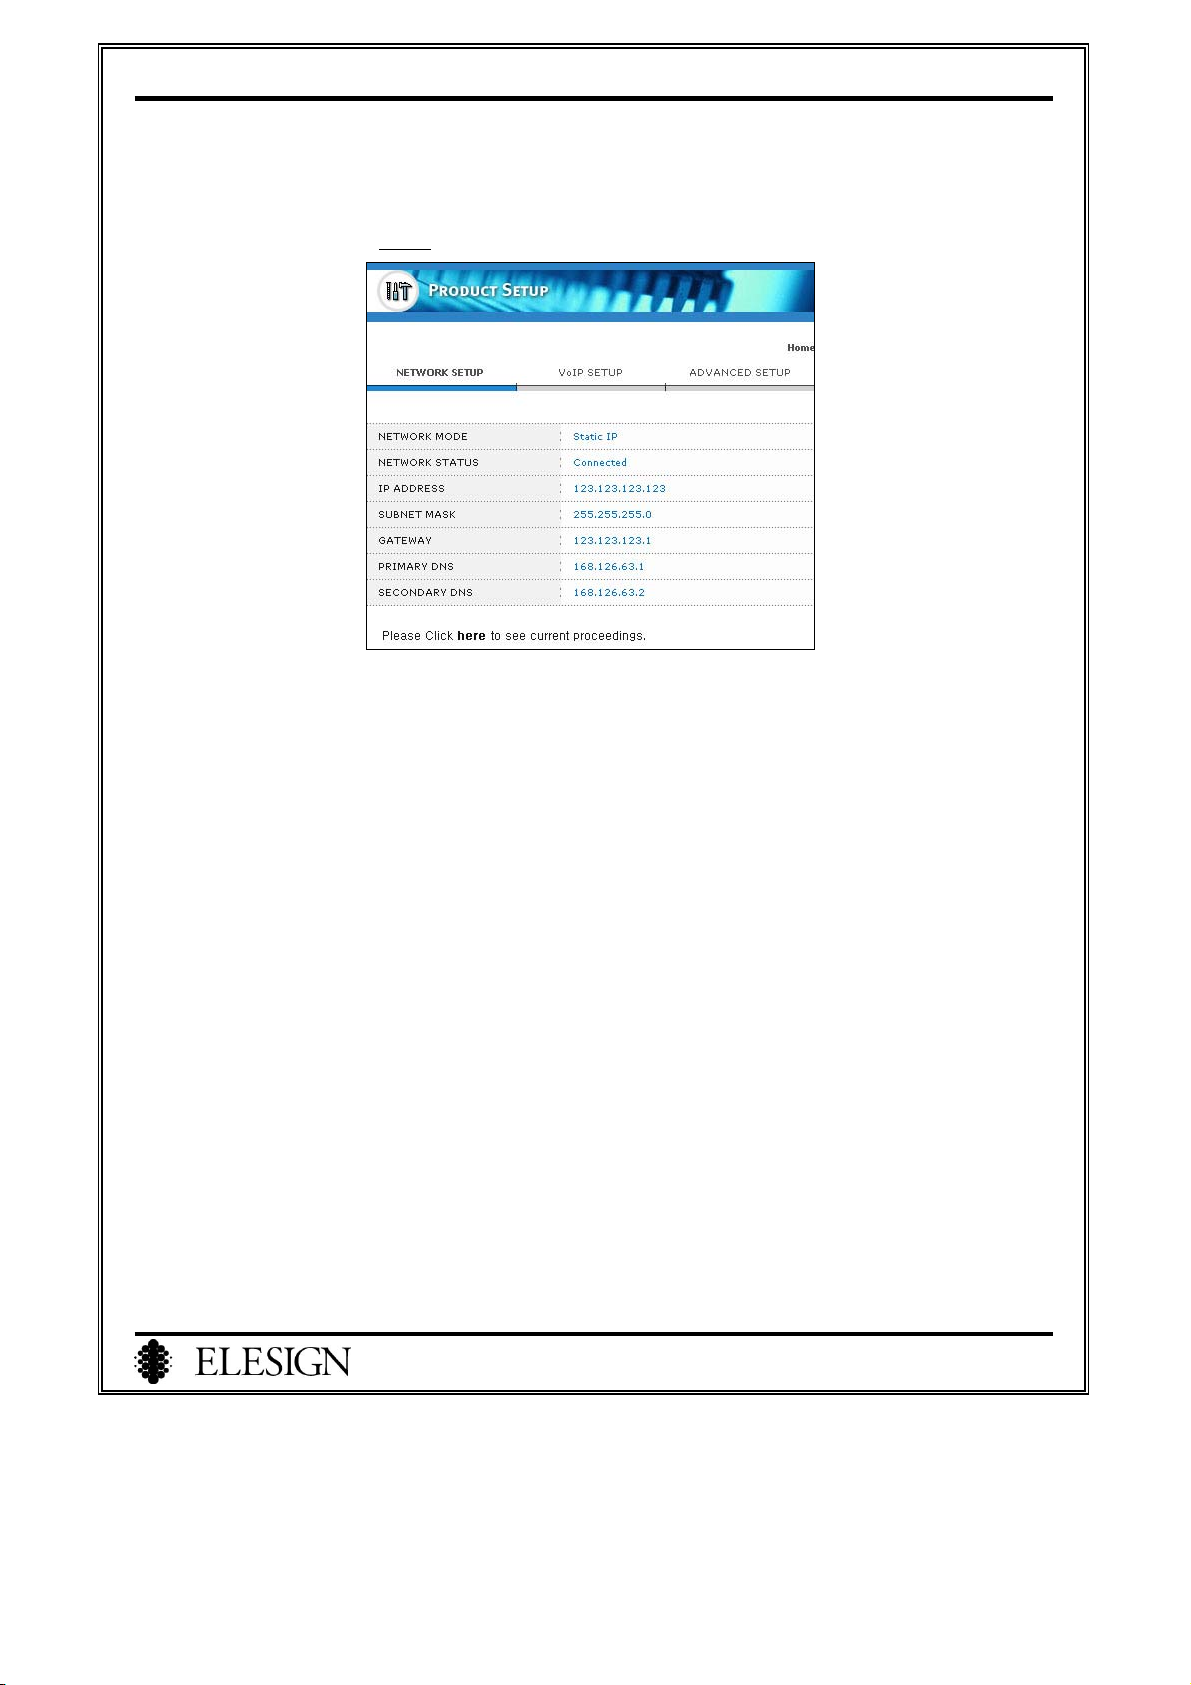
3. Confirmation of Setup
1)
When you see a message, ‘connecting’ for ‘NETWORK STATUS’, please click on ‘HERE’ where it
says ‘Please click HERE
2) If you see a message, ‘Connected’ for ‘Network Status’, the network setup is successfully done.
to see current proceedings.’
4. When Failed to Setup
If you don’t see a message, ‘Connected’ for about a minute, check the items below according to Internet
connection.
1) ADSL Users:
You might have failed to login. Check the ID and Password and try to restart ADSL modem by
rebooting.
2) VDSL Users:
Try to restart VDSL modem by rebooting, or check the physical connections and try again.
3) Cable Modem Users
Try to restart cable modem by rebooting, or check the physical connections and try again.
4) Leased Line – Dynamic IP Users
Check the physical connection and try again.
5) Leased Line – Static IP Users
Check if the IP address and other information are correct and try again. Also if
DNS address is not correct, Internet thru PC might not be possible, so check to
make sure the address is right.
22
Page 25

ESC2420 User Guide version1.0
Chapter 5 VoIP Setup
I. Before Getting Started…………………..…….………..……………….….24
1. Checkpoint……..……………..………………………………………………...24
2. Confirmation of VoIP Service Mode…………………..………...……………24
1) Terminal Type …………………………………….…………………………………24
2) Gateway Type……………………………………..…………..……………………..24
II. VoIP Setup…………………..…...……….…………………………………….25
1. Connect to Setup page……………..…………………….…………………….25
2. Connect to VoIP Setup page………………….………...…………………..….25
3. VoIP Setup…..………………………………………………………..………...26
1) Register as Terminal Type………………….….………….…………………………26
2) Register as Gateway Type..…………………………………………………….……27
4.When Failed to Setup…………….………...………..…………………………28
III. Make a Call……………………………..………………………………...….29
23
Page 26

ESC2420 User Guide version1.0
In order to make an Internet call, VoIP setup is necessary to register to VoIP service. First, if you subscribe for the
service, you will receive the necessary information to register from Service Company.
I. Before Getting Started
1. Checkpoint
The necessary information when registering are E.164 (internet phone number), H.323ID, Password, etc. It
may be different from a company to a company. Check to make sure you have all the necessary information
before getting started.
2. Confirmation of VoIP Service Mode
There are different types of service from one Service Company to another. Select the VoIP setup mode
according to your service provided. Make sure to check the mode and setup accordingly, otherwise, you may
have problem registering.
1) Termin a l Type
If there are 2 of H323 ID necessary to register, you need to setup as ‘Terminal’ for ‘Terminal Type’.
Typically you need 2 of H323 ID and 2 of E.164 (Internet Telephone Number) for this type of service.
2) Gateway Type
If there is 1 of H323ID necessary to register, you need to setup as ‘Gateway’ for ‘Terminal Type’.
Typically you need 1 of H323 ID and 2 of E.164 (Internet Telephone Number) for this type of service.
24
Page 27
ESC2420 User Guide version1.0
II. VoIP Setup (Step ⑥ of the Procedure)
1. Connect to Setup page
Connect to Setup page. Refer to page20 ‘Connect to Setup page’. If you are already in Setup page, start from
number 2 ‘Connect to VoIP Setup page’.
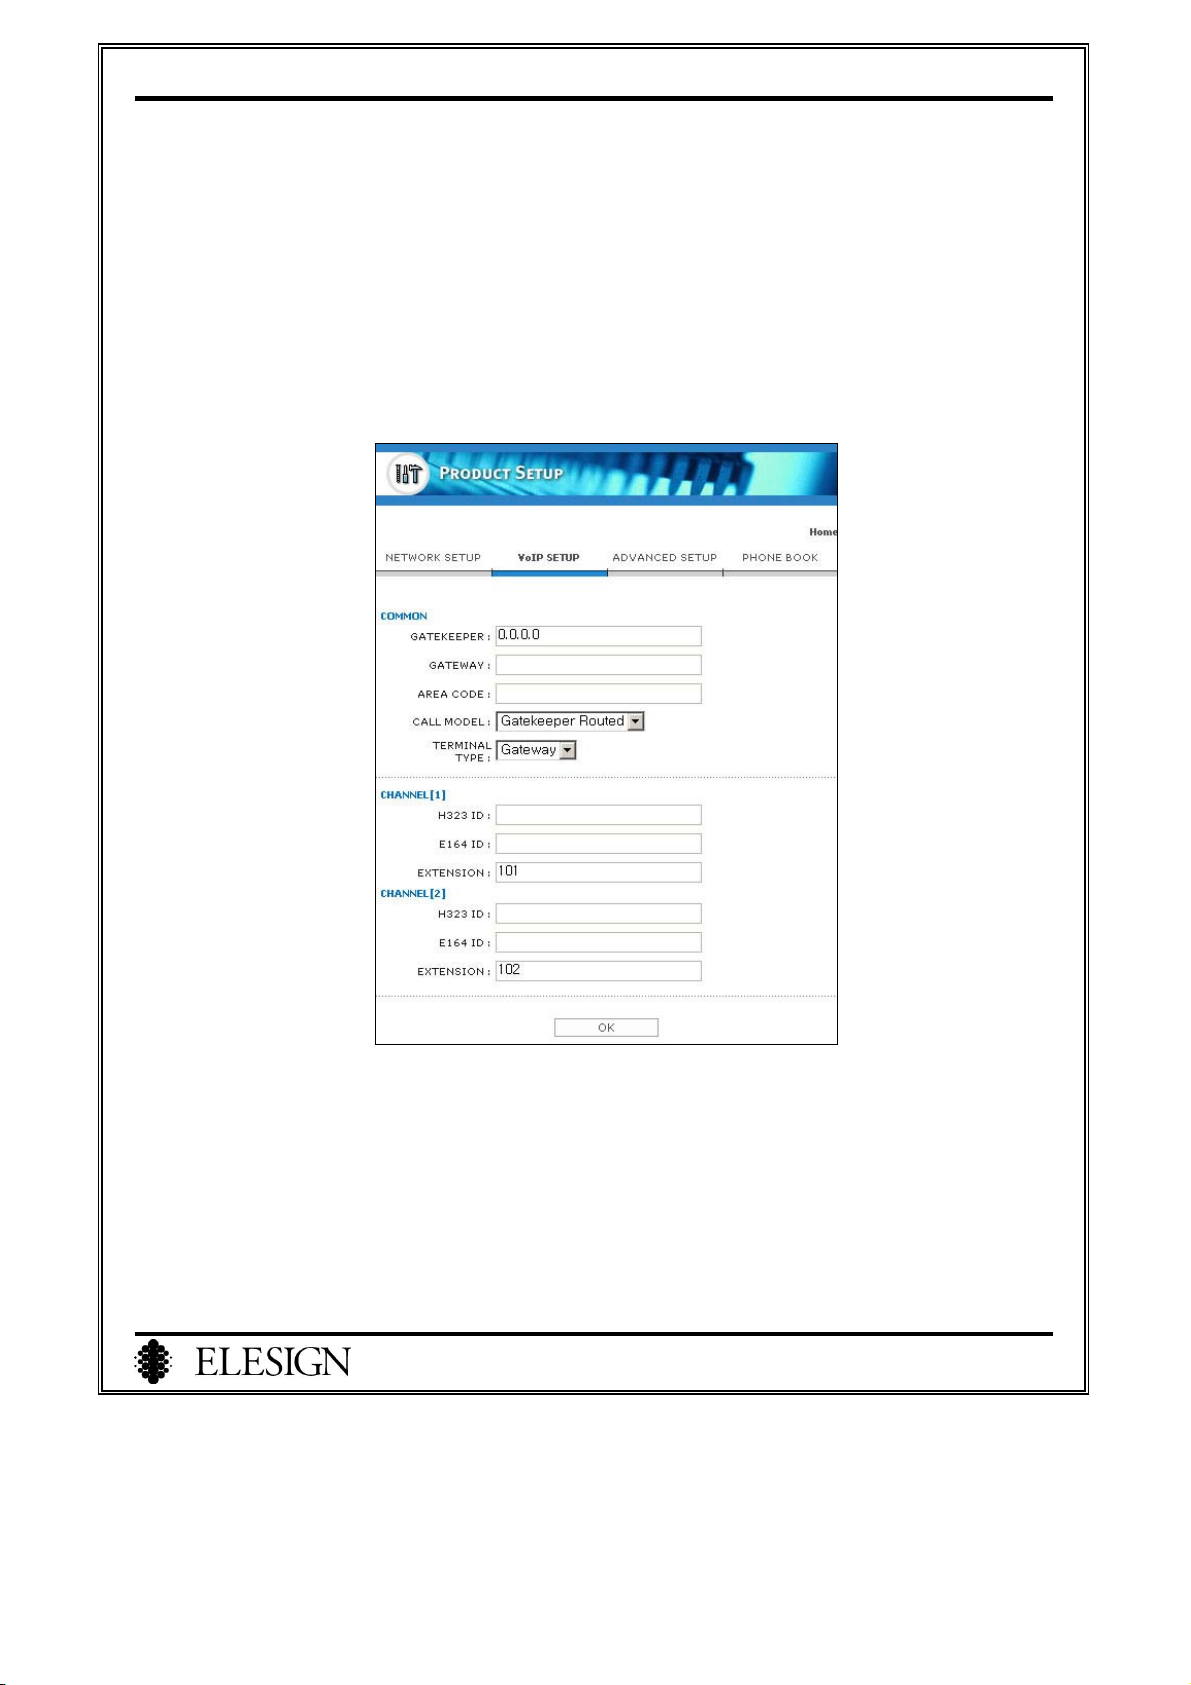
2. Connect to VoIP Setup page
Select ‘VoIP Setup’ from Main Page
25
Page 28
ESC2420 User Guide version1.0
3. VoIP Setup
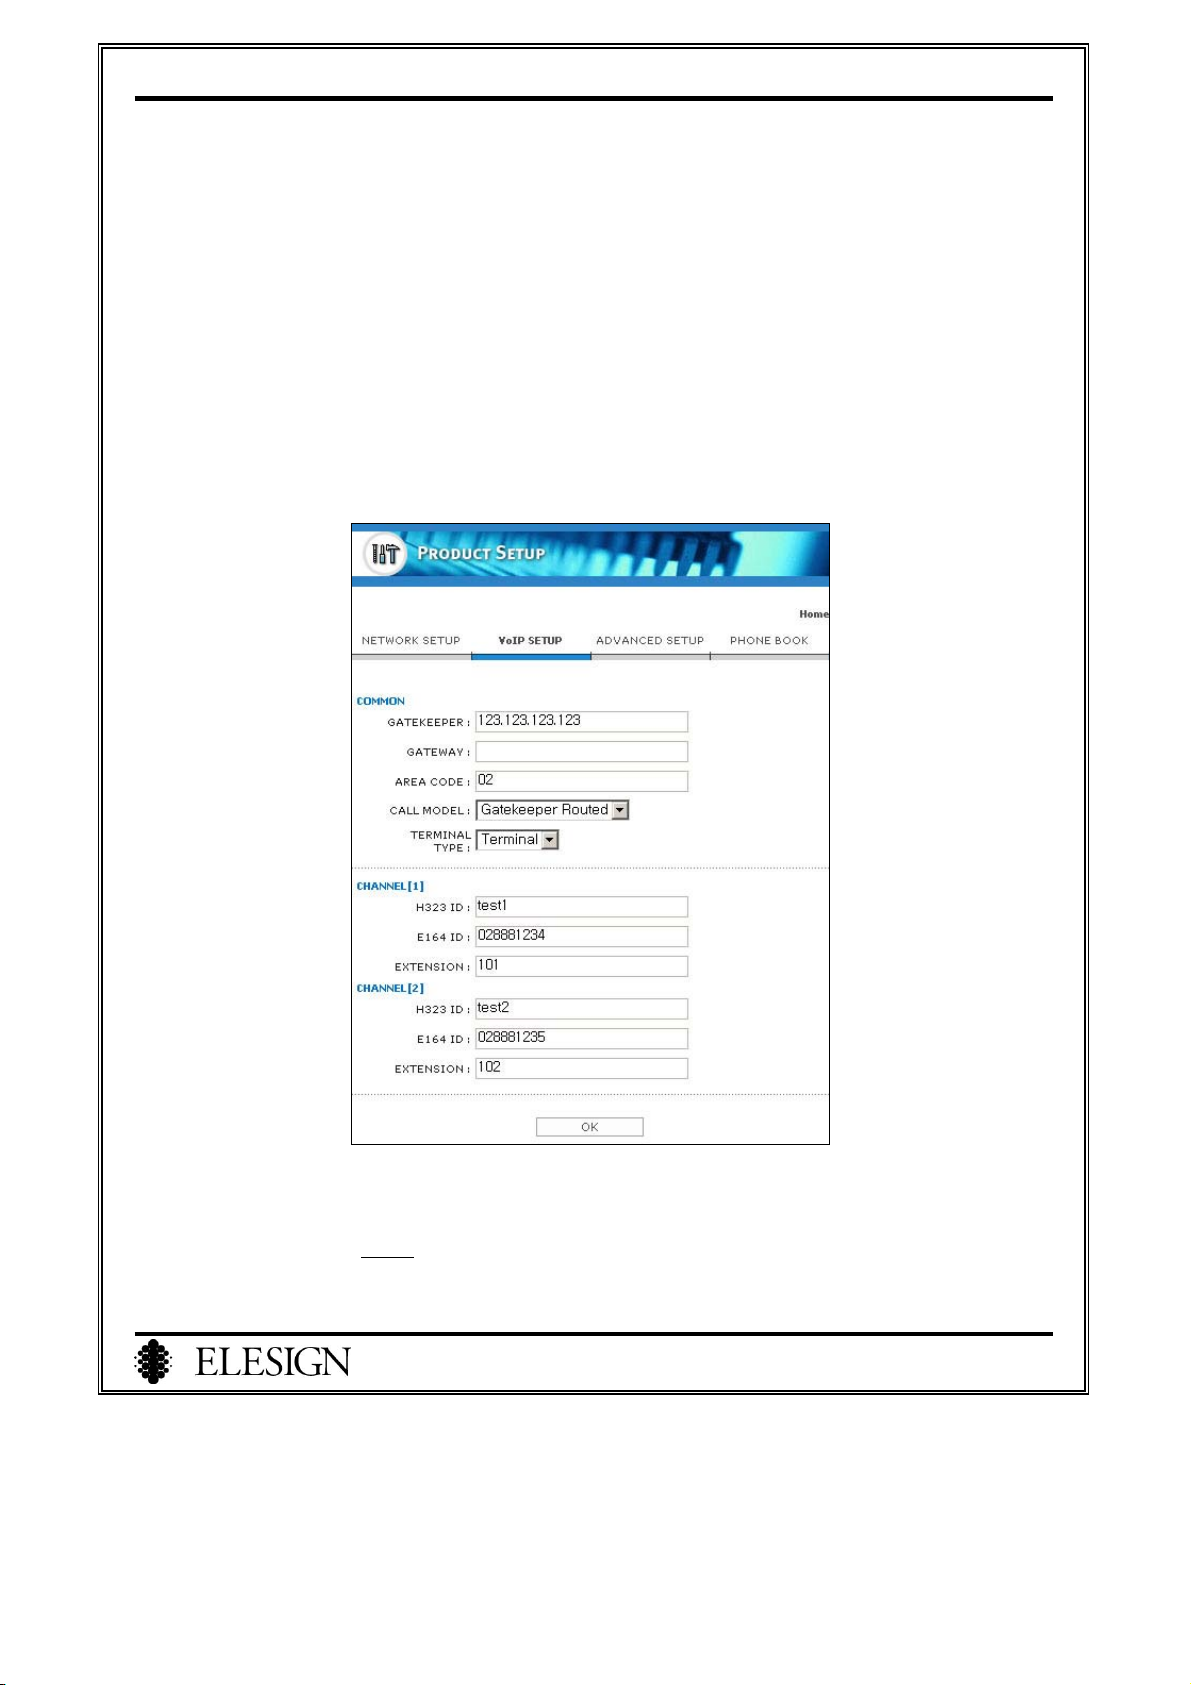
1) Register as Terminal Type
① First, subscribe for Internet call service to get necessary information.
② Input gatekeeper IP address in ‘GATEKEEPER’ box. (Ex: 123.123.123.123)
③ Leave blank for ‘GATEWAY’ box. (For more information regarding setup of media gateway, refer
to page44)
④ Input area code used with PSTN in ‘AREA CODE’ box. (Ex: Seoul – 02)
⑤ Select ‘Gatekeeper Routed’ for ‘CALL MODEL’
⑥ Select ‘Terminal’ for Terminal Type
⑦ Enter H323ID and E164 received from the service company to each box of the channel.
⑧ Click on ‘OK’ button.
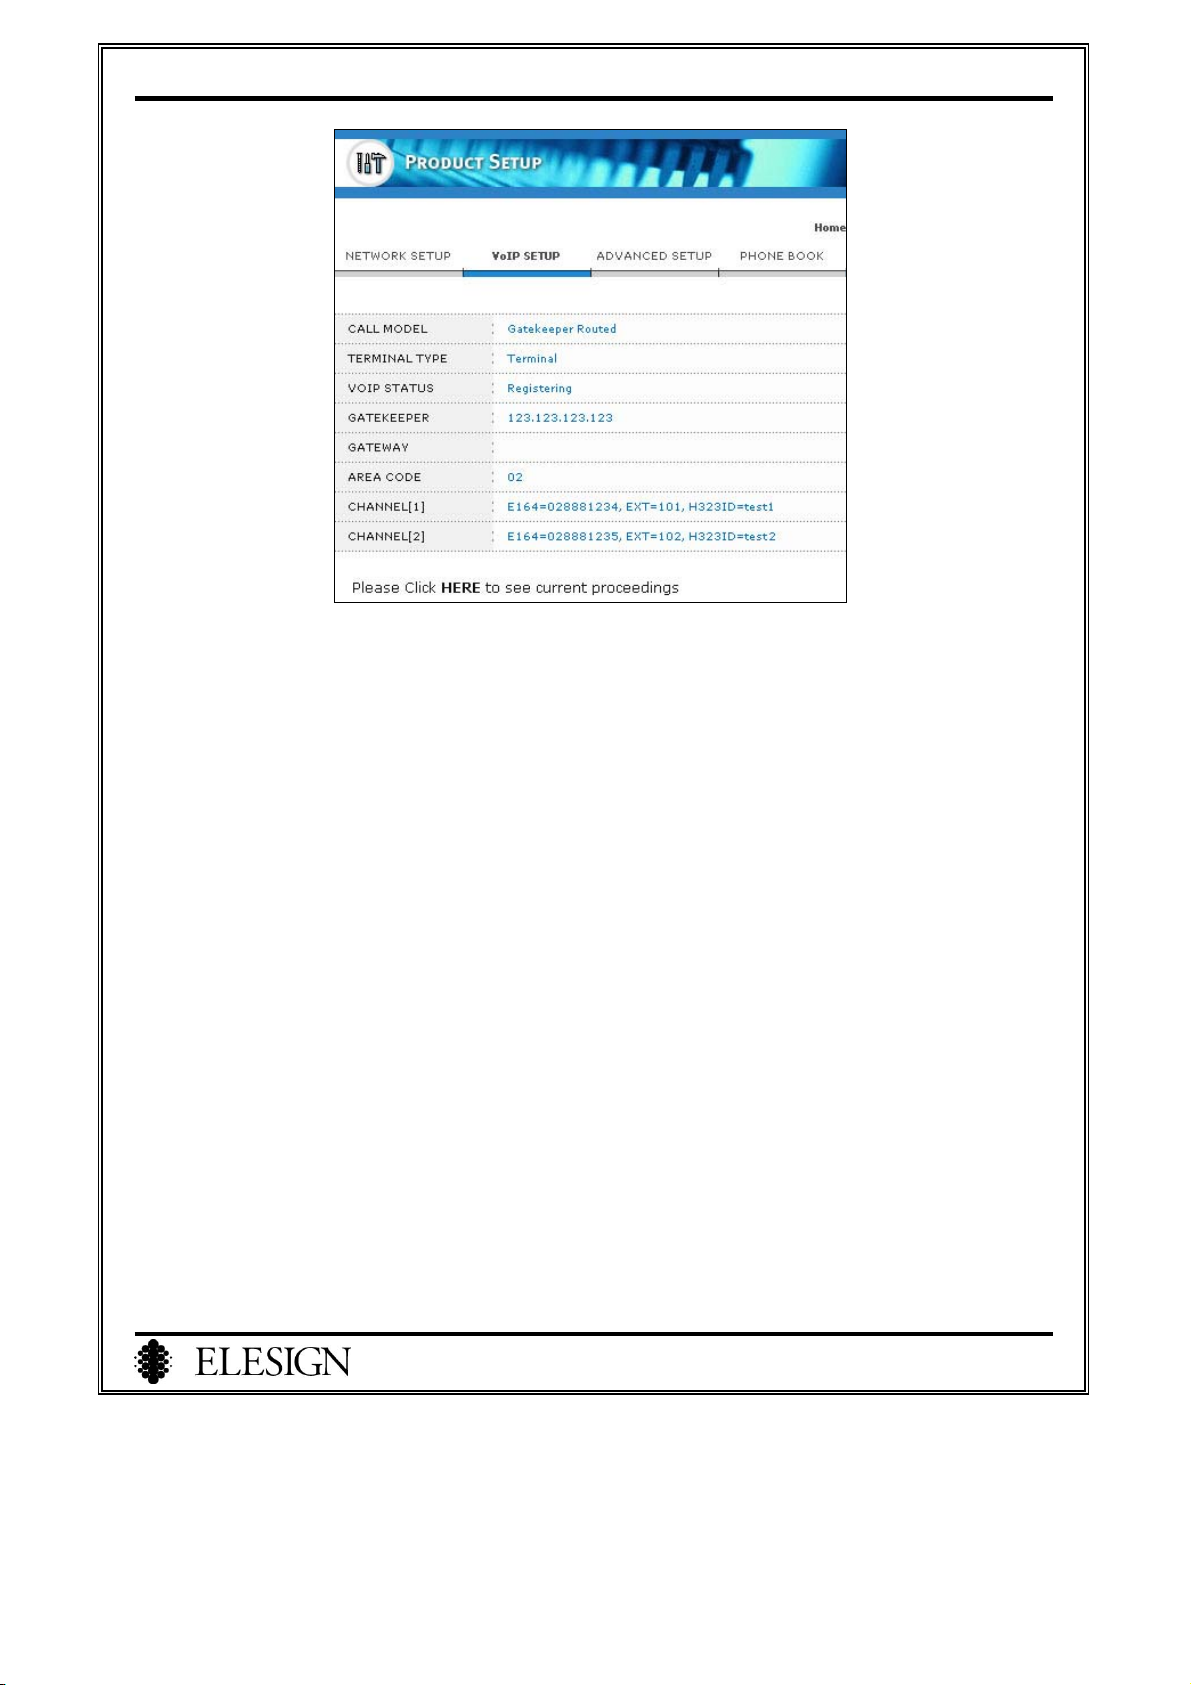
⑨ When you see a message, ‘Registering’ for ‘VoIP Status’, please click on ‘HERE’ where it says
‘Please click HERE
26
to see current proceedings.’
Page 29
ESC2420 User Guide version1.0
⑩
If you see a message, ‘Registered’ for ‘VoIP Status’, the VoIP setup is successfully done.
2) Register as Gateway Type
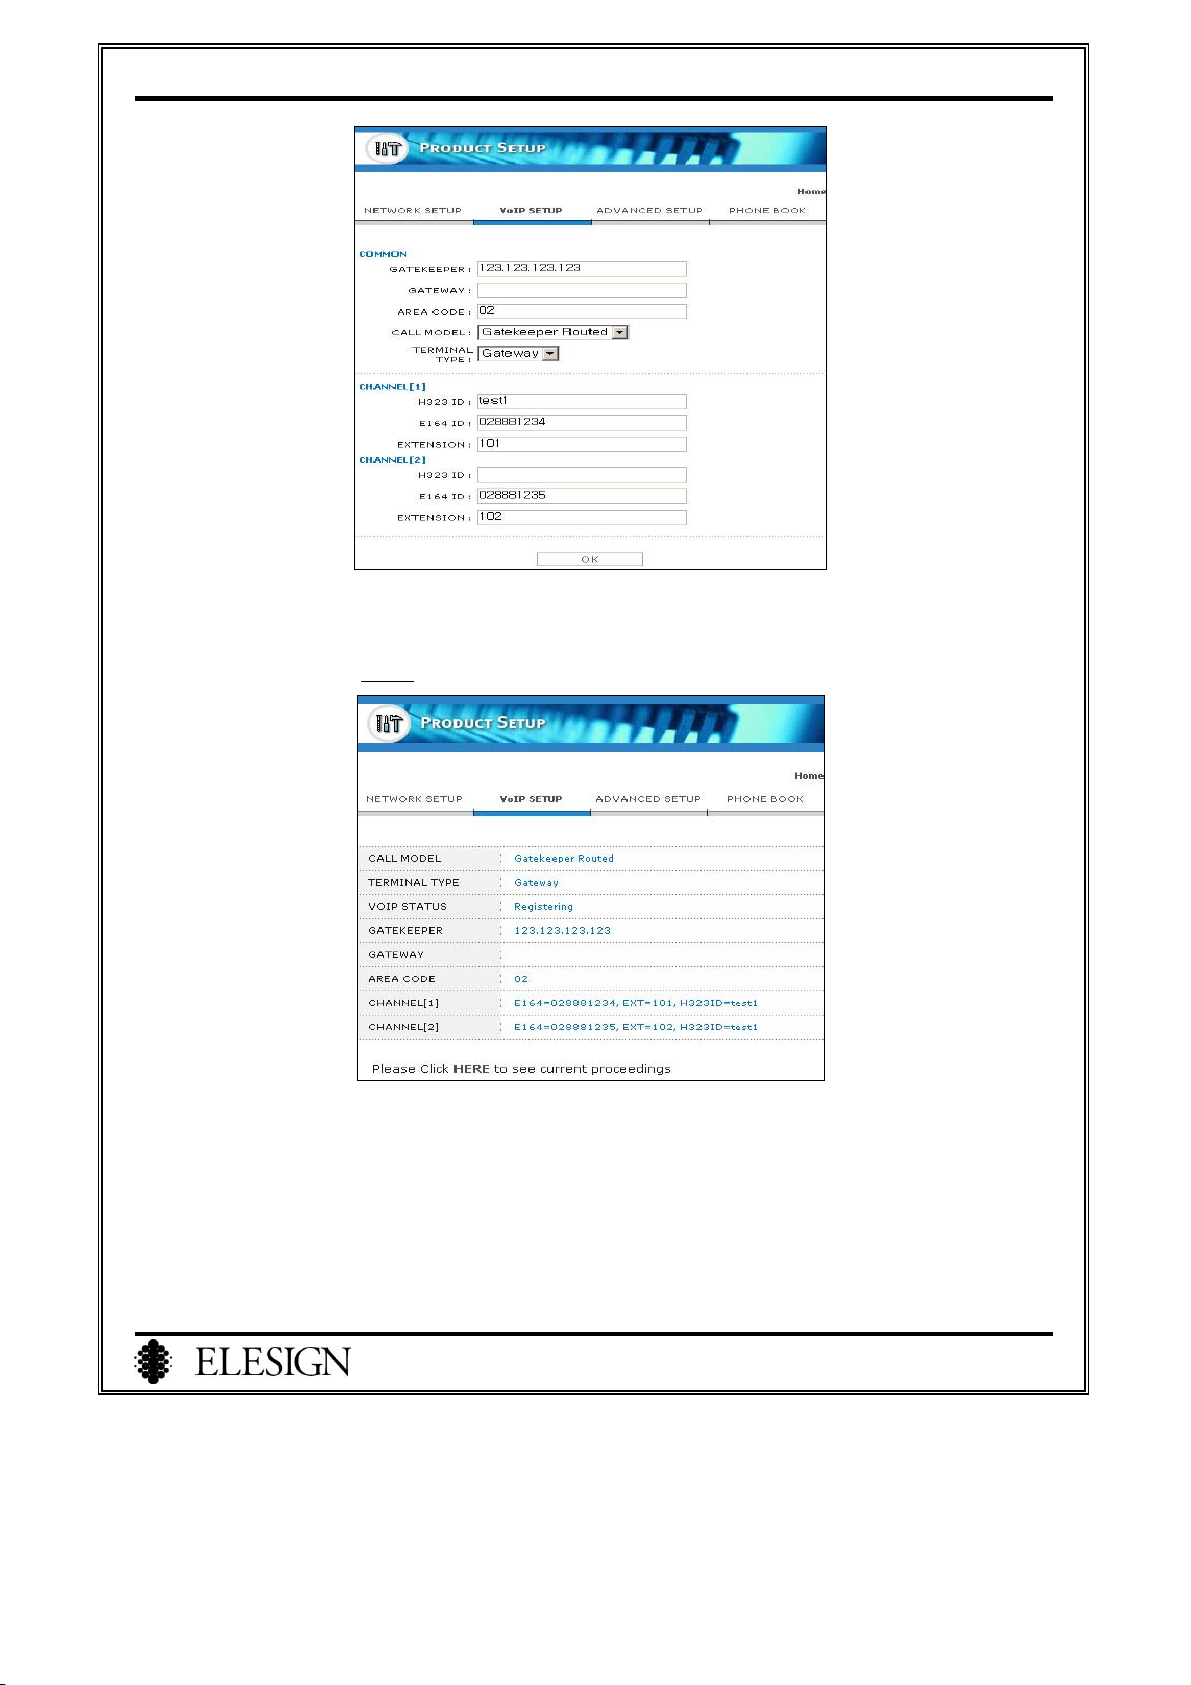
① First, subscribe for Internet call service to get necessary information.
② Input gatekeeper IP address in ‘GATEKEEPER’ box. (Ex: 123.123.123.123)
③ Leave blank for ‘GATEWAY’ box. (For more information regarding setup of media gateway, refer
to page44)
④ Input area code used with PSTN in ‘AREA CODE’ box. (Ex: Seoul – 02)
⑤ Select ‘Gatekeeper Routed’ for ‘CALL MODEL’
⑥ Select ‘Gateway’ for Terminal Type
⑦ Enter H323ID for Channel 1 and E.164 (Internet Telephone number) for each box of the channel.
27
Page 30
ESC2420 User Guide version1.0
⑧ Click on ‘OK’ button.
⑨ When you see a message, ‘Registering’ for ‘VoIP Status’, please click on ‘HERE’ where it says
‘Please click HERE
⑩ If you see a message, ‘Registered’ for ‘VoIP Status’, the VoIP setup is successfully done.
to see current proceedings.’
4. When Failed to Setup
If you don’t see a message ‘Registered’ for about a minute, check to make sure you have inputted the
information correctly. Try again after checking the necessary information regarding the registration.
28
Page 31

ESC2420 User Guide version1.0
III. Make a Call (Step ⑦ of the Procedure)
Dial the number Æ Press ‘#’ (‘Send’)
※ The way to make an Internet call may differ from a service company. In order to receive further
information, contact the service company.
29
Page 32

ESC2420 User Guide version1.0
Chapter 6 Advanced Setup
I. Console Setup…………………………….…….……………………………….32
1.Connect to Setup page……………..…….………….…………….…………..…32
2.Connect to Advanced Setup page……..…..……..………………….…………..32
3.Getting used to Console Setup……....…..…...…………………….…………....32
1) Volume Setup……………………….………………………….…….…………………33
2) Tone Setup……………….……………………….………..…..……………………….33
3) Virtual IP Setup……………….….....……...….…….…….…………………………...33
4) NAT Setup…………………….……....……...….……….………………………….....33
5) Console ID & Password Setup………....……..………………………..………………33
6) Confirmation of Setup....…………….…………..……..………………………………33
II. Volume Setup…………………………………………………………………...34
1.Connect to Setup page…………………………………………….……….. ...…34
2.Connect to Advanced Setup page………………….…………….…….….….....34
3.Volume Setup…………………………………....…..………….…………......….34
III. DHCP Setup……….……………………………………………………..……..35
1. DHCP Setup………………………….………..…….….…………….…..…..….35
2.Connect to Setup page…….……………….…………….………….……….…..35
3. Connect to Advanced Setup page…….………..……………………....…...…..35
4. DHCP Setup…………………..……….…………..………………….…..….......36
IV. Using NAT Function…………...………...…………………………………37
1. NAT Function……...………..……………………..……………………………37
2. Configuration of NAT…………...…………………….……………….……….37
1) Configuring NAT………………………………………………………....……..37
2) Port Forwarding Setup………………………………………………….………..38
30
Page 33

ESC2420 User Guide version1.0
V. Phonebook Setup……………………………………………………..….……39
1. Before Getting Started…………………………….………...……..……..……39
2. Register Individual Information………………………………………..……..39
1) Connect to Setup page……………………………..……..………………….…..……39
2) Connect to Phonebook Setup page……………………..……………..…..…..………39
3) Register Individual Information………………………..……....……….….…………40
3. Register Representative Gateway………………………….……….………....41
VI. Firmware Upgrade ……………………………………..……………………42
1. Connect to Setup page…………………………………………………………42
2. Connect to Advanced Setup page………………...…………….……………..42
3. Firmware Upgrade………………………………………….……...………….42
31
Page 34
ESC2420 User Guide version1.0
This chapter is to setup the advanced option other than basic setup to make an Internet call. You may setup to use
advanced option according to network environment.
I. Console Setup
1. Connect to Setup page
Connect to Setup page. Refer to page20 ‘Connect to Setup page’. If you are already in Setup page, start
from number 2 ‘Connect to Advanced Setup page’.
2. Connect to Advanced Setup page
Select ‘Advanced Setup’ from the main page.
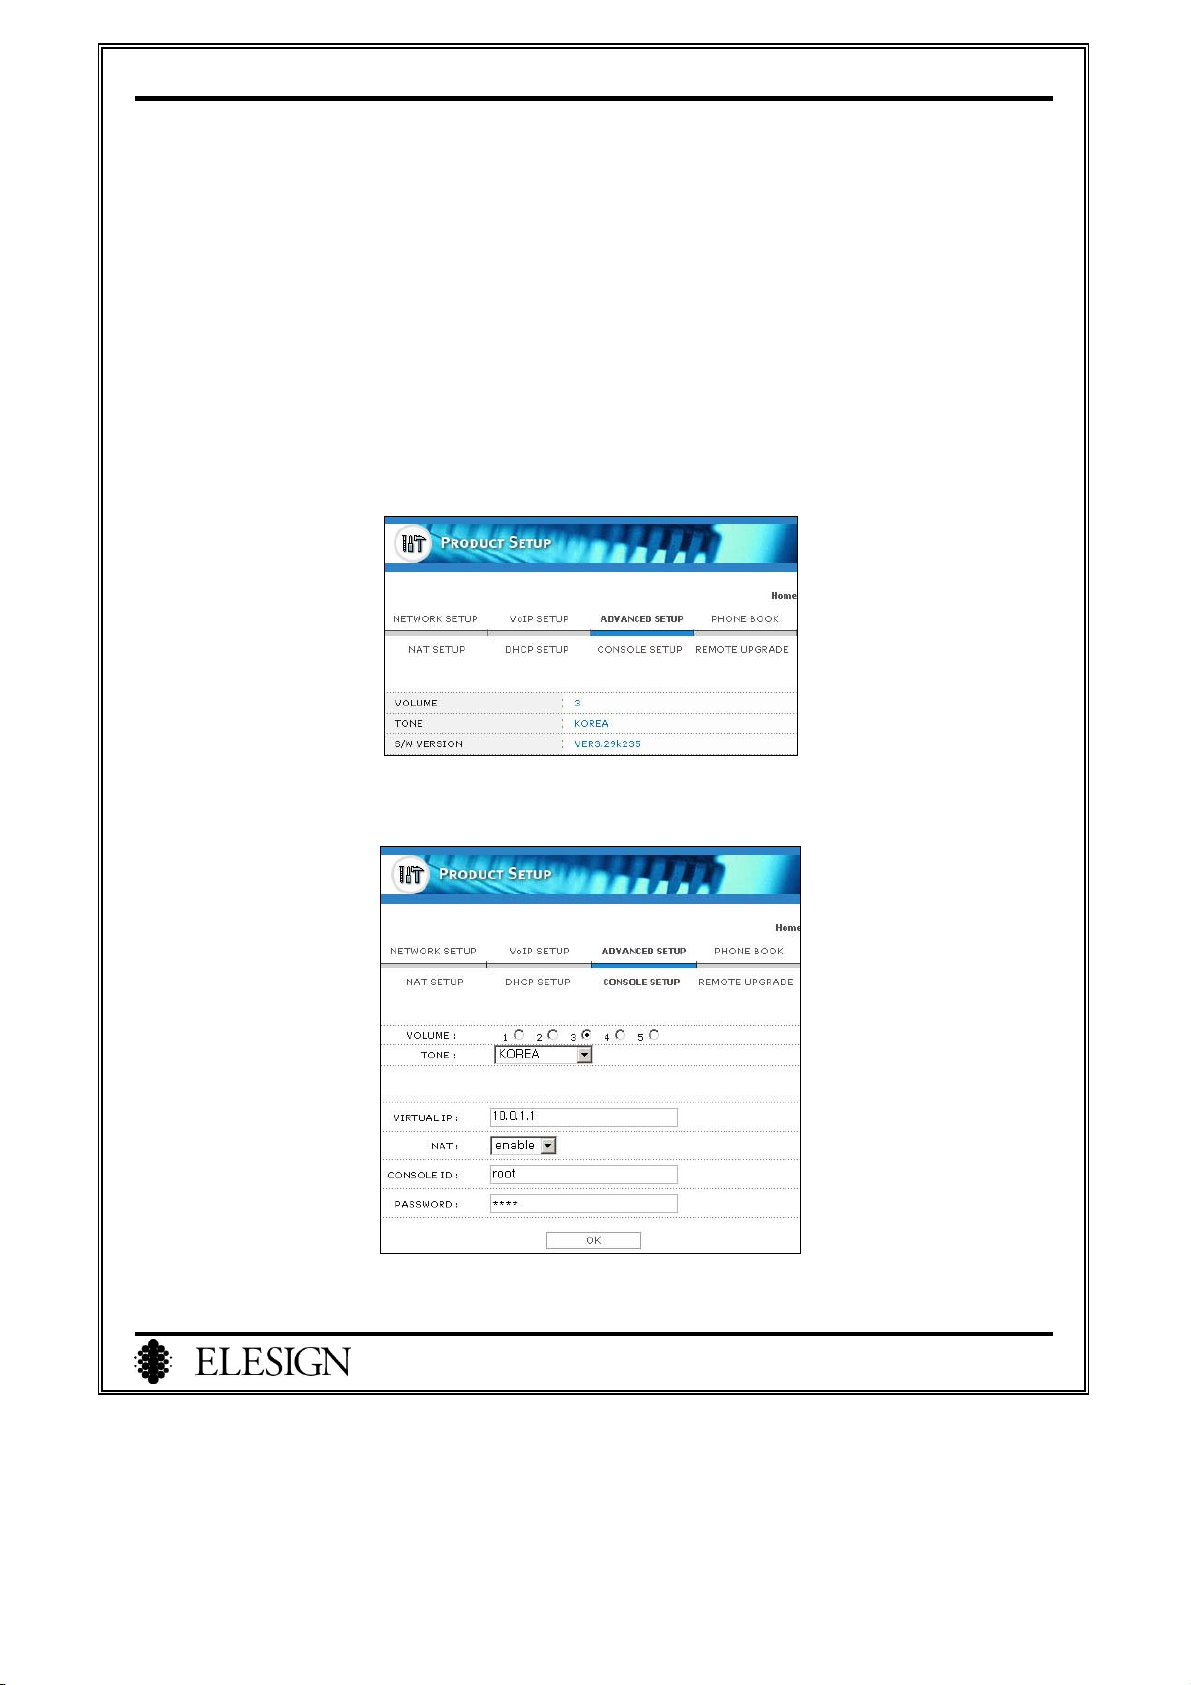
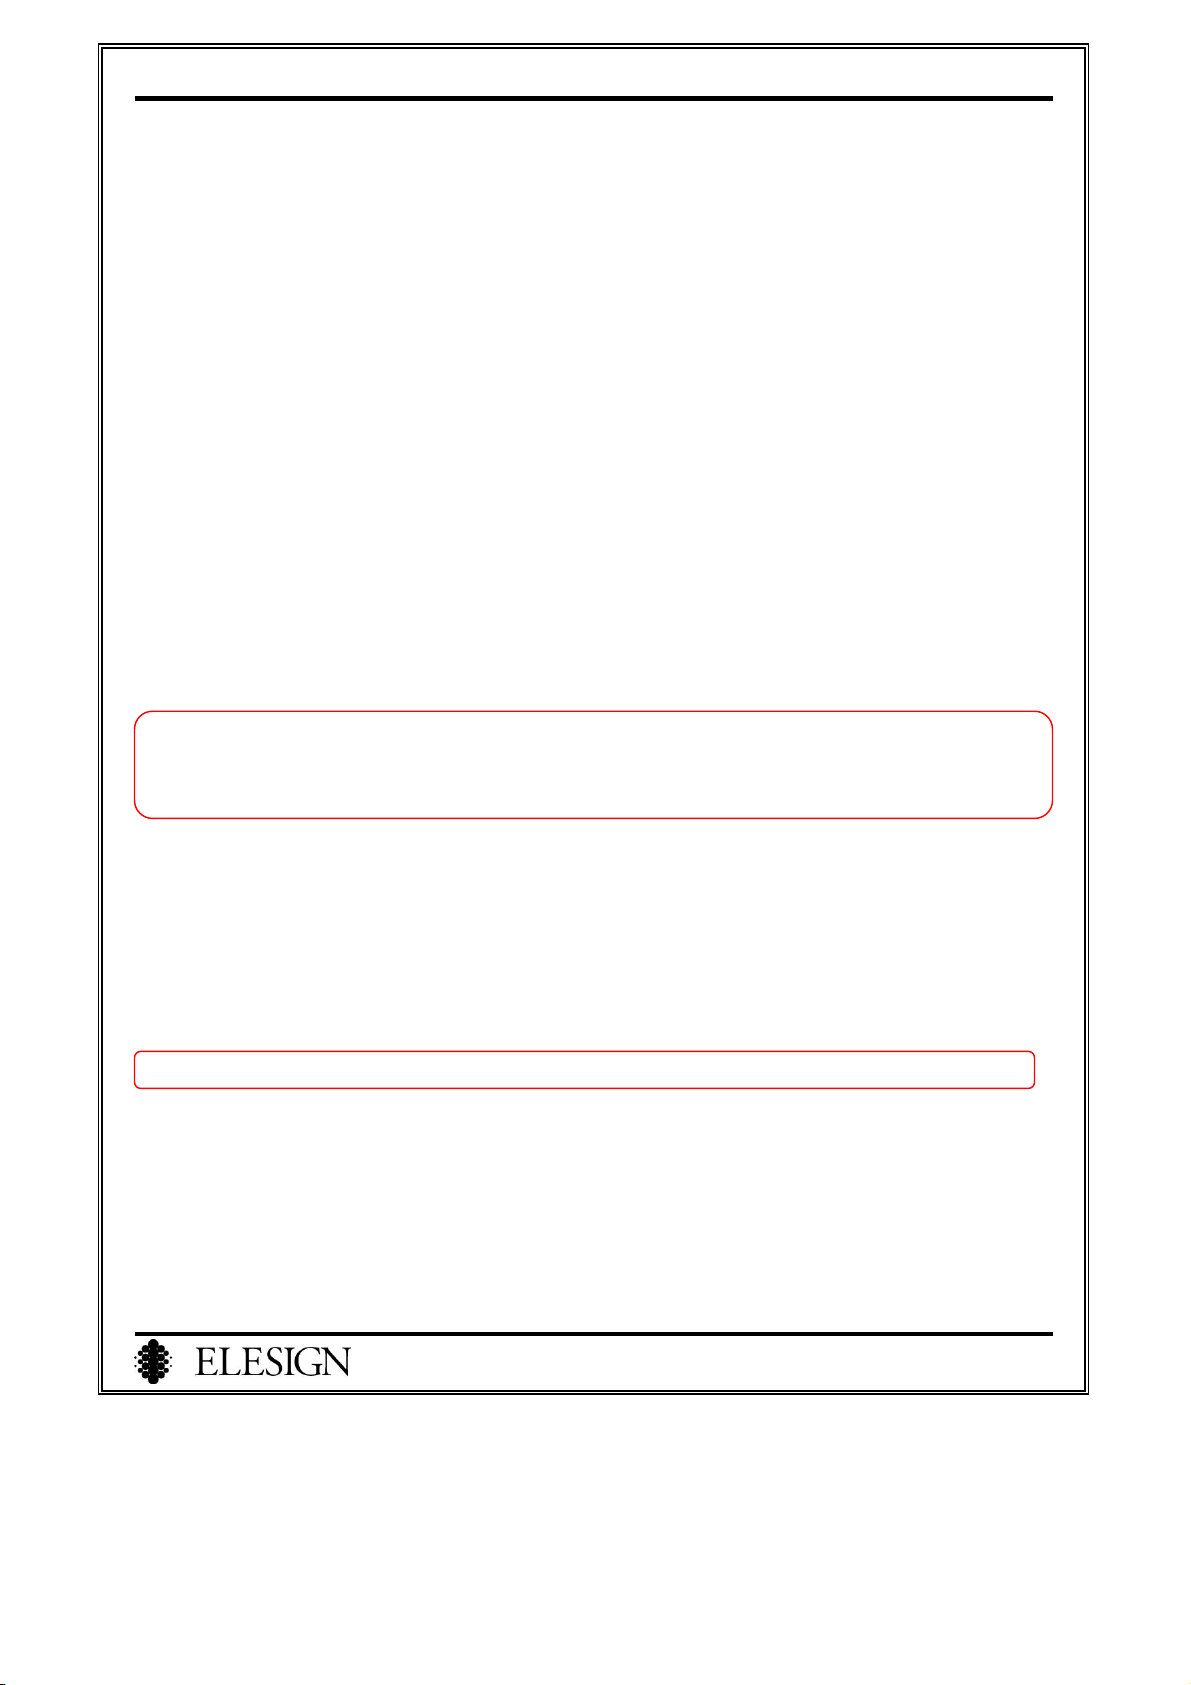
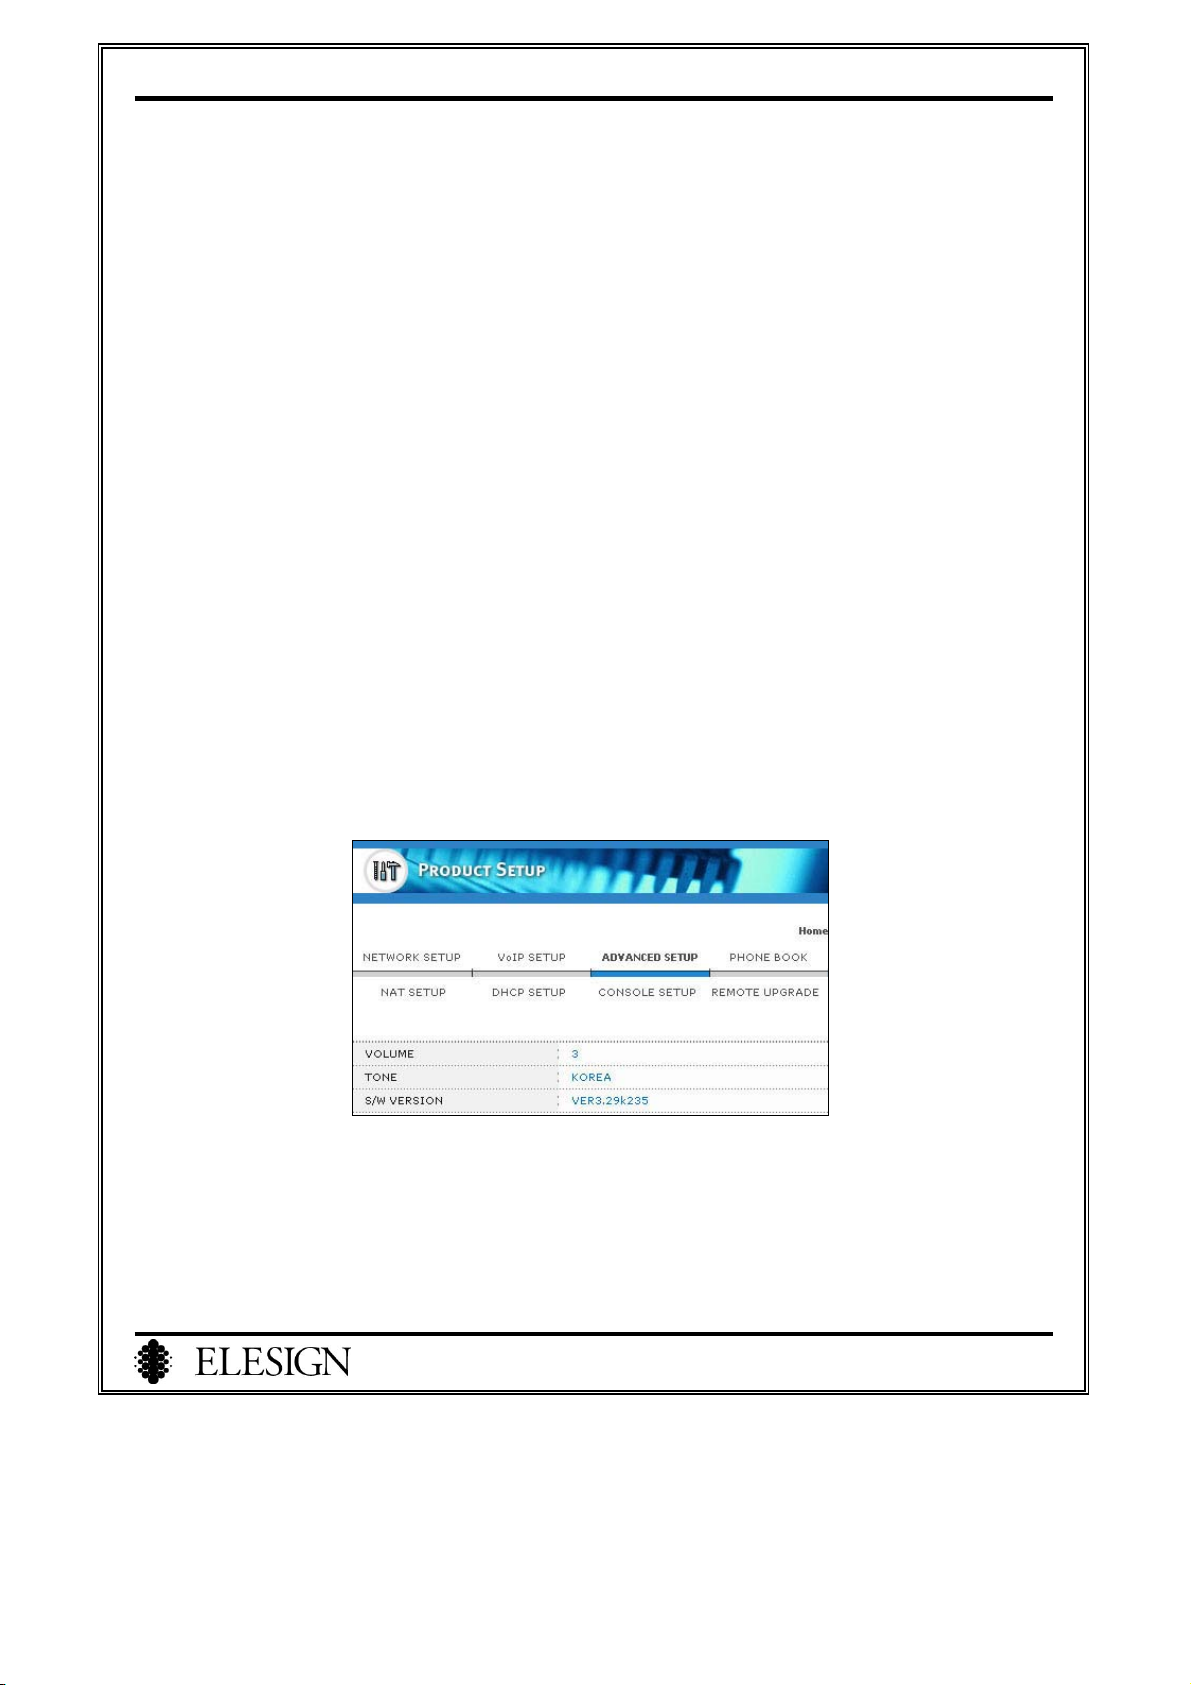
3. Getting Used to Console Setup
Select ‘Console Setup’ from the submenu of ‘Advanced Setup’.
32
Page 35
ESC2420 User Guide version1.0
1) Volume Setup
This option is to adjust the volume. Refer to page34 for more detailed procedure.
2) Tone Setup
This option is to select the dial ton according to the different countries. The gateway has 4 types of tone,
Korean, Japanese, China 3 (TUP), and Guandong. You may distinguish the tone between the Internet call
and PSTN call using this option.
3) Virtual IP Setup
Virtual IP means the network ID of the LAN side of the gateway. This option allows you to change the
network ID since there may be the case where same network ID present within the same network. If you
change the IP address from 10.0.1.1 (default) to 10.0.10.1, virtual IP addresses that are allocated from the
gateway range from 10.0.10.2 to 10.0.10.254.
Virtual IP is used to connect to setup page of the gateway. It is needed to reconnect to the page, so please
remember the value after changing it.
(Ex: If Virtual IP is changed to ’10.0.10.1’, the connecting IP address will change also to ‘http://10.0.10.1)
! Caution: After changing the Virtual IP, reboot the gateway and restart the computer that is connected
to the gateway. You may not be able to connect to the page if you forget the changed value.
4) NAT Setup
This option is to ‘Enable’ or ‘Disable’ NAT function.
5) Console ID and Password Setup
This option is to change Console ID and Password that is used to connect to setup page. Make sure to
remember the changed values.
! Caution: You may not be able to connect to the page if you forget the changed value.
6) Confirmation of Setup
Click on ‘OK’ button after setup.
To store the setup values, disconnect the adapter and reconnect to restart the gateway.
33
Page 36
ESC2420 User Guide version1.0
II. Volume Setup
1. Connect to Setup Page
Connect to Setup page. Refer to page20 ‘Connect to Setup page’. If you are already in Setup page, start
from number 2 ‘Connect to Advanced Setup page’.
2. Connect to Advanced Setup Page
Select ‘Advanced Setup’ from the main page.
3. Volume Setup
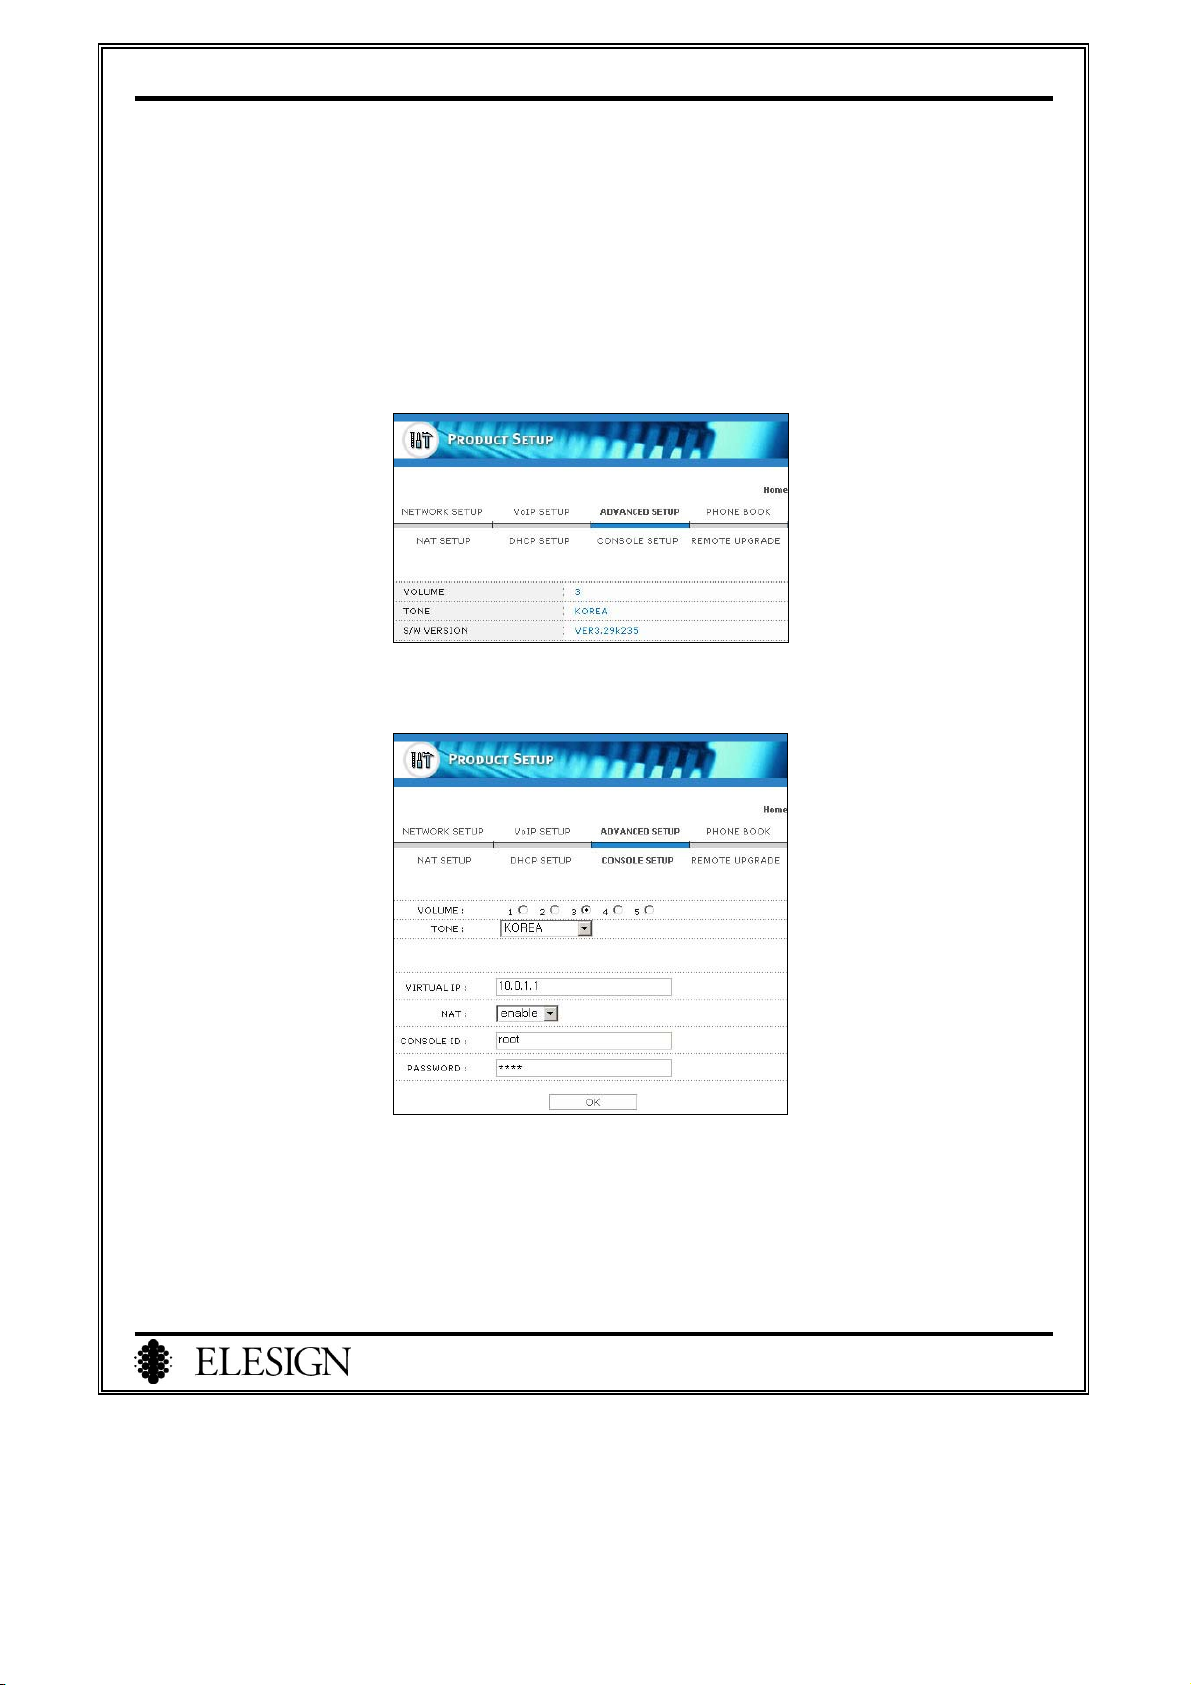
1) Select ‘Console Setup’ from the submenu of ‘Advanced Setup’.
Select the appropriate volume from 1~5 to adjust.
2)
3) Click on ‘OK’ button.
4) To store the setup values, disconnect the adapter and reconnect to restart the gateway.
34
Page 37
ESC2420 User Guide version1.0
III. DHCP Setup
1. DHCP Setup
This option is to restrict the usage of NAT function.
The default setup of the gateway allows you to connect the several computers and the gateway automatically
allocates the private IP. In situation like this, DHCP setup will allows to restrict the allocation of IP to
particular PC.
There is setup option of ‘Use above IP pool only’ in DHCP setup page. If you want to allocate the IP without
any restriction, leave it to ‘OFF’.
When it is setup to ‘ON’, PC’s, other than that are connected to the gateway already, will not receive any IP
address from the gateway. In situation like this, use DHCP setup to manually add PC using MAC address of
PC. Using MAC address of PC, you may allocate virtual IP to PC. The procedure is described below.
2. Connect to Setup Page
Connect to Setup page. Refer to page20 ‘Connect to Setup page’. If you are already in Setup page, start from
number 3 ‘Connect to Advanced Setup page’.
3. Connect to Advanced Setup Page
Select ‘Advanced Setup’ from the main page.
35
Page 38
ESC2420 User Guide version1.0
4. DHCP Setup
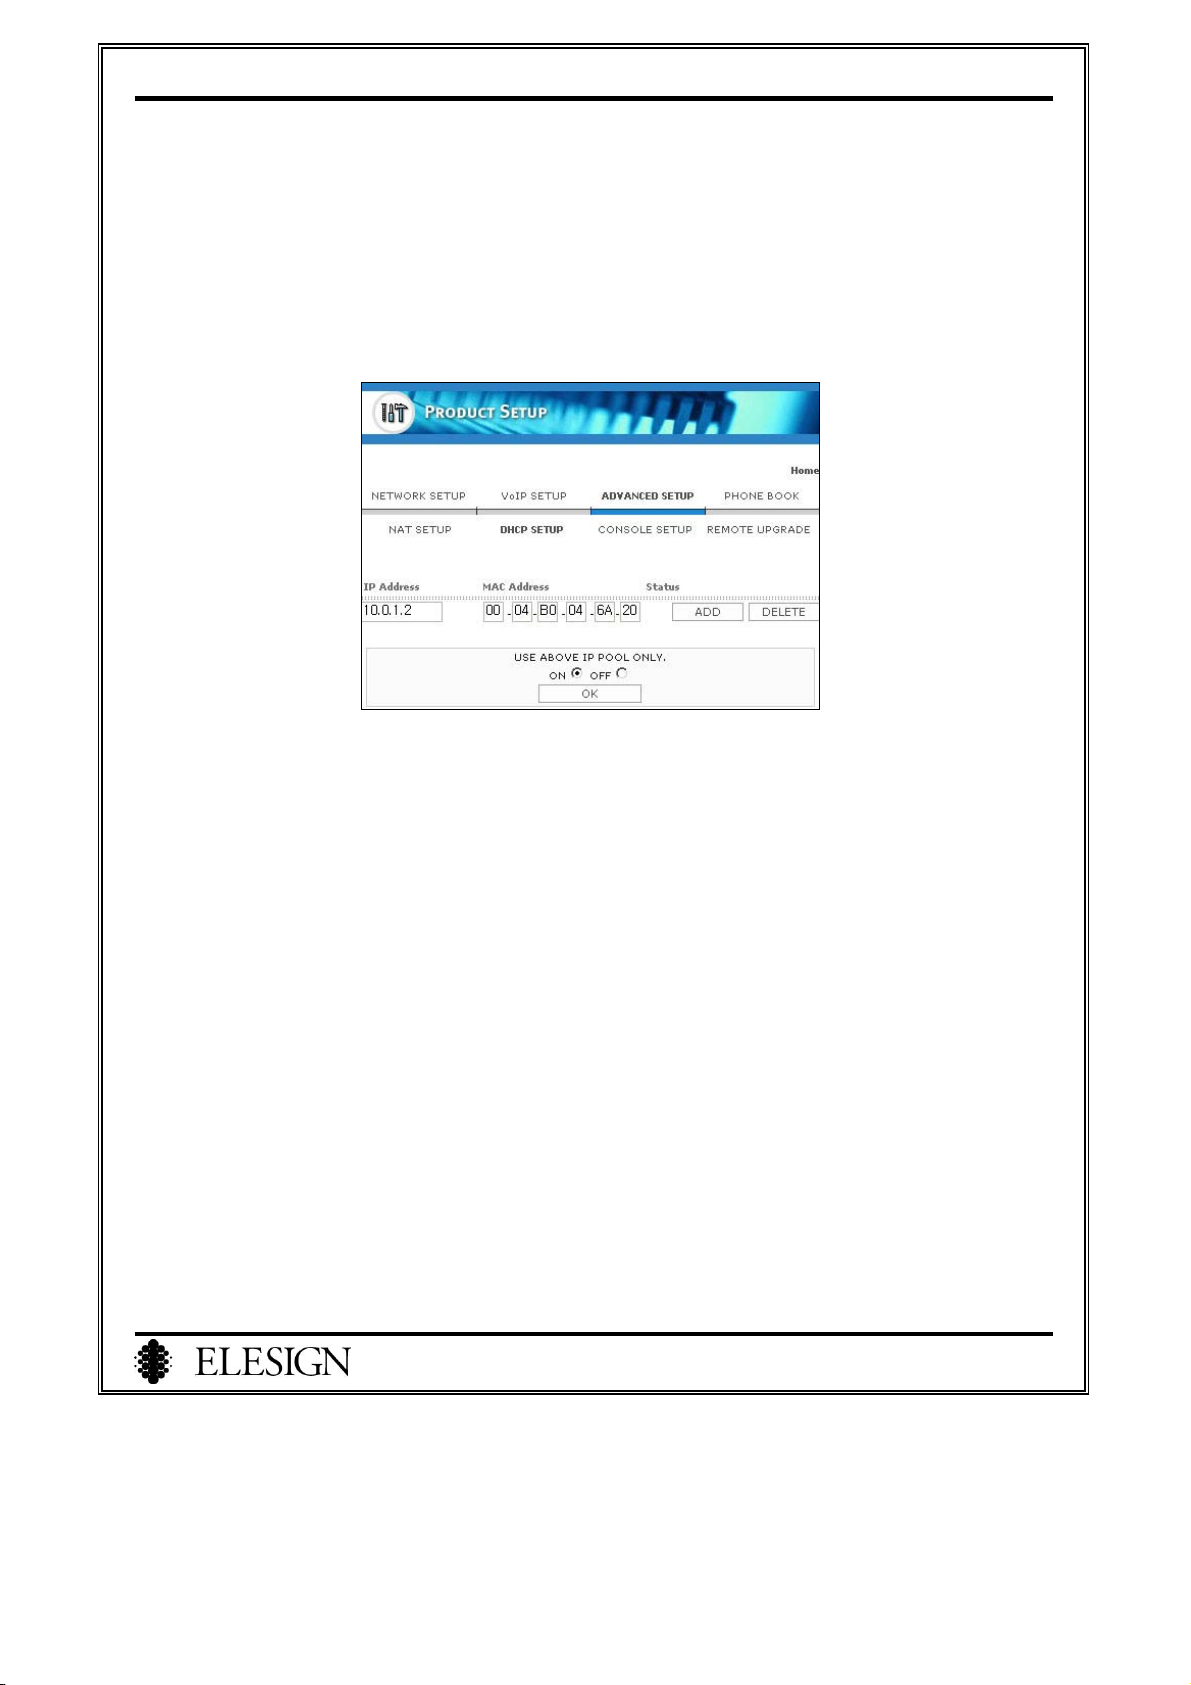
1) Select ‘DHCP Setup’ from the submenu of ‘Advanced Setup’.
2) Select ‘ON’ for the setup option of ‘Use above IP Pool only’.
3) Select virtual IP address that will be allocated to PC. The IP address that can be used ranges ‘10.0.1.2’
to ‘10.0.1.254’.
4) Check the MAC address of PC and input in the box. Click on ‘ADD’ button.
※ Refer to page47 for ‘How to check MAC address’ of PC.
36
Page 39
ESC2420 User Guide version1.0
P
d
IV. Using NAT Function
1. NAT Function
NAT Function is to allocate private IP to PC’s connected to the gateway and enables the usage of Internet.
However, the speed of Internet Connection may go down, if three or more simultaneous calls are on and
more than 20 PC’s are connected.
2. Configuration of NAT
Using private IP allocated from the gateway, you may connect more than one PC to use Internet.
1) Configuring NAT
If you would connect one or several PC to the gateway, the gateway allocates private IP to PC for NAT
environment.
Connect Several PC’s to the gateway using
(Refer to page10 for installation)
Change the network of PC (other than one that used for setup) to ‘Obtain I
dynamically’ (Refer to page12). After setup, turn of the PC’s an
disconnect the adapter from the gateway.
Connect the adapter to the gateway and check LED.
Restart the PC and wait for about a minute
Check to make sure you are able
to connect to Internet from every
PC that is connected to the
gateway.
If you are not able to connect to
Internet, refer to page12 for
‘Network Setup’ of PC.
37
Page 40
ESC2420 User Guide version1.0
2) Port Forwarding Setup
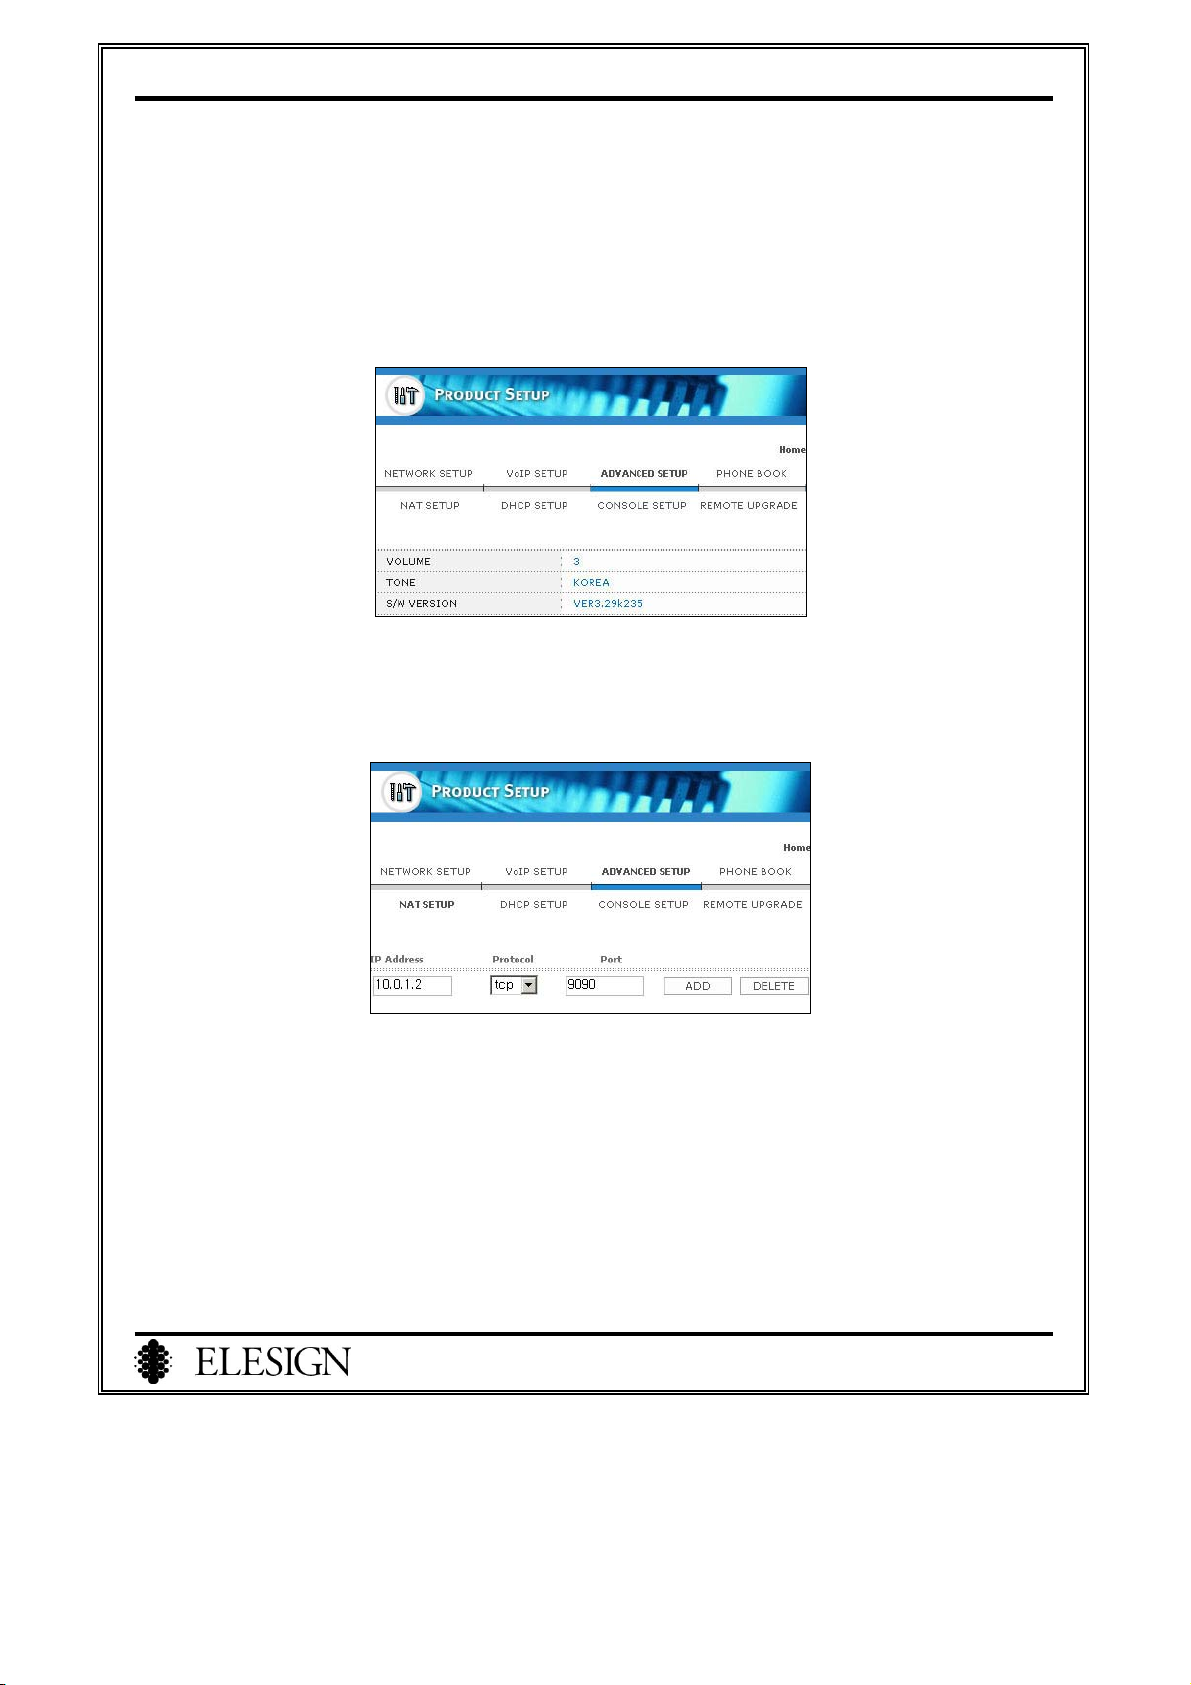
This function enables you to connect to Internet site that uses special port. If Internet programs don’t work
properly, you need to setup for IP address and port forwarding according to the programs.
① Connect to Setup page. Refer to page20 ‘Connect to Setup page’. If you are already in Setup page,
start from number 2 ‘Connect to Advance Setup page’.
② Select ‘Advanced Setup’ from main page.
③ Select ‘NAT Setup’ from submenu of ‘ADVANCED SETUP’
④ Input IP address of PC to setup the option.
⑤ Select transmitting protocol and input the port number. Then click on ‘ADD’ button.
⑥ To delete the IP address, input IP address and click on ‘DELETE’ button.
38
Page 41
ESC2420 User Guide version1.0
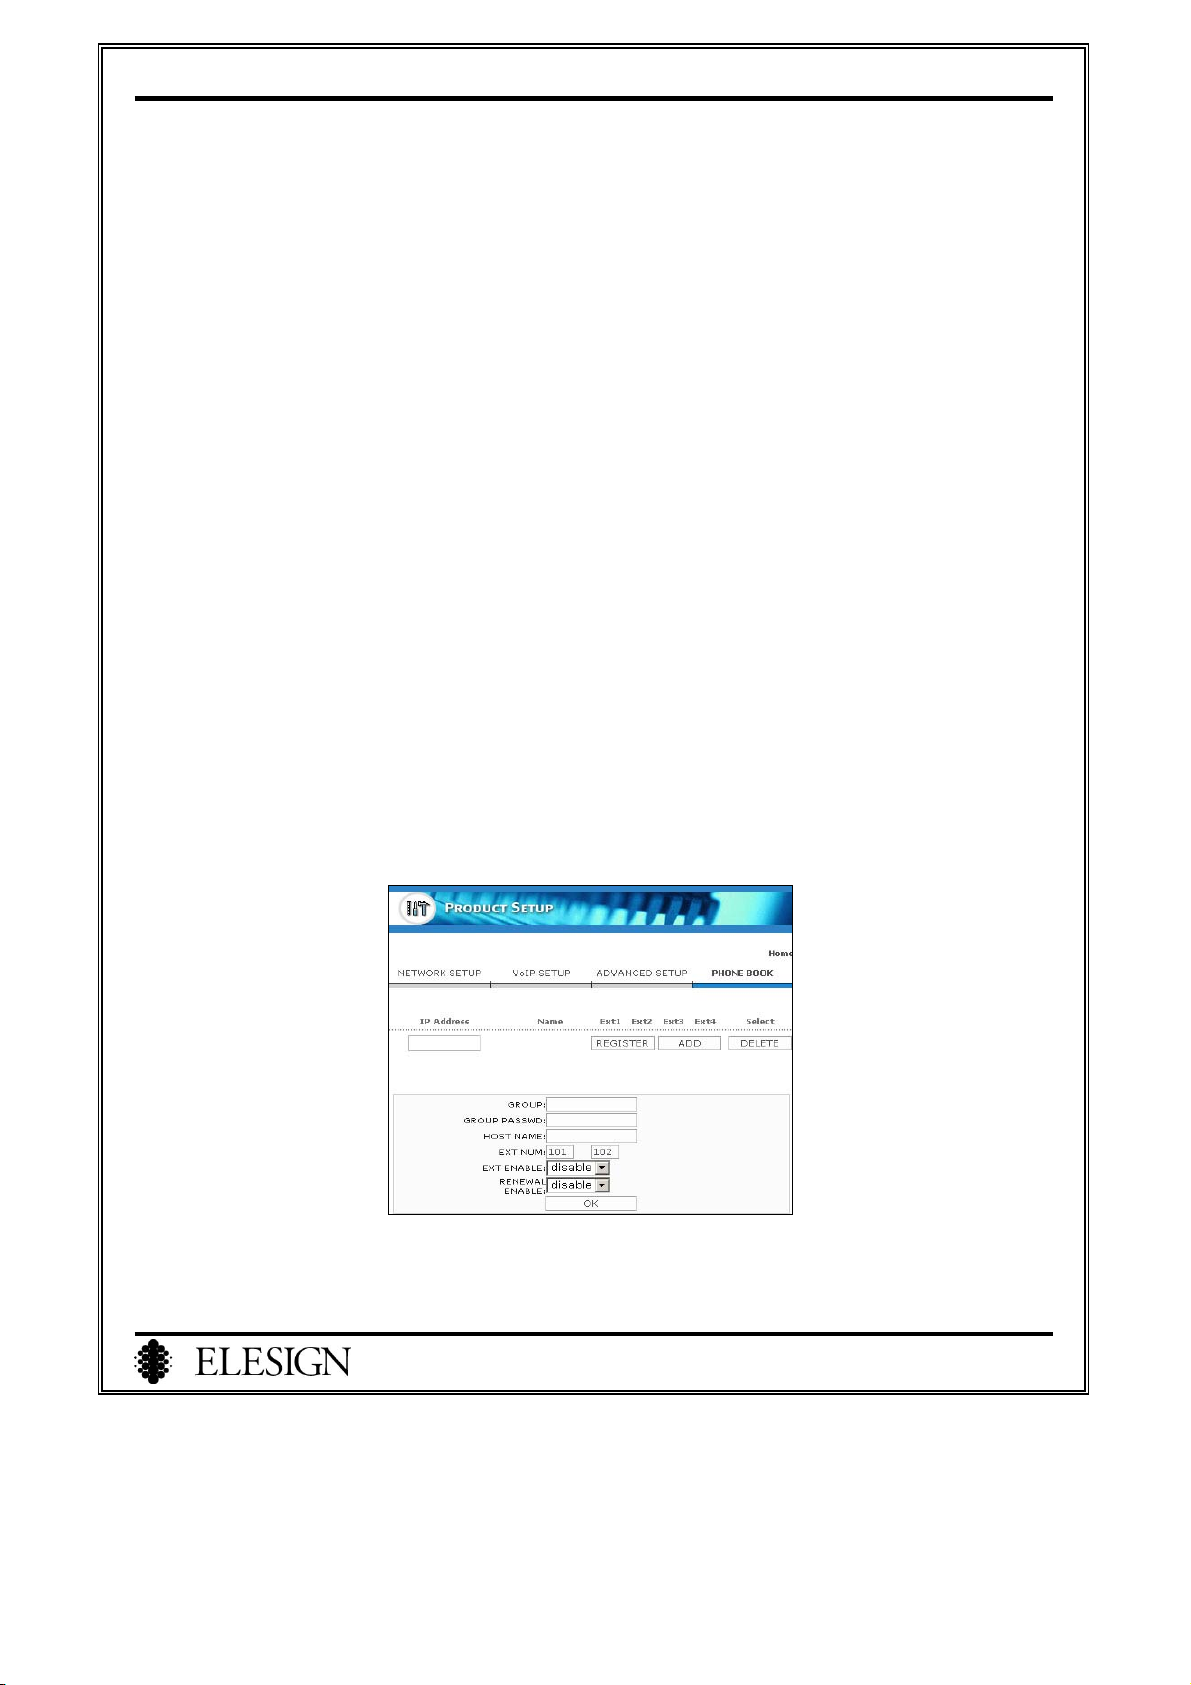
V. Phonebook Setup
This option allows you to make a direct call using extension without using Gatekeeper.
1. Before Getting Started
1) Select the members to form a Group (Maximum 50 person)
2) Decide the name of Group (Maximum 14 letters using English, Korean, Number, or Special Character)
3) Decide the password of Group (Maximum 14 letters using English, Korean, Number, or Special
Character)
4) Decide the host name for each member to use within the Group (Maximum 30 letters using English,
Korean, Number, or Special Character)
5) Decide the extension (3 digit number) of each member to use within the Group.
6) Decide the representative gateway within the Group and let members of the group know the IP address of
it.
2. Register Individual Information
1) Connect to Setup Page
Connect to Setup page. Refer to page20 ‘Connect to Setup page’. If you are already in Setup page, start
from number 2 ‘Connect to Phonebook Setup page’.
2) Connect to Phonebook Setup Page
Select ‘Phonebook’ from the main page.
39
Page 42
ESC2420 User Guide version1.0
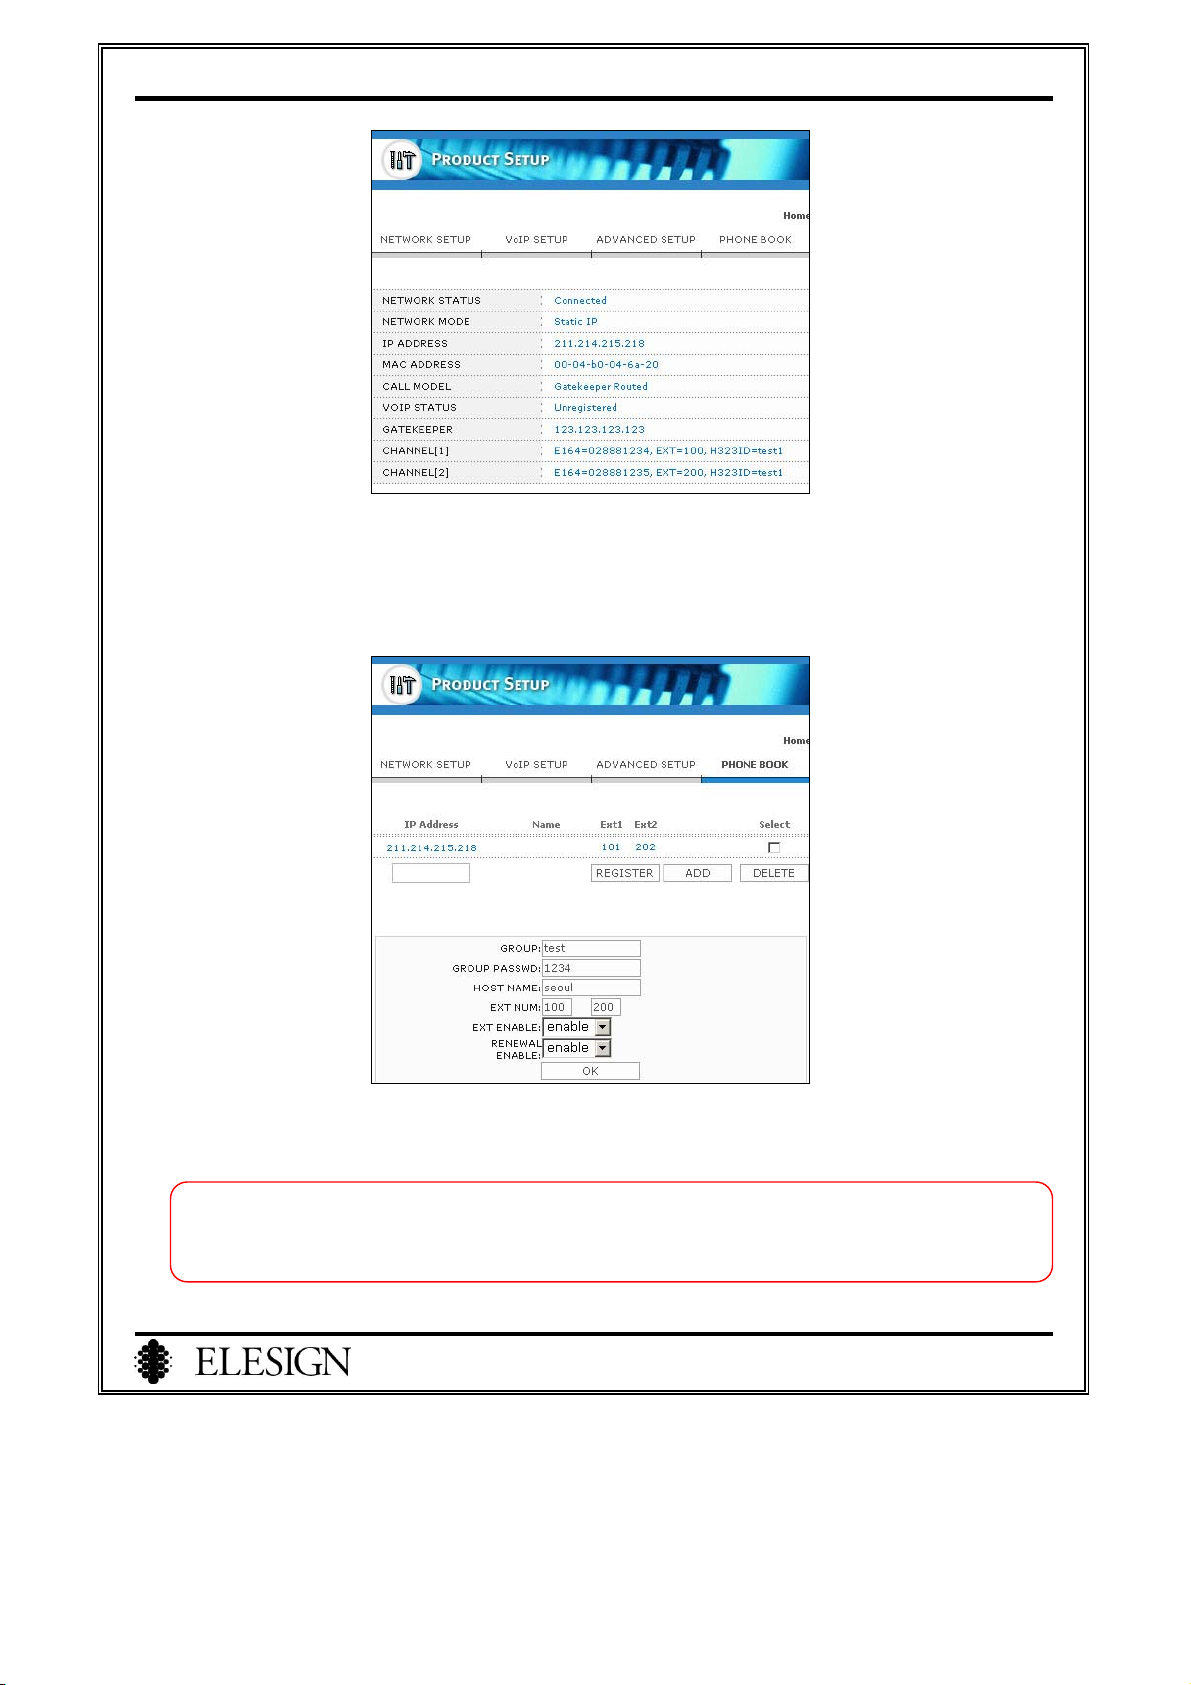
3) Register Individual Information
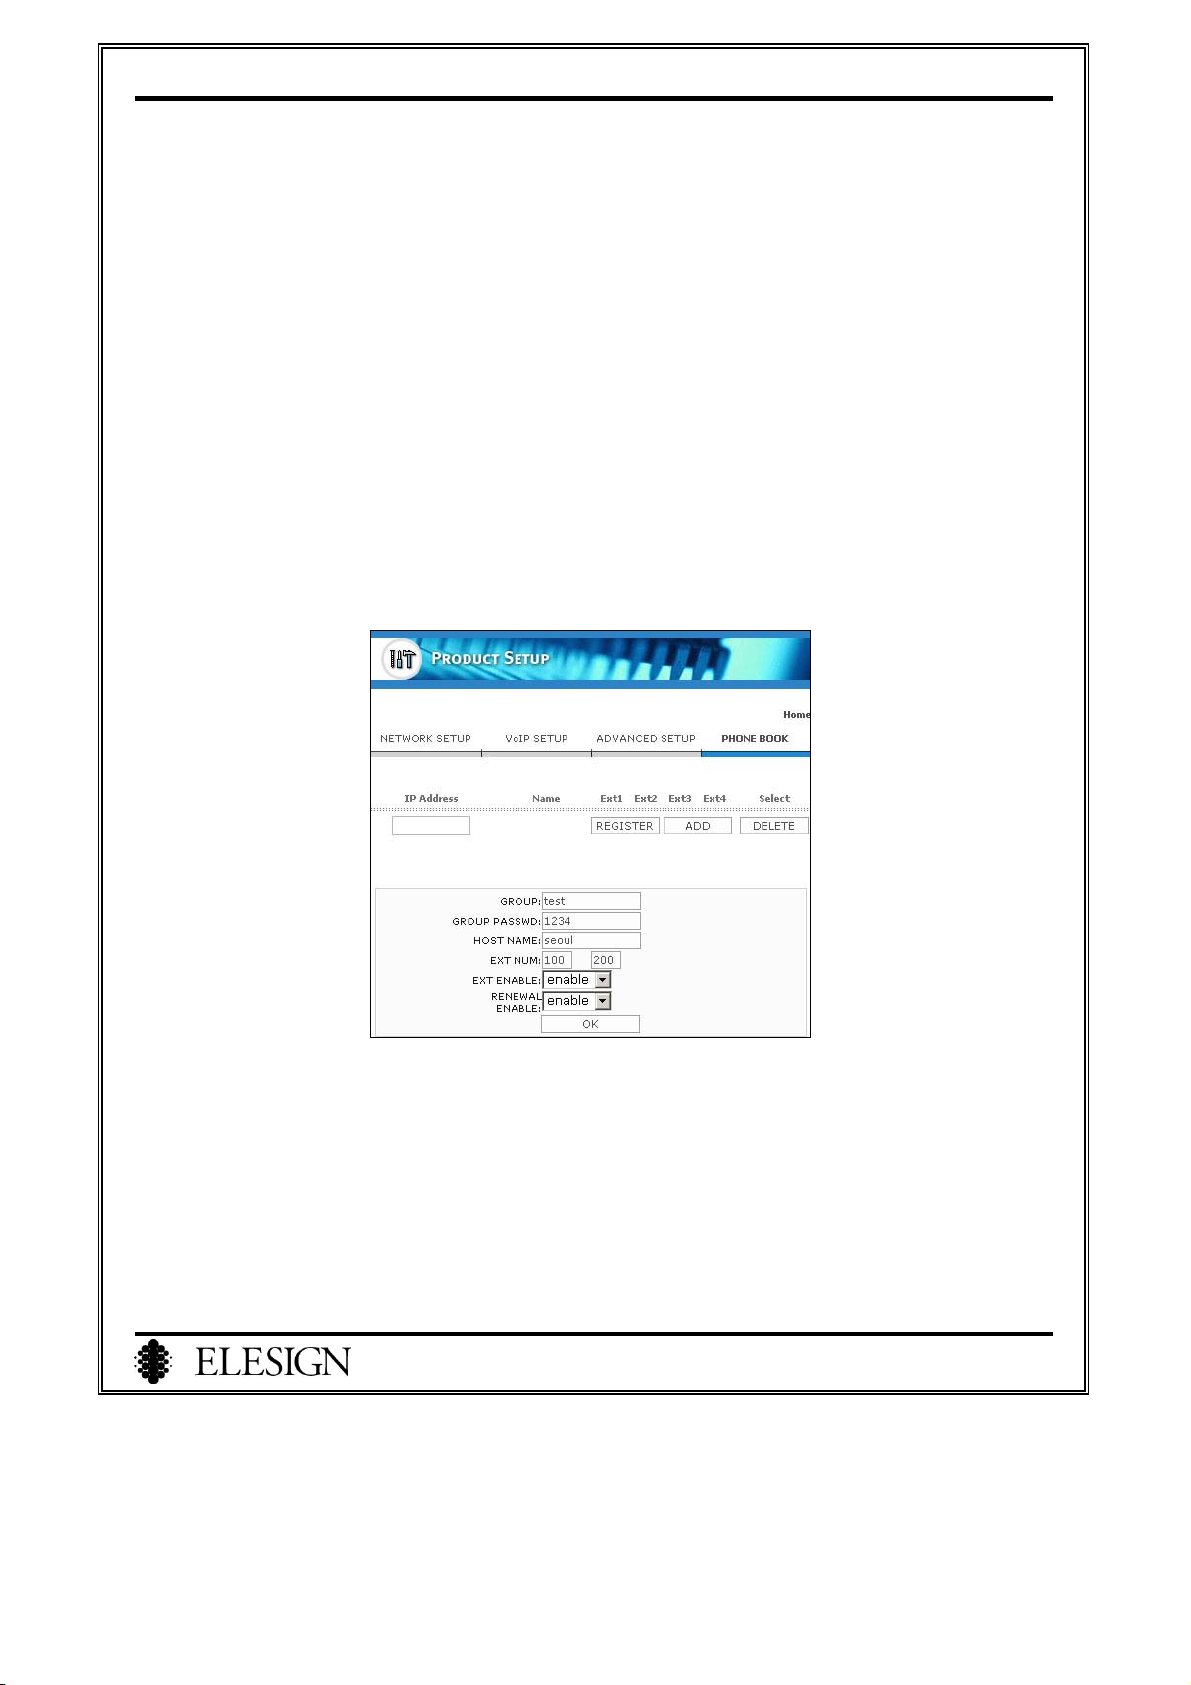
① Input Group name.
② Input Group password.
③ Input Hostname.
④ Input Extension number.
⑤ Select ‘Enable’ for ‘Ext Enable’.
※ ‘EXT ENABLE’ option allows to register other members of the group automatically even
though only one member of the group is registered.
⑥ Select ‘enable’ for ‘Renewal Enable’.
※ ‘RENEWAL ENABLE’ option allows to update the latest information of other members of the
group. If IP address of one of the gateway changes, it will automatically update new IP address on
the list. And if one of the gateways is disconnected from the network, it will automatically be
removed from the list.
⑦ Click on ‘Register’ button to register.
Click on ‘Home’ button to go to main page. You may see the extension information for each
⑧
channel.
40
Page 43
ESC2420 User Guide version1.0
3. Register Representative Gateway
1) Select ‘Phonebook’ from the main page.
2) Input IP address of representative gateway.
3) Click on ‘ADD’ button to register.
4) If representative gateway is added, you will be able to see the information (IP address, Extension and
Host name) of other members within the group in the list. Check the list of IP address and extension.
! Caution: If there are same extensions used by two or more people, you can’t make a call using that
extension. If there is same extension within a Group, please re-register with new extension.
41
Page 44
ESC2420 User Guide version1.0
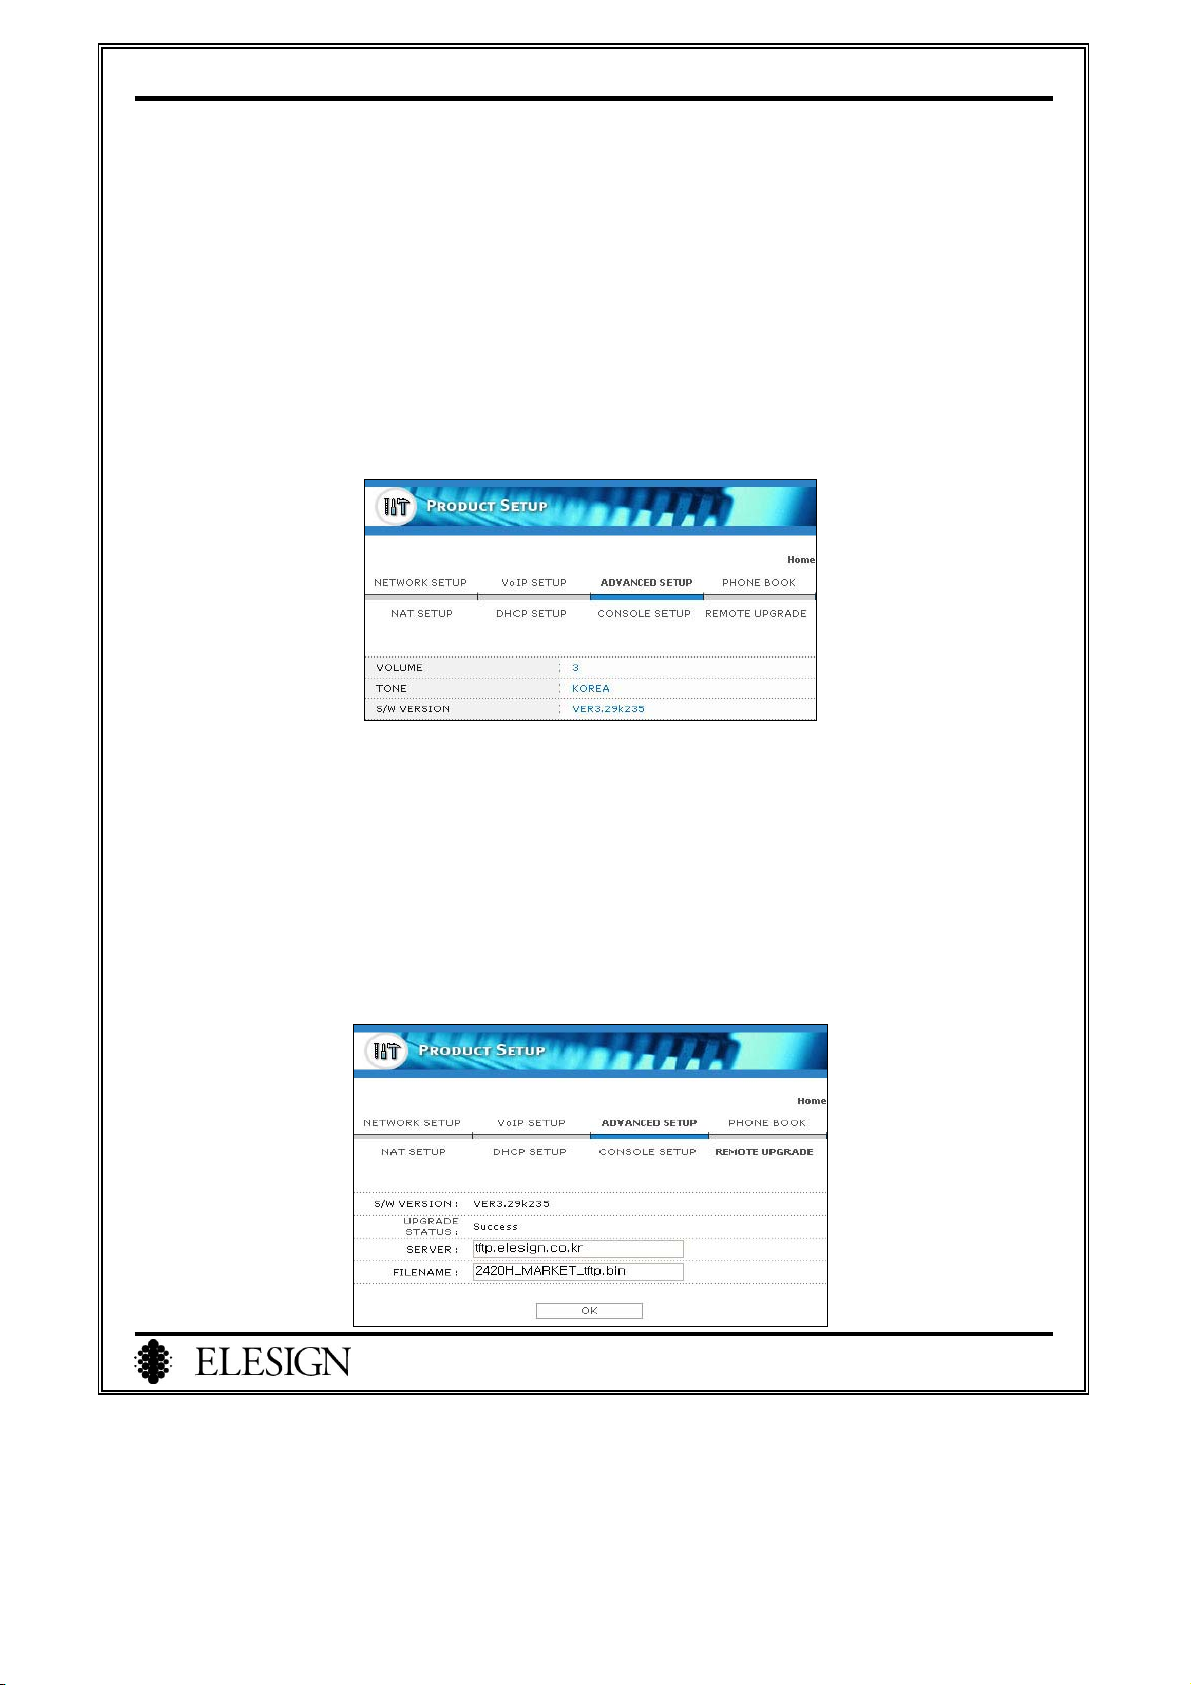
VI. Firmware Upgrade
Firmware Upgrade should be performed automatically. This option is for user to manually upgrade the
firmware.
1. Connect to Setup Page
Connect to Setup page. Refer to page20 ‘Connect to Setup page’. If you are already in Setup page, start
from number 2 ‘Connect to Advanced Setup page’.
2. Connect to Advanced Setup Page
Select ‘Advanced Setup’ from the main page.
3. Firmware Upgrade
1) Select ‘Remote Upgrade’ from the submenu of ‘Advanced Setup’.
2) Confirm the version of the firmware.
3) Leave IP address of server and input the filename that is needed to be downloaded. (Make sure to use
the correct filename.)
4) Click on ‘OK’ button.
5) Check to makes sure that you see a message ‘Success’ for ‘Upgrade Status’. You may check the
version of firmware after downloading is done.
42
Page 45

ESC2420 User Guide version1.0
Chapter 7 Other VoIP Setup Option
I. Media Gateway Setup………………..……………………..…………...……..44
1. Connect to Setup page…………………………….………….…………………44
2. Connect to VoIP Setup page……………………..……………….………...…...44
3. Media Gateway Setup……………………………..……………….………...….44
4. Make a call using Media Gateway……………………………………………...44
II. Direct Call
……….…………………………………..……………….…...….....45
1. Connect to Setup page…………….….………………….………………...……45
2. Connect to VoIP Setup page……………..…………………………….....……..45
3. Direct call Setup…………………………...………………………..……...……45
4. Extension Call setup………………………...…………..………………………45
5. Make a direct to call….......………….….….…………………….….…..…...…45
43
Page 46
ESC2420 User Guide version1.0
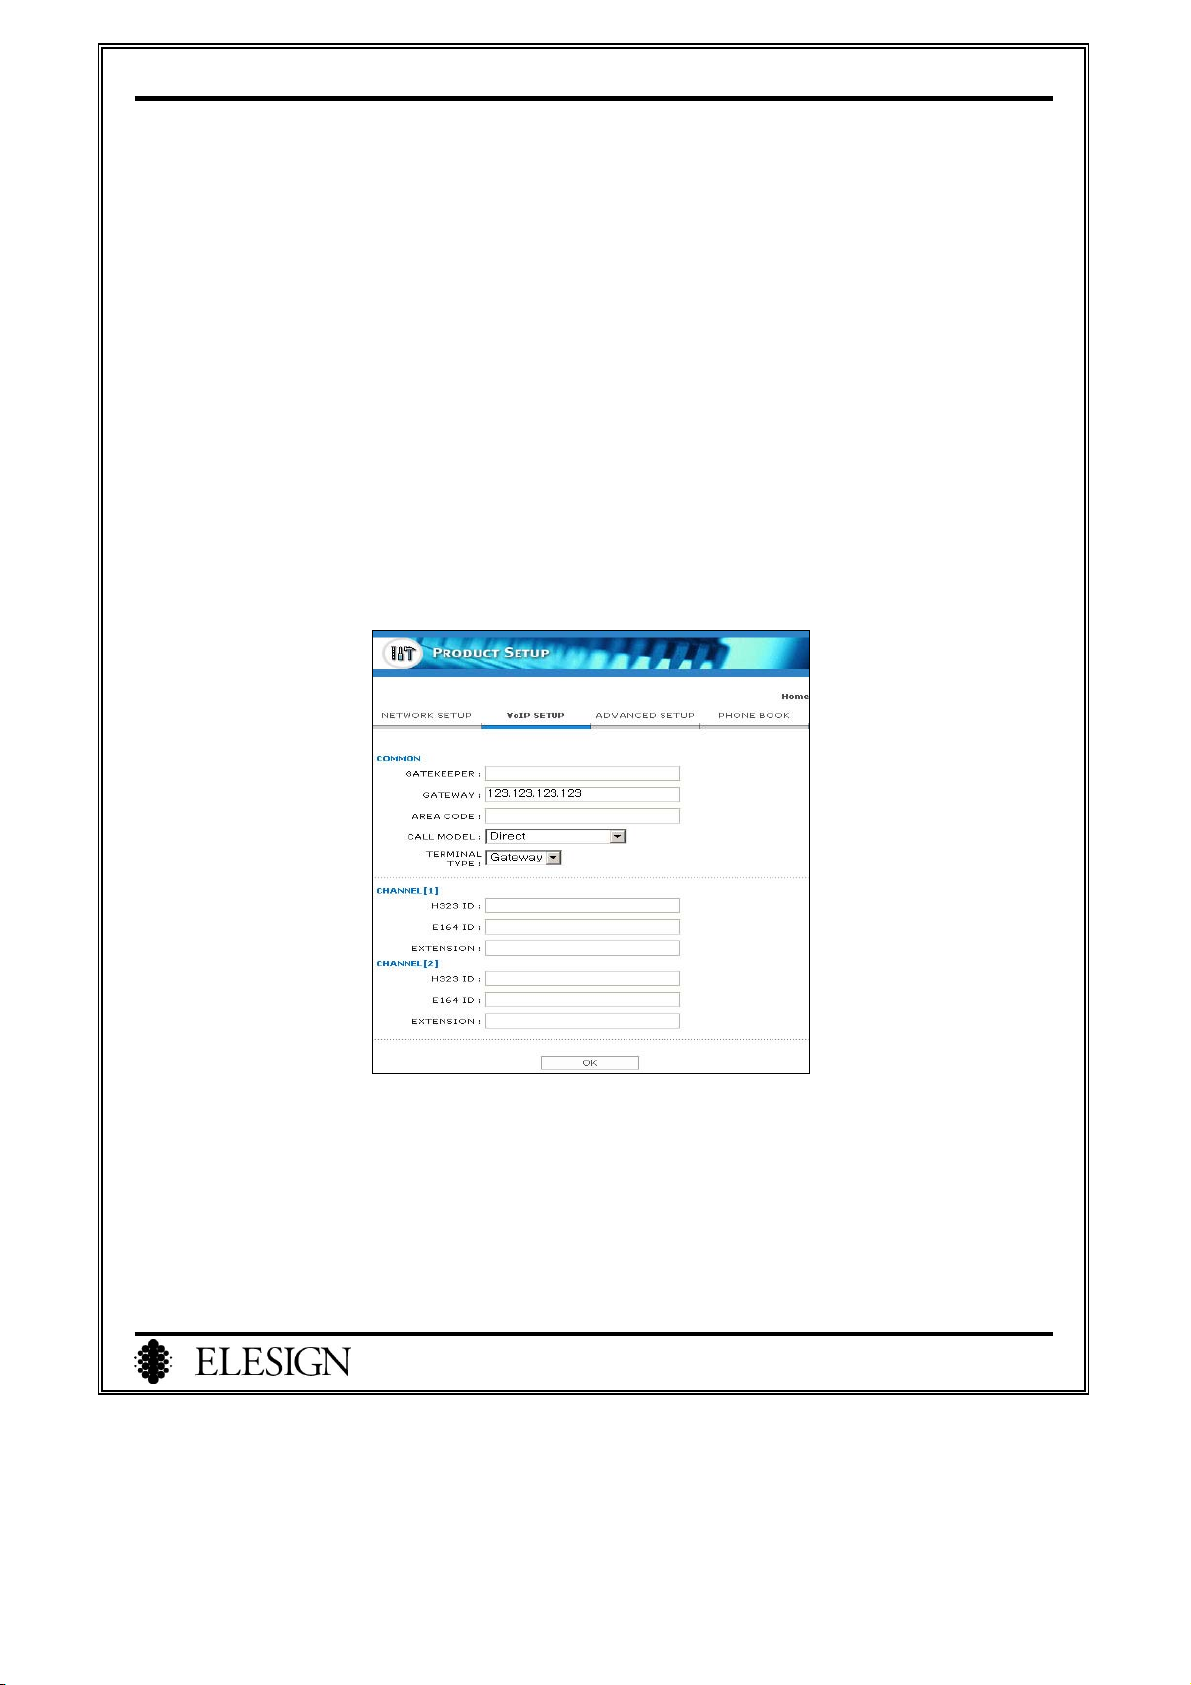
I. Media Gateway Setup
Certain service company uses Media gateway for VoIP service. When this is the case, follow the procedure
below to setup to use media gateway.
1. Connect to Setup Page
Connect to Setup page. Refer to page20 ‘Connect to Setup page’. If you are already in Setup page, start
from number 2 ‘Connect to VoIP Setup page’.
2. Connect to VoIP Setup Page
Select ‘VoIP setup’ from the main page.
3. Media Gateway Setup
1) Enter gateway address in the ‘GATEWAY’ box.
2) Select ‘Direct’ for ‘CALL MODEL’.
3) Click on ‘OK’ button.
4) When you see the confirmation page, you may check the result of the setup.
4. Make a call using Media Gateway
To get information regarding making a call, contact the service company.
44
Page 47
ESC2420 User Guide version1.0
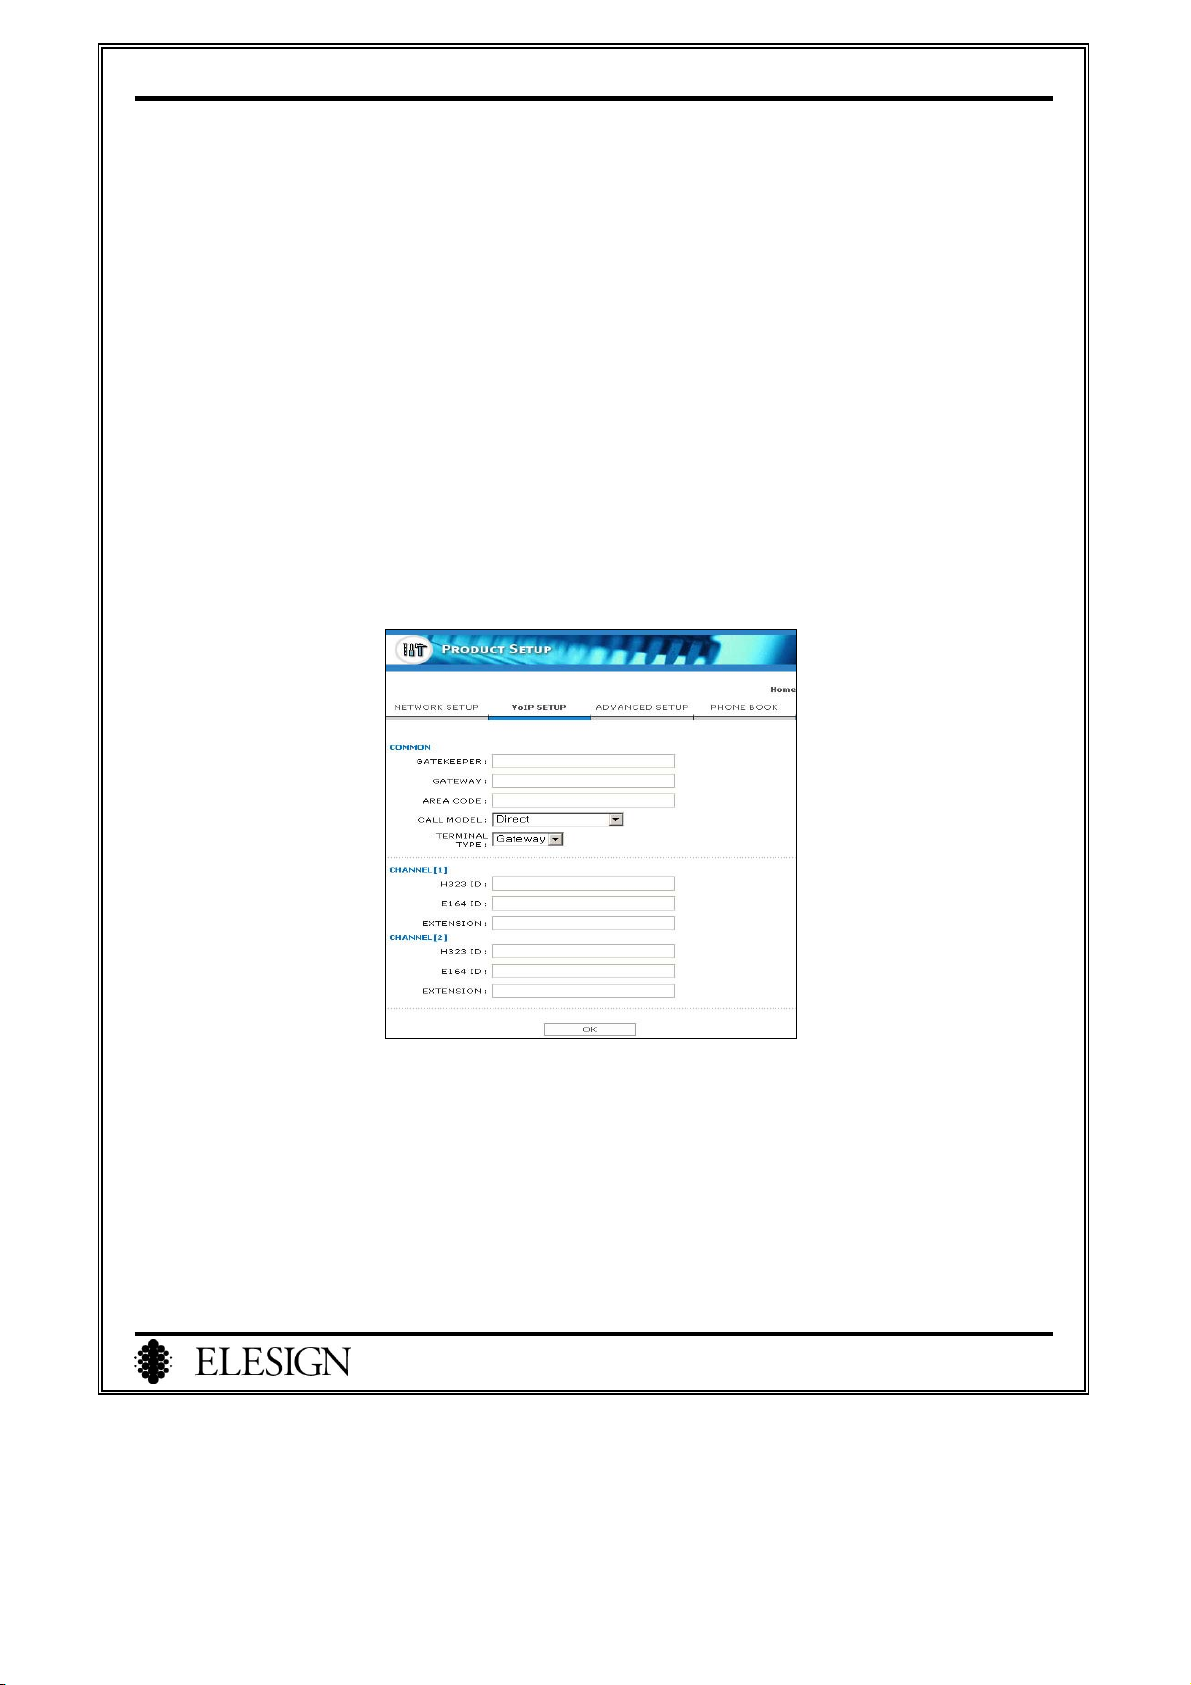
II. Direct call Setup
This option is to make a direct call between gateways without VoIP service. If setup is done for direct call, you
may call to Netmeeting or PC Phone.
1. Connect to Setup Page
Connect to Setup page. Refer to page20 ‘Connect to Setup page’. If you are already in Setup page, start
from number 2 ‘Connect to VoIP Setup page’.
2. Connect to VoIP Setup Page
Select ‘VoIP Setup’ from the main page.
3. Direct Call Setup
1) Select ‘Direct’ for ‘CALL MODEL’
2) Click on ‘OK’ button.
3)
When you see the confirmation page, you may check the result of the setup.
4. Extension Call setup
Refer to page39 for ‘Phonebook setup’ for extension call.
5. Make a Direct Call
Dial Extension number that is designated to each channel of the gateway.
Ex) If extension is 200, 200+#(send)
45
Page 48

ESC2420 User Guide version1.0
Chapter 8 Appendix
I. How to Check MAC Address ……………….…………………………….47
II. Configuration and Installation with other equipments
.…………….48
1. Connect to PBX ……………………………………..………...………………48
46
Page 49
ESC2420 User Guide version1.0
I. How to check MAC Address
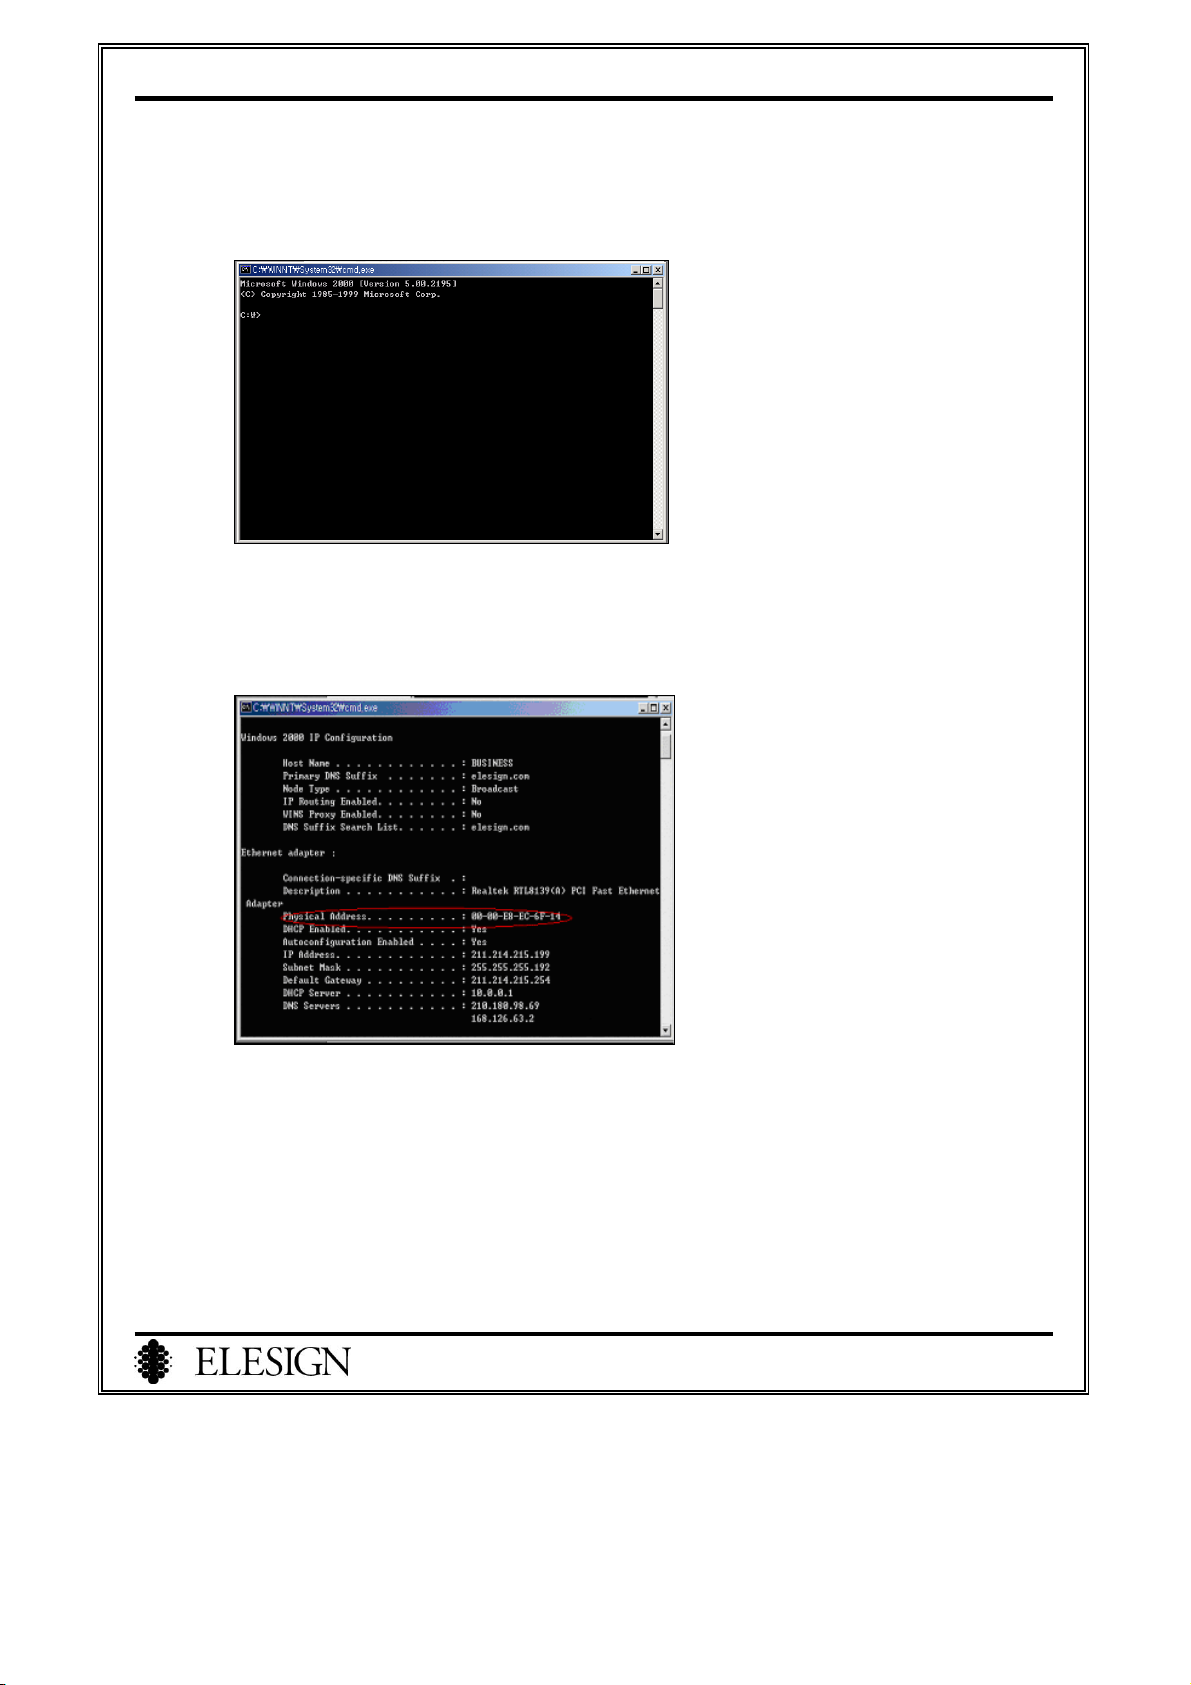
1. Open ‘Command’ window. (Dos window)
2. When you see a prompt, ‘C:W>’, input ‘ipconfig/all’ and hit enter. You will see ‘Physical address’,
and that is the MAC address of PC.
47
Page 50
ESC2420 User Guide version1.0
II. Configuration and Installation with other equipments
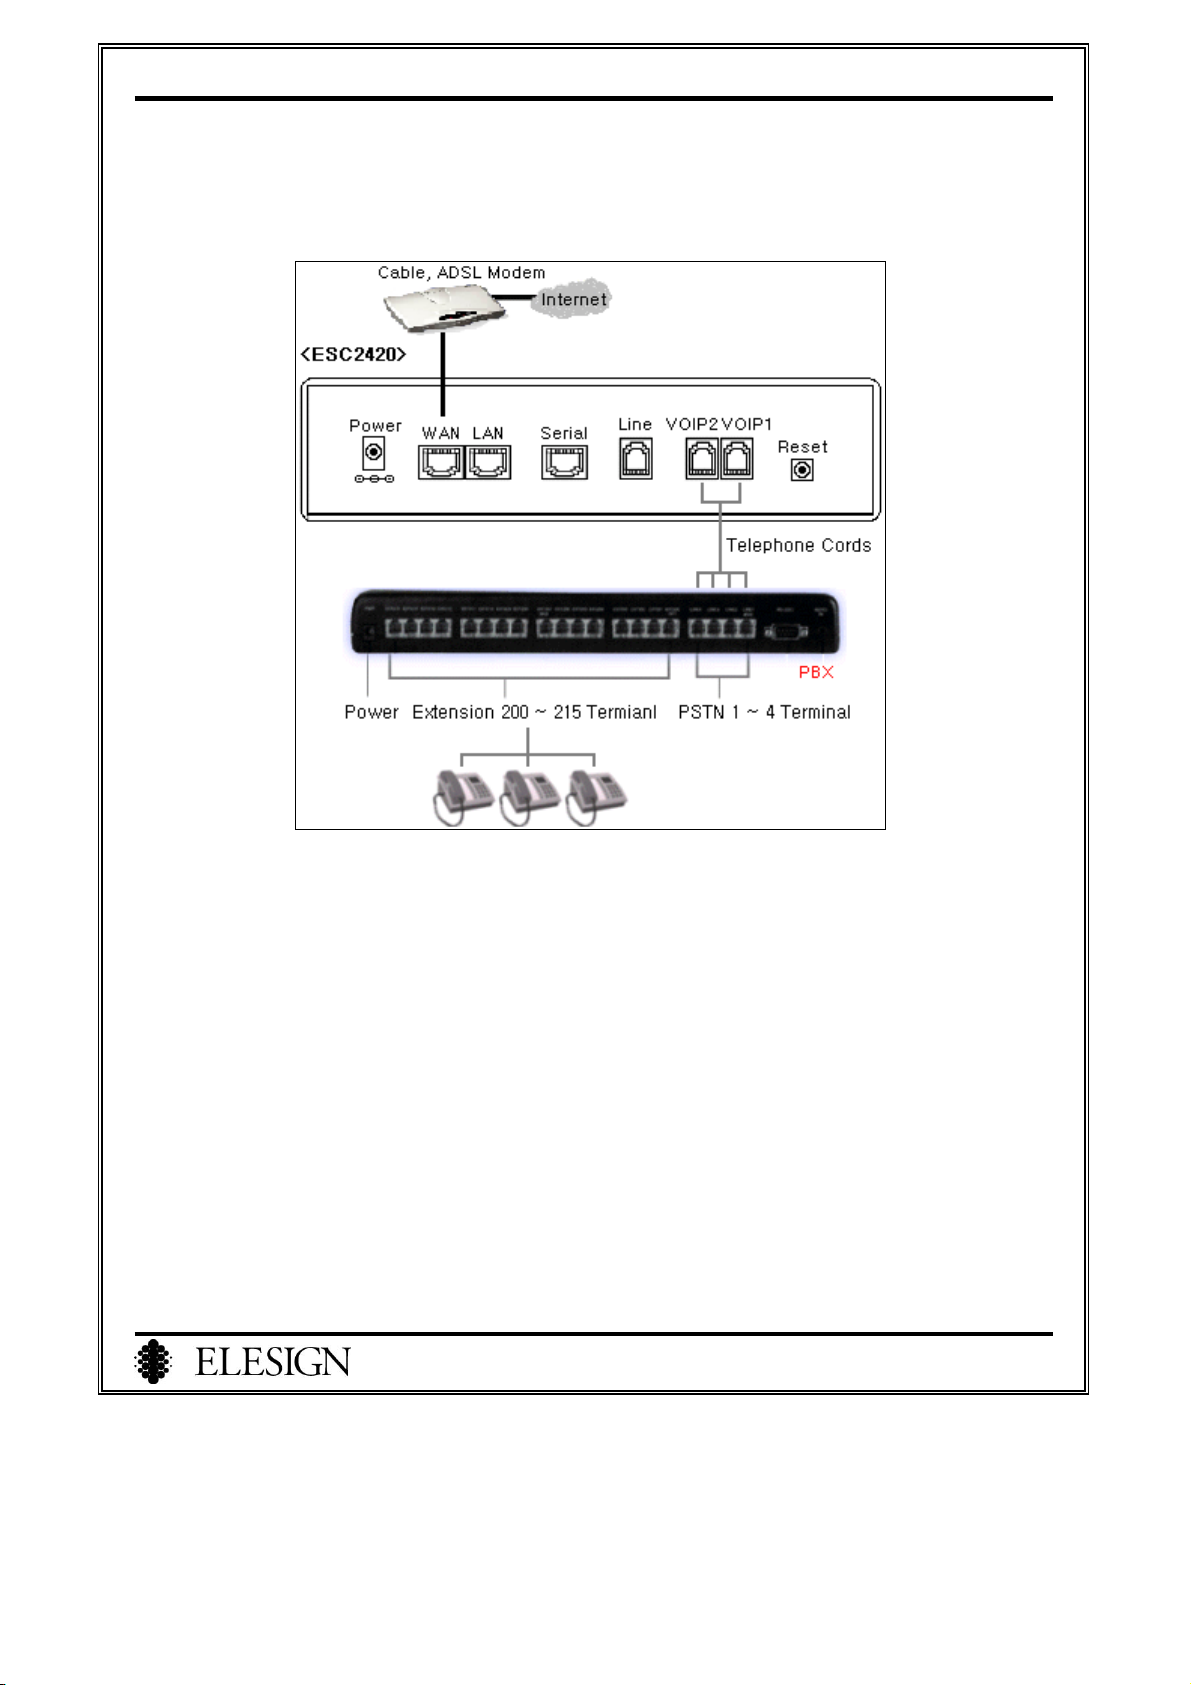
1. Connect to PBX
The telephones that can be directly connected to the gateway are two. You may connect more than two
telephones to use Internet call using PBX. You may connect the gateway to PBX, and you can make
Internet call from any telephone that is connected to PBX. But you may only make two simultaneous
Internet calls at once since the Gateway has only two FXS ports. For more detailed information regarding
the installation, contact the specialist.
48
Page 51

ESC2420 User Guide version1.0
www.ELESIGN.com
49
 Loading...