

elero Antriebstechnik 28445 Users Manual
Com-Serie
Fault
Possible cause
Possible solution
A
①
②
Bedienungsanleitung (Original)
Für einen ordnungsgemäßen und sicheren Gebrauch diesen Anleitungen folgen.
Für künftige Verwendung aufbewahren.
B C
③
④
⑤
⑥
⑦
⑧
⑨
⑪
⑩
⑫
S
P
+-
A B C
Nicht alle Bedienelemente sind auf jedem Gerät verfügbar.
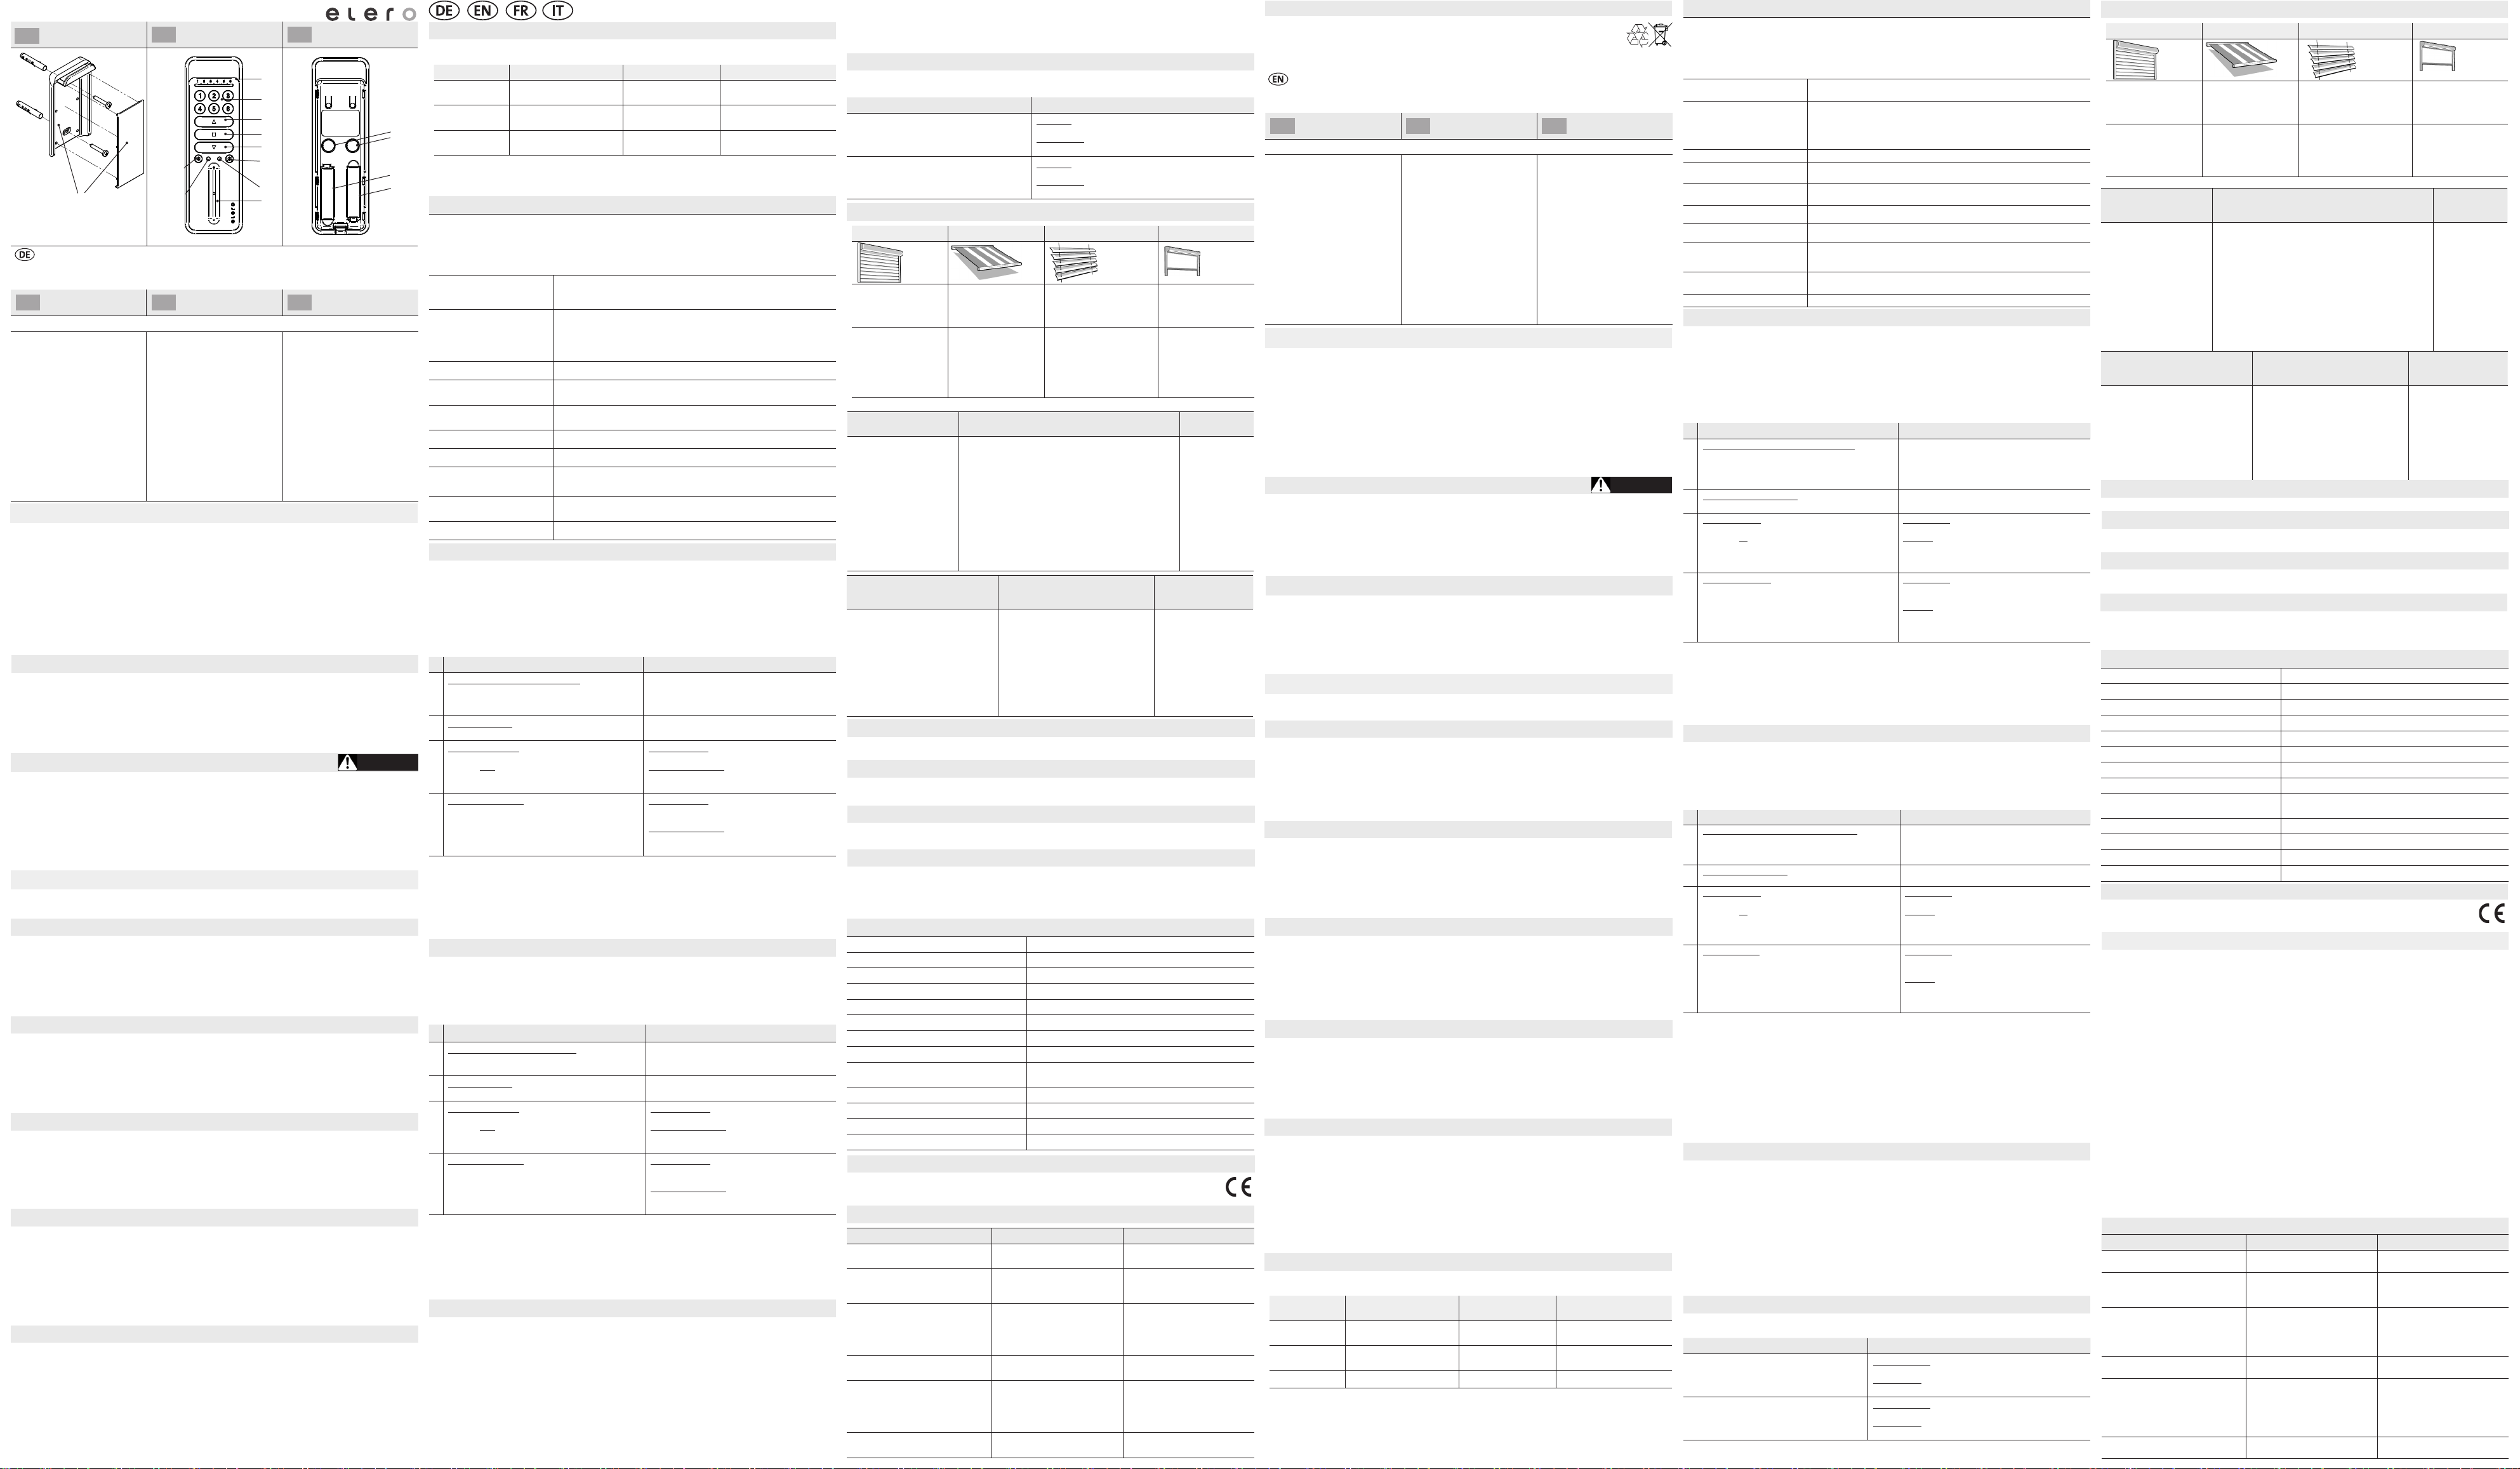
Wandhalter
① Befestigungsplatte
② Abdeckung
(HINWEIS: Zerbrechlich.
Sorgfältig behandeln).
1. Am vorgesehenen Montageort
den Untergrund auf verborgene
Leitungen etc. überprüfen.
2. Vordere Abdeckung nicht parallel
verschieben sondern von hinten
durch die beiden Bohrlöcher
vorsichtig aufdrücken und parallel
abheben (nicht abkippen) oder
von unten her aushebeln.
3. Hintere Abdeckung mit Hilfe der
Schrauben und Dübel am Montageort befestigen.
Geräteübersicht / Lieferumfang
MonoCom:
• 1-Kanal-Handsender; Artikel-Nr. 284050001 (-915: 284050901)
MonoCom Slide:
• 1-Kanal-Handsender mit Slider; Artikel-Nr. 284350001 (-915: 284350901)
LumeroCom:
• 1-Kanal-Handsender mit Umschaltung Auto / Hand; Artikel-Nr. 284250001 (-915: 284250901)
VarioCom:
• 6-Kanal-Handsender (Kanäle kombinierbar) mit Umschal tung Auto / Hand; Artikel-Nr. 284450001 (-915: 284450901)
VarioCom Slide:
• 6-Kanal-Handsender (Kanäle kombinierbar) mit Slider und Umschaltung Auto / Hand;
Artikel-Nr. 284550001 (-915: 284550901)
Jeweils mit Wandhalterung, Befestigungsset (Artikel-Nr. 280400001), 2 eingelegten Batterien, Bedienungsanleitung
Artikel-Nr. 138220001
Bestimmungsgemäßer Gebrauch, Vorhersehbare Fehlanwendung
Der Handsender darf nur zur Steuerung von Rollladen-, Jalousie- und Sonnenschutzanlagen benutzt werden, die mit
elero ProLine 2 Funkempfängern (nur bidirektional) ausgestattet sind.
Zusätzlich ist das Schalten und Dimmen von mit elero Funkempfängern (ProLine 2, bidirektional) und geeignetem
elektronischen Vorschaltgerät ausgestatteten Leuchtmitteln möglich.
Nur zur Verwendung in trockenen Räumen zum Schalten und Steuern von elero Funkantrieben und elero Funkempfängern. Keine Veränderungen am Gerät vornehmen! Gerät nicht fallen lassen, keiner Wärmequelle aussetzen und
nicht in Flüssigkeiten tauchen. Bedienung des Senders aus Unachtsamkeit oder Konzentrationsmangel vermeiden.
Keine Haftung des Herstellers für Schäden infolge der genannten Ursachen.
Sicherheitsinstruktionen
Lesen Sie bitte diese Betriebsanleitung aufmerksam, denn die Vorgehensweise im Einklang mit dieser Anleitung ist
Voraussetzung für die richtige Benutzung des Produkts.
Bedienung des Senders nur in Sichtweite der zu steuernden Geräte vornehmen!
Die Abbildungen in dieser Betriebsanleitung dienen nur zur Illustration. Die Abbildungen können in unwesentlichen
Details von Ihrem Produkt abweichen, diese sind nur als eine allgemeine Information zu verstehen.
elero GmbH arbeitet ständig an der Weiterentwicklung aller Produkte. Jederzeit sind deshalb Änderungen des
Lieferumfangs in Form, Ausstattung und Technik möglich. Die in dieser Betriebsanleitung aufgeführten Informationen
entsprechen dem Informationsstand zum Zeitpunkt des Redaktionsschlusses.
Aus den technischen Angaben, Abbildungen und Informationen dieser Betriebsanleitung können keine Ansprüche
hergeleitet werden.
Inbetriebnahme
Wichtig: Die Batterien sind bei Lieferung bereits aktiviert.
Einlernen des Handsenders „-COM” in die elero Funksteuerung bzw. in den Empfänger: siehe folgende Abschnitte.
Gehäuse önen / schließen
Notwendig
• Zum Einlernen des Handsenders in einen Funkemp fänger.
• Zum Löschen des Handsenders aus einem Funkempfänger.
• Für Batteriewechsel.
• Önen: An der Unterseite des Handsenders die mittige Haltenase mit einem stumpfen Gegenstand vorsichtig
etwas eindrücken und Rückwand abheben.
• Schließen: Rückwand von oben her lagerichtig auegen und im Bereich der Haltenase mit leichtem Druck einrasten.
Batteriewechsel
Die beim Kauf eingesetzten Batterien erreichen das Ende ihrer Lebensdauer möglicherweise schon vor Ablauf der in
der Bedienungsanleitung angegebenen Lebensdauer. Die Batterien können gemäß Batterierichtlinie 2013/56/EU problemlos vom Endnutzer entnommen werden. Nach einem Batteriewechsel bleibt die Codierung des Senders erhalten;
die Codierung muss nicht neu in die Funksteuerung bzw. den Funkempfänger eingelernt werden.
• Batterien vorsichtig herausheben. Ausschließlich 2 identische nicht wiederauadbare Batterien des Typs AAA (Mi-
cro 1,5 V) verwenden, vorzugsweise Alkali-Mangan. Auf richtige Polung achten: Pluspol (+) ist versenkter Kontakt,
Minuspol (-) ist Metallzunge.
Verbrauchte Batterien umweltgerecht entsorgen.
Allgemeines
Die Tasten ⑤ AUF ▲, ⑥ STOPP ■, ⑦ AB/ZU ▼ und ⑫ Slider dienen
• bei Antrieben als Auslöser für Fahrbewegungen
• bei geeigneten Leuchtmitteln für Helligkeitsänderungen (Schalten und Dimmen)
Die Funkverbindung zwischen Handsender und Empfänger erfolgt bidirektional; aber nicht jede Nachricht wird auch
vom Empfänger bestätigt.
Auf eine ungehinderte Funkverbindung zwischen Sender und Empfänger achten.
Die Sendeleistung bzw. Funkreichweite wird durch abnehmende Batterieleistung reduziert. Sinkt die Spannung unter
einen bestimmten Wert, werden Funktionen nicht mehr ausgeführt und auch nichts mehr angezeigt.
Kanalauswahl
Bei der Kanalauswahl wird ein aktivierter Kanal durch die jeweilige grüne Status-LED signalisiert. Die Kanalauswahl
wird überschrieben, sobald alle Statusanzeigen ausgeschaltet sind.
• Kanalauswahl durch kurze Betätigung einer Kanalaus wahl taste (1 bis 6): Einzelner Kanal wird aktiviert oder
deakti viert.
• Kanalauswahl durch lange Betätigung einer Kanalaus wahl taste (1 bis 6): Alle niedrigeren Kanäle einschließlich
des Kanals der betätigten Kanalauswahltaste werden ausgewählt.
• Auswahl einer Gruppe (von bis zu 5 beliebigen Kanälen): Beim Betätigen einer Kanalauswahltaste ist die Statusanzeige für 5 Sekunden aktiv. In diesem Zeitraum können weitere Kanäle zu beliebigen Gruppen zusammengestellt werden.
• Zentralkanal (Auswahl aller 6 Kanäle): Aktivierung erfolgt. sobald alle 6 Kanäle ausgewählt sind.
2 Betriebsarten: Auto oder Hand ⑧, ⑨, ⑩, ⑪
Bedientasten Auto ⑧ und Hand ⑪:
Auto: Ein eingelernter Empfänger reagiert auf Zeitschaltfunktionen eines entsprechenden Steuergerätes bzw. auf
Befehle von Sensoriken.
Hand: Ein eingelernter Empfänger reagiert nicht auf Zeitschaltfunktionen eines entsprechenden Steuergerätes bzw.
auf Befehle von Sensoriken.
• Kurze Betätigung: Istzustand wird vom Empfänger abgefragt.
• Lange Betätigung: Jeweilige Betriebsart wird aktiviert.
Auto LED ⑨ und Hand LED ⑩:
• Sind die ausgewählten Kanäle in der Betriebsart „Auto”, leuchtet die Auto LED grün.
• Sind die ausgewählten Kanäle in der Betriebsart „Hand”, leuchtet die Hand-LED rot.
• Sind die ausgewählten Kanäle teilweise in Betriebsart „Auto” und teilweise in Betriebsart „Hand”, leuchten die Auto
LED ⑨ und die Hand LED ⑩ synchron orange.
Vorderseite
③ Statusanzeige (Status-
LEDs, 1 mittig oder 6)
④ Kanalwahltasten 1 bis 6
⑤ Taste AUF ▲
⑥ Taste STOPP ■
⑦ Taste AB/ZU ▼
⑧ Bedientaste Auto
⑨ Auto LED
⑩ Hand LED
⑪ Bedientaste Hand
⑫ Slider
Rückseite
unter der Abdeckung
⑬ Lerntaste P (links, rund)
⑭ Selektive Lerntaste S
(rechts, rund)
⑮ Batteriefach (2x),
Polarität beachten
9256,&+7
138220001_DE+EN+FR+IT_0918
Bedienelement Slider ⑫
• Fein-Justierung von jalousierbaren und dimmbaren Empfängern.
Aktion / Befehl Rohrantrieb (Funk) Jalousieantrieb (Funk) Combio-868 LI
Wischbewegung
nach oben
Wischbewegung
⑬
⑭
⑮
⑮
nach unten
Slider loslassen Empfänger ist in Selbsthaltung Stopp der Fahrbewegung Helligkeitswert wird beibe-
• Slider-Befehle werden nicht auf andere Funkempfänger geroutet und es erfolgt keine Rückmeldung.
• Slider-Befehle verhalten sich im Gruppenkanal und im Zentralkanal gleich wie im Einzelkanal, ausgenommen
Combio-868 LI.
• Bedienelemente Slider und Tasten ⑤, ⑥ und ⑦ sind gegeneinander verriegelt.
Fahrbewegung nach oben Jalousieren Aufwärts Dimmen heller
Fahrbewegung nach unten Jalousieren Abwärts Dimmen dunkler
halten
Statusanzeige / Kanalanzeige ③
Der Einkanal-Handsender besitzt 1 mittige Statusanzeige und Kanalanzeige.
Der Sechskanal-Handsender besitzt 6 Kanäle und 6 Status-LEDs.
Die Statusanzeige erfolgt für alle ausgewählten Kanäle gleichzeitig bei Betätigung eines der Bedienelemente
⑤ AUF ▲, ⑥ STOPP ■, ⑦ AB/ZU ▼, ⑫ Slider, Bedientaste Auto ⑧ und Hand ⑪.
Die Statusanzeige erfolgt für alle ausgewählten Kanäle synchron (gleichzeitig). Beim Betätigen einer Kanalwahltaste
zeigen die Status-LEDs den Zustand eines aktivierten/deaktivierten Kanals an.
grün
(5 Sekunden)
grün blinkt
(700 ms)
orange blinkt langsam (2 Hz) Kanal (Sender) in keinem Empfänger eingelernt.
orange blinkt schnell (20 Hz) Kanal (Sender) ist im Lernmodus.
orange blinkt schnell (20 Hz)
zyklisch
orange leuchtet, dann grün Kanal ist eingelernt und der Empfänger hat das Signal erhalten.
orange leuchtet, dann rot Kanal ist eingelernt und einer der Empfänger hat das Signal nicht erhalten.
orange oder grün blinkt mehrfach,
dann rot nach 6 Sekunden
orange und grün im Wechsel,
dann rot
rot blinkt schnell Batterien fast erschöpft.
Anzeige ausgewählter Kanal bzw. Kanäle. Solange können weitere Kanäle ausgewählt bzw. abgewählt werden. Jede Auswahl verlängert die Zeit um weitere
5 Sekunden.
Alle LEDs der Statusanzeige blinken 700 ms grün während des Sendens
• wenn kein Kanal ausgewählt ist.
• wenn mehrere Kanäle ausgewählt sind und die Lerntaste P bzw. die Selektive
Lerntaste S gedrückt wird, blinken die Status-LEDs der gewählten Kanäle
grün. Dann ist das Lernen nur in einem Kanal möglich.
Bedienung schon eingelernter Empfänger nicht möglich.
Kanal (Sender) ist im Gruppenlernmodus.
Bedienung schon eingelernter Empfänger nicht möglich.
Kanal (Sender) ist gelöscht.
Kanal (Sender) ist gelöscht.
Lernmodus asynchron (Standard)
Der asynchrone Lernmodus eignet sich für das Einlernen
• des ersten Senders
• eines zusätzlichen Senders
• einzelner Empfänger bei mehreren lernbereiten Empfängern (z.B. mehrere Empfänger an einer Sicherung).
Beim Einlernen eines Senders auf einen Empfänger wird der Schaltzustand Auf bzw. Ab/Zu auf die Aktionen des Antriebs (Laufrichtung) bzw. des entsprechenden Leuchtmittels (Schalten/Dimmen) zugeordnet.
Der asynchrone Lernmodus ist der Standard-Lernmodus. Im asynchronen Lernmodus variieren die Zeiten der Auf-
und Abfahrten der teilnehmenden Empfänger. Bei geeigneten fernsteuerbaren Leuchtmitteln variiert während des
Einlernens die Dauer des Leuchtens. Nach einiger Zeit laufen die Empfänger asynchron zueinander. Somit können
die Treer für einen bestimmten Empfänger besser gesetzt werden.
Handlungsanweisung Resultat
1 Asynchrone Lernbereitschaft aktivieren:
Netzspannung aus- und wieder einschalten oder auf
einem bereits eingelernten Sender gleichzeitig für 3 Sekunden die Tasten [AUF ▲] + [AB/ZU ▼] + [P] drücken.
2 Lernmodus starten:
Für ca. 1 Sekunde die Lerntaste [P] drücken.
3 Ersten Treer setzen:
Sofort nach Beginn einer Fahrbewegung die Taste
[AUF ▲] oder [AB/ZU ▼] drücken.
• Bei einer Auffahrt die Taste [AUF ▲] drücken.
• Bei einer Abfahrt die Taste [AB/ZU ▼] drücken.
4 Zweiten Treer setzen:
Voraussetzung: Erster Treer ist gesetzt.
Sofort nach Beginn einer entgegengesetzten Fahrt die
Taste [AUF ▲] oder [AB/ZU ▼] drücken.
• Bei einer Auffahrt die Taste [AUF ▲] drücken.
• Bei einer Abfahrt die Taste [AB/ZU ▼] drücken.
• Das Einlernen kann immer nur in einem ausgewählten Kanal erfolgen.
• Mit dem Abschluss des Lernvorgangs oder nach Ablauf von 5 Minuten wechselt der Empfänger in den normalen
Betrieb.
• Der Lernmodus kann durch Betätigen der Taste [STOPP ■] für mindestens 6 Sekunden gestoppt werden.
• Es können mehrere Empfänger auf einen Kanal eingelernt werden.
• Sind mehr als 10 Empfänger gleichzeitig im Lernmodus, wechselt der Sender in den Gruppenlernmodus. Nach
Abschluss des Lernvorgangs muss der Gruppenlernmodus im Sender durch Betätigen der Taste [STOPP ■] für
mindestens 6 Sekunden manuell beendet werden.
• Falls der Behang nicht in die gewünschte Richtung läuft, den Sender löschen und diesen neu einlernen.
Empfänger wechselt für 5 Minuten in die asynchrone Lernbereitschaft. Bereit um die Lerntaste [P] zu
empfangen.
Empfänger wechselt in den asynchronen Lernmodus
und beginnt mit zyklischen Auf- und Abfahrten.
Treer erfolgreich:
Empfänger unterbricht kurzzeitig die aktuelle Fahrt.
Treer fehlgeschlagen:
Empfänger unterbricht die aktuelle Fahrt nicht.
→ Aktion „Ersten Treer setzen” wiederholen!
Treer erfolgreich:
Empfänger stoppt die aktuelle Fahrt und signalisiert
den Abschluss des Lernvorgangs.
Treer fehlgeschlagen:
Empfänger stoppt die aktuelle Fahrt nicht.
→ Aktion „Zweiten Treer setzen” wiederholen!
Lernmodus synchron
Der synchrone Lernmodus eignet sich für das
• Einlernen eines zusätzlichen Senders
• gleichzeitige Einlernen mehrerer Empfänger auf einen Sender bzw. Kanal.
Der synchrone Lernmodus ist ein spezieller Lernmodus. Im synchronen Lernmodus stimmen die Zeiten der Auf- und
Abfahrten der teilnehmenden Empfänger überein. Bei geeigneten fernsteuerbaren Leuchtmitteln stimmen die Leucht-
dauern ebenfalls überein. Somit können die Treer für alle teilnehmenden Empfänger gleichzeitig (synchron) gesetzt
werden.
Handlungsanweisung Resultat
1 Synchrone Lernbereitschaft aktivieren:
Auf einem bereits eingelernten Sender gleichzeitig für
3 Sekunden die Tasten [AB/ZU ▼] + [P] drücken.
2 Lernmodus starten:
Für ca. 1 Sekunde die Lerntaste [P] drücken.
3 Ersten Treer setzen:
Sofort nach Beginn einer Fahrbewegung die Taste
[AUF ▲] oder [AB/ZU ▼] drücken.
• Bei einer Auffahrt die Taste [AUF ▲] drücken.
• Bei einer Abfahrt die Taste [AB/ZU ▼] drücken.
4 Zweiten Treer setzen:
Voraussetzung: Erster Treer ist gesetzt.
Sofort nach Beginn einer entgegengesetzten Fahrt die
Taste [AUF ▲] oder [AB/ZU ▼] drücken.
• Bei einer Auffahrt die Taste [AUF ▲] drücken.
• Bei einer Abfahrt die Taste [AB/ZU ▼] drücken.
• Das Einlernen kann immer nur in einem ausgewählten Kanal erfolgen.
• Mit dem Abschluss des Lernvorgangs oder nach Ablauf von 5 Minuten wechselt der Empfänger in den normalen
Betrieb.
• Der Lernmodus kann durch Betätigen der Taste [STOPP ■] für mindestens 6 Sekunden gestoppt werden.
• Es können mehrere Empfänger auf einen Kanal eingelernt werden.
• Sind mehr als 10 Empfänger gleichzeitig im Lernmodus, wechselt der Sender in den Gruppenlernmodus. Nach
dem Abschluss des Lernvorgangs muss der Gruppenlernmodus im Sender durch Betätigen der Taste [STOPP ■]
für mindestens 6 Sekunden manuell beendet werden.
• Falls der Behang nicht in die gewünschte Richtung läuft, den Sender löschen und diesen neu einlernen.
Empfänger wechselt für 5 Minuten in die synchrone
Lernbereitschaft. Bereit um die Lerntaste [P] zu
empfangen.
Empfänger wechselt in den synchronen Lernmodus
und beginnt mit zyklischen Auf- und Abfahrten.
Treer erfolgreich:
Empfänger unterbricht kurzzeitig die aktuelle Fahrt.
Treer fehlgeschlagen:
Empfänger unterbricht die aktuelle Fahrt nicht.
→ Aktion „Ersten Treer setzen” wiederholen!
Treer erfolgreich:
Empfänger stoppt die aktuelle Fahrt und signalisiert
den Abschluss des Lernvorgangs.
Treer fehlgeschlagen:
Empfänger stoppt die aktuelle Fahrt nicht.
→ Aktion „Zweiten Treer setzen” wiederholen.
Selektive Lerntaste S ⑭
• Die Selektive Lerntaste [S] bendet sich unter der Abdeckung auf der Geräterückseite (rechts).
• Die Selektive Lerntaste [S] ist eine spezielle Ausführung der Lerntaste [P].
• Mit der Selektiven Lerntaste [S] ist es möglich, immer nur einen Empfänger selektiv in den Lernmodus zu versetzen, selbst wenn gleichzeitig mehrere Empäfnger lernbereit sind. Ein gezieltes Einlernen bestimmter Empfänger
wird dadurch ermöglicht.
• Ein Empfänger muss sich in einer der beiden Lernbereitschaften (asynchron bzw. synchron) benden.
• Der Einlernprozess kann immer nur in einem Kanal gestartet werden.
• Lernvorgang starten: Lerntaste [S] für ca. 1 Sekunde drücken. Der Lernmodus wird im ersten Empfänger automatisch gestartet.
• Alle lernbereiten Empfänger werden in einer Liste gesammelt.
• Lernmodus im nächsten Empfänger starten: Selektive Lerntaste [S] für ca. 1 Sekunde drücken.
• Lernmodus im vorherigen Empfänger starten: Selektive Lerntaste [S] erst kurz drücken, sofort danach die Selektive Lerntaste [S] für ca. 1 Sekunde drücken.
• Der Vorgang „Treer setzen“ verhält sich wie im Lernmodus asynchron bzw. Lernmodus synchron (jeweils Handll-
ungsanweisung 3 bzw. 4).
• Sind mehr als 10 Empfänger gleichzeitig im Lernmodus, wechselt der Sender in den Gruppenlernmodus. Nach
Abschluss des Lernvorgangs muss der Gruppenlernmodus im Sender durch Betätigen der Taste [STOPP ■] für
mindestens 6 Sekunden manuell beendet werden.
• Nach Abschluss des Lernvorgangs muss der Lernmodus im Sender durch Betätigung der Betätigung der Taste
[STOPP ■] für 6 Sekunden gestoppt werden.
Funkverbindung der Sender und Empfänger löschen
Zum Löschen der Funkverbindung zwischen den Sendern und Empfängern gibt es 2 Handlungsanweisungen, die
jeweils eine bestimmte Aktion im Sender und Empfänger auslösen.
Handlungsanweisung Resultat
Tasten [STOPP] + [P] mindestens 6 Sekunden
drücken bis die Statusanzeige rot leuchtet.
Tasten [AUF ▲] + [AB/ZU ▼] + [STOPP ■] + [P]
mindestens 6 Sekunden drücken bis die Statusanzeige rot leuchtet.
Im Sender:
Die ausgewählten Kanäle werden komplett gelöscht.
Im Empfänger:
Nur der einzelne Sender wird aus dem Empfänger gelöscht.
Im Sender:
Die ausgewählten Kanäle werden komplett gelöscht.
Im Empfänger:
Alle Sender werden aus dem Empfänger gelöscht.
Antrieb kongurieren
Rollladen Markise Jalousie Innen beschattung
Zwischenposition
Behang an beliebiger
Position zwischen oberer
und unterer Endlage
Position Lüftung
Lüftungsschlitze geönet
Voraussetzung für alle Aktionen: Kanal des Handsenders ist in Funkempfänger eingelernt.
Zwischenposition im
Empfänger denieren
Voraussetzung: Behang be-
ndet sich in oberer Endlage.
1. Taste [AB/ZU ▼] betäti-
gen bis die gewünschte
Zwischenposition erreicht ist.
2. Zusätzlich die Taste
[STOPP ■] betätigen.
Der Behang stoppt. Die
Status-LED leuchtet
kurzzeitig.
Zwischenposition ist jetzt
gespeichert.
Eine der Positionen Lüftung / Tuch-
straung / Wendung im Empfänger
denieren
Voraussetzung: Behang bendet sich in
unterer Endlage.
1. Taste [AUF ▲] betätigen bis sich
Lüftungsschlitze önen bzw. die Wen-
dung der Jalousielamellen erreicht ist
bzw. das Markisentuch gespannt ist.
2. Zusätzlich die Taste [STOPP ■]
betätigen.
Der Behang stoppt. Position Lüftung /
Tuchstraung / Wendung ist jetzt gespeichert.
Zwischenposition
Behang an beliebiger
Position zwischen oberer
und unterer Endlage
Position Tuchstraung
Tuch gespannt
Zwischenposition anfahren Zwischenposi-
Voraussetzung: Zwischenposition ist deniert.
• Doppeltastendruck auf Taste [AB/ZU ▼]
(Taste zweimal kurz nacheinander betätigen):
Behang fährt auf die gespeicherte Zwischenposition.
Ist keine Zwischenposition deniert, fährt der Behang in die
untere Endlage.
Wichtig: Bei Anwendung Jalousie und denierter Position
Wendung (Empfänger im JA-Modus oder „JA” im Produktname) erfolgt zusätzlich eine Wendung der Jalousie lamellen.
Ist keine Wendeposition deniert, bleibt der Behang auf der
Zwischenposition mit geschlossenen Jalousielamellen stehen.
Wenn die Zwischenposition für verschiedene Empfänger
gleichzeitig angesteuert werden soll, müssen die Empfänger
auf einem Kanal eingelernt sein.
Eine der Positionen
Lüftung / Tuchstraung / Wendung
anfahren
Voraussetzung: Position Lüftung / Tuchstraung / Wendung ist deniert.
Position Wendung kann nur aus unterer
Endlage angefahren werden.
• Doppeltastendruck auf Taste [AUF ▲]:
Ist keine Position Lüftung / Tuchstraung /
Wendung deniert, fährt der Behang in die
obere Endlage.
Zwischenposition
Behang an beliebiger Position
zwischen oberer und unterer
Endlage
Position Wendung
Wendung der Jalousie-Lamellen durch kurze Fahrt in
entgegengesetzter Fahrtrichtung (nur bei Empfängern
im JA-Modus oder „JA” im
Produktname).
Behang fährt auf die gespeicherte
Position.
Zwischenposition 1
Behang an beliebiger
Position zwischen oberer
und unterer Endlage
Zwischen position 2
weitere beliebige
Position des Behangs
tion löschen
• Tasten
[AB/ZU ▼] +
[STOPP ■]
gleichzeitig für
ca. 3 Sekunden gedrückt
halten.
Zwischenposition
ist jetzt gelöscht.
Status-LED leuchtet kurzzeitig.
Position Lüftung / Tuch-
straung / Wendung /
löschen
• Tasten [AUF ▲] +
[STOPP ■] gleichzeitig
für ca. 3 Sekunden
gedrückt halten.
Position Lüftung / Tuch-
straung / Wendung ist
jetzt gelöscht.
Reinigung
Verwenden Sie zur Reinigung des Produkts keine Lösungs- oder Scheuermittel.
Gewährleistung
Innerhalb der gesetzlichen Garantiezeit beseitigen wir unentgeltlich Gerätemängel, die auf Material- oder Herstel-
lungsfehler beruhen, durch Reparatur oder Umtausch. Die Garantie erlischt bei Fremdeingri.
Reparatur
Bitte um Angabe von Artikelnummer, Artikelbezeichnung, Art des Fehlers, Begleitumstände, eigene Vermutung,
vorausgegangene ungewöhnliche Ereignisse.
Service / Herstelleradresse
Sollten trotz sachgerechter Handhabung Störungen auftreten oder wurde das Gerät beschädigt, wenden Sie sich an
Ihren Vertragspartner oder Händler.
elero GmbH
Antriebstechnik
Maybachstr. 30
732378 Schlierbach
DEUTSCHLAND
www.elero.de
Technische Daten
Spannungsversorgung 3 V, 2 x Micro LR03 (AAA)
Batterielebensdauer typisch bis zu 2 Jahre
Funkfrequenz [MHz] (Band) 868 | 915
Sendeleistung [mW] | [dBm] ≤ 500 | ≤ 10
Anzahl Kanäle 1 bzw. 6 (jeweils bidirektional)
Betriebstemperatur [°C] 0 ... 50
Relative Feuchte 0 ... 95 % nicht kondensierend
Schutzart (IP) 20
Abmessungen (LxBxH) [mm] Modul Handsender 120 x 51 x 26
Gewicht [g] (inkl. Batterien) ca. 90
Montageart (optional) Wandmontage
Artikelnummern Geräteübersicht / Lieferumfang
Konformität CE (alle Varianten -868)
Konformität
Hiermit erklärt elero, dass die Handsender der Baureihe „COM” der Richtlinie 2014/53/EU entsprechen.
Der vollständige Text der EU-Konformitätserklärung ist unter der folgenden Internetadresse verfügbar:
www.elero.de/downloads-service/
Allgemeine Hinweise zur Fehlersuche
Störung Mögliche Ursache Mögliche Lösung
Empfänger reagiert nicht und die Statusanzeige des Senders blinkt orange
Empfänger lässt sicht nicht einlernen Unterschiedliche Systemkongura-
Empfänger reagiert nicht und Statusanzeige des Senders blinkt rot
Empfänger reagiert nicht und Statusanzeige des Senders leuchtet nicht
Empfänger reagiert sporadisch 1. Schlechter Funkempfang
Empfänger fährt in die falsche Richtung Laufrichtungen sind falsch ein-
Kein Sender eingelernt Sender einlernen
tion zwischen Sender und Empfänger (ProLine bzw. ProLine 2)
1. Keine Netzspannung
2. Außerhalb der Funkreichweite
3. Empfänger defekt
Batterie im Sender erschöpft Batterien im Sender tauschen
2. Einuss durch fehlerhafte bzw.
nicht zugelassene Funksysteme
gelernt
Systemkonguration anpassen
1. Netzspannung prüfen.
2. Position des Senders ändern.
Antennenlage des Empfängers
ändern.
3. Empfänger austauschen.
1. Position des Senders ändern.
Antennenlage des Empfängers
ändern.
2. Störquelle lokalisieren und
Störung beheben.
Sender löschen und korrekt einlernen
Entsorgung
Batterien und Altgeräte dürfen nicht mit dem Hausmüll entsorgt werden!
1. Verpackungsmaterial in die Sammelbehälter für Pappe, Papier entsorgen.
2. Altbatterien in einen Wertstobehälter für Altbatterien oder über den Fachhandel entsorgen.
3. Altgeräte über eine Sammelstelle für Elektronikschrott oder einen Fachhändler entsorgen.
Operating instructions (translation)
For safe and proper use, follow these instructions.
Keep them for future reference.
A B C
Not all controls will be present on every device.
Wall bracket
① Fixing plate
② Cover
(NOTE: Fragile.
Handle with care).
1. Check the surface at the intended
installation location for any hidden
cables, etc.
2. Do not slide the front cover so it
is parallel but rather press on it
carefully from the rear through the
two boreholes and lift it o while
keeping it aligned parallel (do not
tilt it) or lever it out from the bottom.
3. Attach the rear cover at the installation location using the screws and
wall plugs.
Devices overview / scope of supply
MonoCom:
• 1-channel handheld transmitter; article no. 284050001 (-915: 284050901)
MonoCom slide:
• 1-channel handheld transmitter with slider; article no. 284350001 (-915: 284350901)
LumeroCom:
• 1-channel handheld transmitter with Auto/Manual switchover; article no. 284250001 (-915: 284250901)
VarioCom:
• 6-channel handheld transmitter (channels combinable) with Auto/Manual switchover; article no. 284450001
(-915: 284450901)
VarioCom Slide:
• 6-channel handheld transmitter (channels combinable) with slider and auto/manual switchover; article no.
284550001 (-915: 284550901)
Wall holder, set of fasteners (article no. 280400001), 2 batteries inserted, operating instructions article no. 138220001
Intended use / foreseeable misuse
The hand-held transmitter may only be used for the control of roller shutters, venetian blinds and shades that are
equipped with elero ProLine 2 radio receivers (bidirectional only).
Switching and dimming of illuminants equipped with elero radio receivers (ProLine 2, bidirectional) and a suitable
electronic ballast is also possible.
Only for use in dry rooms for switching and control of elero radio drives and elero radio receivers. Do not perform any
modications to the device. Do not allow the device to fall, do not expose it to any heat sources and do not immerse
in liquids. Do not operate the transmitter inadvertently or carelessly. The manufacturer will not assume liability for
damage caused by the above.
Safety instructions
Please read this operating manual carefully as the procedure in this manual is a prerequisite for correct use of the product.
Only operate the transmitter within sight of the devices being controlled. The gures in this operating manual are for
illustration purposes only. The illustrations may dier from your product with respect to minor details and are provided
for general information only.
elero GmbH continuously strives to improve all products. As a result, the specications, features and technology of
this product may be changed at any time. The information in this operating manual is based on current information at
the time of publication.
No claims can be derived from the technical data, images and information in this operating manual.
Commissioning
Important: The batteries are already activated on delivery.
For programming the COM hand-held transmitter in the elero radio control or in the receiver: see the following sections.
Opening/closing the housing
Required
• when programming the hand-held transmitter to a receiver.
• when deleting the hand-held transmitter from a receiver.
• when replacing the battery
• To open: On the underside of the hand-held transmitter, carefully push in the centre retaining lug slightly using
a blunt object and lift o the rear panel.
• To close: Attach the rear panel from above in the correct position and engage it in the retaining lug area by
applying slight pressure.
Replacing the battery
The batteries inserted on purchase may reach the end of their lifetime before the lifetime specied in the operating
instructions has expired. The batteries can simply be removed by the end user in accordance with 2013/56/EU. The
coding of the transmitter is retained after the battery is replaced; the coding does not have to be reprogrammed to the
remote control or the radio receiver.
• Lift out the batteries carefully. Always use two identical non-rechargeable batteries of type AAA (Micro 1.5 V),
preferably alkaline batteries. Pay attention to the correct polarity: the positive pole (+) is a countersunk contact,
the negative pole (-) is a metal lug.
Dispose of used batteries in accordance with environmental regulations.
General
The buttons ⑤ OPEN ▲, ⑥ STOP ■, ⑦ DOWN/CLOSE ▼ and ⑫ slider are used
• with drives to trigger travel motion
• with appropriate illuminants for adjusting the brightness
Radio connection between hand-held transmitter and receiver is bidirectional. Not all messages are also conrmed by
the receiver however.
Make sure the radio link between transmitter and receiver is unobstructed.
The transmitting power or radio range will reduce as the battery output declines. If the voltage drops below a certain
value, no more functions will be carried out and nothing will be indicated.
Channel selection
When selecting a channel, an activated channel is indicated by the relevant green status LED. The channel selection
is overwritten as soon as the status LEDs are switched o.
• Channel selection by briey pressing a channel selection button (1 to 6): Individual channel is activated or deactivated.
• Channel selection by pressing a channel selection button and holding it down (1 to 6): All lower channels including
the channel of the channel selection button pressed are selected.
• Selection of a group (of up to any 5 channels): When pressing a channel selection button, the status LED is active
for 5 seconds. During this period, other channels can be combined to form groups as required.
• Central channel (selection of all 6 channels): Activated as soon as all 6 channels are selected.
2 operating modes: Automatic or manual ⑧, ⑨, ⑩, ⑪
Auto ⑧ and manual ⑪ buttons:
Auto: A receiver that is programmed responds to the timer function of a corresponding control unit or to commands
by sensors.
Manual: A receiver that is programmed does not respond to the timer function of a corresponding control unit or to
commands by sensors.
• Press briey: actual status is queried by the receiver.
• Press and hold down: the relevant operating mode is activated.
Auto LED ⑨ and manual LED ⑩:
• If the selected channels are in the "Auto" operating mode, the auto LED lights up green.
• If the selected channels are in the "Manual" operating mode, the manual LED lights up red.
• If the selected channels are partly in the "Auto" operating mode and partly in the "Manual" operating mode, the
Auto LED ⑨ and Manual LED ⑩ light up orange synchronously.
Slider ⑫ control
• Fine adjustment of receivers for dimming and for venetian blinds.
Action / command
Slide up Upward travel movement Venetian blinds move up Dimming becomes brighter
Slide down Downward travel movement Venetian blinds move
Let go of slider Receiver is in maintained mode Movement is stopped Value for brightness is retained
• Slider commands are not routed to other radio receivers and do not result in any feedback.
• Slider commands behave the same in a group channel and a central channel as in a single channel, except
with the Combio-868 LI.
• The slider controls and buttons ⑤, ⑥ and ⑦ are mutually interlocked.
Tubular drive (radio-based) Venetian blind drive
Front side
③ Status indicator (Status
LEDs, 1 central or 6)
④ Channel selection
buttons 1 to 6
⑤ OPEN ▲ button
⑥ STOP ■ button
⑦ DOWN/CLOSE ▼ button
⑧ Auto control button
⑨ Auto LED
⑩ Manual LED
⑪ Manual controlbutton
⑫ Slider
(radio-based)
down
Rear side under the cover
⑬ Programming button P
(left, round)
⑭ Selective programming
button S (right, round)
⑮ Battery compartment
(2x), observe polarity
&$87,21
Combio-868 LI
Dimming becomes darker
Status indicator/channel indicator ③
The single channel handheld transmitter has 1 status indicator in the centre and a channel indicator.
The six-channel handheld transmitter has 6 channels and 6 status LEDs.
The status is indicated for all channels selected simultaneously when one of the controls ⑤ OPEN ▲, ⑥ STOP ■,
⑦ DOWN/CLOSE ▼, ⑫ slider, Auto ⑧ or Manual ⑪ control key are pressed.
The status is indicated for all channels synchronously (simultaneously). When a channel selection button is pressed,
the status LEDs indicate the status of an activated/deactivated channel.
Green (5 seconds) Display of selected channel or channels. Further channels can be selected or de-
Green ashing (700 ms) All status LEDs ash green for 700 ms during transmission
Orange ashing slowly (2 Hz) Channel (transmitter) not programmed in any receiver.
Orange ashing quickly (20 Hz) Channel (transmitter) is in programming mode.
Orange ashing quickly (20 Hz)
and cyclically
Orange lights up, then green Channel is programmed and the receiver has received the signal.
Orange lights up, then red Channel is programmed and one of the receivers has not received the signal.
Orange or green ashes several
times, then red after 6 seconds
Alternating orange and green
then red
Red ashing quickly Batteries almost empty.
selected during this time. Each selection extends the time by another 5 seconds.
• if no channel is selected.
• if several channels are selected and programming button P or Selective
Programming button S is pressed, the status LEDs for the selected channels
ash green. Programming is then only possible in one channel.
Operation of receivers already programmed is not possible.
Channel (transmitter) is in group programming mode.
Operation of receivers already programmed is not possible.
Channel (transmitter) has been deleted.
Channel (transmitter) has been deleted.
Asynchronous programming mode (standard)
Asynchronous programming mode is suitable for programming
• the rst transmitter
• an additional transmitter
• individual receivers in case of several receivers ready for programming (e.g. several receivers using one fuse).
When programming a transmitter to one receiver, the open or down/closed switch state is assigned to the actions of
the drive (travel direction) or of the corresponding illuminant (switching/dimming).
Asynchronous programming mode is the standard programming mode. In asynchronous programming mode, the
times for upward and downward travel of participating receivers vary. In case of suitable remote control illuminants,
the illumination time will vary during programming. After some time, the receivers will run asynchronous to one another.
This will enable the hits for a certain receiver to be set better.
Operating procedure Result
1 Activating asynchronous programming standby:
Switch the mains voltage o and on again or press the buttons [OPEN ▲] + [DOWN/CLOSE ▼] + [P] simultaneously
and hold them down for 3 seconds on a transmitter that is
already programmed.
2 Starting programming mode:
Press the [P] programming button for approx. 1 second.
3 Setting the rst hit:
Immediately after motion commences, press the
[OPEN ▲] or [DOWN/CLOSE ▼] button.
• In case of upward motion, press the [OPEN ▲] button.
• In case of downward motion, press the
[DOWN/CLOSE ▼] button.
4 Setting the second hit:
Prerequisite: First hit has been set.
Immediately after motion in the opposite direction commen-
ces, press the [OPEN ▲] or [DOWN/CLOSE▼] button.
• In case of upward motion, press the [OPEN ▲] button.
• In case of downward motion, press the
[DOWN/CLOSE ▼] button.
• Programming can only ever be performed in one selected channel.
• When programming is complete or after 5 minutes has passed, the receiver will revert to normal operation.
• Programming mode can be stopped by pressing the [STOP ■] button for at least 6 seconds.
• Several receivers can be programmed to one channel.
• If more than 10 receivers at once are in programming mode, the transmitter changes to group programming mode.
Once programming is complete, group programming mode has to be terminated manually in the transmitter by
pressing the [STOP ■] button for at least 6 seconds.
• If the blind moves in the wrong direction, delete the transmitter and program it again.
The receiver changes to asynchronous programming
standby for 5 minutes. Ready to receive programming
button [P].
The receiver changes to asynchronous programming
mode and starts cyclical up and down travel.
Hit successful:
Receiver briey interrupts ongoing travel.
Hit failed:
Receiver does not interrupt ongoing travel.
→ Repeat "Set rst hit" action!
Hit successful:
Receiver stops ongoing travel and signals completion
of programming.
Hit failed:
Receiver does not stop the ongoing travel.
→ Repeat "Setting second hit" action!
Synchronous programming mode
Synchronous programming mode is ideal for
• programming an additional transmitter
• programming several receivers simultaneously to one transmitter or one channel.
Synchronous programming mode is a special programming mode. In synchronous programming mode, the times for
upward and downward travel of the participating receivers are synchronised. With suitable remote controlled illuminants, the illumination times will also be synchronised. As a result the hits for all participating receivers can be set
simultaneously (synchronised).
Operating procedure Result
1 Activating synchronous programming standby:
Press the buttons [DOWN/CLOSE ▼] + [P] simulta-
neously on a transmitter that is already programmed and
hold them down for 3 seconds.
2 Start programming mode:
Press the [P] programming button for approx. 1 second.
3 Setting the rst hit:
Immediately after motion commences, press the
[OPEN ▲] or [DOWN/CLOSE ▼] button.
• In case of upward motion, press the [OPEN ▲] button.
• In case of downward motion, press the
[DOWN/CLOSE ▼] button.
4 Set the second hit:
Prerequisite: First hit has been set.
Immediately after motion in the opposite direction com-
mences, press the [OPEN▲] or [DOWN/CLOSE▼] button.
• In case of upward motion, press the [OPEN ▲] button.
• In case of downward motion, press the
[DOWN/CLOSE ▼] button.
• Programming can only ever be performed in one selected channel.
• When programming is complete or after 5 minutes has passed, the receiver will revert to normal operation.
• Programming mode can be stopped by pressing the [STOP ■] button for at least 6 seconds.
• Several receivers can be programmed to one channel.
• If more than 10 receivers at once are in programming mode, the transmitter changes to group programming mode.
Once programming is complete, group programming mode has to be terminated manually in the transmitter by
pressing the [STOP ■] button for at least 6 seconds.
• If the blind moves in the wrong direction, delete the transmitter and program it again.
• If more than 10 receivers at once are in programming mode, the transmitter changes to group programming mode.
Once programming is complete, group programming mode has to be terminated manually in the transmitter by
pressing the [STOP ■] button for at least 6 seconds.
• Once programming is complete, programming mode has to be stopped in the transmitter by pressing the [STOP ■]
button for 6 seconds.
The receiver changes to synchronous programming
standby for 5 minutes. Ready to receive programming button [P].
The receiver changes to synchronous programming
mode and starts cyclical up and down travel.
Hit successful:
Receiver briey interrupts ongoing travel.
Hit failed:
Receiver does not interrupt ongoing travel.
→ Repeat "Set rst hit" action!
Hit successful:
Receiver stops ongoing travel and signals completion of programming.
Hit failed:
Receiver does not stop the ongoing travel.
→ Repeat "Setting second hit" action!
Selective programming button S ⑭
• Selective Programming button [S] can be found under the cover on the rear of the device (right).
• Selective Programming button [S] is a special version of programming button [P].
• Using Selective Programming button [S] only one selected receiver can be set to programming mode even where
several receivers are set to programming standby at once. This enables targeted programming of certain receivers.
• A receiver must be in one of the two programming standby modes (asynchronous or synchronous).
• The programming process can only ever be started in one channel.
• Start programming process: Press programming button [S] for approx. 1 second. Programming mode is started
automatically in the rst receiver.
• All receivers in programming standby are collected in a list.
• Start programming mode in the next receiver: Press Selective Programming [S] for approx. 1 second.
• Start programming mode in the previous receiver: Press Selective Programming [S] briey initially, then press
Selective Programming [S] for approx. 1 second.
• The "Set hit" procedure behaves as in asynchronous programming mode or in synchronous programming mode
(operating procedure 3 or 4).
Deleting the radio connection between transmitters and receivers
To delete the radio connection between radio transmitters and receivers, there are two operating procedures, each of
which trigger a certain action in the transmitter and receiver.
Operating procedure Result
Press the [STOP] + [P] buttons for at least
6 seconds until the status LED lights up red.
Press the [UP▲] + [DOWN/CLOSE▼] + [STOP ■]
+ [P] buttons for at least 6 seconds until the status
LED lights up red.
In the transmitter:
The selected channels are deleted entirely.
In the receiver:
The individual transmitter only is deleted from the receiver.
In the transmitter:
The selected channels are deleted entirely.
In the receiver:
All transmitters are deleted from the receiver.
Conguring the drive
Roller shutters Awnings Venetian blind Interio shading
Intermediate position of
blind at any position
between upper and lower
end position
Vetilation position
vntilation gaps open
Prerequisite for all actions: The channel of the hand-held transmitter is programmed in the receiver.
Dening the interim position in the receiver
Prerequisite: The blind is in
the upper end position.
1. Press the DOWN/
CLOSE▼] button until
the desired intermediate
position is reached.
2. Additionally press the
[STOP ■] button. The blind
will stop. The status LED
lights up briey.
The intermediate position is
now stored.
Dening one of the ventilation/fabric tautening/tiling positions in the
receiver
Prerequisite: The blind is in the lower end
position.
1. Press the [UP ▲] button until the
ventilation gaps open, the venetian
blind slats are tilted or the awning
fabric is taut.
2. Additionally press the [STOP ■] button.
The blind will stop. The ventilation/fabric
tautening/tilting position has now been
saved.
Intermediate position of
blind at any position
between upper and lower
end position
Fabric tautening
position
Position is taut
Moving to the intermediate position Deleting the
Prerequisite: The intermediate position is dened.
• Press [DOWN/CLOSE ▼]
button twice (in quick succession):
Blind moves to the intermediate position saved.
If no intermediate position has been dened, the blind will
move to the lower end position.
Important: If you are using a venetian blind and a dened tilt
position (receiver in JA mode or "JA" in product name), the
venetian blind slats will also tilt.
If no tilt position has been dened, the blind will stop at the
intermediate position with the slats closed.
If an intermediate position is to be approached for various
receivers simultaneously, the receivers must be programmed
on one channel.
Moving to one of the ventilation/tilting/
fabric tautening positions
Prerequisite: The ventilation/tilting/fabric
tautening position is dened.
The tilting position can only be approached
from lower end position.
• Press the [OPEN ▲] button twice:
If no ventilation/fabric tautening/tilting
position is dened, the blind will travel to
the upper end position.
Intermediate position of blind
at any position between upper
and lower end position
Tilting position
Blind slats are tilted by brief
travel in the opposite direction
(only for receivers in JA mode
or with „JA” in product name).
blind moves to the position saved.
Intermediate position 1 of
blind at any position
between upper and lower
end position
Intermeidate position 2
any subsequent osition
of blind
intermediate
position
• Press the but-
tons [DOWN/
CLOSE ▼]
+ [STOP ■]
simultaneously
for approx. 3
seconds.
The intermediate
position is now
deleted. The
status LED lights
up briey.
Deleting the ventilation/
fabric tautening/tilting
position
• Press the [OPEN ▲]
+ [STOP ■] buttons
simultaneously and
hold them down for
approx. 3 seconds.
The ventilation/tilting/fabric tautening position has
now been deleted.
Cleaning
Do not use solvent or abrasive detergents to clean the product.
Warranty
Within the legal warranty period, we will remedy any defects caused by material or manufacturing defects by repairing
or replacing the unit. Unauthorised modications will void the warranty.
Repairs
Please specify the item number, item description, type of fault, situational circumstances, presumed cause, unusual
events prior to the problem.
Service/manufacturer's address
If malfunctions occur or the device is damaged despite correct handling, contact your contractor or dealer.
elero GmbH Antriebstechnik Maybachstr. 30 732378 Schlierbach DEUTSCHLAND www.elero.de
Technical Data
Power supply 3 V, 2 x Micro LR03 (AAA)
Battery life typical up to 2 years
Radio frequency [MHz] (Band) 868 | 915
Transmitting power [mW] | [dBm] ≤ 500 | ≤ 10
Number of channels 1 resp. 6 (bidirectional in each case)
Operating temperature [°C] 0 ... 50
Relative humidity 0 ... 95 % non condensing
Protection class (IP) 20
Dimensions (LxBxH) [mm] Modul transmitter 120 x 51 x 26
Weight [g] (incl. batteries) ca. 90
Type of mounting (optional) all mounting
item numbers device overview
Conformity CE (all versions -868)
Conformity
elero hereby declares that the COM series handheld transmitter is in compliance with Directive 2014/53/EU.
The full text of the EU Declaration of Conformity is available at the following Internet address:
www.elero.de/downloads-service
US Declaration of conformity
FCC ID: YBU18455
IC: 8929A-18455
USA (FCC)
Part 15 Statement gem. FCC 15.19/RSS Gen Issue 3 Sect. 7.1.3
This devices (elero Transmitter COM-915) complies with Part 15 of the FCC Rules and with Industry Canada license-exempt RSS standard(s). Operation is subject to the following two conditions:
(1) this device may not cause harmful interference, and
(2) this device must accept any interference received, including interference that may cause undesired operation.
Canada, Industry Canada (IC)
Les présent appareils (elero Transmitter COM-915) sont conforme aux CNR d‘Industrie Canada applicables aux
appareils radio exempts de licence. L‘exploitation est autorisée aux deux conditions suivantes :
(1) l‘appareil ne doit pas produire de brouillage, et
(2) l‘utilisateur de l‘appareil doit accepter tout brouillage radioélectrique subi, même si le brouillage est susceptible
d‘en compromettre le fonctionnement.
Caution:
Changes or modications not expressly approved by the party responsible for compliance could void the user’s
authority to operate the equipment.
Information:
This equipment has been tested and found to comply with the limits for a Class B digital device, pursuant to part 15 of
the FCC Rules. These limits are designed to provide reasonable protection against harmful interference in a residen-
tial installation. This equipment generates, uses and can radiate radio frequency energy and, if not installed and used
in accordance with the instructions, may cause harmful interference to radio communications. However, there is no
guarantee that interference will not occur in a particular installation. If this equipment does cause harmful interference
to radio or television reception, which can be determined by turning the equipment o and on, the user is encouraged
to try to correct the interference by one or more of the following measures:
• Reorient or relocate the receiving antenna.
• Increase the separation between the equipment and receiver.
• Connect the equipment into an outlet on a circuit dierent from that to which the receiver is connected.
• Consult the dealer or an experienced radio/ TV technician for help
General notes on troubleshooting
Receiver not responding and status
indicator of transmitter ashing orange
Receiver cannot be programmed Transmitter and receiver systems
Receiver not responding and status
LED of transmitter ashing red
Receiver not responding and status
LED of transmitter not lighting up
Receiver reacting only intermittently 1. Poor radio reception
Receiver moving in the wrong direction Directions are incorrectly programmed Delete transmitter and program
No transmitter programmed Program the transmitter
are congured dierently (ProLine
or ProLine 2)
1. No power supply
2. The receiver is outside the radio
range.
3. Radio receiver defective
Battery in transmitter is used up Replace batteries in transmitter
2. Inuence from faulty or non-ap-
proved radio systems
Adapt the system conguration
1. Check mains voltage.
2. Change the transmitter's
position. Change the position
of the receiver's aerial
3. Replace receiver.
1. Change the transmitter's
position.
Change the position of the
receiver's aerial
2. Localise the source of the inter-
ference and rectify malfunction.
correctly
Aperçu de l'appareil / étendue de la livraison
Com-Serie
Élément de commande molette ⑫
vénitien (radio)
Instruction d'action
Résultat
Touche de programmation sélective S ⑭
Garantie
Dénir la position intermé-
Déplacement en position intermédiaire
Suppression
intermédiaire
Dénir l'une des positions de ventila-
dans le récepteur
Déplacement vers l'une des positions
orientation
Supprimer la position
de la toile / orientation
Adresse du service / du fabricant
Informations générales sur l'identication des erreurs
$77(1=,21(
veneziana (radio)
Indicatore di stato/indicatore canale ③
Istruzione operativa
Risultato
Dati tecnici
Assistenza / Indirizzo del fabbricante
Note generali per la ricerca di guasti
Disposal
Batteries and old units may not be disposed of with household waste.
1. Dispose of packaging in the recycling bin for cardboard and paper.
2. Dispose of old batteries in the recycling bin for used batteries or have a retailer recycle them.
3. Dispose of old units at an electronic waste recycling facility or have a retailer recycle them.
Manuel d‘utilisation (translation)
Suivez ces instructions pour une utilisation correcte et sûre.
Conserve pour une utilisation future.
A B C
Tous les éléments de commande ne sont pas disponibles sur chaque appareil.
Support mural
① Plaque de xation
② Plaque frontale
(REMARQUE : fragile.
Manipuler avec précaution).
1. Vérier le sol sur l'emplacement
de montage pour détecter les
connexions enterrées, etc.
2. Ne pas déplacer parallèlement
la plaque frontale, mais appuyer
prudemment par l'arrière au
travers des deux alésages et
soulever parallèlement (ne
pas basculer) ou faire levier de
l'arrière.
3. Fixer la plaque frontale arrière
sur le lieu de montage à l'aide
des vis.
MonoCom :
• Télécommande 1 canal n° d'article 284050001 (-915: 284050901)
MonoCom Slide :
• Télécommande 1 canal avec molette, n° d'article 284350001 (-915: 284350901)
LumeroCom :
• Télécommande 1 canal avec commutation Auto / Manuel, n° d'article 284250001 (-915: 284250901)
VarioCom :
• Télécommande 6 canaux (canaux combinables) avec commutation Auto / Manuel, n° d'article 284450001 (-915:
284450901)
VarioCom Slide :
• Télécommande 6 canaux (canaux combinables) avec molette et commutation Auto / Manuel, n° d'article
284550001 (-915: 284550901)
Respectivement avec support mural (n° d'article 280400001), 2 piles en place, notice d'utilisation, n° d'article
138220001
Utilisation conforme / mauvais usage prévisible
L’émetteur à main doit seulement être utilisé pour commander des installations de volets roulants, de stores vénitiens
et de protection solaire équipées des récepteurs radio elero ProLine 2 (uniquement bidirectionnels).
La commutation et la gradation des lampes équipées de récepteurs radio elero (ProLIne 2, bidirectionnel) et de
ballast électronique sont possibles.
Utilisation uniquement dans des locaux secs, pour la commutation et la commande de récepteurs radio elero et de
moteurs radio elero. Ne pas modier l'appareil ! Ne pas faire tomber l'appareil, ne pas l'exposer à des sources de
chaleur et ne pas l'immerger dans des liquides. Éviter l'utilisation de l'émetteur par inattention ou défaut de concentration. Le fabricant n'est pas responsable des dommages causés suite aux situations indiquées ci-dessus.
Instructions de sécurité
Veuillez lire ces instructions d'utilisation avec soin. Leur prise en compte lors de l'utilisation est une condition préalable pour l'utilisation correcte du produit.
N'utilisez l'émetteur qu'à portée de vue des appareils à commander ! Les illustrations de ces instructions d'utilisation
ne sont qu'indicatives. Certains détails des illustrations peuvent diérer de votre produit, ces derniers ne visant qu'à
vous fournir des informations d'ordre général.
elero GmbH travaille en permanence au développement de tous ces produits. Des modications de l'étendue de
la livraison sont donc possibles, pour ce qui est de la forme, de l'équipement et de la technique. Les informations
présentées dans ces instructions d'utilisation correspondent aux connaissances au moment de la publication.
Aucune exigence ne peut découler des indications, illustrations et informations données dans ces instructions
d'utilisation.
Mise en service
Important : les piles sont déjà actives lors de la livraison.
Programmation de la télécommande « COM » dans la commande radio elero ou dans le récepteur : voir les sections
suivantes.
Ouvrir / fermer le boîtier
Nécessaire
• Pour programmer la télécommande dans un récepteur radio.
• Pour supprimer la télécommande dans un récepteur radio.
• Pour le remplacement des piles.
• Ouvrir : sur la face du dessous de la télécommande, pousser le taquet de retenue prudemment à l'aide d'un objet
émoussé et lever la paroi arrière.
• Fermer : placer la paroi arrière correctement par le haut et l'enclencher dans la zone du taquet de retenue en
exerçant une légère pression.
Remplacement des piles
Il est possible que les piles mises en place à l'achat arriveront en n de vie avant la n de vie indiquée dans la notice
d'utilisation. Les piles peuvent être retirées par l'utilisateur nal sans problème conformément à la directive piles
2013/56/UE. Après un remplacement des piles, la codication de l'émetteur est conservée. Il n'est pas nécessaire de
le reprogrammer dans la télécommande radio ou dans le récepteur radio.
• Sortir les piles avec prudence. Utiliser ensuite 2 piles identiques non rechargeables AAA (Micro 1,5 V), de pré-
férence alcalines au manganèse. Veiller à la bonne polarité : le pôle positif (+) est un contact aeurant, le pôle
négatif (-) est une languette métallique.
Éliminer les piles usagées dans le respect de l'environnement.
Généralités
Les touches ⑤ MONTÉE ▲, ⑥ STOP ■, ⑦ DESCENTE/FERMETURE ▼ et ⑫ Molette servent pour les
• moteurs de déclencheurs pour les mouvements de déplacement
• lampes adaptées pour des modications de luminosité
La liaison radio entre télécommande et récepteur est bidirectionnelle ; mais chaque message n'est pas conrmé par
le récepteur.
Veiller à une liaison radio parfaite entre émetteur et récepteur.
Une diminution de la puissance des piles a pour eet de réduire la puissance d’émission et/ou la portée radio. Si la
tension chute en dessous d'une valeur précise, aucune fonction ne sera plus eectuée et plus rien ne sera aché.
Sélection de canal
Lors de la sélection du canal, un canal activé est signalé par une LED d'état respectivement verte. La sélection de
canal est écrasée, dès que les achages d'état sont éteints.
• Sélection de canal par une courte pression sur une touche de sélection de canal (1 à 6) : un canal individuel est
activé ou désactivé.
• Sélection de canal par une pression longue sur une touche de sélection de canal (1 à 6) : tous les canaux inférie-
urs, y compris le canal de la touche de sélection de canal actionnée sont sélectionnés.
• Sélection d'un groupe (jusqu'à 5 canaux au choix) : lors de l'actionnement d'une touche de sélection de canal,
l'achage de statut est activé pendant 5 secondes. Durant ce temps, plusieurs canaux peuvent être regroupés en
groupes au choix.
• Canal central (sélection des 6 canaux) : l'activation a lieu dès que les 6 canaux sont sélectionnés.
2 modes de fonctionnement : Auto ou Manuel ⑧, ⑨, ⑩, ⑪
Touches de commande Auto ⑧ et Manuel ⑪ :
Auto : Un récepteur programmé réagit à des fonctions d'horloge d'un appareil de commande correspondant ou aux
ordres de capteurs.
Manuel : Un récepteur programmé ne réagit pas à des fonctions d'horloge d'un appareil de commande correspondant
ou aux ordres de capteurs.
• Court actionnement : l'état réel est interrogé par le récepteur.
• Actionnement long : le mode de fonctionnement respectif est activé.
LED Auto ⑨ et LED Manuel ⑩:
• Si les canaux sélectionnés se trouvent en mode de fonctionnement « Auto », la LED Auto s'allume en vert.
• Si les canaux sélectionnés se trouvent en mode de fonctionnement « Manuel », la LED Manuel s'allume en rouge.
• Si les canaux sélectionnés se trouvent en partie en mode de fonctionnement « Auto » et en partie en mode de
fonctionnement « Manuel », la LED Auto ⑨ et la LED Manuel ⑩ s'allument de manière synchrone en orange.
• Réglage de précision des récepteurs à lames orientables et à gradateur.
Action / ordre Moteur tubulaire (radio) Moteur pour store
Eeurement vers
le haut
Eeurement
vers le bas
Relâcher la
molette
• Les ordres de la molette ne sont pas transmis à d'autres récepteurs radio et aucun retour n'a lieu.
• Les ordres de la molette se comportent dans le canal groupé et dans le canal central comme dans le canal indivi-
duel, à l'exception de Combio-868 LI.
• Les éléments de commande molette et touches ⑤, ⑥ et ⑦ sont verrouillés réciproquement.
Mouvement de déplacement
vers le haut
Mouvement de déplacement
vers le bas
Le récepteur est en mode
maintenu
Côté avant
③ Achage d'état (LED
d'état, 1 centrale ou 6)
④ Touches de sélection de
canal 1 à 6
⑤ Touche MONTÉE ▲
⑥ Touche STOP ■
⑦ Touche DESCENTE/
FERMETURE ▼
⑧ Touche decommande
Auto
⑨ LED Auto
⑩ LED Manuel
⑪ Touche decommande-
Manuel
⑫ Molette
Actionner les stores
vénitiens vers le haut
Actionner les stores
vénitiens vers le bas
Stoppe le mouvement de
déplacement
Face arrière en dessous
de la plaque frontale
⑬ Touche de programmation
P (à gauche, ronde)
⑭ Touche de programmation
sélective S (à droite,
ronde)
⑮ Compartiment à pile
(2x), respecter la polarité
$77(17,21
Combio-868 LI
Réglage de luminosité plus
clair
Réglage de luminosité plus
foncé
La valeur de luminosité est
conservée
Achage d'état / achage de canal ③
La télécommande à un canal possède 1 achage d'état central et un achage de canal.
La télécommande à six canaux possède 6 canaux et six LED d'état.
L'achage d'état se fait pour tous les canaux sélectionnés en même temps ⑤ MONTÉE ▲, ⑥ STOP ■, ⑦ DESCEN-
TE/FERMETURE▼, ⑫ Molette, Touche de commande Auto ⑧ et Manuel ⑪.
L'achage d'état se fait synchronisé pour tous les canaux sélectionnés (en même temps). En actionnant l'une des
touches de sélection de canal, les LED d'état achent l'état du canal activé/désactivé.
vert (5 secondes) Achage du canal ou des canaux sélectionnés. Pendant ce temps, aucun
vert clignote (700 ms) Toutes les LED de l'achage d'état clignotent 700 ms en vert durant
Clignote lentement en orange (2 Hz) Le canal (émetteur) n'est programmé sur aucun récepteur
Clignote rapidement en orange (20 Hz) Le canal (émetteur) est en mode apprentissage.
Clignote rapidement en orange (20 Hz)
de manière cyclique
La LED s'allume en orange puis en vert Le canal est programmé et le récepteur a reçu le signal.
La LED s'allume en orange puis en
rouge
La LED clignote plusieurs fois en orange
ou en vert puis devient rouge au bout de
6 secondes
Orange et vert en alternance, puis
rouge
La LED clignote rapidement en rouge Piles presque épuisées.
autre canal ne peut être sélectionné ou désélectionné. Chaque sélection
prolonge le temps de 5 secondes supplémentaires.
l'émission
• lorsqu'aucun canal n'est sélectionné
• lorsque plusieurs canaux sont sélectionnés et que la touche de
programmation P ou la touche de programmation sélective S est
appuyée, les LED d'état des canaux sélectionnés clignotent en vert. La
programmation n'est alors possible que dans un canal.
L'utilisation d'un récepteur déjà conguré n'est pas possible.
Le canal (émetteur) est en mode programmation groupé.
L'utilisation d'un récepteur déjà conguré n'est pas possible.
Le canal est programmé de manière bidirectionnelle et le récepteur n’a
pas reçu le signal.
Le canal (émetteur) est supprimé
Le canal (émetteur) est supprimé
Mode de programmation asynchrone (standard)
Le mode de programmation asynchrone est idéal pour la programmation
• du premier émetteur
• d'un émetteur supplémentaire
• de récepteurs individuels avec plusieurs récepteurs programmés (par ex. plusieurs récepteurs sur un fusible).
Lors de la programmation d'un émetteur sur un récepteur, l'état de commutation Montée ou Descente/Fermeture est
aecté aux actions du moteur (sens de fonctionnement) ou de la lampe correspondante (commutation/gradation).
Le mode de programmation asynchrone est le mode de programmation standard. En mode de programmation
asynchrone, les temps de montée et de descente des récepteurs participants varient. En présence de lampes
télécommandables adaptées, la durée de l'allumage varie durant la programmation. Au bout d'un certain temps, les
récepteurs fonctionnent de manière réciproquement asynchrone. Les résultats d'un récepteur précis peuvent ainsi
être mieux dénis.
Instruction d'action Résultat
1 Activer le mode de programmation asynchrone :
Éteindre et rallumer la tension réseau sur un émetteur déjà
programmé pendant 3 secondes en appuyant en même
temps sur les touches [MONTÉE ▲] + [DESCENTE/
FERMETURE ▼] + [P].
2 Démarrer le mode de programmation :
Appuyer pendant 1 seconde sur la touche de programmation [P].
3 Dénir la première occurrence :
Dèsle démarrage d'un mouvement de déplacement, appuyez
sur la touche [MONTÉE ▲] ou [DESCENTE/FERMETURE ▼].
• Lors d'une montée, appuyez sur la touche [MONTÉE ▲].
• En cas de descente, appuyez sur la touche [DESCENTE/
FERMETURE ▼].
4 Dénir la seconde occurrence :
Condition requise : la première occurrence est dénie
Dès le démarrage d'un mouvement de déplacement,
appuyez sur la touche [MONTÉE ▲] ou [DESCENTE/FERMETURE ▼].
• Lors d'une montée, appuyez sur la touche [MONTÉE ▲].
• En cas de descente, appuyez sur la touche [DESCENTE/
FERMETURE ▼].
• La programmation doit toujours se faire dans un seul canal sélectionné.
• Une fois le processus de programmation terminé ou au bout de 5 minutes, le récepteur passe en mode normal.
• Le mode de programmation peut être stoppé en appuyant sur la touche [STOP ■] pendant 6 secondes minimum.
• Plusieurs récepteurs peuvent être programmés sur un canal.
• Si plus de 10 récepteurs se trouvent en même temps en mode de programmation, l'émetteur passe en mode programmation groupée. Suite au processus de programmation, le mode de programmation groupée dans l'émetteur
doit être terminé manuellement pendant au moins 6 secondes en appuyant sur la touche [STOP ■]
• Si le tablier se déplace dans un sens incorrect, eacez l’émetteur et programmez-le à nouveau.
Le récepteur passe pendant 5 minutes en mode
de programmation asynchrone. Prêt pour recevoir la touche de programmation [P].
Le récepteur passe en mode de programmation
asynchrone et commence par des montées et
descentes cycliques.
Occurrence réussie :
Le récepteur interrompt brièvement le déplacement actuel
Échec de l'occurrence :
Le destinataire n'interrompt pas la course actuelle.
→ Répéter l'action « Dénir premières occurrences » !
Occurrence réussie:
Le récepteur stoppe le déplacement actuel et
indique la conclusion du processus de programmation.
Échec de l’occurrence:
Le récepteurne stoppe pas la course actuelle.
→ Répéter l'action « Dénir la seconde occurrence » !
Mode de programmation synchrone
Le mode de programmation synchrone est idéal pour
• la programmation d'un émetteur supplémentaire
• la programmation parallèle de plusieurs récepteurs sur un émetteur ou canal
Le mode de programmation synchrone est un mode de programmation spécial. En mode de programmation synchrone, les temps de montée et de descente des récepteurs participants correspondent. Avec des lampes télécom-
mandables adaptées, les durées d'allumage correspondent également. Les occurrences peuvent ainsi être dénies
parallèlement (synchrone) pour tous les émetteurs participants.
1 Activer le mode de programmation synchrone:
Sur un émetteur déjà programmé, appuyez en même
temps pendant 3 secondes sur les touches [DESCENTE/FERMETURE ▼] + [P].
2 Démarrer le mode de programmation:
Appuyer pendant 1 seconde sur la touche de programmation [P].
3 Dénir le premier résultat:
Dèsle démarrage d'un mouvement de déplacement,
appuyez sur la touche [MONTÉE ▲] ou [DESCENTE/
FERMETURE ▼].
• Lors d'une montée, appuyez sur la touche [MONTÉE ▲].
• En cas de descente, appuyez sur la touche
[DESCENTE/FERMETURE ▼].
4 Dénir la seconde occurrence:
Condition requise: la première occurrence est dénie
Dès le démarrage d'un déplacement inverse appuyez
sur la touche [MONTÉE ▲] ou [DESCENTE/FERMETURE ▼]
• Lors d'une montée, appuyez sur la touche [MONTÉE ▲].
• En cas de descente, appuyez sur la touche
[DESCENTE/FERMETURE ▼].
• La programmation doit toujours se faire dans un seul canal sélectionné.
• Une fois le processus de programmation terminé ou au bout de 5 minutes, le récepteur passe en fonctionnement
normal.
• Le mode de programmation peut être stoppé en appuyant sur la touche [STOP ■] pendant 6 secondes minimum.
• Plusieurs récepteurs peuvent être programmés sur un canal.
• Si plus de 10 récepteurs se trouvent en même temps en mode de programmation, l'émetteur passe en mode
programmation groupée. Suite au processus de conguration, le mode de programmation groupée dans l'émetteur
doit être terminé manuellement pendant au moins 6 secondes en appuyant sur la touche [STOP ■]
• Si le tablier se déplace dans un sens incorrect, eacez l’émetteur et programmez-le à nouveau.
• Si plus de 10 récepteurs se trouvent en même temps en mode de programmation, l'émetteur passe en mode de
programmation groupée. Suite au processus de programmation, le mode de programmation groupée dans l'émet-
teur doit être terminé manuellement pendant au moins 6 secondes en appuyant sur la touche [STOPP ■].
• Une fois le processus de programmation terminé, le mode de programmation dans l'émetteur doit être stoppé
pendant 6 secondes en appuyant sur la touche [STOPP ■].
• La touche de programmation sélective [S] se trouve sous la plaque frontale au dos de l'appareil (à droite).
• La touche de programmation sélective [S] est une version spéciale de la touche de programmation [P].
• La touche de programmation sélective [S] permet de ne toujours placer qu'un récepteur sélectif en mode de programmation, même lorsque plusieurs récepteurs sont prêts à être programmés en même temps. Une programmation ciblée de certains récepteurs est ainsi possible.
• Un récepteur doit se trouver dans l'un des deux modes de programmation (asynchrone ou synchrone).
• Le processus de programmation ne peut toujours être démarré que dans un canal.
• Démarrer le processus de programmation : appuyer pendant env. 1 seconde sur la touche de programmation [S]
Le mode de programmation est démarré automatiquement dans le premier récepteur.
• Tous les récepteurs prêts à être programmés sont regroupés dans une liste.
• Démarrer le mode de programmation dans le prochain récepteur : appuyer sur la touche de programmation sélective [S] pendant 1 seconde environ.
• Démarrer le mode de programmation dans le récepteur précédent : n'appuyer que brièvement sur la touche de
programmation sélective [S] puis appuyer immédiatement sur la touche de programmation sélective [S] pendant
1 seconde environ.
• Le processus « Dénir des occurrences » se comporte comme dans le mode de programmation asynchrone ou le
mode de programmation synchrone (respectivement instruction d'action 3 ou 4).
Le récepteur passe pendant 5 minutes en mode de
programmation asynchrone. Prêt pour recevoir la
touche de programmation [P].
Le récepteur passe en mode de programmation
asynchrone et commence par des montées et
descentes cycliques.
Occurrence réussie:
Le récepteur interrompt brièvement le déplacement
actuel
Échec de l’occurrence:
Le récepteur n'interrompt pas la course actuelle.
→ Répéter l'action « Dénir la première occurrence » !
Occurrence réussie:
Le récepteur stoppe le déplacement actuel et indique la conclusion du processus de programmation.
Échec de l'occurrence:
Le récepteurne stoppe pas la course actuelle.
→ Répéter l'action « Dénir la seconde occurrence » !
Supprimer la liaison radio de l'émetteur et du récepteur.
Pour supprimer la liaison radio entre émetteurs et récepteurs, il existe 2 instructions d'action, qui déclenchent respectivement une action précise dans l'émetteur et le récepteur.
Instruction d'action Résultat
Maintenir les touches[STOP] + [P] appuyées pendant au moins 6 secondes jusqu'à ce que l'achage d'état s'allume en rouge.
Maintenir les touches[MONTÉE ▲] + [DESCENTE/
FERMETURE ▼] + [STOP ■] + [P] appuyées
pendant au moins 6 secondes jusqu'à ce que
l'achage d'état s'allume en rouge.
Dans l'émetteur :
Les canaux sélectionnés sont entièrement supprimés.
Dans le récepteur :
Seul l'émetteur individuel est supprimé du récepteur.
Dans l'émetteur :
Les canaux sélectionnés sont entièrement supprimés.
Dans le récepteur :
Tous les émetteurs sont supprimés de l'émetteur.
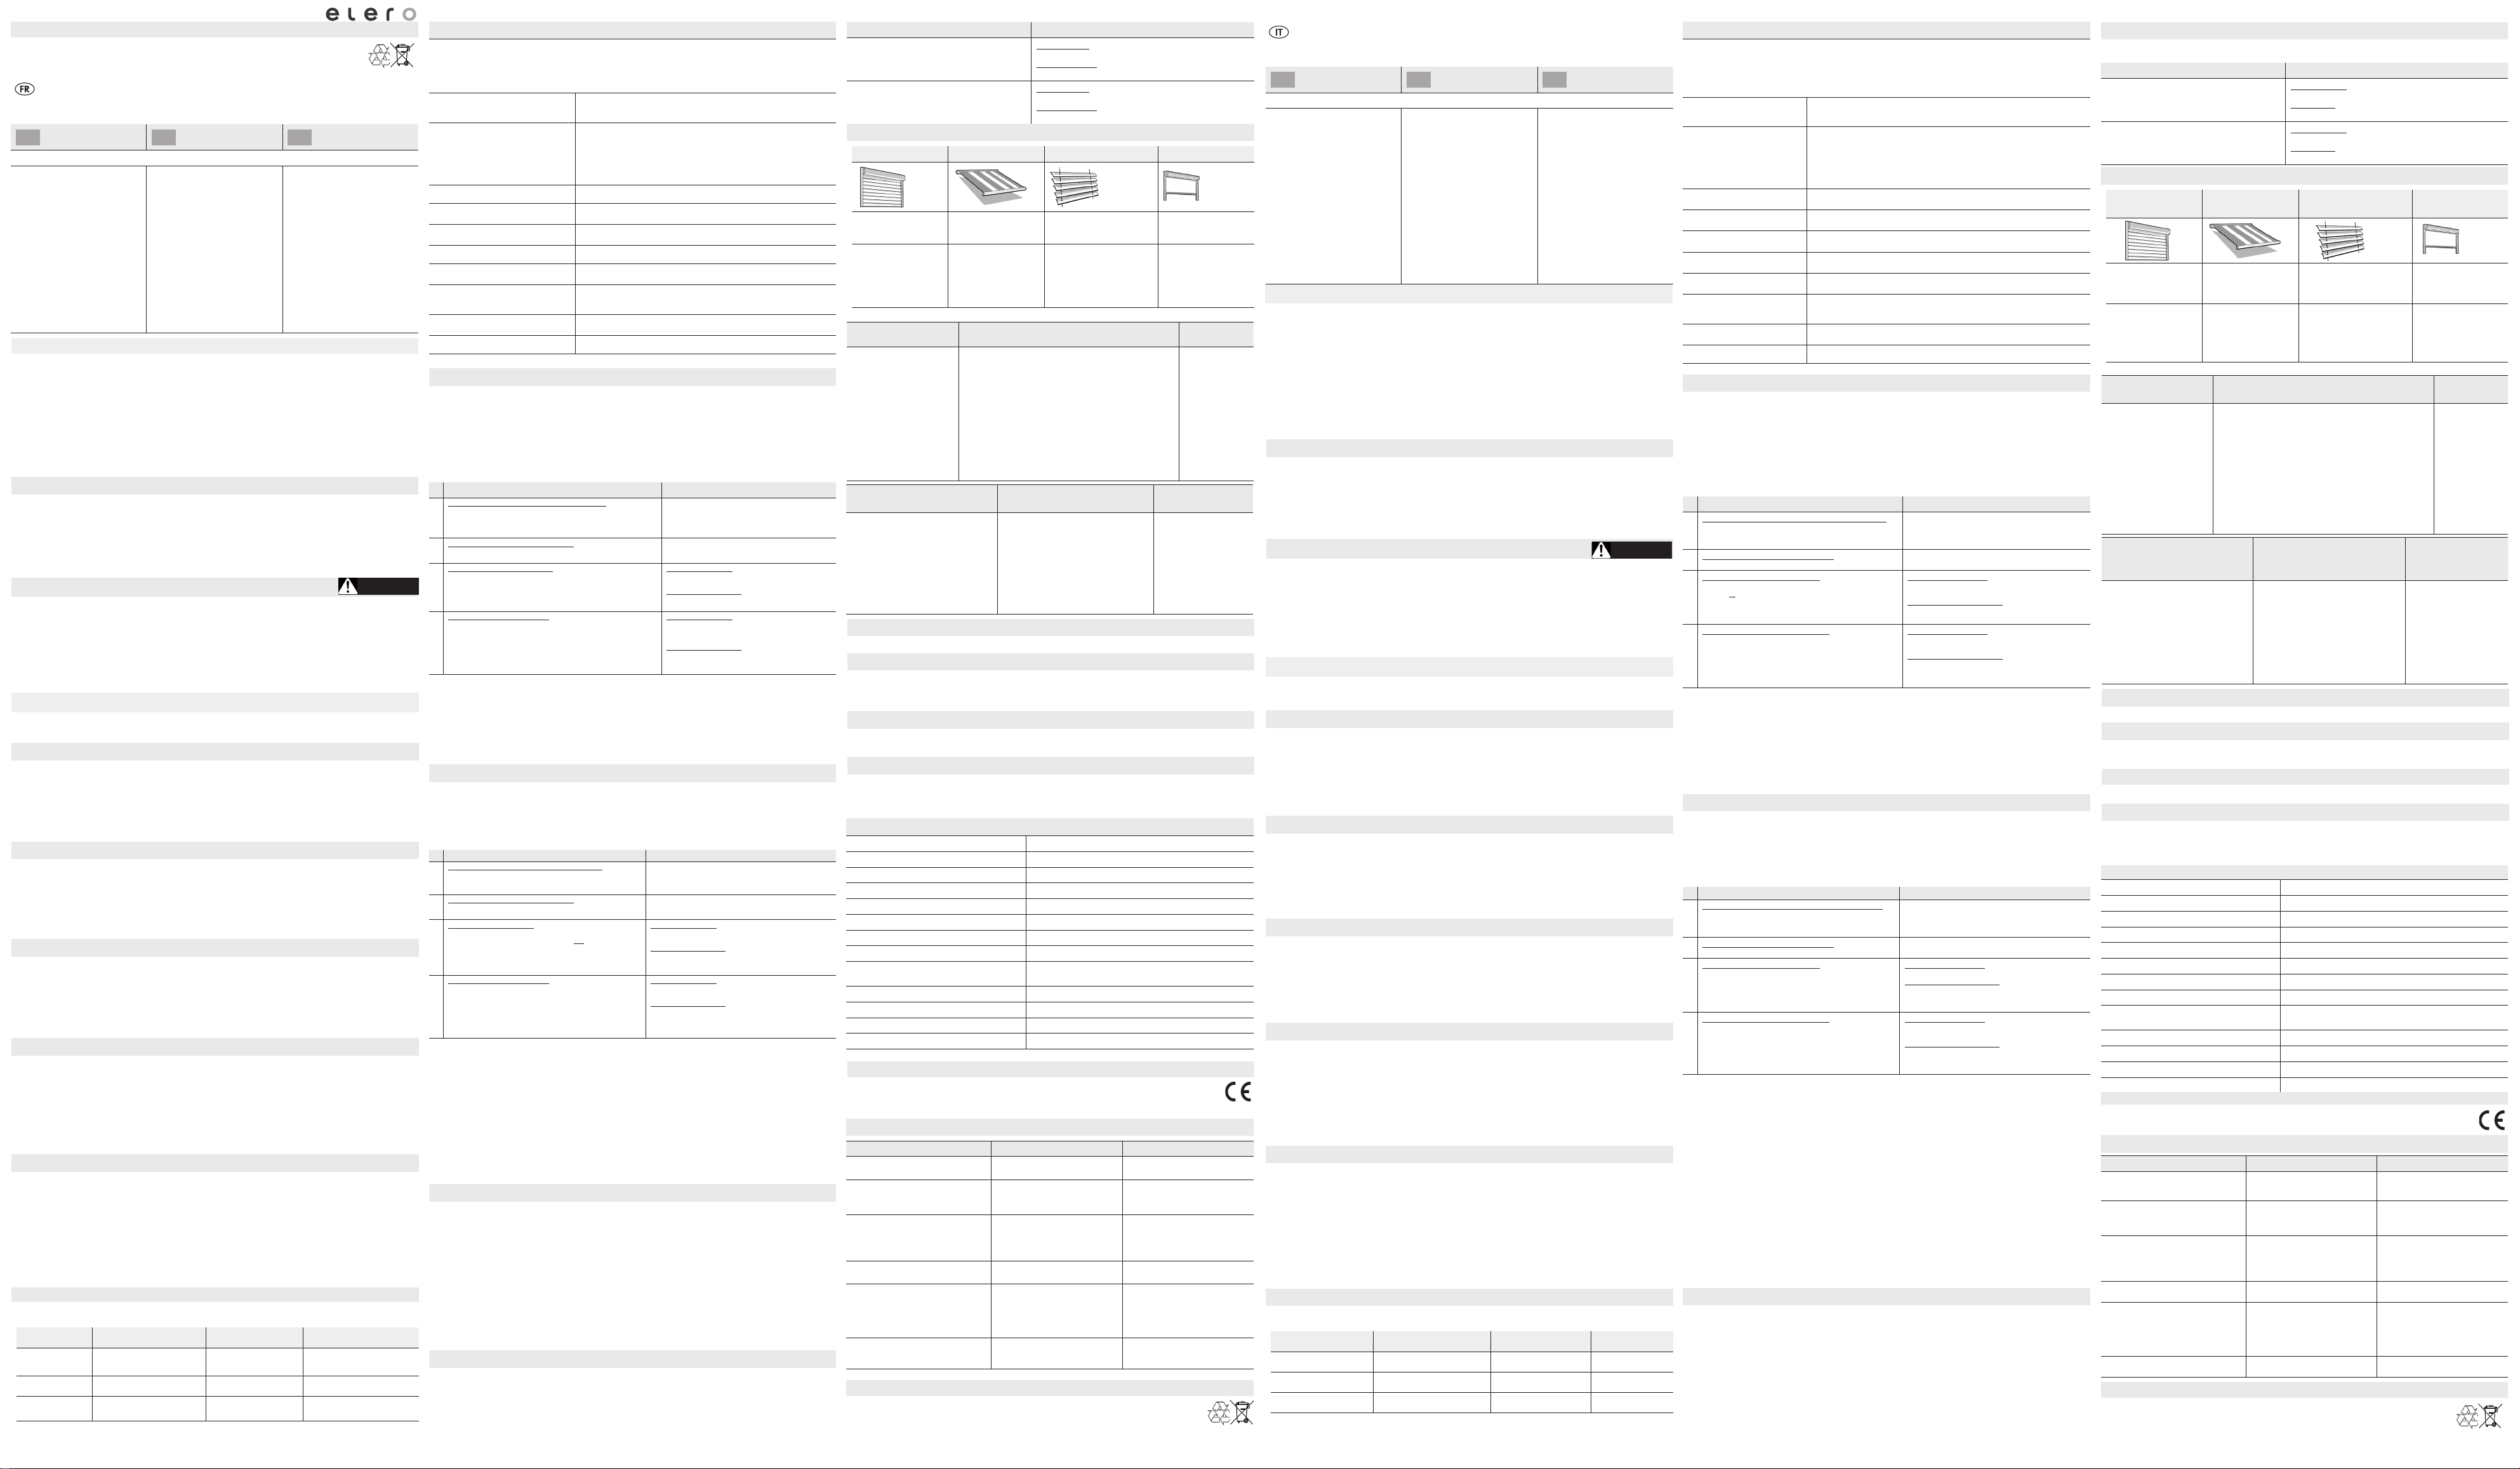
Congurer le moteur
Volets roulants Store banne Store vénitien Stores intérieurs
Entre position tablier en
position libre entre la
position nale haute et
basse
Position aération fente
d'aération ouverte
Condition requise pour toutes les actions : le canal de la télécommande est programmé dans le récepteur radio.
diaire dans le récepteur
Condition requise : le tablier
se trouve à la n de course
supérieure.
1. Appuyer sur la touche
[DESCENTE/FERMETU-
RE ▼] jusqu'à la position
intermédiaire souhaitée.
2. Appuyer en plus sur la
touche [STOP ■]. Le
tablier s’arrête. La LED
d’état s’allume brièvement.
La position intermédiaire est
maintenant enregistrée.
tion / orientation / tension de la toile
Condition requise : le tablier se trouve à
la n de course inférieure.
1. Appuyer sur la touche [MONTÉE ▲]
jusqu'à ce que les fentes d'aération
s'ouvrent ou que l'orientation des
lamelles de store vénitien soit atteinte
ou que la toile de store banne soit
tendue.
2. Appuyer en plus sur la touche [STOP ■].
Le tablier s’arrête. La position d'aération
/ de tension de la toile / d'orientation est
maintenant enregistrée.
Entre position tablier en
position libre entre la
position nale haute et
basse
Position tension de la
toile toile tendue
Condition requise : la position intermédiaire est dénie.
• Appuyer deux fois sur la touche [DESCENTE/FERMETURE ▼]
(Appuyer deux fois de suite brièvement sur la touche):
Le tablier se déplace sur la position intermédiaire mémorisée.
Si aucune position intermédiaire n’est dénie, le tablier se
déplace jusqu’à la n de course inférieure.
Important : lors de l'utilisation d'un store vénitien et d'une
position d'orientation dénie (récepteur en mode OUI ou
« OUI » dans le nom du produit), l'orientation des lamelles du
store vénitien a également lieu.
Si aucune position d'orientation n'est dénie, le tablier reste
en position intermédiaire avec les lamelles de store vénitien
fermées.
Lorsque la position intermédiaire doit être commandée en
même temps pour diérents récepteurs, les récepteurs
doivent être programmés sur un canal.
de ventilation / tension de la toile /
Condition requise : la position d'aération
/ de tension de la toile / d'orientation est
maintenant enregistrée.
La position d'orientation peut être uniquement approchée à partir de la position
nale inférieure.
• Double pression de touche [MONTÉE ▲]:
Si aucune position d'aération, / de tension
de la toile / d'orientation n'est programmée,
le tablier se déplace en n de course
supérieure.
Entre position tablier en
position libre entre la position
nale haute et basse
Position orientation orientation des lamelles de store
vénitien avec une courte
course dans le sens de déplacement opposé (uniquement
pour les récepteurs en mode
OUI ou « OUI » dans le nom
du produit).
le tablier approche la position enregistrée.
Entre position 1 tablier
en position libre entre la
position nale haute et
basse
Position intermédiaire
2 autre position au choix
du tablier
de la position
• Maintenir
simultanément
enfoncées
les touches
[DESCENTE/
FERMETURE
▼] + [STOP
■] pendant
environ 3
secondes.
La position
intermédiaire est
maintenant supprimée. La LED
d’état s’allume
brièvement.
de ventilation / tension
• Maintenir simultanément enfoncées les
touches [MONTÉE ▲]
+ [STOP ■] pendant
environ 3 secondes.
La position d'aération /
de tension de la toile /
d'orientation est maintenant supprimée.
Nettoyage
N'utilisez pas de produit dissolvant ni abrasif pour le nettoyage.
Pendant la durée légale de garantie, nous résolvons gratuitement les problèmes de dispositifs défectueux découlant
d'un défaut du matériel ou de fabrication par le biais d'une réparation ou d'un remplacement. La garantie prend n en
cas d'intervention extérieure.
Réparation
Nous vous demandons de bien vouloir nous indiquer la référence et la désignation de l'article, le type de défaut, les
conditions au moment de la panne, votre avis et les événements inhabituels intervenus en amont.
Si des perturbations venaient à survenir ou si l'appareil était endommagé malgré une manipulation conforme, adressez-vous à votre partenaire contractuel ou à votre revendeur.
elero GmbH Antriebstechnik Maybachstr. 30 732378 Schlierbach ALLEMAGNE www.elero.de
Caractéristiques techniques
Alimentation en tension 3 V, 2 x Micro LR03 (AAA)
Durée de vie des piles d'ordinaire jusqu'à 2 ans
Fréquence radio [MHz] (bande) 868 | 915
Puissance d'émission [mW] | [dBm] ≤ 500 | ≤ 10
Nombre de canaux 1 ou 6 (respectivement bidirectionnel)
Température de service [°C] 0 ... 50
Humidité relative 0 ... 95 % sans condensation
Classe de protection (IP) 20
Dimensions (LxlgxH) [mm] module télécommande 120 x 51 x 26
Poids [g] (avec piles) env. 90
Type de montage (option) Montage mural
Numéros d'articles Aperçu de l'appareil / étendue de la livraison
Conformité CE (toutes les variantes -868)
Conformité
elero déclare par la présente que les télécommandes de la série « COM » sont conformes à la directive 2014/53/UE.
Le texte intégral de la déclaration de conformité UE est disponible à l'adresse Internet suivante :
www.elero.de/downloads-service/
Défaut Cause possible Solution possible
Le récepteur ne réagit pas et l'achage
d'état de l'émetteur clignote en orange
Impossible de programmer le récepteur Conguration système diérente
Le récepteur ne réagit pas et l'achage
d'état de l'émetteur clignote en rouge
Le récepteur ne réagit pas et l'achage
d'état de l'émetteur ne s'allume pas
Le récepteur réagit de manière sporadique
L'émetteur se déplace dans le mauvais
sens
Mise aurebut
Les piles et les anciens dispositifs ne doivent pas être mis au rebut avec les déchets ménagers !
1. Mettre le matériau d'emballage au rebut dans le container destiné au carton et au papier.
2. Mettre les piles usées au rebut dans un container pour matériaux recyclables ou chez votre
commerçant spécialisé.
3. Mettre les anciens dispositifs au rebut dans un lieu de collecte des déchets électroniques ou chez un commerçant
spécialisé.
Aucun émetteur programmé Programmation de l’émetteur
entre émetteur et récepteur (ProLine ou ProLine 2)
1. Pas de tension réseau.
2. Hors de portée radio.
3. Récepteur défectueux
Pile usée dans l'émetteur Remplacer les piles dans l'émetteur
1. Mauvaise réception radio
2. Inuence due à des systèmes radio défectueux ou non
autorisés
Les directions de déplacement
n’ont pas été correctement programmées
Adapter la conguration système
1. Vérier la tension réseau
2. Modier la position de l'émetteur. Modier la position d'antenne du récepteur.
3. Remplacer le récepteur.
1. Modier la position de l'émetteur.
Modier la position d'antenne du
récepteur.
2. Localiser la source de parasites
et éliminer le dérangement.
Eacer l'émetteur et le reprogrammer
Istruzioni per l‘uso (traduzione)
Seguire queste istruzioni per un uso corretto e sicuro.
Conservatzione per uso futuro.
A B C
Non tutti gli elementi di comando sono disponibili su ogni apparecchio.
Sostegno a parete
① Piastra di ssaggio
② Coperchio
(NOTA: fragile.
Manipolare con cura).
1. Sul luogo di montaggio previsto,
vericare se il dispositivo poggia
su linee nascoste, ecc.
2. Non spingere il coperchio anteriore parallelamente, bensì premere
con cautela da dietro attraverso i
due fori e sollevare (non rovesciare) parallelamente, anche
facendo leva da sotto.
3. Montare il coperchio posteriore
nel punto scelto servendosi di viti
e tasselli.
Panoramica degli apparecchi/contenuto della fornitura
MonoCom:
• trasmettitore portatile monocanale; cod. art. 284050001 (-915: 284050901)
MonoCom Slide:
• trasmettitore portatile monocanale con slider; cod. art. 284350001 (-915: 284350901)
LumeroCom:
• trasmettitore portatile monocanale con commutazione Auto/Manuale; cod. art. 284250001 (-915: 284250901)
VarioCom:
• trasmettitore portatile a 6 canali (canali combinabili) con commutazione Auto/Manuale; cod. art. 284450001 (-915:
284450901)
VarioCom Slide:
• trasmettitore portatile a 6 canali (canali combinabili) con slider e commutazione Auto/Manuale; cod. art.
284550001 (-915: 284550901)
Sempre con sostegno a parete, set di ssaggio (cod. art. 280400001), 2 batterie inserite, manuale di istruzioni cod.
art. 138220001
Uso appropriato, uso scorretto prevedibile
Il trasmettitore portatile può essere utilizzato esclusivamente per comandare tapparelle, tende alla veneziana e
impianti di protezione solare dotati di ricevitori radio elero ProLine 2 (solo bidirezionali).
Inoltre sono possibili la commutazione e la dimmerazione di lampade dotate di ricevitori radio elero (ProLine 2,
bidirezionale) e di un apposito ballast elettronico.
Da usare solo in ambienti asciutti per la commutazione e il controllo di motori radio elero e ricevitori radio elero.
Non modicare l'apparecchio! Non far cadere il dispositivo, non esporre a fonti di calore e non immergere in liquidi.
Evitare l'uso del trasmettitore con disattenzione o senza la dovuta concentrazione. Il produttore non si assume alcuna
responsabilità riguardo alle cause citate.
Istruzioni di sicurezza
Leggere con attenzione le presenti istruzioni per l'uso, perché procedere attenendosi alle presenti indicazioni è
presupposto essenziale per un corretto utilizzo del prodotto.
Usare il trasmettitore solo a una distanza che consenta di vedere gli apparecchi da comandare! Le immagini nelle
presenti istruzioni per l'uso sono solo a scopo illustrativo. Le immagini possono presentare rispetto al prodotto acquistato particolari diversi di importanza marginale: devono essere considerate solo a livello di informazione generale.
elero GmbH è costantemente impegnata nell'ulteriore sviluppo di tutti i prodotti. Sono sempre possibili modiche a
forma, dotazione e tecnica della fornitura. Le informazioni riportate nelle presenti istruzioni per l'uso corrispondono
alle conoscenze disponibili al momento della conclusione della stesura.
Le indicazioni tecniche, le immagini e le informazioni delle presenti istruzioni per l'uso non danno adito ad alcun
reclamo.
Messa in funzione
Importante: le batterie sono già attivate alla consegna.
Per l'apprendimento del trasmettitore portatile “COM” nel controllo radio elero o nel ricevitore: vedi paragra successivi
Apertura/chiusura dell'involucro
Necessario
• Per la programmazione del trasmettitore portatile in un ricevitore radio.
• Per la cancellazione del trasmettitore portatile da un ricevitore radio.
• Per la sostituzione delle batterie.
• Apertura: sul lato inferiore del trasmettitore portatile, schiacciare leggermente la linguetta centrale con un oggetto
smussato e abbassare la parete posteriore.
• Chiusura: disporre la parete posteriore dall'alto in senso verticale e far scattare in posizione in prossimità della
linguetta esercitando una lieve pressione.
Sostituzione delle batterie
Talvolta, le batterie utilizzate al momento dell'acquisto del dispositivo raggiungono la ne della loro vita utile già prima
della scadenza indicata nel manuale di istruzioni. Le batterie possono essere smaltite dall'utilizzatore nale senza
problemi nel rispetto della direttiva 2013/56/UE. Dopo la sostituzione della batteria, la codica del trasmettitore rimane
e non deve essere nuovamente programmata nell'automatismo radio o nel ricevitore radio.
• Estrarre le batterie con cautela. Utilizzare esclusivamente 2 batterie identiche non ricaricabili del tipo AAA (Micro
1,5 V), preferibilmente alcaline al manganese. Prestare attenzione alla corretta polarità: il polo positivo (+) è il
contatto cavo, mentre il polo negativo (-) è rappresentato dalla linguetta metallica.
Smaltire le batterie esauste nel rispetto delle norme in materia di protezione dell'ambiente.
Informazioni generali
I tasti ⑤ SU ▲, ⑥ STOP ■, ⑦ GIÙ/CHIUSO ▼ e ⑫ Slider servono
• in caso di motori che determinano spostamenti
• in caso di lampade idonee per modiche della luminosità
Il collegamento radio tra trasmettitore portatile e ricevitore avviene in modo bidirezionale; non tutti i messaggi vengono però anche confermati dal ricevitore.
Vericare che il collegamento radio tra trasmettitore e ricevitore non sia in alcun modo ostacolato.
La potenza di trasmissione ovvero il campo radio si riduce a causa del calo della potenza della batteria. Se la tensione scende al di sotto di un determinato valore, non vengono più eseguite funzioni e non viene più visualizzato nulla.
Selezione canale
Nella selezione del canale viene segnalato un canale attivato mediante il rispettivo LED di stato di colore verde. La
selezione del canale viene sovrascritta nel momento in cui tutti gli indicatori di stato sono spenti.
• Selezione del canale mediante breve azionamento di un tasto di selezione del canale (da 1 a 6): il canale singolo
viene attivato o disattivato.
• Selezione del canale mediante lungo azionamento di un tasto di selezione del canale (da 1 a 6): vengono selezionati tutti i canali inferiori compreso quello del tasto di selezione attivato.
• Selezione di un gruppo (no a massimo 5 canali qualsiasi): all'azionamento di un tasto di selezione del canale
l'indicatore di stato è attivo per 5 secondi. In questo intervallo di tempo altri canali possono essere uniti no a
formare gruppi qualsiasi.
• Canale centrale (selezione di tutti e 6 i canali): attivazione avvenuta. Non appena tutti e 6 i canali sono selezionati.
2 modalità operative: Auto o Manuale ⑧, ⑨, ⑩, ⑪
Tasti di comando Auto ⑧ e Manuale ⑪:
Auto: un ricevitore programmato reagisce alle funzioni di commutazione temporale di un controller o ai comandi dei
sensori.
Manuale: un ricevitore programmato non reagisce alle funzioni di commutazione temporale di un controller o ai
comandi dei sensori.
• Breve azionamento: il ricevitore interroga lo stato eettivo.
• Lungo azionamento: viene attivata la rispettiva modalità operativa.
LED Auto ⑨ e LED Manuale ⑩:
• Se i canali selezionati si trovano nella modalità operativa “Auto”, il LED Auto si illumina in verde.
• Se i canali selezionati si trovano nella modalità operativa “Manuale”, il LED Manuale si illumina in rosso.
• Se i canali selezionati si trovano in parte nella modalità operativa “Auto” e in parte in quella “Manuale”, il LED Auto
⑨ e il LED Manuale ⑩ si illuminano sincronicamente in arancione.
Elemento di comando slider ⑫
• Regolazione ne di ricevitori orientabili e dimmerabili.
Azione/comando Motore tubolare (radio) Motore per tende alla
Movimento di trascinamento verso l'alto
Movimento di trascinamento verso il basso
Rilascio dello slider Il ricevitore è in autoritenuta Arresto dello spostamento Il valore di luminosità
• I comandi dello slider non vengono diretti ad altri ricevitori radio e non si ha alcun riscontro.
• I comandi dello slider si comportano nel canale di gruppo e nel canale centrale allo stesso modo del canale singolo, fatta eccezione per Combio-868 LI.
• Elementi di comando slider e tasti ⑤, ⑥ e ⑦ sono bloccati tra di loro.
Lato anteriore
③ Indicatore di stato (LED
di stato, 1 centrale o 6)
④ Tasti di selezione del
canale da 1 a 6
⑤ Tasto SU ▲
⑥ Tasto STOP ■
⑦ Tasto GIÙ/CHIUSO ▼
Retro sotto il coperchio
⑬ Tasto di programmazio-
ne P (a sinistra, rotondo)
⑭ Tasto di programmazio-
ne selettivo S (a destra,
rotondo)
⑮ Vano batteria (2x),
osservare la polarità
⑧ Tasto di comando Auto
⑨ LED auto
⑩ LED manuale
⑪ Tasto di comando
Manuale
⑫ Slider
Spostamento verso l'alto Spostamento delle tende
Spostamento verso il basso Spostamento delle tende
alla veneziana in su
alla veneziana in giù
Combio-868 LI
Dimmerazione più
chiara
Dimmerazione più
scura
viene mantenuto
Il trasmettitore portatile monocanale possiede 1 indicatore di stato e 1 indicatore canale centrale.
Il trasmettitore portatile a sei canali possiede 6 canali e 6 LED di stato.
L'indicatore di stato avviene contemporaneamente per tutti i canali selezionati all'attivazione di uno degli elementi di
comando ⑤ SU ▲, ⑥ STOP ■, ⑦ GIÙ/CHIUSO ▼, ⑫ slider, elementi di comando Auto ⑧ e Manuale⑪.
L'indicatore di stato avviene sincronicamente (contemporaneamente) per tutti i canali selezionati. All'attivazione di un
tasto di selezione del canale i LED di stato indicano lo stato di un canale attivato/disattivato.
verde (5 secondi) Visualizzazione del canale selezionato o dei canali selezionati. Intanto possono
lampeggia in verde (700 ms) Tutti i LED dell'indicatore di stato lampeggiano per 700 ms in verde durante la
lampeggia lentamente in arancione
(2 Hz)
lampeggia velocemente in
arancione (20 Hz)
lampeggia velocemente in
arancione (20 Hz) ciclicamente
si illumina di arancione, poi di
verde
si illumina di arancione, poi di
rosso
lampeggia più volte in arancione
o verde, poi in rosso dopo 6
secondi
arancione e verde alternato,
poi rosso
lampeggia velocemente in rosso Batterie quasi scariche.
essere selezionati o deselezionati altri canali. Ogni selezione allunga il tempo di
ulteriori 5 secondi.
trasmissione
• se non è selezionato alcun canale
• se sono selezionati più canali e il tasto di programmazione P o il tasto di
programmazione selettivo S è premuto, i LED di stato dei canali selezionati
lampeggiano in verde. In tal caso, la programmazione è possibile solo in un
canale.
Canale (trasmettitore) non programmato in alcun ricevitore.
Il canale (trasmettitore) è in modalità di programmazione.
Impossibile l'uso di un ricevitore già programmato.
Il canale (trasmettitore) è in modalità di programmazione di gruppo.
Impossibile l'uso di un ricevitore già programmato.
Il canale è programmato e il ricevitore ha ricevuto il segnale.
Il canale è programmato e uno dei ricevitori non ha ricevuto il segnale.
Il canale (trasmettitore) è cancellato.
Il canale (trasmettitore) è cancellato.
Modalità di apprendimento asincrona (standard)
La modalità di apprendimento asincrona è adatta per la programmazione
• del primo trasmettitore
• di un altro trasmettitore
• di singoli ricevitori con diversi ricevitori pronti alla programmazione (ad es. diversi ricevitori in un fusibile).
Durante l'apprendimento di un trasmettitore su un ricevitore viene assegnato lo stato di commutazione Su oppure
Giù/chiuso alle azioni del motore (senso di marcia) o della rispettiva lampada (commutazione/dimmerazione).
La modalità di programmazione asincrona è la modalità di programmazione standard. Nella modalità di programmazione asincrona variano i tempi delle salite/discese dei ricevitori partecipanti. In caso di lampade idonee a controllo
remoto varia la durata dell'illuminazione durante la programmazione. Dopo un determinato periodo i ricevitori si muovono asincronicamente incontro. In questo modo è possibile impostare meglio le corrispondenze per un determinato
ricevitore.
Istruzione operativa Risultato
1 Attivare la disponibilità alla programmazione asincrona:
spegnere e riaccendere la tensione di rete oppure premere
contemporaneamente su un trasmettitore già programmato
per 3 secondi i tasti [SU ▲] + [GIÙ/CHIUSO ▼] + [P].
2 Avviare la modalità di programmazione
premere per circa 1 secondo il tasto di programmazione [P].
3 Impostare la prima corrispondenza:
subito dopo l'inizio di uno spostamento, premere il tasto
[SU ▲] o [GIÙ/CHIUSO ▼].
• In caso di salita, premere il tasto [SU ▲].
• In caso di discesa, premere il tasto [GIÙ/CHIUSO ▼].
4 Impostare la seconda corrispondenza:
Requisito: la prima corrispondenza è impostata.
subito dopo l'inizio di una corsa in senso opposto,
premere il tasto [SU ▲] o [GIÙ/CHIUSO ▼].
• In caso di salita, premere il tasto [SU ▲].
• In caso di discesa, premere il tasto [GIÙ/CHIUSO ▼].
• La programmazione può avvenire sempre e solo in un canale selezionato.
• Alla conclusione del processo di programmazione oppure una volta trascorsi 5 minuti il ricevitore passa al funzionamento normale.
• La modalità di programmazione può essere arrestata azionando il tasto [STOP ■] per almeno 6 secondi.
• Diversi ricevitori possono essere programmati su un canale.
• Se nella modalità di programmazione sono contemporaneamente presenti più di 10 ricevitori, il trasmettitore
passa alla modalità di programmazione di gruppo. Attivando il tasto [STOP ■] per almeno 6 secondi, la modalità
di programmazione di gruppo nel trasmettitore deve essere terminata manualmente alla ne del processo di
programmazione.
• Se il telo non si muove nella direzione desiderata, cancellare il trasmettitore e riprogrammarlo.
Il ricevitore passa per 5 minuti alla disponibilità alla
programmazione asincrona. Pronto per ricevere il
tasto di programmazione [P].
Il ricevitore passa alla modalità di programmazione
asincrona e inizia salite e discese cicliche.
Corrispondenza riuscita:
il ricevitore interrompe brevemente la corsa
attuale.
Corrispondenza non riuscita:
Il ricevitore non interrompe la corsa attuale.
→ Ripetere l'azione “Impostare la prima corrispondenza”!
Corrispondenza riuscita:
il ricevitore arresta la corsa attuale e segnala la
conclusione del processo di programmazione.
Corrispondenza non riuscita:
Il ricevitore non arresta la corsa attuale.
→ Ripetere l'azione “Impostare la seconda
corrispondenza”!
Modalità di programmazione sincrona
La modalità di apprendimento sincrona è adatta per la
• programmazione di un altro trasmettitore
• programmazione contemporanea di diversi ricevitori su un trasmettitore o canale.
La modalità di programmazione sincrona è una modalità di programmazione speciale. Nella modalità di programmazione sincrona i tempi delle salite/discese dei ricevitori partecipanti coincidono. In caso di lampade idonee a controllo
remoto anche le durate di illuminazione coincidono. In questo modo è possibile impostare le corrispondenze per tutti i
ricevitori partecipanti contemporaneamente (sincronicamente).
1 Attivare la disponibilità alla programmazione sincrona:
Su un trasmettitore già programmato per un ricevitore,
premere contemporaneamente per 3 secondi i tasti [GIÙ/
CHIUSO ▼] + [P].
2 Avviare la modalità di programmazione:
premere per circa 1 secondo il tasto di programmazione [P].
3 Impostare la prima corrispondenza:
subito dopo l'inizio di uno spostamento, premere il tasto
[SU ▲] o [GIÙ/CHIUSO ▼].
• In caso di salita, premere il tasto [SU ▲].
• In caso di discesa, premere il tasto [GIÙ/CHIUSO ▼].
4 Impostare la seconda corrispondenza:
Requisito: la prima corrispondenza è impostata.
Subito dopo l'inizio di una corsa in senso opposto
premere il tasto [SU ▲] o [GIÙ/CHIUSO ▼].
• In caso di salita, premere il tasto [SU ▲].
• In caso di discesa, premere il tasto [GIÙ/CHIUSO ▼].
• La programmazione può avvenire sempre e solo in un canale selezionato.
• Alla conclusione del processo di programmazione oppure una volta trascorsi 5 minuti il ricevitore passa al funzionamento normale.
• La modalità di programmazione può essere arrestata azionando il tasto [STOP ■] per almeno 6 secondi.
• Diversi ricevitori possono essere programmati su un canale.
• Se nella modalità di programmazione sono contemporaneamente presenti più di 10 ricevitori, il trasmettitore
passa alla modalità di programmazione di gruppo. Attivando il tasto [STOP ■] per almeno 6 secondi, la modalità
di programmazione di gruppo nel trasmettitore deve essere terminata manualmente alla ne del processo di
programmazione.
• Se il telo non si muove nella direzione desiderata, cancellare il trasmettitore e riprogrammarlo.
• Se nella modalità di programmazione sono contemporaneamente presenti più di 10 ricevitori, il trasmettitore
passa alla modalità di programmazione di gruppo. Attivando il tasto [STOP ■] per almeno 6 secondi, la modalità
di programmazione di gruppo nel trasmettitore deve essere terminata manualmente alla ne del processo di
programmazione.
• Attivando il tasto [STOP ■] per 6 secondi deve essere arrestata la modalità di programmazione nel trasmettitore
alla ne del processo di programmazione.
Il ricevitore passa per 5 minuti alla disponibilità alla
programmazione asincrona. Pronto per ricevere il
tasto di programmazione [P].
Il ricevitore passa alla modalità di programmazione
asincrona e inizia salite e discese cicliche.
Corrispondenza riuscita:
il ricevitore interrompe brevemente la corsa attuale.
Corrispondenza non riuscita:
il ricevitore non interrompe la corsa attuale
→ ripetere l'azione “Impostare la prima corrispon-
denza”!
Corrispondenza riuscita:
il ricevitore arresta la corsa attuale e segnala la
conclusione del processo di programmazione.
Corrispondenza non riuscita:
Il ricevitore non arresta la corsa attuale.
→ Ripetere l'azione “Impostare la seconda
corrispondenza”.
Tasto di programmazione selettivo S ⑭
• Il tasto di programmazione selettivo [S] si trova sotto il coperchio sul retro dell'apparecchio (a destra).
• Il tasto di programmazione selettivo [S] è una versione speciale del tasto di programmazione [P].
• Con il tasto di programmazione selettivo [S] è possibile mettere nella modalità di programmazione sempre e solo
un ricevitore, anche quando più ricevitori sono pronti alla programmazione in contemporanea. In questo modo
viene consentita una programmazione mirata di diversi ricevitori.
• Un ricevitore deve trovarsi in uno dei due stati di disponibilità alla programmazione (asincrona o sincrona).
• Il processo di programmazione può essere avviato sempre e solo in un canale.
• Avviare il processo di programmazione: premere il tasto di programmazione [S] per circa 1 secondo. La modalità
di programmazione viene avviata automaticamente nel primo ricevitore.
• Tutti i ricevitori pronti alla programmazione vengono raccolti in una lista.
• Avviare la modalità di programmazione nel ricevitore successivo: premere il tasto di programmazione selettivo [S]
per circa 1 secondo.
• Avviare la modalità di programmazione nel ricevitore precedente: premere solo brevemente il tasto di programmazione [S], subito dopo premere il tasto di programmazione selettiva [S] per circa 1 secondo.
• Il processo “Impostazione della corrispondenza” si comporta come nella modalità di programmazione asincrona o
sincrona (rispettivamente nella istruzione operativa 3 e 4).
Cancellazione del collegamento radio di trasmettitori e ricevitori
Per la cancellazione del collegamento radio tra i trasmettitori e i ricevitori esistono 2 istruzioni operative che provocano una determinata azione nel trasmettitore e nel ricevitore.
Istruzione operativa Risultato
Premere i tasti [STOP] + [P] per almeno 6 secondi
no a quando l'indicatore di stato rosso si accende.
Premere i tasti [SU ▲] + [GIÙ/CHIUSO ▼] +
[STOP ■] + [P] per almeno 6 secondi no a quando
l'indicatore di stato rosso si accende.
Nel trasmettitore:
I canali selezionati vengono completamente cancellati.
Nel ricevitore:
Solo il singolo trasmettitore viene cancellato dal ricevitore.
Nel trasmettitore:
I canali selezionati vengono completamente cancellati.
Nel ricevitore:
Tutti i trasmettitori vengono cancellati dal ricevitore.
Congurare l'azionamento
Tapparella Tenda da sole Tenda alla veneziana Protezione solare per
interni
Posizione intermedia telo
in qualsiasi posizione tra
la posizione nale
superiore e inferiore
Posizione ventilazione
fessura di ventilazione
aperta
Requisito per tutte le azioni: il canale del trasmettitore portatile è programmato nel ricevitore radio.
Denizione della posizione
intermedia nel ricevitore
Requisito: il telo si trova nella
posizione nale superiore.
1. Azionare il tasto
[GIÙ/CHIUSO ▼] no a
quando non si è raggiunta
la posizione intermedia
desiderata.
2. Azionare inoltre il tasto
[STOP ■]. Il telo si arresta.
Il LED di stato si illumina
brevemente.
La posizione intermedia è ora
salvata.
Denizione di una delle posizioni
ventilazione / tensione del tessuto /
orientamento nel ricevitore
Requisito: il telo si trova nella posizione
nale inferiore.
1. Azionare il tasto SALITA▲] no a
quando non si aprono le fessure di
ventilazione o non si ottiene l'orienta-
mento delle lamelle della tenda alla
veneziana ovvero no a quando il telo
per tenda non è teso.
2. Azionare inoltre il tasto [STOP ■].
Il telo si arresta. La posizione ventilazione /
tensione del tessuto / orientamento è ora
salvata.
Posizione intermedia telo
in qualsiasi posizione tra
la posizione nale
superiore e inferiore
Posizione tensione del
tessuto tessuto teso
Accostamento della posizione intermedia Cancellazione
Requisito: la posizione intermedia è denita.
• Premendo due volte il tasto [GIÙ/CHIUSO ▼]
(azionare per due volte in successione brevemente il tasto):
il telo si sposta nella posizione intermedia salvata.
Se non è denita alcuna posizione intermedia, il telo si sposta
no alla posizione nale inferiore.
Importante: con Tenda alla veneziana e posizione denita
Orientamento (ricevitore nella modalità JA oppure “JA” nel
nome di prodotto) si ottiene inoltre un orientamento delle
lamelle della tenda alla veneziana.
Se non è denita alcuna posizione di orientamento, la tenda
rimane nella posizione intermedia con le lamelle della tenda
alla veneziana chiuse.
Se la posizione intermedia deve essere controllata contemporaneamente per diversi ricevitori, i ricevitori devono essere
programmati su un canale.
Accostamento di una delle posizioni
ventilazione / tensione del tessuto /
orientamento
Requisito: la posizione ventilazione /
tensione del tessuto / orientamento è
denita.
La posizione orientamento può essere
accostata solo dalla posizione nale
inferiore.
• Premendo due volte il tasto [SU ▲]:
Se non è denita alcuna posizione ventilazione / tensione del tessuto / orienta-
mento, il telo si sposta no alla posizione
nale superiore.
Posizione intermedia telo in
qualsiasi posizione tra la
posizione nale superiore e
inferiore
Posizione orientamento
orientamento delle lamelle della veneziana mediante breve
corsa nel senso opposto (solo
con ricevitori nella modalità JA
o “JA” nel nome del prodotto).
il telo si sposta sulla posizione salvata.
Posizione intermedia telo
in qualsiasi posizione tra
la posizione nale
superiore e inferiore
Posizione intermedia 2
qualsiasi altra posizione
del telo
della posizione
intermedia
• Tenere premuti
contemporaneamente per
ca. 3 secondi
i tasti [GIÙ/
CHIUSO ▼] +
[STOP ■].
La posizione
intermedia è ora
cancellata. Il LED
di stato si illumina
brevemente.
Cancellazione della
posizione ventilazione /
tensione del tessuto /
orientamento
• Tenere premuti contemporaneamente per ca.
3 secondi i tasti [SU ▲]
+ [STOP ■].
La posizione ventilazione /
orientamento / tensione del
tessuto è ora cancellata.
Pulizia
Per la pulizia del prodotto, non utilizzare solventi o prodotti abrasivi.
Garanzia
Nel periodo di garanzia previsto per legge eliminiamo gratuitamente guasti dell'apparecchio dovuti a difetti di materiale o
di fabbricazione, riparando o sostituendo il dispositivo in questione. La garanzia decade in caso di interferenza esterna.
Riparazione
Indicare codice articolo, denominazione articolo, tipo di errore, condizioni, proprie ipotesi, risultati inusuali.
Qualora, malgrado una manipolazione corretta, si vericassero guasti o l'apparecchio fosse danneggiato, rivolgersi al
proprio partner contrattuale o al rivenditore.
elero GmbH Antriebstechnik Maybachstr. 30 732378 Schlierbach GERMANIA www.elero.de
Alimentazione di tensione 3 V, 2 x Micro LR03 (AAA)
Durata della batteria generalmente no a 2 anni
Frequenza radio [MHz] (banda) 868 | 915
Potenza di trasmissione [mW] | [dBm] ≤ 500 | ≤ 10
Numero di canali da 1 a 6 (sempre bidirezionali)
Temperatura di esercizio [°C] 0 ... 50
Umidità relativa 0 ... 95 % non a condensazione
Tipo di protezione (IP) 20
Dimensioni (lungh. x largh. x alt.) [mm] modulo
trasmettitore portatile
Peso [g] (incl. batterie) ca. 90
Tipo di montaggio (opzionale) Montaggio a parete
Codici articolo Panoramica degli apparecchi/contenuto della fornitura
Conformità CE (tutte le varianti -868)
Conformità
Con la presente elero dichiara che il trasmettitore portatile della serie “COM” è conforme alla direttiva 2014/53/UE.
Il testo completo della dichiarazione di conformità UE è disponibile al seguente indirizzo:
www.elero.de/downloads-service/
Guasto Causa possibile Soluzione possibile
Il ricevitore non reagisce e l'indicatore
di stato del trasmettitore lampeggia in
arancione
Il ricevitore non può essere programmato Congurazioni di sistema diverse
Il ricevitore non reagisce e l'indicatore
di stato del trasmettitore lampeggia
in rosso
Il ricevitore non reagisce e l'indicatore
di stato del trasmettitore non lampeggia
Il ricevitore reagisce sporadicamente 1. Cattiva ricezione radio
Il ricevitore si sposta nella direzione
errata
Smaltimento
Non smaltire batterie e apparecchi vecchi con i riuti domestici!
1. Smaltire il materiale da imballaggio nei contenitori di raccolta per cartone e carta.
2. Smaltire le batterie esauste in un contenitore in materiale riciclabile per batterie esauste
o tramite esercizio specializzato.
3. Smaltire gli apparecchi vecchi tramite un punto di raccolta per riuti di apparecchiature elettriche ed elettroniche o
un rivenditore specializzato.
120 x 51 x 26
Nessun trasmettitore programmato Programmare il trasmettitore
tra trasmettitore e ricevitore
(ProLine o ProLine 2)
1. Nessuna tensione di rete
2. Al di fuori del campo radio
3. Ricevitore difettoso
Batteria esaurita nel trasmettitore Sostituire le batterie nel
2. Inusso da parte di sistemi radio
difettosi o non consentiti
Le direzioni sono programmate in
modo errato
Adeguare la congurazione del
sistema
1. Controllare la tensione di rete.
2. Modicare la posizione del trasmettitore. Cambiare la posizione
dell'antenna del ricevitore.
3. Sostituire il ricevitore.
trasmettitore
1. Modicare la posizione del
trasmettitore.
Cambiare la posizione
dell'antenna del ricevitore.
2. Localizzare la fonte di disturbo
ed eliminare il guasto.
Cancellare il trasmettitore e
programmarlo in modo corretto.
 Loading...