

Page 1
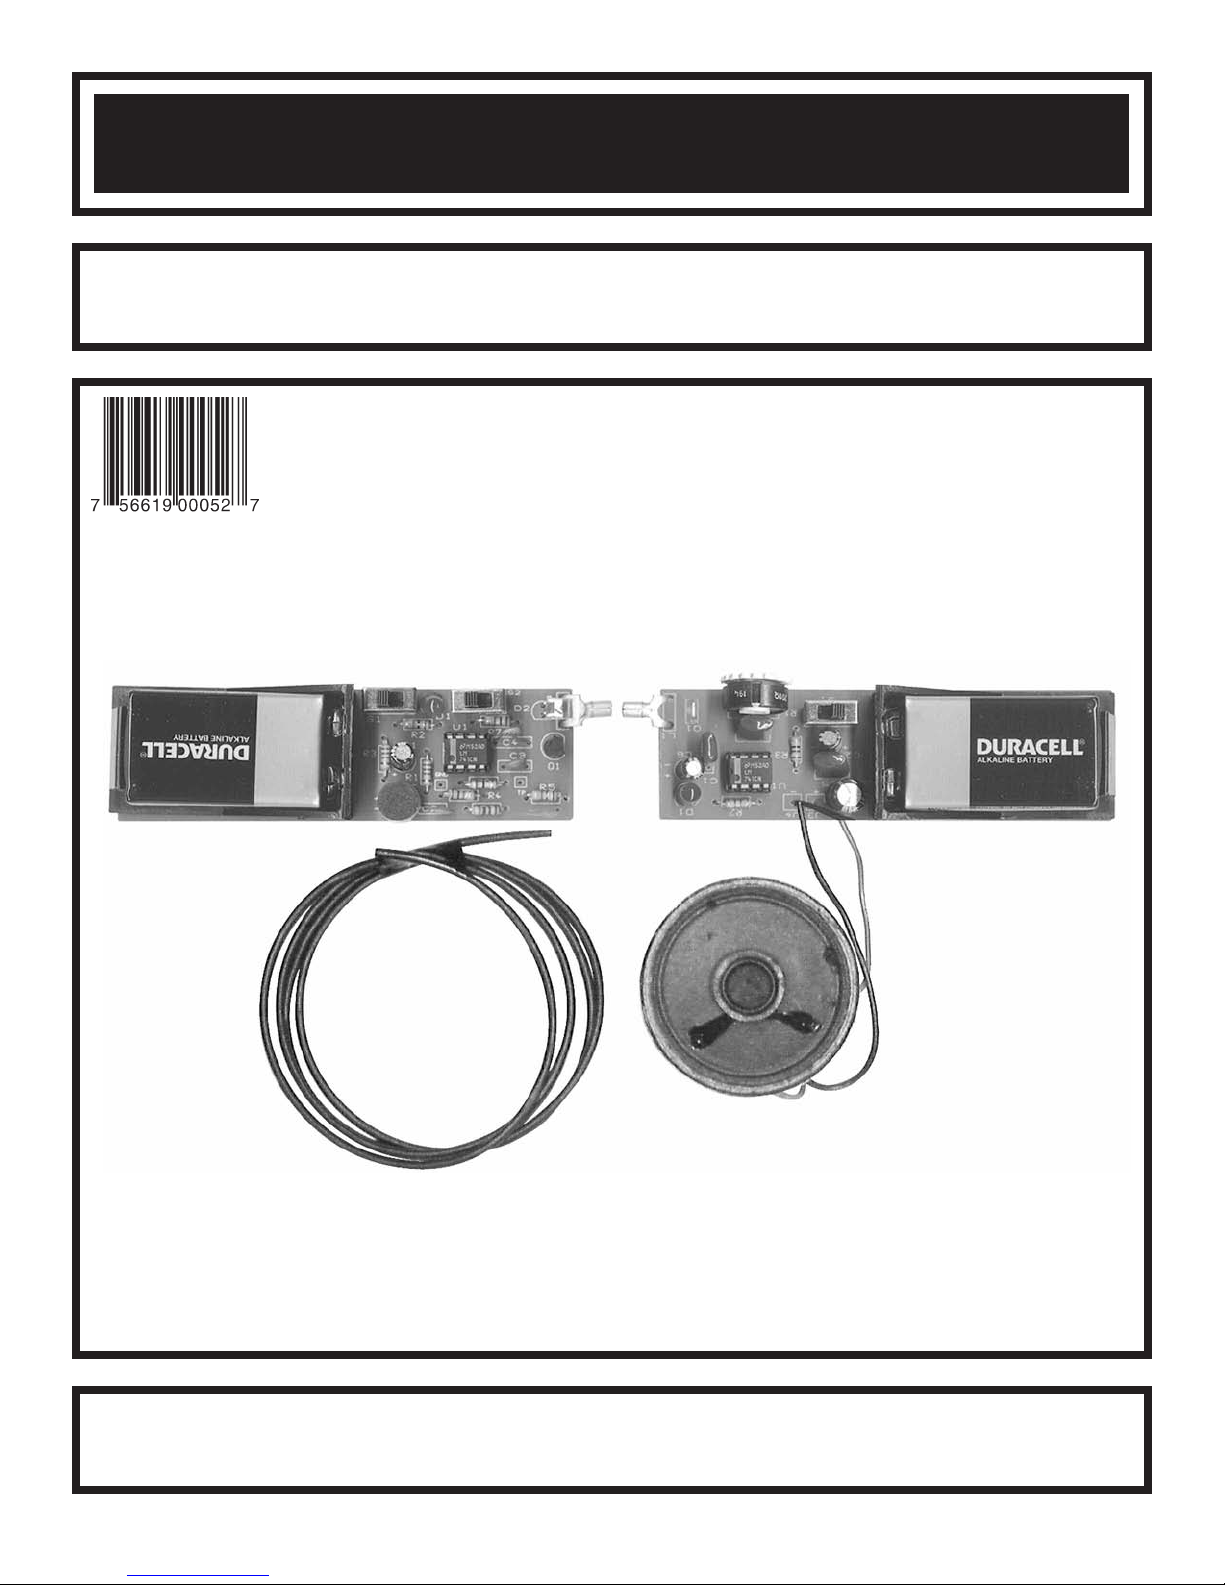
FIBER OPTICS KIT
MODEL FO-30K
Assembly and Instruction Manual
Elenco®Electronics, Inc.
ight © 2005, 1994 b
yr
Cop
t of this book shall be reproduced b
No par
y Elenco
®
Electronics
y means;
y an
, Inc.
electronic
ights reser
All r
, photocopying, or otherwise without written permission from the publisher.
ved. Revised 2005 REV-P 753259
Page 2
INTRODUCTION
The FO-30 kit, an optical voice link, will introduce you to the wonderful world of fiber optics. By building this kit,
you will learn how fiber optics works and how it could be applied to the field of communication.
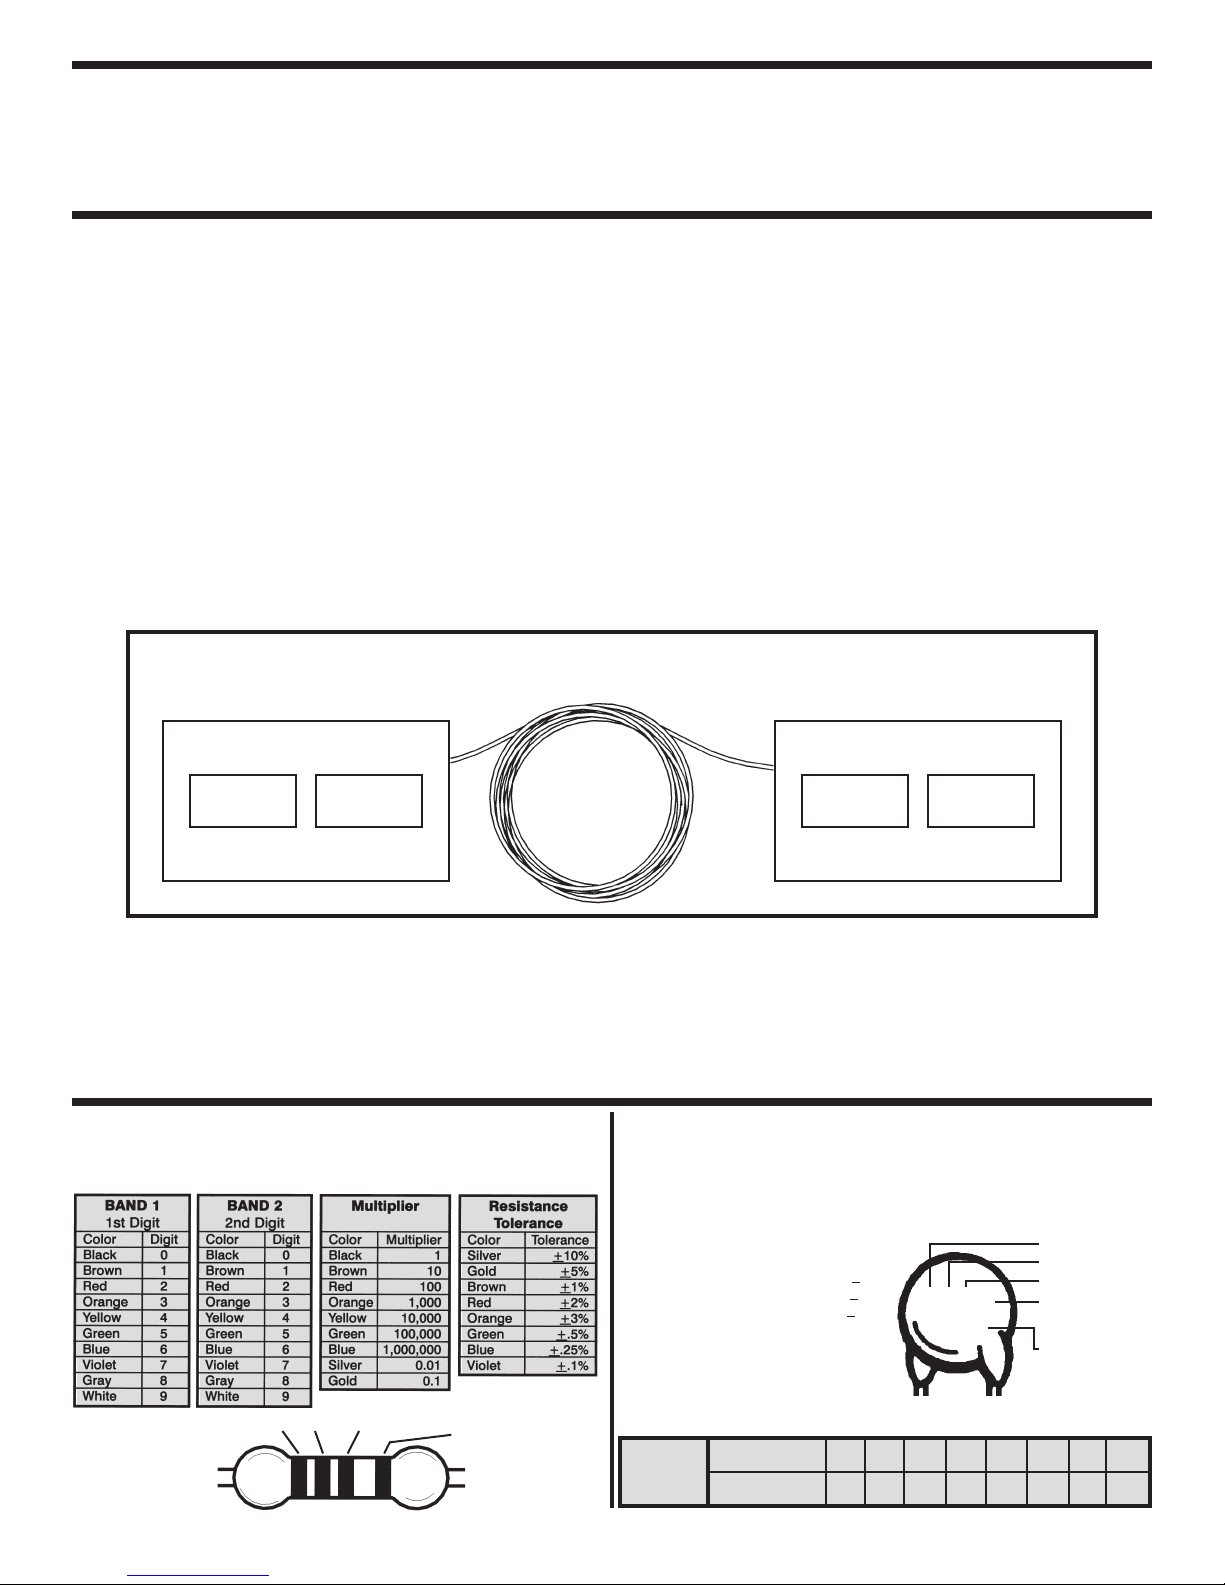
GENERAL OVERVIEW
Fiber optics is a medium linking two electronic
circuits. As shown in the block diagram below, this
FO-30 kit consists of three basic elements; they are
transmitter, fiber optic cable and receiver.
The Transmitter converts an electrical signal into a
light signal. The source, either a light-emitting-diode
(LED) or laser diode, does the actual conversion.
The drive circuit changes the electrical signal fed to
the transmitter into a form required by the source.
1
Fiber-optic cable is the medium for carrying the
light. The cable includes the fiber and its protective
covering.
2
TRANSMITTER
DRIVER
SOURCE
The Receiver accepts the light and converts it back
into an electrical signal. The two basic parts of the
receiver are the detector, which converts it back into
an electrical signal, and the output circuit, which
amplifies and, if necessary, reshapes the electrical
signal.
3
The other parts which are not included in the
diagram consists of connectors which are used to
connect the fibers to the source and detector.
RECEIVERFIBER OPTIC CABLE
DETECTOR
OUTPUT
CIRCUIT
1, 2, 3 The above paragraphs are reproduced by permission TECHNICIAN’S GUIDE TO FIBER OPTICS 2E (PAGE 2)
By Donald J Sterling, Jr. - DELMAR PUBLISHERS, INC., Albany, New York, Copyright 1993
IDENTIFYING RESISTOR VALUES
Use the following information as a guide in properly identifying the
value of resistors.
ANDS
B
1 2 Multiplier
Tolerance
IDENTIFYING CAPACITOR VALUES
Capacitors will be identified b
(picofarads), nF (nanofarads), or
will have their actual value printed on them. Some capacitors may
e their value printed in the following manner.
v
ha
The letter M indicates a toler
The letter K indicates a tolerance of +
The letter J indicates a tolerance of +
Note: The letter
to signify a decimal point; as in 3R3 = 3.3
“R” may be used at times
ance of
For the No.01234589
Multiplier
Multiply By 1 10 100 1k 10k 100k .01 0.1
-1-
y their capacitance value in pF
µF (microfarads). Most capacitors
First Digit
+
10%
5%
20%
103K
Second Digit
Multiplier
Tolerance
100V
Maxim
Working Voltage
alue is 10 x 1,000 = 10,000pF or
The v
.01µF 100V
um
Page 3
PARTS LIST
TRANSMITTER SECTION
If you are a student, and any parts are missing or damaged, please see instructor or bookstore.
If you purchased this fiber optics kit from a distributor, catalog, etc., please contact Elenco
®
Electronics
(address/phone/e-mail is at the back of this manual) for additional assistance, if needed. DO NOT contact your
place of purchase as they will not be able to help you.
RESISTORS
Qty. Symbol Value Color Code Part #
1 R8 220Ω 5% 1/4W red-red-brown-gold 132200
1 R7 1kΩ 5% 1/4W brown-black-red-gold 141000
2 R1, R3 2.2kΩ 5% 1/4W red-red-red-gold 142200
3 R2, R4, R5 10kΩ 5% 1/4W brown-black-orange-gold 151000
1 R6 100kΩ 5% 1/4W brown-black-yellow-gold 161000
CAPACITORS
Qty. Symbol Value Description Part #
1 C3
1 C2 .01µF (103) Discap 241031
1 C4 .022µF (223) Mylar 242217
1 C1 1
100pF (101) Discap 221017
µF Electrolytic 261047
SEMICONDUCTORS
Qty. Symbol Value Description Part #
1 Q1
1 U1 LM741 Integrated Circuit 331741
1 D1 LED Red 350002
1 D2
2N3904 Transistor NPN 323904
Transmitter Clear
LED
350005
MISCELLANEOUS
Qty. Description Part #
1 PC Board 519015A
2 Switch 541103
Microphone 568000
1
1 Battery Holder 590096
1 Polishing Paper 600000
2 Screw 2-56 x 1/4” 641230
2 Nut 2-56 644201
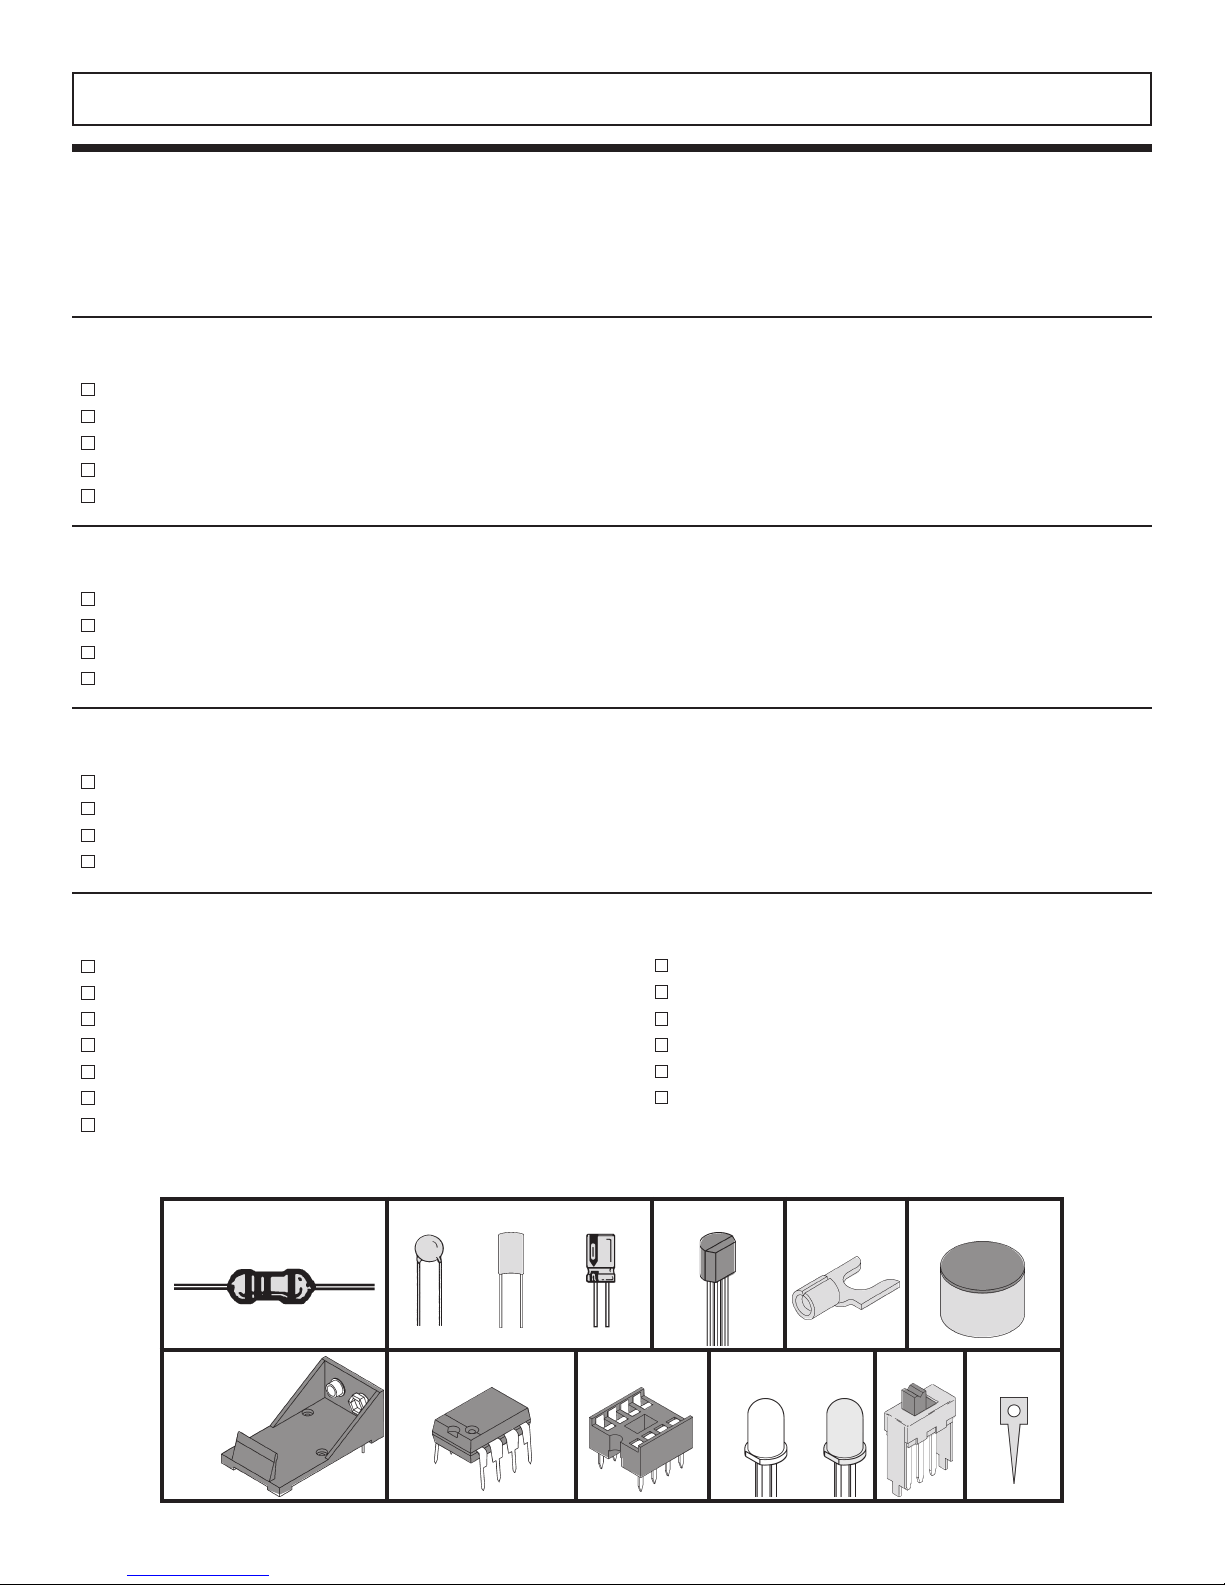
PARTS IDENTIFICATION
Resistor Capacitors
Discap
Battery Holder Test Pin
Integrated Circuit IC Socket Switch
Mylar
Electrolytic
Qty. Description Part #
1 Lug 661106
1 IC Socket 8-Pin 664008
Test Pins 665008
2
1 Manual 753259
3’ Fiber Optic Cable 810020
1 Solder 9ST4
Transistor
ransmitter
T
Lug
LEDs
Red
Microphone
-2-
Page 4

TRANSMITTER
There are 5 main components in the transmitter
(see Figure 1A). They are:
a) Power supply (9V battery)
b) Microphone (MIC)
c) Op-amp LM741, (the driver)
d) NPN transistor 2N3904, and
e) Transmitter LED
The microphone picks up your voice signal and
converts it into a voltage signal. The strength of this
voltage signal depends upon the pitch and loudness
of your voice. This signal is then ac-coupled through
C1 and R2 to the input pin 2 of the LM741 op-amp
for amplification.
The gain of the op-amp LM741 depends on the ratio
of R6 to R2, which is equal to 100k/10k = 10.
Hence, the voice signal coming from the
microphone will be amplified 10 times by this opamp, and the amplified signal will appear at the
output of the op-amp.
At 0 Hz (DC) the impedance of C1 is infinite. The
amplifier then acts as a voltage follower. A voltage
follower is an op-amp in which the output voltage is
equal to the input voltage. In our case, the output
voltage at pin 6 is equal to the input voltage at pin 3
and pin 2 which is about 4.5V. This 4.5V at the input
pins is due to the effect of resistors R4 and R5
which act as a voltage divider. This constant DC
voltage helps keep the NPN transistor (2N3904) on
all the time.
The function of the NPN transistor (2N3904) is
similar to that of a valve, it controls the flow of the
current through the LED. The flow of this current will
depend on the base voltage of the transistor. This
base voltage in turn depends on the loudness and
pitch of your voice. Thus, the light intensity of this
LED will vary as you speak into the microphone.
This encoded light signal will then be transmitted to
the receiver through a fiber optic cable.
The LED (D1) acts as an ON/OFF indicator. It will
also indicate the state of the battery. If the LED
becomes dim, the battery is weak and should be
replaced. C2 filters out any noise that comes
through the voltage divider. C3 helps in stabilizing
the op-amp. It will also reduce any high frequency
noise generated in the transmitter. When S2 is
closed (toward the LED D2), C4 is placed into the
circuit and the op-amp will oscillate at about 1kHz.
As a result, you will hear a shrill noise from the
speaker in the receiver.
SCHEMATIC DIAGRAM
Figure 1A
-3-
Page 5
CONSTRUCTION
Introduction
The most important factor in assembling your FO-30K Fiber Optics Kit is good soldering techniques. Using the
proper soldering iron is of prime importance. A small pencil type soldering iron of 25 - 40 watts is
recommended. The tip of the iron must be kept clean at all times and well tinned.
Safety Procedures
• Wear eye protection when soldering.
•
Locate soldering iron in an area where you do not have to go around it or reach over it.
• Do not hold solder in your mouth. Solder contains lead and is a toxic substance. Wash your hands
thoroughly after handling solder.
• Be sure that there is adequate ventilation present.
Assemble Components
In all of the following assembly steps, the components must be installed on the top side of the PC board unless
otherwise indicated. The top legend shows where each component goes. The leads pass through the
corresponding holes in the board and are soldered on the foil side.
Use only rosin core solder of 63/37 alloy.
DO NOT USE ACID CORE SOLDER!
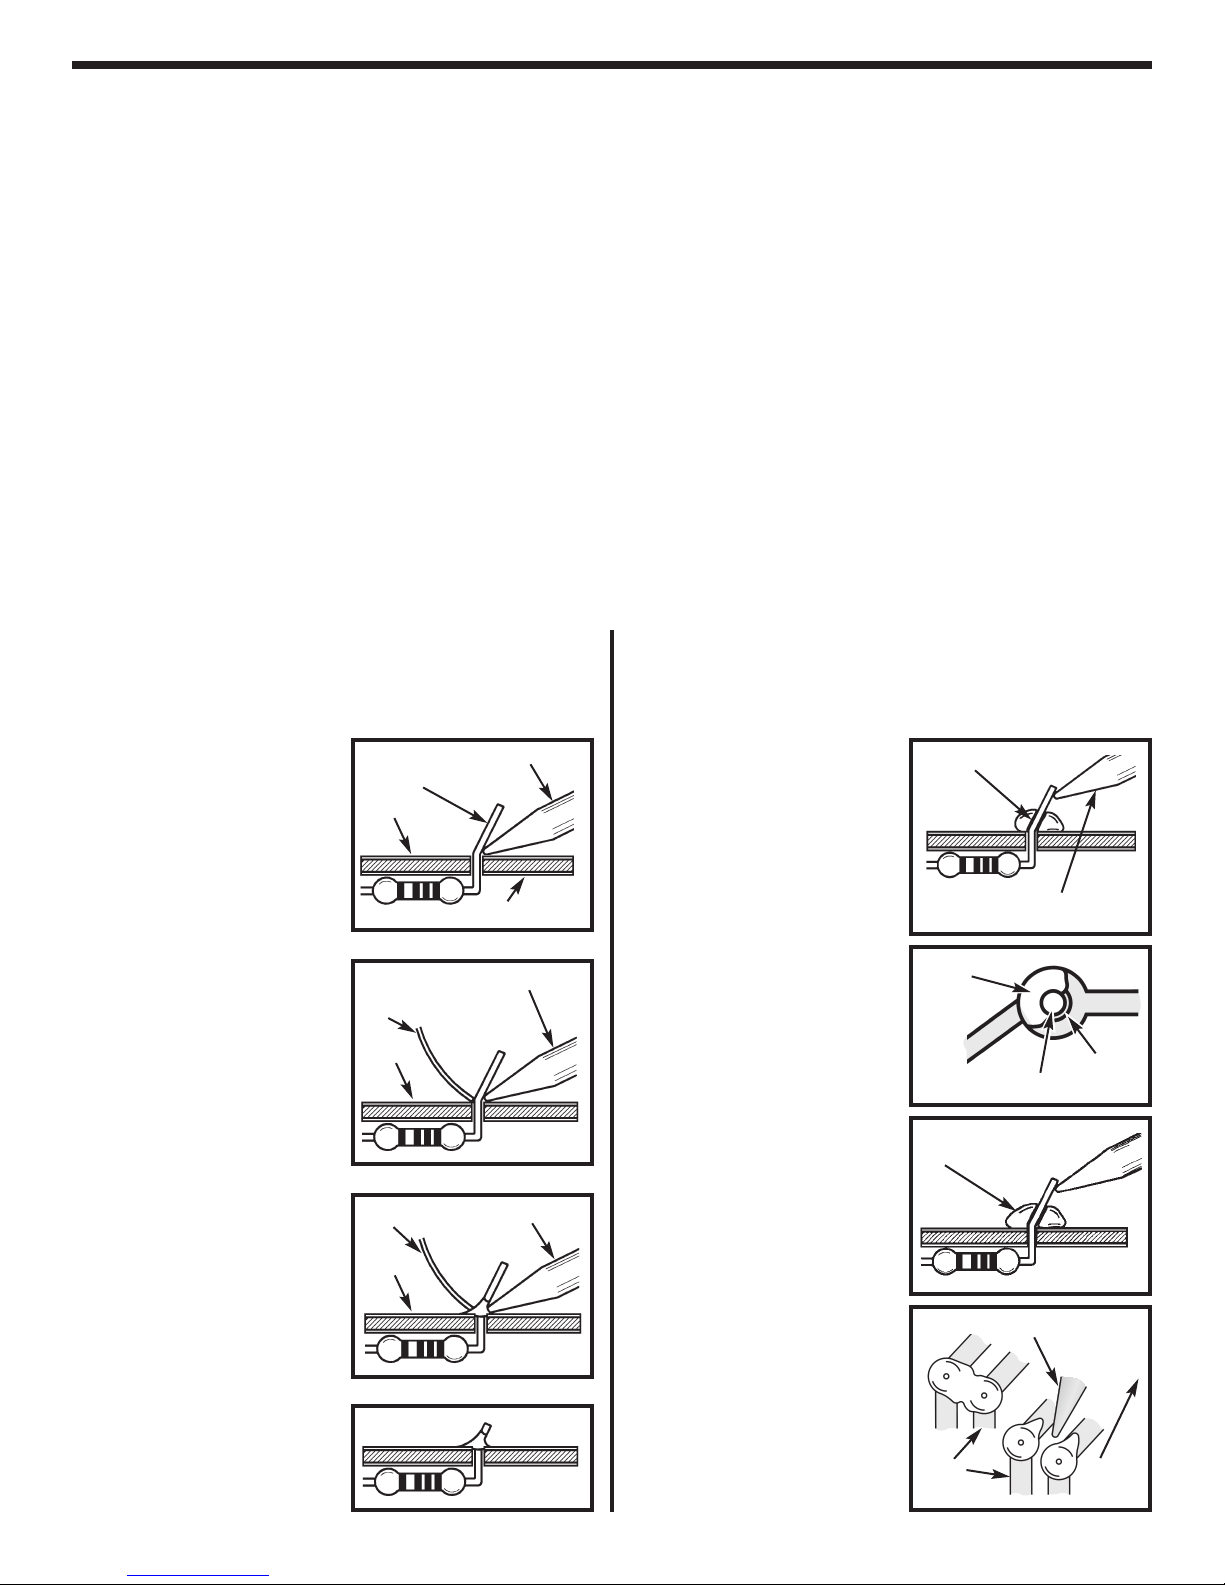
What Good Soldering Looks Like
A good solder connection should be bright, shiny,
smooth, and uniformly flowed over all surfaces.
1. Solder all components from
the copper foil side only.
Push the soldering iron tip
against both the lead and
the circuit board foil.
2. Apply a small amount of
solder to the iron tip. This
allows the heat to leave the
iron and onto the foil.
Immediately apply solder to
the opposite side of the
connection, away from the
iron. Allow the heated
component and the circuit
foil to melt the solder.
3. Allow the solder to flow
around the connection.
Then, remove the solder
and the iron and let the
connection cool.
solder should have flowed
smoothly and not lump
around the wire lead.
4.
Here is what a good solder
connection looks like.
The
Component Lead
Foil
Solder
Foil
Solder
Foil
Soldering Iron
Circuit Board
Soldering Iron
Soldering Iron
Types of Poor Soldering Connections
1. Insufficient heat - the
solder will not flow onto the
lead as shown.
2. Insufficient solder - let the
solder flow over the
connection until it is
covered. Use just enough
solder to cover the
connection.
3. Excessive solder - could
make connections that you
did not intend to between
adjacent foil areas or
.
minals
ter
4. Solder bridges - occur
een
ing
ag y
uns betw
our solder
when solder r
circuit paths and creates a
short circuit. This is usually
caused by using too much
solder. To correct this,
simply dr
iron across the solder
bridge as shown.
Rosin
Soldering iron positioned
incorrectly.
Solder
Component Lead
Solder
Soldering Iron
Foil
Dr
Gap
ag
-4-
Page 6
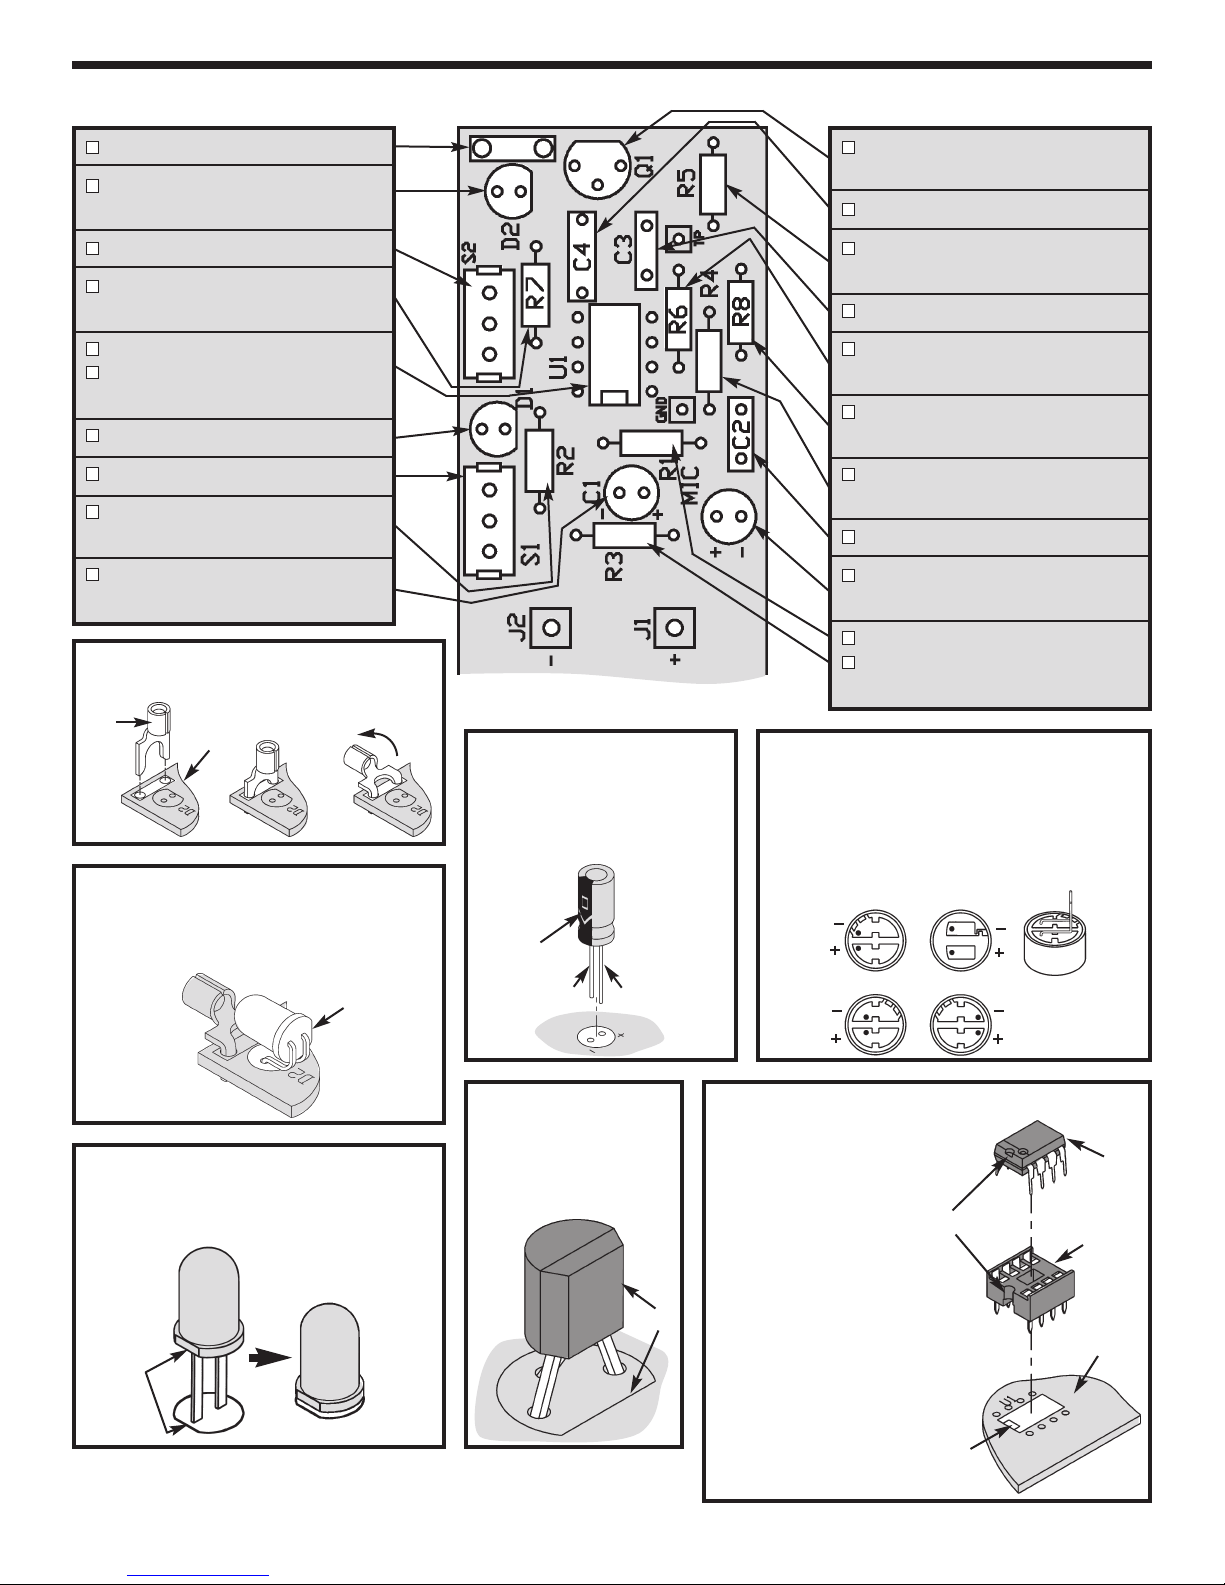
ASSEMBLY INSTRUCTIONS FOR TRANSMITTER
Lug (see Figure A)
D2 - LED Transmitter Clear
(see Figure B)
S2 - Switch
R7 - 1kΩ 5% 1/4W Resistor
(brown-black-red-gold)
8-Pin IC Socket
U1 - 741CN
(see Figure G)
D1 - LED Red (see Figure C)
S1 - Switch
R2 - 10kΩ 5% 1/4W Resistor
(brown-black-orange-gold)
C1 - 1µF Electrolytic Capacitor
(see Figure D)
Figure A
Mount the lug as shown.
Lug
PC Board
Figure B
Bend the leads as shown. Mount the
LED transmitter with the flat side in the
direction shown below.
Figure D
Electrolytics have a polarity
marking indicating the (–)
lead. The PC board is
marked to show the lead
position.
Polarity
Mark
Q1 - 2N3904 NPN Transistor
(see Figure F)
C4 - .022µF (223) Capacitor
R5 - 10kΩ 5% 1/4W Resistor
brown-black-orange-gold)
(
C3 - 100pF (101) Capacitor
R6 - 100kΩ 5% 1/4W Resistor
(brown-black-yellow-gold)
R8 - 220Ω 5% 1/4W Resistor
(red-red-brown-gold)
R4 - 10kΩ 5% 1/4W Resistor
(brown-black-orange-gold)
C2 - .01µF (103) Capacitor
MIC - Microphone
(see Figure E)
R1 - 2.2kΩ 5% 1/4W Resistor
R3 - 2.2kΩ 5% 1/4W Resistor
(red-red-red-gold)
Figure E
You have received one of four different
types of microphones. If you have type A or
B, mount it with the leads in the correct
holes on the PC board. If you have type C
or D, then bend the leads as shown.
A
C
Flat
Figure C
Mount the LED with the flat side in the
same direction as marked on the top
legend.
Mount flush
with PC board
Flat
(–) (+)
Figure F
Mount the tr
in the correct direction
as mar
ked on the top
legend.
ansistor
Flat
-5-
B
Insert the IC socket
into the PC board
with the notch in the
.
wn on
k
Inser
direction sho
the top legend.
Solder the IC soc
into place
the IC into the
et with the
sock
notch in the same
direction as the
notch on the socket.
Figure G
Notch
et
t
Notch
Marking
D
IC
IC
Socket
PC Board
Page 7
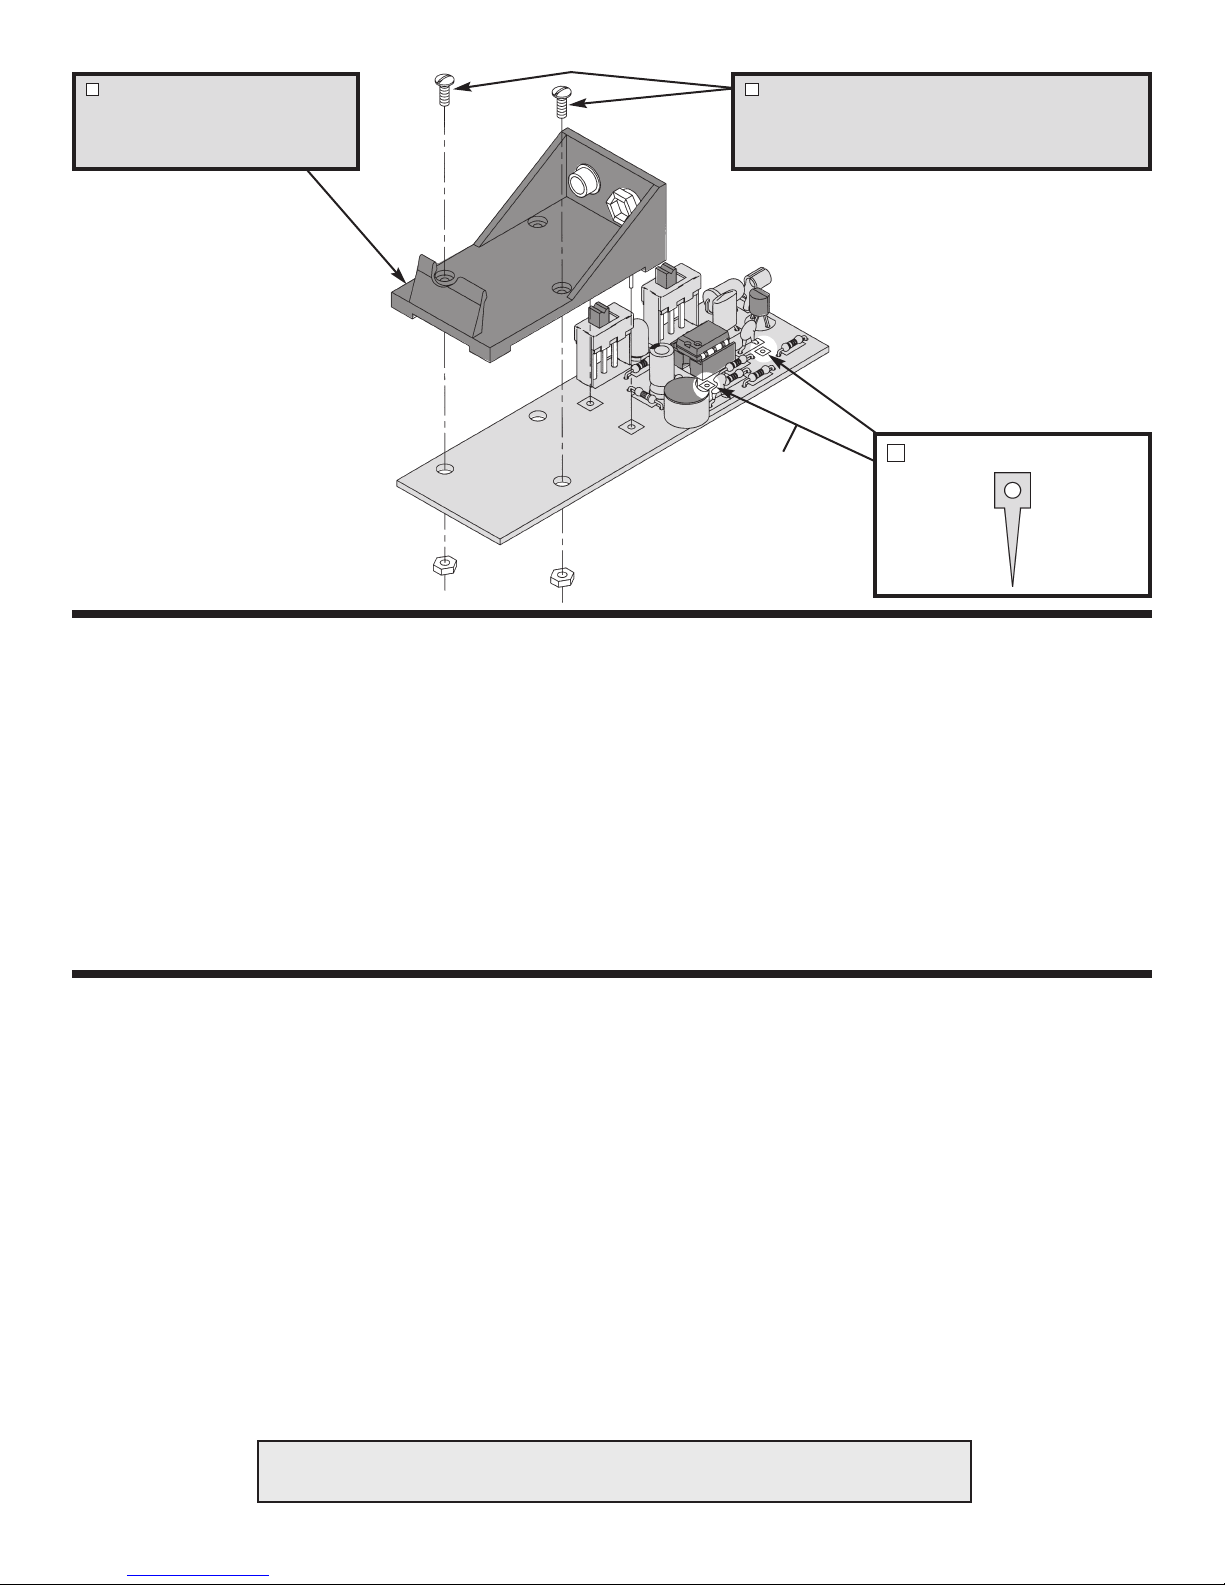
9V Battery Holder
Solder the 9V battery holder to pad
J1 and J2 in the correct position as
shown in the pictorial diagram.
Screws and Nuts
Mount the two screws in the position as shown in the
pictorial diagram. Place the nuts on the screws and
tighten them from the back side of the PC board.
To point marked
TP on PC board
TESTING PROCEDURE
1. Connect a 9 volt battery to the battery holder.
2. Switch S2 to the 1kHz position (toward LED D2)
and S1 on (toward LED D1). Observe that LED
D1 and D2 are on.
ou have a voltmeter, measure the DC voltage
3. If y
on pins 2, 3, and 6 of the IC. All of these voltages
should be 1/2 the battery voltage.
4. If you have an oscilloscope, connect it to test
point TP. Switch S2 in the 1kHz position (toward
QUIZ 1
1. The FO-30 Kit consists of three basic elements
that are found in every fiber optic link. They are
_____________, _____________, and
_____________.
2. The function of the transmitter is to convert an
_____________ signal into a _____________
signal.
3. The function of the fiber optic cable is to transmit
a _____________ signal from the transmitter to
.
the receiv
The receiv
4.
and con
signal.
er
er accepts a _____________ signal
ts it bac
er
v
k to an _____________
To point marked
GND on PC board
GND & TP - Test Point
LED D2) to place C4 in the circuit. You should
see a 6V peak-to-peak square wave of about
1kHz on the scope
5. Switch S2 to the mic position (to
.
ward the
battery), speak into the microphone and observe
your voice waveform on the scope.
If you experience any problems, see the
Troubleshooting Guide on page 20.
5. The microphone picks up a _____________
signal and converts it to an _____________
signal.
6. The gain of the LM-741 is equal to
_____________.
7. The DC output to the op-amp is _____________
volts.
8. The NPN transistor (3904) controls the
_____________ through the LED.
9. The LED (D1) indicated the state of the
_____________.
10. C2 filters out any _____________ that comes
through the v
oltage divider.
4. light, electrical; 5.voice, electrical; 6. IO; 7. 4.5; 8.current; 9. battery; 10.noise
Answers: 1. transmitter, fiber optic cable, receiver; 2. electrical, light; 3. light;
-6-
Page 8

FIBER OPTICS
SECTION A
FIBER OPTICS AND ITS ADVANTAGES
The obvious questions concerning fiber optics are
these: Why go through all the trouble of converting
the signal to light and back? Why not just use wire?
The answers lie in the following advantages of fiber
optics.
a) Wide bandwidth
b) Low loss
c) Electromagnetic immunity
d) Light weight
e) Small size
f ) Safety
g) Security
Of all the above mentioned advantages, wide
bandwidth, low loss and electromagnetic immunity
eatures.
are probably the most impor
tant f
Bandwidth is an effective indication of the rate at
which inf
ormation can be sent.
Potential
information-carrying capacity increases with the
bandwidth of the transmission medium. From the
liest da
ear
ys of radio, useful tr
ansmission
frequencies have pushed upward five orders of
magnitude, from about 100kHz (100 x 10
3
Hz) to
about 10GHz (10 x 109Hz). Optical fibers have a
potential useful range to about 1THz (1 x 10
The infor
have only begun to be e
mation-carrying possibilities of fiber optics
xploited, whereas the same
12
Hz).
potentials of copper cable are pushing their limits.
o give perspective to the incredible capacity that
T
fibers are moving toward, a 10GHz (10 x 10
has ability to tr
ansmit any of the following per
9
) signal
second.
a) 1,000 books
b) 130,000 voice channels
Loss indicates how far the information can be sent.
As a signal travels along a transmission path, be it
copper or fiber, the signal loses strength. The loss
of strength is called attenuation. In a copper cable,
attenuation increases with frequency. The higher
the frequency of the information signal, the greater
the loss. In an optical fiber, attenuation is flat. Loss
is the same at any signaling frequency up until a
very high frequency. The combination of high
bandwidth and low loss has made the telephone
industry probably the heaviest user of fiber optics.
Unlike copper cables, optical fibers do not radiate or
pick-up electromagnetic radiation. Any copper
conductor acts like an antenna, either transmitting
or receiving energy. One piece of electronic
equipment can emit electromagnetic interf
erence
(EMI) that disrupts other equipment. Among
reported problems resulting from EMI are the
wing:
follo
• An electronic cash register interfered with
aeronautical transmissions at 113MHz.
• Coin-operated video games interfered with police
radio transmissions in the 42MHz band.
• Some personal computers tested b
y the Feder
al
Communications Commission (FCC) in 1979
emitted enough radiation to disrupt television
reception se
Since fibers do not r
electromagnetic energy
veral hundred feet away.
adiate or receive
, they make an ideal
transmission medium when EMI is a concern.
Furthermore, signals do not become distorted by
EMI in fiber. As a result, fiber offers very high
standards in error-free tr
ansmission.
4
4 The above paragraphs are reproduced by permission TECHNICIAN’S GUIDE TO FIBER OPTICS 2E (PAGES 24-29)
By Donald J Ster
ling, Jr
- DELMAR PUBLISHERS
.
-7-
., Albany, New York, Copyright 1993
, INC
Page 9

FIBER MATERIAL
There are many materials that can be used to transmit light. The two most
popular optical fibers are glass, which has the best optical characteristics,
and plastic. Plastic is less expensive and does not break easily. This kit
uses a plastic optical cable similar to the one shown.
SECTION B
PRINCIPLES OF LIGHT
Core
Cladding
Jacket
Plastic Optical Cable
WAVELENGTH
Light occupies only a small portion of the
electromagnetic spectrum sho
The equation λ = c/f is used to convert frequency
to wavelength, where
λ = wavelength, c = speed of
light, and F = Frequency of the light w
Note that in Figure 2A, the visible range of light is
ximately 380 x 10
appro
9
meters (red). When using plastic as the fiber optic
-9
meters (violet) to 750 x 10
cable medium, the best results occur around 660 x
-9
10
(orange-red).
Light also can be thought of as little b
energy being r
apidly transmitted. These discrete
groups of energy are called photons, and the
amount of energy present in each photon is
dependent on the frequency at which they are
ansmitted.
tr
energy than lo
Higher frequencies produce more
wer frequencies of light. The equation
for the amount of energy in each photon is E = hƒ.
Where E = energy in joules
tz.
-34
joules-seconds), and ƒ is the frequency
(6.63 x 10
in her
wn in Figure 2A.
ave.
, h is Planc
k’
undles of
s constant
2
2
10
Cosmic Ray
21
10
20
10
Gamma Ray
19
10
18
X-Ray
-
Frequency
(Hz)
10
17
10
16
10
Ultraviolet Ray
15
10
14
10
13
10
Infrared Light
12
10
11
10
10
10
Radar
9
10
8
10
Television & FM Radio
7
10
Shortwave Radio
6
10
AM Radio
5
10
4
10
3
Sound
10
2
10
10
Sonic
0
Visible Light
Figure 2A
Ultraviolet
Violet
Blue
Green
Orange
Red
Infrared
Wavelength
(nm)
400
455
490
550
620
750
800
It is impor
tant to remember that light can be
explained on a wave or a photon energy packet
when investigating the properties of fiber optics.
-8-
Page 10

REFRACTION
The speed of light can be defined as the velocity of
electromagnetic energy in a vacuum such as space.
The speed of light will vary as it travels from one
material to another, which, because of wave motion,
results in light changing its direction. This change of
direction of light is called refraction. In addition,
different wavelengths of light travel at different
speeds in the same material.
Refraction
Red
Orange
Yellow
Green
Blue
Violet
The best example of refraction if the prism of
Figure 2B.
White light entering the prism contains
all colors. The prism refracts the light and changes
speed as it enters the prism. Because each color or
frequency changes speed differently, each is
refracted differently. Red light deviates the least and
travels the fastest, while violet light deviates the
most and travels the slowest. The white light then
emerges from the prism divided into the colors of
the rainbow.
5
Refraction
White Light
Figure 2B
REFRACTIVE INDEX
One of the important measures that you often come
e index. The refractive
across in light is refr
index can be defined as the ratio of the speed of
light in a vacuum to the speed of light in a material.
n = c(vacuum) / c(material)
where: n is the refractive index
c is the speed of light
activ
Since the speed of light in a vacuum is always faster
that the speed of light in an
y mater
ial, the refractive
index is always greater than one. The amount that
a ray of light is refracted depends on the refractive
index of the two materials.
5 The above paragraphs are reproduced by permission TECHNICIAN’S GUIDE TO FIBER OPTICS 2E (PAGES 36, 37)
By Donald J Ster
ling, Jr
- DELMAR PUBLISHERS
.
-9-
., Albany, New York, Copyright 1993
, INC
Page 11

REFLECTION
Before trying to explain reflection, we must first define some important terms shown in Figure 2C.
Reflected Ray
n
1
n
2
Angle of Refraction
Refracted Ray
n1is less than n
θ
1
θ
2
Figure 2C
2
Normal
Incident Ray
Angle of Incidence
Interface
• The normal is an imaginary line perpendicular to
the interf
• The angle of incidence ( θ
ace of the two materials.
) is the angle between
1
the incident ray and the normal.
• The angle of refraction ( θ
) is the angle between
2
the refracted ray and the normal.
Light passing from a lower refractive index to a
higher one is bent toward the normal, as shown in
Figure 2C. Light going from a higher index to a
lower will refract away from the normal, as shown in
Figure 2D-1.
the angle of refr
As the angle of incidence increases,
action approaches 90
O
to the
normal. The angle of incidence that yields an angle
of refr
as sho
action of 90
wn in Figure 2D-2. If the angle of incidence
O
to the nor
mal is the critical angle
increases past the critical angle, the light is totally
reflected bac
enter the second material as sho
The angles of incidence and reflection are equal.
k to the first material so that it does not
wn in Figure 2D-3.
6
6 The above paragraphs are reproduced by permission TECHNICIAN’S GUIDE TO FIBER OPTICS 2E (PAGE 39)
By Donald J Ster
ling, Jr
- DELMAR PUBLISHERS
.
-10-
., Albany, New York, Copyright 1993
, INC
Page 12

n1is greater than n
2
Angle of
reflection
=
Angle of
incidence
Angle of Incidence
n
1
n
2
Angle of
Refraction
Light is bent away from normal
Figure 2D-1
n
1
n
2
Light does not enter
second material
Figure 2D-2 Figure 2D-3
Figure 2D
SNELL’S LAW
Snell’s Law states the relationship between the
incident and refracted rays.
n
sin θ1= n2sin θ
1
where:
θ
1
refr
n
and n2are refr
1
and θ2are angle of incidence and angle of
action respectively
2
active indexes
.
θ
θ
2
Critical Angle
n
1
n
2
When the angle of reflection is
more than the critical angle, light
is reflected.
1
At an angle greater than θc, the light is reflected.
Because reflected light means that n
equal (since they are in the same material), θ
and n2are
1
1
θ2are also equal. The angle of incidence and
reflection are equal.
action and reflection form the basis of light
refr
propagation through an optical fiber.
These simple principles of
7
and
The law shows that the angles depend on the
acted indices on the two materials. Knowing any
refr
three of the values, of course, allows us to calculate
the fourth through simple rearrangement of the
equation.
The critical angle of incidence θc, where θ
O
90
, is
θc = arcsin (n
7 The above paragraphs are reproduced by permission TECHNICIAN’S GUIDE TO FIBER OPTICS 2E (PAGE 40)
)
2/n1
By Donald J Ster
- DELMAR PUBLISHERS
.
ling, Jr
2
=
., Albany, New York, Copyright 1993
, INC
-11-
Page 13

OPTICAL FIBER CONSTRUCTION
The optical fiber has two concentric layers called the
core and the cladding. The inner core is the lightcarrying part. The surrounding cladding provides
the difference in the refractive index that allows total
internal reflection of light through the core. The fiber
usually has an additional coating around the
cladding. The coating, which is usually one or more
layers of polymer, protects the core and cladding
from shock that might affect their optical or physical
properties. Figure 2E shows the cross-section of an
optical cable
8
.
Core
Cladding
Figure 2E
Jacket
8 The above paragraphs are reproduced by permission TECHNICIAN’S GUIDE TO FIBER OPTICS 2E (PAGES 40, 44)
By Donald J Ster
ling, Jr
- DELMAR PUBLISHERS
.
-12-
., Albany, New York, Copyright 1993
, INC
Page 14

SECTION C
HOW LIGHT TRAVELS THROUGH AN OPTICAL CABLE
To best understand how light propagates through an
optical fiber, let us look at an example. Assume that
the core has a refractive index (n
) of 1.48 and the
1
cladding has a refractive index (n2) of 1.46 (these
values are typical for optical fibers). By applying
Snell’s Law, we can calculate the critical angle:
θc = arcsin (n
θc = arcsin (1.46/1.48) = 80.6
O
81
2/n1
)
O
or approximately
Angle of RefractionAngle of Incidence
=
81
O
81
O
Figure 2F shows that as light rays are injected into
the fiber, they strike the core-to-cladding interface at
an angle greater than that of the critical angle
O
(80.6
). As a result, the light will reflect back to the
core. Since the angles of incidence and reflection
are equal, the reflected light will again be reflected.
The light will continue zig-zagging down the length
of the fiber. Any light that strikes the interface at
less than the critical angle will be absorbed by the
cladding. This total internal reflection forms the
basis of light propagation through a simple optical
9
fiber.
n
2
n
1
Core
Light is propagated by
total internal reflection
Figure 2F
Cladding
9 The above paragraphs are reproduced by permission TECHNICIAN’S GUIDE TO FIBER OPTICS 2E (PAGES 40, 44, and 45)
By Donald J Ster
ling, Jr
- DELMAR PUBLISHERS
.
-13-
., Albany, New York, Copyright 1993
, INC
Page 15

AN IMPORTANT UNIT IN FIBER OPTICS (THE DECIBEL)
The decibel is an important unit that you will use
continually in fiber optics as well as in electronics. It
is used to express gain or loss in a system or
component. A transistor, for example, can amplify a
signal, making it stronger by increasing its voltage,
current or power. This is called gain. Similarly, loss
is a decrease in voltage, current, or power. The
basic equations for the decibel are:
dB = 20 log
10(V1/V2
)
dB = 20 log10(I1/I2)
dB = 10 log
10(P1/P2
)
Where V is voltage, I is current, and P is power. The
decibel then is the ratio of two voltages, currents, or
powers. Notice that voltage and current are 20
times the logarithmic ratio, and power is 10 times
the ratio.
The basic use of the decibel is to compare the
power entering the system, circuit, or component to
the power leaving it. In fiber optics, we deal mostly
with loss and optical po
wer. The source emits
optical power. As light travels through the fiber to
the receiver, it loses power. This power loss is
expressed in decibels. For example, if the source
emits 1,000 microwatts (µW) of power and the
detector receives 20µW, the loss through the
system is about 17dB.
Where P
a
nd P
is the power transmitted from the source
r
t
i
s power received by the receiver. A 10dB
r
loss represents a loss of 90% of the power; only
10% remains. A useful figure to remember is 3dB,
which represents a loss of one half of the power.
Fiber optic links easily tolerate losses of 30dB,
meaning that 99.9% of the power from the source is
lost before it reaches the detector. If the source
emits 1,000µW of power, only 1µW reaches the
detector. In fiber optics, it is common to omit the
negative sign.
10
Loss = 10 log
(Pr/Ptr)
10
= 10 log10(20/1,000)
= -16.989 dB
10 The “DECIBEL” Section is reproduced by permission TECHNICIAN’S GUIDE TO FIBER OPTICS 2E
By Donald J Ster
ling, Jr
- DELMAR PUBLISHERS
.
-14-
., Albany, New York, Copyright 1993
, INC
Page 16

ASSEMBLY INSTRUCTIONS
HOW TO TERMINATE AN OPTICAL FIBER
Both ends of the optical cable are terminated in the
same way. Please follow the steps below.
1) Use a razor blade (a very sharp knife will do) to
cut the cable at a right angle to the length of the
cable. Make the cut as close to 90
O
as possible.
2) Place the polishing paper on a work bench or
other flat surface, and apply a few drops of water
or oil to it. Hold the cable at a right angle to the
polishing paper and polish the end that was just
cut. The cable should not flex while polishing.
To avoid flexing, clamp the cable between the
two PC boards with only a small length of the
cable extending beyond the edge of the PC
board.
3) Repeat steps 1 and 2 for the other end.
4) Mount the two ends of the cable to the two
connectors on the transmitter and receiver PC
board as shown in the figure.
QUIZ 2
The three most important f
1.
are _________, _________ and __________.
2. Bandwidth is an indication of the _________ at
which inf
3.
ormation can be sent.
The loss of signal strength is called ________.
4. The two most popular optical fibers are
________ and _________.
5. Unlike copper cables, optical fibers do not
adiate or pic
r
k up _________.
6. The Decibel is a unit used to express
_________ or _________ in a system or
component.
eatures of fiber optics
7.
Refractiv
e index is the ratio of the speed of
_________ in vacuum to the speed of
_________ in any material.
If the angle of incidence is greater than the
8.
critical angle, light will completely _______ back.
The optical fiber has two concentric layers called
9.
the _________ and __________.
The total internal _________ forms the basis of
10.
light propagation through a simple optical fiber.
(5) r
adiation (6) loss, gain (7) light, light (8) reflect (9) cladding, core (10) reflection
w loss, electromagnetic immunity (2) rate (3) attenuation (4) glass, plastic
(1) wide bandwidth, lo
Ans
wers:
-15-
Page 17

PARTS LIST
RECEIVER SECTION
If you are a student, and any parts are missing or damaged, please see instructor or bookstore.
If you purchased this fiber optics kit from a distributor, catalog, etc., please contact Elenco
(address/phone/e-mail is at the back of this manual) for additional assistance, if needed. DO NOT contact your
place of purchase as they will not be able to help you.
®
Electronics
RESISTORS
Qty. Symbol Value Color Code Part #
1 R3 10Ω 5% 1/4W brown-black-black-gold 121000
1 R2 2.2kΩ 5% 1/4W red-red-red-gold 142200
1 R1 200Ω Pot 191322
CAPACITORS
Qty. Symbol Value Description Part #
3 C1, C3, C5 .047µF (473) Mylar 244717
1 C6 10µF Electrolytic 271045
1 C2 47µF Electrolytic 274744
1 C4 220µF Electrolytic 282244
SEMICONDUCTORS
Qty. Symbol Value Description Part #
1 Q1 LPT80A Phototransistor 32T80A
1 U1 LM-386 Audio Op-amp Integrated Circuit 330386
1 D1 LED Red 350002
MISCELLANEOUS
Qty. Description Part #
1 PC Board 519015B
1 Switch 541103
1 Battery Holder 590096
1 Speaker 590102
2 Screws 2-56 x 1/4” 641230
PARTS IDENTIFICATION
Resistor Capacitors
Electrolytic
Battery
Holder
Integrated Circuit IC Socket
Mylar
Transistor
Qty. Description Part #
2 Nuts 2-56 644201
1 Lug 661106
1 IC Socket 8-pin 664008
6” Wire 22ga. Black 814120
6” Wire 22ga. Red 814220
Red
Phototransistor
SwitchLED
Potentiometer
Lug
Speaker
-16-
Page 18

RECEIVER
There are 4 main components in the receiver (refer
to Figure 3). They are:
a) Power Supply (9V battery)
b) Phototransistor LPT80A (the detector)
c) Audio op-amp LM-386
d) Speaker
The phototransistor Q1 (LPT80A) used in a
common-collector configuration has high current
gain. This transistor acts as a valve which controls
the flow of current to the potentiometer R1. The flow
of current is directly proportional to the intensity of
light striking the base. The more intense the light,
the more current will flow through transistor Q1. The
current will then be coupled to the audio amplifier
(LM386) through capacitor C1 for amplification.
The gain of the audio amplifier (LM386) is internally
set to 20. Hence, the voltage signal that is coupled
through C1 to input pin 2 will be amplified 20 times,
and will appear on the output of the op-amp (pin 5).
The above amplified voltage will then be coupled
through C4 to the speaker. The speaker then
converts this voltage into sound.
The LED (D1) acts as an ON/OFF indicator. It will
also indicate the state of the battery. If this LED
becomes dim, the battery is weak and should be
replaced. C2 filters out any noise at the power
supply (9V battery).
Figure 3A
-17-
Page 19

ASSEMBLY INSTRUCTIONS FOR RECEIVER
C6 - 10µF Electrolytic Capacitor
(see Figure B)
D1 - LED (see Figure A)
C1 - .047µF Mylar Cap. (473)
R2 - 2.2kΩ 5% 1/4W Resistor
(red-red-red-gold)
8-Pin IC Socket
U1 - LM386N Integrated Circuit
(see Figure C)
6” Black Wire - Strip 1/8” of
insulation off of both ends of the
wire.
6” Red Wire - Strip 1/8” of
insulation off of both ends of the
wire.
C4 - 220µF Electrolytic Capacitor
(see Figure B)
C5 - .047µF Mylar Cap. (473)
Figure A
Mount the LED with the
flat side in the same
direction as marked on
the top legend.
Mount flush
with PC board
Flat
Figure B
Electrolytics have a
polarity marking
indicating the (–) lead.
The PC board is
marked to show the
lead position.
Polarity
Mark
(–) (+)
Figure C
nsert the IC socket into
I
the PC board with the
notch in the direction
shown on the top
legend. Solder the IC
socket into place. Insert
the IC into the socket
with the notch in the
same direction as the
notch on the socket.
IC
Notch
Notch
Marking
IC
Socket
PC Board
Figure D
Mount the lug as
shown.
that the phototransistor lens lines up
with the lug hole.
Make sure
Figure E
Lug (see Figure D)
Q1 - Phototransistor
(see Figure F)
C3 - .047µF Mylar Cap. (473)
R1 - 200Ω Pot (see Figure E)
R3 - 10Ω 5% 1/4W Resistor
(brown-black-black-gold)
S1 - Switch
C2 - 47µF Electrolytic Capacitor
(see Figure B)
Figure F
Insert the phototransistor into the PC
board in the direction shown.
Screws and Nuts
Mount the two screws in the
position as shown. Place the nuts
on the screws and tighten them
from the back side of the PC
board.
9V Battery Holder
Solder the 9V battery holder to
pad J1 and J2 in the correct
position as shown.
Speaker and 2 Wires
Solder the wires to the correct
position as shown.
– +
-18-
Page 20

INSERT THE CABLE
Slide the cable through the lug
and butt the cable up against the
phototransistor.
TESTING PROCEDURE
1. Plug a fresh 9 volt battery into the battery holder.
2. Turn S1 on (toward the pot), observe that LED
D1 is on.
3. If you have a voltmeter, measure the DC voltage
at pin 5, it should be about 4V.
4. Connect one end of the fiber to the source
connector to the transmitter, and the other end to
the detector connector of the receiver. Make sure
switch S2 of the tr
ansmitter is in the off position
(toward the battery). Now, speak into the
microphone. You should hear your voice from the
er of the receiv
speak
er. Now, place C4 into the
circuit by sliding switch S2 toward the infrared
LED. You should hear a shrill noise from the
speaker
.
QUIZ 3
1. The receiv
They are _________, _________, _________
and ________.
2. The phototransistor Q1 converts a __________
signal into an __________ signal.
The flow of the current through Q1 is directly
3.
proportional to the ________ of light that strikes
its base.
4. The gain of the audio amplifier (LM386) is
internally set to _________.
er consists of 4 main components.
5. The amplifier signal is coupled to the speak
er
through __________.
6. The speaker converts an _________ signal into
a _________ signal.
7. The LED D1 acts as an _________ indicator.
8. C2 filters out any __________ at the power
supply.
9. The pot R1 is a __________ control device.
The LM386 chip is an __________ amplifier
10.
.
(4) 20 (5) C4 (6) electrical, sound (7) On-Off (8) noise (9) volume (10) audio
Answers: (1) power supply, phototransistor, audio op-amp, speaker (2) light, electrical (3) intensity
-19-
Page 21

TROUBLESHOOTING GUIDE
TRANSMITTER
PROBLEM POSSIBLE CAUSE
IF LED D1 DOES NOT LIGHT Check battery connection.
Check orientation of D1.
Check soldering around S1.
THERE IS NO DIM RED GLOW FROM THE Check the value of R1, R4, R5 and orientation of
TRANSMITTER LED D2 transistor Q1 and U1.
Check soldering around Q1 and U1.
THERE IS NO WAVEFORM ON THE Check soldering around S2.
OSCILLOSCOPE WHEN S2 IS ON Check the value of C4.
Check soldering around U1.
THERE IS NO VOICE SIGNAL ON TEST Check resistors R2, R4, R5, and R6.
POINT TP Check microphone orientation.
Check capacitors C1 and C3.
Check U1.
RECEIVER
PROBLEM POSSIBLE CAUSE
IF LED D1 DOES NOT LIGHT Check battery connection.
ientation of D1 or battery lif
k or
Chec
Check soldering around S1.
NO SOUND FR
THE OUTPUT VOLTAGE IS NOT EQUAL Check orientation of U1.
O 4V Check soldering around S1, R1, U1, C5 and C4.
T
Contact ElencoTMElectronics if an
y will not be able to help you.
the
OM THE SPEAKER
y par
ts are missing or damaged.
Foil Side of Receiver PC Board
Check speaker and C4 orientation.
k U1 orientation and soldering.
Chec
k fiber optic cable connection.
Chec
DO NOTcontact y
Foil Side of Transmitter PC Board
e.
our place of purchase as
-20-
Page 22

1
GLOSSARY
1
ABSORPTION Loss of power in an optical fiber, resulting from conversion of optical power into
h
eat and caused principally by impurities, such as transition metals and hydroxyl
ions, and also exposure to nuclear radiation.
ANGLE OF INCIDENCE Angle between the incident ray and the normal.
ANGLE OF REFRACTION Angle between the refracted ray and the normal.
ATTENUATION A general term indicating a decrease in power from one point to another. In
optical fibers, it is measured in decibels per kilometer at a specified wavelength.
BANDWIDTH A range of frequencies.
CABLE A fiber covered by a protective jacket.
CAPACITOR A capacitor stores electrical energy when charged by a DC source. It can pass
alternating current (AC) but blocks direct current (DC) except for a very short
charging current, called transient current.
CLADDING The outer concentric layer that surrounds the core and has a lower index of
refraction.
CONNECTOR A connector is a device which is used to connect both ends of the fiber to the
source and detector.
CORE The central, light-carrying part of an optical fiber; it has an index of refraction
higher than the surrounding cladding.
dB Decibel.
DECIBEL A standard logarithmic unit f
fiber optics, the ratio is power. dB = 10 log
ELECTR
OMAGNETIC
or the ratio of two powers, voltages or currents. In
10(P1/P2
)
INTERFERENCE Any electrical or electromagnetic energy that causes undesirable response,
radation, or failure in electronic equipment. Optical fibers neither emit nor
deg
e EMI.
receiv
EMI Electromagnetic interference.
FIBER A light-carrying conductor made up of glass or plastic.
INDEX OF REFRACTION The ratio of the velocity of light in free space to the velocity of light in a given
material. Symbolized by n.
11 The “GLOSSARY” Section is reproduced by permission TECHNICIAN’S GUIDE TO FIBER OPTICS 2E (PAGES 256-264)
By Donald J Ster
ling, Jr
- DELMAR PUBLISHERS
.
-21-
, INC
., Alban
, New York, Copyright 1993
y
Page 23

INTERFACE Surface that separates two materials.
LED Light-emitting diode.
LIGHT Electromagnetic radiation which is visible to the human eye.
LIGHT EMITTING DIODE A semiconductor diode that spontaneously emits light from the PN junction when
forward current is applied.
NORMAL An imaginary line perpendicular to the interface of two materials.
OP AMP A semiconductor device which is used to amplify current, voltage, or power.
PHOTON A photon of electromagnetic energy. A “particle” of light.
PHOTO-TRANSISTOR A transistor that detects light.
PLASTIC FIBER An optical fiber having a plastic core and plastic coating.
PC BOARD Its full name is printed circuit board. It is a conductive pattern glued to one or both
sides of an insulating mater
ial. Holes are punched or dr
illed through the
conductor and board to allow the interconnection of electronic parts.
PRISM A device which splits white light into a rainbow of colors.
SOURCE The light emitter, either an LED or a laser diode in a fiber optic link.
WAVELENGTH The distance between the same two points on adjacent waves.
NEW
Fiber Optic Lab Kit
with training course Model FO-40K
The course includes a 61 page manual and all of
the material necessary to conduct nine stimulating
experiments related to fiber optic communications.
The experiments will give you a better
understanding of fiber optics techniques and real
fiber optics hardw
Understanding Fiber Optics
NEW
are.
Model VT-501
Learn tomorrow’s technology today!
Fiber optics is changing the way we
live, think and communicate. You will
learn about fiber optic cables,
connectors, couplers, splicers,
transmitters and receivers.
58 minutes viewing time.
Fiber Optic Splice Kit
Model TK-25
or mending or e
F
sleeves and retention clips to complete ten splices. No special
, polishing or adhesiv
tools
xtending 1,000
e required. Instr
µm plastic fiber.
uctions included.
NEW
It contains fiber
-22-
Page 24

Elenco®Electronics, Inc.
150 Carpenter Avenue
Wheeling, IL 60090
(847) 541-3800
Website: www.elenco.com
e-mail: elenco@elenco.com
 Loading...