


SCEE12002B
FR SCARIFICATEUR ÉLECTRIQUE POUR PELOUSE / AÉRATEUR 2 EN 1
TRADUCTION DES INSTRUCTIONS D’ORIGINE
NL ELEKTRISCHE 2-IN-1 VERTICUTEERDER / BELUCHTER
VERTALING VAN DE ORIGINELE INSTRUCTIES
GB ELECTRIC LAWN SCARIFIER / AERATOR 2-IN-1
ORIGINAL INSTRUCTIONS
CZ ELEKTRICKÝ ZAHRADNÍ VERTIKUTÁTOR/PROVZDUŠŇOVAČ 2 V 1
ORIGINÁLNÍ NÁVOD
S02 M01 Y2015
1

1 2 A
B 3 4 5 6 7 8
7
2

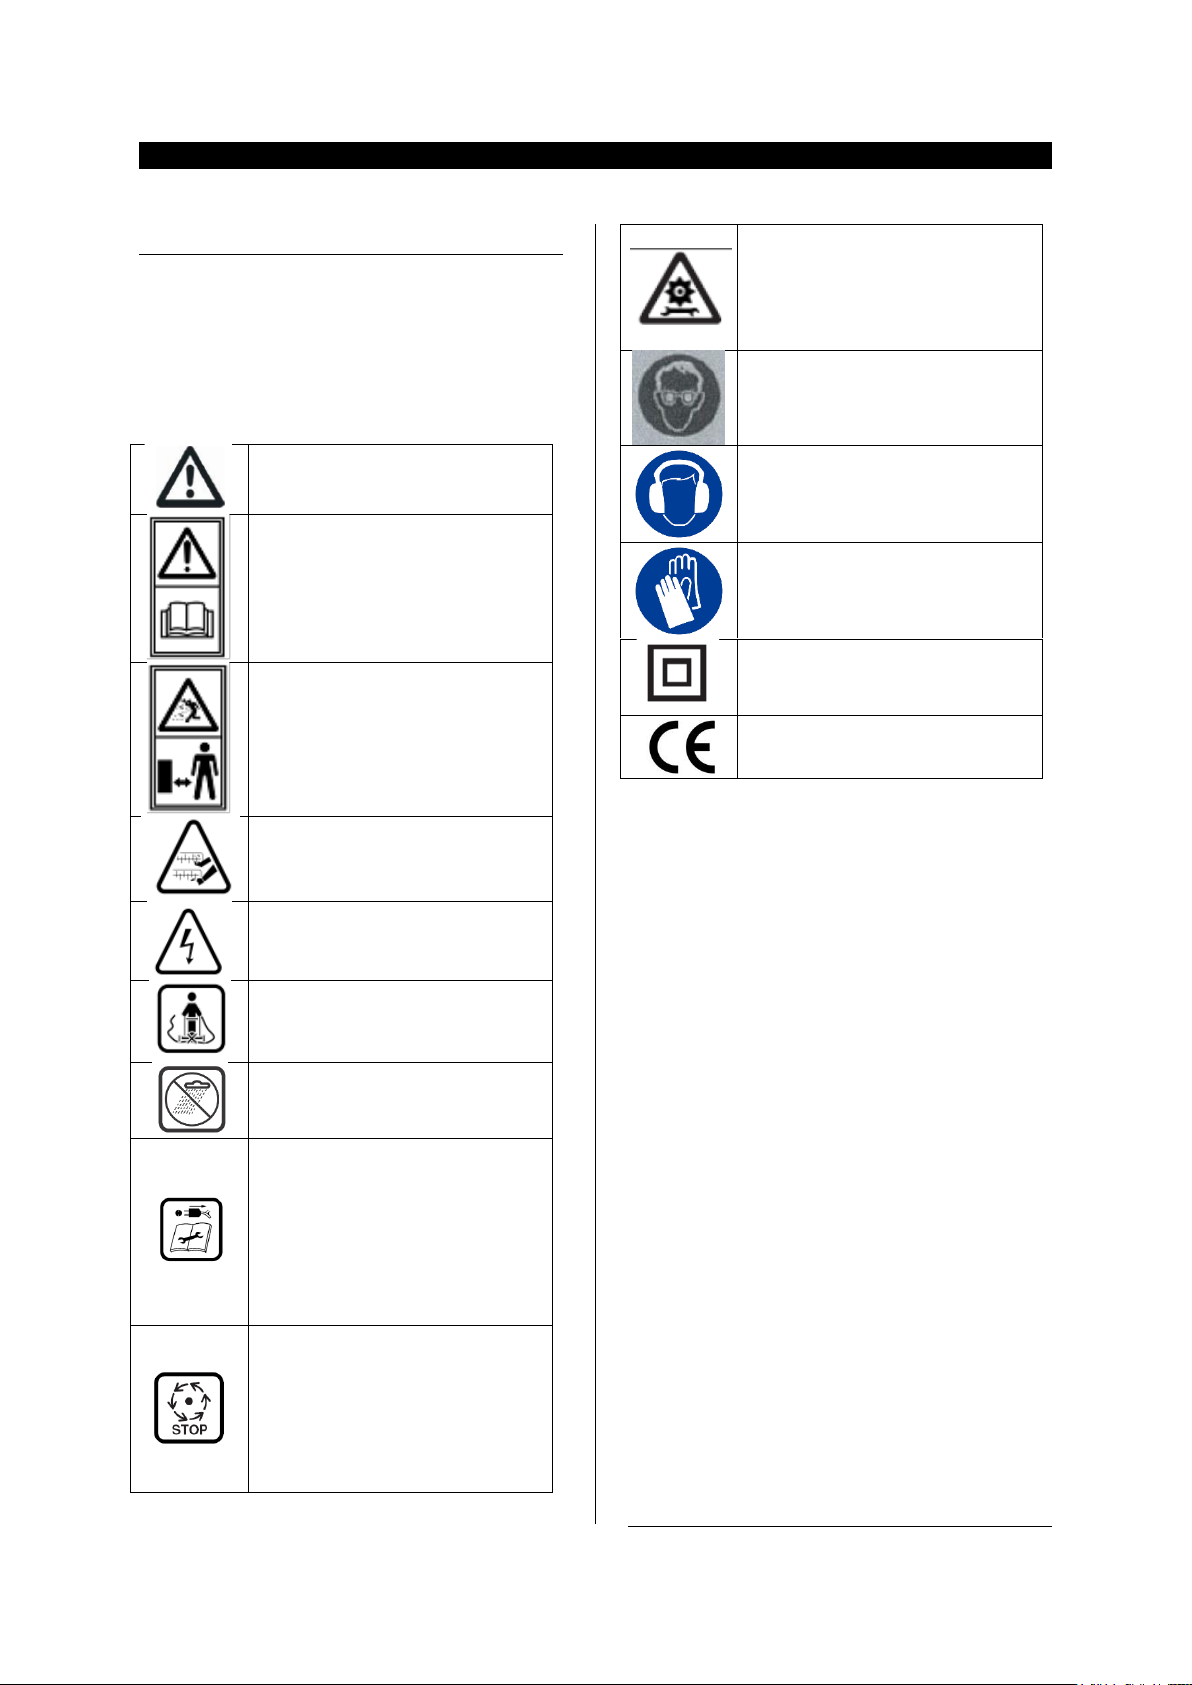
Indications générales sur
d’éventuels dangers.
Attention !
Lire le manuel d’utilisation
Faites attention à ce que les
personnes se trouvant à proximité
ne soient pas blessées par des
projections provenant de la
tondeuse.
Gardez une distance de sécurité
entre l’utilisateur de la machine en
marche et des personnes se
trouvant à proximité.
Griffes/lames coupantes. Attention
à ne pas se couper les orteils ou
les doigts.
Protégez-vous contre les chocs
électriques.
Maintenez le câble de
raccordement hors de portée de la
lame.
Ne pas utiliser l’appareil par temps
de pluie ni l’exposer à la pluie.
Avant d’effectuer des réglages sur
l’appareil ou de le nettoyer, lorsque
le câble se trouve coincé, ou que
l’appareil soit laissé sans
surveillance même pour une courte
durée, arrêter l’appareil et retirer la
fiche de la prise de courant.
Maintenez le câble éloigné des
griffes/lames.
Attendez l’arrêt total de tous les
éléments de l’outil de jardin avant
de les toucher.
Après la mise hors tension de
l’outil de jardin, les lames
continuent à tourner, pouvant
provoquer ainsi des blessures.
Risque de blessures ! Avant de
commencer à travailler, vérifiez le
terrain et retirez tous les objets qui
pourraient être éjectés par l’outil.
Il est recommandé de
porter de s lunettes de sécurité.
Il est conseillé de
porter une protection anti-bruit.
Portez des gants.
Cet appareil est doublement isolé;
par conséquent, aucun câble de
masse n'est nécessaire. Vérifiez si
l’alimentation mentionnée
sur la plaque signalétique de
l’appareil correspond bien à la
tension présente sur le lieu.
CE Conformément aux normes
Européennes d’application en
matière de sécurité
FR SCARIFICATEUR ÉLECTRIQUE POUR PELOUSE / AÉRATEUR 2 EN 1
CONSIGNES DE SECURITE
Attention ! Lire attentivement les instructions
suivantes. Familiarisez-vous avec les éléments
de commande et l’utilisation appropriée de la
machine. Conserver les instructions d’utilisation dans un endroit sûr pour toute utilisation
ultérieure.
SYMBOLES
3

INSTRUCTIONS DE SECURITE
_ Cet appareil peut être utilisé par
des enfants âgés d'au moins 8 ans
et par des personnes ayant
des capacités physiques,
sensorielles ou mentales réduites
ou dénuées d’expérience ou de
connaissance, s'ils (si elles) sont
correctement surveillé(e)s ou si des
instructions relatives à
l'utilisation de l'appareil en toute
sécurité leur ont été données et si
les risques encourus ont été
appréhendés. Les enfants ne
doivent pas jouer avec l’appareil. Le
nettoyage et l'entretien par
l'usager ne doivent pas être
effectués par des enfants sans
surveillance
_ Ne pas utiliser la machine lorsque
vous êtes fatigué ou sous l’emprise de
drogues, d’alcool ou de médicaments.
_ Ne laissez pas les enfants ou toute
autre personne n’ayant pas
connaissance de ces instructions,
utiliser l’appareil. Certaines
réglementations locales mentionnent
un âge limite de l’utilisateur.
_ Ne jamais aérer/scarifier le gazon
lorsque des personnes, en particulier
des enfants, ou des animaux
domestiques se trouvent à proximité.
_ N’oubliez pas que l’utilisateur est
tenu pour responsable des accidents
ou des situations dangereuses
survenant sur autrui ou sur leurs biens
_ Portez toujours une protection
auditive et des lunettes de protection,
si vous travaillez avec la machine.
_ Ne jamais faire fonctionner la
machine si vous marchez pieds nus ou
portez des sandales ouvertes. Porter
toujours des chaussures fermées et
des pantalons longs.
_ Inspecter soigneusement la surface
à travailler et éliminer pierres, bâtons,
fils métalliques, os et autres objets
étrangers.
_ Avant l’utilisation, effectuez toujours
un contrôle visuel afin de constater si
des griffes et des boulons manquent,
sont usés ou endommagés.
_ Toujours remplacer l’ensemble des
griffes et boulons usés ou
endommagés pour préserver l’équilibre
de la machine. Faire attention
lors de l’utilisation de machines
présentant plusieurs griffes, étant
donné que lors de la mise en rotation
d’une griffe, les autres griffes peuvent
également se mettre à tourner.
_ Mettez un écran facial, si vous
utilisez la machine sans dispositif de
ramassage.
_ Ne menez l’appareil qu’au pas, ne
jamais courir.
_ Ne travailler qu’à la lumière du jour
ou avec un bon éclairage.
_ Si possible, évitez d’utiliser la
machine lorsque l’herbe est mouillée
ou prenez des mesures de précaution
supplémentaires pour éviter de glisser.
_ Aérer/scarifier le gazon sur des talus
peut être dangereux.
_ Ne pas utiliser le
scarificateur/l’aérateur de gazon sur
des pentes très abruptes.
- Sur des pentes ou de l’herbe
mouillée, faire attention à ne
pas perdre l’équilibre.
- Toujours aérer/scarifier le gazon
transversalement à la pente,
4

jamais de haut en bas ou de
bas en haut.
- Faites très attention lors d’un
changement
de direction sur une pente.
- Faites très attention en reculant
ou en tirant
la machine vers vous.
_ Lors des travaux d’aération/de
scarification du gazon, poussez la
machine toujours vers l’avant et ne la
tirez jamais vers vous.
_ Les griffes/lames doivent être
totalement à l’arrêt quand vous devez
basculer la machine pour la transporter,
quand vous traversez d’autres
surfaces que des terrains couverts
d’herbes ou quand vous transportez la
machine entre deux surfaces à
aérer/scarifier.
_ N’utilisez jamais la machine sans
dispositif de ramassage ni sans
protection anti-choc.
_ Mettez la machine en marche
conformément aux instructions du
mode d’emploi et veillez à maintenir
les pieds bien à l’écart des parties en
rotation.
_ N’inclinez pas la machine lors du
démarrage ou lorsque vous mettez le
moteur en fonctionnement, sauf si ceci
est nécessaire pour la mettre en
marche quand l’herbe est haute.
Dans ce cas-là, soulever alors la
machine juste ce qu’il faut et
uniquement sur le côté opposé à
l’utilisateur en poussant le guidon
vers le bas. Veillez toujours à ce que
vos mains soient placées sur le guidon
lorsque vous posez la machine sur le
sol.
_ Tenir les pieds et les mains éloignés
des parties rotatives de la machine.
_ Lors du travail, gardez une certaine
distance par rapport à la zone
d’éjection.
_ Ne jamais soulever ni transporter la
machine pendant que le moteur est en
marche.
_ Lors du réglage de la machine,
veillez à ne pas coincer vos pieds ni
vos mains entre les griffes/lames en
rotation ou dans les parties
fixes de la machine.
_ Contrôlez régulièrement le câble
d’alimentation et d’éventuelles
rallonges. Ne jamais raccorder un
câble endommagé à la prise de
courant et ne pas le toucher avant qu’il
ne soit déconnecté du réseau. Un
câble endommagé pourrait vous mettre
en contact avec des pièces sous
tension. Attention, il y a risque de choc
électrique.
_ Ne touchez pas les griffes avant que
la machine ne soit déconnectée du
réseau et que les griffes ne soient à
l’arrêt total.
_ Maintenez le câble d’alimentation et
la rallonge à distance des griffes. Les
griffes peuvent endommager les
câbles et vous mettre en contact avec
des parties sous tension. Attention, il y
a risque de choc électrique.
Retirer la fiche de la prise de
courant :
– à chaque fois que vous vous
éloignez de la machine,
– avant d’éliminer un engorgement,
– pour contrôler, nettoyer ou effectuer
des travaux sur la machine,
– après avoir heurté un objet étranger.
Vérifiez immédiatement que la
machine ne présente pas
d’endommagements, et, si nécessaire,
faites-la réparer,
5

– si la machine commence à vibrer de
manière inhabituelle (vérifier
immédiatement).
Entretien
_ Vérifiez que tous les écrous,
boulons et vis sont bien serrés afin
d’assurer que la machine se trouve
dans un état de fonctionnement
ne présentant aucun danger.
_ Contrôlez régulièrement l’état
d’usure du dispositif de ramassage.
_ Contrôlez la machine et, pour des
raisons de sécurité, remplacez les
pièces usées ou endommagées.
_ Veillez à ce que les pièces de
rechange soient des pièces d’origine
ELEM GARDEN TECHNIC.
_ Portez toujours des gants de jardin,
si vous manipulez ou travaillez près
des griffes/lames aigues.
Branchement électrique
_ La tension de la source de courant
doit coïncider avec les indications se
trouvant sur la plaque signalétique de
l’appareil.
_ Il est recommandé de ne brancher
cet appareil que sur une prise de courant
protégée par un dispositif à courant
différentiel résiduel avec un courant de
défaut de 30 mA.
_ En cas de remplacement du câble,
n’utiliser que le câble d’alimentation
prévu par le fabricant de l’appareil,
pour le numéro de commande et le
type, voir les instructions de service.
_ Ne jamais toucher la fiche de
secteur avec des mains humides.
_ Ne pas écraser le câble
d’alimentation ou sur
la rallonge, ni les coincer ou les tirer
sous risque de les endommager.
Protégez le câble contre la chaleur,
l’huile et les bords tranchants.
_ La rallonge doit disposer de la
section indiquée dans les instructions
d’utilisation et être étanche aux
projections d’eau. La connexion
électrique ne doit pas se trouver dans
l’eau.
_ Portez toujours des gants de jardin,
si vous manipulez ou travaillez près
des griffes/lames aigues.
6
UTILISATION CONFORME
ATTENTION !
Débranchez la fiche avant toute
opération de réglage ou
d’entretien de l’appareil.
L’appareil est conçu pour ratisser, scarifier ou
aérer le gazon dans le domaine privé.
MONTAGE
_ Attention ! Avant d’effectuer tous travaux
de maintenance ou de nettoyage, arrêter
l’appareil et débrancher la fiche de la prise
de courant. Ceci vaut également lorsque le
câble électrique est endommagé, coupé ou
emmêlé.
_ Une fois la machine mise hors tension, les
griffes/lames continuent encore à tourner
pendant quelques secondes.
_ Attention – ne pas toucher une griffe/lame
en rotation.
_ Portez toujours des gants de jardin, si vous
manipulez ou travaillez près des griffes/lames aigues.
Sécurité électrique
Pour des raisons de sécurité, la machine est
équipée d’une double isolation et ne nécessite
pas de prise de terre. La tension de fonctionnement est de 230 V CA, 50 Hz (pour les pays hors
de l’Union européenne 220 V, 240 V suivant la
version). N’utiliser qu’une rallonge électrique
homologuée. Pour plus de renseignements,
contacter le service après-vente autorisé.
Seules les rallonges de type H05VV-F, H05RN-F
ou IEC (60227 IEC 53, 60245 IEC 57) doivent
être utilisées.Contactez votre Centre de services
ELEM TECHNIC GARDEN pour plus de détails:
info@eco-repa.com
Au cas où vous utiliseriez une rallonge pendant
le travail avec l’appareil, n’utilisez que des câbles
ayant les sections de conducteur suivantes :
– 1,0 mm² : longueur maximale 40 m
– 1,5 mm² : longueur maximale 60 m
– 2,5 mm² : longueur maximale 100 m
Remarque : Au cas où une rallonge devrait être
utilisée, celle-ci doit disposer, conformément à
la description figurant dans les instructions de
sécurité, d’un conducteur de protection raccordé au
conducteur de protection de l’installation électrique
par l’intermédiaire de la fiche.
PRECAUTION : Des rallonges non conformes
aux instructions peuvent être dangereuses.
Les versions de câble de rallonge, fiche et accouplement doivent être étanches à l’eau et
autorisées pour l’extérieur.
Les connexions de câble doivent être sèches et
ne pas reposer sur le sol.
Pour plus de sécurité, il est recommandé d’utiliser
un disjoncteur différentiel avec un courant
de défaut de 30 mA maximum. Avant chaque
utilisation de la machine, contrôler ce disjoncteur
différentiel.
Montage
_ Veillez à ne pas coincer le câble d’alimentation lorsque vous dépliez ou repliez le guidon supérieur/inférieur. Ne pas laisser tom-
ber le guidon.
Certaines parties du scarificateur ont été démontées
en vue de son transport. Les vis, volants de
manoeuvre, attaches de câble, crochet de câble,
tournevis et clé sont rangés dans des sacs en
plastique. Le montage est simple si vous respectez
les consignes suivantes :
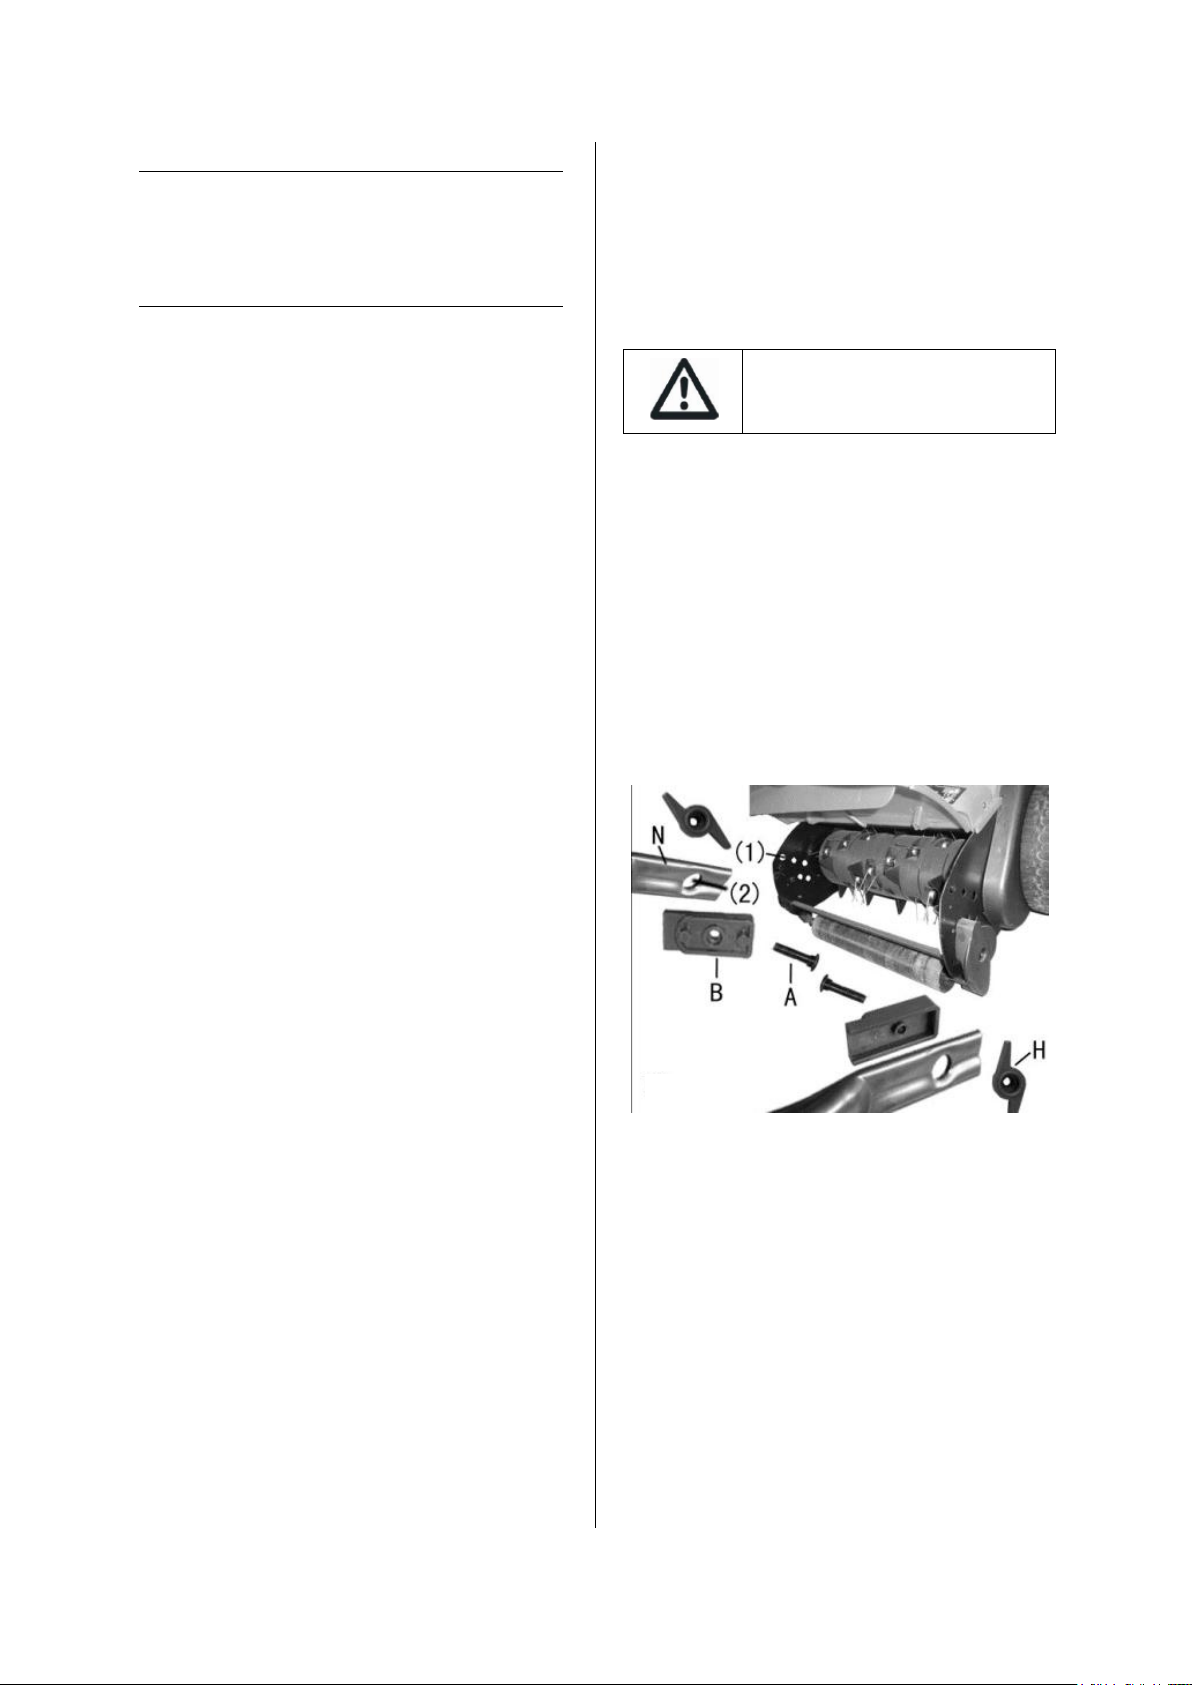
Montage de la partie inférieure de poignée
Insérez la vis de fixation (A) depuis l’intérieur à
travers l’élément gauche.
Positionnez l’élément d’isolation (B) depuis
l’extérieur ; les deux petits morceaux doivent se
bloquer dans les orifices de l’élément latéral (2).
Installez l’élément d’isolation (B) de sorte
que la grande ouverture pointe vers l’extérieur.
Positionnez l’extrémité de l’élément de
poignée (N) dans l’élément d’isolation
(B). Serrez ensuite l’écrou à oreilles (H).
Montez l’élément droit de poignée dans le même
ordre.
7
Montage de la partie supérieure de poignée
ATTENTION !
Débranchez la fiche avant toute
opération de réglage ou
d’entretien de l’appareil.
ATTENTION !
Débranchez la fiche avant toute
opération de réglage ou
d’entretien de l’appareil.
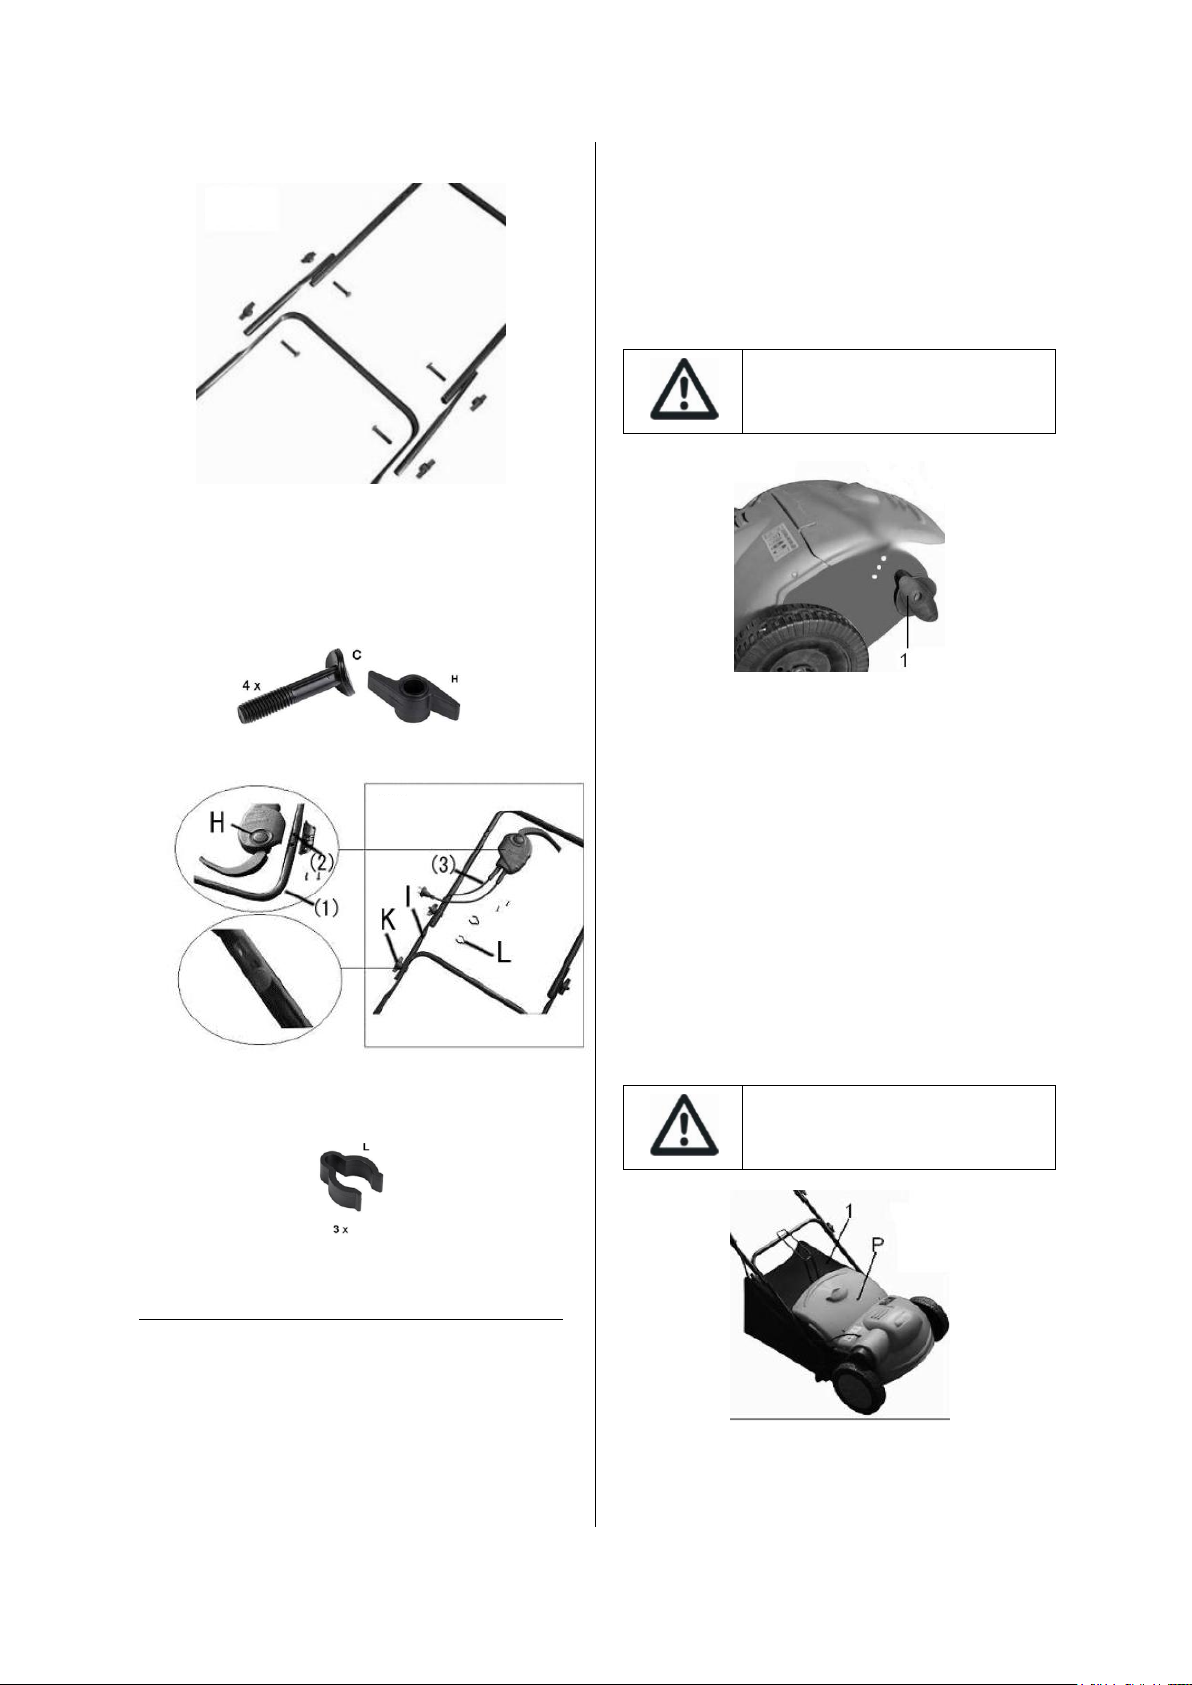
Faites d’abord glisser le dispositif de blocage
du câble au-dessus du mancheron supérieur.
Reliez les deux éléments à l’aide de boulons
à tête de forme spéciale (C) et installez les
boulons avec les écrous à oreilles (H).
Serrez le câble du commutateur à l’aide des
attaches (L) sur la tige de poignée.
Note : Afin de faciliter le démarrage, poussez le
guidon vers le bas pour soulever les roues
avant.
La pelouse doit être scarifiée plusieurs fois par an.
Avant d’utiliser la machine, la pelouse doit être
coupée à une hauteur comprise entre 2,5 et 3,5 cm.
Réglage de la profondeur de travail
La profondeur de travail peut être réglée sur 3
hauteurs. Tirez le bras de réglage (1) pour l’éloigner
du capot latéral et laissez-le s’accrocher dans la
position souhaitée (2). Réglez alternativement la
hauteur à gauche et à droite sur une seule position.
Les bras de réglage doivent toujours être dans la
même position en hauteur.
Position inférieure et intermédiaire du cylindre du
scarificateur :
Retire la mousse et les mauvaises herbes
présentes sur la pelouse.
Position supérieure du cylindre du scarificateur :
Retire les restes d’herbe présents sur la pelouse.
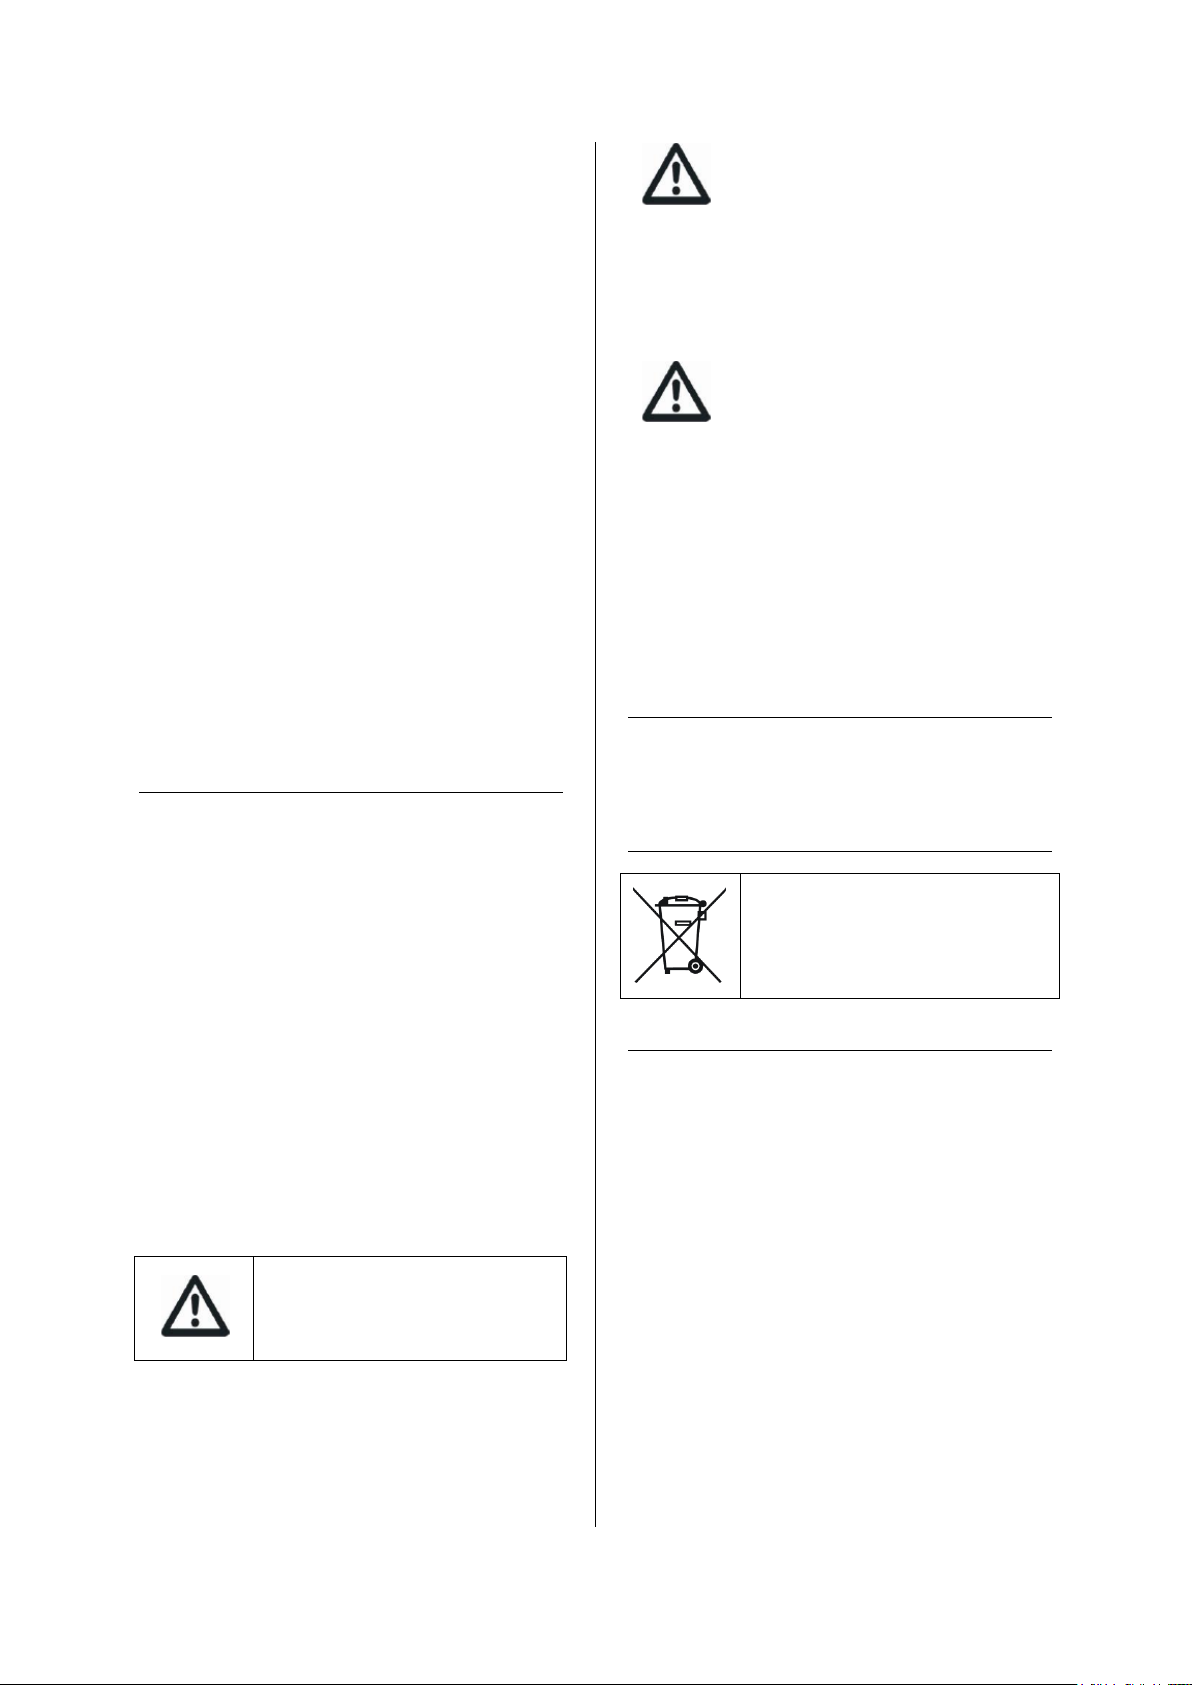
Fixation du sac de ramassage
UTILISATION
_ Une fois la machine mise hors tension, les
griffes/lames continuent encore à tourner
pendant quelques secondes. Attendez l’arrêt
total du moteur ainsi que des griffes/lames
avant de remettre la machine en fonctionnement.
_ Ne pas arrêter l’appareil et le remettre en
fonctionnement à de très courts intervalles.
Relevez le volet de protection (P).
Suspendez le sac de ramassage (1) à l’aide
des crochets sur les deux boulons des
éléments latéraux.
8
ATTENTION !
Débranchez la fiche avant toute
opération de réglage ou
d’entretien de l’appareil.
ATTENTION !
Débranchez la fiche avant toute
opération de réglage ou
d’entretien de l’appareil.
Portez toujours des gants de
jardin, si vous manipulez ou
travaillez près des griffes/lames
aigues.
Avant tous travaux sur la
machine, retirer la fiche du
secteur et enlever le bac de
ramassage.
Portez toujours des gants de
jardin, si vous manipulez ou
travaillez près des griffes/lames
aigues.
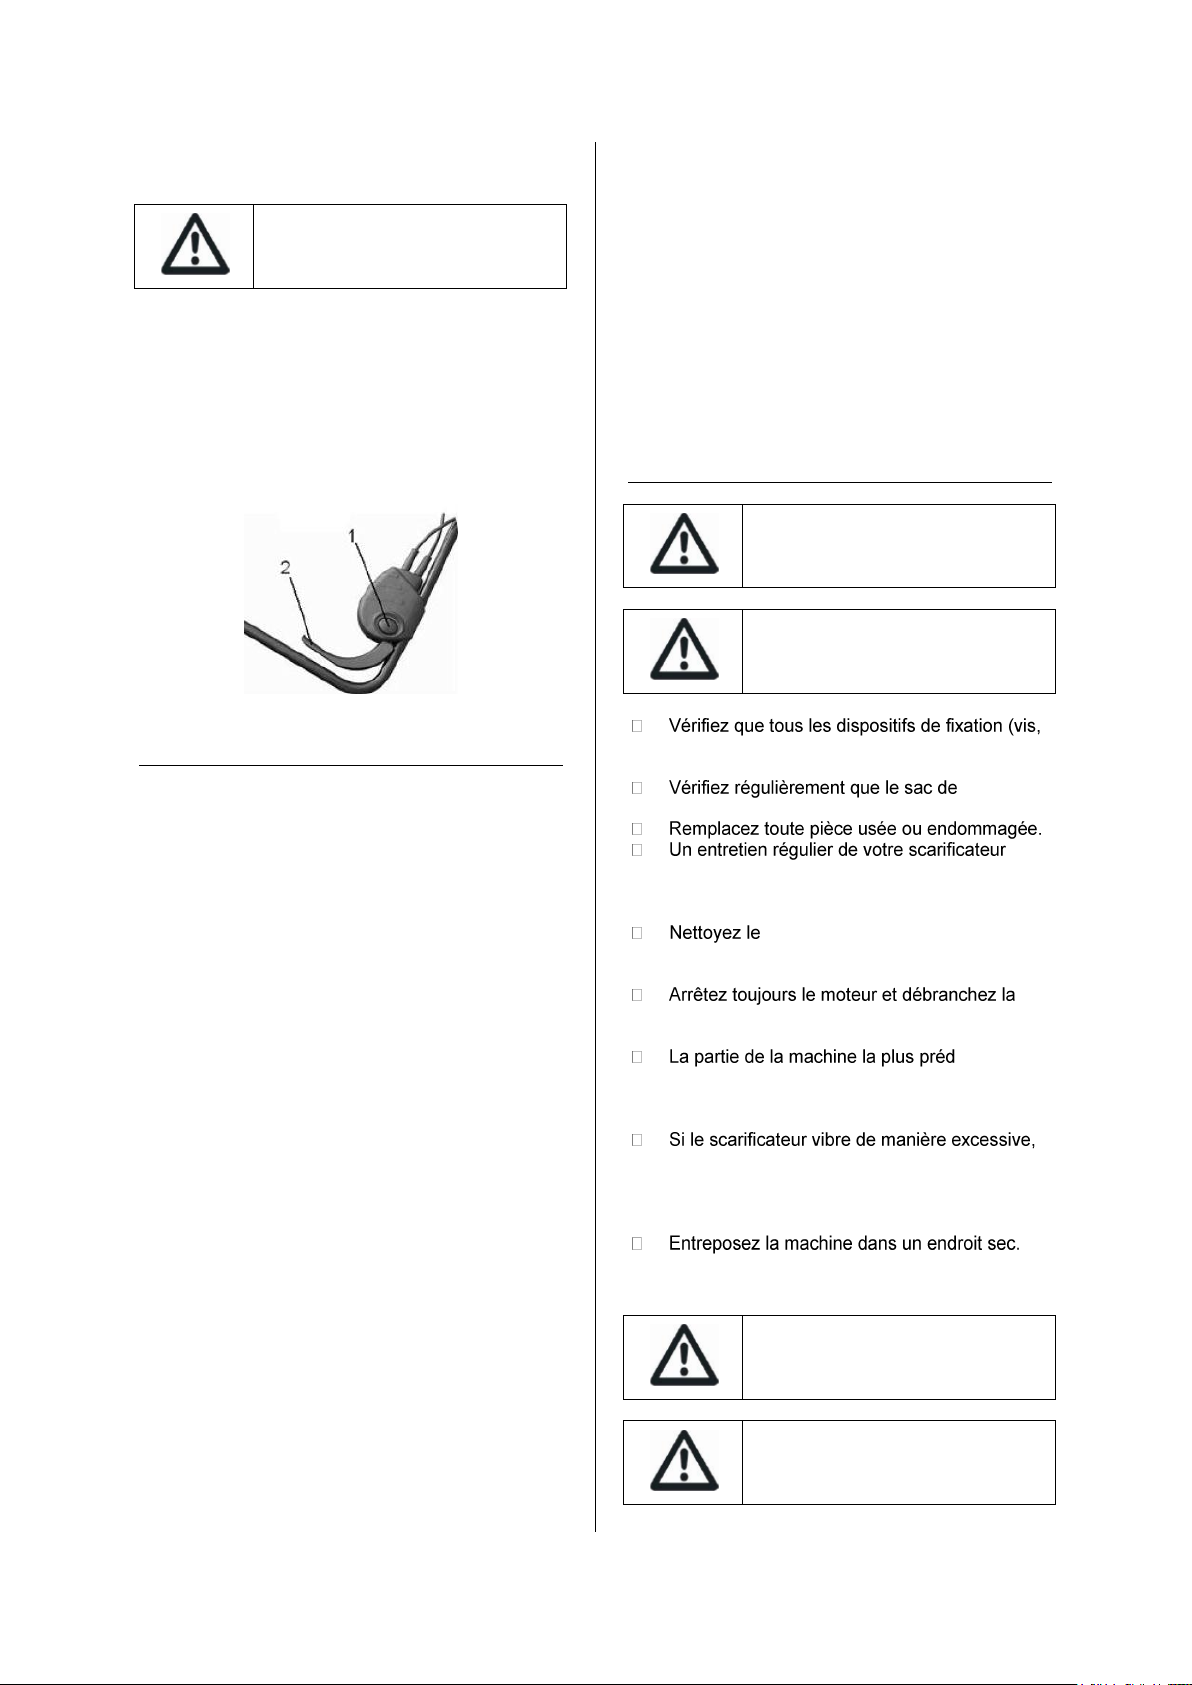
Mise sous / hors tension
Démarrage du moteur
Appuyez sur le bouton (1) et maintenez-le enfoncé.
Relevez le levier (2) et relâchez le bouton (1).
Arrêt du moteur
Relâchez le levier (2).
– Aérez/scarifiez le gazon en commençant les
travaux par des trajectoires d’aller et retour,
recommencer une semaine plus tard de la
même manière perpendiculairement à ces
trajectoires jusqu’à ce que tout le gazon soit
travaillé.
– En fonction de l’état de la pelouse, l’aéra-
tion/la scarification de la mousse et des mauvaises herbes peut dégarnir ou dénuder certains endroits.
Le temps idéal pour aérer ou scarifier le gazon
est en printemps et à la fin de l’automne.
NETTOYAGE ET ENTRETIEN
INSTRUCTIONS D’UTILISATION
Positionnez le SCEE12002B en bordure de la
pelouse et aussi près que possible de la prise de
secteur. Travaillez en vous éloignant de la prise de
secteur.
Après chaque changement de direction, placez le
câble du côté qui a déjà été travaillé.
Lors du travail d’aération/de scarification du gazon
ne pas surcharger le moteur.
Si le moteur est trop sollicité, le nombre de
tours par minute baisse et le bruit du moteur change.
Dans un tel cas, arrêtez-vous, relâchez le levier de
commande et réglez une hauteur de travail plus
élevée. Sinon, le moteur risque d’être endommagé.
_ Portez toujours des gants de jardin, si vous
manipulez ou travaillez près des griffes/lames
aigues.
Les conditions optimales pour aérer/scarifier le
gazon sont présentes quand l’herbe est courte
et légèrement humide. Aérer ou scarifier le gazon quand le sol est très mou ou très dur peut
endommager ce dernier et entraîner un ramas-
sage insatisfaisant.
– Avant d’aérer/de scarifier le gazon, éliminer
la mousse à l’aide d’un produit approprié dis-
ponible dans le commerce.
– Démarrez le SCEE12002B à la hauteur
de travail la plus élevée et abaissez-la suivant
le besoin.
écrous, etc.) sont toujours bien serrés de sorte que
vous pouvez utiliser le scarificateur en toute sécurité.
ramassage n’est pas usé.
prolongera non seulement sa durée de vie mais
facilitera également la scarification précise et facile
à l’aide de votre scarificateur.
scarificateur à l’aide de brosses ou
de chiffons. N’utilisez ni solvant ni eau pour éliminer
la saleté.
fiche avant toute opération d’entretien ou de
nettoyage.
isposée à
l’usure est la lame. Vérifiez régulièrement l’état de la
lame et de son dispositif de fixation. Si la lame est
usée, elle doit être remplacée ou affûtée.
ceci signifie que la lame n’est pas
correctement équilibrée ou a été déformée par des
coups, elle doit, dans ce cas, être réparée ou
remplacée.
Montage et démontage des griffes
9
ATTENTION! Lorsque la pression
acoustique dépasse la valeur de
85 dB(A), il est nécessaire de
porter des dispositifs individuels
de protection de l’ouïe.
Si, après un certain temps, vous
décidez de remplacer votre
machine, ne vous en débarrassez
pas avec les ordures ménagères
mais destinez-la à un traitement
respectueux de l’environnement.
Après l’aération/le scarification du
gazon/stockage
Nettoyer soigneusement les parties extérieures
de la machine à l’aide d’une brosse douce et
d’un torchon. Ne pas utiliser d’eau ni de solvants ou
détergents abrasifs. Enlever toutes les herbes et
particules pouvant adhérer sur la machine et
notamment sur les ouïes de ventilation.
Poser la machine sur le côté et nettoyer la zone
des griffes/lames. Si de l’herbe se trouve coincée, la retirer à l’aide d’un morceau de bois ou
de plastique
Ranger la machine dans un endroit sec
Ne pas poser d’autres objets sur la machine.
Pour gagner de la place, replier complètement le
guidon.
Veillez à ne pas coincer le câble d’alimentation lorsque vous dépliez ou repliez le guidon supérieur/inférieur. Ne pas laisser tom-
ber le guidon.
Avant le stockage de la machine, démonter le
bac de ramassage.
DONNEES TECHNIQUES
Tension 230-240 V ~ 50 Hz
Puissance 1200 Watt
Vitesse à vide 4500 min-1
Largeur de travail 330 mm
Profondeur de travail -3 / 4 / 8 mm
Volume du sac de ramassage 30 l
Brosse métallique 48
Lames en acier 9
Poids 11.2Kg
Degré de protection IP24
Valeurs des émissions sonores mesurées selon la
norme applicable :
Pression acoustique LpA
82.1 dB(A) K = 3 dB(A)
Puissance acoustique LwA
98 dB(A) K = 3 dB(A)
Valeur quadratique moyenne pondérée de
l'accélération selon la norme applicable :
1.07 m/s² K = 1,5 m/s².
La valeur totale de vibrations déclarée
a été mesurée conformément à une méthode
d'essai normalisée et peut être utilisée pour
comparer un outil à un autre; l'indication du fait
que la valeur totale de vibrations déclarée peut
également être utilisée pour une évaluation
préliminaire de l'exposition.
L’émission de vibration au cours de
l'utilisation réelle de l'outil électrique peut
différer de la valeur totale déclarée, selon les
méthodes d'utilisation de l'outil; et signifiant la
nécessité d’identifier les mesures de sécurité
visant à protéger l'opérateur, qui sont basées
sur une estimation de l'exposition dans les
conditions d'utilisation réelles (compte tenu de
toutes les parties constituantes du cycle de
fonctionnement, telles que les temps d'arrêt de
l'outil et de fonctionnement au repos, en plus du
temps de déclenchement).
GARANTIE
Pour les clauses de garantie, reportez-vous
aux conditions de garantie ci-jointes.
MISE AU REBUT
SERVICE APRÈS-VENTE
_ Un commutateur endommagé doit être remplacé
dans nos ateliers du service après-vente.
_ Si le remplacement du câble d’alimentation est
nécessaire, cela doit être réalisé par le fabricant
ou son agent pour éviter un danger.
Service Après-Vente et Assistance
Notre Service Après-Vente répond à vos questions
concernant la réparation et l’entretien de votre
produit et les pièces de rechange. Vous trouverez
des vues éclatées ainsi que des informations
concernant les pièces de rechange également sous
: www.eco-repa.com
Les conseillers techniques et assistants ELEM
GARDEN TECHNIC sont à votre disposition pour
répondre à vos questions concernant nos produits
et leurs accessoires : sav@eco-repa.com
10

ENTREPOSAGE
_ Nettoyez soigneusement toute la machine et ses
accessoires.
_ Entreposez-la hors de la portée des enfants, dans
une position stable et sûre, dans un lieu sec et
tempéré, évitez les températures trop hautes ou
trop basses.
_ Protégez-la du rayonnement direct du soleil.
Tenez-la, si possible, dans le noir.
_ Ne l’enfermez pas dans des sacs en plastique car
de l’humidité pourrait s'y former.
Vous pouvez faire la demande du manuel
d’instruction sous format PDF par mail :
info@eco-repa.com
Fabriqué en Chine 2015
11
NL ELEKTRISCHE 2-IN-1 VERTICUTEERDER / BELUCHTER
Algemene waarschuwing.
Lees de gebruiksaanwijzing.
Voorkom dat personen in de buurt
gewond raken door
weggeslingerde voorwerpen.
Houd personen in de buurt op een
veilige afstand tot het
gereedschap.
Scherpe tanden of messen. Wees
uiterst voorzichtig met tenen en
vingers.
Bescherm uzelf tegen een
elektrische schok.
Houd de aansluitkabel uit de buurt
van de snijmessen.
Gebruik het gereedschap niet in de
regen en stel het niet bloot aan
regen.
Schakel het apparaat uit en trek de
stekker uit het stopcontact voordat
u het apparaat instelt of
schoonmaakt, wanneer de kabel
vast komt te zitten of wanneer u
het apparaat (ook voor
korte tijd) onbeheerd laat. Houd de
stroomkabel uit de buurt van
tanden en messen.
Wacht tot alle delen van de
machine volledig tot stilstand
gekomen zijn voordat u ze
aanraakt. De tanden of
messen draaien na het
uitschakelen van de machine nog
en kunnen verwondingen
veroorzaken.
Gevaar voor verwondingen!
Controleer het werkgebied vóór u
begint te werken en verwijder alle
voorwerpen die door de machine
weggeslingerd zouden kunnen
worden.
Draag oogbescherming.
Het dragen van oorbescherming
wordt aangeraden.
Wear protective gloves.
De machine is dubbel geïsoleerd
overeenkomstig; een aardedraad is
daarom niet nodig.
CE Conform de Europese
toepasselijke standaarden op het
gebied van veiligheid.
VEILIGHEIDSVOORSCHRIFTEN
Let op! Lees de volgende voorschriften zorgvuldig. Maak uzelf vertrouwd met de bedieningselementen en het juiste gebruik van de
machine. Bewaar de gebruiksaanwijzing goed
voor later gebruik.
SYMBOLEN
12

VEILIGHEIDSINSTRUCTIES
_ Dit apparaat kan worden gebruikt
door oudere kinderen minstens 8 jaar
en mensen met een lichamelijke,
zintuiglijke of verstandelijke vermogens
of zonder ervaring of kennis, ze (als
ze) goed bewaakt (e ) s of instructies
voor het gebruik van de machine veilig
aan hen gegeven en als de risico's die
werden aangehouden.
Kinderen mogen niet met het apparaat
spelen.
Reiniging en onderhoud door de
gebruiker mag niet worden uitgevoerd
door kinderen zonder toezicht
_ Gebruik de machine niet wanneer u
moe of ziek bent of onder invloed staat
van alcohol, drugs of medicijnen.
_ Laat geen kinderen of andere
personen die zich niet bewust is van
deze instructies, gebruik het apparaat.
Sommige lokale regelgeving te
vermelden een leeftijdsgrens van de
gebruiker.
_ Verticuteer of belucht het gazon nooit
in de buurt van personen, in het
bijzonder kinderen, of huisdieren.
_ Vergeet niet dat de gebruiker
verantwoordelijk is voor ongelukken of
gevaarlijke situaties die zich op
anderen of hun eigendom
_ Draag altijd een gehoorbescherming
en een veiligheidsbril terwijl u met de
machine werkt.
_ Gebruik de machine niet met blote
voeten of met open sandalen. Draag
altijd stevige schoenen en een lange
broek.
_ Controleer het te bewerken
oppervlak zorgvuldig op stenen,
stokken, metaaldraad, botten en
andere voorwerpen en verwijder deze.
_ Kijk vóór gebruik altijd of er tanden of
tandschroeven ontbreken, versleten of
beschadigd zijn.
_ Vervang versleten of beschadigde
tanden en schroeven altijd per
complete set om onbalans te
voorkomen. Opgepast bij machines
met meer dan één tand, omdat het
ronddraaien van een tand de beweging
van andere tanden kan veroorzaken.
_ Draag een gezichtsbescherming
wanneer u de machine zonder
opvangvoorziening gebruikt.
_ Loop altijd rustig, nooit te snel.
_ Verticuteer of belucht het gazon
alleen bij daglicht of goed kunstlicht.
_ Voorkom indien mogelijk het gebruik
van de machine bij nat gras of neem
extra voorzorgsmaatregelen om
uitglijden te voorkomen.
_ Het beluchten of verticuteren van
gazon op hellingen kan gevaarlijk zijn.
_ Verticuteer of belucht niet op
bijzonder steile hellingen.
– Zorg ervoor dat u op een
helling of op nat gras altijd
stevig staat.
– Belucht of verticuteer het
gazon op een helling altijd
dwars, nooit naar boven of naar
beneden.
– Ga altijd uiterst voorzichtig te
werk bij het veranderen van
richting op een helling.
– Wees uiterst voorzichtig bij
het achteruitlopen of bij het
trekken van de machine.
_ Duw de machine tijdens het
beluchten of verticuteren van het
gazon altijd naar voren toe,
trek deze nooit naar u toe.
13

_ De tanden of messen moeten
stilstaan wanneer u de machine voor
het transport moet kantelen, wanneer u
een gedeelte moet oversteken dat niet
met gras is beplant en wanneer u de
machine naar en van het te beluchten
of verticuteren gebied verplaatst.
_ Gebruik de machine nooit zonder
opvangvoorziening of
botsbescherming.
_ Schakel de machine in zoals in de
gebruiksaanwijzing beschreven en
houd uw voeten ruim uit de buurt van
ronddraaiende delen.
_ Kantel de machine bij het starten of
aantrekken van de motor niet, behalve
wanneer dit voor het starten in hoog
gras nodig is. Til in dit geval de van de
bediener afgewende zijde door het
naar beneden duwen van de
handgreep niet verder dan nodig
omhoog. Let erop dat u beide handen
aan de greep hebt wanneer u de
machine weer laat zakken.
_ Breng handen en voeten niet in de
buurt van of onder ronddraaiende
delen.
_ Houd afstand tot de afvoerzone
terwijl u met de machine werkt.
_ Til of draag de machine nooit terwijl
de motor loopt.
_ Voorkom bij het instellen van de
machine dat uw voeten of handen
tussen de bewegende tanden of
messen en de vaste delen van de
machine worden vastgeklemd.
_ Controleer regelmatig de
stroomkabel en eventuele
verlengkabels. Een beschadigde
kabel mag niet worden aangeraakt of
op het stopcontact worden
aangesloten voordat de verbinding met
het stroomnet is verbroken. Bij een
beschadigde kabel kunt u met
spanningvoerende delen in aanraking
komen.
Voorzichtig, er bestaat het gevaar van
een elektrische schok.
_ Raak de tanden niet aan voordat de
verbinding van de machine met het
stroomnet is verbroken en de tanden
volledig tot stilstand zijn gekomen.
_ Houd stroom- en verlengkabels uit
de buurt van de tanden. De tanden
kunnen de kabels beschadigen en
kunnen u met spanningvoerende delen
in aanraking brengen. Voorzichtig, er bestaat het gevaar van een
elektrische schok.
Trek de stekker uit het stopcontact:
– altijd wanneer u de machine verlaat,
– vóór het verwijderen van
blokkeringen,
– voordat u de machine controleert of
reinigt of aan de machine werkt,
– na het raken van een voorwerp.
Controleer de machine onmiddellijk op
beschadigingen en laat deze indien
nodig repareren,
– als de machine op een ongewone
manier begint te trillen (onmiddellijk
controleren).
Onderhoud
_ Stel vast dat alle moeren, bouten en
schroeven goed vastzitten, zodat een
veilige werktoestand van de machine
gewaarborgd is.
_ Controleer de opvangvoorziening
regelmatig op slijtage.
14

_ Controleer de machine en vervang
veiligheidshalve versleten of
beschadigde delen.
_ Zorg ervoor dat
vervangingsonderdelen van
ELEM GARDEN TECHNIC afkomstig
zijn.
_ Draag altijd tuinhandschoenen
wanneer u de scherpe tanden of
messen vastpakt of er aan werkt.
Stroomaansluiting
_ De spanning van de stroombron
moet overeenkomen met de gegevens
op het typeplaatje van het apparaat.
_ Geadviseerd wordt om dit apparaat
alleen aan te sluiten op een
stopcontact dat is beveiligd met
aardlekschakelaar van 30 mA.
_ Gebruik bij het vervangen van de
kabel van apparaat alleen de door de
fabrikant geadviseerde aansluitkabel.
Zie de gebruiksaanwijzing voor
bestelnummer en type.
_ Pak de stekker nooit met natte
handen vast.
_ Rijd niet over de aansluitkabel of de
verlengkabel, klem deze niet vast en
trek er niet aan.
De kabel kan anders beschadigd
raken. Bescherm de kabel tegen hitte,
olie en scherpe randen.
_ De verlengkabel moet de in de
gebruiksaanwijzing vermelde diameter
hebben en moet spatwaterbeschermd
zijn. De verbinding van stekker en
contrastekker mag niet in het water liggen.
_ Draag altijd tuinhandschoenen
wanneer u de scherpe tanden of
messen vastpakt of er aan werkt.
GEBRUIK VOLGENS BESTEMMING
Het apparaat is bestemd voor het harken, verticuteren of beluchten van gazon, bij particulier
gebruik.
MONTAGE
Voor uw veiligheid
_ Let op! Schakel het apparaat vóór onder-
houds- en reinigingswerkzaamheden uit en
trek de stekker uit het stopcontact. Hetzelfde
geldt wanneer de stroomkabel beschadigd,
doorgesneden of in de war is.
_ Nadat de machine uitgeschakeld is, draaien
de tanden of messen nog enkele seconden
verder.
_ Voorzichtig! – Raak ronddraaiende tanden
of messen niet aan.
_ Draag altijd tuinhandschoenen wanneer u
de scherpe tanden of messen vastpakt of er
aan werkt.
Elektrische veiligheid
Uw machine is voor extra veiligheid geïsoleerd
en heeft geen aarding nodig. De bedrijfsspanning bedraagt 230 V AC, 50 Hz (voor niet-EU-landen 220 V of 240 V, afhankelijk van de uitvoering). Gebruik alleen goedgekeurde
verlengkabels. Informatie is verkrijgbaar bij de
erkende klantenservice.
Neem contact op met uw lokale servicecentrum
ELEM GARDEN TECHNIC voor meer details:
info@eco-repa.com
Er mogen alleen verlengkabels van het type
H05VV-F, H05RN-F of IEC (60227 IEC 53, 60245
IEC 57) worden gebruikt.
Als u een verlengkabel voor het gereedschap gebruikt, moeten dat kabels met de volgende aderdiameters zijn:
– 1,0 mm² : maximale lengte 40 m
– 1,5 mm² :maximale lengte 60 m
– 2,5 mm² : maximale lengte 100 m
Opmerking: Als u een verlengkabel gebruikt,
moet deze (zoals bij de veiligheidsvoorschriften
beschreven) een aardedraad bezitten die via de
stekker met de aardedraad van uw elektrische
installatie verbonden is.
VOORZICHTIG: Verlengkabels die niet volgens
de voorschriften zijn, kunnen gevaarlijk zijn.
Verlengkabels, stekkers en contrastekkers
moeten waterdicht uitgevoerd en voor gebruik
buitenshuis goedgekeurd zijn.
15

OPGELET!
Haal de stekker uit het
stopcontact vóór u afregelingen
of onderhoud uitvoert.
Kabelverbindingen moeten droog zijn en mogen
niet op de grond liggen.
Voor extra veiligheid wordt het gebruik van een
aardlekschakelaar met een uitschakelstroom
van maximaal 30 mA geadviseerd. De aardlekschakelaar moet vóór gebruik altijd worden gecontroleerd.
Montage
Montage van het bovenste deel van de beugel
_ Let er bij het uit elkaar of in elkaar klappen
van de bovenste en onderste handgreep op
dat de stroomkabel niet vastgeklemd wordt.
Laat de handgreep niet vallen.
Voor een gemakkelijker transport werden enkele
onderdelen van de verticuteermachine uit
elkaar gehaald. De schroeven, duimwielen,
kabelclips, kabelhaak, schroevendraaier en een
sleutel zijn te vinden in plastic zakjes. De montage
is eenvoudig wanneer u de volgende instructies
opvolgt:
Montage van het onderste deel van de beugel
Schuif eerst de trekontlaster over de
bonvenste beugel
Gebruik hiervoor de bouten met speciaal
gevormde ronde kop (C) en zet vast met de
vleugelmoeren (H)
Zet de kabel van de schakelaar met de clips (L) vast
op de beugel.
Steek de montageschroef (A) van binnenuit
doorheen het linkse onderdeel. Breng onderdeel (B)
langs de buitenkant aan; de twee nokken
moeten in de gaten van het onderdeel aan de
zijkant (2) passen. (Plaats onderdeel (B) zó
dat de grote opening naar buiten wijst). Duw het
uiteinde van de beugel (N) in het onderdeel (B)..
Zet alles vast met de vleugelmoer (H).
Monteer het gedeelte aan de rechterkant in dezelfde
volgorde.
BEDIENING
_ Nadat de machine uitgeschakeld is, draaien
de tanden of messen nog enkele seconden
verder. Wacht tot de motor en de tanden of
messen stilstaan voordat u het gereedschap
opnieuw inschakelt.
_ Schakel het gereedschap niet kort achtereen uit en weer in.
Opmerking: Duw de greepbeugel naar beneden
om de voorwielen op te tillen en het aanlopen te
16

vergemakkelijken.
OPGELET!
Haal de stekker uit het
stopcontact vóór u afregelingen
of onderhoud uitvoert.
OPGELET!
Haal de stekker uit het
stopcontact vóór u afregelingen
of onderhoud uitvoert.
OPGELET!
Haal de stekker uit het
stopcontact vóór u afregelingen
of onderhoud uitvoert.
Het gazon moet meerdere malen worden scarified
per jaar.
Alvorens de machine, moet het gazon tot een
hoogte van tussen de 2,5 en 3,5 cm worden
gesneden.
Instellen van de werkhoogte
Aan- en uitschakelen
Motor aanzetten
Duw de knop (1) in en hou hem ingedrukt.
Trek aan de hendel (2) en laat de knop (1)
los.
Motor uitschakelen
Laat de hendel (2) los.
De werkhoogte is instelbaar in 3 standen.
Trek aan de instelhendel (1) in de richting weg van
de zijkant en laat hem in de gewenste stand (2)
terugklikken. Stel de hoogte links en rechts om
beurten met 1 standje bij. De instelhendels moeten
altijd in dezelfde stand staan.
Onderste en middelste stand van de verticuteerrol:
Verwijdert mos en onkruid uit het grasveld.
Hoogste stand van de verticuteerrol:
Verwijdert overgebleven grasresten uit het gazon.
Monteren van de opvangzak
Til de beschermkap (P) op. Hang de
opvangzak (1) met de haken aan beide
bouten aan de zijkant van de beugel.
TIPS VOOR DE WERKZAAMHEDEN
Plaats de SCEE12002B aan de rand
van het gazon en zo dicht mogelijk bij het
stopcontact. Werk van het stopcontact weg.
Leg de kabel telkens na het keren van de machine op de tegenoverliggende, reeds gemaaide
zijde.
Tijdens het beluchten en verticuteren de motor
niet overbelasten.
Bij overbelasting daalt het toerental en verandert het geluid van de motor. Stop in dit geval,
laat de schakelhendel los en stel een grotere
werkhoogte in. Anders kan de motor beschadigd worden.
_ Draag altijd tuinhandschoenen wanneer u
de scherpe tanden of messen vastpakt of er
aan werkt.
Optimale voorwaarden voor het beluchten en
verticuteren van het gazon zijn gegeven wanneer
het gras kort en iets vochtig is. Het beluchten of
verticuteren van het gazon wanneer de grond
zeer zacht of hard is, kan deze beschadigen en
ertoe leiden dat de machine slecht verzamelt.
– Bestrijd mos vóór het beluchten of verticuteren
met een in de handel verkrijgbaar middel.
– Begin met de SCEE12002B op de
grootste werkhoogte en stel de hoogte naar
behoefte lager in.
– Belucht of verticuteer het gazon eerst in één
richting heen en weer. Een week later op de-
17

zelfde wijze haaks op deze richting, tot het
OPGELET!
Haal de stekker uit het
stopcontact vóór u afregelingen
of onderhoud uitvoert.
Draag altijd tuinhandschoenen
wanneer u de scherpe tanden of
messen vastpakt of er aan werkt.
Trek altijd voor werkzaamheden
aan het apparaat de stekker uit
het stopcontact en
verwijder de grasbak.
Draag altijd tuinhandschoenen
wanneer u de scherpe tanden of
messen vastpakt of er aan werkt.
AANDACHT! Draag
gehoorbeschermers wanneer het
geluidsniveau 85dB(A)
overschrijdt.
hele gazon bewerkt is.
– Afhankelijk van de toestand van het gazon
kan het beluchten of verticuteren van mos en
dode plantendelen tot gerafelde en kale plekken leiden.
Het optimale tijdstip om het gazon te beluchten
of te verticuteren is in de lente en late herfst.
REINIGING EN ONDERHOUD
Zorg ervoor dat alle montagematerialen
(schroeven, moeren, enz.) altijd volledig vast
zijn aangedraaid zodat u veilig met de
verticuteermachine kunt werken.
Controleer de grasopvangzak regelmatig op
slijtage en scheuren.
Vervang alle versleten of beschadigde
onderdelen.
Regelmatig onderhoud van uw
verticuteermachine verlengt niet alleen zijn
levensduur maar vergemakkelijkt ook het zorgvuldig
en eenvoudig werken ermee.
Reinig de verticuteermachine met borstels of
vodden. Gebruik geen oplosmiddelen of water om
vuil te verwijderen.
Schakel altijd de motor uit en haal de stekker
uit het stopcontact vóór u onderhouds- of
reinigingswerkzaamheden uitvoert.
Het onderdeel van de machine dat het meest
gevoelig is voor slijtage en scheuren is het mes.
Controleer regelmatig de toestand van het mes en
de bevestiging ervan. Wanneer het mes versleten is
dan moet het vervangen of geslepen worden.
Wanneer de verticuteermachine hevig trilt dan
betekent dit dat het mes niet correct is
uitgebalanceerd of dat het is verbogen doordat het
in aanraking is gekomen met harde of vaste
voorwerpen. In dit geval moet het hersteld of
vervangen worden.
Bewaar de machine in een droge ruimte
Demontage en montage van de tanden
Na het beluchten of verticuteren van
het gazon. Opbergen
Maak de buitenkant van de machine grondig
schoon met een zachte borstel en een doek. Gebruik geen water en geen oplos- of polijstmiddelen. Verwijder al het vastzittende gras en deeltjes, in het bijzonder van de ventilatieopeningen
Leg de machine op de zijkant en maak de tanden
of messen schoon. Verwijder samengeperst gras
met een voorwerp van hout of plastic.
Bewaar de machine op een droge plaats.
Plaats geen andere voorwerpen op de machine.
Klap de greepbeugel volledig samen om ruimte te
besparen.
Let er bij het uit elkaar of in elkaar klappen
van de bovenste en onderste handgreep op
dat de stroomkabel niet vastgeklemd wordt.
Laat de handgreep niet vallen.
Voor het bewaren van de machine wordt de
grasbak verwijderd.
TECHNISCHE GEGEVENS
Spanning 230-240 V ~ 50 Hz
Opgenomen vermogen 1200 Watt
Toerental onbelast 4500 min-1
Maaibreedte 330 mm
Maaihoogte -3 / 4 / 8 mm
Inhoud opvangzak 30 l
Aantal tanden van de draadborstel 48
Aantal stalen messen 9
Gewicht 11.2Kg
Beschermingsgraad IP24
Geluidsniveauwaarden gemeten volgens de van
toepassing zijnde standaard :
Lpa (Geluidsdrukniveau)
82.1 dB(A) K = 3 dB(A)
Lwa (Geluidsprestatieniveau
98 dB(A) K = 3 dB(A)
Gewogen kwadratische gemiddelde waarde de van
toepassing zijnde standaard :
1.07 m/s² K = 1,5 m/s².
De aanduiding van het feit dat de
aangegeven totale trillingenwaarde werd
gemeten conform een genormaliseerde
proefmethode en kan worden gebruikt om een
instrument met een ander instrument te
18

vergelijken; de aanduiding van het feit dat de
Als uw machine na verloop van
tijd aan vervanging toe is, geef
hem dan niet met het huisvuil
mee, maar zorg voor een
milieuvriendelijke verwerking.
aangegeven totale trillingenwaarde ook kan
worden gebruikt voor een voorafgaande
evaluatie van de blootstelling.
Een waarschuwing die stipuleert dat
de emissie van trilling in de loop van het
werkelijke gebruik van het elektrische
instrument kan verschillen van de aangegeven
totale waarde, volgens de gebruiksmethodes
van het instrument; door de noodzaak aan te
geven de veiligheidsmaatregelen te identificeren
met de bedoeling de operator te beschermen,
welke gebaseerd zijn op een raming van de
blootstelling in de werkelijke
gebruiksomstandigheden (rekening houdend
met alle bestanddelen van de werkingscyclus,
zoals de stoptijden van het instrument en de
werkingstijden in rust, naast de uitschakeltijd)
GARANTIE
Voor de garantiebepalingen wordt verwezen naar
de bijgevoegde garantievoorwaarden.
ENVIRONNEMENT
SERVICEDIENST
_ Beschadigde schakelaars moeten in de
werkplaats van onze klantendienst hersteld
worden.
_ Als de vervanging van de voedingskabel
noodzakelijk is, moet dit plaatsvinden door de
fabrikant of zijn agent om een gevaar te
voorkomen.
Klantenservice en gebruiksadviezen
Onze klantenservice beantwoordt uw vragen over
reparatie en onderhoud van uw product en over
vervangingsonderdelen. Explosietekeningen en
informatie over vervangingsonderdelen vindt u ook
op :www.eco-repa.com
Het ELEM GARDEN TECHNIC-team voor
gebruiksadviezen helpt u graag bij vragen over onze
producten en toebehoren : sav@eco-repa.com
OPSLAG
Reinig zorgvuldig de gehele machine en het
toebehoren.
Berg de machine op buiten het bereik van
kinderen, in een stabiele en veilige positie en op
een droge plaats met een gematigde temperatuur.
Vermijd te hoge en te lage temperaturen.
Bescherm de machine tegen direct invallend licht.
Bewaar ze, indien mogelijk, op een donkere plaats.
Bewaar de machine niet in plastic of Nylon zakken
om te vermijden dat er zich vocht ophoopt.
U kunt de handleiding in PDF-formaat opvragen
door een e-mail:
info@eco-repa.com
Vervaardigd in China 2015
19

General hazard safety alert.
Read instruction manual.
Pay attention that bystanders are
not injured through foreign objects
thrown from the machine.
Keep bystanders a safe distance
away from the machine.
Sharp tines/blades. Beware of
severing toes or fingers.
Beware electric shock hazard.
Keep supply flexible cord away
from cutting means
Do not use the machine in the rain
or leave it outdoors when it is
raining.
Switch off and remove plug from
mains before adjusting, cleaning or
if the cable is entangled and before
leaving the machine unattended for
any period.
Keep the supply flexible cord away
from the raking tines/blades.
Wait until all machine components
have completely stopped before
touching them. The tines/blades
continue to rotate after the
machine is switched off, a rotating
tine/blade can cause injury.
Risk of injury!
Before beginning work, check the
terrain and remove all objects that
may be flung out by the product.
Wear eye protection.
Wear ear protection.
Wear protective gloves.
This appliance is double insulated,
therefore no earth wire is required.
Check the power mentioned
on the nameplate of the appliance
corresponds to the voltage on the
place.
In accordance with European
standards CE application security
GB ELECTRIC LAWN SCARIFIER / AERATOR 2-IN-1
SAFETY NOTES
Warning! Read these instructions carefully, be
familiar with the controls and the proper use
of the machine. Please keep the instructions
safe for later use!
SYMBOLS
20

SAFETY INSTRUCTIONS
_ This unit can be used by older
children at least 8 years and by
people with physical, sensory or
mental capabilities or lack of
experience or knowledge, if (if) is
monitored correctly (s) or
instructions for using the machine
safely given to them and if the risks
were apprehended. Children should
not play with the appliance.
Cleaning and maintenance by the
user should not be performed by
children unattended
_ Never operate the product when you
are tired, ill or under the influence of
alcohol, drugs or medicine.
_ Do not allow children or any
person who is not aware of these
instructions, use the device. Some
local regulations mention an age
limit of the user.
_ Never rake/verticut while people,
especially children or pets are nearby.
_ Do not forget that the user is
responsible for accidents or
dangerous situations occurring on
others or their property
_ Wear hearing protection and safety
glasses at all times while operating the
machine.
_ Do not operate the machine when
barefoot or wearing open sandals,
always wear substantial footwear and
long trousers.
_ Thoroughly inspect the area where
the machine is to be used and remove
all stones, sticks, wires, bones and
other foreign objects.
_ Before using, always visually inspect
to see that the tines and tine assembly
are not worn, damaged or loose.
_ Replace worn or damaged tine and
assemblies in sets to preserve balance.
On multitined machines, take care as
rotating one tine can cause other tines
to rotate.
_ Wear full eye protection when using
the machine without the catcher.
_ Walk, never run.
_ Rake/Verticut only in daylight or in
good artificial light.
_ Avoid operating the machine in wet
grass, where feasible or take additional
precautions to avoid slipping.
_ Raking/Verticutting on banks can be
dangerous.
_ Do not rake/verticut excessively
steep slopes.
– Always be sure of your
footing on slopes or wet grass.
– Rake/Verticut across the face
of slopes – never up and down.
– Exercise extreme caution
when changing direction on
slopes.
– Use extreme caution when
stepping back or pulling the
machine towards you.
_ Never rake/verticut by pulling the
machine towards you.
_ Stop the machine if the machine has
to be tilted for transportation when
crossing surfaces other than grass and
when transporting the machine to and
from the area to be raked/verticut.
_ Never operate the machine without
the catcher or deflector guard in
position.
21

_ Switch on the motor according to the
instructions with feet well away from
rotating parts.
_ Do not tilt the machine when starting
or switching on the motor, except if the
machine has to be tilted for starting in
long grass. In this case, do not tilt if
more than absolutely necessary and tilt
only the part which is away from the
operator. Always ensure that both
hands are in the operating position
before returning the machine to the
ground.
_ Do not put hands or feet near or
under rotating parts.
_ Always stand clear of the discharge
zone when operating the machine.
_ Never pick up or carry the machine
while the motor is running.
_ Be careful during adjustment of the
machine to prevent entrapment of the
feet and hands between moving
tines/blades and fixed parts
of the machine.
_ Regularly inspect the supply cable
and any extension cables. Do not
connect damaged cables to the supply
or touch a damaged cable before it is
disconnected from the supply. A
damaged cable can lead to contact
with live parts. Beware electric shock
hazard.
_ Do not touch the tines before the
machine is disconnected from the
supply and the tines have come to a
complete stop.
_ Keep supply cables and extension
cables away from the tines. The tines
can cause damage to the cables and
lead to contact with live parts. Beware
electric shock hazard.
Remove the plug from the socket
– whenever you leave the machine,
– before clearing a blockage,
– before checking, cleaning or
working on the machine,
– after striking a foreign object.
Inspect the machine for damage and
make repairs as necessary,
– if the machine starts to vibrate
abnormally (check immediately).
Maintenance
– Keep all nuts, bolts and screws tight
to be sure that the machine is in safe
working condition.
– Check the catcher frequently for
wear or deterioration.
– Examine the machine and replace
worn or damaged parts for safety.
– Ensure replacement parts fitted are
ELEM GARDEN TECHNIC approved.
– Always wear gardening gloves
when handling or working near the
sharp tines/blade.
Power supply
– The voltage indicated on the rating
plate must correspond to the voltage of
the power source.
– We recommend that this equipment
is only connected into a socket which
is protected by a circuit-breaker that
would be actuated by a 30 mA residual
current.
– Only use or replace power supply
cables for this unit which correspond to
the types indicated by the
manufacturer. See the operating
instructions for the order no. and types.
22

– Never touch the mains plug with wet
ATTENTION !
Disconnect the power plug before
carrying out any
adjustments or maintenance.
hands.
f Do not run over, crush or pull the
power supply cable or extension lead,
otherwise it may be damaged. Protect
the cable from heat, oil and sharp
edges.
– The extension lead must have a
cross section in accordance with the
operating instructions and be protected
against splashed water. The
connection must not be in water.
– Always wear gardening gloves when
handling
or working near the sharp tines/blade.
INTENDED USE
This product is intended for domestic, lawn raking, scarifying or verticutting of lawn.
ASSEMBLY
For Your Safety
_ Warning! Switch off, remove plug from
mains before adjusting, cleaning or if cable
is cut, damaged or entangled.
_ The tines/blades continue to rotate for a
few seconds after the machine is switched
off.
_ Caution – do not touch rotating
tines/blades.
_ Always wear gardening gloves when handling or working near the sharp tines/blade.
Electrical Safety
Your machine is double insulated for safety and
requires no earth connection. The operating
voltage is 230 V AC, 50 Hz (for non-EU countries
220 V, 240 V as applicable). Only use approved
extension cables. Contact your ELEM GARDEN
TECHNIC Service Centre for details :
info@eco-repa.com
Extension cords/leads should only be used if
they comply with H05VV-F, H05RN-F types or
IEC type design (60227 IEC 53, 60245 IEC 57).
If you want to use an extension cable when operating your product, only the following cable dimensions should be used:
– 1.0 mm²: max. length 40 m
– 1.5 mm²: max. length 60 m
– 2.5 mm²: max. length 100 m
Note: If an extension cable is used it must be
earthed and connected through the plug to the
earth cable of your supply network in accordance with prescribed safety regulations.
WARNING! Inadequate extension cables can
be dangerous. Extension cable, plug and socket must be of watertight construction and intended for outdoor use.
Cable connections should be kept dry and off
ground.
It is recommended for increased electrical safety to use a Residual Current Device (RCD) with
a tripping current of not more than 30 mA. Always check your RCD every time you use it.
Assembly
_ Ensure the cables are not trapped when
folding/unfolding top/bottom handles. Do
not drop the handles.
Some parts of the scarifier have been dismantled for
transport purpose. The screws, handwheels, cable
clips, cable hook, screwdrivers and spanner are to
be found in plastic bags.
Assembly is simple if you follow these instructions :
Assembling bottom handle part
Insert securing screw (A) form inside through the left
side element. Position insulation element (B) from
outside; the two nubs must catch in the holes of the
side element (2). Place insulating element (B) so
that the large opening points to the outside.
Position tip of handle element (N) in the insulating
element (B).
Then tighten wing nut (H).
23

Assemble the right handle element in the same
ATTENTION !
Disconnect the power plug before
carrying out any adjustments or
maintenance.
order.
Assembling top of handle
First slide cable restraint over upper handle bar.
Attach the two parts to each other by using
the bolts with special shaped head (C) and fix
the bolts in place with the wing nuts (H).
OPERATION
_ The tines/blades continue to rotate for a
few seconds after the machine is switched
off. Allow the motor and tines/blades to
stop rotating before switching “on” again.
_ Do not rapidly switch off and on.
Note: To aid starting push handle down to lift
front wheels.
The lawn should be scarified several times each
year.
Before using the machine, the lawn must be cut to a
height of 2.5 to 3.5 cm.
Setting the working depth
Fasten switch cable with the clips (L) on the handle
rod.
The working depth is adjustable to 3 heights. Pull
adjustment arm (1) away from side cover and allow
catch in desired position (2). Adjust the height
alternately left and right by only 1 position. The
adjustment arms must always be in the same height
position.
Lower and middle position of scarifier cylinder:
Removes moss and weeds from the lawn.
Top position of scarifier cylinder:
Remove grass remnants from the lawn.
24

Attaching catch bag
ATTENTION !
Disconnect the power plug before
carrying out any
adjustments or maintenance.
ATTENTION !
Disconnect the power plug before
carrying out any
adjustments or maintenance.
Lift protective flap (P). Hang catch bag (1)
with the hooks on both bolts of the side
elements.
Switching ON / OFF
Motor on (fig. B2)
Press button (1) and hold.
Lift lever (2) and release button (1).
Motor off (fig. B2)
Release lever (2).
WORKING ADVICE
Place the SCEE12002B on the edge of the lawn, as
close to the power point as possible. Work away
from the power point.
Position the cable to opposite side (already
raked/verticut lawn) at the end of each turn.
When raking/verticutting do not allow the motor to labour.
When the motor labours the speed of the motor
drops and you will hear a change in the motor
sound. When this occurs, stop raking, release
switch lever 2 and raise the height of cut. Failure to
do so could damage the machine.
_ Always wear gardening gloves when han-
dling or working near the sharp tines/blade.
Optimum conditions for raking/verticutting are
when the grass is short and slightly damp. Raking/Verticutting when the ground is very soft or
hard it will may damage the lawn and will result
in poor collection.
– Kill moss with a proprietary moss killer before raking/verticutting.
– Start the SCEE12002B at the highest
raking/verticutting position and lower as necessary.
– Rake/Verticut the lawn in the one direction,
then proceed at right angles a week later until the
whole lawn has been completed.
– The action of removing moss and debris during
raking/verticutting may reveal ragged and bare
patches depending on lawn conditions.
Ideal times for raking/verticutting are spring and
late autumn.
25

CLEANING AND MAINTENANCE
Stop, remove plug from the
power supply and remove the
grassbox.
Always wear gardening gloves
when handling or working near
the sharp tines/blade.
Stop, remove plug from the
power supply and remove the
grassbox.
Always wear gardening gloves
when handling or working near
the sharp tines/blade.
ATTENTION !
The sound power pressure may
exceed 85 dB(A), in this case
individual hearing protection
must be worn.
Make sure all fasteners (screws, nuts, etc.) are
always fully tightened so that you can work safety
with the scarifier.
Check the grass box for wear and tear at
regular intervals
Replace any worn or damaged parts.
Regular care of your scarifier will not only
increase its service life but will also facilitate the
meticulous and easy scarifying of your scarifier.
Clean the scarifier with brushes or cloths. Do
not use any solvents or water to remove dirt.
Always switch off the motor and pull out the
power plug before carrying out any maintenance
and cleaning work.
The part most susceptible to wear and tear in
the machine is the blade. Check the condition of the
blade and its fastener at regular intervals. If the
blade is worn, it must be replaced or sharpened.
If the scarifier vibrates excessively, this means
that the blade is either not balanced correctly or has
been bent out of shape by knocks, in which case it
must be repaired or replaced.
Removing/Fitting Raker Tines
Store the machine in a dry place. Do not place
other objects on top of the machine. To save
space, fold up the handle fully.
Ensure the cables are not trapped when
folding/unfolding top/bottom handles. Do
not drop the handles.
The machine can be stored with the grassbox
Disassembled.
TECHNICAL DATA
Voltage - frequency 230-240 V ~ 50 Hz
Power consumption 1200 Watt
No-load speed 4500 min-1
Working Width 330 mm
Working Depth -3 / 4 / 8 mm
Volume collection bag 30 l
Teeth wire brush 48
Steel blades 9
Weight 11.2Kg
Degree of Protection IP24
Noise emission values measured according to
relevant standard.
Acoustic pressure level LpA
82.1dB(A) K = 3 dB(A)
Acoustic power level LwA
98 dB(A) K = 3 dB(A)
Weighted root mean square acceleration according
to relevant standard. :
1.07 m/s² K = 1,5 m/s².
After Raking or Verticutting/Storage
Clean the exterior of the machine thoroughly using a soft brush and cloth. Do not use water, solvents or polishes. Remove all grass and debris,
especially from the ventilation slots.
Turn the machine on its side and clean the
tine/blade area. If grass or dirt is compacted in
the tine/blade area, remove with a wooden or
plastic implement.
The declared vibration total value has
been measured in accordance with a standard
test method and may be used for comparing one
tool with another that the declared vibration total
value may also be used in a preliminary
assessment of exposure.
A warning that the vibration emission
during actual use of the power tool can differ
from the declared total value depending on the
ways in which the tool is used and of the need to
identify safety measures to protect the operator
that are based on an estimation of exposure in
the actual conditions of use (taking account of
all parts of the operating cycle such as the times
when the tool is switched off and when it is
running idle in addition to the trigger time).
26

SERVICE DEPARTMENT
Should your machine need
replacement after
extended use, do not put it in
the domestic waste but
dispose of it in an
environmentally safe way.
_ Damaged switches must be replaced by our aftersales service department.
_ If replacing the power cord is necessary, it
should be done by the manufacturer or his agent
to avoid a hazard.
After-sales Service and Application Service
Our after-sales service responds to your questions
concerning maintenance and repair of your product
as well as spare parts. Exploded views and
information on spare parts can also be found
under:www.eco-repa.com
ELEM GARDEN TECHNIC application service team
will gladly answer questions concerning our
products and their accessories : sav@eco-repa.com
STORAGE
_ Thoroughly clean the whole machine and its
accessories.
_ Store it out of the reach of children, in a stable and
secure position, in a cool and dry place, avoid too
high and too low temperatures.
_ Protect it from exposure to direct sunlight. Keep it
in the dark, if possible.
_ Don’t keep it in plastic bags to avoid humidity
build-up.
GUARANTEE
Refer to the enclosed guarantee conditions
for the terms and conditions of guarantee.
ENVIRONMENT
You can request the instruction manual in PDF
format by email: info@eco-repa.com
Made in China 2015
27

CZ ELEKTRICKÝ ZAHRADNÍ VERTIKUTÁTOR/PROVZDUŠŇOVAČ 2 V 1
Všeobecná bezpečnostní výstraha
nebezpečí.
Přečtěte si návod k obsluze.
Dávejte pozor, aby nebyli případní
diváci zraněni cizím předmětem
odhozeným ze stroje.
Udržujte osoby v bezpečné
vzdálenosti od stroje.
Ostré hroty/nože. Dejte si pozor na
prsty na nohou nebo rukou.
Dejte si pozor na nebezpečí úrazu
elektrickým proudem.
Udržujte přívodní flexibilní kabel od
řezacích nožů.
Nepoužívejte stroj v dešti nebo
nechávejte venku, když prší.
Před úpravou, čištěním nebo je-li
kabel zamotán a před zanecháním
stroje bez dozoru na jakoukoli
dobu, vytáhněte zástrčku ze
zásuvky.
Udržujte přívodní flexibilní kabel
daleko od hrotů/ostří.
Počkejte, dokud se všechny
součásti stroje zcela nezastaví.
Hroty/nože se nadále otáčejí po
vypnutí přístroje, rotující čepel
může způsobit zranění prstů.
Nebezpečí úrazu!
Před zahájením práce zkontrolujte
terén a odstraňte všechny
předměty, které mohou být strojem
vymrštěny.
Používejte ochranné brýle.
Používejte ochranu sluchu.
Používejte ochranné rukavice.
Toto zařízení je dvojitou izolací;
Proto není nutné použití
uzemňovacího vodiče. Vždy
zkontrolujte, zda napájecí napětí
odpovídá napětí na výkonovém
štítku.
V souladu se základními platnými
bezpečnostními normami
evropských směrnic.
BEZPEČNOSTNÍ POKYNY
Upozornění: Přečtěte si tyto pokyny pozorně a
se seznamte s ovládacími prvky pro správné
používání stroje. Prosím, mějte pokyny
bezpečné uložené pro pozdější použití.
SYMBOLY
28

BEZPEČNOSTNÍ INSTRUKCE
_Tento přístroj není určen pro
použití osobami (včetně dětí do 8 let
věku) se sníženými fyzickými,
smyslovými nebo duševními
schopnostmi, nebo bez patřičných
zkušeností a znalostí, pokud jim
nebyl poskytnut dohled nebo
instrukce týkající se použití výrobku
osobou odpovědnou za jejich
bezpečnost. Je třeba dohlížet na
děti, aby se zajistilo, že si nebudou
hrát se zařízením.
_Nikdy nepoužívejte výrobek, pokud
jste unavení, nemocní nebo pod vlivem
alkoholu, drog nebo léků.
_Nedovolte dětem nebo jakákoli jiné
osobě, která není vědoma těchto
instrukcí, zařízení použít. Některé
místní předpisy mohou změnit
věkovou hranici uživatele.
_Nikdy nepoužívejte stroj, zatímco jsou
lidé, zejména děti, nebo domácí zvířata
v blízkosti.
_Nezapomeňte, že uživatel je
zodpovědný za nehody nebo
nebezpečné situace hrozící ostatním
osobám nebo jejich majetku.
_Používejte ochranu sluchu a
ochranné brýle po celou dobu provozu
zařízení.
_Nepoužívejte stroj bosí nebo v
sandálech, vždy noste pevnou obuv a
dlouhé kalhoty.
_Důkladně zkontrolujte oblast, kde má
být stroj použit a odstraňte všechny
kameny, klacky, dráty, kosti a jiné cizí
předměty.
_Před použitím vždy vizuálně
zkontrolujte, že hroty a další prvky
nejsou opotřebované, poškozené nebo
uvolněné.
_Vyměňte opotřebované nebo
poškozené hroty a sestavte tak, aby
bylo zachováno vyvážení. Na
víceřadých strojích, může rotace
jednoho hrotu způsobit otáčení dalších
hrotů.
_Používejte úplnou ochranu očí při
použití přístroje bez sběrného koše.
_Choďte, nikdy neběhejte.
_Pracujte pouze za denního světla
nebo při dobrém umělém osvětlení.
_Vyhněte se práci se strojem v mokré
trávě, pokud je to možné, nebo učňte
taková opatření, aby se zabránilo
uklouznutí.
_Práce na březích může být
nebezpečná.
_Nepoužívejte vertikutátor na příliš
strmých svazích.
– Vždy si buďte jisty vaším
postavením ve svahu nebo
mokré trávě.
– Vždy pracujte podél svahu –
nikdy nahoru a dolů.
– Na svazích buďte mimořádně
opatrní při změně směru.
– Buďte velmi opatrní při tahání
stroje směrem k sobě.
_Nikdy nepracujte se strojem tahem
směrem k sobě.
_Zastavte stroj, pokud má být
nakloněn nebo převážen přes jiný než
travnatý povrch a při transportu stroje
na a z oblasti, kterou chcete kultivovat.
_Nikdy nepoužívejte stroj bez
ochranných prvků.
29

_Zapněte motor podle pokynů s
nohama v dostatečné vzdálenosti od
rotujících částí.
_Nenaklánějte stroj při rozjezdu nebo
při spouštění motoru, s výjimkou
případů, musí být stroj nakloněn pro
spouštění ve vysoké trávě. V tomto
případě, nenaklánějte více, než je
nezbytně nutné, a nakloňte pouze tu
část, která je daleko od obsluhy. Vždy
se ujistěte, že jsou obě ruce v provozní
poloze, než stroj postavíte na zem.
_Nedávejte ruce nebo nohy do
blízkosti rotujících částí nebo pod ně.
_Při práci se strojem vždy stůjte mimo
výstupní zónu.
_Nikdy nezvedejte ani nepřenášejte
stroj během chodu motoru.
_Buďte opatrní při seřizování stroje,
aby se zabránilo uvíznutí nohou a
rukou mezi pohyblivými hroty/břity a
pevnými částmi stroje.
_Pravidelně kontrolujte napájecí kabel
a prodlužovací kabely. Nepřipojujte
poškozené kabely a nedotýkejte se
poškozeného kabelu dříve, než jej
odpojíte od napájení. Poškozený kabel
může vést ke kontaktu s částmi pod
napětím. Dejte si pozor na nebezpečí
úrazu elektrickým proudem.
_Nedotýkejte se nožů před odpojení
stroje od napájení a jejich úplného
zastavení.
_Udržujte napájecí kabely a
prodlužovací kabely od hrotů. Hroty
mohou způsobit poškození kabelů a
vést ke kontaktu s částmi pod napětím.
Dejte si pozor na nebezpečí úrazu
elektrickým proudem.
Vytáhněte zástrčku ze zásuvky
– kdykoliv opouštíte stroj,
– před odstraněním blokování,
– před kontrolou, čištěním nebo práci
na stroji,
– po nárazu na cizí předmět.
Zkontrolujte, případné poškození stroje
a dle potřeby proveďte opravu,
– v případě, že stroj začne abnormálně
vibrovat (zkontrolovat okamžitě).
Údržba
– Udržujte všechny matice a šrouby
utažené, ujistěte se, že je stroj v
dobrém provozním stavu.
– Zkontrolujte často sběrný koš pro
opotřebení nebo poškození.
– Zkontrolujte stroj a vyměňte
opotřebované nebo poškozené díly pro
zachování bezpečnosti.
– Používejte pouze náhradní díly
schválené ELEM GARDEN TECHNIC.
– Vždy používejte zahradnické
rukavice při manipulaci nebo práci v
blízkosti ostrých hrotů/čepelí.
Napájení
– Vždy kontrolujte, zda přiváděné
napětí odpovídá napětí uvedenému na
typovém štítku.
– Doporučuje se, pro zvýšenou
elektrickou bezpečnost, použít
proudový chránič (RCD) s vypínacím
proudem ne větším než 30 mA. Vždy
zkontrolujte váš proudový chránič při
každém použití.
– Pro tento stroj používejte nebo
měňte pouze napájecí kabely, které
odpovídají typům uvedeným výrobcem.
Viz. Další články návodu k obsluze.
30

– Nikdy se nedotýkejte síťové zástrčky
POZOR!
Před prováděním jakýchkoli
úprav nebo údržby odpojte
napájecí kabel.
mokrýma rukama.
– Nepřejíždějte, nemačkejte ani
vytahujte napájecí nebo prodlužovací
kabel, v tomto případě může dojít k
poškození. Chraňte kabel před
horkem, olejem a ostrými hranami.
– Prodlužovací kabel musí mít průřez
podle návodu k obsluze a musí být
chráněn proti stříkající vodě. Připojení
nesmí být ve vodě.
– Vždy používejte zahradnické
rukavice při manipulaci nebo práci v
blízkosti ostrých hrotů/čepelí.
POUŽITÍ
Tento výrobek je určen pro domácí použití,
hrabání, provzdušňování nebo vertikutaci
trávníku.
SESTAVA
Pro vaší bezpečnost
_ Pozor! Před úpravou, čištěním nebo pokud
kabel je přerušen, poškozen nebo zapleten
vytáhněte zástrčku ze zásuvky.
_ Hroty/nože se budou nadále otáčet po dobu
několika sekund po vypnutí přístroje.
_ Pozor - nedotýkejte se rotujících hrotů/ostří.
_ Vždy používejte zahradnické rukavice při
manipulaci nebo práci v blízkosti ostrých
hrotů/čepelí.
Elektrická bezpečnost
Stroj je opatřen dvojitou izolací pro bezpečnost a
nevyžaduje žádné uzemnění. Napájecí napětí je
230 V AC, 50 Hz (pro země, které nejsou členy EU,
220 V, 240 V podle potřeby). Používejte pouze
schválené prodlužovací kabely. V případě dotazů
kontaktujte naše servisní středisko na telefonu
777 30 20 60.
Prodlužovací kabely/vodiče by měly být použity
pouze tehdy, pokud jsou v souladu s typy H05VV-F,
H05RN-F nebo typu IEC provedení (60227 IEC 53,
60245 IEC 57).
Chcete-li k provozu produktu použít prodlužovací
kabely, měly by být použity pouze tyto rozměry
kabelů:
- 1.0 mm²: max. délka 40 m
- 1,5 mm²: max. délka 60 m
- 2,5 mm²: max. délka 100 m
Poznámka: Pokud používáte prodlužovací kabel,
musí být uzemněn a připojen přes zástrčku kabelu
na uzemnění vaší napájecí sítě v souladu s
předepsanými bezpečnostními předpisy.
VAROVÁNÍ! Nevhodné prodlužovací kabely
mohou být nebezpečné. Prodlužovací kabel,
zástrčka a zásuvka musí být vodotěsné
konstrukce a určena pro venkovní použití.
Kabely by měly být uchovávány v suchu a mimo
dosah země.
Doporučuje se, pro zvýšenou elektrickou
bezpečnost, použít proudový chránič (RCD) s
vypínacím proudem ne větším než 30 mA. Vždy
zkontrolujte váš proudový chránič při každém
použití.
Montáž
_ Ujistěte se, že kabely nejsou zachyceny při
skládání/rozkládání horní/dolní rukojeti.
_ Některé části byly demontovány pro účely
dopravy. Šrouby, kola, kabelové svorky, kabelový
hák, šroubováky a klíče se nacházejí v igelitových
pytlích.
Montáž je jednoduchá, pokud budete postupovat
podle těchto pokynů:
Montáž spodní rukojeti
Vložte zajišťovací šroub (A) zevnitř do levého
bočního elementu. Umístěte prvek (B) z vnější
strany; dva výstupky musí zacpadnout do otvorů
bočního prvku (2). Umístěte prvek (B) tak, aby velké
vystouplé body směřovaly ven.
Umístěte konec rukojeti (N) do prvku (B).
Poté utáhněte křídlovou matici (H).
31

Sestavte pravou část rukojeti prvek ve stejném
POZOR!
Před prováděním jakýchkoli
úprav nebo údržby odpojte
napájecí kabel.
pořadí.
Montáž horní rukojeti
Oba díly přimontujte k sobě pomocí šroubů se
speciálním tvarem hlavy (C) a upevněte šrouby v
místě křídlovými maticemi (H).
PROVOZ
_ Hroty/nože se budou otáčet po dobu několika
sekund po vypnutí přístroje. Nechte motor a
hroty/nože úplně zastavit před opětovním
zapnutím.
_ Vyvarujte se rychlému zapínání a vypínání.
Poznámka: Chcete-li pomoc při rozjezdu, tlačte
rukojeť dolů a zvedněte přední kola.
Trávník by měl být rozrytý několikrát ročně.
Před použitím stroje musí být trávník posekán do
výšky 2,5 až 3,5 centimetrů.
Nastavení pracovní hloubky
Připevněte spínače kabelu pomocí klipů (L) na
rukojeť.
Pracovní hloubka je nastavitelná na 3 výšky.
Vytáhněte seřizovací rameno (1) od bočního krytu a
nastavte výšku do požadované polohy (2).
Nastavujte výšku střídavě vlevo a vpravo pouze o 1
pozici. Ramena nastavení musí být vždy ve stejné
výškové poloze.
Nižší a střední poloha válce vertikutátoru:
Odstraňuje mech a plevel z trávníku.
Horní pozice válce vertikutátor:
Odstraňte zbytky trávy z trávníku.
32

Připojení sběrného koše
POZOR!
Před prováděním jakýchkoli
úprav nebo údržby odpojte
napájecí kabel.
POZOR!
Před prováděním jakýchkoli
úprav nebo údržby odpojte
napájecí kabel.
Zvedněte ochranný kryt (P). Připevněte sběrný koš
(1) háčky na obou šroubech bočních prvků.
ON/OFF vypínač
Zapnutí motoru (obr. B2)
Stiskněte tlačítko (1) a držte.
Zvedněte páku (2) a uvolněte tlačítko (1).
Vypnutí motoru (obr. B2)
Uvolněte páčku (2).
PRACOVNÍ PORADENSTVÍ
Umístěte SCEE12002B na okraji trávníku, co
nejblíže k síťové zásuvky, jak je to možné. Pracujte
směrem od síťové zásuvky.
Umístěte kabel na opačnou stranu zkypřeného
trávníku na konci každého cyklu.
Při hrabání/vertikutaci nepřetěžujte motor.
Když se motor přetíží, otáčky motoru poklesnou a
uslyšíte změnu ve zvuku motoru. Pokud k tomu
dojde, zastavte práci, uvolněte spínací páčku 2 a
zvýšit výšku střihu. V opačném případě by mohlo
dojít k poškození zařízení.
_ Vždy používejte zahradnické rukavice při
manipulaci nebo práci v blízkosti ostrých
hrotů/čepelí.
Optimální podmínky pro shrabování/ vertikutaci
jsou, když je tráva krátká a mírně vlhká.
Shrabování/vertikutace v momentě, kdy je půda
velmi měkká nebo tvrdá, může poškodit trávník a
bude mít za následek špatný sběr materiálu.
– Před shrabováním/vertikutací chemicky odstraňte
mech k tomu určeným přípravkem.
– Spusťte SCEE12002B na nejvyšší
shrabovací/vertikutací pozici a snižujte podle
potřeby.
– Upravujte trávník v jednom směru, poté postupujte
kolmo o týden později, až bude práce na celém
trávníku dokončena.
– Akce na odstranění mechu a nečistot při
hrabání/vertikutaci může odhalit potrhaná a holá
místa v závislosti na stavu trávníku.
Ideální doba pro shrabování/vertikutaci je na
jaře a pozdě na podzim.
33

ČIŠTĚNÍ A ÚDRŽBA
Zastavte, vytáhněte zástrčku ze
zdroje napájení a vyjměte sběrný
koš.
Vždy používejte zahradnické
rukavice při manipulaci nebo
práci v blízkosti ostrých
hrotů/čepelí.
Zastavte, vytáhněte zástrčku ze
zdroje napájení a vyjměte sběrný
koš.
Vždy používejte zahradnické
rukavice při manipulaci nebo
práci v blízkosti ostrých
hrotů/čepelí.
POZOR!
Když akustický tlak překročí
hodnotu 85 dB (A), je nutné nosit
osobní ochranné prostředky
sluchu.
Ujistěte se, že jsou všechny spojovací materiály
(šrouby, matice, atd) vždy úplně utažené tak, že
můžete pracovat bezpečně.
Kontrolujte sběrný koš v pravidelných intervalech
z důvodu případného opotřebení.
Vyměňte opotřebované nebo poškozené díly.
Pravidelná péče o váš přístroj nejen zvýší jeho
životnost, ale také usnadní pečlivou a snadnou
úpravu vašeho trávníku.
Vyčistěte stroj pomocí kartáče nebo hadru.
Nepoužívejte žádná rozpouštědla ani vodu na
odstranění nečistot.
Před prováděním údržby a úklidových prácí
vypněte motor a vždy vytáhněte zástrčku ze
zásuvky.
Nejvíce náchylná část k opotřebení v přístroji je
čepel. Kontrolujte stav čepele a jejího ostří v
pravidelných intervalech. V případě, že je čepel
tupá, musí být nahrazena nebo naostřena.
V případě, že stroj nadměrně vibruje, znamená to,
že čepel buď není správně nasazena nebo může
být ohnuta. V takovém případě musí být opravena
nebo vyměněna.
Demontáž/montáž hrotů
Stroj skladujte na suchém místě. Nepokládejte další
předměty na horní stranu přístroje. Chcete-li ušetřit
místo, složte úplně rukojeť.
Ujistěte se, že kabely nejsou zachyceny při
skládání/rozkládání horní/dolní rukojeti.
Stroj může být uložen s rozloženým sběrným košem.
TECHNICKÁ DATA
Napětí - frekvence 230-240 V ~ 50 Hz
Spotřeba energie 1200 Watt
Otáčky naprázdno 4500 min-1
Pracovní šířka 330 mm
Pracovní hloubka -3 / 4 / 8 mm
Objem sběrného koše 30 l
Počet zubů 48
Počet čepelí 9
Hmotnost 11.2 kg
Stupeň ochrany IP24
Hodnoty emisí hluku z hlediska standardu:
Hladina akustického tlaku LpA
82.1dB(A) K = 3 dB(A)
Hladina akustického výkonu LwA
98 dB(A) K = 3 dB(A)
Hladina vibrací do ruky/paže podle příslušné normy:
1.07 m/s² K = 1,5 m/s².
Skladování po hrabání/vertikutaci
Čistěte vnější části přístroje pečlivě měkkým
kartáčem a hadrem. Nepoužívejte vodu,
rozpouštědla nebo leštidla. Odstraňte všechny
zbytky trávy a nečistot, zejména z větracích otvorů.
Otočte stroj na bok a vyčistit prostor hrotů/čepelí.
Pokud je tráva a nečistoty ztvrdlá v oblasti hrotů,
odstraňte pomocí dřevěných nebo plastových
nástrojů
Celková hodnota deklarovaných
vibrací byla měřena podle standardní zkušební
metody a může být použita pro srovnání
jednoho nástroje do druhého; což znamená, že
celková hodnota deklarovaných vibrací může
být také použita k předběžnému stanovení
hodnot.
Otázka vibrací při aktuálním použití
elektrického nářadí se může lišit od hodnoty
vykázané způsoby použití nástroje; to znamená,
že je třeba určit bezpečnostní opatření, která
chrání obsluhu, které jsou založeny na odhadu
hodnot v aktuálních podmínkách použití (s
ohledem na všechny základní části pracovního
cyklu, jako je výpadek provozu nástroje, a
operací konajících se v době spouštění).
34

SERVISNÍ INFORMACE
Pokud jste se rozhodli
vyměnit zařízení, nevyhazujte
jej s domácím odpadem, ale
zlikvidujte ho v souladu k
životnímu prostředí.
_ Poškozený vypínač musí být nahrazena v našem
servisním středisku.
_ Chcete-li vyměnit napájecí kabel, je zapotřebí,
aby toto být provedeno výrobcem nebo jeho
zástupcem, aby nedošlo k úrazu.
Zákaznický servis a podpora
Náš zákaznický servis odpovídá na otázky týkající
se opravy a údržby vašich částí výrobků a
náhradních dílů. Další dotazy a informace na
info@mataczech.cz
SKLADOVÁNÍ
_ Pečlivě vyčistěte celý stroj a jeho příslušenství.
_ Skladujte mimo dosah dětí ve stabilní a bezpečné
poloze, v suchu a teplu, vyhněte se příliš vysokým
nebo nízkým teplotám.
_ Chraňte jej před přímým slunečním světlem.
Uchovávejte, je-li to možné, ve tmě.
_ Neuzavírejte přístroj do plastových obalů, protože
se v nich může tvořit vlhkost.
ZÁRUKA
Informace naleznete v přiložených záručních
podmínkách.
ŽIVOTNÍ PROSTŘEDÍ
Vyrobeno v Číně 2015
35

36

ELEM GARDEN TECHNIC ,
81 rue de Gozée 6110 Montigny-le-Tilleul Belgique
Belgique Janvier 2015
Mr Joostens Pierre
Président-Directeur Général
ELEM,
Rue de Gozée 81, 6110 Montigny-le-Tilleul, Belgique
Tél : 0032 (0) 71 29 70 70
Fax : 0032 (0) 71 29 70 86
Dossier technique auprès de : info@elemtechnic.com
SN : 2015.01 :001~270
18.11.10893
Date d’arrivée: 02/03/2015
Année de production : 2015
FR
Déclaration de conformité
Nous « ELEM GARDEN TECHNIC » certifions par la présente que la machine spécifiée ci-après répond de par
sa conception et son type de construction ainsi que de par la version que nous avons mise sur le marché aux
prescriptions fondamentales stipulées en matière
de sécurité et d’hygiène par les directives européennes en vigueur.
Toute modification apportée à la machine sans notre accord rend cette
Produit: SCARIFICATEUR ÉLECTRIQUE POUR PELOUSE / AÉRATEUR 2 EN 1
Type: SCEE12002B
Directives européennes en vigueur :
2006/42/ CEE – 2004/108/ CEE
2006/95/ CEE – 2005/88/CEE
Normes harmonisées appliquées :
EN 60335-1 :2012
EN 60335-2-92 :2005
EN 62233 :2008
EN 55014-1/A2 :2011
EN 55014-1/A2 :2008
EN 61000-3-2/A2 :2009
EN 61000-3-3 :2008
Produit: SCARIFICATEUR ÉLECTRIQUE POUR PELOUSE / AÉRATEUR 2 EN 1
Niveau de la pression sonore mesuré sur le lieu de travail :
Valeur quadratique moyenne pondérée de l'accélération selon la norme applicable :
LpA (pression sonore) dB(A) 82.1 K = 3 dB(A)
LWA (puissance sonore) dB(A) 98 K = 3 dB(A)
1.07 m/s² K = 1,5 m/s².
déclaration invalide.
Caractéristiques techniques
Type: SCEE12002B
Tension du réseau V 230-240
Fréquence du réseau Hz 50
Puissance W 1200
37

SN : 2015.01 :001~270
18.11.10893
Aankomstdatum: 02/03/2015
Productiejaar : 2015
ELEM GARDEN TECHNIC ,
81 rue de Gozée 6110 Montigny-le-Tilleul Belgique
België in januari 2015
Mr Joostens Pierre
Directeur
ELEM,
rue de Gozée 81, 6110 Montigny-le-Tilleul, Belgique
Tél : 0032 (0) 71 29 70 70
Fax : 0032 (0) 71 29 70 86
Technisch dossier bij: info@elemtechnic.com
NL
EG-verklaring van overeenstemming
Hierbij « ELEM GARDEN TECHNIC » verklaren wij dat de hierna vermelde machine
door haar ontwerp en bouwwijze en in de
door ons in de handel gebrachte uitvoering voldoet aan de betreffende fundamentele veiligheids-
en gezondheidseisen, zoals vermeld in de desbetreffende EG-richtlijnen. Deze verklaring
verliest haar geldigheid wanneer zonder overleg met ons veranderingen aan de machine worden
Product: ELEKTRISCHE 2-IN-1 VERTICUTEERDER / BELUCHTER
Type : SCEE12002B
Van toepassing zijnde EG-richtlijnen
2006/42/ EEG – 2004/108/ EEG
2006/95/ EEG – 2005/88/ EEG
Toegepaste geharmoniseerde normen
EN 60335-1 :2012
EN 60335-2-92 :2005
EN 62233 :2008
EN 55014-1/A2 :2011
EN 55014-1/A2 :2008
EN 61000-3-2/A2 :2009
EN 61000-3-3 :2008
Product: ELEKTRISCHE 2-IN-1 VERTICUTEERDER / BELUCHTER
Gewogen kwadratische gemiddelde waarde de van toepassing zijnde standaard : 1.07 m/s² K = 1,5 m/s².
Niveau van de geluidsdruk op de werkplek:
LpA (geluidsdruk) dB(A) dB(A) 82.1 K = 3 dB(A)
LWA (geluidsvermogen) dB(A) 98 K = 3 dB(A)
aangebracht.
Technische Daten
Type : SCEE12002B
Netspanning V 230-240
Netfrequentie Hz 50
Vermogen W 1200
38

ELEM GARDEN TECHNIC ,
81 rue de Gozée 6110 Montigny-le-Tilleul Belgique
Belgium in January 2015
Mr Joostens Pierre
Director
ELEM,
rue de Gozée 81, 6110 Montigny-le-Tilleul, Belgique
Tél : 0032 (0) 71 29 70 70
Fax : 0032 (0) 71 29 70 86
Technical file at: info@elemtechnic.com
SN : 2015.01 :001~270
18.11.10893
Arrival date: 02/03/2015
Production year : 2015
GB
Declaration of Conformity
We “ELEM GARDEN TECHNIC ” hereby declare that the machine described below
complies with the relevant basic safety and health requirements of the EU Directives, both in its basic design and
construction as well as in the version put into circulation by us. This declaration shall cease to be valid if the
machine is modified without our prior approval.
Product: ELECTRIC LAWN SCARIFIER / AERATOR 2-IN-1
Type: SCEE12002B
Relevant EU Directives
2006/42/ EC – 2004/108/EC
2006/95/ EC – 2005/88/EC
Applied harmonized standards
EN 60335-1 :2012
EN 60335-2-92 :2005
EN 62233 :2008
EN 55014-1/A2 :2011
EN 55014-1/A2 :2008
EN 61000-3-2/A2 :2009
EN 61000-3-3 :2008
Product: ELECTRIC LAWN SCARIFIER / AERATOR 2-IN-1
LpA (sound pressure) dB(A) 82.1 K = 3 dB(A)
LWA (acoustic power) dB(A) 98 K = 3 dB(A)
Weighted root mean square acceleration according to relevant standard. : 1.07 m/s² K = 1,5 m/s².
Technical Data
Type: SCEE12002B
Mains voltage V 230-240
Mains frequency Hz 50
Power input W 1200
Level of sound pressure:
39

ELEM GARDEN TECHNIC ,
81 rue de Gozée 6110 Montigny-le-Tilleul Belgique
Belgien im Januar 2015
Mr Joostens Pierre
Direktor
ELEM,
Rue de Gozée 81, 6110 Montigny-le-Tilleul, Belgique
Tél : 0032 (0) 71 29 70 70
Fax : 0032 (0) 71 29 70 86
Technische Unterlagen bei: info@elemtechnic.com
SN : 2015.01 :001~270
18.11.10893
Ankunftsdatum: 02/03/2015
Fertigungsjahr: 2015
DE
EG-Konformitätserklärung
Hiermit erklären wir « ELEM GARDEN TECHNIC », dass die nachfolgend bezeichnete
und Bauart sowie in der von uns in Verkehr gebrachten Ausführung den einschlägigen grundlegenden
Sicherheits- und Gesundheitsanforderungen der EG-Richtlinien entspricht. Bei einer nicht mit uns abgestimmten
Änderung der Maschine verliert diese Erklärung ihre Gültigkeit.
Produkt : ELEKTRO RASENVERTIKUTIERER/-BELÜFTER 2-IN-1
Typ : SCEE12002B
Einschlägige EG-Richtlinien
2006/42/ EWG – 2004/108/ EWG
2006/95/ EWG – 2005/88/ EWG
Angewandte harmonisierte Normen :
EN 60335-1 :2012
EN 60335-2-92 :2005
EN 62233 :2008
EN 55014-1/A2 :2011
EN 55014-1/A2 :2008
EN 61000-3-2/A2 :2009
EN 61000-3-3 :2008
Produkt : ELEKTRO RASENVERTIKUTIERER/-BELÜFTER 2-IN-1
LpA (Schalldruck) dB(A) 82.1 K= 3 dB(A)
LWA (Schalleistung) dB(A) 98 K= 3 dB(A)
Hand-Arm-Vibration 1.07 m/s
Maschine aufgrund ihrer Konzipierung
Technische Daten
Typ : SCEE12002B
Netzspannung V 230-240
Netzfrequenz Hz 50
Leistungsaufnahme W 1200
Höhe des Schalldrucks:
2
K= 1.5 dB(A)
40

ELEM GARDEN TECHNIC ,
81 rue de Gozée 6110 Montigny-le-Tilleul Belgique
Belgie, Leden 2015
Mr Joostens Pierre
Ředitel
ELEM,
rue de Gozée 81, 6110 Montigny-le-Tilleul, Belgique
Tél : 0032 (0) 71 29 70 70
Fax : 0032 (0) 71 29 70 86
Technická dokumentace: info@mateczech.cz
SN : 2015.01 :001~270
18.11.10893
Datum dovozu: 02/03/2015
Rok výroby: 2015
CZ
Prohlášení o shodě
My "ELEM GARDEN TECHNIC" tímto prohlašujeme, že níže popsaný stroj je
v souladu s příslušnými základními požadavky na bezpečnost a ochranu zdraví směrnic EU, a to jak ve své
základní koncepce a konstrukci, tak stejně jako ve verzi námi dodávané do oběhu. Toto prohlášení pozbývá
platnosti, pokud je přístroj upraven bez našeho předchozího souhlasu.
Produkt: ELEKTRICKÝ ZAHRADNÍ VERTIKUTÁTOR/PROVZDUŠŇOVAČ 2 V 1
Typ: SCEE12002B
Příslušné směrnice EU
2006/42/ EC – 2004/108/EC
2006/95/ EC – 2005/88/EC
Použité harmonizované normy
EN 60335-1 :2012
EN 60335-2-92 :2005
EN 62233 :2008
EN 55014-1/A2 :2011
EN 55014-1/A2 :2008
EN 61000-3-2/A2 :2009
EN 61000-3-3 :2008
Produkt: ELEKTRICKÝ ZAHRADNÍ VERTIKUTÁTOR/PROVZDUŠŇOVAČ 2 V 1
LpA (akustický tlak) dB(A) 82.1 K = 3 dB(A)
LWA (akustický výkon) dB(A) 98 K = 3 dB(A)
Hladina vibrací do ruky/paže podle příslušné normy: 1.07 m/s² K = 1,5 m/s².
Technická data
Typ: SCEE12002B
Jmenovité napětí: 230-240 V
Jmenovitá frekvence: 50 Hz
Výkon: 1200 W
Hladina akustického tlaku:
41

ZÁRUČNÍ LIST
Výrobek : ELEKTRICKÝ ZAHRADNÍ
VERTIKUTÁTOR/PROVZDUŠŇOVAČ 2 V 1
Model: SCEE12002B
Datum prodeje .................................................
ZÁRUČNÍ LIST
Na tento výrobek se vztahuje 24 měsíců záruka.
Platný záruční list musí být správně vyplněn a odeslán s kopií faktury nebo
pokladního bloku.
Dodavatel:
M.A.T.A. Czech s.r.o.
Radlická 103
150 00 Praha 5
e-mail: info@mataczech.cz
SERVIS :
Tel: 777 302 060
PM Servis
Na barikádách 670
196 00 Praha 9
42

81, rue de Gozée
6110 Montigny-le-Tilleul
Belgique
Tél : 0032 71 29 70 70 Fax : 0032 71 29 70 86
Made in China
S.A.V
sav@eco-repa.com
Service Parts separated
32 / 71 / 29 . 70 . 83 32 / 71 / 29 . 70 . 86
Fabriqué en Chine - Vervaardigd in China - Made in China - Hergestellt in China - Vyrobeno v Číně
2015
Sous réserve de modifications / Technische wijzigingen voorbehouden / Subject to technical modifications
Technische Änderungen vorbehalten / Technické změny vyhrazeny
43
 Loading...