

Page 1
eStat
Installation Manual
www.electricunderoorheating.co.uk
Before you begin installing read
through these instructions carefully
and check that you have all the
components required.
Page 2
TH232-AF-230 400-232-003-B 2010-05-26 1/4
• One (1) thermostat
• One (1) floor sensor
• One (1) wall plate
Turn off power to the heating system at the main power panel to
avoid electrical shock. Installation should be carried out by an
electrician.
All work must conform to the applicable country standards for
electrical installations and wiring.
This thermostat should be connected on a circuit equipped with
a fuse or a circuit breaker. It must be installed on a certified
electrical box equipped with non-metallic cable strain relief
adapters. Use separate adapters for the high-voltage wires and
for the sensor cable.
For a new installation, choose a location about 1.5 m above the
floor.
For electric baseboards, convectors and fan-forced heaters, the
thermostat must be installed facing the heating system and on
an inside wall.
Avoid locations where there are air drafts (top of staircase, air
outlet), dead air spots (behind a door), direct sunlight or
concealed chimneys or stove pipes.
NOTE: The terminals are designed to handle a cross-section of wire
measuring 0.33 to 3.1 mm
2
.
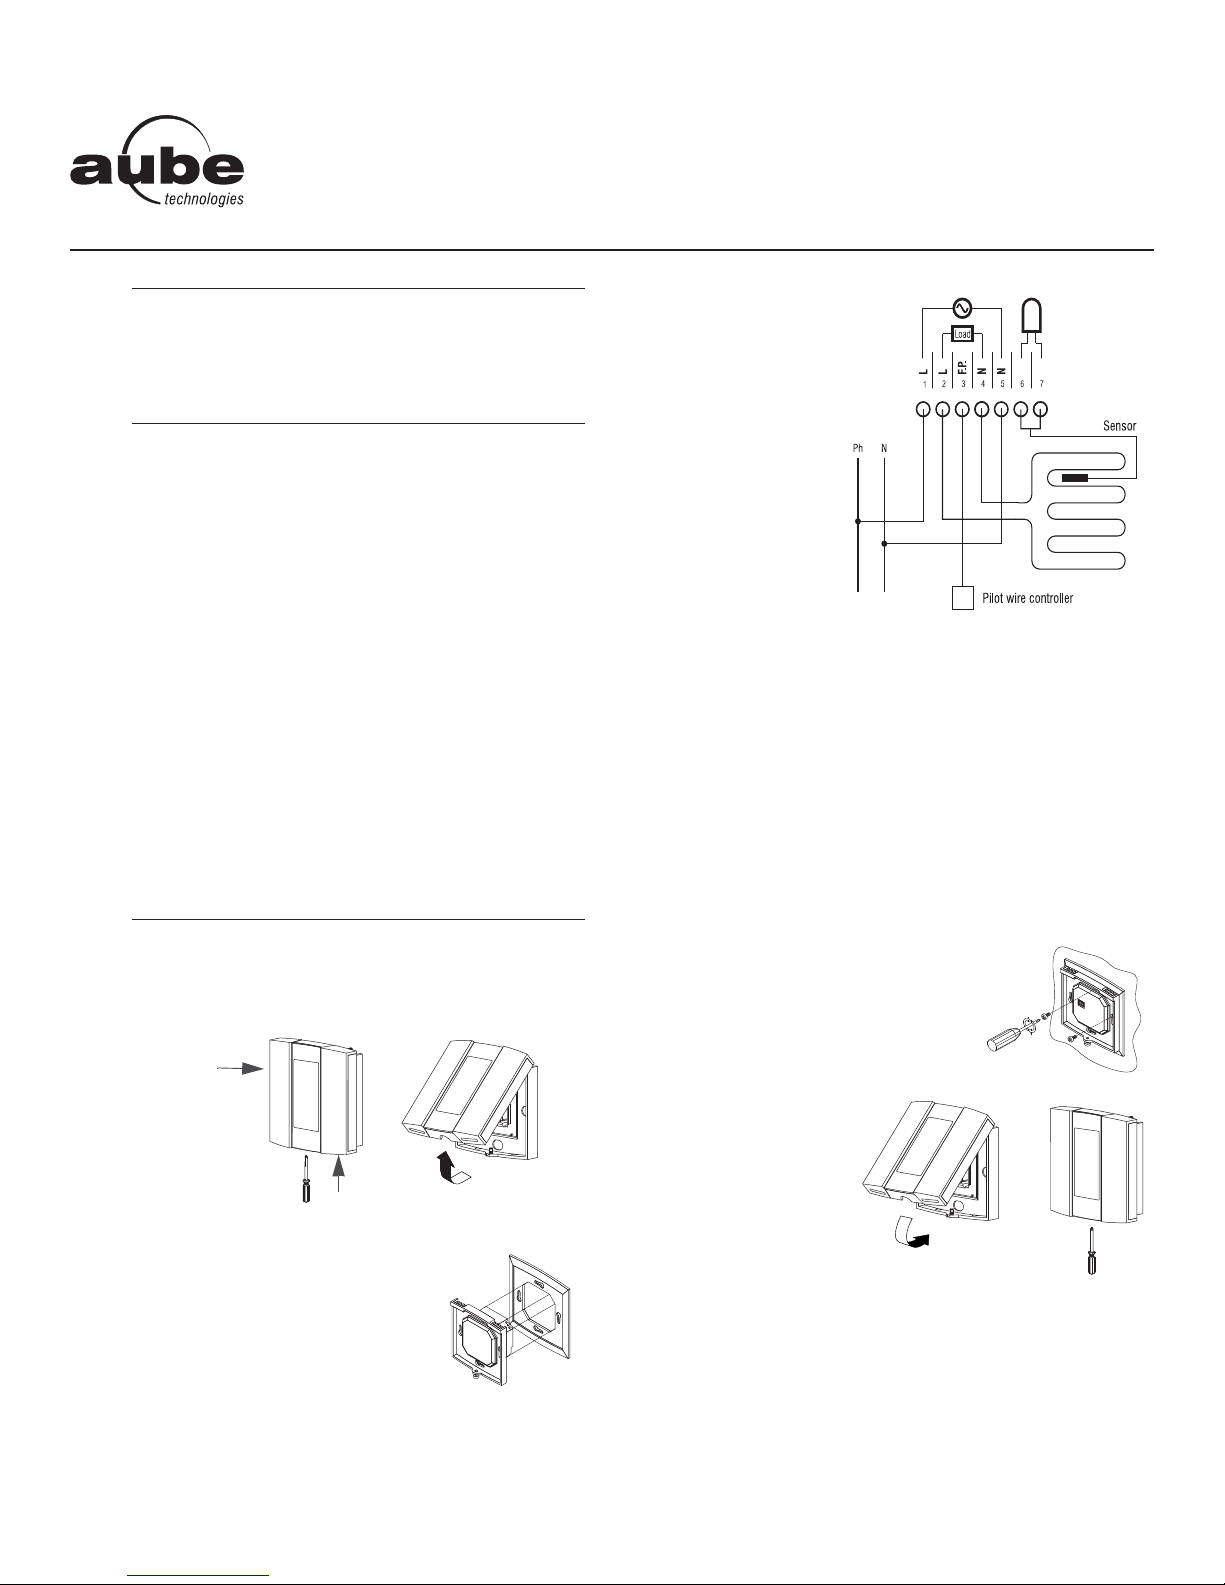
n Loosen the captive screw underneath the base and remove the
faceplate from the base.
o Before making the connections, make sure
that the base covers the electrical box
entirely. If not, install a wall plate at the
back of the base.
p Connect the wires:
• Power:
Terminals 1 & 5
• Load:
Terminals 2 & 4
see note 1
• Pilot Wire:
Terminal 3
see note 2
• Floor sensor:
Terminals 6 & 7
(no polarity)
see note 3
WARNING: Ensure that the wires are tightly secured to the terminals.
Apply a minimum torque of 0.5 Nm (4.4 Lb/in) when tightening the
screws.
Note 1 If a contactor is used between the thermostat and the load,
install a snubber at the contactor’s coil terminal to ensure
the proper operation of the thermostat.
Note 2 This connection is required on some models only.
Note 3 The sensor cable must pass outside the electrical box and
travel inside the wall to the floor. For the proper operation of
the thermostat, the floor sensor must be centered between
two heater wires having a maximum temperature of 80 °C
(176 °F). The floor sensor wire must not cross any heater
wire or be placed close to it.
r Push wires into the electrical box and
secure the base to the electrical box
anchorage. The head of the screw
must be less than 2 mm thick.
s Return the faceplate
to the base.
t Return power to the heating system.
NOTE: Keep the thermostat's air vents clean and unobstructed at all
times.
n
Parts
1.
o
Guidelines
2.
p
Procedure
3.
Base
Faceplate
TH232-AF-230
Installation Instructions
230 V Base
Page 3
TH232-AF-230 400-232-003-B 2010-05-26 2/4
This thermostat provides the following temperature control modes:
Display
Apply power to the thermostat at the main electrical panel. At
power-up, the thermostat is in manual mode and displays the
actual (measured) temperature. The setpoint temperature is 28 °C
(82 °F).
LO The actual temperature is below 0 °C (32 °F).
HI The actual temperature is above 70 °C (158 °F).
Er The thermostat built-in sensor is defective. Replace the
thermostat.
E1 The floor sensor circuit is opened. Check the sensor
connections.
E2 The floor sensor circuit is shorted. Replace the sensor.
4.1 Control Mode Selection
n
Press and hold the Clear button for 3 seconds. The current control mode is displayed
(ctl).
o Press the to select between A, AF and F.
NOTE
: If you have chosen the A or F mode, go to step 7. If you have
chosen the AF mode, the thermostat will control the ambient temperature while keeping the floor temperature within desired limits. If the
floor temperature is too low or too high, the thermost a t will turn h eating
on or off to maintain the floor temperature within the limits regardless
of the ambient temperature. The minimum and maximum floor tempe rature limits are factory-set at 5 °C (41 °F) and 28 °C (82 °F) respectively. To modify the limits, continue with the next step:
p
Press the
Clear
button briefly. The minimum limit is displayed (
FL:LO
).
q Press the button to set the minimum limit.
r
Press the
Clear
button briefly. The maximum limit is displayed (
FL:HI
).
s Press the buttons to set the maximum limit.
t Press the Mode/Return button to exit and save the changes.
NOTE: If no button is pressed for 60 seconds, the thermostat will
save the changes and return to normal display.
4.2 Other Configurations
This procedure allows you to choose the following configurations:
n Press and hold the Pgm button for 3 seconds. The current tem-
perature unit is displayed (unit).
o Press the to toggle between °C and °F.
p Press the Pgm button briefly. The current time format is dis-
played (Hr).
q Press the to toggle between 24H and 12H.
r Press the Pgm button briefly. The current Early Start setting is
displayed (ES).
s Press the to toggle between OFF and On.
t Press the Mode/Return button to exit and save the changes.
n
Description
1.
A mode: controls and displays the ambient air temperature
F mode: controls and displays the floor temperature using
an external temperature sensor (default mode)
AF mode: controls and displa ys the ambient air te mperature
maintains the floor temperature within desired
limits using an external temperature sensor
o
Power Up
2.
p
Error Messages
3.
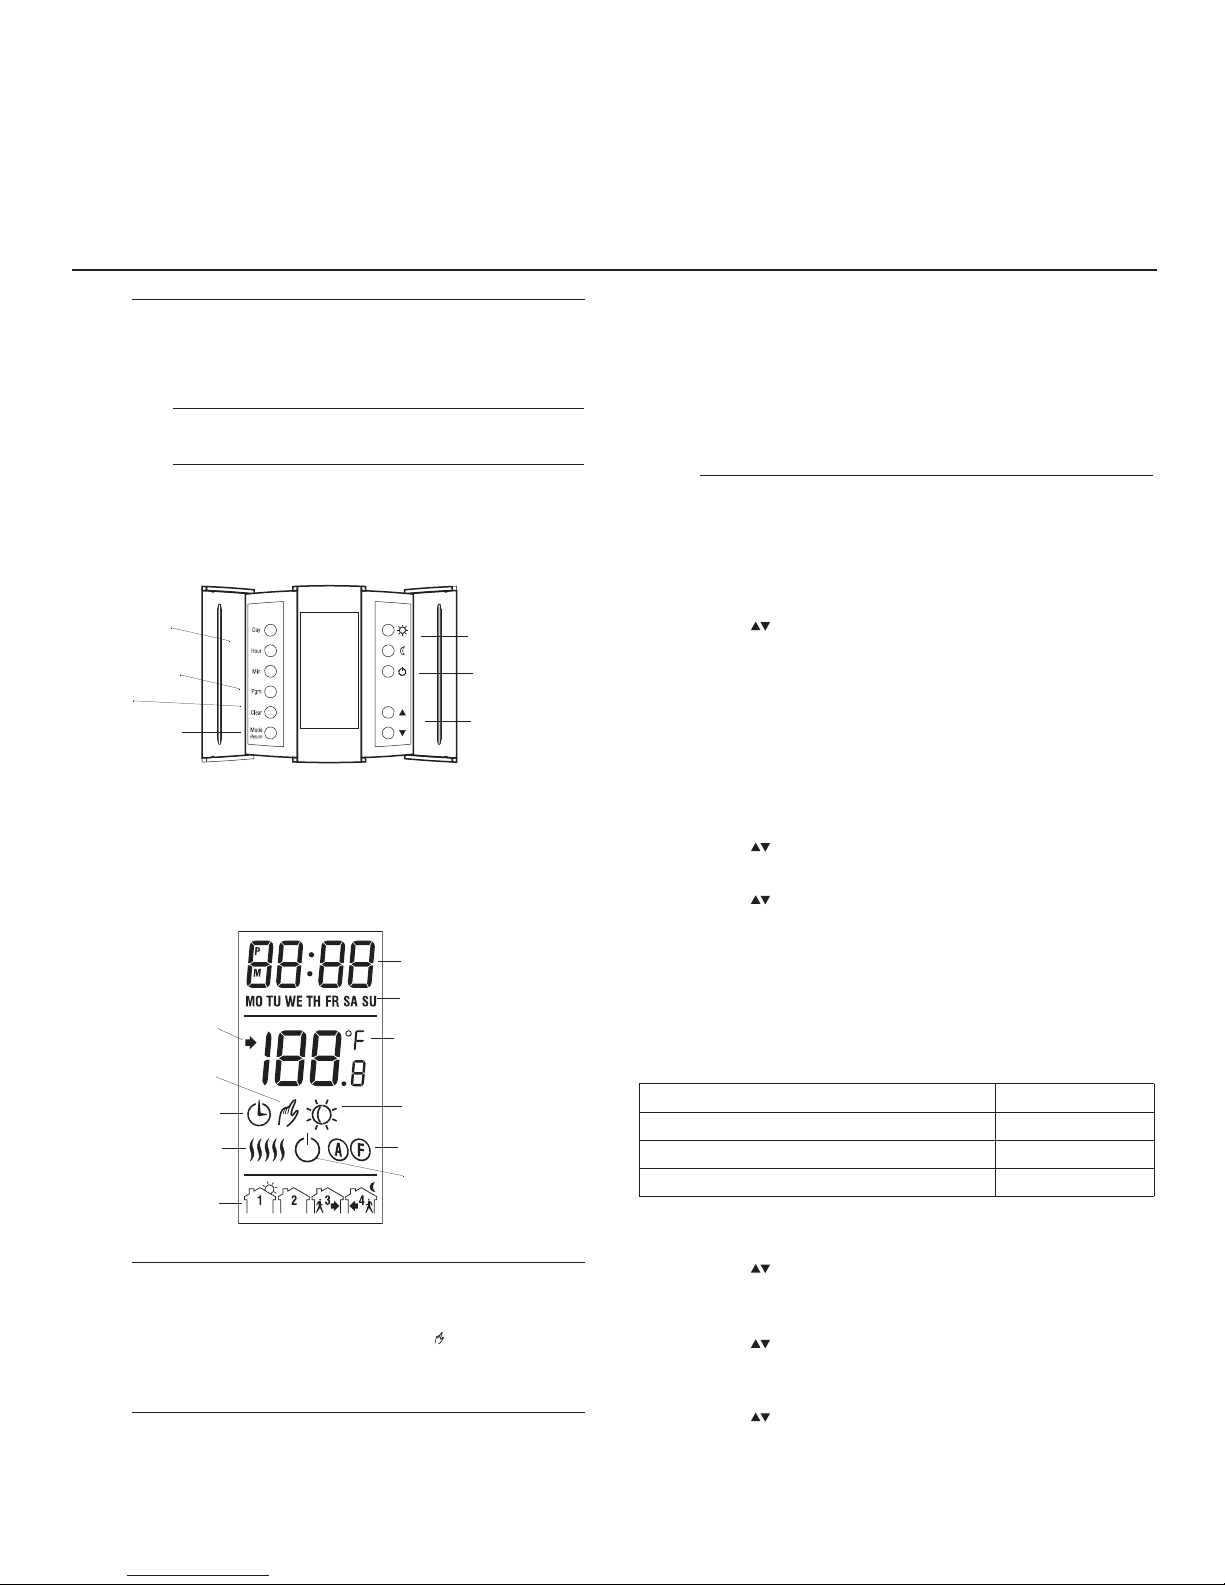
Day and
time setting
Schedule
programming
Mode selection /
Exit
Clear
Temperature
adjustment
Temperature
presets
On/Off button *
* Use this button to disable heating (e.g. in the summer). The
thermostat remains powered and continues to display the time
and temperature.
Time
Day
T emperature
Periods
Heating intensity
indicator
Automatic mode
Appears when the
setpoint temperature
is displayed
Appears when
heating is disabled
Mode indicator (A, F or AF)
Preset temperature
indicators
Manual mode
q
q
Configuration
4.
Parameters Default settings
Temperature format °C
Time format 24H
Early Start setting (see the note below) On
TH232-AF-230
Operating Instructions
Programmable Thermostat
Page 4
TH232-AF-230 400-232-003-B 2010-05-26 3/4
NOTE: Early Start can be used in Automatic mode only. When this
function is set to On, the thermostat calculates the optimal time to
start heating in order to obtain the desired temperature by the set
time. The thermostat re-assesses the start time daily based on the
previous day’s results.
n Press the Hour button to set the hour.
o Set the Min button to set the minutes.
p Set the Day button to set the day.
q Press Mode/Return to exit and save the changes.
Daylight Savings (DLS) Time
When the DLS function is set to US, the thermostat switches to Daylight Savings Time on the second Sunday of March and to normal
time on the first Sunday of November.
When the DLS function is set to Eu, the thermostat switches to Daylight Savings Time on the last Sunday of March and to normal time
on the last Sunday of October.
NOTE: The DLS function is OFF (default setting) when the clock
loses its setting.
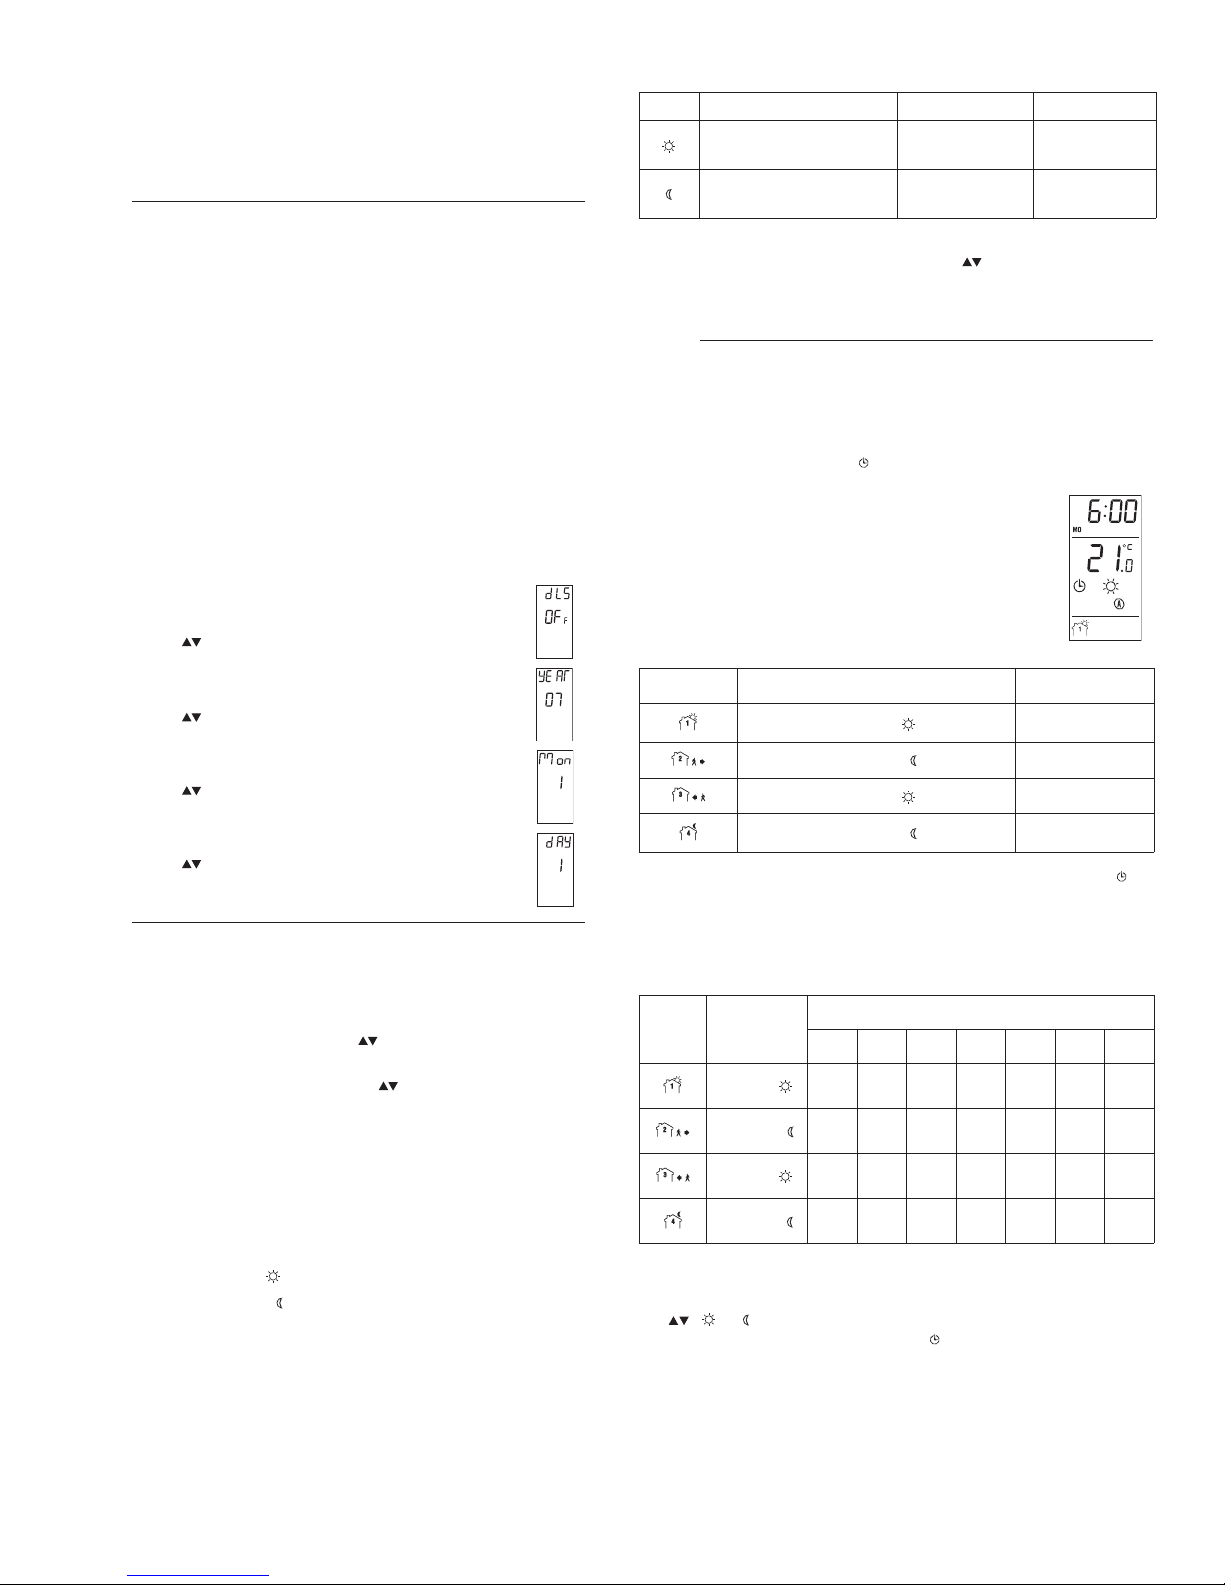
n Press the Day button (3 seconds) until DLS appears
on the screen.
o Press the to toggle between US, Eu and OFF.
p Press the Day button briefly. The year setting is dis-
played.
q Press the to set the current year.
r Press the Day button briefly. The month setting is dis-
played.
s Press the to set the current month.
t Press the Day button briefly. The date setting is dis-
played.
u Press the to set the current date.
v Press Mode/Return to exit and save the changes.
6.1 Setpoint Temperature
The thermostat normally displays the actual (measured) temperature.
To view the setpoint, press one of the buttons once. The setpoint
will appear for the next 5 seconds.
To change the setpoint, press one of the buttons until the desired
temperature is displayed. To scroll faster, press and hold the button.
Backlight
The screen is lit for 12 seconds when any button is pressed.
6.2 Preset Temperatures
The thermostat has 2 preset temperatures:
Comfort temperature
Economy temperature
To use a preset temperature, press the corresponding button. The
corresponding icon will be displayed.
The following table shows the intended use and the default value of
each of the preset temperatures.
To store a preset temperature:
n Set the desired temperature using the buttons.
o Press and hold the corresponding temperature preset button
until the corresponding icon is displayed.
The thermostat has 2 modes of operation: automatic mode and manual mode.
7.1 Automatic Mode
Use automatic mode if you want the thermostat to follow the programmed schedule. The schedule has 4
time periods and uses the 2 preset temperatures. The
thermostat switches to Comfort temperature in periods
1 and 3 and to Economy temperature in periods 2 and
4. The following table shows the intended use of each
time period.
To use the automatic mode, press the Mode button to display on
the screen. The current period number will also appear.
Preprogrammed schedule
The thermostat has been programmed with the following schedule.
Temporary bypass
You can override the temperature of the current period by pressing
the , or buttons. The new setpoint will be used until the beginning of the next period. The clock icon flashes during the bypass.
To cancel the bypass, press the Mode button.
r
Clock and Day Setting
5.
s
Temperature Adjustment
6.
Icon Intended use A/AF modes F mode
Comfort
(when at home)
21 °C (70 °F) 28 °C (82 °F)
Economy (when asleep
or away from home)
16.5 °C (62 °F) 20 °C (68 °F)
t
t
Modes of Operation
7.
Period Temperature setting Typical use
Comfort
Wake-up
Economy
At work
Comfort
At home
Economy
Sleep
Period
Temperature
setting
Period start time
MO TU WE TH FR SA SU
Comfort
6:00 am6:00 am6:00 am6:00 am6:00 am6:00 am6:00
am
Economy
8:30 am8:30 am8:30 am8:30 am8:30
am
--:-- --:--
Comfort
4:00 pm4:00 pm4:00 pm4:00 pm4:00
pm
--:-- --:--
Economy
11:00 pm11:00 pm11:00 pm11:00 pm11:00 pm11:00 pm11:00
pm
Page 5
TH232-AF-230 400-232-003-B 2010-05-26 4/4
Customizing the schedule
You can program the thermostat to use either 2 or 4 periods
each day. For example, you can use 4 periods on weekdays and 2
periods on weekends. If you want to use 2 periods, choose periods “1
and 4” or periods “2 and 3”. Early Start will not work if you choose
periods “1 and 2” or periods “3 and 4”.
n Press Pgm. Period 1 of Monday is displayed.
o If you wish to select another day, press Day repeatedly until the
desired day is displayed.
NOTE: To select all 7 days, hold the Day button for 3 seconds.
This function is helpful if you want the same program every day.
When all 7 days are selected, the start time of the displayed
period will be applied to all 7 days.
p If you wish to select another period, press Pgm repeatedly until
the desired period is displayed.
q Press Hour and Min to set the period start time.
NOTE: To skip the period, press Clear. The thermostat will
display --:-- to indicate that the period will not be used.
r To program another period, go back to step 2.
s Press Mode/Return to exit.
NOTE: If no button is pressed for 60 seconds, the thermostat will
save the changes and return to normal display.
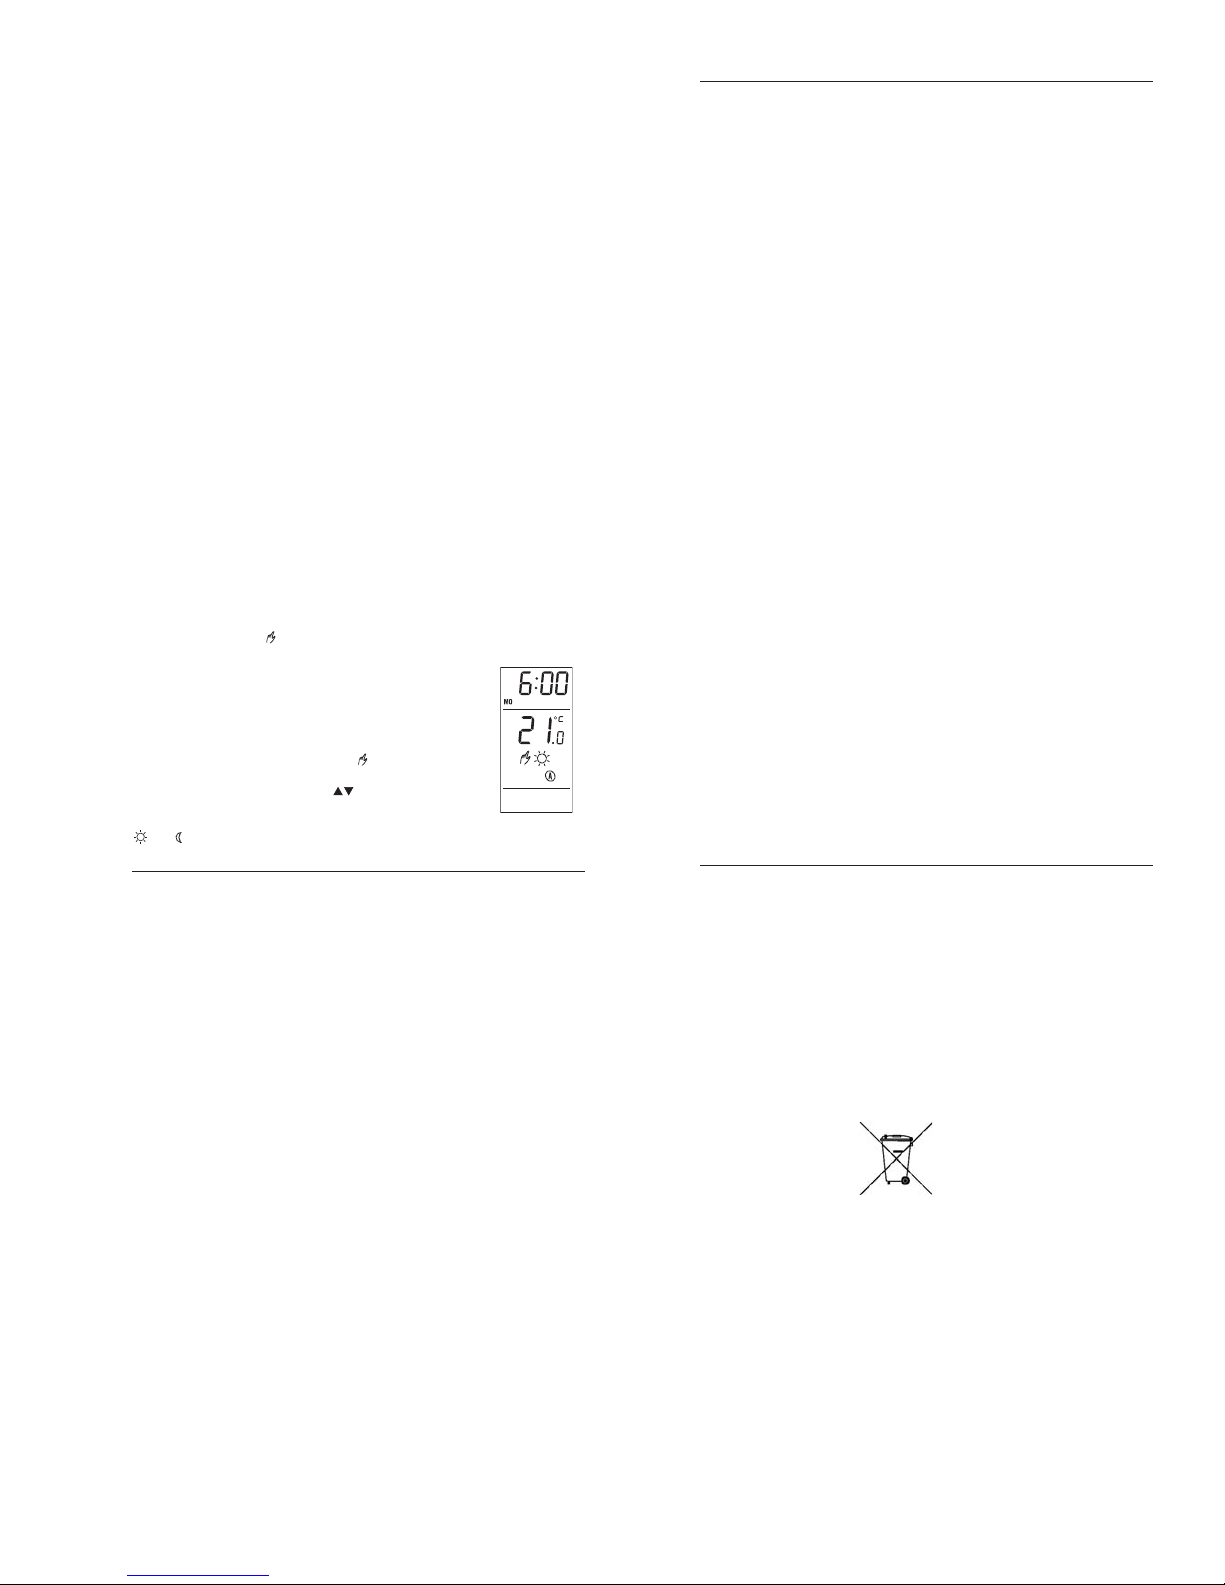
7.2 Manual Mode
In manual mode, the programmed schedule is not
used. Use this mode if you wish to set the temperature
manually or keep the same temperature all the time.
To use the manual mode:
n Press the Mode button to display .
o Set the temperature using the buttons or
select one of the preset temperatures by pressing
the or button.
Supply: 230 VAC, 50 Hz
Maximum Load: 15 A or 3450 Watts (NI)
Rated Impulse: 2500 V
Ambient temperature
setpoint range (A/AF models)
: 5 °C to 30 °C (40 °F to 86 °F)
Floor temperature
setpoint range (F model): 5 °C to 40 °C (40 °F to 104 °F)
Floor temperature
limit range (AF model): 5 °C to 40 °C (40 °F to 104 °F)
Temperature display range: 0 °C to 70 °C (32 °F to 158 °F)
Temperature display resolution: 0.5 °C (1 °F)
Operating temperature: 0 °C to 50 °C (32 °F to 120 °F)
Storage temperature: -20 °C to 50 °C (-4 °F to 120 °F)
Heating cycle length: 15 minutes
Software: Class A
Automatic action: Type 1B and 1Y
Protection index: IP21
Conformity: EN60730-1 / EN50081-1 / EN50082-2
Protection: Class 2
Environment: Normally polluted
Power outage: All programs and temperature settings are saved
during a power outage. The clock must be reprogrammed if the
power outage lasts more than 4 hours. When power returns, the
thermostat returns to the mode of operation preceding the outage.
Aube warrants this product, excluding battery, to be free from defects
in the workmanship or materials, under normal use and service, for a
period of three (3) years from the date of purchase by the consumer. If
at any time during the warranty period the product is determined to be
defective or malfunctions, Aube shall repair or replace it (at Aube's
option).
If the product is defective,
(i) return it, with a bill of sale or other dated proof of purchase, to the
place from which you purchased it, or
(ii) contact Aube. Aube will make the determination whether the
product should be returned, or whether a repla cement product
can be sent to you.
This warranty does not cover removal or reinstallation costs. This
warranty shall not apply if it is shown by Aube that the defect or
malfunction was caused by damage which occurred while th e product
was in the possession of a consumer.
Aube's sole responsibility shall be to repair or replace the product
within the terms stated above. AUBE SHALL NOT BE LIABLE FOR
ANY LOSS OR DAMAGE OF ANY KIND, INCLUDING ANY
INCIDENTAL OR CONSEQUENTIAL DAMAGES RESULTING,
DIRECTLY OR INDIRECTLY, FROM ANY BREACH OF ANY
WARRANTY, EXPRESS OR IMPLIED, OR ANY OTHER FAILURE
OF THIS PRODUCT. Some provinces, states and regions do not
allow the exclusion or limitation of incidental or consequential
damages, so this limitation may not apply to you.
THIS WARRANTY IS THE ONLY EXPRESS WARRANTY AUBE
MAKES ON THIS PRODUCT. THE DURATION OF ANY IMPLIED
WARRANTIES, INCLUDING THE WARRANTIES OF
MERCHANTABILITY AND FITNESS FOR A PARTICULAR
PURPOSE, IS HEREBY LIMITED TO THE THREE-YEAR
DURATION OF THIS WARRANTY. Some regions do not allow
limitations on how long an implied warranty lasts, so the above
limitation may not apply to you.
This warranty gives you specific legal rights, and you may have other
rights which vary from one province, state or region to another.
705 Montrichard
Saint-Jean-sur-Richelieu
Quebec, Canada J2X 5K8
Tel: 1-800-831-AUBE
Email: [email protected]
For more information on our products, go to
www.aubetech.com
u
Technical Specifications
8.
;
Warranty
9.
Technical Assistance
10.
 Loading...