

Page 1
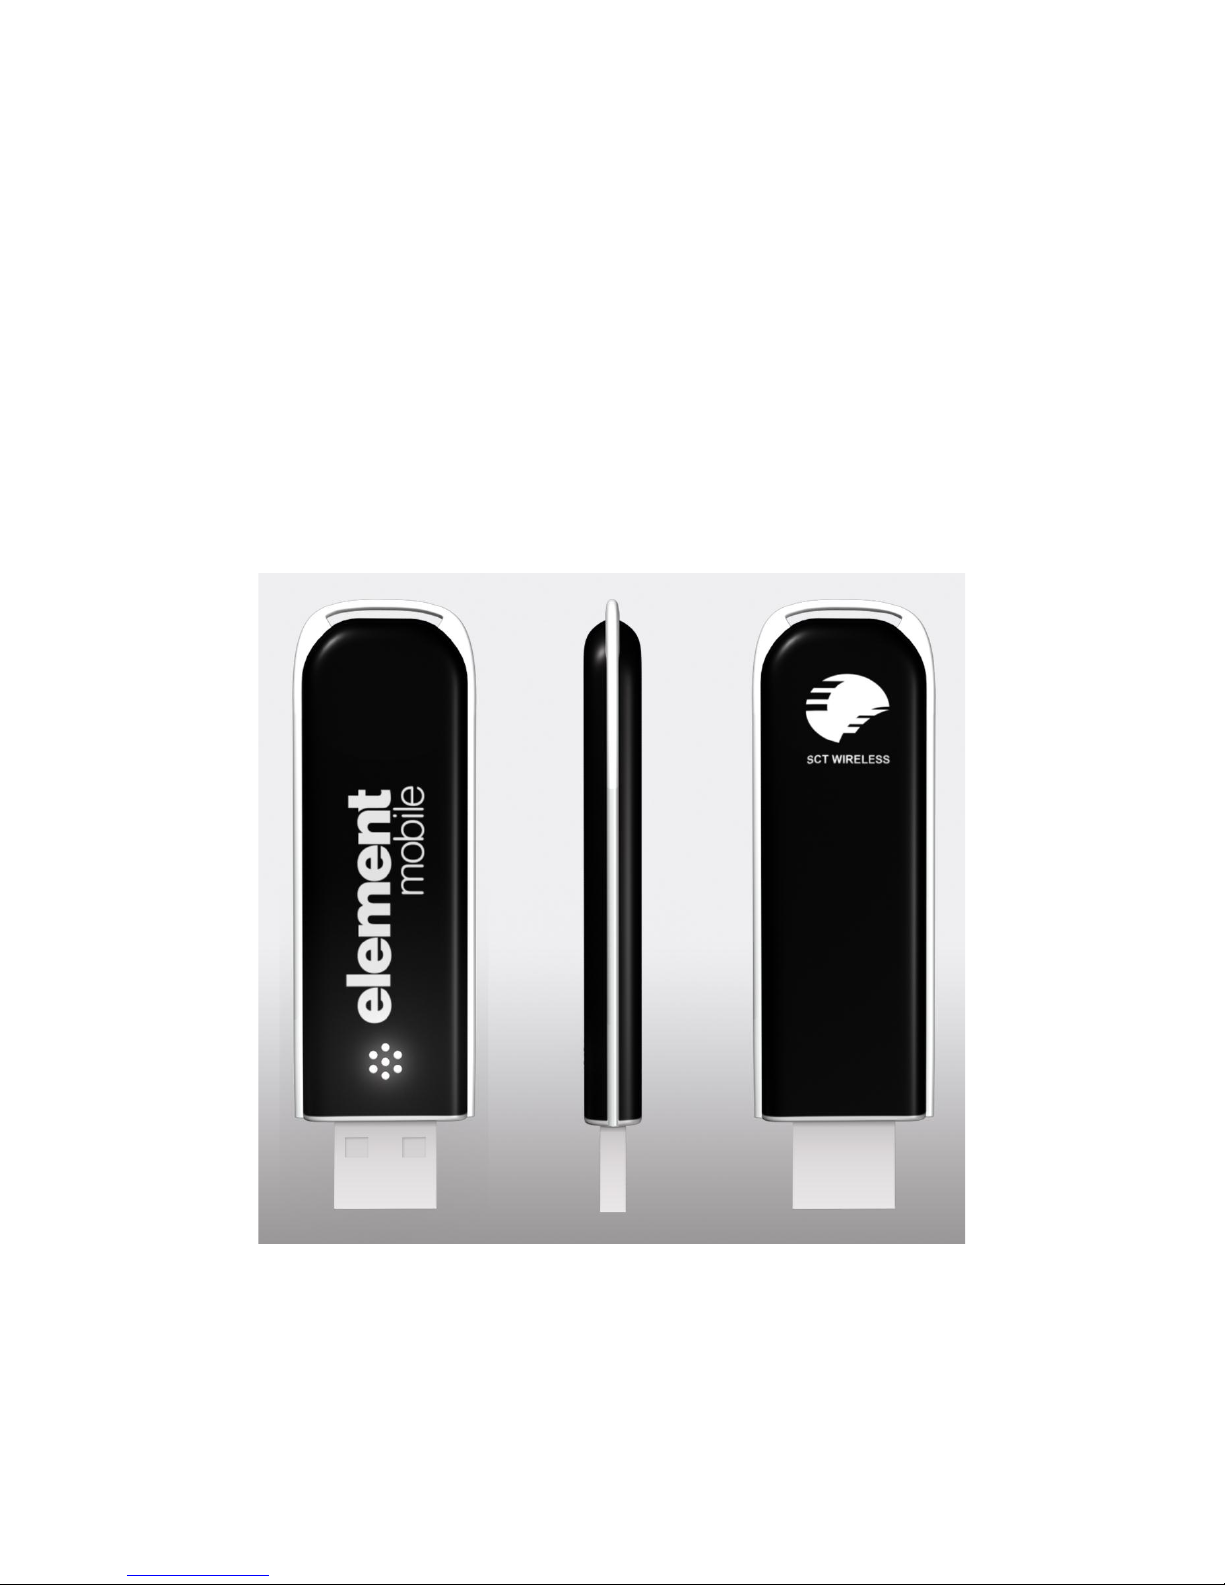
Element Mobile
SCT-UM300 Wireless Broadband Modem
User Guide
Version 1.0
Page 2

1
Introduction
Mobile Connect is a software program running on your PC. With Mobile Connect, the user can
activate the device and establish a data link.
Windows
The Main Window ...........................................................................................................................2
Data Link .........................................................................................................................................3
Basics .............................................................................................................................. 3
Establishing a data link ................................................................................................... 3
Disconnect a data link ..................................................................................................... 3
Profiles (Dialup Configuration) ...................................................................................... 3
Statistics .......................................................................................................................... 4
Settings .............................................................................................................................................5
General ............................................................................................................................ 5
Network........................................................................................................................... 5
Flow warning .................................................................................................................. 6
Version ............................................................................................................................ 7
OTA ................................................................................................................................ 7
Device Activation ........................................................................................................... 8
Live Update ..................................................................................................................... 8
Help ................................................................................................................................................12
Mac Installation .............................................................................................................................13
Mac Home Screen ..........................................................................................................................20
Data Link ...................................................................................................................................... 20
Establishing a data link ................................................................................................. 20
Disconnect a data link ................................................................................................... 21
Device Activation ......................................................................................................................... 21
OTA .............................................................................................................................. 22
View OTA ..................................................................................................................... 22
Display .......................................................................................................................... 22
Device Activation ......................................................................................................... 22
Network......................................................................................................................................... 22
Frequency Band ............................................................................................................ 23
Safety Information .........................................................................................................................24
Page 3
2
The Main Window
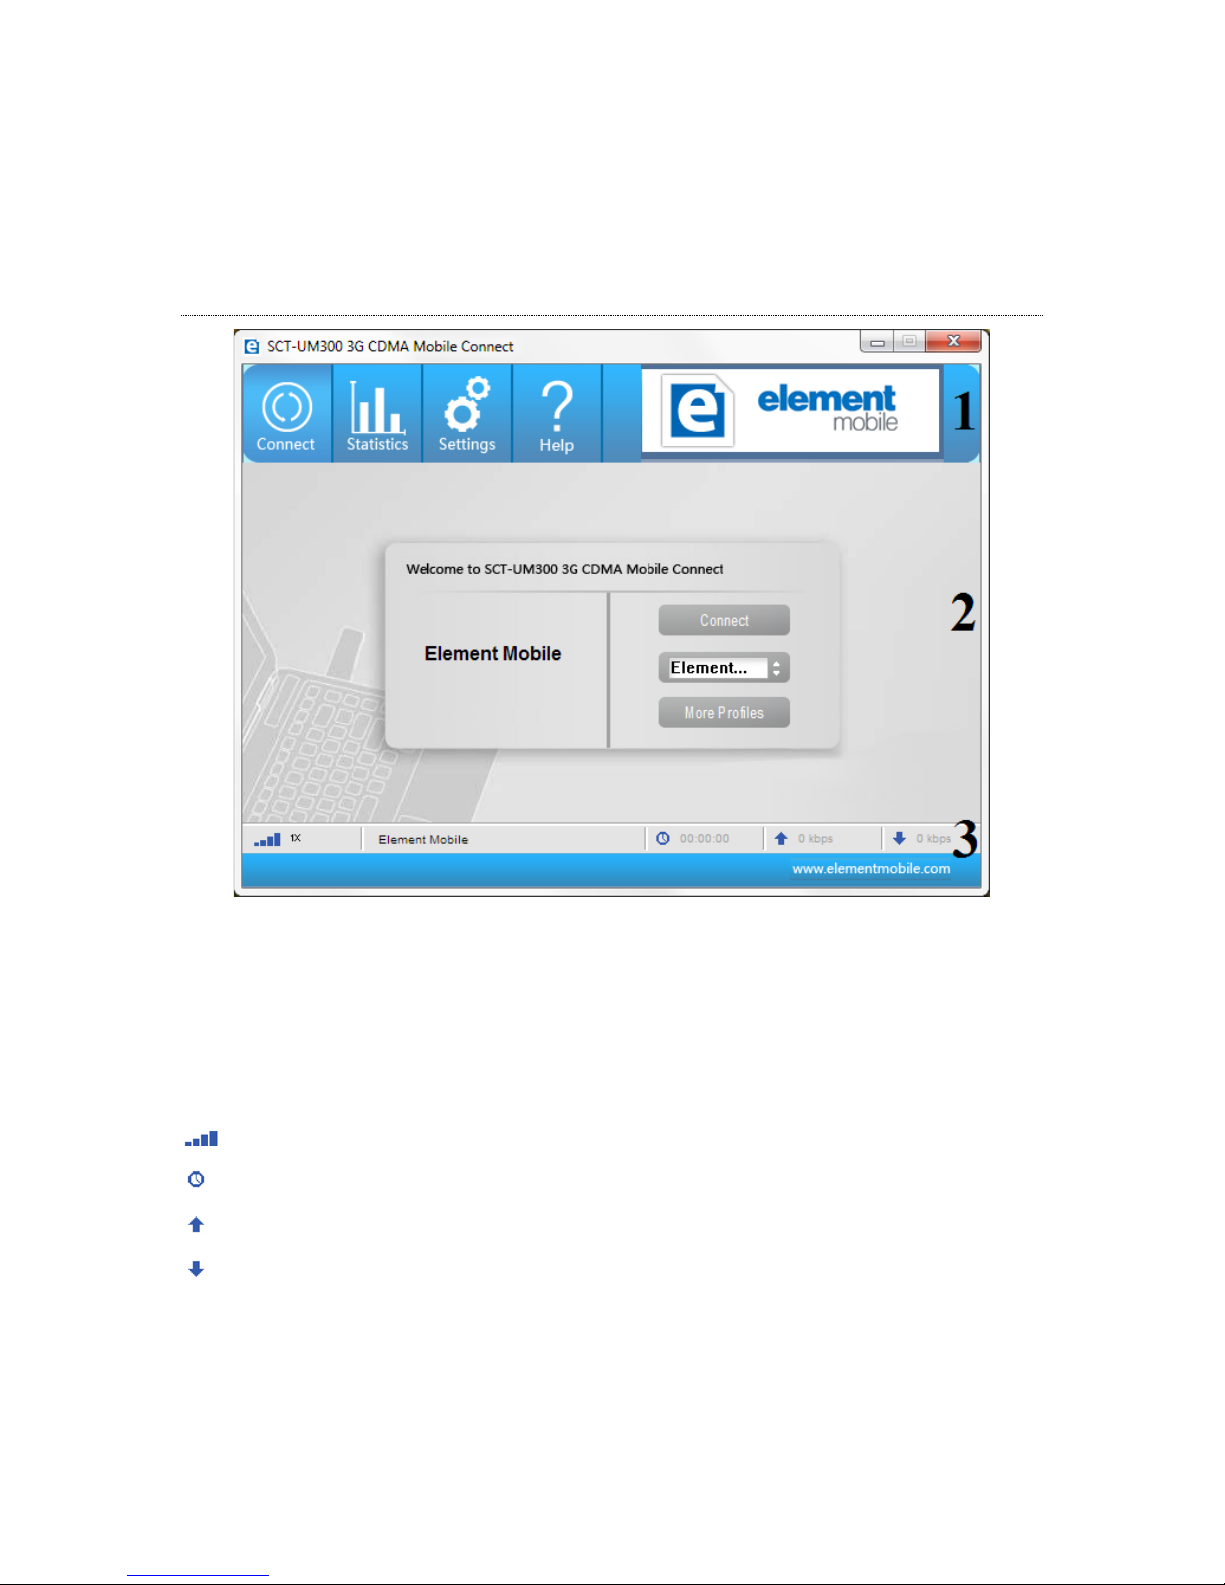
The main window of Mobile Connect consists of three areas:
1. Main Menu - Connect, Statistics, Setting. Make proper configuration to functions.
2. Client - display the details of each function.
3. Status - display the status of the Mobile Equipment.
Icons in the main window
ICON
DESCRIPTION
Signal level
Internet connection duration
Transferring baud rate
Receiving baud rate
Page 4

3
Data Link
Basics
You can establish a dialup data link over CDMA/EVDO via the device.
The dialup data link requires network coverage for CDMA or EVDO. In each of the links, the
device will be connected to a specific phone number.
Establishing a data link
1. Select “Connect” tab
2. Select a profile from the profile list, or click “More Profiles” to set a profile as your
default profile
3. Select “Connect” tab and click the “Connect” button to establish a data link.
Disconnect a data link
To disconnect, press the “Disconnect” button.
Profiles (Dialup Configuration)
Add
1. Select "Connect-->More Profiles".
2. Select "New", enter the profile name, choose a network in the popup window; setup the
device in advanced settings; click "Finish" to save and close the window.
Note:
a. Each profile depends on the setup settings of the carriers. Contact your service provider
for these settings.
b. If the settings for CSD, DNS, PPP and TCP/IP are needed, click on "Advanced Settings"
to enter the proper settings for your carrier. After selecting, click "OK" to save the
settings.
Set Default Profile
1. Select "Connect-->More Profiles"
2. Choose a profile in the list, and then click "Set as Default".
Modify
1. Select "Connect-->More Profiles";
2. Choose a profile in the list, and then click "View/Modify";
3. Make modifications;
4. Click "Finish" to save the settings.
Page 5

4
Delete
1. Select "Connect-->More Profiles"
2. Choose a profile in the list, and then click "Delete"
3. In the confirmation box, click "OK" to proceed.
Restore
1. Select "Connect-->More Profiles"
2. Click "Restore" for initial settings.
Close
After editing the profiles, you can click "Close" to close the profile list windows.
Statistics
Data Flow
To view the data card's traffic statistics in real time or of current or last month, select
"Statistics-->Current Statistic", " Statistics-->Usage This Month", " Statistics -->Usage Previous
Month".
Page 6

5
Settings
General
Auto Launch on Startup
If selected, Mobile Connect will run after Windows startup. Otherwise, Mobile Connect must be
started manually (either by using the desktop icon or the "Start" menu).
1. In the main window, select "Settings-->General"
2. Select the checkbox "Auto Launch on Startup".
Auto Minimized
If selected, Mobile Connect will be minimized after Windows startup. You can check the current
status on the system bar.
1. In the main window, select "Settings-->General"
2. Select the checkbox "Auto Minimized".
Link Auto Reactivation
If selected, Mobile Connect will try to reactive the internet disconnected link when the service
recovers.
1. In the main window, select "Settings-->General"
2. Select the checkbox "Link Auto Reactivation".
The Idle Time Before Disconnect
You can define the idle time before the network connection is terminated, which will take effect
on the next session.
Network
Depending on the coverage area, you may be covered by several networks at a same time. By
default, the phone will choose the available network based on your account.
Frequency Band
By default, the phone will pick a Frequency Band automatically, unless your carrier has special
instructions.
1. In the main window, select "Settings-->Network"
2. Select in "Frequency Band" dropdown list.
Page 7
6
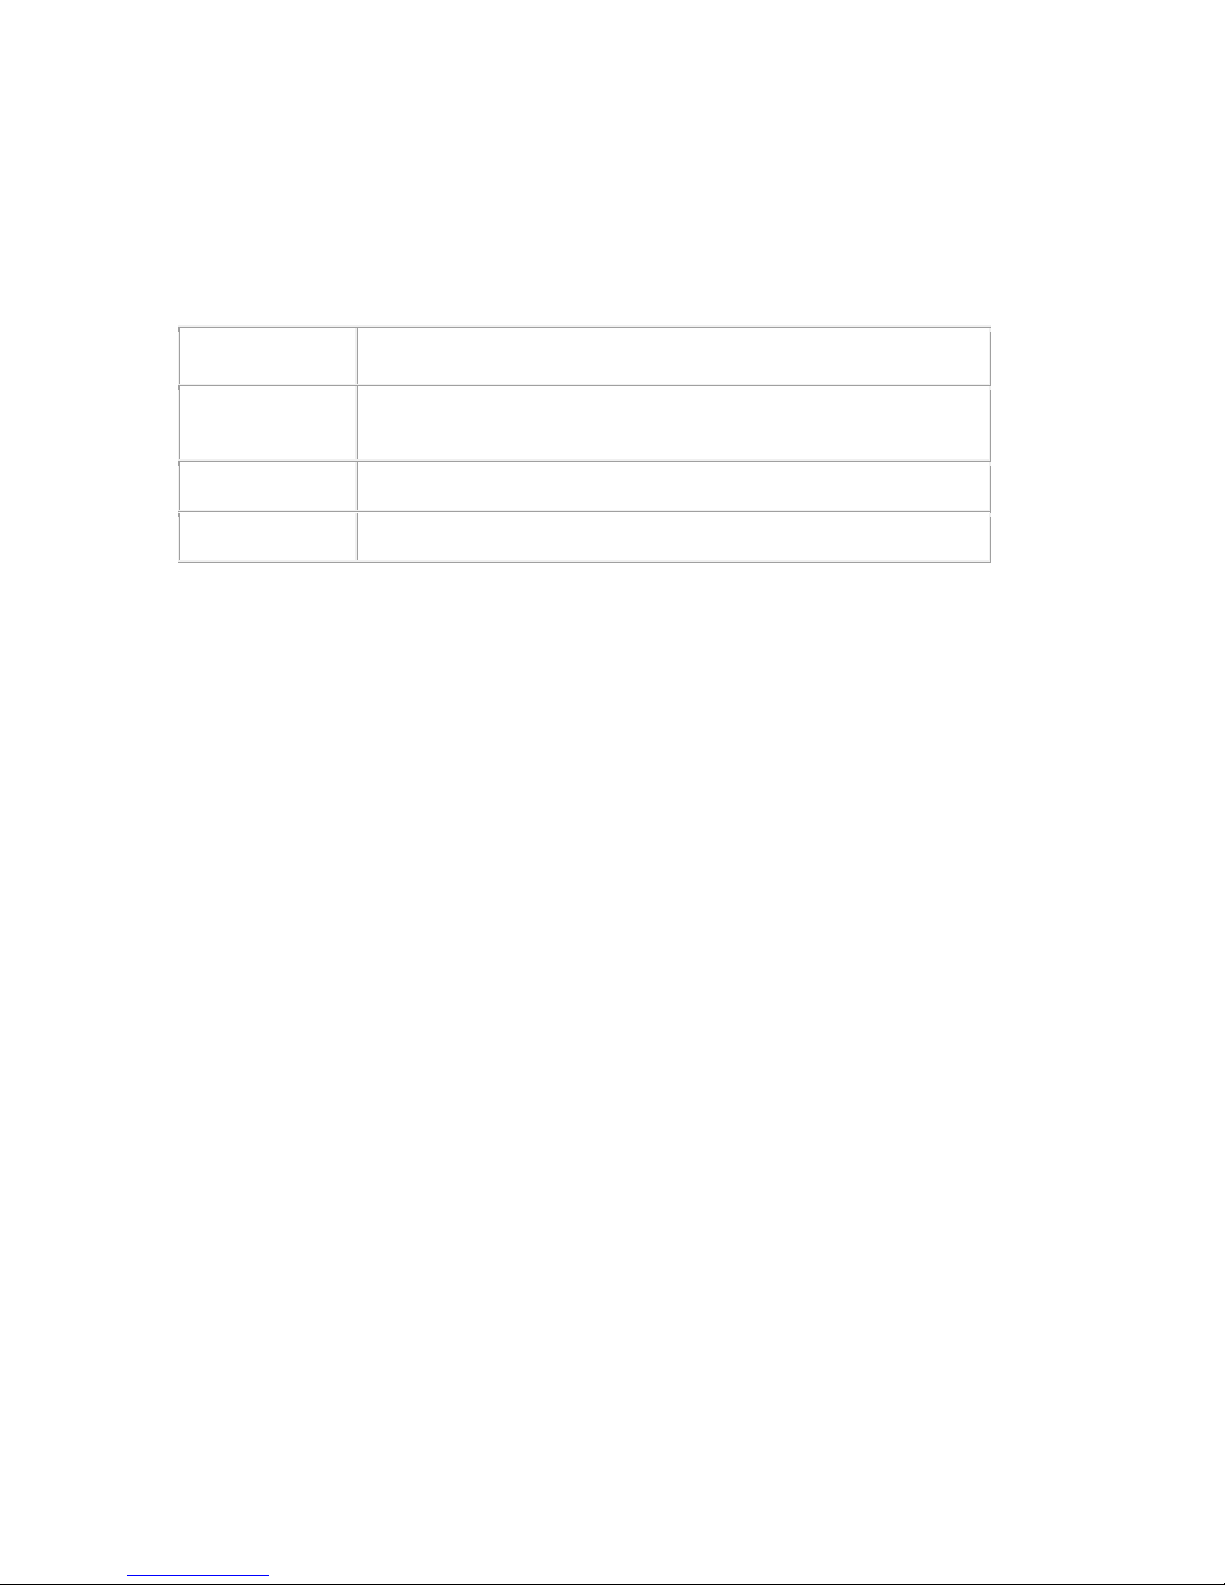
Details of each frequency band
Option
Note
Hybrid
Allows the phone to select the either EVDO or CDMA service based
on the networks available in your current l
ocation.
CDMA 1x Only
Restricts the device to CDMA service.
EVDO Only
Restricts the device to EVDO service.
Select the Network
1. In the main window, select "Settings-->Network"
2. Select "Hybrid", "EVDO Only", or "CDMA1x Only".
Flow warning
In "Settings", "Flow Warning" contains settings for displaying contents, mode of flow statistics,
and setting of threshold alerts.
Display
The display of statistics on flow can be set by data or by time:
1. In the main window, select "Settings-->Flow Warning"
2. Select the checkbox "Warn when a limit is approaching" to activate
3. To display by data, select "Data Limits (MB)" and enter the value of data range; or to
display by time, select "Time Limits (Hours)" and enter the value of time range
4. In the dropdown list "Beginning day of month to calculate", choose the starting date of
the statistics
5. Click on "Apply" to save.
To clear all the records of flow statistics, click "Delete History" and confirm to proceed.
Flow Warning
When the data flow or network connection time has reached the pre-set range, a notifying
message will be displayed as an alert.
1. In the main window, select "Settings-->Flow Warning"
2. In the dropdown list "First warning point (%)", select one for the first-time notification
Page 8
7
3. In the dropdown list "Second warning point (%)", select one for the second-time
notification
4. Click on "Apply" to save.
Version
To view versions, select "Settings-->Version" in the main window.
The version screen displays Software, Driver, Firmware, Firmware build, Hardware, and Boot
Loader versions.
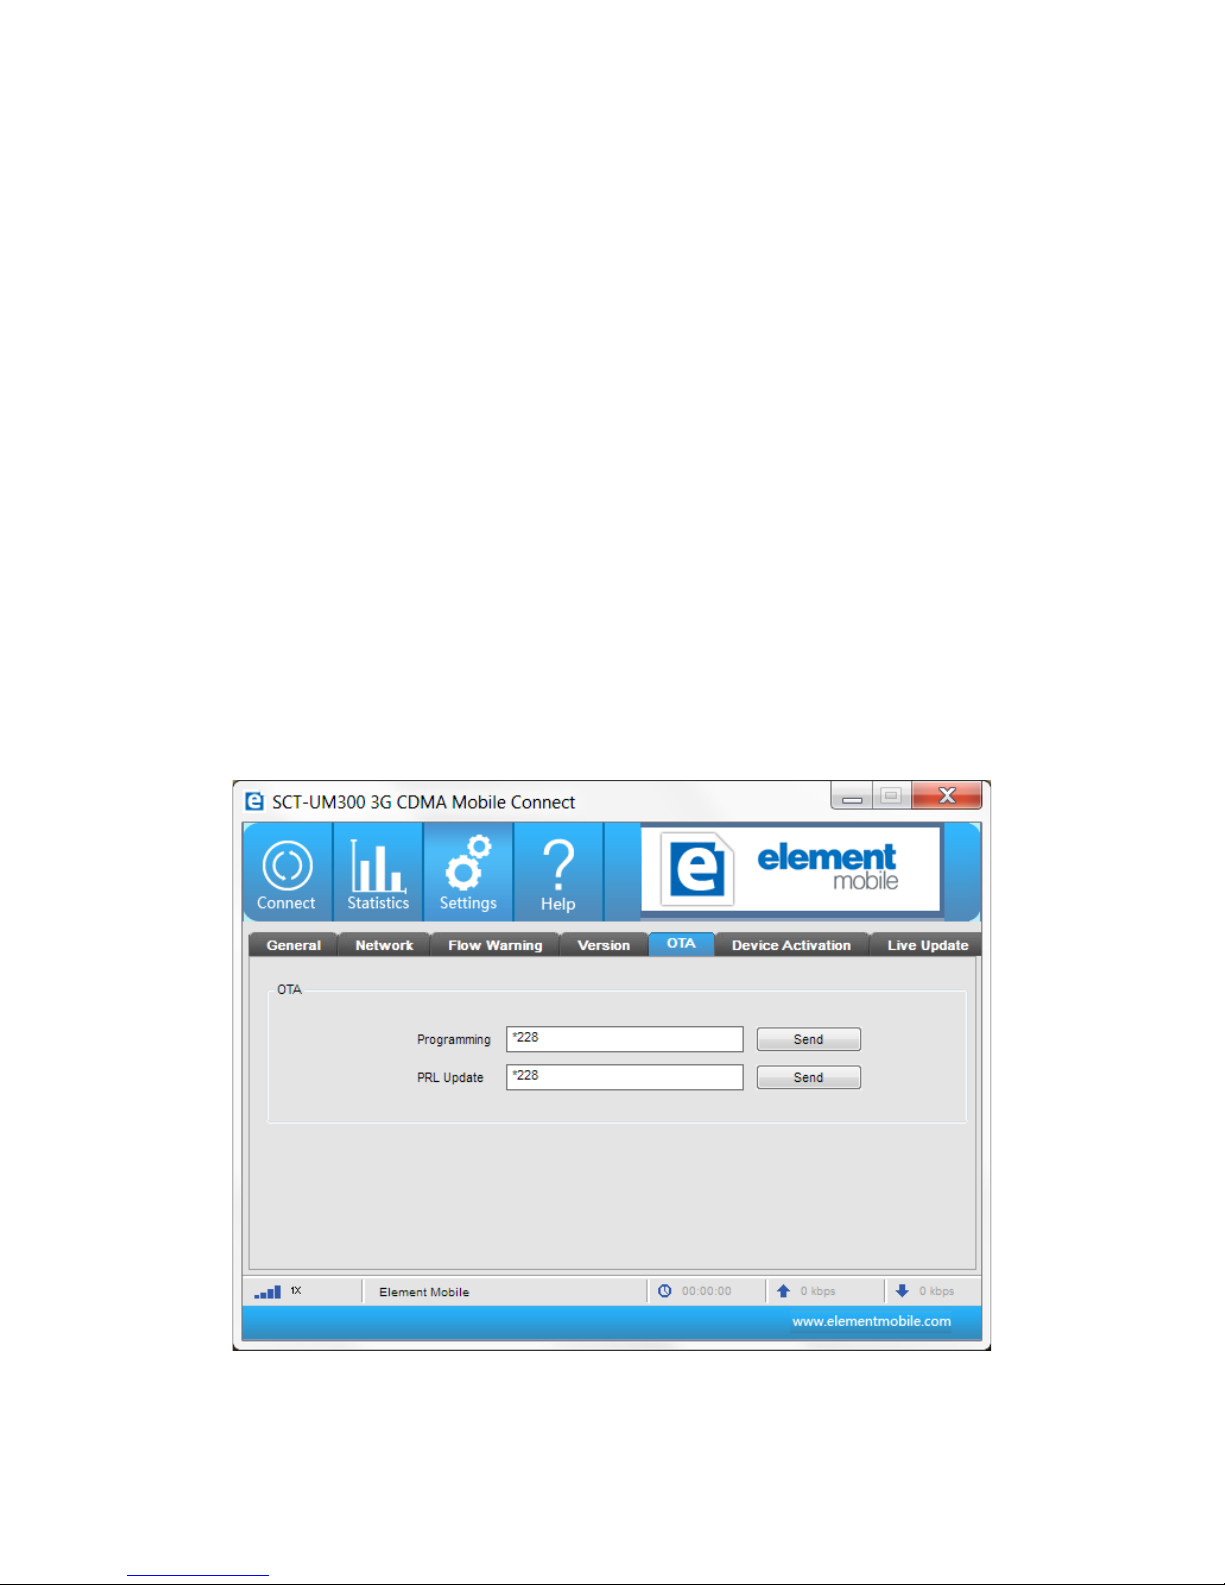
OTA
In "Settings", "OTA" page contains two OTA requests – Programming and PRL Update.
View OTA
1. Make sure the device is connected
2. In the main window, select "Settings-->OTA".
3. Select Programming to have your device programmed via OTA.
4. Select PRL Update to update the PRL in your device via OTA.
5. Click the "Send" button on the OTA option you require.
Page 9

8
Device Activation
In "Settings", the "Device Activation" page contains device parameters and the device activation
function.
Display
The following information is displayed:
1. Electronic Serial Number (ESN): contains the ESN (Electronic Serial Number) of the
device in decimal format
2. MEID Hex: contains the MEID (Mobile Equipment Identity) of the device in hex format
3. pESN Hex: contains the ESN (Electronic Serial Number) of the device in hex format.
Device Activation
1. In the main window, select "Settings-->Device Activation"
2. Input some or all parameters including MDN (Phone Number), MIN (IMSI), SID, NID
and select a PRL file
3. Click on "OK" to activate the device.
Live Update
In "Settings", the "Live Update" page provides a link to download the latest software for update.
Live Update
1. Make sure the network is connected
2. Verify the version of your device by going to the “Settings” tab and selecting “Version”.
The version number is under Software.
3. Open the SCT-UM300 Mobile Connect. Go to the Settings tab and select Live Update.
Press the Update button to launch your browser. Once the browser has opened, close
the SCT-UM300 Mobile Connect.
Page 10
9
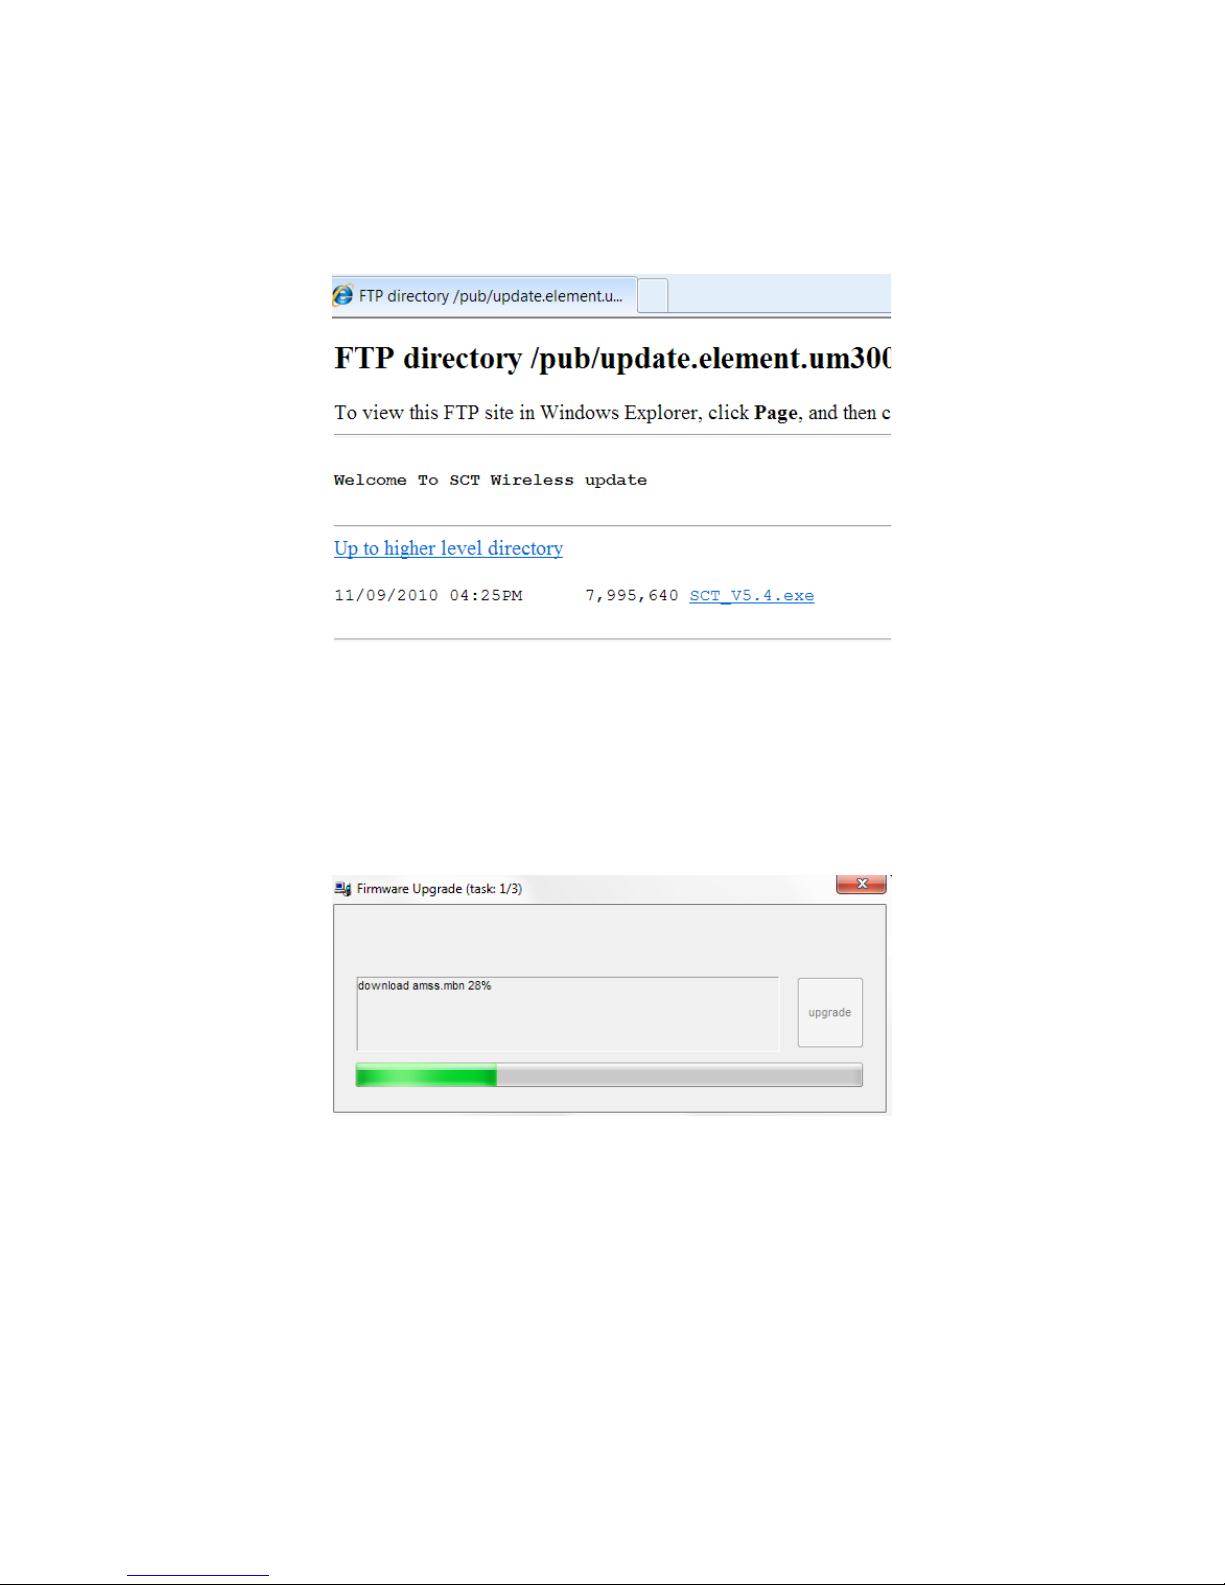
4. The browser will automatically navigate to the Update site. Select the SCT.exe file.
Compare the version from Step 1 to this version. If they are the same, no update is
necessary.
5. When the .exe file is selected, a file download window will appear. Select “Run”. The
update program will be downloaded. The progress will be displayed in a pop-up
window.
6. When the program has fully downloaded, an action pop-up window will appear. Select
“Run” to continue the update.
7. The Firmware Upgrade window will launch. After scanning, the window will display
that the device has been found. To start the process, select Upgrade. The entire
upgrade process takes approximately 5 minutes and 30 seconds.
8. A pop-up warning will appear reminding the user not to remove the device or to close the
program. Doing either of this actions will damage the device. Select “Yes” to
continue.
Page 11
10
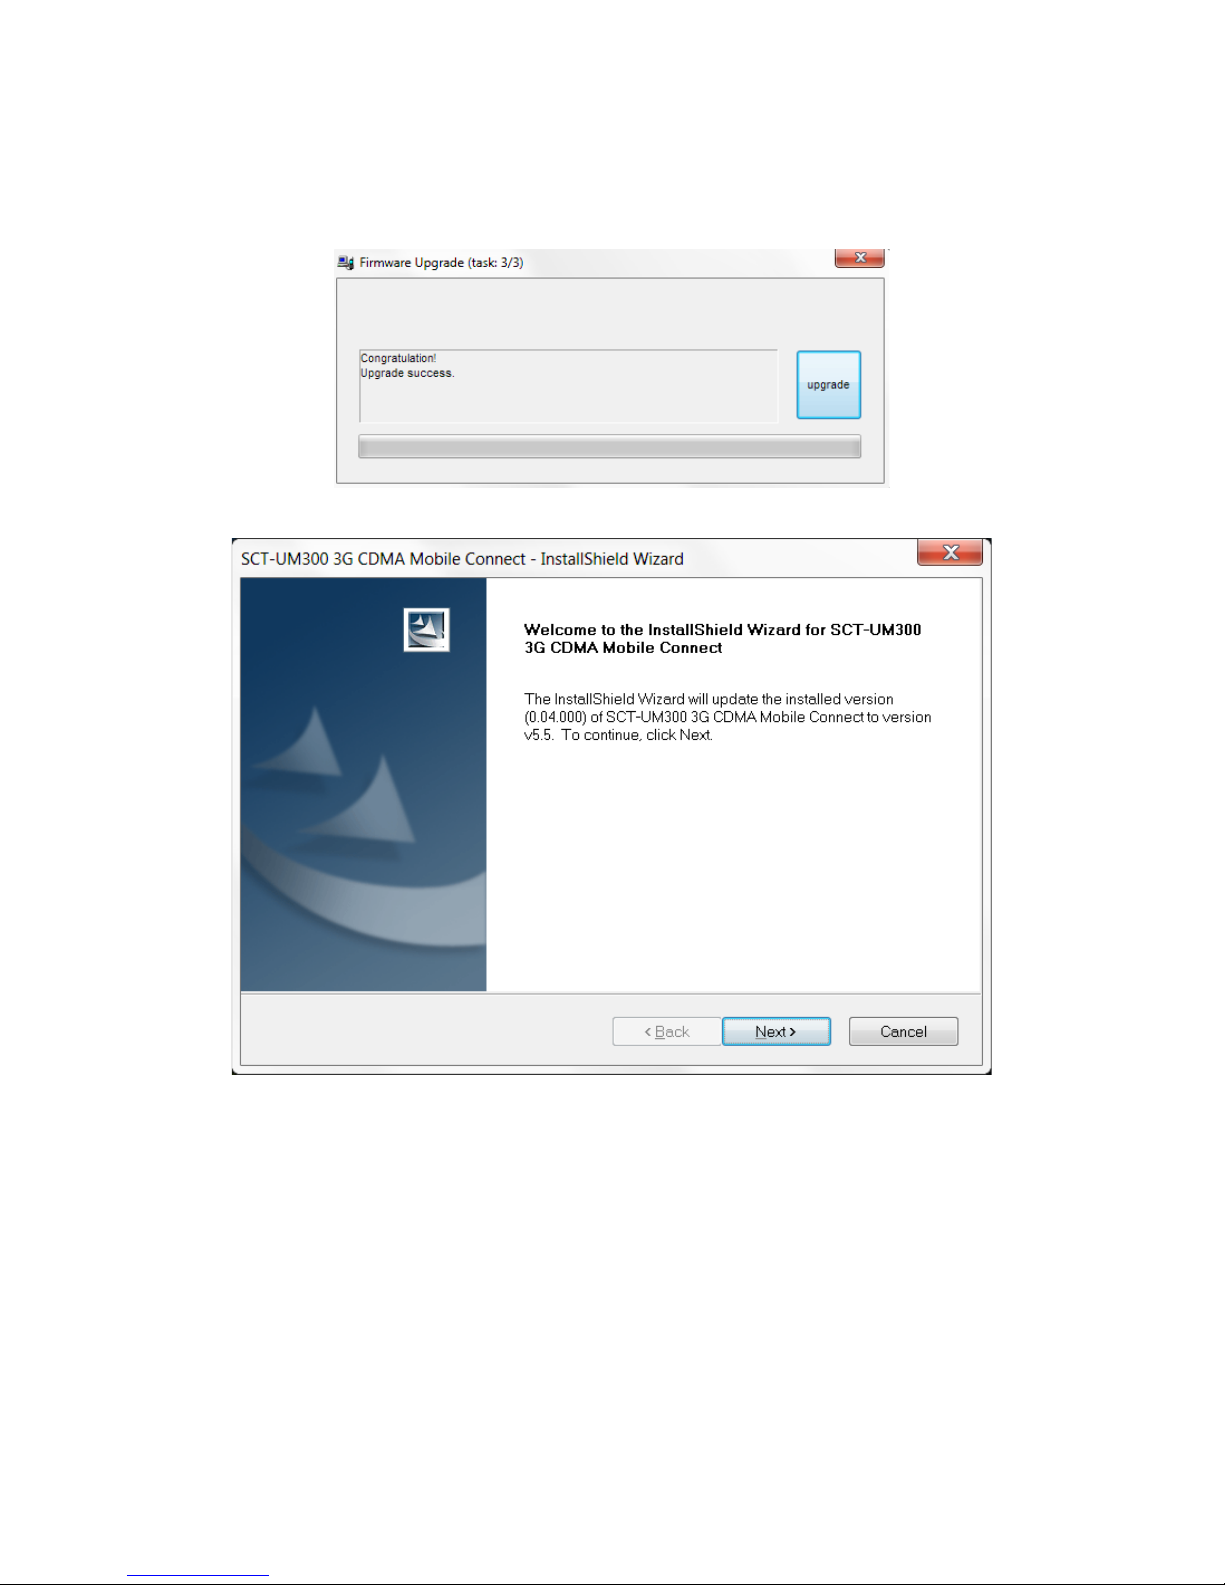
9. The upgrade process will begin with Task 1 of 3 and will continue until Task 3 of 3 is
complete. When the upgrade is complete, the window below will appear.
10. The installation of the new Mobile Connect will now begin. Select “Next” to continue.
Page 12
11
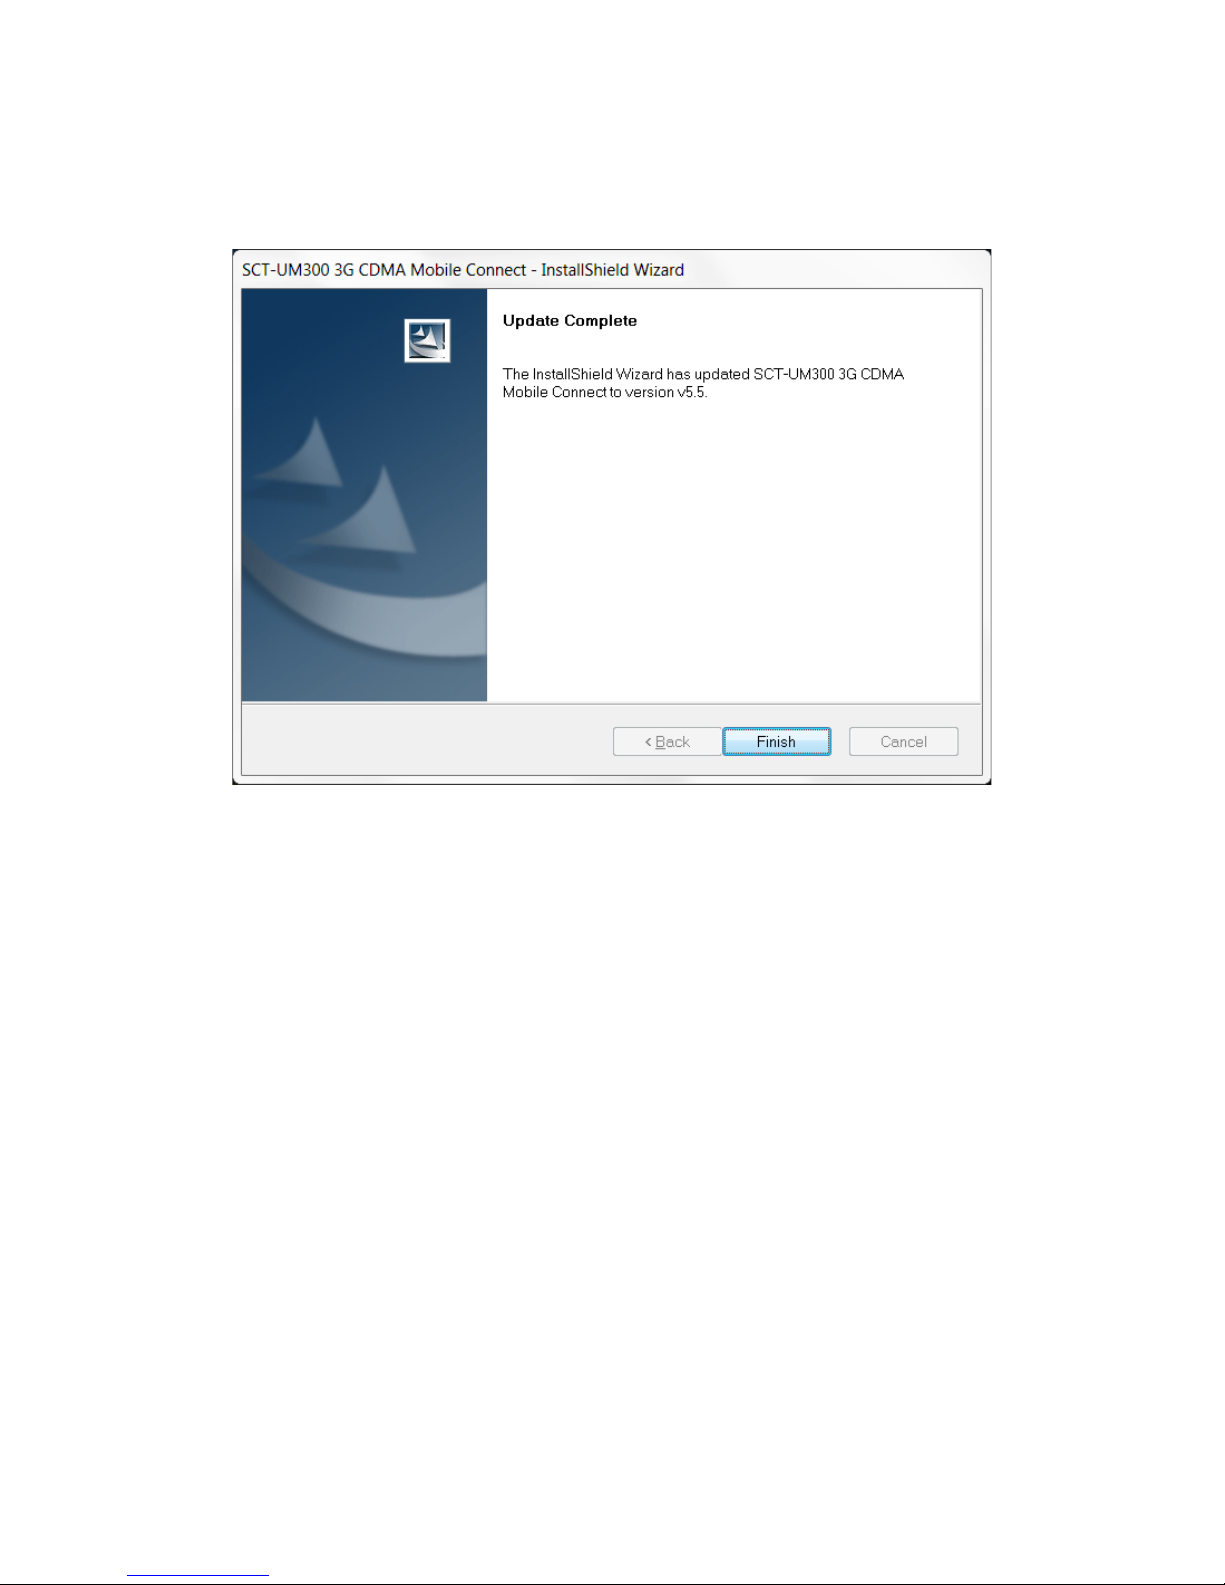
11. A status bar will track the software installation. Select “Finish” to complete the
installation.
Page 13

12
Help
Through Help, you can learn the details of each menu in Mobile Connect for a quick
understanding of functions of mobile. To read, select the "Help" view in the main window.
Page 14
13
Mac Installation
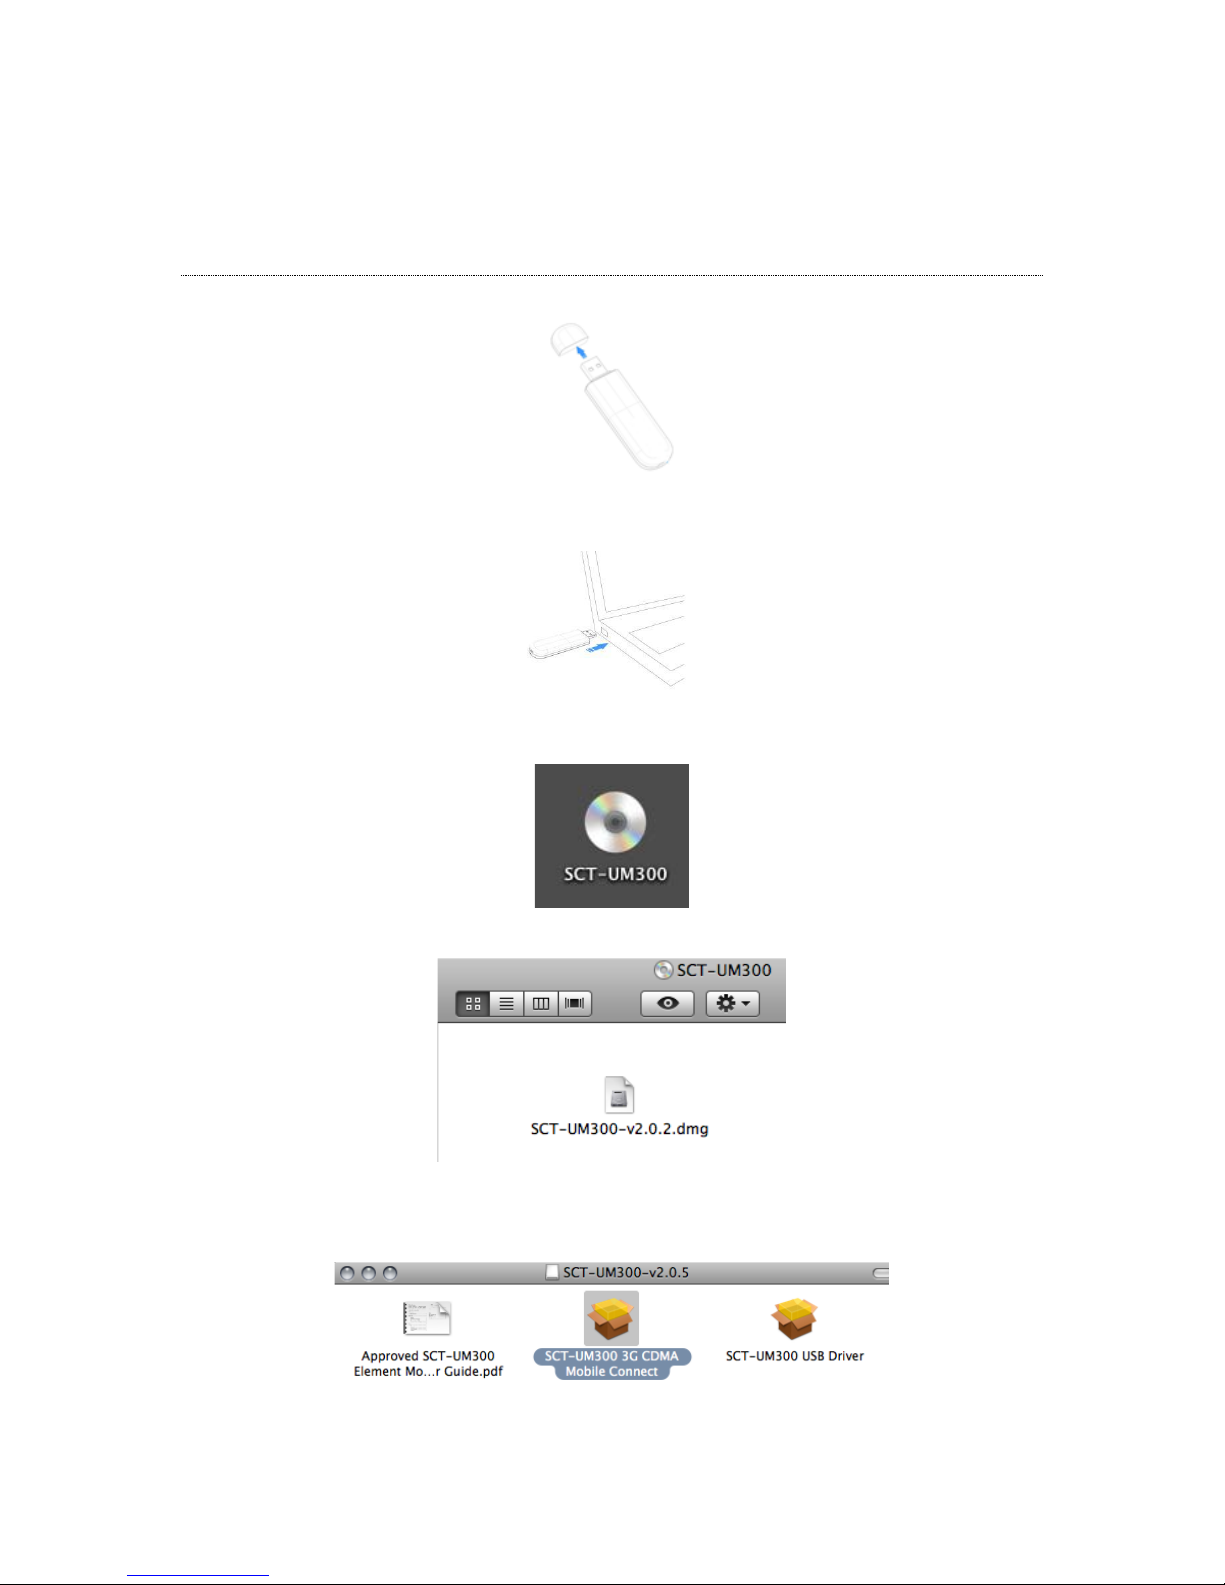
1. Remove the cover from the USB connector of the SCT-UM300.
2. Insert the USB connector of the SCT-UM300 into a USB port on your computer.
3. On the desktop, the icon for the SCT-UM300 will be displayed. Double click the icon
to open the package.
4. The contents will be displayed in a window. Open “SCT-UM300-v2.0.2.dmg”.
5. Three files will be available to select: the SCT-UM300 User Guide, the SCT-UM300
3G CDMA Mobile Connect, and the SCT-UM300 USB Driver. Select “SCT-UM300
3G Mobile Connect”.
Page 15
14
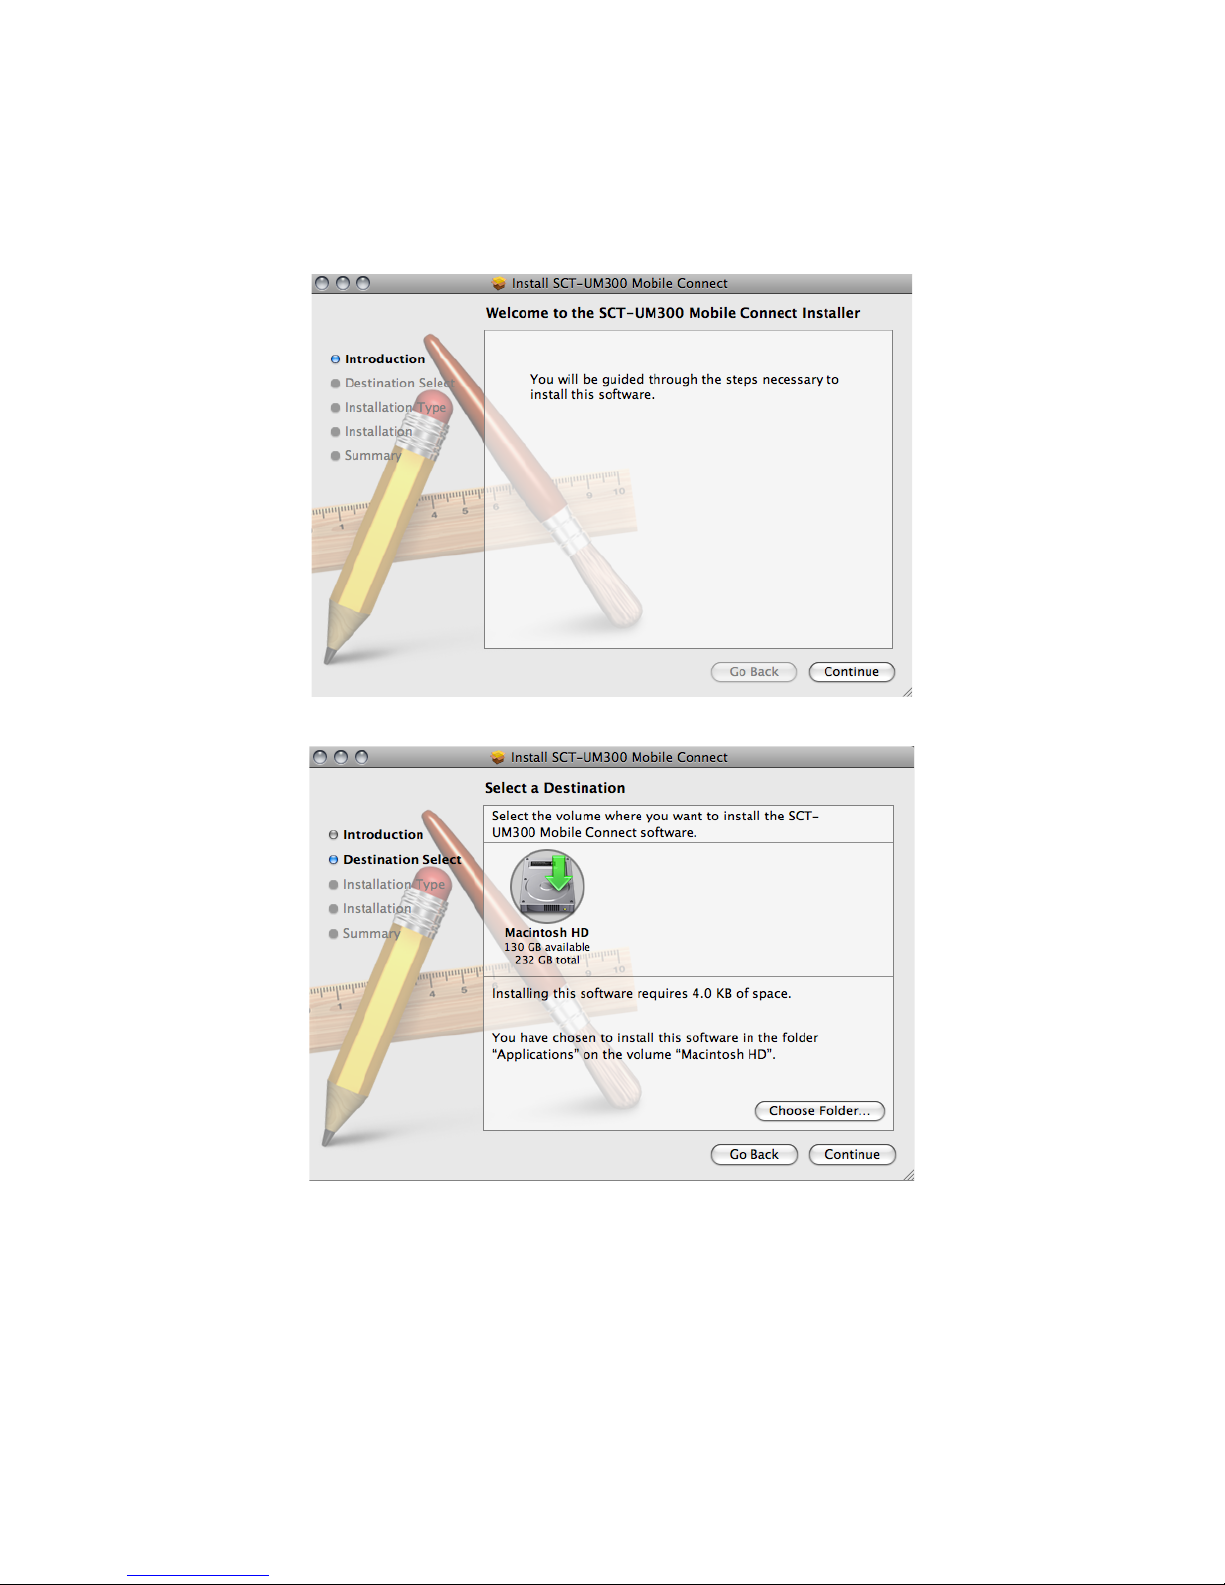
6. The SCT-UM300 Mobile Connect Installer will open and will consist of five steps:
Introduction, Destination Select, Installation Type, Installation, and Summary. Select
“Continue”
7. Select the destination of the software. Press “Continue” to proceed.
Page 16
15
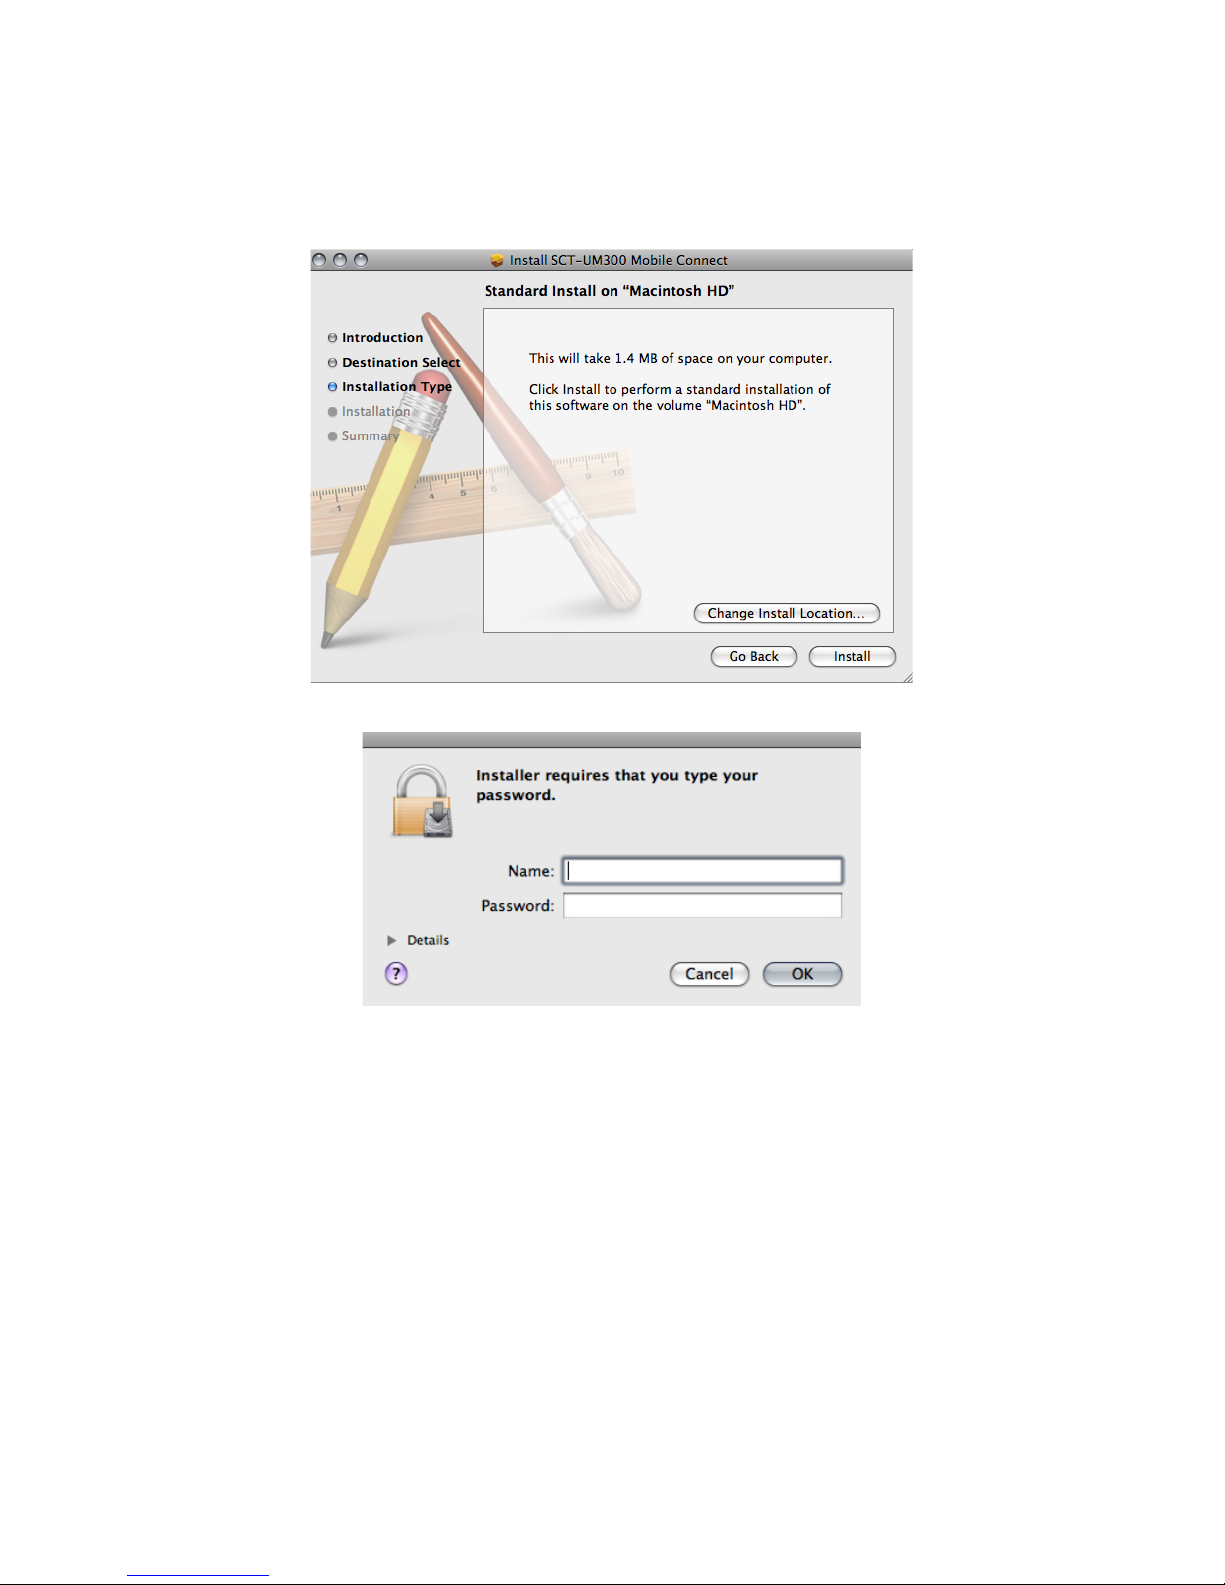
8. The Installation type will be displayed. There is the option to change the Installation
location on this screen. Select “Install” to proceed.
9. The Installer will request your password. Enter your password and press “OK”.
Page 17
16
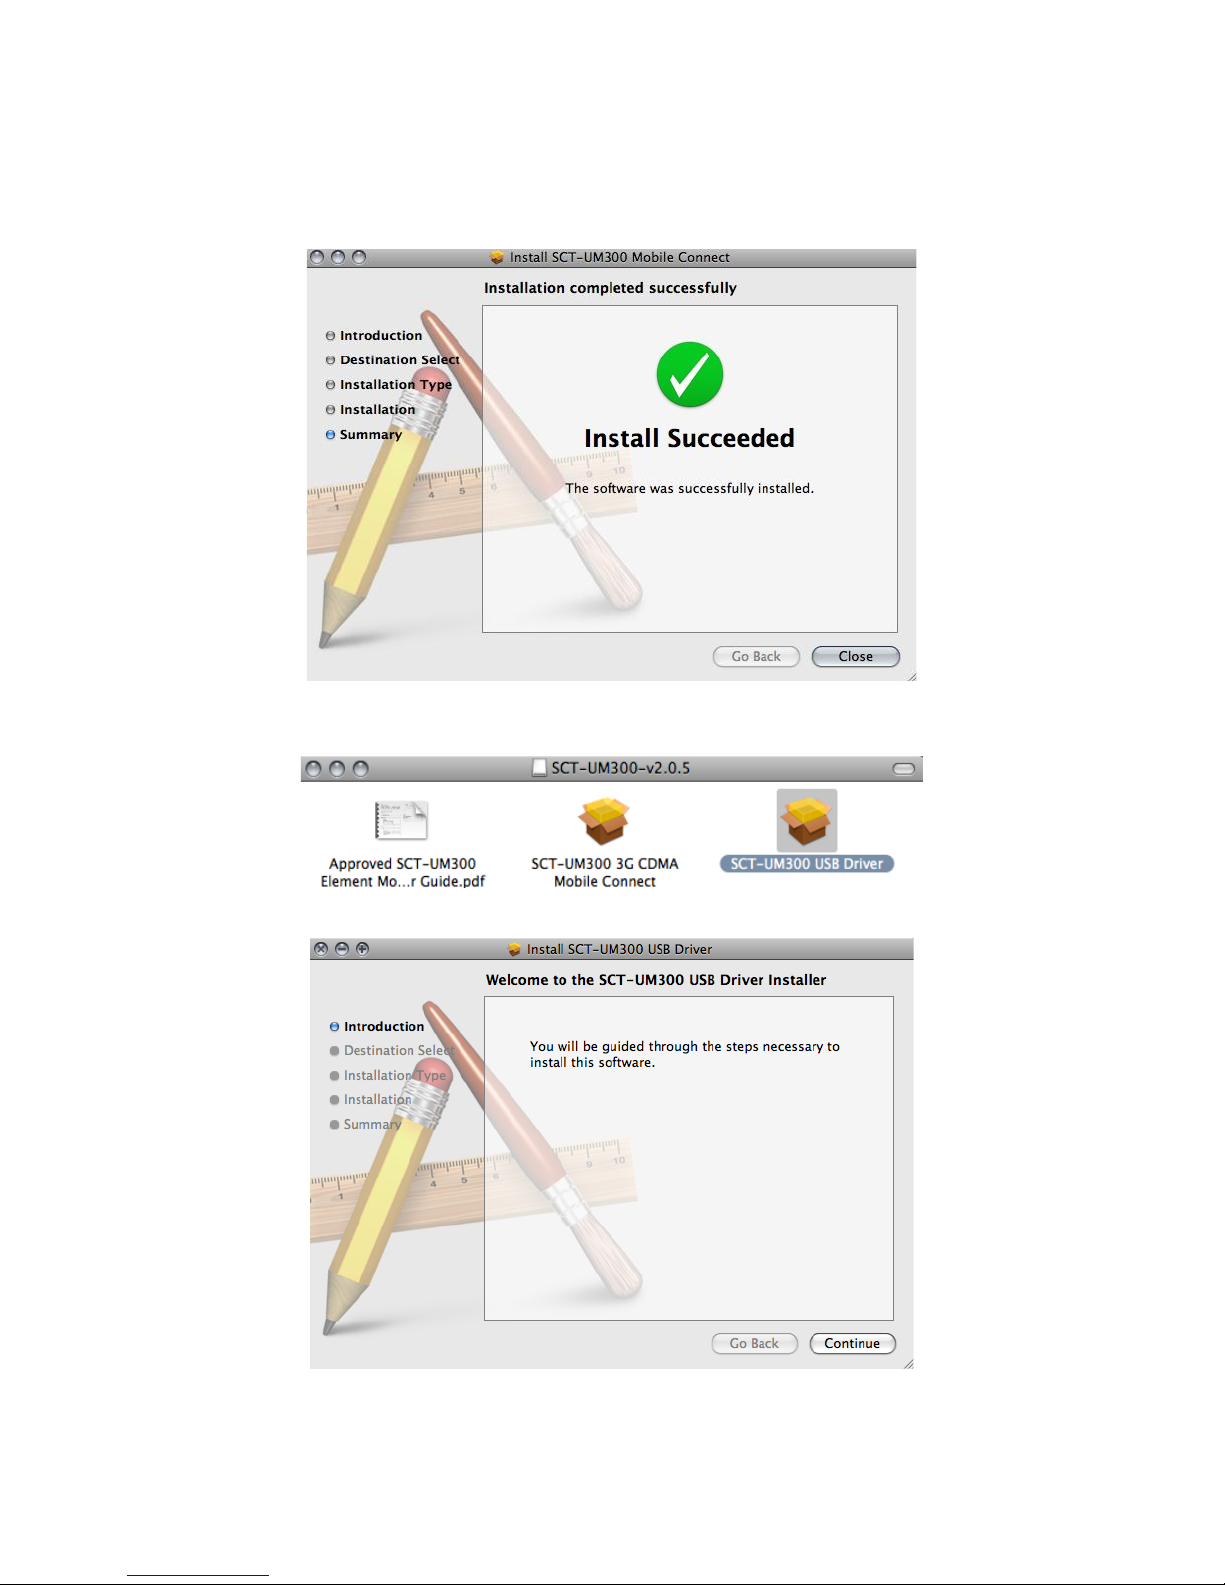
10. The installation process will begin. When the installation is complete, “Install
Succeeded” will be displayed on the Summary Page. Press “Close”.
11. The SCT-UM300-v2.0.5 folder will still be open. Select the “SCT-UM300 USB
Driver” package.
12. The SCT-UM300 USB Driver Installer will open. Press “Continue”.
Page 18
17
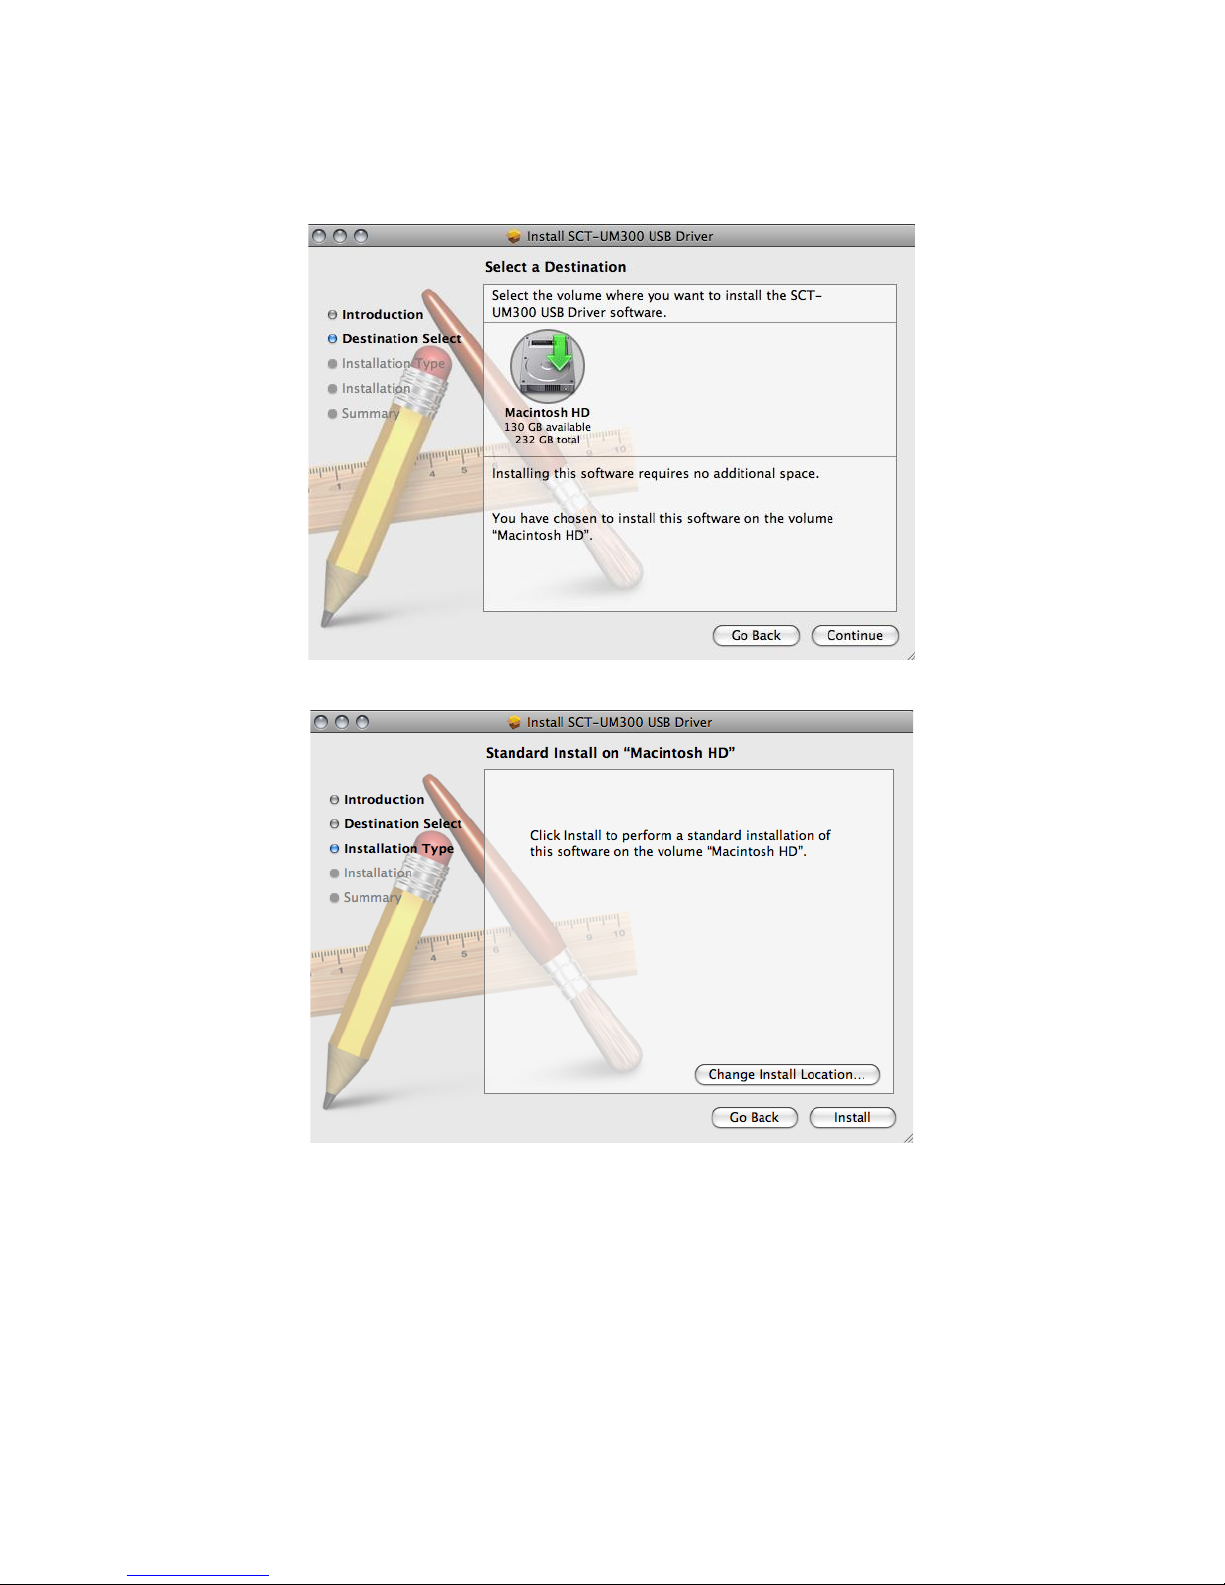
13. Select a Destination for the driver software. Press “Continue”
14. Confirm the installation and location. Press “Install”.
Page 19
18
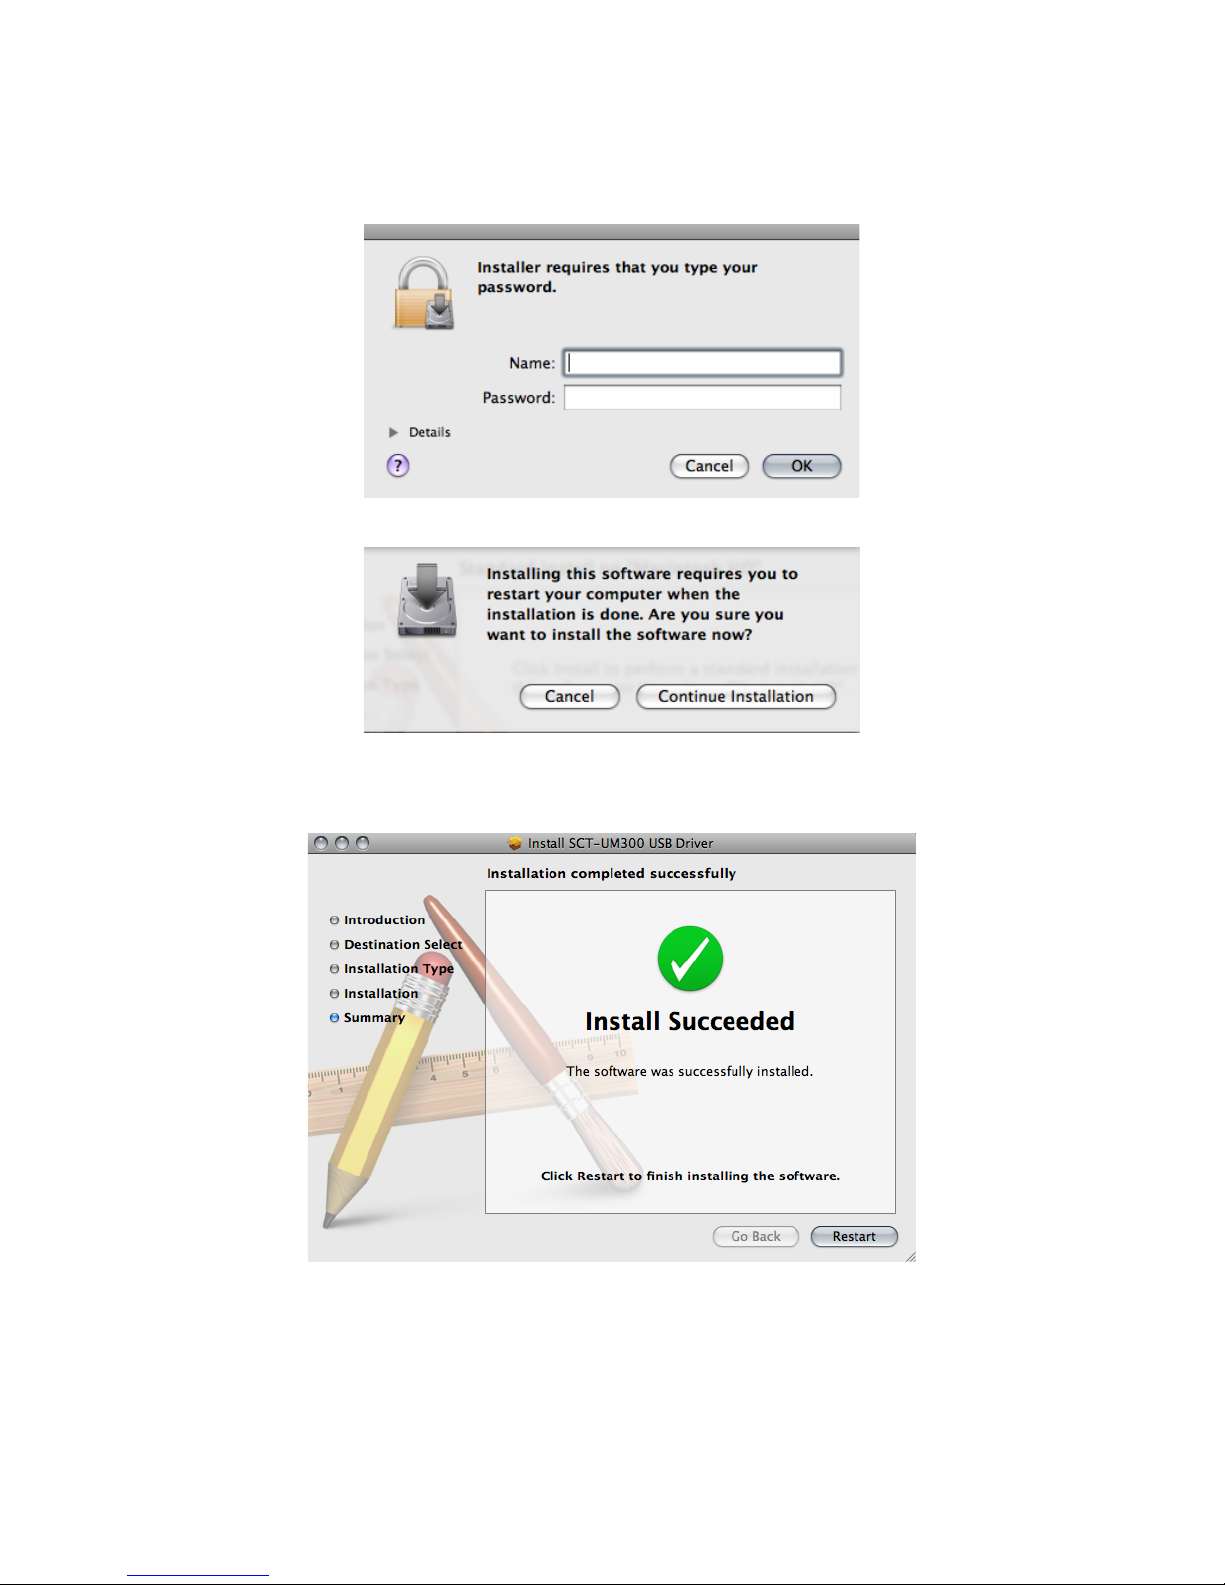
15. The Installer will request your password. Enter your password and press “OK”.
16. The installation will require your computer to restart. Press “Continue Installation”.
17. The installation process will begin. When the installation is complete, “Install
Succeeded” will be displayed on the Summary Page. Press “Restart”.
Page 20
19
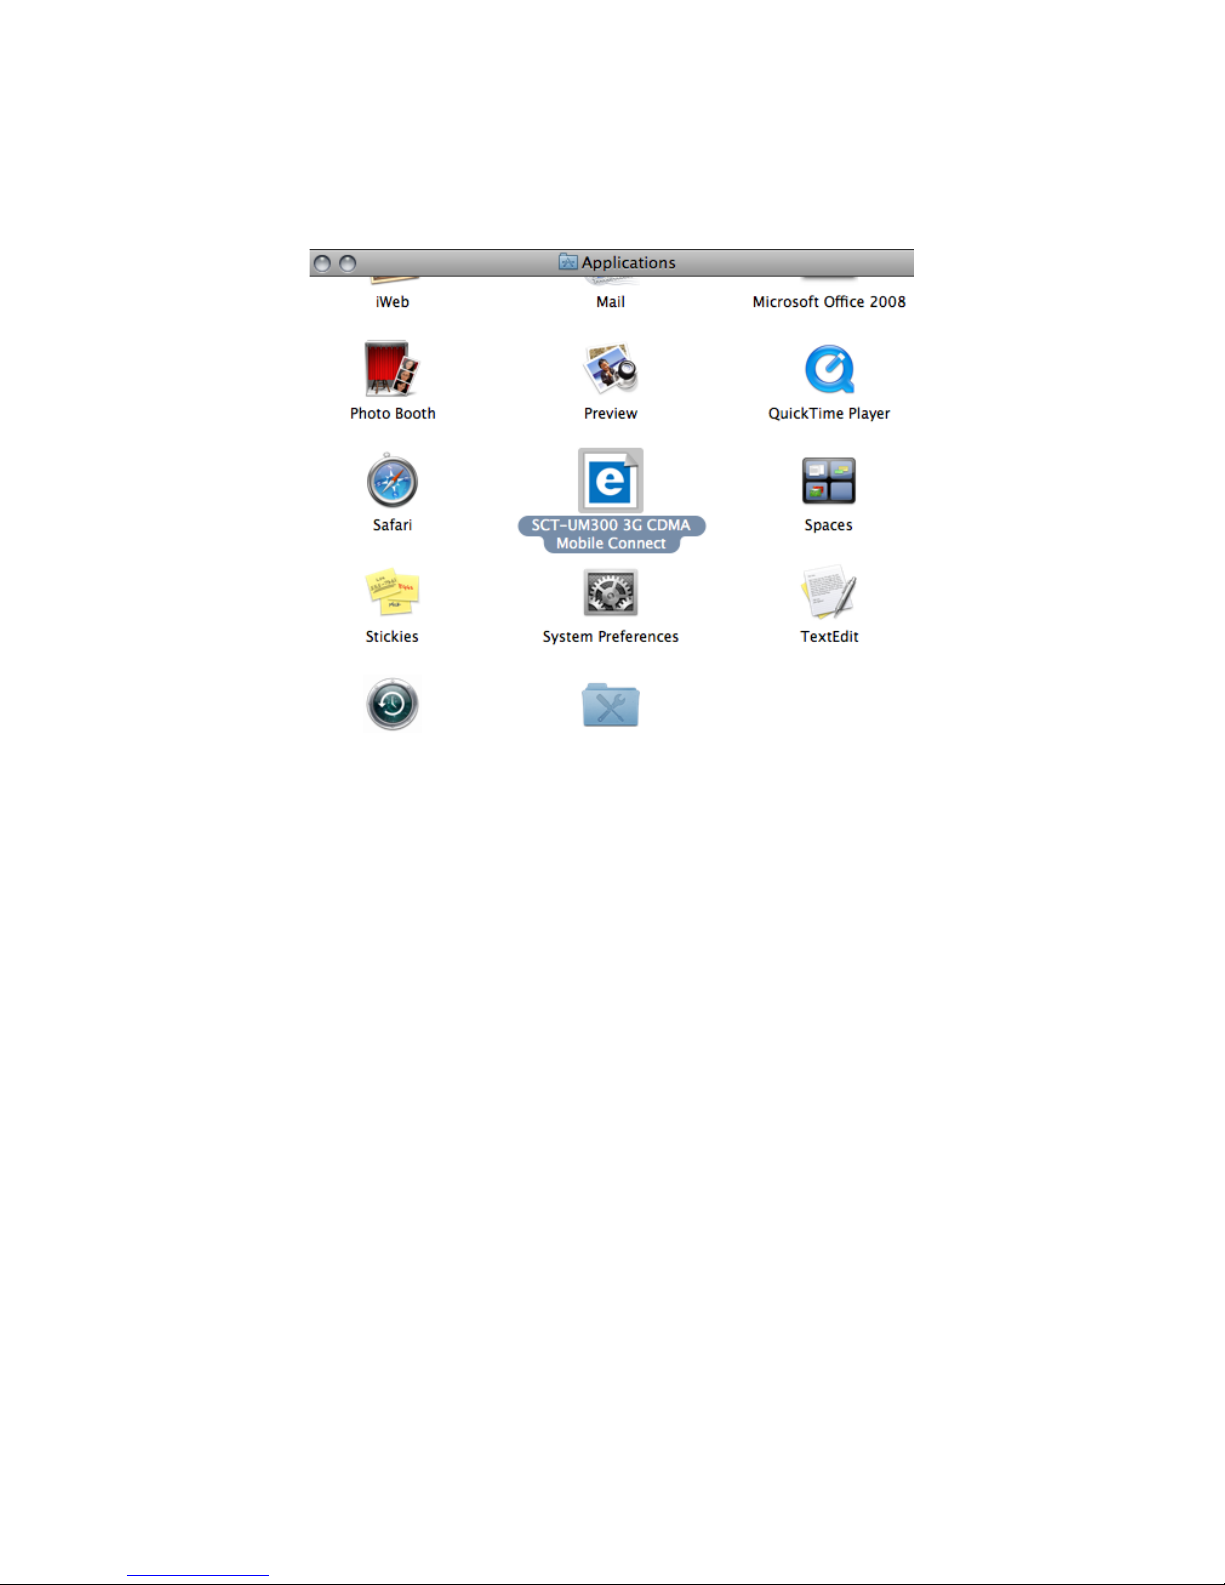
18. After the restart, close any open windows. The Mobile Connect software will be located
in the applications list.
Page 21
20
Mac Home Screen
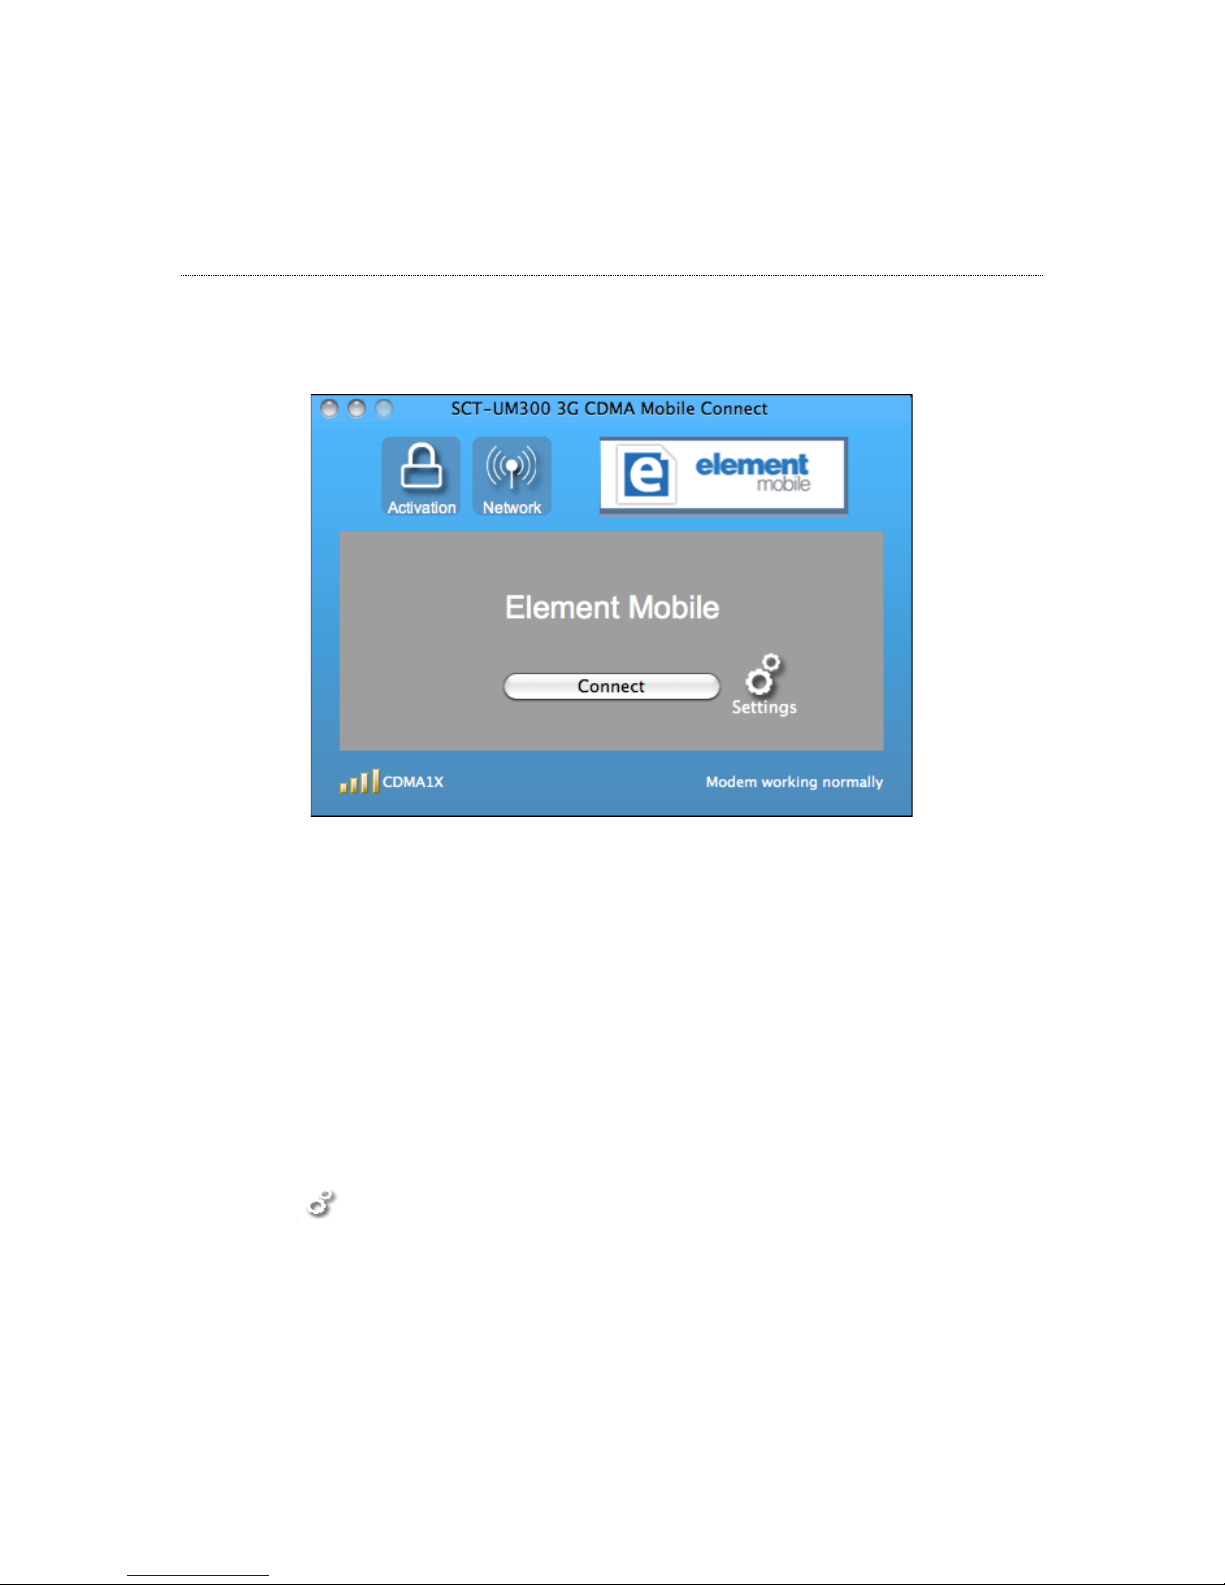
The system supports Mac 10.4.1 and later versions.
The home screen is the first screen displayed when you enter the system, and is shown below:
Data Link
A dialup data link over can be established via the MAC Mobile Connect. It requires network
coverage of CDMA 1X or EVDO. For each link, the MAC Mobile Connect is connected to a
specific phone number.
The MAC Mobile Connect supports download to 3.1Mbps and upload to 1.8Mbps.
Establishing a data link
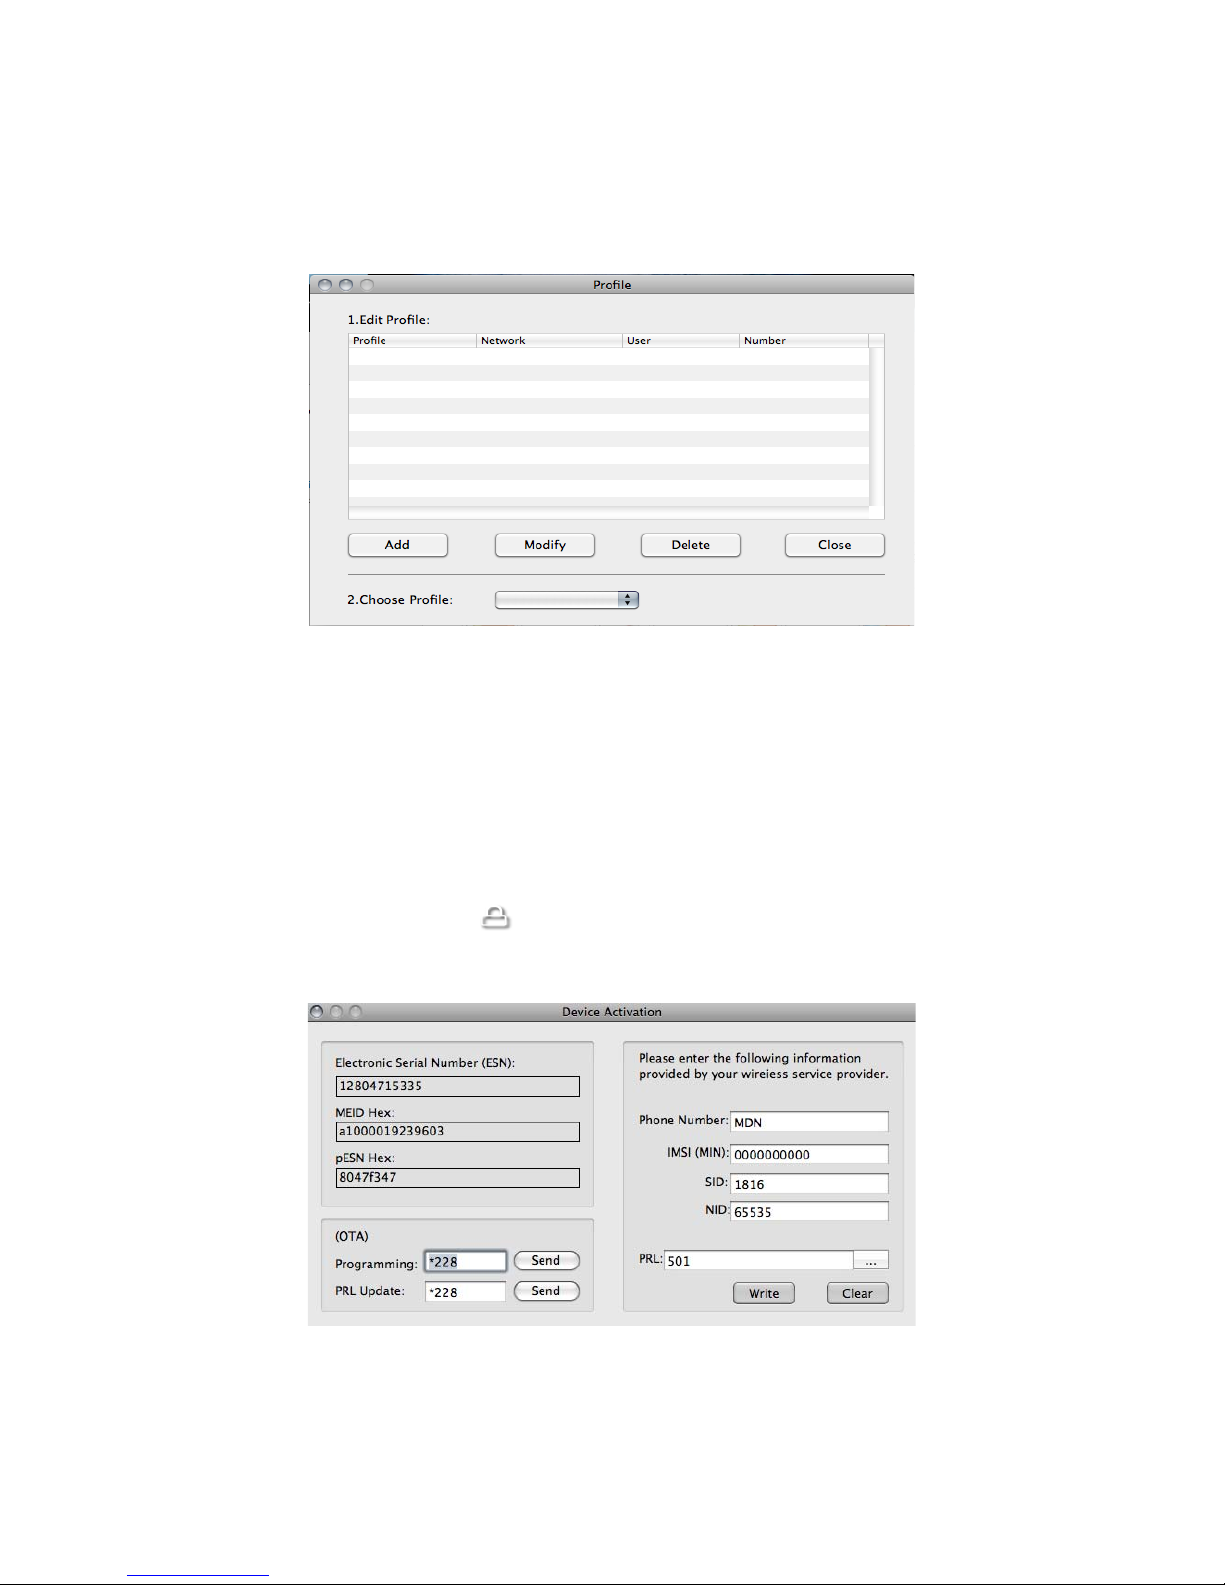
1. Click
to Add, Modify or Delete a profile.
Page 22
21
2. Select a profile from “Choose Profile” - see screen below:
3. Click “Connect” to establish a data link.
Disconnect a data link
To disconnect, click “Disconnect”.
Device Activation
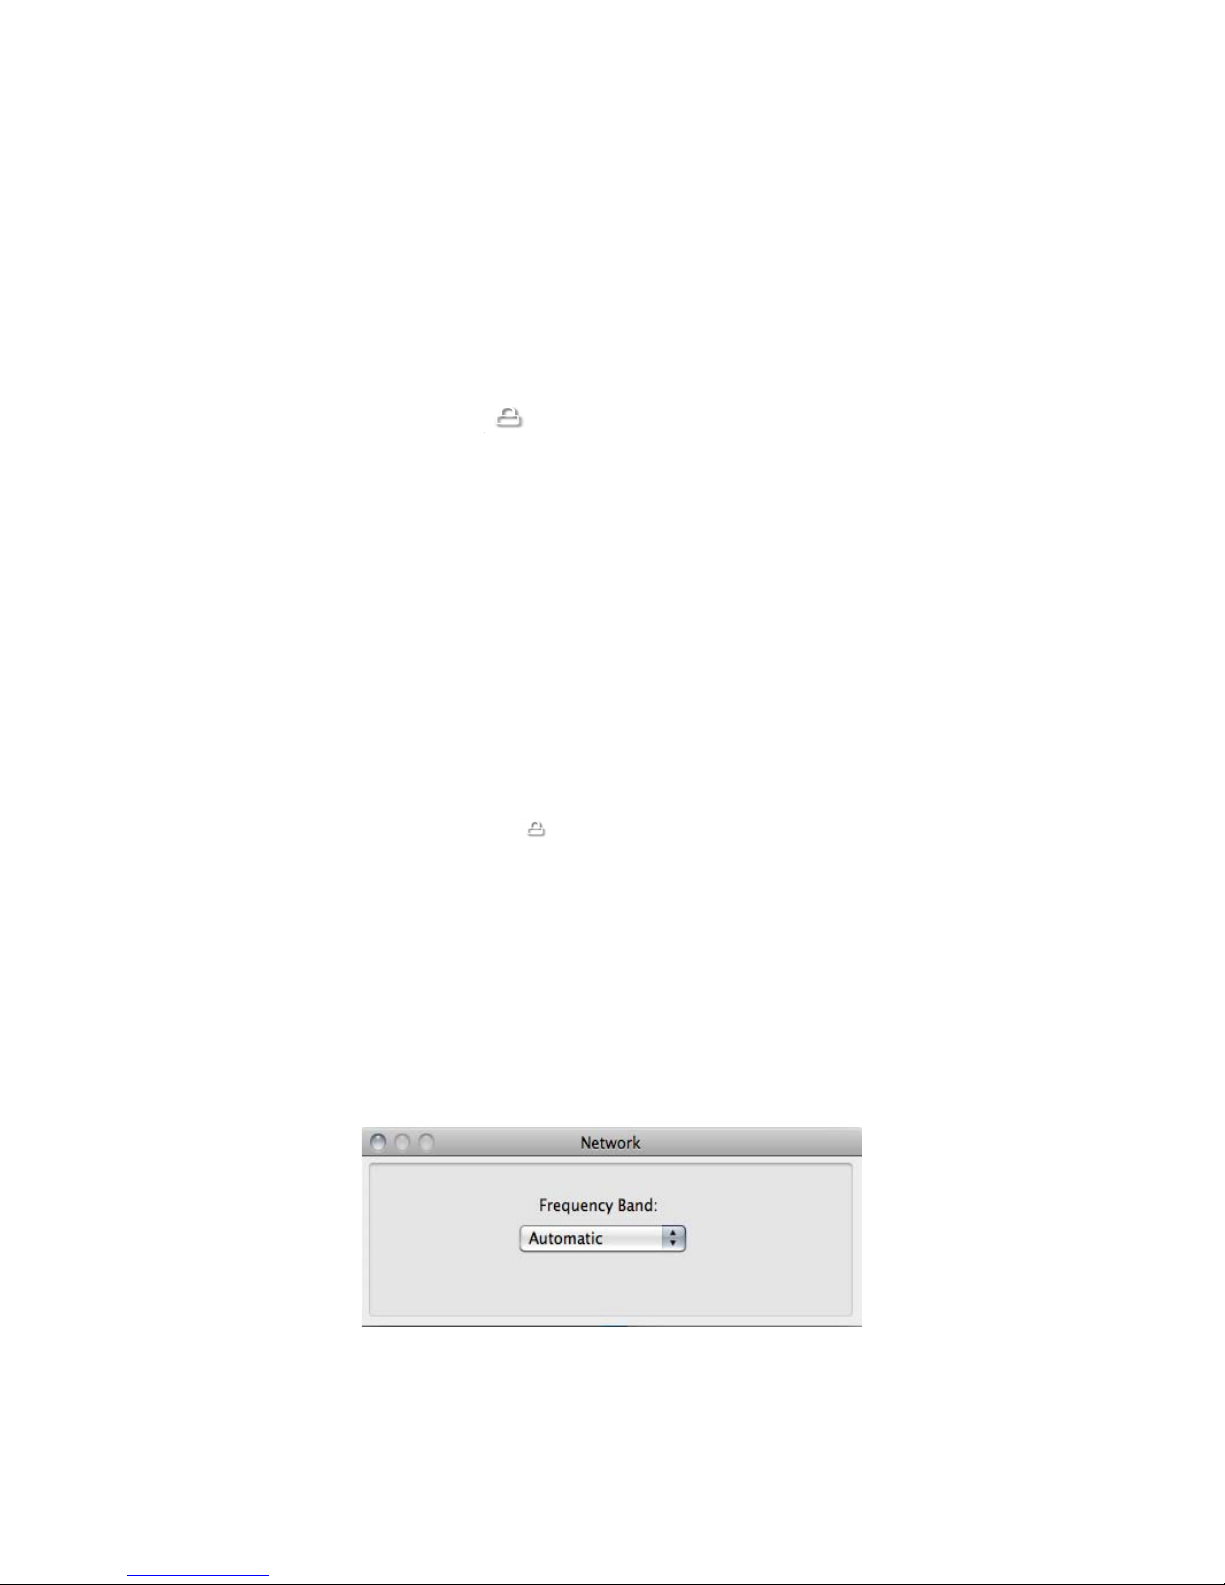
In the main window, Click button, the "Device Activation" page contains device
parameters, OTA, and device activation.
Page 23
22
OTA
In the main window, Click the “Activation” button, the "Device Activation" page contains the
OTA request and Device Activation functions.
View OTA
1. Make sure the device is connected
2. In the main window, Click
.
3. Select Programming to have your device programmed via OTA.
4. Select PRL Update to update the PRL in your device via OTA.
5. Click the "Send" button on the OTA option you require.
Display
The display of parameters as flows:
1. Electronic Serial Number (ESN): contains the ESN (Electronic Serial Number) of the
device in decimal format
2. MEID Hex: contains the MEID (Mobile Equipment Identity) of the device in hex format
3. pESN Hex: contains the ESN (Electronic Serial Number) of the device in hex format
Device Activation
1. In the main window, select the
button.
2. Input some parameters or all parameters with MDN (Phone Number), MIN (IMSI), SID,
NID, and select a PRL file.
3. Click on “Write” to activate the device.
Network
Depending on the region, you may be covered by several networks at a same time. By default,
the device will choose an available network based on your account. You may also choose the
network from the list in Mobile Connect while your settings are up to your account.
Page 24
23
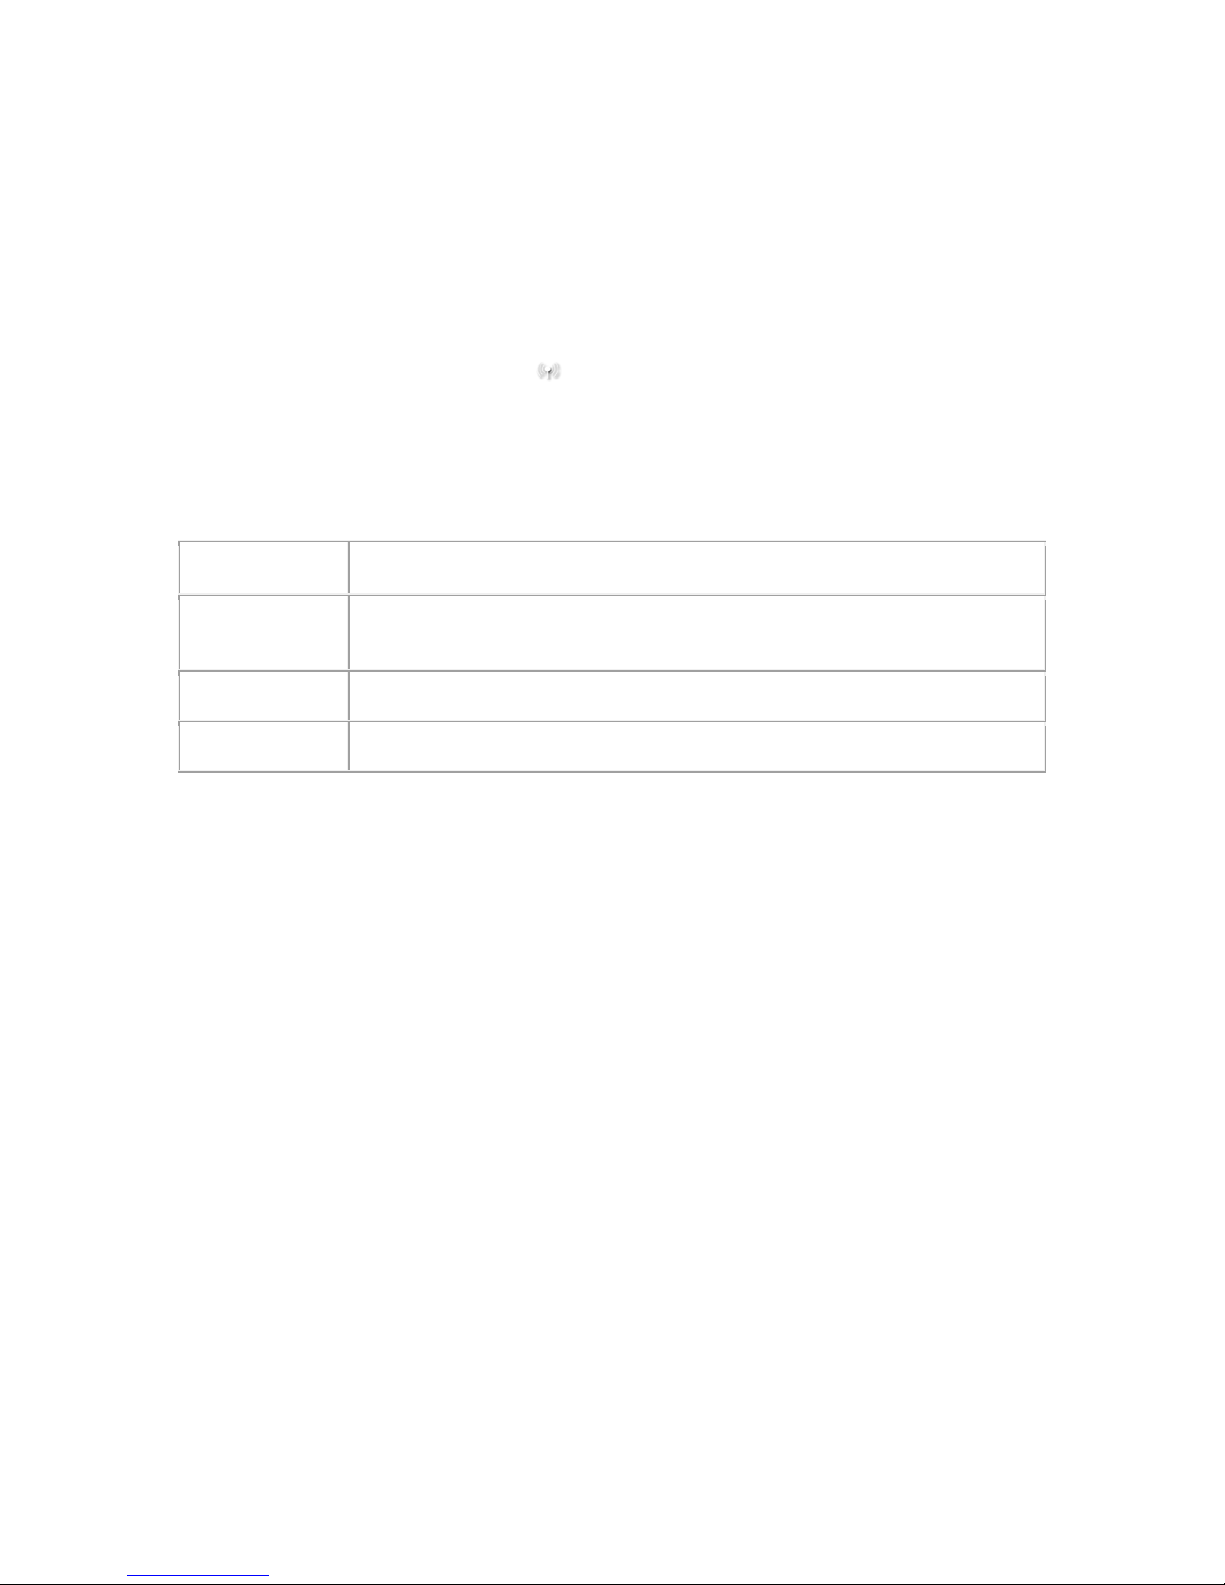
Frequency Band
By default, the phone will pick a Frequency Band automatically, unless the carrier has a special
instruction.
1. In the main window, select the
button
2. Select one of the settings in the Frequency Band dropdown list.
Details of each frequency band
Option
Note
Hybrid
Allows the phone to select the either EVDO or CDMA service based on the
networks available in your curren
t location.
CDMA 1x Only
Restricts the device to CDMA service.
EVDO Only
Restricts the device to EVDO service.
Select the Network
1. In the main window, select "Settings-->Network"
2. Select "Hybrid", "EVDO Only" or "CDMA1x Only".
Page 25

24
Safety Information
Read the safety information carefully to ensure the correct and safe use of your wireless device.
Interference
Do not use your wireless device if using the device is prohibited or when it causes a danger or
interference with electronic devices.
Medical Device
x Observe the rules and regulations set forth by the hospitals and health care facilities.
x Some wireless devices may affect the performance of hearing aids. For any such
problems, consult your service provider.
x If you are using an electronic medical device, consult the doctor or device manufacturer
to confirm whether the radio wave affects the operation of this device.
Area with Inflammables and Explosives
To prevent explosions and fires in areas that are stored with inflammable and explosive devices,
do not use your wireless device and observe the rules.
Traffic Security
x Observe local laws and regulations when using the wireless device.
x Observe the rules and regulations of airline companies. When boarding, power down
your wireless device.
Safety of Children
Do not allow children to use the wireless device without guidance. Small components of the
wireless device may cause a choking hazard.
Care and Maintenance
It is normal that your wireless device gets warm during use. Before you clean the wireless device,
remove it from your computer.
x Use the wireless device in a clean environment. Avoid extreme temperatures when
storing the device.
x Do not get the wireless device wet.
x Do not drop or throw the wireless device.
x Clean your wireless device with a damp cloth or antistatic cloth. Do not use alcohol,
chemicals, or powders to clean it.
x Do not disassemble the device.
Page 26

25
Specific Absorption Rate (SAR)
Your wireless device is a radio transmitter and receiver. It is designed not to exceed the limits for
exposure to radio waves recommended by international guidelines. These guidelines were
developed by the independent scientific organization ICNIRP and include safety margins
designed to assure the protection of all persons, regardless of age and health.
The guidelines use a unit of measurement known as the Specific Absorption Rate, or SAR. The
SAR limit for wireless devices is 2.0 W/kg and the highest SAR value for this device when
tested complied with this limit.
Body Worn Operation
Important safety information regarding radiofrequency radiation (RF)
To ensure compliance with RF exposure guidelines the device must be used with a minimum of
1.5cm separation from the body.
Failure to observe these instructions could result in your RF exposure exceeding the relevant
guideline limits.
Regulatory Information
The following approvals and notices apply in specific regions as noted.
CE Approval (European Union)
The wireless device is approved to be used in the member states of the EU. The wireless device
is in compliance with the essential requirements and other relevant provisions of the Radio and
Telecommunications Terminal Equipment Directive 1999/5/EC (R&TTE Directive).
Federal Communications Commission Notice (United States): Before a wireless device model is
available for sale to the public, it must be tested and certified to the FCC that it does not exceed
the limit established by the government-adopted requirement for safe exposure.
The SAR limit adopted by the USA and Canada is 1.6 watts/kilogram (W/kg) averaged over one
gram of tissue. The highest SAR value reported to the FCC for this device type was compliant
with the limit.
FCC Statement
This device complies with Part 15 of the FCC Rules. Operation is subject to the following two
conditions: (1) this device may not cause harmful interference, and (2) this device must accept
any interference received, including interference that may cause undesired operation.
Page 27

26
This equipment has been tested and found to comply with the limits for a Class B digital device,
pursuant to part 15 of the FCC rules. These limits are designed to provide reasonable protection against
harmful interference in a residential installation. This equipment generates, uses and can radiate radio
frequency energy and, if not installed and used in accordance with the instructions, may cause harmful
interference to radio communications. However, there is no guarantee that interference will not occur
in a particular installation. If this equipment does cause harmful interference to radio or television
reception, which can be determined by turning the equipment off and on, the user is encouraged to try
to correct the interference by one or more of the following measures:
-Reorient or relocate the receiving antenna. -Increase the separation between the equipment and
receiver.
-Connect the equipment into an outlet on a circuit different from that to which the receiver is
connected.
-Consult the dealer or an experienced radio/TV technician for help.
You are cautioned that changes or modifications not expressly approved by the party responsible for
compliance could void your authority to operate the equipment.
 Loading...