

Page 1

Page | 1
Proxy Users
You may need to configure the Xplained board to connect via the proxy first. To do this type
vi ~/.bashrc into the terminal. Then add the following lines to the file:
Substituting username, password, proxyaddress and proxyport for the appropriate values.
If your proxy does not require verification then you need only enter:
Substituting proxyaddress and proxyport for the appropriate values.
Introduction to WiPi
WiPi is an 802.11n compliant USB WLAN adaptor supporting data rates of
up to 150 Mbps and WPA/WPA2-PSK Security. It uses Cisco CleanAir
channel detection technology to minimize interference from non-802.11
modulated sources. This guide covers the setup and use of the WiPi with
the Atmel SAMA5D3 Xplained board.
WiPi on the SAMA5D3 Xplained board
Required Hardware
Atmel SAMA5D3 Xplained Board
(2555198 / 07x2224)
pre-flashed with the Atmel Yocto/Poky demo.
For more information please refer to the User Manual or www.at91.com
WiPi
(2133900 / 07W8938)
USB-A to USB Micro-B cable
(included with SAMA5D3 board)
Ethernet cable
Computer with one free USB port and software installation privileges
Required Software
.inf file available from: www.kernel.org/doc/Documentation/usb/linux-cdc-acm.inf
Serial Connection Software
The SAMA5D3 Xplained board can connect to a computer via a virtual serial port over USB.
In order for your computer to communicate with the board it requires specialized software
which differs depending on your operating system.
Windows Users
The recommended software for Windows users is PuTTY. PuTTY is compatible with all
versions of Windows from 95 onwards and is available from http://www.putty.org/
Linux
There are several options for Linux users depending on your distribution. Popular choices
include Minicom, Picocom and PuTTY.
Page 2
Page | 2
If this returns an “unknown package” error first check your spelling then use the
command and try again
If you have previously connected to the board via the USB to Serial connection you can skip
the rest of this section, otherwise continue with step 3
Required Packages
wpa_supplicant
net-tools
wireless-tools
All the packages listed above (or their equivalents) are required to get the WiPi working with the
Xplained board. To check which packages you currently have installed you can use the command:
This will return a list of installed packages.
Installing new packages (net-tools in this example) can be done via
Setup & Connection
Follow the steps below to get the WiPi working with the Xplained board
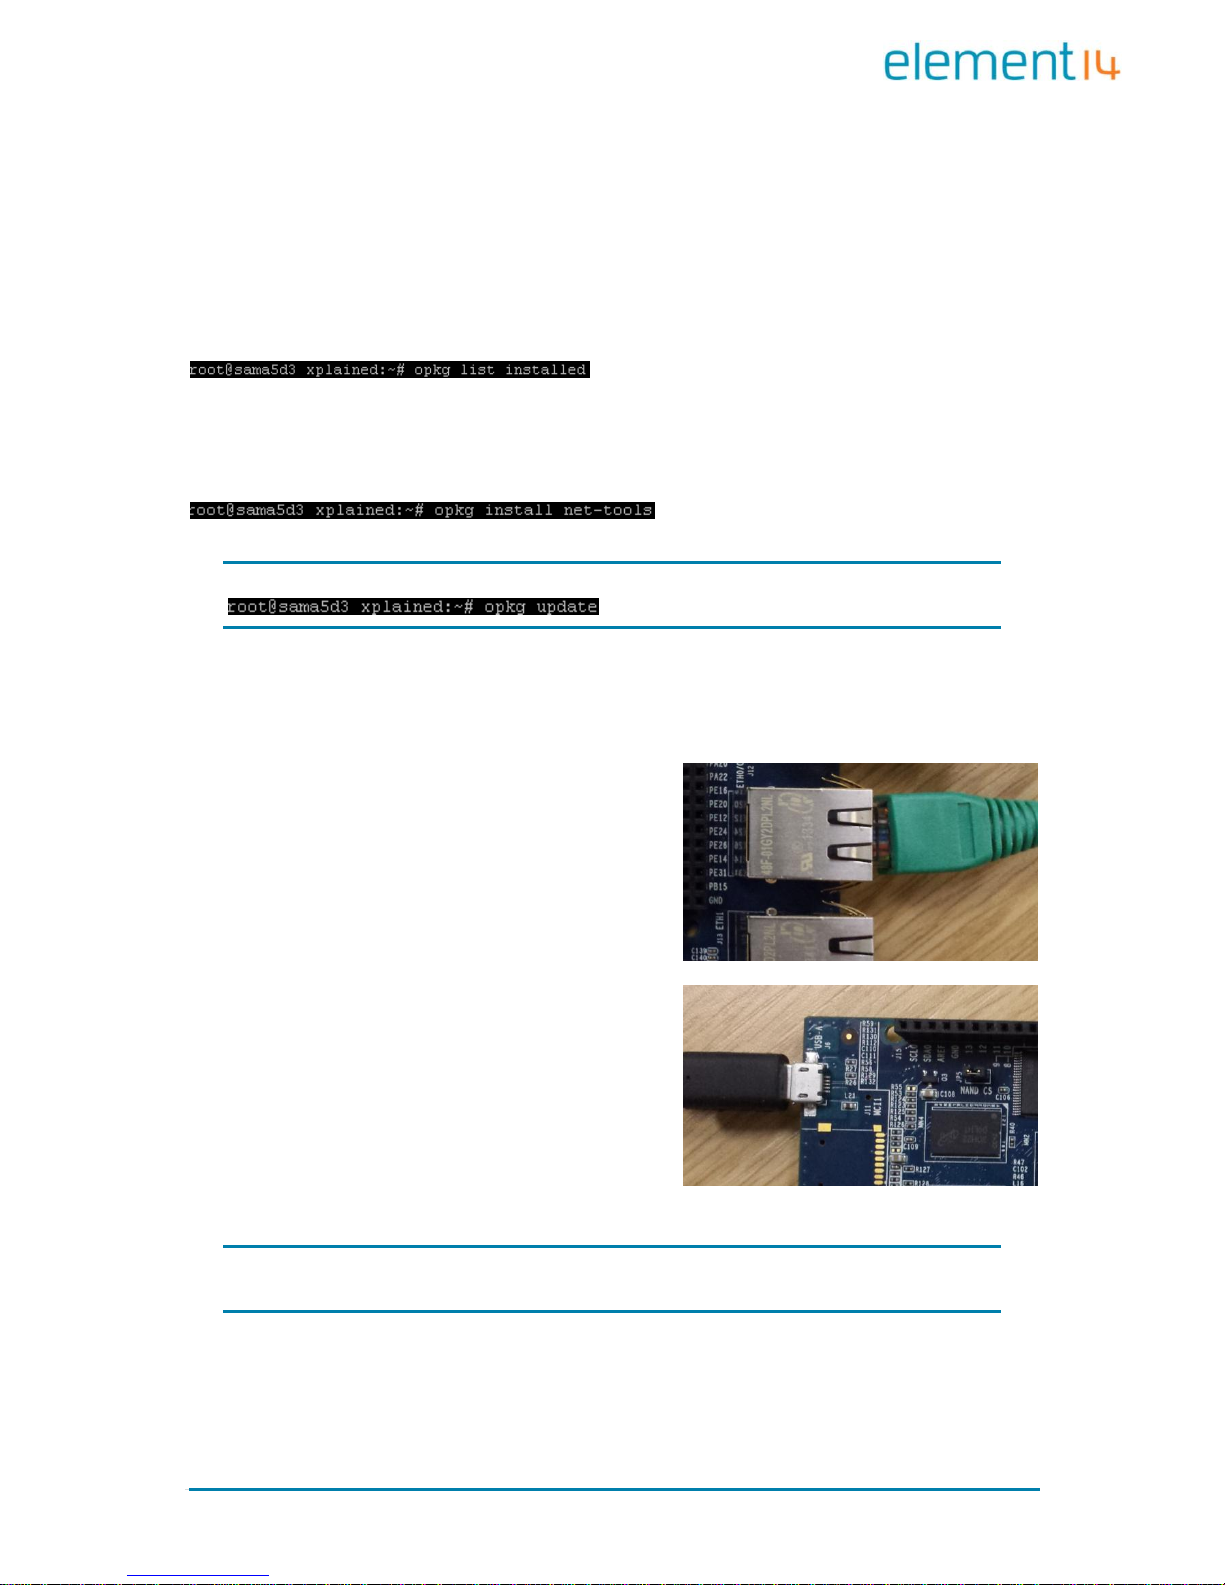
1. Connect the board to the network via an
Ethernet cable
2. Connect the Xplained board to the computer
using a USB-A to USB Micro-B cable
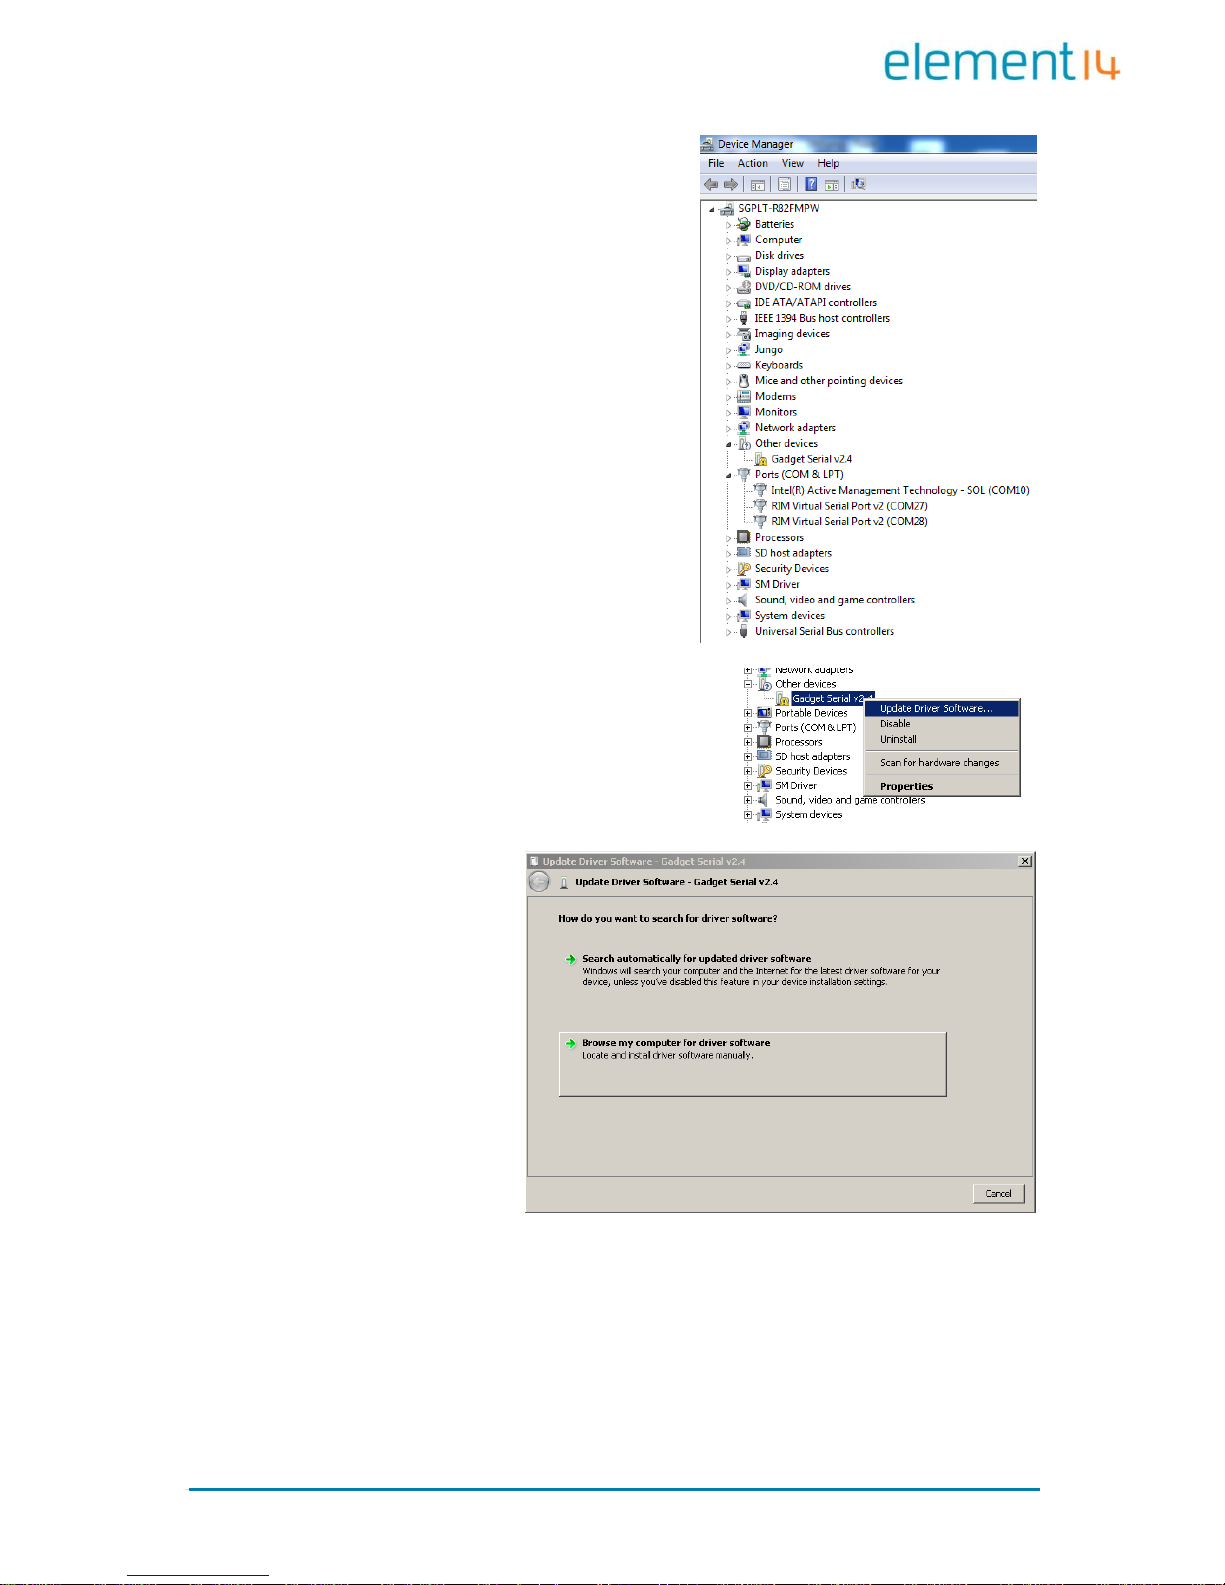
3. Open the Device Manager (Start -> Run -> devmgmt.msc or type devmgmt.msc into the
“search programs and files” area of the start menu)
Page 3
Page | 3
4. In the device manager window the board will be
shown as “Gadget Serial v2.4”
5. Right click the “Gadget Serial v2.4” device and
select “update driver software”
6. Select “Browse my
computer for driver
software”
Page 4
Page | 4
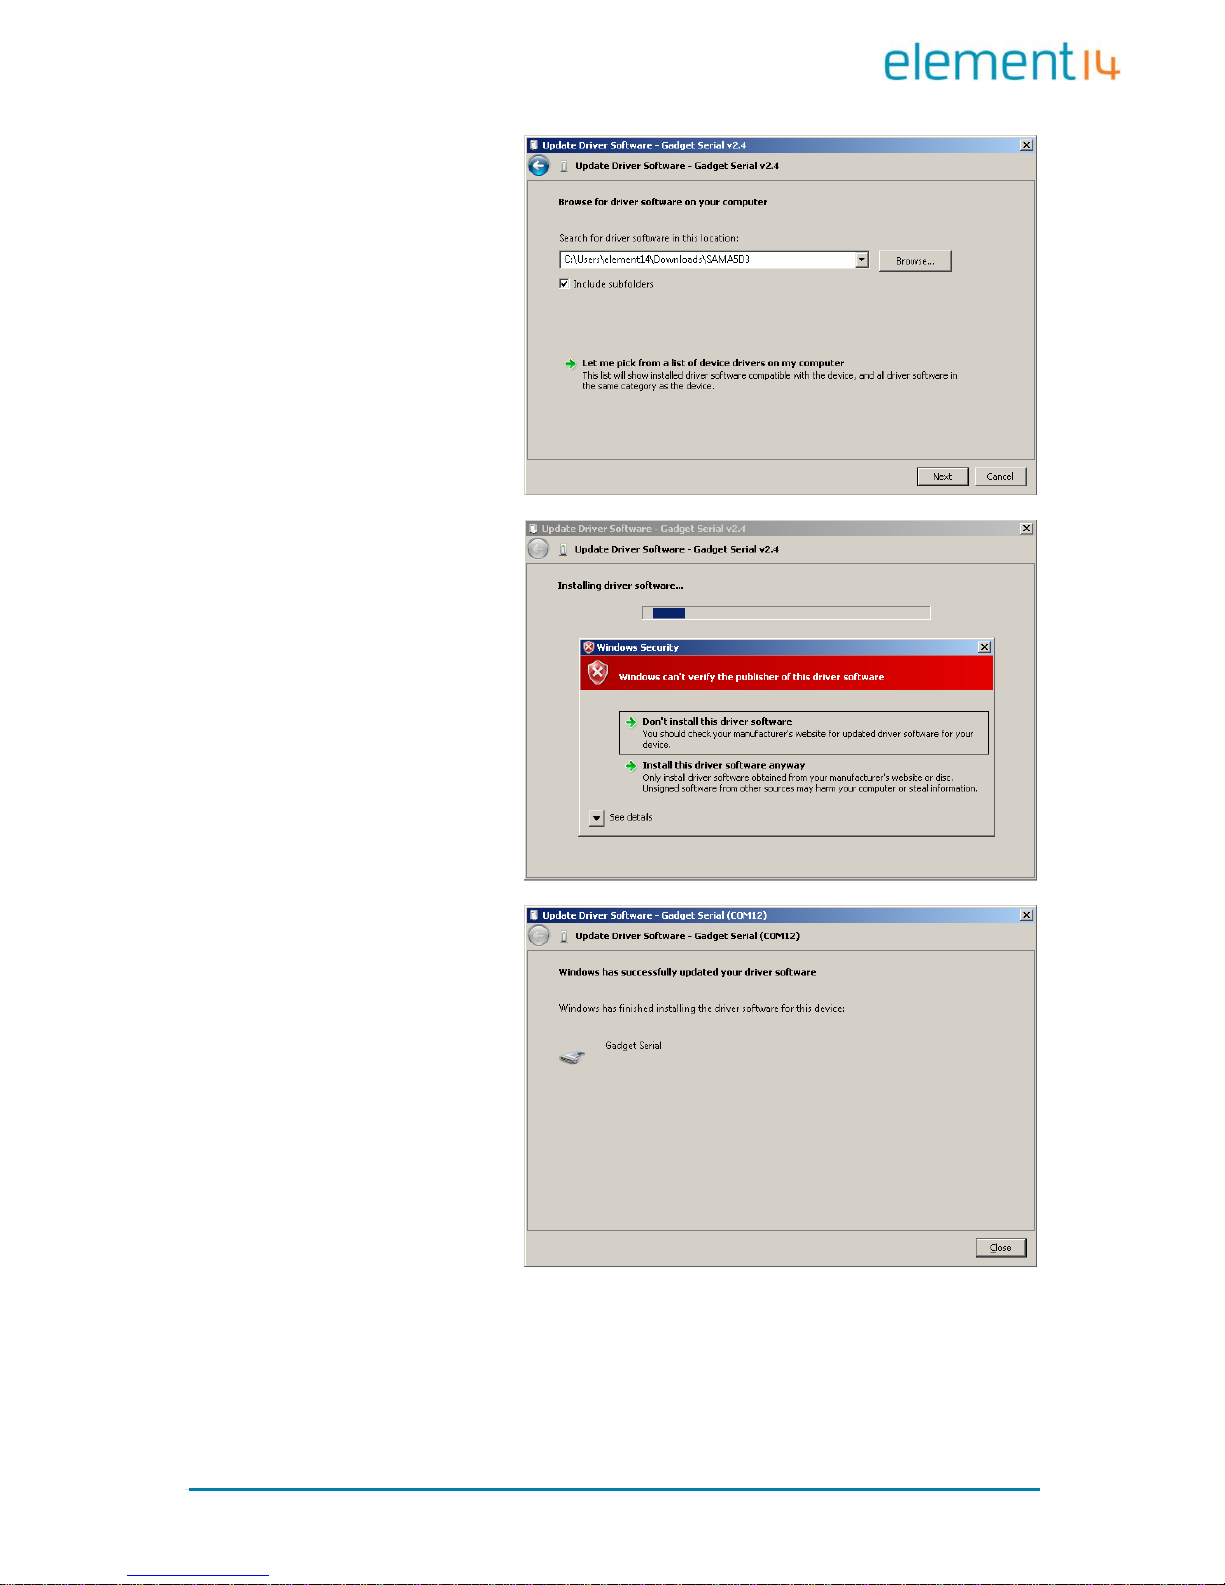
7. Select the location of the
previously downloaded .inf
file and click next
8. You may receive a warning
as shown, click “Install this
driver software anyway”
9. Once the installation has
completed click “Close”
Page 5
Page | 5
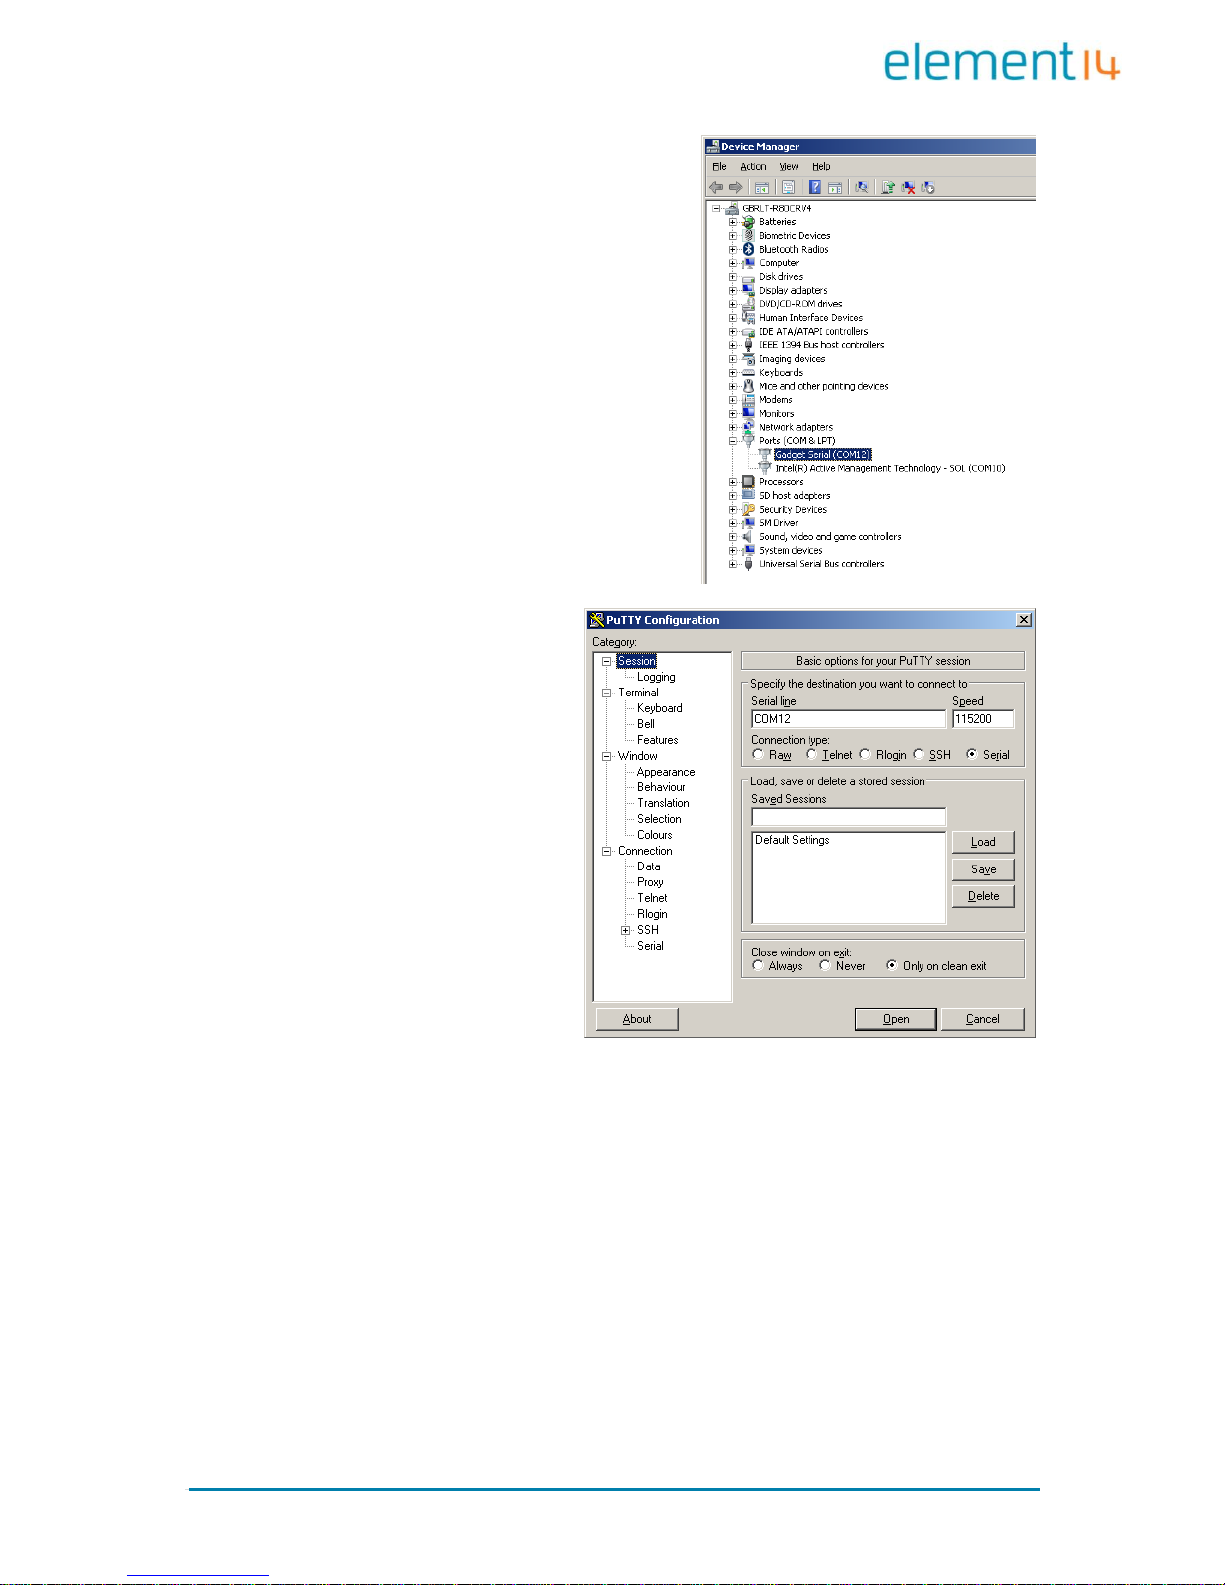
10. The board will now be shown in the Device
Manager along with a COM port (COM12 in this
case). Take note of this as you will need it later.
11. You can now close the Device
Manager and start PuTTY. Ensure
that “serial is selected as the
Connection type on the initial
screen
Page 6
Page | 6
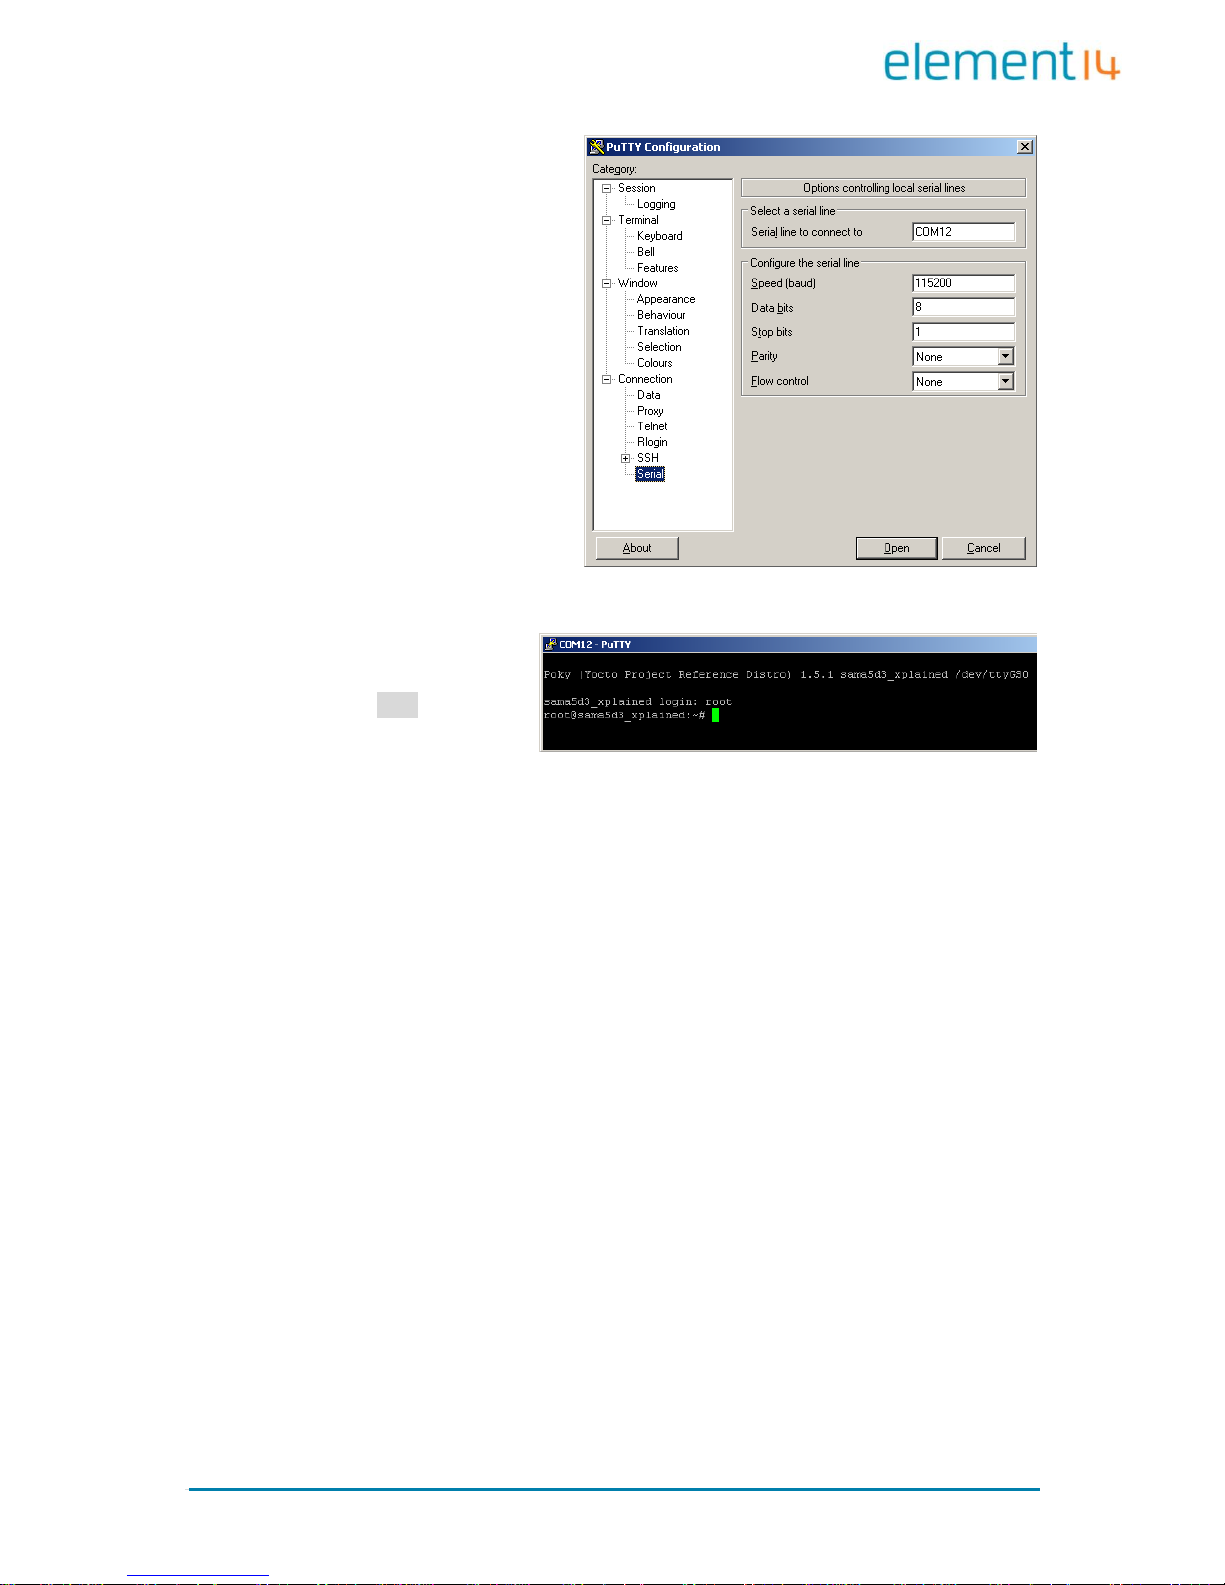
12. The following settings need to be
configured in the “Serial” section
to allow PuTTY to communicate
with the SAMA5D3 Xplained
board. Replace COM12 with
whichever COM port your
computer identified in step 11.
Then click “Open”
13. You will be presented with a
black window, hitting enter
on your keyboard will display
the login prompt. Login with
the username root then hit
enter to access the terminal
on the board.
Page 7
Page | 7
WiPi Setup
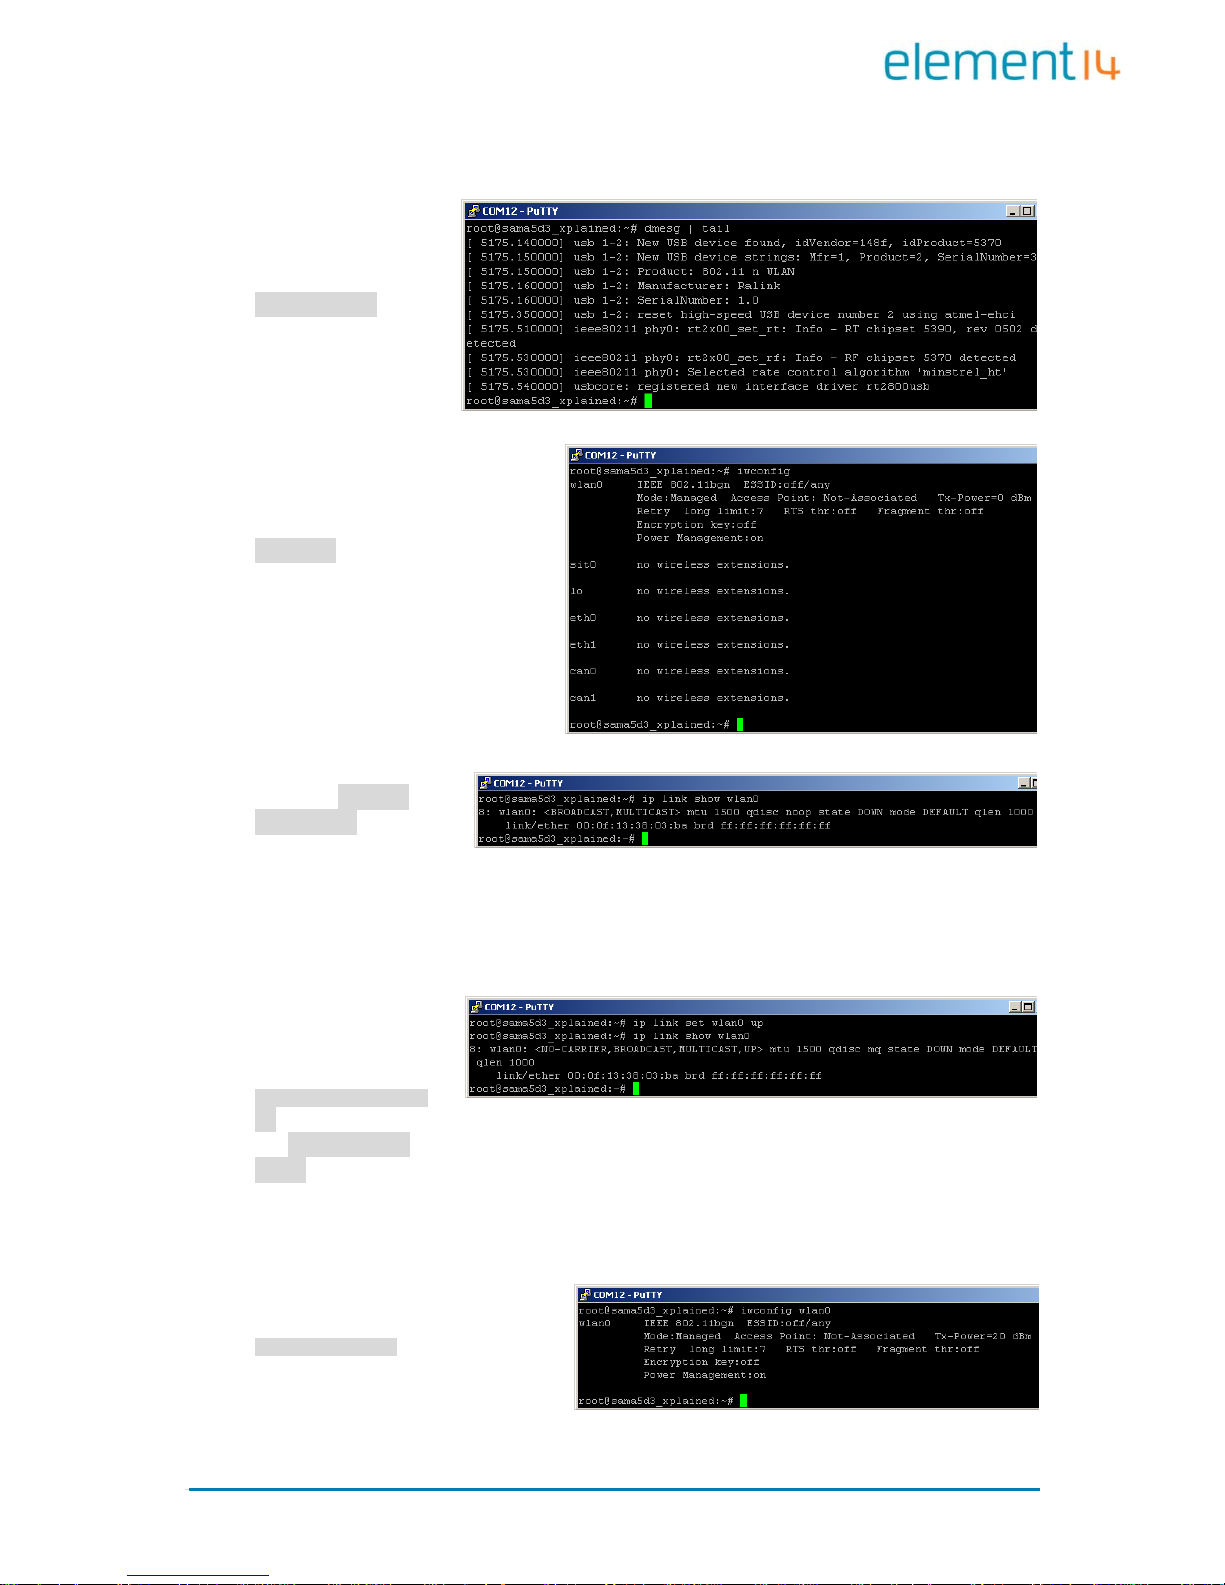
14. You can now
connect the WiPi to
one of the USB
headers on the
board. Typing
dmesg | tail into
the console will
show that the WiPi
has been detected
and installed
15. You can discover the name of the
wireless device by typing
iwconfig into the terminal, this
will display a list of connections.
As can be seen in the image
below the wireless connection is
named “wlan0”
16. Check that the
wireless device is up
by typing ip link
show wlan0 into the
terminal
17. Notice that in step
16 the content
inside the angle
brackets does not
indicate that the
device is currently
“up”. This can be
rectified by entering
ip link set wlan0
up and re-entering
the ip link show
wlan0 command
Notice how the device is now up.
18. Check the connection status with
iwconfig wlan0
Page 8
Page | 8
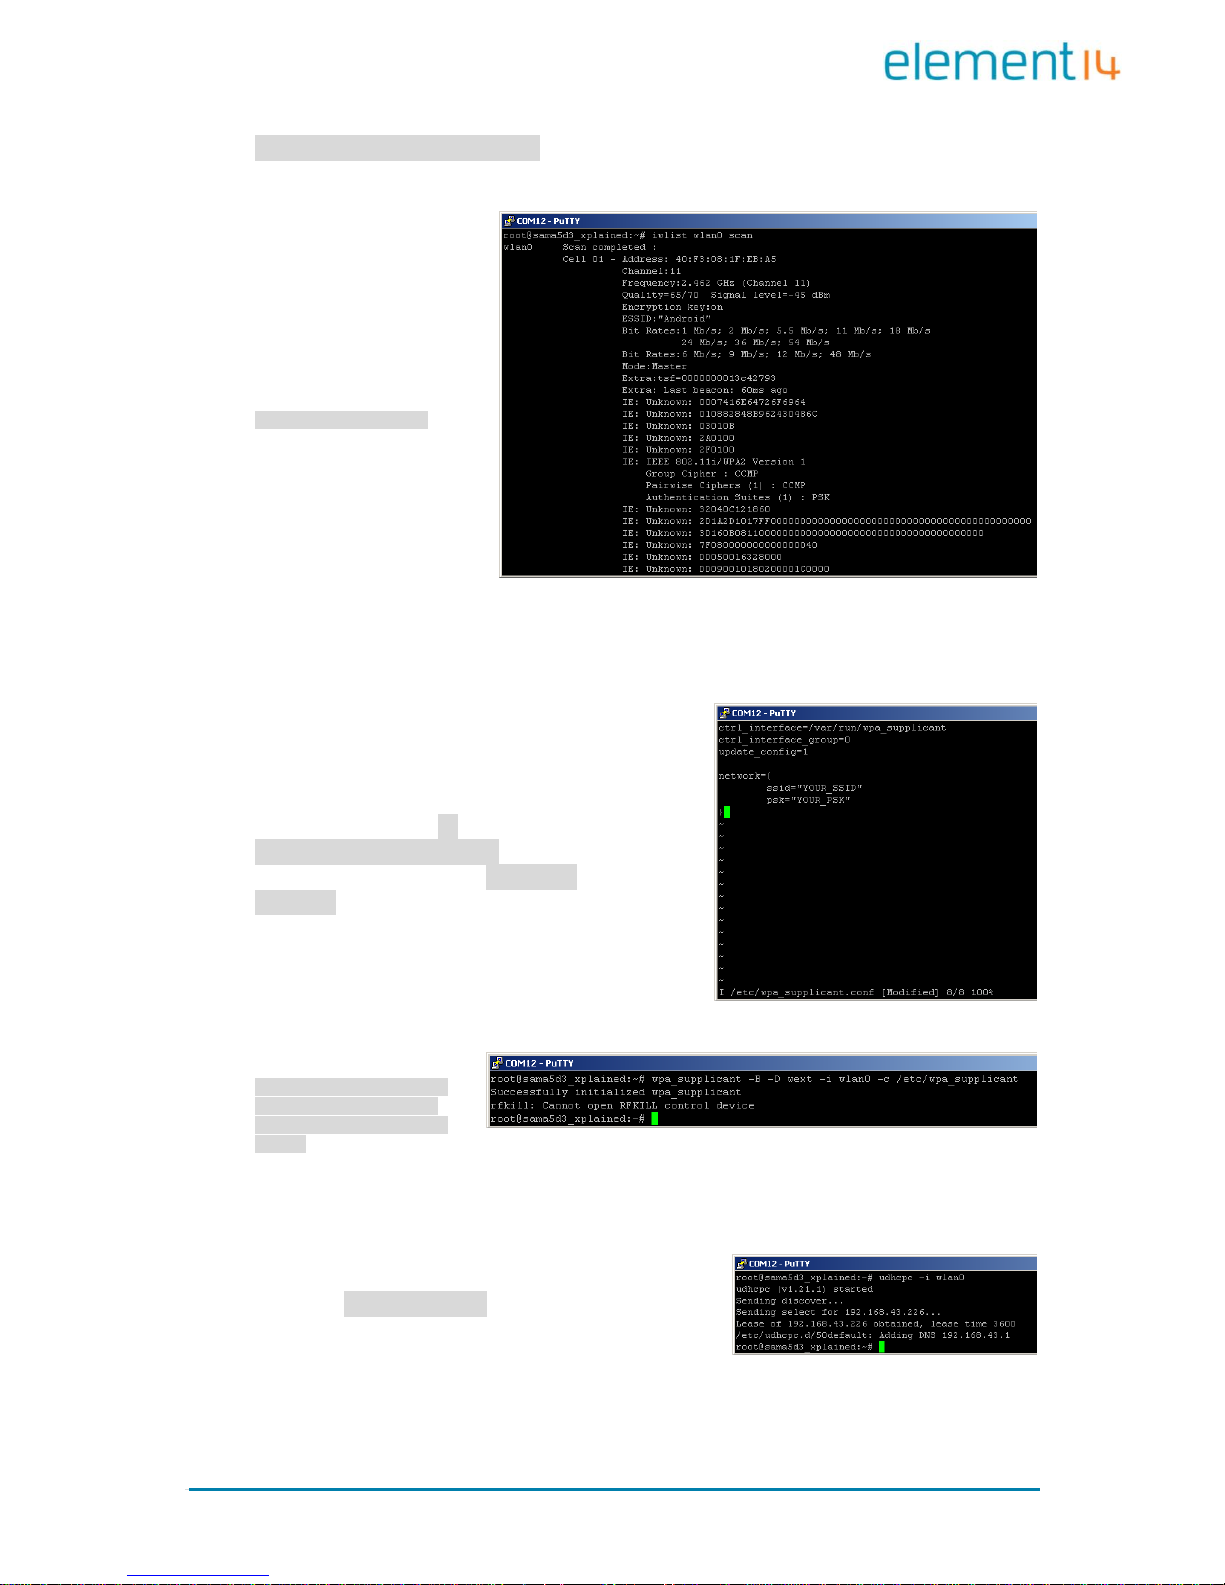
Access point: Not-Associated indicates that we are not currently connected to an access
point
19. At this point you can
scan to show any
networks that are in
range by using the
iwlist wlan0 scan
command.
This will show a list containing all WiFi points in range. Each entry is numbered from cell 01
onwards and will show information for each connection such as the SSID and the encryption
key status (Android and WPA2 in this case)
20. Edit the file wpa_supplicant to provide the SSID
and PSK of the network you wish to connect to. To
do this you can enter vi
/etc/wpa_supplicant.conf and edit the file to
look as below (substituting YOUR_SSID and
YOUR_PSK for the appropriate values)
21. Now initialise the WiFi
connection with the
following command:
wpa_supplicant –B –
D wext -1 wlan0 –c
/etc/wpa_supplicant
.conf
The error message about RFKILL is nothing to be worried about as it is used for hardswitches that block different types of RF radios and we do not use this functionality
22. Get an address from the DHCP server using the
command udhpc –i wlan0
The Xplained board has been assigned an IP Address (192.168.43.1 in this case)
Page 9
Page | 9
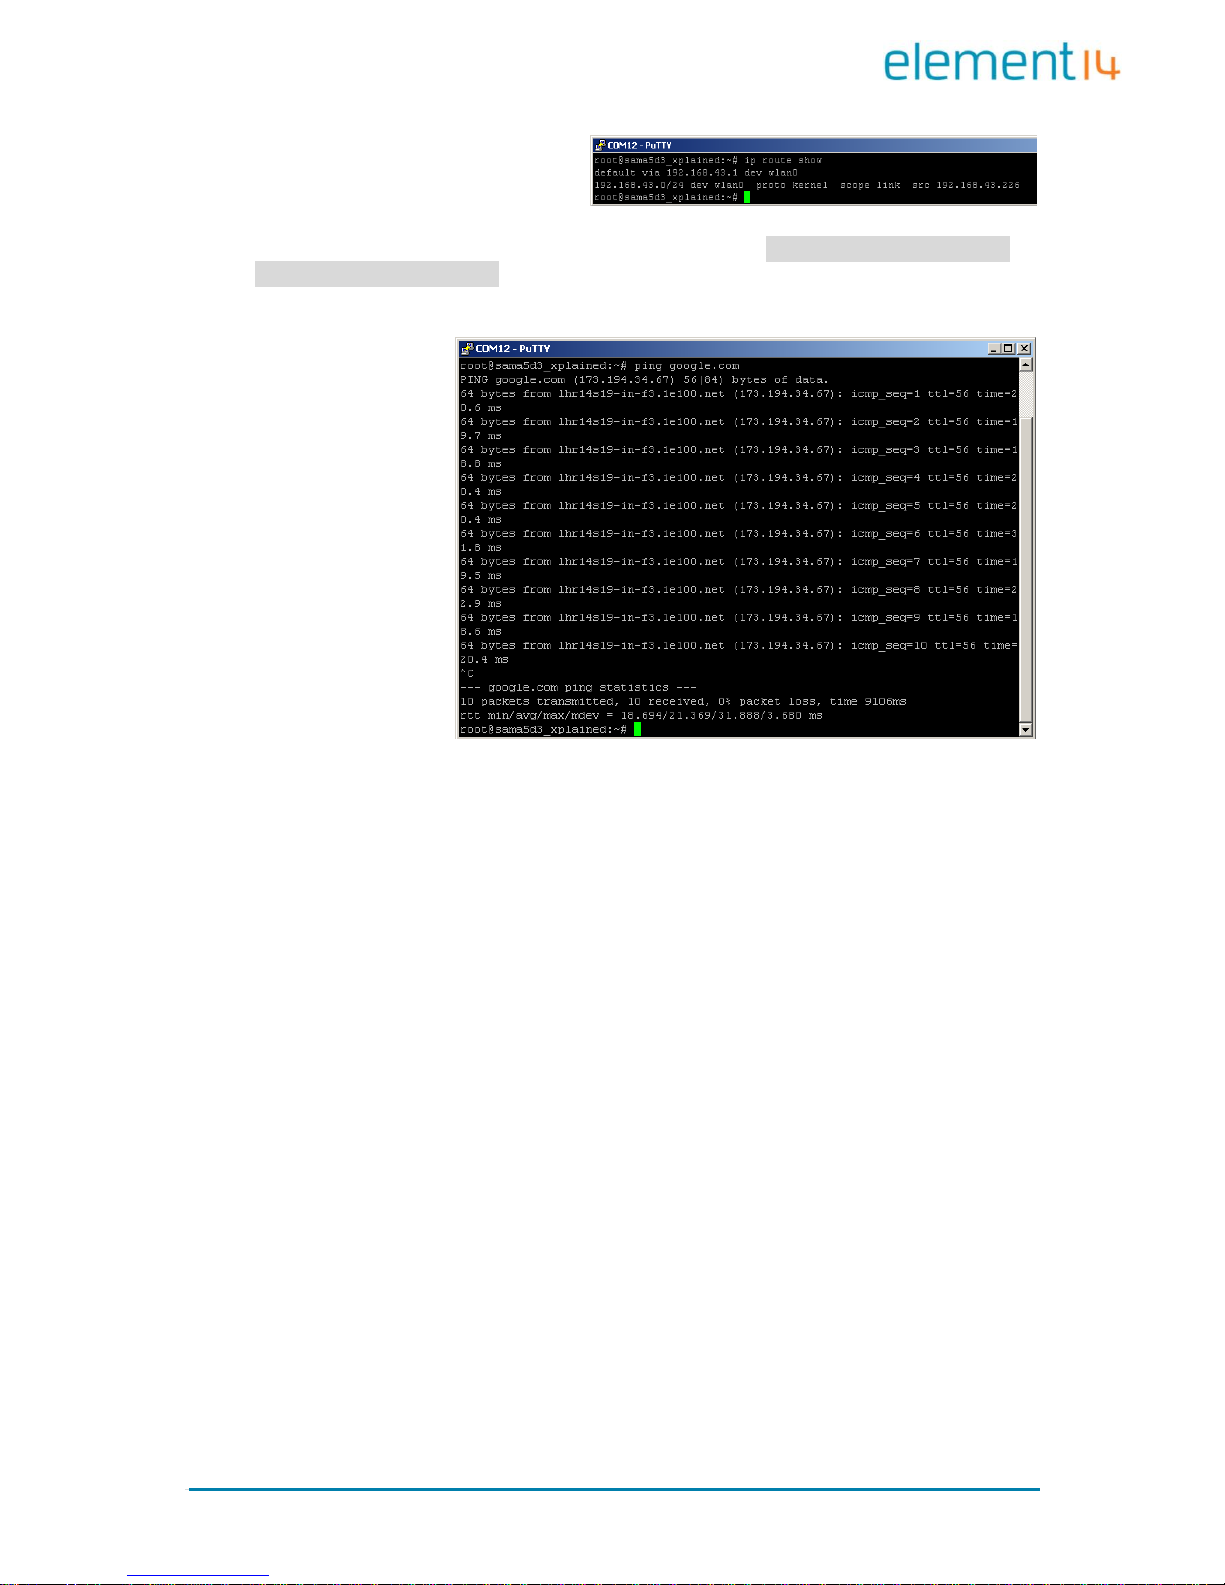
23. Now typing ip route show will show
that you have the correct routing
rules:
If these are incorrect you can set the correct rules by typing: ip route add default via
192.168.43.254 dev wlan0 (substituting the IP Address for the one that was issued in step
21)
24. The connection is
now set up!
You can test this if
you wish via the
ping command:
 Loading...