

Page 1
MPS II Manual
© 2014 Elektron Technology UK Ltd.
Page 2

MPS II User Manual
The MPS II is a world leader in macular pigment density measurement
by Elektron Technology UK Ltd.
Page 3

MPS II Manual
© 2014 Elektron Technology UK Ltd.
All rights reserved. No parts of this work may be reproduced in any form or by any means - graphic, electronic, or
mechanical, including photocopying, recording, taping, or information storage and retrieval systems - without the
written permission of the publisher.
Products that are referred to in this document may be either trademarks and/or registered trademarks of the
respective owners. The publisher and the author make no claim to these trademarks.
While every precaution has been taken in the preparation of this document, the publisher and the author
assume no responsibility for errors or omissions, or for damages resulting from the use of information
contained in this document or from the use of programs and source code that may accompany it. In no event
shall the publisher and the author be liable for any loss of profit or any other commercial damage caused or
alleged to have been caused directly or indirectly by this document.
Printed: October 2014
Page 4

MPS II Manual4
Table of Contents
Part I MPS II
................................................................................................................................... 61 Introduction
.......................................................................................................................................................... 7Elektron Company notices
......................................................................................................................................................... 8Revision History
......................................................................................................................................................... 9Important warnings
......................................................................................................................................................... 10Explanation of symbols used in manual and on instrument
......................................................................................................................................................... 11Database warning
......................................................................................................................................................... 12Acknowledgements
................................................................................................................................... 132 How to use this manual
................................................................................................................................... 143 An Introduction to Macular Pigment
................................................................................................................................... 154 MPS II testing
.......................................................................................................................................................... 16MPS II target
.......................................................................................................................................................... 17Testing strategy
.......................................................................................................................................................... 18Standard test
.......................................................................................................................................................... 19Detailed Test Mode
.......................................................................................................................................................... 20Explanation of terms
Part II Installation
Part III Test Modes Best Practice
Part IV Selecting a Patient
6
21
23
25
................................................................................................................................... 261 Create a New Patient
................................................................................................................................... 282 Select Existing Patient
Part V Standard Test Mode
................................................................................................................................... 301 Standard Test - Summary
................................................................................................................................... 312 Standard Test - Sequence
................................................................................................................................... 343 Patient Instructions
Part VI Detailed Test Mode
................................................................................................................................... 351 Detailed Test - Summary
................................................................................................................................... 362 Detailed Test - Sequence
................................................................................................................................... 403 Patient Instructions Peripheral
................................................................................................................................... 404 Graph Estimate
................................................................................................................................... 415 Test Reports
Part VII Viewing Previous Record Data
Part VIII Configuration Wizard
Part IX Appendix 1 - MPS II Installation
29
34
45
46
49
Part X Appendix 2 - Software Installation
51
© 2014 Elektron Technology UK Ltd.
Page 5

................................................................................................................................... 521 Installation on a new PC
................................................................................................................................... 532 Updating an existing installation
................................................................................................................................... 543 Starting the program
5Contents
Part XI Appendix 3 - Confidence Limits
Part XII Appendix 4 - Example data
Part XIII Appendix 5 - Technical Specification
Part XIV Appendix 6 - Maintenance and Warranty
................................................................................................................................... 611 Regular Inspection
................................................................................................................................... 612 Maintenance
................................................................................................................................... 613 Cleaning
................................................................................................................................... 624 Preventative maintenance
................................................................................................................................... 625 Replacement parts
................................................................................................................................... 636 Spare lenses
................................................................................................................................... 637 Repairs and Recalibration
................................................................................................................................... 638 Warranty
Part XV Appendix 7 - Troubleshooting
Part XVI Appendix 8 - Software License Agreement
55
57
59
61
64
65
Index 0
© 2014 Elektron Technology UK Ltd.
5
Page 6

MPS II Manual6
1 MPS II
www.elektron-healthcare.com
1.1 Introduction
The MPS II / MPS 9000 must be used in accordance with the operating instructions. Please read the
instructions before attempting operation.
The instructions in this manual are to be viewed as an accompaniment to correct training on this
equipment.
The results of a test are only to be analysed by a suitable qualified person, and it is the responsibility
of the practice manager/owner to ensure that only suitably trained personnel are operating this
equipment.
Contact your sales agent for details of on-site training.
© 2014 Elektron Technology UK Ltd.
Page 7

1.1.1 Elektron Company notices
The information contained in this manual is subject to change without notice.
All rights reserved. Reproduction, translation, or adaptation of this manual without prior written
permission of Elektron Technology UK Ltd. is prohibited, except as allowed under copyright laws.
The only warranties for Elektron Technology UK Ltd. products and services are set forth in the
express warranty statements accompanying such products and services. Nothing herein should be
construed as constituting an additional warranty.
Elektron Technology UK Ltd. shall not be liable for technical or editorial errors or omissions
contained herein.
MPS II 7
© 2014 Elektron Technology UK Ltd.
Page 8

MPS II Manual8
Re lea se
Dat e
Chan ge
Version 1.00
24/6/13
New version for V5 software
Version 1.1
03/08/13
Spelling and grammatical corrections and some formatting changes
Version 1.2
30/08/13
Added graph estimate information in Detailed Mode test
Version 1.3
2/14
Information updated
Version 1.4
30/6/14
Information updated and some installation information added
Version 1.5
1/10/14
Information regarding installation added.
1.1.1.1 Revision History
© 2014 Elektron Technology UK Ltd.
Page 9
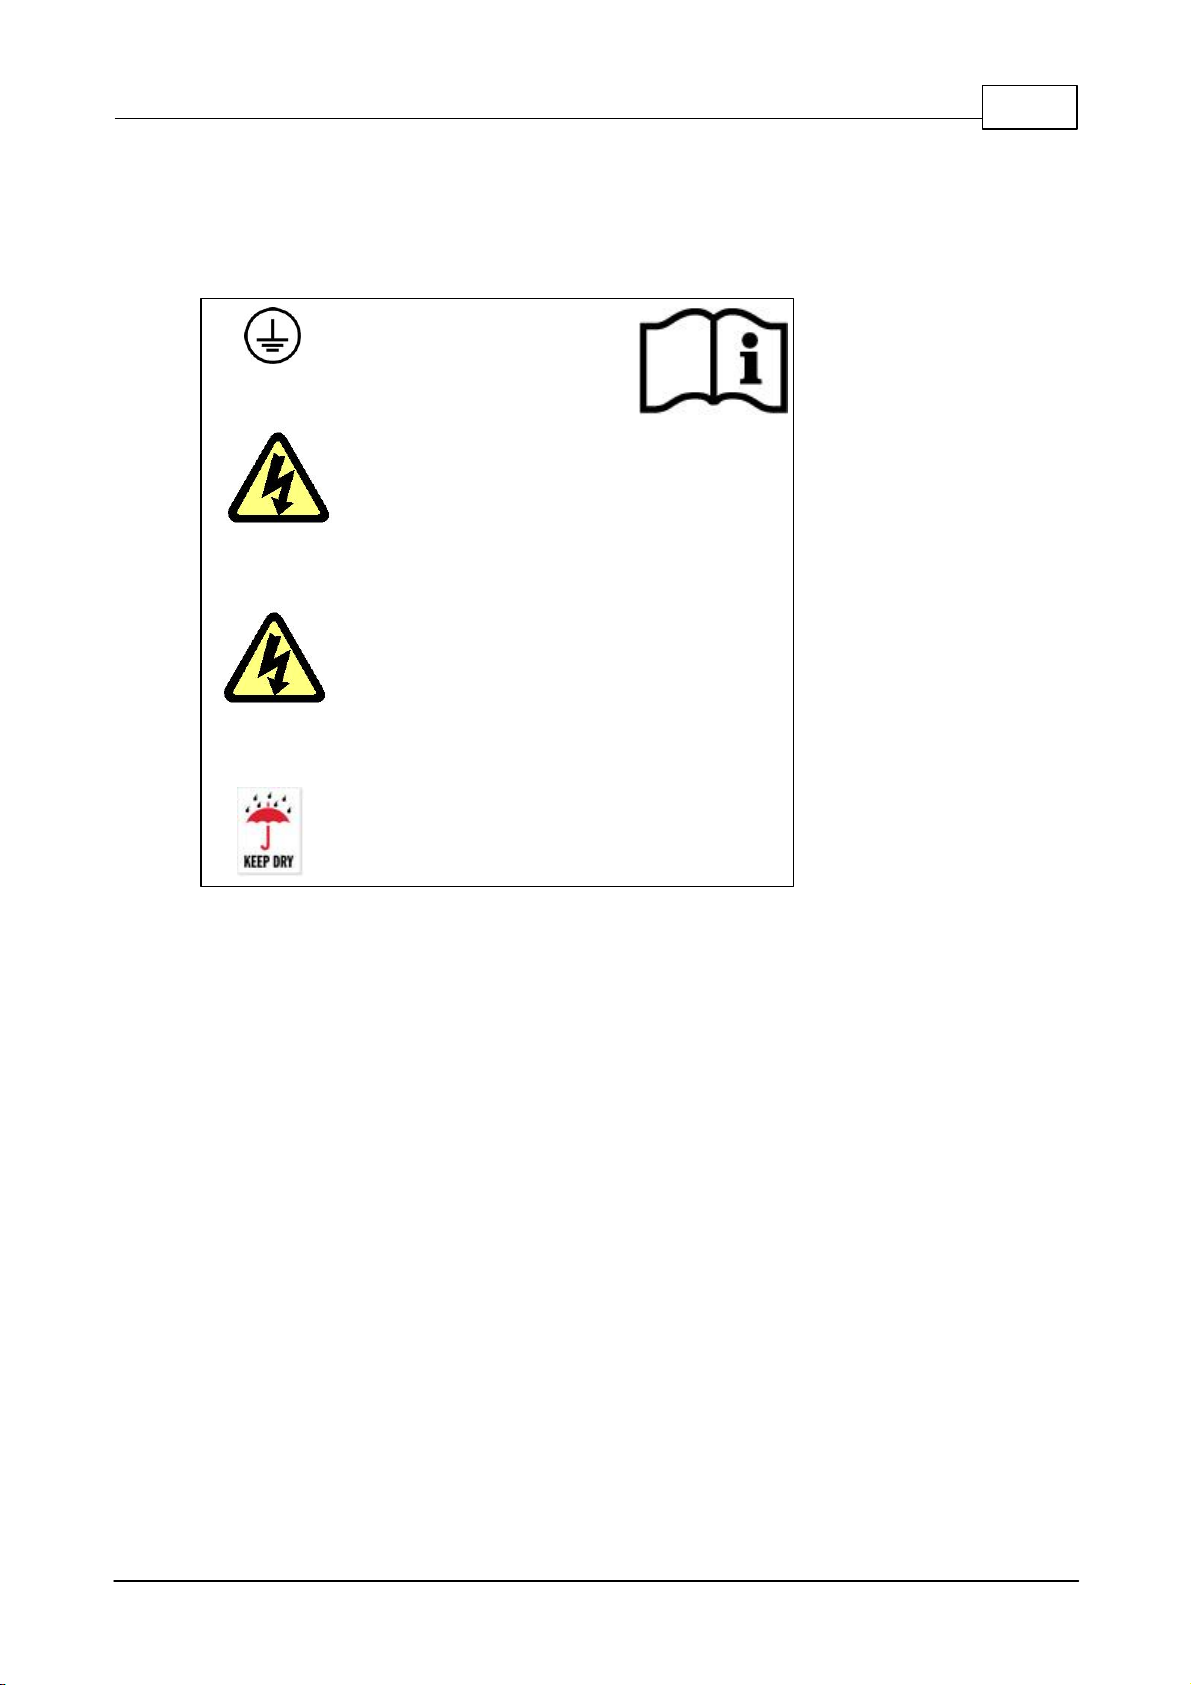
1.1.1.2 Important warnings
WARNING
This unit must be
connected to an
earthed mains supply
WARNING
Hazardous voltages are
present inside the
electrical enclosures of
this unit. No user-
serviceable parts inside
WARNING
This equipment is not
suitable for use in an
oxygen rich
environment
WARNING
This equipment should
be kept dry at all times
MPS II 9
© 2014 Elektron Technology UK Ltd.
Page 10
MPS II Manual10
WARNING
Consult manual
WEEE Directive
Power Off (0)
Power On (1)
Type B Applied Part
Hazardous voltage
CE mark
USB
Protective earth
AC Mains
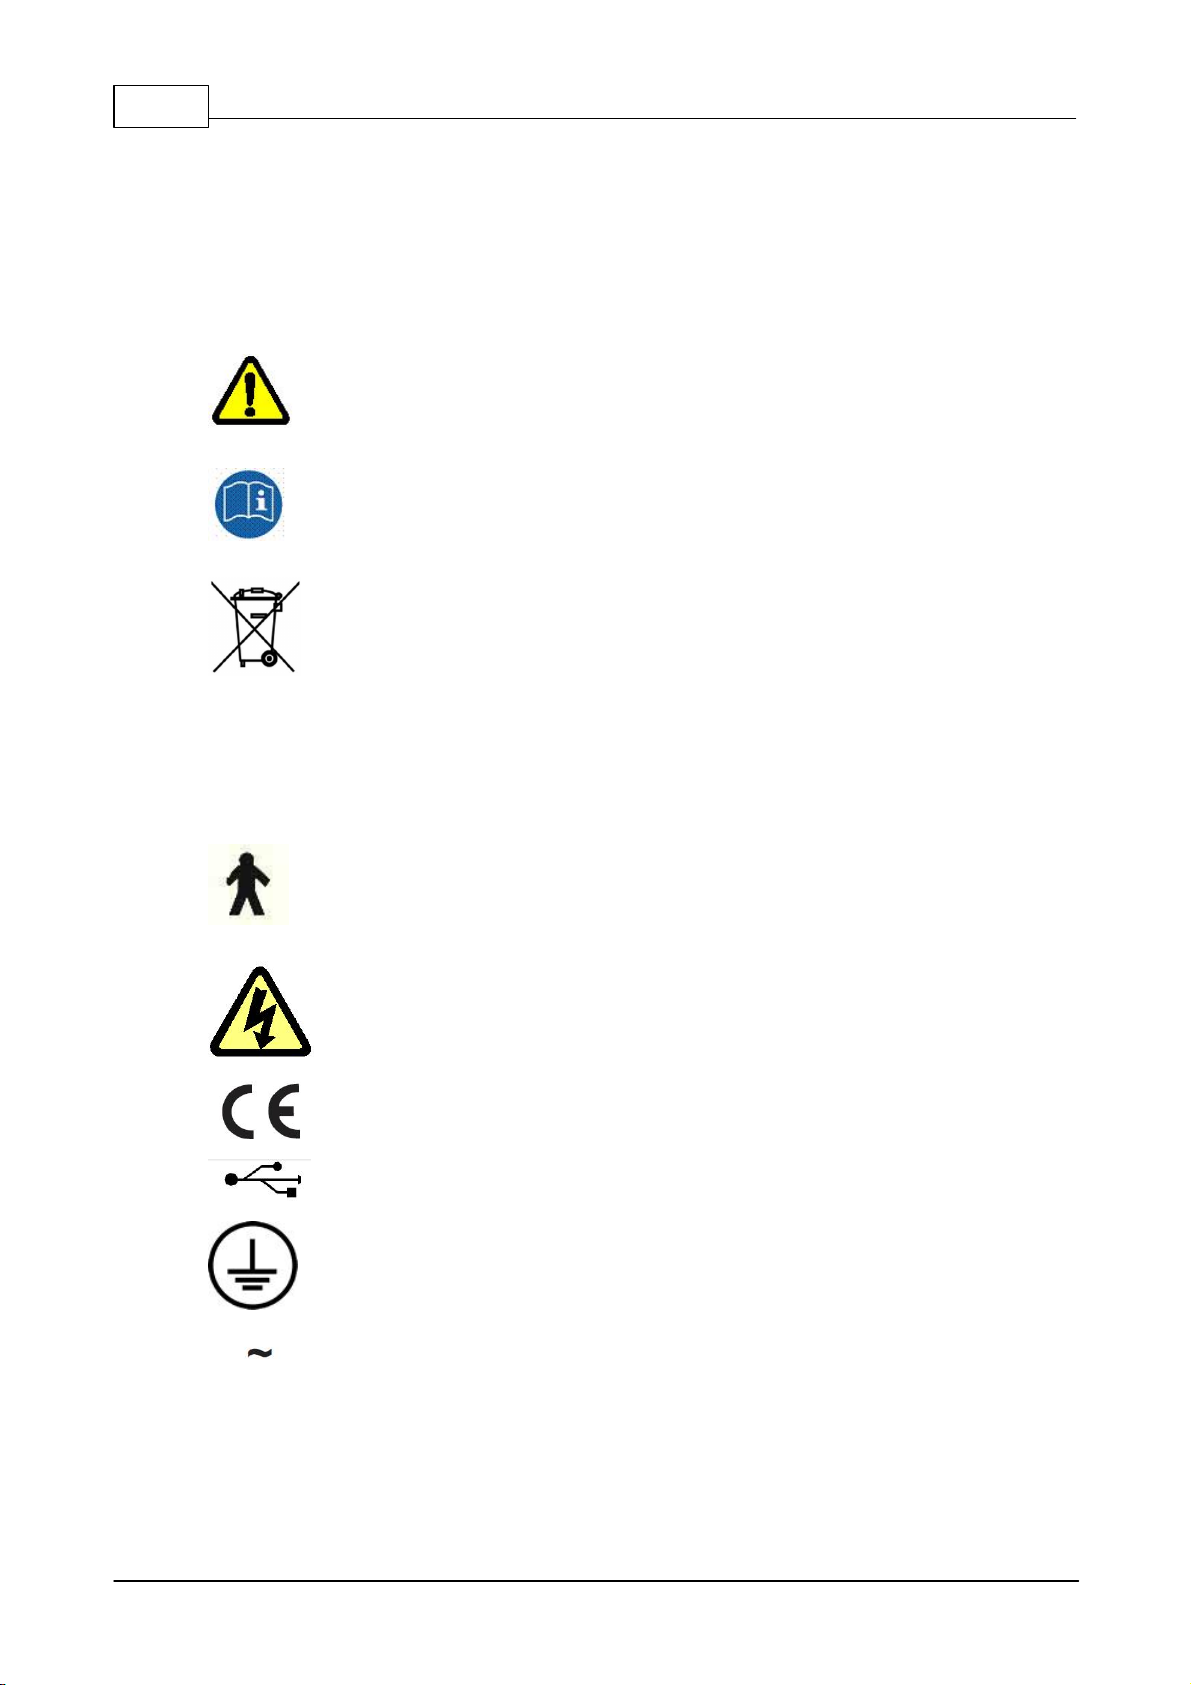
1.1.1.3 Explanation of symbols used in manual and on instrument
Definition of symbols used in the manual and on the instrument.
© 2014 Elektron Technology UK Ltd.
Page 11
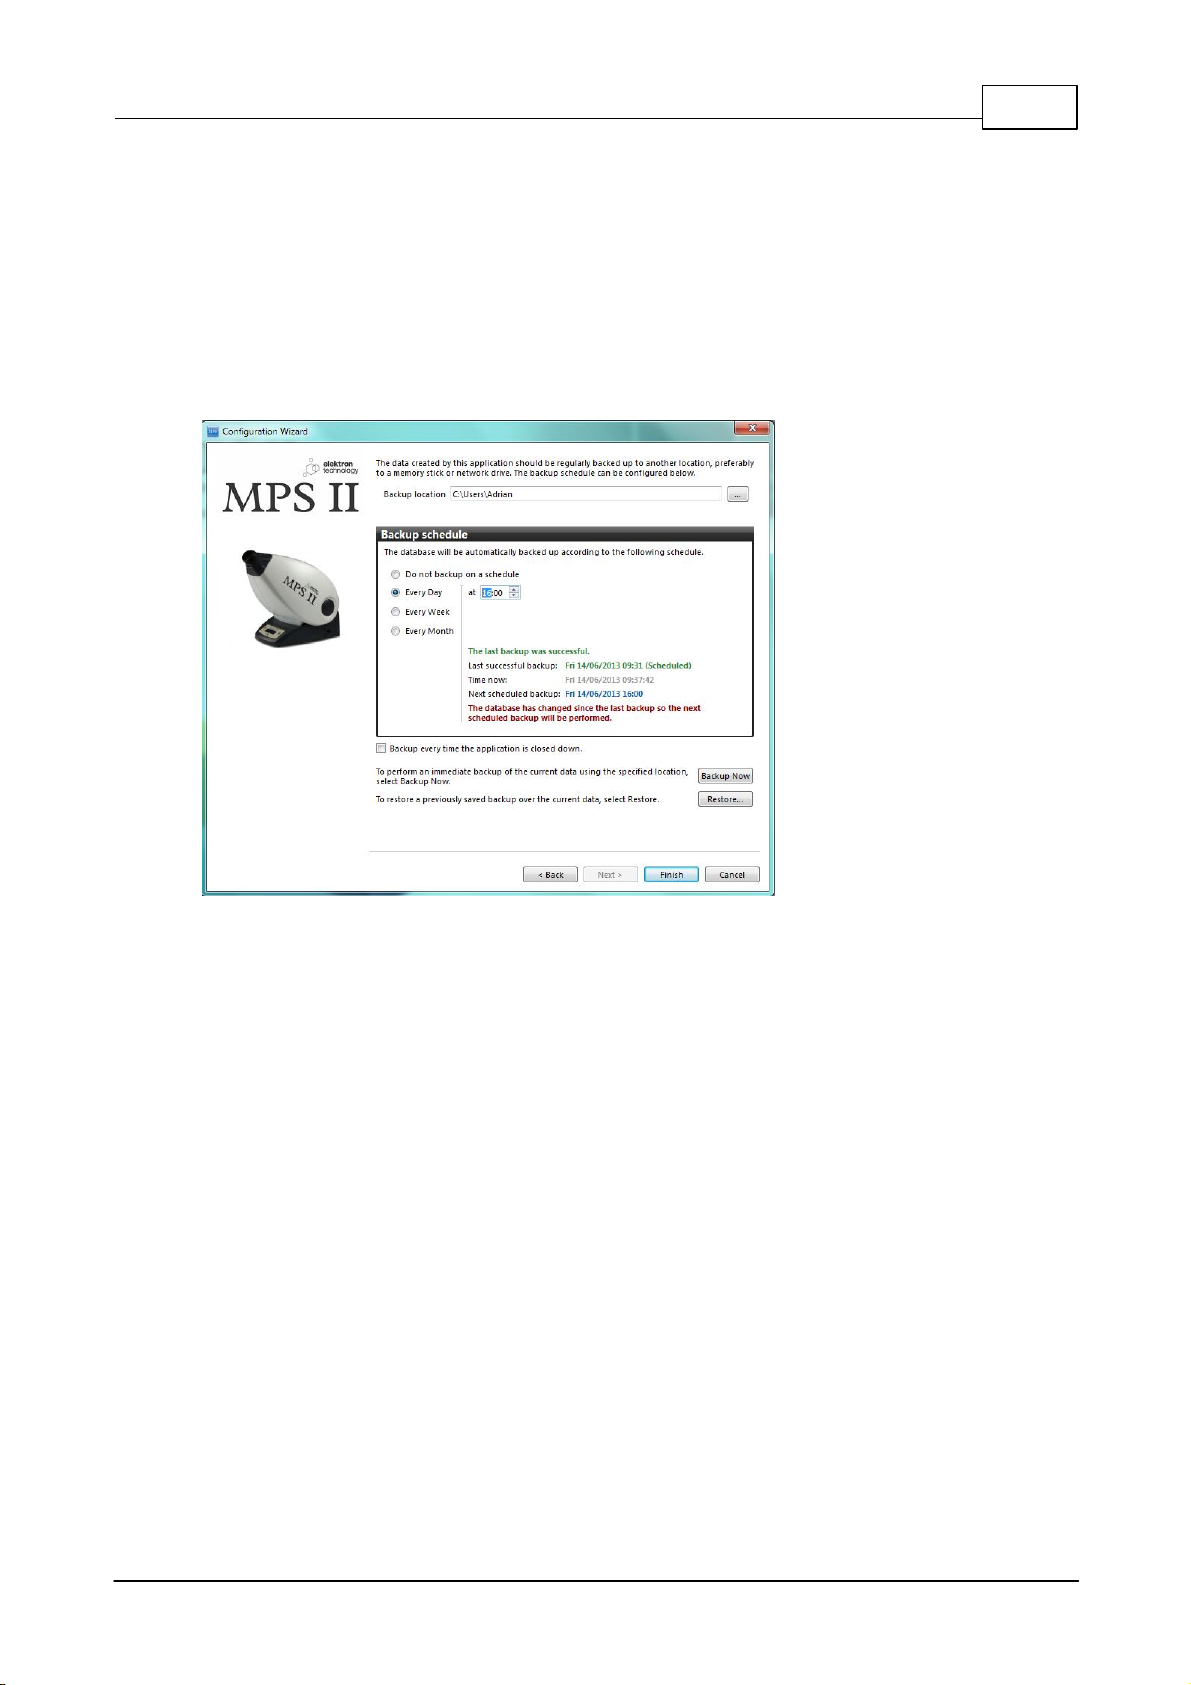
1.1.1.4 Database warning
To reduce the possibility of loss in the unlikely event of computer hard disk failure, it is strongly
recommended that the database of patient records be backed up regularly either on to a USB
memory stick or other suitable removable media and kept off-site or in a suitable safe location.
The configuration wizard (shown below) allows for the backup interval and location to be set.
MPS II 11
The default location is C:\users\login_name\ but can be any location on the PC.
It is good practice that a backup copy of the database is kept off-site or in a suitable fire safe
location.
The database used in the MPS II software is based on the PostgreSQL database program.
The database structure ensures that each patient has an entry (called a record) in the database.
The patient’s record holds all of their contact details and also a copy of every test they complete
along
with risk factor information and any supplementation recommended.
The database has inbuilt security to stop unauthorised access to the information contained within.
Every time a new MP test is performed the results (if saved) are attached to the patient’s “record”
card.
© 2014 Elektron Technology UK Ltd.
Page 12
MPS II Manual12
1.1.1.5 Acknowledgements
Microsoft, Windows, Windows 7TM and Windows 8TM are registered trademarks of Microsoft
Corporation.
Elektron Technology UK Ltd. continuously improves the design processes of its equipment to
minimize the negative impact on the environment and the communities in which the equipment is
manufactured, shipped, and used.
This symbol on the product or on its packaging indicates that to preserve the environment, this
product must be recycled after its useful life as required by law and must not be disposed of with
your household waste. It is your responsibility to dispose of your waste electrical and electronic
equipment by handing it over to a designated collection point for the proper recycling of such
equipment. The separate collection and recycling of your waste equipment at the time of disposal will
help to conserve natural resources and ensure that it is recycled in a manner that protects human
health and the environment. For more information about the authorized collection location nearest to
you, please contact your local city office, your household waste disposal service or the agent from
whom you purchased the product.
© 2014 Elektron Technology UK Ltd.
Page 13
1.2 How to use this manual
This manual is written for use with the MPS II Macular Pigment Screener.
Throughout the manual there are references to MPS II or MPS9000; both of these refer to the standalone MPS II unit which has the manufacturer’s reference number MPS9000 or MPS1000.
Throughout this manual there will be references to laptop or PC where PC stands for Personal
Computer.
It does not matter which computer you have as the software is the same.
If you have a laptop with touch pad or external mouse connected, you need to move the on-screen
arrow cursor over the button/item you want to select and then press the left hand button.
In the event of software upgrades, up to date operational instructions will be installed at the same
time as the software.
Updates of the software can be obtained from your agent (when available).
MPS II 13
Some of the screen shots in this manual may be from different versions of software and may differ
slightly from the software installed on your machine.
The information in this manual was correct at the time of publishing.
It is important that all of the literature and software supplied with the MPS II is kept in a safe place.
Use of the Software
Throughout the software there are visual clues to help you operate the software and perform testing.
The on-screen controls will be colour coded to help you.
Greyed out if they cannot be used.
Blue if they are available for use and
Green if they are the next button you should press to progress.
© 2014 Elektron Technology UK Ltd.
Page 14
MPS II Manual14
1.3 An Introduction to Macular Pigment
Age-related Macular Degeneration (AMD) is the most common cause of vision loss in people over 50
and its prevalence increases with age. There is a growing awareness of the disease, the need to
measure the risk of getting it and how to take preventative action.
As the World's population ages, the condition is expected to become more prevalent creating a
heavy financial burden on health care services.
It is safe to say that if the entire population lived to 100 years, we would all exhibit varying levels of
macular degeneration.
Given that there is no cure for AMD, it is vital to prevent the disease for as long as possible through
diet, lifestyle and optimising Macular Pigment Levels – the internal sunscreen for the eyes.
The macula is the central and most sensitive part of the retina at the back of the eye and macular
pigment acts as an antioxidant that protects the retina from the potentially damaging effects of blue
light – if the density of this pigment is reduced then the retina is made more vulnerable and more
likely to gradually deteriorate. By catching those with low levels of macular pigment, the MPS II
makes it possible to reduce their risk of long-term vision loss.
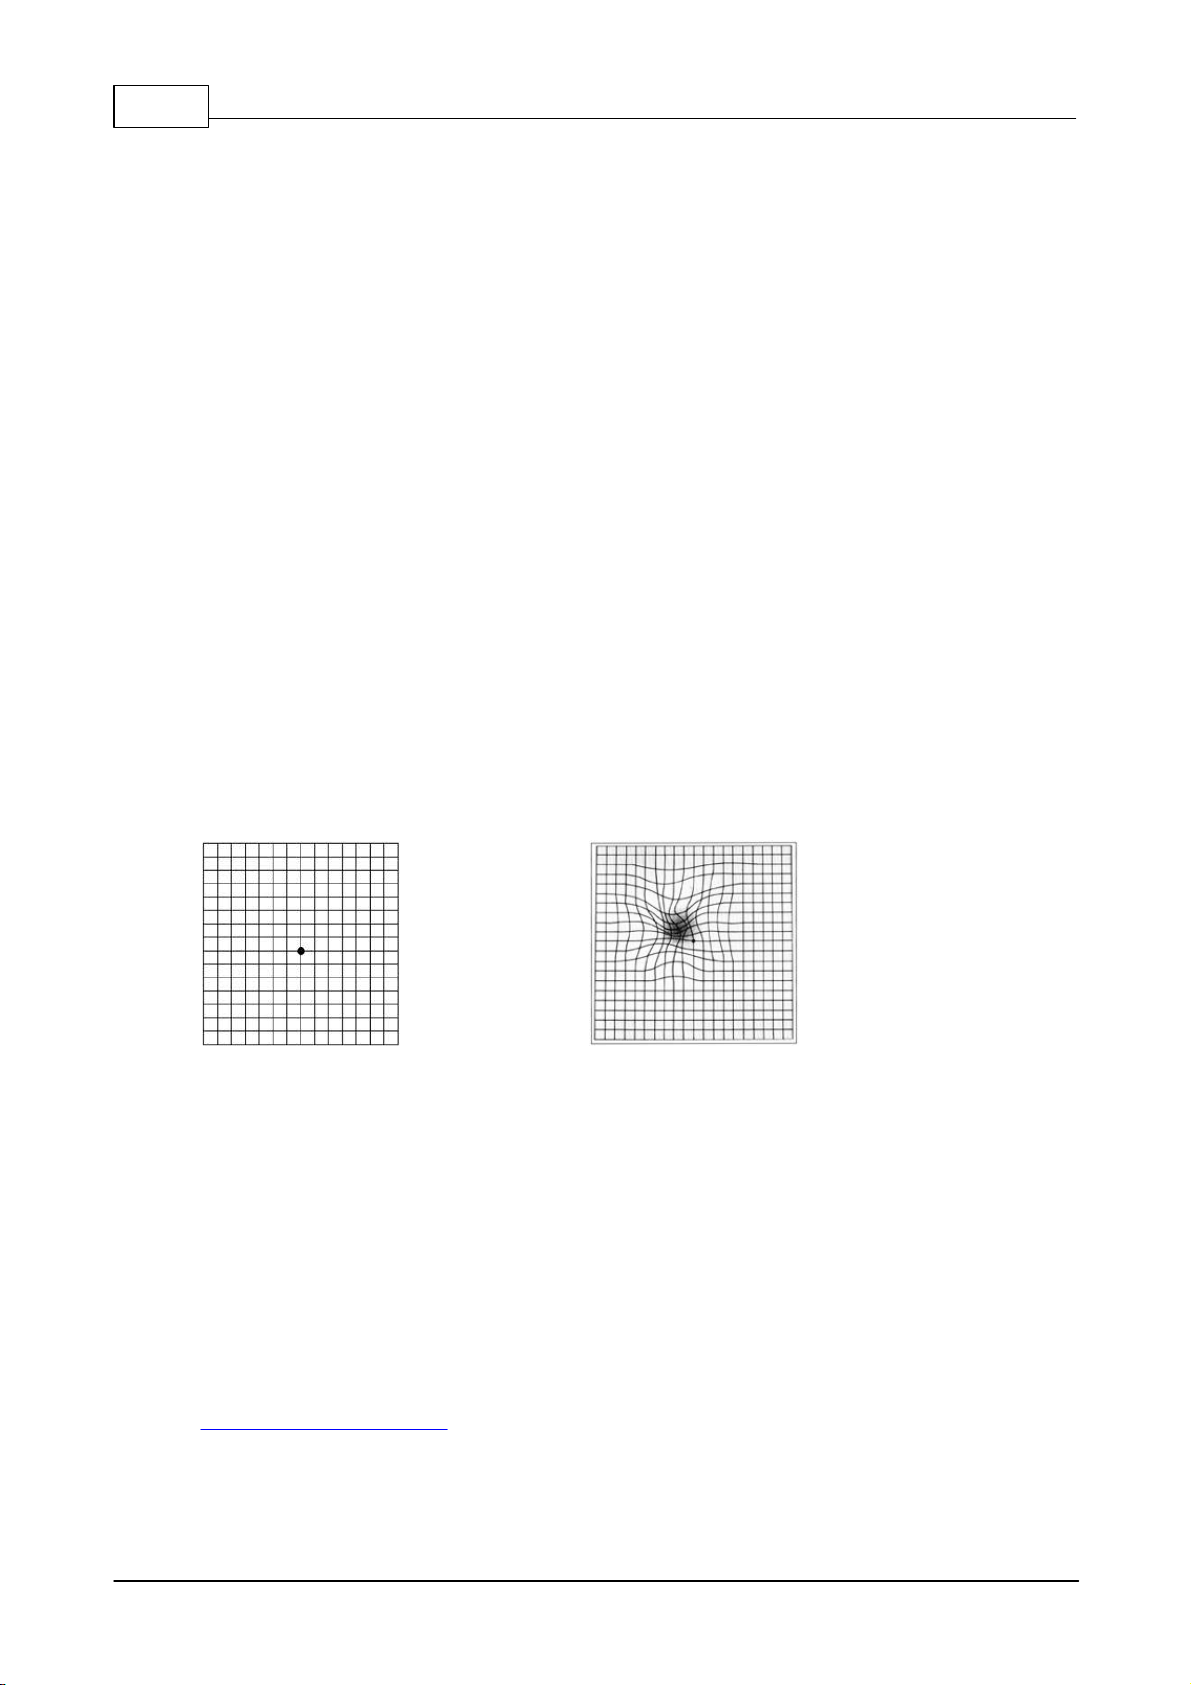
People with AMD experience severely distorted vision and find it very hard to read and recognise
faces.
Eventually the condition can lead to total blindness.
The density of the macular pigment has been shown to be linked to diet and to other lifestyle factors,
including smoking.
Normal Amsler Grid Amsler grid with AMD
The scientifically proven technique for measuring the density of macular pigment, heterochromatic
flicker photometry (HFP), has been available for over 30 years. The new MPS II uses the same
technology, but takes it to the next stage by refining it and making it available in a more accessible
package thanks to advances in LED lighting.
The approach adopted by the MPS II is far easier for patients to use than earlier versions of the
technology. Unlike conventional methods, where observers have to set the point where flicker
disappears (or minimised), the measurement consists of a series of button presses in response to
the onset of flicker, which makes it far easier for the subject to take the test and for the Optical
Practitioner to accurately determine the flicker thresholds and optical density.
Visit our Website for more up to date information regarding clinical papers and developments in the
Prevention, Detection and Treatment of AMD.
Elektron healthcare Website
© 2014 Elektron Technology UK Ltd.
Page 15

1.4 MPS II testing
The MPS II is a computerised instrument for measuring a subject’s Macular Pigment Optical
Density.
It's purpose is to identify patients at risk of developing early stage AMD.
The MPS II uses low intensity light of specific wavelengths at calibrated intensities to gauge a
patient’s heterochromatic flicker response.
The patient looks into the instrument at the stimulus light and is asked to press a button when they
see the light flicker.
The target background luminance is maintained at 250cdm-2 to significantly reduce detection by rods
or short-wave cones.
The MPS II has an internal microprocessor used to control the light intensities and the test program
sequence.
For full operation, the unit is connected to, and controlled from, a computer running the Microsoft
Windows8™, or Windows 8™ operating system.
MPS II 15
The MPS II is easy to use and does not require advanced computer literacy for its operation.
Once installed, you will immediately have the capability to carry out routine macular screening
examinations on your patients.
From then on, your confidence with the unit will grow with every use and you will rapidly discover the
simplicity of operation and the ease of obtaining valuable and accurate macular pigment data.
A powerful database is included in the software that stores the macular pigment results alongside the
patient details. using the database, reports can be generated to monitor the patient’s progress after
supplementation.
© 2014 Elektron Technology UK Ltd.
Page 16

MPS II Manual16
1.4.1 MPS II target
The MPS II target is the most important part of the unit and the lens and optics of the instrument
should be kept clean and free from dust and debris by using the supplied dust cover when the unit is
not in use.
The pictures below shows the view into the eyepiece –
Three circles are visible on a plain white background.
During a test, the central (smaller) target will light a blue-green colour and it is here flicker will be
seen.
The larger circles (either side) are fixation targets used for the peripheral test in the Detailed Mode.
The peripheral fixation targets light up red and the patient is instructed to look at them during
peripheral testing whilst observing the central target through the side of the eye (not required in
Standard mode).
It is important that the patient maintains fixation on the correct target during peripheral testing. If
either of the red peripheral fixation targets is illuminated, then the patient should fixate on these. If
neither of them is illuminated, the patient should look directly at the central target.
In both cases, the response to flicker in the central targets should be the same.
© 2014 Elektron Technology UK Ltd.
Page 17

1.4.2 Testing strategy
Since MP lies within the foveal region other media changes, e.g. lens yellowing, will not affect the
MP value.
Note that the initial blue/green ratio is pre-set by taking the age of the subject into account. The older
the subject the further to the right the start point.
If the subject has been fitted with an Intra-Ocular Lens, the eye may then appear much younger so
the software automatically assumes an age of 20 when the IOL button has been ticked (patient’s
form).
The MPS II first measures the patient's flicker sensitivity. This is used to normalise each subject as
far as possible so that the starting flicker frequency is close to 30Hz. Some subjects still lie outside
this normalisation process. This affects the shape of the curve and hence the accuracy of
measurement. Too high a sensitivity and the curve starts at a high value (> 30 Hz) and remains
shallow. Too low a value, and the curve starts at a low value (< 30 Hz) and is too deep (sometimes
below 5Hz) which may halt the run. Optimum sensitivity occurs when the minimum value falls
between 20 Hz and 15 Hz
In subjects with diabetic media yellowing, the error will be higher because their media appears older.
MPS II 17
When lights are different in colour, it is difficult to say whether or not they are of equal intensity or
luminance.
This device uses the well-known technique of heterochromatic flicker photometry (HFP) to identify the
equal-luminance point of two flickering lights of different wavelengths.
Macular pigment absorbs selectively in the blue region of the visible spectrum, at 460nm, and is
present only in the central 8 degrees of vision.
HFP is performed for central fixation where macular pigment is maximal.
A constant white background illuminance is used; blue and green light are alternately flickered. The
blue light is chosen to match the absorbance of the macular.
In the MPS II, the equal luminance points are obtained by presenting the two lights at a series of
different intensity ratios. The flicker frequency starts at a high rate where flicker cannot be detected
(target appears a steady blue-green colour) and, for each blue-green intensity ratio, the flicker rate
slowly reduces until the patient sees the flicker - at which point they press the response button.
This process is repeated at different intensities to obtain the graph. The curve will have a minimum
which corresponds to the equal luminance point for the blue/green target. The software calculates the
MP value based on this minimum and the patient’s age.
© 2014 Elektron Technology UK Ltd.
Page 18
MPS II Manual18
1.4.3 Standard test
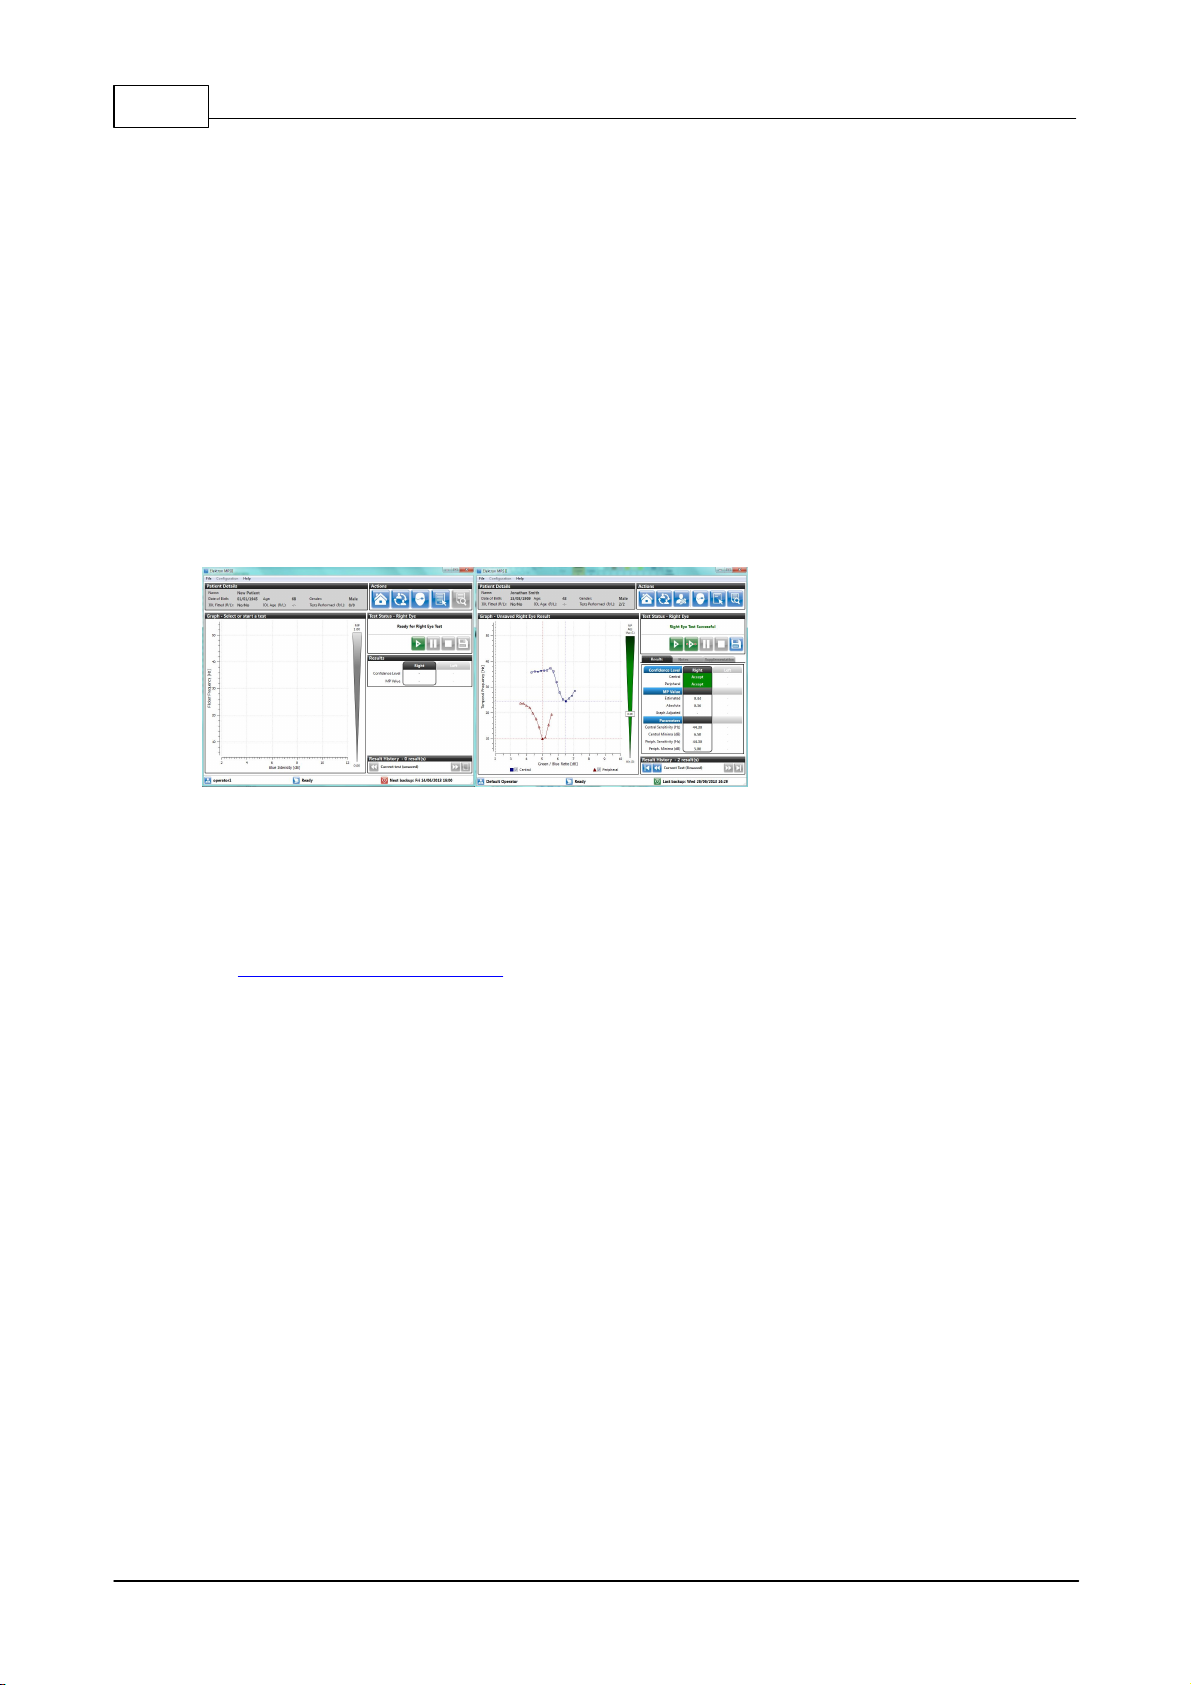
The latest version of the MPS II software implements the Standard mode algorithm from version 4.
Developed by one of the original inventors of the instrument, the algorithm interprets the validity of
screening results.
Previous versions of the software have relied on the operator making subjective judgements on the
result’s validity. The new algorithm relieves the operator of this responsibility by automatically
interpreting the results. Of course the Detailed mode interface remains for the testing of diabetics,
clinical research and teaching, but most will find the ease of use in Standard mode applicable to
most test cases. A simple button click toggles between the two modes (shown below, for
comparison) –
The Standard mode contains a subset of the Detailed mode controls.
The macular index is calculated from the patient’s age and the central run (a peripheral run is not
needed).
The algorithm looks at the patient’s response to the test and analyses the shape of the graph and
the test values.
There are three possible outcomes, clearly displayed below the graph (accept, caution and reject) see Appendix 3 - Confidence limits.
In most cases, the results will be accepted. In a few instances the results will be unacceptable (and
the program ensures these cannot be saved as a valid result). When the Standard mode algorithm
produces a low, but acceptable result, the final decision is left to the operator.
© 2014 Elektron Technology UK Ltd.
Page 19

1.4.4 Detailed Test Mode
The Detailed Mode is used for patients where the Standard Mode is not suitable, people with
diabetes for example.
For this test, two measurements are taken, one with the patient looking directly at the stimulus
target (using the central region of the macular) with the light from the target passing THROUGH their
macular pigment as in standard mode
For the second phase of the test, the patient fixates peripherally on a point 8 to the side of the
stimulus light
(so they are viewing the stimulus where macular pigment is known to be absent).
The patient responds to the stimulus flicker as before and once the test is finished, the central and
peripheral results are then used to determine the patient’s Macular Pigment Optical Density.
This is done by working out the ratio of the amount of blue light absorbed in the central region
compared with the peripheral region.
The greater the density, the more blue light is absorbed.
MPS II 19
© 2014 Elektron Technology UK Ltd.
Page 20

MPS II Manual20
1.4.5 Explanation of terms
There are three possible results given by the MPS II Software depending on what test you are
running.
The Standard test will give an Age estimate.
The Detailed Mode test will give an Age Estimate, an Absolute result and can also give a Graph
Adjusted result under operator control.
These three terms are explained below.
MP-Estimate
This means that the peripheral part of the test has been estimated using the patient’s age. The
patient's MP level has been calculated from their central test result and the estimated peripheral. It is
not an Absolute measurement.
MP-Absolute
This is the full measurement where both parts of the test are undertaken by the patient and is the full
measurement. There is no estimating in it. This test is necessary for patients with eye diseases or
diabetes where we cannot estimate the peripheral result using their age. (diabetics in particular have
different age related results)
To calculate an Absolute measurement we need to perform a central test (where patient looks
directly at the target) and then a peripheral test (where the patient looks at the red fixation point) and
by comparing these 2 results we work out the patient’s MP level.
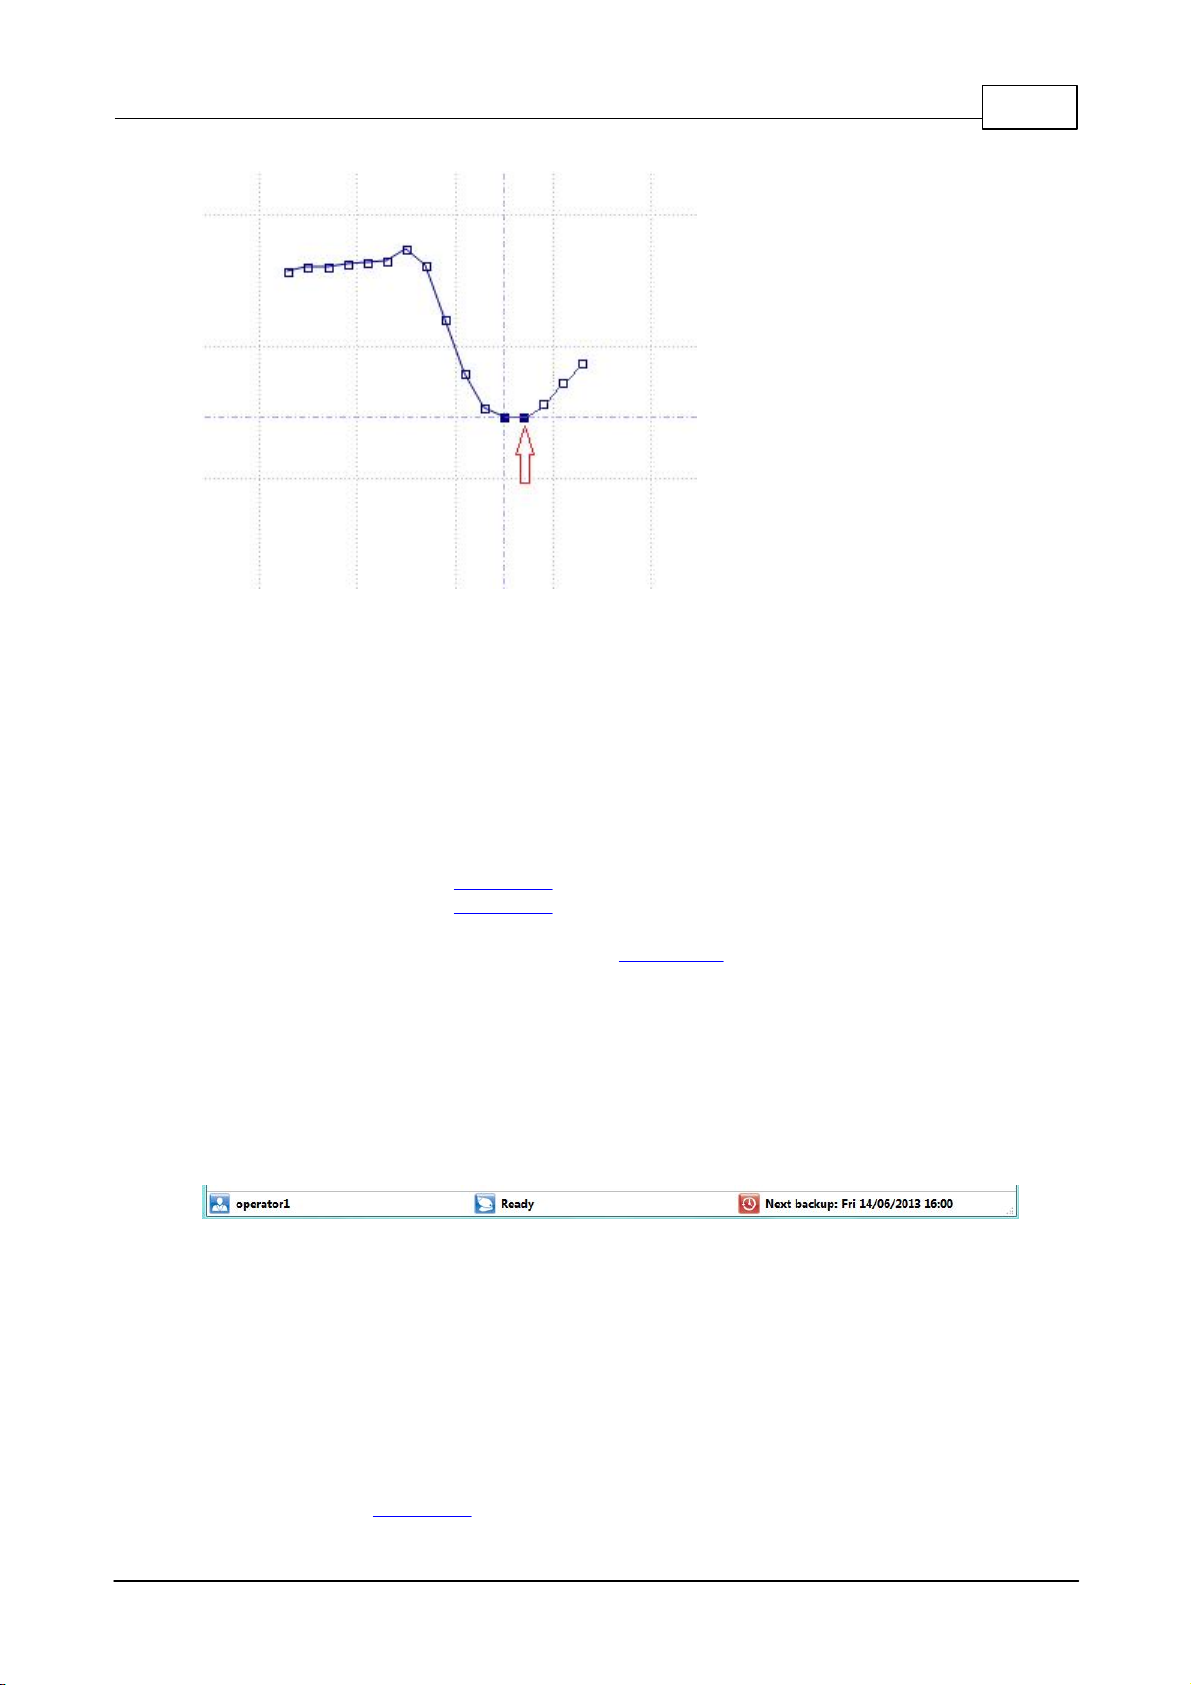
MP-Graph Adjusted
This is where the Absolute result of a detailed test is changed by moving the minimum point on the
graph.
For example, if the patient’s central test curve looked like the picture below, the software would pick
the right hand point (arrowed) as the minimum, but you can see that there are 2 points at exactly the
same point on the Y axis. The operator can move to the other point to see what affect it has on their
MP level result. (in this example, the change will be minimal).
This new MP value is recorded alongside the calculated result in the database as Adjusted as the
operator has changed the result that the software originally calculated.
© 2014 Elektron Technology UK Ltd.
Page 21
2 Installation
MPS II 21
The MPS II is designed to be connected to a laptop or PC using a standard USB cable (supplied).
It is not recommended to extend the supplied cable since communications between the PC/Laptop
and MPS II may be unreliable.
It is not recommended that the USB cable is connected to a USB 3 port as this can cause
connection issues.
See the Quick Start guide or Appendix 1 for connection instructions.
See the Quick Start guide or Appendix 2 for software installation instructions.
See the End User License Agreement (EULA) in Appendix 8 for full detailsof the license on the
software.
(this is the same license agreement that is agreed when installing the software.)
IT IS IMPORTANT THAT YOU DO NOT PLUG THE USB CABLE INTO THE COMPUTER
UNTIL YOU HAVE INSTALLED THE MPS II SOFTWARE AND DRIVER.
The software once installed and running will display the status of the connected instrument at the
bottom of the screen along with the name of the current operator (in this case AC) and the date of the
next scheduled backup.
The MPS II can be placed on any stable, flat surface or electric table.
The instrument should be located to prevent rocking or tilting and to allow ventilation to the base
and rear of the unit.
It is important that no parts of the unit should overhang the edge of the surface on which the MPS
II is mounted.
Ensure that there is sufficient space in front of the unit for the patient to sit comfortably.
The MPS II has an internal power supply unit. The power supply is universal and does not need
adjusting for different mains voltages, but it is important to check that the correctly rated fuses are
being used (see Appendix 1 or the label on the rear of the unit).
© 2014 Elektron Technology UK Ltd.
Page 22

MPS II Manual22
The patient response button is connected into the rear of the unit and must be accessible by the
patient. The on/off switch for the instrument is on the back panel.
© 2014 Elektron Technology UK Ltd.
Page 23

3 Test Modes Best Practice
For both of the tests, Standard and Detailed mode, it is important that the patient is informed of what
to expect to enable them to perform the test correctly.
Below are some tips and tricks to help optimise a test.
-Put a full aperture (or reduced aperture) trial lens in the front slot of the machine with the reading Rx.
If you do not have access to these use the patient’s spectacles (near SV, varifocals or bifocals) or
contact lenses (distance Rx with over-readers, multifocals or monovision near lens) but refrain from
using tinted lenses.
The MPS II has a 5.00D lens within the optics, so a distance Rx will suffice and the Heterochromatic
Flicker Photometry (HFP) procedure is relatively insensitive to blur.
Remember to record the correction used in the patient's Notes.
-Occlude the eye not being tested using an eye patch. Perform in mesopic or scotopic lighting.
Measure the right eye, then the left eye with a central measurement only (ie Standard mode) and
save the results
Installation 23
- Inform the patient that this test requires concentration; however they should be encouraged to blink
naturally. When you detect flicker on the central spot, it’s ‘finger on the buzzer’ and speed is of the
essence.
-There will be a short familarisation test before the main test to check their response to flicker.
This sets the initial blue/green ratio and is recorded as squares on the graph. This takes
approximately 30 seconds. Only if the responses are very inconsistent will an error message appear
stating ‘range too high’ and ‘start again’. When this is over the middle spot will temporally go black.
The patient must keep watching (don’t let the patient move their head), as the second actual test will
take place immediately the screen lights up again.
The flickering central light may appear slightly bleached out and/or leave an after image. Reassure
the patient that this is just because you have been
staring at it much like ‘staring at the sun’
- Watch the screen and if you see the patient pressing the button too quickly, or indeed losing
concentration between responses, pause the test and
remind the patient of the original instructions or restart the test, or repeat the test later. The
importance of constant communication cannot be
over-emphasised. Keep encouraging the patient with phrases like ‘you’re doing well’, ‘look for the
flicker’ and‘you’re nearly finished’, as silence
will cause the patient to question if they are performing the test correctly.
-On average, depending on MP, this measurement takes approximately 60 seconds to complete. The
repeatability of HFP measurements has previously
been studied and amended scoring techniques have reduced the Standard Deviation(SD). However,
with the Standard test mode of a central-only measurement, any ‘noise’
in repeatability testing is minimised and thus measurements taken at different visits can be
compared with confidence
- Only if coexisting pathology is present (diabetic maculopathy, AMD) then take the central and
peripheral measurements (ie Detailed mode).
Perform the central measurement first. Then inform the patient that they should be fixating at the top
of the peripheral red target (left target for RE and vice-versa)
and using their side vision to view the central blue flickering target. They will want to glance at this,
but you must inform them to resist the temptation.
© 2014 Elektron Technology UK Ltd.
Page 24

MPS II Manual24
If they stare at the flickering target directly it forfeits the results, as all they are doing is performing a
central measurement again. Half-way during
the test, pause it and get them to look at the bottom of the red target from then on, but again only
pressing the button when they see the flickering target.
This prevents the flickering target from disappearing due to the Troxler effect. Blinking after pressing
the button can also prevent this.
© 2014 Elektron Technology UK Ltd.
Page 25

4 Selecting a Patient
Start the program and wait until the Main Menu screen is shown –
Test Modes Best Practice 25
You have 2 options here:-
If the patient is new to this test then you will need to create a New Patient in the
database.
If you have tested the patient before then you can select their record from the database,
so select the Test existing patient button.
© 2014 Elektron Technology UK Ltd.
Page 26
MPS II Manual26
4.1 Create a New Patient
If the patient has never been tested on this instrument before then they will not exist in the database.
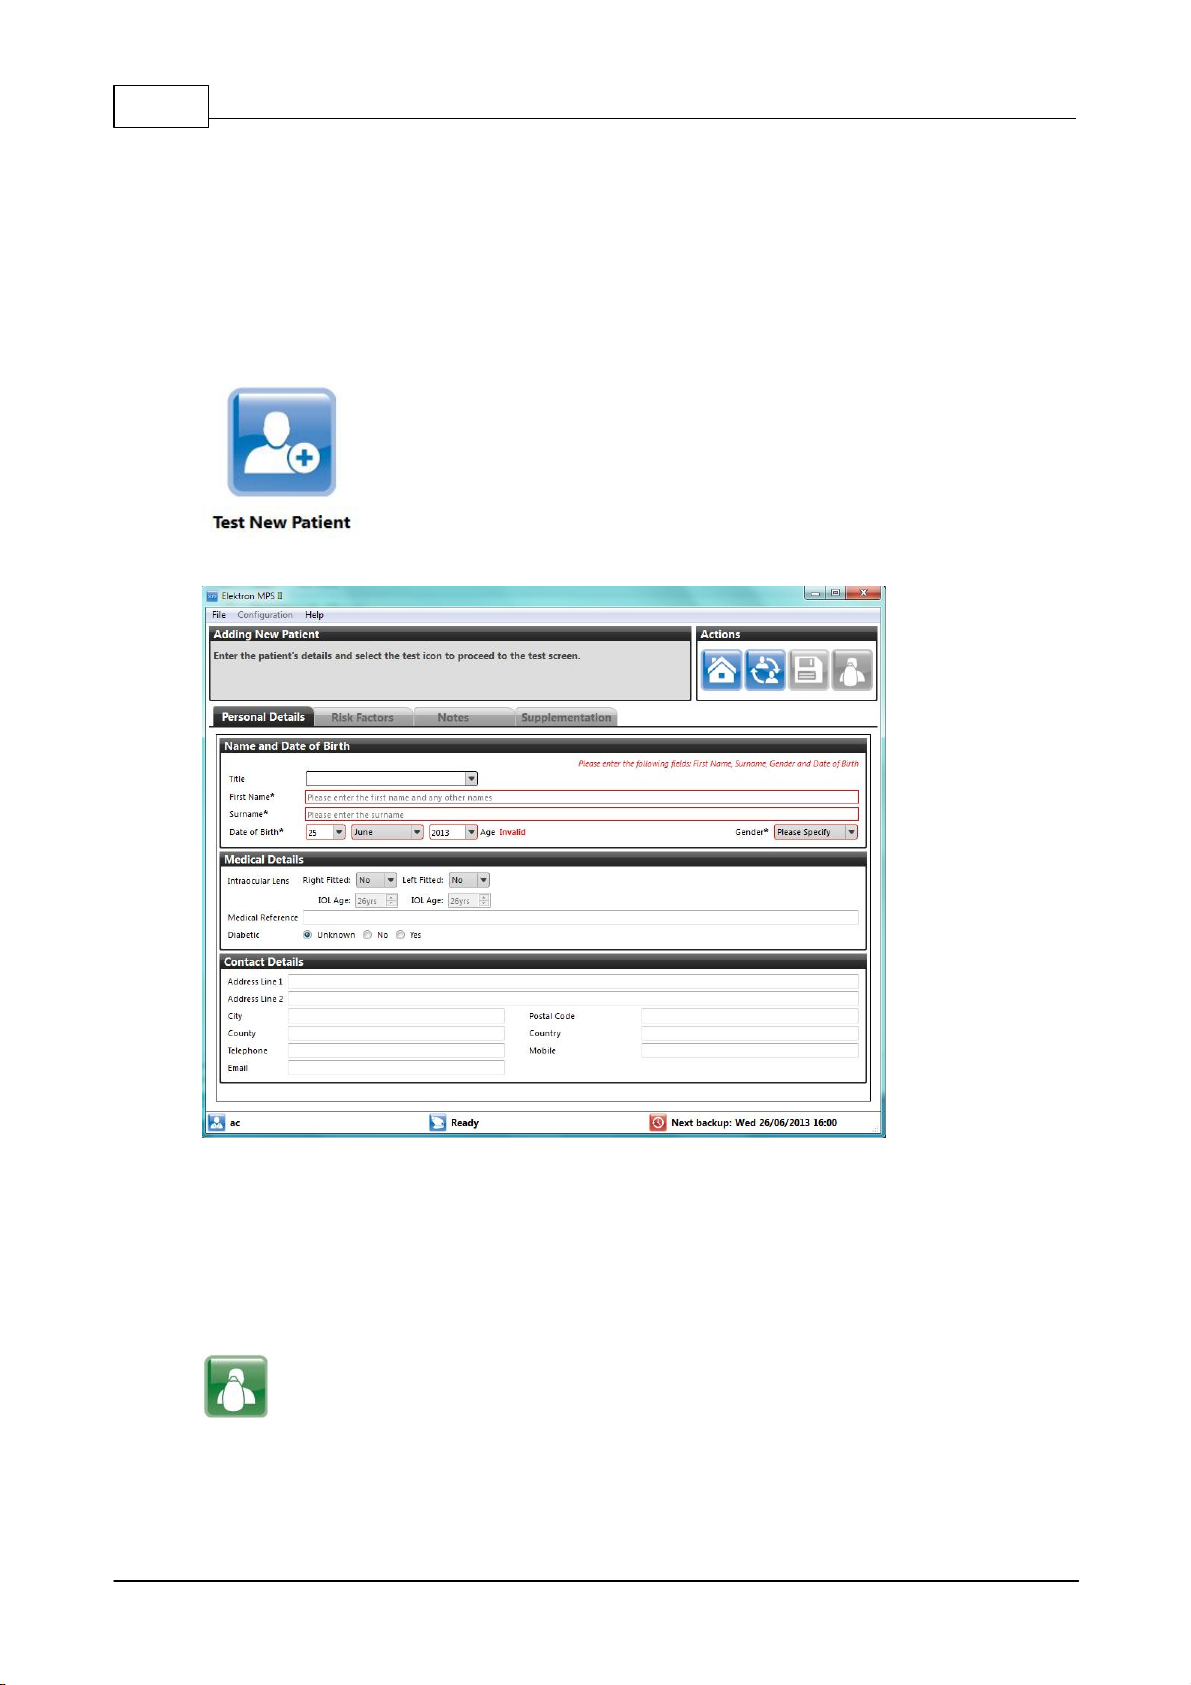
Select the Test New Patient button.
The Patient entry screen will be displayed.
The items that MUST to be filled in are highlighted in red.
You have to enter, at least, the patient’s First name, Surname, Date of birth and Gender to
create a new record. Selecting the title will also set the gender, for exaple, selecting Mr will set
gender as male.
You can see from the screen shot that the age is shown as invalid. This is because the age of the
patient is under 1.
All other fields can be left blank, if required, or can be filled-in at a later date.
Once all of the required patient's details have been entered, the test button will highlight in green
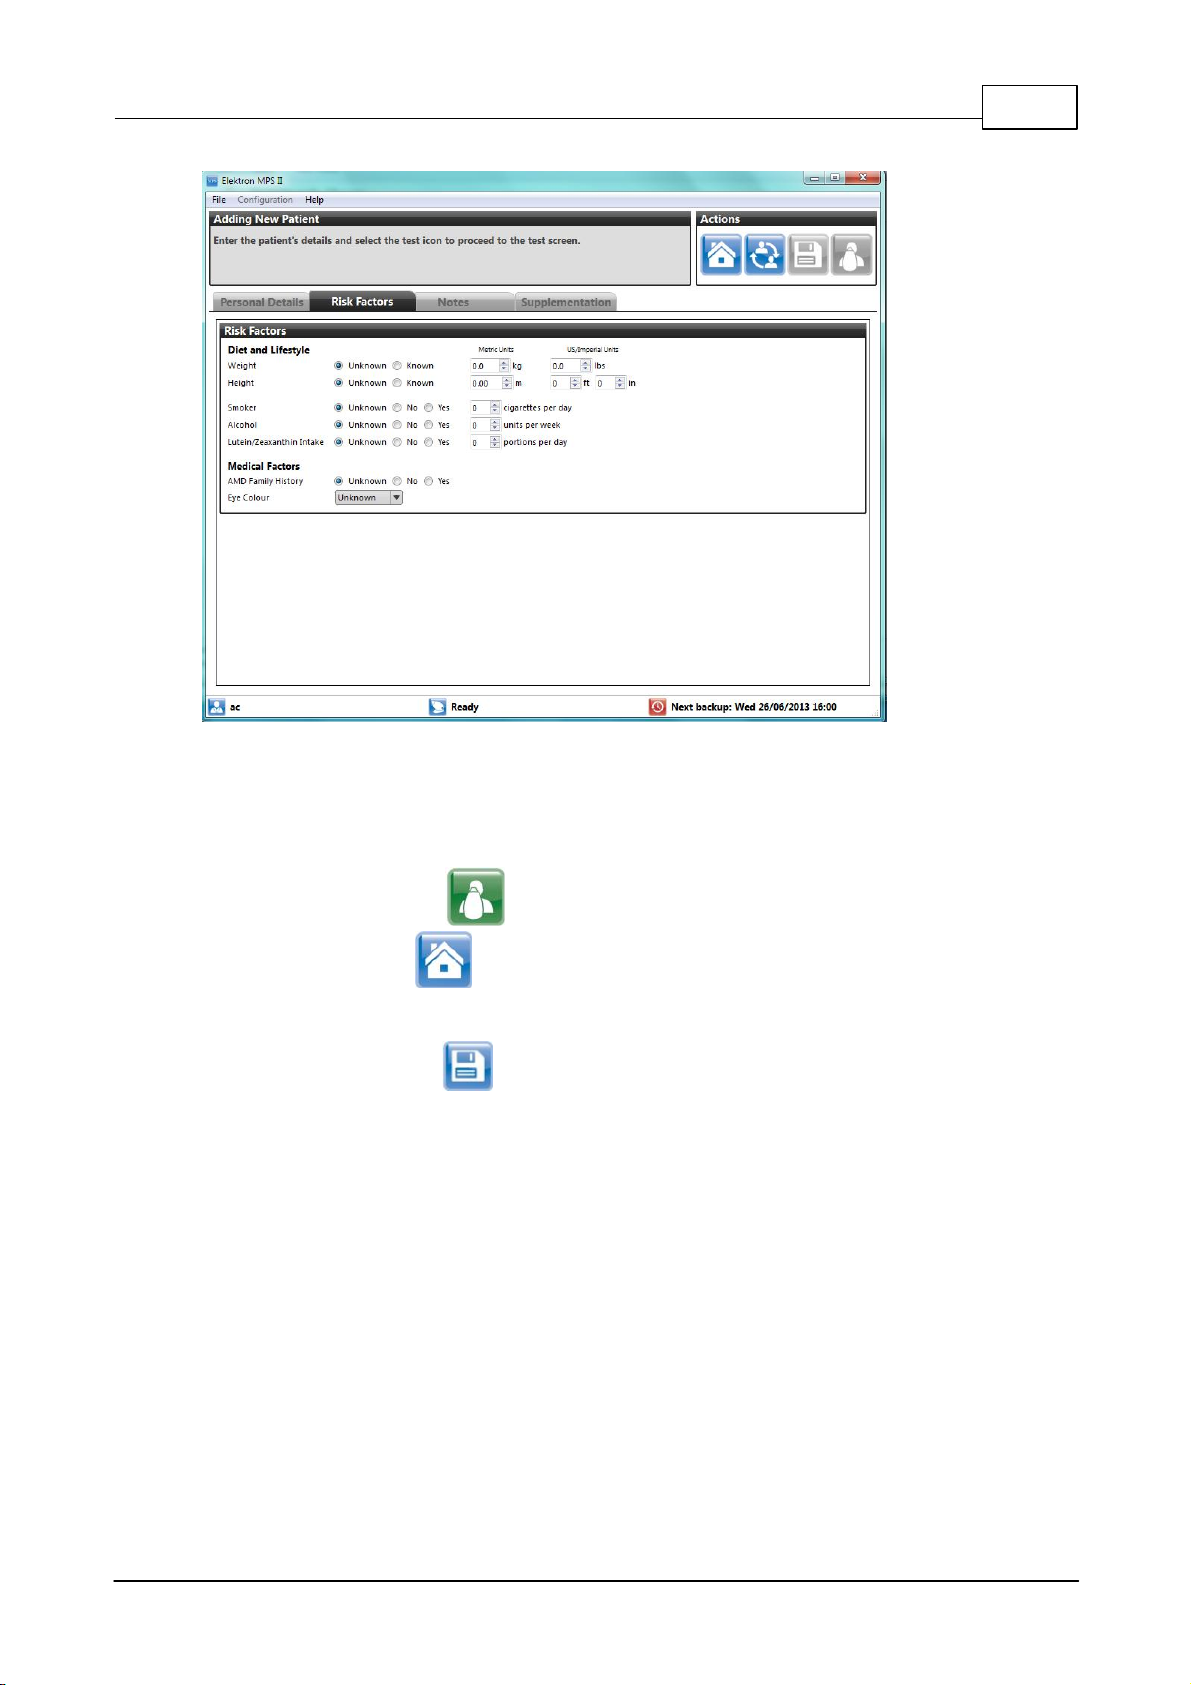
At this time you can also enter any other relevant Risk Factors the patient has by clicking on the
Risk Factors tab.
© 2014 Elektron Technology UK Ltd.
Page 27
Selecting a Patient 27
This gives you an opportunity to discuss the risk factors with a new patient.
There are also tabs for Notes and also for Supplementation, the Notes allows you to enter details
such as the refractive correction worn by the patient (i.e. whether they wore their own glasses) but it
is normal to fill these in after the test.
Press the green test button to create the record and go directly to the test screen or
Press the HOME button to discard all changes made and return to the original screen.
(you will be prompted whether you want to discard the record)
It is also possible to SAVE the changes made but not test the patient at this time.
© 2014 Elektron Technology UK Ltd.
Page 28
MPS II Manual28
4.2 Select Existing Patient
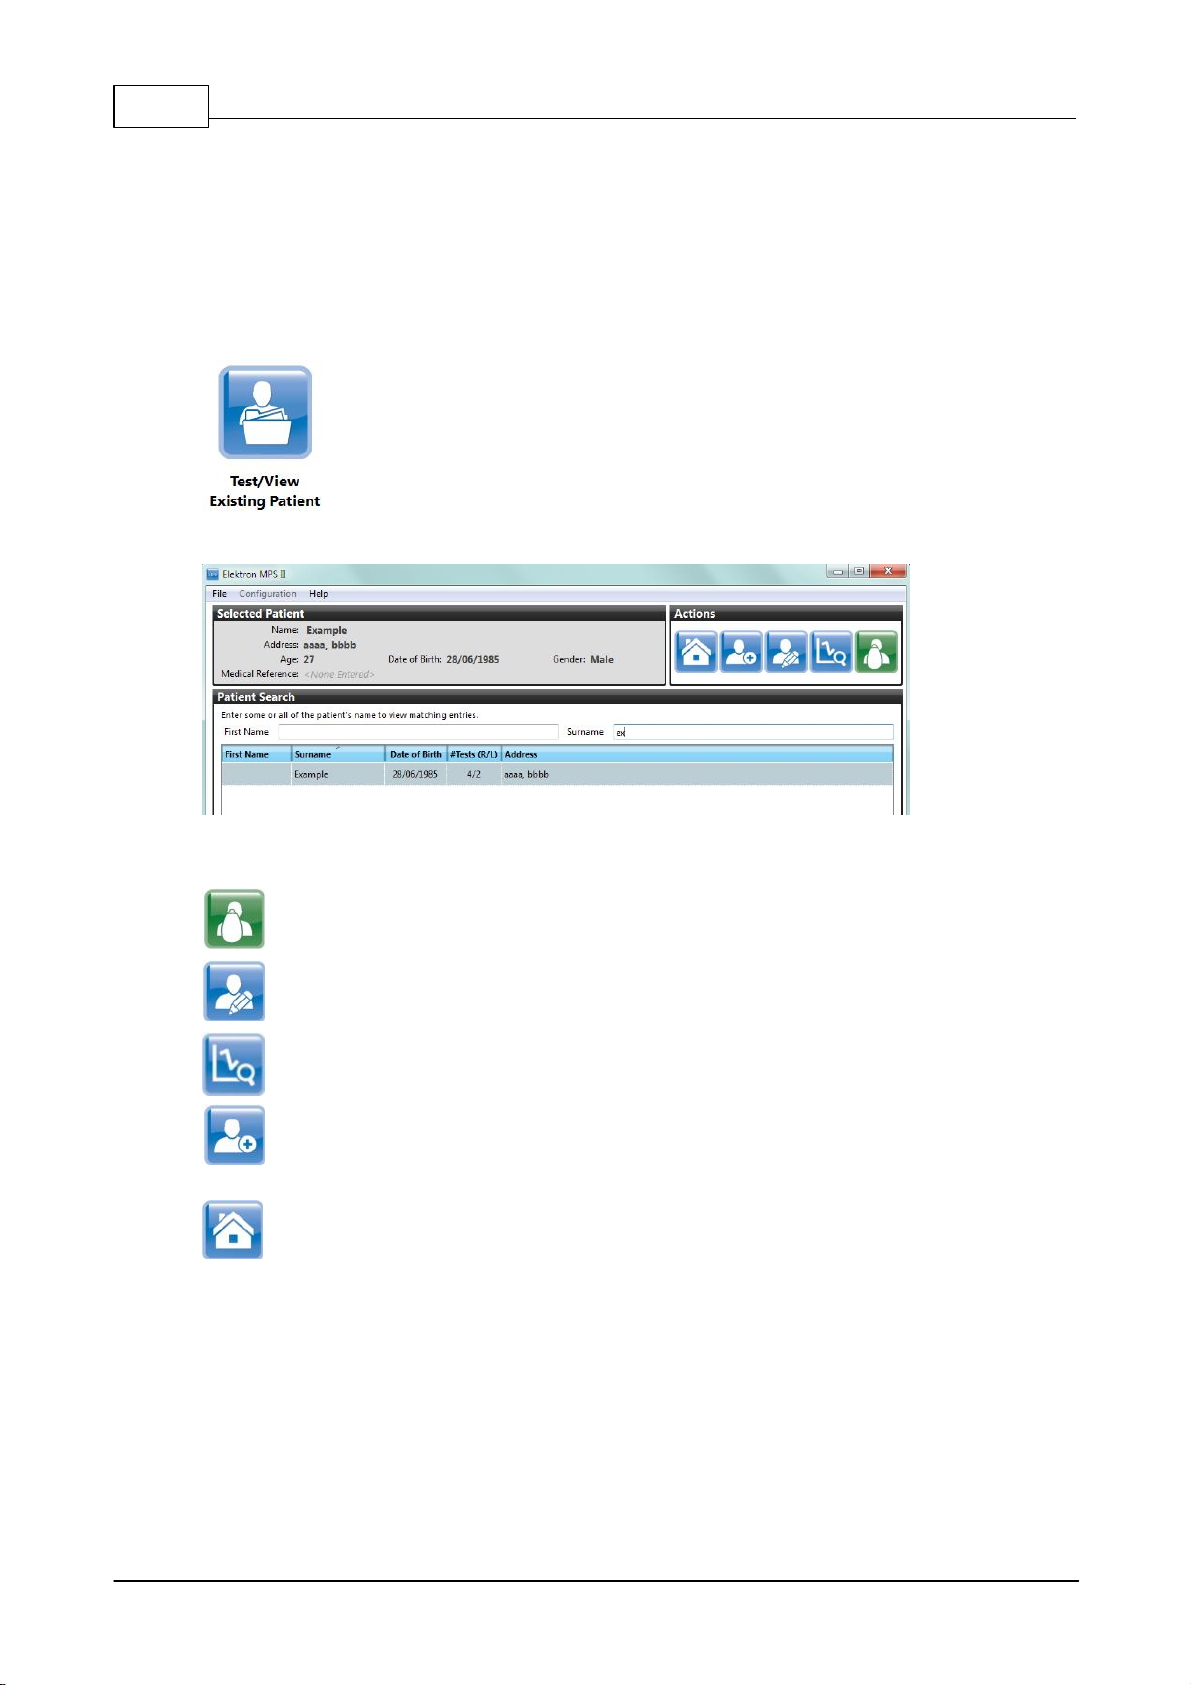
If the patient has previous tests stored in the database then select the Test Existing patient button.
You will be presented with the database listing all patients in alphabetical order by surname.
To find a particular patient you can type their name in the search box - as you start to type
the surname in the search box the records will clear to show all matching records.
When you have found the patient, click on the name to select it.
You can then :-
Test this patient
Edit this patients details in the database
View the patients previous test results
Or if you realise that the patient is not in the database after all, you can ADD them by
clicking the
add new patient button (without having to go back to the main menu and starting again)
Or cancel and return to the Main menu
© 2014 Elektron Technology UK Ltd.
Page 29

5 Standard Test Mode
The Standard test mode performs a central only test (through the patient's macular pigment)
and uses their age to estimate their peripheral test result.
The measured centre and age-estimated peripheral are then used to derive the MPOD value.
This test can reliably and repeatably be used on the majority of the population as long as they do
not have any
pre-existing pathology (diabetic maculopathy, AMD).
In these cases the Detailed mode test must be performed.
The details of the test are here
Selecting a Patient 29
© 2014 Elektron Technology UK Ltd.
Page 30

MPS II Manual30
5.1 Standard Test - Summary
Start the program (normally from the Desktop icon)
Select New patient - Enter data onto the Patients form
or Existing patient - find them in the database
Click the Test icon
By default the Right eye is tested first, occlude the patient's other eye
Instruct the patient on what to expect and how to perform the test.
Start the test.
give the patient feedback during the test
At the end of the test, check that the software has accepted the result for this eye.
Occlude the patient's tested eye, press the swap eyes button and test the other eye.
After testing both eyes, review the results with the patient.
© 2014 Elektron Technology UK Ltd.
Page 31

5.2 Standard Test - Sequence
The testing screen is shown and the RIGHT eye is selected by default.
The Testing screen is used for recording new data and viewing previous records.
Standard Test Mode 31
If you wish to test the LEFT eye first then click the Change eye button.
Make sure the patient is seated comfortably and has an occluder over the eye not being tested.
Give them the response button and ask them to look into the device adjusting the angle so that they
can comfortably press their eye against the eyepiece.
The following are guideline instructions for the patient –
Please look into the eyepiece at the three target circles.
Fixate on the central circle (only look at the light, nowhere else).
The central target will light up a blue-green colour and will start to flicker.
Press and release the response button when you see the target start to flicker.
It is also a good idea to blink after pressing the button.
It will reset and repeat this test 5 or 6 times.
The central target will then dim and come back a slightly different colour, keep
fixating on it
Again the target will start to flicker, press and release the response button as before.
The test will take approximately 1-2 minutes to complete.
The screen shows that the software is READY to test the RIGHT eye.
The software will guide you with what to press by highlighting the next step button in Green.
© 2014 Elektron Technology UK Ltd.
Page 32

MPS II Manual32
The screen shot below shows that we are ready to start the test as the Start test button is the
only green button on screen
Press the start test button when the patient is ready.
The first phase of the test checks the patient’s flicker response and records this on the screen.
A set of five results completes this phase.
Note that there may be more than 5 presentations if the initial spread is too high. The test will not
continue if the patient's responses are too fast or too slow.
If the patient has an acceptable flicker threshold, the measurement phase of the test will follow.
At this point the central target dims and reset a slightly different colour.
It is important that the patient does not think this is the end of the test and that they
continue to look into the instrument.
The on-screen graph will mark the patient’s responses as blue squares, moving from left to right as
the test progresses.
Note that the first central test point is not used or displayed on the graph. The graph will start with
the second point.
A "best fit" curve will be drawn between the points as they are drawn.
Note: you can pause and restart the test or stop it altogether using the controls in the test status
box at any point during the test.
Restart, Pause and Stop.
As the test progresses, give the patient feedback and encouragement.
Ideally, the patient's plotted graph will follow a downward curve with a clearly defined minimum.
Standard mode analysis looks at the shape of this curve and test values for its result.
The result is calculated from the curve minimum and the patient’s age peripheral result .
The patient can be told to relax once the test is complete.
© 2014 Elektron Technology UK Ltd.
Page 33

Standard Test Mode 33
The test will be analysed by the software and the confidence level will be presented on the screen as
a colour code.
The three possible results are
Accept Caution Reject
Accept gives you the all clear that the data is acceptable and the software can determine the
minima.
A caution tells you that the software can determine a minima but is not happy with the cleanliness
of the data - a re-test is advisable.
A reject must always be redone, as no result can be determined form the data.
(More details can be seen in Appendix 3 Confidence Limits section)
The result will appear in the results box on the right hand side of the screen.
If the other eye is to be tested (and we recommend this on an initial consultation) then press the
change eyes button
Move the occluder to the patient's tested eye and reposition them ready for the second eye test.
Once the test is complete, the Save button will become available.
At this point, either save the data by pressing the save button (only one eye to be tested) or test the
other eye by pressing the change eyes button .
It is also possible to retest the current eye.
A test report for the patient can be generated as a PDF for printing by pressing the Generate report
button.
you will be prompted to save the file and then it will be displayed in your default PDF viewer.
If Save is chosen after Both eyes have been tested then both results will be saved at the same time,
it is not necessary to save them individually, although if only testing one eye, this can be saved on
its own.
If you press the home , edit patient or swap patient buttons without saving you will be
prompted that you have not save and asked whether you wish to save or discard the test.
Note that once saved, the results cannot be deleted.
© 2014 Elektron Technology UK Ltd.
Page 34

MPS II Manual34
5.3 Patient Instructions
Please look into the eyepiece at the three target circles.
Fixate on the central circle (only look at the light, nowhere else).
The central target will light up a blue-green colour and will start to flicker.
Press and release the response button when you see the target start to flicker.
It is also a good idea to blink after pressing the button.
It will reset and repeat this test 5 or 6 times.
The central target will then dim and come back a slightly different colour, keep
fixating on it
Again the target will start to flicker, press and release the response button as before.
The test will take approximately 1-2 minutes to complete.
6 Detailed Test Mode
The Detailed Test Mode is used where patient's have a pre-existing pathology, such as diabetic
maculopathy and allows you to
perform a central test (through the patient's macular pigment) and then a peripheral test, where the
patient fixates on a point that is outside their macular pigment and observes the flickering target
from the "corner of their eye".
The measured central and peripheral results are then used to derive the MPOD value.
This test can reliably and repeatably be used on the majority of the population but many patients
will need some practice to perform the peripheral part of the test.
If the patient does not have any pre-existing pathology (diabetic maculopathy, AMD) then the
Standard Test Mode can be used
The details of the test are here
© 2014 Elektron Technology UK Ltd.
Page 35

6.1 Detailed Test - Summary
Start the program (normally from the Desktop icon)
Select New patient - Enter data onto the Patients form
or Existing patient - find them in the database
Click the Test icon
By default the Right eye is tested first, occlude the patient's other eye
Instruct the patient on what to expect and how to perform the test.
Start the central part of the test.
Review the results and then proceed with the Peripheral test.
Review the peripheral result and then Occlude the patient's tested eye and test the
other eye
After testing both eyes, review the results with the patient
Detailed Test Mode 35
© 2014 Elektron Technology UK Ltd.
Page 36

MPS II Manual36
6.2 Detailed Test - Sequence
Please refer to the Standard Mode details section (Standard Test) to find out how to select a patient
Press the Test patient button to go to the testing screen.
Press the switch to Detailed Mode button to change from Standard Mode (Left) to Detailed
Mode (Right).
The testing screen is shown and the RIGHT eye is selected by default.
The Testing screen is used for recording new data and viewing previous records.
To change to the left eye press the swap eyes button
Make sure the patient is seated comfortably and has an occluder over the eye not being tested.
The following are guideline instructions for the patient –
Please look into the eyepiece at the three target circles.
Fixate on the central circle (only look at the light, nowhere else).
The central target will light up a blue-green colour and will start to flicker.
Press and release the response button when you see the target start to flicker.
It is also a good idea to blink after pressing the button.
It will reset and repeat this test 5 or 6 times.
The central target will then dim and come back a slightly different colour, keep
fixating on it
Again the target will start to flicker, press and release the response button as before.
The test will take approximately 1-2 minutes to complete.
The screen shows that the software is READY to test the RIGHT eye.
The software will guide you with what to press by highlighting the next step button in Green.
The screen shot below shows that we are ready to start the test as the Start test button is the
only green button on screen
© 2014 Elektron Technology UK Ltd.
Page 37

Detailed Test Mode 37
If this is the Patient’s first time on the instrument it is a good idea to give them some practice.
(perform a test, but do not save the result
Press the start test button when the patient is ready.
The first phase of the test checks the patient’s flicker response and records this on the screen.
A set of five results completes this phase.
Note that there may be more than 5 presentations if the initial spread is too high. The test will not
continue if the patient's responses are too fast or too slow.
If the patient has an acceptable flicker threshold, the measurement part of the test will start.
At this point the central target dims and reset a slightly different colour.
It is important that the patient does not think this is the end of the test and that they
continue to look into the instrument.
The on-screen graph will mark the patient’s responses as blue squares, moving from left to right as
the test progresses.
Note that the first central test point is not used or displayed on the graph. The graph will start with
the second point.
A "best fit" curve will be drawn between the points as they are drawn.
Note: you can pause and restart the test or stop it altogether using the controls in the test status
box at any point during the test.
Restart, Pause and Stop.
As the test progresses, give the patient feedback and encouragement.
Ideally, the patient's plotted graph will follow a downward curve with a clearly defined minimum.
When the central test is finished, the patient can sit sit back. the software will show the confidence
limits of the central test
The test will be analysed by the software and the confidence level will be presented on the screen as
© 2014 Elektron Technology UK Ltd.
Page 38

MPS II Manual38
a colour code.
The three possible results are
Accept Caution Reject
Accept gives you the all clear that the data is acceptable and the software can determine the
minima.
A caution tells you that the software can determine a minima but is not happy with the cleanliness
of the data - a re-test is advisable.
A reject must always be redone, as no result can be determined form the data.
It is possible to retest the central or peripheral parts of the test, discarding the data collected for that
part of the test but keeping the other part.
for example, if the central test was acceptable, but the peripheral advised caution, then you can
retest the peripheral only while keeping the data from the central test.
(More details can be seen in Appendix 3 Confidence Limits section)
The results section below shows that the central test is acceptable and that an estimated MPOD
value based on the central measurement is 0.44
Once the central test has been completed satisfactorily the peripheral test button will become
active (and coloured green)
Give the patient the new instructions for performing the peripheral test.
For the second part,
Please look into the eyepiece again.
Fixate on the red circle that illuminates to the left or right of the central circle (only
look at the red light, nowhere else).
The Central target will light up a blue/green colour as before and start to flicker,
Respond to the flicker of the central target by Pressing and releasing the response
button but without looking directly at it.
It is also a good idea to blink after pressing the button.
It will reset and repeat this test 5 or 6 times.
The central target will then dim and come back a slightly different colour, keep
fixating on the red target to the side.
Again the central target will start to flicker, press and release the response button as
before.
The test will take approximately 1-2 minutes to complete.
Press the Peripheral Test button when the patient is ready.
The patient’s responses will be displayed on the same graph as the central test as red triangles.
© 2014 Elektron Technology UK Ltd.
Page 39

Detailed Test Mode 39
As with the central test, there is a flicker threshold test to start before the main test starts.
The messages in the test status box tell you which phase of the test is being performed.
At the end of the Peripheral test, the confidence limits are displayed along with the MPOD value.
The Peripheral and central results are combined to produce an absolute MPOD value and this is
displayed below the estimated value.
If the other eye is to be tested (and we recommend this on an initial consultation) then press the
change eyes button
Move the occluder to the patient's tested eye and reposition them ready for the second eye test.
Once the test is complete, the Save button will become available.
At this point, either save the data by pressing the save button (only one eye to be tested) or test the
other eye by pressing the change eyes button .
It is also possible to retest the current eye.
If Save is chosen after Both eyes have been tested then both results will be saved at the same time,
it is not necessary to save them individually, although if only testing one eye, this can be saved on
its own.
If you press the home , edit patient or swap patient buttons without saving you will be
prompted that you have not save and asked whether you wish to save or discard the test.
Note that once saved, the results cannot be deleted.
© 2014 Elektron Technology UK Ltd.
Page 40

MPS II Manual40
6.3 Patient Instructions Peripheral
For the second part,
Please look into the eyepiece again.
Fixate on the red circle that illuminates to the left or right of the central circle (only
look at the red light, nowhere else).
The Central target will light up a blue/green colour as before and start to flicker,
Respond to the flicker of the central target by Pressing and releasing the response
button but without looking directly at it.
It is also a good idea to blink after pressing the button.
It will reset and repeat this test 5 or 6 times.
The central target will then dim and come back a slightly different colour, keep
fixating on the red target to the side.
Again the central target will start to flicker, press and release the response button as
before.
The test will take approximately 1-2 minutes to complete.
6.4 Graph Estimate
Sometimes it may be necessary to adjust the minimum value chosen by the software - for example if
there are 2 points at the bottom of the graph at exactly the same level.
It is unlikely that the software will allow a completely different minimum to be accepted as it will
always advise caution when there are more than one possible minima.
In the case where there are 2 points at the minimum the software will pick the second one of these,
and you can choose the other to see what difference this will make.
To alter the graph cursor position you must first have completed a full measurement using both
central and Peripheral measurements.
You can then move your mouse pointer over the graph curves, you will see a vertical line follows your
cursor over the curve.(arrowed below)
If you left click you will see a pink dot appear on the central (blue) curve (arrowed below).
This denotes the newly chosen Minimum point
© 2014 Elektron Technology UK Ltd.
Page 41

Detailed Test Mode 41
If you now do the same on the peripheral (red) curve But this time, hold down the SHIFT button when
you left click.
A pink Triangle will be shown in the new Minimum position.(yellow arrow below)
The graph estimate reading will be displayed in the table and also the value on the slider will change.
(red arrows below)
You can move and click on the graphs as many times as you like and the Graph estimate value will
change every time.
6.5 Test Reports
There are a number of reports that are available from the software.
These are
1. End of test report - showing the results of the test just performed.
2. Patient time-line report - giving details of a patient's previous results
3. Practice report - giving results of all tests performed in a specific time-frame. This report can also
be run for individual operators.
1. The end of test report
This is available at the end of a test by pressing the report button on the test screen
A typical report might look like this –
© 2014 Elektron Technology UK Ltd.
Page 42

MPS II Manual42
The patient's details are shown, along with the practice details and the graphs and MPOD values
recorded for both eyes.
The test report is generated as a PDF file and you will be prompted to save it before it is displayed in
the computer's default PDF viewer.
From here it can be viewed, resized, printed or saved in another location.
All of the standard controls available with your PDF viewer are available.
(more information on this is available from the help file of your PDF viewer).
The results from both eyes (if tested together) are on the same printout.
2. The Patient time-line report
This is accessed from the main menu by pressing the View reports Button
The report displays all of a patient's tests in a specified date range in graph and table format.
By default the date range is the previous year from today's date.
Click the Patient Time-line tab and select the patient by using the drop down list.
The report will be displayed as below.
© 2014 Elektron Technology UK Ltd.
Page 43

Detailed Test Mode 43
You can change the data range by clicking on either the start or end date the date in the date range
box.
A calendar will be displayed.
You can change the month by clicking the small triangle next to the month and selecting the
required month from the drop down list.
Alternatively you can click the left and right arrows at the top of the box to move one month at a time.
The start and end dates of the report can be selected.
The report can be saved as a PDF by pressing the save and View report button
You will be prompted to save the file and it will then be displayed in your default PDF viewer.
3. Practice time-line report
This report is also accessed from the main menu by pressing the View reports Button
it displays all of the tests performed by all operators for a specified date range.
By default the date range is the previous year from today's date.
© 2014 Elektron Technology UK Ltd.
Page 44

MPS II Manual44
As with the patient time-line, the start and end dates can be changed by clicking on the date.
The report can also be changed to display only the results form a particular operator.
the report can be saved as a PDF by clicking the Save and View report button
You will be prompted to save the file and it will then be displayed in your default PDF viewer.
© 2014 Elektron Technology UK Ltd.
Page 45

7 Viewing Previous Record Data
It is possible to view a patient's result history in two ways.
1. At the start or end of a test, where the Result History (below) is displayed on the lower right corner
of the testing screen or
2. From the main menu, without performing a test.
From the main menu, select a patient as normal in the test/view existing patient screen
Select the patient and then click the View Patient Results button
This will take you to the test screen but will display their most recent test result.
The patient’s previous records can be viewed by using the controls at the bottom of the screen in the
Result History section.
The example below shows that the patient has 10 previous records in the database. Use the Switch
Eyes button to see the graph results from the other eye
Detailed Test Mode 45
There are four buttons that are used to move between records –
The meaning of the buttons is explained below.
Move to the first patient record and display the data
Move to the previous patient record and display the data
Move to the next patient record and display the data
(it is shown greyed out here as we are at the last record)
Move to the last patient record - this will be the one we have not completed yet.
The last button is used to move to a new patient record, ready for recording data.
Note that the screen must be on a new patient record to record data (the last two buttons above will
be greyed out).
Also note that the record count reflects the number of visits regardless of whether a single or both
eyes were tested.
© 2014 Elektron Technology UK Ltd.
Page 46

MPS II Manual46
8 Configuration Wizard
The Configuration wizard runs automatically the first time the software is used after a clean
installation.
It guides the installer through changing the software language, adding users and setting a backup
strategy.
It can also be run at any time by clicking the configuration link on the main menu (home) page.
The first screen allows you to change the displayed language.
NOTE : THE LANGUAGE WILL CHANGE IMMEDIATELY SO IF YOU CANNOT READ THE
LANGUAGE YOU SELECT DO NOT PRESS THE NEXT BUTTON AS YOU MAY NOT BE ABLE TO
NAVIGATE BACK
© 2014 Elektron Technology UK Ltd.
Page 47

Configuration Wizard 47
The second screen allows you to view, select and add new operators.
NOTE : you cannot delete operators, you can only make them inactive.
The third screen allows you to enter details about your practice.
These details will appear on the patient copy of the test report
© 2014 Elektron Technology UK Ltd.
Page 48

MPS II Manual48
The final screen allows you to set up an automatic backup strategy for the database files.
You can select to backup at certain intervals or every time the software is closed down.
The location of the backup can be any folder on the machine or network (if attached to a network).
© 2014 Elektron Technology UK Ltd.
Page 49

9 Appendix 1 - MPS II Installation
The MPS9000 / MPS II must be used in accordance with the operating instructions. Please read the
instructions before attempting operation.
1 Location
The electrical installation of the room where the MPS II is to be operated must comply with
local electrical regulations. The unit must be protected from ingress of liquids and
flammable liquids and gasses..
2 Mains supply*
The mains supply required is 15 VA at 100 to 240 Volts AC. An IEC approved mains lead
must be used with conductors of at least 0.75mm2 cross sectional area (the supplied
power lead meets this specification).
*For USA/Canada - The supplied Hospital grade mains cable must be used but grounding
reliability can only be achieved when the equipment is connected to an equivalent
receptacle marked "Hospital Only" or "Hospital Grade". Outside of the hospital
environment the Hospital grade mains cable must be used and connected to a grounded
(Earthed) outlet to maintain grounding of the equipment.
3 Power connection
Check that the MPS II has the correct rating of fuse for your mains voltage by pulling out
the drawer under the mains input connector and reading the rating from the top of the
fuses. The correct rating is specified in the specification section and on the back panel of
the unit. Connect the supplied mains lead from the mains input connector on the rear of
the MPS II unit to the mains supply wall socket.
4 Accessories
If the unit is located on an electric table, the table should be connected to the mains
supply using a suitable mains lead and the MPS II should be powered from the power
outlet at the top of the table.
5 Safety
Ensure the leads do not trail on the floor and are not subject to abrasion on sharp edges.
Use only laptops, computers, printers and monitors that conform to EN60950.
6 EMC
The MPS II conforms to the requirements of the EMC European Directive 2004/108/EC, but
it does emit radiation and if it causes interference with other items of equipment, position it
further away or try a different orientation. Do not operate transmitters or mobile telephones
in close proximity to the equipment. This equipment complies with the EMC requirements
of EN 60601-1-2 (Class B) which are appropriate for Medical devices, however it should
not be placed in close proximity to sensitive equipment or close to strong sources of EM
fields.
7 Ambient temperature and humidity
The equipment should only be operated if the ambient temperature is between 10 and 35
degrees Celsius and the humidity is between 30% and 80% (non-condensing) and at a
pressure between 700 and 1060 mbar.
For storage and transport the ambient temperature must be between -20 and 50 degrees
Celsius, the humidity between 10% and 80% (non-condensing) and pressure between 500
and 1060 mbar.
8 Electrical connections
The picture below shows the connections on the back panel of the instrument.
Configuration Wizard 49
© 2014 Elektron Technology UK Ltd.
Page 50

MPS II Manual50
It is important that the correct rating of fuse is used in the MPS II as damage may
occur.
The rating is shown below the Mains Inle t Socket.
The instrument must be earthed.
9 Laptop or PC
Connect the mains lead supplied with the laptop/PC to a suitable mains power supply.
Connect the USB data cable (supplied) between the USB interface connector on the rear of
the MPS II device and a spare USB port on the computer.
It is not recomended that the USB cable is connected to a USB 3 port as this can
cause connection issues.
The ‘rectangular’ end of the USB lead goes to a spare USB port on your PC and the
other end (the ‘square’ end) goes into the USB port on the back of the MPS II.
© 2014 Elektron Technology UK Ltd.
Page 51

Appendix 1 - MPS II Installation 51
10 Appendix 2 - Software Installation
The software and drivers need to be loaded on the computer before the MPS II is connected to a PC.
There are two sets of instructions for –
Installing on a new PC, or
Updating an existing copy of the software
Choose the section you need by clicking the links above..
The Laptop or PC must have either a Windows 7TM or Windows 8TM operating system on it.
The specification of the PC should meet or exceed the following :-
1 gigahertz (GHz) or faster 32-bit (x86) or 64-bit (x64) processor
1 gigabyte (GB) RAM (32-bit) or 2 GB RAM (64-bit)
2 GB available hard disk space (32-bit) or 3 GB (64-bit)
At least one unused USB port.
Additional requirements to use certain features:
Adobe PDF reader XI
© 2014 Elektron Technology UK Ltd.
Page 52

MPS II Manual52
10.1 Installation on a new PC
1 Place the supplied MPS II USB Flash drive into a USB port on the computer.
2 If you are prompted for an action, select OPEN FOLDER TO VIEW FILES
3 Open the SOFTWARE folder, it should look similar to the screenshot below.
The MPS II Vx.xx file name will differ, depending on the software version number.
4 Double click on the MPSII-setup-5.xx.xx.exe program to start the installation.
5 Depending on the PC’s UAC (User Account Control) setting, you may see a Windows
security message - answer YES
6 The language selection window will appear, select your language and click OK
7 Click Next
8 Read and Accept the license agreement and click Next
9 Select the destination folder (it is recommended to leave as the default) and click Next
10 Select a start menu folder (it is recommended to leave as the default) and click Next
11 Check the create a desktop icon tick box and click Next
12 Click Install to begin the installation. This will take a few minutes to complete.
13 When completed click the Finish button.
14 The software is now ready to run from the desktop icon.
15 When first run, the Configuration Wizard will run. Details can be found in the configuration
wizard section
© 2014 Elektron Technology UK Ltd.
Page 53

10.2 Updating an existing installation
It is recommended that the existing database be backed-up before updating an existing installation.
Follow the instructions in the previous section Installation on a New PC
The main difference in a software upgrade is that the patient database is NOT overwritten and will be
imported into the new software for immediate use.
Appendix 2 - Software Installation 53
© 2014 Elektron Technology UK Ltd.
Page 54

MPS II Manual54
10.3 Starting the program
The software can be started from the desktop icon or from the standard Windows program menu
(accessed via the Start button).
Double Click the desktop icon to start –
IMPORTANT NOTICE - PLEASE READ
When you first run the software after installation, you will be required to run through the configuration
wizard. This will only happen the first time you run the software.
Once the main menu is displayed, you are ready to operate the software
© 2014 Elektron Technology UK Ltd.
Page 55

Appendix 2 - Software Installation 55
11 Appendix 3 - Confidence Limits
There are three possible test results, shown below the graph –
Accept
The result has been analysed. The result of the analysis is acceptable.
An example is shown below. The data show a distinct minimum at an acceptable flicker rate, and so
the confidence limits on the data are good. You can see that the result is colour coded green and
also the MPOD vertical indicator is also coloured green.
Accept with caution
The result has been analysed and the analysis recommends caution. The graph requires
investigation.
An example is shown below. The data show a very poor minimum (at an acceptable flicker rate), and
so Caution is advised.
Again you can see the result and indicator are coloured coded Orange.
© 2014 Elektron Technology UK Ltd.
Page 56

MPS II Manual56
If a caution is advised, then check the following –
Slightly noisy data Suggest Subject blinks frequently – say after each button
press
Shallow graph Suggest Subject presses button as soon as flicker is seen
Reject
The result has been analysed and the analysis has rejected the result. The test must be repeated.
An example is shown below. The data show a well-defined minimum, but there is an unusual bump
before it.
Here the colour coding is Red for reject.
If a reject occurs, then check the following –
Possible IOL Check with Subject for IOL or Tint or entered age
Minimum same as start Check with Subject for IOL or Tint or entered age
Result reads 0 Check Subject for IOL or Tint or entered age
Data Too Noisy Suggest Subject blinks frequently – say after each button
press
Too few data points Suggest Subject blinks frequently – say after each button
press
Minimum same as end Suggest Subject blinks frequently – say after each button
press
Flicker too high Advise Subject to wait until flick er is seen
© 2014 Elektron Technology UK Ltd.
Page 57

12 Appendix 4 - Example data
The screenshots below show some sample data. they provide examples of the different confidence
accept, caution
Appendix 3 - Confidence Limits 57
This is a result taken in Standard mode.
Data is acceptable, shown by the green area below the graph.
This is an example of where the software advices a retest due to noisy data.
© 2014 Elektron Technology UK Ltd.
Page 58

MPS II Manual58
This is an example of the detailed mode accept screen for data. You can see that both the central
and peripheral test have been accepted.
This is an example of a detailed mode reject.
The central test data has been accepted but the peripheral data is rejected as it does not conform to
the expected results.
You can see in this case that the software has given an estimated MPOD result based on the central
reading but not an absolute reading as the peripheral data is rejected.
© 2014 Elektron Technology UK Ltd.
Page 59

Appendix 4 - Example data 59
13 Appendix 5 - Technical Specification
1 TYPE
Computerised device capable of measuring the Macular Pigment Optical Absorption
Density
Chart distance: 17 cm. Background luminance: 250cdm-
2 STIMULI
LEDs with spectral outputs of 470nm and 530nm
Angular subtense: 1 degree (central), 3 degrees (peripheral fixation) Luminance: 100 –
1000 cdm-
3 FIXATION TARGETS
Diffused red LEDs with broad spectral output of 625 – 675 nm
4 INPUTS / OUTPUTS
USB 1.1 Type B connector (for external control)
Mains input connector (IEC320)
Patient response button
5 ELECTRICAL SPECIFICATION
Mains input voltage: 100-240 Vac, universal input
Fuses: 2 off 20mm x 5mm IEC 60127-2 high breaking capacity
Fuse rating: T1AH250V
Frequency 50/60 Hz
Power consumption: 15 VA
Power input connector: IEC 320 socket
6 DIMENSIONS
300 x 230 x 300 - 350 (variable) (L x D x H) mm
7 WEIGHT
4.5 kg
8 CLASSIFICATION
Mains operated Class 1
Type B Applied Part. Continuous operation
Equipment not suitable for use in presence of flammable anaesthetic mixtures with air or
oxygen or nitrous oxide.
Ordinary equipment without protection against ingress of water
9 ENVIRONMENT
Temperature:
Operating . . . . . . . . . . . . . . 10° to 35°C (41° to 95°F)
Storage. . . . . . . . . . . . . . . . –20° to 50°C (–4° to 122°F)
2
2
Relative humidity:
Operating. . . . . . . . . . . . 30% to 80% (non-condensing)
Storage. . . . . . . . . . . . . . 10% to 90% (non-condensing)
Maximum vibration:
Operating . . . . . . . . . . . . . . 0.9 GRMS using a random-vibration spectrum that
simulates shipment by air
Storage. . . . . . . . . . . . . . . . 1.3 GRMS using a random-vibration spectrum that
simulates shipment by truck
Maximum shock:
Operating . . . . . . . . . . . . . 1.52 m/sec (60 inches/sec) (less than or equal to a pulse
width of 2 ms)
Storage. . . . . . . . . . . . . . . 2.03 m/sec (80 inches/sec) (less than or equal to a pulse
width of 2 ms)
© 2014 Elektron Technology UK Ltd.
Page 60

MPS II Manual60
Altitude:
Operating . . . . . . . . . . . . . . 0 to 3048 m (0 to 10,000 ft)
Storage. . . . . . . . . . . . . . . . 0 to 12,192 m (0 to 40,000 ft)
10 ACCESSORIES AND DETACHABLE PARTS
The MPS II is supplied with the following accessories and detachable parts:
USB Flash Drive containing installation software for PC
Mains cable (country specific)
Dust cover
Patient Response Button (PRB)
Replacement fuses for alternate voltage
11 OPTIONAL EXTRAS
Electric Table (without top)
Custom made top with printer carrier
V shaped table top
Inkjet Printer
12 LIST OF SPARE PARTS
Occluder
Operating Manual
Dust Cover
Mains Cable Replacement
Patient response Button
Replacement fuses
13 EC DECLARATION OF CONFORMITY
When used for the intended application this equipment is considered to be a Class I
Medical Device and complies with the requirements of the Medical Devices Directive 93/42/
EEC (as amended). Any modifications to the equipment may affect the compliance with
the directive and referenced standards.
© 2014 Elektron Technology UK Ltd.
Page 61

Appendix 5 - Technical Specification 61
14 Appendix 6 - Maintenance and Warranty
Regular Inspection
Maintenance
Cleaning
Preventative Maintenance
Replacement Parts
Spare Lenses
Repairs and Re-calibration
Warranty
14.1 Regular Inspection
Inspect the equipment and cables before use.
If any damage is found the equipment should not be used before it has been inspected by a
competent person.
Particular attention should be paid to the mains cable at the back of the instrument and the cable of
the patient response button.
14.2 Maintenance
Before any maintenance or cleaning is undertaken, it is important that the mains cable is removed
from the wall socket, isolating the unit from any power. The equipment can also be isolated from the
mains by removing the detachable mains cable.
14.3 Cleaning
The equipment is housed in an enclosure that can be wiped clean as required. This is done with the
unit disconnected from the supply.
Housing
The housing may be kept clean by wiping with a damp cloth. Do not use abrasive
cleaners. Do not allow liquid to enter the MPS II.
Lens
The lens can be cleaned with any suitable lens cleaning cloth or sterile wipe.
Abrasive cleaners must not be used.
Target Screen
The target screen may, in time, have deposits of dust - depending on the environment it is
used in. Small debris can be “blown clear” of the target screen by blowing into one of the 2
holes that are located on either side of the lens with the eyepiece moulding removed (see
next paragraph). Use a clean air supply of air – e.g. aerosol can, designed for this
purpose.
Eyepiece
The eyepiece could transfer contamination or infection from one person to another.
The eyepiece can be removed for cleaning/disinfection. Replacement eyepieces are
available.
Since the patient is likely to be in contact with the eyepiece, there might be a possibility
of allergenic reactions in some patients.
The material has been selected to be is "Evoprene" which is a thermoplastic elastomer
rather than natural rubber.
© 2014 Elektron Technology UK Ltd.
Page 62

MPS II Manual62
Item
Part number
Dust cover
SUN9303
USB A-B cable
WIR5121
Eyepiece assembly
MPS9000-328
Software CD
SUN5900*
T0.5AH250 HBC fuse
FUS1226
T1AH250V HBC fuse
FUS1227
Manual
MAN2000
To remove the eyepiece, gently squeeze inwards on the 2 sides and pull the eyepiece
away from the unit (see below).
The eyepiece, and any adjacent areas that could come into contact with the patient,
should be kept clean using a damp cloth followed by a suitable antiseptic wipe.
14.4 Preventative maintenance
Every six months it is recommended that the mains lead should be inspected and replaced if there is
any sign of damage to the insulation etc.
The connected computer should be maintained in accordance with the manufacturer’s instructions.
This includes hardware and software maintenance.
The operating system should be kept up to date with any patches and software upgrades.
The MPS II user software should be kept up to date with any patches and upgrades.
Upgrades will be made available from the manufacturer and sales agent’s websites.
14.5 Replacement parts
There are NO user serviceable parts in the MPS II. The following replacement spare parts are
available from your supplier –
© 2014 Elektron Technology UK Ltd.
Page 63

Mains cable (country specific)
Quote country for part number
* The software part number will change with later versions of software. Contact your supplier for the
MF OPT7001
Lens +1D 1.502 Index
MF OPT7002
Lens +2D 1.502 Index
MF OPT7003
Lens +3D 1.502 Index
MF OPT7004
Lens +4D 1.502 Index
latest part number.
14.6 Spare lenses
The following are available for the MPS II as optional extras–
14.7 Repairs and Recalibration
The MPS II contains no user serviceable parts except for replaceable external items (fuses).
The unit must only be serviced by an appropriately qualified person.
Appendix 6 - Maintenance and Warranty 63
The Manufacturer will make available, on request and at its discretion, circuit diagrams, component
part lists, descriptions, calibration instructions, or other information that will assist Service Personnel
to repair those parts of the MPS II that are designated by the Manufacturer as repairable by Service
Personnel.
Calibration
It is recommended that the unit has a calibration check at least once every 2 years to ensure it is
within acceptable limits.
It is of course possible to check it more frequently if required
Please contact your supplier for more details of this.
In case of difficulty please contact your supplier.
14.8 Warranty
If, within 24 months from the date of installation, any defect is discovered in the instrument in respect
of material or workmanship and reasonably within our control, we undertake to make good the defect
at our own expense, provided notice is given to us as soon as it is discovered and that the instrument
is immediately forwarded to our works, carriage paid, in the original packaging and with security
seals unbroken.
If the original packaging is not available, then please contact your service representative to request
packaging.
Please note that Elektron Technology reserves the right to alter the specification of the hardware or
software at any time without notification.
© 2014 Elektron Technology UK Ltd.
Page 64

MPS II Manual64
15 Appendix 7 - Troubleshooting
This chapter deals with any problems or error messages you may get whilst connecting the MPS II
to a PC. In most cases there is a simple solution.
If the connection status message is NOT reading READY when starting the software then the MPS II
is not communicating –
If you see NOT CONNECTED , then please try the following –
Check that the MPS II device is powered
Check that the USB cable between the MPS II device and the laptop/Computer is plugged
in firmly at both ends
If any of the connections were loose, you will have to wait until the software detects the MPS II
device.
.
If none of the above fixes the problem, then try unplugging the USB cable, power cycling the MPS II
and re-connecting the USB cable.
There are various error messages that can be displayed with respect to the databases. make a note
of them as your service provider may need them to help you.
It is always good practice to keep a backup of the database in a safe location to minimise data loss
in the event of a hard drive failure / computer loss.
In the event of a database error, the last backup can be restored with minimal loss of data.
© 2014 Elektron Technology UK Ltd.
Page 65

Appendix 7 - Troubleshooting 65
16 Appendix 8 - Software License Agreement
IMPORTANT NOTICE: PLEASE READ CAREFULLY BEFORE INSTALLING THE SOFTWARE
This licence agreement (Licence) is a legal agreement between you (Licensee or you) and
ELEKTRON TECHNOLOGY UK LIMITED (English company number 04949934) of Broers Building,
JJ Thomson Avenue, Cambridge CB3 0FA (Licensor, us or we).
The following terms are used in this Licence:
• The MPS II computer software and the data supplied with the software, any Maintenance
Release and the associated media (Software);
• Software that corrects faults, add functionality or otherwise amends or upgrades the
Software which we may supply to you from time to time (Maintenance Release);
• printed materials and online or electronic documentation we supply to you in connection with
the Software (Documentation);
• the Macular Pigment Screener portable device provided by the Licensor (MPS Device), and
PC refers to a personal computer.
We may also make available to you open-source software (as defined by the Open Source Initiative
(http://opensource.org) or the Free Software Foundation (http://www.fsf.org) (Open-Source Software)
when we supply you with the Software. Use of Open-Source Software is subject to the relevant third
party licence terms, and such Open-Source Software remains the property of the relevant licensors.
We licence use of the Software and Documentation to you on the basis of and subject to the terms
of this Licence. We do not sell the Software or Documentation to you. Except in respect of any
elements licensed from third parties, we remain the owner of the Software and Documentation at all
times.
OPERATING SYSTEM REQUIREMENTS: THIS SOFTWARE REQUIRES A PERSONAL
COMPUTER WITH WINDOWS 7™ or WINDOWS 8™ OPERATING SYSTEMS.
IMPORTANT NOTICE TO ALL USERS:
• BY INSTALLING, COPYING OR OTHERWISE USING THE SOFTWARE OR CLICKING
ON THE "ACCEPT" BUTTON BELOW YOU AGREE TO THE TERMS OF THIS LICENCE WHICH
WILL BIND YOU AND YOUR EMPLOYEES.
• IF YOU DO NOT AGREE TO THE TERMS OF THIS LICENCE, WE WILL NOT LICENSE
THE SOFTWARE AND DOCUMENTATION TO YOU AND YOU MUST DISCONTINUE THE
INSTALLATION PROCESS NOW BY CLICKING ON THE "CANCEL" BUTTON BELOW THE
DISPLAYED LICENCE AGREEMENT. IN THIS CASE YOU MUST RETURN ANY MEDIA ON
WHICH THE SOFTWARE IS STORED AND ALL ACCOMPANYING DOCUMENTATION TO THE
LICENSOR.
You should print a copy of this Licence for future reference.
1. GRANT AND SCOPE OF LICENCE
1.1 In consideration of you agreeing to abide by the terms of this Licence, the Licensor hereby
grants to you a non-exclusive, non-transferable licence to use the Software and the Documentation
and any Maintenance Release which we make available to you on and subject to the terms of this
Licence.
1.2 You may:
(a) install and use the Software for your personal purposes (if you are a consumer) or your
internal business purposes (if you are a business):
(i) only on one PC; and
(ii) only in conjunction with the MPS Device together with which the Software was provided to
you;
(b) make up to one copy of the Software for back-up purposes only, provided you comply with
the provisions in condition 2(f);
(c) use any Documentation in support of the use permitted under condition 1.2.
1.3 Unless agreed otherwise by the Licensor in writing, the Software may not be used or
installed on more than one PC, and may not be used to process data captured by, or to
© 2014 Elektron Technology UK Ltd.
Page 66

MPS II Manual66
communicate with, more than one MPS Device (and that MPS Device must, unless agreed otherwise
by the Licensor in writing, be the one together with which the Software was provided to you).
2. RESTRICTIONS
Except as expressly set out in this Licence or as permitted by any local law, you undertake:
(a) not to copy the Software or Documentation except where such copying is incidental to
normal use of the Software or where it is necessary for the purpose of back-up or operational
security, nor use the Software on more than one PC;
(b) not to rent, lease, sub-license, loan, translate, merge, adapt, vary or modify the Software or
Documentation;
(c) not to make alterations to, or modifications of, the whole or any part of the Software nor
permit the Software or any part of it to be combined with, or become incorporated in, any other
programs;
(d) not to disassemble, de-compile, reverse engineer or create derivative works based on the
whole or any part of the Software nor attempt to do any such things except to the extent that (by
virtue of section 296A of the Copyright, Designs and Patents Act 1988) such actions cannot be
prohibited because they are essential for the purpose of achieving inter-operability of the Software
with another software program, and provided that the information obtained by you during such
activities:
(i) is used only for the purpose of achieving inter-operability of the Software with another
software program;
(ii) is not disclosed or communicated without the Licensor's prior written consent to any third
party to whom it is not necessary to disclose or communicate it; and
(iii) is not used to create any software which is substantially similar to the Software;
(e) to ensure that any licence k ey we provide to you is kept confidential and is not disclosed to
any third party;
(f) to keep all copies of the Software secure and to maintain accurate and up-to-date records of
the number and locations of all copies of the Software;
(g) to supervise and control use of the Software and ensure that the Software is used by your
employees and representatives in accordance with the terms of this Licence;
(h) to include our copyright notice on all entire and partial copies of the Software in any form;
(i) not to provide, or otherwise make available, the Software in any form, in whole or in part
(including, but not limited to, program listings, object and source program listings, object code and
source code) to any person, other than your employees, without prior written consent from us;
(j) not to use the Software via any communications network or by means of remote access.
3. INTELLECTUAL PROPERTY RIGHTS
3.1 You acknowledge and agree that all intellectual property rights in the Software and the
Documentation throughout the world belong to us, that rights in the Software are licensed (not sold)
to you, and that you have no rights in, or to, the Software or the Documentation other than the right to
use them in accordance with the terms of this Licence.
3.2 You acknowledge that you have no right to have access to the Software in source code form
or in unlocked coding or with comments.
4. LIMITED WARRANTY
4.1 We warrant that:
(a) the media on which the Software is stored and distributed is (at the time it is supplied) free
from defects in design, material and workmanship under normal use;
(b) the Software will, when properly used and on an operating system for which it was designed,
perform substantially in accordance with the functions described in the Documentation; and
(c) that the Documentation correctly describes the operation of the Software in all material
respects,
for a period of 90 days from the date of installation of the Software (Warranty Period). If a defect in
the media occurs during the Warranty Period, we will replace it free of charge if you return it to the
Licensor with (so far as you are able) a documented example of such defect or error.
4.2 If, within the Warranty Period, you notify us in writing of any defect or fault in the Software as
a result of which it fails to perform substantially in accordance with the Documentation, we will, at our
sole option, either repair or replace the Software, provided that you make available all the information
that may be necessary to help us to remedy the defect or fault, including sufficient information to
enable us to recreate the defect or fault.
© 2014 Elektron Technology UK Ltd.
Page 67

Appendix 8 - Software License Agreement 67
4.3 The warranty does not apply:
(a) if the defect or fault in the Software results from you having amended the Software;
(b) if the defect or fault in the Software results from you having used the Software in
contravention of the terms of this Licence.
4.4 We are not obligated to provide any Maintenance Releases. Unless agreed otherwise by us
in writing, we have no obligation to support the Software on more than one PC, or in respect of more
than one MPS Device.
4.5 Any Open-Source Software we provide to you may be used according to the terms and
conditions of the specific licence under which the relevant Open-Source Software is distributed, but
is provided "as is" and expressly subject to the disclaimer in condition 5.7.
5. LIMITATION OF LIABILITY
5.1 You acknowledge that the Software has not been developed to meet your individual
requirements, and that it is therefore your responsibility to ensure that the facilities and functions of
the Software as described in the Documentation meet your requirements. Neither we nor our
suppliers warrant that the functions contained in the Software will meet your requirements or that the
operation of the Software will be uninterrupted or error-free.
5.2 We only supply the Software and Documentation for internal use by your business, and you
agree not to use the Software or Documentation for any re-sale purposes.
5.3 We shall not under any circumstances whatever be liable to you, whether in contract, tort
(including negligence), breach of statutory duty, or otherwise, arising under or in connection with the
Licence for:
(a) loss of profits, sales, business, or revenue;
(b) business interruption;
(c) loss of anticipated savings;
(d) loss or corruption of data or information;
(e) loss of business opportunity, goodwill or reputation; or
(f) any special, indirect or consequential loss or damage, even if we were aware of the
circumstances in which any such loss or damage could arise at the time we supplied the Software to
you.
5.4 Other than the losses set out in condition 5.3 and in condition 5.5 (for which we are not
liable), our maximum aggregate liability under or in connection with this Licence whether in contract,
tort (including negligence) or otherwise, shall in all circumstances be limited to GBP1,500. This
maximum cap does not apply to condition 5.6.
5.5 You agree that in entering into this Licence, either you did not rely on any representations
(whether written or oral) of any kind or of any person other than those expressly set out in this
Licence or (if you did rely on any representations, whether written or oral, not expressly set out in this
Licence) that you shall have no remedy in respect of such representations and (in either case) we
shall have no liability in any circumstances otherwise than in accordance with the express terms of
this Licence.
5.6 Nothing in this Licence shall limit or exclude our liability for:
(a) death or personal injury resulting from our negligence;
(b) fraud or fraudulent misrepresentation;
(c) any other liability that cannot be excluded or limited by English law.
5.7 This Licence sets out the full extent of our obligations and liabilities in respect of the supply
of the Software and Documentation. Except as expressly stated in this Licence, there are no
conditions, warranties, representations or other terms, express or implied, that are binding on us.
Any condition, warranty, representation or other term concerning the supply of the Software and
Documentation which might otherwise be implied into, or incorporated in, this Licence whether by
statute, common law or otherwise, is excluded to the fullest extent permitted by law.
5.8 All references to "we" or "us" in this condition 5 shall, for the purposes of this condition 5
and condition 9.6 only, be treated as including all employees, subcontractors and suppliers of us, all
of whom shall have the benefit of the exclusions and limitations of liability set out in this condition 5,
in accordance with condition 9.6.
6. TERMINATION
6.1 Without prejudice to our other rights and remedies, we may terminate this Licence
immediately by written notice to you if you commit a material or persistent breach of this Licence
which you fail to remedy (if remediable) within 14 days after the service of written notice requiring you
© 2014 Elektron Technology UK Ltd.
Page 68

MPS II Manual68
to do so.
6.2 Upon termination for any reason:
(a) all rights granted to you under this Licence shall cease;
(b) you must cease all activities authorised by this Licence; and
(c) you must immediately delete or remove the Software from all computer equipment in your
possession and immediately destroy or return to us (at our option) all copies of the Software then in
your possession, custody or control and, in the case of destruction, certify to us that you have done
so.
6.3 Any provision in this Licence which expressly or by implication is intended to come into or
continue in force on or after termination of this Licence shall remain in full force and effect.
7. NOTICES
7.1 Any notice required to be given under this Licence shall be in writing. If you are sending
notice, it shall be delivered personally, or sent by pre-paid first-class post or recorded delivered or by
commercial courier or by email to martinreeves@elektron-technology.com. If we are giving notice,
we may do so by posting it on our website at www.elektron-technology.com or, if we have your
contact details, we may either post it (in a manner set out above) or we may email you. If you are
posting notice to us, please send it for the attention of the Company Secretary, Elektron Technology
PLC at Broers Building, 21 JJ Thomson Avenue, Cambridge CB3 0FA.
7.2 Any notice shall be deemed to have been duly received:
(a) if delivered personally, when left at the address and for the contact referred to in condition
7.1, or for the contact at the address referred to by you in any communication you send to us;
(b) if sent by pre-paid first-class post or recorded delivery, at 9,00am on the third working day
after posting (if posted from within the UK) or on the seventh working day after posting (if posted
from outside of the UK);
(c) if delivered by commercial courier, on the date and at the time that the courier's delivery
receipt is signed;
(d) if posted on our website, 12 hours after it is uploaded; or
(e) if sent by email, 24 hours after it is sent.
8. EVENTS OUTSIDE OUR CONTROL
8.1 We will not be liable or responsible for any failure to perform, or delay in performance of, any
of our obligations under this Licence that is caused by an Event Outside Our Control. An Event
Outside Our Control is defined below in condition 8.2.
8.2 An Event Outside Our Control means any act or event beyond our reasonable control,
including without limitation failure of public or private telecommunications networks or electricity
supply.
8.3 If an Event Outside Our Control takes place that affects the performance of our obligations
under this Licence:
(a) our obligations under this Licence will be suspended and the time for performance of our
obligations will be extended for the duration of the Event Outside Our Control; and
(b) we will use our reasonable endeavours to find a solution by which our obligations under this
Licence may be performed despite the Event Outside Our Control.
9. OTHER IMPORTANT TERMS
9.1 We may transfer our rights and obligations under this Licence to another organisation, but
this will not affect your rights or our obligations under this Licence.
9.2 You may only transfer your rights or your obligations under this Licence to another person if
we agree in writing.
9.3 We may require you to, and you agree to, permit us (and/or our contractors and agents) to
inspect and have access to any premises (and to the computer equipment located there) at or on
which the Software is being kept or used, and have access to any records kept in connection with
this Licence, for the purposes of ensuring that you are complying with the terms of this Licence,
provided that we provide reasonable advance notice to you of such inspections, which must take
place at reasonable times.
9.4 This Licence and any document expressly referred to in it constitute the entire agreement
between you and us and supersede all prior agreements, arrangements and understandings between
you and us. You ack nowledge that you have not relied on any statement, promise or representation
made or given by or on behalf of the us which is not set out in this Licence or any document
expressly referred to in it.
© 2014 Elektron Technology UK Ltd.
Page 69

Appendix 8 - Software License Agreement 69
9.5 If we fail to insist that you perform any of your obligations under this Licence, or if we do not
enforce our rights against you, or if we delay in doing so, that will not mean that we have waived our
rights against you and will not mean that you do not have to comply with those obligations. If we do
waive a default by you, we will only do so in writing, and that will not mean that we will automatically
waive any later default by you.
9.6 It is agreed that it is intended to confer a benefit on us and the third parties referred to in
conditions 5.8 and 9.3 by making the exclusions and limitation of liability available to them in
accordance with this Licence, provided that the rights of such third parties under this licence shall
only be enforceable by us on their behalf. We owe no duty to them to enforce such rights and we
may conduct or compromise any relevant proceedings as we see fit.
9.7 Except as provided in condition 9.6, a person who is not a party to this Licence shall not
have any rights under the Contracts (Rights of Third Parties) Act 1999 to enforce any term of this
Licence, but this does not affect any right or remedy of a third party which exists, or is available,
apart from that Act.
9.8 Each of the conditions of this Licence operates separately. If any court or competent
authority decides that any of them are unlawful, invalid or unenforceable, the remaining conditions will
remain in full force and effect. If any invalid, unenforceable or illegal provision of this Licence would
be valid, enforceable and legal if some part of it were deleted, the provision shall apply with the
minimum medication necessary to make it legal, valid and enforceable.
9.9 No variation of this Licence shall be effective unless it is in writing and signed by us.
9.10 This Licence, its subject matter and its formation (and any non-contractual disputes or
claims) are governed by and construed in accordance with English law. We both agree to the
exclusive jurisdiction of the courts of England and Wales.
---------------------------------------------------------------------------------------------THIRD PARTY LICENSE INFORMATION
Developed using Qt 4.7.4, Copyright Nokia 2011, used under the GNU Lesser General Public
License, v2.1 and Nok ia Qt LGPL Exception version 1.0 license.(http://qt-project.org/doc/qt-4.7/
lgpl.html)
Developed using PostgreSQL 9.2, Portions Copyright (c) 1996-2011, PostgreSQL Global
Development Group and Portions Copyright (c) 1994, The Regents of the University of California
under the PostgreSQL license. (http://www.postgresql.org/about/licence/)
Developed using D2XX Drivers from Future Technology Devices International Limited. (http://
www.ftdichip.com/Firmware/vnc2toolchain/License.txt)
The MPS II Application is based in part on the work of the Qwt project. (http://qwt.sourceforge.net/
qwtlicense.html)
Developed using the MinGW - Minimalist GNU for Windows, Mingw.org, under a MIT-style license.
(http://www.mingw.org/license)
Developed using the GNU Compiler Collection from the Free Software Foundation under the GNU
General Public License Version 3 with GCC Runtime Library Exception. (http://www.gnu.org/licenses/
licenses.html and http://www.gnu.org/licenses/gcc-exception.html)
This product includes software developed by the OpenSSL Project for use in the OpenSSL Toolkit.
(http://www.openssl.org/source/license.html).
This product uses the Inno Setup installer for Windows from jrsoftware.org (http://www.jrsoftware.org/
isinfo.php)
----------------------------------------------------------------------------------------------
© 2014 Elektron Technology UK Ltd.
Page 70

MPS II Manual70
GNU LESSER GENERAL PUBLIC LICENSE
Version 2.1, February 1999
Copyright (C) 1991, 1999 Free Software Foundation, Inc.
51 Franklin Street, Fifth Floor, Boston, MA 02110-1301 USA
Everyone is permitted to copy and distribute verbatim copies of this license document, but
changing it is not allowed.
[This is the first released version of the Lesser GPL. It also counts as the successor of the GNU
Library Public License, version 2, hence the version number 2.1.]
Preamble
The licenses for most software are designed to take away your freedom to share and change it.
By contrast, the GNU General Public Licenses are intended to guarantee your freedom to share and
change free software--to make sure the software is free for all its users.
This license, the Lesser General Public License, applies to some specially designated software
packages--typically libraries--of the Free Software Foundation and other authors who decide to use it.
You can use it too, but we suggest you first think carefully about whether this license or the ordinary
General Public License is the better strategy to use in any particular case, based on the
explanations below.
When we speak of free software, we are referring to freedom of use, not price. Our General Public
Licenses are designed to make sure that you have the freedom to distribute copies of free software
(and charge for this service if you wish); that you receive source code or can get it if you want it; that
you can change the software and use pieces of it in new free programs; and that you are informed
that you can do these things.
To protect your rights, we need to make restrictions that forbid distributors to deny you these
rights or to ask you to surrender these rights. These restrictions translate to certain responsibilities
for you if you distribute copies of the library or if you modify it.
For example, if you distribute copies of the library, whether gratis or for a fee, you must give the
recipients all the rights that we gave you. You must make sure that they, too, receive or can get the
source code. If you link other code with the library, you must provide complete object files to the
recipients, so that they can relink them with the library after making changes to the library and
recompiling it. And you must show them these terms so they know their rights.
We protect your rights with a two-step method: (1) we copyright the library, and (2) we offer you this
license, which gives you legal permission to copy, distribute and/or modify the library.
To protect each distributor, we want to make it very clear that there is no warranty for the free
library. Also, if the library is modified by someone else and passed on, the recipients should know
that what they have is not the original version, so that the original author's reputation will not be
affected by problems that might be introduced by others.
Finally, software patents pose a constant threat to the existence of any free program. We wish to
make sure that a company cannot effectively restrict the users of a free program by obtaining a
restrictive license from a patent holder. Therefore, we insist that any patent license obtained for a
version of the library must be consistent with the full freedom of use specified in this license.
Most GNU software, including some libraries, is covered by the ordinary GNU General Public
License. This license, the GNU Lesser General Public License, applies to certain designated
libraries, and is quite different from the ordinary General Public License. We use this license for
certain libraries in order to permit linking those libraries into non-free programs.
© 2014 Elektron Technology UK Ltd.
Page 71

Appendix 8 - Software License Agreement 71
When a program is linked with a library, whether statically or using a shared library, the
combination of the two is legally speaking a combined work, a derivative of the original library. The
ordinary General Public License therefore permits such linking only if the entire combination fits its
criteria of freedom. The Lesser General Public License permits more lax criteria for linking other
code with the library.
We call this license the "Lesser" General Public License because it does Less to protect the
user's freedom than the ordinary General Public License. It also provides other free software
developers Less of an advantage over competing non-free programs. These disadvantages are the
reason we use the ordinary General Public License for many libraries. However, the Lesser license
provides advantages in certain special circumstances.
For example, on rare occasions, there may be a special need to encourage the widest possible
use of a certain library, so that it becomes a de-facto standard. To achieve this, non-free programs
must be allowed to use the library. A more frequent case is that a free library does the same job as
widely used non-free libraries. In this case, there is little to gain by limiting the free library to free
software only, so we use the Lesser General Public License.
In other cases, permission to use a particular library in non-free programs enables a greater
number of people to use a large body of free software. For example, permission to use the GNU C
Library in non-free programs enables many more people to use the whole GNU operating system, as
well as its variant, the GNU/Linux operating system.
Although the Lesser General Public License is Less protective of the users' freedom, it does
ensure that the user of a program that is linked with the Library has the freedom and the wherewithal
to run that program using a modified version of the Library.
The precise terms and conditions for copying, distribution and modification follow. Pay close
attention to the difference between a "work based on the library" and a "work that uses the library".
The former contains code derived from the library, whereas the latter must be combined with the
library in order to run.
GNU LESSER GENERAL PUBLIC LICENSE
TERMS AND CONDITIONS FOR COPYING, DISTRIBUTION AND MODIFICATION
0. This License Agreement applies to any software library or other program which contains a notice
placed by the copyright holder or other authorized party saying it may be distributed under the terms
of this Lesser General Public License (also called "this License"). Each licensee is addressed as
"you".
A "library" means a collection of software functions and/or data prepared so as to be conveniently
linked with application programs (which use some of those functions and data) to form executables.
The "Library", below, refers to any such software library or work which has been distributed under
these terms. A "work based on the Library" means either the Library or any derivative work under
copyright law: that is to say, a work containing the Library or a portion of it, either verbatim or with
modifications and/or translated straightforwardly into another language. (Hereinafter, translation is
included without limitation in the term "modification".)
"Source code" for a work means the preferred form of the work for making modifications to it. For
a library, complete source code means all the source code for all modules it contains, plus any
associated interface definition files, plus the scripts used to control compilation and installation of
the library.
Activities other than copying, distribution and modification are not covered by this License; they
are outside its scope. The act of running a program using the Library is not restricted, and output
from such a program is covered only if its contents constitute a work based on the Library
© 2014 Elektron Technology UK Ltd.
Page 72

MPS II Manual72
(independent of the use of the Library in a tool for writing it). Whether that is true depends on what
the Library does
and what the program that uses the Library does.
1. You may copy and distribute verbatim copies of the Library's complete source code as you
receive it, in any medium, provided that you conspicuously and appropriately publish on each copy an
appropriate copyright notice and disclaimer of warranty; k eep intact all the notices that refer to this
License and to the absence of any warranty; and distribute a copy of this License along with the
Library.
You may charge a fee for the physical act of transferring a copy, and you may at your option offer
warranty protection in exchange for a fee.
2. You may modify your copy or copies of the Library or any portion of it, thus forming a work
based on the Library, and copy and distribute such modifications or work under the terms of Section
1 above, provided that you also meet all of these conditions:
a) The modified work must itself be a software library.
b) You must cause the files modified to carry prominent notices stating that you changed the
files and the date of any change.
c) You must cause the whole of the work to be licensed at no charge to all third parties under the
terms of this License.
d) If a facility in the modified Library refers to a function or a table of data to be supplied by an
application program that uses the facility, other than as an argument passed when the facility is
invoked, then you must mak e a good faith effort to ensure that, in the event an application does not
supply such function or table, the facility still operates, and performs whatever part of its purpose
remains meaningful.
(For example, a function in a library to compute square roots has a purpose that is entirely welldefined independent of the application. Therefore, Subsection 2d requires that any applicationsupplied function or table used by this function must be optional: if the application does not supply
it, the square root function must still compute square roots.)
These requirements apply to the modified work as a whole. If identifiable sections of that work are
not derived from the Library, and can be reasonably considered independent and separate works in
themselves, then this License, and its terms, do not apply to those sections when you distribute
them as separate works. But when you distribute the same sections as part of a whole which is a
work based on the Library, the distribution of the whole must be on the terms of this License, whose
permissions for other licensees extend to the entire whole, and thus to each and every part
regardless of who wrote it.
Thus, it is not the intent of this section to claim rights or contest your rights to work written entirely
by you; rather, the intent is to exercise the right to control the distribution of derivative or collective
works based on the Library.
In addition, mere aggregation of another work not based on the Library with the Library (or with a
work based on the Library) on a volume of a storage or distribution medium does not bring the other
work under the scope of this License.
3. You may opt to apply the terms of the ordinary GNU General Public License instead of this
License to a given copy of the Library. To do this, you must alter all the notices that refer to this
License, so that they refer to the ordinary GNU General Public License, version 2, instead of to this
License. (If a newer version than version 2 of the ordinary GNU General Public License has
appeared, then you can specify that version instead if you wish.) Do not make any other change in
© 2014 Elektron Technology UK Ltd.
Page 73

Appendix 8 - Software License Agreement 73
these notices.
Once this change is made in a given copy, it is irreversible for that copy, so the ordinary GNU
General Public License applies to all subsequent copies and derivative works made from that copy.
This option is useful when you wish to copy part of the code of the Library into a program that is
not a library.
4. You may copy and distribute the Library (or a portion or derivative of it, under Section 2) in
object code or executable form under the terms of Sections 1 and 2 above provided that you
accompany it with the complete corresponding machine-readable source code, which must be
distributed under the terms of Sections 1 and 2 above on a medium customarily used for software
interchange.
If distribution of object code is made by offering access to copy from a designated place, then
offering equivalent access to copy the source code from the same place satisfies the requirement to
distribute the source code, even though third parties are not compelled to copy the source along with
the object code.
5. A program that contains no derivative of any portion of the Library, but is designed to work with
the Library by being compiled or linked with it, is called a "work that uses the Library". Such a work,
in isolation, is not a derivative work of the Library, and therefore falls outside the scope of this
License.
However, linking a "work that uses the Library" with the Library creates an executable that is a
derivative of the Library (because it contains portions of the Library), rather than a "work that uses
the library". The executable is therefore covered by this License. Section 6 states terms for
distribution of such executables.
When a "work that uses the Library" uses material from a header file that is part of the Library, the
object code for the work may be a derivative work of the Library even though the source code is not.
Whether this is true is especially significant if the work can be linked without the Library, or if the
work is itself a library. The threshold for this to be true is not precisely defined by law.
If such an object file uses only numerical parameters, data structure layouts and accessors, and
small macros and small inline functions (ten lines or less in length), then the use of the object file is
unrestricted, regardless of whether it is legally a derivative work. (Executables containing this object
code plus portions of the Library will still fall under Section 6.)
Otherwise, if the work is a derivative of the Library, you may distribute the object code for the work
under the terms of Section 6. Any executables containing that work also fall under Section 6,
whether or not they are linked directly with the Library itself.
6. As an exception to the Sections above, you may also combine or link a "work that uses the
Library" with the Library to produce a work containing portions of the Library, and distribute that work
under terms of your choice, provided that the terms permit modification of the work for the
customer's own use and reverse engineering for debugging such modifications.
You must give prominent notice with each copy of the work that the Library is used in it and that
the Library and its use are covered by this License. You must supply a copy of this License. If the
work during execution displays copyright notices, you must include the copyright notice for the
Library among them, as well as a reference directing the user to the copy of this License. Also, you
must do one of these things:
a) Accompany the work with the complete corresponding machine-readable source code for the
Library including whatever changes were used in the work (which must be distributed under Sections
1 and 2 above); and, if the work is an executable linked with the Library, with the complete machine-
© 2014 Elektron Technology UK Ltd.
Page 74

MPS II Manual74
readable "work that uses the Library", as object code and/or source code, so that the user can
modify the Library and then relink to produce a modified executable containing the modified Library.
(It is understood that the user who changes the contents of definitions files in the Library will not
necessarily be able to recompile the application to use the modified definitions.)
b) Use a suitable shared library mechanism for linking with the Library. A suitable mechanism is
one that (1) uses at run time a copy of the library already present on the user's computer system,
rather than copying library functions into the executable, and (2) will operate properly with a modified
version of the library, if the user installs one, as long as the modified version is interfacecompatible with the version that the work was made with.
c) Accompany the work with a written offer, valid for at least three years, to give the same user
the materials specified in Subsection 6a, above, for a charge no more than the cost of performing
this distribution.
d) If distribution of the work is made by offering access to copy from a designated place, offer
equivalent access to copy the above specified materials from the same place.
e) Verify that the user has already received a copy of these materials or that you have already
sent this user a copy.
For an executable, the required form of the "work that uses the Library" must include any data and
utility programs needed for reproducing the executable from it. However, as a special exception, the
materials to be distributed need not include anything that is normally distributed (in either source or
binary form) with the major components (compiler, kernel, and so on) of the operating system on
which the executable runs, unless that component itself accompanies the executable.
It may happen that this requirement contradicts the license restrictions of other proprietary libraries
that do not normally accompany the operating system. Such a contradiction means you cannot use
both them and the Library together in an executable that you distribute.
7. You may place library facilities that are a work based on the Library side-by-side in a single
library together with other library facilities not covered by this License, and distribute such a
combined library, provided that the separate distribution of the work based on the Library and of the
other library facilities is otherwise permitted, and provided that you do these two things:
a) Accompany the combined library with a copy of the same work based on the Library,
uncombined with any other library facilities. This must be distributed under the terms of the
Sections above.
b) Give prominent notice with the combined library of the fact that part of it is a work based on
the Library, and explaining where to find the accompanying uncombined form of the same work.
8. You may not copy, modify, sublicense, link with, or distribute 0the Library except as expressly
provided under this License. Any attempt otherwise to copy, modify, sublicense, link with, or
distribute the Library is void, and will automatically terminate your rights under this License.
However, parties who have received copies, or rights, from you under this License will not have their
licenses terminated so long as such parties remain in full compliance.
9. You are not required to accept this License, since you have not signed it. However, nothing else
grants you permission to modify or distribute the Library or its derivative works. These actions are
prohibited by law if you do not accept this License. Therefore, by modifying or distributing the
Library (or any work based on the Library), you indicate your acceptance of this License to do so,
and all its terms and conditions for copying, distributing or modifying the Library or works based on
it.
10. Each time you redistribute the Library (or any work based on the Library), the recipient
© 2014 Elektron Technology UK Ltd.
Page 75

Appendix 8 - Software License Agreement 75
automatically receives a license from the original licensor to copy, distribute, link with or modify the
Library subject to these terms and conditions. You may not impose any further restrictions on the
recipients' exercise of the rights granted herein. You are not responsible for enforcing compliance by
third parties with this License.
11. If, as a consequence of a court judgment or allegation of patent infringement or for any other
reason (not limited to patent issues), conditions are imposed on you (whether by court order,
agreement or otherwise) that contradict the conditions of this License, they do not excuse you from
the conditions of this License. If you cannot distribute so as to satisfy simultaneously your
obligations under this License and any other pertinent obligations, then as a consequence you may
not distribute the Library at all. For example, if a patent license would not permit royalty-free
redistribution of the Library by all those who receive copies directly or indirectly through you, then the
only way you could satisfy both it and this License would be to refrain entirely from distribution of the
Library.
If any portion of this section is held invalid or unenforceable under any particular circumstance, the
balance of the section is intended to apply, and the section as a whole is intended to apply in other
circumstances.
It is not the purpose of this section to induce you to infringe any patents or other property right
claims or to contest validity of any such claims; this section has the sole purpose of protecting the
integrity of the free software distribution system which is implemented by public license practices.
Many people have made generous contributions to the wide range of software distributed through that
system in reliance on consistent application of that system; it is up to the author/donor to decide if
he or she is willing to distribute software through any other system and a licensee cannot impose
that choice.
This section is intended to make thoroughly clear what is believed to be a consequence of the rest
of this License.
12. If the distribution and/or use of the Library is restricted in certain countries either by patents or
by copyrighted interfaces, the original copyright holder who places the Library under this License may
add an explicit geographical distribution limitation excluding those countries, so that distribution is
permitted only in or among countries not thus excluded. In such case, this License incorporates the
limitation as if written in the body of this License.
13. The Free Software Foundation may publish revised and/or new versions of the Lesser General
Public License from time to time. Such new versions will be similar in spirit to the present version,
but may differ in detail to address new problems or concerns.
Each version is given a distinguishing version number. If the Library specifies a version number of
this License which applies to it and "any later version", you have the option of following the terms and
conditions either of that version or of any later version published by the Free Software Foundation. If
the Library does not specify a license version number, you may choose any version ever published
by the Free Software Foundation.
14. If you wish to incorporate parts of the Library into other free programs whose distribution
conditions are incompatible with these, write to the author to ask for permission. For software which
is copyrighted by the Free Software Foundation, write to the Free Software Foundation; we
sometimes make exceptions for this. Our decision will be guided by the two goals of preserving the
free status of all derivatives of our free software and of promoting the sharing and reuse of software
generally.
NO WARRANTY
15. BECAUSE THE LIBRARY IS LICENSED FREE OF CHARGE, THERE IS NO WARRANTY
FOR THE LIBRARY, TO THE EXTENT PERMITTED BY APPLICABLE LAW. EXCEPT WHEN
© 2014 Elektron Technology UK Ltd.
Page 76

MPS II Manual76
OTHERWISE STATED IN WRITING THE COPYRIGHT HOLDERS AND/OR OTHER PARTIES
PROVIDE THE LIBRARY "AS IS" WITHOUT WARRANTY OF ANY KIND, EITHER EXPRESSED
OR IMPLIED, INCLUDING, BUT NOT LIMITED TO, THE IMPLIED WARRANTIES OF
MERCHANTABILITY AND FITNESS FOR A PARTICULAR PURPOSE. THE ENTIRE RISK AS TO
THE QUALITY AND PERFORMANCE OF THE LIBRARY IS WITH YOU. SHOULD THE LIBRARY
PROVE DEFECTIVE, YOU ASSUME THE COST OF ALL NECESSARY SERVICING, REPAIR OR
CORRECTION.
16. IN NO EVENT UNLESS REQUIRED BY APPLICABLE LAW OR AGREED TO IN WRITING
WILL ANY COPYRIGHT HOLDER, OR ANY OTHER PARTY WHO MAY MODIFY AND/OR
REDISTRIBUTE THE LIBRARY AS PERMITTED ABOVE, BE LIABLE TO YOU FOR DAMAGES,
INCLUDING ANY GENERAL, SPECIAL, INCIDENTAL OR CONSEQUENTIAL DAMAGES ARISING
OUT OF THE USE OR INABILITY TO USE THE LIBRARY (INCLUDING BUT NOT LIMITED TO
LOSS OF DATA OR DATA BEING RENDERED INACCURATE OR LOSSES SUSTAINED BY YOU
OR THIRD PARTIES OR A FAILURE OF THE LIBRARY TO OPERATE WITH ANY OTHER
SOFTWARE), EVEN IF SUCH HOLDER OR OTHER PARTY HAS BEEN ADVISED OF THE
POSSIBILITY OF SUCH DAMAGES.
END OF TERMS AND CONDITIONS
----------------------------------------------------------------------------------------------
Nokia Qt LGPL Exception version 1.0
As a special exception to the GNU Lesser General Public License version 2.1, the object code form
of a "work that uses the Library" may incorporate material from a header file that is part of the
Library. You may distribute such object code under terms of your choice, provided that the
incorporated material (i) does not exceed more than 5% of the total size of the Library; and (ii) is
limited to numerical parameters, data structure layouts, accessors, macros, inline functions and
templates.
----------------------------------------------------------------------------------------------
PostgreSQL Database Management System
(formerly known as Postgres, then as Postgres95)
Portions Copyright (c) 1996-2012, The PostgreSQL Global Development Group
Portions Copyright (c) 1994, The Regents of the University of California
Permission to use, copy, modify, and distribute this software and its documentation for any purpose,
without fee, and without a written agreement is hereby granted, provided that the above copyright
notice and this paragraph and the following two paragraphs appear in all copies.
IN NO EVENT SHALL THE UNIVERSITY OF CALIFORNIA BE LIABLE TO ANY PARTY FOR
DIRECT, INDIRECT, SPECIAL, INCIDENTAL, OR CONSEQUENTIAL DAMAGES, INCLUDING
LOST PROFITS, ARISING OUT OF THE USE OF THIS SOFTWARE AND ITS DOCUMENTATION,
EVEN IF THE UNIVERSITY OF CALIFORNIA HAS BEEN ADVISED OF THE POSSIBILITY OF
SUCH DAMAGE.
THE UNIVERSITY OF CALIFORNIA SPECIFICALLY DISCLAIMS ANY WARRANTIES,
INCLUDING, BUT NOT LIMITED TO, THE IMPLIED WARRANTIES OF MERCHANTABILITY AND
FITNESS FOR A PARTICULAR PURPOSE. THE SOFTWARE PROVIDED HEREUNDER IS ON
AN "AS IS" BASIS, AND THE UNIVERSITY OF CALIFORNIA HAS NO OBLIGATIONS TO
PROVIDE MAINTENANCE, SUPPORT, UPDATES, ENHANCEMENTS, OR MODIFICATIONS.
----------------------------------------------------------------------------------------------
© 2014 Elektron Technology UK Ltd.
Page 77

Appendix 8 - Software License Agreement 77
Future Technology Devices International Limited
This software is provided by Future Technology Devices International Limited ``as is'' and any
express or implied warranties, including, but not limited to, the implied warranties of merchantability
and fitness for a particular purpose are disclaimed. In no event shall future technology devices
international limited be liable for any direct, indirect, incidental, special, exemplary, or consequential
damages (including, but not limited to, procurement of substitute goods or services; loss of use,
data, or profits; or business interruption) however caused and on any theory of liability, whether in
contract, strict liability, or tort (including negligence or otherwise) arising in any way out of the use of
this software, even if advised of the possibility of such damage.
FTDI drivers may be used only in conjunction with products based on FTDI parts.
FTDI drivers may be distributed in any form as long as license information is not modified.
If a custom vendor ID and/or product ID or description string are used, it is the responsibility of the
product manufacturer to maintain any changes and subsequent WHQL re-certification as a result of
making these changes.
----------------------------------------------------------------------------------------------
Qwt License
Version 1.0, January 1, 2003
The Qwt library and included programs are provided under the terms of the GNU LESSER GENERAL
PUBLIC LICENSE (LGPL) with the following exceptions:
1. Widgets that are subclassed from Qwt widgets do not constitute a derivative work.
2. Static linking of applications and widgets to the Qwt library does not constitute a derivative work
and does not require the author to provide source code for the application or widget, use the shared
Qwt libraries, or link their applications or widgets against a user-supplied version of Qwt. If you link
the application or widget to a modified version of Qwt, then the changes to Qwt must be provided
under the terms of the LGPL in sections 1, 2, and 4.
3. You do not have to provide a copy of the Qwt license with programs that are linked to the Qwt
library, nor do you have to identify the Qwt license in your program or documentation as required by
section 6 of the LGPL.
However, programs must still identify their use of Qwt. The following example statement can be
included in user documentation to satisfy this requirement:
[program/widget] is based in part on the work of
the Qwt project (http://qwt.sf.net).
---------------------------------------------------------------------GNU LESSER GENERAL PUBLIC LICENSE
Version 2.1, February 1999
Copyright (C) 1991, 1999 Free Software Foundation, Inc.
59 Temple Place, Suite 330, Boston, MA 02111-1307 USA
Everyone is permitted to copy and distribute verbatim copies of this license document, but changing
it is not allowed.
[This is the first released version of the Lesser GPL. It also counts as the successor of the GNU
Library Public License, version 2, hence the version number 2.1.]
Preamble
The licenses for most software are designed to take away your freedom to share and change it. By
contrast, the GNU General Public Licenses are intended to guarantee your freedom to share and
change
free software--to make sure the software is free for all its users.
This license, the Lesser General Public License, applies to some specially designated software
packages--typically libraries--of the Free Software Foundation and other authors who decide to use it.
You
can use it too, but we suggest you first think carefully about whether this license or the ordinary
General Public License is the better strategy to use in any particular case, based on the
© 2014 Elektron Technology UK Ltd.
Page 78

MPS II Manual78
explanations below.
When we speak of free software, we are referring to freedom of use, not price. Our General Public
Licenses are designed to make sure that you have the freedom to distribute copies of free software
(and charge for this service if you wish); that you receive source code or can get it if you want it; that
you can change the software and use pieces of it in new free programs; and that you are informed
that you can do these things.
To protect your rights, we need to make restrictions that forbid distributors to deny you these rights
or to ask you to surrender these rights. These restrictions translate to certain responsibilities for
you if you distribute copies of the library or if you modify it.
For example, if you distribute copies of the library, whether gratis or for a fee, you must give the
recipients all the rights that we gave you. You must make sure that they, too, receive or can get the
source code. If you link other code with the library, you must provide complete object files to the
recipients, so that they can relink them with the library after making changes to the library and
recompiling it. And you must show them these terms so they know their rights.
We protect your rights with a two-step method: (1) we copyright the library, and (2) we offer you this
license, which gives you legal permission to copy, distribute and/or modify the library.
To protect each distributor, we want to make it very clear that there is no warranty for the free library.
Also, if the library is modified by someone else and passed on, the recipients should know
that what they have is not the original version, so that the original author's reputation will not be
affected by problems that might be introduced by others.
Finally, software patents pose a constant threat to the existence of any free program. We wish to
make sure that a company cannot effectively restrict the users of a free program by obtaining a
restrictive license from a patent holder. Therefore, we insist that any patent license obtained for a
version of the library must be consistent with the full freedom of use specified in this license.
Most GNU software, including some libraries, is covered by the ordinary GNU General Public
License. This license, the GNU Lesser General Public License, applies to certain designated
libraries, and
is quite different from the ordinary General Public License. We use this license for certain libraries in
order to permit linking those libraries into non-free programs.
When a program is linked with a library, whether statically or using a shared library, the combination
of the two is legally speaking a combined work, a derivative of the original library. The ordinary
General Public License therefore permits such linking only if the entire combination fits its criteria of
freedom. The Lesser General Public License permits more lax criteria for linking other code with
the library.
We call this license the "Lesser" General Public License because it does Less to protect the user's
freedom than the ordinary General Public License. It also provides other free software developers
Less
of an advantage over competing non-free programs. These disadvantages are the reason we use the
ordinary General Public License for many libraries. However, the Lesser license provides advantages
in certain
special circumstances.
For example, on rare occasions, there may be a special need to encourage the widest possible use
of a certain library, so that it becomes a de-facto standard. To achieve this, non-free programs must
be
allowed to use the library. A more frequent case is that a free library does the same job as widely
used non-free libraries. In this case, there is little to gain by limiting the free library to free
software only, so we use the Lesser General Public License.
In other cases, permission to use a particular library in non-free programs enables a greater number
of people to use a large body of free software. For example, permission to use the GNU C Library in
non-free programs enables many more people to use the whole GNU operating system, as well as its
variant, the GNU/Linux operating system.
Although the Lesser General Public License is Less protective of the users' freedom, it does ensure
that the user of a program that is linked with the Library has the freedom and the wherewithal to run
that program using a modified version of the Library.
The precise terms and conditions for copying, distribution and modification follow. Pay close
attention to the difference between a "work based on the library" and a "work that uses the library".
The
© 2014 Elektron Technology UK Ltd.
Page 79

Appendix 8 - Software License Agreement 79
former contains code derived from the library, whereas the latter must be combined with the library in
order to run.
GNU LESSER GENERAL PUBLIC LICENSE
TERMS AND CONDITIONS FOR COPYING, DISTRIBUTION AND MODIFICATION
0. This License Agreement applies to any software library or other program which contains a notice
placed by the copyright holder or other authorized party saying it may be distributed under the terms
of
this Lesser General Public License (also called "this License").
Each licensee is addressed as "you".
A "library" means a collection of software functions and/or data prepared so as to be conveniently
linked with application programs (which use some of those functions and data) to form executables.
The "Library", below, refers to any such software library or work which has been distributed under
these terms. A "work based on the Library" means either the Library or any derivative work under
copyright law: that is to say, a work containing the Library or a portion of it, either verbatim or with
modifications and/or translated straightforwardly into another language. (Hereinafter, translation is
included without limitation in the term "modification".)
"Source code" for a work means the preferred form of the work for making modifications to it. For a
library, complete source code means all the source code for all modules it contains, plus any
associated
interface definition files, plus the scripts used to control compilation and installation of the library.
Activities other than copying, distribution and modification are not covered by this License; they are
outside its scope. The act of running a program using the Library is not restricted, and output from
such a program is covered only if its contents constitute a work based on the Library (independent of
the use of the Library in a tool for writing it). Whether that is true depends on what the Library does
and what the program that uses the Library does.
1. You may copy and distribute verbatim copies of the Library's complete source code as you
receive it, in any medium, provided that you conspicuously and appropriately publish on each copy an
appropriate copyright notice and disclaimer of warranty; k eep intact all the notices that refer to this
License and to the absence of any warranty; and distribute a copy of this License along with the
Library.
You may charge a fee for the physical act of transferring a copy, and you may at your option offer
warranty protection in exchange for a fee.
2. You may modify your copy or copies of the Library or any portion of it, thus forming a work based
on the Library, and copy and distribute such modifications or work under the terms of Section 1
above, provided that you also meet all of these conditions:
a) The modified work must itself be a software library.
b) You must cause the files modified to carry prominent notices stating that you changed the files
and the date of any change.
c) You must cause the whole of the work to be licensed at no charge to all third parties under the
terms of this License.
d) If a facility in the modified Library refers to a function or a table of data to be supplied by an
application program that uses the facility, other than as an argument passed when the facility is
invoked, then you must mak e a good faith effort to ensure that, in the event an application does not
supply such function or table, the facility still operates, and performs whatever part of its purpose
remains meaningful.
(For example, a function in a library to compute square roots has a purpose that is entirely welldefined independent of the application. Therefore, Subsection 2d requires that any applicationsupplied function or table used by this function must be optional: if the application does not supply
it, the square root function must still compute square roots.)
These requirements apply to the modified work as a whole. If identifiable sections of that work are
not derived from the Library, and can be reasonably considered independent and separate works in
themselves, then this License, and its terms, do not apply to those sections when you distribute
them as separate works. But when you distribute the same sections as part of a whole which is a
work based
on the Library, the distribution of the whole must be on the terms of this License, whose permissions
for other licensees extend to the
entire whole, and thus to each and every part regardless of who wrote it.
© 2014 Elektron Technology UK Ltd.
Page 80

MPS II Manual80
Thus, it is not the intent of this section to claim rights or contest your rights to work written entirely
by you; rather, the intent is to exercise the right to control the distribution of derivative or
collective works based on the Library.
In addition, mere aggregation of another work not based on the Library with the Library (or with a
work based on the Library) on a volume of a storage or distribution medium does not bring the other
work under the scope of this License.
3. You may opt to apply the terms of the ordinary GNU General Public License instead of this
License to a given copy of the Library. To do this, you must alter all the notices that refer to this
License, so
that they refer to the ordinary GNU General Public License, version 2, instead of to this License. (If a
newer version than version 2 of the ordinary GNU General Public License has appeared, then you
can specify that version instead if you wish.) Do not make any other change in these notices.
Once this change is made in a given copy, it is irreversible for that copy, so the ordinary GNU
General Public License applies to all subsequent copies and derivative works made from that copy.
This option is useful when you wish to copy part of the code of the Library into a program that is not
a library.
4. You may copy and distribute the Library (or a portion or derivative of it, under Section 2) in object
code or executable form under the terms of Sections 1 and 2 above provided that you accompany
it with the complete corresponding machine-readable source code, which must be distributed under
the terms of Sections 1 and 2 above on a medium customarily used for software interchange.
If distribution of object code is made by offering access to copy from a designated place, then
offering equivalent access to copy the source code from the same place satisfies the requirement to
distribute the source code, even though third parties are not compelled to copy the source along with
the object code.
5. A program that contains no derivative of any portion of the Library, but is designed to work with the
Library by being compiled or linked with it, is called a "work that uses the Library". Such a
work, in isolation, is not a derivative work of the Library, and therefore falls outside the scope of this
License. However, linking a "work that uses the Library" with the Library
creates an executable that is a derivative of the Library (because it contains portions of the Library),
rather than a "work that uses the library". The executable is therefore covered by this License.
Section 6 states terms for distribution of such executables.
When a "work that uses the Library" uses material from a header file that is part of the Library, the
object code for the work may be a derivative work of the Library even though the source code is not.
Whether this is true is especially significant if the work can be linked without the Library, or if the
work is itself a library. The threshold for this to be true is not precisely defined by law.
If such an object file uses only numerical parameters, data structure layouts and accessors, and
small macros and small inline functions (ten lines or less in length), then the use of the object file is
unrestricted, regardless of whether it is legally a derivative work. (Executables containing this object
code plus portions of the Library will still fall under Section 6.)
Otherwise, if the work is a derivative of the Library, you may distribute the object code for the work
under the terms of Section 6.
Any executables containing that work also fall under Section 6, whether or not they are linked directly
with the Library itself.
6. As an exception to the Sections above, you may also combine or link a "work that uses the
Library" with the Library to produce a work containing portions of the Library, and distribute that work
under terms of your choice, provided that the terms permit modification of the work for the
customer's own use and reverse engineering for debugging such modifications.
You must give prominent notice with each copy of the work that the Library is used in it and that the
Library and its use are covered by this License. You must supply a copy of this License. If the work
during execution displays copyright notices, you must include the copyright notice for the Library
among them, as well as a reference directing the user to the copy of this License. Also, you must do
one
of these things:
a) Accompany the work with the complete corresponding machine-readable source code for the
Library including whatever changes were used in the work (which must be distributed under Sections
1 and 2 above); and, if the work is an executable linked with the Library, with the complete machinereadable "work that uses the Library", as object code and/or source code, so that the user can
© 2014 Elektron Technology UK Ltd.
Page 81

Appendix 8 - Software License Agreement 81
modify the Library and then relink to produce a modified executable containing the modified Library.
(It is understood that the user who changes the contents of definitions files in the Library will not
necessarily be able to recompile the application to use the modified definitions.)
b) Use a suitable shared library mechanism for link ing with the Library. A suitable mechanism is one
that (1) uses at run time a copy of the library already present on the user's computer system, rather
than copying library functions into the executable, and (2) will operate properly with a modified version
of the library, if the user installs one, as long as the modified version is interface-compatible with the
version that the work was made with.
c) Accompany the work with a written offer, valid for at least three years, to give the same user the
materials specified in Subsection 6a, above, for a charge no more than the cost of performing this
distribution.
d) If distribution of the work is made by offering access to copy from a designated place, offer
equivalent access to copy the above specified materials from the same place.
e) Verify that the user has already received a copy of these materials or that you have already sent
this user a copy. For an executable, the required form of the "work that uses the Library" must
include any data and utility programs needed for reproducing the executable from it. However, as a
special exception, the materials to be distributed need not include anything that is normally
distributed (in either source or binary form) with the major components (compiler, k ernel, and so on)
of the operating system on which the executable runs, unless that component itself accompanies the
executable.
It may happen that this requirement contradicts the license restrictions of other proprietary libraries
that do not normally accompany the operating system. Such a contradiction means you cannot use
both them and the Library together in an executable that you distribute.
7. You may place library facilities that are a work based on the Library side-by-side in a single library
together with other library facilities not covered by this License, and distribute such a combined
library, provided that the separate distribution of the work based on the Library and of the other
library facilities is otherwise permitted, and provided that you do these two things:
a) Accompany the combined library with a copy of the same work based on the Library, uncombined
with any other library facilities. This must be distributed under the terms of the Sections above.
b) Give prominent notice with the combined library of the fact that part of it is a work based on the
Library, and explaining where to find the accompanying uncombined form of the same work .
8. You may not copy, modify, sublicense, link with, or distribute the Library except as expressly
provided under this License. Any attempt otherwise to copy, modify, sublicense, link with, or
distribute the Library is void, and will automatically terminate your rights under this License. However,
parties who have received copies, or rights, from you under this License will not have their licenses
terminated so long as such parties remain in full compliance.
9. You are not required to accept this License, since you have not signed it. However, nothing else
grants you permission to modify or distribute the Library or its derivative works. These actions are
prohibited by law if you do not accept this License. Therefore, by modifying or distributing the Library
(or any work based on the Library), you indicate your acceptance of this License to do so, and all its
terms and conditions for copying, distributing or modifying the Library or works based on it.
10. Each time you redistribute the Library (or any work based on the Library), the recipient
automatically receives a license from the original licensor to copy, distribute, link with or modify the
Library
subject to these terms and conditions. You may not impose any further restrictions on the recipients'
exercise of the rights granted herein. You are not responsible for enforcing compliance by third
parties with this License.
11. If, as a consequence of a court judgment or allegation of patent infringement or for any other
reason (not limited to patent issues), conditions are imposed on you (whether by court order,
agreement or
otherwise) that contradict the conditions of this License, they do not excuse you from the conditions
of this License. If you cannot distribute so as to satisfy simultaneously your obligations under this
License and any other pertinent obligations, then as a consequence you may not distribute the
Library at all. For example, if a patent license would not permit royalty-free redistribution of the
Library by
all those who receive copies directly or indirectly through you, then the only way you could satisfy
both it and this License would be to refrain entirely from distribution of the Library.
© 2014 Elektron Technology UK Ltd.
Page 82

MPS II Manual82
If any portion of this section is held invalid or unenforceable under any particular circumstance, the
balance of the section is intended to apply, and the section as a whole is intended to apply in other
circumstances. It is not the purpose of this section to induce you to infringe any patents or other
property right claims or to contest validity of any such claims; this section has the sole purpose of
protecting the integrity of the free software distribution system which is implemented by public
license practices. Many people have made generous contributions to the wide range of software
distributed
through that system in reliance on consistent application of that system; it is up to the author/donor
to decide if he or she is willing to distribute software through any other system and a licensee cannot
impose that choice. This section is intended to make thoroughly clear what is believed to be a
consequence of the rest of this License.
12. If the distribution and/or use of the Library is restricted in certain countries either by patents or
by copyrighted interfaces, the original copyright holder who places the Library under this License may
add an explicit geographical distribution limitation excluding those countries, so that distribution is
permitted only in or among countries not thus excluded. In such case, this License incorporates the
limitation as if written in the body of this License.
13. The Free Software Foundation may publish revised and/or new versions of the Lesser General
Public License from time to time. Such new versions will be similar in spirit to the present version,
but may differ in detail to address new problems or concerns.
Each version is given a distinguishing version number. If the Library specifies a version number of
this License which applies to it and "any later version", you have the option of following the terms and
conditions either of that version or of any later version published by the Free Software Foundation. If
the Library does not specify a license version number, you may choose any version ever published
by
the Free Software Foundation.
14. If you wish to incorporate parts of the Library into other free programs whose distribution
conditions are incompatible with these, write to the author to ask for permission. For software which
is
copyrighted by the Free Software Foundation, write to the Free Software Foundation; we sometimes
make exceptions for this. Our decision will be guided by the two goals of preserving the free status
of all derivatives of our free software and of promoting the sharing and reuse of software generally.
NO WARRANTY
15. BECAUSE THE LIBRARY IS LICENSED FREE OF CHARGE, THERE IS NO WARRANTY FOR
THE LIBRARY, TO THE EXTENT PERMITTED BY APPLICABLE LAW. EXCEPT WHEN
OTHERWISE STATED IN WRITING THE COPYRIGHT HOLDERS AND/OR
OTHER PARTIES PROVIDE THE LIBRARY "AS IS" WITHOUT WARRANTY OF ANY KIND,
EITHER EXPRESSED OR IMPLIED, INCLUDING, BUT NOT LIMITED TO, THE IMPLIED
WARRANTIES OF MERCHANTABILITY AND FITNESS FOR A PARTICULAR
PURPOSE. THE ENTIRE RISK AS TO THE QUALITY AND PERFORMANCE OF THE LIBRARY IS
WITH YOU. SHOULD THE LIBRARY PROVE DEFECTIVE, YOU ASSUME THE COST OF ALL
NECESSARY SERVICING, REPAIR OR CORRECTION.
16. IN NO EVENT UNLESS REQUIRED BY APPLICABLE LAW OR AGREED TO IN WRITING
WILL ANY COPYRIGHT HOLDER, OR ANY OTHER PARTY WHO MAY MODIFY AND/OR
REDISTRIBUTE THE LIBRARY AS PERMITTED ABOVE, BE LIABLE TO YOU FOR DAMAGES,
INCLUDING ANY GENERAL, SPECIAL, INCIDENTAL OR CONSEQUENTIAL DAMAGES ARISING
OUT OF THE USE OR INABILITY TO USE THE LIBRARY (INCLUDING BUT NOT LIMITED TO
LOSS OF DATA OR DATA BEING RENDERED INACCURATE OR LOSSES SUSTAINED BY YOU
OR THIRD PARTIES OR A FAILURE OF THE LIBRARY TO OPERATE WITH ANY OTHER
SOFTWARE), EVEN IF SUCH HOLDER OR OTHER PARTY HAS BEEN ADVISED OF THE
POSSIBILITY OF SUCH DAMAGES.
END OF TERMS AND CONDITIONS
----------------------------------------------------------------------------------------------
Copyright (c) 2012 MinGW.org project
Permission is hereby granted, free of charge, to any person obtaining a
© 2014 Elektron Technology UK Ltd.
Page 83

Appendix 8 - Software License Agreement 83
copy of this software and associated documentation files (the "Software"),
to deal in the Software without restriction, including without limitation
the rights to use, copy, modify, merge, publish, distribute, sublicense,
and/or sell copies of the Software, and to permit persons to whom the
Software is furnished to do so, subject to the following conditions:
The above copyright notice, this permission notice and the below disclaimer
shall be included in all copies or substantial portions of the Software.
THE SOFTWARE IS PROVIDED "AS IS", WITHOUT WARRANTY OF ANY KIND, EXPRESS OR
IMPLIED, INCLUDING BUT NOT LIMITED TO THE WARRANTIES OF MERCHANTABILITY,
FITNESS FOR A PARTICULAR PURPOSE AND NONINFRINGEMENT. IN NO EVENT SHALL THE
AUTHORS OR COPYRIGHT HOLDERS BE LIABLE FOR ANY CLAIM, DAMAGES OR OTHER
LIABILITY, WHETHER IN AN ACTION OF CONTRACT, TORT OR OTHERWISE, ARISING
FROM, OUT OF OR IN CONNECTION WITH THE SOFTWARE OR THE USE OR OTHER
DEALINGS IN THE SOFTWARE.
----------------------------------------------------------------------------------------------
GNU GENERAL PUBLIC LICENSE
Version 3, 29 June 2007
Copyright (C) 2007 Free Software Foundation, Inc. <http://fsf.org/>
Everyone is permitted to copy and distribute verbatim copies
of this license document, but changing it is not allowed.
Preamble
The GNU General Public License is a free, copyleft license for
software and other kinds of works.
The licenses for most software and other practical works are designed
to take away your freedom to share and change the works. By contrast,
the GNU General Public License is intended to guarantee your freedom to
share and change all versions of a program--to make sure it remains free
software for all its users. We, the Free Software Foundation, use the
GNU General Public License for most of our software; it applies also to
any other work released this way by its authors. You can apply it to
your programs, too.
When we speak of free software, we are referring to freedom, not
price. Our General Public Licenses are designed to make sure that you
have the freedom to distribute copies of free software (and charge for
them if you wish), that you receive source code or can get it if you
want it, that you can change the software or use pieces of it in new
free programs, and that you know you can do these things.
To protect your rights, we need to prevent others from denying you
these rights or asking you to surrender the rights. Therefore, you have
certain responsibilities if you distribute copies of the software, or if
you modify it: responsibilities to respect the freedom of others.
For example, if you distribute copies of such a program, whether
gratis or for a fee, you must pass on to the recipients the same
freedoms that you received. You must make sure that they, too, receive
or can get the source code. And you must show them these terms so they
know their rights.
© 2014 Elektron Technology UK Ltd.
Page 84

MPS II Manual84
Developers that use the GNU GPL protect your rights with two steps:
(1) assert copyright on the software, and (2) offer you this License
giving you legal permission to copy, distribute and/or modify it.
For the developers' and authors' protection, the GPL clearly explains
that there is no warranty for this free software. For both users' and
authors' sake, the GPL requires that modified versions be marked as
changed, so that their problems will not be attributed erroneously to
authors of previous versions.
Some devices are designed to deny users access to install or run
modified versions of the software inside them, although the manufacturer
can do so. This is fundamentally incompatible with the aim of
protecting users' freedom to change the software. The systematic
pattern of such abuse occurs in the area of products for individuals to
use, which is precisely where it is most unacceptable. Therefore, we
have designed this version of the GPL to prohibit the practice for those
products. If such problems arise substantially in other domains, we
stand ready to extend this provision to those domains in future versions
of the GPL, as needed to protect the freedom of users.
Finally, every program is threatened constantly by software patents.
States should not allow patents to restrict development and use of
software on general-purpose computers, but in those that do, we wish to
avoid the special danger that patents applied to a free program could
make it effectively proprietary. To prevent this, the GPL assures that
patents cannot be used to render the program non-free.
The precise terms and conditions for copying, distribution and
modification follow.
TERMS AND CONDITIONS
0. Definitions.
"This License" refers to version 3 of the GNU General Public License.
"Copyright" also means copyright-like laws that apply to other kinds of
works, such as semiconductor mask s.
"The Program" refers to any copyrightable work licensed under this
License. Each licensee is addressed as "you". "Licensees" and
"recipients" may be individuals or organizations.
To "modify" a work means to copy from or adapt all or part of the work
in a fashion requiring copyright permission, other than the making of an
exact copy. The resulting work is called a "modified version" of the
earlier work or a work "based on" the earlier work.
A "covered work" means either the unmodified Program or a work based
on the Program.
To "propagate" a work means to do anything with it that, without
permission, would make you directly or secondarily liable for
infringement under applicable copyright law, except executing it on a
computer or modifying a private copy. Propagation includes copying,
© 2014 Elektron Technology UK Ltd.
Page 85

Appendix 8 - Software License Agreement 85
distribution (with or without modification), making available to the
public, and in some countries other activities as well.
To "convey" a work means any kind of propagation that enables other
parties to make or receive copies. Mere interaction with a user through
a computer network, with no transfer of a copy, is not conveying.
An interactive user interface displays "Appropriate Legal Notices"
to the extent that it includes a convenient and prominently visible
feature that (1) displays an appropriate copyright notice, and (2)
tells the user that there is no warranty for the work (except to the
extent that warranties are provided), that licensees may convey the
work under this License, and how to view a copy of this License. If
the interface presents a list of user commands or options, such as a
menu, a prominent item in the list meets this criterion.
1. Source Code.
The "source code" for a work means the preferred form of the work
for making modifications to it. "Object code" means any non-source
form of a work.
A "Standard Interface" means an interface that either is an official
standard defined by a recognized standards body, or, in the case of
interfaces specified for a particular programming language, one that
is widely used among developers work ing in that language.
The "System Libraries" of an executable work include anything, other
than the work as a whole, that (a) is included in the normal form of
packaging a Major Component, but which is not part of that Major
Component, and (b) serves only to enable use of the work with that
Major Component, or to implement a Standard Interface for which an
implementation is available to the public in source code form. A
"Major Component", in this context, means a major essential component
(kernel, window system, and so on) of the specific operating system
(if any) on which the executable work runs, or a compiler used to
produce the work, or an object code interpreter used to run it.
The "Corresponding Source" for a work in object code form means all
the source code needed to generate, install, and (for an executable
work) run the object code and to modify the work, including scripts to
control those activities. However, it does not include the work's
System Libraries, or general-purpose tools or generally available free
programs which are used unmodified in performing those activities but
which are not part of the work. For example, Corresponding Source
includes interface definition files associated with source files for
the work, and the source code for shared libraries and dynamically
linked subprograms that the work is specifically designed to require,
such as by intimate data communication or control flow between those
subprograms and other parts of the work.
The Corresponding Source need not include anything that users
can regenerate automatically from other parts of the Corresponding
Source.
The Corresponding Source for a work in source code form is that
same work.
© 2014 Elektron Technology UK Ltd.
Page 86

MPS II Manual86
2. Basic Permissions.
All rights granted under this License are granted for the term of
copyright on the Program, and are irrevocable provided the stated
conditions are met. This License explicitly affirms your unlimited
permission to run the unmodified Program. The output from running a
covered work is covered by this License only if the output, given its
content, constitutes a covered work. This License acknowledges your
rights of fair use or other equivalent, as provided by copyright law.
You may make, run and propagate covered works that you do not
convey, without conditions so long as your license otherwise remains
in force. You may convey covered works to others for the sole purpose
of having them make modifications exclusively for you, or provide you
with facilities for running those works, provided that you comply with
the terms of this License in conveying all material for which you do
not control copyright. Those thus making or running the covered works
for you must do so exclusively on your behalf, under your direction
and control, on terms that prohibit them from making any copies of
your copyrighted material outside their relationship with you.
Conveying under any other circumstances is permitted solely under
the conditions stated below. Sublicensing is not allowed; section 10
makes it unnecessary.
3. Protecting Users' Legal Rights From Anti-Circumvention Law.
No covered work shall be deemed part of an effective technological
measure under any applicable law fulfilling obligations under article
11 of the WIPO copyright treaty adopted on 20 December 1996, or
similar laws prohibiting or restricting circumvention of such
measures.
When you convey a covered work, you waive any legal power to forbid
circumvention of technological measures to the extent such circumvention
is effected by exercising rights under this License with respect to
the covered work, and you disclaim any intention to limit operation or
modification of the work as a means of enforcing, against the work's
users, your or third parties' legal rights to forbid circumvention of
technological measures.
4. Conveying Verbatim Copies.
You may convey verbatim copies of the Program's source code as you
receive it, in any medium, provided that you conspicuously and
appropriately publish on each copy an appropriate copyright notice;
keep intact all notices stating that this License and any
non-permissive terms added in accord with section 7 apply to the code;
keep intact all notices of the absence of any warranty; and give all
recipients a copy of this License along with the Program.
You may charge any price or no price for each copy that you convey,
and you may offer support or warranty protection for a fee.
5. Conveying Modified Source Versions.
© 2014 Elektron Technology UK Ltd.
Page 87

Appendix 8 - Software License Agreement 87
You may convey a work based on the Program, or the modifications to
produce it from the Program, in the form of source code under the
terms of section 4, provided that you also meet all of these conditions:
a) The work must carry prominent notices stating that you modified
it, and giving a relevant date.
b) The work must carry prominent notices stating that it is
released under this License and any conditions added under section
7. This requirement modifies the requirement in section 4 to
"keep intact all notices".
c) You must license the entire work, as a whole, under this
License to anyone who comes into possession of a copy. This
License will therefore apply, along with any applicable section 7
additional terms, to the whole of the work, and all its parts,
regardless of how they are packaged. This License gives no
permission to license the work in any other way, but it does not
invalidate such permission if you have separately received it.
d) If the work has interactive user interfaces, each must display
Appropriate Legal Notices; however, if the Program has interactive
interfaces that do not display Appropriate Legal Notices, your
work need not make them do so.
A compilation of a covered work with other separate and independent
works, which are not by their nature extensions of the covered work,
and which are not combined with it such as to form a larger program,
in or on a volume of a storage or distribution medium, is called an
"aggregate" if the compilation and its resulting copyright are not
used to limit the access or legal rights of the compilation's users
beyond what the individual works permit. Inclusion of a covered work
in an aggregate does not cause this License to apply to the other
parts of the aggregate.
6. Conveying Non-Source Forms.
You may convey a covered work in object code form under the terms
of sections 4 and 5, provided that you also convey the
machine-readable Corresponding Source under the terms of this License,
in one of these ways:
a) Convey the object code in, or embodied in, a physical product
(including a physical distribution medium), accompanied by the
Corresponding Source fixed on a durable physical medium
customarily used for software interchange.
b) Convey the object code in, or embodied in, a physical product
(including a physical distribution medium), accompanied by a
written offer, valid for at least three years and valid for as
long as you offer spare parts or customer support for that product
model, to give anyone who possesses the object code either (1) a
copy of the Corresponding Source for all the software in the
product that is covered by this License, on a durable physical
medium customarily used for software interchange, for a price no
more than your reasonable cost of physically performing this
conveying of source, or (2) access to copy the
© 2014 Elektron Technology UK Ltd.
Page 88

MPS II Manual88
Corresponding Source from a network server at no charge.
c) Convey individual copies of the object code with a copy of the
written offer to provide the Corresponding Source. This
alternative is allowed only occasionally and noncommercially, and
only if you received the object code with such an offer, in accord
with subsection 6b.
d) Convey the object code by offering access from a designated
place (gratis or for a charge), and offer equivalent access to the
Corresponding Source in the same way through the same place at no
further charge. You need not require recipients to copy the
Corresponding Source along with the object code. If the place to
copy the object code is a network server, the Corresponding Source
may be on a different server (operated by you or a third party)
that supports equivalent copying facilities, provided you maintain
clear directions next to the object code saying where to find the
Corresponding Source. Regardless of what server hosts the
Corresponding Source, you remain obligated to ensure that it is
available for as long as needed to satisfy these requirements.
e) Convey the object code using peer-to-peer transmission, provided
you inform other peers where the object code and Corresponding
Source of the work are being offered to the general public at no
charge under subsection 6d.
A separable portion of the object code, whose source code is excluded
from the Corresponding Source as a System Library, need not be
included in conveying the object code work.
A "User Product" is either (1) a "consumer product", which means any
tangible personal property which is normally used for personal, family,
or household purposes, or (2) anything designed or sold for incorporation
into a dwelling. In determining whether a product is a consumer product,
doubtful cases shall be resolved in favor of coverage. For a particular
product received by a particular user, "normally used" refers to a
typical or common use of that class of product, regardless of the status
of the particular user or of the way in which the particular user
actually uses, or expects or is expected to use, the product. A product
is a consumer product regardless of whether the product has substantial
commercial, industrial or non-consumer uses, unless such uses represent
the only significant mode of use of the product.
"Installation Information" for a User Product means any methods,
procedures, authorization k eys, or other information required to install
and execute modified versions of a covered work in that User Product from
a modified version of its Corresponding Source. The information must
suffice to ensure that the continued functioning of the modified object
code is in no case prevented or interfered with solely because
modification has been made.
If you convey an object code work under this section in, or with, or
specifically for use in, a User Product, and the conveying occurs as
part of a transaction in which the right of possession and use of the
User Product is transferred to the recipient in perpetuity or for a
fixed term (regardless of how the transaction is characterized), the
Corresponding Source conveyed under this section must be accompanied
© 2014 Elektron Technology UK Ltd.
Page 89

Appendix 8 - Software License Agreement 89
by the Installation Information. But this requirement does not apply
if neither you nor any third party retains the ability to install
modified object code on the User Product (for example, the work has
been installed in ROM).
The requirement to provide Installation Information does not include a
requirement to continue to provide support service, warranty, or updates
for a work that has been modified or installed by the recipient, or for
the User Product in which it has been modified or installed. Access to a
network may be denied when the modification itself materially and
adversely affects the operation of the network or violates the rules and
protocols for communication across the network.
Corresponding Source conveyed, and Installation Information provided,
in accord with this section must be in a format that is publicly
documented (and with an implementation available to the public in
source code form), and must require no special password or key for
unpacking, reading or copying.
7. Additional Terms.
"Additional permissions" are terms that supplement the terms of this
License by making exceptions from one or more of its conditions.
Additional permissions that are applicable to the entire Program shall
be treated as though they were included in this License, to the extent
that they are valid under applicable law. If additional permissions
apply only to part of the Program, that part may be used separately
under those permissions, but the entire Program remains governed by
this License without regard to the additional permissions.
When you convey a copy of a covered work, you may at your option
remove any additional permissions from that copy, or from any part of
it. (Additional permissions may be written to require their own
removal in certain cases when you modify the work.) You may place
additional permissions on material, added by you to a covered work,
for which you have or can give appropriate copyright permission.
Notwithstanding any other provision of this License, for material you
add to a covered work, you may (if authorized by the copyright holders of
that material) supplement the terms of this License with terms:
a) Disclaiming warranty or limiting liability differently from the
terms of sections 15 and 16 of this License; or
b) Requiring preservation of specified reasonable legal notices or
author attributions in that material or in the Appropriate Legal
Notices displayed by works containing it; or
c) Prohibiting misrepresentation of the origin of that material, or
requiring that modified versions of such material be marked in
reasonable ways as different from the original version; or
d) Limiting the use for publicity purposes of names of licensors or
authors of the material; or
e) Declining to grant rights under trademark law for use of some
trade names, trademarks, or service marks; or
© 2014 Elektron Technology UK Ltd.
Page 90

MPS II Manual90
f) Requiring indemnification of licensors and authors of that
material by anyone who conveys the material (or modified versions of
it) with contractual assumptions of liability to the recipient, for
any liability that these contractual assumptions directly impose on
those licensors and authors.
All other non-permissive additional terms are considered "further
restrictions" within the meaning of section 10. If the Program as you
received it, or any part of it, contains a notice stating that it is
governed by this License along with a term that is a further
restriction, you may remove that term. If a license document contains
a further restriction but permits relicensing or conveying under this
License, you may add to a covered work material governed by the terms
of that license document, provided that the further restriction does
not survive such relicensing or conveying.
If you add terms to a covered work in accord with this section, you
must place, in the relevant source files, a statement of the
additional terms that apply to those files, or a notice indicating
where to find the applicable terms.
Additional terms, permissive or non-permissive, may be stated in the
form of a separately written license, or stated as exceptions;
the above requirements apply either way.
8. Termination.
You may not propagate or modify a covered work except as expressly
provided under this License. Any attempt otherwise to propagate or
modify it is void, and will automatically terminate your rights under
this License (including any patent licenses granted under the third
paragraph of section 11).
However, if you cease all violation of this License, then your
license from a particular copyright holder is reinstated (a)
provisionally, unless and until the copyright holder explicitly and
finally terminates your license, and (b) permanently, if the copyright
holder fails to notify you of the violation by some reasonable means
prior to 60 days after the cessation.
Moreover, your license from a particular copyright holder is
reinstated permanently if the copyright holder notifies you of the
violation by some reasonable means, this is the first time you have
received notice of violation of this License (for any work) from that
copyright holder, and you cure the violation prior to 30 days after
your receipt of the notice.
Termination of your rights under this section does not terminate the
licenses of parties who have received copies or rights from you under
this License. If your rights have been terminated and not permanently
reinstated, you do not qualify to receive new licenses for the same
material under section 10.
9. Acceptance Not Required for Having Copies.
You are not required to accept this License in order to receive or
© 2014 Elektron Technology UK Ltd.
Page 91

Appendix 8 - Software License Agreement 91
run a copy of the Program. Ancillary propagation of a covered work
occurring solely as a consequence of using peer-to-peer transmission
to receive a copy likewise does not require acceptance. However,
nothing other than this License grants you permission to propagate or
modify any covered work. These actions infringe copyright if you do
not accept this License. Therefore, by modifying or propagating a
covered work, you indicate your acceptance of this License to do so.
10. Automatic Licensing of Downstream Recipients.
Each time you convey a covered work, the recipient automatically
receives a license from the original licensors, to run, modify and
propagate that work, subject to this License. You are not responsible
for enforcing compliance by third parties with this License.
An "entity transaction" is a transaction transferring control of an
organization, or substantially all assets of one, or subdividing an
organization, or merging organizations. If propagation of a covered
work results from an entity transaction, each party to that
transaction who receives a copy of the work also receives whatever
licenses to the work the party's predecessor in interest had or could
give under the previous paragraph, plus a right to possession of the
Corresponding Source of the work from the predecessor in interest, if
the predecessor has it or can get it with reasonable efforts.
You may not impose any further restrictions on the exercise of the
rights granted or affirmed under this License. For example, you may
not impose a license fee, royalty, or other charge for exercise of
rights granted under this License, and you may not initiate litigation
(including a cross-claim or counterclaim in a lawsuit) alleging that
any patent claim is infringed by making, using, selling, offering for
sale, or importing the Program or any portion of it.
11. Patents.
A "contributor" is a copyright holder who authorizes use under this
License of the Program or a work on which the Program is based. The
work thus licensed is called the contributor's "contributor version".
A contributor's "essential patent claims" are all patent claims
owned or controlled by the contributor, whether already acquired or
hereafter acquired, that would be infringed by some manner, permitted
by this License, of making, using, or selling its contributor version,
but do not include claims that would be infringed only as a
consequence of further modification of the contributor version. For
purposes of this definition, "control" includes the right to grant
patent sublicenses in a manner consistent with the requirements of
this License.
Each contributor grants you a non-exclusive, worldwide, royalty-free
patent license under the contributor's essential patent claims, to
make, use, sell, offer for sale, import and otherwise run, modify and
propagate the contents of its contributor version.
In the following three paragraphs, a "patent license" is any express
agreement or commitment, however denominated, not to enforce a patent
(such as an express permission to practice a patent or covenant not to
© 2014 Elektron Technology UK Ltd.
Page 92

MPS II Manual92
sue for patent infringement). To "grant" such a patent license to a
party means to make such an agreement or commitment not to enforce a
patent against the party.
If you convey a covered work , knowingly relying on a patent license,
and the Corresponding Source of the work is not available for anyone
to copy, free of charge and under the terms of this License, through a
publicly available network server or other readily accessible means,
then you must either (1) cause the Corresponding Source to be so
available, or (2) arrange to deprive yourself of the benefit of the
patent license for this particular work, or (3) arrange, in a manner
consistent with the requirements of this License, to extend the patent
license to downstream recipients. "Knowingly relying" means you have
actual k nowledge that, but for the patent license, your conveying the
covered work in a country, or your recipient's use of the covered work
in a country, would infringe one or more identifiable patents in that
country that you have reason to believe are valid.
If, pursuant to or in connection with a single transaction or
arrangement, you convey, or propagate by procuring conveyance of, a
covered work, and grant a patent license to some of the parties
receiving the covered work authorizing them to use, propagate, modify
or convey a specific copy of the covered work, then the patent license
you grant is automatically extended to all recipients of the covered
work and works based on it.
A patent license is "discriminatory" if it does not include within
the scope of its coverage, prohibits the exercise of, or is
conditioned on the non-exercise of one or more of the rights that are
specifically granted under this License. You may not convey a covered
work if you are a party to an arrangement with a third party that is
in the business of distributing software, under which you make payment
to the third party based on the extent of your activity of conveying
the work, and under which the third party grants, to any of the
parties who would receive the covered work from you, a discriminatory
patent license (a) in connection with copies of the covered work
conveyed by you (or copies made from those copies), or (b) primarily
for and in connection with specific products or compilations that
contain the covered work, unless you entered into that arrangement,
or that patent license was granted, prior to 28 March 2007.
Nothing in this License shall be construed as excluding or limiting
any implied license or other defenses to infringement that may
otherwise be available to you under applicable patent law.
12. No Surrender of Others' Freedom.
If conditions are imposed on you (whether by court order, agreement or
otherwise) that contradict the conditions of this License, they do not
excuse you from the conditions of this License. If you cannot convey a
covered work so as to satisfy simultaneously your obligations under this
License and any other pertinent obligations, then as a consequence you may
not convey it at all. For example, if you agree to terms that obligate you
to collect a royalty for further conveying from those to whom you convey
the Program, the only way you could satisfy both those terms and this
License would be to refrain entirely from conveying the Program.
© 2014 Elektron Technology UK Ltd.
Page 93

Appendix 8 - Software License Agreement 93
13. Use with the GNU Affero General Public License.
Notwithstanding any other provision of this License, you have
permission to link or combine any covered work with a work licensed
under version 3 of the GNU Affero General Public License into a single
combined work, and to convey the resulting work. The terms of this
License will continue to apply to the part which is the covered work,
but the special requirements of the GNU Affero General Public License,
section 13, concerning interaction through a network will apply to the
combination as such.
14. Revised Versions of this License.
The Free Software Foundation may publish revised and/or new versions of
the GNU General Public License from time to time. Such new versions will
be similar in spirit to the present version, but may differ in detail to
address new problems or concerns.
Each version is given a distinguishing version number. If the
Program specifies that a certain numbered version of the GNU General
Public License "or any later version" applies to it, you have the
option of following the terms and conditions either of that numbered
version or of any later version published by the Free Software
Foundation. If the Program does not specify a version number of the
GNU General Public License, you may choose any version ever published
by the Free Software Foundation.
If the Program specifies that a proxy can decide which future
versions of the GNU General Public License can be used, that proxy's
public statement of acceptance of a version permanently authorizes you
to choose that version for the Program.
Later license versions may give you additional or different
permissions. However, no additional obligations are imposed on any
author or copyright holder as a result of your choosing to follow a
later version.
15. Disclaimer of Warranty.
THERE IS NO WARRANTY FOR THE PROGRAM, TO THE EXTENT PERMITTED BY
APPLICABLE LAW. EXCEPT WHEN OTHERWISE STATED IN WRITING THE COPYRIGHT
HOLDERS AND/OR OTHER PARTIES PROVIDE THE PROGRAM "AS IS" WITHOUT WARRANTY
OF ANY KIND, EITHER EXPRESSED OR IMPLIED, INCLUDING, BUT NOT LIMITED TO,
THE IMPLIED WARRANTIES OF MERCHANTABILITY AND FITNESS FOR A PARTICULAR
PURPOSE. THE ENTIRE RISK AS TO THE QUALITY AND PERFORMANCE OF THE PROGRAM
IS WITH YOU. SHOULD THE PROGRAM PROVE DEFECTIVE, YOU ASSUME THE COST OF
ALL NECESSARY SERVICING, REPAIR OR CORRECTION.
16. Limitation of Liability.
IN NO EVENT UNLESS REQUIRED BY APPLICABLE LAW OR AGREED TO IN WRITING
WILL ANY COPYRIGHT HOLDER, OR ANY OTHER PARTY WHO MODIFIES AND/OR CONVEYS
THE PROGRAM AS PERMITTED ABOVE, BE LIABLE TO YOU FOR DAMAGES, INCLUDING
ANY
GENERAL, SPECIAL, INCIDENTAL OR CONSEQUENTIAL DAMAGES ARISING OUT OF THE
USE OR INABILITY TO USE THE PROGRAM (INCLUDING BUT NOT LIMITED TO LOSS OF
DATA OR DATA BEING RENDERED INACCURATE OR LOSSES SUSTAINED BY YOU OR
© 2014 Elektron Technology UK Ltd.
Page 94

MPS II Manual94
THIRD
PARTIES OR A FAILURE OF THE PROGRAM TO OPERATE WITH ANY OTHER PROGRAMS),
EVEN IF SUCH HOLDER OR OTHER PARTY HAS BEEN ADVISED OF THE POSSIBILITY OF
SUCH DAMAGES.
17. Interpretation of Sections 15 and 16.
If the disclaimer of warranty and limitation of liability provided
above cannot be given local legal effect according to their terms,
reviewing courts shall apply local law that most closely approximates
an absolute waiver of all civil liability in connection with the
Program, unless a warranty or assumption of liability accompanies a
copy of the Program in return for a fee.
END OF TERMS AND CONDITIONS
How to Apply These Terms to Your New Programs
If you develop a new program, and you want it to be of the greatest
possible use to the public, the best way to achieve this is to make it
free software which everyone can redistribute and change under these terms.
To do so, attach the following notices to the program. It is safest
to attach them to the start of each source file to most effectively
state the exclusion of warranty; and each file should have at least
the "copyright" line and a pointer to where the full notice is found.
<one line to give the program's name and a brief idea of what it does.>
Copyright (C) <year> <name of author>
This program is free software: you can redistribute it and/or modify
it under the terms of the GNU General Public License as published by
the Free Software Foundation, either version 3 of the License, or
(at your option) any later version.
This program is distributed in the hope that it will be useful,
but WITHOUT ANY WARRANTY; without even the implied warranty of
MERCHANTABILITY or FITNESS FOR A PARTICULAR PURPOSE. See the
GNU General Public License for more details.
You should have received a copy of the GNU General Public License
along with this program. If not, see <http://www.gnu.org/licenses/>.
Also add information on how to contact you by electronic and paper mail.
If the program does terminal interaction, make it output a short
notice like this when it starts in an interactive mode:
<program> Copyright (C) <year> <name of author>
This program comes with ABSOLUTELY NO WARRANTY; for details type `show w'.
This is free software, and you are welcome to redistribute it
under certain conditions; type `show c' for details.
The hypothetical commands `show w' and `show c' should show the appropriate
parts of the General Public License. Of course, your program's commands
might be different; for a GUI interface, you would use an "about box".
© 2014 Elektron Technology UK Ltd.
Page 95

Appendix 8 - Software License Agreement 95
You should also get your employer (if you work as a programmer) or school,
if any, to sign a "copyright disclaimer" for the program, if necessary.
For more information on this, and how to apply and follow the GNU GPL, see
<http://www.gnu.org/licenses/>.
The GNU General Public License does not permit incorporating your program
into proprietary programs. If your program is a subroutine library, you
may consider it more useful to permit linking proprietary applications with
the library. If this is what you want to do, use the GNU Lesser General
Public License instead of this License. But first, please read
<http://www.gnu.org/philosophy/why-not-lgpl.html>.
----------------------------------------------------------------------------------------------
Copyright © 2009 Free Software Foundation, Inc. <http://fsf.org/>
Everyone is permitted to copy and distribute verbatim copies of this license document, but changing
it is not allowed.
This GCC Runtime Library Exception ("Exception") is an additional permission under section 7 of the
GNU General Public License, version 3 ("GPLv3"). It applies to a given file (the "Runtime Library")
that bears a notice placed by the copyright holder of the file stating that the file is governed by
GPLv3 along with this Exception.
When you use GCC to compile a program, GCC may combine portions of certain GCC header files
and runtime libraries with the compiled program. The purpose of this Exception is to allow
compilation of non-GPL (including proprietary) programs to use, in this way, the header files and
runtime libraries covered by this Exception.
0. Definitions.
A file is an "Independent Module" if it either requires the Runtime Library for execution after a
Compilation Process, or makes use of an interface provided by the Runtime Library, but is not
otherwise based on the Runtime Library.
"GCC" means a version of the GNU Compiler Collection, with or without modifications, governed by
version 3 (or a specified later version) of the GNU General Public License (GPL) with the option of
using any subsequent versions published by the FSF.
"GPL-compatible Software" is software whose conditions of propagation, modification and use would
permit combination with GCC in accord with the license of GCC.
"Target Code" refers to output from any compiler for a real or virtual target processor architecture, in
executable form or suitable for input to an assembler, loader, linker and/or execution phase.
Notwithstanding that, Target Code does not include data in any format that is used as a compiler
intermediate representation, or used for producing a compiler intermediate representation.
The "Compilation Process" transforms code entirely represented in non-intermediate languages
designed for human-written code, and/or in Java Virtual Machine byte code, into Target Code. Thus,
for example, use of source code generators and preprocessors need not be considered part of the
Compilation Process, since the Compilation Process can be understood as starting with the output
of the generators or preprocessors.
A Compilation Process is "Eligible" if it is done using GCC, alone or with other GPL-compatible
software, or if it is done without using any work based on GCC. For example, using non-GPLcompatible Software to optimize any GCC intermediate representations would not qualify as an
Eligible Compilation Process.
1. Grant of Additional Permission.
© 2014 Elektron Technology UK Ltd.
Page 96

MPS II Manual96
You have permission to propagate a work of Target Code formed by combining the Runtime Library
with Independent Modules, even if such propagation would otherwise violate the terms of GPLv3,
provided that all Target Code was generated by Eligible Compilation Processes. You may then
convey such a combination under terms of your choice, consistent with the licensing of the
Independent Modules.
2. No Weakening of GCC Copyleft.
The availability of this Exception does not imply any general presumption that third-party software is
unaffected by the copyleft requirements of the license of GCC.
----------------------------------------------------------------------------------------------
/* ====================================================================
* Copyright (c) 1998-2011 The OpenSSL Project. All rights reserved.
*
* Redistribution and use in source and binary forms, with or without
* modification, are permitted provided that the following conditions
* are met:
*
* 1. Redistributions of source code must retain the above copyright
* notice, this list of conditions and the following disclaimer.
*
* 2. Redistributions in binary form must reproduce the above copyright
* notice, this list of conditions and the following disclaimer in
* the documentation and/or other materials provided with the
* distribution.
*
* 3. All advertising materials mentioning features or use of this
* software must display the following acknowledgment:
* "This product includes software developed by the OpenSSL Project
* for use in the OpenSSL Toolkit. (http://www.openssl.org/)"
*
* 4. The names "OpenSSL Toolkit" and "OpenSSL Project" must not be used to
* endorse or promote products derived from this software without
* prior written permission. For written permission, please contact
* openssl-core@openssl.org.
*
* 5. Products derived from this software may not be called "OpenSSL"
* nor may "OpenSSL" appear in their names without prior written
* permission of the OpenSSL Project.
*
* 6. Redistributions of any form whatsoever must retain the following
* acknowledgment:
* "This product includes software developed by the OpenSSL Project
* for use in the OpenSSL Toolkit (http://www.openssl.org/)"
*
* THIS SOFTWARE IS PROVIDED BY THE OpenSSL PROJECT ``AS IS'' AND ANY
* EXPRESSED OR IMPLIED WARRANTIES, INCLUDING, BUT NOT LIMITED TO, THE
* IMPLIED WARRANTIES OF MERCHANTABILITY AND FITNESS FOR A PARTICULAR
* PURPOSE ARE DISCLAIMED. IN NO EVENT SHALL THE OpenSSL PROJECT OR
* ITS CONTRIBUTORS BE LIABLE FOR ANY DIRECT, INDIRECT, INCIDENTAL,
* SPECIAL, EXEMPLARY, OR CONSEQUENTIAL DAMAGES (INCLUDING, BUT
* NOT LIMITED TO, PROCUREMENT OF SUBSTITUTE GOODS OR SERVICES;
* LOSS OF USE, DATA, OR PROFITS; OR BUSINESS INTERRUPTION)
* HOWEVER CAUSED AND ON ANY THEORY OF LIABILITY, WHETHER IN CONTRACT,
* STRICT LIABILITY, OR TORT (INCLUDING NEGLIGENCE OR OTHERWISE)
© 2014 Elektron Technology UK Ltd.
Page 97

Appendix 8 - Software License Agreement 97
* ARISING IN ANY WAY OUT OF THE USE OF THIS SOFTWARE, EVEN IF ADVISED
* OF THE POSSIBILITY OF SUCH DAMAGE.
* ====================================================================
*
* This product includes cryptographic software written by Eric Young
* (eay@cryptsoft.com). This product includes software written by Tim
* Hudson (tjh@cryptsoft.com).
*
*/
© 2014 Elektron Technology UK Ltd.
Page 98

Back Cover
 Loading...