

elektraLite ELEKTRIC EYE H.P., Elektric Eye User Manual
THE ELEKTRIC EYE USER MANUAL
(V1.02)
Elektralite is a division of Group One. 70, Sea Lane, Farmingdale, NY 11735, USA.
Tel: +1 (516)-249-3662. Fax: +1 (516)-249-8870
WWW.MYELEKTRALITE.COM

INTRODUCTION:
Thank you for choosing Elektralite’s Elektric Eye H.P. fixture.
Please read the User Manual carefully and keep it in a safe place after reading it.
The Elektric Eye is very easy to install and use once you have read the manual. Failure to do so could result in
damage to the fixture, which will not be covered under warranty so please take the time to read it.
When you unpack the Elektric Eye you should find inside the box: the fixture, a 120 volt power cable, a 3 pin
DMX signal cable, a safety cable and of course the CD with the manual. Please check carefully that there is no
damage caused by transportation. Should there be any, consult your dealer immediately and don’t install the
fixture.
Features
¾ Pan 630° / Tilt 265°
¾ 8 colors plus white & rainbow effect
¾ 6 rotating gobos
¾ Strobe : with a frequency of 0~10 flashes per second.
¾ Automatic program
¾ Display : digital address and function setting (also the display can be inverted if
fixture is hung upside down).
¾ High speed pan & tilt movements
¾ Local or remote resetting
¾ Lamp switch ON/OFF locally
¾ Auto test for all functions
¾ Value of each DMX-channel can be displayed
¾ Saved Program : You can edit and save a program internally in the fixture by using either the
display panel of the fixture or using an external controller (your
can save a maximum of 48 scenes. You can then run this saved program by using the “run” feature
from the menu on the display panel
Elektralite CP10xt or CP20xt). You
SAFETY INSTRUCTIONS
A Word of Caution.
Please remember you will be working with 120 volts and you can suffer electric shoc k from any exposed lives
wires. So please be careful at all times and behave wisely.
Now you’re Elektric Eye
ensure a safe operation, it is absolutely essential that the installer and user follow the safety instructions and
warning notes written in this user manual. Remember any damage caused by disregarding the manual or no t
reading it, will not be covered by warranty and Elektralite (or any of its dealers) will not accept responsibility for
any resulting damage or problems.
If the Elektric Eye has been exposed to large environmental temperature changes in transit please do not
switch it on immediately it is unpacked. There maybe internal condensation. So leave the Elektric Eye off until
it has reached the running temperature of the venue.
left Elektralite’s factory in perfect condition. In order to maintain this condition and to
Elektralite’s Elektric Eye needs to be grounded. Do NOT cut the ground pin or try to use two-core cable to
connect it to a 120-volt receptacle. To be safe and to work properly you must have this fixture grounded.
A qualified electrician must do any electrical work.
Make sure that the power is only 120 volts. This unit will be damaged if you chose to install it at any other
- 1 -

voltage. In an installation it is always best to check the voltage before connecting. And remember never try to
connect your Elektric Eye live.
Make sure that the power cable is not damaged and never break off the ground pin.
Always disconnect the power, when the device is not in use or before cleaning it. If you don’t then you are
wasting the lamp life. Merely closing the shutter just stop s the light output, it does NOT T URN OFF THE LAMP.
Never try to disconnect your Elektric Eye by pulling out the plug by tugging the cord.
Never touch the Elektric Eye when powered up. The lamp produces a consi derable amount of heat and as a
result the housing does get hot. You can be burnt if you touch it.
Never look directly into the lamp source. Sensitive person could suffer an epileptic shock.
Never open the Elektric Eye and look at the lamp when the lamp is still on or when it is turned off but still hot or
even warm. The Elektric Eye uses a discharge lamp, which is volatile. The lamp can explode at anytime. Use
extreme caution and do not expose yourself to it. When replacing the lamp do not touch any glass part of the
lamp. Only handle by the silver terminal ends. Do not over tighten when installing a new lamp. Hand tight is
more than enough. PLEASE make sure that power to the fixture is disconnected
down to room temperature before installing a new lamp.
and allow the fixture to cool
Please keep out of reach of the general public, children and animals.
GENERAL GUIDELINES
The Elektric Eye is a lighting fixture for professional use on stages, in clubs, theatres, and so on.
This fixture should only be operated at the voltage, which is stated in the technical specifications in the last
page of this manual.
The Elektric Eye is designed for indoor use only.
The Elektric Eye is not designed for permanent operation. Consistent operation breaks may ensure that the
device will serve you for a long time without defects.
Do not shake the Elektric Eye.
Do not use physical force when installing or operating the Elektralite Eye.
While choosing the installation position, please make sure that the Elektralite Eye is not exposed to extreme
heat, moisture or dust.
The minimum distance from the Elektric Eye front lens to any illuminated surface must be more than 3 feet.
Please be careful what surface you shine the light onto; light also has heat and this can affect the illuminated
surface. Elektralite will not be responsible for fading, color distortion or heat distortion caused by the light
beam.
When you hang the Elektric Eye please use an appropriate safety cable. Please make sure that any hanging
equipment, like threaded rod or C clamp is appropriate for the job. Remember, with a moving yoke fixture, that
the momentum of moving this large mass will cause extra “stress” on any mounting materials.
Only operate the Elektric Eye after you know its functions. Do not permit operation by persons not qualified.
Please use the original packaging if the device is to be transported. [Beware the majority of shipping
companies will not accept any liability for damage if the fixture is not shipped in the manufacturer’s original box
and insert packaging material].
If this fixture is operated in any other way different to that described in this manual, the fixture could be
damaged and any warranty would be void.
- 2 -
INSTALLATION INSTRUCTIONS
A). Installing or replacing the lamp
1. Install the lamp with the fixture unplugged from the electric source.
Never try to replace a lamp with the fixture still turned on and still hooked up to the electric.
2. If you are replacing the lamp, before opening the ho using to replace it,
let it cool down to room temperature. The lamp burns at very high
temperatures and it is a discharge lamp. If the lamp has been running then
expect anything up to half an hour before the housing is cool enough to
consider even opening up.
3. When installing a new lamp do not touch any glass part of the lamp.
Always use a clean cloth to handle lamps. The sweat from your fingers will cause the lamp to
burn incorrectly and will shorten lamp life. If you do touch the glass, then check in the lamp box
for a special wipe to clean the lamp.
4. Only install MSD 250/2 GY 9.5 lamps. Any other lamp is not accept able.
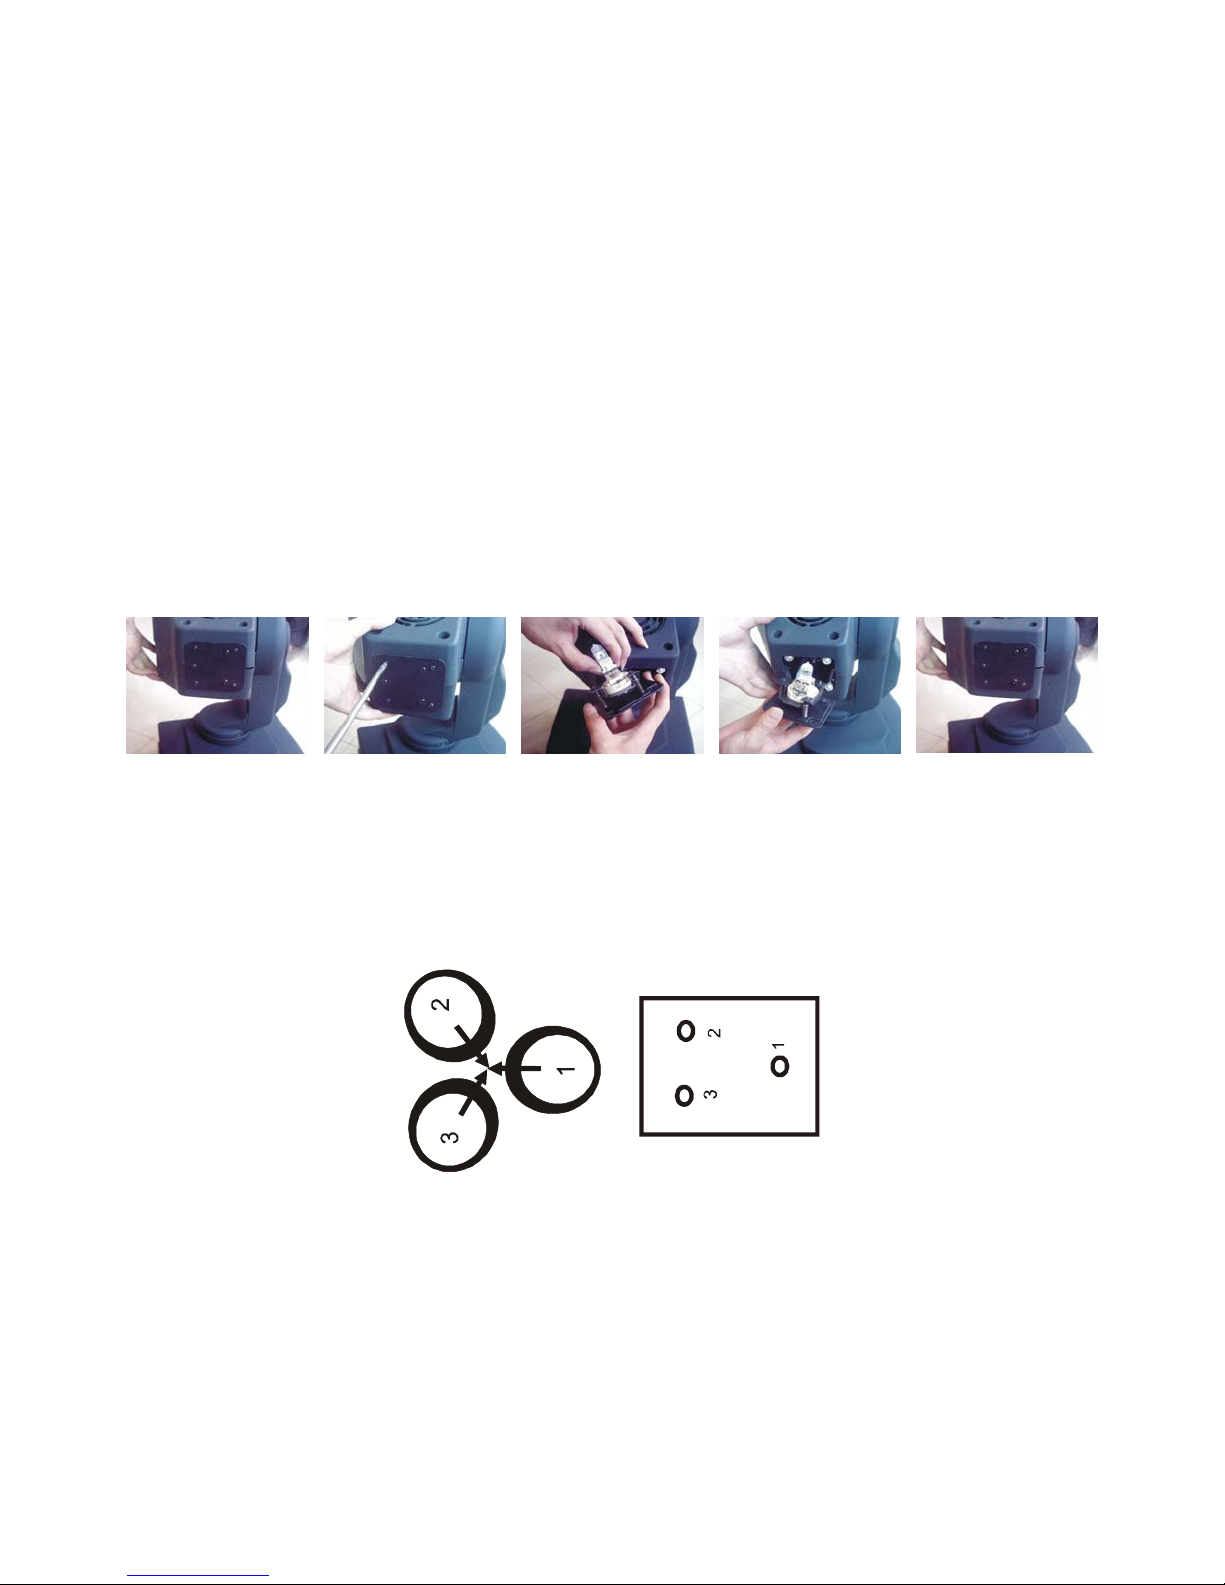
Procedure :
1) Unscrew the 2 screws on the back of the housing that hold the lamp housing plate in position.
2) Gently pull the plate out using the knob in the middle of the plate.
3) Carefully insert the lamp into the socket. The socket is polarized so there is only one way to insert the lamp.
Gently slide the lamp into the socket making sure the spring clips secure the lamp socket correctly. Then insert
the plate back into the fixture and fasten the 2 screws back in place.
4) On the plate there are 3 small screws marked 1, 2 and 3. These are u sed to adj ust the la mp. You can adj u st
the 3 screws to fine-tune the position of the lamp. In this way you can achieve the maximum output from the
lamp.
Please remember the lamp is not a hot-restrike type, you must wait for approximately 10
minutes after turning the lamp off before turning it back on again.
Warning:- Never ever operate the lamp when it is not inside the fixture. MSD lamps are volatile and could
possibly explode. Only turn on the fixture with the lamp securely inside the fixture and the cover plate screwed
on.
- 3 -
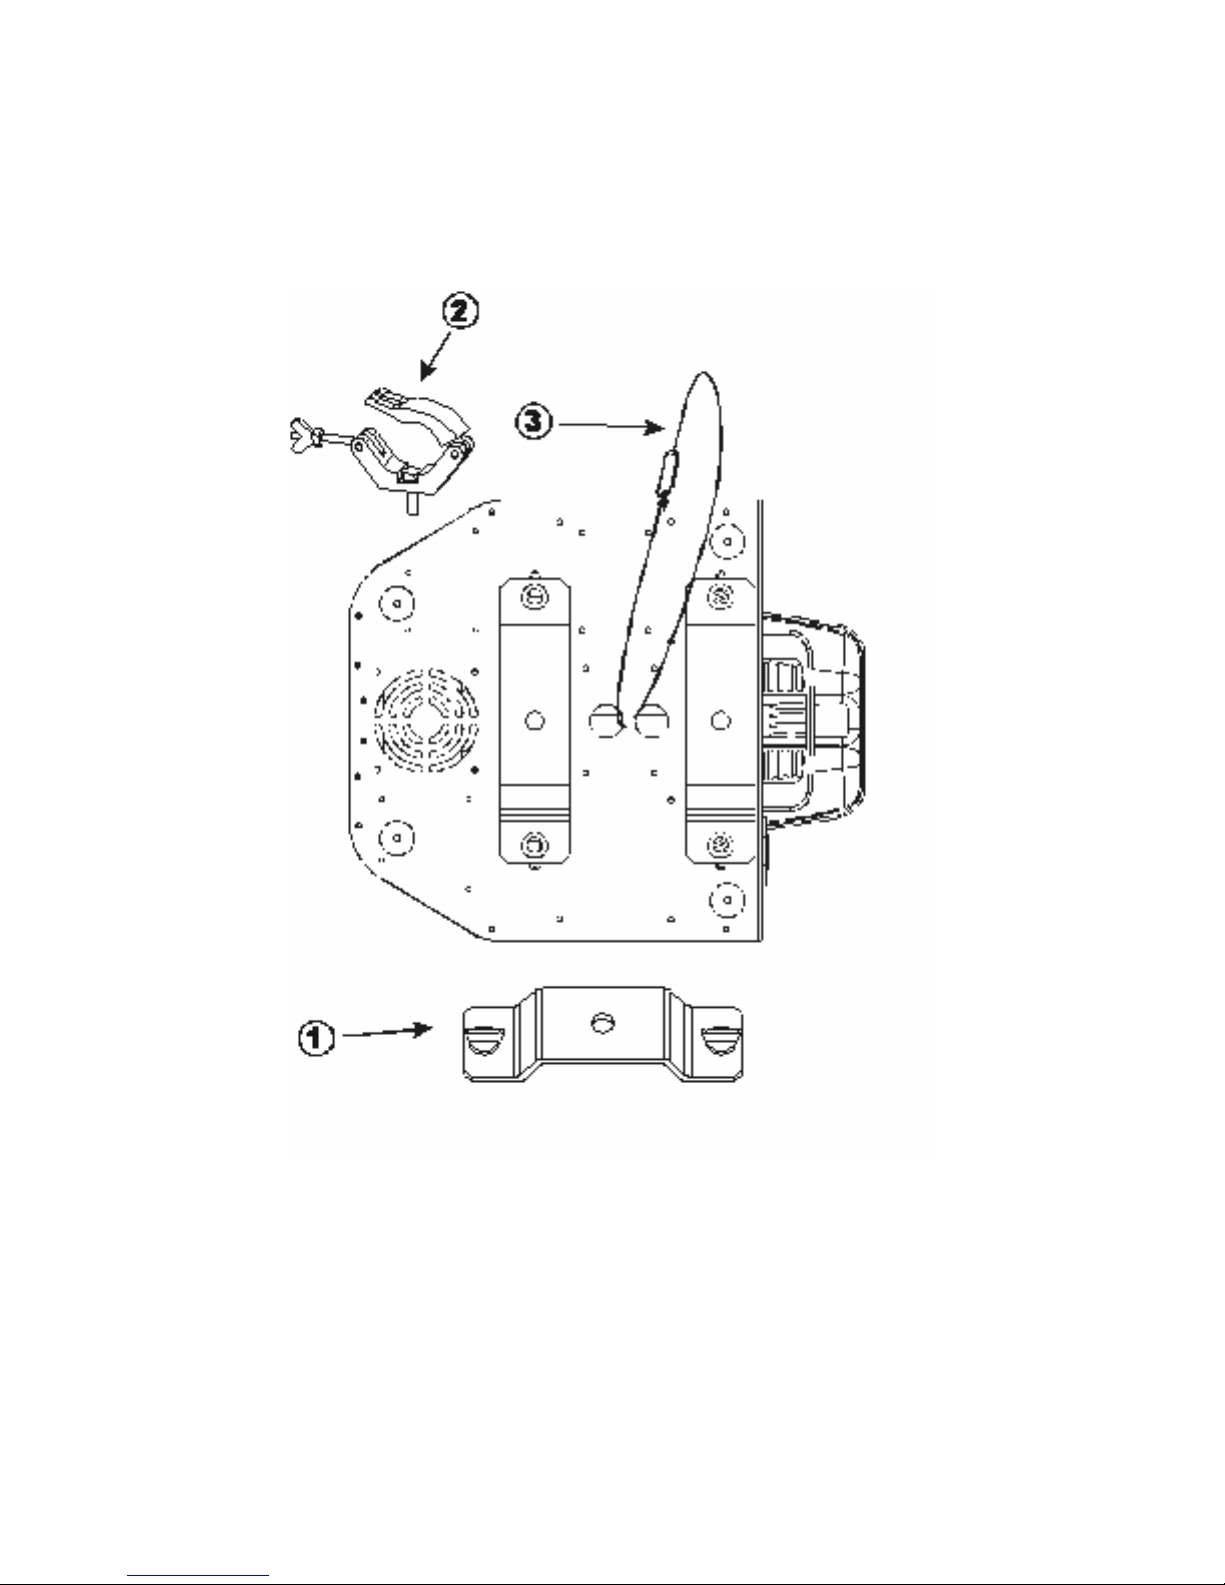
B). Mounting Elektric Eye
Installation using U Bracket Claps (Omega Clamps) with half Cheeseboros/couplers.
1. U Bracket Clamp (also known as an Omega Clamp)
fitted with quarter turn connectors.
2. Half cheeseboro (also known as a half coupler).
A C clamp (or G Clamp) can be used instead of a half
Cheeseboro. Or even a piece of thread rod can be fitted
to the Omega clamp.
3. Safety chain
Fit the half cheeseboros or C clamps to the U brackets. Then fit the U brackets to the Elektric Eye using the
camlocs.
Finally, fit a safety chain to Elektric Eye. Don’t clamp the safety to the half cheeseboros or C Clamp. That
defeats the reason for a safety cable….namely a SEPARATE backup to the primary hanging mechanism.
- 4 -
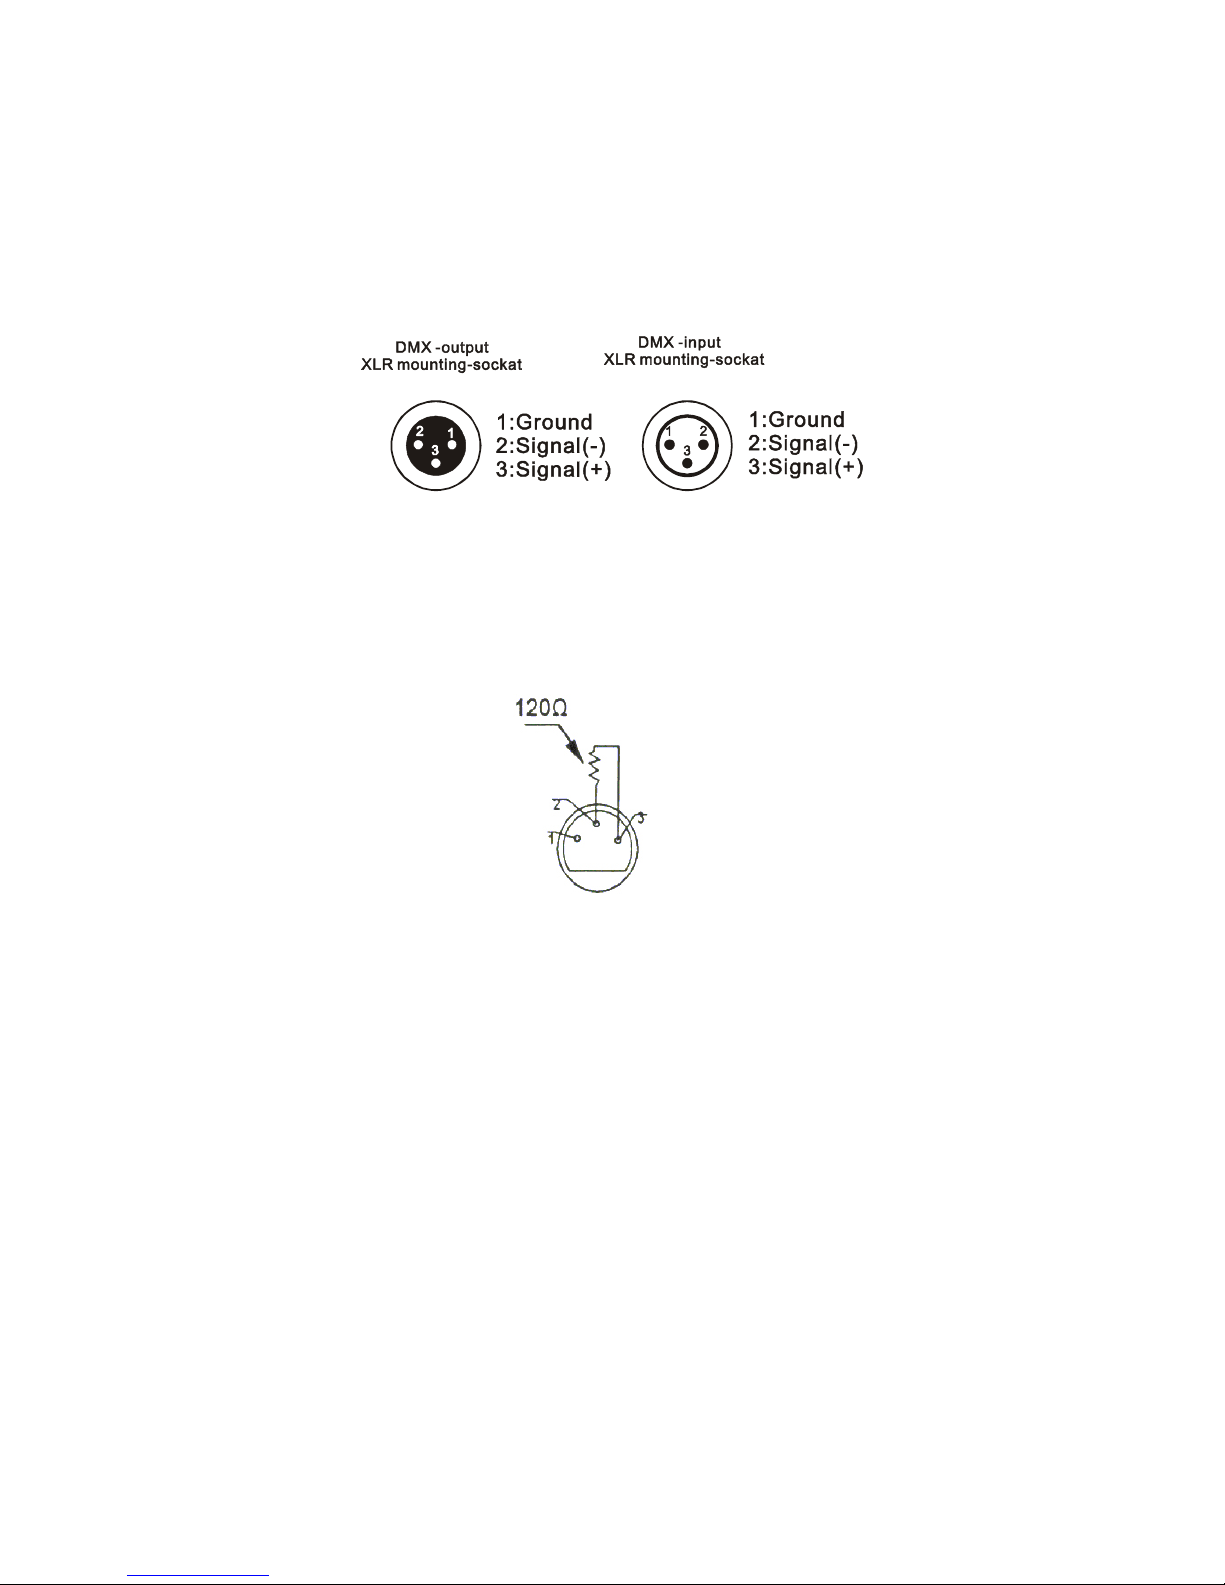
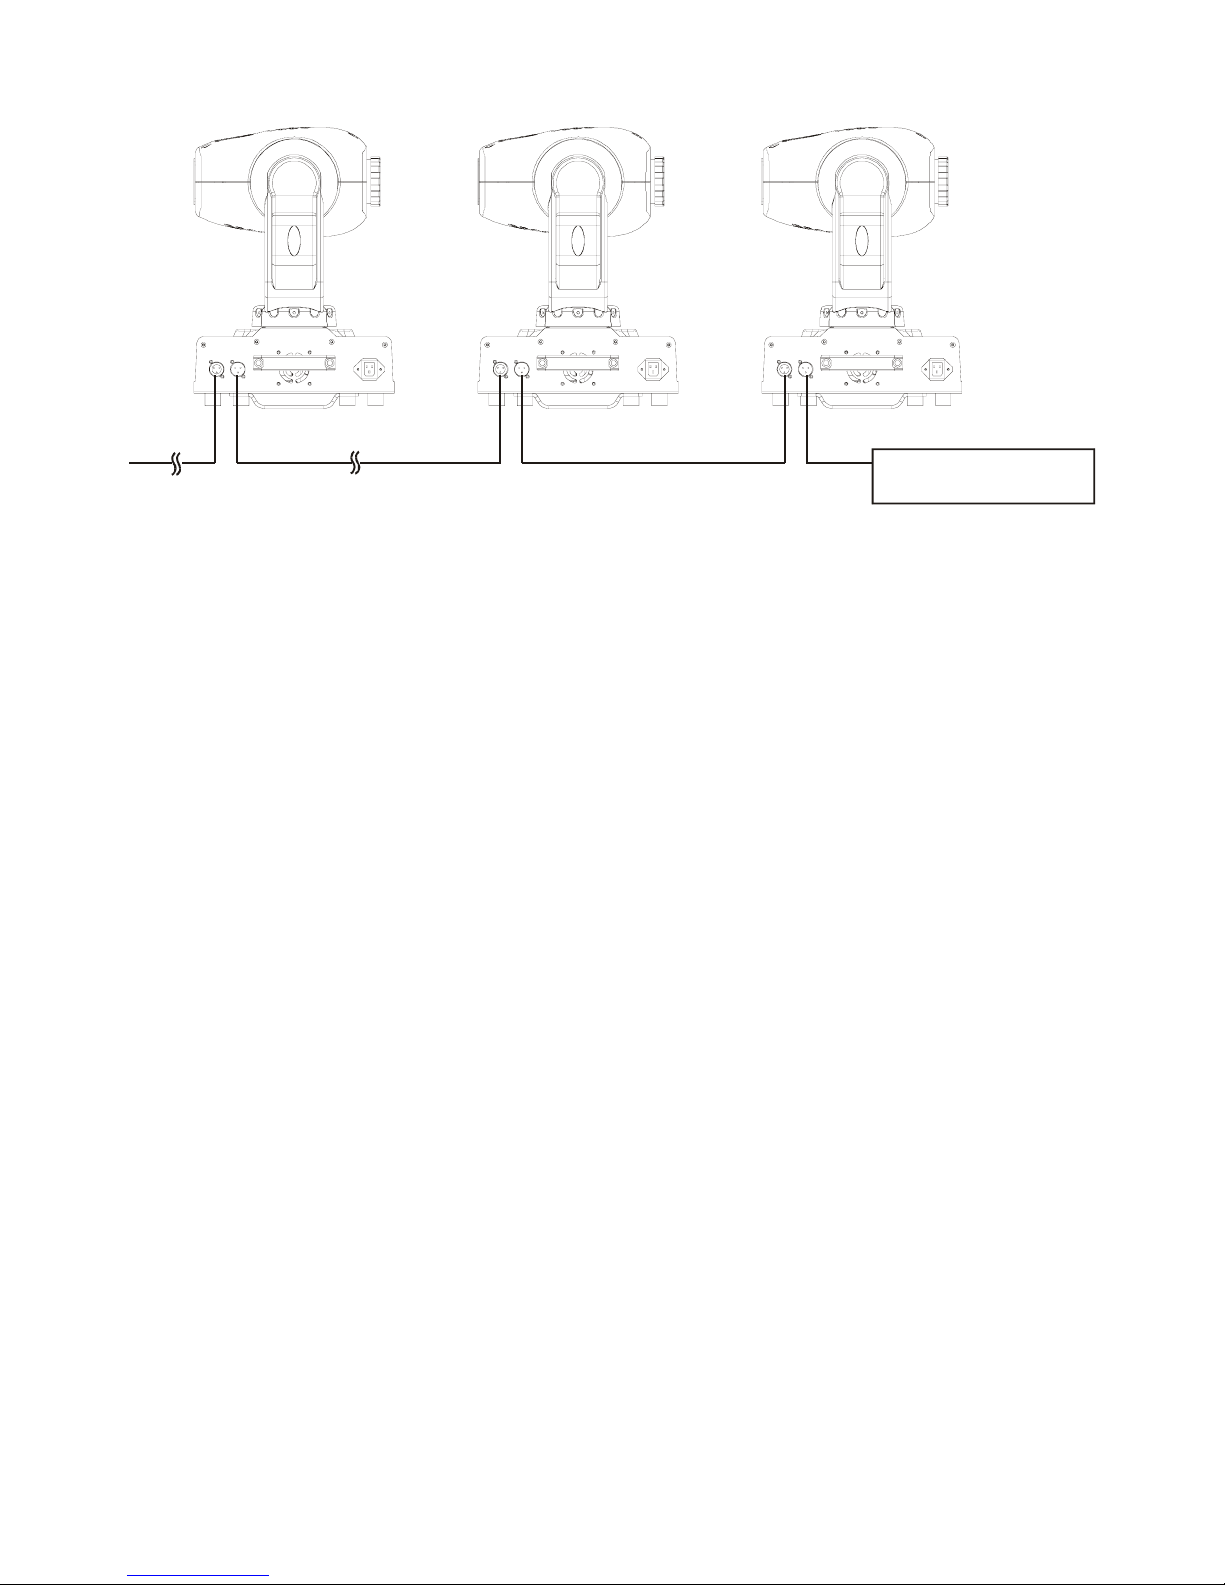
DMX-512 control connection.
Connect the 3 pin XLR cable to the DMX controller and then to the first Elektric Eye in the daisy chain. Doi ng it
this way round avoids the pain of rewiring, if you get the wrong end of the cable back at the controller.
Continue wiring from one Elektric Eye to the next fixture in a daisy chain manner. Never try to Y split cables.
Never try to “star wire” a DMX cable run. It will not work.
If additional cable needs to be made up then two-core cable with a screen needs to be purchased. For wiring
please see the diagram below.
DMX has a maximum running distance of 330 feet. When long distances are involved then there is a tendency
for electrical noise to be evident. In which case, a DMX terminator will be required. The terminator helps
prevent corruption of the DMX signal. To make a DMX terminator, simply solder a 120 ohm re sistor ac ross pins
2 and 3 of an XLR male connector. Then place that connector at the very end of the DMX cable run. In other
words at the last Elektric Eye..
It maybe the case that you will need to connect a 5 pin XLR to the 3 pin XLR. In a normal DMX wiring
configuration, the 5 pin is soldered identically to the 3 pin. So in the 5 pin
1: Ground
2: Signal (-)
3: Signal (+)
Pins 4 and 5 are not used. Be very sure you read the pin numbering on the connector when you solder up the
connector. Do not just wi re up the th ree pin s to the l ef t or right b e cause th e male and fe male conne ctor ha s the
pins on different “sides” of the connector! Read the pin numbers.
- 5 -
CONTROLLER
Projector DMX start address selection
In order for the controller like Elektralite’s CP10xt to control each Elektric Eye it has to know where it is in the
daisy chain of DMX. To do this all Elektric Eyes have to be set to a st art address. To understand the concept of
a starter address we also have to understand the concept of channels and the features those channels have.
Elektric Eye uses 8 channels of DMX. Those channels control the features of Elektric Eye. They are as
follows:-
CHANNEL 1 : select one of the 8 colors, color cycle or rainbow effect
CHANNEL 2 : select one of the 6 gobo’s + open or gobo cycle+ gobo shake
CHANNEL 3 : select gobo rotation speed and direction
CHANNEL 4 :
CHANNEL 5 : pan movement (max. 630°)
CHANNEL 6 : tilt movement (max. 265°)
CHANNEL 7 : speed pan/tilt movement, blackout selection
CHANNEL 8 : auto program control + lamp on, motor reset, lamp switch off
CHANNEL 9 : pan fine
CHANNEL10: tilt fine
So if we start with the first Elektric Eye its first channel is 1. So we refer to it as having a starter address of 1.
The second Elektric Eye will then have its first chan nel or starter address at channel 9.
The third Elektric Eye will then have its first channel or starter address at channel 17, and so on. Now if you
want two Elektric Eyes to be always the same in color, movement and so on then you can set both of them to
the same address. In this way you can create groups of fixtures having the same effects happen at the same
time. There is no restriction on how many Elektric Eyes you have on the same starter address
If you just bought a Elektric Eye and it came with an Elektralite CP10xt, the starter addresses in the
CP10xt have already been set. All y ou have to do is set the starter addresses on Elektric Eyes.
If you have another controller, then you will have to set it’s starter addresses for each Elektric Eye before you
will be able to control any Elektric Eye.
1. If you change the address on Elektric Eye it may appear not to have accepted that address. Turn
2. When you turn on Elektric Eye, if it is receiving data, the display will show “A.001” or “A.009” or
Strobe (0 to 10 flashes a second).
Tips & Tricks
Elektric Eye off wait until the lamp cools down (remember it is not a hot re-strike lamp) and then turn it
back on again.
whatever the address is for Elektric Eye. If there is still no data getting to Elektric Eye, then run a
cable directly from the controller to the fixture.
- 6 -
 Loading...