

Page 1
HS 6000 W
HS 6000 D
Betriebsanleitung. . . . . . . . . . . . . . . . . . . . 3
Operating Instruction . . . . . . . . . . . . . . . . 10
Instructions d'utilisation . . . . . . . . . . . . . . 17
Handleiding . . . . . . . . . . . . . . . . . . . . . . . 24
Manuale d’istruzioni. . . . . . . . . . . . . . . . . 32
Manual de instrucciones . . . . . . . . . . . . . 41
Betjeningsvejledning . . . . . . . . . . . . . . . . 49
115 168 3165 / 5001 - 1.0
Page 2

U2W0068.fm
S
Ê
A
ÖRSÄ
E
K
A
D DEUTSCH ENG ENGLISH
KONFORMITÄTSERKLÄRUNG DECLARATION OF CONFORMITY
Wir erklären in alleiniger Verantwortlichkeit, daß dieses Produkt mit den
folgenden Normen übereinstimmt* gemäß den Bestimmungen der
Richtlinien**
F FRANÇAIS NL NEDERLAND
DECLARATION DE CONFORMITE CONFORMITEITSVERKLARING
Nous déclarons, sous notre seule responsabilité, que ce produit est en
conformité avec les normes ou documents normatifs suivants* en vertu
des dispositions des directives **
IT ITALIANO ES ESPAÑOL
DICHIARAZIONE DI CONFORMITÀ DECLARACION DE CONFORMIDAD
Noi dichiariamo sotto la nostra esclusiva responsabilità che il presente
prodotto è conforme alle seguenti norme* in conformità con le
disposizioni delle normative **
PT PORTUGU
DECLARAÇÃO DE CONFORMIDADE
Declaramos sob nossa responsabilidade que este produto está de
acordo com as seguintes normas* de acordo com as directrizes dos
regulamentos **
FIN SUOMI NO NORGE
VAATIMUKSENMUKAISUUSVAKUUTUS SAMSVARSERKLÆRING
Vakuutamme, että tämä tuote vastaa seuraavia normeja* on direktiivien
määräysten mukainen**
DA DANS
OVERENSSTEMMELSESATTEST OŚWIADCZENIE O ZGODNOŚCI
Hermed erklærer vi på eget ansvar, at dette produkt stemmer overens
ed følgende standarder* iht bestemmelserne i direktiverne**
EL ΕΛΛHNIK
∆ΗΛΩΣΗ ΑΝΤΙΣΤΟΙΧΕΙΑΣ MEGEGYEZŐSÉGI NYILATKOZAT
∆ηλώνουµε µε ιδία ευθύνη ότι το προϊόν αυτό αντιστοιχεί στις
ακόλουθες προδιαγραφές*
σύµφωνα µε τις διατάξεις των οδηγιών**
S SV SVENSK
We herewith declare in our sole repsonsibility that this product complies
with the following standards*
in accordance with the regulations of the undermentioned Directives**
Wij verklaren als enige verantwoordelijke, dat dit product in
overeenstemming is met de volgende normen*
conform de bepalingen van de richtlijnen**
Declaramos bajo nuestra exclusiva responsabilidad, que el presente
producto cumple con las siguientes normas* de acuerdo a lo dispuesto
en las directrices**
KRAN OM ÖVERENSSTÄMMELS
F
Vi försäkrar på eget ansvar att denna produkt överensstämmer med
följande standarder* enligt bestämmelserna i direktiven**
Vi erklærer under eget ansvar at dette produkt samsvarer med følgende
normer* henhold til bestemmelsene i direktiv**
POL POLSKI
Oświadczamy z pełną odpowiedzialnością, że niniejszy produkt
odpowiada wymogom następujących norm* według ustaleń wytycznych
**
HU MAGYAR
Kizárólagos felelősségünk tudatában ezennel igazoljuk, hogy ez a
termék kielégíti az alábbi szabványokban lefektetett követelményeket*
megfelel az alábbi irányelvek előírásainak**
HS 6000 W - HS 6000 D
* EN 609-1
** 98/37/EG, 89/366/EWG, 73/23/EWG, 93/68/EWG
Jürgen Kusserow
Vorstand
ELEKTRA BECKUM AG – Daimlerstraße 1 – 49716 Meppen
2
Page 3
XW0010E1.fm Operating Instruction ENGLISH
ENGLISH
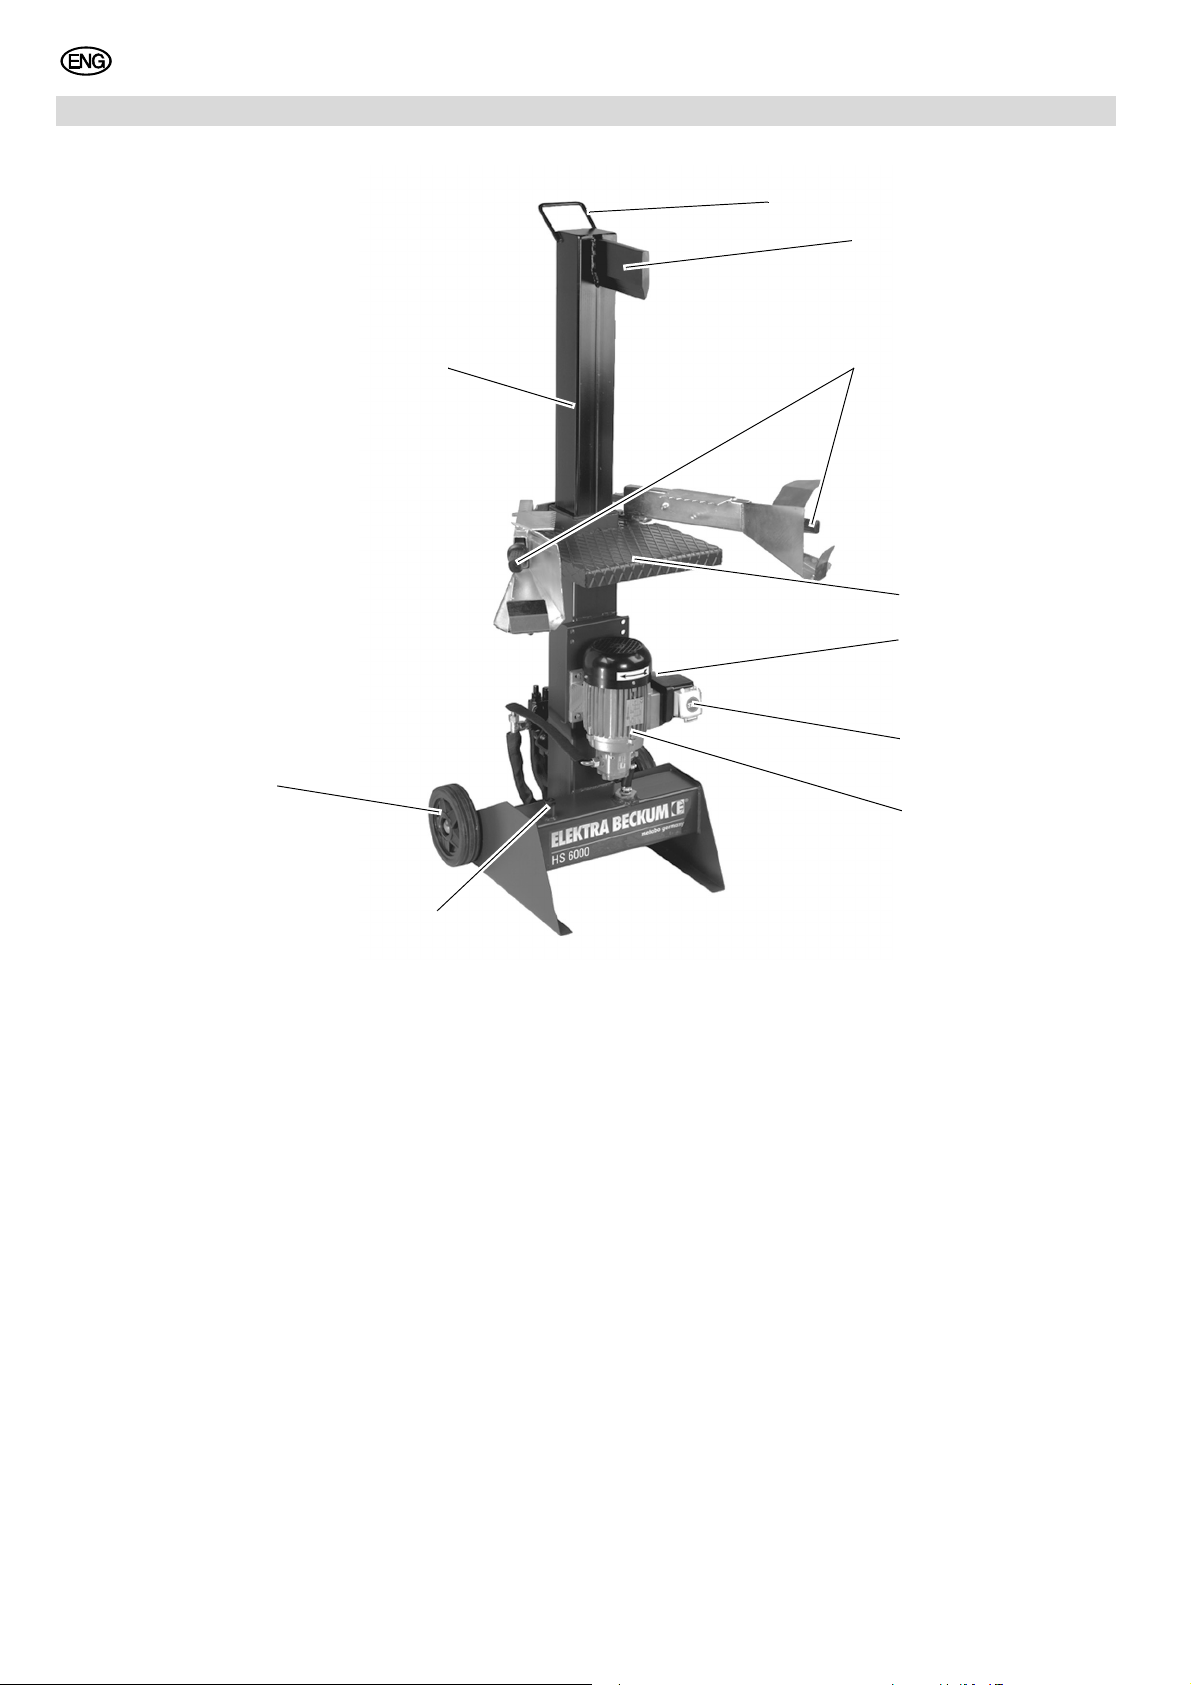
1. Machine overview
1
2
10
9
8
3
4
5
6
7
1 Transport handle
2 Splitting knife
3 Operating levers
4 Work table
5 Power connection
6 ON/OFF switch
7 Motor with hydraulic pump
8 Oil filler cap / dipstick
9 Wheel set
10 Splitter center column
10
Page 4

ENGLISH
Table of Contents
1. Machine overview .....................10
2. Please read first! ....................... 11
3. Safety .........................................11
3.1 Specified conditions of use.........11
3.2 General safety instructions .........11
3.3 Safety devices ............................11
3.4 Symbols on the machine ............12
3.5 Symbols used throughout
these instructions........................12
4. Special product features..........12
5. Transportation and
installation.................................12
5.1 Machine installation ....................12
5.2 Screw in the oil filler cap .............12
5.3 Power connection .......................12
5.4 Initial operation ...........................13
6. Operation...................................13
6.1 Splitting.......................................13
6.2 Changing the start position of
the splitting knife.........................14
7. Care and maintenance .............14
7.1 Changing the hydraulics fluid......14
7.2 Clean the oil filter. .......................14
7.3 Machine storage .........................15
7.4 Maintenance ...............................15
8. Available accessories .........15/51
9. Repairs.......................................15
10. Trouble shooting ......................15
11. Technical specifications ..........16
2. Please read first!
• Read these instructions before initial
operation. Pay special attention to
the safety instructions.
• If you notice transport damage while
unpacking, notify your supplier
immediately. Do not operate the
machine!
• Dispose of the packing in an environmentally friendly manner. Take
to a proper collecting point.
• Keep these instructions for reference on any issues you may be
uncertain about.
• When you hire or sell the machine,
have all documents supplied go with
it.
3. Safety
3.1 Specified conditions of
use
This machine is only intended for splitting firewood as detailed in these instructions. Any other use is not as specified.
Unspecified use, modifications to the
machine, or use of parts not tested and
approved by the equipment manufacturer may cause unforeseeable damage!
This machine is intended for operation
by one person. Other persons shall keep
a sufficient distance to the machine.
Observe the permissible dimensions of
logs to be cut (see "Technical specifications").
Do not overload machine – use it only
within the performance range it was
designed for (see "Technical specifications").
3.2 General safety instructions
When using this machine, observe the
following safety instructions to exclude
the risk of personal injury or material
damage.
Please also observe the special safety
instructions in the respective chapters.
Where applicable, follow the legal directives or regulations for the prevention of
accidents pertaining to the use of log
splitters.
A
General hazards!
Be alert. Know what you are doing. Be
sure you are capable of doing this type
of work. Do not operate machine while
under the influence of drugs, alcohol or
medication.
Keep your work area tidy – a messy
work area invites accidents. Regularly
clear the work area of split wood.
Prevent adverse body positions. Ensure
firm footing and keep your balance at all
times.
Take all surrounding conditions into due
account.
Ensure that there is sufficiently good
lighting.
Do not operate machine near inflammable liquids or gases.
This machine shall only be started and
operated by a person familiar with log
splitters and who is at all time aware of
the dangers associated with the use of
such a machine.
Keep bystanders, particularly children,
out of the danger zone. Persons under
18 years of age shall use this machine
only in the course of their vocational
training, under the supervision of an
instructor.
Do not permit other persons to touch the
machine or power cable while it is running.
B
Danger! Risk of electric shock!
To ensure that the machine remains
weatherproof, before any use check to
see that switch, power cable and plug
are not damaged (no splits, cracks, etc.)
Do not use the power cable for any purpose it is not intended for (power cable is
not included with this machine).
Risk of personal injury and
A
crushing by moving parts!
Do not operate the machine without
installed guards.
Keep sufficient distance to driven components when operating the machine.
Ensure the machine is disconnected
from power supply before servicing.
Ensure that when switching on (e.g. after
servicing) no tools or loose parts are left
on or in the machine.
Turn power off if the machine is not
used.
A
Hazard generated by modification of the machine or use of parts
not tested and approved by the equipment manufacturer!
Use only parts approved by the equipment manufacturer. This applies particularly to:
− Hydraulic lines (see "Spare parts
list" for stock numbers);
− Safety devices (see "Spare parts
list" for stock numbers).
Do not change any parts.
Hazard generated by machine
A
defects!
Keep machine and accessories in good
repair. Observe the maintenance
instructions.
Each time before starting up the
machine, check it for signs of possible
damage. Before proceeding to use the
machine, carefully inspect all safety
equipment, safety systems, and any
slightly damaged parts to ensure that
these function trouble-free and as
intended. Check to see that all moving
parts work properly and do not jam. All
parts must be correctly installed and
meet all conditions necessary for the
proper operation of the machine.
Damaged protection devices or parts
must be repaired or replaced by a qualified specialist. Have damaged switches
replaced by a service centre. Do not use
this machine if the switch cannot be
turned ON or OFF.
Keep handles free of oil, grease and
resin.
3.3 Safety devices
Safety valve
The safety valve prevents motor damage caused by overload when the splitting knife is blocked or jammed. The
safety valve is sealed and must never be
tampered with. Do not attempt to adjust
it.
No-voltage release
The no-voltage release feature prevents
the machine from starting up when the
power is restored after a power failure.
11
Page 5
ENGLISH
Two-hand operation
Two-hand operation ensures that the
splitting knife travels downward only
when both operating levers are simultaneously pressed down.
Protective hose sleeve
The hose sleeve prevents oil from spraying out from damaged hydraulic lines
and causing injury.
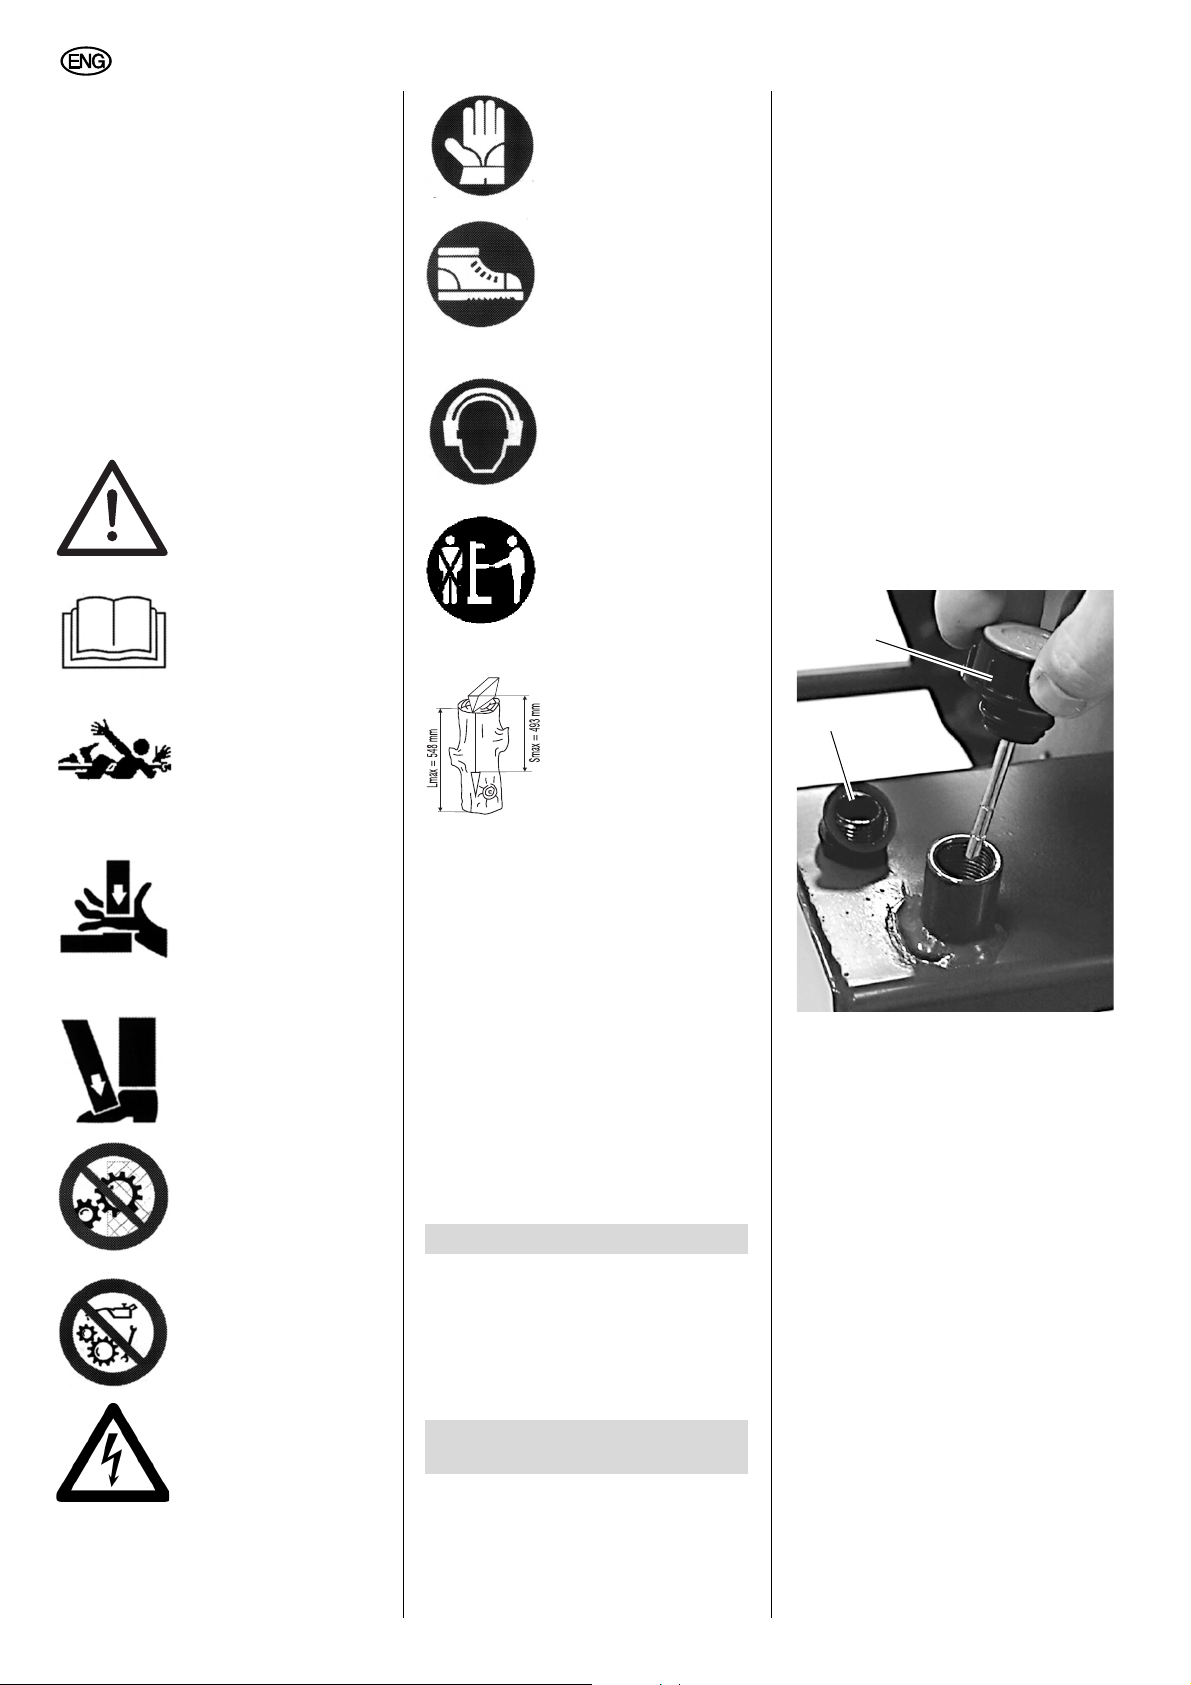
3.4 Symbols on the machine
Danger!
A
Disregard of the following
warnings could lead to severe personal injury or material damage.
Caution!
Moving parts.
Read these instructions
before initial operation.
Wear protective gloves.
Wear non-slip safety
shoes.
Wear hearing protection.
This machine is intended
for operation by one person only.
− level, non-slip ground
− All four of the machine's legs
must stand on firm, level ground
1. Transport the machine on the pallet
to a suitable location.
2. Remove packing and enclosed
parts.
3. Lift machine off the pallet.
5.2 Screw in the oil filler cap
To prevent oil from leaking out during
transport, the oil filler cap is replaced by
a temporary shipping cover sealed with
a gasket. Before using the machine for
the first time, be sure to replace the temporary shipping cover with the oil filler
cap.
Retain the shipping cover and gasket for
use during later transport.
1. Unscrew the shipping cover (12)
and install the oil filler cap (11).
11
Danger of personal
injury. Body parts and
clothing can be caught
by moving parts.
When operating this
splitter, do not place
your hands under the
splitting knife.
Protect your feet from
falling pieces of wood.
Do not remove or disable safety devices.
Do not clean, service or
adjust this machine during operation.
Risk of electric shock!
Maximum length of
wood: 548 mm
Cleaver's maximum
travel through wood:
493 mm
3.5 Symbols used throughout these instructions
Danger!
A
Indicates risk of personal
injury or severe material damage.
Risk of electric shock! Risk of
B
personal injury by electric
shock.
Caution!
A
Risk of material damage.
Advisory note:
3
Supplementary information.
4. Special product features
• Robust welded steel construction for
maximum torsional stability.
• Two-hand control for safe operation.
• 6 tons of ram force.
• Wheel set for easy moving.
5. Transportation and
installation
5.1 Machine installation
Danger!
A
This machine shall only be
operated at a location meeting the following conditions:
12
5.3 Power connection
Danger! High voltage
B
Operate the machine only on a
power source matching the following
requirements (see also "Technical
specifications"):
− Outlets with neutral wire, being
properly installed, grounded and
tested.
− Mains voltage and frequency
must conform with the data
stated on the machine's nameplate.
− Fuse protection by a residual current device (RCD) of 30 mA fault
current sensivity.
− System impedance Z
interconnection point (house
service connection) 0.35 Ohm
maximum.
max.
at the
12
Page 6
ENGLISH
Note
3
Check with your local Electricity
Board or electrician if in doubt whether
your house service connection meets
these requirements.
Position power supply cable so it
does not interfere with the work and
is not damaged.
Protect power supply cable from heat,
corrosive liquids and sharp edges.
Use only rubber-jacketed extension
cords with sufficient wire gauge (see
"Technical specifications").
Do not pull on power supply cable to
unplug.
5.4 Initial operation
Keep clear of the moving split-
A
ting knife!
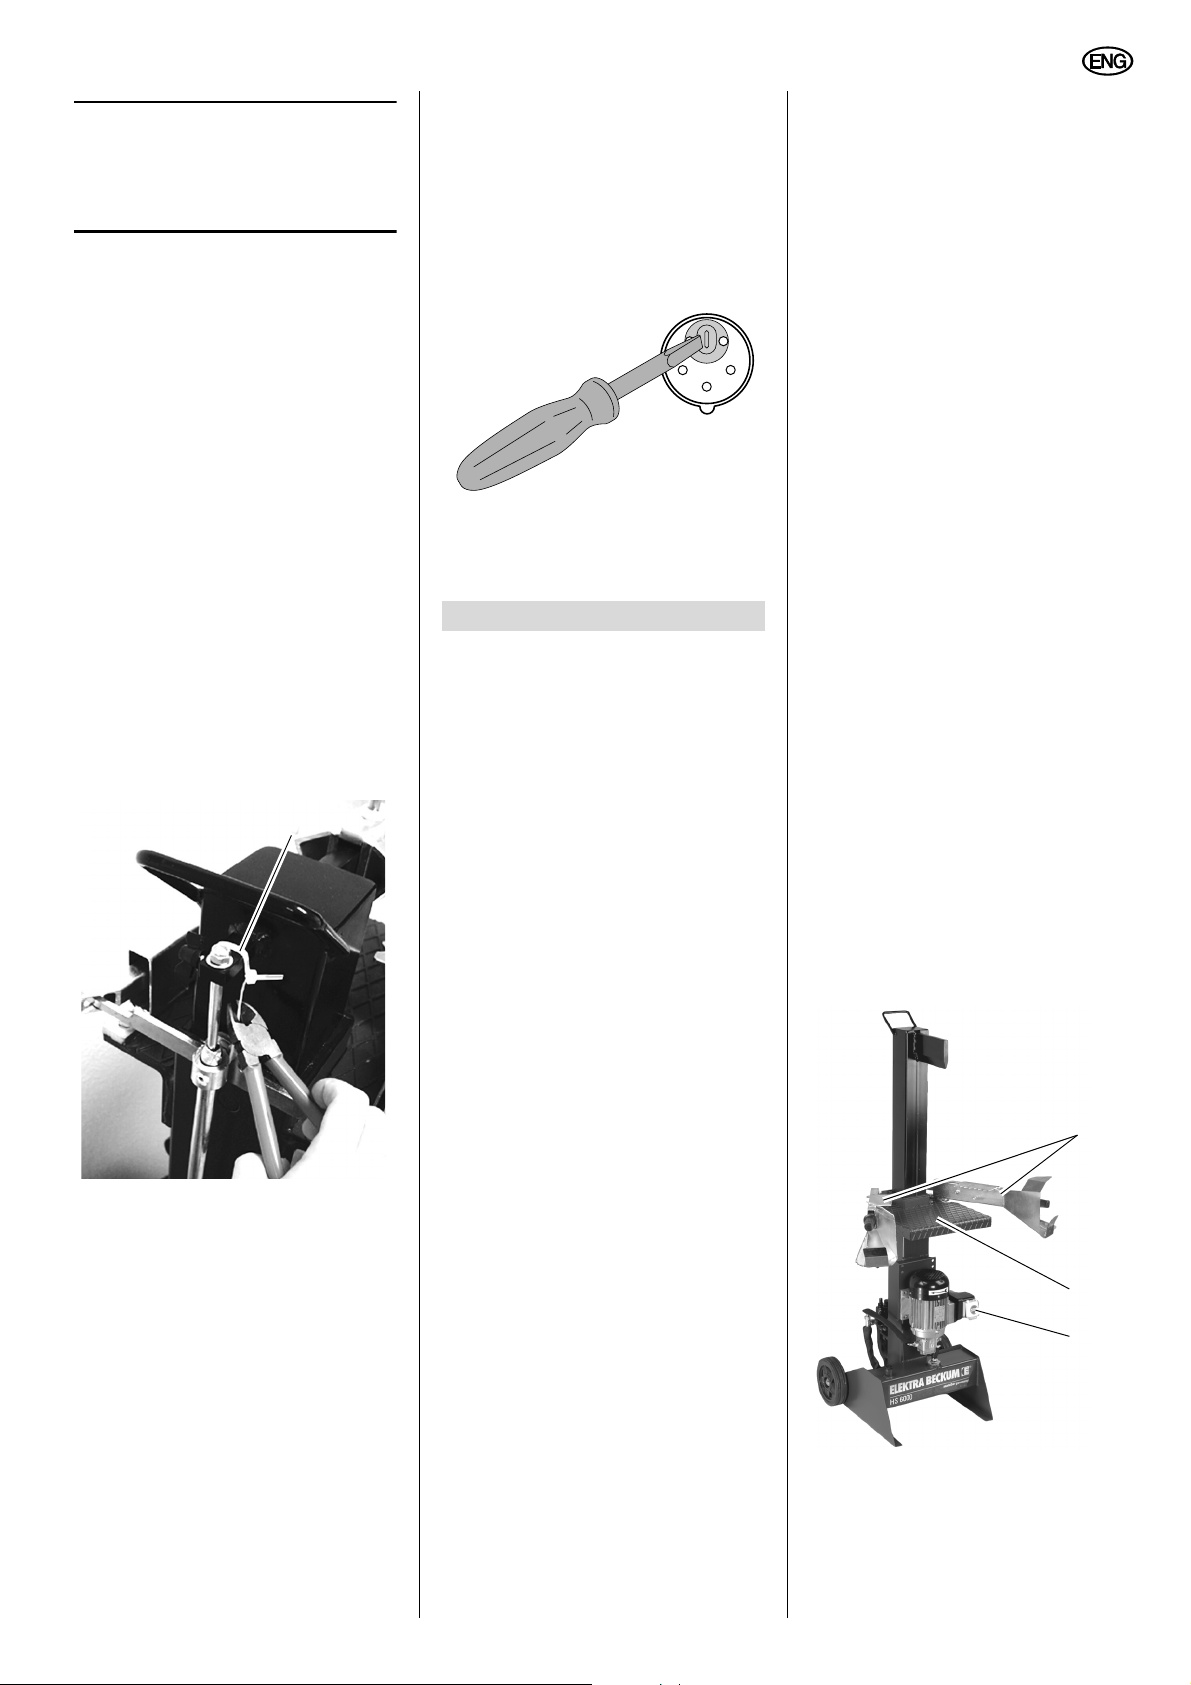
To ensure safe transport, the splitting
knife is retained in the lowest position
during shipping. When the transport
retainer (13) is removed and the
machine is turned on, the splitting
knife will automatically travel upward.
During initial operation, be sure that
there is about one meter of clearance
available above the splitting knife.
13
Changing the direction of rota
B
tion!
(Only applies to machines using AC
current)
Depending on the phase sequence, it
is possible that the electric motor will
turn in the wrong direction. If the electric motor turns in the wrong direction, the splitting wedge cannot be
operated. If such case, the phase
changer setting must be changed:
1. Install machine ready for work and
connect it to the power suply.
2. To check for this condition, start the
splitter (press the GREEN switch). If
the splitting knife does not move,
turn off the machine (press the RED
switch).
3. Unplug the power cable at the splitter.
4. Using a flat-bladed screwdriver,
push the phase changer inside the
machine's plug down and turn it
180°.
Caution!
A
Do not attempt to turn the
phase changer at the contact pins!
5. Turn the machine on again– The
splitting knife will automatically
travel upwards.
6. Operation
Please take note of the following
safety information before operating
the machine!
Also follow the safety instructions
given at the beginning of this manual!
Hazard generated by machine
A
defects!
Before starting any work, check to see
that the following are in proper working
order:
• Check the hydraulic lines for damage. Check for any leaking hydraulic
oil. Check that the hydraulic line
sleeves are in place.
• Check the operating levers for damage. Check that the operating levers
move freely and fully back into their
initial upper operating position.
• Power cable, power cable plug and
switch (if damaged, have replaced
by a qualified electrician)
Hazard generated by insuffi-
A
cient personal protection gear!
• Wear suitable work clothing, providing protection against falling logs.
• Wear hearing protection.
• Wear safety glasses.
• Wear non-slip safety shoes.
Risk of personal injury and
A
crushing by moving parts!
• Do not operate the machine without
installed safety guards.
When the splitter is turned on, the
splitting knife immediately travels to
the top of its travel automatically. Be
sure that there is about 1 meter of
clearance above the splitting knife.
• Keep sufficient distance to driven
components when operating the
machine.
• Do not hold the log to be split
directly with your hands. Use the
claws on the operating levers only.
• Always operate the splitting wedge
with both hands on the operating
levers.
• Always assume a proper, safe work
position:
− at the front on the operator side
− Directly in front of the splitter
A
Danger of injury due to unexpected, sudden movement of the log
being split!
• Only split one piece of wood at a
time.
• Always position the log vertically on
the support table.
• Always split a log lengthwise in the
same direction as the wood fibers
run.
• Logs with branch stubs can be very
difficult to split (irregular cross-grain
structure. If a log gets caught on the
splitting wedge, turn the splitter OFF
before attempting to free it. When
removing a stuck log, do not reach
into the area between it and the support table. After freeing the log, do
not try to split it again at the same
place. Try splitting it again in
another place.
6.1 Splitting
1. Start the splitter (16) – by pressing
the GREEN switch.
14
15
16
2. Place a log vertically on the support
table (15).
3. Hold the log in place with the claws
on the operating levers (14).
4. Move the operating levers.
Movement of the cleaver is control-
13
Page 7
ENGLISH
led by means of the two operating
levers. There are three possible
actions:
− Press both operating levers
downward – The work cycle
starts, and the splitting knife
moves downward to split the log.
− Press only one operating lever
downward – The splitting knife
stops.
− Release both operating levers –
The splitting knife moves back
upward to its start position.
The splitting knife stops automatically in the upper or lower position
(end of travel).
5. When the log is split, release both
operating levers – The splitting knife
then returns to its start position.
6. Remove the split pieces of wood,
and place them off to the side and
out of the immediate work area –
Now you are ready to continue splitting.
7. If you do not intend to continue
working immediately, turn off the
splitter by pressing the RED
switch (16).
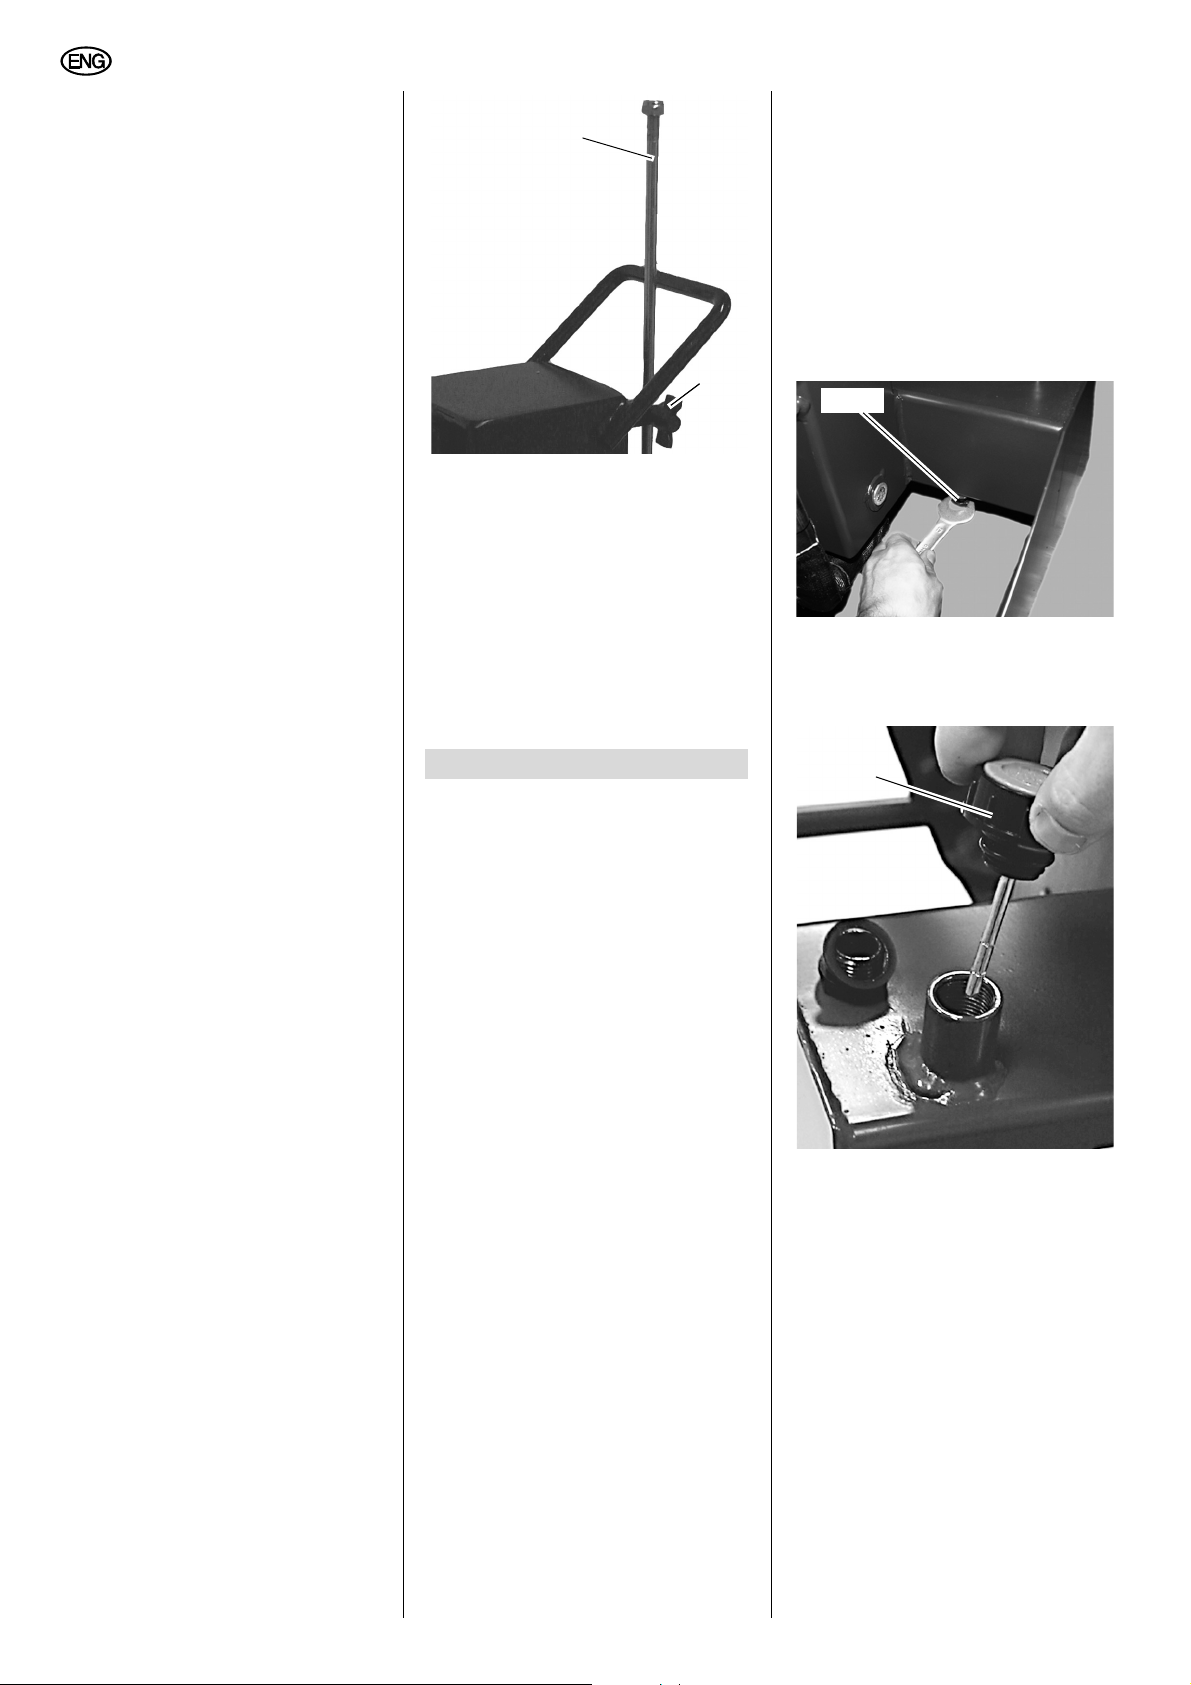
17
18
The upper start position is now set
as desired. Continue to operate the
splitter as previously described.
Resetting the splitting knife to its
upper start position
1. Switch machine OFF.
2. Loosen the wing nut (18) and push
in the control rod (17) until it reaches
the stop. Retighten the wing nut.
The upper start position is now reset
at the maximum height.
7.1 Changing the hydraulics
fluid
1. Move the splitting knife all the way
down, and turn off the splitter.
2. Before starting, place a suitable col-
lecting vessel in position underneath
the draining bolt (19). This vessel
must have a capacity of at least 7 liters.
3. Undo and remove the draining bolt
(19) and allow the oil to drain completely.
19
4. Refit the draining bolt (19) ) together
with the seal and tighten.
5. Unscrew the dipstick (20) and fill the
reservoir with hydraulic oil.
6.2 Changing the start position of the splitting knife
In addition to the height options provided
by the three pivoting support tables, you
can also change the upper start position
of the splitting knife to even better
accommodate the length of the log to be
split. With the upper start position for the
splitting knife set lower, the knife
requires less time to approach the work.
The results in a shorter work cycle.
Lowering the upper start position
1. Turn on the splitter (press the
GREEN switch).
2. Press both operating levers down-
ward – As soon as the splitting knife
has reached the new desired height,
release the right lever.
3. Switch machine OFF
4. Loosen the wing nut (18) and pull
out the control rod (17) until it
reaches the stop. Retighten the
wing nut.
7. Care and maintenance
Danger!
A
Prior to all servicing:
− Switch machine OFF.
− Unplug power cable.
DANGER! Directly after stopping the
splitter, the hydraulic oil and hydraulic system parts may be hot! Let the
splitter cool down before any servicing.
Avoid direct skin contact with hydraulic oil. Wear protective gloves.
Dispose of hydraulic oil in an environmentally friendly manner at a proper
waste oil collection point.
When topping up or changing the
hydraulic oil, be sure to use only
approved types of oil (see "Technical
Specifications").
• Replace damaged parts, especially
safety devices, only with genuine
replacement parts since parts not
tested and approved by the equipment manufacturer can cause
unforeseeable damage.
• Repair and maintenance work other
than described in this section should
only be carried out by qualified specialists.
• Check that all safety devices are
operational again after each service.
20
6. Checking the oil level. With the splitter column retracted the oil level
must be between the upper and
lower marks.
7. Screw the dipstick back in and
tighten it.
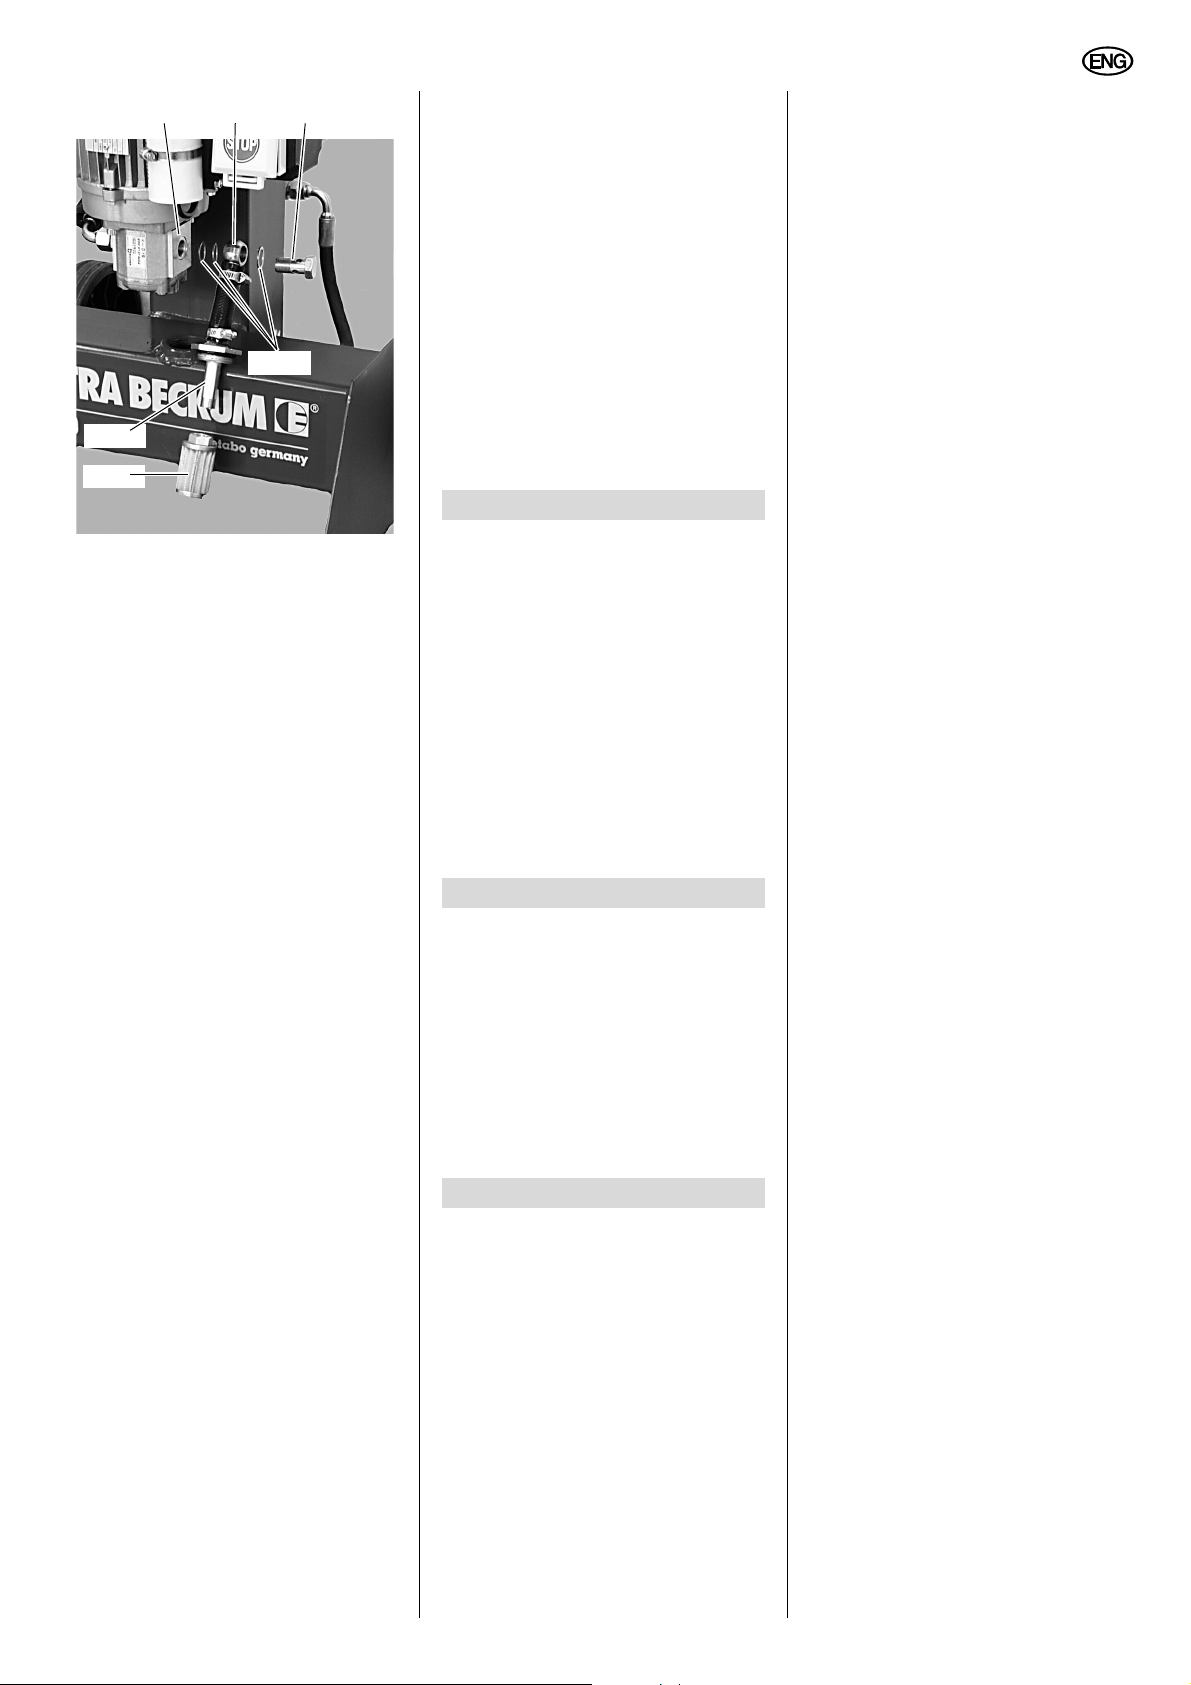
7.2 Clean the oil filter.
1. Undo the hollow bolt (23) on the
pump case (21) and, taking care not
to lose the three ring-seals (24) withdraw the bolt from the hose connector (22).
14
Page 8
ENGLISH
21 22 23
24
25
26
2. Unscrew the oil suction line
fitting (25).
3. Unscrew the oil filter (26) from the
suction line fitting and clean it in a
suitable petroleum-based solvent
such as kerosene (Be sure to thoroughly remove traces of the solvent
from the filter before reinstalling it).
4. Screw the oil filter back into the oil
suction line fitting.
5. Screw the oil suction line fitting back
in with its gasket and tighten it.
6. Refit the hose connector (22) by
means of the hollow bolt (23) on the
pump case - as shown in the diagram (21) with two of the three ringseals (24) between the hose con-
nector and the pump case and the
third ring-seal (24) between the
hose connector and the head of the
hollow bolt.
7.3 Machine storage
1. Lower the splitter column fully, and
with it in this position, turn off the
splitter.
2. When not in use, store the splitter so
that it cannot be started by unauthorized persons (the ON/OFF
switch can be secured with a padlock).
Caution!
A
Do not store the splitter unprotected outdoors or in a damp environment.
7.4 Maintenance
Before each use
Check the ON/OFF switch and the twohand controls for proper function.
Check the hydraulic hoses for damage
(cuts, chafing and kinks).
Check the lubrication system for leaks.
After the first hour of operation
Clean the oil filter.
Every 50 hours of operation
Clean off all moving/articulated parts
(joints, hinges and splitter column
guides) with suitable cloths and then
lightly re-oil them.
Checking the oil level. With the splitter
column retracted the oil level must be
between the upper and lower marks.
Every 200 hours of operation
Clean the oil filter.
Every 1000 hours of operation
Replace the hydraulic oil.
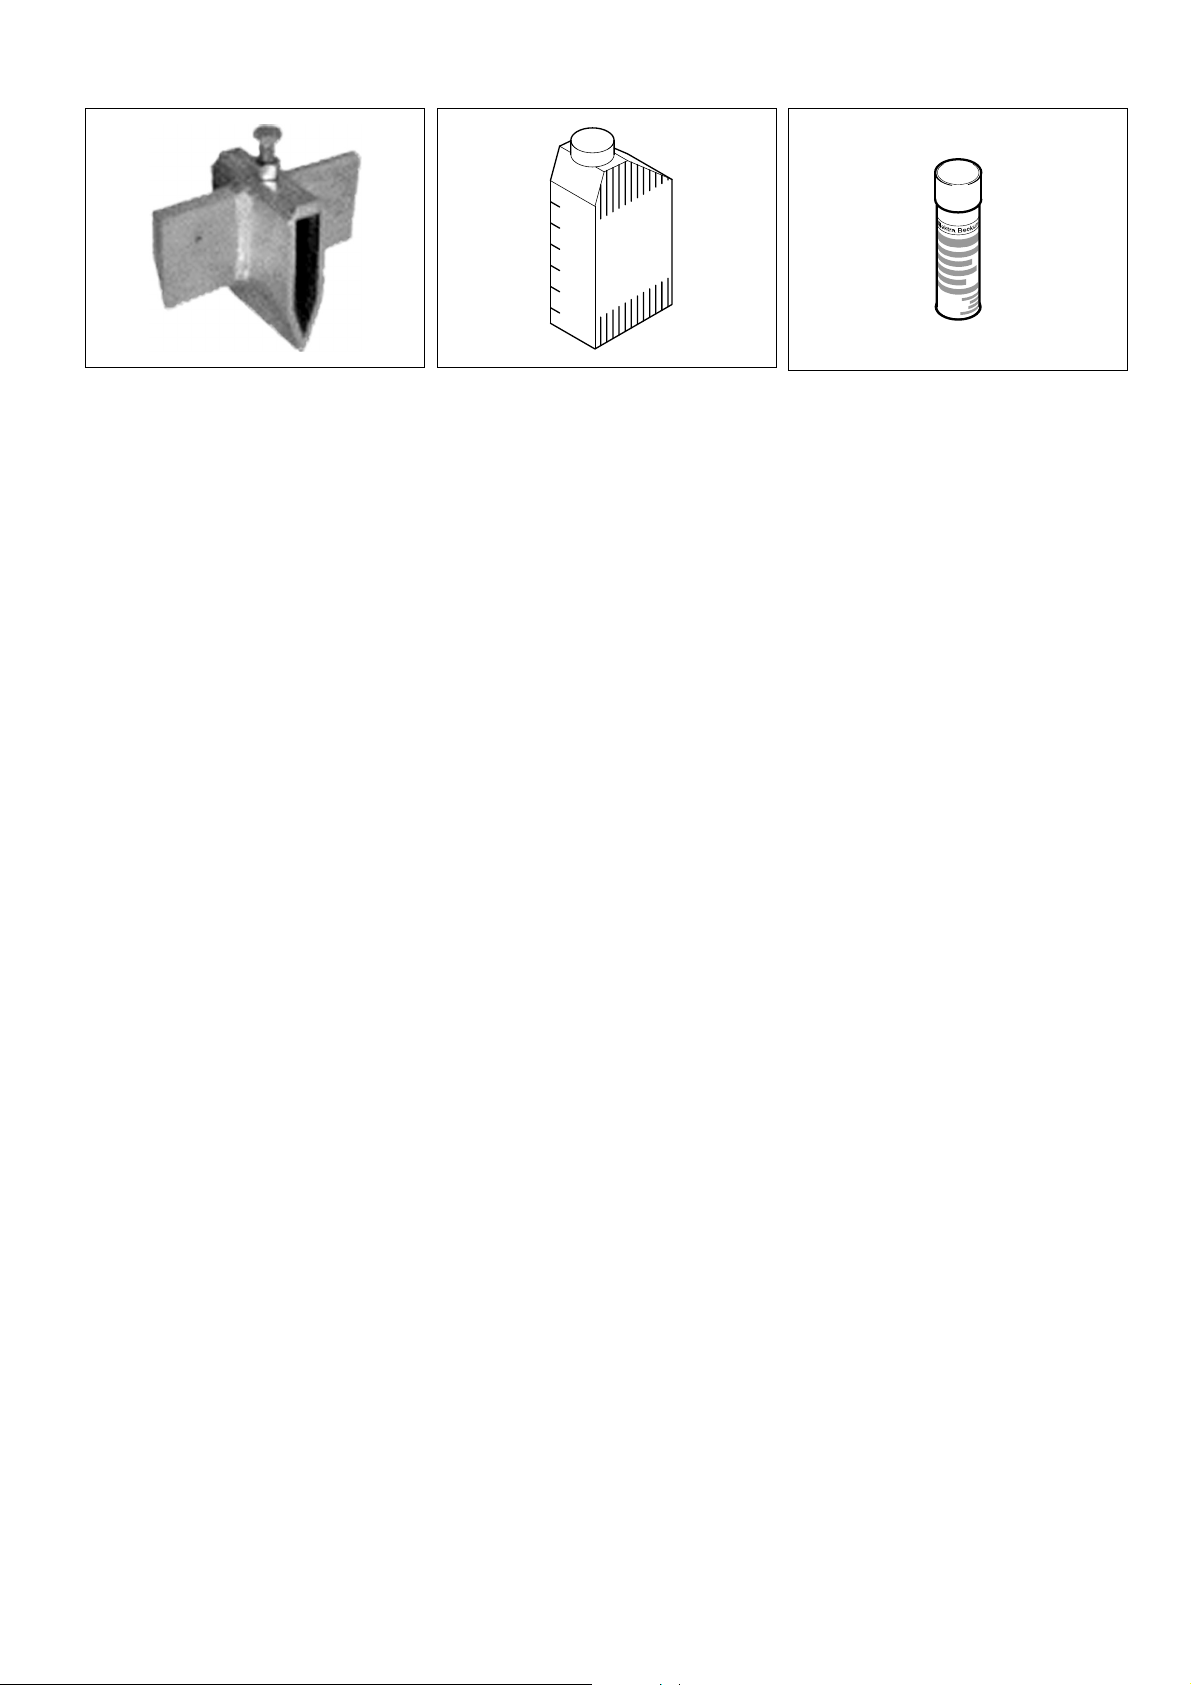
8. Available accessories
For special tasks the following accessories are available at your specialized
dealer – see back cover for illustrations:
A Four-way splitting wedge:
This accessory splits logs into four
pieces in one work cycle. With it,
the amount of work cycles can be
cut in half, significantly reducing
overall splitting time.
B Hydraulic oil for topping up and
refilling.
C Care and Maintenance Spray
For removing resin residue and preserve metal surfaces.
9. Repairs
Danger!
A
Repairs to electric tools must
be carried out by qualified electricians only!
Electric tools in need of repair can be
sent to the service centre of your country. Refer to the spare parts list for the
address.
Please attach a description of the fault to
the electric tool.
10. Trouble shooting
Danger!
A
Before carrying out any repair
service or maintenance work, always:
− Switch machine OFF
− Unplug power cable
Check that all safety devices are
operational again after each fault
service.
Motor does not run
No supply voltage:
− Check cables, plug, outlet and
mains fuse.
Mains voltage too low:
− Use power cable of sufficient wire
gauge (see "Technical specifications").
No-voltage release solenoid tripped by
temporary power failure:
− Switch on again.
Overload protection tripped:
Let motor cool down for approx. 10 min-
utes, then start motor again.
Motor runs, but the splitting wedge
does not move
Phase sequence changed at the phase
changer:
− Change direction of rotation (see
"Power connection").
Low splitting force (ram force)
Splitter column guides are dirty:
− Clean the guides (see "Maintenance").
15
Page 9

ENGLISH
11. Technical specifications
HS 6000 W HS 6000 D
Electrical data Voltage
Nominal current
Fuse protection min. (time-lag or K-type
breaker)
Protection class
Motor: input power P1
Power output P2
Idle speed
Splitting wedge Maximum length of travel
Splitting force
Splitting speed
Return speed
Maximum dimensions of logs to be cut
Maximum diameter
Minimum diameter
Maximum length
Machine dimensions
Length
Width
Height (splitting wedge fully retracted)
Height (splitting wedge fully extended)
Machine weight kg 92 92
Filling capacity/Hydraulic oil l 5 5
V
A
A
kW
kW
-1
min
mm
t
mm/sec
mm/sec
mm
mm
mm
mm
mm
mm
mm
230 (1 ∼ 50 Hz)
13.5
16
IP 54
3.0 kW S1 100%
2.2 kW S1 100%
2880
493
6
45
224
250
100
548
830
570
1100
1600
400 (3 ∼ 50 Hz)
5.1
10
IP 54
3.3 kW S1 100%
2.2 kW S1 100%
2850
493
6
45
224
250
100
548
830
570
1100
1600
Recommended hydraulic oil ARAL Vitam
GF 22
Noise emissions - at idle speed*
Noise emissions - during operation*
* The values stated here only indicate the loudness emitted by this machine. Whether the operator is required to wear hearing protection can not be determined here. This depends on how much noise reaches the ear of the operator. And this, among other
things, depends on the existing ambient conditions (such as other sources of noise near by). Even though it may not be explicitly
required, it is in your own interest to always wear hearing protection when operating this machine.
dB (A)
dB (A)
61
76
ARAL Vitam
GF 22
61
76
16
Page 10
U3w0067.fm
A 091 005 7570
B 091 001 1936 C 091 101 8691
51
Page 11

U4BA_EB3.fm
www.elektra-beckum.de
ZINDEL - Technische Dokumentation und Multimedia, www.zindel.de
 Loading...