

Elektra EAW100W User Manual
MODEL EAW100W
How to get the best out of your
ELECTRA WASHING MACHINE
It is essential that you read through this
Instruction book carefully before your first wash
an retain it for future reference

2
Installation
■
This appliance is heavy. Care should be taken when
moving it.
■
All packing and transit bolts must be removed before
use. Serious damage can occur to the product and to
property if this is not adhered to. See relevant section in
instructions.
■
The washing machine must be unplugged when
removing the interior transits bolts. Do not plug in the
appliance before finishing the removal of the transit
bolts and the fixing of the caps in the holes where the
security bolts were
■
Any plumbing work required to install this appliance
should be carried out by a qualified plumber or
competent person.
■
Any electrical work required to install this appliance
should be carried out by a qualified electrician or
competent person.
■
Care must be taken to ensure that the appliance does not
stand on the electrical supply cable.
■
If the machine is situated on a carpeted floor, please
adjust the feet in order to allow air to circulate freely .
■
It is dangerous to alter the specifications or attempt to
modify this product in any way .
Child Safety
■
This appliance is designed to be operated by adults.
Children should not be allowed to tamper with the
controls or play with the product.
■
Pets and children have been known to climb into
washing machines. Please check your drum before use.
■
The glass door can become very hot during parts of the
washing cycle. Keep children away from the vicinity of
the appliance whilst it is in operation.
■
Keep all packaging well away for children.
■
Keep all detergents in a safe place out of children’s
reach.
During Use
■
Always unplug the appliance and turn off the water after use.
■
Do not overload the appliance. See relevant section in
instruction book.
■
Always look through the glass door to check if water has
drained before opening the door.
■
The user should always check that they have not left their
gas lighter (disposable or otherwise) in their clothing
■
Only wash fabrics which are designed to be machine
washed. If in doubt, consult the care label on the clothes.
■
Before washing, ensure that all pockets are empty and
buttons and zips are fastened. Avoid washing frayed or torn
articles and treat stains such as paint, ink, rust, and grass
before washing. Underwired bras must NOT be machine
washed.
■
Any objects such as coins, safety pins, nails, screws, stones
or any other hard, sharp material can cause extensive
damage and must not be placed into the machine.
■
Garments which have been in contact with volatile
petroleum products should not be machine washed. If
volatile cleaning fluids are used, care should be taken to
ensure that the fluid is removed from the garment before
placing in the machine.
■
Wash small items such as socks, laces, washable belts etc in
a washing bag or pillow case as it is possible for such items
to slip down between the tub and the inner drum.
■
Only use the advised quantities of fabric softener. Damage to
the fabric can ensue if you over-fill. Refer to the
manufacturer’s recommendations of quantities.
■
As some duvets and eiderdowns should be washed in large
commercial machines because of their bulk, please check
with the manufacturer of the item before washing in a
domestic machine.
■
Leave the porthole door slightly ajar between washes to
preserve the door seal.
■
Under no circumstances should you attempt to repair the
machine yourself. Repairs carried out by inexperienced
persons may cause injury or serious malfunctioning. Contact
the Electricity Company Service Department from whom
you purchased the machine .
2
Important Safety Information
It is most important that this instruction book should be retained with the appliance for future reference.
Should the appliance be sold or transferred to another owner , or should you move house and leave the
appliance, always ensure that the book is supplied with the appliance in order that the new owner can get to
know the functioning of the appliance and the relevant warnings.
This information has been provided in the interest of safety. Y ou MUST read it carefully before installing or
using the appliance.

3
Contents
Important Safety Information
2
Your New Washing Machine
4
Technical Specifications
4
Electrical requirements
5
Unpacking Instructions
6
Installation Instructions
7
Positioning 7
Water inlet 7
Water drainage 8
Levelling 9
Special conditions 9
In the interest of the environment 9
Description of the Appliance
10
The Control Panel
11
Operating sequence
12-15
Washing 4,5 kg of white cotton at 90 °C 12
Load the laundry 12
Measure out the detergent 12
Fabric softener 12
Select the required programme 13
Start the machine 13
At the end of the programme 13
Washing 2 kg of mixed fabrics at 50 °C 14
Load the laundry 14
Measure out the detergent 14
Fabric conditioner 14
Select the required option 14
Select the required programme 15
Start the machine 15
At the end of the programme 15
Washing Hints
16-17
Which detergent to use?.... 17
And in which form? 17
How much detergent and fabric softener? 17
Using a water softening agent 17
Wash Care Symbols
18
Washing Programmes
19-20
Maintenance and Cleaning
21
Descaling 21
After each wash 21
External cleaning 21
Cleaning the dispenser drawer 21
Cleaning the drawer recess 21
Cleaning the filter 22
The dangers of freezing 22
Something Not Working
23-24
How to obtain aftersales service quickly
25
Guide to use the Instruction Book
The following symbols will be found in the text to guide you throughout the instructions:
Safety instructions
Hints and tips
4
Your New Washing Machine
Your new electra washing machine, meets all modern needs for effective treatment of laundry
with low water, energy and detergent consumption.
■
Automatic cooling of the wash water to 60°C
before draining, with the 90°C programme. This
reduces thermal shock to fabrics, helping to prevent
any creasing.
■
The special wool programme with its new delicate
wash system treats your woollens with extreme
gentleness.
■
The anti-unbalance device ensures that the washing
machine remains stable when spinning.
Ecological hints
To save water and energy and help protect the
environment, we recommend that you follow these
hints:
■
Adjust the quantity of detergent according to the
hardness of your water supply, the amount of
laundry and the degree of soiling.
■
Select an “ECO” programme for normally soiled
laundry.
■
A programme without prewash is sufficient for
normally soiled laundry.
In the interest of the
environment
■
When the appliance is to be scrapped, cut off the
power supply cable and make the door closing
device unusable to prevent young children from
being trapped inside.
■
Help to keep your country tidy - use authorised
disposal sites for your old appliance.
■
Check with your local Council or Environmental
Health Office to see if there are facilities in your area
for re-cycling this appliance.
■
Materials marked with the symbol are
recyclable.
Technical Specifications
DIMENSIONS Height 85 cm (33.5”)
Width 60 cm (23.6”)
Depth 55 cm (22.7”)
POWER SUPPLY VOLTAGE 230-240 V/50 Hz
MAX. POWER ABSORBED 2600 W (13A)
WATER PRESSURE Minimum (cold) 5 N/cm2(7 psi)
Minimum (hot) 3 N/cm
2
(4 psi)
Maximum 80 N/cm2(110 psi)
MAXIMUM RECOMMENDED LOAD Cotton, linen 4.5 kg (10 lbs)
Synthetics 2 kg (4.5 lbs)
Delicate fabrics 2 kg (4.5 lbs)
Wool 1 kg (2.2 lbs)
SPIN SPEED Maximum 1000 rpm
This appliance complies with the following E.E.C. Directives:
- 73/23 EEC of 19.2.73 (Low Voltage Directive) and subsequent modifications;
- 89/336 EEC of 3.5.89 (Electromagnetic Compatibility Directive) and subsequent modifications.
5
When wiring the plug, ensure that all strands of wire are
securely retained in each terminal. Do not forget to
tighten the mains lead clamp on the plug. If your
electricity supply point has only two pin socket outlets,
or if you are in doubt, consult a qualified electrician.
Should the mains lead ever require replacement, it is
essential that this operation be carried out by a qualified
electrician and should only be replaced with a flexible
cord of the same size i.e. 1,5 mm
2
.
After replacement of a fuse in the plug, the fuse cover
must be reffited. If the fuse cover is lost, the plug must
not be used until a replacement cover is obtained. The
colour of the correct replacement fuse cover is that of
the coloured insert in the base of the plug or the colour
that is embossed in words in the base of the fuse recess
or elsewhere on the plug. Always state this colour when
ordering a replacement fuse cover.
Only 13 amp replacement fuses which are ASTA
approved to B.S. 1362 should be fitted.
Note: Socket outlets are not permitted in bathrooms,
neither should any provision be made for connecting
moveable electrical appliances. No stationary appliance
is to be installed within reach of a person using bath or
shower.
In the case of permanent connection it is necessary that
you install a double pole switch between the appliance
and the electricity supply (mains), with a minimum gap
of 3 mm between the switch contacts and of a type
suitable for the required load in compliance with the
current electrical regulations.
The switch must not break the yellow and green earth
cable at any point.
Any electrical work required to install this
appliance should be carried out by a qualified
electrician or competent person.
Before switching on, make sure the electricity
supply voltage is the same as that indicated on the
appliance rating plate(the rating plate is fixed to
the rear of the appliance).
The flexible mains lead is supplied connected to a B.S.
1363 fused plug having a fuse of 13 amp capacity.
Should this plug not fit the socket outlets in your home,
it should be cut off and replaced with a suitable plug,
following the procedure outlined below-
WARNING
Such a plug cannot be used for any other
appliance and should therefore be properly
disposed of and not left where children might find
it and plug it into a supply socket - with the
obvious consequent danger.
N.B. We recommend the use of good quality plugs and
wall sockets that can be switched off when the machine
is not in use.
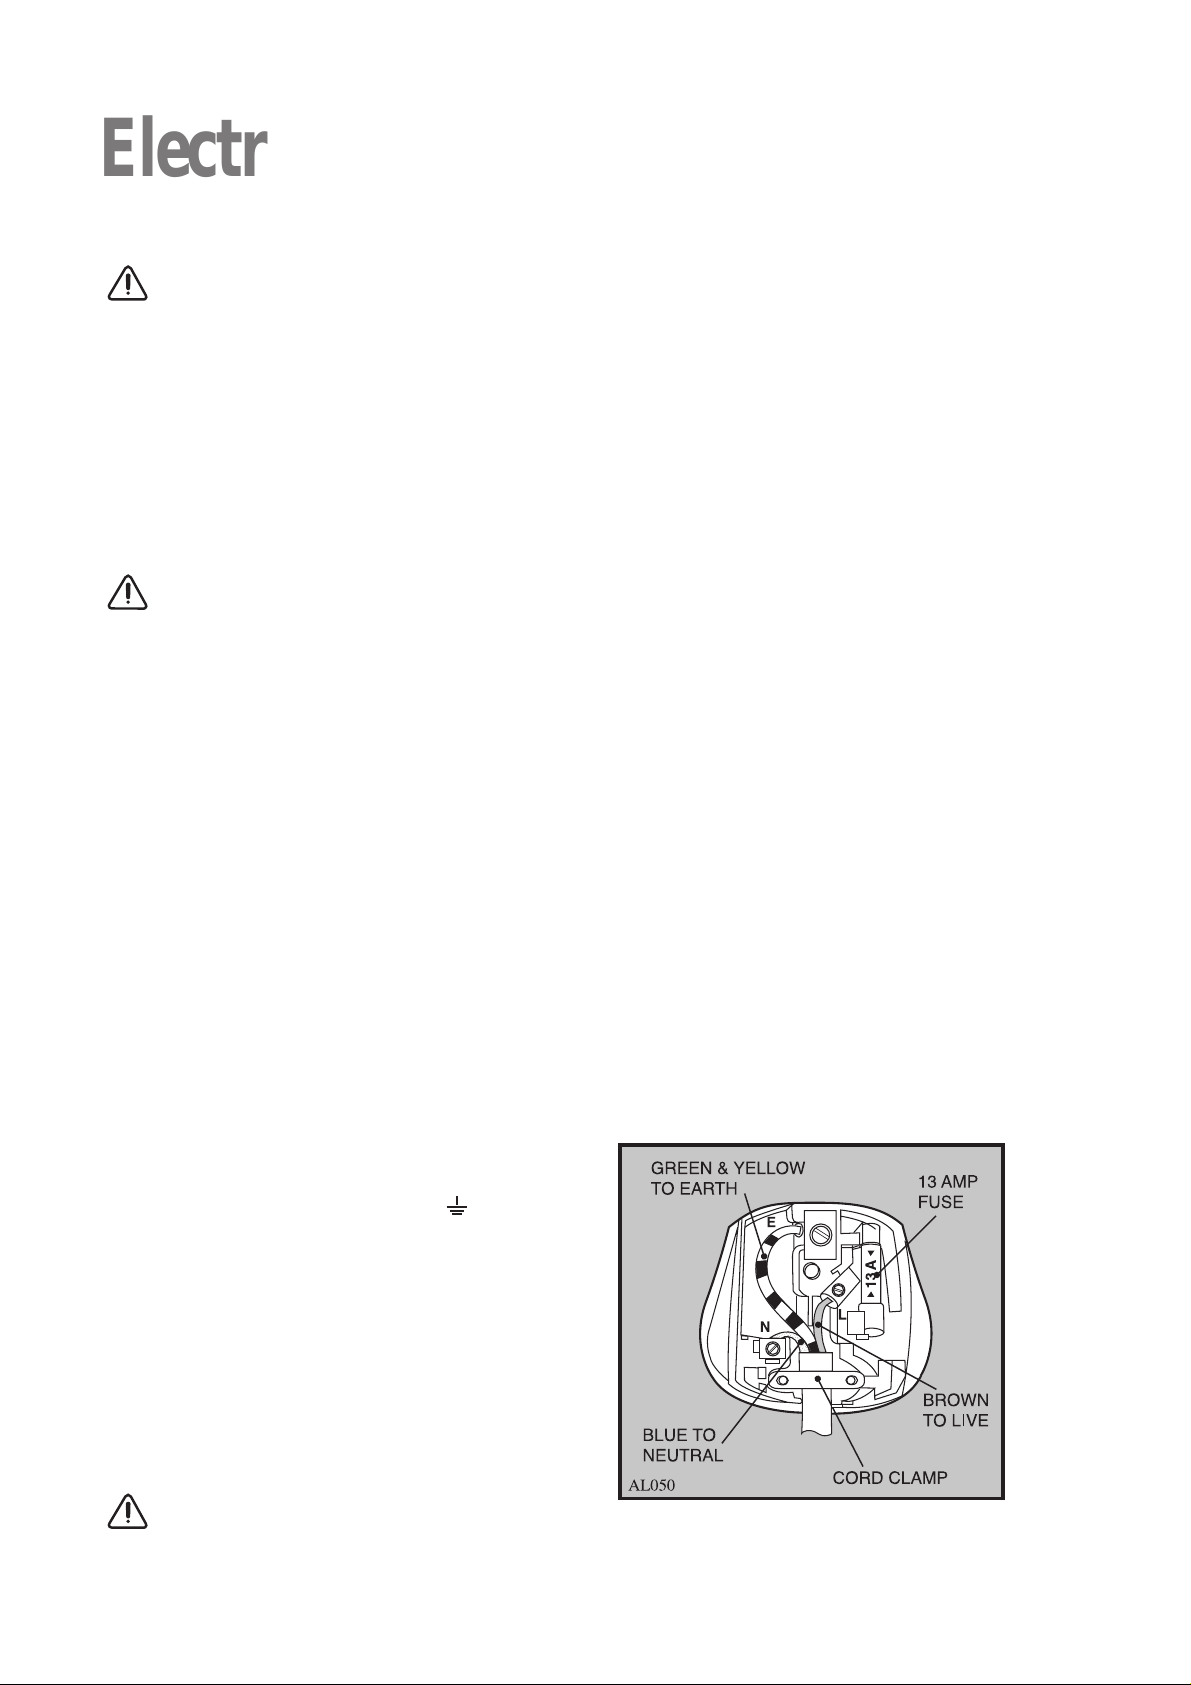
IMPORTANT: The wires in the mains lead fitted to
this appliance are coloured in accordance with the
following code:
GREEN AND YELLOW - EARTH
BLUE - NEUTRAL
BROWN - LIVE
As the colours of the wires in the mains lead of this
appliance may not correspond with the coloured
markings identifying the terminals in your plug, proceed
as follows:
The wire which is coloured green and yellow must be
connected to the terminals in the plug which is marked
with the letter E or by the earth symbol
or coloured
green or green and yellow.
The wire which is coloured blue must be connected to
the terminal which is marked with the letter N or
coloured black.
The wire which is coloured brown must be connected to
the terminal which is marked with the letter L or
coloured red.
WARNING - THIS APPLIANCE MUST BE
EARTHED.
a
a
a
a
a
a
Electrical Requirements
6
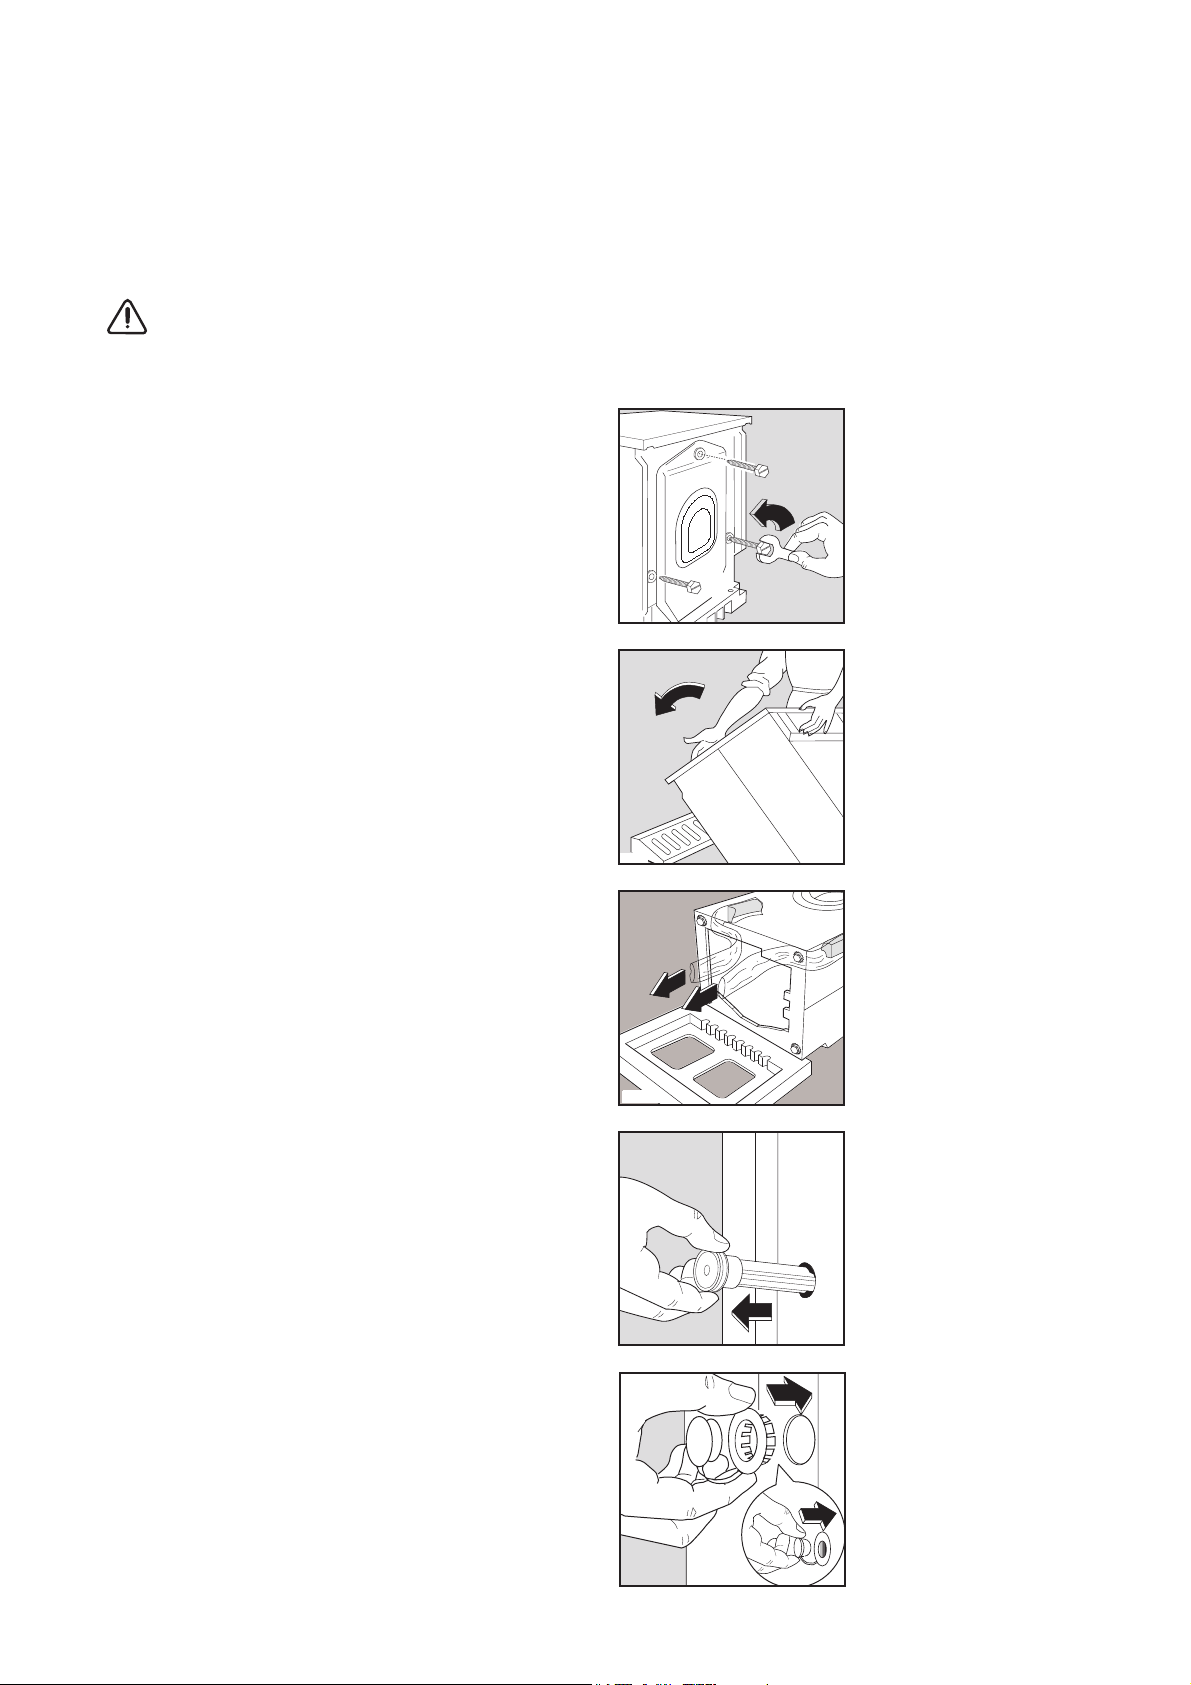
IMPORTANT
Unpacking instructions
All transit bolts and packing must be removed
before using the appliance.
Note: Your electricity company cannot accept
responsibility for damage to your machine if
you operate it without removing the transit
bolts and packaging.
You are advised to keep all the transit bolts and
packaging for re-use in case the appliance has to be
transported again.
■
Unscrew and remove the three rear transit bolts
(using a 10 mm hexagonal spanner).
■
Lay the machine gently on its back, making sure
that the hoses are not squashed.
We suggest a polystyrene angle bracket from the
packing is placed on the floor before tilting it back
to avoid the hoses being squashed.
■
Carefully remove the polyethylene bags located at
the base of the machine by pulling them toward the
centre of the machine.
■
Place the machine in an upright position and
remove the three plastic bolts.
■
Plug the 3 holes with the plastic plugs which you
can find in the envelope containing the instruction
booklet.
0287
P0018
1
2
AL009
P0001
P0002
7
Any plumbing work required to install this
appliance should be carried out by a qualified
plumber or competent person.
Positioning
Your new washing machine has been designed to be
permanently plumbed in to your home’s water supply
and drainage system. However, if this is not possible, it
may be connected to suitable existing taps, with the
drain hose discharging into the sink.
The appliance has two inlet hoses, hot and cold, with
female 3/4” BSP thread connectors. If this connection
is not compatible with the plumbing of the existing
installation, a variety of connectors are available from
good hardware stores and plumbers merchants to suit
most domestic plumbing. Any alterations to your
existing plumbing must be carried out by a competent
person, or qualified plumber.
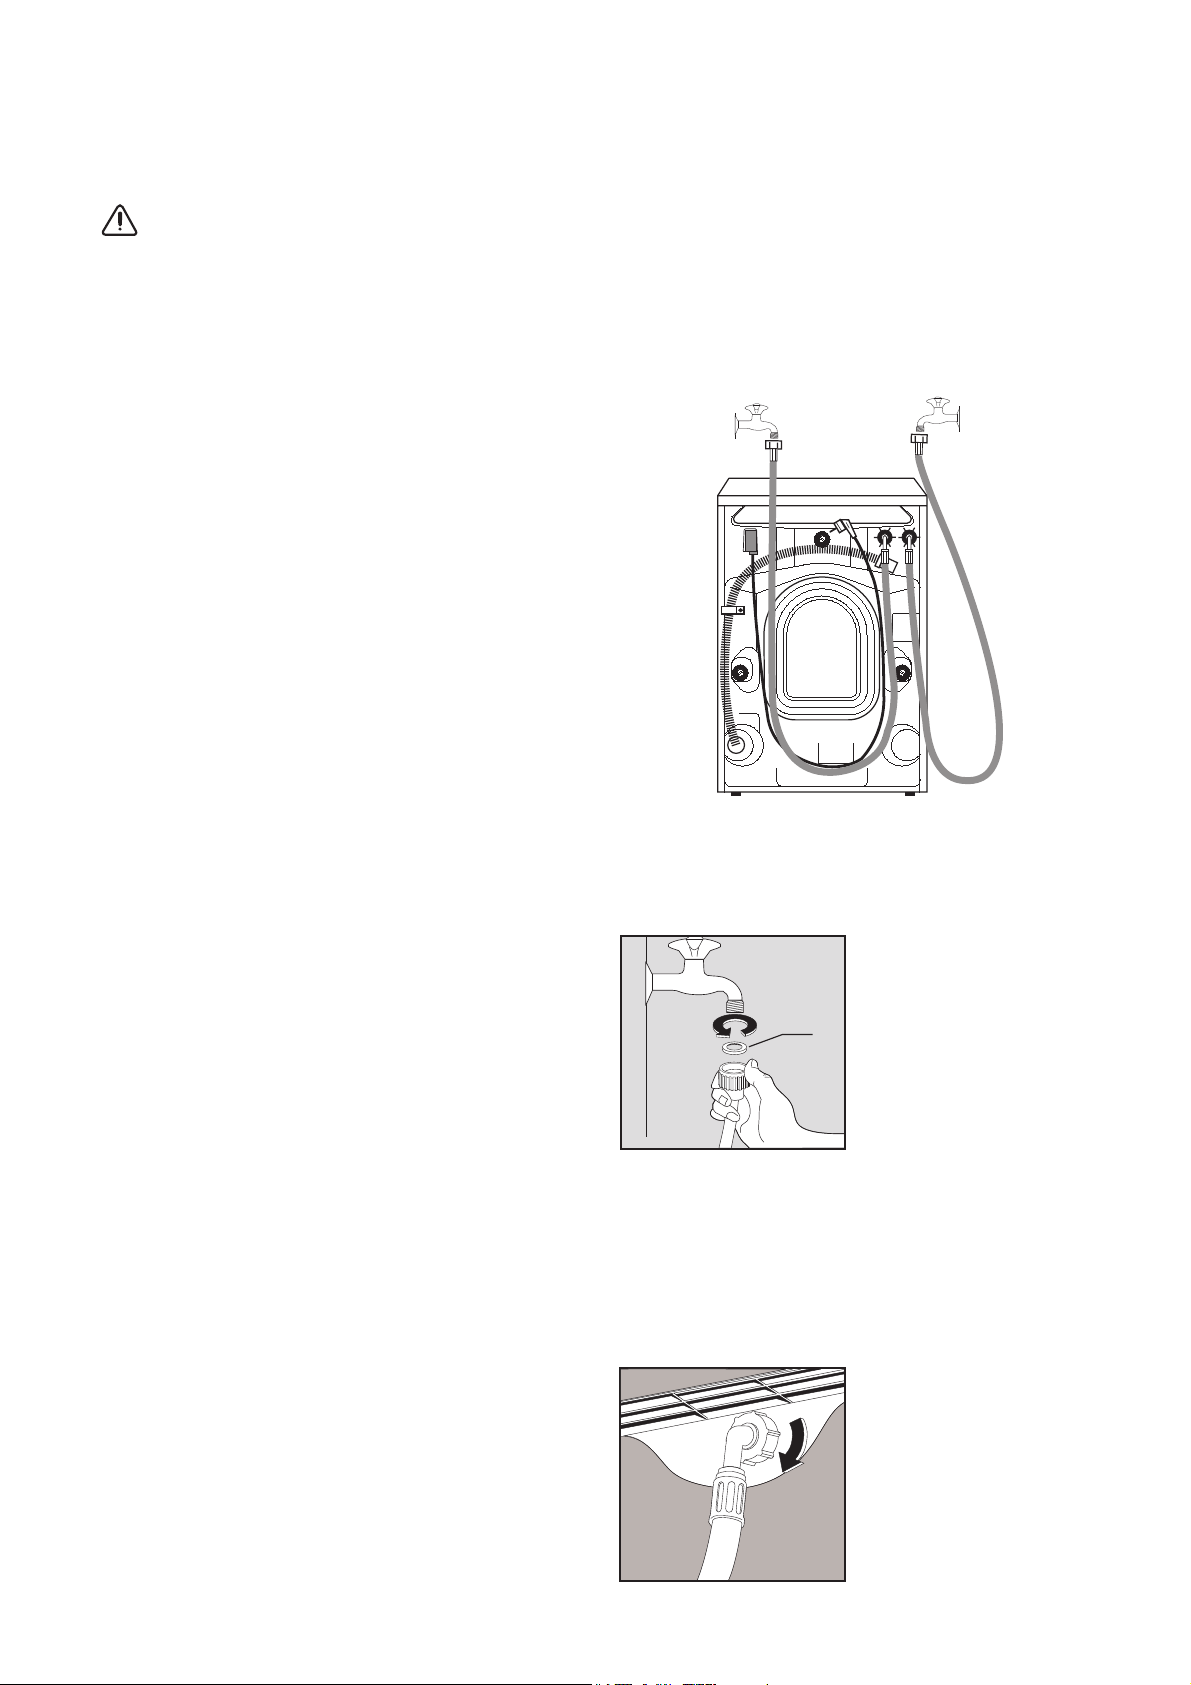
Water inlet
The inlets on the back of the appliance are colour coded,
blue for cold and red for hot.
Before connecting the hoses, be sure to fit the black
washers supplied as per diagram.
If only a cold water supply is available, connect the two
hoses to a cold water outlet by means of a ‘Y’
connection piece.
Installation should comply with local water authority
and building regulation requirements.
The appliance must be given a separate cold water
supply and not be connected to a mixer tap, a single
outlet water heater or a booster pump. A minimum
water pressure of 7psi is required for safe operation of
the appliance.
If you cannot make the cold water connection direct
from the rising mains, you may be able to operate the
appliance from your cold water storage system.
There should be a minimum distance of 5.02m (16
1/2ft) between the appliance’s inlet and the bottom of
the tank.
There will be sufficient pressure for the hot water
supply from the hot water cylinder if the height between
the appliance’s inlet and the bottom of the cold water
storage cistern (not between the appliance and the hot
water cylinder) is at least 2.74m (9ft).
Set the hoses correctly by loosening the ring nuts. After
positioning the inlet hoses, be sure to tighten the ring
nuts again to prevent leaks.
Installation Instructions
HOT WATER SUPPLY
COLD WATER SUPPLY
A
AL013
P0021
8
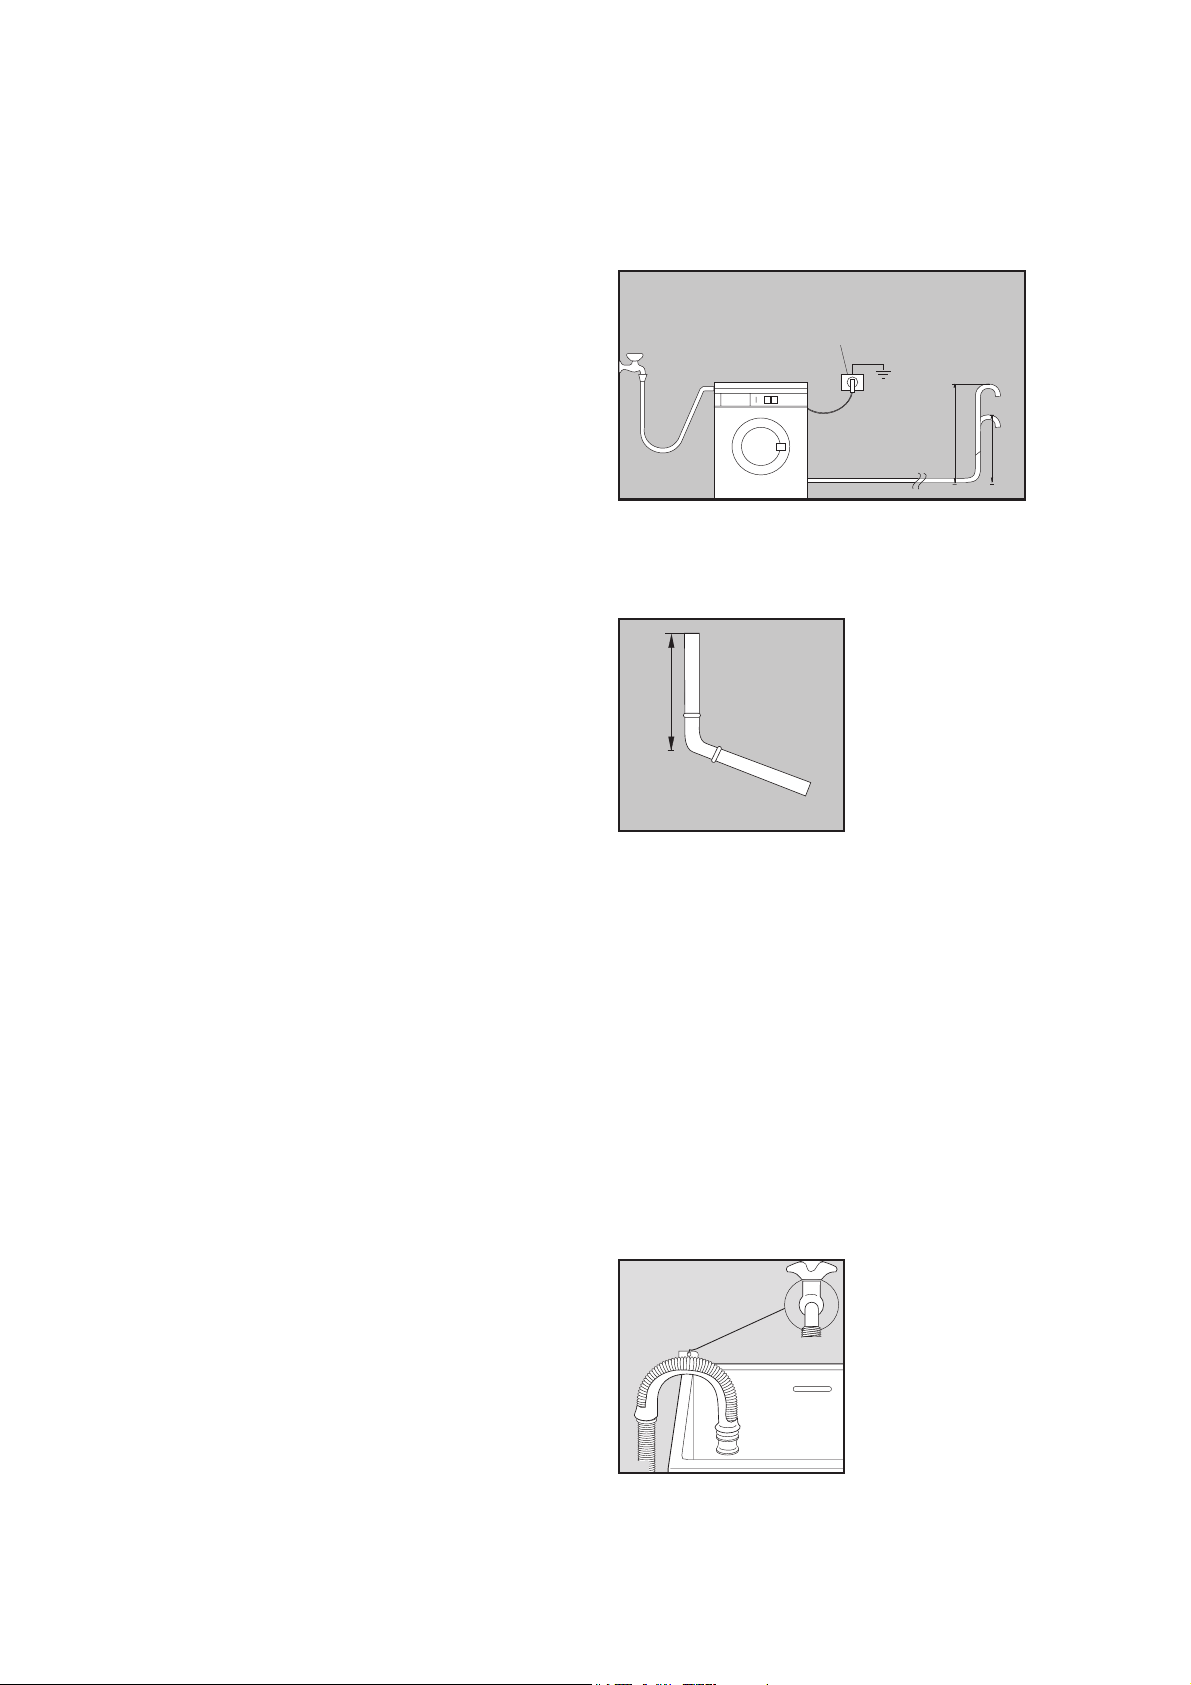
Water drainage
This appliance is designed to be permanently plumbed
into your home's water supply and drainage system.
The appliance drain hose should hook (use the plastic
“U-piece” supplied) into a standpipe with an internal
diameter of approximately 38mm (see diagram) thus
ensuring there is an air break between the drain hose
and standpipe.
When discharging into a standpipe ensure that the top of
the curve in the hose end is no more than 90cm (35.4'')
and no less than 60cm (23.6'') above floor level. The
upright standpipe should have a minimum length of
30cm (12'') from the bottom of the elbow to the top of
the pipe (see diagram).
Make sure that it is designed in such a way, that the end
of the drain hose cannot be covered with water.
The drain hose may be extended to a maximum of 3
metres. An additional drain hose and joining piece is
available from the electricity company from whom you
purchased the machine.
The joining piece must have an internal diameter of
18mm.
If you intend the drain hose to empty into a sink, make
sure that the sink is empty and the plug hose is not
blocked. Use the plastic “U-piece” supplied.
P1039
3 pin
Max. 90 cm.(35.4")
Min.60 cm.
(23.6")
P1040
Min. 30 cm.(12")
1
38 mm.(1/ ") diameter
2
standpipe
P0022
 Loading...