

ELEKTRA d4.100AB, d2.200AB, d1.1200D Product Manual
Troubleshooting
Problem Solution
Power LED off
Check the fuses, power cables and remote for correct
voltage, loose power connections
No Output (Power
LED is on)
Check the head unit for output, gain settings, RCA
connections, speaker cables and connections
No Output (Protect
LED is on)
Speakers may be shorted or damaged; amplifier may
be overheated or overloaded. Check for low voltage
Weak bass
Check speaker polarity and phase, crossover
settings, bass settings on the head unit
Amplifier switches
on and off
Check ground connection, power cable connections
and voltage, remote wire connection
Distorted output
Check gain settings on source and amplifiers.
Speakers may be also damaged.
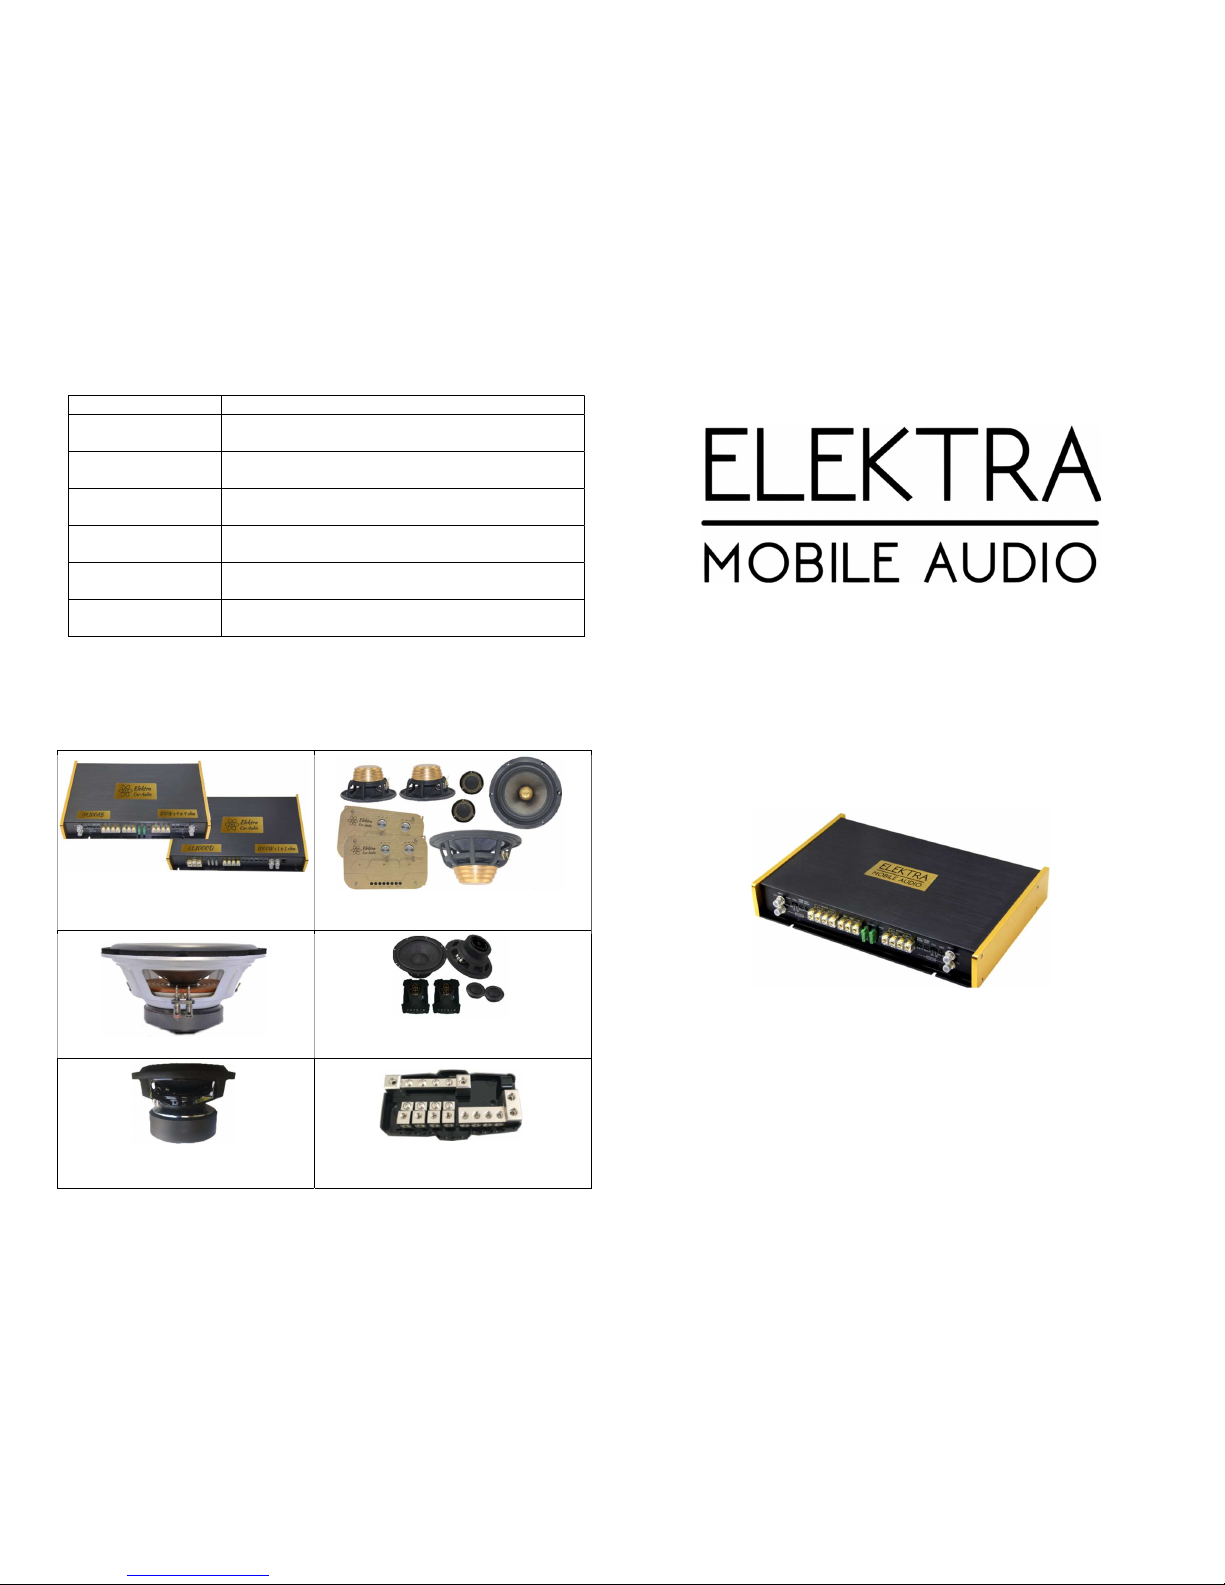
Elektra Car Audio Products
Elektra Car Audio brings reference quality and high end performance to
suit your car audio needs. Here are some other products available
exclusively from Elektra Car Audio to complete your install:
Delta Reference Amplifiers
4.100AB,
2.200AB &
1.1200D
T4.100 Tube Amplifier (Limited Ed)
C.6531n – Competition Level
Three Way Component Set
SW12A
– 12” Subwoofer
E.651f – Entry Level
Two Way Component Set
R12
d2
– 12” Reference Subwoofer
R15d2
– 15” Reference Subwoofer
MANL22.44 – MiniANL Power and
Ground Combination Distribution Block
PRODUCT MANUAL
4.100AB, 2.200AB & 1.1200D
Reference Amplifiers
Features
The 4.100AB, 2.200AB & 1.1200D delta ( ) series amplifiers
are Elektra’s reference car audio amplifiers. The 4.100AB is a 4
channel class AB amplifier that outputs 100W RMS x 4 into 4 ohms.
The 2.200AB is a 2 channel class AB amplifier that outputs 200W
RMS x 2 into 4 ohms. The 1.1200D is a monoblock class D
amplifier that outputs 1200 W RMS x 1 into 1 ohm.
The series amplifiers feature high power and high efficiency
MOSFET circuit design with overload, short circuit, thermal and low
voltage protections. An optional bass remote control is available
separately.
The series amplifiers are designed with a double sided PCB in a
symmetrical layout, Toshiba outputs, 105°C capacitors and Tiffany-
style RCA connectors in a black and gold brushed aluminum
chassis.
Amplifier Specifications
4.100AB
2
.200AB
1.1200D
Dimensions LxWxH (inches) 14x9.2x2.2 14x9.2x2.2 14x9.2x2.2
4Ω
Power @ 13.8V <1%THD
100Wx4 200Wx2 300Wx1
2Ω
Power @ 13.8V <1%THD
150Wx4 250Wx2 600Wx1
1Ω
Power @ 13.8V <1%THD
Not stable Not stable 1200Wx1
4Ω
Bridged @ 13.8V <1%THD
300Wx2 500Wx1 N/A
Frequency Response (Hz) 10-22k 10-22k 10-250
LPF (Hz) 50-250 50-250 50-250
HPF/Subsonic Filter (Hz) 30-4k 30-4k 15-50
SNR (dB) >90 >90 >90
Efficiency >70% >70% >70%
Minimum Load (Ω)
2 2 1
Thermal Protection Yes (80°C) Yes (80°C) Yes (80°C)
Fuse Rating (A) 80 80 100
Fuses must be installed within 18” of the battery and amplifiers.
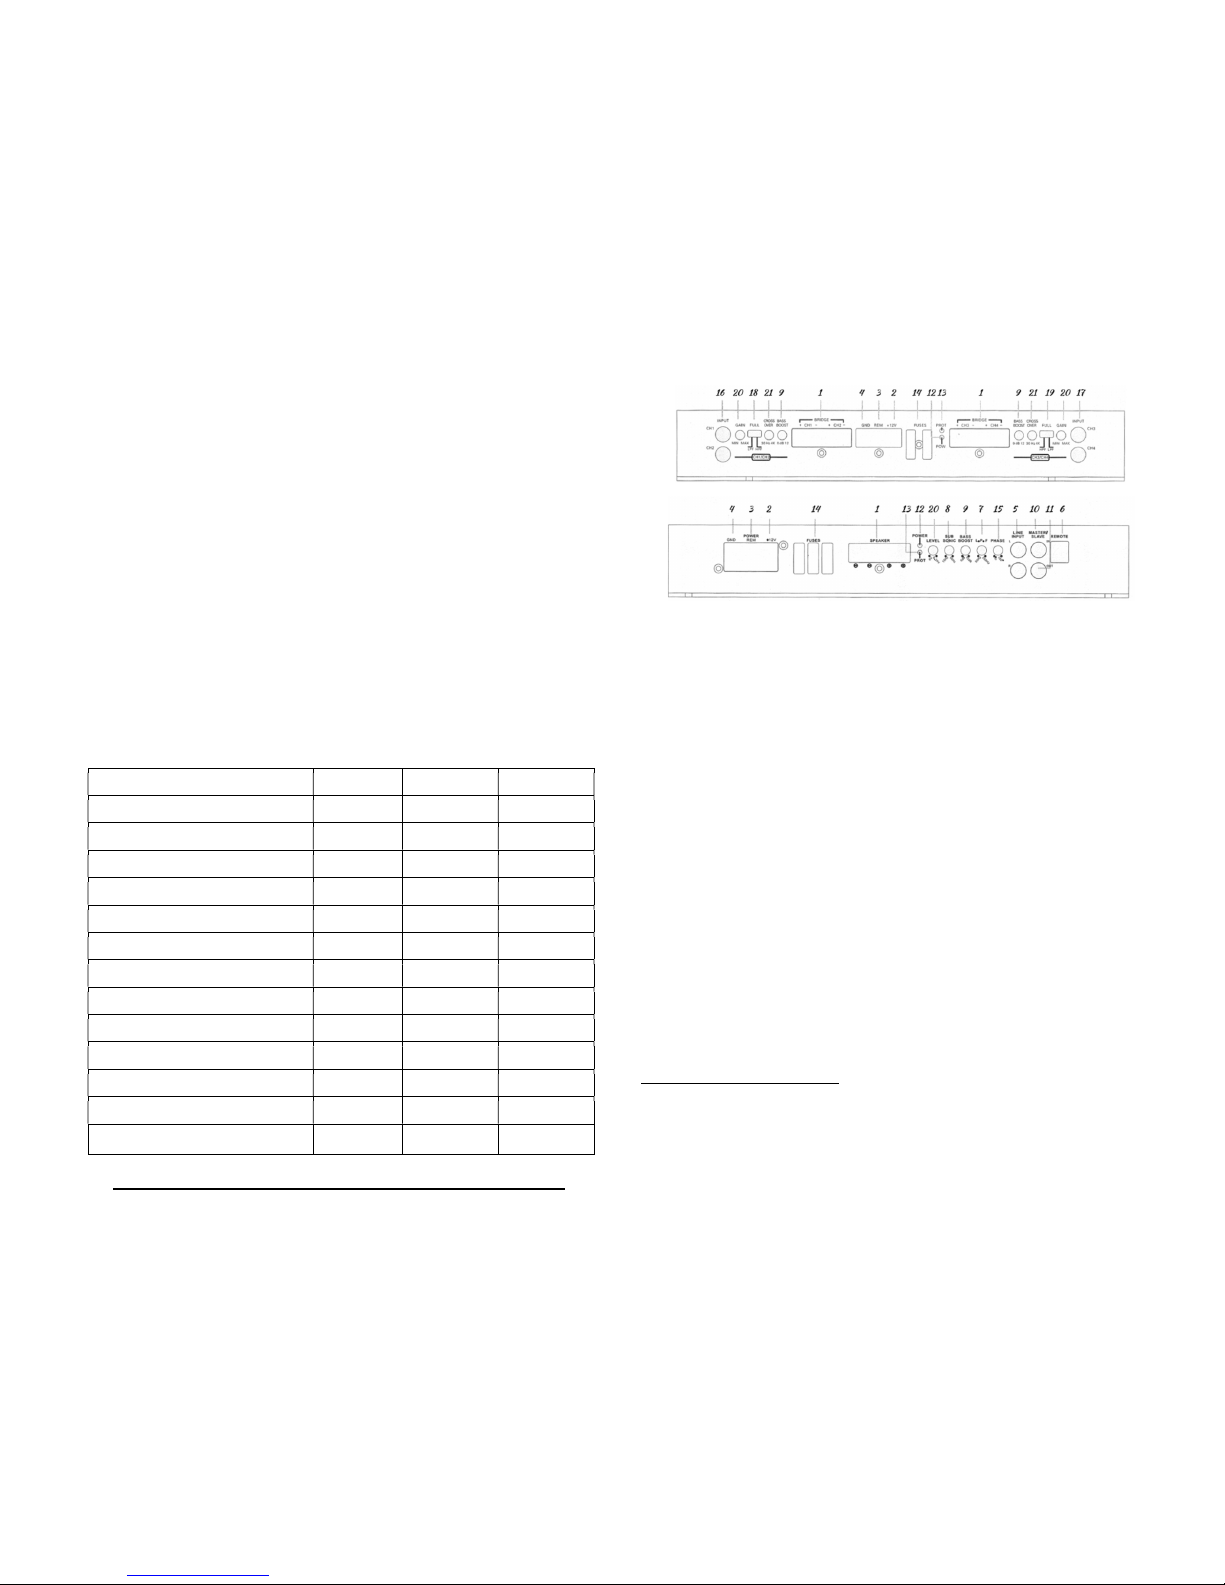
Connections
4.100AB Connections
1.1200D Connections
1. Output Terminals – connect to your speakers using at least 16AWG wire
2. +12V Power Terminal – connect using a fused 4AWG to the battery +ve
3. Remote – connect to the remote wire to turn the amplifier on/off
4. Ground Terminal – connect using 4AWG to an electrical/chassis ground
5. Line Input – connect to your source’s RCA cables
6. Remote Bass Control – connect to your optional bass remote
7. Low Pass Filter – adjust this to filter out unwanted high frequencies
8. Subsonic Filter – adjust this to filter out unwanted low frequencies
9. Bass Boost – adjust the bass boost level between 0dB to 12dB
10. Master Input – connect to the master amplifier (only when strapping)
11. Slave Output – connect to the slave amplifier (only when strapping)
12. Power Indicator – this indicates if the amplifier is running optimally
13. Protection Indicator – this indicates a problem. If this lights up, shut
down the amplifier to troubleshoot the problem.
14. Fuses – If blown, replace only with the same value and type of fuses
15. Phase – adjust this to control the output polarity
16. CH1/2 RCA input – connect to your CH1 and CH2 RCAs
17. CH3/4 RCA input – connect to your CH3 and CH4 RCAs
18. HPF/LPF switch – choose FULL, HPF or LPF crossover mode for CH1/2
19. HPF/LPF switch – choose FULL, HPF or LPF crossover mode for CH3/4
20. Gain Control – adjust this to control the gain for each channel pair
21. Crossover – adjust this to control the HPF/LPF crossover frequency
Strapping TWO 1.1200D’s: Connect source’s RCAs to the master amplifier
only. Connect a single RCA cable from the master amplifier connection to slave
amplifier connection (from #11 to #10 in connection diagram).
Connect the master amp +ve to the subwoofer +ve, the slave amp +ve to the
subwoofer –ve and then connect the master amp –ve to the slave amp –ve.
 Loading...