

Page 1

X-ARRAY™ CONCERT SYSTEMS
Flying Manual
and Structural Ratings
Page 2

X-Array™ Loudspeaker Systems
RIGGING-SAFETY WARNING
This document details general rigging practices appropriate to the sound industry, as they would apply
to the rigging of Electro-Voice X-Array™ loudspeaker systems. It is intended to familiarize the reader
with standard rigging hardware and techniques for suspending X-Array™ loudspeaker systems overhead. Only persons with the knowledge of proper hardware and safe rigging techniques should attempt
to suspend any sound systems overhead. Prior to suspending any Electro-Voice X-Array™ loudspeaker
systems overhead, it is essential that the user be familiar with the strength ratings, rigging techniques
and special safety considerations outlined in this manual. The rigging techniques and practices recommended in this manual are, of necessity, in general terms to accommodate the many variations in loudspeaker arrays and rigging configurations. As such, the user is expressly responsible for the safety of all
specific X-Array™ loudspeaker-array designs and rigging configurations as implemented in practice.
All of the general rigging material contained in this manual is based on the best available engineering
information concerning materials and practices, as commonly recognized in the United States, and is
believed to be accurate at the time of the original printing. As such, the information may not be directly
applicable in other countries. Furthermore, the regulations and requirements governing rigging hardware
and practices may be superseded by local regulations. It is the responsibility of the user to ensure that
any Electro-Voice loudspeaker system is suspended overhead in accordance with all current federal,
state and local regulations.
All specific material concerning the strength ratings, rigging techniques and safety considerations for the
X-Array™ loudspeaker systems is based on the best available engineering information concerning the
use and limitations of the products. Electro-Voice continually engages in testing, research and development of its loudspeaker products. As a result, the specifications are subject to change without notice. It
is the responsibility of the user to ensure that any Electro-Voice loudspeaker system is suspended overhead in accordance with the strength ratings, rigging techniques and safety considerations given in this
document and any manual update notices. All non-Electro-Voice associated hardware items necessary
to rig a complete X-Array™ loudspeaker array (grids, chain hoists, building or tower supports and miscellaneous mechanical components) are the responsibility of others.
Electro-Voice
February, 1998
Page 3

X-Array™ Loudspeaker Systems
TABLE OF CONTENTS
RIGGING-SAFETY WARNING
0. INTRODUCTION
1. X-ARRAY™ RIGGING SYSTEM
1.1 Overview of the X-Array™ Flying Systems............................................................................ 1-2
1.2 Loudspeaker Enclosure Details ............................................................................................. 2-5
1.3 Rigging Hinge Details ...................................................................................................... ...... 5 -7
1.4 Rigging Strap Details ............................................................................................................. 7-8
1.5 Grid Details ............................................................................................................................... 8
2. X-ARRAY™ FLYING TECHNIQUES
2.1 Enclosure and Horn Orientation .......................................................................................... 9-10
2.2 Adjusting the Vertical Angles ............................................................................................. 10-12
Using the Xrsl (long wire-rope rigging strap) Between Enclosures ........................................ 10
PAGES
Using the Xrsl (at the Grid ................................................................................................. 10-11
Using the Xrss (short wire-rope rigging strap) Between Enclosures ................................. 11-12
Using the Xrss at the Grid ......................................................................................................11
Multiple Enclosure Angles ...................................................................................................... 12
2.3 Adjusting the Horizontal Angles ......................................................................................... 12-13
2.4 Balancing and Distributing the Load .................................................................................. 13-14
Array Load Distribution...................................................................................................... 13-14
Balancing the Grid.................................................................................................................. 14
2.5 Using Pull-Up Lines ........................................................................................................... 14-15
Pull-Up Line Techniques ................................................................................................... 14-15
CAUTIONS for Pull-Up Lines ................................................................................................. 15
3. RIGGING-STRENGTH RATINGS, SAFETY .............................................................................. 15-23
FACTORS AND SPECIAL CONSIDERATIONS
3.1 Working-Load Limit and Safety Factors ...................................................................... 15-16
Definitions.................................................................................................................... 15-16
CAUTIONS for Working-Load Limits and Safety Factors................................................. 16
3.2 Structural Rating Overview.......................................................................................... 16-17
3.3 Simplified Structural-Rating Guidelines ............................................................................ 17
The Guidelines ................................................................................................................. 17
CAUTIONS for the Simplified Structural-Rating Guidelines ........................................ 17-19
Discussion of Array Examples.......................................................................................... 19
Page 4

X-Array™ Loudspeaker Systems
3.4 Complex Structural-Rating Analysis .................................................................................. 19-20
Rear Rigging Point Structural-Strength Rating.................................................................. 19-20
(Xrhg, Xrhp, Xrhl & NH32102-2)
Xrhg (grid hinge)
Xrhp (pick-up hinge)
Xrhl (linking hinge)
NH32102-2 (New Haven double-stud swivel-ring fitings)
Front Rigging Point Structural-Strength Rating ................................................................. 20-21
(Xrss, Xrsl & NH32102-2)
Xrss (short wire-rope rigging strap)
Overall Enclosure Structural-Strength Rating ........................................................................ 21
CAUTIONS for a Complex Structural-Rating Analysis ........................................................... 21
3.5 Special Considerations ...................................................................................................... 21-23
Double-Stud Fittings.......................................................................................................... 21-23
Flying a Single Enclosure.......................................................................................................23
3.6 Electro-Voice Structural Analysis Procedures ........................................................................ 23
4. RIGGING INSPECTION AND PRECAUTIONS.......................................................................... 23-24
5. REFERENCES................................................................................................................................ 24
Rigging References
Mechanical Engineering References
Acoustical Engineering References
APPENDICES .................................................................................................................................. 24
A. SERVICING THE X-ARRAY™ RIGGING................................................................................. 25
B. X-ARRAY™ RIGGING ACCESSORIES................................................................................... 25
Page 5
X-Array™ Loudspeaker Systems
0. INTRODUCTION
The X-Array™ product line represents important
advancements in concert-sound-reinforcement
technology. The design goals called for the highest acoustic-output capability with the highest
fidelity, in lightweight, compact enclosures that
were easy to array. The development began with
a clean sheet of paper and took an integrated approach. The individual loudspeaker drivers, horns,
enclosures, rigging hardware and system configurations were designed from the ground up specifically for this high-performance application. A brief
description of the X-Array™ product line is included below. Consult the individual system engineering data sheets for detailed specifications.
Xf: Far-field, two-way, MB/HF loudspeaker system with a 40°H x 20°V coverage pattern. The
system has two ND12A 305-mm (12-in.) MB
drivers and two ND5-16 76-mm (3-in.) HF compression drivers. The Xf utilizes the full-size
X-Array™ enclosure shell and the standard
X-Array™ flying hardware.
Xn: Near-field, three-way, LF/MB/HF loudspeaker system with a rotatable 60° x 40° coverage pattern. The system has one EVX-180B
457-mm (18-in.) woofer, one ND12A 305-mm
(12-in.) MB driver and one ND5-16 76-mm (3-in.)
HF compression driver. The Xn utilizes the fullsize X-Array™ enclosure shell and the standard
X-Array™ flying hardware.
Xb: Bass loudspeaker system with two
EVX-180B 457-mm (18-in.) woofers. The Xb
utilizes the full-size X-Array™ enclosure shell
and the standard X-Array™ flying hardware.
Xds: Subwoofer loudspeaker system with two
EVX-180B 457-mm (18-in.) woofers. The Xds
utilizes the double-wide X-Array™ enclosure
shell and does not have flying hardware.
Xcn: Compact near-field, two-way, MB/HF loudspeaker system with a rotatable 60° x 40° coverage pattern. The system has one ND12A 305-mm
(12-in.) MB driver and one ND5-16 76-mm (3-in.)
HF compression driver. The Xcn utilizes the halfsize X-Array™ enclosure shell and the standard
X-Array™ flying hardware.
Xcb: Compact bass loudspeaker system with
one 457-mm (18-in.) EVX-180B woofer. The Xcb
utilizes the half-size X-Array™ enclosure shell
and the standard X-Array™ flying hardware.
Numerous accessories are available to complete
an X-Array™ loudspeaker system, including rigging hardware, digital electronic controllers,
power amplifiers, cables, racks, cases, dolly
boards and speaker covers. See
B. X-Array™ Rigging Accessories
Appendix
for a list of
available accessories and where to purchase
them. See
Rigging
Appendix A. Servicing the X-Array™
for service information.
1. X-ARRAY™ RIGGING SYSTEM
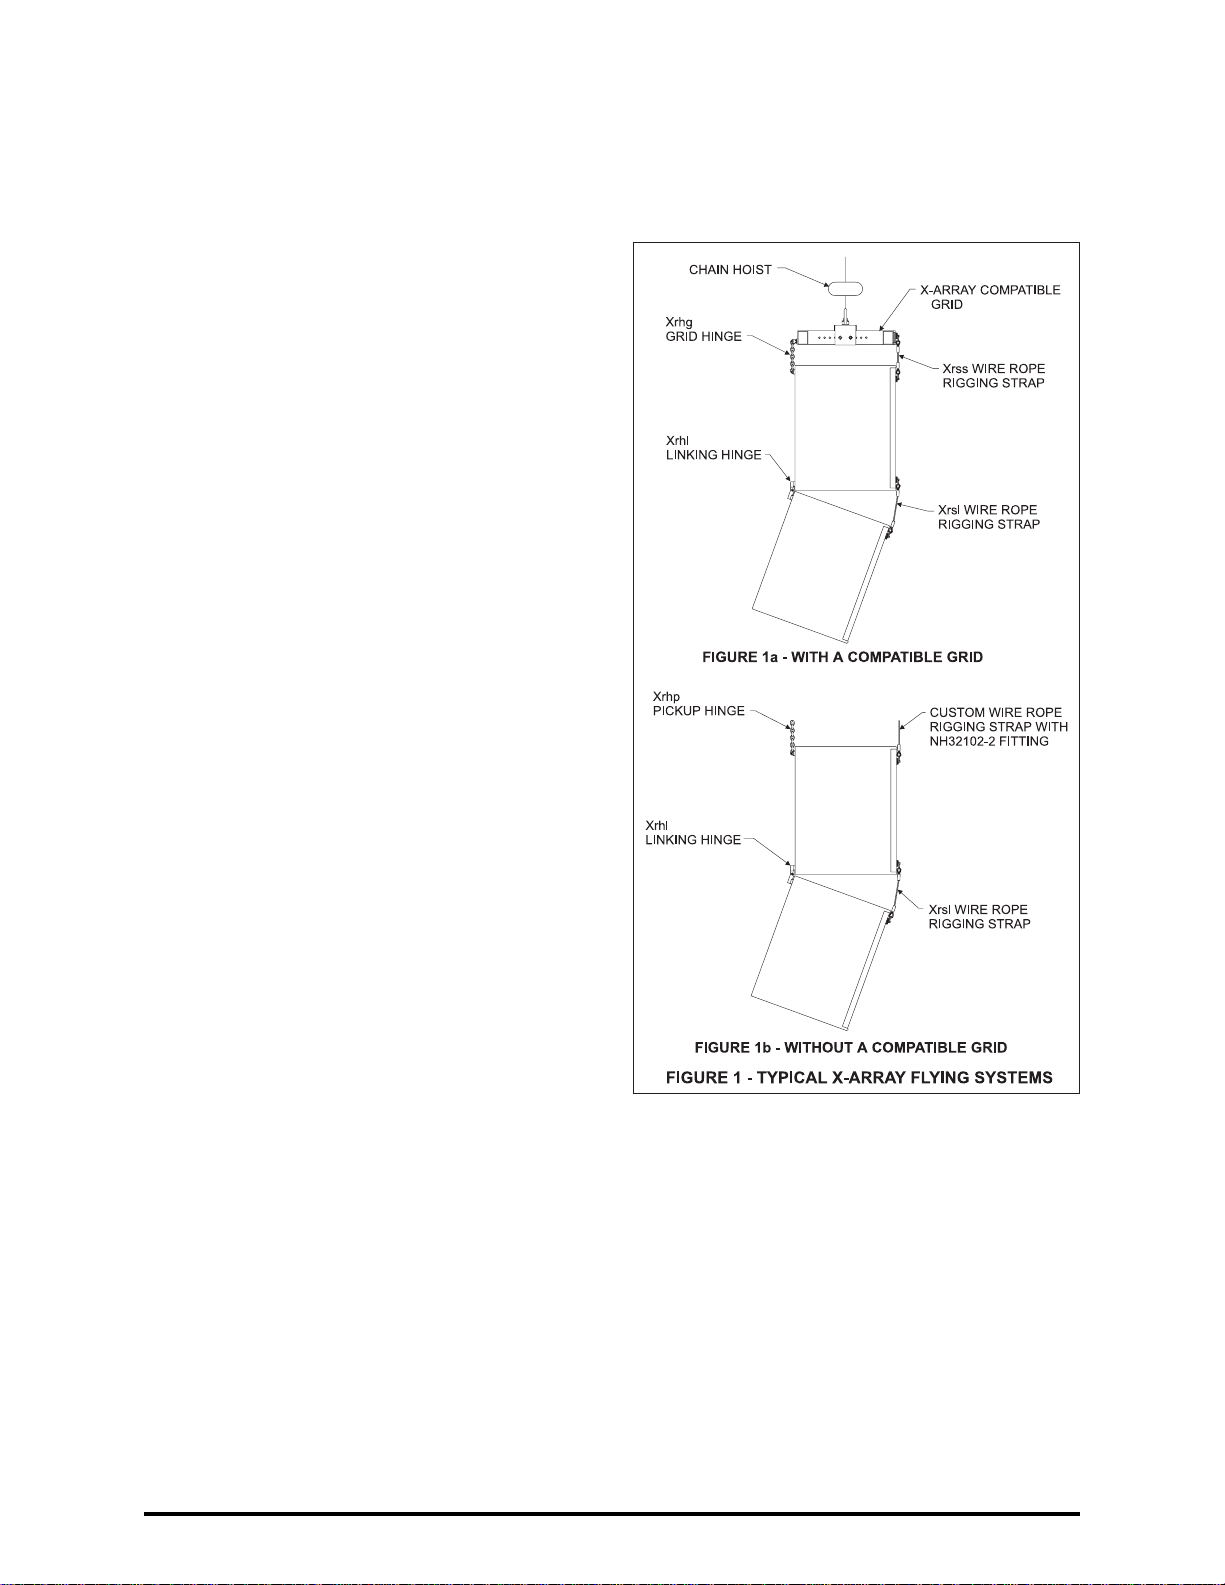
1.1 Overview of the X-Array™ Flying System
The X-Array™ rear-hinge/front-strap flying system
makes constructing arrays easy, predictable and
repeatable. The hinging concept, combined with
the trapezoidal enclosures, allows arrays to be
constructed with the least possible spacing between enclosures.
A basic two-enclosure flying system is shown in
Figure 1 that illustrates the integral components
that make up a typical X-Array™ flying system.
All of the flying X-Array™ loudspeaker systems
utilize horizontal rigging-track hardware on the
back of the enclosure (at both the top and bottom)
and vertical rigging-track hardware on the front
of the enclosures (at both the left and right sides).
The rear rigging-hinge hardware provides the
page 1
Page 6

X-Array™ Loudspeaker Systems
primary support for the loudspeaker enclosures,
while the front rigging hardware is mainly for aiming the enclosures vertically. (The front does provide some secondary support, however.)
Figure 1a illustrates an array column suspended
with a grid. Like the loudspeaker systems, the grid
utilizes horizontal rigging-track hardware at the
back and vertical rigging-track hardware at the
front. The top enclosure is secured to the grid
with two quick-release Xrhg grid hinges at the
rear, and two quick-release Xrss short wire-rope
rigging straps at the front. The grid hinge has only
one possible vertical attachment position on both
the enclosure and the grid. The front straps, however, have six possible vertical attachment positions to choose from on the enclosure and two
possible vertical attachment positions to choose
from on the grid. The grid hinges allow the enclosure to pivot from its top back corner. The vertical
angle of the top enclosure, relative to the grid, is
set by the linear position of the front rigging straps
in the track on the front of the enclosure and on
the grid.
The bottom enclosure shown in Figure 1a is linked
to the top enclosure with two quick-release Xrhl
linking hinges at the rear and two quick-release
Xrsl long wire-rope rigging straps at the front. The
linking hinges allow the bottom enclosure to pivot
from the back corner of the top enclosure. The
vertical angle of the bottom enclosure, relative to
the top enclosure, is set by the linear position of
the front rigging straps in the track on the front of
the top and bottom enclosures. Additional enclosures may be linked together in the same fashion,
as long as the working-load limits for any of the
enclosures, rigging hinges or straps are not exceeded. The array column is raised into position
by a motorized chain hoist of sufficient load rating.
Figure 1a shows the short Xrss rigging straps
securing the top enclosure to the grid and the
long Xrsl rigging straps linking the two enclosures
because this is the most common configuration;
however, the straps may be interchanged in
many circumstances. When the short Xrss rigging
straps are used between the top enclosure and
the grid, the enclosure may be angled upward
relative to the grid or downward a moderate
amount. When the long Xrsl rigging straps are
used between the top enclosure and the grid, the
enclosure may be hung parallel to the grid, or
angled downward substantially relative to the grid.
When the long Xrsl straps are used between enclosures, the bottom enclosure may be hung
parallel to the top enclosure or angled downward
substantially relative to the top enclosure. When
the short Xrss straps are used between enclosures, the bottom enclosure may be hung parallel
to the top enclosure or angled downward a moderate amount relative to the top enclosure.
When a grid is used, each array column must
be balanced by adjusting the position of the grid
hanger towards the front or back until the grid
hangs level. Several of the grids may be connected together horizontally and raised in unison.
When using the grid, the splay angle between
array columns is adjusted by the positioning of the
grid retractable-coupler arms.
In permanent installations, the motorized chain
hoists and grids are sometimes eliminated, and
the loudspeaker columns can be secured directly
to the building structure. This application is shown
in Figure 1b. The back of the top enclosure is sus-
pended with two Xrhp pickup hinges. Each Xrhp
pickup hinge utilizes standard chain that will accept chain connectors, shackles or other standard
rigging hardware which are, in turn, secured to
the building structure via custom wire-rope or
chain assemblies. The front of the enclosure is
suspended by two New Haven NH32102-2
double-stud swivel-ring fittings attached to the
front track of the enclosure and which are, in turn,
secured to the building structure via two custom
wire-rope or chain rigging assemblies. The hardware and techniques used to secure and angle
the bottom enclosure to the top enclosure are
identical to the previously described case where
a grid was employed.
In installations where a custom grid is employed
that does not use track that is compatible with the
X-Array™ Xrhg grid hinge or the Xrss or Xrsl rigging straps, the Xrhp pickup hinge and custom
wire-rope rigging straps that utilize New Haven
NH32102-2 double-stud swivel-ring fittings can
be used to suspend the top enclosure as illustrated in Figure 1b.
Note that the weight of an array can be quite substantial and the grid, chain hoists and building
structural supports used to suspend the array
must be capable of supporting such a load with
a sufficient safety factor. The reader is directed to
section
5. References
of this manual for a list of
rigging references (for background in general rigging practice) and mechanical engineering references (for background in structural engineering
analysis).
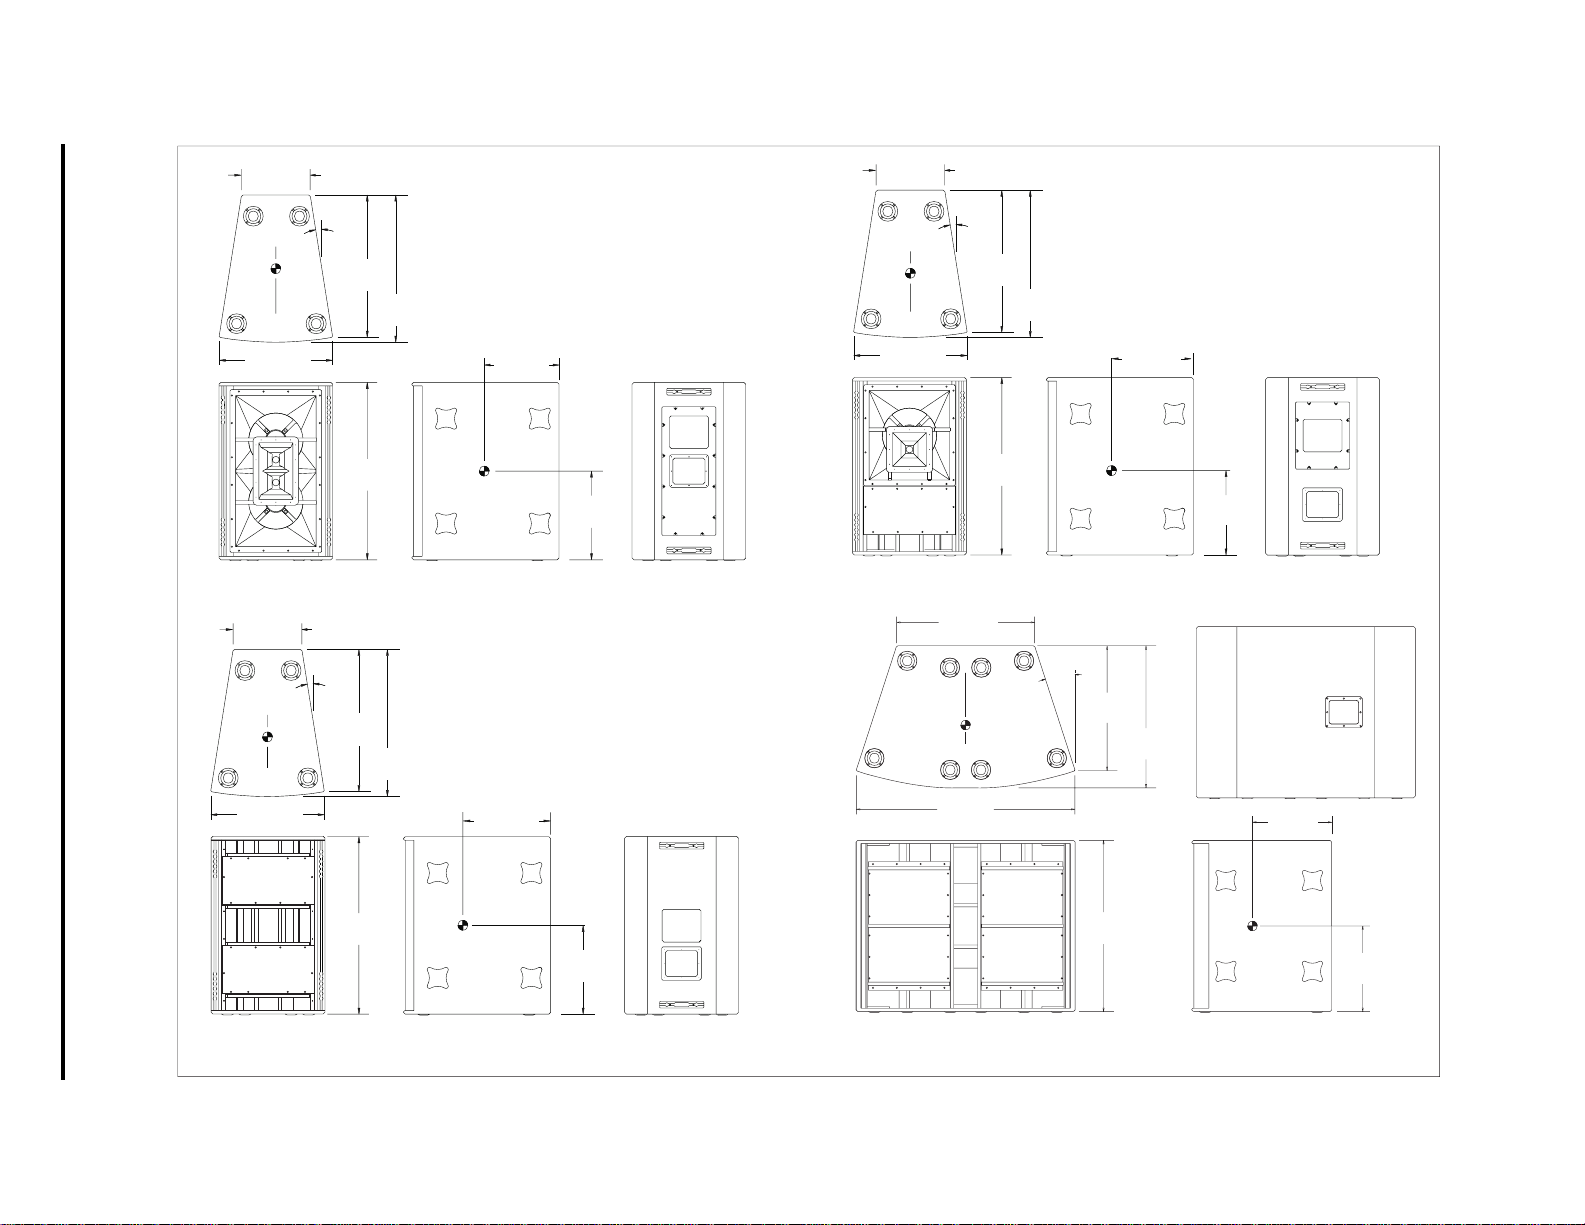
1.2 Enclosure Rigging Hardware Details
All of the flying X-Array™ models utilize identical
rigging hardware, and they all have the same
strength ratings. Figure 2 shows key dimensions,
weights and the centers of gravity for all of the
X-Array™ systems.
A proprietary high-strength aluminum-alloy track
is used at the back of the enclosures near the top
page 2
Page 7
353.8 mm
(13.93 in.)
353.8 mm
(13.93 in.)
X-Array™ Loudspeaker Systems
C
L
584.2 mm
(23.00 in.)
353.8 mm
(13.93 in.)
C
L
584.2 mm
(23.00 in.)
O
9.0
TYP
733.2 mm
(28.87 in.)
914.4 mm
(36.00 in.)
O
9.0
TYP
733.2 mm
(28.87 in.)
758.8 mm
(29.88 in.)
WEIGHT: 87.1 kg (192 lb)
758.8 mm
(29.88 in.)
WEIGHT: WITHOUT EXTERNAL RIGGING: 87.1 kg (192 lb)
WITH EXTERNAL RIGGING: 90.2 kg (199 lb)
384.1 mm
(15.12 in.)
FIGURE 2a - Xf SYSTEM
WEIGHT: 83.5 kg (184 lb)
WEIGHT: WITHOUT EXTERNAL RIGGING: 83.5 kg (184 lb)
WITH EXTERNAL RIGGING: 86.6 kg (191 lb)
438.5 mm
(17.26 in.)
457.2 mm
(18.00 in.)
C
L
584.2 mm
(23.00 in.)
9.0
TYP
733.2 mm
(28.87 in.)
914.4 mm
(36.00 in.)
736.6 mm
(28.98 in.)
C
L
1166 mm
(45.92 in.)
O
WEIGHT: 87.1 kg (192 lb)
WEIGHT: WITHOUT EXTERNAL RIGGING: 87.1 kg (192 lb)
758.8 mm
(29.88 in.)
409.2 mm
(16.11 in.)
FIGURE 2b - Xn SYSTEM
18°
TYP.
667.2 mm
(26.27 in.)
758.8 mm
(29.88 in.)
WEIGHT: 121 kg (267 lb)
WITH EXTERNAL RIGGING: 90.2 kg (199 lb)
441.3 mm
(17.38 in.)
423.3 mm
(16.67 in.)
page 3
914.4 mm
(36.00 in.)
FIGURE 2c - Xb SYSTEM
457.2 mm
(18.00 in.)
FIGURE 2 - X-ARRAY LOUDSPEAKER SYSTEMS
914.4 mm
(36.00 in.)
FIGURE 2d - Xds SYSTEM
457.2 mm
(18.00 in.)
Page 8
X-Array™ Loudspeaker Systems
(17.07 in.)
433.6 mm
WEIGHT: 55.8 kg (123 lb)
(29.88 in.)
758.8 mm
(28.87 in.)
733.2 mm
9.0°
TYP
L
C
353.8 mm
353.8 mm
(13.93 in.)
(13.93 in.)
9.0°
TYP
733.2 mm
(28.87 in.)
758.8 mm
(29.88 in.)
C
L
584.2 mm
(23.00 in.)
(15.40 in.)
391.2 mm
WEIGHT: 60.8 kg (134 lb)
584.2 mm
(23.00 in.)
595.9 mm
595.9 mm
(23.46 in.)
(23.46 in.)
301.6 mm
292.1 mm
(11.88 in.)
(11.50 in.)
FIGURE 2f - Xcb SYSTEM
FIGURE 2 (cont’d) - X-ARRAY LOUDSPEAKER SYSTEMS
FIGURE 2e - Xcn SYSTEM
and bottom for the attachment of two Xrhg, Xrhl
or Xrhp rigging hinges. The track/bracket assembly is extruded as a single piece. One assembly
ties into the back and top of the enclosure, while
a second assembly ties into the back and bottom
of the enclosure. High-strength, aluminum-alloy
bars inside the enclosure tie the top and bottom
track/bracket assemblies together, minimizing
the load applied to the enclosure shell. The track
dimensions are similar to the widely used heavyduty aircraft L-track (such as the New Haven
NH34030-3HD or ATM Fly-Ware™ ATM-TRACK).
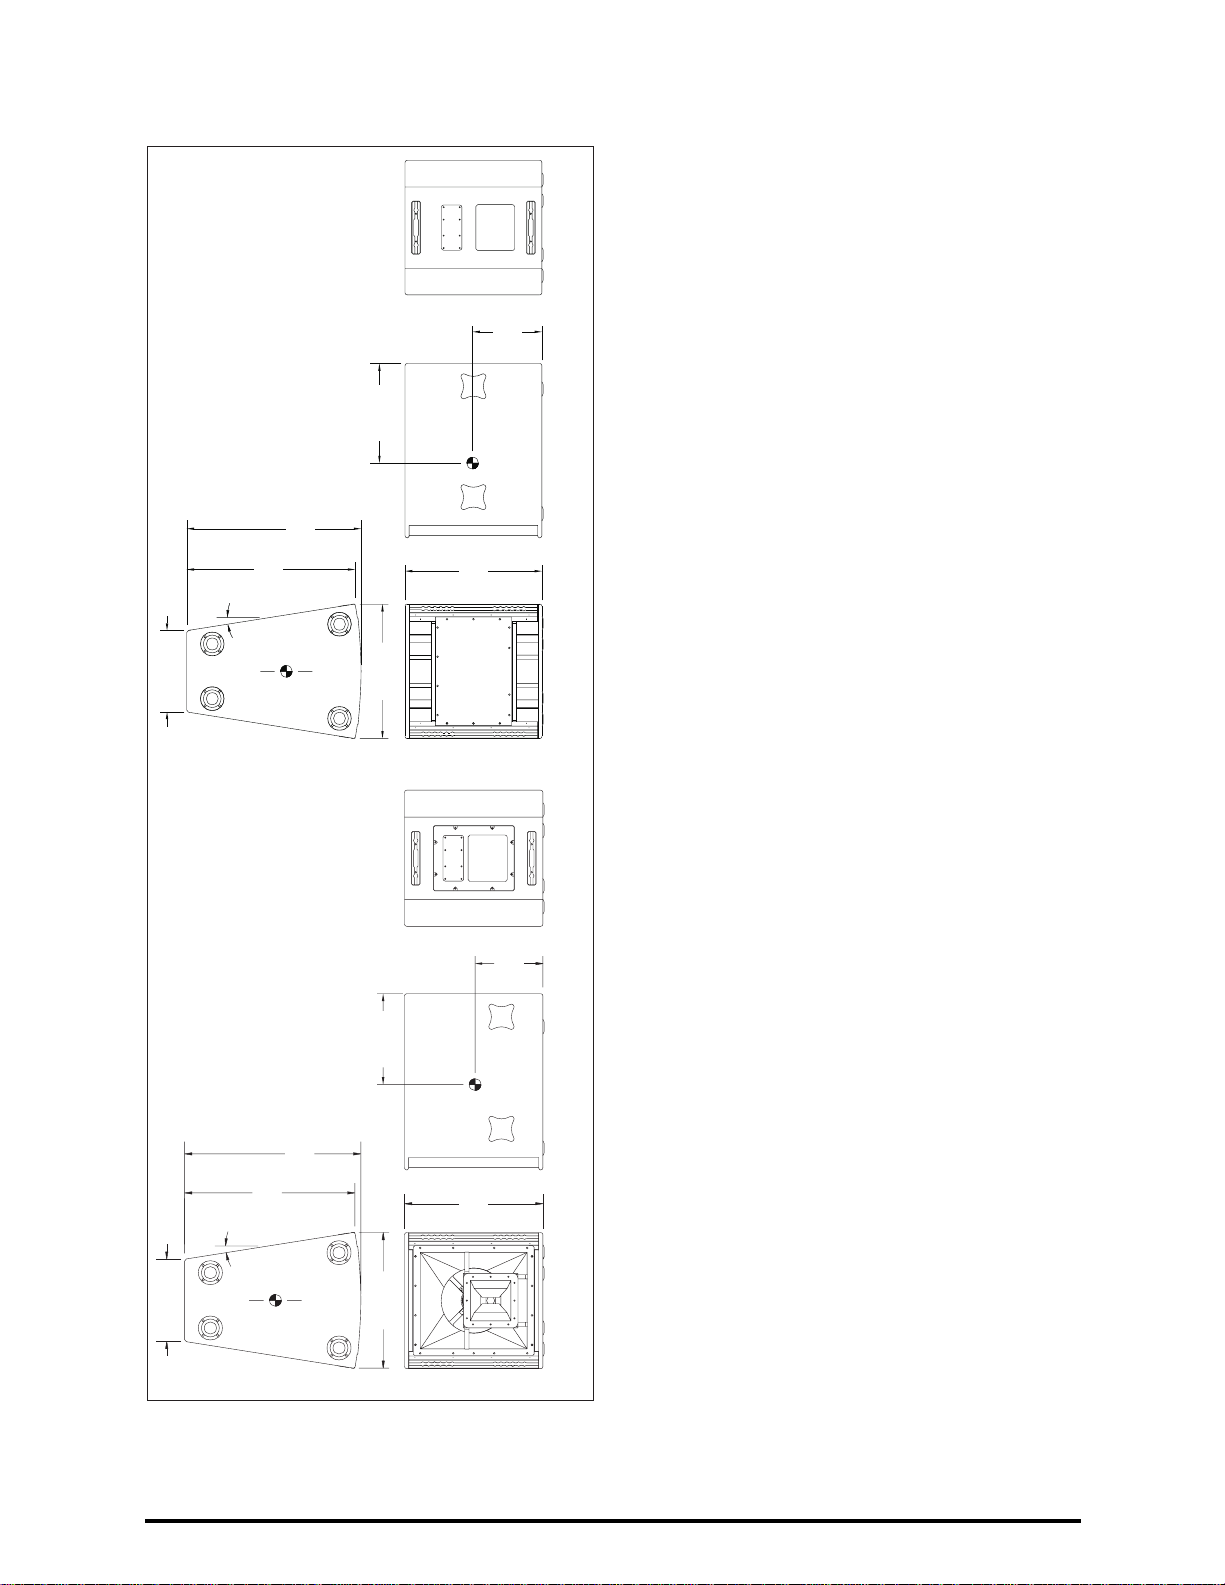
The cutouts in the rear rigging track are shown in
Figure 3a. The large cutout in the center of the
track is for inserting the rigging hinges. The small
holes in the base of the track are for locking the
rigging hinges. The round cutouts on either side
are provided so that two New Haven NH32102-2
double-stud swivel-ring fittings may be installed
for light-duty lifting applications and for pull-ups.
Key dimensions for the rear rigging hardware are
presented in Figure 3a. (See section
3. RiggingStrength Ratings, Safety Factors and Special
Considerations
for a detailed discussion of the
structural strength of the enclosure rear rigging
points.)
At the front of the enclosure is another pair of
proprietary high-strength, aluminum-alloy track/
bracket assemblies which are also extruded as a
single piece. One assembly ties into the left side,
top, bottom of the enclosure, while a second assembly ties into the right side, top and bottom of
the enclosure. The front track extends from the
top to the bottom on both sides of the enclosure,
eliminating the load applied to the enclosure shell.
These track dimensions are also similar to the
widely used heavy-duty aircraft L-track (New
Haven NH34030-3HD or ATM Fly-Ware™ ATMTRACK). On both sides of the enclosure, the front
rigging track has six cutouts near the top and
bottom, as shown in Figure 3b. The New Haven
NH32102-2 double-stud swivel-ring fittings on
the Xrss and Xrsl wire-rope rigging straps may be
installed at any of the cutouts. The relative angle
between a pair of enclosures (or the top enclosure and the grid) is set by the position of the
front rigging-strap fittings in the track cutouts.
Key dimensions for the front rigging hardware
are presented in Figure 3b. (See section
3. Rigging-Strength Ratings, Safety Factors and Special
Considerations
for a detailed discussion of the
structural strength of the enclosure front rigging
points.)
To facilitate the installation and removal of the
linking hinges, alignment feet are installed on the
top and bottom of the X-Array™ enclosures. Male
feet (protruding feet) are located on the bottom
of the enclosures, while female feet (concave
page 4
Page 9
X-Array™ Loudspeaker Systems
HOLE FOR RIGGING
HINGE LOCKING PIN
CUTOUT FOR INSERTING
RIGGING HINGES AND
DOUBLE-STUD FITTINGS
FIGURE 3a - ENCLOSURE REAR RIGGING TRACK
FIGURE 3b - ENCLOSURE FRONT RIGGING TRACK
CUTOUT FOR LOCKING
DOUBLE-STUD FITTING
79.0 mm
(3.11 in.)
25.4 mm
(1.00 in.)
48.0 mm
(1.89 in.)
TYP.
TYP.
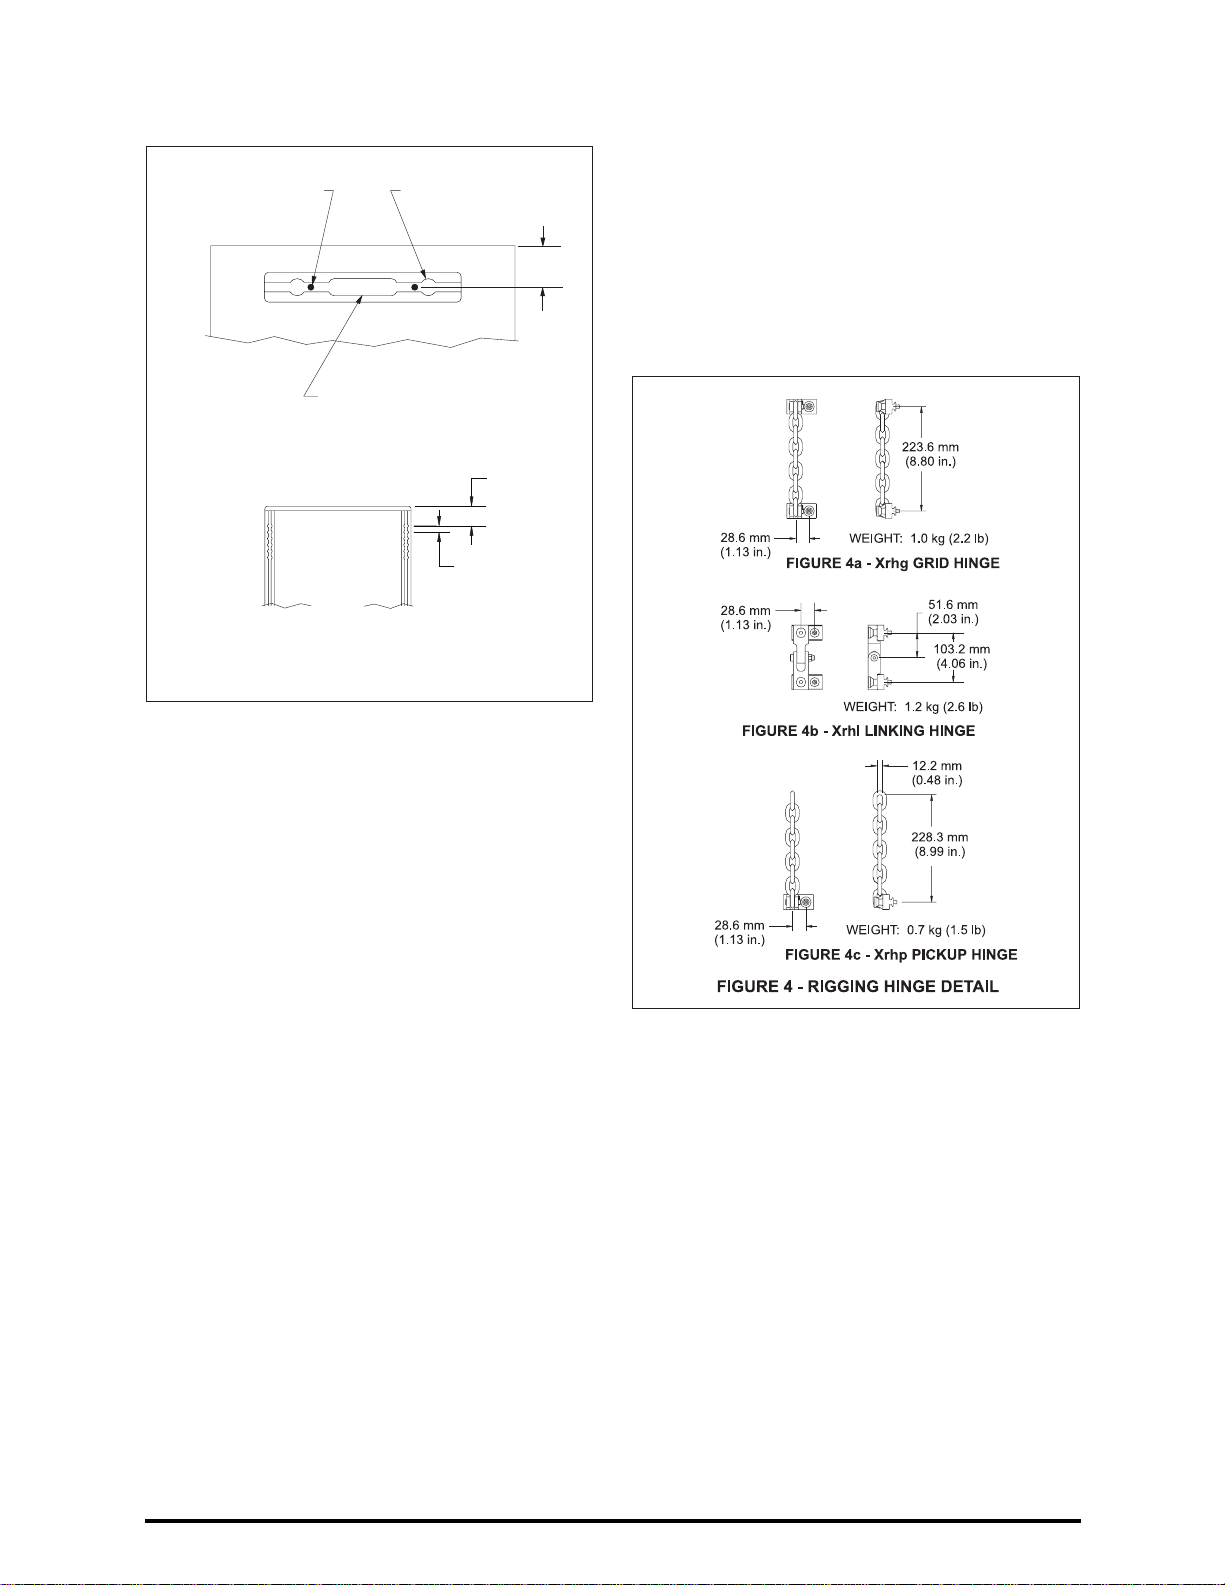
the chain near the ends of the track, as shown in
Figure 5a. (Note: If one grid hinge is installed incorrectly with the chain at the center of the track,
the second grid hinge will not fit into the track cutout.) Key dimensions for the Xrhg grid hinges and
the enclosure are presented in Figures 4a and 5a.
To install an Xrhg grid hinge into the track of an
enclosure, grasp one of the hinge bases and
FIGURE 3 - ENCLOSURE RIGGING HARDWARE DETAIL
dishes) are located on the top. When one enclosure is stacked or lowered on top of another, the
male feet on the bottom of the upper enclosure
slide into the female feet on the top of the lower
enclosure, automatically aligning the enclosures.
If the enclosures do not self align, a light sideways push is all that is needed to make the feet
engage and align. These features allow fast
assembly and disassembly of large loudspeaker
arrays in touring applications.
1.3 Rigging Hinge Details
Xrhg Grid Hinge: Two Xrhg grid hinges are used
to attach the back of an X-Array™ enclosure to
the back of an X-Array™-compatible grid. (See
section
1.5 Grid Details
for a discussion of the
grid.) Each grid hinge consists of two precisionmachined steel bases connected by an alloy-steel
chain, as shown in Figure 4a. Each grid-hinge
base has a locking pin which locks the hinge in
place horizontally in the track on the grid or
X-Array™ enclosure. (See section
3. RiggingStrength Ratings, Safety Factors and Special
Considerations
for a detailed discussion of the
structural strength of the grid hinges.)
The Xrhg grid rigging hinges need not be installed
in the top enclosure and the grid simultaneously.
The length of chain allows the grid hinges to be
installed in the grid first. The grid can then be
floated above the top enclosure while the other
ends of the grid hinges are installed in the track
at the rear of the enclosures. The grid hinges
must be used in pairs and must be installed with
firmly insert the hinge base into the long center
cutout in the track, pressing in until the springloaded locking pin is fully retracted. Then apply
pressure to slide the hinge base sideways towards the end of the track until the spring-loaded
locking pin drops into the hinge-locking-pin hole in
the base of the track. Once the locking pin is fully
engaged, the grid hinge base will be immovable
in the track. ALWAYS CHECK TO MAKE SURE
THE GRID-HINGE BASES ARE SECURELY
LOCKED INTO THE TRACK, AND THAT THE
LOCKING PINS ARE FULLY ENGAGED IN THE
TRACK BEFORE LIFTING ANY LOUDSPEAKER
ENCLOSURES OVERHEAD. Use the same technique for installing the other end of the Xrhg grid
hinge in the track at the rear of the grid.
To remove the Xrhg grid hinge, grasp the lockingpin knob and pull out while applying pressure on
the hinge to slide the hinge base toward the long
cutout at the center of the track. The hinge base
page 5
Page 10

X-Array™ Loudspeaker Systems
will come out of the track once it is aligned with
the center cutout. For added safety, the locking
pin has a special shape which engages with the
track to prevent it from vibrating out of the track
hole during use. If the locking-pin knob seems
difficult to pull out when removing the hinge,
wiggle the hinge base while pulling out on the
knob. When the hinge locking pin is centered
in the track hole, the pin will easily release.
Xrhl Linking Hinge: Two Xrhl linking hinges
are used to link a pair of X-Array™ enclosures
together at their adjacent back corners. Each
linking hinge consists of two precision-machined
steel bases connected by a heavy-duty steel
hinge, as shown in Figure 4b. The hinge arms
pivot, allowing the enclosures to pivot at their
back corners. Each linking-hinge base has a locking pin which locks the hinge in place horizontally
in the rear track of the enclosure. (See section
3.
Rigging-Strength Ratings, Safety Factors and
Special Considerations
for a detailed discussion
of the structural strength of the linking hinges.)
An Xrhl linking hinge must be installed in the top
and bottom enclosures simultaneously. The linking hinges must also be used in pairs and installed with the hinge arms near the ends of the
rigging track as shown in Figure 5b. (Note: If one
linking hinge is installed incorrectly with the hinge
arms at the center of the track, the second linking
hinge will not fit into the track cutout.) Key dimensions for the Xrhl rigging hinges and the enclosure are presented in Figures 4b and 5b.
To install an Xrhl into the track of a pair of enclosures stacked one on top of the other, grasp both
of the hinge bases and firmly insert both of the
hinge bases simultaneously into the long center
cutouts in the track of both enclosures, pressing
in until both spring-loaded locking pins are fully
retracted. Then apply pressure to slide the hinge
bases sideways towards the end of the track until
both spring-loaded locking pins drop into the
hinge-locking-pin holes in the base of the track
on both enclosures. Once the locking pins are
fully engaged, the linking hinge bases will be
immovable in the track. ALWAYS CHECK TO
MAKE SURE THE LINKING-HINGE BASES ARE
SECURELY LOCKED INTO THE TRACK, AND
THAT THE LOCKING PINS ARE FULLY ENGAGED IN THE TRACK BEFORE LIFTING ANY
LOUDSPEAKER ENCLOSURES OVERHEAD.
To remove the Xrhl linking hinge, grasp both of
the locking-pin knobs and pull out while applying
pressure on the hinge to slide the hinge base
toward the long cutout at the center of the track.
The hinge base will come out of the track once
it is aligned with the center cutout. Like the grid
hinge, the locking pin has a special shape which
engages with the track to prevent it from vibrating
out of the track hole during use. If the locking-pin
knob seems difficult to pull out when removing the
hinge, wiggle the hinge base while pulling out on
the knob. When the hinge locking pin is centered
in the track hole, the pin will easily release.
Xrhp Pickup Hinge: Two Xrhp pickup hinges
are used to attach to the back of the top
X-Array™ enclosure in a column to lift the array
where no grid is used or where a custom grid that
is not X-Array™ compatible is used. Each pickup
hinge consists of a single precision-machined
steel base connected by an alloy-steel chain, as
shown in Figure 4c. The pickup-hinge base has a
locking pin which locks it in place when inserted
into the rear track of an X-Array™ enclosure.
Standard chain-link couplers or connectors can
be used to attach the 7.95-mm (5/16-in.) alloysteel chain of the Xrhp to standard rigging hardware (such as shackles, other chains, wire-rope
slings, etc.), which are in turn secured to a custom grid or directly to the building structure. (See
section
tors and Special Considerations
3. Rigging-Strength Ratings, Safet Fac-
for a detailed
discussion of the structural strength of the pickup
hinges.)
The pickup hinges must be used in pairs and installed with the chain near the ends of the track,
page 6
Page 11

X-Array™ Loudspeaker Systems
as shown in Figure 5c. (Note: If one pickup hinge
is installed incorrectly with the chain at the center
of the track, the second pickup hinge will not fit
into the track cutout.) Key dimensions for the Xrhp
rigging hinges and the enclosure are presented in
Figures 4c and 5c.
To install an Xrhp pickup hinge into the track of
an enclosure, grasp the hinge base and firmly insert it into the long center cutout in the track,
pressing in until the spring-loaded locking pin is
fully retracted. Then apply pressure to slide the
hinge base sideways towards the end of the track
until the spring-loaded locking pin drops into the
hinge-locking-pin hole in the base of the track.
Once the locking pin is fully engaged, the pickup
hinge base will be immovable in the track. ALWAYS CHECK TO MAKE SURE THE PICKUPHINGE BASES ARE SECURELY LOCKED INTO
THE TRACK, AND THAT THE LOCKING PINS
ARE FULLY ENGAGED IN THE TRACK BEFORE LIFTING ANY LOUDSPEAKER ENCLOSURES OVERHEAD.
To remove the Xrhp pickup hinge, grasp the locking-pin knob and pull out while applying pressure
on the hinge to slide the hinge base toward the
long cutout at the center of the track. The hinge
base will come out of the track once it is aligned
with the center cutout. For added safety, the locking pin has a special shape which engages with
the track to prevent it from vibrating out of the
track hole during use. If the locking-pin knob
seems difficult to pull out when removing the
hinge, wiggle the hinge base while pulling out on
the knob. When the hinge locking pin is centered
in the track hole, the pin will easily release.
1.4 Rigging Strap Details
Two rigging straps (either two Xrss straps or two
Xrsl straps) are used to attach a pair of enclosures together at the front, or to attach the front of
the top enclosure to an X-Array™-compatible
grid. The short Xrss wire-rope rigging strap,
shown in Figure 6a, and the long Xrsl wire-rope
rigging strap, shown in Figure 6b, are identical
except for their length. Both consist of two New
Haven NH32102-2 double-stud swivel-ring fittings
connected together with a 4.76-mm (.188-in.) diameter, galvanized and black-plastic-coated, aircraft wire rope. (See section
3. Rigging-Strength
Ratings, Safety Factors and Special Considerations
for a detailed discussion of the structural
strength of the rigging straps.)
Two Xrss straps are typically used to attach the
front of the top enclosure to an X-Array™-compatible grid as shown in Figure 7a; however, the Xrsl
may be substituted. Key dimensions for the front
rigging straps on the enclosures are presented in
Figure 7a. (See section
1.5 Grid Details
for a dis-
cussion of the grid.) When the short Xrss rigging
straps are used between the top enclosure and
the grid, the top enclosure may be angled upward
relative to the grid or downward a moderate
amount. When the long Xrsl rigging straps are
used between the top enclosure and the grid, the
enclosure may be hung parallel to the grid, or
angled downward substantially relative to the grid.
Two Xrsl straps are typically used to link two enclosures together at the front; however, the Xrss
may be substituted. When the long Xrsl straps are
used between enclosures, the bottom enclosure
may hung parallel to the top enclosure or angled
downward substantially relative to the top enclosure. When the short Xrss straps are used between enclosures, the bottom enclosure may
hung parallel to the top enclosure or angled
downward a moderate amount relative to the top
enclosure. (See the section
sures
for details.)
2.2 Aiming the Enclo-
To attach the front of an X-Array™ enclosure to a
building structure, custom wire-rope assemblies
may be fabricated using the New Haven
NH32102-2 double-stud swivel-ring fitting. That
same fitting may be used on custom wire-rope
assemblies to secure the front of an enclosure to
a custom grid that does not have track at the
front.
In certain circumstances, two New Haven
NH32102-2 double-stud swivel-ring fittings may
page 7
Page 12

X-Array™ Loudspeaker Systems
be used on custom wire-rope assemblies to
attach to the rigging track on the back of an
X-Array™ enclosure as shown in Figure 7b. Key
dimensions for the rigging straps on the enclosures are presented in Figure 7b. In light lifting
applications, double-stud-fitting custom assemblies could be used instead of the Xrhp pickup
hinges. The reader is cautioned that THE STANDARD DOUBLE-STUD FITTINGS ARE NOT AS
STRONG AS THE Xrhp, Xrhg and Xrhl RIGGING
HINGES. (See section
3. Rigging Strength-Rat-
ings, Safety Factors and Special Considerations
for a detailed discussion of the structural strength
of the NH32102-2 fittings and the rigging hinges.)
To attach the double-stud swivel-ring fittings to
the enclosure rigging track, as shown in Figure 7,
grasp the fitting between the thumb and first two
fingers. Push in the spring-loaded safety locking
pin with your free hand and lift the outer locking
ring over the pin by pressing with your thumb.
Continue to press with your thumb until the two
legs of the fitting are fully exposed. Insert the two
round feet on the end of the legs into the round
cutouts in the track and slide the fitting to the
desired position. Center the main body of the fitting over one of the track cutouts, with the feet
located on either side (i.e., the feet positioned directly under the teeth of the track). Release the
outer locking ring. The round protrusion on the
bottom of the fitting should lock into the round cutout in the track, with the locking ring retracting to
its normal position, allowing the safety pin to reappear and extend over the locking ring. If the fitting
does not lock into the track, nudge it along the
track and wiggle as necessary until it settles into
position. If the outer locking ring does not fully retract, push the ring towards the track until the
safety pin reappears and extends over the locking
ring. When locked, the fitting will be immoveable
in the track and the locking ring of the fitting may
not be lifted. To remove the fitting, reverse the
procedure. ALWAYS CHECK TO MAKE SURE
THAT THE DOUBLE-STUD FITTING IS SECURELY LOCKED INTO THE TRACK, AND
THAT THE SAFETY PIN IS EXTENDED OVER
THE LOCKING RING BEFORE LIFTING ANY
LOUDSPEAKER ENCLOSURE OVERHEAD.
1.5 Grid Details
ATM Fly-WareTM manufactures the MEGS-4000-T
grid, shown in Figure 8, specifically for the
X-Array™ loudspeaker systems. The grid is completely compatible with the X-Array™ systems,
and has track on the front and rear for connecting
to the top enclosure in an array column. The track
on the rear of the grid, shown in Figure 8b, has a
single large cutout for inserting the Xrhg grid
hinges, and has hinge locking-pin holes similar to
the track on the rear of the enclosures. Standard
double-stud aircraft fittings cannot be used at the
rear of the grid. The track on the front of the grid,
shown in Figure 8c, provides two attachment positions for the Xrsl or Xrss rigging straps. A grid
suspending a column of loudspeakers is balanced, front to back, by adjusting the position of
the hanger shown in Figure 8d. The hanger is se-
cured to the center bar with bolts or quick-release
pins. Multiple positions for the hanger are available from the back to the front of the grid.
Multiple grids can be linked together with retractable couplers, shown in Figure 8e, the position of
which sets the splay angle between adjacent columns. Each grid comes with two long couplers in
the front and two short couplers in the rear. The
couplers on one side of the grid have male ends
while the couplers on the other side of the grid
have female ends. This allows several grids to be
linked together by inserting the male ends of one
grid’s couplers into the female ends of another
grid’s couplers, as shown in Figure 8f. The couplers are secured to the front and rear grid bars
with bolts or quick-release pins. The front and
rear couplers may be swapped from front to rear
to attain a wider range of splay angles. Two examples are shown in Figures 8g and 8h.
The working-load structural-strength ratings of the
X-Array™ loudspeaker systems allow a maximum
weight of 726 kg (1,600 lb) to be suspended in a
single column, which is well within the workingload limit of the ATM Fly-Ware™ MEGS-4000-T
grid. When using the MEGS-4000-T grid, always
follow the manufacturers instructions, recommendations and safety precautions, and never exceed
any structural limit as provided by ATM.
page 8
Page 13

X-Array™ Loudspeaker Systems
FIGURE 8 - ATM FLYWARE MEGS 4000-T X-ARRAY-COMPATIBLE GRID
2. X-ARRAY™ FLYING TECHNIQUES
The X-Array™ rear-hinge/front-strap flying system
makes constructing vertical arrays easy, predictable and repeatable. The enclosures utilize rigging hinges that allow them to pivot at their rear
corners. The relative vertical angles, from one enclosure to another, are set by the position of the
front rigging straps. Horizontal angles are set at
the top of array columns by retractable coupling
arms on the grids.
2.1 Enclosure and Horn Orientation
The X-Array™ systems lend themselves to easy
array construction. All of the full-size X-Array™
models – the Xf, Xn, and Xb – have identical dimensions and rigging. With grilles in place the
full-size systems are indistinguishable from one
another, allowing them to be arrayed in any configuration while maintaining a consistent appear-
ance. The Xf and the Xb are acoustically symmetrical side to side and top to bottom and, therefore, do not need to be rotated upside down for
any reason when designing arrays. The Xn, however, is not acoustically symmetrical top to bottom
(the low-frequency section is at one end, while the
mid-bass-/high-frequency section is at the other
end), which may necessitate that some enclosures be turned upside down for optimal array
performance. The Xn is shipped from the factory
with the woofer at the bottom and the mid-bass-/
high-frequency section at the top. If the enclosure
is turned upside down so that the woofer is up
and the mid-bass-/high-frequency section is
down, the alignment feet on the enclosure must
be swapped around so that the male feet (protruding feet) are on the bottom and the female
feet (concave dishes) are on the top as arrayed.
The grille should also be rotated so that the grille
page 9
Page 14

X-Array™ Loudspeaker Systems
badge is right side up, maintaining a consistent
appearance. In addition the high-frequency horn
may be rotated, offering the choice of a 60°H x
40°V pattern or a 40°H x 60°V pattern.
All of the half-size X-Array™ models – the Xcn,
and Xcb – also have identical dimensions and appearance with grilles on, and have rigging that is
identical to the full-size models. The Xcb is acoustically symmetrical side to side and top to bottom
and, therefore, does not need to be rotated upside down for any reason when designing arrays.
The Xcn, however, is not acoustically symmetrical
top to bottom (the high-frequency horn is offset
slightly to one end inside the mid-bass horn),
which may necessitate that some enclosures be
turned upside down for optimal array performance. The Xcn is shipped from the factory with
the high-frequency horn offset towards the bottom. If the enclosure is turned upside down so
that the high-frequency horn is at the top, the
alignment feet on the enclosure must be swapped
around so that the male feet (protruding feet) are
on the bottom and the female feet (concave
dishes) are on the top as arrayed. The grille
should also be rotated so that the grille badge is
right side up, maintaining a consistent appearance. In addition the high-frequency horn may be
rotated, offering the choice of a 60°H x 40°V pat-
tern or a 40°H x 60°V pattern.
2.2 Adjusting the Vertical Angles
Using the Xrsl (long wire-ropr rigging strap)
Between Enclosures: The long Xrsl rigging
straps are the primary recommendation for setting
the angle between enclosures because they provide the widest range between a pair of enclosures. Figure 9a shows the round cutouts (or
“holes”) in the front rigging tracks of a pair of enclosures, each numbered 0 through 5. These
twelve positions allow a range of angles between
enclosures from 0° (enclosures parallel to each
other) to 18°down in 1.8° increments. For instance, when the fittings of the Xrsl rigging straps
are inserted into cutouts #0 on both the upper
and lower enclosures (position “0-0”), as shown in
Figure 9b, the resulting angle between the two enclosures is 0°. Notice in Figure 9b that the rigging
strap and fittings cover up all of the track cutouts
so that there are no round cutouts (or “holes”)
showing. Thus, the “0-0” position can also be
thought of as the “0-holes-showing” position. An
equation can be written that predicts the relative
angle of the enclosures when the Xrsl is used:
Angle = - (Holes Showing) x 1.8°
for the Xrsl
where negative (“-”) angles indicate downward angles and positive (“+”) angles indicate
upward angles.
If the double-stud fittings of the Xrsl strap are inserted into cutout #3 in the upper enclosure and
cutout #4 in the lower enclosure (position “3-4”),
as shown in Figure 9c, a total of 7 holes are showing, making the angle between the two enclosures
-(7 x 1.8°) = -12.6°. This system makes it easy to
obtain the desired vertical array shape without
having to experiment with balancing the enclosures.
Using the Xrsl (long wire-rope rigging strap) at
the Grid: The long Xrsl rigging straps may also
be used to attach the top enclosure in an array
column to the ATM Fly-WareTM MEGS-4000-T
grid. The Xrsl rigging straps allow the top enclosure to hang at 0° (parallel to the grid) to 10.8°
down relative to the grid in 1.8° increments.
Figure 10a shows the two cutouts in the track on
the front of the ATM grid, numbered 0 and 1, and
the six cutouts in the enclosure track, numbered
0 through 5. The same equation discussed in the
previous paragraph for determining angles between enclosures also applies to the Xrsl when
determining angles between the top enclosure
and the ATM grid:
page 10
Page 15

X-Array™ Loudspeaker Systems
Angle = - (Holes Showing) x 1.8°
for the Xrsl
where negative (“-”) angles indicate downward angles and positive (“+”) angles indicate
upward angles.
Angle = 7.2°- (Holes Showing) x 1.8°
for the Xrss
where negative (“-”) angles indicate downward
angles and positive (“+”) angles indicate upward
angles.
For example, if the fittings of the short Xrss straps
are inserted into track cutout #2 on both the upper
and lower enclosures (position “2-2”), as shown in
Figure 11b, the resulting angle between the enclosures is 7.2° - (4 x 1.8°) = 0° with a total of
4 holes showing. If the fittings of the Xrss short
straps are inserted into track cutout #4 on both
the upper and lower enclosures (position “4-4”),
as shown in Figure 11c, the resulting angle be-
tween the two enclosures with 8 holes showing
is 7.2° - (8 x 1.8°) = -7.2°.
Using the Xrss at the Grid: The short Xrss
rigging straps are the primarily recommendation
for use with the ATM grid because they offer the
ability to angle the top enclosure both upward
and downward relative to the grid. The short Xrss
rigging straps allow the top enclosure a range of
angles relative to the grid from 7.2° up to 3.6°
down in 1.8° increments. The same equation discussed in the previous paragraph for determining
For example, when the fittings of the Xrsl straps
are inserted into cutout #0 on the grid and cutout
#0 on the top enclosure (position “0-0”), as shown
in Figure 10b, no holes are showing and the angle
of the top enclosure relative to the grid is
-(0 x 1.8°) = 0°. If cutout #0 on the grid and #3 on
the enclosure are chosen (position “1-3”), as
shown in Figure 10c, a total of 3 holes are show-
ing, making the angle of the top enclosure relative
to the grid -(3 x 1.8°) = -5.4°.
Using the Xrss (short wire-rope rigging strap)
Between Enclosures: The short Xrss rigging
straps may also be used between enclosures;
however, the Xrss offers a lesser range of downward angles than the long Xrsl rigging strap. The
short Xrss rigging straps allow a range of angles
between the enclosures of 0° (enclosures are parallel) to 10.8° down in 1.8° increments. The Xrss
rigging strap is 101.6 mm (4.0 in.) shorter than
the Xrsl strap. Therefore, for the same angle,
there will be four more holes showing when the
short Xrss rigging strap is used compared to the
long Xrsl strap. This results in an additional 7.2°
upward angle when the short Xrss is used. Thus,
the equation for the Xrss becomes:
page 11
Page 16

X-Array™ Loudspeaker Systems
angles between enclosures also applies to the
Xrss when determining angles between the top
enclosure and the ATM grid:
Angle = 7.2°- (Holes Showing) x 1.8°
for the Xrss
where negative (“-”) angles indicate downward angles and positive (“+”) angles indicate
upward angles.
For example, when the short Xrss straps are used
between the ATM grid and the top enclosure for
0° relative angle between the two (position “0-4”),
there are 4 holes showing as illustrated in
Figure 12b. This means that the formula for the
short Xrss strap must be offset by 4 compared to
the long Xrsl strap; or in this example, 7.2° (4 x 1.8°) = 0°. If the fittings on the Xrss short
straps are inserted into track cutout #1 on the grid
and track cutout #0 on the top enclosure (position
“1-0”), as shown in Figure 12c, one hole is showing and the top enclosure is angled 7.2° (1 x 1.8°) = +5.4° upward relative to the grid.
Multiple Enclosure Angles: The relative vertical
angle between the grid and the top enclosure or
between adjacent enclosures is determined by
the attachment position of the Xrss and Xrsl rigging straps in the rigging track in the grid and enclosures. Note that the straps set the
angles
between grid and enclosures, and that
those relative angles are
mining the
absolute angle
cumulative
of the enclosures lower
relative
when deter-
in the array. This is best illustrated by the example shown in Figure 13.
An Xrss rigging strap is attached at position 1-5
between the ATM grid and the top enclosure,
resulting in a relative angle between the grid and
enclosure of -3.6°. (See the sections immediately
above for how to calculate the relative angles
based on the rigging strap attachment locations.)
Since the grid is level at 0°, the absolute angle of
top enclosure is -3.6° (pointing down). Moving
down the array, an Xrsl rigging strap is attached
in position 1-2 between the first and second enclosures, resulting in a relative angle of -5.4° between the two. In other words, the second
enclosure is angled down 5.4° more than the top
enclosure, making the absolute angle of the second enclosure -3.6° -5.4° = -9.0°. Finally, an Xrsl
rigging strap is attached at position 2-2 between
the second and third enclosure, resulting in a
relative angle of -7.2° between the two. In other
words, the third enclosure is angled down 7.2°
more than the second enclosure, making the absolute angle of the third enclosure -3.6° -5.4°-7.2°
= -16.2°. Thus, the absolute vertical angle of any
enclosure in an array, is the sum of all of the relative angles of the enclosures above.
2.3 Adjusting Horizontal Angles
When using the ATM Fly-WareTM MEGS-4000-T
grid, the horizontal shape (the splay angles between array columns) of a loudspeaker array is
POSITION1-5(-3.6°)
Xrss
-3.6°
POSITION1-2(-5.4°)
Xrsl
-9.0°
POSITION2-2(-7.2°)
Xrsl
-16.2°
FIGURE 13 - THE RELATIVE ENCLOSURE ANGLES
ADD IN A COLUMN
page 12
Page 17

X-Array™ Loudspeaker Systems
easily set by coupling the grids together. The
ATM grid and couplers are shown in Figures 8e
and 8f. The splay angle between array columns is
determined by the position of the couplers within
the grids front and rear bars, which is illustrated
in Figure 8g . The front and rear couplers may be
swapped to attain small or 0° splay angles, as
shown in Figure 8h.
2.4 Load Distribution Front to Back
Array Load Distribution: Within the X-Array™
flying system, the ratio of the total load supported
by the rear hinges versus the front straps is important, because the front rigging straps have a
lower working-load limit then the rear rigging
hinges. The ratio of the total load supported by
the front versus the rear rigging hardware is dependent on the location of the center of gravity of
the assembly of enclosures in an array column.
Two grid hinges are capable of supporting the
entire load of an array column weighing 726 kg
(1,600 lb) while maintaining a safety factor of 8:1
with no contribution from the front straps. Two
front rigging straps are capable of supporting the
entire load of an array column weighing 454 kg
(1,000 lb) while maintaining a safety factor of 8:1
with no contribution from the rear hinges. It is possible that some array shapes will transfer most or
all of the weight of a column to the front or to the
rear rigging hardware, therefore it is not valid to
assume that the total weight will be distributed
evenly over all four attachment points and to simply add up the individual working-load limits of
each piece of rigging hardware to determine how
much total weight may be suspended. Distributing
the majority of the weight of an array column to
the rear is desirable because of the higher
strength of the grid hinges and linking hinges.
If the total weight of a column of loudspeakers is
454 kg (1,000 lb) or less, the user typically need
not be concerned about the weight distribution
front to back because the front rigging straps
would be capable of supporting the entire weight
of the column while maintaining a safety factor in
excess of 8:1. If the total weight of a column of
loudspeakers is greater than 454 kg (1,000 lb) –
but less than the 726-kg (1,600-lb) maximum –
the user must be concerned about the weight distribution front to back to ensure that a safety factor of 8:1 is maintained in the front rigging straps.
Typically, the most common array configurations
used in touring and permanent-installation applications, do distribute the majority of the weight of
an array column to the rear.
Some common shapes of array columns are
shown in Figure 14. The center of gravity of array
columns, such as the one shown in Figure 14a, in
which there are no enclosures angled upward and
there are no pull ups, is located towards the rear
of the column. The weight distribution of these
types of arrays is always towards the rear of the
enclosures throughout the column, resulting in the
majority of the load being supported by the stronger rigging hinges than the less-strong rigging
straps. In these cases, the user need not have
any concern for the weight distribution other than
to balance a grid.
The center of gravity for array columns, such as
the one shown in Figure 14b, in which the top two
enclosures are angled upward, is located more
towards the front for the top enclosure. This shifts
much of the load from the stronger rear hinges to
the less-strong rigging straps. In these cases the
user must be concerned about the weight distribution front to back to ensure that too much load
is not applied to the front straps. As mention before, the user need only be concerned if the total
weight of a column of loudspeakers is greater
than 454 kg (1,000 lb). Electro-Voice recommends that no more than the top two X-Array™
enclosures in a column be angled upwards, and
that the upward angle is no greater than 15° to
ensure that a safety factor of 8:1 is maintained
in the front rigging straps.
The reader should note that the rating examples
given above are valid for when the rigging hinges
and straps are loaded at nearly 0° vertically. The
reader is cautioned that the strength ratings of the
rigging hardware varies with angle, and should
consult section
Safety Factors and Special Considerations
3. Rigging-Strength Ratings,
for a
page 13
Page 18

X-Array™ Loudspeaker Systems
detailed discussion of the structural strength of
the rigging hardware.
Balancing the Grid: When using a grid, as
shown in Figure 14, the pickup point on the grid
(the hanger) must be positioned directly above
the combined center of gravity for the entire column of enclosures so that the grid will be balanced and hang level. With enclosures facing
straight ahead or angled down, as shown in
Figure 14a, the grid hanger must be shifted towards the back to be located directly above the
combined center of gravity for the entire column,
so that the grid will be balanced and hang level.
With enclosures angled up, as shown in
Figure 14b, the grid hanger must be shifted forward. To ensure maximum stability, Electro-Voice
recommends that the grid be level ±5°. (See
Figure 8c for hanger front-to-back adjustment
detail for the ATM grid.)
2.5 Using Pull-Up Lines
Pull-Up Line Techniques: In a column of
X-Array™ loudspeakers, the rear rigging hinges
allow the enclosures to pivot vertically (to angle
up or down) while the front rigging straps set the
vertical angles. The rigging straps can only constrain the downward angle to resist gravity. In
other words, if, in an array column, there were
only rear hinges and there were no front rigging
straps at all, each enclosure in the column would
naturally point downward due to gravity. The precise downward angle of each free-hanging enclo-
sure would be dependent on the center of gravity
of that enclosure and the weight of all of the enclosures suspended beneath it. The front rigging
straps can be used to limit the angle to less than
that which gravity would dictate, but the front rigging straps cannot be used to increase the angle
beyond which gravity would naturally allow the
enclosure to hang. Therefore, if a pair of front rigging straps on an enclosure were installed in
track positions that would enable a greater downward angle than gravity would allow, those rigging
straps would be slack when the enclosure was
free hanging. To force that enclosure to angle
down more than gravity would allow, a pull-up
line would need to be attached to the bottom
of the enclosure at the rear.
Pull-up lines are usually attached to the bottom
back corner of the bottom enclosure in an array
column. Pulling back and up will force the enclosure to angle down more until the front straps are
taut. Even if the enclosure with the slack front
straps is not at the bottom of an array column,
pulling back and up on the bottom enclosure will
force that enclosure down until the straps are taut.
It should be noted that, because the relative
angles between the enclosures are limited by the
front rigging straps, a pull-up cannot further increase the angles between the enclosures where
the front rigging straps were already taut, it will
only further tilt down the enclosures with the slack
straps. An example requiring a pull-up line is illustrated in Figure 15.
When the lower enclosures in a vertical array require relative downward angles greater than the
18° maximum permitted by the Xrsl long rigging
straps, the front straps may be omitted from those
enclosures. A pull-up line attached to the bottom
enclosure can then be used to set the downward
angles of the lower enclosures, as shown in
Figure 16, as long as the working-load limit of the
Xrhl linking hinges is not exceeded.
When a significant downward angle is required for
the top enclosure in an array column, the top enclosure should be attached directly to a structural
support (such as a building or a large custom
grid) using a pair of Xrhp pickup hinges at the
rear. A pull-up line can the be used to pull the
top enclosure to the required angle, as shown in
Figure 17. Custom front wire-rope straps utilizing
the New Haven NH32102-2 double-stud fittings
can then be added to the front of the top of the
enclosure as redundant safety lines. Less then 1"
of slack in the front safety straps is recommended. In applications where the total weight of
the column is no greater then 454 kg (1,000 lb),
custom wire-rope straps utilizing the New Haven
NH32102-2 double-stud fittings may be used in
place of the pickup hinges at the rear of the top.
page 14
Page 19

X-Array™ Loudspeaker Systems
This configuration cannot be implemented with a
grid like that shown in Figure 8 because the grid
cannot be balanced.
To attach a pull-up line to the bottom enclosure
in an array column, a long Xrsl rigging strap (or
other similar strap) may be attached to the two
round cutouts in the rear rigging track as shown
in Figure 18. A variety standard rigging hardware
components (such as shackles, threaded chain
connectors, carabiners, etc.) may be used to secure the pull-up line to the Xrsl wire-rope strap.
The attachment hardware should have a diameter
of at least 9.5 mm (.375 in.) to eliminate the possibility of kinking the wire rope of the Xrsl. Attaching
the pull-up to only one of the round cutouts in the
rear track is not recommended because it would
cause the column to twist.
CAUTIONS for Pull-Up Lines: When a grid is
used, the Xrhg grid hinge is used to attach the
back of the top enclosure in a column to the back
of the grid, while the Xrss or Xrsl rigging straps
are used to attach the front. If too much force is
applied on a pull-up line, the chain on the Xrhg
grid hinges could go slack, shifting all of the
weight of the entire array column to the front rigging straps. This condition presents two problems
of serious concern. The first concern is that, when
all of the weight shifts to the front straps, the grid
will become unbalanced, resulting in the front of
the grid tilting down and the back tilting up. This
imbalance could cause a sudden shift in the load
that could be dangerous. If multiple grids are
coupled together horizontally and one grid becomes unbalanced, there could be dangerous
twisting forces between the unbalanced grid and
adjacent balanced grids. The second concern is
that, when all of the weight shifts to the front
straps, a safety factor of 8:1 may not be maintained for the front rigging straps.
When a grid is not used, the Xrhp pickup hinge
is used to attach the back of the top enclosure
to building structural supports, while custom wirerope assemblies are used to support the top enclosure front. If too much force is applied on a
pull-up line, the chain on the Xrhp pickup hinges
could go slack, shifting all of the weight of the entire array column to the front wire-rope assemblies. The concern here is that, when all of the
weight shifts to the front straps, a safety factor of
8:1 may not be maintained for the front wire-rope
assemblies.
THE USER IS CAUTIONED TO TENSION THE
PULL-UP LINE ONLY UNTIL THE SLACK IN THE
FRONT RIGGING STRAPS HAS BEEN REMOVED. NEVER PULL UP ENOUGH TO CAUSE
THE CHAIN OF ANY Xrhg GRID HINGES OR
Xrhp PICKUP HINGES TO GO SLACK.
3. RIGGING-STRENGTH RATINGS, SAFETY
FACTORS, AND SPECIAL SAFETY CONSIDERATIONS
3.1 Working Load Limit and Safety Factors
Definitions: The structural ratings for all of the
X-Array™ rigging components and complete
page 15
Page 20

X-Array™ Loudspeaker Systems
loudspeaker systems are based on test results
in which parts were stressed to failure. Manufacturers typically present the structural-strength
ratings of mechanical components or systems
as either the working-load limit (WLL) or the ultimate-break strength. Electro-Voice chooses to
present the structural-load ratings of the
X-Array™ loudspeaker systems as the
load limit.
The working-load-limit rating represents
working-
the maximum load that should ever be applied to
a mechanical component or system. THE USER
SHOULD NEVER APPLY A LOAD THAT EXCEEDS THE WORKING-LOAD LIMITS OF ANY
OF THE RIGGING COMPONENTS OR COMPLETE LOUDSPEAKER SYSTEMS DESCRIBED
IN THIS MANUAL.
The working-load limits for the X-Array™ rigging
components and complete loudspeaker systems
described in this manual are based on an 8:1
safety factor. The safety factor is defined as the
ratio of the ultimate-break strength divided by the
working-load limit, where the ultimate-break
strength represents the force at which a part will
structurally fail. For example, if a part has working-load limit of 454 kg (1,000 lb) based on an 8:1
safety factor, it would not structurally fail until a
force of at least 3,629 kg (8,000 lb) was applied;
however, the user should never apply a load to
that part that exceeds 454 kg (1,000 lb). The
safety factor provides a margin of safety above
the working-load limit to accommodate normal
dynamic loading and normal wear.
CAUTIONS for Working-Load Limits and
Safety Factors: The working-load limits defined
by the manufacturer of any rigging component
should never be exceeded. Electro-Voice bases
the working-load limits of its products on an 8:1
safety factor. Other manufacturers of rigging components may base their working-load limits on
safety factors other than 8:1. For example, 5:1
safety factors are fairly common amongst rigging
manufacturers because many regulatory agen-
cies call for a minimum safety factor of 5:1.
When an X-Array™ loudspeaker system is in-
stalled where local regulations only require a
safety factor of 5:1, Electro-Voice insists that the
working-load limits of the X-Array™ components
never be exceeded, resulting in a safety factor of
8:1 still being maintained for the Electro-Voice
components. The user is cautioned that some local regulations may require safety factors higher
than 8:1. In that circumstance, Electro-Voice insists that the user maintain the higher safety factor as required by the local regulations throughout
the entire X-Array™ installation. It is the responsibility of the user to make sure that any X-Array™
installation meets any applicable local, state or
federal safety regulations.
3.2 Structural Rating Overview
There are two independent strength ratings that,
together, give a complete description of the overall
structural performance capabilities of any X-Array™
loudspeaker system. They are defined as follows:
1. The strength of each individual rigging
point; which is the combined strength of the
rigging track mounted on the enclosure with
the removable rigging-hinge and/or rigging-strap
assemblies.
2. The total strength of the overall enclosure;
which is a function of the combined forces from all
of the rigging points acting on the enclosure as a
whole.
The array designer must be aware of the workingload-limit ratings and the loads being applied to
the individual rigging points and the overall enclosure. An X-Array™ loudspeaker system is only as
strong as its weakest link. It is usually the case
that one of the working-load limits will be approached sooner that the other. WHEN SUSPENDING ANY X-ARRAY™ LOUDSPEAKER
SYSTEM OVERHEAD, THE WORKING-LOAD
LIMITS MUST NEVER BE EXCEEDED FOR
EACH INDIVIDUAL RIGGING POINT, OR THE
OVERALL ENCLOSURE.
The forces acting on each individual rigging point
and on the overall enclosures in an X-Array™ flying system will vary with each array configuration.
Determining the forces throughout an array
requires complex mathematical calculations.
Electro-Voice engineers have, however, defined
a set of
simplified structural-rating guidelines
that
eliminate the need for the complex calculations
for most array configurations. The interaction of
the complex forces throughout arrays were analyzed to develop this set of conservative guidelines, presented below, to enable a rigger to
page 16
Page 21

X-Array™ Loudspeaker Systems
immediately determine on site whether or not an
array is safe without having to make weight-distribution calculations. The structural strength ratings
of the individual rigging points and the overall
X-Array™ enclosures are also presented below
so that a
complex structural analysis
can be made
for any array configuration. The reader should
consult an experienced structural engineer to
perform the complex structural analysis.
The reader is directed to section
5. References
of this manual for a list of rigging references (for
background in general rigging practice) and mechanical engineering references (for background
in structural engineering analysis).
3.3 Simplified Structural-Rating Guidelines
The Guidelines: Electro-Voice engineers have
defined a set of simplified structural-rating guidelines that will enable a rigger to immediately
evaluate the safety of an X-Array™ system on
site without having to make complex force-distribution calculations. A combination of destructive
testing and computer modeling were used to analyze the complex forces throughout arrays.
Conservative working-load ratings were utilized to
simplify the guidelines. Therefore, array configurations other than those illustrated in these simplified guidelines may be permissible – for those
applications, consult section
tural-Rating Analysis
for a detailed structural
3.4 Complex Struc-
analysis.
The simplified structural-rating guidelines are
shown in Figure 19. (Note that there is a label on
the back of each flying X-Array™ loudspeaker
enclosure that includes the graphics shown in
Figure 19.) These guidelines provide a simplified
rating for typical arrays based on the:
1. Vertical angle of each enclosure
2. Total weight of that enclosure plus all of the
enclosures and rigging hung below it.
3. Relative side-to-side and front-to-back angles
of the front Xrss or Xrsl rigging straps, or
any custom front rigging straps.
4. Relative side-to-side angles of the Xrhg grid
hinges or Xrhp pickup hinges.
Figure 19 includes a graph of the working-load
weight-versus-angle limit rating for the X-Array™
enclosures. This working-load weight limit is applicable to every enclosure in an array, and includes
the weight of that enclosure plus the total weight
of all enclosures and rigging hardware suspended
below it. The absolute enclosure angle is the vertical angle of that enclosure, where 0° represents
an upright enclosure facing straight ahead
(0°-elevation angle). These working-load-versusangle limits take into account the complex forces
generated in the front rigging straps, the rear rigging hinges, the enclosure and the (optional) pullup line, as a result of the complex weight
distribution throughout the array.
Also included in the simplified structural-rating
guidelines in Figure 19 are side-to-side and front-
to-back angle limits for the front rigging straps on
the top enclosure. These limits apply to the Xrss
and Xrsl rigging straps, as well as any custom
wire-rope rigging straps used at the front of the
top enclosure.
In addition, the guidelines in Figure 19 include a
side-to-side angle limit for the Xrhg grid hinges
and the Xrhp pickup hinges. Front-to-back limits
are not necessary for the Xrhg and Xrhp hinges.
The Xrhl linking hinges do not require any specific
angle limits, because the front-to-back angles are
taken into account by the enclosure weight-versus-angle ratings, and side-to-side angles are impossible to achieve with the linking hinges.
CAUTIONS for the Simplified Structural-Rating
Guidelines: WHEN APPLYING THE
SIM-
PLIFIED STRUCTURAL-RATING GUIDELINES
TO ANY X-ARRAY™ LOUDSPEAKER SYSTEM
SUSPENDED OVERHEAD, THE USER MUST
OBEY THE FOLLOWING RULES:
1. Never exceed the working-load-versusangle limit for any enclosure in the array.
2. For the top enclosure, never exceed the sideto-side angle limit or the front-to-back angle
limit for the Xrss rigging strap, the Xrsl rigging
strap or any custom rigging strap.
3. For the top enclosure, never exceed the
side-to-side angle limits for the Xrhg grid
hinges or the Xrhp pickup hinges.
4. Always make sure that the hinge locking
pins on every Xrhl linking hinge, Xrhg grid
hinge and Xrhp pickup hinge are fully engaged in the rigging track on the back of
every enclosure (and grid, when applicable)
before lifting overhead.
5. Always make sure that the double-stud fittings on every Xrss rigging strap, Xrsl rigging strap or any custom rigging strap are
securely locked in the rigging track on the
front of every enclosure (and grid, when
applicable) before lifting overhead.
6. Never angle more than the top two enclosures up in any array column. All other enclosures must be pointed straight ahead or
at a downward angle.
page 17
Page 22

X-Array™ Loudspeaker Systems
CAUTION
RIGGING STRAPS
UP
Xrss, Xrsl OR CUSTOM
Xrhg OR Xrhp RIGGING HINGES
CAUTION
NEVER EXCEED RIGGING-STRAP-ANGLE
OR RIGGING-HINGE-ANGLE LIMITS FOR
TOP ENCLOSURE.
CAUTION
WHEN PULLING UP, NEVER
ALLOW RIGGING HINGE
DOWN
CHAINS TO GO SLACK.
NEVER ANGLE
MORE THAN TWO
Xrhl LINKING HINGE
ENCLOSURES UP
STRAPS
Xrss OR Xrsl RIGGING
CAUTION
DOUBLE -STUD FITTINGS MUST
BE SECURELY LOCKED IN TRACK
BEFORE LIFTING OVERHEAD.
PULL UP
OPTIONAL
CAUTION
NEVER EXCEED WORKING-LOAD-
VERSUS-ANGLE LIMIT FOR
ANY ENCLOSURE.
FRONT STRAPS MAY BE
ELIMINATED FOR GREATER
DOWNWARD ANGLES
O
ANGLE BETWEEN ENCLOSURES AND GRID.
(APPROXIMATELY 1.8 PER TRACK POSITION.)
THE PRIMARY STRUCTURAL SUPPORT.)
2. INSTALL THE FRONT STRAPS TO SET THE RELATIVE
1. INSTALL THE REAR HINGES. (THE REAR HINGES ARE
RIGGING INSTRUCTIONS
SIMPLIFIED RIGGING-RATING GUIDELINES
1. THESE SIMPLIFIED RIGGING-RATING GUIDELINES PROVIDE
3. IF ANY ENCLOSURES DO NOT ANGLE DOWN FAR ENOUGH,
ENCLOSURES AND RIGGING SUSPENDED BELOW IT.
A. VERTICAL ANGLE OF EACH ENCLOSURE.
B. TOTAL WEIGHT OF EACH ENCLOSURE PLUS ALL
RATINGS FOR TYPICAL ARRAYS BASED ON THE:
LEAVING SLACK IN THE FRONT STRAPS, USE A PULL-UP
LINE TO TAKE THE SLACK OUT OF THE STRAPS.
C. RELATIVE ANGLES OF THE FRONT RIGGING STRAPS.
D. RELATIVE ANGLE OF THE Xrhg OR Xrhp HINGES.
DETERMINING THE FORCES THROUGHOUT AN ARRAY REQUIRES
COMPLEX CALCULATIONS. THESE GUIDELINES ELIMINATE THE NEED
FOR WEIGHT-DISTRIBUTION CALCULATIONS BY UTILIZING CONSERVATIVE
BEFORE LIFTING OVERHEAD
BE FULLY ENGAGED IN TRACK
HINGE LOCKING PINS MUST
CAUTION
TOTAL WEIGHT (KG)
Xrhg GRID HINGES OR
Xrhp PICKUP HINGES
SLACK OUT OF FRONT STRAPS.
CAUSE TOP RIGGING HINGE
CAUTION
1. ONLY USE PULL UP TO TAKE
2. NEVER PULL UP ENOUGH TO
CHAINS TO GO SLACK.
726
RIGGING HINGE INSTALLATION
Xrhl LINKING HINGES
O
-
+
TYP
MAX
±10°
REAR VIEW
Xrhg OR Xrhp RIGGING-
HINGE-ANGLE LIMITS
FOR TOP ENCLOSURE
MAX
15°
SIDE VIEW
181
NOT ALLOWED
-90°
-80°
-70°
-60°
-50°
FIGURE 19 - SIMPLIFIED RIGGING-RATING GUIDELINES
DOWN
ABSOLUTE ENCLOSURE ANGLES
0° -10° -20° -30° -40°
UP
91
272
363
454
544
635
WORKING-LOAD LIMIT VERSUS ANGLE FOR EACH ENCLOSURE
15° 10° 5°
NOT ALLOWED
RIGGING-STRAP-
ANGLE LIMITS FOR
TOP ENCLOSURE
TYP
MAX
±10°
WORKING-LOAD RATINGS. OTHER ARRAY CONFIGURATIONS MAY BE
PERMISSIBLE - FOR THOSE APPLICATIONS, CONSULT THE X-ARRAY
FLYING MANUAL FOR DETAILED STRUCTURAL ANALYSIS.
2. WHEN USING A GRID, ALWAYS BALANCE THE GRID SO IT IS LEVEL 5 .
3. ONLY USE NEW HAVEN NH32102-2 FITTINGS ON RIGGING STRAPS.
SUSPENDING ANY LOUDSPEAKERS OVERHEAD.
5. READ THE X-ARRAY FLYING MANUAL BEFORE
4. ONLY USE ELECTRO-VOICE Xrhg, Xrhp and Xrhl RIGGING HINGES.
RESPONSIBILITY OF OTHERS.
6. ALL NON-ELECTRO-VOICE HARDWARE IS THE
FRONT VIEW
TOTAL WEIGHT OF ENCLOSURE PLUS ALL ENCLOSURES AND RIGGING BELOW VERSUS ANGLE
1600
1400
1200
1000
800
600
400
200
TOTAL WEIGHT (LB)
page 18
Page 23

X-Array™ Loudspeaker Systems
−θ
+θ
−θ
+θ
θ
θ
θ
θ
7. When using pull-up lines, never pull up
enough to allow the chains to go slack on
the rear Xrhg grid hinges or Xrhp pickup
hinges.
8. When using a grid, always make sure that
the grid is balanced and hangs level ±5°.
9. Only use New Haven NH32102-2 doublestud swivel-ring fittings on the Xrss rigging
straps, Xrsl rigging straps or any custom
rigging straps.
10. Only use Xrhl linking hinges, Xrhg grid
hinges, or Xrhp pickup hinges manufactured by Electro-Voice.
Discussion of Array Examples: As an example,
if the top enclosure in a column was angled down
10°, the enclosure working-load-versus-angle limit
from the simplified structural-rating guidelines
shown in Figure 19 would indicate that a total of
726 kg (1,600 lb) could be safely suspended –
including the weight of the top enclosure plus all
of the enclosures and rigging suspended below.
If, however, the top enclosure in a column was
angled up 10°, the total allowable weight would
then only be 499 kg (1,100 lb) – including the
weight of the top enclosure plus all of the enclosures and rigging suspended below. The enclosure working-load-versus-angle limit shown in
Figure 19 not only applies to the top enclosure in
an array column, but also applies to every enclosure in an array column. In arrays where a pull-up
line is not used, the top enclosure is always the
limiting factor because it supports the most
weight. However, in arrays where a pull-up line is
used to achieve substantial downward angles, it is
possible that a lower enclosure could be the limiting factor.
3.4 Complex Structural-Rating Analysis
For a complete structural-rating analysis, the
forces in each individual piece of rigging hardware throughout the X-Array™ system must be
determined, as well as the forces on each enclosure. Determining these forces requires complex
page 19
Page 24
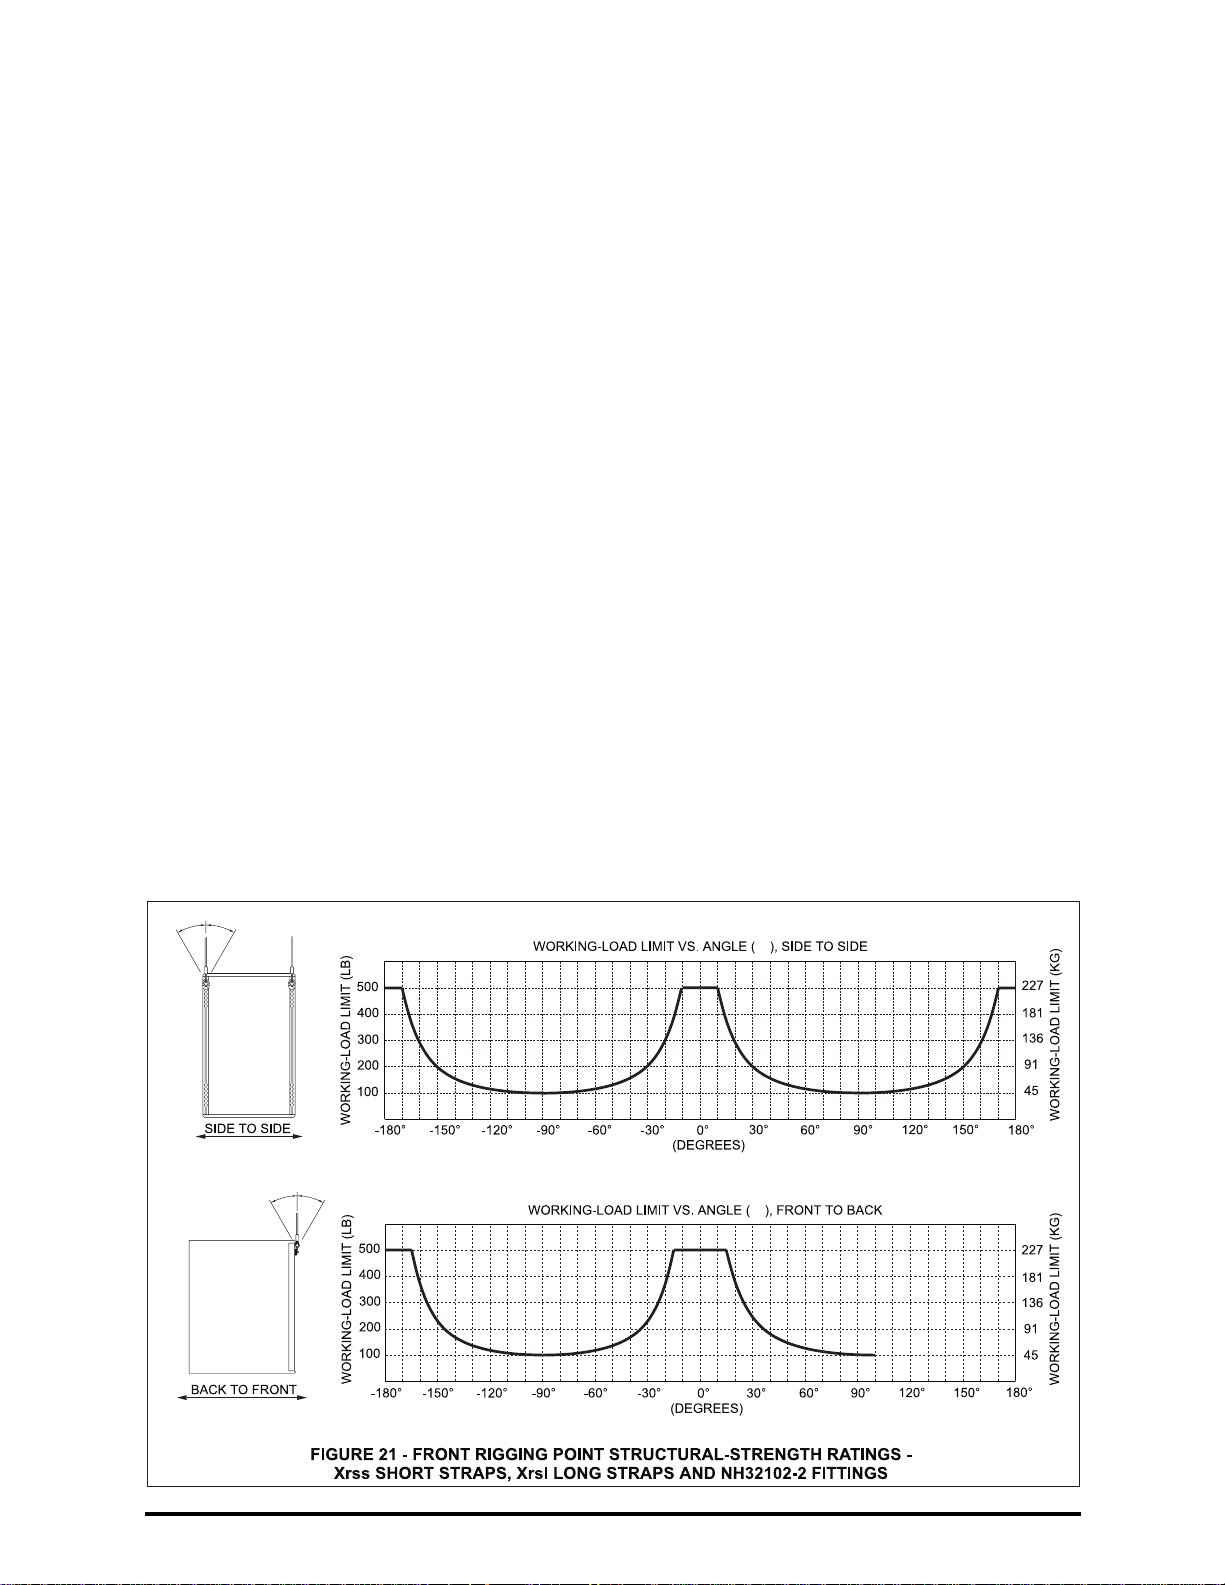
X-Array™ Loudspeaker Systems
mathematical calculations. All of these forces
must then be compared to the working-load limits
detailed below for each of the rigging points and
the overall enclosures. The reader should consult
an experienced structural engineer to perform the
complex structural analysis. WHEN SUSPENDING ANY X-ARRAY™ LOUDSPEAKER SYSTEM
OVERHEAD, THE WORKING-LOAD LIMITS
MUST NEVER BE EXCEEDED FOR EACH INDIVIDUAL RIGGING POINT, AND THE OVERALL
ENCLOSURE.
Rear Rigging Structural-Strength Ratings: The
working-load limit of each individual rigging point
on the rear of an X-Array™ enclosure is dependent upon the rigging-track/bracket assembly as it
is mounted in the enclosure, the specific removable rigging-hardware assembly and the angle of
pull. The structural-strength ratings for the Xrhg
grid hinge, Xrhp pickup hinge, Xrhl linking hinge
and New Haven NH32102-2 fitting are shown in
Figure 20.
The Xrhg grid and Xrhp pickup hinges have identical structural-strength ratings, as shown in
Figure 20a. It should be noted that the front-toback-angle range is only 270° because the hinge
chains can only be put into tension and the enclosure prevents a full 360° rotation. It also should
be noted that the Xrhg grid and Xrhp pickup
hinges are rated only to be used over side-to-side
pull angles of a maximum of ±10° as shown in
Figure 20a. The front-to-back ratings are valid
over the entire side-to-side range of ±10°.
The front-to-back structural-strength ratings for
the Xrhl linking hinges shown in Figure 20b cover
a full 360° rotation. Although it is not possible to
put the hinge into tension over 360°, it is possible
for the linking hinges to go into compression when
pull-up straps are employed. Therefore, the 360°
rating is necessary to accommodate both tension
and compression. It also should be noted that the
Xrhl linking hinges are rated only to be used over
side-to-side pull angles of a maximum of ±5° as
shown in Figure 20b. The front-to-back ratings are
valid over the entire side-to-side range of ±5°.
The structural-strength ratings for the New Haven
NH32102-2 fitting, shown in Figure 20c, do not
vary with the angle of pull both side to side and
front to back. Therefore, only a single rating is
stated instead of a graph showing variations with
angles.
It should be clarified that all of the structuralstrength ratings shown in Figure 20 are for a
single rear rigging point. There are, however, two
rear rigging points on the enclosure – each having the structural-strength ratings shown in
Figure 20. The rear rigging strength ratings are
identical for all of the X-Array™ loudspeaker
model enclosures.
Front Rigging Structural-Strength Ratings:
The working-load limit of each individual rigging
point on the front of an X-Array™ enclosure is dependent upon the rigging-track/bracket assembly
as it is mounted in the enclosure, the New Haven
NH32102-2 double-stud fitting and the angle of
+α
−α
α
α
+β
−β
β
β
page 20
Page 25

X-Array™ Loudspeaker Systems
pull. The Xrss short wire-rope rigging strap, Xrsl
long wire-rope rigging strap and New Haven
NH32102-2 fitting have identical structuralstrength ratings as shown in Figure 21. The
ratings vary with both the side-to-side and frontto-back angles and, therefore, are illustrated with
two graphs. The rigging straps and/or fittings have
a side-to-side range of 360°; however, the frontto-back range is only 270° because the enclosure
prevents a full 360° rotation.
It should be clarified that all of the strength ratings
shown in Figure 21 are for a single front rigging
point. There are, however, two front rigging points
on the enclosure – each having the structuralstrength ratings shown in Figure 21. The front rigging strength ratings are identical for all of the
X-Array™ model enclosures.
Overall Enclosure Structural-Strength Ratings:
The actual strength of an X-Array™ enclosure will
depend on the complex total of the combined
forces from each of the rigging points acting on
the enclosure as a whole and will vary with the
array configuration. However, for the sake of simplicity, Electro-Voice chooses to define the working-load limit of the overall enclosure as the sum
total of the weight of that enclosure plus the
weight of all of the enclosures and rigging hardware suspended below. This simplified workingload weight rating for the overall enclosure,
shown in Figure 22, is defined as being independent of the angles of pull on the individual rigging points. The Electro-Voice engineers have
chosen to define the working-load limits of the individual rigging points as a function of pull angle
so that they take into account any variations in
enclosure strength that might occur as a function
of pull angle. This approach allows the enclosure
working-load limit to be defined as independent of
pull angles, making the complex structural-rating
analysis easier. The enclosure strength ratings
are identical for all of the X-Array™ models.
CAUTIONS for a Complex Structural Rating
Analysis: WHEN APPLYING A
STRUCTURAL-RATING ANALYSIS
COMPLEX
TO ANY
X-ARRAY™ LOUDSPEAKER SYSTEM SUSPENDED OVERHEAD, THE USER MUST OBEY
THE FOLLOWING RULES:
1. For the front of every enclosure in an array,
never exceed the working-load-versusangle limit for the Xrss rigging straps, the
Xrsl rigging straps or any custom rigging
straps.
2. For the back of every enclosure in an array,
never exceed the working-load-versusangle limit for the Xrhl linking hinges, the
Xrhg grid hinges, Xrhp pickup hinges or any
custom rigging straps.
3. Always make sure that the hinge locking
pins on every Xrhl linking hinge, Xrhg grid
hinge and Xrhp pickup hinge are fully engaged in the rigging track on the back of
every enclosure (and grid, when applicable)
before lifting overhead.
4. Always make sure that the double-stud fittings on every Xrss rigging strap, Xrsl rigging strap or any custom rigging strap are
securely locked in the rigging track on the
front of every enclosure (and grid, when
applicable) before lifting overhead.
5. When using pull-up lines, never pull up
enough to allow the chains to go slack on
the rear Xrhg grid hinges, the Xrhp pickup
hinges or any custom rigging strap assembly.
6. When using a grid, always make sure that
the grid is balanced and hangs level ±5°.
7. Only use New Haven NH32102-2 doublestud swivel-ring fittings on the Xrss rigging
straps, Xrsl rigging straps or any custom
rigging straps.
8. Only use Xrhl linking hinges, Xrhg grid
hinges, or Xrhp pickup hinges manufactured by Electro-Voice.
3.5 Special Considerations
Double-Stud Fittings: All of the X-Array™ mod-
els will accept the standard aircraft-type doublestud fittings in the rear as well as the front rigging
tracks. Electro-Voice recommends using only the
New Haven NH32102-2 double-stud swivel-ring
fitting with X-Array™ loudspeaker systems because it is the only double-stud fitting that has a
secondary locking mechanism (an additional locking pin) that eliminates the possibility of the fitting
vibrating loose from the rigging track. In addition,
Electro-Voice recommends using the NH32102-2
double-stud fitting for attachment to the front rig-
page 21
Page 26

X-Array™ Loudspeaker Systems
page 22
Page 27

X-Array™ Loudspeaker Systems
ging track when custom wire-rope rigging straps
are required. The standard Xrss and Xrsl wirerope rigging straps use the NH32102-2 fitting.
The Xrhp pickup hinge is typically recommended
in applications where no grid is used, however,
custom wire-rope assemblies using the NH321022 double-stud fitting may be substituted in light
duty applications where the total weight suspended is 454 kg (1,000 lb) or less. When lifting
columns weighing more than 454 kg (1,000 lb) –
but less than 726 kg (1,600 lb) – the Xrhp pickup
hinge must be used.
Flying a Single Enclosure: When linked together in columns, X-Array™ enclosures must
always be suspended vertically (in other words,
the enclosures may be suspended upside down
or right side up, but never sideways). However,
a single enclosure may be suspended without a
grid in any orientation – vertically (right side up or
upside down) or horizontally (sideways). Because
the weight of a single enclosure is below the
working-load limits of the individual rigging points
and the overall enclosure, the enclosure can be
suspended in any configuration. Several possibilities are shown in Figure 23. Custom wire-rope
rigging-strap assemblies would typically be employed using the New Haven NH32102-2 doublestud fittings for this application. It should be noted
that all of the configurations shown in Figure 23
are not specifically covered in section
fied Structural-Rating Guidelines,
3.3 Simpli-
as shown in
Figure 19. These configurations would, however,
be covered in section
3.4 Complex Structural-Rat-
ing Analysis.
3.6 Electro-Voice Structural-Analysis Procedures
Electro-Voice maintains a structural pull-test facility in Buchanan, Michigan USA which includes
load cells with digital-electronic display and recording. The load cells are calibrated annually by
an independent laboratory to a standard traceable
to the United States National Bureau of Standards. This pull-test facility is capable of pulling to
destruction individual rigging components as well
as complete loudspeaker systems. This facility is
utilized by the design engineering group to test
engineering prototypes, and by the manufacturing
quality assurance group for testing production
components and systems.
Electro-Voice utilizes state-of-the-art computermodeling programs for structural analysis
throughout the development of loudspeaker systems. The computer modeling enables the complex forces in the rigging components and
enclosures to be analyzed for loudspeakers assembled into arrays in both static and dynamic
conditions.
Structural testing and computer modeling were
used throughout the engineering development of
all of the X-Array™ individual rigging components
and complete loudspeaker systems described in
this manual. Testing and modeling involving both
anticipated use and anticipated misuse were performed as part of the analysis. Engineering prototypes were stressed to failure and designs were
revised based on those test results. Production
systems and components were stressed to failure
for verification of the final designs.
4. RIGGING INSPECTION AND PRECAUTIONS
Electro-Voice X-Array™ Loudspeaker Sys-
tems: Prior to each use, inspect the loudspeaker
enclosures for any cracks, deformations, missing
or damaged components which could reduce enclosure strength. Inspect the track and bracket
assemblies on the enclosures for any cracks, deformations, missing or loose screws which could
reduce the flying hardware strength. Replace any
loudspeaker systems that are damaged or missing hardware. Never exceed the limitations or
maximum recommended load for the X-Array™
systems.
Electro-Voice X-Array™ Rigging Hinges: Prior
to each use, inspect the rigging hinges for cracks,
burrs, corrosion or missing or damaged components which could reduce hinge assembly
strength. Replace any rigging hinges that are
damaged or missing hardware. Always double
check that each rigging hinge is securely locked
into position in the track on the X-Array™ enclosures and grids before lifting. Never exceed the
limitations or maximum recommended load for the
X-Array™ hinges.
Wire-Rope Rigging-Strap Assemblies: Prior to
each use, inspect the wire rope for cuts, abrasion,
tears, fraying, knots, chemical damage, burns, or
corrosion which could reduce rigging strap
strength. Inspect the rigging fittings for any
cracks, burrs, deformation, corrosion or missing
or damaged components which could reduce fitting strength. Replace any rigging straps that
have damaged wire rope, or damaged or missing
hardware. Always double check that each fitting
on each of the rigging straps is securely locked
into position in the track on the X-Array™ enclosures and grids before lifting. Never exceed the
limitations or maximum recommended load for the
rigging strap assemblies.
Grid Assemblies: Prior to each use, inspect the
grid assembly and associated hardware for any
cracks, deformations, broken welds, corrosion,
missing or damaged components which could reduce the grid assembly strength. Replace any
damaged grid assemblies. Never exceed the limitations or maximum recommended load intended
page 23
Page 28

for grid assembly design. Never exceed the limitations or maximum recommended load for the
grid assemblies.
Chain Hoists: Prior to each use, inspect the chain
hoist and associated hardware (including motor, if
applicable) for any cracks, deformation. broken
welds, corrosion, missing or damaged components
which could reduce the hoist strength. Replace any
damaged chain hoists. Never exceed the limitations
or maximum recommended load specified by the
hoist manufacturer. Always raise and lower the load
slowly and evenly, avoiding any rapid changes in
speed or shifting loads that could result in a sudden
jolt to the suspended system. Never exceed the
limitations or maximum recommended load for the
chain hoists.
Building, Tower or Scaffold Supports: Prior to
each use, the strength and load-bearing capabilities of the building, tower or scaffold structural
supports should be evaluated and certified by a
professional engineer as being adequate for supporting the intended rigging system (including the
loudspeakers, grids, chain hoists and all associated hardware). Prior to each use, inspect the
building, tower or scaffold structural supports for
any cracks, deformation, broken welds, corrosion,
missing or damaged components which could reduce the structural strength. Damaged structural
supports should be replaced or repaired and recertified by a professional engineer. Never exceed the limitations or maximum recommended
load for the supports.
Miscellaneous Mechanical Components: Prior
to each use, inspect all mechanical components
(chain, wire ropes, slings, shackles, hooks, fittings, etc.) for any cracks, deformation, broken
welds, slipping crimps, fraying, abrasion, knots,
corrosion, chemical damage, loose screws, missing or damaged components which would reduce
the maximum strength specified by the component manufacturer. Replace any damaged mechanical components. Never exceed the
limitations or maximum recommended load for the
mechanical components.
5. REFERENCES
5.1 Rigging References
[1] W.E. Rossnagel, L.R. Higgins & J.A.
MacDonald,
tion and Industrial Operations
Company, New York, NY, USA (1988).
[2] J.O. Glerum,
Southern Illinois University Press, Carbondale, IL,
USA (1987).
[3] P. Carter,
way Press, New York, NY, USA (1988).
Handbook of Rigging for Construc-
, McGraw-Hill Book
Stage Rigging Handbook
Backstage Handbook
, Broad-
,
[4] ATM Fly-Ware™,
tion Rigging Guide
USA (1995).
[5] Wire Rope Technical Board,
Users Manual
Stevensville, MD, USA (1985).
[6] Broderick & Bascom Rope Company,
Rigger’s Handbook
[7] MacWhite Wire Rope Company,
, ATM Fly-Ware™, Carson, CA,
, American Iron and Steel Institute,
, Sedalia, MO, USA (1993).
of Tables, Data and Helpful Information
WI, USA (1991).
[8] Acco Chain & Lifting Division,
User’s Manual
(1992).
[9] Newberry, W.G.,
Newberry Investments Company, Calgary,
Alberta, Canada (1989).
5.2 Mechanical Engineering References
[10] J.L. Meriam & L.G. Kraige,
, Acco Corporation, York, PA, USA
Mechanics, Volume One - Statics,
Sons, Inc., New York, NY, USA (1992).
[11] J.L. Meriam & L.G. Kraige,
Mechanics, Volume Two - Dynamics,
& Sons, Inc., New York, NY, USA (1992).
[12] J.E. Shigley & C.R. Mischke,
Engineering Design
New York, NY, USA (1989).
[13] A. Jensen & H.H. Chenoweth,
Engineering Mechanics,
pany, New York, NY, USA (1983).
APPENDICES
A. SERVICING THE X-ARRAY™ RIGGING
The following service items are available for servicing the X-Array™ loudspeaker rigging:
Enclosure Rigging Hardware: The rigging hardware should not require service by the user.
Enclosure Alignment-Foot Replacement: Each
foot is installed with four wood screws. If a screw
hole strips out during installation, rotate the foot
and reinstall the screws. The following service
parts are available:
Male Alignment Feet: 28333
Female Alignment Feet: 28334
Alignment-Foot Screw: 63088-CP
Electro-Voice, 600 Cecil St., Buchanan, MI 49107
USA, 616-695-6831
Rigging Hinge Service: The hinge knob/lockingpin assembly on the Xrhl, Xrhg or Xrhp may be
repaired with the hinge knob/locking-pin repair kit.
To remove the knob/locking-pin assembly from
the hinge, first unscrew the nut on the knob, then
unscrew the knob from the pin. To install a new
Riggermeister Produc-
Wire Rope
Catalog
, Kenosha,
Chain Sling
Handbook for Riggers
,
Engineering
John Wiley &
Engineering
John Wiley
Mechanical
, McGraw-Hill Book Company,
Applied
McGraw-Hill Book Com-
page 24
Page 29

assembly, place the spring on the pin, insert the
pin into the hinge base and screw the knob on the
pin. Check to make sure the spring is under tension, then screw the locking nut on the end of the
pin until it is tight against the knob. For repair, use
the following kit:
Hinge Knob/Locking-Pin Repair Kit: 84982
Electro-Voice, 600 Cecil St., Buchanan, MI 49107
USA, 616-695-6831
B. X-ARRAY™ RIGGING ACCESSORIES
The following rigging accessories are available for
X-Array™ loudspeaker systems from ElectroVoice and other manufacturers:
Grid: This ATM Fly-Ware™ “T” shaped, all-steelconstruction grid was specifically designed a
single column of X-Array™ systems. Multiple
grids can be linked together with couplers on front
and back retractable arms, the position of which
sets the splay angle between adjacent columns.
Part number MEGS-4000-T. ATM Fly-ware™,
2100 S. Wilmington Ave., Carson, CA 90810
USA, 310-834-5914
Xrhg Grid Hinge: Two Xrhg grid rigging hinges
are used to attach the rear of the top enclosure in
a column to the rear of an X-Array™-compatible
grid. Each hinge consists of two precision-machined steel rigging-track fittings connected by
an alloy-steel chain. Part number 510-2999.
Electro-Voice, 600 Cecil St., Buchanan, MI 49107
USA, 616-695-6831
Xrhp Pickup Hinge: Two Xrhp pickup rigging
hinges are used to create custom rigging assemblies to attach to the rear of the top enclosure in a
column when an ATM grid is not used. Each
hinge consists of one precision-machined steel
rigging-track fitting with an alloy-steel chain. Part
number 510-2999. Electro-Voice, 600 Cecil St.,
Buchanan, MI 49107 USA, 616-695-6831
Xrhl Linking Hinge: Two Xrhl linking rigging
hinges are used to link two enclosures together at
the rear. Each hinge consists of two precisionmachined steel rigging-track fittings connected by
a heavy-duty steel hinge. Part number 510-2998.
Electro-Voice, 600 Cecil St., Buchanan, MI 49107
USA, 616-695-6831
Xrsl Long Rigging Strap: Two Xrsl long rigging
straps are used at the front of two enclosures to
adjust their relative vertical angles. The Xrsl may
also be used to attach the front of the top enclosure to the ATM grid when upward angles are not
required. Each all-steel strap consists of two New
Haven NH32102-2 double-stud fittings connected
by black plastic-coated wire rope. Sound Manufacturing Inc., 3336 Primera Ave., Hollywood, CA
90068 USA, 213-850-5042
Xrss Short Rigging Strap: Two Xrss short rig-
ging straps are used to attach the front of the top
enclosure to the ATM grid. The Xrss may also be
used at the front of two enclosures when a limited
range of vertical angles are required. The all-steel
Xrss utilizes the same construction as the Xrsl.
Sound Manufacturing Inc., 3336 Primera Ave.,
Hollywood, CA 90068 USA, 213-850-5042
New Haven NH32102-2 Fitting: The New Haven
NH32102-2 swivel-ring, double-stud fitting recommended for attachment to both the front and rear
X-Array™ rigging track is available for the user to
make custom rigging attachment hardware.
Sound Manufacturing, Inc., 3336 Primera Ave.,
Hollywood, CA 90068, USA, 213-850-5042.
Custom Rigging Strap Assemblies: Custom
wire-rope rigging strap assemblies that use the
New Haven NH32102-2 fitting may be ordered.
Sound Manufacturing, Inc., 3336 Primera Ave.,
Hollywood, CA 90068, USA, 213-850-5042.
General Rigging Supplies: A wide variety of
standard and specialty rigging hardware components for both touring and permanent-installation
applications is available. Sound Manufacturing
Inc., 3336 Primera Ave., Hollywood, CA 90068
USA, 213-850-5042 or ATM Fly-ware™, 2100 S.
Wilmington Ave., Carson, CA 90810 USA, 310834-5914
page 25
Page 30

600 Cecil Street, Buchanan, MI 49107
Phone: 616/695-6831, Fax: 616/695-1304, www.electrovoice.com
X-ARRA Y-Flying Manual Part Number 534637— 9821
©Telex Communications, Inc., 1998 • Litho in U.S.A.
 Loading...