

Electrovaya Scribbler SC2000 SERIES User Manual
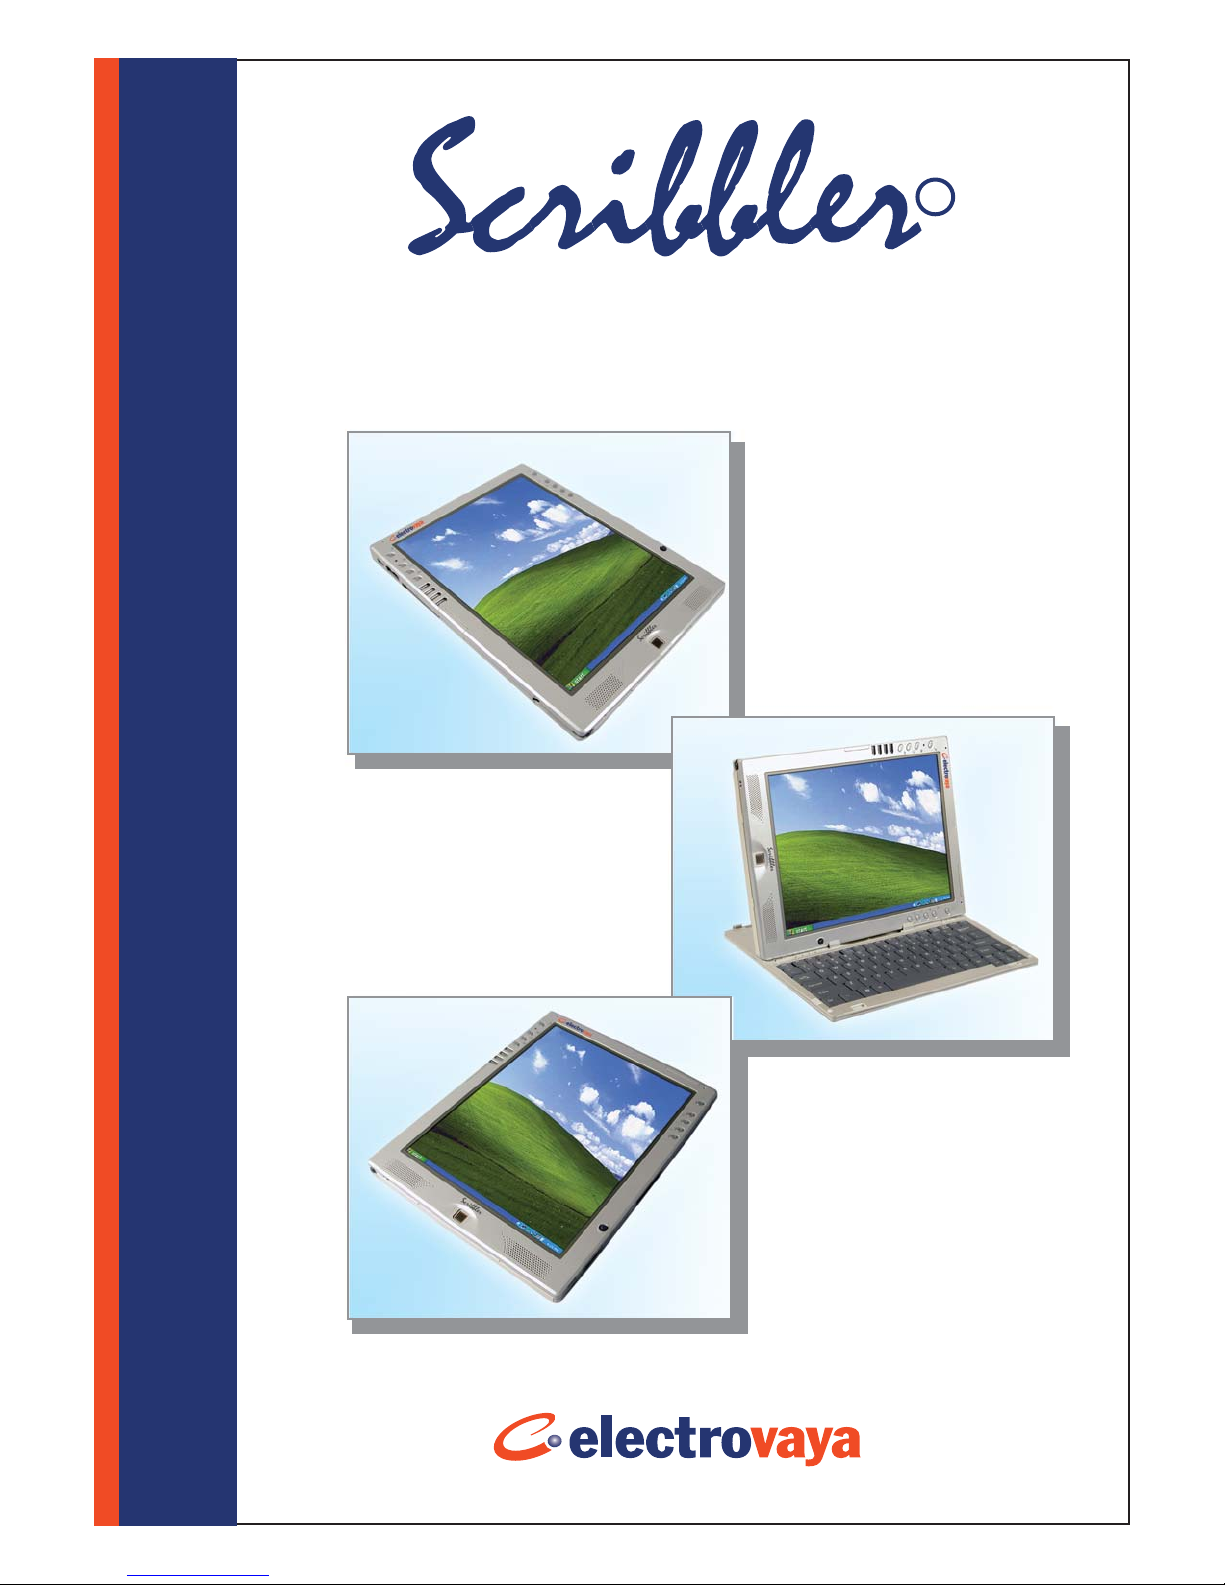
USER MANUAL
SC2000 SERIES
R

Table of Contents
SC 2000 SERIES Highlights .............................................. 01
Accessory Checklist ............................................................... 02
Standard Accessories...................................................................... 02
Optional Accessories....................................................................... 02
Introduction to the Scribbler.............................................. 03
Exterior................................................................................................. 03
Indicators............................................................................................ 04
Properties............................................................................................ 04
Using Your Scribbler .............................................................. 05
Specifications.....................................................................................05
Button Functions............................................................................... 06
Primary Functions.............................................................................. 07
Secondary Functions......................................................................... 08
Battery.................................................................................................. 10
How to Replace the Battery................................................................ 10
How to Charge the Battery................................................................. 11
Battery Charging Time....................................................................... 11
How to Conserve Power..................................................................... 12
How to Prolong the Battery Life.......................................................... 13
How to Hot Swap the Battery............................................................. 13
Use and Setup of the Fingerprint Recognition Device ......... 14
How to Register to Use the Fingerprint Recognition Device............... 14
How to Set Up Fingerprint Recognition for Login............................... 16
How to Use Fingerprint Recognition to Restrict File Access............... 16
Calibrating the Screen..................................................................... 18
Adjusting the Screen Brightness.................................................. 19
Setting the Screen Orientation..................................................... 20
How to Connect to External Projectors and Monitors.......... 21

Upgrading Your Scribbler............................................................... 22
Upgrading the Memory........................................................................ 22
How to Replace the Hard Drive........................................................... 23
How to Recover Your Operating System............................................. 25
How to Use the Recovery CD.............................................................. 25
Safety Guidelines ....................................................................... 26
Safety Information............................................................................. 26
Safety and Regulatory Information............................................... 26
Power Cord and Power Supply Usage Guidelines.................... 27
Battery Safety Guidelines............................................................... 28
Operating Specifications................................................................. 28
Contacting Technical Support ........................................... 29
Contacting the Manufacturer......................................................... 29
Calling for Assistance....................................................................... 29
Scribbler
Declaration of Conformity (Safety Standards) ...... 30
Appendices .................................................................................... 31
Pointers for Using the Operating System................................... 31
Practical Information............................................................................ 31
Help and Support Center..................................................................... 32
Using Your Accessories................................................................... 33
How to Use the Stylus Tether............................................................... 33
How to Change the Stylus Tip............................................................. 33
Eraser Setup........................................................................................ 34
Using the Eraser.................................................................................. 34
Keyboard Stand................................................................................... 35
Using Your Keyboard Stand................................................................. 36
Maintaining Your LCD Display......................................................... 37
LCD Display Maintenance Guidelines.................................................. 37

SC 2000 SERIES Highlights
Even Lighter and Thinner
At 1.4kg and 1.87cm thick, the ultra-thin design makes taking your Scribbler with you even
easier.
Longer-lasting Battery
The long-life battery gives a run time of about six to ten hours (used continuously).
Fingerprint Recognition
This unique fingerprint recognition system makes your Scribbler even safer and more
convenient.
Intelligent Light Sensor
The light sensor automatically adjusts the screen brightness in response to the
environment, changing it to a comfortable viewing level.
Array Microphone
The array microphone eliminates background noise, increasing the rate of speech recognition.
This greatly improves sound quality, even during Internet calls.
Reduced Parallax
Special measures to reduce the gap between the stylus tip and the on-screen ink make
writing on your Tablet feel even more natural.
01

Accessory Checklist
Standard Accessories
(dependent upon model and configuration)
Power Cord
AC Adapter
Cleaning Cloth
Stylus (includes an eraser function)
Stylus Tether
Recovery CD
Microsoft Windows XP Tablet PC Edition Introductory Guide
Scribbler User Manual
Slip Cover
Detachable Keyboard and Mouse
Optional Accessories
Mini USB Keyboard
USB Mouse
Wire Stand
Keyboard Stand
USB RF Mouse
Portfolio
External Battery Charger
Cradle
Scribbler
02

Introduction to the Scribbler
Exterior
Your Scribbler at a Glance
Microphone
Windows Task Manager
Antenna
Microphone (optional)
Power On/Off
Light Sensor
Windows Start Menu
Windows Journal Button
Tablet PC Input Panel
Button
Power Indicator
Hard Drive Access
Indicator
Battery Indicator
Wireless Network Indicator
Antenna
Power Jack
External Monitor Port
USB Port
Rotate Button
ESC Button
Function Button
Wireless Network On/Off
LCD Display
Direction Joystick
+ Enter Button
Fingerprint Recognition
Device
Stereo Speakers
Headphone Out
MIC In
IrDA Port
IEEE 1394 Port
USB Port
Fan
Memory Expansion Slot
Docking Station
Connection Port
Hard Drive Slot
Battery Lock
Keyboard Stand
Connection Port
03
LAN Port
Modem Port
PCMCIA Slot
Stylus Holder
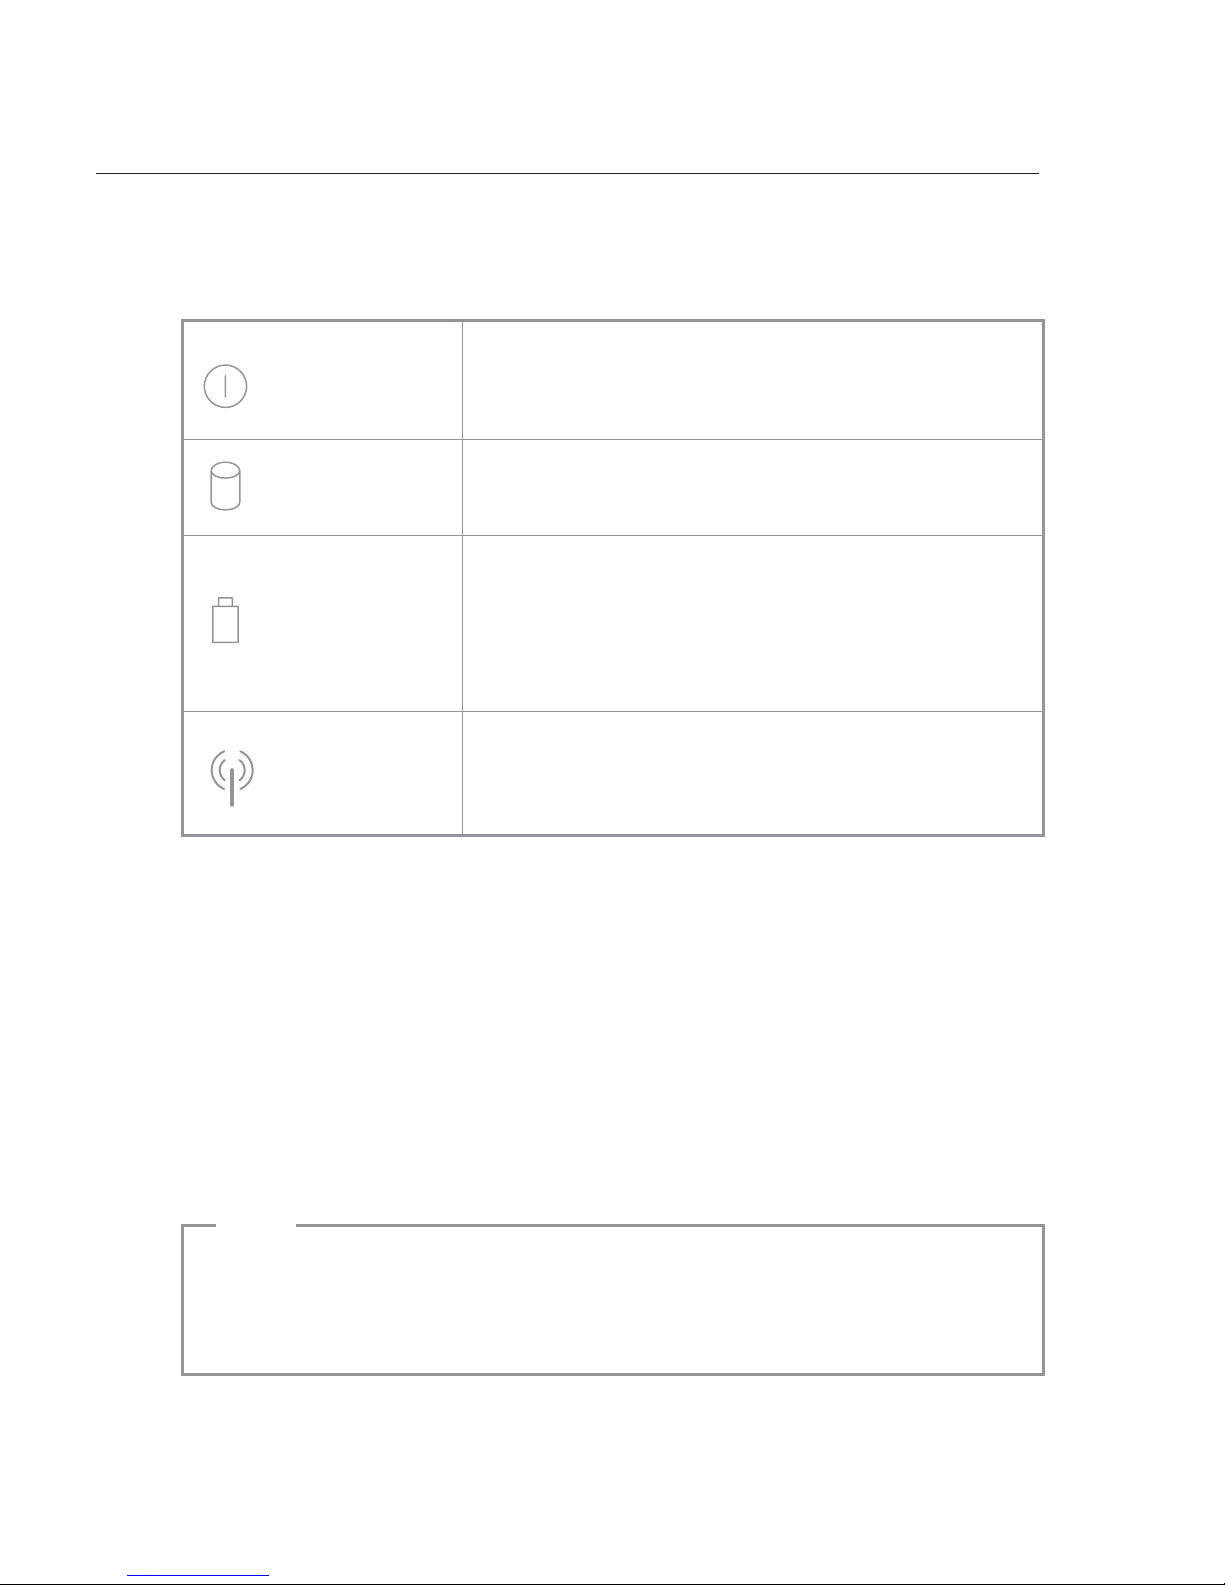
Indicators
Power Indicator
Scribbler
A steady green light indicates the computer is turned on; an
orange light indicates Standby mode. When the light is off,
the computer is either off or in Hibernate mode.
Hard Drive Access
Indicator
Battery Indicator
Wireless Network
Indicator
A slowly flashing green light indicates the computer is
accessing the hard drive.
A steady red light indicates the battery is charging. A flashing
red light indicates the battery is low. If the AC adapter is not
connected at this time, the red light will continue to flash until
it goes out. This means that the battery has run too low and
is entering a protected state.
When the wireless network is activated, the light will shine
green. When the wireless network is shut down, the light will
go out.
Properties
The Scribbler size is designed with the user's comfort in mind: while writing, you can
conveniently rest your hand on top of the screen.
The Scribbler advanced speech recognition system also allows it to be used as a
dictation machine. (See Note 1.)
The wireless network function lets you conduct business no matter where you are,
increasing your efficiency.
Using the stylus, you can write directly on the screen, and handwritten documents can even
be converted into typed text. (See Note 2.)
Notes:
1. The next Chinese version of Microsoft Windows XP Tablet PC Edition will have the
speech recognition function.
(The current traditional-character Chinese version does not have this function.)
2. The more correct the user's handwriting, the greater the handwriting recognition rate.
04

Using Your Scribbler
Specifications
Processor
Intel Pentium M Processor 1.2 GHz
Memory
256MB (or 512MB, upgradable to 1GB)
Hard Drive
30G (or larger)
Display
12.1" TFT LCD, resolution 1024x768
External Interface
External Monitor Port
IEEE 1394 Port
MIC In
Headphone Out
IrDA Port
USB Port x2
RJ45 LAN Port
RJ11 Modem Port
PCMCIA Slot
Keyboard Stand Connection Port (Please consult the section "Using Your Keyboard
Stand" under "Using Your Accessories.")
Docking Station Connection Port
Light Sensor
Can automatically adjust the screen brightness in response to the environment.
To enable the light sensor, please follow the steps below:
Go to "Control Panel" "Light Sensor" Place a checkmark in the box next to
"Enable Light Sensor." Now, the light sensor will automatically adjust the screen
brightness.
Note:
Once you have enabled the light sensor, adjusting the brightness under
"Tablet and Pen Settings" "Display" "Screen Brightness" will not produce any
effect. The screen brightness will be regulated by the light sensor instead.
05
Scribbler
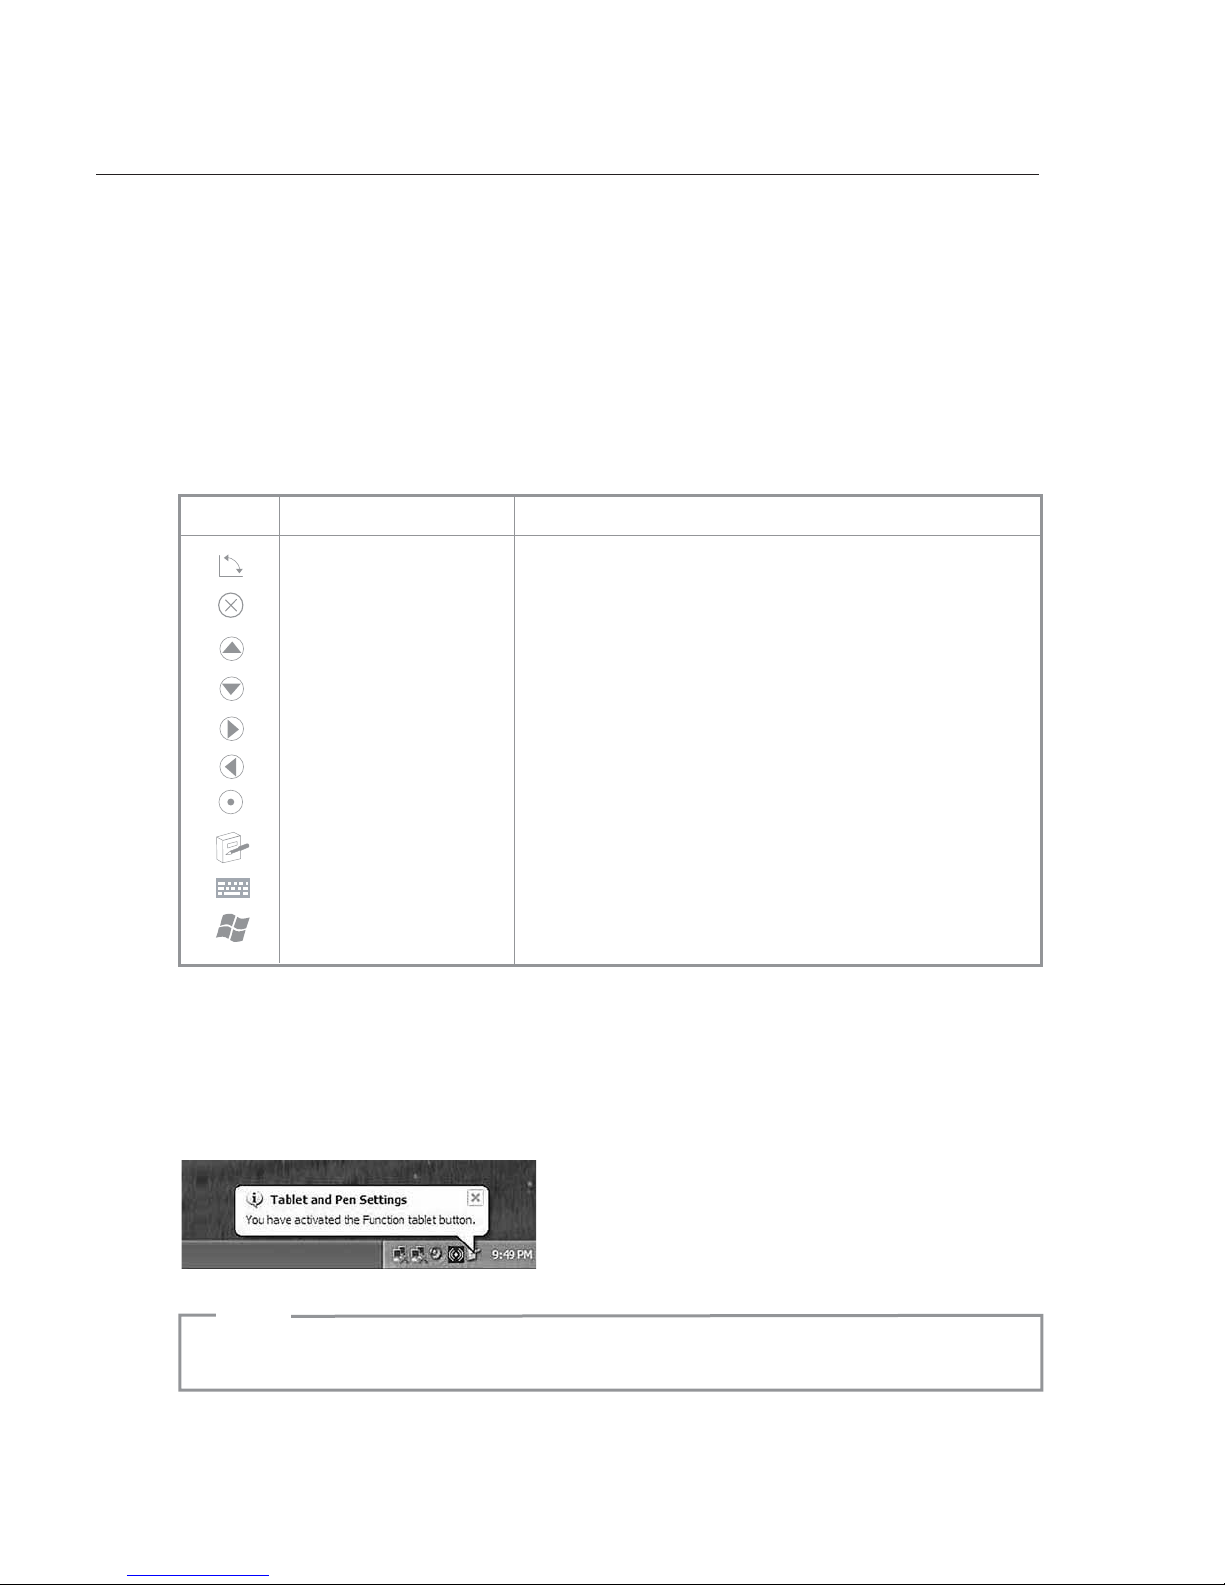
Button Functions
This product comes with fourteen different function buttons that can be used after entering
Windows. To enable you to access your favorite applications quickly, some of these fourteen
function buttons even offer additional functions. You can even define functions for four of
them, setting them to suit your individual needs and preferences.
The four directions on the Direction Ball (four separate functions) together with the
Enter function count as five function buttons.
Each button has a built-in primary function. However, combined with the [Fn] button, some
buttons can also be programmed to have another function as well . These additional functions
are called secondary functions. Of the fourteen buttons, you may assign your personal
secondary functions to four.
When you start to operate your computer, you should
understand the following two types of button functions:
1. Primary Functions
Pre-set system functions. There is no way for you to reset these. The icon to the side
of the actual button represents its primary function.
2. Secondary Functions
Additional functions accessed by pressing the [Fn] button. For some buttons, these
are user-programmable; for others, they have already been assigned.
When the Windows desktop icon appears on the taskbar in the lower right-hand corner of
the screen, both kinds of functions described above have been assigned successfully and can
be used. The different primary and secondary function settings can help you use your Tablet
PC more efficiently and even improve your work performance.
06
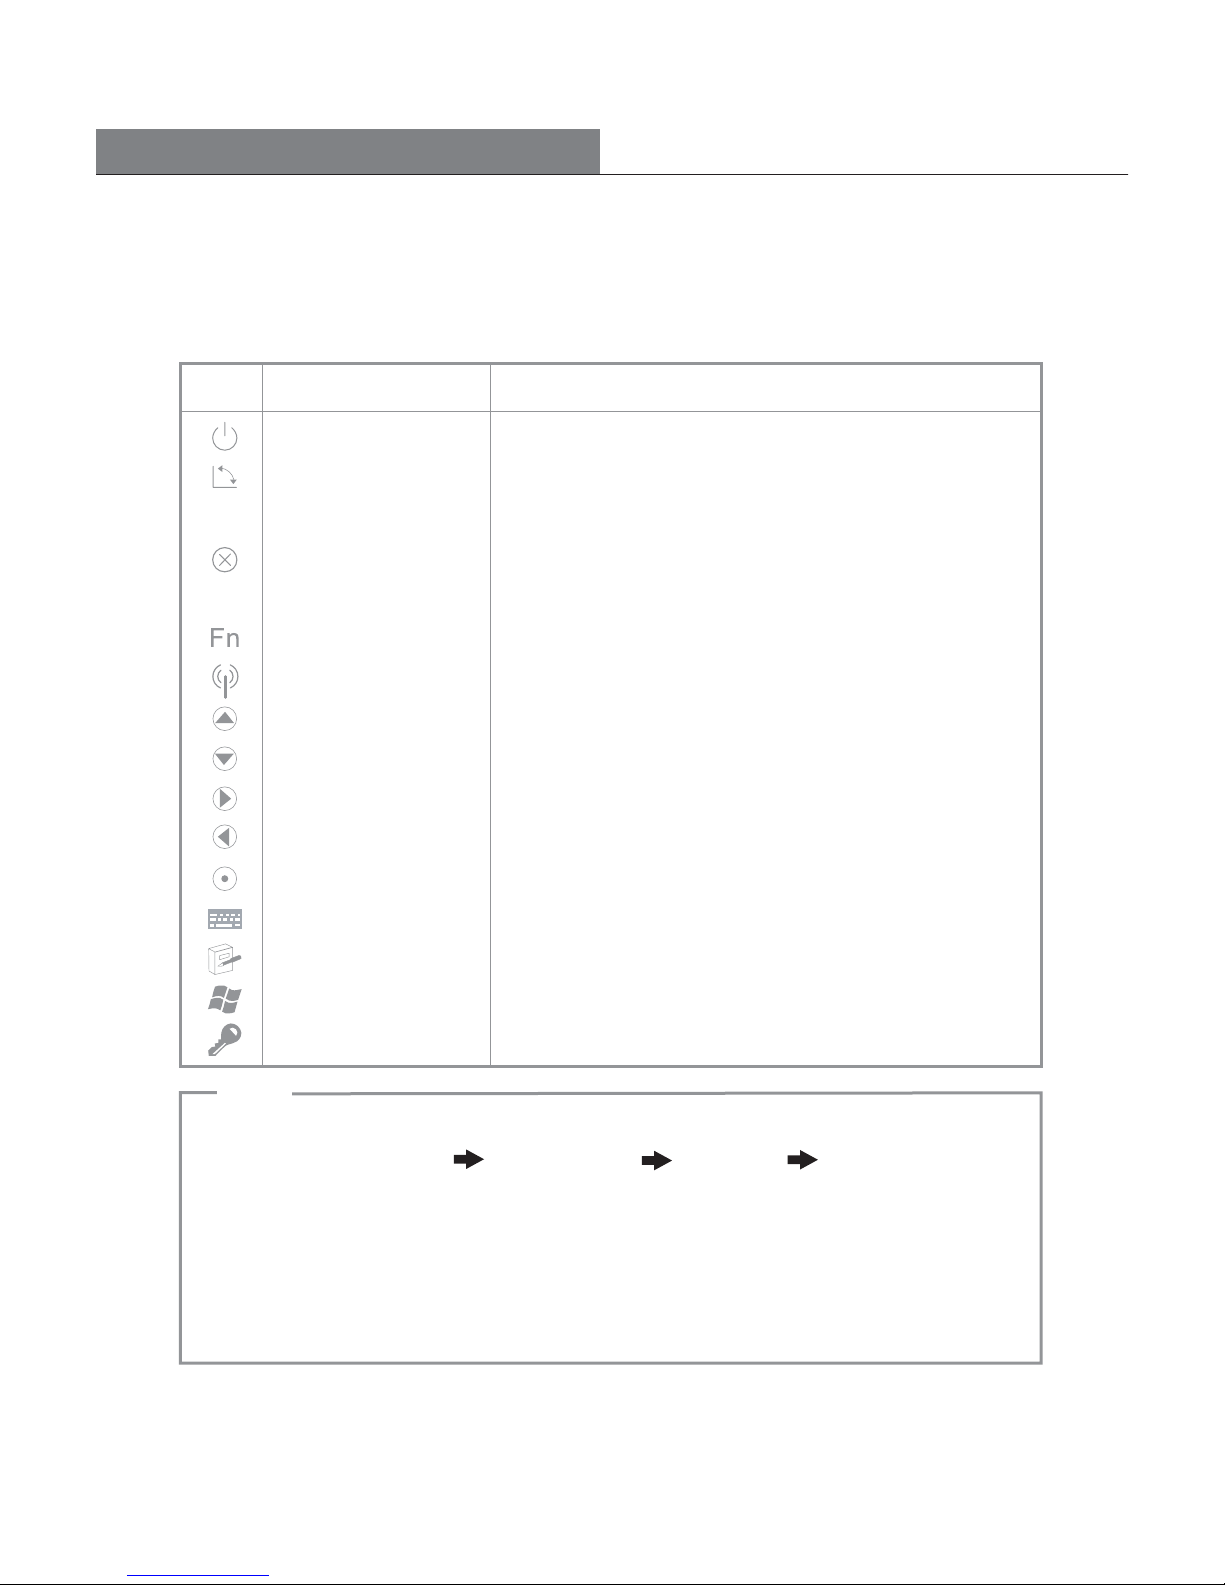
Using Your Scribbler
Primary Functions
Each button has a basic primary function that has already been defined. These basic functions
are described as follows:
Icon Button Function Description
Power On/Off computer power switch (See Note 1.)
Rotate rotates the screen between two types of pre-set
orientations (user-programmable, see page 20)
ESC the same as a normal keyboard [ESC] key, exits the
current application
Function activates the secondary functions
Wireless Network activates the wireless network function (See Note 2.)
Up Direction
Down Direction same as keyboard [Dn Arrow] key
Right Direction same as keyboard [Right Arrow] key
Left Direction same as a normal keyboard [Left Arrow] key
Enter same as a normal keyboard [Enter] key
Tablet PC Input Panel turns the Tablet PC input panel on/off
Journal activates "Windows Journal" software
Start opens/closes Windows "Start Menu"
Windows Security opens "Windows Task Manager," i.e. [Ctrl] + [Alt] + [Del]
Notes:
1. You may set the power button to make the computer enter Standby or Hibernate mode.
(Go to "Control Panel" "Power Options" "Advanced" "Power Buttons"
and set as Standby or Hibernate.)
2. To activate or shut down the wireless network, you need to hold down the Wireless
Network Button for two seconds. This is so that the user will not accidentally activate it.
3. The Direction Ball will automatically adjust the other functions along with the four
different screen rotations. For example, if the screen is rotated from a primary
setting to a secondary setting, the arrow orientation will also change.
same as keyboard [Up Arrow] key
(See Note 3.)
07
Scribbler
Secondary Functions
Aside from the four function buttons listed immediately below, the other buttons all either
are or can be programmed with secondary functions.
1. Power Button
2. Fn Button
3. Windows Security
4. Wireless Network Button
Icon Button Secondary Function (Primary Button + [Fn])
Rotate Default: Email Client (user-programmable)
ESC moves the present work display to the background
Up Direction [Page Up]
Down Direction [Page Down]
Right Direction [Tab]
Left Direction [Shift] + [Tab]
Enter [Alt] + [Tab]: you can switch between open programs
Journal Default: Volume Up (user-programmable)
Tablet PC Input Panel Default: Volume Down (user-programmable)
Start Default: Internet Browser (user-programmable)
How to Use the Secondary Functions
You only need to press the [Fn] button to activate a secondary button function. When you
press it, the Windows icon taskbar in the lower right-hand corner of the desktop will display the
following message:
Note:
"User-programmable" means that you can assign the secondary function.
08
Using Your Scribbler
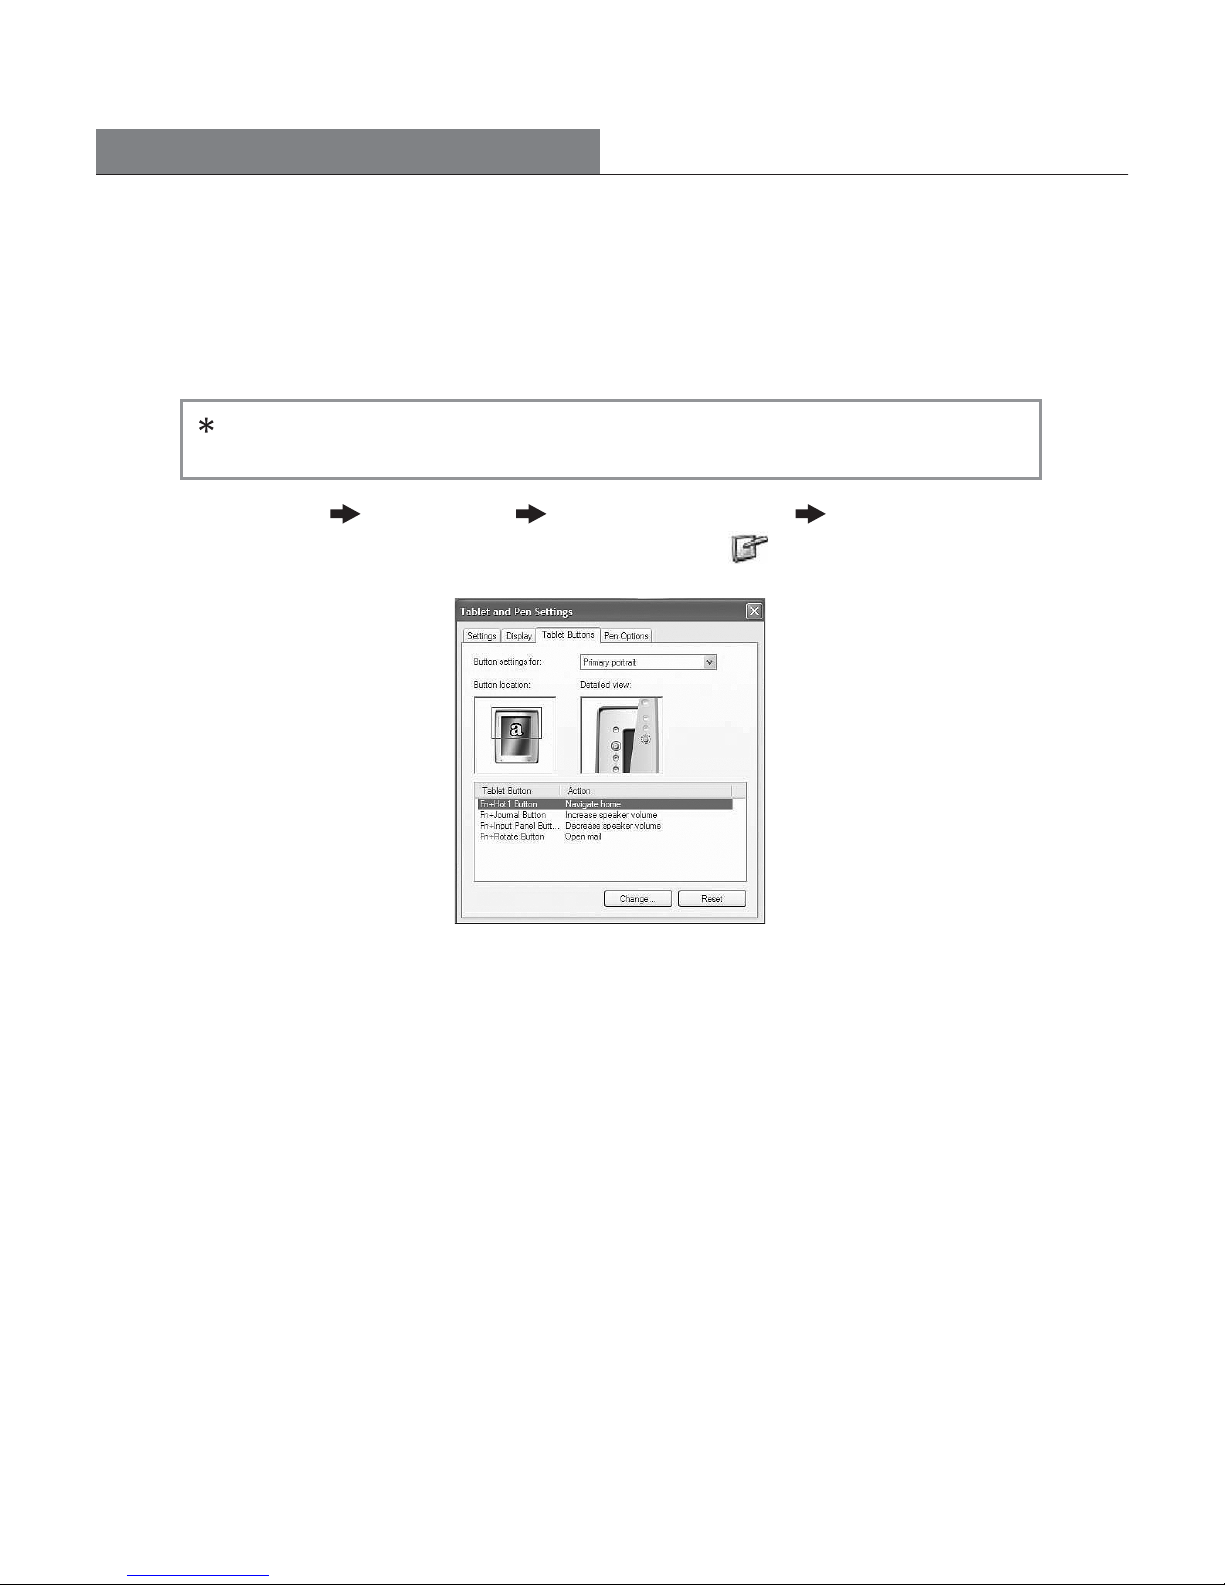
How to Assign Secondary Functions to Buttons
You can only assign button functions when the Windows "Start Menu" taskbar is on-screen.
Below, we explain how to assign secondary functions to the four programmable buttons. These
four buttons not only have primary functions, but also may be assigned secondary functions.
Remember, to activate the secondary button functions, hold down the [Fn] button and then
press the specific secondary function button.
1. Go to "Start" "Control Panel" "Tablet and Pen Settings" "Tablet Buttons."
Or double-tap the "Change Tablet and Pen Settings" icon on the taskbar in the
lower right-hand corner of the desktop.
2. From among the four available buttons, select an appropriate one to add a
secondary function. Below the "Tablet Buttons" heading, you will see the following four
options:
Fn + Hot1 Button
Fn + Journal Button
Fn + Input Panel Button
Fn + Rotate Button
3. Tap on "Change."
4. Double-check the "Button Name" in the first row of the "Change Tablet Button Action"
dialog box to confirm the button selection.
5. Select a secondary function you often use from among the fifty-four different options in
the "Action" scroll list.
6. Tap "OK" to confirm your selection.
09
 Loading...