

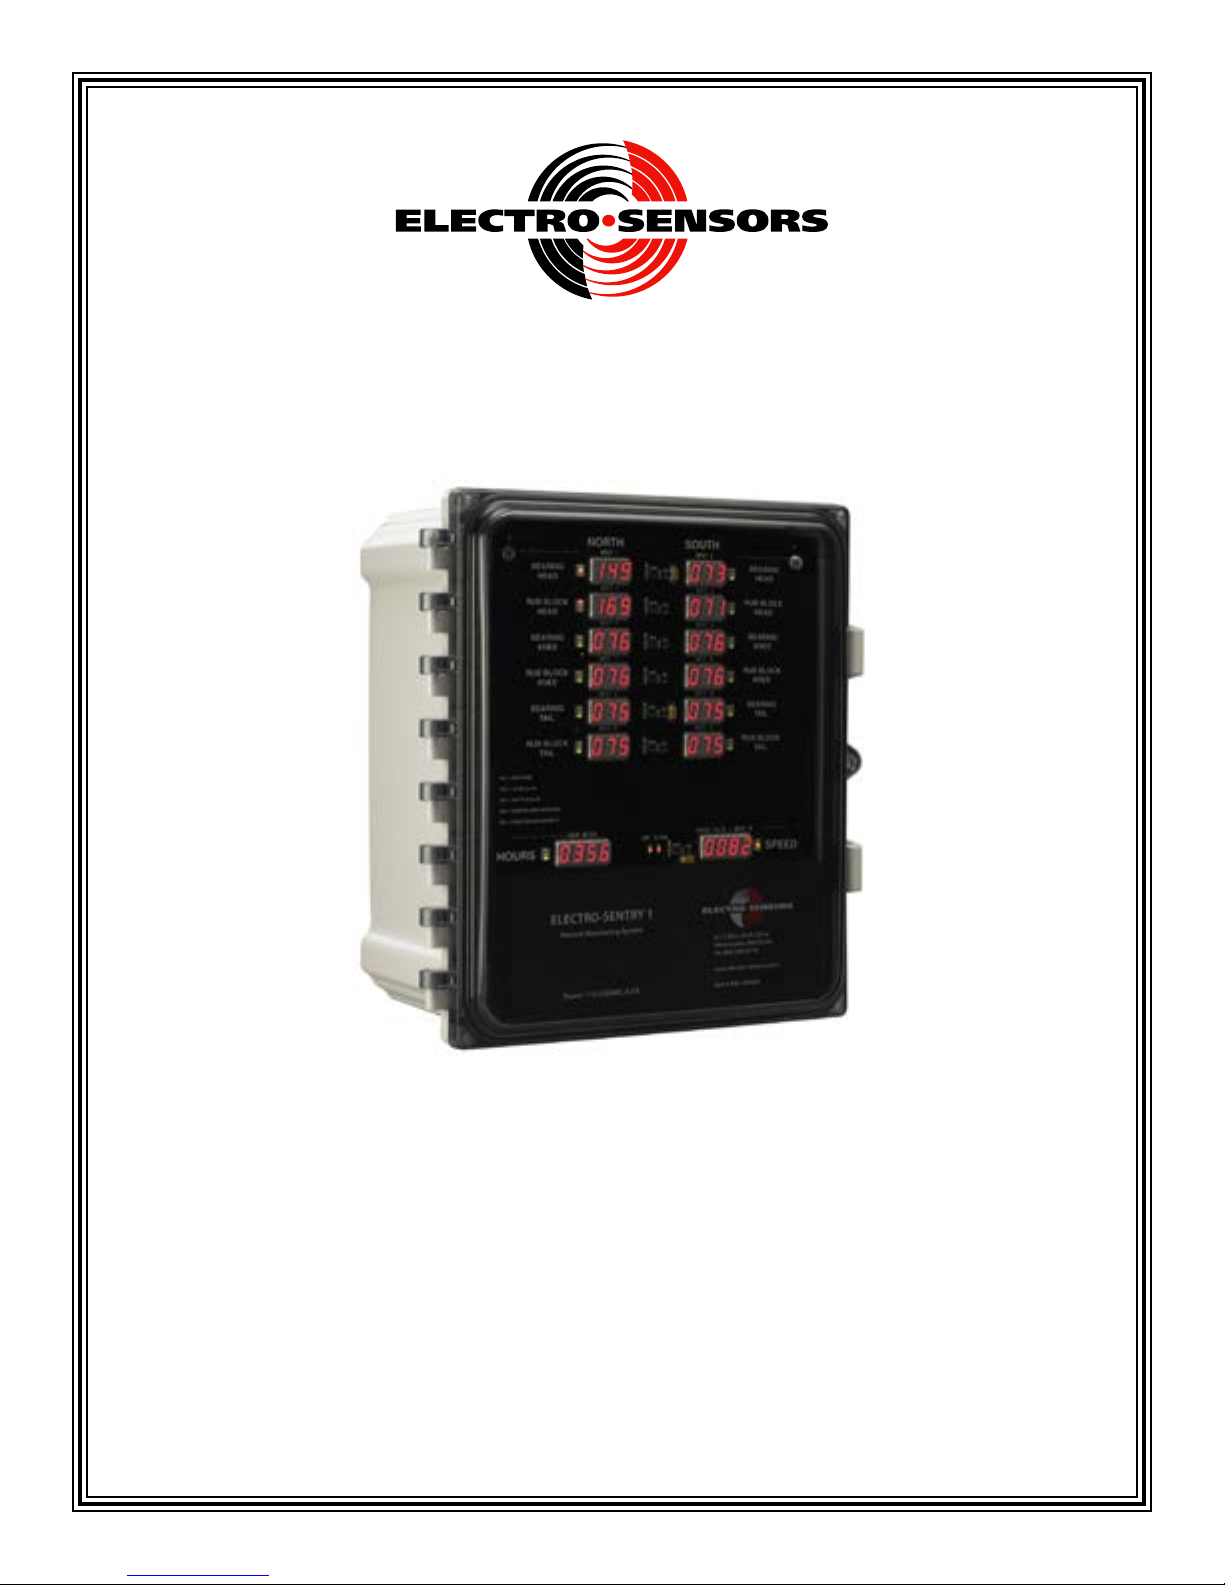
Electro-Sentry 1
Installation & Operation Manual
Part Number: 990-005500
Revision D
Electro-Sensors®, Inc.
6111 Blue Circle Drive
Minnetonka, MN 55343-9108
Contact us at:
Local: 952-930-0100
National: 1-800-328-6170
Fax: 952-930-0130
Web: www.electro-sensors.com
Sales: sales@electro-sensors.com
Support: tech@electro-sensors.com

Introduction To This Manual
What is in this
manual?
Who should
use this manual
(audience)
This installation and operation manual provides detailed technical information about the ElectroSentry 1. It should serve as your technical resource to install, set up, operate, and test the ElectroSentry 1.
Keep in mind that the function of the Electro-Sentry 1 installed in a mechanical process is to
monitor speed and temperature; therefore, it must be installed by qualified personnel only. This
manual is designed for persons who have the primary responsibility to install, set up, operate, and
test the Electro-Sentry 1.
The secondary audience would be those persons seeking technical information about the electrical
concepts and operation of the Electro-Sentry 1.
Knowledge
level
Notices · Installing Electro-Sensors, Inc., products is the responsibility of the purchaser, and is in no way
Persons installing, setting up, and operating the Electro-Sentry 1 should have good knowledge
and understanding of electrical and mechanical concepts and principles pertaining to speed and
temperature monitoring and associated alarms.
Again, the Electro-Sentry 1 should be installed by qualified personnel only.
guaranteed by Electro-Sensors, Inc.
· While the information in this manual has been carefully reviewed, Electro-Sensors, Inc., assumes
no liability for any errors or omissions in this manual. Additionally, Electro-Sensors, Inc.,
reserves the right to make changes to any part of the information in this manual or the product
described herein without further notices.
· No part of this manual may be photocopied, reproduced, or translated to another language
without the prior written consent of Electro-Sensors, Inc.
Copyright © 2012 Electro-Sensors, Inc. All rights reserved.

Table of Contents
Quick Start Guide: .........................................................................................................................................I
Description .....................................................................................................................................................1
Front-Panel Displays ......................................................................................................................................1
Front-Panel User Interface .............................................................................................................................1
Enclosure ........................................................................................................................................................1
Ratings and Conduit Holes ......................................................................................................................1
Material and Recommended Minimum Installation Area ........................................................................16
Dimensions, With and Without Mounting Feet .......................................................................................22
Modes of Operation: ......................................................................................................................................1
Normal Mode ...........................................................................................................................................1
Program Mode .........................................................................................................................................1
Entering and Using Program Mode ...............................................................................................................1
How to reset the Electro-Sentry 1 to Factory Defaults ..................................................................................2
The UserVar Variables: ..................................................................................................................................2
Speed Variables (Var01 through Var10) ...................................................................................................2
Sensor Type Select Variable (Var11) ........................................................................................................3
The Warning, Shutdown, and BIAS Setpt Temperature Variables (Var12 through Var25) ......................4
Temperature Display Select (Var30) ........................................................................................................5
System Variables (Var31 through Var36) .................................................................................................6
Electro-Sentry 1 Operation Notes Section: ....................................................................................................9
Alarms....... ...............................................................................................................................................9
Latching and holding of Alarms ..............................................................................................................9
How to ‘clear’ Alarms ..............................................................................................................................9
Using multiple Electro-Sentry 1’s in the same application ......................................................................10
Built-in Test Features Section: .......................................................................................................................10
Temperature Rise and Speed Drop Alarm Test Features .........................................................................10
Troubleshooting Section: ...............................................................................................................................11
Standard Temperature vs. 4-20mA Temperature Sensors ........................................................................11
‘Out-of-Range’ Sensor Detection.............................................................................................................11
LCD Display and 4-digit LED Speed Display Error Messages ...............................................................12
Concerning the Var34 Disable/Enable Commands: .................................................................................14
The Green Indicator LEDs, the Replaceable Fuse F12, and the Resettable Fuses F1 through F11: .......15
Specifications Table .......................................................................................................................................16
Front Panel Drawing ......................................................................................................................................17
Terminal Block Connections ..........................................................................................................................18
SW1 Vac Selection Switch .............................................................................................................................18
I/O Board - Terminal Drawing .......................................................................................................................19
Typical Wiring Connection Examples ...........................................................................................................20
User Variable List ...........................................................................................................................................21
Free Catalog and Application Assistance
1.800.328.6170
Website: www.electro-sensors.com
990-005500 Revision D
Electro-Sentry 1 Quick Start Guide
Here are the basic questions/steps the user needs to
perform to get the Electro-Sentry 1 (a.k.a. ES1) up
and running:
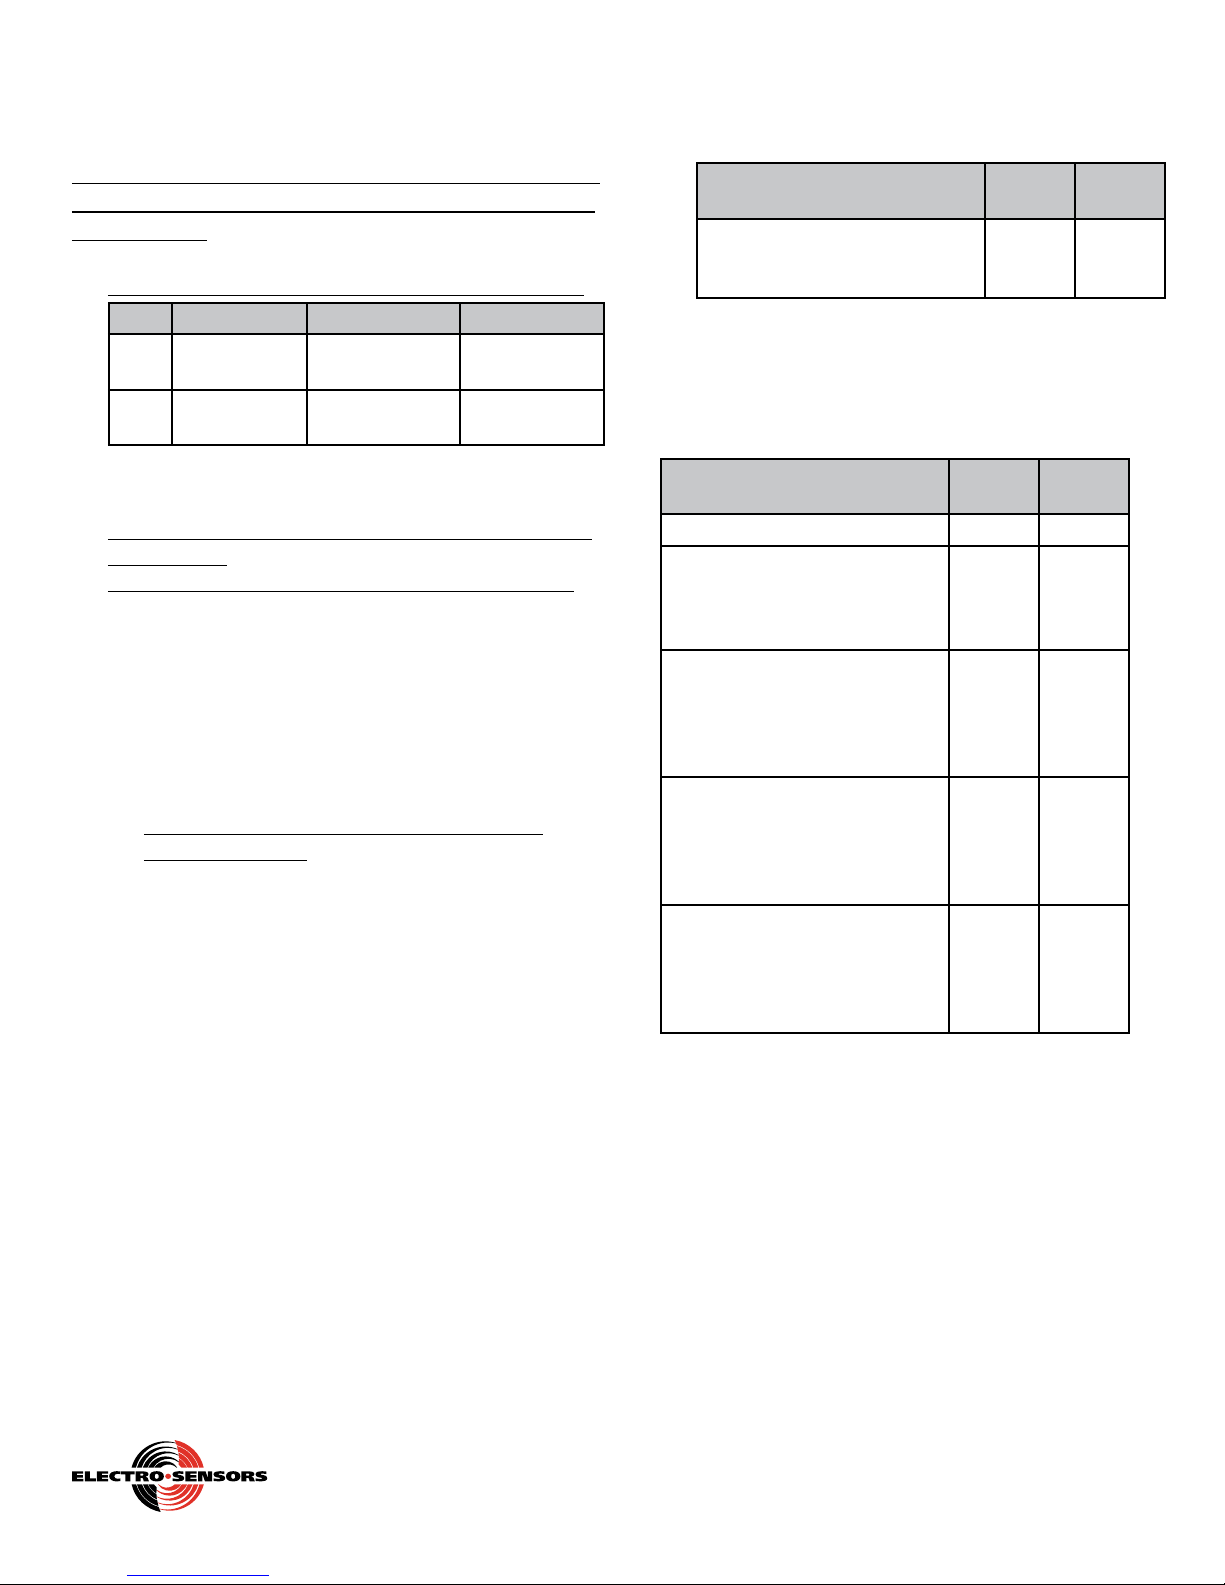
1) What is the application’s voltage? 115 or 230 Vac?
VAC SW1 Position Fuse F12 Notes:
115 Towards Right 115Vac/0.4Amp
Slo-Blo
230 Towards Left 230Vac/0.2Amp
Slo-Blo
(The ES1 is shipped with one 230Vac/0.2 Amp Slo-Blo fuse,
and one extra 115Vac/0.4 Amp Slo-Blo fuse).
2) Do you need to display speed, or need Speed Alarm
Monitoring?
A) NO, Speed Display/Alarm Monitoring is not needed:
Skip User Variables Var01 through Var08.
Skip the setting of the SW9 3-DIP Switch.
Set Var09 Speed_Display_Select to either a ‘0002’
or a ‘0003’ to disable Speed Monitoring, as needed.
Skip Var10 MAX_ANALOG_RPM.
Skip Var34 Hour_and_Speed_Command_Select for
now. [If you plan to use the Hour Meter feature, we
will return to Var34 later in section (5) below].
B) YES, Speed Alarm Monitoring and/or Speed
Display is needed:
What type of Speed encoder are you using? A 4-20
mA Analog encoder or a Pulse-Train encoder?
Set Var01 Encoder_Type_Select, as needed:
‘0000’ = 4-20 mA Analog Speed Encoder Type
(speed signal is received at TB16).
‘0001’ = Pulse-Train Speed Encoder Type
(speed signal is received at TB30).
When Var01 = 0001, then you need to set
the SW9 3-DIP Switch for NPN or PNP/
5V logic-level Encoder Type, as needed
per your pulse-train encoder. The SW9
DIP switch is on the back side of the Front
Panel, to the left of the J7 ribbon cable.
The Factory default setting of SW9 is for
an NPN Pulse-Train Encoder (which is
SW9’s switch #1 = ON, switch #2 = OFF,
switch #3 = OFF).
Note: Electro-Sensors Pulse-Train
Encoders are NPN encoders.
Factory Setting
User Selectable
Variable Default
Value
Var01 Encoder_Type_Select.
0000 = 4-20mA Analog Encoder.
0001 = Pulse-Train Encoder.
0000
User’s
Value
For applications using a 4-20 mA Analog Speed
Encoder (i.e., Var01 = 0000):
Set the following variables as needed:
Variable Default
Value
Var02 Pulse_Per_Rev Value. N.A.
Var03 RPM_at_20mA.
This is the analog encoder’s rated
RPM corresponding to 20mA.
(See Note2).
Var10 MAX_ANALOG_RPM.
This is the peak RPM seen by the
analog encoder in the application,
and the 100% RPM on which the
speed setpts are based.
Var04 Speed_Slowdown_Alarm_
SetPt %. (See Note
This is the ‘Yellow_Alarm’
speed expressed as a % of Var10
MAX_ANALOG_RPM.
Var06 Speed_Shutdown_Alarm_
Setpt %. (See Note3).
This is the ‘Red_Alarm’ speed
expressed as a % of Var10
MAX_ANALOG_RPM.
Note1: “N.A.” means not applicable to this portion of
Electro-Sentry 1 set-up.
Note2: The definition of Var03 is slightly different when
Var01 is programmed for an analog speed encoder
versus a pulse-train speed encoder.
Note3: If you only need to display the speed, without Speed
Alarm Monitoring, then you can skip setting Var04
and Var06. But you then need to set Var09 to either a
‘0002’ or ‘0003’ as needed per your speed viewing
needs. (More about Var09 on next page).
3
).
0200
RPM
0200
RPM
0090
%
0080
%
User’s
Value
1
N.A.
1
Free Catalog and Application Assistance
1.800.328.6170
Website: www.electro-sensors.com
I
990-005500 Revision D
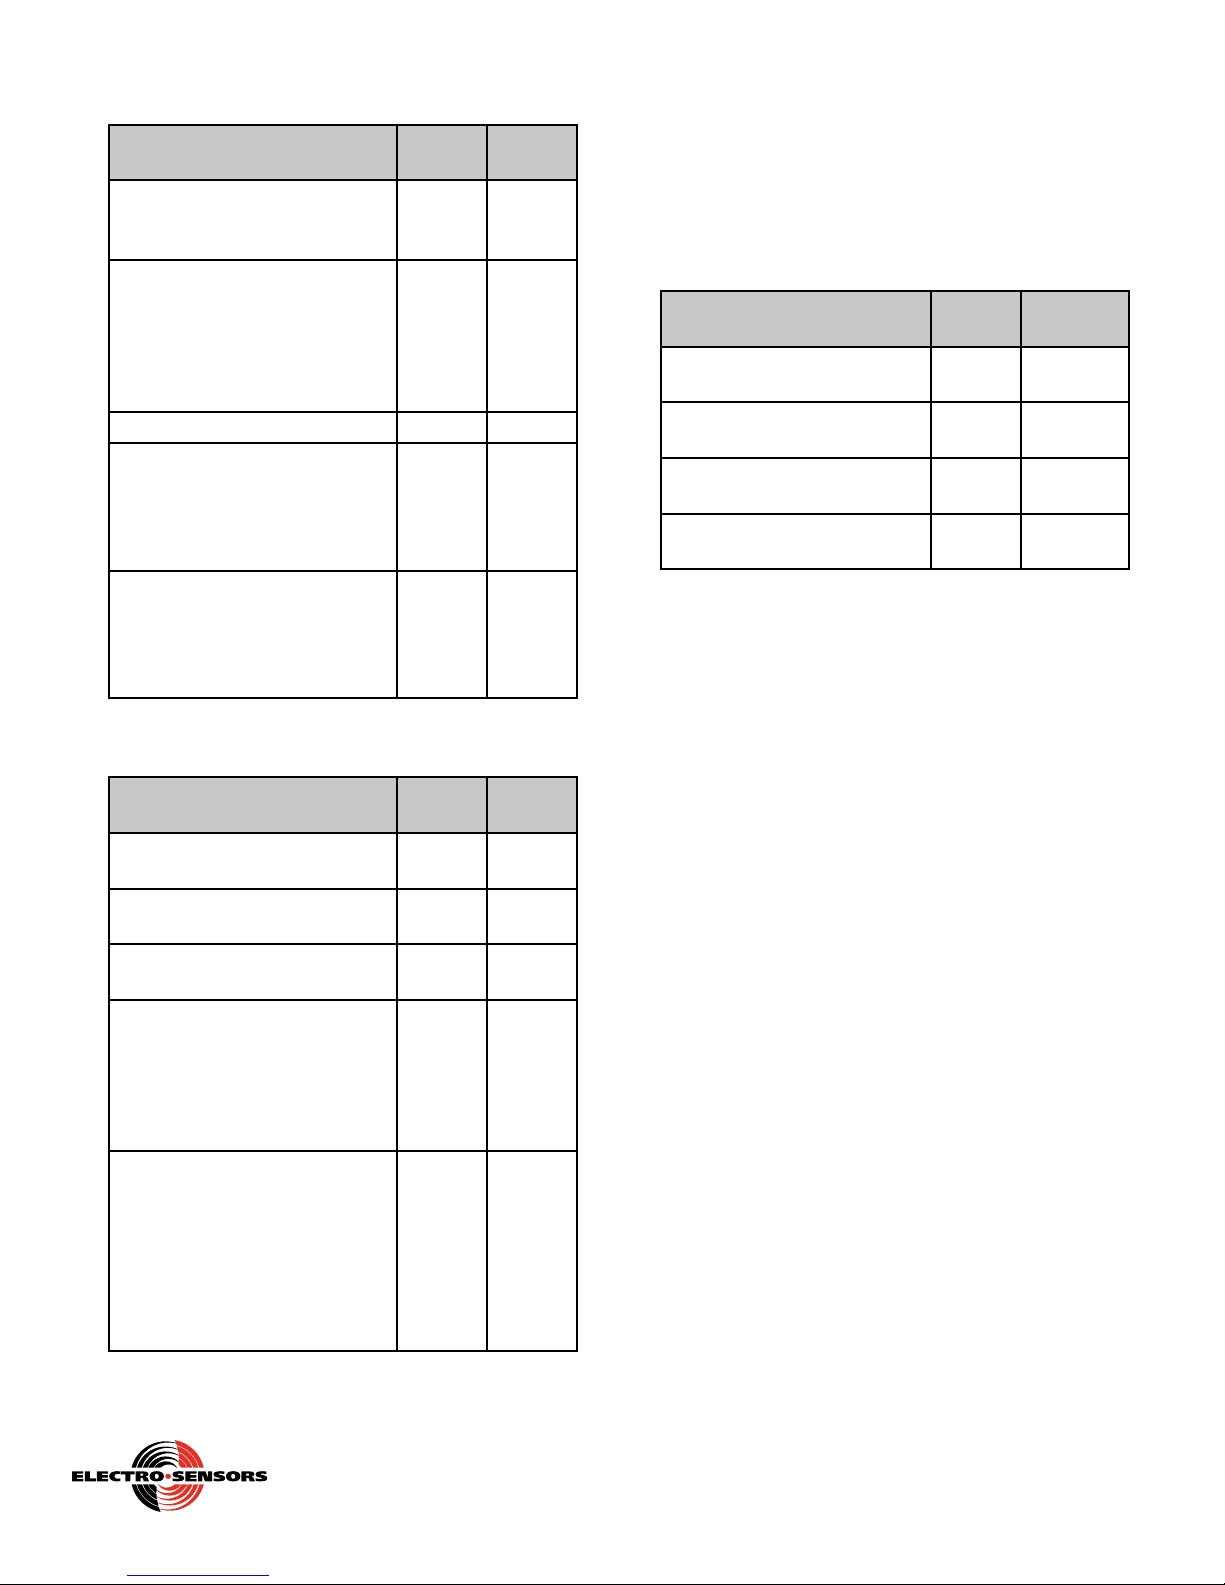
For applications using a Pulse-Train Speed Encoder
(i.e., Var01 = 0001): Set the following variables as needed:
Variable Default
Value
Var02 Pulse_Per_Rev Value.
Most Electro-Sensors pulser
0008
PPR
targets give 8 PPR.
Var03 PULSE_MAX_RPM.
This is the peak RPM of the
0200
RPM
rotating pulser target seen in the
application, and the 100% RPM
on which the speed setpts are
based. (See Note
2
).
Var10 MAX_ANALOG_RPM N.A. N.A.
Var04 Speed_Slowdown_Alarm_
3
SetPt %. (See Note
)
0090
%
This is the ‘Yellow_Alarm’
speed expressed as a % of Var03
PULSE_MAX_RPM.
Var06 Speed_Shutdown_Alarm_
Setpt %. (See Note3)
0080
%
This is the ‘Red_Alarm’ speed
expressed as a % of Var03
PULSE_MAX_RPM.
User’s
Value
Note: See the “UserVar Variables” section in the Reference
portion of the User Manual for details on any of the
above mentioned VarXX’s, if so needed.
What Speed alarms do you need?
Is a Speed Slowdown Warning Alarm or a Speed
Shutdown Alarm needed?
If so, connect the application’s ‘alarm’ circuitry to the ES1’s
terminal blocks as shown in the following table:
Function Relay
Output#
Speed (or temperature)
4 TB24
Shutdown Alarm
Speed (or temperature)
3 TB22
Warning Alarm
Speed Only
2 TB20
Shutdown Alarm
Speed Only
1 TB18
Warning Alarm
(These four ES1 relay outputs are ‘Dual Form C SPDT’).
See Reference portion of the User Manual, pages 16, 18,
and 19, for details on any of the above mentioned terminal
blocks, if so needed.
Terminal
Blocks
TB23
TB21
TB19
TB17
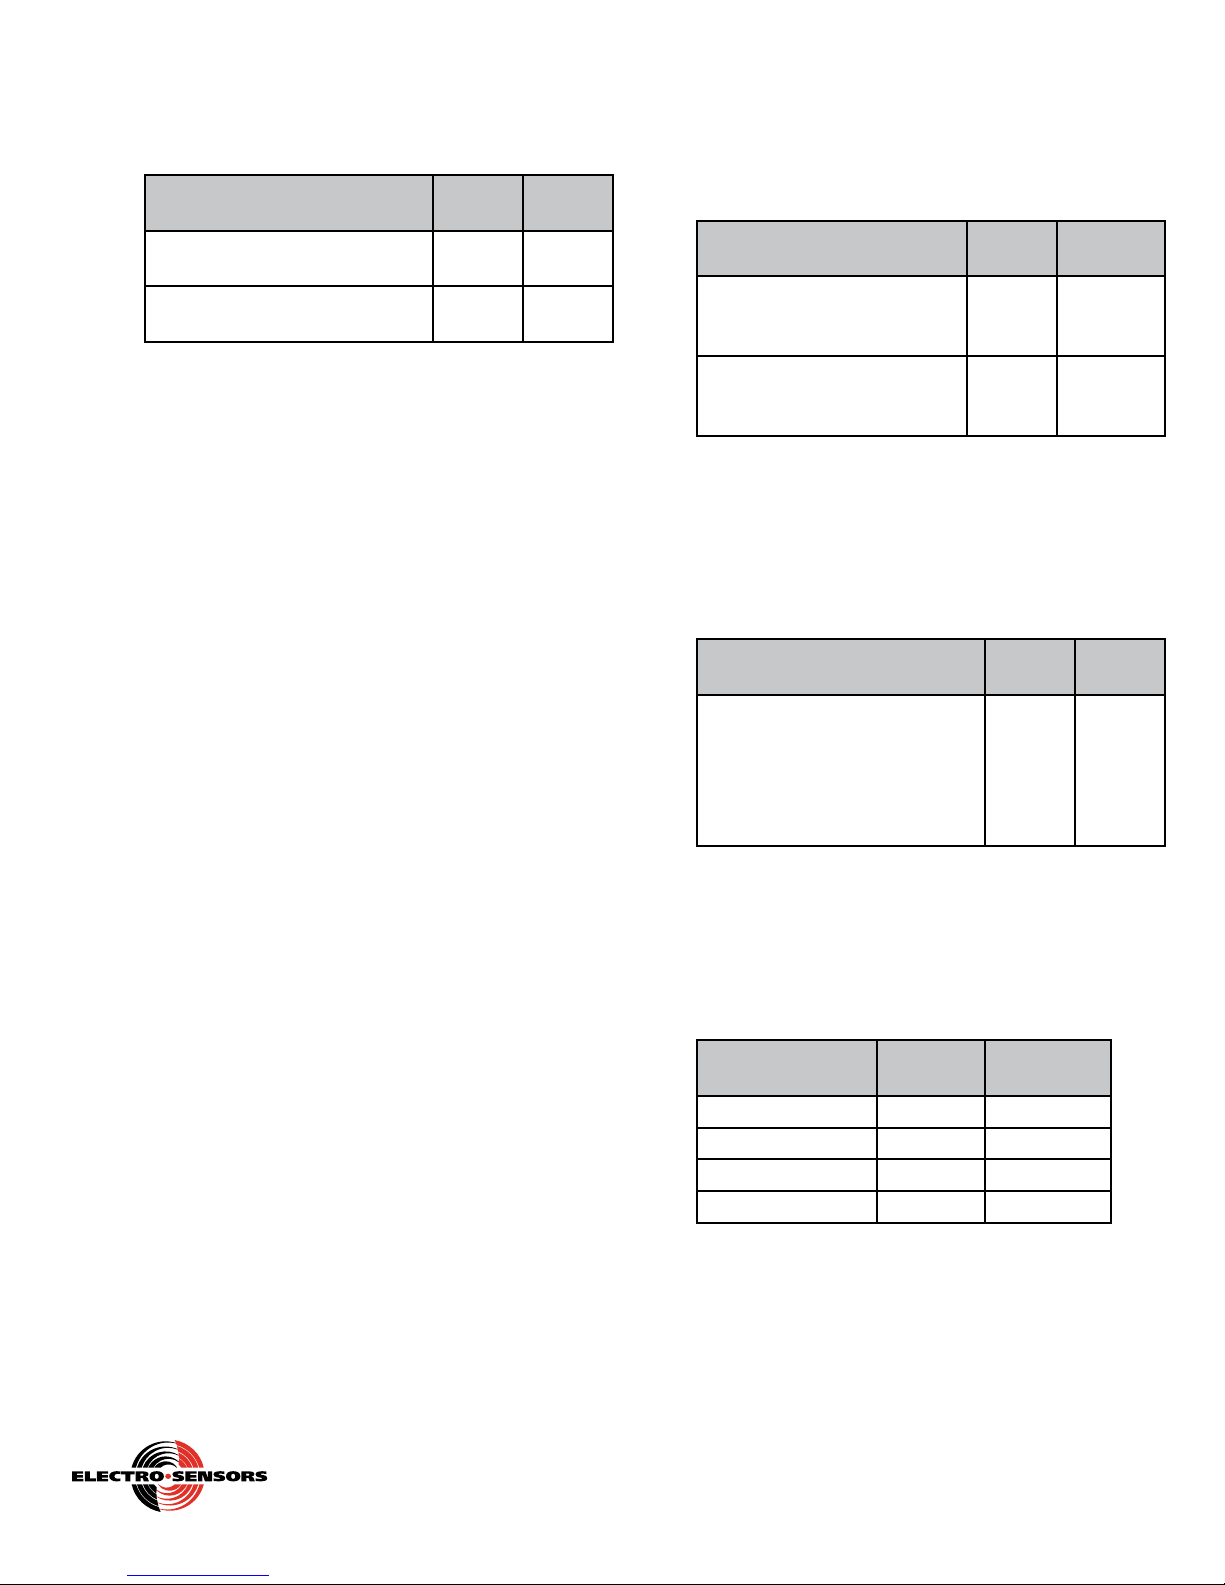
For either type of Speed Encoder (i.e., Var01 = 0000
or 0001): Set the following variables as needed:
Variable Default
Value
Var05 Speed_Slowdown_Alarm_
Delay
Var07 Speed_Shutdown_Alarm_
Delay
0001
sec
0001
sec
Var08 Underspeed_Start_Delay 0005
sec
Var09 Speed_Display_Select.
0000
0000 = % and Enable.
0001 = RPM and Enable.
0002 = % and Disable
0003 = RPM and Disable
3
(See Note
Var34 Hour_and_Speed_
)
0000
Command_Select.
0000 = Maintained
Disable/Enable.
0001 = One-Shot Disable/Enable
with Disable = Closed.
0002 = One-Shot Disable/Enable
with Disable = Open.
User’s
Value
Factory default for Var34 is 0000 for a ‘Maintained’
Disable/Enable command needed at input TB34.
Free Catalog and Application Assistance
1.800.328.6170
Website: www.electro-sensors.com
II
990-005500 Revision D

3) How to set-up your Electro-Sentry 1 for
Temperature Monitoring:
A) The application’s Temperature sensors are typically
connected to the Electro-Sentry 1’s 4-20 mA
Analog Inputs as follows:
Terminal
Block
TB1 1 Head Bearing Left
TB2 2 Head Bearing Right
TB3 3 Head Rub Block Left
TB4 4 Head Rub Block Right
TB5 5 Knee Bearing Left
TB6 6 Knee Bearing Right
TB7 7 Knee Rub Block Left
TB8 8 Knee Rub Block Right
TB9 9 Tail Bearing Left
TB10 10 Tail Bearing Right
TB11 11 Tail Rub Block Left
TB12 12 Tail Rub Block Right
For the TB1 through TB12 terminal blocks:
Pin1 = +24Vout_A, Pin 2 = 4-20 mA Signal Input,
Pin 3 = Gnd_A.
All 12 Analog Inputs can be setup for sensors
B)
Analog
Input # Description
having a Temperature proportional 4-20mA output.
Six Analog Inputs can also be setup for sensors
having a Contact Closure output, as shown in the
following table.
Terminal
Block
TB1 1 Ye s No N.A.
TB2 2 Ye s No N.A.
TB3 3 Ye s Yes See Var11
TB4 4 Ye s Yes See Var11
TB5 5 Ye s No N.A.
TB6 6 Ye s No N.A.
TB7 7 Ye s Yes See Var11
TB8 8 Ye s Yes See Var11
TB9 9 Ye s No N.A.
TB10 10 Yes No N.A.
TB11 11 Yes Ye s See Var11
TB12 12 Yes Ye s See Var11
If your application uses Contact-Closure sensors for Rub
Blocks, etc, then see page 3 of the Reference portion
of the User Manual for details on how to setup Var11.
4
: Factory default for Var11 is 0000, for all
Note
Analog Inputs are set for 4-20 mA
Analog
Input #
Temperature sensors.
Temp
Sensor
Contact
4
Closure Var11
C)
For those Analog Inputs that you are not using
(i.e., those Analog Inputs having no Temperature sensors
or no Contact-Closure sensors connected to them):
You must turn ‘OFF’ the effect of any unused Analog
Inputs by setting their BIAS Temperature Setpts to
‘0999’. The BIAS Setpts are in Var14 through Var25,
and correspond to the 4-20 mA Analog Inputs as
follows:
Var# Description Default
Value
14 Input #1 BIAS
Temperature SetPt.
15 Input #2 BIAS
Temperature SetPt.
16 Input #3 BIAS
Temperature SetPt.
17 Input #4 BIAS
Temperature SetPt.
18 Input #5 BIAS
Temperature SetPt.
19 Input #6 BIAS
Temperature SetPt.
20 Input #7 BIAS
Temperature SetPt.
21 Input #8 BIAS
Temperature SetPt.
22 Input #9 BIAS
Temperature SetPt.
23 Input #10 BIAS
Temperature SetPt.
24 Input #11 BIAS
Temperature SetPt.
25 Input #12 BIAS
Temperature SetPt.
The factory default settings for all the BIAS
Temperature Setpts Var14 through Var25 is 0000,
which enables all Analog Inputs, but which disables
their BIAS alarm feature. (More details about the
BIAS alarm feature later).
What temperature scale do you want to use, Fº
D)
0000
0000
0000
0000
0000
0000
0000
0000
0000
0000
0000
0000
Fahrenheit or Cº Celsius?
Set Var30 Temperature_Display_Select as needed.
Variable Default
Value
Var30 Temperature_Display_
Select.
0000 = Fahrenheit, Fº.
0001 = Celsius, Cº.
Free Catalog and Application Assistance
Website: www.electro-sensors.com
III
0000
(Fº)
990-005500 Revision D
User’s
Value
User’s
Value
1.800.328.6170
E) What temperature levels do you want for the
‘Yellow_Alarm’ Warning Setpt, and the ‘Red_
Alarm’ Shutdown Setpt?
Set the following variables as needed:
Variable Default
Value
Var12 Warning_Setpt_
Temperature (‘Yellow_Alarm’)
Var13 Shutdown_Setpt_
Temperature (‘Red_Alarm’)
F)
Do you want to use the BIAS Temperature Setpt
0160
degrees
0175
degrees
alarm feature?
This is where the temperature difference (or deviation)
of a left-side temperature sensor triggers a BIAS Setpt
‘Yellow_Alarm’ if it exceeds its right-side companion
sensor by the left-side BIAS Setpt amount (and likewise
vice-versa). The BIAS Setpts are in Var14 through
Var25 (as shown in the table to the left).
The factory default settings for all the BIAS
Temperature Setpts Var14 through Var25 is 0000,
which enables all Analog Inputs, but which disables
their BIAS alarm feature.
See the table on page 5 of the Reference portion of the
User Manual for more details about left-side/right-side
temperature sensor BIAS companion pairs.
If you want to use the BIAS Temperature Setpt
alarm feature, then set the desired Analog Input’s
VarXX BIAS Temperature Setpt to the deviation
desired, in degrees.
– For example, set left-side Input #1 temperature
sensor’s BIAS setpt Var14 to 0020 degrees
if you want a BIAS Setpt ‘Yellow_Alarm’ to
happen when Input #1’s temperature rises 20
degrees higher than its right-side companion’s
temperature at Input #2.
If you do NOT want to use the BIAS Temperature
Setpt alarm feature, then set (or leave) the desired
Analog Input’s VarXX BIAS Temperature Setpt to
0000 (to disable the BIAS Setpt feature).
See section (3, A) above for which Analog Input is a
left-side input and which Analog Input is a right-side
input (as set by the position of the Analog Input’s
corresponding 3-digit LED display on the ES1’s FrontPanel).
See section (3, C) above for the correlation between
VarXX BIAS Temperature Setpts and the Analog Input
#’s.
See the “UserVar Variables” section in the Reference
portion of the User Manual for details on any of the
above mentioned VarXX’s, if so needed.
User’s
Value
What Temperature or Contact Closure alarms do
G)
you need?
Is a Temperature or Contact Closure Warning Alarm
or a Temperature Shutdown Alarm needed?
If so, connect the application’s ‘alarm’ circuitry to the
ES1’s terminal blocks as shown in the following table:
Function Relay
Output#
(Speed or) Temperature
Shutdown alarm
(N/A to Contact Closure)
(Speed or) Temperature/
Contact Closure
Warning alarm
(These two ES1 relay outputs are ‘Dual Form C SPDT’).
4 TB24
3 TB22
Terminal
Blocks
4) Do you need a Horn, a Red Light, a Yellow Light,
or a Green Light for audio/visual alarm indication,
whenever a Speed alarm, a Temperature alarm or a
Contact Closure alarm occurs?
A) If you need a Horn, then set Var33 Horn_Operation_
Select, as needed:
Variable Default
Value
Var33 Horn_Operation_Select.
See details in Reference Section.
Note: A setting of 0999 is for
a solid blast until a manual
‘Silence_Horn/Alarm_RESET’
command is given.
See Reference portion page 6 for details on Var33.
Then connect the application’s ‘Horn’ circuitry to the
ES1 as shown in the table below.
B) If you need a Red Light, a Yellow Light, or a Green
Light then connect the application’s ‘Light(stack)’
circuitry to the ES1’s terminal blocks as shown in the
following table:
Horn or
Light(stack)
Horn 8 TB28
Red Light(stack) 7 TB27
Yellow Light(stack) 6 TB26
Green Light(stack) 5 TB25
(These four ES1 relay outputs are ‘Single Form A
SPST’).
Relay
Output #
0999
Terminal
Block
TB23
TB21
User’s
Value
IV
Free Catalog and Application Assistance
1.800.328.6170
Website: www.electro-sensors.com
990-005500 Revision D

5) Do you need to use the Hour Meter?
A) NO, the Hour Meter is not needed:
Skip User Variables Var31 and Var32.
Skip Var34 Hour_and_Speed_Command_Select
[unless you already set-up Var34 for Speed
Monitoring - then leave Var34 ‘as-is’].
B) YES, the Hour Meter is needed:
Set the following variables as needed:
Variable Default
Var31 Hour_Meter_Warning_
Time
Var32 Hour_Meter_
Maintenance_Time
Var34 Hour_and_Speed_
Command_Select.
0000 = Maintained
Disable/Enable.
0001 = One-Shot Disable/Enable
with Disable = Closed
0002 = One-Shot Disable/Enable
with Disable = Open.
Value
9000
Hours
9500
Hours
0000
chart on the inside of the Electro-Sentry 1’s front cover.
User’s
Value
Note: The Hour Meter increments and its discrete Green/
Yellow/Red LEDs light-up only if all of the following
are true:
· If Var31 is non-zero.
(i.e., Var31 = 0000 disables the Hour Meter).
· AND If in Normal Mode, not in Program Mode.
(i.e., Being in Program Mode disables the Hour
Meter).
· AND If the Hour_and_Speed_Enable command
is present. (i.e., The Hour_and_Speed_Disable
command disables the Hour Meter).
If any one of these three prerequisites are NOT met, then
the Hour Meter does NOT increment hours, NOR do the
Hour Meter’s discrete Green/Yellow/Red LEDs light-up
as per the number of hours reached.
6) Leave Var35 Test Mode Select at the default value of
‘0000’, to operate the ES1 in the ‘real-live-data-mode’.
7) Please see the Reference Section of the User Manual
for details of any of the UserVars.
8) Please see the Reference Section of the User Manual
for details of the TBx terminal blocks (found on pages
18 and 19 of the Reference Section), or use the handy
diagram silkscreened into the back side of the FrontPanel.
9) For easy reference, log your user variable values in the
V
Free Catalog and Application Assistance
1.800.328.6170
Website: www.electro-sensors.com
990-005500 Revision D

Electro-Sentry 1 Reference Manual
Description
The Electro-Sentry 1 (a.k.a. ES1) is a Complete Single-Leg
Hazard Monitoring System. The ES1 contains the following:
At-a-glance Temp/Speed monitoring with alarm identification,
for up to twelve 4-20 mA analog Temperature sensors, and for
one 4-20 mA analog or pulse-train Speed sensor.
8 relay outputs, for Temperature/Speed alarms, for a Green/
Yellow/Red Lightstack operation, and for a Horn.
Built-in Hour Meter to aid in maintenance schedules.
Minimal end-user calibration and setup, with calibration stored
in non-volatile EEPROM memory.
Easy one-button tests of systems and alarms, for simulating
temperature increases and speed decreases.
Rugged, industrial-duty systems and sensors.
Front-Panel Displays
• Twelve Temperature 3-digit LED displays, each with its own
discrete Green/Yellow/Red status LED.
• One Speed 4-digit LED display, with its own discrete Green/
Yellow/Red status LED.
• One Hour Meter 4-digit LED display, with its own discrete
Green/Yellow/Red status LED.
• One Four-digit LCD display to aid in programming UserVars
(located in lower-left-corner of Front-Panel).
Front-Panel User Interface
• Four Push-buttons for programming UserVars. The buttons are
ENTER, SHIFT-LEFT, INCRement, and DECPT.
• One Push-button for Hour_Meter_RESET.
• One Push-button for Test_Left_Side_Temperature_Rise.
• One Push-button for Test_Right_Side_Temperature_Rise.
• One Push-button for Test_Speed_Drop.
Enclosure
The enclosure is rated: NEMA 3R, NEMA 4, NEMA 4X, and
NEMA 12. Customer to cut their own conduit holes, preferably in
the bottom wall of the enclosure.
Modes of Operation:
The Electro-Sentry 1 has two modes of operation, Normal Mode
and Program Mode.
When in either mode the Front-Panel temperature and speed
displays, and their alarms are active. The presence of either
mode can be seen by looking at the small four-digit LCD display
located in the lower-left-corner of the Front-Panel, as follows.
Normal Mode
This mode is the normal operation mode, and it is to be used
when the user is NOT changing any of the UserVars.
The Normal Mode is indicated by the absence of the “VAR”
icon in the lower-left-corner of the LCD display.
Program Mode
This mode allows the user to change the UserVar variables.
The LCD display will display the name of the present active
variable (as ‘PrXX’) or its value (as ‘XXXX’).
The Program Mode is indicated by the presence of the “VAR”
icon in the lower-left-corner of the LCD display.
Entering and Using Program Mode:
Programming is accomplished by using the four pushbuttons
located in the lower left corner of the Front-Panel.
The four UserVar programming buttons are ENTer, Shift-left,
INCRement, and DECPT.
a) Press the ENTer button. The “Var” icon will display on the
LCD and the 4 digits will show “PR01”.
b) Press the INCRement button repeatedly until you get to the
variable you want to change.
c) Press the ENTer button to access that variable.
d) While in that variable you must press the INCRement button
to change the active digit (flashing digit), then press the
Shift-left button to work your way through all accessible
digits. (Not all digits are accessible in all UserVars).
e) When you are done with that variable press the ENTer button
to save that new UserVar value, and return to the ‘PrXX’ list.
f) To step to the next variable in the ‘PrXX’ list press the
INCRement button.
g) To exit the Program Mode and get back to Normal Mode,
repeatedly press the INCRement button while in the ‘PrXX’
list until the “VAR” icon disappears, or simply press the
DECPT button while in the ‘PrXX’ list to make a ‘quick-
exit’ out of Program Mode.
Note: If the user does NOT manually exit the Program
Mode, and if there is no further activity in Program
Mode for one minute, then the ES1 automatically
exits the Program Mode.
When this ‘auto-exit’ is performed, any UserVar
that was changed and accepted by pressing the
ENTER button during the present Program Mode
session will have their new value properly retained.
If the LCD screen was displaying a UserVar’s value
(and not displaying the name ‘PrXX’) at the instant
the ‘auto-exit’ was performed, then that particular
UserVar value is restored to its previous value
(and its new unsaved value is lost). This since the
user had NOT pressed the ENTER button during
the present Program Mode session to accept the
present ‘flashing’ new value of that UserVar.
Note: Electro-Sentry 1’s UserVars all have the decimal point
locked in the far right position.
Free Catalog and Application Assistance
1.800.328.6170
Website: www.electro-sensors.com
1
990-005500 Revision D
How to reset the Electro-Sentry 1’s UserVars back to
factory-defaults
Use this procedure to reset the Electro-Sentry 1’s UserVars back
to factory-default values:
1) Remove the Vac power.
2) Simultaneously press and hold the INCRement and ENTER
buttons (located just below the small four-digit LCD display
in the lower-left-corner of the Front-Panel).
3) Re-apply the Vac power.
4) When the small LCD display shows “rESE”, release the
buttons. (The UserVars have now been automatically reset to
their factory-default values).
The UserVar Variables:
Speed variables (Var01 through Var10)
The Electro-Sentry 1 has two speed signal inputs (only one at a
time can be programmed for use, as per Var01):
the first input accepts a 4-20 mA signal (TB16),
the second input accepts pulse train signals (TB30).
Var01. Encoder_Type_Select.
The Var01 range is limited to these below listed choices:
Var01
Value
0000
0001
Factory default for Var01 is 0000 for 4-20 mA Encoder Type.
If Var01=0001 for Pulse-Train Encoder Type, then the NPN vs
PNP or 5V logic-level Encoder Type is further selected by SW9
(the 3-pin DIP switch located on the back side of the Front Panel,
to the left of the J7 ribbon cable) as follows:
PNP, 5V Logic OFF ON OFF
Encoder
Type
Selection
4-20mA
Analog
Pulse-
Train
Switch Pin # 1 Pullup 2 Pulldown 3 Cap filter
NPN ON OFF OFF
Note: Switch ‘ON’ is towards your right when facing SW9.
Speed
Signal
Input
TB16
TB30
SW9 Switch
Speed vs. mA or RPM
Reference Points
0% speed = 4mA = 0 RPM.
20mA = Var03_RPM_at_20mA
(but this 20mA point is NOT necessarily the 100% speed point. See
Var10 MAX_ANALOG_RPM for
related information).
0% speed = 0 RPM.
100% speed = Var03_PULSE_
MAX_RPM
Var02. Pulse_Per_Rev Value.
This is the number of pulses generated by the rotating magnetic
target.
Var02 range is 0000 to 9999 PPR.
Factory default for Var02 is 0008 PPR,
Note: If Var01=0000 for the 4-20 mA Analog Encoder Type,
then Var02 is irrelevant and its value is ignored, and
a value of 60 PPR is assumed for internal frequency
calculations.
Var03. PULSE_MAX_RPM or RPM_at_20mA.
If Var01=0000 for 4-20mA encoder type, then Var03 is the
encoder’s rated RPM that corresponds to a 20mA output.
If Var01=0001 for Pulse-Train encoder type, then Var03 is
the maximum RPM of the rotating magnetic target seen in the
application.
Var03 range is 0000 to 9999 RPM.
Factory default for Var03 is 0200 RPM.
Var04. Speed_Slowdown_Alarm_Setpt_%
Var04 is the speed at which a slowdown warning alarm occurs,
as expressed in % of Var03 PULSE_MAX_RPM for pulse-train
encoders, and % of Var10 MAX_ANALOG_RPM for 4-20mA
encoders.
(Alarms as: Speed display’s discrete Yellow-LED /
Yellow-Lightstack-Relay / Speed-Only-Warning-Relay /
Speed-Temperature-Warning-Relay / Horn-Relay).
Var04 range is 0000 to 2000 %.
Factory default for Var04 is 0090 %.
Var05. Speed_Slowdown_Alarm_Delay.
This is the number of seconds to wait after the speed has dropped
below the slowdown Setpt, before actually triggering the alarm.
Var05 range is 0000 to 0030 seconds.
Factory default for Var05 is 0001 second.
Var06. Speed_Shutdown_Alarm_Setpt_%.
Var06 is the speed at which a shutdown alarm occurs as
expressed in % of Var03 PULSE_MAX_RPM for pulse-train
encoders, and % of Var10 MAX_ANALOG_RPM for 4-20mA
encoders.
(Alarms as: Speed display’s discrete Red-LED /
Red-Lightstack-Relay / Speed-Only-Shutdown-Relay /
Speed-Temperature-Shutdown-Relay / Horn-Relay).
Var06 range is 0000 to 2000 %.
Factory default for Var06 is 0080 %.
Var07. Speed_Shutdown_Alarm_Delay.
This is the number of seconds to wait after the speed has dropped
below the shutdown Setpt, before actually triggering the alarm.
Var07 range is 0000 to 0030 seconds.
Factory default for Var07 is 0001 second.
Free Catalog and Application Assistance
1.800.328.6170
Website: www.electro-sensors.com
2
990-005500 Revision D

Var08. Underspeed_Start_Delay_Time.
This is the number of seconds to wait after an
Hour_and_Speed_Enable command has been given, before
enabling speed monitoring.
Var08 range is 0000 to 0030 seconds.
Factory default for Var08 is 0005 seconds.
Var09. Speed_Display_Select.
Show speed in % or RPM on the 4-digit LED Speed Display, and
Enable/Disable Speed Alarm Monitoring.
The Var09 range is limited to the display selections listed below:
Var09
Value
Display
Selection
Speed Alarm
Monitoring
0000 Speed in % Enabled
0001 Speed in RPM Enabled
0002 Speed in % Disabled
0003 Speed in RPM Disabled
Factory default for Var09 is 0000 for speed in ‘%’ and Speed
Alarm Monitoring enabled.
Var10. MAX_ANALOG_RPM.
When Var01=0000 for 4-20mA analog encoder type, then Var10
MAX_ANALOG_RPM is the maximum RPM seen by the
4-20mA encoder in the application.
Note: Var10 is meant to be used when the application’s
maximum speed is less than the analog speed encoder’s
rated 20mA RPM (i.e. a Var10 less than Var03).
Var10 range is 0000 to 9999 RPM.
Factory default for Var10 is 0200 RPM.
Note: If Var01 is set for Pulse-Train encoder type, then Var10 is
irrelevent and it’s value is ignored.
Sensor Type Select Variable (Var11)
Var11. Belt_Alignment_Sensor_Type_Select.
Var11 allows the Analog Inputs #’s 3, 4, 7, 8, 11, and 12, to be
programmed for either 4-20mA Temperature type sensors or for
Contact-Closure type sensors. Rub Block sensors are always
expected to be operated in pairs and are horizontally across from
each other on the ES1’s Front-Panel.
Var11 range is 0000 to 1111, with only 0’s and 1’s allowed.
The left-most-digit programs the Contact-Closure’s Sensor Logic.
The three-right-most-digits program the Analog Input pair’s
Sensor Type.
0Var11=
0 0 0
· Left-most-digit = ‘0’: programs the normally ‘Open-circuit’
case as the ‘non-alarm’ Green zone state, and the ContactClosure’s ‘Closed -circuit’ case as the ‘Yellow_Alarm’ state.
· Left-most-digit = ‘1’: programs the normally ‘Closed-circuit’
case as the ‘non-alarm’ Green zone state, and the ContactClosure’s ‘Open-circuit’ case as the ‘Yellow_Alarm’ state.
Factory default for Var11 is 0000, for all Analog Inputs are set
for 4-20 mA temperature sensors.
Notes for Var11:
· When a Contact-Closure sensor gives an alarm it is a ‘Yellow_
Alarm’ only (i.e., no ‘Red_Alarm’ for a Contact-Closure).
· When a Contact-Closure sensor ‘alarms’, it alarms with
the corresponding 3-digit display’s discrete Yellow-LED /
Yellow-Lightstack-Relay / Speed-Temperature-Warning-Relay
/ Horn-Relay, and the 3-digit LED display shows ‘ALr’. If
the Contact-Closure sensor were to return to the Green zone
‘non-alarm’ state, then the ‘Yellow_Alarm’ remains ‘latched’,
with the 3-digit LED display remaining at ‘ALr’. Once the
Contact-Closure sensor has returned to the Green zone ‘nonalarm’ state, then to ‘clear’ the latched ‘Yellow_Alarm’ the user
must give a ‘Silence_Horn/Alarm_RESET’ command to the
ES1. (See Operating Note section “How to Clear Alarms” for
details.)
Sensor Type:
0 = 4-20mA
1 = Contact Closure
Tail Rub Block Pair (Inputs 11 & 12)
Knee Rub Block Pair (Inputs 7 & 8)
Head Rub Block Pair (Inputs 3 & 4)
Sensor Logic:
0 = Open ckt is “SAFE”, Closed ckt = Alarm
1 = Closed ckt is “SAFE”, Open ckt = Alarm
(Var11 continued on next page).
Free Catalog and Application Assistance
3
1.800.328.6170
Website: www.electro-sensors.com
990-005500 Revision D

· When the message ‘bAd’ is shown on the Contact Closure’s
corresponding 3-digit LED display, the associated relays go
into a ‘Yellow_Alarm’ to indicate that something is NOT
normal. Most likely the user has programmed for a ContactClosure sensor, while they are still using a 4-20 mA type
temperature sensor. (‘bAd’ means verify sensor type).
Contact Closure’s
Input
Current Range
20.83mA or more
1.1mA to 20.8mA
1mA or less
Defined
State
Closed-Circuit
(Valid)
Bad Sensor
(Invalid)
Open-Circuit
(Valid)
Message on
3-digit
LED display
SAF or ALr,
as per Var11 (Valid)
bAd
(Verify sensor type)
SAF or ALr,
as per Var11 (Valid)
· Changes to the “Var11_Belt_Alignment_Sensor_Selection”
automatically clear any corresponding ‘orphaned’ alarms when
changing sensor pairs from Temperature sensors to ContactClosure sensors, and vice versa.
· A Contact-Closure input can be turned ‘OFF’ completely by
setting the input’s BIAS setpt to ‘0999’. See discussion on
Var14 through Var25 setpts below. (However note, the BIAS
feature itself is not applicable to Contact-Closure sensors).
IMPORTANT NOTE: If an analog input is programmed for
use with a Contact-Closure type sensor, then an external resistor
between 360Ω to 390Ω (1 watt minimum) must be used
‘in-line’ with the corresponding Analog Input’s Signal terminal
(TBx pin2), as shown in the figure below.
The Electro-Sentry 1 is supplied with (8) eight 360Ω, 1 watt
resistors.
The Warning and Shutdown SetPt Temperature
Variables (Var12 and Var13)
Var12. Warning_Setpt_Temperature degrees (for all
temperature sensors).
If a Temperature Sensor exceeds this SetPt, then the ES1 gives an
alarm by the corresponding temperature display’s discrete
Yellow-LED / Yellow-Lightstack-Relay /
Temperature-Warning-Relay / Horn-Relay, and the 3-digit LED
display ‘Latches’ the highest value reached.
Var12 range is 0000 to 0250 degrees.
Factory default for Var12 is 0160 degrees.
Var13. Shutdown_Setpt_Temperature degrees (for all
temperature sensors).
If a Temperature Sensor exceeds this SetPt, then the ES1 gives an
alarm by the corresponding temperature display’s discrete
Red-LED / Red-Lightstack-Relay /
Temperature-Shutdown-Relay / Horn-Relay, and the 3-digit LED
display ‘Latches’ the highest value reached.
Var13 range is 0000 to 0250 degrees.
Factory default for Var13 is 0175 degrees.
Notes: For Var12 and Var13: To ‘clear’ the latched Yellow or
Red_Alarm the user must give a ‘Silence_Horn/Alarm_RESET’
command to the ES1 once the temperature has dropped below the
associated setpt. (See Operations Notes Section “How to Clear
Alarms” for details).
TBx
1
2
3
ES1’s
4-20mA
Input
360Ω to 390Ω
1 watt minimum
Contact Closure
Type Sensor
Free Catalog and Application Assistance
1.800.328.6170
Website: www.electro-sensors.com
4
990-005500 Revision D

The BIAS Setpt Temperature Variables (Var14 through
Var25)
The below listed BIAS Setpts set the temperature difference
(or deviation) at which a left-side temperature sensor triggers a
BIAS Setpt ‘Yellow_Alarm’ if it exceeds its right-side companion
sensor by the left-side BIAS Setpt amount.
And likewise vice-versa if a right-side sensor exceeds its left-side
companion sensor by the right-side BIAS Setpt amount.
Each sensor input has its own BIAS Setpt, with range 0000 to
9999.
A BIAS Setpt = 0000 enables the Analog Input, but disables
its BIAS Alarm “Left-side sensor vs. Right-side sensor”
comparison feature.
A BIAS Setpt between 0001 and 0998 enables the Analog
Input, and enables its BIAS Alarm feature by giving it the
desired temperature deviation SetPt value.
A BIAS Setpt = 0999 disables an Analog Input completely
by turning ‘OFF’ that particular temperature sensor’s input
and its effects on the temperature alarms. The sensor’s 3digit LED display then shows ‘OFF”.
Note: Even though the BIAS setpts accept up to 0998 degrees,
typical ESI sensors only run up to 248 degrees.
The BIAS Setpts are in Var14 through Var25, and all have a
factory default of 0000, which enables all analog inputs, but
which disables their BIAS alarm feature.
The left-side/right-side BIAS ‘companion’ pairs are listed
below with their associated analog input, UserVar variable, and
nomanclature.
Input # Variable Nomanclature
1 Var14 Head Bearing Left BIAS SetPt
2 Var15 Head Bearing Right BIAS SetPt
When a BIAS Setpt’s deviation value is exceeded, it gives an
alarm by turning ON the corresponding temperature display’s
discrete Yellow-LED, plus putting the Yellow-Lightstack-Relay
/ Speed-Temperature-Warning-Relay / Horn-Relay, all into their
alarm states.
Also, once a sensor goes into a BIAS Setpt ‘Yellow_Alarm’,
its 3-digit LED display ‘Latches’ the highest value reached. To
‘clear’ the latched BIAS Setpt ‘Yellow_Alarm’ the user must give
a ‘Silence_Horn/Alarm_RESET’ command to the ES1 once the
temperature has dropped below the BIAS setpt. (See Operations
Notes Section “How to Clear Alarms” for details).
Var30. Temperature_Display_Select. (Temperature in Fº
Fahrenheit or Cº Celsius).
The Var30 range is limited to these below listed choices:
‘0000’ = display temperatures in Fº Fahrenheit.
‘0001’ = display temperatures in Cº Celsius.
Note: If you setup your ES1 to display temperatures in
Fahrenheit Fº and have your temperature setpts in Fº, and
then later change Var30 to Celsius Cº, the ES1 does NOT
automatically convert the setpts over to equivilent Cº
values, (or vice versa Cº to Fº)
Factory default for Var30 is 0000 for degrees Fahrenheit.
3 Var16 Head Rub Block Left BIAS SetPt
4 Var17 Head Rub Block Right BIAS SetPt
5 Var18 Knee Bearing Left BIAS SetPt
6 Var19 Knee Bearing Right BIAS SetPt
7 Var20 Knee Rub Block Left BIAS SetPt
8 Var21 KneeRub Block Right BIAS SetPt
9 Var22 Tail Bearing Left BIAS SetPt
10 Var23 Tail Bearing Right BIAS SetPt
11 Var24 Tail Rub Block Left BIAS SetPt
12 Var25 Tail Rub Block Right BIAS SetPt
13 Var26 Unused / Reserved
14 Var27 Unused / Reserved
15 Var28 Unused / Reserved
16 Var29 Unused / Reserved
Free Catalog and Application Assistance
1.800.328.6170
Website: www.electro-sensors.com
5
990-005500 Revision D

System Variables (Var31 through Var36)
Var33=
Var31. Hour_Meter_Warning_Time in Hours.
(Alarms as: Hour Meter display’s discrete Yellow LED only, with
no relays involved).
The Hour Meter keeps track of how long the system has been in
operation, assuming a few prerequisites are first met.
The Hour Meter increments and its discrete Green/Yellow/Red
LEDs light-up only if all three of the following cases are true:
If Var31 is non-zero.
(i.e., Var31 = 0000 disables the Hour Meter).
AND If in Normal Mode, not in Program Mode.
(i.e., Being in Program Mode disables the Hour Meter).
AND If the Hour_and_Speed_Enable command is present
at TB34. (i.e., The Hour_and_Speed_Disable command
disables the Hour Meter).
If any one of these three prerequisites are NOT met, then the
Hour Meter does NOT increment hours, NOR do the Hour
Meter’s discrete Green/Yellow/Red LEDs light-up as per the
number of hours reached.
Var31 range is 0000 to 9999 Hours.
Factory default for Var31 is 9000 Hours.
Var32. Hour_Meter_Maintenance_Time in Hours.
(Alarms as: Hour Meter display’s discrete Red LED only, with no
relays involved).
Var32 range is 0000 to 9999 Hours.
Factory default for Var32 is 9500 Hours.
Var33. Horn_Operation_Select.
Var33 selects how the user wants the Horn-Relay to sound.
Var33 range is 0000 to 1999.
The Var33 value is limited to these below listed choices.
X
X X X
The three right-most digits set the
Horn sounding ‘time’:
000 to 998 = the number of minutes to
sound the Horn.
(See Note
999 = sound the Horn indefinitely.
5
).
5
The Hour Meter value is automatically saved once every 10
minutes, because of this at most only 10 minutes of operating
time is ignored if the ES1’s Vac power is lost.
For normal Hour Meter operation once the Var31 Hour value is
exceeded, then the Hour Meter’s discrete Green LED turns ‘OFF’
and its discrete Yellow LED turns ‘ON’.
When operation exceeds the Var32 Hour value, then the Hour
Meter’s discrete Yellow LED turns ‘OFF’ and its discrete Red
LED turns ‘ON’.
The Hour_Meter feature does NOT trigger the Horn-Relay alarm,
nor the Yellow-Lightstack-Relay alarm, nor the
Red-Lightstack-Relay alarm, nor the Unit_Alarm_LEDs.
If not manually cleared after 9999 hours, the Hour Meter holds at
9999 hours with its discrete Yellow or Red LEDs ‘ON’.
There is an Hour_Meter_RESET button on the Front-Panel, and
an AUX_Hour_Meter_RESET at input TB31:1,2, that can be
used to ‘clear’ the Hour Meter. When an Hour_Meter_RESET
command is given for longer than 3 seconds it returns the meter
to 0000 and turns OFF the Hour Meter’s discrete Yellow/Red
LEDs, and turns ON the Hour Meter’s discrete Green LED.
Note: A Var31 = ‘0000’ disables the Hour Meter (i.e., keeps it
from growing), and also turns ‘OFF’ the Hour Meter’s
discrete Green/Yellow/Red LEDs. This Var31 = 0000
feature does NOT clear the Hour Meter, but rather keeps
it from growing any further when an Hour_and_Speed_
Enable command is present.
Note: If the UserVar programming LCD screen is in Program
Mode, then the Hour Meter feature is disabled and the
Hour Meter cannot increase (even if an Hour_and_Speed_
Enable command is present). Also when in Program Mode
the Hour_Meter_RESET command is disabled.
The left-most digit selects Horn ‘type’:
0 = the Horn is a solid blast.
1 = the Horn is an oscillating blast.
(1 sec ON, 3 sec OFF, etc.).
Note5: The user can always give a manual ‘Silence_Horn/
Alarm_RESET’ command at any time to turn OFF the
Horn, and keep it OFF, until the Horn sounds again for
the next alarm event.
The usable values of Var33 are 0000 to 1999. Some examples are
shown in the table below:
Var33
Value
0000 Solid Blast Indefinite
Horn
Type
Horn
Time
Notes
This has the same effect as
Var33=0999
0001 Solid Blast 1 Min. ---
0030 Solid Blast 30 Min. ---
0999
6
Solid Blast Indefinite
Solid Horn until a ‘Silence_
Horn/Alarm_RESET’ given
This is an oscillating blast
for ‘0’ minutes, consisting
1000 Oscillating 0
of only one ‘beep’ lasting
1 second ON and then a
continuous OFF
1001 Oscillating 1 Min. ---
1030 Oscillating 30 Min. ---
Oscillate Horn until a
1999 Oscillating Indefinite
‘Silence_Horn/Alarm_
RESET’ given.
6
: Factory default for Var33 is 0999 for solid blast until a
Note
‘Silence_Horn/Alarm_RESET’ command is given.
Free Catalog and Application Assistance
1.800.328.6170
Website: www.electro-sensors.com
6
990-005500 Revision D

Note: The Var33 Horn_Operation_Select can be changed at
any time, whether or not an alarm event is present. Also,
while the Horn Relay #8 is sounding, Var33 can be
changed ‘on-the-fly’ from solid blast to oscillating blast,
or from oscillating blast to solid blast, and its effects are
immediately heard (as long as the Horn ‘time’ has not
expired following an alarm event.)
Note: The Horn-Relay is also used to tell the user that a
‘Silence_Horn/Alarm_RESET’ command has existed
for 60 or more seconds. This happens independently of
how Var33 is programmed. See Troubleshooting Section
“LCD Display and 4-digit LED Display Error Messages,
Err6” for details.
Var34. Hour_and_Speed_Command_Select.
Var34 selects how the Disable/Enable commands are given to the
ES1 for operating the Hour_Meter and for Speed_Monitoring.
The Var34 range is limited to these below listed choices:
‘0000’ = Disable (i.e., Stop) the Hour_Meter and Speed_
Monitoring by a ‘maintained’ open input at TB34 (i.e.,
TB34 pin 1 disconnected from pin 2).
Enable (i.e., Run) the Hour_Meter and Speed_
Monitoring by a ‘maintained’ closed input at TB34 (i.e.,
TB34 pin 1 connected to pin 2).
‘0001’ = Disable (i.e., Stop) the Hour_Meter and Speed_
Monitoring by a ‘maintained’ closed or
a ‘one-shot’ closed input at TB32 pins 1 and 2.
Enable (i.e., Run) the Hour_Meter and Speed_
Monitoring by a ‘one-shot’ closed input at TB34 pins
1 and 2, (but if-and-only-if the ‘Disable’ input at TB32
pins 1 and 2 is open).
‘0002’ = Disable (i.e., Stop) the Hour_Meter and Speed_
Monitoring by a ‘maintained’ open or
a ‘one-shot’ open input at TB32 pins 1 and 2.
Enable (i.e., Run) the Hour_Meter and Speed_
Monitoring by a ‘one-shot’ closed input at TB34 pins
1 and 2, (but if-and-only-if the ‘Disable’ input at TB32
pins 1 and 2 is closed).
Note: When Var34 = 0001 or 0002, then the Disable command
takes precedence over the Enable command. Because of
this, the Enable (Run) command at TB34 is only effective
if the Disable (Stop) command at TB32 is not present.
Note: If not using Speed Monitoring, then see Var09 for how to
disable Speed Monitoring completely, which then leaves
the Var34 settings to apply to just the Hour_Meter.
Var35. Test_Mode_Select.
This variable selects whether to operate the ES1 in the ‘real-livedata-mode’ or in a ‘test-data-mode’.
The Var35 range is limited to these below listed choices:
Var35
Value
LED Display
Operation
Mode
Method of Relay Output Testing
0000 Live Data N.A.
0001 Test Data
In simulated alarm events
(as described below)
0002 Test Data All relays held ‘energized’
0003 Test Data All relays held ‘de-energized’
Test each of the 8 digital inputs
0004 Test Data
with each of the 8 relay outputs.
(See next table for details on
Var35 = 0004).
When Var35 is set to a ‘0001’, a ‘0002’, a ‘0003’, or a ‘0004’,
then the LCD and LED displays cycle through and display all
‘0000’, all ‘1111’, all ‘2222’, etc, all the way up to all ‘9999’,
then wrap back around to all ‘0000’, repeating the cycle
indefinitely.
Also when Var35 is set to ‘non-zero’ the following happens:
When the LCD/LED displays all show ‘0000’, then the small
discrete LED warning lights are all OFF, and all four of the
LCD’s decimal points are ON as ‘0.0.0.0.’.
- And with Var35 = ‘0001’ the 8 output Relays are all
de-energized.
When the LCD/LED displays all show ‘1111’, ‘2222’, or
‘3333’, then the small discrete LED warning lights are all
Green.
- And with Var35 = ‘0001’ the 8 output Relays simulate a
‘Green zone’ event (i.e., all is okay – no alarms present).
When the LCD/LED displays all show ‘4444’, ‘5555’, or
‘6666’, then the small discrete LED warning lights are all
Yellow.
- And with Var35 = ‘0001’ the 8 output Relays simulate a
‘Yellow_Alarm’ event (i.e., a warning event).
When the LCD/LED displays all show ‘7777’, ‘8888’, or
‘9999’, then the small discrete LED warning lights are all
Red.
- And with Var35 = ‘0001’ the 8 output Relays simulate a
‘Red_Alarm’ event (i.e., a shutdown event).
(Var35 continued on next page).
Factory default for Var34 is 0000 for a ‘maintained’ closed
input is needed at TB34 for an Enable command.
Note: See the “Troubleshooting Section” for related discussion
of ‘Concerning the Var34 Disable/Enable Commands’ vs.
the Speed Display’s discrete LED’s and speed alarms.
Free Catalog and Application Assistance
1.800.328.6170
Website: www.electro-sensors.com
7
990-005500 Revision D

When Var35 is set to a ‘0004’, then the ‘test-data-mode’
correspondence between the 8 digital switch/button inputs and
the 8 Relay outputs is shown in the table below.
(Momentarily closing the following Remote Switch Digital
Inputs or pressing the associated Front Panel button will
momentarily de-energize the following relay, otherwise the relay
is energized):
Input Nomanclature Relay
TB32 Hour_and_Speed_Disable command 8
TB33 Silence_Horn/Alarm_Reset 7
TB34 Hour_and_Speed_Enable command 6
TB31:
1-2
TB31:
3-4
TB31:
5-6
TB31:
7-8
TB31:
9-10
Aux_Hour_Meter_Reset or
HOUR_METER_RESET button on Front
Panel
Aux_Test_Left_Side or
TEST_LEFT_SIDE button on Front Panel
Aux_Test_Right_Side or
TEST_RIGHT_SIDE button on Front Panel
Aux_Test_Speed or
TEST_SPEED button on Front Panel
Aux_Silence_Horn/Alarm_Reset 1
5
4
3
2
CAUTION: Doing this Var35 test may cause actual system
alarms.
Factory default for Var35 is 0000 for operate in ‘real-livedata-mode’.
Var36. Software Identification. (Read Only)
This variable shows which version of software is loaded into
the Electro-Sentry 1. Var36’s value is viewable only, with NO
changes allowed.
Note: The Software Identification is also shown for 2
seconds on the LCD display during power-up.
Free Catalog and Application Assistance
1.800.328.6170
Website: www.electro-sensors.com
8
990-005500 Revision D

Electro-Sentry 1 Operation Notes Section:
Alarms
1) The Unit_Alarm_LEDs blink when there is an alarm on the
unit, so operator can identify which unit has the alarm.
2) Speed alarms are active only when the Hour_and_Speed_
Enable command is present at TB34 AND if Var09 has
Speed Monitoring Enabled.
3) Temperature and Contact Closure alarms are always active,
independent of the Hour_and_Speed_Disable/Enable
commands.
Latching and holding of Alarms
4) Concerning the Temperature displays and ‘setpt violation
latching’:
During any Temperature ‘Yellow_Alarm’ or ‘Red_Alarm’
(i.e., a BIAS Setpt Alarm, a Warning Alarm, or a Shutdown
Alarm), the corresponding 3-digit LED temperature display
is only allowed to increase in value as the violation escalates.
This means that if the temperature input cools down on
its own accord, the maximum temperature reached will be
‘latched’ on the display, the discrete Yellow/Red LEDs will
‘latch’, and the associated relays will ‘latch’. To return the
3-digit LED temperature display to show ‘live’ temperatures,
the user must manually acknowledge the alarm by giving a
‘Silence_Horn/Alarm_RESET’ command.
5) Concerning the Contact-Closure displays and ‘alarm
latching’:
When a Contact-Closure sensor ‘alarms’, it alarms with
the corresponding 3-digit display’s discrete Yellow-LED /
Yellow-Lightstack-Relay / Speed-Temperature-Warning-
Relay / Horn-Relay, and the 3-digit LED display shows ‘ALr’
(for “Alarm”). If the Contact-Closure sensor were to return
to the Green zone ‘non-alarm’ state, then the ‘Yellow_Alarm’
remains ‘latched’, with the 3-digit LED display remaining
at ‘ALr’. Once the Contact-Closure sensor has returned to
the Green zone ‘non-alarm’ state, then to ‘clear’ the latched
‘Yellow_Alarm’ the user must give a ‘Silence_Horn/Alarm_
RESET’ command to the ES1. After that, the 3-digit LED
display then shows “SAF” (for “Safe”).
6) Concerning the Speed display and ‘setpt violation
latching’:
The ES1’s ‘setpt violation latching’ feature is slightly
different for the 4-digit Speed display than it is for the
Temperature displays. For the 4-digit Speed display during
a ‘Yellow_Alarm’ or ‘Red_Alarm’, the Speed’s discrete
Yellow/Red LEDs and Speed Alarm relays do ‘Latch’ once
the speed drops below one of the Speed Setpts, but the
actual 4-digit Speed display itself does NOT ‘Latch’. This
is because for safety reasons, we want to show ‘live’ speeds
at all times, whether or not the speed sensor has previously
dropped below one of the Speed Setpts and then since
recovered on its own.
How to ‘clear’ Alarms
7) There are four ways to give a manual ‘Silence_Horn/Alarm_
RESET’ command to the ES1.
By ‘closing’ the regular ‘Silence_Horn/Alarm_RESET’
input at TB33 pins 1 and 2.
By ‘closing’ the AUXILARY ‘Silence_Horn/Alarm_
RESET’ input at TB31 pins 9 and 10.
By simultaneously pressing the Front-Panel’s TEST_
LEFT_SIDE and TEST_RIGHT_SIDE Temperature
Rise test buttons.
By simultaneously ‘closing’ the AUX_TEST_LEFT_
SIDE and AUX_TEST_RIGHT_SIDE inputs at TB31
pins 3-4 and 5-6.
A ‘Silence_Horn/Alarm_RESET’ command is used to first
turn OFF the Horn-Relay unconditionally, and further used
to ‘clear’ a Speed, Temperature, or Contact Closure alarm
(provided the alarm event has dissipated).
Note: There are a few instances where an active existing
Speed, Temperature, or Contact Closure Alarm, is
‘automatically cleared’ without the user having to give a
manual ‘Silence_Horn/Alarm_RESET’ command to the
ES1, and these are the following cases:
A Speed Alarm is automatically ‘cleared’ when the
‘Hour_and_Speed_Enable’ command is removed,
or when the Var09 Speed Monitoring selection is
changed from ‘Enabled’ to ‘Disabled’, or when the
Var01 Encoder Type Select is changed.
A Temperature or Contact Closure Alarm is
automatically ‘cleared’ when a sensor with an active
alarm (either a Temperature Setpt ‘Red_Alarm’ or
‘Yellow_Alarm’, or a BIAS Setpt ‘Yellow_Alarm’,
or a Contact Closure Alarm) has its BIAS Setpt
changed to ‘999’ to turn ‘OFF’ that sensor.
A Temperature or Contact Closure Alarm is
automatically cleared if the sensor type is changed.
A Contact Closure Alarm can be automatically
cleared when Var11’s Logic Selection is changed.
If one of the TEST_Features have been used (i.e.,
the TEST_LEFT_SIDE or the TEST_RIGHT_SIDE
Temperature Rise tests, or the TEST_SPEED
features), and if a ‘Red_Alarm’ or ‘Yellow_Alarm’
was generated by one of those tests, then that alarm
will automatically ‘clear-out’ 60 seconds after the
last TEST_Feature was used.
Also, if a ‘real’ alarm event has dissipated
during those 60 seconds following a
TEST_Feature operation, then it too will be
automatically ‘cleared’ 60 seconds after the last
TEST_Feature was used.
Free Catalog and Application Assistance
1.800.328.6170
Website: www.electro-sensors.com
9
990-005500 Revision D

Using multiple Electro-Sentry 1’s in the same
application
7) Multiple Electro-Sentry 1’s can be connected together to the
same external Green/Yellow/Red Lightstack status indicator
to monitor a larger overall system, as follows:
Connect all of the individual ES1’s Green-Lightstack-
Relays in series with each other and with the external
Lightstack.
Connect all of the individual ES1’s Yellow-Lightstack-
Relays in parallel with each other and with the external
Lightstack.
Connect all of the individual ES1’s Red-Lightstack-
Relays in parallel with each other and with the external
Lightstack.
With multiple Electro-Sentry 1’s connected together as
described, the following alarm behavior is seen:
The external Green Lightstack is lit if-and-only-if all
ES1’s have no alarms present.
The external Green Lightstack is unlit if any ES1 has
any alarm present.
The external Yellow Lightstack is lit if any ES1 has a
‘Yellow_Alarm’ present.
The external Yellow Lightstack is unlit if-and-only-if all
ES1’s have no ‘Yellow_Alarms’ present.
The external Red Lightstack is lit if any ES1 has a ‘Red_
Alarm’ present.
The external Red Lightstack is unlit if-and-only-if all
ES1’s have no ‘Red_Alarms’ present.
Built-in Test Features Section:
Temperature Rise and Speed Drop Alarm Test Features
1) Press and hold the ‘TEST_LEFT_SIDE’ button on the
Front-Panel to artificially increase the temperature readings
in the left side column of temperature displays. Keep the
button pressed-in to increase the temperatures to levels
above the Var12_Warning_Setpt_Temperature, the Var13_
Shutdown_Setpt_Temperature, and/or the individual BIAS_
Temperature_Setpts. (This test can also be accessed by TB31
pins 3-4). This test can be used to test the effectiveness of
how the temperature alarm output relays will work with the
overall application. Give a manual ‘Silence_Horn/Alarm_
RESET’ command to the ES1 to ‘clear’ any alarms generated
by this test. (See Operations Notes Section “How to Clear
Alarms” for details).
CAUTION: This test will cause actual system alarms.
2) Press and hold the ‘TEST_RIGHT_SIDE’ button on the
Front-Panel to artificially increase the temperature readings
in the right side column of temperature displays. Keep
the button pressed-in to increase the temperatures to levels
above the Var12_Warning_Setpt_Temperature, the Var13_
Shutdown_Setpt_Temperature, and/or the individual BIAS_
Temperature_Setpts. (This test can also be accessed by TB31
pins 5-6). This test can be used to test the effectiveness of
how the temperature alarm output relays will work with the
overall application. Give a manual ‘Silence_Horn/Alarm_
RESET’ command to the ES1 to ‘clear’ any alarms generated
by this test. (See Operations Notes Section “How to Clear
Alarms” for details).
CAUTION: This test will cause actual system alarms.
Note: Concerning the TEST_LEFT_SIDE and TEST_
RIGHT_SIDE temperature tests, only one of these
tests can be performed at a time. If both of these
temperature tests are attempted at the same time, then
the test feature is disabled, and the dual activation
is actually an “Alarm_RESET” command. (See the
Operation Notes “How to Clear Alarms” for details).
3) Press and hold the ‘TEST_SPEED’ button on the Front-Panel
to artificially decrease the Speed Display value. Keep the
button pressed-in to decrease the speed to levels below the
Var04_Slowdown_Setpt and the Var06_Shutdown_Setpt.
(This test can also be accessed by TB31 pins 7-8). This test
can be used to test the effectiveness of how the speed alarm
output relays will work with the overall application. Give a
manual ‘Silence_Horn/Alarm_RESET’ command to ‘clear’
any alarms generated by this test. (See Operations Notes
Section “How to Clear Alarms” for details).
Note: For the ‘TEST_SPEED’ button feature to work, the
following requirements must first be met:
• Var09 must be set for Speed Monitoring Enabled.
• An Hour_and_Speed_Enable command must be
present at TB34.
CAUTION: This test will cause actual system alarms.
Free Catalog and Application Assistance
1.800.328.6170
Website: www.electro-sensors.com
10
990-005500 Revision D

Troubleshooting Section:
Standard Temperature vs. 4-20mA Temperature
Sensors
As a quick troubleshooting guide for any of the 4-20 mA
Temperature Sensors, the following voltages can be seen at the
4-20 mA Input terminals TB1 thru TB12 (voltages as measured
between pin 2 Signal and pin 3 Analog Ground), corresponding
to the following standard temperatures:
Fº Cº mA TBx Vdc
248 120 20.000 9.60
212 100 18.000 8.64
175 79.44 15.944 7.64
160 71.11 15.111 7.25
100 37.78 11.778 5.65
80 26.67 10.667 5.11
70 21.11 10.111 4.85
60 15.56 9.555 4.58
32 0 8.000 3.85
0 -17.78 6.222 2.99
-40 -40 4.000 1.92
‘Out-of-Range’ Sensor Detection
1) A 4-20 mA out-of-normal-range Temperature Sensor
Detection feature works as shown in the table below:
Temperature
Sensor’s Input
Current Range
3.9mA to
20.1mA
20.83mA
or higher
20.1mA to
20.83mA
1.0mA to
3.9mA
1.0mA or
lower
Note7: Because the ‘out-of-range’ Temperature Sensor LO and
OPn cases have 4-20mA signals less than 3.9mA, they are
not Var12 and Var13 over-temperature setpoint violations,
(but rather would be under-temperature cases). Because
the ES1 monitors for over-temperature behavior and not
under-temperature behavior, these cases are not outright
temperature violations. However, the Temperature Sensor
LO and OPn cases are treated as ‘Yellow_Alarm’ events
because the effected sensor could be programmed for the
BIAS setpt feature. And if a sensor goes ‘out-of-range’,
then the user needs to know this.
Message shown
on 3-digit
LED Display
N.A. (Live
Temperature)
CLS
(Closed Circuit)
HI
(High_mA)
LO
(Low_mA)
OPn
(Open Circuit)
Type of Alarm
N.A.
(Green zone.)
Red_Alarm
Red_Alarm
Yellow_Alarm
Yellow_Alarm
7
7
A) If a Temperature sensor fails as ‘LOW_mA’ or ‘Open_ckt’,
then its 3-digit display shows the “LO” or “OPn” message
respectively, and it alarms with its discrete Yellow-LED /
Yellow-Lightstack-Relay / Speed-Temperature-WarningRelay /Horn-Relay.
Also in this situation the opposite side companion sensor
does NOT go into a BIAS Setpt ‘Yellow_Alarm’ as a
BIAS response, for code is in place to see that the first
sensor failed. Because of this the second sensor does
NOT compare to a ‘out-of-range’ sensor.
B) If a Temperature sensor fails as ‘HI_mA’ or ‘Closed_ckt’,
then its 3-digit display shows the “HI” or “CLS” message
respectively, and it alarms with its discrete Red-LED / RedLightstack-Relay / Speed-Temperature-Shutdown-Relay /
Horn-Relay.
Note: Since the ‘HI’ and ‘CLS’ cases have 4-20 mA signals
exceeding 20.1 mA, these cases must be treated as
over-temperature “Red_Alarms’.
C) Concerning the Temperature displays and ‘out-of-range’
sensor latching:
During any ‘out-of-range’ Temperature Sensor ‘Yellow_
Alarm’ or ‘Red_Alarm’ (the OPn, LO, HI, or CLS cases),
the corresponding 3-digit LED temperature display ‘latches’
the most recent message, and will not automatically
return to showing ‘live’ temperature values (even if the
sensor ‘recovers’). This means that once an ‘out-of-range’
Temperature Sensor has been detected, the corresponding 3digit LED display will show the most recent message. This
allows the ES1 to show if a Temperature Sensor’s condition
goes from bad to worse, such as a LO case turning into an
OPn case, or a HI case turning into a CLS case, and vice
versa. To return the 3-digit LED temperature display to show
‘live’ temperatures, the user must manually acknowledge the
alarm by giving a ‘Silence_Horn/Alarm_RESET’ command.
2) If an analog input is programmed as a ‘Contact-Closure’
input by Var11, then the 3-digit messages shown are SAF,
ALr, or bAd.
For ‘Contact-Closure’ sensors the SAF and ALr are normal
valid messages, and the bAd message is used for invalid
sensor indication. See Var11 Belt_Alignment_Sensor_Type_
Select section for details.
(Section continued on next page).
11
Free Catalog and Application Assistance
1.800.328.6170
Website: www.electro-sensors.com
990-005500 Revision D

3) A 4-20mA out-of-normal-range Analog Speed Encoder
Detection feature works as shown in the table below (this is
when Var01 Encoder_Type_Select is set to 0000):
Speed Sensor’s
Input Current
Range
3.9mA to
20.7mA
20.83mA
or higher
20.7mA to
20.83mA
1.0mA to
3.9mA
1.0mA or lower
Message shown
on 4-digit
LED Display
N.A.
(Live Speed)
CLS
(Closed Circuit)
HI
(High_mA)
LO
(Low_mA)
OPn
(Open Circuit)
Type of Alarm
9
N.A.
(Green zone.)
Yellow_Alarm
8,9
N.A.
(Green zone.)
Red_Alarm
Red_Alarm
8
been detected, but the actual Speed display itself does NOT
‘Latch’. This is because for safety reasons, we want to show
‘live’ speeds at all times whenever the speed sensor is within
the normal 4-20 mA range, whether or not the speed sensor
has previously strayed above or below the normal 4-20 mA
range, and then since recovered on its own.
LCD Display and 4-digit LED Speed Display Error
Messages
1) There are hardware error, calibration error, operational error,
and other messages, displayed on the LCD and the 4-digit
LED speed display.
These messages are listed in the following five tables
below, and are listed from highest rank to lowest rank.
(Higher ranking messages can have lower ranking messages
‘silently’ stacked-up behind them, so clearing a higher
ranking message may reveal the next highest ranking error
message behind it - if the prerequisite conditions are met).
Note8: Because the ‘out-of-range’Analog Speed Encoder HI
and CLS cases have 4-20mA signals exceeding 20.7mA,
these cases are not Var04 and Var06 under-speed setpoint
violations (but rather are over-speed cases). Since the ES1
monitors for under-speed and not over-speed, the HI and
CLS cases are not outright speed violations.
However, if an Analog Speed Encoder has its 4-20mA
signal in the CLS range, then most likely the encoder
has been physically damaged. To alert the user to this
possibility the CLS range creates a ‘Yellow_Alarm’ if the
CLS condition exists for more then the Var05 time delay.
On the other hand, the LO and OPn cases have signals less
than 3.9mA. That means they are under-speed setpoint
violations, and create a ‘Red-Alarm’ if the LO or OPn
conditions exist for more than the Var07 time delay.
9
: For Analog Speed Encoders, the acceptable signal range
Note
extends up to 20.7mA to allow for display of slight
overspeeds such as 103%, 104%, etc. before ‘HI’ kicks-in.
(This is in contrast to temperature sensor signals having a
maximum acceptable signal of 20.1mA).
A) Concerning the Speed display and ‘out-of-range’ sensor
latching:
The ES1’s ‘out-of-range’ sensor latching feature is slightly
different for the 4-digit Speed display than it is for the
Temperature displays. For the 4-digit Speed display, IF the
Speed Encoder is of the 4-20 mA Analog Encoder type,
AND if it is detected as an ‘out-of-range’ sensor, THEN the
Speed Display will show the appropriate OPn, LO, HI, or
CLS out-of-range sensor message.
However, if the analog Speed Encoder ‘recovers’ on its own
to normal 4-20 mA ranges, then the Speed Display will NOT
‘Latch’ that alpha message, but rather will automatically
return to showing ‘live’ speed in % or in RPM. However,
the Speed’s discrete Yellow and Red LEDs and Speed
Alarm relays do ‘Latch’ once an out-of-range sensor has
12
The hardware error messages are (these are the highest
ranking):
LCD
Display
Message
LED
Speed
Display
Definition
Message
Err6 Err6 ‘Silence_Horn/Alarm_RESET’
command existing for a
continuous 60 seconds or more
Note: If the ‘Silence_Horn/Alarm_RESET’ command
exists for a continuous 60 seconds or more, then it is
assumed that one of the following has occured:
the ‘Silence_Horn/Alarm_RESET’ input at TB33
is ‘shorted-out’,
or the ‘AUX_Silence_Horn/Alarm_RESET’ at
TB31 Pins 9 and 10 are both ‘shorted-out’,
or the Front-Panel’s TEST_LEFT_SIDE and
TEST_RIGHT_SIDE Temperature Rise test
buttons are somehow both ‘shorted-out’.
or the AUX_TEST_LEFT_SIDE and AUX_
TEST_RIGHT_SIDE inputs at TB31 pins 3-4 and
5-6 are both ‘shorted-out’.
If any one of these four events occurs, then a
‘Yellow_Alarm’ or ‘Red_Alarm’’ could happen, but
the ES1 would not be able to latch those alarms and
they would automatically ‘clear’ once their offending
alarm event dissipated. This results in the user never
knowing an ‘Alarm’ came and went, unacknowledged.
This defeats one of the main reasons for using an ES1
in the first place (i.e., latch and hold alarms).
To warn the user of such a ‘short-out’, the HornRelay goes into a 0.25 second ON, 0.25 second OFF,
repeating cycle, the LCD shows ‘Err6’ and the 4-digit
LED Speed Display shows ‘Err6’.
Free Catalog and Application Assistance
1.800.328.6170
Website: www.electro-sensors.com
990-005500 Revision D

The speed calibration error messages are (with their ranking
in this order):
LCD
Display
Message
LED
Speed
Display
Definition
Message
Err2 Err2 Var02_PPR * Var03_PULSE_
MAX_RPM combo is less than
0.5Hz
(when Var01 = 0001 for
Pulse-Train Encoder Type).
Err2 Err2 Var03_RPM_at_20mA = 0000
(when Var01 = 0000 4-20mA
Encoder Type).
Err1 Err1 Var02_PPR * Var03_PULSE_
MAX_RPM combo exceeds
9999Hz
(when Var01 = 0001 for
Pulse-Train Encoder Type only).
Err5 Err5 A Speed Relay_Setpt exceeds
9999Hz
(when Var01 = 0001 for
Pulse-Train Encoder Type).
Err5 Err5 Either a a speed relay setpt is
grossly large, or Var10_MAX_
ANALOG_RPM is grossly larger
than Var03_RPM_at_20mA,
either way causes the Speed
Relay_Setpts to exceed an
equivalent 9999Hz
(when Var01 = 0000 for 4-20mA
Encoder Type).
The speed operational error messages are (with their ranking
in this order):
LCD
Display
Message
LED
Speed
Display
Definition
Message
Err3 Err3 Speed signal is above 9999Hz
(when Var01 = 0001 for
Pulse-Train Encoder Type only).
Err4 Err4 Speed signal is greater than the
maximum allowed for the present
Var02_PPR value and Var03_
PULSE_MAX_RPM value
(when Var01 = 0001 for
Pulse-Train Encoder Type only).
Also, when the speed signal is from an Analog Encoder,
these following 4-20 mA sensor ‘out-of-range’ operational
error messages can be seen on the 4-digit LED speed display.
(Because only one of these four 4-20 mA sensor operational
error messages can happen at a given time, they each have
equal ranking against each other in the ‘out-of-range’ group
of messages):
LCD
Display
Message
LED
Speed
Display
Definition
Message
Live
Speed
Live
Speed
CLS Analog Speed Encoder is
20.83mA or more.
HI Analog Speed Encoder is
between 20.7mA and 20.83mA.
Stop LO Analog Speed Encoder is
between 1.0mA and 3.9mA.
Stop OPn Analog Speed Encoder is 1.0mA
or less.
Other LCD/LED speed display messages are (these are
lowest ranking):
LCD
Display
Message
LED
Speed
Display
Definition
Message
Flashing
9999
FFFF Speed signal exceeds the 4-digit
capability of the displays.
Stop 0000 Speed signal is 0 Hz, 0 RPM, 0%,
or 4mA.
To summarize, the hardware error message of “Err6” is
highest priority of all messages.
The speed calibration errors of ‘Err2’, ‘Err1’, ‘Err5’ are next
highest priority, followed by the speed operational errors of
‘Err3’ and ‘Err4’.
Next in priority are all of the 4-20 mA sensor out-of-range
operational errors of CLS, HI, LO, and OPn.
Finally, at the bottom of the priority list is ‘FFFF’ and
‘0000’. The ‘HI’ and ‘CLS’ analog 4-20 mA input sensor
operational errors, take precedence over the ‘FFFF’ 4-digit
LED overflow output error. This because you can’t have valid
output results unless of course you first have proper input
data. Because of this the ‘HI’ and ‘CLS’ analog input errors
outrank the ‘FFFF’ display output error.
The ‘LO’ and ‘OPn’ analog 4-20 mA input sensor
operational errors, take precedence over the ‘0000’ 4-digit
zero speed value. Again, this since you can’t have valid
output results unless of course you first have proper input
data. Because of this the ‘LO’ and ‘OPn’ analog input errors
outrank the ‘0000’ display zero speed value.
Note: These ‘out-of-range’ error messages involved with the
4-20 mA speed sensor, can also be seen in the 3-digit
13
Free Catalog and Application Assistance
1.800.328.6170
Website: www.electro-sensors.com
990-005500 Revision D

temperature displays. See Troubleshooting Section,
“Out-of-range Sensor Detection” for details.
2) Electro-Sentry 1’s 4-digit LED speed display can show in
‘%’ or in ‘RPM’, as per the Var09 selection (as already
discussed). However to aid in troubleshooting , the small
LCD display (mainly used for UserVar programming)
can toggle between % and RPM just by pressing the
INCREMENT button when in Normal Mode. This LCD
feature is independent of Var09.
When displaying ‘%’ values the LCD shows the ‘OUT%’
icon in the upper-right-corner.
When displaying ‘RPM’ values the LCD does not show the
‘OUT%’ icon in the upper-right-corner.
Concerning the Var34 Disable/Enable Commands:
If an Hour_and_Speed_Enable command is NOT present
at TB34, then none of the Speed display’s discrete Green/
Yellow/Red LEDs are enabled, nor are the speed alarms
enabled. However even without an Hour_and_Speed_Enable
command present, the Speed display continues to show
speed in % or RPM - this is so speed can be displayed on a
ramp-down to ‘STOP’ after an Hour_and_Speed_Disable
command has been given.
If an Hour_and_Speed_Enable command is present at TB34
AND if Var09 has Speed Monitoring Enabled, then the
Speed display’s discrete Green/Yellow/Red LEDs and speed
alarms are all enabled and will activate as needed.
Note: Var09 can be used to disable Speed Alarm
Monitoring, thereby allowing the Hour_and_Speed_
Enable command to be used for starting/stopping just
the Hour_Meter in those applications that do not use
Speed Alarm Monitoring. See Var09 for details.
Note: If an Hour_and_Speed_Enable command is already
present when changing Var09 ‘on-the-fly’, then the
effects of enabling Speed Alarm Monitoring are not
seen until after the Var08 Underspeed Start Delay
time plus the time of Var05 delay or Var07 delay has
passed, after the instant Var09 has been changed to
Enable Speed Alarm Monitoring.
Temperature sensors and their discrete LEDs, displays, and
alarms are always active, independent of the Var34 based
Hour_and_Speed_Disable/Enable commands.
14
Free Catalog and Application Assistance
1.800.328.6170
Website: www.electro-sensors.com
990-005500 Revision D

The Green Indicator LEDs, the Replaceable Fuse F12,
and the Resettable Fuses F1 through F11:
1) The Electro-Sentry 1 has two Green indicator LEDs
for the on-board power circuits.
The Green indicator LED D34 is for the digital power
circuit.
The Green indicator LED D28 is for the analog power
circuit.
If one or both of the Green LEDs D34 and D28 are
‘OFF’, then perform the following troubleshooting
steps:
a) Is the SW1 Vac Selection Switch set FIRMLY
to the proper 115Vac or 230Vac position (and
NOT inadvertently sitting part-way between the
selections)?
b) Is there proper Vac power applied to the ES1 unit at
terminal block TB29?
c) Is the main replaceable Fuse F12 still GOOD?
Note: F12 is a replaceable fuse (it is not the
resettable type).
d) If one or both of the Green LEDs D34 and D28 are
still ‘OFF’ after successfully performing the first
three steps, then the Electro-Sentry 1’s main power
circuitry has been damaged.
2) The Electro-Sentry 1 uses on-board resettable fuses in the
output circuits of the digital power supply (Fuse F11), and
the analog power supply (Fuse F10).
If a higher than normal current occurs in the ES1’s
digital circuit section, then Fuse F11 heats-up and
effectively removes the +24Vout_D voltage and the
Green indicator LED D32 turns ‘OFF’.
If a higher than normal current occurs in the ES1’s
analog circuit section, then Fuse F10 heats-up and
effectively removes the +24Vout_A voltage and the
Green indicator LED D30 turns ‘OFF’.
If either the Green LEDs D32 or D30 are ‘OFF’, then
perform the following troubleshooting steps:
a) First, verify that the Green LEDs D34 and D28 are
both ‘ON’. If not, then see section (1) above.
b) Next, remove the Vac power from the ES1 unit for
about 2 minutes (to allow Fuse F11, or Fuse F10, to
cool-down).
c) Then, re-apply the Vac power to the ES1 unit.
d) If the Green LED D32 or D30 is still ‘OFF’, then
the on-board digital power supply or the analog
power supply (whatever the case may be), has been
damaged.
3) The Electro-Sentry 1 uses on-board resettable fuses in the
power supply paths going to the 4-20 mA Temperature/
Contact Closure sensors, the 4-20 mA Analog Speed
encoder, and the Frequency Pulse Train Speed encoder.
resettable fuses are in series with pins #1 of TB1 thru TB14.
There is one on-board resettable fuse for each pair of Inputs,
as follows:
Input Fuse Input Terminal
Blocks
Analog Input
Pairs
F1 TB1 & TB2 #1 & #2
F2 TB3 & TB4 #3 & #4
F3 TB5 & TB6 #5 & #6
F4 TB7 & TB8 #7 & #8
F5 TB9 & TB10 #9 & #10
F6 TB11 & TB12 #11 & #12
F7 TB13 & TB14 #13 & #14
(Unused)
For the 4-20 mA Analog Speed encoder the resettable fuse
is in series with pins #1 of TB15 and TB16, as follows:
Input Fuse Input Terminal
Blocks
Analog Input
Pairs
F8 TB15 & TB16 #15 & #16
(#15 is unused)
For the Frequency Pulse Train Speed encoder the resettable
Fuse F9 is in series with pin #1 of TB30.
If a higher than normal current occurs in any of the
Temperature or Contact Closure sensors, the Analog Speed
encoder, or the Frequency Pulse Train Speed encoder, then
the corresponding resettable fuse heats-up and effectively
removes the +24 Vdc output power from the sensor’s TBx
terminal block pin #1. If it appears any one of these sensors
have no +24 Vdc power at their TBx terminal block, then
perform the following troubleshooting steps to try to restore
the +24 Vdc power:
a) First, verify that all four Green indicator LEDs D28,
D30, D32, and D34 are ‘ON’. If not, see sections (1)
and (2) above.
b) Next, remove the corresponding TBx terminal block
for about 2 minutes and let the effected resettable fuse
cool-down. (This means for the 4-20 mA Temperature
sensors you must unplug BOTH of the TBx terminal
blocks of an Input pair to remove all electrical current
flowing through the effected resettable fuse in order for
it to cool-down).
c) Finally, plug-in the corresponding TBx terminal block,
and see if the resettable fuse holds or then trips again.
If the fuse trips again, then check for a BAD sensor or
BAD wiring going out to that sensor.
For the Temperature or Contact Closure sensors the
15
Free Catalog and Application Assistance
1.800.328.6170
Website: www.electro-sensors.com
990-005500 Revision D

Specifications Table
Power Parameters
Voltage 115 Vac or 230 Vac
Frequency 50 - 60 Hz
Electrical Connection 3-Pos Pluggable Terminal Block
Fuse (F12) 115 Vac 0.4 Amp Slo-Blo
Fuse (F12) 230 Vac 0.2 Amp Slo-Blo
Input Signal Parameters
12 - Analog Temperature (4-20mA) or
TB1 through TB12
Temperature Sensor
Calibration
TB16 Analog Speed (4-20mA)
Sensor Type
TB13, 14, 15 Unused
TB30
Frequency Range 0.1 Hz to 9999 Hz Pulse Train Signal
up to 6 - Contact Closure/6 - Analog
(See Var11)
4mA @ -40ºC (-40ºF)
20mA @ +120ºC (+248ºF)
2 - Wire 4-20mA (ESI Model ST420)
3 - Wire 4-20mA (ESI Model FB420)
Digital Pulse Train Speed
(NPN, PNP, 5V Logic Level)
See Section about Var01 and SW9
Setpoint Accuracy Parameters
Temperature setpts ±1º Fahrenheit
Speed setpts
w/analog encoder
Speed setpts
w/pulse-train encoder
±0.5% of full scale error.
±0.1% of full scale error.
Specications are subject to change without
notice.
Set Point Data Parameters
Speed Two (Warning and Shutdown)
Temperature Two (Warning and Shutdown)
Temperature Bias Twelve (Warning Only)
Hour Meter Two (Warning and Maintenance)
Relay Output Data Parameters
Relays 1, 2, 3, 4 5 Amp Dual Form C SPDT
Relays 5, 6, 7, 8 5 Amp Single Form A SPST
Relay Contact Rating 5 Amp @ 30 Vdc, or 250 Vac resistive
Physical/Environment Parameters
Enclosure Material Polycarbonate
Recommended
Minimum Installation
Area
Operating Temperature -30ºC to +70ºC (-22ºF to +158ºF)
Storage Temperature -40ºC to +80ºC (-40ºF to +176ºF)
Shipping Weight 12 pounds
15.4” x 14.7”
16
Free Catalog and Application Assistance
1.800.328.6170
Website: www.electro-sensors.com
990-005500 Revision D

ELECTRO-SENTRY 1
FRONT PANEL
INPUT 1
Front Panel Drawing
INPUT 2
BEARING
HEAD
RUB BLOCK
HEAD
BEARING
KNEE
RUB BLOCK
KNEE
BEARING
TAIL
RUB BLOCK
TAIL
RED
YELLOW
GREEN
RED
YELLOW
GREEN
RED
YELLOW
GREEN
RED
YELLOW
GREEN
RED
YELLOW
GREEN
RED
YELLOW
GREEN
INPUT 3
INPUT 4
INPUT 5 INPUT 6
INPUT 7
INPUT 9
INPUT 8
INPUT 10
INPUT 11 INPUT 12
The “discrete” LEDs
RED
BEARING
YELLOW
GREEN
RED
YELLOW
GREEN
RED
YELLOW
GREEN
RED
YELLOW
GREEN
RED
YELLOW
GREEN
RED
YELLOW
GREEN
HEAD
RUB BLOCK
HEAD
BEARING
KNEE
RUB BLOCK
KNEE
BEARING
TAIL
RUB BLOCK
TAIL
Speed Display Messages:
Err1 = Var02 or Var03 is too big.
Err2 = Var02 or Var03 is too small.
Err3 = Speed Signal > 9999 Hz.
Err4 = Speed Signal > Max allowed.
Err5 = Speed Relay SetPt is too big.
FFFF or Flashing 9999 = Overflow
HOURS
RED
YELLOW
GREEN
INCR
DECPT
SHIFT-LEFT
ENTER
HOUR METER SPEED: PULSE / INPUT 16
HOUR METER
RESET
UNIT ALARM
TEST
LEFT SIDE
REDRED
TEST
RIGHT SIDE
TEST
SPEED
Messages:
For 4-20mA Sensors:
OPn = Open Circuit
LO = 1.0 To 3.9 mA
HI = 20.1 To 20.8 mA
CLS = Closed or Shorted Circuit
For Contact Closure Sensors:
bAd = Check Sensor Type
ALr = Alarm State
SAF = Safe Non-Alarm State
Other:
Err6 = Continuous Alarm RESET command
Free Catalog and Application Assistance
Website: www.electro-sensors.com
17
RED
YELLOW
SPEED
GREEN
1.800.328.6170
990-005500 Revision D

Terminal Block Connections
Analog Inputs (4-20mA)
Analog Inputs 1 - 16
(TB13, 14, 15
Unused)
Relay Outputs (Dual Form C SPDT)
Relay #1
Speed Only
Warning
Relay #2
Speed Only
Shutdown
Relay #3
Speed/Temp
Warning
Relay #4
Speed/Temp
Shutdown
Relay Outputs (Single Form A SPST)
Relay #5
Green Light (Stack)
Relay #6
Yellow Light (Stack)
Relay #7
Red Light (Stack)
Relay #8
Horn
TB1
Through
TB16
TB17
TB18
TB19
TB20
TB21
TB22
TB23
TB24
TB25
TB26
TB27
TB28
+24 Vout Analog
(Resettable fused at
1
50mA per pair max,
at 70ºC/158ºF)
See* note below
2 4-20mA Signal
3 Analog Ground
1 Normally Open
2 Common
3 Normally Closed
1 Normally Open
2 Common
3 Normally Closed
1 Normally Open
2 Common
3 Normally Closed
1 Normally Open
2 Common
3 Normally Closed
1 Normally Open
2 Common
3 Normally Closed
1 Normally Open
2 Common
3 Normally Closed
1 Normally Open
2 Common
3 Normally Closed
1 Normally Open
2 Common
3 Normally Closed
1 Normally Open
2 Common
1 Normally Open
2 Common
1 Normally Open
2 Common
1 Normally Open
2 Common
AC Power Inputs
1 Hot (115Vac)
115Vac/
230Vac
TB29
2 Earth Ground
3
Neutral
(Hot 230Vac)
Frequency Pulse Train Speed Input
+24 Vout Digital
(Resettable fused at
Pulse-Train
Input
1
TB30
27mA max, at
70ºC/158ºF)
2 Signal
3 Digital Ground
Remote Switch Digital Inputs (Contact Closure)
Aux Hour
Meter Reset
Aux Test Left Side
Temp Rise
Aux Test Right Side
Temp Rise
Aux Test Speed Drop
Aux Silence Horn
/Alarm Reset
Hour_and_Speed_
Disable command
Silence Horn/Alarm
Reset
Hour_and_Speed_
Enable command
TB31
TB32
TB33
TB34
1 Input
2 Digital Ground
3 Input
4 Digital Ground
5 Input
6 Digital Ground
7 Input
8 Digital Ground
9 Input
10 Digital Ground
1 Input
2 Digital Ground
1 Input
2 Digital Ground
1 Input
2 Digital Ground
*Note: Analog input “pairs” and their corresponding terminal
blocks are described on Page 15.
Example: Two sensors per pair with each drawing 25mA each is
permissable. One sensor drawing 50mA is permissable as long as
no sensor is used in its corresponding “paired” input.
SW1 Vac Selection Switch
The Vac power is selectable via selector switch SW1 located next
to the Vac TB29 terminal block on the I/O terminal board. Slide
the switch to the right for 115 Vac or to the left for 230 Vac.
The ES1 is shipped with SW1 set for 115Vac, and with the
replaceable fuse, F12, as a 115Vac/0.4Amp Slo-Blo fuse.
If your application needs SW1 switched to 230Vac, then also
install a 230Vac/0.2Amp Slo-Blo fuse into F12
The ES1 is shipped with one extra 115Vac/0.4Amp Slo-Blo fuse
and one 230Vac/0.2Amp Slo-Blo fuse.
Free Catalog and Application Assistance
1.800.328.6170
Website: www.electro-sensors.com
18
990-005500 Revision D

I/O Board - Terminal Drawing
ELECTRO-SENTRY 1
USER ACCESSIBLE TERMINALS
ON I/O BOARD
FUSE F12: SLO-BLO 0.4A/115VAC
VAC SELECTOR SWITCH
230V
SW1
115V
1
F12
TB29
Neut/Hot
Earth Gnd
Hot
SLO-BLO 0.2A/230VAC
DIGITAL
CONNECTIONS
D32
D34
Ground.D (Shield)
Signal in
+24Vout.D
1
PULSE TRAIN SPEED
Aux Hour Reset
1 2 3 4 5 6 7 8 9 10
1 10
Green LED
+24Vout.D
Green LED
+24.Digital
1 2
Ground.D
Ground.D
Aux Test Left
1 2 1 21 21 2
Aux Test Right
Aux Test Speed
Ground.D
Ground.D
Aux Silence Horn / Alarm Reset
Ground.D
Green LED
D30
+24Vout.A
Green LED
D28
+24.Analog
TB30 TB31
The Remote Switch Digital Inputs
Ground.D
Stop_Hour_Spd
1 1
TB32
Alarm Reset
Ground.D
Run_Hour_Spd
1
TB34TB33
Ground.D
Silence Horn/
NOTE: Analog and Digital circuits are NOT the same
(+24Vout.A Vs. +24Vout.D)
(Ground.A Vs. Ground.D)
Brown, Black, and Shield refers to the wires used on Electro-Sensors TT420 temperature sensors.
Blue
LED
Blue
LED
Blue
LED
Blue
LED
Blue
LED
Blue
LED
Blue
LED
Blue
LED
Relay 8
HORN
Relay 7
RED
LIGHT (STACK)
Relay 6
YELLOW
LIGHT (STACK)
Relay 5
GREEN
LIGHT (STACK)
Relay 4
SPEED/TEMP
SHUTDOWN
Relay 3
SPEED/TEMP
WARNING
Relay 2
SPEED ONLY
SHUTDOWN
Relay 1
SPEED ONLY
WARNING
COM
N.O.
COM
N.O.
COM
N.O.
COM
N.O.
N.C.
COM
N.O.
N.C.
COM
N.O.
N.C.
COM
N.O.
N.C.
COM
N.O.
N.C.
COM
N.O.
N.C.
COM
N.O.
N.C.
COM
N.O.
N.C.
COM
N.O.
2
1
2
1
2
1
2
1
3
2
1
3
2
1
3
2
1
3
2
1
3
2
1
3
2
1
3
2
1
3
2
1
TB28
TB27
TB26
TB25
TB24
TB23
TB22
TB21
TB20
TB19
TB18
TB17
+24Vout.A (Brown)
Signal in (Black)
Ground.A (Shield)
+24Vout.A (Brown)
Signal in (Black)
Ground.A (Shield)
+24Vout.A (Brown)
Signal in (Black)
Ground.A (Shield)
+24Vout.A (Brown)
Signal in (Black)
Ground.A (Shield)
+24Vout.A (Brown)
1 2 3 1 2 3 1 2 3 1 2 3 1 2 3 1 2 3 1 2 3 1 2 3 1 2 3 1 2 3 1 2 3 1 2 3 1 2 3 1 2 3 1 2 3 1 2 3
TB1
TB2
TB3
TB4
IN 1
IN 2
IN 3
IN 4
TB5
IN 5
Signal in (Black)
Ground.A (Shield)
+24Vout.A (Brown)
Signal in (Black)
Ground.A (Shield)
TB6
IN 6
4-20mA ANALOG CONNECTIONS
+24Vout.A (Brown)
Signal in (Black)
Ground.A (Shield)
+24Vout.A (Brown)
Signal in (Black)
TB8
TB7
IN 8
IN 7
Ground.A (Shield)
+24Vout.A (Brown)
Signal in (Black)
Ground.A (Shield)
+24Vout.A (Brown)
Signal in (Black)
TB9
TB10
IN 9
IN 10
19
Ground.A (Shield)
+24Vout.A (Brown)
Signal in (Black)
Ground.A (Shield)
+24Vout.A (Brown)
Signal in (Black)
TB11
TB12
IN 11
IN 12
n/a
n/a
n/a
n/a
Ground.A (Shield)
TB13
IN 13
n/a
TB14
IN 14
n/a
TB15
IN 15
n/a
n/a
n/a
+24Vout.A
Signal in
TB16
IN 16
Ground.A
ANALOG SPEED
Free Catalog and Application Assistance
1.800.328.6170
Website: www.electro-sensors.com
990-005500 Revision D

Typical Wiring Connection Examples
TT420
TEMPERATURE
TRANSMITTER
Bearing and
Rub Block sensors
FB420
SHAFT SPEED
SENSOR
4-20mA
ST420
SPEED
TB1
1
2
3
+24VDC
DC GND
TRANSMITTER
FIELD ELECTRO-SENTRY 1
BRN+
BLK-
SHIELD
TYPICAL
TEMPERATURE TRANSMITTER TT420
WIRING DETAIL
FIELD ELECTRO-SENTRY 1
RED
CLEAR
BLACK
SHIELD
TYPICAL
SPEED TRANSMITTER FB420
WIRING DETAIL
FIELD ELECTRO-SENTRY 1
BRN+
BLK-
SHIELD
TYPICAL
SPEED TRANSMITTER ST420
WIRING DETAIL
TBx-1
TBx-2
TBx-3
TB16-1
TB16-2
TB16-3
SHIELD
TBx-1
TBx-2
TBx-3
+24Vout.A
Signal in
Ground.A
+24Vout.A
Signal in
Ground.A
+24Vout.A
Signal in
Ground.A
FIELD ELECTRO-SENTRY 1
Dry Contact
FOR VAR34 = 0000 (MAINTAINED CLOSED = ENABLE)
(MAINTAINED OPEN = DISABLE)
TB34-1
TB34-2
IN
COM
WIRING DETAIL
FIELD ELECTRO-SENTRY 1
Dry Contact
TB34-1
TB34-2
IN
COM
FOR VAR34 = 0001/0002 (MOMENTARY CLOSED = ENABLE)
WIRING DETAIL
FIELD ELECTRO-SENTRY 1
Dry Contact
TB32-1
TB32-2
IN
COM
FOR VAR34 = 0001 (MOMENTARY CLOSED = DISABLE)
WIRING DETAIL
Hour_and_Speed
Disable/Enable
Input
Hour_and_Speed
Enable
Input
Hour_and_Speed
Disable
Input
HORN OR BEACON
TYPICAL HORN OR LIGHT (STACK) ALARM
FIELD
ELECTRO-SENTRY 1
NORMALLY CLOSED
COMMON
NORMALLY OPEN
TYPICAL SPEED OR TEMPERATURE
WARNING ALARM
TB17, TB18, TB21, TB22
WIRING DETAIL
FIELD ELECTRO-SENTRY 1
TB28, TB27, TB26, TB25
WIRING DETAIL
WARNING
RELAY CONTACT
HORN OR
LIGHT (STACK)
RELAY CONTACT
20
FIELD ELECTRO-SENTRY 1
Dry Contact
TB32-1
TB32-2
FOR VAR34 = 0002 (MOMENTARY OPEN = DISABLE)
WIRING DETAIL
FIELD
ELECTRO-SENTRY 1
NORMALLY CLOSED
COMMON
NORMALLY OPEN
TYPICAL SPEED OR TEMPERATURE
SHUTDOWN ALARM
TB19, TB20, TB23, TB24
WIRING DETAIL
Free Catalog and Application Assistance
Website: www.electro-sensors.com
990-005500 Revision D
IN
Hour_and_Speed
Disable
Input
COM
SHUTDOWN
RELAY CONTACT
1.800.328.6170

User Variable List
Var # Description Pg#Default
Value
Var01 Encoder Type Select
0000 = 4-20mA Analog
0001 = Pulse Train
Var02 PPR Value 2 0008
Var03 Pulse Max RPM or
RPM @ 20mA
Var04 Speed Slowdown Alarm
SetPoint %
Var05 Speed Slowdown Alarm
Delay
Var06 Speed Shutdown Alarm
SetPoint %
Var07 Speed Shutdown Alarm
Delay
Var08 Underspeed Start Delay
Time
Var09 Speed Display Select
0000 = % w/Alarms
0001 = RPM w/Alarms
0002 = % w/o Alarms
0003 = RPM w/o Alarms
Var10 Max Analog RPM 3 0200
Var11 Belt Alignment Sensor Type
Select
(4-20mA or
Contact Closure)
0 = 4-20mA Sensor
1 = Contact Closure Sensor
xxx? = TRB (Inputs 11,12)
xx?x = KRB (Inputs 7,8)
x?xx = HRB (Inputs 3,4)
0xxx = Open Ckt = Good
1xxx = Closed Ckt = Good
Var12 Temp Warning SetPoint 4 0160
Var13 Temp Shutdown
SetPoint
Var14 Input #1 Bias Temp Set-
Point
Var15 Input #2 Bias Temp Set-
Point
Var16 Input #3 Bias Temp Set-
Point
Var17 Input #4 Bias Temp Set-
Point
Var18 Input #5 Bias Temp Set-
Point
2 0000
2 0200
2 0090
2 0001
2 0080
2 0001
2 0005
3 0000
3 0000
4 0175
4 0000
4 0000
4 0000
4 0000
4 0000
User’s
Value
Var19 Input #6 Bias Temp Set-
4 0000
Point
Var20 Input #7 Bias Temp Set-
4 0000
Point
Var21 Input #8 Bias Temp Set-
4 0000
Point
Var22 Input #9 Bias Temp Set-
4 0000
Point
Var23 Input #10 Bias Temp Set-
4 0000
Point
Var24 Input #11 Bias Temp Set-
4 0000
Point
Var25 Input #12 Bias Temp Set-
4 0000
Point
Var26 Unused N/A
Var27 Unused N/A
Var28 Unused N/A
Var29 Unused N/A
Var30 Temp Display Select
4 0000
0000 = ºF
0001 = ºC
Var31 Hour Meter Warning Time
4 9000
(In hours)
Var32 Hour Meter Maint. Time
5 9500
(In hours)
Var33 Horn Operation Select
5 0999
0xxx = Solid Horn
1xxx = Oscillating Horn
x000 - x999 = Horn ‘time’
in Minutes.
Var34 Hour and Speed Command
6 0000
Select.
0000 = Maintained
Disable/Enable.
0001 = One-Shot
Disable/Enable
w/Disable = Closed.
0002 = One-Shot
Disable/Enable
w/Disable = Open.
Var35 Test Mode Select
6 0000
0000 = Operate
0001 = Test w/Relays
0002 = Test w/o Relays
0003 = Test w/o Relays
0004 = Test w/Manual
Relay control
Var36 Software Identification
7 N/A
(Read Only)
21
Free Catalog and Application Assistance
1.800.328.6170
Website: www.electro-sensors.com
990-005500 Revision D

7.88
7.57
Electro-Sentry Enclosure Dimensions
12.68
12.05
7.63
13.41
14.88
14.00
22
Free Catalog and Application Assistance
1.800.328.6170
Website: www.electro-sensors.com
990-005500 Revision D

This page left intentionally blank.
23
Free Catalog and Application Assistance
1.800.328.6170
Website: www.electro-sensors.com
990-005500 Revision D

 Loading...