

Page 1
1
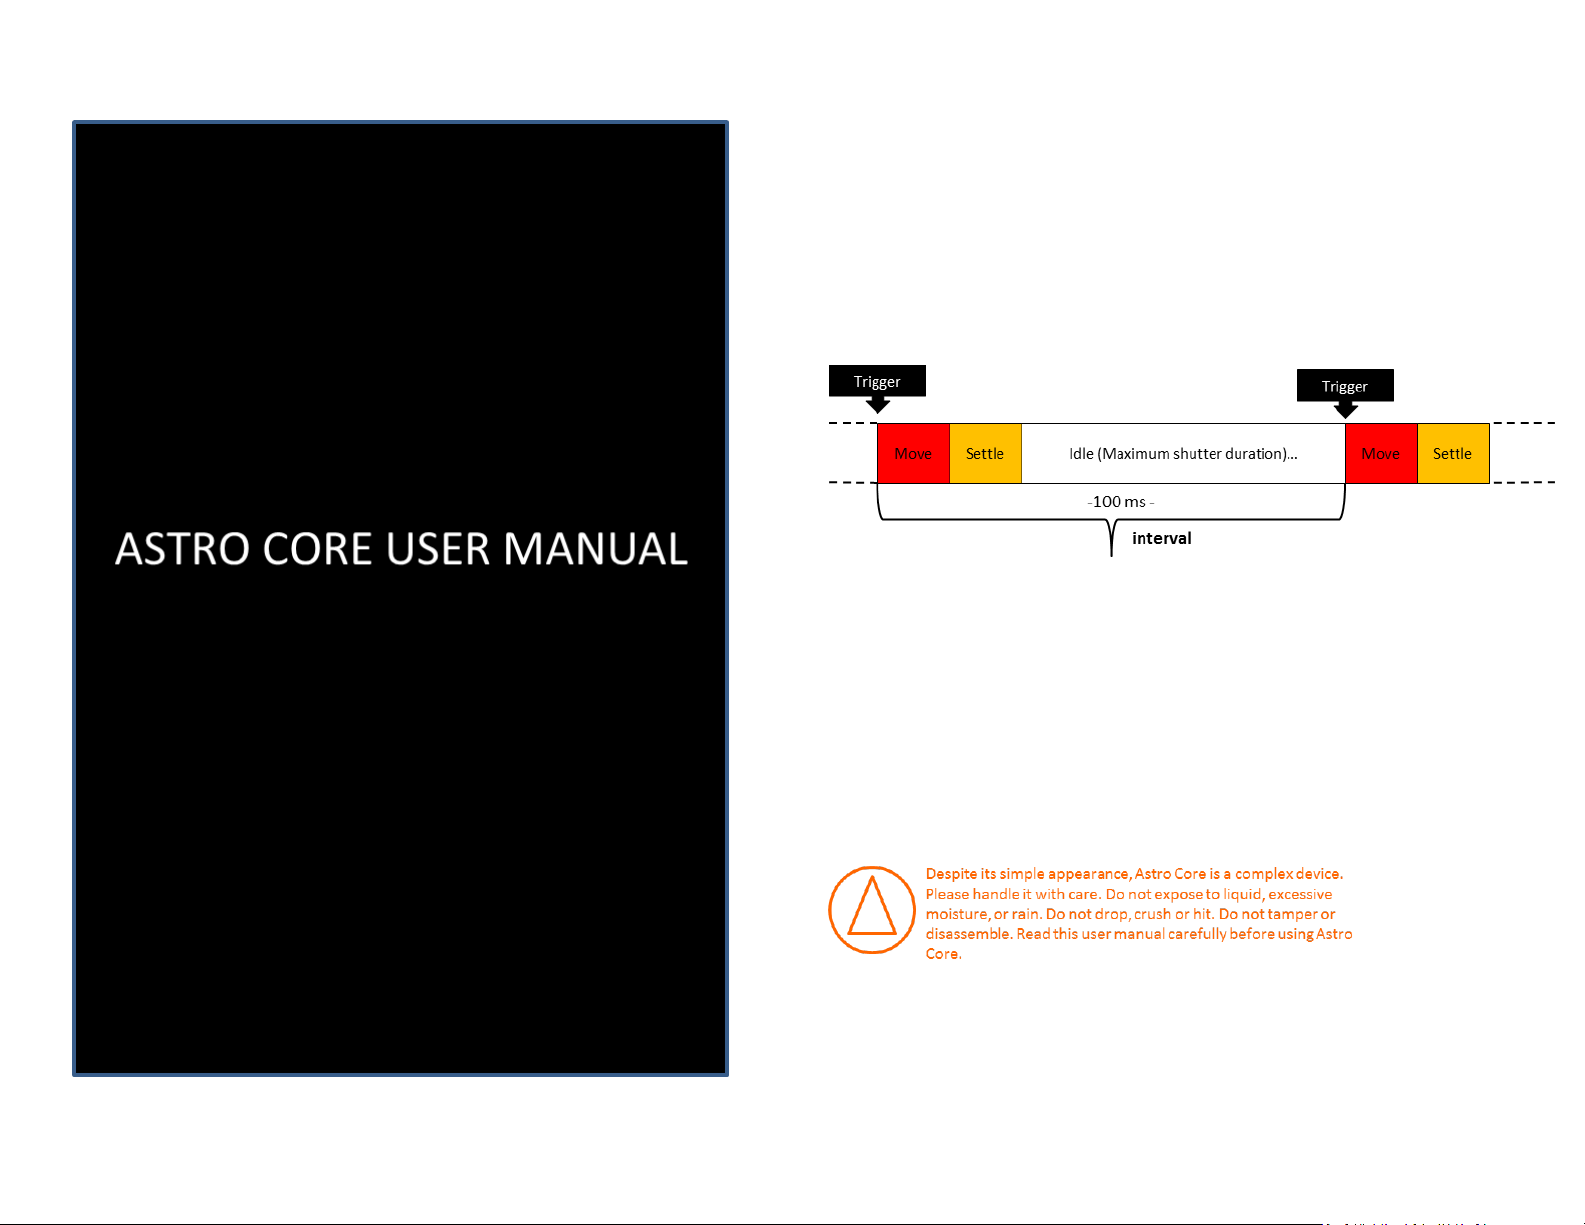
Astro Core is an advanced intervalometer and motion control device for time-lapse
photography. It minimizes the cables needed to do synchronized pan, tilt, and linear
motion combinations. In this guidebook you will find everything you need to know
about using the Astro Core. In addition, we will share a lot of the things we have
learned about time-lapse while making the Astro, Pico, and Astro Core.
Let’s get started with the basics.
Astro Core works as a remote control DSLR camera. Using settings that you
program, it will trigger your camera at specific intervals and make small movements
between photos. It has a standard 2.5mm jack, and connects to your camera
through the cable included in your package.
Once Astro Core is done taking pictures, you can upload all of the images to your
computer and assemble them into a time-lapse video. To assemble your videos, you
can use one of the many free software alternatives, such as iMovie for Mac, or
Windows Movie Maker for PC. For greater control, we recommend using more
advanced software like Adobe Lightroom, LR Time-lapse, and Adobe After Effects.
Technical Details:
Power source: 2 AA batteries (not included)
Maximum speed: 1.5 degrees/second in panorama mode
Maximum load when panning: 22 lb. / 10 Kg (centered weight)
Maximum load when tilting: 6.6 lb. / 3 Kg (centered weight)
Operating Temperature: 32 to 104⁰ / 0 to 40⁰ C
Page 2

2
CONTENTS
WHAT IS ASTRO CORE………..1
WHAT IS TIME-LAPSE?..........3
Frames per Second
Recorded FPS
Playback FPS
ANATOMY………………………….4
Batteries
Connectivity
Status LED
GETTING STARTED………………5
Attach Tripod Plate
Mount Camera
Connect Camera
Set Up a Program
Start/Cancel a Program
TIME-LAPSE GUIDE ………………5
GENERAL SETUP…………………..6
Pan
Tilt
Pan & Tilt
Pan & Motion
Tilt & Motion
Pan & Tilt & Motion
SETTING UP A PROGRAM…….8
CAMERA SETTINGS……………………14
Modes
Shutter Speed
Aperture
Focus & Zoom
ISO
White Balance
Capture Format
FIRMWARE UPDATE…………………..16
GEAR………………………………………….17
CHECKLIST………………………………….17
SCENARIOS…………………………………18
Clouds………………………………………………..18
Traffic…………………………………………………19
Crowds……………………………………………….19
Stars……………………………………………….….20
City………………………………………………….…20
Water………………………………………………...21
Landscape ………………………………………….21
TROUBLESHOOTING……………………22
FCC Compliance…………………………..23
Warranty…………………………………..24
Page 3
3
WHAT IS TIME-LAPSE?
Time-lapse photography is the process of capturing an event that happens
over a long period of time and playing it back as a video of much shorter
duration. While DSLR cameras are great, they are not specifically designed
to take time-lapse videos. For this reason it is important to understand
some basic concepts of time-lapse photography and its potential pitfalls in
order to achieve the best results.
Frames per Second
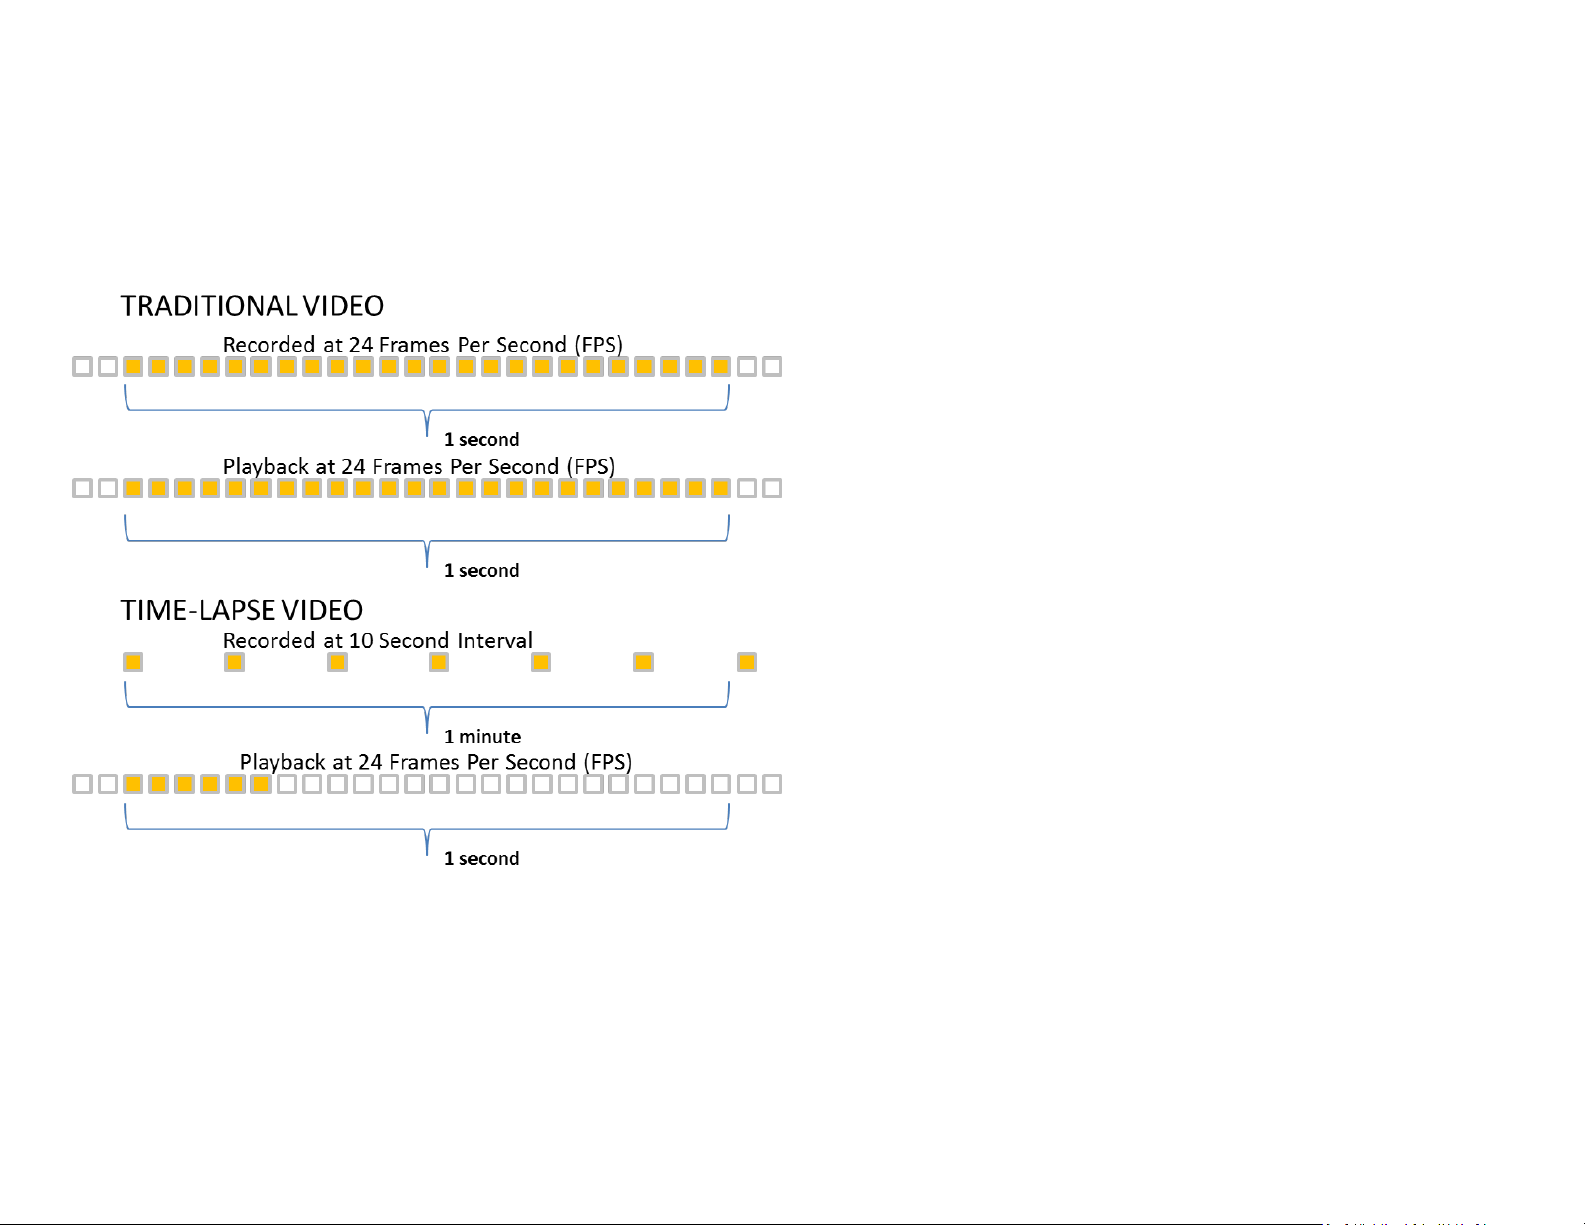
Frames per Second is sometimes abbreviated as FPS. Frames per seconds
indicates the number of pictures that fit into a second of video footage.
Most videos are either 24 or 30 FPS.
Recorded FPS
This is the number of pictures taken per second. Since time-lapse
photography requires taking pictures one or more seconds apart, it is more
practical to call it Interval. A long interval means that photos will be taken
further apart; while, a short interval captures images in quick succession.
For reference, traditional movies are recorded at 24 FPS which means each
picture is taken at an interval of 1/24 seconds. In contrast, taking pictures in
2 second intervals would be .5 FPS.
Playback FPS
This refers to the speed at which individual pictures/frames will be played
back. Since a video is essentially a collection of photos, Playback FPS means
how many pictures will be shown in one second. Most videos play back at
24 or 30 FPS.
With a traditional video, the Recorded FPS and the Playback FPS are the
same; and thus, you don’t have to worry about it. In time-lapse
photography you control the Recorded FPS (interval between photos) to
achieve your desired results. Time-lapse photography works by taking
pictures at long intervals and playing them back much faster, usually at 24
or 30 FPS.
Example: If photos are taken using a 15 second interval and played back at
30 FPS, the video will playback 450 times faster than real-time, and 12 hours
will be compressed into just 96 seconds.
Page 4

4
ANATOMY
Batteries
Peel back the rubber Battery Cover on top of Astro Core and insert two AA
batteries. We recommend using high capacity, lithium rechargeable batteries.
The Astro Core is a Low Energy Bluetooth device (BLE) which means it can stay in
standby mode for a long time. Batteries will last at least a month in standby mode
only. When in use, your time lapse scenario and amount of movement will
determine how quickly the battery is used. There are no buttons on the Astro core.
Connectivity
Astro Core comes with one cable. The Camera Cable has a specific
connector for your camera on one end, and a plug on the other that
connects to the 2.5mm jack on Astro Core.
Status LED
Color helps user identify unit to select for
pan / tilt / linear
Solid: Receiving commands from app.
Slow Blink: Standby state.
Fast Blinking Red (2x per second): Low Battery. Replace
Batteries
Slow Blinking: Executing program.
Slow Blinking Red or Red on during execution: Shutter open
on camera for exposure.
Solid Blue during firmware update indicates
update in progress.
Page 5
5
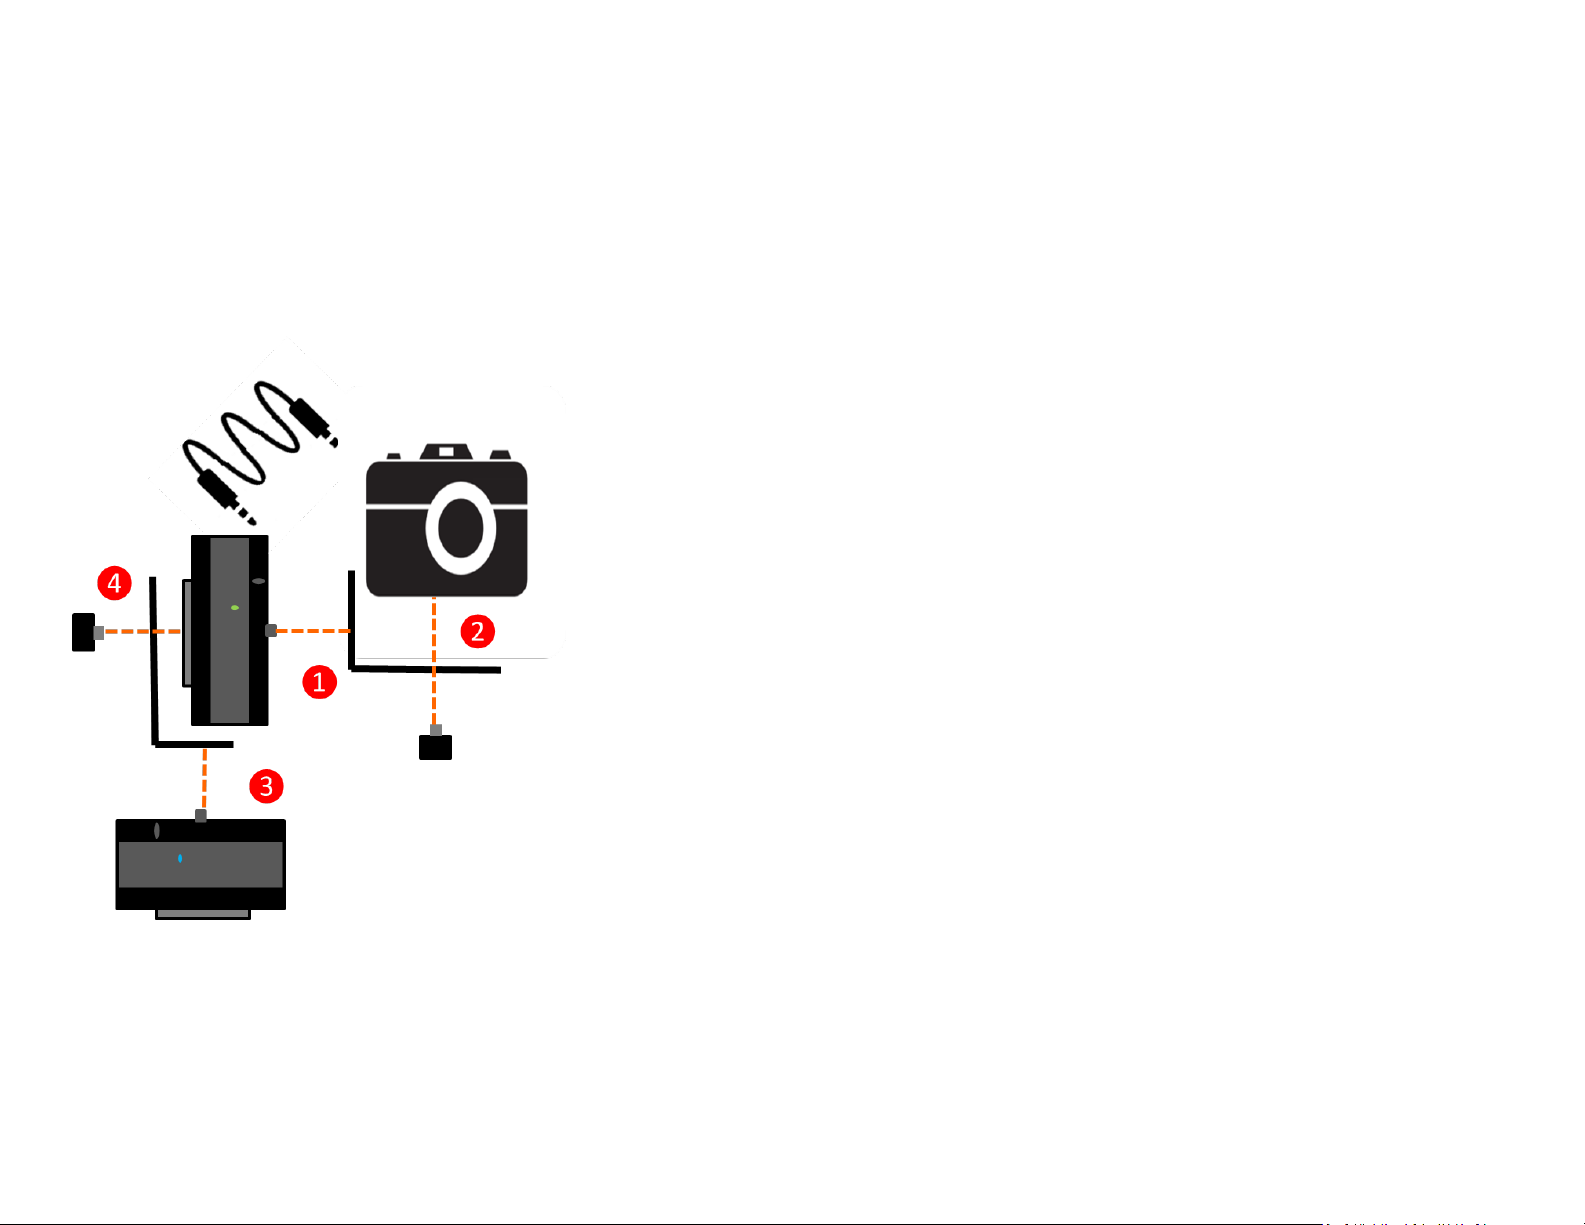
GETTING STARTED
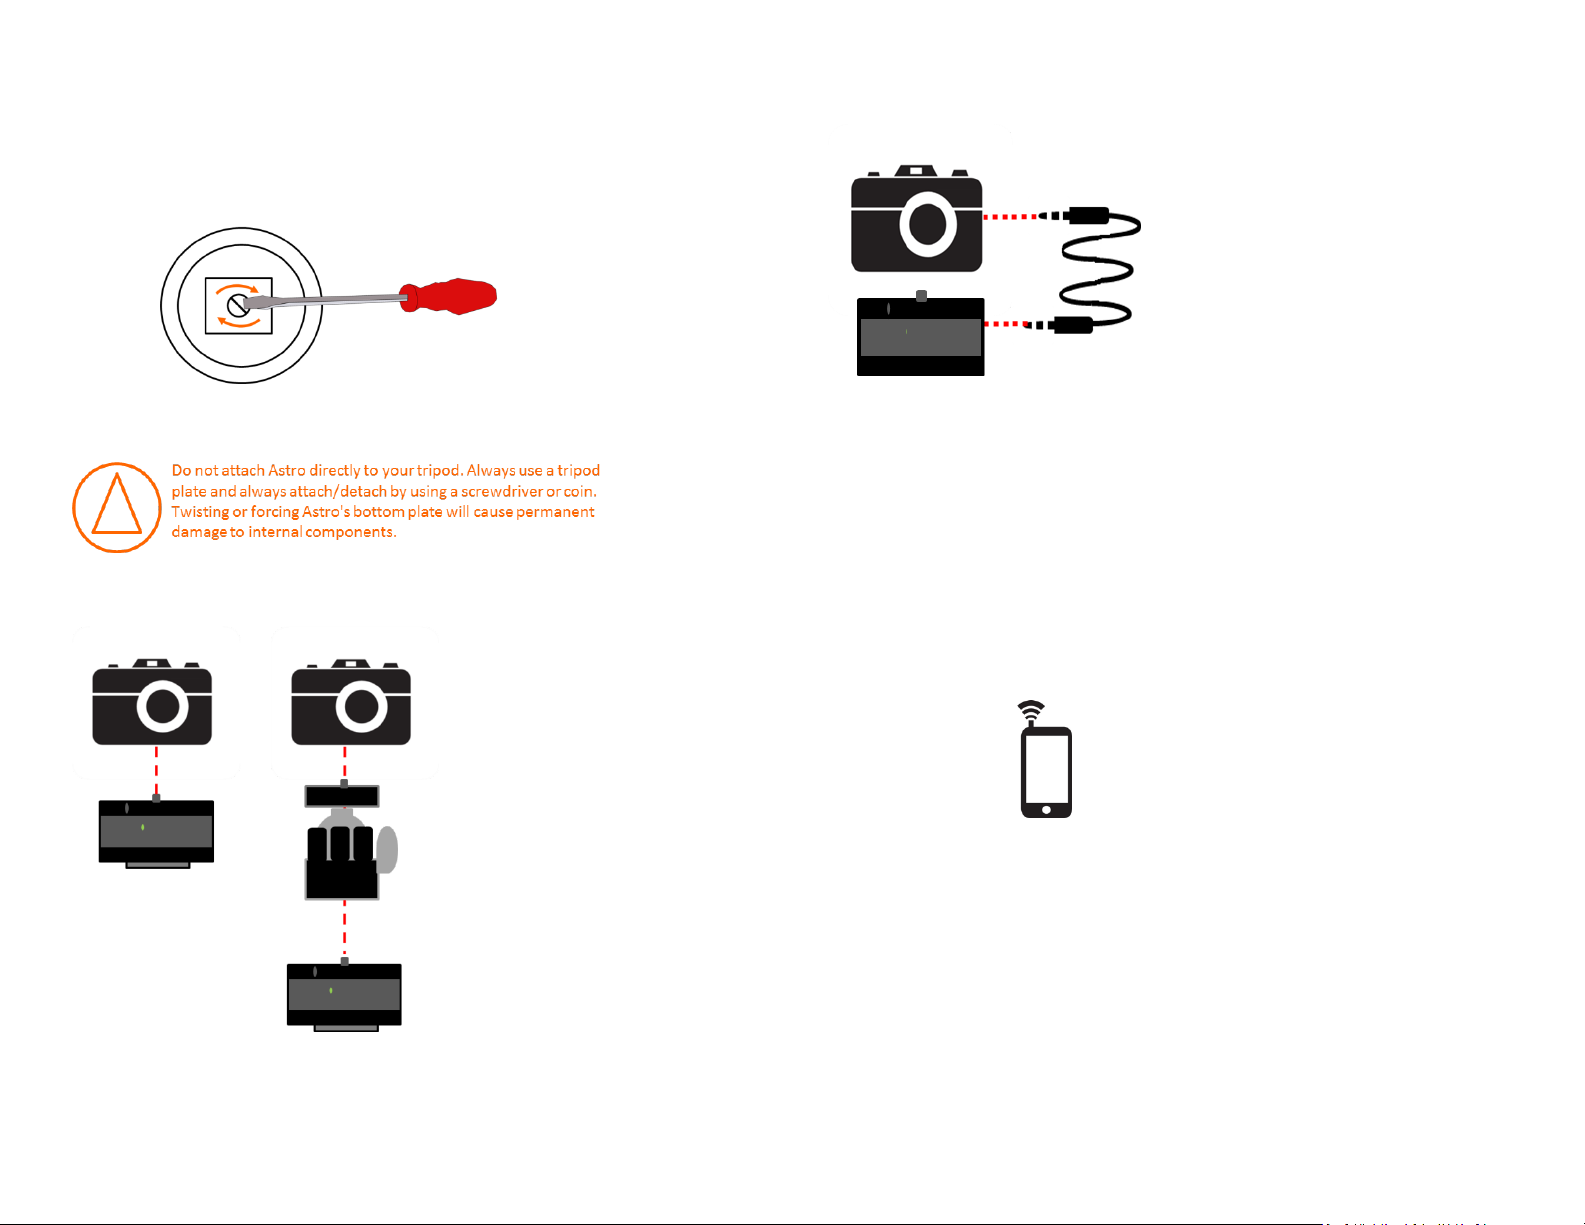
1 Attach Tripod Plate
Hold Astro Core upside down and attach a tripod plate. Tighten until plate is
firmly in place.
2 Mount Camera
Screw Astro Core directly to your camera or to a ball head.
Using a ball head offers more flexibility when composing shots and aligning the camera.
Attaching a ball head might require a 1/4 to 3/8 thread adapter.
3 Connect Camera
Connect Astro Core to your camera using the Camera Cable.
Set the camera to Manual Focus. Auto Focus delays can cause interval discrepancies or
failure to shoot.
4 Set Up a Program
Use your smartphone with the Astro Core application to set up a program.
See details in the next section.
5 Start/Cancel a Program
Press the applications Send button to start a time-lapse. Commands will be
sent over Bluetooth. Use the applications Stop button to stop a time-lapse
or to clear the queue if a command was saved by accident.
Page 6
6
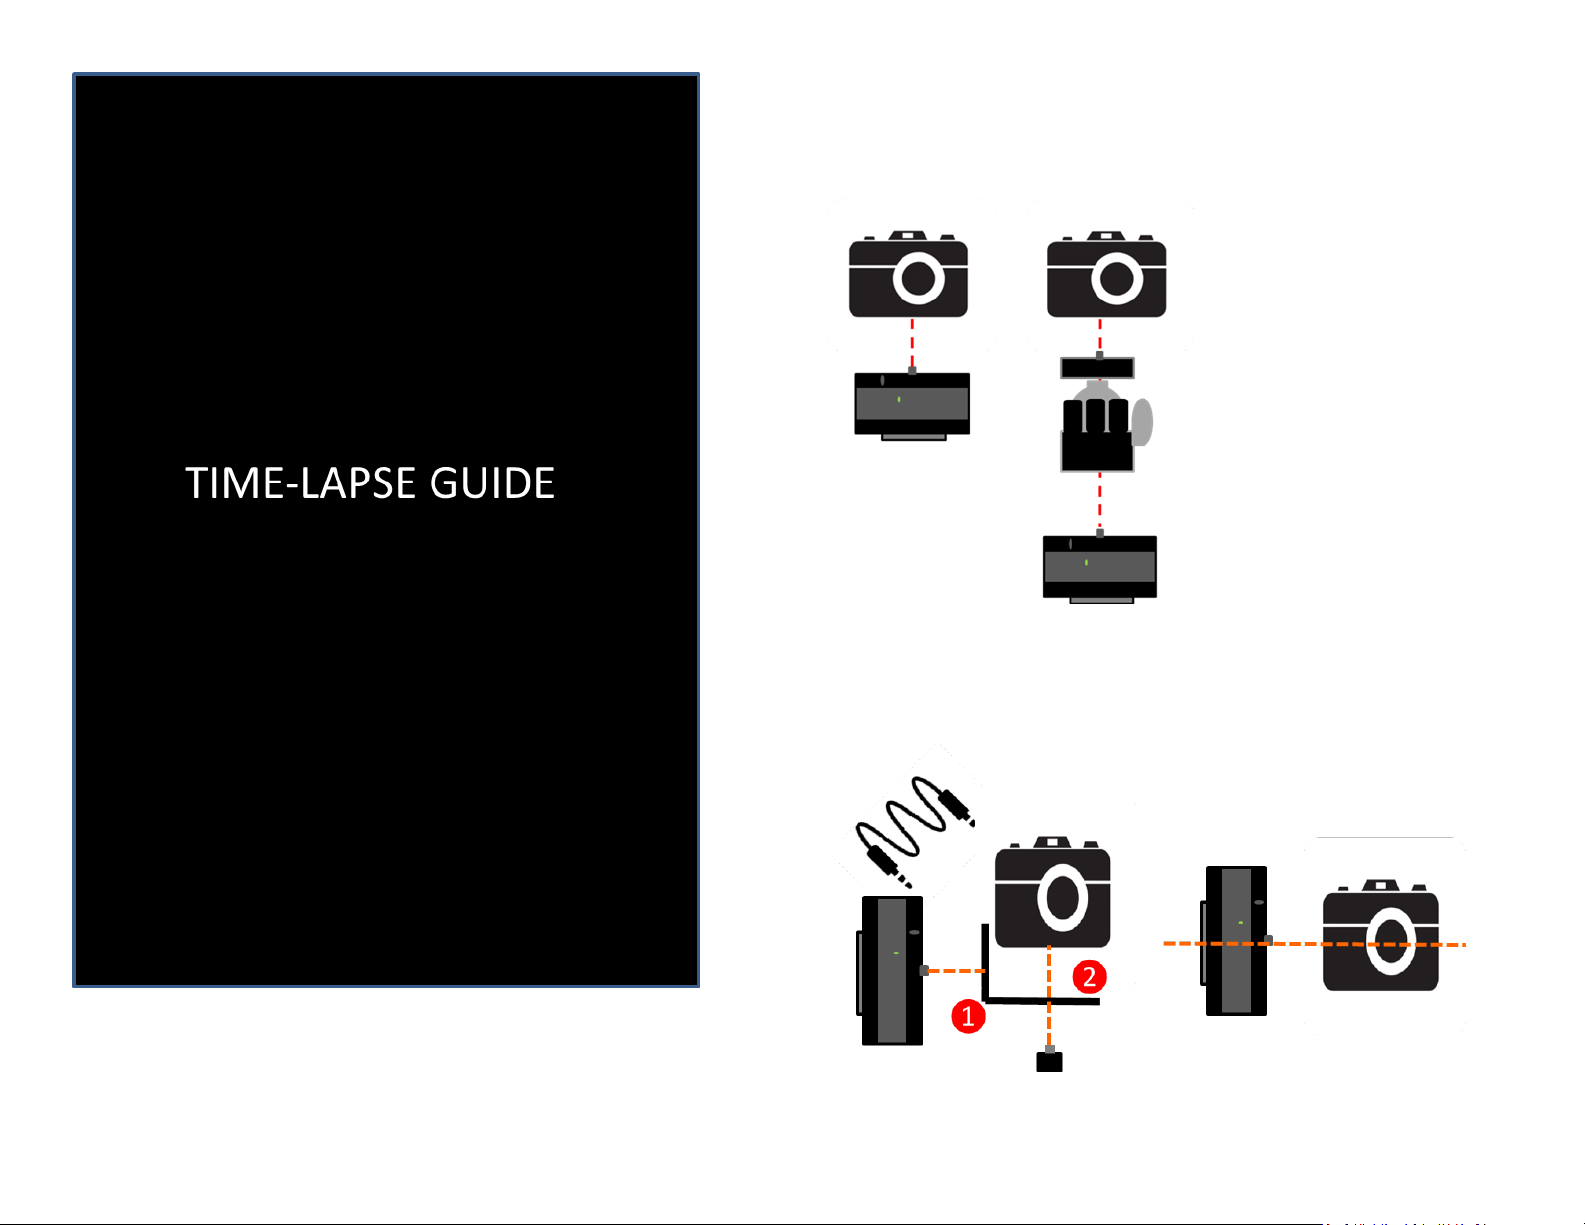
GENERAL SETUP
Pan
Screw Astro Core into a ballhead or directly into the camera.
Tilt
Screw Astro Core into one of the 5 threads on the L-bracket. Use the thread
that properly centers your camera with Astro Core. Attach the camera to
the L-bracket with the thumb screw, and connect the camera to Astro Core.
Page 7
7
Pan & Tilt
Set up a tilting Astro Core. For panning, screw a second Astro Core into a
second L-bracket using the outermost thread, and attach the second Lbracket into the tilting Astro Core with the thumb screw. Screw Astro Core
into one of the 5 threads on the L-bracket. Use the thread that properly
centers your camera with Astro Core. Attach the camera to the L-bracket
with the thumb screw, and connect the camera to Astro Core.
Note: Only the tilting Astro Core connects to the camera. Both Astro Cores should be
programmed with the same total duration and same interval. The rotation angle can be
different.
Pan & Motion
Set up an Astro Core for linear motion per the separate Linear Mount User
Manual instructions. Attach the camera to the Astro Core per the pan
instructions above.
Tilt & Motion
Follow the instructions to set up the Linear Mount per the separate Linear
Mount User Manual instructions, but attach a ball-head instead of an Astro
Core. Set up a camera for Tilt. Use an extra L-bracket and attach it to the
ball head on the Linear Mount.
Pan & Tilt & Motion
Set up an Astro Core for linear motion per the separate Linear Mount User
Manual instructions. Follow the Pan & Tilt instructions, where the Astro
Core for step 3 is already on the Linear Mount for panning.
Page 8
8
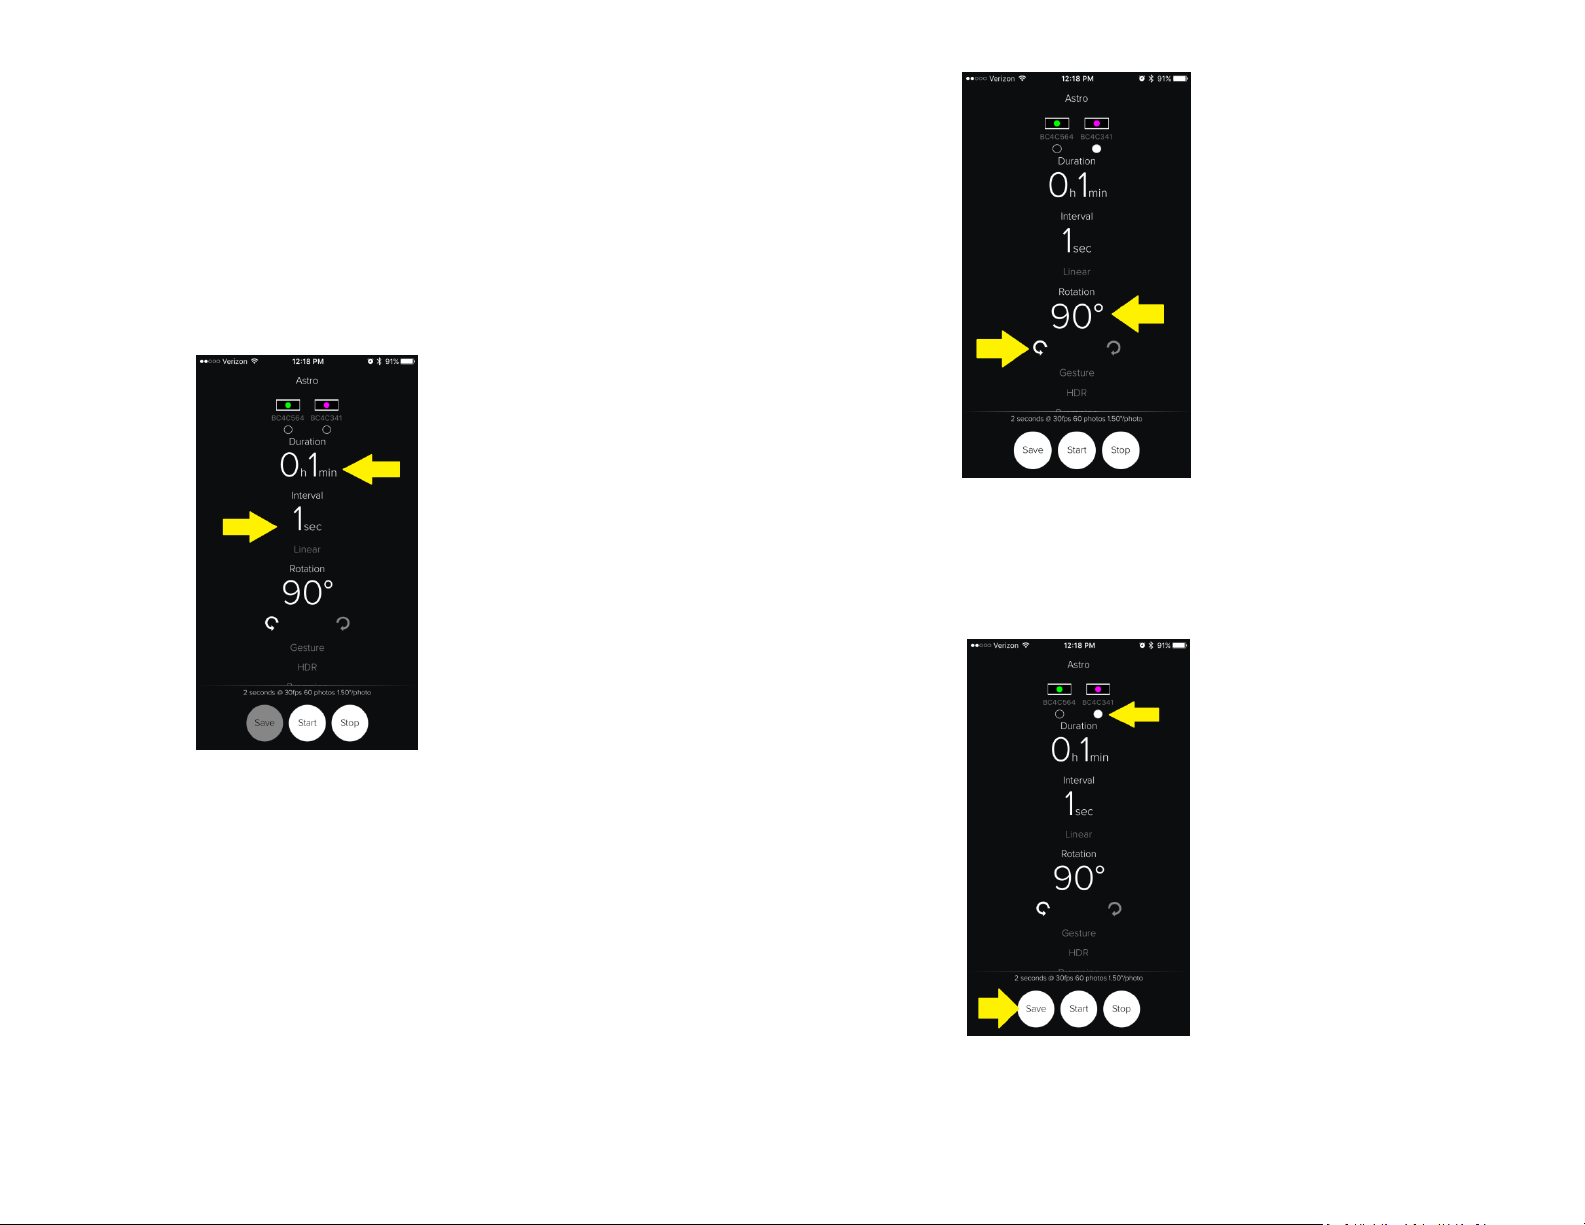
SETTING UP A PROGRAM
First make sure your Bluetooth is enabled on your phone.
Open your Astro Core application on your iOS or Android smartphone. Once
you have opened it, the application can recognize up to three Astro Core
units. The application will show those units at the top of the screen with a
different colored flashing LED for each unit.
Step 1: For all modes, you will first set the Duration of the Time-Lapse in
hours and minutes and then set up the Interval of the Time-Lapse in
seconds.
Manual Mode
If you are using Manual Mode for all setup, follow these instructions next. If
instead you would like to do Gesture Mode, skip to the next section.
Step 2: Pan: If you are not doing a Pan, skip to step 3. If you are using a unit
for Pan, you will set this unit up first. At the top of the app, select the
amount of rotation desired and whether you would like to pan clockwise or
counter clock wise.
Once this is set up, select the unit the commands should go to using LED
color, and then press the ‘Save’ button to Save the commands to the pan
unit. The Time-Lapse will not start at this time. Both the ‘Save’ and ‘Start’
command will grey out while the commands are being saved to the unit.
Page 9

9
Step 3: Tilt: If you are not doing a Tilt, skip to Step 5. If you are using a
unit for Tilt to do a tilt only you will set this up first, or if you are doing a
pan and tilt, you will set this unit up second. Select the amount of rotation
desired for tilt and whether you would like to tilt clockwise or counter
clock wise. Once this is set up, select the unit the commands should go to
using LED color, and then press the ‘Save’ button to Save the commands
to the pan unit. The Time-Lapse will not start at this time. Both the ‘Save’
and ‘Start’ command will grey out while the commands are being saved to
the unit.
Step 4: Linear: The last item to set up will be Linear Motion.
Select the desired distance and direction of movement (left or right) as
shown below. Once this is set up, select the unit the commands should go
to using LED color, and then press the ‘Save’ button to Save the
commands to the pan unit. The Time-Lapse will not start at this time. Both
the ‘Save’ and ‘Start’ command will grey out while the commands are
being saved to the unit.
Step 5: Start: Use the Start button to start the Time-Lapse. Once a Time-
Lapse is started, you can use the ‘Stop’ button to Stop the units at any time.
Page 10

10
Gesture Mode
For Gesture programming, follow Step 1 and Step 2 above. Once that is
complete, you will need to record a gesture that will capture the rotation
for both pan and tilt.
Step 2: Record: Press the record button. You will then need to flip your
phone into landscape mode.
Touch the screen and hold with a finger (outside of the circle) until the
circle line is white, then record your motion for your pan, tilt, or pan and tilt,
then release your finger when your gesture is complete.
Step 3: Pan: If you are not doing a Pan, skip to step 4. If you are using a unit
for Pan, you will set this unit up first. Select the unit the commands should
go to using LED color, and then press the ‘Save’ button to Save the
commands to the pan unit. The Time-Lapse will not start at this time. Both
the ‘Save’ and ‘Start’ command will grey out while the commands are being
saved to the unit.
Page 11

11
Step 4: Tilt: If you are not doing a Tilt, skip to Step 5. If you are using a
unit for Tilt to do a tilt only you will set this up first, or if you are doing a
pan and tilt, you will set this unit up second. Select the unit the commands
should go to using LED color, and then press the ‘Save’ button to Save the
commands to the pan unit. The Time-Lapse will not start at this time. Both
the ‘Save’ and ‘Start’ command will grey out while the commands are
being saved to the unit.
Step 5: Linear: The last item to set up will be Linear Motion.
Select the desired distance and direction of movement (left or right) as
shown below:
Once this is set up, select the unit the commands should go to using LED
color, and then press the ‘Save’ button to Save the commands to the pan
unit. The Time-Lapse will not start at this time. Both the ‘Save’ and ‘Start’
command will grey out while the commands are being saved to the unit.
Step 6: Start: Use the Start button to start the Time-Lapse. Once a Time-
Lapse is started, you can use the ‘Stop’ button to Stop the units at any time.
Page 12

12
Repositioning
The reposition menu provides methods to move the Astro Core to point in
the direction desired. This is most critical for the unit that holds the camera.
The Left or Right buttons will move the unit in the corresponding direction
up to 360 degrees. If the Stop button is pressed, it will stop before it reaches
360 degrees. Take care to make sure that the camera lens does not have
any interference with an L-bracket and nothing is in its way or it may cause
the motor to burn out. During each scenario run, the unit will track its
movements. If a scenario needs to be stopped and re-run, the Home button
may be pressed to allow the unit to return to its start position. If multiple
units are being used, these buttons will only apply to the currently selected
unit.
Page 13

13
ADVANCED FEATURES
BRAMPING
Bulb ramping, or bramping, is a method of
adjusting exposure settings to maintain a
specific exposure value throughout the duration
of a time-lapse sequence. The bulb ramping
feature allows for selection of linear or nonlinear options. Settings for exposure range from
1/10 to 30 for start and end values.
SPEED RAMP
Speed ramping is a process where the capture
frame rate of the camera changes over time
throughout the duration of the time-lapse
sequence. The speed ramp feature allows for
selection of linear or non-linear options.
Settings for speed ramping range from 1 to 10.
HDR
HDR is a high dynamic range technique used to
reproduce a greater dynamic range of
luminosity than is possible with standard digital
imaging or photographic techniques. The Astro
Core allows for selection of the Middle Exposure and the exposure value
(EV) step.
Page 14

14
CAMERA SETTINGS
When shooting time-lapse, it is better to have control over all of the
camera’s settings in order to get the best results. We recommend against
automatic settings because the camera will calculate them differently for
each photo and potentially introduce unpleasant flicker in the final video.
Modes
Av Aperture Priority: This mode allows you to select a constant aperture
while the shutter speed is set by the camera. It is not recommended to use
this mode for time-lapse photography unless you are using it for a day to
night sequence. Even for day to night sequences, the small variations in
shutter speed will introduce flicker in the video that will have to be removed
in post-production.
Tv Shutter Priority: In shutter priority mode you can set the shutter speed
and let the camera choose an appropriate aperture. This mode is not ideal
for time-lapse as it will not only introduce light flicker but also DOF (depth
of field) flicker that cannot be corrected in post-production.
B Bulb: Most cameras have a 30 second exposure limit. Bulb mode allows
you to use an external device to control the duration of the shutter beyond
30 seconds.
M Manual: In manual mode you set both the aperture and shutter speed.
We recommend always using manual mode when taking time-lapse
sequences. If you are shooting in manual mode (and you really should), it is
important to understand how each setting affects the time-lapse.
Shutter Speed
Shutter speed controls the amount of time that the shutter will stay open
for the sensor to capture light. This not only affects the amount of light it
receives, but also the amount of movement that is captured. A fast shutter
speed will freeze a moving object; whereas, a slow setting will produce a
blurred result. A neutral density filter (ND filter) may be needed to achieve
long exposures in bright light.
Depending on the subject, you may want to use a slow or fast shutter
speed. For fast moving subjects like cars, a fast shutter speed will produce
jumps or even make cars appear in one frame and disappear in the next.
The discontinuity can be distracting and is normally undesirable in a timelapse video. On the other hand, using a slow shutter speed will produce
smooth and continuous motion but will reduce sharpness.
Every time your camera takes a picture, the shutter opens and closes. This
process is not perfectly consistent every time; the small variations cause
every picture to have slightly different exposures and become noticeable as
flicker. To prevent that from happening, you can use a lens with manual
aperture control, or avoid shutter times shorter than 1/100 seconds.
Aperture
The aperture setting controls the amount of light that enters the camera as
well as the depth of field (DOF). A large aperture lets in more light and
produces a shallow DOF; whereas, a small aperture will capture less light
and show more objects in focus.
Page 15

15
Focus & Zoom
First, make sure you disable autofocus and image stabilization on your lens
or camera. Choose a focal length that allows you to capture enough context
around your subject.
Time-lapse photography is all about change; many times the subtle changes
around your main subject are what make a time-lapse great. For the same
reason, avoid extreme zoom.
ISO
ISO refers to the sensitivity of the camera to light. A small number provides
less sensitivity, while a high number generates high sensitivity. Low settings
generate cleaner images. In contrast high ISO settings produce nosier
images as the camera tries to extract as much information as possible from
the sensor. Every camera is different; take a couple of test photos at varying
ISO settings to see if the noise level is acceptable. Much like the other
settings we have discussed, never use auto ISO because it can produce
flicker and other inconsistencies.
White Balance
White balance refers to the temperature of the color in the picture. It is best
to manually choose the desired temperature or a preset to ensure
consistent results and reduce flicker.
Capture Format
This means using RAW image format. It is okay to use JPG for tests or rough
sequences, but always use RAW when capturing your final sequence.
Page 16

16
FIRMWARE UPDATE
If a firmware update is necessary for the Astro Core unit, it will be delivered
through an application update. The application will detect the firmware of
the unit, and if it is older than the current firmware, will request to update
the unit. If there are multiple units requiring update, it will work through all
the units.
Procedure
Once the application determines that a firmware update is needed, it will
notify the user that a firmware update is necessary.
While you may choose to postpone the update, the application and unit will
perform best if the firmware is updated. In addition, if there are new
features supported in the application that require a firmware update, it may
cause unexpected behavior if those features are used and the unit is not
updated.
Prior to starting an update, you should ensure that you have ample battery
power in your batteries. If necessary, close the application to allow you to
change the batteries. Once this is complete, and you start to perform the
update, you will be instructed through the steps of the update.
The update may take up to 5 minutes per unit. You will first be instructed to
place the phone into airplane mode and to then turn Bluetooth on. This will
minimize any interference. You should also look to make sure that the Astro
Units are the only Bluetooth devices within a short range (30 feet). Place the
phone within 1-2 feet of the units and begin the update. The update will
update all units it was connected to at the time of the update start. DO NOT
introduce new units during the update. Once the update is done, the
application will restart. You will need to remove the batteries and place
them back in to do a “reboot” on the unit. It sometimes may take a minute
or two for the app to identify the unit(s), though it is usually much faster. If
you have a flashing LED (i.e. green flashing LED), the unit is not connected to
the application and likely needs the batteries removed/replaced. If the LED
is solid blue, that unit is in the process of being updated. At the end of the
update, a successful update will either turn the LED solid red or flashing red.
If the LED remains blue after 10 minutes, the update has failed. Once all
other updates complete, you will need to have that unit updated again.
Be sure to take your phone out of airplane mode when all updates have
been completed.
Page 17

17
GEAR LIST
This is a list of useful items for shooting time-lapse. You might not need all
the equipment every time, but it is good to have these items on hand.
✓ Camera
✓ Lenses
✓ Tripod
✓ Memory
✓ Batteries
✓ L-Bracket(s)
✓ Astro Core(s)
✓ Ballhead(s)
✓ Cable
✓ ND Filter
✓ Smartphone
✓ Tent or other gear
CHECKLIST
With so many things to control, it is easy to forget something. We always go
through this checklist to help us remember everything.
✓ Charged and spare batteries
✓ Enough memory (freshly formatted SD cards if
possible)
✓ Set lens to manual focus and disable image
stabilization
✓ Set camera to manual
✓ Adjust shutter (not faster than 1/100 seconds; not
slower than your interval allows)
✓ Set the aperture (larger is better)
✓ Set ISO
✓ Set white balance (use a preset)
✓ Set capture format to RAW
✓ Program and connect Astro Core
✓ Level the camera
✓ Focus
✓ Take a couple of test shots
✓ Start the program
✓ Be patient :)
Page 18

18
Moving clouds can be impressive yet difficult subjects; pay close attention
to light changes.
Aperture: Use a small to medium aperture such as f4-f11 to keep everything
in focus.
Shutter: Use fast shutter speeds such as 1/100 seconds, to capture crisp
slow moving clouds. If the clouds are above you and causing a lot of light
variation, it is a good idea to use a slower shutter speed. This would be
typically around 1/3 seconds.
Duration: Depends on how much the clouds are moving. Use 30 minutes – 1
hour.
Rotation: Concentrate on big cloud formations and rotate 15 – 30 degrees.
Interval: Clouds move faster than it appears; use a small interval of 2 – 4
seconds.
Recommend: Camera, Lens, Tripod, Ballhead
Page 19

19
Moving traffic is one of the best scenarios to use slow shutter speeds to
smooth motion.
Aperture: Use a small aperture to keep everything in focus and allow for
long shutter times, f8–f 11.
Shutter: Use a shutter speed of about 3/4 of the interval, allowing some
time for the camera to process the photo. If you are shooting in daylight,
you may need an ND filter to allow for long exposures.
Duration: Fast paced cities are captured best in 15–30 minutes.
Rotation: Since the subject is already moving, a slight rotation of 30–60
degrees goes a long way.
Interval: A 1 – 3 seconds interval will work best.
Recommend: Camera, Lens, Tripod, Ballhead, ND Filter
Busy crowds can be very interesting subjects. Use a slightly long shutter
time to smooth the motion and make it fluid.
Aperture: Use a small aperture such as f8-f11 to keep everything in focus.
Shutter: Your shutter speed should be around 3/4 of the interval to capture
the motion. You might need an ND filter.
Duration: 15 minutes–1 hour.
Rotation: Slight motion will work best, 0–30 degrees.
Interval: Take a photo every 1–3 seconds to keep the motion fluid.
Recommend: Camera, Lens, Tripod, Ballhead, ND Filter
Page 20

20
Some of the most beautiful time-lapse videos capture the sky at night.
Aperture: Use a large aperture such as f2.8-4 and then this will let a lot of
light in and keep the image sharp.
Shutter: You will need long exposure times, between 20–30 seconds.
Make sure you disable long exposure noise reduction (LENR).
Duration: Shoot all night; 6 hours or more!
Rotation: Stars move a lot during the night. If you are pointing straight up,
keep movement to a minimum. We recommend framing a landmark for
orientation and moving anywhere from 0–30 degrees.
Interval: Set the interval a little higher than the shutter duration to allow for
processing time. For example, use a 35 second interval with 30 second
exposures.
Recommend: Camera, Lens, Tripod, Ballhead, Tent and other gear
Using a tilt-shift effect it is possible to make cities look like miniature toy
cities. You can use a special tilt-shift lens or simulate it using software.
Aperture: Use a medium aperture such as f3.6-f5 for maximum sharpness.
Shutter: Use very short exposures, around 1/100 seconds. In this case, it is
desirable to freeze motion to cause a staccato effect.
Duration: 30 minutes – 1 hour.
Rotation: Slight motion will work best; 0–15 degrees.
Interval: Take a photo every 2–5 seconds to keep the motion somewhat
fluid.
Recommend: Camera, Lens, Tripod, Ballhead
Page 21

21
In time lapse videos, flowing water looks like a mysteriously peaceful mist.
Aperture: Use a large aperture such as f2.8-f4 to keep the image sharp.
Shutter: You will need an ND filter to allow for long exposure times of 5–10
seconds.
Duration: 30 minutes–2 hours.
Rotation: Tilt up or down 30–45 degrees to capture a waterfall or pan 15–
45 degrees to capture a river.
Interval: Set the interval a little higher than the shutter speed to allow for
processing time.
Recommend: Camera, Lens, Tripod, Ballhead
The idea here is to capture how shadows move over time, avoid cloudy days
and fast moving subjects. For better results, use a wide angle lens.
Aperture: Use a small aperture to keep everything in focus f 11–f 16.
Shutter: Sharpness is key, use 1/100 seconds.
Duration: 3–5 hours will bring shadows to life.
Rotation: Use 45–90 degrees to get a great field of view.
Interval: To capture the maximum amount of detail, use 20 second
intervals.
Recommend: Camera, Lens, Tripod, Ballhead, ND Filter
LANDSCAPE
Page 22

22
TROUBLESHOOTING
1. Device recognition issues (flashing LED with app open)
If your Astro Core unit is not showing up in the application, there are several
things to try:
a) Ensure you are giving 1-2 minutes to allow the device to be
recognized.
b) Make sure that Bluetooth is enabled in your phone settings.
c) Remove and then replace the battery in the Astro Core.
d) Place new batteries in the unit.
e) Close and restart the Astro Core application.
f) Power down and restart your phone (hold the power button for
several seconds until it shuts down, wait 30 seconds, then power up
again.
g) Try using airplane mode with Bluetooth enabled to determine if
other signal sources are interfering in any way.
h) If you are using Android, see if the phone/OS is recognizing the
device in the Bluetooth settings. If it does not see the device, it is an
issue with the phone, operating system (i.e. Marshmallow has some
issues around Bluetooth device recognition), or possibly the Astro
Core itself. Can the phone be upgraded to resolve a potential OS
issue? Try a different phone if possible to help determine if the
issue is a phone/OS issue. The iOS operating system will not show
devices in the Bluetooth settings. This does not indicate an issue
with the device.
2. Gesture feature issues
a) If your Astro Core does not seem to be calculating the correct
rotation using Gesture Mode, it is likely an issue with the phone.
To help assess this, you can download a free application called
Sensor Kinetics from the App Store or Play Store. Using the
Rotation Sensor feature, you should be able to start a similar
motion using the start button and then stop when the motion is
complete in a fashion similar to the gesture, and then evaluate
the blue ‘yaw’ for pan and the green ‘pitch’ for Tilt to determine
what your phone hardware is providing to the application. If
your phone hardware is not correct, the application cannot be
correct. Look to your phone provider for an update to the
phone software in this situation. Until then, you may be limited
to using Manual Mode.
b) If the duration of the gesture is going longer than expected, this
is because the duration needs to be rounded up to a duration
that can be evenly split into the requested intervals, and split
into 61 segments. Segments are calculated by the phone
gyrometer software. This should not be as noticeable on longer
durations, however may be more noticeable on short durations.
3. Blurry pictures
If you are getting blurry pictures, ensure that your firmware is up to date. If
this does not fix the issue, make sure your interval allows enough time for
movement and settling.
4. Device moving that was not set up to move
If one of your devices is moving during a scenario in which you did not
instruct it to move, use the Stop button to clear the queue for that unit and
start again. It may be running a previously sent scenario that is stored in its
queue. You may use the manual positioning to place the units back in the
starting position.
5. Red Flashing LED
If you have a red flashing LED, the red LED is used for multiple purposes. The
first is that it is on during camera exposures. The rate of the flash will
depend on the scenario you have designed. The LED will stay on for the
whole exposure. If you have speed ramping on, the rate of flash will change.
If you have bulb ramping on, the duration of the red LED will change. The
second use for the red LED is for a low battery. If the battery is low, the red
LED will flash at a consistent rate of 2x per second. The red LED is also used
as an indicator that the firmware update has completed. Either solid red or
flashing red will indicate a completed firmware update.
6. Unit not responding
A unit that needs a reset (removing and replacing batteries) can be
identified by a solid LED when the app is exited and no scenario is being run.
This can happen in a rare instance in exiting the app.
Page 23

23
7. Battery Level Issues
Battery level indicators may show battery level well above zero percent but
the unit is unable to turn. This is because some scenarios take less power to
run than others (i.e. HDR, STL with no movement, etc.). If you plan on
running a scenario with movement, ensure that your battery levels are in
the 80-90% range before starting.
8. Unsupported functions
The Astro Core application does not support multi-unit speed ramping
combined with movement. It also does not support multi-unit Gesture
combined with bulb ramping. The app does not currently prevent the
attempt to use these features, however, these are unsupported and to be
used at your own risk.
FCC Compliance Statement
FCC AND COMPLIANCE
PER FCC 15.19(a)(3) AND (a)(4), THIS DEVICE COMPLIES WITH PART 15 OF THE FCC
RULES. OPERATION IS SUBJECT TO THE FOLLOWING TWO CONDITIONS: (1) THIS
DEVICE MAY NOT CAUSE HARMFUL INTERFERENCE, AND (2) THIS DEVICE MUST
ACCEPT ANY INTERFERENCE RECEIVED, INCLUDING INTERFERENCE THAT MAY
CAUSE UNDESIRED OPERATION.
The Astro Core has been tested and found to comply with the limits for a Class B
digital device, pursuant to Part 15 of the FCC rules. These limits are designed to
provide reasonable protection against harmful interference in a residential
installation. This equipment generates, uses, and can radiate radio frequency
energy and, if not installed and used in accordance with the instructions, may cause
harmful interference to radio communications.
INDUSTRY CANADA COMPLIANCE
PER RSS-GEN, SECTION 8.4, THIS DEVICE COMPLIES WITH INDUSTRY CANADA'S
LICENSE-EXEMPT RSSs. OPERATION IS SUBJECT TO THE FOLLOWING TWO
CONDITIONS: (1) THIS DEVICE MAY NOT CAUSE INTERFERENCE, AND (2) THIS
DEVICE MUST ACCEPT ANY INTERFERENCE, INCLUDING INTERFERENCE THAT MAY
CAUSE UNDESIRED OPERATION OF THE DEVICE.
CONFORMITÉ AUX NORMES D’INDUSTRIE CANADA
SELON LA SECTION 8.4 DU RSS-GEN, CET APPAREIL EST CONFORME A L’EXEMPT DE
LICENCE RSS D’INDUSTRIE CANADA. SON FONCTIONNEMENT EST SOUMIS AUX
DEUX CONDITIONS SUIVANTES: (1) CET APPAREIL NE DOIT PAS CAUSER
D’INTERFÉRENCE ET (2) CET APPAREIL DOIT ACCEPTER TOUTES LES INTERFÉRENCES,
Y COMPRIS LES INTERFÉRENCES POUVANT ENTRAÎNER UN
FONCTIONNEMENTINDÉSIRABLE.
NOTE: ELECTRONIC TECHNOLOGIES, LLC IS NOT RESPONSIBLE FOR ANY CHANGES
OR MODIFICATIONS NOT EXPRESSLY APPROVED BY ELECTRONIC TECHNOLOGIES,
LLC IN WRITING. SUCH UNAPPROVED MODIFICATIONS COULD
VOID THE USER’S AUTHORITY TO OPERATE THE EQUIPMENT.
There is no guarantee that interference will not occur in a particular installation. If
this equipment does cause harmful interference to radio or television reception,
which can be determined by turning the equipment off and on, the user is
encouraged to try to correct the interference by one or more of the following
measures:
• Reorient or relocate the Astro Core.
• Increase the separation between the Astro Core and receiver.
• Consult the dealer or an experienced radio/TV technician for help.
This product should be disposed of separately from household waste.
For more information and customer support visit www.orderastro.com
© 2017 Electronic Technologies, LLC All rights reserved.
Astro and the Astro logo are trademarks or registered trademarks of
Electronic Technologies, LLC in the United States of America and/or
other countries. All trademarks, trade names, icons, logos, written
material, images, code, and product names used in association with
this product are copyrights, trademarks, or other intellectual property
exclusively owned and controlled by Electronic Technologies, LLC.
Adobe After Effects and Adobe Lightroom are trademarks of Adobe Systems,
Inc., registered in the U.S. and other countries. iMovie is a trademark of Apple
Inc., registered in the U.S. and other countries. Windows Movie Maker is a
registered trademark of Microsoft Corporation in the United States and other
countries.
Patent Pending.
Page 24

24
WARRANTY – ASTRO CORE
Electronic Technologies warranties the Astro Core to be free
from defects in materials and workmanship for one year from
the date of purchase. This warranty applies to customers who
properly complete the online product registration form found on
the http://www.orderastro.com Website. Please reference
included literature found above.
If you are unable to use the internet, please fill out and submit
the enclosed warranty registration card to be eligible for the one
year warranty. Electronic Technologies will repair or replace any
components that fail in normal use. Failures due to abuse,
misuse, unauthorized alteration, modification, or repair are not
covered. The warranty is valid only for the original owner who
purchases the unit from an authorized dealer. An original sales
receipt dated within the warranty period is required for all
warranty claims. Please see our website, www.orderastro.com,
for full details.
 Loading...