

Page 1
Instruction Manual
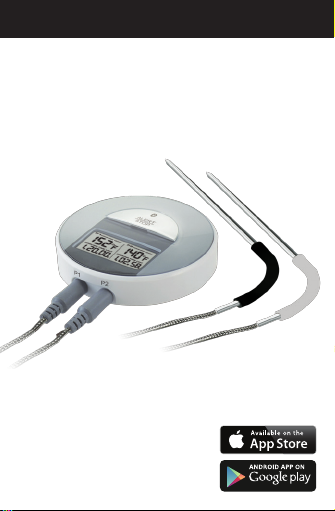
Grill Smart
Page 2
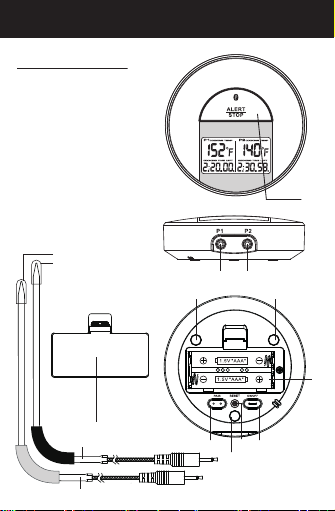
Main Unit
Location of Control
1. Alert button
2. Pair
3. Reset
4. Power On/Off
5. Magnets
6. Battery Compartment
7. Battery Door
8. Probe 1
9. Probe 2
10. Jack 1
11. Jack 2
12. Probe cover
12
7
8
9
1
10
11
55
6
3
2
4
5
Page 3

Features
Thanks you for purchasing Grill Smart.
This product is designed as a bluetooth cooking thermometer
by working with ipad, iphone , iPod or other iOS devices.
• Support IOS version 7.1 or above
• Support Bluetooth version 4.0
• Grill Smart monitoring by mobile App
• Dual probes allow measuring simultaneously
• Pre-programmed doneness temperature or user own
setting
• Timer function
• Record of cooking history with graphical chart and
personal notes
• Social sharing of cooking record and finished food photo
• Selectable alert sound
• Anticipation
• Operating temperature from 0 °C to 50°C
• Temperature measuring range from -40°C to 250°C
• Fahrenheit / Celsius reading
• Simple connection procedures
• Low battery notification
• App multi - language: English, French, German, Spanish,
swedish, Italian, Portuguese.
Page 4
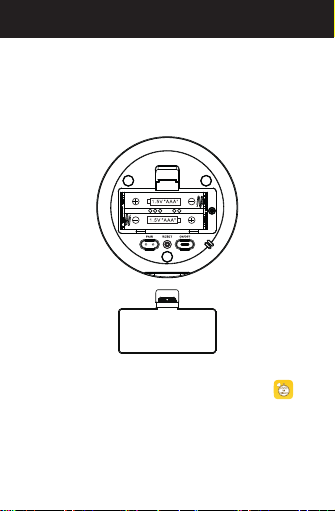
Getting started
Getting started
1. Install battery:
1.1 Open the battery door.
1.2 Insert AAA x 2 batteries in polarity (+) and (-) as indicated.
1.3 Close the battery Door.
2. Install Grill Smart App on your device.
2.1 Access App Store and search for “Grill Smart” .
2.2 Select and install Grill Smart App on your device.
Page 5
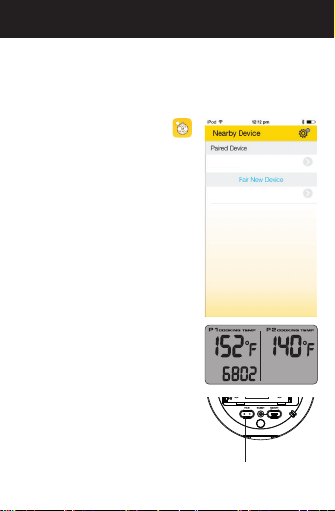
Pairing
3. Pair the cooking thermometer with the Grill Smart app.
3.1 Before running the Grill Smart app, make sure the
Bluetooth is turned ON at your mobile device.
3.2 After you tap the App icon ,
the ‘Nearby Devices’ screen
appears. You need to pair the
cooking thermometer device
before you enter the main app
screen.
3.3 Press the “Pair” button of the
cooking thermometer.
The LCD will show the device
ID under the P1 Temperature
reading e.g. 6802.
3.4 The new BTC_6802 will be
displayed on the App “Pair New
Device’, it is ready for Pairing.
Tap the BTC_6802 will start
the pairing and connection
process. The cooking
thermometer will sound BI-BI
once when it is paired. Then
the BTC_6802 will show on
Paired Device on the App.
BTC_6802
BTC_DB09
PAIR
Page 6
Pairing
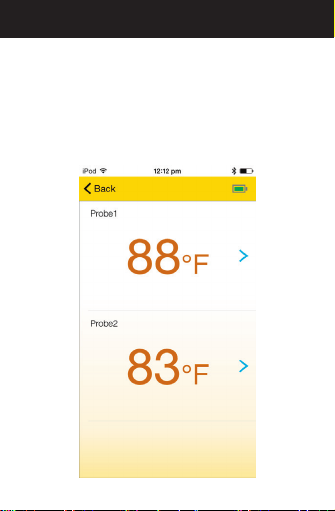
3.5 Tap the BTC_6802 at Paired device to go inside the
App main page.
3.6 If your unit connects one probe the App will show Probe 1
only. If your unit connects two probes the App will show
Probe 1 and Probe 2. You can tap Probe 1 or 2 on screen
to go in details and setting of individual Probe.
BTC_6802
Page 7
Edit probe name
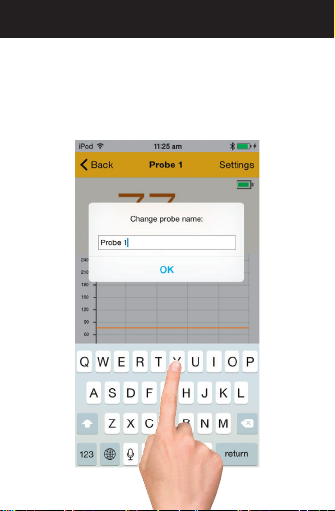
Edit probe name:
Tap the probe 1 / 2, it will pop up change probe name.
User can change the probe name.
Press ok to save.
Page 8

Setting Cooking Parameter
Press Settings on the App to enter cooking parameter menu.
PRESET Mode
Roll the meat column to select meat type. Roll the taste
column to select desired doneness level.
Press Done to start cooking and the screen will return to
main page showing the selected meat type and taste,with
graphical chart showing target temperature and real time
temperature trend.
MANUAL Mode
Roll the temperature column to set the target alert
temperature. Press Done to confirm and start cooking.
Page 9

Change the Temperature Unit
Go to Settings to press either Fahrenheit / Celsius icon to
select temperature unit.
Page 10

Alert Sound Selection
Go to Settings to press the icon to select you desired
alert sound.
Roll the sound type column to select the sound.
Press “ ” icon to listen the sound.
Press “ ” to stop the sound.
Press Done to confirm selection.
You can record your personal alert sound.
Roll the sound type column to Customize 1-5 to record
maximum 5 personal alert sounds. Press the “ ” Icon
to start recording and press “ ” icon to complete the
recording.
Press the “ ” icon to listen the sound.
Press Done to confirm selection.
Page 11

Setting the Timer
You can add 10 timers in the App.
Go to Settings. Press the “ ” icon to enter the timer
page.
Press “ ” and roll the hours and min column to set
your desired time. Press Done to confirm.
Press “ ” icon to start timer.
Press “ ” icon to pause the timer.
Page 12

Setting the Pre-Alert
Go to settings.
Press “ ”icon to enter Pre - Alert setting page.
You can set pre-alert by time or temperature.
Press the Time. Roll the hours and min column to select
your desired time. Press Done to confirm.
Press the Temp. Roll the digit column to select your
desired temperature.
Press Done to confirm.
Page 13

Photo Shooting
You can take photo of you food. Press the “ ” icon to
take photo and it will place at the app screen automatically.
Page 14

Information Sharing
You can share the cooking information as Image, PDF or
CSV through the Social App which installed at your mobile
device or by e-mail. Press the “ ” icon to select the
type of information you want to share.
Page 15

History
Your cooking history will record and store inside the App.
You can recall the information by pressing the “ ” icon.
Press individual history to browse the details.
Page 16

Notes Writing
You can write notes on your cooking record by pressing the
“ ” icon. The notes will attach to your cooking history
and can share through the Information Sharing function.
Page 17

APP Sleep ON / OFF
You can change the APP Sleep ON/OFF.
Select App Sleep on , the App screen will auto off if
your mobile device set as auto lock.
Select App sleep off the App screen will always on.
Page 18

Battery status indicator
Battery status indicator
It indicates the battery level of your GST device. While the
battery level drops below 20%, the battery icon is in red
status and a low battery warning will pop up for to remind
battery replacement.
Meanwhile, low battery indicator icon will shown on the
alarm clock LCD.
Above 60%
Between
20% ~ 60%
Below 20%
Page 19

unit
Grill Smart
buzzer
Manufacturer reserves the right to update the contents
of this manual and App.
space
Page 20

Disposal of Your Old Product
Your product is designed and manufactured with high quality
materials and components, which can be recycled and reused. When
this crossed-out wheeled bin symbol is attached to a product it
means the product is covered by the European Directive
2002/96/EC.
Please inform yourself about the local separate collection
system for electrical and electronic products.
Please act according to your local rules and do not dispose of your
old products with your normal household waste. The correct disposal
of your old product will help prevent potential negative consequences
for the environment and human health.
Disposal of Flat Batteries / Accumulators
You, as the end user, are legally obliged (Battery Ordinance)
to return all flat batteries and rechargeable batteries.
Disposal in the household waste is prohibited.
“European Directive 2006/66/EC” Batteries, including
rechargeable batteries, which contain hazardous substances
are marked by symbols which indicate the prohibition of
disposal in the household waste.
The designations for the heavy metals concerned
are as follows:
Cd = cadmium, Hg = mercury, Pd = lead. You can return flat
batteries / rechargeable batteries free of charge to the
collection points in your community or anywhere where
batteries / rechargeable batteries are sold.
You thus fulfil your statutory obligations and help protect the
environment.
Caution
Replace only with the same or equivalent type of battery, please refer
to the engraved battery marks inside the battery compartment for the
correct battery polarity (+) and (-). Danger of explosion is possible if
battery is incorrectly replaced.
This product complies with the requirement of the 1999/5/EC directive.
Use this unit and mobile phone only in environments with ambient
temperatures between 0°C and 70°C.
The maximum operating temperature of the unit is 70°C
Page 21

xxx-xxxxxx
xxx
 Loading...