

Page 1
Instruction Manual
[For iPod, iPhone and iPad User]
Page 2
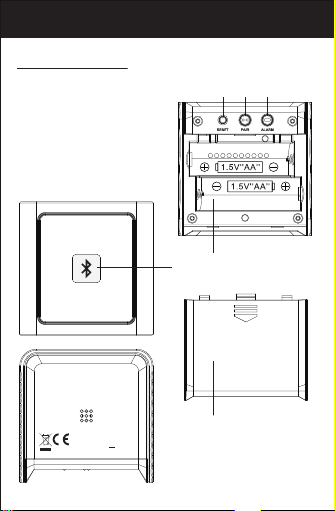
Main Unit
Location of Control
1. Snooze button /
LED indicator
2. Alarm
3. Pair
4. Reset
5. Battery
Compartment
6. Battery door
4 3 2
5
1
FCC ID: PEQA440110813
Electronics Tomorrow Ltd.
Model No: A440
DC 3V 2 X 1.5V - - MADE IN CHINA
6
Page 3

Features
Thank you for purchasing the Alarm Cube. This product is
designed as a Alarm Cube by working with your iPad,
iPhone, iPod or other iOS devices.
- Support iOS version 7 or above;
- Support Bluetooth version 4.0.
- Set wake up buzzer alarm with snooze function, up to 10
alarms.
- Take full control of the Alarm Cube with i-device app via
Bluetooth Low Energy.
- Selectable alarm tone pattern and volume to different
alarms.
- Set count down timer.
- Monitor the battery status of the Alarm Cube and have
battery warning if it is at low level.
Before you start using it
• Please make sure to read the instruction manual
carefully.
• Following and respecting the instuctions in your
manual will prevent damage to your instrument and
loss of your statutory rights arising from defects due
to incorrect use.
• We shall not be liable for any damage occuring as a
result of non-following of these instructions. Likewise,
we take no responsibility for any incorrect readings
and for any consequences which may result from
them.
• Please take particular note of the safety advice!
• Please keep this instruction manual for future
reference.
Page 4
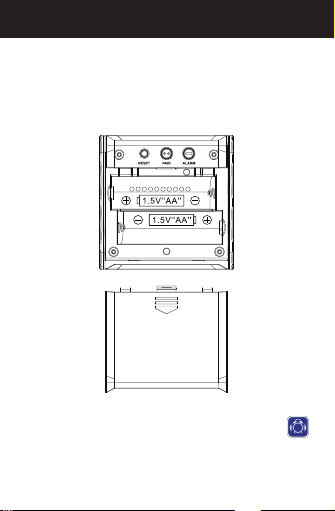
Getting started
1. Install battery
1.1 Open the battery compartment.
1.2 Insert 2 x AA batteries in polarity (+) and
(-) as indicated.
1.3 Close the battery compartment.
2. Install BleAlarm App on your idevice.
2.1 Access app store and search for BleAlarm .
2.2 Select and install BleAlarm App on your
idevice.
BLE
ALARM
Page 5

Pairing the Alarm Cube
3. Pair the Alarm Cube with BleAlarm app.
3.1 Before running the BleAlarm app, make sure the
Bluetooth is turned ON at your i-device.
BLE
3.2 After you tap the app icon , the ‘Nearby Devices’
screen appears. You need to pair the Alarm Cube
device before you enter the main app screen.
ALARM
Page 6
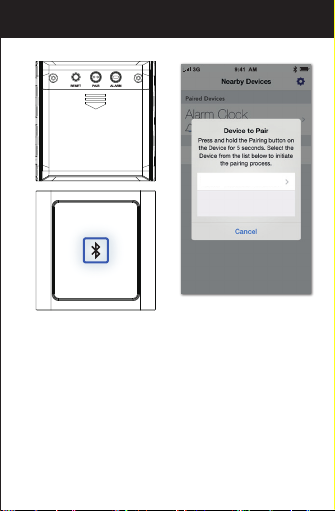
Pairing the Alarm Cube
New Alarm Cube
3.3 Tap “ Pair New Device”
to search for nearby
devices.
3.4 Press and hold the [PAIR]
button on the Alarm Cube
device for 5 seconds. You
can find that the flashing
LED will turn from red to
blue.
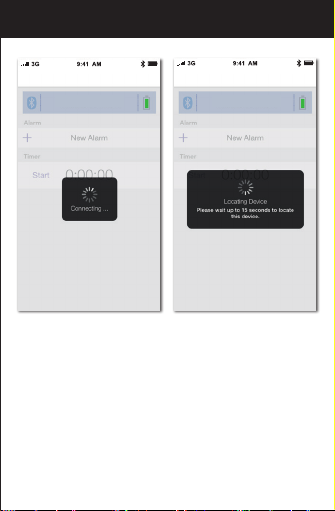
3.5 The new Alarm Cube will
be displayed on App and
is ready for pairing. Tap
the "New Alarm Cube" will
start the pairing and
connection process. Once
the Alarm Cube is paired,
it will start time and data
synchronization.
Page 7
Pairing the Alarm Cube
Alarm Cube Alarm Cube
3.6 After the connection is made, the following information
will be synchronized:
i) Current time and date
ii) Alarms & timer setting
iii) Unit battery level
3.7 When the Alarm Cube is paired with one i-device,
other i-devices cannot pair with it again.
3.8 One idevice can pair up to 5 Alarm Cube.
Page 8

Rename the Alarm Cube
4. Rename the device.
Tap the device name (default is “Alarm Cube”) at the
top of the screen to edit the Alarm Cube device name.
Alarm Cube
Page 9

Battery status indicator
5. Battery status indicator
It indicates the battery level of your Alarm Cube
device. While the battery level drops below 20%, the
battery icon is in red status and a low battery warning is
popped up for battery replacement remainder.
Above 60%
Between
20% ~ 60%
Below 20%
Page 10

Setting the alarm time
6. Setting the alarm time
6.1 Tap [New Alarm] to create a new alarm or tap the
existing alarm to modify.
Alarm Cube
6.2 The alarm setting screen appears. You can edit and
adjust different items on this screen, which include:
i) Alarm Name: Tap to edit you preferred name to this
alarm.
ii) Time: Tap to adjust the time for this alarm.
iii) Day of Week: Tap to select which day of week to enable
the alarm.
- If none is selected, it will be as a once alarm.
- If all days are selected, it will be as a daily alarm.
iv) Sound pattern: Tap to select which tone pattern (5
options plus one random pattern available) is applied to
this alarm.
Page 11

Setting the alarm time
v) Alarm volume level: Tap to select the alarm sound
volume level (three options: Low, Med and High).
6.3 Complete the alarm setting.
i) Tap [Done] to save the alarm setting and go back to
main screen.
ii) Tap [Cancel] to restore to the original alarm setting and
go back to main screen.
iii) Tap [Delete Alarm] to delete the current alarm and go
back to main screen.
Page 12

Snooze operation
7. Using the SNOOZE function
7.1 When the alarm sounds, press the [Snooze] button to
stop alarm and the snooze will repeat three time every
5 minutes.
7.2 “Maximum Snooze” and “Snooze Duration” default
value can be adjusted in the preference screen
according to user own preference.
Page 13

To turn off the alarm
8. To disable the alarm
8.1 When the alarm sounds,
press the [Snooze] button
once or press [Alarm] to
disable the alarm.
8.2 The alarm will sound for
1 minute and stop
automatically. If Snooze
Enabled setting is ON,
the alarm will repeat
every 5 minutes. You can
press the [Snooze] button
to interrupt the alarm
momentarily, or can press
[Alarm] button to turn off
the alarm and stop the
snooze function
completely.
Alarm Cube
8.3 User can tap the alarm
time to disable the alarm
completely ( Please
make sure your app is
paired with the device)
Page 14

Setting the Timer
9. To set the timer
Tap timer of main screen and to go into timer screen.
Alarm Cube
9.1 You can edit and adjust items below on this screen.
i) Timer period:
Turn the roller to adjust the timer period.
ii) Sound pattern:
Tap to select the tone pattern (5 options plus one
random pattern available).
iii) Sound volume level:
Tap to select the sound volume level (three options:
Low, Med and High).
Page 15

Setting the timer
9.2 Using the Timer
In the Home screen, you can tap “Start” under Timer to
start counting.
Alarm Cube Alarm Cube
Then you can tap “Stop” to stop the current timer and
“Start” to re-continue the timer again. The timer can be
reset by tapping the [Reset].
Page 16

Delete the Alarm Cube record
10. Delete the Alarm Cube record.
Alarm Cube
You can tap the at
Nearby Devices screen to
enter the Known Devices
page. By tapping “Edit” and
then the , you can select
“Delete” to delete the Alarm
Cube record on the current
idevice.
Alarm Cube
Cube
Page 17

Preference
11) Preference setting
Tap the to enter the Preference screen. You can
edit and adjust the following items on this screen.
11.1 Snooze Enabled: Tap to select ON/OFF to
enable/disable the Snooze functionality. If 'Snooze
Enabled' is ON, you will have two more options, which
are:
Maximum Snoozes: The maximum number of times to
repeat the snooze function, which can be set to
Unlimited or values from 1 to 9.
Snooze Duration: The time interval between snooze
function, which can be set to values from 1 to 15
minutes.
Page 18

Preference
11.2 Alarm Sound Duration: The alarm duration, which can
be set to values from 1 to 15 minutes.
11.3 Auto DST update: It will adjust Daylight Saving Time
(DST) automatically based on your idevice time zone
setting. The alarm clock will be automatically one hour
ahead of Standard Time in summer time and will be
back to the normal Standard Time when back to winter
time, according to your idevice’s time zone.
11.4 Device Version: The Alarm Cube firmware version is
shown for reference.
Tap [Done] to save the setting or Tap [Cancel] to
restore the setting, and then go back to main screen.
Page 19

Reset the Vibration Alarm
12. Reset the Alarm Cube
If the Alarm Cube is not working
properly, press RESET button
with a pointed object, the LED
flashes twice in (purple) color.
Then the LED will flash once per
6 seconds in red color.
Alarm Cube
After reset, all data in the Alarm
Cube is deleted. And you need
to press and hold the [PAIR]
button again to re-pair the
Alarm Cube. If it has been
paired previously with the same
i-device, you can select
“Restore” to restore all setting
and data or select “Erase” to
start all from scratch.
Page 20

unit
Vibration Alarm
buzzer
space
Page 21

Disposal of Your Old Product
Your product is designed and manufactured with high quality
materials and components, which can be recycled and reused. When
this crossed-out wheeled bin symbol is attached to a product it
means the product is covered by the European Directive
2002/96/EC.
Please inform yourself about the local separate collection
system for electrical and electronic products.
Please act according to your local rules and do not dispose of your
old products with your normal household waste. The correct disposal
of your old product will help prevent potential negative consequences
for the environment and human health.
Disposal of Flat Batteries / Accumulators
You, as the end user, are legally obliged (Battery Ordinance)
to return all flat batteries and rechargeable batteries.
Disposal in the household waste is prohibited.
“European Directive 2006/66/EC” Batteries, including
rechargeable batteries, which contain hazardous substances
are marked by symbols which indicate the prohibition of
disposal in the household waste.
The designations for the heavy metals concerned
are as follows:
Cd = cadmium, Hg = mercury, Pd = lead. You can return flat
batteries / rechargeable batteries free of charge to the
collection points in your community or anywhere where
batteries / rechargeable batteries are sold.
You thus fulfil your statutory obligations and help protect the
environment.
Caution
Replace only with the same or equivalent type of battery, please refer
to the engraved battery marks inside the battery compartment for the
correct battery polarity (+) and (-). Danger of explosion is possible if
battery is incorrectly replaced.
This product complies with the requirement of the 1999/5/EC directive.
Use this unit and mobile phone only in environments with ambient
temperatures between 0°C and 35°C.
Page 22

018-140077
BAC
 Loading...