

Page 1

SummitSummit
3208GLD3208GLD
Installation, OperationInstallation, Operation
and Programmingand Programming
Electronics Line (E.L.) Ltd.
www.elecline.com
ELECTRONICS LINE’S TECHNICAL SUPPORT DEPARTMENT: (972)-3-9211110
Electronics Line (E.L.) Ltd. reserves the right to change the information within this manual without prior notice.
ZI0084A (12/98)
Page 2

2
Page 3

TABLE OF CONTENTS
Introduction.................................................................................................................................................. 3
About the Summit 3208GLD Installation, Operation and Programming Manual...................................................3
Publication Information .........................................................................................................................................3
Chapter One: Overview ...............................................................................................................................4
1.1: Specifications ................................................................................................................................................4
1.2: Zones.............................................................................................................................................................5
1.3: Telephone Dialer ...........................................................................................................................................6
1.4: Remote Programming...................................................................................................................................6
1.5: Other Features...............................................................................................................................................7
Chapter Two: Installation.............................................................................................................................. 8
2.1: Parts and Options..........................................................................................................................................8
2.2: Mounting the Keypad.....................................................................................................................................8
2.3: Wiring Diagram............................................................................................................................................10
2.4: Terminal Connections..................................................................................................................................11
2.5: Fuse Replacement ......................................................................................................................................12
2.6: Turning on the System.................................................................................................................................12
2.7: Testing the System......................................................................................................................................12
Chapter Three: System Operation for the 3106 LED and 3108 LCD Keypads.............................................13
3.1: General........................................................................................................................................................13
3.2: Display and Controls....................................................................................................................................13
3.3: System Status Displays...............................................................................................................................14
3.4: Menu Selections/Direct Commands ............................................................................................................15
3.5: Arming/Disarming........................................................................................................................................16
3.6: User Codes..................................................................................................................................................17
3.7: Emergency and Duress...............................................................................................................................17
3.8: Zone Bypassing/Unbypassing......................................................................................................................18
3.9: Event Log ....................................................................................................................................................19
3.10: System Partitioning....................................................................................................................................19
3.11: Tests..........................................................................................................................................................20
3.12: Additional Operations.................................................................................................................................20
Chapter Four: Programming.......................................................................................................................23
4.1: General........................................................................................................................................................23
4.2: Guide to Programming ................................................................................................................................23
4.3: Programming Procedure.............................................................................................................................23
4.4: Programming Parameters...........................................................................................................................24
Appendix A: Troubleshooting .....................................................................................................................45
Appendix B: Hexadecimal Conversion Chart..............................................................................................46
Glossary ....................................................................................................................................................47
INTRODUCTION
About the Summit 3208GLD Installation, Operation and Programming Manual
This manual is designed to help you, the installer, with the installation process for the Summit 3208GLD We
strongly urge you to read through this manual, in its entirety, before beginning the installation process so
that you can best understand all that this security system has to offer your customers. This manual is not
intended for end user use. End users are encouraged to read the Summit 3208GLD User Manual that
accompanies the system. If you have any questions concerning any of the procedures described in this
manual please contact Electronics Line at (972)-3-9211110.
Publication Information
Catalog Number: ZI0084A (12/98)
3
Page 4

CHAPTER ONE: OVERVIEW
1.1: Specifications
Power Input
Power Output
Zones
Keypads
User Codes
Open/Close
Windows
Remote
Programming
Current
Consumption
Operating
Temperature
Dimensions
Weight
AC: 15Vac, 30VA transformer.
Battery backup: 12Vdc, 6.5 Ah or 7Ah (UL requirement).
Auxiliary power - regulated 12Vdc nominal at 1A max. including keypads and detection
devices for 4 hours standby. (For CSFM Fire applications - 220mA max. including
keypads and smoke detectors for 24 hours standby).
Bell output - regulated 12Vdc nominal from auxiliary power, unregulated 9 – 18 Vdc,
600mA total auxiliary power.
Number of zones - 8 onboard (expandable to 32)
Types - 3108 LCD keypad, 3106 LED keypad
Number of keypads - Up to 8 supervised
Current draw - 40mA without backlight, 60mA with backlight
Distress Keys - 3 user initiated
Number of users – 15
Number of digits per user code - 3 to 6
Authorization levels - 15
Number of windows - 1 opening window + 1 closing window for
each day of the week per sub-system
Window sizes - + 15 min, + 30 min, + 45 min, +60 min.
Equipment - Remote Programmer software package.
Access - Direct (Password), Callback, Off-hook.
Control Panel: Approximately 130mA
3108 LCD Keypad: 20mA without backlight, 60mA with backlight.
3106 LED Keypad: 20mA without backlight, 70mA with backlight.
3508 Zone Expander Module:
10mA
3528 Wireless Zone Expander Module:
10mA
3402 Output Relay Module:
15mA all relays deactivated, 30mA per activated relay.
3407 Output Relay Module:
15mA all relays deactivated, 30mA per activated relay.
3417 Transistor Module:
10 mA all transistors deactivated.
725mA all relays transistors (drawing a max. 100mA each).
0° to 60°C (32° to 140°F).
12” x 12” x 4” (30.5cm x 30.5cm x 10.2 cm).
Approx. 6.5 lbs. (3 Kg).
4
Page 5

1.2: Zones
The Summit 3208GLD comprises 8 on-board zones that are expandable to a total of 32. Both hardwire and
wireless zone expanders are available. Each zone can be precisely configured to suit a wide variety of
applications.
Zone Descriptors
Each zone can be assigned an individual zone descriptor. These can be chosen from the standard zone
descriptor library or from one of the four custom zone descriptors that are programmable by the installer.
Zone Type
One of fifteen zone types can be defined for each zone. The zone type dictates the nature of a specific
zone’s operation. The following is an explanation of each zone type.
Perimeter and Interior Zones
Different methods of arming the system rely on the definition of zones as perimeter or interior. For example,
when the user wishes to remain on the premises, STAY arming secures only perimeter zones allowing free
movement within the protected area. Perimeter and Interior zones can be defined as ‘Normal’, ‘Primary’,
‘Secondary’ or ‘Conditional’.
Normal Zone: A normal zone generates an alarm when opened.
Primary and Secondary Zones: Primary zones never actually generate an alarm; they are always used in
conjunction with secondary zones. A secondary zone will generate an alarm only if opened during the entry
delay of a primary zone. These zones are used when the primary zone is an unprotected area that is
crossed by an intruder to reach the area protected by the secondary zone. This rules out the need to
compromise the sensitivity of the devices installed in the secondary zone to achieve maximum false alarm
immunity.
Conditional Zone: Conditional zones do not generate an alarm when opened during the entry delay otherwise, an alarm is generated instantly. These zones can be used for detectors protecting the area in
which a keypad has been installed or the area crossed in order to reach the keypad.
Common Zone: A common zone belongs to all systems. An alarm will only be generated from a common
zone if all the sub-systems are armed. Common zones are generally used in partitioned systems where a
corridor is shared by more than one protected area.
24hr zones
24hr zones are always operational regardless of system status and will generate an instant alarm when
opened. If an exit/entry delay is defined for a 24hr zone, it will be ignored by the system.
Fire and Verified Fire Zones: Fire zones are designed for use with smoke detectors. A fire zone will
generate an instant alarm when opened. Verified fire zones will not sound an alarm and will not send a
message to the central station unless a second detection has been made within a minute of the first. The
Summit 3208GLD control panel can be programmed to enable automatic or manual power reset for latching
smoke detectors (see address 495).
Emergency/Holdup: Emergency/Holdup zones are 24hr zones designed for use with panic buttons in the
case of holdup situations, medical emergencies etc. It is recommended that glassbreak detectors be
connected to Emergency/Holdup zones.
Tamper: This zone type is used with tamper switches and is designed to prevent unauthorized opening of
the metal housing.
Keyswitch zones
Two zone types offering different operational modes are available for use with a momentary keyswitch.
On/Off STAY and On/Off AWAY: A keyswitch zone can be defined to either STAY or AWAY arm the
system.
Swinger Zones
Swinger zones limit the amount of alarms that can be sent from a specific zone within a predetermined time
period. This feature is designed for use with zones that are highly prone to false alarms. The swinger
parameters are programmed at address 388 and at the second address for each specific zone.
5
Page 6

System Partitioning
The system can be partitioned into a maximum of 4 independent sub-systems with individual account
numbers, keypads, user codes and relays assigned exclusively for each sub-system. A sub-system is
created when at least one zone is assigned to it.
1.3: Telephone Dialer
The Summit 3208GLD allows for up to four different telephone numbers to be programmed into the system
using either pulse or tone dialing. The Summit 3208GLD supports several communication protocols
including pulse protocols enabling communication with most popular central station receivers. Up to 16
digits can be programmed for each telephone number. Different groups of event messages (Burglary, Fire,
Open/Close messages etc.) can be programmed for single or multiple central station notification, enabling
notification of up to four central stations. Message transmission can be programmed as Primary, Backup or
Duplicate.
In some cases the central station handles events reported per zone and in others per event. Additionally, an
event code can comprise of either one or two digits and can include additional information such as the user
number in opening and closing messages or zone ID in event oriented zone messages. These codes are
usually assigned by the central station - consult the central station operator for a listing of the different event
codes.
Follow-me
Using the Follow-me feature, the panel can notify the user that the system has undergone certain events by
sounding a sequence of tones over the telephone. The user acknowledges that the message has been
received by pressing 0, 9 or # on their telephone. If this acknowledgement is not received within the oneminute time window, opened the moment the panel starts dialing, the control panel redials. The number of
dialing attempts made depends on the value programmed at address 197.
Telephone #4 is designed for use with this feature, as it is the only telephone number that can be easily
programmed by the user, without the need to enter programming mode.
Telephone Line Supervision
Approximately 20 seconds after the telephone line is cut, all keypads sound a trouble beep and the
message “Telephone Comm. Failure” appears on LCD keypads.
1.4: Remote Programming
Electronics Line’s remote programming software enables all programming and operation to be performed
from a PC. This can be done from either a remote location or on-site using the ‘Off-hook’ communication
option. The software provides a comprehensive interface to the Summit 3208GLD control panel facilitating
and cutting down the time taken in programming the system.
A number of programmable options, relating to when and how RP communication is established, are
available at address 496. The tollsaver feature, RP Callback, makes remote programming more costeffective and increases the level of security. Using this feature, the Remote Programmer establishes a
connection with the panel. The panel recognizes the passcode, hangs up and calls the number programmed
at addresses 172-179 within 60 seconds.
Answering Machine Override
Answering machine override enables the control panel to distinguish between regular incoming calls and a
communication attempt by the RP (remote programmer) software. An RP call is identified by the control
panel as a sequence of two calls within a 30-second time window.
1. The control panel does not answer the first incoming call.
2. The control panel opens a 30-second time window from the moment the telephone stops ringing.
3. The control panel answers after 1 ring and RP communication is established.
Note: The 30-second time window will only start if the number of rings in first call exceeds the
number of rings set for the control panel. For example, if the control panel is programmed to pick
up after 3 rings, the time window will not start unless the first call was at least 3 rings.
6
Page 7

1.5: Other Features
Opening and Closing Windows
This feature helps cut down on the amount of opening and closing reports sent to the central station. The
opening and closing windows are programmable windows of time, during which the user usually arms or
disarms the system. Disarming during an opening window or arming during a closing window does not send
a report to the central station. If the system is not disarmed or armed during the appropriate window, a
‘Failed to Open’ or ‘Failed to Close’ message is sent to the central station.
The Summit 3208GLD offers the opportunity to choose from a list comprising three opening and four closing
window times. The times in this list can be programmed according to the user’s entry and exit scheduling
requirements. If required, the user can activate the ‘Late to Close’ command to extend the closing window
period for that day. The user may opt to program an auto arming time at the end of a closing window so that
the system automatically arms itself at a set time. This prevents situations where the system is left unarmed
at the end of the day.
Latch-Key
The latch key feature has been designed to inform parents whether their children have arrived home safely
and on schedule. The panel sends a ‘Failed to Open’/‘Failed to Close’ message to the central station or
follow-me number if the MENU/NEXT key is not pressed during the appropriate window.
Dealer Lockout
The control panel’s parameter settings can be restored during the 60 seconds following power-up using the
unalterable code “123456”. Activating Dealer Lockout disables this feature and the code can only be
restored using the RP software.
7
Page 8

CHAPTER TWO: INSTALLATION
LCD Module
LED /
GND - + VDD
2.1: Parts and Options
Standard Parts
Summit 3208GLD Household Burglary Alarm Control Panel without keypad 1 each
2.2K ohm burglary End Of Line Resistors 8 each
Installation, Operation, and Programming Manual 1 each
User Manual 1 each
Optional Parts List
3106 LED Keypad
3108 LCD Keypad
3407 7 Relay Output Relay Module
3508 8 Zone Expander Module
3528 Wireless Zone Expander
RP3206 Up/Downloading Software
3911 Up/Downloading Remote Programmer & RS232 Cable
12Vdc Adapter for Remote Programmer
12Vdc/7Ah battery
3722 15Vac 30VA Transformer
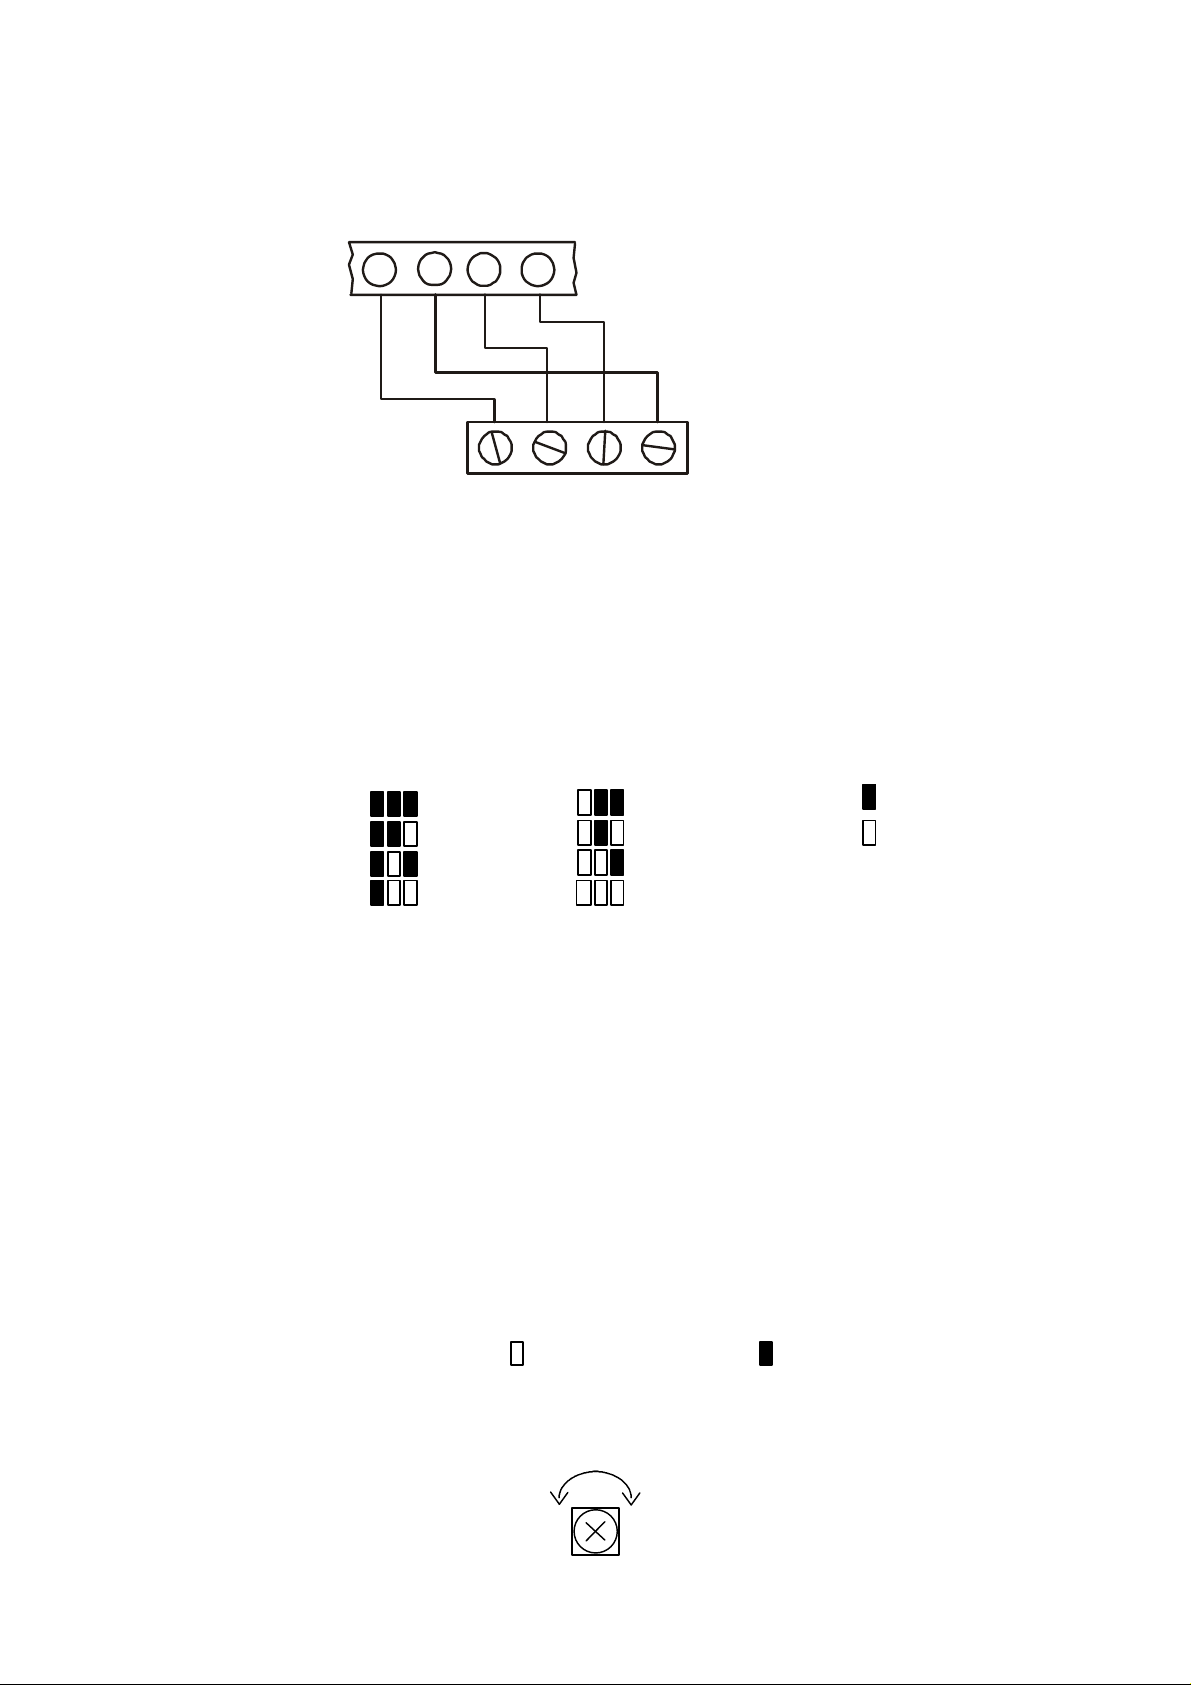
2.2: Mounting the Keypad
Both the LCD and LED keypads are supplied configured to keypad address 1 in unsupervised mode. To
connect the keypad/s you will need a small flat-head screwdriver. The maximum recommended distance
between the control panel and the keypad is 1,000m (3,000ft.).
LED / LCD Module - rear view, cover removed
LCSP
terminal block
G
B
R
L
E
A
E
C
N
K
LSCP
W
H
I
R
T
E
E
D
LCD Contrast
trimmer
Buzzer
MicroController
Jumpers
B
S
C
A
Tamper
Switch
8
Page 9
Keypad Wiring Connections
VDD
WHITE
LSCP
CONTROL PANEL
Supervised
Unsupervised
S
GNDVDD
5 6 7
BLACK
LSCP
+
-
8
GREEN
RED
KEYPAD
GND
Keypad unit address
Up to eight individually addressed supervised keypads can be installed with the control panel. If more than
one keypad is installed with same unit address, all keypads must be configured as unsupervised.
To configure the keypad unit address:
1. Using a small flat-head screwdriver, open the back cover of the keypad.
2. Locate the jumpers marked “CBA”.
3. Install the jumpers according to the diagram below.
4. Disconnect and reconnect the power supply.
Keypad 1
Keypad 2
Keypad 3
Keypad 4
Keypad 8
-
Keypad 5
Keypad 6
Keypad 7
+
CBACBA
Jumper installed
Jumper removed
On LED keypads, the keypad’s system defines which zone expander is associated with the keypad. See
Addresses 132-139 for keypad system allocation.
System 1: Zone Expander A System 2: Zone Expander B
System 3: Zone Expander C System 4: Zone Expander D
Note: If zone expander A is not in use, the control panel’s 8 onboard zones are displayed from a
System 1 keypad.
Keypad supervision
A supervised keypad will generate an alarm should it become disconnected from the control panel.
To configure the keypad supervision setting:
1. Using a small flat-head screwdriver, open the back cover of the keypad.
2. Locate the jumper marked S.
3. To configure the keypad in supervised mode, remove the jumper.
S
Adjusting the display contrast on the LCD keypad
If the LCD display is unclear, the contrast may be adjusted using the LCD contrast trimmer.
Bright
Dim
9
Page 10
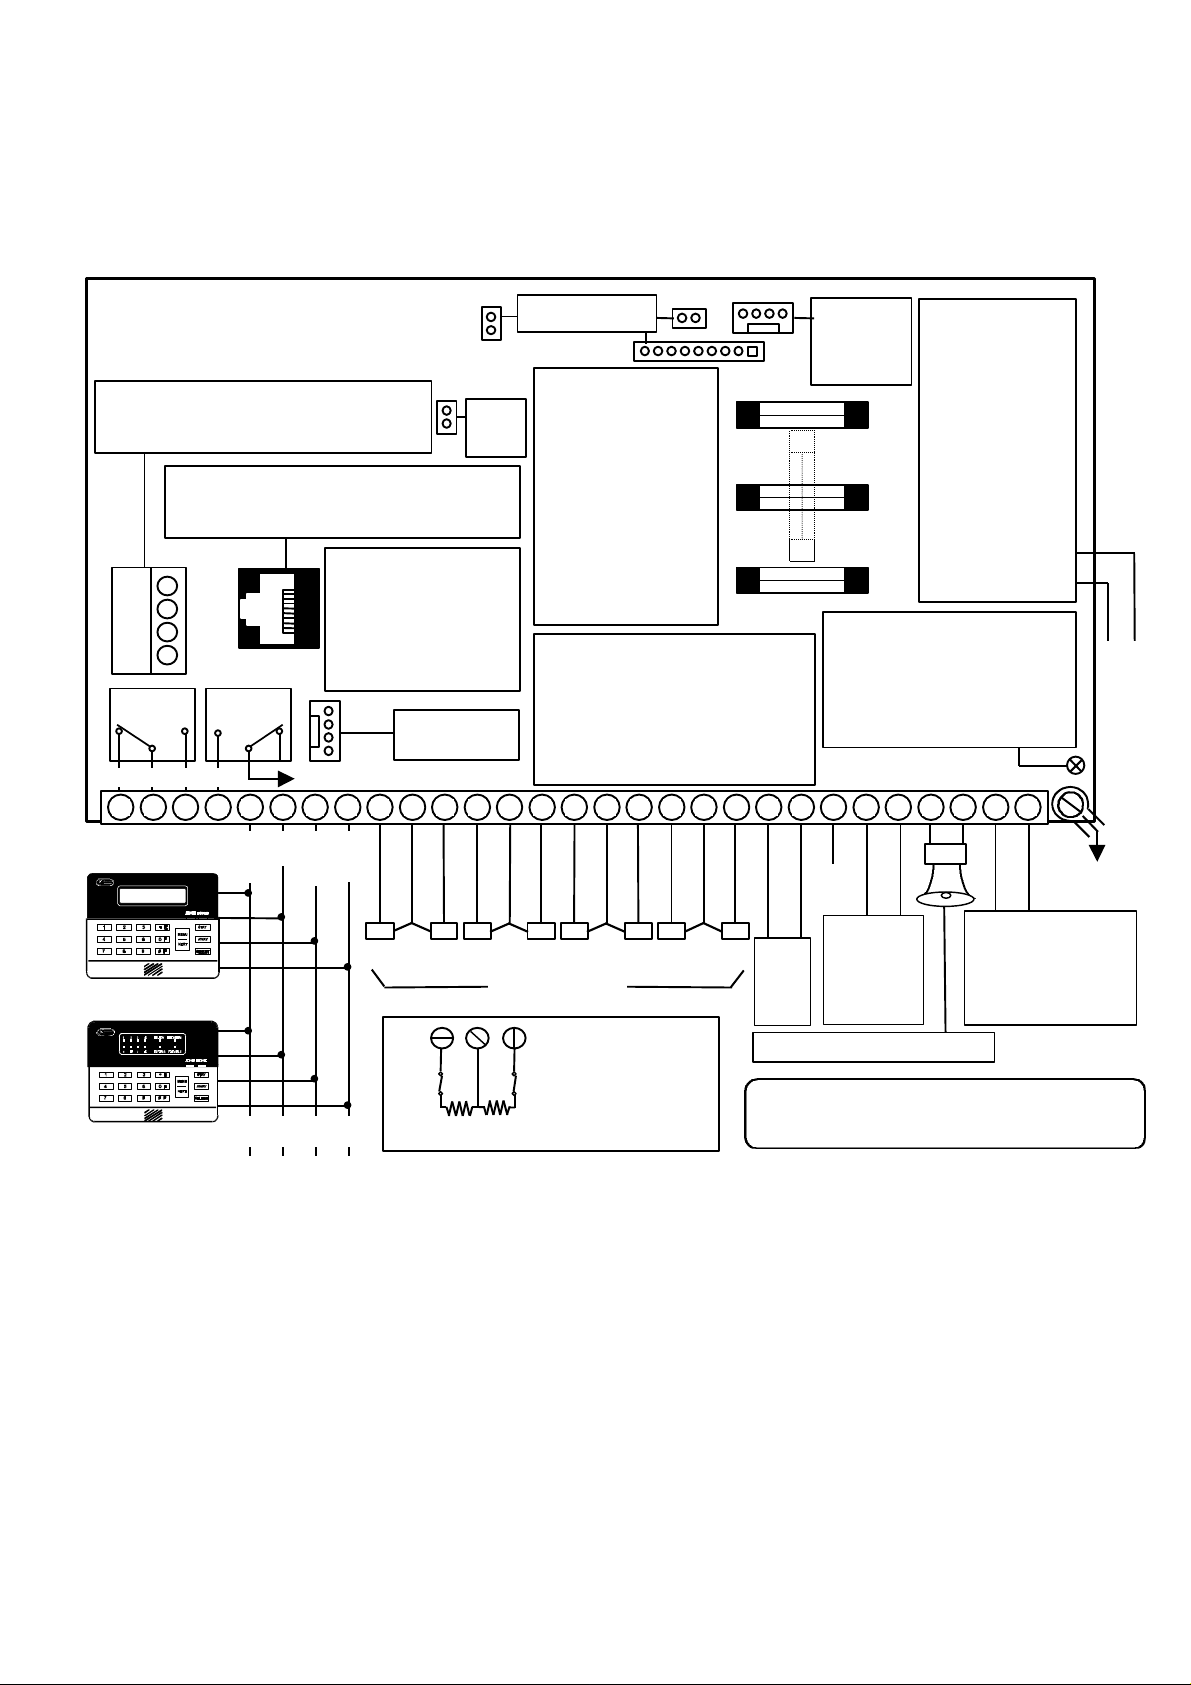
2.3: Wiring Diagram
BLACK
RED
4
terminals 24 and 25)
the Installation manual
to Earth
+
-
2.2K
N.C.
2.2K
BLACK
RED
GREEN
WHITE
+ -
Electronics Line (E.L.) Ltd.
SUMMIT 3208GLD
Household Burglary and Fire Alarm Panel
TELCOM
1 & 2: Outgoing line to telephone
3 & 4: Incoming line from telephone company
TELCOM
4 & 5: Incoming line from telephone company
3 & 6: Outgoing line to telephone
1
2
3
J4
-or-
K5
N.C. C. N.O. N.O.
1
8
K6
Internally connected to + AUX Power
8-POSITION
TELEPHONE SOCKET
Attach the incoming
telephone line and
telephone according to the
instructions provided in
Factory
LSCP Bus
Connector
Test
Point
For Future Use
PROTECTION FUSES
F1 (BATT): 3A/250V
(bel 5MF3)
F2 (AUX): 1.6A/250V
(bel 5MF1.6)
F3 (BELL): 3A/250V
(bel 5MF3)
Install F3 horizontally to
supply 12V nominal
regulated power to bell.
Install vertically to supply
9-18V unregulated to
AUXILIARY POWER OUTPUT
Regulated 12Vdc nominal.
Fire: In accordance with CSFM (Fire)
supplies 220mA for 24 hours.
Burglary: Supplies 1A for 4 hours
(including 100mA to smoke detector,
Long Range
Radio
Interface
Connector
F1
12V/7Ah
BATTERY
Use
POWERSONIC
PS-1270 or
YUASA NP7-12
Replace the battery
every 3 - 5 years
F3
F2
LED SYSTEM
STATUS INDICATOR
On = Telephone Tone Detection
Off = System in Communication
Flashing = Dialing
Flashing (1 pulse/sec) = Standby
Mic
2928272625242322212019181716151413121110987654321
Connect
Use Electronics Line
3108 LCD Keypad
Use Electronics Line
3106 LED Keypad
LSCP Bus
Z1 Z2 Z3 Z4 Z5 Z6 Z7 Z8
Zone Connections
Typical End of
Line Resistor
N.C.
Zone
Connections
(EOLR)
Smoke
(+) (-)
AUX
Power
Output
Siren Audio Output: 8Ω, 8W
OBSERVE PROPER WIRING CONNECTIONS!
Refer to the Installation manual for further information
Detector
Output
12V nominal
max. 100mA
Transformer
15Vac/30VA
Do not connect to a
switch-controlled
receptacle
Label Part Number:
ML0032A (1/99)
Page 11
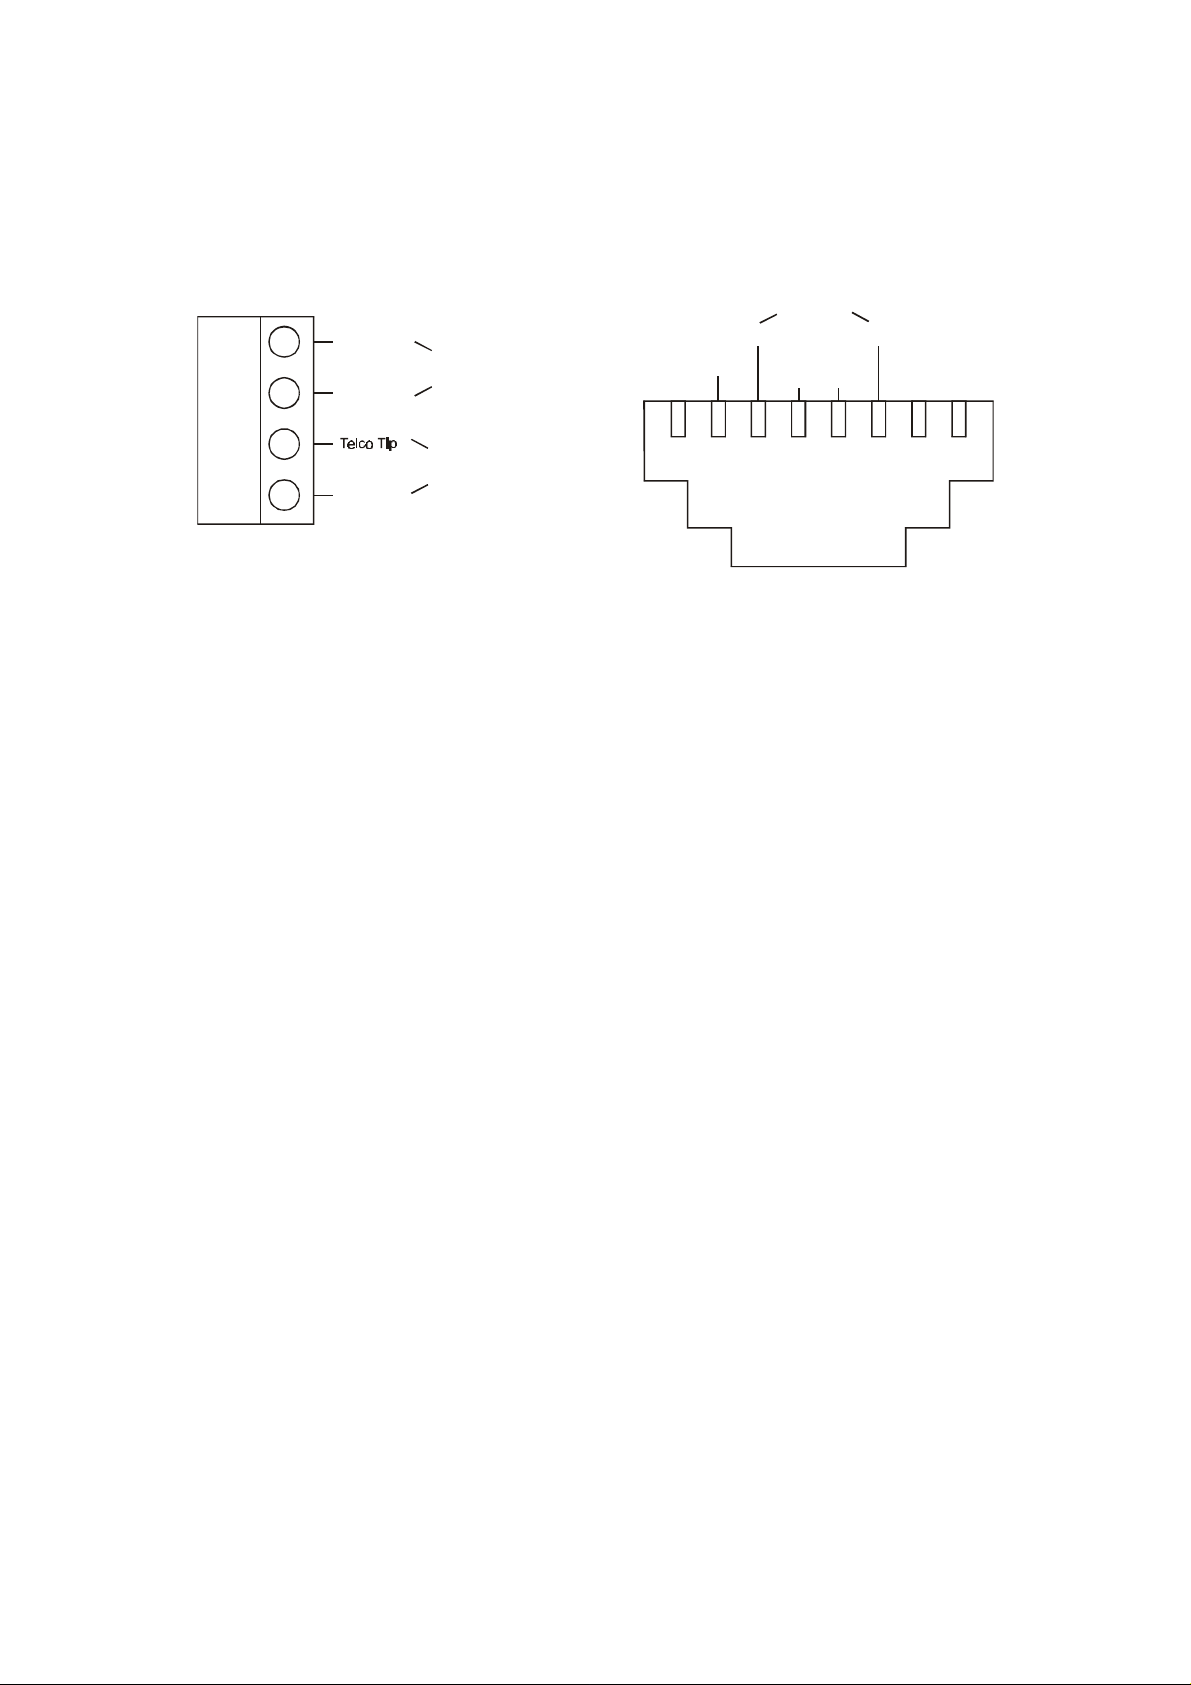
2.4: Terminal Connections
1
2
3
4
5
6
7
8
Earth
Incoming Line
from Telephone
Telephone Connections
Connector J4:
The telephone line should be connected as follows:
Company
1
2
Home Tip
Home Ring
Outgoing Line
to Telephone
L-
Outgoing Line
to Telephone
L-
-Or-
3
4
On-Board Relay Contacts
Terminals 1, 2, 3 and 4:
K5: 1 - N.C., 2 - Common, 3 - N.O.
K6: 4 - N.O. (Relay K6 is internally connected to + AUX power supply)
Keypad Connections
Terminals 5(-), 6(+), 7(LSCP-), 8(LSCP+):
5 (Black) Common Ground -, 6 (Red) AUX power +, 7 (Green) LSCP - signal, and 8 (White) LSCP + signal.
Make sure that the wires are connected to the same connections on the keypad.
Telco Ring
Incoming Line
from Telephone
Company
8-Position Telephone Socke
L+
L+
t
Zone Connections
Terminals 9(+), 10(-), 11(+), 12(+), 13(-), 14(+), 15(+), 16(-), 17(+), 18(+), 19(-), 20(+):
Zone 1:
Zone 2:
Zone 3:
Zone 4:
Terminals 9 and 10
Terminals 11 and 10
Terminals 12 and 13
Terminals 14 and 13
Zone 5:
Zone 6:
Zone 7:
Zone 8:
Terminals 15 and 16
Terminals 17 and 16
Terminals 18 and 19
Terminals 20 and 19 (Fire by default)
Auxiliary Power Output
Terminals 21(+), 22(-):
Regulated 12Vdc nominal at 1A max. including keypads and detection devices for 4 hours standby. (For
CSFM Fire applications - 220mA max. including keypads and smoke detectors for 24 hours standby).
Microphone
Terminal 23
Microphone input for listen-in applications (software dependant).
Smoke Detector Power Output
Terminals 24(+), 25(-):
These terminals provide up to 100mA for powering latching smoke detectors. The smoke detector output is
active low and is restored either automatically or manually.
Bell Power Output
Terminals 26(+), 27(-):
Connect these terminals to supply power to the bell. The power requirements are as follows: AUX power
(12Vdc nominal regulated; 9 - 18Vdc unregulated), rated at 600mA. with 40VA transformer.
AC Power Input
Terminals 28, 29:
Connect a 16.5Vac Class II transformer rated at 40VA, using 18AWG wire.
11
Page 12

2.5: Fuse Replacement
There are 3 protection fuses on the Summit 3208GLD control panel board, the layout of the fuses is shown
in the following diagram:
Battery
Protection Fuse
3 Amp / 250V
Bell Power Output
Protection Fuse
3 Amp / 250V
AUX Power Output
Protection Fuse
1.6 Amp / 250V
F1 (Battery Protection Fuse): Protects the battery charger circuit and the control panel from a short circuit.
To replace this fuse use a bel 5MF3 or other 3A/250V fuse.
F2 (Bell Power Protection Fuse): Protects the active bell output (terminal 26). When the fuse is installed
in the horizontal position 12Vdc nominal regulated power is supplied to the bell. When the fuse is installed
in the vertical position, unregulated (approx. 9 to 18Vdc) power is supplied to the bell and terminal 28. To
replace this fuse use a bel 5MF3 or other 3A/250V fuse.
F1
F3
F2
F3 (AUX Power Output Protection Fuse): Protects terminals 6 (keypad power), 21 (AUX output) and 24
(smoke detector power output). To replace this fuse use a bel 5MF1.6 or other 1.6A/250V fuse.
MAKE SURE YOU REPLACE A FUSE WITH THE CORRECT RATING !
2.6: Turning on the System
Once all of the systems components are properly connected to their destination terminals, the Summit
3208GLD is ready to be turned on. To avoid the risk of electrical shock or damage to the control panel,
make sure that both the AC supplier and the battery are connected properly before plugging in the system.
If you experience any difficulties in applying power to the unit, please contact Electronics Line’s Technical
Support Department.
2.7: Testing the System
All system functions can be tested manually using the LED or LCD keypads. Additionally, circuit tests also
performed automatically by the control panel. For further information on testing using the keypads, see
3.11: Tests.
12
Page 13

CHAPTER THREE: SYSTEM OPERATION FOR THE 3106 LED AND 3108 LCD KEYPADS
Display
Display
Indicators
Key
LED Keypad
LCD Keypad
3.1: General
The Summit 3208GLD can be operated by using either the 3108 LCD or 3106 LED keypads. All the parameters
can be programmed using either the LCD keypad or the Remote Programmer software. Refer to Chapter Four:
Programming, page 23, for instructions relating to programming the system.
3.2: Display and Controls
Keypad Layout
LED
Numeric
Keypad
Buzzer
LCD
Status
Arming
Keys
Select
LED Display
1 - 8: Used to display zone status and system status.
READY: Indicates if the system is ready to perform functions.
PROGRAM: Indicates if the system is in programming mode. The Program LED lights up if SELECT is pressed
and blinks to indicate that the system is waiting for an authorized user code to be entered.
BYPASS: Indicates if zones have been bypassed. The Bypass LED and the relevant zone LEDs blink to
indicate that zones have been bypassed.
TROUBLE: Blinks if a trouble situation exists within the system (telephone communication failure).
Status Indicators
ARMED: On when the system is armed, off when the system is disarmed.
Note: If the keypad is programmed to display all systems, the Armed LED lights up only when all
systems are armed.
POWER: On when both the AC and the backup battery are connected, provided that the voltage supplied by
the battery is over 10.8V and AC power supply is between 50 - 60 Hz. The indicator blinks slowly when the
battery is low and turns off to indicate AC power loss.
System Trouble Chimes
The keypad indicates certain trouble situations, such as AC loss and low battery by chiming. Pressing any
key on the keypad terminates these chimes.
13
Page 14

Keys and Keypad Functions
0 - 9: The numeric keys are used to enter user codes, telephone numbers, to issue commands and for numeric
programming.
Q , #: These keys are used in programming the control panel. Pressing the Q key during the exit delay cancels
the delay, immediately arming the system. On the LCD keypad, the Q key is used for scrolling back during
operation and programming. The # key is used for entering hexadecimal digits (A - F) during programming.
MENU/NEXT: On the LCD keypad, pressing the MENU/NEXT key displays the main menu and is used to scroll
through the menu items. On both the LCD and LED keypads the MENU/NEXT key is used to log in an arrival
when using the latch key feature. Additionally, the MENU/NEXT key generates an emergency alarm when held
down simultaneously with one of the distress keys (E, F or P).
SELECT: Pressing SELECT followed by a command code causes a system function to occur. On the LCD
keypad, pressing this key when a menu is open results in the selection of the menu item.
STAY: Pressing STAY, when the system is ready to arm, arms only the system's perimeter zones.
AWAY: Pressing the AWAY key, when the system is ready to arm, arms both the perimeter and interior zones.
On the LCD keypad, pressing AWAY returns the display back to the main menu when scrolling or
programming.
Note: If one-key arming is enabled, the user can arm the system using the STAY and AWAY keys
without having to enter a user code.
3.3: System Status Displays
On the LED keypad system status is displayed using the eight zone LEDs as well as the Ready, Program,
Bypass and Trouble LEDs. LEDs 1 - 8 represent alarm situations from the corresponding zone. The other LEDs
show if the system is ready, whether zones are bypassed, if the system is in programming mode and if a trouble
condition exists.
The LCD display of the system status includes descriptions of open zones, alarms, etc. The following are
typical LCD displays:
Arming Display
Description Display
System ready to arm SYSTEM 1 READY
System ready to arm with bypassed zones SYSTEM 1 READY
(BYPASSED)
System not ready to arm due to open perimeter zones SYSTEM NOT RDY
(OPEN ZONES)
System armed, exit delay counting SYSTEM 1 ARMED
011 SEC TO EXIT
System ready for perimeter arming (interior zones open) SYSTEM 1 READY
FOR STAY ARMING
System ready for perimeter arming with perimeter bypassed
zones
System armed, exit delay ended - system is fully armed SYSTEM 1 ARMED
SYSTEM 1 READY
FOR STAY (BYPASSED)
14
System Perimeter armed, exit delay ended (STAY pressed) SYSTEM 1 ARMED/P
System armed, immediate mode SYSTEM 1 ARMED
IMMEDIATE
Page 15

Zone Status Display
Zone status will only be displayed if detailed display is selected
Zone 1, Bedroom, is open ZONE 1 OPEN
BEDROOM
Zone 3, Front Door, has been bypassed ZONE 3 BYPASSED
FRONT DOOR
Zone 4 has been tampered with ZONE 4 TAMPER
Zone 4, bedroom, is in alarm ZONE 4 IN ALARM
BEDROOM
System Status Display
AC power has been disconnected: SYSTEM AC LOSS
Backup battery is low (under 10.8V) or has been
disconnected:
Communication failure or the telephone has been
disconnected:
Time and Date display (scrolls every few seconds): THU, 28 JUL 94
Refer to Appendix A for information on returning system status display to normal.
SYSTEM LOW BATT
TELEPHONE COMM.
FAILURE
12:37 PM
3.4: Menu Selections/Direct Commands
There are two ways to perform a command on the control panel:
• Direct commands (LCD and LED keypads)
• Menu selections (LCD keypad only)
Direct Command Codes
To perform a direct command:
1. Press “SELECT”.
2. Enter the operation code for the desired command (refer to the “Command Codes” table below).
3. If prompted to, enter an authorized user code; an acknowledgment tone is sounded to indicate that the
command has been performed.
Command Codes
Disarm System X (1 - 4)
1X
Perimeter Arm System X (1 - 4)
21X
Normal Arm System X (1 - 4)
22X
Late to Close HHMM
23X
Bypass Zone X (1 - 32)
31X
Unbypass Zone X (1 - 32)
32X
Chime On
33
Chime Off
34
Unbypass All zones
39
Set Time HHMM, DDMMYY
41
Walk Test
421
Bell Test
422
Telephone Test
423
System Test
425
Battery Test
426
Fire Sensor Reset
43
Bell Cancel
44
Stop Telephone Call
45
Follow Me
46
User Codes
5
View Log
61
Clear Log
62
Show Versions
64
Manual Programming
71
Default Programming 1
72
Default Programming 2
73
Remote Programming: off hook
741
Remote Programming: Callback
742
Reset Relay X
83X
Set Relay X
84X
Access Control
9
15
Page 16

Menu Selections Using the LCD Keypad
To make a menu selection from the menu:
1. Press MENU/NEXT; the main menu will be displayed and the selection pointed to by >.
2. Press MENU/NEXT to scroll through the menu items. Pressing “Q“scrolls backwards and pressing any
numeric key displays that number’s associated menu item. To abort at any time, press AWAY.
3. Press SELECT to select the displayed menu item (indicated by the arrow). Certain menu items may require
an authorized passcode.
Example:
Selection Display
Pressing MENU/NEXT for the first time displays >1 OPEN / DISARM
NEXT. . .
Pressing MENU/NEXT displays the next menu item in the
same menu:
Pressing SELECT when the CLOSE/ARM menu is selected
displays
Note: The selection numbers are the direct command numbers for specific menu items. These commands can be performed without having to scroll through the menus. For further information, refer to
the direct command operating procedure.
>2 CLOSE / ARM
NEXT. . .
>21 PERIM ARM
NEXT. . .
Main Menu
1 - DISARM 421 - WALK TEST 7 - PROG.
2 - ARM 422 - BELL TEST 71 - MANUAL PROGRAMMING
21 - PERIMETER ARM 423 - TELEPHONE TEST 72 - LOAD DEFAULT PROG. #1
22 - NORMAL ARM 425 - SYSTEM TEST 73 - LOAD DEFAULT PROG. #2
23 - LATE TO CLOSE 426 - BATTERY TEST 74 - REMOTE PROGRAMMING
3 - BYPASS 43 - FIRE SENSOR RESET 741 - OFF HOOK
31 - BYPASS ZONE 44 - BELL CANCEL 742 - CALLBACK
32 - UNBYPASS ZONE 45 - STOP COMMUNICATIONS 8 - AUX RELAY
33 - CHIME ON 46 - FOLLOW ME 83 - RESET RELAY
34 - CHIME OFF 5 - USER CODES 84 - SET RELAY
39 - UNBYPASS ALL 6 - VIEW/LOG 9 - ACCESS CONTROL
4 - SERVICE 61 - VIEW LOG
41 - SET TIME & DATE 62 - CLEAR LOG
42 - TEST 64 - SHOW VERSIONS
3.5: Arming/Disarming
Arming & Disarming
To arm the system:
• Press AWAY to arm both the perimeter and interior or STAY to arm the perimeter only; the Armed LED
lights up to indicate that the system is armed.
The system can also be armed by entering an authorized passcode or by selecting one of the arming options
from the Arm menu.
To disarm the system:
• Enter an authorized passcode. If the system is in alarm, entering an authorized passcode will disarm the
system and terminate the alarm.
Forced Arming
Forced arming enables the user to arm the system even if all zones are not secured. If zones are still not
secured after the exit delay has ended, an alarm will be generated. The ability to force arm the system is
optional and is selected at address 494.
Note: Electronics Line recommends waiting until all of the zones are secured and the system can be
armed normally.
16
Page 17

Immediate Arming
The system can be immediately armed, canceling the entry or exit delay for the arming period.
To arm the system immediately:
• Press Q during the exit delay; the delay is cancelled and the system is armed immediately.
Note: Immediate arming disables both the exit and entry delays for the arming period.
3.6: User Codes
Most operations executed from the control panel require a user code. Different user code authorization levels
restrict certain functions to specific users. That is to say, of the 15 users that are able to operate the system, not
all of them have access to all system operations. For example, an installer with a level 12 user code can only
test and program the system. The installer does not have the ability to arm and disarm the system, which
maintains a high level of security for the user. Each of the 15 user codes can be programmed with 3 to 6 digits.
Each user code has an authorization level and can be assigned to either a specific sub-system or to all
systems.
The following list explains each of the authorization levels:
Level 0 No functions are assigned to the user code
Level 1 Allows only normal arming (AWAY), interior & perimeter zones
Level 2 Operations of Level 1 + Perimeter arming (STAY)
Level 3 Same as Level 2
Level 4 Operations of Level 3 + Disarming, bell cancel, chime on/off, fire sensor reset and auxiliary relay
operations
Level 5 Operations of Level 4 + view log, Follow-me telephone number programming and access control
Level 6 Operations of Level 5 + Zone bypass/unbypass, clock setting, late to close, clear log, remote
programming and stop call
Level 7 Operations of Level 6 + User code programming
Level 8 Same as Level 7
Level 9 Operations of Level 7 + Tests
Level 10 Operations of Level 9 + Programming
Level 11 Not available at this time
Level 12 Allows only tests & programming
Level 13 Allows only view & clear log
Level 14 Allows only tests
Level 15 Duress code level allows arm, disarm, stop call, bell cancel and fire sensor reset
3.7: Emergency and Duress
Distress Keys
In the case of an emergency, 3 types of alarm can be generated from the keypad.
To generate a distress key alarm.
1. Press and hold down the MENU/NEXT key.
2. Keeping the MENU/NEXT key held down, press the required distress key, for more than 1 second; the
relevant event code is reported to the central station and, if programmed, the bell is activated.
The distress key combinations are:
• MENU/NEXT and E - Emergency (Event code at address 255 or 289)
• MENU/NEXT and F - Fire alarm emergency (Event code at address 256 or 290)
• MENU/NEXT and P - Police emergency (Event code at address 257 or 291)
DuressCode
The duress code is a user code designed for situations where the user is being forced to operate the system.
This user code performs the selected operation, while sending the duress event message (address 259 or 293)
to the central station. A duress code has an authorization level of 15. For further information on programming
user codes see 3.6: User Codes.
17
Page 18

Note: In the message to the central station, the control panel always indicates the system of the keypad
from which the duress code was entered.
User codes and system partitioning
When the Summit 3208GLD is partitioned into several sub-systems, user codes can be associated either with a
specific sub-system or with the entire system. Assigning a user code to only one system will default all
operations to that system. For example, if a user code is assigned to system 3, entering the code arms system
3 without the need to indicate the system number. A user code authorized to all of the subsystems can perform
functions affecting the entire system, such as arming and disarming. To assign a user code to all of the
systems, program the code as belonging to system 5.
Programming User Codes
To program user codes (LCD keypad only):
1. Select User Codes from main menu or press SELECT, 5; the LCD display requests a user code.
2. Enter an authorized user code; the display reads:
In the above example: The code displayed is for User 1. The user code is “1234” - 4 digits with “..” following,
signifying that two digits were not used in this user code. The user code is assigned to system 1. The user code
authorization level is 10. The current field is indicated by “>”.
3. To scroll through the user codes, press MENU/NEXT to scroll forward and Q to scroll back.
4. To scroll through the different fields, press SELECT.
5. To change the value of the current field, enter the required value.
6. Press AWAY to exit user code programming or MENU/NEXT to program the next user code.
USER 01 : > 1234. .
SYS. : 1 LEVEL: 10
Note: A user cannot program a code to a higher access level or to a sub-system other than the one to
which their code belongs. Additionally, a user cannot view user codes assigned to a higher access
level. The system accepts the first user code it recognizes. To prevent being locked out of the system,
do not program user codes beginning with the same numeric combination. For example, the 3 digit
user code “123” and the 4 digit code “1234” are programmed in the same system. Any attempt to enter
“1234” is impossible as the system recognizes “123” the moment the third digit is entered.
3.8: Zone Bypassing/Unbypassing
A bypassed zone is ignored by the system when arming. Bypassing and unbypassing can only be performed if
the system is disarmed.
To bypass a zone:
1. From the Bypass menu, select Bypass or press SELECT 3, 1.
2. Enter an authorized user code and a zone number.
To unbypass a zone:
1. From the Bypass menu, select Unbypass or press SELECT 3, 2.
2. Enter an authorized user code and the bypassed zone number.
To unbypass all zones:
1. From the Bypass menu, select Unbypass All or press SELECT 3, 9.
2. Enter an authorized user code.
Note: On a control panel with zone expanders, the control panel waits for an extra digit when zones 1,
2 or 3 are bypassed. This allows bypassing of the additional zones (for example, 11, 24, or 32). In this
case, when enter the zone number and press MENU/NEXT to indicate that no additional digit is
necessary.
18
Page 19

3.9: Event Log
The event log records the last 100 events the system has undergone. The event log uses the FIFO (first in, first
out) method. Once the log is full, the oldest event will automatically be erased. The event log can only be
viewed with the LCD keypad.
View Event Log
To view the event log:
1. From the View/Log menu select View Log or press SELECT 6, 1.
2. Enter an authorized user code.
3. Scroll through the log by pressing the MENU/NEXT key. The events are displayed starting with the most
recent event registered in the log.
4. Press AWAY to exit the log.
The following table shows examples of typical event log displays.
Event Display
Day 23 in month, time 12:45, alarm from zone 2,
Bathroom
Day 23 in month, time 12:50, system 1 was armed
(perimeter) by user 11.
System message: Last message was successfully sent
to the central station.
Log viewing completed. *** END OF LOG ***
23 12:45 ALARM
BATHROOM, 02
23 12:50 STAY
SYS.1 BY USER 11
23 13:56 SYSTEM
REPORT SENT
Clear Event Log
To clear the log:
1. From the View/Log menu, select Clear Log or press SELECT 6, 2.
2. Enter an authorized user code; the log is erased and the message “***END OF LOG***” is displayed. Clear
Log also causes the Armed LED to stop flashing and zone in alarm messages to be cleared.
3.10: System Partitioning
The Summit 3208GLD can be operated in partitioned mode where the system is separated into a maximum of
four sub-systems. A sub-system is created when at least one zone has been assigned to it. The following
section describes how certain elements of the system are affected by system partitioning.
Zones
Each zone can be assigned to a one of the four sub-systems. A common zone is assigned to all sub-systems
and will only be armed in the event that all systems are armed.
User Codes
User codes are assigned to any sub-system or to the entire system during user code programming. For more
information on the programming of user codes refer to page 18.
Keypad Display
The keypad can display either the entire system or a specific sub-system. This is programmed at parameter
addresses 132 - 139.
Arming & Disarming
Pressing STAY or AWAY on a keypad assigned to a specific sub-system arms only that sub-system. Entering a
user code assigned to a specific sub-system arms the system to which the user code has been assigned. To
disarm a sub-system, the user code entered must be assigned to either that sub-system or to all systems. All
arming methods are available for each sub-system.
Note: If the user code entered is assigned to all systems, the panel asks which system to arm. Entering
System 5 arms all the sub-systems that are ready.
19
Page 20

3.11: Tests
Walk Test
The walk test allows detection devices to be tested without generating an alarm.
To perform a walk test:
1. Press SELECT 4, 2, 1 or select Walk Test from the Test menu.
2. Test the control panel’s detection devices; an opened zone causes the keypad to beep.
3. To end the walk test, press AWAY.
Walk test mode is automatically terminated after 4 minutes and 15 seconds.
Note: During a walk test, an open zone will not create an alarm. However, this does not apply to
zones programmed as tamper zones and 24hr zones (Emergency/Holdup, Fire and Verified Fire)
opening these zones will create an alarm.
Bell Test
To perform a bell test:
• Press SELECT 4, 2, 2 or select Bell Test from the Test menu; a 1 second ring is heard and the test is
terminated automatically.
Telephone Communicator Test
To perform a telephone communicator test:
• Press SELECT 4, 2, 3 or select Telephone Test from the Test menu; a test message is sent to all
central stations that are programmed to receive communications from the control panel. The control
panel returns to normal operation after the telephone communication test is initiated. The report code
for this message is at address 251 or 285.
Note: The control panel seizes the telephone line to run this test.
System Test
To perform a system test:
• Press “SELECT” 4, 2, 5 or select System Test from the Test menu; the system tests the control panel’s
electronic circuitry. Should the LCD display the message “System Failure”, contact our technical
support department.
Battery Test
To perform a battery test:
• Press “SELECT” 4, 2, 6 or select Batt. from the Test menu; the battery is tested under loading
conditions, the control panel returns to normal operation and the battery status display is updated. For
the test to be successful the voltage must not be lower than 10.8V under loading conditions. This test is
automatically executed by the system every 30 seconds.
3.12: Additional Operations
Set Time & Date
To set the time and date:
1. On the LCD keypad, press SELECT 4, 1; the panel prompts you to enter a user code.
2. Enter an authorized user code; the panel prompts you to set the date.
3. Enter the date (DDMMYY).
4. Enter the time in 24 hour format (HHMM).
5. Press AWAY; the panel returns to normal operation.
or
1. On the LED keypad, press SELECT 4, 1; the Program LED lights up.
2. Enter an authorized user code.
3. Enter the date (DDMMYY).
4. Enter the time in 24 hour format (HHMM).
5. Press AWAY; the Program LED turns off.
20
Page 21

Bell Cancel
The bell is automatically stopped when the system is disarmed. To stop the bell manually:
1. On the LCD keypad, press SELECT 4, 4; the panel prompts you to enter a user code.
2. Enter an authorized user code; the bell stops ringing immediately and the system sends a Bell Cancel
event code to the central station.
or
1. On the LED keypad, press SELECT 4, 4; the Program LED lights up.
2. Enter an authorized user code; the bell stops ringing immediately, the Program LED turns off and the
system sends a Bell Cancel event code to the central station.
Stop Communications
To stop all communications and clear communication message buffers:
1. On the LCD keypad, press SELECT 4, 5; the panel prompts you to enter a user code.
2. Enter an authorized user code; all communication buffers are cleared and all communications stop
immediately.
or
1. On the LED keypad, press SELECT 4, 5; the Program LED flashes.
2. Enter an authorized user code; the Program LED turns off, all communication buffers are cleared and all
communications stop immediately.
Follow-me
To program a telephone number (telephone #4) for the Follow-me feature:
1. On the LCD keypad, press SELECT 4, 6; the panel prompts you to enter a user code.
2. Enter an authorized user code; the panel prompts you to enter the telephone number.
3. Enter the required telephone number using keys 0 - 9, # to include a three second pause and Q to switch to
tone dialing (DTMF).
or
1. On the LED keypad, press SELECT 4, 6; the Program LED flashes.
2. Enter an authorized user code; the Program LED lights up.
3. Enter the desired telephone number, using keys 0 - 9, # to include a three second pause and Q to switch to
tone dialing (DTMF); after a short delay the Program LED turns off.
Examples: To program telephone number 921-1110 using DTMF dialing, enter Q9211110. To dial telephone
number 9211110 in pulse dialing, and then switch to tone dialing to access extension 231 after a pause, key in
9211110#Q231. Up to 16 digits can be entered, including pauses (#) and tone dialing switches (Q). The Q key
will appear on the display as “T” and the # will appear as “,”.
To disable the Follow-me number enter # (“,”) as the first digit of the number.
Note: Make sure all types of messages that need to be passed to the “follow me” number are routed
correctly (see Chapter Four: Programming). A follow me number can be set on any phone number,
however, only telephone number 4 can be changed through “SELECT” 4, 6.
Late To Close
When using opening/closing windows, the control panel must be armed within the programmed time frame for
the closing window. If the user wishes to stay on the premises and arm the system at a later time, a “Late to
Close” condition can be activated in order to extend the window and prevent a message being sent to the
central station.
To activate a “Late to Close” condition:
1. On the LCD keypad, press SELECT 2, 3; the system prompts you to enter the system number.
2. Enter the system number; the system prompts you to enter a user code.
3. Enter an authorized user code; the system prompts you to set a time.
4. Enter the new closing hour in 24-hour format (HH); the command is acknowledged and the system returns
to normal operation.
or
1. On the LED keypad, press SELECT 2, 3. The Program LED turns on.
2. Enter the system number; the Program LED begins flashing
3. Enter an authorized user code.
4. Enter the new closing hour in 24-hour format (HH). The command is acknowledged, the system returns to
normal operation and the Program LED turns off.
21
Page 22

Latch Key
When the latch key feature is activated (address 411), the MENU/NEXT key is used to acknowledge arrivals or
departures from the system during opening or closing windows. If MENU/NEXT is not pressed after the user
code is entered, a ‘Failed to Open’ or ‘Failed to Close’ event code is sent to the central station.
Zone Chime
A zone can be programmed to chime when opened.
To program a zone to chime:
1. Press SELECT 3,3.
2. Enter an authorized user code.
3. Enter a zone number; the zone is programmed to chime when opened.
To deactivate a zone chime:
1. Press SELECT 3, 4.
2. Enter an authorized user code.
3. Enter the zone number; the zone will not chime when opened.
Access Control
This feature is designed for use with an electric door latch. The user is able to release the door latch from the
keypad by activating a relay programmed to “Access Control” mode – see address 477. A relay is controlled by
its corresponding keypad. For example, ‘Keypad 1’ controls ‘Relay 1’, ‘Keypad 2’ controls ‘Relay 2’ and so on.
Note: Keypad 8 cannot be used to operate this feature, as it has no relay assigned.
To activate an access control relay:
1. Press SELECT 9.
2. Enter an authorized user code; the relay is activated for the programmed cutoff time.
Set Relay
Relays can be manually activated and deactivated using this operation. A relay activated in this way is not
dependent on system status and stays activated until manually reset.
To manually activate a relay:
1. Press SELECT 8,4.
2. Enter the number of the relay you want to activate (1-7).
3. Enter an authorized user code; the relay is activated.
To manually reset a relay:
1. Press SELECT 8,3.
2. Enter the number of the relay you want to reset (1-7).
3. Enter an authorized user code; the relay is deactivated.
22
Page 23

CHAPTER FOUR: PROGRAMMING
4.1: General
The Summit 3208GLD control panel can be programmed using either the 3108 LCD keypad or the Remote
Programmer, Electronics Line’s up/downloading software. For keypad operation refer to Chapter 3.
For programming using the Remote Programmer refer to the instructions provided with the software. Contact
your nearest Electronics Line office or agent to obtain a copy of the software.
4.2: Guide to Programming
The control panel has 500 parameter addresses. All the programmed data is stored in the EEPROM memory
and is saved even if both AC and battery power are disconnected. To make programming easier, the Summit
3208GLD includes a default program including typical values for most installations. This means that, in most
cases, only the programming of customer specific parameters (such as telephone numbers, account numbers,
etc.) is required. Programming changes are made by entering a new value at the appropriate address. This
chapter includes a complete list of parameter addresses and the options available for each address.
4.3: Programming Procedure
Electronics Line suggests the following:
• Always load a default program when receiving a new panel by pressing SELECT 7, 2 (Default Program 1)
or SELECT 7, 3 (Default Program 2 - if available).
• Before installation and programming, plan the application well using the programming form provided.
• Use the following procedure to program the data from the programming form into the control panel.
To program the Summit 3208GLD using the 3108 LCD keypad:
1. Press SELECT 7, 1 to enter programming mode.
2. Enter an authorized user code.
3. Enter a 3-digit parameter address; the keypad displays the selected address within a group of related
parameters (zones, telephone numbers, routing etc.). For example, if a zone parameter address is
selected, the four parameters relating to that specific zone are displayed and the first digit of the selected
address flashes.
4. Pressing MENU/NEXT or entering data moves the cursor to the next parameter digit. To move back to the
previous digit press the Q.
5. To move to another item within the current group, press SELECT and then MENU/NEXT or Q to scroll
forwards and backwards through the available options. For example, if zone 1 is selected, the zone number
flashes when SELECT is pressed. MENU/NEXT and Q enable you to scroll forward and backwards through
the zones.
6. To exit programming mode, press AWAY.
7. For the modifications to take effect, disconnect and reconnect both AC and battery power supplies.
Note: The system allows two minutes to begin programming before automatically exiting programming
mode. Programming mode is immediately aborted if the control panel is in communication (both
incoming and outgoing calls).
LCD Keypad Programming Display
Entering programming mode
SELECT ADDR : 0 0 0
( 0 0 0 - 4 9 9 )
First digit blinking, any key will change this digit
Press:
Q
to move to the
previous digit
SELECT to select
another address or
group of parameters
MENU/NEXT to move
to the next digit or
group
AWAY to exit
programming mode
23
Page 24

After entering parameter changes
Parameter address
ADDR: 000 ZONE 01
VAL=> 58 08 12 05
First digit blinking
Group ID
Upon entering a digit, the display automatically moves to the next digit. To move to the next digit without
entering a modification, press MENU/NEXT. To move back to the previous digit, press Q.
Entering Hex data
Pressing # scrolls through the hexadecimal digits A, B, C, D, E and F. If the original digit is decimal (0-9),
press # to change the digit to A. If the original digit is hexadecimal (A-F), press # to move to the next
hexadecimal digit in sequence.
4.4: Programming Parameters
This section comprises a complete listing of the Summit 3208GLD control panel’s programming parameters.
The following table lists the addresses for each group of programming parameters.
ADDRESSES PARAMETERS ADDRESSES PARAMETERS
000-127
128-131
132-139
140-179
180-195
196-197
198-201
202-261
262-295
296-310
378-381
Zone Parameters
System Parameters
Keypad Parameters
Telephone Numbers
Account Numbers
Telephone Line Parameters
Communication Protocols
Zone Oriented Event Codes
Event Oriented Event Codes
Event & Message Routing
Exit Timers
388
389-409
410
411
412-475
476
477-490
491-493
494
495
496
Swinger Parameters
Opening & Closing Windows
Bell Cut-Off
Dealer Lockout & Latchkey
Custom LCD Zone Descriptors
Zone Expanders
Relay Parameters
Periodic Test
Arming Options & Arming Ring
Detailed Display, Bell Muting
& Fire Sensor Reset
Police Key Operation
& RP Communication Options
24
382-384
385-387
Entry Timers
Pulse Counters
497-498
499
AC Loss & Restore
Listen-In Time Out
Page 25

ADDRESSES 000-127: ZONE PARAMETERS
000-003: Zone # 1 Parameters
Each zone is individually defined in four parameter addresses. The following four addresses relate to
zone 1 but the method of programming zones 2 - 32 is identical.
000 LCD Zone Descriptor and Entry Delay for Zone #1
Select a zone descriptor and entry delay for zone 1 from the table below. Entry delay options
#1, #2 and #3 are set at addresses 382, 383 and 384, respectively. The four custom LCD
messages can be programmed at addresses 412-475.
No
Delay
00 40 80 C0 no message 20 60 A0 E0 LOBBY
01 41 81 C1 1ST FLOOR 21 61 A1 E1 LIVNG ROOM
02 42 82 C2 2ND FLOOR 22 62 A2 E2 MSTR BEDRM
03 43 83 C3 3RD FLOOR 23 63 A3 E3 MAT
04 44 84 C4 4TH FLOOR 24 64 A4 E4 MOTION
05 45 85 C5 BACK DOOR 25 65 A5 E5 NORTH
06 46 86 C6 BASEMENT 26 66 A6 E6 NURSERY
07 47 87 C7 BATHROOM 27 67 A7 E7 OFFICE
08 48 88 C8 BEDROOM 28 68 A8 E8 PANIC
09 49 89 C9 BEDROOM 1 29 69 A9 E9 PERIMETER
0A 4A 8A CA BEDROOM 2 2A 6A AA EA POOL
0B 4B 8B CB BEDROOM 3 2B 6B AB EB ROOF
0C 4C 8C CC COMPUTER 2C 6C AC EC ROOM
0D 4D 8D CD CONFERENCE 2D 6D AD ED ROOM 1
0E 4E 8E CE CORRIDOR 2E 6E AE EE ROOM 2
0F 4F 8F CF DINING 2F 6F AF EF ROOM 3
10 50 90 D0 DOOR 30 70 B0 F0 ROOM 4
11 51 91 D1 EAST 31 71 B1 F1 SHIPPING
12 52 92 D2 EMERGENCY 32 72 B2 F2 SHOP
13 53 93 D3 ENTRANCE 33 73 B3 F3 SLIDE DOOR
14 54 94 D4 EXIT 34 74 B4 F4 SOUTH
15 55 95 D5 EXTERIOR 35 75 B5 F5 STAIRS
16 56 96 D6 FAMILY 36 76 B6 F6 STORAGE
17 57 97 D7 FIRE 37 77 B7 F7 STUDY
18 58 98 D8 FRONT DOOR 38 78 B8 F8 VAULT
19 59 99 D9 GARAGE 39 79 B9 F9 WAREHOUSE
1A 5A 9A DA GUEST ROOM 3A 7A BA FA WEST
1B 5B 9B DB HALL 3B 7B BB FB WINDOW
1C 5C 9C DC HOLDUP 3C 7C BC FC (custom #1)
1D 5D 9D DD INTERIOR 3D 7D BD FD (custom #2)
1E 5E 9E DE KITCHEN 3E 7E BE FE (custom #3)
1F 5F 9F DF LAUNDRY 3F 7F BF FF (custom #4)
Delay#1Delay#2Delay
#3
Descriptor No
Delay
Delay#1Delay#2Delay
#3
Descriptor
25
Page 26
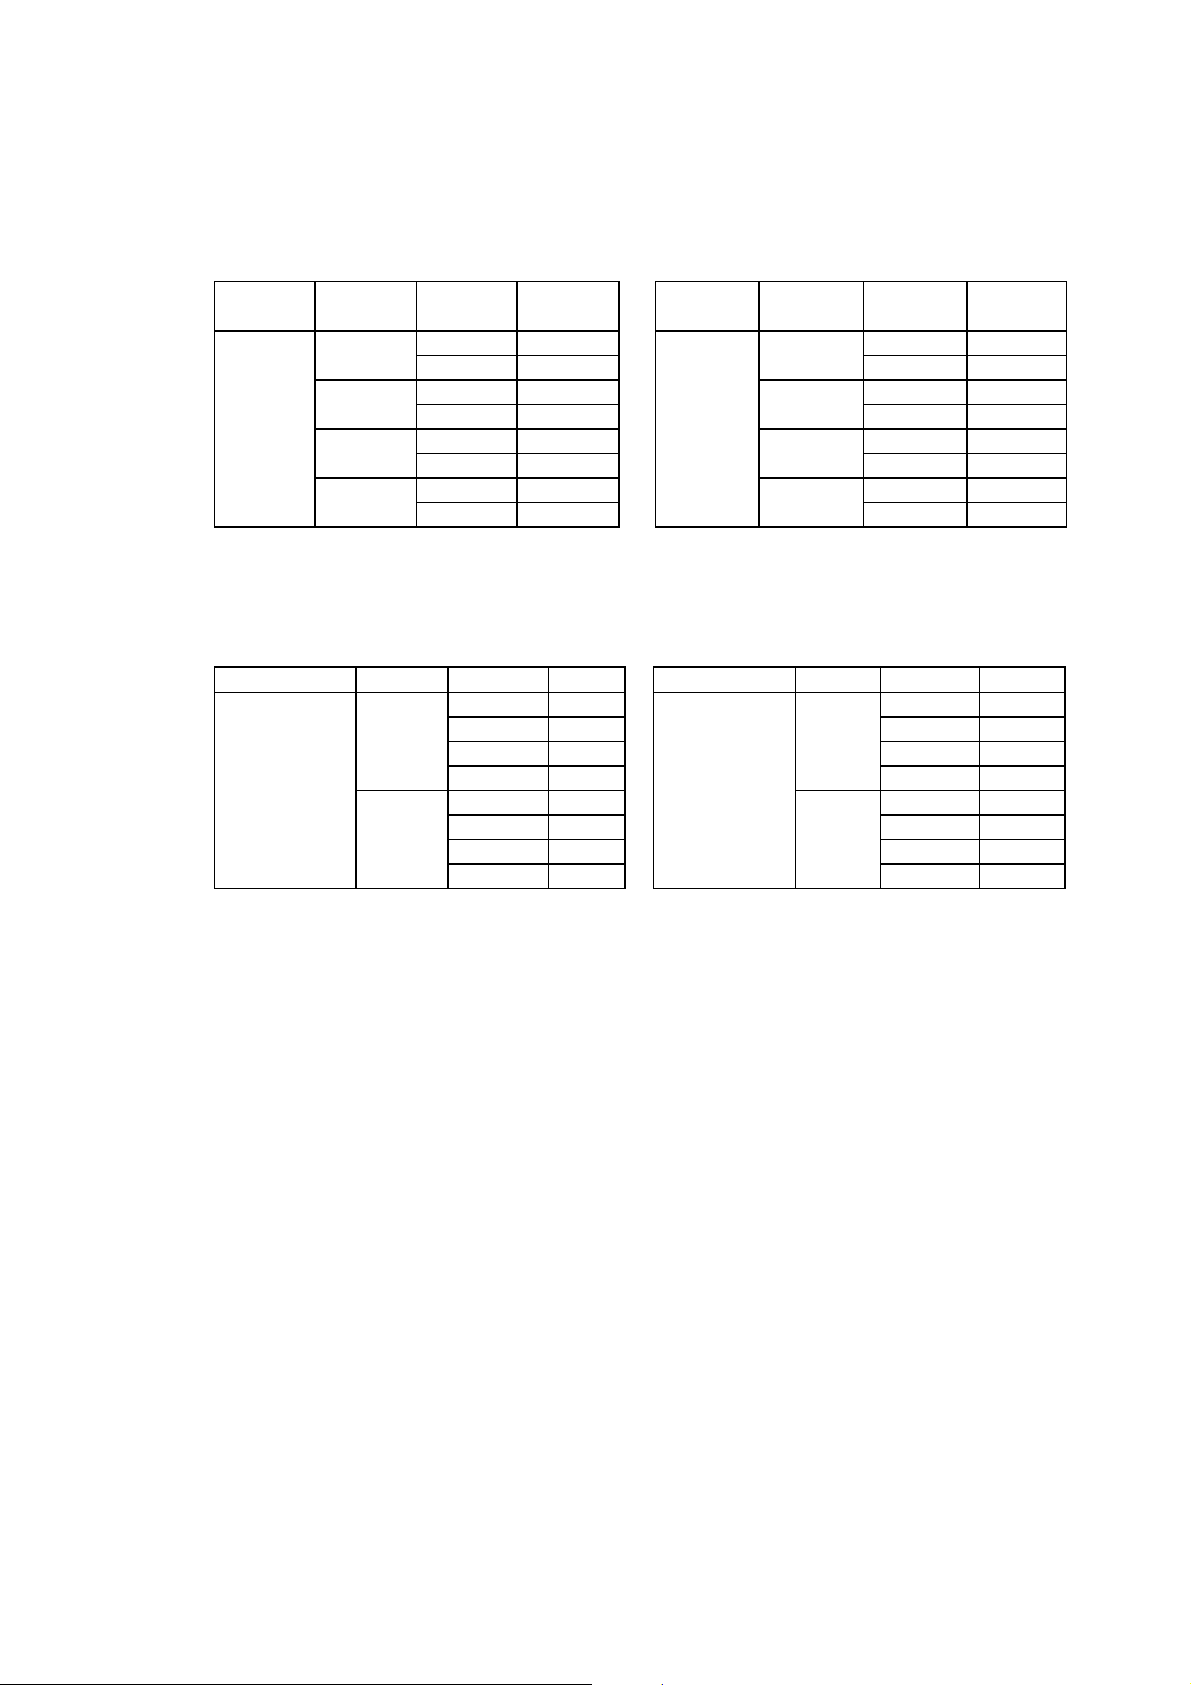
001 First Digit: Loop Speed, Pulse Count and Swinger Setting for zone # 1
The following table lists the options for the loop speed, pulse count and swinger setting. A slow
loop response (150ms) should be entered for motion sensors and contacts. Enter a fast loop
response (50ms) for shock sensors. The three optional pulse count settings can be
programmed at addresses 385-387 and the swinger setting is programmed at address 388. A
full explanation of these features can be found in this section at their respective addresses.
First digit value:
Loop
Speed
Slow Active 3 Fast Active B
Second Digit: Bypassability, Zone Chime and System ID
The second digit of this address deals with a number of options. Select whether the zone is
bypassable, if the zone chime feature is enabled and to which system the zone is assigned
from the table below.
Second digit value:
Bypassable Chime System Value Bypassable Chime System Value
No 4 3 Yes 4 B
Pulse
Count
None - 0 None - 8
#1 - 2 #1 - A
#2 - 4 #2 - C
#3 - 6 #3 - E
Swinger
Setting
Active 1 Active 9
Active 5 Active D
Active 7 Active F
No 2 1 No 2 9
Yes 2 5 Yes 2 D
Value Loop
Speed
1 0 1 8
3 2 3 A
1 4 1 C
3 6 3 E
4 7 4 F
Pulse
Count
Swinger
Setting
Value
002 First Digit: Zone ID for zone#1
Zone ID is the number that can be sent to identify the zone in event code messages to the
central station (event oriented event code table). Generally, the zone ID is the same as the
zone number.
First digit value:
Enter a value between 0 – F for Zone ID
Second Digit: Loop type for zone #1
Select the loop type for this zone from the following list.
Second digit value:
0 – N.C. restore on short, alarm on open.
1 – N.O. alarm on short, restore on open.
2 – EOLR alarm on short, restore on normal, alarm on open.
003 First Digit: Zone type for zone #1
Select a zone type from the following list. For a full explanation of each zone type, see 1.2:
Zones.
First digit value:
0 – Perimeter normal zone. 9 – Verified Fire Zone.
1 – Perimeter primary zone. A – Fire Zone.
2 – Perimeter secondary zone. B – Common Zone.
3 – Perimeter conditional zone. C – Emergency/Holdup (24 Hour).
4 – Interior normal zone. D – Tamper.
5 – Interior primary zone. E – On/Off STAY.
6 – Interior secondary zone. F – On/Off key switch AWAY.
7 – Interior conditional zone.
Note: Zones defined as Emergency/Hold-up, Tamper, Fire and Verified Fire will ignore
the entry/exit delay even if defined.
26
Page 27

Second Digit: Listen-In, Event Code Transmission to the Central Station and Bell
Activation
Select the type of output for this zone in the event of an alarm.
Second digit value:
Listen-In
Activated
No Yes 1
Yes No 8
004-007 Same as above for zone #2
008-011 Same as above for zone #3
012-015 Same as above for zone #4
016-019 Same as above for zone #5
020-023 Same as above for zone #6
024-027 Same as above for zone #7
028-031 Same as above for zone #8
ADDRESSES 032-063: Zones 9 - 16 These addresses are added to the control panel with either the
3508 or 3528 zone expanders (zone expander jumper setting B). Zone expanders are programmed at
address 476.
032-035 Same as above for zone #9
036-039 Same as above for zone #10
040-043 Same as above for zone #11
044-047 Same as above for zone #12
048-051 Same as above for zone #13
052-055 Same as above for zone #14
056-059 Same as above for zone #15
060-063 Same as above for zone #16
Send Message to
Central Station
No No 0
Yes Yes 5
Activate
Bell
No 4
Yes 9
Value
ADDRESSES 064 – 095: Zones 17 - 24 These addresses are added to the control panel with either the
3508 or 3528 zone expanders (zone expander jumper setting C). Zone expanders are programmed at
address 476.
064-067 Same as above for zone #17
068-071 Same as above for zone #18
072-075 Same as above for zone #19
076-079 Same as above for zone #20
080-083 Same as above for zone #21
084-087 Same as above for zone #22
088-091 Same as above for zone #23
092-095 Same as above for zone #24
ADDRESSES 096-127: Zones 25 - 32 These addresses are added to the control panel with either the
3508 or 3528 zone expanders (zone expander jumper setting D). Zone expanders are programmed at
address 476.
096-099 Same as above for zone #25
100-103 Same as above for zone #26
104-107 Same as above for zone #27
108-111 Same as above for zone #28
112-115 Same as above for zone #29
116-119 Same as above for zone #30
120-123 Same as above for zone #31
124-127 Same as above for zone #32
27
Page 28

ADDRESSES 128 – 131: SYSTEM PARAMETERS
These addresses offer a number of options for each sub-system. The keypad tones (beeps) and one-key
arming feature for each sub-system can be set at these addresses. Program only system 1 for
unpartitioned systems.
128 First Digit: Keypad Arming/Disarming Tones for System #1
Each sub-system’s keypads can be programmed to beep during arming, disarming and during
the entry delay. Select the keypad tones for system #1 from the table below.
First digit value:
Arm Beep Continuous on Entry Disarm Beep Value
No 0
No No 1 1
3 2
Yes No 3
No 4
1 No 1 5
3 6
Yes No 7
No 8
3 No 1 9
3 A
Yes No B
No C
Continuous No 1 D
3 E
Yes No F
Second Digit: Display, Power Trouble Tones and One Key Arming for System #1
The second digit of this address offers options for the display type of each sub-system’s
keypads and the tones sounded for power related trouble conditions. One-Key Arming allows
the user the capability to arm the system, using either the STAY or AWAY keys, without
needing to enter a user code. Select these options for system #1 from the table below.
Second digit value:
Display
Type
Summarized Yes 3
Detailed Yes B
One Key
Arming
Disabled Yes 1
Enabled Yes 5
Disabled Yes 9
Enabled Yes D
Beep for
AC Loss
No No 0
Yes No 2
No No 4
Yes No 6
No No 8
Yes No A
No No C
Yes No E
Beep for
Low Battery
Yes 7
Yes F
Value
28
129 Same as above for System #2
130 Same as above for System #3
131 Same as above for System #4
Page 29

ADDRESSES 132 – 139: KEYPAD PARAMETERS
The following addresses offer options for the configuration of each keypad.
132 First Digit: Backlight and Buzzer Operation for Keypad # 1
Select the backlight and buzzer options from the following table.
First digit value:
Buzzer Backlight Value
On after keystroke for 1 minute 0
On for opening windows 1
Audible On for closing windows 2
On for opening/closing windows 3
On at all times 4
On after keystroke for 1 minute 8
On for opening windows 9
Silent On for closing windows A
On for opening/closing windows B
On at all times C
Second Digit: Keypad Supervision, System Operation and Display for keypad #1
In partitioned systems, each keypad is associated with a specific sub-system and can be
programmed to display only its own sub-system or all the sub-systems. Keypad supervision is
selected at this address and on the keypad itself - see 2.2: Mounting the Keypad.
Second digit value:
Supervision
No 4 4 3 Yes 4 4 B
Display
System
1 1 0 1 1 8
2 2 1 2 2 9
3 3 2 3 3 A
All 2 5 All 2 D
Operate
System
1 4 1 C
3 6 3 E
4 7 4 F
Value Supervision
Display
System
Operate
System
Value
133 Same as above keypad #2
134 Same as above keypad #3
135 Same as above keypad #4
136 Same as above keypad #5
137 Same as above keypad #6
138 Same as above keypad #7
139 Same as above keypad #8
ADDRESSES 140 - 179: TELEPHONE NUMBERS
Consecutive addresses are used to enter telephone numbers up to 16 digits. Indicate the end of the
telephone number with the hex digit F. To enter a 3 second pause enter C, for a 7 second pause enter D,
to switch from pulse to tone dialing, enter E. Other telephone data and parameters are entered at later
addresses.
Note: The emergency telephone numbers shall not be set or programmed to place a call to a
police station that has not been specifically assigned by that police station for such service.
140-147 Telephone #1(primary)
148-155 Telephone #2(backup)
156-163 Telephone #3
164-171 Telephone #4 Note: Usually used with the Follow-me feature (SELECT, 4, 6).
172-179 Telephone number for Remote Programmer Callback.
The Remote Programmer Callback telephone number is programmed using the same method
as telephone numbers 1 - 4.
29
Page 30

ADDRESSES 180 - 195: ACCOUNT NUMBERS
Account numbers are transmitted to the central station with the event code to identify the source of the
event. Each system can be given a separate account number. If the system is not partitioned, only enter
the account number for System 1. For partitioned systems, program account numbers for all subsystems. Account numbers are entered in four consecutive addresses. To enter an account number
always enter 8 digits in sequence (if the number is less than 8 digits, use leading zeros).
Certain protocols can handle more than one transmission length. This means that in some protocols
either 5 or 8 digit account numbers, for example, can be sent. The following example illustrates how to
program account numbers for a protocol that handles 3 or 4 digit account numbers.
When transmitting an account number to the central station, the control panel automatically ignores any
sequence of zeros at the beginning of the number.
Enter the following to program a 3 digit account number for System 1:
Address →
Value →
180 181 182 183
00 00 01 23
In the above example the account number will be regarded as “123”. If a 4 digit account number “0123” is
required, enter the following:
Address →
Value →
180 181 182 183
10 00 01 23
The first digit indicates to the control panel that the zero is to be considered as part of the 4 digit account
number.
180-183 Account # for System 1
184-187 Account # for System 2
188-191 Account # for System 3
192-195 Account # for System 4
ADDRESSES 196-197: TELEPHONE LINE PARAMETERS
196 First Digit: Dialing Options and Telephone Event Message Enable/Disable
The first digit of this address comprises the following options.
• Dialing Initiation – the control panel only dials if a dial tone is detected within the time-out
(programmed at address 197) or allowed anyway after the second time-out.
• Dialing Mode – the panel can be programmed to use either pulse or tone (DTMF) dialing.
• Telephone Event Message Enable/Disable – this option enables or disables telephone
communications to the central station and follow-me number. If disabled, there is no need
to program any of the other parameters regarding central station communications
(telephone numbers, event codes etc.).
Note: This option does not affect RP communications. The RP Callback number,
addresses 172-179, may still be programmed.
First digit value:
Dialing Initiation Dialing Mode Telephone Event Message Value
Pulse No 0
Dial Anyway Yes 2
DTMF No 4
Yes 6
Pulse No 8
Do not Dial Yes A
Without Tone DTMF No C
Yes E
30
Second Digit: Time-Outs for Acknowledgment
Acknowledgments are tones transmitted from the central station to the control panel to confirm
successful transmission of event codes. There are 2 acknowledgment tones, Ack1 and Ack2.
Ack1 is the tone that confirms that the central station has recognized that the panel is
attempting to send an event code. Time-Out for Ack1 is the amount of time the panel waits for
Ack1 to be sent after the central station picks up. If Ack1 is not received within this time period,
the panel makes another dialing attempt (if programmed at address 197). Ack2 is the tone that
confirms that the central station has received and understood the message. Time-Out for Ack2
is the amount of time the panel waits for Ack2 after sending the message. If Ack2 is not
received during this time period, the panel makes another message attempt (if programmed at
Page 31

address 197). Note: When using the Follow-me feature, Ack1 is received when the user
Dialing
Message
Value
Dialing
Message
Value
presses 0, 9 or # on their telephone and Ack2 is not relevant.
Second digit value:
Time-Out Time-Out
Ack 1 Ack 2 Value Ack 1 Ack 2 Value
2 sec 0 2 sec 8
2 sec 3 sec 1 30 sec 3 sec 9
5 sec 2 5 sec A
10 sec 3 10 sec B
2 sec 4 2 sec C
15 sec 3 sec 5 60 sec 3 sec D
5 sec 6 5 sec E
10 sec 7 10 sec F
197 First Digit: Dialing & Message attempts
The first digit of this address deals with the number of times the panel attempts to dial or
transmit an event code message until a successful transmission is sent.
First digit value:
1 0 1 8
1 2 1 5 2 9
5 2 5 A
10 3 10 B
1 4 1 C
2 2 5 10 2 D
5 6 5 E
10 7 10 F
Second Digit: Dial Tone Wait and Anti Jamming
The default value for the second digit of this parameter has been chosen according to the
requirements of the local telecommunications authority. If any problems are experienced,
please contact Electronics Line Technical Support Dept.
Second digit value:
0 - Dial after 1 second, 2 second anti-jam
1 - Dial after 5 seconds, 2 second anti-jam
2 - Dial after 10 seconds, 2 second anti-jam
3 - Dial after 20 seconds, 2 second anti-jam
4 - Dial after 1 second or if dial tone present, 2 second anti-jam
5 - Dial after 5 seconds or if dial tone present, 2 second anti-jam
6 - Dial after 10 seconds or if dial tone present, 2 second anti-jam
7 - Dial after 20 seconds or if dial tone present, 2 second anti-jam
8 - Dial after 1 second, 10 second ant-jam
9 - Dial after 5 seconds, 10 second anti-jam
A - Dial after 10 seconds, 10 second anti-jam
B - Dial after 20 seconds, 10 second anti-jam
C - Dial after 1 second or if dial tone present, 10 second anti-jam
D - Dial after 5 seconds or if dial tone present, 10 second anti-jam
E - Dial after 10 seconds or if dial tone present, 10 second anti-jam
F - Dial after 20 seconds or if dial tone present, 10 second anti-jam
31
Page 32

ADDRESSES 198 - 201: COMMUNICATION PROTOCOLS
Each of the four telephone numbers is associated with a telephone communication protocol
programmable at these addresses. These can be defined according to the protocol used in
communications with the central station and whether the message sent will be from either the zone or
event oriented event code tables. Telephone #4 is usually associated with the “follow-me” feature, as it is
the lowest priority telephone number and can be modified by the user.
Protocol Formats.
First digit value:
5 - Follow Me 8 – Scantronics
6 - SIA 110 baud A - Contact ID
7 - SIA 300 baud F - Pulse Protocols
IMPORTANT: The value entered at the second digit is dependent on the first digit. If the value entered is
anything other than F, only the event code table needs to be chosen.
Event Code Table.
Second digit value:
0 - Event oriented table 8 - Zone oriented table
For pulse protocols, the data frequency and data rate should be defined in addition to the event code
table. Select the second digit value from the following table.
Event Code Table, Data Frequency and Data Rate Options for Pulse Protocols.
Second digit value:
Event Code Format Data Frequency Ack. Frequency Data Rate Value
1400Hz 10pps 0
1800Hz 20pps 1
2300Hz 10pps 2
Event Oriented 20pps 3
1400Hz 10pps 4
1900Hz 20pps 5
2300Hz 10pps 6
20pps 7
1400Hz 10pps 8
1800Hz 20pps 9
2300Hz 10pps A
20pps B
Zone Oriented 1400Hz 10pps C
1900Hz 20pps D
2300Hz 10pps E
20pps F
Pulse protocol examples: Ademco 4/2 Slow (10pps) - F8
Ademco 4/2 Fast (20pps) - F9
198 Protocol for telephone #1
199 Protocol for telephone #2
200 Protocol for telephone #3
201 Protocol for telephone #4
ADDRESSES 202 - 261: ZONE ORIENTED EVENT CODE TABLE
The following is a guide to programming event codes.
• 00 - No message is sent for this event.
• 0X (where X is any number between 1 and 9) - A 1 digit event code is sent for this event.
• XX - A 2 digit event code is sent for this event.
• X0 - For opening and closing events, the 0 is replaced with the user number. For other events both
digits are regarded as the event code.
32
Page 33

The following are the addresses for zone oriented event code messages. For event oriented codes refer
to addresses 262 - 295.
202 Event code for zone restore
203 Event code for zone 1
204 Event code for zone 2
205 Event code for zone 3
206 Event code for zone 4
207 Event code for zone 5
208 Event code for zone 6
209 Event code for zone 7
210 Event code for zone 8
211 Event code for zone 9
212 Event code for zone 10
213 Event code for zone 11
214 Event code for zone 12
215 Event code for zone 13
216 Event code for zone 14
217 Event code for zone 15
218 Event code for zone 16
219 Event code for zone 17
220 Event code for zone 18
221 Event code for zone 19
222 Event code for zone 20
223 Event code for zone 21
224 Event code for zone 22
225 Event code for zone 23
226 Event code for zone 24
227 Event code for zone 25
228 Event code for zone 26
229 Event code for zone 27
230 Event code for zone 28
231 Event code for zone 29
232 Event code for zone 30
233 Event code for zone 31
234 Event code for zone 32
235 Event code for opening (disarming)
236 Event code for normal closing (arming)
237 Event code for closing with bypassed zones
238 Event code for perimeter closing (STAY arming)
239 Event code for LSCP unit tamper
240 Event code for LSCP unit tamper restore
241 Event code for wireless unit supervision failure
242 Event code for wireless unit supervision restore
243 Event code for wireless unit jamming
244 Event code for wireless unit jamming restore
245 Event code for failed to open
246 Event code for failed to close
247 Event code for AC loss
248 Event code for AC restore
249 Event code for low battery
250 Event code for battery restore
251 Event code for manual telephone test
252 Event code for log 75% full
253 Event code for clock change or completion of remote programming
33
Page 34

254 Event code for user initiated bell cutoff
255 Event code for “E” button
256 Event code for “F” button
257 Event code for “P” button
258 Event code for keypad emergency restore
259 Event code for duress
260 Event code for periodic test Note: This event code is reported with user code 0.
261 Event code for system initialization
ADDRESSES 262 - 295: EVENT ORIENTED EVENT CODE TABLE
The following is a guide to programming event codes.
• 00 - No message is sent for this event.
• 0X (where X is any number between 1 and 9) - A 1 digit event code is sent for this event.
• XX - A 2 digit event code is sent for this event.
• X0 - For opening and closing events, the 0 is replaced with the user number. For zone events, the 0 is
replaced with the zone ID. For system events, such as AC loss, both digits are regarded as the event code.
The following are the addresses for event oriented event code messages. For zone oriented codes refer
to addresses 202 – 261.
262 Event code for zone in alarm
263 Event code for zone alarm restore
264 Event code for zone trouble (battery low)
265 Event code for zone trouble restore (battery low)
266 Event code for zone tamper
267 Event code for zone tamper restore
268 Event code for zone emergency alarm
269 Event code for opening (disarming)
270 Event code for normal closing (arming)
271 Event code for closing with bypassed zones
272 Event code for perimeter closing
273 Event code for LSCP unit tamper
274 Event code for LSCP unit tamper restore
275 Event code for wireless unit supervision failure
276 Event code for wireless unit supervision restore
277 Event code for wireless unit jamming
278 Event code for wireless unit jamming restore
279 Event code for failed to open
280 Event code for failed to close
281 Event code for AC loss
282 Event code for AC restore
283 Event code for low battery
284 Event code for battery restore
285 Event code for manual telephone test
286 Event code for log 75% full
287 Event code for clock change or completion of remote programming
288 Event code for user initiated bell cutoff
289 Event code for “E” button
290 Event code for “F” button
291 Event code for “P” button
292 Event code for keypad emergency restore
293 Event code for duress
294 Event code for periodic test Note: This event code is reported with user code 0.
295 Event code for system initialization
34
Page 35

ADDRESSES 296-310: EVENT & MESSAGE ROUTING
Event code messages can be routed in several ways. Each telephone number can be set as a primary,
back-up or duplicate number for a specific group of events. The control panel can also be programmed
not to dial a certain telephone number for certain events. A primary number is the first number the
control panel dials when an event occurs. If the control panel is unsuccessful in dialing the primary
number, the back-up number is dialed. A duplicate number is used to report the same event to several
locations and is dialed only after a successful transmission has been made to the primary number.
Routing also determines whether messages are entered in the log, whether the bell is activated and
which bell pattern is sounded.
296-298 Message routing for burglary alarm messages
(alarm, alarm restore, holdup, keypad emergency, police)
296 Message routing for burglary alarms, telephone numbers 4 and 3
Telephone #4
First digit value:
0 - Do not call this telephone number
1 - Primary telephone number
2 - Duplicate telephone number
3 - Backup telephone number
Note: If the Follow-me feature is used, define this number as a duplicate telephone
number.
Telephone #3
Second digit value:
0 - Do not call this telephone number
1 - Primary telephone number
2 - Duplicate telephone number
3 - Backup telephone number
297 Message routing for burglary alarms, telephone numbers 2 and 1
Telephone #2
First digit value:
0 - Do not call this telephone number
1 - Primary telephone number
2 - Duplicate telephone number
3 - Backup telephone number
Telephone #1
Second digit value:
0 - Do not call this telephone number
1 - Primary telephone number
2 - Duplicate telephone number
3 - Backup telephone number
298 Bell Delay, Log Entry and Bell Activation for burglary alarms Select from the following
options to set the 20 second bell delay, log entry and bell activation for burglary alarms.
Bell Delay and Log Entry
First digit value:
0 – No bell delay, no log
1 – Bell delay, no log
8 – No bell delay, log
9 – Bell delay, log
Bell Activation
Second digit value:
0 – No bell
1 – Bell pattern 1
2 – Bell pattern 2
3 – Steady bell
Note: Pulsed signals are available for special alarm types.
35
Page 36

299-301 Message routing for LSCP unit trouble messages Same as addresses 296 – 298
302-304 Message routings for fire trouble messages Same as addresses 296 - 298
Note: Fire zones have a fixed bell pattern - pulse on and off for half a second in groups
of three with an interval of one and a half seconds between each sequence. The cut-off
time is fixed at four minutes.
305-307 Message routings for open and close messages (duress, opening, normal closing,
perimeter closing, forced arming, failed to open and failed to close)
Same as addresses 296 – 298
308-310 Message routings for service messages (telephone test, ac loss and restore, low battery,
battery restore, bell cutoff, clock change, log 75% full and periodic test)
Same as addresses 296 – 298
311-377 Not available.
ADDRESSES 378-381: EXIT TIMERS
The exit delay timer determines the amount of time the user has to leave the premises after arming the
system. Enter a hexadecimal value number between 0 - 255 seconds using the hexadecimal conversion
chart in Appendix B. Note: Zones defined as Emergency/Hold-up, Tamper, Fire and Verified Fire
will ignore the exit delay even if defined.
378 Exit Delay Time for System 1
379 Exit Delay Time for System 2
380 Exit Delay Time for System 3
381 Exit Delay Time for System 4
ADDRESSES 382-384: ENTRY TIMERS
The entry delay timer determines the amount of time the user has to disarm the system before an alarm
is generated. Three different entry delay times can be programmed and each zone can be assigned one
of these delays. Enter a hexadecimal value number between 0 - 255 seconds using the hexadecimal
conversion chart in Appendix B. Note: Zones defined as Emergency/Hold-up, Tamper, Fire and
Verified Fire will ignore the entry delay even if defined.
382 Entry Delay 1
383 Entry Delay 2
384 Entry Delay 3
ADDRESSES 385-387: PULSE COUNTERS
Using a pulse counter helps eliminate false alarms and is very similar to pulse count selection in motion
detectors. When a pulse counter is assigned to a zone, the zone must be opened the selected number of
times, in the designated time period, before the panel generates an alarm.
Second digit value:
0 - 2 pulses within a period of 2 seconds 4 - 3 pulses within a period of 5 seconds
1 - 2 pulses within a period of 5 seconds 5 - 3 pulses within a period of 10 seconds
2 - 2 pulses within a period of 10 seconds 6 - 3 pulses within a period of 20 seconds
3 - 2 pulses within a period of 20 seconds 7 - 3 pulses within a period of 30 seconds
Note: A pulse counter should not be assigned to a zone using door contacts.
385 Pulse Counter Option 1
386 Pulse Counter Option 2
387 Pulse Counter Option 3
36
Page 37

ADDRESS 388: SWINGER PARAMETERS
Swinger mode.
Defining a zone as a Swinger limits the number of alarms that can be generated from that zone within a
pre-programmed amount of time. Each zone can be programmed with its Swinger option active. All
swinger zones are assigned the same swinger setting.
Example: If zone 1 is set as a swinger at address 001, and swinger mode is set to “1 alarm in 1 arming
period” at address 388, only one alarm will be accepted from this zone within every one arming period.
Any subsequent alarms from this zone are ignored by the system.
388
00 - 1 alarm in 1 arming period
or enter a hexadecimal value at this address from 01 to FF. Each hexadecimal unit represents
a period of 15 minutes. This can be calculated by multiplying the required amount of time by 4
then converting to hexadecimal using the conversion chart in Appendix B. For example, to
program one alarm every three and a quarter hours, enter 0D. 3¼ x 4 = 13, 13 = D.
ADDRESSES 389-409: OPENING & CLOSING WINDOWS
For each day of the week, one of three opening window options and four closing window options can be
set. These are programmable at addresses 389-395. To program a window time and size, use the following table. The times listed in the rows indicate the center of the window. The size of the window can be
selected from the columns. For example, a window starting at 7:30 and ending at 8:30 will be programmed as 41 (8:00 ±30 minutes). Note: To disable an opening or closing window option, enter FF.
Time
±±15
min
00:00 12:00
00:30
01:00
01:30
02:00
02:30
03:00
03:30
04:00
04:30
05:00
05:30
06:00
06:30
07:00
07:30
08:00
08:30
09:00
09:30
10:00
10:30
11:00
11:30
04 05
08 09 0A 0B
0C 0D 0E 0F
10 11 12 13
14 15 16 17
18 19 1A 1B
1C 1D 1E 1F
20 21 22 23
24 25 26 27
28 29 2A 2B
2C 2D 2E 2F
30 31 32 33
34 35 36 37
38 39 3A 3B
3C 3D 3E 3F
40 41 42 43
44 45 46 47
48 49 4A 4B
4C 4D 4E 4F
50 51 52 53
54 55 56 57
58 59 5A 5B
5C 5D 5E 5F
±±30
min
±±45
min
±±60
min
Time
12:30
13:00
13:30
14:00
14:30
15:00
15:30
16:00
16:30
17:00
17:30
18:00
18:30
19:00
19:30
20:00
20:30
21:00
21:30
22:00
22:30
23:00
23:30
±±15
min
±±30
min
±±45
min
min
60 61 62 63
64 65 66 67
68 69 6A 6B
6C 6D 6E 6F
70 71 72 73
74 75 76 77
78 79 7A 7B
7C 7D 7E 7F
80 81 82 83
84 85 86 87
88 89 8A 8B
8C 8D 8E 8F
90 91 92 93
94 95 96 97
98 99 9A 9B
9C 9D 9E 9F
A0 A1 A2 A3
A4 A5 A6 A7
A8 A9 AA AB
AC AD AE AF
B0 B1 B2 B3
B4 B5 B6 B7
B8 B9 BA
BC
±±60
389 Opening Window Option 1
390 Opening Window Option 2
391 Opening Window Option 3
392 Closing Window Option 1
393 Closing Window Option 2
394 Closing Window Option 3
395 Closing Window Option 4
37
Page 38

396-409 Daily Windows Settings
A different combination of windows can be programmed for each day of the week and for
each system. Select a value for each digit of these addresses from the following table.
Open Close Value Open Close Value
No Windows 0 #2 #3 A
#1 4 #4 B
#1 #2 5 #1 C
#3 6 #3 #2 D
#4 7 #3 E
#2 #1 8 #4 F
#2 9
MONDAY
396
397
398
399
400
401
402
403
404
405
406
407
408
409
First digit value: System 1 Second digit value: System 2
First digit value: System 3 Second digit value: System 4
TUESDAY
First digit value: System 1 Second digit value: System 2
First digit value: System 3 Second digit value: System 4
WEDNESDAY
First digit value: System 1 Second digit value: System 2
First digit value: System 3 Second digit value: System 4
THURSDAY
First digit value: System 1 Second digit value: System 2
First digit value: System 3 Second digit value: System 4
FRIDAY
First digit value: System 1 Second digit value: System 2
First digit value: System 3 Second digit value: System 4
SATURDAY
First digit value: System 1 Second digit value: System 2
First digit value: System 3 Second digit value: System 4
SUNDAY
First digit value: System 1 Second digit value: System 2
First digit value: System 3 Second digit value: System 4
ADDRESS 410: BELL CUT-OFF
410
ADDRESS 411: DEALER LOCKOUT & LATCH KEY
411 First Digit: Latch Key
Enter the desired bell cut-off time, 1 - 255(FF) seconds.
When the latch key feature is activated a ‘Failed to Open’ or ‘Failed to Close’ message is sent
to the central station if MENU/NEXT is not pressed after the user code is entered during an
opening or closing window. This feature is used in conjunction with the opening/closing
windows programmed at addresses 389 – 409.
First digit value:
0 - Latch key not activated
1 - Latch key activated
Second Digit: Dealer Lockout
For a period of 60 seconds following power-up, the dealer code ‘1,2,3,4,5,6’ is valid. This code
can be cancelled by activating dealer lockout. Note: Once activated, the dealer lockout
option is irreversible.
Second digit value:
0 - Dealer lockout not activated
1 - Dealer lockout activated
38
Page 39

ADDRESSES 412-475: CUSTOM LCD ZONE DESCRIPTORS
Four of the descriptors that can be assigned to each zone (see Address 000) can be customized to suit a
specific installation. A total of sixteen characters, including spaces, can be entered for each LCD custom
zone descriptor using the following table. Each custom zone descriptor is entered in a series of
consecutive addresses. It is recommended to fill in all 16 characters for each custom zone descriptor.
Example: To set Custom Zone Descriptor 1 as “ABC”, enter 41, 42, 43, 20, 20, 20, 20, 20, 20, 20, 20,
20, 20, 20, 20, 20 at addresses 412-427, respectively.
20 space 2D
21 ! 2E
22
23
25
26
27
28
29
2A
2B
2C
“
#
%
&
‘
(
)
Q
+
,
2F
30
31
32
33
34
35
36
37
38
39
.
/
0
1
2
3
4
5
6
7
8
9
41
42
43
44
45
46
47
48
49
4A
4B
4C
4D
A
B
C
D
E
G
H
K
M
4E
4F
50
51
52
F
53
54
55
I
J
56
57
58
L
59
5A
N
O
P
Q
R
S
T
U
V
W
X
Y
Z
61
62
63
64
65
66
67
68
69
6A
6B
6C
6D
G
M
A
B
C
D
E
F
6E
6F
70
71
72
73
74
H
I
J
K
L
75
76
77
78
79
7A
412-427 Custom Zone Descriptor 1
428-443 Custom Zone Descriptor 2
444-459 Custom Zone Descriptor 3
460-475 Custom Zone Descriptor 4
ADDRESS 476: ZONE EXPANDERS
476 Definition of Zone Expander Modules. When installing zone expanders (hardwire or
wireless), the system must be programmed to recognize the existence of the additional zones.
All defined zone expanders are supervised. If a zone expander is disconnected, all its zones
are opened. Note: Following any modifications made to this address, disconnect and
re-apply both AC and battery power to enable the changes to take effect.
n
o
p
q
r
s
t
u
v
w
x
y
z
Zone Expander
To install any combination of zone expander units enter the data value from the following table.
Second digit value
Units Value Units Value Units Value Units Value
A(1-8) 1 A,B 3 B,D A A,C,D D
B(9-16) 2 A,C 5 C,D C B,C,D E
C(17-24) 4 A,D 9 A,B,C 7 A,B,C,D F
D(25-32) 8 B,C 6 A,B,D B
Wireless Zone Expander
To add wireless zone expander units, enter a value from the following table. A wireless zone expander must
be defined in both the first and second digits of this address. For example, if three zone expanders ABC are
added to the control panel and B is wireless, the data entered at this address should be 27.
First digit value
W/L Units Value W/L Units Value W/L Units Value W/L Units Value
A(1-8) 1 A,B 3 B,D A A,C,D D
B(9-16) 2 A,C 5 C,D C B,C,D E
C(17-24) 4 A,D 9 A,B,C 7 A,B,C,D F
D(25-32) 8 B,C 6 A,B,D B
39
Page 40

ADDRESSES 477-490: RELAY PARAMETERS
Output relay modules are optional add-on peripherals that are connected to the control panel via the
LSCP bus. Relays can be used for various purposes including status indication, additional bell outputs
and access control. Each individual relay is programmed at two addresses.
477 Operation Mode Relay 1(and onboard relay K5)
Each relay can be programmed to activate or deactivate based on specific events or status
conditions. The following table lists the various relay operation mode options. Note: In some
cases, changing the relay’s mode type can activate the relay for the duration of the
cutoff time.
Type Description Activated by Deactivated by Value
Access Access control Pressing SELECT, 9
Cutoff 00
on the keypad
Status System 1 armed System 1 armed System disarmed/ Cutoff 01
Status System 2 armed System 2 armed System disarmed/ Cutoff 02
Status System 3 armed System 3 armed System disarmed/ Cutoff 03
Status System 4 armed System 4 armed System disarmed/ Cutoff 04
Event Silent alarm Keypad Emergency,
Cutoff 05
Police Emergency, Duress
Event System 1 alarm System 1 alarm Cutoff / System 1 disarm 06
Event System 2 alarm System 2 alarm Cutoff / System 2 disarm 07
Event System 3 alarm System 3 alarm Cutoff / System 3 disarm 08
Event System 4 alarm System 4 alarm Cutoff / System 4 disarm 09
Event Fire alarm Fire zone in alarm or keypad fire
Cutoff 0A
emergency
Status System 1 status System 1 Not ready, Pulsing if
system has bypassed zones
Status System 2 status System 2 Not ready, Pulsing if
system has bypassed zones
Status System 3 status System 3 Not ready, Pulsing if
system has bypassed zones
Status System 4 status System 4 Not ready, Pulsing if
system has bypassed zones
Status Power trouble System power trouble (AC or
System 1 ready without
0C
bypassed zones
System 2 ready without
0D
bypassed zones
System 3 ready without
0E
bypassed zones
System 4 ready without
0F
bypassed zones
System power is OK 10
Battery)
Event Telephone trouble Failed communication attempt
Cutoff 11
(only activated after all message
attempts have failed)
Status Pre-alarm Pre-Alarm (if 20 sec bell delay) Bell activated/Bell
12
Cancel/ System disarm
Status Exit/Entry sys. 1 System 1 in Exit/Entry System 1 not in
14
Exit/Entry
Status Exit/Entry sys. 2 System 2 in Exit/Entry System 2 not in
15
Exit/Entry
Status Exit/Entry sys. 3 System 3 in Exit/Entry System 3 not in
16
Exit/Entry
Status Exit/Entry sys. 4 System 4 in Exit/Entry System 4 not in
17
Exit/Entry
Status Bell Bell activated Bell deactivated 18
40
Page 41

478 Output and Cutoff Relay 1(and onboard relay K5)
The second address concerns the following characteristics of the relay’s operation.
• Polarity – the relay’s status when deactivated
• Output – how the relay acts when activated
• Cutoff – the duration for which the relay is activated
First digit value:
Output Polarity Value
Steady relay Normally Off 0
Normally On 1
1sec ON, 1sec OFF Normally Off 2
Normally On 3
Note: After changing the relay polarity, press SELECT 8,3 or activate the relay via the
remote programming software.
Certain operation modes deactivate the relay according to changes in system status, others
deactivate the relay according to the cutoff time or a combination of the two. For example, if
a system is in alarm, the relay is activated until the system is disarmed or after the
programmed cutoff time, whichever happens first.
If the cutoff is set to be continuous, the relay is activated until manually reset using the
command SELECT 8, 3.
Entering 0 – No Operation, cancels the operation of the relay even if the relay mode is not
dependent on cutoff time.
Second digit value:
Cutoff Value Cutoff Value Cutoff Value Cutoff Value
None 0 20 secs 4 2 mins 8 15 mins C
2 secs 1 30 secs 5 3 mins 9 20 mins D
5 secs 2 60 secs 6 5 mins A ---- E
10 secs 3 90 secs 7 10 mins B Continuous F
479-480 Same as above for Relay 2 (and onboard relay K6)
481-482 Same as above for Relay 3
483-484 Same as above for Relay 4
485-486 Same as above for Relay 5
487-488 Same as above for Relay 6
489-490 Same as above for Relay 7
ADDRESSES 491-493: PERIODIC TEST
Periodic test transmissions are used to check the system's ability to communicate with the central
station. The frequency of these transmissions and the time at which the transmissions take place are
programmed at these three addresses.
491 Periodic Test Timer Frequency
Select the frequency of the periodic test transmissions from the following table.
Note: The control panel automatically adjusts for a leap year.
Setting Value Setting Value Setting Value
No Test 00 Monthly, 5
1 Hour Test 01 Monthly, 6
6 Hour Test 02 Monthly, 7
12 Hour Test 03 Monthly, 8
Daily Test 04 Monthly, 9
Weekly, Monday 05 Monthly, 10
Weekly, Tuesday 0D Monthly, 11
Weekly, Wednesday 15 Monthly, 12
Weekly, Thursday 1D Monthly, 13
Weekly, Friday 25 Monthly, 14
Weekly, Saturday 2D Monthly, 15
Weekly, Sunday 35 Monthly, 16
Monthly, 1
Monthly, 2
Monthly, 3
st
nd
rd
0E Monthly, 17
16 Monthly, 18
1E Monthly, 19
th
th
th
th
th
th
th
th
th
th
th
th
th
th
th
2E Monthly, 21
36 Monthly, 22
3E Monthly, 23
46 Monthly, 24
4E Monthly, 25
56 Monthly, 26
5E Monthly, 27
66 Monthly, 28
6E Monthly, 29
76 (except Feb)
7E Monthly, 30
86 (except Feb)
8E Monthly, 31
96 (except Feb, Apr,
9E Jun, Sep & Nov)
st
nd
rd
th
th
th
th
th
th
th
st
AE
B6
BE
C6
CE
D6
DE
E6
EE
F6
FE
Monthly, 4th 26 Monthly, 20th A6
41
Page 42

492 Periodic Test Time Setting (Hour)
The periodic test time is set at two addresses, 492 and 493. The hour at which the test will take
place is programmed at this address. Note: If either the 6-hour or 12-hour test has been
programmed this is the time of the first test. If the 1-hour test has been programmed,
only the minutes setting needs to be defined (Address 493).
Select a two digit value from the following table:
Time Value Time Value Time Value Time Value
00:00 00 06:00 06 12:00 0C 18:00 12
01:00 01 07:00 07 13:00 0D 19:00 13
02:00 02 08:00 08 14:00 0E 20:00 14
03:00 03 09:00 09 15:00 0F 21:00 15
04:00 04 10:00 0A 16:00 10 22:00 16
05:00 05 11:00 0B 17:00 11 23:00 17
493 Periodic Test Time Setting (Minutes)
Enter a hexadecimal value between 0-59 using the hexadecimal conversion chart in Appendix B.
ADDRESSES 494-496: MISCELLANEOUS
494 First Digit: Arming Options
The first digit of this address offers the following options:
• Auto unbypass upon disarm – the control panel automatically unbypasses all bypassed
zones when the system is disarmed.
• Send ‘Arm’ only if all systems armed – the control panel only sends the arming event
code message when all existing sub-systems are armed. The panel sends this message
with the account number for the last sub-system to be armed.
• Auto arming at the end of closing window – if the system has not been armed by the end
of the closing window, the control panel automatically arms itself.
• Force Arm – the panel can be programmed to enable or disable forced arming.
First digit value:
Auto unbypass
upon disarm
No Yes 3
Yes Yes B
Second Digit: Arming Ring
The control panel can be programmed to sound the bell/siren for 1 second on arming each
system or only after all sub-systems have been armed.
Second digit value:
0 – no arming ring
1 – 1 second ring after arming of every system
5 – 1 second ring only after all systems are armed
Send ‘Arm’ only if
all systems armed
No Yes 1
Yes Yes 5
No Yes 9
Yes Yes D
Auto arming at the
end of closing window
No No 0
Yes No 2
No No 4
Yes No 6
No No 8
Yes No A
No No C
Yes No E
Force Arm Value
Yes 7
Yes F
42
Page 43

495 First Digit: Detailed Display
The keypad can be programmed to show the detailed display at all times or only when the
system is disarmed.
First digit value:
0 – Detailed display only when system disarmed.
1 – Detailed display at all times.
Second Digit: Fire Sensor Reset and Bell Muting for Listen-In Applications
The second digit of this address concerns the following:
• Power reset for latching smoke detectors – an activated fire sensor can be reset in two
ways. The fire sensor can be reset manually (SELECT, 43) or the system can be
programmed to automatically reset fire sensors. In both cases, power is restored 15
seconds after the zone has been reset.
• Bell Muting for Listen-In applications – the bell is not sounded until after a message has
been sent to the central station. Note: In the event that the telephone line has been
disconnected, the bell is sounded immediately even if bell muting is activated.
Second digit value:
Fire Sensor Reset Bell Muting Value
User initiated Off 0
On 1
Automatic Off 2
On 3
496 First Digit: Police Key Operation and Remote Programming Communication Speed
The following two options are available at the first digit of this address:
• The Police key can be programmed to generate a silent or audible alarm.
• The remote programming speed can be set to either 110 BPS or 300 BPS.
First digit value:
Remote Programmer tel.
Communication speed
300 BPS silent 0
110 BPS silent 8
Police Key alarm Value
audible 4
audible C
Second Digit: Remote Programming Communication Options
The following options are available at the second digit of this address:
• The panel can be programmed to enable RP access 24 hours a day or only when all of the
sub-systems are disarmed.
• The panel can be programmed to enable RP access to be established directly or using the
RP callback feature.
• The number of rings after which the panel picks up can be set to 1, 3, 7 or 17 rings
Second digit value:
Remote
Prog.
Access
24 hours 17 3 disarmed 17 B
Remote
Prog.
Comm.
direct 3 1 direct 3 9
call 7 2 call 7 A
callback 3 5 callback 3 D
Number
of
Rings
1 0 1 8
1 4 1 C
7 6 7 E
17 7 17 F
Value Remote
Prog.
Access
Remote
Prog.
Comm.
Number
of
Rings
Value
43
Page 44

ADDRESSES 497-498: AC LOSS & RESTORE
497 AC loss report delay.
The AC loss report delay determines how many minutes the panel will wait after AC power has
been lost before transmitting a message to the central station. Select a value in hexadecimal
for the AC loss report delay. For hexadecimal value conversions refer to the hexadecimal
conversion chart located in Appendix B.
498 AC restore report delay.
The AC restore report delay determines how many minutes the panel will wait after AC power
has been regained before transmitting a message to the central station. Select a value in
hexadecimal for the AC restore report delay. For hexadecimal value conversions refer to the
hexadecimal conversion chart located in Appendix B.
ADDRESS 499: LISTEN-IN TIME OUT
499
Select a value in seconds for the listen in time out. Select a value in hexadecimal from the
hexadecimal conversion chart located in Appendix B.
44
Page 45

APPENDIX A: TROUBLESHOOTING
The following is a guide to troubleshooting, using the Summit 3208GLD security system.
Problem Reason Action
Telephone line failure appears
when the telephone line is not
connected (control panel used as a
local alarm).
Event codes programmed at
values above “00”.
Program event codes as “00” and
power down the panel.
Keypad display not responsive. A Keypad at a different address
has been activated.
No display on keypad. Auxiliary power fuse blown. Replace fuse.
Constant low battery message on
display.
No sound from the bell. Blown bell fuse or wrong
Zone expander does not give any
zone indications.
A single output does not react
properly.
Wrong alarm or trouble indicator
from the zone.
Failure to communicate with the
central station.
Failure to communicate with the
central station.
Faulty battery or battery fuse
blown.
parameters.
Zone expander supervision is not
programmed.
Programming error. Correct the programming for the
Wrong zone loop type selected. Reprogram zone type parameters
Wrong telephone number, wrong
event code, wrong protocol, or
wrong telephone line parameters.
Incorrect telephone line
communication.
Wait for time out to activate, or
press “AWAY” key.
Replace battery at least every five
years or replace the blown fuse.
Replace fuse or program the bell
parameters correctly.
Reprogram parameters.
specific relay.
for the correct loop type.
Consult with the central station
owner/operator and program the
appropriate parameters.
Incoming line should be connected
to terminals 3 and 4. Outgoing
telephone line to terminals 1 and 2.
45
Page 46

APPENDIX B: HEXADECIMAL CONVERSION CHART
The following is a decimal (i.e. number of hours, minutes, etc.) to hexadecimal conversion chart:
Dec Hex
0 0
1 1
2 2
3 3
4 4
5 5
6 6
7 7
8 8
9 9
10 A
11 B
12 C
13 D
14 E
15 F
16 10
17 11
18 12
19 13
20 14
21 15
22 16
23 17
24 18
25 19
26 1A
27 1B
28 1C
29 1D
30 1E
31 1F
32 20
33 21
34 22
35 23
36 24
37 25
38 26
39 27
40 28
41 29
42 2A
Dec Hex
43 2B
44 2C
45 2D
46 2E
47 2F
48 30
49 31
50 32
51 33
52 34
53 35
54 36
55 37
56 38
57 39
58 3A
59 3B
60 3C
61 3D
62 3E
63 3F
64 40
65 41
66 42
67 43
68 44
69 45
70 46
71 47
72 48
73 49
74 4A
75 4B
76 4C
77 4D
78 4E
79 4F
80 50
81 51
82 52
83 53
84 54
85 55
Dec Hex
86 56
87 57
88 58
89 59
90 5A
91 5B
92 5C
93 5D
94 5E
95 5F
96 60
97 61
98 62
99 63
100 64
101 65
102 66
103 67
104 68
105 69
106 6A
107 6B
108 6C
109 6D
110 6E
111 6F
112 70
113 71
114 72
115 73
116 74
117 75
118 76
119 77
120 78
121 79
122 7A
123 7B
124 7C
125 7D
126 7E
127 7F
128 80
Dec Hex
129 81
130 82
131 83
132 84
133 85
134 86
135 87
136 88
137 89
138 8A
139 8B
140 8C
141 8D
142 8E
143 8F
144 90
145 91
146 92
147 93
148 94
149 95
150 96
151 97
152 98
153 99
154 9A
155 9B
156 9C
157 9D
158 9E
159 9F
160 A0
161 A1
162 A2
163 A3
164 A4
165 A5
166 A6
167 A7
168 A8
169 A9
170 AA
171 AB
Dec Hex
172 AC
173 AD
174 AE
175 AF
176 B0
177 B1
178 B2
179 B3
180 B4
181 B5
182 B6
183 B7
184 B8
185 B9
186 BA
187 BB
188 BC
189 BD
190 BE
191 BF
192 C0
193 C1
194 C2
195 C3
196 C4
197 C5
198 C6
199 C7
200 C8
201 C9
202 CA
203 CB
204 CC
205 CD
206 CE
207 CF
208 D0
209 D1
210 D2
211 D3
212 D4
213 D5
214 D6
Dec Hex
215 D7
216 D8
217 D9
218 DA
219 DB
220 DC
221 DD
222 DE
223 DF
224 E0
225 E1
226 E2
227 E3
228 E4
229 E5
230 E6
231 E7
232 E8
233 E9
234 EA
235 EB
236 EC
237 ED
238 EE
239 EF
240 F0
241 F1
242 F2
243 F3
244 F4
245 F5
246 F6
247 F7
248 F8
249 F9
250 FA
251 FB
252 FC
253 FD
254 FE
255 FF
46
Page 47

GLOSSARY
24 hr zone
-A-
AC Loss
Account Number
Answering
Machine Override
Armed
Arming Ring
Audible Alarm
Authorization
Level
Auto Arming
Auxiliary
Power Output
Away Arming
-B-
Backup
Battery Test
Bell
Bell Cancel
Bell Cut-Off
Bell Muting
Bell Test
Bypassed Zone
A zone which is always active regardless of whether the system is armed or disarmed.
Opening a 24hr zone always generates an alarm.
The disruption of AC power.
The number transmitted to the central station along with an event code to identify the source
of the event.
The method used in RP communication allowing the control panel to share a telephone line
with answering machines, fax machines etc.
The state during which the control panel is activated. In most cases, when the system is
armed, a tripped zone generates an alarm
A one-second ring sounded by the bell, which indicates that the system has been armed.
An alarm that activates the siren when generated.
Each user code is assigned an authorization level. Authorization levels grant or limit access
to certain system operations.
The system arms itself automatically at the end of a closing window – see Closing Window.
The Auxiliary Power Output supplies power to detectors and additional detection devices.
Arming the entire system, both interior and perimeter zones.
The telephone number dialed if the panel fails to communicate with the primary telephone
number.
A test that checks the control panel’s battery backup. A battery test is performed
automatically every 30 seconds and can also be initiated manually.
Audible alarm device activated by a DC voltage.
A keypad operation that immediately stops the bell/siren.
The programmable amount of time the bell/siren is sounded when an audible alarm is
generated.
A feature used in Listen-in applications where the bell is not sounded until after a message
has been sent to the central station.
A manual test that sounds the bell for 1 second.
Alarms from a bypassed zone are ignored by the system.
-C-
Callback
Central Station
Communication
Chime
Clear Log
Closing Window
Command Code
Common Zone
A toll saver feature used during remote programming. The RP software establishes
communication with the control panel, the control panel hangs up and calls the RP Callback
telephone number programmed at addresses 172-179.
The sending of event codes and account numbers to the central monitoring station.
A series of tones sounded by the keypad. Each zone can be programmed to sound a chime
when opened. Chimes also indicate system trouble conditions such as low battery or
telephone line failure.
The operation that deletes all the events recorded in the event log.
A programmed period of time in which the user usually arms the system. Arming the system
during a closing window does not send a closing message to the central station. The system
can also be programmed to arm itself automatically at the end of a closing window.
A sequence of numbers that perform an operation when entered after pressing SELECT.
A zone defined as Common belongs to all systems. The zone is designed for partitioned
systems where, for example, a corridor is shared by more than one protected area. An alarm
will only be generated from a common zone if all the sub-systems are armed.
47
Page 48

Communication
Protocol
Conditional Zone
-D-
Dealer Lockout
Default Program
Detailed Display
Disarmed
Distress Keys
Duplicate Number
Duress Code
-E-
EEPROM
Emergency
Holdup Zone
End Of Line
Resistor
Entry Delay
Event Code
Event Log
Exit Delay
See Protocol.
A zone that will not generate an alarm during the entry delay.
An option that disables the default restore code “123456”.
The default program contains the factory parameter settings. For typical installations, the
default program minimizes the amount of programming that needs to be performed by the
installer.
The keypads for each sub-system can be programmed to show a detailed or summarized
display of the system. The detailed display includes system troubles, sub-system status,
time/date and zone status.
The state in which the system is deactivated. When the system is disarmed, only 24hr zones
and distress keys are capable of generating an alarm.
The Emergency, Fire and Police keys (E, F and P) that generate an alarm when pressed with
the MENU/NEXT key.
A telephone number which is dialed in addition to the primary number.
This code sends an event message to the central station, notifying that the user has been
forced to arm or disarm their system.
Non-volatile memory.
A 24hr zone designed for use with panic buttons and glassbreak detectors – see 24hr zones.
A loop type used to prevent tampering with the cables connecting detection devices. Any
attempt to cut the cable results in an alarm signal.
Zones can be programmed to initiate an entry delay when opened. The entry delay is a preprogrammed amount of time that allows the user enough time to enter the protected area
and disarm the system without generating an alarm.
The code transmitted to the central station when an event occurs.
A record of the last 100 events that the system has undergone.
The amount of time the user has to exit the protected area without generating an alarm.
-F-
Failed To Close
Failed to open
Fire Zone
Follow Me
Forced Arming
-I-
Immediate Arming
Interior Zone
-K-
Keypad
Unit Address
Keyswitch
The message sent to the central station when the system has still not been armed at the end
of a closing window – see Closing Window.
The message sent to the central station when the system has still not been disarmed at the
end of an opening window – see Opening Window.
A 24hr zone designed for use with smoke detectors – see Verified Fire Zone.
A communication format typically used with telephone #4. The control panel dials the follow
me number to notify the user of events that have occurred.
Arming the system when zones are still open. If zones are still open at the end of the exit
delay an alarm is generated.
The canceling of the exit/entry delay when the system is armed. This is done by pressing the
“Q” during the delay.
Zones of this type are not armed when the “STAY” key is pressed – see Stay Arming.
The hardware configuration that identifies the keypad to the control panel. A keypad can be
configured to one of 8 unit addresses.
A key operated switch used for arming and disarming the system. Keyswitches can be used
to either Stay or Away arm the system.
48
Page 49

-L-
Latch Key
Late to Close
-M-
Manual
Programming
MENU/NEXT key
Message Routing
-N-
Normal Arming
Normally Closed
Normally Open
-O-
Off Hook
Opening Window
Output Relay
A feature designed to inform parents whether their children have arrived home safely. The
panel sends a message to the central station and/or the follow-me number if MENU/NEXT is
not pressed during the appropriate window.
A command that extends the closing window period if the system needs to be armed later
than usual – see Closing Window.
Programming from either a LCD or LED keypad.
The key used for scrolling through menus on the LCD keypad. Also used with the “Q”, “0” or
“#” keys to send distress messages and to register Latch Key arrivals.
The designated destinations of event messages. The system can be programmed to send
different groups of events to up to four central stations.
See Away Arming.
A loop type that generates an alarm when opened.
A loop type that generates an alarm when closed.
A direct connection between a PC and the control panel enabling on-site programming using
the RP software.
A programmed period of time in which the user usually disarms the system. Disarming the
system during an opening window does not send an opening message to the central station.
Programmable outputs that react to different system events and status conditions.
-P-
Partitioned
System
Perimeter Arming
Perimeter Zone
Periodic Test
Primary Number
Protocol
Pulse Count
-R-
Remote
Programming
Relay Module
-S-
SELECT Key
Silent Alarm
Stay Arming
Stop
Communications
Sub-System
A system that is divided into a number of independent sub-systems.
See Stay Arming.
A zone intended for detection devices that protect the outer perimeter of the premises. These
zones are used in conjunction – see Stay Arming.
Test transmission used to check the control panel’s capability to communicate with the
central station.
The first telephone number the panel attempts to dial when an event occurs.
Communication format used in event message transmissions to the central station.
The setting that determines the number of times a zone must be opened within a certain time
period in order to generate an alarm.
Programming the control panel from a PC using the RP software. Remote Programming can
be performed from a remote location or on-site – see Off Hook.
A peripheral add-on module providing a number of output relays – see Output Relay.
The key used to choose menu items and enter command codes.
A silent alarm sends an event message to the central station without sounding the siren.
Arming perimeter zones only, enabling unrestricted movement within the protected area.
A command that immediately stops the control panel transmitting to the central station and
clears all pending messages.
An independent division of the system – see Partitioned System.
49
Page 50

Summarized
Display
Supervised
Keypad
Swinger Zone
-T-
Telephone Com-
municator Test
Toll Saver
Transistor Module
Trouble Tones
-U-
Up/Downloading
Software
Unbypass
Unpartitioned
System
Unsupervised
Keypad
User Code
A keypad display mode without zone status – see Detailed Display.
A supervised keypad generates an alarm when disconnected from the control panel.
A zone from which the number of alarms sent within a predetermined time period is limited.
A manual test that checks the control panel’s ability to communicate with all programmed
telephone numbers.
See Callback.
Peripheral add-on module that uses transistors instead of relays to provide programmable
outputs – See Output Relay.
The tones sounded by the keypad when certain trouble conditions occur.
See Remote Programming.
Restoral of a bypassed zone – see Bypassed Zone.
Operating the control panel as one system – see Partitioned System.
An unsupervised keypad will not generate an alarm if disconnected from the control panel.
Unsupervised keypads are used when the installation requires that more than one keypad be
configured to the same unit address – see Keypad Unit Address.
The code that grants access to certain operational capabilities. The operations available to a
specific user are dependent on the authorization level assigned to their user code –
see Authorization Level.
-V-
View Log
Verified Fire Zone
-W-
Walk Test
-Z-
Zone
Zone Chime
Zone Descriptor
Zone Expander
Zone ID
An LCD keypad operation that allows the user to view a record of the last 100 events the
system has undergone.
A fire zone which will not sound an alarm and/or send a message to the central station
unless a second detection has been made within a minute of the first.
A test that allows detection devices to be tested without generating an alarm. This does not
apply to devices connected to 24hr zones.
The physical connection of a detector to the control panel.
A command that causes the keypad to chime if a specific zone is opened.
A name assigned to a zone that appears on the LCD keypad whenever an event occurs
related to the zone.
A peripheral add-on module that adds extra zones to the control panel. Can be either wired
or wireless.
The number associated with messages regarding a specific zone (event oriented event code
table).
50
Page 51

ELECTRONICS LINE (E. L.) LTD. AND ITS SUBSIDIARIES - LIMITED WARRANTY
ELECTRONICS LINE (E. L.) LTD. AND ITS SUBSIDIARIES (EL) warrants its products to be free from manufacturing defects in
materials and workmanship for two years following the date of sale. EL will, within said period, at its option, repair or replace any product
failing to operate correctly without charge to the original purchaser or user. In case of defect, contact the security professional who installed
and maintains your security system. In order to exercise the warranty, the product must be returned by the user or purchaser, shipping
costs prepaid and insured to EL. After repair or replacement, EL assumes the cost of returning products under warranty. EL will not be
responsible for any dismantling or reinstallation changes.
This warranty shall not apply to any equipment, or any part thereof, which has been repaired by others, improperly installed, improperly
used, abused, altered, damaged, subjected to acts of God, or on which any serial numbers have been altered, defaced or removed.
There is no express or implied warranty of merchantability or warranty of fitness for a particular purpose. Any action for
breach of warranty, including but not limited to any implied warranty of merchantability, must be brought within the six months following the
end of the warranty period. In no case shall EL be liable to anyone for any consequential or incidental damages for breach of this or any other
warranty, express or implied, even if the loss or damage is caused by the EL's own negligence or fault.
In no event shall EL be liable for an amount in excess of EL's original selling price of the product, for any loss or damage, whether
direct, indirect, incidental, consequential, or otherwise arising out of any failure of the product. CONSEQUENTLY, EL SHALL HAVE NO
LIABILITY FOR ANY PERSONAL INJURY, PROPERTY DAMAGE, OR OTHER LOSS BASED ON A CLAIM THE PRODUCT FAILED
TO GIVE WARNING. EL's warranty, as herein above set forth, shall not be enlarged, diminished or affected by and no obligation or liability
shall arise or grow out of EL's rendering of technical advice or service in connection with Buyers order of the goods furnished hereunder.
This warranty contains the entire warranty. Additionally, this warranty is in lieu of all other obligations or liabilities on the
part of EL. It is the sole warranty and any prior agreements or representations, whether oral or written, are either merged herein
or are expressly canceled. EL neither assumes, nor authorizes any other person purporting to act on its behalf to modify, to
change, or to assume for it, any other warranty or liability concerning its products.
EL RECOMMENDS THAT THE ENTIRE SYSTEM BE COMPLETELY TESTED WEEKLY.
Warning: Despite frequent testing, and due to, but not limited to, any or all of the following: criminal tampering, electrical or
communications disruption, it is possible for the system to fail to perform as expected. EL does not represent that the product/system may
not be compromised or circumvented; or that the product or system will prevent any personal injury or property loss by burglary, robbery, fire
or otherwise; nor that the product or system will in all cases provide adequate warning or protection. A properly installed and maintained alarm
may only reduce risk of burglary, robbery, fire or otherwise but it is not insurance or a guarantee that these events will not occur. Therefore,
the installer should in turn advise the consumer to take any and all precautions for his or her safety including, but not limited to, fleeing the
premises and calling police or fire department, in order to mitigate the possibilities of harm and/or damage.
EL is not an insurer of either the property or safety of the user's family or employees, and limits its liability for any loss or damage
including incidental or consequential damages to EL’s original selling price of the product regardless of the cause of such loss or damage. If
the user wishes to protect itself to a greater extent, EL will, at user's sole cost and expense, obtain an insurance policy to protect the user,
supplemental to user's own policy, at a premium to be determined by EL's insurer upon written notice from user by Certified Mail, Return
Receipt Requested, to EL's home office address, and upon payment of the annual premium cost by user.
Some states do not allow limitations on how long an implied warranty lasts or do not allow the exclusion or limitation of incidental or
consequential damages, or differentiate in their treatment of limitations of liability for ordinary or gross negligence, so the above limitations or
exclusions may not apply to you. This Warranty gives you specific legal rights and you may also have other rights which vary from state to
state.
51
 Loading...