

Page 1
Summit
3208GLD
USER MANUAL
Electronics Line
Page 2

Table of Contents
1: Introduction .................................................................................................................................. 2
2: Overview ...................................................................................................................................... 3
3: Keypad Functions......................................................................................................................... 4
3.1: Keypads................................................................................................................................. 4
3.2: 3108 LCD Keypad Layout...................................................................................................... 4
4: Basic System Operation............................................................................................................... 5
4.1: Arming and Disarming ........................................................................................................... 5
4.2: Distress Keys......................................................................................................................... 6
5: Advanced System Operation........................................................................................................ 7
5.1: Menu Navigation.................................................................................................................... 7
5.2: Bypassing Zones ................................................................................................................... 7
5.3: Chime ON/Chime OFF .......................................................................................................... 8
5.4: Set Time and Date................................................................................................................. 8
5.5: Fire Sensor Reset.................................................................................................................. 8
5.6: Bell Cancel ............................................................................................................................ 8
5.7: Stop Communications ........................................................................................................... 9
5.8: Follow Me .............................................................................................................................. 9
5.9: User Codes............................................................................................................................ 9
5.10: Event Log........................................................................................................................... 10
5.11: Access Control .................................................................................................................. 11
5.12: Opening and Closing Windows ......................................................................................... 11
6: Testing the System..................................................................................................................... 12
6.1: Walk Test............................................................................................................................. 12
6.2: Bell Test............................................................................................................................... 12
6.3: Telephone Test.................................................................................................................... 12
7: Quick Reference Guide.............................................................................................................. 13
8: LED Keypad Operation .............................................................................................................. 14
Reference Information.................................................................................................................... 15
Catalog Number: ZI0099C (3/03) Version 1.0
1: Introduction
Congratulations on purchasing the Summit 3208GLD security system. You have taken
a major step in protecting your home or business. In addition to the explanation you will
receive from your installer, we urge you to read through this manual so that you can
take full advantage of its features. Keep this manual in an accessible location for future
reference.
Note: Remember that no security system can prevent emergencies. This system
is only intended to alert you in case of an emergency and should not take the
place of prudent security practices or life and property insurance.
IMPORTANT
The Summit 3208GLD has many features to suit a wide range of applications. This
manual outlines all of these features but it is likely that there are options that are not
relevant to your system. If you have any questions regarding the availability of the
features described in the manual, please ask your installer.
-2-
Page 3

2: Overview
Your security system is made up of a control panel, one or more keypads, and various
detectors and sensors. The metal cabinet contains the control panel and the stand-by
battery. There is normally no reason for anyone but the installer to have access to the
control panel.
Keypads
System operation is performed using any of the keypads installed with your system.
They are usually mounted in areas close to the entrance of your home or business for
convenience. Keypads are available with either an LCD or LED display that provide a
user-friendly interface with the Summit 3208GLD security system.
Zones
The Summit 3208GLD security system comprises 8 security zones expandable to 32. A
zone can be defined as a protected area in your security system. Each zone can be
protected by one or more detection devices such as motion detectors, magnetic
contacts, glassbreak detectors and shock sensors. When one of these detection
devices is activated it “opens” the zone to which it is connected.
System Monitoring
Your security system can be monitored either by a monitoring service or by using the
Follow-me feature. When using a monitoring service, the Summit 3208GLD sends a
message to a central station when an event occurs within your system. The Follow-me
feature enables you to enter the telephone number where you can be reached, in order
for the system to contact you when an event occurs.
Partitioned Systems
The Summit 3208GLD can be partitioned into individual sub-systems that operate as
separate security systems. In this mode, each sub-system operates as normal though
more than one keypad can not be used simultaneously. You must wait until the first
keypad has completed its operation.
Zones
321 4 5 6 7 8
Keypads
Control Panel
Siren
Figure 2.1: Typical Security System Setup
-3-
System Monitoring
Central
Station
Or
Page 4
3: Keypad Functions
3.1: Keypads
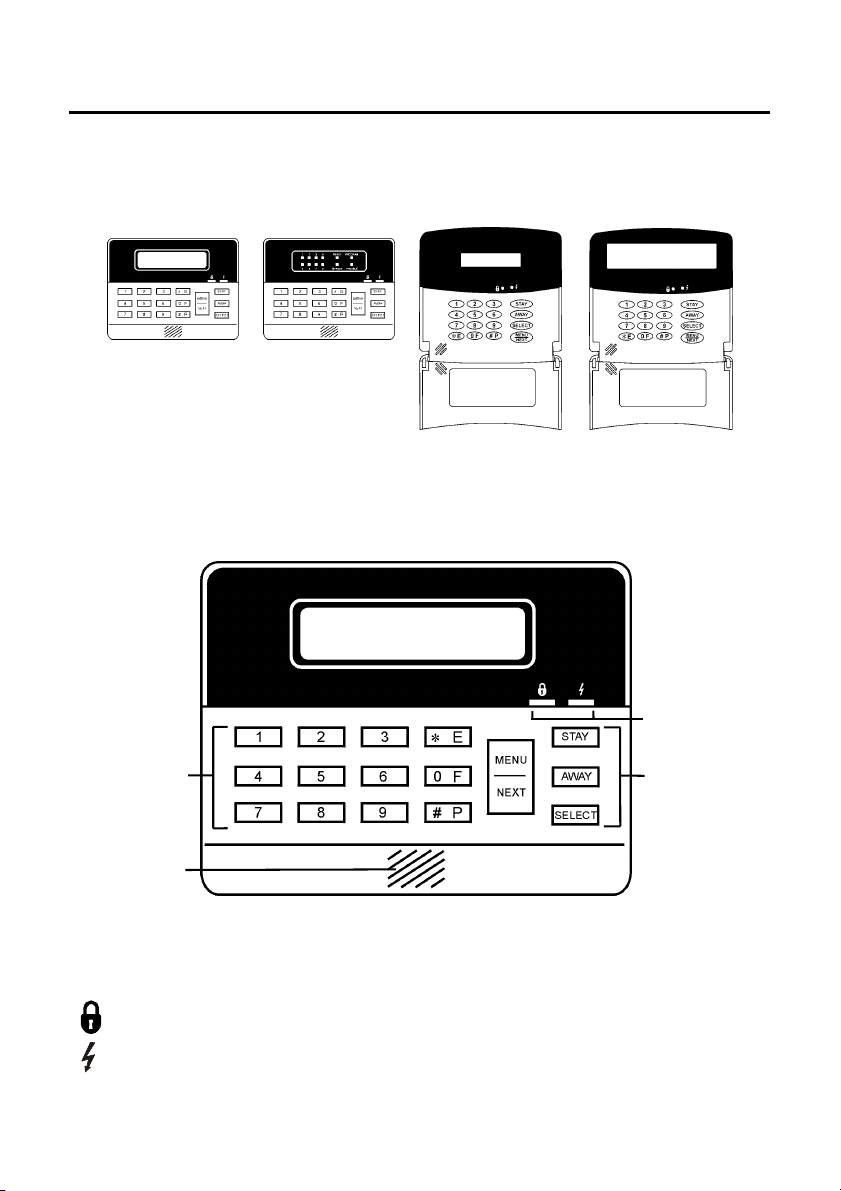
The Summit 3208GLD security system supports the keypads pictured in Figure 3.1.
The layout for each keypad differs but the operation instructions for all the keypads are
identical.
3108 LCD
3106 LED
3118 LCD
3128 LCD
Figure 3.1: 3208GLD Keypads
For simplicity, this manual relates to the 3108 LCD in all the operating instructions. If
your security system includes 3106 LED keypads, refer to 8: LED Keypad Operation.
3.2: 3108 LCD Keypad Layout
LCD Display
Status
Indicators
Numeric
Keypad
Buzzer
Function
Keys
Figure 3.1: 3108 LCD Keypad Layout
The 3108 LCD keypad includes a 32-character liquid crystal display. All operations are
performed using the numeric keypad and the function keys: STAY, AWAY, SELECT
and MENU/NEXT.
ARMED: The Armed LED lights up to indicate the system is armed and goes out
when the system is disarmed.
POWER: The Power LED lights up when both AC & battery power are OK, blinks
when the battery is low & AC power is OK and goes out in the event of AC power
failure.
-4-
Page 5

4: Basic System Operation
4.1: Arming and Disarming
Arming can be defined as activating the system. When the system is armed, it monitors
the zones that are protected using the various connected detection devices. If a
detection is made, the zone is opened and an alarm is generated.
Likewise, if a zone is opened when the system is disarmed an alarm is not generated –
this does not apply to 24hr zones that are always active regardless of system status.
Two main arming modes are available, “Away” and “Stay”, these modes enable you to
arm the whole security system or only the zones that protect the perimeter of the
protected premises.
Note: If one-key arming is enabled, it is not necessary to enter your user code
when arming the system.
Away Arming
Away arming activates the entire system. You use this method of arming when leaving
the premises.
To Away arm the system:
1. Check that no zones are open (i.e. all entrances are secured and the premises are
empty) so that the system is “ready” for arming.
2. Press the AWAY key.
3. Enter your user code; the LCD displays “SYSTEM X ARMED, XX SEC TO EXIT!”
4. Exit the area within the exit delay count down. Note: Failure to exit during the exit
delay will result in an alarm.
Stay Arming
Stay arming activates the system’s perimeter zones. When only the perimeter is armed,
you are able to wander freely in the protected area without triggering an alarm. Stay
arming is usually used to arm a home at night.
To Stay arm the system:
1. Check that no perimeter zones are open (i.e. all doors and windows are secured) so
that the system is “ready” for arming.
2. Press the STAY key.
3. Enter your user code; the LCD displays “SYSTEM X ARMED, XX SEC TO EXIT!”;
at the end of the delay, the system is armed.
Disarming
When you enter the premises, the keypad chimes for the duration of the entry delay.
You must disarm the system within the entry delay time to prevent the system from
triggering an alarm.
• To disarm the system, enter your user code.
-5-
Page 6

Alarm Indication
In the event that an alarm has occurred, the LCD displays
information regarding the zone that generated the alarm. This
information is displayed until the next time the system is armed.
The example, shown in Figure 4.1, indicates that an alarm has
ZONE 4 IN ALARM
BEDROOM
Figure 4.1: Alarm Indication
occurred in Zone 4 - Bedroom. Note: If upon returning to the
premises your panel indicates an alarm has taken place,
leave immediately and telephone the monitoring service or
the relevant authorities.
4.2: Distress Keys
In the event of an emergency, you can trigger three kinds of alarm from the keypad.
To generate a distress key alarm:
1. Press and hold down the MENU/NEXT key.
2. Keeping the MENU/NEXT key held down, press E, F or P for more than 1 second.
EMERGENCY
FIRE POLICE
Figure 4.2: Distress Keys
-6-
Page 7

5: Advanced System Operation
The procedures included in this section are all performed using the command code for
each function. For quick reference, all command codes are listed on the pull up card
located at the rear of the keypad or on the inside of the keypad’s door.
Alternatively, you can select functions by browsing through the menu as explained in
the following section.
5.1: Menu Navigation
To select an item from the menu:
1. Press MENU/NEXT; the first item in the main menu is displayed.
2. Press MENU/NEXT to scroll through the menu. Press “4” to scroll backwards.
3. Press SELECT to select the displayed menu item (indicated by the arrow, “>”).
Certain menu items require you to enter your user code in order to gain access.
To exit the menu at any time, press AWAY.
The following is a list of menu items and their shortcut command codes.
1 - DISARM
2 - ARM
21 - PERIMETER ARM
22 - NORMAL ARM
23 - LATE TO CLOSE
3 - BYPASS
31 - BYPASS ZONE
32 - UNBYPASS ZONE
33 - CHIME ON
34 - CHIME OFF
39 - UNBYPASS ALL
4 - SERVICE
41 - SET TIME & DATE
42 - TEST
421 - WALK TEST
422 - BELL TEST
423 - TELEPHONE TEST
425 - SYSTEM TEST*
426 - BATTERY TEST*
43 - FIRE SENSOR RESET
44 - BELL CANCEL
45 - STOP COMM.
46 - FOLLOW ME
5 - USER CODES
6 - VIEW/LOG
61 - VIEW LOG
62 - CLEAR LOG
63 - PRINT LOG
64 - SHOW VERSIONS*
7 - PROGRAMMING*
71 - MANUAL PROG.*
72 - LOAD DEFAULT*
74 - REMOTE PROG.*
741 - OFF HOOK*
742 - CALLBACK*
75 - PERIPHERALS*
8 - AUX RELAY*
83 - RESET RELAY*
84 - SET RELAY*
9 - ACCESS CONTROL
*Installer Functions
5.2: Bypassing Zones
When a zone is bypassed, it is ignored by the system and does not generate an alarm
when opened.
To bypass a zone:
1. Select Bypass Zone from the Bypass menu or press SELECT, 3,1.
2. Enter your user code.
3. Enter the number of the zone you want to bypass; a scrolling list of bypassed zones
is displayed on the LCD.
4. Press AWAY to exit.
Note: the Summit 3208GLD can be expanded to 32 zones. In such systems, the
control panel waits for an extra digit when you try to bypass zones 1, 2, or 3.
This allows you to bypass the additional zones (for example, zones 11, 24 or 32).
In this case, press MENU/NEXT to indicate that no additional digit is necessary.
-7-
Page 8

To unbypass a zone:
1. From the Bypass menu, select Unbypass or press SELECT, 3, 2.
2. Enter your user code and the bypassed zone number.
3. Press AWAY to exit.
To unbypass all zones:
1. From the Bypass menu, select Unbypass All or press SELECT, 3, 9.
2. Enter your user code.
5.3: Chime ON/Chime OFF
Using this feature, you can set a zone to cause the keypad to chime when opened.
To set a zone to chime:
1. Press SELECT, 3,3.
2. Enter your user code.
3. Enter a zone number; the zone is programmed to chime when opened.
To deactivate the zone chime:
1. Press SELECT, 3, 4.
2. Enter your user code.
3. Enter the zone number; the zone will not chime when opened.
5.4: Set Time and Date
To set the time and date:
1. Press SELECT, 4, 1.
2. Enter your user code.
3. Enter the date (DDMMYY).
4. Enter the time in 24 hour format (HHMM).
5. Press SELECT; the modifications to the time and date take effect.
On the LCD keypad, pressing # when the panel is in standby mode toggles the time
display to either 24hr or 12hr format.
5.5: Fire Sensor Reset
If programmed by the installer, smoke detectors must be manually reset after detection.
To manually reset smoke detectors:
1. Press SELECT, 4, 3.
2. Enter your user code.
5.6: Bell Cancel
To cancel bell operation:
• Enter your user code.
If the system is armed, this cancels the bell and disarms the system. If the system is
disarmed, only the bell is cancelled.
-8-
Page 9

When the keypad is mounted outside the protected area or when the system is armed
using the Stay method, you may want to cancel the bell without disarming.
To cancel bell operation without disarming the system:
1. Press SELECT, 4, 4.
2. Enter your user code.
5.7: Stop Communications
To stop the control panel communicating with the monitoring service:
1. Press SELECT, 4, 5.
2. Enter your user code; all communication buffers are cleared and all com-
munications stop immediately.
5.8: Follow Me
In addition to the services provided by professional monitoring companies, the Summit
3208GLD is able to contact you to inform that an event has occured within the system.
To program the Follow Me telephone number:
1. Press SELECT, 4, 6.
2. Enter your user code.
3. Enter the required telephone number (up to 16 digits, # = 3-second pause,
4 = switch to tone dialing). Note: The 4 key will appear on the display as “T”
and the # will appear as “,”.
5.9: User Codes
User codes permit or restrict access to various operations such as arming and
disarming the system. The Summit 3208GLD enables you to program 15 individual
user codes with 15 different authorization levels. Each user code can be programmed
with 3 to 6 digits.
To program user codes:
1. Press SELECT, 5.
2. Enter your user code; user 1 is displayed.
Figure 5.1 shows a typical user code as it appears on the LCD
display. In the example User Code 1 (authorization level 10) is
programmed as 1234 – a 4-digit code assigned to System 1.
The current field is indicated by “>”.
3. Press MENU/NEXT to scroll to the user codes you want to program.
4. To move from field to field, press SELECT.
5. To change the value of the current field, enter the required value.
6. Press AWAY to exit user code programming or MENU/NEXT to program the next
user code.
US ER 01: > 111111
SYS. 1 LEVEL 10
Figure 5.1: User Codes
-9-
Page 10

Authorization Levels
g
The following table shows the operations available to each authorization level. Note
that Level 10 is the highest authorization level offering access to all operations.
Level 0
Level 1
Level 2
Level 3
Level 4
Level 5
Level 6
Level 7
Level 8
Level 9
Level 10*
Level 11
Level 12
Level 13
Level 14
Level 15**
* Master Code
Away Arm
Stay Arm
Disarm
Bell Cancel
Chime ON/OFF
Fire Sensor Reset
Set/Reset Relay
Follow-me
Access Control
Bypass/Unbypass
Set Clock
Late to Close
View Log
Clear Log
Remote Programming
Stop Communications
Program User Codes
Tests
Access denied to all functions
9
9 9
9 9
9 9 9 9 9 9 9
9 9 9 9 9 9 9 9 9
9 9 9 9 9 9 9 9 9 9 9 9 9 9 9 9
9 9 9 9 9 9 9 9 9 9 9 9 9 9 9 9 9
9 9 9 9 9 9 9 9 9 9 9 9 9 9 9 9 9
9 9 9 9 9 9 9 9 9 9 9 9 9 9 9 9 9 9
9 9 9 9 9 9 9 9 9 9 9 9 9 9 9 9 9 9 9
9 9 9 9 9 9 9 9 9 9 9 9 9 9 9 9 9 9 9
Not available
9
9 9
9 9
9
Programming
**Duress Code
System Allocation
Each user code is assigned to a system. This is only relevant if your security system is
partitioned into sub-systems. When programming user codes, define the system to
which the user code belongs. Assigning a user code to System 5 gives the user access
to all available sub-systems. Note: If your security system is unpartitioned, assign
all codes to System 1.
5.10: Event Log
The event log records the last 100 events that the system has undergone. The event
log uses the FIFO (first in, first out) method. Once the log is full, the oldest event will
automatically be erased.
In the example (Figure 5.2), the log shows that an alarm occurred in Zone 2 - Bedroom
at 12:50 on the 23
To view the event log:
1. Press SELECT, 6, 1.
2. Enter your user code; the most recent event is displayed.
3. Press MENU/NEXT to scroll through the previous events.
rd
of the month.
23 12:50 ALARM
BEDROOM 02
Figure 5.2: Event Lo
-10-
Page 11

4. Press AWAY to exit the log.
g
To clear the event log:
1. Press SELECT, 6, 2.
2. Enter your user code; the event log is erased and the “End
of Log “ message is displayed.After the log is cleared, the
Armed LED stops flashing and all zone in alarm messages
are cleared.
END OF LOG
444
Figure 5.3: End of Lo
444
An add-on module is available that enables you to print the log using a standard printer.
To print the log:
1. Press SELECT, 6, 3.
2. Enter your user code.
5.11: Access Control
This feature enables you to open an electric door latch from the keypad.
To use the Access Control feature:
1. Press SELECT, 9.
2. Enter your user code.
5.12: Opening and Closing Windows
This feature is designed for systems installed in properties that are armed and
disarmed at regular times during the week. For example, a shop that is opened at
8:00am and closed at 5:00pm Monday to Friday.
As an extra security measure, the Summit 3208GLD can be programmed to send a
message to the central station if the system is not armed or disarmed at the regular
times. In the above example, a time “window” of 30 minutes could be programmed
around the shops opening and closing times (i.e. 7:45 to 8:15am and 4:45 to 5:15pm).
A message can also be sent if the system is armed and disarmed at irregular times.
To prevent situations where the premises are vacated without having armed the
system, the Summit 3208GLD can be programmed to automatically arm at the end of a
closing window.
Late to Close
If you want to stay on the premises and arm the system at a later time, you can delay
the closing window time using the “Late to Close” command.
To set a later closing time:
1. Press SELECT 2, 3.
2. Enter the system number.
3. Enter your user code.
4. Enter the new closing hour in 24Hr fomat (HH).
Latch-key
The Latch-key feature is designed to inform parents whether their children have arrived
home safely. If MENU/NEXT is not pressed during the appropriate window, the panel
sends a message to the monitoring service or Follow-me number.
-11-
Page 12

6: Testing the System
To determine whether the system is functioning normally, there are a number of tests
that can be performed. Electronics Line recommends that you perform these tests
weekly.
6.1: Walk Test
A walk test enables you to check detection devices such as motion detectors and
magnetic contacts.
To perform a walk test:
1. Press SELECT 4, 2, 1.
2. Enter your passcode.
3. Test your system’s detection devices. When activated, the keypad chimes
indicating that the zone is open.
4. To exit Walk Test mode, press AWAY.
Walk Test mode is automatically terminated after 4 minutes and 15 seconds.
Note: During a walk test, an open zone will not generate an alarm. However,
this does not apply to zones programmed as tamper zones and 24hr zones
and opening these zones will generate an alarm.
6.2: Bell Test
The bell test sounds the bell for one second to check that it is functioning.
To perform a bell test.
1. Press SELECT 4, 2, 2.
2. Enter your passcode.
6.3: Telephone Test
This test sends a message to each of the monitoring services to check that the
system’s dialer is functioning and correctly programmed.
To perform a telephone test:
1. Press SELECT 4, 2, 3.
2. Enter your passcode.
Note: The control panel seizes the telephone line in order to run this test.
-12-
Page 13

7: Quick Reference Guide
Arming Disarming
Ensure that there is no movement in the
protected areas and that all windows and
doors are secure.
Enter the premises via the designated
entry route; the keypad chimes during the
entry delay.
SYSTEM 1 READY
SYSTEM 1 ARMED
020 SEC TO ENTRY
Press AWAY or STAY Enter your passcode
PASSCODE…
PASSCODE:
∗ ∗ ∗ ∗ ∗ ∗
Enter your passcode The system is disarmed
SYSTEM 1 ARMED
011 SEC. TO EXIT
SYSTEM 1 READY
Leave the premises before the
end of the exit delay
Distress Keys
Press and hold down MENU/NEXT
+ E, F or P for over a second
SYSTEM 1 ARMED
01 - 00:24 KpD MRG
EMERGENCY
-13-
Page 14

8: LED Keypad Operation
The 3106 LED keypad includes a simple LED display intended for basic system
operation. This section provides you with a guide to this display.
Figure 8.1: 3106 LED Display
1 - 8: Used to display zone status and system status.
READY: Indicates that the system is ready to arm.
PROGRAM: Indicates that the system is in programming mode. The Program LED is lit
when SELECT is pressed and flashes when the system waits for an authorized user
code to be entered.
BYPASS: The Bypass LED and the relevant zone LEDs flash to indicate that zones
have been bypassed.
TROUBLE: Flashes in the event of system trouble. If this occurs, contact your installer.
ARMED: The Armed LED lights up to indicate the system is armed and goes out
when the system is disarmed.
POWER: The Power LED lights up when both AC & battery power are OK, blinks
when the battery is low & AC power is OK and goes out in the event of AC power
failure.
-14-
Page 15

Reference Information
To be filled out by the installer.
Installer: _______________________ Date Installed: _________ Phone #: ______________
Monitoring Service
1. Address: _______________________ Telephone: _____________ Account #: _________
2. Address: _______________________ Telephone: _____________ Account #: _________
3. Address: _______________________ Telephone: _____________ Account #: _________
4. Address: _______________________ Telephone: _____________ Account #: _________
Delays
Entry 1: ____ Entry 2: ____ Entry 3: ____ Exit 1: ____ Exit 2: ____ Exit 3: ____ Exit 4: ____
Zones
1. _________________________________
2. _________________________________
3. _________________________________
4. _________________________________
5. _________________________________
6. _________________________________
7. _________________________________
8. _________________________________
9. _________________________________
10. _________________________________
11. _________________________________
12. _________________________________
13. _________________________________
14. _________________________________
15. _________________________________
16. _________________________________
Bell/Siren
Burglar Alarm Bell Pattern: Steady Pulsed 1 Pulsed 2 Bell Cut-off Time: _______
Notes
_____________________________________________________________________________
_____________________________________________________________________________
_____________________________________________________________________________
_____________________________________________________________________________
_____________________________________________________________________________
_____________________________________________________________________________
_____________________________________________________________________________
_____________________________________________________________________________
_____________________________________________________________________________
17. _________________________________
18. _________________________________
19. _________________________________
20. _________________________________
21. _________________________________
22. _________________________________
23. _________________________________
24. _________________________________
25. _________________________________
26. _________________________________
27. _________________________________
28. _________________________________
29. _________________________________
30. _________________________________
31. _________________________________
32. _________________________________
-15-
 Loading...