


ZI0099B (6/99)
3208GLD
USER MANUAL
First Edition
Notice: Electronics Line (E.L.) Ltd. reserves the right to change the information within this manual without notice.
Electronics Line (E.L.) Ltd.
www.elecline.com

2
Alarm Indication............................................................................................................................ 7
Accidental Alarms......................................................................................................................... 7
User Codes ...................................................................................................................................... 8
Emergency Keys & Duress .............................................................................................................. 9
Bypassing/Unbypassing................................................................................................................... 9
Event Log ....................................................................................................................................... 10
Partitioned/Unpartitioned Operation............................................................................................... 10
Additional Features ........................................................................................................................ 10
Setting the Time and Date.......................................................................................................... 10
Follow Me ................................................................................................................................... 11
Late to Close............................................................................................................................... 11
Latch Key.................................................................................................................................... 11
Trouble Shooting............................................................................................................................ 12
Glossary ......................................................................................................................................... 13
Quick Reference Guide.................................................................................................................. 14
System Reference Guide ............................................................................................................... 14
I
NTRODUCTION
Thank you for purchasing the Summit security system. You have taken a major step in
protecting your home or business. In addition to the explanation you will receive from
your installer, we urge you to read through this manual. This will help you familiarize
yourself with the system, so that you can take advantage of its many advanced
features. This booklet should be kept in an accessible location and the system
reference guide, located in the rear portion of this manual, should be filled out. If you
do not understand any part of this manual, contact your installer.
Note: Remember that no security system can prevent emergencies. This system
is only intended to alert you in case of an emergency and should not take the
place of prudent security practices, or life and property insurance.
G
ETTING STARTED
Your Security System is made up of a control panel, one or more keypads, and various
detectors and sensors. The metal cabinet contains the control panel, fuses and the
stand-by battery. There is normally no reason for anyone but the installer to have
access to the control panel.
3
SYSTEM 1 READY
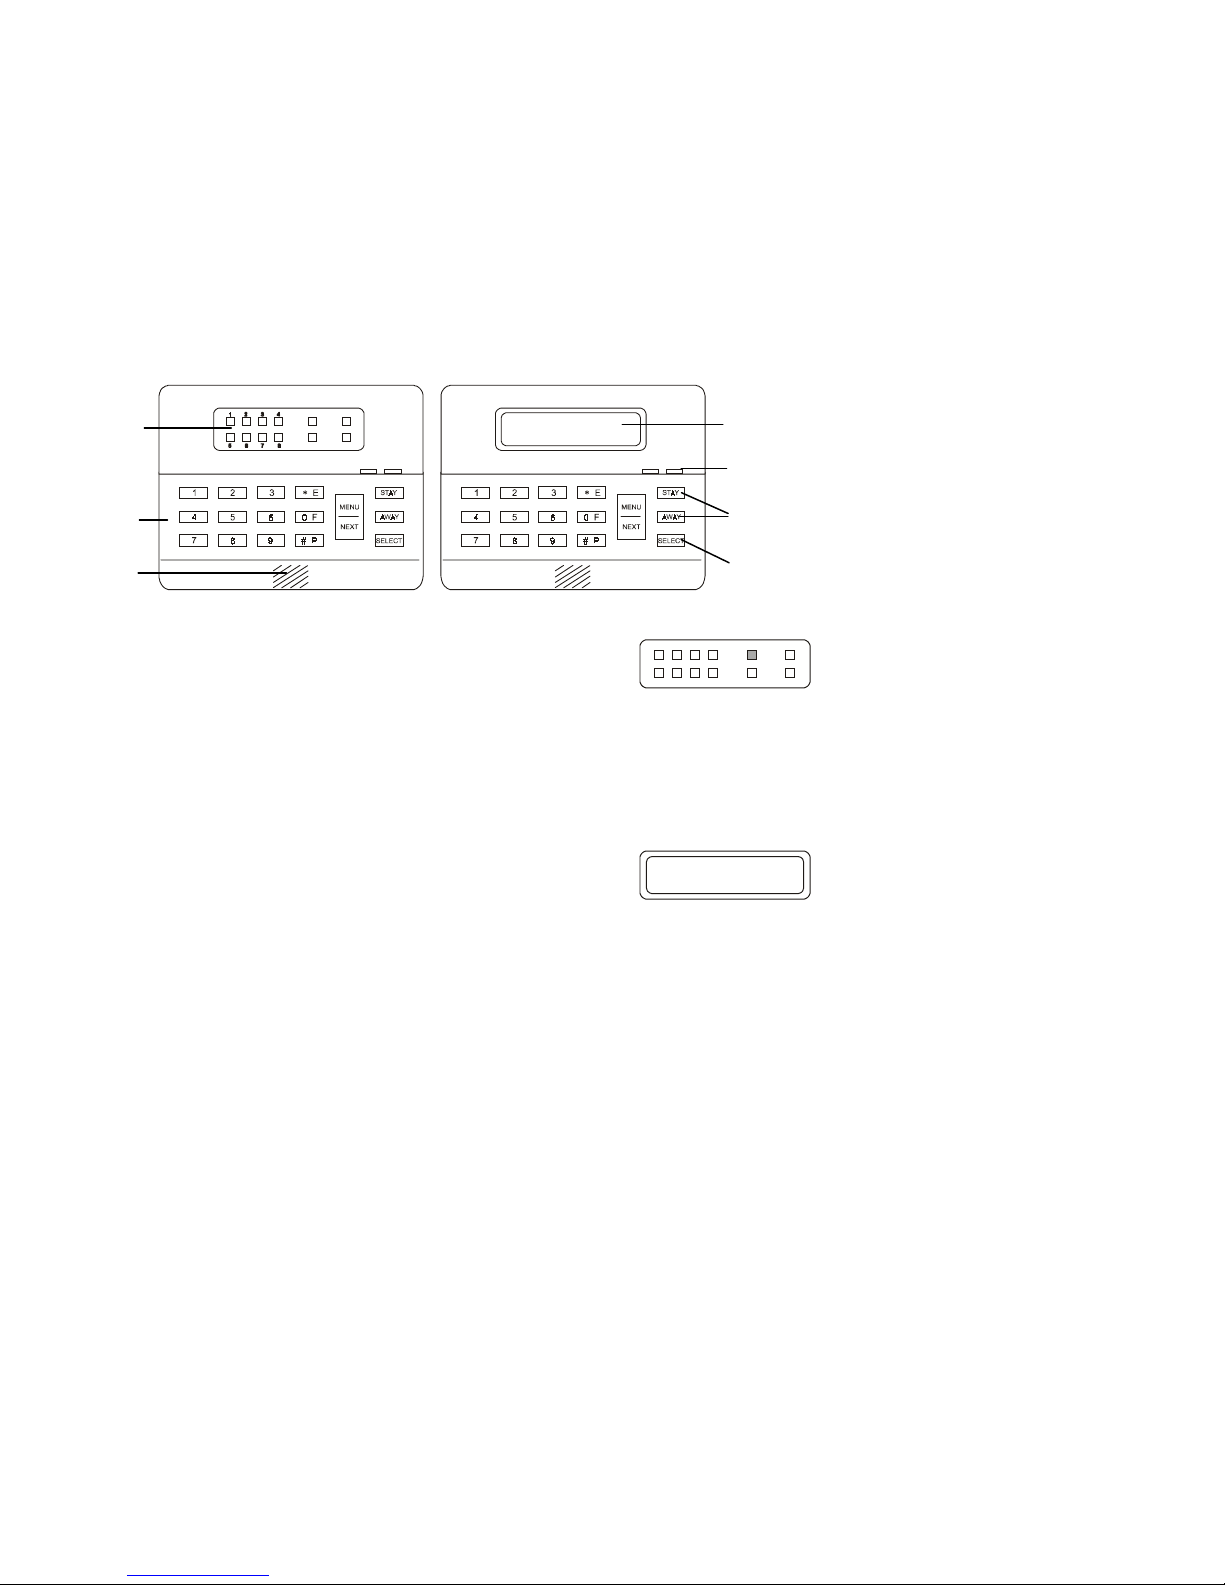
Keypad Layout
ARMED
READY
BYPASS
TROUBLE
PROGRAM
POWER
ARMED POWER
3106 LED Keypad
The 3106 LED keypad uses light emitting diodes to indicate the
system’s status. It is made up of indicators for 8 zones,
programming, readiness of the system for use, bypassing of
zones, trouble situations, power and arming. The keypad is used
by entering command codes for the desired functions. If your
Summit is operated by a 3106 LED keypad, look for the LED
display next to instructions related specifically to the operation of
your system.
3108 LCD Keypad
The 3108 LCD keypad uses a liquid crystal display to indicate the
system’s status for up to 32 zones. In addition, it also has LED
indicators for power and arming. The keypad is used either by
entering command codes or by scrolling through the menu. If your
Summit is operated by a 3108 LCD keypad, look for the LCD
display next to instructions related specifically to the operation of
your system.
LCD Display
Status
Indicators
Arming
Keys
Select
Key
LED
Dis
play
Numeric
Keypad
Buzzer

4
OPEN/DISARM
NEXT...
>1
39 Unbypass All zones 5 User Codes 84X Set Relay X
41 Set Time
HHMM MMDDYY
61 View Log 9 Access Control
421 Walk Test 62 Clear Log
To issue a command from the keypad using a Command Code:
1. Press "SELECT". The program indicator will turn on (LED keypad only).
2. Enter the command code.
3. Enter your authorized user code should the keypad indicate a need for one.
LCD Menu Selection
The menu offers you the ability to select keypad functions by scrolling through the
menu items. The following are the menu selections offered by the Summit 3208GLD:
1 - DISARM
2 - ARM
21 - PERIMETER ARM
22 - NORMAL ARM
23 - LATE TO CLOSE
3 - BYPASS
31 - BYPASS ZONE
32 - UNBYPASS ZONE
33 - CHIME ON
34 - CHIME OFF
39 - UNBYPASS ALL
4 - SERVICE
41 - SET TIME & DATE
42 - TEST
421 - WALK TEST
422 - BELL TEST
423 - TELEPHONE TEST
425 - SYSTEM TEST
426 - BATTERY TEST
43 - FIRE SENSOR RESET
44 - BELL CANCEL
45 - STOP COMM.
46 - FOLLOW ME
5 - USER CODES
6 - VIEW/LOG
61 - VIEW LOG
62 - CLEAR LOG
64 - SHOW VERSIONS
7 - PROGRAMMING
71 - MANUAL PROG.
72 - LOAD DEFAULT #1
73 - LOAD DEFAULT #2
74 - REMOTE PROG.
741 - OFF HOOK
742 - CALLBACK
75 - PERIPHERALS
8 - AUX RELAY
83 - RESET RELAY
84 - SET RELAY
9 - ACCESS CONTROL
To select a function from the menu:
1. Press the “MENU/NEXT” key to scroll forwards until you
reach the desired function. You may scroll backwards by
pressing the 4 key.
2. Press “SELECT” to select a menu item.
3. Continue pressing the “MENU/NEXT” and “SELECT” keys
until you reach the desired function.
4. Enter your authorized user code (if asked to).

5
System not ready to arm due to open
perimeter zones:
SYSTEM NOT RDY
(OPEN ZONES)
System armed, exit delay counting: SYSTEM 1 ARMED
XX SEC TO EXIT!
System ready for perimeter arming (interior
zones open).
SYSTEM 1 READY
FOR STAY ARMING
System ready for perimeter arming with
perimeter bypassed zones.
SYSTEM 1 READY
STAY (BYPASSED)
System armed, exit delay ended – system is
fully armed:
SYSTEM 1 ARMED
System Perimeter armed, exit delay ended
(STAY pressed):
SYSTEM 1 ARMED/P
System armed, immediate mode:
SYSTEM 1 ARMED
IMMEDIATE
Zone Status Display
Zone status will only be displayed if detailed
display is selected:
ZONE 1 OPEN
BEDROOM
-or- ZONE 3 BYPASSED
FRONT DOOR
-or- ZONE 4 TROUBLED
KITCHEN
Zone 4, bedroom, is in alarm (appears only if
an alarm has taken place):
ZONE 04 IN ALARM
BEDROOM
System Status Display
System AC Power was lost: SYSTEM AC LOSS
System Backup battery is too low (under
10.8V):
SYSTEM LOW BATT
Communication or telephone supervision has
failed:
TELEPHONE COMM.
FAILURE
Time and Date display (Set Time and Date by
SELECT, 4, 1 and Passcode):
Note: This display scrolls every few seconds.
THU , 28 JUL 94
12 : 37 PM
In addition, both the LED and LCD keypads are equipped with Armed and Power
indicators.

6
SYSTEM 1 READY
SYSTEM 1 ARMED
011 SEC TO EXIT
SYSTEM 1 ARMED
IMMEDIATE
in the area armed, such as during the day, when your home would be empty, or at night
when your business would be closed.
To arm the system using the LED keypad:
1. Check to make sure the ready indicator is on.
2. Press either the “STAY” or “AWAY” keys. If one key
arming is disabled, enter your user code.
3. The ARMED indicator will light up, indicating that the
system is armed. Exit the area within the exit delay
countdown. Note: Failure to exit during the exit delay
period will result in an alarm.
To arm the system using the LCD keypad:
1. Check that the display reads “SYSTEM X READY.”
2. Press the “STAY” or “AWAY” keys. A user code needs to
be entered if one key arming has been disabled. The LCD
display will read “SYSTEM X ARMED, XX SEC TO EXIT!”
Note: If the system is partially ready, you will only be
able to arm the perimeter.
3. The ARMED indicator lights up, indicating that the system
is armed. Exit the area within the exit delay count down.
Note: Failure to exit during the exit delay will result in
an alarm.
4. For immediate arming (to eliminate the exit/entry delay)
press either the “STAY” or “AWAY” key, followed by your
authorized user code (if necessary) and then the 4 key.
The system can be programmed to have an exit delay, allowing you to exit the area,
within a certain time frame, without sending an alarm. Your keypad/s may be
programmed to have continuous beeps throughout the exit/entry delay period. Ask your
installer to program these features for you.

7
SYSTEM 1 READY
ZONE 4 IN ALARM
BEDROOM
Bypassing a zone removes it from your system.
Note: A bypassed zone is not
protected by the security system.
D
ISARMING (DEACTIVATING THE SYSTEM
)
Upon arriving back to the area protected by your Summit, you will need to disarm the
system. Failure to disarm the system during the entry delay (if programmed) or after
entering the protected area will result in an alarm.
To disarm the system using the LED keypad:
Enter your authorized user code. The system is now disarmed
and the armed indicator will turn off.
To disarm the system using the LCD keypad:
Enter your authorized user code. The system is now disarmed
and the armed indicator will turn off.
Alarm Indication
On the LED keypad the zone indicator for the zone/s in alarm
will blink. The LCD display will display which zone is in alarm.
Note: If upon returning to the premises your panel indicates an
alarm has taken place, leave immediately. Go to the nearest
neighbor and telephone the authorities for help.
Accidental Alarms
Should the alarm sound accidentally while disarming the system make sure to notify
your alarm monitoring service and the appropriate authorities.

8
USER CODES
NEXT...
>5
US ER 01 : > 111111
SYS. 1 LEVEL 10
pg,ppgg
and Access control
Level 6
Operations of Level 5 + Zone bypassing, Clock change, Late to Close, Log
clear, Remote programming and stop call
Level 7
Operations of Level 6 + User code programming
Level 8
Same as Level 7
Level 9
Operations of Level 7 + Tests
Level 10
Operations of Level 9 + Programming
Level 11
Not available at this time
Level 12
Allows only Tests & Programming
Level 13
Allows only Log view & clear
Level 14
Allows only Tests
Level 15
Duress code level allows Arm, Disarm, Stop Call and Bell Cancel
To program user codes using the LCD keypad:
1. Press the “MENU/NEXT” key until the user code display
appears on screen.
2. Press “SELECT”.
3. Enter your authorized user code. The display will show the
first user number for that system, the associated user code,
the sub-system to which the code is assigned (partitioned
systems only) and the authorization level. The user code
field is indicated by >. Changing authorization levels is done
by reprogramming the authorization level of a specified
code.
4. To scroll through all user codes, press the “MENU/NEXT”
key to move forward and the 4 key to move backward.
5. To change field press “SELECT”; the > symbol appears next
to the data of the current field.
6. Enter your modifications and press “AWAY” to exit.
Note: Level 0 does not allow you to perform any operations and is only assigned to delete a
user code.

9
SELECT ZONE 1-8
<AWAY> TO EXIT
SYSTEM 1 READY
(BYPASSED)
ZONE 01 BYPASSED
FRONT DOOR
y
To activate an emergency key press the “MENU/NEXT” key and then, while pressing
the key, press the desired emergency key, for over one second. These keys may be
programmed to sound a siren when pressed. Contact your installer to find out if this has
been programmed for your Summit security system.
A user code can be programmed for a duress situation. A duress code has an
authorization level of 15. This user code will perform the selected operations (such as
arming, disarming, bell canceling, etc.) while sending a duress code to the central
station, notifying them of a duress (hostage) situation.
B
YPASSING/UNBYPASSING
Zones which can not be armed, due to any number of reasons, can be bypassed,
excluding them from an arming. Please consider if the area needs to be bypassed
before following the procedure.
Note: A bypassed zone is not protected by the security
system.
To bypass a zone using the LED keypad:
1. Press “SELECT” 3, 1 and enter your authorized user code if
the PROGRAM indicator is blinking.
2. Enter the zone number.
3. Press “AWAY”; the zone number and the BYPASS
indicators blink.
To unbypass a zone using the LED keypad:
1. Press “SELECT” 3, 2 and enter your authorized user code if
the PROGRAM indicator is blinking.
2. Enter the zone number.
3. Press “AWAY”; The zone number indicator will turn off
(unless the zone is still open) and the BYPASS indicator will
turn off.
To bypass using the LCD keypad:
1. Press “SELECT” 3, 1 and enter your authorized user code.
2. Enter the zone number or scroll through the menu. The LCD
display will display that zones have been bypassed and list
the zones bypassed, one per screen.

10
** END OF LOG **
SET TIME HHMM
00:00
SET DATE DDMMYY
21/11/98
3. Scroll through the log using the MENU/NEXT key.
4. The screen will display the end of the event log.
To clear the event log:
1. Press “SELECT” 6, 2 or scroll through the menu.
2. Enter your authorized user code. The display will indicate
the end of the event log and the log will then be erased.
P
ARTITIONED/UNPARTITIONED OPERATION
The Summit 3208GLD control panel can be operated in partitioned mode, enabling one
Summit security system to operate as up to four separate sub-systems. Ask your
security installer about partitioning.
The Summit security system acts as it normally does in partitioned mode, except for
during the following:
• Should a sub-system be communicating with the control panel through its keypad,
the other sub-systems will not be able to communicate with the control panel using
their system’s keypad until the operating sub-system has completed its desired
function.
• The system number needs to be entered when performing system functions.
In unpartitioned mode, the system number is one.
A
DDITIONAL FEATURES
The following is a listing of the additional features offered by the Summit security
system. Consult with your installer for programming these features using the LED
keypad.
Setting the Time and Date
1. To set the time and date:
2. Press “SELECT” 4, 1 or scroll through the menu.
3. Enter your authorized user code.
4. Enter the date (DDMMYY).
5. Enter the time in 24 hour format (HHMM).
6. Press “AWAY” to return to the normal system display.

11
DD/MM/YY HH:MM
01 / 12 / 99 12:00
can be used to enter a pause in the dialing (ideal for
dialing extension numbers) and the 4 key can be used for
switching from pulse to tone dialing.
When receiving a Follow Me call, confirm that the message has been received by
pressing 0, 9 or # on your telephone.
Late to Close
This operation is used when the system is programmed to work with “Opening and
Closing Windows”. Please contact your security installer to find out whether or not this
function has been programmed for your system. A late to close condition can be
activated if you wish to remain on the premises for longer than the time programmed
for the Closing Window.
To activate a “Late to Close” condition:
1. Press SELECT 2, 3.
2. Enter the system number.
3. Enter an authorized user code.
4. Enter the new closing hour in 24-hour format (HH);
the new closing time appears.
Latch Key
The latch key feature is used when you want to verify the departure or arrival of
individuals from the area protected by your Summit security system. Please contact
your security installer to find out whether or not this function has been programmed for
your system.

12
of the Exit/Entry delay.
AC contact has been lost or
the battery is low.
Press any key and contact your installer.
Ready light
blinking slowly.
The system is not ready to be
armed.
Secure the open zone.
Programming
light is blinking
slowly.
A user code is required to
perform the desired function.
Enter your authorized user code.
Programming
light is on.
Waiting for input to be entered
using the keypad.
Enter information, press the AWAY key
or wait. After 2 minutes the system will
return to normal.
Bypass light is
blinking slowly.
A zone is being bypassed. The display will return to normal after the
bypassed zone is unbypassed.
Zone will not
bypass
Zone not programmed to subsystem (partitioned mode
only).
Zone is not programmed to
bypass.
Bypass the zone using the correct subsystem’s keypad).
Contact your installer.
Trouble Shooting for your LCD keypad:
Problem Reason Solution
System will not
arm.
A zone is open. Secure the open zone or bypass the
specific zone.
Invalid user code. Use a valid user code.
Power light
blinking slowly.
Battery is low. Contact your installer.
Power light is
off.
AC contact has been lost and
the battery is low.
Contact your installer.
Keypad beeping. The Entry/Exit delay is active. The keypad will stop beeping at the end
of the Exit/Entry delay.
AC contact has been lost or
the battery is low.
Press any key and contact your installer.

13
Armed:
The state between arming and disarming.
Upon detection, the system sends alarms and
activates the siren.
Authorization level:
Assigned to each user code.
Determines which alarm control panel activities can
be performed by the different users.
Away key:
Completely arms the system (perimeter
and interior), which can be programmed as a one
touch key operation.
Bypass zone x:
Tells the system to ignore signals
from the designated zone (x).
Clear log:
The user may choose to clear the events
recorded.
Disarmed:
System is not armed and will neither send
nor sound an alarm, except for an event from a 24
hour zone.
Duress user code:
Should a user have to forcefully
perform a system operation, keying in this code will
send an event message to the central station,
notifying them of a duress situation.
Emergency keys:
These keys, which are available for
police, fire and emergency inform the central station
of an emergency situation.
Entry del ay:
A delay set for a zone which allows the
user enough time to enter the armed area and disarm
the system, without generating an alarm.
Event log:
Records the events that the system has
undergone.
Exit delay:
A delay set for a zone which allows the
user enough time to exit the armed area, without
generating an alarm.
Follow me:
Typically the 4th telephone number. This
number can be programmed to send a message to
wherever the user is, notifying them of an event.
Immediate arm:
This arms the system immediately,
without allowing for both exit and delays. This is done
by pressing the “4” after arming.
can send emergency codes.
Menu:
The menu lists all of the operations available in
the Summit 3208GLD. This is available only on the
LCD keypad by pressing the “MENU/NEXT” key.
Partitioned mode:
Partitioned mode divides the
system into up to 4 sub-systems and control keypad
user access, as well as sub-system zone assignment.
Power Indicator:
Indicates the status of the primary
and backup power supplies to the system.
Select key:
Using this key enables the selection of a
menu option (LCD keypad only) or command code
sequence.
Set time:
Allows the time and date to be set.
Stay key:
Pressing this key arms the perimeter only
(stay mode).
Sub-system:
A system out of the 4 available in
partitioned mode.
Unbypass zone x:
Restores the zone to protection
mode.
Unpartitioned:
The Summit 3208GLD is not set to
work with sub-systems.
User codes:
A user code allows the user to perform
the functions of the system. User codes are assigned
levels, which effect their functionality and can be
assigned to the different sub-systems. Up to 15 user
codes can be assigned to the system.
View Log:
Selecting this option allows the user to
view a record of the last 100 events the system has
undergone.
Zone descriptor:
A name assigned, by the user, to a
zone. Displayed on the LCD keypad with all
messages relating to the specified zone.
Zones:
A detector (or several detectors) connected to
a control panel

14
Monitoring Service
Account Number:
Passcode:
For Service:
Address:
Emergency Telephone Numbers
Police:
Fire: Emergency:
User Codes
NAME
/CODE/LEVEL NAME/CODE/LEVEL
1.
2.
3.
4.
5.
6.
7.
8.
9.
10.
11.
12.
13.
14.
15.
16.
Delay
Entry Delay:
Exit Delay:
Zone Description
Zone #
DeviceType Descr. Zone # Device Type Descr.
1.
2.
3.
4.
5.
6.
7.
8.
9.
10.
11.
12.
13.
14.
15.
16.
17.
18.
19.
20.
21.
22.
23.
24.
25.
26.
27.
28.
29.
30.
31.
32.
Bell/Siren Outputs
Fire Alarm: Steady Pulsed
Burglar Alarm: Steady Pulsed

15
 Loading...