

Page 1

Page 2
Revision A 12/29/04* II 1111981
Page 3
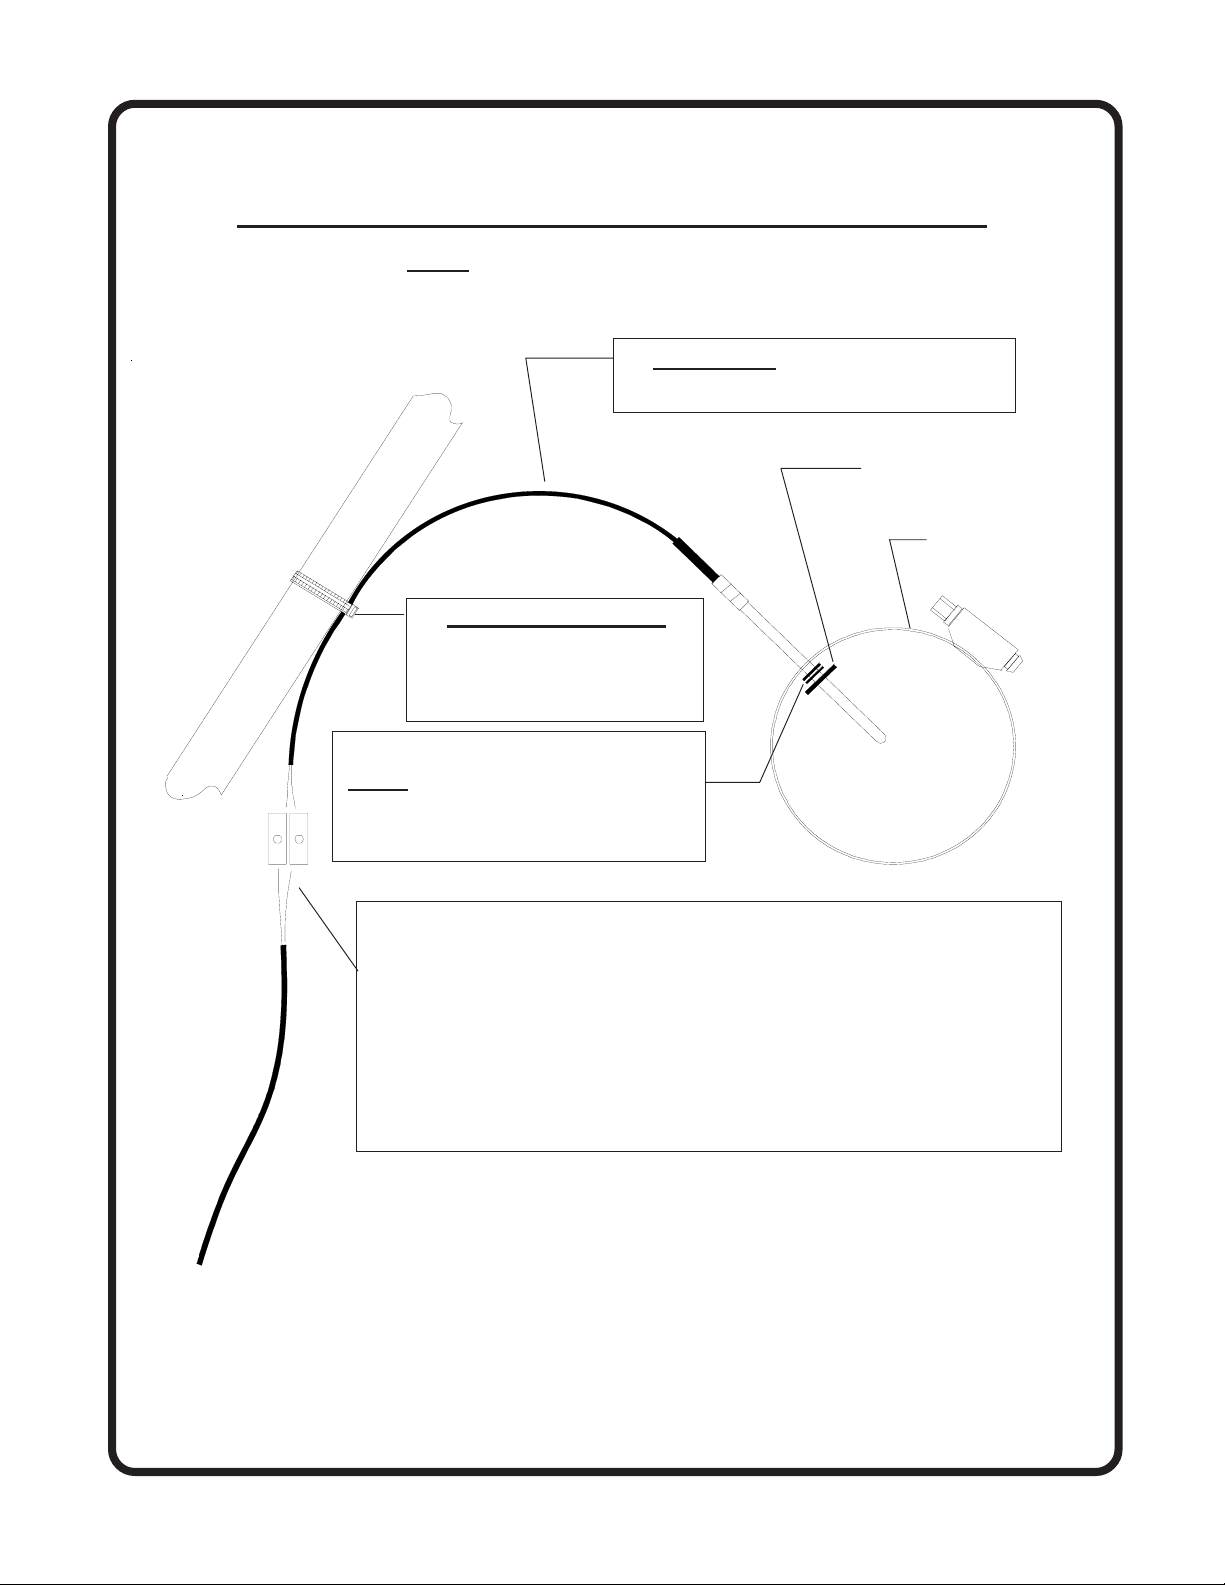
P-110 Standard EGT Probe
1218121
)
ImporImpor
Impor
ImporImpor
All steps All steps
All steps
All steps All steps
3. Both clip rings must be on the
inside of the hose clamp.
The rubber band is used to hold
the washer on during shipping.
tant Installation Inftant Installation Inf
tant Installation Inf
tant Installation Inftant Installation Inf
mustmust
must
mustmust
be read before installing a probe. be read before installing a probe.
be read before installing a probe.
be read before installing a probe. be read before installing a probe.
1. Leave slack in the cable to allow
for engine movement and vibration.
2. Do Not Overtighten.
Over time, tight wire wraps
will cause the wire to break.
ormationormation
ormation
ormationormation
S.S. Washer.
Hose Clamp.
Drill 13/64" Hole
(See II Manual)
(
4. The Type-K thermocouple wire's yellow and red insulation must
be stripped 3/8" for proper overlap in the OLC-1 (Over-Lap Connector). Back out the set screw, insert wires into opposite ends
(matching colors) so wire insulation is just inside the nylon housing
and the ends of the wires are not exposed on the opposite side.
Tighten the set screw until the set screw stops turning and the hex
driver starts to flex (4-5 in-lbs). Tug on the wires (1-2 lbs) to
insure proper connection.
Page 4
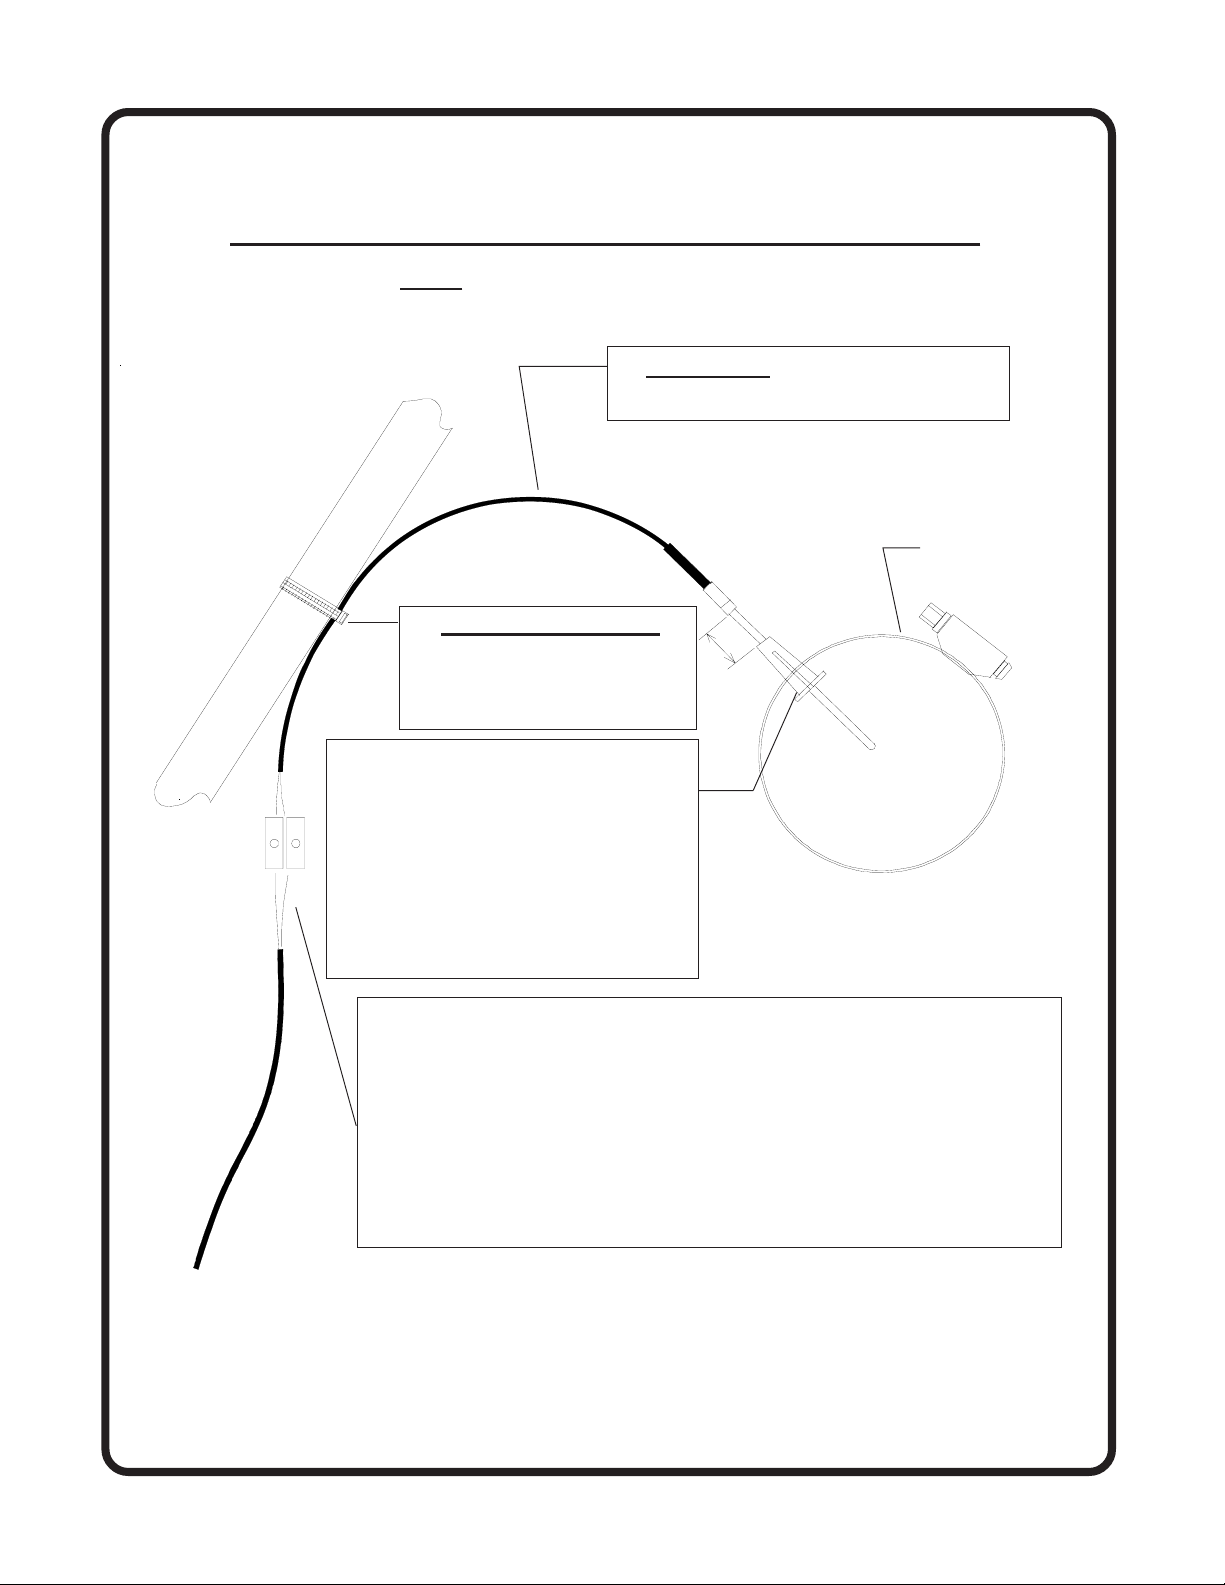
P-110 Fast Response EGT Probe
1218122
)
ImporImpor
Impor
ImporImpor
All steps All steps
All steps
All steps All steps
3. The slit in the ferrule must be
placed perpendicular to the hose
clamp band and the spring must
be 3/8" back from the ferrule. If
the probe is placed in a hole
larger than 0.130", use a S.S.
washer between the exhaust pipe
and the ferrule.
tant Installation Inftant Installation Inf
tant Installation Inf
tant Installation Inftant Installation Inf
mustmust
must
mustmust
be read before installing a probe. be read before installing a probe.
be read before installing a probe.
be read before installing a probe. be read before installing a probe.
1. Leave slack in the cable to allow
for engine movement and vibration.
2. Do Not Overtighten.
Over time, tight wire wraps
will cause the wire to break.
3/8"
ormationormation
ormation
ormationormation
Hose Clamp.
Drill 0.130" Hole
(See II Manual)
(
4. The Type-K thermocouple wire's yellow and red insulation must
be stripped 3/8" for proper overlap in the OLC-1 (Over-Lap Connector). Back out the set screw, insert wires into opposite ends
(matching colors) so wire insulation is just inside the nylon housing
and the ends of the wires are not exposed on the opposite side.
Tighten the set screw until the set screw stops turning and the hex
driver starts to flex (4-5 in-lbs). Tug on the wires (1-2 lbs) to
insure proper connection.
Page 5

ContentsContents
Contents
ContentsContents
Warranty ------------------------------------------------------------------------- 2Warranty ------------------------------------------------------------------------- 2
Warranty ------------------------------------------------------------------------- 2
Warranty ------------------------------------------------------------------------- 2Warranty ------------------------------------------------------------------------- 2
Installation Instructions ------------------------------------------------------- 3Installation Instructions ------------------------------------------------------- 3
Installation Instructions ------------------------------------------------------- 3
Installation Instructions ------------------------------------------------------- 3Installation Instructions ------------------------------------------------------- 3
1. UBG-16 Over View ------------------------------------------------------------------------------------- 3
2. Important Information and Initial Check Out --------------------------------------------------- 4
3.
"UBG-16"
4. EGT Probe Installation -------------------------------------------------------------------------------- 6
5. CHT Probe Installation ------------------------------------------------------------------------------- 6
6. TIT Probe Installation --------------------------------------------------------------------------------- 6
7. Oil Temperature Probe Installation ---------------------------------------------------------------- 6
8. Carb. Temp. Probe Installation ---------------------------------------------------------------------- 7
9. OAT Probe Installation -------------------------------------------------------------------------------- 7
10. Other Temperature Probe Installation ------------------------------------------------------------- 7
11. Install Additional Temperature Cables and Mark The Cables for the
12. Route the 16-pin Circular Connectors ------------------------------------------------------------ 9
13. Route Each Extension Cable ------------------------------------------------------------------------ 9
14. Install Functional Modules & Accessories -------------------------------------------------------- 10
15. Route the Power and Ground Wires --------------------------------------------------------------- 10
16. Route the Display Intensity Control Wire -------------------------------------------------------- 10
17. Route the (Optional) External Warning Control Line ----------------------------------------- 1 1
18. Route the (Optional) RS-232 Data Output Line ------------------------------------------------- 1 1
19. Drill Two Holes for the Mode and Step Switch -------------------------------------------------- 1 1
20. Install the Instrument in the Panel ------------------------------------------------------------------ 1 1
21. Configure the UBG-16 for Your Aircraft -------------------------------------------------------- 12
22. System Ground Test ----------------------------------------------------------------------------------- 12
Configuration Form --------------------------------------------------------------------- 5
"UBG-16"
------ 8
Troubleshooting Suggestions ------------------------------------------------Troubleshooting Suggestions ------------------------------------------------
Troubleshooting Suggestions ------------------------------------------------
Troubleshooting Suggestions ------------------------------------------------Troubleshooting Suggestions -----------------------------------------------Specifications and Operating Features ------------------------------------ 15-16Specifications and Operating Features ------------------------------------ 15-16
Specifications and Operating Features ------------------------------------ 15-16
Specifications and Operating Features ------------------------------------ 15-16Specifications and Operating Features ------------------------------------ 15-16
UBG-16 Wiring Diagrams ----------------------------------------------------UBG-16 Wiring Diagrams ----------------------------------------------------
UBG-16 Wiring Diagrams ----------------------------------------------------
UBG-16 Wiring Diagrams ----------------------------------------------------UBG-16 Wiring Diagrams ---------------------------------------------------Appendix A - Adding a Temperature Probe to the UBG-16 ---------Appendix A - Adding a Temperature Probe to the UBG-16 ---------
Appendix A - Adding a Temperature Probe to the UBG-16 ---------
Appendix A - Adding a Temperature Probe to the UBG-16 ---------Appendix A - Adding a Temperature Probe to the UBG-16 --------Appendix B - UBG-16 Circular Connectors -----------------------------Appendix B - UBG-16 Circular Connectors -----------------------------
Appendix B - UBG-16 Circular Connectors -----------------------------
Appendix B - UBG-16 Circular Connectors -----------------------------Appendix B - UBG-16 Circular Connectors ----------------------------Appendix C - UBG-16 Remote Head Wiring Diagram ----------------Appendix C - UBG-16 Remote Head Wiring Diagram ----------------
Appendix C - UBG-16 Remote Head Wiring Diagram ----------------
Appendix C - UBG-16 Remote Head Wiring Diagram ----------------Appendix C - UBG-16 Remote Head Wiring Diagram ---------------STC Information ---------------------------------------------------------- See BackSTC Information ---------------------------------------------------------- See Back
STC Information ---------------------------------------------------------- See Back
STC Information ---------------------------------------------------------- See BackSTC Information ---------------------------------------------------------- See Back
1
1313
13
1313
1717
17
1717
1818
18
1818
1919
19
1919
2020
20
2020
Page 6

WW
arar
W
WW
Electronics International Inc. warrants this instrument and system components to be free from defects in materials and workmanship for a period of one year from the user invoice date. Electronics International Inc. will
repair or replace any item under the terms of this Warranty provided the item is returned to the factory prepaid.
1. This Warranty shall not apply to any product that has been repaired or altered by any person other than
Electronics International Inc., or that has been subjected to misuse, accident, incorrect wiring, negligence,
improper or unprofessional assembly or improper installation by any person. This warranty does not cover
any reimbursement for any person’s time for installation, removal, assembly or repair. Electronics
International retains the right to determine the reason or cause for warranty repair.
2. This warranty does not extend to any machine, vehicle, boat, aircraft or any other device to which the
Electronics International Inc. product may be connected, attached, interconnected or used in conjunction with in
any way.
3. The obligation assumed by Electronics International Inc. under this warranty is limited to repair, replacement
or refund of the product, at the sole discretion of Electronics International Inc.
4. Electronics International Inc. is not liable for expenses incurred by the customer or installer due to factory
updates, modifications, improvements, upgrades, changes, or any other alterations to the product that may affect
the form, fit, function or operation of the product.
ranty / ranty /
ar
ranty /
arar
ranty / ranty /
AgrAgr
Agr
AgrAgr
eementeement
eement
eementeement
5. Personal injury or property damage do to misinterpretation or lack of understanding this product is solely the
pilots responsibility. The pilot must understand the operation of this product before flying the aircraft. Do not
allow anyone to operate the aircraft that does not know the operation of this product. Keep the Operating Manual
in the aircraft at all times.
6. Electronics International Inc. is not responsible for shipping charges or damages incurred under this Warranty.
7. No representative is authorized to assume any other liability for Electronics International Inc. in connection
with the sale of Electronics International Inc. products.
8. If you do not agree to and accept the terms of this warranty, you may return the product for a
refund.
This Warranty is made only to the original user. THIS WARRANTY IS IN LIEU OF ALL OTHER
WARRANTIES OR OBLIGATIONS: EXPRESS OR IMPLIED. MANUFACTURER EXPRESSLY DISCLAIMS ALL IMPLIED WARRANTIES OF MERCHANTABILITY OR FITNESS
FOR A PARTICULAR PURPOSE. PURCHASER AGREES THAT IN NO EVENT SHALL
MANUFACTURER BE LIABLE FOR SPECIAL, INCIDENTAL OR CONSEQUENTIAL DAMAGES, INCLUDING LOST PROFITS OR LOSS OF USE OR OTHER ECONOMIC LOSS. EXCEPT AS EXPRESSLY PROVIDED HEREIN, MANUFACTURER DISCLAIMS ALL OTHER
LIABILITY TO PURCHASER OR ANY OTHER PERSON IN CONNECTION WITH THE USE
OR PERFORMANCE OF MANUFACTURER’S PRODUCTS, INCLUDING SPECIFICALLY
LIABILITY IN TORT.
2
Page 7
UBG-16UBG-16
UBG-16
UBG-16UBG-16
INSTINST
INST
INSTINST
1. 1.
"UBG-16""UBG-16"
1.
"UBG-16"
1. 1.
"UBG-16""UBG-16"
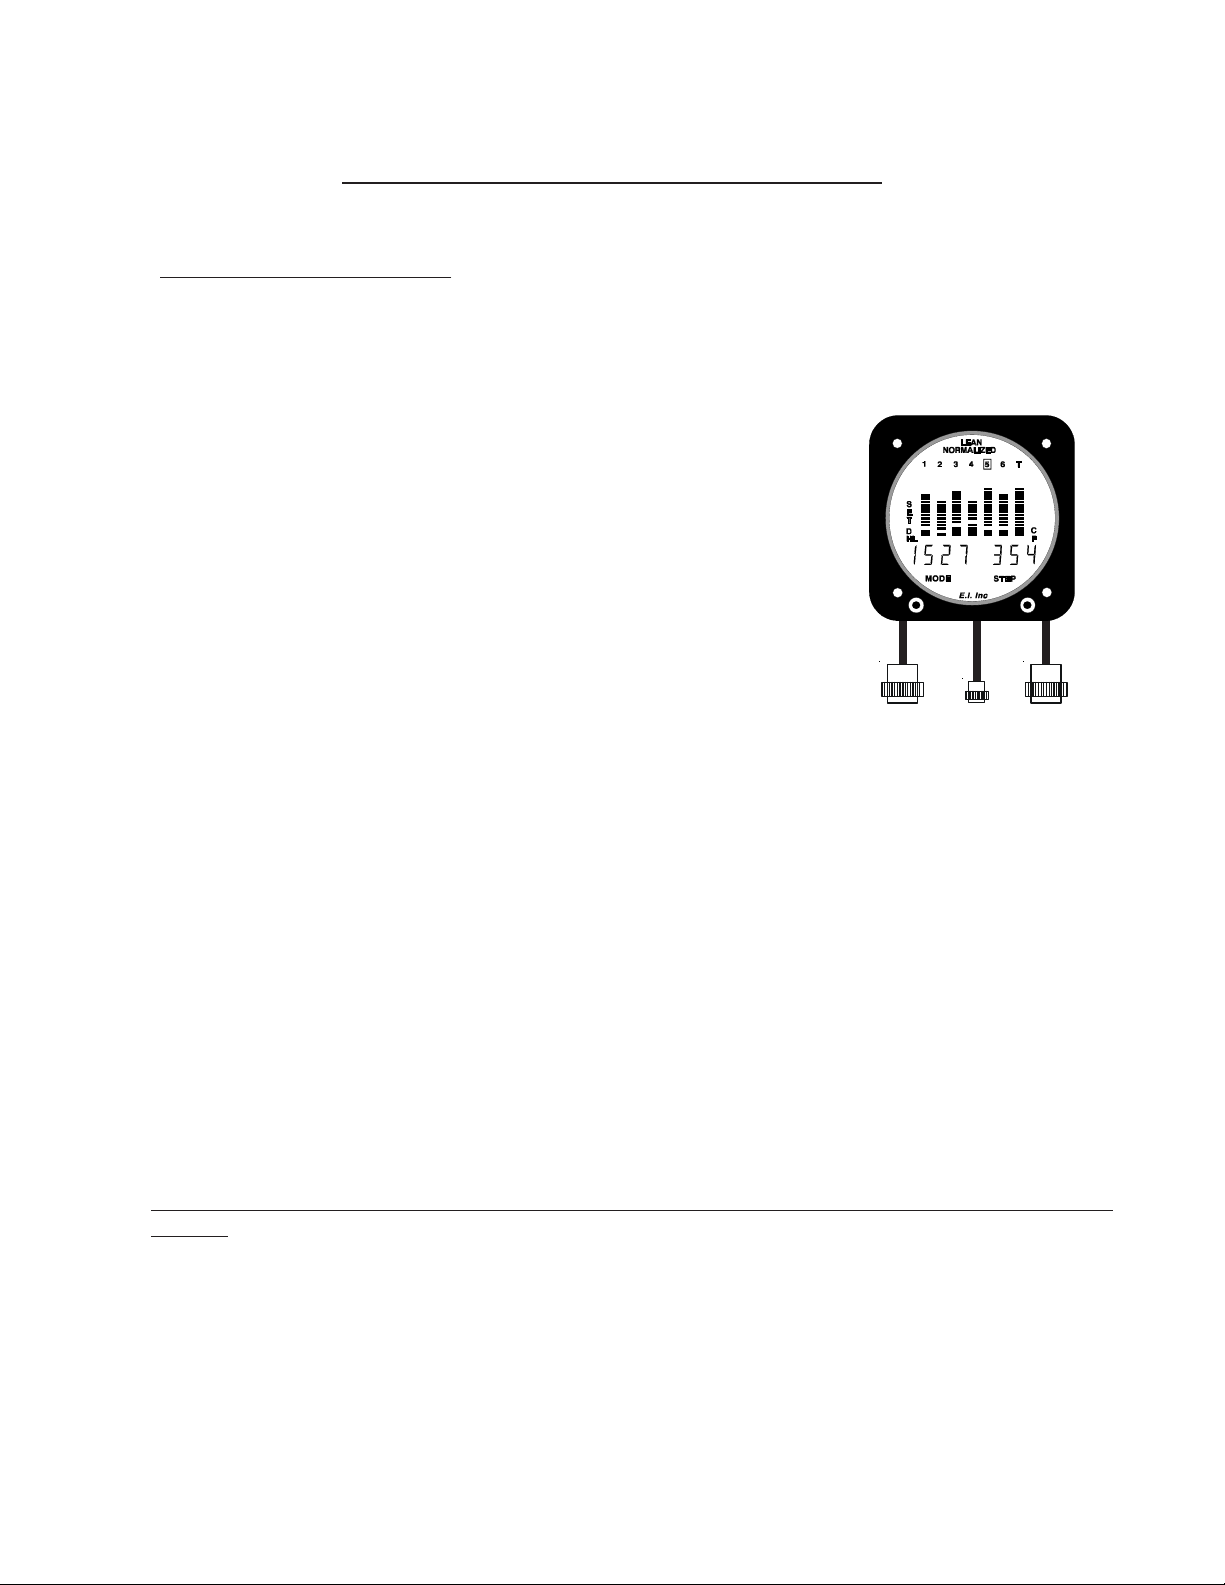
The UBG-16 was designed for use in a single engine aircraft. (For twin engines, use two UBG16’s.)
On the back of the UBG-16 are three circular connectors. As seen in
the diagram to the right:
The first 1 to 7 channels of the LEFT 16-pin connector are used to
monitor EGT’s. Any remaining channels may be used to monitor
other functions.
The first 1 to 7 channels of the RIGHT 16-pin connector are used
to monitor CHT’s. Any remaining channels may be used to
monitor other functions.
The small 9-pin connector connects the instrument to power,
ground, display intensity control, RS232 Recorder and any warning devices.
Over View Over View
Over View
Over View Over View
ALLAALLA
ALLA
ALLAALLA
TION INSTRTION INSTR
TION INSTR
TION INSTRTION INSTR
UCTIONSUCTIONS
UCTIONS
UCTIONSUCTIONS
16-Pin
EGT's
9-Pin 16-Pin
CHT's
The UBG-16 comes with three preassembled wire harnesses which simply plug into the three
circular connectors at the back of the instrument. Two of the wire harnesses are identical. One
will be used to connect the EGT probes to the UBG-16 and the other will be use to connect the
CHT probes to the UBG-16. The wire harnesses were assembled with only enough cables to
accommodate the EGT and CHT channels. Any additional temperature measurement (TIT, OAT,
Carb Temp, Cowl, etc.) requires a Type K thermocouple extension cable be added to the appropriate harness. Any desired function such as RPM, M.P., Oil Pressure, Fuel Pressure, Fuel Flow,
Gyro Vacuum, Volts, Amps, etc., requires an Electronics International Functional Module be
added to the appropriate harness.
The UBG-16 does not require any programming before installation. All setup can be accomplished
on the face of the instrument. The UBG-16 does not use any internal batteries, so once installed
the instrument never has to be removed from the panel.
Read step #2 below then perform only the remaining steps that apply to your configu-Read step #2 below then perform only the remaining steps that apply to your configu-
Read step #2 below then perform only the remaining steps that apply to your configu-
Read step #2 below then perform only the remaining steps that apply to your configu-Read step #2 below then perform only the remaining steps that apply to your configuration.ration.
ration.
ration.ration.
3
Page 8

2. 2.
Important Information and Initial Check OutImportant Information and Initial Check Out
2.
Important Information and Initial Check Out
2. 2.
Important Information and Initial Check OutImportant Information and Initial Check Out
The installer and aircraft owner must read the Warranty before starting the in-The installer and aircraft owner must read the Warranty before starting the in-
The installer and aircraft owner must read the Warranty before starting the in-
A.
The installer and aircraft owner must read the Warranty before starting the in-The installer and aircraft owner must read the Warranty before starting the in-
stallation.stallation.
stallation. There is information in the Warranty that may alter your decision to install this
stallation.stallation.
If you do not accept the terms of the Warranty, do not install this in-If you do not accept the terms of the Warranty, do not install this in-
instrument.
strument.strument.
strument.
strument.strument.
If you are not an FAA Certified Aircraft Mechanic familiar with the issues of If you are not an FAA Certified Aircraft Mechanic familiar with the issues of
B.
If you are not an FAA Certified Aircraft Mechanic familiar with the issues of
If you are not an FAA Certified Aircraft Mechanic familiar with the issues of If you are not an FAA Certified Aircraft Mechanic familiar with the issues of
installing aircraft EGT/CHT instruments, installing aircraft EGT/CHT instruments,
installing aircraft EGT/CHT instruments,
installing aircraft EGT/CHT instruments, installing aircraft EGT/CHT instruments,
The installer should use current aircraft standards and practices to install thisThe installer should use current aircraft standards and practices to install this
The installer should use current aircraft standards and practices to install this
The installer should use current aircraft standards and practices to install thisThe installer should use current aircraft standards and practices to install this
instrument (refer to AC 43.13).instrument (refer to AC 43.13).
instrument (refer to AC 43.13).
instrument (refer to AC 43.13).instrument (refer to AC 43.13).
Check that any necessary FAA Approvals (STC's, etc.) are available for yourCheck that any necessary FAA Approvals (STC's, etc.) are available for your
C.
Check that any necessary FAA Approvals (STC's, etc.) are available for your
Check that any necessary FAA Approvals (STC's, etc.) are available for yourCheck that any necessary FAA Approvals (STC's, etc.) are available for your
aircraft before starting the installation. A copy of the AML is located at the backaircraft before starting the installation. A copy of the AML is located at the back
aircraft before starting the installation. A copy of the AML is located at the back
aircraft before starting the installation. A copy of the AML is located at the backaircraft before starting the installation. A copy of the AML is located at the back
of this manual. of this manual.
of this manual.
of this manual. of this manual.
D. Read the entire Installation Instructions and resolve any issues you may have before starting
the installation. This may eliminate any delays once the installation is started.
Inspect the contents of this package prior to installation.Inspect the contents of this package prior to installation.
E.
Inspect the contents of this package prior to installation. Look for the following items:
Inspect the contents of this package prior to installation.Inspect the contents of this package prior to installation.
1) Proper instrument (UBG-16 for a single engine, UBG-16T for a twin engine).
If you do not accept the terms of the Warranty, do not install this in-
If you do not accept the terms of the Warranty, do not install this in-If you do not accept the terms of the Warranty, do not install this in-
Do Not attempt to install this instrument.Do Not attempt to install this instrument.
Do Not attempt to install this instrument.
Do Not attempt to install this instrument.Do Not attempt to install this instrument.
Resolve any issues you may have before starting the installation.Resolve any issues you may have before starting the installation.
Resolve any issues you may have before starting the installation.
Resolve any issues you may have before starting the installation.Resolve any issues you may have before starting the installation.
2) Correct length and number of extension cables (one for each temperature probe).
3) Correct number and type of temperature probes.
4) Correct Functional Modules (if required).
If you did not receive the proper instrument, probes, cables, functional modules or hardware
for your installation, contact either the dealer you purchased the instrument from or Electronics International Inc. for assistance. In most cases E.I. can exchange parts for only the
cost of shipping. Please have the purchase date, dealer name and serial number of the unit
available when you call.
Before starting the installation make sure the instrument will fit in the locationBefore starting the installation make sure the instrument will fit in the location
F.
Before starting the installation make sure the instrument will fit in the location
Before starting the installation make sure the instrument will fit in the locationBefore starting the installation make sure the instrument will fit in the location
you intend to install it without obstructing the operation of any controls. Note:you intend to install it without obstructing the operation of any controls. Note:
you intend to install it without obstructing the operation of any controls. Note:
you intend to install it without obstructing the operation of any controls. Note:you intend to install it without obstructing the operation of any controls. Note:
The UBG requires two non-standard holes be drilled in the aircraft instrumentThe UBG requires two non-standard holes be drilled in the aircraft instrument
The UBG requires two non-standard holes be drilled in the aircraft instrument
The UBG requires two non-standard holes be drilled in the aircraft instrumentThe UBG requires two non-standard holes be drilled in the aircraft instrument
panel outside the bezel area.panel outside the bezel area.
panel outside the bezel area.
panel outside the bezel area.panel outside the bezel area.
G. If this instrument is to replace an existing gauge in the aircraft, it is the installer's responsibil-
ity to move or replace any existing instruments or components in accordance with FAA approved methods and procedures.
WARNINGWARNING
WARNING
WARNINGWARNING
Do Not use screws that penetrate
the instrument face more than
.125". Display damage may result.
4
Page 9
3. 3.
"UBG-16""UBG-16"
3.
"UBG-16"
3. 3.
"UBG-16""UBG-16"
If you are installing the UBG-16, fill out the following configuration form. This form will document
which Temperature probes or Functional Modules will be connected to specific input channels on the
UBG-16.
8-Input Channels
LEFT
Channels: Function: Comments:
Configuration Form Configuration Form
Configuration Form
Configuration Form Configuration Form
LEFT
RIGHT
8-Input Channels
1 to ______ EGTs
(BAR 7) TIT, Oil T, OFF
L________ __________
L________ __________
L________ __________
L 8 __________
Right
Channels: Function: Comments:
1 to ______ CHTs
Up to 7 channels may be used to monitor EGTs. Each channel will be
displayed on a column of bars. A total of 7 columns are available. Enter
the number of EGTs you will be monitoring.
The 7th column of bars is intended to display EGT (on a 7-cylinder engine)
or TIT or Oil Temp or it may be turned off (circle one). However, the TIT
or Oil Temp probe
EGT channel (e.g., #5 on a 4-cylinder engine or #7 on a 6-cylinder engine).
In order, list the unused channels on the LEFT connector and indicate the
functions to be monitored on each channel. OAT or Carb Temp must only
be connected to channel L7, L8, R7 or R8 (these are precision channels). If
a channel is not used, write "OFF" in the Function Column for that channel.
Channel 8 is the last available channel on the left.
The number of CHTs monitored must be the same as the number of
EGT's monitored. The CHTs are monitored on the RIGHT Channels.
Enter the number of CHTs you will be monitoring.
must be connected to the next channel after the last
R________ __________
R________ __________
R________ __________
R 8 __________
Note: The UBG-16 digital display steps through the channels starting with number one on the LEFT and ending
with number 8 on the RIGHT.
In order, list the unused channels on the RIGHT connector and indicate
the functions to be monitored on each channel. OAT or Carb Temp
must only be connected to channel L7, L8, R7 or R8 (these are precision
channels). If a channel is not used, write "OFF" in the Function Column
for that channel.
Channel 8 is the last available channel on the Right.
5
Page 10

4. 4.
EGT Probe InstallationEGT Probe Installation
4.
EGT Probe Installation
4. 4.
EGT Probe InstallationEGT Probe Installation
Look at each exhaust stack and determine the best location at which all of the EGT probes can be
mounted at the same distance down from the exhaust ports. The ideal location is 1 1/2", but ease
of installation should prevail. Drill a 13/64" diameter hole in each exhaust stack. Insert the probe
and tighten the hose clamp. As the hose clamp is heated and cooled, it will become loose as it
conforms to the exhaust stack. After the first 10 hours of operation, each hose clamp should be
retightened.
IMPORTANT NOTE: For Cessna 210’s or any aircraft using a slip joint in the exhaust system,
install the EGT probes
slip joint can damage the probe.
5. 5.
CHT Probe InstallationCHT Probe Installation
5.
CHT Probe Installation
5. 5.
CHT Probe InstallationCHT Probe Installation
A single CHT probe should be placed on the hottest cylinder. In a 6-cylinder engine this would be
one of the center cylinders. On a 4-cylinder engine this would be one of the back cylinders.
If a second CHT probe is to be installed it should be placed on one of the front unobstructed
cylinders. This will allow the UBG-16 to detect shock-cooling automatically.
ABOVE OR BELOW THE SLIP JOINT. Installing a EGT probe in the
Most engines have a port just below the lower spark plug for the CHT probe.
primary CHT probe in one of the cylinders, do not remove it. The UBG-16 is not STC'd as a
primary replacement instrument. Select another cylinder for your probe. If you’re putting a
CHT probe on every cylinder use our P-102 Gasket CHT Probe for your primary cylinder.
6. 6.
TIT Probe InstallationTIT Probe Installation
6.
TIT Probe Installation
6. 6.
TIT Probe InstallationTIT Probe Installation
If you currently have a TIT gauge mounted in the aircraft it may be a primary engine instrument.
If this is the case you will need to install a secondary TIT probe. The TIT probe should be installed on the inlet of the Turbo-charger one to two inches before the Turbo-charger flange. Drill
a 13/64" diameter hole in the exhaust stack. Insert the probe and tighten the hose clamp. As the
hose clamp is heated and cooled, it will become loose as it conforms to the exhaust stack. After the
first 10 hours of operation, each hose clamp should be retightened.
7. 7.
OIL Temperature Probe InstallationOIL Temperature Probe Installation
7.
OIL Temperature Probe Installation
7. 7.
OIL Temperature Probe InstallationOIL Temperature Probe Installation
Sometimes finding a location for a secondary oil temperature probe can be a problem. The P-120,
P-100, P-111, P-112, P-114 and P-128 are all sealed probes appropriate for measuring oil temperature. See the "Probes" section of the price sheet for dimension information.
If your engine has a
6
Page 11

LYCOMING
IO 320, IO 360 and IO 540
Remove the 5/8" - 18 plug located on the rear engine accessory case above and forward of the oil
filter adaptor or oil screen as applicable. Install E.I.’s P-120 Oil Probe with a new oil seal and
torque to Lycoming’s specifications. Check for oil leaks after the first flight.
All Other Engines
Equipped with a 5/8"-18 Secondary Oil Drain Plug
Remove the 5/8"-18 Secondary oil drain plug located on the bottom of the engine. Install E.I.’s P120 Oil Probe with a new oil seal and torque to specifications.
flight.
If another location is used to measure oil temperature, make sure the probe does not interfere with
the operation of the engine.
8. 8.
Carb Temp Probe InstallationCarb Temp Probe Installation
8.
Carb Temp Probe Installation
8. 8.
Carb Temp Probe InstallationCarb Temp Probe Installation
Remove the threaded plug located in the carburetor housing just below the throttle valve. Install
the Carburetor Temperature Probe (P-128) in this hole using a lock washer. Care should be taken
not to over-tighten the probe and strip the threads in the carburetor housing.
Check for oil leaks after the first
NOTE:NOTE:
NOTE: A Carb Temp Probe should be connected to a precision channel on the UBG. That would
NOTE:NOTE:
be channel 7 or 8 on the left and right Circular Connector. A three to four degree F error can
occur in some instances if the Carburetor Probe is not connected to a precision channel.
9. 9.
OAT Probe InstallationOAT Probe Installation
9.
OAT Probe Installation
9. 9.
OAT Probe InstallationOAT Probe Installation
Mount the OAT Probe in an appropriate location on the aircraft, using the hardware supplied.
The OAT Probe is sensitive to air temperature changes. For this reason, do not mount the OAT
probe in the path of the cowl or engine exiting air (i.e., on the belly of the aircraft). Also, if the
probe is mounted in the cowling area near a turbo or hot cylinder head, radiant heat may influence the probe temperature. Other than these consideration the OAT Probe may be mounted in
an air intake vent, on the side of the cowling or anywhere else on the aircraft.
NOTE:NOTE:
NOTE: An OAT Probe should be connected to a precision channel on the UBG. That would be
NOTE:NOTE:
channel 7 or 8 on the left and right Circular Connector. A three to four degree F error can occur
in some instances if the OAT Probe is not connected to a precision channel.
10. 10.
10.
10. 10.
Other Temperature Probe InstallationOther Temperature Probe Installation
Other Temperature Probe Installation
Other Temperature Probe InstallationOther Temperature Probe Installation
Other temperature probes (Cowl Temp, CDI Temp, Water Temp, etc.) may be installed using
current aircraft standards and practices (refer to AC 43.13). Make sure these probes do not
interfere with the operation of the engine or aircraft.
7
Page 12

11. 11.
11.
11. 11.
for the for the
for the
for the for the
Install Additional Temperature Cables and Mark The CablesInstall Additional Temperature Cables and Mark The Cables
Install Additional Temperature Cables and Mark The Cables
Install Additional Temperature Cables and Mark The CablesInstall Additional Temperature Cables and Mark The Cables
"UBG-16""UBG-16"
"UBG-16"
"UBG-16""UBG-16"
There are two identical pre-wired Extension Cable Harnesses in the installation kit. One end of
each harness has a 16-pin Circular Connector and the other end has red Slip-on connectors on the
individual extension cables (see the Wiring Diagram at the back of this manual). There is a type K
thermocouple extension cable for each EGT and CHT temperature to be measured. The end of
each extension cable in the harness has a piece of yellow heat shrink marked with its channel
number. One of these harnesses is to be connected to the EGT probes (and LEFT connector on the
UBG-16) and the other is to be connected to the CHT probes (and the RIGHT connector on the
UBG-16). Refer to step 4 (Configuration Form) to identify which harness will be used for EGT's
and which will be used for CHT's.
Mark the Circular Connector that will be connected to the EGT probes. The first 4 or 6 channels
(starting with channel #1) are used to monitor EGT's. Any additional channels may be used to
monitor other temperatures or functions. There are 8 channels available on each 16-pin Circular
Connector. Any channel used to measure a temperature other than EGT or CHT (TIT, OAT,
Carb Temp, etc.) will have a type K thermocouple extension cable lose in the kit. Plug any additional extension cables into the appropriate pins of the Circular Connector (see "Appendix A" at
the back of this manual).
Any channel used to monitor functions other than temperature (RPM, M.P., Oil Pressure, Volts,
Amps, etc.) will require a Functional Module. Installation of a Functional Module will be covered
later in this manual.
Mark each of the Type K thermocouple extension cables in this harness (on the yellow heat shrink)
with the temperature function for which it will be used (i.e., CHT, EGT, Oil, etc.). An ink pen or
marker works well.
Note:Note:
Note: If a cable needs to be removed from a connector, you
Note:Note:
tool may be purchased from E.I.
Mark the Circular Connector that will be connected to the CHT probes. The first 4 or 6 channels
(starting with channel #1) are used to monitor CHT's. Any additional channels may be used to
monitor other functions. There are 8 channels available on each 16-pin Circular Connector. Any
channel used to measure a temperature other than EGT or CHT (TIT, OAT, Carb Temp, etc.)
will have a type K thermocouple extension cable lose in the kit. Plug any additional extension
cables into the appropriate pins of the Circular Connector (see "Appendix A" at the back of this
manual).
Any channel used to monitor a function other than temperature (RPM, M.P., Oil Pressure, Volts,
Amps, etc.) will require a Functional Module. Installation of a Functional Module will be covered
later in this manual.
Mark each of the Type K thermocouple extension cables in this harness (on the yellow heat shrink)
with the temperature function for which it will be used (i.e., CHT, EGT, Oil, etc.). An ink pen or
marker works well.
mustmust
must use an extraction tool. This
mustmust
Note: Note:
Note: Any channel will accept any one of E.I.’s probes or Functional Module.
Note: Note:
8
Page 13

12. 12.
12.
12. 12.
Route the 16-pin Circular ConnectorsRoute the 16-pin Circular Connectors
Route the 16-pin Circular Connectors
Route the 16-pin Circular ConnectorsRoute the 16-pin Circular Connectors
Do not continue with this step unless each Extension Cable has been marked as previously described.
Starting from under the instrument panel, route the 16-pin circular connector wire harness up to
the instrument mounting location. (See the wiring diagram at the back of this manual). Place the
circular connector about 9 inches back from the panel. Tie wrap the harness in place approximately 1 foot back from the circular connector. This will allow the harness to be flexible and
accommodate varying lengths in instrument wires.
freedom of travel of any controls.freedom of travel of any controls.
freedom of travel of any controls.
freedom of travel of any controls.freedom of travel of any controls.
Be sure these wires do not obstruct theBe sure these wires do not obstruct the
Be sure these wires do not obstruct the
Be sure these wires do not obstruct theBe sure these wires do not obstruct the
13. 13.
13.
13. 13.
Route Each Extension CableRoute Each Extension Cable
Route Each Extension Cable
Route Each Extension CableRoute Each Extension Cable
Starting from under the instrument panel, route each Extension Cable to its appropriate probe. If
new connectors are to be installed on the ends of the cables, you may want to pull any excess cable
length through the fire wall and cut it off at this time. However, it is recommended you leave some
extra wire length under the instrument panel in case you choose to move the UBG to a different
location at a later date.
strument.strument.
strument. The Extension Cables and Probe Wires are made of type K thermocouple wire that
strument.strument.
must not be substituted or extended with regular copper wire. Also, it is important these wires not
be kinked (i.e.,
Connect each probe to its associated Extension Cable using the supplied OLC-1 Overlap Connectors. See OLC-1 Installation Instructions for details.
sure there is no strain or pull on the cable against the probe or connectors. Dress each cable up to
the instrument keeping them away from any hot areas such as exhaust stacks, cylinder heads, etc.
Tie off any excess cable under the instrument panel.
freedom of travel of any controlsfreedom of travel of any controls
freedom of travel of any controls
freedom of travel of any controlsfreedom of travel of any controls
do not bend the wires on a radius less than 1 inchdo not bend the wires on a radius less than 1 inch
do not bend the wires on a radius less than 1 inch
do not bend the wires on a radius less than 1 inchdo not bend the wires on a radius less than 1 inch
Varying cable lengths will not affect the accuracy of this in-Varying cable lengths will not affect the accuracy of this in-
Varying cable lengths will not affect the accuracy of this in-
Varying cable lengths will not affect the accuracy of this in-Varying cable lengths will not affect the accuracy of this in-
).).
).
).).
When tie wrapping these cables down, be
Be sure these cables do not obstruct theBe sure these cables do not obstruct the
Be sure these cables do not obstruct the
Be sure these cables do not obstruct theBe sure these cables do not obstruct the
..
.
..
9
Page 14

14. 14.
14.
14. 14.
Install UBG-16 Functional Modules & AccessoriesInstall UBG-16 Functional Modules & Accessories
Install UBG-16 Functional Modules & Accessories
Install UBG-16 Functional Modules & AccessoriesInstall UBG-16 Functional Modules & Accessories
If a channel on the UBG-16 is to be used to monitor a function other than temperature, an appropriate Functional Module must be installed. A Functional Module is a small box with circuitry
used to convert pressure, RPM, Voltage, Amps, etc. to an appropriate signal the UBG can display.
This signal can be connected to any unused channel on the UBG-16. These modules are small and
light and are tie wrapped under the instrument panel. They come with a Circular Connector so
they may be installed and removed easily. Below is a list of the functional modules available:
FM-OP - Oil Pressure FM-FP - Fuel Pressure
FM-MP - Manifold Pressure FM-Gyro - Gyro Vacuum
FM-RPM - RPM FM-VA - Volts/Amps
FM-Flow - Fuel Flow (Flow only)
You may install any Functional Modules at any time. Installation Instructions for the various
Functional Modules are included with the modules.
The UBG-16 has optional items that may be installed. These items are listed below.
MUX-8A - Data Recorder AV-17 - Voice Annunciator
AP-7V - Vertical Annunciator Panel AP-7H - Horizontal Annunicator Panel
ATG-1 - Annunciator Tone Generator CP-1 - LED Intensity Control Pot
AL-1(x) - Chrome Annunciator Light A-103 - 3 1/8" Adaptor Plate
You may install any of the options at any time. Installation Instructions for the various options
are included with the options.
15. 15.
15.
15. 15.
16. 16.
16.
16. 16.
Route the Power and Ground WiresRoute the Power and Ground Wires
Route the Power and Ground Wires
Route the Power and Ground WiresRoute the Power and Ground Wires
Route the red wire in the 9-pin wire harness to the aircraft’s 12 or 24 volt
applicable via an independent five amp circuit breaker,
engine startengine start
engine start. An alternate method would be to route the red lead to the bus via a five amp in-line
engine startengine start
fuse. If the latter method is used, a spare fuse should be kept in the aircraft.
Route the black wire in the harness to a good ground .
obstruct the freedom of travel of any controls.obstruct the freedom of travel of any controls.
obstruct the freedom of travel of any controls.
obstruct the freedom of travel of any controls.obstruct the freedom of travel of any controls.
Route the Display Intensity Control WireRoute the Display Intensity Control Wire
Route the Display Intensity Control Wire
Route the Display Intensity Control WireRoute the Display Intensity Control Wire
Connect the white/orange wire to Electronics International's Intensity Control Pot (CP-1). If a
CP-1 has not been previously installed in the aircraft panel, do so at this time. This CP-1 will dim
the display on the UBG for night operation. If this line is left open, the display will remain at full
intensity at all times.
the UBG-16 must be OFF duringthe UBG-16 must be OFF during
the UBG-16 must be OFF during
the UBG-16 must be OFF duringthe UBG-16 must be OFF during
Tie wrap these wires so they do notTie wrap these wires so they do not
Tie wrap these wires so they do not
Tie wrap these wires so they do notTie wrap these wires so they do not
RADIO BUSRADIO BUS
RADIO BUS as
RADIO BUSRADIO BUS
10
Page 15

An alternate method is to connect the white/orange wire to the panel light rheostat. When the
panel lights are turned on for night operation the UBG display will dim. With this method their is
no guarantee that the panel lights and UBG display intensity will match.
Tie wrap all wires so they do not obstruct the freedom of travel of any controls.Tie wrap all wires so they do not obstruct the freedom of travel of any controls.
Tie wrap all wires so they do not obstruct the freedom of travel of any controls.
Tie wrap all wires so they do not obstruct the freedom of travel of any controls.Tie wrap all wires so they do not obstruct the freedom of travel of any controls.
17. 17.
17.
17. 17.
18. 18.
18.
18. 18.
19. 19.
19.
19. 19.
Route the (Optional) External Warning Control LineRoute the (Optional) External Warning Control Line
Route the (Optional) External Warning Control Line
Route the (Optional) External Warning Control LineRoute the (Optional) External Warning Control Line
The white/yellow wire can be connected to an external light (an AL-1 is supplied in this kit), buzzer
(ATG-1), voice annunciator (AV-17), a relay, etc. This wire grounds when a warning is activated
in the UBG. The current in this line must be limited to 1/10 of an amp maximum. Exceeding this
Tie wrap this wire soTie wrap this wire so
limit will damage the unit. If this feature is not used, leave this line open.
it does not obstruct the freedom of travel of any controls.it does not obstruct the freedom of travel of any controls.
it does not obstruct the freedom of travel of any controls.
it does not obstruct the freedom of travel of any controls.it does not obstruct the freedom of travel of any controls.
Route the (Optional) RS-232 Data Output LineRoute the (Optional) RS-232 Data Output Line
Route the (Optional) RS-232 Data Output Line
Route the (Optional) RS-232 Data Output LineRoute the (Optional) RS-232 Data Output Line
The white/green wire can be connected to Electronics International's MUX-8A for data recording.
Refer to the MUX-8A Operating and Installation Instructions for details.
Drill Two Holes for the Mode and Step SwitchDrill Two Holes for the Mode and Step Switch
Drill Two Holes for the Mode and Step Switch
Drill Two Holes for the Mode and Step SwitchDrill Two Holes for the Mode and Step Switch
A drill template is enclosed in the kit. Mount the drill template to the front of the aircraft instrument panel. Punch the two holes in the drill template for the Mode and Step Switch. Remove the
drill template and drill the two holes using a 1/4" drill bit. You may want to drill a pilot hole first.
Tie wrap this wire so
Tie wrap this wire soTie wrap this wire so
20. 20.
20.
20. 20.
Install the Instrument in the PanelInstall the Instrument in the Panel
Install the Instrument in the Panel
Install the Instrument in the PanelInstall the Instrument in the Panel
Install the instrument from behind the instrument panel using 6 x 32 screws.
SCREWS THAT PENETRATE THE INSTRUMENT FRONT PANEL MORE THANSCREWS THAT PENETRATE THE INSTRUMENT FRONT PANEL MORE THAN
SCREWS THAT PENETRATE THE INSTRUMENT FRONT PANEL MORE THAN
SCREWS THAT PENETRATE THE INSTRUMENT FRONT PANEL MORE THANSCREWS THAT PENETRATE THE INSTRUMENT FRONT PANEL MORE THAN
1/8" -- DOING SO WILL BREAK THE GLASS DISPLAY.1/8" -- DOING SO WILL BREAK THE GLASS DISPLAY.
1/8" -- DOING SO WILL BREAK THE GLASS DISPLAY.
1/8" -- DOING SO WILL BREAK THE GLASS DISPLAY.1/8" -- DOING SO WILL BREAK THE GLASS DISPLAY.
Connect all the Circular Connectors to the UBG in the following manner:
A)A)
A) Push the two mating connectors together and twist them until they snap into position.
A)A)
B)B)
B) Turn the locking ring on the instrument connector clockwise (1 1/2 turns) until it locks
B)B)
into position.
If you are using the optional remote head for the UBG-16, secure the body of the UBG-16 underneath the instrument panel in a location that will not obstruct the freedom of travel of any controls. Route the wires from the body to the remote head making sure that the wires do not obstruct the freedom of travel of any controls. Connect the cable from the head to the body.
11
DO NOT USEDO NOT USE
DO NOT USE
DO NOT USEDO NOT USE
Page 16

21. 21.
21.
21. 21.
Configure the UBG for Your AircraftConfigure the UBG for Your Aircraft
Configure the UBG for Your Aircraft
Configure the UBG for Your AircraftConfigure the UBG for Your Aircraft
To configure the UBG to operate with the temperature probes and Functional modules installed in
your aircraft, refer to the Power-up Programming section in the Operating Instructions. Use the
Configuration Form found in this manual as a reference.
22. 22.
22.
22. 22.
System Ground TestSystem Ground Test
System Ground Test
System Ground TestSystem Ground Test
A. Turn the master switch on and look for a near ambient temperature reading on each tempera-
ture channel. If the instrument does not power-up (display a reading), check the power and
ground leads (red and black leads) for an open, loose or poor connection.
If you suspect that any channel is not receiving a signal, remove the probe from the engine
(leaving it connected to the Extension Cable) and apply a temperature to it. Look for an increase in reading on the display for that channel. Check the other channels for an increase in
reading. You may have connected the probe to the wrong Extension Cable. If the reading is
decreasing, you may have reversed the connectors on the Extension Cable leads (the yellow
wire on the probe must connect to the yellow wire on the Extension Cable).
B. Start the engine and check each channel for a proper reading. On the ground (after a few
minutes) EGT’s will read around 900°F and CHT’s will read around 200°F. If you suspect any
channel is not receiving a signal properly, see step A of the “Troubleshooting” section of this
manual.
12
Page 17

TRTR
OUBLESHOOOUBLESHOO
TR
OUBLESHOO
TRTR
OUBLESHOOOUBLESHOO
Because high reliability is designed into Electronics International’s equipment, there is no reason to put
up with poor operation. We have few problems with our probes, cables and units and installation is
simple. Usually fixing a problem is just a matter of inspecting the installation at a few key points.
StrategyStrategy
Strategy
StrategyStrategy
TING SUGGESTIONSTING SUGGESTIONS
TING SUGGESTIONS
TING SUGGESTIONSTING SUGGESTIONS
If you have more than one problem,
them at once can be confusing and misleading. In many cases fixing one problem first will lead you
to the solution for fixing all of the problems. Therefore, take one problem on one channel and
proceed with the following:
A. A.
Instrument Check OutInstrument Check Out
A.
Instrument Check Out
A. A.
Instrument Check OutInstrument Check Out
If there is an identical symptom on each channel, then the instrument may have a problem. But if
even one channel of the instrument is operating properly, the instrument probably does not have a
problem. A good method to test the instrument is to remove all the Extension Cables by disconnecting the Extension Cable Circular Connector. Then look for a reading on all channels to be
near cabin temperature for temperature channels or zero for channels measuring functions other
than temperature (RPM, Oil Pressure, etc.). The only inputs the UBG requires to operate properly and measure cabin temperature is power (red lead) and ground (black lead). Check the
power and ground leads for proper connection (pull on the wire at each connector).
Note:Note:
Note: Few problems turn out to be the instrument.
Note:Note:
B. B.
Probe Check OutProbe Check Out
B.
Probe Check Out
B. B.
Probe Check OutProbe Check Out
FIX ONE PROBLEM AT A TIMEFIX ONE PROBLEM AT A TIME
FIX ONE PROBLEM AT A TIME
FIX ONE PROBLEM AT A TIMEFIX ONE PROBLEM AT A TIME
. .
. Trying to fix all of
. .
There are two good methods of testing a probe. Perform one or both of the following:
1.1.
1. A probe can be tested with an ohmmeter. Disconnect the probe from the Extension Cable.
1.1.
When testing the resistance between the connectors, the probe should measure a “short” (less
than 5 ohms). When measuring from one lead (either lead) of the probe to the probe sheath
(metal tip), there should be an “open” (10k or greater).
2.2.
2. Another method of checking a probe is to plug the suspected bad probe into a channel that is
2.2.
working properly. If the problem follows the probe, you have a defective probe.
C. C.
Extension Cable Check OutExtension Cable Check Out
C.
Extension Cable Check Out
C. C.
Extension Cable Check OutExtension Cable Check Out
With the Extension Cable connected to the UBG, remove the probe from the suspected bad Extension Cable. Set the UBG to the proper channel and look for a near cabin temperature reading. A
very high or low reading indicates a short to ground in the cable. Next, connect an ohmmeter, set
13
Page 18

to 10K range, to the open probe ends of the suspected bad Extension Cable. Set the UBG to the
proper channel and look for a high (+ or -) reading. A near cabin temperature reading or no
change in reading indicates an open in the cable or its connectors. Most problems of this kind are
usually one of the following:
Improper OLC-1 Connections:Improper OLC-1 Connections:
1. 1.
Improper OLC-1 Connections: Pull on wires installed in the Over-Lap Connector to
1.
Improper OLC-1 Connections:Improper OLC-1 Connections:
1. 1.
check the connection. You may have insulation in the overlap area. Remove the wires from
the OLC-1 and inspect.
Broken Wire:Broken Wire:
2. 2.
Broken Wire: A wire can be broken from a too-tight tie-wrap or by repeatedly flexing
2.
Broken Wire:Broken Wire:
2. 2.
the wire. Inspect the wires for a break. Note: A wire can be broken while the insualtion is
still intact.
Cable Chafed to Ground:Cable Chafed to Ground:
3. 3.
Cable Chafed to Ground: If a cable is routed around a metal object, it will over time
3.
Cable Chafed to Ground:Cable Chafed to Ground:
3. 3.
chafe the wire and short to the object. Inspect the wires for chafing.
14
Page 19

SPECIFICSPECIFIC
SPECIFIC
SPECIFICSPECIFIC
Model:Model:
Model: UBG-16
Model:Model:
Weight:Weight:
Weight: Unit only: 22 oz., One probe and 6 foot cable: 3.5 oz., One Probe and 20 foot cable: 7 oz.
Weight:Weight:
Environmental:Environmental:
Environmental: Meets TSO C43a
Environmental:Environmental:
Power Requirements:Power Requirements:
Power Requirements: 10.5 to 30 Volts, 3/10 Amp.
Power Requirements:Power Requirements:
Display:Display:
Display: Plasma (viewable in direct sunlight). Display dims for night operation.
Display:Display:
Accuracy:Accuracy:
Accuracy: 1/2% in accordance with TSO C43a.
Accuracy:Accuracy:
Power-up Test:Power-up Test:
Power-up Test: Flashes all bars, segments and nomenclature.
Power-up Test:Power-up Test:
Probes:Probes:
Probes: Type K, Ungrounded (for improved accuracy, stability and reliability).
Probes:Probes:
Extension Cables:Extension Cables:
Extension Cables: Type K, any length or size. Non-Temp cables are tin/copper.
Extension Cables:Extension Cables:
Channels:Channels:
Channels: Maximum of 16 Channels.
Channels:Channels:
AA
TIONS and OPERATIONS and OPERA
A
TIONS and OPERA
AA
TIONS and OPERATIONS and OPERA
S1111981
TING FEATING FEA
TING FEA
TING FEATING FEA
TURESTURES
TURES
TURESTURES
11/11/98
EGT and CHT Analyzer Channels:EGT and CHT Analyzer Channels:
EGT and CHT Analyzer Channels: 1 to 7, programmable from front panel (left channels for
EGT and CHT Analyzer Channels:EGT and CHT Analyzer Channels:
EGTs and right channels for CHTs).
EGT Bar Resolution:EGT Bar Resolution:
EGT Bar Resolution: 1 to 104°F per Bar, programmable from front panel.
EGT Bar Resolution:EGT Bar Resolution:
CHT Bar Resolution:CHT Bar Resolution:
CHT Bar Resolution: 33°F per Bar.
CHT Bar Resolution:CHT Bar Resolution:
Lean Operating Mode:Lean Operating Mode:
Lean Operating Mode:
Lean Operating Mode:Lean Operating Mode:
A. Activated after 10°F rise in hottest EGT.
B. Peak detected when 5°F decrease in any EGT or TIT.
Scan Rate:Scan Rate:
Scan Rate: Programmable from 1 to 9 second per channel.
Scan Rate:Scan Rate:
15
Page 20

UBG-16
RS-232 (5-volt) Output
0721991
7/21/99
1. General Description1. General Description
1. General Description
1. General Description1. General Description
The UBG transmits serial RS-232 (5-volt) data on the white/green wire (pin 9). The serial data transmitted is the same as that shown on the digital display as each channel is selected. The white/green wire may
be connected to a PC through Electronics International’s 8 Channel Multiplexer Unit (MUX-8). If the
transmitted signal is inverted, it may be connected directly to a PC. The serial data is transmitted in a
comma delimited format, suitable for importing into most spreadsheet and data base programs.
2. Instrument Operation2. Instrument Operation
2. Instrument Operation
2. Instrument Operation2. Instrument Operation
The UBG outputs RS232 (5-volt) data in all operating modes.
3.3.
TT
ransmit Specificationsransmit Specifications
3.
T
ransmit Specifications
3.3.
TT
ransmit Specificationsransmit Specifications
* Baud Rate: 9600
* Data Bits: 8
* Start Bit: 1 (Logic Low)
* Stop Bit: 1 (Logic High 5-volts)
* Parity: None
* Transmit Rate: 5 seconds to transmit all 16 channels.
4.4.
TT
ransmit Fransmit F
4.
T
ransmit F
4.4.
TT
ransmit Fransmit F
The UBG transmits the following record:The UBG transmits the following record:
The UBG transmits the following record:
The UBG transmits the following record:The UBG transmits the following record:
UBG,L1,R1,L2,R2,L3,R3,L4,R4,L5,R5,L6,R6,L7,R7,L8,R8CrLf
UBG Instrument identifier.
, A comma separates data fields.
L1 Left channel 1 reading (-999 to 1999 decimal points are not transmitted).
R 1 Right channel 1 reading (-999 to 1999 decimal points are not transmitted).
Cr Carriage return (0Dh)
Lf Line feed (0Ah)
ormatormat
ormat
ormatormat
Other left channels are L2, L3, etc.
Other right channels are R2, R3, etc.
16
Page 21

WARNINGWARNING
WARNING
WARNINGWARNING
Do Not use screws that penetrate
the instrument face more than
.125". Display damage may result.
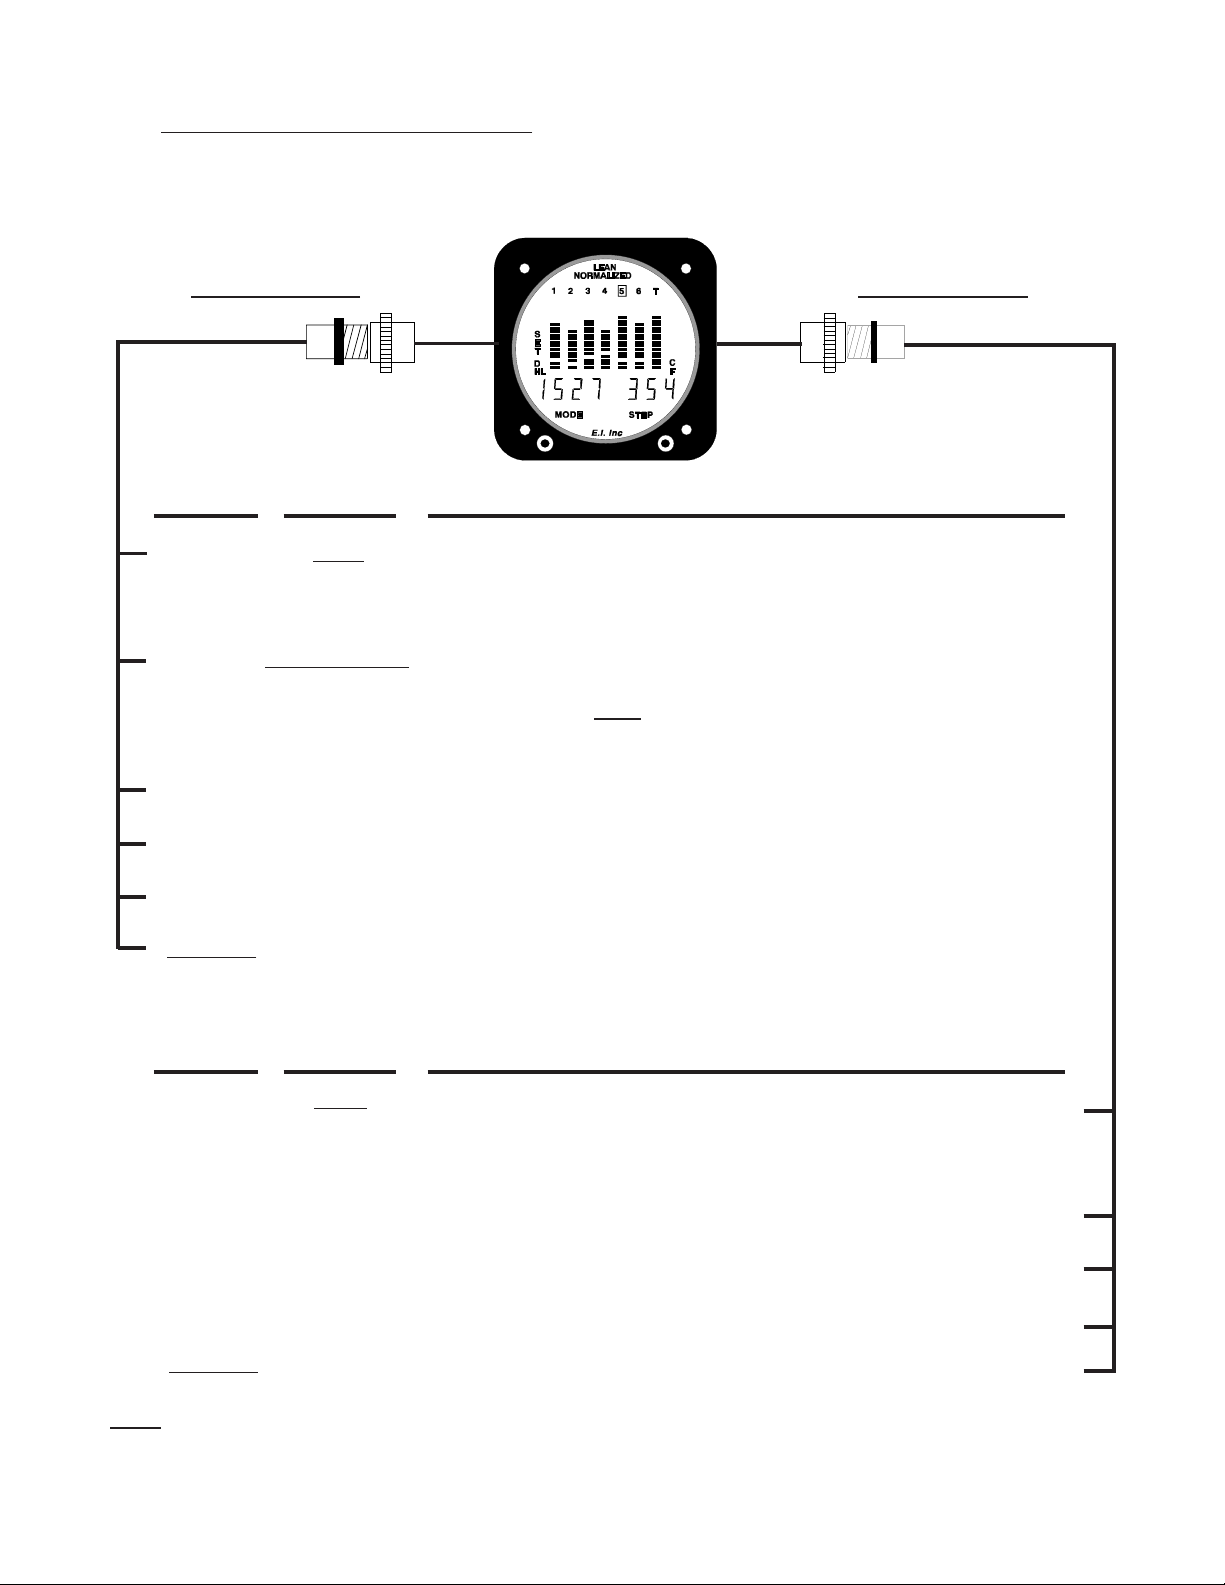
UBG-16
Wiring Diagram
Right Channels
For monitoring CHT's and other
temperatures or functions.
Channel #1.
Channel #2.
Channel #3.
Channel #4.
Channel #5,
Channel #6.
Channel #7.
Channel #8.
1
2
3
4
5
6
7
8
Right Extension Cable Harness. Left Extension Cable Harness.
UBG-16
Back View
Left Channels
For monitoring EGT's and other
temperatures or functions.
1
Channel #1.
2
Channel #2.
3
Channel #3.
4
Channel #4.
5
Channel #5,
6
Channel #6.
7
Channel #7.
8
Channel #8.
Note: Any channel used to measure a temperature must
be connected to a Type K thermocouple extension cable.
Note: The first 4 or 6 channels on the left and right must
be used to monitor EGT and CHT respectively.
Note: If using the 7th column of bars to display TIT or
Oil Temp, the probe must be connected to the next LEFT
channel after the last EGT channel.
Note: OAT or Carb Temp must be connected to channel
7 or 8 on the left or right. These are "precision" channels.
Note: Any left or right channel will accept any one of
E.I.'s probes or Functional Modules.
Note: Varying cable lengths will not affect accuracy.
Connecting Wire Harness.
White/Orange
Red
Black
White/Grn
White/Yel
17
Description Connects To:
Display Dimming.
Power Lead.
Ground Lead.
(Optional) RS232 Data Output Line.
Connect to MUX-8 to record data.
(Optional) External Warning Control
Line. Can be connected to a relay to
control an external light, buzzer, etc.
This line grounds when a warning is
blinking on the display. Current must
be limited to 1/10 amp maximum.
CP-1 Intensity
Control Pot.
12/24 Volt, Radio
Bus. via 5 amp fuse.
Ground
Page 22

Appendix A
Adding a Temperature Probe to the UBG-16
If you have an unused channel and would like to add an extension cable and probe to your instrument, perform
the following steps:
1. Order an XCS Extension Cable (at the proper length) and appropriate probe from Electronics
International Inc.
2. Disconnect the cable harness at the Circular Connector on the back of the UBG.
3. Insert the the XCS Extension Cable into the Circular Connector at the proper location (see below).
Once these connectors are installed
extraction tool is used you can damage the Circular Connector. An extraction tool may be purchased from Electronics International Inc.
4. Follow the appropriate steps in the Installation Instructions for mounting the probes and routing the
Extension Cables.
5. Reconnect the cable harness to the Circular Connector at the back of the UBG.
do not try to remove them without an extraction tool. Unless an
Extension Cable Harness
Back View (wire side)
2
1
Yel
Yel
3
Red
16
5
Red
7
Red
8
Yel
5
3
6
Yel
10
7
Yel
14
Yel
Yel
2
6
18
1
Red
4
Yel
Red
Note: 1 Red = Channel #1 Red wire.
1
3
2
Red
4
7
Red
6
11
Red
8
15
1 Yel = Channel #1 Yel wire.
Page 23

Appendix B
UBG-16
Circular Connectors
Extension Cable Harness, Back View (wire side)
OR
Instrument Connector, Front View
Note: 1 Red = Channel #1 Red wire (Gnd)
2
1
Yel
3
6
Yel
3
Red
2
Yel
1
Red
2
Red
1
3
1 Yel = Channel #1 Yel wire (Signal)
Yel
4
Yel
6
8
Red
6
Red
15
4
Red
7
11
14
10
Yel
5
Yel
7
16
5
Red
7
Red
8
Yel
Connecting Cable Harness, Back View (wire side)
OR
Instrument Connector, Front View
W/
3
Yel
W/
6
Org
Blk
Red
1
4
Note: See Wiring Diagram for
hook up information.
W/
9
Grn
7
19
Page 24

Cable
UBG-16 Head
Side View
WARNINGWARNING
WARNING
WARNINGWARNING
Do Not use screws that penetrate
the remote face more than .125".
Display damage may result.
Appendix C
UBG-16 Remote Head
Wiring Diagram
UBG-16 Body
Side View
UBG-16 Body
Back View
Right Extension Cable Harness. Left Extension Cable Harness.
Connecting Wire Harness.
20
Page 25

Page 26

Page 27

Page 28

Page 29

Page 30

Page 31

Page 32

Page 33

Page 34

Page 35

 Loading...