

Page 1
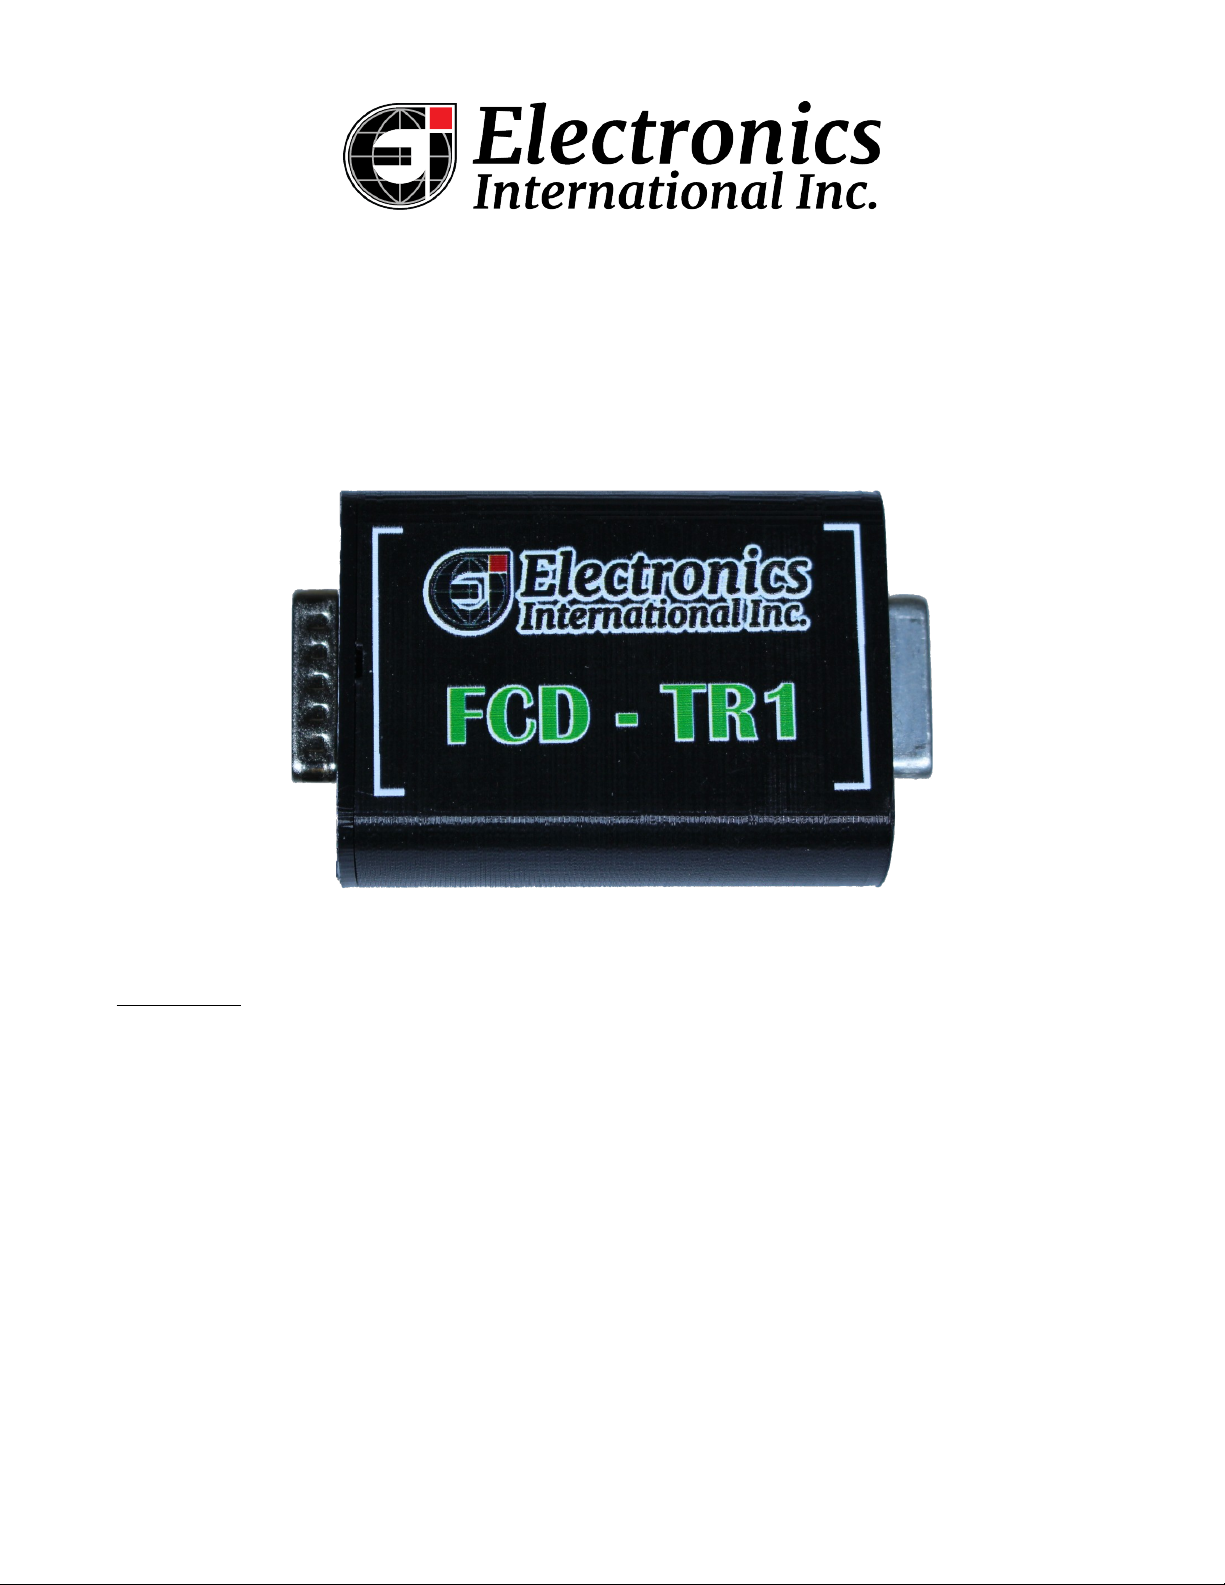
FCD-TR1 Operating Instructions
1203181 Rev A, 9/23/2019
Field Calibration Device for Electronics International’s TR-1-xx Instrument Line
Overview:
The FCD-TR1 is a field calibration device which will work with any Electronics International (EI) TR1 instrument. The TR-1 can be configured or calibrated in the field using this device and an iPad or
iPhone (iPad is recommended). The FCD-TR1 can be used for the following:
Downloading Recorded Flight Data
Calibrating a Fuel Tank Gauge
Modifying the TR-1 brightness settings to match other instruments in your aircraft panel
Adjusting the K-Factor for a Fuel Flow Gauge
Calibrating the Torque Sensor for your aircraft
Testing the External Warning Light outputs
Testing the needle and the digital display
Other calibration
IMPORTANT: The FCD-TR1 is not intended to be permanently installed. It is meant only for
1
Page 2
calibration or testing of a TR-1 gauge on the ground. It must be removed before flight.
Connecting the FCD-TR1:
To use the FCD-TR-1, perform the following steps:
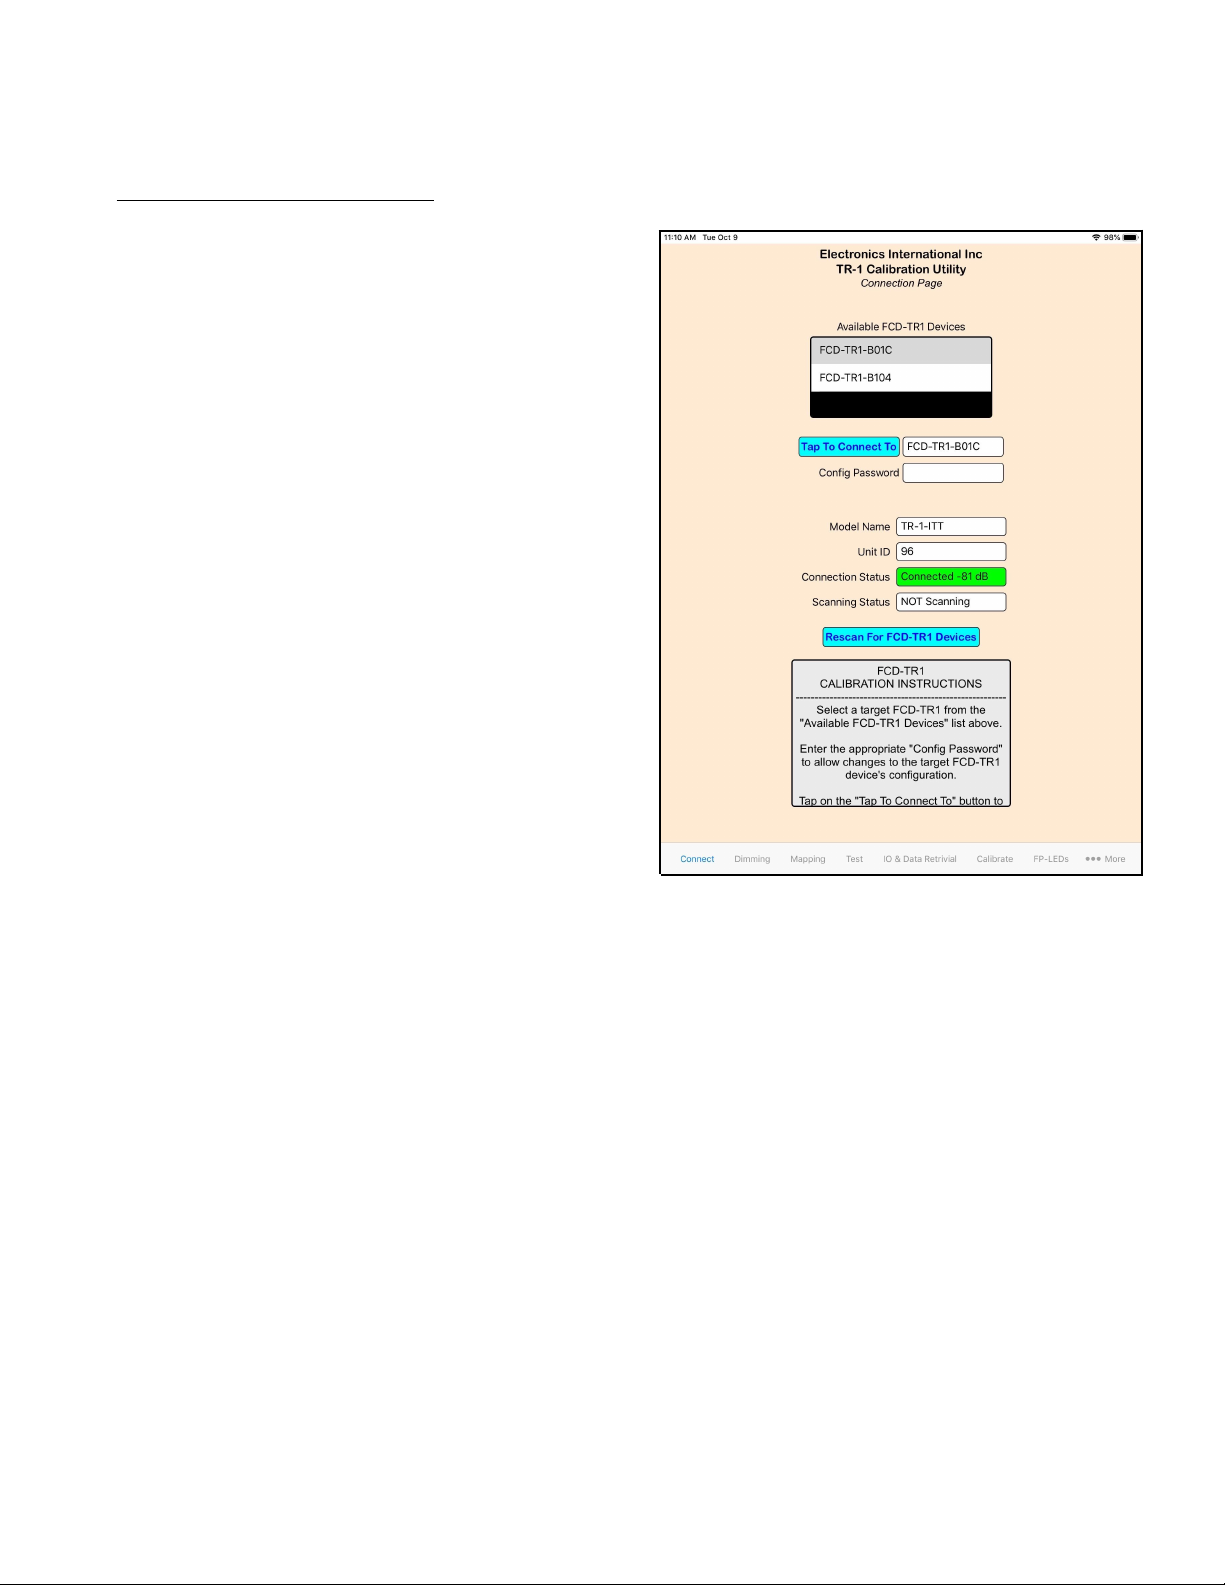
1. Install the EI Field Calibration Device
application from the Apple App Store
a. On your iPad go to the App Store and search
for FCD-TR1.
b. Get the App.
2. Gain access to the back of the TR-1.
3. Remove the TR-1 back connector.
4. Connect the FCD-TR1 inline between the TR-1
and the aircraft wire harness.
5. Open the FCD-TR1 App on your iPad.
6. Turn on the power to the TR-1.
a. The FCD-TR1 should show up in the
available FCD-TR1 Devices window.
b. If you have more than one FCD-TR1
powered up, both will show up in the list.
Choose the one you wish to connect to.
7. Tap the FCD-TR1 in the list, and then tap the
‘Tap to Connect To’ button on the App.
a. The Model Name and Unit ID should show
the correct information.
b. The Connection Status should indicate
"Connected" in green.
You are now connected to the FCD-TR1 and the TR-1 gauge itself. You can continue with the desired
calibration. See below.
2
Page 3
Important: Once you have completed making changes on any tab of the application, click the
‘Store Changes On TR-1’ button to save your changes to internal FLASH memory.
Setting the Brightness and Dimming Levels:
The TR-1 gauges are equipped with a photocell to automatically dim the gauge in accordance with the
ambient light. Also, all the TR-1 gauges can be set up to operate from an external dimming input. For
either operation you can configure the bright and dim levels.
To set the Bright and Dim levels perform the
following steps:
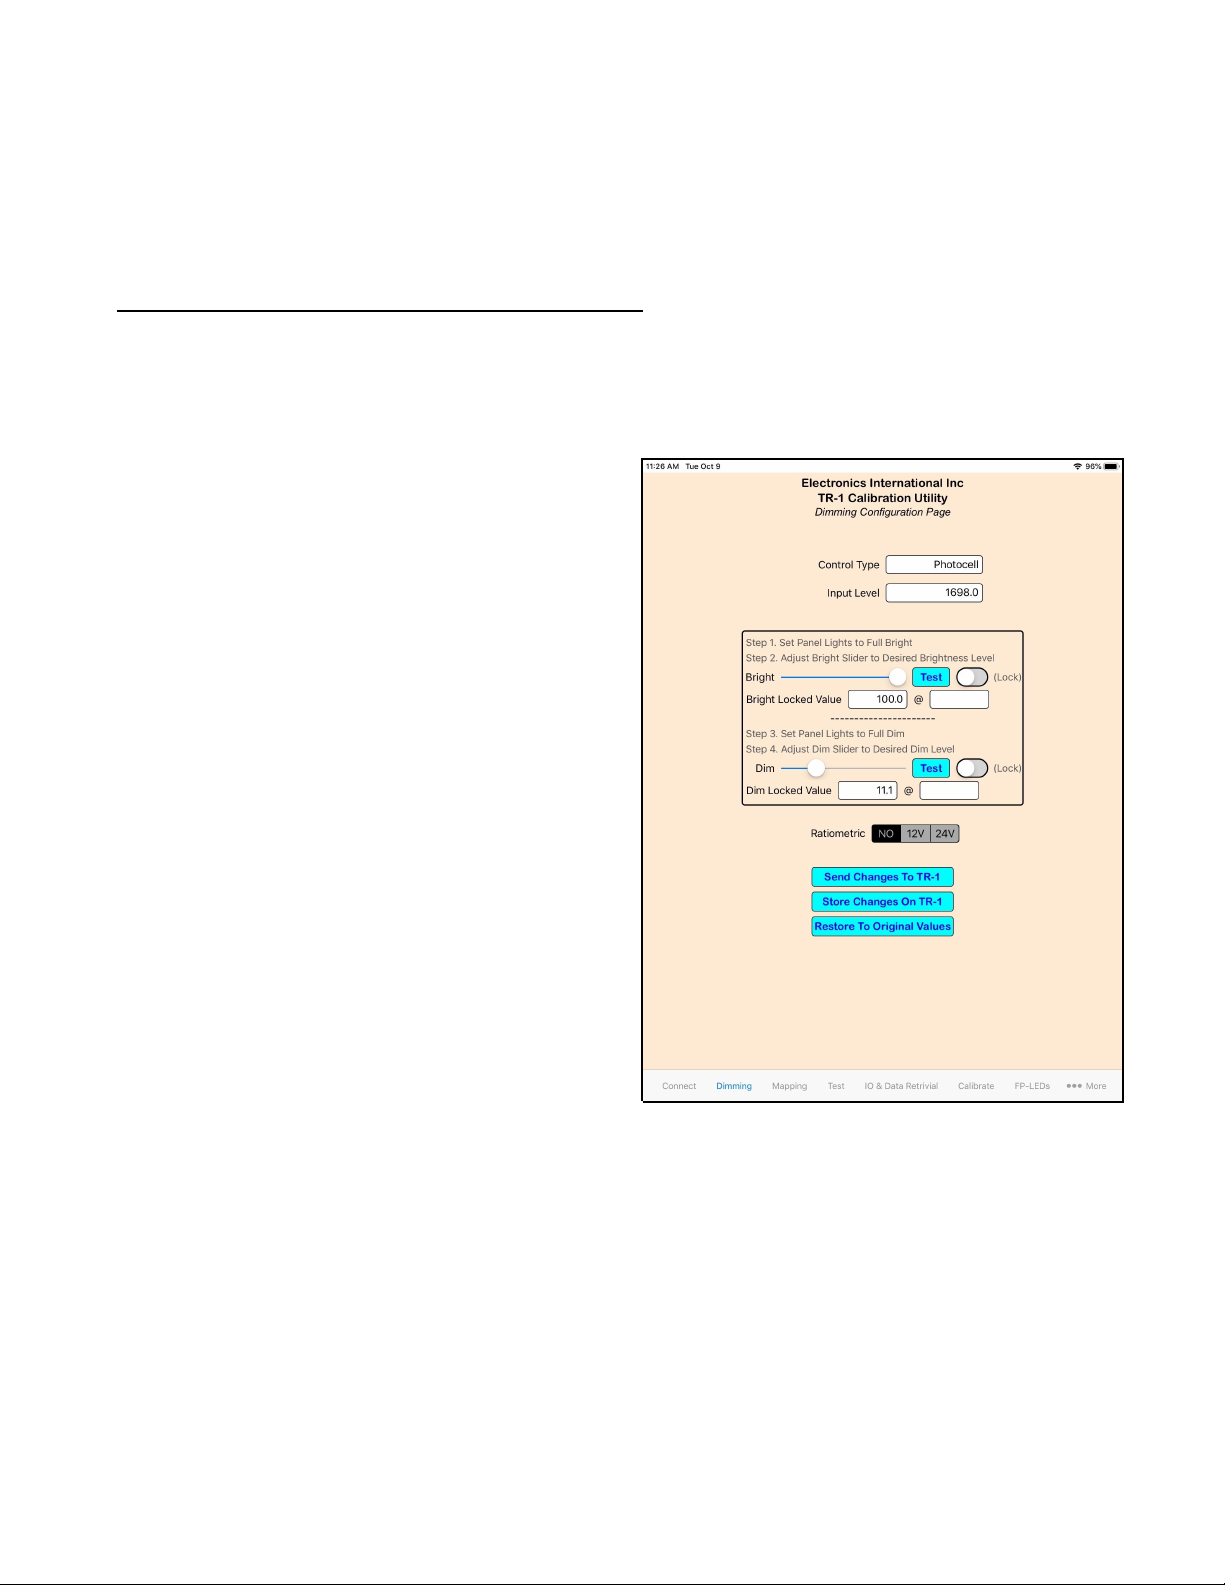
1. Click on the ‘Dimming’ tab at the bottom of
the screen
2. Choose your Control Type (Press Done on
keyboard once a selection is made)
a. Select ‘Photocell’ (If equipped) for auto
dimming
b. Select ‘External Pot’ for an external
voltage or PWM input
c. Select ‘BAPFD Mode’ (Bright At Pot Full
Dim Mode). The ‘BAPFD Mode’ is for
aircraft panels that use an external input,
but wish to turn the dimming pot all the
way down during daylight operation.
Since the TR-1 has a digital display,
turning the brightness all the way down
will make the digits unreadable in
daylight. So in this mode the dimming pot
will lower the gauge brightness down as
the pot is turned down, but then turns the
TR-1 brightness to full bright at the very
lowest setting of the pot.
3. If you changed the input type above, then click the ‘Send Changes to TR-1’ button so it will go
to the new mode.
4. If you are using an external input, and that input voltage varies with the bus voltage, then click
the appropriate bus voltage in the ‘Ratiometric’ setting. Select ‘NO’ if the external voltage has
its own regulator or is PWM.
5. If you change this setting, then click the ‘Send Changes to TR-1’ button.
6. Set the input for full bright.
a. For Photocell, expose the gauge to a bright cockpit.
b. For an External Pot, turn the Pot all the way to full bright.
3
Page 4
7. Ensure the Bright and Dim sliders are unlocked.
8. Move the “Bright” slider to a high level, such as 90% or 95%. Press “Test” to view this
brightness on the TR-1. When the desired brightness is reached, pushthe “Lock” switch next to
the slider to lock in that brightness.
9. Now set the input for full dim level.
a. For a Photocell, expose the gauge to a dim cockpit or use a blanket to simulate.
b. For an External Pot, turn to full dim level.
c. For control pot BAPFD mode, turn the dimmer knob full counter clockwise and then
back it off 1/8 turn to a “Dim” position, leaving room at full counter-clockwise or full
bright, but just above full counter clockwise.
10. Move the “Dim” slider to a low level, such as 5% or 10%. Press “Test” to view this dimness
level on the TR-1. When the desired dimness is reached, push the “Lock” switch next to the
slider to lock in that dimness.
11. Click the ‘Dim Lock’ button to hold this value.
12. Click the ‘Send Changes to TR-1’ button.
13. Important: Click ‘Store Changes On TR-1’ button to lock values into memory.
You should now be able to adjust your brightness control (or the cabin ambient light) and observe the
programmed TR-1 brightness behavior.
Fuel Tank Calibration:
Most TR-1 gauges are fully calibrated at the factory and need no adjustment. However, some gauges
such as fuel level may need to be calibrated for the tank in an aircraft. Follow these steps to map the
values from the fuel probe to the correct units (Gallons, Liters, Pounds, etc.) for you gauge.
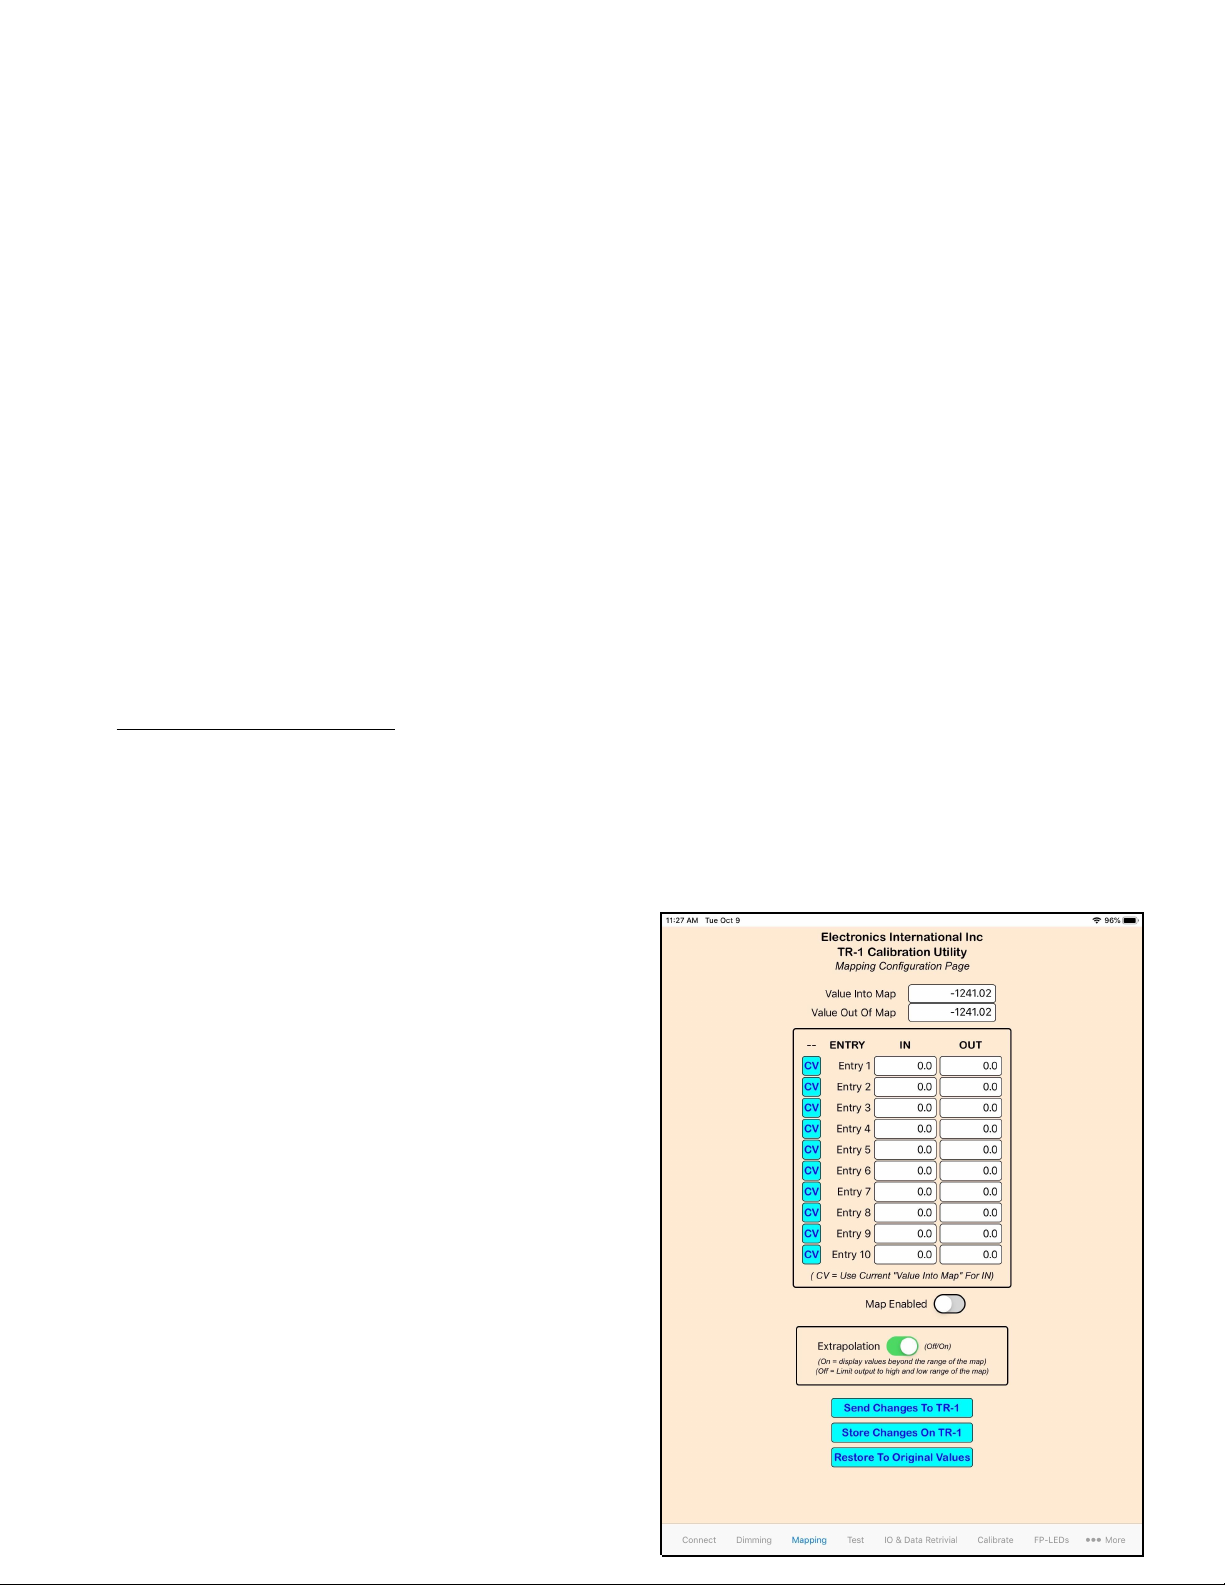
1. Select the ‘Mapping’ tab at the bottom of the
screen.
2. Start with an empty tank and add the unusable
fuel.
3. The ‘Value Into Map’ at the top of the screen
indicates counts coming from your fuel probe.
The ‘Value Out of Map’ just below this
indicates the calibrated fuel level in your desired
units. This value may not be accurate until
calibration is complete.
4. Press the ‘CV’ button to calibrate for a 0 fuel
level. Then press the ‘Send Changes to TR-1’
button.
5. You can calibrate the tank at 10 points but in
this example we will only calibrate with 5.
6. Divide your full fuel level by 4 and enter the
values into the ‘OUT’ fields. Example: full tank
= 40 gallons / 4 = 10. We will enter 0, 10, 20,
4
Page 5
30, and 40 for the first 5 entries and 0.0 for all the rest.
7. Now put 10 gallons in the tank (entry 2) and watch the ‘Value into Map’ change as you add
fuel. The value must go up or down as fuel is added. If you go over the 10.0 gallon, you can
correct the OUT value to match the pump.
8. Once the ‘Value into Map” has stabilized, press the ‘CV’ button. Then press the ‘Send
Changes to TR-1’ button.
9. Perform these same steps for each of the entries. Make sure the ‘Value into Map’ goes the
same way (up or down) for each gallon of fuel added. It should not change directions.
Important: Once you have finished calibrating the tank, press the ‘Store Change On TR-1’ button.
The fuel tank is now calibrated.
Adjusting the K-Factor for Fuel Flow:
Fuel flow transducers are affected by aircraft plumbing
and installation. To ensure the fuel flow displayed on the
gauge is calibrated to the flow to the engine, you may
need to adjust the K-Factor on the TR-1. First,
determine if the fuel flow gauge is reading as expected.
This can be done with performance charts or by doing a
flow test. If you find you need to adjust K-Factor on the
TR-1, perform the following:
1. Go to the main ‘Connect’ screen and enter the
Config Password.
a. The default password is "level2" but it could
be different if you have changed it.
b. The Config Password box should turn yellow
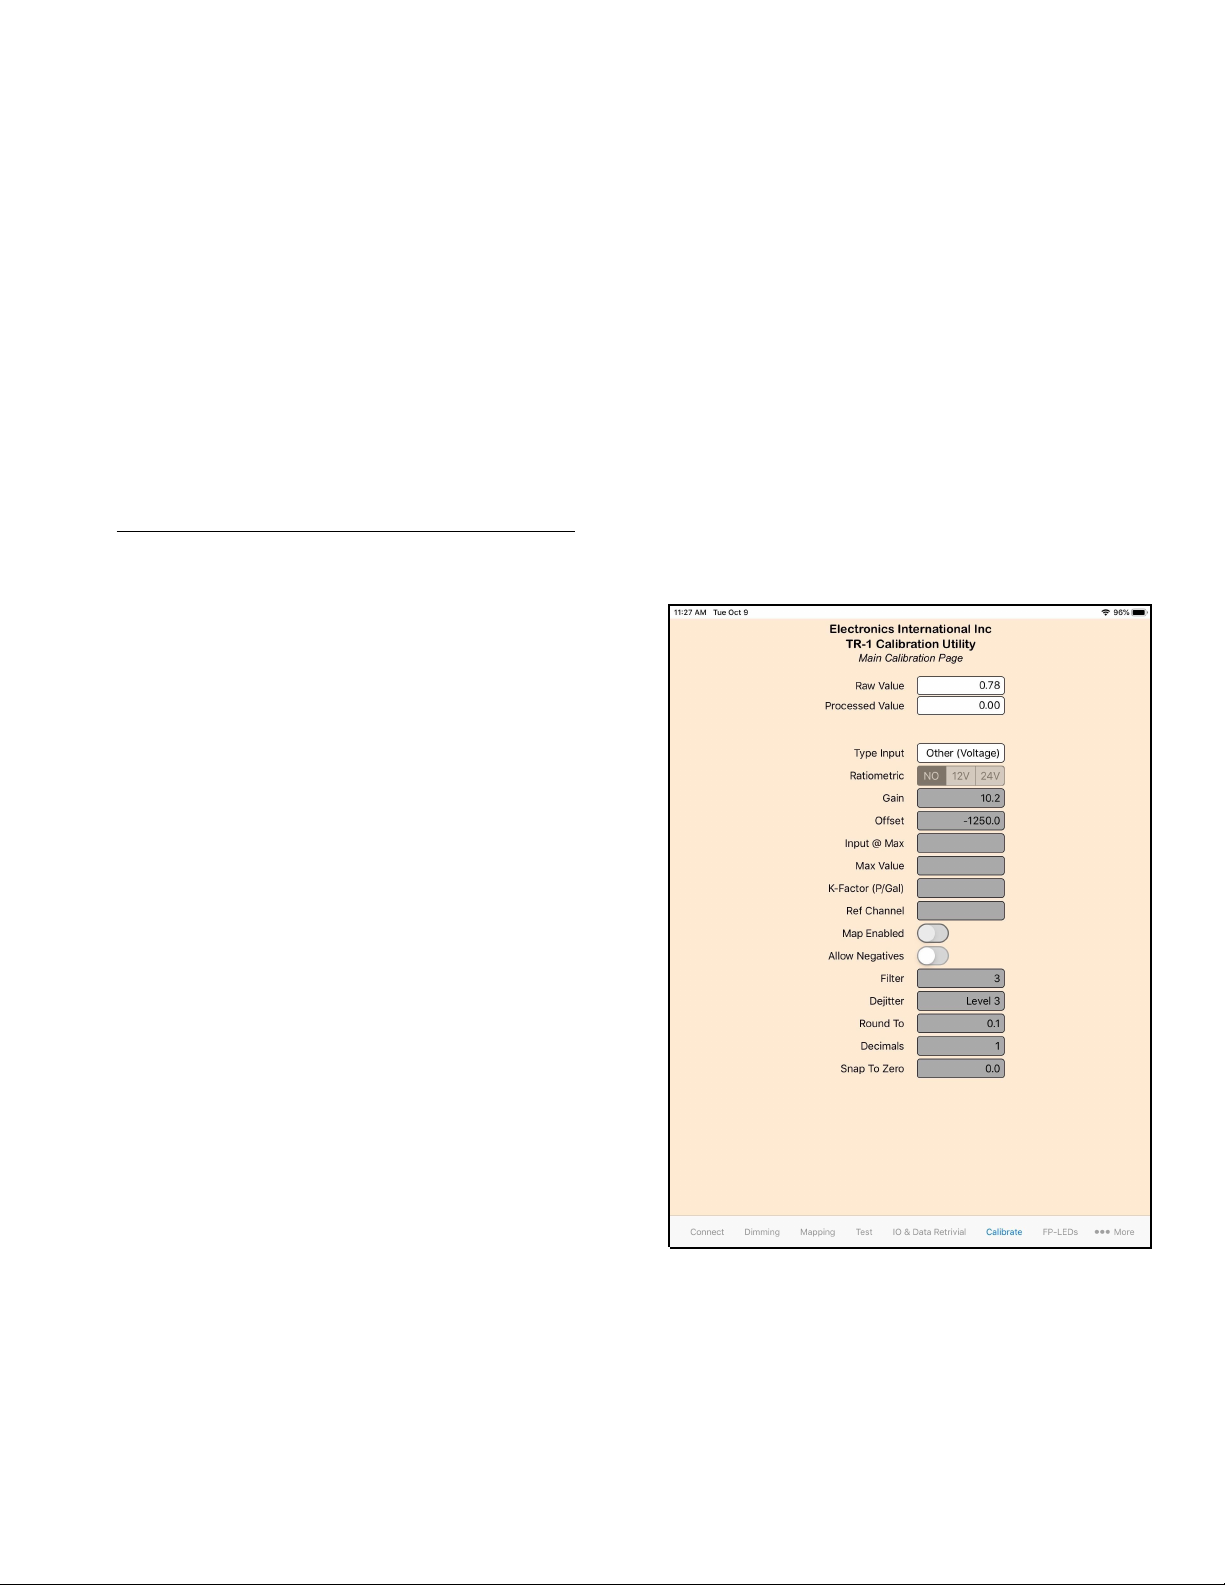
2. Go to the Calibrate screen.
3. Write down the current K-Factor.
4. Calculate the new K-Factor.
a. New K-Factor = Old K-Factor x (Displayed
FF / Expected FF )
b. example:
1. Expected FF = 57.0 gph. Gauge Display
FF = 55.3 gph, K-Factor = 38000
2. New K-Factor = 38000 * (55.3 / 57.0) =
36867
5. Enter the new K-Factor in the appropriate window.
6. Click the ‘Send Changes to TR-1’ button.
7. Important: Click ‘Store Changes On TR-1’ button.
5
Page 6
Calibrating your Torque Sensor (Or other sensor):
The TR-1 Torque gauge should be fairly well calibrated from the factory. However, all torque sensors
do have a certain amount of tolerance built in. If you perform a dead weight test and find that you
would like to more closely calibrate the TR-1 reading, you can follow these steps to do so.
NOTE: These steps can be followed for any other gauge
with a linear input transducer and a well calibrated
means of testing it.
1. Go to the main ‘Connect’ screen and enter the
Config Password.
a. The default password is "level2" but it could
be different if you have changed it.
b. The Config Password box should turn yellow
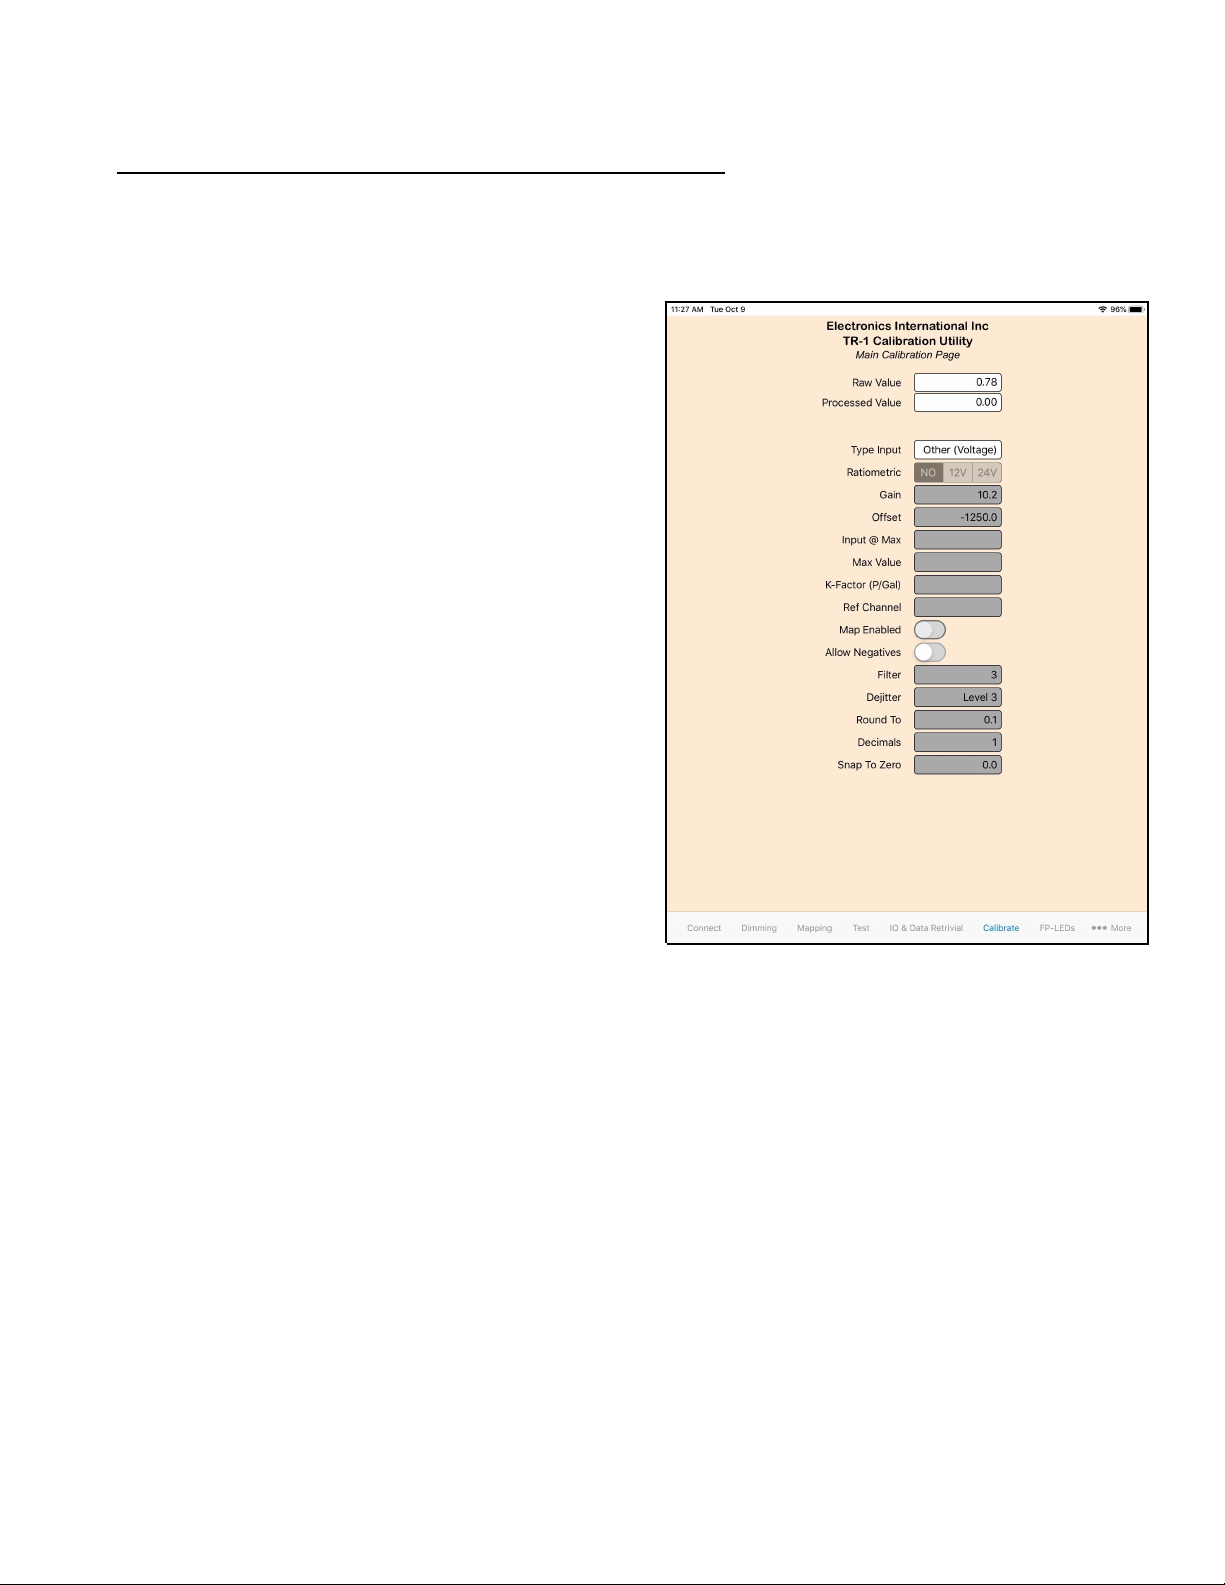
2. Go to the Calibrate screen.
3. Note and record the Gain and Offset readings.
Typically only the Gain will need to be adjusted.
4. Calculate the new Gain based on your dead
weight tester
a. New Gain = Old Gain x (Expected Value /
Displayed Value)
b. Example:
1. Dead Weight Tester = 3984 Ft-Lbs
2. Gauge Reading = 3995 Ft-Lbs
3. Old Gain = 0.9987
4. New Gain = 0.9987 * (3984 / 3995) =
0.99595
c. Enter the new Gain in the appropriate
window.
d. Click the ‘Send Changes to TR-1’ button.
e. Important: Click ‘Store Changes On TR-1’ button.
6
Page 7
Downloading Recorded Flight Data:
Recorded flight data can be downloaded by number
of flights or by number of hours. Data is first
retrieved and stored locally to the iPad/iPhone. You
may save the flight data files using the iTunes
software and then view them using the CSV viewer
of your choice.
To retrieve, download and view recorded flight data:
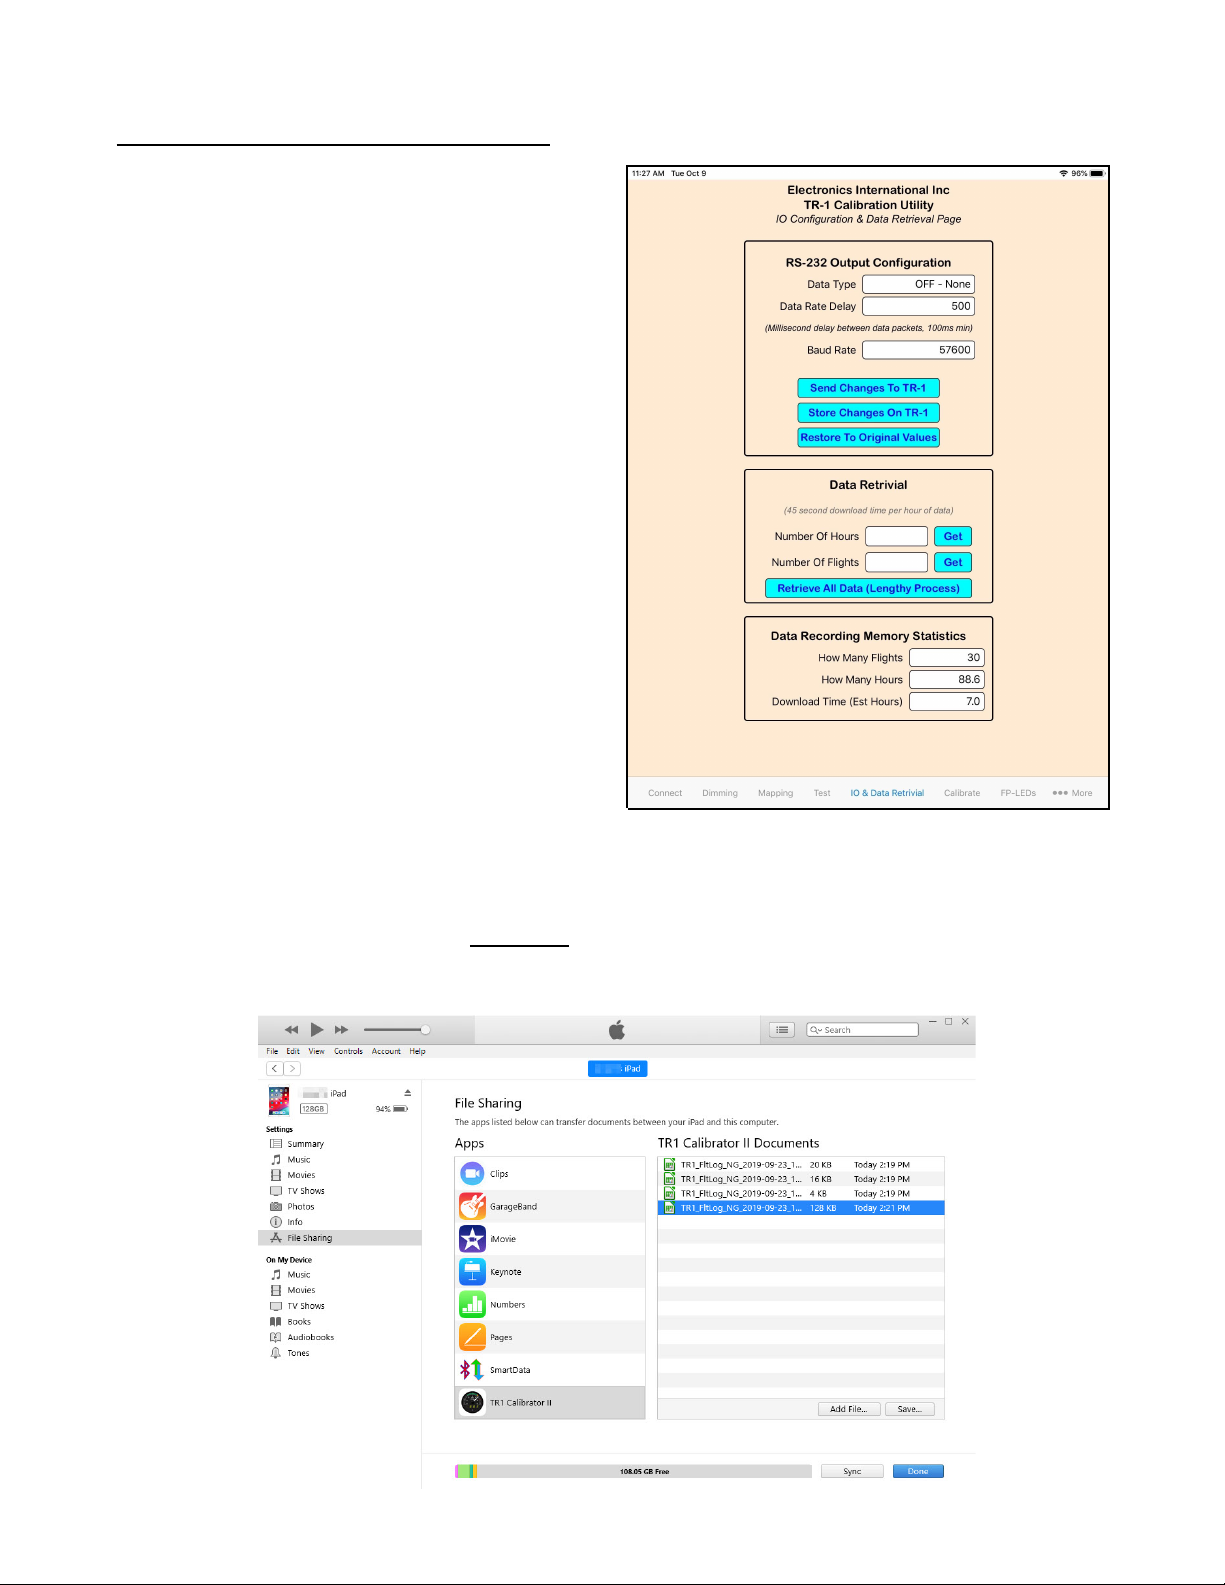
1. Select the ‘IO & Data Retrieval’ tab at the bottom
of the screen.
2. You may choose to download either by ‘Number
of Hours’ or by ‘Number of Flights’. Identify your
desired amount in their respective box and select
‘Get’ for the corresponding selection.
Note: You may choose the ‘Retrieve All Data
(Lengthy Process)’ option; however, this may take a
number of hours to download.
3. Once the retrieval process completes, you may
disconnect from the TR-1 instrument and then
connect your iPad/iPhone to your computer using your device USB cable.
4. Using iTunes, you may save the file to your computer and then view the CSV file using the CSV
viewer of your choice (e.g. Microsoft Excel). If you need further assistance viewing the files on your
iPad/iPhone device, you may search apple.com for “Use iTunes to share files between your computer
and your iPhone, iPad, or iPod touch” and follow the instructions for your specific device. See the
screenshot below, this represents what your iTunes software may look like when downloading the
files.
7
 Loading...