

Page 1

Model:LCDVD192E
INSTRUCTION MANUAL
Before using the TV, please read this manual thoroughly,
and retain it for future reference.
Page 2

CONTENTS
CONN ECTIONS
MAINTENANCE
SAFETY
PRECAUTION
IMPORTANT
SAFETY
INSTRUCTION
ACCESSORIES
GETTING
STARTED
CONTROL
REFERENCE
GUIDE
Remote Control
Front Frame
Back Frame
Side Panel
Antenna Connection
S-Video Connectio n
AV Connection
Y Pb Pr Connection
HDMI Connection
VGA Connection
Headphone Connection
Power Cord Connection
WALL MOUNT
INSTALLATION
INITIAL SETUP
Turning The Unit On
Source Selection
TV SETUP
Picture Menu
Sound Menu
Function Menu
ATV Menu
PC Menu
1
2
2
1
3
4
7
8
3
3
5
6
9
2
8
8
8
9
9
10
10
10
7
11
12
12
13
14
15
18
19
6
4
6
10
Page 3

CONTENTS
20
21
12
11
DISC
FORMATS
CD / DVD
OPERATION
27
13
CUSTOMIZING
THE DVD
FUNCTION
SETTINGS
DVD Function General Setup
System Setup
Language Setup
Audio Setup
Digital Setup
Basic Operations
Special Functions
Mp3 / JPEG Playback
27
29
31
24
32
33
14
DISPLAY
MODE
PC Formats
Video Formats
34
35
15
SPECIFICATION
36
16
TROUBLESHOOTING
GUIDE
DVD Symptom
TV Symptom
37
26
SAFETY CLASS :This is an IEC safety class I product
and it must be grounded for safety.
Page 4
* CAUTION MARKI NG WA S LOCATED AT BOT TOM
ENCLOSURE OF TH E APPARATUS.
SAFETY PRECAUTION
CAUTION
•
T REVENT FIRE OR SHOC HA ZA RD, DO NOT
• EXPOSE THIS UNIT TO RAIN OR MOISTURE. DO
NOT PLACE O BJ ECTS FILLED WITH LIQUIDS ON
OR NEAR TH
• SHOULD ANY TROU BLE OCCUR , DISCONN ECT
THE AC POWE R CORD AND REFE R SERVICING
TO A QUALIFI ED TECHNICIAN .
TO REDUCE THE RISK OF FIRE OR ELECTRIC
SHOCK, DO NOT E XP OS E THIS APPLIANCE TO
RAIN OR MOISTURE.
O
IS UNIT.
K
WARNI NG :
PL ACEMENT INFORMATION
• Do not use this unit in places that are extremely
hot, cold, dusty or humid.
• Do not restrict the air flow of this unit by placing it
somewhere with poor a ir flow, by covering it wi th
a cloth, by placing it on bedding or ca rp eting.
SAFETY INFORMATION
• When connecting or disconnectin g the AC power
cord, grip the plug and n ot t he cord itself. Pulling
the cord may damage it an d create a hazard.
• When you are not goin g to use the unit for a long
period of time, dis co nnect the AC power cord .
CONDENSATION INFORMATION
• When left in a heated room where it is warm and
damp, water dro plets or condensation may form
inside the equipment. When there is condensation
inside the unit, the unit may not funct io n normally.
Let the unit stand for 1-2 hours before turning the
power on or gradually heat the room and let the
unit dry before use.
RATING PLATE LO CATION
The rating plate is located on the rear of the uni t.
FCC STATEMENTS
NOTE: This unit has been tested an d fo un d to comply
with the limits for a Class B digital d ev ic e, pur suant
to Part 15 of t he FCC Rules. These limits are designed
to provide reasonable protection a ga inst harmful
interference in a resid en tial installation.
This unit generates, uses and c an r adiate radio
frequency energ y and, if not installed and used in
accordance with the i ns tructions, may cause harmful
interference to radio com mu ni cation. However, there
is no guarantee that inte rference will not occur in a
particular installation. If this unit does caus e ha rmful
interference to radio or television reception, which
can be determined by turnin g th e unit off and on, the
user is encouraged to try to correct the inte rference
by one or more of the following measures:
- Reorien t or relocate the recei vi ng antenna.
- Increase the separation between the unit and
receiver.
- Connect the unit into an outl et o n a circuit different
from that to wh ic h the receiver is connected .
- Consult the dealer or an experience d ra di o/TV
technician for help.
Changes or modifications to t his unit
not expressly approved by the party responsible
for compliance could void the u se r authority
to operate the unit.
• DANGER OF EXPLOSION IF BATTERY IS
INCORRECTLY RE PL ACED. REPLACE ONLY
WITH THE SAME OR EQUIVALENT TYPE.
• TO PREVENT ELECTRIC SHOCK, MATCH
WIDE BLADE O F PLUG TO WIDE SLOT OF
WAL L OUTLET, THEN FULLY INSERT.
• USE OF CONTROLS O R AD JUSTMENTS OR
PERFORMANCE OF PROCEDUR ES OTHER
THAN THOSE SPECIFIED MAY RESULT IN
HA ZARDOU S RADIATION EXPOSURE.
CAUTION
INVISIBLE LASER RADIATION WHEN
OPEN AND INTERLOCKS DEFEATED.
AVOID EXPOSURE TO BEAM
This product
contains a low
power laser device.
CLASS 1 LASER
PRODUCT
The exclamation point within an equilateral
triangle is intended to alert the user to
the presence of important operating and
maintenance (servicing) instructions in the literature
accompanying the appliance.
The lightning flash
with arrowhead symbol,
within an equilateral triangle,is intended to
alert the user to the presence of uninsulated
“dangerous voltage”within the product’s enclosure
that may beof sufficient
magnitude to constitute a
risk of electric shock to persons.
WARNING : TO REDUCE THE RISK OF ELECTRIC
SHOCK, DO NOT REMOVE COVER (OR BACK).
NO USER SERVICEABLE PARTS INSIDE.
REFER SERVICING TO QUALIFIED SERVICE
PERSONNEL.
WARNI NG :
1
Page 5

IMPORTANT SAFETY INSTRUCTIONS
1) Read the se i nstructions. 12) Use only with the cart, stand,
2) Keep these instructi on s. tripod, bracket , or t able
3) Heed all warnings. specified by the manufacturer,
4) Follow all instructions. or sold with the appa ra tus.
5) Do not use this appara tu s near water. When a car t is u sed, use caution when
6) Clean only with a dry c lo th. moving the cart / apparatus combination to
7) Do not block any ventilati on o penings. avoid injury f rom tip-over.
Install in accordan ce w ith the 13) Unplug this appar at us during lightning
manufacturer's instructions. Storms or when unused for long periods of
8) Do not install near any heat sources such time.
as radiators, heat re gi sters, stoves, or 14) Refer a ll s er vicing to qualified se rvice
other apparatus (In cl uding amplifiers) that personnel. Ser vicing i s required when the
produce heat. apparatus has been da ma ged in any way,
9) Do not defect the safety purpose of the such as the power cord or plug is damaged,
polarized or ground in g-type plug. liquid has been spilled or object s ha ve fallen
A polarized plug has two blades w it h one into the appara tu s, the apparatus has been
wider than the other. exposed to rain or moistu re, does not operate
A grounding type plug h as t wo blades normally, or has been dropped.
and a third gro unding prong.
The wide blade or the third p rong is
provided for your s af ety.
If the provided plug do es n ot fit into your
wall outlet, consult an electri ci an for
replacement of the obsolete outlet.
10) Protect the p ower cord from bein g wa lked on
or pinched particularly at plugs, conve ni ence
receptacles, and th e po int where they exit
from the appa ratus.
11) Only use attachments / access or ies specified
by the manufacturer.
MAINTENANCE
CLEANING THE DISC
A defective or soiled disc inse rted into th e un it can cause sound to drop ou t du ring
playback .
Handle the disc by holding its inne r an d outer edges.
• Do NOT touch the surface of the unlabe le d side of the disc.
• Do NOT stick paper or tape on the su rface.
• Do NOT expose the disc to dire ct sunlight or excessive heat.
• NEVER use solvents such as be nz ine or alcohol to clean the disc.
• Clean the disc before p la yback. Wipe the disc f rom the center
outward with a cleani ng cloth.
• Do NOT use irregular shaped disc s
(example : heart shaped, octagonal, etc.) .
They may cause malfunctions.
CLEANING THE UNIT
• Be sure to turn t he u nit off and disconnect the AC power cord before maintaining the unit.
• Wipe the unit with a dry s oft cloth. If the surfaces are extremel y di rty,
wipe clean with a cloth that has be en d ipped in a weak soap-and-wa ter solution and
wrung out thoroughl y. Wipe with a dr y cloth.
• Never use alcohol, benzine, t hinner, cleaning fluid or ot he r chemicals. Do NOT use compressed
air to remove d ust.
IMPORTAN T NOTE
Before transporting the unit, rem ove the disc from the disc compar tment.
2
Page 6

ACCESSORIES
Please check and identify the supplied accessories.
Remote control ............... .. ............................. .. ............................. ......................... .
Batter y(AA) . ..
Power Cord ............... .. ............................. .. ............................. ............................. .. ....................
War ranty Card ................ .. ........................... .. ............................. .. ............................. .. ................
Instruction Manual ........ .. ............................. .. ........................... .. ............................. .. ..............
...................
..................... .. ............................. .. ............................. .. ....................... ...... .. ..... .
GETTING STARTED
USING THE REMOTE CONTROL
• Poi nt the remote control at the remote sensor located on the unit.
• When there is a strong ambient light source, the p er formance of the infrared remote sensor
may be degraded, causing unreliable operation.
• The recommended effec ti ve distance for remote op eration is about 16 feet (5 meters).
TO IN STALL THE BATTERIES
1. Open the batte ry door. 2. Inser t 2 "AA" batteries
.
BATTERY REPLACEMENT
When the batter ie s become weak, the operati ng d istance of the remo te control is great ly
reduced and you wil l ne ed to replace the bat teries.
CAUTION: Danger of explosion if batter y is incorrectly replaced.
NOTES
• If the remote con trol is not going to be used for a lo ng t ime, remove the bat teries to avoid
damage caused by batter y leakage corros ion.
• Do not mix old and new batteries. Do not mix ALKALINE, standard (CARBON-ZINC) or
recharg ea bl e (NICKEL-CADMIUM) batter ies.
• Always remove batteries as soon as they become w eak.
• Weak batteries can leak and severely damage the remote co nt rol.
WAR NI NG :
• Do not dispose batteries in a fire. Batteries ma y explode or leak.
• Batteries shall not be expo sed to excessive heat such as s un shine, fire or the like .
3
x 1
x 2
x 1
x 1
x 1
Page 7
MU T E
A- BRE PEAT
LAN G
0
EN T ER
VO L +
VO L -
CH +
CH -
MU T E
DI S PL AY
1 2 3
4
7
0
5
6
8
9
FA V +
SM O DE
PM O DE
SL EE P
ME NULA N G SU B .
FA V -
??
TV / AV
EP G
ANGL E
AUDI O
ZOOM
A- B
INT ROPRO G
D.M ENU
TIT LE
D.D ISP
GOT O
D.SE TUP
0
EN T ER
VO L+
VO L-
CH +
CH -
MU TE
DI SP LA Y
1 2 3
4
7
0
5
6
8
9
CCD
RE CA LL/ -/ --
S. MO DE
P. MO DE
TV /A V
SLO W
ZOO M
PR OG
SUB TITLE
TIT LE
D.D ISP
GOT O
D.S ETUP
EX IT
MTS
ANG LE
3
9
2
7
8
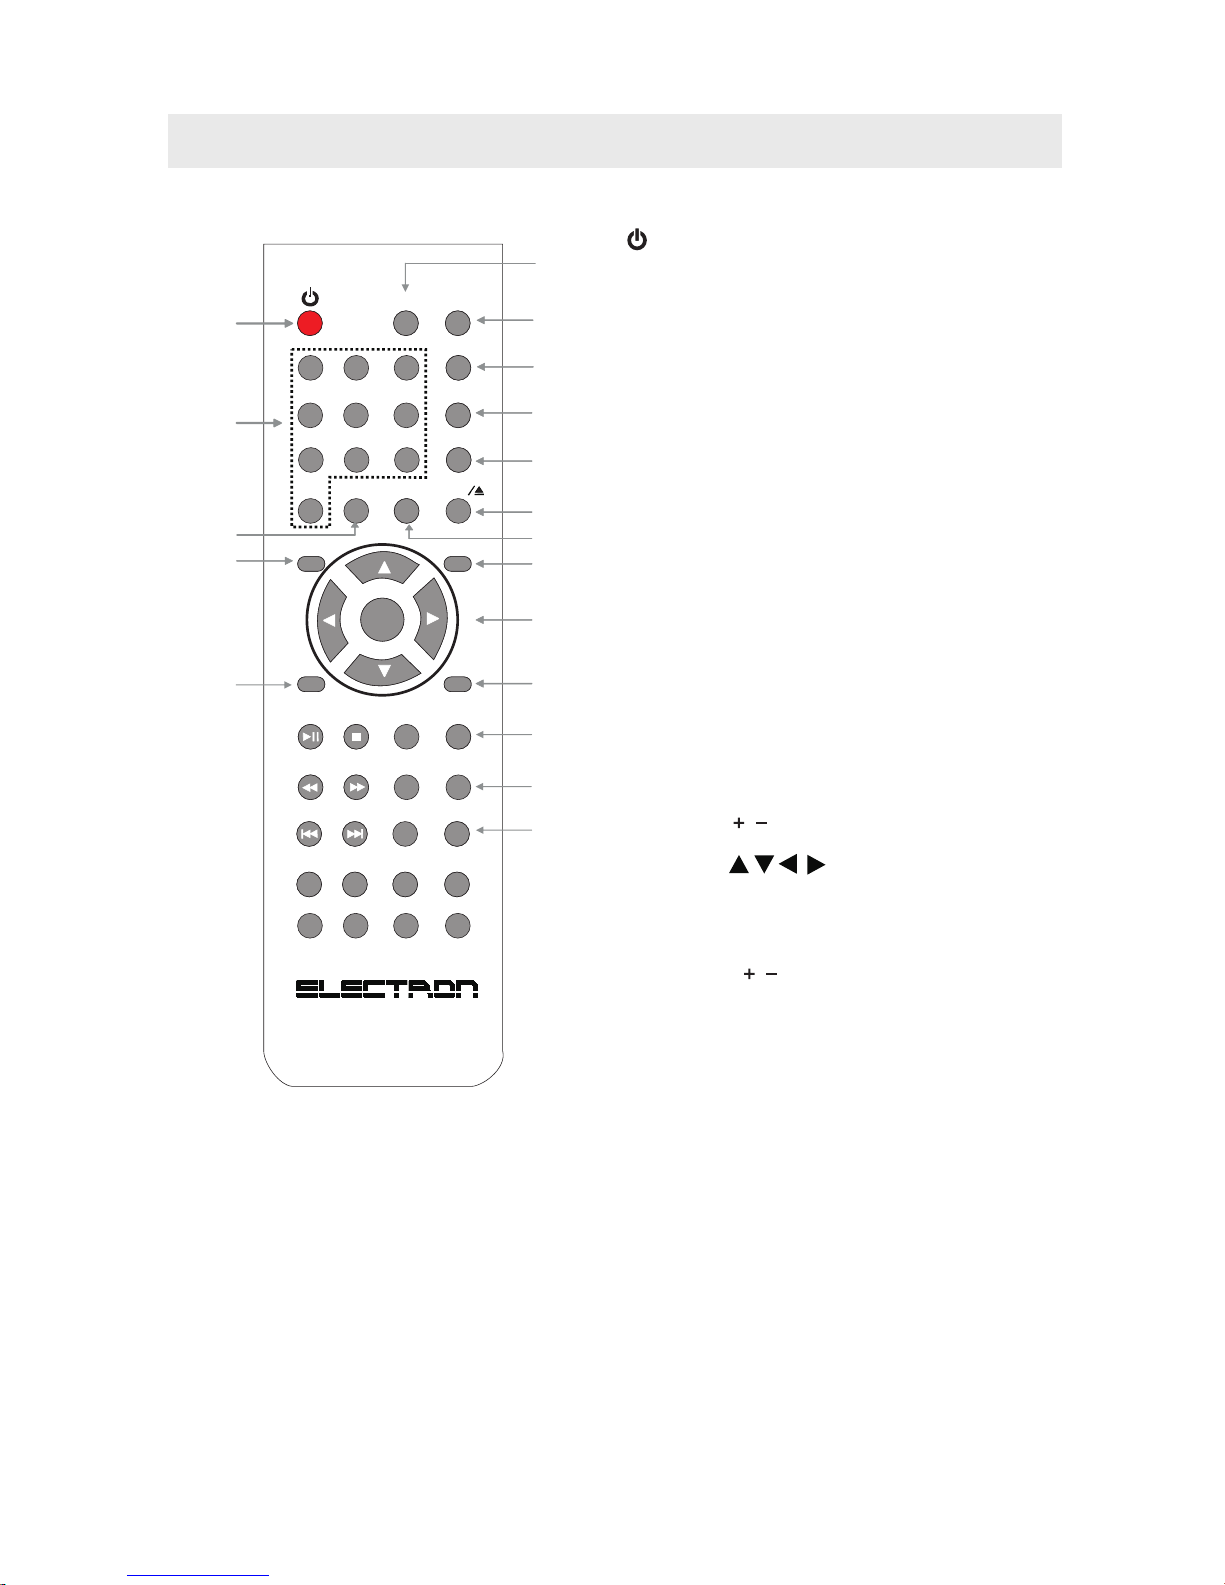
CONTROL REFERENCE GUIDE
1
4
11
5
11
10
15
12
13
6
13
16
14
3
9
2
7
8
TV FUNCTION BUTTONS
1.
Press to turn O N th e un it or put it in STANDBY (OFF)
mode.
2. Display Button
Press to Displa y th e source and channel informatio n.
3. T V / AV Butt on
Press to switch the source input.
4. Number (0 - 9) Buttons
Press to select S el ec t specific channels.
5. RECALL Button
Press to switch repeatedly betwe en the last two
channels displayed.
6. MUTE Button
Press to turn t he s ound on / off.
7. P. MOD E Button
Press to select f rom preset scre en d isplay settings to
match the type of show you are watching.
8. S. MODE Button
Press to select f rom preset sound settin gs to
match the type of show you are watching.
9. SLEEP Button
Press to set the SL EE P timer.
The unit will remain on for t he t ime that is set,
and will automatically sh ut off after ward s.
10. MTS (Multi Channel Television Sound) Button
Press to select b et ween MONO sound,
STEREO sound and Secondary Audio Program (SAP).
11. VOLUME ( / ) Button s
Press to adjust t he volume level.
12. CURSOR ( , , , ) Buttons
Press to highli gh t selections on a menu screen and
adjust cer ta in settings.
ENTER Button
Press to confir m se lections on a menu screen.
13. CHANNEL ( / ) Buttons
Press to change t he T V channels.
14. MENU Button
Press to displa y th e on-screen TV menu.
15. EX IT Button
Press to exit the T V SETUP menu and return directly
to normal viewing.
16. CCD But to n
Press to activate the Closed Captionin g fe ature.
This function only works on programs broad ca sted
with captions.
STANDBY / ON Button
4
REMOTE CONTROL
Page 8

CONTROL REFERENCE GUIDE
MU T E
A- BRE PEAT
LAN G
0
EN T ER
VO L +
VO L -
CH +
CH -
MU T E
DI S PL AY
1 2 3
4
7
0
5
6
8
9
FA V +
SM O DE
PM O DE
SL EE P
ME NULA N G SU B .
FA V -
??
TV / AV
EP G
ANGL E
AUDI O
ZOOM
A- B
INT ROPRO G
D.M ENU
TIT LE
D.D ISP
GOT O
D.SE TUP
0
EN T ER
VO L+
VO L-
CH +
CH -
MU TE
DI SP LA Y
1 2 3
4
7
0
5
6
8
9
CCD
RE CA LL/ -/ --
S. MO DE
P. MO DE
TV /A V
SLO W
ZOO M
PR OG
SUB TITLE
TIT LE
D.D ISP
GOT O
D.S ETUP
EX IT
MTS
ANG LE
3
9
2
7
8
28
18
36
31
32
25
27
35
19
20
34
33
30
29
24
23
22
21
17
26
DVD FUNCTION BUTTONS
17. - / – Button
Press to ente r the title, chapter and track select io n.
18. Button
Press to eject a di sc.
19. Button
Press to start and resume playback of a disc.
Button
Press to pause playback and single frame a dvance on
DVDs
20. Button
Press to stop playing a disc. Press it twice, th e un it's
memory will be cleared.
21. Button
Press to Fast reve rse pl ay back .
22. Button
Press to Fast for wa rd playback.
23. PREV Button
Press to select t he p revious title, chapter or t ra ck on
a disc.
24. NE XT Butto n
Press to select t he n ext title, chapter or track on a disc
25. ANGLE Button
Press to switch the camera angle of th e vi de o
presentation
when scenes with multiple camera an gl es are
recorded on a D VD
26. SLOW Butt on
Press to perform slow forward playback of a DVD.
27. DVD SETUP Button
Press to ente r and exit the SETUP menu of the DVD.
28. ZOOM Button
Press to zoom in or z oom out a image.
29. PROGRAM Button
Press to ente r into the favorite list to program the
contents in a disc.
30. LA NG UAGE Button
Press to select o ne of the sound languages
programmed on a DVD.
31. REPEAT Button
Press to repeat a chapter or title of a DVD.
Press to repeat a single track or whole CD.
32. A-B Button
Press to perform point-to-point repeat playba ck on
a DVD or CD.
33. SUBTITL E Bu tton
Press to select o ne of the subtitle languages
programmed on a DVD.
34. TITLE Button
Press to show tit le m enu.
35. DVD DISPLAY Button
Press to change d is c status information displayed
on the screen.
36. GOTO Butto n
Press to skip directly to a specific locatio n on a
DVD/CD.
5
REMOTE CONTROL
Page 9
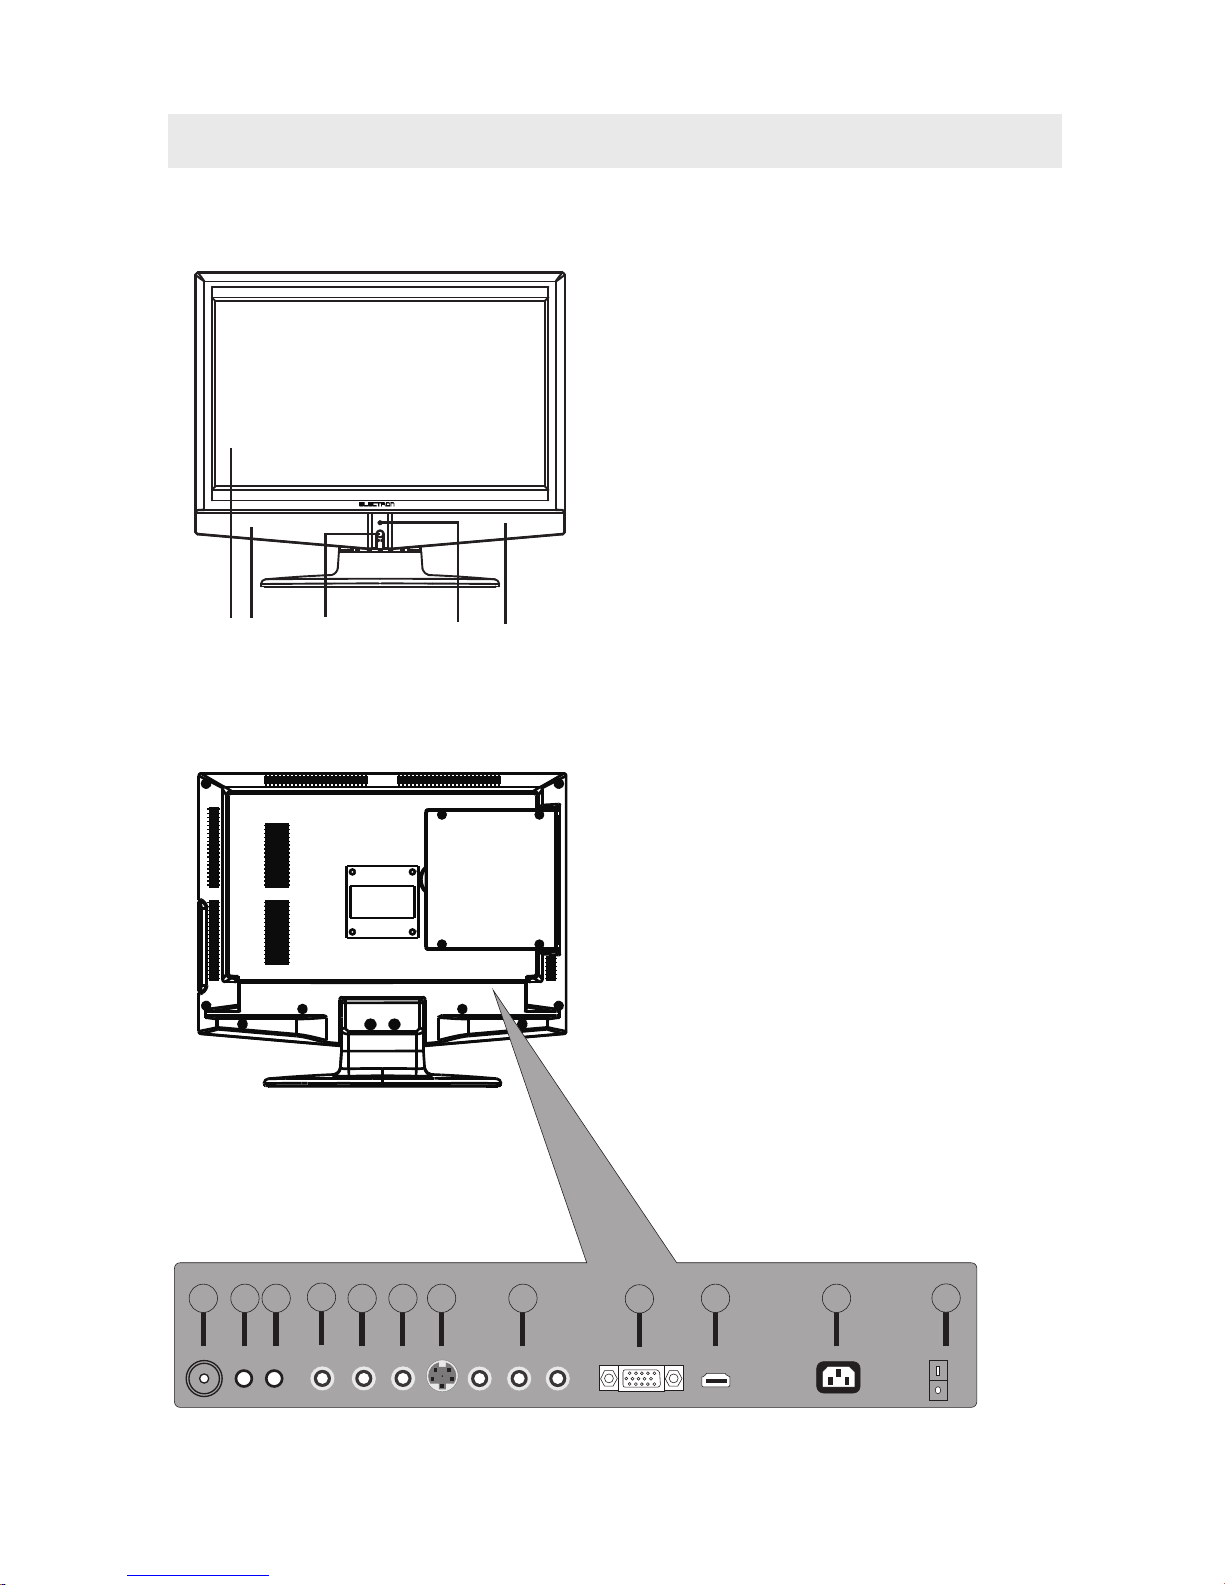
CONTROL REFERENCE GUIDE
1. Color LCD Screen
2. Remote Sensor
Do not block this sensor or the
remote control will not work.
3. Standby Indicator
Indicates whether the unit is ON
or in STANDBY (OFF) mode.
Light in red: The unit is in STANDBY.
Light in green: The unit is turned ON.
4. Speakers
BACK VIEW
31 424
FRONT VIEW
1. TV ANTENNA Terminal
2. HEADPHONE Jack
3. PC AUDIO IN Jack
4. AUDIO IN Jack (LEFT)
5. AUDIO IN Jack (RIGHT)
6. VIDEO IN Jack
7. S-VIDEO Jack
8. Y / PB / PR Jacks
9. VGA IN Jack
10. HDMI IN Jack
11. AC IN (120V)
12. POWER SWITCH
ON
OFF
1
5
6
7
8
4
10
9
11
12
2
3
6
Page 10
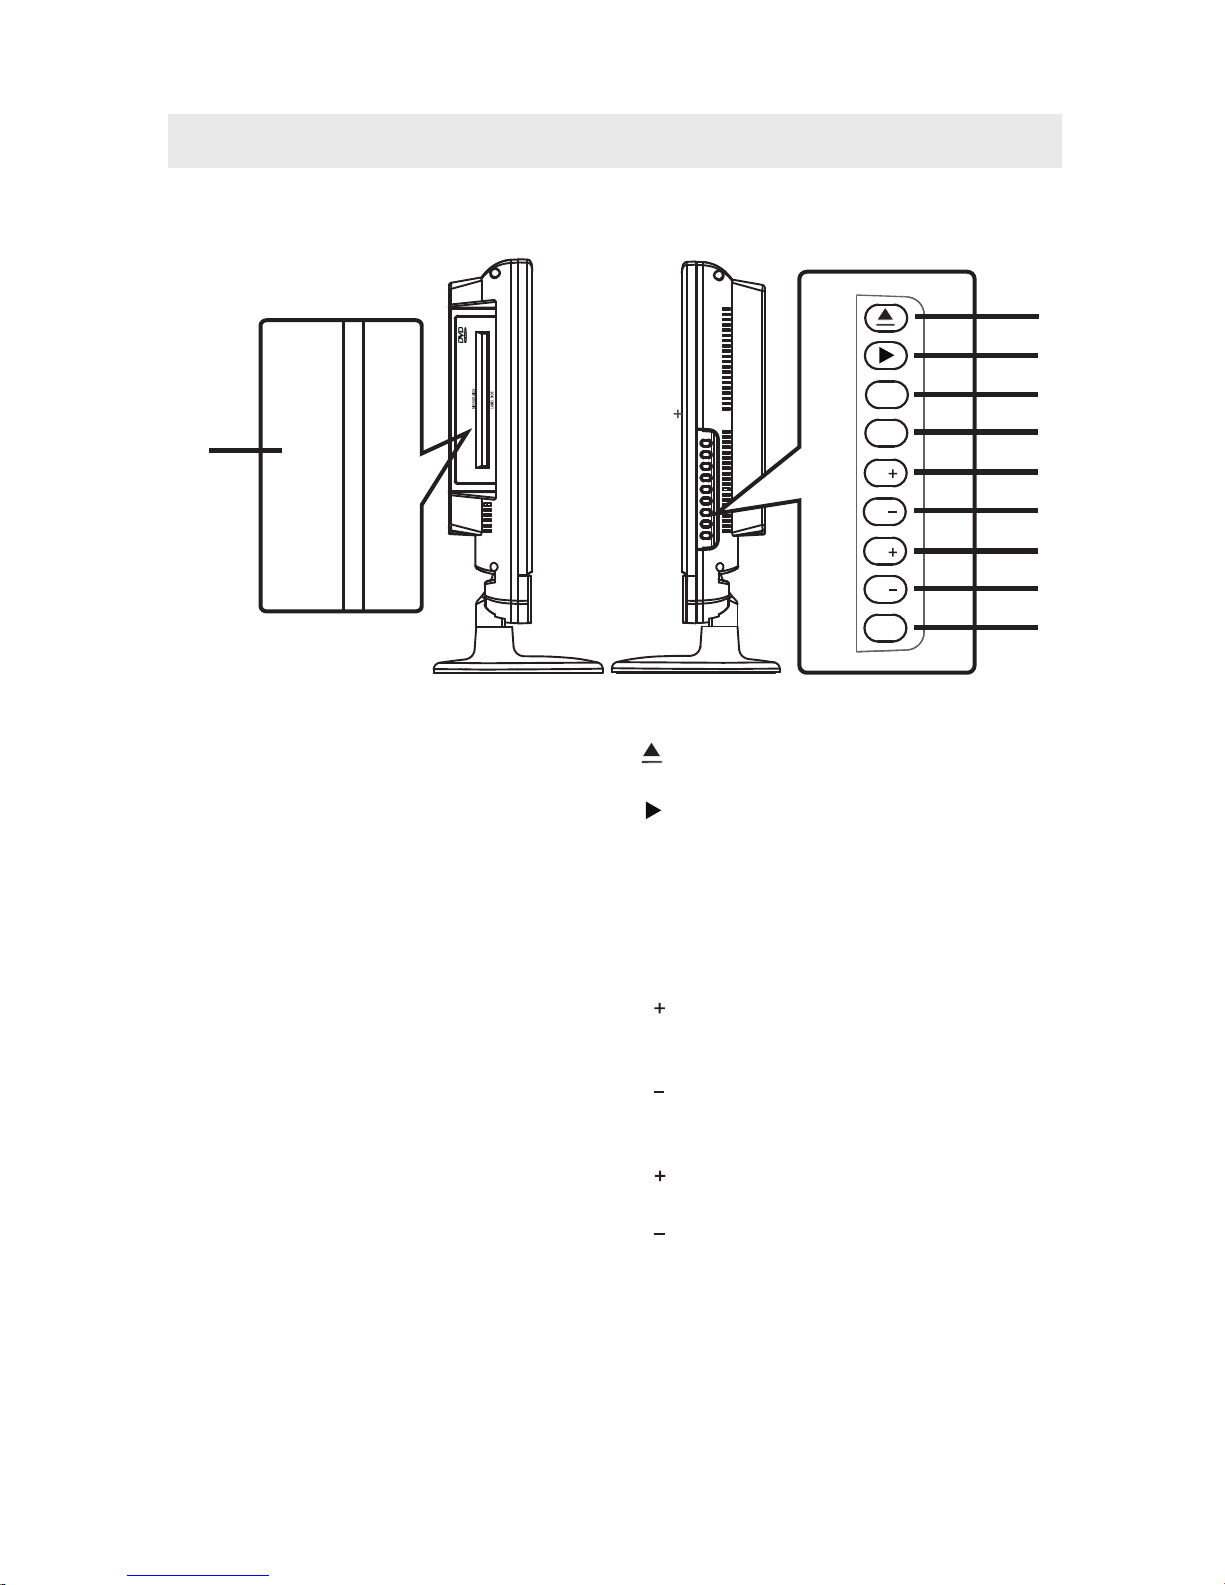
1
1. Disc Door
Inser t discs to disc door
Note: When inserting a disc, please
take note of the indication of direction
around the disc door for operation.
(right direction: put the label side of
the disc against yourself )
.
SIDE VIEW
CONTROL REFERENCE GUIDE
TV/ AV
Menu
P
P
V
V
Power
1
2
3
4
5
6
7
8
9
1. Button
Press to eject a disc.
2. Button
Press to start or resume playback of a disc.
3. T V / AV Button
Select ATV, AV, S-VIDEO, YPbPr, HDMI,
PC, or DVD.
4. Menu Button
Press to display the on-screen TV menu.
5. P Button
Press to change the TV channels and up
highlight selections on the menu screen.
6. P Button
Press to change the TV channels and down
highlight selections on the menu screen.
7. V Button
Press to adjust the volume up.
8. V Button
Press to adjust the volume down.
9. Power Button
Press to turn the unit on and off.
MIRROR SIDE
LABEL SIDE
7
Page 11
CONNECTIONS
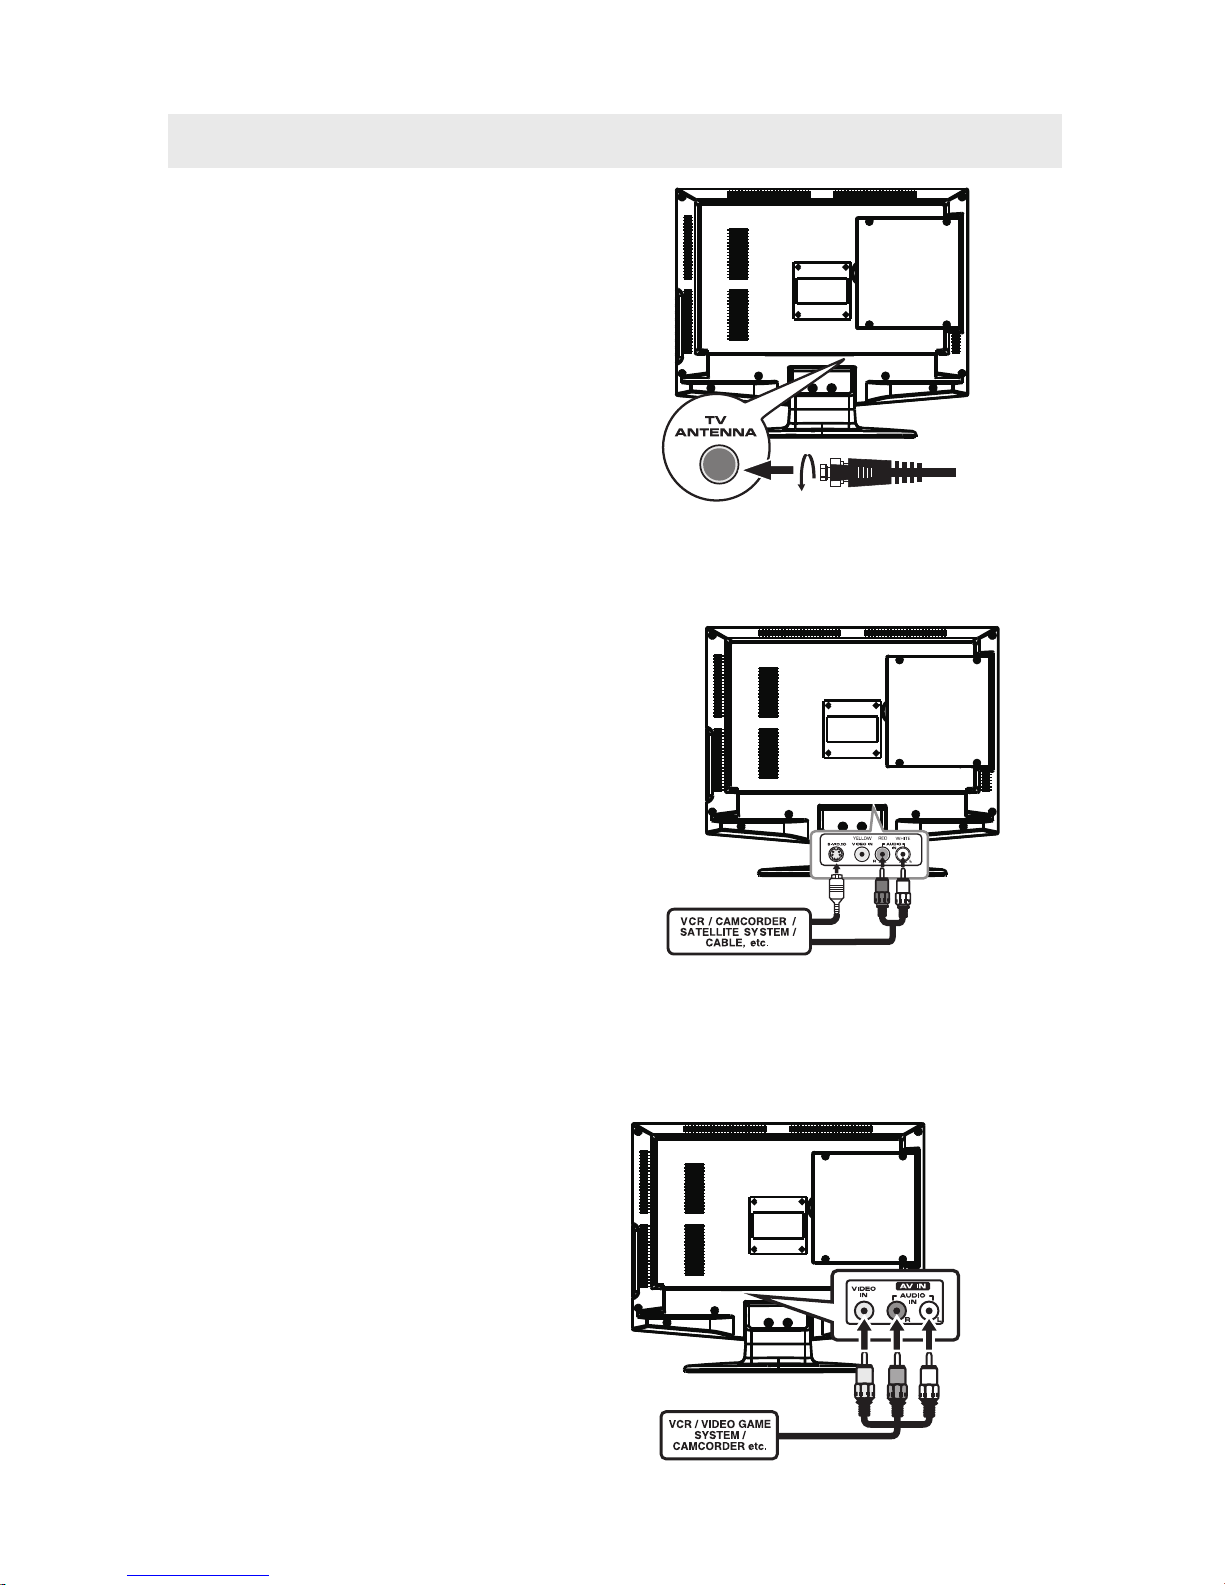
CONNECTING A TV ANTENNA / CABLE / SATELLITE
To view television channels correctly, a signal must
be received from one of the following sources:
- An indoor or outdoor ae ri al antenna
- A cable system
- A satellite syste m
For receiving ove r-the-air T V broadcasts, we
recommend that yo u us e an external fixed anten na .
Should you require the use of a tempor ar y antenna,
please ensure that yo u purchase an antenna with
sufficient ability to receive in weak signal are as.
Only when you are in cl os e proximity to a tr an sm itter
will a temporary a ntenna reprod uc e a signal as
strongly as a fixed a ntenna.
CONNECTING AN A/V DEVICE
To connect to other equipment such as a VCR, camcorder, satellite system or cable, etc.
NOT E
Connecting to a VCR / C am co rder /
Satellite System / Cable
Connect the AUDIO and S -V IDEO cable
(not included) as shown.
Make sure you connect the cable from the o th er
equipment (AUDIO OU T an d S-VIDEO OUT) to
this unit (AUDIO IN and S -V IDEO IN).
NOT E
Please refer to t he u se r manual for the other
equipment for more info rmation.
CONNECTING DEVICES WITH A COMPOSITE (YELLOW RC A-TYPE)
VIDEO OUTPUT
To connect A/V devices such as a VCR, video game system or camcorder.
Connecting to a VCR / V id eo Game System / Camcorde r
Connect the AUDIO / VID EO c able (not included) as shown.
Make sure you connect the cable from the o th er equipment (AUDIO and VIDEO OUT ) to this unit
(AUDIO and VIDEO IN).
NOT E
Please refer to t he u se r manual
for the other equipment for
more information.
Satellite, cable or T V antenna
cable to TV ANTENNA
terminal (cable not inclu de d)
To AUDI O / VID EO
IN ja cks (AV IN )
To AUDI O / VID EO
OUT j acks
To S-VI DEO OUT / A UDI O OUT j ack s
To AUDI O IN
jac ks (AV IN)
8
To S-VI DIO IN
jac ks (AV IN)
Page 12
CONNECTIONS
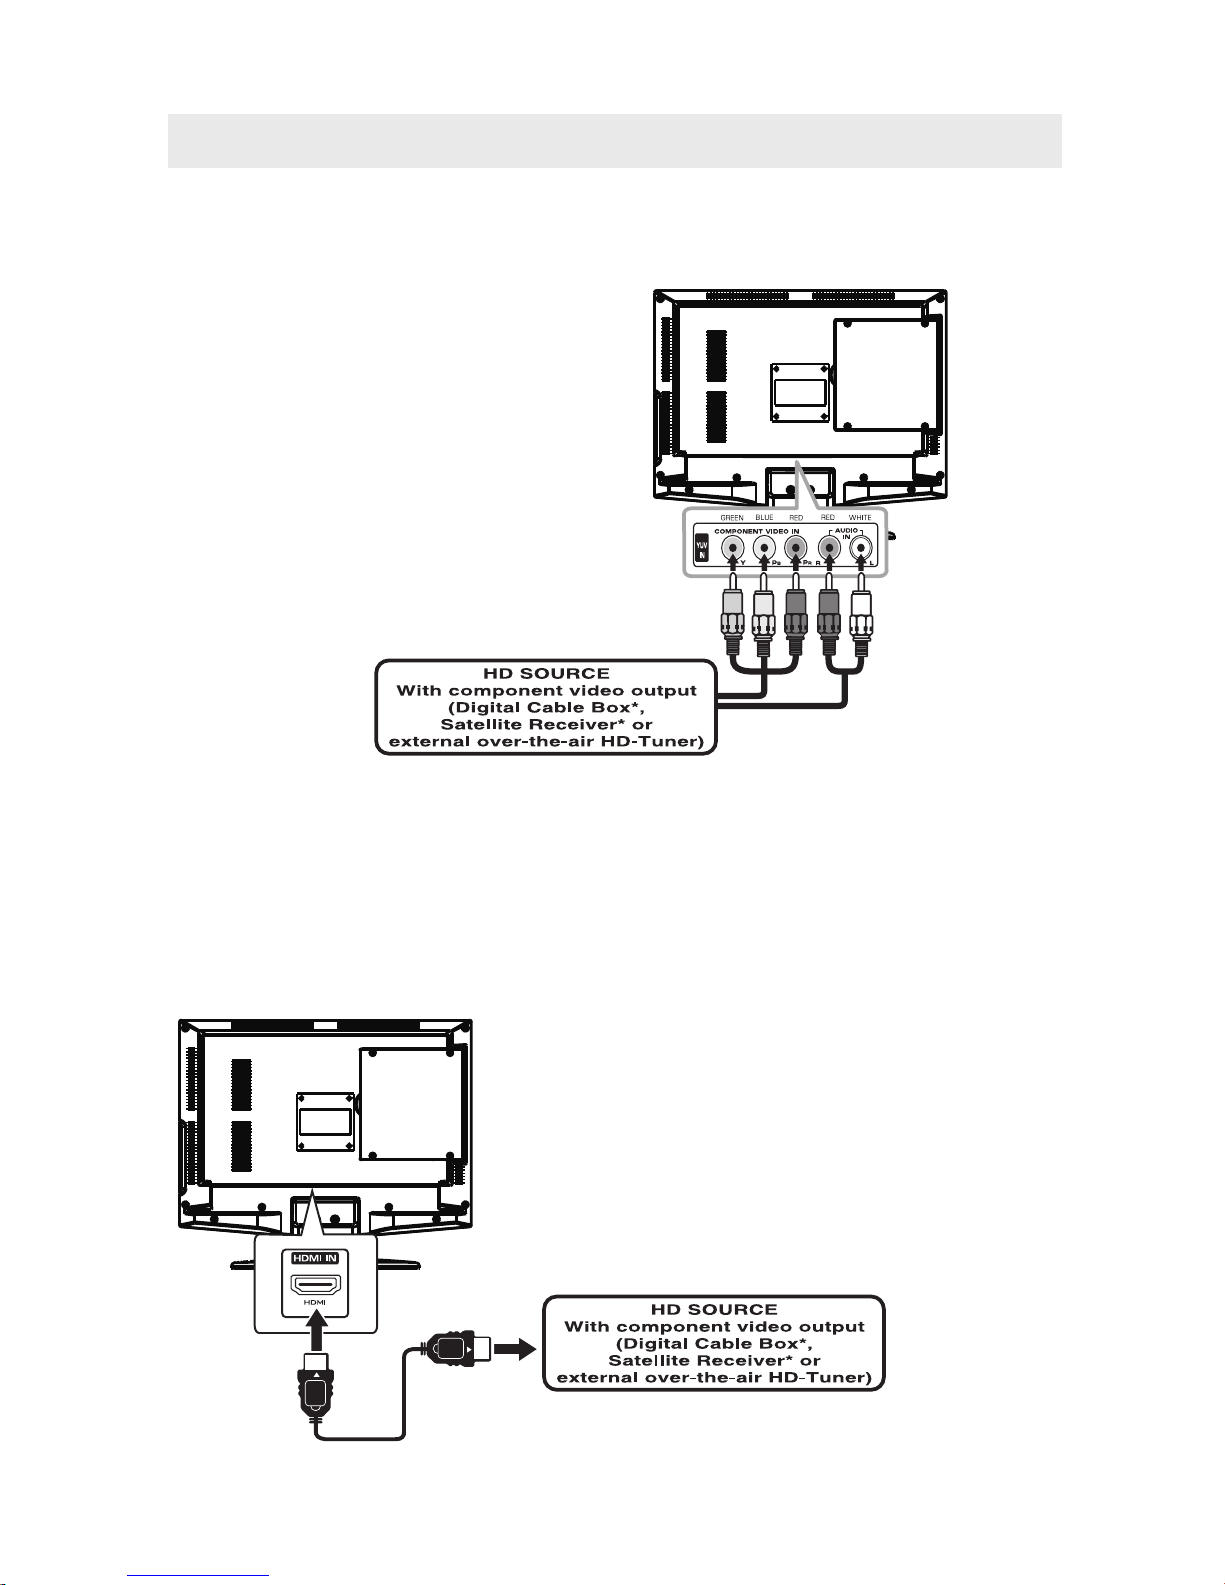
CONNECTING A HIGH-DEFINIT IO N (H D) SOURCE USING Y Pb Pr CONNECTION
High-Definition (HD) Device s wi th component video output must be connected to the YPbPr input.
Connect the component video cab le a nd audio cable (not included) as shown.
Make sure you connect the component video cable an d au dio cable from the other equipmen t
(Y Pb Pr OUT and AUDIO OUT) to this unit (Y Pb Pr IN and AUDIO IN).
NOT E
When connecting a DVD player to the television,
the picture res olution is solely dependent upon
the resolution suppor ted by the DVD playe r attached.
DVD player resolu ti on s vary from 480i to 1080i,
and this television can sup po rt DVD players up to
a maximum resolution of 1080i.
* May require a subscription
for receiving HD channels,
check with your cable/satel lite
service provider f or d et ails.
To COMPONENT
VIDEO OUT jacks
CONNECTING A HIGH-DEFINIT IO N (H D) SOURCE USING HDMI CONNECTION
HDMI (High Definition Multimedi a In terf ac e) supports both vid eo a nd audio on a single digital connection
for use with DVD players, DTV, se t-top boxes and othe r di gital AV devices. HDMI was developed to provide
the technologies of High Bandwidth Digital Conte nt P rotection (HDCP) as wel l as Digital Visual Interface
(DVI) in one specification. HDC P is u se d to protect digita l content transmitted and received by
DVI-compliant or HDMIcompli an t displays.
HDMI has the capabili ty to suppor t stan da rd, enhanced or high-definiti on v ideo plus standard to
multi-channel surro un d-sound audio. HDMI features in cl ude uncompressed digital vide o, a bandwidth of
up to 2.2 gigabytes per s ec ond (with HDT V signals) , on e connector (instead of several cables and
connectors), and communicat io n between the AV source and AV de vi ces such as DTVs.
To HDMI
IN jack
To HDMI
OUT jack
To COMPONENT
VIDEO IN jacks
(YPbPr IN)
To AUDIO
IN jacks
(YPbPR IN)
To AUDIO
OUT jacks
Connect the HDMI cable (not inclu de d) as
shown:
Make sure you connect the cable from the
source equipment (HDM I OU T) to this unit
(HDMI IN).
HDMI CABLE
(NOT INC LUD ED)
9
Page 13

CONNECTIONS
CONNECTING A PC
Connect the 15-pin D-SUB PC/VGA connector
from your computer to the 15-pin D-SUB PC/VGA
input on this unit using a monito r cable and an
audio cable (not included) as sho wn .
Make sure you connect the cable from the c om puter
(VGA and AUDIO - PC OUT) to this unit
(VGA and AUDIO - PC IN).
CONNECTING THE POWER CO RD
You ca n po wer your T V un it by plugging the detachable AC po wer cord into the AC socket on the bac k of
the unit and into a wall AC power outlet. Check that the rated voltage of your unit m atches your local
voltage. Make s ure that the AC power c ord is fully inserted into the unit.
CAUTION: (for North America)
TO PREVENT ELEC TRIC SHOCK ,
MATCH WIDE BLADE OF PLUG TO
WIDE SLOT OF WALL OUTLET, THEN
FULLY INSERT.
TO PC Connector
TO AUDIO OUT jacks
NOT E
• Be sure the AC po wer cord is disconnecte d and
all functions are off before making connec ti ons.
• Make sure that all the components are
connected corre ctly.
• To prevent electrical sho ck , match wide blade of
plug to wide slot of wall outlet, then fully insert.
• When you are not goin g to use the unit for a
long period of time , di sconnect the power cord.
• The apparatus shall n ot b e exposed to dripping
or splashing and that no objects fi ll ed with
liquids, such as va se s, shall be placed on apparatus .
• Mains plug is used as the disconnec t de vice. It shall remain rea di ly operable and should not be
obstructed during intended use. To be completely disconnecte d the apparatus from su pp ly mains,
the mains plug of the a pparatus shall be disconnecte d from the mains socket outlet completely.
To AC wall outlet
• Turn d ow n the volume before
connecting headphones to
the unit, then adjust the
volume to your desi red level.
• When headphones are
connected, no sound will co me
from the fron t speakers.
NOT E
Avoidin g li stening to sound at high
levels for prolon ge d period of time.
This may be harmful to yo u an d may
cause hearing loss.
CONNECTING HEADPHONES
Headphones
(1/8"[ 3.5mm ]diameter pl ug )
NOT INCLUDE D
10
Page 14

WALL MOUNT INSTALLATION
INSTALLING / REMOVING THE BASE STAND
WARNI NG : Th e LCD Display is ve ry fragile, and must be protected at all times when removing the base
stand.
Be sure that no hard or sharp object, or anything that could scr atch or damage the LCD display, comes into
contact with it. Do NOT exert pressure o n the front of the unit a t an y time because the screen could cra ck .
1. Disconnect all cables or cords connected to the unit.
2. Lay the unit down on a flat surface with the back side facing up. Please make sure to place a soft
cushioned material (suc h as a pillow or thick piece of foam) beneath the screen.
3. To remove the ba se stand, loosen screws off the holes then pull downward s to release
the base stand.
4. To install the base stand, put t he stand into the hole at the botto m of the TV then inser t screws to the
holes and tighten.
MOUNTING ON THE WALL
NOT E
Remove the base stand before mou nt ing the unit on the wall.
This unit is VESA-compliant, an d is d esigned to be wall-mounted with a V ESA-compliant 3” x 3”
(75mm x 75mm) mounting kit design ed f or flat-panel TVs (not sup plied). Mount this unit according to
the instructions included in th e mo unting kit.
3”
3”
11
Page 15

INITIAL SETUP
When you turn on your television set for
the first time, be sure to place it on a solid
stable surface.
To avoid danger, do not expose the TV
to water, or a heat source
(e.g. lamp, candle, radiator).
Do not obstruct the ventilation grid
at the rear and be sure to leave sufficient
gaps around the unit.
PUTTING THE UNIT ON A PROPER PL ACE
SOURCE SELECTION
1. Press the TV /AV button on the remote control.
2.
TV, AV, S-Video, Y Pb Pr, HDMI, PC, DVD)
and select any of them using the button or
the ENTER button.
ource
NOTE:
Before watching please make sure all necessary
cables and devices are connected.
Use the or button to select the options
(A
(The screen will change to your desired s ).
ATV
AV
S-Video
YPBPR
HDMI
PC
SOURCE
DVD
12
Page 16

TV SETUP
PICTURE MENU
1. Press the MENU button.
2. Use or button to sel ec t the PICTURE menu,then press button to en ter the setting.
3. Use or button to sel ec t the options (Picture Mode, Br ig htness, Contrast, Saturation, Sharpne ss , Hue,
Color Temp) and adjust them using the or bu ttons. (The screen will chang e to your desired setting).
4. Press the MENU button to return to previous menu, repeat ste p 2 to adjust other settings.
5. To exit the MAIN MENU and return to the normal screen, press the EX IT b utton on remote con trol.
In ATV / AV/ S-Video mode
Brightness : Adjust to brighten the darkest pa rts of
the picture.
.
Saturation : Adjust the color of the picture.
.
Hue: Adjust the tint of the picture.
(Towa rd purple / To war d gre en)
In Y Pb Pr / HDMI mode
Brightness : Adjust to brighten the darkest pa rts of
the picture.
.
Saturation : Adjust the color of the picture.
Picture Mode : Select fro m preset screen display
settings to match t he type of show you are watching.
(Stan da rd, User, Soft & Vivid)
(Select User mode to recall your customed settings
on contrast, brightness, satu ration, sharpness & hue.)
Note : You c an also select simply by pressing t he
P.MODE button.
BRI GHTNE SS
50
CON TRAST
50
SATU RATIO N
50
Contrast : Adjust to sharpe n th e pi cture quality.
The black port ions of the picture b ecome richer in
darkness and the white beco me b righter.
Sharpness : Adjust the sharpness le vel to improve
detail in the picture .
Color Temp : Adjust the three color tem pe rature of
the picture. Select Standard ( balanced) / Warm
(red white) mod e / Co ld (blue white).
5
SHA RPNES S
HUE
50
Picture Mode : Select fro m preset screen display
settings to match t he type of show you are watching
(Stan da rd, User, Soft & Vivid).
(Select User mode to recall your customed settings
on contrast, brightness, satu ration, sharpness & tint.)
Note : You c an also select simply by pressing t he
P.MODE button.
BRI GHTNE SS
50
Contrast : Adjust to sharpe n th e pi cture quality.
The black port ions of the picture b ecome richer in
darkness and the white beco me b righter.
Sharpness : Adjust the sharpness le vel to improve
detail in the picture .
CON TRAST
50
Color Temp : Adjust the three color tem pe rature of the pictu re. Select Standard (balanced) / Warm
(red white) mod e / Co ld (blue white).
5
SHA RPNES S
SATU RATIO N
50
FE
R
EN
PICTURE
PICTURE MODE
BRIGHTNESS 50
CONTRAST 50
SATURATION 50
SHARPNESS 5
HUE 50
COLOR TEMP
USER
MOVE ADJUST
BACK
NORMAL
MENU
FE
R
EN
PICTURE
PICTURE MODE
BRIGHTNESS 50
CONTRAST 50
SATURATION 50
SHARPNESS 5
COLOR TEMP
USER
MOVE ADJUST
BACK
NORMAL
MENU
HUE 50
13
Page 17

TV SETUP
PICTURE MENU
In PC mode
Brightness : Adjust to brighten the darkest pa rts of
the picture.
Color temp : Adjust the three color temperature of the picture. Select stan dard (balanced) / Warm
(red white) / Col d (b lue white) mode
- Resolution : 13 66 x 768 max
- Refresh F requency : 60Hz max.
Picture Mode : Select fro m preset screen displ ay
settings to match t he type of show you are watching
(Stan da rd, User, Soft & Vivid)
(Select User mode to recall your customed settings
on contrast, brightness, satu ration, sharpness & hue.)
Note : You c an also select simply by pressing t he
P.MODE button.
Contrast : Adjust to sharpe n th e picture quality.
The black portions of the picture b ecome richer in
darkness and the white be co me b righter.
BRI GHTNE SS
50
CON TRAST
50
SOUND MENU
1. Press the MENU button.
2. Use or button to sel ec t the SOUND menu, then press the button to enter the setting.
3. Use or button to sel ec t the options (Sound Mode, Bass, Treble, AVL) and adjust th em u si ng
the or buttons.
4. Press the MENU button to return to previous menu, repeat ste p 2 to adjust other settings.
5. To exit the MAIN MENU and return to the normal screen, press the EX IT b utton on remote con trol.
Experiment with different sound setti ng s un til you find the settings you pre fe r.
In all source modes
Balance,
Sound Mode : Select from preset sound settings
to match the ty pe of show you are wa tching.
(Stan da rd, User, Movi e, M usic, Speech)
(Select User mode to recall your customed setting
on bass, treb le.)
Note :You can also select simply by pressin g th e
S. MODE button.
Bass : Adjust the bass ra ng e.
BAS S
50
Treble : Adjus t th e treble range.
Balance : Adjust the ba la nc e level toward the
left o r right speakers.
AVL : Adjust on/off of Auto Volume Level er.
BAL ANCE
0
TRE BLE
50
SOUND
USER
MOVE ADJUST
BACK
MENU
SOUND MODE
BASS 50
TREBLE 50
BALANCE 0
AVL
OFF
SOUND
USER
MOVE ADJUST
BACK
MENU
SOUND MODE
BASS 50
TREBLE 50
BALANCE 0
AVL
OFF
SOUND
USER
MOVE ADJUST
BACK
MENU
SOUND MODE
BASS 50
TREBLE 50
BALANCE 0
AVL
OFF
R
EN
PICTURE
PICTURE MODE
BRIGHTNESS 50
CONTRAST 50
SATURATION 50
SHARPNESS 5
HUE 50
COLOR TEMP
USER
MOVE ADJUST
BACK
NORMAL
MENU
14
Page 18

FUNCTION MENU
1. Press the MENU button.
2. Use the or button to s el ect the FUNCTION menu, then press the b ut ton to enter the setting.
3. Use the or button to s el ect the options (Language, Aspect Ratio , OS D Duration, Blue Screen,
CCD Mode, V- Chip, Reset ) and adjus t th em using the or buttons.
4. Press the MENU button to return to previous menu, repeat ste p 2 to adjust other settings.
5. To exit the MAIN MENU and return to the normal screen, press the EX IT b utton on the remote c on trol.
In ATV / AV / S-Video mode
V-Chip : Press the button, then input the 4-digit pass word to enter Child Loc k setup.
(Initial password is 0000.) (Ref er to the next page Parental for detai ls .)
Reset : Reset t he T V / AV/ S-Video / Y P b Pr / HDMI / PC mode to the factory settings.
In Y PbPr / HDMI mode
Language : Select the language yo ur p refer.
(English / Italiano / Spa nish / Portuguese /
Francais / Deutsch)
Aspect Ratio : Select the screen ration your prefer
for watching(Full , 4: 3, Zoom).
OSD Duration :
: 5 Seconds,10Seconds,
30Seconds,60Seconds, Never.
Blue Screen : Select to swi tch on/off of
blue background.
Reset : Reset t he T V / AV/ S-Video / Y P b Pr / HDMI
mode to the factory settings.
In PC mode
Language : Select the language yo ur p refer.
(English / Italiano / Spa nish / Portuguese /
Francais / Deutsch)
OSD Duration :
: 5 Seconds,10Seconds,
30Seconds,60Seconds, Never.
Reset : Reset t he T V / AV/ S-Video / Y P b Pr / HDMI /
mode to the factory settings.
.
Select the le ng th of time for the On
screen menu i s di splayed
/
PC
Select the le ng th of time for the On
screen menu i s di splayed
PC
Language : Select the language yo ur p refer.
(English / Italiano / Spa nish / Portuguese /
Francais / Deutsch)
Aspect Ratio : Select the screen ration your prefer
for watching(Full , 4: 3, Zoom).
OSD Duration :
: 5 Seconds,10Seconds,
30Seconds,60Seconds, Never.
Blue Screen : Select to swi tch on/off of
blue background.
CC Mode : Sel ec t the mode of Closed Caption
Display: t
Select the le ng th of time for the On
screen menu i s di splayed
OFF, CC1, CC2,CC3, CC4 , TT1, TT2, TT3, T 4.
TV SETUP
FUNCTION
ENGLISH
MOVE ADJUST
BACK
LANGUAGE
ASPECT RATIO
CC MODE
OSD DURATION
BLUE SCREEN
V-CHIP
RESET
FULL
OFF
60 SECONDS
OFF
MENU
FUNCTION
ENGLISH
MOVE ADJUST
BACK
LANGUAGE
ASPECT RATIO
OSD DURATION
BLUE SCREEN
V-CHIP
RESET
FULL
OFF
60 SECONDS
MENU
FUNCTION
ENGLISH
MOVE ADJUST
BACK
LANGUAGE
ASPECT RATIO
OSD DURATION
BLUE SCREEN
V-CHIP
RESET
FULL
OFF
60 SECONDS
MENU
15
Page 19

TV Rating :
ENTER
Set U.S. TV ratings.
(Use the button , , , to hi ghlight a rating level,
press the button to change Lock or Unlock.)
V-Chip
In V-Chip menu, press the b utton and input the 4-digit password to enter de ta iled setting and use
the or button to adju st t he setting.(New Password, TV Rating, MPAA, CAN ENGLISH, AN RANCE)
New Password :
MPAA :
C F
To change the password, input a
new 4-digit password two times.
(Remember your password!)
Set U.S. Movie (MPAA ) ratings.
CAN ENGLISH :
AN RANCE
Set Canadian English ratings.
C F : Set Canadian French rat in gs.
TV SETUP
Reset
NOT E
If you reset the TV to the factor y settings, all your present settings on PICTURE & AU DI O will be erased
and replaced by the fac tory's def au lt settings
CHANGE CODE
NUM BERMOV E
BAC K
MEN U
0~9
ENT ER NEW PAS SWO RD
ENT ER PASSW ORD AG AIN
FUNCTION
MOV E ADJ UST
BAC K
NEW PA SSW ORD
TV RAT ING
MPAA
CAN E NGLIS H
CAN F RANCE
OFF
OFF
E
E
MEN U
FUNCTION
NUM BER
BAC K
MEN U
ENT ER PASSW ORD
0 - 9
FUNCTION
MOVE
ENTER
BACK
MENU
NO
YES
FUNCTION
MOV E ENT ER BA CK
MEN U
FV
-
B
-
-
-
-
RATI NG
TV-Y
TV-Y 7
TV-G
TV-P G
TV-1 4
TV-M A
STATU S
BLO CK
BLO CK
BLO CK
BLO CK
BLO CK
BLO CK
V
-
-
-
B
B
B
S
-
-
-
B
B
B
L
-
-
-
B
B
B
D
-
-
-
B
B
-
16
Page 20

TV SETUP
Canadian English Ratings
Ra ting
De fined as
G
PG
PG -1 3
R
NC -1 7
X
GE NE RA L AUDIENCE S, S ui ta bl e for all ages.
PARENTAL GUIDANCE SUGGESTED
- So me m at er ia l ma y no t be sui ta bl e for children.
PARENTS STRONGLY CAU TI ON ED
- So me m at er ia l ma y be inappropriate for children under 13.
RE ST RI CT ED, Under 17 requires accompanying pare nt
or a du lt g ua rd ia n for viewing in movie theaters.
No o ne 1 7 or u nd er a dm itted in movie theater.
Ad ul t au dience only.
NONE
No t rated.
Age
Defined as
TV -Y
TV -Y 7
TV -G
TV -P G
TV -1 4
TV -M A
Recommende d for al l ch il dr en .
Ge ne ral Audi en ce .
Parental Guidance Su gg es te d.
Parental Strongly Cautione d.
Ma tu re Aud ie nc e on ly.
Contents
FV
D
L
S
V
Fan tasy Violence
Su gg es ti ve D ia lo gue
St ro ng L an gu ag e
Se xu al S it uations
Vi ol en ce
Di re ct ed t o ol de r ch il dren.
Defined as
Ch ildren.
Reco mmended for children age 8 an d older.
GE NERAL AUD IENCE S, Suitable for all ages
Description
C
G
PG
14
Rating
PARENTAL GUIDANCE SUG GESTED
- So me material may no t be suitab le for children.
Vi ewers 14 ye ars and older
Exem pt.
E
C8 +
18
Ad ult Program ming.
U.S. TV Ratings
U.S. MPAA Ratings
GE NERAL AUD IENCES, S uitab le for all ag es.
No t recomme nded for young child ren.
No t suitable for children und er the age of 13.
Description
G
13 ans+
16 ans+
18 ans+
Rating
No t suitable for children und er the age of 16.
Ad ult Program ming.
Exem pt.
E
8 ans+
Canadian French Ratings
17
Page 21

ATV MENU
1. Press the MENU button.
2. Use the or button to s el ect the TV menu, then press the button to enter the setting.
3. Use the or button to s el ect the options (Channel, Searc h Type, Auto Search, Color System,
Sound System, Fine Tune, Skip) an d adjust them using the or buttons.
4. Press the MENU button to return to previous menu, repeat ste p 2 to adjust other settings.
5. To exit the MAIN MENU and return to the normal screen, press the EX IT b utton on the remote c on trol.
In ATV mode
Channel : Switc h the channels by the sequence of
digit
.
Search Type :
Search automatically.
Color Syste m : Se lect the color system ava ilable:
NTSC / PAL / AUTO.
Sound Syste m : Select the sound system ava ilable:
M / AUTO.
AIR (over-the-air broadcasts, CH 2-69),
CATV (cable/satellite broadcasts, CH 1-125) ,
HRC (CH 1-125) or IRC (CH 1-125)
mode are available.
Auto : Search for usable stations and stores them in memor y
Fine Tune : The frequency changes to allow fine
tuning.
On - Skip weak channels.
Off - No channel skip.
Skip :
TV SETUP
ATV
FOU ND CHAN NEL:
(CH ANNEL 0 02 43 .75 M Hz
BAC K
TV\ AUDIO S EARCH
000
MEN U
10 %
ATV
MOV E E NTER
BAC K
MEN U
NO
YES
ATV
COL OR SYST EM
SOU ND SYST EM
FIN E TUNE
SKI P
MOV E ADJUS T
BAC KMEN U
CHA NNEL
SEA RCH TYP E
AUT O SEA RCH
OFF
77. 25 MHz
005
AIR
M
NTS C
18
Page 22

PC MENU
1. Press the MENU button.
2. Use the or button to s el ect the TV menu, then press the button to enter the setting.
3. Use the or button to s el ect the options (H Position, V Position, Phase, Clock, Auto Adjust) and
adjust them using the or buttons.
4. Press the MENU button to return to previous menu, repeat ste p 2 to adjust other settings.
5. To exit the MAIN MENU and return to the normal screen, press the EX IT b utton on the remote c on trol.
In PC mode
TV SETUP
H : Centre the image by movin g it l ef t or right .
V : Centre the image by mov in g it u p or down.
Positio n
Positio n
H POS ITION
50
50
V POS ITION
Auto Adjust : Adjust the screen display
automatically.
50
CLO CK
50
PHA SE
PC
H POS ITION
V POS ITION
PHA SE
CLO CK
AUT O ADJU ST
MOV E ADJUS T
BAC K
0
-2
0
0
MEN U
PC
Phase : Adjusts the image if there is flicker of screen
letters, color misalignment , or b lurring.
Clock : Adjusts the display clock to change width
of the image.
19
Page 23

DISC FORMATS
NOT ES ON COPYRIGHT
It is forbidden by law to cop y, broadcast, show,
broadca st o n cable, play in public or rent
copyrighted mater ia l without permission.
Apparatus Claims of U.S. Patent Nos. 6,836,549;
6,381,747; 7,050,698; 6,5 16,132; and 5,583,936
licensed for limited viewin g us es only.
DVDs are copy protected, and any rec ordings made
from these discs will b e di stor te d. T his product
incorporates copyrigh t protection techno lo gy that is
protected b y method claims of certain U.S. paten ts
and other intellectual proper ty right s ow ned by
Macrovision Corpo ra tion and other rights owners.
Use of this copyrig ht protection techn ol ogy must be
authorized by Macro vi sion Corporation, and is
intended for home and other l im ited viewing uses
only, unless otherwise au th orized by Macrovision
Corporation. Reverse engineering or disassembly
is prohibited .
The unit can play:
REGION MANAGEMENT INFORMATION
Region Ma na gement Information: This unit is
designed and manufactured to respond to the
Region Ma na gement Information that is encoded
on DVDs. If the region nu mb er printed on the
DVD does not correspo nd to the region number
of this unit, this un it c annot play that disc.
The region number of this equipment is .
DISC FUNCTION OR OPERATION
THAT IS NOT AVAILA BLE
When the symbol appears on the screen,
it indicates that the funct io n or operation
attempted is not available at that time.
This occurs because the DVD manufactu rer
determines the specific f un ctions.
Certain fu nc tions may not be available on
some discs. Be sure to read the documentation
provided with the DVD.
ICONS USED ON DVDs
Sample Icons
Language selections for audio
Language selections for subti tl es
Screen aspect ratio
Multiple camera angles
Region co de i ndicator
NOT E
When playing back a CD- G (G raphics) or
CD EXT RA disc, the audio por ti on will be played,
but the graphic images may not be sho wn .
TITLES, CHAPTERS AND TRACKS
• DVDs are divided into "TITLES" and "CHAPTERS".
If the disc has more than o ne movie on it,
each movie would be a separate "TITLE".
“CHAPTERS" are sect io ns of titles.
•
Audio CDs are divided into "TRACKS".
NOT E
Numbers identify each title, chapter and trac k
on a disc. Most discs have thes e nu mber s record
on them, but some do not.
NOT ES ON UNAUTHORIZED DISCS
You ma y no t be able to playback some DVDs
on this equipment if they were purchased fro m
outside your geographic area or made for
business purposes.
DVDs
[8cm/12cm disc]
Audio CDs
[8cm/12cm disc]
CD-R CD-RW
Compatible
A "TRACK" is usually on e so ng on an Audio CD.
20
Page 24

CD/DVD OPERATION
This owner’s manual explains the basic instructions of this unit. Some DVDs are produced with
limited operation during playback. For example, many DVDs do not allow users to skip government
warnings, or in some cases previews or other features. This is not a defect in the unit. Refer to
the instruction notes of discs.
“ ” may appear on the screen during operation. A “ ” means that the desired operation is
not permitted by the unit or disc.
BASIC OPERATIONS
NOTE: For som e di scs, after load in g the content o f th e disc, need to p re ss the or select fr om the disc menu
to start.
Please make s ur e when insertin g the Disc, the lab el s ide of the disc s ho uld be facing you w he n inserting
the Disc inco rr ectly, you m ay d amage the DVD m ec hanism.
INSERT DISC TO DVD
Insert the Di sc t o the Disc door (la be l side of the dis c ha s to face towar ds f ront of the unit) , the player
will load the d is c automatical ly. Ther e wi ll have an on scr ee n indicatio n “C LOSE” then “REA D” . After
loading the d is c content, it wil l sw itch to play mo de a utomatica ll y. If the disc i s al ready place d in side,
the disc will b e re ad automatica ll y.
TURN ON AND OFF THE DVD FUNCTION
Tur n on t he LCD TV a nd t hen press the TV / AV but to n repeatedl y to s elect DVD mod e.
PL AYING A PICTURE FILE DISC
This unit can play JPG files recorded on CD-R and CD-RW disc s.
1. Hold the disc by its edge and gently p ush it into the door, wi th t he label side facing the front.
2. The unit will load the d is c and automatically display the contents of the disc on the screen, while also
beginning to play the pictu re file. These files will then be playe d back one by one.
3. Press the button to go to the folder list.
4. Press the or button to highlight a file to play. Press the button to st ar t playba ck .
PAUSING /PLAYING PLAYBAC K
Press the butto n to switch between pausing and playing.
STO PP IN G PL AYB ACK
Press the butto n at the location where you want to interrupt playback . To resume playback a t the
position where the di sc w as stopped, press the button .
If you press the button twice, the unit's memory will be cleared and pressing the button wi ll
reset the disc to t he beginning.
SKIP (FORWA RD / R EV ER SE )
• Press the PREV button to go back to previous chapters/tracks.
• Press the NEXT button to ad vance chapters/tracks.
• For an Audio CD, use the number bu ttons (remote control only) to jump dire ct ly to that track number.
•
•
TITLE (for DVD disc only)
Press the TITLE button, there will have an on screen indication “TITLE”.
Press the direction or numeric buttons to sele ct your favorite title.
21
Page 25

CD/DVD OPERATION
VOLUME
Press the VOL - / VOL + but tons to adjust the output vol um e.
NOT E: Playback DVD discs in original c ode, is not adjustable.
MUTE
Press the MUTE button to mute the audio output. There will have an on screen sy mb ol indicate “MUTE”.
Press again to ca ncel, or Press the VOL + button to cancel and adjust the volume.
In case there is no audio o ut put, try to pres s the MUTE button to cancel mute.
ZOOM
Press the ZOO M bu tton to zoom in t he p icture.
There are 6 z oom modes, pres s th e ZOOM button t o to ggle betwee n di fferent z oo m modes in sequ en t.
(Zoom2 - Zoom 3 - Zo om4 - Zoom1/2 - Z oo m1/3 - Zoom1/4 - Zo om OFF)
In Zoom2-4, y ou m ay use the , , , butt on s to pan the pict ur e for your favori te p ortion.
A - B
In normal Playback, fast for ward or fast reverse, pre ss t he A-B button at where yo u wa nt to
star t th e repeat por ti on. There will have an on screen indication “REPEAT A “.
In normal Playback, fast for ward or fast reverse, pre ss t he A-B button again at where you want to
stop the repeat p or tion. There will have an on screen indicati on “REPEAT A B“.
The repeat function s ta rted to pl ay back the por tion from A to B automa tically.
Press the A-B button again to cancel. There wi ll h ave an on screen indication “A B CANCEL”.
NOT E:
For Super VCD, VCD & CD discs, repe at A-B is only function within the same track. When playing the
others, repeat A-B will can ce l automatically.
For Super DVD discs, re pe at A-B is only function within the same Title /Ch ap ter. When play in g the
others, repeat A-B will can ce l automatically.
PROGRAM
Using Progr am p layback, you ca n se lect max. 16 tr ac ks from the dis c to p layback in pr og rammed order.
OSD for progr am p layback as belo w.
If it is in PBC ON status, using program playback will turn to PBC OFF automatically.
According to th e highlight area input the title an d ch apter number by the numeric butto ns, press the
button to start; or move to the <PL AY> b y the navigation buttons, pre ss the ENTER button to start.
While playing the pro gr am, you may press the PRO GR AM b utton to display the program menu for edit.
To clear the program by moving to <CLEA R> by the navigation buttons, press the ENTER button.
Or press the button to end the program. When press the button again, the disc w ill play by sequent.
While playing the pro gr am, there will have an on screen indication “PRG PLAY” and the cu rrent title
and chapter number.
•
•
•
•
•
•
•
•
•
•
•
•
•
•
•
TITTL E
CHAPT ER
TRACK
TITLE/CHAPTER PROGRAMMED PLAYBACK (D VD )
TRACK PROGRAMMED PLAYBACK (CD)
22
Page 26

CD/DVD OPERATION
FAST FORWA RD / FA ST R EV ER SE
1.Press the or button when a disc is playing.
Each time the or button is pressed, the speed of fas t scan changes in the following sequence:
2. Press the button to play when you reach the d esired point to res ume playback at normal speed.
SLOW-MOTION PLAY (DVD)
1. Press the SLOW button on remote control in the play mode. Each t im e the SLOW button is pressed,
the speed of slow-m otion playback changes in the fol lo wing sequence:
2. Press the button to return to the nor mal playback speed.
.
SUBTITLE SELECTIO N (D VD )
1. While a DVD is playing, press the SUBTITLE button to display the current t he l anguage setting,
as shown in the example.
2. Press the SUBTITLE button rep eatedly to select the desired subtitle language.
NOT E
• If only one language is rec orded, the language does not chan ge .
• About two seconds later, playback conti nues with the new subtitle you selected .
•
• The number of langu ag es recorded differs dependi ng on the disc.
• This function can only be used for di sc s on which subtitles have been re corded in multiple languages.
LANG UAGE SELECTION (DVD)
ANGLE SELECTION (DVD)
Some DVDs contain scenes which ha ve been shot from a number of different angles. For thes e
discs, the same scene can be viewed from each of these d if ferent angles.
1. While you are play in g a DVD with different angles recorded, press th e AN GL E button to view
the number of the cur rent angle availabl e.
2. Press the ANGLE button repeatedly to ch ange the scene to the next angle in those recorded.
• About two seconds later, playback conti nues from the new angle you selected.
• If no button is pre ssed within 10 seconds, playback co ntinues without changing the current angle.
NOT E
This functi on c an only be used for d is cs on which sce ne s shot from multiple an gl es have been record ed .
.
NOTE: During Slow motion, the sound will be off
I
If no button is pressed wit hi n a few seconds, playback continues without changing th e cu rrent subtitle.
On some discs, the sound is recorded in two or more fo rmats. Follow the directions be low to select the
preferred l anguage and sound system.
1. While a disc is playing, press the L ANGUAGE button to s how the current audio format numb er.
2. Press the LANGUAGE button repeatedl y to select the desired audio for mat.
Note
• If only one audio format is recorded, the number does not chan ge.
• About two seconds later, playback conti nues in the new audio format.
Sequence of angle shots
(Example)
1/3 2/3 3/3
FORWAR D X 2 -- -> FORWA RD X 4 - --> FORWAR D X 8 ---> FORWA RD X 20 ---> PL AY
BACKWARD X 2 --- > BACKWARD X 4 --- > BA CKWARD X 8 --- > BA CKWARD X 20 ---> P LAY
SF 1/2 ---> SF 1/3 ---> SF 1/ 4 -- -> SF 1/5 ---> SF 1/6 ---> SF 1/7 --- > PL AY
23
Page 27

DISPLAY function (DVD)
Using D.DISP, you can check the cu rrent settings of
the following items: ANGL E, AUDIO and SUBTITLE.
If a DVD contains title numbers, you ca n locate a specific title by dire ctly selecting a title number.
1. Press the GOTO button.
2. Press the or button to highlight a specific
field and press the cor responding number
button(s) for the title y ou want.
3. Press the ENTER button to confirm. The Unit will start playback abo ut 3 seconds later.
You ca n mo ve to a specific location by entering its corresponding time (ho ur s, m in utes, seconds)
1. Press the GOTO button.
2. Press the or button to highlight time.
3. Press the corresponding number buttons for the se tting point you want.
4. Press the ENTER button to confirm. The Unit will start playback abo ut 3 seconds later.
NOT E
• Some discs may not resp on d to this process.
• Some scenes may not be locate d as precisely as specified.
• This method for accessing speci fic locations is available on ly w ithin the current title of the DVD.
While the disc is playing, press the D.DISPLAY
button repeatedly to display information on
operation status.
LOCATING A SPECIFIC TITLE (DVD)
LOCATING A SPECIFIC CHAPTER / TRACK
If you know the chapter / t rack number you want to play, you can loca te a
specific chapter / track by d irectly selecting a chapter / t rack number.
1. Press the GOTO button to search for your desired chapte r / track.
2. Press the or button to highlight a chapter / trac k and press the correspon ding number button(s)
for the chapter / track you want.
3. Press the ENTER button to confirm. Playba ck s tarts from t he selected chapter / track.
LOCATING A SPECIFIC TIME
CD/DVD OPERATION
SPECIAL FUNCTIONS
24
Page 28

DVD REPEATING
You ca n pl ay a specific title or chapter repeatedly. (Title rep ea t, chapter repeat, A-B repeat)
REPEATING A CHAPTER
You ca n pl ay the same chapter repeatedly.
1. While the disc is playing, press the REPEAT button until the ind icator displays
on the screen.
The current chapter is played repeatedly.
REPEATING A TITLE
You ca n pl ay the same title repeatedl y.
2. While the disc is playing, press the REPEAT button until the ind icator displays on the scre en .
The current title is pl ayed repeatedly.
TO RE SU ME N OR MA L PL AYB ACK
3. While the disc is playing, press the REPEAT button until the ind ic ator displays on the screen .
CD REPEATING
You ca n pl ay a single track and whole disc repe atedly.
REPEATING A SINGLE TRACK
You ca n pl ay the same track repeatedl y.
1. While the disc is playing, press the REPEAT button until the ind icator displays on the scre en .
The current track is pl ayed repeatedly.
REPEATING A WHOLE DISC
2. While the disc is playing, press the REPEAT button until the ind icator displays on the scre en .
The whole disc is played repeatedly.
TO RE SU ME N OR MA L PL AYB ACK
3. Press the REPEAT button until the indicator displays o n the screen.
REPEATING A SPECIFIC SECTION (DVD) (CD)
You ca n pl ay a specific section repeate dly.
1. While the disc is playing, press the A-B button at the beginning of the section ( is displayed )
you want to play repeatedly.
2. Press the A-B button again at the end of the sectio n ( is displayed).
3. The Unit will immediatel y be gin replaying your selection.
TO RE SU ME N OR MA L PL AYB ACK
4. While the disc is playing, press the A-B button until the indic ator displays on the screen.
NOT E
• A-B repeat can only be us ed w ithin the same title. If the start and end of the section to be repeated
are in differen t titles, A-B repeat is cancelled .
• The A-B repeat functi on d oes not operate in scenes where d ifferent camera angles are recorded.
CD/DVD OPERATION
25
Page 29

CD/DVD OPERATION
MP3/JPEG PLAYBACK
Then will fir st ly display the MP 3 co ntents auto ma tically and s ta rt to play the firs t fi le (highlig ht ed file).
Screen as fol lo w:
After loadi ng t he MP3 / JPEG disc, i t wi l start to scan f or t he stored MP3 / JP EG folders.
01
10
09
08
07
06
05
04
03
02
MP 3 M P3
01 M P 3
Display cur rent
MP3 playbac k
function
Highlight f ile for
current pla yback.
Buttons for s witching
between MP3 a nd JPEG
playback fu nction.
Using the navigation buttons to check you folder and playback or move to the file.
NOT E:
Press the , butto ns to move the highlight to fol ders , documents or mode selection.
Press the numeric buttons to select the contents d irectly. For number over 10, p ress the 0 button first.
(e.g. File number 15, pre ss 0 then 5.)
When playback MP3 fil es , there is no picture displ ay, o nl y audio output.
Playing the JPEG discs, press the PROGRAM button to se lect slide effects. There are 17 slide modes,
press the PROGR AM b utton to toggle among dif fe rent modes in sequence.
(Wipe top, Wipe botto m, Wipe left , Wi pe right, Diaginal wipe left top, Diaginal wipe right top, Diaginal
wipe left bottom, Diaginal wipe right bot tom, Extend from center H, Extend from center V, Com press to
center H, Compres s to center V, Window H, Window V, Wipe from el se to center Random, None )
When play or pause with p ic ture playback, you may use the navigation butto ns to flip / rotate the p ic ture.
button to flip hori zo ntally.
button to flip ve rtically.
button to rotate left 90˚.
button to rotate right 90˚.
Press the / butto ns to select next / previous page or press numeric buttons to
view the correspond in g pictures.
The maximum JPEG image size that ca n be d isplayed is 1280 x 1024.
•
•
•
•
•
•
•
•
•
•
01
10
09
08
07
06
05
04
03
02
PI C T UR E
JP G
01 P I C TU R E
Display cur rent
Picture pla yback
function
Scroll bar to v iew
next page.
Buttons for s witching
between MP3 a nd JPEG
playback fu nction.
26
Page 30

NOTE: In Setup mode, th e fo llowing functions may be cancel or pa use :
TITLE, SUBTITLE, DISPLAY, PL AY, PAUSE, STOP, SLOW , FF, FR, PREV, NEXT,
GOTO, ZOOM, ANG LE, LANGUAGE, PROGRAM, REPEAT, A-B.
DVD Function General setup
CUSTOMIZING THE DVD FUNCTION SETTINGS
SYSTEM SETUP
DVD SETUP MENU is only available in DVD mode. So before starting to set up please ma ke sure the unit
is switched to th e DVD mode.
Press the TV/AV button and use to highlight the DVD option, then p ress the Enter button
to enter into the D VD mode.
▲ or ▼ button
SYSTEM SETUP
NTSC
PAL
AUTO
EXIT SETUP
RATI NG
PASS W ORD
TV TYPE
TV SYSTEM
DEFAULT
NOT E:
NTSC format is generally used for TVs.
Check your TV user gui de for supported formats.
If PAL is selected with a non-compatible television
you may experience interference or picture
scrolling.
TV SYSTEM
Select the TV system available.
SYSTE M SET UP
EXIT SE TUP
RATI NG
PASS W ORD
TV TYPE
TV SYST EM
DEFAULT
1. Press the D.SETUP button to activate the DVD
player OSD menu.
2. Use the ▲ or ▼ button to selec t the
SYSTEM SETUP menu, then press the
► button to enter the setting.
3. Use the ▲ or ▼ button to selec t the options
(T V System, TV Type, Pass Word, Rat in g, Default,
Exit Setup) , then pres s th e ► button to enter into
for detailed options and adjust t hem using
the ▲ or ▼ buttons.
4. Press the ◄ button to return to previous
menu, repeat step 3 to adjust other settings.
5. Press the D.SETUP button to e xit the OSD menu,
or move the highlight to EXIT SETUP then press
the ENTER button to exi t.
SYSTEM SETUP
EXIT SETUP
RATI NG
PASS W ORD
TV TYPE
TV SYSTEM
DEFAULT
4:3PS
4:3LB
16:9
TV TYPE
DVDs are produced i n a variety of screen
aspect ratios. This menu enables you to s el ect one
of the thre e as pect ratios:
4:3 PS (Normal)
4:3 LB (Normal)
16:9 (Wide)
Select the most appropriate aspect ratio for the
DVD being viewed.
27
Page 31

PASS WORD
The default setting is locked . No Rating selection or
change password could be done.
To edit the Rating setting, please enter
default password “0000” by the numeric buttons,
then press the ENTER button to confirm.
To change password, inp ut a ny 4 digit number when
the lock is unlocked. Once th e 4 digit number
is entered, that will be your new password.
SYSTEM SETUP
EXIT SETUP
RATI NG
PASS W ORD
TV TYPE
TV SYSTEM
DEFAULT
CUSTOMIZING THE DVD FUNCTION SETTINGS
Pan Scan
Letter Box
Wide-screen
4:3PS (Normal)
4:3LB (Normal)
16:9 ( )
• When wide-screen video is playe d, this mode clips
the right and left sides of the image so that it can
be viewed on a conventional screen.
• Some wide-screen DVDs that do not per mit
Pan Sca n mo de playback are automatic al ly played
in letterbox mode (black bands top and bottom).
• When wide-screen video is playe d in this mode
on a conventional screen, bla ck bands appear at
the top and bottom of the screen.
Wide Screen
• This is the correct mode for playing wi de -screen
videos on a wide-screen.
NOT E:
• The displayable picture size is preset on the DVD.
Therefore the pla yback picture of some DVDs
may not conform to the picture size select.
• When you play DVDs recorded in the 4:3 aspect
ratio, the playback picture will always appears in
the 4:3 aspect ratio regardless of the TV T YP E
setting.
• TV TYPE will always change to Wide screen
af ter you switch of f the unit.
Cut off when a
wide-screen
video image
is played.
SYSTEM SETUP
1 KID SAFE
2 G
3 PG
4 PG13
5 PG-R
6 R
7 NC-17
8 ADULT
EXIT SETUP
RATI NG
PASS W ORD
TV TYPE
TV SYSTEM
DEFAULT
RATING
Playback for some discs with rati ng , you can select
the rating setting according to your preference.
Rating restriction divided in eight d ifferent
category from KID SAFE to ADULT.
NOT E:
Only editable when password is unlocked.
And only can function when passwo rd is locked.
It does not, however, reset either the Password
or the Rating setting.
28
Page 32

DEFAULT SETTING
Press the ENTER b ut ton to restore fa ct ory default.
It takes 3-5 seconds to reset the DVD settings to
the factor y defaul t.
SYSTEM SETUP
RESTOR E
EXIT SETUP
RATI NG
PASS W ORD
TV TYPE
TV SYSTEM
DEFAULT
OSD LANGUAGE
Use the navigation buttons to s el ec t the
OSD LANGUAGE setup icon, pres s the EN TER button
to confirm. There are 6 languages for your selection,
press the ▲ and ▼ buttons to switch among
different languages (
FRENCH/PORTUG UE SE/ITALIAN ).
Press the ENTER button to confirm.
ENGLISH/GERMAN/SPANI SH/
NOT E:
If the selected language is not included in you DVD
disc content, it will select the default lang ua ge
of the disc autom at ically.
LANGU AGE S ETUP
AUDIO L ANG
SUBTI TLE L ANG
MENU LA NG
EXIT SE TUP
OSD LAN GUA GE
CUSTOMIZING THE DVD FUNCTION SETTINGS
LANGUAGE SETUP
1. Press the D.SETUP button to act ivate the DVD
player OSD menu.
2. Use the ▲ or ▼ button to select th e
LANGUAGE SETUP menu, then press the
► button to enter the set ti ng.
3. Use the ▲ or ▼ button to select th e op tions
(OSD Language, Audio Lang, Subtitle Lang,
Menu Lang, Exit Setup) , then press the ► b ut ton
to enter into for detai le d options and adjust them
using the ▲ or ▼ buttons.
4. Press the ◄ button to return to previous
menu, repeat step 3 to adjust other settings.
5. Press the D.SETUP button to exi t the OSD menu,
or move the highlight to EXIT SETUP then press
the ENTER button to exit.
LANGU AGE S ETU P
AUDIO L ANG
SUBTI TLE L ANG
MENU LA NG
EXIT SE TUP
OSD LAN GUA GE
ENGLI SH
GERMA N
SPAN ISH
FRENC H
PORTU GUE SE
ITAL IAN
29
Page 33

LANGUAGE SETU P
EXIT SETUP
MENU LANG
SUBTITLE LANG
AUDIO LANG
OSD LANGUAGE
ENGLISH
GERMAN
SPAN ISH
FRENCH
PORTUGUESE
ITAL IAN
LANGUAGE SETU P
MENU LANG
EXIT SETUP
SUBTITLE LANG
AUDIO LANG
OSD LANGUAGE
ENGLISH
GERMAN
SPAN ISH
FRENCH
PORTUGUESE
ITAL IAN
LANGUAGE SETU P
SUBTITLE LANG
MENU LANG
EXIT SETUP
AUDIO LANG
OSD LANGUAGE
ENGLISH
GERMAN
SPAN ISH
FRENCH
PORTUGUESE
ITAL IAN
CUSTOMIZING THE DVD FUNCTION SETTINGS
AUDIO LANGUAGE
Use the navigation buttons to s el ec t the
AUDIO LANG setup icon, press the ENTER button
to confirm. There are 6 languages for you selection,
press the ▲ and ▼ buttons to switch among
different languages. (ENGLISH / GER MA N / SPANISH
/ FRENCH /PORTUGU ES E/ I TALIAN ).
Press the ENTER button to confirm.
NOT E:
If the selected language is not included in you DVD
disc content, it will select the default lang ua ge
of the disc autom at ically.
SUBTITLE L ANGUAGE
Use the navigation buttons to s el ec t the
SUBTITLE LANG setup icon, press the E NT ER b ut ton
to confirm. There are 6 languages for you selection,
press the ▲ and ▼ buttons to switch among
different languages. (ENGLISH / GER MA N / SPANISH
/ FRENCH /PORTUGU ES E/ I TALIAN ).
Press the ENTER button to confirm.
NOT E:
If the selected language is not included in you D VD
disc content, it will select the default lang ua ge
of the disc autom at ically.
MENU LANGUAGE
Use the navigation buttons to s el ec t the
MENU L ANG setu p ic on , press the ENTER button
to confirm. There are 6 languages for you selection,
press the ▲ and ▼ buttons to switch among
different languages. (ENGLISH / GER MA N / SPANISH
/ FRENCH/PORTUG UE SE / I TALIAN ).
Press the ENTER button to confirm.
30
Page 34

TONE
Use the ▲ and ▼ buttons to adjust the Tone settin g.
AUDIO SETUP
EXIT SETUP
TON E
b
+ 4
+ 2
+ 0
- 2
- 4
#
AUDIO S ETU P
EXIT SE TUP
TON E
CUSTOMIZING THE DVD FUNCTION SETTINGS
AUDIO SETUP
1. Press the D.SETUP button to act ivate the DVD
player OSD menu.
2. Use the ▲ or ▼ button to select th e
AUDIO SETUP menu, then pres s th e
► button to enter the set ti ng.
3. Use the ▲ or ▼ button to select th e op tions
(Audio Out, Tone, Exit Setup) ,
then press the ► button to enter into
for detailed options and adjust them using
the ▲ or ▼ buttons.
4. Press the ◄ button to return to previous
menu, repeat step 3 to adjust other settings.
5. Press the D.SETUP button to exi t the OSD menu,
or move the highlight to EXIT SETUP then press
the ENTER button to exit.
31
Page 35

MODE LE FT S PEAKE R RIGHT S PEAKER
STERE O ST EREO- L STE REO-R
L-MON O L- MONO L- MONO
R-MON O R- MONO R- MONO
MIX-M ON O L-MON O+R-M ON O L-MON O+R-M ON O
DYNAMI C RA NGE
When switch the compress mode to
“Audio output”, adjust the compressed ratio
for different effect.
When selected FULL, the peak signal value
is smallest.
When selected OFF, the peak signal value
is highest.
DUAL MONO
You can se le ct four different audio output,
STEREO, MONO L, MONO R, MIX MONO.
The audio out description of th ese
selections is shown in the table below.
Dolby Digital Setup
DIGITAL S ETU P
EXIT SETUP
MIX MONO
MONO R
MONO L
STEREO
DYNAMIC RA NGE
DUAL MON O
FULL
OFF
6 / 8
4 / 8
2 / 8
DIGITAL S ETU P
EXIT SETUP
DUAL MON O
DYNAMIC RA NGE
CUSTOMIZING THE DVD FUNCTION SETTINGS
DIGITAL SETUP
EXIT SE TUP
DUAL MONO
DYNAM IC RA NGE
DIGITAL SETUP
1. Press the D.SETUP button to act ivate the DVD
player OSD menu.
2. Use the ▲ or ▼ button to select th e
DIGITAL SETUP menu, then press t he
► button to enter the set ti ng.
3. Use the ▲ or ▼ button to select th e op tions
(Dynamic Range, Dual Mono, Exit Setup) ,
then press the ► button to enter into
for detailed options and adjust them using
the ▲ or ▼ buttons.
4. Press the ◄ button to return to previous
menu, repeat step 3 to adjust other settings.
5. Press the D.SETUP button to exi t the OSD menu,
or move the highlight to EXIT SETUP then press
the ENTER button to exit.
32
Page 36

Horizontal
Scanning Frequency
Resolution
(KHz)
Vertical
Scanning Frequency
(Hz)
Format
640 × 480
640 × 480
640 × 480
800 × 600
800 × 600
800 × 600
800 × 600
1024 × 768
1024 × 768
1024 × 768
1366 × 768
47.7
DISPLAY MODE
PC FORMATS
● This product does not support the display mode not listed above.
In order to achieve the best display effect, please select the above-listed
11 display modes input signal.
● Because of the difference of display drivers output signal
(especially non-standard signal output), the display image may appear little
disturbance which can be adjusted through “AUTO” button on the PC menu.
● To prolong this unit’s service life, please set your computer to power management
mode.
NOTE:
33
Page 37

DISPLAY MODE
VIDEO FORMATS
SUPPORTED COMPONENT / HDMI INPUT MODE
Horizontal
Scanning Frequency
Resolution
(KHz)
Vertical
Scanning Frequency
(Hz)
Format
720 × 480
720 × 480
1280 × 720
1280 × 720
1920 × 1080
1920 × 1080
31.47
15.734
37.5
45
31.25
33.75
59.94
59.94
50
60
50
60
480 p
480 i
1080 i
720 p
720 p
1080 i
● The above listed formats are also related to the AV devices you are about to connect.
Before you connect this unit with others please read all instructions carefully and
make sure all necessary cables are connected.
● This unit may be incompatible with some other formats which are not meet the
above conditions.
.
NOTE:
34
Page 38

SPECIFICATION
19" LCD TV / DVD COMBO
Panel Type TFT LCD
18.5 inches / 47 cm
Diagonal Size
Screen Format 16:9
Color System
NTSC
Model Description
Panel
Resolution 1366 × 768
View Angle
Response Time
Contrast
Brightness
Maximum Color
300 nit
1000 : 1
170°(H) / 160°(V)
5 ms
16.7 M
Sound Output
RF Input 75 ohm external terminal
HDMI Input
Video: 480i, 480p, 720p, 1080i
Audio: Two channel linear PCM 32, 44.1 and 48kHz, 16, 20 and 24 bits
PC-RGB Input
D-sub 15pin
G: 0.7Vp-p, 75ohms
B: 0.7Vp-p, 75ohms
R: 0.7Vp-p, 75ohms
Power Requirement
Power Consumption 80W ≤
Standby Consumption ≤ 3W
Dimension(with stand)
Approx. 496(L) 252(W) 425(H) mm× ×
Mass Weight
Supplied Accessory
Others
Input/
Output
Jacks
Systems
Power
Sound System
M
Audio System
BTSC
L/R Speaker: 2W + 2W
Composite Video Input
Component/Y Pb Pr Input
Sound Input
Phono jack 1: For CVBS/Component Audio input
Phono jack 2: For PC-RGB Audio input
500mV rms, Impedance: 20k ohms
Headphone Output 3.5 mm diameter jack
1.0 Vp-p, 75ohm s RA C
S-Video Input
Region Code
1
DVD
Disc Size
8cm / 12cm disc
Compatible Disc Type
DVD, DVD-R /+R, DV D- RW/ +RW, V CD , CD, CD-R, CD -RW
Y: 1.0Vp-p, 75ohms
C: 0.3Vp-p, 75ohms
RAC
Y: 1.0 Vp-p, 75ohm s, 0 .3V negative sy nc
Pb: 0.7Vp-p, 75 oh ms
Pr : 0.7Vp-p, 75o hm s
AC 120V, 60Hz
6, 5 Kg
Power Cord, Instruction Manual, Remote Control, Warranty Card, Batteries
* This manual is only for your reference.
Specifications are subject to update without prior notice.
35
Page 39

• Make sure the AC power cord is connected.
• Turn on the unit.
• Remove any obstacles between the remote and the unit.
• Use the remote near the unit.
• Point the remote at the remote sensor on the unit.
• Replace the batteries in the remote with new ones.
No power.
The remote does not
function.
• Make sure that you’ve selected DVD mode.
• The
system is in pause mode.Press the
button to return to
normal play mode.
• Fast
forward or fast reverse is performed.Press the button
to return to normal play mode.
• Make
sure
the AUDIO
/
VIDEO
output
and AV IN input
connections are correct.
• This
unit is too hot. Power off the unit for 30 minutes to cool
down.
• The region number of the disc doesn’t match the region number
of this unit.
• Clean the disc.
• The disc is scratched
plugs and jacks are dirty.Wipe them with a cloth slightly
• Clean the disc
• There is no disc inside(“No Disc”appears on the screen).
• Insert the disc correctly with the label side facing yourself.
• Clean the disc.
• A non-NTSC disc has been inserted.The unit and disc region
number are incompatible.
• Condensation may have formed inside the unit due to a
sudden change in temperature.Wait about an hour for it to
clean and try again.
DVD
No s ound or o nly a
very low-level sound is
heard.
No picture
The picture is not clear
Severe hum or noiseis
heard.
The disc does not play.
SYMPTOM CAUSE (AND REMEDY)
TROUBLESHOOTING GUIDE
• The
moistened with alcohol.
36
Page 40

SYMPTOM CAUSE (AND REMEDY)
TV
Bad
Picture
(snow,
multiple
images
distortion,blurry)
No sound.
Black
and
White
picture.
No picture or sound.
Coloredpatches of
picture.
Panel function key does
not respond correctly.
• Chec k the location of the antenna and adjust it if necessary.
• Make sure the antenna cable is firmly connected.
• Make sure all input cables are firmly connected.
• Increase the volume.
• Chec k the PICTURE setting within the PICTURE menu.
• Make sure the unit is plugged in and turned on.
• Make sure that the ATV mode is selected.
• Try a new channel to check for possible station trouble.
• Make sure the antenna is connected properly.
• Increase the volume.
•
• Make sure all cables are firmly connected.
• Chec k for local interference.
• Make sure there are no unshielded electrical devices nearby
that are causing interference.
• Turn the TV off for 30 minutes, then try it again.
• Under the influence of electrostatic phenomenon, the product
may malfunction and require usertopowerreset.
• Unplug and re-plug the AC power cord.
TROUBLESHOOTING GUIDE
• Check to make sure the program you are watching is broadcast
in Color and not Black & White.
• Check
whether the mute function has been activated on the
Remote Control.
The display monitor's
panel goes hot.
• LCD TV takes inside lighten phosphor. It may increase the
temperature of the screen in some occasions. It's not a defect.
Unusual dots
• Black dots and Bright points may appear on the LCD screen.
This is a structural property of the LCD panel and is not a defect.
Stripes on screen
• Adjust the impulse phase may decrease stripes.(RGB in)
T he top of the monitor
• It may occur during long-time working. It's not a defect.
gets hot.
Make sure the antenna or audio/video source device is
working properly.
Unable to select a
certain channel.
The channel may be skipped. Choose this channel by
directly selecting the buttons from the remote control.
•
Disorder displ ay
at power on.
•
•
This may be caused because of a very short interval
between POWER OFF and ON.
Unplug the power and restart.
37
 Loading...