

Page 1
OPERATING INSTRUCTIONS
PORTABLE CD PLAYER
WARNING: TO REDUCE RISK OF FIRE OR ELECTRIC SHOCK, DO NOT
EXPOSE THIS APPLIANCE TO RAIN OR MOISTURE.
40 SECONDS ANTI-SHOCK
Page 2

CAUTIONCAUTIONCAUTION
Use of controls or adjustments or performance of
procedures other than those specified herein may
result in hazardous radiation exposure.
This compact disc player is classified as a CLASS
1 LASER product.
Invisible laser radiation when open and
interlocks defeated. Avoid exposure to
beam.
PRECAUTIONSPRECAUTIONSPRECAUTIONS
To maintain good performance
Do not use the unit in places which are extremely
hot, cold, dusty or humid, In particular, do not use
or keep the unit in following places.
In a high humidity area such as a bathroom near
a heater
In an area exposed to direct sunlight (e. g., inside
a parked car, where it can become extremely hot)
Near sources of strong magnetism, such as tele visions, speakers, or magnets
Where there is a lot of movement or vibration,
such as on a car dashboard or an unstable shelf
CLASS 1 LASER PRODUCT
KLASSE 1 LASER PRODUKT
LUOKAN 1 LASER LAITE
KLASS 1 LASER APPARAT
If you hear no sound when playing a disc, DO
NOT turn the volume up high because the music
could suddenly begin at high volume. To avoid
hurting your ears or damaging the speakers, turn
the volume control to the lowest level before
starting playback and slowly turn it up to the
desired level
Note on listening with the headphonesNoteNote onon listeninglistening withwith thethe headphonesheadphones
Listen at moderate volumes to avoid hearing
damage
Do not wear the headphones while driving or
cycling. lt may create a traffic hazard
You should use extreme caution or temporarily
discontinue use in potentially hazardous situations,
such as walking, jogging, etc
CAUTIONCAUTIONCAUTION
Listening to headphone stereo at full power for
extended periods of time can result in hearing
damage
Do not touch pickup lens
Note on condensationNoteNote onon condensationcondensation
lf the unit is suddenly moved from a cold place
to a warm one, it may cause in condensation on
the pickup lens and malfunction or playback
difficulties, should this occur, leave the unit for
a few hours, then try playback again.
For safety
Do not attempt to disassemble this. Laser rays fr mo
the optical pickup are dangerous to the eyes
Make sure that pins or other foreign objects do
not get inside the player
Take care not to drop the unit or subject it to strong
shocks
To keep dust fr m the pickup lens, keep the disco
compartment lid closed after use. Never touch
the lens
OPERATING
INSTRUCTIONS
PORTABLE CD PLAYER
40 SECONDS ANTI-SHOCK
1
Page 3
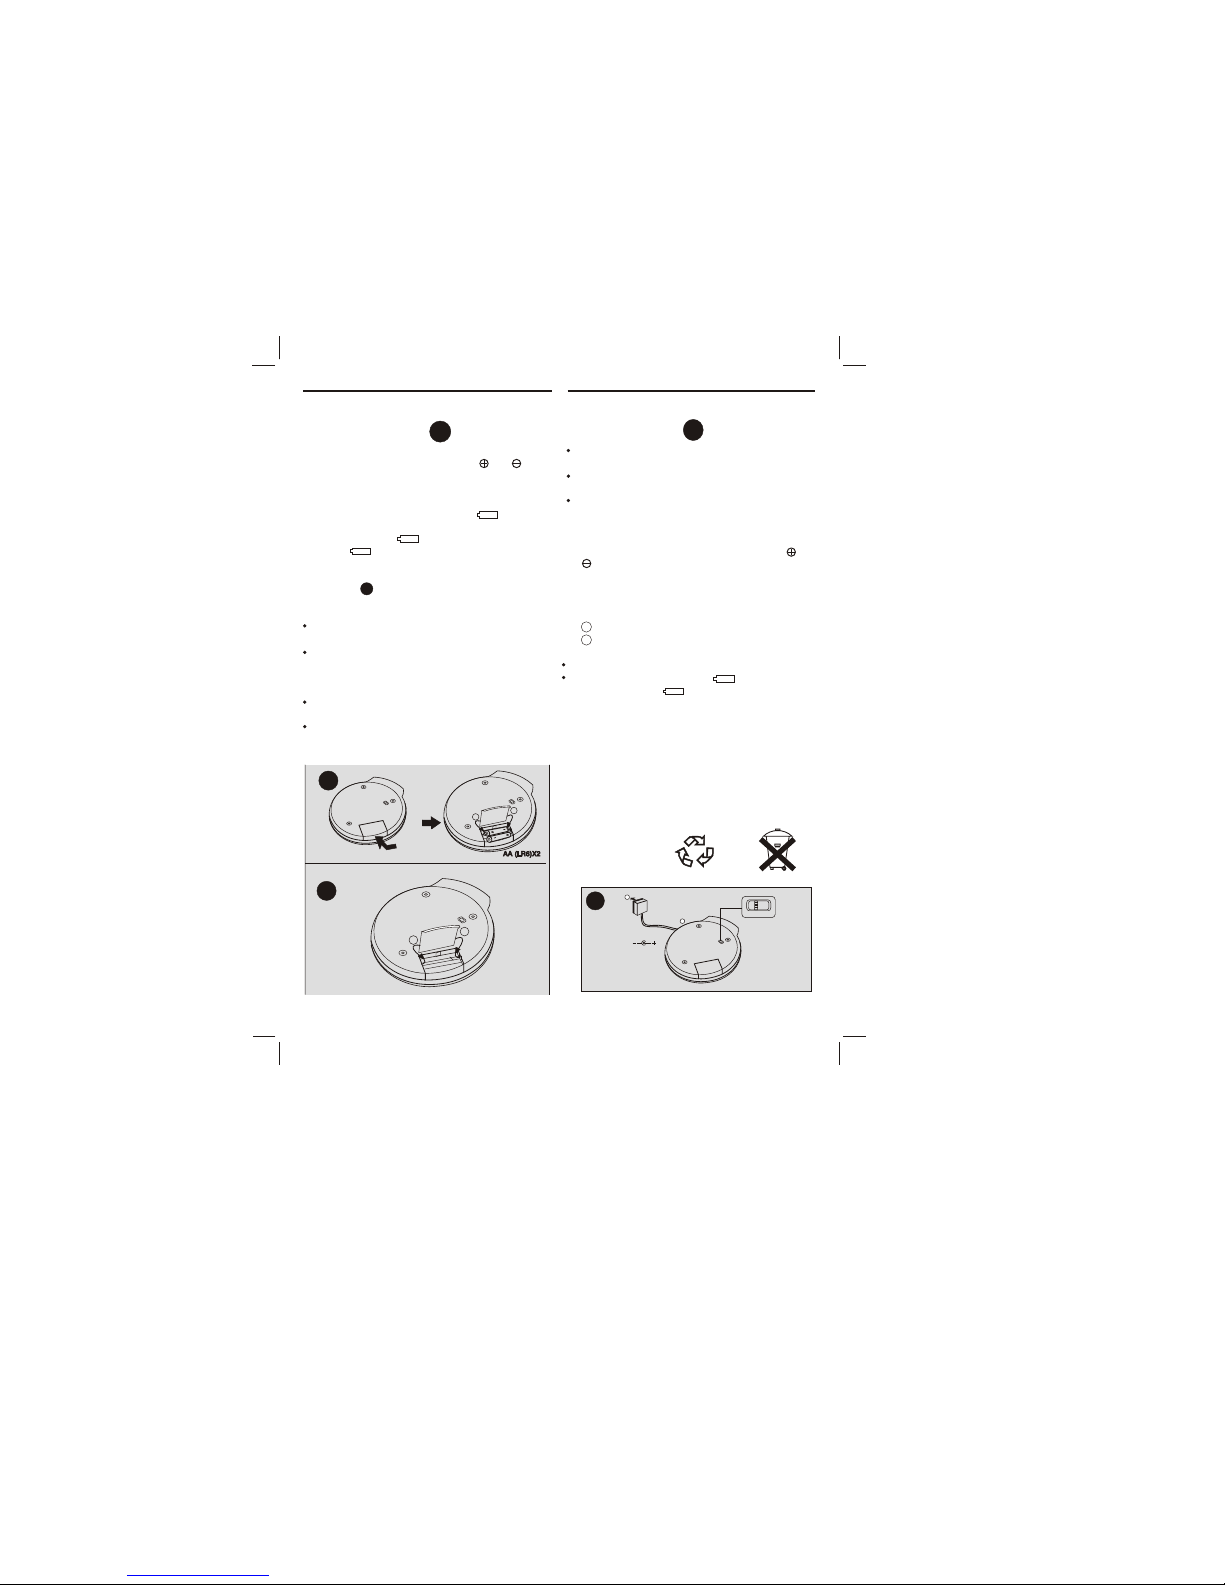
USING ON DRY CELL
BATTERIES A
USING ON RECHARGEABLE
BATTERIES C
Open the battery compartment and insert two LR6
(size AA) alkaline batteries with the and marks
correctly aligned.
Battery replacement
The battery indicator in the display according
to the remaining power of the batteries. Replace
the batteries when lights. If the unit remains in
use after lights. the operation will stop.
If the cover of the battery compartment
comes off B
Note on dry cell batteries
Do not mix the different types of batteries, or an
old battery with a new one
To prevent the risk of electrolyte leakage or
explosions, never recharge the batteries, apply
heat to them,or take them apart,must set recharge
button to "OFF".
When not using the batteries, remove them to
prevent needless battery wear
If liquid leaks from the batteries, wipe thoroughly
to remove
recycling options or proper disposal.
solid waste officials in your area for details about
various state and local laws. Check with your local
the batteries into the municipal waste stream under
end of their useful life, it may be illegal to dispose
The rechargeable batteries are recyclable, At the
ATTENTION
will stop.
remains in use after lights, the current operation
Recharge the batteries when lights, If the unit
Time to recharge the batteries
2 to a wall outlet
1 to DC 4.5 V jack
3. Connect the AC adaptor.
to "off ", otherwise the CD player will be damaged
to "on", after recharging or in other condition switch
2. When recharge please switch the recharge button
marks correctly aligned.
1. Insert the rechargeable batteries with the and
while it is opened
compartment, you cannot charge the batteries
Before charging the batteries, close the disc
rechargeable batteries before use
Be sure to read the instructions of the purchased
batteries. which are commercially available
Be sure to use size AA Ni-Cd 1.2V rechargeable
Ni-Cd
Cd
C
DC 4.5V
CHARGE
OFF ON
111
2
A
B
1
2
1
2
2
Page 4

BEFORE PLAYBACK
3
E
F
G
333
222
111
BASS
HOLD
HOLD switch D
Release the HOLD switch to OFF position before
playback. When not using the unit, set the HOLD
switch to the ON position, Accidentally pressed
button will not function. If buttons are pressed when
the HOLD switch is set to the ON position. "HOLD"
light on the display.
Turning on and off D
Turning the power on
Press PLAY/PAUSE. Power is turned on and
playback starts.
Turning off the power
If no new operations are done within 30 seconds
from the end of last operation, the power is turned
off automatically. (Auto power off function) you can
turn off the power before it is automatically turned
off by pressing STOP
Standby mode D
When an operation finishes, the unit goes into
standby mode until the auto power off function
automatically turns off the power.
To enter standby mode, press PLAY/PAUSE
to start playback, then press STOP
Adjusting the sound E
Volume E
Turn the VOLUME control to adjust the volume.
BASS BOOST E
Switch on the BASS BO OST for extra bass emp hasized.
the pivot gently.
Pick up the disc, holding its edge, while pressing
To remove the disc G
3. Close the disc compartment.
2. Place a disc in the center with the label side facing up.
1. Push the OPEN switch to open the disc compartment
Inserting a disc F
Page 5

PLAYBACK H
Playback starts from the first track.
3. Press PLAY/PAUSE
2. Place a disc.
1. Release HOLD to OFF position.
Connect the supplied headphone tot he
PHONE
ja ck.
BASIC OPERATION
To stop: Press STOP
To pause: Press PLAY/PAUSE
To resume, press it again.
To search for the
beginning of a track: Press or
To locate ad esired
p assage: Keep o r P ressed.
Release theb utton until t h e
s t artof d esired p assage.
MODE KEY:
NORMAL REPEAT ONE REPEAT ALL
SHUFF INTRO
REPEAT ONE: " 1"light on display
and will repeat the track you selected
REPEAT ALL: " ALL" light on display
and will repeat entire tracks
INTRO: "INTRO" lights on display
and will play the first 10 seconds of
each track
SHUFF: "SHUFF" light on display
Plays every tracks in random order
ANTI SHOCK: light on display until
Press again then change to normal play
DISC: If no diSC, then " diSC" is display
PROGRAM:
1. Press PROGRAM key, Then "PROG 00" start flashing.
2. Press skip/searched or key to search the track
No.
3. When desired track is display, press PROGRAM
key to register, Then track No. display to "00" again.
4. Repeat 2-3 (up to 20 tracks) after register 20 tracks.
display shows the first registered track.
5. Registered tracks can be check by press PROGRAM
key, And it can be changed by repeat 2-3.
6. Press play key, then PROG stops flashing and starts
playing.
7. Open the door or power off to clean programing
4
H
111
222
333
111
2
333
HOLD
Page 6

CONNECTION TO AN
EXTERNAL UNIT I
MAINTENANCE
Use a commercially available connection cord
which has a 3.5mm stereo plug at one and two
phono plugs at the other end.
Connect the stereo plug to the LINE OUT jack
of the unit and connect the phono plugs to the
analog input (AUX) terminals of the external unit.
NOTENOTENOTE
Turn off the power of both units before connection.
DO NOT connect to the PHONES inputs of an
amplifier(with a built-in phonoe qualizer - amplifier)
Adjust the volume and X-BASS on this unit.
To clean the lens J
If the lens become dirty, the player will skip or not
play, If this occurs, clean the lens in the following.
manner, T o remove dust or dust particles, first use
a camera lens blower/brush 1 to blow a few times
to loosen particles, then gently brush the lens 2
clean finish by blowing the lens again.
Note
Take care not to get too much solution on the swab.
which could flow into the unit and cause damage.
Pressing too strongly with the swab could scratch
or break the lens.
To clean the discs K
Before playing, wipe the disc from the center out
with a cleaning cloth, After playing, store the disc
in its case.
J
K
5
I
LINE IN
CD IN
AUX
R L
Page 7

6
SPECIFICATIONS
Tracking system 1-beam laser
Laser pickup Semiconductor laser
D/A conversion 8-times oversampling digital fillter
+1- bit DAC
Frequency response
20-20,000 Hz
Outputs PHONES: stereo jack (3.5mm)
[20mW+20mW, 32 ohms at 1
kHz]
Line out stereo jack(3.5mm) 400mV/47Kohm
Input DC 4.5V for external power from
AC adaptor:
Power DC 3V fr m Alkaline batteries
(2 x AA or LR6): Not included.
DC 2.4V from the rechargeable
batteries: Not included.
Dimensions 129 (w) x 27(H) X 143(D) mm
Weight 280 grams (9.8 oz.) without
batteries
Supplied accessory
Stereo headphones (1)
The specifications and external appearance of this
unit are subject to change without notice.
Not included.
o
Page 8

SUBJECT TO MODIFICATION WITHOUT NOTICE!
 Loading...