

Page 1
A reference guide for using Elektrons Analog Four Synthesizer.
A4 Is developed by Swedish company Elektron and is an
analogue four voice synthesizer. 2 Analogue Oscillators, 2 Sub
Oscillators and a Noise Osc per voice. It contains 4 synth tracks,
FX Track, CV Track, and Sequencer.
ANALOG 4 REFERENCE GUIDE
A BLUESKYREPUBLIK PU
BLICATION
Page 2

ANALOG 4
REFERENCE
GUIDE
A BLUESKYREPUBLIK
PUBLICATION
INTRODUCTION
This guide is designed as a reference, based more on workflow.
Full details are given in the official A4 manual and hence this
guide a quick reference rather than in depth detail on each
parameter. It should be used in conjunction with the official A4
manual. It is ideally suited for new users but hopefully there is
also something for the more experienced user too.
Conventions used in the text
[FUNCTION] Physical Buttons are shown in square brackets.
(LEVEL) Rotary controls shown in curved bracked.
Combinations are shown with a + inbetween control sequence
i.e. [FUNCTION] + [KEYB C1]. Items shown in red on the A4 are
selected by [FUNCTION] + X.
Elektron: www.elektron.se
Elektron Forum: Elektron User
Blueskyrepublik Videos: www.youtube.com/user/BlueSkyRepublik
CONTENTS
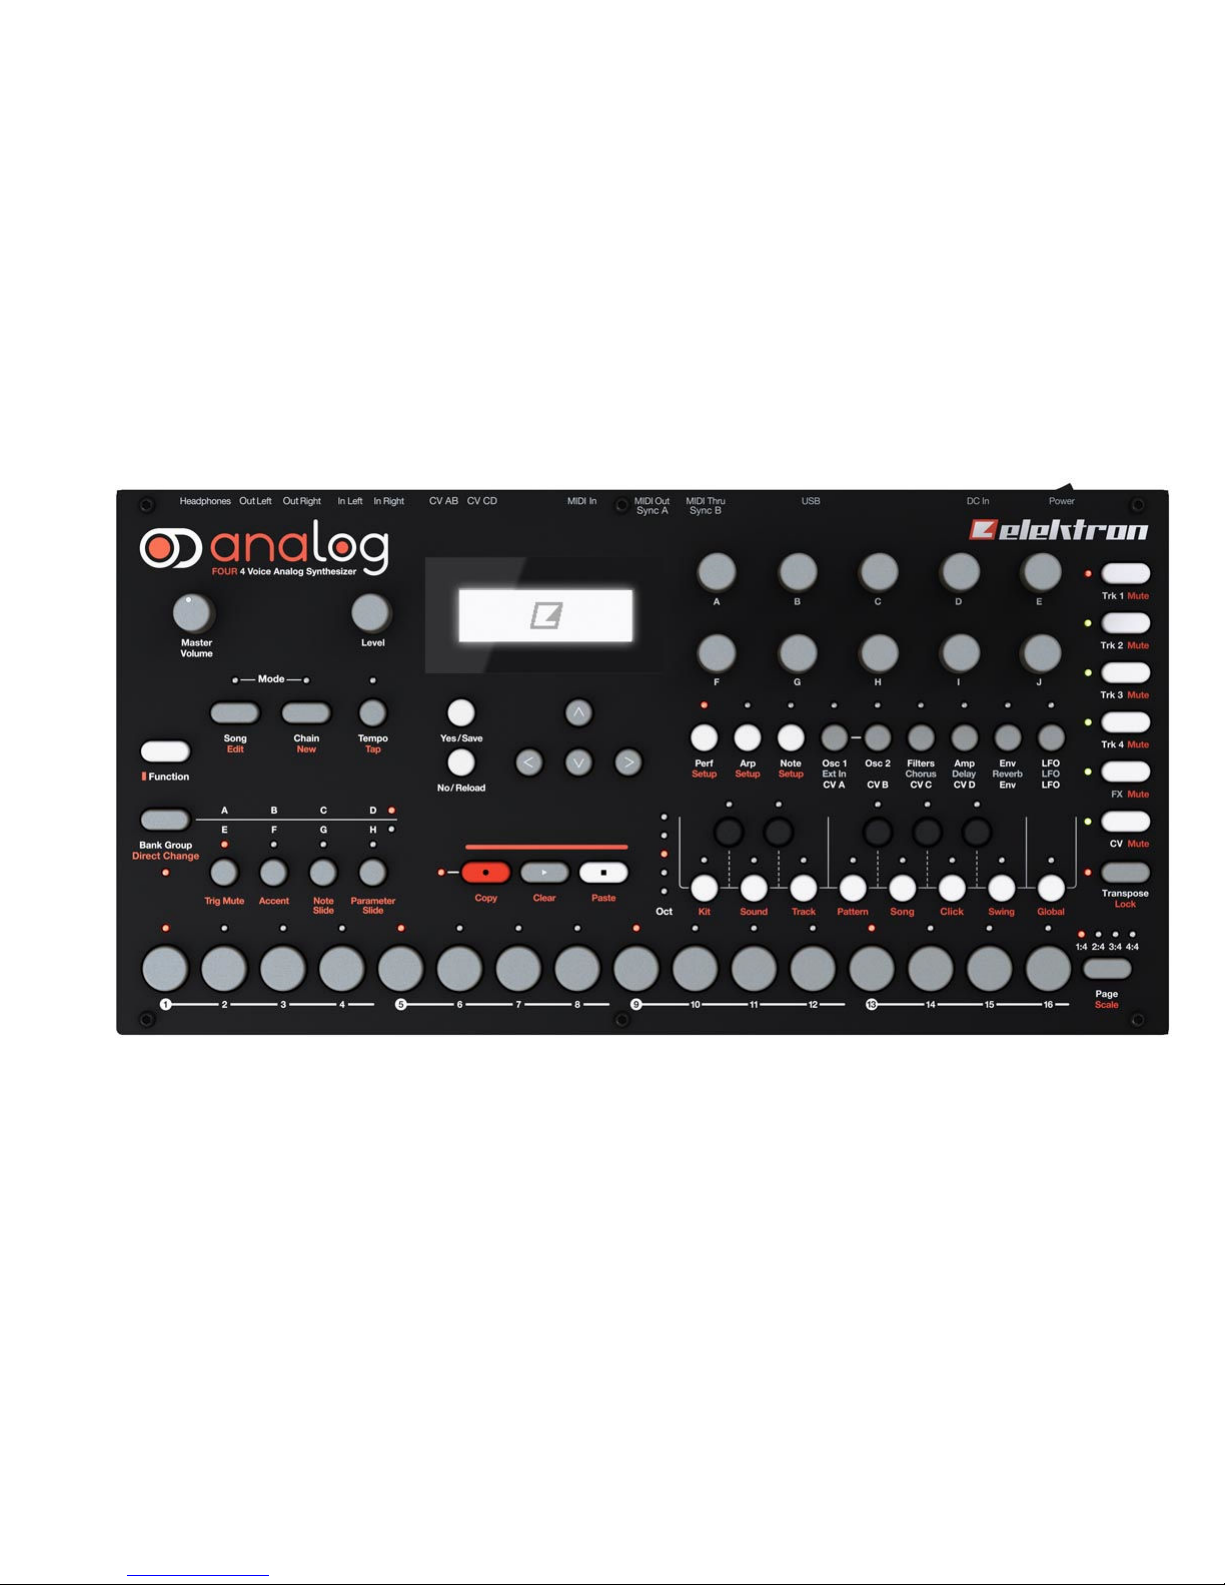
1. REFERENCE IMAGE
2. CONFIGURATION
3. GLOBAL
4. TRACKS & SOUNDS
5. KITS
6. SEQUENCER
7. PERFORMANCE MODE
8. CHAINS & SONGS
9. MIDI & CV
10. OTHER I/O
11. MISCELLANOUS
Page 3
Page 4
4
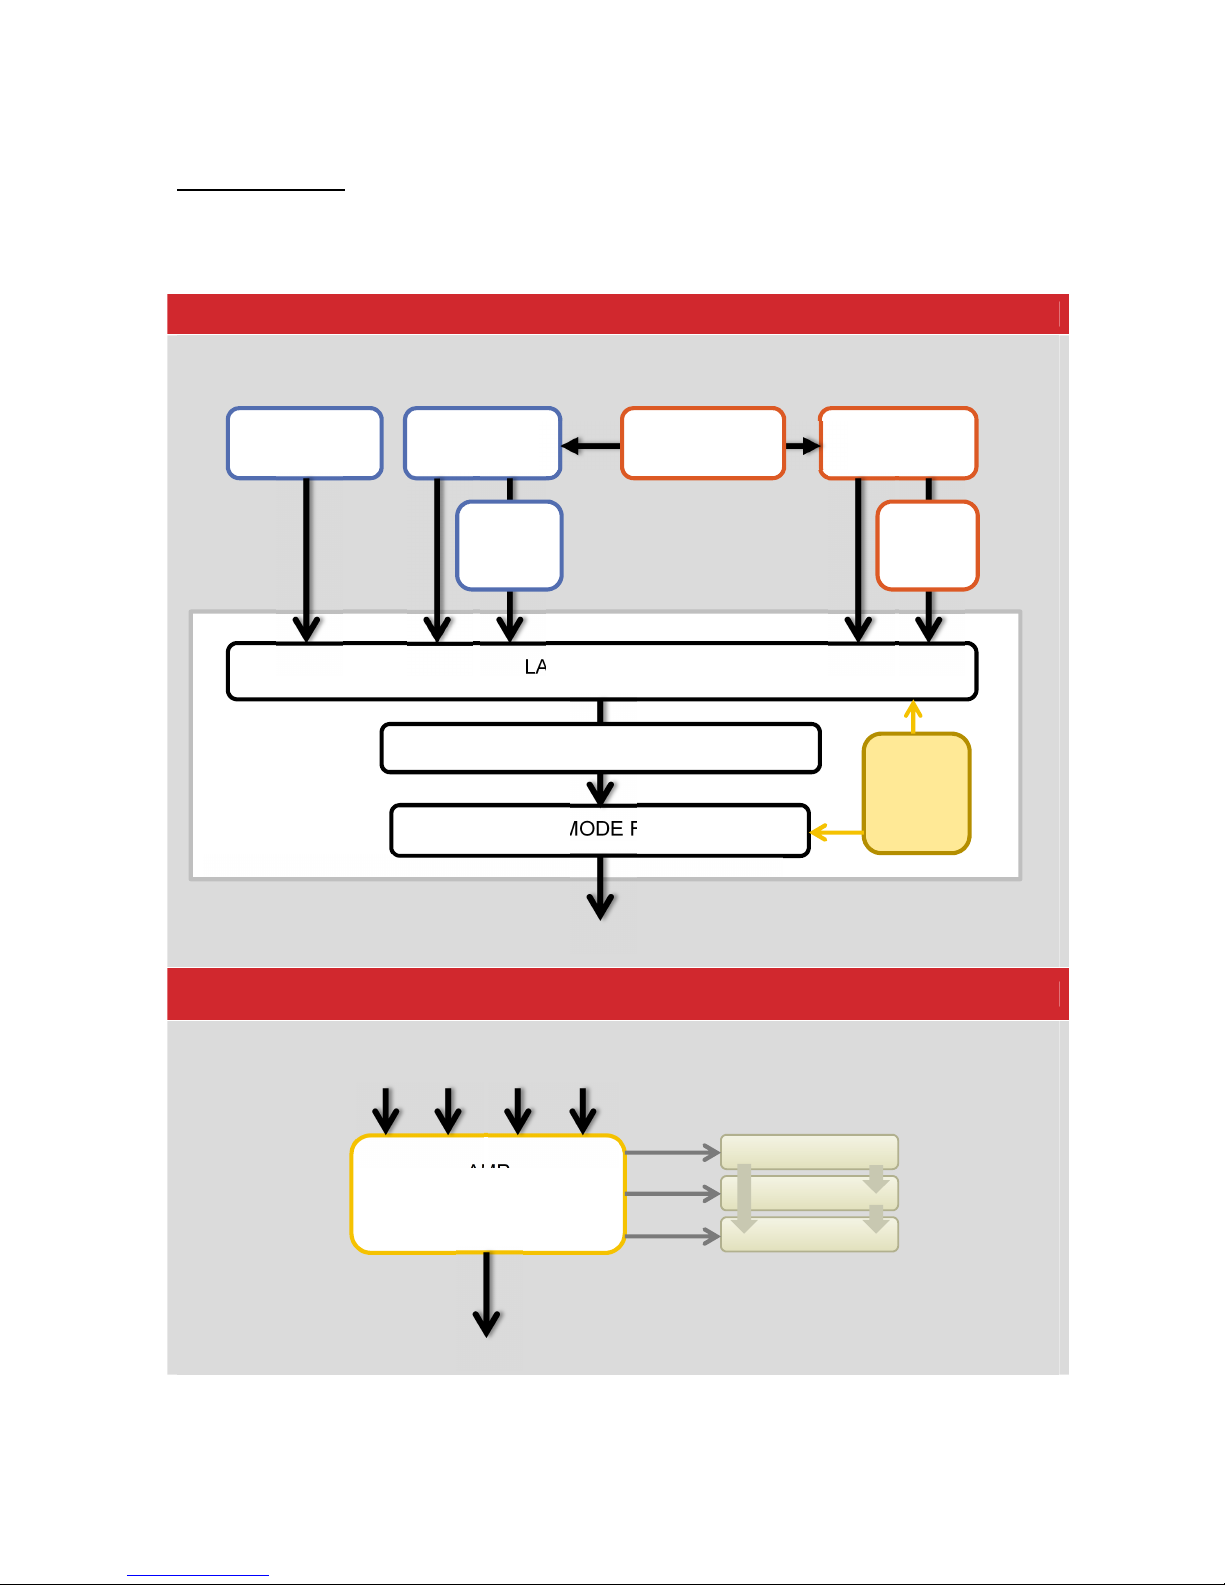
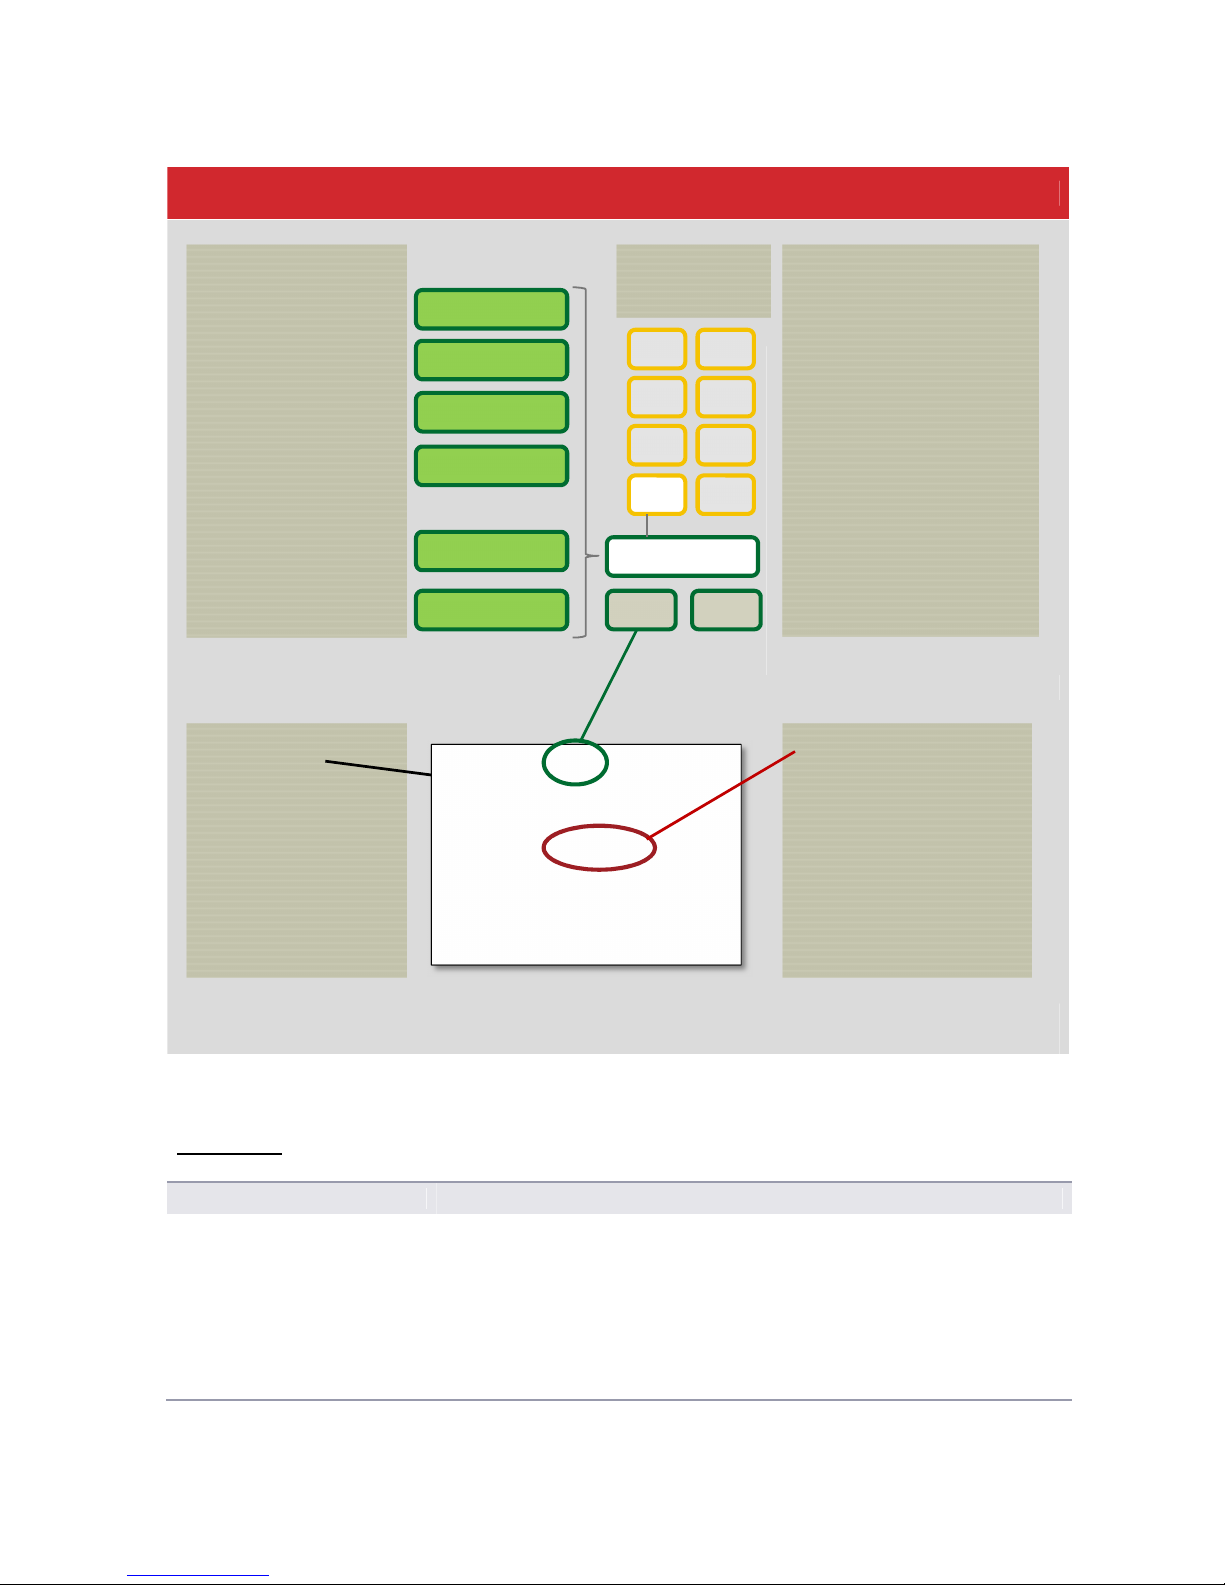
2. Configuration
The A4 contains 4 Voices, with 2 Osc, 2 Sub Osc and noise Osc per voice plus a ladder filter
and a multimode filer each.
Voice 1 to 4
Voice X (x4). Parameter pages are shown
Ouput Section
OSC 1
Page 1
OSC 2
Page 1
Noise OSC
Osc1 Page 2
LADDER FILTER
MULTIMODE FILTER
Filter Page 1
Overdrive Distortion
1/2 Mod & Sync
Osc2 Page 2
Sub
OSC 1
Page 1
Sub
OSC 2
Page 1
AMP
VCA/PAN/ ENV/VOL
CHORUS
DELAY
REVERB
ENVF
Page 1
Page 5
5
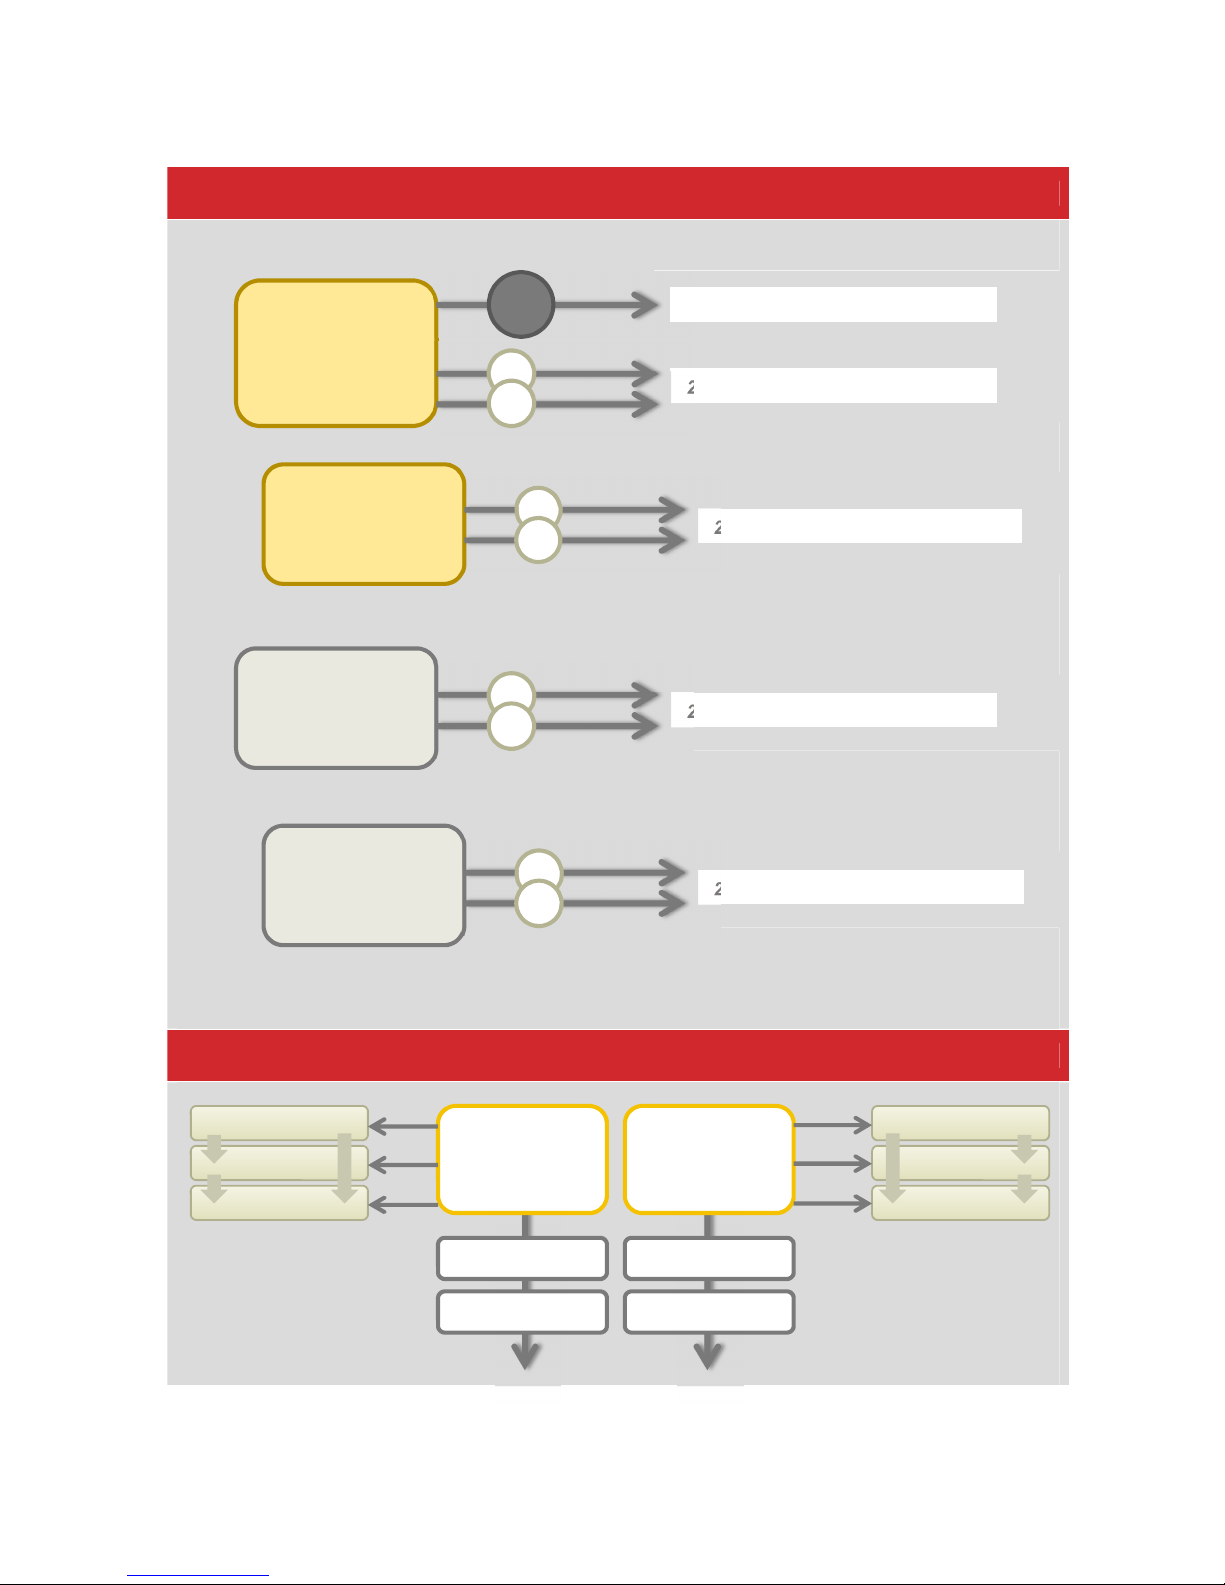
Modulation Section (Env & LFO)
External Routing (to FX Track)
ENVF
Page 1
2x ASSIGNABLE
DESTINATION
s
FILTER CUTOFF’s
FIXED DEST
ENV2
Page 2
2x ASSIGNABLE
DESTINATION
s
LFO1
Page 1
2x ASSIGNABLE
DESTINATION
s
LFO2
Page 2
2x ASSIGNABLE
DESTINATION
s
INPUT
Left
INPUT
Right
PAN
PAN
VOL
VOL
CHORUS
DELAY
REVERB
CHORUS
DELAY
REVERB
Page 6
6
Song Structure
3.0 Global
Accessing Global Settings
Press [FUNCTION] + [KEYB C2]
Navigating menus
1. Select Global Slot in global Menu
2. Use the [˄] and [˅] buttons (under the display) to navigate up and down
the menu options
3. Use the [<] or [>] buttons to select each parameter setting for the
selected option
4. Press [Yes /Save] to confirm / save the selection. Some parameters auto
save and this selection isn’t required.
5. Press [No / Reload] to cancel and backup from menu
Track 1 (Synth)
Track 2 (Synth)
Track 3 (Synth)
Track 4 (Synth)
Track 5 (FX)
Track 6 (CV)
SONG
•
Series of Song
Rows incl Chains
•
Max 16 songs
•
Songs are
played row by
row – top to
bottom
PATTERN
•
Trigs for Synth, CV &
FX + Trigless Locks
•
Parameter Locks
•
Trig Mutes
•
Accent. Swing &
Slide Trigs
•
ARP & Note
parameters
Linked Kit info
Track length / Time
Signatures
A
E
B
F
C
G
D
H
BANK
8 Banks host 16
Pattern 1 (A01)
A02
A03
KIT
•
Up to 4 Sounds
(1 per track) plus
CV and FX track.
Max 128 kits.
•
Level Settings
•
Performance
mode
parameters
•
Kits are linked to
patterns for
sequencing
_ _: 1x
A02 A01 A02
00: 4x B01
01: 1x D04 A04
02: 2x H01
03: 1x A01 A02
CHAIN
•
Sequence of
patterns shown in a
song row.
•
Max 64 chains are
available with 256
patterns
Page 7

7
Global Slot Selection
Up to 4 storage slots are available to save global configurations
1. Select Global Mode
2. Select ‘Global Slot’ in the menu options
3. Use [<] or [>] to select the desired slot
4. The setting flashes until [Yes / Save] is pressed to confirm.
Any global parameter changes will be stored in the selected slot
Synth Config Setup
Not recommended to change
1. Select Global Mode
2. Select ‘Synth Config’ in the menu options
3. Press [Yes / Save] to select
4. Select the ‘Master Tune’ and use [<] or [>] to adjust (440Hz default)
5. Use [<] or [>] to select ‘Calibration’
6. ‘Calibration’ op up widow appears, select [Yes/Save] to start or
[No/Reload] to cancel.
Other Options available in the
GLOBAL settings (detailed
elsewhere)
• Midi Config
• CV Config
• Sysex Dump
• OS Upgrade
4 Track & Sound Control
Track Configuration
Track 1- Synth Track, used for synth sounds per track
Track 2- Synth Track, used for synth sounds per track
Track 3- Synth Track, used for synth sounds per track
Track 4- Synth Track, used for synth sounds per track
Track 5- FX Track, used for effect send setup and external audio
Track 6- CV Track, used for controlling external CV and Gate signals.
See Song Structure in Section 2
Loading a Sound to a Track
1. Select a track to edit (1-4) by pressing [Trk 1], [Trk 2], [Trk 3] or [Trk 4]
2. Press [FUNCTION] + [KEYB D1] i.e. Sound
3. Select LOAD TRACK SOUND press [Yes/Save]
4. Use (LEVEL) control or [<] [>] buttons to browse stored preset sounds
5. Select [Yes/Save] to load highlighted sound
Or
1 Press [No/Reload] + [KEYBD D1] i.e. Sound for Quick Reload
Note: Sounds which are used in a sequencer pattern will show a step
indicator to avoiding changing sounds used in other patterns
Track LED Status
LED to the right of the button indicates:
☼
Red
Selected for Edit Unmuted Audible
☼
Green
Deselected Unmuted Audible
☼
Amber
Selected for Edit Muted Inaudible
☼
Off
Deselected Muted Inaudible
Muting / Unmuting Tracks
Select [FUNCTION] + [Trk X]
X = Track Number
Page 8

8
Saving Sounds
1. Select a track with sound to store by pressing [Trk 1], etc
2. Press [FUNCTION] + [KEYB D1] i.e. Sound
3. Select SAVE TRACK SOUND press [Yes/Save]
4. Use (LEVEL) control or [<] [>] buttons to browse to sound slot (max 128)
5. Select [Yes/Save] to store to highlighted sound slot
Or
1 Press [YES/SAVE] + [KEYB D1] i.e. Sound for Quick Save
Renaming Sound
1. Select a track with sound to rename i.e. [Trk 1], etc
2. Press [FUNCTION] + [KEYB D1] i.e. Sound
3. Select RENAME SOUND press [Yes/Save]
4. Use (LEVEL) control or [˄] [˅] buttons to change character
5. Use [<] [>] buttons to change text position
6. Press [Yes/Save] to store new name
Clear Sound from a Track
1. Select a track with sound to clear i.e. [Trk 1], etc
2. Press [FUNCTION] + [KEYB D1] i.e. Sound
3. Select CLEAR TRACK SOUND press [Yes/Save]
4. Press [Yes/Save] to confirm or [No/Reload] to cancel
Clearing a Track
1. Select a track to clear i.e. [Trk 1], etc
2. Select GRID RECORDING Mode by pressing [REC]
3. Press [FUNCTION] + [PLAY] i.e. Clear : Press again to UNDO
Copying / Pasting Track
1. Select a track to Copy i.e. [Trk 1]
2. Select GRID RECORDING Mode by pressing [REC]
3. Press [FUNCTION] + [REC] i.e. Copy
4. Select a Destination Track i.e. [Trk 2]
5. Press [FUNCTION] + [STOP] i.e. Paste : Press again to UNDO
Adjusting Sound Settings
1. Press [FUNCTION] + [KEYB D1] i.e. Sound
2. Select SOUND SETTINGS, press [Yes/Save]
3. Scroll to desired setting;
• Oscillator Drift – Select to increase warmth by adding subtle pitch drift
• Legato Mode – Active = Envelopes not retriggered for overlapping
keyboard or midi notes. Does not affect sequencer notes.
• Portamento – Pitch Slide between notes (Midi / Keyboard) Note Slide is
used for sequencer. ON / OFF / LEGATO (Overlapping notes only)
• Velocity to Vol. How midi velocity will affect volume. OFF / LOG
(Logarithmic curve) / LIN (linear curve) / EXP (Exponential)
• Velocity Mod
• Pitch Bend
• Modulation Wheel
• Breath Controller
• Aftertouch
Page 9

9
Playing a Sound
Use the Keyboard Keys to play a sound
C# D# E# F# G#
●● ●●●
○○○○○○○○
C1 D E F G A B C2
Use the
[˄] [˅] keys to move the keyboard octave up and down. Octave Led
on the left of the keyboard shows current position
Simulating a Chord Sound
1. Select ‘5th’ as Sub Oscilator Type
This will play a note 7 semitones below when playing notes
Editing a Synth Sound
1. Select a track with sound to edit by pressing [Trk 1], etc
2. To change the Track level use (LEVEL) Control (Left hand bargraph on
display shows set level)
3. Select PARAMETER page to edit [Osc1, Osc2, Filters, Amp, Env, LFO]
4. Display changes to show the selected parameter list. Where 2 pages
exist pressing the PARAMETER again will change to page 2.
See configuration section to see location of sound parameters.
Adding FX to Sounds
Chorus, Delay and Reverb are available on the FX track. See the
configuration section for order of effects.
1. Select a track with sound to edit by pressing [Trk 1], etc
2. Select the Amp section by pressing [AMP]
3. Adjust the control for (CHO) (DEL) (REV) to change the send amount.
4. Select the [FX] Track 5
5. Switch to the selected effect by pressing the [Chorus],[Delay], [Reverb]
button (these are indicated in grey under the performance buttons)
6. Adjust the effect settings as desired.
Note: The chain of effects means that Chorus signal can be routed to Delay
and Reverb, Delay signal can be routed to Reverb.
Quick Save & Reload of Track
1.Press [Yes/Save] + [KEYBD E1] i.e.Track for Quick Save
1. Press [No/Reload] + [KEYBD E1] i.e.Track for Quick Reload
Parameter Set
10 per page
Page No Bar
Level for Track
TUN FIN DET TRK LEV
WAV SUB PW SPD PWM
120
.0
OSC1
1:1:1
■
_ _ : [
A01 ]
KIT
gggg----YAZOO
YAZOOYAZOO
YAZOO
OFF
OFFOFF
OFF
OSC1
A01
A01A01
A01
Page 10

10
4.1. Envelopes and LFO’s
The A4 has a number of configurable modulation sources.
Track 1-4 Each Contains
• An output stage AMP Envelope per track.
• 2 Configurable and routable modulation envelopes per track, ENVF and ENV2.
• The first envelope ENVF also by default is linked to the 2 Filter’s cutoff.
• Each Envelope as 2 assignable modulation destinations.
• T2 LFO’s per track are also configurable and routable to 2 destinations each.
• These modulation sources form part of the synth track section and therefore are saved
with the sounds.
FX Track contains
• 2 Additional LFO’s (each with 2 destinations) dedicated to modulating the FX track
parameters.
• These modulation sources form part of a kit and therefore are saved with the kit.
Adjusting Amp Output section
Envelope
1. Select the Track to Adjust eg [Trk 1]
2. Press [Amp] performance button to select the Amplifier output
parameters
3. Adjust the ADSR and Shape setting as required.
Assigning an Envelope to a
track sound
1. Select Track to adjust eg [Trk 1]
2. Select sound Envelopes by pressing performance button [Env]
3. Press [Env] button to toggle Page 1, ENVF and Page 2 ENV2 to the
desired envelope.
4. Use control (G) or (I) to select Envelope destination
5. Adjust (H) or (J) to change depth i.e. amount of envelope used to
modulate the selected destination
6. Adjust the other Envelope parameters ADSR etc as desired
Assigning an LFO to a track
sound
1. Select desired Track to adjust eg [Trk 1]
2. Select LFO by pressing performance button [LFO]
3. Press [LFO] button to toggle Page 1, LFO1 and Page 2 LFO2
4. Use control (G) or (I) to select LFO destination
5. Adjust (H) or (J) to change depth i.e. amount of LFO used to modulate
the selected destination
6. Adjust the other LFO parameters Speed, Wav etc as desired
Assigning an LFO to the FX
track
1. Select FX Track to adjust [FX]
2. Select LFO by pressing performance button [LFO]
3. Press [LFO] button to toggle Page 1, LFO1 and Page 2 LFO2
4. Use control (G) or (I) to select LFO destination (FX Specific)
5. Adjust (H) or (J) to change depth i.e. amount of LFO used to modulate
the selected destination
6. Adjust the other LFO parameters Speed, Wav etc as desired
Page 11

11
5. KITS
A Kit is a combination of all 4 synth track sounds, FX and CV Tracks, Level Settings and
Performance mode parameters. Kits do not necessarily need to contain any sounds. but sound
settings are saved with kits. A pattern is always ‘linked’ to a kit. A maximum of 128 Kits can be
stored.
Kit Information
The Loaded Kit is displayed on the left of the display.
The kit name will briefly change when a new track is selected to show the
track sound
Loading a Kit
1. Press [FUNCTION] + [KEYB C1] i.e. Kit
2. Select LOAD KIT press [Yes/Save]
3. Use (LEVEL) control or [<] [>] buttons to browse stored kits
4. Select [Yes/Save] to load highlighted sound
Or
1 Press [No/Reload] + [KEYBD C1] i.e Kit for Quick Reload
Note: Small Circles are shown next to kits which are not used in a pattern
Reloading Kit to default saved
status
1. Press [FUNCTION] + [KEYB C1] i.e. Kit
2. Select RELOAD
3. Use [<][>] to cycle Current Kit (KIT) or (ALL KITS)
4. Press [Yes/Save]
Saving Kits
1. Press [FUNCTION] + [KEYB D1] i.e. Kit
2. Select SAVE KIT press [Yes/Save]
3. Use (LEVEL) control or [<] [>] buttons to browse to a kit slot to save the
new kit to (max 128)
4. Select [Yes/Save]
5. The Naming Menu Opens to create a name for the saved kit. Use
(LEVEL) control or [˄] [˅] buttons to change character
6. Use [<] [>] buttons to change text position
7. Press [Yes/Save] to store new name
Or
Press [YES/SAVE] + [KEYB C1] i.e.Kit for Quick Save
Note: Kit will be saved, linked to the currently selected pattern
Clearing Content of Current
Kit (Initialize)
1. Press [FUNCTION] + [KEYB D1] i.e. Kit
2. Select CLEAR KIT press [Yes/Save]
3. Select [Yes/Save] to confirm
TUN FIN DET TRK LEV
WAV SUB PW SPD PWM
120
.0
OSC1
1:1:1
■
_ _ : [
A01 ]
KIT
gggg----YAZOO
YAZOOYAZOO
YAZOO
OFF
OFFOFF
OFF
OSC1
A01
A01A01
A01
Page 12

12
Renaming Kit
Open Kit to be renamed and save it to its current location which allows
renaming at point of saving.
Copying / Pasting Kits
1. Press [FUNCTION] + [KEYB D1] i.e. Kit
2. Select the LOAD KIT or SAVE KIT Option, press [Yes/Save]
3. Use (LEVEL) control or [<] [>] buttons to browse to a kit slot to Copy from
and press [FUNCTION] + [REC] i.e. Copy
4. Use (LEVEL) control or [<] [>] buttons to browse to a kit slot to Paste to
and press [FUNCTION] + [STOP] i.e. Paste
5. Select [Yes/Save] to confirm
6. SEQUENCER
The Sequencer is the tool for creating and editing patterns which control the synth, FX and CV
playback. 16 patterns can be stored in one of 8 banks (A-H) giving a total of 128 Patterns.
Adjustments in patterns are automatically saved.
Definitions
Note Trig
A Step in the pattern that triggers a note in the synth
to create a melody or beat.
Step LED ☼ Fully Lit
Steps not configured to trig are shown off ☼
Trigless Locks
A Step in the pattern that does not trigger a note but
triggers a parameter change (parameter lock)
Step LED ☼ Half Lit
Steps not configured to trig are shown off ☼
Parameter Locks
Allows unique setting of parameters for each trig.
Can be used for Note and Trigless locks.
Sound Locks
Allows different sounds to be set for each sequencer
step.
Overview of Sequencer
Pages are activated using the [Page] Button in Grid [REC] Edit Mode.
[FUNCTION] + [Page] to Set up Grid / Scale settings
Steps – Trigs set for each step by selecting [TRIG] button
1 2 3 4 5 6 7 8 9 10 11 12 13 14 15 16
● ○ ○ ○ ● ○ ○ ○ ● ○ ○ ○ ● ○ ○ ○
Page
1
● ○ ○ ○ ● ○ ○ ○ ● ○ ○ ○ ● ○ ○ ○
Page
2
● ○ ○ ○ ● ○ ○ ○ ● ○ ○ ○ ● ○ ○ ○
Page
3
● ○ ○ ○ ● ○ ○ ○ ● ○ ○ ○ ● ○ ○ ○
Page
4
Page 13

13
Selecting a Pattern
1. Press [Bank Group] to select the group from which to choose a pattern.
Toggling the [Bank Group] switches between bank groups A-D and E-F.
2. Press [Bank A/E] or [Bank B/F] or [Bank C/G] or [Bank D/H] to select the
desired bank. Example Shows Bank E selected.
3. The Trig Key LEDs will illuminate half bright ☼ for a few seconds where a
pattern is loaded. Currently loaded pattern LED will show fully lit ☼
4. Select a pattern, while the Trig LEDs are illuminated, by pressing one of
the illuminated [TRIG] buttons. The Pattern is then loaded and indicated on
the display.
Patterns are named by the Bank + Trig Location, i.e. A01, E16 etc
Playing Pattern
1. Press [PLAY] to play the track
2. Select [STOP] to stop playback
3. To Stop all FXs and kill sounds press [STOP] [STOP]
Transport status is shown on the display
Pausing Playback
1. Press [PLAY] to Play the sequencer
2. Press [PLAY] while its running to Pause the sequencer
3. Press [PLAY] again to continue playback from paused position
Setting Tempo
1. Press [TEMPO] Button, Current Tempo is displayed
2. Use (LEVEL) control in units or [˄] [˅] buttons to adjust decimal setting.
Tempo is shown on the main display
Temporary Tempo Shift
1. Press [<] or [>] to shift Tempo +/-10% during playback or tempo setting
Immediately Change Patterns
to beginning during playback
(Direct Start Pattern Mode)
1. Press and toggle [FUNCTION] + [BANK GROUP]
2. Red ☼ ‘Pattern Mode’ LED indicates Direct Start mode is selected.
3. Select a new pattern. The pattern will start straight away from beginning
A B C D ☼
E F G H ☼
☼ ☼ ☼ ☼
TUN FIN DET TRK LEV
WAV SUB PW SPD PWM
120
.0
OSC1
1:1:1
■
_ _ : [
A01 ]
KIT
gggg----YAZOO
YAZOOYAZOO
YAZOO
OFF
OFFOFF
OFF
OSC1
A01
A01A01
A01
Page 14

14
Immediately Change Patterns
at same step during playback
(Direct Jump Pattern Mode)
1. Press and toggle [FUNCTION] + [BANK GROUP]
2. Yellow ☼ LED ‘Pattern Mode’ indicates Direct Start mode is selected.
3. Select a new pattern. The pattern will start at the same synchronised step
to the previous playing pattern.
Change Pattern at the end of
current pattern to start of new
(Sequential Pattern Mode)
1. Press and toggle [FUNCTION] + [BANK GROUP]
2. Off ☼ ‘Pattern Mode’ LED indicates Sequential (default) mode.
3. Select a new pattern. The pattern will start at the end of the current
pattern.
Saving a Pattern
1. Press [FUNCTION] + [KEYB F1] i.e. Pattern
2. Select the SAVE PATTERN option
3. Press [Yes/Save] – Pattern is saved
Or
1 Press [Yes/Save] + [KEYBD F1] i.e. Pattern for Quick Save
Reload an active Pattern
1. Press [FUNCTION] + [KEYB F1] i.e. Pattern
2. Select the RELOAD PATTERN option
3. Press [Yes/Save] – Pattern is saved
Or
1 Press [No/Reload] + [KEYBD F1] i.e. Pattern for Quick Reload
Clearing a Pattern
1. Press [FUNCTION] + [PLAY] i.e. Clear. Hold Until Timeout Window clears
2. Press [FUNCTION] + [PLAY] i.e. Clear again to UNDO Clear (if undo
possible is shown on the display)
Copying and Pasting Pattern
1. Select Pattern to Copy
2. Press [FUNCTION] + [REC] i.e. Copy; to copy current pattern
3. Navigate using [BANK GROUP] & [BANK] + [TRIG] to select a
destination pattern slot
4. Press [FUNCTION] + [STOP] i.e. Paste, Hold until Timeout window clears
Page 15

15
6.1 Creating and Editing a Basic Pattern
Composing a basic Pattern
using Grid Mode
1. Select the track to add a sound for a pattern i.e. [Trk 1]
2. Enter GRID RECORDING Mode by pressing the [REC] transport button.
The REC Led lights red ☼ and Rec ● is displayed on the main display.
3. Select the step page to edit (16 steps per page, 4 pages max) using the
[Page] button (see Scale). The selected page is shown by the fully lit LED.
4. Select the steps [TRIG] buttons for a desired NOTE TRIGs. Pressing a
Keyboard note first or as well as a TRIG will add Note Trigs. Step LED lights
fully for the step.
5. Press [FUNCTION] + [TRIG] for a TRIGLESS LOCK on a step. Step LED
is shown half lit.
6. Press [PLAY] to listen to the sequence
Shifting Sequence Steps (Grid
Mode)
1. When in GRID mode (i.e. REC )Press [FUNCTION] + [<] or [>] to shift
one step each press back and forth
Composing a basic Pattern
using Live Recording Mode
1. Select the track to add a sound for a pattern i.e. [Trk 1]
2. Press [REC] + [PLAY] Buttons
3. Sequence plays and is set to record. The Main display shows Rec ● and
Play ► and the REC LED Flashes in time with sequence.
4. Play the [KEYBD] Keyboard Keys in real time to record notes
5. To Erase notes in realtime press [TrkX] + [NO/RELOAD]. The trig step
triggered while erasing will delete the trig.
Multiple [Trk] Tracks can be pressed and erased
6. Press [STOP] to stop recording AND playback.
or
6. Press [PLAY] to keep sequencer playing but stop / exit recording mode.
Note: live recording uses micro timing quantize in GLOBAL -> Sequencer
Config section
Setting Micro Timing of Trig
Quantize in Grid Mode
1. Press [REC] to enter the GRID MODE
2. Press and hold a [TRIG] Key
3. Use [<] or [>] to adjust the TRIG uTM setting
Or
1. Press [REC] for GRID MODE
2. Press [NOTE] setting button
3. Press and hold a [TRIG] key
3. Adjust (D) to tune Quantize uTM
1 2 3 4
☼ ☼ ☼ ☼
Page 16

16
Quantize notes destructively
while recording
1. While recording press [FUNCTION] + Press Encoder (D)
Immediately Change Patterns
to beginning during playback
(Direct Start Pattern Mode)
1. Press and toggle [FUNCTION] + [BANK GROUP]
2. Red ☼ ‘Pattern Mode’ LED indicates Direct Start mode is selected.
3. Select a new pattern. The pattern will start straight away from beginning
Immediately Change Patterns
at same step during playback
(Direct Jump Pattern Mode)
1. Press and toggle [FUNCTION] + [BANK GROUP]
2. Yellow ☼ LED ‘Pattern Mode’ indicates Direct Start mode is selected.
3. Select a new pattern. The pattern will start at the same synchronised step
to the previous playing pattern.
Change Pattern at the end of
current pattern to start of new
(Sequential Pattern Mode)
1. Press and toggle [FUNCTION] + [BANK GROUP]
2. Off ☼ ‘Pattern Mode’ LED indicates Sequential (default) mode.
3. Select a new pattern. The pattern will start at the end of the current
pattern.
Copying / Pasting a
Sequencer Track Page
1. Select Track eg [Trk 1]
2. Select GRID MODE by pressing [REC]
3. Select Track Page [Page]
4. Copy Page by Pressing [Page] + [REC] i.e. Copy
5. Select Destination Page, [Page]
6. Press [Page] + [STOP] i.e. Paste: Press Again for Undo
Clearing Sequencer Track
Page
1. Select Track eg [Trk 1]
2. Select GRID MODE by pressing [REC]
3. Select Track Page [Page]
4. Clear by Pressing [Page] + [PLAY] i.e. Clear: Press Again for Undo
Setting Length and timing of
all track patterns (SCALE
MENU - Normal Mode)
1. Select SCALE MENU by [FUNCTION] + [Page]
2. Select [<] or [>] to select and highlight SCALE section (lower bar
indicates area selected)
3. Select [˄] or [˅] to Select the NORM check box (Normal mode). All track
lengths are the same in Normal mode.
4. Select [<] or [>] to select and highlight PATTERN section, Left number =
Number of Steps Selected i.e. 64/64. Note: 16 steps per page of the seq.
5. Use (LEVEL) or [˄] or [˅] to adjust setting
6. Select [>] to move to right number, i.e. Total Step length 64/64
(16,32,48,64 are the available options)
7. Use (LEVEL) or [˄] or [˅] to adjust setting
8. Change Time Signature with far right most number (options are 1/8X,
1/4X, 1/2X, 3/4X, 1X, 3/2X, 2X). Select [>] to move to far right number
9. Use [˄] or [˅] to select time signature
Note: Extending Patterns will also copy over the existing trigs
Quickly Changing Total
Pattern Length
1. Select SCALE MENU by [FUNCTION] + [Page]
2. Press [Page] to toggle through selected pattern length. Page LEDs
indicate Pattern length
Page 17

17
Quickly Changing Pattern
Steps
1. Select SCALE MENU by [FUNCTION] + [Page]
2. Press [TRIG] at selected step length position. Trig LEDs indicate step
length
Setting Length of individual
track patterns (SCALE MENU
- Advanced Mode)
1. Select Track eg [Trk 1] to adjust
2. Select SCALE MENU by [FUNCTION] + [Page]
3. Select [<] or [>] to select and highlight SCALE section (lower bar
indicates area selected)
4. Select [˄] or [˅] to Select the ADV check box (Advanced mode). All track
lengths can be set individually.
5. Select [<] or [>] to select and highlight TRACK section.
6. Adjust Steps and Length as per Normal mode above.
7. Select [<] or [>] to select and highlight MASTER section.
8. The First (left) number in this section indicates the total steps played
before track restarts. Adjust using (LEVEL) or [˄] or [˅]
9. The Second (right) number is the Master time signature
10. Select another track and follow same process for other Tracks
Note: Chained patterns are affected by this setting. Also the INF setting
(infinitely) will affect how this is.
Setting up a Click track
(internal metronome)
1. Press [FUNCTION] + [KEYB A1] i.e Click
2. Use [˄] or [˅] to navigate to selection
3. Use [<] or [>] to activate or deactivate metronome
4. Adjust TIME SIG NUMerator setting i.e. 4/4 (note measure)
5. Adjust TIME SIG DENominator setting i.e. 4/4 (beat measure)
6. Adjust PREROLL. Sets LIVE RECORDING mode count in, i.e.bars
metronome sounds before sequence starts
7. Adjust VOLUME of metronome.
Quick start of Metronome
1. Press [FUNCTION] + [KEYBD A1] [KEYBD A1] i.e. Click, twice to toggle
metronome ON/OFF
Page 18

18
6.2 Advanced Pattern Settings
NOTE Menu
The NOTE Menu [NOTE] allows control of the note settings for the active
track and are used for the TRIGs. These are not stored with Kits.
These are typically used as default settings for generating a number of
Trigs. For example changing the Length will allow trigs to be set using the
new length.
Settings are:
NOT - Note Value
VEL - Velocity
LEN - Length
uTM – Micro Timing, i.e. nudges Trig forward and back
ENV – Controls if the ENVF Envelope should be retriggered when a new
trig is activated
ENV – Controls if the ENV2 Envelope should be retriggered when a new
trig is activated
LFO – Controls if the LFO1 Envelope should be retriggered when a new trig
is activated
LFO – Controls if the LFO2 Envelope should be retriggered when a new trig
is activated
Enabling Track Transpose
1. Select Track i.e. [Trk 1]
2. Ensure ‘Track Transposable’ setting allows track to be transposed, i.e.
[FUNCTION] + [Note]
3. Use [˄] or [˅] to navigate to ‘TRK X TRANSPOSABLE’
4. Use [<] or [>] to activate or deactivate
5. Check affected Track can be transposed using [TRANSPOSE] + [Trk X]
Or
1. Select [TRANSPOSE] + [Trk X] to quickly select a track to transpose
With [TRANSPOSE] Pressed the Transposable Tracks are show fully lit
LED ☼
Quickly Activating Transpose
for a track
1. Select Track [Trk X]
2 Press and hold [TRANSPOSE]
3. Press [KEYBD X] any key, to perform the actual transposition
Note: Half lit ☼ TRANSPOSE LED indicates an active transpose in place
Locking Transpose mode
1. Select Track [Trk X]
2. Press [FUNCTION] + [TRANSPOSE], Transpose LED remains lit ☼
3. Press [KEYBD X] any key, to perform the actual transposition
Note: Trigs cannot be set with the keyboard when transpose is locked.
Clearing Transpose Keys 1. Press [TRANSPOSE] + [PLAY] i.e. Clear
Page 19

19
Changing Octave range of
keyboard
1. Use [˄] or [˅] to adjust octave range, keyboard octave led ☼ reflects
value
Destructing transpose
(permanent transposition of
trigs)
1. Select [Trk X] + [˄] or [˅]
Note: Transpose active is not needed for this function
Adjusting Pattern Swing
1. Press [FUNCTION] + [KEYBD B1] i.e. Swing
2. Use (LEVEL) or [˄] or [˅] to adjust swing % from 50% to 80%
Setting a tracks mute mask
per Trig (TRIG MUTE)
1. Select track [Trk X]
2. Press [FUNCTION] + [BANK GROUP A/E] i.e. Trig Mute
3. Press the [TRIG] of the step to mute, LED lights fully ☼ for Muted Trigs in
TRIG MUTE mode
Quick Mute of Trigs (TRIG
MUTE)
1. Select track [Trk X]
2. Select and Press Desired [TRIG] + [BANK GROUP A/E] i.e. Trig Mute
Bank A/E LED is Lit ☼ when TRIG is pressed if a Mute is in place
Clearing a tracks mute masks
(TRIG MUTE)
1. Select track [Trk X]
2. Press [FUNCTION] + [BANK GROUP A/E] i.e. Trig Mute
3. Press [FUNCTION] + [PLAY] i.e. Clear
Setting a Trig’s Vol / Filter
ENVF Behaviour (ACCENT)
1. Select track [Trk X]
2. Press [FUNCTION] + [BANK GROUP B/F] i.e. Accent
3. Adjust the (LEVEL) or [˄] or [˅] to change setting (0-127), higher value
means more accentuation.
4. Select [TRIG]s to be accentuated, which show fully lit ☼ in Accent mode
DEP Parameter in Filter ENVF affects amount of accent
Quick Vol / Filter Env Accent
of Trigs (ACCENT)
1. Select track [Trk X]
2. Select and Press Desired [TRIG] + [BANK GROUP B/F] i.e. Accent
Bank B/F LED is Lit ☼ when TRIG is pressed if a Accent is in place
Clearing a tracks Vol / Filter
Accents (ACCENT)
1. Select track [Trk X]
2. Press [FUNCTION] + [BANK GROUP B/F] i.e. Accent
3. Press [FUNCTION] + [PLAY] i.e. Clear
Sliding Notes between each
other (NOTE SLIDE)
1. Select track [Trk X]
2. Press [FUNCTION] + [BANK GROUP C/G] i.e. Note Slide
3. Select [TRIG]s to place a note slide, which show fully lit ☼ in Note Slide
mode
Pitch slides from note prior to the selected Note Slide Trig
SLI Parameter in OSC2 affects speed of slide
Page 20

20
Quick Note Slide between
each other (NOTE SLIDE)
1. Select track [Trk X]
2. Select and Press Desired [TRIG] + [BANK GROUP C/G] i.e. Note Slide
Bank C/G LED is Lit ☼ when TRIG is pressed if a Note Slide is in place
Clearing a tracks Note Slide
(NOTE SLIDE)
1. Select track [Trk X]
2. Press [FUNCTION] + [BANK GROUP C/G] i.e. Note Slide
3. Press [FUNCTION] + [PLAY] i.e. Clear
Sliding Parameters between
each other (PARAMETER
SLIDE)
1. Select track [Trk X]
2. Press [FUNCTION] + [BANK GROUP D/H] i.e. Parameter Slide
3. Set a Parameter Lock on a desired TRIG (see Parameter Lock Section)
4. Select [TRIG]s to place a parameter slide, which show fully lit ☼ in
Parameter Slide mode
Parameter slides from a parameter lock to unlocked and vice versa (one
must be a parameter lock)
speed of slide is affected by current tempo
Quick Parameter Slide
between each other
(PARAMETER SLIDE)
1. Select track [Trk X]
2. Select and Press Desired [TRIG] + [BANK GROUP D/H] i.e. Parameter
Slide
Bank D/H LED is Lit ☼ when TRIG is pressed if a Parameter Slide is in
place
Clearing a tracks Parameter
Slide (PARAMETER SLIDE)
1. Select track [Trk X]
2. Press [FUNCTION] + [BANK GROUP D/H] i.e. Parameter Slide
3. Press [FUNCTION] + [PLAY] i.e. Clear
6.3 Advanced Sound Pattern Design – Parameter & Sound Locks
Up to 128 different parameters can be locked in a pattern. All Parameters in the parameter
pages, ARP and NOTE menus can be locked. Actual Parameters must be adjusted not
performance controls.
Assigning a different sound
per Trig (SOUND LOCK)
1. Select Desired Track [Trk X]
2. Set to GRID MODE by pressing [REC], Rec LED lit
3. Press and Hold the selected Trig [TRIG]
4. Adjust the (LEVEL) Controller to select a new sound. The available
sounds appear in the browser on the left of the screen
5. Release the [TRIG] button and the sound is assigned to the Trig.
6. The Trig LED ☼ will Flash and by pressing and holding the [TRIG] button
the selected sound is displayed.
Page 21

21
Adjusting the parameters per
Trig in GRID Mode
(PARAMETER LOCK)
1. Select Track (Trk X]
2. Select GRID MODE by pressing [REC], Rec LED Lit
3. Press and Hold the selected Trig button [TRIG]
4. Adjust the Parameter using one of the DATA ENTRY Controls (A)-(J).
5. The Selected / Adjusted (locked) Parameter will indicate the value and
display inverted while the Trig button is pressed.
6. The Trig LED ☼ will Flash and by pressing and holding the [TRIG] button
the selected parameter is displayed and inverted.
Clearing individual parameters
per Trig in GRID Mode
(PARAMETER LOCK)
1. Select Track (Trk X]
2. Select GRID MODE by pressing [REC], Rec LED Lit
3. Press and Hold the selected Trig button [TRIG]
4. PRESS the DATA ENTRY Control (A)-(J) of the Parameter to clear
Trigs removed and re-entered also removes locks
Clearing all locked parameters
in GRID Mode (PARAMETER
LOCK)
1. Select Track (Trk X]
2. Select GRID MODE by pressing [REC], Rec LED Lit
3. Press and Hold the selected Trig button [TRIG] (or select multiple Trigs)
4. PRESS [PLAY] i.e. Clear
Adjusting the parameters per
Trig in LIVE Mode
(PARAMETER LOCK)
1. Select Track (Trk X]
2. Select LIVE RECORDING MODE by pressing [REC] + [PLAY], Rec LED
Flashes
3. Adjust the Parameter using one of the DATA ENTRY Controls (A)-(J).
Parameters per trig change as the control is adjusted through each step
Clearing locked parameters in
LIVE Mode (PARAMETER
LOCK)
1. Select Track (Trk X]
2. Select LIVE RECORDING MODE by pressing [REC] + [PLAY], Rec LED
Flashes
3. Press and Hold the [FUNCTION] + [NO/RELOAD] over the period of the
track to erase
Also switching to GRID mode allows individual erasure
Page 22

22
6.5. Arpeggiator
The A4 has an Arpeggiator per track i.e. Total of 6, the settings of which form part of the
pattern. These are not stored with the kit.
ARP MENU. Setting Note
Playback of Arp
1. Select Desired Track [Trk X]
2. Open Arpeggiator Setup Menu,by pressing [ARP] button
3. Functions available are:-
MOD – Mode (OFF, TRU – Playback as per order entered, UP – ascending
order, DWN – Descending order, CYC – Ascending then descending order,
SHF – Random over octave range (set by RNG), RND – randomized notes.
SPD – Speed of Arp, sync’ed to tempo.
RNG – Octave Range
LEG – Legato control. ON – Plays overlapping notes, releasing old after
new note. OFF – Sends MIDI note off before start of each arp note.
LEN – Length of Arp notes
NO2, NO3, NO4 – Offset in semitones for 3 arp notes (TRK KEY SCALE /
TRK KEY NOTE in NOTES SETUP affect this setting)
Creating a ARP Sequence
1. Select Track (Trk X]
2. Set up ARP Settings as above.
2. Open Arpeggiator – [FUNCTION] + [ARP], Track is indicated on the left of
display.
3. Set Length using Controller (E), Max length is 16.
4. Press [TRIG] buttons to select the desired ARP note (indicated on central
display)
5. Press and hold [TRIG] + (A) Control to adjust trig offset.
button to select the desired ARP note (indicated on central display)
7. Performance Mode
Performance mode is a powerful facility where up to 5 parameters, from any of the tracks, can
be assigned to one single macro controller. A maximum of 10 performance macros are
available, each assigned to a Data Entry knob (A) – (J). The Macro knob by default is 0-127
range, but bipolar settings are also possible. Performance mode settings are saved with the
kit. Performance macros cannot be parameter locked.
Page 23

23
Setting up a Performance
Macro Controller
1. Select [FUNCTION] + [Perf] to enter Performance Menu
2. Select PERF CONFIGURE option using (LEVEL) or [˄] or [˅] and
[YES/SAVE] to select
3. Select a desired DATA ENTRY knob to control the macro by turning the
selected knob or [˄] or [˅] and pressing [YES/SAVE] . These are named in
the menu alongside the controller (A)-(J).
4. Set Parameter 1 (Use Controllers A & F)
• Press (A) to cycle through Track selections to desired track
• Turn (A) to select the chosen tracks parameter
• Turn (F) to select the depth (offset) of the original track value
5. Repeat Step 4 for the other 4 parameters, use controller B/G for Param
2, C/H for Param 3, D/I for Param 4, E/J for Param 5.
6. Press [YES/SAVE] to complete the setting
Naming / Renaming a
Performance Control Macro
1. Select [FUNCTION] + [Perf] to enter Performance Menu
2. Select PERF RENAME option using (LEVEL) or [˄] or [˅] and
[YES/SAVE] to select
3. Select a desired DATA ENTRY knob to rename by turning the selected
knob or [˄] or [˅] and pressing [YES/SAVE]
4. Use (LEVEL) control or [˄] [˅] buttons to change character
5. Use [<] [>] buttons to change text position
6. Press [Yes/Save] to store new name
Setting Performance Macro
knob to Bipolar (-64 to +63)
mode
1. Select [FUNCTION] + [Perf] to enter Performance Menu
2. Select PERF CONFIGURE option using (LEVEL) or [˄] or [˅] and
[YES/SAVE] to select
3. In Edit mode, Press the (LEVEL) control until BiPolar is selected
Using the 5 Track mixer
1. Press [Perf] [Perf] to select Performance mode page 2, Perf LED lit dim.
2. Adjust The Track Levels using Track 1 = (A), Track 2 = (B), Track 3 = (C),
Track 4 =(D) and Track 5 = (E)
Using the Track Mutes for
immediate muting
1. Press [Perf] to select Performance mode.
2. Use Grid [Trig] 1-6 button to toggle Mute tracks.
3. Track LEDs also indicate the muted state as well as the display which
shows a – for a muted track and a □ for playable track. The Trig LED also is
off when muted
Using the Track Mutes for
delayed muting
1. Press [Perf] to select Performance mode.
2. Hold Grid [FUNCTION] + [Trig] 1-6 button to toggle Mute tracks in a
delayed fashion. Muted / Unmuted when key is released.
3. Tracks to be muted display with a X and those to be unmuted with a +
Page 24

24
8. Chains & Songs
Chains:Sequences of several patterns
Songs:Patterns and Chains structured in sequence to form a full song.
One Song is always active. Songs contain Song Rows (shown by row number i.e. 00,01,03
etc) and Scratch Pad Row (shown by _ _ )
Typical Workflow in structuring
a Song
• Create or select sounds and assign to tracks, creating a Kit
• Develop a pattern sequence per track (Trigs, Locks etc)
• Set up and save patterns in banks. These will be referenced as
Bank + Pattern i.e. A01, B05 etc
• Use Patterns to build chains i.e. series of Patterns
• Configure series of chains for the song structure
• Mix and playback
Playback of Song
Editing a CHAIN
1. Select [FUNCTION] + [KEYBD G1] i.e. Song to enter Song Menu
2. Select Option EDIT to modify an existing Song (may be cleared if a blank
song is required). Use (LEVEL) control or [˄] [˅] and [Yes/Save] to select.
Or
1. Press [FUNCTION] + [SONG] i.e Edit
3. Song Structure appears with highlighted current pattern.
4. To insert a new Pattern, navigate to location before or after a pattern
using [˄],[˅],[<],[>] (Highlighting a pattern will mean the pattern will be
replaced rather than inserted)
5. Select [Bank Group] desired
6. Select [Bank X/X] + [TRIG] of Pattern to add to chain.
7. Pattern now appears in the chain at the desired location.
8. Navigate to the 1x (or cycle number) and adjust control (A) to set the
number of chain cycles required in the song
_ _: 1x A02
A01 A02
00: 4x B01
01: 1x D04 A04
02: 2x H01
03: 1x A01 A02
Chain Mode Plays in Sequence Left to Rig
ht
1x, 2x etc indicates
number of times chain
plays before moving
to next song row
Song Mode Plays in
numerical order, top to
bottom
3
Current Pattern is highlighted as its played
A02
Page 25

25
Clear a CHAIN
1. Enter Song mode as shown in the ‘edit chain’ section.
2. Select the cycle setting number (i.e. 1x), number is highlighted with a box
when selected
3. Press [FUNCTION] + [PLAY] i.e. Clear : Undo function by repeating
Clearing single pattern from a
Chain
1. Enter Song mode as shown in the ‘edit chain’ section.
2. Select the Pattern to Clear (i.e. A01), number is highlighted with a white
box when selected
3. Press [FUNCTION] + [No/Reload]
Adding a new, blank scratch
pad row
1. Enter Song mode as shown in the ‘edit chain’ section.
2. Hold Grid [FUNCTION] + [CHAIN] i.e. new.
3. A new scratch pad row will be added and the previous one will form a
song row and added as 00. The current pattern will by default be the first
pattern in the chain.
Quick Pattern entry
1. In the standard page view a pattern can be entered into the currently
selected chain slot. Pressing [CHAIN] + [<],[>] will move the position as
indicated in the bottom left of the display
2. Select [Bank Group] desired
3. Select [Bank X/X] + [TRIG] of Pattern to add to chain.
4. Pattern now appears in the chain at the selected location. Need to
change to Song view to see the full song structure.
Copying / Pasting Chains
1. Enter Song mode as shown in the ‘edit chain’ section.
2. To select the copy chain, a good method is to select the cycle setting
number (i.e. 1x), number is highlighted with a box when selected
3. Press [FUNCTION] + [REC] i.e. Copy
4. Select the destination row i.e. the cycle setting number
3. Press [FUNCTION] + [STOP] i.e. Paste : Undo function by repeating
Play back modes for CHAINs
and SONGs
Playback Configuration
CHAIN
MODE
[CHAIN]
SONG
MODE
[SONG]
Playback Action
OFF
☼
OFF
☼
Current Pattern is played repeatedly
ON
☼
OFF
☼
Current Chain is played in sequence
repeatedly
OFF
☼
ON
☼
Song Plays through all rows (incl scratch
pad) then stops.
Pressing [STOP][STOP] to return to the
start position
On standard screen Row and Pattern are displayed bottom right corner
Song & Chain Modes cannot be selected together
Page 26

26
Song Display
►120.0
120.0120.0
120.0
Transport Status and BPM Tempo
0001:1
0001:10001:1
0001:1
Bars & Beats Played
----------------
TTTT––––64
6464
64
Pattern Transpose Offset
□□- □□□
Pattern Mute Status (Shows Track Muted)
- - - - : -
Start position of Next or Selected Pattern
Navigating Song Rows and
Patterns
• Use (LEVEL) or [˄],[˅] to Navigate Up and down the Song
•
Use [<],[>] to navigate across rows
•
Songs can be played from any position after selecting a pattern and
pressing [PLAY]
Adding a new Song Row
1. Select the row to enter a new row below
2. Press [FUNCTION] + [Yes/Save], new row is inserted below selected
row, Pattern A01 is added by default.
Adding Chains and Patterns See the edit Chain section for adding patterns and chains
Rearranging a Pattern in a
Chain
1. Select the pattern to move (highlight dark)
2. Press [FUNCTION] + [<] or [>] to move the pattern
Rearranging a Song Row in a
Song
1. Select the row to move (pattern highlight dark)
2. Press [FUNCTION] + [˅] or [˄] to move the pattern
Adding Mutes to Patterns
1. In Song Mode, Select (Highlight) Pattern to Mute
2. Press [FUNCTION] + [Trk X] for the track to mute for the selected pattern
Display shows muted track in bottom right corner when pattern is selected
Transposing a Pattern
1. In Song Mode, Select (Highlight) Pattern to Transpose
2. Press [TRANSPOSE] + [KEYBD X] for the new note setting for the
selected pattern
Display shows transpose pos in bottom right corner when pattern is
selected
Saving a Song
1. Select [FUNCTION] + [KEYBD G1] i.e. Song to enter Song Menu
2. Select Option SAVE using (LEVEL) control or [˄] [˅] and [Yes/Save] to
select.
3. Select a Song Slot to save to using (LEVEL) control or [˄] [˅] and
[Yes/Save] to select.
Or
1. Press [Yes/Save] + [KEYDB G1] to save to existing location
Page 27

27
Reloading active song (restore
to saved version)
1. Select [FUNCTION] + [KEYBD G1] i.e. Song to enter Song Menu
2. Select Option RELOAD using (LEVEL) control or [˄] [˅] and [Yes/Save] to
select.
Or
1. Press [No/Reload] + [KEYDB G1] to reload
Loading a new song
1. Select [FUNCTION] + [KEYBD G1] i.e. Song to enter Song Menu
2. Select Option LOAD using (LEVEL) control or [˄] [˅] and [Yes/Save] to
select.
3. Select a Song to Load and press [Yes/Save] to load
Clearing active song
1. Select [FUNCTION] + [KEYBD G1] i.e. Song to enter Song Menu
2. Select Option CLEAR using (LEVEL) control or [˄] [˅] and [Yes/Save] to
select.
3. Press [Yes/Save] to confirm
Renaming a Song
1. Select [FUNCTION] + [KEYBD G1] i.e. Song to enter Song Menu
2. Select RENAME option using (LEVEL) or [˄] or [˅] and [YES/SAVE] to
select
3. Use (LEVEL) control or [˄] [˅] buttons to change character
4. Use [<] [>] buttons to change text position
5. Press [Yes/Save] to store new name
9. MIDI & CV
The A4 Has MIDI IN, OUT and THRU as well as 2 dual CV Outputs (A&B, C&D) for connecting
to external devices.
9.1 MIDI Configuration
Setting MIDI Synchronization
(Transport & Clock)
1. Select [FUNCTION] + [KEYBD C2] i.e. Global Mode
2. Select MIDI CONFIG option using (LEVEL) or [˄] or [˅] and [YES/SAVE]
to select
3. Select MIDI SYNC option using (LEVEL) or [˄] or [˅] and [YES/SAVE] to
select
4. Set up Configuration Use (LEVEL) control or [˄] [˅] buttons to change
parameter and [<] [>] buttons to change status.
• CLOCK RECEIVE, = Accept External MIDI Clock
• CLOCK SEND, = Send A4 MIDI Clock
• TRANSPORT RECEIVE, = Accept MIDI System real time
messages (i.e. Play, Stop etc)
• TRANSPORT SEND, = A4 Sends MIDI System real time
messages (i.e. Play, Stop etc)
• PROG CH RECEIVE, = Accept MIDI Control of Pattern Change /
Queue
• PROG CH SEND, = A4 Sends MIDI Control of Pattern Change /
Queue
Page 28

28
Setting the MIDI Port
1. Select [FUNCTION] + [KEYBD C2] i.e. Global Mode
2. Select MIDI CONFIG option using (LEVEL) or [˄] or [˅] and [YES/SAVE]
to select
3. Select MIDI PORT CONFIG option using (LEVEL) or [˄] or [˅] and
[YES/SAVE] to select
4. Set up Configuration Use (LEVEL) control or [˄] [˅] buttons to change
parameter and [<] [>] buttons to change status.
• TURBO SPEED, = MIDI Transfer Multiplier (MIDI IN/OUT) for
compatible devices
• OUT PORT FUNC, MIDI = Send MIDI Data, DIN 24 Sync, DIN 48
Sync
• THRU PORT FUNC, Same As OUT PORT Settings
• INPUT FROM = DISABLED A4 disregards incoming MIDI, MIDI
Listens only to MIDI IN Port, USB listens only to USB Port MIDI,
MIDI + USB Listens to both
• OUTPUT TO = DISABLED A4 sends no MIDI, MIDI sends only to
MIDI IN Port, USB sends only to USB Port MIDI, MIDI + USB sends
to both
• PARAM OUTPUT = OFF Data Entry knobs do not send MIDI data,
NRPN Data Entry knobs send NRPN MIDI, CC Data Entry knobs
Send CC MIDI.
• ENCODER CFG = INT No MIDI Data is sent from Level & Data
Entry knobs, INT+EXT Level & Data Entry Sends MIDI
• KEYBOARD CFG = INT No MIDI Data is sent from Level & Data
Entry knobs, INT+EXT Level & Data Entry Sends MIDI
• RECEIVE NOTES, = External MIDI Keyboard Active
• RECEIVE CC/NRPM, = External MIDI Device CC/NRPN Active
Setting Up MIDI Channels
1. Select [FUNCTION] + [KEYBD C2] i.e. Global Mode
2. Select MIDI CONFIG option using (LEVEL) or [˄] or [˅] and [YES/SAVE]
to select
3. Select MIDI CHANNELS option using (LEVEL) or [˄] or [˅] and
[YES/SAVE] to select
4. Set up Configuration Use (LEVEL) control or [˄] [˅] buttons to change
parameter and [<] [>] buttons to change status.
• TRACK 1 CHANNEL, Selects the dedicated MIDI channel to control
the tracks synth, OFF means incoming messages disregarded
• TRACK 2 CHANNEL, Selects the dedicated MIDI channel to control
the tracks synth, OFF means incoming messages disregarded
• TRACK 3 CHANNEL, Selects the dedicated MIDI channel to control
the tracks synth, OFF means incoming messages disregarded
• TRACK 4 CHANNEL, Selects the dedicated MIDI channel to control
the tracks synth, OFF means incoming messages disregarded
• TRACK FX CHANNEL, Selects the dedicated MIDI channel to
control the track FX, OFF means incoming messages disregarded
• TRACK CV CHANNEL, Selects the dedicated MIDI channel to
control the track CV, OFF means incoming messages disregarded
• PERF CHANNEL, Selects the dedicated MIDI channel for sending
performance knobs, OFF means incoming messages disregarded
• AUTO CHANNEL, Selects the MIDI channel to control the currently
active track for keyboard / performance knobs, OFF means
incoming messages disregarded
• PROG CH IN CH, Selects the Channel for Program Change inputs
(Pattern change)
• PROG CH OUT CH, Selects the Channel for Program Change
outputs (Pattern change)
Page 29

29
Sending MIDI DIN Sync
1. Press [PLAY] to start clock with a 2 millisecond delay to allow devices to
react.
2. Press [STOP] and [STOP] again will prepare sync and hold clock until
[PLAY] is pressed or a midi start message is sent (no delay)
9.2 CV Configuration
2 dual (AB)(CD) ¼” , Control Voltage / Gate outputs and a CV Track for control of the output
are available on the A4.
CV / Gate Overview
Typically CV/Gate signals were used on traditional analogue synthesizers as a means to
communicate with each other. MIDI later superseded CV, however CV/Gate functions have
again become popular to allow communication with older and modular equipment and where
improved resolution is required.
Although the implementation of CV can vary, it typically uses a mechanism of Voltage per
Octave (1V per Octave) and Hertz per Volt as controls. The A4 Supports both as well as a
linear control voltage output.
Gate is a pulsed output to trigger note events. Two types are typically used, Voltage Trigger (VTrig) and Short Circuit trigger (S-Trig)
NOTE: It is important to use the correctly wired connections and cables when using
CV/MIDI for the selected configuration to ensure proper operation and to protect the
integrity of any hardware equipment.
Page 30

30
Setting CV / Gate Settings
1. Select [FUNCTION] + [KEYBD C2] i.e. Global Mode
2. Select CV CONFIG option using (LEVEL) or [˄] or [˅] and [YES/SAVE] to
select
3. Select CV x CONFIG (where x is the selected channel A,B,C or D) option
using (LEVEL) or [˄] or [˅] and [YES/SAVE] to select
Or
1. Select [CV] i.e. CV Track
2. Select [FUNCTION] + [CV x] where x is the channel, A,B,C or D
3. Set up Configuration Use (LEVEL) control or [˄] [˅] buttons to change
parameter and [<] [>] buttons to change status.
• TYPE, Type of Signal sent to the output, GROUNDED = Turns CV
Off, PITCH V/OCT, PITCH HZ/OCT, VALUE LIN, TRIG Note Start
Short Pulse, GATE Long Pulse at Note Duration.
See Table for further details
CV / GATE Settings
Function Parameter Parameter Parameter
PITCH V/OCT
MIDDLE C
Overall Pitch Tuning
V/OCT
Pitch width of signal
---
PITCH HZ/OCT
TUNING
overall Tuning of Pitch CV
OCTAVE WIDTH
Pitch width of signal
---
VALUE LIN
MIN
Lowest allowed voltage
level
MAX
Highest allowed voltage
level
---
TRIG
LENGTH
Length of Trig signals sent.
Allows adjustment to match
equipment that needs
longer pulses
POLARITY
Selects the polarity of trig
signals sent (V Trig or S
Trig) to match equipment
connected
LEVEL
Sets Trig levels in volts,
typically 5V is adequate.
GATE
---
Page 31

31
9.3 CV Track
The CV Track parameters will change depending on what the CV Configuration for each
channel is set to. Typically the parameters that are common are TUN / FIN for Course and Fine
Tuning, VAL, Voltage Level of CV (Value Lin), SRC, Notes for Sending to CV Output.
Selecting CV Track
1. Select [CV] i.e. CV Track
2. Select [CV x] where x is the channel, A,B,C or D for the selected CV
channel. Parameters shown will change depending upon CV Config.
Assigning Tracks to CV Output
1. Select [CV] i.e. CV Track
2. Select [CV x] where x is the channel, A,B,C or D.
3. Adjust (E) Controller for assigning Track 1-4, FX or CV to CV Output
Identifying Output Connection
required
1. Select [CV] i.e. CV Track
2. Select [CV x] where x is the channel, A,B,C or D.
3. Plug indicator at the bottom of display shows the Tip or Ring flashing
showing how the connection will send CV/Gate signals
10. Other I/O
Installing KITS using SYSEX
Requires connection to external Sysex source i.e. PC or MAC via MIDI /
USB MIDI and a SYSEX File Utility e.g. Elektron’s C6 SysEx Tool
1. Select [FUNCTION] + [KEYBD C2] i.e. Global Mode
2. Select SYSEX DUMP option using (LEVEL) or [˄] or [˅] and [YES/SAVE]
to select
3. Select SYSEX RECEIVE
4. Select KIT and location to store downloaded KIT, using (LEVEL) or [˄] or
[˅] and [YES/SAVE] to select
5. System Waits to receive data
Use a SysEx tool to send KIT file
Installing PATTERN, SOUND,
GLOBAL Slot, SONG using
SYSEX
Follow same process as for KIT above
Page 32

32
Saving KITS using SYSEX
Requires connection to external Sysex source i.e. PC or MAC via MIDI /
USB MIDI and a SYSEX File Utility e.g. Elektron’s C6 SysEx Tool
1. Select [FUNCTION] + [KEYBD C2] i.e. Global Mode
2. Select SYSEX DUMP option using (LEVEL) or [˄] or [˅] and [YES/SAVE]
to select
3. Select SYSEX SEND
4. Select KIT and location to save to PC, using (LEVEL) or [˄] or [˅] and
[YES/SAVE] to select
5. System Waits to send data
Use a SysEx tool to receive KIT file
Saving PATTERN, SOUND,
GLOBAL Slot, SONG using
SYSEX
Follow same process as for KIT above
Upgrading OS
Requires connection to external Sysex source i.e. PC or MAC via MIDI /
USB MIDI and a SYSEX File Utility e.g. Elektron’s C6 SysEx Tool
1. Select [FUNCTION] + [KEYBD C2] i.e. Global Mode
2. Select OS UPGRADE option using (LEVEL) or [˄] or [˅] and [YES/SAVE]
to select
Or
1. Press [FUNCTION] while turning on the power switch to the A4
2. Press [TRIG 4] for OS Upgrade and confirm
3. System Waits to receive data
4. Cancel with [No/Reload] if necessary
Use a SysEx tool to receive OS Update file. System Restarts when
complete and OS Version is show on startup screen
Connecting an External Audio
Signal
1. The A4 has 2 (L & R) ¼” Inputs for connecting an external audio signal
that feed into the FX Track. (See Configuration Diagrams)
2. Select the FX Track by pressing [FX].
3. Press [Ext In] and the set up parameters appear on the display.
4. The Volume, Pan and FX Sends for Chorus, Delay and Reverb are
adjustable for the External Input.
Page 33

33
11. Miscellaneous
Test Mode
1. Press [FUNCTION] while turning on the power switch to the A4
2. Press [TRIG 1] for Test Mode
3. The Diagnostic results should show 0 Errors, UI [+] and NVRAM [+]. If
errors occur contact Elektron.
Erasing ALL Kits, Patterns,
Sounds and Songs
1. Press [FUNCTION] while turning on the power switch to the A4
2. Press [TRIG 2] for Empty Reset and confirm
3. All Kits, Patterns, Sounds and Songs are erased.
Factory Reset
1. Press [FUNCTION] while turning on the power switch to the A4
2. Press [TRIG 3] for Factory Reset and confirm
3. The unit will be restored to factory settings.
 Loading...