


Electromatic Equipment Co., Inc.
-12-
NOTES
Electromatic Equipment Co., Inc.
-1-
TABLE OF CONTENTS
1.0 Introduction ………………………………………………………..… 2
2.0 Calibration curves ……………….………………………………..… 4
3.0 Design of the device ……………………………………………….. 5
3.1 Menu
3.2 Keypad symbols
4.0 Most common reasons for miss readings ……….……………..… 8
5.0 Device maintenance instructions ………………………………..… 8
6.0 Changing batteries ………………………………………………..… 9
7.0 Determination of the material moisture …………………………… 9
8.0 Technical data …………………………………………………….… 10
10.0 Warranty ……………………………………………………………… 11

Electromatic Equipment Co., Inc.
-2-
1.0 INTRODUCTION
1. Place the empty provided cup (0.5 litre) on the scale
and turn the scale on. It shows 0.0 gram.
2. Fill up the cup with the sample material (+/- 1.0g). The
fill quantity is shown on the upper left corner on the
display of the humimeter FS2.
3. Make sure that the measuring chamber is completely
empty. It is important that no material is left in the
measuring chamber when you turn on the device.
4. Switch on the humimeter FS2 by pressing the power
button (
) for 3 sec.
5. As the next step, please do the self calibration. The
word “calibrate” will show up on your display. Accept
by pressing the
button.
6. In case a menu point is shown, press the left button
( ) until you reach the measuring window.
7. Select the right calibration curve for your material
under test using the buttons
or .
Electromatic Equipment Co., Inc.
-11-
9.0 WARRANTY
Electromatic Equipment Co., Inc. (Electromatic) warrants to the original purchaser
that this product is of merchantable quality and confirms in kind and quality with the
descriptions and specifications thereof. Product failure or malfunction arising out of
any defect in workmanship or material in the product existing at the time of delivery
thereof which manifests itself within one year from the sale of such product, shall be
remedied by repair or replacement of such product, at Electromatic’s option, except
where unauthorized repair, disassembly, tampering, abuse or misapplication has
taken place, as determined by Electromatic. All returns for warranty or non-warranty
repairs and/or replacement must be authorized by Electromatic, in advance, with all
repacking and shipping expenses to the address below to be borne by the
purchaser.
THE FOREGOING WARRANTY’S IN LIEU OF ALL OTHER W ARRANTIES,
EXPRESSED OR IMPLIED, INCLUDING BUT NOT LIMITED TO, THE
WARRANTY OF MERCHANTABILITY AND FITNESS FOR ANY PARTICULAR
PURPOSE OR APPLICATION. ELECTROMATIC SHALL NOT BE RESPONSIBLE
NOR LIABLE FOR ANY CONSEQUENTIAL DAMAGE, OF ANY KIND OR
NATURE, RESULTING FROM THE USE OF SUPPLIED EQUIPMENT, WHETHER
SUCH DAMAGE OCCURS OR IS DISCOVERED BEFORE, UPON OR AFTER
REPLACEMENT OR REPAIR, AND WHETHER OR NOT SUCH DAMAGE IS
CAUSED BY MANUFACTURER’S OR SUPPLIER’S NEGLIGENCE WITHIN ONE
YEAR FROM INVOICE DATE.
Some State jurisdictions or States do not allow the exclusion or limitation of
incidental or consequential damages, so the above limitation may not apply to you.
The duration of any implied warranty, including, without limitation, fitness for any
particular purpose and merchantability with respect to this product, is limited to the
duration of the foregoing warranty. Some states do not allow limitations on how long
an implied warranty lasts but, not withstanding, this warranty, in the absence of such
limitations, shall extend for one year from the date of invoice.
Electromatic Equipment Co., Inc.
600 Oakland Ave. Cedarhurst, NY 11516 - USA
Tel: 1-800-645-7330 / Tel: 516-295-4300 / Fax: 516-295-4399
Every precaution has been taken in the preparation of this manual. Electromatic assumes no
responsibility for errors or omissions. Neither is any liability assumed for damages resulting
from the use of information contained herein. Any brand or product names mentioned herein
are used for identification purposes only, and are trademarks or registered trademarks of their
respective holders.
Electromatic Equipment Co., Inc.
-10-
8.0 TECHNICAL DATA
Resolution of the display 0,1% water content
0,5°C temperature
Measuring range 5 up to 50 % depending on the material
Operation temperature 0°C up to 40°C
Storage temperature -20°C up to 60°C
Temperature compensation Automatically
Power supply 4 pcs. 1.5 Volt AA Alkaline batteries
(1800 measurements)
Auto Switch OFF After app. 6 minutes
Current consumption 55 mA (with light)
Display 128 x 64 matrix display (lighted)
Dimensions 260 x 70 x 250 mm
Weight app. 1.3 kg (with batteries)
Degree of protection IP 40
Scope of supply Plastic case
Digital scale 1000g
Measuring cup 0.5 litre
4 x 1.5Volt AA Alkaline Batteries
Electromatic Equipment Co., Inc.
-3-
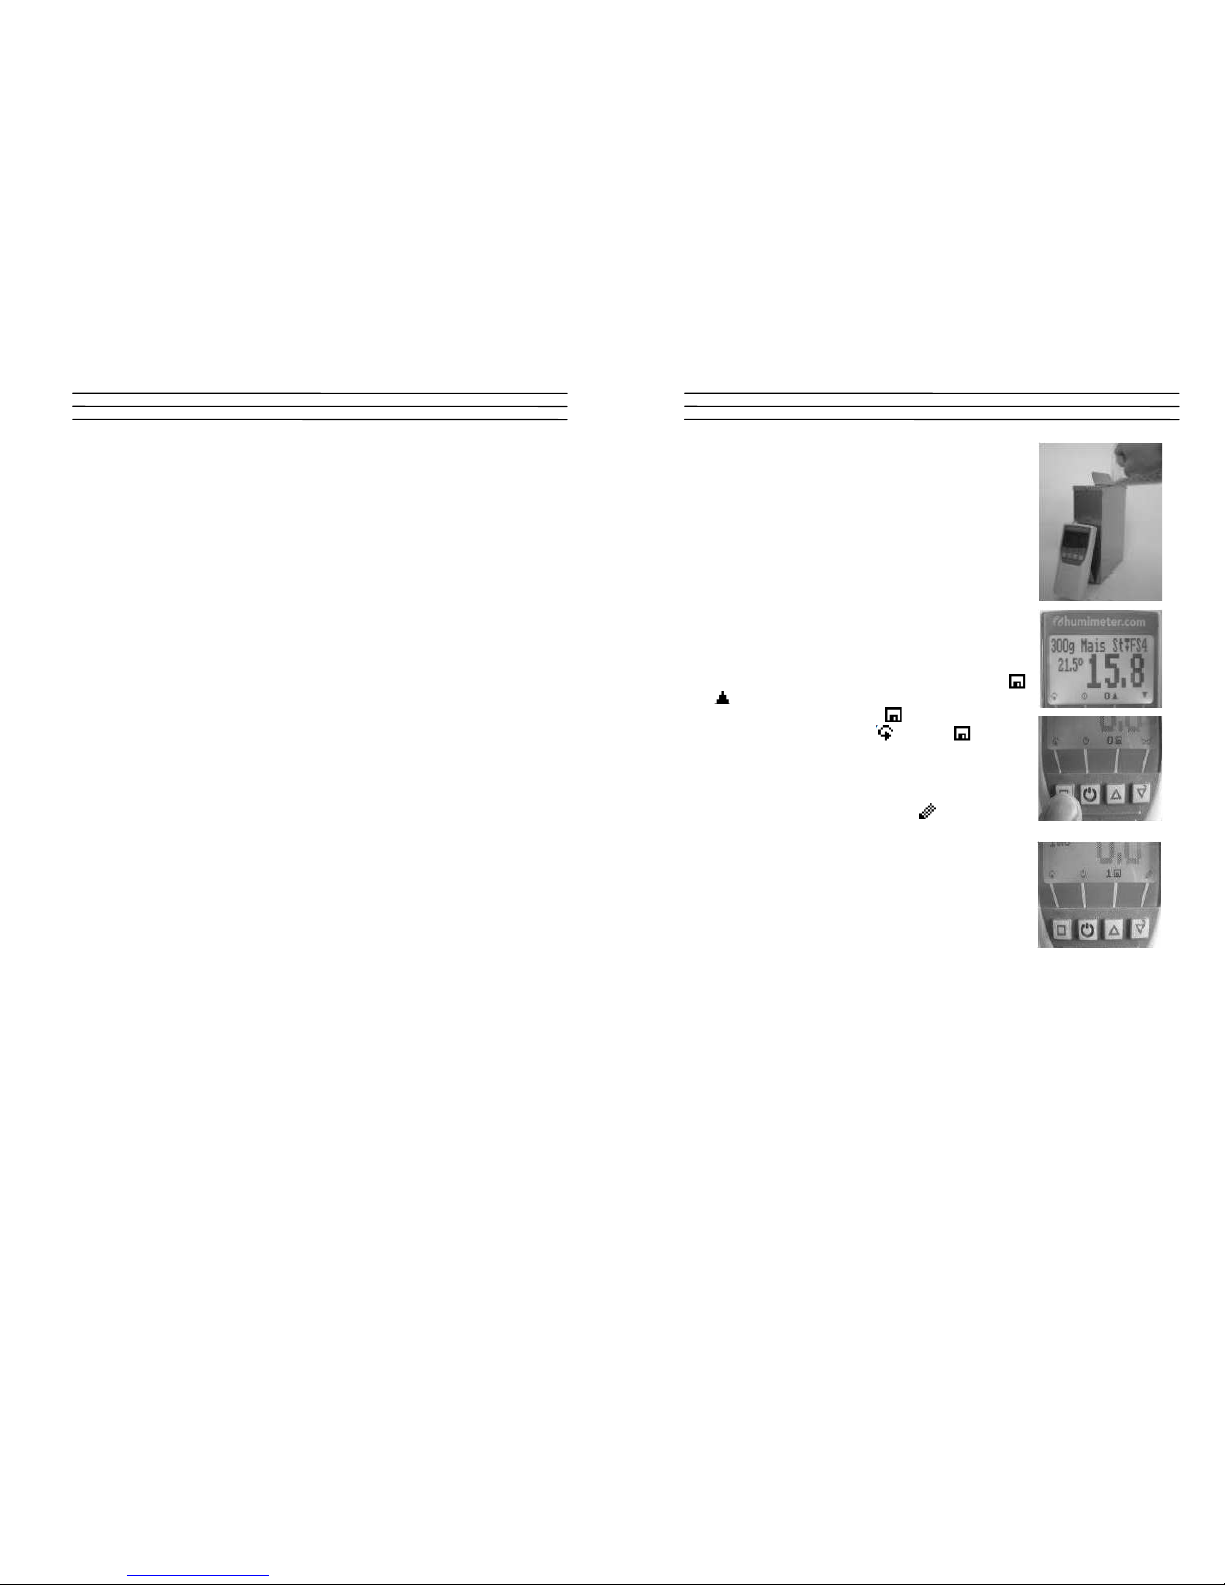
8. Fill up the measuring device with the sample material.
The filling needs to be done slowly and constantly to
ensure reproducible results.
9. The display shows the measuring result.
10. To save the results in the stor menu press the
( button). The storage was successful when the
number in front of the symbol
increased. To reach
the store menu please press (
) until the appears.
11. To name the saved results press the
button.
12. Empty the humimeter and ensure that no grain rests
are accumulated in the measuring chamber.

Electromatic Equipment Co., Inc.
-4-
2.0 CALIBRATION CURVES
Name of Calibration
curve
Material
under test
Fill quantity
300g corn stand. corn standard 300g
300g corn hand corn hand reaped 300g
300g rye rye 300g
300g triticale triticales 300g
300g whea/spe.pe wheat / spelt peeled 300g
300g barley barley 300g
190g oats oats 190g
300g rape rape 300g
230g pumpkin pumpkin seed 230g
310g peas peas 310g
300g soybean soybean 300g
277g beetle beans beetle bean 277g
295g horse bean horse bean 295g
180g sunflower sunflower seed 180g
reference -------- --------
Reference: To test the humimeter FS2. Do not use for measuring the moisture!
Electromatic Equipment Co., Inc.
-9-
6.0 CHANGING BATTERIES
Your new device is provided with batteries.
Change the batteries:
1. Press with your finger onto the arrow of the battery
cap and pull it back.
2. Remove the empty batteries.
3. Put four new batteries in the device. Make sure the
position of the battery poles is correct.
4. Press down the batteries and close the cap.
7.0 DETERMINATION OF THE MATERIAL MOISTURE
The principle is a comparison measurement with the drying out method according to
DIN 10350: 1967 09. Take the measured sample and weigh it. Dry it out in an oven
and weigh it again. Following formula can be taken to determine the absolute
moisture:
Note: The dried material may not be used any more for measuring purposes!
Mn : Mass with average moisture content
M
t
: Mass of the dried sample
%F : Calculated absolute moisture
Exemption from liability
For miss-readings and wrong measurements and of this resulting damage we refuse
any liability. This is a device for quick determination of moisture. The moisture
depends on multiple conditions and multiple materials. Therefore we recommend a
plausibility check of the measuring results. Each device includes a serial number
and the guarantee stamp. If those are broken, no claims for guarantee can be
made. In case of a faulty device, please contact Electromatic.
%F = x 100
Mn - M
t
Mn

Electromatic Equipment Co., Inc.
-8-
4.0 MOST COMMON REASONS FOR MISS READINGS
• Product temperature out of application range
Material below 0°C resp. above 40°C (32 to 104 °F) may cause faulty
measurements. The storage of cold material in a warm storage area usually
creates condensed water which may lead to major measuring errors.
• Not adjusted material
Let your humimeter FS2 adjust to the surrounding temperature of the material for
approximately half an hour.
A very high temperature difference has a negative effect on the stability of the
measurement result.
• Wrong calibration curve
Before you measure your sample, double check the correct selection of the
calibration curve.
• Wrong fill quantity
Fill exactly the right weight (± 1.0 g) in the measuring chamber.
• Wet or mouldy material
• Frozen measuring material.
5.0 DEVICE MAINTENANCE INSTRUCTIONS
To provide a long lives of your device please do not expose it to strong mechanical
loads or heat e.g. dropping it or direct sunlight exposure.
Clean your device using a dry cloth. The measuring chamber needs to be cleaned
with a dry and soft brush.
Any kind of wet cleaning damages the device. The instrument is not rainproof. Keep
it in dry areas.
We recommend an interval ISO-conforming device check with the drying method.
Electromatic will also provide for a fee a test with a calibration certificate.
Electromatic Equipment Co., Inc.
-5-
3.0 DESIGN OF THE DEVICE
Batteries slot
(flipside)
Measuring
chamber
Filler assistance
Name of
calibration
Moisture content
POWER button

Electromatic Equipment Co., Inc.
-6-
3.1 Menu
There are 3 menu levels.
The symbols show the key functions in the different menus.
1. Type Selection :
2. Store Menu :
3. Main menu:
Edit Logs
Manual Logs
Clear Logs
Print Logs
Last Log
All Logs
Clear
Send Logs
Manual Logs
Clear Logs
Options
Date / Time
Language
Unlock
°C / °F
Password
Reset
Materialcalib.
Status
Electromatic Equipment Co., Inc.
-7-
3.2 Keypad symbols
Measuring window:
: Rolling Menu
: Power ON / OFF
: Switch upper
: Switch lower
: Save
: Hold
: Watch the measuring rows
: Suppliers data can be added
Menu:
: Enter
: Switch upper
: Switch lower
: Exit
: Enter numbers
: Enter letters
: Next or right
: Left
: Yes
: No
: Shift
: OK

FS2
GRAIN MOISTURE METER
OPERATING INSTRUCTIONS
Distributed by:
ABQ Industrial LP USA
Tel: +1 (281) 516-9292 / (888) 275-5772 eFax: +1 (866) 234-0451
Web: https
://www.abqindustrial.net E-mail: info@abqindustrial.net
 Loading...