

Electrolux Z4009, 75 Tornado Operating Instructions Manual
Z4009
75 Tornado Vacuum Cleaner
Operating Instructions
2
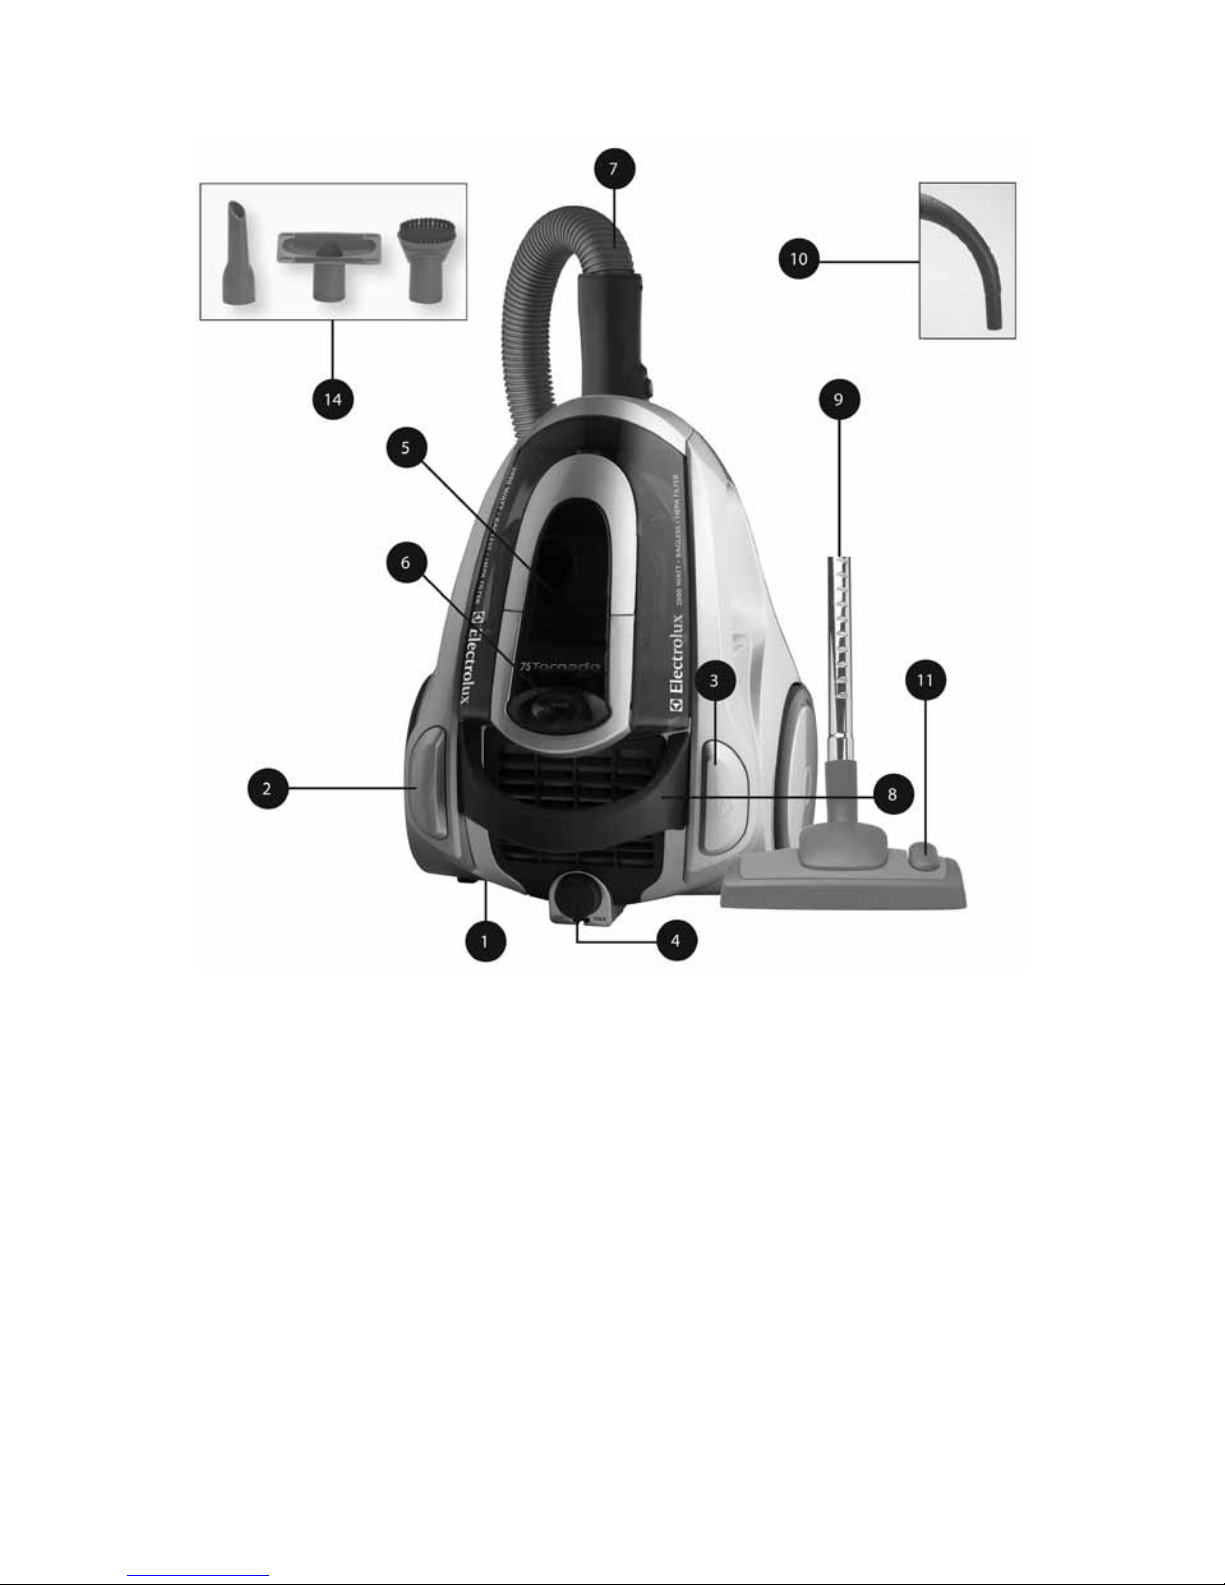
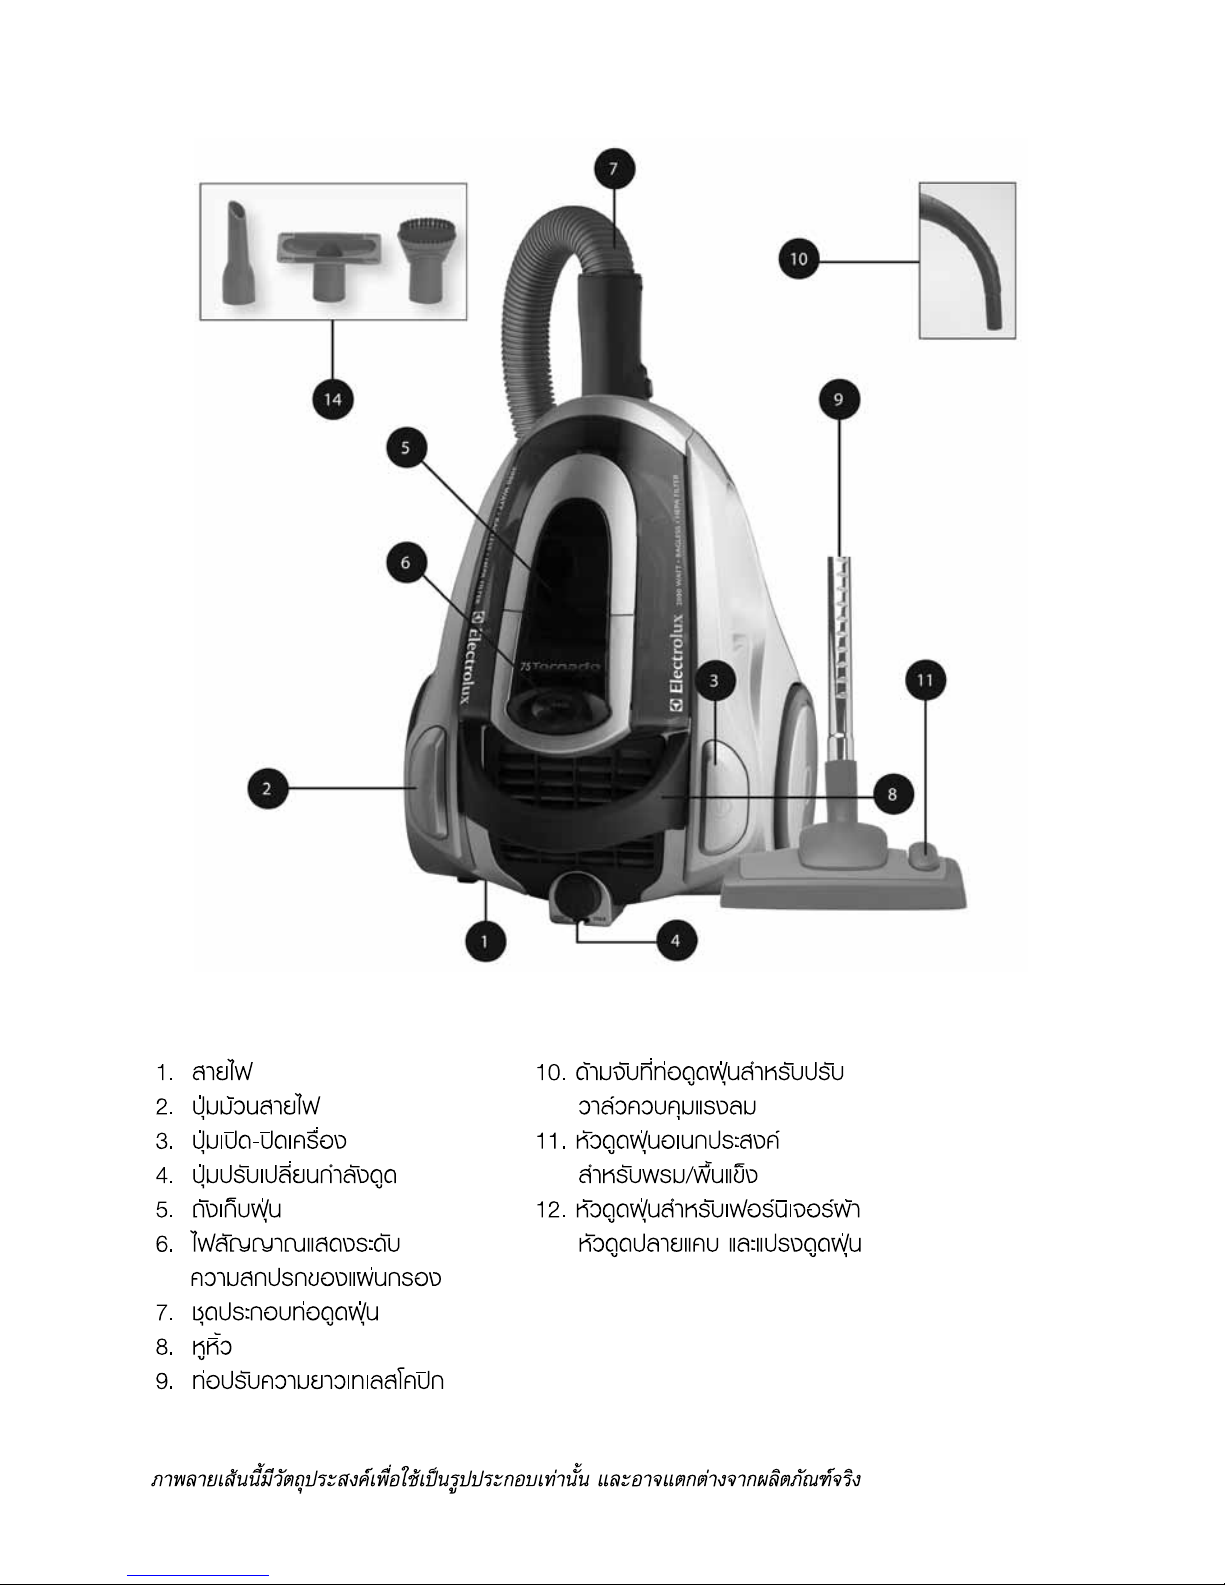
Line drawings are solely for illustration purposes and are subject to variations from actual product.
1. Mains cable
2. Cable rewind button
3. On/off button
4. Variable suction control
5. Dust container
6. Filter indicator
7. Hose assembly
8. Carrying handle
9. Telescopic tube
10. Hose handle with
air valve control
11. Combination carpet/
hard floor nozzle
12. Upholstery nozzle,
Crevice nozzle and
Dusting brush
3
Dear Customers,
Please read through these operating
instructions carefully. Above all please
observe the safety instructions on the
first few pages of these operating
instructions! Please keep these
operating instructions for later reference.
Pass them on to any subsequent owner
of the appliance.
Important Safety
Instructions
READ ALL INSTRUCTIONS
BEFORE USING (THIS APPLIANCE)
When using an electrical appliance
basic precautions should always be
followed, including the following. Before
connecting the cleaner to an electrical
supply outlet, ensure that the voltage
marked on the rating plate (on the
underside of the cleaner) is correct for
your electrical supply. If it does not
comply, do not use the cleaner prior to
contacting the manufacturer.
WARNING – To reduce the risk of fire,
electric shock, or injury:
1. Do not leave vacuum cleaner when
plugged in. Unplug from outlet when
not in use and before servicing.
2. To reduce the risk of electric shock,
do not use outdoors or on wet
surfaces.
3. Young children should be supervised
to ensure that they do not play with
the appliance. Close attention is
necessary when used near children.
4. This appliance is not intended for use
by persons (including children) with
reduced physical, sensory or mental
capabilities, or lack of experience
and knowledge, unless they have
been given supervision or instruction
concerning use of the appliance by
a person responsible for their safety
Children should be supervised to
ensure that they do not play with the
appliance.
5. Use only as described in this
manual. Use only manufactures
recommended attachments.
6. Do not use with damaged cord or
plug. If vacuum cleaner is not
working as it should, has been
dropped, damaged, left outdoors,
or dropped in water, enter it to a
service centre before using.
7. Do not pull or carry on cord, use as
a handle.
Do not close door on cord, or pull
around sharp edges or corners. Do
not run vacuum cleaner over cord.
Keep cord away from heated
surfaces.
8. Do not unplug by pulling on the cord.
To unplug, grasp the plug, not the
cord.
9. Do not handle the plug or vacuum
cleaner with wet hands.
10. Do not put any object into openings.
Do not use with any opening
blocked.
Keep free of dust, lint, hair and
anything that may reduce airflow.
11. Keep hair, loose clothing, fingers and
all parts of body away from openings
and moving parts.
12. Turn all controls off before
unplugging.
13. Use extra care when cleaning on
stairs.
14. Do not use to pick up flammable or
combustible liquids, such as
gasoline, or use in areas where they
may be present.
15. Unplug before connecting the hose.
16. Do not pick up anything that is
burning or smoking, such as
cigarettes, matches, or hot ashes.
17. Do not use without dust bag and/or
filter in place.
18. Do not use extension cords or
outlets with inadequate current
carrying capacity.
4
19. We recommend you do not use
your vacuum on carpet cleaning
foams, sharp or heavy building
materials or plaster dust. They
could damage or clog dustbag and
cause failures to other key parts
in your vacuum cleaner and render
your warranty invalid.
20. Store your cleaner indoors in a cool,
dry area.
21. Keep your work area well lighted.
22. Unplug electrical appliances before
vacuuming them.
Customer
Information
Electrolux decline all responsibility for all
damages arising from improper use of
the appliance, or in cases where there
has been tampering with the appliance
other that by an Authorised Electrolux
service agent. This appliance has
been designed with the environment in
mind and all plastic parts are marked
accordingly for recycling purposes.
For your closest service agent for
servicing or to obtain accessories for
your vacuum cleaner, please contact our
customer service help line noted on back
cover of this booklet.
The symbol
on the product or on its
packaging indicates that this product
may not be treated as household
waste. Instead it shall be handed over
to the applicable collection point for
the recycling of electrical and electronic
equipment. By ensuring this product
is disposed of correctly, you will help
prevent potential negative consequences
for the environment and human health,
which could otherwise be caused by
inappropriate waste handling of this
product. For more detailed information
about recycling of this product, please
contact your local city office, your
household waste disposal service or the
shop where you purchased the product.
Service & Repair
It is dangerous to alter the specifications
or modify the product in any way. Under
no circumstances should you attempt to
repair the cleaner yourself.
NB! To avoid injury and prevent damage
to the vacuum cleaner a defective cord
must only be replaced by an authorised
service provider approved by the
manufacturer to avoid a hazard. The
vacuum cleaner should be serviced by
an authorised service provider and only
genuine.
WARNING: On collection of proprietary
carpet conditioning powder, it is
recommended that the dust container
is emptied and the cartridge filter is
cleaned after each use. Some of the
preparations contain substances
which while left in the vacuum cleaner
for extended periods, could cause
damage. Many air fresheners, household
deodorants, sprays and polishes contain
highly inflammable gas propellants,
because of this it is particularly
important that these products are used
strictly in accordance with the relevant
manufacturers instructions, it is essential
that none of the above products are
sprayed directly into the vacuum cleaner
or any of the filters, hose assembly or
dust chamber.
5
Filter indicator: before commencing
cleaning, plug the cleaner in and turn
it on (without the hose attached to the
cleaner).
If the indicator is red, clean the filter.
If the indicator is clear, attach the hose
and all the other necessary attachments
and commence cleaning.
5. Press the On/Off button to activate
the cleaner.
6. By moving the variable power
control, the suction power can be
adjusted.
7. You may adjust the air valve on
the handle.
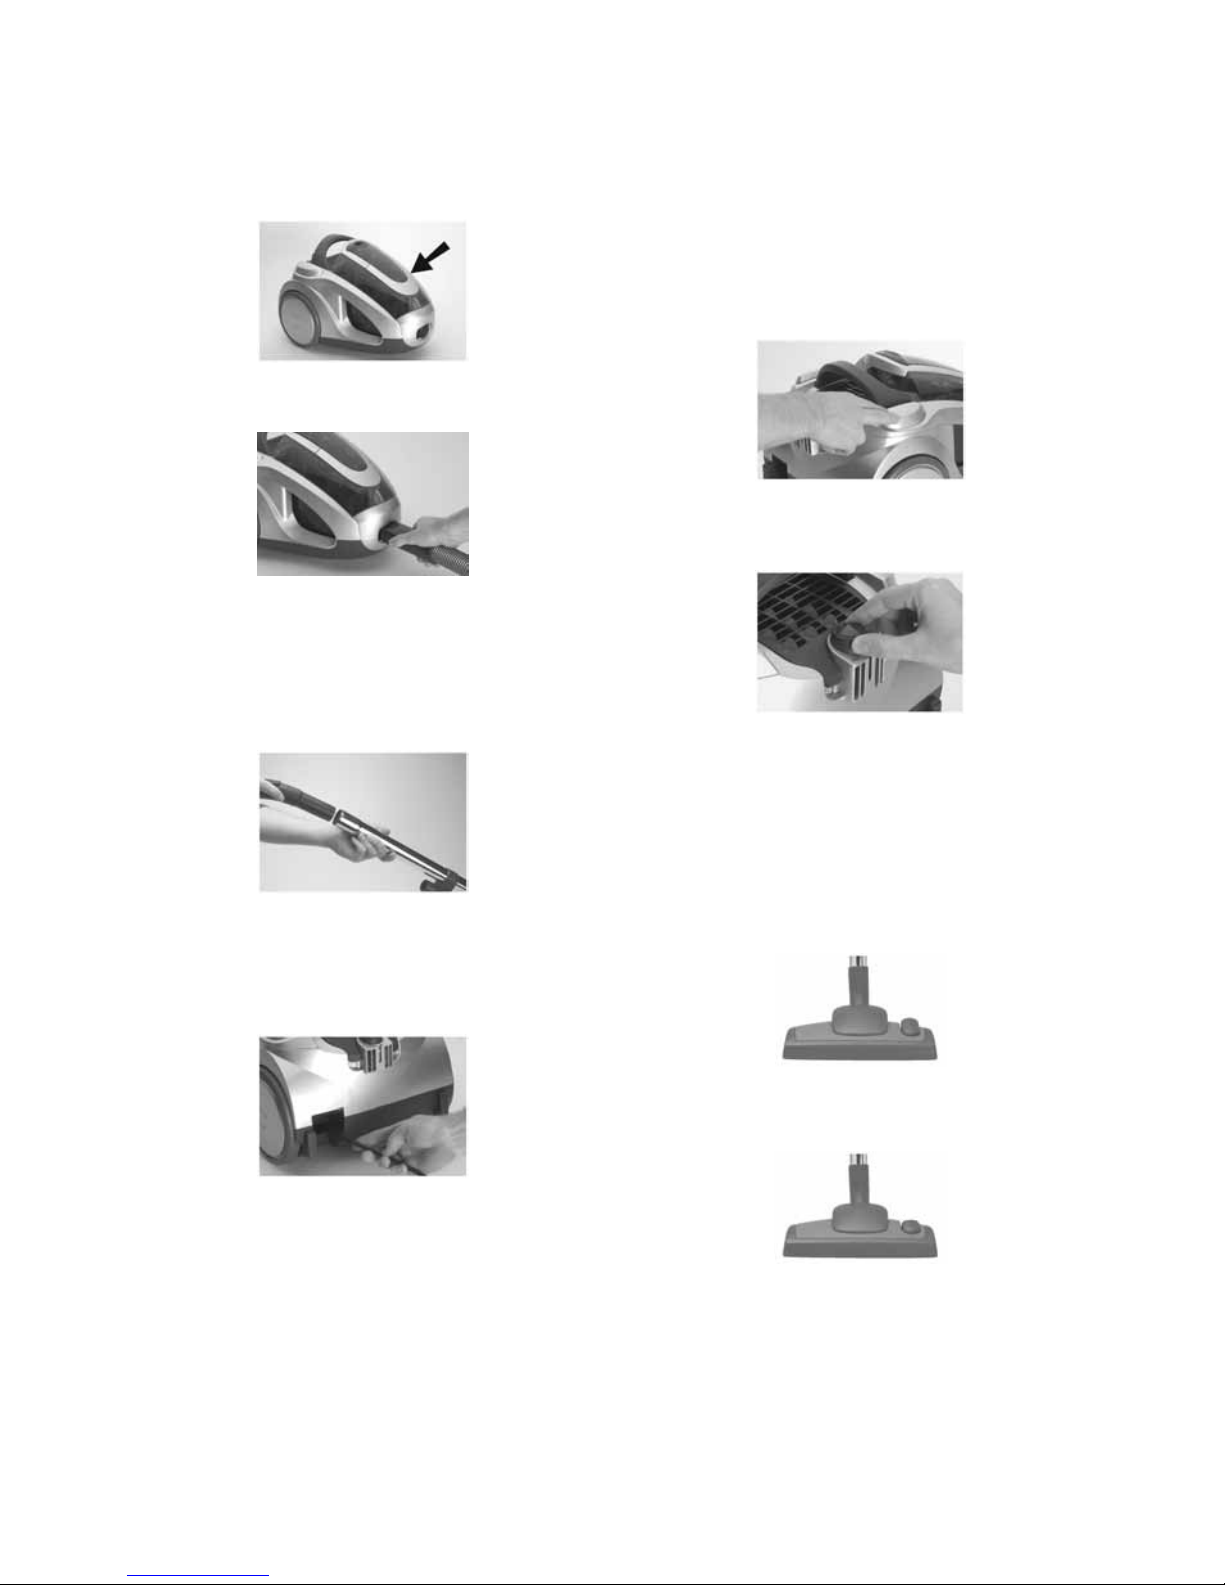
GETTING THE BEST RESULTS
Carpets: Use the floor nozzle with the
lever in horizontal position.
Hard Floors: Use the floor nozzle with
the lever in vertical position.
Loose rugs/curtains/light weight
fabrics: Reduce the suction power. Use
the floor nozzle for loose rugs and the
upholstery nozzle for curtains, cushions,
fabrics, etc.
Assembling The
Vacuum Cleaner
GETTING STARTED
1. Check the dust container is in place.
2. To connect the hose into the suction
inlet push it until it clicks.
To disconnect the hose form the
suction inlet, push the button at the
end of the hose.
3. Attach the telescopic tube to the
hose handle and floor nozzle by
pushing and twisting together. (Twist
and pull apart to dismantle).
4. Extend the cable and connect to the
mains. The cleaner is fitted with cord
rewind, ensure cord is not twisted
before use. (Press foot pedal to
rewind. Note: Please hold the plug to
prevent it striking you or the
machine).
6
Confined areas: Use the crevice nozzle
for crevices, corners and radiators.
Dusting brush - Use for removal of
dust coverage on furniture and slatted
blinds.
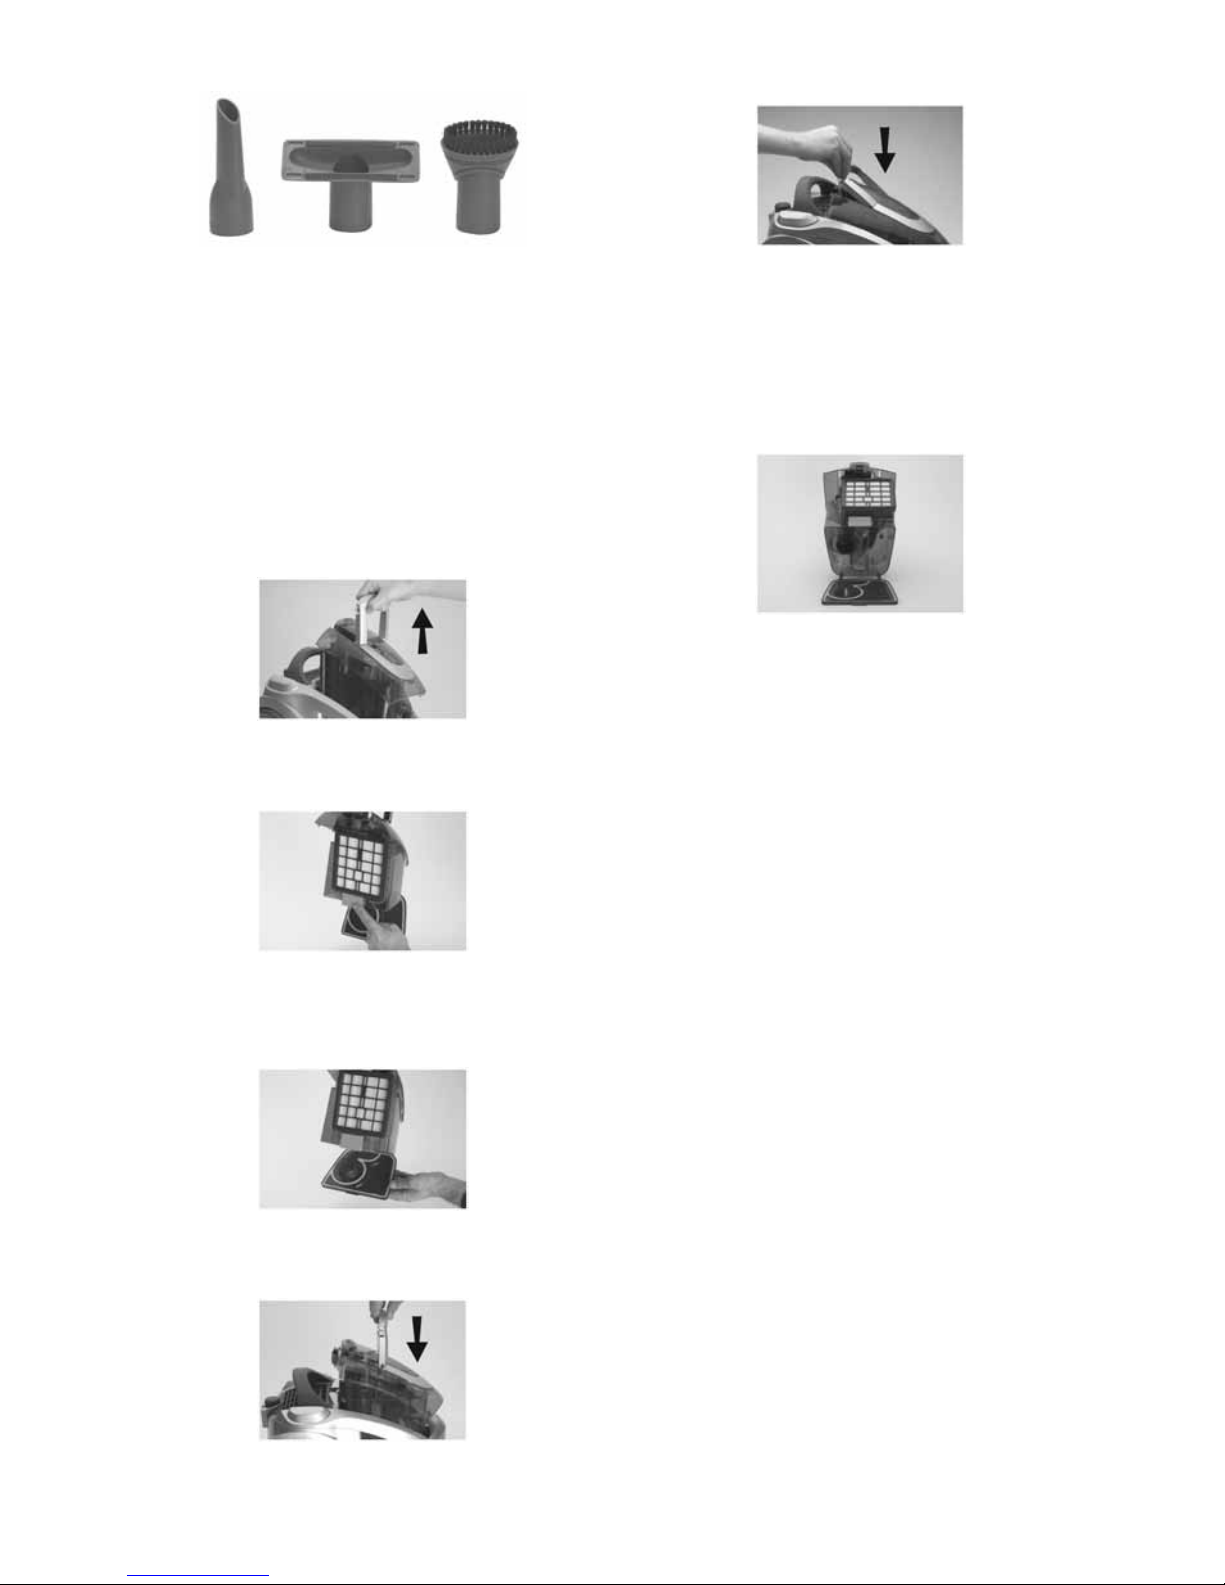
REMOVING THE CONTENTS OF THE
DUST CONTAINER
Always operate the cleaner with the dust
container installed.
1. Remove the dust container by lifting
the handle on top of the container.
2. Remove the contents of the dust
container by pushing the orange-
coloured opening button.
3. Close the dust container lid until it
clicks.
4. Put the dust container back into the
cleaner.
5. Lock the dust container in place
by pushing down on the handle until
it clicks into place.
REMOVAL, CLEANING AND FITTING
THE PLASTIC CONE ASSEMBLY
To ensure there is no restriction of air
flow resulting in loss of suction after
the emptying of the dust container, it is
essential that the plastic cone is checked
for blockages.
REMOVAL OF THE PLASTIC
CONE SECTION
1. Place the dust container upside
down with the HEPA filter facing
away from you.
2. Open the dust compartment cover
flap by pressing the flap release
button.
3. The plastic cone assembly is located
on the left hand side. Twist the cone
assembly anti clockwise and lift out
the one assembly.
4. Check for residue build up,
if present, wipe clean and replace the
cone assembly in the locking position
in the dust container. Turn clockwise
to lock it in position (please note that
the cone assembly can only be fitted
one way.)
5. Close the flap and install the dust
container in the vacuum cleaner
body, ensuring it is locked into
position.
7
Please note: It is normal for the dust
container full indicator to flicker ON and
OFF during use. If the dust container
is emptied and the indicator is still
flickering, this indicates the HEPA filter
and frame is clogged. In this case follow
the instructions replacing or cleaning the
HEPA filter and frame.
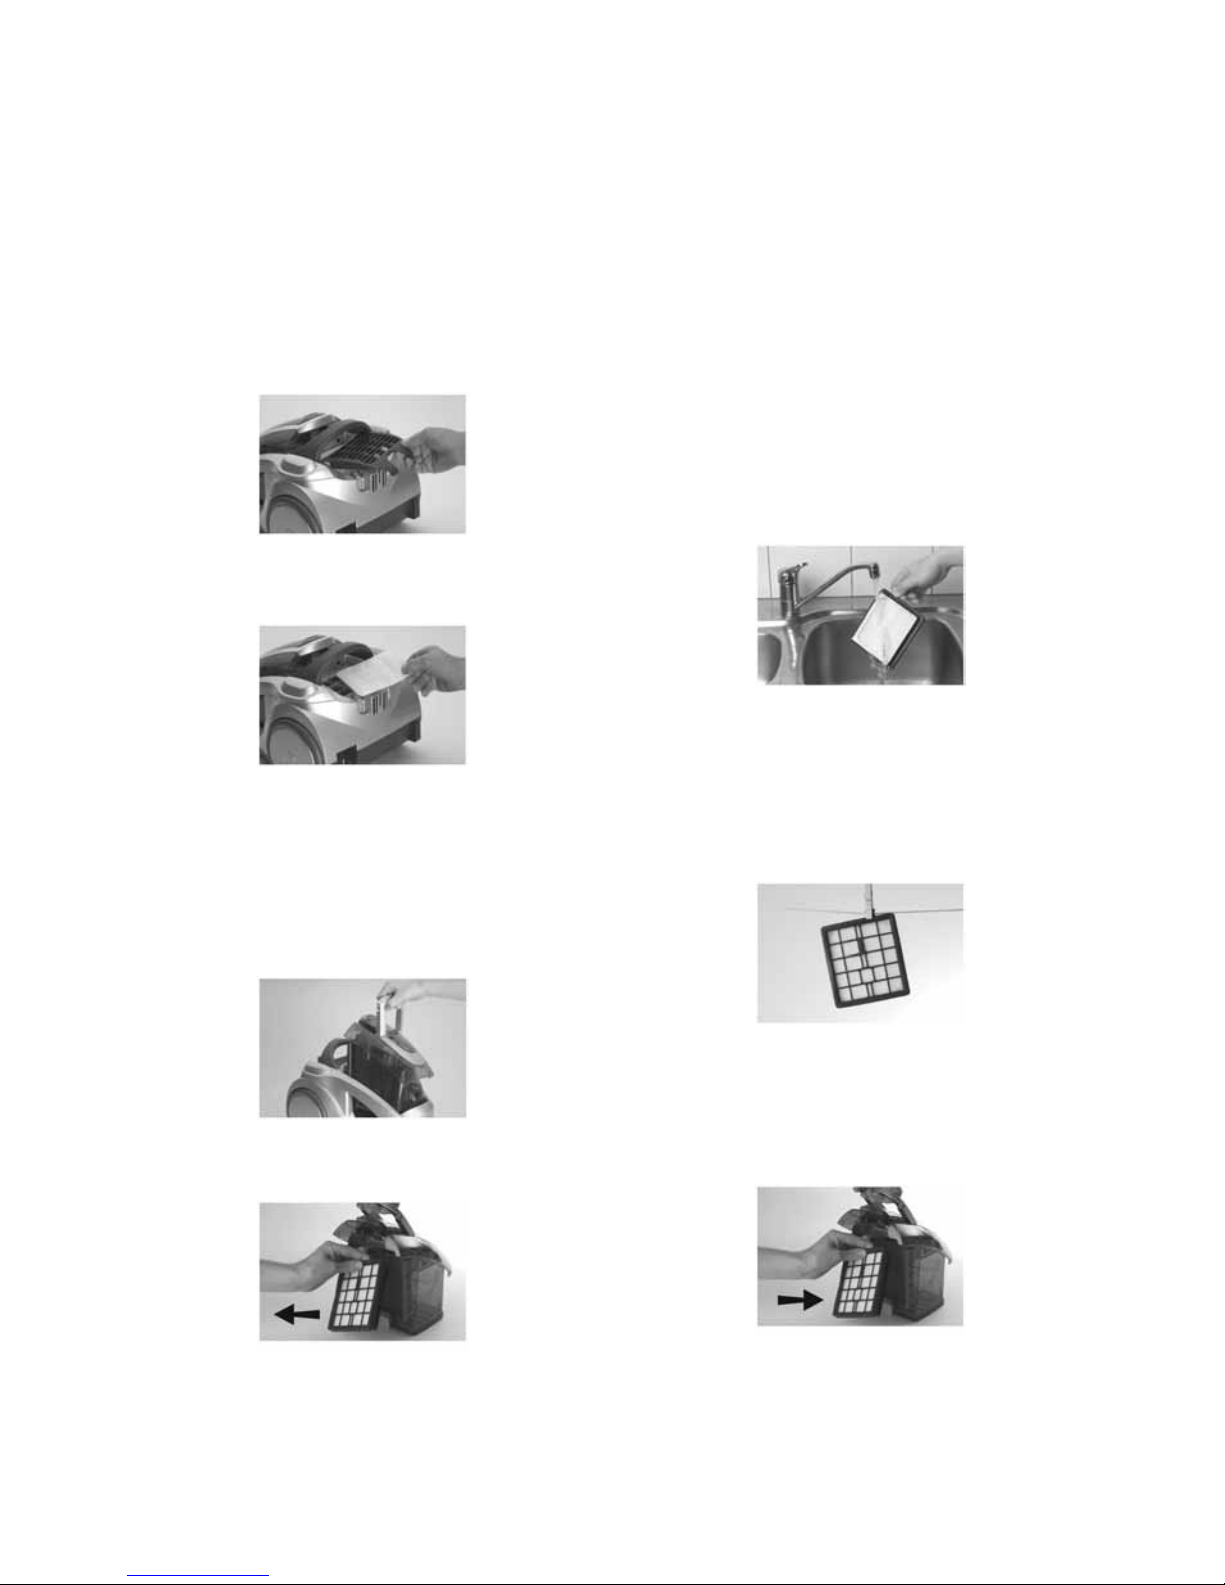
CLEANING THE EXHAUST FILTER
Open the filter grill to remove the exhaust
filter.
Take the filter out of the grill and insert a
new one. Close the filter grill.
REPLACING AND CLEANING
THE PROTECTION FILTER AND
HEPA FILTER
1. Remove the dust container by lifting
the handle on top of the container.
2. a. There are two pre- motor filters
in this vacuum cleaner, a spongy
grey protection filter, and the
framed HEPA filter.
b. Remove the HEPA filter frame
from the container by pulling
on the release tab on the top
right side of the filter frame.
Remove the grey protection
filter by simply pulling it loose
from the container.
c. Tap the HEPA filter face down
on a flat surface covered with
a sheet of paper. This will
dislodge excessive residue from
the HEPA filter. Dispose of the
cover sheet with the dust residue.
Gently beat the grey protection
filter in an open air space to
properly dislodge any dust.
3. If necessary both the HEPA filter
and grey protection filter can be
washed under a tap with cold
water. Always wash the filter from the
underside, do not scrub of use
cleaning agents on the filter.
4. Air dry both the HEPA filter and grey
protection filter for 24 hours to
ensure it is completely dry before
reusing. Avoid direct sunlight or
extreme drying conditions.
5. a. Refit the grey protection filter
by aligning it with the dust
container and sitting it in place,
then fit the HEPA filter by aligning
the frame with the dust container
and simply sliding the HEPA filter
into place.

8
b. When fitted correctly the tab in
the top right corner of the frame
should depress a black safety
tab, allowing the dust container
to fit back into the vacuum
cleaner.
6. If either of the filters appear damaged
do not re use them.
Trouble Shooting And
Customer Information
The vacuum cleaner does not start
1. Check that the power cord is
connected to the mains.
2. Check that the plug and power cord
are not damaged.
3. Check for a faulty/blown fuse.
The vacuum cleaner stops
1. Check whether the dust container is
full. If so, empty it.
2. Is the nozzle, tube or hose blocked.
3. Are the filters blocked.
Water has entered the vacuum
cleaner
It will be necessary for the Fan Unit /
Motor to be replaced by an Authorised
Electrolux service agent. Damage to
the Fan Unit / Motor caused by the
penetration of water is not covered by
warranty.
Technical Data
Rated Voltage: 220 – 240V, 50/60Hz
Max Power (W): 2000W
9
 Loading...