

Page 1
User
Manual
Tumble
Dryer
MODEL TYPES:
XDEX75NZHS
XDEX76NZHS
137212000B (0910)Manufactured by Electrolux Home Products, NA
Page 2

Thank you for selecting our appliance
We wish you lots of enjoyment with your new appliance and we hope that you will consider our brand again when
purchasing household appliances.
Please read this user manual carefully and keep it throughout the product life cycle as a reference document. The
user manual should be passed on to any future owner of the appliance.
The following symbols are used in this manual:
Important information concerning your personal safety and information on how to avoid damaging the
appliance.
General information and tips
Environmental information
Content
Safety information - - - - - - - - - - - - - - - - - - - - - 3-4
Description of the appliance - - - - - - - - - - - - - - - - 4
Control panel and functions - - - - - - - - - - - - - - - 5-6
Programme table - - - - - - - - - - - - - - - - - - - - - - 6-7
Drying Hints - - - - - - - - - - - - - - - - - - - - - - - - - 7-8
Before the fi rst use - - - - - - - - - - - - - - - - - - - - - - 8
Operating Sequence - - - - - - - - - - - - - - - - - - - - - 9
Care and cleaning - - - - - - - - - - - - - - - - - - - - - - 9
What to do if... - - - - - - - - - - - - - - - - - - - - - - - - 10
Technical data - - - - - - - - - - - - - - - - - - - - - - - - 11
Dimensions - - - - - - - - - - - - - - - - - - - - - - - - - - 11
Installation instruction - - - - - - - - - - - - - - - - 12-15
Environmental concerns - - - - - - - - - - - - - - - - - 16
Warranty - - - - - - - - - - - - - - - - - - - - - - - - - - - - 17
Notes - - - - - - - - - - - - - - - - - - - - - - - - - - - - - - 18
2
Page 3

Important Safety Information
In the interest of your safety and to ensure the correct use, before installing and fi rst using the appliance, read this
user manual carefully, including its hints and warnings. To avoid unnecessary mistakes and accidents, it is important to ensure that all people using the appliance are thoroughly familiar with its operation and safety features.
Save these instructions and make sure that they remain with the appliance if it is moved or sold, so that everyone
using it through its life will be properly informed on appliance use and safety.
General safety
• It is dangerous to alter the specifi cations or attempt to
modify this product in any way.
• This appliance is not intended for use by persons (including
children) with reduced physical, sensory or lack of experience and knowledge, unless they have been given supervision or instruction concerning use of the appliance by a
person responsible for their safety.
• Make sure that small pets do not climb into the drum. To
avoid this, please check into the drum before using.
• Any objects such as coins, safety pins, nails, screws,
stones or any other hard, sharp material can cause extensive damage and must not be placed into the machine.
• In order to avoid danger of fi res caused by excessive drying, do not use appliance to dry the following items: Cushions, quilts and the like (these items accumulate heat).
• Items such as foam rubber (latex foam), shower caps,
waterproof textiles, rubber backed articles and clothes or
pillows fi tted with foam rubber pads should not be dried in
the tumble dryer.
• Always unplug the appliance after use, clean and maintenance.
• Under no circumstances should you attempt to repair the
machine yourself. Repairs carried out by inexperienced
persons may cause injury or serious malfunctioning. Contact your local Service Centre. Always insist on genuine
spare parts.
• Items that have been soiled with substances such as cooking oil acetone, petrol, kerosene, spot removers, turpentine, waxes and wax removers should be washed in hot
water with an extra amount of detergent before being dried
in the tumble dryer.
• Danger of explosion: Never tumble dry items that have been
in contact with infl ammable solvents (petrol, methylated
spirits, dry cleaning fl uid and the like). As these substance
are volatile, they could cause an explosion. Only tumble dry
items washed with water.
• Risk of fi re: items that have been spotted or soaked with
vegetable or cooking oil constitute a fi re hazard and should
not be placed in the tumble dryer.
• Ensure you have adequate ventilation in the installation
room to avoid the back fl ow of gases into the room from
appliances burning other fuels, including open fi res.
• If you have washed your laundry with stain remover you
must execute an extra rinse cycle before loading your
tumble dryer.
• Please make sure that no gas lighters or matches have
accidentally been left in pockets of garments to be loaded
into appliance.
WARNING! - RISK OF FIRE!
Never stop a tumble dry before the end of the drying
cycle unless all items are quickly removed and spread
out so that the heat is dissipated.
Installation
• This appliance is heavy. Care should be taken when moving it.
• When unpacking the appliance, check that it is not damaged. If in doubt, do not use it and contact the Service
Centre.
• All packing must be removed before use.
• Serious damage can occur to the product and to property
if this is not adhered to.
• See relevant section in the user manual.
• The fi nal part of a tumble dryer cycle occurs without heat
(cool down cycle ) to ensure that the items are left at a
temperature that ensures that items will not be damaged.
• Any electrical work required to install this appliance should
be carried out by a qualifi ed electrician or competent person.
• Care must be taken to ensure that the appliance does not
stand on the electrical supply cable.
• If the machine is situated on a carpeted fl oor, please adjust
the feet in order to allow air to circulate freely.
• After having installed the appliance, check that it is not
pressing or standing on its electrical supply cable or/and
drain hose.
3
Page 4
Important Safety Information, continued
Use
• This appliance is designed for domestic use. It must not
be used for purposes other than those for which it was
designed.
• Only wash fabrics which are designed to be machine dried.
Follow the instructions on each garment label.
• Do not dry unwashed items in the tumble dryer.
• Do not overload the appliance. See the relevant section in
the user manual.
• Clothes which are dripping wet should not be placed in the
dryer.
• Garments which have been in contact with volatile petroleum products should not be machine dried. If volatile
cleaning fl uids are used, care should be taken to ensure
that the fl uid is removed from the garment before placing in
the machine.
• Never pull the power supply cable to remove the plug from
the socket; always take hold of the plug itself.
Description of the appliance
• Never use the tumble dryer if the power supply cable, the
control panel, the working surface or the base are damaged
so that the inside of the tumble dryer is accessible.
• Fabric softeners, or similar products should be used as
specifi ed by the fabric softener instructions.
Child safety
• This machine is not intended for use by young children or
infi rm persons without supervision.
• Children should be supervised to ensure that they do not
play with the appliance.
• The packaging components (e.g. plastic fi lm, polystyrene)
can be dangerous to children - danger of suffocation! Keep
them out of children’s reach.
• Keep all detergents in a safe place out of children’s reach.
• Make sure that children or pets do not climb into the drum.
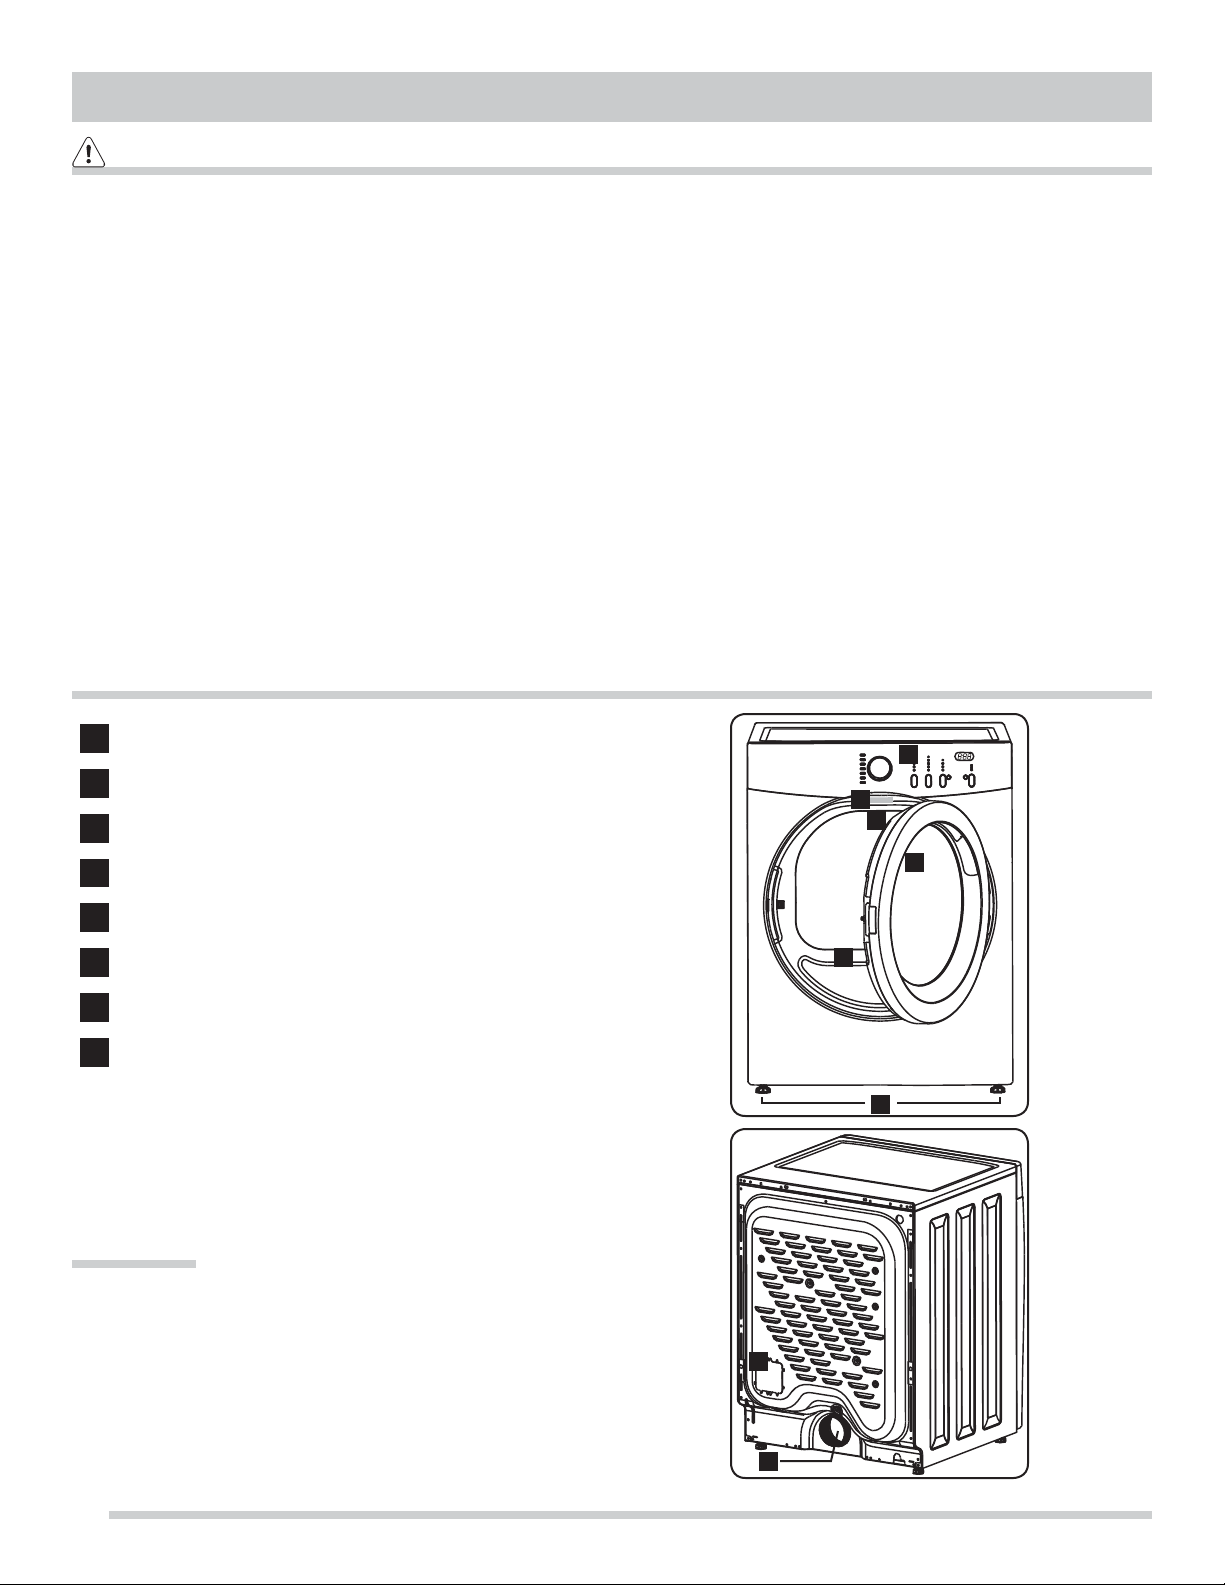
1
Control panel
2
Serial number / Rating plate
3
Drum lamp
4
Door opening handle
5
Lint («fl uff») fi lter
6
Adjustable feet
7
Electrical terminal cover
8
Rear vent outlet
Drum Lamp
The drum light will turn on when the appliance door is
opened and remain lighted for 4 minutes or until the door is
closed.
IMPORTANT!
The bulb for the interior lighting must be changed by our
Customer Care Department.
1
2
3
4
5
6
7
8
4
Page 5
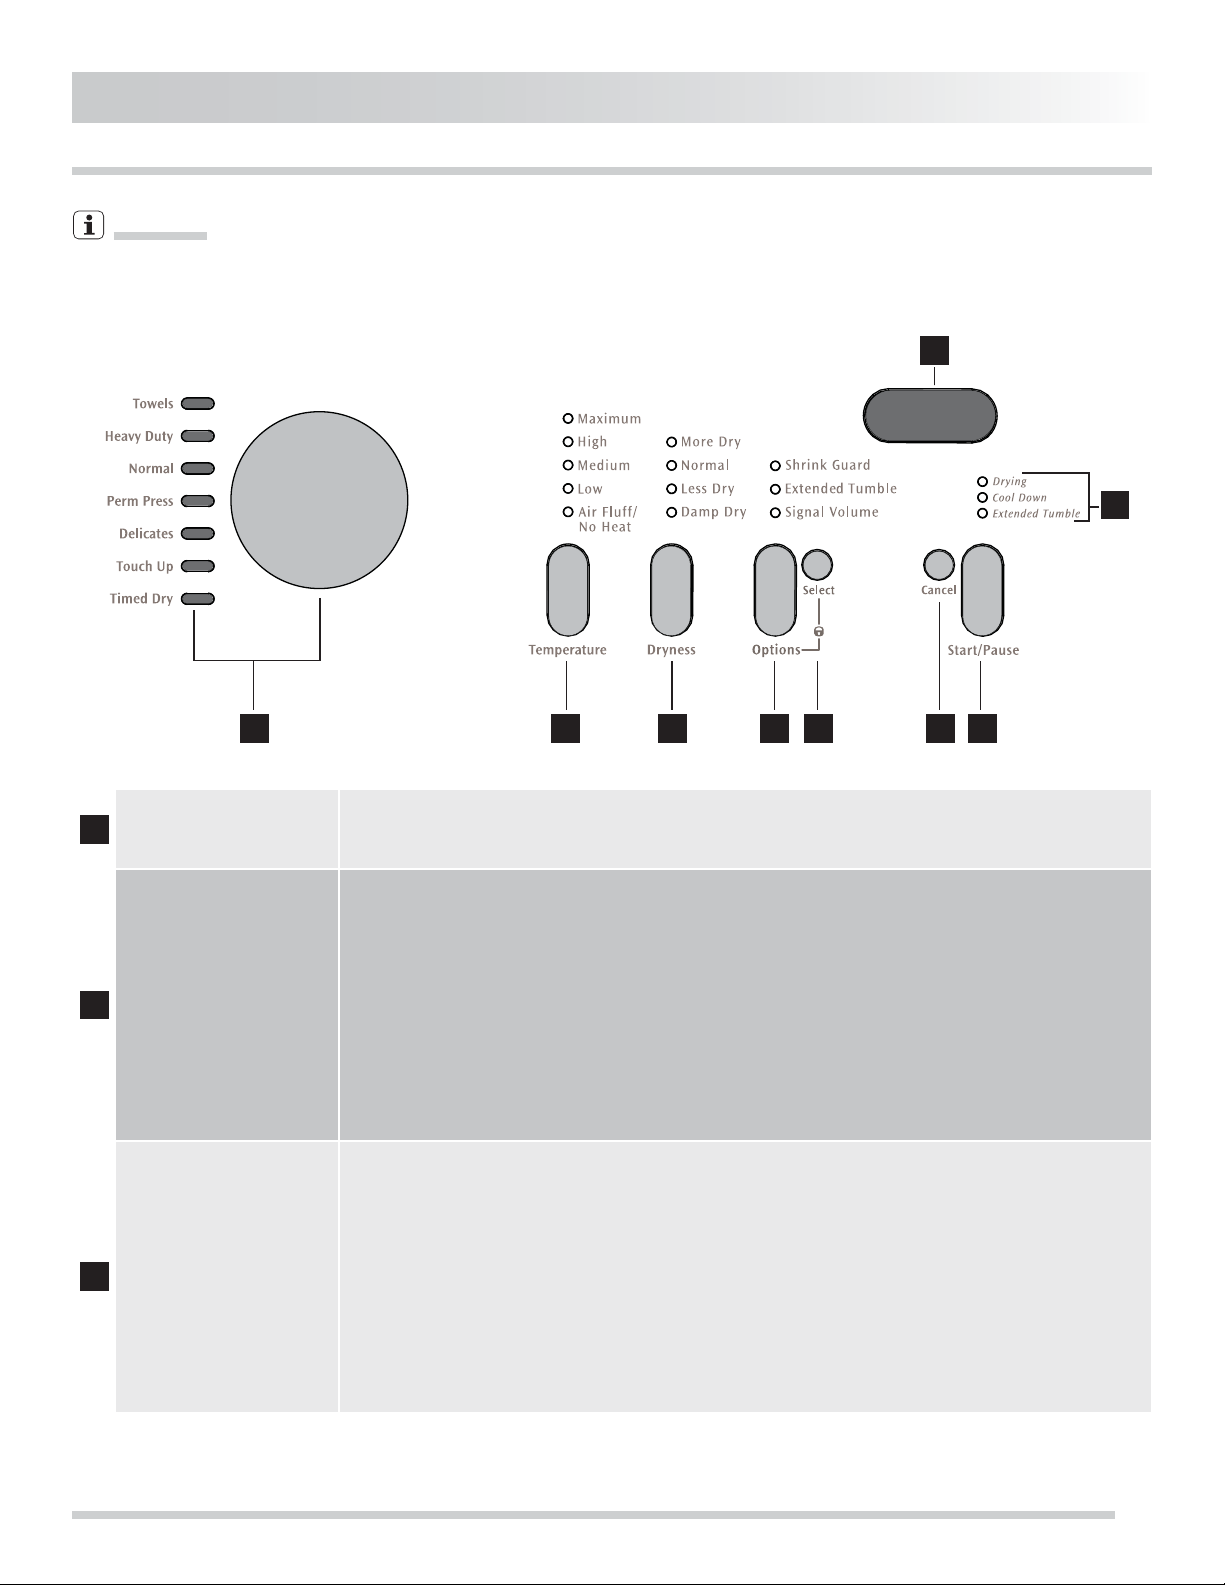
Control Panel
Information
Henceforth, the programme selector dial, the display, the different buttons and the door pilot light will be indicated in all the
book with the relevant numbers given in this picture.
9
8
1 2 3 4 5 6 7
Programme Selector Dial
1
and Programme Indicator
Pilot Lights
2
Temperature Button
3
Dryness Level Button
The programme selector dial allows to select a drying programme. It can be turned either
clockwise or anticlockwise. (See «Programme Table» for more details about the drying programmes).
This button allows you to change the drying temperature according to the fi ber content of
fabrics to be dried. (See «Drying hints» for more details).
• MAXIMUM: Recommended for durable fabrics and towels.
• HIGH: Recommended for most cotton fabrics.
• MEDIUM: Recommended for wrinkle free, easy care, lightweight fabrics and bulky loads.
• LOW: Recommended for delicate fabrics.
• AIR FLUFF/NO HEAT: This setting (no heat) should only be used with a Timed Dry cycle to dry
items containing feathers, down, foam rubber, plastics or rubber-like materials; to refresh
clothing, stuffed animal, pillows or blankets; and to dust draperies.
Note: Not all temperatures are available in every programme. For best results, follow the care
label instructions.
This button allows you to change the desired dryness level of the fabrics at the end of an
automatic programme. (See «Drying hints» for more details).
• MORE DRY: If load is too damp at the end of the programme, select this level for similar
loads in the future.
• NORMAL: Select this dryness level for most automatic programmes.
• LESS DRY: If load is over dried at the end of the programme, select this level for similar
loads in the future.
• DAMP DRY: Select this dryness level for items you wish to partially dry before hanging or
ironing.
Note: Not all dryness levels are available in every programme. For best results, follow the care
label instructions. Dryness level is not selectable on Timed Dry Programmes.
5
Page 6

Control Panel, continued
By pressing this button you can select one of the following options:
• SHRINK GUARD: Select Shrink Guard to lower the initial drying temperature to protect fabrics
from overdrying.
• EXTENDED TUMBLE: Select Extended Tumble if the dried load might not be removed
promptly at the end of the cycle. The dry load will continue tumbling without heat to help
4
Options Button
5
Select Button
6
Cancel/Reset Button
7
Start/Pause Button
8
Indicator Lights
9
Display
reduce wrinkling. When the Signal is selected, a beep will be heard periodically. The load
may be removed any time during Extended Tumble.
• SIGNAL VOLUME: If you select this option, an acoustic signal will sound when setting a dry-
ing programme, in case of wrong selection, in the event of operating problems and at the
end of the programme. This signal has a three-level-adjustable volume or can be turned
off. Choose the desired volume level or turn it off by pressing the button 5.
By pressing this button you can confi rm or delete the options selected by means of button 4.
Press this button to stop the drying programme.
Press this button to start, pause or restart a drying programme.
The following pilot lights indicate which drying phase the appliance is carrying out:
• DRYING
• COOL DOWN
• EXTENDED TUMBLE (if option is selected)
The display shows the following information:
• The duration of the selected programme: After selecting a programme the duration of the
selected programme appears on the display. During the programme, the time remaining is
updated every minute.
• Message «PAU» (PAUSE): It is displayed alternately with the estimated time remaining when
the cycle is paused.
• Message «LOC» (LOCK): It is displayed alternately with the estimated cycle time when you
lock the controls.
Programme Table
Drying Programmes / Factory Preset Levels and Options
Load Capacity / Type of Laundry
TOWELS (Programme duration approximately 60 minutes)
Temperature: Maximum
Dryness Level: More Dry
Options: Signal Volume
Select this Auto Dry programme for towel loads.
HEAVY DUTY (Programme duration approximately 45 minutes)
Temperature: Maximum
Dryness Level: Normal Dry
Options: Signal Volume
Select this Auto Dry programme for sturdy work clothes.
NORMAL (Programme duration approximately 50 minutes)
Temperature: Maximum
Dryness Level: Normal Dry
Options: Signal Volume
Select this Auto Dry programme for cotton items.
6
Available
Temperatures
Maximum
High
Maximum
High
Medium
Low
Maximum
High
Medium
Low
Available
Dryness Levels
More Dry
Normal Dry
More Dry
Normal Dry
Less Dry
Damp Dry
More Dry
Normal Dry
Less Dry
Damp Dry
Available
Options
Signal volume
Shrink Guard
Extended Tumble
Signal Volume
Shrink Guard
Extended Tumble
Signal Volume
Page 7

Programme Table, continued
Drying Programmes / Factory Preset Levels and Options
Load Capacity / Type of Laundry
PERM PRESS (Programme duration approximately 40 minutes)
Temperature: Medium
Dryness Level: Normal Dry
Options: Signal Volume
Select this Auto Dry programme for cotton and blends with a
no-iron fi nish.
DELICATES (Programme duration approximately 20 minutes)
Temperature: Low
Dryness Level: Less Dry
Options: Shrink Guard, Extended Tumble, Signal Volume
Select this Auto Dry programme for knits and delicate items.
TOUCH UP (Programme duration approximately 15 minutes)
Temperature: Low
Dryness Level: Not available
Options: Signal Volume
Select this Timed Dry programme for cotton items.
TIMED DRY (Programme duration approximately 15 to 90 minutes)
Temperature: High
Dryness Level: Not available
Options: Signal Volume
Select this Timed Dry programme for cotton items.
Available
Temperatures
High
Medium
Low
Medium
Low
Low Not Available Extended Tumble
Maximum
High
Medium
Low
Air Fluff/No Heat
Available
Dryness Levels
Normal Dry
Less Dry
Damp Dry
Normal Dry
Less Dry
Damp Dry
Not Available Shrink Guard
Available
Options
Shrink Guard
Extended Tumble
Signal Volume
Shrink Guard
Extended Tumble
Signal Volume
Signal Volume
Extended Tumble
Signal Volume
Drying Hints
Before loading the laundry
Never tumble dry the following:
Particularly delicate items such as net curtains, woollen,
silk, fabrics with metal trim, nylon tights, bulky materials
such as anoraks, blankets, eiderdowns, sleeping bags,
feather quilts and any items containing rubber foam or
materials similar to rubber foam.
• Always follow the instructions on garment labels:
may be tumble dried
normal drying (high temperature)
delicate drying (low temperature)
do not tumble dry
• Close pillowcases and covers with fasteners to prevent
small laundry items getting tangled inside them. Close
press studs, zips and hooks and tie belts and apron
strings.
• Sort laundry according to type and degree of drying re-
quired.
• Do not over-dry laundry, this avoids creasing and saves
energy.
• Avoid drying dark clothes with light coloured fl uffy items
such as towels as they could attract the fl uff.
• The laundry must be thoroughly spun before tumble drying.
• Easy-care items, too, e.g. shirts, should be briefl y pre-spun
before drying (depending on crease resistance approx. 30
seconds or using the special brief spin programme of your
washing machine).
• Knitted textiles (knitted underwear) may shrink a little during
drying. Please do not overdry items of this type. It is advisable to allow for shrinkage when choosing the size of new
purchases.
• To avoid a static charge when drying is completed, use
either a fabric softener when you are washing the laundry
or a fabric conditioner specifi cally for tumble dryers.
• Remove the laundry when the dryer has fi nished drying.
• If individual items are still damp after drying, set a brief
post-drying time, for at least 30 minutes. This will be
necessary particularly for multilayered items (e.g. collars,
pockets, etc.).
7
Page 8

Drying Hints, continued
Make sure that no metal objects are left in the laundry (e.g. hair
clips, safety pins, pins).
Button up pillowcases, close zip fasteners, hooks and poppers. Tie any belts or long tapes.
Remove persistent stains before washing.
Rub particularly soiled areas with a special detergent or
detergent paste. Treat curtains with special care. Remove
hooks or tie them up in a bag or net.
Maximum loads
Recommended loads are indicated in the programme charts.
General rules:
Cotton, linen: drum full but not too tightly packed;
Synthetics: drum no more than half full;
Delicate fabrics and woollens: drum no more than one third full.
Try to load to the maximum capacity of the machine as
small loads are uneconomical.
Before the First Use
Laundry weights
The following weights are indicative:
bathrobe 1200 g
napkin 100 g
quilt cover 700 g
sheet 500 g
pillow case 200 g
tablecloth 250 g
towelling towel 200 g
tea cloth 100 g
night dress 200 g
ladies’ briefs 100 g
man’s work shirt 600 g
man’s shirt 200 g
man’s pyjamas 500 g
blouse 100 g
man’s underpants 100 g
WARNING!
Ensure that the electrical connections comply with the installation instructions.
IMPORTANT!
Remove any material from the drum.
IMPORTANT!
Before using your tumble dryer for the fi rst time, we recommend that you place a few damp cloths inside the appliance
and dry for 30 minutes. There may be dust inside a brand
new tumble dryer.
Child Safety Lock
To avoid having someone accidentally start the dryer, press
the buttons 4 and 5 at the same time and hold about 10 seconds until «LOC» is displayed alternately with the estimated
cycle time. To unlock the controls, press Options and Select
at the same time and hold about 10 seconds until «LOC» is
no longer displayed.
Before setting another programme, it is necessary to disable
this function.
8
Page 9

Operating Sequence
1. Check that the lint fi lter is
clean and in place.
2. Load the dryer and close the door.
Load items loosely. The average wet load will fi ll the drum
1/3 to 1/2 full. Items need room to tumble freely for even
drying and less wrinkling. If desired, place a dryer fabric
softener sheet on top of
the load at the beginning of
the cycle. To save energy
and time and avoid uneven drying and wrinkling,
do not overload the dryer.
When drying large items,
dry only two or three items
at a time. Fill out the load
with small and medium
sized items. For delicate or
very small loads, add two
or three similar items to
improve tumbling action.
3. Select the appropriate programme and settings for each load.
Turn the programme selector dial (1) in either direction to
select the programme desired. The estimated drying time
for Auto Dry cycles or the actual drying time for Timed Dry
cycles will be displayed. A suitable drying temperature,
dryness level and options will automatically be indicated for
the cycle selected. See the «Programme Table» for more
details. To change the drying temperature and dryness
level, press the Temperature (2) and Dryness (3) buttons to
scroll to the desired settings. To select or delete an option,
press Options (4); then, while the indicator is blinking, press
Select (5). The indicator will light when the option has been
selected. It will no longer be lighted when the option has
been deleted. Adjustments made to a programme will be remembered and recalled each time that programme is selected
in the future. To return to factory settings, press the Start/
Pause (7) and Select (5) buttons at the same time and hold until
the signal sounds.
4. Start the programme by pressing button 7.
Close the door and press Start (7)to begin the programme.
The dryer will not operate with the door open. To interrupt
the programme, press Pause (7); press Start (7) to resume
the programme. Press Cancel (6) to stop the programme.
If changes to the programme, temperature, dryness level or
options are attempted after the programme starts, the lights
will blink and a signal will beep. To change the programme
once it has begun, press Cancel (6) and select a new programme. To change the temperature, dryness level or options once the programme has begun, press Pause (7) and
make the new selections. A signal will sound at the end of
the cycle if the signal volume option has been selected.
5. When the programme ends...
• Remove the items promptly and hang or fold.
• You are advised to unplug the appliance.
• Clean the fi lter after every drying programme. A clean fi lter
ensures correct functioning of the appliance.
Care and Cleaning
IMPORTANT:
You must DISCONNECT the appliance from the electricity
supply, before you can carry out any cleaning or maintenance
work.
External cleaning
Use only soap and water and then dry thoroughly.
Important: do not use methylated spirit, diluents or similar
products.
Cleaning the fi lter
Your dryer will only function well if the fi lter is clean.
Clean the lint («fl uff») fi lter after every load. Lint build-up on
the fi lter restricts air fl ow, which causes longer drying times.
The fi lter is located at the bottom of the door opening.
Remove fi lter by pulling straight up. Remove the lint and
replace the fi lter.
Cleaning the drum and
moisture probes
Occasionally a waxy buildup may form on the lint fi lter
and/or moisture sensing
bars in the back of the drum
from using dryer-added
fabric softener sheets. To
remove this build-up, wash
them with warm, soapy water. Dry the fi lter thoroughly
and replace. Do not operate
the dryer without the lint fi lter in place.
CAUTION!
Do not use furniture cleaners or aggressive cleaning agents
to clean the machine. Use a damp cloth to wipe down the
operating screen and housing.
9
Page 10

What to do if...
IMPORTANT!
Certain problems are due to lack of simple maintenance or oversights, which can be solved easily without calling out an engineer. Before contacting your local Service Centre, please carry out the checks listed below.
During appliance operation it is possible that few acoustic signals sound to indicate that the appliance is not working.
Once the problem has been eliminated, press the button 7 to restart the programme. If after all checks, the problem persists,
contact your local Service Centre.
Malfunction Possible Cause / Solution
Dryer does not start.
Dryer runs but won’t heat.
Drying cycle takes too long, outside of the dryer
feels too hot or smells hot.
Excessive wrinkling.
Electrical power cord is not securely plugged in or plug may be loose.
• Make sure the plug fi ts tightly in wall outlet.
House fuse blown or circuit breaker tripped.
• Reset circuit breaker or replace fuse.
• Make sure electrical line is not overloaded and the dryer is on a separate circuit.
Thermal limiter tripped.
• Call authorized service person for replacement.
There are 2 house fuses in the dryer circuit. If 1 of the 2 fuses is blown, the drum may
turn but the heater will not operate. (electric models).
• Replace fuse.
Lint fi lter is clogged with lint.
• Make sure all lint has been removed from the dryer lint fi lter before starting each
cycle.
Exhaust duct requirements have not been met.
• Exhaust duct must be at least 100 mm in diameter and made of rigid or semirigid metal.
• When in place, the duct must have no more than two 90° bends and must not
exceed 2 m.
Drying procedures have not been followed.
• See “Operating Instructions.”
Outside exhaust hood or exhaust duct may be clogged or restricted.
• Clean out any obstruction.
High humidity.
• Use a dehumidifi er near the dryer.
Dryer is overloaded.
• Do not overload. See “Operating Instructions.”
Items left in dryer too long.
• Remove items as soon as cycle ends.
Insuffi cient sorting of items.
• See “Operating Instructions.”
Drying temperature too high.
• Follow fabric care label instructions.
10
Page 11

Technical data
Electrical connection information Information on the electrical connection is given on the rating plate
Voltage [V] 230-240, single phase [50 Hz]
Connected load
Maximum dry load Cotton
Usage range in domestic setting
Frequency (Hz)
above the appliance door opening.
Synthetics
220-230, single phase [60 Hz]
4500 watts
10 kg
4 kg
+ 5°C + 35°C
50 - 60
Dimensions
1
1
dryer width
2
dryer height
68.5 cm (27”)
2
91.5 cm (36”)
3
dryer depth with loading door open
4
dryer depth with loading door closed
129 cm (50.8”)
75.5 cm (29.75”)
3
4
11
Page 12

Installation
Positioning
It is recommended that, for your convenience, the machine is
positioned close to your washing machine.
The tumble dryer must be installed in a clean place, where
dirt does not build up. Make sure there are no obstructing
items or material near the air-intake louvres provided at the
back (e.g. paper, rags etc.).
To keep vibration and noise to a minimum when the dryer
is in use, it should be placed on a fi rm, level surface. Once
in its permanent operating position, check that the dryer is
absolutely level with the aid of a spirit level. If it is not, raise or
lower the feet until it is.
Venting
Whilst drying, the tumble dryer will expel a certain amount
of warm, very moist air, and this should be removed from
the room as quickly as possible to prevent condensation.
Carry the dryer’s exhaust outside via a 100 mm diameter
venting system ending at a fi xed ventilation grille fi tted to an
exterior wall. The dryer must be exhausted outdoors. Do
not exhaust dryer into a chimney, a wall, a ceiling, an attic, a
crawl space or any concealed space of a building. A clothes
dryer produces combustible lint. If the dryer is not exhausted
outdoors, some fi ne lint will be expelled into the laundry area.
An accumulation of lint in any area of the home can create a
health and fi re hazard.
WARNING!
It is important not to connect the vent hose to, for example, a
cooker hood, or a chimney or fl ue pipe designed to carry the
exhaust from a fuel burning appliance.
The feet must never be removed.
Do not restrict the fl oor clearance through deeppile carpets, strips
of wood or similar. This might cause heat build-up which would
interfere with the operation of the appliance.
Use only 100 cm diameter rigid or fl exible metal duct and
approved vent hood which has a swing-out damper(s) that
open when the dryer is in operation. When the dryer stops,
the dampers automatically close to prevent drafts and the
entrance of insects and rodents. To avoid restricting the
outlet, maintain a minimum of 30 cm clearance between the
vent hood and the ground or any other obstruction.
WARNING!
The appliance must not be installed behind the lockable door,
a sliding door or a door with a hinge on the opposite side to
that of the appliance.
12
Page 13

Venting, continued
Do not screen the exhaust ends of the vent system, or use
any screws, rivets or other fasteners that extend into the duct
to assemble the exhaust system. Lint can become caught in
the screen, on the screws or rivets, clogging the duct work
and creating a fi re hazard as well as increasing drying times.
Use an approved vent hood to terminate the duct outdoors,
and seal all joints with metal foil duct tape. All male duct pipe
fi ttings MUST be installed downstream with the fl ow of air.
Install male fi ttings in correct direction:
correct incorrect
Exceeding the length of duct pipe or number of elbows
allowed in the “MAXIMUM LENGTH” chart can cause an accumulation of lint in the exhaust system. Plugging the system
could create a fi re hazard, as well as increase drying times.
Number of 90° turns
100 mm louvered 65 mm
0 19.5 m 14.6 m
1 15.9 m 12.2 m
2 13.5 m 9.8 m
3 9.8 m 7.3 m
4 9.5 m 4.9 m
MAXIMUM LENGTH
of 100mm Rigid Metal Duct
VENT HOOD TYPE
(Preferred)
If installing fl exible metal (semi-rigid) venting, do not exceed 2 m
total duct length.
13
Page 14

Electrical connection
This machine is designed to operate on a 230-240 V or 220230 V, single phase, 50 or 60 Hz (depending on country of
fi nal destination). Check that your domestic electrical installation can take the maximum load required (4,5 Kw) also taking
into account any other appliances in use.
Connect the machine to an earthed socket, in accordance
with current wiring regulations.
1
Access cover screw
2
Terminal block
3
Neutral (“N” terminal)
WARNING!
The manufacturer declines any responsibility for damage or injury through failure to comply with the above safety precautions.
Should the appliance power supply cable need to be installed
or replaced, this must be carried out by our Service Center.
IMPORTANT!
The power supply cable must be accessible after installing
the machine. If the fl exible cord is provided without plug, the
appliance must be provided an accessible all pole disconnection. The nominal cross-sectional area of conductors must
have a value between 2,5mm2 - 4,0mm2.
Installing power supply cord
1. Turn off power supply to outlet.
2. Remove the screw (1) securing the terminal block access
cover in the lower corner on the back of the dryer.
3. Slide cover upward approximately 1 mm and slowly pull it
away from the back panel.
IMPORTANT!
An electrical supply line fi lter is attached to the inside recess
of the terminal block access cover. The terminal block access
cover may be temporarily removed from the line fi lter in order
to ease installation of power supply cord.
4
Earth/Ground (“ ” terminal)
5
Live (“L” terminal)
6
Internal ground (GREEN screw)
7
Strain relief
8
Terminal screw recovery slot
1
2
3
4
5
14
6
7
8
Page 15

4. Remove the strain relief cap nut (7) and thread the dryer
power cord through it.
5. Continue threading the power supply cord through the
strain relief below the terminal access, temporarily leaving
the cap nut loose at this time.
6. Attach the power cord neutral conductor and one of the
BLACK wires from the line fi lter to the “N” terminal (3) on the
terminal block. Tighten the screw securely.
1
Access cover screw
2
Terminal block
3
Neutral (“N” terminal)
4
Earth/Ground (“ ” terminal)
NOTE
If a terminal screw falls during cord installation, it can be retrieved
in the terminal screw recovery slot (8) below the access panel.
7. Attach the power cord ground (earth) conductor and the
CLEAR-coated wire to the “ ” terminal (4) on the terminal
block. Tighten the screw securely.
8. Attach the power cord “live” conductor and the other
BLACK wire to the “L” terminal (5) on the terminal block.
Tighten the screw securely.
9. Slide the strain relief cap nut up the cord and tighten
securely on the strain relief threads.
10. Snap line fi lter back into terminal block access cover.
11. Reinsert terminal block cover and slide downward slightly,
ensuring lower retaining tabs are in place. Reinstall screw
removed earlier.
IMPORTANT!
Supplied strain relief fi ts supply cords ranging from 11.4 mm
to 18.0 mm. If your installation requires a cord outside these
dimension parameters, purchase and install the appropriate
strain relief from a local supply store.
5
Live (“L” terminal)
6
Internal ground (GREEN screw)
7
Strain relief
8
Terminal screw recovery slot
1
2
3
4
5
6
7
8
5
6
4
3
15
Page 16

General Installation
1. Connect the exhaust duct to the outside exhaust system.
Use of a 100 cm clamp
is recommended to
connect the dryer to
the exhaust vent system. Use metal foil tape
to seal all other joints.
2. Carefully slide the dryer to its fi nal position. Adjust one or
more of the legs until the dryer is resting solidly on all four
legs. Place a level on top of the dryer. The dryer MUST be
level and resting solidly on all four legs. Rock alternating
corners to check for stability.
IMPORTANT:
Be sure the power is off at a circuit breaker/fuse box before
plugging the power cord into an outlet.
3. Plug the power cord into a grounded outlet.
4. Turn on the power at the circuit breaker/fuse box.
5. Read the Use & Care instruction at the beginning of this
guide. It contains valuable and helpful information that will
save you time and money.
6. If you have any questions during initial operation, please
review the “Avoid Service Checklist” before calling for
service.
7. Place these instructions in a location near the dryer for
future reference.
NOTE
A wiring diagram and technical data sheet are located inside
the dryer console.
Environmental concerns
Packaging materials
The materials marked with the symbol are recyclable.
This means that they can be recycled by disposing of them
properly in appropriate collection containers.
Old appliance
Use authorised disposal sites for your old appliance. Help to
keep your country tidy!
The symbol
that this product may not be treated as household waste.
Instead it should be taken to the appropriate collection point
for the recycling of electrical and electronic equipment. By
ensuring this product is disposed of correctly, you will help
prevent potential negative consequences for the environment
and human health, which could otherwise be caused by in
appropriate waste handling of this product. For more detailed
information about recycling of this product, please contact
your local council, your household waste disposal service or
the shop where you purchased the product.
16
on the product or on its packaging indicates
Ecological tips
• Keep the lint screen clean and exhaust the dryer correctly.
• Sort laundry properly and select proper temperature and
cycle settings. Choose an automatic dry cycle whenever
possible for accurate drying time.
• Dry only full loads. Single items and small loads usually
take longer to dry.
• Avoid overloading, adding wet items to a partially dry load,
and overdrying.
• Dry one load after another to take advantage of a warm
dryer.
• Opening the door needlessly causes warm air to escape,
which prolongs drying time.
• If possible, use the dryer on low humidity days.
• Install the dryer in an area where the room temperature is
at least 7°C.
Page 17

INTERNATIONAL WARRANTY
AUTOMATIC WASHERS - AUTOMATIC DRYERS - WASTE DISPOSERS
COOK TOPS - COOKER HOODS - OVENS - RANGES - DISHWASHERS
THIS WARRANTY APPLIES OUTSIDE
THE UNITED STATES AND PUERTO RICO.
For your protection as the original purchaser, for home use, this appliance
is warranted as set forth below.
IMPORTANT: This Warranty shall not apply if the appliance has been subject
to any accident, abuse or misuse, or damage by fire, flood or other acts of
God. This Warranty covers only parts obtained through our Authorized
Service Agency.
1-YEAR - MANUFACTURE & MATERIAL:
During the 1st year from the date of installation, we will, through ourAuthorized
Service Agency, repair or replace (at our option) FOB factory any part that
becomes inoperable due to defects in manufacture or material under normal
use and service.
CUSTOMER'S RESPONSIBILITES:
1. Record the model and serial number on this Warranty and keep it
with your sales slip or invoice as a record of your installation date.
2. Provide proper connection to utilities, installation, setting of controls,
and maintenance in accordance with instructions in the user's
manual for the appliance.
3. Pay charges for pick up and delivery of the appliance, labor,
transportation, local duties or taxes associated with warranty service
including any charge to analyze the condition of the appliance.
During the 1-Year Warranty, such charges are the responsibility of
the dealer from whom the appliance was purchased, or as specified
at the time of the purchase of the appliance.
4. Replacement of glass and light bulbs.
HOW TO OBTAIN SERVICE:
Contact the dealer where the appliance was purchased or any other of our
authorized dealers. The dealer will make the necessary arrangements or refer
you to our Authorized Service Agency.
THERE ARE NO OTHER WARRANTIES EXPRESS OR IMPLIED COVERING THIS APPLIANCE,
EXCEPT THIS WARRANTY, WHICH IS IN LIEU OF ALL OTHER WARRANTIES, INCLUDING, TO THE
EXTENT PERMITTED BY LAW, ANY IMPLIED WARRANTY OR MERCHANTABILITY OR FITNESS
FOR A PARTICULAR PURPOSE. IN NO EVENT SHALL WE BE LIABLE FOR SPECIAL, INDIRECT
OR CONSEQUENTIAL DAMAGES, ORFOR ANY DELAY IN THEPERFORMANCE OF THIS WARRANTY
DUE TO CAUSES BEYOND OUR CONTROL. THE SOLE AND EXCLUSIVE REMEDY UNDER THIS
WARRANTY SHALL BELIMITED TO THE REPLACEMENT OF PARTSAS HEREINBEFORE PROVIDED.
ID09-816A
ELECTROLUX INTERNATIONAL COMPANY
PITTSBURGH, PA 15220, U.S.A.
17
Page 18

Notes
18
 Loading...