

Page 1
WTSL4E201
EN WASHER DRYER USER MANUAL 2
DE WASCH-TROCKNER BENUTZERINFORMATION 38
Page 2

CONTENTS
1. SAFETY INFORMATION...................................................................................... 3
2. SAFETY INSTRUCTIONS.....................................................................................5
3. PRODUCT DESCRIPTION................................................................................... 7
4. CONTROL PANEL...............................................................................................8
5. PROGRAMMES ................................................................................................11
6. CONSUMPTION VALUES..................................................................................16
7. OPTIONS...........................................................................................................17
8. SETTINGS......................................................................................................... 19
9. DAILY USE - WASHING ONLY.......................................................................... 19
10. DAILY USE - DRYING ONLY............................................................................23
11. DAILY USE - WASHING & DRYING................................................................. 24
12. HINTS AND TIPS............................................................................................. 26
13. CARE AND CLEANING....................................................................................28
14. TROUBLESHOOTING......................................................................................32
15. TECHNICAL DATA...........................................................................................36
16. GUARANTEE ..................................................................................................36
WE’RE THINKING OF YOU
Thank you for purchasing an Electrolux appliance. You’ve chosen a product that
brings with it decades of professional experience and innovation. Ingenious and
stylish, it has been designed with you in mind. So whenever you use it, you can be
safe in the knowledge that you’ll get great results every time.
Welcome to Electrolux.
Visit our website for:
Get usage advice, brochures, trouble shooter, service information:
www.electrolux.com/webselfservice
Register your product for better service:
www.registerelectrolux.com
Buy Accessories, Consumables and Original spare parts for your appliance:
www.electrolux.com/shop
CUSTOMER CARE AND SERVICE
Always use original spare parts.
When contacting our Authorised Service Centre, ensure that you have the following
data available: Model, PNC, Serial Number.
The information can be found on the rating plate.
Warning / Caution-Safety information
General information and tips
Environmental information
Subject to change without notice.
www.electrolux.com2
Page 3

1. SAFETY INFORMATION
Before the installation and use of the appliance, carefully
read the supplied instructions. The manufacturer is not
responsible for any injuries or damages that are the result
of incorrect installation or usage. Always keep the
instructions in a safe and accessible location for future
reference.
1.1 Children and vulnerable people safety
WARNING!
Risk of suffocation, injury or permanent disability.
• This appliance can be used by children aged 8 years
and above and by persons with reduced capabilities
provided that they have been given instruction and/or
supervision regarding the safe use of the appliance and
understand the potential hazards involved.
• Do not let children play with the appliance.
• Children under 3 years of age should be kept away from
the appliance unless continuously supervised.
• Keep all packaging away from children and dispose of it
appropriately.
• Keep detergents away from children.
• Keep children and pets away from the appliance door
when it is open.
• If the appliance has a child safety device, this should be
activated.
• Children shall not carry out cleaning and user
maintenance of the appliance without supervision.
1.2 General Safety
• Do not change the specification of this appliance.
• The appliance shall be installed as a freestanding
product or below the kitchen worktop if space margins
permit.
• Do not install the appliance behind a lockable door, a
sliding door or a door with a hinge on the opposite side,
ENGLISH
3
Page 4

that would prevent the appliance door from being fully
opened.
• Connect the mains plug to the mains socket only at the
end of the installation process. Make sure that the
mains plug is accessible after installation..
• The ventilation opening in the base (if applicable) must
not be covered by a carpet, mat, or any floor covering.
• Ensure good air ventilation in the located room to avoid
the back flow of gases into the room from appliances
burning gas or other fuels, including open fires.
• Exhaust air must not be discharged into a flue which is
used for exhausting fumes from any appliances burning
gas or other fuels.
• The operating water pressure at the water entry point
from the outlet connection must be between 0.5 bar
(0.05 MPa) and 8 bar (0.8 MPa).
• Do not exceed the maximum load of 9 kg (refer to the
"Programme chart" chapter).
• The appliance must be connected to the water mains
using the new supplied hose sets, or other new hose
sets supplied by the Authorised Service Centre.
• Old hose sets must not be reused.
• If the mains power supply cable is damaged, it must be
replaced by the manufacturer, its Authorised Service
Centre or similarly qualified persons to avoid an
electrical hazard.
• Wipe away lint or packaging debris that has
accumulated around the appliance.
• Items that have been soiled with substances such as
vegetable or mineral oil, acetone, alcohol, petrol,
kerosene, spot removers, turpentine, waxes and wax
removers should be washed separately with an extra
amount of detergent before being dried in the washer
dryer.
• Do not use the appliance if items have been soiled with
industrial chemicals.
• Do not dry unwashed items in the wash dryer.
www.electrolux.com4
Page 5

• Items such as foam rubber (latex foam), shower caps,
waterproof textiles, and rubber backed articles and
clothes, or pillows fitted with foam rubber pads should
not be dried in the washer dryer.
• Fabric softeners, or similar products, should only be
used as specified by the product manufacturer’s
instructions.
• Remove all objects from items that could be a source of
fire ignition such as lighters or matches.
• Never stop the washer dryer before the end of the
drying cycle unless all items are quickly removed and
separated so that residual heat can dissipate.
• The final part of the washer dryer cycle takes place
without heat (cool down cycle) to ensure that items
reach a temperature that will not cause damage to
them.
• Do not use high pressure water sprays and/or steam to
clean the appliance.
• Clean the appliance with a moist cloth. Use only neutral,
detergents. Do not use abrasive products, abrasive
cleaning pads, solvents or metal objects.
• Before any maintenance operation, deactivate the
appliance and disconnect the mains plug from the
socket.
2. SAFETY INSTRUCTIONS
2.1 Installation
• Follow the installation instruction
supplied with the appliance.
• Do not install or use the appliance
where the temperature can be less
than 0°C or where it is exposed to the
weather.
• Always keep the appliance vertical
when being moved.
• Make sure that there is air circulation
between the appliance and the floor.
• Remove all the packaging and the
transit bolts.
• The floor area where the appliance is to
be installed must be flat, stable, heat
resistant and clean.
• Keep the transit bolts in a safe place. If
the appliance is to be moved in future
they must be reattached to lock the
drum to prevent internal damage.
• Always take care when moving the
appliance as it is heavy. Always use
safety gloves and enclosed footwear.
• Do not install or use a damaged
appliance.
• Do not install the appliance where the
appliance door cannot be fully opened.
• Adjust the feet to have the necessary
space between the appliance and the
flooring.
• When the appliance is in its permanent
position, check that it is fully level with
ENGLISH
5
Page 6

the aid of a spirit level. If it is not, adjust
the feet accordingly.
2.2 Electrical Connection
WARNING!
Risk of fire and electrical
shock.
• The appliance must be earthed.
• Always use a correctly installed
shockproof socket.
• Do not use multi-plug adapters and
extension cables.
• Do not pull the mains cable to
disconnect the appliance. Always pull
the mains plug.
• Do not touch the mains cable or the
mains plug with wet hands.
• This appliance complies with the E.E.C.
Directives.
2.3 Water Connection
• Do not cause damage to the water
hoses.
• Before connection to new pipes, pipes
not used for a long time, where repair
work has been carried out or new
devices fitted (water meters, etc.), let
the water flow until it is clean and clear.
• Ensure that there are no visible water
leaks during and after the first use of
the appliance.
2.4 Use
WARNING!
Risk of injury, electrical
shock, fire, burns or damage
to the appliance.
• This appliance is for household use
only.
• Do not put flammable products or
items that are wet with flammable
products in, near or on the appliance.
• Do not touch the glass door while a
programme is in operation. The glass
can get hot.
• Do not dry damaged (torn, frayed)
items that contain padding or fillings.
• If laundry has been washed with a stain
remover, carry out an additional rinse
cycle before starting a drying cycle.
• Make sure that all metal objects are
removed from the laundry.
• Only dry fabrics that are suitable to dry
in the washer dryer. Follow the
cleaning instruction on the item label.
• Plastic items are not heat resistant.
– If a detergent ball is used, remove
it before starting a drying
programme.
– Do not use a detergent ball if
setting a non-stop programme.
WARNING!
Risk of injury or damage to
the appliance.
• Do not sit or stand on the open door.
• Do not dry dripping wet clothes in the
appliance.
2.5 Disposal
• Disconnect the appliance from the
mains electrical and water supplies.
• Cut off the mains electrical cable close
to the appliance and dispose of it.
• Remove the door catch to prevent
children or pets from becoming
trapped in the drum.
• Dispose of the appliance in
accordance with local requirements for
the disposal of Waste Electrical and
Electronic Equipment (WEEE).
www.electrolux.com6
Page 7
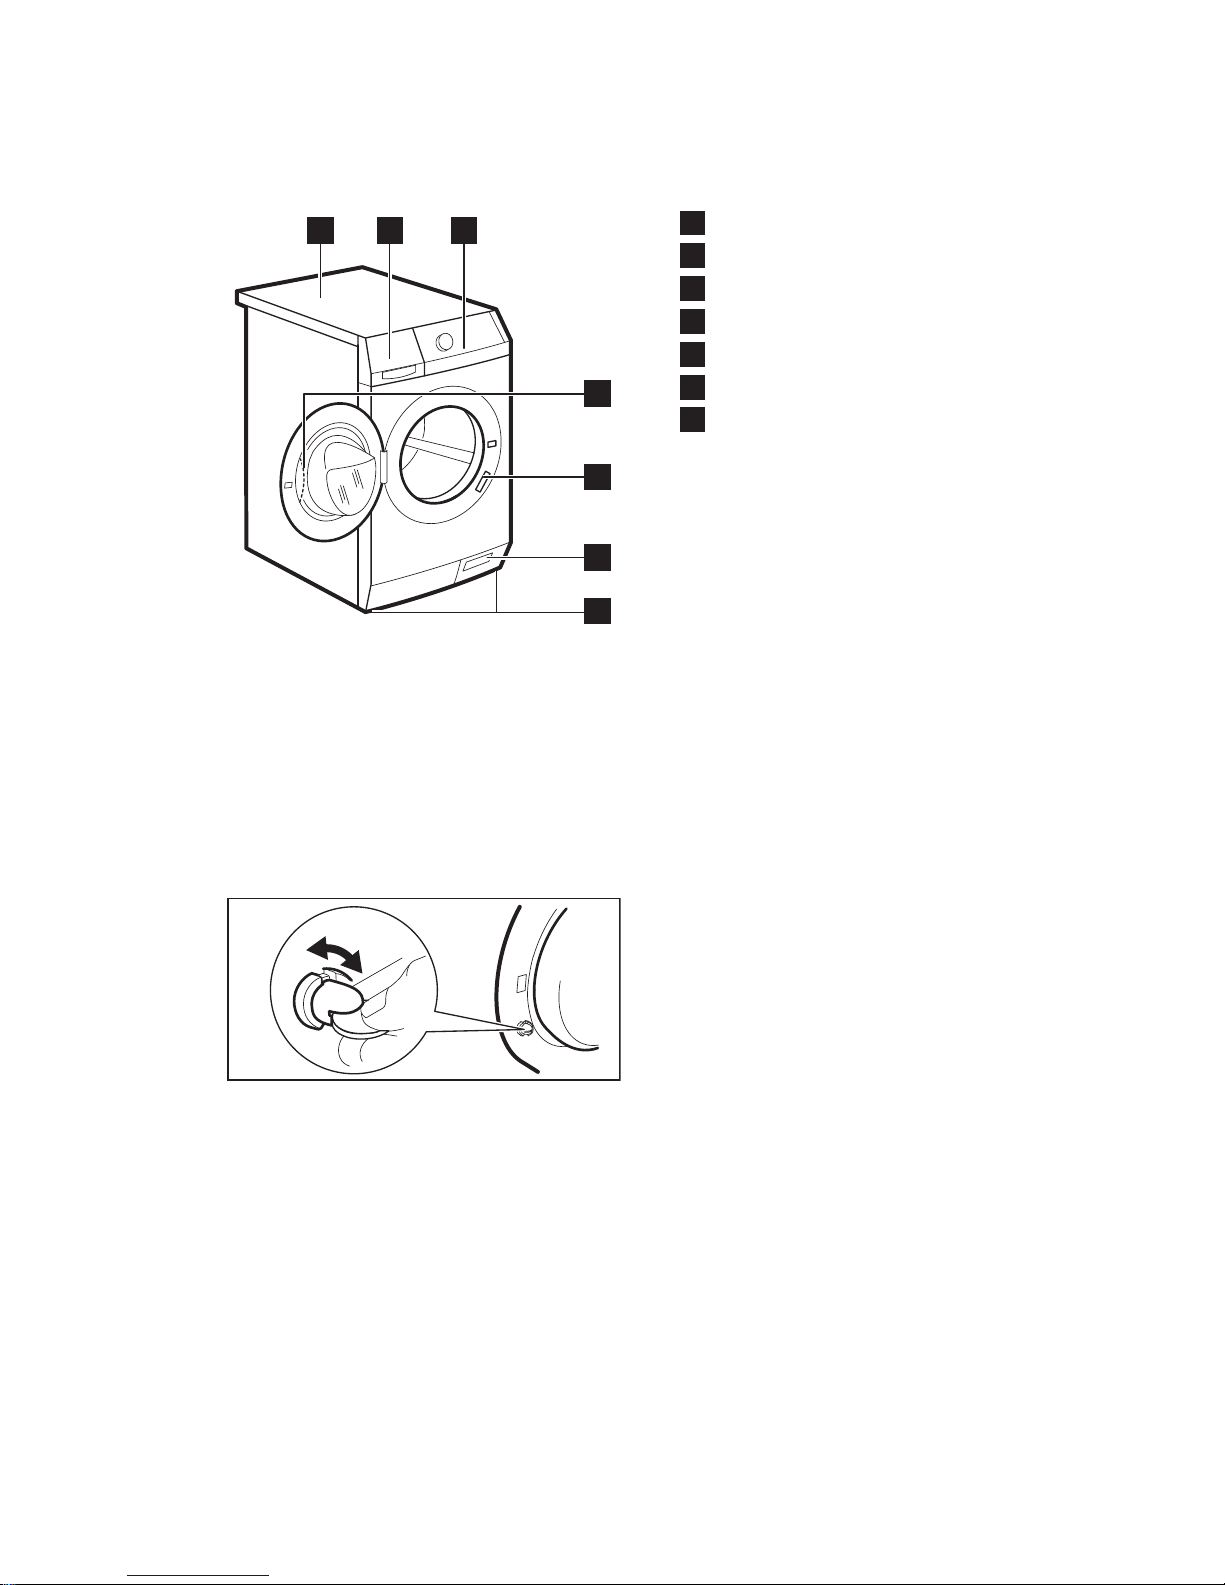
3. PRODUCT DESCRIPTION
3.1 Appliance overview
1
2
3
5
6
7
4
1
Worktop
2
Detergent dispenser
3
Control panel
4
Door handle
5
Rating plate
6
Drain pump filter
7
Feet for levelling the appliance
3.2 How to activate the child
safety device
This device prevents children or pets from
being closed in the drum.
Turn the device clockwise, until the groove
is horizontal.
You cannot close the door.
To close the door, turn the device
anticlockwise until the groove is vertical.
3.3 Fixing plate kit (4055171146)
Available from your authorised dealer.
If you install the appliance on a plinth,
secure the appliance in the fixing plates.
Read carefully the instructions supplied
with the accessory.
ENGLISH
7
Page 8
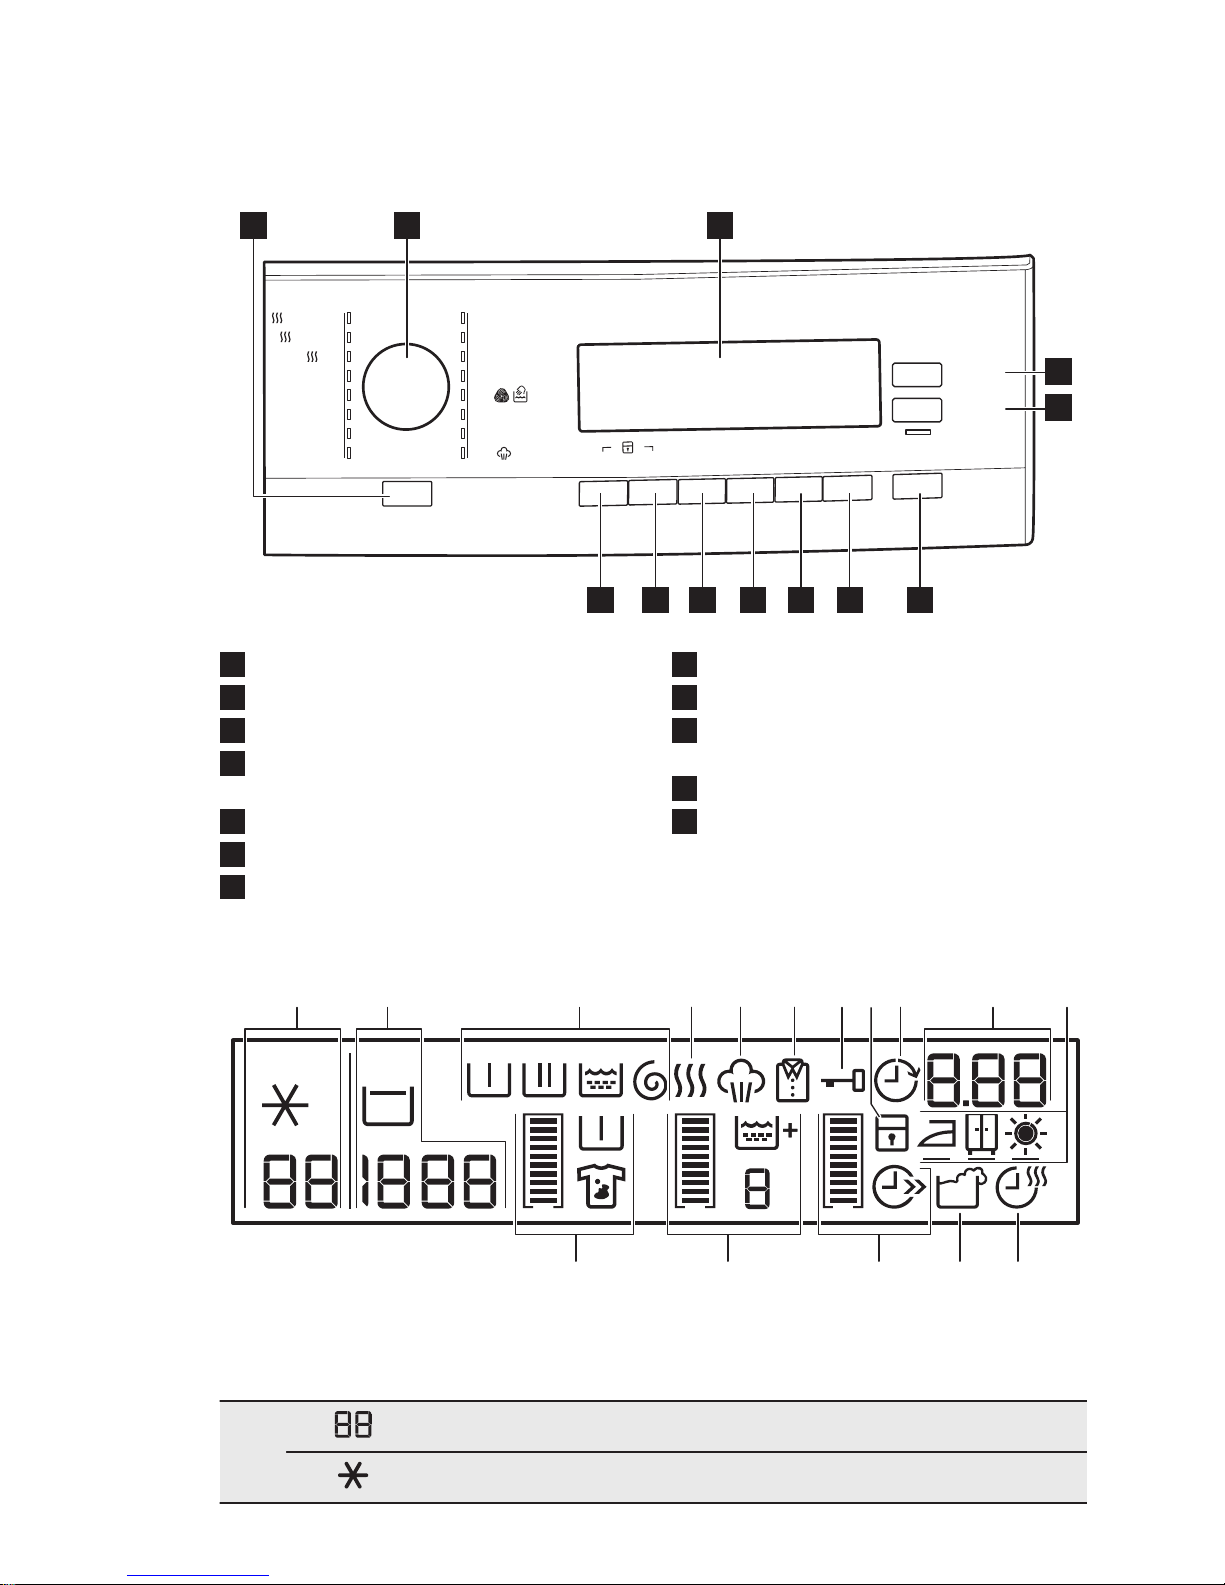
4. CONTROL PANEL
4.1 Control panel description
Temp.
Flecken
Taches/
Vorwäsche
Prélavage
U./Min.
T/min.
Extra
Spülen
Rinçage +
Start/Pause
Départ/Pause
Zeit Sparen
Gain de
Temps
Zeitvorwahl
Départ
Différé
Koch/Bunt
Blanc/Couleurs
Koch/Bunt
Blanc/Couleurs
Pflegeleicht
Synthétiques
Seide
Soie
Pflegeleicht
Synthétiques
Leichtbügeln
Repassage Facile
Feinwäsche
Délicats
Wolle
Laine
Wolle
Laine
20 min - 3 kg
Non Stop 60 min.
Anti-Allergie
Anti-Allergies
Schleudern/Pumpen
Essorage/Vidange
Dampf
Vapeur
Spülen
Rinçage
Energiesparen
Economique
Marche/Arrêt
Ein/Aus
Trockenzeit
Minuterie
Trockengrad
Niveau de
séchage
1 2 3
4
5
6789101112
1
Ein/Aus - Marche/Arrêt button
2
Programme knob
3
Display
4
Trockengrad - Niveau de séchage
button
5
Trockenzeit - Minuterie button
6
Start/Pause - Départ/Pause button
7
Zeitvorwahl - Départ Différé button
8
Zeit Sparen - Gain de Temps button
9
Extra Spülen - Rinçage + button
10
Flecken - Taches / Vorwäsche Prélavage button
11
U./Min. - T/min. button
12
Temperatur - Température button
4.2 Display
A HC
NOP
D E F G I
LM
KB J
The display shows:
A
Temperature of the set programme
Cold water
www.electrolux.com8
Page 9
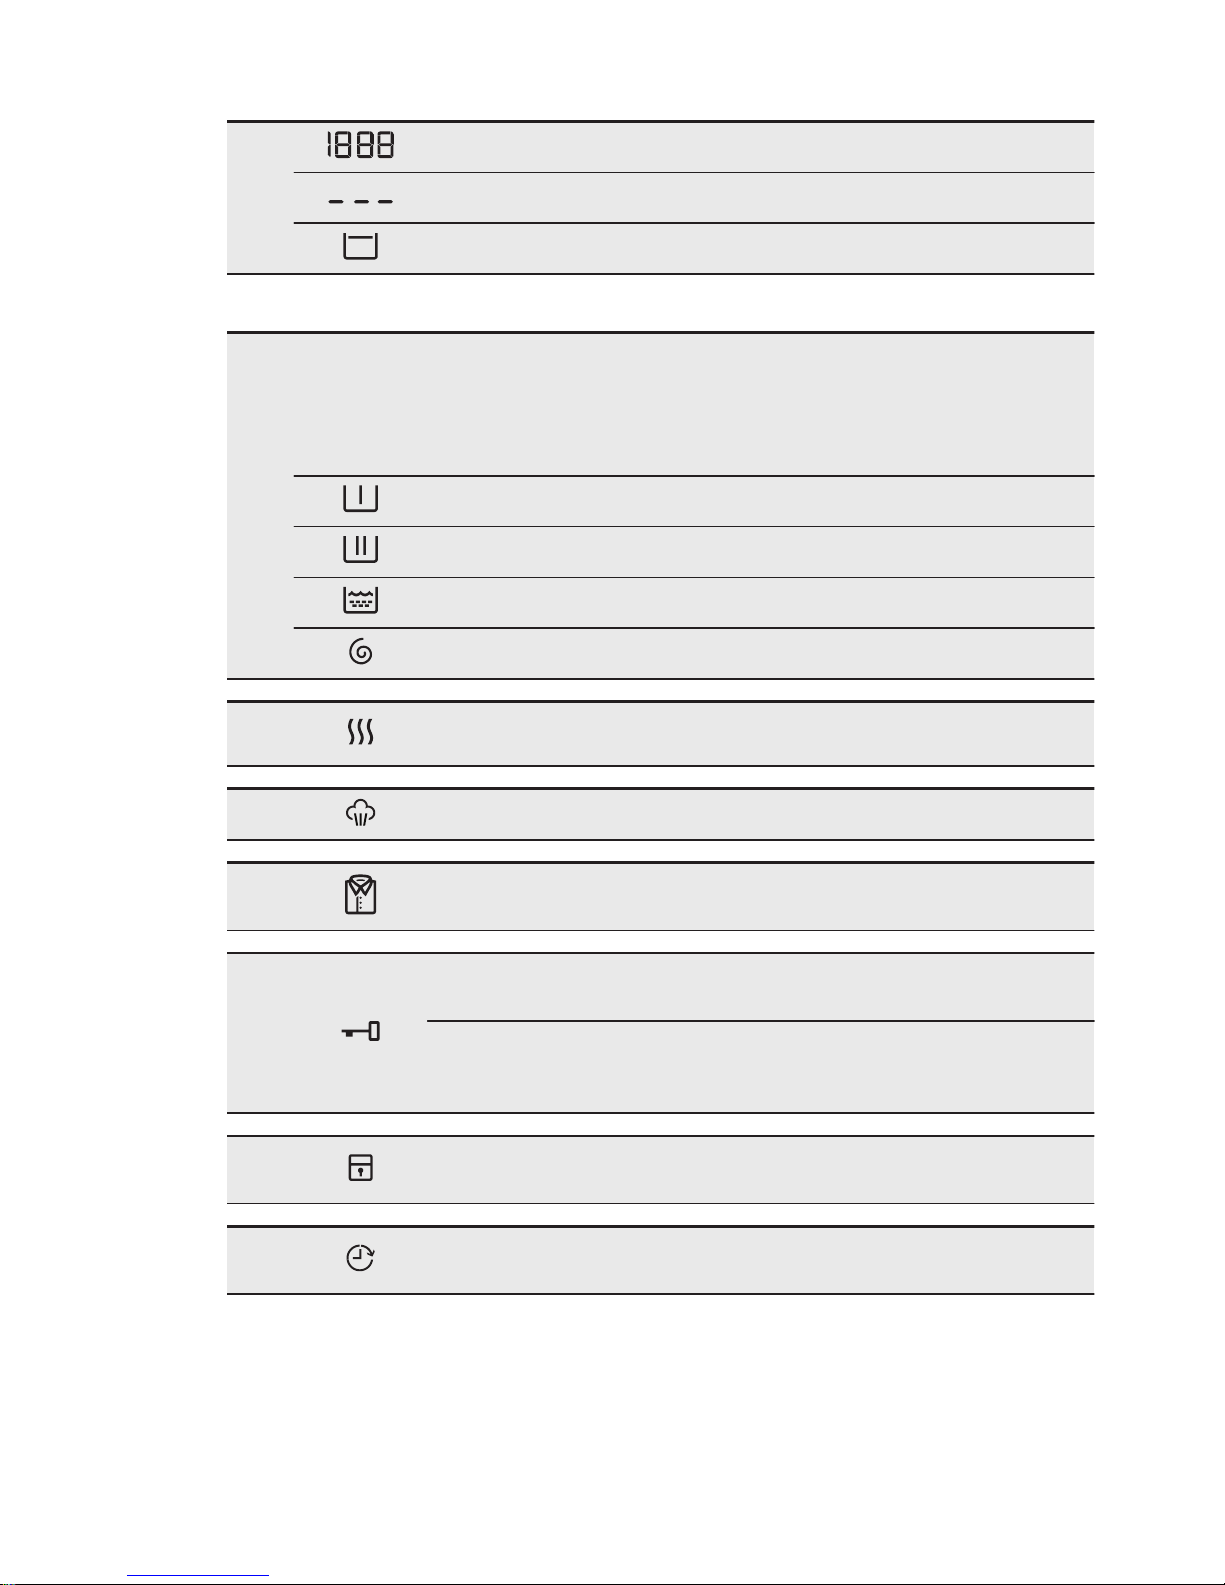
B
Spin speed of the set programme
No Spin symbol
1)
Rinse hold symbol
1)
Only available for SPIN/DRAIN programme.
C
The phase symbols
When a programme is set, all the symbols of the phases related to the programme come on.
When the programme starts, only the symbol of the phase in operation flashes.
When the programme is completed, the symbol of the last phase is on.
Prewash phase
Washing phase
Rinse phase
Spin phase
D
The drying symbol comes on when you set a drying programme.
E
The steam symbol comes on when you set a Steam programme.
F
The anti-crease symbol comes on when you set a drying programme.
G
You cannot open the appliance door when the symbol is on. You
can open the door only when the symbol goes off.
If the programme is completed but the symbol stays on:
• The «Rinse hold» function is on.
• There is water in the drum.
H
The child safety lock symbol comes on when this device is activated.
I
The delay start symbol comes on when you set the delay start
function.
ENGLISH
9
Page 10
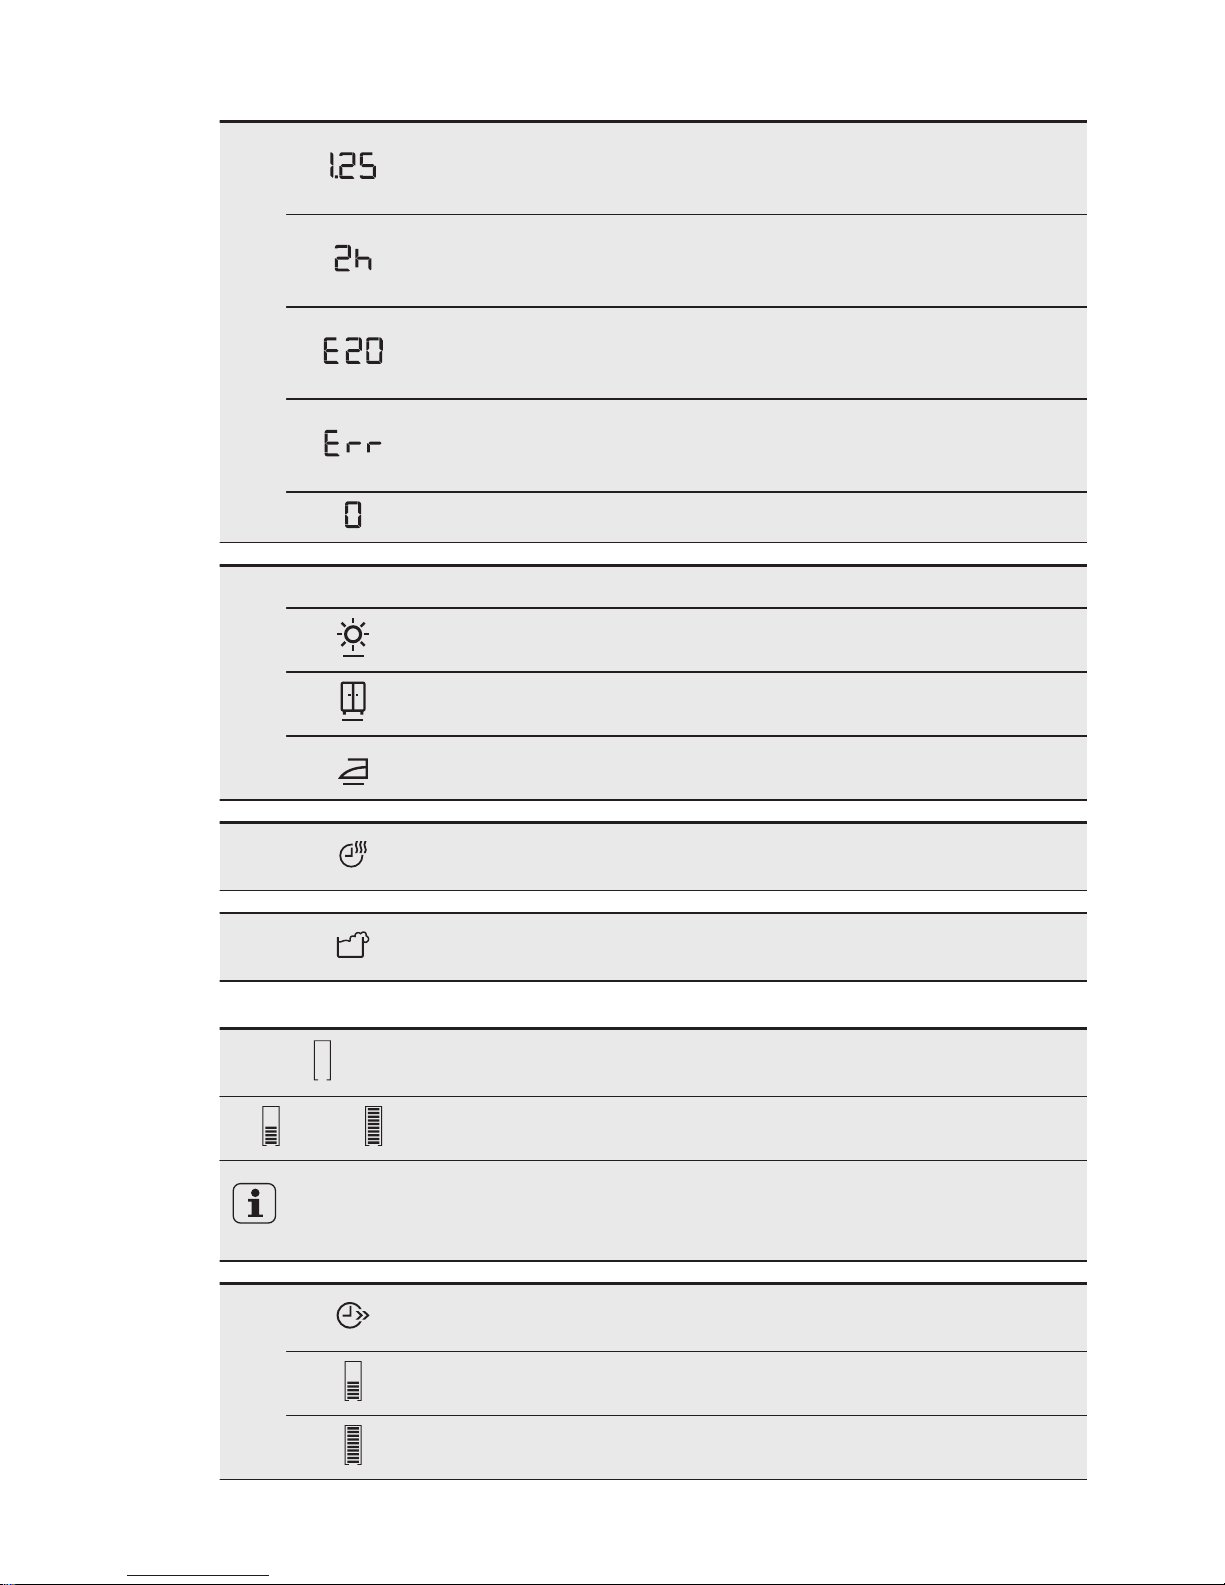
J
Programme time (washing and/or drying phase)
When the programme starts, the programme time decreases with
steps of 1 minute.
Delay start
When you press the delay start button, the display shows the delay
start time
Alarm codes
If the appliance has a malfunction, the display shows alarm codes.
Refer to «Troubleshooting».
The display shows this message for some seconds when:
• You cannot set a function with the washing programme.
• You try to change the washing programme while it operates.
When the programme is completed.
K
Dryness level symbols: they come on when you set an automatic drying.
Extra dry level symbol
Store dry level symbol
Iron dry level symbol
L
The drying time symbol comes on when you set the a drying programme.
M
The detergent overdosing symbol comes on at the end of the cycle
when the appliance detects too much detergent.
Graphic bars
The empty indicator bar appears only if the related function is
available for the set programme.
The indicator bar fills accordingly to the set functions.
If you make a wrong selection the message Err indicates that the selection
is not possible.
N
The Zeit Sparen - Gain de Temps symbol comes on when you set
one of the programme duration.
Shortened time
Extra Quick
www.electrolux.com10
Page 11
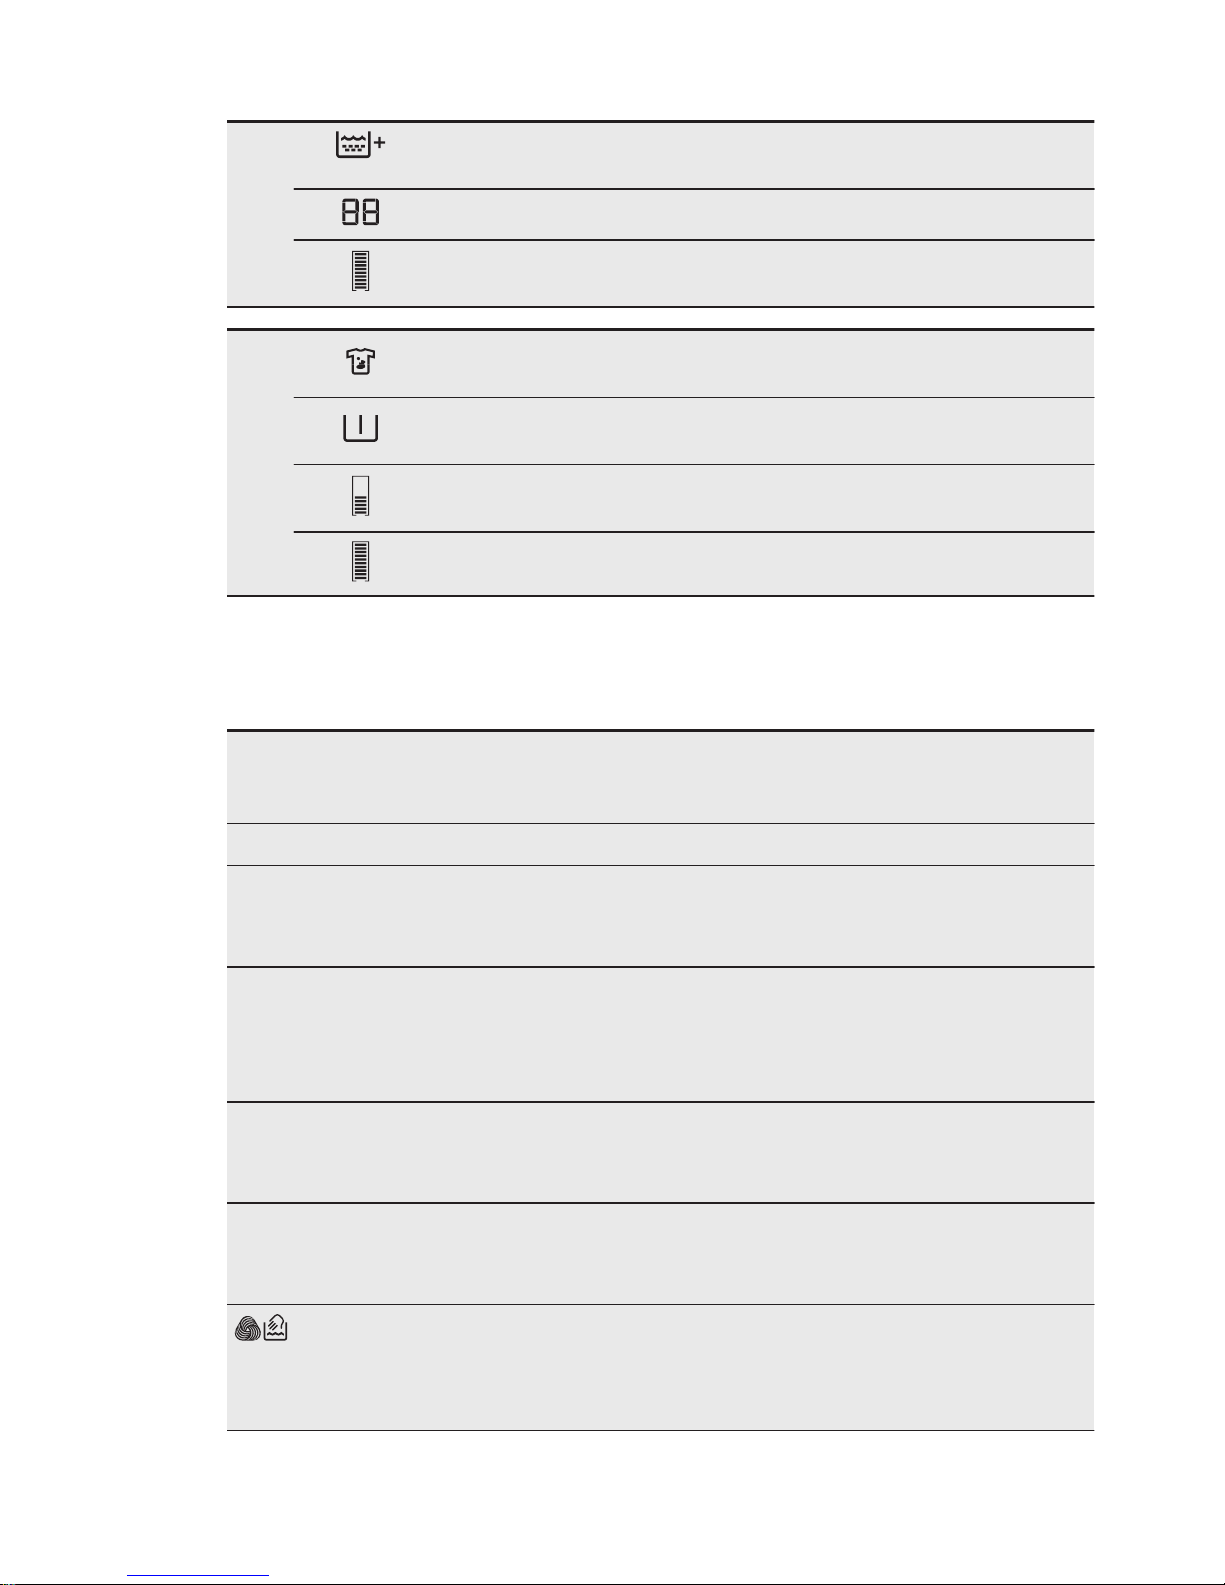
O
The Extra Spülen - Rinçage + symbol comes on when this function
is activated.
The value shows the total number of the rinses.
The indicator bar is fully filled when you set the maximum number
of rinses.
P
The Flecken - Taches symbol comes on when you activate the
function.
The Vorwäsche - Prélavage symbol comes on when this function is
activated.
The indicator bar is not fully filled when you set only one of the
functions.
The indicator bar is fully filled when you set the two functions.
5. PROGRAMMES
5.1 Programme Chart
Programme
Temperature range
Maximum load
Maximum spin
speed
Programme description
(Type of load and soil level)
Washing programmes
Koch/Bunt - Blanc/Couleurs
95°C - Cold
9 kg
1600 rpm
White cotton and coloured cotton.
Normal soil and light soil.
Energiesparen - Economique
1)
60°C - 40°C
9 kg
1600 rpm
White cotton and fast-coloured
cotton. Normal soil. The energy con-
sumption decreases and the time of
the washing programme is extended.
Pflegeleicht - Synthétiques
60°C - Cold
4 kg
1200 rpm
Synthetic items or mixed fabric
items. Normal soil.
Seide - Soie
30°C
1 kg
1200 rpm
Special programme for silk and
mixed synthetic items.
Wolle - Laine
40°C - Cold
2 kg
1200 rpm
Machine washable wool, hand
washable wool and delicate fabrics with «hand washing» care sym-
bol.
2)
ENGLISH
11
Page 12
Programme
Temperature range
Maximum load
Maximum spin
speed
Programme description
(Type of load and soil level)
Non Stop 60 min
40°C - 30°C
1 kg
1200 rpm
Complete programme composed of a
washing phase and of a drying phase
for a small load of mixed fabrics (cotton and synthetic items).
Anti-Allergie - Anti-Allergies
60° C
9 kg
1600 rpm
White cotton items. This programme removes micro-organisms
thanks to the washing by 60°C and
adds one rinse. In this way the wash
is more effective.
Steam programmes
3)
Steam can be used for dried, washed or worn once laundry. These programmes can
reduce creases and odours and make your laundry softer.
Do not use any detergent. If necessary, remove stains by washing or using localized
stain removal.
Steam programmes do not perform any hygienic cycle.
Do not set a Steam programme with these types of items:
•
Items to be washed at a temperature lower than 40°C.
• Items where it is not specified on the care label as being suitable for tumble drying.
• All items with plastic, metal, wooden parts or alike.
Dampf - Vapeur
40°C
1.5 kg Steam programme for cotton and
synthetic items. This cycle helps to
refresh and dewrinkle the laundry. Do
not set this programme with items
washed at a temperature lower than
40°C.
Washing programmes
Spülen - Rinçage
Cold
9 kg
1600 rpm
To rinse and spin the laundry. All
fabrics, except woollens and very
delicate fabrics. Reduce the spin
speed accordingly to the type of laundry.
Schleudern/Pumpen - Essorage/Vidange
4)
9 kg
1600 rpm
To spin the laundry and to drain the
water in the drum. All fabrics, ex-
cept woollens and delicate fabrics.
20 min.- 3 kg
40°C - 30°C
3 kg
1200 rpm
Cotton and synthetic items with
light soil level or worn only once.
www.electrolux.com12
Page 13
Programme
Temperature range
Maximum load
Maximum spin
speed
Programme description
(Type of load and soil level)
Leichtbügeln - Repassage
Facile
60°C - Cold
4 kg
800 rpm
Synthetic items requiring a gentle
wash. Normal and light soil.
5)
Feinwäsche - Délicats
40°C - Cold
4 kg
1200 rpm
Delicate fabrics such as acrylics,
viscose, polyester items. Normal
soil.
Drying programmes
Wolle - Laine
1 kg Drying programme for woollens.
Pflegeleichte - Synthétiques
3 kg Drying programme for synthetic
items.
Koch/Bunt - Blanc/Couleurs
6 kg Drying programme for cotton items.
1)
The washing programme Energiesparen - Economique at 60ºC with a load of 9 kg and the
drying programme Koch/Bunt - Blanc/Couleurs are the reference programmes for the data entered in the energy label, in compliance with EEC 92/75 standards.
The water temperature of the washing phase may differ from the temperature declared for the selected programme.
2)
During this cycle the drum rotates slowly to ensure a gentle wash. It can seem that the drum
doesn't rotate or doesn't rotate properly, but this is normal for this programme.
3)
If you set a Steam programme with dried laundry, at the end of the cycle the laundry could
be humid. It is better to expose the items to the fresh air for about 10 minutes to let the humidity dry. When the programme is completed, quickly remove the laundry from the drum. After a
steam cycle, items may be ironed however with less effort.
4)
Set the spin speed. Make sure it is suitable for the type of fabric being washed. If you set
the No Spin option then only the drain phase is available.
5)
To reduce creasing, this cycle regulates the water temperature and performs a soft wash
and spin phase. The appliance adds some rinses. This programme is not compatible with drying.
ENGLISH
13
Page 14
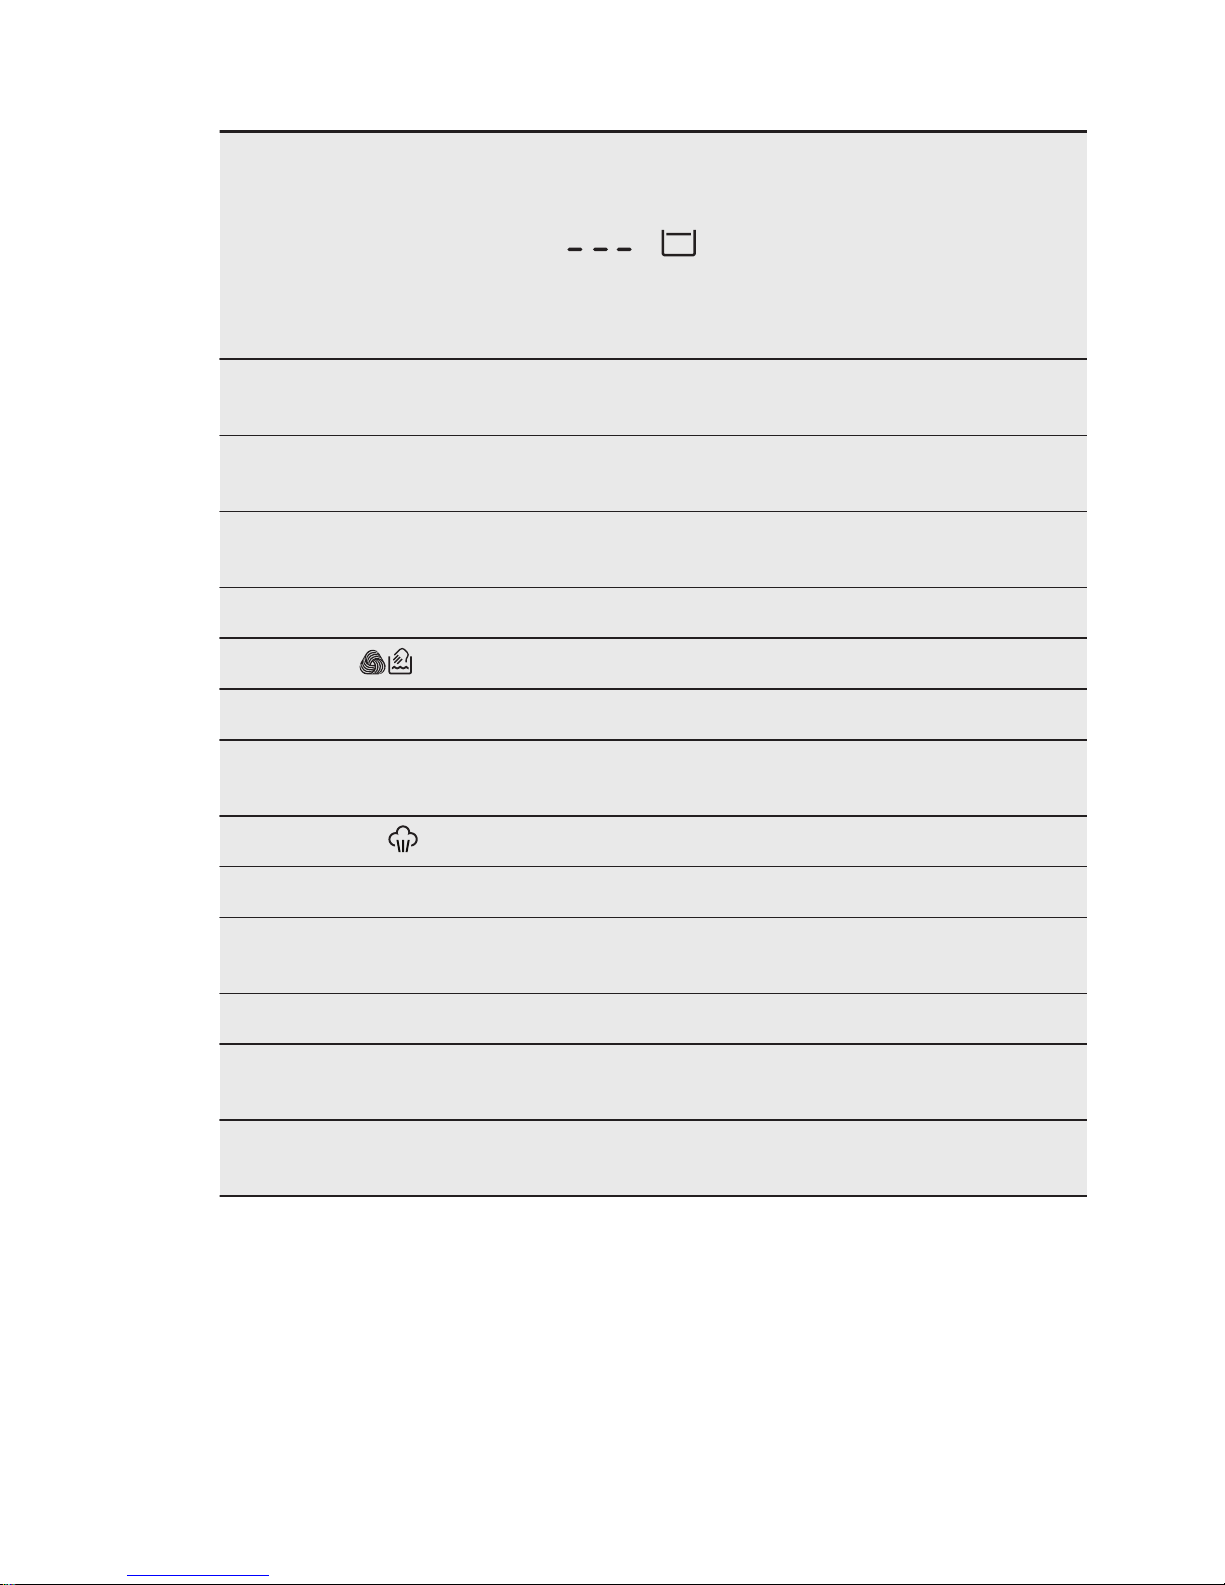
Programme options compatibility
Programme
U./
Min. -
T/min.
Fleck-
en -
Ta-
ches /
Vorwä-
sche -
Prélav-
age
1)
Extra
Spülen
- Rin-
çage +
2)
Zeit
Sparen Gain
de
Temp
s
3)
Zeit-
vor-
wahl Départ
Différé
Koch/Bunt - Blanc/
Couleurs
■ ■ ■ ■ ■ ■
Energiesparen - Economique
■ ■ ■ ■
■
4)
■
Pflegeleicht - Synthétiques
■ ■ ■ ■ ■ ■
Seide - Soie
■ ■
Wolle - Laine
■ ■ ■
Non Stop 60 min
■
Anti-Allergie - Anti-Allergies
■ ■ ■ ■ ■
Dampf - Vapeur
■
Spülen - Rinçage
■ ■ ■
Schleudern/Pumpen Essorage/Vidange
■ ■ ■
20 min.- 3 kg
■ ■
Leichtbügeln - Repassage Facile
■ ■
■
5)
■ ■ ■
Feinwäsche - Délicats
■ ■ ■ ■ ■ ■
1)
If you use liquid detergent, set a programme without Prewash. The Stain option is not avail-
able with a temperature lower than 40°C.
2)
If the permanent Extra Rinse option is activated, the appliance adds some additional rinses.
In the Rinse programme, if you set a low spin speed the appliance performs delicate rinses
and a short spin.
3)
If you set a shorter duration, we recommend that you decrease the load size. It is possible
to fully load the appliance, however the washing results can be less satisfactory.
4)
For this programme you can set only the Extra Quick duration.
5)
Only the Prewash option is available.
www.electrolux.com14
Page 15
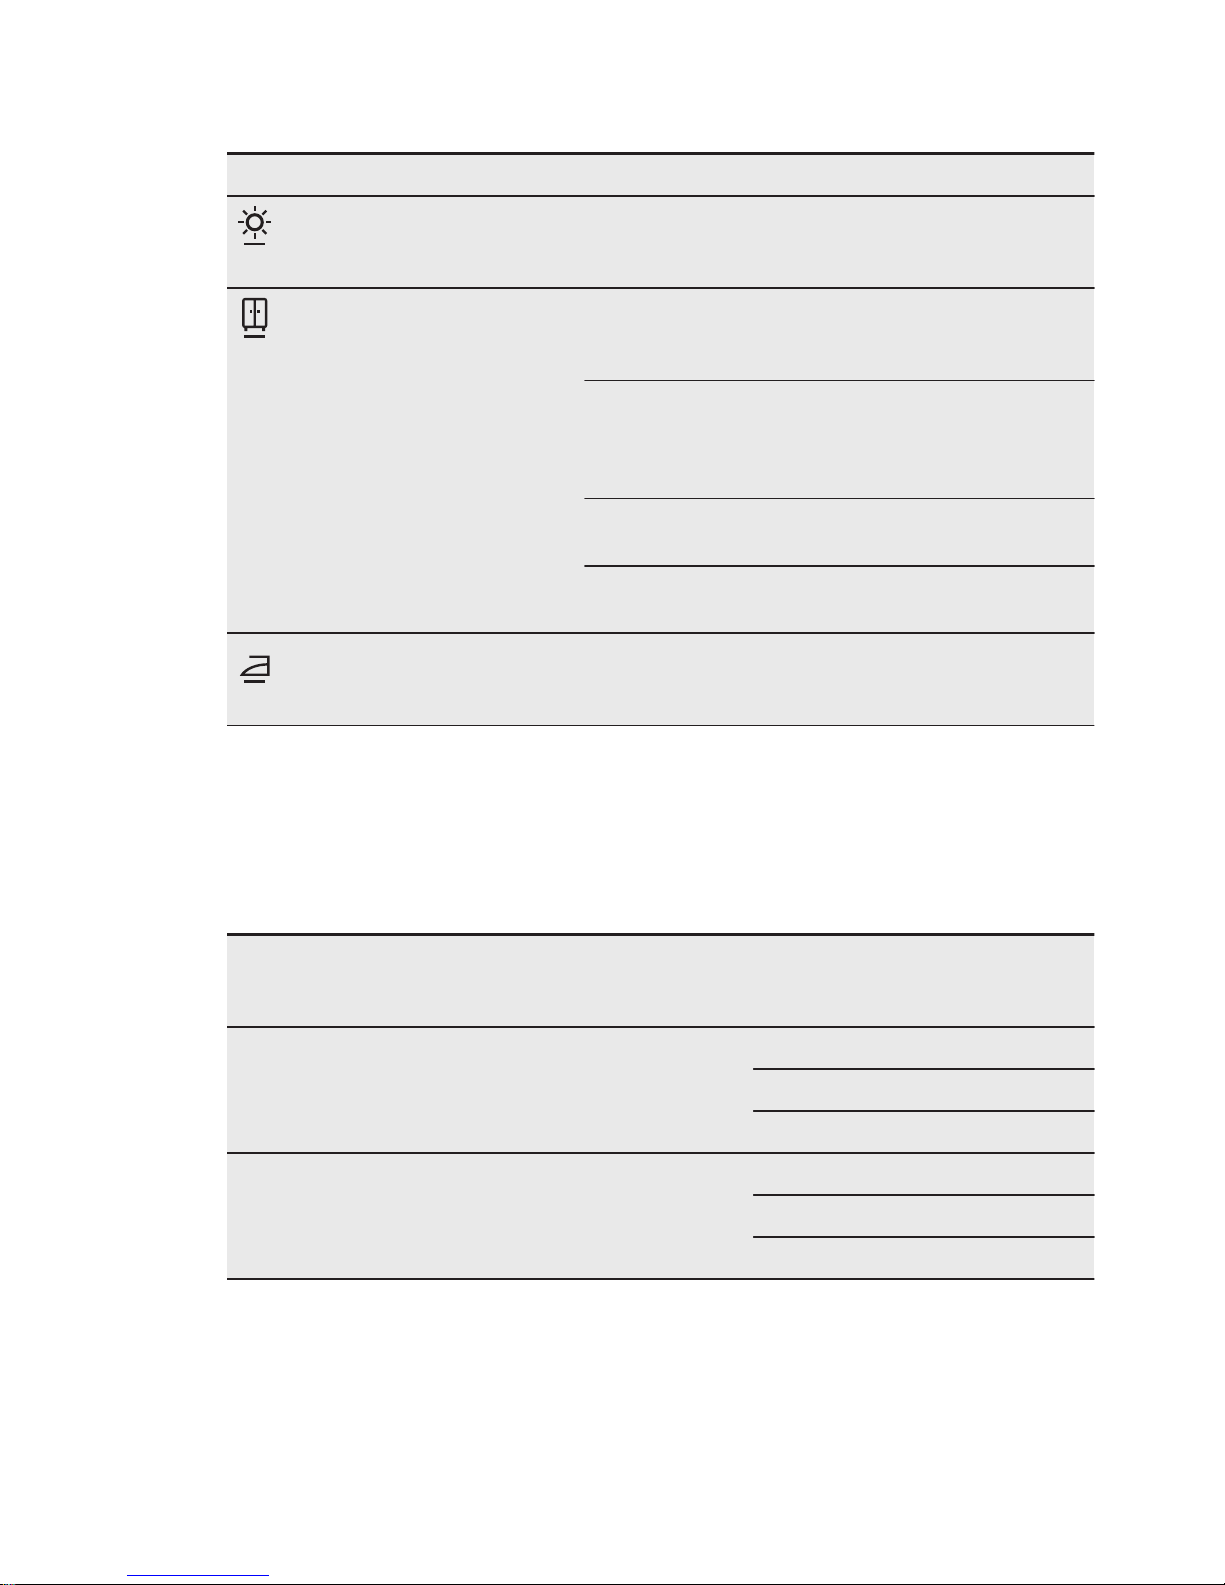
5.2 Automatic drying
Dryness Level Type of fabric Load
Extra Dry
For towelling materials
Cottons and Linen
(bathrobes, bath towels,
etc)
up to 6 kg
Cupboard Dry
1)
For items to be stored
Cottons and Linen
(bathrobes, bath towels,
etc)
up to 6 kg
Synthetics and mixed
fabrics
(jumpers, blouses, underwear, household linen)
up to 3 kg
Silk items (blouses, shirts,
clothing..)
up to 1 kg
Wool items (woollen jumpers)
up to 1 kg
Iron Dry
Suitable for ironing
Cottons and Linen
(sheets, tablecloths, shirts,
etc)
up to 6 kg
1)
Hints for test institute The test performance, in accordance with EN 50229, must be car-
ried out with a FIRST drying load of the maximum declared drying capacity (load composition
according to EN61121) by setting the AUTOMATIC CUPBOARD DRY programme for Cotton.
The SECOND drying load with the residual load must be tested by setting the AUTOMATIC
CUPBOARD DRY programme for Cotton.
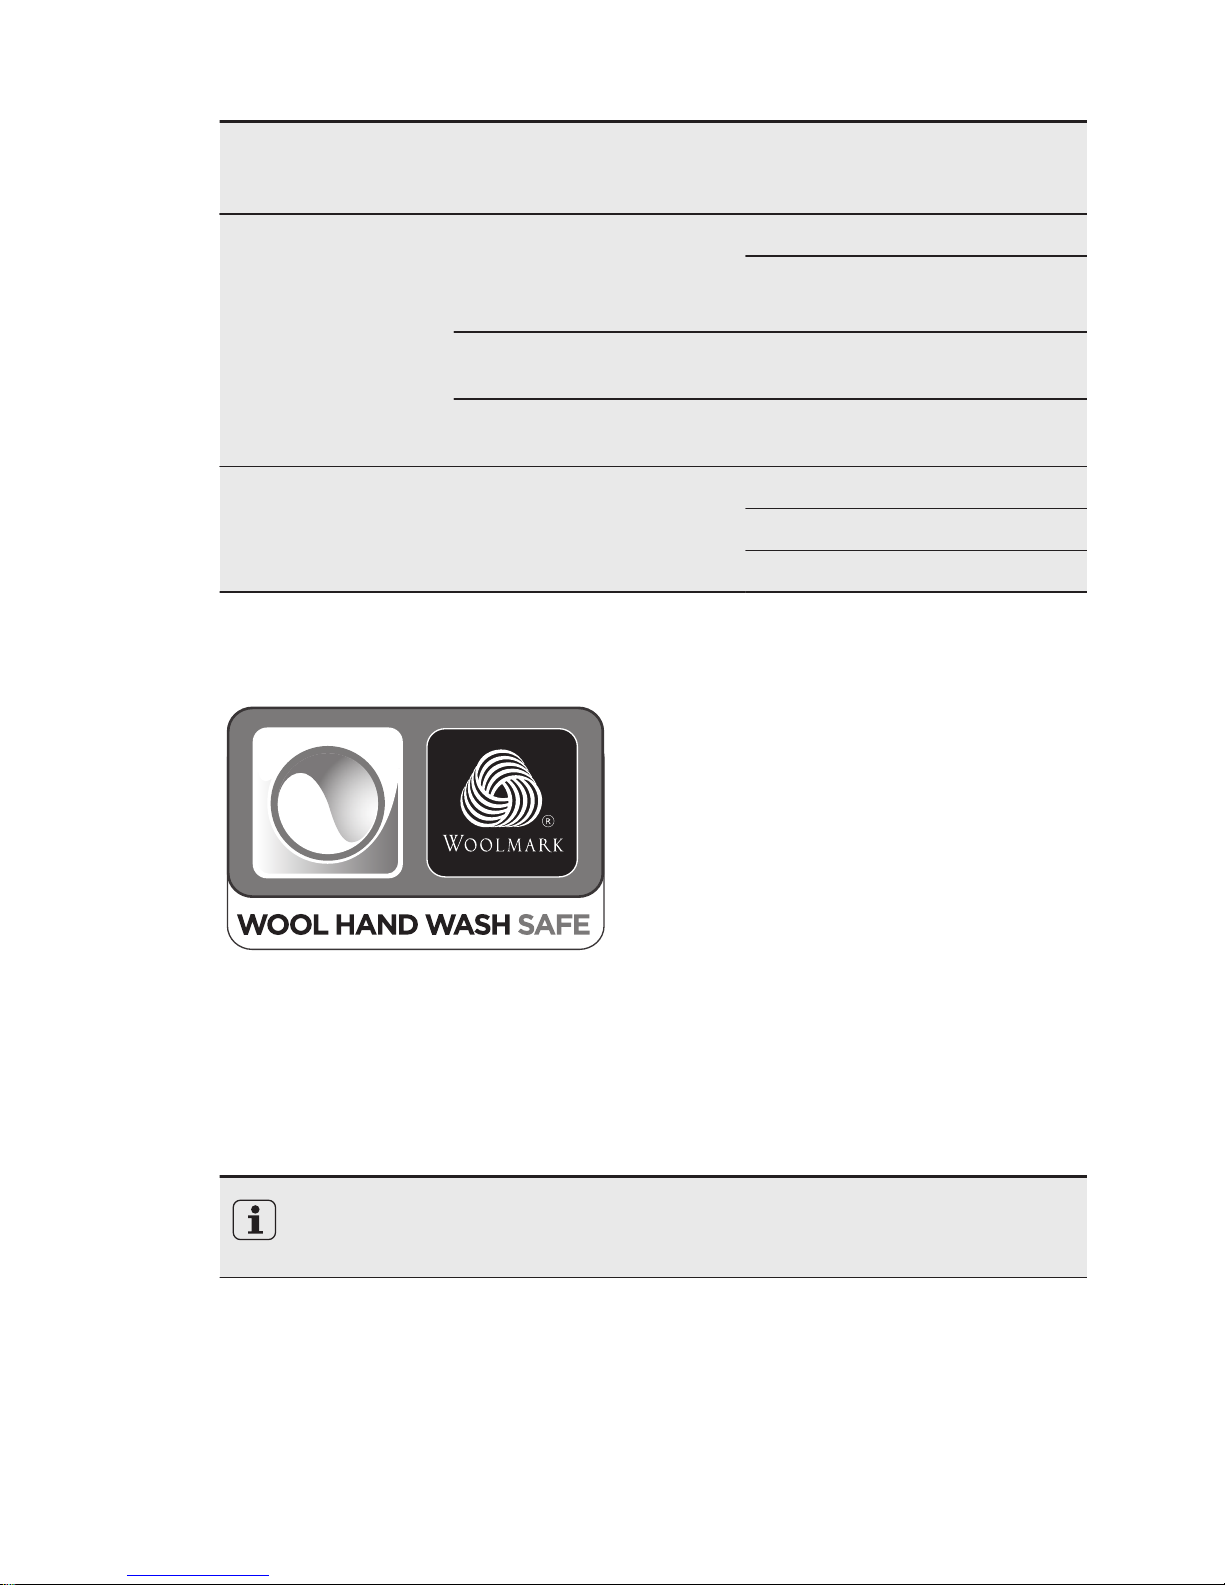
5.3 Timed drying
Dryness Level Type of fabric Load
(kg)
Spin
speed
(rpm)
Suggested
duration
(mins)
Extra Dry
For towelling materials
Cottons and Linen
(bathrobes, bath towels,
etc)
6 1600 220 - 240
4 1600 140 - 160
2 1600 100 - 110
Cupboard Dry
For items to be stored
Cottons and Linen
(bathrobes, bath towels,
etc)
6 1600 210 - 230
4 1600 130 - 150
2 1600 90 - 100
ENGLISH
15
Page 16
Dryness Level Type of fabric Load
(kg)
Spin
speed
(rpm)
Suggested
duration
(mins)
Cupboard Dry
For items to be stored
Synthetics and mixed
fabrics
(jumpers, blouses, underwear, household linen)
3 1200 100 - 110
1 1200 40 - 50
Wool
(woollen jumpers)
1 1200 110 - 130
Silk
(blouses, shirts, clothes etc)
1 1000 80
Iron Dry
Suitable for ironing
Cottons and Linen
(sheets, tablecloths, shirts,
etc)
6 1600 150 - 170
4 1600 85 - 105
2 1600 55 - 65
5.4 Woolmark Apparel Care Blue
• The wool wash cycle of this machine
has been approved by The Woolmark
Company for the washing of wool
garments labelled as «hand wash»
provided that the garments are washed
according to the instructions issued by
the manufacturer of this washing
machine. Follow the garment care label
for drying and other laundry
instructions. M1144
• The wool drying cycle of this machine
has been approved by The Woolmark
Company for the drying of wool
garments labelled as «hand wash»
provided that the garments are dried
according to the instructions issued by
the manufacturer of this machine.
Follow the garment care label for other
laundry instructions. M1224
In UK, Eire, Hong Kong and India the
Woolmark symbol is a certification
trademark.
6. CONSUMPTION VALUES
The data in this table are approximate. Different variables can affect the
data: the quantity and type of laundry, the water and ambient temperature.
www.electrolux.com16
Page 17
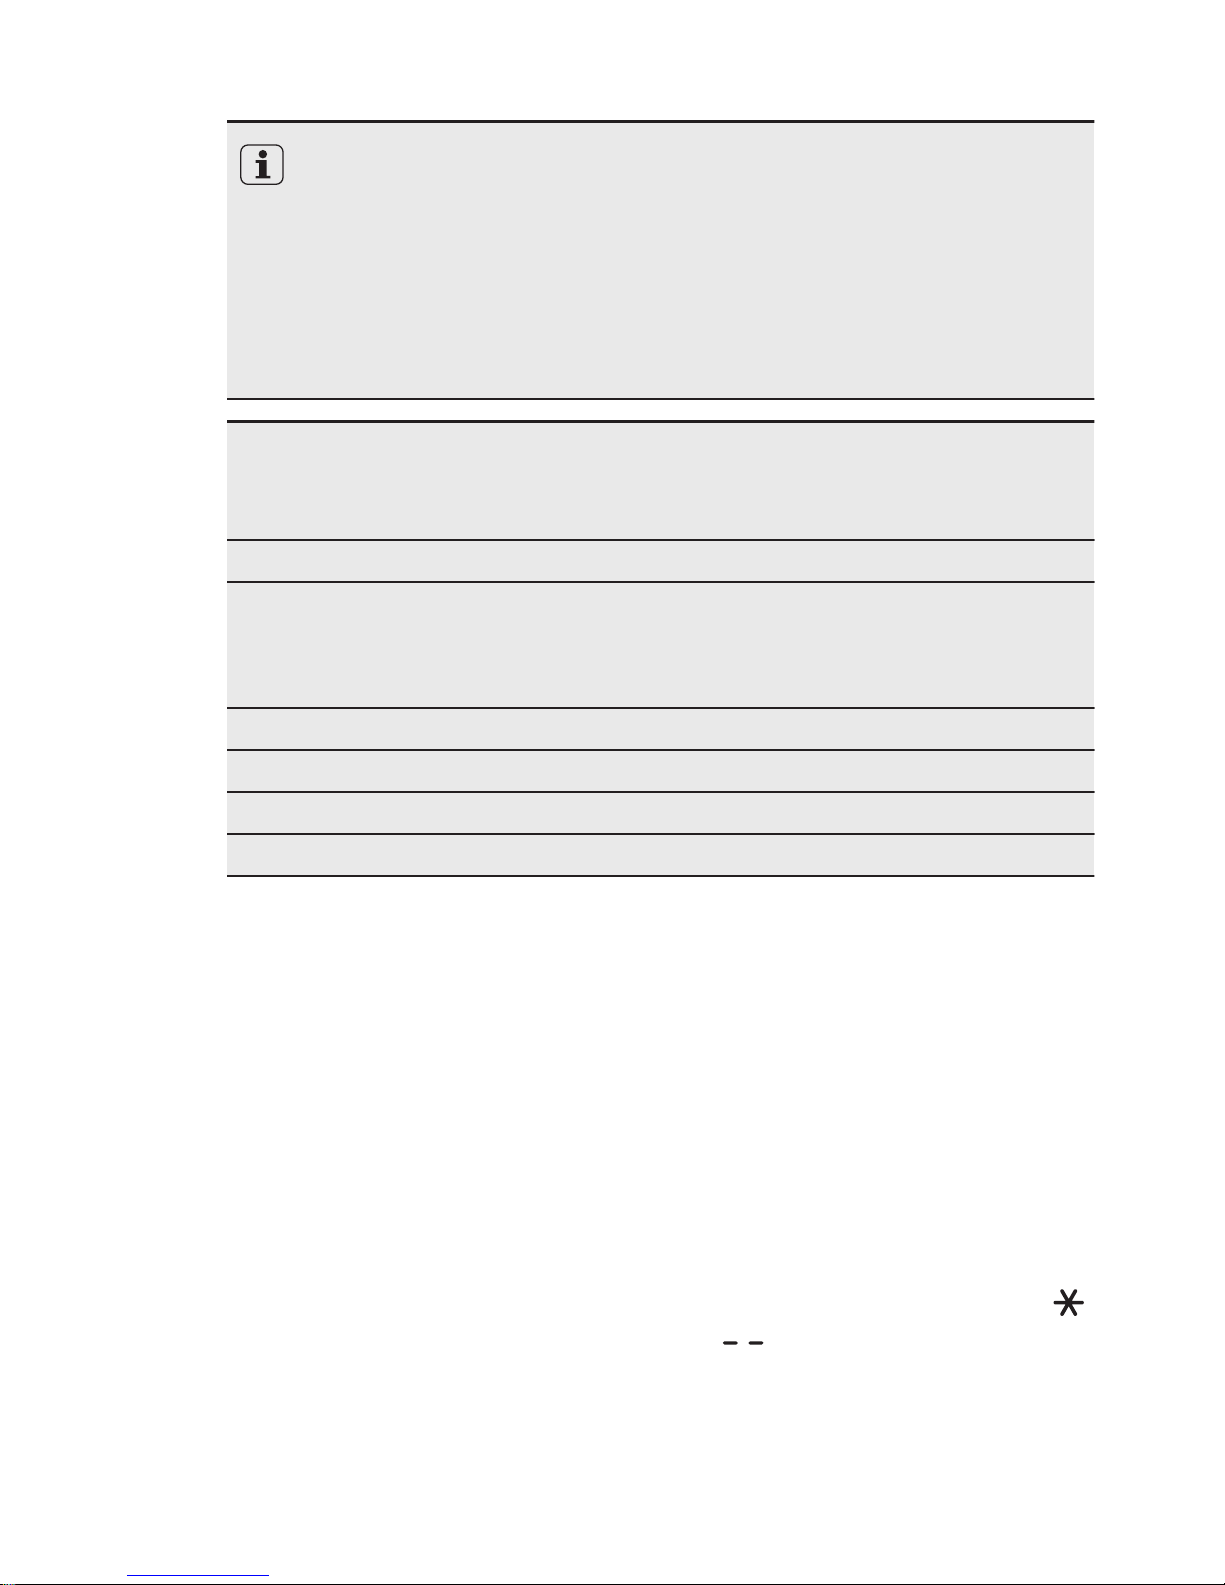
At the start of the programme, the display shows the programme duration
for the maximum load capacity.
During the washing phase the programme duration is automatically calculated and can be greatly reduced if the laundry load is lower than the maximum load capacity (e.g. Cotton 60°C, maximum load capacity 9 kg, the
programme duration exceeds 2 hours; actual load 1 kg, the programme
duration will be less than 1 hour).
When the appliance is calculating the real programme duration a dot flashes in the display.
Programmes Load
(kg)
Energy
consumption
(kWh)
Water consumption
(litre)
Approximate programme duration
(minutes)
Cottons 60°C 9 1.6 69 168
Energiesparen - Economique
Cotton Energy Saving Pro-
gramme 60°C
1)
9 1.05 56 244
Cottons 40°C 9 1.0 69 164
Synthetics 40°C 4 0.6 48 105
Delicates 40°C 4 0.7 58 86
Wool/Handwash 30°C 2 0.35 57 61
1)
«Cotton Energy Saving programme » at 60°C with a load of 9 kg is the reference pro-
gramme for the data entered in the energy label, in compliance with EEC 92/75 standards.
7. OPTIONS
7.1 Ein/Aus - Marche/Arrêt
Press this button to activate or deactivate
the appliance. A tune sounds when the
appliance is activated.
The AUTO Stand-by function automatically
deactivates the appliance to decrease the
energy consumption when:
• You do not use the appliance for 5
minutes before you press the Start/
Pause - Départ/Pause button.
All settings are cancelled.
Press the Ein/Aus - Marche/Arrêt
button to activate the appliance again.
Set the washing programme and all
possible functions again.
• 5 minutes after the end of the washing
programme.
Refer to "AUTO Stand-by option".
7.2 Programme knob
Turn this knob to set a programme. The
related programme indicator comes on.
7.3 Temperatur - Température
Press this button to change the default
temperature. When the display shows
and , the appliance does not heat the
water.
7.4 U./Min. - T/min.
Press this button to:
ENGLISH
17
Page 18
• Decrease the maximum speed of the
programme spin phase.
The display indicates only
the spin speeds available
for the set programme.
• Deactivate the spin phase.
• Activate the Rinse Hold option.
Set this option to prevent fabrics from
creasing. The washing programme
ends with water in the drum. The drum
turns regularly to reduce creasing.
The door stays locked. You must drain
the water to unlock the door.
7.5 Flecken - Taches /
Vorwäsche - Prélavage
Press this button to add the stain and the
prewash phase to a programme.
Press the button repeatedly to activate
one or both options. The related indicator
and the indicator bar illuminate in the
display.
• Flecken - Taches: Use this option for
laundry with hard stains to remove.
When you set this option, put the stain
remover into compartment
. This
option increases the programme
duration.
This option is not available
with a temperature lower
than 40° C.
• Vorwäsche - Prélavage: Use this
option to add a prewash phase before
the washing phase.
We recommend that you use this
option when you have very soiled
laundry.
This option increases the
programme duration.
7.6 Extra Spülen - Rinçage +
Press the Extra Spülen - Rinçage + button
to add rinsing phases to a programme.
Use this option for persons allergic to
detergents and in areas where the water is
soft.
7.7 Zeit Sparen - Gain de Temps
With this option you can decrease the
programme duration.
• Press this button one time to set
'Shortened duration' for items with
daily soil.
• Press this button two times to set
'Extra Quick' for slightly soiled items
only.
Some programmes accept
only one of the two options.
7.8 Zeitvorwahl - Départ Différé
With this option you can delay the start of
a programme from 30 minutes to 20
hours.
The display shows the related indicator
and delay time.
7.9 Start/Pause - Départ/Pause
Press button Start/Pause - Départ/Pause
to start or interrupt a programme.
7.10 Trockengrad - Niveau de
séchage
Press this button to set one of 3 automatic
dryness levels available. The display
shows the symbol of the set level:
• Iron dry – laundry to be ironed
• Cupboard dry – laundry to be put
in storage
•
Extra dry – laundry to be fully
dried
You cannot set all
automatic levels for each
type of fabric.
7.11 Trockenzeit - Minuterie
Press this button to set the time that suits
the fabrics you have to dry. The display
shows the set value.
www.electrolux.com18
Page 19
Each time you press this button the time
value increases by 5 minutes.
Drying durations may be
restricted by the programme
selected.
8. SETTINGS
8.1 Acoustic signals
The acoustic signals operate when:
• You activate the appliance.
• You deactivate the appliance.
• You press the buttons.
• The programme is completed.
• The appliance has a malfunction.
To deactivate/activate the acoustic
signals, press Flecken Taches Vorwäsche Prélavage and Extra Spülen Rinçage + at the same time for 6 seconds.
If you deactivate the acoustic
signals, they continue operate
when the appliance has a
malfunction.
8.2 Child Lock
With this option you can prevent that the
children play with the control panel.
• To activate/deactivate this option,
press Temp. and U./Min. - T/min. at
the same time until the indicator
comes on/goes off.
You can activate this option:
• After you press Start/Pause - Départ/
Pause : the options and the
programme knob are locked.
• Before you press Start/Pause - Départ/
Pause : the appliance cannot start.
8.3 Permanent Extra Rinse
With this option you can permanently have
an extra rinse when you set a new
programme.
• To activate/deactivate this option
press Zeit Sparen - Gain de Temps
and Zeitvorwahl - Départ Différé at the
same time until the relevant indicator
comes on/goes off.
9. DAILY USE - WASHING ONLY
9.1 Before first use
1. Put a small quantity of detergent in the
compartment for washing phase.
2. Set and start a programme for cotton
at the highest temperature without
laundry.
This removes all possible dirt from the
drum and the tub.
9.2 Loading the laundry
1. Open the appliance door.
2. Put the laundry in the drum, one item
at a time.
3. Shake the items before you put them
in the appliance.
Make sure you do not put too much
laundry in the drum.
4. Close the door firmly.
CAUTION!
Make sure that no laundry
becomes trapped between
the seal and the door. There
is a risk of water leakage or
damage to the laundry.
ENGLISH
19
Page 20
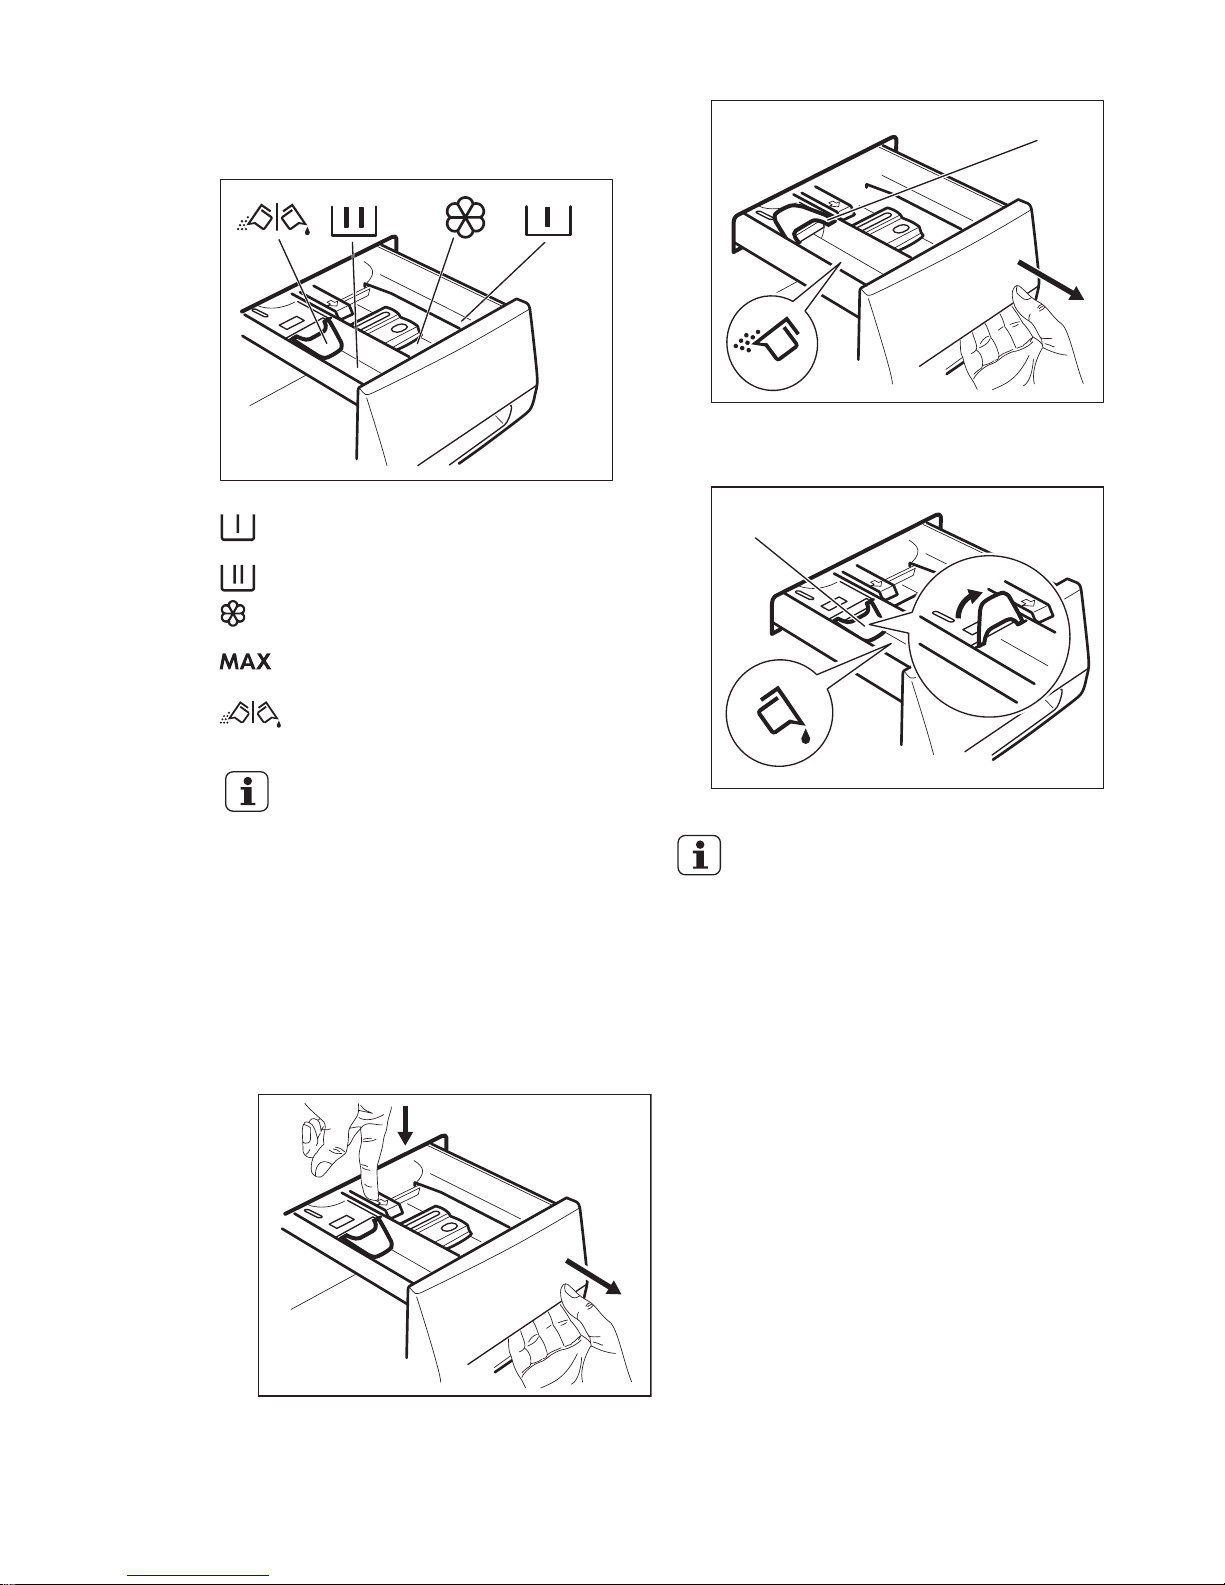
9.3 Filling the detergent and
additives
Compartment for prewash phase,
soak programme or stain remover.
Compartment for washing phase.
Compartment for liquid additives
(fabric conditioner, starch).
Maximum level for quantity of liquid
additives.
Flap for powder or liquid detergent.
Always follow the instructions
that you find on the
packaging of the detergent
products.
9.4 Check the position of the
flap
1. Pull out the detergent dispenser until it
stops.
2. Press the lever down to remove the
dispenser.
1
2
3. To use powder detergent, turn the flap
up.
A
4. To use liquid detergent, turn the flap
down.
B
With the flap in the
position DOWN:
• Do not use gelatinous
or thick liquid
detergents.
• Do not put more liquid
detergent than the
limit shown on in the
flap.
• Do not set the
prewash phase.
• Do not set the delay
start function.
5. Measure out the detergent and the
fabric conditioner.
6. Carefully close the detergent
dispenser.
Make sure that the flap does not cause a
blockage when you close the drawer.
9.5 Activating the appliance
1. Connect the mains plug to the mains
socket.
2. Open the water tap.
www.electrolux.com20
Page 21
3. Press button Ein/Aus - Marche/Arrêt
to activate the appliance.
A short tune sounds.
9.6 Setting a programme
1. Turn the programme knob and set the
programme:
• The related programme indicator
comes on.
• The indicator of Start/Pause Départ/Pause flashes.
• The display shows: the default
temperature, the spin speed, the
indicators of the programme
phases and the programme
duration.
2. If necessary, change the temperature,
the spin speed, the cycle duration, or
add available options. When you
activate an option, the indicator of the
set option comes on.
If you set something
incorrect, the display shows
the message Err.
9.7 Starting a programme
without the delay start
Press button Start/Pause - Départ/Pause
to start the programme.
The relevant indicator stops to flash and
stays on.
On the display the indicator of the phase is
operation starts to flash.
The programme starts, the door is locked.
The display show the indicator
.
The drain pump can operate
for a short time when the
appliance fills water.
9.8 Behaviour of the appliance
After approximately 15
minutes from the start of the
programme:
• The appliance adjusts
automatically the cycle
time to the laundry you
have put in the drum to
have perfect washing
results in the minimum
necessary time.
• The display shows the
new time value.
9.9 Starting a programme with
the delay start
1. Press button Zeitvorwahl - Départ
Différé again and again until the
display shows the number of minutes
or hours of delay.
The related indicator comes on.
2. Press button Start/Pause - Départ/
Pause.
The appliance starts the countdown of the
delay start.
When the countdown is completed, the
programme starts automatically.
Before you press button
Start/Pause - Départ/Pause
to start the appliance, you
can cancel or change the set
of the delay start.
9.10 Cancelling the delay start
To cancel the delay start:
1. Press button Start/Pause - Départ/
Pause to set the appliance to pause.
The related indicator flashes.
2. Press button Zeitvorwahl - Départ
Différé repeatedly until the display
shows .
3. Press button Start/Pause - Départ/
Pause again to start the programme
immediately.
9.11 Interrupting a programme
and changing a option
You can change only some options before
they operate.
ENGLISH
21
Page 22
1. Press button Start/Pause - Départ/
Pause.
The related indicator flashes.
2. Change the option set.
3. Press the button Start/Pause -
Départ/Pause again.
The programme continues.
9.12 Cancelling a running
programme
1. Press button Ein/Aus - Marche/Arrêt
to cancel the programme and to
deactivate the appliance.
2. Press button Ein/Aus - Marche/Arrêt
again to activate the appliance.
Now, you can set a new washing
programme.
Before starting the new
programme the appliance
could drain the water. In this
case, make sure that the
detergent is still in the
detergent compartment, if
not fill the detergent again.
9.13 Opening the door
If the temperature and level of
the water in the drum are too
high and/or the drum still
rotates you cannot open the
door.
While a programme or the delay start
operates, the appliance door is locked.
1. Press button Start/Pause - Départ/
Pause.
In the display the related door lock
indicator goes off.
2. Open the appliance door.
3. Close the door and press button
Start/Pause - Départ/Pause.
The programme or the delay start
continues.
9.14 End of cycle
When the programme has finished, the
appliance stops automatically. The
acoustic signal operates (if it is active).
In the display comes on and the door
locked indicator goes off.
The indicator of Start/Pause - Départ/
Pause button goes off.
1. Press button Ein/Aus - Marche/Arrêt
to deactivate the appliance.
After five minutes from the end of the
programme, the energy saving function
automatically deactivates the appliance.
When you activate the
appliance again, the display
show the end of the last set
programme. Turn the
programme knob to set a
new cycle.
2. Remove the laundry from the
appliance.
3. Make sure that the drum is empty.
4. Keep the door ajar, to prevent mildew
and odours
9.15 Draining water out after end
of cycle
The washing programme is
completed, but there is water in the
drum:
The drum turns regularly to prevent the
creases in the laundry.
The door lock indicator is on. The
door stays locked.
You must drain the water to open the
door:
1. If necessary, decrease the spin speed.
2. Press the Start/Pause - Départ/Pause
button.
The appliance drains the water and spins.
3. When the programme is completed
and the door lock indicator
goes
off, you can open the door .
4. Press Ein/Aus - Marche/Arrêt some
seconds to deactivate the appliance.
The appliance drains and
spins automatically after
approximately18 hours.
www.electrolux.com22
Page 23
9.16 AUTO Stand-by option
The AUTO Stand-by function automatically
deactivates the appliance to decrease the
energy consumption when:
• You do not use the appliance for 5
minutes before you press Start/Pause Départ/Pause button.
Press the button Ein/Aus - Marche/
Arrêt to activate the appliance again.
• After 5 minutes from the end of the
washing programme
Press the button Ein/Aus - Marche/
Arrêt to activate the appliance again.
The display shows the end of the last
set programme.
Turn the programme knob to set a new
cycle.
If you set a programme or an
option that ends with water in
the drum, the AUTO Standby function doesn't
deactivate the appliance to
remind you to drain the
water.
10. DAILY USE - DRYING ONLY
WARNING!
Refer to Safety chapters.
10.1 Preparation to drying
1. Press button Ein/Aus - Marche/Arrêt
for some seconds to activate the
appliance
2. Load the laundry one item at a time.
3. Turn the programme dial to the drying
programme applicable for the items to
dry.
The display shows a minimum time value
and the following symbols:
The drying symbol comes on.
The anti-crease symbol comes on.
The drying time symbol comes on.
When drying a big amount of
laundry, to have good drying
performances, make sure
that the laundry itself is not
rolled up and that is uniformly
distributed in the drum.
To have best performances in
drying when you wash the
laundry set a spin cycle at the
maximum speed allowed for
your type of items.
You can dry your laundry in two ways:
10.2 Automatic drying
1. Press button Trockengrad - Niveau de
séchage repeatedly until a black line
appears under one of the dryness
level symbol:
Extra dry level
Cupboard dry level
Iron dry level
The drying time symbol goes off
The display shows a time value, calculated
on a default load size. If the amount of
your laundry is more or less than the
default size, the appliance adjusts
automatically the time value during the
cycle.
2. Press button Start/Pause - Départ/
Pause to start the programme. In the
display:
The door locked symbol comes
on.
The drying symbol starts to flash.
ENGLISH
23
Page 24
The symbol of the set level stays
on (e.g. Cupboard dry).
The other level symbols go off.
The display updates regularly the drying
cycle time (every minute).
You cannot set all levels for
all kind of laundry (refer to
"Programmes for automatic
drying" table) .
10.3 Timed drying
1. Press button Trockenzeit - Minuterie
repeatedly to set the time value (see
the «Drying Programme» table).
The drying symbol comes on.
The anti-crease symbol comes on.
The drying time symbol comes on.
Set time value.
Each time you press this button the time
value increases by 5 minutes. The display
shows the set time value.
After some seconds the set time value on
the display changes: the appliance
calculates also the duration of the anticrease and the cooling phases.
Final time value.
2. Press Start/Pause - Départ/Pause to
start the programme. The text bar tells
that the appliance is drying. The
display shows the new time value
every minute.
The drying symbol starts to flash.
The door locked symbol comes
on.
If you set the time value of
only 10 minutes, the
appliance performs only a
cooling phase.
10.4 At the end of the drying
programme
1. The appliance stops automatically.
2. The acoustic signals operate (if they
are active).
3. In the display comes on.
4. The indicator of button Start/Pause -
Départ/Pause goes off.
5. The last minutes of the drying cycle
the appliance performs the anti-crease
phase.
The anti-crease symbol
flashes.
The door is still locked (the symbol
is on).
6. Press button Ein/Aus - Marche/Arrêt
for some seconds to deactivate the
appliance.
After some minutes from
the end of the
programme, the energy
saving function
automatically deactivates
the appliance.
7. When the door locked light goes
off you can open the door.
8. Remove the laundry from the
appliance. Make sure that the drum is
empty.
9. Keep the door ajar, to prevent mildew
and odours.
10. Close the water tap.
11. DAILY USE - WASHING & DRYING
WARNING!
Refer to Safety chapters.
www.electrolux.com24
Page 25
11.1 NON-STOP programme
WARNING!
Do not put a plastic device/
ball for the detergent into the
drum.
1. Press button Ein/Aus - Marche/Arrêt
for some seconds to activate the
appliance .
2. Load the laundry one item at a time.
3. Put the detergent and the additives in
the appropriate compartment.
4. Turn the programme dial to the
washing programme. The display
shows the symbols of the different
washing phases.
5. Set the available options.
WARNING!
Do not set a spin speed
lower than the automatic
speed of the set programme.
11.2 Washing and Drying at
automatic levels
1.
Press button Trockengrad - Niveau de
séchage repeatedly until the black line
appears under one of the dryness
level symbol.
The iron dry level
The cupboard dry level
The extra dry level
The drying symbol comes on.
The anti-crease symbol comes on.
The display shows that the appliance is
ready to start.
The time value on the display is the
duration of both cycles washing and
drying, calculated on a default load
size.
To have a good drying the
appliance does not let you
set a too low spin speed for
the items to be washed and
dried.
2. Press button Start/Pause - Départ/
Pause to start the programme.
The set dryness level symbol stays
on (e.g. Cupboard dry). The others
level symbols go off.
The door locked symbol comes
on.
The display shows the new time value
each minute.
The last minutes of the drying
cycle the appliance performs
the anti-crease and the
cooling phases.
11.3 Washing and Timed drying
WARNING!
Do not put a plastic device/
ball for the detergent into the
drum.
1. Press button Trockenzeit - Minuterie
repeatedly to set the drying time value:
The drying symbol comes on.
The anti-crease symbol comes on.
The drying time symbol comes on.
The display shows the set drying value
time .
Set drying time value.
Each time you press this button the time
value increases by 5 minutes.
To have a good drying we
suggest you to do not set a
too low spin speed for the
items to be washed and
dried.
ENGLISH
25
Page 26
2. After some seconds the display shows
the total duration of the cycles:
Final time value (washing + drying
+ anti-crease + cooling phases)
If you set a drying time of only
10 minutes, the final time
value includes also the anticrease and the cooling
phases.
3. Press button Start/Pause - Départ/
Pause to start the programme.
The door is locked.
The display shows the new time value
each minute.
11.4 At the end of the drying
programme
1. The appliance stops automatically.
2. The acoustic signals operate (if they
are active).
3. In the display comes on.
4. The indicator of button Start/Pause -
Départ/Pause goes off.
5. The last minutes of the drying cycle
the appliance performs the anti-crease
phase.
The anti-crease symbol
flashes.
The door is still locked (the symbol
is on).
6. Press button Ein/Aus - Marche/Arrêt
for some seconds to deactivate the
appliance.
After some minutes from
the end of the
programme, the energy
saving function
automatically deactivates
the appliance.
7. When the door locked light goes
off you can open the door.
8. Remove the laundry from the
appliance. Make sure that the drum is
empty.
9. Keep the door ajar, to prevent mildew
and odours.
10. Close the water tap.
11.5 Fluff in the fabrics
During the washing and/or drying phase,
some types of fabric, (sponge, wool,
sweatshirt) could release fluff.
The released fluff could stick to the fabrics
during the next cycle.
To prevent the fluff in your laundry, we
recommend that you:
• Do not wash dark fabrics after you
have washed and dried light coloured
fabrics (new sponge, wool, sweatshirt )
and the contrary.
• Line dry this type of fabrics at open air
when they are washed the first time.
• Clean the drain filter.
• After the drying phase, clean the empty
drum, the gasket and the door with a
wet cloth.
11.6 How to remove the fluff in
the garments
To remove the fluff inside the drum, set a
special programme:
1. Empty the drum.
2. Clean the drum, the gasket and the
door with a wet cloth.
3. Set the rinse programme.
4. Press at the same time U./Min. - T/
min. and Extra Spülen - Rinçage + to
activate the cleaning function until the
display shows CLE.
5. Press Start/Pause - Départ/Pause to
start the programme.
12. HINTS AND TIPS
WARNING!
Refer to Safety chapters.
12.1 The laundry load
• Divide the laundry in: white, coloured,
synthetics, delicates and wool.
• Obey the washing instructions that are
on the laundry care labels.
www.electrolux.com26
Page 27

• Do not wash white and coloured items
together.
• Some coloured items can discolour
with the first wash. We recommend
that you wash them separately for the
first times.
• Button up pillowcases, close zippers,
hooks and poppers. Tie up belts.
• Empty the pockets and unfold the
items.
• Turn multilayered fabrics, wool and
items with painted illustrations inside
out.
• Remove hard stains.
• Wash heavy soil stains with a special
detergent.
• Be careful with the curtains. Remove
the hooks or put the curtains in a
washing bag or pillowcase.
• Do not wash laundry without hems or
with cuts. Use a washing bag to wash
small and/or delicate items (e.g.
underwired bras, belts, tights, etc. ).
• A very small load can cause balance
problems with the spin phase. If this
occurs, adjust manually the items in
the tub and start the spin phase again.
12.2 Stubborn stains
For some stains, water and detergent is
not sufficient.
We recommend that you pre-treat these
stains before you put the items in the
appliance.
Special stain removers are available. Use
the special stain remover that is applicable
to the type of stain and fabric.
12.3 Detergents and additives
• Only use detergents and additives
specially made for washing machines:
– powder detergents for all types of
fabric,
– powder detergents for delicate
fabrics (40 °C max) and woollens,
– liquid detergents, preferably for low
temperature wash programmes (60
°C max) for all types of fabric, or
special for woollens only.
• Do not mix different types of
detergents.
• To help the environment, do not use
more than the correct quantity of
detergent.
• Obey the instructions that you find on
the on packaging of these products.
• Use the correct products for the type
and colour of the fabric, the
programme temperature and the level
of soil.
• If your appliance does not have the
detergent dispenser with the flap
device, add the liquid detergents with a
dosing ball (supplied by the detergent's
manufacturer).
12.4 Ecological hints
• Set a programme without the prewash
phase to wash laundry with normal soil.
• Always start a washing programme
with the maximum load of laundry
allowed.
• If necessary, use a stain remover when
you set a programme with a low
temperature.
• To use the correct quantity of
detergent, check the water hardness of
your domestic system. Refer to "Water
hardness".
12.5 Water hardness
If the water hardness in your area is high
or moderate, we recommend that you use
a water softener for washing machines. In
areas where the water hardness is soft it is
not necessary to use a water softener.
To know the water hardness in your area,
contact your local water authority.
Use the correct quantity of the water
softener. Obey the instructions that you
find on the packaging of the product.
12.6 Drying hints
Prepare the drying cycle
• Open the water tap.
• Check if the drain hose is connected
properly. Refer to installation chapter
for more information.
• For the maximum laundry load of the
drying programmes, refer to the drying
programmes table.
ENGLISH
27
Page 28
12.7 Items not suitable for drying
Do not set a drying programme for
this laundry:
• Very delicate items.
• Synthetic curtains.
• Pieces of clothing with metal inserts.
• Nylon stockings.
• Quilts.
• Bed covers.
• Duvets.
• Anoraks.
• Sleeping bags.
• Fabrics with residue of hair sprays, nail
solvents or similar.
• Garments with foam-rubber or
materials similar to foam-rubber.
12.8 Garment labels
When you dry the laundry, obey the
indications on the labels of the
manufacturers:
• = The item can be tumble dried
• = The drying cycle is at high
temperature
• = The drying cycle is at reduced
temperature
• = The item can not be tumble dried.
12.9 Drying cycle duration
The drying time can change depending
on:
• speed of the last spin
• dryness level
• type of laundry
• weight of the load
12.10 Additional drying
If, at the end of the drying programme, the
laundry is still damp, set a short drying
cycle again.
WARNING!
To avoid creasing and
shrinkage do not overdry
the laundry.
12.11 General Tips
Refer to the «Drying programmes» table to
find the average drying times.
Experience will help you to dry the laundry
better. Take note of the duration of the
cycles done before.
To avoid the static charge at the end of
the drying cycle:
1. Use fabric conditioner in the washing
cycle.
2. Use special fabric conditioner for
tumble dryers.
When the drying programme is completed
remove the laundry promptly.
13. CARE AND CLEANING
WARNING!
Refer to Safety chapters.
13.1 External cleaning
Clean the appliance with soap and warm
water only. Fully dry all the surfaces.
CAUTION!
Do not use alcohol, solvents
or chemical products.
13.2 Descaling
If the water hardness in your area is high
or moderate, we recommend that you use
a water descaling product for washing
machines.
Regularly examine the drum to prevent
limescale and rust particles.
To remove rust particles use only special
products for washing machines. Do this
separately from the laundry wash.
Always obey the instructions
that you find on the
packaging of the product.
13.3 Maintenance wash
With the low temperature programmes it is
possible that some detergent stays in the
www.electrolux.com28
Page 29
drum. Perform a maintenance wash
regularly. To do this:
• Remove all laundry from the drum.
• Select the cotton programme with the
highest temperature with a small
quantity of detergent.
13.4 Door seal
Regularly examine the seal and remove all
objects from the inner part.
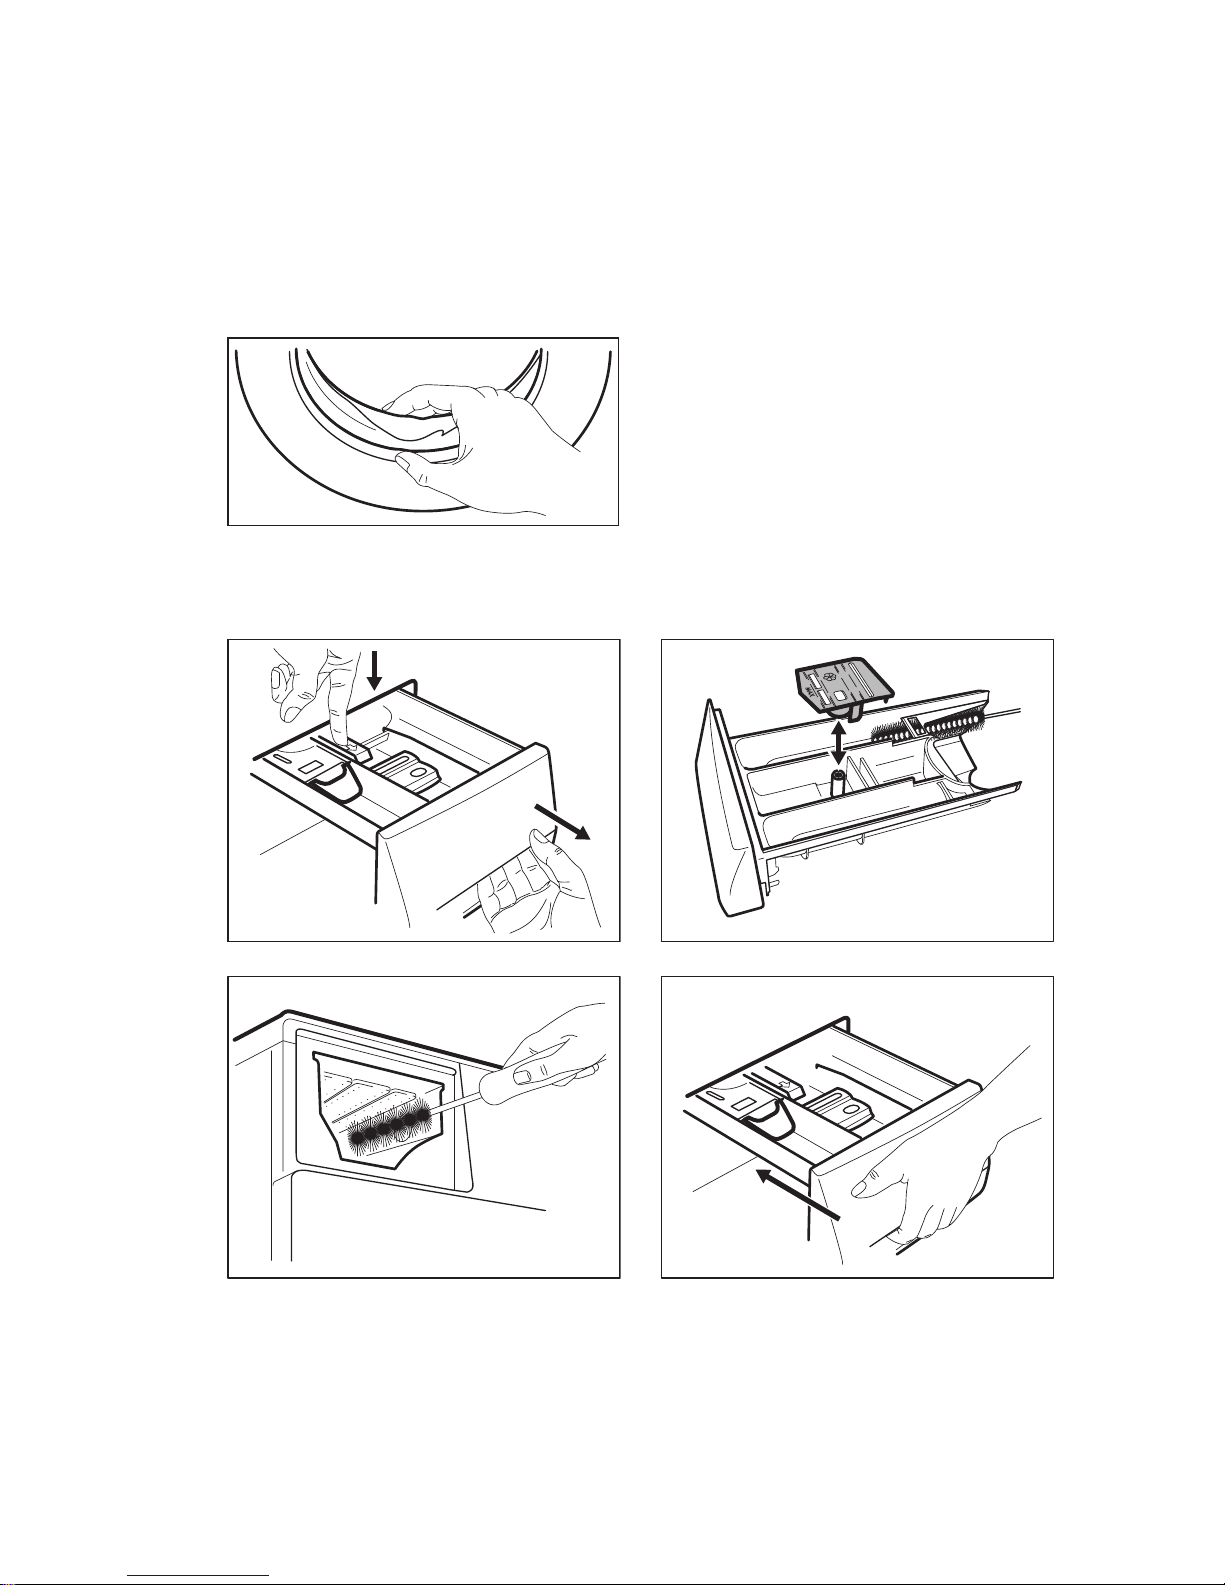
13.5 Cleaning the detergent dispenser
1.
1
2
2.
3. 4.
ENGLISH
29
Page 30
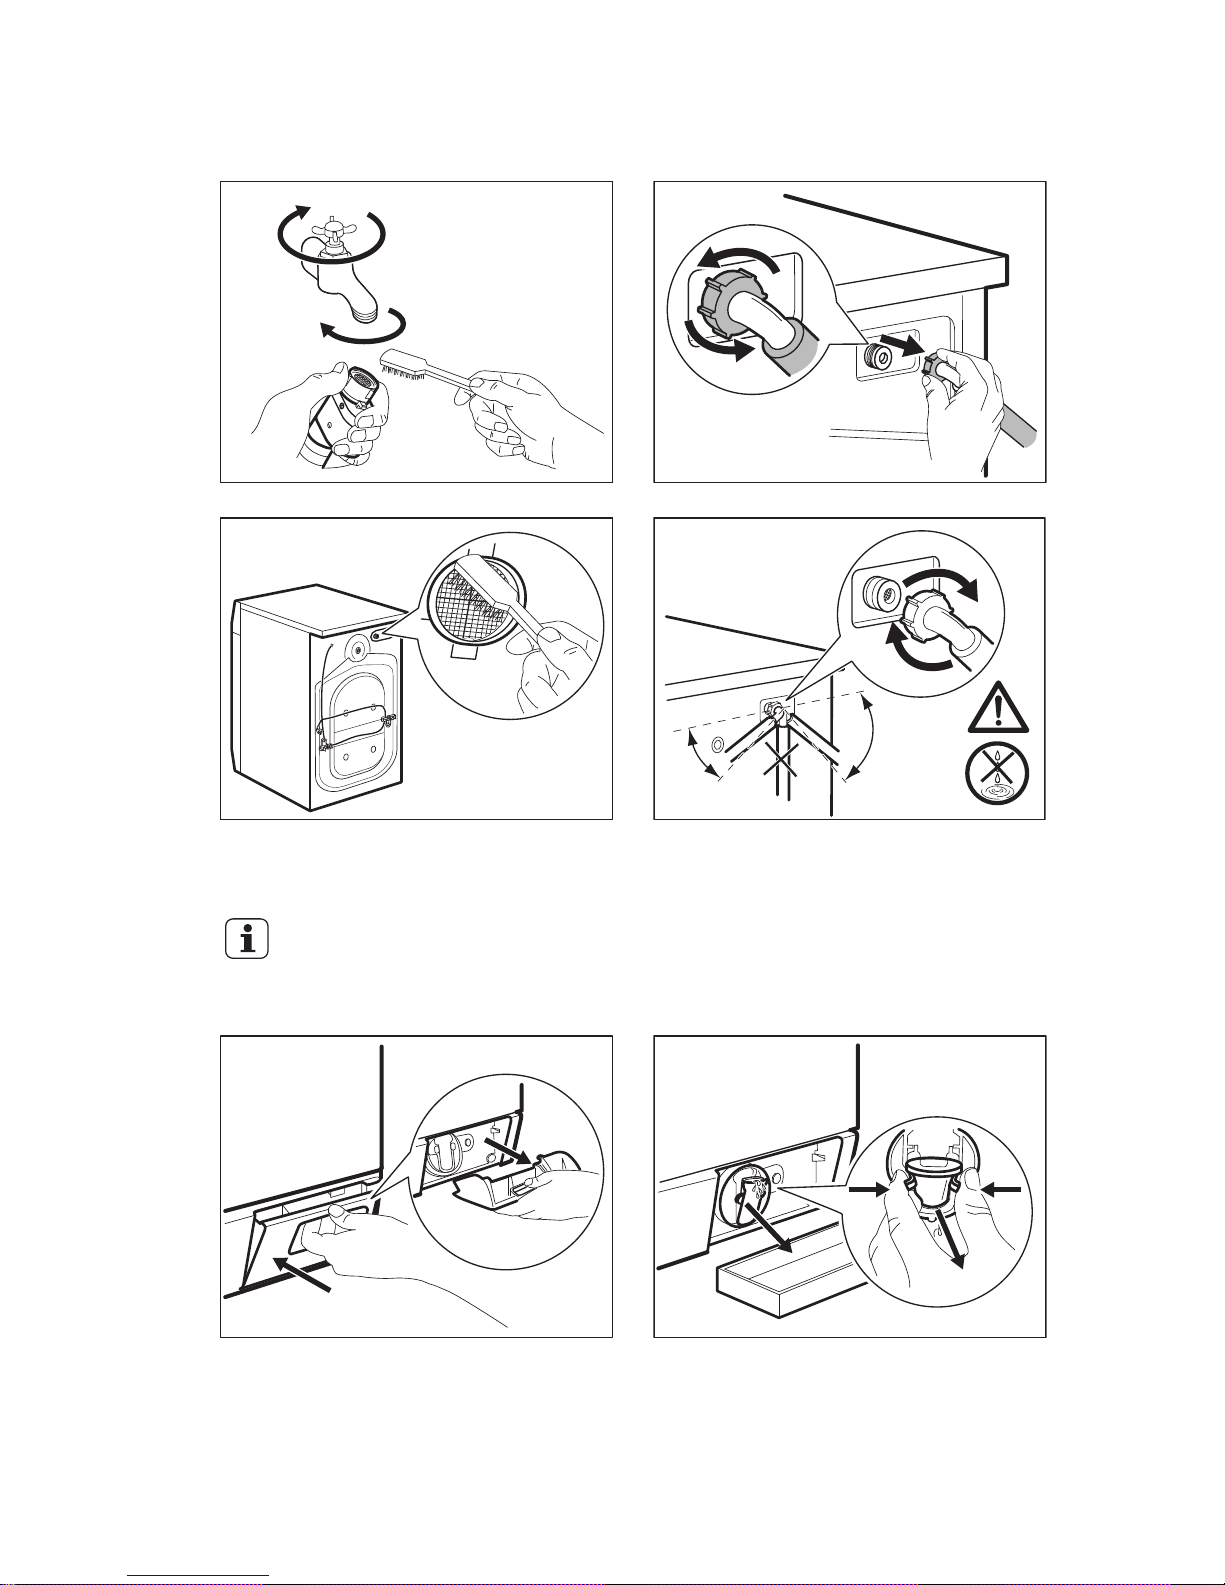
13.6 Cleaning the inlet hose and the valve filter
1.
1
2
3
2.
3. 4.
45°
20°
13.7 Cleaning the drain filter
Do not clean the drain filter if the water in the appliance is hot.
1.
1
2
2.
2
11
www.electrolux.com30
Page 31
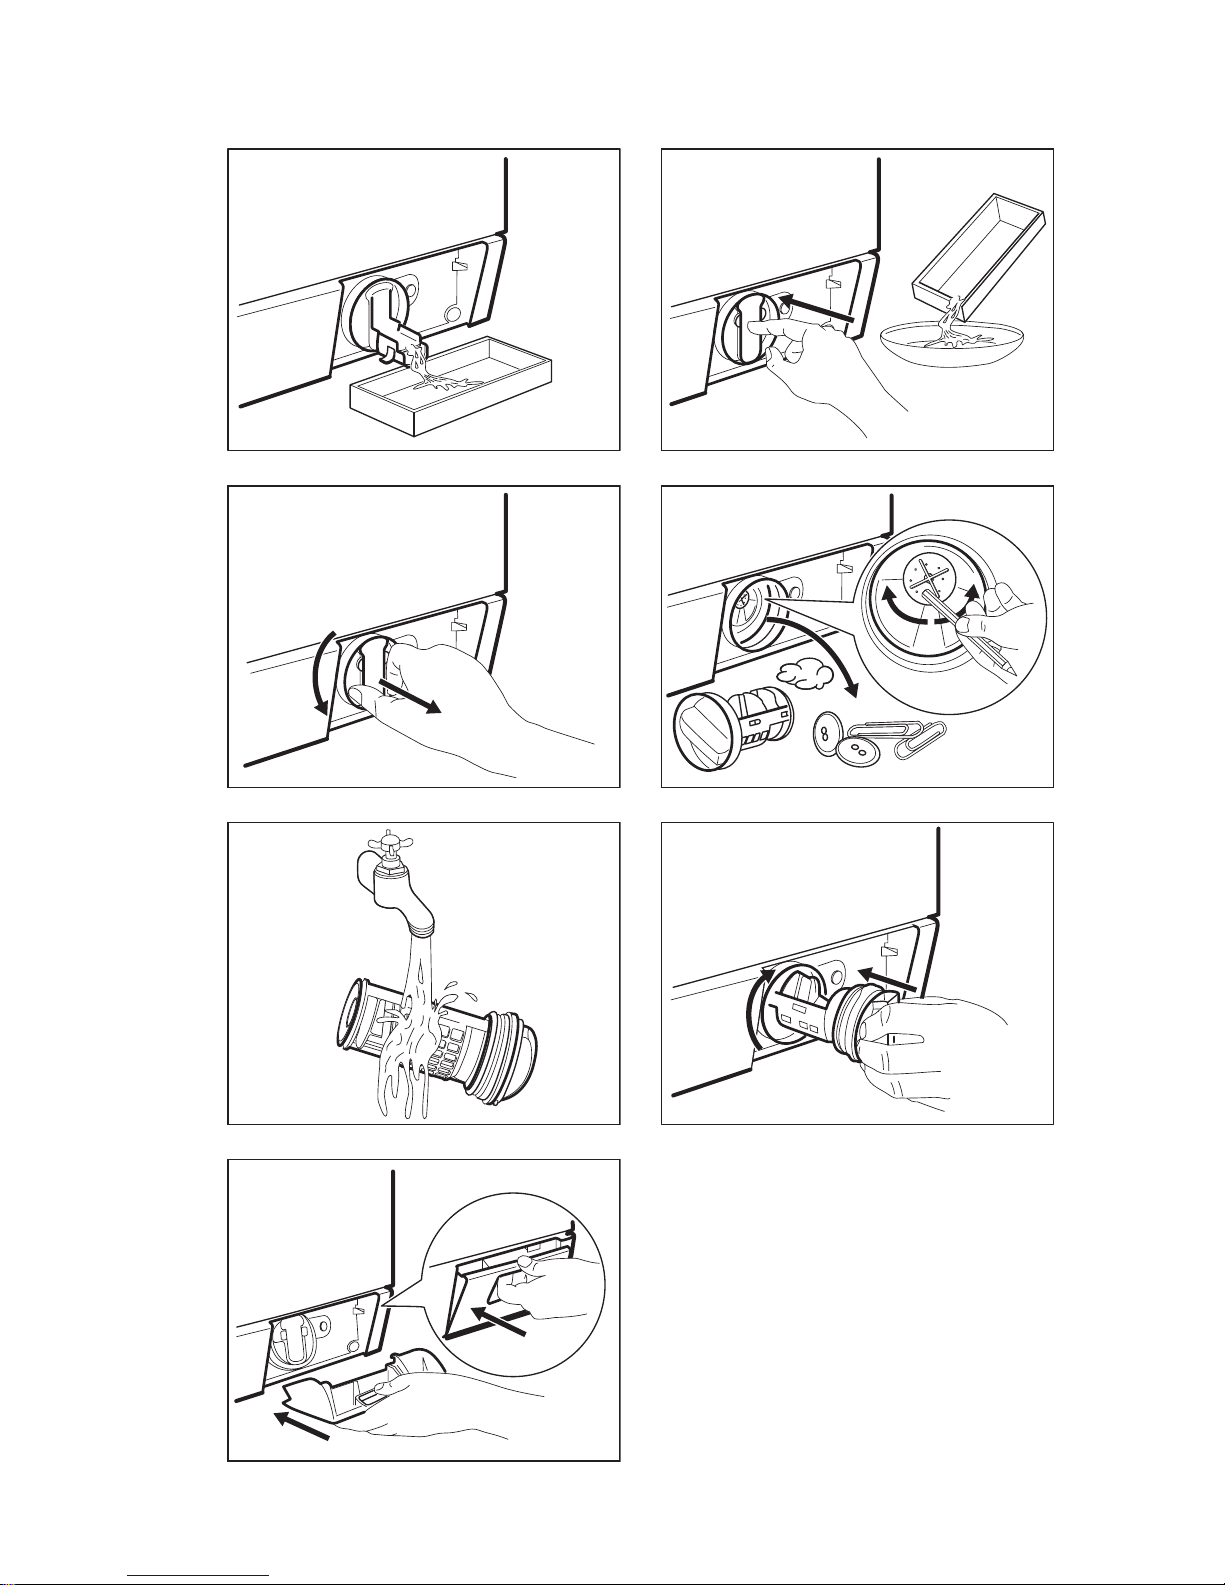
3. 4.
1
2
5.
1
2
6.
7. 8.
1
2
9.
1
2
ENGLISH
31
Page 32
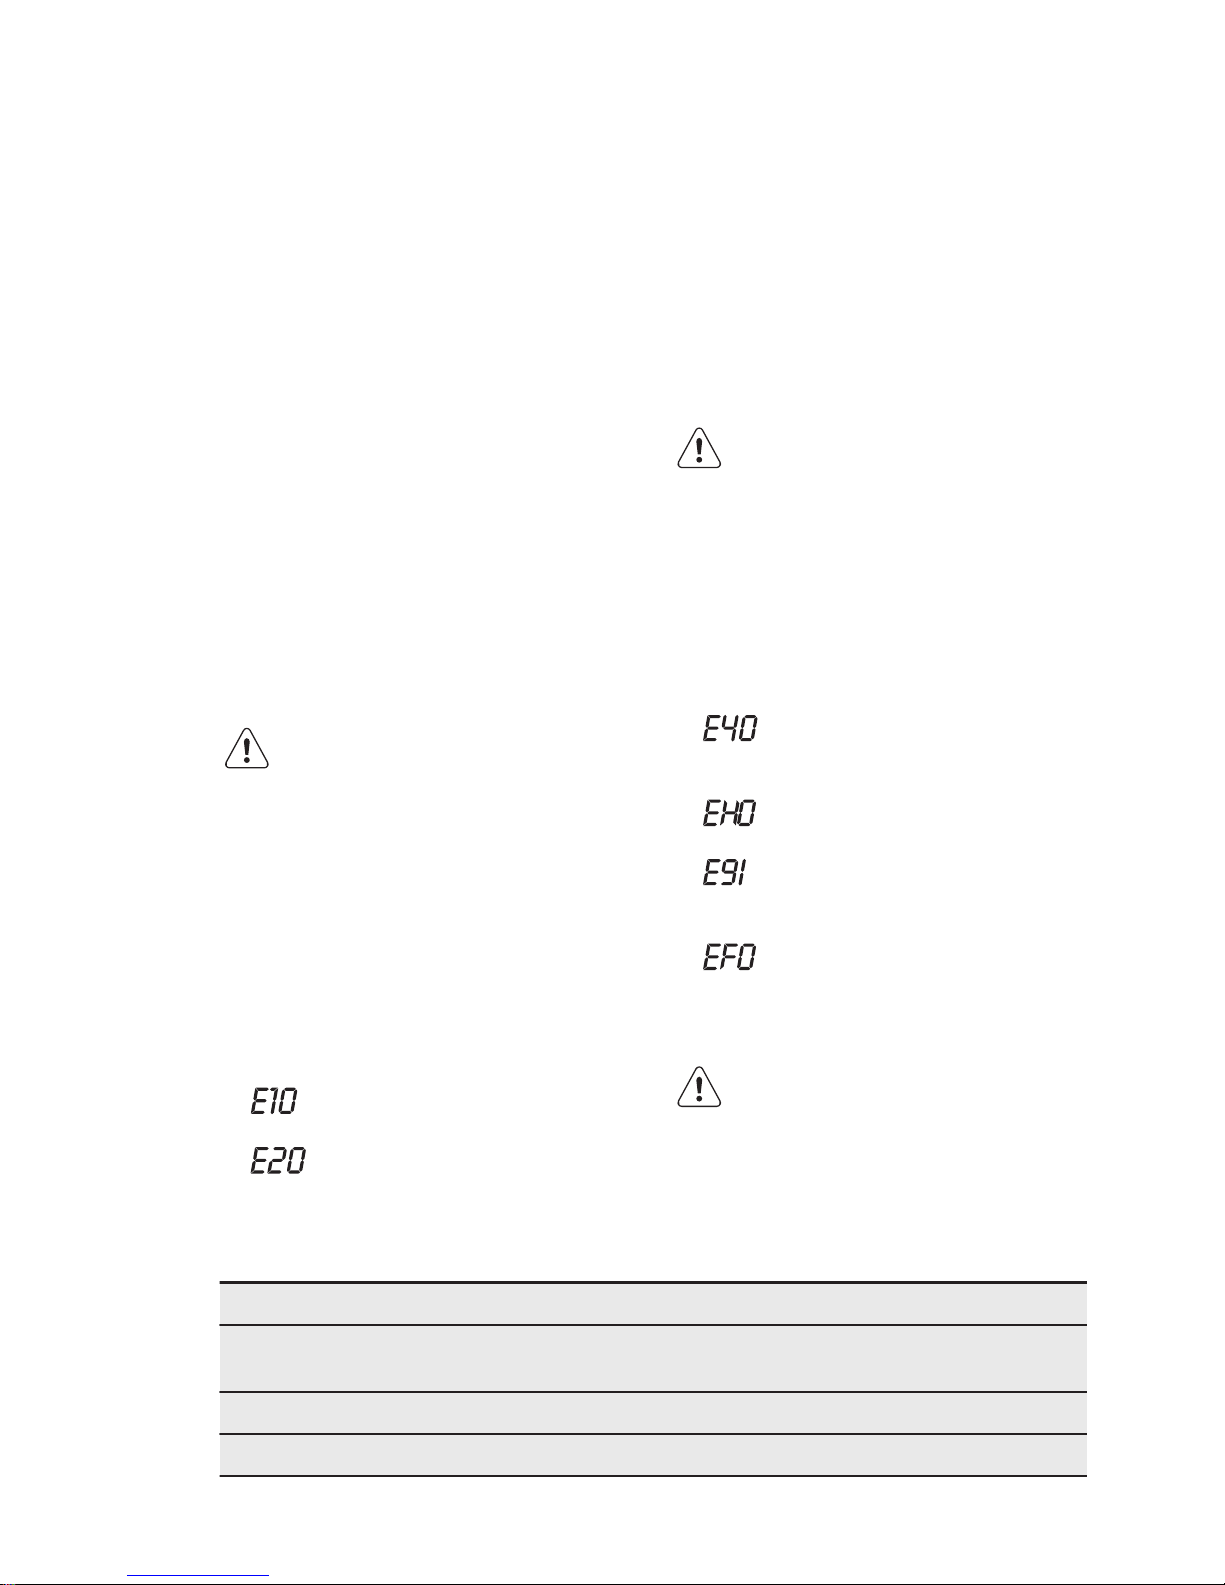
13.8 Emergency drain
Because of a malfunction, the appliance
cannot drain the water.
If this occurs, do steps (1) through (9) of
'Cleaning the drain filter'. If necessary,
clean the pump.
When you drain the water with the
emergency drain procedure, you must
activate the drain system again:
1. Put 2 litres of water in the main wash
compartment of the detergent
dispenser.
2. Start the programme to drain the
water.
13.9 Frost precautions
If the appliance is installed in an area
where the temperature can be less than
0° C, remove the remaining water from the
inlet hose and the drain pump.
1. Disconnect the mains plug from the
mains socket.
2. Close the water tap.
3. Put the two ends of the inlet hose in a
container and let the water flow out of
the hose.
4. Empty the drain pump. Refer to the
emergency drain procedure.
5. When the drain pump is empty, install
the inlet hose again.
WARNING!
Make sure that the
temperature is higher than 0
°C before you use the
appliance again.
The manufacturer is not
responsible for damages
caused by low temperatures.
14. TROUBLESHOOTING
WARNING!
Refer to Safety chapters.
14.1 Introduction
The appliance does not start or it stops
during operation.
First try to find a solution to the problem
(refer to the table). If the problem persists,
contact the Authorised Service Centre.
With some problems, the acoustic
signals operate and the display shows
an alarm code:
• - The appliance does not fill with
water properly.
• - The appliance does not drain
the water.
• - The appliance door is open or
not closed correctly. Please check the
door!
• - The mains supply is unstable.
Wait until the mains supply is stable.
• - No communication between
electronic elements of the appliance.
Switch off and switch on again.
• - The anti-flood device is on.
Disconnect the appliance and close the
water tap. Contact the Authorised
Service Centre.
WARNING!
Deactivate the appliance
before you do the checks.
14.2 Possible failures
Problem Possible solution
The programme does
not start.
Make sure that the mains plug is connected to the mains
socket.
Make sure that the appliance door is closed.
Make sure that there is not a damaged fuse in the fuse box.
www.electrolux.com32
Page 33

Problem Possible solution
Make sure that the Start/Pause has been pressed.
If the delay start is set, cancel the setting or wait for the end
of countdown.
Deactivate the Child Lock function if it is on.
The appliance does not
fill with water properly.
Make sure that the water tap is open.
Make sure that the pressure of the water supply is not too
low. For this information, contact your local water authority.
Make sure that the water tap is not clogged.
Make sure that the filter of the inlet hose and the filter of the
valve are not clogged. Refer to “Care and cleaning”.
Make sure that the inlet hose has no kinks or bends.
Make sure that the connection of the water inlet hose is correct.
The appliance does not
fill with water and drain
immediately.
Make sure that the drain hose is in the correct position. The
hose may be too low.
The appliance does not
drain the water.
Make sure that the sink spigot is not clogged.
Make sure that the drain hose has no kinks or bends.
Make sure that the drain filter is not clogged. Clean the filter,
if necessary. Refer to 'Care and cleaning'.
Make sure that the connection of the drain hose is correct.
Set the drain programme if you set a programme without
drain phase.
Set the drain programme if you set an option which ends
with water in the tub.
The spin phase does not
operate or the washing
cycle lasts longer than
usually.
Set the spin programme.
Make sure that the drain filter is not clogged. Clean the filter,
if necessary. Refer to 'Care and cleaning'.
Adjust manually the items in the tub and start the spin phase
again. This problem may be caused by balance problems.
There is water on the
floor.
Make sure that the couplings of the water hoses are tight
and there is not water leakages.
Make sure that the drain hose have no damages.
ENGLISH
33
Page 34

Problem Possible solution
Make sure you use the correct detergent and the correct
quantity of it.
You cannot open the
appliance door.
Make sure that the washing programme is finished.
Set the drain or the spin programme if there is water in the
drum.
Make sure that the appliance receives electrical power.
This problem may be caused by a failure of the appliance.
Contact the Authorised Service Centre. If you need to open
the door, please read carefully «Emergency door opening».
The appliance makes an
unusual noise.
Make sure the levelling of the appliance is correct. Refer to
'Installation'.
Make sure that the packaging and/or the transit bolts are re-
moved. Refer to 'Installation'.
Add more laundry in the drum. The load may be too small.
The cycle is shorter than
the time displayed.
The appliance calculates a new time according to the laundry
load. See the ‘Consumption Values’ chapter.
The cycle is longer than
the time displayed.
An unbalanced laundry load increases the duration time. This
is a normal behaviour of the appliance.
The washing results are
not satisfactory.
Increase the detergent quantity or use a different detergent.
Use special products to remove the stubborn stains before
you wash the laundry.
Make sure that you set the correct temperature.
Decrease the laundry load.
You cannot set an option.
Make sure that you press only the wanted button(s).
The appliance does not
dry or does not dry correctly.
Turn the water tap on.
Make sure the drain filter is not clogged.
Reduce the laundry load.
Make sure you have set the correct cycle. if necessary ,set
again a short drying time.
www.electrolux.com34
Page 35
Problem Possible solution
The laundry is full of different colours fluff.
The fabrics washed in the previous cycle released fluff of a
different colour:
• The drying phase helps to eliminate some fluff.
• Clean the clothes with a fluff remover.
In case of an excessive amount of fluff in the drum run the
special programme to clean it (refer to “Fluff in the fabrics" for
more details).
After the check, activate the appliance. The programme continues from the point of
interruption.
If the problem occurs again, contact the Authorised Service Centre.
If the display shows other alarm codes. Deactivate and activate the appliance. If the problem
continues, contact the Authorised Service Centre.
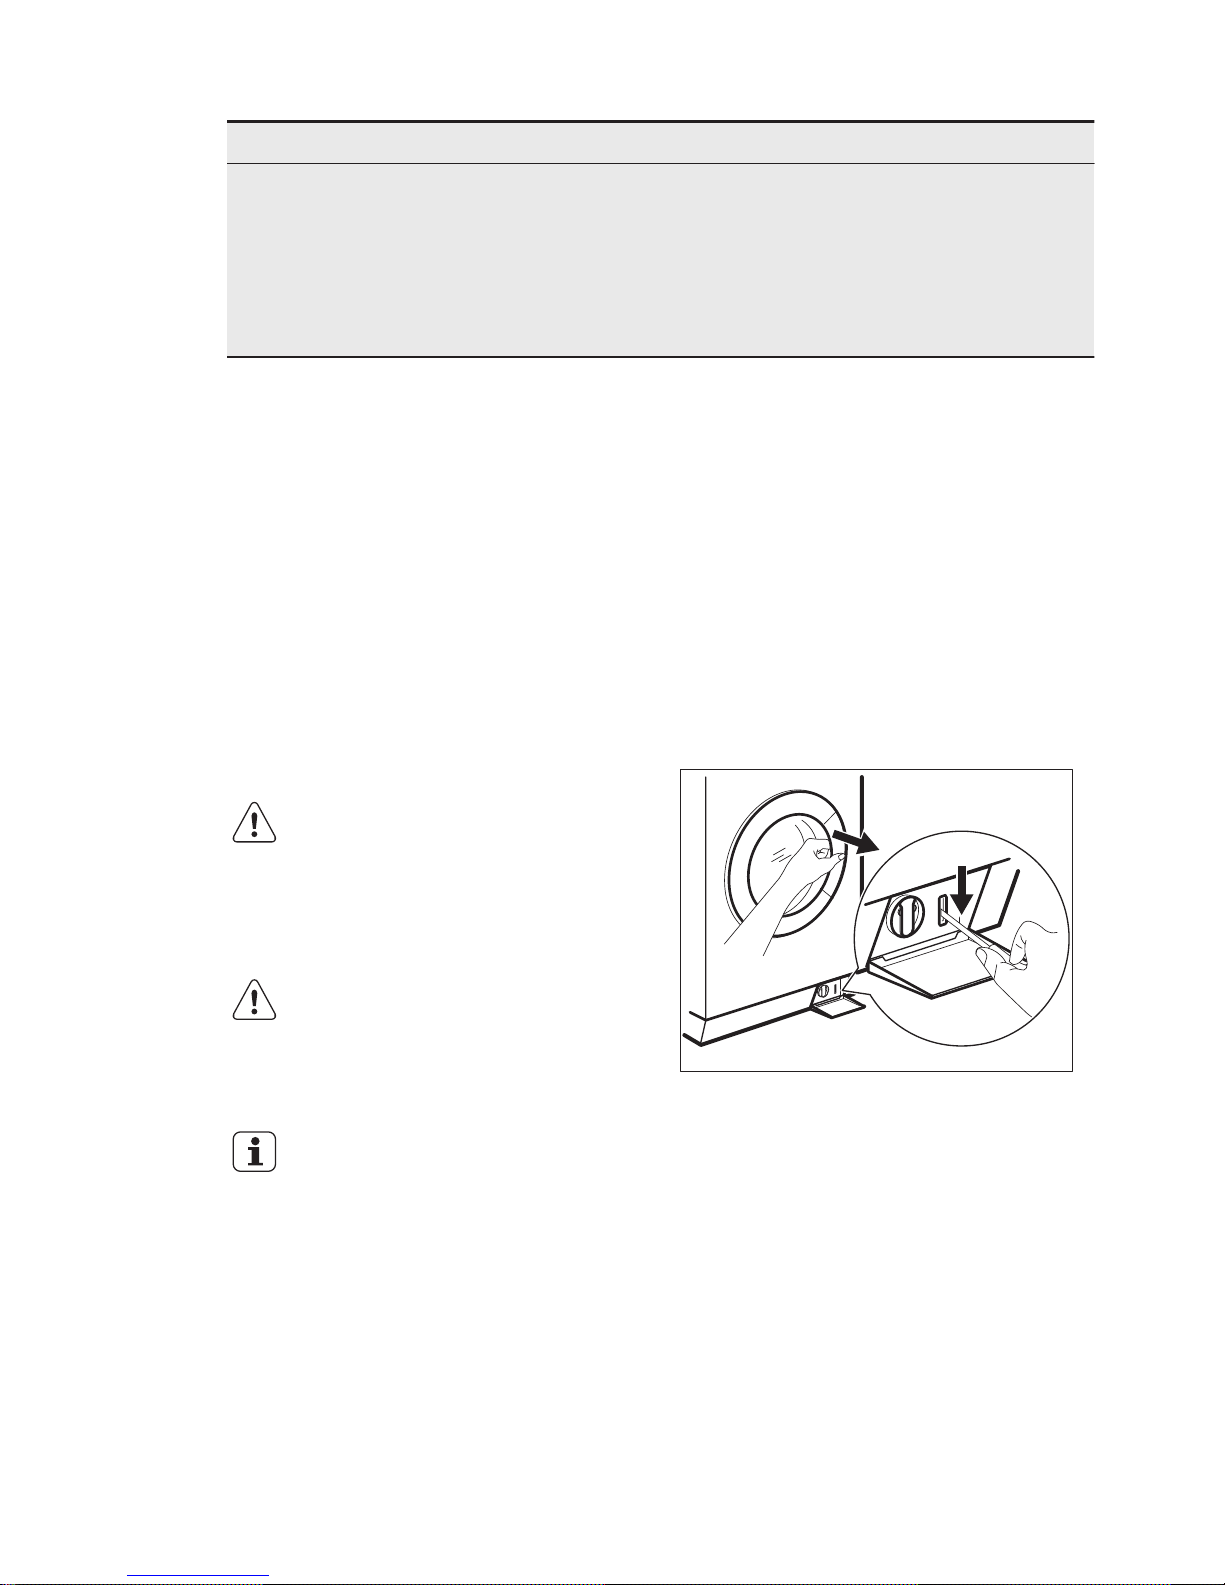
14.3 Emergency door opening
In case of power failure or functioning
failure the appliance door remains locked.
The washing programme continues when
the power is restored. If the door remains
locked in case of failure, it is possible to
open it using the emergency unlock
function.
Before opening the door:
CAUTION!
Make sure that the water
temperature is not too
high and the laundry is not
hot. If necessary, wait until
they cool down.
CAUTION!
Make sure that the drum is
not rotating. If necessary,
wait until the drum stops
rotating.
Make sure that the water
level inside the drum is not
too high. If necessary,
proceed with an
emergency drain (refer to
«Emergency drain» in
«Care and cleaning»
chapter).
To open the door, proceed as follows:
1. Press the Ein/Aus - Marche/Arrêt
button to switch the appliance off.
2. Disconnect the mains plug from the
mains socket.
3. Open the filter flap.
4. Keep the emergency unlock trigger
pulled downward and, at the same
time, open the appliance door.
5. Take out the laundry and then close
the appliance door.
6. Close the filter flap.
ENGLISH
35
Page 36
15. TECHNICAL DATA
Dimension Width/ Height/ Depth/
Total depth
600 mm/ 850 mm/ 605 mm/ 639
mm
Electrical connection Voltage
Overall power
Fuse
Frequency
230 V
2200 W
10 A
50 Hz
Level of protection against ingress of solid particles and moisture ensured by the protective cover, except where the low voltage equipment has
no protection against moisture
IPX4
Water supply pressure Minimum
Maximum
0,5 bar (0,05 MPa)
8 bar (0,8 MPa)
Maximum wash load Cotton 9 kg
Maximum dry load Cotton
Synthetics
6 kg
3 kg
Spin Speed Maximum 1600 rpm
16.
CH
GUARANTEE
Customer Service Centres
Point of Service
Industriestrasse 10
5506 Mägenwil
Le Trési 6
1028 Préverenges
Via Violino 11
6928 Manno
Morgenstrasse 131
3018 Bern
Zürcherstrasse 204E
9000 St. Gallen
Seetalstrasse 11
6020 Emmenbrücke
St. Jakob-Turm Birsstrasse 320B
4052 Basel
Comercialstrasse 19
7000 Chur
Spare parts service Industriestrasse 10,
5506 Mägenwil, Tel. 0848 848 111
Specialist advice/Sale Badenerstrasse
587, 8048 Zürich, Tel. 044 405 81 11
Warranty For each product we provide a
two-year guarantee from the date of
purchase or delivery to the consumer (with
a guarantee certificate, invoice or sales
receipt serving as proof). The guarantee
covers the costs of materials, labour and
travel. The guarantee will lapse if the
operating instructions and conditions of
use are not adhered to, if the product is
incorrectly installed, or in the event of
damage caused by external influences,
force majeure, intervention by third parties
or the use of non-genuine components.
www.electrolux.com36
Page 37

17. ENVIRONMENTAL CONCERNS
Recycle the materials with the symbol .
Put the packaging in applicable containers
to recycle it. Help protect the environment
and human health and to recycle waste of
electrical and electronic appliances. Do
not dispose appliances marked with the
symbol with the household waste.
Return the product to your local recycling
facility or contact your municipal office.
For Switzerland:
Where should you take your
old equipment?
Anywhere that sells new
equipment or hand it in to
official SENS collection points
or official SENS recycling
firms.
The list of official SENS
collection points can be
found at www.erecycling.ch
ENGLISH
37
Page 38

INHALTSVERZEICHNIS
1. SICHERHEITSHINWEISE...................................................................................39
2. SICHERHEITSANWEISUNGEN..........................................................................42
3. GERÄTEBESCHREIBUNG.................................................................................44
4. BEDIENFELD.....................................................................................................45
5. PROGRAMME .................................................................................................. 48
6. VERBRAUCHSWERTE...................................................................................... 54
7. OPTIONEN........................................................................................................ 55
8. EINSTELLUNGEN..............................................................................................57
9. TÄGLICHER GEBRAUCH - NUR WASCHEN.....................................................57
10. TÄGLICHER GEBRAUCH - NUR TROCKNEN................................................. 61
11. TÄGLICHER GEBRAUCH - WASCHEN UND TROCKNEN...............................63
12. TIPPS UND HINWEISE.................................................................................... 65
13. REINIGUNG UND PFLEGE.............................................................................. 67
14. FEHLERSUCHE...............................................................................................71
15. TECHNISCHE DATEN..................................................................................... 75
16. GARANTIE.......................................................................................................76
WIR DENKEN AN SIE
Vielen Dank, dass Sie sich für ein Gerät von Electrolux entschieden haben. Sie
haben ein Produkt gewählt, hinter dem jahrzehntelange professionelle Erfahrung und
Innovation stehen. Bei der Entwicklung dieses großartigen und eleganten Geräts
haben wir an Sie gedacht. So haben Sie bei jedem Gebrauch die Gewissheit, dass
Sie stets großartige Ergebnisse erzielen werden.
Willkommen bei Electrolux.
Besuchen Sie uns auf unserer Website, um:
Anwendungshinweise, Prospekte, Fehlerbehebungs- und Service-Informationen
zu erhalten:
www.electrolux.com/webselfservice
Ihr erworbenes Produkt zu registrieren, um den besten Service dafür zu
gewährleisten:
www.registerelectrolux.com
Zubehör, Verbrauchsmaterial und Original-Ersatzteile für Ihr Gerät zu erwerben:
www.electrolux.com/shop
REPARATUR- UND KUNDENDIENST
Bitte verwenden Sie ausschließlich Original-Ersatzteile für Ihre Produkte.
Halten Sie folgende Angaben bereit, wenn Sie sich an den Kundendienst wenden
Modell, Produktnummer (PNC), Seriennummer.
Diese Informationen finden Sie auf dem Typenschild.
Warnungs-/ Sicherheitshinweise
Allgemeine Informationen und Empfehlungen
Informationen zum Umweltschutz
Änderungen vorbehalten.
www.electrolux.com38
Page 39

1. SICHERHEITSHINWEISE
Lesen Sie die mitgelieferte Gebrauchsanleitung sorgfältig
vor Montage und Inbetriebnahme des Geräts. Bei
Verletzungen oder Schäden infolge nicht
ordnungsgemäßer Montage oder Verwendung des Geräts
übernimmt der Hersteller keine Haftung. Bewahren Sie die
Anleitung immer an einem sicheren und zugänglichen Ort
zum späteren Nachschlagen auf.
1.1 Sicherheit von Kindern und schutzbedürftigen
Personen
WARNUNG!
Erstickungs- und Verletzungsgefahr sowie Gefahr
einer dauerhaften Behinderung.
• Dieses Gerät kann dann von Kindern ab 8 Jahren und
von Personen mit eingeschränkten Fähigkeiten bedient
werden, wenn sie dabei beaufsichtigt werden und/oder
ihnen die sichere Benutzung des Geräts erklärt wurde,
und wenn sie die potenziellen Gefahren der Benutzung
kennen.
• Kinder dürfen nicht mit dem Gerät spielen.
• Halten Sie Kinder unter 3 Jahren vom Gerät fern, wenn
sie nicht ständig beaufsichtigt werden.
• Halten Sie sämtliches Verpackungsmaterial von Kindern
fern und entsorgen Sie es auf angemessene Weise.
• Halten Sie alle Wasch- und Reinigungsmittel von
Kindern fern.
• Halten Sie Kinder und Haustiere vom geöffneten Gerät
fern.
• Falls Ihr Gerät mit einer Kindersicherung ausgestattet
ist, empfehlen wir, diese zu aktivieren.
• Kinder dürfen keine Reinigung und Wartung ohne
Beaufsichtigung durchführen.
DEUTSCH
39
Page 40

1.2 Allgemeine Sicherheit
• Nehmen Sie keine technischen Änderungen am Gerät
vor.
• Das Gerät muss freistehend oder unterhalb der
Küchenarbeitsfläche installiert werden, sofern die
Platzverhältnisse dies zulassen.
• Das Gerät darf nicht hinter einer verschließbaren Tür,
einer Schiebetür oder einer Tür mit einem Scharnier auf
der gegenüberliegenden Seite, aufgestellt werden, wenn
dadurch eine vollständige Öffnung der Gerätetür
verhindert wird.
• Stecken Sie den Netzstecker erst nach Abschluss der
Montage in die Steckdose. Vergewissern Sie sich, dass
der Netzstecker nach der Installation des Geräts
zugänglich ist.
• Die Lüftungsöffnung im Gerätesockel (falls vorhanden)
darf nicht von einem Teppich, einer Matte oder einem
Bodenbelag blockiert werden.
• Der Raum, in dem das Gerät aufgestellt wird, muss gut
belüftet sein, damit keine Gase in den Raum
zurückströmen, die von offenem Feuer oder von
anderen Geräten stammen, die mit Brennstoffen
arbeiten.
• Die Abluft darf nicht über denselben Abzug abgeleitet
werden, über den der Dunstabzug von mit Gas oder
sonstigen Brennstoffen betriebenen Geräten erfolgt.
• Der Betriebswasserdruck am Wassereinlass der
Wasserversorgung muss zwischen 0,5 bar (0,05 MPa)
und 8 bar (0,8 MPa) liegen.
• Überschreiten Sie nicht die maximale Beladungsmenge
von 9 kg (siehe Kapitel „Programmübersicht“).
• Das Gerät muss mit den neu gelieferten Schlauch-Sets
oder anderen neuen, vom autorisierten Kundendienst
gelieferten Schläuchen an die Wasserversorgung
angeschlossen werden.
• Alte Schläuche dürfen nicht wieder verwendet werden.
www.electrolux.com40
Page 41

• Wenn das Netzkabel beschädigt ist, muss es vom
Hersteller, seinem autorisierten Kundenservice oder
einer gleichermaßen qualifizierten Person ausgetauscht
werden, um Gefahren durch elektrischem Strom zu
vermeiden.
• Wischen Sie die um das Gerät ggf. angesammelten
Flusen und/oder Verpackungsrückstände weg.
• Wäschestücke, die mit Substanzen wie zum Beispiel
Speise- oder Mineralöl, Aceton, Alkohol, Kerosin,
Fleckentfernern, Terpentin, Wachsen und
Wachsentfernern verschmutzt sind, müssen vor dem
Trocknen im Wasch-Trockner in heißem Wasser und
mit zusätzlichem Waschmittel gewaschen werden.
• Verwenden Sie das Gerät nicht, wenn Teile davon mit
industriellen Chemikalien verschmutzt sind.
• Trocknen Sie keine ungewaschenen Wäschestücke im
Wasch-Trockner.
• Artikel wie Schaumgummi (Latexschaumgummi),
Duschhauben, imprägnierte Textilien,
gummibeschichtete Wäschestücke und Kleider oder
Kissen mit Schaumgummipolstern dürfen nicht im
Wasch-Trockner getrocknet werden.
• Weichspüler oder ähnliche Produkte dürfen nur
entsprechend den Herstelleranweisungen benutzt
werden.
• Entfernen Sie alle Gegenstände aus der Wäsche, die
eine Entzündungsquelle darstellen könnten, z. B.
Feuerzeuge oder Streichhölzer.
• Wenn Sie den Wasch-Trockner vor dem Ende des
Trockengangs anhalten müssen, entnehmen Sie sofort
die gesamte Wäsche und breiten Sie diese zur
Wärmeableitung aus.
• Während der letzten Phase (Abkühlphase) des
Trockengangs wird keine Wärme zugeführt, um
sicherzustellen, dass Wäschestücke nicht beschädigt
werden.
DEUTSCH
41
Page 42

• Reinigen Sie das Gerät nicht mit einem Wasser- und/
oder Dampfstrahl.
• Reinigen Sie das Gerät mit einem feuchten Tuch.
Benutzen Sie nur neutrale Reinigungsmittel. Benutzen
Sie keine Scheuermittel, scheuernde
Reinigungsschwämmchen, Lösungsmittel oder
Metallgegenstände.
• Schalten Sie das Gerät immer aus und ziehen Sie den
Netzstecker aus der Steckdose, bevor
Reinigungsarbeiten durchgeführt werden.
2. SICHERHEITSANWEISUNGEN
2.1 Montage
• Halten Sie sich an die mitgelieferte
Montageanleitung.
• Stellen Sie das Gerät nicht an einem
Ort auf, an dem die Temperatur unter 0
°C absinken kann oder an dem es
Witterungseinflüssen frei ausgesetzt ist.
• Das Gerät muss stets in aufrechter
Lage transportiert werden.
• Stellen Sie sicher, dass die Luft
zwischen dem Gerät und dem Boden
zirkulieren kann.
• Entfernen Sie die
Verpackungsmaterialien und die
Transportschrauben.
• Der Bodenbereich, in dem das Gerät
aufgestellt wird, muss eben, stabil,
hitzebeständig und sauber sein.
• Bewahren Sie die Transportschrauben
an einem sicheren Ort auf. Sollte das
Gerät in Zukunft transportiert werden,
müssen die Transportschrauben
wieder angebracht werden, um die
Trommel zu sperren und damit
Schäden im Geräteinneren zu
verhindern.
• Gehen Sie beim Transport des Geräts
vorsichtig vor, denn es ist schwer.
Tragen Sie dazu stets
Sicherheitshandschuhe und feste
Schuhe.
• Stellen Sie ein beschädigtes Gerät
nicht auf und benutzen Sie es nicht.
• Stellen Sie das Gerät nicht an einem
Ort auf, an dem die Tür nicht
vollständig geöffnet werden kann.
• Stellen Sie die Füße so ein, dass der
dazu erforderliche Abstand zwischen
Gerät und Bodenbelag vorhanden ist.
• Überprüfen Sie den waagrechten
Stand des Geräts mit einer
Wasserwaage, wenn es an seinen
endgültigen Platz gestellt wird. Richten
Sie es gegebenenfalls mit den
Schraubfüßen entsprechend aus.
2.2 Elektrischer Anschluss
WARNUNG!
Brand- und
Stromschlaggefahr.
• Das Gerät muss geerdet sein.
• Schließen Sie das Gerät unbedingt an
eine sachgemäß installierte
Schutzkontaktsteckdose an.
• Verwenden Sie keine
Mehrfachsteckdosen oder
Verlängerungskabel.
• Ziehen Sie nicht am Netzkabel, wenn
Sie das Gerät vom Netzstrom trennen
möchten. Ziehen Sie stets am
Netzstecker.
• Fassen Sie das Netzkabel oder den
Netzstecker nicht mit nassen Händen
an.
• Das Gerät entspricht den EWGRichtlinien.
2.3 Wasseranschluss
• Achten Sie darauf, die
Wasserschläuche nicht zu
beschädigen.
www.electrolux.com42
Page 43

• Bevor Sie neue oder lange Zeit nicht
benutzte Schläuche, an denen
Reparaturarbeiten ausgeführt wurden
oder neue Geräte (Wasserzähler usw.)
angepasst wurden, an das Gerät
anschließen, lassen Sie Wasser durch
die Schläuche fließen, bis es sauber
austritt.
• Stellen Sie sicher, dass es keine
sichtbaren Wasserlecks während und
nach dem ersten Gebrauch des
Gerätes gibt.
2.4 Verwendung
WARNUNG!
Verletzungs-, Stromschlag-,
Brand-, Verbrennungsgefahr
sowie Risiko von Schäden
am Gerät.
• Dieses Gerät ist ausschließlich zur
Verwendung im Haushalt bestimmt.
• Laden Sie keine entflammbaren
Produkte oder Gegenstände, die mit
entflammbaren Produkten benetzt
sind, in das Gerät und stellen Sie
solche nicht in die Nähe oder auf das
Gerät.
• Berühren Sie während des Ablaufs
eines Programmes nicht die Glastür.
Das Glas kann sehr heiß werden.
• Trocknen Sie keine beschädigten
(zerrissenen/ausgefransten)
Wäschestücke mit Wattierungen oder
Füllungen im Gerät.
• Wenn die Wäsche mit einem
Fleckentferner gewaschen wurde,
führen Sie vor Beginn des
Trockengangs einen zusätzlichen
Spülgang durch.
• Achten Sie darauf, dass alle
Metallobjekte aus der Wäsche entfernt
wurden.
• Trocknen Sie nur Textilien, die für den
Wasch-Trockner geeignet sind.
Beachten Sie die Waschhinweise auf
dem Textiletikett.
• Kunststoffteile sind nicht
hitzebeständig.
– Wenn eine Dosierkugel verwendet
wurde, entfernen Sie diese vor
Beginn eines Trockenprogramms.
– Verwenden Sie keine Dosierkugel,
wenn Sie ein Non-Stop-Programm
einstellen.
WARNUNG!
Verletzungsgefahr sowie
Risiko von Schäden am
Gerät.
• Setzen oder stellen Sie sich nicht auf
die geöffnete Gerätetür.
• Trocknen Sie keine tropfnassen
Wäschestücke im Gerät.
2.5 Entsorgung
• Trennen Sie das Gerät vom Stromnetz
und von der Wasserversorgung.
• Schneiden Sie das Netzkabel in der
Nähe des Geräts ab, und entsorgen
Sie es.
• Entfernen Sie das Türschloss, um zu
verhindern, dass sich Kinder oder
Haustiere in der Trommel einschließen.
• Entsorgen Sie das Gerät nach den
lokalen Vorschriften zur Rücknahme
und Entsorgung von Elektroaltgeräten
(WEEE).
DEUTSCH
43
Page 44
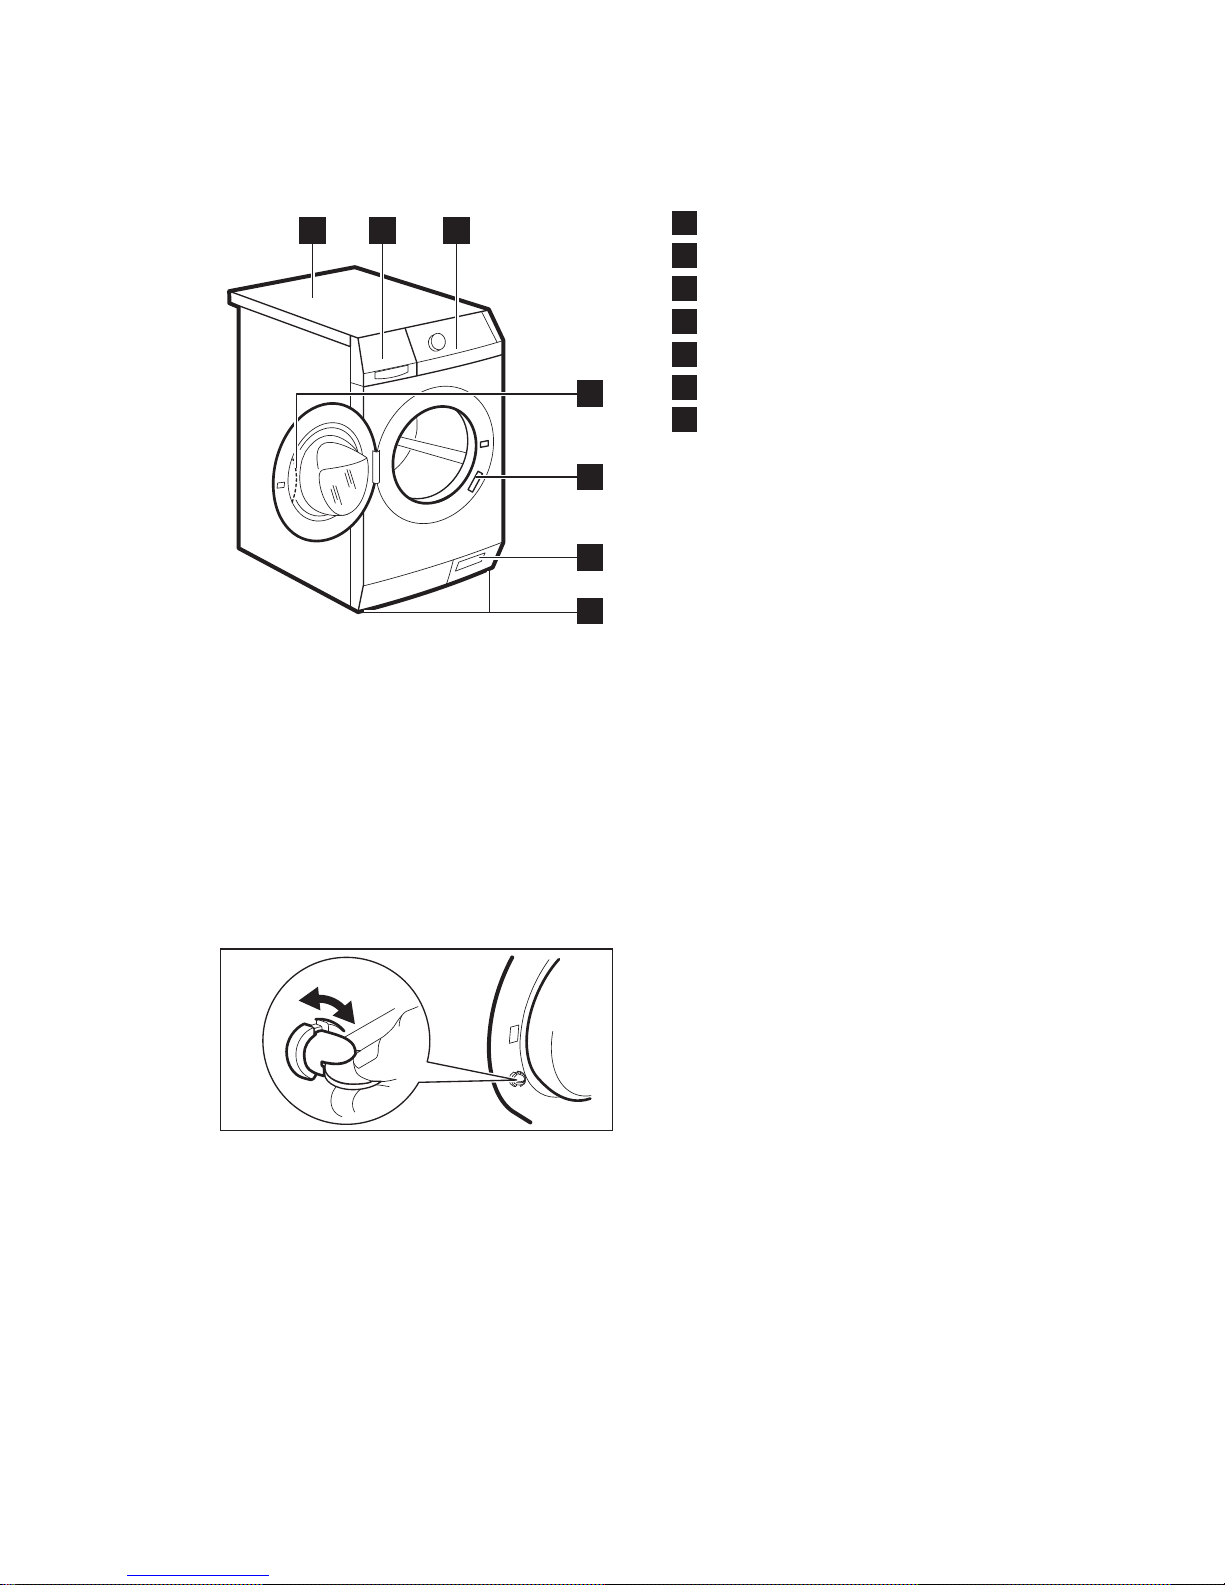
3. GERÄTEBESCHREIBUNG
3.1 Geräteübersicht
1
2
3
5
6
7
4
1
Arbeitsplatte
2
Waschmittelschublade
3
Bedienfeld
4
Türgriff
5
Typenschild
6
Filter der Ablaufpumpe
7
Füße für die Ausrichtung des Geräts
3.2 Einschalten der
Kindersicherung
Diese Vorrichtung sorgt dafür, dass Kinder
oder Haustiere nicht in der Trommel
eingeschlossen werden können.
Drehen Sie die Vorrichtung im
Uhrzeigersinn, bis sich die Einkerbung in
waagerechter Lage befindet.
Die Tür lässt sich nicht schließen.
Zum Schließen der Tür drehen Sie die
Vorrichtung gegen den Uhrzeigersinn, bis
sich die Einkerbung in senkrechter Lage
befindet.
3.3 Satz Fixierplatten
(4055171146)
Erhältlich bei Ihrem autorisierten Händler.
Wenn Sie das Gerät auf einem Sockel
aufstellen, befestigen Sie es mithilfe der
Fixierplatten.
Lesen Sie die mit dem Zubehör gelieferte
Gebrauchsanleitung sorgfältig durch.
www.electrolux.com44
Page 45
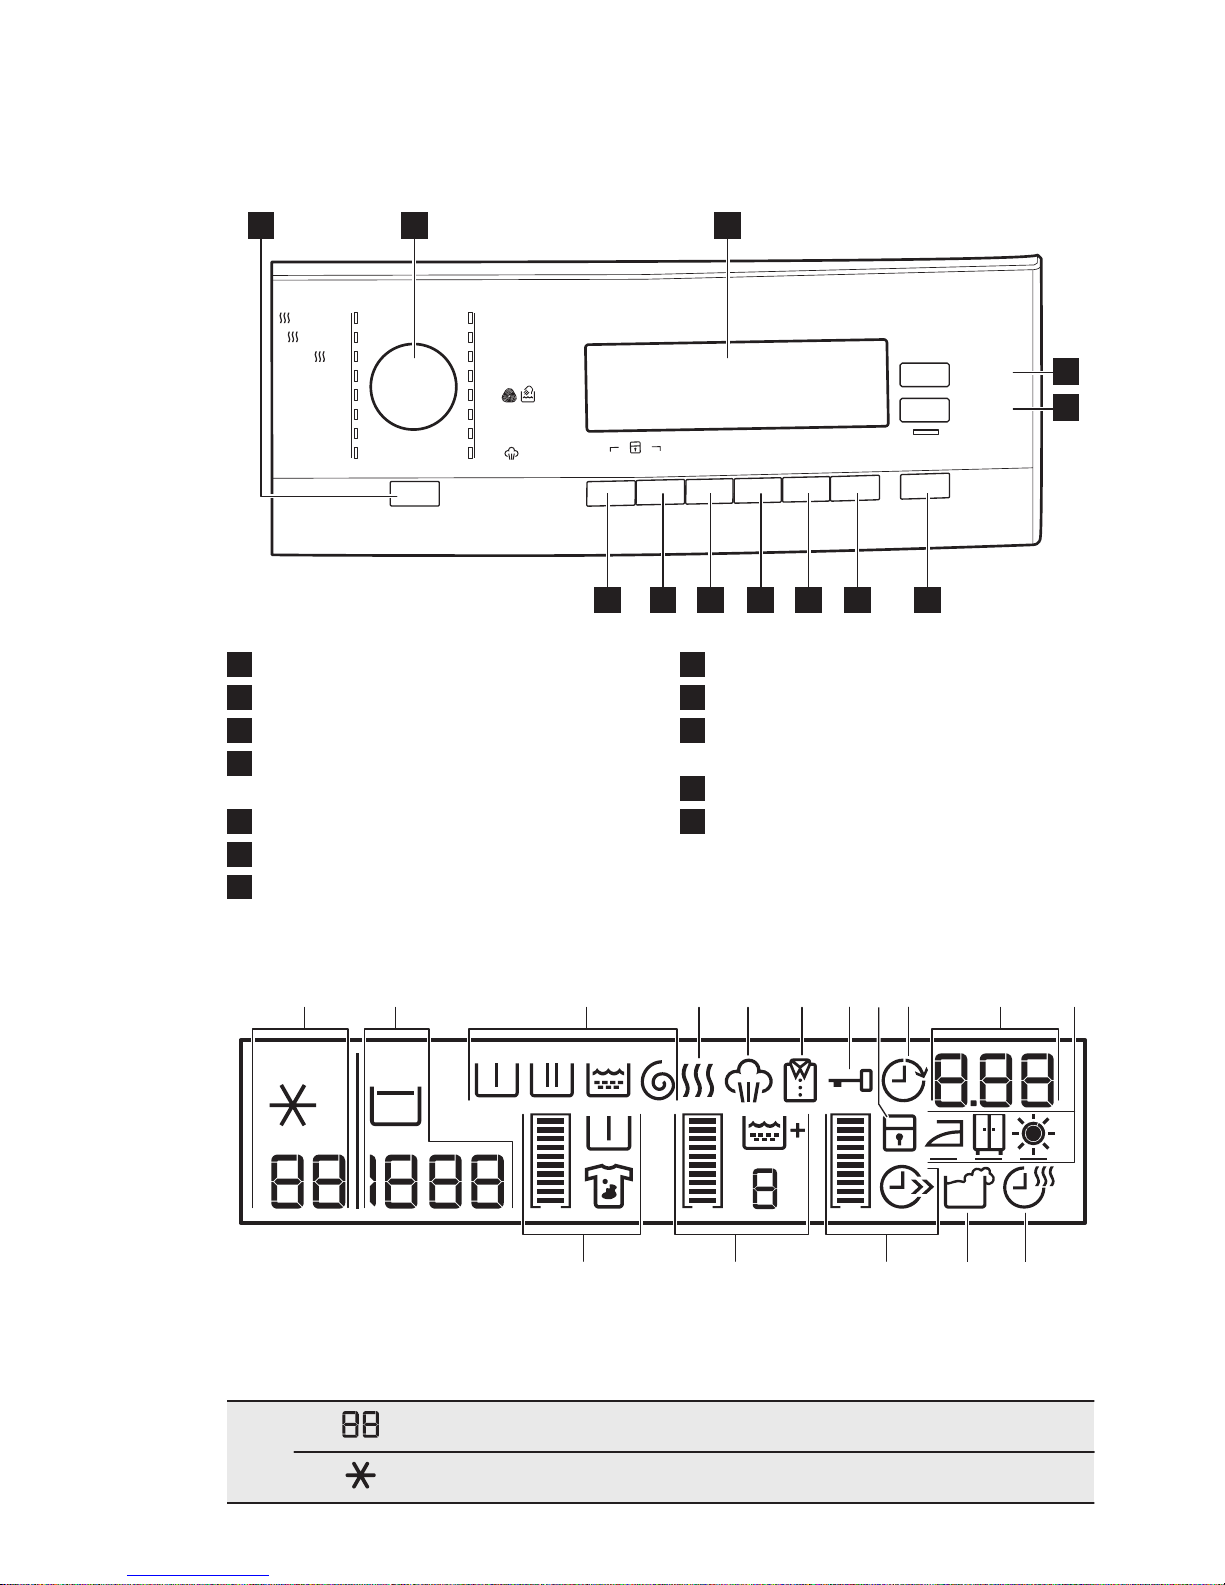
4. BEDIENFELD
4.1 Bedienfeldbeschreibung
Temp.
Flecken
Taches/
Vorwäsche
Prélavage
U./Min.
T/min.
Extra
Spülen
Rinçage +
Start/Pause
Départ/Pause
Zeit Sparen
Gain de
Temps
Zeitvorwahl
Départ
Différé
Koch/Bunt
Blanc/Couleurs
Koch/Bunt
Blanc/Couleurs
Pflegeleicht
Synthétiques
Seide
Soie
Pflegeleicht
Synthétiques
Leichtbügeln
Repassage Facile
Feinwäsche
Délicats
Wolle
Laine
Wolle
Laine
20 min - 3 kg
Non Stop 60 min.
Anti-Allergie
Anti-Allergies
Schleudern/Pumpen
Essorage/Vidange
Dampf
Vapeur
Spülen
Rinçage
Energiesparen
Economique
Marche/Arrêt
Ein/Aus
Trockenzeit
Minuterie
Trockengrad
Niveau de
séchage
1 2 3
4
5
6789101112
1
Taste Ein/Aus - Marche/Arrêt
2
Programmwahlschalter
3
Display
4
Taste Trockengrad - Niveau de
séchage
5
Taste Trockenzeit - Minuterie
6
Taste Start/Pause - Départ/Pause
7
Taste Zeitvorwahl - Départ Différé
8
Taste Zeit Sparen - Gain de Temps
9
Taste Extra Spülen - Rinçage +
10
Taste Flecken - Taches / Vorwäsche Prélavage
11
Taste U./Min. - T/min.
12
Taste Temperatur - Température
4.2 Display
A HC
NOP
D E F G I
LM
KB J
Im Display wird folgendes angezeigt:
A
Temperatur des gewählten Programms
Kaltwasser
DEUTSCH
45
Page 46
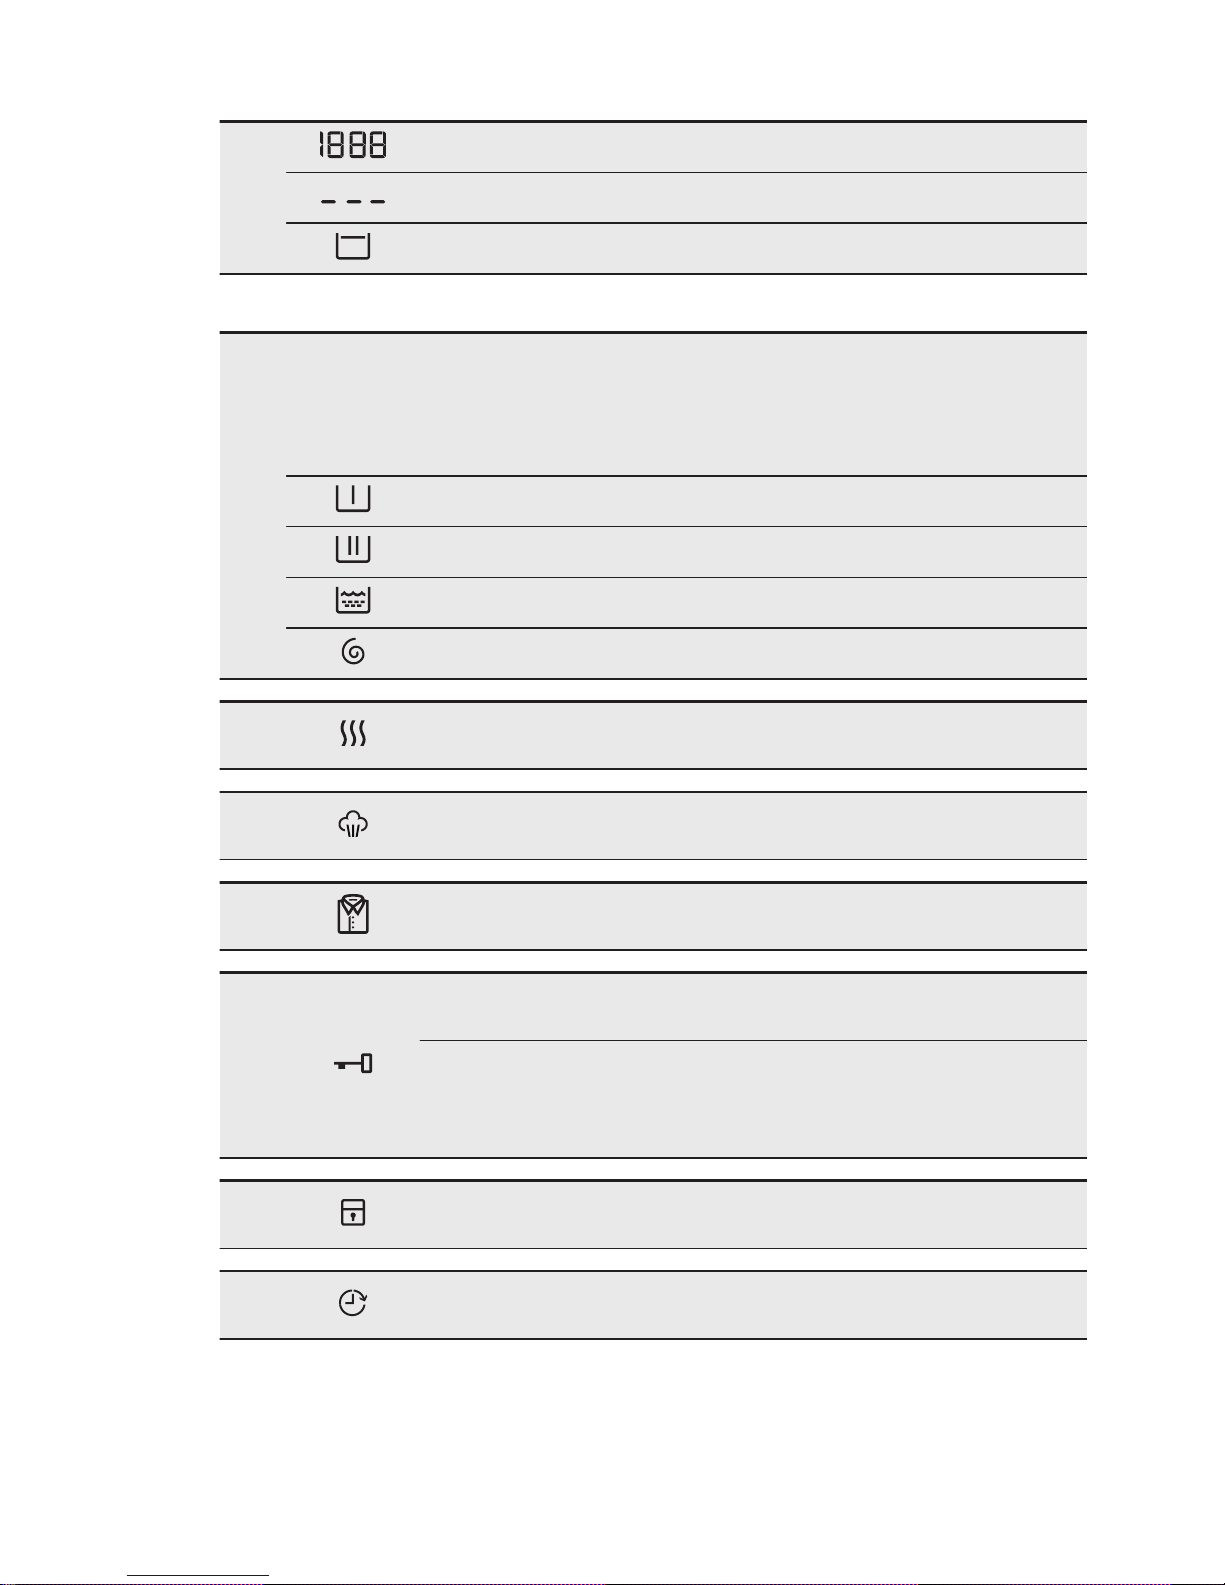
B
Schleuderdrehzahl des eingestellten Programms
Symbol Kein Schleudern
1)
Symbol Spülstopp
1)
Nur verfügbar für das Programm Schleudern/Pumpen.
C
Symbole für die Waschphasen
Wenn ein Programm eingestellt ist, leuchten alle Symbole für die Phasen des
Programms auf.
Beim Start des Programms blinkt nur das Symbol der aktuell laufenden Phase.
Nach Ende des Programms leuchtet das Symbol der letzten Phase.
Vorwaschgang
Hauptwaschgang
Spülgang
Schleudergang
D
Dieses Trockensymbol leuchtet auf, wenn Sie ein Trockenprogramm auswählen.
E
Dieses Dampfsymbol leuchtet auf, wenn Sie ein Dampfprogramm
auswählen.
F
Dieses Knitterschutzsymbol leuchtet auf, wenn Sie ein Trockenprogramm auswählen.
G
Sie können die Gerätetür nicht öffnen, solange dieses Symbol
leuchtet. Sie können die Tür erst öffnen, wenn das Symbol erlischt.
Wenn das Symbol nicht erlischt, obwohl das Programm beendet
ist:
• Die „Spülstopp-Funktion“ ist eingeschaltet.
• Es befindet sich Wasser in der Trommel.
H
Das Symbol für die Kindersicherung erscheint, wenn diese Funktion eingeschaltet ist.
I
Das Zeitvorwahlsymbol leuchtet auf, wenn Sie die Funktion Zeitvorwahl eingestellt haben.
www.electrolux.com46
Page 47
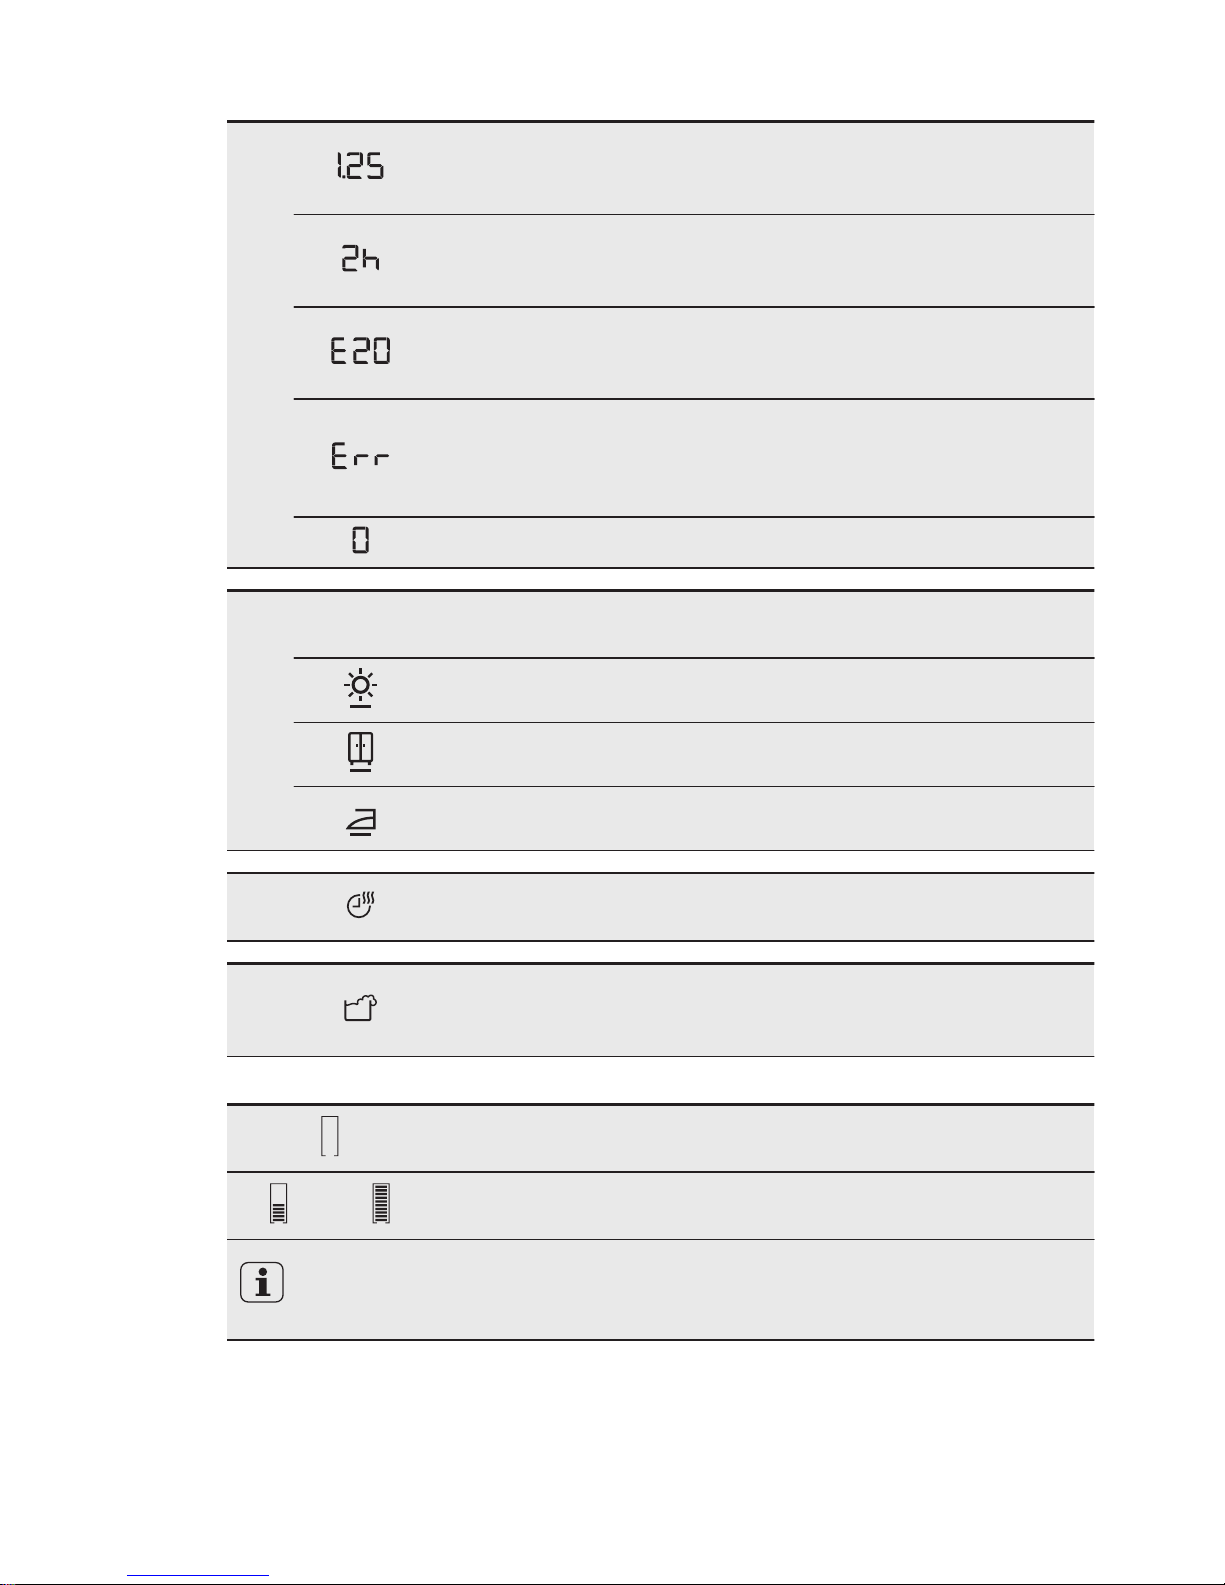
J
Programmdauer (Wasch- und/oder Trockengang)
Wenn das Programm beginnt, verringert sich die angezeigte Zeit in
Minutenschritten.
Zeitvorwahl
Wenn Sie die Zeitvorwahl-Taste drücken, zeigt das Display die verbleibende Zeit bis zum Programmstart an.
Alarmcodes
Bei einer Störung des Geräts erscheinen im Display Alarmcodes.
Siehe hierzu „Fehlersuche“.
Diese Meldung erscheint einige Sekunden lang im Display, wenn:
• Sie versuchen, eine Funktion einzustellen, die für das gewählte
Waschprogramm nicht zur Verfügung steht.
• Sie versuchen, ein laufendes Waschprogramm zu ändern.
Das Programm beendet ist.
K
Trockengrad-Symbole: Leuchten auf, wenn Sie die Funktion Automatiktrock-
nen einstellen.
Symbol Extratrocken
Symbol Schranktrocken
Symbol Bügeltrocken
L
Dieses Trockenzeitsymbol leuchtet auf, wenn Sie ein Trockenprogramm auswählen.
M
Dieses Symbol für die Waschmittelüberdosierung leuchtet am
Ende des Programms auf, wenn das Gerät eine zu große Menge
Waschmittel feststellt.
Anzeigebalken
Der leere Anzeigebalken erscheint nur, wenn die entsprechende
Funktion für das Programm verfügbar ist.
Der Anzeigebalken füllt sich entsprechend der eingestellten Funktionen.
Wenn Sie eine falsche Funktion wählen, erkennen Sie an der Anzeige Err,
dass die Auswahl nicht möglich ist.
DEUTSCH
47
Page 48
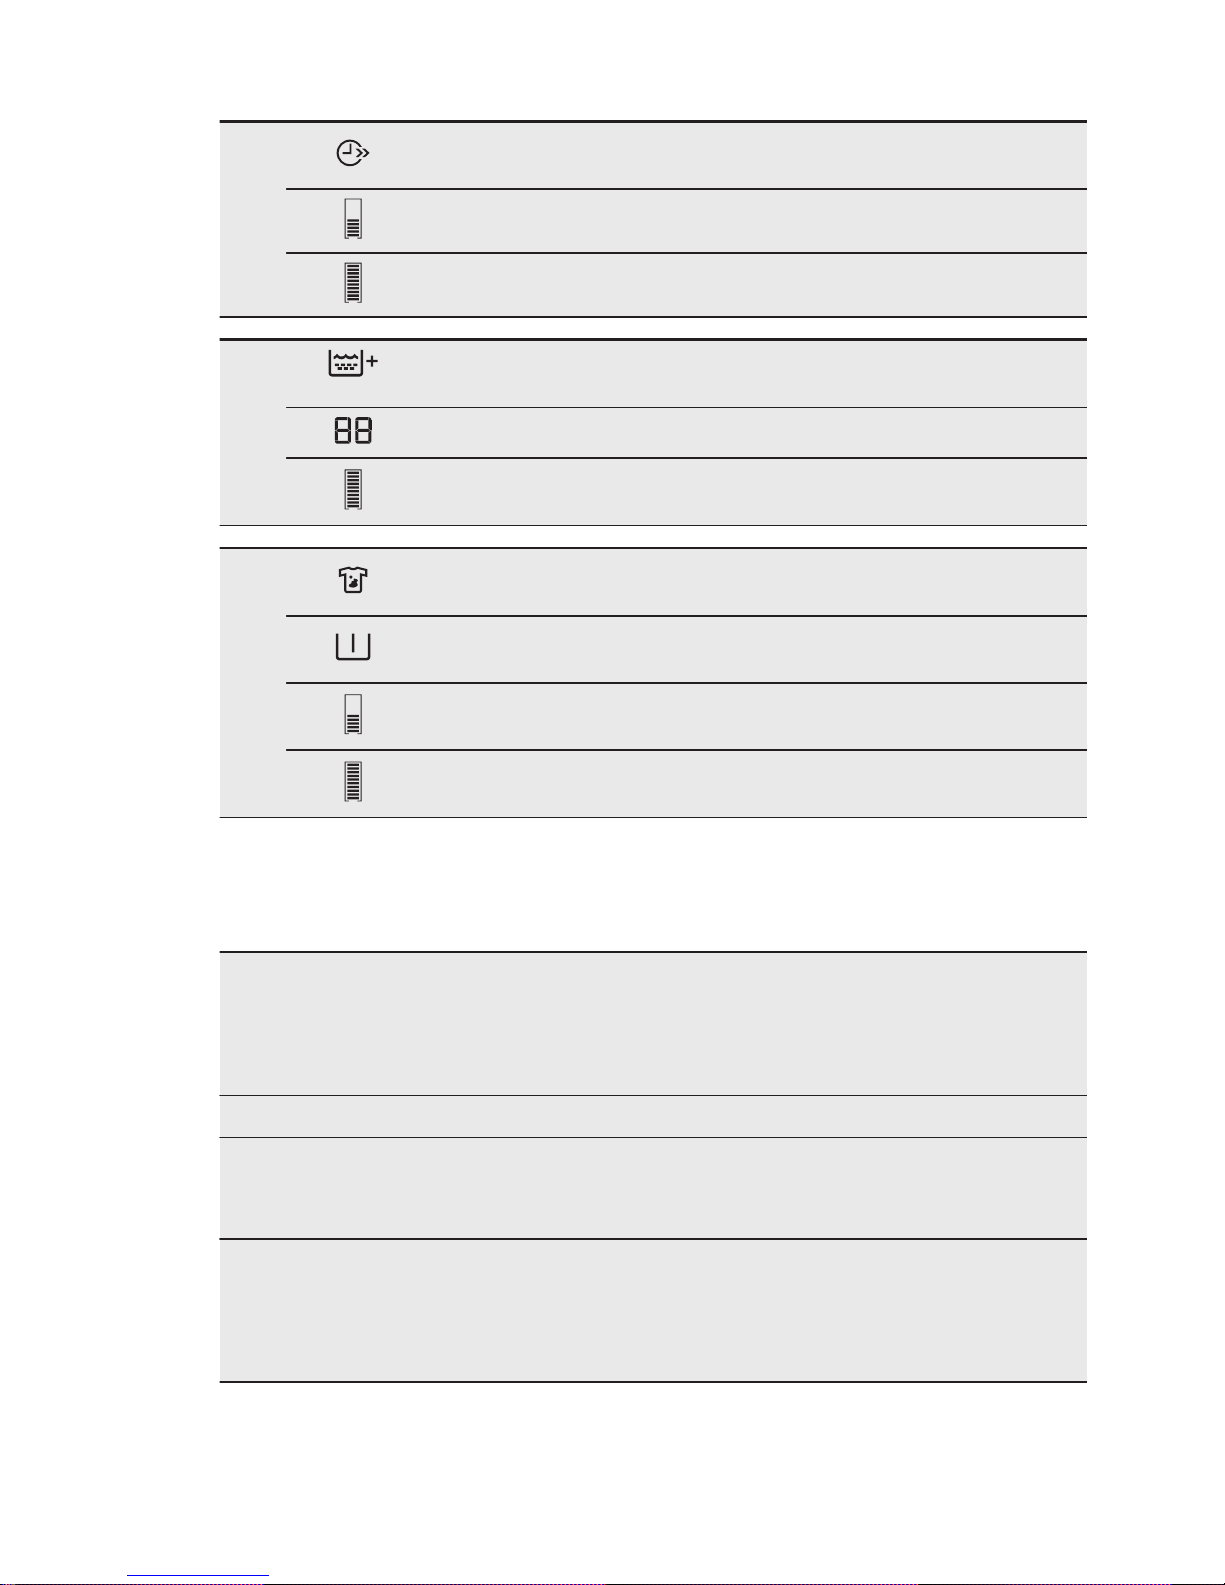
N
Das Symbol Zeit Sparen - Gain de Temps leuchtet, wenn Sie die
Programmdauer einstellen.
Verkürzte Programmdauer
Extra Kurz
O
Das Symbol Extra Spülen - Rinçage + erscheint, wenn diese Funktion eingeschaltet ist.
Die Zahl steht für die Gesamtzahl der Spülgänge.
Der Anzeigebalken ist komplett gefüllt, wenn Sie die maximale Anzahl an Spülgängen einstellen.
P
Das Symbol Flecken - Taches erscheint, wenn diese Funktion eingeschaltet ist.
Das Symbol Vorwäsche - Prélavage erscheint, wenn diese Funktion eingeschaltet ist.
Der Anzeigebalken ist nicht ganz gefüllt, wenn Sie nur eine der
Funktionen einstellen.
Der Anzeigebalken ist vollständig gefüllt, wenn Sie beide Funktionen einstellen.
5. PROGRAMME
5.1 Programmübersicht
Programm
Temperaturbereich
Maximale Beladung
Maximale
Schleuderdrehzahl
Programmbeschreibung
(Beladung und Verschmutzungsgrad)
Waschprogramme
Koch/Bunt - Blanc/Couleurs
95 °C – kalt
9 kg
1600 U/min
Weiße und bunte Baumwollwäsche. Normal und leicht verschmutzt.
Energiesparen - Economique
1)
60 °C - 40 °C
9 kg
1600 U/min
Weiße und farbechte Baumwollwäsche. Normal verschmutzt. Der
Energieverbrauch verringert sich und
die Dauer des Waschprogramms wird
verlängert.
www.electrolux.com48
Page 49
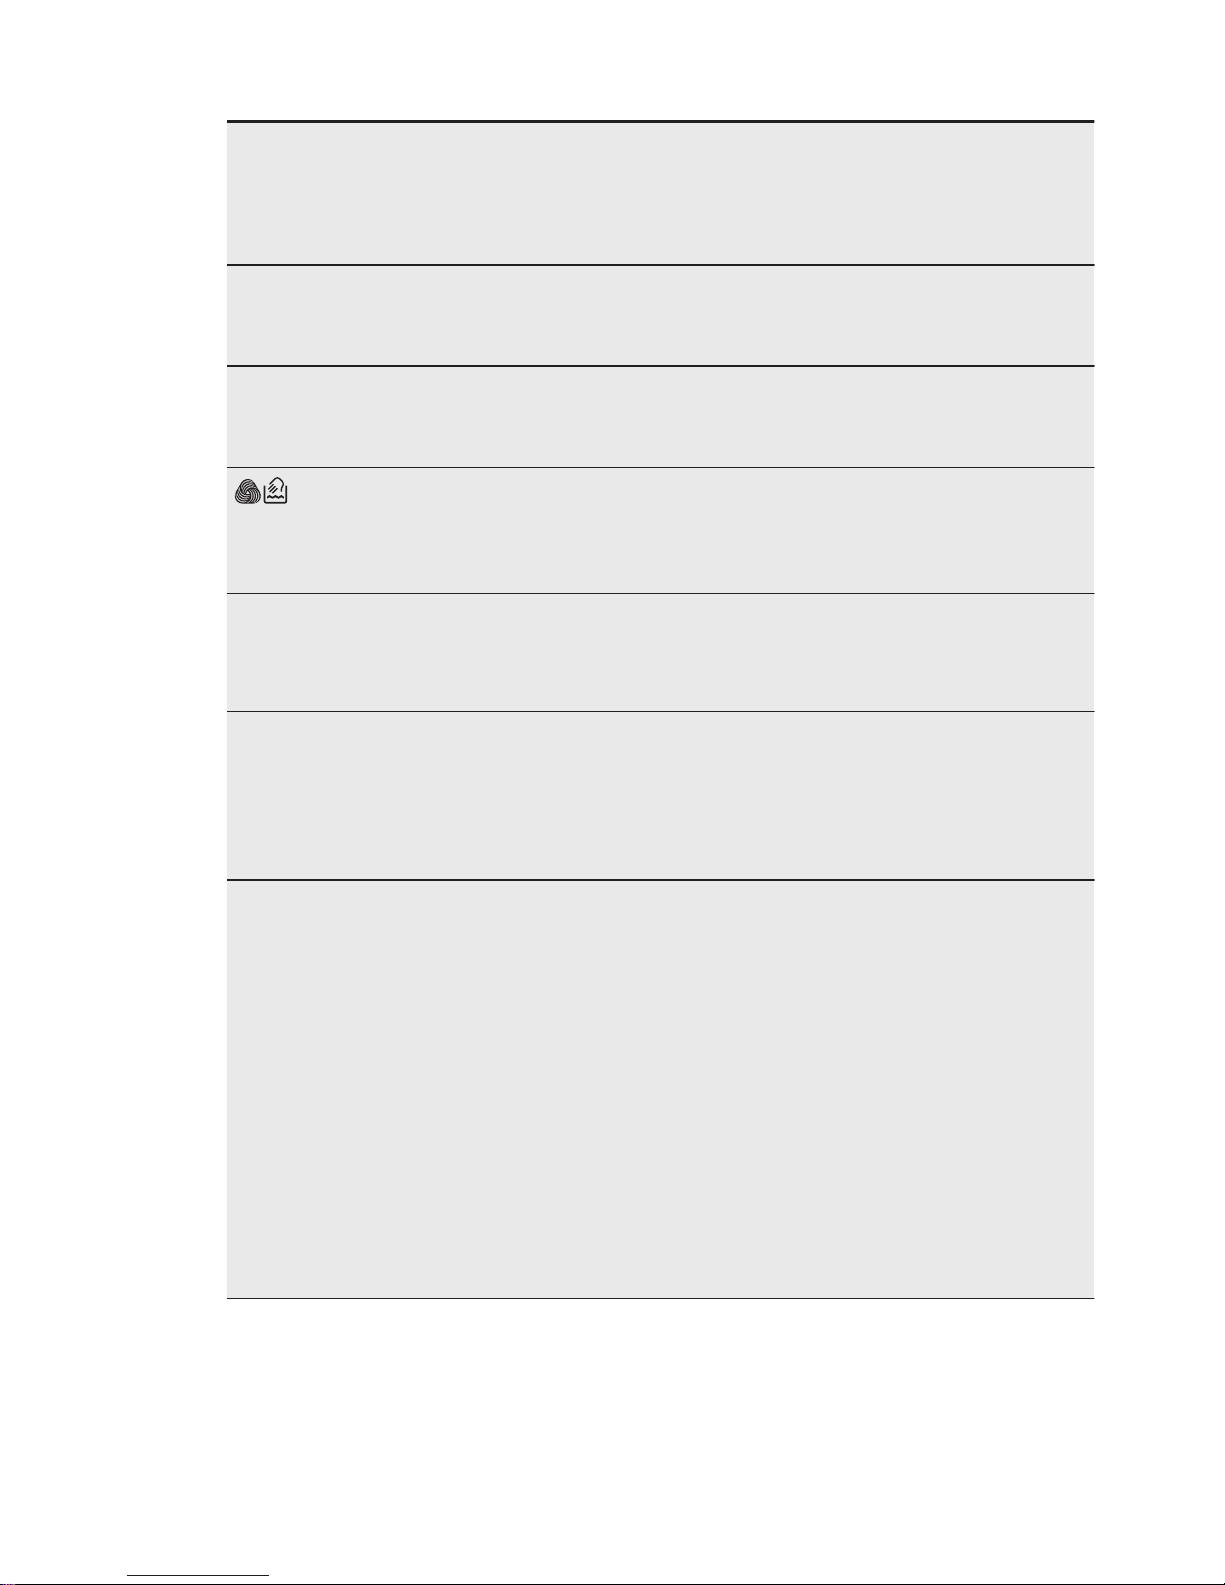
Programm
Temperaturbereich
Maximale Beladung
Maximale
Schleuderdrehzahl
Programmbeschreibung
(Beladung und Verschmutzungsgrad)
Pflegeleicht - Synthétiques
60 °C – kalt
4 kg
1200 U/min
Pflegeleichtes oder Mischgewebe. Normal verschmutzt.
Seide - Soie
30 °C
1 kg
1200 U/min
Spezialprogramm für Wäschestücke
aus Seide und gemischten Synthetikfasern.
Wolle - Laine
40 °C – kalt
2 kg
1200 U/min
Waschmaschinenfeste Wolle,
handwaschbare Wolle und Feinwäsche mit dem „Handwäsche“-
Pflegesymbol.
2)
Non Stop 60 min
40 °C - 30 °C
1 kg
1200 U/min
Komplettprogramm, bestehend aus
Wasch- und Trockengang bei geringer Beladung mit Mischfasern (Baumwolle und Synthetik).
Anti-Allergie - Anti-Allergies
60 °C
9 kg
1600 U/min
Weiße Baumwollwäsche. Dieses
Programm beseitigt Mikroorganismen
durch den Waschgang mit 60 °C und
enthält einen zusätzlichen Spülgang.
Auf diese Weise wird die Reinigung
effektiver.
Dampfprogramme
3)
Dampf kann für getrocknete, gewaschene oder einmal getragene Wäsche benutzt werden. Diese Programme können Falten und Gerüche reduzieren und machen Ihre Wäsche weicher.
Verwenden Sie kein Waschmittel. Entfernen Sie Flecken bei Bedarf durch Waschen
oder einen an der entsprechenden Stelle angewendeten Fleckentferner.
Dampfprogramme sind keine Hygieneprogramme.
Für folgende Kleidungsstücke dürfen Sie das Dampfprogramm nicht benutzen:
• Wäsche, die bei einer Temperatur unter 40 °C gewaschen werden muss.
• Wäsche, die laut Kleidungsetikett nicht trocknergeeignet ist.
• Wäsche mit Besätzen aus Kunststoff, Metall, Holz o. Ä.
DEUTSCH
49
Page 50
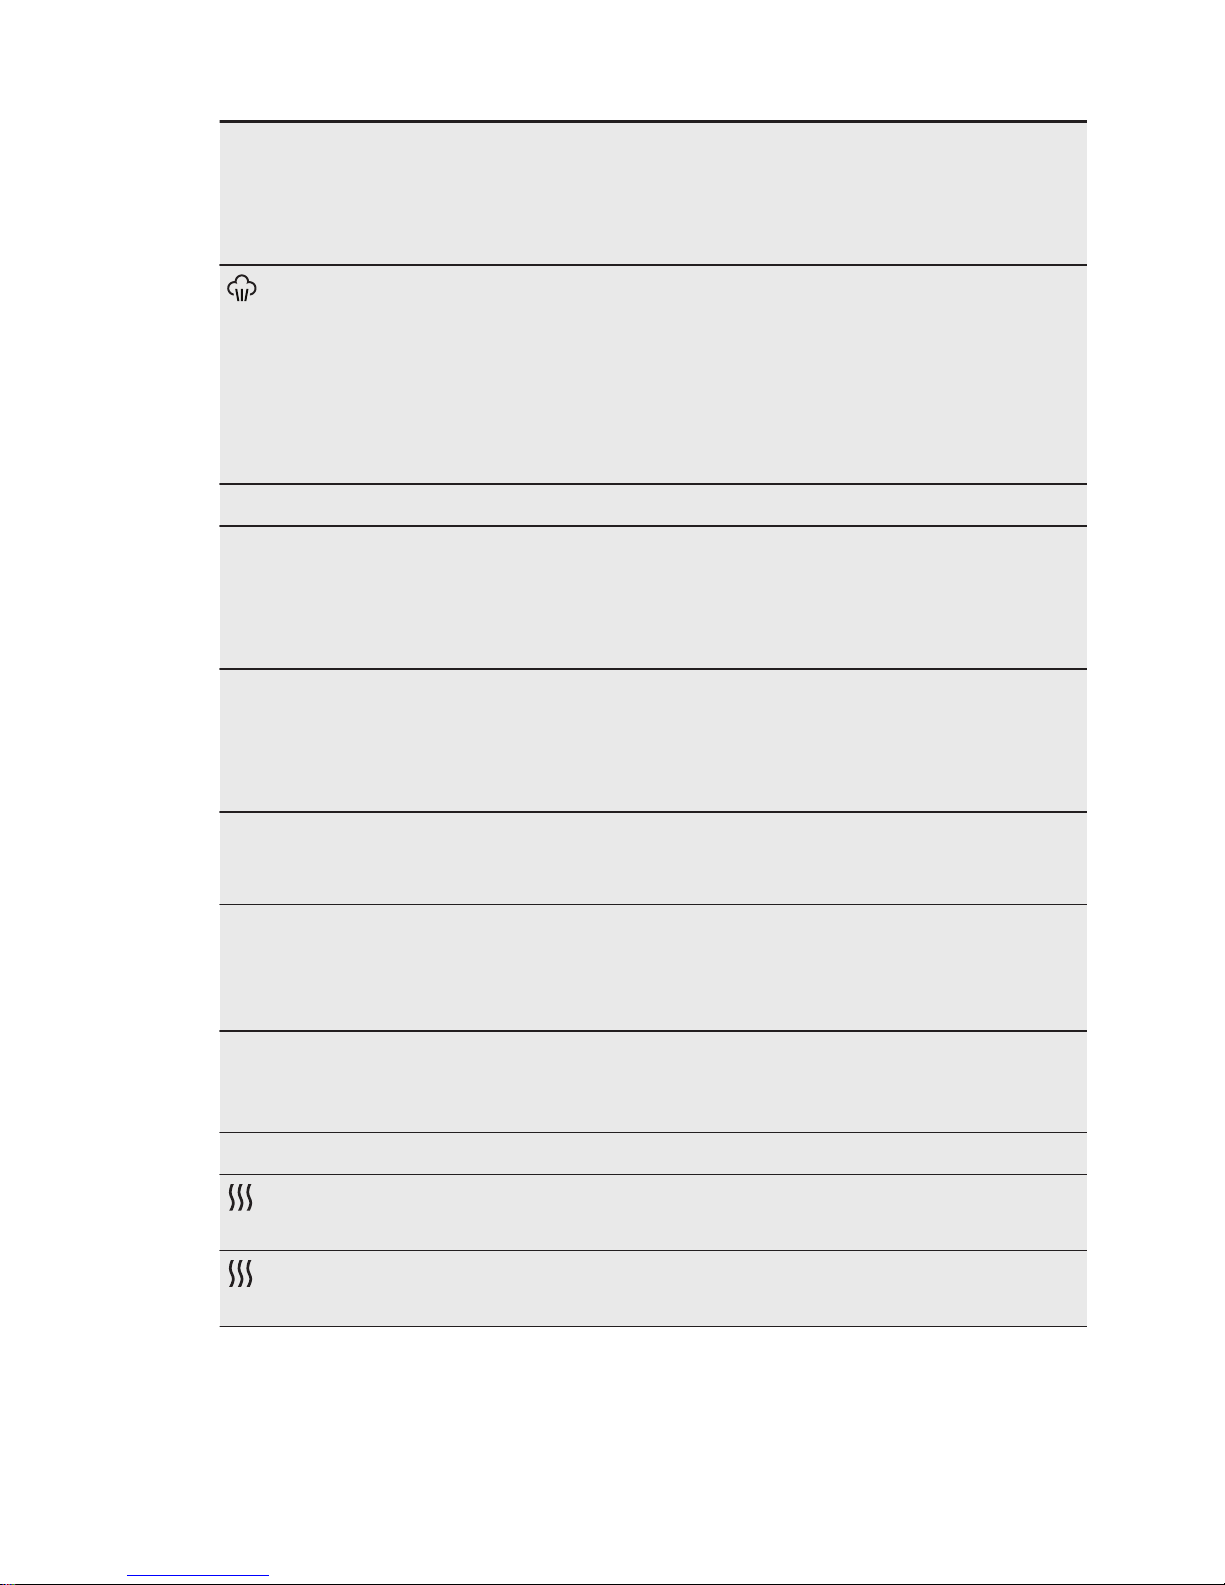
Programm
Temperaturbereich
Maximale Beladung
Maximale
Schleuderdrehzahl
Programmbeschreibung
(Beladung und Verschmutzungsgrad)
Dampf - Vapeur
40 °C
1,5 kg Dampfprogramm für Baumwolle
und pflegeleichte Wäsche. Dieses
Programm hilft beim Auffrischen und
der Beseitigung von Falten in der Wäsche. Stellen Sie dieses Programm
nicht für Wäschearten ein, die bei einer Temperatur unter 40 °C gewaschen werden müssen.
Waschprogramme
Spülen - Rinçage
Kalt
9 kg
1600 U/min
Spülen und Schleudern der Wäsche.
Alle Gewebearten, außer Wollwäsche und empfindliche Feinwäsche.
Verringern Sie die Schleuderdrehzahl
je nach Wäscheart.
Schleudern/Pumpen - Essorage/Vidange
4)
9 kg
1600 U/min
Schleudern der Wäsche und Abpumpen des in der Trommel verbliebenen Wassers. Alle Gewebearten,
außer Wollwäsche und Feinwäsche.
20 min.- 3 kg
40 °C - 30 °C
3 kg
1200 U/min
Teile aus Baumwolle oder Synthetik, die leicht verschmutzt sind
oder nur einmal getragen wurden.
Leichtbügeln - Repassage
Facile
60 °C – kalt
4 kg
800 U/min
Pflegeleichte Textilien, die schonend gewaschen werden sollen.
Normal und leicht verschmutzt.
5)
Feinwäsche - Délicats
40 °C – kalt
4 kg
1200 U/min
Feinwäsche, wie z. B. aus Acryl,
Viskose, Polyester. Normal versch-
mutzt.
Trockenprogramme
Wolle - Laine
1 kg Trockenprogramm für Wollwäsche.
Pflegeleichte - Synthétiques
3 kg Trockenprogramm für pflegeleichte
Wäsche.
www.electrolux.com50
Page 51
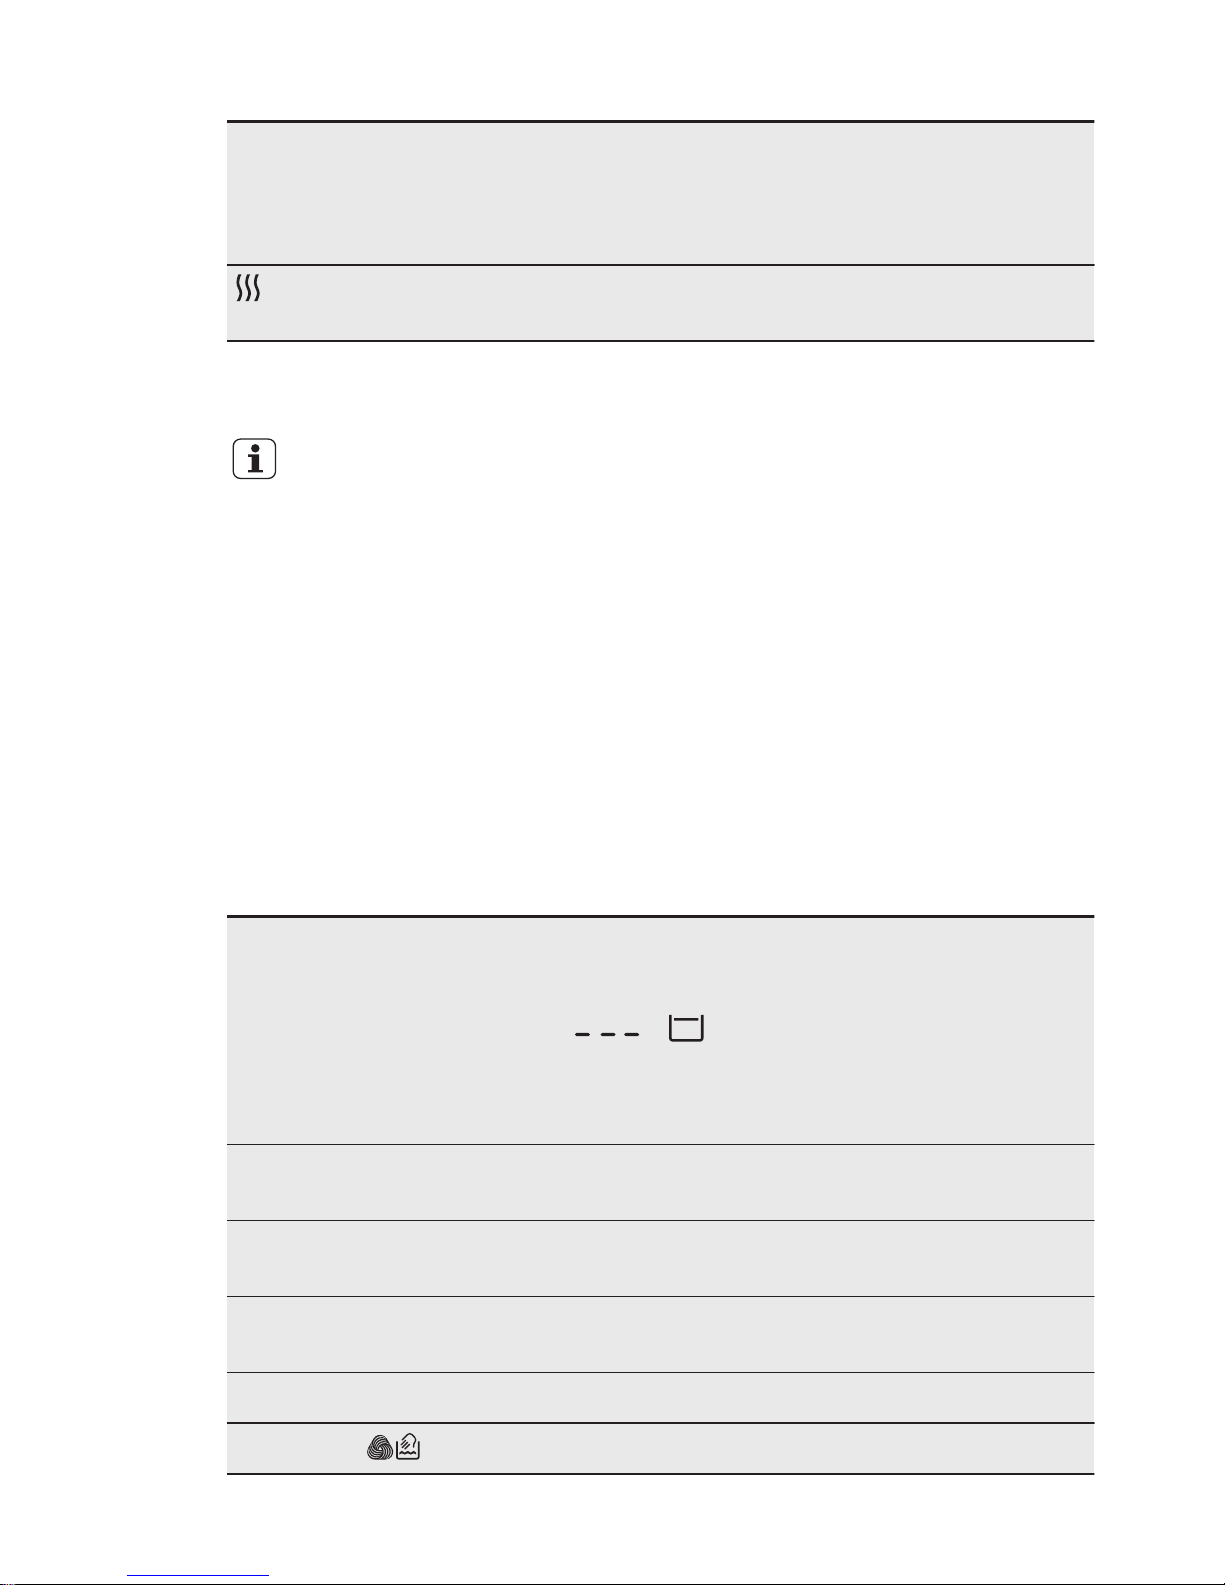
Programm
Temperaturbereich
Maximale Beladung
Maximale
Schleuderdrehzahl
Programmbeschreibung
(Beladung und Verschmutzungsgrad)
Koch/Bunt - Blanc/Couleurs
6 kg Trockenprogramm für Baumwollwä-
sche.
1)
Das Waschprogramm Energiesparen - Economique bei 60 °C mit einer Beladung von 9 kg
und das Trockenprogramm Koch/Bunt - Blanc/Couleurs sind in Übereinstimmung mit EWG
92/75 die Referenzprogramme für die im Energielabel eingetragenen Werte.
Die Wassertemperatur in der Waschphase kann von der für das ausgewählte
Programm angegebenen Temperatur abweichen.
2)
Während dieses Programms dreht sich die Trommel langsam, um einen schonenden
Waschgang zu gewährleisten. Die Trommel scheint sich nicht oder nicht ordnungsgemäß zu
drehen, aber dies ist normal für dieses Programm.
3)
Wenn Sie ein Dampfprogramm für trockene Wäsche anwenden, wird sich diese nach Programmende möglicherweise etwas feucht anfühlen. Hängen Sie die Wäsche am besten 10 Minuten an der frischen Luft auf, um die Feuchtigkeit entweichen zu lassen. Nehmen Sie nach
Ablauf des Programms die Wäsche schnell aus der Trommel. Nach einem Dampfprogramm
lässt sich die Wäsche leichter bügeln.
4)
Stellen Sie die Schleuderdrehzahl ein. Achten Sie darauf, dass diese für den zu waschenden
Wäschetyp geeignet ist. Wenn Sie die Option „Kein Schleudern“ auswählen, ist nur das Abpumpprogramm verfügbar.
5)
Um Knitterfalten zu reduzieren, reguliert dieser Waschgang die Wassertemperatur und führt
einen schonenden Wasch- und Schleudergang aus. Das Gerät führt zusätzliche Spülgänge
aus. Dieses Programm kann nicht mit dem Trockenprogramm kombiniert werden.
Mögliche Programmkombinationen
Programm
U./
Min. -
T/min.
Fleck-
en -
Ta-
ches /
Vorwä-
sche -
Prélav-
age
1)
Extra
Spülen
- Rin-
çage +
2)
Zeit
Sparen -
Gain
de
Temp
s
3)
Zeit-
vor-
wahl Départ
Différé
Koch/Bunt - Blanc/
Couleurs
■ ■ ■ ■ ■ ■
Energiesparen - Economique
■ ■ ■ ■
■
4)
■
Pflegeleicht - Synthétiques
■ ■ ■ ■ ■ ■
Seide - Soie
■ ■
Wolle - Laine
■ ■ ■
DEUTSCH
51
Page 52
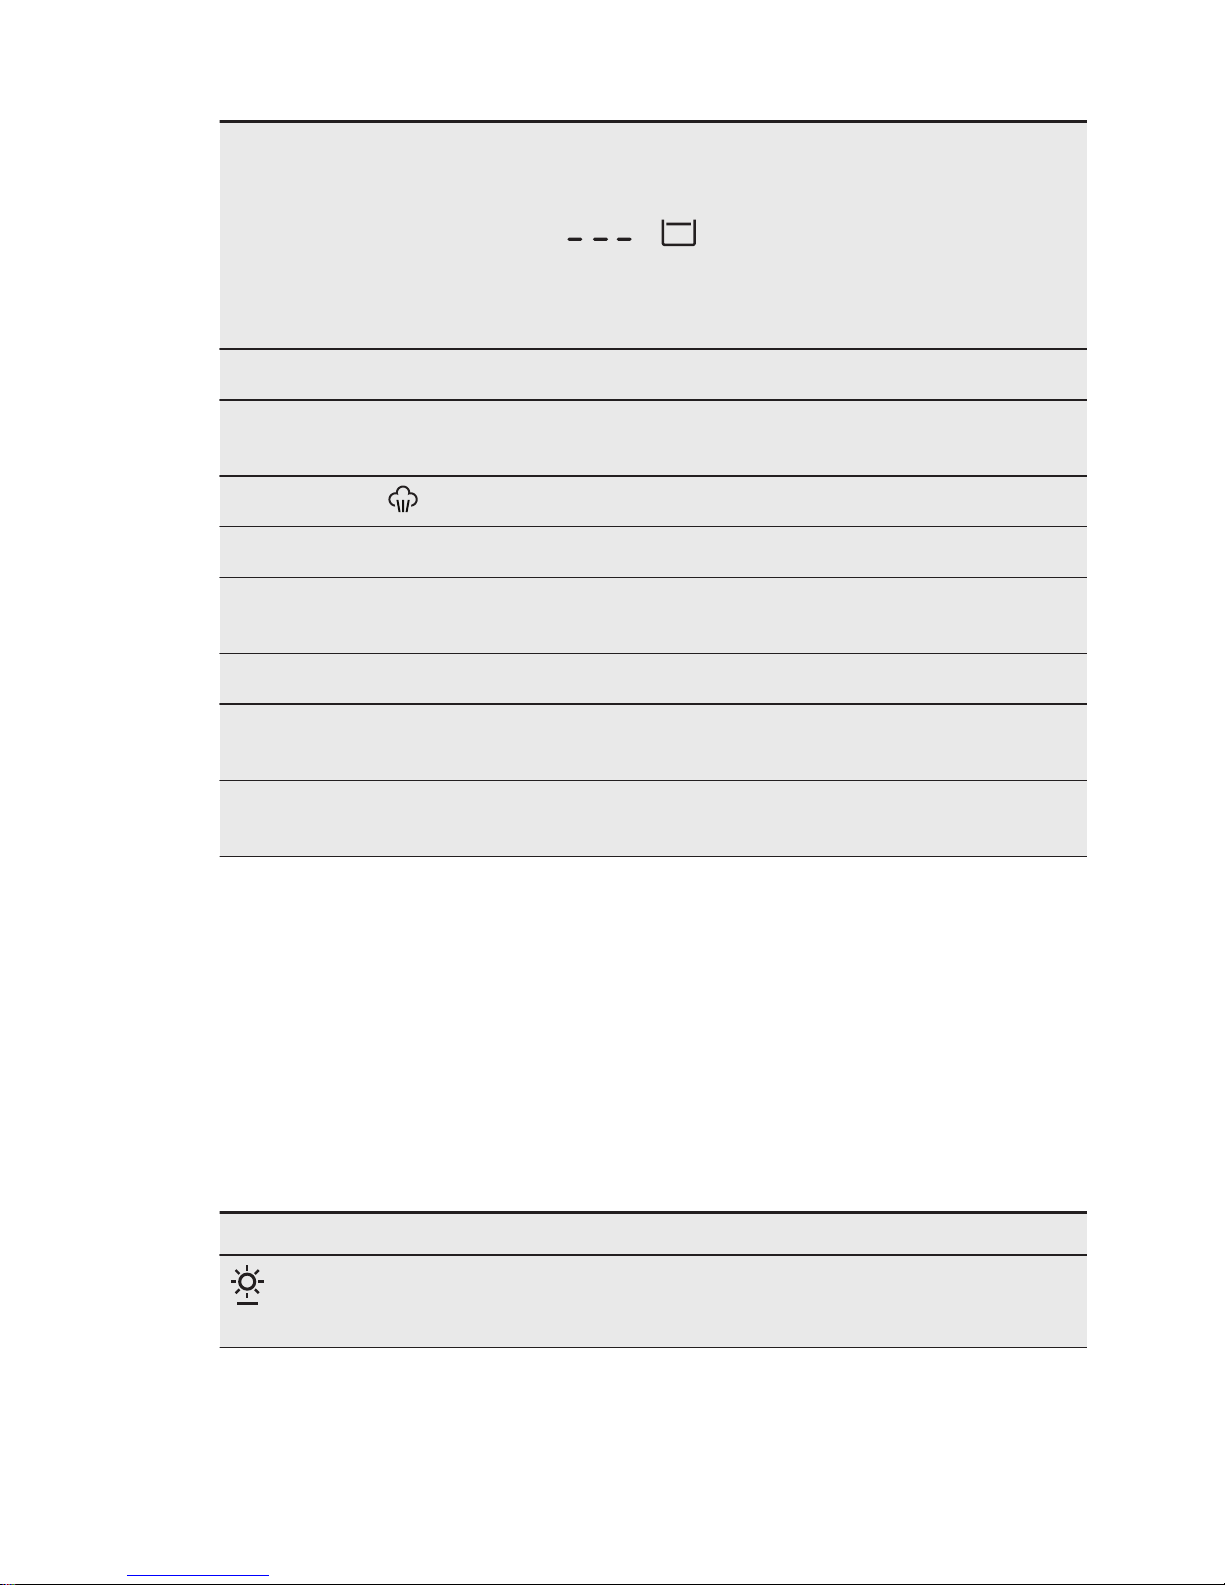
Programm
U./
Min. -
T/min.
Fleck-
en -
Ta-
ches /
Vorwä-
sche -
Prélav-
age
1)
Extra
Spülen
- Rin-
çage +
2)
Zeit
Sparen Gain
de
Temp
s
3)
Zeit-
vor-
wahl Départ
Différé
Non Stop 60 min
■
Anti-Allergie - Anti-Allergies
■ ■ ■ ■ ■
Dampf - Vapeur
■
Spülen - Rinçage
■ ■ ■
Schleudern/Pumpen Essorage/Vidange
■ ■ ■
20 min.- 3 kg
■ ■
Leichtbügeln - Repassage Facile
■ ■
■
5)
■ ■ ■
Feinwäsche - Délicats
■ ■ ■ ■ ■ ■
1)
Wenn Sie Flüssigwaschmittel benutzen, wählen Sie ein Programm ohne Vorwäsche. Die
Flecken-Option ist bei Temperaturen unter 40 °C nicht verfügbar.
2)
Ist die Funktion Extra Spülen permanent eingeschaltet, führt das Gerät zusätzliche Spülgänge aus. Wenn Sie im Spülprogramm eine niedrige Schleuderdrehzahl einstellen, werden
Schonspülgänge und ein kurzer Schleudergang durchgeführt.
3)
Wenn Sie die Programmdauer verkürzen, empfehlen wir Ihnen die Wäschemenge zu verringern. Das Gerät kann zwar voll beladen werden, aber die Waschergebnisse sind eventuell weniger zufriedenstellend.
4)
Bei diesem Programm können Sie nur die Option Extra Kurz wählen.
5)
Es steht nur die Option Vorwäsche zur Verfügung.
5.2 Automatiktrocknen
Trockengrad Gewebetyp Beladung
Extra Trocken
Für Frotteewaren
Baumwolle und Leinen
(bademäntel, Badetücher
usw.)
bis zu 6 kg
www.electrolux.com52
Page 53
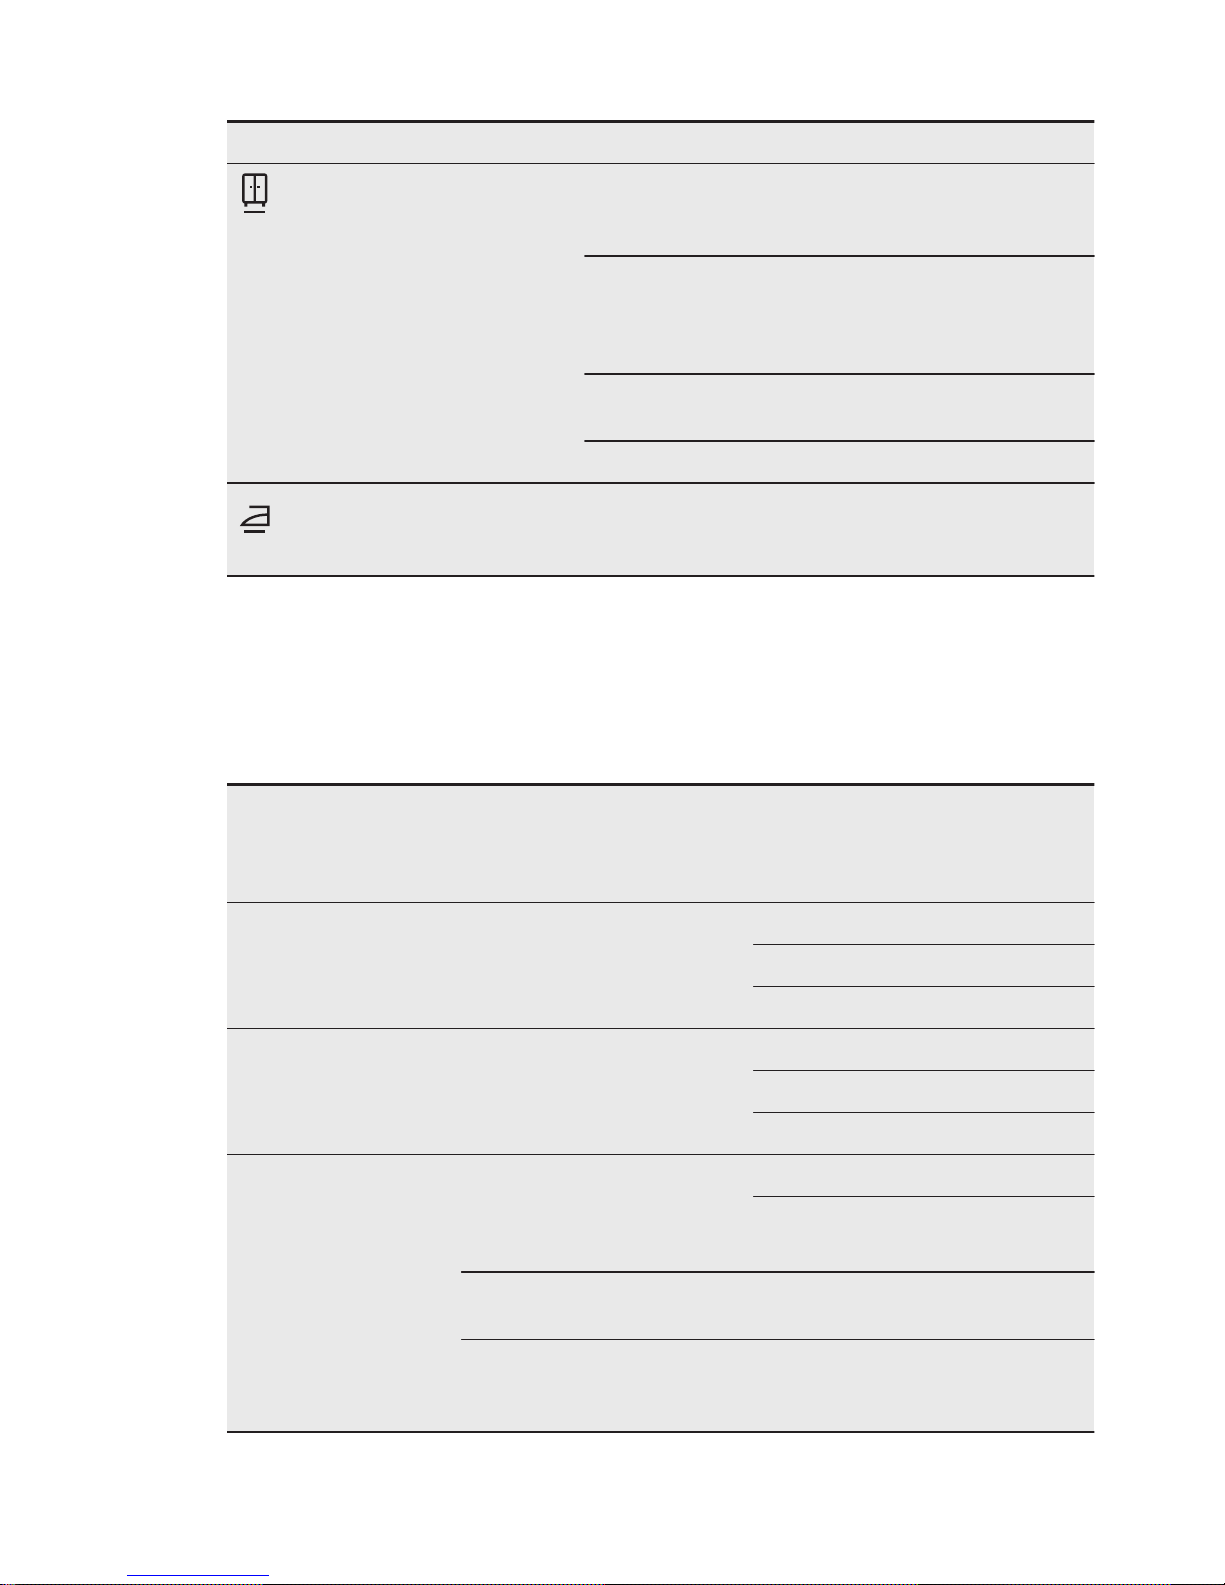
Trockengrad Gewebetyp Beladung
Schranktrocken
1)
Für Wäsche, die in den Schrank
gelegt werden soll
Baumwolle und Leinen
(bademäntel, Badetücher
usw.)
bis zu 6 kg
Pflegeleichtes und Mischgewebe
(pullover, Blusen, Unterwäsche, Haushaltswäsche)
bis zu 3 kg
Seide (Blusen, Hemden,
Wäsche..)
bis zu 1 kg
Wolle (Wollpullover) bis zu 1 kg
Bügeltrocken
Geeignet zum Bügeln
Baumwolle und Leinen
(betttücher, Tischtücher,
Hemden usw.)
bis zu 6 kg
1)
Hinweise für Prüfinstitute Das Prüfverfahren gemäß EN 50229 muss mit einer ERSTEN
Trocknerbeladung bei maximaler angegebener Trockenleistung (Wäschezusammensetzung
gemäß EN61121) mit dem AUTOMATIKPROGRAMM SCHRANKTROCKEN für Baumwolle
durchgeführt werden. Die ZWEITE Trocknerbeladung mit der Restladung muss mit dem AUTOMATIKPROGRAMM SCHRANKTROCKEN für Baumwolle durchgeführt werden.
5.3 Zeitgesteuertes Trocknen
Trockengrad Gewebetyp Bela-
dung
(kg)
Schleuderdrehzahl (U/
min)
Vorgeschlagene
Dauer
(Min.)
Extra Trocken
Für Frotteewaren
Baumwolle und Leinen
(bademäntel, Badetücher
usw.)
6 1600 220 - 240
4 1600 140 - 160
2 1600 100 - 110
Schranktrocken
Für Wäsche, die in
den Schrank gelegt
werden soll
Baumwolle und Leinen
(bademäntel, Badetücher
usw.)
6 1600 210 - 230
4 1600 130 - 150
2 1600 90 - 100
Schranktrocken
Für Wäsche, die in
den Schrank gelegt
werden soll
Pflegeleichtes und Mischgewebe
(pullover, Blusen, Unterwäsche, Haushaltswäsche)
3 1200 100 - 110
1 1200 40 - 50
Wolle
(wollpullover)
1 1200 110 - 130
Seide
(Blusen, Hemden, Wäsche
usw.)
1 1000 80
DEUTSCH
53
Page 54
Trockengrad Gewebetyp Bela-
dung
(kg)
Schleuderdrehzahl (U/
min)
Vorgeschlagene
Dauer
(Min.)
Bügeltrocken
Geeignet zum Bügeln
Baumwolle und Leinen
(betttücher, Tischtücher,
Hemden usw.)
6 1600 150 - 170
4 1600 85 - 105
2 1600 55 - 65
5.4 Woolmark Apparel Care Blau
• Das Waschprogramm Wolle dieser
Maschine wurde von der Firma
Woolmark auf das Waschen von
Wolltextilien mit der
Pflegekennzeichnung
„Handwäsche“ getestet und
zugelassen, vorausgesetzt, dass die
Wäsche gemäß der Anleitung auf dem
Kleidungsetikett und gemäß den
Angaben des Maschinenherstellers
gewaschen wird. Beachten Sie die auf
dem Kleidungsetikett angegebene
empfohlenen Art der Behandlung und
die Trocknungshinweise. M1144
• Das Trockenprogramm Wolle dieser
Maschine wurde von der Firma
Woolmark auf das Trocknen von
Wolltextilien mit der
Pflegekennzeichnung
„Handwäsche“ getestet und
zugelassen, vorausgesetzt, dass die
Wäsche gemäß der Anleitung auf dem
Kleidungsetikett und gemäß den
Angaben des Maschinenherstellers
getrocknet wird. Beachten Sie die auf
dem Kleidungsetikett angegebene
empfohlene Art der Behandlung.
M1224
In Großbritannien, Irland, Hongkong und
Indien ist das Woolmark-Symbol ein
zertifiziertes Warenzeichen.
6. VERBRAUCHSWERTE
Bei den in dieser Tabelle angegebenen Werten handelt es sich um Richtwerte. Folgende Variablen können diese Werte verändern: Die Wäscheart
und -menge, die Wasser- und Raumtemperatur.
Zu Beginn des Programms zeigt das Display die Programmdauer für die
maximale Beladung an.
Während der Waschphase wird die Programmdauer automatisch berechnet und verringert sich möglicherweise beträchtlich, wenn die Wäsche weniger wiegt als die maximal zulässige Beladung. Zum Beispiel beträgt die
maximale Beladung bei Baumwolle 60 °C 9 kg und die Programmdauer
überschreitet 2 Stunden. Wiegt die tatsächliche Beladung 1 kg, beträgt die
Programmdauer weniger als 1 Stunde.
Während das Gerät die tatsächliche Programmdauer berechnet, blinkt ein
Punkt im Display.
www.electrolux.com54
Page 55
Programme Bela-
dung
(kg)
Energieverbrauch
(kWh)
Wasserverbrauch (Liter)
Ungefähre Programmdauer (in Minuten)
Baumwolle 60 °C 9 1.6 69 168
Energiesparen - Economique
Baumwolle-Energiespar-
programm bei 60 °C
1)
9 1.05 56 244
Baumwolle 40 °C 9 1.0 69 164
Pflegeleicht 40 °C 4 0.6 48 105
Feinwäsche 40 °C 4 0.7 58 86
Wolle/Handwäsche 30 °C 2 0.35 57 61
1)
„Baumwolle-Energiesparprogramm“ bei 60 °C mit einer Beladung von 9 kg ist in Übereinstimmung mit EG 92/75 das Referenzprogramm für die auf dem Energielabel eingetragenen
Werte.
7. OPTIONEN
7.1 Ein/Aus - Marche/Arrêt
Drücken Sie diese Taste, um das Gerät
ein- oder auszuschalten. Wird das Gerät
eingeschaltet, ist eine Tonfolge zu hören.
Die Funktion AUTO Standby schaltet das
Gerät in den folgenden Fällen automatisch
aus, um den Energieverbrauch zu
verringern:
• Wenn Sie nicht innerhalb von 5
Minuten die Taste Start/Pause Départ/Pause drücken.
Alle Einstellungen werden gelöscht.
Drücken Sie die Taste Ein/Aus Marche/Arrêt, um das Gerät wieder
einzuschalten.
Stellen Sie das Waschprogramm und
die gewünschten Funktionen erneut
ein.
• 5 Minuten nach Programmende.
Siehe „AUTO Standby-Option“.
7.2 Programmwahlschalter
Drehen Sie diesen Schalter, um ein
Programm einzustellen. Die
entsprechende Programmanzeige leuchtet
auf.
7.3 Temperatur - Température
Drücken Sie die Taste zum Ändern der
Standardtemperatur. Wenn das Display
und anzeigt, heizt das Gerät das
Wasser nicht auf.
7.4 U./Min. - T/min.
Drücken Sie diese Taste, um:
• Die maximale Schleuderdrehzahl des
Programms verringern.
Das Display zeigt nur die
Schleuderdrehzahlen an,
die für das eingestellte
Programm verfügbar sind.
• Schalten Sie den Schleudergang aus.
• Schalten Sie die Option Spülstopp
ein.
Wählen Sie diese Option, um
Knitterfalten zu vermeiden. Das
Waschprogramm ist beendet, aber es
steht Wasser in der Trommel. Die
Trommel dreht sich regelmäßig, um
Knitterfalten in der Wäsche zu
vermeiden.
DEUTSCH
55
Page 56
Die Tür bleibt verriegelt. Sie müssen
das Wasser abpumpen, um die Tür
entriegeln zu können.
7.5 Flecken - Taches /
Vorwäsche - Prélavage
Drücken Sie diese Taste, um einem
Programm eine Fleckenbehandlungs- und
die Vorwäsche-Phase hinzuzufügen.
Drücken Sie die Taste mehrmals, um eine
oder beide Optionen zu aktivieren. Im
Display erscheint die entsprechende
Anzeige und der Anzeigebalken.
• Flecken - Taches: Verwenden Sie
diese Option für Wäsche mit schwer zu
entfernenden Flecken.
Bei Wahl dieser Option geben Sie den
Fleckentferner in das Fach
. Mit
dieser Option verlängert sich die
Programmdauer.
Diese Option ist bei
Temperaturen unter 40 °C
nicht verfügbar.
• Vorwäsche - Prélavage: Wählen Sie
diese Option, um vor dem
Hauptwaschgang einen Vorwaschgang
durchzuführen.
Wir empfehlen, diese Option zu
verwenden, wenn Ihre Wäsche stark
verschmutzt ist.
Mit dieser Option
verlängert sich die
Programmdauer.
7.6 Extra Spülen - Rinçage +
Drücken Sie die Taste Extra Spülen Rinçage +, um einem Programm weitere
Spülphasen hinzuzufügen.
Diese Option empfiehlt sich für Menschen,
die unter Waschmittelallergien leiden, und
in Gebieten mit weichem Wasser.
7.7 Zeit Sparen - Gain de Temps
Mit dieser Option können Sie die
Programmdauer verkürzen.
• Drücken Sie diese Taste einmal, um die
Programmdauer für normal
verschmutzte Wäsche zu verkürzen.
• Drücken Sie diese Taste zweimal, um
„Extra Kurz“ für leicht verschmutzte
Wäsche einzustellen.
Bei einigen Programmen
kann jeweils nur eine dieser
beiden Optionen eingestellt
werden.
7.8 Zeitvorwahl - Départ Différé
Mit dieser Option können Sie den Start
eines Programms um 30 Minuten bis 20
Stunden verzögern.
Auf dem Display erscheint die
entsprechende Anzeige und die
Zeitvorwahl.
7.9 Start/Pause - Départ/Pause
Drücken Sie die Taste Start/Pause Départ/Pause, um ein Programm zu
starten oder zu unterbrechen.
7.10 Trockengrad - Niveau de
séchage
Drücken Sie diese Taste, um einen der 3
verfügbaren automatischen Trockengrade
auszuwählen. Auf dem Display erscheint
das Symbol des eingestellten
Trockengrads:
•
Bügeltrocken – Wäsche, die
gebügelt werden soll
•
Schranktrocken – Wäsche, die in
den Schrank gelegt werden soll
• Extra Trocken – Wäsche, die
vollständig getrocknet werden soll
Es können nicht alle
Automatikstufen für jede
Wäscheart eingestellt
werden.
7.11 Trockenzeit - Minuterie
Drücken Sie diese Taste zum Einstellen
der Trockenzeit für die jeweilige zu
trocknende Wäscheart. Auf dem Display
erscheint die eingestellte Trockenzeit.
www.electrolux.com56
Page 57
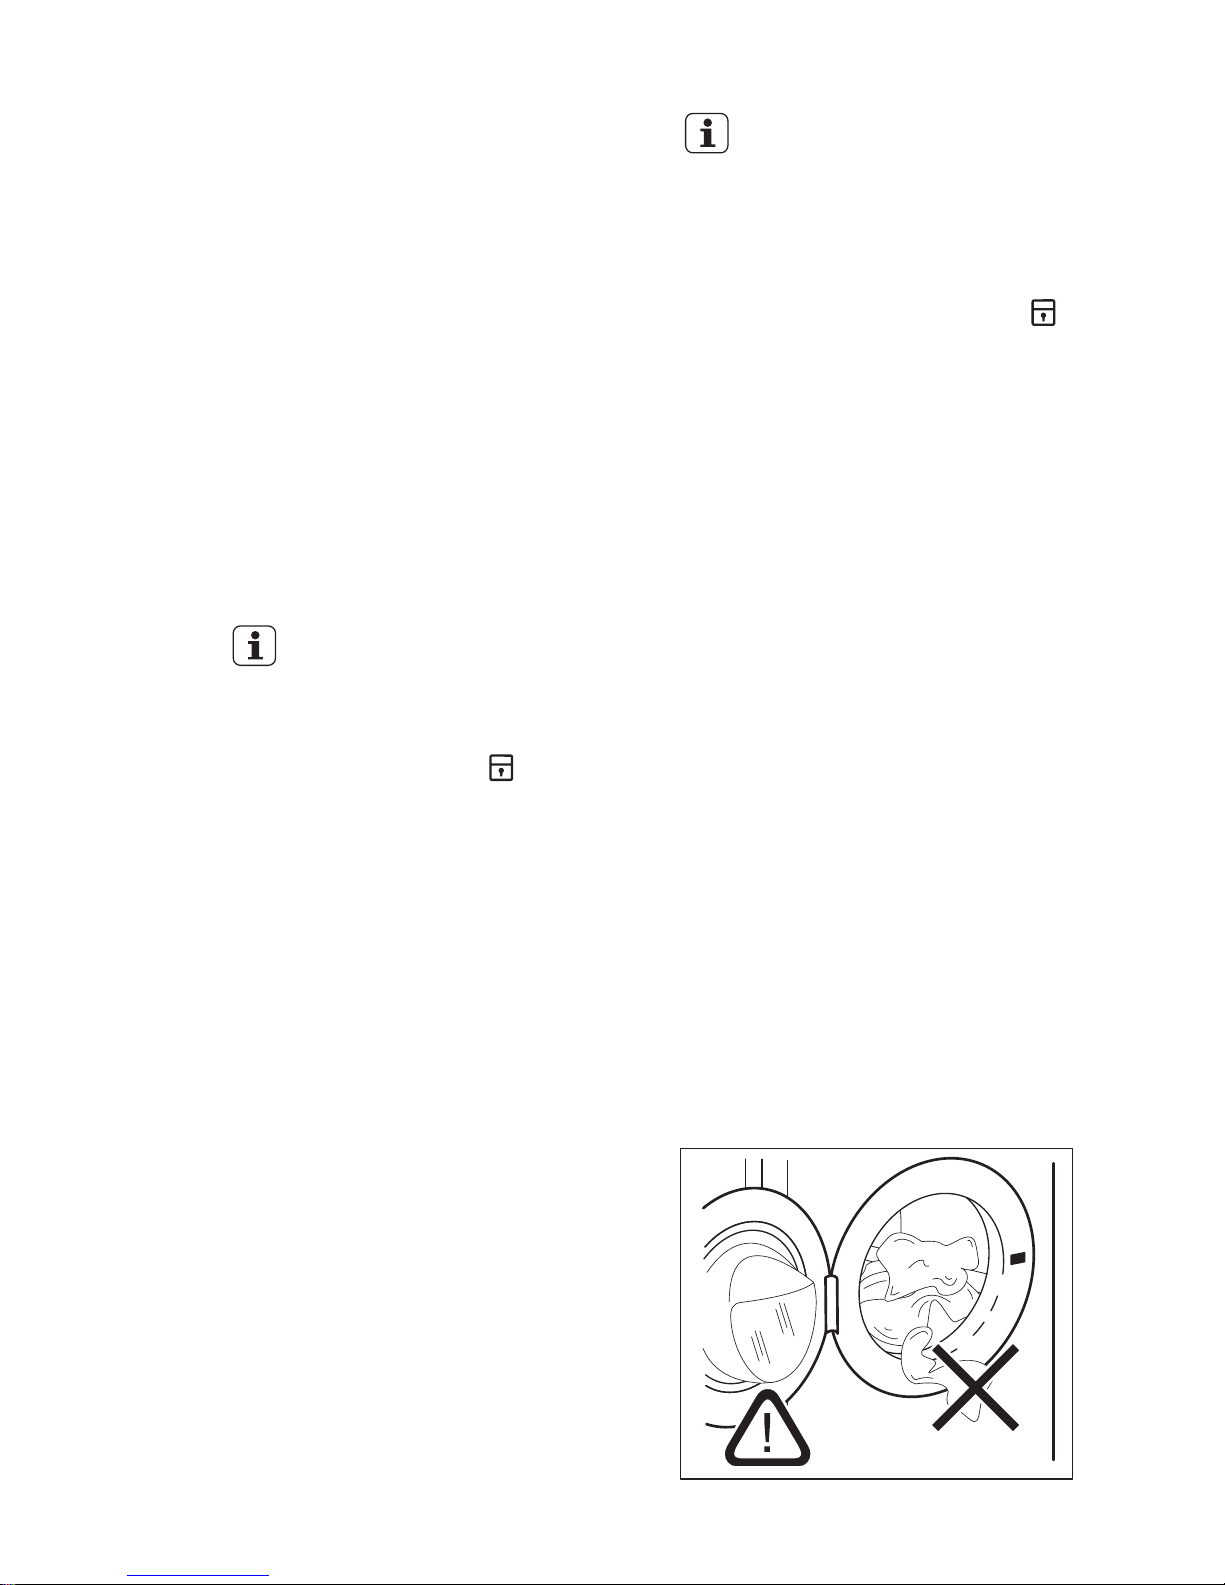
Durch jeden Tastendruck erhöht sich die
Trockenzeit um 5 Minuten.
Die Trockenzeit lässt sich, je
nach ausgewähltem
Programm, möglicherweise
nur eingeschränkt einstellen.
8. EINSTELLUNGEN
8.1 Signaltöne
Es ertönen akustische Signale, wenn:
• Sie das Gerät einschalten.
• Sie das Gerät ausschalten.
• Sie eine Taste drücken.
• Das Programm beendet ist.
• Eine Störung des Geräts vorliegt.
Zum Ein-/Ausschalten der akustischen
Signale drücken Sie Flecken Taches Vorwäsche Prélavage und Extra Spülen Rinçage + 6 Sekunden lang gleichzeitig.
Sind die akustischen Signale
ausgeschaltet, ertönen sie
nur noch dann, wenn eine
Störung vorliegt.
8.2 Kindersicherung
Diese Option verhindert, dass Kinder mit
dem Bedienfeld spielen.
• Drücken Sie zum Ein-/Ausschalten
dieser Option Temp. und U./Min. - T/
min. gleichzeitig, bis die Anzeige
aufleuchtet/erlischt.
Sie können diese Option einschalten:
• Nachdem Sie Start/Pause - Départ/
Pause gedrückt haben: Die Optionen
und der Programmwahlschalter sind
gesperrt.
• Bevor Sie Start/Pause - Départ/Pause
drücken: Das Gerät kann nicht starten.
8.3 Extra Spülen dauerhaft
einschalten
Wenn Sie diese Option wählen, ist bei
jeder neuen Programmauswahl die
Funktion Extra Spülen eingeschaltet.
• Drücken Sie zum Ein-/Ausschalten
dieser Option Zeit Sparen - Gain de
Temps und Zeitvorwahl - Départ Différé
gleichzeitig, bis die zugehörige Anzeige
aufleuchtet/erlischt.
9. TÄGLICHER GEBRAUCH - NUR WASCHEN
9.1 Reinigen Sie vor dem ersten
Gebrauch
1. Geben Sie eine kleine
Waschmittelmenge in das
Waschmittelfach für die Hauptwäsche.
2. Stellen Sie ein Koch-/BuntwäscheProgramm mit der höchsten
Temperatur ein und starten Sie das
Programm mit leerer Trommel.
So werden alle eventuellen
Verunreinigungen aus Trommel und
Bottich entfernt.
9.2 Einfüllen der Wäsche
1. Öffnen Sie die Tür des Geräts.
2. Geben Sie jedes Wäschestück einzeln
in die Trommel.
3. Schütteln Sie jedes Wäschestück
leicht aus, bevor Sie es in das Gerät
legen.
Achten Sie darauf, nicht zu viel Wäsche
einzufüllen.
4. Drücken Sie die Tür fest zu.
DEUTSCH
57
Page 58
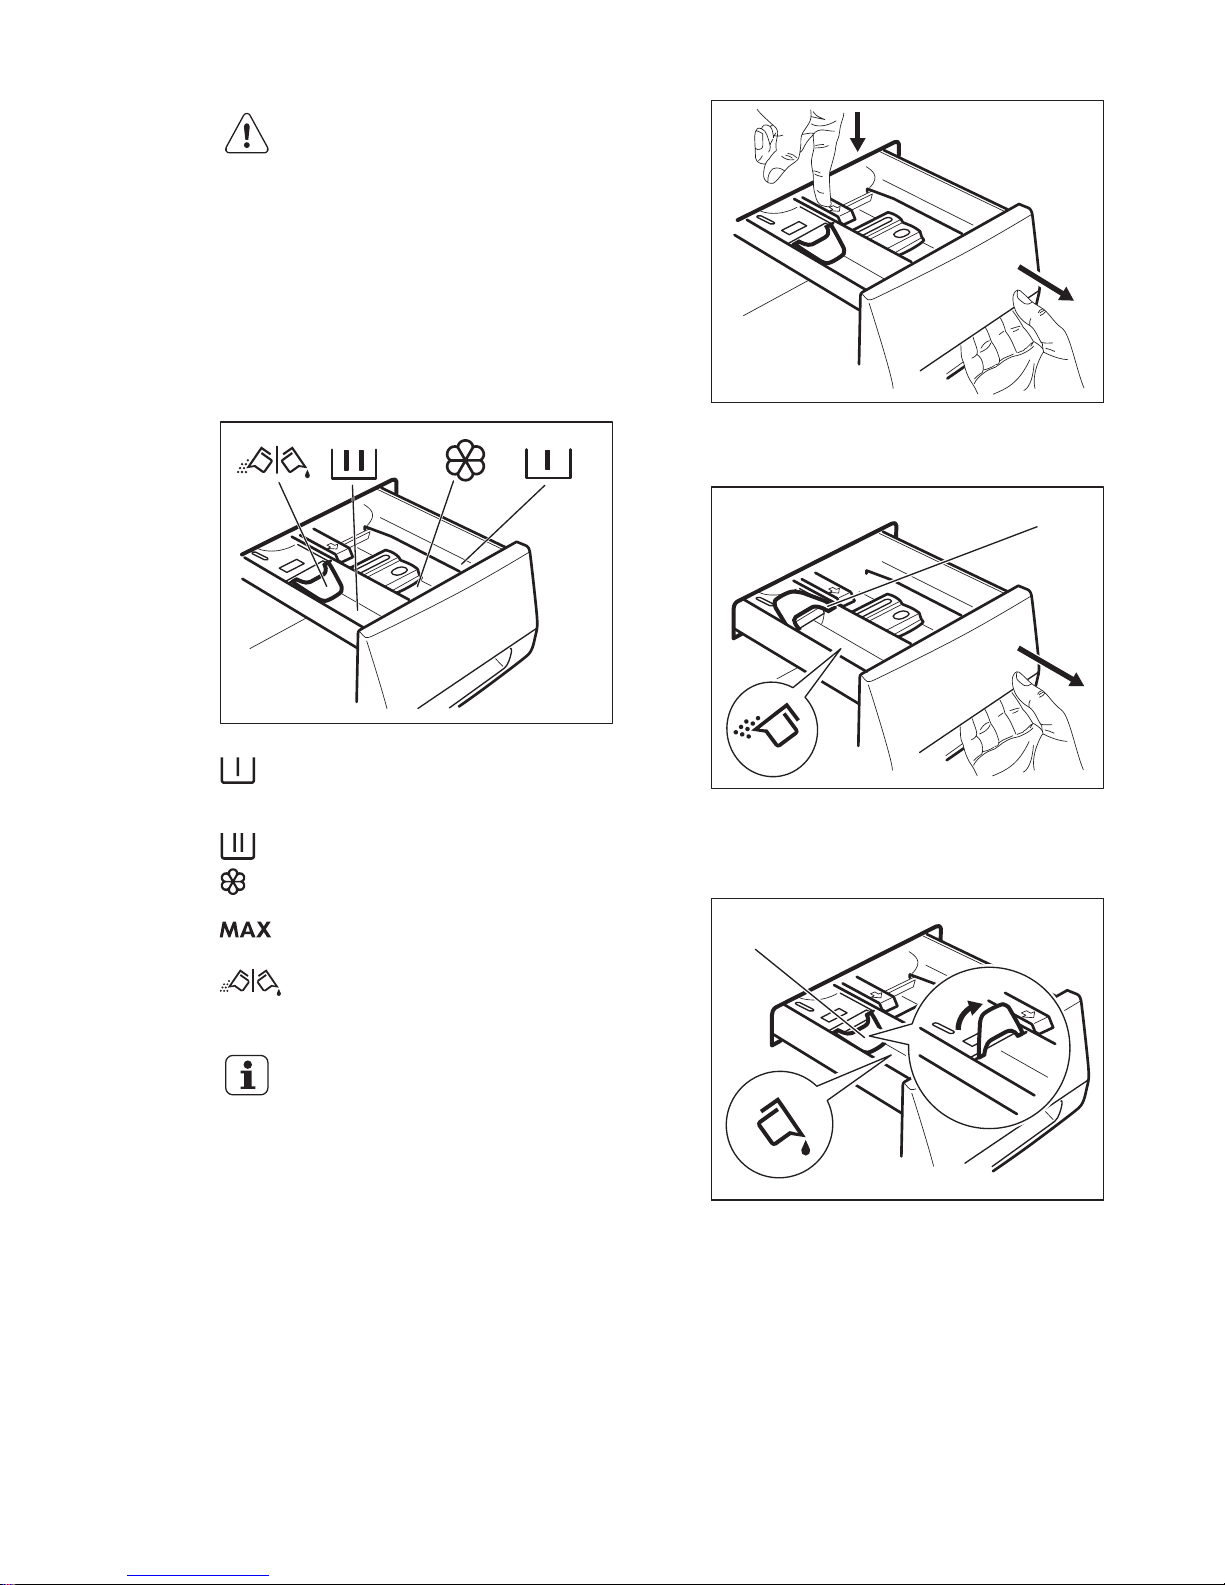
ACHTUNG!
Achten Sie darauf, dass keine
Wäschestücke zwischen der
Dichtung und der Tür
feststecken. Dies könnte zu
Wasserlecks oder
Beschädigungen der Wäsche
führen.
9.3 Einfüllen von Wasch- und
Pflegemitteln
Fach für Vorwasch-,
Einweichwaschmittel oder
Fleckentferner.
Fach für die Hauptwäsche.
Fach für flüssige Pflegemittel
(Weichspüler, Stärke).
Maximaler Füllstand für flüssige
Pflegemittel.
Klappe für Waschpulver oder
Flüssigwaschmittel.
Halten Sie sich immer an die
Anweisungen auf der
Verpackung der
Waschmittelprodukte.
9.4 Überprüfen Sie die Position
der Klappe
1. Ziehen Sie die Waschmittelschublade
bis zum Anschlag heraus.
2. Drücken Sie den Hebel nach unten
und ziehen Sie die Schublade heraus.
1
2
3. Drehen Sie die Klappe nach oben,
wenn Sie Waschpulver verwenden.
A
4. Drehen Sie die Klappe nach unten,
wenn Sie Flüssigwaschmittel
verwenden.
B
www.electrolux.com58
Page 59

Klappe in der Position
„Unten“:
• Verwenden Sie keine
Gelwaschmittel oder
Flüssigwaschmittel mit
dicker Konsistenz.
• Füllen Sie nicht mehr
Flüssigwaschmittel ein
als bis zur
Markierungslinie auf
der Klappe.
• Stellen Sie nicht den
Vorwaschgang ein.
• Stellen Sie nicht die
Zeitvorwahl ein.
5. Messen Sie Waschmittel und
Weichspüler ab.
6. Schließen Sie die
Waschmittelschublade vorsichtig.
Achten Sie darauf, dass die Klappe beim
Schließen der Waschmittelschublade nicht
blockiert.
9.5 Einschalten des Geräts
1. Stecken Sie den Netzstecker in die
Netzsteckdose.
2. Öffnen Sie den Wasserhahn.
3. Drücken Sie die Taste Ein/Aus -
Marche/Arrêt, um das Gerät
einzuschalten.
Es ertönt ein kurzes Signal.
9.6 Einstellen eines Programms
1. Stellen Sie das Programm durch
Drehen des Programmwahlschalters
ein:
• Die entsprechende
Programmkontrolllampe leuchtet
auf.
• Die Kontrolllampe Start/Pause Départ/Pause blinkt.
• Im Display wird die
Standardtemperatur, die
Schleuderdrehzahl, die
Phasenanzeige und die
Programmdauer angezeigt.
2. Ändern Sie ggf. die Temperatur,
Schleuderdrehzahl und die
Programmdauer, oder fügen Sie zur
Auswahl stehende Optionen hinzu. Die
Kontrolllampe der gewählten Option
leuchtet auf, sobald die Option
eingeschaltet wird.
Wenn Sie einen Fehler
machen, erscheint im Display
die Meldung Err.
9.7 Starten eines Programms
ohne Zeitvorwahl
Drücken Sie die Taste Start/Pause Départ/Pause, um das Programm zu
starten.
Die entsprechende Kontrolllampe hört auf
zu blinken und leuchtet dauerhaft.
Auf dem Display blinkt die Kontrolllampe
des aktiven Waschgangs.
Das Programm startet, die Tür ist
verriegelt. Auf dem Display erscheint die
Anzeige .
Die Ablaufpumpe kann sich
während des Wasserzulaufs
eine kurze Zeit einschalten.
9.8 Verhalten des Gerätes
Etwa 15 Minuten nach dem
Start des Programms:
• Das Gerät stellt
automatisch die
Programmdauer für die
Menge der eingefüllten
Wäsche in der Trommel
ein, um perfekte
Waschergebnisse in
kurzer Zeit zu erzielen.
• Das Display zeigt die neue
Dauer an.
9.9 Starten eines Programms
mit Zeitvorwahl
1. Drücken Sie die Taste Zeitvorwahl Départ Différé wiederholt, bis das
Display die Zeit in Minuten oder
Stunden anzeigt.
Die entsprechende Anzeige leuchtet auf.
2. Drücken Sie die Taste Start/Pause Départ/Pause.
Das Gerät zählt die Zeit herunter.
Nach Ablauf der Zeitvorwahl startet das
Programm automatisch.
DEUTSCH
59
Page 60
Sie können die Einstellung
der Zeitvorwahl vor dem
Einschalten des Geräts mit
der Taste Start/Pause Départ/Pause jederzeit
abbrechen oder ändern.
9.10 Abbrechen der Zeitvorwahl
Abbrechen der Zeitvorwahl:
1. Drücken Sie die Taste Start/Pause Départ/Pause, um die Maschine in
den Pausenmodus zu schalten.
Die zugehörige Kontrolllampe blinkt.
2. Drücken Sie die Taste Zeitvorwahl Départ Différé wiederholt, bis im
Display angezeigt wird.
3. Drücken Sie die Taste Start/Pause Départ/Pause erneut, um das
Programm sofort zu starten.
9.11 Unterbrechen eines
Programms und Ändern einer
Option
Einige Optionen können nur geändert
werden, bevor sie durchgeführt werden.
1. Drücken Sie die Taste Start/Pause Départ/Pause.
Die zugehörige Kontrolllampe blinkt.
2. Ändern Sie die eingestellte Option.
3. Drücken Sie die Taste Start/Pause -
Départ/Pause erneut.
Das Programm wird fortgesetzt.
9.12 Abbrechen eines laufenden
Programms
1. Drücken Sie die Taste Ein/Aus Marche/Arrêt, um das Programm
abzubrechen und das Gerät
auszuschalten.
2. Drücken Sie die Taste Ein/Aus Marche/Arrêt erneut, um das Gerät
einzuschalten.
Anschließend können Sie ein neues
Waschprogramm einstellen.
Vor dem Start des neuen
Programms pumpt das Gerät
möglicherweise Wasser ab.
Prüfen Sie in diesem Fall, ob
sich noch Waschmittel im
Fach befindet. Füllen Sie
anderenfalls Waschmittel ein.
9.13 Öffnen der Tür
Wenn die Wassertemperatur
und der Wasserstand in der
Trommel zu hoch sind, und/
oder die Trommel sich noch
dreht, lässt sich die Tür nicht
öffnen.
Während ein Programm oder die
Zeitvorwahl aktiv ist, ist die Tür verriegelt.
1. Drücken Sie die Taste Start/Pause Départ/Pause.
Das Türverriegelungssymbol erlischt im
Display.
2. Öffnen Sie die Gerätetür.
3. Schließen Sie die Tür und drücken Sie
die Taste Start/Pause - Départ/Pause.
Das Programm bzw. die Zeitvorwahl läuft
weiter.
9.14 Programmende
Wenn das Programm beendet ist, schaltet
sich das Gerät automatisch aus. Falls
Signaltöne eingeschaltet sind, ertönt ein
Signalton.
Im Display leuchtet und die Anzeige
Türverriegelung erlischt.
Die Kontrolllampe der Taste Start/Pause Départ/Pause erlischt.
1. Drücken Sie die Taste Ein/Aus Marche/Arrêt, um das Gerät
auszuschalten.
Fünf Minuten nach Ende des Programms
schaltet die Energiesparfunktion das Gerät
automatisch aus.
Wenn Sie das Gerät wieder
einschalten, sehen Sie im
Display das Ende des letzten
Programms. Drehen Sie den
Programmwahlschalter, um
ein neues Programm
einzustellen.
www.electrolux.com60
Page 61
2. Nehmen Sie die Wäsche aus dem
Gerät.
3. Vergewissern Sie sich, dass die
Trommel leer ist.
4. Lassen Sie die Tür offen, damit sich
kein Schimmel und keine
unangenehmen Gerüche bilden.
9.15 Abpumpen des Wassers
nach dem Programmende
Das Waschprogramm ist beendet,
aber es steht Wasser in der Trommel:
Die Trommel dreht sich regelmäßig, um
Knitterfalten in der Wäsche zu vermeiden.
Die Anzeige Türverriegelung leuchtet.
Die Tür bleibt verriegelt.
Sie müssen das Wasser abpumpen, um
die Tür öffnen zu können:
1. Reduzieren Sie, falls erforderlich, die
Schleuderdrehzahl.
2. Drücken Sie die Taste Start/Pause Départ/Pause.
Das Gerät pumpt das Wasser ab und
schleudert.
3. Wenn das Programm beendet ist und
die Türverriegelungsanzeige
erlischt, können Sie die Tür öffnen.
4. Halten Sie die Taste Ein/Aus Marche/Arrêt einige Sekunden
gedrückt, um das Gerät
auszuschalten.
Nach etwa 18 Stunden
pumpt das Gerät
automatisch das Wasser ab
und schleudert.
9.16 Option AUTO Standby
Die Funktion AUTO Standby schaltet das
Gerät in den folgenden Fällen automatisch
aus, um den Energieverbrauch zu
verringern:
• Wenn Sie nicht innerhalb von 5
Minuten die Taste Start/Pause Départ/Pause drücken.
Drücken Sie die Taste Ein/Aus Marche/Arrêt, um das Gerät wieder
einzuschalten.
• 5 Minuten nach Ende eines
Waschprogramms
Drücken Sie die Taste Ein/Aus Marche/Arrêt, um das Gerät wieder
einzuschalten.
Im Display wird das Ende des zuletzt
eingestellten Programms angezeigt.
Drehen Sie den
Programmwahlschalter, um ein neues
Programm einzustellen.
Haben Sie ein Programm
gewählt, das vor dem
Abpumpen des Wassers aus
der Trommel endet, schaltet
die Funktion AUTO Standby
das Gerät nicht aus, um Sie
daran zu erinnern, dass das
Wasser abgepumpt werden
muss.
10. TÄGLICHER GEBRAUCH - NUR TROCKNEN
WARNUNG!
Siehe Kapitel
"Sicherheitshinweise".
10.1 Vorbereitung des
Trockengangs
1. Halten Sie die Ein/Aus - Marche/ArrêtTaste einige Sekunden lang gedrückt,
um das Gerät einzuschalten
2. Füllen Sie die Wäsche Stück für Stück
ein.
3. Drehen Sie den
Programmwahlschalter auf das
geeignete Trockenprogramm.
Das Display zeigt die Mindestzeit und
folgende Symbole an:
Das Trockensymbol leuchtet auf.
DEUTSCH
61
Page 62
Das Knitterschutzsymbol leuchtet
auf.
Das Trockenzeitsymbol leuchtet
auf.
Wenn Sie große
Wäschemengen trocknen,
achten Sie darauf, dass die
Wäschestücke nicht eingerollt
und gleichmäßig in der
Trommel verteilt sind, um ein
gutes Trockenergebnis zu
erzielen.
Wählen Sie die für die
Wäscheart maximal zulässige
Schleuderdrehzahl, um eine
optimale Trockenleistung zu
erzielen.
Sie können die Wäsche auf zwei Arten
trocknen:
10.2 Automatiktrocknen
1. Drücken Sie die Taste Trockengrad -
Niveau de séchage wiederholt, bis
unter einem der Trockengrad-Symbole
eine schwarze Linie erscheint.
Trockengrad Extratrocken
Trockengrad Schranktrocken
Trockengrad Bügeltrocken
Das Trockenzeitsymbol erlischt
Das Display zeigt eine anhand einer
Standardbeladung berechnete Trockenzeit
an. Weicht die Wäschemenge von der
Standardbeladung ab, dann passt das
Gerät automatisch die Trockenzeit
während des Trockengangs an.
2. Drücken Sie die Taste Start/Pause Départ/Pause, um das Programm zu
starten. Im Display:
Das Türverriegelungssymbol leuchtet auf.
Das Trockensymbol beginnt zu
blinken.
Das Symbol des ausgewählten
Trockengrads (z.B. Schranktrocken) bleibt eingeschaltet.
Alle anderen Trockengradsymbole
erlöschen.
Die Dauer des Trockengangs wird
regelmäßig (im Minutentakt) im Display
aktualisiert.
Es können nicht alle
Trockengrade für alle
Wäschearten eingestellt
werden (siehe Tabelle
„Programme für das
Automatiktrocknen“).
10.3 Zeitgesteuertes Trocknen
1. Drücken Sie die Taste Trockenzeit -
Minuterie wiederholt, um die
Trockenzeit einzustellen (siehe Tabelle
„Trockenprogramme“).
Das Trockensymbol leuchtet auf.
Das Knitterschutzsymbol leuchtet
auf.
Das Trockenzeitsymbol leuchtet
auf.
Eingestellte Trockenzeit.
Durch jeden Tastendruck erhöht sich die
Trockenzeit um 5 Minuten. Die eingestellte
Trockenzeit erscheint auf dem Display.
Die eingestellte Trockenzeit ändert sich
nach einigen Sekunden im Display: das
Gerät berechnet auch die Dauer der
Knitterschutz- und Abkühlphase.
Gesamtdauer.
2.
Drücken Sie Start/Pause - Départ/
Pause, um das Programm zu starten.
www.electrolux.com62
Page 63
Die Textzeile zeigt an, dass sich das
Gerät in der Trockenphase befindet.
Die verbleibende Trockenzeit wird im
Minutentakt im Display aktualisiert.
Das Trockensymbol beginnt zu
blinken.
Das Türverriegelungssymbol leuchtet auf.
Wenn Sie nur 10 Minuten für
die Trocknung einstellen,
führt das Gerät lediglich eine
Abkühlphase aus.
10.4 Am Ende des
Trockenprogramms
1. Das Gerät wird automatisch
ausgeschaltet.
2. Falls Signaltöne aktiviert sind, ertönt
ein Signalton.
3. Im Display erscheint .
4. Die Kontrolllampe der Taste Start/
Pause - Départ/Pause erlischt.
5. Bei den letzten Minuten des
Trockenprogramms handelt es sich
um die Knitterschutzphase.
Das Knitterschutzsymbol blinkt.
Die Tür ist noch verriegelt (das Symbol
leuchtet).
6. Halten Sie die Ein/Aus - Marche/ArrêtTaste einige Sekunden lang gedrückt,
um das Gerät auszuschalten.
Einige Minuten nach
Ende des Programms
schaltet die
Energiesparfunktion das
Gerät automatisch aus.
7. Sobald die Anzeige für die
Türverriegelung erlischt, kann die
Tür geöffnet werden.
8. Nehmen Sie die Wäsche aus dem
Gerät. Vergewissern Sie sich, dass die
Trommel leer ist.
9. Lassen Sie die Tür offen, damit sich
kein Schimmel und keine
unangenehmen Gerüche bilden.
10. Schließen Sie den Wasserhahn.
11. TÄGLICHER GEBRAUCH - WASCHEN UND
TROCKNEN
WARNUNG!
Siehe Kapitel
"Sicherheitshinweise".
11.1 NON-STOP Programm
WARNUNG!
Legen Sie keinen
Dosierbehälter mit
Waschmittel in die Trommel.
1. Halten Sie die Ein/Aus - Marche/ArrêtTaste einige Sekunden lang gedrückt,
um das Gerät einzuschalten.
2. Füllen Sie die Wäsche Stück für Stück
ein.
3. Füllen Sie das Waschmittel und die
Pflegemittel in die entsprechenden
Fächer.
4. Drehen Sie den
Programmwahlschalter auf das
Waschprogramm. Das Display zeigt
die Symbole der verschiedenen
Waschgänge an.
5. Stellen Sie die verfügbaren Optionen
ein.
WARNUNG!
Stellen Sie keine
Schleuderdrehzahl ein, die
niedriger als die automatische
Drehzahl des eingestellten
Programms ist.
11.2 Waschen und Trocknen mit
Automatikstufen
1. Drücken Sie die Taste Trockengrad Niveau de séchage wiederholt, bis
unter einem der Trockengrad-Symbole
eine schwarze Linie erscheint.
DEUTSCH
63
Page 64
Bügeltrocken
Schranktrocken
Extratrocken
Das Trockensymbol leuchtet auf.
Das Knitterschutzsymbol leuchtet
auf.
Das Display zeigt an, dass das Gerät
startbereit ist.
Die auf dem Display angezeigte Dauer
ist die anhand einer
Standardbeladung berechnete Dauer
des Wasch- und Trockengangs.
Um ein gutes
Trockenergebnis zu erzielen,
können Sie für die zu
waschende und trocknende
Wäsche keine zu niedrige
Schleuderdrehzahl einstellen.
2. Drücken Sie die Taste Start/Pause Départ/Pause, um das Programm zu
starten.
Das Symbol des ausgewählten
Trockengrads (z.B. Schranktrocken) bleibt eingeschaltet. Alle anderen Trockengradsymbole erlöschen.
Das Türverriegelungssymbol leuchtet auf.
Die verbleibende Trockenzeit wird im
Minutentakt im Display aktualisiert.
Bei den letzten Minuten des
Trockenprogramms handelt
es sich um die Knitterschutzund Abkühlphase.
11.3 Waschen und
zeitgesteuertes Trocknen
WARNUNG!
Legen Sie keinen
Dosierbehälter mit
Waschmittel in die Trommel.
1. Drücken Sie die Taste Trockenzeit Minuterie wiederholt, um die
Trockenzeit einzustellen.
Das Trockensymbol leuchtet auf.
Das Knitterschutzsymbol leuchtet
auf.
Das Trockenzeitsymbol leuchtet
auf.
Im Display wird die eingestellte
Trockenzeit eingeblendet.
Einstellen der Trockenzeit.
Durch jeden Tastendruck erhöht sich die
Trockenzeit um 5 Minuten.
Um ein gutes
Trockenergebnis zu erzielen,
empfehlen wir für die zu
waschende und trocknende
Wäsche keine zu niedrige
Schleuderdrehzahl
einzustellen.
2. Das Display zeigt nach einigen
Sekunden die Gesamtdauer des
Trockengangs an:
Gesamtdauer (Waschen + Trocknen + Knitterschutz + Abkühlphase)
Wenn Sie nur 10 Minuten für
die Trocknung einstellen,
schließt die Gesamtdauer
auch die Knitterschutz- und
Abkühlphase ein.
3. Drücken Sie die Taste Start/Pause Départ/Pause, um das Programm zu
starten.
Die Tür ist verriegelt.
Die verbleibende Trockenzeit wird im
Minutentakt im Display aktualisiert.
www.electrolux.com64
Page 65
11.4 Am Ende des
Trockenprogramms
1. Das Gerät wird automatisch
ausgeschaltet.
2. Falls Signaltöne aktiviert sind, ertönt
ein Signalton.
3. Im Display erscheint
.
4. Die Kontrolllampe der Taste Start/
Pause - Départ/Pause erlischt.
5. Bei den letzten Minuten des
Trockenprogramms handelt es sich
um die Knitterschutzphase.
Das Knitterschutzsymbol
blinkt.
Die Tür ist noch verriegelt (das Symbol
leuchtet).
6. Halten Sie die Ein/Aus - Marche/ArrêtTaste einige Sekunden lang gedrückt,
um das Gerät auszuschalten.
Einige Minuten nach
Ende des Programms
schaltet die
Energiesparfunktion das
Gerät automatisch aus.
7. Sobald die Anzeige für die
Türverriegelung erlischt, kann die
Tür geöffnet werden.
8. Nehmen Sie die Wäsche aus dem
Gerät. Vergewissern Sie sich, dass die
Trommel leer ist.
9. Lassen Sie die Tür offen, damit sich
kein Schimmel und keine
unangenehmen Gerüche bilden.
10. Schließen Sie den Wasserhahn.
11.5 Flusen in der Wäsche
Während des Wasch- und/oder
Trockengangs können sich bei
bestimmten Textilarten (Schwammtücher,
Wolle oder Sweatshirts) Flusen ablösen.
Die abgelösten Flusen können an den
Wäschestücken im nächsten Programm
anhaften.
Um Flusen in Ihrer Kleidung zu vermeiden,
wird Folgendes empfohlen:
• Waschen Sie keine dunklen Textilien,
nachdem Sie hell gefärbte
Wäschestücke (insbesondere neue
Schaumstoffe, Wolle und Sweatshirts)
gewaschen und getrocknet haben und
umgekehrt.
• Lassen Sie diese Textilarten beim
erstmaligen Waschen auf der
Wäscheleine im Freien trocknen.
• Reinigen Sie das Ablaufsieb.
• Reinigen Sie nach der Trockenphase
die leere Trommel, die Dichtung und
die Tür gründlich mit einem feuchten
Tuch.
11.6 So entfernen Sie Flusen in
den Wäschestücken
Starten Sie ein spezielles Programm, um
die Flusen aus der Trommel zu entfernen:
1. Leeren Sie die Trommel.
2. Reinigen Sie die Trommel, die
Dichtung und die Tür gründlich mit
einem feuchten Tuch.
3. Wählen Sie das Programm „Spülen“.
4. Schalten Sie die Reinigungsfunktion
durch gleichzeitiges Drücken der
Tasten U./Min. - T/min. und Extra
Spülen - Rinçage + ein, bis im Display
CLE angezeigt wird.
5. Drücken Sie Start/Pause - Départ/
Pause, um das Programm zu starten.
12. TIPPS UND HINWEISE
WARNUNG!
Siehe Kapitel
"Sicherheitshinweise".
12.1 Beladung
• Teilen Sie die Wäsche auf, und zwar in:
Kochwäsche, Buntwäsche, Synthetik,
Feinwäsche und Wolle.
• Halten Sie sich an die Anweisungen auf
den Kleidungsetiketten.
• Waschen Sie weiße und bunte Wäsche
nicht zusammen.
• Manche farbigen Textilien können beim
ersten Waschen färben. Wir empfehlen,
sie deshalb die ersten Male separat zu
waschen.
• Knöpfen Sie Kopfkissen zu und
schließen Sie Reißverschlüsse, Haken
und Druckknöpfe. Schließen Sie Gürtel.
DEUTSCH
65
Page 66

• Leeren Sie die Taschen und falten Sie
die Wäscheteile auseinander.
• Wenden Sie mehrlagige Textilien, Wolle
und bedruckte Wäschestücke vor dem
Waschen.
• Entfernen Sie hartnäckige Flecken.
• Waschen Sie stark verschmutzte
Bereiche mit einem speziellen
Waschmittel.
• Seien Sie vorsichtig mit Gardinen.
Entfernen Sie die Haken, oder stecken
Sie die Gardinen in einen Beutel oder
Kopfkissenbezug.
• Waschen Sie keine ungesäumten
Wäschestücke und Wäschestücke mit
Schnitten im Stoff in der Maschine.
Waschen Sie kleine und/oder
empfindliche Wäschestücke, wie z. B.
Bügel-BHs, Gürtel, Strumpfhosen
usw., in einem Wäschenetz.
• Eine sehr geringe Beladung kann in der
Schleuderphase Probleme
verursachen. Verteilen Sie die
Wäschestücke in diesem Fall mit der
Hand neu und starten Sie die
Schleuderphase erneut.
12.2 Hartnäckige Flecken
Für manche Flecken sind Wasser und
Waschmittel nicht ausreichend.
Wir empfehlen, diese Flecken
vorzubehandeln, bevor Sie die
entsprechenden Textilien in das Gerät
geben.
Spezial-Fleckentferner sind im Handel
erhältlich. Verwenden Sie einen SpezialFleckentferner, der für den jeweiligen
Fleckentyp und Gewebetyp geeignet ist.
12.3 Wasch- und Pflegemittel
• Verwenden Sie nur speziell für
Waschmaschinen bestimmte Waschund Pflegemittel:
– Waschpulver für alle Gewebearten,
– Waschpulver für Feinwäsche
(höchstens 40 °C) und Wolle,
– Flüssigwaschmittel, vorzugsweise
für Programme mit niedrigen
Temperaturen (max. 60 °C) für alle
Gewebearten oder nur speziell für
Wolle.
• Mischen Sie nicht verschiedene
Waschmittel.
• Verwenden Sie der Umwelt zuliebe
nicht mehr als die angegebene
Waschmittelmenge.
• Halten Sie sich an die Anweisungen auf
der Verpackung dieser Produkte.
• Verwenden Sie die korrekten Produkte
für Art und Farbe des Gewebes,
Programmtemperatur und
Verschmutzungsgrad.
• Ist Ihr Gerät nicht mit einer Klappe in
der Waschmittelschublade
ausgerüstet, geben Sie das
Flüssigwaschmittel in eine Dosierkugel
(vom Hersteller des Waschmittels).
12.4 Umwelttipps
• Stellen Sie zum Waschen normal
verschmutzter Wäsche ein Programm
ohne Vorwäsche ein.
• Waschen Sie immer mit der
angegebenen maximal zulässigen
Beladung.
• Benutzen Sie ggf. einen Fleckentferner,
wenn Sie ein Programm mit niedriger
Temperatur auswählen.
• Erkundigen Sie sich nach der
Wasserhärte Ihres Hausanschlusses,
um die richtige Waschmittelmenge
verwenden zu können. Siehe
„Wasserhärte“.
12.5 Wasserhärte
Wenn die Wasserhärte Ihres
Leitungswassers hoch oder mittel ist,
empfehlen wir die Verwendung eines
Enthärters für Waschmaschinen. In
Gegenden mit weichem Wasser ist die
Zugabe eines Enthärters nicht erforderlich.
Wenden Sie sich an Ihr örtliches
Wasserversorgungsunternehmen, um die
Wasserhärte in Ihrem Gebiet zu erfahren.
Verwenden Sie die richtige Menge
Wasserenthärter. Halten Sie sich an die
Anweisungen auf der Verpackung des
Produkts.
12.6 Tipps zum Trocknen
Vorbereiten des Trockengangs
• Öffnen Sie den Wasserhahn.
• Überprüfen Sie, ob der Ablaufschlauch
ordnungsgemäß angeschlossen ist.
Näheres siehe „Montage“.
www.electrolux.com66
Page 67
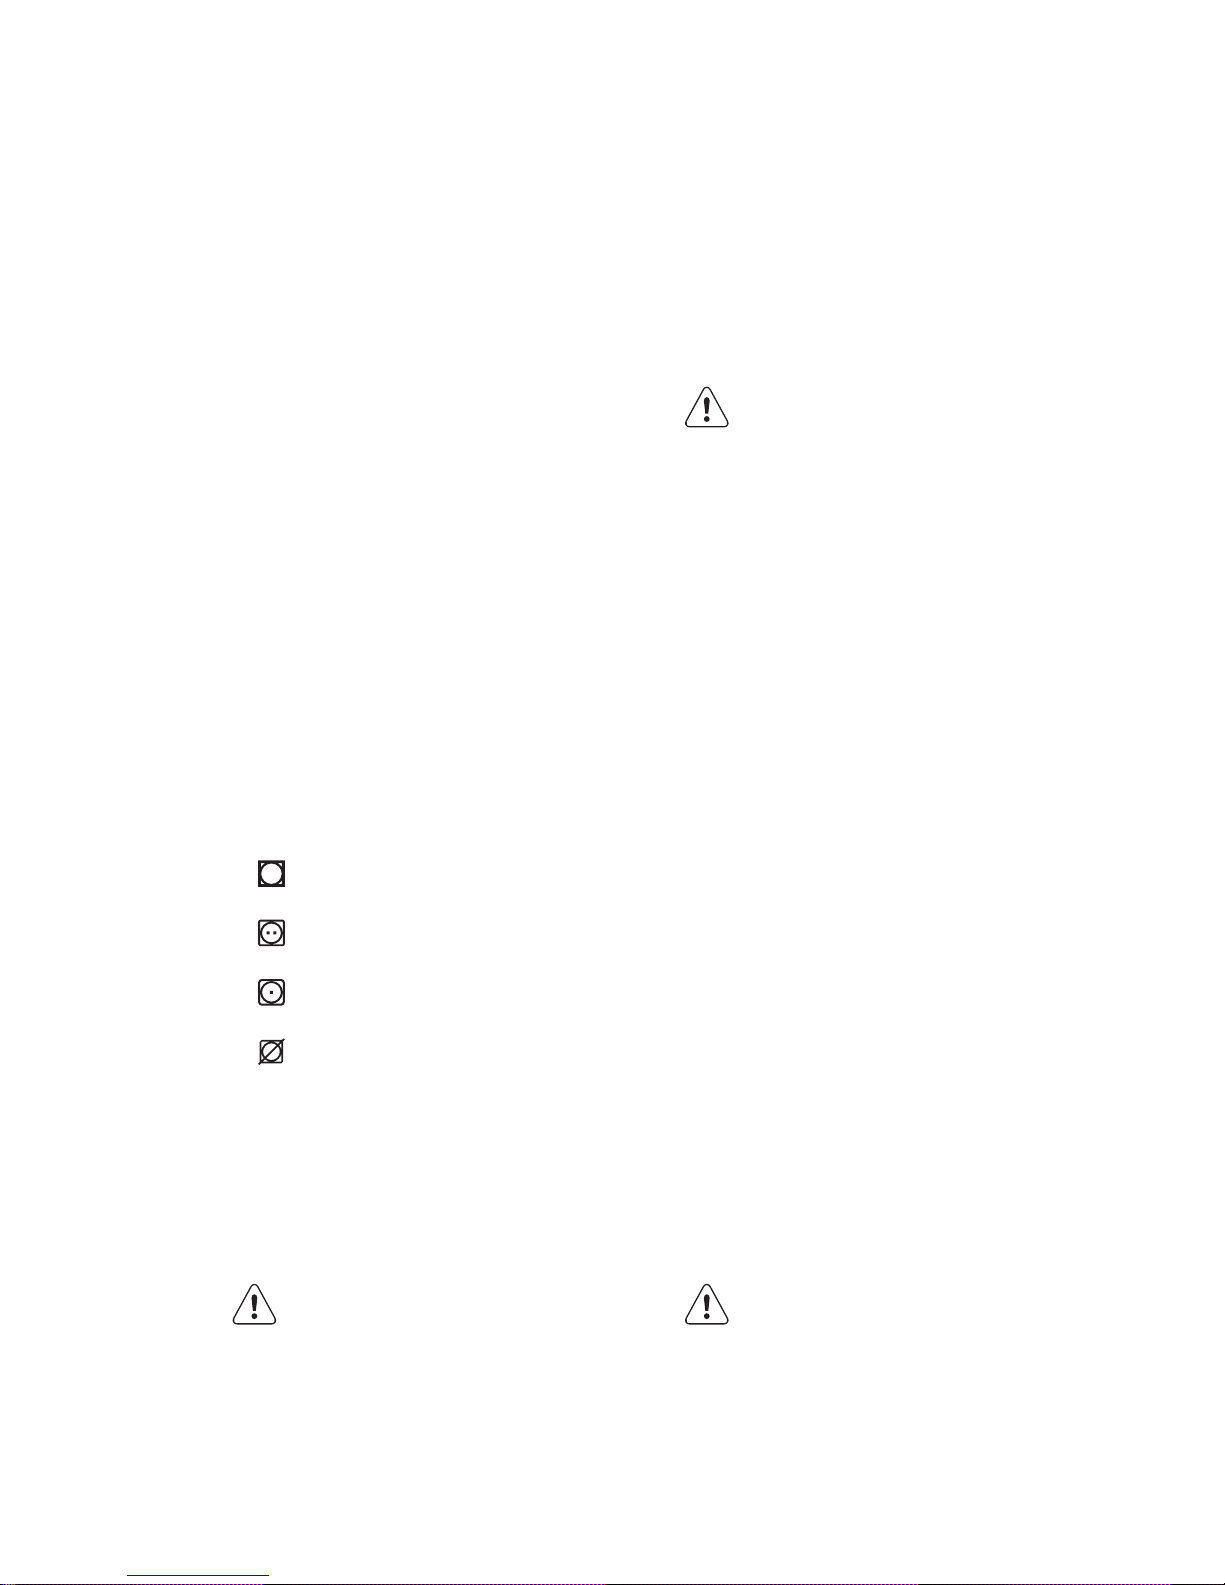
• Informationen zur Höchstbeladung für
die Trockenprogramme entnehmen Sie
bitte der Tabelle „Trockenprogramme“.
12.7 Für Trockner nicht
geeignete Textilien
Stellen Sie kein Trockenprogramm für
folgende Wäschearten ein:
• Besonders empfindliche Gewebe.
• Synthetikvorhänge.
• Kleidungsstücke mit Metalleinsätzen.
• Nylonstrümpfe.
• Steppdecken.
• Bettdecken.
• Daunen.
• Anoraks.
• Schlafsäcke.
• Gewebe mit Resten von Haarsprays,
Nagellackentferner oder ähnlichen
Lösungsmitteln.
• Kleidungsstücke aus Schaumgummi
oder ähnlichen schwammartigen
Materialien.
12.8 Pflegekennzeichen
Bitte befolgen Sie beim Trocknen von
Wäsche die Anweisungen auf den
Kleidungsetiketten des Herstellers:
• = Kann im Trockner getrocknet
werden
• = Trocknen bei hohen
Temperaturen
• = Trocknen bei niedrigen
Temperaturen
• = Kann nicht im Trockner
getrocknet werden.
12.9 Dauer des Trockengangs
Die Trockenzeit hängt ab von:
• Drehzahl des letzten Schleudergangs
• Trockengrad
• Wäscheart
• Gewicht der Beladung
12.10 Zusätzlicher Trockengang
Ist die Wäsche am Ende eines
Trockenprogramms noch zu feucht,
wählen Sie noch einen kurzen
Trockengang.
WARNUNG!
Trocknen Sie die Wäsche
nicht zu lang, um
Knitterbildung und ein
Einlaufen der
Wäschestücke zu
vermeiden.
12.11 Allgemeine Tipps
Die durchschnittlichen Trockenzeiten
können Sie der Tabelle
„Trockenprogramme“ entnehmen.
Mit der Erfahrung wird die Einstellung der
Trockenzeiten leichter. Merken Sie sich die
Dauer bereits durchgeführter
Trockengänge.
Zur Vermeidung elektrostatischer
Aufladung nach dem Trocknen:
1. Verwenden Sie beim Waschen einen
Weichspüler.
2. Verwenden Sie ein spezielles
Pflegemittel für Wäschetrockner.
Nehmen Sie die Wäsche unmittelbar nach
Ablauf des Trockenprogramms aus der
Trommel.
13. REINIGUNG UND PFLEGE
WARNUNG!
Siehe Kapitel
"Sicherheitshinweise".
13.1 Reinigen der Außenseiten
Reinigen Sie das Gerät nur mit warmem
Wasser und mit etwas Spülmittel. Reiben
Sie alle Oberflächen sorgfältig trocken.
ACHTUNG!
Verwenden Sie keinen
Alkohol, keine Lösungsmittel
und keine Chemikalien.
DEUTSCH
67
Page 68
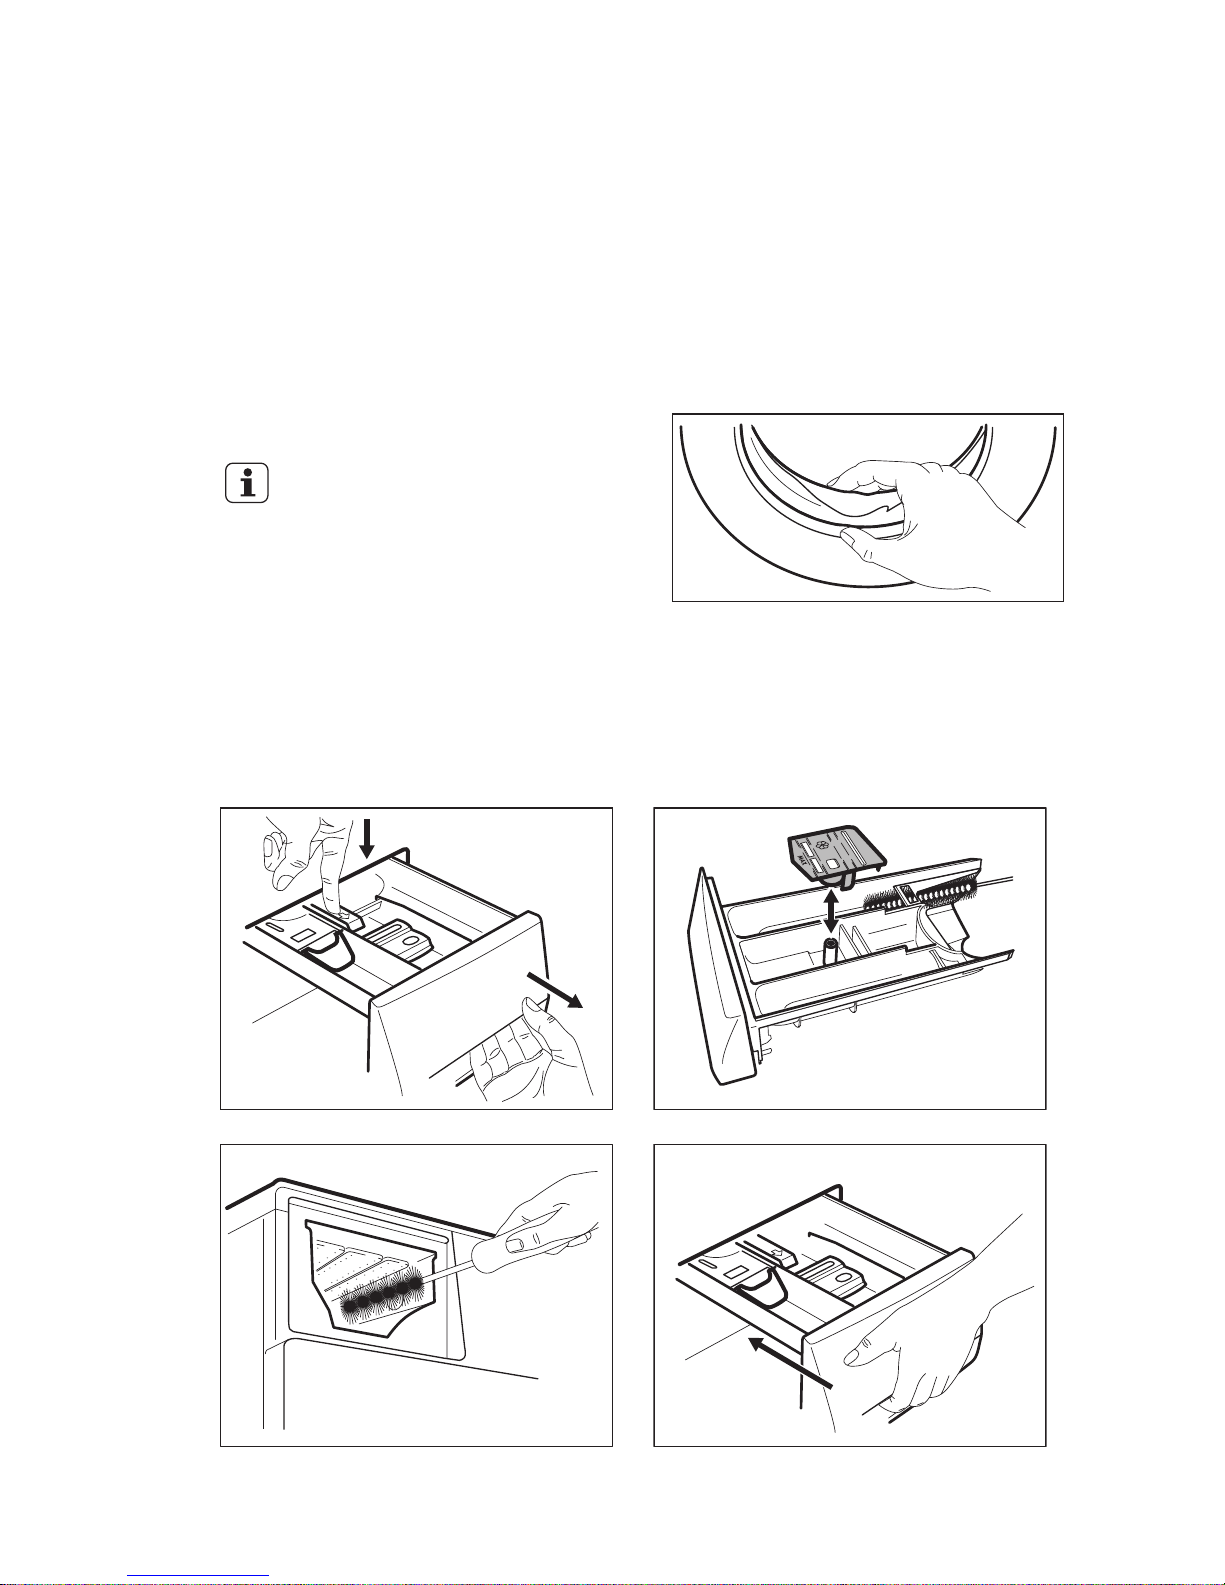
13.2 Entkalkung
Wenn die Wasserhärte Ihres
Leitungswassers hoch oder mittel ist,
empfehlen wir die Verwendung eines
Entkalkers für Waschmaschinen.
Überprüfen Sie regelmäßig, dass sich kein
Kalk und keine Rostpartikel in der
Trommel abgesetzt haben.
Verwenden Sie zur Entfernung von Rost
nur Spezialprodukte für Waschmaschinen.
Führen Sie die Entkalkung nicht
gleichzeitig mit einer Wäsche durch.
Halten Sie sich immer an die
Anweisungen auf der
Verpackung des Produkts.
13.3 Waschgang zur Pflege der
Maschine
Bei Waschprogrammen mit niedrigen
Temperaturen kann etwas Waschmittel in
der Trommel zurückbleiben. Führen Sie
regelmäßig einen Waschgang zur Pflege
der Maschine durch. Vorgehensweise:
• Nehmen Sie die Wäsche aus der
Trommel.
• Wählen Sie ein Programm für
Baumwollwäsche mit der maximalen
Temperatur und einer kleinen Menge
Waschmittel.
13.4 Türdichtung
Überprüfen Sie die Türdichtung
regelmäßig und entfernen Sie ggf. darin
verfangene Gegenstände.
13.5 Reinigen der Waschmittelschublade
1.
1
2
2.
3. 4.
www.electrolux.com68
Page 69
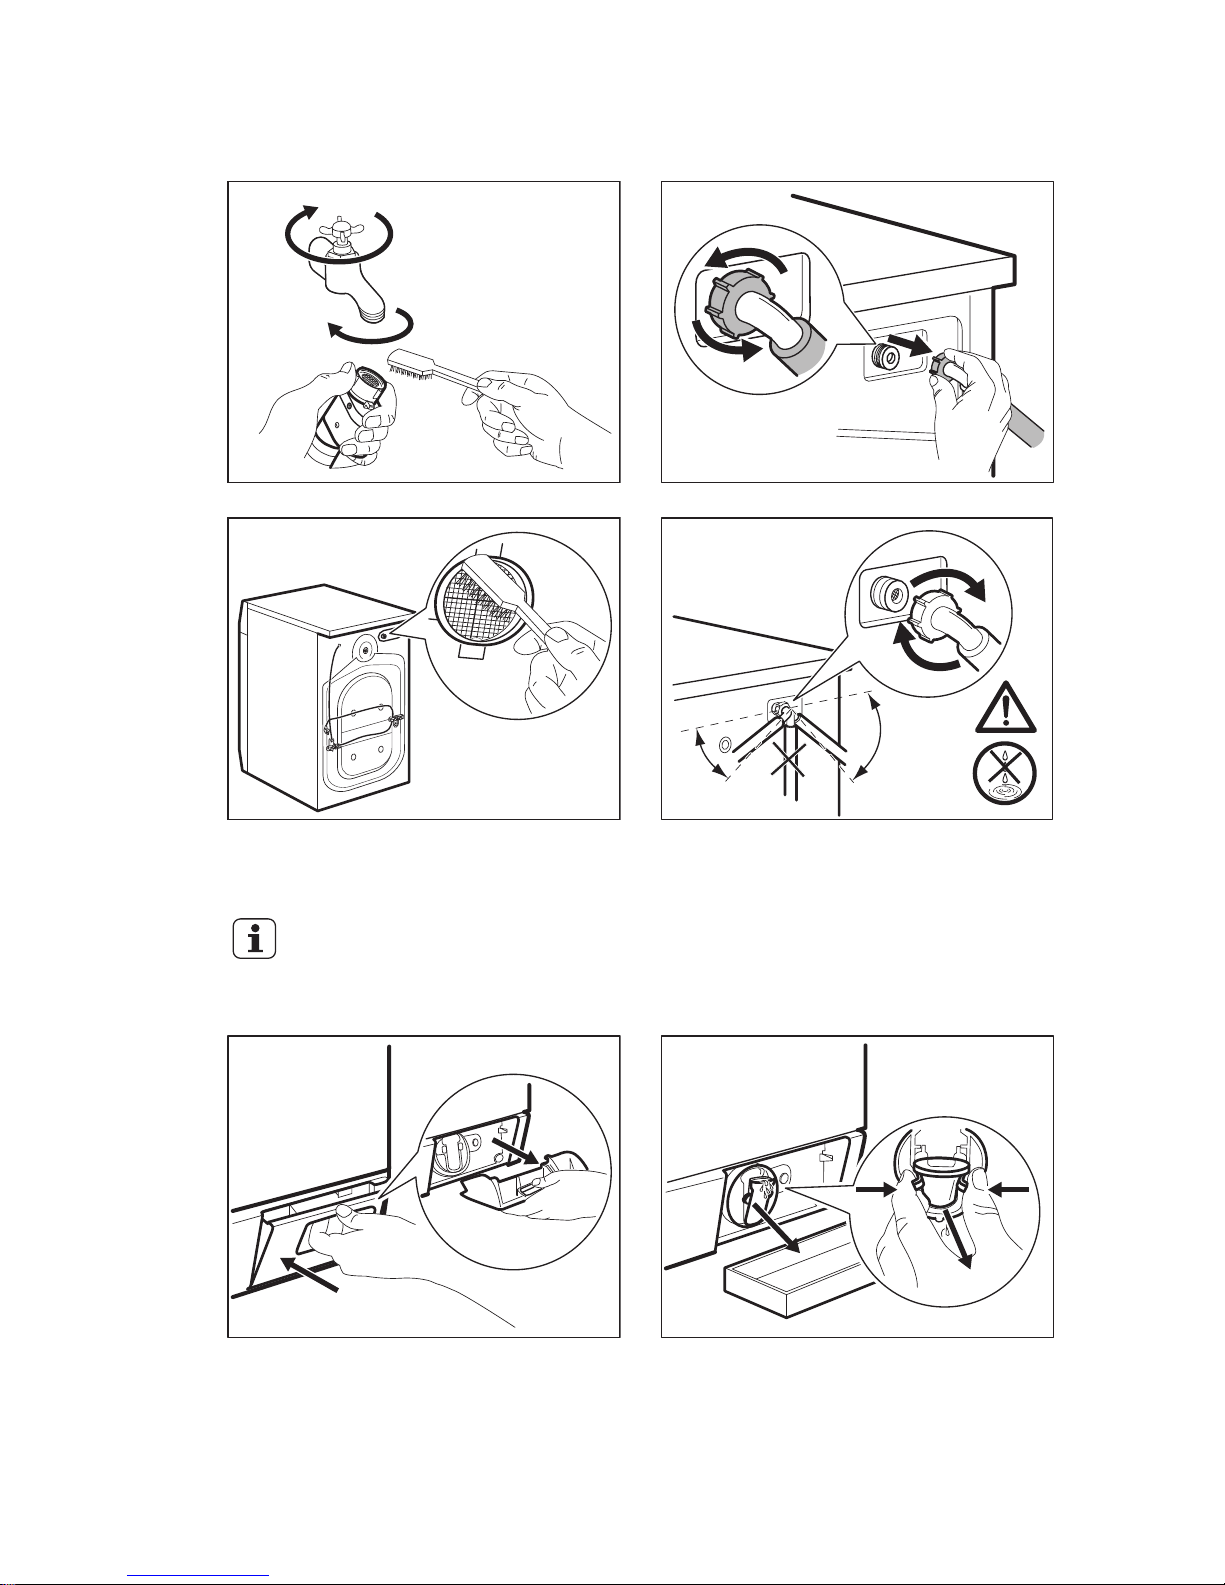
13.6 Reinigen des Zulaufschlauchs und Ventilfilters
1.
1
2
3
2.
3. 4.
45°
20°
13.7 Reinigen des Ablauffilters
Reinigen Sie den Ablauffilter nicht, wenn das Wasser im Gerät heiß ist.
1.
1
2
2.
2
11
DEUTSCH
69
Page 70
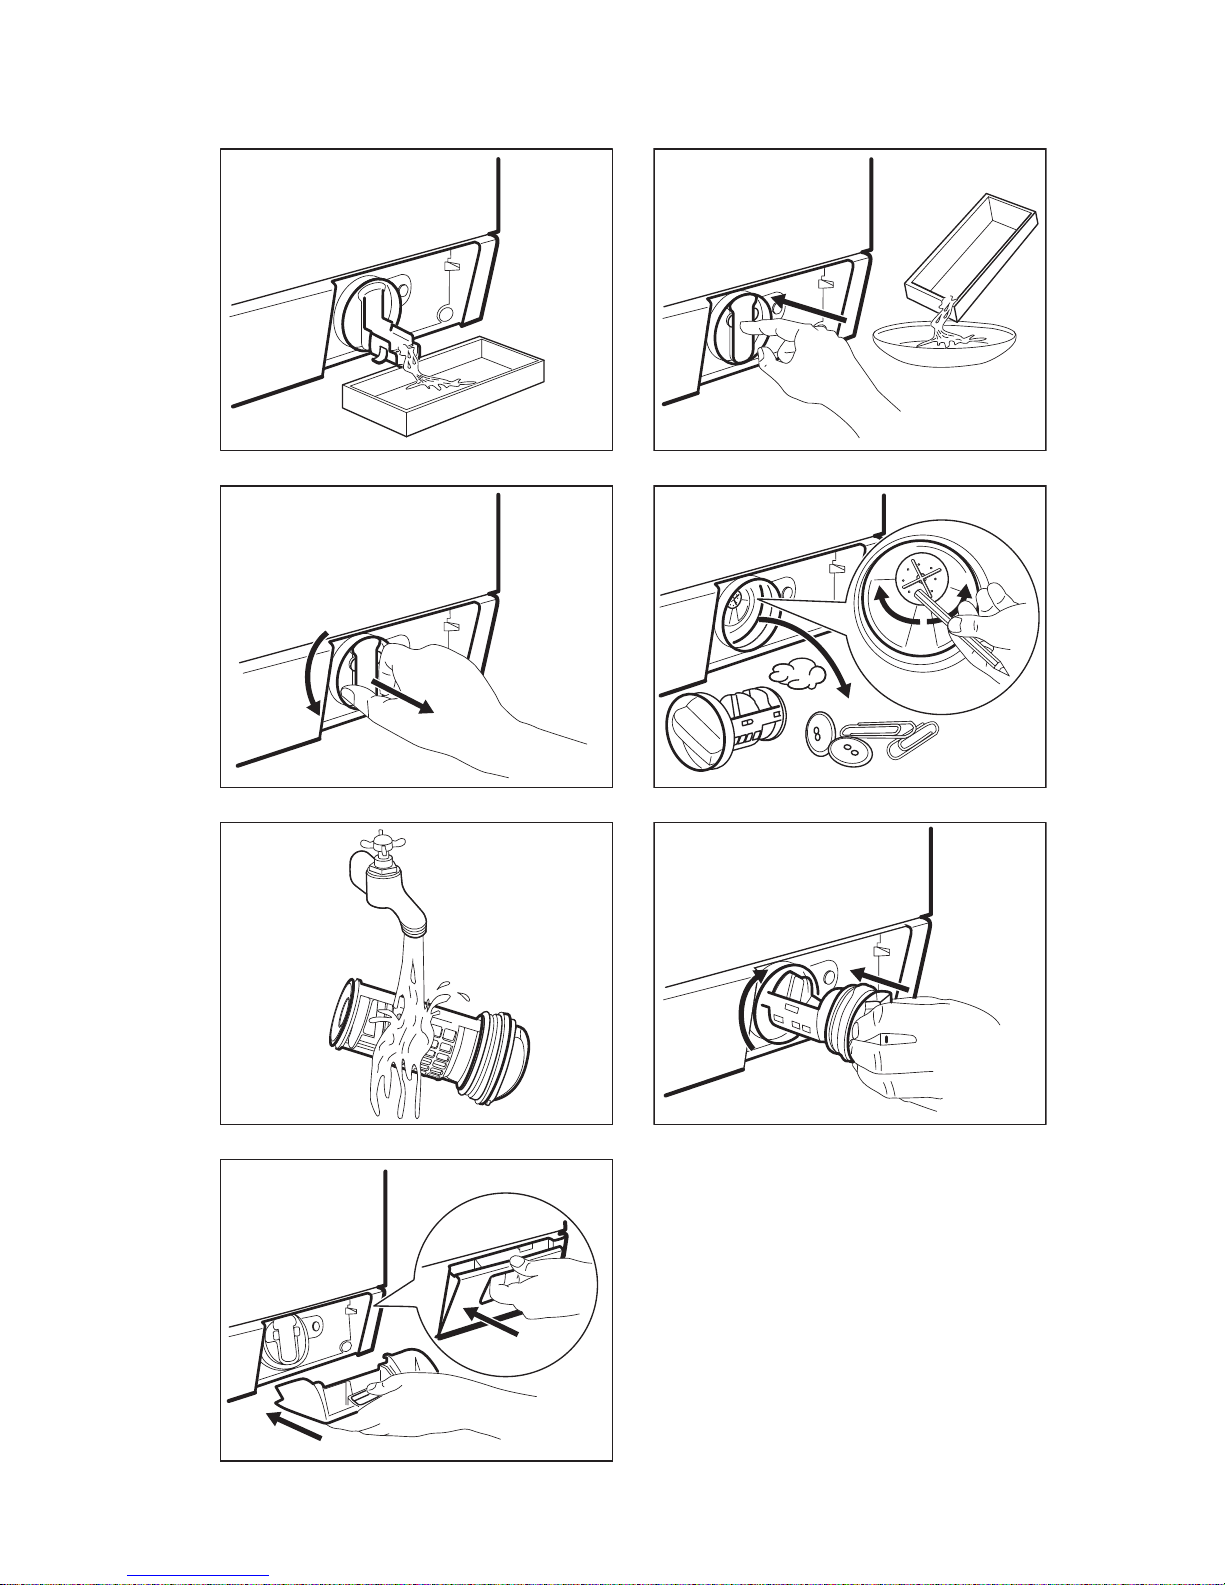
3. 4.
1
2
5.
1
2
6.
7. 8.
1
2
9.
1
2
www.electrolux.com70
Page 71
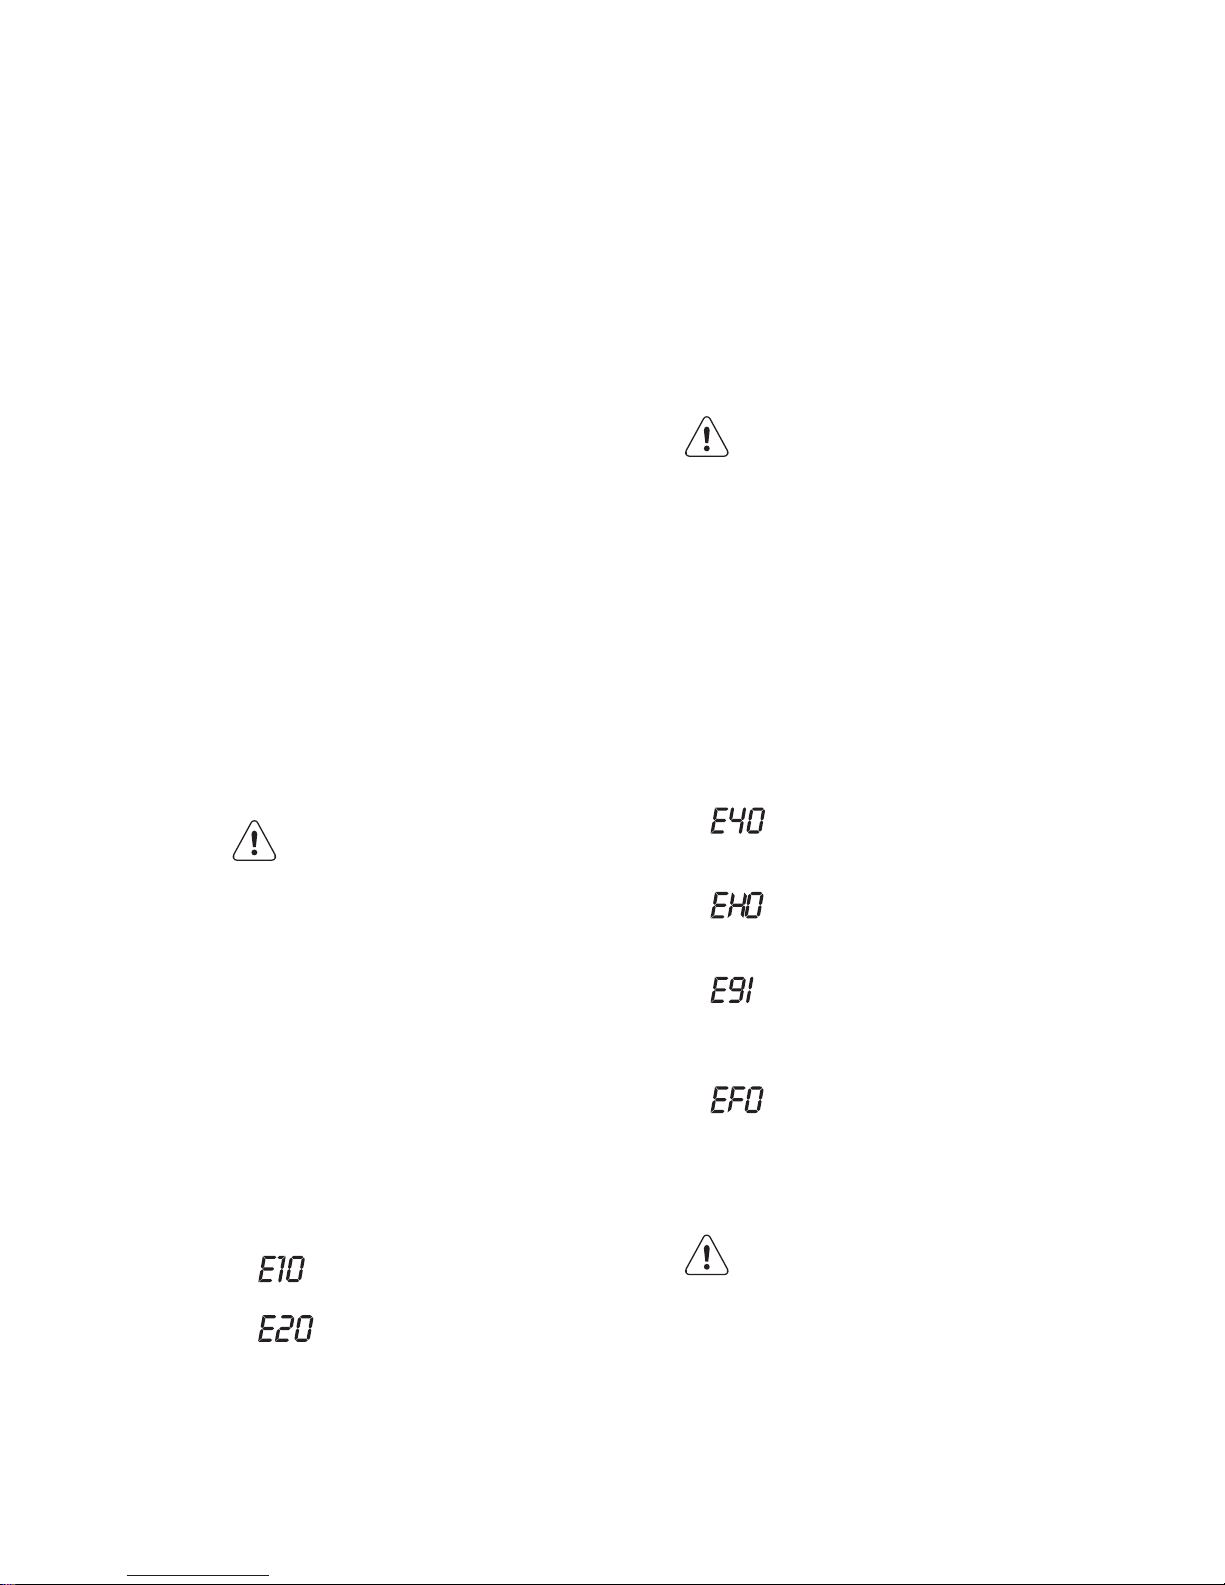
13.8 Notentleerung
Das Gerät kann aufgrund einer
Funktionsstörung das Wasser nicht
abpumpen.
In diesem Fall führen Sie die Schritte (1)
bis (9) unter „Reinigen des
Ablauffilters“ durch. Reinigen Sie bei
Bedarf die Pumpe.
Wenn Sie das Wasser über die
Notentleerung ablassen, müssen Sie das
Abpumpsystem wieder einschalten:
1. Gießen Sie zwei Liter Wasser in das
Waschmittelfach für die Hauptwäsche.
2. Starten Sie das Gerät, um das Wasser
abzupumpen.
13.9 Frostschutzmaßnahmen
Falls das Gerät in einem Bereich installiert
ist, in dem die Temperatur unter 0 °C
sinken kann, entfernen Sie das im
Zulaufschlauch und in der Ablaufpumpe
verbliebene Wasser.
1. Trennen Sie den Netzstecker von der
Netzversorgung.
2. Schließen Sie den Wasserhahn.
3. Stecken Sie die beiden Enden des
Zulaufschlauchs in einen Behälter und
lassen Sie das Wasser aus dem
Schlauch fließen.
4. Leeren Sie die Ablaufpumpe. Siehe
Notentleerungsverfahren.
5. Befestigen Sie den Zulaufschlauch
wieder, wenn die Ablaufpumpe
entleert ist.
WARNUNG!
Stellen Sie sicher, dass die
Temperatur über 0 °C liegt,
bevor Sie das Gerät wieder
einschalten.
Der Hersteller ist nicht für
Schäden verantwortlich, die
auf zu niedrige Temperaturen
zurückzuführen sind.
14. FEHLERSUCHE
WARNUNG!
Siehe Kapitel
"Sicherheitshinweise".
14.1 Einführung
Das Gerät startet nicht oder bleibt
während des Betriebs stehen.
Versuchen Sie zunächst, selbst eine
Lösung für das Problem zu finden (siehe
Tabelle). Tritt das Problem weiterhin auf,
wenden Sie sich an den autorisierten
Kundendienst.
Bei einigen Problemen ertönt ein
Signalton und im Display wird ein
Alarmcode angezeigt:
• – Der Wassereinlauf in das Gerät
funktioniert nicht ordnungsgemäß.
• – Das Gerät pumpt das Wasser
nicht ab.
• – Die Gerätetür steht offen oder
ist nicht richtig geschlossen.
Überprüfen Sie bitte die Tür!
• – Die Netzspannung ist nicht
konstant. Warten Sie, bis die
Netzspannung wieder konstant ist.
• – Keine Kommunikation zwischen
den elektronischen Bauteilen des
Geräts. Schalten Sie das Gerät aus
und wieder ein.
• – Das Aqua-Control-System ist
eingeschaltet. Schalten Sie das Gerät
aus und drehen Sie den Wasserhahn
zu. Wenden Sie sich an einen
autorisierten Kundendienst.
WARNUNG!
Schalten Sie das Gerät aus,
bevor Sie die Überprüfungen
vornehmen.
DEUTSCH
71
Page 72

14.2 Mögliche Störungen
Problem Mögliche Abhilfe
Das Programm startet
nicht.
Vergewissern Sie sich, dass der Netzstecker in die Netzsteckdose eingesteckt ist.
Vergewissern Sie sich, dass die Tür geschlossen ist.
Vergewissern Sie sich, dass im Sicherungskasten keine Si-
cherung ausgelöst hat.
Überzeugen Sie sich, dass Start/Pause gedrückt wurde.
Wenn die Zeitvorwahl eingestellt ist, brechen Sie die Zeitvor-
wahl ab oder warten Sie, bis sie abgelaufen ist.
Schalten Sie die Kindersicherung aus, falls sie eingeschaltet
ist.
Der Wassereinlauf in das
Gerät funktioniert nicht
ordnungsgemäß.
Vergewissern Sie sich, dass der Wasserzulauf geöffnet ist.
Vergewissern Sie sich, dass der Wasserdruck der Wasser-
versorgung nicht zu niedrig ist. Diese Information erhalten Sie
von Ihrem Wasserversorger.
Vergewissern Sie sich, dass der Wasserzulauf nicht verstopft
ist.
Überzeugen Sie sich, dass der Filter des Zulaufschlauchs
und der Filter des Ventils nicht verstopft sind. Siehe „Reinigung und Pflege“.
Vergewissern Sie sich, dass der Zulaufschlauch nicht geknickt oder zu stark gekrümmt ist.
Vergewissern Sie sich, dass der Wasserzulaufschlauch ordnungsgemäß angebracht ist.
Das Wasser, das in das
Gerät einläuft, wird sofort abgepumpt.
Vergewissern Sie sich, dass sich der Ablaufschlauch in der
richtigen Höhe befindet. Der Schlauch ist möglicherweise zu
niedrig positioniert.
Das Gerät pumpt das
Wasser nicht ab.
Vergewissern Sie sich, dass der Siphon nicht verstopft ist.
Vergewissern Sie sich, dass der Ablaufschlauch nicht ge-
knickt oder zu stark gekrümmt ist.
Vergewissern Sie sich, dass der Ablauffilter nicht verstopft ist.
Reinigen Sie ggf. den Filter. Siehe „Reinigung und Pflege“.
Vergewissern Sie sich, dass der Wasserablaufschlauch ord-
nungsgemäß angebracht ist.
Haben Sie ein Programm ohne Abpumpphase gewählt, stell-
en Sie das Abpumpprogramm ein.
www.electrolux.com72
Page 73

Problem Mögliche Abhilfe
Haben Sie ein Programm mit Spülstopp gewählt, stellen Sie
das Abpumpprogramm ein.
Das Gerät schleudert
nicht oder das Waschprogramm dauert länger
als gewöhnlich.
Stellen Sie das Schleuderprogramm ein.
Vergewissern Sie sich, dass der Ablauffilter nicht verstopft ist.
Reinigen Sie ggf. den Filter. Siehe „Reinigung und Pflege“.
Verteilen Sie die Wäschestücke mit der Hand neu und start-
en Sie die Schleuderphase erneut. Das Problem kann durch
eine Unwucht verursacht worden sein.
Es befindet sich Wasser
auf dem Boden.
Vergewissern Sie sich, dass alle Wasseranschlüsse vollkommen dicht sind, sodass kein Wasser austreten kann.
Vergewissern Sie sich, dass der Wasserablaufschlauch keine
Beschädigungen aufweist.
Verwenden Sie ein geeignetes Waschmittel in der richtigen
Menge.
Die Tür des Geräts lässt
sich nicht öffnen.
Vergewissern Sie sich, dass das Waschprogramm beendet
ist.
Stellen Sie das Abpump- oder Schleuderprogramm ein,
wenn sich noch Wasser in der Trommel befindet.
Stellen Sie sicher, dass das Gerät mit Spannung versorgt
wird.
Das Problem kann durch eine Gerätestörung verursacht worden sein. Wenden Sie sich an den autorisierten Kundendienst. Wenn Sie die Tür öffnen müssen, lesen Sie sorgfältig
„Öffnen der Tür im Notfall“.
Das Gerät macht ungewöhnliche Geräusche.
Stellen Sie sicher, dass das Gerät richtig ausgerichtet ist.
Siehe hierzu „Montage“.
Überzeugen Sie sich, dass das Verpackungsmaterial und/
oder die Transportsicherungen entfernt wurden. Siehe hierzu
„Montage“.
Füllen Sie mehr Wäsche ein. Die Beladung ist möglicherwe-
ise zu gering.
Das Programm ist kürzer als die angezeigte
Zeit.
Das Gerät berechnet eine neue Programmdauer entsprechend der Beladung. Siehe Abschnitt „Verbrauchswerte“.
Das Programm ist länger
als die angezeigte Zeit.
Wenn die Wäsche ungleich in der Trommel verteilt ist, verlängert sich die Programmdauer. Dies ist ein normales Verhalten
des Geräts.
DEUTSCH
73
Page 74
Problem Mögliche Abhilfe
Die Waschergebnisse
sind nicht zufriedenstellend.
Erhöhen Sie die Waschmittelmenge oder benutzen Sie ein
anderes Waschmittel.
Entfernen Sie vor dem Waschgang hartnäckige Flecken mit
einem Spezialprodukt.
Achten Sie darauf, die richtige Temperatur einzustellen.
Verringern Sie die Beladung.
Sie können keine Option
einstellen.
Achten Sie darauf, dass Sie nur die gewünschte(n) Taste(n)
drücken.
Das Gerät trocknet nicht
oder nicht richtig.
Drehen Sie den Wasserhahn auf.
Vergewissern Sie sich, dass der Ablauffilter nicht verstopft ist.
Verringern Sie die Wäschemenge.
Vergewissern Sie sich, dass Sie das richtige Programm eingestellt haben. Stellen Sie bei Bedarf erneut eine kurze
Trockenzeit ein.
Die Wäsche ist voller
verschiedenfarbiger Flusen.
Im vorherigen Waschgang haben sich andersfarbige Flusen
von der Wäsche gelöst.
• Der Trockengang entfernt einige dieser Flusen.
• Reinigen Sie die Wäschestücke mit einem Flusenentferner.
Befindet sich eine sehr große Menge Flusen in der Trommel,
starten Sie das Spezialprogramm, um die Trommel zu reinigen (siehe „Flusen in der Wäsche“).
Schalten Sie das Gerät nach der Überprüfung wieder ein. Das Programm wird an der Stelle
fortgesetzt, an der es unterbrochen wurde.
Tritt das Problem erneut auf, wenden Sie sich an den autorisierten Kundendienst.
Wenn im Display andere Alarmcodes angezeigt werden. Schalten Sie das Gerät aus und
wieder ein. Tritt das Problem weiterhin auf, wenden Sie sich an den autorisierten
Kundendienst.
14.3 Öffnen der Tür im Notfall
Im Falle eines Stromausfalls oder einer
Gerätestörung bleibt die Tür verriegelt.
Das Waschprogramm wird fortgesetzt,
sobald die Stromversorgung wieder
hergestellt ist. Bleibt die Tür wegen einer
Störung verriegelt, kann sie mit der
Notentriegelungsfunktion geöffnet werden.
Vor dem Öffnen der Tür:
ACHTUNG!
Achten Sie darauf, dass
das Wassertemperatur
nicht zu hoch und die
Wäsche nicht heiß ist.
Warten Sie sonst, bis
Wasser und Wäsche sich
abgekühlt haben.
www.electrolux.com74
Page 75
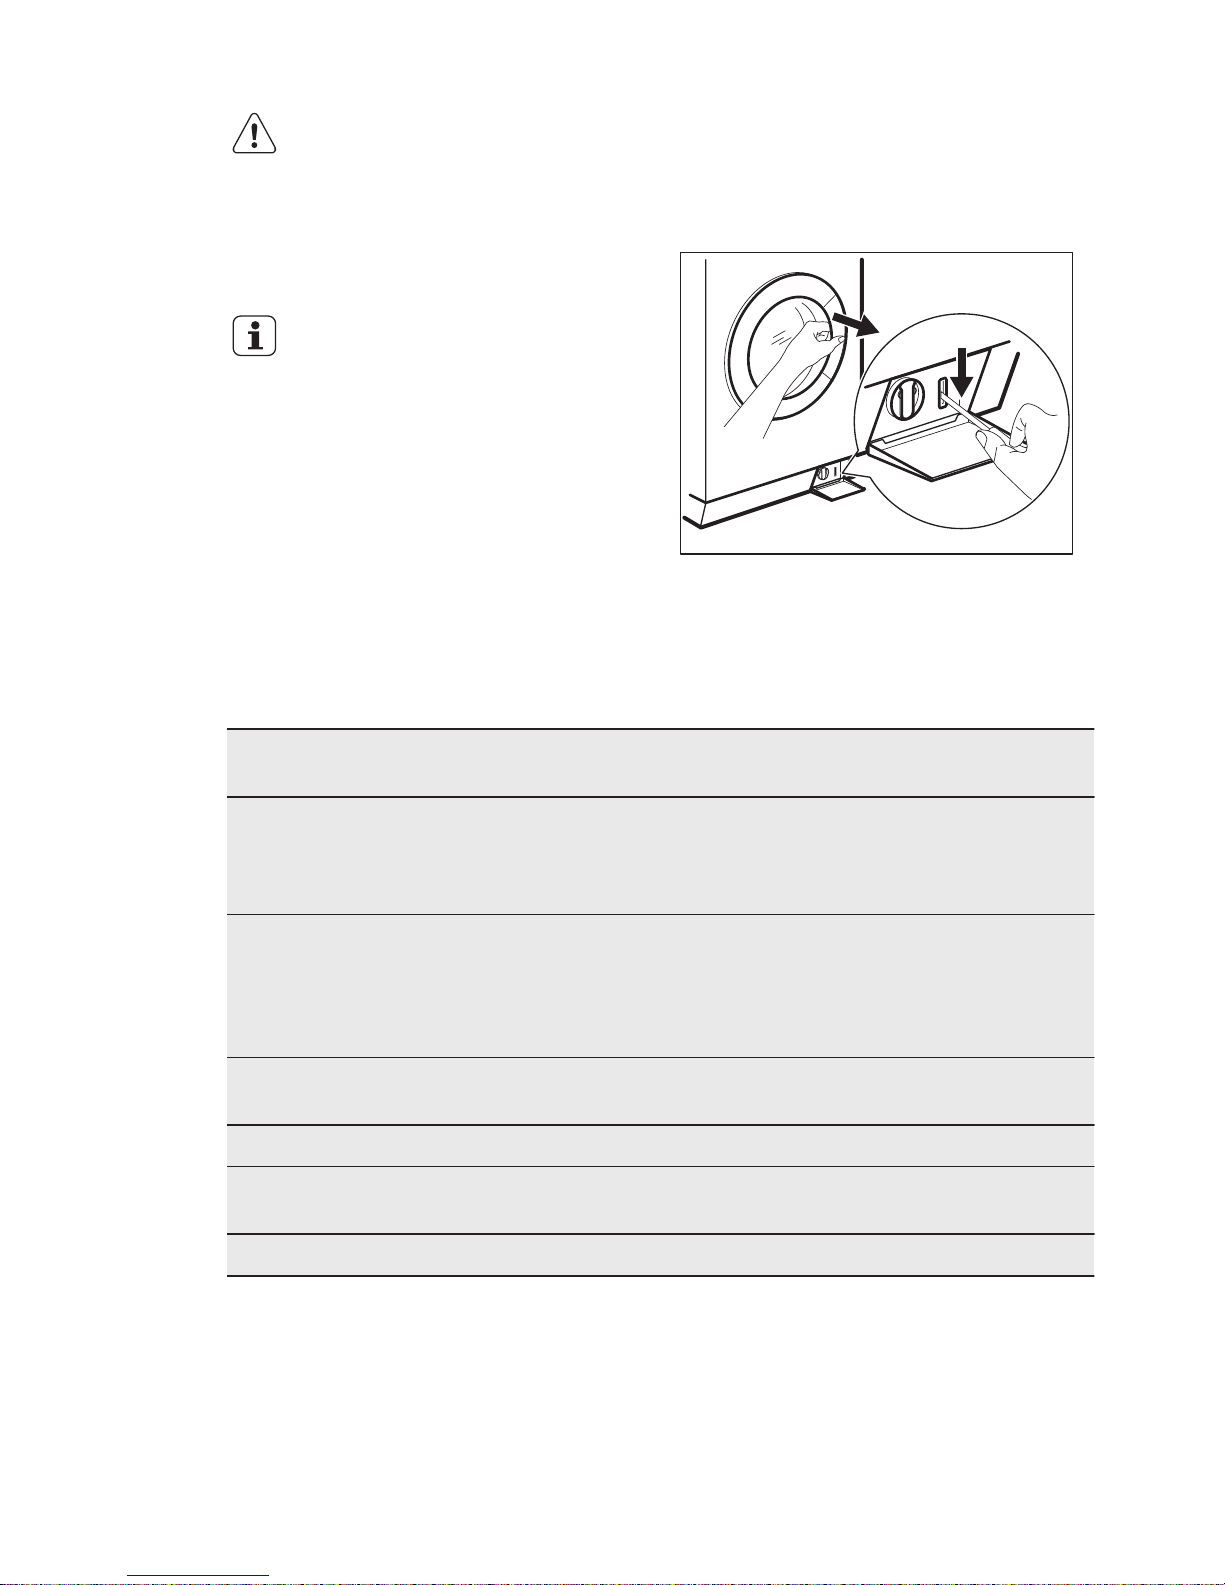
ACHTUNG!
Vergewissern Sie sich,
dass die Trommel sich
nicht dreht. Warten Sie
sonst, bis die Trommel
zum Stillstand gekommen
ist.
Stellen Sie sicher, dass
der Wasserstand in der
Trommel nicht zu hoch ist.
Führen Sie, falls
erforderlich, eine
Notentleerung durch
(siehe „Notentleerung“ im
Abschnitt „Reinigung und
Pflege“).
Öffnen Sie die Tür folgendermaßen:
1. Schalten Sie das Gerät durch Drücken
der Taste Ein/Aus - Marche/Arrêt aus.
2. Trennen Sie den Netzstecker von der
Netzversorgung.
3. Öffnen Sie die Filterklappe.
4. Drücken Sie den Auslöser für die
Notfallentriegelung nach unten und
öffnen Sie gleichzeitig die Gerätetür.
5. Nehmen Sie die Wäsche heraus und
schließen Sie die Gerätetür.
6. Schließen Sie die Filterklappe.
15. TECHNISCHE DATEN
Abmessungen Breite/Höhe/Tiefe/
Gesamttiefe
600 mm/850 mm/605 mm/639
mm
Elektrischer Anschluss Spannung
Gesamtleistung
Sicherung
Frequenz
230 V
2200 W
10 A
50 Hz
Die Schutzverkleidung gewährleistet einen Schutz
gegen das Eindringen von festen Fremdkörpern
und Spritzwasser (Feuchtigkeit), außer an den
Stellen, an denen das Niederspannungsgerät keinen Schutz gegen Feuchtigkeit besitzt.
IPX4
Wasserdruck Mindestwert
Höchstwert
0,5 bar (0,05 MPa)
8 bar (0,8 MPa)
Maximale Beladung Baumwolle 9 kg
Max. Trockenladung Baumwolle
Pflegeleicht
6 kg
3 kg
Schleuderdrehzahl Höchstwert 1600 U/min
DEUTSCH
75
Page 76
16.
CH
GARANTIE
Kundendienst
Servicestellen
Industriestrasse 10
5506 Mägenwil
Le Trési 6
1028 Préverenges
Via Violino 11
6928 Manno
Morgenstrasse 131
3018 Bern
Zürcherstrasse 204E
9000 St. Gallen
Seetalstrasse 11
6020 Emmenbrücke
St. Jakob-Turm Birsstrasse 320B
4052 Basel
Comercialstrasse 19
7000 Chur
Ersatzteilverkauf Industriestrasse 10,
5506 Mägenwil, Tel. 0848 848 111
Fachberatung/Verkauf Badenerstrasse
587, 8048 Zürich, Tel. 044 405 81 11
Garantie Für jedes Produkt gewähren wir
ab Verkauf bzw. Lieferdatum an den
Endverbraucher eine Garantie von 2
Jahren. (Ausweis durch Garantieschein,
Faktura oder Verkaufsbeleg). Die
Garantieleistung umfasst die Kosten für
Material, Arbeits- und Reisezeit. Die
Garantieleistung entfällt bei
Nichtbeachtung der Gebrauchsanweisung
und Betriebsvorschriften, unsachgerechter
Installation, sowie bei Beschädigung durch
äussere Einflüsse, höhere Gewalt, Eingriffe
Dritter und Verwendung von Nicht-Original
Teilen.
17. UMWELTTIPPS
Recyceln Sie Materialien mit dem Symbol
. Entsorgen Sie die Verpackung in den
entsprechenden Recyclingbehältern.
Recyceln Sie zum Umwelt- und
Gesundheitsschutz elektrische und
elektronische Geräte. Entsorgen Sie
Geräte mit diesem Symbol nicht mit
dem Hausmüll. Bringen Sie das Gerät zu
Ihrer örtlichen Sammelstelle oder wenden
Sie sich an Ihr Gemeindeamt.
Für die Schweiz:
Wohin mit den Altgeräten?
Überall dort wo neue Geräte
verkauft werden oder Abgabe
bei den offiziellen SENSSammelstellen oder offiziellen
SENS-Recyclern.
Die Liste der offiziellen SENSSammelstellen findet sich
unter www.erecycling.ch
*
www.electrolux.com76
Page 77

DEUTSCH
77
Page 78

www.electrolux.com78
Page 79

DEUTSCH
79
Page 80
www.electrolux.com/shop
132950200-A-522015
 Loading...