

Page 1
WS140SL
WS16SL
WS200SL
WS21SL
WS290SL
Wärmeschublade
DE
Chauffe Vaisselle
FR
Scaldastoviglie
IT
Warming Drawer
EN
Gebrauchsanweisung
Mode d’Emploi
Instruzioni di uso
User Manual
Page 2

2
WWW.ELECTROLUX.COM
INHALTSVERZEICHNIS
INFORMATIONEN ZUR SICHERHEIT ............................................................... 3
GERÄTEBESCHREIBUNG ................................................................................. 8
BEDIENUNG ........................................................................................................ 9
FASSUNGSVERMÖGEN .................................................................................. 13
REINIGUNG UND PFLEGE .............................................................................. 14
WAS IST IM FALLE EINER FUNKTIONSSTÖRUNG ZU TUN ......................... 14
INSTALLATIONSANLEITUNG .......................................................................... 15
UMWELT- UND GESUNDHEITSSCHUTZ ........................................................ 16
EINBAU .............................................................................................................. 61
WIR DENKEN AN SIE
Vielen Dank, dass Sie sich für ein Gerät von Electrolux entschieden haben. Sie haben
ein Produkt gewählt, hinter dem jahrzehntelange professionelle Erfahrung und
Innovation stehen. Bei der Entwicklung dieses großartigen und eleganten Geräts haben
wir an Sie gedacht. So haben Sie bei jedem Gebrauch die Gewissheit, dass Sie stets
großartige Ergebnisse erzielen werden. Willkommen bei Electrolux.
Besuchen Sie uns auf unserer Website, um:
Anwendungshinweise, Prospekte, Fehlerbehebungs- und Service-Informationen zu
erhalten:
www.electrolux.com
Lhr erworbenes Produkt zu registrieren, um den besten Service dafür zu
gewährleisten:
www.electrolux .com/productregistration
Zubehör,
Verbrauchsmaterial und Original-Ersatzteile für Ihr Gerät zu erwerben:
www.electrolux.com/shop
REPARATUR- UND KUNDENDIENST
Bitte verwenden Sie ausschließlich Original-Ersatzteile für Ihre Produkte.
Halten Sie folgende Angaben bereit, wenn Sie sich an den Kundendienst wenden
(diese Informationen finden Sie auf dem Typenschild): Modell, Produktnummer (PNC),
Seriennummer.
Warnungs-/ Sicherheitshinweise.
Allgemeine Informationen und Empfehlungen.
Informationen zum Umweltschutz
Änderungen vorbehalten.
Page 3
DEUTSCH
INFORMATIONEN ZUR SICHERHEIT
Lesen Sie die Anweisungen sorgfältig vor der Installation
und bevor Sie Ihr Gerät in Betrieb setzen. Der Hersteller
haftet nicht für unsachgemäße Installation und Nutzung
der Geräte, die Verletzungen und Schäden verursachen
können. Halten Sie die Anweisungen griffbereit, so dass
sie während des Gebrauchs leicht konsultierbar sind.
Dieses Gerät entspricht den vorgeschriebenen
Sicherheitsbestimmungen. Ein unsachgemäßer Gebrauch
kann jedoch zu Schäden an Personen und Sachen
führen.
Sicherheit von Kindern und gefährdeten
Erwachsenen
WARNUNG!
Erstickungs-, Verletzungs- und dauerhafte
Unfähigkeitsgefahr.
Dieses Gerät kann dann von Kindern ab 8 Jahren, von
Personen mit eingeschränkten körperlichen,
sensorischen oder geistigen Fähigkeiten sowie von
Personen ohne bisherige Erfahrung im Umgang mit
solchen Geräten bedient werden, wenn sie dabei von
einer Person, die für ihre Sicherheit verantwortlich ist,
beaufsichtigt werden.
Kinder dürfen nicht mit dem Gerät spielen. Kinder unter
3 Jahren dürfen sich nicht unbeaufsichtigt in der Nähe
des Geräts aufhalten.
Kinder dürfen das Gerät nicht reinigen oder warten,
wenn sie dabei nicht beaufsichtigt werden.
Halten Sie Kinder und Haustiere vom Gerät fern, wenn
es in Betrieb oder in der Abkühlphase ist. Berührbare
Teile sind heiss.
Halten Sie das Verpackungsmaterial von Kindern fern.
Reinigung und Wartung des Geräts darf nicht von
Kindern ohne Aufsicht erfolgen.
3
Page 4

4 WWW.ELECTROLUX.COM
Halten Sie Kinder unter 8 Jahren vom Gerät und dem
Netzkabel fern.
Warnungen zur allgemeinen Sicherheit
WARNUNG! Dieses Gerät und seine Teile werden
bei Gebrauch heiß. Achten Sie darauf, die heißen Teile
nicht zu berühren. Halten Sie Kinder unter acht Jahren
von dem Gerät fern, es sei denn, diese werden dabei
ständig beaufsichtigt.
Der Ofen wird bei Gebrauch heiß. Halten Sie während
des Backens oder Bratens Kinder in sicherem Abstand
von dem Ofen.
ACHTUNG! Benutzen Sie das Gerät nur im
eingebauten Zustand. Nur so ist sichergestellt, dass
Sie nicht mit Strom führenden Teilen in Berührung
kommen.
Fassen Sie die Elemente im Inneren erst an, nachdem
der Ofen abgekühlt ist.
ACHTUNG! Öffnen Sie auf keinen Fall das Gehäuse
des Gerätes. Eventuelles Berühren
spannungsführender Teile sowie Verändern des
elektrischen und mechanischen Aufbaus gefährden
Sie und führen möglicherweise zu Funktionsstörungen
des Gerätes.
Lesen Sie vor dem ersten Benutzen aufmerksam die
Gebrauchsanweisung. Dadurch schützen Sie sich
selbst und vermeiden Schäden an Ihrem Gerät
Das Gerät kann im Innenraum je nach gewählter
Temperatur und Benutzungsdauer bis zu ca. 80 °C
heiß werden. Verwenden Sie zum Herausnehmen des
erwärmten Geschirrs bei Bedarf Topfhandschuhe.
Stellen oder setzen Sie sich nicht auf die geöffnete
Geschirrschublade. Der Teleskopauszug wird
Page 5

DEUTSCH
beschädigt. Die Belastbarkeit der Geschirrschublade
beträgt max. 25kg.
Bewahren Sie keine Kunststoffbehälter oder brennbare
Gegenstände im Gerät auf. Beim Einschalten können
sie schmelzen oder sich entzünden. Brandgefahr!
Benutzen Sie das Gerät nicht zum Beheizen von
Räumen. Durch die Temperaturentwicklung können
leicht entzündbare Gegenstände in der Nähe zu
brennen beginnen.
Nicht mehr benutzte Geräte müssen vom Elektronetz
getrennt und alle wegführenden elektrischen Leitungen
entfernt werden, damit sie z. B. für spielende Kinder
keine Gefahr darstellen.
Installation
Während der Installation folgen Sie die Anweisungen
die getrennt geliefert wurden.
ACHTUNG! Vergleichen Sie vor dem Anschließen
des Gerätes die Anschlussdaten (Spannung und
Frequenz) auf dem Typenschild mit denen des
Elektronetzes. Diese Daten müssen unbedingt
übereinstimmen, damit keine Schäden am Gerät
auftreten. Im Zweifelsfall fragen Sie Ihren
Elektroinstallateur.
Nur qualifiziertes Personal darf das Gerät installieren
und ersetzen Sie das Kabel ersetzen.
Die Elektronik muss mit einer Einrichtung zur
Abschaltung ausgestattet sein, womit das Gerät sich
von jedem Pol vom Netz ausschalten lässt und die
vollständige Trennung unter der
Überspannungskategorie III bietet.
Wenn ein Stecker für die elektrische Verbindung
verwendet wird, dann muss er nach der Installation
zugänglich sein.
5
Page 6

6 WWW.ELECTROLUX.COM
ACHTUNG! Die elektrische Sicherheit des Gerätes
ist nur dann gewährleistet, wenn es an ein
vorschriftsmäßig installiertes Schutzleitersystem
angeschlossen wird. Der Hersteller kann nicht für
Schäden verantwortlich gemacht werden, die durch
eine fehlende oder unterbrochene
Schutzleiterverbindung verursacht werden (z. B.
elektrischer Schlag).
Reinigung
Verwenden Sie keine Scheuermittel oder scharfe
Metallschaber zum Reinigen des Türglases, da diese
die Oberfläche zerkratzen und somit zum Zersplittern
des Glases führen können.
Aus Gründen der elektrischen Sicherheit darf das Gerät
nicht mit Hochdruckreinigern oder Dampfreinigern
gereinigt werden.
Verwenden Sie keinesfalls einen Dampfreiniger. Zum
einen kann der Dampf an spannungsführende Teile
gelangen und einen Kurzschluss auslösen. Zum
anderen kann der Dampfdruck zu dauerhaften
Beschädigungen von Oberflächen und Bauteilen
führen, für die der Hersteller keinen Schadenersatz
leistet.
Wartung
ACHTUNG! Bei Installations- und Reparaturarbeiten
muss das Gerät vom Netz getrennt sein. Das Gerät ist
nur dann elektrisch vom Netz getrennt, wenn eine der
folgenden Bedingungen erfüllt ist:
- die Sicherungen der Hausinstallation ausgeschaltet
sind;
- die Netzanschlussleitung vom Elektronetz getrennt
ist. Ziehen Sie bei Geräten mit Netzstecker nicht an
Page 7
DEUTSCH
der Anschlussleitung, sondern am Stecker, um das
Gerät vom Netz zu trennen.
Wenn das Anschlusskabel beschädigt ist, kann dieses
nur vom Hersteller, seinem Servicepartner oder einer
anderen qualifizierten Person ausgetauscht werden,
um eine gefährliche Situation zu verhindern.
ACHTUNG! Wird der Stecker von der
Netzanschlussleitung entfernt, muss das Gerät von
einer Elektrofachkraft eingebaut und angeschlossen
werden. Beauftragen Sie bitte eine Elektrofachkraft, die
die landesüblichen Vorschriften und die
Zusatzvorschriften der örtlichen
Elektroversorgungsunternehmen genau kennt und
sorgfältig einhält. Der Hersteller kann nicht für Schäden
verantwortlich gemacht werden, die durch Fehler beim
Einbau oder Anschluss verursacht werden.
ACHTUNG! Installations- und Wartungsarbeiten
sowie Reparaturen dürfen nur qualifizierte Fachleute
durchführen. Durch unsachgemäße Installations- und
Wartungsarbeiten oder Reparaturen können erhebliche
Gefahren für den Benutzer entstehen, für die der
Hersteller nicht haftet.
ACHTUNG! Eine Reparatur des Gerätes während
der Garantiezeit darf nur von einem vom Hersteller
autorisierten Kundendienst vorgenommen werden,
sonst besteht bei nachfolgenden Schäden kein
Garantieanspruch mehr.
7
Page 8
8 WWW.ELECTROLUX.COM
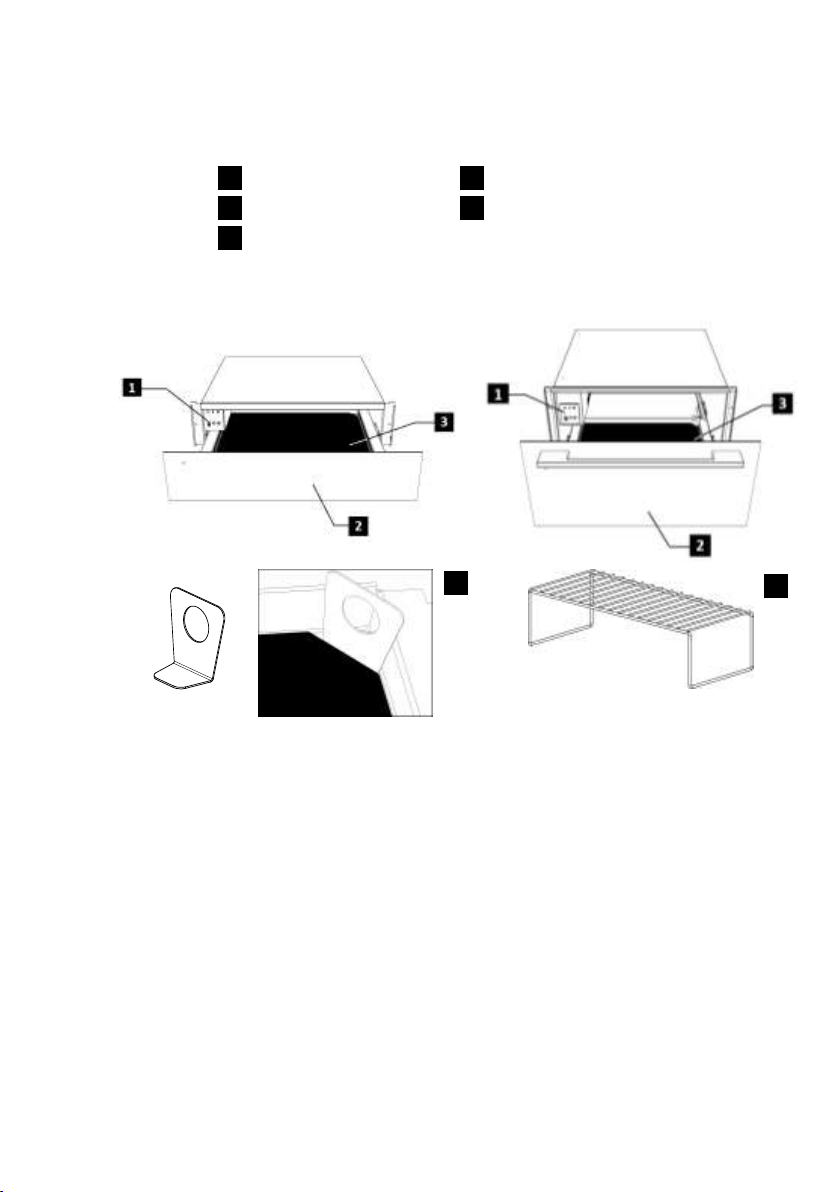
Bedienfeld
Glas Entfernungswerkzeug
Vorderseite
Rost für Schublade*
Glas / Antirutschauflage
WS140SL/ WS16SL/ WS200SL/ WS21SL
WS290SL
* Rost für Schublade nur mit dem Model
WS290SL erhältlich
3 5 2 4 1 5 4
GERÄTEBESCHREIBUNG
Hauptkomponenten
Bedienprinzip
Dieses Gerät verfügt über ein
Heißluftsystem. Ein Gebläse verteilt die
Wärme des Heizkörpers optimal in der
Schublade.
Das Thermostat ermöglicht die
Bestimmung und Überwachung der
gewünschten Geschirrtemperatur.
Durch die entstehende Luftzirkulation wird
das Geschirr gleichmäßig und schnell
erwärmt.
Ein Schutzgitter verhindert die Berührung
mit Heizkörper und Gebläse.
Der Boden der Geschirrschublade ist mit
einer Antirutschauflage ausgelegt, die das
Verrutschen des Geschirrs beim Öffnen
und Schließen der Schublade verhindert.
Page 9
DEUTSCH
BEDIENUNG
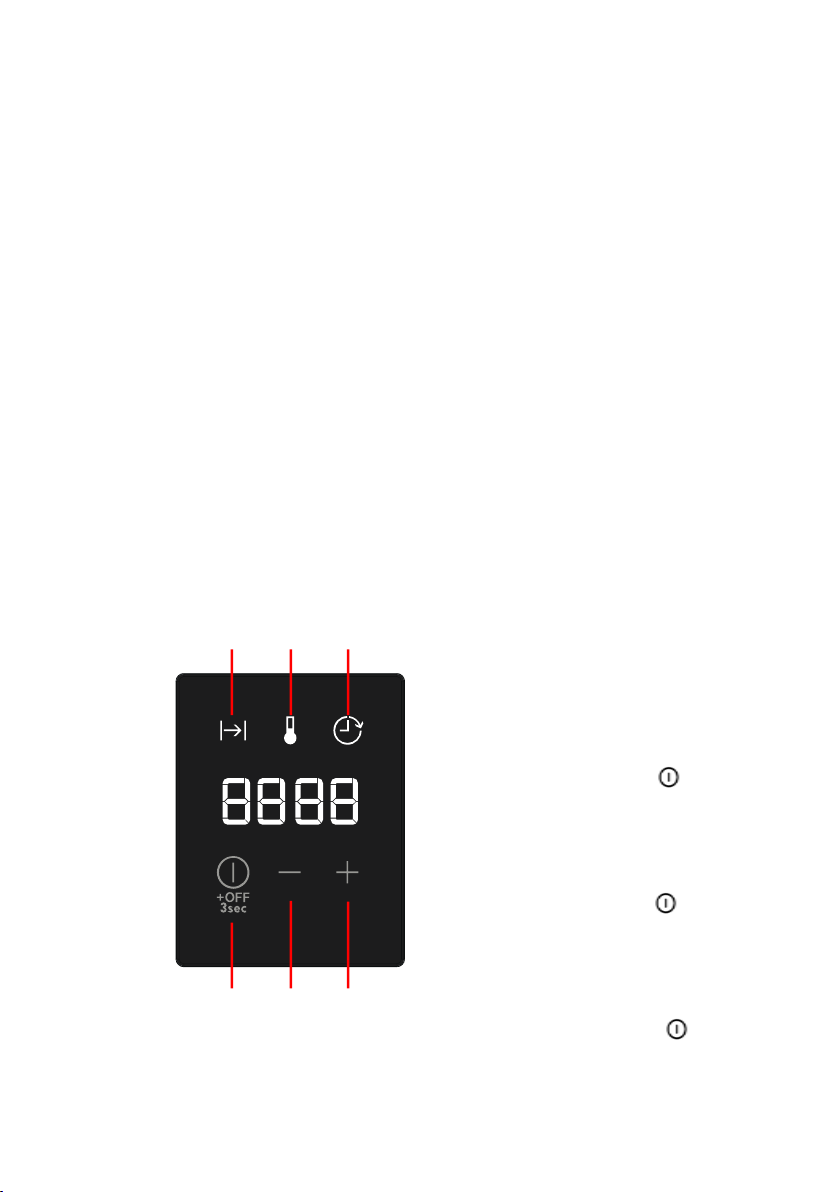
1 2
3
4 5 6
1. Timeranzeige
2. Temperaturanzeige
3. Anzeige Verzögerter Start
4. Funktion / ON / OFF Taste
5. „-“-Taste (Reduzieren)
6. „+“-Taste (Erhöhen)
Vor dem ersten Gebrauch
Vor dem ersten Benutzen sollten Sie wie
folgt vorgehen:
Wischen Sie Ihr Gerät mit einem
feuchten Tuch ab und trocken Sie es
anschließend, entsprechend die
Hinweise „Reinigung und Pflege“.
Heizen Sie die leere Schublade
mindestens 2 Stunden lang auf. Stellen
Sie dazu den Temperaturknebel auf
Maximum (siehe Kapitel "Temperatur
wählen").
Sorgen Sie dabei für eine gute
Belüftung der Küche.
Die Bauteile sind mit einem Pflegemittel
geschützt. Deshalb kommt es beim ersten
Aufheizen vorübergehend zur
Geruchsbildung. Die Geruchsbildung und
eventuell auftretender Dunst vergehen
nach kurzer Zeit und weisen nicht auf
einen Falschanschluss oder Gerätedefekt
hin.
Bedienelemente
9
Bedienprinzip
Stand-by modus
In diesem Modus ist das Gerät völlig
abgeschaltet und weder Licht noch
Anzeige leuchten.
Normalbetrieb
In diesem Modus erzeugt das Gerät
Wärme. Die restliche Betriebsdauer und
die eingestellte Zeit werden im Wechsel
alle 2 Sekunden in der Anzeige
angezeigt. Die Timer- und die
Temperaturanzeige leuchten
abwechselnd alle 2 Sekunden, in
Abstimmung mit der Anzeige. Die
Betriebsanzeige leuchtet permanent bis
der Timer auf Null steht.
Um den Normalbetrieb einzustellen,
gehen Sie wie folgt vor:
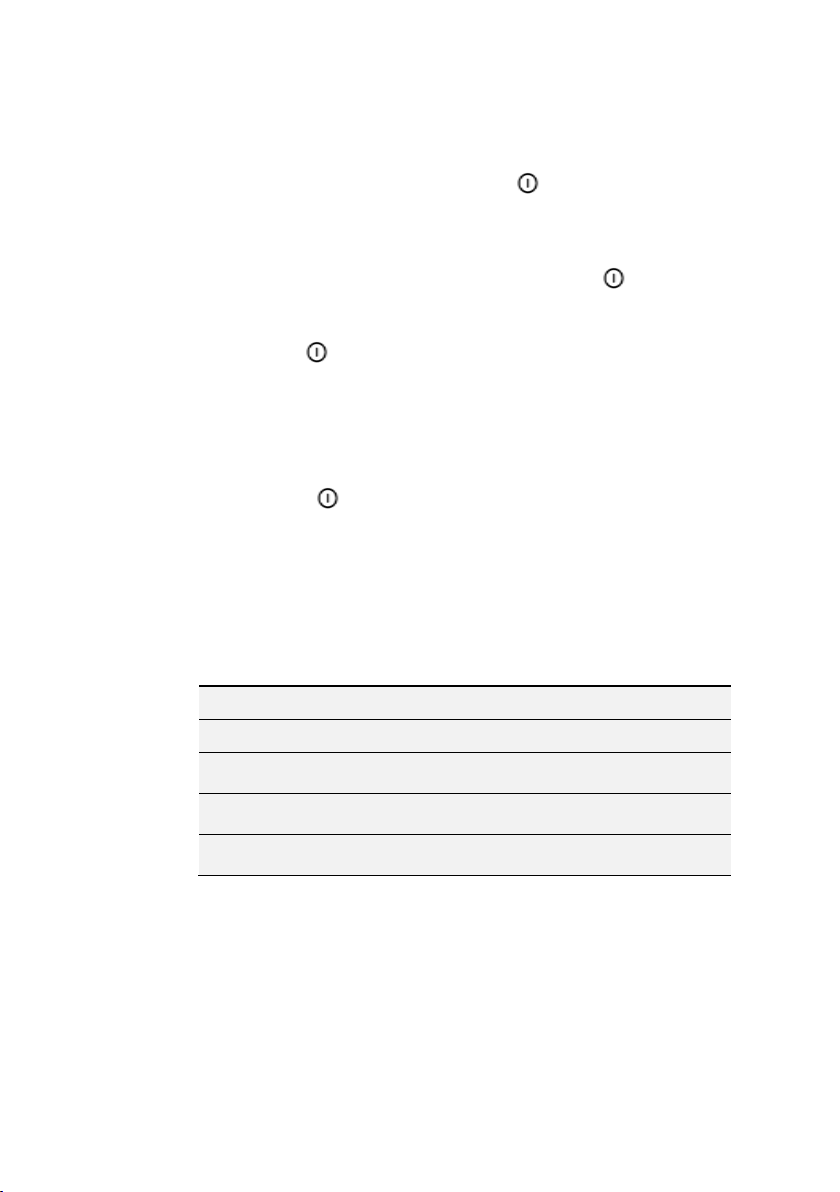
1. Drücken Sie die „ “-Taste einmal
oder mehrere Male bis die Timeranzeige zu blinken beginnt.
1. Drücken Sie die „+“- oder „-“-Taste,
um die gewünschte Betriebszeit
zwischen 0h00 – 4h00 einzustellen.
2. Drücken Sie die „ “-Taste, um zu
bestätigen. Die Temperaturanzeige
beginnt zu blinken.
2. Drücken Sie die „+“- oder „-“-Taste,
um die gewünschte Temperatur
zwischen 30 – 80ºC einzustellen.
3. Drücken Sie die „ “-Taste für 3
Sekunden oder warten Sie 5
Sekunden.
3. Die Wärmeschublade beginnt den
Betrieb mit den eingestellten
Parametern.
Page 10
10
WWW.ELECTROLUX.COM
ºC
Funktion
30ºC
Antauen
40ºC
Teig gehen lassen
Tassen/Gläser vorwärmen
60ºC
Geschirr vorwärmen
Speisen warm halten
80ºC
Speisen erhitzen
Niedertemperaturgaren
Verzögerter Start
In diesem Modus wird im Display die
restliche Zeit bis zum Start des Betriebs
mit einem Countdown angezeigt. Die
Betriebsanzeige blinkt und die Anzeige
für den verzögerten Start leuchtet.
Um einen verzögerten Start
einzustellen, gehen Sie wie folgt vor:
1. Programmieren Sie die Parameter
für den normalen Betrieb wie in den
Punkten 1) bis 4) des vorherigen
Abschnitts.
2. Drücken Sie die „ “-Taste, um zu
bestätigen. Die Anzeige für den
verzögerten Start beginnt zu
blinken.
3. Drücken Sie die „+“- oder „-“-Taste,
um die gewünschte Verzögerung
zwischen 0h00 – 9h50 einzustellen.
4. Drücken Sie die „ “-Taste für 3
Sekunden.
5. Die Wärmeschublade beginnt den
verzögerten Start.
6. Nach Ablauf der Verzögerungszeit
beginnt die Wärmeschublade den
Betrieb mit den eingestellten
Parametern.
Betrieb abbrechen
Die Programmierung kann jederzeit
abgebrochen werden durch Drücken
der „ “-Taste für 3 Sekunden .
Der Betrieb oder der verzögerte Start
können abgebrochen werden durch
Drücken der „ “-Taste für 3
Sekunden (zum Beispiel wenn ein
Gast früher gekommen ist oder das
Geschirr warm genug zu sein
scheint).
Funktion wählen
Ermöglicht die stufenlose Einstellung der
Temperatur zwischen ca. 30 und 80 °C.
Ist die gewählte Temperatur erreicht,
schaltet sich die Heizung ab. Sobald die
Temperatur unter den eingestellten Wert
sinkt, schaltet sich die Heizung wieder ein.
Page 11

DEUTSCH
Aufheizzeiten
Fassungsvermögen
Zeit (min)
Geschirr für 6 Personen
30 – 35
Geschirr für 12 Personen
40 – 45
Unterschiedliche Faktoren beeinflussen
die Aufheizzeit:
Material und Dicke des Geschirrs
Beladungsmenge
Beladungsanordnung
Temperatureinstellung
Absolute Angaben sind daher nicht
möglich.
11
Absolute Angaben sind daher nicht
möglich.
Bei der Einstellung auf 60ºC und um
eine gleichmäßige Erwärmung zu
erreichen, können folgende Werte als
Anhaltspunkte genannt werden:
Vorschläge für die Funktion
Speisen warmhalten:
Heizen Sie das Gerät grundsätzlich 15
Minuten vor, um sicherzustellen, dass im
Innenraum die erfoderliche Temperatur
vorliegt.
Niedertemperaturgaren
Beim Niedertemperaturgaren lässt sich
Fleisch bei niedrigen
Temperaturen schonend über eine
längere Garzeit zubereiten.
Die Gardauer ist abhängig von der
Grösse des Fleischstückes.
Verwenden Sie Geschirr aus
Glass,Porzelan oder Cheramik
Zubereitung
Heizen Sie das Gerät mit dem Geschirr
bei 80°C für 10 Minuten vor.
Das Fleisch in einer Pfanne mit Fett
scharf anbraten und auf dem
vorgewärmten Geschirr in die
Wärmeschublade stellen. Einstellung
bleibt bei 80°C.
Page 12

12
WWW.ELECTROLUX.COM
Anwendung
Menge
Anbraten auf der
Kochstelle
Garzeiten
Rind
Ganzbleu
1kg
Auf allen Seiten je 2 Min.
1-1.5 Std.
Nicht ganz
durchgebraten
1kg
Auf allen Seiten je 3 Min.
1.5 - 2 Std
À point
1kg
Auf allen Seiten je 3 Min.
2-2.5 Std
durchgebraten
1kg
Auf allen Seiten je 3 Min.
2.25 – 2.5 Std
Kalb
Filet, ganz
1kg
Auf allen Seiten je 2 Min.
1.75 - 2 Std
Karree am
Stück
1kg
Auf allen 4 Seiten je 3
Min.
2 – 2.5 Std
Schwein
Filet, ganz
500-600 g
Auf allen Seiten je 2 Min.
1.5 Std.
Lamm
RückenfiletFilet
400g
Auf beiden Seiten je 2
Min.
1 – 1.25 Std
Tabelle: Niedertemperaturen (Referenzwerte)
Wenn Sie das gegarte Fleisch warm halten wollen, stellen Sie auf Einstellung 60°C
zurück. Wir empfehlen nicht länger als 1 Std Warmzuhalten.
Page 13
DEUTSCH
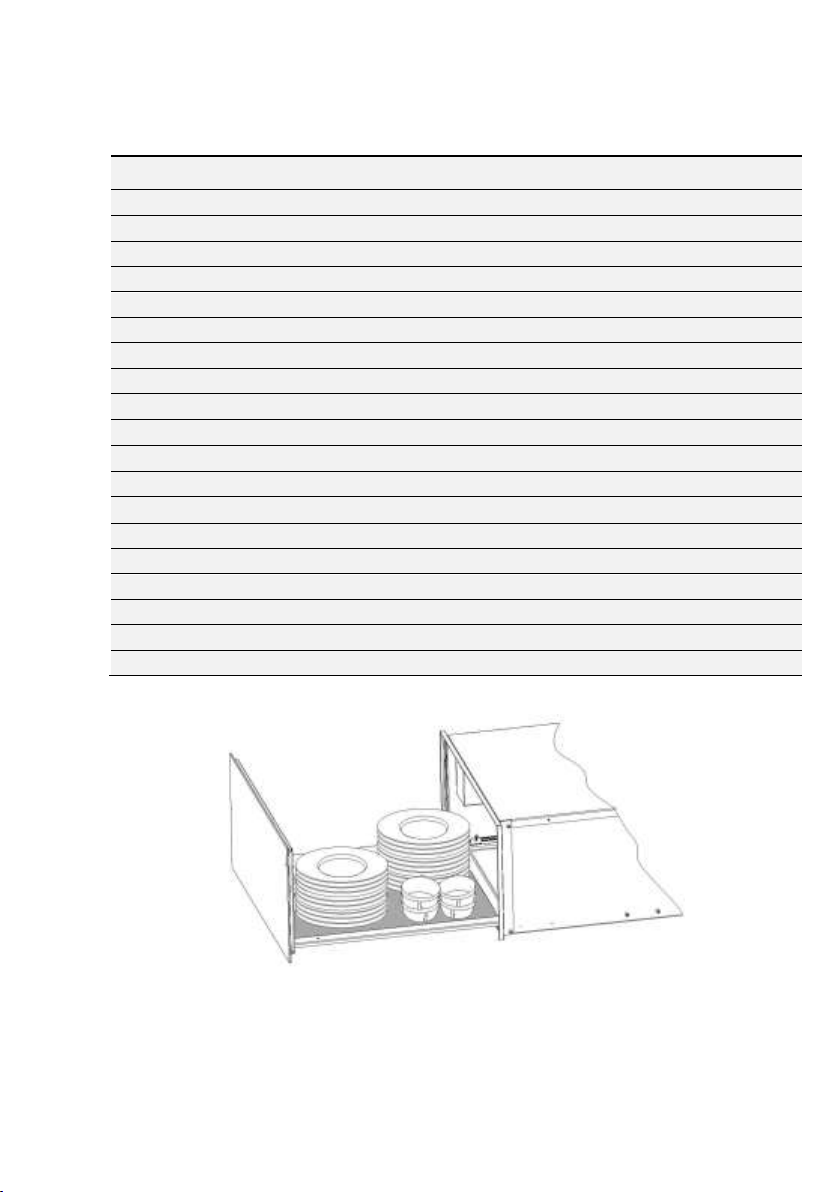
FASSUNGSVERMÖGEN
WS 140 / 16 SL
WS 200 / 21 SL
WS 290 SL
Geschirr für 6 Personen
Geschirr für 8 Personen
Geschirr für 12 Personen
6 x 24 cm flache Teller
8 x 24 cm flache Teller
12 x 24 cm flache Teller
6 x 10 cm Suppenteller
8 x 10 cm Suppenteller
12 x 10 cm Suppenteller
1 x 19 cm Servierteller
1 x 19 cm Servierteller
1 x 19 cm Servierteller
1 x 17 cm Servierteller
1 x 17 cm Servierteller
1 x 17 cm Servierteller
1 x 32 cm Fleischteller
2 x 32 cm Fleischteller
2 x 32 cm Fleischteller
oder
oder
oder
20 Teller mit 28 cm
30 Teller mit 28 cm
40 Teller mit 28 cm
oder
oder
oder
80 Espressotassen
120 Espressotassen
160 Espressotassen
oder
oder
oder
40 Teetassen
60 Teetassen
80 Teetassen
oder
oder
oder …
…
Das Fassungsvermögen hängt von der Größe der Geschirrstücke ab:
13
Page 14

14
WWW.ELECTROLUX.COM
REINIGUNG UND PFLEGE
Die Reinigung stellt die einzige,
normalerweise erforderliche Wartung
dar.
ACHTUNG!
Die Reinigung muss an dem von der
Stromversorgung getrennten Gerät
durchgeführt werden. Ziehen Sie den
Stecker aus der Steckdose oder schalten
Sie den Stromversorgungskreis des
Gerätes ab.
Benutzen Sie keine aggressiven
Reinigungs- oder Scheuermittel, keine
kratzenden Scheuertücher noch spitze
Gegenstände, denn es können Flecken
entstehen.
Stirnseite und bedienblende
Es reicht, das Gerät mit einem feuchten
Lappen zu reinigen. Geben Sie, falls das
Gerät sehr verschmutzt sein sollte,
einige Tropfen Geschirrspülmittel ins
Waschwasser. Wischen Sie danach das
Gerät mit einem trockenen Lappen ab.
Für Wärmeschubladen mit
Edelstahlvorderseite können
Spezialmittel für Edelstahloberflächen
verwendet werden. Diese Mittel
vermeiden dass die Oberflächen schnell
wieder schmutzig werden. Tragen Sie
das Mittel mit einem weichen Tuch
flächig und sparsam auf.
Innenraum
Reinigen Sie nach jeder Nutzung die
Innenwände mit einem feuchten Lappen.
Geben Sie, falls das Gerät sehr
verschmutzt sein sollte, einige Tropfen
Geschirrspülmittel ins Waschwasser.
Wischen Sie danach die Oberflächen mit
einem trockenen Lappen ab.
Verhindern Sie das Eindringen von
Wasser in die Belüftungslöcher.
Nutzen Sie die Wärmeschublade nur
nachdem sie trocken ist.
Antirutschauflage
Die Antirutschauflage kann zur
Reinigung des Schubladenbodens
herausgenommen werden.
Die Auflage reinigen Sie am besten von
Hand mit warmem Wasser und einem
milden Spülmittel. Trocknen Sie sie im
Anschluss gut ab. Legen Sie die
Antirutschauflage erst wieder in die
Schublade, wenn sie ganz trocken ist.
WAS IST IM FALLE EINER FUNKTIONSSTÖRUNG ZU
TUN
ACHTUNG!
Jegliche Art von Reparatur darf nur von
spezialisierten Fachleuten ausgeführt
werden. Jeder Eingriff, der durch nicht
vom Hersteller autorisierte Personen
vorgenommen wird, ist gefährlich.
Folgende Probleme können behoben
werden, ohne den Kundendienst zu
benachrichtigen:
Das Geschirr erwärmt nicht
ausreichend? Prüfen Sie, ob:
- das Gerät eingeschaltet ist.
- die richtige Temperatureinstellung
gewählt wurde.
- Sie die Austrittsöffnungen durch
große Platten oder Schüsseln
verdeckt haben.
Sie das Geschirr lange genug
erwärmt haben.
Unterschiedliche Faktoren
beeinflussen die Aufheizzeit, zum
Beispiel:
- Material und Dicke des Geschirrs
- Beladungsmenge
- Beladungsanordnung
Temperatureinstellung
Das Geschirr erwärmt nicht? Prüfen
Sie, ob:
- Sie ein Gebläsegeräusch hören.
- Falls das Gebläse läuft, ist der
Heizkörper defekt. Falls das Gebläse
nicht läuft ist das Gebläse defekt.
die Sicherung der Hausinstallation
ausgelöst hat.
Temperatur lässt sich nicht mehr
regeln:
Der Temperaturregler ist defekt.
Beim Einschalten des Gerätes leuchtet
der Ein-/Aus-Schalter nicht?
Die Kontrolllampe des Schalters ist
defekt.
Page 15
DEUTSCH
INSTALLATIONSANLEITUNG
Vor der Installation
Überprüfen Sie, dass die
Versorgungsspannung, die auf dem
Typenschild angegeben ist, mit Ihrer
Netzspannung übereinstimmt.
Öffnen Sie die Schublade und
entnehmen Sie alle Zubehörteile sowie
das Verpackungsmaterial.
ACHTUNG!
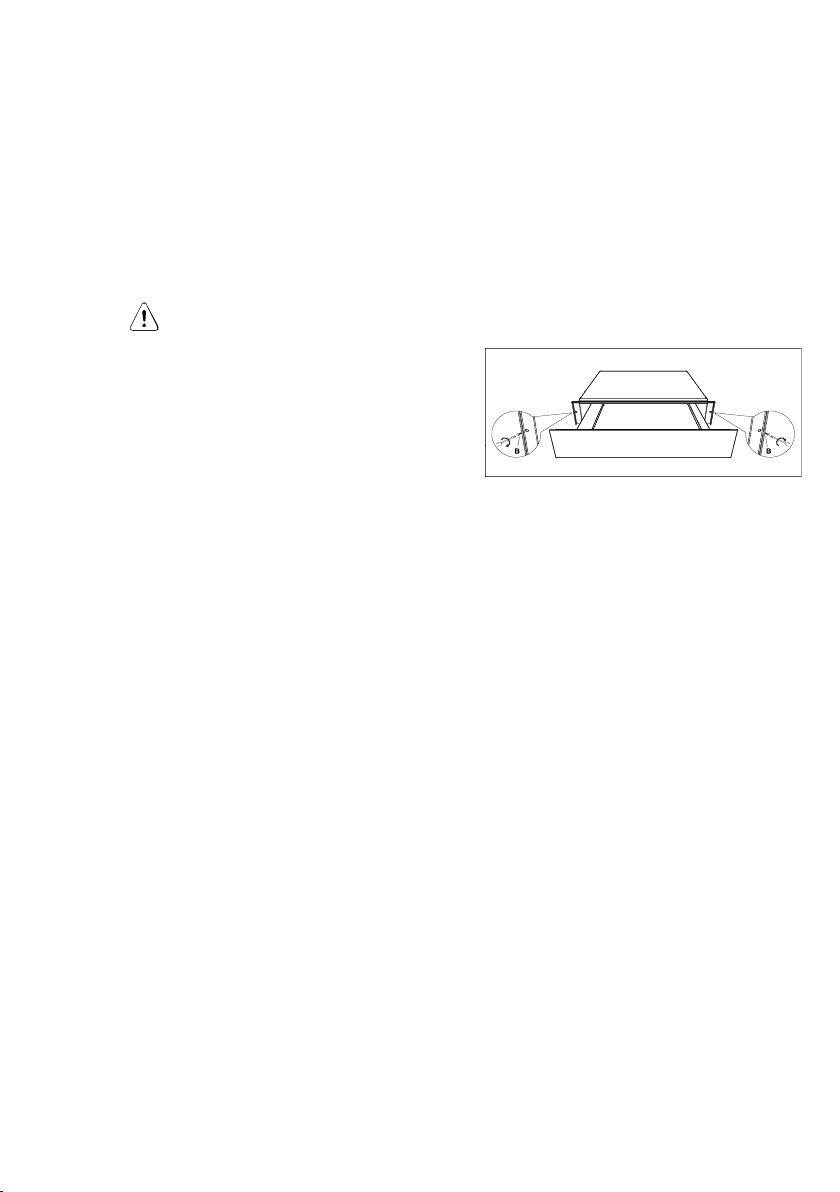
Die Vorderseite der Schublade kann mit
einer Schutzfolie versehen sein. Ziehen
Sie diese Folie vor der ersten Benutzung
des Gerätes Ofens vorsichtig ab, indem
Sie an deren Unterseite beginnen.
Vergewissern Sie sich, dass die
Wärmeschublade nicht beschädigt ist.
Überprüfen Sie, ob die Schublade richtig
schließt Benachrichtigen Sie den
Kundendienst im Falle von vorhandenen
Schäden.
Achten Sie darauf, dass die Steckdose
nach Einbau des Gerätes leicht
zugänglich ist, ausserhalb der
Gerätenische.
Der Geschirrwärmer darf ausschließlich
in Kombination mit den vom Hersteller
angegeben Geräten eingebaut werden.
Bei Kombination mit anderen Geräten
erlischt der Garantieanspruch, da die
Gewähr für einen ordnungsgemäßen
Betrieb nicht mehr gegeben ist.
Einbau
Für den Einbau von Geschirrwärmer und
Kombinationsgerät muss ein fest
eingebauter Zwischenboden vorhanden
sein, der die erforderliche Tragfähigkeit
für beide Geräte gewährleistet.
Das Kombinationsgerät wird ohne
weiteren Zwischenboden direkt auf den
eingebauten Geschirrwärmer gestellt.
Beachten Sie für den Einbau des
Kombinationsgerätes unbedingt die
Informationen der jeweiligen Gebrauchsbzw. Montageanweisung.
Die wichtigen Masse für den Einbau
werden in “mm” auf den letzten Seiten
dargestellt. Wie folgt vorgehen:
15
1. Stellen Sie das Gerät bis zur
Schwadenleiste in den
Umbauschrank und richten Sie es
aus.
2. Achten Sie darauf, dass das
Gehäuse des Gerätes rechtwinklig
ausgerichtet wird.
3. Öffnen Sie die Schublade und
befestigen Sie das Gerät mit den
mitgelieferten Schrauben an den
Seitenwänden des Schrankes.
Elektroanschluss
Der Elektroanschluss muss von einem
qualifizierten Techniker gemäß der
geltenden Gesetzgebung durchgeführt
werden.
Vor Anschluss der Wärmeschublade an
das Hauptnetz muss sichergestellt
werden, dass Spannung und Frequenz
des Hauptnetzes den Angaben des
Typenschilds entsprechen. Dieses
befindet sich im Innern des
Heizblocks.Der Elektroanschluss erfolgt
über einen allpoligen Schalter, der für die
entsprechende Stromstärke geeignet ist.
Dieser Schalter sollte einen
Mindestabstand von 3 mm zwischen den
Kontakten aufweisen, sodass eine
Unterbrechung im Notfall bzw. bei einer
Reinigung der Wärmeschublade möglich
ist. Falls für den Elektroanschluss ein
Stecker verwendet wird, so muss nach
der
Installation der Zugriff auf diesen Stecker
gewährleistet sein.
Der Anschluss muss mit einer
angemessenen Erdung gemäß dem
geltenden Vorschriften ausgestattet sein.
Page 16
16
WWW.ELECTROLUX.COM
ACHTUNG!
Die wärmeschublade muss geerdet
sein.
Das Auswechseln des biegsamen
Stromkabels an der Wärmeschublade
sollte nur von einem qualifizierten
Kundendienstmitarbeiter vorgenommen
werden, da hierfür besonderes
Werkzeug erforderlich ist.
Der Hersteller und der Wiederverkäufer
lehnen jegliche Haftung für eventuelle
Schäden ab, die Personen, Tieren oder
Sachen infolge der Nichtbeachtung der
vorliegenden Installationsanleitung
zugefügt werden.
UMWELT- UND GESUNDHEITSSCHUTZ
Recyceln Sie Materialien mit dem
Symbol. Entsorgen Sie die Verpackung
in den entsprechenden
Recyclingbehältern.
Recyceln Sie zum Umwelt- und
Gesundheitsschutz elektrische und
elektronische Geräte.
Entsorgen Sie Geräte mit diesem
Symbol nicht mit dem Hausmüll. Bringen
Sie das Gerät zu Ihrer örtlichen
Sammelstelle oder wenden Sie sich an
Ihr Gemeindeamt.
Page 17

FRANÇAIS
SOMMAIRE
CONSIGNES DE SÉCURITÉ ............................................................................ 18
DESCRIPTION DE L'APPAREIL ....................................................................... 23
UTILISATION ..................................................................................................... 24
CAPACITÉ DE CHARGE................................................................................... 27
NETTOYAGE ET ENTRETIEN .......................................................................... 28
QUE FAIRE EN CAS DE MAUVAIS FONCTIONNEMENT ............................... 28
INSTRUCTIONS POUR L'INSTALLATION ....................................................... 29
PROTECTION DE L’ENVIRONEMENT ............................................................ 30
L'INSTALLATION ............................................................................................... 61
NOUS PENSONS À VOUS
Merci d'avoir choisi ce produit Electrolux. Avec ce produit, vous bénéficiez de dizaines
d'années d'expérience professionnelle et d'innovation. Ingénieux et élégant, il a été conçu
sur mesure pour vous. Grâce à cet appareil, vous savez que chaque utilisation vous
apportera satisfaction. Bienvenue chez Electrolux.
Visitez notre site Internet pour :
Obtenir des conseils d'utilisation, des brochures, de l'aide, des informations :
www.electrolux.com
Enregistrer votre produit pour obtenir un meilleur service :
www.electrolux.com/productregistration
Acheter des accessoires, consommables et pièces de rechange d'origine pour
votre appareil :
www.electrolux.com/shop
17
SERVICE APRÈS-VENTE
N'utilisez que des pièces de rechange d'origine.
Avant de contacter le service, assurez-vous de disposer des informations suivantes.
Vous trouverez ces informations sur la plaque signalétique. Modèle, PNC, numéro de
série.
Avertissement/Attention: consignes de sécurité.
Informations générales et conseils.
Informations en matière de protection de l'environnement.
Sous réserve de modifications.
Page 18

18
WWW.ELECTROLUX.COM
CONSIGNES DE SÉCURITÉ
Avant d'installer et d'utiliser cet appareil, lisez
soigneusement les instructions fournies. Le fabricant ne
peut être tenu pour responsable des dommages et
blessures liés à une mauvaise installation ou utilisation.
Conservez toujours cette notice avec votre appareil pour
vous y référer ultérieurement. Votre appareil est aux
normes de sécurité en vigueur. Une utilisation
inadéquate peut constituer un danger pour l'utilisateur.
Sécurité des enfants et des personnes vulnérables
Advertissement!
Risque d'asphyxie, de blessure ou d'invalidité
permanente.
Cet appareil peut être utilisé par des enfants de plus de
8 ans, ainsi que des personnes dont les capacités
physiques, sensorielles et mentales sont réduites ou
dont les connaissances et l'expérience sont
insuffisantes, à condition d'être surveillés par une
personne responsable de leur sécurité.
Ne laissez pas les enfants jouer avec l'appareil. Les
enfants de moins de 3 ans ne doivent pas être laissés
sans surveillance à proximité de l'appareil.
Ne laissez pas les emballages à la portée des enfants.
Tenez les enfants éloignés de l'appareil lorsqu'il est en
cours de fonctionnement ou lorsqu'il refroidit. Les parties
accessibles sont chaudes.
Les enfants ne doivent pas nettoyer ni entreprendre une
opération de maintenance sur l'appareil sans
surveillance.
L'appareil et son cordon d'alimentation doivent être
conservés hors de portée des enfants âgés de moins de
8 ans.
Page 19
19
FRANÇAIS
Sécurité générale
AVERTISSEMENT: L'intérieur de l'appareil devient
chaud lorsqu'il est en fonctionnement. Ne touchez pas
les éléments chauffants se trouvant dans l'appareil.
Utilisez toujours des gants de cuisine pour retirer ou
enfourner des accessoires ou des plats allant au four.
La température des surfaces accessibles peut être
élevée pendant le fonctionnement de l'appareil.
ATTENTION! Ne mettez l'appareil en marche qu'une
fois celui-ci dûment encastré, car c'est la seule façon
d'interdire l'accès aux composants électriques.
ATTENTION! N'ouvrez jamais la structure de
l'appareil. D'éventuels contacts avec les pièces
conductrices ou modifications des composants
électriques ou mécaniques peuvent constituer un
danger pour la sécurité de l'utilisateur et perturber le bon
fonctionnement de l'appareil.
Selon la température et le temps de fonctionnement
sélectionnés, la température à l'intérieur de l'appareil
peut monter jusqu'à 80 ºC. Utilisez des gants de cuisine
pour vous protéger les mains quand vous retirez la
vaisselle de l'intérieur du chauffe-vaisselle.
Le tiroir peut supporter un poids maximum de 25 kg.
Prenez garde de ne pas le surcharger, cela
endommagerait les rails télescopiques.
Les récipients et objets synthétiques ou qui prennent
facilement feu ne doivent pas être rangés dans le
chauffe-vaisselle. Si l'appareil est mis en marche, ils
peuvent fondre ou brûler. Danger d'incendie.
N'utilisez pas votre appareil comme chauffage de
maison. Les hautes températures peuvent mettre le feu
à des objets facilement inflammables situés près de
l'appareil.
Page 20
20
WWW.ELECTROLUX.COM
Quand vous cessez définitivement d'utiliser l'appareil, à
la fin de sa vie utile, débranchez-le du réseau et
éliminez le câble électrique pour éviter le danger que les
enfants s'en servent pour s'amuser.
Installation
Le système électrique doit être équipé d'un moyen de
déconnexion, avec une séparation de contact sur tous
les pôles assurant une coupure complète de la catégorie
de surtension III.
Si une fiche est utilisée pour la connexion électrique,
alors la même doit être accessible après l'installation.
ATTENTION! Avant de brancher l'appareil, comparez-
en les données (tension et fréquen-ce) indiquées sur la
plaque des caractéristi-ques avec celles de votre réseau
électrique. Elles doivent correspondre, pour éviter tout
problème. En cas de doute, appelez un électricien.
ATTENTION! Si la prise de l'appareil doit être
changée, l'installation et le branchement doivent être
effectués par un technicien. Adressez-vous à un
électricien attitré qui respecte les normes de sécurité. La
responsabilité du fabricant n'est pas engagée pour des
dommages provenant d'une erreur de montage ou de
branchement.
ATTENTION! La sécurité électrique de l'appareil n'est
assurée que s'il est relié à la terre. La responsabilité du
fabricant n'est pas engagée pour des dommages
provenant d'un manque ou d'un défaut du système de
protection de l'installation (choc électrique par exemple).
Nettoyage
N'utilisez pas de nettoyeur vapeur pour nettoyer
l'appareil.
Page 21
21
FRANÇAIS
N'utilisez pas de produits abrasifs ni de racloirs pointus
en métal pour nettoyer la porte en verre car ils peuvent
rayer sa surface, ce qui peut briser le verre.
N'utilisez pas d'appareils de nettoyage à haute pression
ou qui projettent de la vapeur. La vapeur peut atteindre
les composants électriques et provoquer un court-circuit.
La pression de la vapeur peut aussi endommager
durablement la surface de l'appareil et ses composants.
Réparation
Avant toute opération de maintenance, déconnectez
l'alimentation électrique.
Si le câble d'alimentation est endommagé, il ne doit être
remplacé que par un professionnel qualifié afin d'éviter
tout danger.
ATTENTION! L'appareil doit être débranché du
réseau électrique quand sont effectués les travaux
d'installation et de réparation. Pour que l'appareil soit
débranché, vous devez constater l'une des conditions
suivantes :
- Les fusibles/disjoncteur du tableau électrique sont
débranchés.
- L'appareil est débranché de la prise murale, ce
qui doit être fait en tirant sur la prise de l'appareil et non
sur le câble électrique.
ATTENTION! Les réparations et entretiens, tout
particulièrement sur les pièces sous tension, ne peuvent
être effectués que par des techniciens agréés par le
fabricant. Le fabricant et les revendeurs déclinent toute
responsabilité pour d'éventuels dommages, causés aux
personnes, aux animaux ou aux biens, qui découlent de
réparations ou entretiens effectués par des personnes
non autorisées.
Page 22

22
WWW.ELECTROLUX.COM
ATTENTION! Les réparations au cours de la période
de garantie ne doivent être exécutées que par des
techniciens agréés par le fabricant. Dans le cas
contraire, tout dommage provenant de ces réparations
est exclu de la garantie.
Page 23
FRANÇAIS
DESCRIPTION DE L'APPAREIL
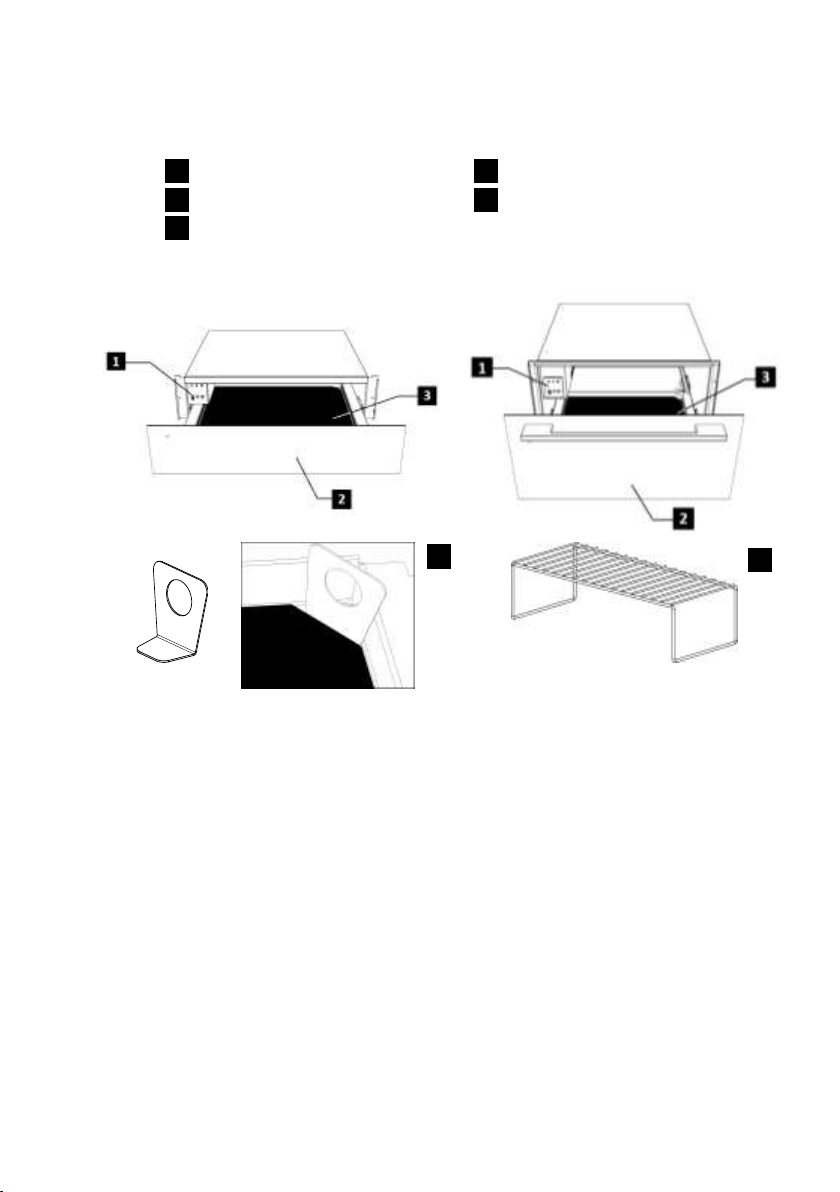
Panneau de contrôle
Outil de suppression de verre
Panneau d'avant
Grille de tiroir-réchaud*
Verre / Revêtement antidérapant
WS140SL/ WS16SL/ WS200SL/ WS21SL
WS290SL
* La Grille de tiroir-réchaud est
uniquement disponible avec le modèle
WS290SL
3 5 2 4 1
5
4
Composants principaux
23
Principe de fonctionnement
Votre appareil est équipé d'un système
de circulation d'air chaud. Un ventilateur
distribue la chaleur, générée par une
résistance électrique, dans tout l'intérieur
de l'appareil.
Le thermostat permet de définir et de
contrôler la température souhaitée pour
la vaisselle.
La circulation de l'air chaud fait que la
vaisselle est chauffée rapidement et
uniformément.
La résistance ainsi que le ventilateur
sont protégés par une grille métallique.
La base du tiroir est équipée d'un
revêtement antidérapant pour empêcher
la vaisselle de glisser quand vous ouvrez
ou fermez le tiroir.
Page 24
24
WWW.ELECTROLUX.COM
1 2
3
4 5 6
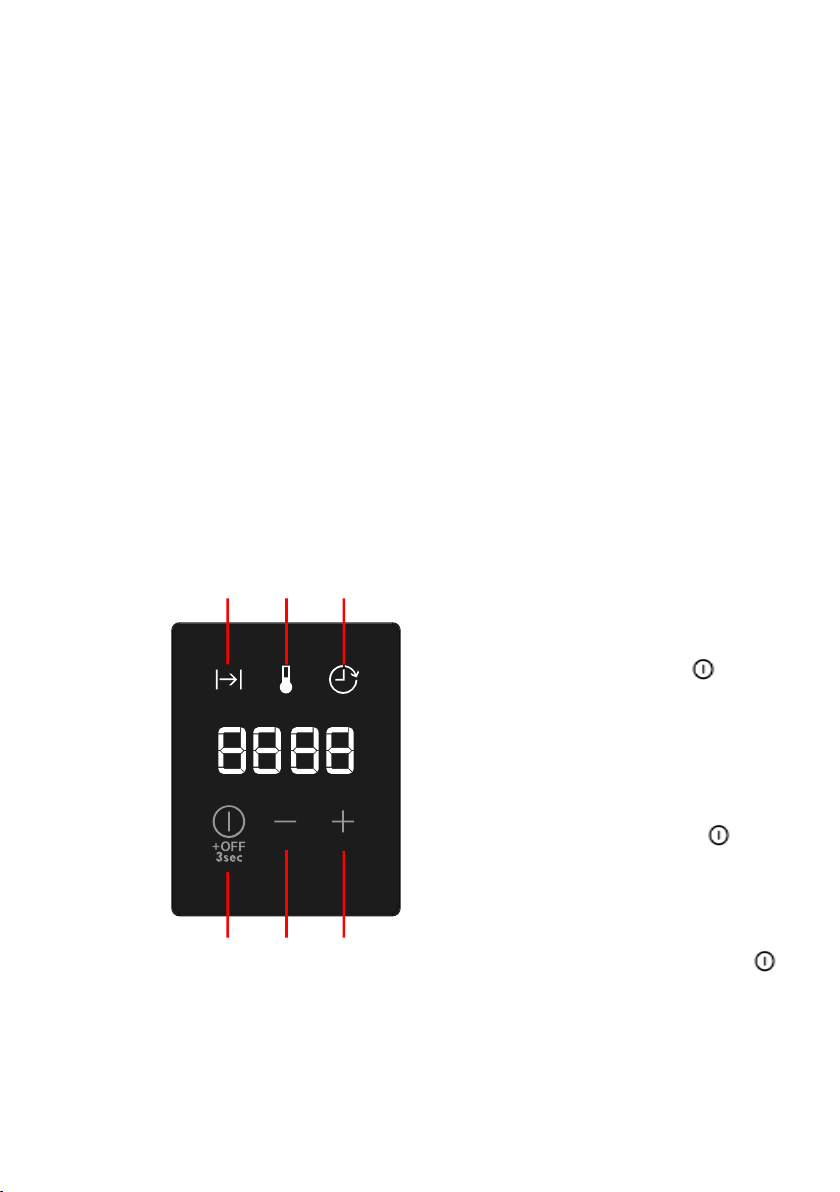
1. Indicateur lumineux de la minuterie
2. Indicateur lumineux de la température
3. Indicateur lumineux du départ différé
4. Bouton fonction / ON/OFF
5. Bouton Down « - » (moins)
6. Bouton « + » (plus)
UTILISATION
Avant la première utilisation
Avant d'utiliser l'appareil pour la première
fois, vous devez en laver l'intérieur et
l'extérieur en suivant les indications sur
le nettoyage figurant au chapitre
«Nettoyage et entretien».
Ensuite, chauffez le chauffe-vaisselle
pendant au moins 2 heures en tournant
le sélecteur de température sur la
position maximum (consultez le chapitre
« Sélectionner la température »).
Veillez à aérer correctement la cuisine.
Les pièces de l'appareil sont protégées
par un produit spécial qui peut
éventuellement, lors de la première mise
en marche, dégager une odeur et un peu
de fumée qui disparaissent très vite. Ni
l'une ni l'autre ne constituent une
anomalie de fonctionnement de
l'appareil.
Tableau de commandes
Paramètres de fonctionnement
Mode Veille
Dans ce mode, tout le système est
déconnecté et aucun indicateur
lumineux ou affichage n’est allumé.
Fonctionnement normal
Dans ce mode, le système génère de
la chaleur. L’affichage indique le temps
de fonctionnement restant et la
température réglée, par alternance
toutes les 2 secondes. L’indicateur
lumineux de la minuterie et celui de la
température s’allument alternativement
toutes les 2 secondes et affichent les
indications correspondantes.
L’indicateur lumineux de
fonctionnement est allumé en continu
jusqu’à ce que la minuterie atteigne
zéro.
Pour programmer le fonctionnement
normal, procédez de la manière
suivante :
1. Appuyez sur le bouton “ ” une ou
plusieurs fois jusqu’à ce que
l’indicateur lumineux de la
minuterie clignote.
2. Appuyez sur les boutons “+” ou “-”
pour régler le temps de
fonctionnement désiré, entre 0h00
et 4h00.
3. Appuyez sur le bouton “ ” pour
valider. L’indicateur lumineux de la
température se met à clignoter.
4. Appuyez sur les boutons “+” ou “-”
pour régler la température désirée,
entre 30ºC et 80ºC.
5. Appuyez sur le bouton “ ”
pendant 3 secondes ou attendez 5
secondes.
6. Le tiroir chauffant commence à
fonctionner en fonction des
paramètres enregistrés.
Page 25
FRANÇAIS
Départ différé
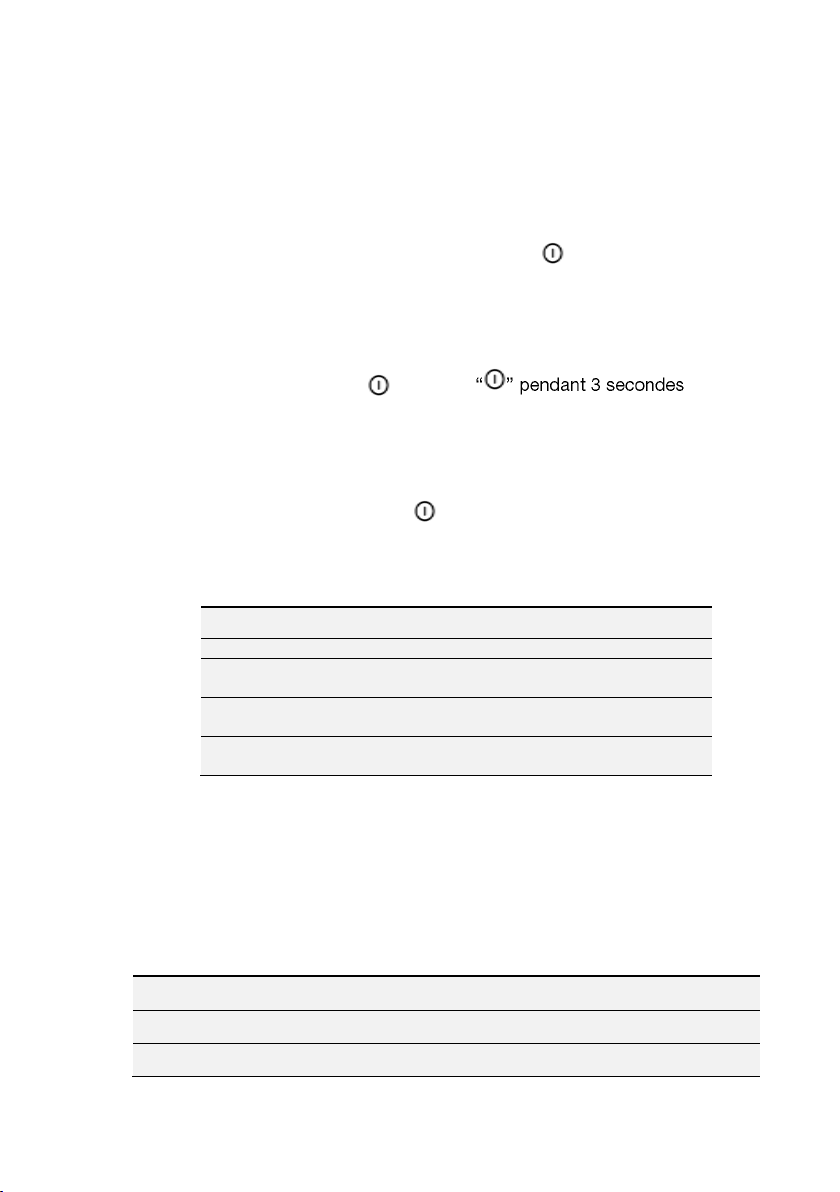
ºC
Fonction
30ºC
Dégivrage
40ºC
Levage de la pâte
Chauffage de tasses/verres
60ºC
Chauffage de vaisselle
Gardez les aliments chauds
80ºC
Chauffage d’aliments
Cuission à basse temperature
Charge
Temps (min)
Vaiselle pour 6 personnes
30 – 35
Vaiselle pour 12 personnes
40 – 45
Dans ce mode, l’affichage indique le
temps restant avant que l’appareil ne
démarre ainsi que le compte à
rebours. L’indicateur lumineux de
fonctionnement clignote et l’indicateur
du départ différé est allumé.
Pour programmer un départ différé,
procédez de la manière suivante :
1. Programmez les paramètres de
fonctionnement normal comme
indiqué aux points 1) à 4) de la
section précédente.
2. Appuyez sur le bouton “ ” pour
valider. L’indicateur lumineux de
départ différé se met à clignoter.
3. Appuyez sur les boutons “+” ou “-”
pour régler le départ différé voulu
entre 0h00 et 9h50.
4. Appuyez sur la touche “ ”
pendant 3 secondes.
5. Le tiroir chauffant se met en mode
départ différé.
25
6. Lorsque le compte à rebours est
terminé, le tiroir chauffant se met
en marche en fonction des
paramètres enregistrés.
Annuler une opération
La programmation peut être annulée à
tout moment en appuyant sur le
bouton “ ” pendant 3 secondes.
L’opération ou le départ différé
peuvent être annulés (parce qu’un
invité arrive plus tôt ou que la vaisselle
semble être suffisamment chaude, par
exemple) en appuyant sur le bouton
Selectionner la fonction
Vous pouvez sélectionner des
températures entre 30 et 80 ºC.
Dès que la température sélectionnée est
atteinte, le chauffage s'éteint. Il se
rallume automatiquement si la
température redescend.
Temps de chauffage
Le temps de chauffage dépend de
plusieurs facteurs :
Matériel et épaisseur de la vaisselle ;
Quantité de charge ;
Disposition de la vaisselle ;
Température sélectionnée.
Il est dès lors impossible d'indiquer des
temps de chauffage rigoureusement
exacts.
Les temps ci-dessous sont donnés à titre
indicatif pour le thermostat en 60ºC et
pour obtenir un chauffage uniforme de la
vaisselle:
Page 26

26
WWW.ELECTROLUX.COM
Utilisation
Poids
Préparation sur le
plan de cuisson
Temps de
cuisson
Boeuf
Bleu
1kg
2 minutes sur chaque
côté
1 – 1.5 hr
Saignant
1kg
3 minutes sur chaque
côté
1.5 – 2 hrs
À point
1kg
3 minutes sur chaque
côté
2 – 2.5 hrs
Bien cuit
1kg
3 minutes sur chaque
côté
2.25 – 2.5hrs.
Veau
Filet
1kg
2 minutes sur chaque
côté
1.75 – 2hrs.
Carré
1kg
3 minutes sur chaque
côté.
2 – 2.5hrs.
Porc
Filet
500-600 g
2 minutes sur chaque
côté
1.5 hrs.
Agneau
Filet
400g
2 minutes sur chaque
côté
1 – 1.25 hrs.
ATTENTION:
Chauffer le plat pendant 15 minutes afin
de vous assurer que la température
nécessaire soit atteinte. Présenter les
mets chauffés dans les plats
préchauffés. Conseil : disposer les plats
dans l’appareil dès la période de
préchauffage.
La durée de cuisson est définie en
fonction du poids de la viande.
Utiliser des plats en verre, en porcelaine
ou en céramique.
Preparation:
Chauffer l’appareil avec les plats à
80°C pendant une dizaine de minutes.
Faire cuire la viande dans une poêle
Cuisson à basse temperature
Cuisson à basse température : ce mode
de cuisson convient particulièrement
bien à la viande qui a besoin de cuir
pendant un certain temps à de faibles
températures.
avec un peu de matière grasse et
disposer ensuite sur le plat préchauffé
avant de la mettre dans le tiroir
chauffant. La température définie est
toujours de 80°C.
Tableau : Cuisson à basse température (références)
Si vous voulez garder au chaud la viande cuite, merci de régler sur 60°C. Nous vous conseillons de ne
pas garder au chaud votre plat plus d’une heure.
Page 27
FRANÇAIS
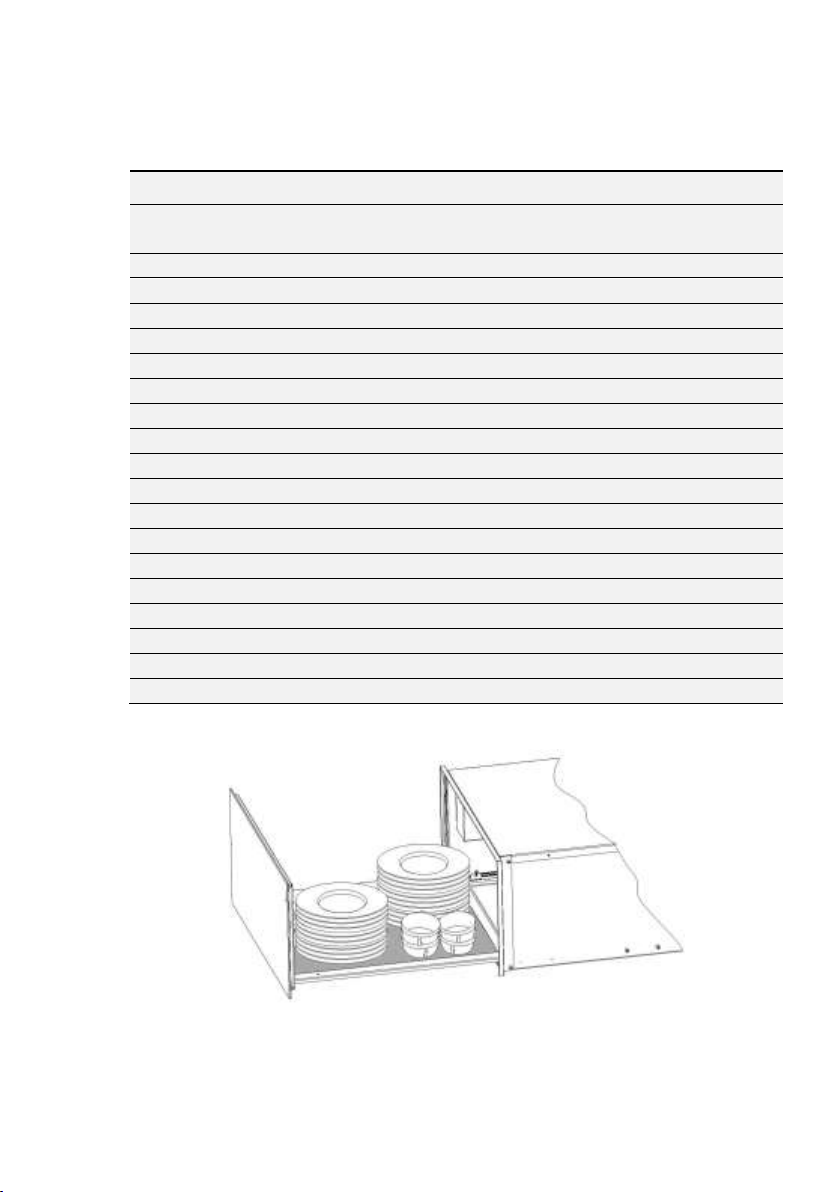
CAPACITÉ DE CHARGE
WS 140 / 16 SL
WS 200 / 21 SL
WS 290 SL
Service de 6
personnes
Service de 8 personnes
Service de 12 personnes
6 assiettes de 24 cm
8 assiettes de 24 cm
12 assiettes de 24 cm
6 bols de 10 cm
8 bols de 10 cm
12 bols de 10 cm
1 plat de 19 cm
1 plat de 19 cm
1 plat de 19 cm
1 plat de 17 cm
1 plat de 17 cm
1 plat de 17 cm
1 plat de 32 cm
2 plats de 32 cm
2 plats de 32 cm
ou
ou
ou
20 plats de 28 cm
30 plats de 28 cm
40 plats de 28 cm
ou
ou
ou
80 tasses à café
120 tasses à café
160 tasses à café
ou
ou
ou
40 tasses à thé
60 tasses à thé
80 tasses à thé
ou
ou
ou … …
…
La capacité de charge dépend des dimensions des articles de vaisselle:
27
Page 28

28
WWW.ELECTROLUX.COM
NETTOYAGE ET ENTRETIEN
Le nettoyage est l'unique entretien
normalement nécessaire.
ATTENTION
Le nettoyage doit être effectué quand le
chauffe-vaisselle est débranché de
l'alimentation électrique. Retirez la prise
du mur ou débranchez le circuit
d'alimentation du chauffe-vaisselle.
N'utilisez pas de produits de nettoyage
agressifs ou abrasifs, ni frottoirs ni objets
pointus qui peuvent provoquer des
rayures. N'utilisez pas d'appareils de
nettoyage à haute pression ou qui
projettent de la vapeur.
Partie avant de l'appareil et
tableau de commandes
Il suffit de nettoyer la chauffe-vaisselle
avec un chiffon humide. S'il est très sale,
ajoutez quelques gouttes de produit
vaisselle à l'eau de lavage. Essuyez
ensuite les surfaces avec un chiffon sec.
Les chauffe-vaisselle dont l'avant est en
acier inoxydable peuvent être nettoyés
avec des produits spéciaux pour ce type
de surface. Ces produits évitent que les
surfaces ne se resalissent rapidement.
Appliquez une fine couche de produit sur
toute la surface avec un chiffon doux.
Les chauffe-vaisselle dont l'avant est en
aluminium peuvent être nettoyés avec un
produit léger pour les vitres et un chiffon
doux qui ne laisse pas de fibres.
Nettoyez dans le sens horizontal sans
appuyer car l'aluminium est un métal
mou qui se raye ou se coupe facilement.
Interieur du chauffe-vaisselle
Nettoyez régulièrement l'intérieur du
chauffe-vaisselle avec un chiffon humide.
S'il est très sale, ajoutez quelques
gouttes de produit vaisselle dans l'eau de
lavage. Nettoyez ensuite les surfaces
avec un chiffon sec. Évitez de faire
entrer de l'eau dans les orifices par où
circule l'air. Attendez que votre chauffevaisselle soit bien sec avant de le
réutiliser.
Revêtement antiderapant
Vous pouvez retirer le revêtement
antidérapant pour nettoyer plus
facilement le tiroir. Le revêtement peut
être lavé à la main avec de l'eau chaude
et quelques gouttes de produit vaisselle.
Séchez-le bien pour finir. Vous ne devez
remettre en place le revêtement
antidérapant que lorsque le tiroir est bien
sec.
QUE FAIRE EN CAS DE MAUVAIS FONCTIONNEMENT
ATTENTION!
Seuls des techniciens spécialisés sont à
même d'effectuer les réparations, de
quelque type que ce soit. Toute
réparation effectuée par des personnes
non agréées par le fabricant est
dangereuse.
Avant d'appeler l'assistance technique,
vérifiez les cas suivants:
La vaisselle ne chauffe pas
suffisamment?
Vérifiez les points suivants :
L'appareil est bien branché et en
marche.
Vous avez sélectionné la
température adéquate.
Les orifices par où circule l'air sont
obstrués par de la vaisselle.
La vaisselle a chauffé pendant un
temps suffisant?
Le temps de chauffage dépend de
divers facteurs, en particulier :
Matière et épaisseur de la vaisselle.
Quantité de vaisselle.
Rangement et disposition de la
vaisselle.
La vaisselle ne chauffe pas? Vérifiez
les points suivants :
Le ventilateur fonctionne (il fait du
bruit). C'est peut-être alors la
Page 29
FRANÇAIS
résistance qui est en panne ; si le
ventilateur ne fait pas de bruit, c'est
lui qui doit être en panne.
Les plombs ont sauté ou le tableau
électrique a disjoncté.
La vaisselle est trop chaude?
Le sélecteur de température ne
marche pas correctement.
L'interrupteur marche/arrêt ne s'allume
pas?
Le pilote de l'interrupteur a fondu.
INSTRUCTIONS POUR L'INSTALLATION
Avant l'installation
Vérifiez que la tension d'alimentation de
l'appareil, indiquée sur la plaque des
caractéristiques, correspond à celle de
votre installation.
Ouvrez le tiroir et retirez tous les
accessoires ainsi que le matériel
d'emballage.
ATTENTION !
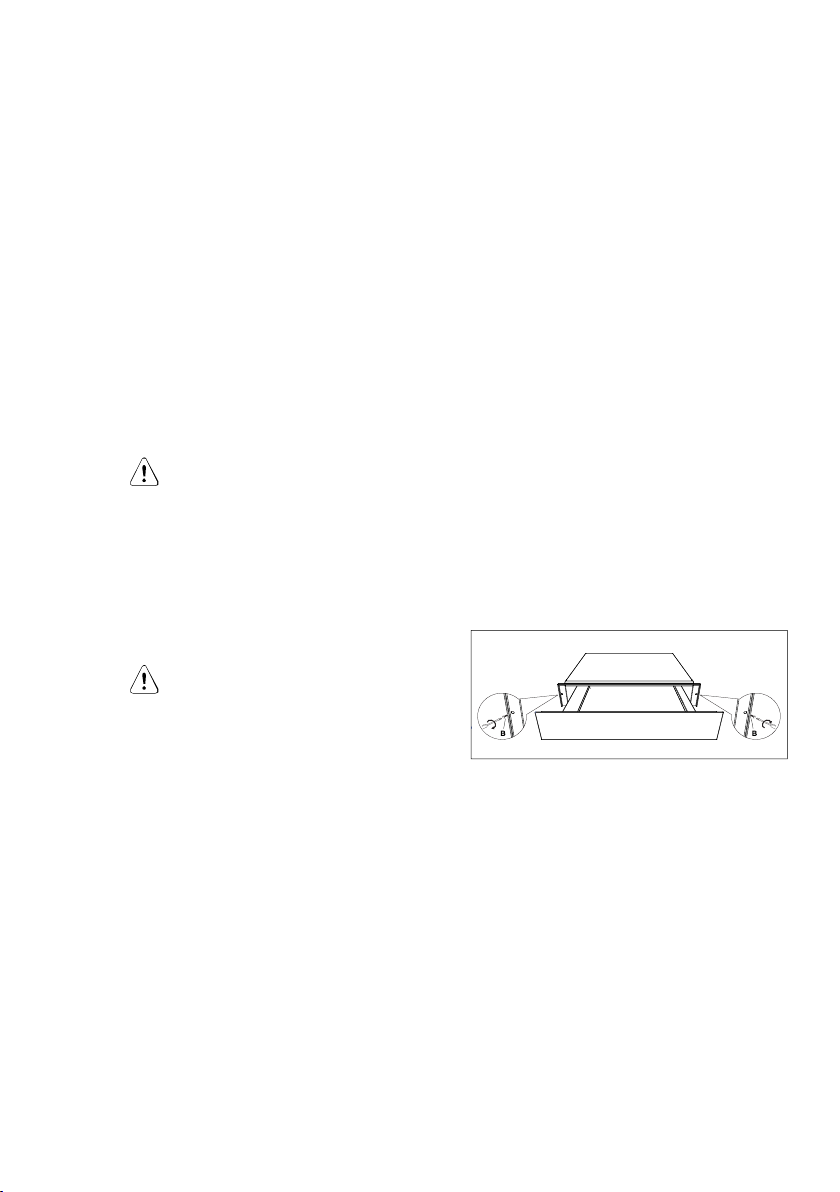
Le devant du chauffe-vaisselle peut être
enveloppé d'une pellicule de protection.
Retirez soigneusement cette pellicule
avant la première utilisation.
Vérifiez que le chauffe-vaisselle n'est pas
endommagé. Assurez-vous que le tiroir
s'ouvre et se ferme correctement. En cas
de détérioration, appelez le Service
d'assistance technique.
ATTENTION :
La prise de courant doit rester facilement
accessible après l'installation du chauffevaisselle.
Le chauffe-vaisselle ne peut être
encastré et combiné qu'avec les
appareils indiqués par le fabricant. La
garantie n'est pas valable s'il est monté
et combiné avec d'autres appareils, car il
n'est alors pas possible de garantir un
fonctionnement correct.
Installation
Pour encastrer le chauffe-vaisselle et le
combiner avec un autre appareil, vous
devez utiliser une étagère intermédiaire
fixe, capable de supporter le poids des
deux appareils.
L'appareil combiné avec le chauffevaisselle devra être placé directement
sur le chauffe-vaisselle. Une étagère de
séparation n'est pas nécessaire.
Pour encastrer l'appareil combiné avec le
chauffe-vaisselle, suivez les indications
figurant dans le manuel d'instructions et
de montage de cet appareil.
Les dimensions à prendre en
considération pour l'installation sont
indiquées en millimètres dans les croquis
présentés dans les dernières pages.
Procédez de la façon suivante :
1. Placez le chauffe-vaisselle sur
l'étagère et poussez-le vers le fond
de façon à ce qu'il soit bien centré et
bord à bord avec l'avant du meuble.
2. Assurez-vous que la structure du
chauffe-vaisselle est bien à niveau et
bien stable sur l'étagère.
3. Ouvrez le tiroir pour fixer le chauffe-
vaisselle sur les côtés du meuble
avec les deux vis fournies.
4.
Branchement électrique
L’installation électrique doit être réalisée
par un électricien qualifié et respecter la
législation en vigueur.
Avant de brancher le chauffe-vaisselle
sur secteur, assurez-vous que la tension
et la fréquence du secteur correspond à
ceux indiqués sur la plaque signalétique
se trouvant à l'intérieur du bloc chauffant.
Le branchement électrique s’effectue
avec un interrupteur omnipolaire
approprié pour tolérer l’intensité et
présentant un espacement minimum de
3 mm entre ses éléments de contact,
ceci afin d’assurer le découplage en cas
d’urgence ou lors de du nettoyage du
chauffe-vaisselle. Si vous utilisez une
prise pour le branchement, celle-ci doit
rester accessible après l’installation.
29
Page 30
30
WWW.ELECTROLUX.COM
Le branchement doit disposer d’une
prise de terre adéquate et répondant aux
normes actuelles.
ATTENTION :
Le chauffe-vaisselle doit être relié à
la terre.
Si le câble d’alimentation flexible du
chauffe-vaisselle a besoin d’être changé,
RONEMENT
l’opération doit être réalisée par un
employé du service après-vente car des
outils particuliers sont nécessaires.
Le fabricant et les revendeurs déclinent
toute responsabilité en cas de
dommages provoqués par des
personnes, des animaux ou des objets
lorsque les instructions d’installation ne
sont pas respectées.
Recyclez les matériaux portant le
symbole. Déposez les emballages dans
les conteneurs prévus à cet effet.
Contribuez à la protection de
l'environnement et à votre sécurité,
recyclez vos produits électriques et
électroniques.
Ne jetez pas les appareils portant
le symbole
avec les ordures ménagères.
Emmenez un tel produit dans votre
centre local de recyclage ou contactez
vos services municipaux.
Page 31

ITALIANO
INDICE
INFORMAZIONI PER LA SICUREZZA ............................................................. 32
DESCRIZIONE DELL'APPARECCHIO ............................................................. 37
UTILIZZO ........................................................................................................... 38
CAPACITÀ DI CARICO ..................................................................................... 42
PULIZIA E MANUTENZIONE ............................................................................ 43
COSA FARE SE LO SCALDASTOVIGLIE NON FUNZIONA ........................... 43
ISTRUZIONI DI INSTALLAZIONE ..................................................................... 44
SALVAGUARDIA DELL‘AMBIENTE .................................................................. 45
INSTALLAZIONE ............................................................................................... 61
PENSATI PER VOI
Grazie per aver acquistato un'apparecchiatura Electrolux. Avete scelto un prodotto che ha
alle spalle decenni di esperienza professionale e innovazione. Ingegnoso ed elegante, è
stato progettato pensando a voi. Quindi, in qualsiasi momento desiderate utilizzarlo,
potete esser certi di ottenere sempre i migliori risultati. Benvenuti in Electrolux.
Visitate il nostro sito web per:
ricevere consigli, scaricare i nostri opuscoli, eliminare eventuali anomalie,
ottenere informazioni sull'assistenza:
www.electrolux.com
registrare il vostro prodotto e ricevere un servizio migliore:
www.electrolux.com/productregistration
acquistare accessori, materiali di consumo e ricambi originali per la vostra
apparecchiatura:
www.electrolux.com/shop
31
SERVIZIO CLIENTI E MANUTENZIONE
Consigliamo sempre l’impiego di ricambi originali.
Quando si contatta l'Assistenza, accertarsi di disporre dei seguenti dati.
Le informazioni si trovano sulla targhetta di identificazione. Modello, numero
dell'apparecchio (PNC), numero di serie.
Avvertenza / Attenzione - Importanti Informazioni di Sicurezza
Informazioni e suggerimenti generali
Informazioni sull'ambiente.
Con riserva di modifiche.
Page 32
32
WWW.ELECTROLUX.COM
INFORMAZIONI PER LA SICUREZZA
Leggere attentamente le istruzioni fornite prima di
installare e utilizzare l'apparecchiatura. Il produttore non
è responsabile se un'installazione ed un uso non corretto
dell'apparecchiatura provocano lesioni e danni. Tenere
sempre le istruzioni a portata di mano in caso di
necessità durante l'utilizzo. Questo apparecchio è
conforme alle vigenti norme di sicurezza. Un uso
improprio può causare danni a persone o cose.
Sicurezza dei bambini e delle persone vulnerabili
AVVERTENZA!
Rischio di soffocamento, lesioni o invalidità
permanente.
Questa apparecchiatura può essere usata da bambini
a partire dagli 8 anni e da adulti con limitate capacità
fisiche, sensoriali o mentali o con scarsa esperienza o
conoscenza sull'uso dell'apparecchiatura, se
sorvegliati o se sono stati istruiti relativamente all'uso
dell'apparecchiatura e hanno capito i rischi coinvolti.
Non consentire ai bambini di giocare con
l'apparecchiatura. Tenere lontani dall'apparecchiatura
i bambini incustoditi sotto i 3 anni.
Tenere i materiali di imballaggio al di fuori della
portata dei bambini.
Tenere i bambini e gli animali domestici lontano
dall'apparecchiatura durante il funzionamento o
raffreddamento. Le parti accessibili sono
incandescenti.
La pulizia e gli interventi di manutenzione non devono
essere eseguiti dai bambini senza supervisione.
Tenere l'apparecchiatura e il rispettivo cavo fuori dalla
portata dei bambini di età inferiore agli 8 anni.
Page 33

33
ITALIANO
Avvertenze di sicurezza generali
All'interno l'apparecchiatura si scalda mentre è in
funzione. Non toccare le resistenze
dell'apparecchiatura. Servirsi sempre degli appositi
guanti da apparecchio per estrarre o inserire accessori
o pentole resistenti al calore.
Il vano interno dell'apparecchio può raggiungere
temperature fino a 80°C a seconda della temperatura
selezionata e del periodo di funzionamento. Utilizzare,
se necessario, guanti o strofinacci da cucina per
estrarre le stoviglie dallo scaldastoviglie.
Non appoggiarsi né sedersi sul cassetto, si potrebbero
danneggiare le guide telescopiche. La portata
massima del cassetto è di 25 kg.
Non conservare contenitori in plastica oppure oggetti
infiammabili nello scaldastoviglie. Questi oggetti
potrebbero infatti fondersi o incendiarsi quando si
accende l'apparecchio. Pericolo di incendio!
Non utilizzare l'apparecchio per riscaldare l’ambiente
della cucina. Oggetti facilmente infiammabili posti
nelle sue vicinanze potrebbero prendere fuoco a
causa dell'elevata temperatura.
Gli apparecchi che non vengono più utilizzati devono
essere staccati dalla rete di alimentazione e il cavo
elettrico reso inutilizzabile, in modo che non
rappresentino un pericolo per i bambini.
Installazione
La protezione contro il contatto diretto deve essere
garantita dal modo di integrazione.
L'impianto elettrico deve essere dotato di un
interruttore onnipolare di protezione con apertura
minima tra i contatti della categoria di sovratensione III.
Page 34

34
WWW.ELECTROLUX.COM
Se per il collegamento elettrico si usa una spina,
quest'ultima deve essere accessibile dopo
l'installazione.
Attenzione! Prima di allacciare l'apparecchio alla
rete elettrica, confrontare i dati di allacciamento
(tensione e frequenza) indicati sulla targhetta dati con
quelli della rete elettrica in uso. Nel caso in cui i dati
non dovessero coincidere si potrebbero verificare dei
problemi. Per qualsiasi dubbio rivolgersi a un
elettricista.
Attenzione! Se la spina elettrica viene rimossa,
l'apparecchio deve essere montato e collegato da un
elettricista specializzato. Rivolgersi in tal caso a un
elettricista specializzato che sia a conoscenza delle
norme di sicurezza e che esegua i lavori nel rispetto
delle stesse. Il produttore non si assume alcuna
responsabilità per danni causati da errori di montaggio
o allacciamento
Attenzione! La sicurezza elettrica dell'apparecchio
viene garantita solo se questo è allacciato a un
regolamentare conduttore di messa a terra. Il
produttore non risponde di danni causati dalla
mancanza o dal funzionamento difettoso del
conduttore di messa a terra (per es. scossa elettrica).
Attenzione! Utilizzare l'apparecchio solo dopo che è
stato incassato correttamente. Solo in questo modo
non si corre il rischio di toccare elementi sotto
tensione.
ATTENZIONE! Non aprire mai la struttura
dell'apparecchio. Il possibile contatto con elementi
sotto tensione o eventuali modifiche alla struttura
elettrica e meccanica possono generare situazioni di
Page 35

35
ITALIANO
pericolo per l'utente e compromettere il corretto
funzionamento dell'apparecchio.
Pulizia
Non utilizzare detergenti abrasivi o raschietti di metallo
per pulire il vetro della porta per non rigare la
superficie e causare la rottura del vetro.
Non usare una pulitrice a vapore per pulire
l'apparecchiatura.
Non utilizzare pulitori a getto di vapore o ad alta
pressione. Il vapore potrebbe infatti raggiungere i
componenti sotto tensione e provocarne il
cortocircuito. La pressione del vapore, a lungo andare,
può anche danneggiare permanentemente le superfici
e i componenti dell'apparecchio.
Riparazioni
Se il cavo di alimentazione è danneggiato, deve
essere sostituito dal produttore, da un tecnico
autorizzato o da una persona qualificata per evitare
situazioni di pericolo.
Attenzione! Prima di eseguire lavori di installazione
o riparazione, staccare l'apparecchio
dall'alimentazione elettrica. Per staccare l'apparecchio
dall'alimentazione elettrica, assicurarsi di:
- staccare gli interruttori e i fusibili del quadro elettrico.
- staccare la spina dell'apparecchio dalla presa
elettrica. Per staccare l'apparecchio dalla rete non
tirare il cavo di alimentazione, ma estrarre
direttamente la spina.
Attenzione! I lavori di manutenzione o riparazione,
specialmente di parti sotto tensione, devono essere
eseguiti esclusivamente da personale tecnico
autorizzato dal produttore. Il produttore e il rivenditore
non si assumono alcuna responsabilità per eventuali
Page 36

36
WWW.ELECTROLUX.COM
danni causati a persone, animali o cose derivanti da
lavori di riparazione o manutenzione eseguiti da
personale non autorizzato.
Attenzione! Eventuali riparazioni all'apparecchio
durante il periodo di garanzia possono essere eseguite
solo da tecnici autorizzati dal produttore. In caso
contrario, qualsiasi danno derivante da tali lavori di
riparazione è escluso dalla garanzia.
Page 37
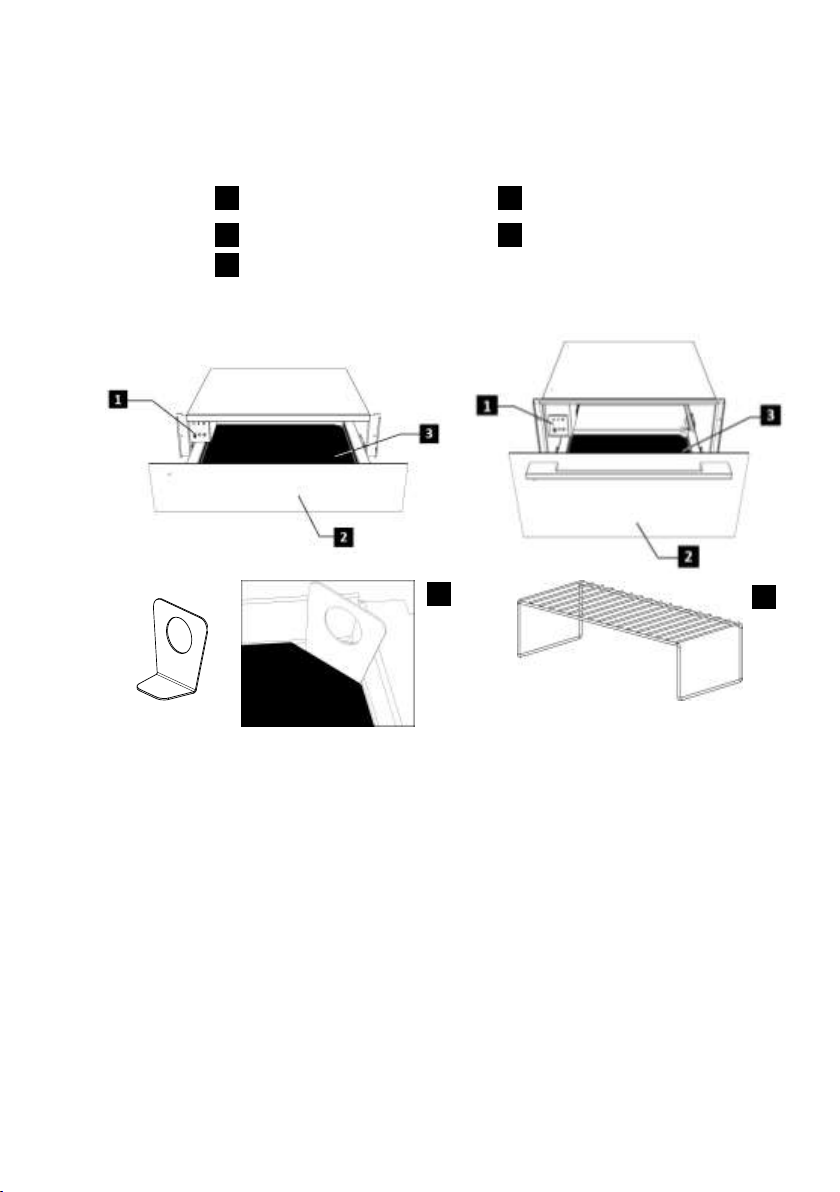
DESCRIZIONE DELL'APPARECCHIO
Pannello comandi
Strumento per la
rimozione del vetro
Panello frontale
Griglia cassetto*
Vetro / Base antiscivolo
WS140SL/ WS16SL/ WS200SL/ WS21SL
WS290SL
* Disponibile solo con il modello
WS290SL
3 5 2 4 1
5
4
Elementi principali
ITALIANO 37
Come funziona lo scaldastoviglie
L'apparecchio è dotato di un sistema di
ventilazione ad aria calda. Una ventola
distribuisce all'interno dell'apparecchio il
calore prodotto da una resistenza.
Il termostato permette di impostare e
controllare la temperatura desiderata per
le stoviglie.
La circolazione dell'aria riscalda le
stoviglie in modo uniforme e rapido.
Una griglia di protezione impedisce che si
possano toccare accidentalmente la
resistenza di riscaldamento e la ventola.
La base del cassetto è rivestita con
materiale antiscivolo per impedire che le
stoviglie possano spostarsi quando si
apre o chiude il cassetto.
Page 38
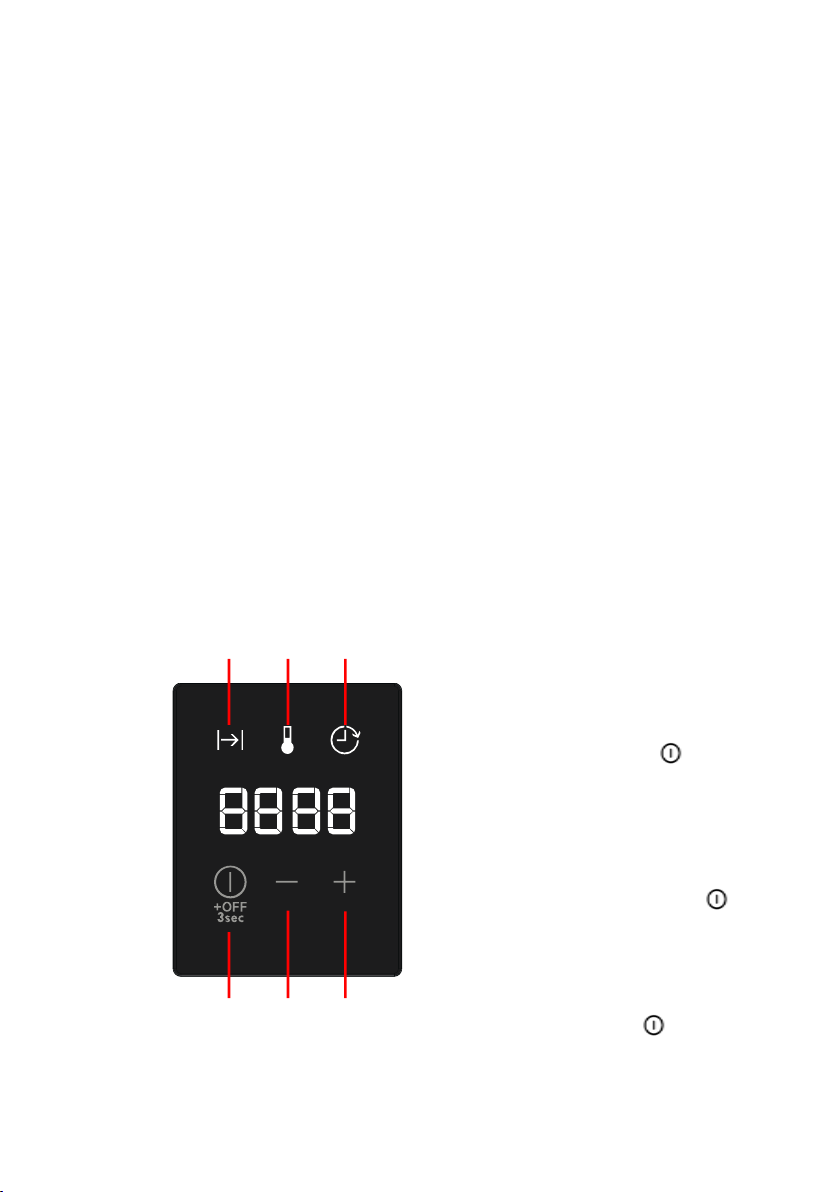
38 WWW.ELECTROLUX.COM
1 2
3
4 5 6
1. Spia timer
2. Spia temperatura
3. Spia avvio ritardato
4. Tasto Funzione / ON
5. Tasto “-” (diminuzione)
6. Tasto “+” (aumento)
UTILIZZO
Prima del primo utilizzo
Prima di utilizzare l'apparecchio per la
prima volta è necessario pulirne l'interno
e l'esterno, seguendo le istruzioni per la
pulizia fornite nella sezione "Pulizia e
manutenzione".
Riscaldare poi lo scaldastoviglie per
almeno 2 ore. Portare la manopola della
temperatura sulla posizione massima
(vedi sezione "Selezione della
temperatura").
Assicurarsi che la cucina sia ben areata
durante questa operazione.
Le parti dell’apparecchio sono state
trattate con un apposito prodotto
protettivo. Questo prodotto potrebbe
essere la causa di cattivi odori al primo
riscaldamento dell'apparecchio. Odori ed
eventuale fumo scompaiono velocemente
e non sono da attribuire a un problema di
allacciamento o a un difetto
dell'apparecchio.
Pannello comandi
Principio di funzionamento
Modalità stand-by
Quando si trova in modalità stand-by
l'intero sistema è disinserito e il display e
le spie sono spenti.
Funzionamento normale
Quando si trova in questa modalità il
sistema genera calore. Il display indica
alternativamente ogni 2 secondi il tempo
di funzionamento rimanente e la
temperatura impostata. Le spie del timer
e della temperatura si illuminano
alternativamente ogni 2 secondi in
sintonia con le indicazioni del display. La
spia di funzionamento rimane accesa
ininterrottamente finché il timer arriva a
zero.
Per programmare il funzionamento
normale, procedere come segue:
1. Premere il tasto “ ” una o più
volte finchè la spia del timer
lampeggia.
2. Premere i tasti “+ o “-” per
impostare il tempo di
funzionamento desiderato tra 0:00
e 4:00 ore.
3. Premere il tasto “ ” per
confermare. La spia della
temperatura inizia a lampeggiare.
4. Premere i tasti “+” o “-” per
impostare la temperatura
desiderata tra 30 e 80ºC.
5. Premere il tasto “ ” per 3 secondi
oppure attendere 5 secondi.
6. Il cassetto scaldastoviglie inizia a
funzionare con i parametri
impostati.
Page 39
ITALIANO
Avvio ritardato
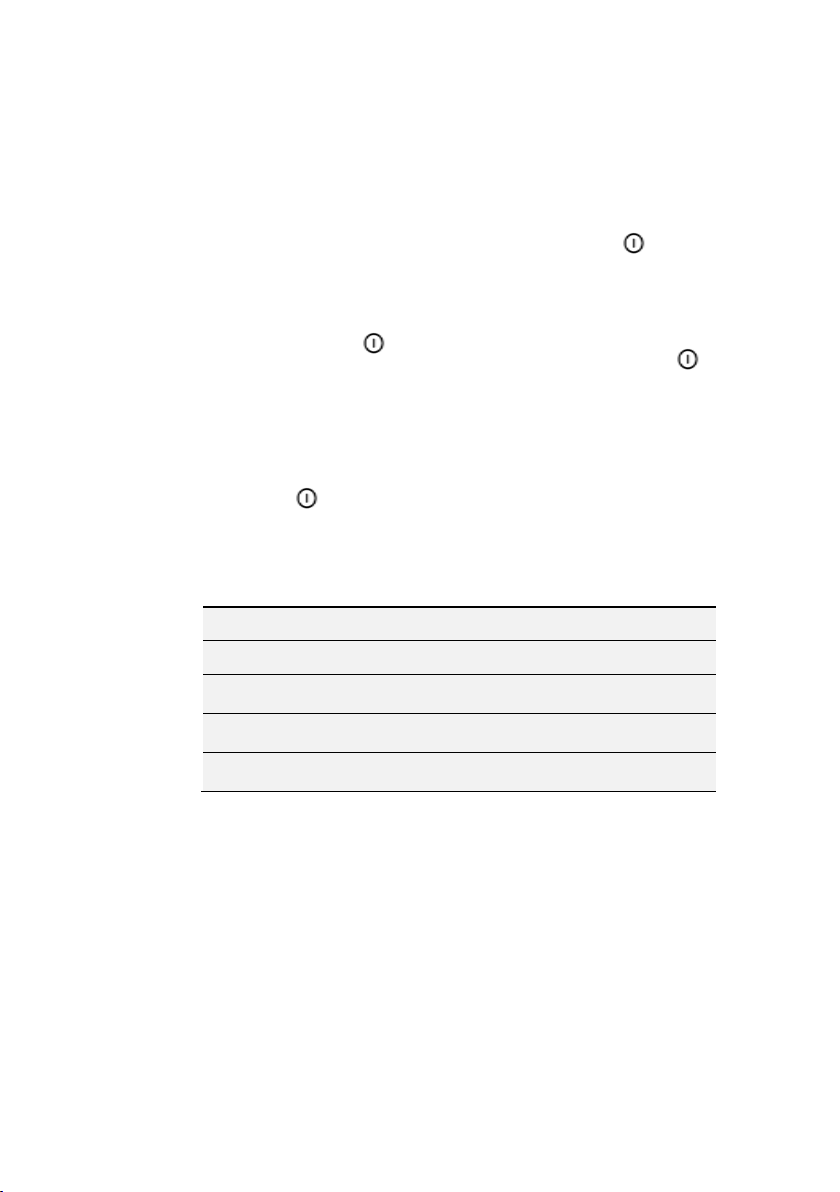
ºC
Funzione
30 ºC
Scongelamento
40ºC
Lievitazione impasti
Riscaldamento tazze/bicchieri
60 ºC
Riscaldamento stoviglie
Tenere in caldo gli alimenti
80 ºC
Riscaldamento alimenti
Cottura a bassa temperatura
In questa modalità il display indica il
tempo rimanente all’inizio del
funzionamento facendo il conto alla
rovescia. La spia di funzionamento
lampeggia e quella dell’avvio ritardato è
accesa.
Per impostare l’avvio ritardato procedere
come segue:
1. Programmare i normali parametri di
funzionamento come ai punti da 1)
a 4) del paragrafo precedente.
2. Premere il tasto “ ” per
confermare. La spia di avvio
ritardato inizia a lampeggiare.
3. Premere i tasti “+” o “-” per
impostare il ritardo di avvio
desiderato tra 0:00 e 9:50 ore.
4. Premere il tasto “ ” per 3 second.
5. Il cassetto scaldastoviglie entra in
modalità avvio ritardato.
6. Trascorso il periodo di avvio
ritardato, il cassetto scaldastoviglie
39
inizia a funzionare con i parametri
impostati.
Annullamento operazione
Il programma impostato può essere
annullato in qualsiasi momento
premendo il tasto “ ” per 3 secondi.
Il funzionamento o l’avvio ritardato
possono essere annullati (ad esempio,
se un ospite arriva in anticipo o le
stoviglie sembrano sufficientemente
calde) premendo il tasto “ ” per 3
secondi.
Selezione della funzione
Si può impostare una temperatura
compresa tra 30 e 80°C.
Raggiunta la temperatura selezionata, il
riscaldamento si disinserisce. Non
appena la temperatura scende sotto il
valore impostato, il riscaldamento si
riattiva.
Page 40
40
WWW.ELECTROLUX.COM
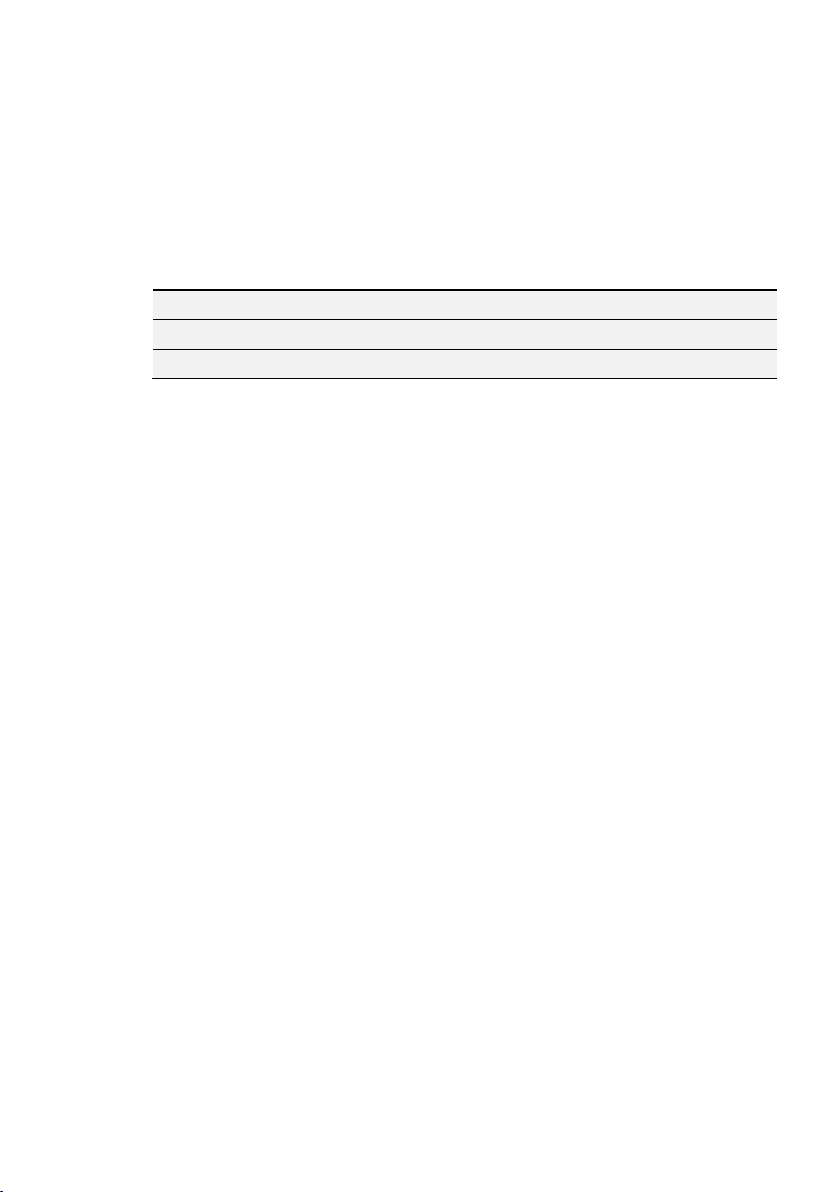
Carico
Tempo (min)
Stoviglie per 6 persone
30–35 min.
Stoviglie per 12 persone
40–45 min.
Tempi di riscaldamento
Diversi fattori influenzano i tempi di
riscaldamento:
materiale e spessore delle stoviglie;
quantità di stoviglie caricate;
disposizione delle stoviglie caricate;
impostazione della temperatura.
Non è quindi possibile fornire indicazioni
assolute.
Impostando la temperatura su 60ºC e per
raggiungere un riscaldamento
omogeneo, possono essere considerati
indicativi i seguenti valori:
Suggerimenti per la funzione "tenere in
caldo gli alimenti" e "riscaldamento
alimenti":
Preriscaldare il cassetto di riscaldamento
per 15 minuti di modo che lo spazio
interno raggiunga la temperatura
desiderata.
Cottura a bassa temperatura
Utilizzando la modalità di cottura a bassa
temperatura, è possibile cuocere
delicatamente la carne per un periodo di
tempo prolungato. Il tempo di cottura
dipende dalla dimensione del pezzo di
carne. Utilizzare piatti di vetro, ceramica
o porcellana.
Preparazione:
preriscaldare l'apparecchio con i piatti a
80°C per 10 minuti.
scottare la carne in padella con olio o
burro e collocarla nel cassetto di
riscaldamento sui piatti preriscaldati.
Mantenere la temperatura impostata su
80°C.
Page 41

ITALIANO
Tabella: cottura a bassa temperatura (Valori di riferimento)
Applicazione
Quantità
Arrostire delicatamente sul
piatto di cottura
Tempi di cottura
Manzo
Completamente al
sangue
1 kg
su tutti i lati, lasciar cuocere 2
minuti per lato
1 – 1.5 ora
Al sangue
1 kg
su tutti i lati, lasciar cuocere 3
minuti per lato
1.5 – 2 ora
Cottura media
1 kg
su tutti i lati, lasciar cuocere 3
minuti per lato
2 – 2.5 ora
Ben cotto
1 kg
su tutti i lati, lasciar cuocere 3
minuti per lato
2.25 – 2.5 ore
Vitello
Filetto, intero
1 kg
su tutti i lati, lasciar cuocere 2
minuti per lato
1.75 - 2 ore
Costoletta, un
pezzo unico
1 kg
su tutti i 4 lati, lasciar cuocere 3
minuti per lato
2 – 2.5 ore
Maiale
Filetto, intero
500-600 g
su tutti i lati, lasciar cuocere 2
minuti per lato
1.5 ora
Agnello
Filetto
400 g
su tutti i lati, lasciar cuocere 2
minuti per lato
1 – 1.25 ora
Se si desidera mantenere al caldo la carne cucinata, impostare nuovamente la temperatura su 60°C. Non
è consigliabile utilizzare la funzione di riscaldamento per più di un'ora.
41
Page 42
42
WWW.ELECTROLUX.COM
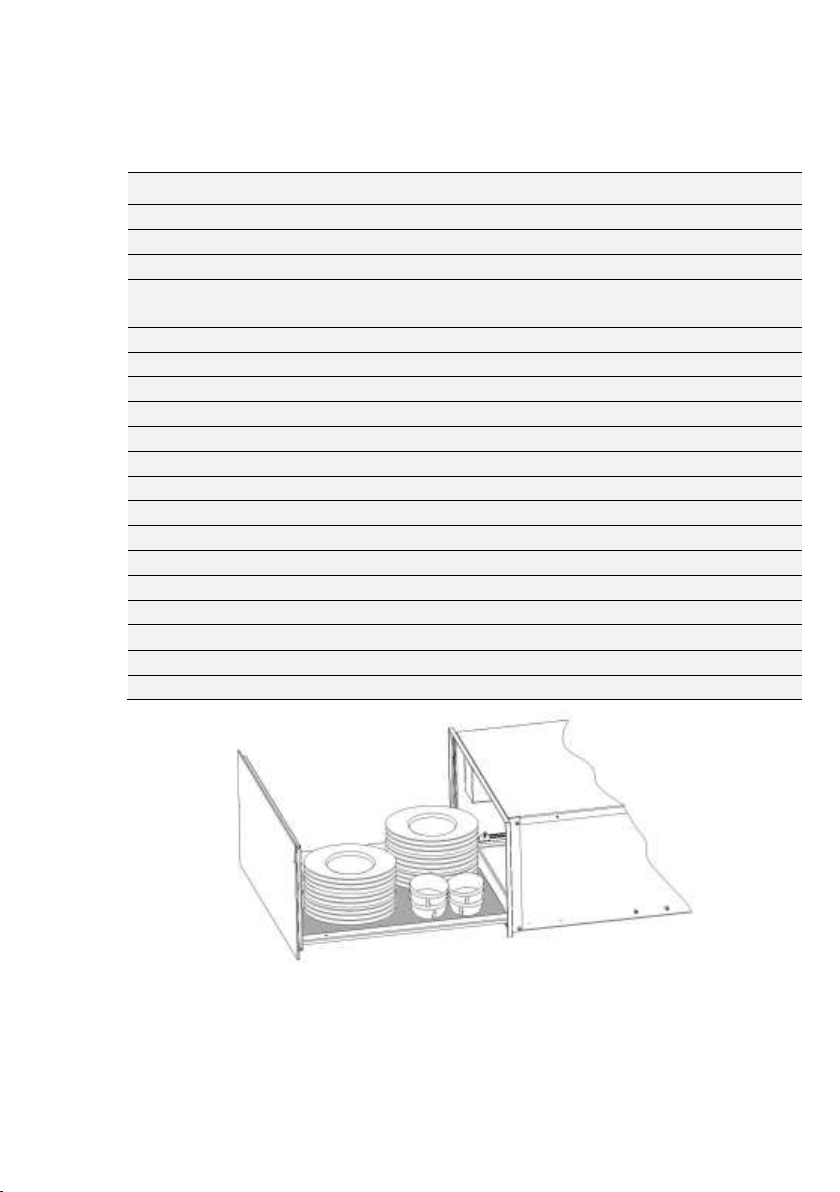
WS 140 / 16 SL
WS 200 / 21 SL
WS290SL
Stoviglie per 6 persone
Per 8 persone
Per 12 persone
6 piatti Ø 24 cm
8 x 24 cm Piatti piani
12 x 24 cm Piatti piani
6 scodelle per minestra
Ø 10cm
8 x 10 cm Piatti fondi
12 x 10 cm Piatti fondi
1 ciotola Ø 19 cm
1 x 19 cm Piatti portata
1 x 19 cm Piatti portata
1 ciotola Ø 17 cm
1 x 17 cm Piatti portata
1 x 17cm Piatti portata
1 ciotola Ø 32 cm
2 x 32 cm Piatti pizza
2 x 32 cm Piatti pizza
o
oppure
oppure
20 piatti Ø 28 cm
30 piatti con 28 cm
40 piatti con 28 cm
o oppure
oppure
80 tazzine da caffè
120 tazzine da caffè
160 tazzine da caffè
o
oppure
oppure
40 tazze da tè
60 tazze da tè
80 tazze da tè
o oppure
oppure … …
...
CAPACITÀ DI CARICO
La capacità di carico dell’apparecchio dipende dalle dimensioni delle stoviglie:
Page 43

ITALIANO
PULIZIA E MANUTENZIONE
43
La pulizia rappresenta generalmente
l'unico tipo di manutenzione necessaria.
ATTENZIONE!
Prima di iniziare la pulizia staccare
l'apparecchio dall'alimentazione di rete.
Togliere la spina dalla presa o disattivare
il circuito di alimentazione dello
scaldastoviglie.
Non utilizzare detergenti aggressivi o
prodotti abrasivi, spugne abrasive né
oggetti appuntiti, perché potrebbero
macchiare l'apparecchio.
Non utilizzare assolutamente pulitori a
getto di vapore o ad alta pressione.
Frontale e pannello comandi
È sufficiente pulire lo scaldastoviglie con
un panno umido. Nel caso dovesse
essere particolarmente sporco,
aggiungere un paio di gocce di
detergente all'acqua di pulizia.
Asciugare quindi le superfici con un
panno asciutto.
Gli scaldastoviglie con frontali in acciaio
inossidabile possono essere puliti con
detergenti speciali appositi. Questi
prodotti rallentano la formazione dello
sporco sulla superficie dell'apparecchio.
Applicare una minima quantità di prodotto
con un panno morbido su tutta la
superficie da trattare.
Per la pulizia di scaldastoviglie
con frontale di aluminio
Utilizzare un detergente delicato non
abrasivo da applicare con un panno
morbido e senza pelucchi. Pulire la
superficie in senso orizzontale senza fare
pressione, dal momento che l’alluminio si
graffia facilmente.
Vano interno dello
scaldastoviglie
Pulire il vano interno dello scaldastoviglie
con un panno umido dopo ogni uso. Nel
caso dovesse essere particolarmente
sporco, aggiungere un paio di gocce di
detergente all'acqua di pulizia.
Asciugare quindi le superfici
con un panno asciutto
Evitare che defluisca acqua nei fori di
ventilazione.
Riutilizzare lo scaldastoviglie solo quando
si è asciugato completamente.
Base antiscivolo
La base antiscivolo può essere tolta per
pulire il fondo del cassetto.
Pulire la base preferibilmente a mano con
acqua calda e un detersivo delicato.
Asciugare bene.
Reinserire la base antiscivolo solo
quando si sia completamente asciugata.
COSA FARE SE LO SCALDASTOVIGLIE NON
FUNZIONA
ATTENZIONE!
Qualunque tipo di riparazione deve
essere eseguita solo da un tecnico
autorizzato. Eventuali riparazioni eseguite
da una persona non autorizzata dal
produttore sono pericolose.
I seguenti guasti possono essere rimossi
dall'utente senza che sia necessario
l'intervento del Servizio Assistenza.
Le stoviglie non si riscaldano a
sufficienza. Verificare se:
l'apparecchio sia acceso;
sia stata impostata la temperatura
giusta;
le aperture di ventilazione non siano
ostruite dalle stoviglie;
le stoviglie siano state riscaldate per
un periodo sufficientemente lungo.
I tempi di riscaldamento possono
dipendere da diversi fattori, per
esempio:
Page 44
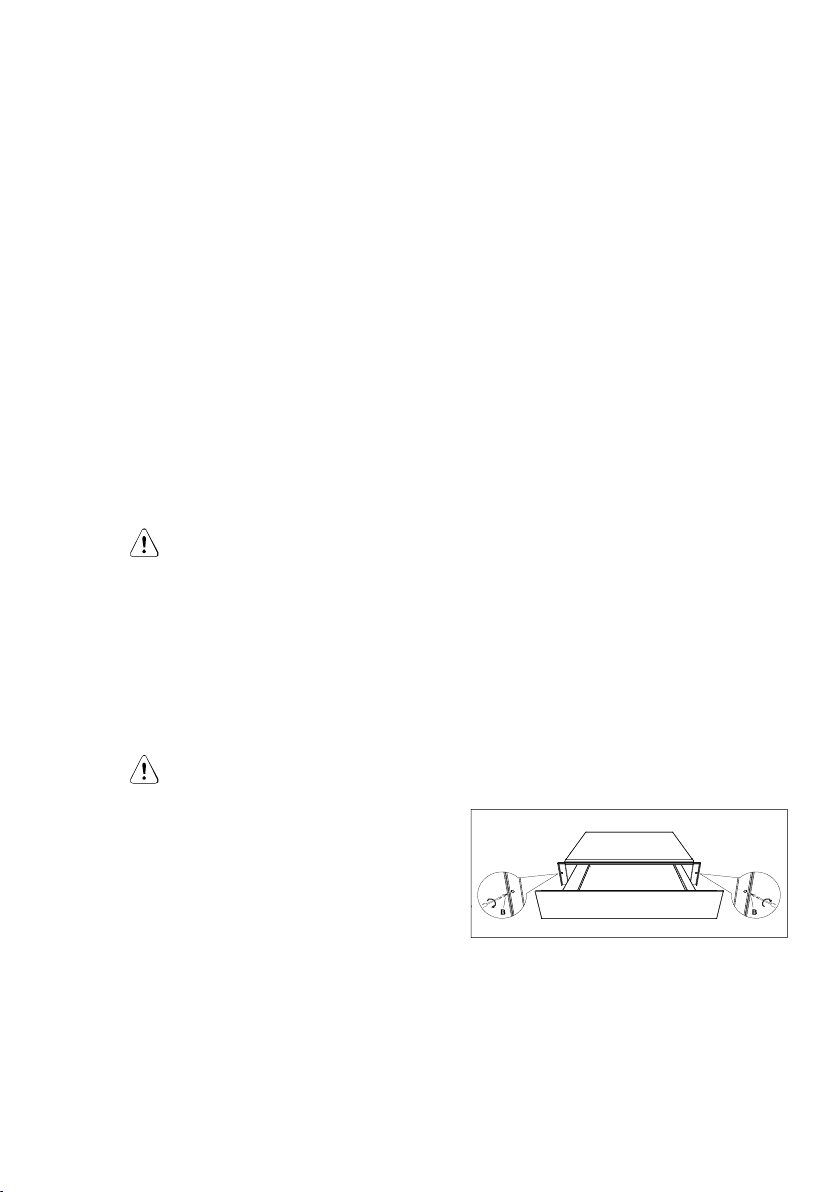
44
WWW.ELECTROLUX.COM
materiale e spessore delle stoviglie;
quantità di stoviglie caricate;
disposizione delle stoviglie caricate;
Le stoviglie non si riscaldano affatto.
Verificare se:
si sente il rumore di ventola. Se la
ventola è in funzione, significa che la
resistenza di riscaldamento è
difettosa. Se la ventola non funziona,
significa che è rotta.
ISTRUZIONI DI INSTALLAZIONE
i fusibili si sono fusi o gli interruttori
salvavita sono scattati.
Le stoviglie si riscaldano troppo:
il selettore della temperatura non
funziona.
La spia dell'interruttore on/off non si
accende:
la spia di controllo è fulminata.
Prima dell’installazione
Verificare che la tensione di ingresso
indicata sulla targhetta delle
caratteristiche corrisponda alla tensione
della presa di corrente da utilizzare.
Aprire il cassetto, rimuovere tutti gli
accessori e il materiale d'imballaggio.
ATTENZIONE!
Il frontale dello scaldastoviglie potrebbe
essere ricoperto da un film protettivo.
Rimuovere la protezione con cautela
prima di utilizzare lo scaldastoviglie per
la prima volta.
Assicurarsi che lo scaldastoviglie non sia
in alcun modo danneggiato. Controllare
che il cassetto si apra e chiuda
correttamente. In presenza di danni
informare il Servizio Assistenza.
ATTENZIONE:
La presa di corrente deve essere
facilmente accessibile anche dopo che lo
scaldastoviglie è stato incassato.
Lo scaldastoviglie può essere incassato
solo sugli elettrodomestici indicati dal
produttore. Se montato in combinazione
con altre apparecchiature, la garanzia
cessa di essere valida in quanto è
impossibile garantirne il corretto
funzionamento.
Incasso
Per procedere al montaggio dello
scaldastoviglie in combinazione con un
altro apparecchio, predisporre un piano
intermedio fisso nell’unità di
alloggiamento che assicuri la portata
necessaria per entrambi gli apparecchi.
L'apparecchio combinato viene invece
posizionato senza ulteriori piani
intermedi direttamente sullo
scaldastoviglie incassato.
Per l'incasso dell'apparecchio combinato
fare riferimento alle indicazioni contenute
nel relativo libretto di istruzioni e
montaggio.
Le relative dimensioni per l'incasso sono
indicate in mm e riportate nelle tabelle
che appaiono alla fine di questo libretto.
Procedere come indicato:
1. Posizionare lo scaldastoviglie sul
ripiano e farlo scorrere all’interno del
recesso in modo che sia centrato e
allineato alla parte frontale dell’unità.
2. Assicurarsi che la struttura dello
scaldastoviglie sia allineata e poggi
perfettamente sul ripiano.
3. Aprire il cassetto e fissare lo
scaldastoviglie alle pareti laterali
dell’unità di alloggiamento con le due
viti in dotazione.
Allacciamento elettrico
L’allacciamento elettrico deve essere
realizzato da un elettricista qualificato
conforme alla legislazione vigente.
Prima di allacciare lo scaldastoviglie alla
rete elettrica, assicurarsi che i dati di
tensione e frequenza riportati sulla
targhetta che si trova all’interno
Page 45
ITALIANO
dell’apparecchio corrispondano a quelli
della vostra rete elettrica.
L’allacciamento elettrico è realizzato
attraverso un interruttore onnipolare,
adatto all’intensità di alimentazione e con
una distanza minima di 3 mm tra i
contatti, così da garantire il disinnesto in
caso di emergenza o durante la pulizia
dello scaldastoviglie.
Qualora per l’allacciamento elettrico
dovesse essere utilizzata una spina,
dovrà essere accessibile dopo
l’installazione.
L’allacciamento deve contemplare una
corretta messa a terra, nel rispetto nella
normativa vigente.
ATTENZIONE:
L’apparecchio deve essere collegato
a terra.
Se il cavo flessibile di alimentazione
allacciato allo scaldastoviglie deve
essere sostituito, rivolgersi a un servizio
assistenza autorizzato, poiché sono
necessari degli attrezzi appositi.
Il fabbricante e i rivenditori non si
assumono alcuna responsabilità per
eventuali danni causati a persone,
animali o cose derivanti dalla mancata
osservanza delle istruzioni fornite per
l’installazione.
SALVAGUARDIA DELL‘AMBIENTE
45
Riciclare i materiali con il
simbolo.
Buttare l'imballaggio negli appositi
contenitori per il riciclaggio.
Aiutare a proteggere l’ambiente e la
salute umana e a riciclare rifiuti derivanti
da apparecchiature elettriche ed
elettroniche.
.
Non smaltire le apparecchiature
che riportano il simbolo insieme ai
normali rifiuti
domestici. Portare il prodotto al punto di
riciclaggio più vicino o contattare il
comune di residenza.
Page 46
46 WWW.ELECTROLUX.COM
CONTENTS
SAFETY INFORMATION ................................................................................... 47
APPLIANCE DESCRIPTION ............................................................................. 52
USE .................................................................................................................... 53
LOAD CAPACITY .............................................................................................. 57
CLEANING AND MAINTENANCE ..................................................................... 58
WHAT TO DO IF THE CROCKERY WARMER DOESN’T WORK ................... 59
INSTALLATION INSTRUCTIONS ..................................................................... 59
ENVIRONMENT CONCERNS ........................................................................... 60
INSTALLATION ................................................................................................. 61
WE'RE THINKING OF YOU
Thank you for purchasing an Electrolux appliance. You’ve chosen a product that brings
with it decades of professional experience and innovation. Ingenious and stylish, it has
been designed with you in mind. So whenever you use it, you can be safe in the
knowledge that you’ll get great results every time. Welcome to Electrolux.
Visit our website to:
Get usage advice, brochures, trouble shooter, service information:
www.electrolux.com
Register your product for better service:
www.electrolux.com/productregistration
Buy Accessories, Consumables and Original spare parts for your appliance:
www.electrolux.com/shop
CUSTOMER CARE AND SERVICE
We recommend the use of original spare parts.
When contacting Service, ensure that you have the following data available.
The information can be found on the rating plate. Model, PNC, Serial Number.
Warning / Caution-Safety information.
General information and tips.
Environmental information.
Subject to change without notice.
Page 47
SAFETY INFORMATION
Carefully read the instructions before installing and
using the equipment. The manufacturer is not liable for
improper installation and use of the equipment that may
cause injuries and damage. Always keep the
instructions at hand, so they can be easily referred to
during use. This appliance complies with current safety
standards. Improper use of the appliance may put the
user at risk.
Safety of children and vulnerable adults
WARNING!
Risk of choking, injury or permanent disability.
This appliance can be used by children aged 8 years
and above and persons with reduced physical,
sensory or mental capabilities or lack of experience
and knowledge if they are given supervision or
instructions concerning how to use the appliance in
a safe way and understand the hazards involved.
Children should not play with the appliance.
Keep packaging materials away from children.
Keep children and pets away from the appliance
during operation or when cooling.
Cleaning and maintenance should not be done by
children without supervision.
WARNING: Accessible parts may become hot
during use. Young children should be kept away.
ENGLISH 47
Page 48

48 WWW.ELECTROLUX.COM
Warnings on general safety
WARNING: The appliance and its accessible
parts become hot during use. Care should be taken
to avoid touching heating elements. Children less
than 8 years of age shall be kept away unless
continuously supervised.
During use the appliance becomes hot. Care should
be taken to avoid touching heating elements inside
the oven.
Depending on the temperature selected and the
operating time, the temperature inside the appliance
may reach 80 ºC. To take crockery out of the
crockery warmer protect your hands by using oven
gloves or an oven cloth.
Do not sit or hang on the drawer. The telescopic
runners will be damaged. The maximum load
capacity of the drawer is 25 kg.
Do not store synthetic containers or easily
inflammable objects inside the crockery warmer.
When you switch on the appliance such containers
and objects may melt or catch fire. Fire danger.
Do not use the appliance to heat up the air
temperature in the kitchen. The high temperatures
reached may cause easily inflammable objects close
to the appliance to catch fire.
When you stop using the appliance at the end of its
working life, disconnect it from the power supply and
render the electrical cable unusable so that the
appliance is not a danger if, for example, children
use it for playing.
Page 49

ENGLISH 49
Installation
During installation, follow the instructions supplied
separately.
Only qualified personnel can install the appliance
and replace the cable.
The electric system must be equipped with a means
for disconnection, with a contact separation in all
poles that provides full disconnection under
overvoltage category III.
If a plug is used for the electric connection, then it
must be accessible after installation.
The connection should include correct earthing, in
compliance with current norms.
WARNING! Before connecting the appliance
compare the power data (voltage and frequency)
indicated on the characteristics plate with those of
the power supply in question. If these data do not
match there may be problems. In case of doubt,
contact an electrician.
WARNING! If the electrical wire plug is removed,
the appliance must be installed and connected by a
technician. Contact a qualified electrician who knows
and respects current safety standards. The
manufacturer cannot be held responsible for
damage resulting from fitting or connecting errors.
WARNING! The electrical safety of the appliance
can only be guaranteed if it is earthed. The
manufacturer cannot be held responsible for
damage resulting from the absence of or defects in
the installation’s protection system (e.g. electrical
shock).
Page 50

50 WWW.ELECTROLUX.COM
WARNING! Only use the appliance once it has
been fitted into its built-in position. Only in this
manner can it be guaranteed that users cannot
access the electrical components.
WARNING! Never open up the appliance’s frame.
Possible contacts with electrical conducting parts or
changes to electrical or mechanical components
may represent a danger to users’ safety and
prejudice the correct working of the appliance.
Cleaning
Do not use harsh abrasive cleaners or sharp metal
scrapers to clean the oven door glass since they can
scratch the surface, which may result in shattering of
the glass.
Do not use steam cleaners to clean the appliance.
Do not use high pressure or steam jet cleaning
devices. The steam may affect electrical
components and cause a short circuit. The steam
pressure may also cause damage to the appliance’s
surface and components in the long term.
Repairs
Disconnect the appliance from the power supply
before carrying out any maintenance operation.
WARNING! The appliance must be disconnected
from the electrical current when installation and
repair work is being done. To disconnect the
appliance from the current, one of the following
conditions must apply:
- The switchboard fuses / circuit breakers must be
disconnected.
Page 51

ENGLISH 51
- The plug should be removed from the socket. To
remove the plug from the socket do not pull on the
electric cable but rather pull out the plug itself
directly.
WARNING! Repairs and maintenance, especially
of parts carrying electrical current, must only be
done by technicians authorised by the manufacturer.
The manufacturer and retailers do not accept
responsibility for any damaged caused to people,
animals or property as a result of repairs and
maintenance carried out by non-authorised
personnel.
WARNING! Repairs undertaken during the
guarantee period must only be done by technicians
authorised by the manufacturer. If this is not the
case then any damage resulting from the repair in
question is excluded from the guarantee.
Page 52
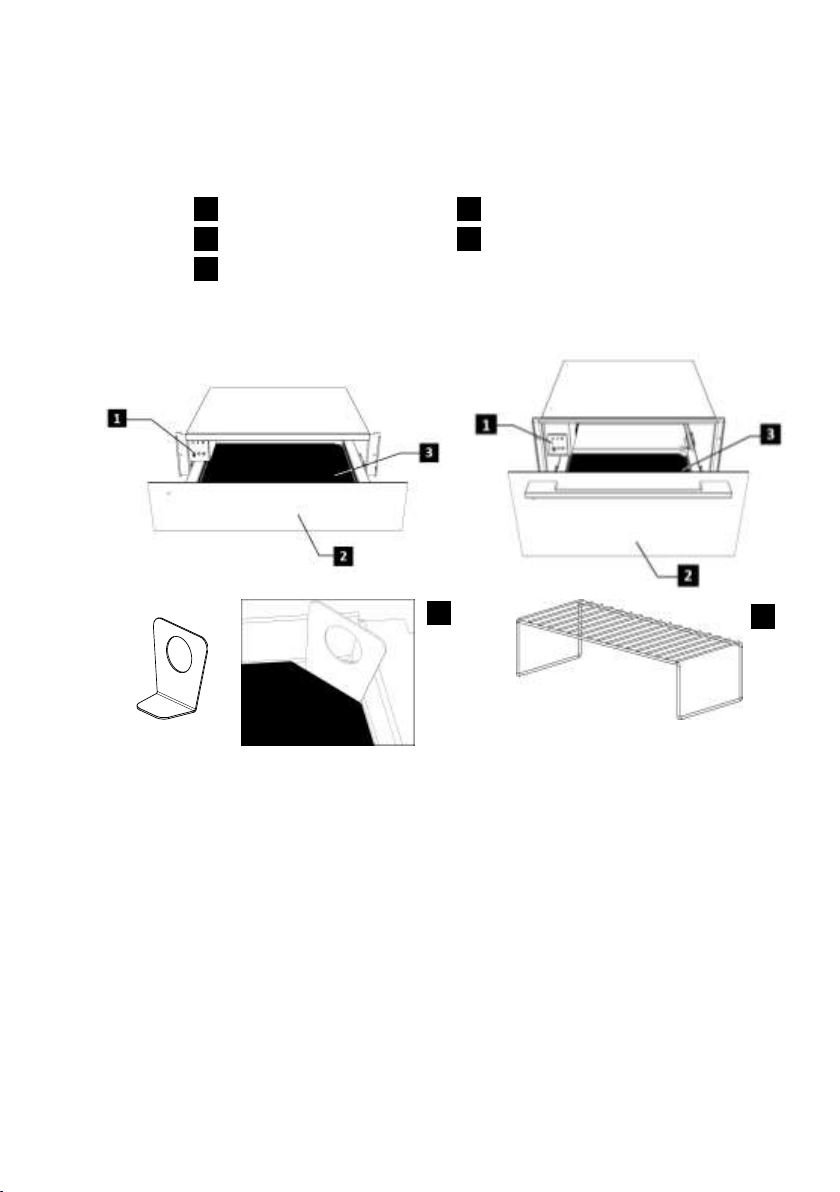
52 WWW.ELECTROLUX.COM
Control Panel
Glass removal tool
Front Panel
Drawer Grid *
Glass/ Anti-Slip mat
WS140SL/ WS16SL/ WS200SL/ WS21SL
WS290SL
*Drawer Grid only available with the
model WS290SL
3 5 2 4 1 5 4
APPLIANCE DESCRIPTION
Main Components
How the crockery warmer works
This appliance is equipped with a warm
air circulation system. A fan distributes
the heat generated by an electrical
heating element throughout the interior of
the appliance.
The thermostat allows the user to define
and control the temperature wanted for
the crockery.
The circulating hot air that is generated
heats up the crockery quickly and evenly.
A metal grille protects both the heating
element and the fan.
The base of the drawer is fitted with a
non-slip mat to prevent plates and dishes
sliding around, when the drawer is
opened and closed.
Page 53
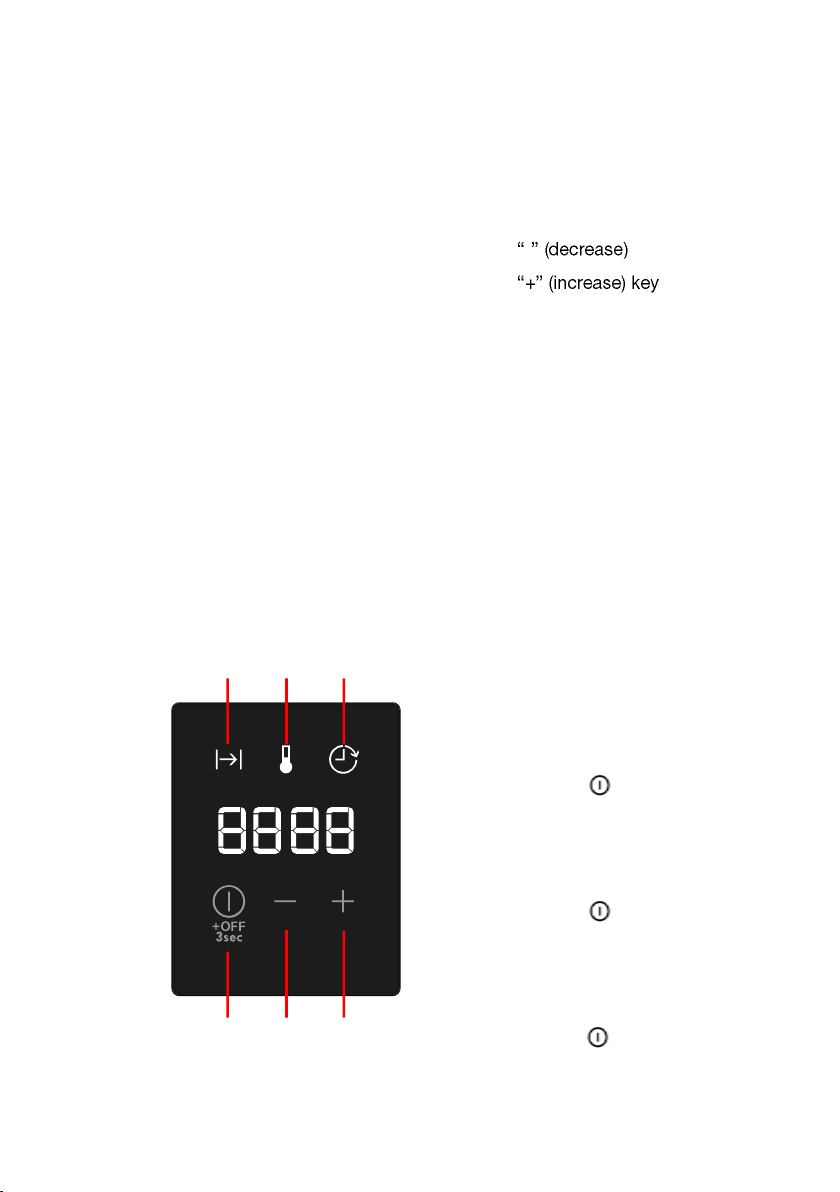
USE
1 2
3
4 5 6
1. Timer indicator light
2. Temperature indicator light
3. Delayed Start indicator light
4. Function / ON/OFF key
5. -
6.
Before using for the first time
Before using the appliance for the first
time you should clean the interior and the
exterior, following the cleaning
instructions given in the section
“Cleaning and Maintenance”.
Then heat the crockery warmer for at
least 2 hours. For this, turn the
temperature control to the maximum
position (see section ‘Selecting
temperature”).
Make sure the kitchen is well-ventilated
when you are doing this.
The appliance’s parts are protected by a
special product. For this reason, during
the first heating an odour will be
released. Both the odour and any smoke
that may form will disappear after a short
time and neither signifies that there is
anything wrong with the connection or
the appliance.
Control Panel
ENGLISH 53
Operating settings
Stand-by mode
In this mode the whole system is
disconnected and no indicator light or
display is lit.
Normal Operation
In this mode the system is generating
heat. The display shows the remaining
operating time and the set temperature
alternating each 2 seconds. The Timer
and Temperature indicator lights lightup alternating each 2 seconds and
coordinated with the display indication.
The Operation indicator light is
illuminated continuously until the Timer
reaches zero.
To program the normal operation,
proceed as follows:
1. Press the “ ” key once or several
times until the Timer indicator light
is flashing.
2. Press the “+” or “-” keys to set the
desired operation time in the range
0h00 – 4h00.
3. Press the “ ” key to validate. The
Temperature indicator light starts to
flash.
4. Press the “+” or “-” keys to set the
desired temperature in the range
30 – 80ºC.
5. Press the “ ” key for 3 seconds or
wait 5 seconds.
6. The Warming Drawer starts to
operate with the set parameters.
Page 54
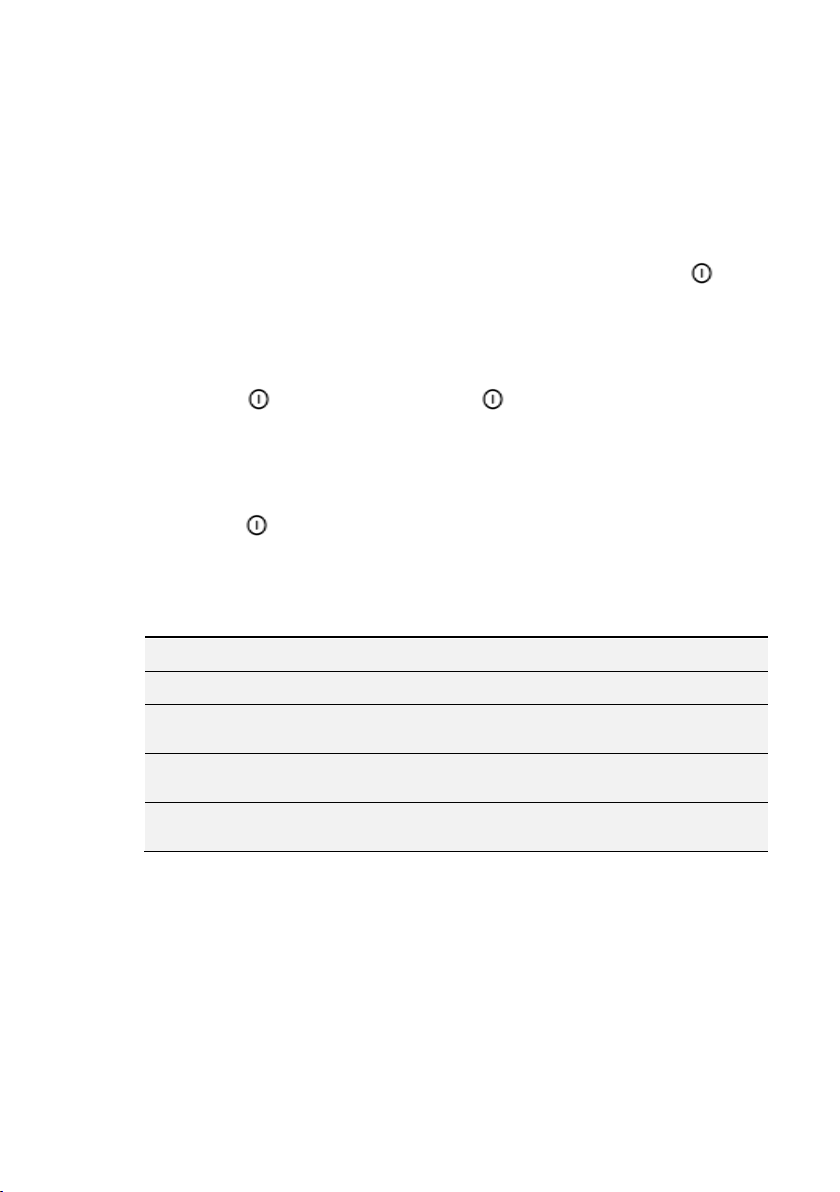
54 WWW.ELECTROLUX.COM
ºC
Function
30ºC
Defrosting
40ºC
Proving dough
Cups / glasses warming
60ºC
Crockery warming
Keep food warm
80ºC
Food Warming
Low temperature cooking
Delayed Start
In this mode the Display shows the
remaining time for the operation to
start and counting-down. The
Operation indicator light will blink and
the Delayed Start indicator is
illuminated.
To set a delayed start, proceed as
follows:
1. Program the normal operation
parameters as in points 1) to 4) of
the previous section.
7. Press the “ ” key to validate. The
Delayed Start indicator light starts
to flash.
2. Press the “+” or “-” keys to set the
desired start delay in the range
0h00 – 9h50.
8. Press the “ ” key for 3 seconds.
3. The Warming Drawer enters the
Delayed Start mode.
4. When the delay has elapsed the
Warming Drawer starts to operate
with the set parameters.
Cancel Operation
The programming can be cancelled at
any time by pressing the “ ” key for
3 seconds.
The operation or the delayed start can
be cancelled (for example, because a
guest arrived earlier or the crockery
seems warm enough)by pressing the
“ ” key for 3 seconds.
Selecting function
You can select temperatures between 30
and 80 °C.
As soon as the selected temperature is
reached, the heating is turned off. When
the temperature drops to a value below
than the one selected, the heating is
turned back on.
Heating times
Various factors affect heating times:
Material and thickness of the
crockery;
Load quantity;
How the crockery is arranged;
Temperature setting.
It is therefore not possible to give any
precise heating times.
However, as a guide, the following
times are given for the thermostat
setting of 60ºC and for uniform heating
of the crockery:
Page 55

ENGLISH 55
Load
Time (min)
Crockery for 6 people
30 – 35
Crockery for 12 people
40 --- 45
Suggestions for the function
Keep Food Warm and Food
Warming:
Preheat the Warming Drawer 15 minutes
to ensure the interior space has the
required temperature.
Low temperature cooking
With the low temperature cooking meat
can be gently prepared at low
temperatures over a longer period of
cooking time. The cooking time is
dependent on the piece of meat’s size.
Use dishes made of glass, china or
ceramics.
Preparation:
Preheat the device with the dishes at
80°C for 10 minutes.
Sear the meat in a pan using fat and
place it into the heat drawer on the
preheated dishes. Keep the setting at
80° C.
Page 56

56 WWW.ELECTROLUX.COM
Application
Quantity
Roast gently on the
cooking plate
Cooking
times
Beef
Completely rare
1kg
on all sides, on each 2min.
1 – 1.5 hr
Rare
1kg
on all sides, on each 3min
1.5 – 2 hrs
Medium
1kg
on all sides, on each 3min
2 – 2.5 hrs
Well-done
1kg
on all sides, on each 3min
2.25 – 2.5hrs.
Veal
Filet, whole
1kg
on all sides, on each
2min.
1.75 – 2hrs.
Loin, in one
piece
1kg
on all 4 sides, on each
3min.
2 – 2.5hrs.
Porc
Filet, whole
500-600 g
on all sides, on each 2min.
1.5hrs
Lamb
Filet
400g
on all sides, on each 2min
1 – 1.25hrs.
Table: Low Temperature Cooking (Reference Values)
If you wish to keep the cooked meat warm, put the settingback to 60° C. We recommend not to use
the warming function for more than 1hr.
Page 57
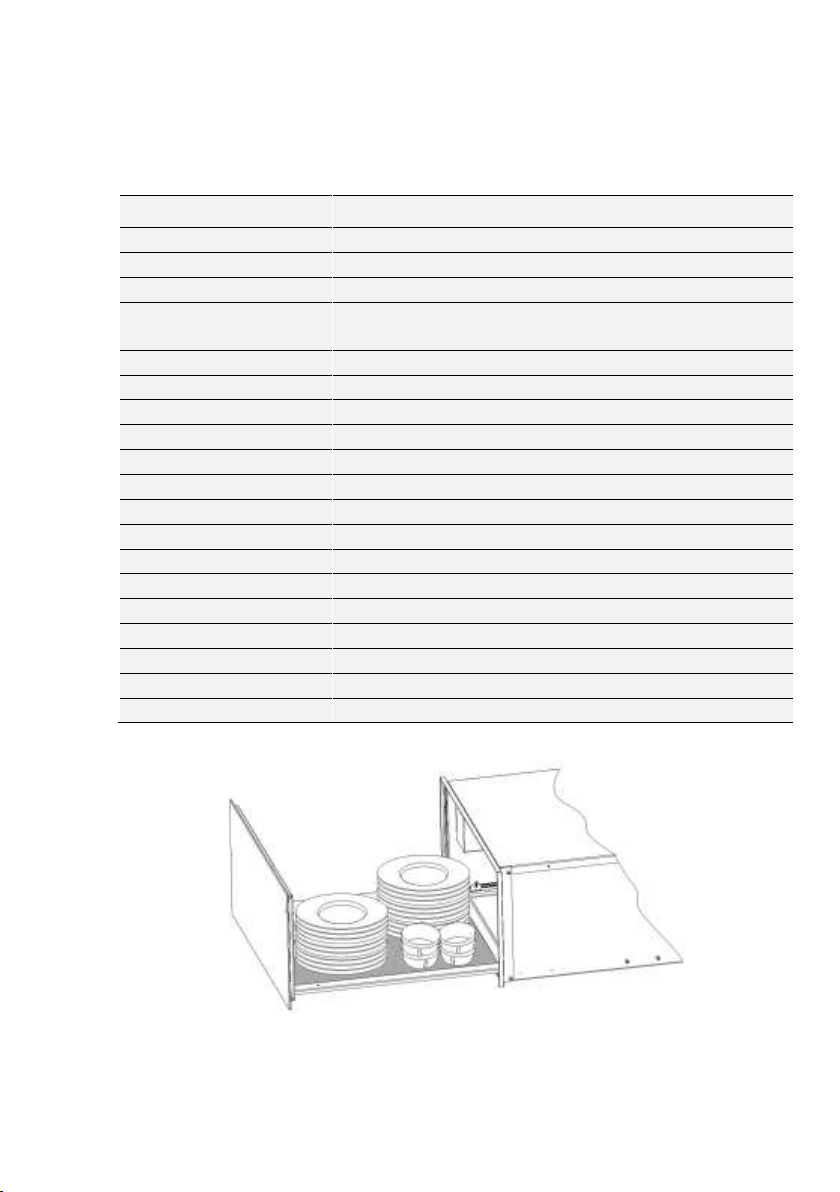
WS 140 / 16 SL
WS 200 / 21 SL
WS 290 SL
Stoviglie per 6 persone
Per 8 persone
Per 12 persone
6 piatti Ø 24 cm
8 x 24 cm Piatti piani
12 x 24 cm Piatti piani
6 scodelle per minestra
Ø 10cm
8 x 10 cm Piatti fondi
12 x 10 cm Piatti fondi
1 ciotola Ø 19 cm
1 x 19 cm Piatti portata
1 x 19 cm Piatti portata
1 ciotola Ø 17 cm
1 x 17 cm Piatti portata
1 x 17cm Piatti portata
1 ciotola Ø 32 cm
2 x 32 cm Piatti pizza
2 x 32 cm Piatti pizza
o
oppure
oppure
20 piatti Ø 28 cm
30 piatti con 28 cm
40 piatti con 28 cm
o oppure
oppure
80 tazzine da caffè
120 tazzine da caffè
160 tazzine da caffè
o
oppure
oppure
40 tazze da tè
60 tazze da tè
80 tazze da tè
o oppure
oppure … …
...
LOAD CAPACITY
Load capacity depends on the size of the crockery items:
ENGLISH 57
Page 58

58 WWW.ELECTROLUX.COM
CLEANING AND MAINTENANCE
Cleaning is the only maintenance action
that is required normally.
WARNING!
Cleaning must be done with the crockery
warmer disconnected from the electrical
power supply. Remove the plug from the
power socket or disconnect the crockery
warmer power supply circuit.
Do not use aggressive or abrasive
cleaning products, abrasive sponges or
pointed objects since stains or abrasion
marks may appear.
Do not use high pressure or steam jet
cleaning appliances.
Appliance front and control
panel
The crockery warmer can be cleaned
using just a damp cloth. If it is very dirty,
add a few drops of washing-up liquid to
the washing water.
Wipe the surfaces dry using a dry cloth.
For stainless steel fronted crockery
warmers,
special products for treatment of
stainless steel surfaces can be used.
These products prevent the surfaces
becoming dirty again for some time.
Apply a thin layer of such a product on
the surface using a soft cloth.
On aluminium fronted crockery warmers
use a gentle glass cleaning product and
a soft cloth that does not release fluff.
Wipe horizontally without pressing on the
surface since aluminium is sensitive to
scratches and cuts.
Interior of the crockery warmer
Clean the inside of the crockery warmer
regularly using a damp cloth. If it is very
dirty add a few drops of washing-up
liquid to the washing water.
Wipe the surfaces dry using a dry cloth.
Avoid water entering through the air
circulation opening.
Only use the crockery warmer again
when it is completely dry.
Anti-slipt mat
The non-slip surface mat can be
removed to facilitate cleaning of the
drawer.
The mat can be cleaned by hand using
hot water with a few drops of washing-up
liquid. Dry thoroughly.
The non-slip mat should only be replaced
when it is completely dry.
Page 59

ENGLISH 59
WHAT TO DO IF THE CROCKERY WARMER DOESN’T
WORK
WARNING!
Any type of repair must only be done by a
specialised technician. Any repair done by a
person not authorised by the manufacturer is
dangerous.
Before contacting Technical Assistance,
check on the following:
The crockery doesn’t heat up enough.
Check whether:
The appliance has been switched on.
The appropriate temperature has been
selected.
The air circulation orifices are covered by
the crockery.
The crockery was left to heat up for
sufficient time.
Heating time depends on several factors,
such as, for example:
Crockery material type and thickness.
Quantity of crockery.
How the crockery is arranged.
The crockery doesn’t heat up at all. Check
whether:
You can hear the noise of a fan.If the fan
The switchboard fuses / circuit breakers
The crockery is heating up too much, check
if:
The thermostat selector is broken.
The on/off switch does not light up, check if:
The switch’s pilot light has blown.
INSTALLATION INSTRUCTIONS
WARNING!
Read the "Safety Information" carefully for
your safety and correct operation of the
appliance before installing the appliance.
Before installation
Check that the input voltage indicated on the
characteristics plate is the same as the
voltage of the power outlet you are going to
use.
Open the drawer and take out all the
accessories and remove the packing material.
WARNING!
The front surface of the crockery heater may
be wrapped in a protective film. Before using
the crockery warmer for the first time, remove
this film carefully.
Make sure that the crockery warmer is not
damaged in any way. Check that the drawer
opens and closes correctly. If you find any
damage, contact the Technical Assistance
Service.
ATTENTION:
The power socket should be easily accessible
after the crockery warmer has been installed.
The crockery warmer should only be built-in in
combination with those appliances indicated
by the manufacturer.
Installation
To build-in the crockery warmer in
combination with another appliance there
must be a fixed, interim shelf in the housing
unit to support the weight of both appliances.
The appliance to be combined with the
crockery warmer will be placed directly on the
latter without any need to have a separating
shelf.
To build-in the appliance which is combined
with the crockery warmer, follow the
instructions set out in the respective
instructions and fitting booklet.
The relevant installation dimensions are
indicated in mm in the diagrams shown at the
end of this booklet. Proceed as follows:
1. Place the crockery warmer on the shelf
and slide it towards the interior of the
niche in such a way that it is centred and
completely lined up with the front of the
unit.
2. Check that the crockery warmer’s frame is
properly levelled and is sitting evenly on
the shelf.
is operating then the heating element is
broken; if the fan is not operating then the
fan is broken.
have fused / tripped out.
Page 60
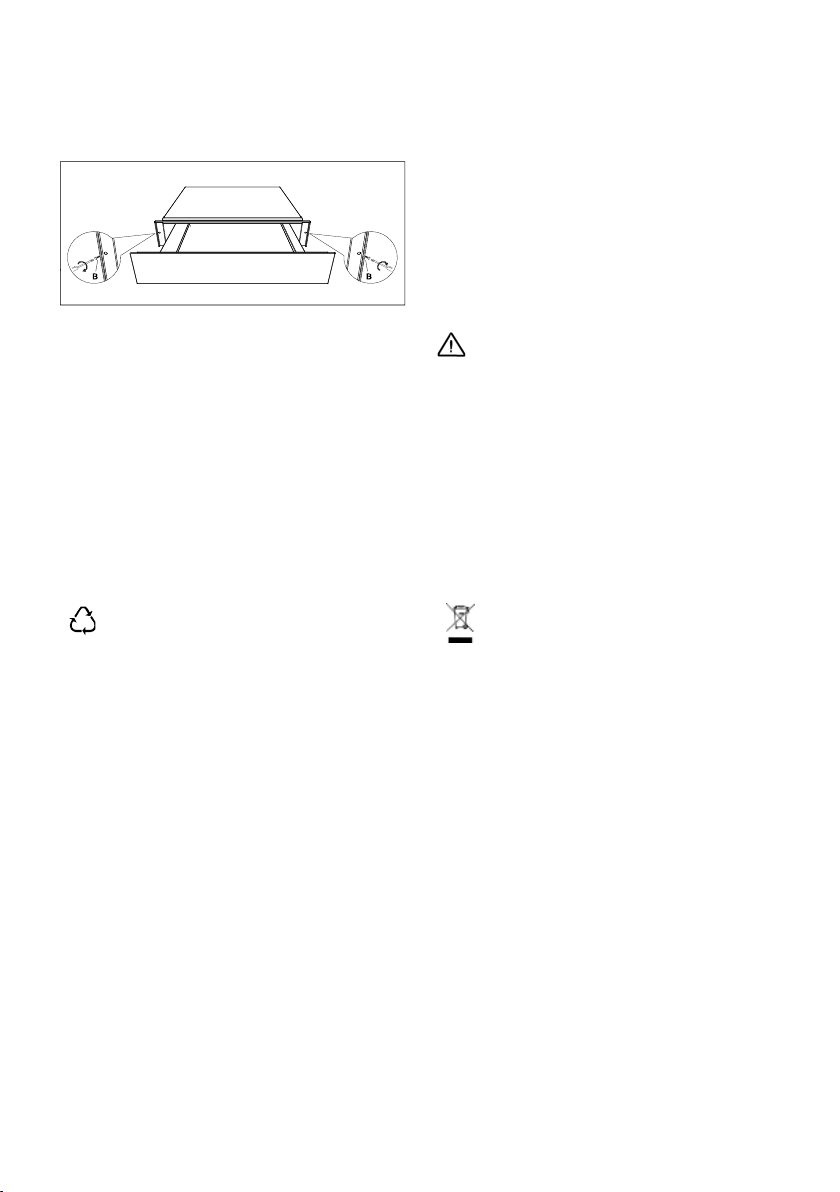
60 WWW.ELECTROLUX.COM
3. Open the drawer and fix the crockery
warmer to the sides of the unit using the
provided screws.
Electrical Connection
Electrical installation must be performed by an
electrician qualified in accordance with the
legislation in force.
Before connecting the crockery warmer to the
electric mains, check that the voltage and
frequency of the mains matches that which is
ENVIRONMENT CONCERNS
Recycle the materials with the symbol.
Put the packaging in applicable containers to
recycle it.
Help protect the environment and human
health and to recycle waste of electrical and
electronic appliances.
shown on the rating plate located in the
heating block inside.
The electric connection is made via an
omnipolar switch, which is suitable for the
intensity to be tolerated and which has a
minimum gap of 3mm between its contacts,
which will ensure disconnection in case of
emergency or when cleaning the crockery
warmer.
If a plug is used for the electric connection,
then it must be accessible after installation.
The connection should include correct
earthing, in compliance with current norms.
WARNING:
The crockery warmer must be earthed.
The manufacturer and retailers do not accept
responsibility for any damage that may be
caused to people, animals or property if these
installation instructions are not observed.
Do not dispose appliances marked
with the symbol with the household
waste. Return the product to your local
recycling facility or contact your municipal
office.
Page 61
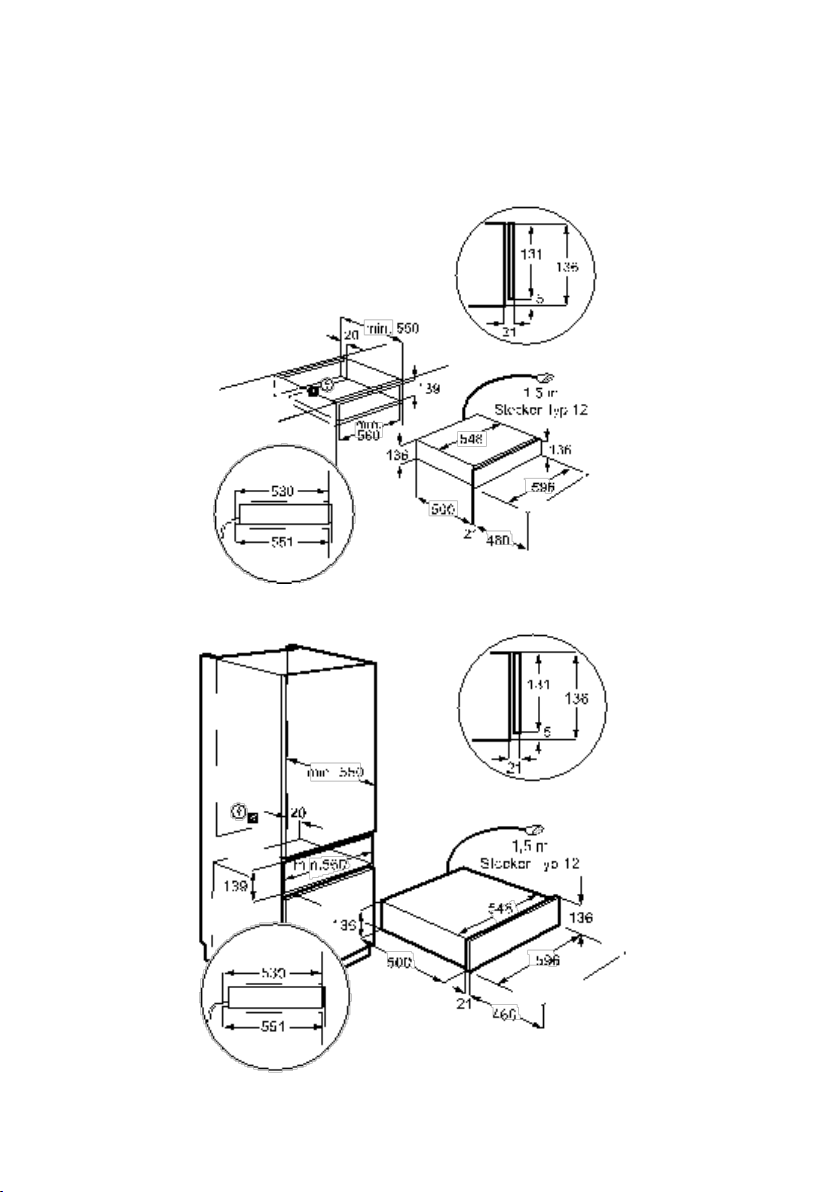
EINBAU / L'INSTALLATION / INSTALLAZIONE /
INSTALLATION
WS140SL
61
Page 62
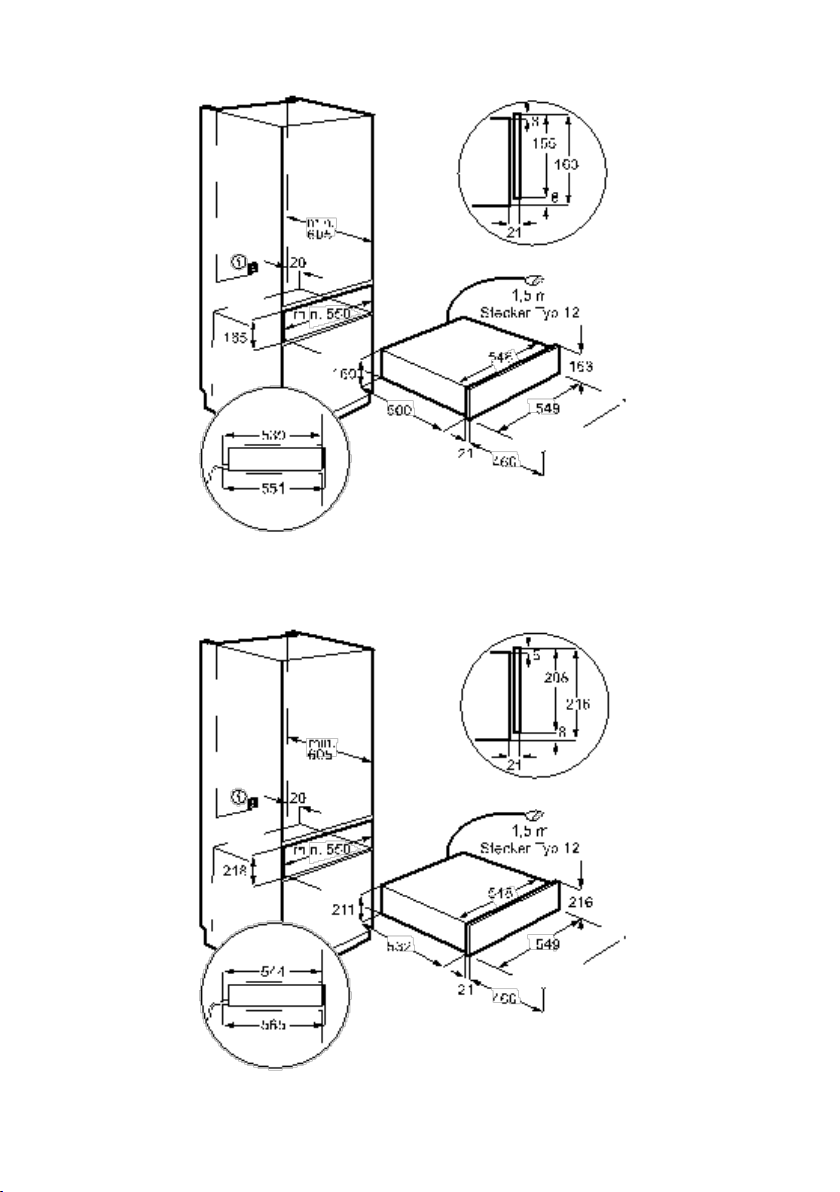
62 WWW.ELECTROLUX.COM
WS16SL
WS21SL
Page 63
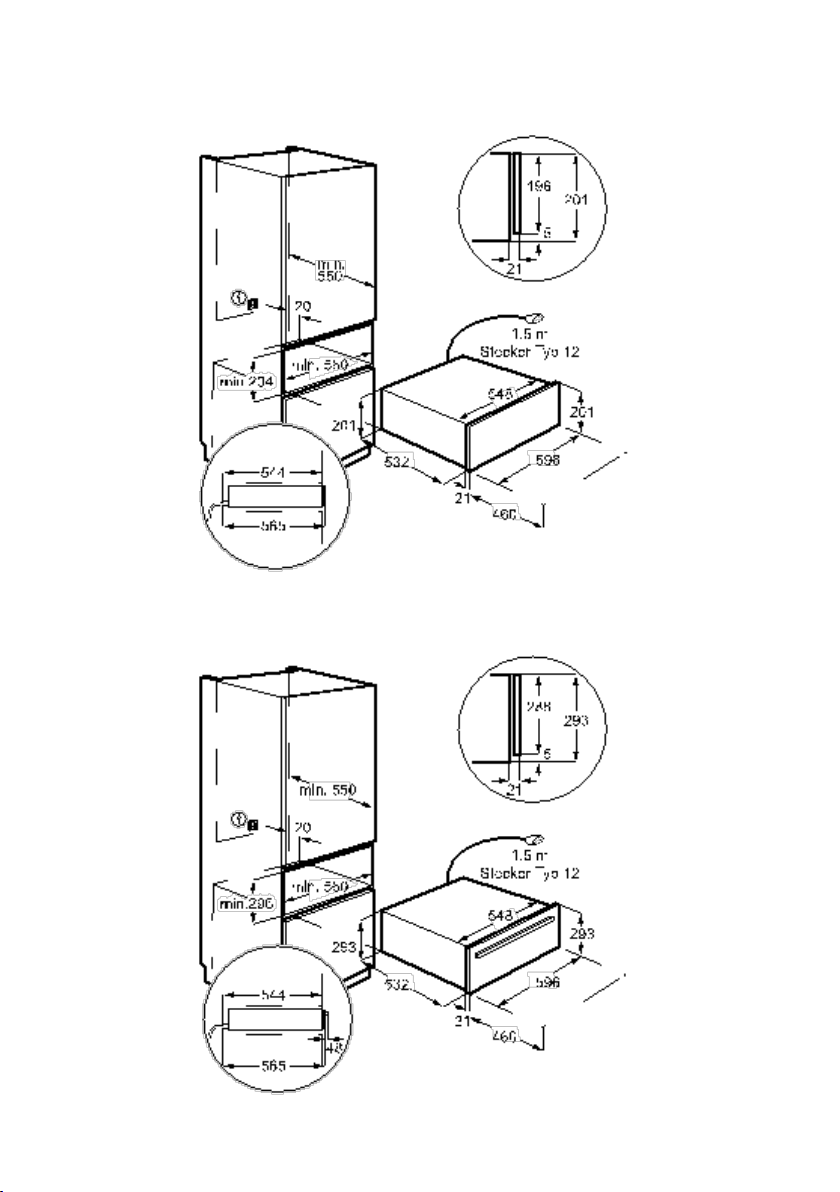
WS200SL
63
WS290SL
Page 64
Page 65

Page 66

Page 67

Page 68
www.electrolux.com/shop
943906-b - 132018
 Loading...