

Page 1
Installation
INSTALLING THE WINE COOLER
Your Electrolux wine cooler has been designed for either free-standing or built-in
installation(refer to the Built-in Installation section of this manual for instructions).
In either case, the front grille must NOT be obstructed.
SITE PREPERATION
1 Position the unit on a flat, level surface, capable of supporting the entire
weight of the unit. Remember the unit will be significantly heavier once it is
fully loaded.
2 This unit requires a grounded and polarized 115 VAC, 60Hz, 15A circuit
(normal household current).
3 Avoid connecting the unit to a Ground Fault Interruptor (GFI). GFIs are prone
to nuisance tripping which will cause the unit to shut down. GFIs are generally
not used on circuits which power equipment that must run unattended for
long periods of time.
4 The unit must be installed according to your local codes and ordinances.
!
DD
ANGERANGER
D
ANGER
DD
ANGERANGER
ELECTROCUTION HAZARD!
Electrical Grounding Required. This appliance is equipped with a three prong
(grounding) polarized plug for your protection against possible shock hazards.
• NEVER remove the round grounding prong from the plug.
• NEVER use a two-prong grounding adapter.
• NEVER use an extension cord to connect power to the unit.
Where a two-prong wall receptacle is encountered or a longer power cord is required,
contact a qualified electrician to have it replaced in accordance with applicable
electrical codes.
Page 2
Site Preparation
NONO
TETE
NO
TE
NONO
TETE
DOOR
SWING
Figure 1
CABINET
OR WALL
0"
CLEARANCE
NEEDED
UL124A
2 - 3/4”
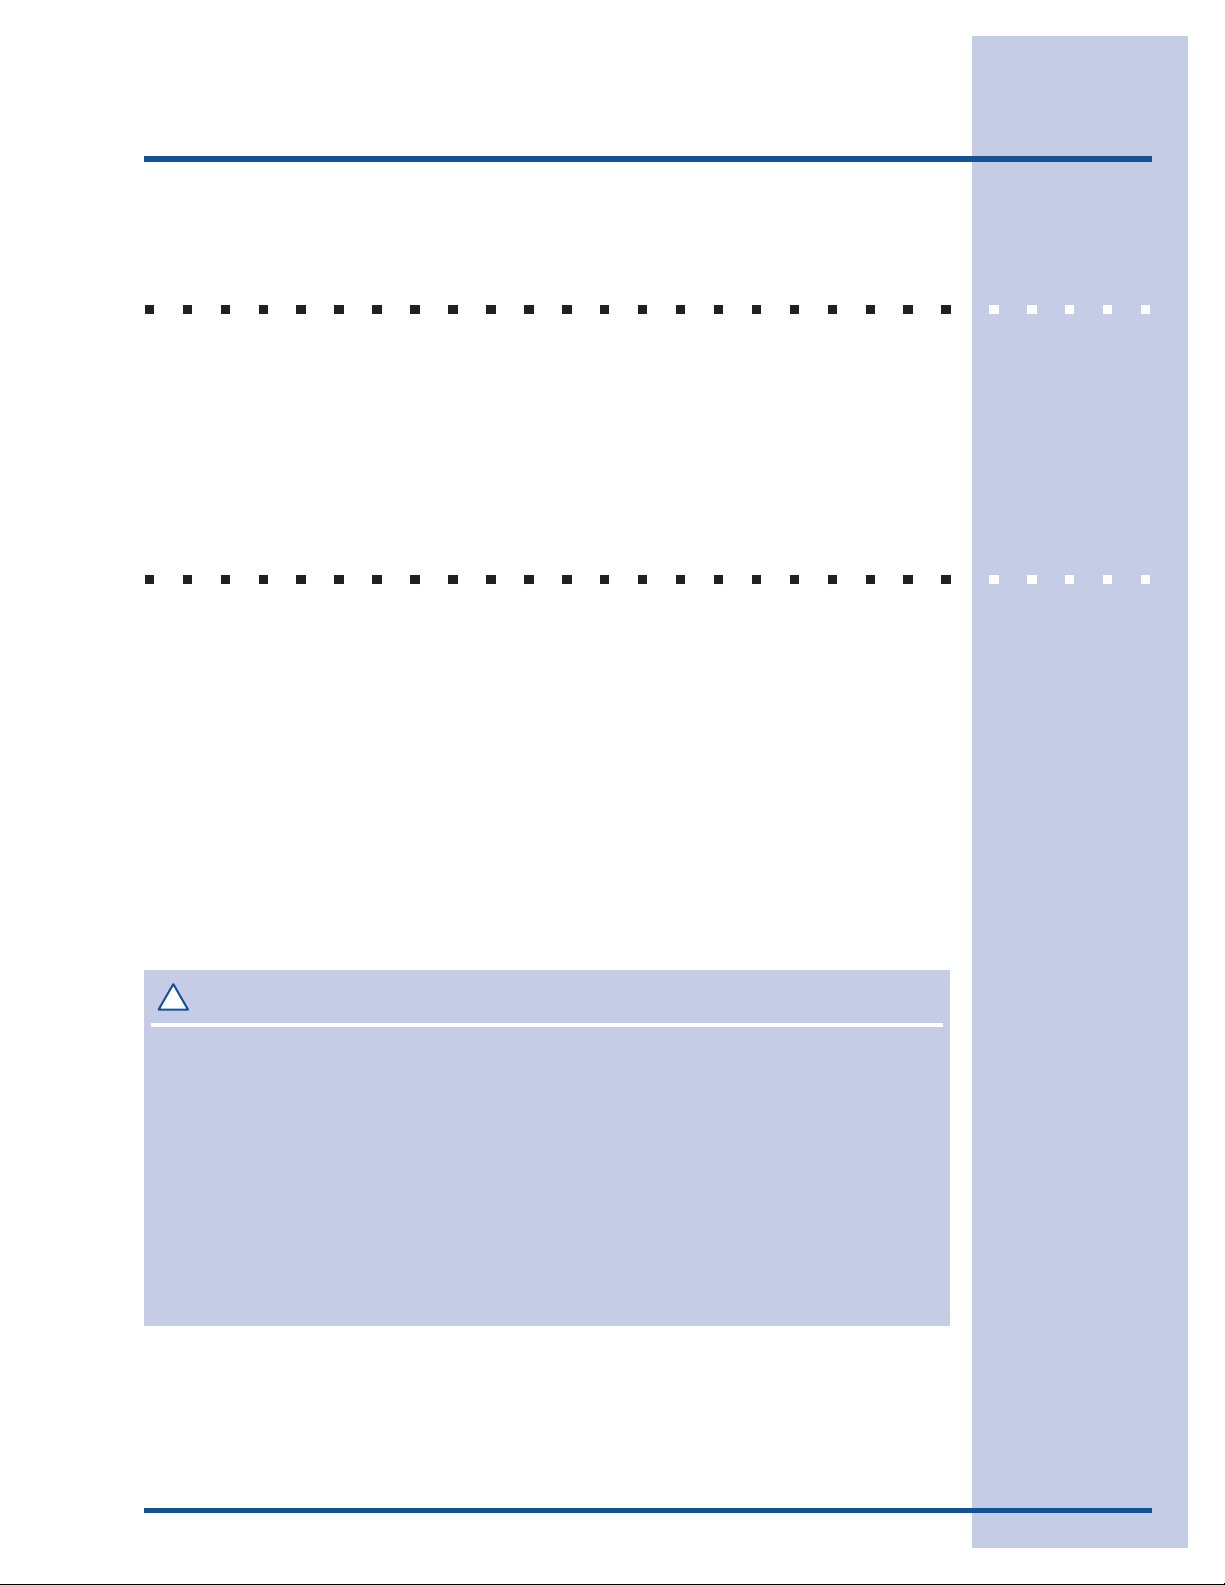
All units require zero clearance when installed flush with a
cabinet or wall (see Figure 1). Electrolux stainless steel
models require a minimum 2-3/4 inch handle clearance
when installed against a wall or cabinet that extends
beyond the front edge of the unit (see Figure 2).
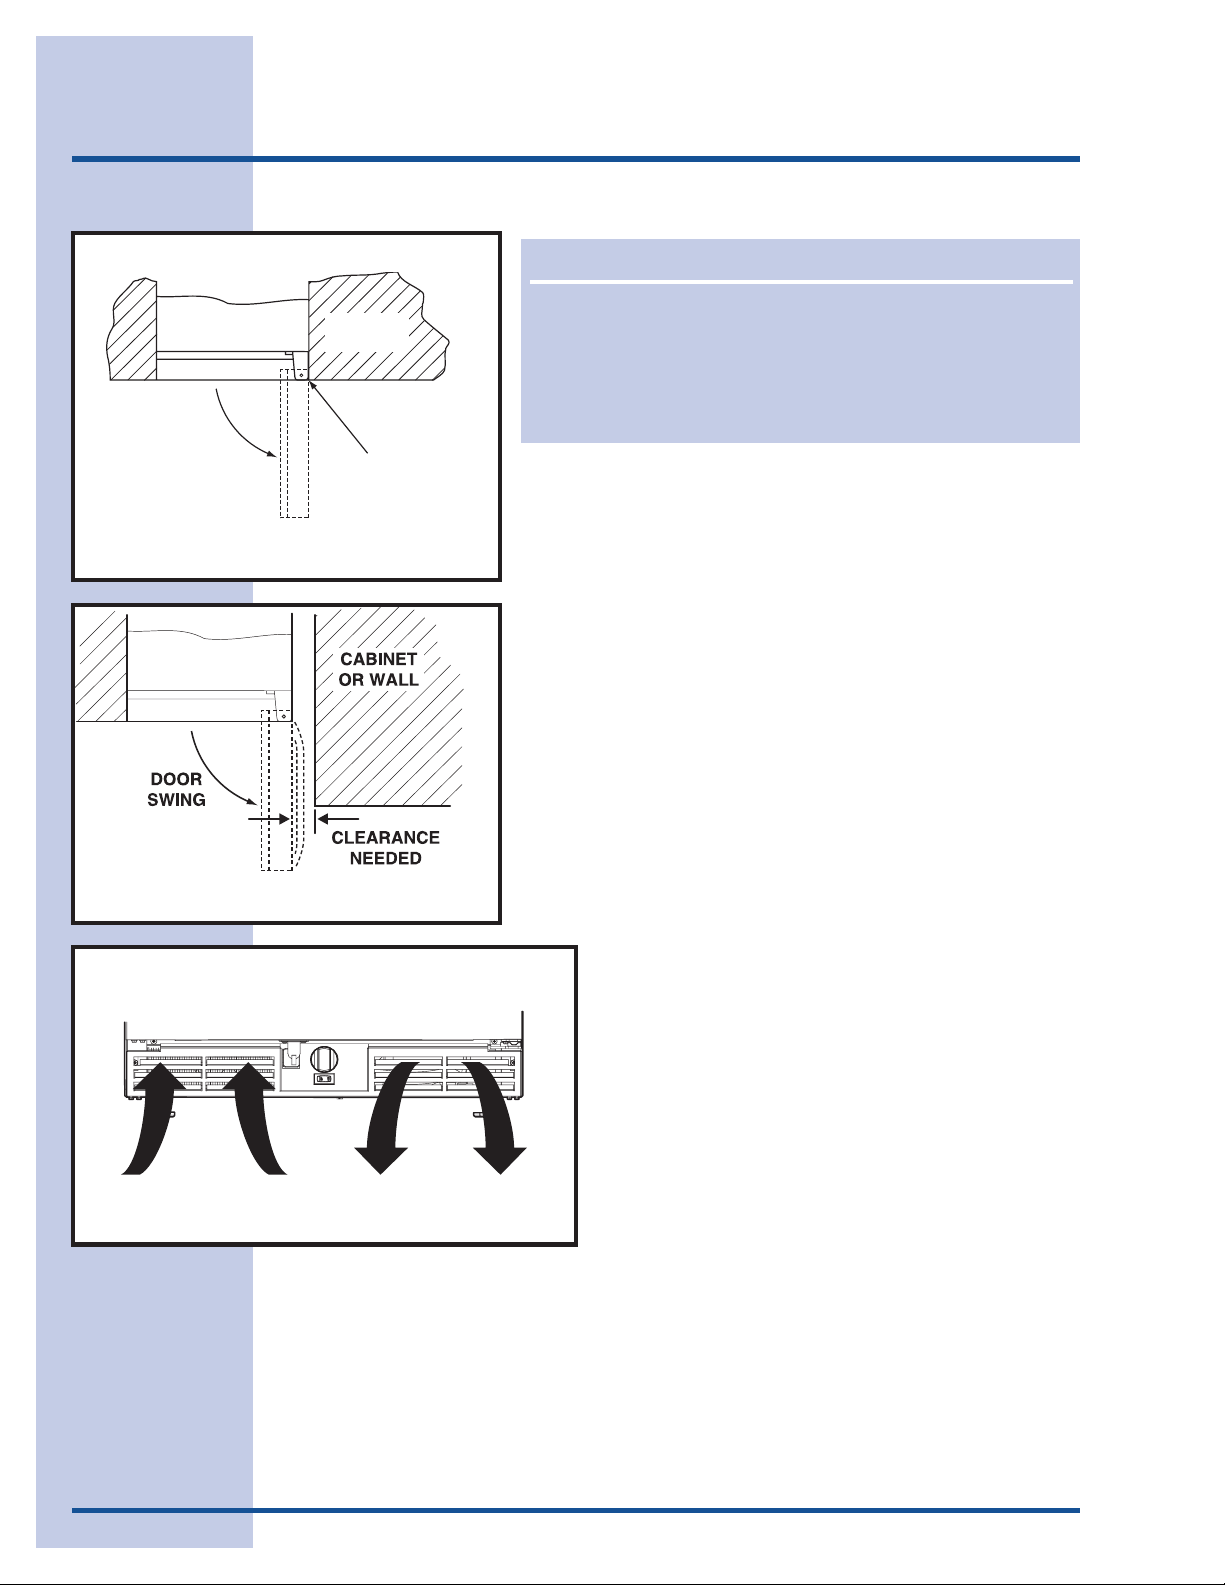
5 Position the unit to allow free air flow
through the front grille (see Figure 3).
6 Wipe out inside of unit with a damp cloth.
7 Final finish of the wooden wine rack trim
must be applied at least 24 hours before reinstalling the wooden rack trim into the
cabinet.
8 Be sure to install the Anti-Tip brackets.
Follow the instructions provided with the
Anti-Tip bracket kit.
Figure 2
INTAKE EXHAUST
Figure 3
Page 3

Wood Trim
WINE RACKS WITH WOOD TRIM
Your Electrolux wine cooler is equipped with a natural wood trim on the wine racks
for appearance and durability. The wood trim has been coated at the factory with a
clear vinyl sealer, which will adequately protect the wood in normal usage.
!
CACA
UTIONUTION
CA
UTION
CACA
UTIONUTION
To prevent permanent damage to the inner liner of your wine cooler , the wine rack
wood trim MUST be removed from the unit for staining and/or finishing. Allow stain/
finish to dry thoroughly (at least 24 hours per coat) in accordance with the stain/finish
manufacturer’s instructions prior to re-installing the wood trim inside the cabinet of the
wine cooler . Failure to do so may cause the inner liner of the unit to have a permanent
odor, which is not covered by the warranty.
You have 3 options regarding the wood trim on the wine racks.
(1) You can leave as is, (2) add a final finish coat or (3) you may stain the wood
trim. The final finish coat was not applied at the factory so that the wood trim could
be stained. YOU CANNOT STAIN THE WOOD TRIM ONCE YOU APPLY THE
FINAL FINISH. Review the following guidelines when staining and or sealing the
wood to ensure proper adhesion and durability of the finish.
To add a final finish coat:
1 Remove five racks with wood trim from unit, see RACK REMOVAL/
INSTALLATION.
2 Remove screws securing wood trim to racks.
3 Lightly scruff sand the molding with 280 grit 3M Tri-M-Ite® sand-paper.
4 Remove sanding dust with a clean, dry cloth.
5 Apply a thin coat of a clear protective finish; the factory-applied seal is
compatible with virtually all finishes. A low odor, water clean up, quick drying
finish such as Minwax Polycrylic® is recommended. Follow container label
for directions.
6 Lightly sand and reapply if desired.
Page 4

Wood Trim
To stain for a different wood color:
1 Remove five racks with wood trim from unit, see Rack Removal/
Installation.
2 Remove screws securing wood trim to racks.
3 Apply Minwax Water-Based Wood Stain® to wood with a synthetic foam
brush. Stain must penetrate approximately 3 minutes. After this period, while
stain is still wet, take a stain dampened rag and remove all excess stain.
Wipe in the direction of the grain with medium pressure to achieve the
desired stain color.
4 After 2 hours, repeat step three. This will even out the color of the wood.
5 Allow stain to dry for a minimum of 3 hours before finishing.
6 If desired sand the wood with very fine sandpaper to smooth the surface from
the staining process.
7 Remove all dust from the wood. Apply one coat of Minwax Ultra Fast-Drying
Polycrylic Protective Finish® with a synthetic foam brush to the wood. This
finish should be applied in a thin coat following the direction of the grain. First
apply the finish to the back and sides of the wood. Allow this to dry for two
hours. Next apply the finish to the front side of the wood and allow to dry for
two hours. Sand with very fine sandpaper (220 grit). Reapply in the same
manner 3 times total. After the third coat do not sand the surface.
8 Allow the final coat to dry for 24 hours before installing the wood to the wine
cooler racks.
Page 5

Leveling
TURN FOOT TO ADJUST
LEVELING THE UNIT
Position the unit on a flat, level surface, capable of supporting the entire weight of
the unit when full.
This unit contains four adjustable leveling legs. Turn the legs clockwise to raise and
counterclockwise to lower (see Figures 4 and 5).
Figure 4
CHECK
LEVEL
Figure 5
Page 6

Figure 6
Door Reversal
REVERSING THE DOOR
All Electrolux wine cooler models are field reversible for left or
right hand opening. The door opening is easily reversed by
moving the hinge hardware to the opposite side (see Figure 6).
To reverse the door:
1 Remove top hinge screw pin (7/64" Allen wrench)
from cabinet (see Figure 7).
Remove door by tilting forward and lifting off bottom
hinge pin.
2 Remove plastic screw plugs (3 top and 3 bottom)
from new hinge location (see Figure 8), and remove
hinge pin hole plug in top of door (see Figure 9). Do
not discard.
PLASTIC
PLUGS
Figure 8
Figure 7
Hole
Plug
Figure 9
Page 7

Door Reversal
3 Remove top hinge (3 screws), reinstall hinge screw pin, and
remount on opposite side BOTTOM (see Figure 10).
4 Remove the two door closer plastic inserts from the existing
bottom hinge and install as shown on the new bottom hinge
(see Figure 11).
5 Remove existing bottom hinge (3 screws) and remount on
opposite side TOP. Remove top hinge screw pin.
6 With bottom of door facing up, remove pivot plate (2 screws),
flip over, and remount on opposite side of door (see Figure 12).
7 Holding door upright with top of door tilted forward, place hole of
door pivot plate on bottom hinge screw pin (see Figure 13). Be
sure that the bosses on the closers align with holes in hinge
and hinge plate.
8 Tilt top of door into position in top hinge and install top hinge
screw pin.
9 In empty hinge holes, install plastic screw plugs (3 top and 3
bottom) and door hole plug (1,door top) removed in step 2.
HINGE
SCREW
PIN
Figure 10
DOOR
CLOSER
INSERTS
Figure 11
BOSS
UL313
UL312
Figure 12
Figure 13
CLRCO008
UL319
BOSS
 Loading...