

Page 1
INSTRUCTION BOOK
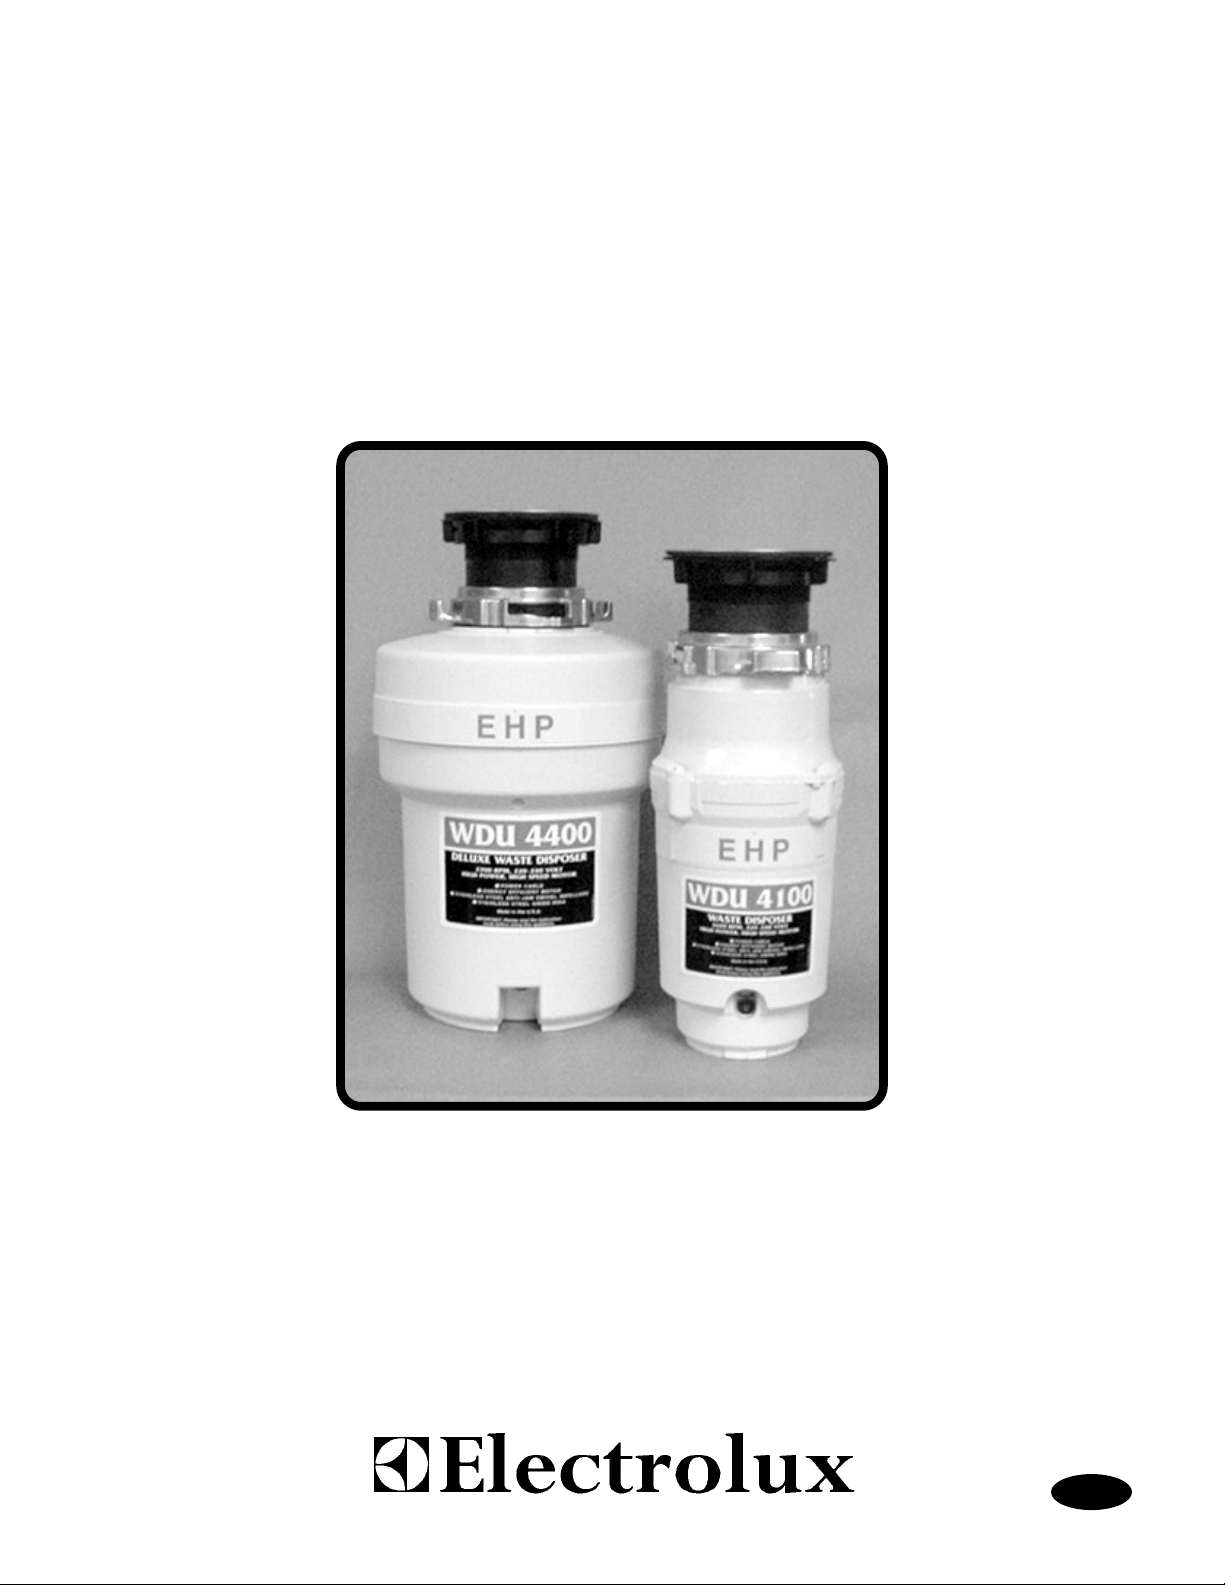
Waste Disposal Unit WDU4100 and WDU4400
EN
Page 2

Page 3

Warnings
It is most important that this instruction book should be retained with the appliance for future reference.
Should the appliance be sold or transferred to another owner, or should you move house and leave the
appliance, always ensure that the instruction book is left with the appliance in order that the new owner
can get to know the functioning of the appliance and the relevant warnings.
These warnings are provided in the interest of safety. You MUST read them carefully before installing or
using the appliance.
• To reduce the risk of injury, close supervision of
children is necessary when the appliance is in use.
• Do not put your fingers or hands into the waste
disposer.
• Turn the control switch to the ‘off’ position before
attempting to clear a blockage or remove an object
from the disposer.
• When attempting to loosen a blockage in a waste
disposer, use a long wooden object such as a
wooden spoon or wooden handle of a broom or mop.
• When attempting to remove an object from a waste
disposer use long-handled tongs or pliers.
• When not in use, leave the disposer cover in place
to reduce the risk of objects falling into the
disposer, you must ensure that the appliance is
switched off.
Contents
General Features and Parts Page 3
Specifications Page 3
Installation Page 4
Electrical Connections Page 6
Helpful Hints Page 7
Operation Page 7
Cleaning and Maintenance Page 8
Something Not Working? Page 8
Service Page 9
Customer Care Page 9
Guarantee Conditions Page 10
• To reduce the risk of injury by materials that
may be rejected by a waste disposer, do no put
the following into a disposer:
a. Glass, china or plastic
b. Large whole bones
c. Metal, such as bottle tops, tin cans or
aluminum foil
d. Rubber items or string
e. Wooden items
f. Leather or cloth items
g. Whole ‘corn on the cob’
h. Clam or oyster shells
i. Drain cleaner
• Do not operate the disposer unless the splash
guard is in place.
• See ‘Electrical Connections’ for the correct
earthing of the appliance.
2
Page 4
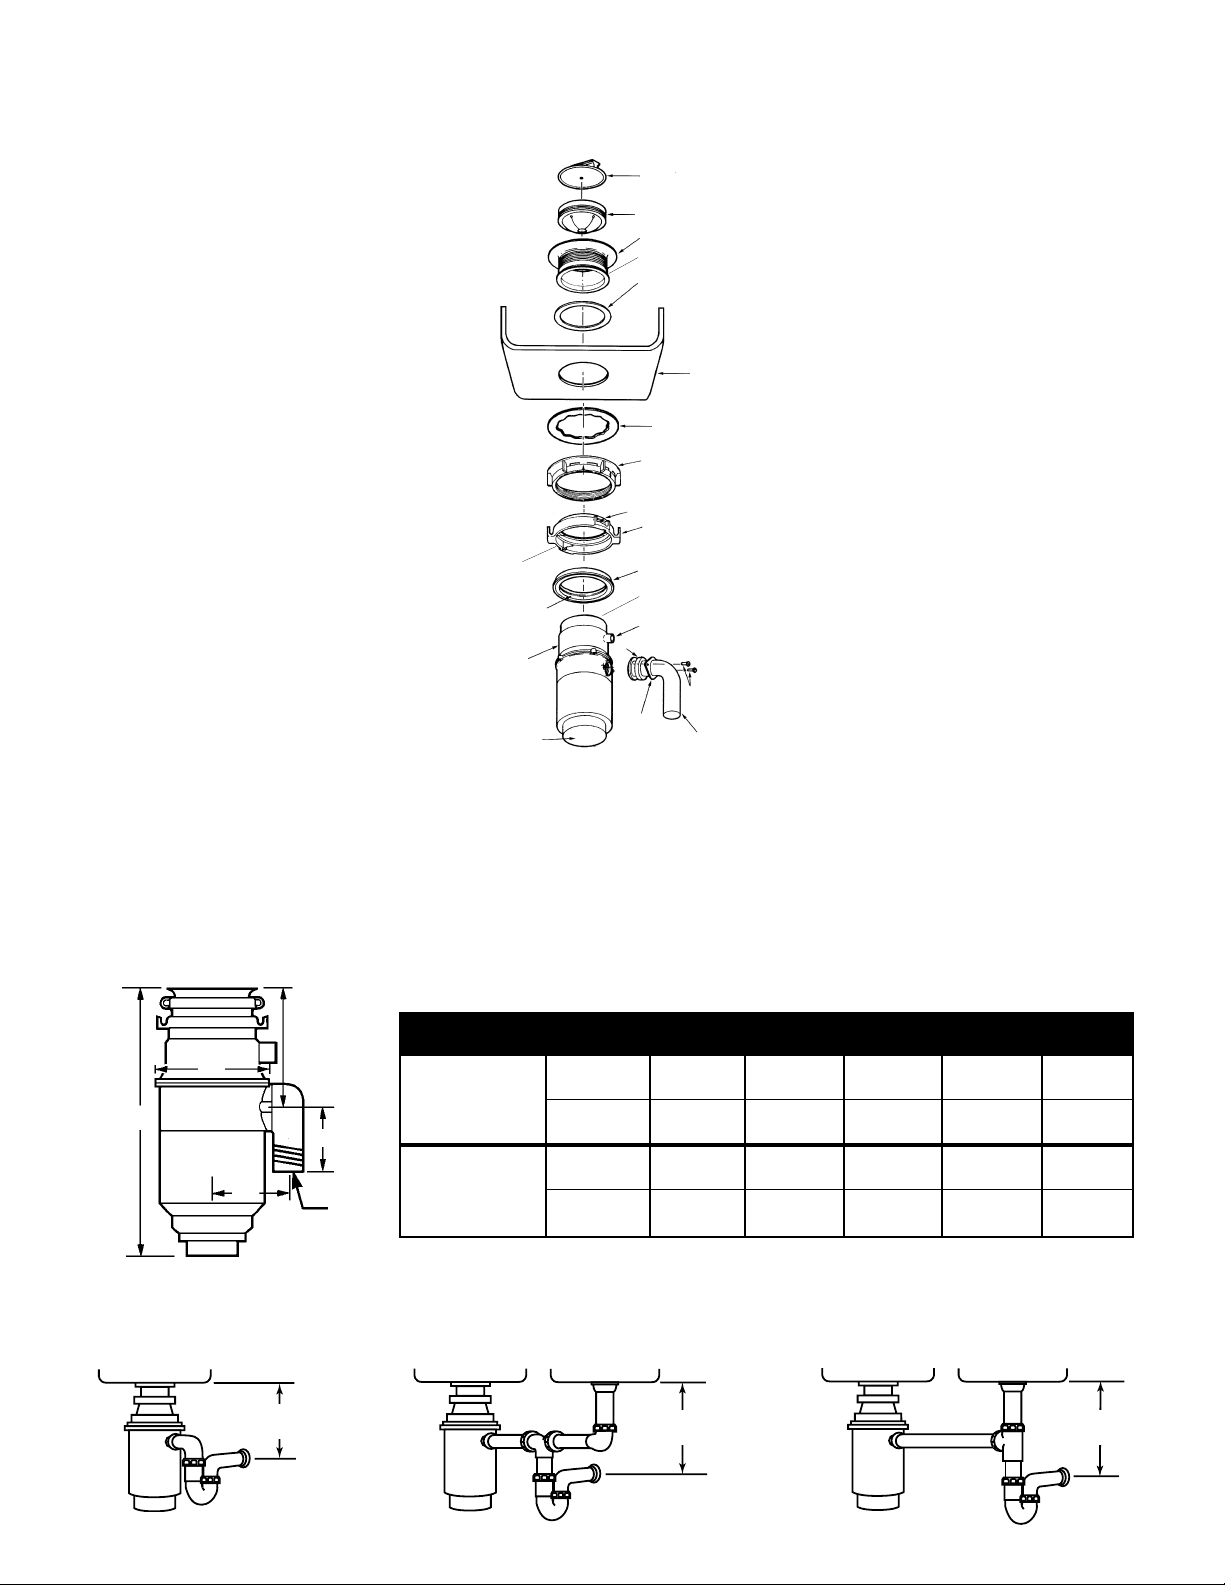
General Features and Parts
Specifications
STOPPER
REMOVABLE SPLASH GUARD
SINK FLANGE
DIAMETER 33/8 X 12 THREADS/INCH
RUBBER SINK FLANGE GASKET
FIBER GASKET
SUPPORT RING
NOTE ARROWS INDICATING UP
MOUNT RING
TIGHTENING EARS
CUSHION MOUNT
DISHWASHER DISCHARGE INLET
ELBOW GASKET
SCREWS
ELBOW
FLANGE
END BELL
(ELECTRICAL CONNECTIONS)
Z
GROOVE G
HOPPER
DISHCHARGE ELBOW
Y
SINK
Electrical specifications are on the disposer rating label.
Dimensions
Some Typical Installations
“E”
1
1
/2”
(38mm)
BPS
“B”
“D”
“C”
“A”
SINGLE BOWL DOUBLE BOWL / CENTRE OUTLET DOUBLE BOWL / END OUTLET
10” (254 mm)
APPROX.
10” (254 mm)
APPROX.
10” (254 mm)
APPROX.
MODEL “A” “B” “C” “D” “E”
WDU4100
Inches 14
1
/16 615/16 53/16 51/16 23/4
mm 357 176 132 129 70
WDU4400
Inches 15
1
/8 71/4 85/8 59/16 23/4
mm 384 184 219 141 70
3
Page 5

Installing the waste disposer
When INSTALLING the disposer, refer to the
EXPLODED VIEW on page 3.
The installation of this appliance should be carried
out by a competent or qualified plumber.
Before installing a new disposer, inspect waste pipe.
Ensure the drain is clear of obstruction before use.
If the dishwasher drain pipe is to be connected to
the disposer, it will be necessary to remove the
knock out plug from the dishwasher discharge inlet
on the disposer. The plug can be knocked out using
a hammer and chisel or screwdriver. The knock out
plug will fall into the disposer, please ensure that
this is removed before the installation of the disposer.
The disposer is equipped with an easy to use
mounting system. The disposer mounting comes
completely assembled, so it will be necessary to
disassemble the mounting parts before continuing
with the installation.
Carefully observe how the mounting parts
disassemble, as this will make re-installation simple
and understandable.
Turn the mount ring clockwise to remove it from the
disposer hopper. The mount ring is shipped in the
‘support’ position.
Raise the mount ring upward toward the top of
the sink flange, exposing cushion mount. Remove
cushion mount from the sink flange. The mount
ring can now be removed.
Unscrew the support ring from the sink flange.
Installation
The disposer is supplied with two sink gaskets.
A. The thin gasket assembled with the sink flange is
for use instead of putty with stainless steel sinks
and most pressed steel sinks.
B. The thick gasket included in the carton is for use
instead of putty with cast iron sinks and some
deep well pressed steel sinks.
If for any reason you do use plumbers putty, follow
this procedure:
Form a ring of putty around the underside of the
sink flange. Insert the sink flange into sink opening,
press down firmly on sink flange to squeeze out any
excess putty. Then, from underneath the sink, use a
knife to trim off excess putty flush with bottom
edge of the sink opening. If you use putty, do NOT
use gasket(s).
When positioning the disposer ensure that the red
reset button is easily accessible after completion of
the installation.
KNOCK OUT
PLUG
4
Fig. A
Page 6

When using a gasket:
Insert the sink flange through the sink gasket into
sink opening. Do not rotate the sink flange, once it
is seated. From underneath the sink, place the fibre
gasket over the sink flange and screw the support
ring on to the sink flange.
Note
There are arrows indicating the correct side to face
upward.
Do not overtighten, the sink flange will not move
when tightened securely.
Slip the mount ring over bottom end of the sink
flange and hold in place while installing cushion
mount flanged side down, so that the inside groove
‘G’ on cushion mount fits over the lip on the sink
flange. When the cushion mount is properly seated,
the mount ring can be pulled downward over the
outside of cushion mount and will rotate freely.
Lift the disposer into position so the two projections
‘Y’ on top of the disposer hopper fit into the two
slots ‘Z’ on the mount ring.
Turn the mount ring counter clockwise about one
quarter inch so that the hopper projections engage.
This will now support the disposer. Rotate the
mount ring (and disposer) counter clockwise until
the disposer waste outlet is in the desired position.
Connect the waste elbow to disposer and connect
to trap.
Test the installation for water leaks and be sure all
plumbing connections are tight. Make all connections
in accordance with current regulations.
5
Page 7

Electrical Connections
The disposer is designed to be connected to a 240V
50Hz electricity supply.
All electrical installation work should be carried out
by a trained electrician or competent person.
THIS APPLIANCE MUST BE EARTHED.
The manufacturer disclaims any responsibility
should these safety instructions not be carried out.
The disposer is supplied with a mains lead which has
the following coloured wires:
Green and Yellow –Earth
Blue –Neutral
Brown –Live
When fitting a plug or connecting to a flex
connection unit or fused spur, the wires of your
mains lead may not correspond with the markings
identifying the terminals in your flex connector or
fused spur, proceed as follows:
Connect the green and yellow (earth) wire to the
terminal which is marked with the letter ‘E’ or the
earth symbol, or coloured green or green and yellow.
Connect the blue (neutral) wire to the terminal
which is marked with the letter ‘N’ or coloured
black.
Connect the brown (live) wire to the terminal which
is marked with the letter ‘L’ or coloured red.
It is recommended to connect the disposer to a flex
connection unit. This connection point should then
be controlled by a 13 amp switched fused unit
positioned above kitchen worktop level which is
easily accessible.
The 13 amp fuse should conform to BS1362 and be
ASTA or BS1 approved.
13 AMP FUSE
BS 1362
6
Page 8

Operation
1 Turn on the tap
Remove drain plug and turn on a medium flow of
cold water. Keep the water running so that any
ground waste particles wash through the drain.
2 Starting up
When you press the control switch the disposer is
on and ready for use.
3 Add food waste
Put vegetable peelings, corn on the cob(s), rinds,
table scraps, seeds, pits, bones and coffee grounds
as well as cigarette and cigar butts and soft seafood
shells into the disposer ready to be shredded. Keep
the water running while shredding the waste food.
4 Run the disposer
Before turning the control switch off, let the water
and the disposer run for a further 15 seconds after
the shredding has stopped. This will help to flush all
the waste through the trap and drain.
Do NOT operate the disposer unless the
splash guard is in place.
Helpful Hints
Use your disposer ‘before’ and
‘after’ meals:
While preparing food the vegetable peelings, meat
wrappings or salad trimmings can be put into the
waste disposer by turning on the cold water tap and
allowing the peelings etc. to run into the disposer.
Then switch on the disposer. When your meal is
over, scrape any food scraps remaining, directly into
the disposer.
How to speed up food waste disposal
• Cut or break up large bones, melon rinds,
grapefruit skins and corn cobs. Also fibrous
materials such as pineapple or vegetable stalks.
• Items such as large bones, fibrous husks such as
whole corn on the cob or pea pods, require
considerable cutting time. For this reason, you
may prefer to place them in your dustbin.
How to use the disposer wisely
Your disposer is designed to handle normal food
waste, BUT it will not grind and dispose of items
such as:
• Glass, china or plastic
• Large whole bones
• Metal, such as bottle tops, tin cans
or aluminum foil
• Rubber items or string
• Wooden items
• Leather or cloth items
• Whole ‘
corn on the cob’
• Clam or oyster shells
• Drain cleaner
You MUST put any waste like this into your bin –
NOT in your waste disposer, as any of these may
cause severe damage to the appliance.
7
Page 9

Cleaning and Maintenance
Important
Before any maintenance or cleaning is carried
out, you must DISCONNECT the appliance from
the electricity supply.
Cleaning
The disposer is self-cleaning, but you can flush it
by filling the sink with cold water, turning on the
disposer and removing the plug. While the water
is draining through the disposer, allow the tap to
continue running. When the sink is empty, your
disposer will be clean.
Removable splash guard
If you need to remove or replace the splash guard,
simply pull the guard out from the top. To replace
the guard, insert it into the flange.
Do NOT operate the disposer without the
splash guard is in place.
Something Not Working?
Before contacting your local Electrolux Service Centre, we recommend that you do a few simple checks:
PROBLEM CAUSE SOLUTION
The disposer • Bottle caps or similar objects • Turn off the disposer control switch, and
is noisy have fallen into the disposer water, wait for cutting disc to stop, then
remove the object.
• Check to see if the turntable • Turn off the disposer control switch and water,
will rotate freely wait for cutting disc to stop, then remove
the object by using tongs or pliers to free it.
The disposer is • If the turntable is rotating freely: • This button may require resetting only
not running Check the reset button, to see (depress the red button, until it clicks and
if it has tripped it clicks and remains depressed).
• If reset button has not tripped • Check plug top fuse and control switch fuse.
If the disposer is supplied from a 13 amp
socket, plug another appliance i.e. food mixer
etc. into the socket to check the supply. Also
your fuse box or circuit breaker. If the fuses
and supply are all intact, contact your local
Service Force Centre.
REMOVE SPLASH GUARD
TURNTABLE
8
Page 10

Service
In the event of your appliance requiring service, or if
you wish to purchase spare parts, please contact your
local Service Force Centre by telephoning:
08705 929929
Your telephone call will be automatically routed to
the Service Force Centre covering your post code
area.
For the address of your local Service Force Centre
and further information about Service Force, please
visit the website at www.serviceforce.co.uk
Before calling out an engineer, please ensure you
have read the details under the heading "Something
Not Working."
When you contact the Service Force Centre you will
need to give the following details:
1. Your name, address and post code
2. Your telephone number
3. Clear and concise details of the fault
4. The model and serial number of the
appliance (found on the rating plate)
5. The purchase date
Please note that a valid purchase receipt or guarantee
documentation is required for in-guarantee service
calls.
CUSTOMER CARE DEPARTMENT
For general enquiries concerning your Electrolux
appliance or for further information on Electrolux
products, please contact our Customer Care
Department by letter or telephone at the address
below or visit our website at www.electrolux.co.uk
Electrolux
Customer Care Department
55-77 High Street
Slough
Berkshire
SL1 1DZ
Tel: 08705 727727 (*)
* Calls to this number may be recorded for training
purposes.
9
PROBLEM CAUSE SOLUTION
• If the turntable does not rotate • Check the disposer for any object(s) such as a
nail, metal tab from beverage can, etc. lodged
between the table and the grind ring. Rotate
the turntable with the long handle of a broom
or mop, then remove the object with pliers or
tongs. If no object etc. is present in the disposer,
contact your local Service Force Centre.
If the disposer • The appliance is leaking from • Improper fitting of the sink flange.
is leaking the top
• Support ring is not tightened sufficiently.
• Defective cushion mount.
• The appliance is leaking from • The leak may be due to improper tightening
the waste elbow of the elbow flange bolts.
If after the above checks, there is still a fault contact you local Electrolux Service Force Centre.
In-guarantee customers should ensure that the above checks have been made as the engineer will make
a charge if the fault is not a mechanical or electrical breakdown.
Please note that proof of purchase is required for any in-guarantee service calls.
Page 11

Guaranteed Conditions
STANDARD GUARANTEED CONDITIONS
We, Electrolux, undertake that if within 12 months
of the date of the purchase this Electrolux appliance
or any part thereof is proved to be defective by
reason only of faulty workmanship or materials,
we will, at our option repair or replace the same
FREE OF CHARGE for labour, materials or carriage
on condition that:
• The appliance has been correctly installed and
used only on the electricity supply stated on the
rating plate.
• The appliance has been used for normal domestic
purposes only, and in accordance with the
manufacturer’s instructions.
• The appliance has not been serviced, maintained,
repaired, taken apart or tampered with by any
person not authorised by us.
• All service work under this guarantee must be
undertaken by an Electrolux Service Force Centre.
• Any appliance or defective part replaced shall
become the Company’s property.
• This guarantee is in addition to your statutory
and other legal rights.
Home visits are made between 8:30am and 5:30pm
Monday to Friday. Visits may be available outside
these hours in which case a premium will be
charged.
Exclusions
This guarantee does not cover:
• Damage or calls resulting from transportation,
improper use or neglect, the replacement of any
light bulbs or removable parts of glass or plastic.
• Costs incurred for calls to put right an
appliance which is improperly installed or calls
to appliances outside the United Kingdom.
• Appliances found to be in use within a
commercial environment, plus those which are
subject to rental agreements.
• Products of Electrolux manufacture which are
not marketed by Electrolux.
European Guarantee
If you should move to another country within
Europe then your guarantee moves with you to your
new home subject to the following qualifications:
• The guarantee starts from the date you first
purchased your product.
• The guarantee is for the same period and to the
same extent for labour and parts as exists in the
new country of use for this brand or range of
products.
• This guarantee relates to you and cannot be
transferred to another user.
• Your new home is within the European
Community (EC) or European Free Trade Area.
• The product is installed and used in accordance
with our instructions and is only used domestically,
i.e. a normal household.
• The product is installed taking into account
regulations in your new country.
Before you move please contact your nearest
Customer Care centre, listed below, to give them
details of your new home. They will then ensure
that the local Service Organization is aware of
your move and able to look after you and your
appliances.
France Senlis +33 (0) 3 44 62 20 13
Germany Nürnberg +49 (0) 800 234 7378
Italy Pordenone +39 (0) 800117511
Sweden Stockholm +46 (0) 20 78 77 50
UK Slough +44 (0) 1753 219898
10
Page 12

55-77 High Street
Slough
Berkshire
SL1 1DZ
Tel: 08705 950950
© Electrolux Household Appliances Limited 2001 560C473P01 Rev. A
 Loading...