


User manual Electronic-Fridge
SANTO 72398-6 KA
2
Dear Customer
Thank you for choosing one of our high-quality products.
With this appliance you will experience the perfect combination of
functional design and cutting edge technology.
Our appliances are engineered to deliver the best performance and control
- indeed we are setting the highest standards of excellence.
In addition to this you will find environmental and energy saving aspects as
an integral part of our products.
To ensure optimal and regular performance of your appliance please read
this instruction manual carefully . It will enable you to navigate all pr ocesses
perfectly and most efficiently.
To refer to this manual any time you need to, we recommend that you to
keep it in a safe place, and please pass it to any future owner of the
appliance.
We wish you much joy with your new appliance.
The following symbols are used in this manual
Important information concerning your personal safety and information on
how to avoid damaging the appliance
General information and tips
Environmental information

3
Contents
Safety . . . . . . . . . . . . . . . . . . . . . . . . . . . . . . . . . . . . . . . . . . . . . . . . . .4
Disposal . . . . . . . . . . . . . . . . . . . . . . . . . . . . . . . . . . . . . . . . . . . . . . . .5
Appliance Packaging Information . . . . . . . . . . . . . . . . . . . . . . . . . . . . . .5
Disposal of old Appliances . . . . . . . . . . . . . . . . . . . . . . . . . . . . . . . . .5
Remove transport safeguard . . . . . . . . . . . . . . . . . . . . . . . . . . . . . . . .6
Fitting the Door Handle . . . . . . . . . . . . . . . . . . . . . . . . . . . . . . . . . . .7
Electrical connection . . . . . . . . . . . . . . . . . . . . . . . . . . . . . . . . . . . . . .8
Prior to Inital Start-up . . . . . . . . . . . . . . . . . . . . . . . . . . . . . . . . . . . .8
Control panel . . . . . . . . . . . . . . . . . . . . . . . . . . . . . . . . . . . . . . . . . . . .8
Starting up - setting the temperature . . . . . . . . . . . . . . . . . . . . . . . .9
Interior Accessories . . . . . . . . . . . . . . . . . . . . . . . . . . . . . . . . . . . . . .12
Storage shelves . . . . . . . . . . . . . . . . . . . . . . . . . . . . . . . . . . . . . . . . . . . . .12
Bottle Holder . . . . . . . . . . . . . . . . . . . . . . . . . . . . . . . . . . . . . . . . . . . . . . .12
Quick chill shelf . . . . . . . . . . . . . . . . . . . . . . . . . . . . . . . . . . . . . . . . . . . . .13
Bottle and Can Holder . . . . . . . . . . . . . . . . . . . . . . . . . . . . . . . . . . . . . . .13
Dismantling of the Bottle and Can Holder . . . . . . . . . . . . . . . . . . . . . .13
Door rack . . . . . . . . . . . . . . . . . . . . . . . . . . . . . . . . . . . . . . . . . . . . . . . . . .13
Installation of the carbon filter . . . . . . . . . . . . . . . . . . . . . . . . . . . . . . .14
Changing the carbon filter . . . . . . . . . . . . . . . . . . . . . . . . . . . . . . . . . . .14
Fresh food refrigeration . . . . . . . . . . . . . . . . . . . . . . . . . . . . . . . . . .15
Defrosting . . . . . . . . . . . . . . . . . . . . . . . . . . . . . . . . . . . . . . . . . . . . .15
Switching off the appliance . . . . . . . . . . . . . . . . . . . . . . . . . . . . . . .16
Cleaning and Care . . . . . . . . . . . . . . . . . . . . . . . . . . . . . . . . . . . . . . .16
Energy Saving Tips . . . . . . . . . . . . . . . . . . . . . . . . . . . . . . . . . . . . . . .17
What to do if . . . . . . . . . . . . . . . . . . . . . . . . . . . . . . . . . . . . . . . . . .18
Correcting Malfunctions . . . . . . . . . . . . . . . . . . . . . . . . . . . . . . . . . . . . .18
Changing the light bulb . . . . . . . . . . . . . . . . . . . . . . . . . . . . . . . . . . . . . .19
Service and Spare Parts . . . . . . . . . . . . . . . . . . . . . . . . . . . . . . . . . . . . . .20
Customer Care Department . . . . . . . . . . . . . . . . . . . . . . . . . . . . . . . . . .20
Guarantee Conditions . . . . . . . . . . . . . . . . . . . . . . . . . . . . . . . . . . . . . . .21
Installation - Electrical Connection . . . . . . . . . . . . . . . . . . . . . . . .22
Positioning . . . . . . . . . . . . . . . . . . . . . . . . . . . . . . . . . . . . . . . . . . . . .23
Rear spacer . . . . . . . . . . . . . . . . . . . . . . . . . . . . . . . . . . . . . . . . . . . . . . . . .23
Rehingeing the door . . . . . . . . . . . . . . . . . . . . . . . . . . . . . . . . . . . . . . . . .24
Regulations, Standards, Guidelines . . . . . . . . . . . . . . . . . . . . . . . . .26
4
Safety
The safety aspects of our refrigerators/freezers comply with accepted
technical standards and the German Appliance Safety Law. Nevertheless, we
consider it our obligation to make you aware of the following safety
information:
Intended use
• The refrigerator is intended for use in the home. It is suitable for cooling
food. If the appliance is used for purposes other than those intended or
used incorrectly , no liability can be accepted by the manufactur er for any
damage that may be caused.
• Alterations or changes to the freezer are not permitted for reasons of safety.
• If you use the refrigerator in a commercial application or for purposes
other than the cooling of foods, please observe all valid legal regulations
for your application.
Prior to initial start–up
• Check the refrigerator for transport damage. Under no circumstance
should a damaged appliance be plugged in! In the event of damage, please
contact the retailer.
Refrigerant
The refrigerant isobutane (R600a) is contained within the r efrigerant cir cuit
of the appliance, a natural gas with a high level of environmental
compatibility, which is nevertheless flammable.
• During transportation and installation of the appliance, be certain that
none of the components of the refrigerant circuit become damaged.
• If the refrigerant circuit should become damaged:
– avoid open flames and sources of ignition;
– thoroughly ventilate the room in which the appliance is situated.
Safety of children
• Packaging (e.g. wr aps, polystyrene) can be danger ous for children. Ther e is
a risk of suffocation! Keep packaging material away from children!
• Please make old appliances unusable prior to disposal. Pull out the mains
plug, cut off the mains cable, break or remove spring or boltcatches, if
fitted. By doing this you ensure that children cannot lock themselves in
the fridge when playing (there is risk of suffocation!)or get themselves
into other dangerous situations.
• This appliance is not intended for use by persons (including children) with
reduced physical, sensory or mental capabilities, or lack of experience and
knowledge, unless they have been given supervision or instruction
concerning use of the appliance by a person responsible for their safety.
5
Children should be supervised to ensure that they do not play with the
appliance. !
Daily Operation
• Do not operate any electrical appliances in the refrigerator (e.g. electric
ice cream makers, mixers etc.).
• Before cleaning the appliance, always switch it off and unplug it, or pull
the house fuse or switch off the circuit breaker.
• When unplugging always pull the plug from the mains socket, do not pull
on the cable.
In case of malfunction
• If a malfunction occurs on the appliance, please look first in the "What to
do if ..." section of these instructions. If the information given there does
not help, please do not perform any further repairs yourself.
• Refrigerators/freezers may only be repaired by qualified service engineers.
Improper repair s can give rise to significant hazards. If your appliance needs
repairing, please contact your local Service Force Centr e.
Disposal
Appliance Packaging Information
All materials are environmentally sound! They can be dumped or burned at
an incinerating plant without danger!
About the materials: The plastics can be recycled and are identified as
follows:
>PE< for polyethylene, e.g. the outer covering and the bags in the interior.
>PS< for polystyrene foam, e.g. the pads, which are all free of
chlorofluorocarbon.
The carton parts are made from recycled paper and should be disposed of
at a waste-paper recycling collection location.
Disposal of old Appliances
For environmental reasons, refrigeration appliances must be disposed of
properly. This applies to your old appliance, and - at the end of its service
life - your new appliance as well.
Warning! Before disposing of old appliances make them inoper able. Remove
plug from mains, sever the power cable, remove or destr oy any snap or latch
closures. This eliminates the danger that playing children can lock
themselves inside the appliance (danger of suffocation!) or place themselves
in any other life-endangering situations.
Dispos al:
• The appliance may not be disposed of with domestic waste or bulky refuse.
• The refrigerant circuit, especially the heat exchanger at the back of the
appliance, must not be damaged.
6
• The symbol on the product or on its packaging indicates that
this product may not be treated as household waste. Instead it
should be handed over to the appropriate collection point for the
recycling of electrical and electronic equipment. By ensuring this
product is disposed of correctly, you will help prevent potential
negative consequences for the environment and human health,
which could otherwise be caused by inappropriate waste handling of
this product. For more detailed information about recycling of this
product, please contact your local council, your household waste
disposal service or the shop where you purchased the product.
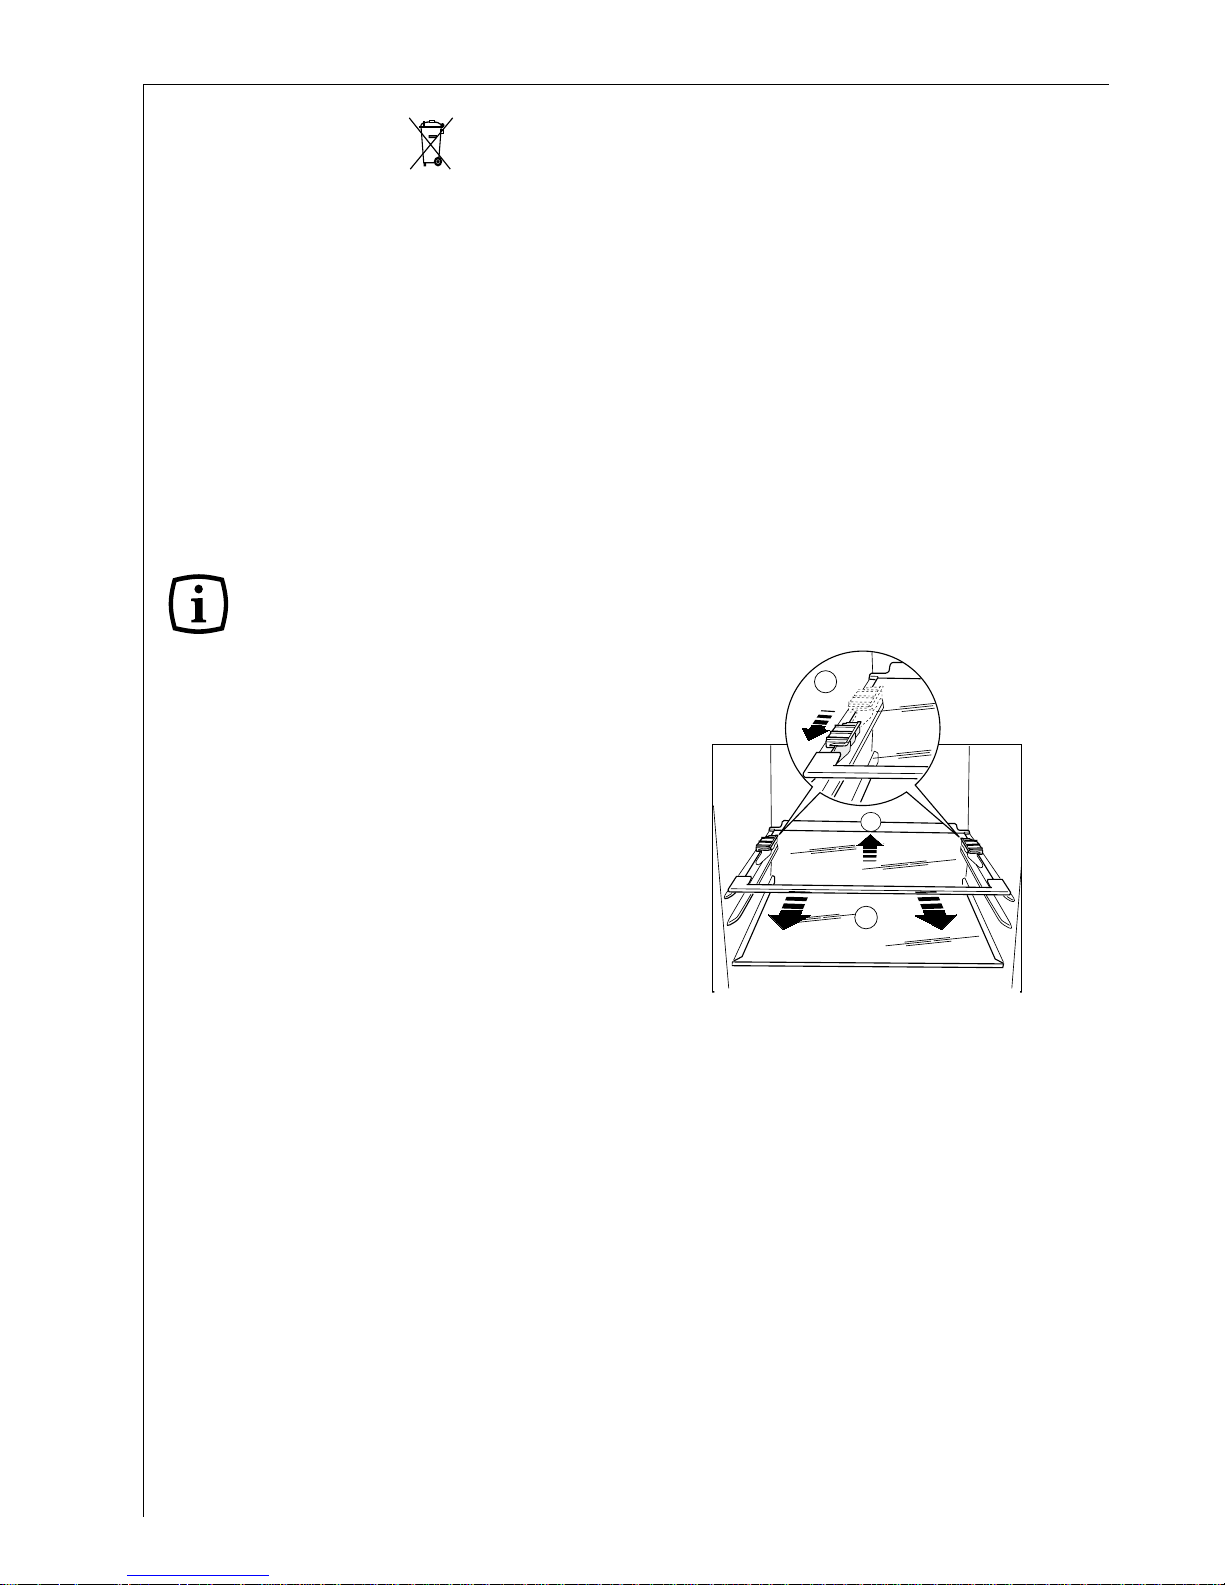
Remove transport safeguard
The appliance and the interior fittings are protected for transport.
•Remove all adhesive tape and packing pieces from the interior of the
appliance.
Your appliance is equipped with shelf
retainers that make it possible to
secure the shelves during
transportation.
To remove them proceed as follows:
Move the shelf retainers in the
direction of the arrow, raise the shelf
from the rear and push it forward
until it is freed and remove the
retainers.
A
C
B
7
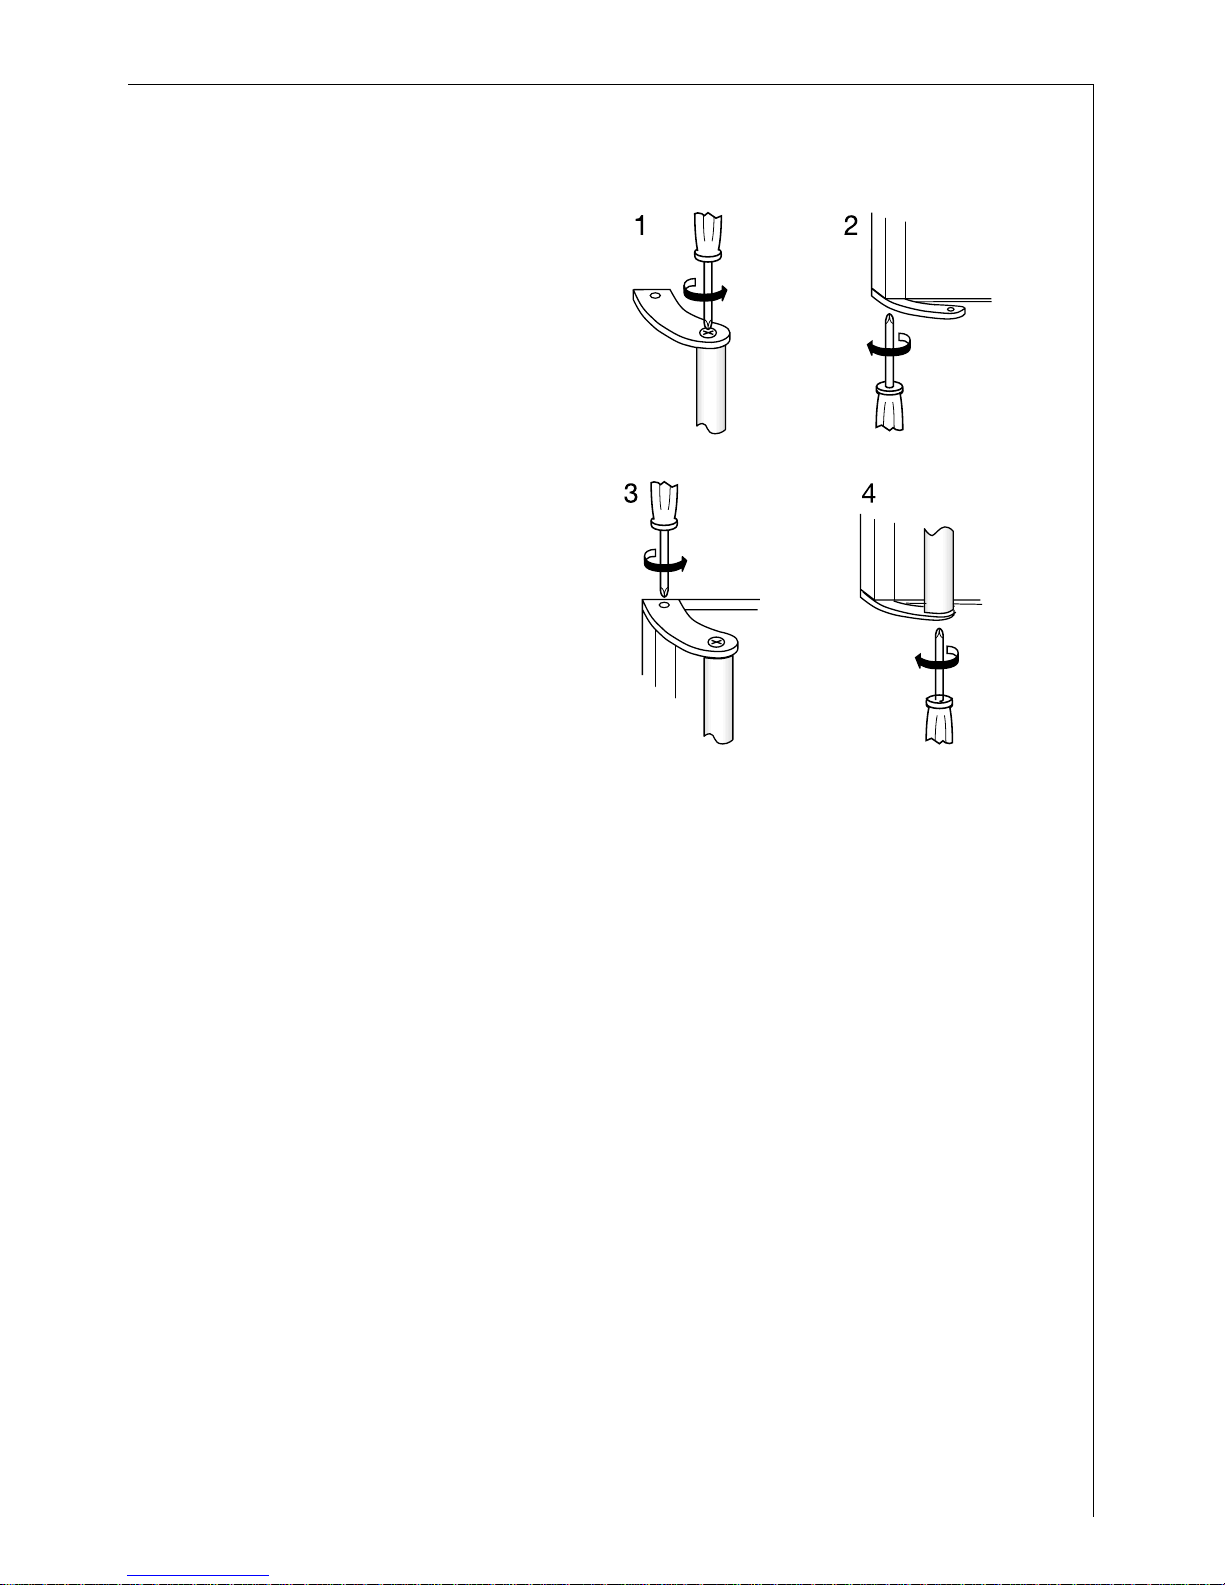
1. Screw the top handle
bracket to the handle rod
(1). Fit the bottom handle
bracket on the lower lefthand side of the door (2).
2. Fit the top handle bracket
on the top left-hand side
of the door (3) and screw
the handle rod to the
bottom handle bracket (4).
Attention!
Do not overtighten the
screws (max. 2 Nm) as you
may damage the door
handles.
Fitting the Door Handle

8
Electrical connection
Before initial start-up, refer to the appliance rating plate to ascertain if
supply voltage and current values correspond with those of the mains at the
installation location.
e.g.: AC 230 ... 240 V 50 Hz or
230 ... 240 V~ 50 Hz
(i.e. 230 to 240 volts alternating current, 50 Hertz)
The rating plate is inside the appliance on the left.
A correctly installed, earthed socket is requir ed for the electrical supply. The
supply must have a fuse rating of at least 10 Amps.
If the socket is not accessible once the appliance is built in, the electrical
installation must include suitable means of isolating the appliance from the
mains (e.g. fuse, cut-out, current trip or similar with a minimum contact
separation of 3 mm).
Attention: it must be possible to disconnect the appliance from the mains
power supply; the plug must therefore be easily accessible after the
installation.
Attention: If the supply cord is damaged, it must be replaced by a special
cord or assembly available from the manufacturer or its Service Agent.
Prior to Initial Start–Up
• Please clean the appliance interior and all accessories prior to initial start-
up (see section: “Cleaning and Care”).
Control panel
B
C
E
D
F
A
A. Button ON/OFF
B. Temperature setting button (for warmer temperatures)
C. Temperature display
D. Temperature setting button (for colder temperatures)
E. COOLMATIC function and COOLMATIC indicator (yellow)
F ALARMOFF button and red warning light

9
Temperature setting buttons
The temperature is adjusted using the “B“ and “D“ buttons. These buttons
are connected to the temperature display.
• The temperature display is switched over from the display of the ACTUAL
temperature (Temperature display is illuminated) to the display of the
DESIRED temperature (Temperature display flashes) by pressing one of the
two buttons, “B“ or “D“ .
• Each time one of the two buttons is pressed again the DESIRED temperature
is adjusted by 1 °C. The DESIRED temperature must be reached within 24
hours.
If neither button is pressed, the temperatur e display automatically switches
back after a short period (approx. 5 sec.) to the display of the ACTUAL
temperature.
DESIRED temperature means:
The temperature that has been selected for inside the fridge. The DESIRED
temperature is indicated by flashing numbers.
ACTUAL temperature means:
The temperature display indicates the current temperature inside the fridge.
The ACTUAL temperature is indicated with illuminated number s.
Temperature display
The temperature display can indicate several pieces of information.
• During normal operation, the temperature currently present in the fridge
(ACTUAL temperature) is displayed.
• When the temperature is being adjusted a flashing display indicates the
fridge temperature currently set (DESIRED temperature).
ALARM OFF button
With the ALARM OFF button, the acoustic warning signal can be switched
off, e.g. the "Open Door" warning when loading or rearranging food to be
chilled.
Starting Up - Setting the Temperature
1. Plug the mains plug into the mains socket.
2. Press button (A). The appliance starts.
3. Press either the “B“ or “D“ button. The temperature display switches over
and the DESIRED temperature currently set flashes on the temperature
display .
4. Set the required temperature by pr essing the “B“ or “D“ buttons (see section
"Temperature setting buttons"). The temperature display will immediately
show the changed setting. Each time the button is pressed the temperatur e
 Loading...