

Electrolux SANTO 70342 KG User Manual

SANTO 70342 KG
Fridge-Freezer
Operating Instructions
2
Dear customer,
Before switching on your new refrigerator/freezer please read read these
operating instructions carefully. They contain important information for
safe use, for installation and for care of the appliance.
Please keep these operating instructions for future reference. Pass them on
to possible new owners of the appliance.
Notes which are important for your safety or for the proper functioning of
the appliance are stressed with a warning triangle and/or with signal words
(Warning!, Caution!, Attention!). Please observe the following carefully.
Additional information regarding operation and practical applications of
the appliance appear after this symbol.
Tips and notes concerning economical and environmentally sound use of
the appliance are marked with the flower.
In the event of a malfunction, these operating instructions contain information on how to rectify faults yourself, see the “Something Not Working”
section.
For futher assistance contact your local AEG service Force Centre, see the
chapter “Service and Spare Parts.
Printed on paper manufactured with environmentally sound processes.
who thinks ecologically acts accordingly ...

3
Contents
Safety . . . . . . . . . . . . . . . . . . . . . . . . . . . . . . . . . . . . . . . . . . . . . . . . . .4
Disposal . . . . . . . . . . . . . . . . . . . . . . . . . . . . . . . . . . . . . . . . . . . . . . . .5
Appliance Packaging Information . . . . . . . . . . . . . . . . . . . . . . . . . . . . . .5
Disposal of old Appliances . . . . . . . . . . . . . . . . . . . . . . . . . . . . . . . . . . . . .5
Remove Transport Packaging . . . . . . . . . . . . . . . . . . . . . . . . . . . . . . .6
Operation and control panel - Fridge . . . . . . . . . . . . . . . . . . . . . . . . .7
Starting up - Setting the Temperature . . . . . . . . . . . . . . . . . . . . . . .8
Interior Accessories . . . . . . . . . . . . . . . . . . . . . . . . . . . . . . . . . . . . . . .9
Storage shelves . . . . . . . . . . . . . . . . . . . . . . . . . . . . . . . . . . . . . . . . . . . . . .9
Door rack . . . . . . . . . . . . . . . . . . . . . . . . . . . . . . . . . . . . . . . . . . . . . . . . . . .9
Fresh food refrigeration . . . . . . . . . . . . . . . . . . . . . . . . . . . . . . . . . .10
Operation and indicator panel - Freezer . . . . . . . . . . . . . . . . . . . . .11
Starting up - Setting the Temperature . . . . . . . . . . . . . . . . . . . . . .12
Freezing and storing frozen food . . . . . . . . . . . . . . . . . . . . . . . . . . .14
Preparation of Ice Cubes . . . . . . . . . . . . . . . . . . . . . . . . . . . . . . . . .15
Freezing calender . . . . . . . . . . . . . . . . . . . . . . . . . . . . . . . . . . . . . . . .15
Ice packs . . . . . . . . . . . . . . . . . . . . . . . . . . . . . . . . . . . . . . . . . . . . . . .15
Defrosting . . . . . . . . . . . . . . . . . . . . . . . . . . . . . . . . . . . . . . . . . . . . .16
Cleaning and Care . . . . . . . . . . . . . . . . . . . . . . . . . . . . . . . . . . . . . . .17
Energy Saving Tips . . . . . . . . . . . . . . . . . . . . . . . . . . . . . . . . . . . . . . .18
What to do if . . . . . . . . . . . . . . . . . . . . . . . . . . . . . . . . . . . . . . . . . .19
Correcting Malfunctions . . . . . . . . . . . . . . . . . . . . . . . . . . . . . . . . . . . . .19
Changing the light bulb . . . . . . . . . . . . . . . . . . . . . . . . . . . . . . . . . . . . . .20
Service and Spare Parts . . . . . . . . . . . . . . . . . . . . . . . . . . . . . . . . . . .21
Customer Care Department . . . . . . . . . . . . . . . . . . . . . . . . . . . . . . .21
Guarantee Conditions . . . . . . . . . . . . . . . . . . . . . . . . . . . . . . . . . . . .22
Installation - Electrical Connection . . . . . . . . . . . . . . . . . . . . . . . . .23
Positioning - Rear spacer . . . . . . . . . . . . . . . . . . . . . . . . . . . . . . . . . . . . .24
Reversing the door . . . . . . . . . . . . . . . . . . . . . . . . . . . . . . . . . . . . . . . . . .25
Regulations, Standards, Guidelines . . . . . . . . . . . . . . . . . . . . . . . . .26
4
Safety
The safety aspects of our refrigerators/freezers comply with accepted technical standards and the German Appliance Safety Law. Nevertheless, we
consider it our obligation to make you aware of the following safety information:
Intended use
• The refrigerator is intended for use in the home. It is suitable for the cooling, freezing and storing of frozen food, as well as for making ice. If the
appliance is used for purposes other than those intended or used incorrectly, no liability can be accepted by the manufacturer for any damage
that may be caused.
• Alterations or changes to the freezer are not permitted for reasons of
safety.
• If you use the refrigerator in a commercial application for purposes other
than the cooling, freezing or frozen storage of foods, please observe all
valid legal regulations for your application.
Prior to initial start–up
• Check the refrigerator for transport damage. Under no circumstance
should a damaged appliance be plugged in! In the event of damage, please
contact your retailer.
Refrigerant
The refrigerant isobutane (R600a) is contained within the refrigerant circuit
of the appliance, a natural gas with a high level of environmental compatibility, which is nevertheless flammable.
• During transportation and installation of the appliance, be certain that
none of the components of the refrigerant circuit become damaged.
• If the refrigerant circuit should become damaged:
– avoid open flames and sources of ignition;
– thoroughly ventilate the room in which the appliance is situated.
Safety of children
• Packaging (e.g. wraps, polystyrene) can be dangerous for children. There is
a risk of suffocation! Keep packaging material away from children!
• Please make old appliances unusable prior to disposal. Pull out the mains
plug, cut off the mains cable, break or remove spring or boltcatches, if fitted. By doing this you ensure that children cannot lock themselves in the
fridge when playing (there is risk of suffocation!)or get themselves into
other dangerous situations.
• Often children cannot recognise the hazards present in household
appliances. It is therefore important that you ensure adequate supervision
and never let children play with the appliance!
25
F
D
PR18
F
F
F
E
E
H
G
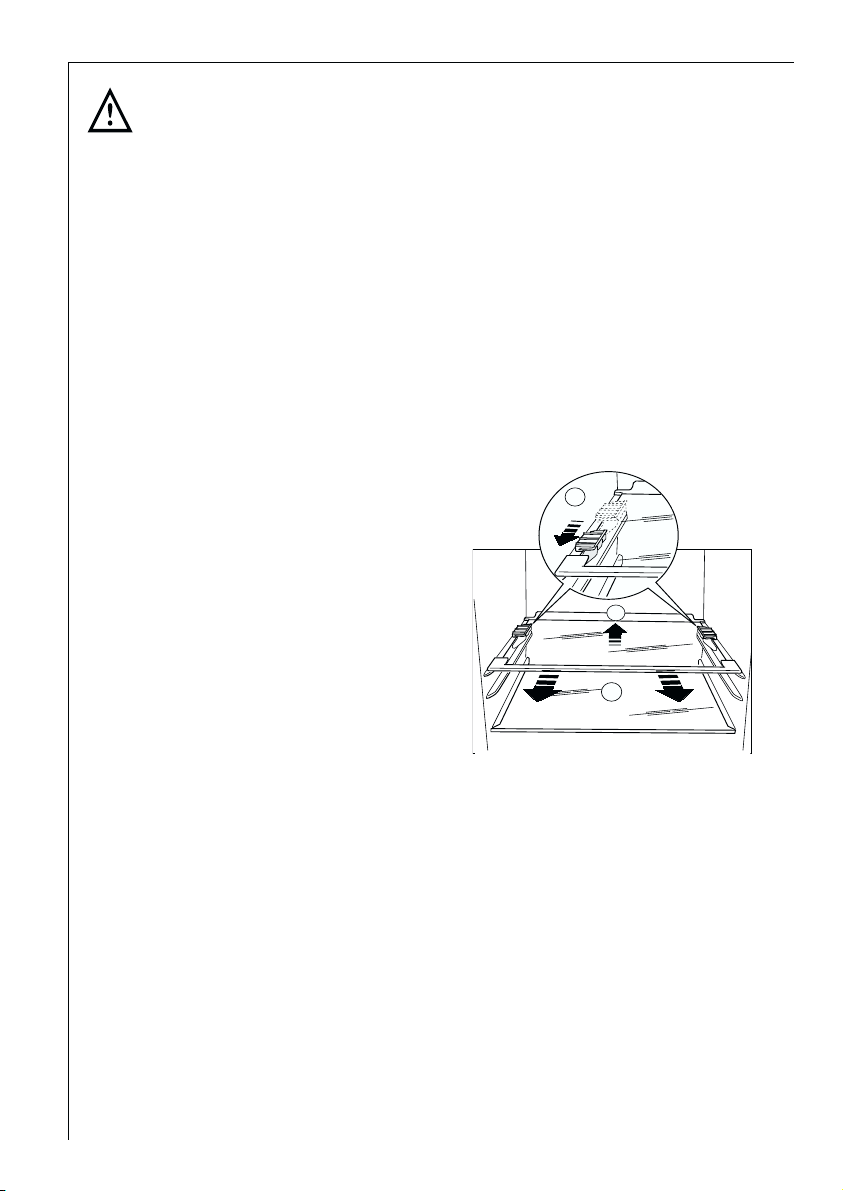
Reversing the door
The side at which the door hangs can be changed from the right side (fac-
tory supplied) to the left side, if the installation site requires.
Warning! When changing the side at which the door opens, the appliance
must not be connected to the mains. Remove plug from the mains befo-
rehand.
Procced as follow:
1. Remove the clip-in ventilation grille
(D).
2. Remove the bottom hinge (E) by
unscrewing the fixing screws.
3. Slide the bottom door off the centre
hinge (H).
4. Remove the centre hinge and slide
the top door off pin (G); unscrew pin
(G) and refit it on the opposite side.
5. Remove the two plugs, to reveal the
holes for the hinge pivots, and
remount them on the other side.
6. Refit the top door and the centre
hinge (H) on the opposite side.
7. Refit the bottom door.
8. Using a 10 mm spanner, unscrew
the hinge pin (E) and reassemble it
on the opposite side of the hinge;
9. Refit bottom hinge (E) on the oppo-
site side, using the screws previously
removed.
10. Remove blanking cover (F) from ven-
tilation grille (D) by pushing it in the
direction of the arrow and refit it on
the opposite side.
11. Refit ventilation grille (D), clipping it
into place.

5
Daily Operation
• Containers with flammable gases or liquids can leak at low temperatures.
There is a risk of an explosion! Do not store any containers with flammable materials such as, for example, spray cans, fire extinguisher refill cartridges etc in the refrigerator/freezer.
• Bottles and cans must not be placed in the freezer compartment. They can
burst when the contents freeze, high carbonate content drinks can even
explode! Never store lemonade, juices, beer, wine, sparkling wine etc. in
the freezer compartment. Exception: high alcohol content spirits can be
stored in the freezer compartment.
• Do not put ice creams or ice cubes in the mouth immediately after remo-
val from the freezer compartment. Very cold ice can freeze to the lips or
tongue and cause injury.
• Do not touch frozen food with wet hands. Your hands could freeze to the
food.
• Do not operate any electrical appliances in the refrigerator/freezer (e.g.
electric ice cream makers, mixers etc.).
• Before cleaning the appliance, always switch off the appliance and unplug
it, or pull the house fuse or switch off the circuit breaker.
• When unplugging always pull the plug from the mains socket, do not pull
on the cable.
Service
• Under no circumstances should you attempt to repair the appliance your-
self. Repairs carried out by inexperienced persons may cause injury or
serious malfunctioning. Contact your local AEG Service Force Centre.
Disposal
Appliance Packaging Information
All materials are environmentally sound!
The plastics can be recycled and are identified as follows:
>PE< for polyethylene, e.g. the outer covering and the bags in the interior.
>PS< for polystyrene foam, e.g. the pads, which are all free of chlorofluo-
rocarbon.
The carton parts are made from recycled paper and should be disposed of
at a waste-paper recycling collection location.
Disposal of old Appliances
For environmental reasons, refrigeration appliances must be disposed of
properly. This applies to your old appliance, and - at the end of its service
life - for your new appliance as well.
6
A
C
B
Warning! Before disposing of old appliances make them inoperable. Remove plug from mains, sever the power cable, remove or destroy any snap or
latch closures, to prevent small children being trapped inside.
• Use an authorised disposal site.
Contact your local Council or Enviromental Health Office to see if there are
facilities in your area to recycle the appliance;
Remove Transport Packaging
The appliance and the interior fittings are protected for transport.
• Remove all adhesive tape and packing pieces from the interior of the
appliance.
Your appliance is equipped with shelf
retainers that make it possible to
secure the shelves during transportation.
To remove them proceed as follows:
Move the shelf retainers in the direc-
tion of the arrow, raise the shelf from
the rear and push it forward until it
is freed and remove the retainers.
23
Installation
Electrical Connection
Any electrical work required to install this appliance should be carried
out by a qualified electrician or competent person.
WARNING – THIS APPLIANCE MUST BE EARTHED
The manufacturer declines any liability should these safety measures not
be observed.
Before switching on, make sure the electricity supply voltage is the same as
that indicated on the appliance rating plate. The rating plate is inside, on the
left.
The appliance is supplied with a 13 amp plug fitted. In the event of having
to change the fuse in the plug supplied, a 13 amp ASTA approved (BS 1362)
fuse must be used.
Important!
The wires in the mains lead are
coloured in accordance with the fol-
lowing code:
Green and Yellow Earth
Blue Neutral
Brown Live
As the colours of the wires in the
mains lead of this appliance may not
correspond with the coloured mark-
ings identifying the terminals in your
plug, proceed as follows:
1. The wire coloured green and yellow must be connected to the terminal
marked with the letter “E” or by the earth symbol or coloured green and yel-
low.
2. The wire coloured blue must be connected to the terminal marked “N” or
coloured black.
3. The wire coloured brown must be connected to the terminal marked “L” or
coloured red.
4. Upon completion there must be no cut, or stray strands of wire present and
the cord clamp must be secure over the outer sheath.
Warning! A cut-off plug inserted into a 13 amp socket is a serious safety
(shock) hazard. Ensure that the cut-off plug is disposed of safely.
D207
GREEN & YELLOW
13 AMP. FUSE
BROWN
CORD CLAMP
BLUE
13 AMP
7
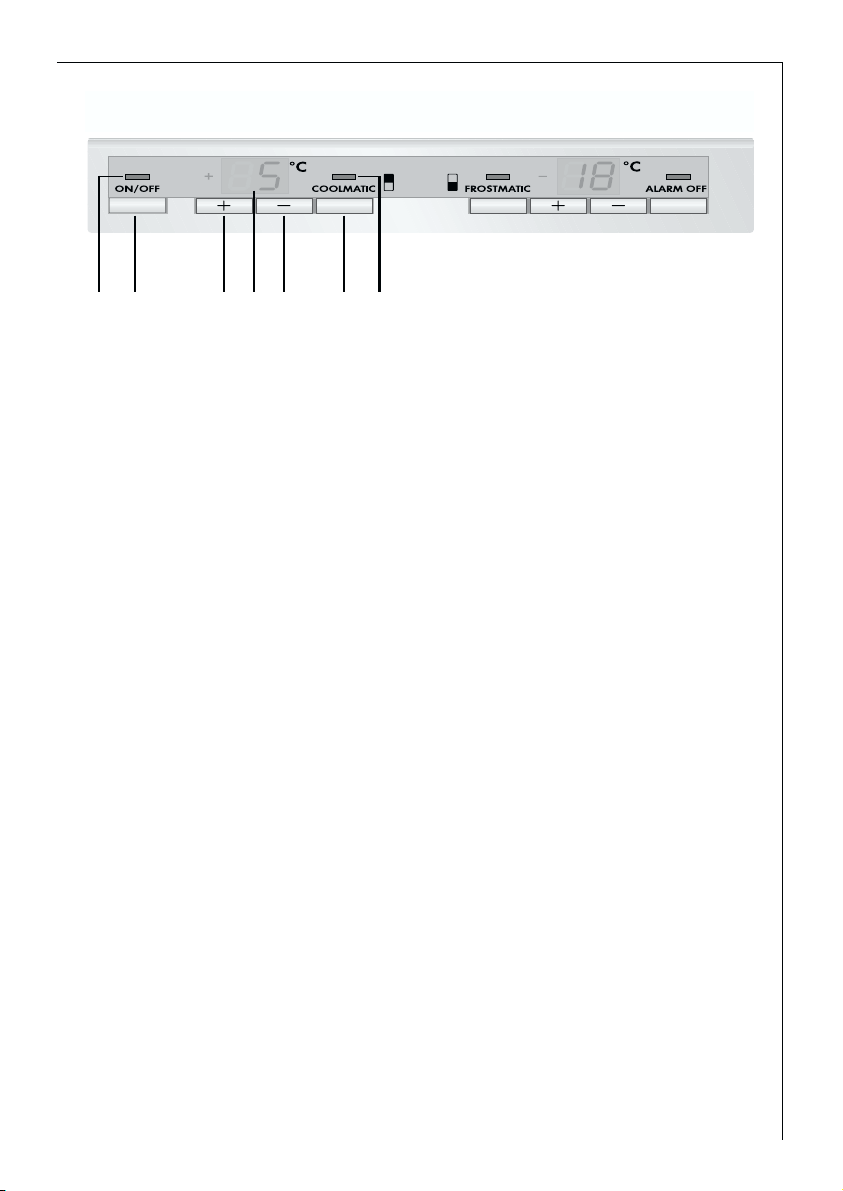
Operation and control panel - Fridge
A. Mains pilot indicator (green)
B. Fridge button ON/OFF
C. Temperature setting button (for warmer temperatures)
D. Temperature display
E. Temperature setting button (for colder temperatures)
F. COOLMATIC function "ON" indicator (yellow)
G. COOLMATIC button
Temperature setting buttons
The temperature is adjusted using the „C“ and „E“ buttons. These buttons
are connected to the temperature display.
• The temperature display is switched over from the display of the ACTUAL
temperature (Temperature display is illuminated) to the display of the DESIRED temperature (Temperature display flashes) by pressing one of the two
buttons, „C“ or „E“ .
• Each time one of the two buttons is pressed again the DESIRED temperature is adjusted by 1 °C. The DESIRED temperature must be reached within 24
hours.
If neither button is pressed, the temperature display automatically switches
back after a short period (approx. 5 sec.) to the display of the ACTUAL temperature.
DESIRED temperature means:
The temperature that has been selected for inside the fridge. The DESIRED
temperature is indicated by flashing numbers.
ACTUAL temperature means:
The temperature display indicates the current temperature inside the fridge.
The ACTUAL temperature is indicated with illuminated numbers.
Temperature display
The temperature display can indicate several pieces of information.
B C ED G FA

8
• During normal operation, the temperature currently present in the fridge
(ACTUAL temperature) is displayed.
• When the temperature is being adjusted a flashing display indicates the
fridge temperature currently set (DESIRED temperature).
Starting Up - Setting the Temperature
1. Plug the mains plug into the mains socket.
2. Press ON/OFF button. The green mains pilot indicator illuminates. The
appliances start.
3. Press either the „C“ or „E“ button. The temperature display switches over and
the DESIRED temperature currently set flashes on the temperature display.
4. Set the required temperature by pressing the „C“ or „E“ buttons (see section
"Temperature setting buttons"). The temperature display will immediately
show the changed setting. Each time the button is pressed the temperature is adjusted by 1 °C.
From a food safety point of view +5 °C should be considered sufficiently
cold for storing food in the fridge.
5. Once the required temperature has been set, after a short period (approx. 5
sec.) the temperature display will change and again indicate the current
ACTUAL temperature inside the fridge. The display will change from flashing
to continuous illumination.
Information! When the setting is changed, the compressor does not start
immediately if automatic defrosting is currently taking place. As the storage temperature within the fridge is reached quickly you can store food
immediately after switching on.
COOLMATIC
The COOLMATIC function is suited for quick cooling of large quantities of
goods in the refrigerator.
1. The COOLMATIC function is switched on by pressing the COOLMATIC button. The yellow light illuminates.
The COOLMATIC function now provides for intensive cooling. A DESIRED
temperature of +2 ÞC is automatically selected. The COOLMATIC function is
ended automatically after a period of 6 hours.
2. The COOLMATIC function can be ended manually at any time by pressing
the COOLMATIC button again. The yellow light goes out.
Holiday function
The holiday function sets the temperature at +15°C. This function allows
you to keep the refrigerator shut and empty during a long holiday period
(e.g. the summer holidays) without the formation of a bad smell.
21
Service and Spare Parts
In the event of your appliance requiring service, or if you wish to purchase spare parts, please
contact your local Service Force Centre by telephoning:
0870 5 929929
Your telephone call will be automatically routed to the Service Force Centre covering your post
code area. For address of your local Service Force Centre and further information about Service
Force, please visit the website at www
.serviceforce.co.uk.
Before calling out an engineer, please ensure you have read details under the heading “Some-
thing Not Working”. When you contact the Service Force Centre you will need to give following
details
:
1. Your name, address and post code
2. Your telephone number
3. Clear and concise details of the fault
4. The model and serial number of the apliance. (found on the rating plate).
5. The purchase date
Please note that a valid purchase receipt or guarantee documentation is required for
in-guarantee service calls.
For Customer Services in the Republic of Ireland please contact us at the address
below:
AEG
Electrolux Group (Irl) Ltd
Long Mile Road
Dublin 12 - Republic of Ireland
Tel: +353 (0) 1 4090751
Email: service.eid@electrolux.ie
Customer Care Department
For general enquiries concerning your AEG appliance or for futher information on AEG
products, please contact our Customer Care Department by letter or telephone at the
address below or visit our website at www.aeg.co.uk.
Customer Care Department
AEG Domestic Appliances
55-77 High Street,
Slough,
Berkshire
SL1 1DZ
Tel: 08705 350 350*
* calls to this number may be recorded for training purposes
9
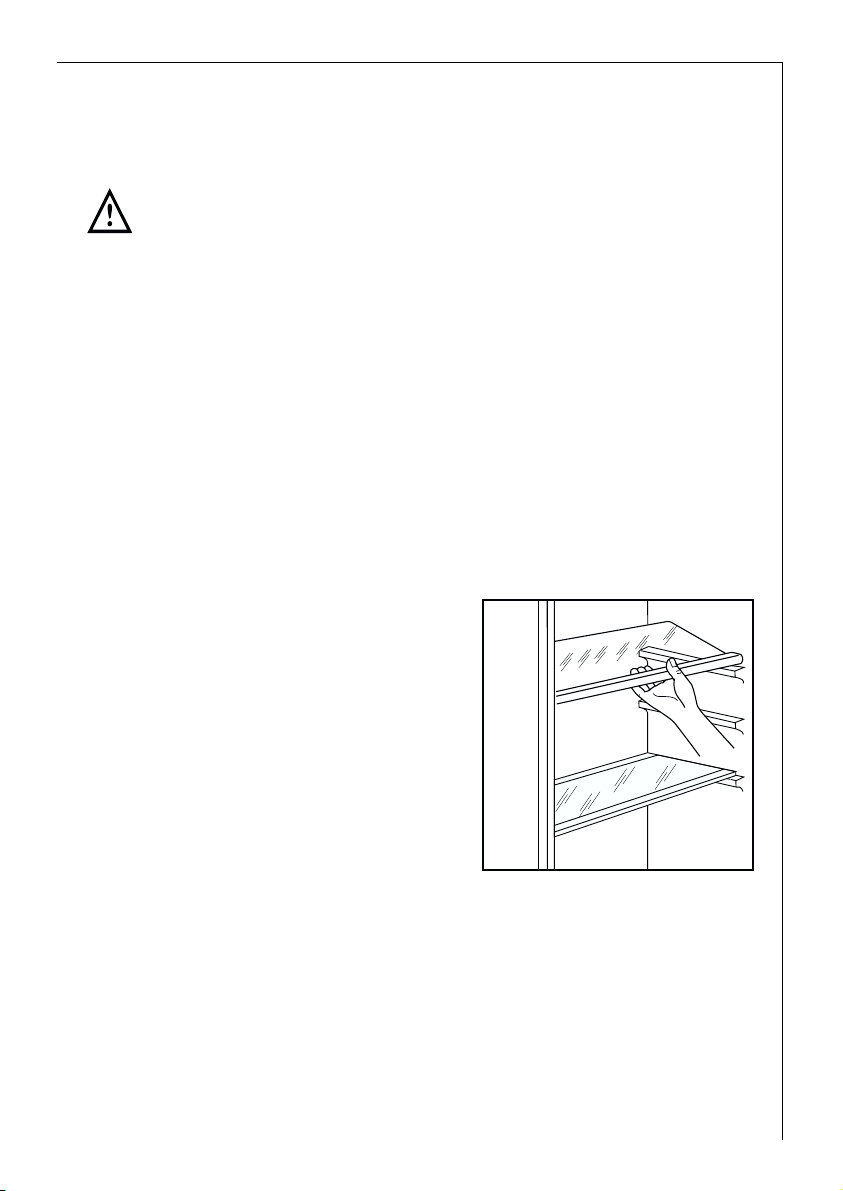
Interior Accessories
Storage shelves
• You should always slide one of the full size glass storage shelf into the
lowest set of guides, above the fruit and the vegetable containers, and
keep it in this position.
• The height of the storage shelves
can be adjusted:
• To do this pull the storage shelf
forward until it can be swivelledupwards or downwards and
removed.
• Please do the same in reverse to
insert the shelf at a different height.
Adjusting the upper door rack
• Depending on the food stored, the upper door racks can be changed to
other holders or removed. Take out the refrigerators food, press the door
racks digonally upwards at their edges, reposition them, and press them
back into place.
D338
1. To turn on the holiday function, press button (C).
2. Press button (C) continuously until the letter “H” (Holiday) appears on the
temperature indicator. The temperature indicator can modify the displayed
temperature up to +8°C, 1° at a tim. 8°C will be followed by the letter “H”.
Now the refrigerator is in the “holiday” function in the energy-saving mode.
The fridge compartment must be empty with holiday function on.
Turning OFF the refrigeration compartment
To turn off the refrigerator press the button “C” several times until the sym-
bol “OF” appears in the temperature indicator (F). Press the button “C” again
for about 5 seconds. In the temperature indicator there is a “count down”
i.e. a backward counting from “3” to “1”. When “1” appears the refrigerator
is turned off. The temperature indicator switches off.
 Loading...