

Page 1
We suggest you record the model, type and serial
service information, always refer to these numbers
when inquiring about service.
date of purchase.
Model S670 Series
return this product to
the store. Call 1-800-800-8975*
www.sanitairevac.com for any
of the following:
accessories
Warranty Station
*En Mexico llame al (55) 5343-4384
www.sanitairevac.com
©2004 Electrolux Home Care Products Ltd. Printed in U.S.A.
Page 2
Assemble
3
......................................................
4
.............................................
5
....................................................
6
Quick Kleen® Fan Chamber
........................
6
Warranty
To reduce the risk of electric shock,
this appliance
The plug will fi t in a polarized outlet only one way. If the
still does not fi t, con tact a qualifi ed electrician to install
the proper outlet. Do not change the plug in any way.
The bag may have come dislodged in shipping. Check
the bag to insure proper seating before attempting to
dust bag. Damage may result to the motor.
The cleaner is designed to pick up dirt and dust particles.
Avoid picking up hard or sharp objects with the cleaner
to avoid bag breakage, or possible motor damage.
The instructions in this booklet serve as a guide to
telephone toll free:
3900 Peoria, Illinois 61612, USA.
The Sanitaire Limited Warranty for com plete service
any time. The bearings are permanently
When using an electrical appliance, basic precautions should
always be followed, including the following:
WARNING
To reduce the risk of fi re, electric shock, or injury:
Turn off the
switch and unplug the electrical cord when not in use and before
servicing.
when used by or near children.
outdoors, or dropped into water, return it to a service center
on cord, or pull cord around sharp edges or corners. Do not
surfaces.
carrying capacity.
Turn off all controls before unplugging.
the cord.
opening blocked; keep free of dust, lint, hair, and anything that
This vacuum cleaner creates suction and contains a revolving
cigarettes, matches, or hot ashes.
gasoline, or use in areas where they may be present.
Page 3
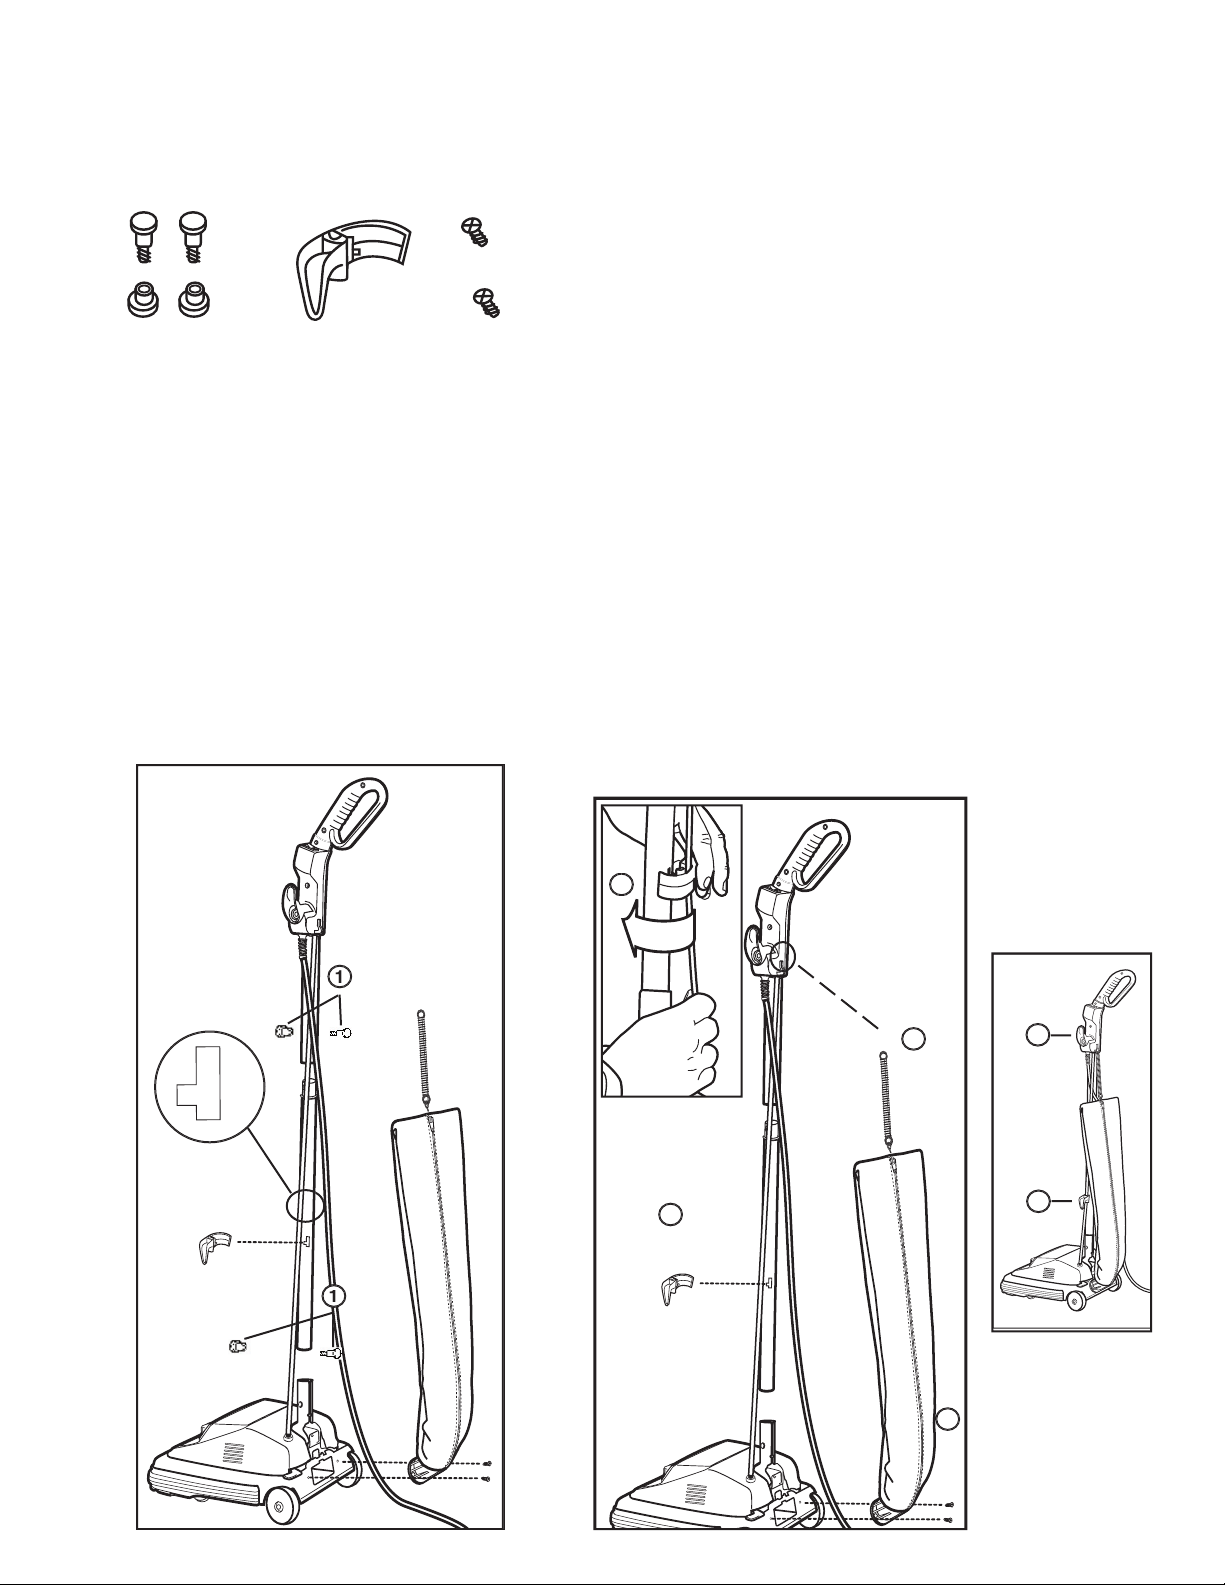
3
Assembly Packet is with ownerʼs guide.
A
2-Part
Cord Hook
C
Screws
Attach the Handle
correctly, see Detail A.
Align the holes on the lower handle and the socket. Insert
a 2-part bolt (A) in the bottom center of the handle and
tighten.
away from cleaner.
Align the holes on the upper handle
to the holes on the lower handle. Insert a 2-part bolt (A)
Attach Lower Cord Hook
cord into the groove on the cord hook pulling any slack toward
the base of the cleaner. On the cord hook, fi nd the curved
tab and place in slot on lower handle section, keep cord taut
while pressing the cord hook to the left until it snaps into slot
on opposite side of handle. The hook should point downward
on the same side that the cord exits the hood.
Attach Outer Bag
coupling must seat firmly against the
screw holes. Start the bag screws by hand, then tighten with
a screwdriver.
The cleaner has two convenient cord storage hooks attached
to the handle. However, some models feature a quick release
cord hook on the upper handle. A downward twist of the cord
the cord around the hooks for storage. Fasten the plug to the
cord to prevent unwinding.
2
3
3
4
4
Page 4

UP
THROAT
BO
T
T
O
M
UP
THROAT
B
OT
T
O
M
UP
THROAT
BO
T
T
O
M
The upright vacuum cleaner is designed to be used on
as damage to the
fl oor covering may result. Above the fl oor cleaning tools are
available (optional).
WARNING: Avoid injury. Keep loose clothing, hair, fi ngers,
and all other parts of body away from any
Turn off the switch and unplug the cleaner
The front of the cleaner has an adjustment that raises or
the cleaner cord unplugged, set the adjustment to lowest
setting for maximum cleaning. If the cleaner is diffi cult to
for effective cleaning.
cord disconnected from outlet.
adjustment knob, place handle in operating position and tilt
cleaner back to remove weight from front wheels.
With the tip of the foot, press down to release the handle lock
and adjust it to the desired position for (1) storing upright, (2)
operating the cleaner at a comfortable height for the user,
and (3) cleaning underneath low furniture.
2. Use
3.Clean
ON/OFF
The power switch is mounted on the handle. Push ON (-)
or OFF (O).
The instructions given in this booklet serve as a guide to
check the bag, belt and brush roll often.
vacuum cleaner. The purpose of a paper bag is to trap dirt.
allow air to pass through. If the paper bag becomes clogged,
quickly and will decrease performance even before the bag
appears to be full. For that reason, when vacuuming carpet
fresheners or cleaners, powder, plaster dust, or similar fi ne
substances, the bag may need to be changed more often.
Turn off the switch and unplug the electrical
cord before changing
dust bag. Never operate
the vacuum cleaner without the dust bag.
4. Unfold
5. Place bag
throat on
sleeve.
3. Pull bag throat
off sleeve.
2. Roll down
coil spring.
GENUINE
zipper
down.
6. Roll up coil spring.
7. Place paper bag into outer bag.
NOTE: Be certain there are no
folds at the top or bot-
tom of the paper bag.
8. Lift zipper.
EUREKA PRODUCT
EUREKA PRODUCT
Ask for GENUINE EUREKA
dust bags–Style F & G.
Page 5

9 9
8 8
7
Motor
Pulley
2
1 1
5
®
Bag Care
(Micron Filter Bag is
standard on some models)
occasionally trapped dust particles will need to be cleaned
from the inside of it. The dust accumulation can be vacuumed
out with another vacuum or the bag may be removed to shake
out. If you desire, the bag may be hand laundered. The zipper
on the bag should be down and the bag should remain right
side out. Use warm water (150°F 65°C) and a mild detergent.
as
either will cause abrasion to the delicate polyester fabric.
as dry cleaning fl uids will damage plastic
The brush roll belt on the upright vacuum cleaner drives the
should be checked regularly to be sure it is in good condition.
away any hair or thread wound around the brush roll or the
Turn off the switch and unplug the electrical
cord before replacing belt. Belt pulleys can
servicing the drive belt.
or brush roll belt could
cause carpet or
cleaner damage.
2. Pull up on belt to rotate it off the motor pulley. Lift up
on brush roll and remove worn belt.
over both end caps (fl at side against end cap).
Align holes
and secure.
5.
Slant brush roll forward so end
caps are in line with
slots in cleaner
6.
7. Place lower side of belt into belt guide and pull to
stretch the belt around the left side of motor pulley.
8. Place slots of bottom plate over tabs of cleaner
9. Seat and secure cam locks.
Ask for GENUINE EUREKA replacement belts, No. 52100A
GENUINE
EUREKA PRODUCT
Check for brush wear (see Brush Roll instructions on
3. Place new belt around brush roll.
4. Align brush roll pulley with belt guide.
Belt
Guide
4
3
5
6
Page 6

6
track on either side into brush roll
slot. Re place second brush strip
from op po site end of brush roll.
ends of brush roll.
C. Position end cap with fl at sides
of center hole over fl at sides of
thread ed shaft.
A. Align holes and secure rubber
end cap cover fl at side against
end cap.
A. Remove rubber end cap cover
from one end.
C. Remove end cap.
end.
When properly assembled, the brush roll should rotate freely between the
two end caps. Check the condition of the belt; change if necessary. Replace
the brush roll, belt, and bottom plate (see How To Replace A Worn Belt).
G
Shaft washer (D) not included in ball bearing brush roll as sem bly.
A B C D E
(On some models)
CAUTION:
Turn off the switch and unplug
the electrical cord before
cleaning.
The clear, removable fan chamber cover
the cover provides easy access to the motor
fan. Grease buildup, dirt, or other obstructions,
visible through the fan cover, should be
chrome bottom plate by releasing the two
cam locks (see Brush Roll Belt, Figure 1 and
2). Remove the belt from, the motor pulley,
then loosen and remove the screws on either
side of the fan cover, as indicated by the
arrows. Push the cam locks outward against
the wheels to lift the cover from the cleaner
cleared; however, caked grease may need to
fan blades with one hand and turn the wrench
counterclockwise. Remove the motor pulley
and lift the fan off the motor shaft. Clean the
area and replace the fan over the motor shaft.
Tighten the motor pulley snugly clockwise with
the wrench. If necessary, replace the fan cover
or the gasket with replacement parts.
fan cover by fi rst placing the exhaust end into
fan cover fi rmly. Next replace the belt and
screws by hand to be sure they are straight,
then tighten.
(fan cover, gasket, two screws) Part No.
52334.
The rotating brush roll sweeps and combs the carpet nap. Keep the brush
of the brush roll no longer touch a straight edge held across the bottom
carpet nap. To maintain the most effective cleaning, replace the wood
to instructions).
(chromed steel brush roll)
Turn off the switch and unplug the electrical cord before
grasp center of brush roll and lift to remove.
Ask for GENUINE EUREKA replacement brush strip.
Page 7

hat This Warranty Covers
hat This Warranty Covers
Your Sanitaire cleaner is warranted to be free from all defects in material and
workmanship
in normal household use for a period of two years and fi ve years for the motor and base
assembly. The warranty is granted only to the original purchaser and members of his or
her immediate household. The warranty is subject to the following provisions.
hat This Warranty Does Not Cover
hat This Warranty Does Not Cover
•
Parts of the cleaner that require replacement under normal use, such as disposable
dust bags, fi lters, drive belts, light bulbs, and brush roll bristles.
Damages or malfunctions caused by negligence, abuse, or use not in accordance with
the Ownerʼs Guide.
•
Defects or damages caused by unauthorized service or the use of other than Genuine
Eureka/Sanitaire parts.
hat Electrolux Home Care Products North America Will Do
hat Electrolux Home Care Products North America Will Do
Electrolux Home Care Products North America will, at its option, repair or replace a
defective cleaner or cleaner part that is covered by this warranty. As a matter of warranty
policy, Electrolux Home Care Products North America will not refund the consumerʼs
purchase price.
E
xtended Warranty for Upright Cleaner (Only)
xtended Warranty for Upright Cleaner (Only)
The base of the Sanitaire Upright cleaner is warranted for fi ve years from the original
E
E
date of purchase.
E
xtended Warranty for SYSTEM_PRO Canisters
xtended Warranty for SYSTEM_PRO Canisters
The motor for SYSTEM_PRO canister cleaners is warranted for fi ve years from the
E
E
original date of purchase.
arranty Registration
arranty Registration
Please fi ll out and return the warranty registration card accompanying your cleaner.
btaining Warranty Service
To obtain warranty service you must return the defective cleaner or cleaner part along
with proof of purchase to any Sanitaire Authorized Warranty Station.
You will fi nd the nearest location in the Yellow Pages, under “Vacuum Cleaners–Service
and Repair.” Be certain that the Warranty Station is “Sanitaire Au tho rized.”
For the location of the nearest Sanitaire Authorized Warranty Station or for service
information, telephone toll free:
USA: 1-800-800-8975
Mexico: (55) 5343-4384 www.sanitairevac.com
Canada: 1-800-800-8975
If you prefer, you can write to Electrolux Home Care Products North America, Service
Division, P.O. Box 3900, Peoria, Illinois 61612, USA. In Canada write to Electrolux Home
Care Products North America, 866 Langs Drive, Cambridge, Ontario N3H 2N7.
If it is necessary to ship the cleaner outside your community to obtain warranty repair, you
must pay the shipping charges to the Sanitaire Au tho rized Warranty Station. Re turn shipping
charges will be paid by the Warranty Station. When returning parts for repair, please in clude
the model, type, and serial numbers from the data plate on the cleaner.
F
urther Limitations and Exclusions
Any warranty that may be implied in connection with your purchase or use of the
F
F
cleaner, including any warranty of Merchantability or any warranty for Fitness For A
Particular Purpose is limited to the duration of this warranty. Some states do not allow
limitations on how long an implied warranty lasts, so the above limitations may not
apply to you.
Your relief for the breach of this warranty is limited to the relief expressly provided
above. In no event shall Electrolux be liable for any consequential or incidental damages
you may incur in connection with your purchase or use of the cleaner. Some states do
not allow the exclusion or limitation of incidental or consequential damages, so the
above limitation or exclusion may not apply to you.
This warranty gives you specifi c legal rights. You may also have other rights which
vary by state.
uestions & Answers about Genuine Eureka/Sanitaire Products
Q:
Why should I use only Genuine Eureka/Sanitaire paper bags, belts, and parts in my
Eureka/Sanitaire vacuum cleaner?
A: Using Genuine Sanitaire Products, which are made to our exacting
specifi cations and engineered with emphasis on quality, performance,
and customer sat is fac tion, ensures the long life and cleaning effi ciency
of your vacuum clean er. Overall, this saves you money and helps to
Q:
How can I be sure I am using only Genuine Eureka/Sanitaire products in my vacuum
cleaner?
A: Typically, packaged products and paper bags can be identifi ed by a
call our toll-free number, 1-800-800-8975, for the lo ca tion of a nearby
Q:
Are there any differences between “made to fi t” or “imitation” and Genuine Eureka/
Sanitaire paper bags, belts, and parts?
A: Yes, there are some very important differences in materials, quality, and
experienced related dif fi cul ties.
Bloomington, Illinois 61701
THE SANITAIRE LIMITED WARRANTY
GEN U INE
EUREKA PRODUCT
Household Warranty
(Standard on most models)
Turn off the switch and unplug the electrical
cord before replacing headlight bulb.
the lens, as illustrated. Place a screwdriver into one notch;
twist or pry the screwdriver to release the lens. Repeat for
the second notch on the opposite side.
to remove. Secure new bulb into socket and rotate bulb
socket backward.
opening. Rotate lens to position and press down at each
Ask for GENUINE EUREKA replacement bulb,
40009A.
3
cord before cleaning unit.
To keep the vacuum cleaner looking new, it can be wiped
with a damp cloth and a mild soap solution, then thoroughly
dried. Never use any type of chemical as chemicals can
damage the cleaner. When not in use, the cleaner should
 Loading...