

Page 1

S 60240 DT4
Gebruiksaanwijzing
Mode d`emploi
Gebrauchsanleitung
Instruction book
Libretto d’istruzioni
Koel/vriescombinatie
Réfrigérateur
Congélateur
Kühl - Gefrierkombination
Refrigerator- freezer
Combination
Frigorifero-Congelatore combinato
PERFEKT IN FORM UND FUNKTION
B/AE/18. (08.)
200382264
Page 2
2
Lees deze gebruiksaanwijzing aandachtig door voordat u het apparaat installeert en in gebruik neemt. U vindt hierin aanwijzingen m.b.t. de veiligheid, praktische informatie, informatie m.b.t. het milieu en tips. Als u het apparaat volgens de
aanwijzingen gebruikt, zal het naar volle tevredenheid werken.
M.b.v. onderstaande symbolen kunt u informatie makkelijk vinden:
Aanwijzingen m.b.t. de veilligheid
Aanwijzingen die belangrijk zijn voor uw veiligheid of voor het functioneren van het apparaat.
Praktische informatie
Informatie m.b.t. het milieu
Tips
Tips m.b.t. levensmiddelen en het bewaren daarvan.
Het symbool op het product of op de verpakking wijst erop dat dit product niet als huishoudafval mag worden
behandeld. Het moet echter naar een plaats worden gebracht waar elektrische en elektronische apparatuur wordt
gerecycled. Als u ervoor zorgt dat dit product op de correcte manier wordt verwijderd, voorkomt u mogelijk voor
mens en milieu negatieve gevolgen die zich zouden kunnen voordoen in geval van verkeerde afvalbehandeling. Voor
meer details in verband met het recyclen van dit product, neemt u het best contact op met de gemeentelijke
instanties, het bedrijf of de dienst belast met de verwijdering van huishoudafval of de winkel waar u het product
hebt gekocht.
NL
Inhoudsopga
Inhoudsopgavvee
Belangrijke aanwijzingen m.b.t. de veiligheid . . . . . . .3
Algemene aanwijzingen m.b.t. de veiligheid . . . . .3
Veiligheid van kinderen . . . . . . . . . . . . . . . . . . . . . .3
Vóór het in gebruik nemen . . . . . . . . . . . . . . . . . . .3
Veiligheidsmaatregelen voor isobutaan . . . . . . . . .3
Aanwijzingen voor de gebruiker . . . . . . . . . . . . . . .4
Algemene informatie . . . . . . . . . . . . . . . . . . . . . . . .4
Beschrijving van het apparaat, belangrijkste
onderdelen . . . . . . . . . . . . . . . . . . . . . . . . . . . . . . . . . .4
Bedienen van het apparaat . . . . . . . . . . . . . . . . . . .5
In gebruik nemen . . . . . . . . . . . . . . . . . . . . . . .5
Temperatuur instellen . . . . . . . . . . . . . . . . . . . .5
Gebruik van de koelruimte . . . . . . . . . . . . . . . .5
Bewaren in de koelruimte . . . . . . . . . . . . . . . . .5
Gebruik van de vriezer . . . . . . . . . . . . . . . . . . . . . . .5
Invriezen . . . . . . . . . . . . . . . . . . . . . . . . . . . . . . .5
Bewaren in de vriesruimte . . . . . . . . . . . . . . . .6
IJsblokjes maken . . . . . . . . . . . . . . . . . . . . . . . .6
Praktische informatie . . . . . . . . . . . . . . . . . . . . . . . .6
Tips6
Energie besparen . . . . . . . . . . . . . . . . . . . . . . . .6
Het apparaat en het milieu . . . . . . . . . . . . . . .7
Onderhoud . . . . . . . . . . . . . . . . . . . . . . . . . . . . . . . .8
Ontdooien . . . . . . . . . . . . . . . . . . . . . . . . . . . . . .8
Reiniging en onderhoud . . . . . . . . . . . . . . . . . .8
Als de koelkast niet in gebruik is . . . . . . . . . . .8
Problemen oplossen . . . . . . . . . . . . . . . . . . . . . . . . .8
Lamp vervangen . . . . . . . . . . . . . . . . . . . . . . . . .8
Als iets niet werkt . . . . . . . . . . . . . . . . . . . . . . . . . . .9
Aanwijzingen voor de installateur . . . . . . . . . . . .10
Technische gegevens . . . . . . . . . . . . . . . . . . . . . . . .10
Installeren van het apparaat . . . . . . . . . . . . . . . . .10
Vervoer, uitpakken . . . . . . . . . . . . . . . . . . . . . .10
Reiniging . . . . . . . . . . . . . . . . . . . . . . . . . . . . . .10
Opstelling . . . . . . . . . . . . . . . . . . . . . . . . . . . . .10
Deurdraairichting omzetten . . . . . . . . . . . . . .11
Elektrische aansluiting . . . . . . . . . . . . . . . . . .12
Bewaartijdentabel (1) . . . . . . . . . . . . . . . . . . . . . .13
Bewaartijdentabel (2) . . . . . . . . . . . . . . . . . . . . . .13
Page 3
3
NL
Belangrijke aanwijzingen m.b.t. de veiligheid
Algemene aanwijzingen m.b.t. de veiligheid
Bewaar deze gebruiksaanwijzing goed en geef hem door aan
een evt. volgende eigenaar van het apparaat.
Dit apparaat is alleen bedoeld voor gebruik in het
huishouden, voor het bewaren van levensmiddelen en dient
volgens de voorschriften te worden gebruikt.
Reparaties aan dit apparaat, ook vervangen van het
aansluitsnoer, mogen alleen door ELECTROLUX SERVICE
uitgevoerd. Daarbij mogen alleen originele DISTRIPARTS-
onderdelen gebruikt worden. Onvakkundige reparaties kunnen tot aanzienlijke risico's voor de gebruiker leiden!
Het apparaat is alleen spanningloos als de stekker uit het
stopcontact is getrokken. Voordat u het apparaat gaat reinigen, dient u het altijd spanningloos te maken. Trek de stekker
nooit aan het snoer, maar aan de stekker zelf uit het stopcontact. Als het stopcontact moeilijk bereikbaar is, schakel
dan de zekering in de huisinstallatie uit.
Het aansluitsnoer mag niet verlengd worden.
Zorg ervoor dat de stekker niet wordt platgedrukt of
beschadigd door de achterkant van het koel/vriesapparaat.
- Een beschadigde stekker kan oververhit raken en brand
veroorzaken.
Plaats geen zware voorwerpen of het koel/vriesapparaat
zelf op het aansluitsnoer.
- Daardoor bestaat kans op kortsluiting en brand.
Trek de stekker niet uit het stopcontact door aan het snoer
te trekken, vooral niet als het koel/vriesapparaat uit de nis
wordt getrokken.
- Schade aan het snoer kan kortsluiting, brand en/of een
elektrische schok veroorzaken.
- Als het aansluitsnoer beschadigd is, moet het worden vervangen door onze service-afdeling of door een erkend
installateur.
Als het stopcontact los zit, steek de stekker er dan niet in.
- Daardoor bestaat kans op een elektrische schok of brand.
Gebruik het apparaat niet zonder de afdekking van de binnenverlichting.
Gebruik bij het schoonmaken, het ontdooien of het uitnemen van diepvriesproducten of het ijsblokjesbakje geen
scherpe of puntige voorwerpen. Die kunnen het apparaat
beschadigen.
Zorg ervoor dat er geen vloeistoffen bij de temperatuurregelaar en de verlichting komen.
Consumptie-ijs en ijsblokjes niet direct uit de vriesruimte in
de mond stoppen. IJs kan aan lippen of tong vastvriezen en
verwondingen veroorzaken.
Eenmaal ontdooide levensmiddelen mogen niet opnieuw
ingevroren worden, maar moeten zo snel mogelijk geconsumeerd worden.
Kant-en-klare diepvriesproducten volgens de aanwijzingen
van de fabrikant van deze producten bewaren.
Probeer niet het ontdooiproces te versnellen m.b.v. elektrische verwarmingstoestellen of chemische stoffen.
Laat kunststof onderdelen niet met hete voorwerpen in aanraking komen.
Geen bussen of flessen met brandbaar gas of vloeistof in het
apparaat bewaren. Explosiegevaar!
Veiligheid van kinderen
Houd de verpakking uit de buurt van kinderen.
Kunststof folie kan verstikkingsgevaar opleveren.
Het apparaat is bedoeld voor gebruik door volwassenen. Laat kinderen niet met het apparaat of de bedieningselementen spelen.
Als u het apparaat afdankt, trek dan de stekker uit het
stopcontact, snijd het aansluitsnoer af (zo dicht
mogelijk bij het apparaat) en haal de deur eruit. U verhindert daardoor, dat spelende kinderen een elektrische schok krijgen of elkaar of zichzelf in het apparaat opsluiten.
Dit apparaat is niet bedoeld voor gebruik door
kinderen, personen met verminderde lichamelijke, zintuigelijke of geestelijke capaciteiten of een gebrek aan
kennis en ervaring, tenzij er toezicht is ingesteld door
de persoon die verantwoordelijk is voor hun veiligheid
of tenzij zij van deze persoon instructies hebben
gekregen over het gebruik.
Vóór het in gebruik nemen
Zet het apparaat tegen de muur om te voorkomen dat u
zich verbrandt aan warmte afgevende onderdelen (compressor, condensor).
Trek altijd eerst de stekker uit het stopcontact voordat u
het apparaat gaat verplaatsen.
Let erop dat het apparaat niet op het aansluitsnoer staat.
Rond het apparaat moet voldoende luchtcirculatie zijn.
Gebrek aan luchtcirculatie kan tot oververhitting leiden.
Volg daarom de aanwijzingen m.b.t. de installatie.
Zie hoofdstuk "Plaatsing".
Als u zich niet aan deze aanwijzingen houdt, kan
de fabrikant niet aansprakelijk worden gesteld
voor eventuele schade.
Veiligheidsmaatregelen voor isobutaan
Waarschuwing
Het koelmiddel van het apparaat is isobutaan
(R 600a) dat in hoge mate brandbaar en explosief is.
Houd ventilatie-openingen in het apparaat of in het
inbouwmeubel vrij.
Gebruik geen mechanische apparaten of andere middelen om het ontdooiproces te bespoedigen, die niet
door de fabrikant worden aangeraden.
Beschadig het koelcircuit niet.
Gebruik geen elektrische apparaten binnenin het
apparaat, tenzij ze door de fabrikant worden geadviseerd.
Geen koolzuurhoudende dranken, flessen en blikjes in de
diepvriesruimte bewaren.
Het dooiwaterafvoergootje regelmatig controleren en
schoonmaken - een sticker binnenin het apparaat herinnert u daaraan. Bij verstopping van het afvoergootje kan
het verzamelde dooiwater storingen veroorzaken.
Page 4
4
Aanwijzingen voor de gebruiker
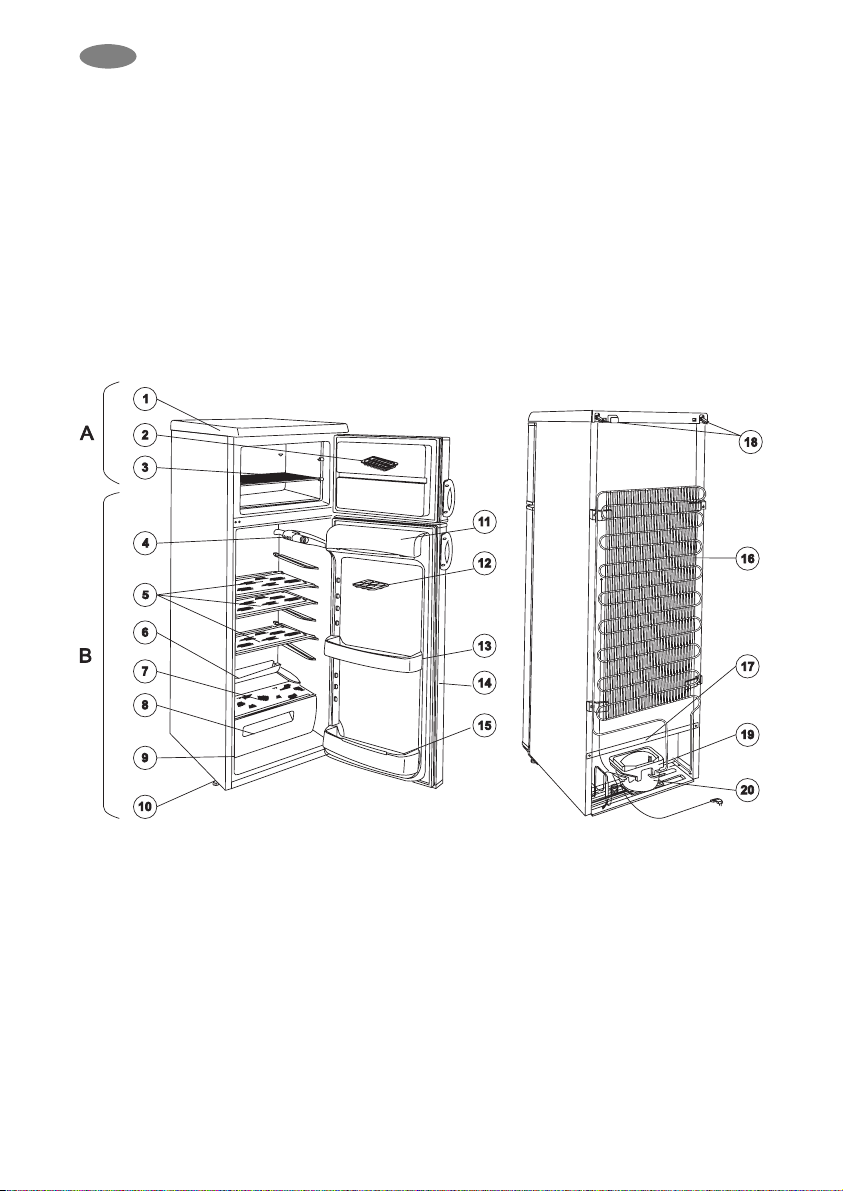
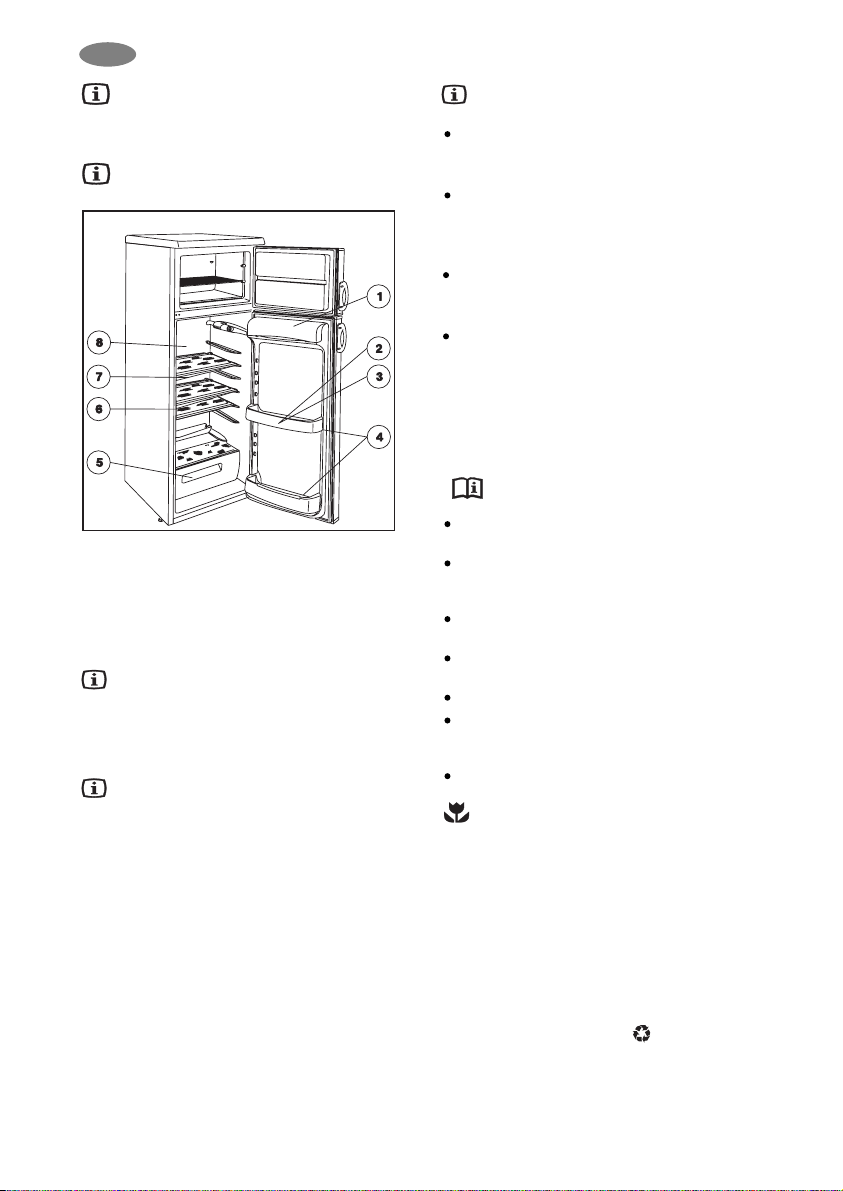
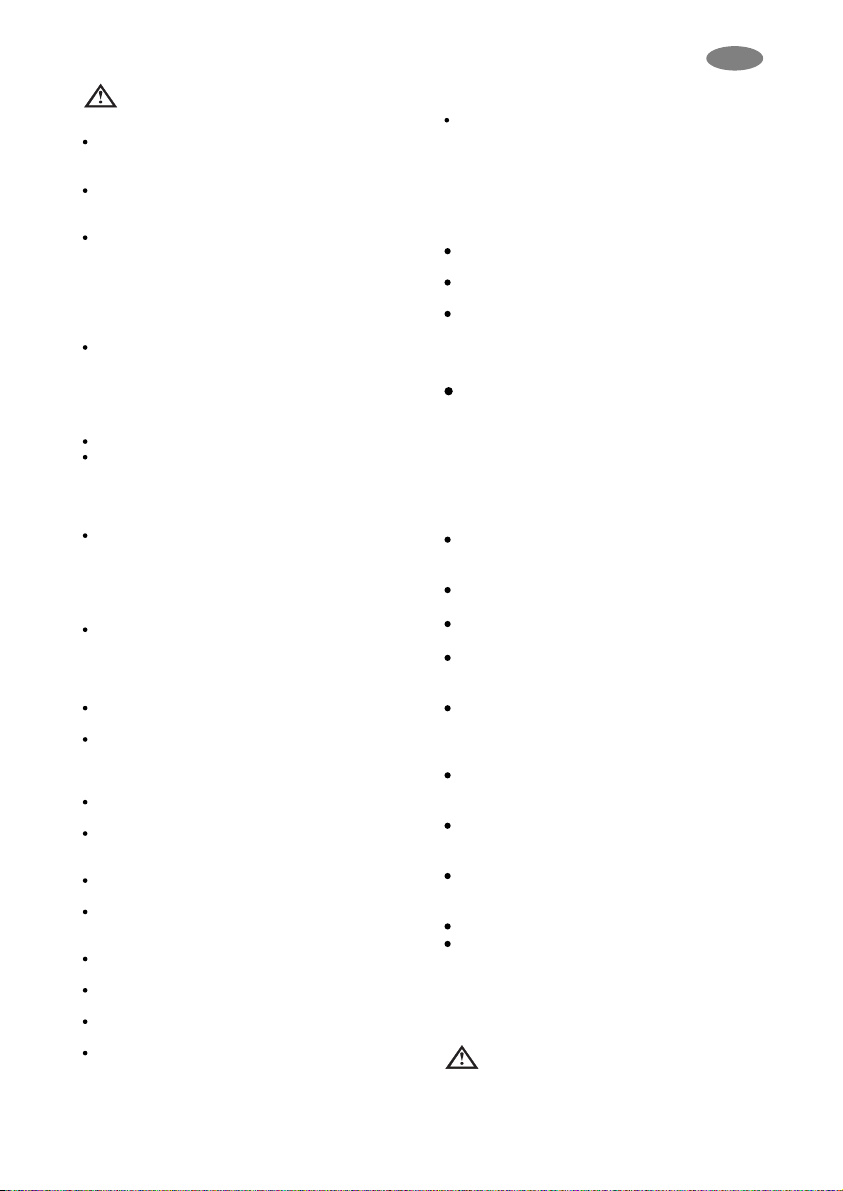
Beschrijving van het apparaat, belangrijkste onderdelen
A - vriesruimte
B - koelruimte
1. bovenblad
2. ijsblokjesbakje
3. rooster in de vriesruimte
4. verlichting
5. glasplaat
6. dooiwaterlekbak
7. glasplaat
8. groentela
9. typeplaatje
10. stelvoeten
11. botervakje
12. eierrekje
13. deurvak
14. deurrubber
15. flessenvak
16. condensor
17. dooiwaterafvoergootje
18. afstandshouder
19. condensbakje
20. compressor
Algemene informatie
Dit apparaat is een huishoud-koel/vriescombinatie met één
compressor. De vriesruimte bovenin heeft een eigen deur en
is geheel afgesloten van de koelruimte.
Het is geschikt voor het koelen van levensmiddelen, het
bewaren van diepvriesproducten, het invriezen van levensmiddelen en het maken van ijsblokjes.
Het apparaat is geschikt voor gebruik in een bepaalde klimaatklasse (bepaalde omgevingstemperaturen).
De klimaatklasse vindt u op het typeplaatje.
NL
Page 5
5
manier voorkomt u onnodige rijpvorming.
Levensmiddelen kunnen geurtjes van elkaar overnemen.
Bewaar levensmiddelen daarom in gesloten schaaltjes,
aluminiumfolie, vetvrij papier of vershoudfolie. Op deze
Bedienen van het apparaat
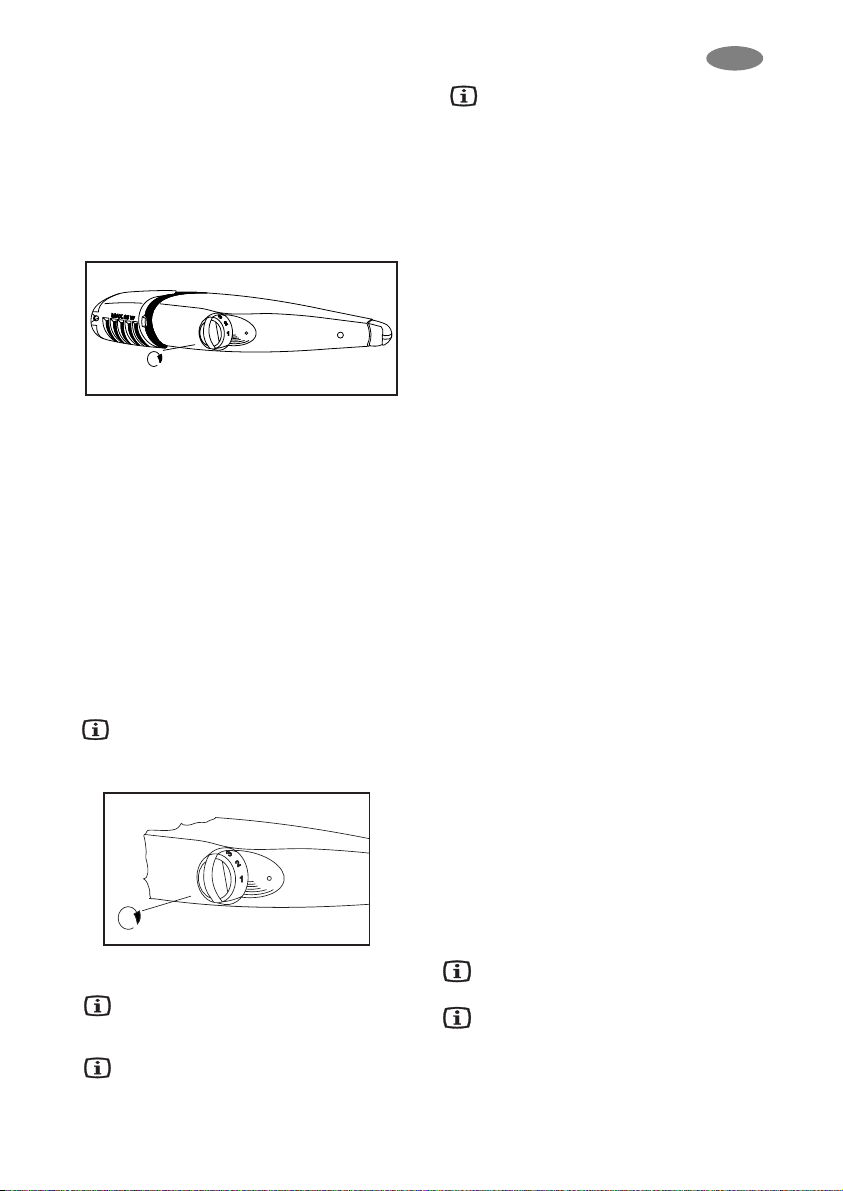
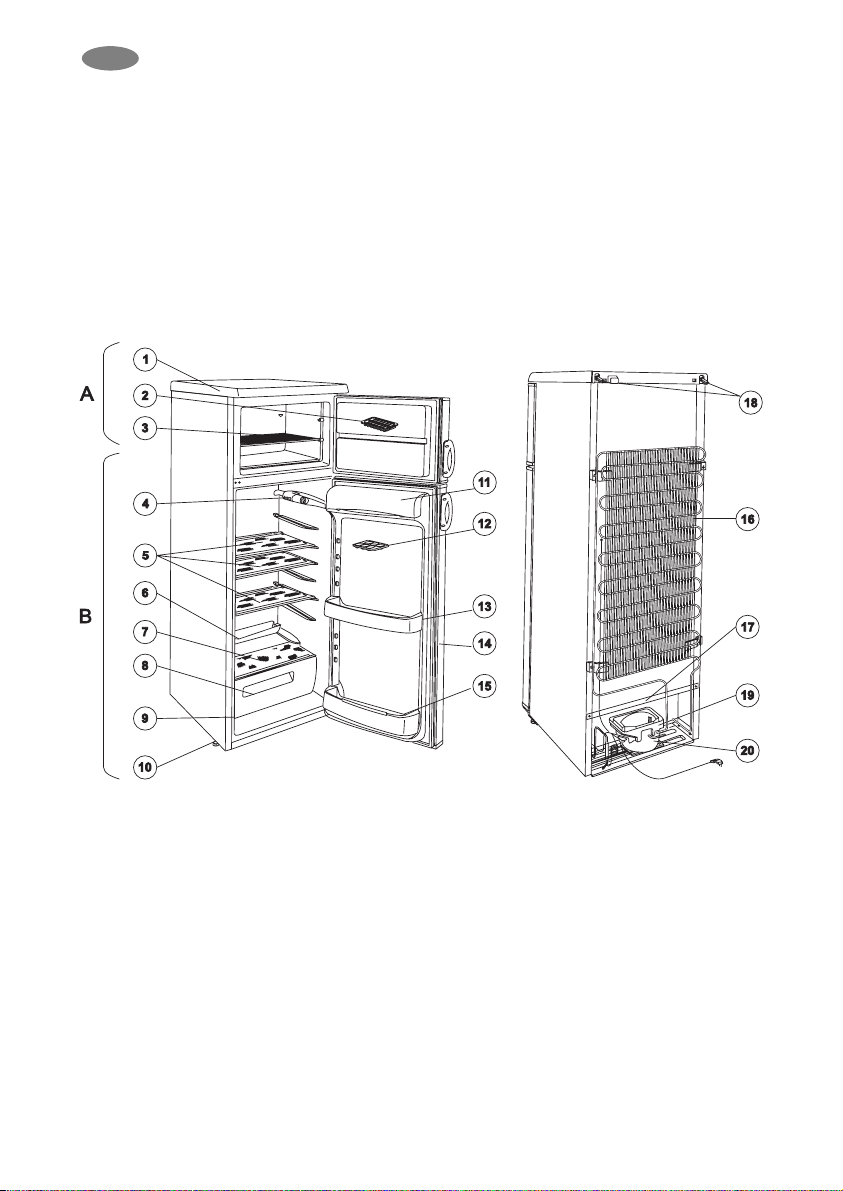
In gebruik nemen
Zet de accessoires in de koelkast en steek de stekker in het
stopcontact. Draai de temperatuurregelaar aan de
rechterkant van de koelruimte vanuit „0” rechtsom (zie
afb.). Op stand „0” is het apparaat buiten werking.
In het volgende hoofdstuk vindt u aanwijzingen m.b.t. de
instelling.
Temperatuur instellen
De thermostaat zorgt er automatisch voor dat de ingestelde
temperatuur wordt aangehouden en schakelt regelmatig
het apparaat kortere of langere tijd uit.
Hoe hoger het cijfer waarop u de temperatuurregelaar
draait, hoe intensiever er gekoeld wordt.
In de vriesruimte wordt een temperatuur van -18 °C of
kouder bereikt, als u de temperatuurregelaar op „3” draait.
In dit geval wordt de temperatuur in de koelruimte automatisch +5 °C of kouder. Stand „3” is geschikt voor normaal
gebruik.
De temperatuur in het apparaat is niet alleen afhankelijk
van de instelling van de temperatuurregelaar, maar ook van
de omgevingstemperatuur, vaak openen van de deur, de
hoeveelheid levensmiddelen enz.
Op stand „6”, de hoogste stand, (bijv. tijdens een
hittegolf) werkt de compressor continu. Dit heeft
geen negatieve invloed op het functioneren van het
apparaat.
Gebruik van de koelruimte
Voor optimaal koelen is luchtcirculatie in het apparaat nodig. Bedek daarom de roosters niet geheel met
papier, grote schalen enz.
Zet geen hete levensmiddelen in de koelruimte. Laat
ze eerst tot kamertemperatuur afkoelen. Op deze
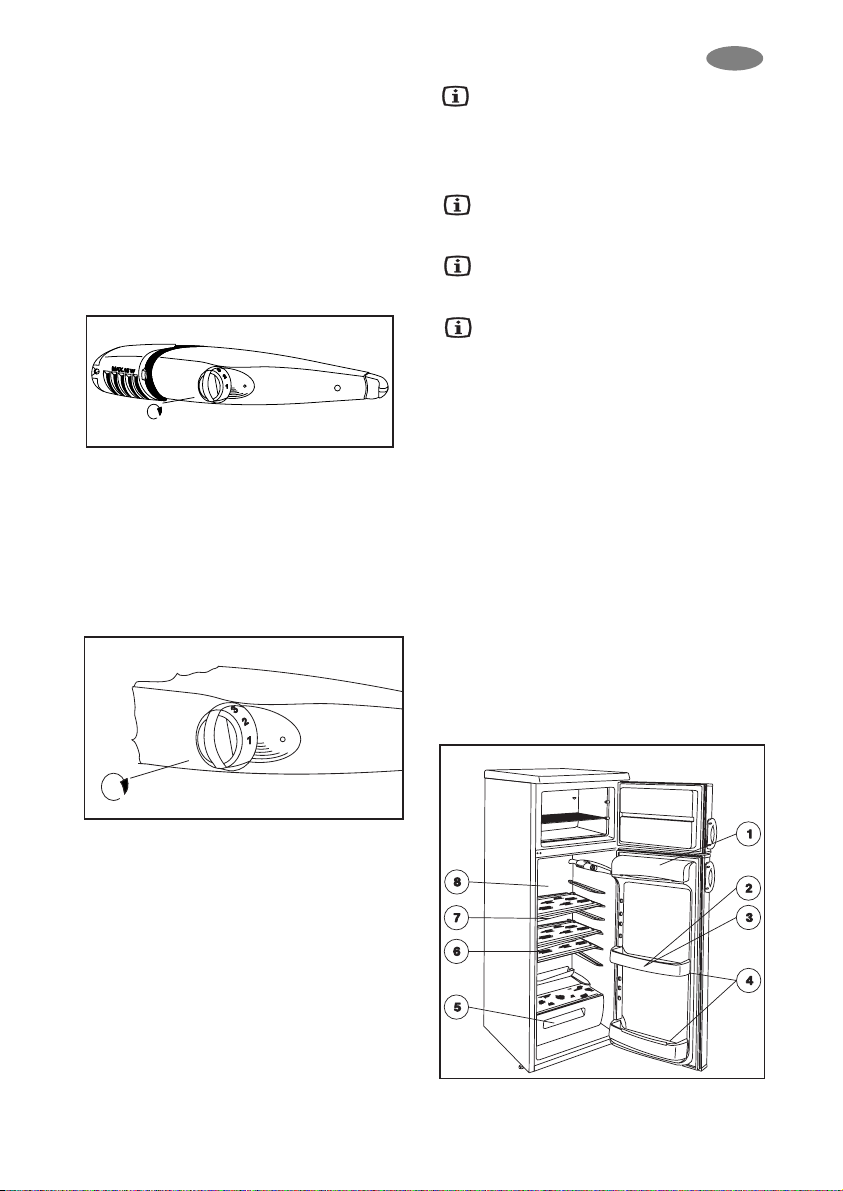
Bewaren in de koelruimte
Bewaar de levensmiddelen zoals aangegeven in de afbeelding:
1. boter, kaas
2. eieren
3. tubes, blikjes, zure room, kleine flessen
4. grote flessen, frisdrank
5. fruit, groenten
6. vers vlees, vleeswaren, worst enz.
7. melk, zuivelproducten
8. kant-en-klare producten, gebak, levensmiddelen in
afgedekte schaaltjes, open blikjes enz.
Bewaartijden en temperaturen
De tabellen achterin de gebruiksaanwijzing informeren u
over bewaartijden.
De bewaartijd kan niet exact worden aangegeven, omdat
hij afhankelijk is van de versheid en de behandeling van de
levensmiddelen. De bewaartijden zijn daarom slechts
richtlijnen.
Als u gekochte diepvriesproducten niet direct wilt consumeren, kunnen ze ongeveer 1 dag (tot ze gaan ontdooien) in de koelkast bewaard worden.
Gebruik van de vriezer
Invriezen
Het invriezen van verse levensmiddelen dient altijd goed
voorbereid te worden.
Zet voordat u gaat invriezen de temperatuurregelaar op
stand „3”. Zet de levensmiddelen direct op de verdamperplaat. Het invriezen duurt ongeveer 24 uur. Zet daarna de
temperatuurregelaar op de gewenste stand of laat hem op
stand „3” staan, deze stand is geschikt voor normaal
gebruik. Ingevroren producten kunt u het beste op het
draadrooster in de vriesruimte bewaren.
Open tijdens het invriezen de deur van de vriesruimte liever niet.
Zet de temperatuurregelaar niet op een hogere
stand (bijv. „6”). De invriestijd zou hierdoor wel korter worden, maar de temperatuur in de koelruimte zou
constant onder 0 °C komen, waardoor opgeslagen dranken
en levensmiddelen zouden bevriezen.
NL
Page 6
6
Bewaren in de vriesruimte
Na het invriezen kunt u de diepvriesproducten het beste
naar het draadrooster in de vriesruimte verplaatsen, zodat
u weer ruimte hebt in de invriesruimte. Tussentijds
invriezen heeft geen nadelige invloed op reeds ingevroren
producten.
Let goed op de bewaartijd die staat aangegeven op
diepvriesproducten die u koopt. Bewaartijden voor
zelf ingevroren producten vindt u op de binnenkant van de
deur van de vriesruimte. De symbolen staan voor verschillende levensmiddelen, de cijfers staan voor de maximale
bewaartijd in maanden.
Diepvriesproducten kunnen alleen veilig bewaard
worden, als ze niet ontdooid zijn voordat ze in de
vriesruimte worden geplaatst. Als de diepvriesproducten al
ontdooid zijn, kunt u ze niet opnieuw invriezen, maar
dienen ze zo snel mogelijk geconsumeerd te worden.
IJsblokjes maken
Vul het ijsblokjesbakje met water en zet het in de vriesruimte. Als u de bodem van het ijsblokjesbakje nat maakt
en de temperatuurregelaar op de maximale stand zet, gaat
het invriezen sneller. Vergeet niet, de temperatuurregelaar
na het invriezen weer op de normale stand te draaien.
U kunt de ijsblokjes makkelijker losmaken door het ijsblokjesbakje onder stromend water te houden en het dan iets
te verdraaien. Mocht het ijsblokjesbakje vastgevroren zijn,
gebruik dan geen scherpe voorwerpen om het los te maken.
Daarmee kunt u beschadigingen veroorzaken.
Praktische informatie
Dankzij de variabele platen kunt u de koelruimte aan
uw eisen aanpassen. U kunt de platen ook verplaatsen
als de deur 90° open staat.
Na openen en sluiten van de deur van de vriesruimte
ontstaat in het apparaat een vacuüm. Na sluiten van
Tips
In dit hoofdstuk vindt u praktische tips om het apparaat zo
energiezuinig mogelijk te gebruiken. U vindt hier ook
informatie m.b.t. het milieu.
Energie besparen
Zet het apparaat liever niet in de zon of naast een
warmte afgevend apparaat.
Zorg ervoor dat de condensor en de compressor voldoende ventilatie hebben. Bedek de ventilatie-openingen niet.
Doe levensmiddelen in een afgesloten schaaltje of in
vershoudfolie om onnodige rijpvorming te voorkomen.
Open de deur niet onnodig en laat hem niet langer
open staan dan nodig is.
Doe levensmiddelen altijd in een afgesloten schaaltje.
Laat warme levensmiddelen en vloeistoffen altijd eerst
tot kamertemperatuur afkoelen voordat u ze in het
apparaat zet.
Houd de condensor schoon.
Het apparaat en het milieu
Dit apparaat bevat, zowel in het koelcircuit als in het isolatiemateriaal, geen gassen die de ozonlaag kunnen aantasten. Het apparaat mag niet samen met huisvuil of gesloopte apparaten weggegooid worden. Uit het oogpunt van
milieubescherming moeten afgedankte koel- en
vriestoestellen volgens de plaatselijke regelingen op
deskundige wijze verwerkt worden. Informeer bij de
gemeente naar de mogelijkheden in uw woonplaats. Zorg
ervoor dat het koelcircuit, vooral aan de achterkant bij de
warmtewisselaar, niet beschadigd wordt.
De materialen met het symbool „ ” zijn geschikt voor
recycling.
de deur duurt het 2-3 minuten voordat u de deur weer
kunt openen.
Stel de vriesruimte zodanig in dat de binnentemperatuur nooit warmer dan -18 °C wordt. Bij te hoge temperaturen bederven de diepvriesproducten.
Controleer elke dag even of het apparaat goed functioneert. Zo constateert u evt. storingen tijdig.
Vries nooit grotere hoeveelheden tegelijk in dan in
„Technische gegevens” staat aangegeven. De levensmiddelen bevriezen anders niet tot in de kern en kunnen dan na het ontdooien bijv. smaak en geur verliezen.
Maak tijdens het invriezen liever geen ijsblokjes, dat
vermindert de invriescapaciteit.
NL
Page 7
7
Controleer regelmatig of het dooiwaterafvoer-
gootje niet verstopt is. Een sticker in het apparaat
herinnert u daaraan. Als het afvoergootje verstopt is, kan
het dooiwater schade veroorzaken aan de isolatie van het
apparaat.
Maak het gootje schoon m.b.v. het meegeleverde krabbertje (zie afb.). Het krabbertje kunt u weer in het gootje opbergen.
Meestal raakt het afvoergootje verstopt door in papier verpakte levensmiddelen. Het papier komt in aanraking met de
achterzijde van de koelruimte en vriest daaraan vast. Als u
de levensmiddelen uit de koelruimte haalt, scheurt het
papier en dat kan tot verstopping van het afvoergootje leiden.
Doe dus voorzichtig met in papier verpakte levensmiddelen.
Onderhoud
Ontdooien
Een deel van het vocht uit de koelruimte wordt tijdens het
gebruik in de vorm van ijs of rijp afgescheiden.
Dikke lagen ijs en rijp hebben een isolerend effect. Het
koelvermogen wordt minder, de temperatuur stijgt en er is
meer energie nodig.
Bij dit type apparaat gebeurt het ontdooien van de koelruimte automatisch, zonder dat u daaraan iets hoeft te
doen. De thermostaat onderbreekt regelmatig de werking
van de compressor. Het koelen wordt dan onderbroken, de
temperatuur van de verdamperplaat stijgt boven 0 °C en
het ontdooien begint. Als de verdamperplaat een temperatuur van +3 tot +4 °C heeft bereikt, start de thermostaat
het koelen weer.
Het dooiwater loopt via het dooiwaterafvoergootje in het
condensbakje bovenop de compressor en verdampt door de
warmte.
Als erg veel koelvermogen nodig is, bijv.
tijdens een hittegolf, werkt de koelkast soms continu. Er wordt dan niet automatisch ontdooid.
Het is niet abnormaal als er na het ontdooien kleine restjes
ijs en rijp op de achterkant van de koelruimte achterblijven.
De vriesruimte kan niet automatisch worden ontdooid
omdat de diepvriesproducten geen hogere temperaturen
kunnen verdragen.
De laag ijs kan afgeschraapt en verwijderd worden met een
plastic schraper, mits de laag niet te dik is.
Als de ijslaag zo dik is, dat hij niet met de kunststof schraper verwijderd kan worden, moet de vriesruimte ontdooid
worden (in het algemeen 2 tot 3 keer per jaar).
Neem de levensmiddelen uit het apparaat en wikkel ze in
enkele lagen krantenpapier of dekens. Bewaar ze op een zo
koel mogelijke plaats.
Maak het apparaat spanningloos en laat de deuren van
vries- en koelruimte open.
Reinig de koelruimte zoals beschreven en hoofdstuk
„Reiniging en onderhoud”. Reinig de vriesruimte als volgt:
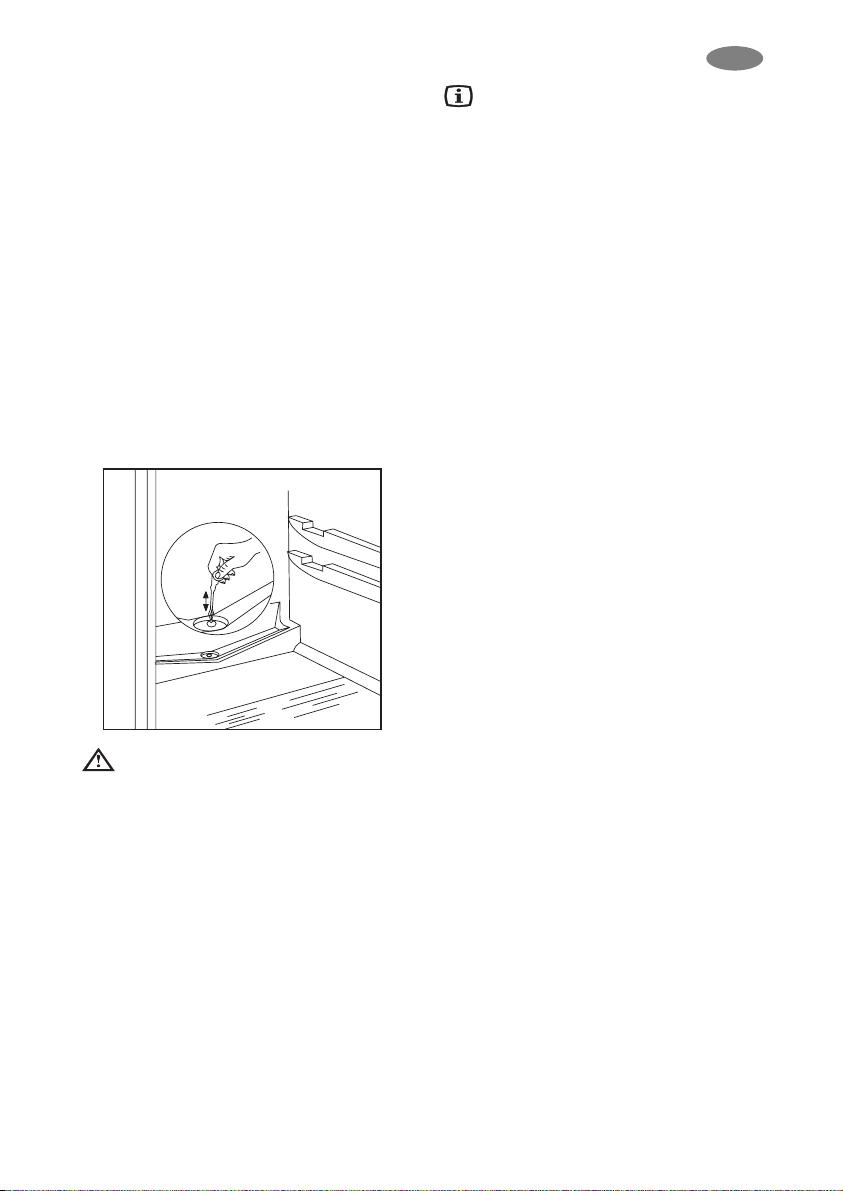
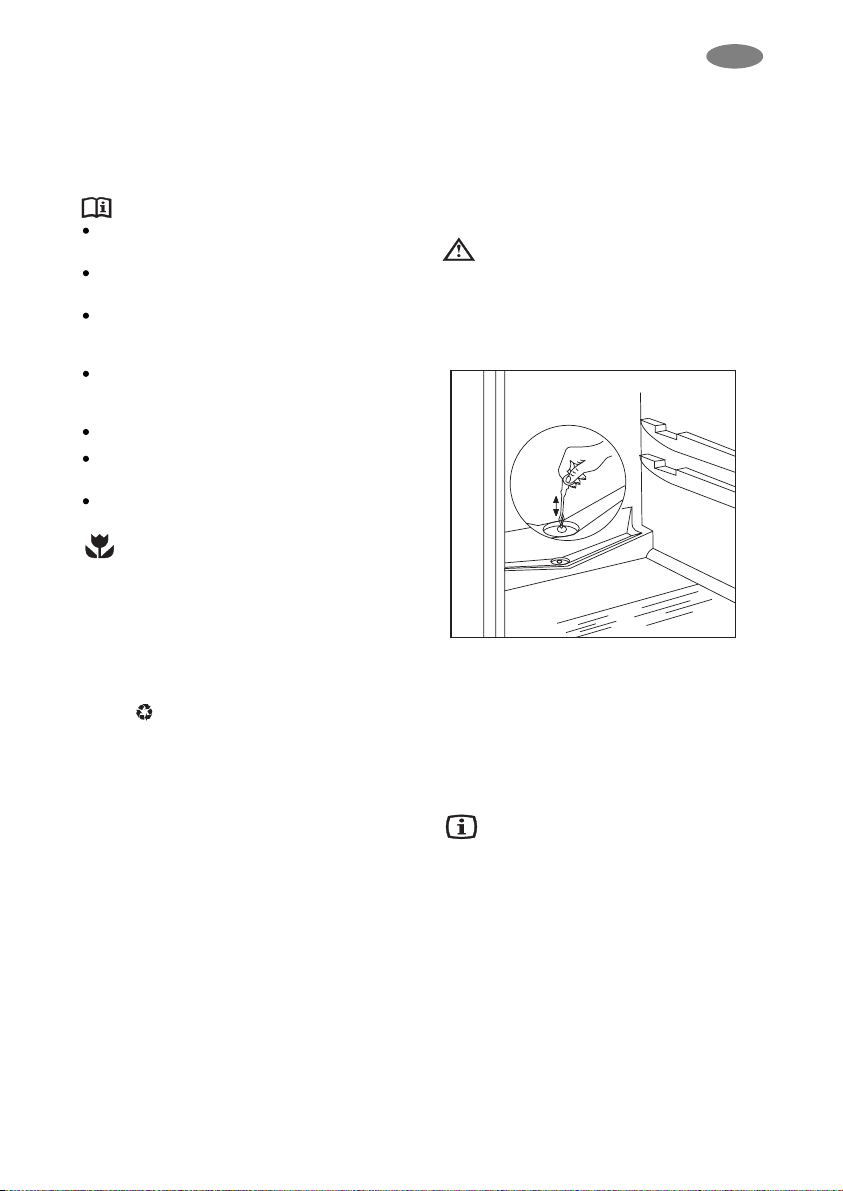
Veeg het dooiwater met een zachte doek of spons van de
verdamperplaat weg. Het weggeveegde dooiwater verzamelt zich onderin het apparaat. In de afbeelding ziet u, hoe
u het water kunt verwijderen.
Trek de kunststof stop uit de dooiwateropening in de vriesruimte. Zet een hoog genoeg bakje onder het gootje in de
koelruimte, waarin het dooiwater kan lopen.
Het bakje in de afbeelding wordt niet met het apparaat
meegeleverd!
Na het ontdooien de binnenzijde van het apparaat droog
wrijven en de kunststof stop weer op z'n plek zetten.
Steek de stekker weer in het stopcontact en leg de levensmiddelen weer in het apparaat.
Zet na het ontdooien de temperatuurregelaar op de hoogste stand, zodat het apparaat zo snel mogelijk weer de
geschikte bewaartemperatuur kan bereiken.
NL
Page 8
8
Reiniging en onderhoud
Wij adviseren u de binnenzijde van de koelruimte elke 3 tot
4 weken schoon te maken (u kunt het beste tegelijkertijd
de vriesruimte ontdooien).
Gebruik geen reinigingsmiddel of zeep.
Trek de stekker uit het stopcontact. De binnenzijde van het
apparaat met handwarm water schoonmaken en droog
wrijven. Reinig het deurrubber met schoon water. Steek na
het reinigen de stekker weer in het stopcontact.
Stof en vuil die zich op de achterkant van de koelkast en
de condensor hebben afgezet, dient u één of twee maal per
jaar te verwijderen. Maak dan ook het condensbakje
bovenop de compressor schoon.
Als de koelkast niet in gebruik is
Als de koelkast langere tijd niet in gebruik is, gaat u als
volgt te werk:
Trek de stekker uit het stopcontact.
Maak de koelkast leeg.
Ontdooien en schoonmaken zoals hiervoor beschreven.
De deur open laten om geurvorming te voorkomen.
Problemen oplossen
Lamp vervangen
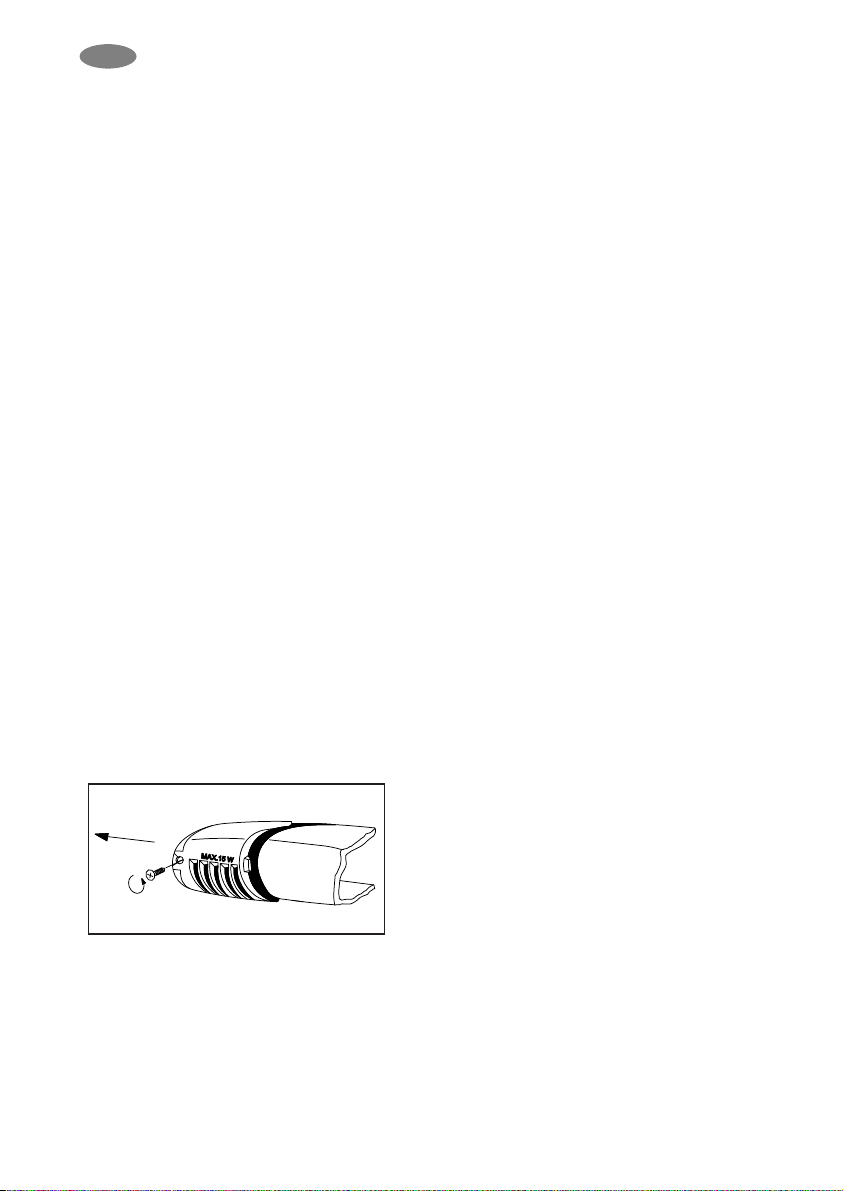
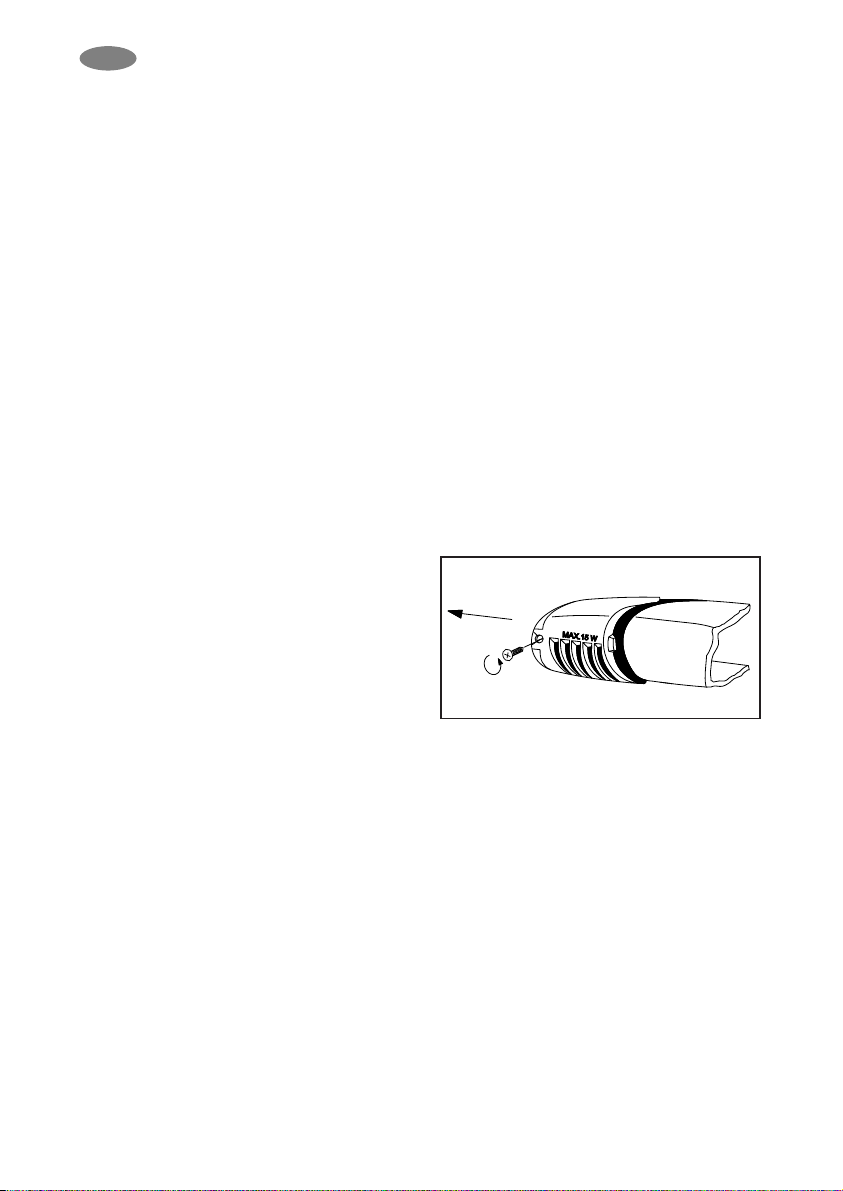
Als de lamp kapot is, kunt u hem als volgt vervangen:
Trek de stekker uit het stopcontact.
Schroef de afdekking los en trek hem in de richting van de
pijl. Nu kunt u de lamp vervangen. (Type gloeilamp: Mignon
322, 230 V, 15 W, fitting E 14)
Zet daarna de afdekking weer terug, draai de schroef vast
en steek de stekker in het stopcontact.
Als de lamp defect is, heeft dat geen nadelige invloed op
de werking van de koelruimte.
NL
Page 9
9
Als iets niet werkt
Er kan soms een kleine storing optreden, die u zelf kunt
verhelpen. In de tabel vindt u informatie m.b.t. het opheffen van zulke kleine storingen.
Als het apparaat aanstaat, is er soms wat geluid te horen
(compressor, circulatie). Dan is er geen sprake van een storing.
Wij willen u er nogmaals op wijzen dat het appa-
raat met onderbrekingen werkt. Als de compressor
stopt, wil dat niet zeggen dat het apparaat niet werkt.
Daarom moet u altijd eerst de stekker uit het stopcontact
trekken, voordat u elektrische onderdelen aanraakt.
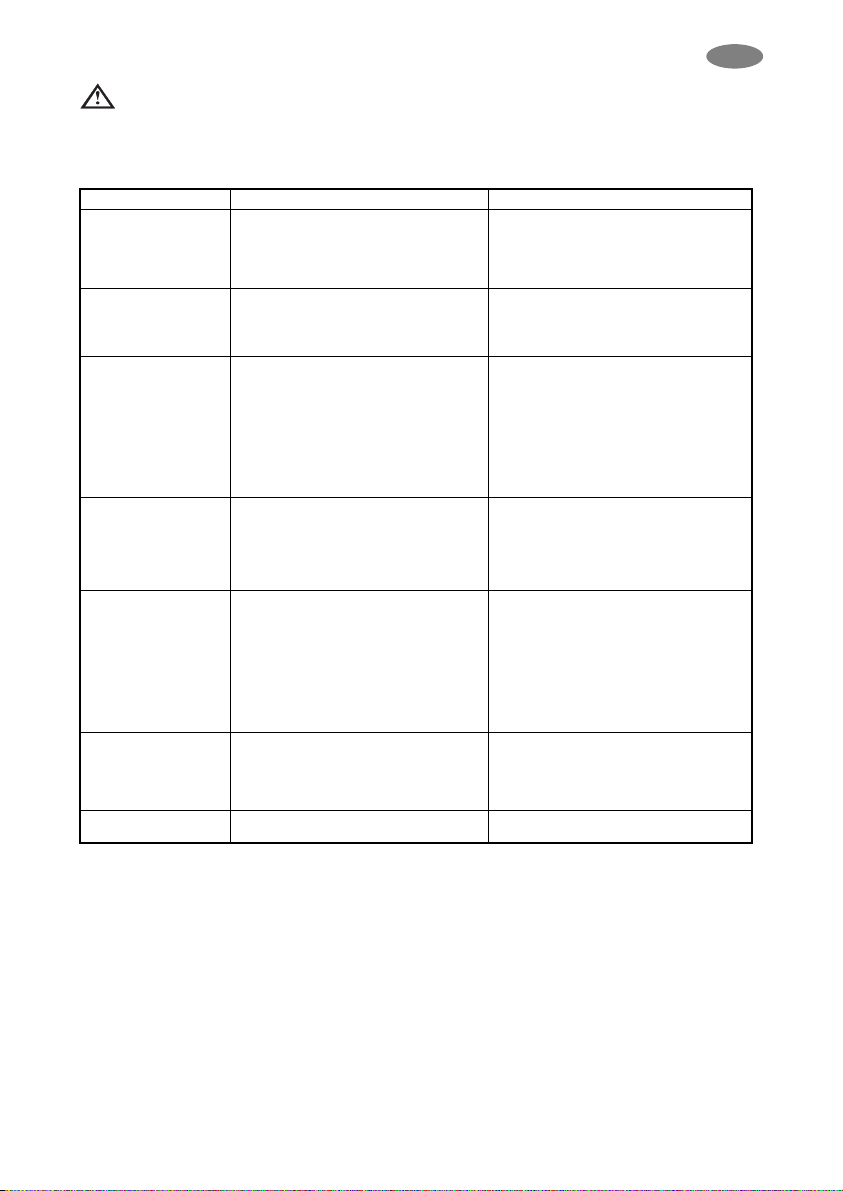
Probleem
Het is te warm in de koelruimte.
Het is te warm in de vriesruimte.
Er loopt water langs de
achterwand van de koelruimte.
Er loopt water in de koelruimte.
Er loopt water op de vloer.
Er zijn te veel rijp en ijs.
De compressor werkt continu.
Het apparaat werkt helemaal niet. Het koelt niet en
de binnenverlichting
brandt niet. Ook de lampjes
branden niet.
Het apparaat maakt veel
geluid.
Mogelijke oorzaak
De temperatuurregelaar is te laag ingesteld.
De levensmiddelen zijn niet koud genoeg of staan
op een verkeerde plek.
De deur gaat niet goed dicht of is niet goed ges-
loten.
De temperatuurregelaar is te laag ingesteld.
De deur gaat niet goed dicht of is niet goed ges-
loten.
U wilt te veel levensmiddelen tegelijk invriezen.
De in te vriezen levensmiddelen staan te dicht op
elkaar.
Dat is normaal. Tijdens het automatische ontdooien smelt het ijs op de achterwand.
De afvoer van de koelruimte kan verstopt zijn.
Levensmiddelen kunnen de lekbak blokkeren zodat
er geen water in kan stromen.
Het afvoergootje loopt niet in de condensbak
boven de compressor.
De levensmiddelen zijn niet goed ingepakt.
De deuren gaan niet goed dicht of zijn niet goed
gesloten.
De temperatuurregelaar is niet goed ingesteld.
De temperatuurregelaar is niet goed ingesteld.
De deuren gaan niet goed dicht of zijn niet goed
gesloten.
U wilt te veel levensmiddelen tegelijk invriezen.
U hebt warme levensmiddelen in het apparaat
gezet.
Het apparaat staat op een te warme plek.
De stekker zit niet in het stopcontact.
De zekering in de huisinstallatie is uitgeschakeld.
De temperatuurregelaar is niet ingesteld.
Er staat geen spanning op het stopcontact.
(Probeer er een ander apparaat op aan te sluiten.)
Het apparaat staat niet goed.
Oplossing
Op een hogere stand instellen.
De levensmiddelen op de juiste plek zetten.
Controleren of de deur goed dicht kan en of het
deurrubber onbeschadigd en schoon is.
Op een hogere stand instellen.
Controleren of de deur goed dicht kan en of het
deurrubber onbeschadigd en schoon is.
Een paar uur wachten en de temperatuur nog eens
controleren.
De levensmiddelen zodanig neerzetten dat de
koude lucht goed kan circuleren.
Maak de afvoer schoon.
Zet de levensmiddelen zodanig neer dat ze de
achterwand niet direct raken.
Plaats het de afvoergootje in de condensbak.
De levensmiddelen beter inpakken.
Controleren of de deuren goed dicht kunnen en of
de deurrubbers onbeschadigd en schoon zijn.
De temperatuurregelaar op een lagere stand
instellen.
De temperatuurregelaar op een lagere stand
instellen.
Controleren of de deuren goed dicht kunnen en of
de deurrubbers onbeschadigd en schoon zijn.
Een paar uur wachten en de temperatuur nog eens
controleren.
Laat de levensmiddelen tot kamertemperatuur
afkoelen.
Probeer de omgevingstemperatuur te verlagen.
De aansluiting controleren.
Zekering vervangen.
Apparaat in werking stellen volgens de aanwijzingen in hoofdstuk „In gebruik nemen”.
Contact opnemen met een elektro-installateur.
Controleren of het apparaat stabiel staat (alle vier
voeten moeten op de vloer staan).
Als u de storing aan de hand van de aanwijzingen niet kunt oplossen, neem dan contact op met Service.
NL
Page 10
10
Aanwijzingen voor de installateur
Technische gegevens
Installeren van het apparaat
Modell
bruto-inhoud (l)
nuttige inhoud (l)
breedte (mm)
hoogte (mm)
diepte (mm)
energieverbruik (kWh/24 uur)
(kWh/jaar)
energie-efficiëntieklasse
invriesvermogen (kg/24 h)
max. bewaartijd bij stroomuitval (uur)
neutrale stroomsterkte (A)
gwwicht (kg)
aantal compressoren
S 60240 DT4
vriesruimte: 44
koelruimte: 190
vriesruimte: 44
koelruimte: 186
545
1404
604
0,46
168
A++
3
19
0,8
51
1
Vervoer, uitpakken
U kunt het apparaat het beste rechtop in de originele verpakking vervoeren. Zie ook de aanwijzingen
op de verpakking.
Na elk transport mag het apparaat pas na ca. 2 uur
ingeschakeld worden.
Pak het apparaat uit en controleer het op transportschade.
Neem in geval van transportschade contact op met de
leverancier en sluit het apparaat niet aan.
Reiniging
Verwijder het plakband waarmee de onderdelen in het
apparaat vastgezet zijn.
Neem de binnenkant van het apparaat met handwarm
water en wat mild reinigingsmiddel af. Gebruik een zachte
doek.
Wrijf daarna de binnenkant van het apparaat droog.
Opstelling
De omgevingstemperatuur heeft invloed op het stroomverbruik. Daarom moet het apparaat op een plaats staan
waarvan de omgevingstemperatuur overeenkomt met de
klimaatklasse waarvoor het uitgevoerd is, zie onderstaande
tabel. De klimaatklasse vindt u op het typeplaatje.
Klimaatklasse Omgevingstemperatuur
SN +10 ..,+32 °C
N +16 ..,+32 °C
ST +18 ..,+38 °C
Als de omgevingstemperatuur te laag is, kan de temperatuur in de koelruimte te hoog worden.
Als de omgevingstemperatuur te hoog is, moet de compressor langer werken, de automatische ontdooiing werkt niet
meer, de temperatuur in de koelruimte stijgt en er wordt
meer energie verbruikt.
NL
Page 11
11
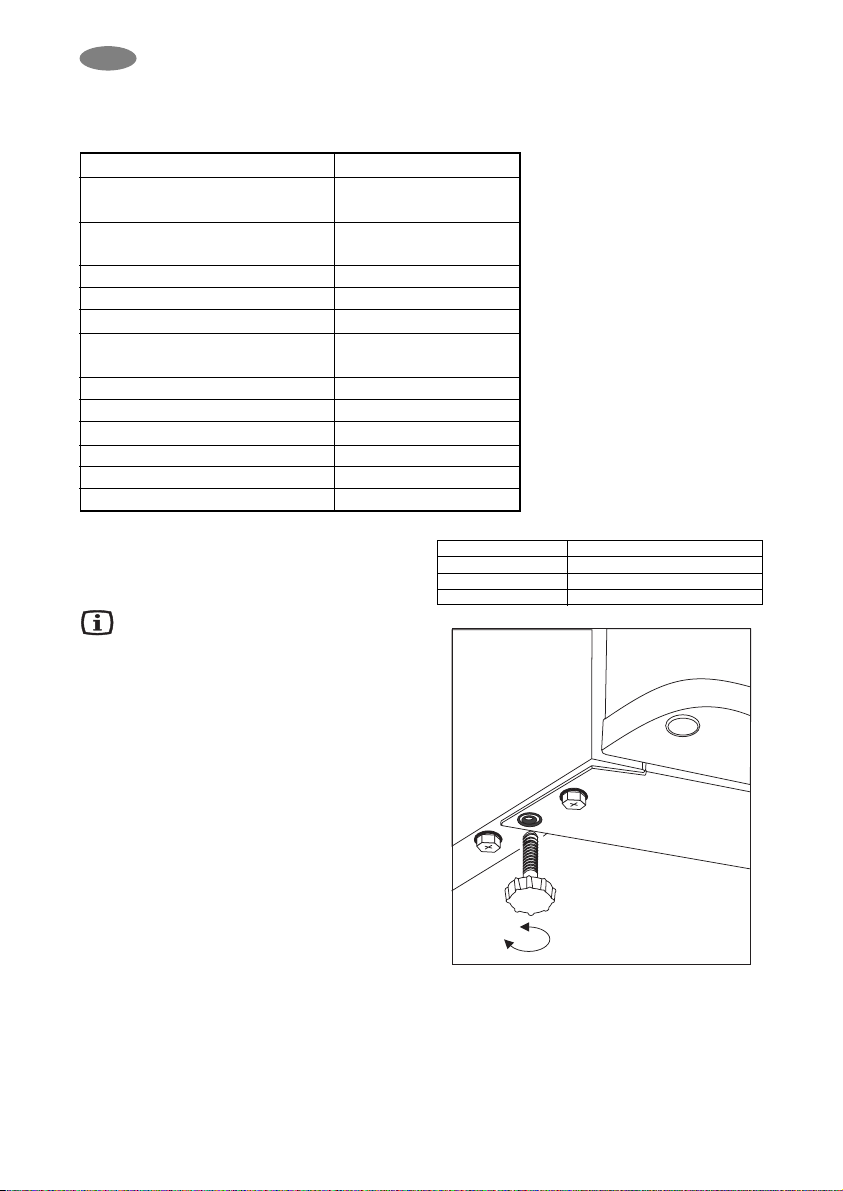
Het apparaat moet waterpas staan. Daartoe kunt u de
stelvoeten (1) aan de voorzijde verstellen. De afstandsringen
(2) zijn onderdeel van de stelvoeten. Als het apparaat
waterpas moet worden gezet, kunnen deze afstandsringen
worden verwijderd.
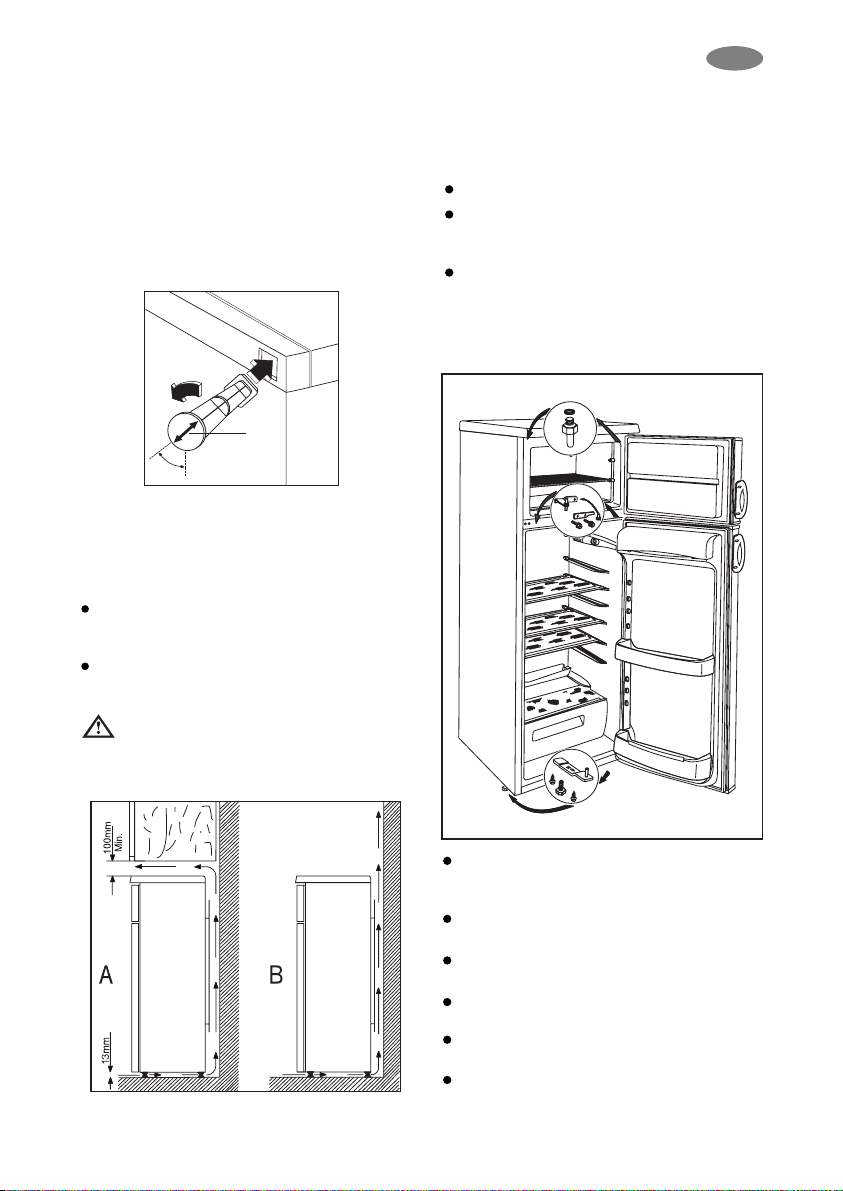
In het onderdelenzakje bevinden zich twee afstandhouders die in de bovenste hoeken aan de achterzijde
geplaatst dienen te worden. Steek de afstandhouders in
de gaten en let erop dat de pijl (A) staat zoals in de figuur; draai de afstandhouders dan 45° pijl staat verticaal)
zodat ze vast komen te zitten in Fig..
Zet het apparaat niet direct in de zon of dicht bij een verwarming of fornuis.
Is opstelling naast een warmtebron niet te vermijden, dan
moeten de volgende minimale afstanden worden aangehouden:
Naast een gas- of elektrisch fornuis 3 cm. Als de afstand kleiner is, plaats dan een warmte-isolerende plaat
van 0,5 tot 1 cm dik tussen de twee apparaten.
Naast een olie- of kolenkachel 30 cm.
De koelkast moet geheel tegen de muur staan.
Houd de minimale afstanden aan (zie afb.).
A: opstelling onder een keukenkastje
B: vrije opstelling
Deurdraairichting omzetten
Als dat handiger in het gebruik is, kunt u de deurdraairichting van rechts naar links omzetten.
Ga als volgt te werk:
Trek de stekker uit het stopcontact.
Kantel het apparaat voorzichtig achterover en zorg
ervoor dat de compressor de vloer niet raakt. U kunt
dit het beste met twee personen doen.
Verwijder voorzichtig (bijv. m.b.v. een mes) de
afdekkapjes van de schroeven die het onderste
afdekrooster vasthouden. Dan kan het afdekrooster
worden verwijderd door de plaatschroeven (2 stuks) los
te draaien.
Maak het onderste deurscharnier van de koelruimte los
door de schroeven (2 stuks) en de vulplaatjes (2 stuks)
te verwijderen.
Neem de deur van de koelruimte los door hem
voorzichtig naar beneden te trekken.
Maak het dubbele deurscharnier los door de schroeven
(2 stuks) en de vulplaatjes (2 stuks) te verwijderen.
Neem de deur van de vriesruimte los door hem
voorzichtig naar beneden te trekken.
Schroef de stift van het bovenste deurscharnier van de
vriesruimte los en schroef hem dan op de andere kant.
Verwijder de afdekkapjes van het dubbele deurscharnier
aan de linker kant en plaats ze dan op de andere kant.
NL
A
45°
PR60
Page 12
12
Zet de deur van de vriesruimte op de stift van het
bovenste deurscharnier.
Zet het dubbele deurscharnier aan de linker kant m.b.v.
de schroeven (2 stuks) en de vulplaatjes (2 stuks). Let
erop dat de rand van de deur van de vriesruimte parallel loopt met de rand van de kast.
Zet de deur van de koelruimte op de stift van het
dubbele deurscharnier.
Zet het onderste deurscharnier aan de linker kant m.b.v.
de schroeven (2 stuks) en de vulplaatjes (2 stuks). Let
erop dat de rand van de deur van de koelruimte parallel loopt met de rand van de kast.
Trek het gedeelte van het afdekrooster in de richting
van de pijl (1) en plaats het op de andere kant (2).
Zet het afdekrooster terug en bevestig het met de
plaatschroeven (2 stuks). Bevestig dan de afdekkapjes
weer.
Zet het apparaat op z'n plek, zet het waterpas en steek
de stekker in het stopcontact.
U kunt ook contact opnemen met ELECTROLUX SERVICE.
Een servicetechnicus kan tegen betaling het deurscharnier
overzetten.
Elektrische aansluiting
Deze koelkast is ontworpen voor 230 V AC (~) 50 Hz.
Het apparaat moet worden aangesloten aan een volgens
de voorschriften geïnstalleerd stopcontact met randaarde.
Als zo'n stopcontact niet aanwezig is, laat het dan door
een erkend installateur in de buurt van de koelkast aanbrengen.
Dit apparaat voldoet aan de volgende EU-richtlijnen:
– 73/23/EEG van 19.02.1973 (incl. wijzigingsrichtlijnen) -
laagspanningsrichtlijn
– 89/336/EEG van 03.05.1989 (incl. wijzigingsrichtlijnen -
EMC-richtlijn
– 96/57 EEC - 96/09/03 (richtlijn energie-efficiëntie) en
latere aanvullingen
NL
Page 13
13
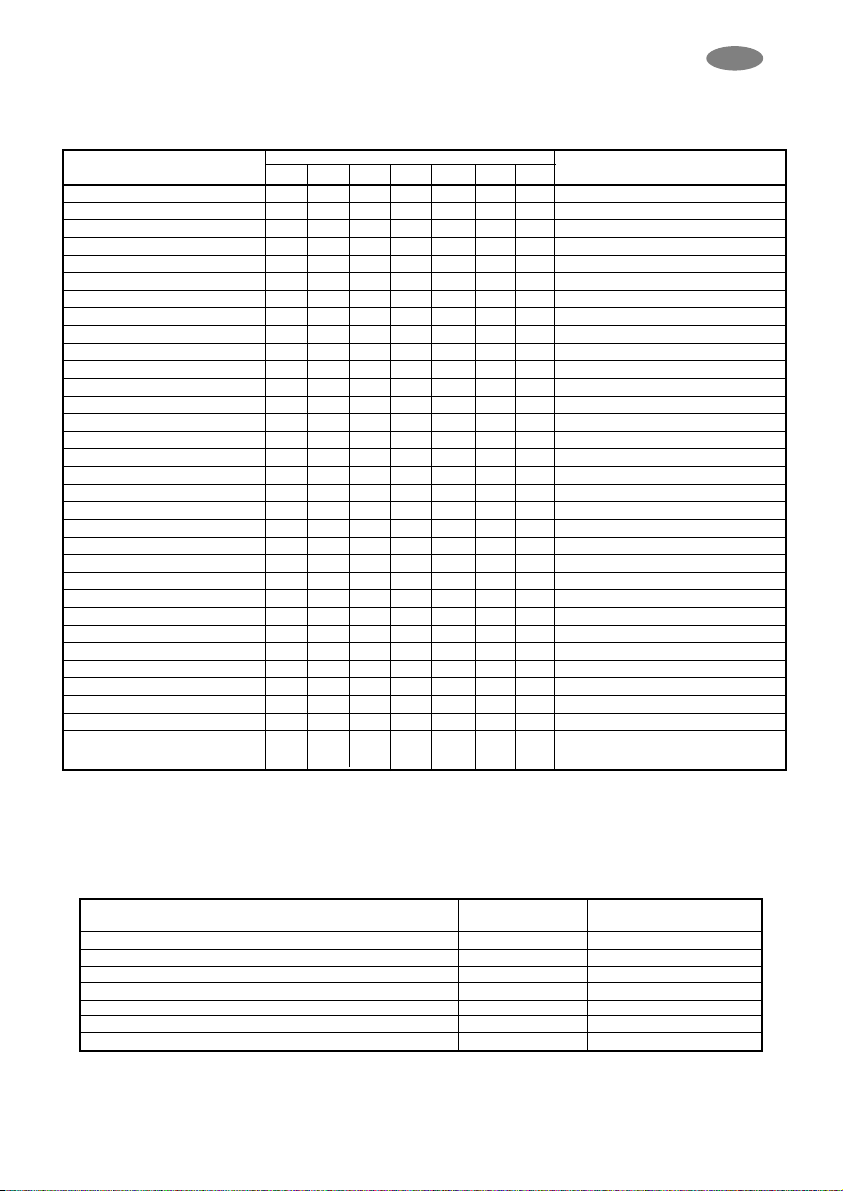
Bewaartijdentabel (1)
Verse levensmiddelen in de koelkast bewaren
X: normale bewaartijd
x: mogelijke bewaartijd (geldt alleen voor echt verse producten)
Soort Bewaartijd in dagen Verpakking
12345 67
rauw vlees XXx x x vershoudfolie, luchtdicht
gekookt vlees XXXx x x afgesloten schaaltje
gebraden vlees XXXx x afgesloten schaaltje
rauw gehakt X afgesloten schaaltje
gebraden gehakt XXx x afgesloten schaaltje
vleeswaren XXx x vershoudfolie, vetvrij papier
verse vis X x x vershoudfolie, luchtdicht
gekookte vis XXx x afgesloten schaaltje
gebakken vis XXx x x afgesloten schaaltje
vis uit blik X x x afgesloten schaaltje
verse kip XXXx x x vershoudfolie, luchtdicht
gebraden kip XXXx x x afgesloten schaaltje
verse eend, gans XXXx x x vershoudfolie, luchtdicht
gebraden eend, gans XXXXx x x afgesloten schaaltje
boter ongeopend XXXX X XXoriginele verpakking
boter geopend XXx x x x x originele verpakking
melk XXXx x originele verpakking
room XXx x kunststof schaaltje
zure room XXXXx x x kunststof schaaltje
kaas (hard) XXXXXXXaluminium folie
kaas (zacht) XXXXx x x vershoudfolie
kwark XXXXx x x vershoudfolie
eieren XXXXXXX
spinazie. XXx x vershoudfolie
erwten, bonen XXXXx x x vershoudfolie
paddestoelen XXx x x vershoudfolie
wortelen, bieten XXXXXXXvershoudfolie
tomaten XXXXXXXvershoudfolie
kool XXXXXx x vershoudfolie
snel rottend fruit (aardbei, framboos enz.) XXXx x vershoudfolie
ander fruit XXXXx x x vershoudfolie
fruit uit blik XXXx x afgesloten schaaltje
Soort in de koelruimte in de ****-vriesruimte
+2 – +7 °C -18°C
groente 1 dag 12 maanden
kant-en-klare producten 1 dag 6 maanden
aardappelgerechten, pastagerechten 1 dag 12 maanden
soep 1 dag 6 maanden
fruit 1 dag 12 maanden
vlees 1 dag 5 maanden
consumptie-ijs 1 dag 3 weken
Bewaartijdentabel (2)
Diepvriesproducten bewaren
NL
Page 14
FR
14
Avant l`installation et l`utilisation de l`appareil nous vous conseillons de procéder à la lecture complète du mode
d`emploi contenant des prescriptions de sécurité, des informations importantes et des conseils. En respectant les pre-
scriptions du mode d`emploi l`appareil fonctionnera convenablement et à votre satisfaction.
Les symboles utilisés:
Prescriptions de sécurité
Les prescriptions et cautions de ce symbole servent à la protection de l`appareil et de votre personne.
Importantes instructions et informations
Informations pour la protection de l`environnement
Conseils pratiques
Vous trouverez ici des conseils pratiques concernant les aliments et leur stockage.
Le symbole sur le produit ou son emballage indique que ce produit ne peut être traité comme déchet ménager. Il
doit plutôt être remis au point de ramassage concerné, se chargeant du recyclage du matériel électrique et électronique. En vous assurant que ce produit est éliminé correctement, vous favorisez la prévention des conséquences
négatives pour l'environnement et la santé humaine qui, sinon, seraient le résultat d'un traitement inapproprié
des déchets de ce produit. Pour obtenir plus de détails sur le recyclage de ce produit, veuillez prendre contact avec
le bureau municipal de votre région, votre service d'élimination des déchets ménagers ou le magasin où vous avez
acheté le produit.
Sommaire
Informations importantes de la sécurité . . . . . . . . . . .15
Prescriptions générales de sécurité . . . . . . . . . . . . . . . .15
Prescriptions de sécurité pour l`enfants . . . . . . . . . . . .15
Prescriptions de sécurité . . . . . . . . . . . . . . . . . . . . . . . .15
Prescriptions de sécurité pour isobutane . . . . . . . . . . .15
A l`attention de l`exploiteur . . . . . . . . . . . . . . . . . . . .16
Informations générales . . . . . . . . . . . . . . . . . . . . . . . . . .16
Description de l`appareil, les parties principales . . . . .16
Commande de l`appareil . . . . . . . . . . . . . . . . . . . . . . . .17
Mise en service . . . . . . . . . . . . . . . . . . . . . . . . . . . . . .17
Régulation de la température . . . . . . . . . . . . . . . . .17
L`utilisation du réfrigérateur . . . . . . . . . . . . . . . . . .17
Stockage dans le réfrigérateur . . . . . . . . . . . . . . . . .17
Temps et température de stockage des
aliments . . . . . . . . . . . . . . . . . . . . . . . . . . . . . . . . . . .18
L`utilisation du congélateur . . . . . . . . . . . . . . . . . . . . . .18
Congélation . . . . . . . . . . . . . . . . . . . . . . . . . . . . . . . .18
Stockage dans le congélateur . . . . . . . . . . . . . . . . . .18
Préparation du glaçon . . . . . . . . . . . . . . . . . . . . . . . .18
Renseignements et conseilles utiles . . . . . . . . . . . . . . .18
Idées et suggestions . . . . . . . . . . . . . . . . . . . . . . . . . . . .19
Comment économiser d`énergie . . . . . . . . . . . . . . .19
Armoire et environnement . . . . . . . . . . . . . . . . . . . .19
Entretien . . . . . . . . . . . . . . . . . . . . . . . . . . . . . . . . . . . . . .19
Le dégèlement . . . . . . . . . . . . . . . . . . . . . . . . . . . . . .19
Nettoyage régulier . . . . . . . . . . . . . . . . . . . . . . . . . . .20
Appareil hors d`usage . . . . . . . . . . . . . . . . . . . . . . . .20
Dépannage . . . . . . . . . . . . . . . . . . . . . . . . . . . . . . . . . . . .20
Replacement de l`ampoule . . . . . . . . . . . . . . . . . . . .20
Si quelque chose ne fonctionne pas . . . . . . . . . . . . . . .20
A l`attention de la personne qui mettra en service
l`appareil . . . . . . . . . . . . . . . . . . . . . . . . . . . . . . . . . . . .22
Caractéristiques techniques . . . . . . . . . . . . . . . . . . . . . .22
Mise en marche de l`appareil . . . . . . . . . . . . . . . . . . . .22
Livraison, désemballage . . . . . . . . . . . . . . . . . . . . . . .22
Nettoyage . . . . . . . . . . . . . . . . . . . . . . . . . . . . . . . . . .22
Installation . . . . . . . . . . . . . . . . . . . . . . . . . . . . . . . . .22
Changement le sens d`ouverture des portes . . . . . .23
Branchement électrique . . . . . . . . . . . . . . . . . . . . . .24
Temps de stockage (1) . . . . . . . . . . . . . . . . . . . . . . . . .25
Temps de stockage (2) . . . . . . . . . . . . . . . . . . . . . . . . .26
Page 15
FR
15
Informations importantes de la sécurité
Prescriptions générales de sécurité
Conservez ce mode d`emploi qui doit suivre l`appareil au
cours de déménagement ou en cas de changement de propriétaire.
L`appareil n`est conçu qu`au stockage des produits alimentaires dans les conditions normales de ménage et
selon les prescriptions de ce mode d`emploi.
Uniquement un atelier qualifié et autorisé par la fabrique peut exécuter les entretiens périodiques et les
réparations, y compris la réparation et le changement
du câble électrique. Pour une réparation n`utilisez que des
pièces de rechange livrées par la fabrique. Un cas contraire
peut causer l`endommagement de l`appareil ou autres
dégâts matériels ou personnels.
L`appareil n`est hors tension que si la fiche de courant est
retirée de la prise. Toujours retirez la fiche de la prise avant
le nettoyage, l`entretien ou le dégèlement de l`appareil (Ne
tirez jamais la fiche par le câble). Dans le cas où la prise est
difficilement accessible mettez l`appareil hors tension en
déconnectant le réseau.
Il est interdit de rallonger le câble.
Assurez-vous que la prise n'est pas écrasée ou endommagée par l'arrière de l'appareil. Une prise de courant
endommagée peut s'échauffer et causer un incendie.
- Ne placez pas d'objets lourds ou l'appareil sur le câble
d'alimentation (risque de court circuit et incendie).
Ne débranchez pas l'appareil en tirant sur le câble, particulièrement lorsque l'appareil est tiré de son emplacement.
- Si le câble d'alimentation est endommagé ou écrasé
peut causer un court circuit, un incendie et/ou une électrocution.
Important: En cas de dommage du câble d’alimentation,
il ne doit être remplacé que par un professionnel qualifié.
- Si la prise murale est mal fixée, ne branchez pas l'appareil (risque d'électrocution ou incendie).
Il est interdit de faire fonctionner l`appareil si la calotte
de lampe n`est pas mise.
N`utilisez pas des outils pointus, coupants ou durs au cours
du nettoyage, du dégèlement ou à l`enlèvement des aliments congelés ou du bac à glaçon. Vous risquez d`abîmer
le système réfrigérant.
Evitez la pénétration du liquide au régulateur de température ou dans le système de l`éclairage.
Vous risquez des engelures si vous consommez du glaçon
et de la glace immédiatement après les sortir du compartiment de congélation.
Ne rencongelez des aliments une fois dégelés, consommez
les le plus vite possible.
Suivez attentivement les instructions du producteur concernant le temps de conservation des produits congelés
(Mirelite).
Il est interdite d`accélérer le dégèlement en utilisant de
chauffage électrique ou des produits chimiques.
Evitez qu`un pot chaud touche les parties en plastique du
réfrigérateur.
Ne stockez pas de gaz ou de liquide combustible dans
l`appareil, vous risquez une explosion.
Ne mettez pas des boissons en bouteille ou des boissons
gazeuses ainsi que des compotes dans le compartiment de
congélation.
Vérifiez et nettoyez systématiquement l`orifice d`écoulement de l`eau de dégèle se produisant durant le dégèlement. Un label attire votre attention à cela à l`intérieur de
l`appareil. En cas d`un engorgement l`eau de dégèle accumulée peut causer un dégât prématuré de l`appareil.
Prescriptions de sécurité
pour l`enfants
Ne laissez jamais les enfants jouer au matériel d`emballage. La feuille en plastique peut causer asphyxie.
L`appareil doit être manipulé par adultes. Ne laissez pas les
enfants jouer à l`appareil ou à ses parties de réglage.
Si vous terminez d`utiliser l`appareil, retirez la fiche
secteur de la prise, coupez le câble de raccordement (le
plus proche de l`appareil) et démontez la porte de
l`appareil. Ainsi il devient possible d`éviter que les enfants
subissent de l`électrocution ou un asphyxie dans l`appareil
Cet appareil n'est pas destiné à être utilisé par des enfants
ou des personnes dont les capacités physiques, sensorielles
ou mentales, ou le manque d'expérience et de connaissance les empêchent d'utiliser l'appareil sans risque
lorsqu'ils sont sans surveillance ou en l'absence d'instruction d'une personne responsable qui puisse leur assurer
une utilisation de l'appareil sans danger.
Prescriptions de sécurité pour isobutane
Mise en garde
L`isobutane (R 600a) constitue l`agent réfrigérant de
l`appareil, qui est plus intensément inflammable et
explosif.
Maintenir dégagées les ouvertures de ventilation dans
l`enceinte de l`appareil ou dans la structure d`encastrement.
Ne pas utiliser de dispositifs mécaniques ou autres moyens
pour accélérer le processus de dégivrage autres que ceux
recommandés par le fabricant.
Ne pas endommager le circuit de réfrigération.
Ne pas utiliser d`appareils électriques à l`intérieur du compartiment destiné à la conservation des denrées, à moins
qu`ils ne soient du type recommandé par le fabricant.
Prescriptions de sécurité
Posez l`appareil contre le mur pour éviter le risque de tout
contact avec les parties chaudes (compresseur, condenseur) et prévenir les brûlures éventuelles.
Avant le déplacement de l`appareil retirez la fiche de la
prise secteur.
Veillez à ce que le câble électrique ne reste pas coincé sous
l`appareil au cours de sa mise en place.
Assurez un courant d`air suffisant pour l`appareil pour
éviter son surchauffe. Suivez attentivement les instructions de la mise en service.
Voir le chapitre "Arrangement".
Respectez les prescriptions du mode du mode
d`emploi au point de vue de la protection de la
vie et des biens.
Page 16
16
FR
A l`attention de l`exploiteur
Informations générales
La désignation de l`appareil est: „Combinaison de
réfrigérateur et de congélateur à un compresseur moteur,
l` unité de congélation située en haut”. En plus des prestations conventionnelles, l`appareil possède une unité de
congélation entièrement séparé de l`autre unité qui est
munie d`une porte propre. L`appareil est donc capable au
stockage refroidi ou bien congelé des aliments, à la congélationde ménage des aliments d`une quantité indiquée
dans le mode d`emploi ainsi qu `à la production du
glaçon.
L`appareil est conforme aux prescriptions des normes
dans les limites de température selon les classes climatiques.
Le plaque signalétique contient le chiffre de la classe
climatique.
Description de l`appareil, les parties principales
A - Congélateur
B - Réfrigirateur
1. Toit
2. Bac à glaçon
3. Tablette en fils du congélateur
4. Éclairage
5. Tablette en verre
6. Collecteur de l'eau de dégel
7. Tablette en verre
8. Bac de fruits
9. Plaque signalétique
10. Pieds réglables
11. Compartiment de beurre
12. Compartiment d'oeuf
13. Loge(s) dans la porte
14. Étanchement de porte
15. Loge de bouteilles
16. Condensateur
17. Conduit de l'eau de dégel
18. Cales
19. Bac évaporateur
20. Compresseur
Page 17
17
FR
Mise en service
Placez les accessoires dans le réfrigérateur, insérez la fiche
du câble secteur dans la prise secteur. Mettez en marche
l`appareil en tournant le bouton régulateur de la température dans le sens de l`aiguilles de la montre qu`il quitte la
position „0” selon la figure. Dans la position „0” le réfrigérateur est hors de service.
L`alinéa suivant donne des instructions concernant
l`ajustement.
Commande de l`appareil
Régulation de la température
Suivant leur ajustement les régulateurs de la température
arrêtent l`appareil pour un temps plus ou moins long
ensuite le mettent de nouveau en marche, assurant ainsi la
température désirée.
Tourner le bouton vers les chiffres plus grands le refroidissement deviendra plus intense.
L`utilisation du réfrigérateur
Un courant d`air intérieur est nécessaire pour un
refroidissement convenable. Ne couvrez donc pas
entièrement la surface des tablettes par papier, plats, etc.
Ne mettez pas de plat chaud dans le réfrigérateur,
laissez le préalablement refroidi à la température
ambiante.
L`aliment peut prendre l`odeur d`un autre, fermez
donc les aliments dans un pot, enveloppez les par
feuille en plastique, en aluminium avant leur placement
dans l`appareil. Ainsi les aliments vont garder leur
teneur d`humidité.
Dans le congélateur une température de -18 °C, ou encore
plus basse peut être atteint en mettant le bouton réglant la
température à la position moyenne (au repère de 2-3 environ). Dans ce cas la température s'ajustant de façon
automatique dans le réfrigerateur est de +5 °C à peu près,
ou bien d'une valeur en bas.
La position moyenne (2-3) correspond en général aux
besoins de réfrigération quotidiens.La température
intérieure de l`appareil sera influencée, outre la position du
régulateur, par la température ambiante, la fréquence de
l`ouverture des portes ainsi que par la quantité des aliments
récemment placés etc.
Stockage dans le réfrigérateur
Nous vous conseillons de prendre en considération la figure pour ranger les aliments différents:
1. Beurre, fromage
2. Oeufs
3. Crèmes fraîches, conserves, aliments en tube, petites
bouteilles
4. Grandes bouteilles, eau gazeuse, crème Chantilly
5. Fruits, légumes, salades
6. Viandes fraîches, charcuterie, saucisson, etc.
7. Lait, produits laitiers
8. Plats préparés, pâtisseries, aliments en pot, conserves
entamées, boissons etc.
Dans la position „6”, la position maximale,
- dans le cas d`une charge augmentée p.e. dans
une canicule - les compresseurs peuvent continuellement fonctionner ce qui n`abîme pas l`appareil.
Page 18
18
FR
Temps et température de stockage des
aliments
Voir le tableau Température de stockage concernant la
durée de stockage des aliments à la fin de ce mode
d`emploi.
Il est impossible de prédéterminer le temps de stockage des
aliments car ce temps dépendra de la fraîcheur et de la
manipulation des aliments refroidis. Pour cela les temps ne
sont donnés qu`en titre d`orientation.
Ne voulant pas utiliser les aliments achetés en état congelés vous pouvez les stocker durant env. un jour (Jusqu`à
leur dégelèrent).
L`utilisation du congélateur
Congélation
Dans le compartiment il est possible de congeler de divers
aliments frais.
Pour un résultat satisfaisant prenez en considération les
suivants.
Toujours congelez de l`aliment frais et en parfait état.
Faites les préparatifs suivant l`annexe „Renseignements
pour la congélation de ménage des aliments”.
Avant de commencer la congélation, mettre le bouton du
régulateur de température à la position „3” et installer le
rayon en fil de l'espace de congélation dans la position la
plus haute. Ensuite, emmagasiner la quantité à congéler,
immédiatement sur le rayon en fil. Le procès de congélation se produira en 24 heures environ. Après 24 heures,
remettre le bouton du régulateur de température dans la
position moyenne (2-3) ou le laisser dans la position „3”, ce
qui correspondra aux besoins de réfrigération quotidiens. Il
convient de stocker les marchandises congélées sous le
rayon en fil de l'espace de congélation sur le panneau de
réfrigération ou l'une sur l'autre.
Evitez l`ouverture de la porte du compartiment de
congélation durant la congélation.
N`est pas utile de tourner le régulateur vers les posi-
tions plus hautes (p.e. „6”). Vous pourriez diminuer le
temps de congélation, mais la température de l`espace normal de refroidissement baisserai au dessous de 0 °C en
résultant la congélation des aliments et boissons y placés.
Ne jamais congelez des quantités qui dépassent
celle indiquée dans les „caractéristiques techniques” car la congélation ne sera pas parfaite et après
la décongélation diverses anomalies peuvent arriver
(perte d`arôme, destruction, etc.).
Ne préparez pas du glaçon durant le procédé de
congélation car ça diminue la puissance de congélation.
Pour plus d`information voir l`annexe „Renseignement pour la
congélation de ménage des aliments”.
Stockage dans le congélateur
Il convient de transférer, après la congélation, les provisions
congélées du rayon en fil de l'espace de congélation à l'espace en bas de celui-ci, assurant ainsi de la place pour une
congélation suivante. L'ajustabilité du rayon en fil („2” positions) de l'espace de congélation ne peut être exploitée
qu'en mode de travail de stockage, étant donné, que la congélation ne peut être accomplie qu'exclusivement avec le
rayon en fil dans sa position la plus haute. Les marchandises stockées ne seront pas endommagées par une congélation intermédiaire.
Respectez le temps de stockage indiqué dans l`embal-
lage dans le cas des aliments congelés achetés. Pour
les aliments congelés maison un guide placé sur la porte du
congélateur donne des indications. Les symboles indiquent
les divers aliments, et les chiffres le temps maximal de conservation.
Le stockage des aliments „congelés” n`est sûr que dans
le cas si avant la mise dans le congélateur ils n`ont pas
été décongelés, même pour une période courte. Consommez
les aliments décongelés le plus tôt possible, ne les recongelez
pas.
Préparation du glaçon
Pour la préparation de glaçon remplissez de l`eau le bac à
glaçon et placez le dans le compartiment de congélation.
Il est possible de réduire le temps de préparation du glaçon
par l`humidification de la base du bac ou bien par l`intensification du refroidissement. Après avoir terminé la préparation n`oubliez pas de remettre le régulateur du
refroidissement!
Pour sortir les cubes de glace faites couler de l`eau sur le
bac et tordez le légèrement. N`utilisez pas couteau ou
autres objets métalliques pour faire sortir le bac gelé contre le compartiment, vous risquez d`abîmer le système
réfrigérant.
Renseignements et conseilles utiles
Nous vous attirons l`attention que la répartition des tablettes est changeable qui augmente considérablement la disponibilité de l`espace normal de
refroidissement. Le changement de la place des
tablettes est possible en ouvrant la porte à 90°.
En ouvrant et ensuite refermant la porte un espace
d`air raréfié se produit à l`intérieur de l`appareil causé
par la température basse. Attendez quelques minutes
après la fermeture de la porte - si vous voulez la rouvrir - pour que la tension intérieure s`égalise.
Faites attention à ce que l`appareil fonctionne toujours dans la position du régulateur dans laquelle la
température intérieure ne monte jamais au dessus de
-18 °C, car une température plus haute peut causer
une altération des aliments congelés.
Assurez vous quotidiennement du fonctionnement
sans faille du congélateur pour le but de prévenir
l`altération des aliments et de détecter à temps une
panne éventuelle.
Page 19
19
FR
Idées et suggestions
Ce chapitre vous donne des idées et suggestions à l`utilisation de l`appareil pour diminuer la consommation en
énergie. Il donne encore information sur l`environnement.
Comment économiser d`énergie
Plus basse est la température ambiante de l`appareil
plus petite est la consommation d`énergie.
N`installez pas l`appareil dans la proximité des sources
de chaleur ou sur endroit ensoleillé.
Assurez une bonne aération pour le compresseur et le
condenseur donc n`empêchez pas le passage du
courant d`air.
Mettez les aliments dans des pots bien fermés, ou
enveloppez les en feuille pour empêcher la formation
de la gelée blanche.
Evitez l`ouverture inutile et prolongée des portes.
Ne mettez pas l`aliment en état chaud dans l`appareil,
laissez le refroidir jusqu`à la température ambiante.
Maintenez propre le condenseur.
Armoire et environnement
La matière isolante et l`agent de congélation de l`armoire
ne contiennent pas des gaz qui ne sont pas nuisibles pour
la couche d`ozone. Evitez tout endommagement du système réfrigérant surtout à l`arrière à proximité du système.
Les autorités municipales donnent de renseignement concernant les endroits de l`élimination des appareils délabrés.
Les matières désignées utilisées dans cet appareil sont réutilisables .
Entretien
Le dégèlement
Pendant le fonctionnement de l`appareil l`une partie de
l`humidité se trouvant dans l`espace de refroidissement se
précipite sous forme de glace ou de gelée blanche.
La couche épaisse de glace ou de gelée blanche a un effet
isolant et diminue la puissance frigorifique, qui se traduit
dans l`augmentation de la consommation en énergie, dans
la montée de la température intérieure des espaces de
refroidissement, enfin si la couche est trop épaisse elle
empêche l`ouverture de la porte du compartiment de congélation.
A ce type de la gamme le dégèlement de la glace gelée sur
la plaque frigorifique se fait automatiquement sans intervention extérieure. Le régulateur périodiquement arrête la
marche du compresseur - le refroidissement cesse - et la
charge thermique intérieure de l`appareil fait monter la
température de la plaque frigorifique au dessus du 0 °C et
le dégèlement s`accomplit. Quand la température atteint
les +3 ou +4 °C le régulateur de la température redémarre
le compresseur.
L`eau du dégèlement coule à travers un tube de sortie se
trouvant au dos de l`appareil dans un bac d`évaporation
placé au dessus du compresseur où la chaleur du compresseur l`évaporise.
Attirons l`attention à ce qu`il faut régulièrement
contrôler et nettoyer l`orifice d`écoulement de
l`eau du dégèlement - un label avertit à ce dans
l`intérieur de l`appareil - car en cas d`une obturation de
cette orifice l`eau accumulée pénétrant dans l`isolation
de l`appareil causera la détérioration prématurée de
l`appareil.
Nettoyez l`orifice de sortie de l`eau du dégèlement à l`aide
du nettoyeur de tube joint à l`appareil et présenté sur la
figure. Stockez le nettoyeur dans l`orifice de sortie.
Un cas très caractéristique de l`engorgement de l`orifice de
sortie est le suivant: le papier enveloppant l`aliment gèle
contre le fond du réfrigérateur. En sortant l`aliment le papier se déchire et engorge le tube d`écoulement. Manipulez
donc avec attention les aliments enveloppés en papier.
En cas d`une charge accentuée, p.e. dans canicule le
réfrigérateur peut continuellement fonctionner
rendant le dégèlement automatique provisoirement
inopérant.
Des tâches de glace ou de gelée blanche restant sur le fond
de l`appareil après la fonte ne constituent pas d`anomalie.
Il est impossible de munir le congélateur par un dispositif
de dégèlement automatique, car les aliments congelés ne
supportent pas la température du dégel.
Grattez la mince couche de givre qui recouvre les parois à
l'aide d'une spatule en plastique.
Si la couche de glace est trop épaisse et il n`est pas possible l`éliminer par la pelle un dégèlement devient nécessaire.
Sa fréquence dépende de l`utilisation (en générale 2-3 fois
par an).
Page 20
20
FR
Procédez comme suite: sortez les aliments congelés de
l`appareil, placez les dans un panier couvert de chiffon et
stockez dans un endroit frais, ou transmettez les dans un
autre réfrigérateur.
Retirez la fiche de la prise mettant ainsi hors tension les
deux parties de l`appareil.
Ouvrez les portes et nettoyez le réfrigérateur suivant le
chapitre „Nettoyage systématique”, exécutant le nettoyage
du congélateur selon les mentionnés
cidessous:
Essuyez l`eau du dégèlement à l`aide d`une éponge ou d`un
chiffon. L`eau s`accumule dans un creux convenablement
formé dans la partie basse de l`appareil et vous pouvez
l`éliminer suivant l`indication de la figure.
Otez le bouchon du tube de traversée de l`eau de dégèlement se trouvant dans l`ecpace de congélation. Placez un
plateau sous l`orifice du tube dans l`espace normal.
Le plateau sur la figure ne constitue pas l`accessoire de
l`appareil.
Séchez les surfaces et remettez le bouchon après le dégèlement et l`écoulement de l`eau.
Remettez la fiche dans la prise et replacez les aliments.
Faites fonctionner l`appareil pendant quelques heures en
tournant le régulateur sur le degré le plus haut pour que la
température de stockage nécessaire soit atteinte la plus
vite.
Nettoyage régulier
Lavez l`intérieur de l`appareil une fois par 3-4 semaines par
l`eau tiède et séchez le (il est conseillé de lier le lavage au
dégèlement du congélateur).
Il est interdit d`utiliser du savon ou des produits abrasifs
pendant le nettoyage.
Mettez l`appareil hors tension. Lavez son intérieur par l`eau
tiède et séchez le. Lavez l`étanchement de porte par eau
limpide. Mettez l`appareil sous tension après le nettoyage.
Eliminez une ou deux fois par an la couche de poussière
accumulée sur le condenseur au dos de l`appareil et nettoyez le plateau d`évaporation.
Appareil hors d`usage
Procédez comme suite au cas d`une non utilisation prolongée de l`appareil:
Débranchez l`appareil.
Enlevez de l`appareil les aliments y trouvants.
Exécutez la décongélation et le nettoyage suivant les
précédents.
Laissez un peu ouverte la porte pour éviter la production
d`odeur.
Dépannage
Replacement de l`ampoule
Vous pouvez changer l`ampoule brûlé selon les suivants:
Mettez appareil hors tension.
Dévissez la vis de fixation du globe et retirez le selon la
flèche. Vous avez ainsi accès à l`ampoule.
(Le type de l`ampoule: Mignon 322, 230 V, 15 W, douille E
14).
Remettez le globe et fixez le par la vis. Mettez l`appareil
sous tension.
La manque de l`éclairage n`influence pas le fonction-
nement de l`appareil.
Si quelque chose ne fonctionne pas
Au cours du fonctionnement de l`appareil peuvent arriver
des petits incidents qui n`exigent pas l`appel d`un expert.
Le tableau suivant vous donne des renseignements de les
maîtriser vous-même et éviter ainsi les dépenses inutiles.
Nous vous attirons l`attention à ce que le fonctionnement
de l`appareil produit quelques effets phoniques (compresseur, circulation du liquide) qui ne constituent pas de
dégâts, ils appartiennent au fonctionnement normal.
Page 21
21
FR
Défaut
Espace intérieur du
réfrigérateur trop chaud
Espace intérieur du congélateur trop chaud
Eau coule sur le paroi de
fond de l`appareil.
Eau coule dans l`armoire.
Eau coule sur le plancher.
La formation de glace et de
gelée blanche est trop forte
Compresseur marche continuellement
L`appareil ne fonctionne
pas de tout. Pas de
refroidissement, pas de
lumière. Les voyants ne brûlent pas.
L`appareil produit trop de
bruit.
Cause possible
Régulateur de température mal réglé.
Si les aliments sont trop chauds, ils sont mal
rangés.
L`étanchement de la porte n`est pas bon ou elle
a resté ouverte.
Régulateur mal réglé.
L`étanchement de la porte n`est pas bon ou elle
a resté ouverte.
Le stockage des aliments à congélés est très serré.
C`est normal. Pendant le dégèlement automa-
tique de gelée blanche se fond sur le paroi de
fond.
Engorgement dans le tube d`écoulement.
Les aliments sont rangés de telle façon qu`ils
empêchent la sortie de l`eau.
Le tube d`écoulement n`est pas conduit au
plateau d`évaporation.
Aliments mal enveloppés.
Portes restant ouvertes, ou étanchement
défectueux.
Régulateur mal réglé.
Régulateur mal réglé.
Portes restant ouvertes ou étanchement
défectueux.
Quantité d`aliments mis dedans pour congeler
est trop grande.
Aliment placé est trop chaud.
Milieu du réfrigérateur trop chaud.
La fiche n`est pas correctement insérée.
Fusible est sauté.
Régulateur de température n`est pas enclenché.
Pas de courant dans la prise (tâchez de contacter
un autre appareil).
La stabilité de l`appareil n`est pas bon.
Elimination
Mettez le régulateur à une position plus haute.
Placez les aliments aux endroits convenables.
Vérifiez la fermeture et l`étanchéité de la porte.
Mettez le régulateur à une position plus haute.
Vérifiez de la porte. la fermeture et l`étanchéité.
Rangez les aliments de telle façon que l`air froide
puisse circuler.
Nettoyez l`orifice du tube.
Rangez les aliments de telle façon qu`ils ne
touchent pas le paroi de fond.
Conduisez le tube d`écoulement dans le plateau
d`évaporation.
Enveloppez les aliments avec plus de soin.
Vérifiez la fermeture des portes ou l`état de
l`étanchement.
Tournez le régulateur vers une température plus
haute.
Tournez le régulateur vers une température plus
haute.
Vérifiez la fermeture des portes ou l`état de
l`étanchement.
Attendez quelques heures et vérifiez encore la
température.
La température des aliments placés ne doit
dépasser la température ambiante.
Tâchez diminuer la température de la salle où se
trouve le réfrigérateur.
Insérez correctement la fiche dans la prise.
Changez le fusible.
Mettez en marche l`appareil suivant le chapitre
„Mise en utilisation”.
Appelez un électricien.
Vérifiez la stabilité (les quatre pieds doivent se
reposer sur sol)
Si les conseils restent sans succès avertissez un atelier de réparation spécialisé.
Nous vous attirons l`attention de nouveau à ce que
l`arrêt du compresseur ne signifie pas l`état hors
tension de l`appareil. Il est INTERDIT de toucher les parties
électriques de l`appareil avant le débrancher du réseau!
Page 22

22
FR
A l`attention de la personne qui mettra en service l`appareil
Caractéristiques techniques
Mise en marche de l`appareil
Livraison, désemballage
Faites livrer l`appareil dans son emballage original,
dans une position verticale et respectez les signalisa-
tions sur l`emballage.
Après chaque livraison laissez reposer l`appareil durant 2
heures sans le mettant en marche.
Désemballez l`appareil et vérifiez s`il n`y a pas de traces
d`endommagements. Si oui signalez les immédiatement là
où l`appareil a été acheté. Gardez l`emballage endommagé.
Nettoyage
Enlevez les bandes adhésives fixant contre tout déplacement les éléments dans l`intérieur de l`appareil.
Lavez l`intérieur de l`appareil par d`eau tiède et de liquide
vaisselle. Utilisez de chiffon mou.
Séchez l`intérieur de l`appareil après nettoyage.
Model
volume brut (l)
volume net (l)
Largeur. (mm):
Hauteur (mm):
Profondeur (mm):
Consommation. en énergie (kW/24 h)
(kW/an)
Classe d`énergie suivant la norme d`UE
Puissance de congélation (kg/24h)
Temps de stockage max. en cas de panne (h)
Intensité de courant électrique nominale (A)
Masse (kg)
Nombre des compresseurs
S 60240 DT4
congélateur: 44
refroidisseur. 190
congélateur. 44
refroidisseur. 186
545
1404
604
0,46
168
A++
3
19
0,8
51
1
Installation
La température ambiante influence la consommation en
énergie et le fonctionnement correcte de l'appareil.
Au cours de l'installation de l'appareil il faut prendre en
considération qu'il ne fonctionnera correctement que dans
les limites de température ambiante indiqués dans le
tableau ci-dessous :
Classe climatique Température ambiante
SN +10 ..,+32 °C
N +16 ..,+32 °C
ST +18 ..,+38 °C
Dans le cas où la température ambiante tombe au-dessous
de la limite inférieure la température de l'espace réfrigérant
pourrait monter au-dessus de la température prescrite.
Quand la température ambiante monte au-dessus de la
limite supérieure, la durée de fonctionnement du compresseur va se prolonger, la décongélation automatique
sera déranger, la température dans l'espace réfrigérant va
monter enfin la consommation en énergie va aussi s'augmenter.
A l'installation de l'appareil veillez à ce que sa position soit
horizontale. Réglez cette position à l'aide des deux pieds
réglables sur la partie inférieure avant (1).
Page 23

23
FR
Dans le sachet des accessoires, il y a deux entretoises à mettre dans les trous prévus à cet effet, à
l'arrière de l'appareil. Introduisez les entretoises
dans les trous situés à l'arrière de l'appareil
(flèche (A) comme indiqué sur la Figure), puis
tournez-les de 45° jusqu'à accrochage (flèche verticale).
N'exposez pas l'appareil aux rayons de soleil, ne
posez le à la proximité d'un foyer ou d'un fourneau.
Dans le cas où il serait impossible de prendre en considération cette précaution il est impératif de
respecter les distances minimum suivantes :
Dans le cas d'un chauffage électrique ou à gaz
quand cette distance 3 cm ou moins entreposez
une plaque thermiquement isolante d'une épaisseur de 0,5 - 1 cm entre les deux appareils.
Dans le cas d'un chauffage à l'huile ou au charbon cette distance doit être augmenté à 30 cm
car ici le dégagement de chaleur est plus grand.
La conception de l'appareil permet son utilisation en
le poussant contre le mur.
A l'installation de l'appareil il faut respecter les dis-
tances minimum de la figure :
A: pose au-dessous d'une armoire murale
B: installation dans une espace libre
Changement le sens d'ouverture de la
porte
Si nécessaire le sens d'ouverture de la porte peut être
inversé.
Normalement les portes s'ouvrent à droite.
Exécutez le changement suivant la figure et les indications
ci-dessous :
Mettez l'appareil hors tension.
Inclinez le légèrement en faisant attention à ce que le
compresseur ne touche pas le sol. Pour ce faire il est
conseillé d'appeler une aide qui va fixer l'appareil dans
cette position durant le procédé.
Dévissez les deux pieds réglables. Dévissez aussi les 2
vis qui portent en bas la porte et les 2 vis du côté
opposé.
Retirez légèrement vers le bas la porte et enlevez la.
Démontez le porteur double de la porte en dévissant
les deux vis.
Ôtez la porte du congélateur en la tirant légèrement
vers le bas.
Dévissez la cheville porteuse supérieure de la porte du
congélateur et revissez le sur le côté opposé.
Ôtez les boulons de couverture gauches du porteur
double de la porte et remettez les au côté opposé.
Remettez la porte du congélateur sur la cheville porteuse supérieure.
A
45°
PR60
Page 24

24
FR
Remontez sur le côté gauche le porteur double de la
porte à l'aide des deux vis. Veuillez à ce que le bord de
la porte soit parallèle avec le bord du paroi de l'appareil.
Remettez la porte du réfrigérateur sur la cheville du
porteur double.
Remontez sur le côté gauche le porteur inférieur de la
porte à l'aide des deux vis et les pieds réglables. Veuillez
à ce que le bord de la porte du réfrigérateur soit parallèle avec la paroi de l'appareil.
Remontez la poignée sur le côté opposé et insérez les
clous en plastique livrés avec l'appareil dans les trous
restant libres.
Réglez si nécessaire la fermeture des portes en ajustant
horizontalement le porteur central de la porte après
avoir desserrer les vis.
Remettez l'appareil à ça place, nivelez le et mettez le
sous tension.
Ne voulant pas vous même exécuter le montage décrit cidessus appelez le concessionnaire le plus proche. Les
experts de la fabrique exécuteront le montage contre remboursement.
Branchement électrique
Votre appareil ne peut être branché qu'en 230 V
monophasé.
Vérifiez que le compteur électrique peut supporter l'intensité absorbée par votre appareil compte tenu des autres
appareils déjà branchés.
Calibre des fusibles en ligne (un par phase) 10 A en 230 V.
Important
L'installation doit être réalisée conformément aux règles
de l'art, aux prescriptions de la norme NF.C 15.100 et
aux prescriptions de l'E.D.F.
Utilisez un socle de prise de courant comportant une
borne de mise à la terre, qui doit être obligatoirement
raccordée conformément à la norme NF.C.15.100 et aux
prescriptions de l'E.D.F; cette prise de courant doit
impérativement être accessible.
L'appareil ne doit pas être raccordé à l'aide d'un prolongateur ou d'une prise multiple.
Vérifiez que la prise de terre est conforme aux règlements
en vigueur.
Notre responsabilité ne saurait être engagée en cas
d'accidents ou d'incidents provoqués par une mise à la
terre inexistante ou défectueuse.
Page 25

25
FR
Temps de stockage (1)
Le temps et le manière de stockage des aliments frais.
Légende
:
X: temps de stockage normal
x: temps de stockage possible (seulement des marchandises sûrement fraîches)
Aliments Temps de stockage en jour Mode et matériel d`emballage
1234567
viandes crues XXx x x sachet en feuille hermétiquement
fermé
viande bouillie XXXx x x pot couvert
viande cuite XXXx x pot couvert
hachis de viande crue X pot couvert
hachis de viande cuite XXx x pot couvert
charcuterie, saucisse XXx x sachet en feuille, papier paraffiné
poisson fraîche X x x sachet en feuille hermétiquement
fermé
poisson bouillie XXx x pot couvert
poisson cuite XXx x x pot couvert
conserve de poisson ouverte X x x pot couvert
poulet vidé XXXx x x sachet en feuille hermétiquement
fermé
poulet rôti XXXx x x pot couvert
poule vidée XXx x x sachet en feuille hermétiquement
fermé
poule bouillie XXx x x pot couvert
canard, oie vidé, frais XXXx x x sachet en feuille hermétiquement
fermé
canard, oie rôti XXXXx x x pot couvert
beurre dans emballage ouvert XXXXXXXdans l`enveloppe original
beurre enveloppée XXx x x x x dans l`enveloppe original
dans l`enveloppe original XXXx x dans l`enveloppe original
crème fraîche XXx x dans verre
crème double XXXXx x x dans verre
fromage (dur) XXXXXXXfeuille en aluminium
fromage (à pâte molle) XXXXx x x sachet en feuille
fromage blanc XXXXx x x sachet en feuille
oeuf XXXXXXX
épinard, oseille XXx x sachet en feuille
petits pois, haricots verts XXXXx x x sachet en feuille
champignon XXx x x sachet en feuille
carotte XXXXXXXsachet en feuille
piment vert XXx x x sachet en feuille
tomate XXXXXXXsachet en feuille
chou XXXXXx x sachet en feuille
fruits trop périssables
(fraise, framboise) XXXx x sachet en feuille
fruits XXXXx x x sachet en feuille
conserves de fruit ouvertes XXXx x pot couvert
gâteaux à la crème XXx x pot couvert
Page 26

26
FR
Temps de stockage (2)
Temps de stockage de marchandises congelées
dans l`espace dans le compartiment
Marchandise normal de congélation à 4 étoiles,
+2 – +7 °C -18 °C
Légumes:
haricots verts, petits pois, légume mixte, maïs, courge 1 jour 12 mois
Plat préfabriqué:
plats avec viande, avec garniture, légume en nature 1 jour 12 mois
Plat préfabriqué:
filet en roulade, jambonneau rôti, plat en gelée 1 jour 6 mois
Plats de pomme de terre, pâtes alimentaires:
purée de pomme de terre, pomme frite, boulette, gnocchi 1 jour 12 mois
Potages:
bouillon, soupe d`haricot vert, soupe de petits pois 1 jour 6 mois
Fruits:
cerise, griotte, crème de fruit, purée de marrons 1 jour 12 mois
Viandes:
poulet, canard, oie, 1 jour 5 mois
poisson en filet, thon 1 jour 6 mois
Glace, crème à la glace 1 jour 3 semaines
La fabrique réserve tout droit de changement de production.
Page 27

27
DE
Bevor Sie Ihr Gerät anschließend in Betrieb nehmen, lesen Sie bitte zuerst die Gebrauchsanleitung durch, die
Sicherheitshinweise und wichtige Informationen enthält.
Nur so können Sie das Gerät sicher und zuverlässig nutzen und werden viel Freude daran haben.
Folgende Signalbegriffe werden Ihnen helfen, sich in der Gebrauchsanleitung besser zurecht zu finden.
Sicherheitsvorschriften
Die Warnungen mit diesem Symbol dienen Ihrer Sicherheit und der Ihres Gerätes
Wichtige Hinweise und Informationen
Umwelthinweise
Bei diesem Symbol finden Sie Tips zur Lagerung von Lebensmitteln
Das Symbol auf dem Produkt oder seiner Verpackung weist darauf hin, dass dieses Produkt nicht als normaler
Haushaltsabfall zu behandeln ist, sondern an einem Sammelpunkt für das Recycling von elektrischen und elektronischen Geräten abgegeben werden muss. Durch Ihren Beitrag zum korrekten Entsorgen dieses Produkts
schützen Sie die Umwelt und die Gesundheit Ihrer Mitmenschen. Umwelt und Gesundheit werden durch falsches
Entsorgen gefährdet. Weitere Informationen über das Recycling dieses Produkts erhalten Sie von Ihrem Rathaus,
Ihrer Müllabfuhr oder dem Geschäft, in dem Sie das Produkt gekauft haben.
Wichtige Hinweise für Ihre Sicherheit . . . . . . . . . . . .28
Allgemeine Sicherheitsvorschriften . . . . . . . . . . . . . . .28
Für die Sicherheit Ihrer Kinder . . . . . . . . . . . . . . . . . .28
Sicherheitsvorschriften für die Inbetriebnahme . . . .28
Informationen für Sicherheitsvorschriften
von Isobutan . . . . . . . . . . . . . . . . . . . . . . . . . . . . . . . . .28
Zum Betrieb des Gerätes . . . . . . . . . . . . . . . . . . . . . .29
Allgemeine Informationen . . . . . . . . . . . . . . . . . . . . . .29
Bedienungselemente des Gerätes . . . . . . . . . . . . . . . .29
So bedienen Sie Ihr Gerät . . . . . . . . . . . . . . . . . . . . . .30
Inbetriebnahme . . . . . . . . . . . . . . . . . . . . . . . . . . . . .30
Temperaturregelung, Einstellung
der Temperatur . . . . . . . . . . . . . . . . . . . . . . . . . . . . . .30
Lagerung im Kühlbereich . . . . . . . . . . . . . . . . . . . . .30
Lagerzeit und Kühltemperatur für verschiedene
Lebensmittel . . . . . . . . . . . . . . . . . . . . . . . . . . . . . . . .30
Lagern im Gefrierbereich . . . . . . . . . . . . . . . . . . . . . . .31
Einfrieren . . . . . . . . . . . . . . . . . . . . . . . . . . . . . . . . . . .31
Lagern . . . . . . . . . . . . . . . . . . . . . . . . . . . . . . . . . . . . .31
Eiszubereitung . . . . . . . . . . . . . . . . . . . . . . . . . . . . . .31
Wichtige Informationen und Ratschläge . . . . . . . . . . .31
Inhalt
Tips und Hinweise . . . . . . . . . . . . . . . . . . . . . . . . . . . . . .31
Und so können Sie Energie sparen . . . . . . . . . . . . . .31
Geräte und Umgebung . . . . . . . . . . . . . . . . . . . . . . .32
Instandhaltung . . . . . . . . . . . . . . . . . . . . . . . . . . . . . . .32
Abtauen . . . . . . . . . . . . . . . . . . . . . . . . . . . . . . . . . . .32
Regelmäßige Reinigung . . . . . . . . . . . . . . . . . . . . . . .33
Außer Betrieb gesetztes Gerät . . . . . . . . . . . . . . . . .33
Fehlerbeseitigung . . . . . . . . . . . . . . . . . . . . . . . . . . . . . .33
Wechsel der Glühlampe . . . . . . . . . . . . . . . . . . . . . . .33
Wenn etwas nicht funktioniert . . . . . . . . . . . . . . . . . .33
Zu Händen von Inbetriebnahmer . . . . . . . . . . . . . . . .35
Technische Daten . . . . . . . . . . . . . . . . . . . . . . . . . . . . . .35
Inbetriebnahme . . . . . . . . . . . . . . . . . . . . . . . . . . . . . . .35
Transport, Auspacken . . . . . . . . . . . . . . . . . . . . . . . . .35
Reinigung . . . . . . . . . . . . . . . . . . . . . . . . . . . . . . . . . .35
Standort . . . . . . . . . . . . . . . . . . . . . . . . . . . . . . . . . . .35
Wechsel des Türanschlags . . . . . . . . . . . . . . . . . . . . .46
Elektrischer Anschluß . . . . . . . . . . . . . . . . . . . . . . . .47
Lagerzeittabelle (1) . . . . . . . . . . . . . . . . . . . . . . . . . . .48
Lagerzeittabelle (2) . . . . . . . . . . . . . . . . . . . . . . . . . . .49
Page 28

28
Wichtige Hinweise für Ihre Sicherheit
Allgemeine Sicherheitsvorschriften
Sollten Sie Ihr Gerät einmal weitergeben wollen, vergessen
Sie bitte nicht die Gebrauchsanleitungen dazuzulegen.
Sie haben ein Gerät für den Haushalt erworben, und es
sollte auch nur zur Lagerung von Lebensmitteln gebraucht
werden.
Wartungen und Reparaturen (einschließlich Verbesserung
und Austausch der Netzleitung) nur durch eine
autorisierte Werkstatt durchführen lassen. Für
Reparaturen dürfen nur Original-Ersatzteile benutzt werden,
anderenfalls könnte Ihr Gerät beschädigt oder Sie selbst verletzt werden.
Ihr Gerät ist nur vom Netz getrennt, wenn Sie den
Netzstecker aus der Steckdose ziehen. Deshalb ziehen Sie
vor Reparaturen, Reinigungen oder Abtauen den
Netzstecker aus der Steckdose. Wenn die Steckdose schwer
zu erreichen ist, drehen Sie die Sicherung heraus.
Es ist verboten, das Netzkabel zu verlängern!
Bitte prüfen, dass das Netzkabel nicht von der
Geräterückseite eingeklemmt und beschädigt wird. Ein
beschädigtes Netzkabel kann überhitzen und einen
Brand verursachen.
- Keine schweren Gegenstände bzw. das Gerät selbst auf
das Netzkabel stellen. Kurzschluss- und Brandgefahr!
Den Netzstecker nie am Kabel aus der Steckdose
ziehen, besonders wenn das Gerät aus der Nische gezogen wurde. Eine Beschädigung des
- Netzkabels kann Kurzschluss, Feuer und/oder
Stromschlag verursachen.
Ein beschädigtes Netzkabel muß durch eine qualifizierte Fachkraft oder vom Kundendienst ersetzt werden.
- Den Netzstecker niemals in eine lockere oder
beschädigte Steckdose stecken. Stromschlag- und
Brandgefahr!
Ohne der Abdeckblende der Innenbeleuchtung darf das
Gerät nicht in Betrieb gesetzt werden!
Die Innenwände sind kratzempfindlich, deshalb sollten Sie
beim Reinigen nie Eiskratzer oder andere spitzen
Gegenstände benutzen.
Achten Sie darauf, daß keine Flüssigkeiten mit dem
Temperaturregler, bzw. der Beleuchtungsarmatur in
Berührung kommen.
Das Eis kann Verletzungen verursachen wenn Sie das Eis
sofort verkonsumieren.
Das gefrorene Lebensmittel nach dem Auftauen darf nicht
nochmals gefroren werden dies sollte baldmöglichst aufgebraucht werden.
Im Falle der schnellgefrorenen Lebensmittel befolgen Sie
immer die Vorschriften des Herstellers.
Es ist verboten, das Abtauen mit einem elektrischen
Heizgerät oder chemischen Material zu beschleunigen!
Bewahren Sie keine heißen Töpfe in unmittelbarerer Nähe
der Kunststoffteile des Gerätes auf.
Lagern Sie keine entflammbaren Gase und Flüssigkeiten im
Gerät - es besteht Explosionsgefahr.
Im Gefrierraum dürfen keine kohlensäurehaltigen Getränke
in Flaschen eingelagert werden.
Kontrollieren und reinigen Sie regelmäßig den
Tauwasserablauf. Im Fall einer Verstopfung kann das
Tauwasser nicht abfließen, dies könnte eine vorzeitige
Beschädigung des Gerätes verursachen.
Sicherheitsvorschriften für die
Inbetriebnahme
Stellen Sie das Gerät mit der Rückseite an die Wand.
Die Wärme abgebenden Teile (Kompressor und
Verflüssiger) sollen die Wand nicht berühren.
Bevor Sie das Gerät verschieben, sollte der
Netzstecker aus in der Steckdose genommen sein.
Beim Aufstellen des Gerätes achten Sie darauf, daß
es nicht auf das Anschlußkabel gestellt wird.
Achten Sie auf ausreichende Belüftung des Gerätes.
Nicht ausreichende Belüftung hätte eine Erwärmung
des Gerätes zufolge. Um Ihrem Gerät die erforderliche
Belüftung zu sichern, befolgen Sie bitte die Hinweise
für die „Inbetriebnahme des Gerätes”.
Siehe Abschnitt "Standort".
Für die Sicherheit Ihrer Kinder
Ihre Kinder sollten nicht mit den Klebebändern und
Verpackungsmaterialien des Gerätes spielen, da
Lebensgefahr durch Ersticken besteht!
Das Gerät sollte ausschließlich von Erwachsenen bedient werden. Achten Sie darauf, daß Ihre Kinder mit
dem Gerät oder dessen Bedienungselementen nicht
spielen.
Sollte das Gerät am Ende seine Lebensdauer außer
Betrieb gesetzt werden, so ziehen Sie den Netzstecker
aus der Steckdose, trennen Sie das Anschlußkabel
durch (möglichst nah am Gerät) und montieren Sie die
Tür ab. Dadurch verhindern Sie, daß sich spielende
Kinder selbst einsperren oder einen Stromschlag erleiden.
Das Gerät darf von Kindern und Personen, deren physische, sensorische oder geistige Fähigkeiten sowie Mangel
an Erfahrung und Kenntnissen einen sicheren Gebrauch
des Gerätes ausschließen, nur unter Aufsicht oder nach
entsprechender Einweisung durch eine Person benutzt
werden, die sicherstellt, dass sie sich den Gefahren des
Gebrauchs bewusst sind.
Um Personen- und Sachschäden zu vermeiden,
halten Sie sich an die Sicherheitsvorschriften der
Gebrauchsanleitung. Für Schäden infolge von
Nichtbeachtung dieser Vorschriften haftet der Hersteller
nicht.
Informationen für Sicherheitsvorschriften von Isobutan
Warnung
Ihr Gerät enthält im Kältekreislauf Isobutan (R 600a);
bei diesem Stoff besteht Feuer- und Explosionsgefahr.
Belüftungsöffnungen der Geräteverkleidung oder des
Aufbaus von Einbaumöbeln nicht verschließen.
Zum Beschleunigen der Abtauung keine anderen
mechanischen Einrichtungen oder sonstige künstlichen Mittel als die vom Hersteller empfohlenen
benutzen.
Kühlkreislauf nicht beschädigen.
Keine elektrischen Geräte innerhalb des
Lebensmittellagerraumes betreiben, die nicht vom
Hersteller freigegeben sind.
DE
Page 29

29
DE
Zum Betrieb des Gerätes
Allgemeine Informationen
Sie haben mit Ihrem Gerät eine Kühl- Gefrierkombination
mit einem Motorkompressor erworben, in der sich der
Gefrierbereich oben befindet.
Die Kühl-Gefrierkombination verfügt über 2 separate Türen.
Das Gerät entspricht den Normen der auf dem Typschild
angegebenen Klimaklasse unter Berücksichtigung der
dort aufgeführten Temperatur.
Bedienungselemente des Gerätes
A - Gefrierraum
B - Kühlraum
1. Abdeckung
2. Eiswürfelschale
3. Ablagegitter im Tiefkühllagerfach
4. Beleuchtungsarmatur
5. Glasplatte
6. Tauwassersammelbecken
7. Glasplatte
8. Gemüseschale
9. Typenschild
10. Verstellbare Füße
11. Butterfach
12. Eierablage
13. Türabstellfächer
14. Türdichtung
15. Flaschenfach
16. Verflüssiger
17. Tauwasserabführung
18. Abstandhalter
19. Verdunstungsschale
20. Verdichter
Page 30

30
So bedienen Sie Ihr Gerät
Inbetriebnahme
Legen Sie das beiliegende Zubehör in den Kühlschrank und
stecken Sie den Netzstecker in die geerdete Steckdose.
Mit dem Temperaturregler, der sich auf der rechten Seite
des normalen Kühlbereiches befindet, können Sie die
Temperatur einstellen, indem Sie den Regler im
Uhrzeigersinn drehen. (Siehe nachstehende Abbildung). In
der Position „0” befindet sich das Gerät außer Betrieb.
Bitte lesen Sie hierzu auch den nächsten Abschnitt.
Lagern im Kühlbereichs
Die Luft im Kühlbereich muß ausreichend zirkulieren
können, um entsprechend zu kühlen. Decken Sie
bitte deshalb die Gitterablagen mit Papier oder einem
Tablett o. ä. auf keinen Fall ab.
Lassen Sie heiße Speisen vor dem Einlegen in den
Kühlbereich auf Zimmertemperatur abkühlen, um
unnötige Reif- und Eisschichtbildung zu vermeiden.
Verpacken Sie angebrochene Lebensmittel in
geeigneten Verpackungsfolien oder Behälter. So
bleiben Aroma und Frische besser erhalten. Das Gemüse
kann so z.B. mehrere Tage seine Feuchtigkeit bewahren
und trocknet nicht aus
.
Temperaturregelung, Einstellung der
Temperatur
Das Kühlaggregat läuft nicht ununterbrochen. Wenn das
Gerät die eingestellte Temperatur erreicht hat, schaltet sich
der Thermostat automatisch aus, steigt die Temperatur
wieder, so schaltet es sich wieder ein.
Je höher die Ziffer auf dem Temperaturregler, desto intensiver ist die Kühlung.
Wird der Temperaturregler auf eine mittlere Stufe
„2-3” eingestellt, so wird im Gefrierbereich eine
Temperatur von höchstens. -18 °C und im Kühlbereich
automatisch +5 °C erreicht. Eine solche mittlere
Einstellung (Stufe „2-3”) genügt i.d.R. den alltäglichen
Ansprüchen.
Die Temperaturen im Gefrier- und Kühlbereich sind neben
der Einstellung des Temperaturreglers und der
Außentemperatur auch von der Menge der eingelegten
Lebensmittel und der Häufigkeit des Türöffnens abhängig.
Bei der höchsten Einstellung des
Temperaturreglers (also Stufe „6”) kann das
Kühlaggregat bei erhöhter Belastung (z.B. bei Hitze)
ununterbrochen laufen. Zu einer Schädigung Ihrer
Gefrierkombination kommt es dadurch nicht.
Lagerung im Kühlbereich
Beim Einlagern der verschiedenen Lebensmittel sollten Sie
die nebenstehende Abbildung beachten.
1. Butter, Käse, Tuben
2. Eier
3. Konserven, Saure Sahne o.ä., kleinere Flaschen
4. Große Flaschen, Getränke
5. Obst, Gemüse, Salat
6. Frischfleisch, Aufschnitt, Wurst usw.
7. Milch, Milchprodukte
8. Fertigspeisen, Backwaren, Lebensmittel in
geschlossenen Gefäßen, angebrochene Dosen,
Getränke (liegend) usw.
Lagerzeit und Kühltemperatur für verschiedene Lebensmittel
Informationen über Lagerzeit und Kühltemperatur entnehmen Sie bitte der Tabelle „Lagerzeit” am Ende der
Gebrauchsanleitung.
Da die Lagerzeit in erster Linie von der Frische des zu kühlenden Lebensmittels bzw. seiner vorherigen Wervendung
abhängt, ist sie in diesem Rahmen nicht eindeutig zu bestimmen. Deshalb sind die angegebenen Daten lediglich als
Orientierungspunkte zu verstehen.
DE
Page 31

31
DE
Wenn Sie die gekauften tiefgekühlten Lebensmittel nicht
sofort aufbrauchen, können Sie sie zum Auftauen einen Tag
lang im Kühlbereich dieses Types lagern.
Lagern im Gefrierbereich
Einfrieren
Im Gefrierfach haben Sie die Möglichkeit frische
Lebensmittel für den Haushalt einzufrieren. Um beste
Ergebnisse zu erzielen, beachten Sie bitte die folgenden
Hinweise:
Frieren Sie immer nur frische und einwandfreie
Lebensmittel ein.
Führen Sie die Vorbereitungen nach dem beigefügten
Anhang „Wegweiser zum Einfrieren von Lebensmitteln im
Haushalt” durch.
Bevor Sie mit dem Einfrieren beginnen, stellen Sie den
Temperaturregler auf „3” und legen Sie das Ablagegitter in
die oberste Position. Dann legen Sie das verpackte
Gefriergut direkt auf das Ablagegitter. Während 24 Std. ist
die frische Ware bis zum Kern gefroren. Stellen Sie nach 24
Std. den Temperaturregler auf eine mittlere Stufe „2-3”,
oder belassen Sie ihn auf „3” (diese Stellung entspricht den
alltäglichen Anforderungen). Die bereits tiefgefrorene Ware
lagern Sie am besten unter dem Ablagegitter an dem
Kälteerzeuger oder aufeinander.
Während des Einfriervorgangs sollten Sie die Tür des
Tiefkühllagerfachs möglichst nicht
öffnen.
Es ist nicht zweckmäßig den Temperaturregler in
eine höhere Stellung (z.B. auf „6”) zu stellen. Der
Prozeß des Einfrierens könnte zwar dadurch beschleunigt
werden, die Temperatur im Kühlbereich würde aber auf
Dauer unter 0 °C sinken, was zum Frieren der im
Kühlschrank gelagerten Lebensmittel und Getränke führen
würde.
Frieren Sie nie eine größere Menge frische Ware
auf einmal ein, als es in der Tabelle „Technische
Daten” angegeben ist, sonst kann die Ware nicht schnell
genug bis zum Kern durchgefroren werden und so können nach dem Auftauen Qualität- und
Geschmacksverluste auftreten.
Während des Einfrierens sollten Sie die
Eiszubereitung vermeiden, weil die Gefrierleistung
dadurch vermindert wird.
Eiszubereitung
Füllen Sie die beigelegte Eiswürfelschale mit Wasser auf
und legen Sie sie ins Gefrierfach. Die Zubereitungszeit kann
dadurch verkürzt werden, daß der Temperaturregler auf die
maximale Temperatur einstellt wird. Vergessen Sie nicht,
nach der Eiswürfelzubereitung den Temperaturregler
wieder zurückzustellen.
Zum Gebrauch der Eiswürfel die Eiswürfelschale kurz unter
Wasser halten, die Schale sanft drehen oder leicht schlagen. Festgefrorene Eiswürfelschalen sind vorsichtig zu
lösen. Auf keinen Fall spitze Gegenstände oder Messer
gebrauchen, da sonst das Kältesystem beschädigt werden
kann.
Wichtige Informationen und
Ratschlä
ge
Die Ablagegitter im Kühlbereich sind höhenverstellbar.
Beim Öffnen der Tür in einem 90° Winkel lassen sich die
Ablagegitter herausziehen und in der gewünschten
Höhe wieder einsetzen.
Nach dem Öffnen und Schließen der Gefrierraumtür
entsteht wegen der tiefen Temperatur ein Vakuum.
Wenn Sie nach dem Schließen die Tür erneut öffnen
wollen, warten Sie 2-3 Minuten bis der Druck ausgeglichen wird.
Ihre Tiefkühlkost erfordert eine gleichmäßige
Lagertemperatur von -18 °C. Eine höhere Temperatur
reduziert die Haltbarkeit Ihres Gefriergut.
Überzeugen Sie sich möglichst jeden Tag von der einwandfreien Funktion des Gefrierbereiches, um
eventuelle Funktionsstörungen rechtzeitig zu merken
und somit ein Verderben der tiefgekühlten
Lebensmittel zu vermeiden.
Tips und Hinweise
In diesem Abschnitt erhalten Sie nützliche Hinweise zur
Einsparung von Energie sowie zum Umweltschutz.
Und so können Sie Energie sparen:
Standorte im Bereich direkter Sonneneinstrahlung und
Heizungsquellen sind zu vermeiden.
Achten Sie auf die ausreichende Belüftung des
Kompressors und Verflüssigers.
Lagern
Es ist zweckmäßig die bereits gefrorene Ware von dem
Ablagegitter des Tiefkühlfaches in den Raum
- welcher unter dem Ablagegitter zu finden ist umzustapeln. So schaffen Sie Platz für das Einfrieren
frischer Lebensmittel.
Die Faltbarkeit des Ablagegitter (2 Positionen) kann nur bei
Lagern ausnutzen, nämlich das Einfrieren darf nur in der
oberen Position des Ablagegitters ausführen.
Das Einfrieren frischer Ware beeinträchtigt den Zustand von
bereits tiefgekühlten Produkten nicht.
Beachten Sie bitte bei fertiger Tiefkühlkost die
Hinweise zur Lagerzeit auf der Verpackung des
Herstellers. Wenn Sie die Lebensmittel selber einfrieren,
empfehlen wir Ihnen, sich an den Gefrierplan an der Tür des
Gefrierbereiches zu orientieren.
Achten Sie darauf, daß eingefrorene Produkte bis
zum Einlagern im Gefrierbereich nicht antauen.
Einmal aufgetaute oder angetaute Produkte nicht wieder
einfrieren, außer sie werden zu einem Fertiggericht weiter
verarbeitet.
Page 32

32
Geräte und Umgebung
Sie haben ein Gerät erworben, dessen Kälte- und
Isolierkreislauf umweltverträglich ist und somit die
Ozonschicht der Erde in keinerlei Weise beschädigt.
Sollte Ihr Gerät am Ende seiner Lebensdauer aus Ihrem
Haushalt entfernt werden, nehmen
Spermüllannahmestellen Ihr Gerät entgegen, und entsorgen bzw. wiederverwerten seine verschiedene Teile
umweltverträglich.
Informationen über Spermüllannahmestellen erhalten Sie
bei den städtischen Ämtern.
Die wiederverwendbaren Teile des Gerätes sind mit diesem
Zeichen gekennzeichnet.
Instandhaltung
Abtauen
Nach einer bestimmten Betriebszeit kann sich im Kühlraum
des Gerätes eine Reif- bzw. Eisschicht bilden.
Diese Reif- und Eisschicht wirkt isolierend, die Kälteabgabe
wird dadurch erschwert, was zur erhöhten Temperatur der
Kühlräume führen kann und den Stromverbrauch ansteigen
läßt. Eine dicke Reif- und Eisschicht kann dazuführen daß
sich die Tür des Gefrierfaches schwer öffnen läßt.
Bei diesem Typ von Kühl- und Gefrierkombinationen besitzt
der Kühlbereich eine Abtauvollautomatik. Damit entfällt ein
Abtauen des Kühlbereiches. Der Temperaturregler unterbricht
immer wieder den Motorkompressor - während dieser Zeit
wird der Kühlprozeß unterbrochen - die Innentemperatur
steigt über 0 °C und es erfolgt ein Abtauen. Steigt die
Temperatur über +3 - +4 °C, so aktiviert der Temperaturregler
wieder den Kühlprozeß.
Das Wasser sammelt sich im Sammelbehälter, läuft durch den
Tauwasserablauf über die Tauwasserabführung in die
Auffangschale (auf dem Kompressor) auf der Rückseite des
Gerätes und verdunstet dort durch die Wärme des
Kompressors.
Kontrollieren und reinigen Sie bitte den
Tauwasserablauf regelmäßig - einen Hinweis hierzu
finden Sie auch im Inneren des Gerätes - sonst
könnte im Falle einer Verstopfung das angesammelte
Wasser in die Isolierung gelangen und somit zu einer
vorzeitigen Funktionsstörungen des Gerätes führen.
Verwenden Sie beim Reinigen des Tauwasserablaufes das mitgelieferte und auch in der Abb. dargestellte Reinigungsgerät.
Bewahren Sie es am Tauwasserablauf auf.
Ein typisches Beispiel für die Verstopfung der
Tauwasserabführung besteht darin, daß in Papier verpackte
Lebensmittel mit der Rückwand des Kühlbereiches in
Berührung kommen und dort festfrieren. Beim
Herausnehmen des Lebensmittels kann das Papier reißen und
in die Tauwasserabführung gelangen und dadurch eine
Verstopfung verursachen.
Gehen Sie deshalb beim Einlegen von in Papier verpackte
Lebensmittel aus den eben ernannten Gründen vorsichtig vor.
Bei voller Auslastung (z.B. bei Hitze) läuft der Kühlschrank
ununterbrochen, während dieser Zeit ist die
Abtauvollautomatik unwirksam.
Nach dem Abtauen sind Reif- bzw. Eisschichtflecken
auf der Rückseite des Kühlschrankes nicht unüblich.
Der Gefrierbereich kann mit einer Abtauvollautomatik nicht
versehen werden, da das Gefriergut die Abtautemperatur
nicht verträgt.
Hat sich eine Reif- und Eisschicht gebildet, kann diese mit
einem Kunststoffschaber entfernt werden, wenn sie nicht zu
dick ist.
Hat sich eine dickere Reif- und Eisschicht gebildet, die nicht
mehr mit dem Kunststoffschaber entfernt werden kann, muß
der Gefrierbereich abgetaut werden. Die Häufigkeit des
Abtauens hängt vom Gebrauch ab (i.d.R. 2-3 mal jährlich).
Nehmen Sie Ihr Gefriergut während des Abtauvorganges aus
dem Gefrierbereich heraus, wickeln Sie es in mehrere Lagen
Zeitungspapier ein und lagern Sie es an einem kühlen Ort
oder bewahren Sie es in einem anderen Kühlschrank oder truhe auf.
Ziehen Sie den Netzstecker aus der Steckdose, so wird sowohl
der Kühl- als auch der Gefrierbereich außer Betrieb gesetzt.
Lassen Sie die Türen geöffnet und reinigen Sie den
Kühlbereich, wie es im Abschnitt „Regelmäßige Reinigung”
beschrieben ist. Bei der Reinigung des Gefrierbereiches gehen
Sie bitte wie folgt vor:
Führen Sie das beim Abtauen angesammeltes Tauwasser mit
einem Schwamm oder Lappen ab. Das im unteren Teil des
Die Lebensmittel in luftdichtem Verpackungsmaterial
verpacken, um unnötige Reif- und Eisschichtbildung zu
vermeiden.
Vermeiden Sie unnötiges und zu langes Öffnen der
Türen.
Heiße Speisen vor dem Einlegen ins Gerät auf
Zimmertemperatur abkühlen lassen.
Um hohe Leistung bei niedrigem Energieverbrauch zu
erzielen, muß der Verflüssiger regelmäßig gereinigt
werden.
DE
Page 33

33
DE
Gerätes angesammelte Wasser kann mit einem Schwamm
oder hygroskopischem Lappen entfernt werden.
Nachdem Sie das Gerät abgetaut und das Wasser entfernt
haben, wischen Sie alles gut trocken, und drücken Sie den
Verschlußstopfen hinein.
Stecken Sie den Netzstecker wieder in die Steckdose und
legen Sie die Lebensmittel zurück.
Es ist empfehlenswert, ein paar Stunden lang den
Temperaturregler in der höchsten Einstellung zu lassen, um
die gewünschte Lagertemperatur zu erreichen.
Regelmäßige Reinigung
Achtun
g: Vor der Reinigung Gerät abschalten und
Netzstecker ziehen!
Zweckmäßig ist es, den Kühlbereich alle 3-4 Wochen mit
lauwarmem Wasser abzuwaschen und trocken zu wischen
(die Reinigung des Gefrierbereiches erledigen Sie am besten
gleichzeitig mit dem Abtauen).
Verwenden Sie bei der Reinigung bitte keine Scheuermilch
oder Seife.
Die Türdichtung waschen Sie am besten mit klarem Wasser
ab und wischen sie anschließend trocken. Nach der
Reinigung können Sie den Netzstecker in die Steckdose
stecken.
Ein- bis zweimal jährlich sollten Sie auf der Rückseite des
Gerätes den Staubbelag am Kondensator entfernen und
die Auffangschale auf dem Kompressor sauber machen.
Fehlerbeseitigung
Wechsel der Glühlampe
Wenn die Glühlampe defekt ist, können Sie diese leicht
selbst austauschen:
Ziehen Sie den Netzstecker.
Drehen Sie die Schraube der Abdeckung heraus und ziehen
Sie die Abdeckung in Pfeilrichtung ab. Jetzt können Sie die
Außer Betrieb gesetztes Gerät
Sollten Sie Ihr Gerät längere Zeit nicht brauchen, gehen Sie
wie folgt vor:
Trennen Sie das Gerät vom Netz.
Nehmen Sie die Lebensmittel heraus.
Reinigen Sie das Gerät auf die eben geschilderte Weise.
Lassen Sie die Türen offen, um Geruchsbildung zu vermeiden.
Wenn etwas nicht funktioniert
Bei allen elektrischen Geräten können Störungen
auftreten, zu deren Beseitigung Sie nicht unbedingt den
Kundendienst benötigen. In der nächsten Tabelle wollen
wir Ihnen über diese Störungen ein paar Hinweise geben,
damit Sie von überflüssigen Reparaturkosten verschont
bleiben.
Wir machen Sie darauf aufmerksam, daß bei jedem arbeitenden Kompressor-Aggregat Geräusche auftreten, die
teils vom laufenden Motor, teils vom Kältemittel, das durch
die Rohre strömt, herrühren. Das ist kein Fehler, sondern
ein Zeichen der normalen Funktion.
Wir möchten Sie noch einmal darauf hinweisen,
daß das Kühlaggregat nicht ununterbrochen
laufen muß. Wenn der Thermostat es also abschaltet, und
das Kälteaggregat nicht in Betrieb ist, so bleibt die
Stromversorgung dennoch gewährleistet. Berühren Sie
nicht die stromführen den Teile des Gerätes solange Ihr
Gerät an das Stromnetz angeschlossen ist!
defekte Glühlampe ersetzen. (Typ: Mignon 322, 230 V, 15 W,
Sockel E 14)
Setzen Sie die Abdeckung der Glühlampe zurück und
schrauben Sie die Schraube wieder ein. Stecken Sie zum
Schluß den Netzstecker in die Steckdose.
Eine defekte Innenbeleuchtung beeinträchtigt die
Funktionsfähigkeit des Gerätes nicht.
Page 34

34
Problem
Kühlraum ist zu warm.
Gefrierbereich ist zu
warm.
Wasser fließt auf der
Rückwand des
Kühlbereiches ab.
Wasser fließt in den
Kühlbereich.
Wasser fließt auf den
Boden.
Erhöhte Reif- und
Eisschichtbildung
Der Kompressor läuft
ununterbrochen.
Das Gerät ist zu laut.
Lösungen, Tips
Temperaturregler höher einstellen.
Kleinere Menge einlagern Speisen auf
Zimmertemperatur abkühlen lassen.
Kontrollieren, ob die Tür richtig geschlossen ist.
Höhere Einstellung vornehmen.
Kontrollieren, ob die Tür richtig verschlossen ist.
Kleinere Menge einlagern.
Mehr Freiraum zwischen den Produkten lassen.
Reinigung des Wasserablaufes.
Die Lebensmittel sollten nicht mit der Rückwand in
Berührung kommen.
Zurücklegen der Tauwasserabführung in die
Auffangschale.
Überprüfen und ändern Sie ggf. die Verpackung der
Lebensmittel.
Kontrollieren Sie, ob die Türen gut ver schlossen sind.
Niedrigere Einstellung vornehmen.
Niedrigere Einstellung vornehmen.
Kontrollieren Sie, ob die Türen gut verschlossen sind.
Nach einigen Stunden die Temperatur erneut kon-
trollieren.
Speisen auf Zimmertemperatur abkühlen lassen.
Senkung der Umgebungstemperatur, in der das Gerät
aufgestellt ist.
Kontrollieren Sie, ob alle 4 Füße stabil auf dem
Boden stehen.
Mögliche Ursachen
Kühltemperatur ist falsch eingestellt.
Zu große Menge Frischware wurde auf einmal einge-
lagert.
Speisen waren nicht richtig abgekühlt Tür ist nicht
richtig verschlossen.
Eingestellte Temperatur ist zu niedrig.
Tür ist nicht richtig verschlossen.
Zu große Menge Frischware wurde auf einmal einge-
lagert.
Die einzufrierenden Lebensmittel liegen zu dicht
aneinander.
Eine völlig normale Funktion. Während der
Abtauvollautomatik taut die Reifschicht auf der
Rückwand ab.
Wasserablauf ist verstopft.
Wasser wird durch die eingelegte Ware am Abfließen
gehindert.
Die Tauwasserabführung mündet nicht in die
Auffangschale auf dem Kompressor.
Nicht jede Ware ist richtig verpackt.
Die Türen schließen nicht richtig.
Der Temperaturregler ist zu hoch eingestellt.
Der Temperaturregler ist zu hoch eingestellt.
Die Türen sind nicht richtig verschlossen.
Zu große Menge frische Ware wurde auf einmal eingelegt.
Warme Speisen wurden eingelegt.
Gerät steht in der Nähe einer Wärmequelle.
Unebenheiten im Boden sind durch Unterlegen nicht
ausgeglichen worden.
Wenn diese Hinweise keine Ergebnisse bringen, bitte den Kundendienst benachrichtigen.
DE
Page 35

35
DE
Technische Daten
Zu Händen von Inbetriebnahmer
Modell
Bruttoinhalt (Liter)
Nettoinhalt (Liter)
Breite (mm)
Höhe (mm)
Tiefe (mm)
Energieverbrauch (kWh/24Std)
(kWh/Jahr)
Energieeffizienzklasse
Gefriervermögen (kg/24Std)
Maximale Lagerzeit bei Störung (Std.)
Nennstromstärke (A)
Gewicht (kg)
Anzahl der Kompressoren
S 60240 DT4
Gefrierbereich: 44
Kühlbereich: 190
Gefrierbereich: 44
Kühlbereich: 186
545
1404
604
0,46
168
A++
3
19
0,8
51
1
Inbetriebnahme
Transport, Auspacken
Das Gerät sollte stehend und in Originalverpackung transportiert werden.
Nach jedem Transport muß das Gerät zur Beruhigung des
Kältekreislaufes ca. 2 Stunden ruhig stehen, bevor es
eingeschaltet wird.
Prüfen Sie zunächst, ob das Gerät unbeschädigt
angeliefert wurde. Sollten Sie Schäden feststellen,
benachrichtigen Sie umgehend den Händler, bei dem Sie
das Gerät gekauft haben. In diesem Falle bewahren Sie das
Verpackungsmaterial auf.
Reinigung
Entfernen Sie alle Klebebänder, die die Zubehörteile des
Gerätes gegen Verrutschen gesichert haben.
Das Geräteinnere und alle Zubehörteile mit lauwarmem
Wasser reinigen, dem ein mildes Reinigungsmittel zugesetzt werden kann. Benutzen Sie einen weichen Lappen.
Nach der Reinigung wischen Sie das Geräteinnere trocken.
Standort
Die Umgebungstemperatur hat eine Auswirkung auf den
Energieverbrauch und die einwandfreie Funktion des
Kühlgerätes.
Bei der Standortwahl sollten Sie darauf achten, das Gerät
in einem Raum mit einer Umgebungstemperatur in Betrieb
zu setzen die seiner Klimaklasse entspricht. Die Klimaklasse
ist dem Typenschild zu entnehmen.
Klimaklasse Umgebungstemperatur
SN +10 ... +32 °C
N +16 ... +32 °C
ST +18 ... +38 °C
Sinkt die Raumtemperatur unter die untere Grenze, kann
ein ungewünschter Temperaturanstieg im Kühlbereich
erfolgen.
Steigt die Raumtemperatur über die obere Grenze, schaltet
sich der Kompressor für längere Zeit ein, dies kann zu
Funktionsstörungen bei der Abtauvoll-automatik führen,
und es kann ein Temperaturanstieg im Kühlbereich entstehen bzw. der Energieverbrauch erhöht werden.
Das Gerät soll waagerecht auf dem Boden stehen. Dies erreichen Sie mit den 2 verstellbaren Füßen (vorne unten).
Page 36

36
Wechsel des Türanschlags
Gehen Sie bitte in der Reihenfolge der nachstehenden
Beschreibung und Abbildung vor:
Ziehen Sie den Netzstecker aus der Steckdose.
Kippen Sie das Gerät vorsichtig nach hinten. Nehmen
Sie am besten eine zweite Person zu Hilfe, die das
Gerät festhält.
Schrauben Sie beide verstelbare Füße, ferner das
unteren Türlager befestigende bzw. an der anderen
Seite befindliche je 2 Schrauben ab.
Nehmen Sie die Tür des Kühlbereiches vorsichtig nach
unten heraus.
Im Beipack 2 Distanzstücke enthalten, die an der GeräteRückseite montiert werden müssen. Distanzstücke in die
Öffnungen einsetzen (Pfeil A) und dann um 45° bis zum
Einhaken drehen (Pfeil A) senkrecht.
Standorte für das Kühlgerät im Bereich direkter
Sonneneinstrahlung oder unmittelbar neben einem Ofen,
Herd oder Heizungskörper sind zu vermeiden.
Wenn die Räumlichkeit dies nicht zuläßt, sollten Sie die
Mindestabstände zu solchen Geräten einhalten:
zu Gas- und Elektroherden 3 cm
Kann dieser Abstand nicht eingehalten werden, muß
eine 0,5 - 1 cm dicke nicht brennbare Isolierplatte
dazwischen gestellt werden.
zu Öl- und Kohleherden 30 cm
Das Kühlgerät ist so gefertigt, daß es bis zum Anschlag an
die Wand gestellt werden kann.
Beim Aufstellen müssen die Mindestabstände einge-
halten werden. (siehe Abb.)
A: Wenn das Kühlgerät unter einen Hängeschrank
aufgestellt wird
B: Wenn das Kühlgerät „frei” steht
Demontieren Sie das Doppelttürlager mit der
Entfernung der zwei Schrauben.
Nehmen Sie die Tür des Gefrierbereiches vorsichtig
nach unten heraus.
Schrauben Sie den Bolzen des oberen Türlagers des
Gefrierbereiches ab und montieren Sie sie an der
gegenüberliegenden Seite.
Setzen Sie die Blindstopfen der Scharnierplatte von der
linken Seite auf die Rechte um.
Befestigen Sie die Gefrierraumtür an den Bolzen des
oberen Türlagers.
Montieren Sie das Doppelttürlager mit den zwei
Schrauben auf die linke Seite. Achten Sie darauf, daß
die Tür des Gefrierbereiches parallel zur Kante sitzt.
DE
A
45°
PR60
Page 37

37
DE
Setzen Sie die Kühlraumtür an den Bolzen des
Doppelttürlagers.
Montieren Sie das untere Türlager von unten an die
linke Seite mit den zwei Schrauben und schrauben Sie
die zwei Schrauben an die rechte Seite zurück. Endlich
schrauben Sie auch die beide verstellbare Füße an die
beide Seite zurück. Achten Sie darauf, daß die Tür des
Kühlraumes gerade sitzt. (parallel zur Gefrierraumtür
ausrichten).
Montieren Sie die zwei Griffe an die andere Seite um
und decken Sie die Gewindelöcher in Beutel der
Gebrauchsanleitung befindliche Blindstopfen ab.
Die Passung der Türen ist mit Hilfe des Doppelttürlagers
möglich. Dazu soll das Doppelttürlager in waagrechter
Richtung absetzen wenn Sie die Schrauben gelockert
haben.
Positionieren Sie nun das Gerät, richten Sie es
waagerecht aus, und schließen Sie es an.
Sie können diesen Türwechsel auch von Fachleuten durchführen lassen. Benachrichtigen Sie bitte die nächste
Kundendienststelle. Die entstehenden Kosten sind von
Ihnen zu übernehmen.
Elektrischer Anschluß
Das Gerät kann nur an ein, mit einer 230 V
Nennspannung und 50 Hz Nennfrequenz versehenes
Netz mit Wechselspannung angeschlossen werden.
Das Gerät muß an eine vorschriftsmäßig installierte
Schutzkontaktsteckdose angeschlossen werden. Lassen
Sie sich gegebenenfalls - von einem qualifizierten Elektriker in der Nähe des Kühlschrankes eine
Schutzkontaktsteckdose vorschriftsmäßig installieren zu
lassen.
Dieses Gerät entspricht der EG-Richtlinie
Niederspannung
73/23 EWG - 73/02/19 - und Elektromagnetische
Verträglichkeit
89/336 EWG - 89/05/03 in der jeweils aktuellen
Fassung.
96/57 EEC - 96/09/03 (Energieeffizienzrichtlinie) und
nachfolgende Neufassungen
Page 38

38
Lagerzeittabelle (1)
Dauer und Art der Lagerung frischer Lebensmittel im Kühlschrank
Symbolerklärung:
X Übliche Lagerzeit
x Mögliche Lagerzeit (bezieht sich nur auf vollkommen frische Ware)
Lebensmittel Lagerzeit in Tagen Art der Verpackung
1234567
Rohes Fleisch XXx x x Gefrierbeutel, luftdicht verpacken
Fleisch (gekocht) XXXx x x Frischhaltebox
Fleisch (gebraten) XXXx x Frischhaltebox
Hackfleisch (roh) X Frischhaltebox
Hackfleisch (gebraten) XXx x Frischhaltebox
Aufschnitt, Bockwurst XXx x Beutel, Klarsichtsfolie
Fisch (frisch) X x x Beutel, luftdicht verpacken
Fisch (gekocht) XXx x Frischhaltebox
Fisch (gebraten) XXx x x Frischhaltebox
Fischkonserve, angebrochen X x x Frischhaltebox
Hähnchenteile, frisch XXXx x x Beutel, luftdicht verpacken
Hähnchen, gebraten XXXx x x Frischhaltebox
Hühnerteile, frisch XXx x x Beutel, luftdicht verpacken
Huhn, gekocht XXx x x Frischhaltebox
Gänse-, Ententeile, frisch XXXx x x Beutel, luftdicht verpacken
Gans, Ente gebraten XXXX x x x Frischhaltebox
Butter, nicht angebrochen XXXX XXXin Originalverpackung
Butter, bereits angebrochen XXx x x x x in Originalverpackung
Milch (Tüte) XXXx x in Originalverpackung
Sahne XXx x in Becher
Saure Sahne o.ä. XXXX x x x in Becher
Hartkäse XXXX XXXAlufolie
Weichkäse XXXX x x x Beutel
Quark XXXX x x x Beutel
Eier XXXX XXX
Spinat, Sauerampfer XXx x Beutel
Erbsen, Bohnen XXXX x x x Beutel
Pilze XXx x x Beutel
Möhren, Spargel XXXX XXXBeutel
Grüne Paprika XXx x x Beutel
Tomate XXXX XXXBeutel
Kohlarten XXXX Xx x Beutel
Schnell verderbliches Obst
(z.B. Erdbeere, Himbeere) XXXx x Beutel
Sonstiges Obst XXXX x x x Beutel
Angebrochene Obstkonserve XXXx x Frischhaltebox
Desserts, Torten XXx x Frischhaltebox
DE
Page 39

39
DE
LaLaggerz
erz
eittabelle (2)
eittabelle (2)
Lagerzeit tiefgekühlter, eingefrorener Lebensmittel
Der Hersteller hält sich Änderungen des Produktes vor.
Lebensmittel Im normalen Kühlbereich Im 4 Sternen Gefrierfach:
+2 - +7 °C - 18 °C
Gemüse:
grüne Bohnen, grüne Erbsen, Mais, wasserhaltige,
rohe Gemüse (z.B. Kürbis) 1 Tag 12 Monate
Fertige Speisen:
Fleischgerichte, Eintöpfe 1 Tag 12 Monatee
Fertige Speisen:
Rinderhack, Eisbeingulasch, Sülze usw. 1 Tag 6 Monate
Kartoffeln- und Nudelngerichte:
Kartoffelpüree, Knödel, Nockeln, Pommes Frites 1 Tag 12 Monate
Suppen:
Fleischsuppe, Bohnensuppe, Erbsensuppe 1 Tag 6 Monate
Obstsorten:
Sauerkirsche, Kirsche, Stachelbeere, Obstcreme, Kastanienpüree usw. 1 Tag 12 Monate
Fleisch:
Geflügel (Hähnchen, Gans, Ente) und ihre Teile, 1 Tag 5 Monate
Fisch 1 Tag 6 Monate
Eiscreme, Eis 1 Tag 3 Wochen
Page 40

40
GB
Before installing and using the appliance read this user's instruction book carefully. It contains safety precautions, hints,
information and ideas. If the refrigerator is used in compliance with the instructions written, it will operate properly and
provide you with greatest satisfaction.
The symbols below help you to find things more easily:
Safety precautions
Warnings and information at this symbol serve safety for you and your appliance.
Hints, useful information
Environmental information
Symbol for ideas
At this symbol ideas can be found according to food and its storing.
The symbol on the product or on its packaging indicates that this product may not be treated as household waste.
Instead it shall be handed over to the applicable collection point for the recycling of electrical and electronic
equipment. By ensuring this product is disposed of correctly, you will help prevent potential negative consequences for the environment and human health, which could otherwise be caused by inappropriate waste handling of this product. For more detailed information about recycling of this product, please contact your local city
office, your household waste disposal service or the shop where you purchased the product.
Contents
Important safety information..........................................41
General safety precautions..............................................41
Precautions for child safety.............................................41
Safety precautions for installation ...............................41
Safety precautions for isobutane..................................41
Instructions for the User...................................................42
General information..........................................................42
Description of the appliance, main parts...................42
Handling the appliance ....................................................43
Putting it into use..........................................................43
Controlling the temperature, setting.......................43
How to use the cooling compartment.....................43
Storing in the refrigerator...........................................43
Storage time and temperature of foods .................43
How to use the freezer.....................................................44
Freezing..............................................................................44
Storing in the freezer....................................................44
How to make ice cubes.................................................44
Some useful information and advice...........................44
Hints and ideas....................................................................44
How to save energy........................................................44
The appliance and environment................................45
Maintenance ........................................................................45
Defrosting..........................................................................45
Regular cleaning.............................................................46
When the refrigerator is not in use..........................46
Trouble shooting .................................................................46
How to change the bulb...............................................46
If something does not work........................................47
Instructions for the Installer............................................48
Technical data......................................................................48
Installing the appliance....................................................48
Transportation, unpacking...........................................48
Cleaning.............................................................................48
Placement .........................................................................48
Change of door opening direction............................49
Electrical connection.....................................................50
Storage time chart (1).........................................................51
Storage time chart (2)........................................................52
Page 41

41
GB
Important safety information
General safety precautions
Keep these instructions and they should remain at the
appliance when moving away or changing owner.
This appliance is designed for storing food, domestic
use according to these instructions only.
Specialised companies that are qualified to do so by
the manufacturer must carry out service and repairs
including repairing and changing the power cord.
Accessory parts supplied by them should be used only
for repairing. Otherwise the appliance can be damaged
or can cause other damage or injury.
The appliance is out of circuit only in that case if the
plug is removed from the socket. Before cleaning and
maintenance always unplug it (do not get it by the
cable). If the socket is difficult to reach, switch off the
appliance by cutting off the current.
Power cord must not be lengthened.
Make sure that the power plug is not squashed or
damaged by the back of the fridge/freezer.
- A damaged power plug may overheat and cause a
fire.
Do not place heavy articles or the fridge/freezer
itself on the power cord.
- There is a risk of a short circuit and fire.
Do not remove the power cord by pulling on its lead,
particularly when the fridge/freezer is being pulled
out of its niche.
- Damage to the cord may cause a short-circuit, fire
and/or electric shock.
- If the power cord is damaged, it must be replaced by
a certified service agent or qualified service personnel.
If the power plug socket is loose, do not insert the
power plug.
- There is a risk of electric shock or fire.
Without the lamp cover of interior lighting you must
not operate the appliance.
When cleaning, defrosting, taking out frozen food or
ice tray do not use sharp, pointed or hard devices, as
they can cause damage to the appliance.
Be careful not to allow liquids to the temperature control and lighting box.
Ice and ice-cream can cause hurt if they are eaten
immediately after removal from the frozen food compartment.
After dissolving frozen food must not be refrozen, it
must be used up as soon as possible.
Store pre-packed frozen food in accordance with the
frozen food manufacturer's instructions.
You must not make defrosting faster with any electric
heating appliance or chemicals.
Do not put hot pot to the plastic parts.
Do not store flammable gas and liquid in the appliance, because they may explode.
Do not store carbonated drinks, bottled drinks and
bottled fruits in the frozen food compartment.
Check and clean the outlet of melting water coming
during defrosting regularly - a label inside the appli-
Precautions for child safety
Do not allow children to play with the packaging of
the appliance. Plastic foil can cause suffocation.
Adults must handle the appliance. Do not allow children to play with it or its controlling parts.
If you are discarding the appliance pull the plug out of
the socket, cut the connection cable (as close to the
appliance as you can) and remove the door to prevent
playing children to suffer electric shock or to close
themselves into it.
This appliance is not intended for use by persons
(including children) with reduced physical sensory or
mental capabilities, or lack of experience and knowledge, unless they have been given supervision or
instruction concerning use of the appliance by a person responsible for their safety.
Safety precautions for
installation
Put the appliance to the wall to avoid touching or
catching warm parts (compressor, condenser) to prevent possible burn.
When moving the appliance take care of the plug not
to be in the socket.
When placing the appliance take care not to stand it
on the power cord.
Adequate air circulation should be around the appliance, lacking this leads to overheating. To achieve sufficient ventilation follow the instructions relevant to
installation.
See chapter "Placement".
For the safety of life and property keep the pre-
cautions of these user's instructions as the manufacturer is not responsible for damages caused by
omission.
Safety precautions for
isobutan
e
Warning
The refrigerant of the appliance is isobutane (R600a)
that is inflammable and explosive to a greater extent.
Keep ventilation openings, in the appliance enclosure
or in the built-in structure, clear of obstruction.
Do not use mechanical devices or other means to
accelerate the defrosting process, other than those
recommended by the manufacturer.
Do not damage the refrigerant circuit.
Do not use electrical appliances inside the food storage compartments of the appliance, unless they are of
the type recommended by the manufacturer.
ance warns you for this. If it is clogged the melting
water gathered can cause earlier failure.
Page 42

42
GB
Instructions for the User
General information
The official designation of the appliance is „refrigerator-freezer combination with one motor compressor and freezer placed
in the upper part”. The appliance has - besides the general
services - a freezer with its own door and is completely separated from the other unit.
According to this the appliance is suitable for storing frozen
and deep-frozen food, freezing products in quantity given in
the user's instructions at home and making ice.
The appliance can meet the requirements of standards
between different temperature limits according to the climate class.
The letter symbol for climate class can be found on the
data label.
Description of the appliance, main parts
A - Freezer
B - Refrigerator
1. Cover
2. Ice tray
3. Wire shelf in the frozen food compartment
4. Lighting box
5. Glass shelf
6. Defrost water collector
7. Glass shelf
8. Vegetable box
9. Data label
10. Adjustable feet
11. Butter compartment
12. Egg tray
13. Door shelf
14. Door gasket
15. Bottle shelf
16. Condenser
17. Defrost water outlet
18. Spacer
19. Evaporative tray
20. Compressor
Page 43

43
GB
Handling the appliance
Putting it into use
Place the accessories into the refrigerator then plug to the
mains socket. To start cooling turn the control dial on the
right-hand side of the fresh food compartment from „0”
clockwise according to the figure. In „0” position the appliance is out of operation.
The next paragraph will give instructions for setting.
Controlling the temperature, setting
The thermostatic controller interrupts the operation of the
appliance automatically for more or less time depending
on the setting then restarts it assuring the required temperature.
Turning the control knob towards the bigger numbers cooling becomes more and more intensive.
In the freezer -18 °C or lower temperature can be reached,
if the thermostatic control knob is set to the „Medium”
(approx. 2-3) position. In this case the temperature developing automatically in the freezer is about +5 °C or lower.
„Medium” position (2-3) is usually adequate for everyday
use.
The temperature coming about in the refrigerator is
effected by not only the position of the thermostatic control but the ambient temperature, frequency of door openings and the quantity of food put into it newly, etc.
In the maximum i.e. „6” position - in case of
increased demand e.g. during heatwaves - the
compressor may operate continually. This does not cause
damages to the appliance.
How to use the cooling compartment
Developing interior air circulation is necessary for
adequate cooling. For this reason you are asked not
to cover the whole surface of the wire shelves with paper,
trays, etc.
Do not put hot food into the refrigerator. Allow it
to reach room temperature naturally. In this way
unnecessary frost building up can be avoided.
Foods can take over odours from each other. So it
is essential to put foods in closed dishes or wrap
them in cellophane, aluminium foil, grease-proof paper
or cling film before placing them into the refrigerator.
This way foods will keep their moisture e.g. vegetables
will not dry out after some days.
Storing in the refrigerator
When placing the different kinds of food take into consideration the sketch below in figure:
1. Butter, cheese
2. Eggs
3. Tubes, cans, sour cream, small bottles
4. Drinks in big bottles, soda-water and mousse
siphon
5. Fruits, vegetables, salads
6. Fresh meat, cold cuts, sausages, etc.
7. Milk, dairy products
8. Ready-cooked foods, confectionery, foods in
dishes covered, opened cans, bottles laid, etc.
Storage time and temperature of foods
The storage time chart at the end of the instruction book
gives information about storage time.
The storage time can not be determined exactly in advance,
as it depends on the freshness and handling of the cooled
food. That is why the storage time made known is only
informative.
Page 44

44
GB
If you do not want to use up deep-frozen foods bought
immediately they can be stored for about 1 day (until dissolving) in the refrigerator.
How to use the freezer
Freezing
In the compartment various fresh food can be frozen at
home. Mind the following to get thorough result.
Freeze fresh and faultless food only.
Before starting freezing set the thermostatic control knob
to position „3” and put the wire shelf in the frozen food
compartment to the highest position. Then put in the
quantity to be frozen, directly on the wire shelf. Freezing
is completed in approx. 24 hours. After 24 hours set the
thermostatic control knob back to „Medium” (2-3) position, or leave that in position „3” which is usually adequate
for everyday use. It is practical to store the frozen food on
the cooling plate or on each other under the wire shelf in
the frozen food compartment.
Avoid opening the door of frozen food compartment
during freezing if possible.
It is not expedient to set the thermostat knob to
higher (e.g. „6”) position. Freezing time could be
reduced this way, but the temperature of the fresh food
compartment would go beyond 0 °C permanently, which
would cause freezing to foods and drinks stored there.
Never freeze food in bigger quantity than given in
the „Technical data” at the same time, otherwise
freezing will not be thorough and after dissolving various deterioration may take place (losing taste and
aroma, lysing, etc.).
Do not make ice during freezing preferably, because
making ice reduces freezing capacity.
Storing in the freezer
After finishing freezing it is practical to put the frozen
food from the wire shelf in the frozen food compartment
to the place under that making room for a next possible
freezing. Adjustment of the wire shelf in the frozen food
compartment („2” positions) can be used only during storing, as freezing can be done only at the highest position of
the wire shelf. Food already stored is not damaged by
another freezing.
(The goods when are put directly on the cooling plate
freeze too fast!)
Do not forget to keep to the storage time given on
the packaging of frozen products if you buy them
frozen. To store home-frozen products see the storing
instructions placed in the door of the freezer. Symbols signify the various foods, numbers mean maximum storing
time given in months.
It is safe to store quick-frozen, frozen foods only if
they have not dissolved even for a short time until
placing them into the freezer.
If the deep-frozen food has already dissolved, refreezing is
not recommended, it has to be used up as soon as possible.
How to make ice cubes
To make ice cubes fill the enclosed ice cube tray with water
and put it to the frozen food compartment. Wetting the
bottom of the tray and setting thermostatic control knob
to maximum position can shorten preparing time. After
finishing do not forget to reset the thermostatic control to
the suitable position.
Ready ice cubes can be taken out of the tray under running
water then twist or hit it. If the ice tray freezes to the compartment, avoid using metal tools or knife to take it out as
the cooling system can be damaged.
Some useful information and
advice
The variable shelves are worth paying attention to,
which increases the usability of the fresh food compartment considerably. Rearranging the shelves is also
possible when the door is open at an angle of 90°.
After opening and closing the door of freezer vacuum
will rise inside the appliance because of the low temperature. So wait 2-3 minutes after closing the door if you want to open it again - while inner pressure
equalises.
Take care of operating the freezer at a position of thermostatic control so that the inside temperature can
never go above -18 °C, since temperature higher than
this can deteriorate frozen foods.
It is practical to make sure of faultless operation of the
appliance daily so as to notice possible failure in time
and prevent deterioration of frozen foods.
How to save energy
The colder the ambient temperature of the appliance
is the less energy it uses.
Avoid putting the appliance in a sunny place and near
anything that gives off heat.
Be sure that the condenser and the compressor are
well ventilated. Do not cover the sections where ventilation is.
Wrap products in tightly closing dishes or cling film to
avoid building up unnecessary frost.
Do not leave the door open longer than necessary and
avoid unnecessary openings.
Put foods into the appliance only in a closed dish.
Put warm foods into the appliance only when they are
at room temperature.
Keep the condenser clean.
Hints and ideas
In this chapter practical hints and ideas are given about
how to use the appliance to reach maximum energy saving
and there is environmental information about the appliance as well.
Page 45

45
GB
The appliance and environment
This appliance does not contain gasses which could damage the ozone layer, in either its refrigerant circuit or insulation materials. The appliance shall not be discarded
together with the urban refuse and rubbish. Avoid damaging the cooling unit, especially at the rear near the heat
exchanger. Information on your local disposal sites may be
obtained from your municipal authorities.
The materials used on this appliance marked with the sym-
pol are recyclable.
Maintenance
Defrosting
Bleeding part of the moisture of cooling chambers in form
of frost and ice goes with the operation of the appliance.
Thick frost and ice has an insulating effect, so it reduces
cooling efficiency as the temperature increases in the cooling chambers and they need more energy.
At this type of appliance defrosting the cooling plate of
the refrigerator is automatic without any external intervention. The thermostatic control interrupts the operation
of compressor at regular intervals for more or less time during this cooling is interrupted - the temperature of the
cooling plate goes above 0 °C due to interior heating load
of the compartment, so defrosting occurs. When the surface temperature of the cooling plate has reached +3 - +4
°C the thermostatic control restarts operation of the system.
Melting water flows through defrost water outlet leaded
through the back into the evaporative tray maintained on
the top of compressor and evaporates due to its warmth.
Check and clean the outlet of melting water coming during defrosting regularly
- a label inside the appliance warns you for this. If it is
clogged the melting water gathered can cause earlier
failure as it can go to the insulating of the appliance.
Clean the melting water outlet with the supplied pipe
scraper that can be seen in the figure. The pipe scraper has
to be stored in the outlet.
The most typical case of clogging up in the melting water
outlet when you put food wrapped in some paper into the
appliance and this paper contacts back plate of the refrigerator and freezes to it. If you remove the food right at this
moment the paper will tear and it can cause clogging up in
the outlet by getting into it.
So you are asked to be careful - because of the
above - when placing foods wrapped in paper into the
appliance.
In case of increased demand e.g. during heatwaves,
the refrigerator temporarily happens to operate con-
stantly. During this the automatic defrosting is ineffective.
Remaining small ice and frost stains on back plate of the
refrigerator after defrosting period is not abnormal.
The freezer can not be equipped with automatic defrosting
set since the deep-frozen and frozen foods do not endure
melting temperature.
Provided it is not too thick, the layer of frost and ice can be
scraped off and removed using a plastic scraper.
When ice coating is so thick that it cannot be removed with
the plastic scraper, the cooling plate has to be defrosted.
Frequency of defrosting depends on usage (generally 2-3
times a year).
Take the frozen foods out of the appliance, and put them
into a basket lined with paper or cloth. Store them in a possibly cool place or replace them into another refrigerator.
Pull out the mains plug from the mains socket, so both
parts of the appliance are out of operation.
Open the doors of both parts of the appliance and clean the
refrigerator according to 'Regular cleaning'. Maintain and
clean the freezer as following:
Sweep the melting water with a cloth or sponge off the
cooling plate. The melting water swept down gathers in the
bottom of the appliance and can be removed with a hygroscopic cloth or a sponge.
Wipe the surfaces after defrosting.
Put the mains plug into the mains socket and put foods
taken out back to their places.
It is recommended to operate the appliance at the highest
position of the thermostatic control for some hours so that
it can reach the sufficient storing temperature as soon as
possible.
Page 46

46
GB
Regular cleaning
It is recommended to wash the inside of the refrigerator in
3-4 weeks time using lukewarm water then wipe it (it is
practical to clean the inside of the freezer and defrost it at
a time).
Household cleaner or soap must not be used.
After breaking the circuit wash the appliance with lukewarm water then wipe it. Clean the door gasket with clean
water. After cleaning apply voltage to the appliance.
It is recommended to remove the dust and dirt collected
on the back of the refrigerator and the condenser and to
clean the evaporative tray on top of the compressor once
or twice a year.
When the refrigerator is not in use
In case the appliance will not be used for a long time follow these steps:
Break the circuit of the appliance.
Remove foods from the refrigerator.
Defrost and clean it as written before.
Leave the door open to avoid a build up of air inside.
Trouble shooting
How to change the bulb
Should the light fail to work you can change it as below:
Break the circuit of the appliance.
Unscrew the plate screw fixing the lamp cover, then take
the lamp cover off in the direction of arrow and the bulb
can be changed. (Type of the bulb: Mignon 322, 230 V, 15
W, E 14 thread)
After changing bulb replace the lamp cover, screw the plate
screw and apply voltage to the appliance.
The lack of light does not influence operation of the refrigerator.
Page 47

47
GB
If something does not work
During operation of the appliance some smaller but
annoying trouble can often occur, which does not require
calling a technician out. In the following chart information
is given about them to avoid unnecessary charges on service.
We draw your attention that operation of appliance goes
with certain sounds (compressor- and circulating sound).
This is not trouble, but means normal operation.
We draw it to your attention again that the appli-
ance operates discontinuously, so the stopping of
compressor does not mean being no-current. That is why
you must not touch the electrical parts of the appliance
before breaking the circuit.
Possible cause
Thermostatic control can be set wrongly.
If products are not cold enough or placed wrongly.
The door does not close tightly or it is not shut
properly.
Thermostatic control can be set wrongly.
The door does not close tightly or it is not shut
properly.
Products in big quantity to be frozen were put in.
Products to be frozen are placed too closely to each
other.
It is normal. During automatic defrosting frost
melts on the back plate.
The outlet of the chamber can be clogged up.
Products placed in can prevent water from flowing
into the collector.
The melting water outlet flows not into the evapo-
rative tray above the compressor.
Products are not wrapped properly.
Doors are not shut properly or do not close tightly.
The thermostatic control can be set wrongly.
The thermostatic control is set wrongly.
Doors are not shut properly or do not close tightly.
Products in big quantity to be frozen were put in.
Too warm food was put in.
The appliance is in too warm place.
Plug is not connected to the mains socket properly.
The fuse burnt out.
The thermostatic control is not on.
There is no voltage in the mains socket. (Try to connect another appliance into it.)
The appliance is not supported properly.
Solution
Set the thermostat knob to higher position.
Place the products to the appropriate place.
Check if the door closes well and the gasket is
unhurt and clean.
Set the thermostat knob to higher position.
Check if the door closes well and the gasket is
unhurt and clean.
Wait some hours and then check the tempera-
ture again.
Place the products in a way so that cold air
could circulate among them.
Clean the outlet.
Replace the products so that they can not touch
the back plate directly.
Put the melting water outlet to the evaporative
tray.
Wrap the products better.
Check if the doors close well and the gaskets are
unhurt and clean.
Set the thermostat knob to a position that gives
higher temperature.
Set the thermostat knob to a position that gives
higher temperature.
Check if the doors close well and the gaskets are
unhurt and clean.
Wait some hours and then check the tempera-
ture again.
Put food at max. room temperature.
Try to reduce the temperature in the room
where the appliance stands.
Connect the mains plug properly.
Change the fuse.
Start the appliance according to instructions in
chapter „Putting it into use”.
Call an electrician.
Check if the appliance stands stable (all the four
feet should be on the floor).
Problem
It is too warm in the refrigerator.
It is too warm in the freezer.
Water flows at the back plate
of the refrigerator.
Water flows into the chamber.
Water flows onto the floor.
There are too much frost and
ice.
The compressor operates continually.
The appliance does not work at
all. Neither cooling, nor lighting works. Indicator lamps do
not give light.
The appliance is noisy.
Inasmuch as the advice does not lead to result, call the nearest brand-mark service.
Page 48

48
GB
Instructions for the Installer
Technical data
Installing the appliance
Transportation, unpacking
It is recommended to deliver the appliance in original packaging, in vertical position considering the
protective warning on packaging.
After each transportation the appliance must not be
switched on for approx. 2 hours.
Unpack the appliance and check if there are damages on
it. Report possible damages immediately to the place you
bought it. In that case retain packaging.
Cleaning
Remove every adhesive tape, which ensure the parts not to
move in the appliance.
Wash the inside of the appliance using lukewarm water and
mild detergent. Use soft cloth.
After cleaning wipe out the inside of the appliance.
Model
Gross capacity (l)
Net capacity (l)
Width (mm)
Height (mm)
Depth (mm)
Energy consumption (kWh/24h)
(kWh/year)
Energy class, according to EU standards
Freezing capacity (kg/24h)
Rising time (h)
Rated current (A)
Weight (kg)
Number of compressors
S 60240 DT4
Freezer: 44
Refrigerator: 190
Freezer: 44
Refrigerator: 186
545
1404
604
0,46
168
A++
3
19
0,8
51
1
Placement
The ambient temperature has an effect on the energy consumption and proper operation of the appliance. When
placing, take into consideration that it is practi- cal to
operate the appliance between ambient tem- perature
limits according to the climate class that is given in the
chart below and can be found in the data label.
Class of climate Ambient temperature
SN +10 ... +32 °C
N +16 ... +32 °C
ST +18 ... + 38 °C
If the ambient temperature goes below the lower data the
temperature of the cooling compartment can go beyond
the prescribed temperature.
If the ambient temperature goes beyond the upper data
this means longer operating time of the compressor, breakdown in the automatic defrosting increasing temperature
in the cooling compartment or increasing energy consumption.
When placing the appliance ensure that it stands level. This
can be achieved by two adjustable feet (1) at the bottom
in front.
Page 49

49
GB
The plastic bag of accessories also contains two spacers
to be fitted into special holes in the back of the appliance. Fit the spacers into the holes, taking care to ensure
that the arrow (A) is positioned as shown in Figure. Then
turn them through 45° (arrow (A) vertical) until they lock
into place.
Do not stand the appliance on a sunny place or close to a
radiator or cooker.
If it is unavoidable because of furnishing and the appliance
has to be stood near a cooker take these minimum distances into consideration:
In case of gas or electric cooker 3 cm must be left,
when it is less put a 0,5 - 1 cm non-flam insulation
between the two appliances.
In case of oil or coal-fired stove the distance must be
30 cms since they give off more heat.
The refrigerator is designed to operate when it is totally
pushed to the wall.
When placing the refrigerator keep minimal dis-
tances recommended in figure.
A : placing it under a wall-cupboard
B : placing it freely
Change of door opening direction
Should the setting-up place or handling demand it, dooropening direction can be refitted from right-handed to
left-handed.
Appliances on the market are right-handed.
Following operations are to be done on the basis of figures
and explanations:
Disconnect the appliance from the electricity supply.
Tilt back the appliance carefully. It is recommended to
ask another person for help, who can keep the appliance at this position safely.
Unscrew on the both sides adjustable feet (2 pieces)
and the fixing screws (2 pieces) of bottom door holder and the far side screws (2 pieces) too.
Take off the door of the refrigerator by pulling it slightly downwards.
Dismount the double door holder by removing the
screws (2 pieces).
Take off the door of the freezer by pulling it slightly
downwards.
Unscrew the top door holding pin of the freezer, then
screw it back on the other side.
Remove the covering nails of the double door holder on
the left side and put them to the other side.
Fit the door of the freezer to the top door holding pin.
A
45°
PR60
Page 50

50
GB
Fix the double door holder onto the left side using the
screws (2 pieces). Be careful that the door edge of the
freezer is parallel with the edge of the mantle.
Fit the door of the refrigerator to the double door
holding pin.
Fix the bottom door holder onto the left side using the
screws (2 pieces) and the adjustable foot as well as
screw the 2 pieces screws on the opposite side into the
vacant holes. Be careful that the door edge of the
refrigerator is parallel with the edge of the mantle.
Put over the handle on the opposite side and cover up
the vacant holes with the plastic nails from the bag of
instruction book.
After released the screws the adaptation of the doors
can be adjusted with the horizontal control of central
door holder.
Put the appliance to its place, set it level and connect
to the electricity supply.
In case you do not want to perform the procedures above,
call the nearest brand-mark service. Technicians will
accomplish the refitting expertly for charge.
Electrical connection
This refrigerator is designed to operate on a 230 V
AC (~) 50 Hz supply.
The plug must be put into a socket with protective contact. If there is no such, it is recommended to get an
electrician to fit an earthed socket in compliance with
standards near the refrigerator.
This appliance complies with the following E.E.C.
Directives:
73/23 EEC of 19.02.73 (Low Voltage Directive) and subsequent modifications,
89/336 EEC of 03.05.89 (Electromagnetic
Compatibility Directive) and subsequent modifications.
96/57 EEC - 96/09/03 (Energy Efficiency Directive) and
its subsequent amendments
Page 51

51
GB
Storage time chart (1)
Time and method of storage of fresh foods in the refrigerator
Foods Storage time in days Method of packaging
123456 7
Raw meat XXx x x cling film, airtight
Cooked meat XXXx x x dish covered
Roasted meat XXXx x dish covered
Raw minced meat X dish covered
Roasted minced meat XXx x dish covered
Cold cuts, Vienna sausage XXx x cling film, cellophane, grease-proof
paper
Fresh fish X x x cling film, airtight
Cooked fish XXx x dish covered
Fried fish XXx x x dish covered
Tinned fish, open X x x dish covered
Fresh chicken XXXx x x cling film, airtight
Fried chicken XXXx x x dish covered
Fresh hen XXx x x cling film, airtight
Boiled hen XXx x x dish covered
Fresh duck, goose XXXx x x cling film, airtight
Roasted duck, goose XXXXx x x dish covered
Butter unopened XXXXXX Xoriginal packaging
Butter opened XXx x x x x original packaging
Milk in a plastic bag XXXx x original packaging
Cream XXx x plastic box
Sour cream XXXXx x x plastic box
Cheese (hard) XXXXXX Xaluminium foil
Cheese (soft) XXXXx x x cling film
Curds XXXXx x x cling film
Egg XXXXXX X
Spinach, sorrel XXx x cling film
Green peas, green beans XXXXx x x cling film
Mushroom XXx x x cling film
Carrot, roots XXXXXX Xcling film
Bell-pepper XXx x x cling film
Tomato XXXXXX Xcling film
Cabbage XXXXXxxcling film
Quickly rotting fruits (strawberry, raspberry, etc.) XXXx x cling film
Other fruits XXXXx x x cling film
Tinned fruits opened XXXx x dish covered
Cakes filled with cream XXx x dish covered
Notation:
X usual storage time
x possible storage time (concerns to really fresh product only)
Page 52

GB
Foods In the fresh food In the **** frozen food
compartment +2 - +7°C compartment -18°C
Vegetables:
green beans, green peas, mixed vegetables, marrow, corn, etc. 1 day 12 months
Ready-cooked foods:
vegetable dish, trimmings, with meat, etc. 1 day 12 months
Ready-cooked foods:
sirloin steaks, stew from knuckle of ham, meat from pig pudding, etc. 1 day 6 months
Foods from potatoes, pasta:
mashed potato, gnocchi, dumpling, pasta filled with jam, chips 1 day 12 months
Soups:
meat-broth, soup from green beans, soup from green peas, etc. 1 day 6 months
Fruits:
sour cherry, cherry, gooseberry, fruit cream, mashed maroon 1 day 12 months
Meat:
chicken, duck, goose 1 day 5 months
fillets, tuna fish 1 day 6 months
Popsicle, ice-cream 1 day 3 weeks
Storage time chart (2)
Storage time of deep-frozen and frozen products
The manufacturer reserves the right to make any changes in the products.
52
Page 53

IT
Indice
Prima di installare e di mettere in uso l'apparecchiatura, leggere attentamente questo libretto d'istruzioni. Contiene misure precauzionali sulla sicurezza, consigli, informazioni e suggerimenti. Se il frigorifero viene utilizzato in conformità alle
istruzioni qui descritte, funzionerà adeguatamente e ne sarete pienamente soddisfatti.
I simboli seguenti vi facilitano la ricerca delle informazioni:
Misure di sicurezza
Le avvertenze e le informazioni precedute da questo simbolo si riferiscono alla sicurezza per
voie per la vostra apparecchiatura.
Consigli, informazioni utili
Informazioni sulla protezione dell'ambiente
Simbolo per i suggerimenti
Sono preceduti da questo simbolo i suggerimenti sugli alimenti e sulla loro conservazione.
Il simbolo sul prodotto o sulla confezione indica che il prodotto non deve essere considerato come un normale
rifiuto domestico, ma deve essere portato nel punto di raccolta appropriato per il riciclaggio di apparecchiature
elettriche ed elettroniche. Provvedendo a smaltire questo prodotto in modo appropriato, si contribuisce a evitare
potenziali conseguenze negative, che potrebbero derivare da uno smaltimento inadeguato del prodotto. Per informazioni più dettagliate sul riciclaggio di questo prodotto, contattare l'ufficio comunale, il servizio locale di smaltimento rifiuti o il negozio in cui è stato acquistato il prodotto.
Informazioni importanti sulla sicurezza............................54
Misure generali di sicurezza............................................54
Precauzioni per la sicurezza dei bambini...................54
Precauzioni per la sicurezza dell'installazione..........54
Istruzioni per l'utilizzatore......................................................55
Informazioni generali........................................................55
Descrizione dell'apparecchiatura,
componenti principali.......................................................55
Sistemazione dell'apparecchiatura ...............................56
Messa in funzione ....................................................56
Controllo della temperatura,
impostazione..............................................................56
Come usare il frigorifero........................................56
Conservazione nel frigorifero ...............................56
Tempo e temperatura di
conservazione degli alimenti................................56
Utilizzo del congelatore....................................................57
Congelazione..............................................................57
Conservazione nel congelatore ............................57
Come ottenere i cubetti di ghiaccio ..................57
Alcune informazioni e consigli utili.............................57
Consigli e suggerimenti....................................................57
Come risparmiare energia......................................57
L'apparecchiatura e l'ambiente............................58
Manutenzione......................................................................58
Sbrinamento...............................................................58
Regolari operazioni di pulizia...............................59
Quando il frigorifero non viene utilizzato.......59
Eliminazione dei guasti.....................................................59
Sostituzione della lampadina ...............................59
Se qualcosa non funziona ...............................................59
Istruzioni per l'installatore......................................................61
Installazione dell'apparecchiatura.................................61
Trasporto, rimozione degli imballi.......................61
Pulizia ...........................................................................61
Posizionamento..........................................................61
Reversibilità della porta ..........................................62
Collegamento elettrico...........................................62
Tabella dei tempi di conservazione (1)...............................65
Tabella dei tempi di conservazione (2)...............................64
53
Page 54

IT
Informazioni importanti sulla sicurezza
Misure generali di sicurezza
Conservare questo libretto d'istruzioni che dovrebbe
sempre accompagnare l'apparecchiatura in caso di
trasloco o di cessione ad altre persone.
Questa apparecchiatura è stata progettata per conservare gli alimenti nell'ambito domestico e deve essere
usata solo in conformità a queste istruzioni.
L'assistenza e le riparazioni devono essere svolte da
aziende specializzate, a ciò abilitate da parte del produttore, preposte anche alla riparazione e alla sostituzione del cavo di alimentazione. Gli accessori forni-
ti da tali aziende dovrebbero essere usati solo per le
riparazioni, altrimenti l'apparecchiatura potrebbe
subire dei danni o causare altri guasti o infortuni.
L'apparecchiatura è scollegata dal circuito solo nel caso
in cui la spina sia staccata dalla presa. Prima di eseguire
le operazioni di pulizia e di manutenzione, si raccomanda di scollegare l'apparecchiatura (evitare di tirare
il cavo). Se la presa è di difficile accesso, spegnere l'apparecchiatura staccando la corrente.
Non si devono collegare prolunghe al cavo di alimentazione.
Assicurarsi che la spina non venga schiacciata o danneggiata dal fianco posteriore del frigorifero/congelatore.
- Una spina danneggiata potrebbe surriscaldarsi e
causare un incendio.
Non collocare oggetti pesanti o il frigorifero/congelatore stesso sopra il cavo elettrico.
- Esiste il rischio di corto circuito e incendio.
Non rimuovere il cavo elettrico premendo sulla sua
sommità, specialmente quando il frigorifero/congelatore é stato tolto dalla sua sede.
- Un danno al cavo elettrico potrebbe causare un
corto circuito, un incendio e/o uno shock elettrico.
- Se il cavo elettrico risulta danneggiato deve essere
sostituito da personale tecnico qualificato.
Se la presa della spina non é sicura, non inserire la
spina.
- Esiste il rischio di shock elettrico o incendio.
Se la lampadina per l'illuminazione interna non è
provvista di copertura, l'apparecchiatura non deve
essere azionata.
Durante le operazioni di pulizia e di sbrinamento o
quando si estraggono alimenti congelati o i contenitori
del ghiaccio, non usare oggetti appuntiti o rigidi perché potrebbero danneggiare l'apparecchiatura.
Prestare attenzione che non vengano versati liquidi sul
sistema di controllo della temperatura e sulla scatola
d'illuminazione.
Ghiaccio e gelati possono provocare disturbi se ingeriti
immediatamente dopo essere stati tolti dallo scomparto di congelazione.
Una volta scongelati, gli alimenti non possono essere
ricongelati e devono essere consumati nel minor tempo
possibile.
Conservare gli alimenti surgelati confezionati secondo
le istruzioni del produttore.
Non accelerare lo sbrinamento con apparecchiature
elettriche riscaldanti o con sostanze chimiche.
Non mettere contenitori caldi sulle parti in plastica.
Non conservare gas o liquidi infiammabili nell'apparecchiatura perché potrebbero esplodere.
Non conservare bevande gassate, bibite in bottiglia e
frutta in barattoli nello scomparto per alimenti congelati.
Controllare e pulire regolarmente lo scarico di raccolta dell'acqua condensata derivante dallo sbrinamento (questa
avvertenza è riportata anche su un'etichetta all'interno
dell'apparecchiatura). Se lo scarico è ostruito, l'acqua condensata che vi si raccoglie può provocare danni prima del
tempo.
Precauzioni per la sicurezza dei bambini
Non permettere ai bambini di giocare con gli imballaggi dell'apparecchiatura; potrebbero soffocarsi con la
pellicola in plastica.
L'apparecchiatura deve essere manovrata dagli adulti.
Non permettere ai bambini di giocare con la stessa o
con i suoi comandi.
Se si vuole rottamare l'apparecchiatura, staccare la
spina dalla presa, tagliare il cavo di collegamento (il più
possibile vicino all'apparecchiatura) e smontare la
porta per evitare che i bambini giocando prendano una
scarica elettrica o rimangano intrappolati all'interno.
Questo apparecchio non deve essere utilizzato da persone (e bambini) con ridotte capacità
fisiche, sensoriali o mentali o prive dell'esperienza e delle
nozioni necessarie, salvo i casi in cui agiscano sotto
sorveglianza o siano stati opportunamente istruiti sull'uso di tale apparecchio da persone responsabili per la
loro sicurezza.
Precauzioni per la sicurezza dell'installazione
Accostare l'apparecchiatura alla parete per evitare di
toccare o di afferrare le parti calde (compressore, condensatore) e quindi di scottarsi.
Quando si sposta l'apparecchiatura, prestare attenzione che la spina non sia inserita nella presa.
Quando si posiziona l'apparecchiatura, prestare attenzione che non si trovi sul cavo di alimentazione.
Intorno all'apparecchiatura deve essere assicurata una
buona ventilazione, altrimenti può avvenire un surriscaldamento. Seguire le istruzioni sull'installazione
per ottenere una ventilazione adeguata.
Vedi capitolo "Posizionamento".
Per la vostra incolumità e per la sicurezza dei
vostri beni, conservare le misure precauzionali
contenute nel presente libretto, in quanto il produttore
non è responsabile per danni provocati dalla mancata
osservanza delle stesse.
54
Page 55

IT
Istruzioni per l'utilizzatore
Descrizione dell'apparecchiatura, componenti principali
Informazioni generali
La denominazione ufficiale dell'apparecchiatura è „frigorifero-congelatore combinato con un compressore a
motore e con il congelatore posto nella parte superiore”.
L'apparecchiatura, oltre a fornire le prestazioni generiche,
è dotata di un congelatore con una sua porta, completamente separato dall'altra unità.
Di conseguenza, questa apparecchiatura è adibita alla conservazione di alimenti congelati e surgelati, alla conge-
lazione di prodotti, in ambito domestico, nelle quantità
riportate nelle istruzioni per l'utilizzatore, e alla produzione di ghiaccio.
L'apparecchiatura soddisfa i requisiti delle norme riguardo
ai diversi limiti di temperatura, secondo la classe climatica.
La lettera che identifica la classe 3climatica è indicata sull'etichetta dei dati.
A - Frigorifero
B - Congelatore
1. Copertura
2. Vassoio per il ghiaccio
3. Ripiano a griglia nello scomparto per alimenti
congelati
4. Cassetta d'illuminazione
5. Ripiano in vetro
6. Raccoglitore dell'acqua di sbrinamento
7. Ripiano in vetro
8. Cassetti per le verdure
9. Targhetta dei dati
10. Piedini regolabili
11. Scomparto per il burro
12. Scomparto per le uova
13. Mensola della porta
14. Guarnizione della porta
15. Mensola portabottiglie
16. Condensatore
17. Scarico dell'acqua di sbrinamento
18. Distanziale
19. Vaschetta per l'evaporazione
20. Compressore
55
Page 56

IT
Messa in funzione
Sistemare gli accessori nel frigorifero e inserire la spina nella
presa di corrente. Per avviare la refrigerazione, ruotare il selettore, che si trova sul lato destro dello scomparto per gli alimenti freschi, spostandolo da „0” in senso orario, secondo la figura. Sulla posizione „0” l'apparecchiatura non funziona.
Nel paragrafo successivo sono riportate le istruzioni per
l'impostazione.
Sistemazione dell'apparecchiatura
Controllo della temperatura, impostazione
Il sistema di controllo del termostato interrompe automaticamente il funzionamento dell'apparecchiatura per
un periodo di tempo più o meno lungo, a seconda dell'impostazione, e poi lo riavvia per garantire la temperatura richiesta.
Ruotando la manopola di controllo verso i numeri più alti,
si ha una maggiore refrigerazione.
Nel congelatore si possono ottenere temperature da -18 °C
in giù regolando la manopola del termostato sulla
posizione „Media” (all'incirca 2-3). In tal caso, la temperatura che si forma automaticamente nel frigorifero è di
circa +5 °C o inferiore. La posizione „Media” (2-3) va bene
di solito per gli usi di tutti i giorni.
La temperatura all'interno del frigorifero deriva non solo
dall'impostazione del termostato, ma anche dalla temperatura ambiente, da quante volte è stata aperta la porta,
dalla quantità di cibo inserita di recente, ecc.
Nella posizione massima, cioè nella posizione „6”,
nel caso sia richiesta una maggiore refrigerazione
o in periodi molto caldi, il compressore può funzionare
continuamente. Ciò non provoca alcun danno all'apparecchiatura.
Come usare il frigorifero
Affinché ci sia un raffreddamento adeguato, è
necessario che l'aria circoli all'interno. Per questo
motivo si consiglia di non coprire tutta la superficie delle
mensole con carta, vassoi, ecc.
Conservazione nel frigorifero
Quando si inseriscono diversi tipi di alimenti, si deve tenere
presente il disegno riportato nella figura:
1. Burro, formaggio
2. Uova
3. Tubetti, lattine, panna, bottigliette
4. Bibite in bottiglie, acqua minerale e mousse
in recipienti a sifone
5. Frutta, verdura, insalate
6. Carne fresca, affettati, salumi, ecc.
7. Latte, latticini
8. Cibi precotti, pasticceria, alimenti in
contenitori chiusi, lattine aperte, bottiglie
distese.
Non inserire cibi caldi all'interno del frigorifero.
Lasciare che si raffreddino naturalmente raggiungendo la temperatura ambiente. In questo modo si
può evitare un'inutile formazione di brina.
Gli alimenti possono assumere gli odori degli altri
alimenti; è importante quindi mettere i cibi in
contenitori chiusi o avvolgerli con cellophane, alluminio,
carta oleata o pellicola prima di inserirli nel frigorifero.
In questo modo gli alimenti manterranno la loro umidità, ad es. le verdure rimarranno fresche anche dopo
qualche giorno.
Tempo e temperatura di conservazione degli
alimenti
La tabella alla fine del libretto d'istruzioni fornisce informazioni sui tempi di conservazione.
Il tempo di conservazione non può essere stabilito con
esattezza in anticipo in quanto dipende dalla freschezza e
dal trattamento degli alimenti. Per questo motivo il tempo
di conservazione riportato è solo indicativo.
Se non si vogliono consumare gli alimenti surgelati subito
dopo l'acquisto, si possono conservare in frigorifero per 1
giorno circa (finché si scongelano).
56
Page 57

IT
Utilizzo del congelatore
Congelazione
A casa si possono congelare diversi tipi di alimenti freschi
nello scomparto congelatore. Seguire le istruzioni sotto
riportate per ottenere buoni risultati.
Congelare solo alimenti freschi e non deteriorati.
Prima di iniziare la congelazione, regolare la manopola del
termostato nella posizione „3” e sistemare il ripiano a
griglia dello scomparto cibi surgelati nella posizione più alta.
Disporre poi il quantitativo da congelare direttamente sul
ripiano a griglia. La congelazione si compie nel giro di circa
24 ore. Dopo 24 ore, riportare la manopola del termostato
alla posizione „Media” (2-3), o lasciarla nella posizione „3”
che di solito è adatta per gli usi normali. Per praticità il cibo
congelato si conserva sulla piastra di raffreddamento o
impilato sotto il ripiano a griglia, nello scomparto per cibi
congelati.
Evitare possibilmente di aprire la porta dello scomparto per alimenti congelati durante la conge-
lazione.
Non è consigliabile impostare la manopola del ter-
mostato su una posizione più elevata (ad es. „6”). In
questo modo si ridurrebbe il tempo necessario per la congelazione, ma la temperatura dello scomparto per gli alimenti
freschi sarebbe sempre inferiore agli 0 °C, con conseguente
congelazione di cibi e bevande conservate al suo interno.
Non superare mai le quantità di alimenti da con-
gelare in un'unica volta indicate nei „Dati tecnici”, altrimenti la congelazione non sarà completa e, dopo
lo sbrinamento, gli alimenti potrebbero risultare deteriorati (perdita di gusto e di aroma, lisi ecc.).
E' preferibile non produrre ghiaccio durante la con-
gelazione in quanto si ridurrebbe la capacità di
congelazione.
Come ottenere i cubetti di ghiaccio
Per ottenere i cubetti di ghiaccio riempire d'acqua il vassoio
preposto e inserirlo nello scomparto per gli alimenti congelati. Se si inumidisce il fondo del vassoio e se si imposta la
manopola del termostato sulla posizione massima, si può
ridurre il tempo di preparazione. Alla fine, non dimenticare
di impostare il termostato sul valore adeguato.
Quando i cubetti di ghiaccio sono pronti, estrarli mettendo il
vassoio sotto l'acqua corrente, piegandolo o battendolo. Se il
vassoio per il ghiaccio si gela attaccandosi allo scomparto,
non usare oggetti metallici o un coltello per estrarlo, in
quanto danneggerebbero l'impianto di raffreddamento.
Conservazione nel congelatore
Dopo aver finito di congelare, per praticità si passa il cibo
congelato dal ripiano a griglia dello scomparto per cibi
congelati alla posizione inferiore, facendo posto per una
nuova eventuale congelazione. La sistemazione del ripiano
a griglia nello scomparto per cibi congelati („3” posizioni)
si può utilizzare solo per la conservazione, dato che la congelazione può avvenire soltanto col ripiano a griglia nella
posizione più alta. Il cibo già riposto non viene danneggiato da una nuova congelazione.
Ricordarsi di osservare i tempi di conservazione
indicati sulle confezioni dei prodotti surgelati. Per
conservare prodotti congelati in casa, seguire le istruzioni
per la conservazione riportate sulla porta del congelatore.
I simboli rappresentano i vari alimenti, i numeri indicano il
tempo di conservazione massimo espresso in mesi.
E' opportuno conservare gli alimenti congelati con
la congelazione rapida o congelati normalmente
solo se non si sono scongelati anche per breve tempo, prima
di essere inseriti nel congelatore. Se gli alimenti surgelati si
sono già scongelati; si sconsiglia di ricongelarli, devono
essere consumati il più presto possibile.
Alcune informazioni e consigli utili
Meritano un'attenzione particolare le mensole a
posizione variabile che incrementano notevolmente
l'utilizzo del vano per gli alimenti freschi. E' possibile
disporre le mensole anche quando la porta è aperta
con un'angolazione di 90°.
Dopo aver aperto e richiuso la porta del congelatore,
all'interno si crea una depressione a causa della bassa
temperatura. Dopo aver chiuso la porta, è necessario
aspettare 2-3 minuti prima di riaprirla, finché la pressione interna si riequilibra.
Il congelatore deve essere azionato impostando il termostato in modo da garantire una temperatura interna massima di -18 °C, in quanto temperature più elevate possono deteriorare gli alimenti congelati.
E' consigliabile accertarsi del funzionamento perfetto
dell'apparecchiatura giorno per giorno, in modo da
notare possibili guasti in tempo ed evitare il deterioramento degli alimenti congelati.
Consigli e suggerimenti
In questo capitolo sono riportati consigli pratici e suggerimenti su come utilizzare l'apparecchiatura con il massimo
risparmio energetico, e informazioni per la protezione dell'ambiente in merito all'utilizzo dell'apparecchiatura.
Come risparmiare energia
Evitare di collocare l'apparecchiatura in una posizione
assolata e vicino a qualsiasi sorgente di calore.
Accertarsi che il condensatore e il compressore ricevano un'adeguata ventilazione. Non coprire i punti in
cui circola l'aria.
Sistemare gli alimenti in recipienti ben chiusi o avvolgerli in una pellicola aderente per evitare che si formi
brina.
Non lasciare la porta aperta più a lungo di quanto sia
necessario e aprirla solo quando serve.
Gli alimenti vanno inseriti nell'apparecchiatura solo in
recipienti chiusi.
Inserire nell'apparecchiatura gli alimenti solo quando
sono a temperatura ambiente.
Tenere pulito il condensatore.
57
Page 58

IT
Pulire lo scarico per l'acqua di sbrinamento con il raschietto fornito, indicato nella figura. Il raschietto deve essere
conservato nello scarico.
La causa più frequente di ostruzione dello scarico per l'acqua di sbrinamento è dovuta all'inserimento di alimenti
avvolti in carta all'interno dell'apparecchiatura. La carta
può venire a contatto con la parete posteriore del frigorifero e congelarsi. Togliendo il cibo, la carta si può strappare
e il frammento può finire nello scarico, ostruendolo. Si raccomanda quindi di prestare attenzione quando si
inseriscono alimenti avvolti in carta all'interno dell'apparecchiatura.
Quando è necessaria una maggiore refrigerazione,
ad es. in caso di temperature elevate, il frigorifero
può funzionare temporaneamente in modo continuativo; in
questa fase, lo sbrinamento automatico non può avvenire.
Può succedere che dopo lo sbrinamento rimangano piccole
tracce di ghiaccio e brina sulla parete posteriore del frigorifero.
Il congelatore non può essere dotato di un sistema per lo
sbrinamento automatico, in quanto gli alimenti congelati e
surgelati non tollerano le temperature di scongelamento.
Purché non sia troppo spesso, lo strato di brina e ghiaccio
può essere rimosso con un raschietto di plastica.
Quando lo strato di ghiaccio è così spesso che non può
essere raschiato con la paletta di plastica, il ripiano refrigerante deve essere sbrinato. La frequenza dipende dall'uso
(di solito 2-3 volte all'anno).
Togliere gli alimenti congelati dall'apparecchiatura e
inserirli in una cesta rivestita di carta o di stoffa. Conservarli
possibilmente in un luogo fresco o inserirli in un altro frigorifero.
Estrarre la spina dalla presa di corrente in modo che
entrambe le parti dell'apparecchiatura non possano funzionare.
Aprire le porte di tutte e due gli scomparti e pulire il frigorifero secondo quanto descritto nel paragrafo 'Regolari
operazioni di pulizia'. Eseguire le seguenti operazioni di
manutenzione e pulizia del congelatore:
Rimuovere l'acqua di sbrinamento dal ripiano di raffreddamento con un panno o una spugna. L'acqua di sbrinamento si raccoglie sul fondo dell'apparecchiatura e può essere
scaricata come indicato nella figura.
Estrarre il tappo in plastica dall'apertura per il passaggio
dell'acqua di sbrinamento, nello scomparto per gli alimenti congelati. Sistemare una bacinella sufficientemente alta
sotto lo scarico nello scomparto per alimenti freschi per
raccogliere l'acqua di sbrinamento.
La bacinella nella figura non è un accessorio dell'apparecchiatura!
Dopo lo sbrinamento e dopo aver scaricato l'acqua asciugare le superfici, rimettere il tappo di plastica al suo posto.
Inserire la spina nella presa di corrente e risistemare gli alimenti all'interno dell'apparecchiatura.
Si consiglia di avviare l'apparecchiatura impostando il termostato sulla posizione più alta per alcune ore, in modo da
raggiungere una temperatura di conservazione sufficiente
il più presto possibile
.
L'apparecchiatura e l'ambiente
Questa apparecchiatura non contiene gas che possono danneggiare lo strato di ozono, né nel circuito
refrigerante, né nei materiali di isolamento.
L'apparecchiatura non deve essere smaltita assieme
ai rifiuti urbani e alle immondizie. Evitare di danneggiare il sistema refrigerante, soprattutto sul retro, vicino allo scambiatore di calore. Si possono ottenere
informazioni sulle discariche più vicine presso il
vostro comune.
I materiali utilizzati per questa apparecchiatura che
riportano il simbolo sono riciclabili.
Manutenzione
Sbrinamento
Durante il funzionamento dell'apparecchiatura, parte dell'umidità delle camere di raffreddamento viene rilasciata
sottoforma di brina e ghiaccio.
Uno spessore notevole di brina e di ghiaccio ha un effetto
isolante, riducendo così l'efficienza di raffreddamento man
mano che la temperatura aumenta, consumando più energia.
In questo tipo di apparecchiatura lo sbrinamento del ripiano refrigerante del frigorifero è automatico; non necessita di alcun intervento esterno. Il termostato interrompe il
funzionamento del compressore ad intervalli regolari per
un tempo più o meno lungo; in questa fase il raffreddamento si interrompe, la temperatura del ripiano refrigerante aumenta superando 0 °C a causa del riscaldamento
all'interno dello scomparto e avviene lo sbrinamento.
Quando la temperatura superficiale del ripiano refrigerante raggiunge +3 - +4 °C, il termostato fa riavviare
l'impianto.
L'acqua di sbrinamento confluisce sul retro, attraverso lo
scarico preposto, fino alla vaschetta per l'evaporazione
sistemata sopra il compressore, ed evapora a causa del
calore di quest'ultimo.
Controllare e pulire regolarmente lo scarico per
l'acqua di sbrinamento-questa avvertenza è
riportata anche su un'etichetta all'interno dell'apparecchiatura. Se lo scarico è ostruito, l'acqua che si raccoglie
può causare un guasto perché può riversarsi sul sistema
di isolamento dell'apparecchiatura.
58
Page 59

IT
Sostituzione della lampadina
Nel caso la lampadina non funzioni, procedere come segue
per la sostituzione:
scollegare l'apparecchiatura.
Sganciare la piastra che fissa il coprilampada come indica-
to nella figura, estrarre il coprilampada in direzione della
freccia e sostituire la lampadina. (Tipo di lampadina:
Mignon 322, 230 V, 15 W, filo E 14).
Dopo aver sostituito la lampadina, rimontare il coprilampada, riavvitare la piastra e collegare l'apparecchiatura.
La mancanza di luce non influisce sul funzionamento del
frigorifero.
Regolari operazioni di pulizia
Si consiglia di lavare l'interno del frigorifero ogni 3-4 settimane con acqua tiepida e poi asciugarlo (si consiglia di
pulire l'interno del congelatore e di sbrinarlo in un'unica
volta).
Non si devono usare detersivi o saponi.
Dopo aver scollegato l'apparecchiatura, lavarla con acqua
tiepida e asciugarla. Pulire la guarnizione della porta con
acqua pulita. Dopo la pulizia, collegare l'apparecchiatura.
E' consigliabile rimuovere la polvere e la sporcizia che si
accumulano sul retro del frigorifero e sul condensatore, e
di pulire la vaschetta per l'evaporazione sul compressore
una o due volte all'anno.
Quando il frigorifero non viene utilizzato
Nel caso l'apparecchiatura non venga utilizzata per un
lungo periodo, procedere come segue:
scollegare l'apparecchiatura.
Togliere gli alimenti dal frigorifero.
Sbrinarlo e pulirlo come precedentemente descritto.
Lasciare aperta la porta per evitare la formazione di aria
all'interno
Eliminazione dei guasti
Se qualcosa non funziona
Durante il funzionamento dell'apparecchiatura, possono
accadere spesso piccoli inconvenienti che non richiedono
l'intervento di un tecnico. Nello schema seguente vengono
fornite informazioni su come evitare di sovraccaricare
inutilmente il servizio di assistenza.
Si richiama l'attenzione sul fatto che il funzionamento
dell'apparecchiatura prevede certi rumori (del compressore
e della ventilazione). Questi non indicano che ci sono
guasti, ma rientrano nel normale funzionamento.
Si ricorda inoltre che l'apparecchiatura non fun-
ziona continuamente, quindi quando il compressore
si ferma non significa che non c'è corrente. Per questo
motivo bisogna evitare di toccare le parti elettriche dell'apparecchiatura prima di scollegarla.
59
Page 60

IT
Soluzione
Impostare la manopola del termostato su un valore più alto.
Sistemare gli alimenti in modo appropriato.
Controllare che la porta si chiuda bene e che la
guarnizione sia integra e pulita.
Impostare la manopola del termostato su un valore più alto.
Controllare che la porta si chiuda bene e che la
guarnizione sia integra e pulita.
Aspettare alcune ore e poi controllare nuovamente la temperatura.
Sistemare gli alimenti in modo che l'aria possa circolare liberamente tra loro.
Pulire lo scarico.
Risistemare gli alimenti in modo che non siano
direttamente a contatto con il pannello posteriore.
Collegare lo scarico dell'acqua di sbrinamento
con la vaschetta per l'evaporazione.
Avvolgere meglio gli alimenti.
Controllare che le porte chiudano bene e che le
guarnizioni siano integre e pulite.
Impostare il termostato in modo che ci sia una
temperatura più elevata.
Impostare il termostato in modo che ci sia una
temperatura più elevata.
Controllare che le porte chiudano bene e che le
guarnizioni siano integre e pulite.
Aspettare alcune ore e controllare nuovamente la
temperatura.
Inserire gli alimenti quando hanno raggiunto la
temperatura ambiente.
Cercare di ridurre la temperatura nella stanza in
cui l'apparecchiatura è installata.
Collegare la spina correttamente.
Sostituire il fusibile.
Avviare l'apparecchiatura secondo le istruzioni
riportate nel capitolo 'Messa in funzione'.
Chiamare un elettricista.
Controllare che l'apparecchiatura sia stabile (tutti
e quattro i piedini dovrebbero appoggiare sul pavimento).
Causa possibile
Il termostato può essere stato impostato su una
posizione errata.
I prodotti non sono abbastanza freddi o sono stati
sistemati in modo sbagliato.
La porta non si chiude ermeticamente o non è
stata chiusa in modo adeguato.
Il termostato può essere stato impostato su una
posizione errata.
La porta non si chiude ermeticamente o non è
stata chiusa in modo adeguato.
E' stata inserita una grande quantità di alimenti da
congelare.
I prodotti da congelare sono stati sistemati troppo
vicini l'uni agli altri.
E' normale; durante lo sbrinamento automatico, la
brina si scioglie sul pannello posteriore.
Lo scarico della camera di raffreddamento può
essere ostruito.
Gli alimenti in lattine impediscono all'acqua di
defluire nel raccoglitore.
Lo scarico dell'acqua di sbrinamento non convoglia
l'acqua sulla vaschetta per l'evaporazione sopra al
compressore.
I prodotti non sono stati avvolti adeguatamente.
Le porte non sono state chiuse bene o non chiudono ermeticamente.
Il termostato può essere stato impostato in
maniera errata.
Il termostato è stato impostato in maniera errata.
Le porte non sono state chiuse bene o non chiudono ermeticamente.
E' stata inserita una grande quantità di prodotti da
congelare.
Sono stati inseriti alimenti troppo caldi.
L'apparecchiatura è posizionata in un punto troppo
caldo.
La spina non è stata inserita correttamente nella
presa di corrente.
Il fusibile è saltato.
Il termostato non è acceso.
Non c'è tensione nella presa di corrente. (Verificare
se c'è tensione collegando un'altra apparecchiatura).
Non ha un adeguato supporto.
Problema
La temperatura è troppo
elevata all'interno del
frigorifero.
La temperatura è troppo
elevata all'interno del
congelatore.
Scorre acqua sulla parte
posteriore del frigorifero.
Scorre acqua nella camera di raffreddamento.
C'è acqua sul pavimento.
Si è formata troppa
brina e troppo ghiaccio.
Il compressore funziona
continuamente.
L'apparecchiatura non
funziona: non funziona
nè il sistema di raffreddamento nè l'illuminazione. Le luci dell'indicatore sono spente.
L'apparecchiatura fa
rumore.
Nel caso questi consigli non vi siano di aiuto, contattare il servizio assistenza più vicino.
60
Page 61

IT
peratura nello scomparto refrigerante o maggiori consumi
energetici.
Quando si posiziona l'apparecchiatura, accertarsi che sia su
un piano livellato. Livellarla con i due piedini regolabili (1)
in basso, nella parte anteriore.
Nel sacchetto degli accessori si trovano due distanziali. I
distanziali devono essere montati nei fori sulla parte
posteriore dell'apparecchio. Inserire i distanziali nei fori.
Fare attenzione che la freccia (A) sia disposta come nella
figura, quindi fissare il distanziale ruotandolo di 45o (la
freccia sia verticale).
Non installare l'apparecchiatura in un luogo assolato o
vicino a un radiatore o a un fornello.
Se ciò è inevitabile a causa dell'arredamento e l'apparecchiatura deve essere posizionata vicino a un fornello,
tenere in considerazione le seguenti distanze minime:
per i fornelli a gas o elettrici, devono essere lasciati 3
cm; se la distanza è inferiore, inserire un isolamento
infiammabile di 0,5-1 cm tra le due apparecchiatura.
per le stufe a petrolio o a carbone, deve essere mantenuta la distanza di 30 cm, in quando queste emettono più calore.
Il frigorifero è stato progettato per funzionare quando è
addossato completamente al muro.
Quando si posiziona il frigorifero, devono essere
osservate le distanze minime indicate nella figura.
A: posizionamento al di sotto di un pensile
B: posizionamento libero.
Istruzioni per l'installatore
Pulizia
Togliere tutte le strisce adesive che bloccano i componenti
affinché non si muovano all'interno dell'apparecchiatura.
Lavare l'interno dell'apparecchiatura con acqua tiepida e
un detergente neutro, usando un panno morbido.
Dopo la pulizia, asciugare l'interno dell'apparecchiatura.
Trasporto, rimozione degli imballi
Si consiglia di consegnare l'apparecchiatura nell'imballo originale, in posizione verticale con-
siderando le avvertenze riportate sugli imballi.
Dopo ogni trasporto, l'apparecchiatura non deve essere
accesa per circa 2 ore.
Togliere l'apparecchiatura dall'imballo e controllare che
non vi siano danni. Eventuali danni devono essere comunicati immediatamente al negozio dove è stata acquistata. In
tal caso, conservare gli imballi.
Installazione dell'apparecchiatura
Posizionamento
La temperatura ambiente influisce sul consumo di energia
e sul funzionamento adeguato dell'apparecchiatura.
Quando questa viene posizionata, ricordarsi che l'apparecchiatura va azionata nell'ambito dei valori della temperatura ambiente, secondo la classe climatica indicata nello
schema seguente e che è riportata nella targhetta dei dati.
Classe climatica Temperatura ambiente
SN +10 ... +32 °C
N +16 ... +32 °C
ST +18 ... +38 °C
Se la temperatura ambiente scende al di sotto dei valori
più bassi, la temperatura dello scomparto refrigerante può
superare la temperatura prevista.
Se la temperatura ambiente supera i valori massimi, il
compressore lavorerà più a lungo, ci sarà un guasto nel sistema di sbrinamento automatico, un aumento della tem-
61
45°
PR60
A
Page 62

IT
Fissare il doppio fermaporta sul lato sinistro usando le
due viti e i due spessori. Prestare attenzione che il
bordo della porta del congelatore sia parallelo al
bordo della cappa.
Inserire la porta del frigorifero sul perno del doppio
fermaporta.
Fissare il fermaporta inferiore sul lato sinistro usando
le due viti e i due spessori. Prestare attenzione che il
bordo della porta del frigorifero sia parallelo al bordo
della cappa.
Estrarre l'elemento di copertura della griglia in
direzione della freccia (1) e rimetterlo al contrario (2).
Rimontare la griglia di copertura e fissarla con le due
viti, poi risistemare i coprivite.
Rimettere l'apparecchiatura al suo posto, livellarla e
collegarla.
In caso non si voglia eseguire la procedura sopra descritta,
contattare il servizio assistenza più vicino. I tecnici esperti
eseguiranno il montaggio con un addebito.
Reversibilità della porta
Nel caso il luogo d'installazione o d'utilizzo lo richieda, la
direzione di apertura della porta può essere modificata da
destra a sinistra.
Le apparecchiature disponibili sul mercato hanno l'apertura a destra.
Eseguire le operazioni seguenti sulla base delle figure e
delle spiegazioni:
Estrarre la spina dalla presa di corrente.
Inclinare l'apparecchiatura all'indietro facendo atten-
zione che il compressore non tocchi il pavimento. Si
consiglia di chiedere aiuto ad un'altra persona che
possa mantenere l'apparecchiatura saldamente in
questa posizione.
Rimuovere con attenzione (ad es. con un coltello) i
coprivite che fissano la griglia di copertura inferiore;
toglierla svitando le due viti.
Smontare il fermaporta inferiore del frigorifero, svitando le due viti e i due spessori.
Togliere la porta del frigorifero tirandola leggermente
verso il basso.
Smontare il doppio fermaporta svitando le due viti e i
due spessori.
Togliere la porta del congelatore tirandola leggermente verso il basso.
Svitare il perno fermaporta superiore del congelatore
e riavvitarlo sul lato opposto.
Togliere le coperture del doppio fermaporta sul lato
sinistro e montarle sul lato opposto.
Inserire la porta del congelatore sul perno fermaporta
superiore.
Collegamento elettrico
Questo frigorifero è stato progettato per funzionare con
un'alimentazione di 230 V AC (~) 50 Hz.
La spina deve essere inserita in una presa con contatti
protetti; se questa non è disponibile, si consiglia di far
installare una presa di terra da un elettricista, in conformità agli standard relativi al frigorifero.
Questa apparecchiatura è conforme alle
seguenti direttive CEE:
73/23 CEE del 19.02.73 (Direttiva sulla bassa tensione)
e successive modifiche,
89/336 CEE del 03.05.89 (Direttiva sulla compatibilità
elettromagnetica) e successive modifiche,
Direttiva 96/57/CE del 3/9/96 (Direttiva sul rendimento energetico dei frigoriferi) e successive modifiche.
62
Page 63

IT
Tabella dei tempi di conservazione (1)
Tempo e metodi di conservazione di alimenti freschi nel frigorifero
Alimenti Tempo di conservazione in giorni Tipo di involucro
1234567
Carne cruda XXx x x pellicola aderente, sigillata
Carne cotta XXXx x x recipiente coperto
Carne arrostita XXXx x recipiente coperto
Carne macinata cruda X recipiente coperto
Carne macinata cotta XX x x recipiente coperto
Affettati, salumi XX x x pellicola aderente, cellophane,
carta oleata
Pesce fresco X x x pellicola aderente, sigillata
Pesce cotto XXx x recipiente coperto
Pesce fritto XXx x x recipiente coperto
Pesce in scatola, lattina aperta X x x recipiente coperto
Pollo fresco XXXx x x pellicola aderente, sigillata
Pollo fritto XXXx x x recipiente coperto
Gallina fresca XXx x x pellicola aderente, sigillata
Gallina bollita XXx x x recipiente coperto
Anatra fresca XXX x x x pellicola aderente, sigillata
Anatra arrosto XXXXx x x recipiente coperto
Burro (confezione chiusa) XXXXXXXinvolucro originale
Burro (confezione aperta) XXx x x x x involucro originale
Latte in contenitore di plastica XXXx x involucro originale
Panna XXx x recipiente in plastica
Panna acida XXXXx x x recipiente in plastica
Formaggio (stagionato) XXXXXXXfoglio di alluminio
Formaggio (fresco) XXXXx x x pellicola aderente
Latte cagliato XXXXx x x pellicola aderente
Uova XXXXXXX
Spinaci XXx x pellicola aderente
Piselli verdi, fagioli verdi XXXXx x x pellicola aderente
Funghi XXx x x pellicola aderente
Carote, radici XXXXXXXpellicola aderente
Peperoni XXx x x pellicola aderente
Pomodori XXXXXXXpellicola aderente
Cavoli XXXXXx x pellicola aderente
Frutta deperibile velocemente
(fragole, lamponi, ecc.) XXXx x pellicola aderente
Altra frutta XXXXx x x pellicola aderente
Frutta in scatola (confez. aperta) XXXx x recipiente coperto
Dolci ripieni di crema XXx x recipiente coperto
Nota:
X: tempo di conservazione normale
x: tempo di conservazione possibile (riguarda solo prodotti veramente freschi)
63
Page 64

IT
Tabella dei tempi di conservazione (2)
Tempo di conservazione di alimenti surgelati e congelati
Nello scomparto Nello scomparto ****
Alimenti per alimenti freschi per alimenti congelati
+2 - +7 °C -18 °C
Verdure:
fagioli verdi, piselli verdi, verdure miste,
zucchine, grano, ecc. 1 giorno 12 mesi
Alimenti precotti:
piatti di verdure, contorni, con carne, ecc. 1 giorno 12 mesi
Alimenti precotti:
bistecche di lombo, stufato di coscia, carne
di sanguinaccio, ecc. 1 giorno 6 mesi
Alimenti composti da patate, pasta:
purè di patate, gnocchi, gnocchi ripieni,
pasta ripiena, patatine fritte 1 giorno 12 mesi
Minestre:
brodo di carne, minestra di fagioli verdi,
minestra di piselli verdi, ecc. 1 giorno 6 mesi
Frutta:
amarene, ciliegie, uva spina, crema
di frutta, crema di marroni 1 giorno 12 mesi
Carne:
pollo, anatra e interiora 1 giorno 5 mesi
filetti, tonno 1 giorno 6 mesi
Ghiaccioli, gelati 1 giorno 3 settimane
Il produttore si riserva il diritto di apportare qualsiasi modifica ai prodotti.
64
Page 65

IT
65
Page 66

B/AE/18. (08.)
Page 67

Page 68

2008. 09. 01.
AEG Hausgeräte GmbH
Postfach 1036
D-90327 Nürnberg
Sie können Ersatzteile, Zubehör und Pflegemittel on-line bestellen bei
http://www.aeg-electrolux.de
© Copyright by AEG
Technische Änderungen vorbehalten
200382264 - 00 - 3608
 Loading...