


I
NTRODUCTION
W
e are pleased that you have chosen this refrigerator and
h
ope you will derive much satisfaction from using it, but first
a
few well-meant words of advice:
I
t is important to read through these instructions carefully
b
efore beginning to use the refrigerator.
T
o ensure good refrigeration and economical operation, the
r
efrigerator must be installed and used as described in
t
hese instructions.
T
he refrigerator is designed for building-in to leisure vehic-
l
es such as caravans or motorhomes.
T
he appliance is certified according to the EU-Gas-Directive
9
0/396/EEC.
T
RANSIT DAMAGE
I
nspect the refrigerator for damage. Transit damage must
b
e reported without delay to whoever is responsible for
t
ransport but not later than seven days after the refrigerator
w
as delivered.
M
ODELS
T
he three models are intended for different sources of
e
nergy:
S105 G ......................... LPGas
S105 GE..............LPGas and Electric
D
ATA PLATE
C
heck the data plate, inside the refrigerator, to ensure that
y
ou have received the right model.
T
he right gas pressure is 30 mbar.
T
he right voltage is 230 volts.
T
he data plate contains e. g. the following details:
Model designation .......................
Product number .........................
Serial number ...........................
S
ince these details will be needed if you have to get in
t
ouch with service personnel, it is a good idea to make a
n
ote of them here.
C
ONTENTS
O
PERATING INSTRUCTIONS ... .. ..... ...........6
CONTROLS.. ...................................6
STARTING THE REFRIGERATOR .... .........6
REGULATING THE TEMPERATURE.. .........6
FOOD STORAGE . ..... ....... ..... .. ...........6
ICE-MAKING....................................6
DEFROSTING...................................6
CLEANING THE REFRIGERATOR . .. ..........7
TURNING OFF THE REFRIGERATOR .........7
IF THE `FRIDGE FAILS TO WORK.............7
MAINTENANCE..... .. ..... .. ..... ..............7
SOME USEFUL HINTS .. .. ..... ..... ...........7
GUARANTEE ...................................7
SERVICE AND SPARE PARTS....... ..........7
TECHNICAL DATA .. ....... ....... .............7
I
NSTALLATION INSTRUCTIONS.. ..... .. .........7
REPOSITIONING THE HINGES . ..... ..........7
DOOR PANEL...................................8
INSTALLATION /BUILDING-IN .... .............8
LP GAS CONNECTION .. ..... ....... ...........8
ELECTRICAL CONNECTION..... ..... .........8
O
PERATING AND INSTALLATION INSTRUCTIONS
F
OR ELECTROLUX REFRIGERATORS.
5
O
PERATING INSTRUCTIONS
C
ONTROLS
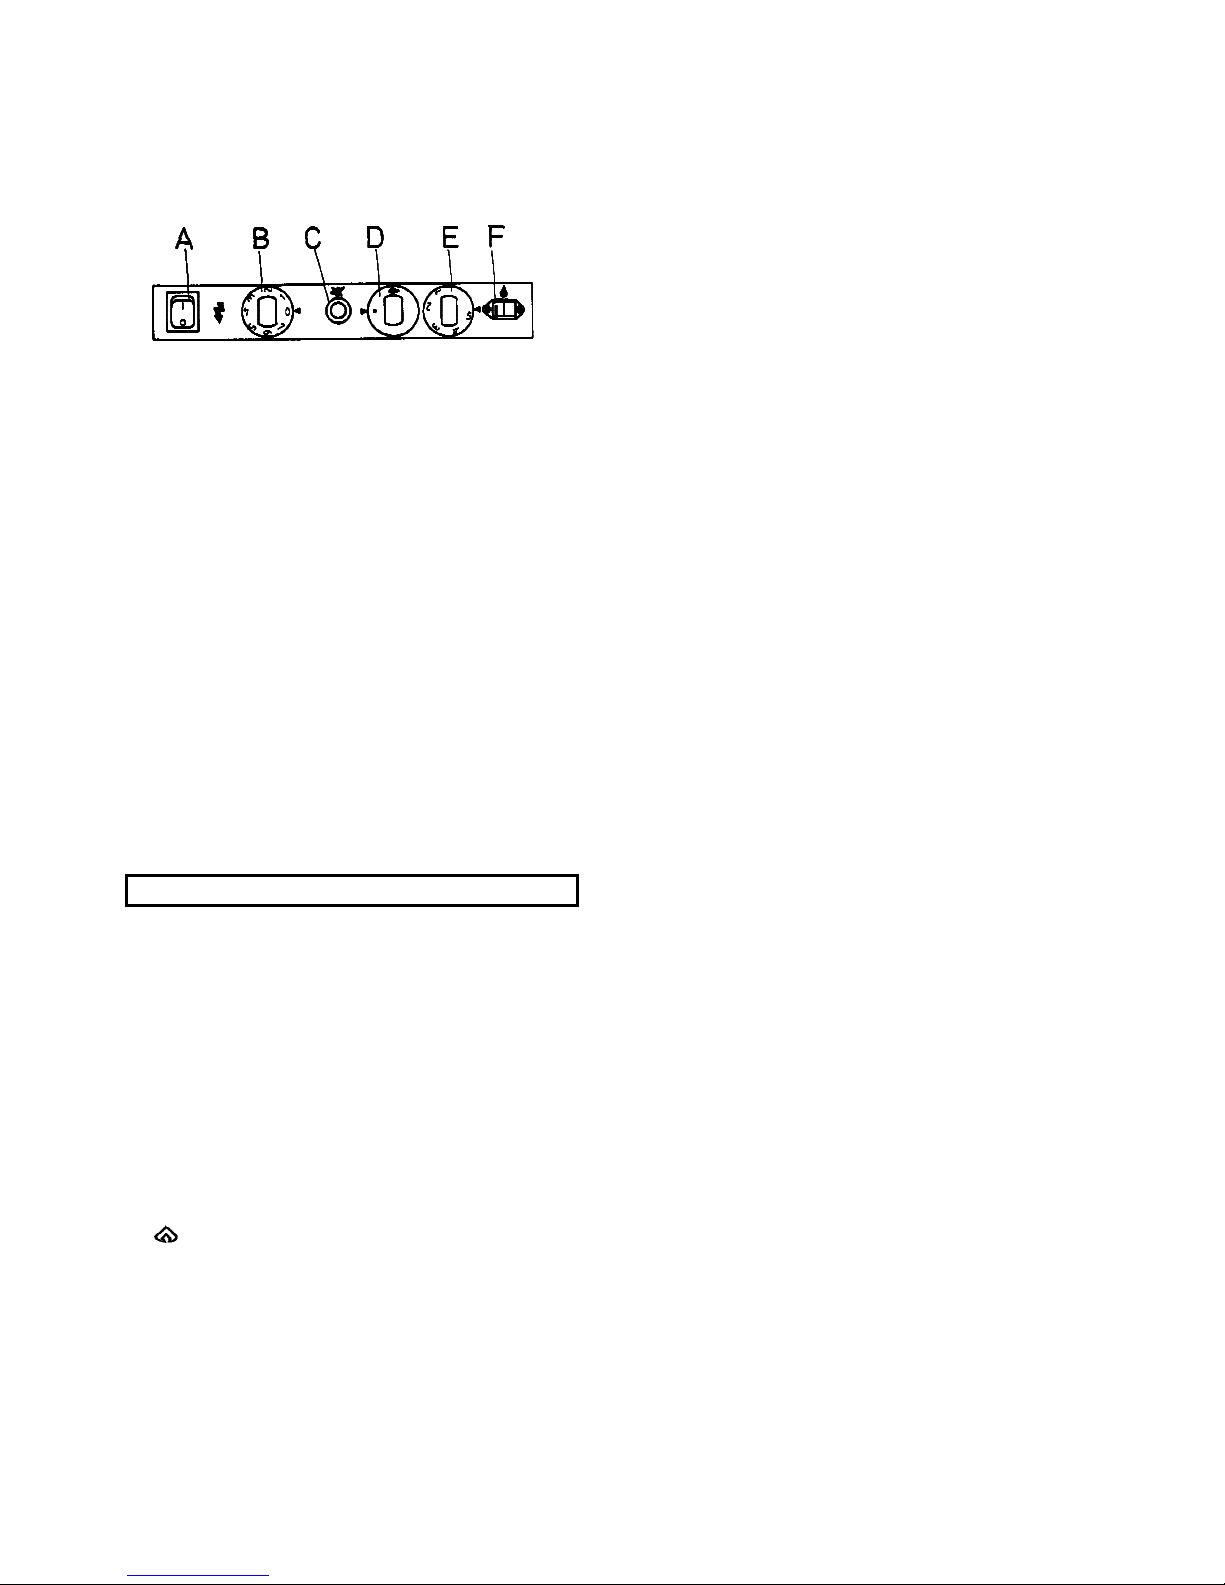
T
he controls are located at the base of the refrigerator and
c
ontain the following elements - as far as the refrigerator is
e
quipped for the corresponding type of energy, fig 1:
A
rocker switch (A) is used to select the electric power
s
upply.
R
efrigerator temperature is controlled by a thermostat (B)
w
hen the unit runs on 230 V.
T
he piezoelectric igniter discharges sparks over the burner
w
hen the button (C) is depressed.
T
he gas supply is turned on/off by means of the knob (D).
T
he refrigerator is fitted with a safety device which auto-
m
atically shuts off the supply of gas if the flame goes out.
T
he safety device can be opened manually by depressing
k
nob (D).
R
efrigerator temperature is controlled by a thermostat (E)
w
hen the refrigerator runs on LP gas. Please note that the
t
hermostat has no ``off'' position.
A
lso on the control panel is a flame indicator (F). Its pointer
(
red) is in the green zone of the scale when the flame is
a
light.
S
TARTING THE REFRIGERATOR
T
he position numbers refer to fig. 1.
L
P Gas operation
A
fter initial installation, after servicing, changing gas cylin-
d
ers etc., the gas pipes may contain some air which should
b
e allowed to escape by briefly turning on the refrigerator or
o
ther appliances. This will ensure that the flame lights
i
mmediately.
T
o start gas operation:
1
. Open the shut-off valve of the gas bottle (check that there
is enough gas). Open any shut-off valve of the gas installation.
2
. Check that the switch for mains operation is off.
3
. Turn on the gas supply by turning the (D) knob to position
4
. Set the thermostat knob (E) to the highest setting.
5
. Keeping the flame failure device buttom (D) pressed,
operate the igniter (C) until the flame lights.
6
. Keep the (D) buttom pressed for a further 10 to 15 se-
conds then release it.
Y
ou can check that the flame is alight by watching the
i
ndicator (F) (pointer moves to green area).
T
o terminate gas operation, turn knob (D) to ●.
2
30 V Operation
● Turn off gas opertion (when applicable).
● Turn the knob (B) of the thermostat to its highest (col-
dest) position.
● Set switch (A) to position I. The switch will light up green
when the power supply is connected.
R
EGULATING THE TEMPERATURE
T
he position number refers to fig. 1.
O
nce the refrigerator has been started it will take a few
h
ours to become cold.
O
n 230 V operation the refrigerator is controlled by a ther-
m
ostat and the thermostat knob (B) should be set at 3-5. If
a
lower (colder) temperature is desired, set the thermostat
t
o a higher figure.
O
n LP gas operation the refrigerator temperature is regu-
l
ated by the gas thermostat (E), which should be set at 3-4.
I
f a lower (colder) temperature is desired, set the thermostat
t
o a higher figure.
F
OOD STORAGE
A
lways keep food in closed containers. Never put hot food
i
n the refrigerator; allow it to cool first.
N
ever keep items in the refrigerator which might give
o
ff flammable gases.
T
he 2-star (**) frozen food compartment is intended for the
s
torage of frozen food and for making ice. It is not suitable
f
or freezing items of food.
N
ever put bottles or cans of fizzy drinks in the frozen food
s
torage compartment as they may burst when freezing. Also
d
on't give children ice lollies straight from the compartment
a
s they could cause frost burns.
M
ost kinds of frozen food can be stored in the frozen food
c
ompartment for about a month. This period of time may
v
ary, however, and it is important to follow the instructions
o
n the individual packings.
I
CE-MAKING
F
ill the ice tray just below the brim with drinking water and
p
ut it on the freezer shelf. It is possible to make ice faster
b
y turning the control knob temporarily to its highest value
b
ut do not forget to turn it back to its regular setting after-
w
ards as the refrigerator might otherwise become too cold.
D
EFROSTING
F
rost will gradually accumulate on the refrigerating sur-
f
aces. It must not be allowed to grow too thick as it acts as
a
n insulator and adversely affects refrigerator perfor-mance.
C
heck the formation of frost regularly every week and when
i
t gets about 3 mm thick, defrost the refrigerator.
T
o defrost the `fridge, turn it off and remove the ice tray and
a
ll food items. Warning: normally the temperature of items
o
f fozen foods would rise unduly during defrosting and so
t
hey should be consumed within 24 h or discarded.
D
o not try to accelerate defrosting by using any kind of
h
eating appliance, as this might damage the plastic sur-
f
aces of the refrigerator. Neither should any sharp objects
b
e used to scrape off the ice.
T
he defrost water runs from a collector channel down a
t
ube to a drip tray at the rear of the refrigerator where it
e
vaporates. When all the ice has melted, wipe the refrigera-
Caution! Only use one source of energy at a time
6
 Loading...