

Page 1
Use & Care Manual
Single-Door
Refrigerator
Welcome & Congratulations 2
Safety Instructions
Installation
Features at a Glance
Temperature Controls
Looking Inside
Food Storage
& Energy Saving Tips
Care & Cleaning
2-3
3-4
4
4
5-6
6
7
READ AND SAVE THESE INSTRUCTIONS
Warranty
Before You Call
8
9-10
P/N 297055300 (0508)
Page 2

PLEASE COMPLETE AND MAIL IN THE
REGISTRATION CARD
REFRIGERATOR.
INCLUDED WITH YOUR
PRODUCT
2
Page 3
SAFETY INSTRUCTIONS
WARNING WARNING
WARNING
WARNING WARNING
ELECTRICAL INFORMATION
These guidelines must be followed to ensure that safety
mechanisms in the design of this refrigerator will operate
properly.
• Refer to the serial plate for correct electrical rating.
The power cord of the appliance is equipped with a
three-prong grounding plug for your protection against
shock hazards. It must be plugged directly into a
properly grounded three-prong receptacle. The power
supply circuit must be installed in accordance with
current edition of the National Electrical Code (NFPA
70) and local codes and ordinances. Consult a qualified
electrician. Receptacles protected by Ground Fault
Circuit Interrupters (GFIC) are NOT RECOMMENDED.
Do not use an extension cord or adapter plug.
• If voltage varies by 10% or more, refrigerator performance
may be affected. Operating refrigerator with insufficient
power can damage the motor. Such damage is not
covered under the warranty. If you suspect your house
voltage is high or low, consult your power company for
testing.
• To prevent the refrigerator from being turned off
accidentically, do not plug unit into an outlet controlled
by a wall switch or pull cord.
• Do not pinch, knot, or bend the cord in any manner.
INSTALLATION
This Owner’s Guide provides specific operating instructions for
your model. Use the refrigerator only as instructed in this
Owner’s Guide. Before starting the refrigerator, follow these
important first steps.
INSTALLATION
• Choose a place that is near a grounded electrical outlet. Do
Not use an extension cord or an adapter plug.
• For the most efficient operation, the refrigerator should be
located where surrounding temperatures will not drop
below 40° F (5° C) or exceed 110° F (43° C).
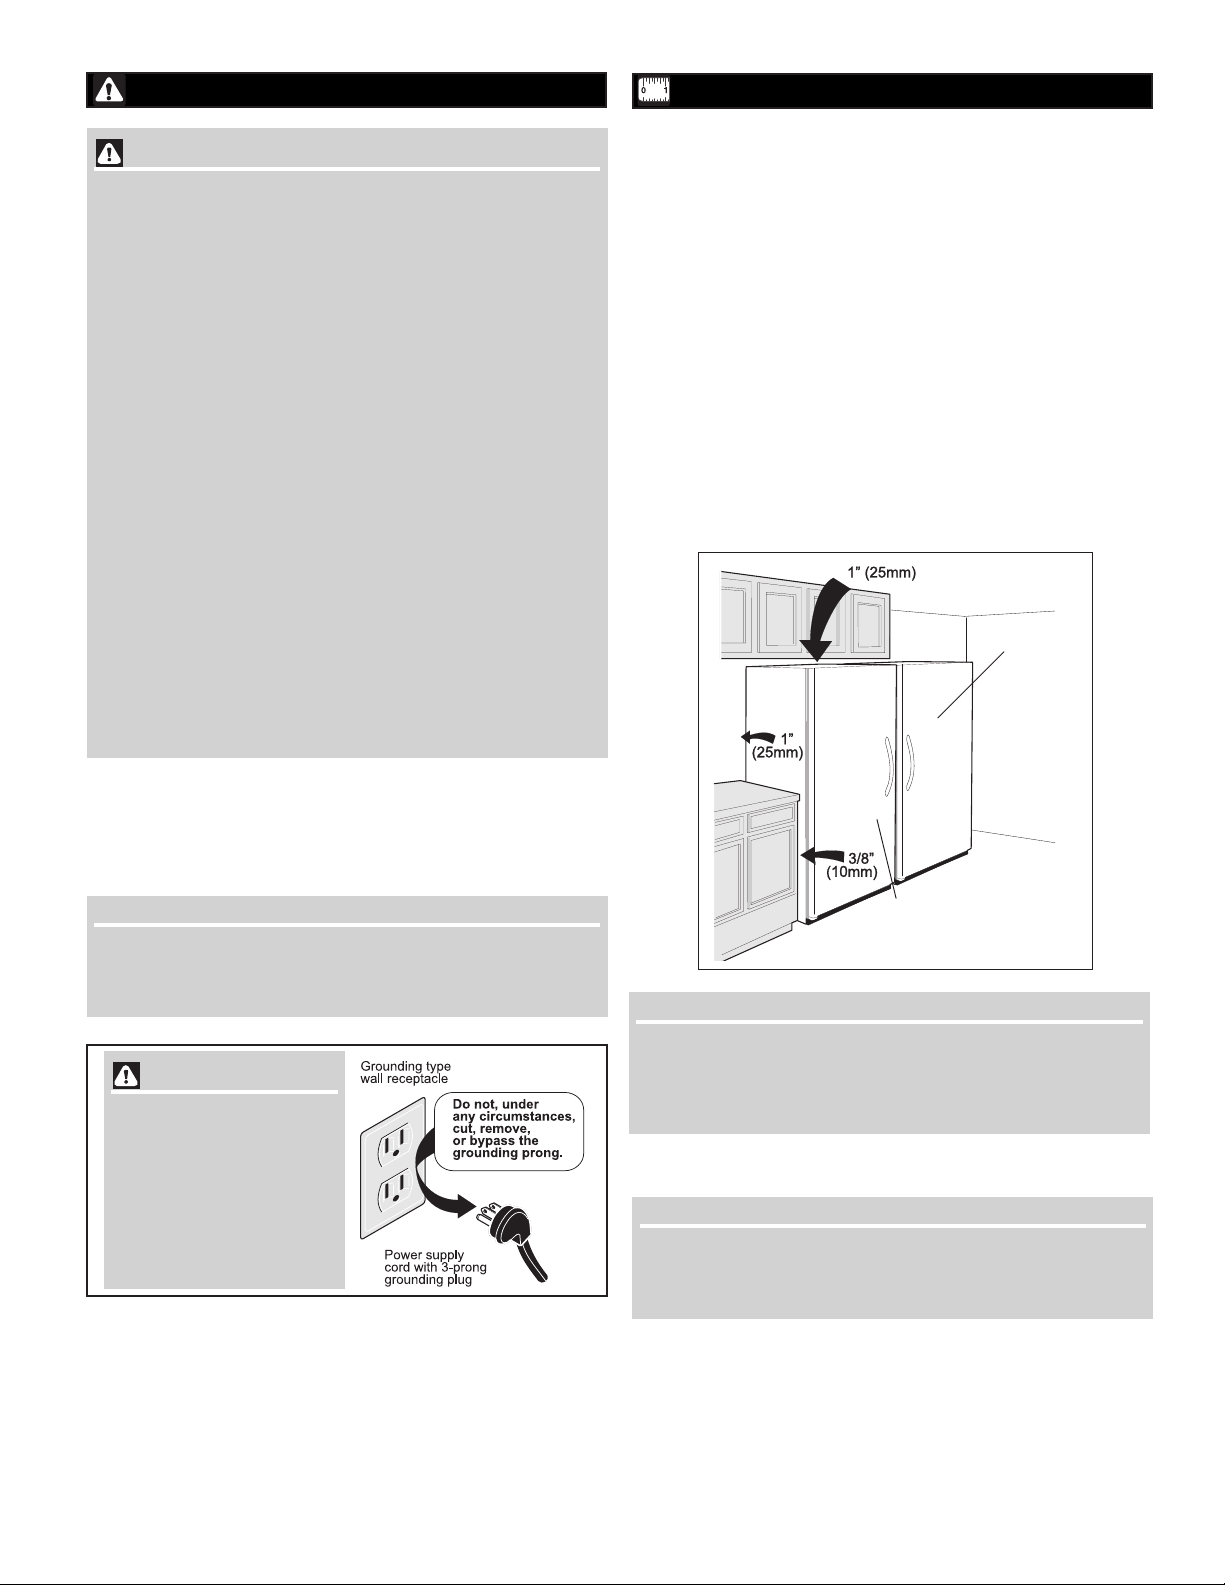
• Allow the following clearances for ease of installation,
proper air circulation, and electrical connections:
Sides 3/8” minimum
Back & Top 1” minimum
• Do Not block the toe grille on the lower front of your
refrigerator. Sufficient air circulation is essential for the
proper operation of your refrigerator.
Refrigerator
OTHER PRECAUTIONS
• To defrost refrigerator, always unplug unit first.
• Never unplug the refrigerator by pulling on the cord. Always
grip the plug firmly, and pull straight out from the receptacle.
NOTENOTE
NOTE
NOTENOTE
Turning the temperature control to OFF turns off the
compressor, but does not disconnect the power to the light
bulb or other electrical components.
WARNING WARNING
WARNING
WARNING WARNING
Avoid fire hazard or
electric shock. Do not use
an extension cord or an
adapter plug. Do not
remove any prong from
the power cord.
Freezer
Installation
NOTENOTE
NOTE
NOTENOTE
The exterior walls of the refrigerator may become quite warm
as the compressor works to transfer heat from the inside.
Temperatures as much as 30° F warmer than room
temperature can be expected.
DOOR OPENING
NOTENOTE
NOTE
NOTENOTE
If your refrigerator is placed with the door hinge side against a
wall, you may have to allow additional space so the door can
be opened wider.
3
Page 4

LEVELING
g
g
The refrigerator must have all bottom corners resting firmly on a
solid floor. The floor must be strong enough to support a fully
loaded refrigerator . NOTE: It is Very Important for your
refrigerator to be level in order to function properly. If the
refrigerator is not leveled
during installation, the
door may be misaligned
and not close or seal
properly, causing
cooling, frost, or moisture
problems.
To Level Refrigerator:
After discarding crating
Tur n
Right To
Lower
Unpacking and Leveling
Tur n
Left To
Raise
Plastic
Levelin
Feet
Cratin
Screw
screws and wood base,
use a carpenter’s level to
level the refrigerator from
front-to-back. Adjust the
plastic leveling feet in
front, ½ bubble higher, so
that the door closes
easily when left halfway
open.
Unpacking and Leveling
Discard The (4) Crating Screws
And (2) Wood Bases
Leveling Instructions for all Refrigerator/Freezer Pair:
• Remove two leg levelers provided in literature bag. While
unit is lying on its back for wood skid removal, install both
leg levelers in rear of unit.
• Level door of first unit using all four levelers and slide unit
into place. Recheck for levelness and adjust if necessary.
• Measure distance from floor to bottom of door on first unit.
Adjust and level second unit so door height matches.
• Leg Level Adjustments
• One full turn of all four leg levelers will raise door 5/32”.
• One full turn of both front leg levelers will raise door
3/16” and tilt top of door back 7/16”.
• One full turn of both rear leg levelers will lower door
1/32” and tilt top of door forward 7/16”.
• One full turn of both side leg levelers will raise door
3/16” and tilt top of door 3/8”.
• Slide second unit into place leaving a minimum gap of 3/16”
between units for door swing clearance.
• This last step may require at least one extraction of the
second unit to properly align units in a “built-in” application.
CAUTION CAUTION
CAUTION
CAUTION CAUTION
To allow door to close and seal properly, do not let food
packages extend past the front of the shelves
DOOR REMOVAL
If door must be removed :
1. Gently lay refrigerator on its back, on a rug or blanket.
2. Remove two base screws and base panel.
3. Remove bottom hinge screws.
4. Remove plastic top hinge cover.
5. Remove screws from top hinge.
6. Remove top hinge from cabinet.
7. Remove door and bottom hinge from cabinet.
8. To replace door, reverse the above order and securely
tighten all screws to prevent hinge slippage.
FEATURES AT A GLANCE
COOL DOWN PERIOD
For safe food storage, allow 4 hours for the refrigerator to
cool down completely. The refrigerator will run continuously
for the first several hours.
TEMPERATURE CONTROL
The temperature control is located inside the refrigerator
compartment. The temperature is factory
preset to provide satisfactory food storage
temperatures. However, the temperature
control is adjustable to provide a range of
temperatures for your personal satisfaction.
If a colder temperature is desired, turn the
temperature control knob toward COLDEST
and allow several hours for temperatures to
stabilize between adjustments.
Cold Control
Shelf Front
4
Page 5

LOOKING INSIDE
INTERIOR LIGHTING
The lights come on automatically when the door is opened. To
replace the light bulb, turn the temperature control to OFF and
unplug the electrical cord. Replace the old bulb with a bulb of
the same wattage.
MID LEVEL LIGHTING
The light comes on automatically when the door is opened. To
replace the light bulb, turn the temperature control to OFF and
unplug the electrical cord. Remove the lens from the lamp
housing by unsnapping it from the lamp housing using your
fingers or a screwdriver. Be careful not to break the locking tabs
on the lamp housing. Replace the old bulb with a bulb of the
same type and wattage. To replace the lens, snap one side of
the lens opening to the tab on the lamp housing. Then carefully
attach the other side.
TO ADJUST CANTILEVER SHELVES
NOTENOTE
NOTE
NOTENOTE
Cantilever shelves are supported at the back of the
refrigerator.
1 Lift front edge up.
2 Pull shelf out.
Replace the shelf by
inserting the hooks at rear of
the shelf into the wall
bracket. Lower the shelf into
the desired slots and lock
into position.
DOOR STORAGE
Door bins, shelves, and racks are provided for convenient
storage of jars, bottles, and cans. Frequently used items can be
quickly selected.
Some models have door racks or bins that can accommodate
gallon-sized plastic drink containers and economy-sized jars
and containers.
The dairy compartment, which is warmer than the general food
storage section, is intended for short term storage of cheese,
spreads, or butter.
CAUTION CAUTION
CAUTION
CAUTION CAUTION
To avoid personal injury or property damage, handle
tempered glass shelves carefully. Shelves may break
suddenly if nicked, scratched, or exposed to sudden
temperature change.
ADJUSTABLE INTERIOR
SHELVES
Multi-position adjustable interior
shelves can be moved to any
position for larger or smaller
packages. The shipping spacers
that stabilize the shelves for
shipping may be removed and
discarded.
ADJUSTABLE DOOR BINS
Some models have adjustable door
bins that can be moved to suit
individual needs.
To move door bins
1. Lift bin straight up.
2. Remove bin.
3. Place bin in desired position.
4. Lower bin onto supports
until locked in place.
DELI DRAWER
Adjustable Door Bin
5
Page 6

HUMIDITY CONTROL (SOME MODELS)
The Humidity Control, present on some models with crisper
drawers, allows you to adjust the humidity within the crisper. This
can extend the life of fresh vegetables that keep best in high
humidity.
FOOD STORAGE AND
ENERGY SAVING TIPS
FOOD STORAGE IDEAS
Fresh Food Storage
• The fresh food compartment should be kept between 34° F
and 40° F with an optimum temperature of 37° F.
• Avoid overcrowding the refrigerator shelves. This reduces
the circulation of air around the food and results in uneven
cooling.
Fruits and Vegetables
• Storage in the crisper drawers traps moisture to help
preserve the fruit and vegetable quality for longer time
periods.
Meat
• Raw meat and poultry should be wrapped securely so
leakage and contamination of other foods or surfaces does
not occur.
VACATION AND MOVING TIPS
Short Vacations:
Leave the refrigerator operating during vacations of less
than three weeks.
Long Vacations:
If the refrigerator will not be used for several months:
• Remove all food and unplug the power cord.
• Clean and dry the interior thoroughly.
• Leave the refrigerator door open slightly, blocking it open if
necessary, to prevent odor and mold growth.
Moving: When moving the refrigerator, follow these
guidelines to prevent damage:
• Disconnect the power cord plug from the wall outlet.
• Remove foods, then defrost, and clean the refrigerator.
• Secure all loose items such as base panel, baskets, and
shelves by taping them securely in place to prevent
damage.
• In the moving vehicle, secure refrigerator in an upright
position to prevent movement. Also protect outside of
refrigerator with a blanket, or similar item.
6
Page 7

CARE AND CLEANING
Keep your refrigerator clean to prevent odor build-up. Wipe up
any spills immediately and clean at least twice a year. Never
use metallic scouring pads, brushes, abrasive cleaners or
strong alkaline solutions on any surface. Do not wash any
removable parts in a dishwasher.
Always unplug the electrical
power cord from the wall outlet before cleaning.
CAUTION CAUTION
CAUTION
CAUTION CAUTION
• When moving the refrigerator, pull straight out. Do not
shift the refrigerator from side to side as this may tear
or gouge the floor covering.
• Damp objects stick to cold metal surfaces. Do not
touch interior metal surfaces with wet or damp hands.
Care & Cleaning Chart
Part What To Use Tips and Precautions
Interior/Door
Liner
Door Gaskets
Drawers/Bins
Glass Shelves
Exterior and
Handles
Exterior and
Handles
(Stainless Steel
Models Only)
• Soap and water
• Baking soda and water
• Soap and water
• Soap and water
• Soap and water
• Glass cleaner
• Mild liquid sprays
• Soap and water
• Non Abrasive Glass
Cleaner
• Soap and water
• Ammonia
• Stainless Steel Cleaners
Use 2 tablespoons of baking soda in 1 quart of warm water. Be sure to wring
excess water out of sponge or cloth before cleaning around controls,
light bulb or any electrical part.
Wipe gaskets with a clean soft cloth.
Do not wash any removable items (bins, drawers, etc.) in dishwasher.
Allow glass to warm to room temperature before immersing in warm water.
Do not use commercial household cleaners, ammonia, or alcohol to clean
handles. Use a soft cloth to clean smooth handles. Do Not use a dry cloth to
clean smooth doors.
Clean stainless steel front and handles with non-abrasive soapy water and a
dishcloth. Rinse with clean water and a soft cloth. Wipe stubborn spots with an
ammonia-soaked paper towel, and rinse. Use a non-abrasive stainless steel
cleaner. These cleaners can be purchased at most home improvement or
major department stores. Always follow manufacturer's instructions.
NOTE: Always clean, wipe and dry with the grain to prevent cross-grain
scratching. Wash the rest of the cabinet with warm water and mild liquid
detergent. Rinse well, and wipe dry with a clean soft cloth.
NOTENOTE
NOTE
NOTENOTE
• Turning the refrigerator temperature control to “OFF” turns
off the compressor, but does not disconnect electrical
power to the light bulb or other electrical components. To
turn off power to your refrigerator, you must unplug the
power cord from the wall outlet.
• Do not use razor blades or other sharp instruments which
can scratch the appliance surface when removing
adhesive labels. Any glue left from tape or labels can be
removed with a mixture of warm water and mild
detergent, or, touch the glue residue with the sticky side of
tape you have already removed. Do not remove the
serial plate.
7
Page 8

WARRANTY
REFRIGERATOR WARRANTY Your refrigerator is protected by this warranty
FULL ONE-YEAR
WARRANTY
LIMITED 2nd– 5TH
YEAR WARRANTY
(Cabinet Liner and
Sealed System)
LIMITED
WARRANTY
(Applicable to the
State of Alaska)
In the U.S.A.. and Puerto Rico, your appliance is warranted by Electrolux Major Appliances North America, a division of Electrolux Home Products,
Inc. In Canada, your appliance is warranted by Electrolux Major Appliances North America, a division of Electrolux Canada Corp. Electrolux Home
Products, Inc. and Electrolux Canada Corp. are referred to in this warranty as “Electrolux”. We authorize no person to change or add to any of our
obligations under this warranty. Our obligations for service and parts under this warranty must be performed by us or an authorized Electrolux
servicer.
*NORMAL
RESPONSIBILITIES
OF THE CUSTOMER
EXCLUSIONS This warranty does not cover the following:
IF YOU NEED
SERVICE
This warranty only applies in the 50 States of the U.S.A. and Puerto Rico, and Canada. Product features or specifications as described or illustrated
are subject to change without notice.
WARRANTY
PERIOD
One year from
original purchase
date.
Second through fifth
years from original
purchase date.
Time periods listed
above.
This warranty applies only to products in ordinary household use, and the consumer is responsible for the items
listed below:
1. Proper use of the appliance in accordance with instructions provided with the product.
2. Proper installation by an authorized servicer in accordance with instructions provided with the appliance and in
accordance with all local plumbing, electrical and/or gas codes.
3. Proper connection to a grounded power supply of sufficient voltage, replacement of blown fuses, repair of loose
connections or defects in house wiring.
4. Expenses for making the appliance accessible for servicing, such as removal of trim, cupboards, shelves, etc., which
are not a part of the appliance when it was shipped from the factory.
5. Damages to finish after installation.
6. Replacement of light bulbs and/or fluorescent tubes (on models with these features).
1. CONSEQUENTIAL OR INCIDENTAL DAMAGES SUCH AS PROPERTY DAMAGE AND INCIDENTAL EXPENSES
RESULTING FROM ANY BREACH OF THIS WRITTEN OR ANY IMPLIED WARRANTY.
Note: Some states do not allow the exclusion or limitation of incidental or consequential damages, so this limitation or
exclusion may not apply to you.
2. Service calls which do not involve malfunction or defects in workmanship or material, or for appliances not in ordinary
household use. The consumer shall pay for such service calls.
3. Damages caused by services performed by servicers other than Electrolux, or its authorized servicers; use of parts
other than genuine Electrolux parts; obtained from persons other than such servicers; or external causes such as
abuse, misuse, inadequate power supply or acts of God.
4. Products with original serial numbers that have been removed or altered and cannot be readily determined.
Keep your bill of sale, delivery slip, or some other appropriate payment record. The date on the bill establishes the
warranty period should service be required. If service is performed, it is in your best interest to obtain and keep all
receipts. This written warranty gives you specific legal rights. You may also have other rights that vary from state to state.
Service under this warranty must be obtained by contacting Electrolux.
USA
800-944-9044
Electrolux Major Appliances North America,
a division of Electrolux Home Products, Inc.
P.O. Box 212378
Augusta, GA 30917
THROUGH OUR AUTHORIZED SERVICERS,
Pay all costs for repairing or replacing any parts of this
appliance which prove to be defective in materials or
workmanship. Excludes ori ginal and replacement Ice & Water
filter cartridges (if equipped). Original and replac ement
cartridges are warranted for 30 days (parts only).
Repair or replace any parts in the cabinet liner or sealed
refrigeration system (compressor, condenser, evaporator,
dryer or tubing) which prove to be defective in materials or
workmanship.
All of the provisions of the full warranties above and the
exclusions listed below apply.
WE WILL:
THE CONSUMER WILL BE
RESPONSIBLE FOR:
Costs of service calls that are listed under
NORMAL RESPONSIBILITIES OF THE
CONSUMER.*
Costs for pickup and delivery of the appliance
required because of service. Costs for labor, parts
and transportation other than with respect to the
cabinet liner or Sealed Refrigeration System.
Costs of the technician's travel to the home and any
costs for pick up and delivery of the appliance
required because of service.
800-265-8352
Electrolux Major Appliances North America,
a division of Electrolux Home Products, Inc.
5855 Terry Fox Way
Mississauga, Ontario
Canada
L5V 3E4
8
Page 9

BEFORE YOU CALL
GNITOOHSELBUORT
EDIUG
MELBORPESUACNOITCE
B
RROC
sedulcnitsilsihT.esnepxednaemituoyevasyamtI.tsilsihtweiver,ecivresrofgnillacerofe
.ecnailppasihtnislairetamropihsnamkrowevitcefedfotluserehttoneratahtsecnerucconommoc
NOITAREPOROTAREGIRFER
.nurtonseodrotaregirfeR
.tpurretni
rutarepmeT•
.noitisopFFO
•rotaregirfeRdeggulpebtonyam
tiucric
aregirfeR
.gnoloot
rohcumootsnurrot
•rotaregirfeRneebyltnecersah
.emit
•rotaregirfeRylt
.nepo
.wol
•rotaregirfeR,ytridsiteksag
ow
.rekaerb
.egatuorewoP•
.gnolootro
aotnideggulpsirotaregirfeR•
tluafdnuorgasahtahttiucric
ehtnisilortnoce
.esoolebyamgulpro,ni
deppirtronwolbesufesuoH•
.tohsirehtaewedistuoromooR•
fodoireparofdetcennocsid
hromrawfostnuomaegraL•
to
.yltnecerderotsneebevahdoof
yltneuqerfootdenepoerasrooD•
hgilsebyamrood
oottessilortnoCerutarepmeT•
.dettifylroopro,dekcarc,nr
cti
eeS• lortnoCerutarepmeTehtgnitteS .noitceS
.rekaerbtiucric
rehtroflamrons'tI•rotaregirfeesehtrednuredrahkrowot
.snoitidnoc
ehtrofsruoh4sekattI•taregirfernwodloocotr
.yletelpmoc
esuaclliwdoofmraW•rotaregirferehtlitnueromnurot
aW•rotaregirfer.eromnurottisesuac
eeS• "SMELBORPROOD" noitceS .
•sruohlareveswollA.gnittes
rotaregirferderisedniatniamotredroniregnolnurot
ehtgniretneriamr
.netfosselsroodnepO
.erutarepmet
.naicinhcetdeifitrecaybdekceh
.teltuootnidehsupylthgitsigulperusnE•
ma51ahtiwesufecalper/kcehC•
.ynapmoCcirtcelElacolllaC.sthgilesuohkcehC•
o
.dehcaersierutarepmetderised
remrawaotbonklortnocnruT
.ezilibatsoterutarepmetehtrof
evah,teltuoehttuobaerusnuerauoyfI.tiucricrehtonaesU•
teseR.esufyaled-emitp
esuaclliwlaesroodehtniskaeL.teksagegnahcronaelC•
ttessilortnoCerutarepmeT•
erutarepmetrotaregirferroiretnI
.dlocootsi
erutarepmetrotaregirferroiretnI
.mrawootsi
ecafruslanretxerotaregirfeR
.mrawsierutarepmet
.wol
.mraw
ooD•
.ylreporp
tnecer
.yl
.emit
oo
ehtrof
oottessilortnoCerutarepmeT•
sirognolootnepotpeksir
.yltneuqerfootdenepo
gnilaesebtonyamrooD•
tohromrawfostnuomaegraL•
derotsneebevahyamdoof
neebyltnecersahrotaregirfeR•
fodoireparofdetcennocsid
wrotaregirferlanretxeehT•
slla
remrawF°03sahcumsaebnac
.erutarepmetmoornaht
eeS• "SMELBORPROOD" .noitceS
eles
otlortnocnruT•
nepO.denepo
.erutarepmetdetc
.ezilibatsoterutarepmet
.ezilibatsoterutarepmet
.netfosselroodeht
.tenibacrotaregirferehtedisnimorftaeh
sruohlareveswollA.gnittesremrawaotlortnocehtnruT•
ehtrofsruohlareveswollA.gnittesredloca
siroodehtemityreverotaregirferehtsretneriamraW•
stihcaerotecnahcadahsahrotaregirferehtlitnutiaW•
.yletelpmocnwodloocotsruoh4seriuqerrotaregirfeR•
refsnartotskrowrosserpmocehtelihwlamronsisihT•
ESIONDNADNUOS
revenehwsleveldnuosreduoL
.nosirotaregirfer
.rosserpmoc
nehwsleveldnuosregnoL
.nosemocrosserpmoc
.elcycNO
evahsrotaregirfernredoM•
dnayticapacegarotsdesaercni
utarepmetelbatserom
ycneiciffehgihaeriuqer
asetareporotaregirfeR•
yehT.ser
rehgiht
ehtfotratsehtgnirudserusserp
.roiretni
.nurotseunitnocrotaregirfer
,wolsilevelesiongnidnuorrusehtnehW.lamronsisihT•
e
htslooctielihwgninnurrosserpmocehtraehthgimuoy
saraeppasidroffolevellliwdnuoS.lamronsisihT•
9
Page 10

BEFORE YOU CALL
MELBORPESUACNOITCERROC
).tnoC(ESIONDNADNUOS
dnuosgnikcarcrognippoP
.nosemocrosserpmocnehw
pip
.se
,dnuosgnilgrugrognilbbuB
iliobretawekil
.gn
ongnilttarrognitarbiV
.esi
.ylthgils
irotaregirfeR•
.dnuoSgnippanS
orotaregirfer
.ffodnan
noisnapxeogrednustraplateM•
retawtohnisa,noitcartnocdna
loocotdesu(tnaregirfeR•
gnitalucricsi)rotaregirfer
.metsysehttuohguorht
skcortI.leveltonsirotaregirfeR•
devomsitinehwroolfehtno
.llawehtgnihcuots
ehtgninrutlortnoCdloC•
.lamronsisihT•
.noitceS
ehtni"gnileveL"ot spetStsriF .noitceS
.lamronsisihT•
.nurotseunitnocrotaregirfer
ehtni"gnileveL"otrefeR.tinuehtleveL• spetStsriF
saraeppasidroffolevellliwdnuoS.lamronsisihT•
refeR.ylthgilsrotaregirferevomrorotaregirferehtleveleR•
ROTAREGIRFEREDISNITSORF/ERUTSIOM/RETAW
foedisninosmroferutsioM
.sllawrotaregirfer
.ylreporp
.dimuhdnatohsirehtaeW•
gnilaesebtonyamrooD•
ootnepotpeksirooD•
.yltneuqerfootdenepo
siro,gnol
"eeS• SMELBORPROOD .noitceS"
.lamronsisihT•
.netfosselroodehtnepO•
ROTAREGIRFEREDISTUOTSORF/ERUTSIOM/RETAW
foedistuonosmroferutsioM
.rotaregirfer
disnimorf
.edistuo
gnilaesebtonyamrooD•
riadlocehtgnisuac,ylreporp
otrotaregirferehte
morfriatsiommrawteem
"eeS• SMELBORPROOD .noitceS"
ROTAREGIRFERNIRODO
.rotaregirfernisrodO
.rotaregirfereht
.denaelcebotsdeenroiretnI•
nierasrodognortshtiwsdooF•
.ylthgitdoofehtrevoC•
a,retawmraw,egnopshtiwroiretninaelC•
.adosgnikabdn
SMELBORPROOD
.esolctonlliwrooD
.ylthgils
skcortI.leveltonsirotaregirfeR•
devomsitinehwroolfehtno
.noitceS
ehtecrofnacnoitidnocsihT•
ehtni"gnileveL"otrefeR.roodehtngilasim spetStsriF
dnaerauqsfotuotenibac
NOTONSIBLUBTHGIL
.notonsiblubthgiL
.rotaregirfereht
.tuodenrubsiblubthgiL•
ehtni serutaeFrotaregirfeR .noitceS
gnihcaersitnerruccirtceleoN•
"eeS• NOITAREPOROTAREGIRFER .noitc
hgiLroiretnI"rednusnoitceridwolloF• "
eS"
thgiLleveLdiM"ro"t
10
 Loading...