

Page 1

Service manual
1
MSG-07/09/12HRIN2
SERVICE
MANUAL
Page 2

Service manual
2
1 Precaution
1.1 Safety Precaution
To prevent injury to the user or other people and property damage, the following instructions must be followed.
Incorrect operation due to ignoring instruction will cause harm or damage.
Before service unit, be sure to read this service manual at first.
1.2 Warning
Installation
Do not use a defective or underrated circuit breaker.
Use this appliance on a dedicated circuit.
There is risk of fire or electric shock.
For electrical work, contact the dealer, seller, a
qualified electrician, or an Authorized service center.
Do not disassemble or repair the product, there is risk of
fire or electric shock.
Always ground the product.
There is risk of fire or electric shock.
Install the panel and the cover of control box
securely.
There is risk of fire of electric shock.
Always install a dedicated circuit and breaker.
Improper wiring or installation may cause fore or electric
shock.
Use the correctly rated breaker of fuse.
There is risk of fire or electric shock.
Do not modify or extend the power cable.
There is risk of fire or electric shock.
Do not install, remove, or reinstall the unit by
yourself (customer).
There is risk of fire, electric shock, explosion, or injury.
Be caution when unpacking and installing the
product.
Sharp edges could cause injury, be especially careful of
the case edges and the fins on the condenser and
evaporator.
For installation, always contact the dealer or an
Authorized service center.
There is risk of fire, electric shock, explosion, or injury.
Do not install the product on a defective installation
stand.
It may cause injury, accident, or damage to the product.
Be sure the installation area does not deteriorate
with age.
If the base collapses, the air conditioner could fall with it,
causing property damage, product failure, and personal
injury.
Do not let the air conditioner run for a long time
when the humidity is very high and a door or a
windows is left open.
Moisture may condense and wet or damage furniture.
Take care to ensure that power cable could not be
pulled out or damaged during operation.
There is risk of fire or electric shock.
Do not place anything on the power cable.
There is risk of fire or electric shock.
Do not plug or unplug the power supply plug during
operation.
There is risk of fire or electric shock.
Do not touch (operation) the product with wet hands.
There is risk of fire or electric shock.
Do not place a heater or other appliance near the
power cable.
There is risk of fire and electric shock.
Do not allow water to run into electric parts.
It may cause fire, failure of the product, or electric shock.
Do not store or use flammable gas or combustible
near the product.
There is risk of fire or failure of product.
Do not use the product in a tightly closed space for a
long time.
Oxygen deficiency could occur.
When flammable gas leaks, turn off the gas and
open a window for ventilation before turn the
product on.
Do not use the telephone or turn switches on or off.
There is risk of explosion or fire.
If strange sounds, or small or smoke comes from
product. Turn the breaker off or disconnect the
power supply cable.
There is risk of electric shock or fire.
Stop operation and close the window in storm or
hurricane. If possible, remove the product from the
window before the hurricane arrives.
There is risk of property damage, failure of product, or
electric shock.
Do not open the inlet grill of the product during
operation. (Do not touch the electrostatic filter, if the
unit is so equipped.)
There is risk of physical injury, electric shock, or product
failure.
When the product is soaked (flooded or submerged),
contact an Authorized service center.
There is risk of fire or electric shock.
Be caution that water could not enter the product.
There is risk of fire, electric shock, or product damage.
Ventilate the product from time to time when
operating it together with a stove, etc.
There is risk of fire or electric shock.
Turn the main power off when cleaning or
maintaining the product.
Page 3
Service manual
2
There is risk of electric shock.
When the product is not be used for a long time,
disconnect the power supply plug or turn off the
breaker.
There is risk of product damage or failure, or unintended
operation.
Take care to ensure that nobody could step on or fall
onto the outdoor unit.
This could result in personal injury and product damage.
CAUTION
Always check for gas (refrigerant) leakage after
installation or repair of product.
Low refrigerant levels may cause failure of product.
Install the drain hose to ensure that water is drained
away properly.
A bad connection may cause water leakage.
Keep level even when installing the product.
To avoid vibration of water leakage.
Do not install the product where the noise or hot air
from the outdoor unit could damage the
neighborhoods.
It may cause a problem for your neighbors.
Use two or more people to lift and transport the
product.
Avoid personal injury.
Do not install the product where it will be exposed to
sea wind (salt spray) directly.
It may cause corrosion on the product. Corrosion,
particularly on the condenser and evaporator fins, could
cause product malfunction or inefficient operation.
Operational
Do not expose the skin directly to cool air for long
periods of time. (Do not sit in the draft).
This could harm to your health.
Do not use the product for special purposes, such
as preserving foods, works of art, etc. It is a
consumer air conditioner, not a precision refrigerant
system.
There is risk of damage or loss of property.
Do not block the inlet or outlet of air flow.
It may cause product failure.
Use a soft cloth to clean. Do not use harsh
detergents, solvents, etc.
There is risk of fire, electric shock, or damage to the
plastic parts of the product.
Do not touch the metal parts of the product when
removing the air filter. They are very sharp.
There is risk of personal injury.
Do not step on pr put anything on the product.
(outdoor units)
There is risk of personal injury and failure of product.
Always insert the filter securely. Clean the filter
every two weeks or more often if necessary.
A dirty filter reduces the efficiency of the air conditioner
and could cause product malfunction or damage.
Do not insert hands or other object through air inlet
or outlet while the product is operated.
There are sharp and moving parts that could cause
personal injury.
Do not drink the water drained from the product.
It is not sanitary could cause serious health issues.
Use a firm stool or ladder when cleaning or
maintaining the product.
Be careful and avoid personal injury.
Replace the all batteries in the remote control with
new ones of the same type. Do not mix old and mew
batteries or different types of batteries.
There is risk of fire or explosion.
Do not recharge or disassemble the batteries. Do not
dispose of batteries in a fire.
They may burn of explode.
If the liquid from the batteries gets onto your skin or
clothes, wash it well with clean water. Do not use the
remote of the batteries have leaked.
The chemical in batteries could cause burns or other
health hazards.
Page 4
Service manual
3
2 Function
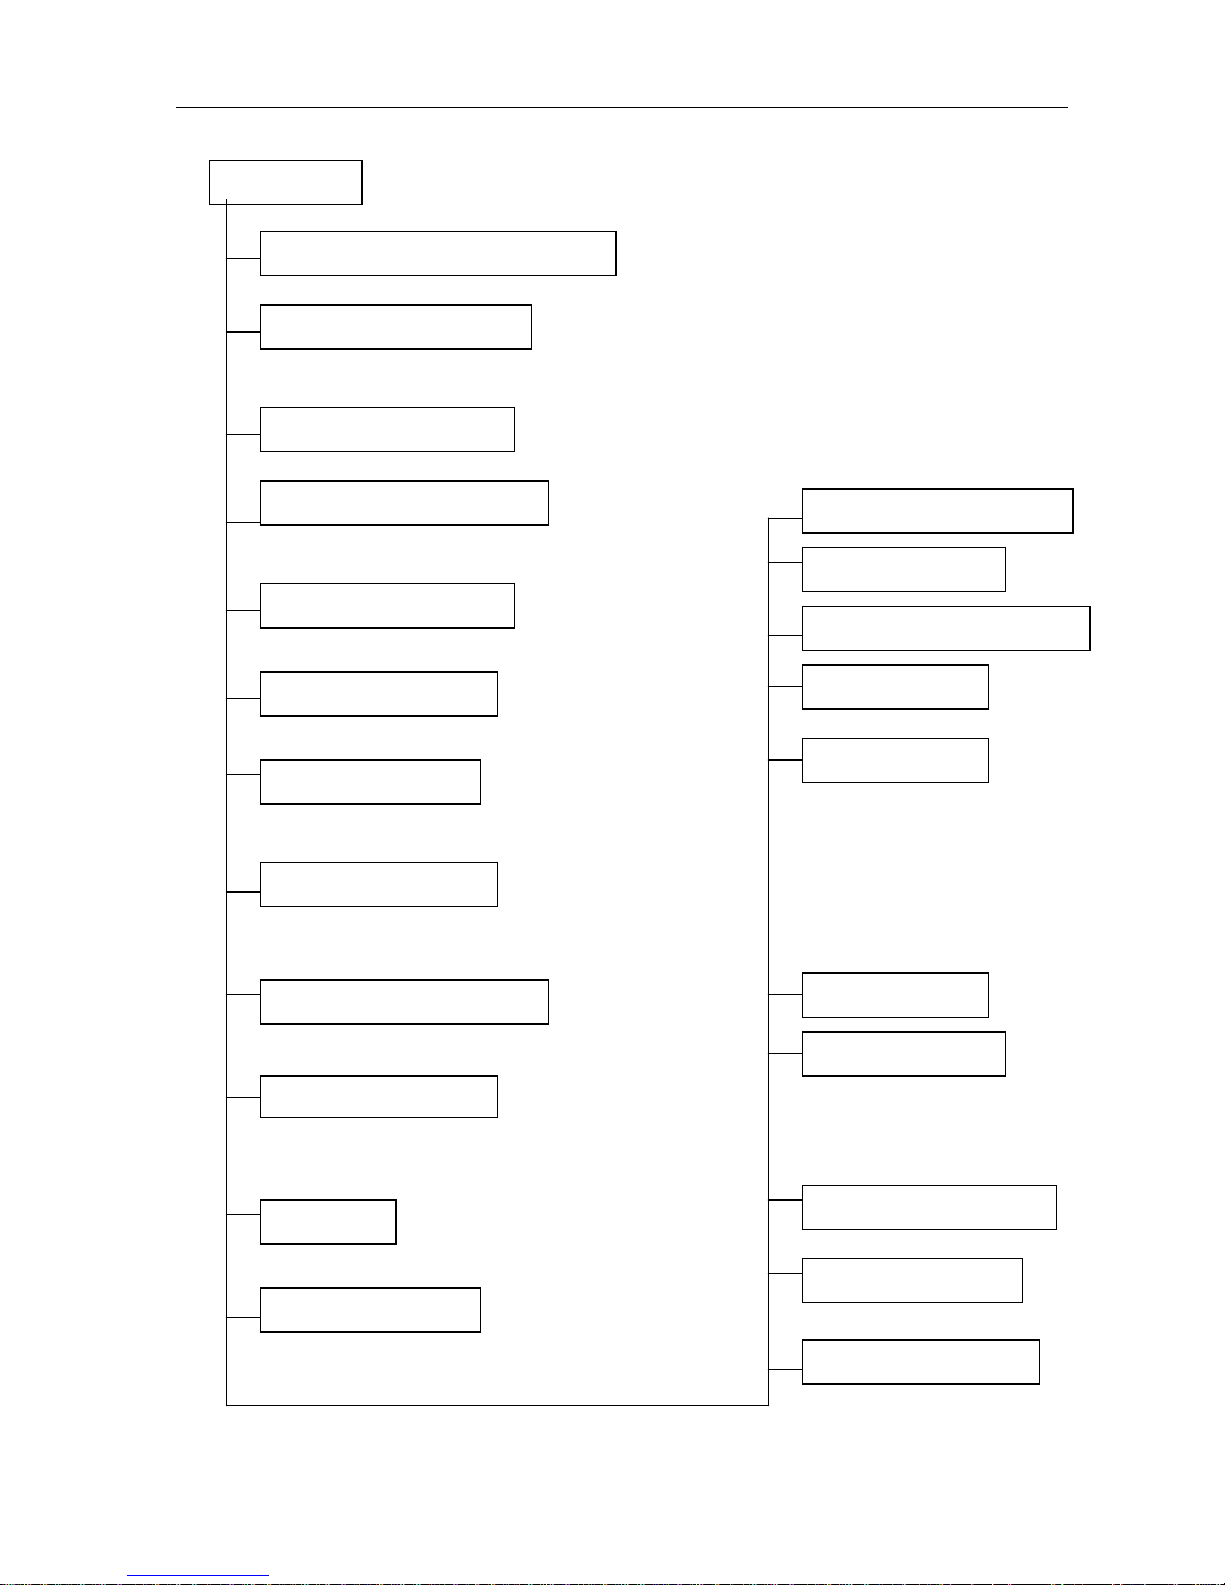
Indoor unit
Operation ON/OFF by remote controller
Room temperature sensor.
Pipe temperature sensor.
Sensing by room temperature
Maintain the room temperature in accordance with the setting temperature.
Room temperature control
Prevent the water being frozen on evaporator by sensing
the evaporator pipe temperature in cooling mode
Anti-freezing control in cooling
Restarting is for approx. 3 minutes..
Time Delay Safety control
Turbo wind, high, med, low, breeze.
Indoor fan speed control
The unit will decide the louver direction according to operation mode.
Two-direction air vane
The fan is turn to low speed (cooling/heating).
The unit will be turn off at the seventh hour.
Sleep mode auto control
The function is usually used in rainy days in
springtime or damp areas.
Independent dehumidification
The louver can be set at the desired position or swing up and
down automatically
Air flow Direction control
The mode can be change by the room temperature.
Auto mode
DSP High-speed Chip
Flexible wiring connection
Auto defrosting
Temp. Compensation
Prevent the cold wind at
the beginning of unit start
Anti-cold function
Self-diag. function
Auto-restart function
When the power supply is interrupted and then
restore, the air conditioners automatically
restore the previous function setting.
Tele Remote control (Optional)
Driving heating at -15℃
High efficiency (30%)
Work voltage (160v-253v)
Page 5
Service manual
4
The unit has 3 minutes delay between continuously ON/OFF operations.
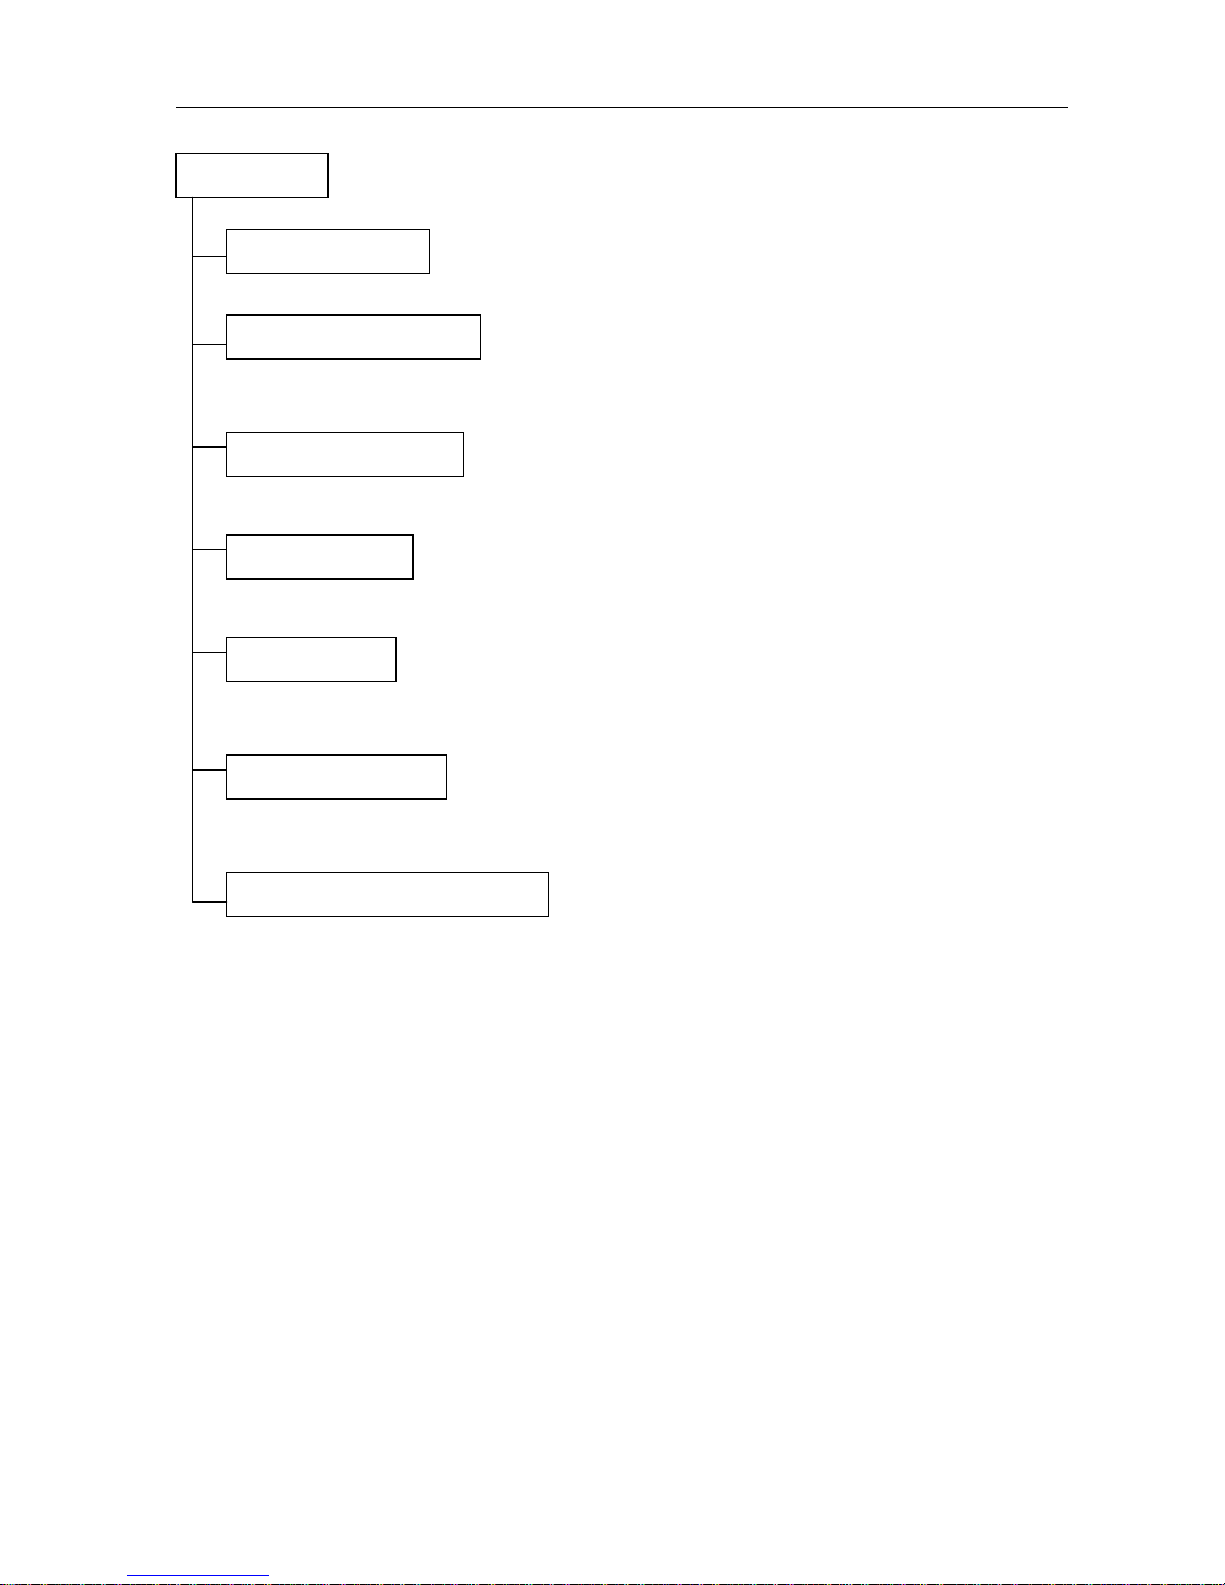
Outdoor unit
Power relay control
The hydrophilic fin can improve the heating efficiency at operation mode.
Hydrophilic aluminum fin
It is only operated in the heating operation mode except defrosting operation.
Anti-rust cabinet
Valve protection cover
4 way valve control
Made from electrolytic zinc steel sheet and anti-rust coated components.
It protects the valves and prevents water from dripping.
Low noise air flow system
Bird tail propeller fan makes the outdoor unit run more quietly.
Discharge pipe temperature protect
Page 6

Service manual
5
3 Dimension
3.1 Indoor unit (Inverter Eco)
model W H A
7K/9K 750 250 188
12K 815 280 195
3.2 Outdoor unit (Inverter Eco)
Dimension
Model
W H D L1 L2 L3
7K/9K/12K 780 540 250
530 315 590
Page 7

Service manual
6
4 Specification
Model MSG-07HRIN2 MSG-09HRIN2 MSG-12HRIN2
Power source 220-240V~ 50Hz 220-240V~ 50Hz 220-240V~ 50Hz
Capacity BTU/H 7000(2700~9000) 9000(2730~10600) 12000(3070~13300)
Input W 780(305~990) 990(305~1180) 1340(334~1494)
Running current A 4.8(1.35~6.2) 4.5(1.2~6.6) 5.8(1.60~7.60)
Cooling
EER BTU/W.H,W/W
9.0, 2.62 9.0, 2.62 9.0, 2.61
Capacity BTU/H 9000(2700~11000) 12000(2730~14000) 15000(3070~17060)
Input W
940(280~1140) 1240(283~1450) 1560(320~1773)
Running current A 4.4(1.35~6.7) 5.5(1.45~9.3) 6.8(1.6~10.6)
Heating
COP W/W 2.81 2.82 2.82
Moisture r
emoval
L/h 1.0 1.0 1.2
Max. input consumption W
2300 2300 2600
Model BG130X1C-20FZ BG130X1C-20FZ BG130X1C-20FZ
Type Rotary Inverter Rotary Inverter Rotary Inverter
Brand TOSHIBA TOSHIBA TOSHIBA
Refrigerant oil ml 370 370 370
Refrigerant oil type POE POE POE
Compressor
Capacitor uF \ \ \
Refrigerant R407C g
850 850 1200
Input W RPG13H RPG13H RPG13C
Brand Welling Welling Welling
Capacitor uF 1.2uF/≥450VAC 1.2uF/≥450VAC 1.5uF/≥450VAC
Speed level 3 3 3
Indoor fan motor
Hi/Mid/Lo speed ( rpm) 1050/950/750 1100/1000/800 1060/900/800
Air flow(indoor) Hi/Mid/Lo m3/h 500/410/320 520/430/330 560/460/380
Noise level (indoor) Hi/Mid/Lo dB(A) 35/32/26 36/32/26 36/32/26
Input W YDK25-6-3 YDK25-6-3 YDK25-6-3
Capacitor uF 2.5uF/≥450VAC 2.5uF/≥450VAC 2.5uF/≥450VAC
Outdoor fan motor
Brand Welling Welling Welling
Noise lever (outdoor)
dB(A) 51 51 53
dimension (W*H*D) 750*250*188 750*250*188 815*280*195
Packing (W*H*D) 830*336*280 830*336*280 915*360*275
Indoor unit
Net/Gross weight kg 8/10 8/10 9/12
dimension (W*H*D) 780*540*250 780*540*250 780*540*250
Packing (W*H*D) 910*575*335 910*575*335 910*575*335
Outdoor unit
Net/Gross weight kg 37/40 37/40 40/43
Liquid side mm φ6.35 φ6.35 φ6.35
Gas side mm φ9.53 φ9.53 φ12.7
Max. refrigerant pipe le
ngth
10 10 10
Refrigerant piping
Max. difference in level
5 5 5
Operation temp
17℃~30℃ 17℃~30℃ 17℃~30℃
Ambient temp
-15℃~45℃ -15℃~45℃ -15℃~45℃
Application area
m2
14-18 18-24 20-30
Page 8

Service manual
7
5 Refrigerant cycle diagram
Page 9

Service manual
8
6 Operation limits
6.1 Cooling operation
Outdoor unit air temp.℃ DB
Indoor air temp. ℃ DB
Note: The chart is the result from the continuous operation under constant air temperature conditions.
However, excludes the initial pull-down stage.
6.2 Heating operation
Indoor air temp. ℃ DB
Outdoor unit air temp.℃ DB
Note: The chart is the result from the continuous operation under constant air temperature conditions.
However, excludes the initial pull-down stage.
Page 10

Service manual
9
7 Wiring diagram
Indoor unit 7k/9K
Indoor unit 12K
Page 11

Service manual
10
Outdoor unit
Page 12
Service manual
11
8 Installation details
8.1 Wrench torque sheet for installation
Outside diameter Torque
mm inch Kgf.m
φ6.35
1/4 1.8
φ9.52
3/8 4.2
φ12.7
1/2 5.5
8.2 Connecting the cables
The power cord of connect should be selected according to the following specifications sheet.
Unit 7k/9K 12K
mm2 1.0 1.5
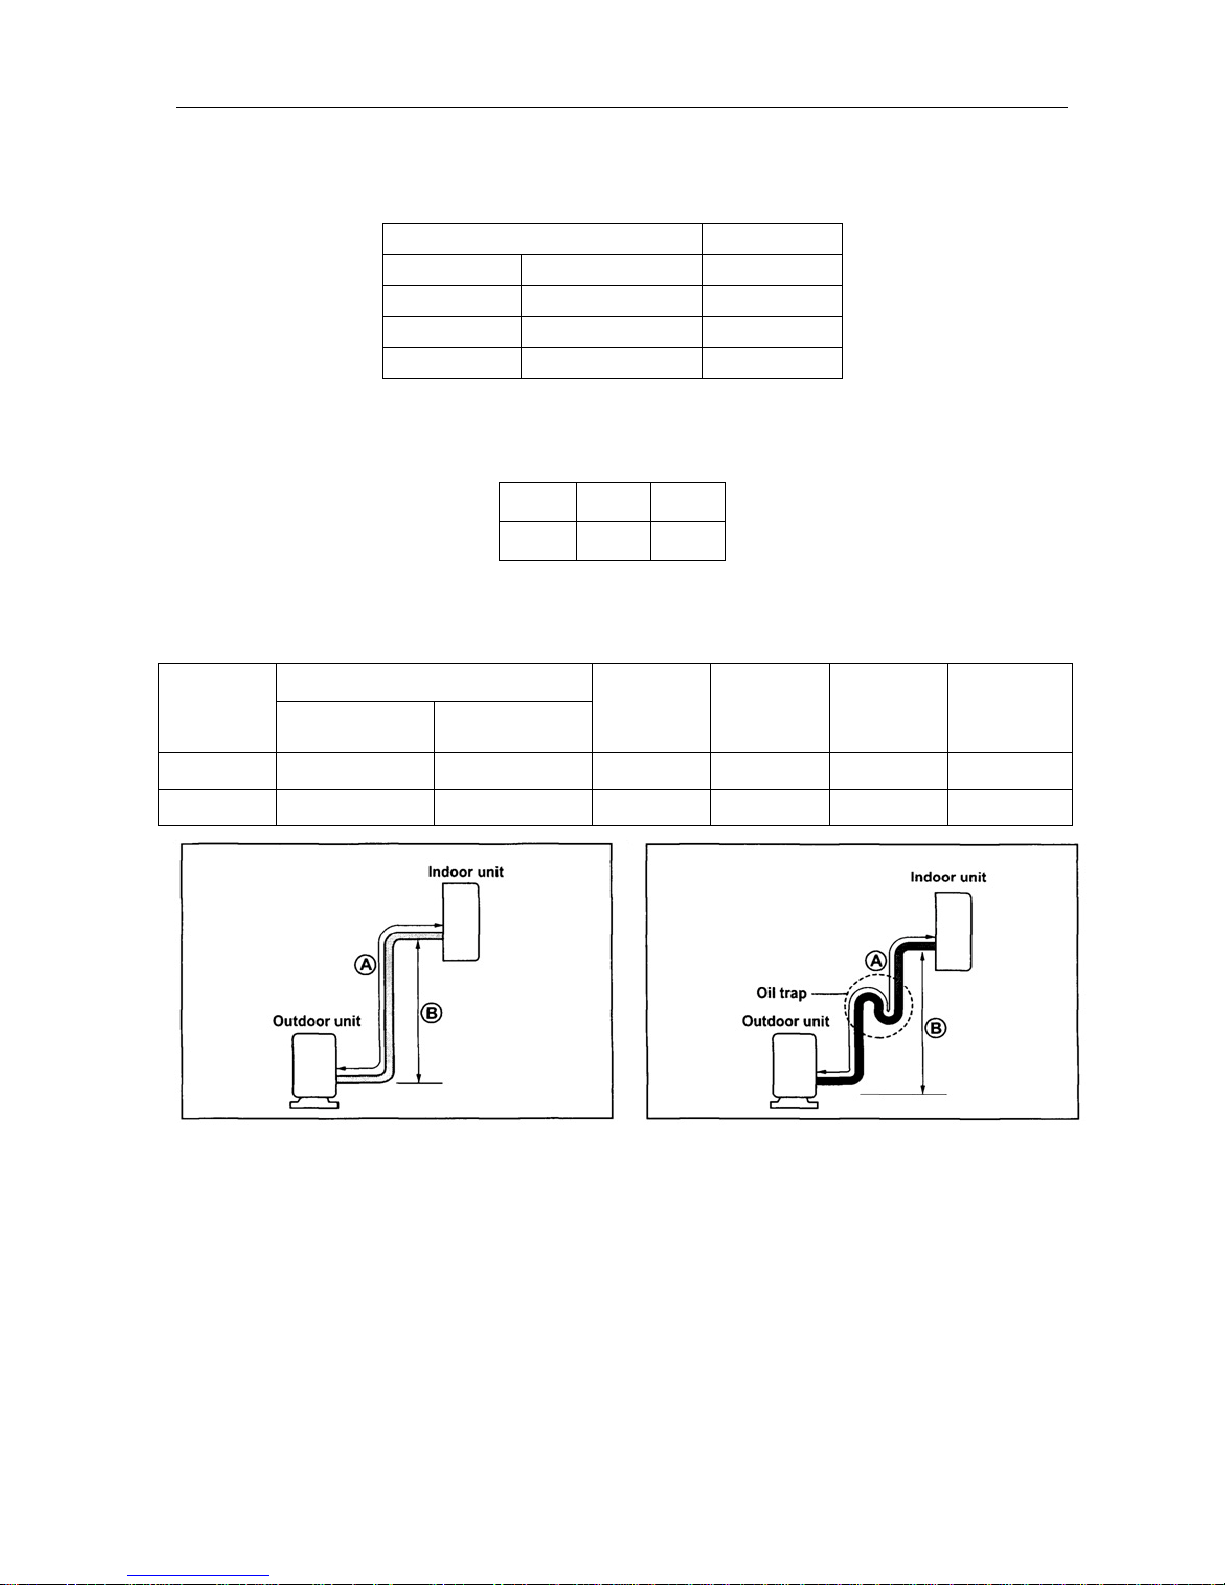
8.3 Pipe length and the elevation
Pipe size
Capacity
Btu/h
GAS LIQUID
Standard
length
(m)
Max.
Elevation
B (m)
Max.
Length
A (m)
Additional
refrigerant
(g/m)
7k/9k
3/8’’ (φ9.52) 1/4’’ (φ6.35)
5 5 10 30
12k
1/2’’ (φ12.7) 1/4’’ (φ6.35)
5 5 10 30
Caution:
Capacity is base on standard length and maximum allowance length is base of reliability.
Oil trap should be installed per 5-7 meters.
In case that
more than 5m.
Page 13
Service manual
12
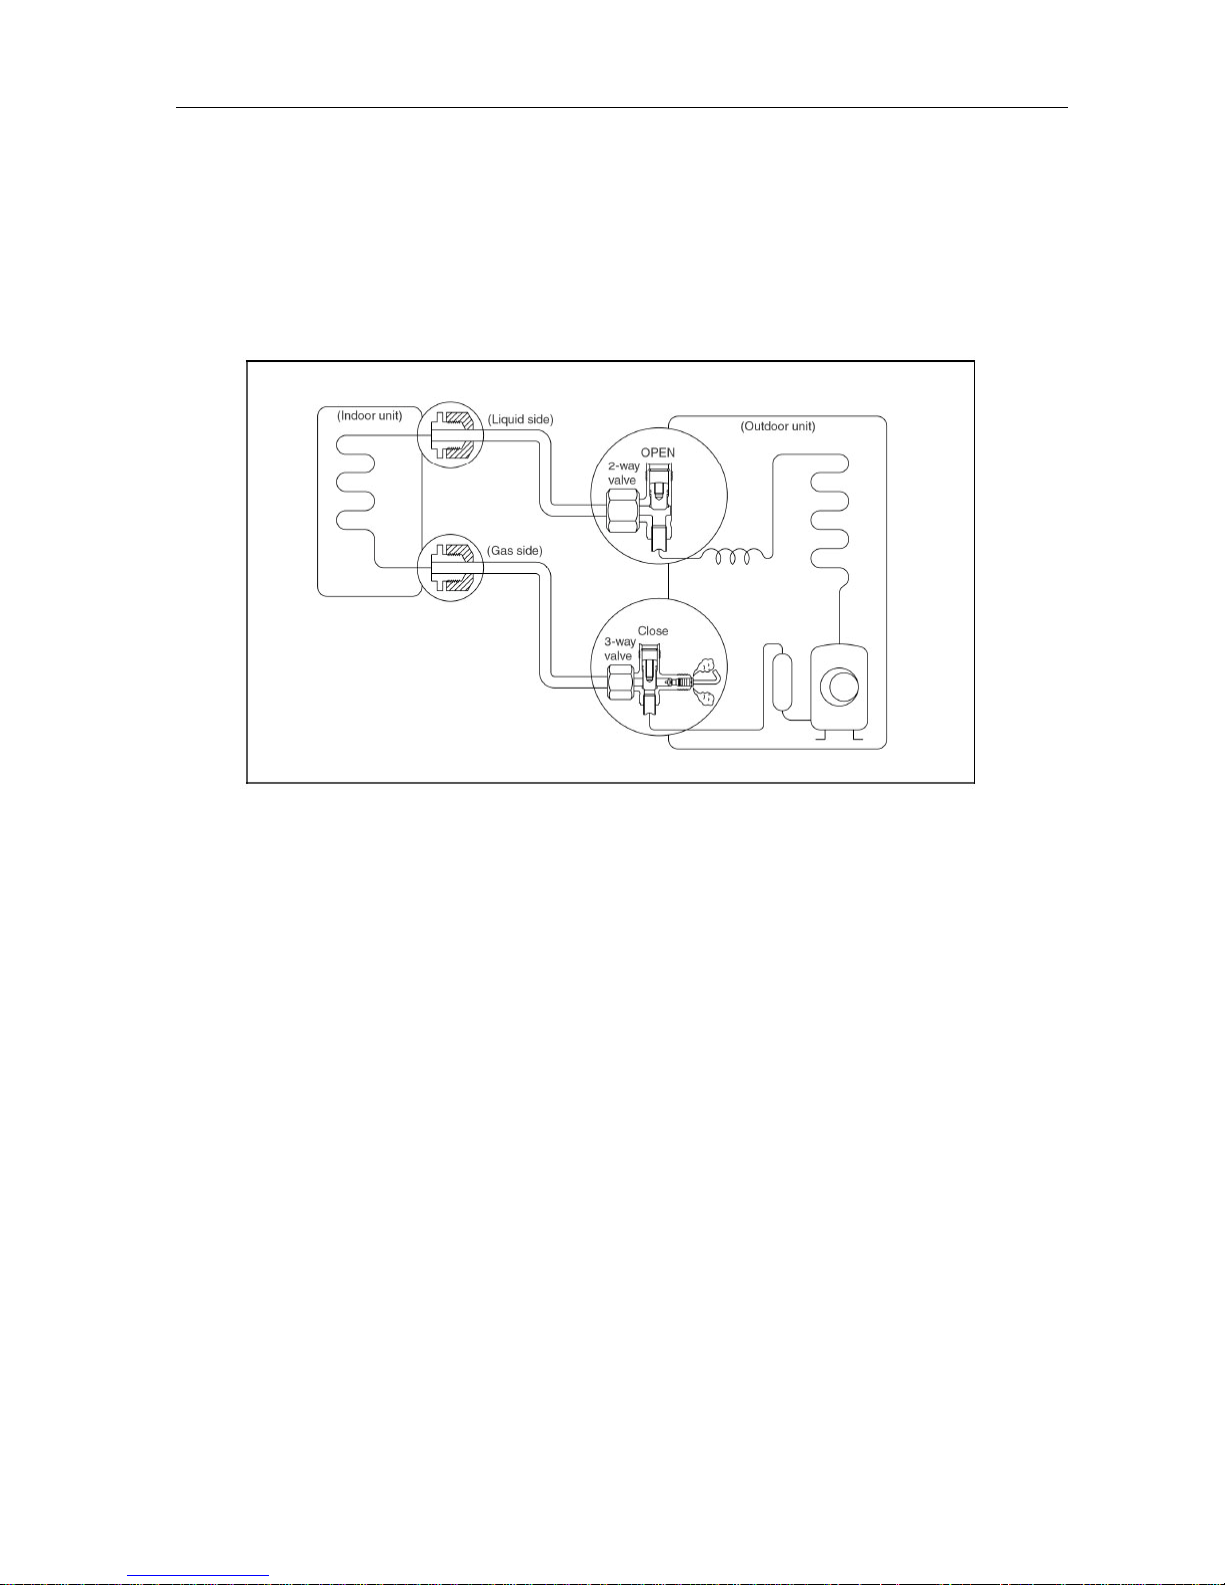
8.4 Air purging of the piping and indoor unit
Required tools:
Hexagonal wrench; adjustable wrench; torque wrenches, wrench to hold the joints and gas leak detector.
Note:
The air in the indoor unit and in the piping must be purged. If air remains in the refrigeration piping, it will
affect the compressor, reduce the cooling capacity, and could lead to a malfunction of unit.
Be sure, using a torque wrench to tighten the service port cap (after using the service port), so that it
prevents the gas leakage from the refrigeration cycle.
Procedure
1. Recheck the piping connections.
2. Open the valve stem of the 2-way valve
counterclockwise approximately 90’, wait
10 seconds, and then set it to closed
position.
Be sure to use a hexagonal wrench to operate
the valve stem
3. Check for gas leakage.
Check the flare connection for gas leakage
4. Purge the air from the system.
Set the 2-way valve to the open position and
remove the cap from the 3-way valve’s
service port.
Using the hexagonal wrench to press the
valve core pin, discharge for three seconds
and then wait for one minute.
5. Use torque wrench to tighten the service
port cap to a torque of 18n.m
6. Set the 3-way valve to the opened
position.
7. Mounted the valve stem nuts to the 2-way
and 3-way valves.
8. Check for gas leakage.
At this time, especially check for gas leakage
from the 2-way and 3-way stem nuts, and
from the service port.
Caution:
If gas leakage is discovered in step (3) above,
take the following measures.
If the leaks stop when the piping connections are
tightened further, continue working from step (4).
If the gas leaks do not stop when the connections
are retightened, repair the location of the leak,
discharge all of the gas through the service port,
and then recharge with the specified amount of
gas from a gas cylinder.
Page 14

Service manual
13
8.5 Pumping down (Re-installation)
Procedure
1. Confirm that both the 2-way and 3-way valves are set to the opened position.
Remove the valve stem caps and confirm that the valve stems are in the opened position.
Be sure to use a hexagonal wrench to operate the valve stems.
2. Operate the unit for 10 to 15 minutes.
3. Stop operation and wait for 3 minutes, then connect the charge set to the service port of the
3-way valve.
Connect the charge hose with the push pin to the gas service port.
4. Air purging of the charge hose.
Open the low-pressure valve on the charge set slightly to purge air from the charge hose.
5. Set the 2-way valve to the close position.
6. Operate the air conditioner at the cooling cycle and stop it when the gauge indicates 0.1MPa.
7. Immediately set the 3-way valve to the closed position.
Do this quickly so that the gauge ends up indicating 0.3 to 0.5Mpa.
8. Disconnect the charge set, and amount the 2-way and 3-way valve’s stem nuts and service
port caps.
Use a torque wrench to tighten the service port cap to a torque of 18n.m
Be sure to check for gas leakage.
Page 15

Service manual
14
8.6 Re-air purging (Re-installation)
Procedure:
1. Confirm that both the 2-way and 3-way valves are set to the closed position.
2. Connect the charge set and a charging cylinder to the service port of the 3-way valve.
Leave the valve on the charging cylinder closed.
3. Air purging.
Open the valves on the charging cylinder and the charge set. Purge the air by loosening the flare nut
on the 2-way valve approximately 45’ for 3 seconds then closing it for 1 minute; repeat 3 times.
After purging the air, use a torque wrench to tighten the flare nut to on the 2-way valve.
4. Check the gas leakage.
Check the flare connections for gas leakage.
5. Discharge the refrigerant.
Close the valve on the charging cylinder and discharge the refrigerant until the gauge indicates 0.3 to
0.5 Mpa.
6. Disconnect the charge set and the charging cylinder, and set the 2-way and 3-way valves to
the open position.
Be sure to use a hexagonal wrench to operate the valve stems.
7. Mount the valve stems nuts and the service port cap.
Be sure to use a torque wrench to tighten the service port cap to a torque 18N.m.
Be sure to check the gas leakage.
Page 16
Service manual
15
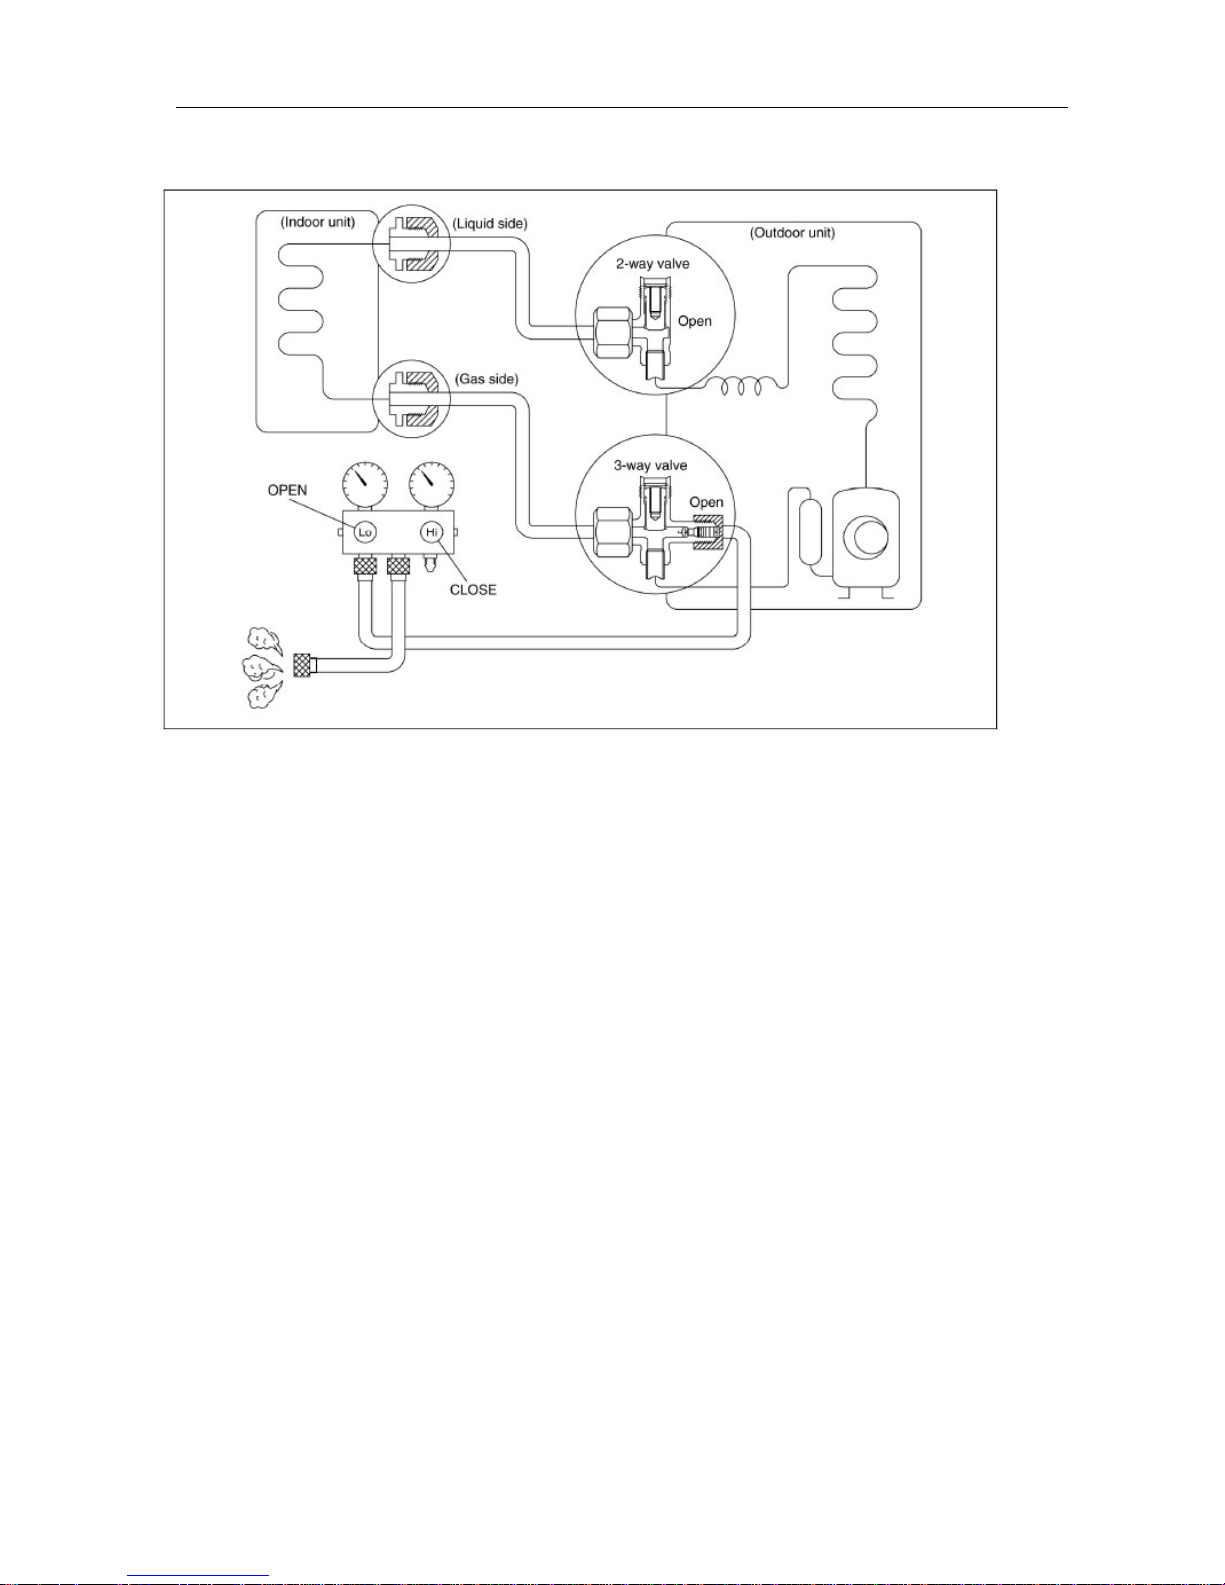
8.7 Balance refrigerant of the 2-way, 3-way valves
Procedure:
1. Confirm that both the 2-way and 3-way valves are set to the open position.
2. Connect the charge set to the 3-way valve’s service port.
Leave the valve on the charge set closed.
Connect the charge hose with the push pin to the service port.
3. Open the valves (Low side) on the charge set and discharge the refrigerant until the gauge
indicates 0.05 to 0.1 Mpa.
If there is no air in the refrigeration cycle [the pressure when the air conditioner is not running is
higher than 0.1Mpa, discharge the refrigerant until the gauge indicates 0.05 to 0.1 Mpa. If this is the
case, it will not be necessary to apply a evacuation.
Discharge the refrigeration gradually; if it is discharged too suddenly, the refrigeration oil sill be
discharged.
Page 17
Service manual
16
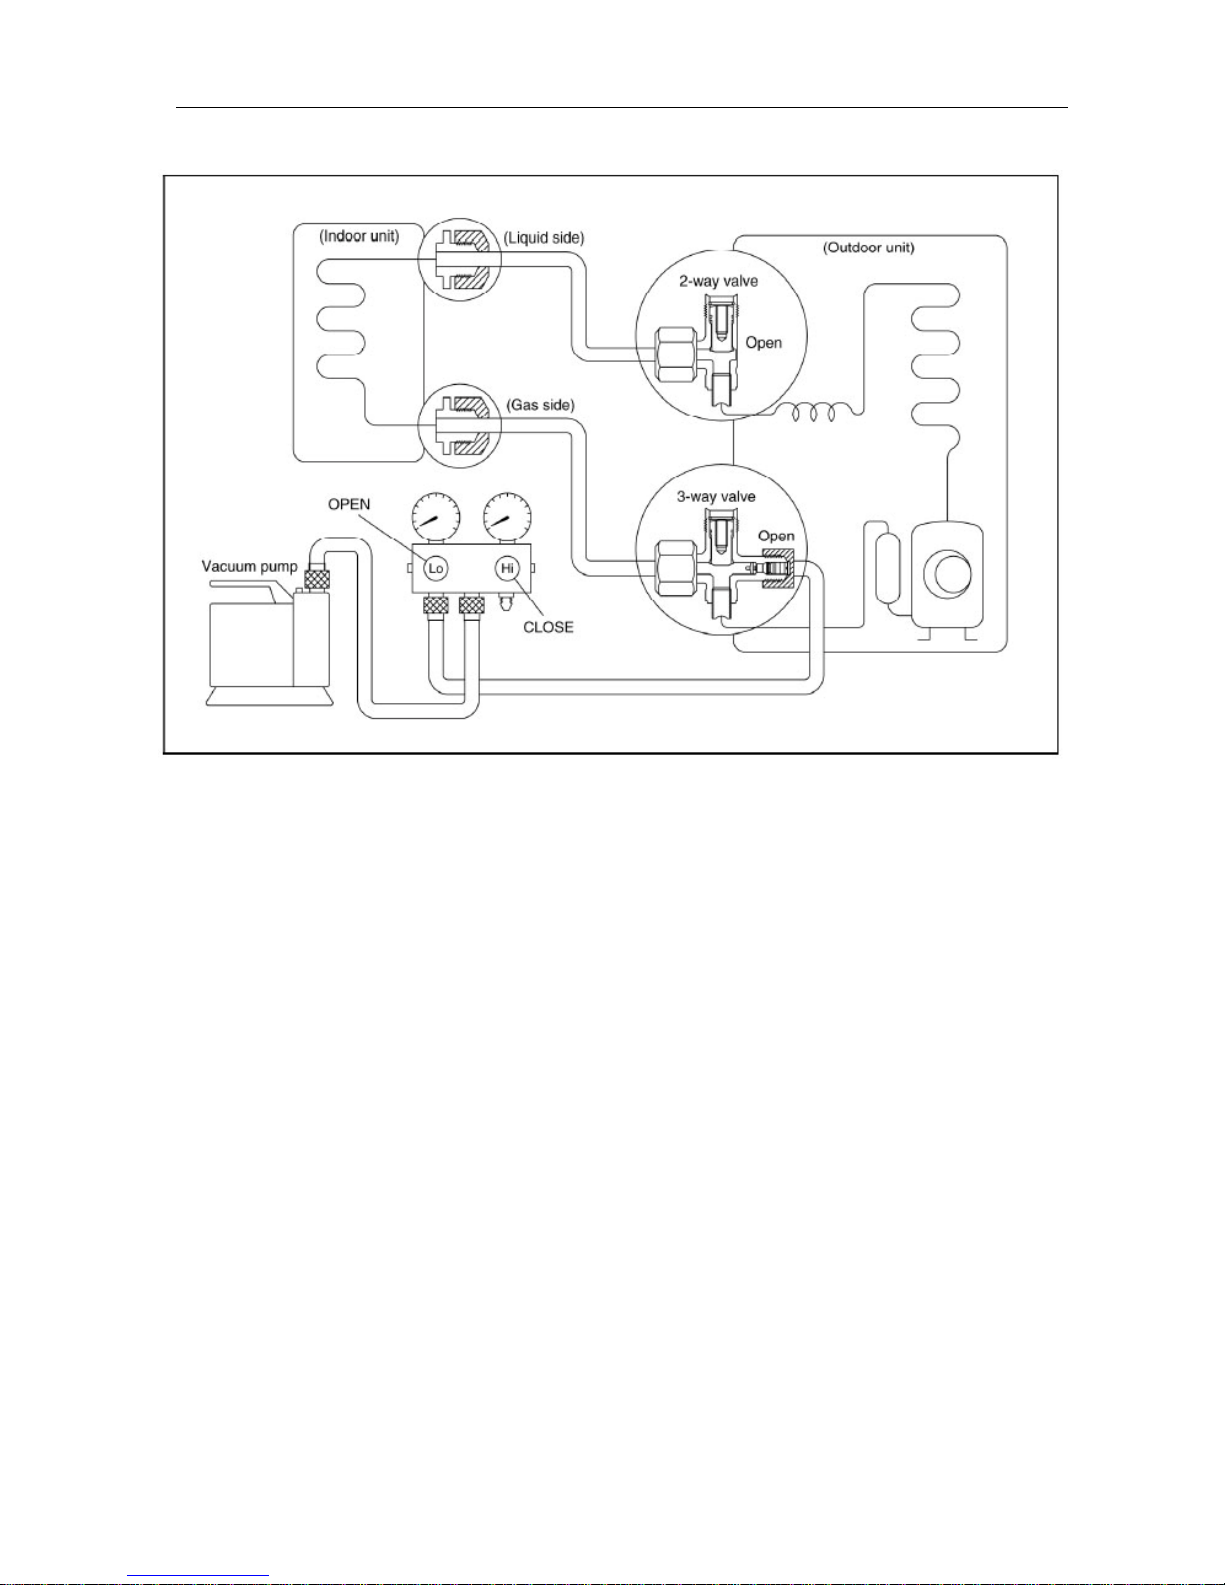
8.8 Evacuation
Procedure:
1. Connect the vacuum pump to the charge set’s centre hose.
2. Evacuation for approximately one hour.
Confirm that the gauge needle has moved toward -0.1 Mpa (-76 cmHg) [vacuum of 4 mmHg or less].
3. Close the valve (Low side) on the charge set, turn off the vacuum pump, and confirm that the
gauge needle does not move (approximately 5 minutes after turning off the vacuum pump).
4. Disconnect the charge hose from the vacuum pump.
Vacuum pump oil, if the vacuum pump oil becomes dirty or depleted, replenish as needle.
Page 18
Service manual
17
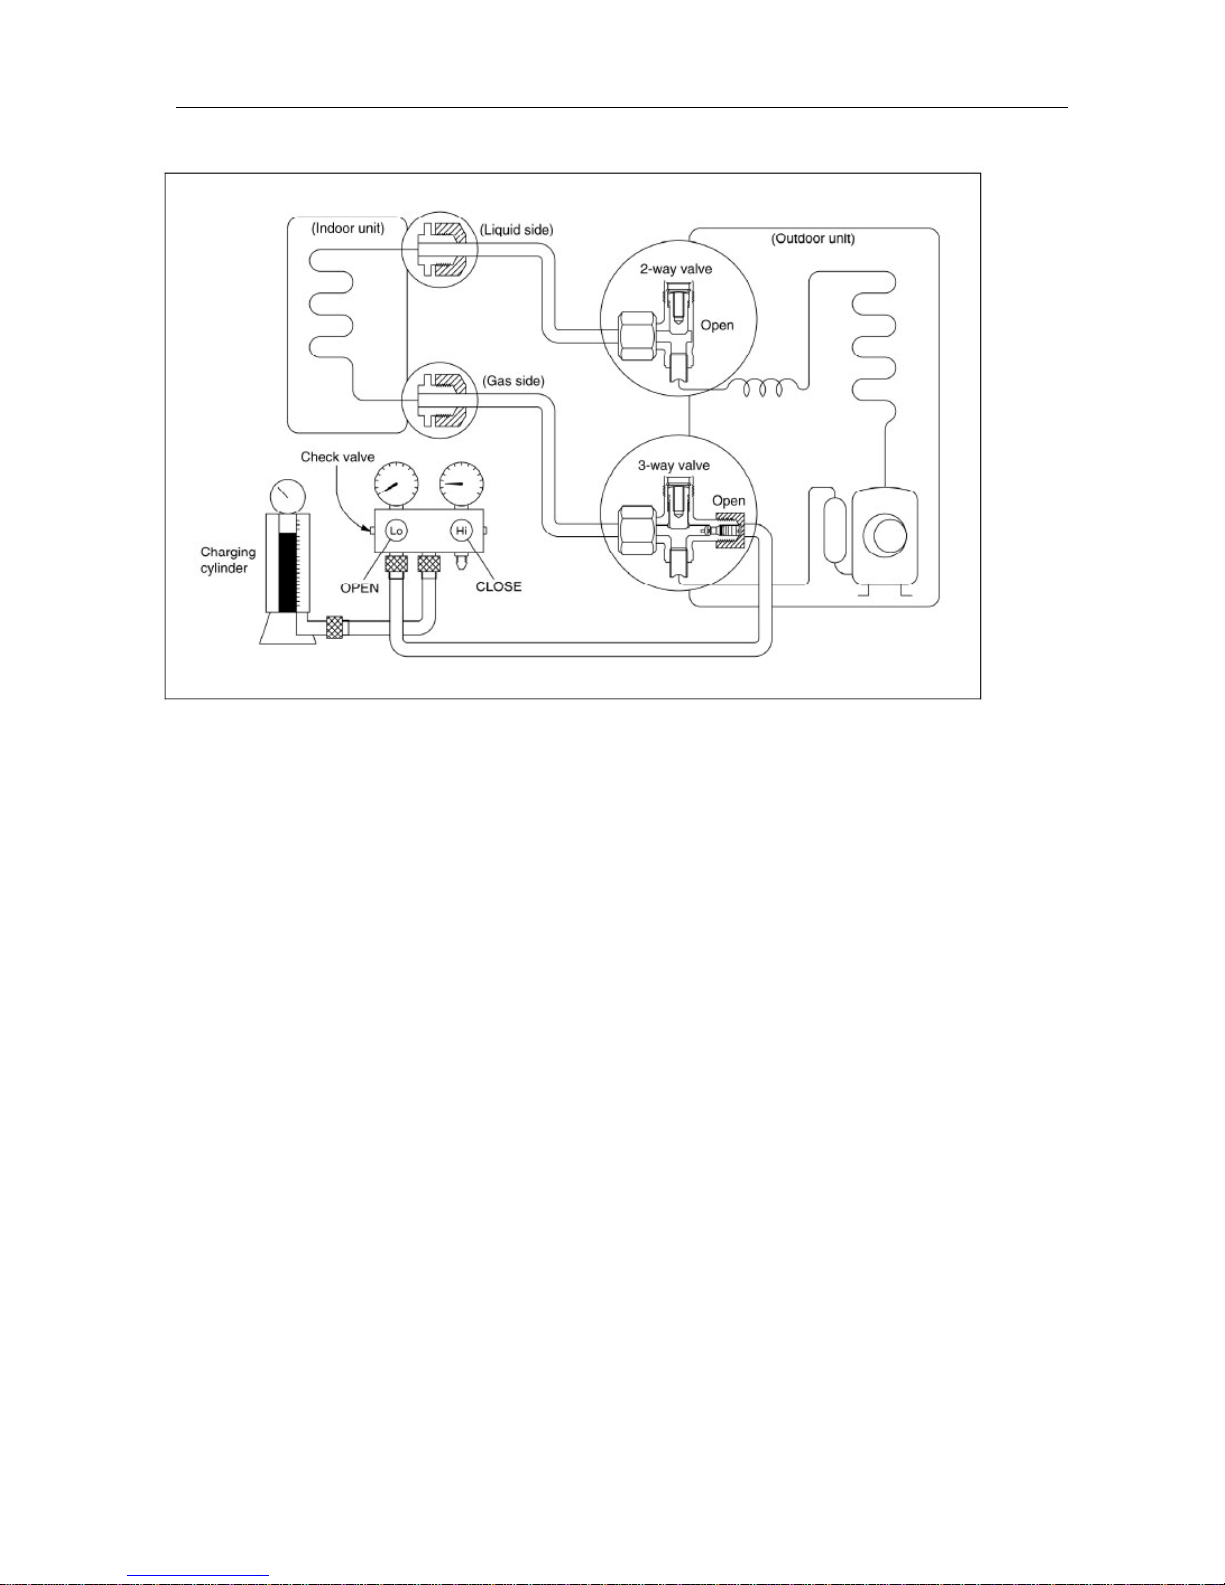
8.9 Gas charging
Procedure:
1. Connect the charge hose to the charging cylinder.
Connect the charge hose which you disconnected from the vacuum pump to the valve at the bottom
of the cylinder.
2. Purge the air from the charge hose.
Open the valve at the bottom of the cylinder and press the check valve on the charge set to purge the
air (be careful of the liquid refrigerant).
3. Open the valves (Low side) on the charge set and charge the system with liquid refrigerant.
If the system cannot be charge with the specified amount of refrigerant, if can be charged with a little
at a time (approximately 150g each time0 while operating the air conditioner in the cooling cycle;
however, one time is not sufficient, wait approximately 1 minute and then repeat the
procedure.(pumping down-pin).
4. Immediately disconnect the charge hose from the 3-way valve’s service port.
Stopping partway will allow the refrigerant to be discharged.
If the system has been charged with liquid refrigerant while operating the air conditioner, turn off the
air conditioner before disconnecting the hose.
5. Mounted the valve stem caps and the service port
Use torque wrench to tighten the service port cap to a torque of 18N.m.
Be sure to check for gas leakage.
Page 19

Service manual
18
9 Electronic function
9.1 Display board
① Auto indicator
This indicator illuminates when the air conditioner is in AUTO operation.
② Timer indicator
This indicator illuminates when TIMER is set ON/OFF.
③ PRE.-DEF. Indicator (For Cooling & Heating models only)
This indicator illuminates when the air conditioner starts defrosting automatically or when the warm air
control feature is activated in heating mode.
④ OPERATION indicator
This indicator illuminates when the air conditioner is running.
9.2
Protection
10.2.1 3 minutes delay at restart for compressor.
10.2.2 Temperature protection of compressor top, compressor stops when the temp. of top of
compressor is more than 115℃, compressor runs when the temp. of top of compressor is less than
100℃.
10.2.3 Voltage protection, unit stops when the voltage is more than 260V and less than 175V.
10.2.4 Inverter module Protection, Inverter module Protection itself has a protection function against
current, voltage and temperature.
10.2.5 Sensor protection at open circuit and breaking disconnection
10.2.6 Fan Speed is out of control. When Indoor Fan Speed is too high(higher than 2100RPM)or too
low(lower than 300RPM), the unit stops and LED displays failure information and can’t return to normal
operation automatically.
10.2.7Cross Zero signal error warning. If there is no Cross Zero signal in 4 minutes, the unit stops and
LED displays failure information and can’t return to normal operation automatically.
9.3 Fan-only mode
The compressor、4-way valve and outdoor fan is off at fan-only mode. The setting temperature
can not be changed. Fan speed can be selected as high/mid/low/ auto.
9.4 Cooling mode
9.4.1 The 4-way valve is closed at cooling mode.
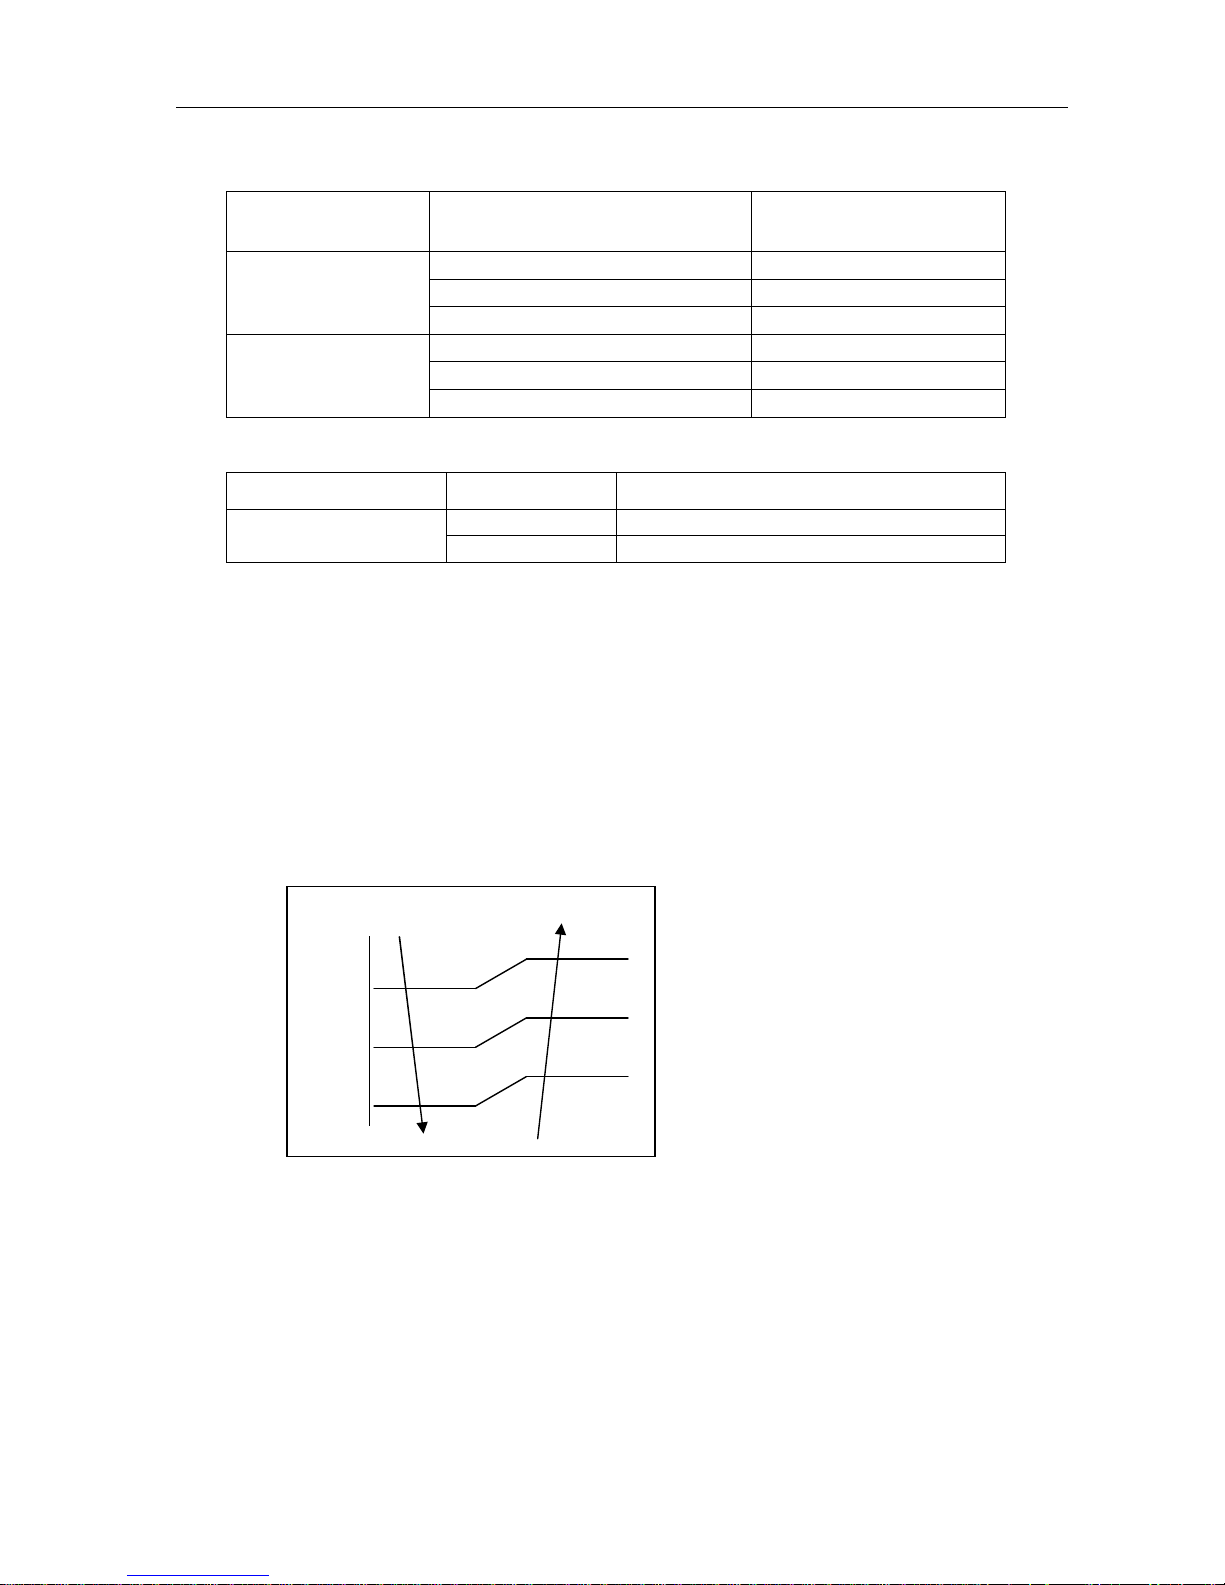
9.4.2 Action of compressor at cooling mode: compressor must run for 7 minutes after starting and then
judge the difference between setting temperature and room temperature. Meanwhile other
protections are still valid.
℃
3.5
3.0 A
2.5 B
2.0 C
1.5 D
1.0 E
0.5 F
-0.5 G
-1.0
H
Page 20
Service manual
19
9.4.3 Auto fan at cooling mode:
Condition
T=Indoor Temp.-Setting Temp.
Indoor fan speed
T<1.5℃ Low
1.5℃<T<4℃ Mid.
Room temp. up
T>4℃ High
T> 3℃ High
1℃<T<3℃ Mid.
Room temp. down
T<1℃ Low
9.4.4 Anti-freezing control to indoor evaporator at cooling mode( T: evaporator temp. )
Evaporator Temp. Compressor
0℃<T< 4℃ Decrease frequency of compressor
T< 0℃ Off
9.4.5 Rated capacity test
Set mode to cooling mode
Set temp. to 17°C
Set fan speed to high speed
Press economy button on remoter controller
After running for 5 hours, the rated capacity testing will be cancelled.
9.5 Dehumidifying mode
9.5.1 The 4-way valve is off.
9.5.2 The indoor fan is fixed in breeze speed
9.5.3 The action of compressor follows the rules below;
9.5.4 Low room temperature protection:
When room temperature decreases to below 10℃, compressor and outdoor fan will stop (indoor
fan is Breeze). Dehumidifying operation will be resumed when room temperature restores to over 12℃.
9.5.5 At dehumidifying mode, the anti-freezing function of the indoor heat exchanger is the same as
that of cooling mode.
Room temp.—setting temp.
2.5 F3
2.0
1.5 F2
1.0
0.5 F1
0.0
F1
Page 21

Service manual
20
9.6 Heating mode
9.6.1 Generally, the 4-way valve is open at heating mode, but it is closed at defrosting. 4-way valve
must delay 2 minutes compared with compressor if the compressor changed into non-heating
mode or turned off. 4-way valve doesn't delay in defrosting mode.
9.6.2 Generally, the outdoor fan is turned off with the on-off action of compressor in heating mode,
except for the defrosting mode or the end of defrost.
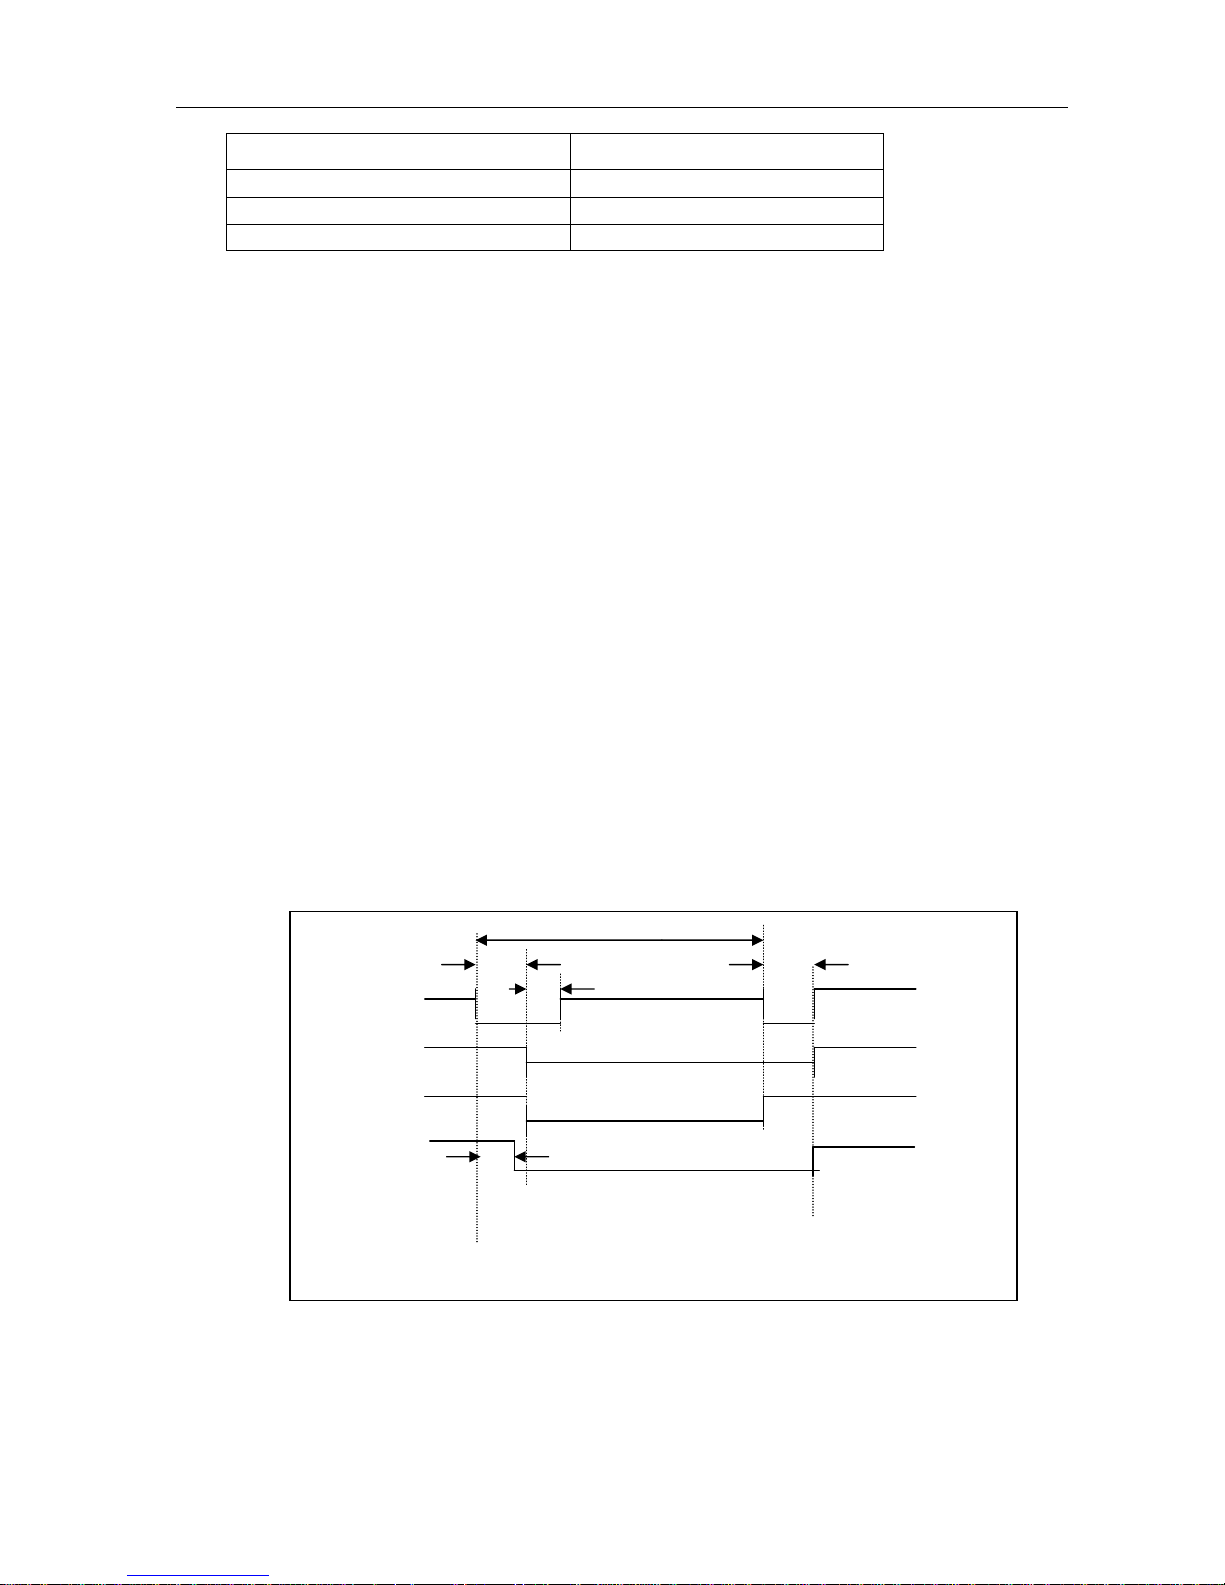
9.6.3 Action of compressor at heating mode: compressor must run for 7 minutes after starting and then
judge the difference between setting temperature and room temperature. Meanwhile other
protections are still valid.
9.6.4 Indoor Fan actions at heating mode
Indoor Fan can be set at HIGH/MID/LOW/AUTO by using a remote controller, but Anti-cold wind function
prevails.
Anti-cold wind control function at heating mode
Condition (T= Indoor exchanger temp.) Indoor fan speed
T<34℃ Off
34℃<T<37℃ Breeze
37℃<T<44℃ Low speed
Indoor exchanger temp. up
T>44℃ Setting fan speed
T> 38℃ Setting fan speed
33℃<T<38℃ Low sped
24℃<T<33℃ Breeze
Indoor exchanger temp. down
T<24℃ Off
When the indoor temp. reaches setting temp, indoor changes to breeze speed immediately, after 127
second, indoor fan stop.
9.6.5 Auto wind at heating mode
Condition (T=Indoor Temp.-Setting Temp.) Indoor fan speed
T<1.5℃ High
1.5℃<T<2.5℃ Med.
Room temp. up
T>2.5℃ Low
T<1.0℃ High
1.0℃<T<2.0℃ Med.
Room temp. down
T>2.0℃ Low
℃
+5.0 H
+4.5
+3.5 G
+3.0 F
+2.5 E
+2.0 D
+1.5 C
+1.0 B
+0.5 A
Page 22
Service manual
21
9.6.6 Indoor evaporator high-temperature protection at heating mode
Condition (T= Indoor exchanger temp.) Compressor
T<48℃ On
53℃<T<63℃ Decrease frequency of compressor
T>63℃ Off
9.7 Defrosting operation (Available for heating mode only).
9.7.1 Defrosting condition:
9.7.1.1 When outdoor temp. is higher than 0℃,
Defrosting starts when meeting one of the following conditions,
a. The temperature of outdoor heat exchanger remains consecutively lower than 3°c for more
than 40 minutes, and the temperature remains consecutively -4°c for more than 3 minutes,
b. The temperature of outdoor heat exchanger remains consecutively lower than 3°c for more
than 80 minutes, and the temperature remains consecutively -2°c for more than 3 minutes
9.7.1.2 When outdoor temp. is lower than 0℃,
Defrosting starts when meeting one of the following conditions,
a. The temperature of outdoor heat exchanger remains consecutively lower than 3°c for more
than 40 minutes, and the temperature remains consecutively -6°c for more than 3 minutes,
b. The temperature of outdoor heat exchanger remains consecutively lower than 3°c for more
than 40 minutes, and the temperature remains consecutively -6°c for more than 3 minutes,
c. The temperature of indoor unit pipe decreases 5°c than before
9.7.1.3 The temperature of outdoor heat exchanger remains consecutively lower than 3°c for more
than 120 minutes, and the temperature remains consecutively -2°c for more than 3 minutes
9.7.2 Ending condition of defrosting
If one of following conditions is satisfied, end the defrosting and turn into heating mode:
a. The defrost time has reached to 10 minutes.
b. When the temperature of outdoor heat exchanger rises up to 8°C and this continues for more than 80
seconds.
c. When the temperature of outdoor heat exchanger rises up to 12°C
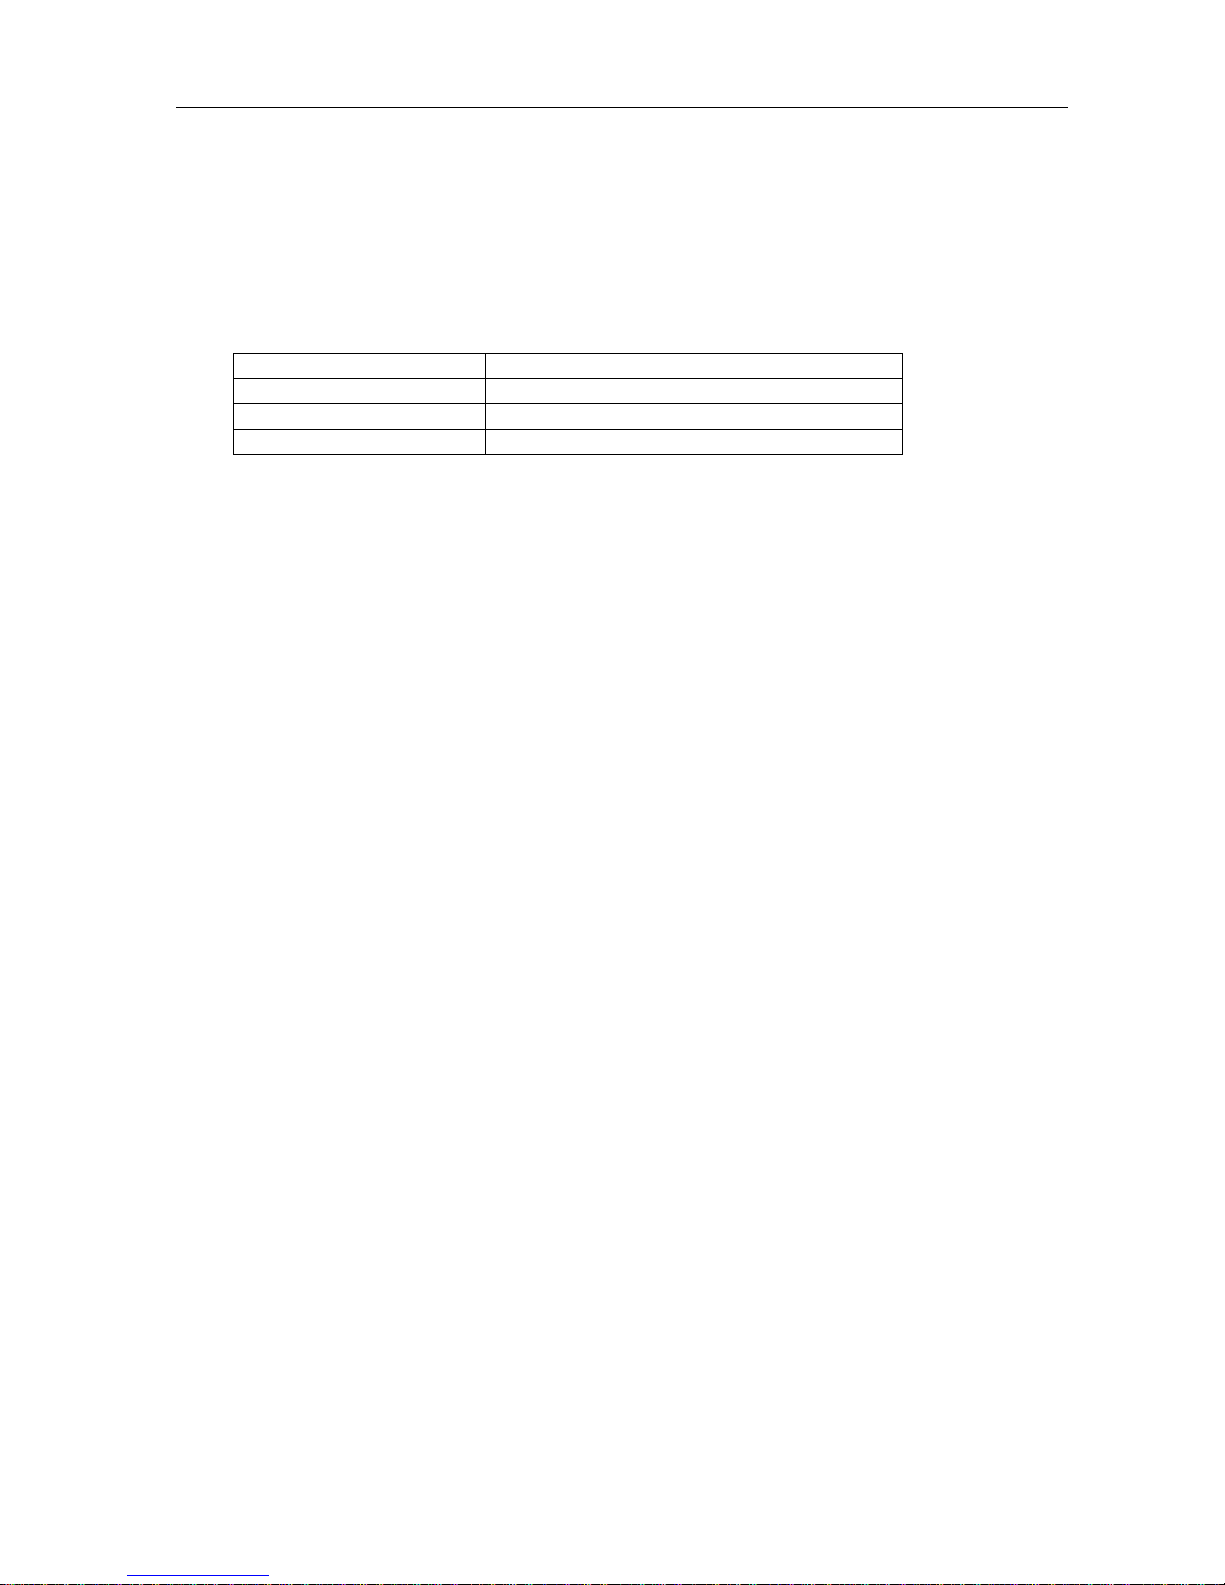
9.7.3 Defrosting Actions:
9.7.4 Rated capacity test
Set mode to heating mode
Set temp. to 30 °C
Set fan speed to high speed
Press economy button on remote controller
After 5 hours, the rated capacity testing will be cancelled.
max. 10 minutes
60s
ON 10s 30s
Com. OFF
ON ON
4 way valve OFF
ON ON
Outdoor fan OFF
ON ON
Indoor fan
OFF
Breeze 10 seconds, then stop
Page 23
Service manual
22
9.8 Outdoor low temperature protection
Factory standard unit has not this function.
Unit stops when outdoor temp. is low than -15°C and lasting time more than 60 minutes, and unit runs
again when outdoor temp. higher than -12°C.
When indoor PCB J7 jump is on, this function is available.
9.9 Auto operation mode
The air conditioner automatically selects one of the following operation modes: cooling, heating or fan
only according to the temp. difference between room temp. (TA) and set temp. (TS).
TA—TS Operation mode
TA—TS>1℃ Cooling
-1℃≤TA-TS≤+1℃ Fan-only
TA-TS<-1℃ Heating
9.10 Manual switch
9.10.1 Mode changes when push this button.
Cooing mode Auto modeUnit off Cooing mode
9.10.2 At Cooing mode, after 30 minutes cooling operation whose fan speed is set as low, the A/C
operates with a setting temp. of 24℃.
9.10.3 At auto mode, the A/C operates with a set temp. of 24℃
9.11 Timer Function
9.11.1 The maximum length of timer is 24 hours and the minimum resolving power is 15 minutes.
9.11.2 Timer on: first turn off the A/C, the A/C will be automatically on at the set time.
9.11.3 Timer off: first turn on the A/C, the A/C will be automatically off at the set time
9.11.4 Timer on/off function( on time is earlier than off time): first turn off the A/C, it will be automatically
on at set time, and later be off at the set time, then unit turns on at set time.
9.11.5 Timer off/on function( off time is earlier than on time): first turn on the A/C, it will be
automatically off at set time, and later be on at the set time, then unit turns off at set time.
9.12 Auto restart function
In case of a sudden power failure, this function automatically sets the unit to previous settings before the
power failure when power returns.
Page 24

Service manual
23
10 Troubleshooting
10.1 Indoor Unit Error Display
Defrosting Timer Auto Operation
LED status
X
X
O
☆
Module protection
O
X
X
☆
Compressor top protection against temperature
X
O
X
☆
Open or short circuit of outdoor temperature sensor
X
O
O
☆
Over load or too low voltage protection
O
O
O
☆
Open or short circuit of indoor temperature sensor
O
O
☆
☆
Fan speed out of control
☆
X
O
☆
Zero-crossing examination error
X
X
☆
☆
EEPROM data error
☆
☆
☆
☆
Indoor/outdoor communication protection
O X O ☆
Low temperature protection of outdoor ambient
O (bright) X ( extinguished) ☆ (flash)
10.2 Outdoor Unit Error Display
There is a LED(red) on outdoor main control board. The LED is on when the unit is running. The
LED flashes at a frequency of 0.5Hz if the unit is standby. The LED flashes at a frequency of 5Hz if
there is any malfunction.
Page 25
Service manual
24
10.3 Problem Solution
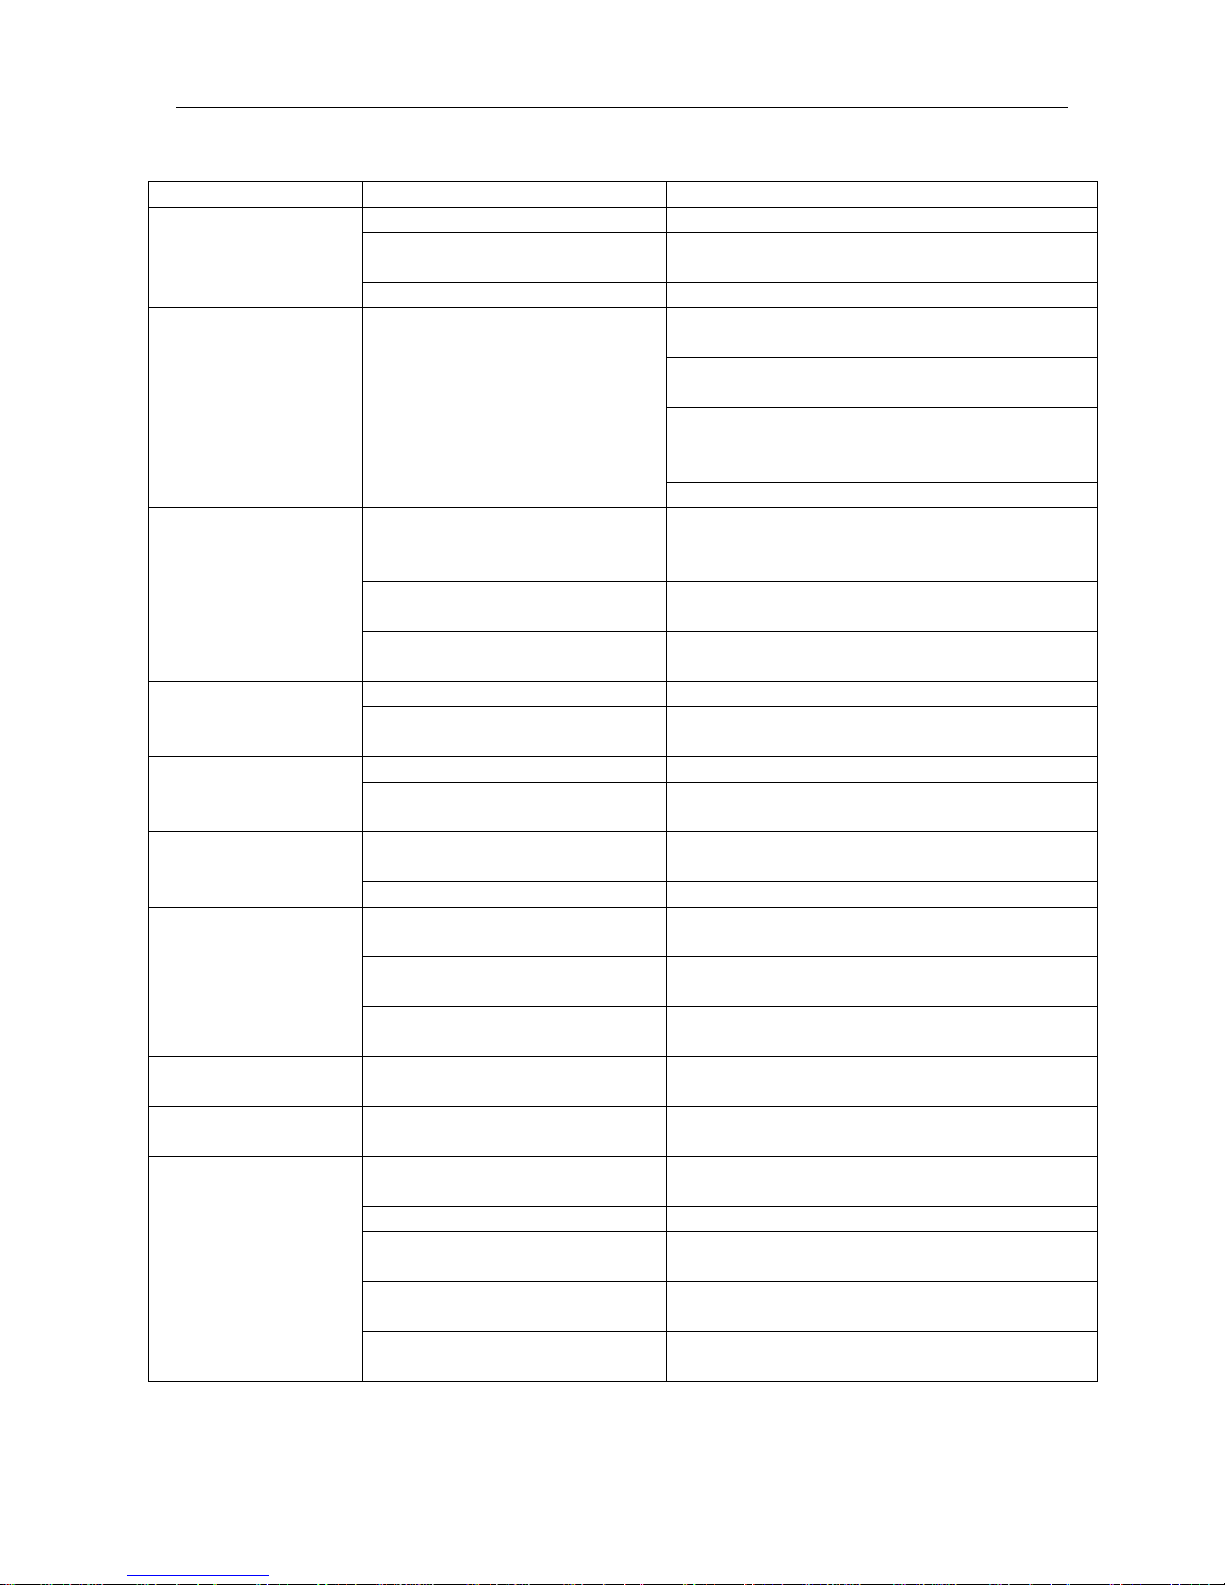
Problem Cause Remedy
Power failure Check the power cord.
Transformer failure Check the input and output on transformer.
Replace it if failure.
Not operating
Indoor main control board failure Replace it after checked failure.
Check wiring. Correct if there is any wrong
connection.
Check the sequence of compressor wiring.
Correct if in wrong sequence.
Check the resistance between P-N、P-U、P-V、
P-W、N-U、N-V、N-W on inverter control board.
Replace if any one of this group is fault.
Module protection
The frequency converter module
protect against current、voltage
and temperature for 4 times
within 1 hour.
Replace the compressor after checked failure.
Lack of refrigerant.
Check leakage. Recycle the refrigerant.
Correct and recharge if there is any leakage in
the refrigerant system.
Over-current protector failure. Check the resistance of compressor
over-current protector. Replace if failure.
Compressor top
protection against
temperature
Outdoor main control board
failure.
Replace it after checked failure.
Temperature sensor failure. Replace after checked failure. Open or short circuit
of outdoor
temperature sensor.
Outdoor main control board
failure.
Replace after checked failure.
Temperature sensor failure. Replace after checked failure. Open or short circuit
of indoor temperature
sensor.
Indoor main control board
failure.
Replace after checked failure.
Power failure. Wait if checked the power failure is really too
low.
Over load or too low
voltage protection.
Power control board failure. Replace after checked failure.
Wiring failure. Correct if the wiring of indoor fan motor is
loosen.
Indoor fan motor failure. Check the input of indoor fan motor. Replace if
failure.
Fan speed out of
control.
Indoor main control board
failure.
Replace after checked failure.
Zero-crossing
examination error
Indoor main control board
failure.
Replace after checked failure.
EEPROM data error Indoor main control board
failure.
Replace after checked failure.
Wiring failure.
Check wiring. Correct if there is any wrong
wiring or the wiring is loosen.
Inverter control board failure. Replace after checked failure, no +5V power.
Outdoor main control board
failure.
Replace if the LED is not on.
Indoor main control board
failure.
Replace if the photo coupler on indoor main
control board is failure.
Indoor/outdoor units’
communication
protection.
Outdoor power control board
failure.
Replace if the photo coupler on outdoor main
control board is failure.
Page 26
Service manual
25
11 Characteristic of temperature sensor
Temp.℃ Resistance KΩ Temp.℃ Resistance KΩ Temp.℃ Resistance KΩ
-10 62.2756 17 14.6181 44 4.3874
-9 58.7079 18 13.918 45 4.2126
-8 56.3694 19 13.2631 46 4.0459
-7 52.2438 20 12.6431 47 3.8867
-6 49.3161 21 12.0561 48 3.7348
-5 46.5725 22 11.5 49 3.5896
-4 44 23 10.9731 50 3.451
-3 41.5878 24 10.4736 51 3.3185
-2 39.8239 25 10 52 3.1918
-1 37.1988 26 9.5507 53 3.0707
0 35.2024 27 9.1245 54 2.959
1 33.3269 28 8.7198 55 2.8442
2 31.5635 29 8.3357 56 2.7382
3 29.9058 30 7.9708 57 2.6368
4 28.3459 31 7.6241 58 2.5397
5 26.8778 32 7.2946 59 2.4468
6 25.4954 33 6.9814 60 2.3577
7 24.1932 34 6.6835 61 2.2725
8 22.5662 35 6.4002 62 2.1907
9 21.8094 36 6.1306 63 2.1124
10 20.7184 37 5.8736 64 2.0373
11 19.6891 38 5.6296 65 1.9653
12 18.7177 39 5.3969 66 1.8963
13 17.8005 40 5.1752 67 1.830
14 16.9341 41 4.9639 68 1.7665
15 16.1156 42 4.7625 69 1.7055
16 15.3418 43 4.5705 70 1.6469
 Loading...