

Page 1

MO325G
................................................ .............................................
EN MICROWAVE OVEN USER MANUAL 2
IT FORNO A MICROONDE ISTRUZIONI PER L’USO 19
Page 2

www.electrolux.com
2
CONTENTS
1. SAFETY INFORMATION . . . . . . . . . . . . . . . . . . . . . . . . . . . . . . . . . . . . . . . . . . . . . . . . . . . 3
2. SAFETY INSTRUCTIONS . . . . . . . . . . . . . . . . . . . . . . . . . . . . . . . . . . . . . . . . . . . . . . . . . . 5
3. PRODUCT DESCRIPTION . . . . . . . . . . . . . . . . . . . . . . . . . . . . . . . . . . . . . . . . . . . . . . . . . 7
4. BEFORE FIRST USE . . . . . . . . . . . . . . . . . . . . . . . . . . . . . . . . . . . . . . . . . . . . . . . . . . . . . . 7
5. CONTROL PANEL . . . . . . . . . . . . . . . . . . . . . . . . . . . . . . . . . . . . . . . . . . . . . . . . . . . . . . . 8
6. DAILY USE . . . . . . . . . . . . . . . . . . . . . . . . . . . . . . . . . . . . . . . . . . . . . . . . . . . . . . . . . . . . . 9
7. AUTOMATIC PROGRAMMES . . . . . . . . . . . . . . . . . . . . . . . . . . . . . . . . . . . . . . . . . . . . . . 12
8.
USING THE ACCESSORIES . . . . . . . . . . . . . . . . . . . . . . . . . . . . . . . . . . . . . . . . . . . . . . . 13
9. ADDITIONAL FUNCTIONS . . . . . . . . . . . . . . . . . . . . . . . . . . . . . . . . . . . . . . . . . . . . . . . . 14
10.
HELPFUL HINTS AND TIPS . . . . . . . . . . . . . . . . . . . . . . . . . . . . . . . . . . . . . . . . . . . . . . . 14
11. CARE AND CLEANING . . . . . . . . . . . . . . . . . . . . . . . . . . . . . . . . . . . . . . . . . . . . . . . . . . . 15
12.
TROUBLESHOOTING . . . . . . . . . . . . . . . . . . . . . . . . . . . . . . . . . . . . . . . . . . . . . . . . . . . . 15
13. INSTALLATION . . . . . . . . . . . . . . . . . . . . . . . . . . . . . . . . . . . . . . . . . . . . . . . . . . . . . . . . . 16
WE’RE THINKING OF YOU
Thank you for purchasing an Electrolux appliance. You’ve chosen a product that brings with it
decades of professional experience and innovation. Ingenious and stylish, it has been designed
with you in mind. So whenever you use it, you can be safe in the knowledge that you’ll get great
results every time.
Welcome to Electrolux.
Visit our website for:
Get usage advice, brochures, trouble shooter, service information:
www.electrolux.com
Register your product for better service:
www.electrolux.com/productregistration
Buy Accessories, Consumables and Original spare parts for your appliance:
www.electrolux.com/shop
CUSTOMER CARE AND SERVICE
We recommend the use of original spare parts.
When contacting Service, ensure that you have the following data available.
The information can be found on the rating plate. Model, PNC, Serial Number.
Warning / Caution-Safety information
General information and tips
Environmental information
Subject to change without notice.
Page 3

1. SAFETY INFORMATION
Before the installation and use of the appliance, carefully
read the supplied instructions. The manufacturer is not
responsible if an incorrect installation and use causes injuries and damages. Always keep the instructions with
the appliance for future reference.
1.1 Children and vulnerable people safety
WARNING!
Risk of suffocation, injury or permanent disability.
• This appliance can be used by children aged from 8
years and above and persons with reduced physical,
sensory or mental capabilities or lack of experience and
knowledge if they are supervised by an adult or a person who is responsible for their safety.
• Do not let children play with the appliance.
• Keep all packaging away from children.
• Keep children and pets away from the appliance when
it operates or when it cools down. Accessible parts are
hot.
• If the appliance has a child safety device, we recommend that you activate it.
• Cleaning and user maintenance shall not be made by
children without supervision.
• Keep the appliance and its cord out of reach of children less than 8 years.
ENGLISH 3
1.2 General Safety
• This appliance is intended to be used in household and
similar applications such as:
– staff kitchen areas in shops, offices and other work-
ing environments;
– farm houses;
Page 4

www.electrolux.com
4
• Internally the appliance becomes hot when in opera-
• Do not use a steam cleaner to clean the appliance.
• Before maintenance cut the power supply.
• If the door or door seals are damaged, the appliance
• The appliances are not intended to be operated by
• Only a competent person can carry out any service or
• Do not heat liquids and other foods in sealed contain-
• Only use utensils that are suitable for use in microwave
• When heating food in plastic or paper containers, keep
• The appliance is intended for heating food and bever-
• If smoke is emitted, switch off or unplug the appliance
• Microwave heating of beverages can result in delayed
– by clients in hotels, motels and other residential envi-
ronments;
– bed and breakfast type environments.
tion. Do not touch the heating elements that are in the
appliance. Always use oven gloves to remove or put in
accessories or ovenware.
must not be operated until it has been repaired by a
competent person.
means of an external timer or separate remote-control
system.
repair operation that involves the removal of a cover
which gives protection against exposure to microwave
energy.
ers. They are liable to explode.
ovens.
an eye on the appliance due to the possibility of ignition.
ages. Drying of food or clothing and heating of warming pads, slippers, sponges, damp cloth and similar
may lead to risk of injury, ignition or fire.
and keep the door closed in order to stifle any flames.
eruptive boiling. Care must be taken when handling the
container.
Page 5

ENGLISH 5
• The contents of feeding bottles and baby food jars shall
be stirred or shaken and the temperature checked before consumption, in order to avoid burns.
• Eggs in their shell and whole hard-boiled eggs should
not be heated in the appliance since they may explode,
even after microwave heating has ended.
• The appliance should be cleaned regularly and any
food deposits removed.
• Failure to maintain the appliance in a clean condition
could lead to deterioration of the surface that could adversely affect the life of the appliance and possibly result in a hazardous situation.
• The temperature of accessible surfaces may be high
when the appliance is operating.
• The microwave oven shall not be placed in a cabinet
unless it has been tested in a Cabinet.
• The rear surface of appliances shall be placed against
a wall.
• Pay attention to the minimum dimensions of the cabinet (if applicable). Refer to the installation chapter.
• The appliance must be operated with the decorative
door open (if applicable).
• Do not use harsh abrasive cleaners or sharp metal
scrapers to clean the glass door since they can scratch
the surface, which may result in shattering of the glass.
• If the supply cord is damaged, it must be replaced by
the manufacturer, an authorized Service or similarly
qualified persons in order to avoid a hazard.
2.
SAFETY INSTRUCTIONS
2.1 Installation
WARNING!
Only a qualified person must install this appliance.
• Remove all the packaging.
• Do not install or use a damaged appliance.
• Obey the installation instruction supplied with the appliance.
Page 6

www.electrolux.com
6
• Always be careful when you move the
• Do not pull the appliance by the handle.
• Keep the minimum distance from the
• Make sure that the appliance is installed
• The sides of the appliance must stay
Electrical connection
• All electrical connections should be
• The appliance must be earthed.
• Make sure that the electrical information
• If the appliance is connected to the
• Make sure not to cause damage to the
• Do not pull the mains cable to discon-
appliance because it is heavy. Always
wear safety gloves.
other appliances and units.
below and adjacent safe structures.
adjacent to appliances or to units with
the same height.
WARNING!
Risk of fire and electrical shock.
made by a qualified electrician.
on the rating plate agrees with the power supply. If not, contact an electrician.
socket via an extension cord, make
sure the cord is earthed.
mains plug and to the mains cable.
Contact the Service or an electrician to
change a damaged mains cable.
nect the appliance. Always pull the
mains plug.
• Make sure that the ventilation openings
are not blocked.
• Do not let the appliance stay unattended during operation.
• Do not apply pressure on the open
door.
• Do not use the appliance as a work
surface and do not use the cavity for
storage purposes.
2.3 Care and Cleaning
WARNING!
Risk of injury, fire or damage to
the appliance.
• Before maintenance, deactivate the appliance and disconnect the mains plug
from the mains socket.
• Clean regularly the appliance to prevent
the deterioration of the surface material.
• Do not allow food spills or cleaner residue to accumulate on door sealing surfaces.
• Remaining fat or food in the appliance
can cause fire.
• Clean the appliance with a moist soft
cloth. Only use neutral detergents. Do
not use abrasive products, abrasive
cleaning pads, solvents or metal objects.
• If you use an oven spray, obey the safety instructions on the packaging.
2.2 Use
WARNING!
Risk of injury, burns or electric
shock or explosion.
• Use this appliance in a household environment.
• Do not change the specification of this
appliance.
2.4 Disposal
WARNING!
Risk of injury or suffocation.
• Disconnect the appliance from the
mains supply.
• Cut off the mains cable and discard it.
Page 7
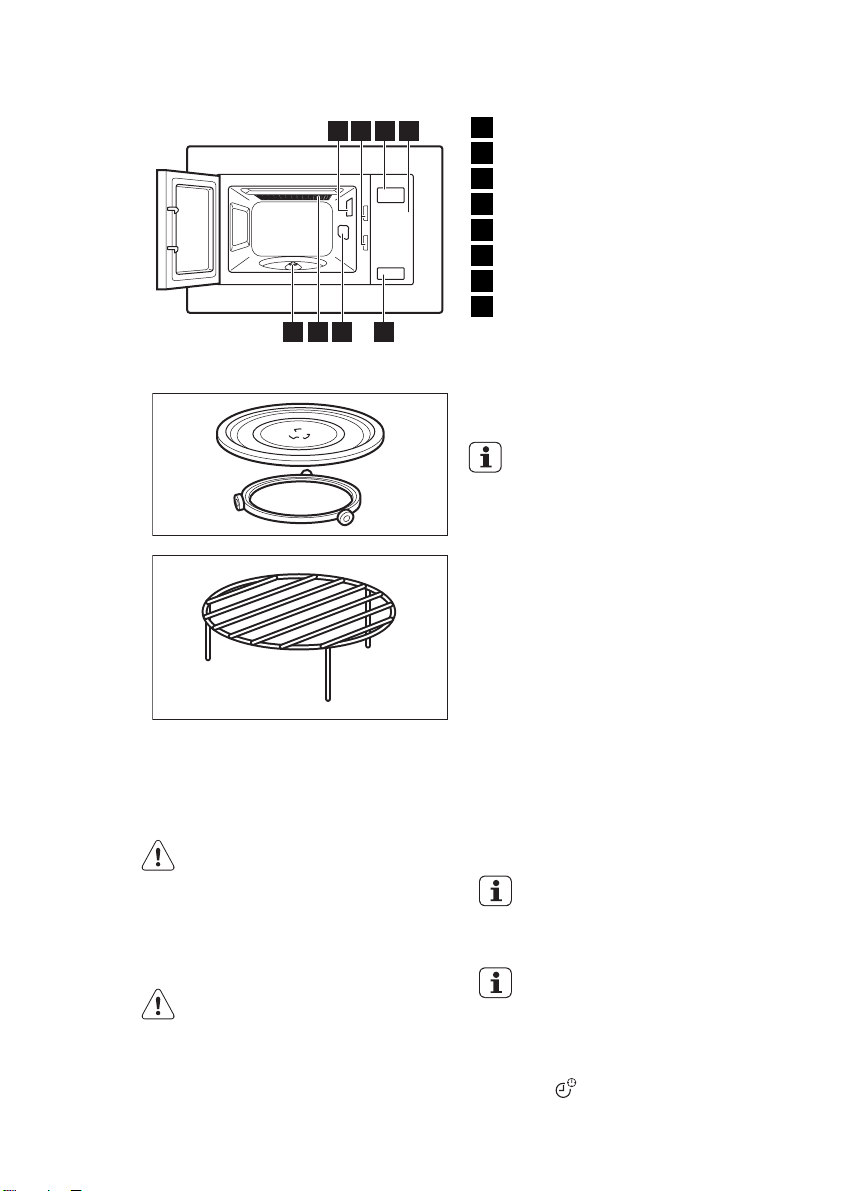
3. PRODUCT DESCRIPTION
1 2
3 4
8 67
3.1 Accessories
5
ENGLISH 7
Lamp
1
Safety interlock system
2
Display
3
Control panel
4
Door opener
5
Waveguide cover
6
Grill
7
Turntable shaft
8
Turntable set
Glass cooking tray and roller guide.
Always use the turntable set to
prepare food in the appliance.
Grill Rack
For grilling food and combi cooking.
4. BEFORE FIRST USE
WARNING!
Refer to the Safety chapters.
4.1 Initial Cleaning
• Remove all parts from the appliance.
• Clean the appliance before first use.
Refer to chapter "Care and Clean-
ing".
4.2 Setting the time
When you connect the appliance
to the electrical supply or after a
power cut, the display shows 0:00
and an acoustic signal sounds.
You can set the time in 24 hour
clock system.
If the clock is not set it does not
operate when the appliance is not
in use.
1.
Press .
2.
Turn the Setting knob to enter the
amount of hours.
Page 8
www.electrolux.com
8
3.
Press to confirm.
4.
Turn the Setting knob to enter the
amount of minutes.
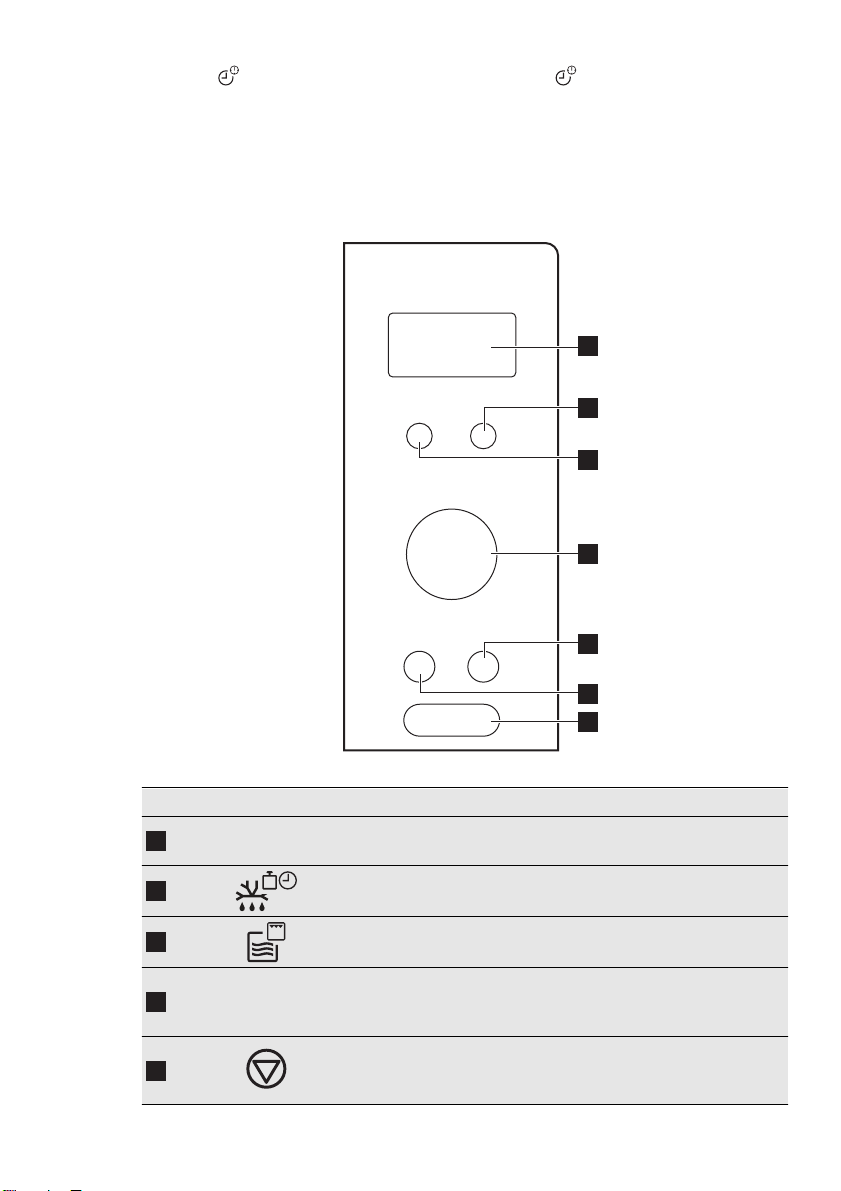
5. CONTROL PANEL
5.
Press to confirm.
1
2
3
4
5
6
7
Symbol Function Description
1
2
3
— Display
Defrosting button
Function button To choose the function.
Shows the settings and current time.
To defrost food by weight or
time.
To set the cooking time,
4
— Setting knob
weight or to activate the auto
cooking programmes.
To deactivate the appliance
5
Stop / Clear button
or delete the cooking settings.
Page 9

Symbol Function Description
6
7
6. DAILY USE
ENGLISH 9
Clock / Kitchen
Timer button
Start / +30 sec but-
ton
To set the clock.
To start the appliance or increase the cooking time for
30 seconds at full power.
WARNING!
Refer to the Safety chapters.
6.1 Activating and deactivating
the appliance
1.
Press the button with the function you
want to activate.
2.
Repeatedly press the button or turn
the Setting knob to set the desired
function.
3.
Press to confirm.
4.
Turn the Setting knob to set the desired time.
5.
Press to confirm and activate the
appliance.
6.
To deactivate the appliance you can:
– wait until the appliance deactivates
automatically when the time comes
to an end.
– open the door. The appliance stops
automatically. Close the door to
continue cooking. Use this option
to inspect the food.
–
press
.
CAUTION!
Do not let the appliance operate
when there is no food in it.
6.2 General information about
using the appliance
General:
• After you deactivate the appliance, let
the food stand for some minutes.
• Remove the aluminium foil packaging,
metal containers, etc. before you prepare the food.
Cooking:
• If possible, cook food covered with material suitable for use in the microwave.
Only cook food without a cover if you
want to keep it crusty
• Do not overcook the dishes by setting
the power and time too high. The food
can dry out, burn or catch fire in some
places.
• Do not use the appliance to cook eggs
or snails in their shells, because they
can explode. With fried eggs, pierce the
yolks first.
• Prick food with "skin" or "peel", such as
potatoes, tomatoes, sausages, with a
fork several times before cooking so
that the food does not explode.
• For chilled or frozen food, set a longer
cooking time.
• Dishes which contain sauce must be
stirred from time to time.
• Vegetables that have a firm structure,
such as carrots, peas or cauliflower,
must be cooked in water.
• Turn larger pieces after half of the cooking time.
• If possible, cut vegetables into similarsized pieces.
• Use flat, wide dishes.
• Do not use cookware made of porcelain, ceramic or earthenware with small
holes, e. g. on handles or unglazed bottoms. Moisture going into the holes can
cause the cookware to crack when it is
heated.
• The glass cooking tray is a work space
for heating food or liquids. It is necessary for the operation of the microwave.
Page 10

www.electrolux.com
10
Defrosting meat, poultry, fish:
• Put the frozen, unwrapped food on a
• Turn the food after half of the defrosting
Defrosting butter, portions of gateau,
quark:
• Do not fully defrost the food in the ap-
Defrosting fruit, vegetables:
• Do not fully defrost fruit and vegetables,
Suitable cookware and materials
Cookware / Material Microwave Grilling
Ovenproof glass and porcelain (with
no metal components, e. g. Pyrex,
heat-proof glass)
Non-ovenproof glass and porcelain1)X -- -- --
small upturned plate with a container
below it so that the defrosting liquid
collects in the container.
time. If possible, divide and then remove the pieces that started to defrost.
pliance, but let it defrost at room temperature. This gives a more even result.
Fully remove all metal or aluminium
packaging before defrosting.
which are to be further prepared while
raw, in the appliance. Let them defrost
at room temperature.
• You can use a higher microwave power
to cook fruit and vegetables without defrosting them first.
Ready meals:
• You can prepare ready meals in the appliance only if their packaging is suitable
for microwave use.
• You must follow the manufacturer's instructions printed on the packaging
(e.g. remove the metal cover and pierce
the plastic film).
Defrosting
Heating
Cooking
X X X X
Glass and glass ceramic made of
X X X X
ovenproof / frost-proof material (e.
g. Arcoflam), grill shelf
Ceramic 2), earthenware
2)
X X X --
Heat-resistant plastic up to 200 °C3)X X X --
Cardboard, paper X -- -- --
Clingfilm
Roasting film with microwave safe
closure
3)
Roasting dishes made of metal, e.
X -- -- --
X X X --
-- -- -- X
g. enamel, cast iron
Baking tins, black lacquer or silicon-
3)
coated
-- -- -- X
Baking tray -- -- -- X
Browning cookware, e. g. Crisp pan
-- X X --
or Crunch plate
Page 11
ENGLISH 11
Cookware / Material Microwave Grilling
Defrosting
Ready meals in packaging
1)
With no silver, gold, platinum or metal plating / decorations
2)
Without quartz or metal components, or glazes which contain metals
3)
You must follow the manufacturer’s instructions about the maximum temperatures.
X suitable -- not suitable
3)
X X X X
Heating
Cooking
6.3 Power setting table
Press the
Function
Power setting Approximate Percentage of Power
button
1 time P100 100 %
2 times P 80 80 %
3 times P 50 50 %
4 times P 30 30 %
5 times P 10 10 %
Other functions
Press the
Function
Power setting Function mode
button
6 times G Full Grill
Combi Cooking
7 times C – 1 Microwaves 55%, Grill 45%
8 times C – 2 Microwaves 36%, Grill 64%
6.4 Quick Start
•
Press
30 seconds at full function power. The
cooking time increases by 30 seconds
with each additional press of the button. The maximum cooking time is 95
minutes.
• In standby mode, turn the Setting knob
counterclockwise to set the cooking
time, then press
ance at full microwave power.
to activate the appliance for
to start the appli-
6.5 Defrosting
You can choose between 2 defrosting
modes:
•Weight defrosting
•Time defrosting
Weight and time defrosting
1.
Press once to set the weight defrosting or twice for time defrosting.
2.
Turn the Setting knob to input the desired weight or time.
3.
Press to confirm and start the appliance.
For weight defrosting the time is
set automatically. Weight defrosting should not be used on food
that is left out of the freezer for
more than 20 min, or for frozen
ready-made food.
Page 12
www.electrolux.com
12
To activate weight defrosting you
must use more than 100 g of food
and less than 2000 g.
To defrost less than 200 g of food
place it on the edge of the turntable.
6.6 Cooking
You can cook food in maximum 2 stages.
If one stage is defrosting, set it as the first
stage.
Multi-stage cooking:
1.
Press
mode.
2.
Turn the Setting knob to set defrosting
time or food weights.
3.
Press
4.
Turn the Setting knob to select the desired power level.
and set the defrosting
to confirm.
7. AUTOMATIC PROGRAMMES
5.
Press
6.
Turn the Setting knob to input the
time.
7.
Press
pliance.
After each stage an acoustic signal
sounds.
to confirm.
to confirm and start the ap-
6.7 Grilling or Combi Cooking
1.
Press the Function button.
2.
Turn the Setting knob to set the de-
sired function.
3.
Press
4.
Turn the Setting knob to input the
time.
5.
Press
pliance.
to confirm.
to confirm and start the ap-
WARNING!
Refer to the Safety chapters.
7.1 Auto Cooking
You can use Auto Cooking function to
easily cook food.
1.
In standby mode, turn the Setting
knob clockwise to choose the desired
menu.
Menu Weight
A - 1
Pizza
A - 2
Potato
A - 3
Meat
A - 4
Fish
2.
Press
3.
Turn the Setting knob to set the
weight of the menu.
4.
Press
pliance.
to confirm.
to confirm and start the ap-
200 g
400 g
200 g
400 g
600 g
250 g
350 g
450 g
250 g
350 g
450 g
Page 13

Menu Weight
A - 5
Vegetable
A - 6
Beverage
A - 7
Pasta
A - 8
Popcorn
A - 9
Chicken
A - 10
Reheat
8. USING THE ACCESSORIES
WARNING!
Refer to the Safety chapters.
ENGLISH 13
200 g
300 g
400 g
1 cup (120 ml)
2 cups (240 ml)
3 cups (360 ml)
50 g (add 450 ml of water)
100 g (add 800 ml of water)
50 g
100 g
400 g
800 g
1200 g
200 g
400 g
600 g
8.1 Inserting the turntable set
8.2 Inserting the grill rack
1.
Place the roller guide around the turntable shaft.
2.
Place the glass cooking tray on the
roller guide
Place the grill rack on the turntable set.
Page 14

www.electrolux.com
14
CAUTION!
Do not cook food without the
turntable set. Use only the turntable set provided with the appliance.
9. ADDITIONAL FUNCTIONS
9.1 Child Safety Lock
The Child Safety Lock prevents an accidental operation of the appliance.
To activate or deactivate the Child Safety
Lock press and hold
until an acoustic signal sounds.
When the Child Safety Lock is on, display
shows the current time.
for 3 seconds,
9.2 Kitchen Timer
1.
Press twice.
10. HELPFUL HINTS AND TIPS
Never cook food directly on the
glass cooking tray.
2.
Turn the Setting knob to enter the
time.
3.
Press to confirm.
You can set maximum 95 minutes.
When the set time is reached, an
acoustic signal sounds.
Timer still works when you open
the door or pause the appliance.
Press
to cancel.
10.1 Tips for the microwave
Problem Remedy
You cannot find details for the
amount of food prepared.
The food got too dry. Set shorter cooking time or select lower mi-
The food is not defrosted, hot or
cooked after the time came to an
end.
After the cooking time comes to
an end, the food is overheated at
the edge but is still not ready in the
middle.
To get better results for rice use a flat,
wide dish.
10.2 Defrosting
Always defrost roast with the fat side
down.
Look for a similar food. Increase or shorten
the length of the cooking times according to
the following rule: Double the amount = al-
most double the time, Half the amount =
half the time
crowave power.
Set longer cooking time or set higher power.
Note that large dishes need longer time.
Next time set a lower power and a longer
time. Stir liquids halfway through, e.g. soup.
Do not defrost covered meat because this
may cause cooking instead of defrosting.
Always defrost whole poultry breast side
down.
Page 15

10.3 Cooking
Always remove chilled meat and poultry
from the refrigerator at least 30 minutes
before cooking.
Let the meat, poultry, fish and vegetables
stay covered after cooking.
Brush a little oil or melted butter over the
fish.
Add 30 - 45 ml of cold water for every
250 g of vegetables. Cut the fresh vegetables into even size pieces before cooking.
Cook all vegetables with a cover on the
container.
10.4 Grilling
Grill flat food items in the middle of the grill
rack.
11. CARE AND CLEANING
ENGLISH 15
Turn the food over halfway through the
set time and continue grilling.
10.5 Combi Cooking
Use the Combi Cooking to keep the
crispness of certain foods.
At the half of the cooking time, turn over
the foods then continue.
There are 2 modes for Combi Cooking.
Each mode combines the microwave and
the grill functions at different time periods
and power levels.
WARNING!
Refer to the Safety chapters.
Notes on cleaning:
• Clean the front of the appliance with a
soft cloth with warm water and a cleaning agent.
• To clean metal surfaces, use a usual
cleaning agent.
• Clean the appliance interior after each
use. Then you can remove dirt more
easily and it does not burn on.
12. TROUBLESHOOTING
WARNING!
Refer to the Safety chapters.
Problem Possible cause Remedy
The appliance does
not operate.
The appliance does
not operate.
The appliance does
not operate.
The appliance is deactivated.
The appliance is not plugged in.
The fuse in the fuse box is
blown.
• Clean stubborn dirt with a special
cleaner.
• Clean all accessories regularly and let
them dry. Use a soft cloth with warm
water and a cleaning agent.
• To soften the hard to remove remains,
boil a glass of water at full microwave
power for 2 to 3 minutes.
• To remove odours, mix a glass of water
with 2 tsp of lemon juice and boil at full
microwave power for 5 minutes.
Activate the appliance.
Plug in the appliance.
Check the fuse. If the fuse
blows more than one time,
contact a qualified electrician.
Page 16

www.electrolux.com
16
The appliance does
not operate.
The lamp does not
operate.
There is sparking in
the cavity.
There is sparking in
the cavity.
The turntable set
makes scratching or
grinding noise.
The appliance stop
to operate without a
clear reason.
If you cannot find a solution to the problem yourself, contact your dealer or the
customer service centre.
We recommend that you write the data here:
Model (MOD.) .........................................
Product number (PNC) .........................................
Serial number (S.N.) .........................................
Problem Possible cause Remedy
The door is not closed properly.
Make sure that nothing
blocks the door.
The lamp is defective. The lamp has to be replace.
There are metal dishes or
dishes with metal trim.
There are metal skewers or
aluminium foil that touches
the interior walls.
There is an object or dirt below the glass cooking tray.
Remove the dish from the
appliance.
Make sure that the skewers
and foil does not touch the
interior walls.
Clean the area below the
glass cooking tray.
There is a malfunction. If this situation repeats call
the customer service center.
The necessary data for the customer
service center is on the rating plate on the
appliance.
13. INSTALLATION
CAUTION!
Do not block the air vents. If you
do that, the appliance can overheat.
CAUTION!
Do not connect the appliance to
adapters or extension leads. This
can cause overloading and risk of
fire.
• The appliance is for built-in use only.
• The fitted cabinet must not have a back
wall behind the appliance.
• Put the appliance far away from steam,
hot air and water splashes.
• If you transport the appliance in cold
weather, do not activate it immediately
after the installation. Let is stand in the
room temperature and absorb the heat.
13.1 Electrical installation
WARNING!
Only a qualified person must do
the electrical installation.
The manufacturer is not responsible if you do not follow the safety
precautions from the chapter
"Safety Information".
This appliance is supplied with a main cable and main plug.
CAUTION!
Minimum installation height is 85
cm.
1. Check if the dimensions of the furniture meet the installation distances.
Page 17

ENGLISH 17
C
D
A
B
Installation distances
Dimension mm
A 380 + 2
B 560 + 8
C 500
D 18
2.
Put the template on the bottom of
cabinet and mark the spots for
screws. Remove the template and fix
the bracket with the screws.
=
3.
Install the appliance. Make sure the
=
bracket locks the back of the appliance.
4. Open the door and fix the appliance to
the cabinet with a screw.
Page 18

www.electrolux.com
18
14. ENVIRONMENT CONCERNS
Recycle the materials with the symbol
. Put the packaging in applicable
containers to recycle it.
Help protect the environment and human
health and to recycle waste of electrical
and electronic appliances. Do not dispose
appliances marked with the symbol
with the household waste. Return the
product to your local recycling facility or
contact your municipal office.
Page 19

ITALIANO 19
INDICE
1. INFORMAZIONI PER LA SICUREZZA . . . . . . . . . . . . . . . . . . . . . . . . . . . . . . . . . . . . . . . . 20
2. ISTRUZIONI DI SICUREZZA . . . . . . . . . . . . . . . . . . . . . . . . . . . . . . . . . . . . . . . . . . . . . . . 23
3. DESCRIZIONE DEL PRODOTTO . . . . . . . . . . . . . . . . . . . . . . . . . . . . . . . . . . . . . . . . . . . . 24
4. PREPARAZIONE AL PRIMO UTILIZZO . . . . . . . . . . . . . . . . . . . . . . . . . . . . . . . . . . . . . . . 25
5. PANNELLO DEI COMANDI . . . . . . . . . . . . . . . . . . . . . . . . . . . . . . . . . . . . . . . . . . . . . . . . 26
6. UTILIZZO QUOTIDIANO . . . . . . . . . . . . . . . . . . . . . . . . . . . . . . . . . . . . . . . . . . . . . . . . . . 27
7. PROGRAMMI AUTOMATICI . . . . . . . . . . . . . . . . . . . . . . . . . . . . . . . . . . . . . . . . . . . . . . . 30
8.
UTILIZZO DEGLI ACCESSORI . . . . . . . . . . . . . . . . . . . . . . . . . . . . . . . . . . . . . . . . . . . . . 31
9. FUNZIONI AGGIUNTIVE . . . . . . . . . . . . . . . . . . . . . . . . . . . . . . . . . . . . . . . . . . . . . . . . . . 32
10.
CONSIGLI E SUGGERIMENTI UTILI . . . . . . . . . . . . . . . . . . . . . . . . . . . . . . . . . . . . . . . . . 32
11. PULIZIA E CURA . . . . . . . . . . . . . . . . . . . . . . . . . . . . . . . . . . . . . . . . . . . . . . . . . . . . . . . . 33
12.
RISOLUZIONE DEI PROBLEMI . . . . . . . . . . . . . . . . . . . . . . . . . . . . . . . . . . . . . . . . . . . . . 34
13. INSTALLAZIONE . . . . . . . . . . . . . . . . . . . . . . . . . . . . . . . . . . . . . . . . . . . . . . . . . . . . . . . . 35
PENSATI PER VOI
Grazie per aver acquistato un'apparecchiatura Electrolux. Avete scelto un prodotto che ha alle
spalle decenni di esperienza professionale e innovazione. Ingegnoso ed elegante, è stato
progettato pensando a voi. Quindi, in qualsiasi momento desiderate utilizzarlo, potete esser certi
di ottenere sempre i migliori risultati.
Benvenuti in Electrolux.
Visitate il nostro sito web per:
ricevere consigli, scaricare i nostri opuscoli, eliminare eventuali anomalie, ottenere
informazioni sull'assistenza.
www.electrolux.com
registrare il vostro prodotto e ricevere un servizio migliore:
www.electrolux.com/productregistration
acquistare accessori, materiali di consumo e ricambi originali per la vostra
apparecchiatura:
www.electrolux.com/shop
SERVIZIO CLIENTI E MANUTENZIONE
Consigliamo sempre l’impiego di ricambi originali.
Quando si contatta l'Assistenza, accertarsi di disporre dei seguenti dati.
Le informazioni si trovano sulla targhetta di identificazione. Modello, numero dell'apparecchio
(PNC), numero di serie.
Avvertenza / Attenzione - Importanti Informazioni di Sicurezza
Informazioni e consigli generali
Informazioni in materia di sicurezza ambientale
Con riserva di modifiche.
Page 20

www.electrolux.com
20
1. INFORMAZIONI PER LA SICUREZZA
Leggere attentamente le istruzioni fornite prima di installare e utilizzare l'apparecchiatura. Il produttore non è responsabile se un'installazione ed un uso non corretto dell'apparecchiatura provocano lesioni e danni. Tenere sempre le istruzioni a portata di mano in caso di necessità durante l'utilizzo.
1.1 Sicurezza dei bambini e delle persone vulnerabili
AVVERTENZA!
Rischio di soffocamento, lesioni o invalidità permanente.
• Questa apparecchiatura può essere usata da bambini
a partire dagli 8 anni e da adulti con limitate capacità fisiche, sensoriali o mentali o con scarsa esperienza o
conoscenza sull'uso dell'apparecchiatura, se sorvegliati
o se sono stati istruiti relativamente all'uso dell'apparecchiatura e hanno capito i rischi coinvolti.
• Non consentire ai bambini di giocare con l'apparecchiatura.
• Tenere i materiali di imballaggio al di fuori della portata
dei bambini.
• Tenere i bambini e gli animali domestici lontano dall'apparecchiatura durante il funzionamento o raffreddamento. Le parti accessibili sono incandescenti.
• Se l’apparecchiatura dispone di un dispositivo di sicurezza per i bambini, consigliamo di attivarlo.
• La pulizia e gli interventi di manutenzione non devono
essere eseguiti dai bambini senza supervisione.
• Tenere l'apparecchiatura e il rispettivo cavo fuori dalla
portata dei bambini di età inferiore agli 8 anni.
1.2 Avvertenze di sicurezza generali
• L'apparecchiatura è destinata all'uso domestico e applicazioni simili, tra cui:
Page 21

ITALIANO 21
– cucine di negozi, uffici e altri ambienti di lavoro;
–fattorie;
– da clienti di hotel, motel e altri ambienti residenziali;
– nei bed and breakfast.
• All'interno l'apparecchiatura si scalda mentre è in funzione. Non toccare le resistenze dell'apparecchiatura.
Servirsi sempre degli appositi guanti da forno per
estrarre o inserire accessori o pentole resistenti al calore.
• Non usare una pulitrice a vapore per pulire l'apparecchiatura.
• Prima di eseguire qualsiasi intervento di manutenzione,
scollegare l'apparecchiatura dalla rete elettrica.
• Se la porta o le guarnizioni della porta sono danneggiate, il forno non deve essere messo in funzione finché
non è stato riparato da una persona competente.
• Le apparecchiature non prevedono l'utilizzo mediante
un timer esterno o un telecomando.
• Qualsiasi intervento di servizio o riparazione che preveda lo smontaggio di un coperchio previsto per proteggere dall'esposizione all'energia a microonde va eseguito esclusivamente da una persona competente.
• Non si devono riscaldare liquidi o altri alimenti in contenitori sigillati perché potrebbero esplodere.
• Usare solo utensili adatti all'uso in forno a microonde.
• Quando si riscaldano o cuociono alimenti in recipienti di
plastica, carta, controllare il forno per evitare il rischio di
incendio.
• L'apparecchiatura è destinata alla cottura di alimenti e
bevande. L'asciugatura di alimenti e capi di vestiario e il
riscaldamento di compresse riscaldanti, pantofole, spugne, panni umidi e simili può comportare il rischio di lesione, accensione o incendio.
Page 22

www.electrolux.com
22
• Se viene emesso del fumo, spegnere l'apparecchiatura
• Il riscaldamento a microonde di bevande può provoca-
• Agitare o scuotere il contenuto dei biberon e dei vasetti
• Non riscaldare nell'apparecchiatura le uova con il gu-
• Pulire l'apparecchiatura regolarmente e togliere even-
• Non mantenendo l'apparecchiatura in condizioni pulite
• La temperatura delle superfici accessibili può essere
• Il forno a microonde non deve essere inserito in un mo-
• La superficie posteriore delle apparecchiature deve es-
• Fare attenzione alle dimensioni minime del mobile (ove
• L'apparecchiatura deve essere messa in funzione con
• Non utilizzare detergenti abrasivi o raschietti di metallo
• Se il cavo di alimentazione è danneggiato, deve essere
o disinserire la spina del cavo di alimentazione e tenere
la porta chiusa per soffocare le eventuali fiamme.
re un'ebollizione ritardata con fuoriuscita della bevanda
fare quindi attenzione quando si manipola il contenitore.
di alimenti per bambini e controllarne la temperatura
prima del consumo per evitare scottature.
scio e le uova sode intere in quanto potrebbero esplodere, anche successivamente alla fase di riscaldamento con il forno a microonde.
tuali residui di cibo.
si può provocare il deterioramento della superficie, pregiudicare la durata dell'apparecchiatura e si possono
creare delle situazioni di pericolo.
elevata quando l'apparecchiatura è in funzione.
bile se non è studiato per il montaggio ad incasso.
sere posta contro la parete.
previsto). Fare riferimento al capitolo Installazione.
la porta decorata aperta (ove prevista).
per pulire il vetro della porta per non rigare la superficie
e causare la rottura del vetro.
sostituito dal produttore, da un tecnico autorizzato o da
Page 23

ITALIANO 23
una persona qualificata per evitare situazioni di pericolo.
2.
ISTRUZIONI DI SICUREZZA
2.1 Installazione
AVVERTENZA!
L'installazione dell'apparecchiatura deve essere svolta unicamente
da personale qualificato.
• Rimuovere tutti i materiali di imballag-
gio.
• Non installare e utilizzare l'apparecchia-
tura se è danneggiata.
• Attenersi alle istruzioni fornite insieme
all'apparecchiatura.
• Prestare sempre attenzione in fase di
spostamento dell'apparecchiatura, dato
che è molto pesante. Indossare sempre
di guanti di sicurezza.
• Non tirare l’apparecchiatura per la ma-
niglia.
• È necessario rispettare le distanze mini-
me dalle altre apparecchiature.
• Assicurarsi che l'apparecchiatura sia in-
stallata sotto e vicino a parti adeguatamente ancorate a una struttura fissa.
• I lati dell'apparecchiatura devono resta-
re adiacenti ad apparecchiature o unità
con la stessa altezza.
Collegamento elettrico
AVVERTENZA!
Rischio di incendio e scossa elettrica.
• Tutti i collegamenti elettrici devono es-
sere realizzati da un elettricista qualificato.
• L'apparecchiatura deve disporre di una
messa a terra.
• Verificare che i dati elettrici riportati sulla
targhetta dei dati corrispondano a quelli
dell'impianto. In caso contrario, contattare un elettricista.
• Se l'apparecchiatura è collegata alla
presa mediante una prolunga, assicurarsi che il cavo sia collegato a terra.
• Accertarsi di non danneggiare la spina
e il cavo. Contattare il Centro di Assistenza o un elettricista qualificato per
sostituire un cavo danneggiato.
• Non tirare il cavo di alimentazione per
scollegare l’apparecchiatura. Tirare solo
la spina.
2.2 Utilizzo
AVVERTENZA!
Rischio di ferite, ustioni, scosse
elettriche o esplosioni.
• Utilizzare l’apparecchiatura in un ambiente domestico.
• Non apportare modifiche alle specifiche
di questa apparecchiatura.
• Verificare che le aperture di ventilazione
non siano ostruite.
• Non lasciare mai l'apparecchiatura incustodita durante il funzionamento.
• Non esercitare pressione sulla porta
aperta.
• Non utilizzare l'apparecchiatura come
superficie di lavoro e la cavità del forno
come spazio di conservazione.
2.3 Pulizia e cura
AVVERTENZA!
Vi è il rischio di lesioni, incendio o
danni all'apparecchiatura.
• Prima di eseguire qualunque intervento
di manutenzione, spegnere l'apparecchiatura ed estrarre la spina dalla presa.
• Pulire regolarmente l'apparecchiatura
per evitare il deterioramento dei materiali che compongono la superficie.
• Non lasciare che si accumulino resti di
cibo versato o residui di detergente sulle superfici di sigillatura della porta.
Page 24

www.electrolux.com
24
• I residui di grasso o cibo nell'apparecchiatura possono provocare un incendio.
• Pulire l'apparecchiatura con un panno
inumidito e morbido. Utilizzare solo detergenti neutri. Non usare prodotti abrasivi, spugnette abrasive, solventi od oggetti metallici.
• Se si utilizza uno spray per il forno, seguire attentamente le istruzioni di sicurezza sulla confezione.
3. DESCRIZIONE DEL PRODOTTO
1 2
3 4
8 67
5
2.4 Smaltimento
AVVERTENZA!
Rischio di lesioni o soffocamento.
• Staccare la spina dall'alimentazione
elettrica.
• Tagliare il cavo di alimentazione e smaltirlo adeguatamente.
Lampadina
1
Blocco di sicurezza
2
Display
3
Pannello dei comandi
4
Apertura porta
5
Copertura guida d'onda
6
Grill
7
Albero del piatto girevole
8
3.1 Accessori
Kit piatto girevole
Vassoio di cottura in vetro e guida a rulli.
Utilizzare sempre il piatto girevole
per preparare il cibo all'interno
dell'apparecchiatura.
Griglia per il grill
Per la cottura al grill e combinata.
Page 25

4. PREPARAZIONE AL PRIMO UTILIZZO
ITALIANO 25
AVVERTENZA!
Fare riferimento ai capitoli sulla sicurezza.
4.1 Prima pulizia
• Togliere tutte le parti dall'apparecchiatura.
• Pulire l'apparecchiatura prima di utilizzarla per la prima volta.
Vedere il capitolo "Pulizia e cura".
4.2 Impostazione dell'ora
Quando si collega l'apparecchiatura alla corrente elettrica o dopo
un'interruzione di corrente, il display mostra 0:00 e viene messo
un segnale acustico.
È possibile impostare l'ora con il
sistema 24 ore.
Se l'orologio non è impostato non
funziona se l'apparecchiatura non
viene utilizzata.
1.
Premere .
2.
Ruotare la manopola delle Impostazioni per regolare le ore.
3.
Premere per confermare.
4.
Ruotare la manopola delle Impostazioni per regolare i minuti.
5.
Premere per confermare.
Page 26

www.electrolux.com
26
5. PANNELLO DEI COMANDI
1
2
3
4
5
6
7
Simbolo Funzione Descrizione
1
2
3
— Display
Tasto scongela-
mento
Tasto funzione Per scegliere la funzione.
Mostra le impostazioni e l'ora
corrente.
Per scongelare il cibo in base
al peso o al tempo.
Per impostare il tempo di cot-
4
—
Manopola delle im-
postazioni
tura, il peso o per attivare i
programmi di cottura automatica.
Per disattivare l'apparecchia-
5
Tasto stop/annulla
tura o annullare le impostazioni di cottura.
6
Tasto orologio/timer
cucina
Per impostare l'ora.
Page 27

Simbolo Funzione Descrizione
7
6. UTILIZZO QUOTIDIANO
Tasto avvio/+30
sec.
ITALIANO 27
Per avviare l'apparecchiatura
o aumentare il tempo di cottura per 30 secondi alla massima potenza.
AVVERTENZA!
Fare riferimento ai capitoli sulla sicurezza.
6.1 Attivazione e disattivazione
dell'apparecchiatura
1.
Premere il tasto con la funzione che si
desidera impostare.
2.
Premere il tasto ripetutamente o ruotare la manopola delle Impostazioni
per impostare la funzione desiderata.
3.
Premere per confermare.
4.
Ruotare la manopola delle Impostazioni per impostare il tempo desiderato.
5.
Premere per confermare e attivare l'apparecchiatura.
6.
Per spegnere l'apparecchiatura è
possibile:
– attendere che l'apparecchiatura si
disattivi automaticamente una volta
trascorso il tempo.
– Aprire la porta. L'apparecchiatura si
ferma automaticamente. Chiudere
la porta per proseguire la cottura.
Utilizzare questa opzione per controllare il cibo.
–
Premere
ATTENZIONE
Non lasciare l'apparecchiatura in
funzione senza cibo all'interno.
.
6.2 Informazioni generali sull'uso
dell'apparecchiatura
Informazioni generali:
• Dopo aver spento l'apparecchiatura, lasciare la pietanza in forno per alcuni minuti.
• Togliere il foglio di alluminio di imballaggio, i contenitori di metallo, ecc. prima
di preparare il cibo.
Cottura:
• Se possibile, cuocere gli alimenti coperti con del materiale adatto all'uso nel
microonde. Cuocere senza coperchio
solo se lo si vuole rosolato
• Non cuocere eccessivamente i piatti
impostando la potenza e il tempo su
valori troppo alti. Il cibo potrebbe seccarsi, scoppiare o rapprendersi in alcuni
punti.
• Non usare l'apparecchiatura per cuocere uova nel loro guscio o lumache, poiché potrebbero scoppiare. Per le uova
fritte, forare prima il tuorlo.
• Forare con una forchetta diverse volte i
cibi con "pelle" o "buccia" come patate,
pomodori, salsicce prima di cuocerli,
per evitare che scoppino.
• I cibi freddi o congelati necessitano di
tempi di cottura più lunghi.
• Mescolare di tanto in tanto i piatti contenenti salse.
• Le verdure sode, come carote, piselli o
cavolfiore devono essere cotte nell'acqua.
• Girare i pezzi più grandi a circa metà
tempo di cottura.
• Se possibile, tagliare le verdure a pezzi
di dimensioni simili.
• Utilizzare piatti piani e larghi.
• Non usare stoviglie in porcellana, ceramica o argilla che presentano parti porose, ad es. manici o fondi non laccati.
L'umidità che penetra nei fori può provocare la rottura delle pentole durante il
riscaldamento.
• Il vassoio di cottura in vetro serve per riscaldare pietanze o liquidi. È necessario
Page 28

www.electrolux.com
28
Scongelamento di carne, pollame,
pesce:
• Sistemare i cibi congelati e senza invo-
• Girare il cibo a metà tempo di sconge-
Scongelamento di burro, fette di
torta, formaggio morbido:
• Non scongelare completamente nel-
Pentole e materiali adatti
Pentole/Materiale Microonde Grill
Vetro e porcellana resistente al fuoco (senza parti in metallo, ad es. pirex, vetro resistente al calore)
Vetro e porcellana non resistente al
fuoco
Vetro e vetroceramica in materiale
resistente al fuoco e al gelo (ad es.
Arcoflam), griglia
Ceramica 2), terracotta
Plastica termoresistente fino a
200°C
Cartone, carta
Pellicola per alimenti
Sacchetti di cottura con chiusura
adatta alle microonde
Recipienti di cottura in metallo, ad
es. smalto, ghisa
Teglie laccate in nero o rivestite in
silicone
per il funzionamento del forno a microonde.
lucro su un piccolo piatto capovolto posto sopra un contenitore cosicché il liquido di scongelamento possa scorrere
via.
lamento. Se possibile, dividere e quindi
rimuovere i pezzi che hanno iniziato a
scongelarsi.
l'apparecchiatura, ma lasciarli scongelare a temperatura ambiente. Il risultato
sarà più uniforme. Prima dello scongelamento, rimuovere completamente gli
involucri in metallo o alluminio.
1)
2)
3)
3)
3)
Scongelamento di frutta, verdure:
• Non scongelare completamente frutta e
verdura, che devono essere preparate
ulteriormente mentre sono ancora crude, all'interno dell'apparecchiatura, ma
lasciar scongelare a temperatura ambiente.
• Si può usare una potenza più elevata
per le microonde per cuocere frutta e
verdura senza doverle prima scongelare.
Pietanze pronte:
• È possibile preparare pietanze pronte
all'interno dell'apparecchiatura solo se
la confezione è adatta al microonde.
• È necessario seguire le istruzioni del
produttore stampate sulla confezione
(ad es. togliere la copertura di metallo e
forare la pellicola di plastica).
Scongelamento
Riscaldamen-
Cottura
to
X X X X
X -- -- --
X X X X
X X X --
X X X --
X -- -- --
X -- -- --
X X X --
-- -- -- X
-- -- -- X
Page 29

ITALIANO 29
Pentole/Materiale Microonde Grill
Scongelamento
Riscaldamen-
Cottura
to
Lamiera dolci
Pentole per rosolare, ad es. piatto
-- -- -- X
-- X X --
crisp
Piatti pronti confezionati
1)
Senza applicazioni o decorazioni in argento, oro, platino o metallo
2)
Senza componenti in quarzo o metallo o smalto contenente metalli
3)
Per le temperature massime bisogna seguire le istruzioni del produttore.
X adatto -- non adatto
3)
X X X X
6.3 Tabella impostazioni di potenza
Premere il
tasto Fun-
zione
Impostazione di poten-zaPercentuale approssimativa di po-
tenza
1 volta P100 100 %
2 volte P 80 80 %
3 volte P 50 50 %
4 volte P 30 30 %
5 volte P 10 10 %
Ulteriori funzioni
Premere il
tasto Fun-
zione
Impostazione di poten-
za
Modalità funzione
6 volte G Doppio Grill
Cottura combinata
7 volte C – 1 Microonde 55%, Grill 45%
8 volte C – 2 Microonde 36%, Grill 64%
6.4 Avvio rapido
•
Premere
tura per 30 secondi alla massima potenza. Il tempo di cottura aumenta di 30
secondi ad ogni singola pressione del
tasto. Il tempo di cottura massimo è di
95 minuti.
• In modalità standby, ruotare la manopola delle Impostazioni in senso antiorario per impostare il tempo di cottura,
quindi premere
per attivare l'apparecchia-
per avviare l'appa-
recchiatura alla massima potenza microonde.
6.5 Scongelamento
È possibile scegliere tra 2 modalità di
scongelamento:
• Scongelamento in base al peso
• Scongelamento in base al tempo
Page 30

www.electrolux.com
30
Peso e tempo scongelamento
1.
2.
3.
6.6 Cottura
È possibile cucinare il cibo in massimo 2
passaggi. Se uno dei passaggi è lo scongelamento, impostarlo come primo passaggio.
Premere una volta per impostare
il peso per lo scongelamento o due
volte per il tempo di scongelamento.
Ruotare la manopola delle Impostazioni per inserire il peso o il tempo desiderato.
Premere per confermare e attivare l'apparecchiatura.
Per lo scongelamento in base al
peso il tempo viene impostato automaticamente. Lo scongelamento in base al peso non può essere
utilizzato con cibo lasciato al di
fuori del congelatore per più di 20
min., o con cibo pronto surgelato.
Per attivare lo scongelamento in
base al peso è necessario che il
cibo pesi più di 100 g e meno di
2000 g.
Per scongelare un cibo che pesa
meno di 200 g, sistemarlo sul bordo del piatto girevole.
Cottura multipassaggio:
1.
Premere
di scongelamento.
2. Ruotare la manopola delle Impostazioni per imposare il tempo o il peso per
lo scongelamento.
3.
Premere
4.
Ruotare la manopola delle Impostazioni per selezionare il livello di potenza
desiderato.
5.
Premere
6.
Ruotare la manopola delle Impostazioni per inserire il tempo.
7.
Premere
l'apparecchiatura.
Dopo ogni passaggio viene emesso un
segnale acustico.
e impostare la modalità
per confermare.
per confermare.
per confermare e attivare
6.7 Grill o Cottura combinata
1. Premere il tasto Funzione.
2. Ruotare la manopola delle Impostazio-
ni per impostare la funzione desiderata.
3.
Premere
4. Ruotare la manopola delle Impostazioni per inserire il tempo.
5.
Premere
l'apparecchiatura.
per confermare.
per confermare e attivare
7. PROGRAMMI AUTOMATICI
AVVERTENZA!
Fare riferimento ai capitoli sulla sicurezza.
7.1 Cottura automatica
È possibile usare la funzione di Cottura
automatica per semplificare la preparazione del cibo.
Menù Peso
A - 1
Pizza
A - 2
Patate
1. In modalità standby, ruotare la manopola Impostazioni in senso orario per
scegliere il menù desiderato.
2.
Premere
3. Ruotare la manopola delle Impostazioni per impostare il peso dal menù.
4.
Premere
l'apparecchiatura.
per confermare.
per confermare e attivare
200 g
400 g
200 g
400 g
600 g
Page 31

Menù Peso
A - 3
Carne
A - 4
Pesce
A - 5
Verdura
A - 6
Bevande
A - 7
Pasta
50 g (aggiungere 450 ml d'acqua)
100 g (aggiungere 800 ml d'acqua)
A - 8
Popcorn
A - 9
Pollo
A - 10
Riscaldamento
ITALIANO 31
250 g
350 g
450 g
250 g
350 g
450 g
200 g
300 g
400 g
1 tazza (120 ml)
2 tazze (240 ml)
3 tazze (360 ml)
50 g
100 g
400 g
800 g
1.200 g
200 g
400 g
600 g
8. UTILIZZO DEGLI ACCESSORI
AVVERTENZA!
Fare riferimento ai capitoli sulla sicurezza.
8.1 Introduzione del kit per il piatto girevole
1.
Posizionare la guida a rulli attorno all'albero del piatto girevole.
2.
Sistemare il vassoio di cottura in vetro
sulla guida a rulli
Page 32

www.electrolux.com
32
8.2 Inserire la griglia per il grill
collocare gli alimenti sul piatto girevole.
ATTENZIONE
Non cucinare il cibo senza il kit
per il piatto girevole. Usare esclusivamente il piatto girevole in dotazione con l'apparecchiatura.
9. FUNZIONI AGGIUNTIVE
2.
9.1 Sicurezza bambini
La Sicurezza bambini evita l'attivazione
accidentale dell'apparecchiatura.
Per attivare o disattivare la Sicurezza
bambini tenere premuto
di, fino a che non viene emesso un segnale acustico.
Quando la Sicurezza bambini è attiva, il
display mostra l'ora corrente.
per 3 secon-
Ruotare la manopola delle Impostazioni per inserire il tempo.
3.
Premere per confermare.
È possibile impostare al massimo 95 minuti.
9.2 Timer cucina
1.
Premere due volte .
10. CONSIGLI E SUGGERIMENTI UTILI
Non cucinare mai il cibo direttamente sul vassoio di cottura in vetro.
Una volta trascorso il tempo impostato, viene emesso un segnale
acustico.
Il timer rimane è ancora in funzione quando si apre la porta o si
mette in pausa l'apparecchiatura.
Premere
per annullare.
10.1 Consigli per il microonde
Problema Soluzione
Non è possibile trovare dettagli per
la quantità di cibo preparato.
Il cibo è diventato troppo asciutto. Impostare un tempo di cottura più breve o
Cercare un cibo simile. Aumentare o ridurre
la durata dei tempi di cottura in base alla seguente regola: Quantità doppia = quasi il
doppio del tempo, Metà quantità = metà
tempo
selezionare una potenza inferiore.
Page 33

Problema Soluzione
Il cibo non si è ancora scongelato,
oppure è caldo o ha superato il
tempo di cottura.
Una volta terminato il tempo di
cottura, il cibo si surriscalda ai bordi ma non è ancora pronto al cen-
Impostare un tempo di cottura più lungo o
selezionare una potenza più elevata. Piatti
grandi richiedono un tempo più lungo.
La volta successiva selezionare una potenza
più bassa e un tempo più lungo. Girare i liquidi a metà cottura, ad es. la zuppa.
tro.
Per ottenere risultati ottimali con il riso
usare piatti piani e larghi.
10.2 Scongelamento
Scongelare sempre l'arrosto con la parte
grassa rivolta verso il basso.
Non scongelare carne avvolta in quanto
potrebbe cuocersi invece di scongelarsi.
Scongelare sempre il petto di pollo intero
rivolto verso il basso.
dure fresche in pezzi delle stesse dimensioni prima di passare alla cottura. Cuocere tutte le verdure con un coperchio sul
contenitore.
10.4 Grill
Cuocere al grill i cibi sottili mettendoli al
centro della griglia.
Girare la pietanza a metà del tempo impostato e continuare a grigliare.
ITALIANO 33
10.3 Cottura
Estrarre sempre la carne e il pollame freddi dal frigorifero almeno 30 minuti prima
della cottura.
Lasciare la carne, il pollame, il pesce e le
verdure coperti dopo la cottura.
Spennellare il pesce con dell'olio o del
burro fuso.
Aggiungere 30 - 45 ml di acqua fredda
per ogni 250 g di verdure. Tagliare le ver-
11. PULIZIA E CURA
AVVERTENZA!
Fare riferimento ai capitoli sulla sicurezza.
Note sulla pulizia:
• Pulire la parte anteriore dell'apparecchiatura con un panno morbido inumidito con acqua tiepida saponata.
• Per pulire le superfici metalliche, utilizzare un normale detergente.
• Pulire l'interno del forno dopo ogni utilizzo. In questo modo è possibile eliminare più facilmente le macchie.
• Rimuovere lo sporco tenace con detergenti speciali.
10.5 Cottura combinata
Utilizzare la cottura combinata per mantenere la croccantezza di alcuni alimenti.
A metà del tempo di cottura, girare la pietanza e poi continuare.
Esistono 2 modalità per la cottura combinata. Ciascuna modalità abbina le funzioni
di cottura al microonde e grill in momenti
e a livelli di potenza diversi.
• Pulire tutti gli accessori regolarmente e
lasciarli asciugare. Utilizzare un panno
morbido inumidito con acqua tiepida
saponata.
• Per ammorbidire le parti dure da rimuovere, portare a ebollizione un bicchiere
d'acqua nel microonde alla massima
potenza per 2 / 3 minuti.
• Per eliminare gli odori, aggiungere 2
cucchiaini di succo di limone in un bicchiere d'acqua e far bollire nel microonde alla massima potenza per 5 minuti.
Page 34

www.electrolux.com
34
12. RISOLUZIONE DEI PROBLEMI
AVVERTENZA!
Fare riferimento ai capitoli sulla sicurezza.
Problema Causa possibile Soluzione
L'apparecchiatura
non funziona.
L'apparecchiatura
non funziona.
L'apparecchiatura
non funziona.
L'apparecchiatura
non funziona.
La lampadina non si
accende.
Sono presenti delle
scintille nella cavità.
Sono presenti delle
scintille nella cavità.
Il kit per il piatto girevole provoca dei
graffi o rumore di
abrasione.
L'apparecchiatura si
arresta senza un
motivo preciso.
Qualora non sia possibile trovare una soluzione al problema, contattare il rivenditore od il Centro di Assistenza.
Consigliamo di annotarle in questo spazio:
Modello (MOD.) .........................................
Numero Prodotto (PNC) .........................................
Numero di serie (S.N.) .........................................
L'apparecchiatura è disattivata.
L'apparecchiatura non è
collegata alla presa di alimentazione.
Il fusibile nella scatola dei fusibili è scattato.
La porta non è chiusa correttamente.
La lampadina è difettosa. La lampadina deve essere
Sono stati inseriti piatti di
metallo o con bordi metallici.
Sono presenti degli spiedi in
metallo o un foglio di alluminio che toccano le pareti interne.
È presente un oggetto o dello sporco al di sotto del vassoio di cottura in vetro.
È presente un malfunzionamento.
Accendere l'apparecchiatura.
Inserire la spina dell’apparecchiatura nella presa di
corrente.
Controllare il fusibile. Se il
fusibile scatta più di una volta, contattare un tecnico
qualificato.
Assicurarsi che niente blocchi la porta.
sostituita.
Togliere il piatto dall'appa-
recchiatura.
Assicurarsi che gli spiedi e il
foglio di alluminio non tocchino le pareti interne.
Pulire l'area sottostante il
vassoio di cottura in vetro.
Se il problema persiste,
contattare il Centro di Assistenza.
Le informazioni necessarie per il Centro di
Assistenza si trovano sulla targhetta dei
dati applicata sull'apparecchiatura.
Page 35

13. INSTALLAZIONE
ATTENZIONE
Evitare di ostruire le aperture di
ventilazione, altrimenti l'apparecchiatura potrebbe surriscaldarsi.
ATTENZIONE
Non collegare l'apparecchiatura
ad adattatori o a prolunghe. Potrebbe verificarsi un sovraccarico
e rischio di incendio.
• L'apparecchiatura deve essere obbligatoriamente incassata.
• Il mobile in cui la si incassa non deve disporre della parete posteriore.
• Tenere l'apparecchiatura lontana da vapore, aria calda e schizzi d'acqua.
• Se si trasporta l'apparecchiatura d'inverno, non attivarla immediatamente
dopo l'installazione. Lasciarla riposare a
temperatura ambiente in modo che si
riscaldi.
13.1 Installazione dell'impianto
elettrico
AVVERTENZA!
L’installazione dell'apparecchiatura deve essere eseguita da personale qualificato.
ITALIANO 35
C
D
A
B
Distanze per l'installazione
Dimensioni mm
A 380 + 2
B 560 + 8
C 500
D 18
2.
Sistemare il modello sul fondo del mobile e contrassegnare i punti per le viti.
Rimuovere il modello e fissare la staffa
mediante le viti.
Il produttore non è responsabile
qualora non vengano applicate le
precauzioni del capitolo "Informazioni per la sicurezza".
La dotazione standard dell'apparecchiatura al momento della fornitura prevede un
cavo di rete e una spina.
ATTENZIONE
Altezza minima di installazione: 85
cm.
1.
Verificare che le dimensioni del mobile
rispettino le distanze per l'installazione.
=
3.
Installazione dell’apparecchiatura. As-
=
sicurarsi che la staffa blocchi il retro
dell'apparecchiatura.
Page 36

www.electrolux.com
36
4. Aprire la porta e fissare l'apparecchia-
tura al mobile mediante una vite.
14. CONSIDERAZIONI AMBIENTALI
Riciclare i materiali con il simbolo
Buttare l'imballaggio negli appositi
contenitori per il riciclaggio.
Aiutare a proteggere l’ambiente e la salute
umana e a riciclare rifiuti derivanti da
apparecchiature elettriche ed elettroniche.
Non smaltire le apparecchiature che
riportano il simbolo
insieme ai normali
.
rifiuti domestici. Portare il prodotto al
punto di riciclaggio più vicino o contattare
il comune di residenza.
Page 37

ITALIANO 37
Page 38

www.electrolux.com
38
Page 39

ITALIANO 39
Page 40

www.electrolux.com/shop
892961090-B-292013
 Loading...