

Page 1

GEBRAUCHSANWEISUNG
OPERATING INSTRUCTION
JRU 44601
2222784-30
D
t
Page 2
2 Gedruckt auf umweltschonend hergestelltem Papier
Sicherheitshinweise
Bevor Sie Ihr neues KŠltegerŠt in Betrieb
nehmen, lesen Sie bitte diese
Gebrauchsanweisung aufmerksam durch.
Diese sind Sicherheitshinweise. Wir ersuchen Sie
daher, die folgenden Punkte vor der Installation
des GerŠtes und seiner Inbetriebnahme
aufmerksam durchzulesen.
Es wird empfohlen, diese Gebrauchsanweisung gut
aufzubewahren und bei einem eventuellen Verkauf
des GerŠtes dem neuen Besitzer auszuhŠndigen.
Benutzung im Haushalt
¥ Die KŸhl- und/oder GefrierschrŠnke sind zur
Einlagerung und/oder zum Einfrieren von
Lebensmitteln bestimmt.
¥ Vor der Installation sicherstellen, dass das GerŠt
nicht beschŠdigt ist. Mšgliche TransportschŠden
sind dem HŠndler unverzŸglich mitzuteilen.
¥
Das GerŠt ist schwer. Scharfe Metallkanten am
GerŠt hinten und unten stellen ein Verletzungsrisiko
dar. Beim Aufstellen oder Verschieben sind
Schutzhandschuhe zu tragen.
¥ Sollte die Installation des GerŠtes eine €nderung
der elektrischen Hausinstallation verlangen, so darf
diese nur von Elektro-FachkrŠften durchgefŸhrt
werden.
¥ Bitte prŸfen, dass das Netzkabel nicht von der
GerŠterŸckseite eingeklemmt und beschŠdigt wird.
Ein beschŠdigtes Netzkabel kann Ÿberhitzen und
einen Brand verursachen.
¥ Keine schweren GegenstŠnde bzw. das GerŠt
selbst auf das Netzkabel stellen. Kurzschluss- und
Brandgefahr!
¥ Den Netzstecker nie am Kabel aus der Steckdose
ziehen, besonders wenn das GerŠt aus der Nische
gezogen wurde. Eine BeschŠdigung des
Netzkabels kann Kurzschluss, Feuer und/oder
Stromschlag verursachen.
¥ Keine ElektrogerŠte (z.B. Eismaschinen) in das
GerŠt stellen.
¥ Es sollten keine kohlensŠurehaltigen GetrŠnke in
das Gefrier- bzw. Frosterfach eingestellt werden,
sie kšnnten platzen.
¥ Speiseeis und EiswŸrfel nicht unmittelbar aus dem
Gefrierfach in den Mund nehmen. Sehr kaltes Eis
kann an Lippen oder Zunge festfrieren und
Verletzungen verursachen.
¥ TiefkŸhlgut nicht mit nassen HŠnden berŸhren. Die
HŠnde kšnnten daran festfrieren.
¥ Tritt eine Stšrung oder ein Defekt ein, versuchen
Sie nicht, das GerŠt selbst zu reparieren.
ElektrogerŠte dŸrfen nur von Elektro-FachkrŠften
repariert werden, da durch unsachgemŠsse
Reparaturen erhebliche FolgeschŠden entstehen
kšnnen. Sich an die nŠchstgelegene
Kundendienststelle wenden und nur OriginalErsatzteile anfordern.
Sicherheit fŸr Kinder
¥ Die Teile des Verpackungsmaterials (z.B.
KunststoffhŸllen, Polystyrol) kšnnen fŸr Kinder
gefŠhrlich werden. Erstickungsgefahr!
¥ Im Falle der Entsorgung des GerŠtes ist das
Anschlusskabel durchzutrennen und der
TŸrverschluss unbrauchbar zu machen, damit sich
spielende Kinder nicht im GerŠt einschlie§en
kšnnen.
Umweltnormen
¥ Das GerŠt darf nicht mit dem HausmŸll oder
SperrmŸll entsorgt werden. Auskunft Ÿber
Abholtermine oder SammelplŠtze gibt die šrtliche
Gemeindeverwaltung an.
Hinweise zur Benutzung der Gebrauchsanweisung
Die folgenden Symbole erleichtern das Lesen der Gebrauchanweisung:
Sicherheitshinweise bezŸglich der Benutzung des GerŠtes
RatschlŠge fŸr den korrekten Gebrauch und die optimale Ausnutzung des GerŠtes.
Informationen zum Umweltschutz
D
Page 3
Gebrauch
KŸhlabteil - Inbetriebnahme
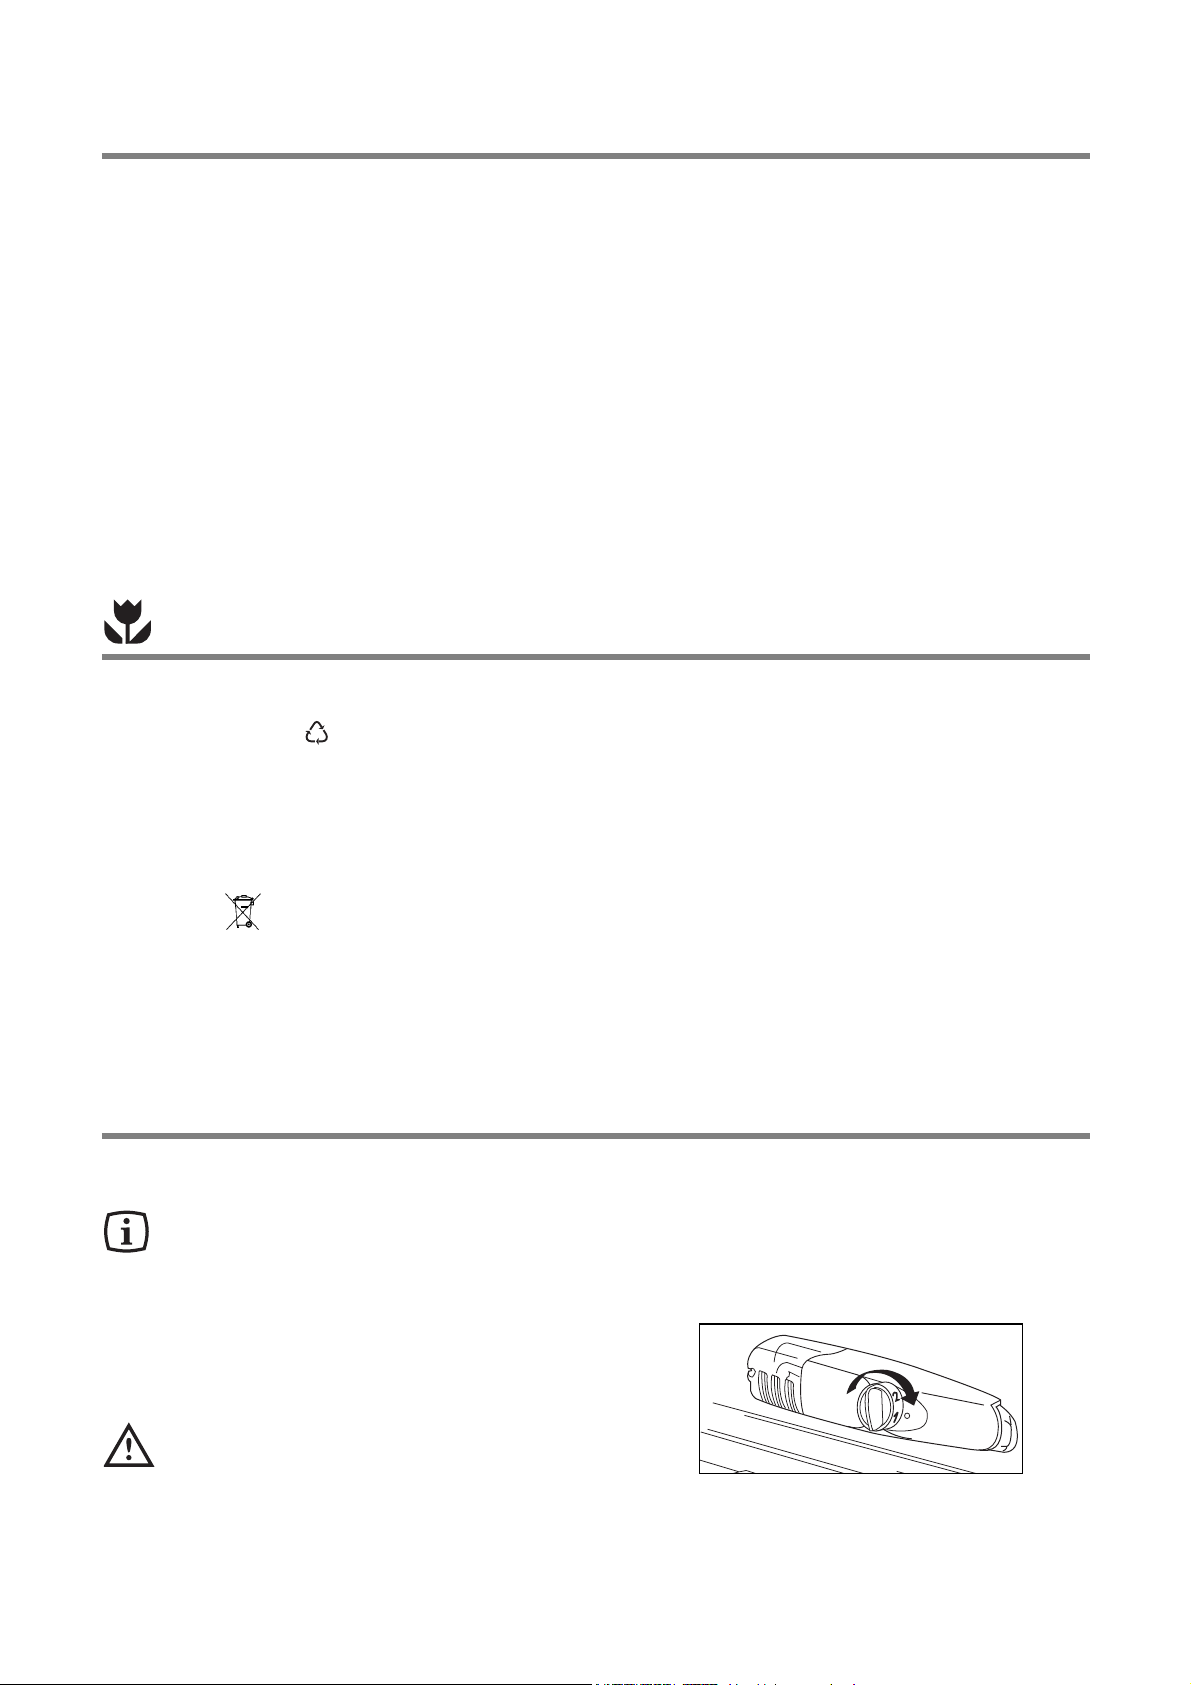
¥ Den Stecker in die Steckdose einsetzen. KŸhl-
schranktŸr šffnen und Thermostatknopf von der
Stellung ÇOÈ (STOP) aus im Uhrzeigersinn
drehen.
¥ Das GerŠt ist eingeschaltet. Den Stillstand des
GerŠtes erhŠlt man durch Drehen des
Thermostatknopfes auf das Symbol ÇOÈ.
Vor Inbetriebnahme
Man sollte mindestens 2 Std. warten, bevor
das GerŠt in Betrieb genommen wird, damit
das KŠltemittel zurŸckstršmen kann.
¥ Bevor Sie das GerŠt in Betrieb nehmen, beseitigen
Sie den typischen ÇNeugeruchÈ am besten durch
Auswaschen der Innenteile mit lauwarmem Wasser
und einem neutralen Reinigungsmittel. SorgfŠltig
nachtrocknen.
Bitte keine Reinigungs- bzw. Scheuermittel
verwenden, die das GerŠt beschŠdigen
kšnnten.
Das GerŠt sowie Teile der Innenausstattung sind fŸr
den Transport geschŸtzt.
Alle KlebebŠnder sowie Polsterteile aus dem
GerŠteinnenraum entfernen.
Sicherheitshinweise . . . . . . . . . . . . . . . . . . . . . . . . . . . . . . . . . . . . . . . . . . . . . . . . . . . . . . . . . . . . . . . . . . . . . .2
Entsorgung . . . . . . . . . . . . . . . . . . . . . . . . . . . . . . . . . . . . . . . . . . . . . . . . . . . . . . . . . . . . . . . . . . . . . . . . . . . . .3
Gebrauch
Vor Inbetriebnahme / KŸhlabteil - Inbetriebnhame / Temperaturregelung . . . . . . . . . . . . . . . . . . . . .3
KŸhlabteilausstattung / Tipps . . . . . . . . . . . . . . . . . . . . . . . . . . . . . . . . . . . . . . . . . . . . . . . . . . . . . . . . . . . . . .4
Gefrierabteil - Temperaturregelung / Gefrierabteilausstattung / Tipps . . . . . . . . . . . . . . . . . . . . . . . . . . . . . . .5
Wartung Abtauen . . . . . . . . . . . . . . . . . . . . . . . . . . . . . . . . . . . . . . . . . . . . . . . . . . . . . . . . . . . . . . . . . . . . . . . .5
Reinigung / Innenbeleuchtung . . . . . . . . . . . . . . . . . . . . . . . . . . . . . . . . . . . . . . . . . . . . . . . . . . . . . . . . . . . . .6
Wenn etwas nicht funktioniert / Kundendienst und Ersatzteile . . . . . . . . . . . . . . . . . . . . . . . . . . . . . . . . . .7
Technische Angabe . . . . . . . . . . . . . . . . . . . . . . . . . . . . . . . . . . . . . . . . . . . . . . . . . . . . . . . . . . . . . . . . . . . . . .8
TŸranschlag wechseln . . . . . . . . . . . . . . . . . . . . . . . . . . . . . . . . . . . . . . . . . . . . . . . . . . . . . . . . . . . . . . . . . . .8
Anschlagwechsel VerdampferfachtŸr . . . . . . . . . . . . . . . . . . . . . . . . . . . . . . . . . . . . . . . . . . . . . . . . . . . . . . . .9
Installation Aufstellung . . . . . . . . . . . . . . . . . . . . . . . . . . . . . . . . . . . . . . . . . . . . . . . . . . . . . . . . . . . . . . . . . . .9
Elektrischer Anschluss / Vorbereitung des LŸftungsgitters . . . . . . . . . . . . . . . . . . . . . . . . . . . . . . . . . . . . . . .10
Einbau unter eine Arbeitsplatte . . . . . . . . . . . . . . . . . . . . . . . . . . . . . . . . . . . . . . . . . . . . . . . . . . . . . . . . . . .11
Montage der Sockelblende . . . . . . . . . . . . . . . . . . . . . . . . . . . . . . . . . . . . . . . . . . . . . . . . . . . . . . . . . . . . . . .14
Inhalt
3
Entsorgung
Verpackungsmaterialien
¥ Die mit dem Symbol gekennzeichneten Materialien sind recyclingfŠhig.
>PE<=PolyŠthylen >PS<=Polystyrol >PP<=Polypropylen
SŠmtliche Verpackungsmaterialien sind recyclingfŠhig.
In Deutschland kšnnen Sie die Verpackung an den HŠndler zurŸckgeben, bei dem Sie das GerŠt gekauft
haben.
Entsorgung von AltgerŠten
Das Symbol auf dem Produkt oder seiner Verpackung weist darauf hin, dass dieses Produkt nicht als
normaler Haushaltsabfall zu behandeln ist, sondern an einem Sammelpunkt fŸr das Recycling von elektrischen
und elektronischen GerŠten abgegeben werden muss.
Durch Ihren Beitrag zum korrekten Entsorgen dieses Produkts schŸtzen Sie die Umwelt und die Gesundheit
Ihrer Mitmenschen. Umwelt und Gesundheit werden durch falsches Entsorgen gefŠhrdet. Weitere
Informationen Ÿber das Recycling dieses Produkts erhalten Sie von Ihrem Rathaus, Ihrer MŸllabfuhr oder dem
GeschŠft, in dem Sie das Produkt gekauft haben.
Page 4
Richtiges KŸhlen
¥ keine warmen Speisen oder dampfenden
FlŸssigkeiten in den KŸhlschrank einstellen.
¥ Geruchverbreitende Lebensmittel mŸssen
abgedeckt oder eingewickelt werden.
¥ Die Lebensmittel mŸssen so eingelagert werden,
dass die KŠlte um sie frei zirkulieren kann.
Nachstehend einige praktische RatschlŠge:
¥ Fleisch (alle Sorten) in Plastikfolie einpacken und
auf die Glasplatte, die sich Ÿber der GemŸseschale
befindet, legen. In dieser Lage kann das Fleisch
lŠngstens 1-2 Tage aufbewahrt werden.
¥ Gekochte Nahrungsmittel, kalte Platten, usw.
zugedeckt aufbewahren. Sie kšnnen auf jede
beliebige Ablage gelegt werden.
¥ Obst und GemŸse: (nach vorherigem SŠubern
und Waschen) in den GemŸseschalen
aufbewahren.
¥ Butter und KŠse: in speziellen BehŠltern
aufbewahren oder in Alu- bzw. Plastikfolie
einpacken, um den Kontakt mit der Luft zu
vermeiden.
¥
Milch in Flaschen: gut verschlossen in den
Flaschenhalter der InnentŸr stellen.
Wenn Bananen, Kartoffeln, Zwiebeln und
Knoblauch nicht verpackt sind, sollten sie nicht
in den KŸhlschrank gegeben werden.
4
Temperaturregelung
¥ Der Drehknopf fŸr die Temperaturwahl ist im
KŸhlraum rechts.
¥ Die richtige Einstellung erhŠlt man, unter
BerŸcksichtigung folgender, die Innentemperatur
beeinflussender Faktoren:
¥ Raumtemperatur
¥ HŠufigkeit des TŸršffnens
¥ Menge der eingelagerten Lebensmittel,
¥ Aufstellung des GerŠtes.
¥ Die Temperatur wird automatisch geregelt.
¥ Stellung ã1Ò = wŠrmste Innentemperatur
¥ Stellung ã6Ò = kŠlteste Innentemperatur
¥ Stellung ã0Ò = KŸhlung aus
Die mittlere Einstellung ist meistens die
geeigneteste.
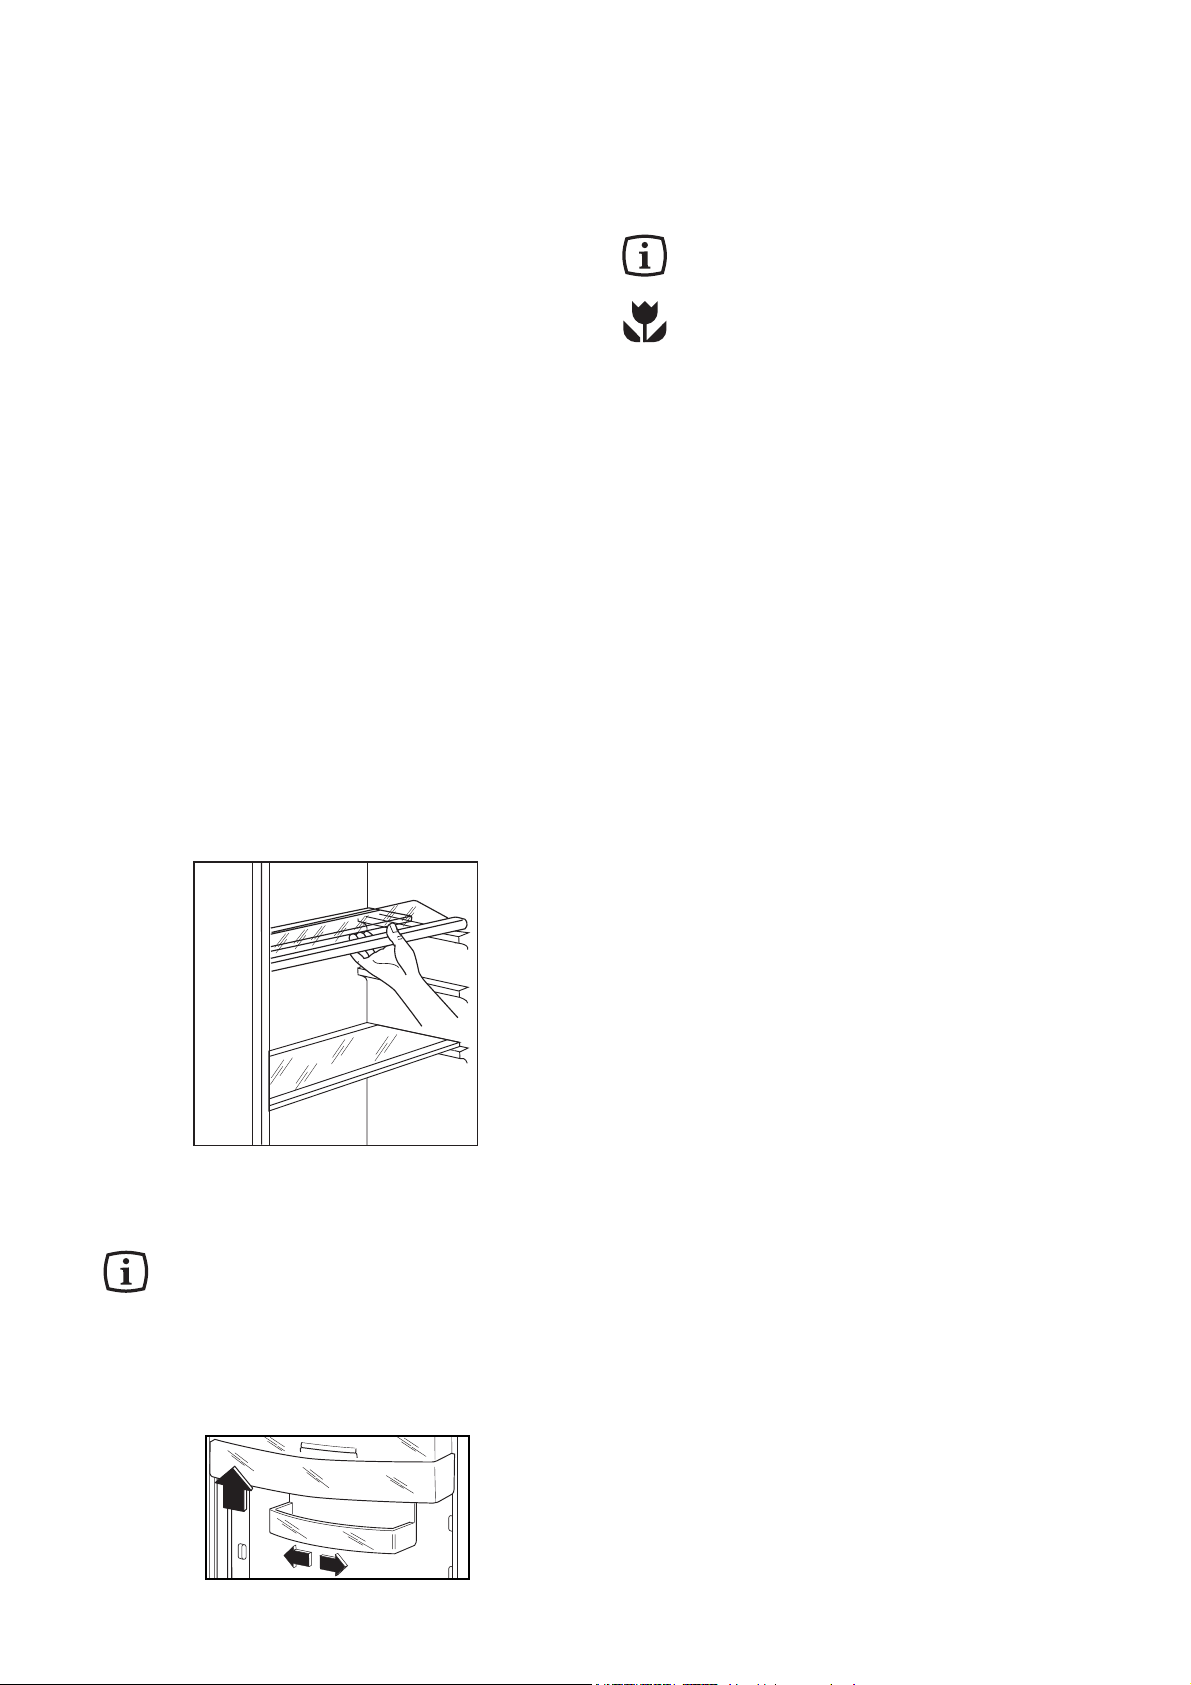
KŸhlabteilausstattung
Abstellregale
¥ Zur Einlagerung von Lebensmittel-Packungen
verschiedener Grš§e, sind die AbstellflŠche
hšhenverstellbar.
¥ Dazu die AbstellflŠche soweit nach vorne ziehen,
bis sie sich nach oben oder unten abschwenken
und herausnehmen lŠ§t.
¥ Das Einsetzen in eine andere Hšhe bitte in
umgekehrter Reihenfolge vornehmen.
¥ Zur besseren Raumnutzung kšnnen die vorderen
Halbteile der Ablagen auf die rŸckwŠrtigen
hinaufgelegt werden.
Die Glasablage Ÿber der GemŸseschale und
die Flascheablage mŸssen immer in der
Stellung verbleiben, um eine korrekte
Luftzirkulation zu gewŠhrleisten.
¥ Dieser Modell ist mit einer variablen Ablagebox
ausgestattet, die seitlich verschiebbar unter einem
TŸrabstellfach angebracht ist.
¥ Zur besseren Reinigung kšnnen die obere und die
untere Ablagen ebenfalls herausgenommen
werden.
Tipps
Energie-Einsparung
¥ Das GerŠt nicht in der NŠhe von Herden,
Heizkšrpern oder anderen WŠrmequellen
aufstellen. Bei hoher Umgebungstemperatur lŠuft
der Kompressor hŠufiger und lŠnger. Bitte im
Abschnitt ÒAufstellungÓ nachsehen.
¥ TŸr nur so lange wie nštig gešffnet lassen.
¥ Hšchste KŠlteeinstellung bei hoher
Raumtemperatur und erheblicher
Lebensmittelmenge kann fortdauernden
KŸhlschrank-Betrieb verursachen, dabei kann sich
eine Reif- oder Eisschicht an der hinteren
Innenwand bilden.
In diesem Falle den Thermostatknopf auf wŠrmere
Temperaturen stellen, damit das automatische
Abtauen, mit folglich geringerem Stromverbrauch,
gewŠhrleistet werden kann.
¥ Keine warmen Speisen in das GerŠt stellen.
Warme Speisen erst abkŸhlen lassen.
¥ TiefkŸhlgut zum Auftauen in den KŸhlraum legen.
Die KŠlte im TiefkŸhlgut wird so zur KŸhlung im
KŸhlraum genutzt.
D338
Page 5
5
Gefrierabteil
Temperaturregelung
¥ Der Thermostatknopf regelt das KŸhl- und
Gefrierabteil.
¥ FŸr das Einfrieren von Lebensmitteln ist es nicht
nštig die Einstellung des Thermostatknopfes von
der Ÿblichen Normalstellung zu Šndern.
¥ WŸnscht man aber ein rasches Einfrieren, dann
mu§ der Thermostatknopf auf die hšchste Stellung
gedreht werden.
Dabei aber darauf achten, dass im KŸhlfach die
Temperatur nicht unter Null sinkt. In diesem Falle
den Thermostatknopf auf eine niedrigere
Markierung drehen.
¥ Nach einem lŠngeren Stillstand oder bei der ersten
Inbetriebnahme des GerŠtes mu§ vor der
Einlagerung der TiefkŸhlkost die hšchste Stellung
des Thermostatknopfes gewŠhlt werden. Nach ca.
2 Std. kann dieser auf eine mittlere Stellung
zurŸckgedreht werden.
Gefrierabteilausstattung
EiswŸrfelbereitung
Das GerŠt hat eine oder mehrere EiswŸrfelschalen,
welche mit Wasser aufgefŸllt in das Gefrierfach
gestellt werden.
Bitte zur Entnahme der EiswŸrfelschalen
keine MetallgegenstŠnde benutzen!
Tipps
Einfrieren und TiefkŸhllagern
¥ Die Lebensmittel in kleine Portionen einteilen,
damit der Gefriervorgang beschleunigt wird; dies
ermšglicht das spŠtere Auftauen von kleineren
Portionen.
¥ Die Lebensmittel in Alu- oder PolyŠthylenfolien
luftdicht verpacken.
¥ Die einzufrierenden Lebensmittel sollen mit den
TiefkŸhlkosten nicht in BerŸhrung kommen, um ein
Temperaturanstieg an diese zu verhindern.
¥ Speiseeis, das direkt aus dem Gefrierfach
genommen wird, kann KŠlte-Brandwunden
verursachen.
¥ Es ist empfehlenswert, auf der Verpackung das
Einfrierdatum zu notieren, damit die
Aufbewahrungszeit eingehalten werden kann.
¥ Der Transport vom VerkŠufer zum Verbraucher
mu§ in kurzer Zeit erfolgen.
¥
Es sollten keine kohlensŠurehaltigen GetrŠnke
in das Gefrierfach eingestellt werden, da sie
explodieren kšnnen.
¥ Einmal aufgetaute Lebensmittel verderben schnell
und kšnnen kein ein zweites Mal eingefroren
werden.
Wartung
Vor jeder Reinigungsarbeit immer den
Netzstecker aus der Steckdose ziehen.
Dieses GerŠt erhŠlt im Kaltekreislauf
Kohlenwasserstoff. Aus diesem Grund darf
die Wartung und das NachfŸllen
ausschlie§lich von autorisierten
Fachpersonal durchgefŸhrt werden.
Abtauen
KŸhlraum
¥ Die sich auf der Innenwand des GerŠtes bildende
Reifschicht taut in bestimmten ZeitabstŠnden
automatisch ab. Dies erfolgt jeweils in den
Stillstandszeiten des Motorkompressors. Das
Tauwasser tropft dabei in die Tauwasserrinne, lŠuft
dann in eine Verdunsterschale am Unterteil des
GerŠtes und verdunstet dort.
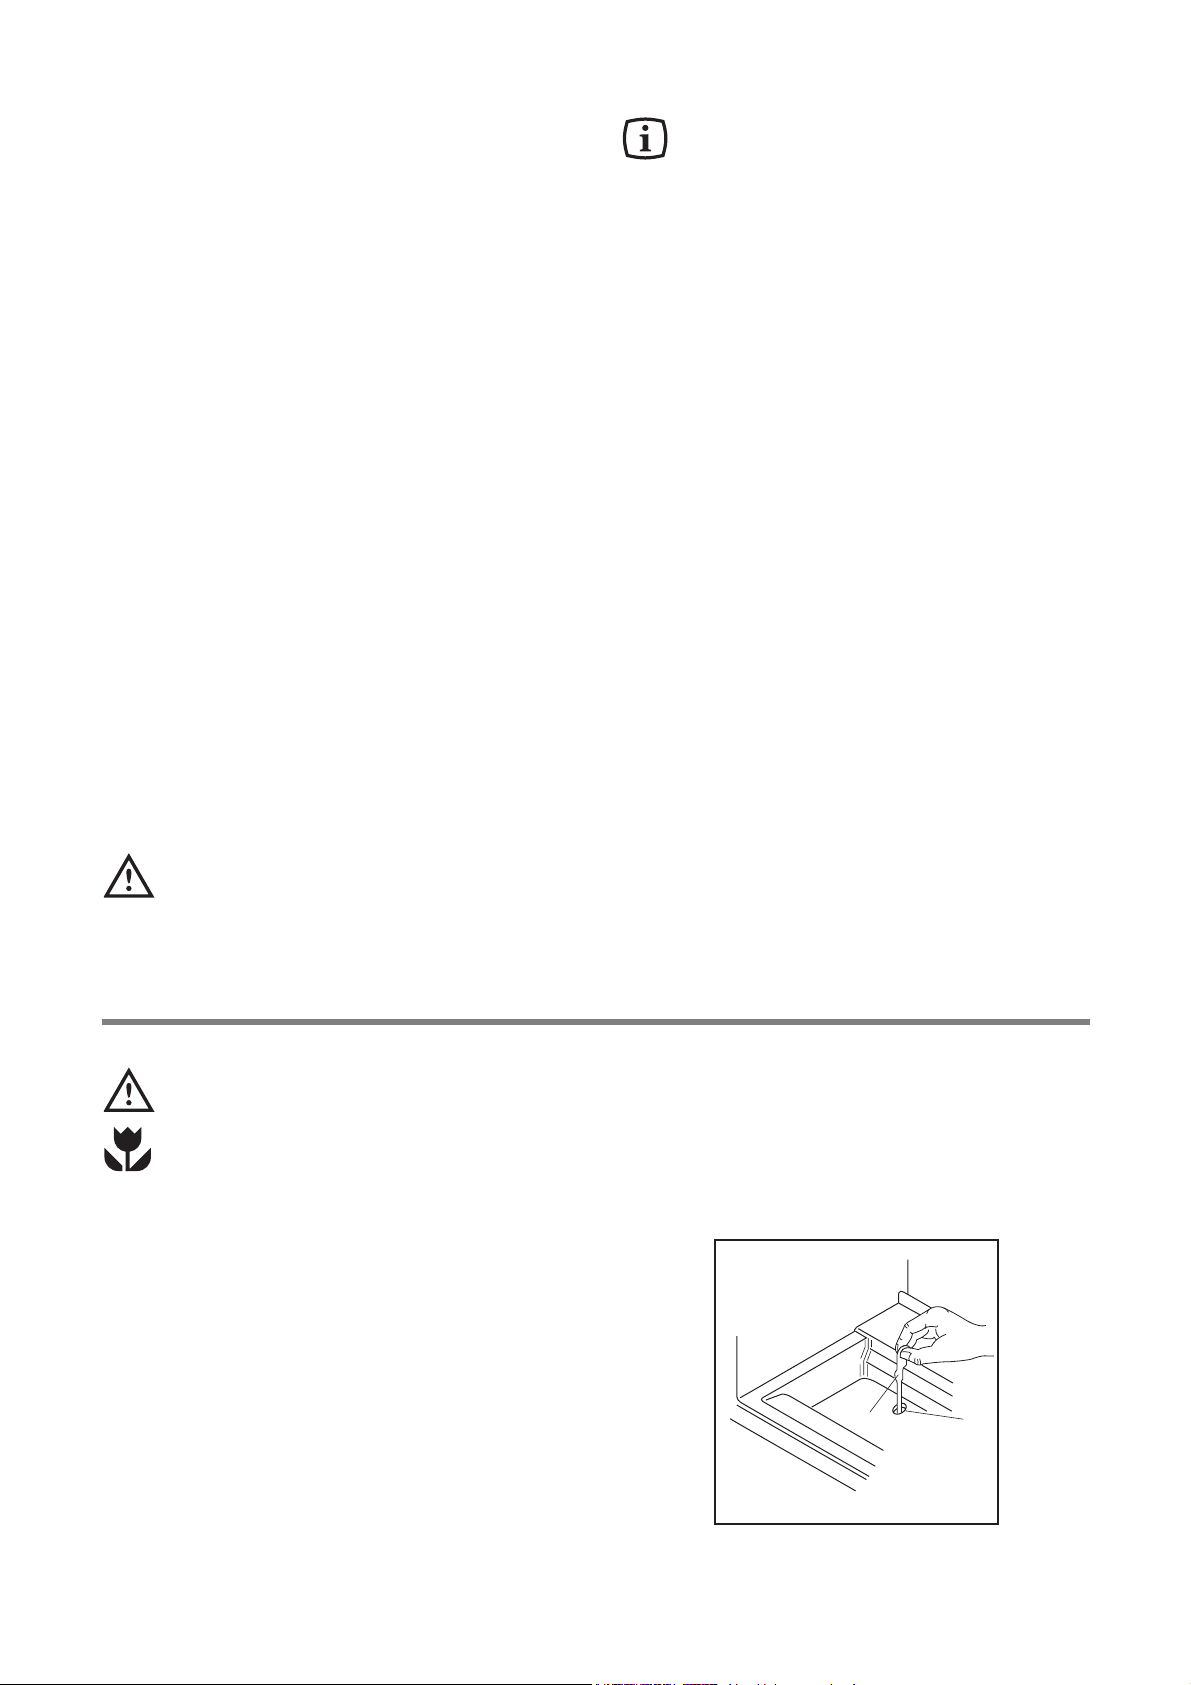
¥
Wir empfehlen, das Ablaufloch (F) des
Abtauwassers, das sich unter der GemŸseschale
befindet, regelmŠ§ig zu reinigen.
Benutzen Sie hierzu das dafŸr geeignete
ReinigungsgerŠt (P). Auf diese Weise wird
verhindert, dass das Wasser in die
GemŸseschublade flie§t.
P
S.I.011
F
Page 6
6
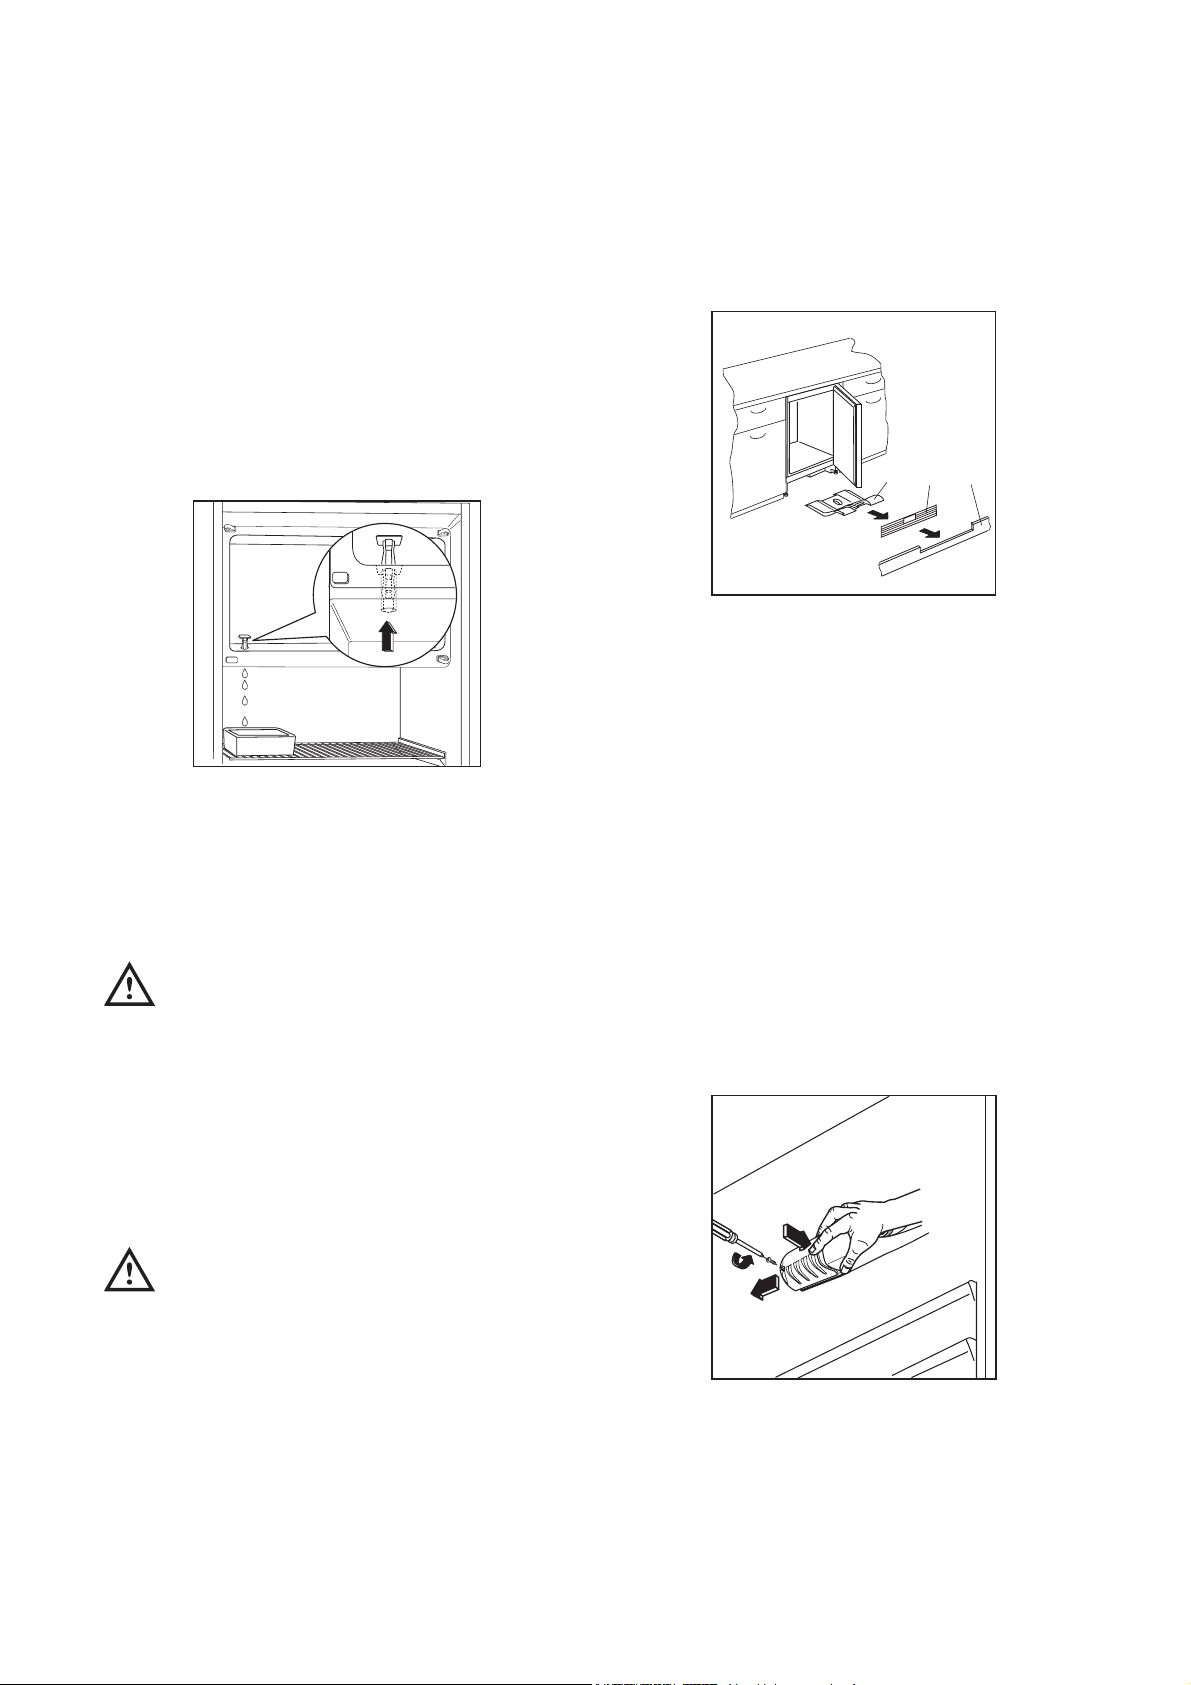
Gefrierraum
¥ Die Reifschicht mit dem Plastikschaber abkratzen.
¥ Wenn im Gefrierabteil die Eisschicht stŠrker als ca.
5 mm ist, tauen Sie Ihr GerŠt ab.
Um ein vollstŠndiges Abtauen durchzufŸhren, geht
man wie folgt vor:
¥ TiefkŸhlgut herausnehmen, in mehrere Lagen
Zeitungspapier einpacken und abgedeckt an einem
kŸhlen Ort lagern.
¥ Thermostatknopf auf ÇOÈ einstellen oder Stecker
aus der Steckdose herausziehen;
¥ TŸr offen lassen. Ein GefŠ§ auf den ersten Rost
direkt unter das Ablaufloch stellen. Den Stšpsel wie
in der Abbildung gezeigt entfernen.
¥ Nach beendetem Abtauprozess das Gefrierteil gut
nachtrocknen und den Stšpsel wieder hineingeben.
¥ Nach dem Abtauen, GerŠt einschlie§lich
Innenausstattung grŸndlich reinigen.
¥ Lebensmittel einlagern und GerŠt wieder in Betrieb
nehmen.
Benutzen Sie niemals MetallgegenstŠnde,
um die Reifschicht abzukratzen, damit eine
BeschŠdigung des GerŠtes vermieden
werden kann.
Benutzen Sie kein mechanisches oder
anderes Mittel fŸr einen schnelleren
Abtauproze§ mit Ausnahme der vom
Hersteller empfohlenen.
Reinigung
Bitte keine Reinigungs- bzw. Scheuermittel
verwenden, die das GerŠt beschŠdigen
kšnnten.
Benutzen Sie nie MetallgegenstŠnde um
das GerŠt zu reinigen, da es beschŠdigt
werden kšnnte.
Den Innenraum mit lauwarmem Wasser und einem
neutralen Reinigungsmittel reinigen.
Gut nachwaschen und sorgfŠltig trocknen.
Der Aufbau des GerŠtes erlaubt auch die Reinigung
der GerŠterŸckseite mit Hilfe eines Staubsaugers,
um einen sicheren und stromsparenden Betrieb des
GerŠtes zu gewŠhrleisten
1. Nehmen Sie die KŸchenmšbelsockelblende (1)
ab;
2. demontieren Sie die BelŸftungsblende (2);
3. ziehen Sie vorsichtig die Verdunsterschale (3)
heraus. Achten Sie darauf, dass sich darin
Abtauwasser befinden kann.
Stillstandszeiten
¥ Den Stecker aus der Steckdose ziehen. Alle
Lebensmittel herausnehmen und GerŠt reinigen.
¥ Die TŸr offen lassen, um im Inneren eine gute
Luftzirkulation zu gewŠhrleisten und somit
Geruchsbildung zu vermeiden.
Innenbeleuchtung
¥ Vor dem Lampenwechsel GerŠt abschalten und
den Netzstecker ziehen.
1. Lšsen Sie die Befestigungsschraube der
Lampenabdeckung.
2. Heben Sie den beweglichen Teil ab, indem Sie
wie in der Abbildung gezeigt darauf drŸcken.
3. Defekte Lampe durch eine neue Lampe gleicher
Leistung auswechseln.
PR151
21
3
S.I.013
D411
Page 7
7
Wenn etwas nicht funktioniert
Falls das GerŠt Stšrungen aufweisen sollte, bevor Sie den Kundendienst verstŠndigen, ŸberprŸfen Sie
zuerst folgendes:
Störung Abhilfe
Im GerŠt wird es nicht kalt genug
GerŠt kŸhlt zu stark.
Der Kompressor lŠuft stŠndig
Wasser im KŸhlschrank.
GerŠusche
Der Drehknopf auf kŠltere Temperatur drehen.
Die Lebensmittel mŸssen so eingelagert werden, dass die KŠlte um sie frei zirkulieren
kann.
TŸr richtig schlie§en.
Die Umgebungstemperatur ist zu warm.
Der Drehknopf auf wŠrmere Temperatur drehen.
Der Drehknopf auf niedrigere Zahlen drehen.
Die Umgebungstemperatur ist zu warm.
Achten Sie darauf, da§ diese …ffnungen nicht durch Sockelblenden oder Geschirr
abgedeckt werden.
Innerhalb der letzen 24 Std. wurden grš§ere Mengen warmer Lebensmittel eingelagert.
TŸr nur so lange wie nštig gešffnet lassen.
Die Ablaufšffnung an der RŸckwand im GerŠteinnenraum ist verstopft. Mit einem nicht
scharfkantigen Gegenstand reinigen.
Manchmal sind sie charakterstisch fŸr KŠltegerŠte.
Wenn KŠltemittel in dŸnne Rohre einstršmt, kšnnen Sie ein blubberndes oder
plŠtscherndes GerŠusch hšren.
Immer wenn der Kompressor ein- oder ausschaltet, ist ein Klicken zu hšren.
GerŠusche kšnnen durch das Instand setzen der Mšbelstruktur entstehen.
Kundendienst und Ersatzteile
Sollten Sie nach o.e. PrŸfungen zu keinem Resultat
kommen, so wenden Sie sich bitte an unseren
nŠchsten Kundendienst.
Um ein rasches Beheben des Schadens zu
ermšglichen, ist es beim Anruf an den Kundendienst
notwendig anzugeben:
¥ Modellbezeichnung
¥ Erzeugnis-Nummer (PNC)
¥ Fertigungs-Nummer (S-No.)
Diese Angaben finden Sie auf dem Typschild links an
der Innenseite des GerŠtes. Damit Sie die Daten
schnell bei der Hand haben, empfehlen wir, sie hier
einzutragen.
Page 8
Technische Angabe
Die technischen Angaben sind auf dem Typschild genannt, das auf der rechten inneren Seite der Anlage liegt.
Im Falle einer Stromunterbrechung wŠhrend der Lagerung von TiefkŸhlkost bzw. von
eingefrorenen Lebensmitteln soll die TŸr des Gefrierfaches nicht gešffnet werden. Die
TiefkŸhlkost verdirbt nicht, wenn es sich um eine kurze Unterbrechung handelt (12 Std.) und das
GerŠt voll ist. Wenn das nicht der Fall ist, ist es nštig, die tiefgefrorenen Lebensmittel innerhalb
kurzer Zeit zu verbrauchen (eine Temperaturerhšhung der TiefkŸhlkost verkŸrzt die
Aufbewahrungsdauer).
Ma§en
Höhe
815 mm
596 mm
540 mm
Breite
Tiefe
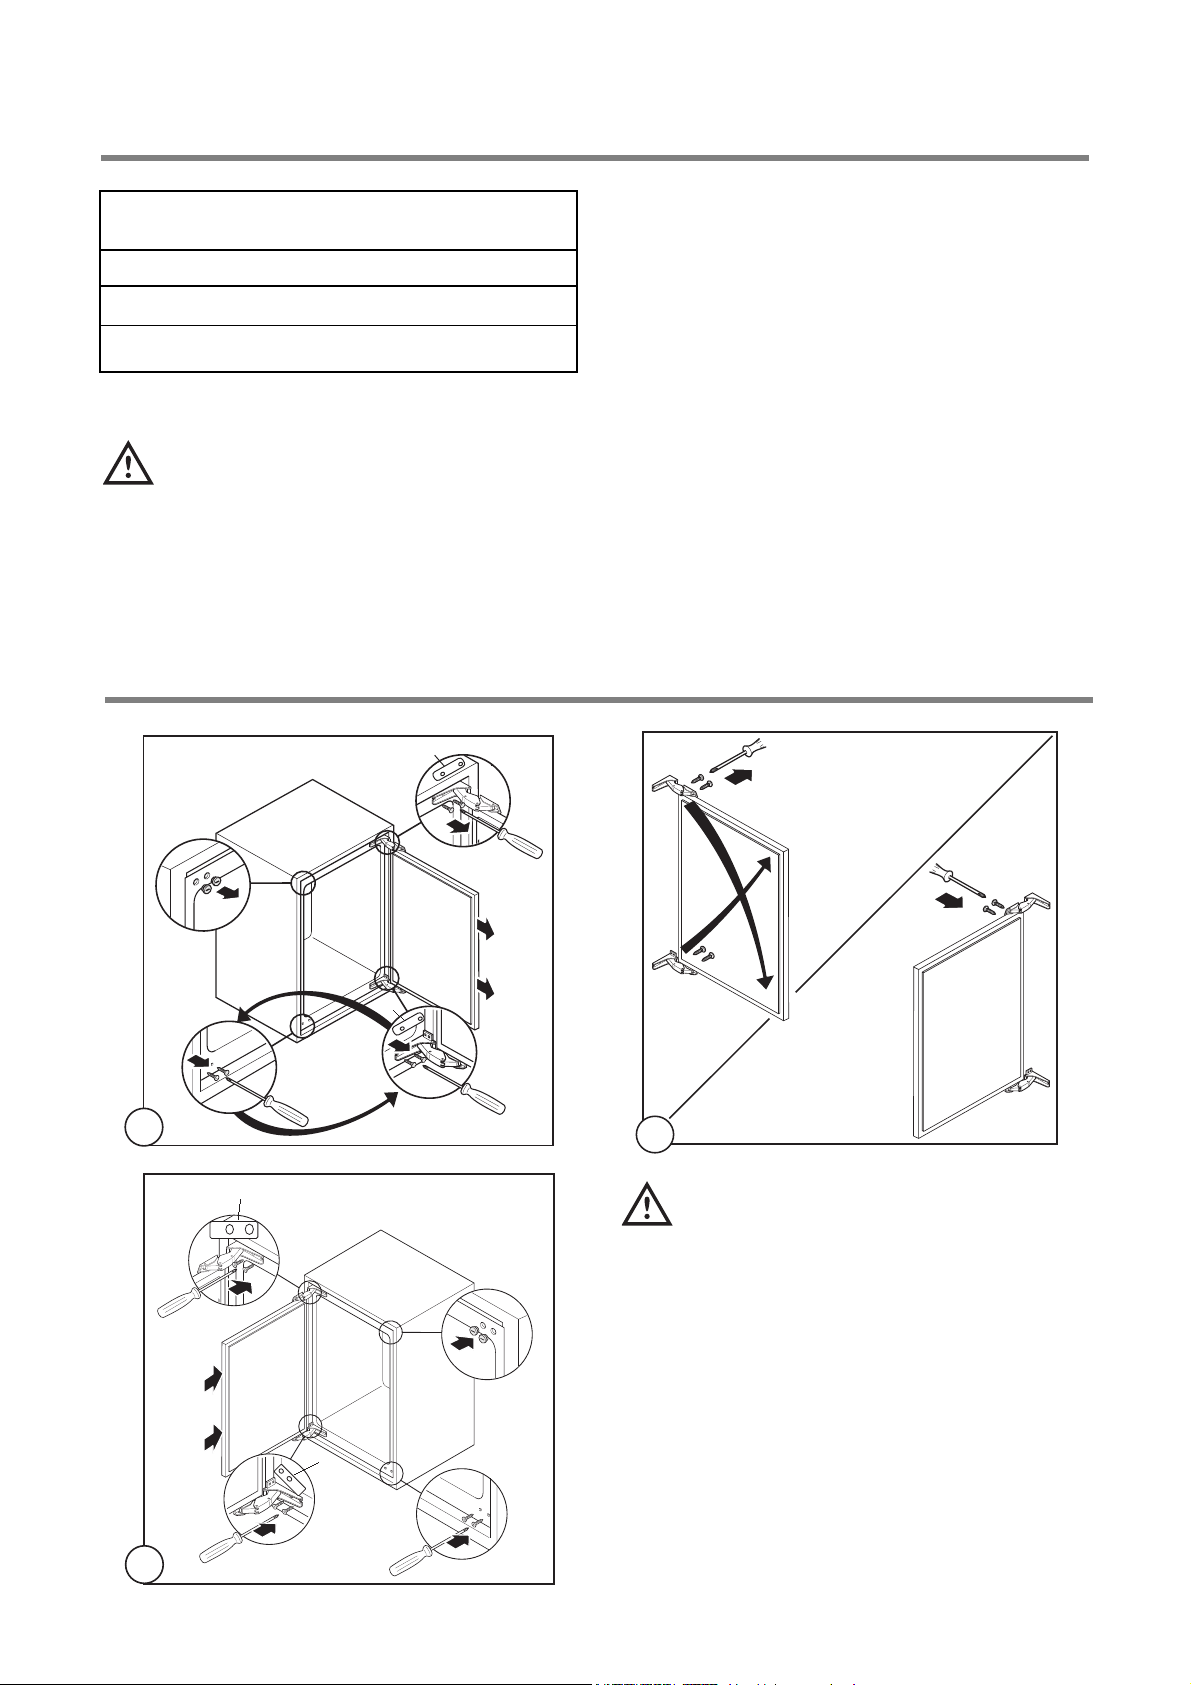
TŸranschlag wechseln
Achtung!
Bei einer niedrigen Raumtemperatur (z.B. im
Winter) kann es vorkommen, dass die
Dichtung nicht perfekt am Schrank haftet. Die
Wiederherstellung der Dichtung erfolgt
automatisch nach gewisser Zeit. Wollen Sie
aber diesen Prozess beschleunigen, so
genŸgt es die Dichtung mit einem Fšn zu
erwŠrmen.
8
6
4
1
6
7
8
5
2
1
6
10
6
3
2
13
9
6
12
11
3
Page 9

9
Anschlagwechsel VerdampferfachtŸr
Installation
Vor der Installation sicherstellen, dass das
GerŠt nicht beschŠdigt ist. Mšgliche
TransportschŠden sind dem HŠndler
unverzŸglich mitzuteilen.
¥ WŠhrend das GerŠt in Betrieb ist, werden der
VerflŸssiger und der Kompressor, die sich auf der
RŸckseite des GerŠtes befinden, hei§. Aus
GrŸnden der Sicherheit muss eine
MindestbelŸftung gesichert sein. Siehe
Aufstellungsanweisungen.
¥
Wichtig: Die Netzanschlu§leitung darf nur durch
eine Fachkraft ausgewechselt werden. Wenden
Sie sich im Reparaturfall an unseren
Kundendienst.
Aufstellung
¥ Das GerŠt darf nicht in unmittelbarer NŠhe von
Heizkšrpern oder sonstigen WŠrmequelle
aufgestellt werden.
¥ Ein Standort mit direkter Sonneneinstrahlung sollte
vermieden werden.
Die Klimaklasse finden Sie auf dem Typschild, das
sich rechts im Innenraum des GerŠtes befindet.
Nachstehende Tabelle zeigt, welche
Umgebungstemperatur welcher Klimaklasse
zugeordnet ist:
Klimaklasse
SN +10 bis +32¡C
+16 bis +32¡C
+18 bis +38¡C
+18 bis +43¡C
N
ST
T
fŸr Umgebungstemperatur von
Zu beachten: Wird dieses GerŠtes bei anderen
Umgebungstemperaturen betrieben als den in der
entsprechenden Klimaklasse angegebenen Werten,
sind folgende Hinweise zu beachten: sinkt die
Umgebungstemperatur unter den angegebenen
Mindestwert ab, kšnnte die Lagertemperatur im
Gefrierabteil nicht mehr garantiert sein; es wird daher
empfohlen, die eingelagerten Lebensmittel so rasch
als mšglich zu verbrauchen.
12 3
180°
45
Page 10

10
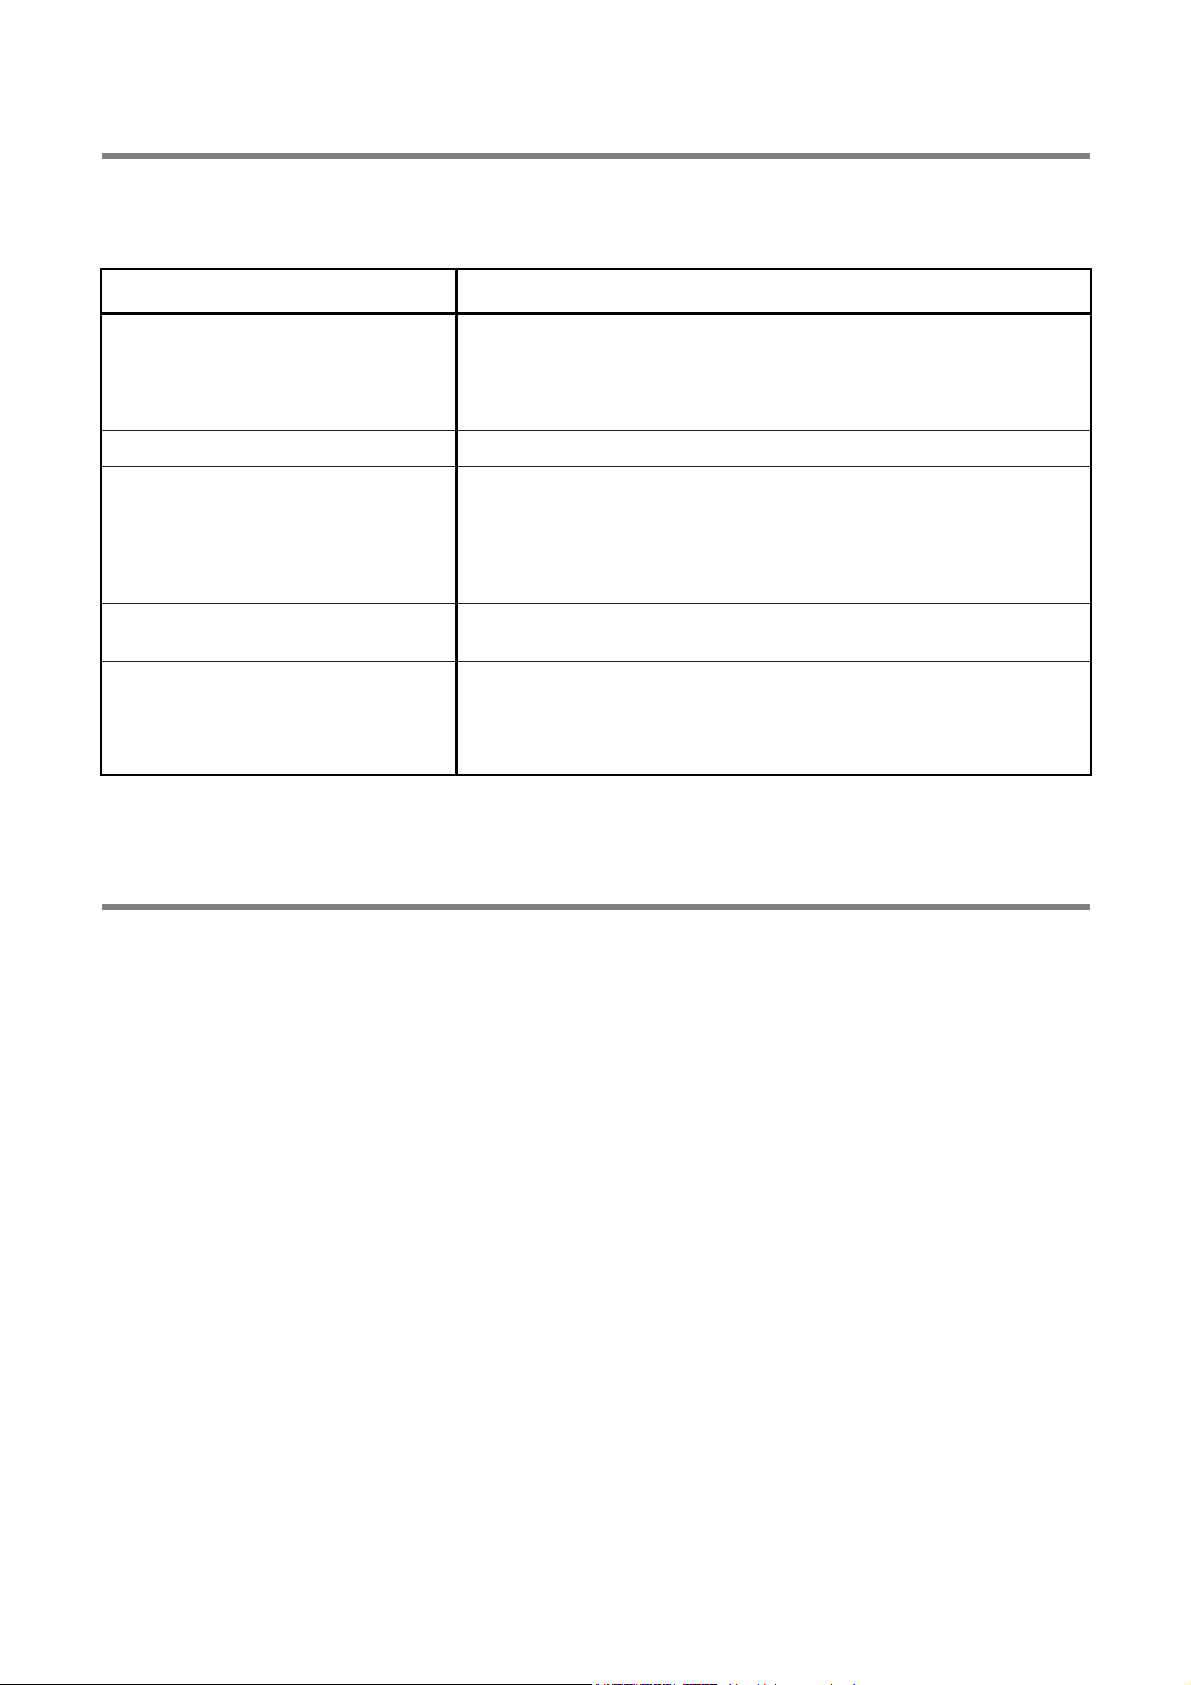
Vorbereitung des LŸftungsgitters
Nehmen Sie das Gitter aus der unteren
Verpackungsschale.
TŸr …ffnung links:
- entfernen Sie die linke TŸrlagerblende (A) vom
Gitter durch einen Schnitt von hinten.
TŸr …ffnung rechts:
- entfernen Sie die rechte TŸrlagerblende (B) vom
Gitter durch einen Schnitt von hinten.
FŸr die Positionierung des Gitters am GerŠt drŸcken
Sie das Gitter auf die Haken (a) bis diese einrasten.
Das GerŠt mit den Montagewinkeln in der Nische
befestigen, danach das Gitter montieren.
Elektrischer Anschluss
Bevor Sie den Stecker in die Steckdose einstecken,
ŸberprŸfen Sie bitte, dass die auf dem Typschild des
GerŠtes angegebene Spannung sowie Frequenz mit
dem Anschlusswert des Hauses Ÿbereinstimmen.
Eine Abweichung von ±6% von der
Nominalspannung ist zulŠssig.
FŸr die Anpassung des GerŠtes an andere
Spannungen muss ein Spartransformator
angemessener Leistung vorgeschaltet werden.
Wichtig
Das GerŠt muss unbedingt
vorschriftsmŠ§ig geerdet werden.
Zu diesem Zweck ist der Stecker des
Anschlusskabels mit dem dafŸr vorgesehenen
Kontakt versehen. Sollte die Netzleitung im
Haus nicht mit einer Erdleitung versehen sein,
so muss das GerŠt an eine getrennte
Erdleitung vorschriftsmŠ§ig und unter
Hinzuziehung eines Fachmanns
angeschlossen werden.
Die Erzeugerfirma lehnt jede
Verantwortung ab, falls diese
UnfallverhŸtungsvorschrift nicht beachtet
wird.
Dieses GerŠt entspricht der folgende EWG Richtlinie:
- 73/23 EWG vom 19.2.73 (Niederspannung)
und folgende €nderungen;
- 87/308 EWG vom 2.6.87 (Funkentstšrung);
- 89/336 EWG vom 03/05/89 (Elektromagnetische VertrŠglichkeit) und folgende
€nderungen.
Wichtig
Es muss mšglich sein, das GerŠt vom Netz zu
trennen; nach der Installation muss die
Steckdose daher zugŠnglich bleiben.
A
B
DO002/2
a
a
DO001
Page 11

Das GerŠt ist mit regulierbaren FŸssen
ausgestattet, um es der gewŸnschten Hšhe (max
870 mm) anzupassen; diese befinden sich an den
vier unteren Ecken des GerŠtes.
Einbau unter eine Arbeitsplatte
Nischenma§e
Die Ma§e der Nische mŸssen den angegebenen
Werten entsprechen.
2. Winkel (D) rechts und links wie abgebildet
befestigen.
3. GerŠt in die Nische einschieben. Die zum
Anschluss des GerŠtes nštige SchutzkontaktSteckdose sollte so positioniert sein, dass sich sie
nicht vom GerŠt verdeckt wird.
1. Mitgelieferte Montageteile
Linke Seite Rechte Seite
2
4. Fugenabdeckprofil (B) am GerŠt ankleben, wie in
der Abbildung gezeigt.
11
600
596
555
max
DO013
1xB
1xA
2xG
2xL
2xF
2xD
1
550
min.
600
1xK
2xC
18xI
+
max. 890 mm
3
-
-
+
1
B
4
Page 12

12
5. GerŠt festschrauben
6. MšbeltŸr montieren.
I
ab
C
click
5
10
b
6
click
8
2
1
a
Möbeltür Innenseite
c
a
I
=
C
=
4
3
c
b
9
I
F
27,5 cm
27,5 cm
10
7
55 cm
Page 13

13
7. Abdeckung (A) anbringen.
45°
A
1
2
3
11
14
1
L
=
2
12
10
=
L
15
90°
115°
13
8 mm
F
G
I
K
Page 14

14
Montage der Sockelblende
Achtung
Um die FunktionalitŠt des GerŠtes nicht zu
beeintrŠchtigen ist es notwendig das
Original-LŸftungsgitter zu benutzen.
¥ Bei einer lichten Einbauhšhe Ma§ A=820 mm und
einer Sockelblendenhšhe Ma§ a=100 mm kann die
Sockelblende unverŠndert montiert werden.
Ebenso bei einer lichten Einbauhšhe Ma§
B=890 mm und einer Sockelblendenhšhe Ma§
b=170 mm.
¥ Bei Sockelblendenhšhen grš§er als a=100 mm,
b=170 mm, ist die Sockelblende mittig 580 mm
breit auf eine verbleibende Resthšhe von
a=100 mm, b=170 mm auszuschneiden.
¥ Sockelblende an der KŸchenzeile befestigen.
Wichtig
Die Sockelblende muss mit mindestens
25 mm Abstand von der TŸr montiert
werden.
A = 820
B = 890
a = 100
b = 170
580
25 - 80
DO008b
25
Page 15

Printed on paper manufactured with environmentally sound processes 15
Instructions for the use of the instructions booklet
Notes which are important for your safety or for the proper functioning of the appliance
Supplementary information regarding operation and practical applications of the appliance.
Tips and notes concerning economical and environmentally sound use of the appliance
t
Safety Instructions
This information has been provided in the interests of your safety. Please read it before installing or
using the appliance. Please retain the instruction book for future reference. If owner ship is transferred,
please leave the user manual for the new owner.
Domestic Use
¥ The domestic refrigerators and freezers are
designed to be used specifically for the storage of
edible foodstuffs only.
¥ Check the appliance for transport damage. Under
no circumstances should a damaged appliance be
installed. In the event of damage please contact
your retailer.
¥ This appliance is heavy. The edges and projecting
parts of the cabinet may be sharp. Be careful when
moving the cabinet and always use gloves.
¥ Any electrical work required to install this appliance
should be carried out by a qualified electrician or
competent person.
¥ Make sure that the power plug is not squashed or
damaged by the back of the appliance. Make sure
that the cable is not trapped underneath the
appliance, nor touches the motor.
¥ Do not remove the power cord by pulling on its
lead, particularly when the appliance is being
pulled out of its niche. If the power plug socket is
loose, do not insert the power plug. Damage to the
cord may cause a short-circuit, fire and/or electric
shock.
¥ Do not use electrical appliances inside the
appliance.
¥ Do not keep carbonated drinks or bottles in the freezer
compartment. The glass bottles may break.
¥ Ice lollies can cause Ôfrost/freezer burnsÕ if
consumed straight from the freezer.
¥ It is dangerous to try and alter the specifications or
modify this product in any way.
¥ Under no circumstances should you attempt to
repair the appliance yourself. Refer to your local
Service Centre, and always insist on genuine spare
parts.
Child Safety
¥ This appliance is designed to be operated by
adults only. Do not allow the children to tamper
with the controls or play with the products. There is
a risk of suffocation! Keep packaging material
away from children!
Environment Protection
¥ This appliance does not contain gasses which
could damage the ozone layer, in either its
refrigerant circuit or insulation materials. The
appliance shall not be discarded together with the
urban refuse and rubbish. Avoid damaging the
cooling unit. Information on your local disposal
sites may be obtained from your municipal
authorities.
Remove the plug and ensure that any locks or
catches are removed, to prevent young children
being trapped inside.
Disposal
Appliance Packaging Information
¥ The materials marked with the symbol are
recyclable.
>PE< for polyethylene, e.g. sheet wrapping
material
>PS< for polystyrene, e.g. padding material
(always CFC-free)
>POM< polyoxymethylene, e.g. plastic clips.
All materials are environmentally sound! Information
concerning collection schedules or locations can be
obtained from your local Council or Environmental
Health Office.
Page 16

Use and Control
Before Use
Wait two hours before connecting the
appliance to allow the oil to flow back in the
compressor.
¥ Before using the appliance for the first time, wash
the interior and all internal accessories with
lukewarm water and some neutral soap so as to
remove the typical smell of a brand-new product,
then dry thoroughly.
Do not use detergents or abrasive
powders, as these will damage the finish.
¥ Remove safety elements used for transportation.
Refrigerator compartment
Starting the appliance
¥ Insert the plug into the wall socket and turn the
thermostat knob clockwise beyond position ÇOÈ
(OFF).
¥ Turn the thermostat control to the required setting.
16
Safety Instructions . . . . . . . . . . . . . . . . . . . . . . . . . . . . . . . . . . . . . . . . . . . . . . . . . . . . . . . . . . . . . . . . . . . . . .15
Disposal . . . . . . . . . . . . . . . . . . . . . . . . . . . . . . . . . . . . . . . . . . . . . . . . . . . . . . . . . . . . . . . . . . . . . . . . . . . . . .15
Use and Control Before Use / Starting the appliance / Temperature control / Internal parts . . . . . . . . . . . . .16
Hints / Freezer compartment - Temperature control / Interior accessories . . . . . . . . . . . . . . . . . . . . . . . . . . .17
Freezer compartment - Hints . . . . . . . . . . . . . . . . . . . . . . . . . . . . . . . . . . . . . . . . . . . . . . . . . . . . . . . . . . . . .18
Maintenance Defrosting . . . . . . . . . . . . . . . . . . . . . . . . . . . . . . . . . . . . . . . . . . . . . . . . . . . . . . . . . . . . . . . . . .18
Cleaning / Changing the light bulb . . . . . . . . . . . . . . . . . . . . . . . . . . . . . . . . . . . . . . . . . . . . . . . . . . . . . . . . .19
Something not Working . . . . . . . . . . . . . . . . . . . . . . . . . . . . . . . . . . . . . . . . . . . . . . . . . . . . . . . . . . . . . . . . . .20
Customer Service and Spare Parts . . . . . . . . . . . . . . . . . . . . . . . . . . . . . . . . . . . . . . . . . . . . . . . . . . . . . . . .20
Technical Specifications . . . . . . . . . . . . . . . . . . . . . . . . . . . . . . . . . . . . . . . . . . . . . . . . . . . . . . . . . . . . . . . . .20
Door reversal . . . . . . . . . . . . . . . . . . . . . . . . . . . . . . . . . . . . . . . . . . . . . . . . . . . . . . . . . . . . . . . . . . . . . . . . . .21
Inner door reversal . . . . . . . . . . . . . . . . . . . . . . . . . . . . . . . . . . . . . . . . . . . . . . . . . . . . . . . . . . . . . . . . . . . . .22
Installation Positioning . . . . . . . . . . . . . . . . . . . . . . . . . . . . . . . . . . . . . . . . . . . . . . . . . . . . . . . . . . . . . . . . . .22
Electrical connection / Grid preparation . . . . . . . . . . . . . . . . . . . . . . . . . . . . . . . . . . . . . . . . . . . . . . . . . . . . .23
Building-in the appliance under a worktop . . . . . . . . . . . . . . . . . . . . . . . . . . . . . . . . . . . . . . . . . . . . . . . . . .23
Fitting the plinth . . . . . . . . . . . . . . . . . . . . . . . . . . . . . . . . . . . . . . . . . . . . . . . . . . . . . . . . . . . . . . . . . . . . . . . .27
Contents
At the end of the Appliance Life
¥ When disposing of your appliance use an
authorised disposal site.
The symbol on the product or on its
packaging indicates that this product may not be
treated as household waste. Instead it shall be
handed over to the applicable collection point for
the recycling of electrical and electronic equipment.
By ensuring this product is disposed of correctly,
you will help prevent potential negative
consequences for the environment and human
health, which could otherwise be caused by
inappropriate waste handling of this product. For
more detailed information about recycling of this
product, please contact your local city office, your
household waste disposal service or the shop
where you purchased the product.
¥ Remove the plug and ensure that any locks or
catches are removed, to prevent young children
being trapped inside.
Page 17

Temperature Control
¥ The thermostat control situated inside the fridge
compartment regulates the temperature of the
appliance.
¥ It allows you to adjust the temperature inside the
refrigerator according to use and external
conditions.
¥ Setting ã1Ò = hightest temperature, warmest
setting
¥ Setting ã6Ò = lowest temperature, coldest
setting.
¥ Setting ã0Ò = Off
A medium setting is generally the most suitable.
Internal Parts
Storage shelves
¥ The shelves can be removed for cleaning.
¥ To permit storage of food packages of various
sizes, the shelves can be placed at different
heights.
¥ To remove the internal shelf pull forward until it can
be tipped up or down and removed.
¥ Please do the same in reverse to insert the shelf at
a different height.
Hints
Saving Energy
¥ Pay careful attention to where the cabinet is
placed. See the section ÒInstallationÓ. When
installed correctly the cabinet will consume less
energy.
¥ Try to avoid keeping the doors open for long
periods or opening the doors too frequently as
warm air will enter the cabinet and cause the
compressor to switch on unnecessarily often.
¥ If the ambient temperature is high, the thermostat
knob is on the coldest setting (higher numbers) and
the appliance is fully loaded, the compressor may
run continuously, causing frost or ice to form on the
evaporator. If this happens, turn the knob to a
warmer setting (lower numbers) to allow automatic
defrosting and so a saving in electricity
consumption.
¥ Do not place warm foods inside the appliance.
Allow warm foods to cool first.
¥ Put frozen food in the fridge to defrost. The cold in
the frozen food will then be used to cool the fridge.
17
Hints for refrigeration
¥ Do not store warm food or evaporating liquids in
the refrigerator and do cover or wrap up the food,
particularly if it has a strong smell.
To help you use your refrigerator correctly, here are
some useful hints:
¥ Raw meat (beef, pork, lamb & poultry): wrap in
polythene bags and place on top of the salad
compartment, this being the coldest spot in the
refrigerator.
Meat can only be stored safely in this way for
one or two days at the most.
¥ Cooked food, cold cuts, jelly, etc.: these should
be well covered and can be stored on any of the
glass shelves.
¥ Fruit & vegetables: these should be thoroughly
cleaned and placed in the bottom bins.
¥
Butter & cheese: these should be placed in
special airtight containers or wrapped in aluminium
foil or polythene bags to keep out as much air as
possible.
¥ Milk bottles: these should have a top and should
be stored in the bottle rack on the door.
Bananas, potatoes, onions and garlic, if not
packed, must not be kept in the refrigerator.
¥ For better use of space, the front half-shelves can
lie over the rear ones.
The glass shelf above the vegetable drawers
and the bottle shelf should always remain in
position, to ensure correct air circulation.
Door shelves
¥ This model is equipped with a variable storage box
which is
fitted under
a door shelf
compartment and can be slid sideways.
D338
Page 18

Hints
Freezing of fresh food and storage of frozen food
¥ Prepare food in small portions to enable it to be
rapidly and completely frozen and to make it
possible subsequently to thaw only the quantity
required.
¥ Wrap up the food in aluminium foil or polythene
and make sure that the packages are airtight.
¥ Do not allow fresh, unfrozen food to touch food
which is already frozen, thus avoiding a rise in
temperature of the latter.
¥ Do not touch frozen food with wet hands. Your
hands could stick to the food and cause skin
abrasions.
¥ It is advisable to show the freezing-in date on each
individual pack to enable you to keep tab of the
storage time.
¥ Be sure that frozen foodstuffs are transferred from
the foodstore to the freezer in the shortest possible
time.
¥
Do not put carbonated liquids (fizzy drinks,
etc.) in the freezing compartment as they may
burst.
¥ Once defrosted, food deteriorates rapidly and
cannot be refrozen.
Maintenance
Unplug the appliance before carrying out
any maintenance operation.
Warning
This appliance contains hydrocarbons in its
cooling unit maintenance and recharging must
therefore only be carried out by authorised
technicians.
Defrosting
Refrigerator compartment
¥ Defrosting the refrigerator compartment is
automatic. The defrost water drains out through a
trough into a container at the back of the appliance,
above the motor compressor, where it evaporates.
¥ It is important to periodically clean the defrost
water drain hole (F) situated under the salad
drawers to prevent the water overflowing and
dripping onto the food inside. Use the special
cleaner provided (P), which you will find already
inserted into the drain hole.
18
Freezer compartment
Temperature Control
¥ To freeze fresh foods it is not necessary to change
the setting of the thermostat knob.
¥ For a quicker freezing operation, turn the
thermostat knob to the coldest setting; but
remember that, in this condition, the refrigerator
compartment temperature might drop below 0¡C. If
this occurs reset thermostat knob to a warmer
setting.
¥ At the first starting-up or after a period out of use,
before putting the products in the compartment, let
the appliance run for at least two hours on the
coldest setting, then turn the thermostat knob to
the normal operating position.
Interior Accessories
Ice-cube production
This appliance is equipped with one or more trays for
the production of ice-cubes.
Fill these trays with water, then put them in the
freezer compartment.
Do not use metallic instruments to remove
the trays from the freezer.
P
F
S.I.011
Page 19

19
Freezer compartment
¥ Remove the frost with a plastic scraper.
¥ Whenever the thickness of the frost exceeds 5 mm
complete defrosting should be carried out.
Prooceed as follows:
¥ Remove any stored food, wrap it in several layers
of newspaper and put it in a cool place.
¥ Pull out the plug from the wall socket or turn the
thermostat knob to the ÇOÈ setting.
¥ Leave the door open, place a basin on the top shelf
of the refrigerator compartment, under the drain
hole, remove the plug as shown in the figure.
¥ When defrosting is completed, dry the interior
thoroughly and refit the plug.
¥ Turn the thermostat knob back to the required
setting or replace the plug in the power socket.
¥ Reload the previously removed food into the
compartment.
Never use sharp metal tools to scrape off
frost from the evaporator as you could
damage it.
Do not use a mechanical device or any
artificial means to speed up the thawing
process other than those recommended by
the manufacturer.
Cleaning
Never use metal objects for cleaning your
appliance as it may get damaged.
NEVER use detergents, abrasive powders,
highly perfumed cleaning products or wax
polishes to clean the interior as these will
damage the surface and leave a strong
odour.
Clean the inside with warm water and bicarbonate of
soda. Rinse and dry thoroughly.
The appliance is equipped with a ventilation grid.
Keep clean to guarantee good ventilation and good
working order of the appliance.
An accumulation of dust will affect the performance
of the appliance and cause excessive electricity
consumption.
When the appliance is not in use
Disconnect the appliance from the electricity supply.
Empty all foods and clean the appliance, leaving the
doors ajar to prevent unpleasant smells.
Changing the light bulb
¥ Should the interior light fail to work, first switch off
the appliance and disconnect from the electricity
supply, then replace the bulb as follows:
1. unscrew the light cover securing screws.
2. unhook the moving part by pressing it as shown
in the figure.
3. Replace the bulb by other with another with the
same charcteristics.
The structure of the appliance permits cleaning of
the rear zone close to the wall, using a vacuum
cleaner.
1. Remove the plinth (1), then the ventilation grid (2);
2. Carefully pull the air deflector out (3), checking
that there is no water left from the defrosting.
PR151
21
3
S.I.013
D411
Page 20

Technical specifications
The technical data is indicated in the rating plate on the right side inside the appliance.
20
Something not Working
Problems may be due to causes which can easily be solved before calling the Technical Service. Please
follow these instructions:
Weight surpasses the storage limit of the door shelf so spread weight more evenly or
take some products out.
The appliance is not properly installed. Please look in the ÒBuilding-inÓ section.
Set a lower temperature.
Distribute the food products to allow cold air to circulate around them.
Make sure that the door is completely closed and that the insulating strip is complete
and clean.
The temperature where the cabinet is placed is above normal room temperature.
Set a warmer temperature.
Turn the thermostat knob to a lower number.
The temperature where the cabinet is placed is above normal room temperature.
Check that the ventilation is sufficient and that the ventilation openings are
unobstructed.
The cause could be the introduction of large quantities of food and/or frequent
opening/closing of the door.
Sometimes is normal. During automatic defrosting frost thaws on the cooling plate.
Place the drain hose at the back of the cabinet above the drain bowl.
Sometimes this is normal. Temperature control may cause clicking sounds when the
system is connected or disconnected.
The injected cooling gas may produce a gurgling sound while passing through the
tubes.
The motor may cause a humming noise and/or slight bumping.
The insulation material used has a tendency to slighly increase noise levels, how ever it
allows for much better insulation and a lower energy consumption.
Door does not close
It is too warm inside the refrigerator
It is too cold inside the refrigerator.
The compressor works continuously.
There is water inside/outside the refrigerator.
Water comes out on the floor.
Noises
SYMPTOM SOLUTION
¥ Model Number (PNC)
¥ Serial Number (S-No.)
This information can be found on the rating plate
inside the cabenit on the left hand wall. We
recommend that you enter this information here, so
that it is handy if needed.
If you cannot find the remedy for a malfunction in
these operating instructions, please contact your
dealer or our customer service department and
consult the Guarantee card.
Selective ordering of replacement parts can save
unnecessary travel and costs.
For this reason always provide the following
appliance information:
¥ Model Name
Customer service and spare parts
Dimensions
Height
815 mm
596 mm
540 mm
Width
Depth
Page 21

21
If there is a power failure when food is in the freezer, do not open the door of the freezer
compartment. The frozen food will not be affected if the power cut is of short duration (up to 12
hours) and the freezer compartment is full, otherwise, it is recommended that the food should be
used within a short time (a temperature increase of the frozen food shortens its safe storage
period).
Door reversal
Warning!
If the ambient temperature is cold (i.e. in
Winter), the gasket may not fit perfectly to the
cabinet. In that case, wait for the natural fitting
of the gasket or accelerate this process by
heating up the part involved with a normal
hairdrier.
1
6
6
4
1
7
8
5
2
6
3
2
6
10
13
3
9
6
12
11
Page 22

22
Inner door reversal
Installation
Take utmost care when handling your
appliance so as not to cause any damages to
the cooling unit with consequent possible fluid
leakages.
¥ During normal operation, the condenser and
compressor at the back of the appliance heat up
considerably. Always ensure that there is adequate
ventilation as a failure to do this will result in
component failure and possible food loss. See
installation instructions.
¥
Important: if the supply cable is damaged, it must
be replaced by authorized service or qualified
personnel using a special cable of the same type.
The following table shows which ambient
temperature is correct for each climate classification:
Positioning
¥ Unpack the cabinet and check that it is in good
condition and free of any transport damage.
¥ Place the refrigerator away from direct sunlight and
heat sources.
¥ Avoid prolonged exposure of the appliance to
direct sunlight.
The climate classification can be found on the rating
plate, which is located inside the cabinet on the right
hand wall.
Climate
classification
SN +10 to +32¡C
+16 to +32¡C
+18 to +38¡C
+18 to +43¡C
N
ST
T
for an ambient temperature of
When the ambient temperature is not included
within the range indicated for the class of this
appliance, the storage temperature in the
appliance cannot be guaranteed; therefore it is
advisable to use the food stored as soon as
possible.
12 3
45
180°
Page 23

Electrical connection
Before plugging in, ensure that the voltage and
frequency shown on the serial number plate
correspond to your domestic power supply.
Voltage can vary by ±6% of the rated voltage.
For operation with different voltages, a suitably sized
auto-transformer must be used.
Important
The appliance must be earthed.
The power supply cable plug is provided with a
contact for this purpose.
If the domestic power supply socket is not
earthed. connect the appliance to a separate
earth in compliance with current regulations,
consulting a specialist technician.
The Manufacturer declines all
responsibility if the above safety
precautions are not observed.
This appliance complies with the following E.E.C.
Directives:
- 87/308 EEC of 2/6/87 relative to radio
interference suppression.
- 73/23 EEC of 19.2.73 (Low Voltage
Directive)
and subsequent modifications.
- 89/336 EEC of 3.5.89 (Electromagnetic
Compatibility Directive) and subsequent
modifications.
Attention!
It must be possible to disconnect the appliance
from the mains power supply; the plug must
therefore be easily accessible after installation.
Grid preparation
Left door opening:
Remove the left side (A) of the grid cutting it from the
rear (see figure).
Right door opening:
Remove the right side (B) of the grid cutting it from
the rear (see figure).
To position the grid on the appliance proceed as
follows:
Apply the grid to the base of the appliance by
pushing on to the clasps (a) until they click.
Building in the appliance under a worktop
Dimensions of the recess
The dimensions of the recessed installation area
must correspond with those indicated in the figure.
23
A
B
DO002/2
a
DO001
a
600
550
min.
600
DO013
Page 24

24
1. Installation kit
2. Two cabinet securing brackets (D) are supplied
with the installation pack. They need to be
assembled onto the cabinet prior to cabinet being
pushed into the Kitchen aperture.
- To fit these brackets remove the two screws at the
top left and right hand front corners of the cabinet.
- Position the two brackets as shown in the figure
and replace the two securing screws.
Left hand
bracket
Right hand
bracket
2
3. Push the appliance into place. The plug socket
necessary for connection of the appliance to the
electricity supply should be positioned, so that the
plug is not placed in the recess.
To adjust the height proceed as follows:
- Loosen or tighten the two front feet.
- The rear feet are adjusted by turning the screw
in the front kick plate to the left or right.
4. The joint cover (B) is to be assembled after having
installed the appliance in the recess.
1xB
1xA
1xK
2xG
2xL
2xF
2xD
1
2xC
18xI
+
-
max. 890 mm
3
596
555
max
-
+
1
B
4
Page 25

I
5. Screw appliance into place and retain the cabinet
with screws (I) through the securing brackets into
the worktop or adjacent woodwork as necessary.
6. To mount the furniture door proceed as shown in
the figures:
25
Upper part of kitchen
furniture panel
ab
C
click
5
2
1
10
a
C
4
3
b
6
click
8
Möbeltür Innenseite
c
a
I
=
=
c
9
b
I
F
27,5 cm
27,5 cm
10
55 cm
7
Page 26

26
45°
7. Refit the covering strip (A).
A
1
2
3
11
14
1
L
=
2
12
10
=
L
15
90°
115°
13
8 mm
F
G
I
K
Page 27

27
Fitting the plinth
Important
For the efficient operation of the appliance, it is
important that the original ventilation grid is
used.
¥ For an opening height dimension A=820 mm and a
plinth height dimension a=100 mm, the plinth may
be fitted without adjustments. The same applies to
an opening height dimension B=890 mm and a
plinth height dimension b=170 mm.
¥ For plinth heights greater than a=100 mm, b=170
mm, a cut should be made in the plinth, 580 mm
wide, in the centre of the appliance position,
leaving a remaining height of a=100 mm, b=170
mm.
¥ Attach plinth to the kitchen units.
Important
The plinth must be positioned at a minimun
distance of 25 mm from the door.
A = 820
B = 890
a = 100
b = 170
580
25 - 80
DO008b
25
Page 28

 Loading...