

Page 1
Kühlschrank / réfrigérateur / frigorifero / fridge
BENUTZERINFORMATION
NOTICE D’UTILISATION
ISTRUZIONI PER L’USO
USER MANUAL
2223 378-53
IK 331
I
UK
F
D
Page 2

2
WARNUNGEN UND WICHTIGE HINWEISE
Es ist sehr wichtig, daß diese Bedienungsanleitung mit dem betreffenden Gerät aufbewahrt wird. Sollte
dieses Gerät verkauft bzw. einer anderen Person gegeben werden, so ist es nötig, die Anleitung
beizufügen, damit der neue Besitzer über den Betrieb des Gerätes bzw. die entsprechenden Warnungen.
Sollte dieses Gerät mit Magnet-Türverschluß als Ersatz für ein altes Gerät dienen, das noch mit einem
Schnappschloß ausgerüstet ist, so machen Sie bitte dieses Schloß unbrauchbar, bevor Sie das Gerät
beiseite stellen oder zum Müll geben. Sie verhindern damit, daß spielende Kinder sich selbst einsperren
und damit in Lebensgefahr kommen.
Diese Warnungen wurden zu Ihrem bzw. dem Schutz anderer erarbeitet.Wir bitten Sie daher, diese
aufmerksam zu lesen, bevor das Gerät in Betrieb genommen wird.
Sicherheit
• Dieses Gerät wurde hergestellt, um von
Erwachsenen benutzt zu werden. Es ist
unbedingt darauf zu achten, daß Kinder es nicht
anfassen oder es als Spielzeug verwenden.
• Es ist gefährlich, die Eigenschaften dieses
Gerätes zu ändern.
• Vor der inneren bzw. äußeren Reinigung des
Gerätes sowie beim Auswechseln der Glühlampe
(bei damit ausgestatteten Geräten) das Gerät
spannungslos machen.
• Eis aus dem Gefrier- bzw. Frosterfach nicht
sofort essen, es könnte Kälte-Brandwunden
verursachen.
• Dieses Gerät ist schwer. Beim Versetzen bitte
darauf achten!
• Beachten Sie, dan während der Bewegung
des Gerätes der Kältemittelkreislauf nicht
beschädigt wird.
• Das Gerät darf nicht in unmittelbarer Nähe
von Heizkörpern oder Gasherden aufgestellt
werden.
• Ein Standort mit direkter Sonneneinstrahlung
sollte vermieden werden.
• Eine ausreichende Luftzirkulation an der
Geräterückseite muß gewährleistet sein.
Jegliche Beschädigung des Kühlkreislaufes
ist zu vermeiden.
• NUR FÜR GEFRIERSCHRÄNKE
(Einbaugeräte ausgenommen): ein optimaler
Aufstellungsort ist der Keller.
• Keine Elektrogeräte (z.B. Eismaschinen) in
das Gerät stellen.
Störungen - Kundendienst
• Sollte die Installation des Gerätes eine Änderung
der elektrischen Hausinstallation verlangen, so
darf diese nur von Elektro-Fachkräften
durchgeführt werden.
• Eventuelle Reparaturen dürfen nur von einem
Kundendienst oder sonstigen autorisierten
Stellen durchgeführt werden.
• Es ist wichtig, daß nur Original-Ersatzteile
verwendet werden.
• Dieses Gerät enthält im Kältekreislauf
Kohlenwasserstoff. Aus diesem Grund darf die
Wartung und das Nachfiillen ausschließlich von
autorisiertem Fachpersonal durchgeführt werden.
• Benutzen Sie nie Metallgegenstände um das
Gerät zu reinigen, da es beschädigt werden
könnte.
• Tritt eine Störung oder ein Defekt ein, versuchen
Sie nicht, das Gerät selbst zu reparieren.
Elektrogeräte dürfen nur von Elektro-Fachkräften
repariert werden, da durch unsachgemäße
Reparaturen erhebliche Folgeschäden entstehen
können. Wenden Sie sich bitte an die nächste
Kundendienststelle.
Aufstellung
• Sich vergewissern, daß das Gerät nach der
Installation nicht auf dem Netzkabel steht.
Wichtig:Beschädigte Versorgungskabel müssen
durch ein Spezialkabel bzw. einen Spezialsatz
ersetzt werden, die beim Hersteller oder den
Kundendienst erhältlich sind.
• Während das Gerät in Betrieb ist, werden der
Verflüssiger und der Kompressor, die sich auf der
Rückseite des Gerätes befinden, heiß. Es ist
darauf zuachten, dass die Luft um das Gerät frei
zirkulieren kann, damit die Wärme abgeführt
werden kann. Eine ungenügende Luftzirkulation
kann einen unregelmässigen Betrieb bzw.
Schäden am Gerät verursachen. Achten Sie auf
die Installationsanweisungen.
• Teile, die heiß werden (z.B. Kompressorgehäuse,
Verflüssiger und zugehörige Rohre), sollen nicht
frei zugänglich sein. Wo es auch immer möglich
ist, soll das Gerät mit der Rückseite gegen eine
Wand gestellt werden.
• Während des Transports kann es vorkommen,
daß das im Motorkompressor enthaltene Öl in
den Kältekreislauf abläuft. Man sollte mindestens
2 Std. warten, bevor das Gerät in Betrieb
genommen wird, damit das Öl in den Kompressor
zurückströmen kann.
Page 3
3
Gebrauch
• Die Haushaltskühl- und Gefriergeräte sind nur
zur Einlagerung bzw. zum Einfrieren von
Nahrungsmitteln bestimmt.
• Die beste Leistung erzielt man bei
Raumtemperaturen von +18°C bis +43°C (Klasse
T); +18°C bis +38°C (Klasse ST); +16°C bis
+32°C (Klasse N); +10°C bis +32°C (Klasse SN);
die Geräteklasse ist auf dem Typschild
angegeben.
Zu beachten: Wird dieses Gerätes bei anderen
Umgebungstemperaturen betrieben als den in
der entsprechenden Klimaklasse angegebenen
Werten, sind folgende Hinweise zu beachten:
sinkt die Umgebungstemperatur unter den
angegebenen Mindestwert ab, könnte die
Lagertemperatur im Gefrierabteil nicht mehr
garantiert sein; es wird daher empfohlen, die
eingelagerten Lebensmittel so rasch als möglich
zu verbrauchen.
• Einaufgetautes Produkt darf nicht wieder
eingefroren werden.
• Für das Aufbewahren bzw. das Einfrieren der
Lebensmittel sind die Anweisungen des
Herstellers zu befolgen.
• In allen Kühl- und Gefriergeräten bedecken sich
im Laufe der Zeit alle kälteführenden Teile mit
einer Reif bzw. Eissicht. Diese Schicht wird je
nach Modell automatisch oder mit der Hand
abgetaut.
• Die Reifsicht niemals mit Metallgegenständen
abkratzen, das Gerät könnte beschädigt werden.
Dazu nur einen Plastikschaber verwenden.
• Zum Lösen der festgefrorenen Eisschalen keine
scharfkantigen oder spitzn Gegenstände
benutzen.
• Es sollten keine kohlensäurehaltigen Getränke in
das Gefrier- bzw. Frosterfach eingestellt werden,
sie könnten platzen.
Umweltnormen
Dieses Gerät enthält im Kühlkreislauf und in der
Isolierung kein ozonschädigendes Gas. Das
Gerät darf nicht mit dem Hausmüll entsorgt
werden. Eine Beschädigung des
Kältemittelkreislaufs, insbesondere des
Wärmetauschers auf der Rückseite des Gerätes,
muß verhindert werden. Auskunft über
Abholtermine oder Sammelplätze gibt die
örtliche Gemeindeverwaltung an. Die in diesem
Gerät verwendeten und mit dem Symbol
gekennzeichneten Materialien,sind
recyclingfähig.
Entsorgung von Altgeräten
Das Symbol auf dem Produkt oder seiner
Verpackung weist darauf hin, dass dieses Produkt
nicht als normaler Haushaltsabfall zu behandeln ist,
sondern an einem Sammelpunkt für das Recycling
von elektrischen und elektronischen Geräten
abgegeben werden muss. Durch Ihren Beitrag zum
korrekten Entsorgen dieses Produkts schützen Sie
die Umwelt und die Gesundheit Ihrer Mitmenschen.
Umwelt und Gesundheit werden durch falsches
Entsorgen gefährdet. Weitere Informationen über
das Recycling dieses Produkts erhalten Sie von
Ihrem Rathaus, Ihrer Müllabfuhr oder dem Geschäft,
in dem Sie das Produkt gekauft haben.
HINWEISE ZUR VERPACKUNGSENTSORGUNG
Verpackungen und Packhilfsmittel unserer ElektroGroßgeräte sind mit Ausnahme von Holzwerkstoffen
recyclingfähig und sollen grundsätzlich der
Wiederverwertung zugeführt werden.
Wir empfehlen Ihnen:
• Papier-, Pappe- und Wellpappeverpackungen
sollten in die entsprechenden Sammelbehälter
gegeben werden.
• Kunststoffverpackungsteile sollten ebenfalls in
die dafür vorgesehenen Sammelbehälter
gegeben werden. Solange solche in Ihrem
Wohngebiet noch nicht vorhanden sind, können
Sie diese Materialien zum Hausmüll geben.
Als Packhilfsmittel sind bei uns nur recyclingfähige
Kunststoffe zugelassen, z.B.:
In den Beispielen steht
PE für Polyäthylen** 02 = ^ PE-HD; 04 = ^ PE-LD
PP für Polypropylen
PS für Polystyrol
BESTANDTEILE AUS PLASTIK
Zur einfacheren Entsorgung und/oder Recycling ist
ein Großteil der Materialien dieses Gerätes
gekennzeichnet, um ihre Identifizierung zu
ermöglichen.
02**
PE
05
PP
06
PS
SAN
PS
ABS
Page 4
4
Reinigung der Innenteile
Bevor Sie das Gerät in Betrieb nehmen, beseitigen
Sie den typischen «Neugeruch» am besten durch
Auswaschen der Innenteile mit lauwarmem Wasser
und einem neutralen Reinigungsmittel Sorgfältig
nachtrocknen.
Bitte keine Reinigungs- bzw. Scheuermittel
verwenden, die das Gerät beschädigen
könnten.
GEBRAUCH
INHALT
Warnungen und wichtige Hinweise . . . . . . . . . . . . . . . . . . . . . . . . . . . . . . . . . . . . . . . . . . . . . . . . . .2
Hinweise zur Verpackungsentsorgung . . . . . . . . . . . . . . . . . . . . . . . . . . . . . . . . . . . . . . . . . . . . . . . .3
Gebrauch - Reinigung der innenteile - Bedienungsblende - . . . . . . . . . . . . . . . . . . . . . . . . . . . . . . . .4
Gebrauch - Tasten zur Temperatureinstellung - Temperaturanzeige - Schnellkühlen - Taste . . . . . . . . .
Inbetriebnahme und Temperaturregelung - Hinweise zum richtigen Kühlen . . . . . . . . . . . . . . . . . . . . . .
Höhenverstellbare Abstellregale . . . . . . . . . . . . . . . . . . . . . . . . . . . . . . . . . . . . . . . . . . . . . . . . . . . . . . .5
Gebrauch - Höhenverstellung der Innentürablagen - Flaschenablage - Umluftsystem . . . . . . . . . . . .6
Tips - Tips für das Kühlen - Wartung - Regelmäßige Reinigung - Stillstandzeiten . . . . . . . . . . . . . . . .7
Wartung - Innenbeleuchtung - Abtauen - Störungen . . . . . . . . . . . . . . . . . . . . . . . . . . . . . . . . . . . . . .8
Technische Daten - Installation - Transportsicherungen - Aufstellung - Elektrischer Anschluß . . . . .9
Installation - Montageanleitungen für den integrierten Einbau . . . . . . . . . . . . . . . . . . . . . . . . . . . . . 10
Kundendienst/Garantie . . . . . . . . . . . . . . . . . . . . . . . . . . . . . . . . . . . . . . . . . . . . . . . . . . . . . . . . . . . 35
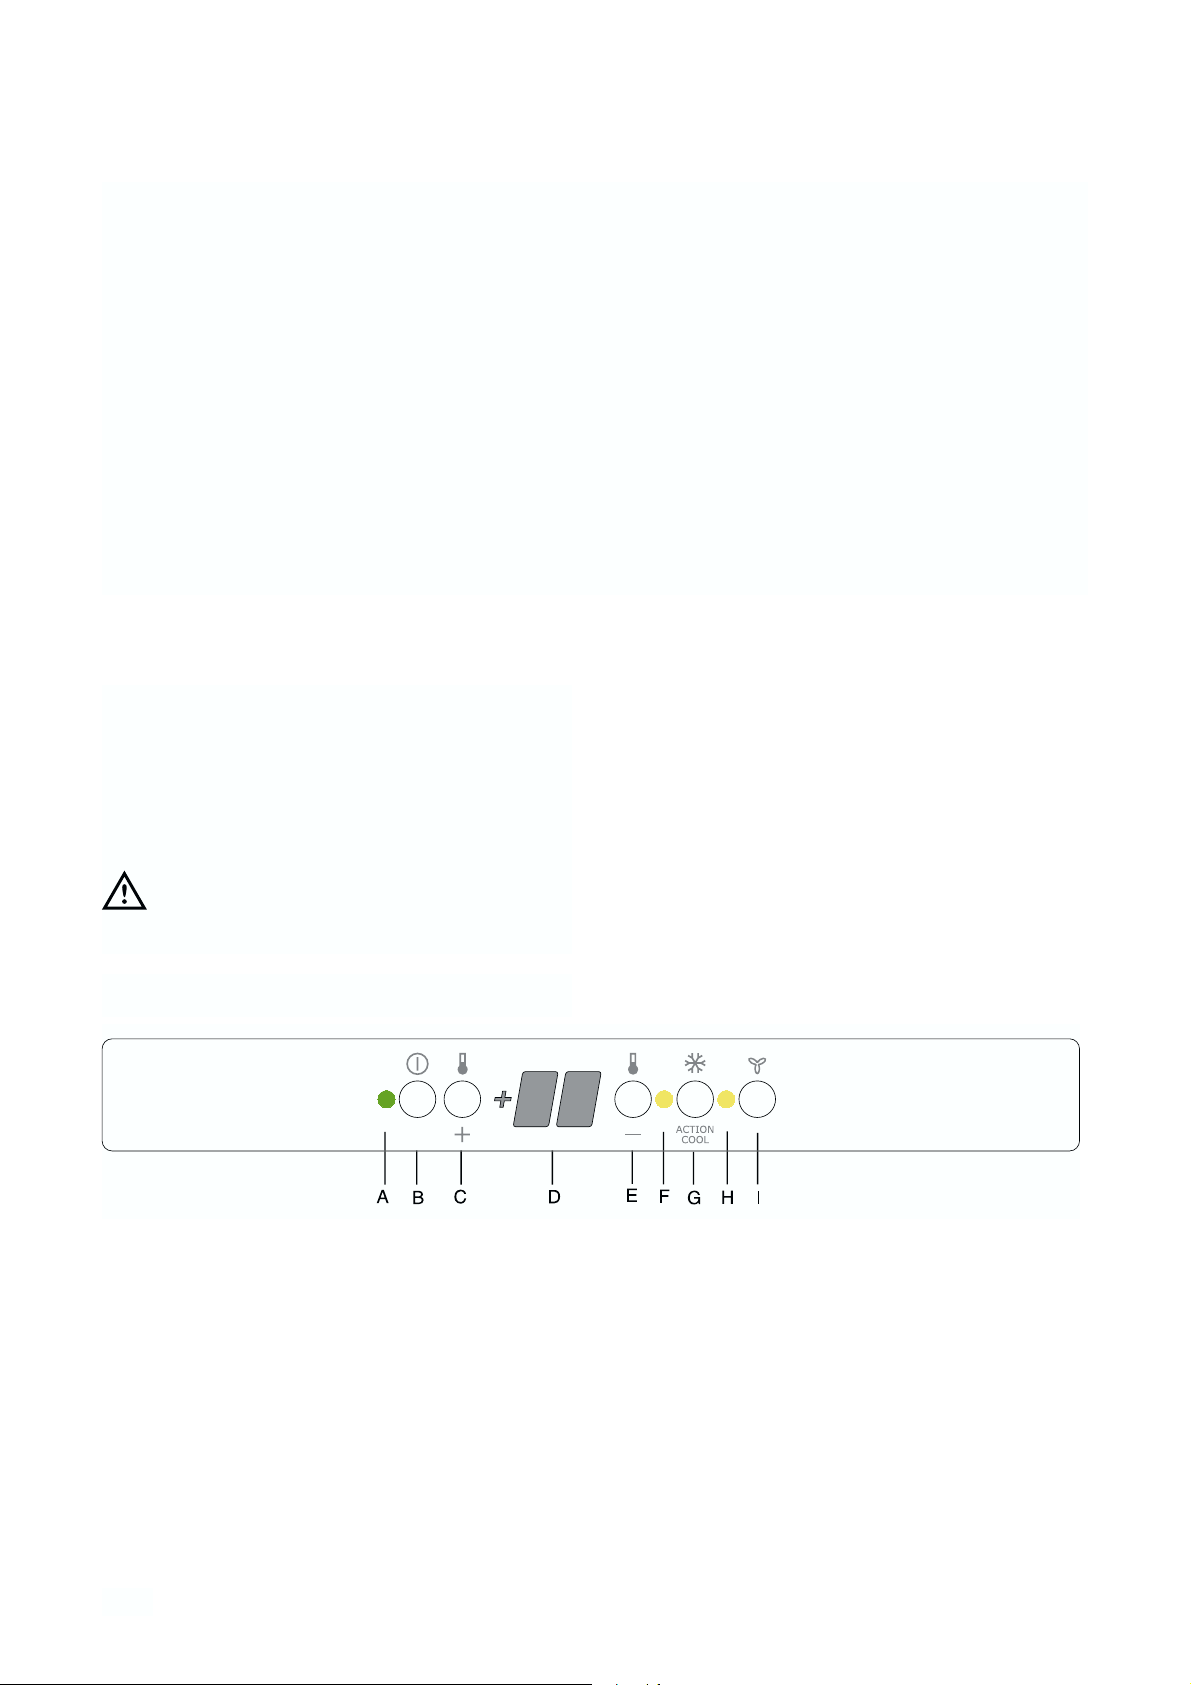
Bedienungsblende
F
A. Netzkontrollanzeige (grün)
B. EIN/AUS Taste
C. Taste zur Temperatureinstellung (wärmer)
D. Temperaturanzeige
E. Taste zur Temperatureinstellung (kälter)
F. Schnellkühlenanzeige (gelb)
G. Schnellkühlen Taste
H. DAC Anzeige
I. DAC Taste
ON/OF
Page 5
5
Tasten zur Temperatureinstellung
Durch Druck auf eine der Tasten zur Temperatureinstellung (C oder E) wird die Temperaturanzeige
vom Anzeigemodus (Temperaturanzeige leuchtet)
auf den Eingabemodus (Temperaturanzeige blinkt)
umgeschaltet. Mit jedem weiteren Druck auf eine der
Tasten C oder E wird die gewünschte GefrierraumTemperatur um 1°C verstellt.
Möchten Sie die eingestellte Temperatur erhöhen,
müssen Sie die Taste (C) drücken. Um die
eingestellte Temperatur zu vermindern, müssen Sie
die Taste (E) drücken. Nach der Eingabe blinkt die
Anzeige noch einige Sekunden und zeigt danach
wieder die aktuelle Innentemperatur des
Gefrierraumes an.
Temperaturanzeige
Im Normalbetrieb wird im Display die mittlere
Temperatur des Kühlraumes angezeigt.
Achtung:
Zu häufiges Öffnen oder zu langes Offenhalten der
Türe kann zu Temperaturschwankungen führen.
Abweichungen können auch durch eine zu große
Menge an neu eingelagerten warmen Lebensmitteln
verursacht werden.
Schnellkühlen -Taste
Mit der Schnellkühlen-Funktion schalten Sie das
Kühlabteil auf die höchste Kühlleistung. Es empfehlt
sich besonders, wenn Sie große Mengen von
Lebensmitteln, Getränke oder Speisen
schnellstmöglich abkühlen möchten. Durch Drücken
der Taste (G) schaltet man die SchnellkühlenFunktion ein. Die gelbe Anzeige (F) leuchtet.
Die Schnellgefrier-Funktion schaltet sich nach 6
Stunden automatisch ab.
Hinweise zum richtigen Kühlen
Um die besten Leistungen des Kühlschrankes zu
erreichen, beachten Sie bitte folgendes:
• Keine warmen Speisen oder dampfenden
Flüssigkeiten in den Kühlschrank einstellen.
• Geruchverbreitende Lebensmittel müssen
abgedeckt oder eingewickelt werden.
• Die Lebensmittel müssen so eingelagert werden,
daß die Kälte um sie frei zirkulieren kann.
Inbetriebnahme und
Temperaturregelung
• Netzstecker in die Steckdose stecken. EIN/AUS
Taste (B) drücken. Die grüne Lampe (A) leuchtet
auf. (Ca.3 Sek.)
• Der Kühlschrank ist auf die eine
Kühlraumtemperatur von +5°C eingestellt. Diese
Temperatur wird erst nach ein paar Stunden
erreicht.
• Beim Einschalten des Kühlschrankes erscheint
auf der Temperaturanzeige (D) die momentane
Innentemperatur.
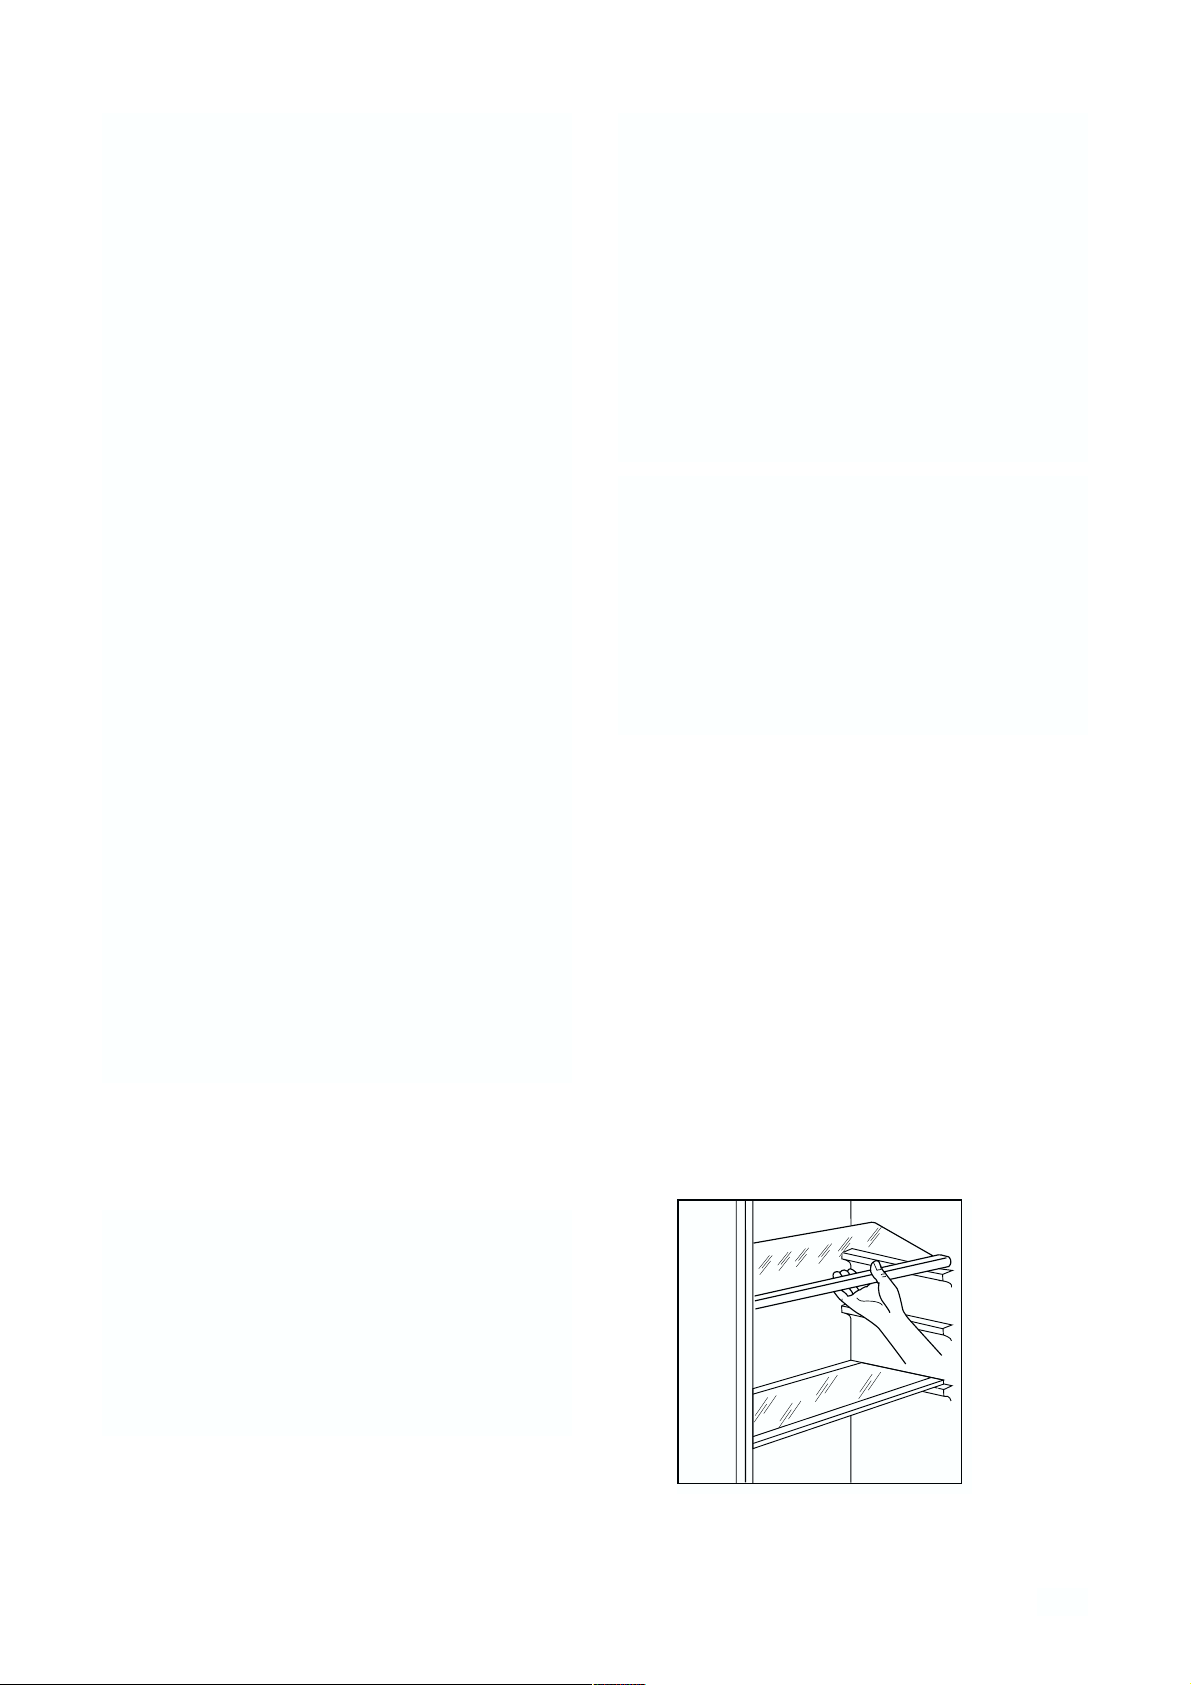
Höhenverstellbare Abstellregale
Der Abstand zwischen den verschiedenen Abstellregalen kann je nach Wunsch geändert werden. Dazu
die Regale herausnehmen und auf das gewünschte
Niveau einsetzen.
Zur besseren Raumnutzung können die vorderen
Halbteile der Ablagen auf die rückwärtigen
hinautgelegt werden.
D338
Page 6
6
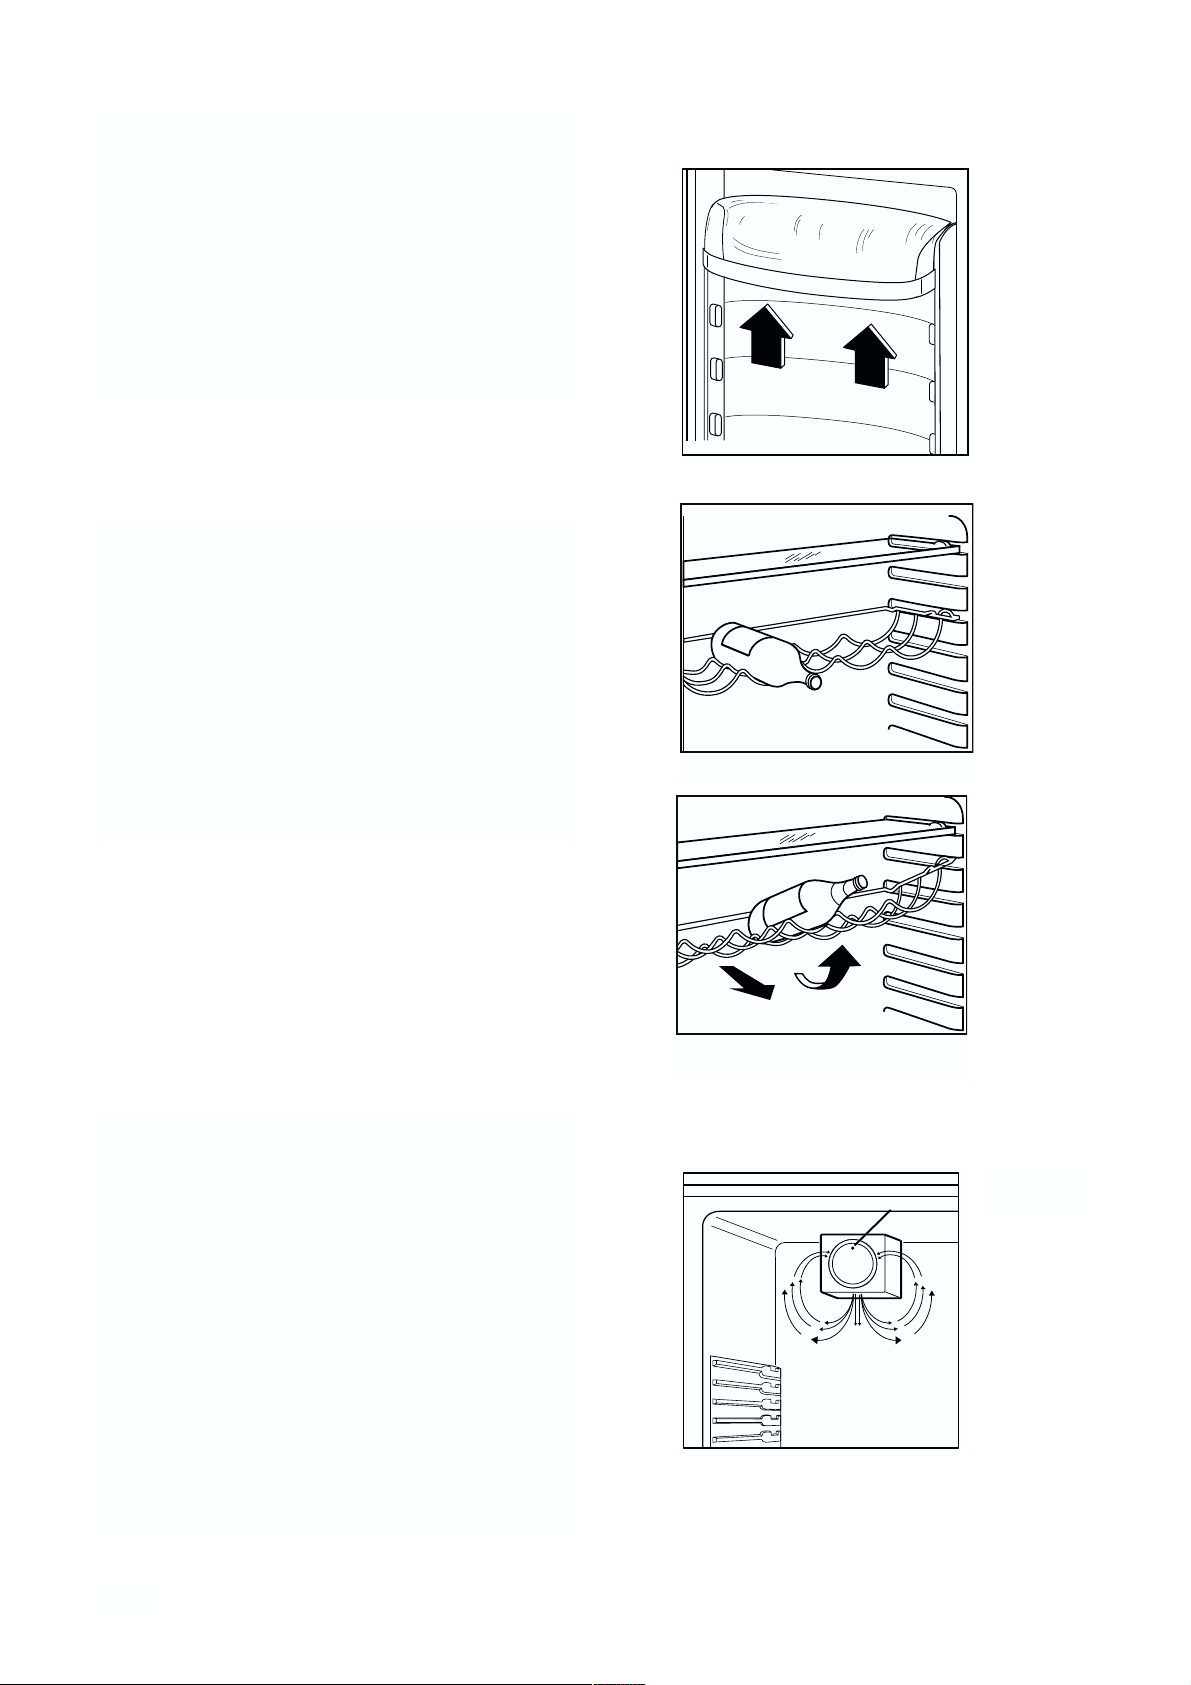
Höhenverstellung der
Innentürablagen
Zur Einlagerung von Lebensmittel-Packungen
verschiedener Größe, sind die Abstellregale der
Innentür höhenverstellbar.
Hierzu wie folgt vorgehen:
das Abstellregal stufenweise in Pfeilrichtung drücken
bis es frei wird; dann in der gewünschten Höhe
wieder anbringen.
Flaschenablage
Flaschen mit dem Flaschenhals nach vorne in die
Ablage legen.
Achtung: N ur ungeöffnete Flaschen waagrecht
lagern.
Zur Lagerung angebrochener Flaschen kann die
Flaschenablage schräggestellt werden.
Dazu die Flaschenablage soweit nach vorne ziehen,
bis sie sich nach oben abschwenken läßt, und dann
die vordere Auflage in die nächsthöhere Ebene
einschieben.
Umluftsystem
Der Kühlschrank ist innen mit einem speziellen
Gebläse, dem sogenannten D.A.C. (Dynamik Air
Cooling) ausgestattet, das über den Schalter
(I - Bedienungsblende ) eingeschaltet wird. Das
Aufleuchten der grünen Kontrollleuchte (Abb. 1)
bedeutet, dass das Gebläuse läuft.
Der Gebrauch des Gebläses (D.A.C.) ist bei einer
Raumtemperatur über 25°C besonders
empfehlenswert.
Diese Vorrichtung gewährt ein rasches Abkühlen der
Nahrungsmittel bzw. eine bessere
Temperaturgleichmäßigkeit im gesamten
Kühlschrank.
Abb. 1
Kontrolllampe
Page 7
7
TIPS
Tips für das Kühlen
Nachstehend einige praktische Ratschläge:
Fleisch (alle Sorten) in Plastikfolie einpacken und
auf die Glasplatte, die sich über der Gemüseschale
(über den Gemüseschalen) befindet, legen.
In dieser Lage kann das Fleisch längstens 1-2
Tage aufbewahrt werden.
Gekochte Nahrungsmittel, kalte Platten, usw.
zugedeckt aufbewahren. Sie können auf jeden
beliebigen Rost gelegt werden.
Obst und Gemüse: nach vorherigem Säubern und
Waschen in der Gemüseschale (in den
Gemüseschalen) aufbewahren.
Butter und Käse: in speziellen Behältern aufbewahren oder in Alu- bzw. Plastikfolie einpacken, um
den Kontakt mit der Luft zu vermeiden.
Milch in Flaschen: gut verschlossen auf die Konsol
der Innentür stellen.
Wenn Bananen, Kartoffeln, Zwiebeln und
Knoblauch nicht verpackt sind, sollen sie nicht
in den Kühlschrank gegeben werden.
WARTUNG
Vor jeder Reinigungsarbeit immer den
Netzstecker aus der Steckdose ziehen.
Achtung: Dieses Gerät enthält im Kältekreislauf
Kohlenwasserstoff. Aus diesem Grund darf die
Wartung und das Nachfiillen ausschließlich von
autorisiertem Fachpersonal durchgeführt werden.
Regelmäßige Reinigung
Benutzen Sie nie Metallgegenstände um das Gerät
zu reinigen, da es beschädigt werden könnte.
Den Innenraum mit lauwarmem Wasser und Natron
und die lackierten Teile mit einem Poliermittel
reinigen.
Gut nachwaschen und sorgfältig trocknen.
Den Kondensator und den Motorkompressor mit
einer Bürste oder einem Staubsauger reinigen. Dies
begünstigt den guten Betrieb mit folglicher
Stromersparnis.
Stillstandszeiten
Bei längerem Stillstand des Gerätes, müssen Sie
folgendermaßen vorgehen:
• den Stecker aus der Steckdose ziehen;
• alle Lebensmittel herausnehmen;
• Gerät abtauen, Innenraum und Zubehörteile
reinigen;
• die Türen offen lassen, um im Innern eine gute
Luftzirkulation zu gewährleisten und somit
Geruchsbildung zu vermeiden.
Page 8
8
STÖRUNGEN
Falls das Gerät Störungen aufweisen sollte,
überprüfen Sie zuerst folgendes:
• Steckt der Netzstecker in der Steckdose?
• Befindet sich der Hauptschalter der elektrischen
Anlage in der richtigen Stellung?
• Ist die Stromzufuhr unterbrochen?
• Befindet sich der Thermostatknopf in richtiger
Stellung?
• Wasserpfütze auf dem Boden des Kühlfaches:
• Abtauwasserloch verstopft? (siehe Abschnitt
“Abtauen”)
Sollten Sie nach o.e. Prüfungen zu keinem Resultat
kommen, so wenden Sie sich bitte an unseren
nächsten Kundendienst.
Um ein rasches Beheben des Schadens zu
ermöglichen, ist es beim Anruf an den
Kundendienst notwendig, die Modell- und
Seriennummer anzugeben, die Sie dem
Garantieschein oder dem Typenschild (– linke
Seite – unten) entnehmen können.
Abtauen
Die sich auf dem Verdampfer des Kühlschrankes
bildende Reifschicht taut jedesmal in den Stillstandzeiten des Motorkompressors von selbst ab. Das
Tauwasser läuft durch eine Rinne in eine Plastikschale auf der Rückseite des Gerätes (über dem
Kompressor) und verdunstet dort.
Wir empfehlen, das in der Mitte der
Abtauwasserrinne des Kühlraumes befindliche
Ablaufloch für das Abtauwasser regelmäßig zu
reinigen, um zu vermeiden, daß das
Abtauwasser auf die eingelagerten Lebensmittel
tropft.Verwenden Sie den dafür vorgesehenen
Reiniger,der sich schon im Ablaufloch befindet.
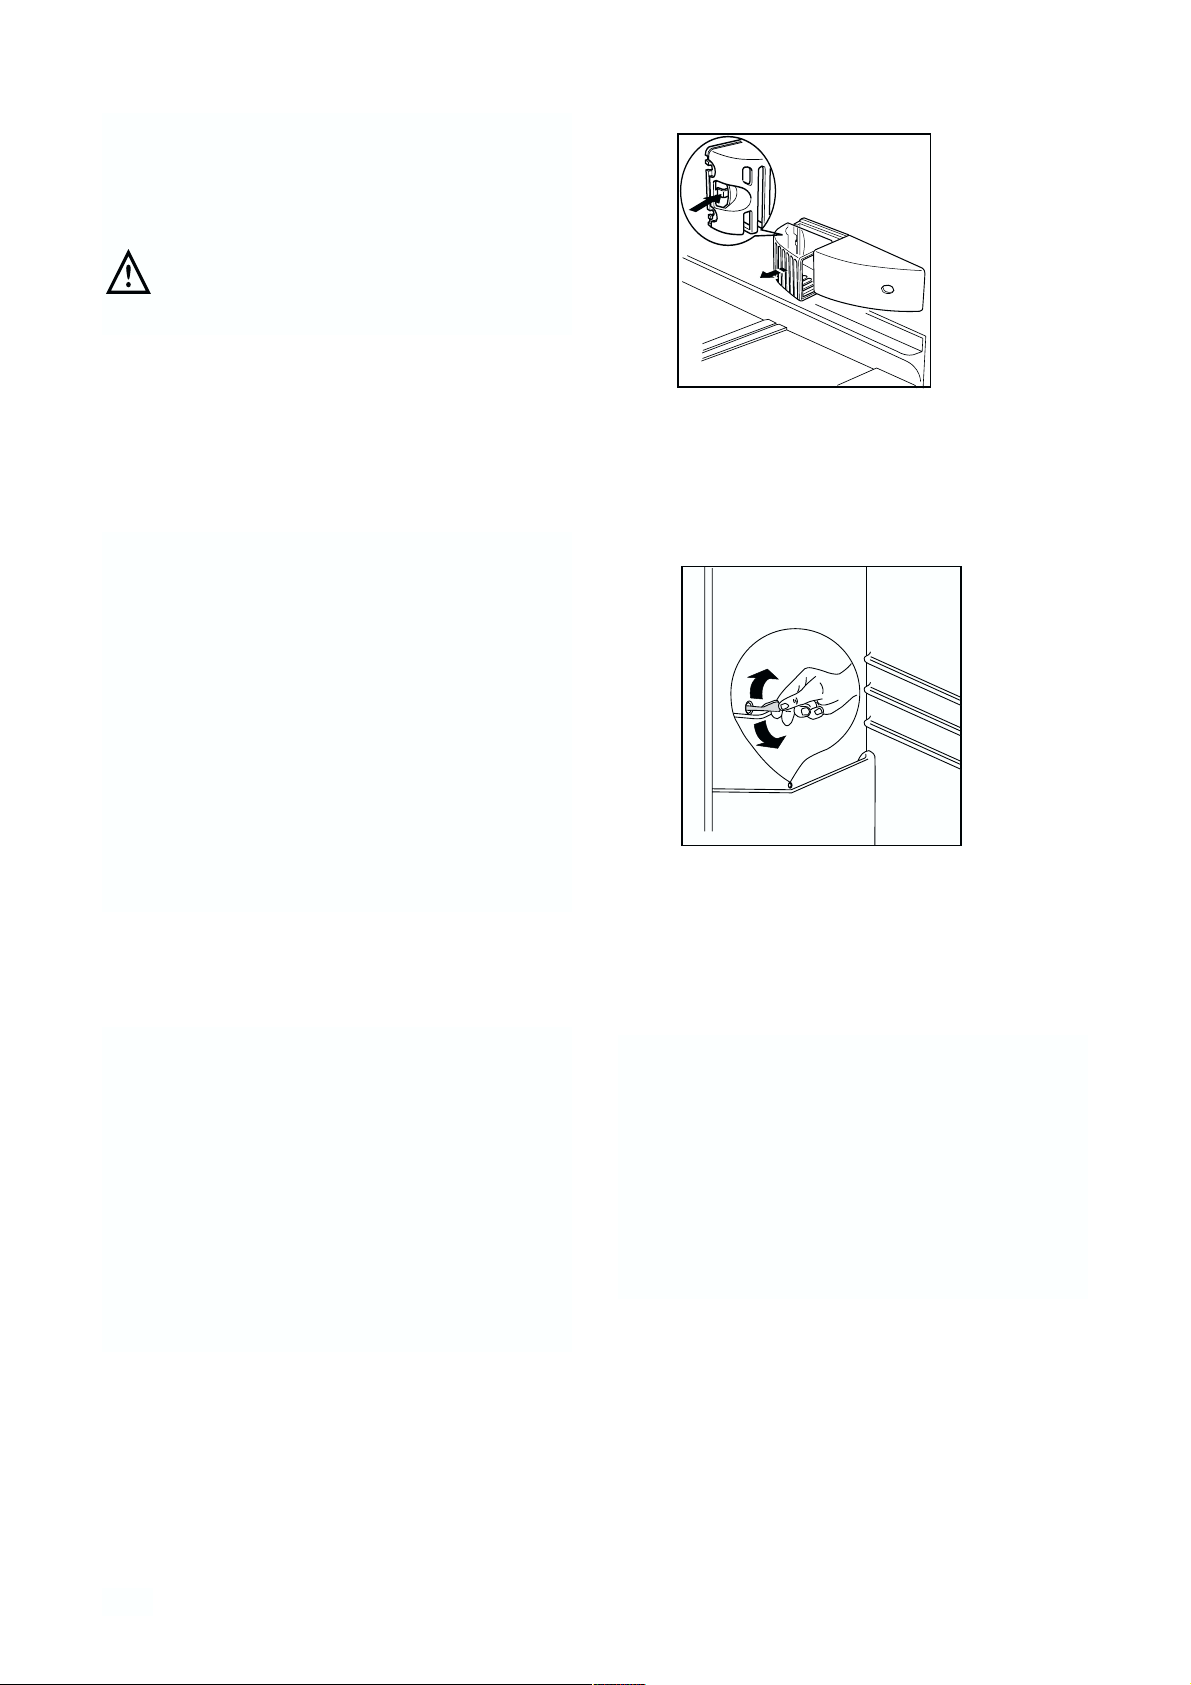
Innenbeleuchtung
Um die Lampe su wechseln, drücken die hintere
Kupplung und gleichzeitig nehmen die Abdeckung in
der Pfeil-Richtung heraus.
Die maximale Leistung ist am
Leuchtkörper angegeben.
D037
Page 9
9
INSTALLATION
Aufstellung
Das Gerät sollte nicht in der Nähe von
Wärmequellen wie Heizkörpern oder Öfen
aufgestellt und vor direkter Sonneneinstrahlung
geschützt werden.
Für den Einbau bitte den entsprechenden Abschnitt
durchlesen.
Elektrischer Anschluß
Bevor Sie den Stecker in die Steckdose einstecken,
überprüfen Sie bitte, daß die auf dem Typenschild
des Gerätes angegebene Spannung sowie
Frequenz mit dem Anschlußwert des Hauses
übereinstimmen. Eine Abweichung von ±6% von der
Nominalspannung ist zulässig. Für die Anpassung
des Gerätes an andere Spannungen muß ein
Spartransformator angemessener Leistung
vorgeschaltet werden.
Das Gerät muß unbedingt vorschriftsmäßig geerdet
werden. Zu diesem Zweck ist der Stecker des
Speisekabels mit dem dafür vorgesehenen Kontakt
versehen. Sollte die Netzleitung im Haus nicht mit
einer Erdleitung versehen sein, so muß das Gerät
an eine getrennte Erdleitung vorschriftsmäßig und
unter Hinzuziehung eines Fachmanns
angeschlossen werden.
Wichtig
Es m
uß möglich sein, das Gerät vom Netz zu
trennenn; Nach der Installation muß die Steckdose
daher zugänglich bleiben.
TECHNISCHE DATEN
330
0,397
145
Nutzinhalt des Kühlschrankes in Liter
Energieverbrauch in kWh/24h
Energieverbrauch in kWh/Jahr
Die Technische Daten können Sie auf dem Typschild feststellen. Das Typschild befindet sich links unten an der
Seitewand.
Die Erzeugerfirma lehnt jede Verantwortung ab,
falls diese Unfallverhütungsvorschrift nicht
beachtet wird.
Dieses Gerät entspricht der folgende EWG
Richtlinie:
- 87/308 EWG vom 2.6.87 (Deutschland-
Ausführung) bzw. der ÖVE-Richtlinie Nr. F 61/84
(Österreich-Ausführung) bezüglich
Funkentstörung.
- 73/23 EWG vom 19/02/73 (Niederspannung) und
folgende Änderungen;
- 89/336 EWG vom 03/05/89 (Elektromagnetische
Verträglichkeit) und folgende Änderungen.
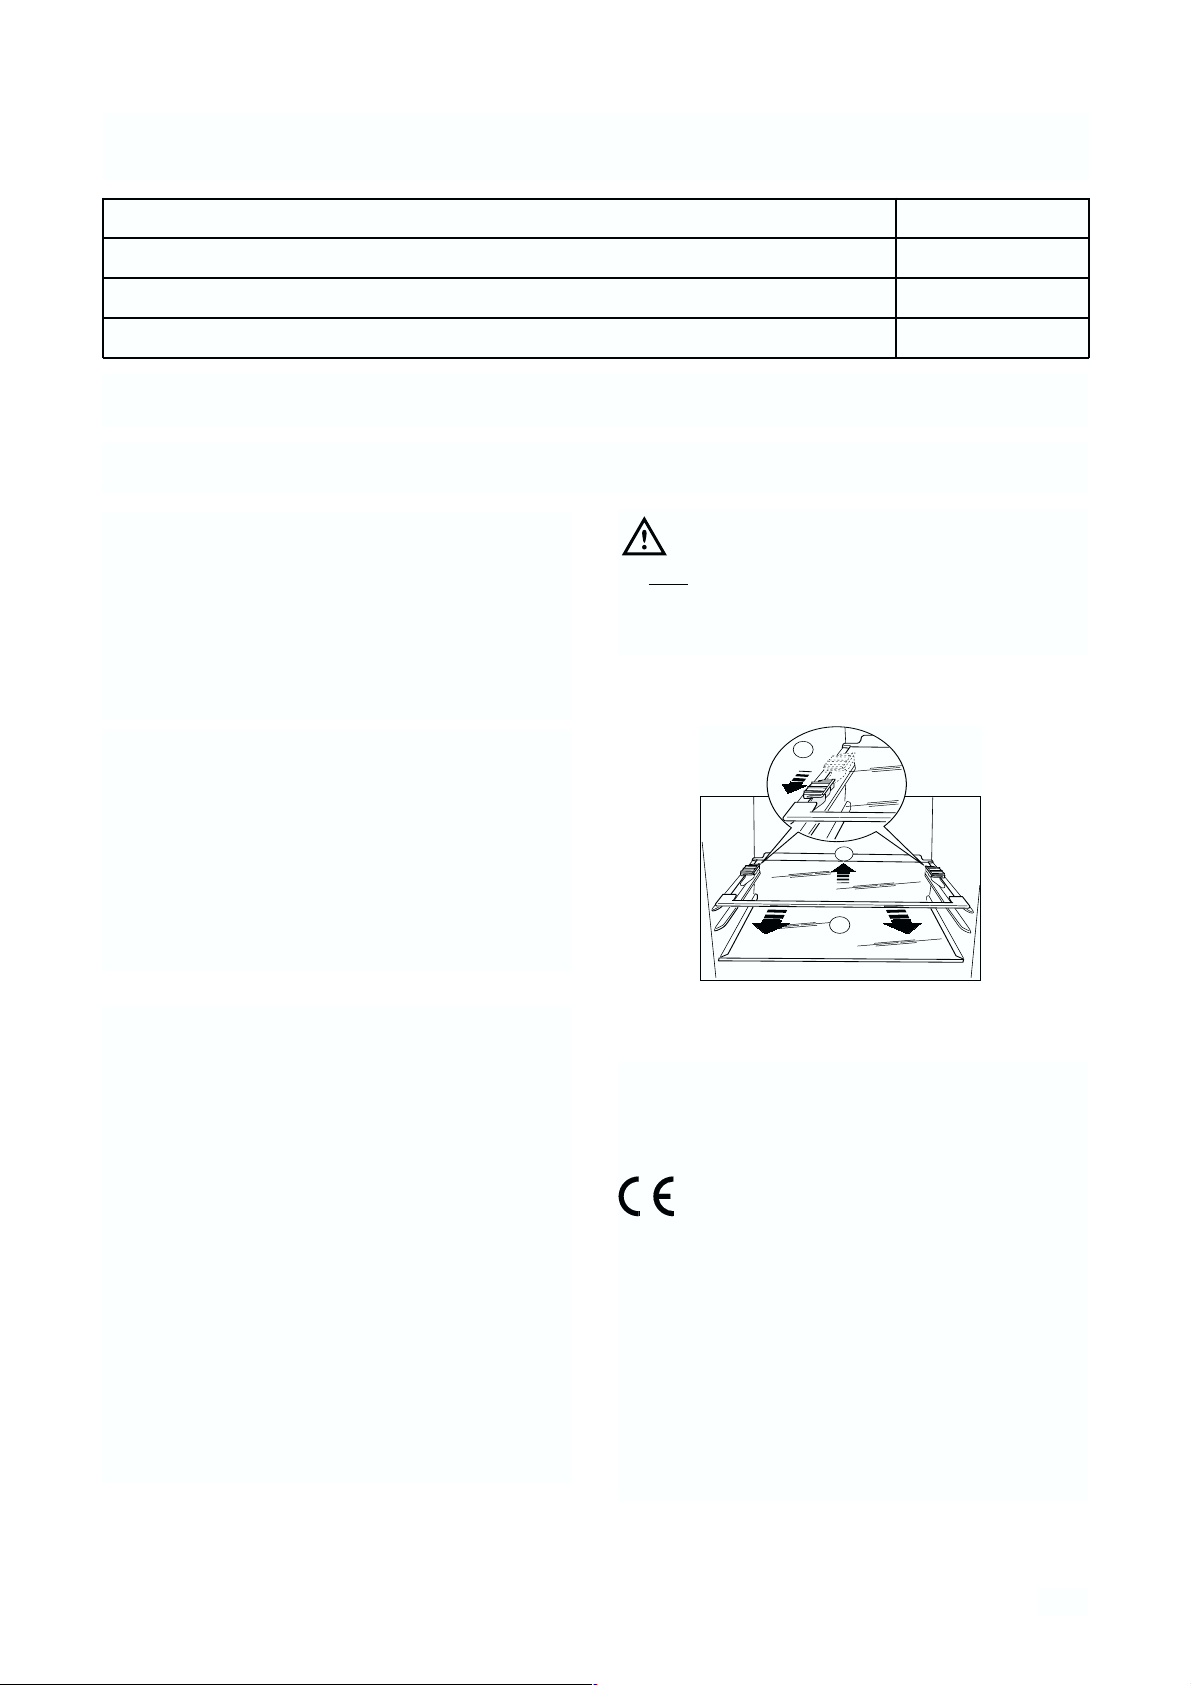
Transportsicherungen
Ihr Gerät ist mit Transportsicherung versehen, die die
Ablage während des Transportes sichern.
Entfernen Sie diese wie folgt:
die Transportsicherungen zunächst entlang der
Glasplattenkante so weit wie möglich nach vorne
ziehen, Glasplatte hinten hochheben, in Pfeilrichtung
ziehen bis sich das Glas löst und die Sicherungen
entfernen.
A
B
C
Page 10
10
Anweisungen für den
integrierten Einbau
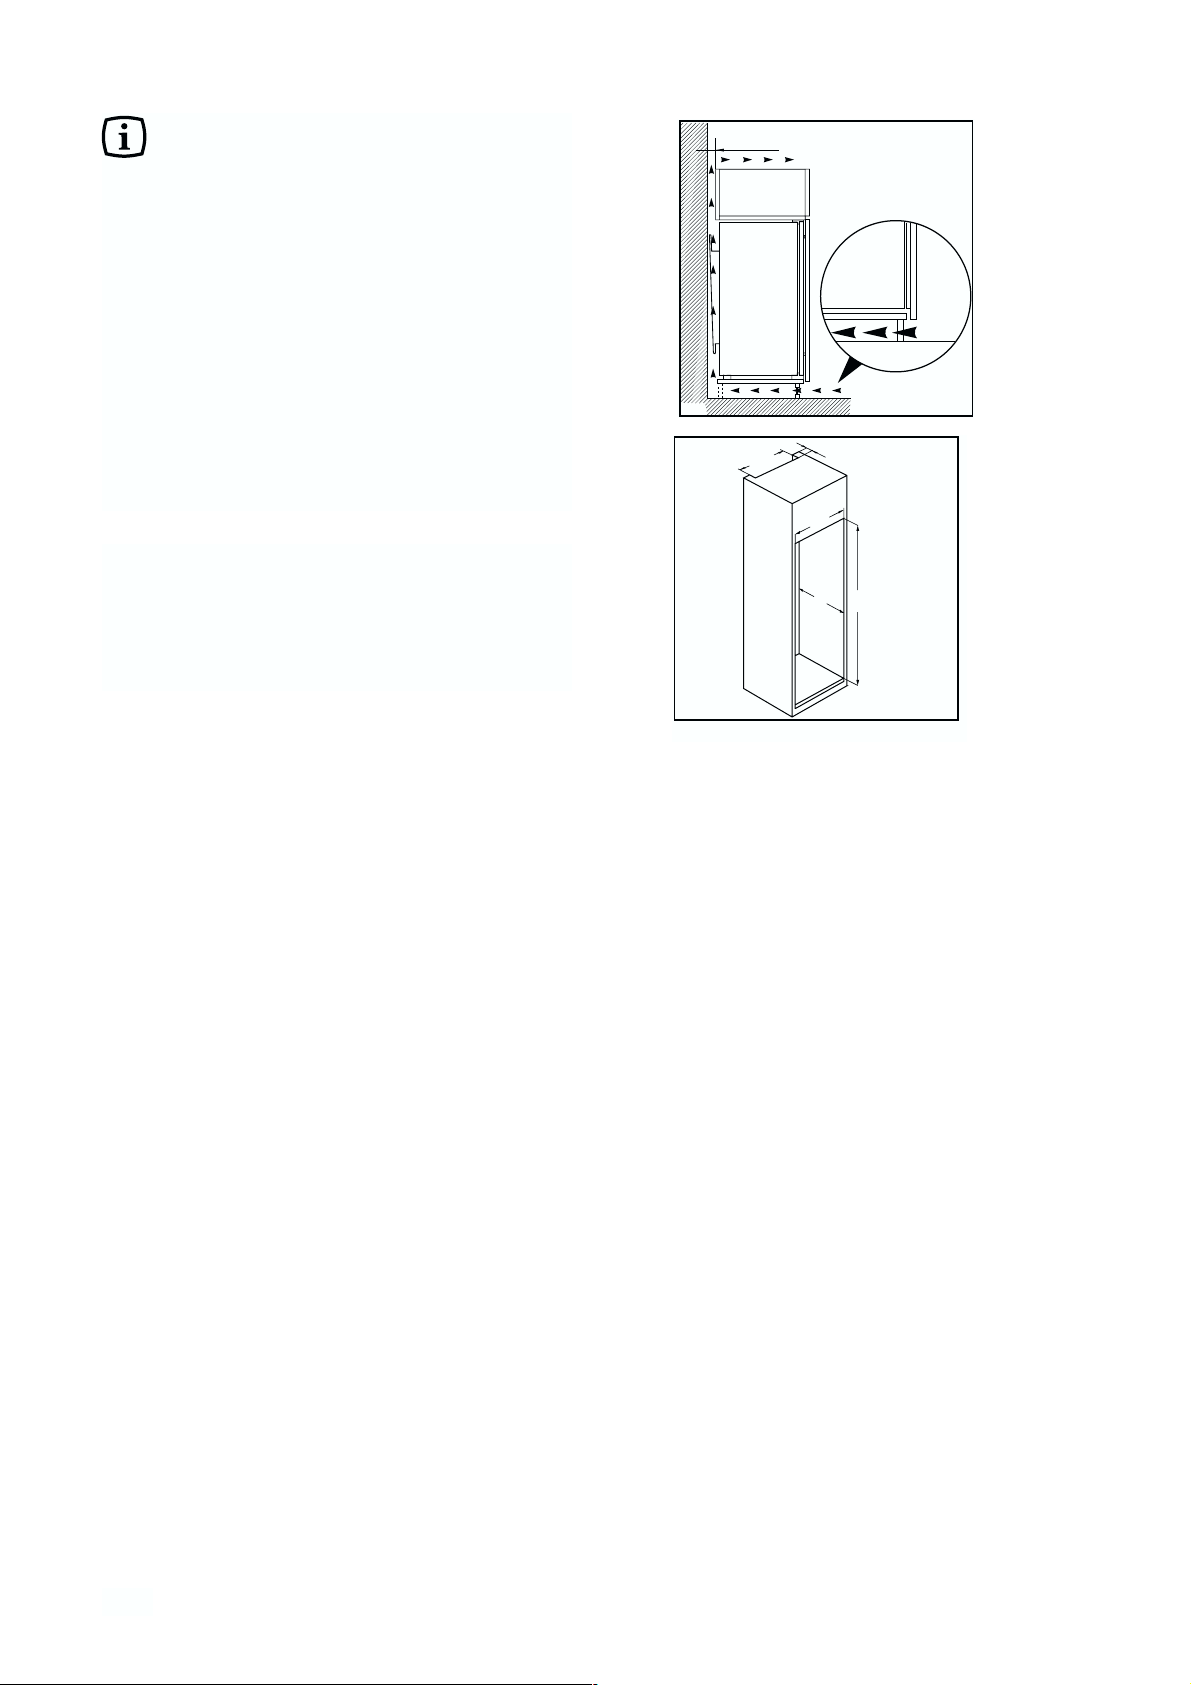
Nischenmaße
Höhe (1) 1780 mm
Tiefe (2) 550 mm
Breite (3) 560 mm
Aus Gründen der Sicherheit muß eine Mindestbelüftung gesichert sein, wie aus der Abb. hervorgeht:
Achtung: Die Ventilations - Öffnungen müssen
immer saubergehalten werden.
Ferner ist auch am hinteren Einbauschrankteil ein
Lüftungskamin mit folgenden Maßsen notwendig:
Tiefe 50 mm
Breite 540 mm
D567
50 mm
min.
200 cm
2
min.
2
200 cm
PR01
540
50
3
2
1
Page 11

11
AVERTISSEMENTS ET CONSEILS IMPORTANTS
Il est très important que cette notice d’utilisation soit gardée avec l’appareil pour toute future
consultation. Si cet appareil devait être vendu ou transféré à une autre personne, assurez-vous que la
notice d’utilisation suive l’appareil, de façon à ce que le nouvel utilisateur puisse être informé du
fonctionnement de celui-ci et des avertissements relatifs.Si cet appareil, muni de fermeture
magnétique, doit être employé pour en remplacer un autre avec une fermeture à ressort, nous vous
conseillons de rendre celle-ci inutilisable avant de mettre l’ancien appareil de côté. Cela dans le but
d’éviter que des enfants puissent s’y renfermer et se mettre ainsi en danger de mort.
Ces avertissements sont donnés pour votre sûreté et pour celle d’autrui.Nous vous prions donc de
bien vouloir les lire attentivement avant d’installer et d’utiliser l’appareil.
Sûreté
• Cet appareil a été conçu pour être utilisé par des
adultes. Veillez donc à ce que les enfants n’y
touchent pas ou qu’ils ne l’utilisent pas comme
un jouet.
• Débranchez toujours la prise de courant avant de
procéder au nettoyage intérieur et extérieur de
l’appareil et au remplacement de la lampe
d’éclairage (pour les appareils qui en sont
équipés).
• Ne consommez pas certains produits tels que les
bâtonnets glacés dès leur sortie de l’appareil; la
température très basse à laquelle ils se trouvent
peut provoquer des brûlures.
• Cet appareil est lourd. Faites attention lors du
déplacement.
• Faites très attention lorsque vous déplacez
l’appareil afin de ne pas endommager des
parties du circuit de réfrigérant et ainsi
d’éviter le risque de fuites de liquide.
• L’appareil ne doit pas être situé à proximité de
radiateurs ou cuisinières à gaz.
• Evitez une exposition prolongée de l’appareil
aux rayons solaires.
• II doit y avoir une circulation d’air suffisante à
la partie arrière de l’appareil et il faut éviter
tout endommagement du circuit réfrigérant.
• Seulement pour congélateurs (sauf modèles
encastrés): un emplacement optimal est la
cave.
• Ne pas mettre d’instruments électriques à
l’intérieur de l’appareil (sorbetière, par
exemple).
Service/Réparation
• Une éventuelle modification à l’installation
électrique de votre maison qui devait être nécessaire pour l’installation de l’appareil ne devra être
effectuée que par du personnel qualifié.
• Il est dangereux de modifier ou d’essayer de
modifier les caractéristiques de cet appareil.
• Cet appareil contient des hydrocarbures dans
son circuit de réfrigérant; I’entretien et la
recharge ne doivent done être effectués que par
du personnel autorisé.
• En cas de panne, n’essayez pas de réparer
l’appareil vous-même. Les réparations effectuées
par du personnel non qualifié peuvent provoquer
des dommages. Contactez le Service AprèsVente le plus proche et n’exigez que des pièces
détachées originales.
Installation
• Assurez-vous, après avoir installé l’appareil, que
celuici ne repose pas sur le câble d’alimentation.
Important: en cas de dommage au câble
d’alimentation, il faudra le remplacer avec un
câble spécial ou un ensemble disponibles chez le
fabricant ou le service technique aprés-vente.
• L’appareil se réchauffe sensibilment au niveau du
condenseur et du compresseur.Veillez à ce que
l’air circule librement tout autour de l’appareil.
Une ventilation insuffisante entraìnerait un
mauvais fonctionnement et des dommages sur
l’appareil. Suivez les instructions données pour
l’installation.
• A cause du système de transport, l’huile
contenue dans le compresseur pourrait s’écouler
dans le circuit réfrigérant. Attendez 2 heures au
moins avant de brancher l’appareil pour
permettre à l’huile de refluer dans le
compresseur.
Utilisation
• Les réfrigérateurs et/ou congélateurs ménagers
sont destinés uniquement à la conservation et/ou
congélation des aliments et des boissons.
• Pour le bon fonctionnement de votre appareil, la
température ambiante du local doit être comprise
entre +18°C et +43°C (Classe T); +18°C et
+38°C (Classe ST); +16°C et +32°C (Classe N);
+10°C et +32°C (Classe SN); La classe
d’appartenance est indiquée sur la plaque
signalétique.
ATTENTION: En dehors des températures
ambiantes indiquées par la classe climatique
Page 12
12
d’appartenance de ce produit, il est obligatoire de
respecter les indications suivantes: lorsque la
température ambiante descend sous la valeur
minimum, la température de conservation du
compartiment congélateur peut ne pas être
garantie; il est donc conseillé de consommer les
produits que ce dernier contient au plus vite.
• Un produit décongelé ne doit jamais être
recongelé.
• Suivez les indications du fabricant pour la
conservation et/ou congélation des aliments.
• Dans tous les appareils de réfrigération et
congélation il y a des surfaces qui se couvrent de
givre. Suivant le modèle, ce givre peut être
éliminé automatiquement (dégivrage
automatique) ou bien manuellement.
• N’essayez jamais d’enlever le givre avec un objet
métallique, vous risqueriez d’endommager
irréparablement l’évaporateur. N’employez pour
cela que une spatule en plastique.
• De même, ne décollez jamais les bacs à glace
avec un couteau ou tout autre objet tranchant.
• Ne placez ni bouteilles ni boîtes de boissons
gazeuses dans le congélateur/compartiment à
basse température, elles pourraient exploser.
Protection de l’environnement
Cet appareil ne contient pas, dans son circuit de
réfrigérant et ses matières isolantes, de gaz
réfrigérant nocifs à la couche d’ozone. L’appareil
ne doit pas être mis au rebut avec les ordures
urbaines et la ferraille. Il faut éviter d’endommager le circuit de réfrigérant, surtout à l’arrière
de l’appareil, près de l’énchangeur thermique.
Vous pouvez vous renseigner sur les centres de
ramassage auprès de votre bureau municipal.
Les matériaux utilisés dans cet appareil
identifiés par le symbole sont recyclables.
Elimination des vieux appareils
Le symbole sur le produit ou son emballage
indique que ce produit ne peut être traité comme
déchet ménager. Il doit être remis au point de
collecte dédié à cet effet (collecte et recyclage du
matériel électrique et électronique).
En procédant à la mise au rebut de l'appareil dans
les règles de l'art, nous préservons l'environnement
et notre sécurité, s'assurant ainsi que les déchets
seront traités dans des conditions optimum.
Pour obtenir plus de détails sur le recyclage de ce
produit, veuillez prendre contact avec les services
de votre commune ou le magasin où vous avez
effectué l'achat.
RENSEIGNEMENTS POUR L’ÉLIMINATION
DES MATÉRIAUX D’EMBALLAGE
Tous les matériaux et les accessoires utilisés pour
emballer nos grands électroménagers, sauf ceux qui
sont en bois recyclables et peuvent donc se
récupérer.Voici ce que nous vous conseillons:
• Déposez les emballages en papier, en carton et
en carton ondulé aux endroits prévus pour le
ramassage de ce genre de matériau.
• Mettez les piéces en plastique dans les
conteneurs prévus à cet effet. Si ce genre de
conteneurs n’existent pas encore à l’endroit où
vous habitez, vous pouvez éliminer les matériaux
en question en les mettant dans les ordures
ménagères.
Pour les emballages de matières plastiques
recyclables, par example:
Les exemples reportent les symboles suivants:
PE pour polyéthylène** 02 = ^ PE-HD; 04 = ^ PE-LD
PP pour le polypropylène
PS pour le polystyrène
PIÉCES EN MATIÉRE PLASTIQUE
Pour faciliter l’élimination et :ou le recyclage des
matériaux, la plupart des pièces de l’appareil ont
une contremarque qui en facilite l’indentification.
02**
PE
05
PP
06
PS
SAN
PS
ABS
Page 13
13
Nettoyage
L’appareil étant convenablement installé, nous vous
conseillons de le nettoyer soigneusement avec de
l’eau tiède savonneuse, pour enlever l’odeur
caractéristique de «neuf».
N’utilisez pas de produits abrasifs, de
poudre à récurer ni d’éponge métallique.
UTILISATION
SOMMAIRE
Avertissements et conseils importants . . . . . . . . . . . . . . . . . . . . . . . . . . . . . . . . . . . . . . . . . . . . . .11
Renseignements pour l’élimination des matériaux d’emballage . . . . . . . . . . . . . . . . . . . . . . . . . .12
Utilisation - Nettoyage - Panneau de contrôle - . . . . . . . . . . . . . . . . . . . . . . . . . . . . . . . . . . . . . . . .13
Utilisation - Mise en service - Réglage de la température - Réfrigération - Eléments modulables . . .14
Utilisation - Balconnets - Clayette porte bouteille - Recirculation de l’air . . . . . . . . . . . . . . . . . . . . . .15
Conseils - Conseils pour la réfrigeration - Entretien - Nettoyage - Arrêt prolongé - Remplacement . . .
de l’ampoule - Dégivrage . . . . . . . . . . . . . . . . . . . . . . . . . . . . . . . . . . . . . . . . . . . . . . . . . . . . . . . . . . .16
Anomalie de fonctionnement - Informations techniques - Installation - Emplacement - . . . . . . . . .
Arrêts pour clayettes . . . . . . . . . . . . . . . . . . . . . . . . . . . . . . . . . . . . . . . . . . . . . . . . . . . . . . . . . . . . . .17
Installation - Branchement électrique - Installation - Instructions pour l’encastrement . . . . . . . . . . .18
Garantie . . . . . . . . . . . . . . . . . . . . . . . . . . . . . . . . . . . . . . . . . . . . . . . . . . . . . . . . . . . . . . . . . . . . . . . .35
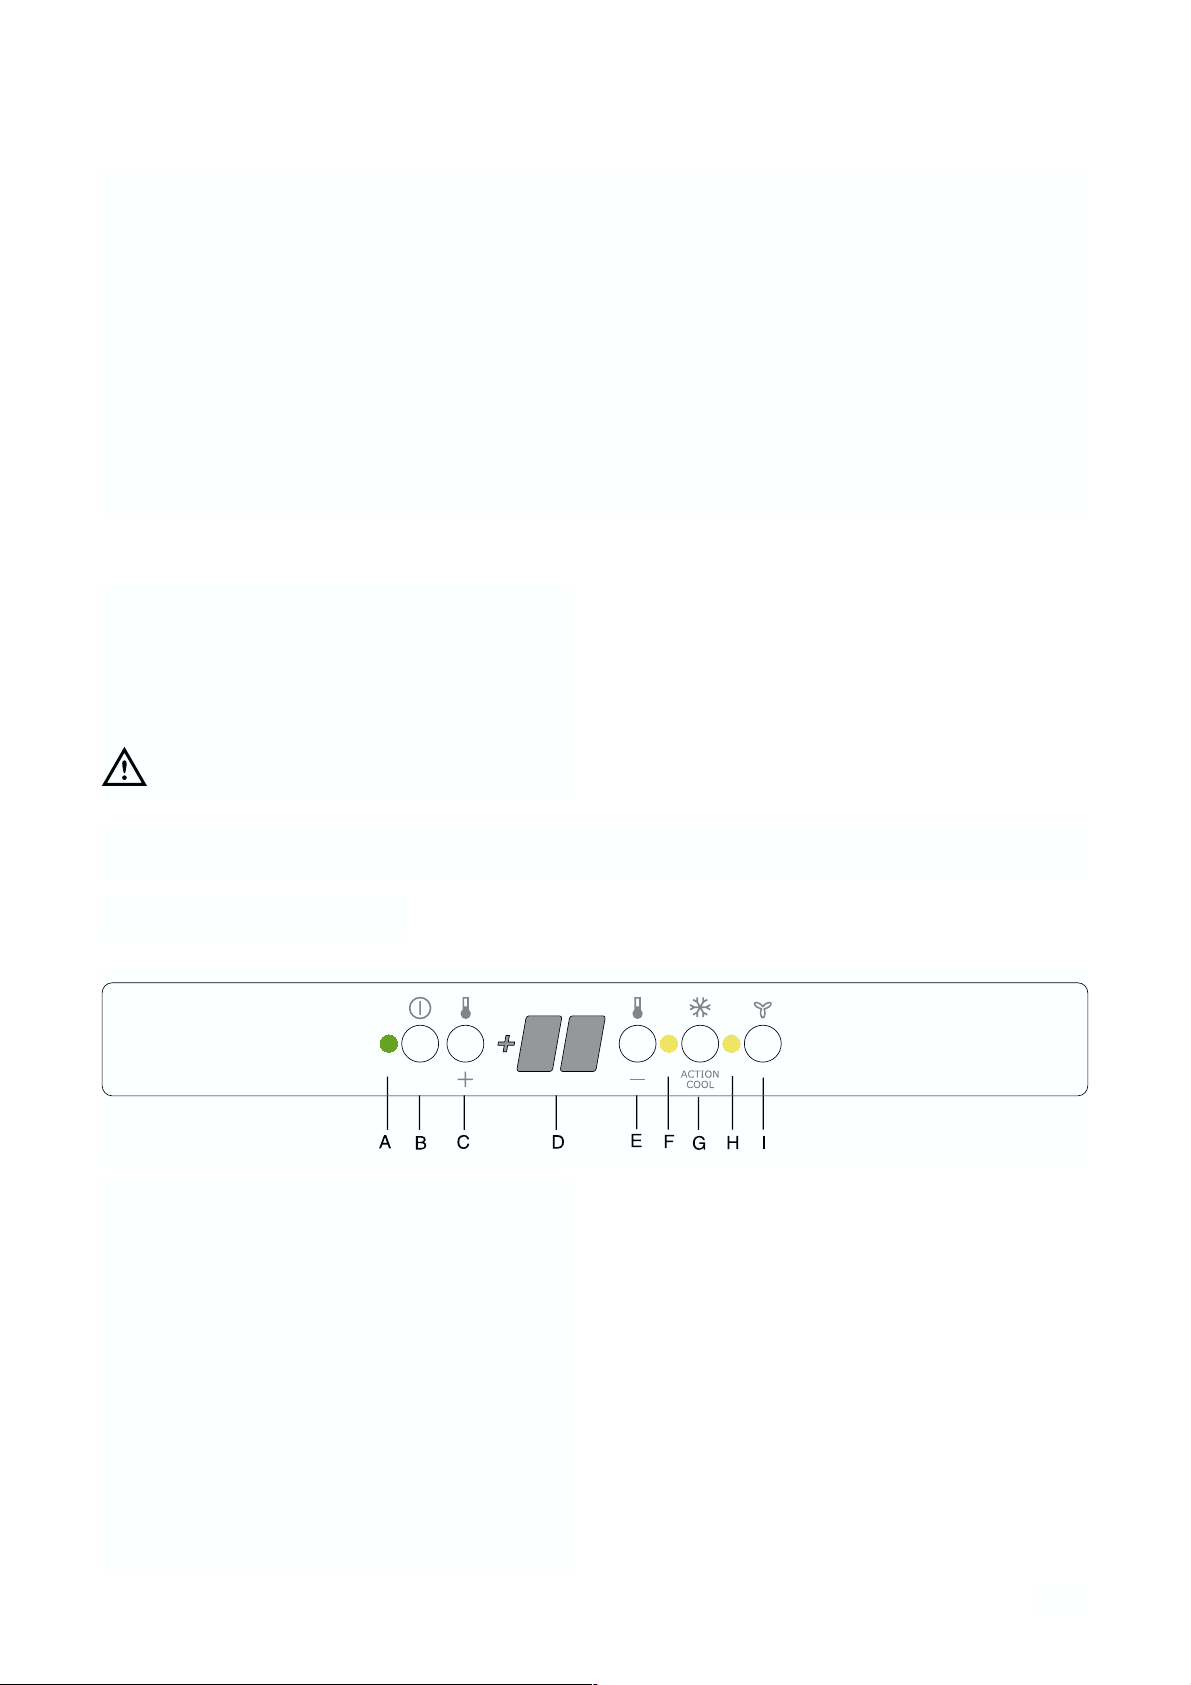
Panneau de contrôle
Utilisation du réfrigérateur
F
A. Témoin ALLUMÉ/ÉTEINT
B. Touche ALLUMÉ/ÉTEINT du réfrigérateur
C. Touche de réglage de la température du
réfrigérateur (augmenter)
D. Indicateur de température du réfrigérateur
E. Touche de réglage de la température du
réfrigérateur (abaisser)
F. Témoin fonction Super cooling
G. Touche fonction Super cooling
H. Témoin fonction DAC
I. Touche fonction DAC
ON/OF
Page 14
14
A.Témoin ALLUMÉ/ÉTEINT
B.Touche ALLUMÉ/ÉTEINT
ALLUMÉ: appuyer sur la touche (B); le
témoin (A) doit s'allumer.
ÉTEINT:
maintenir enfoncée la touche (B)
jusqu'à ce que le témoin (A) et
l'indicateur de température
s'éteignent.
C - E. Touches de réglage de la
température
En appuyant sur la touche (C ou E), la température
programmée clignote sur l'indicateur (B). La
modification du réglage de température est possible
uniquement alors que l'indicateur clignote. Pour
obtenir une température plus élevée, appuyer sur la
touche (C), pour obtenir une température plus basse
appuyer sur la touche (E). L'indicateur affiche
pendant quelques secondes la température
programmée et affiche ensuite à nouveau la
température interne du réfrigérateur.
La température programmé est atteinte dans les 24
heures.
Attention !
Durant la phase de stabilisation après la première
mise en service, il est possible que la température
affichée ne corresponde pas à la température
programmée, la température affichée pouvant en
l'occurrence être inférieure à la température
programmée.
D. Indicateur de température
Durant le fonctionnement normal est affichée la
température moyenne du réfrigérateur.
Attention!
Un écart entre la température affichée et la
température programmée est normal, en particulier
lorsque:
- la température programmée a été modifiée
depuis peu,
- la porte du réfrigérateur est restée ouverte
pendant un certain temps,
- des aliments chauds ont été placés dans le
réfrigérateur.
F.Touche fonctionSuper cooling
G.Témoin fonction Auto Fresh
La fonction Auto Fresh a pour effet de faire
fonctionner le réfrigérateur au maximum de sa
puissance. Il est recommandé d'utiliser cette fonction
lorsque sont introduites dans le réfrigérateur de
grandes quantités d'aliments.
Appuyer sur la touche de la fonction Auto Fresh (G).
Le témoin de la fonction Auto Fresh (F) doit
s'allumer. La température interne est alors abaissée
à +2°C.
Au bout de 6 heures environ, la fonction Auto Fresh
se désactive automatiquement.
Réfrigération
Pour obtenir le meilleur rendement du compartiment
réfrigérateur:
• n’introduisez pas d’aliments encore chauds ou de
liquides en évaporation dans la cuve;
• couvrez les aliments, surtout s’ils sont
aromatiques;
• placez les denrées de façon à ce que l'air puisse
circuler tout autour.
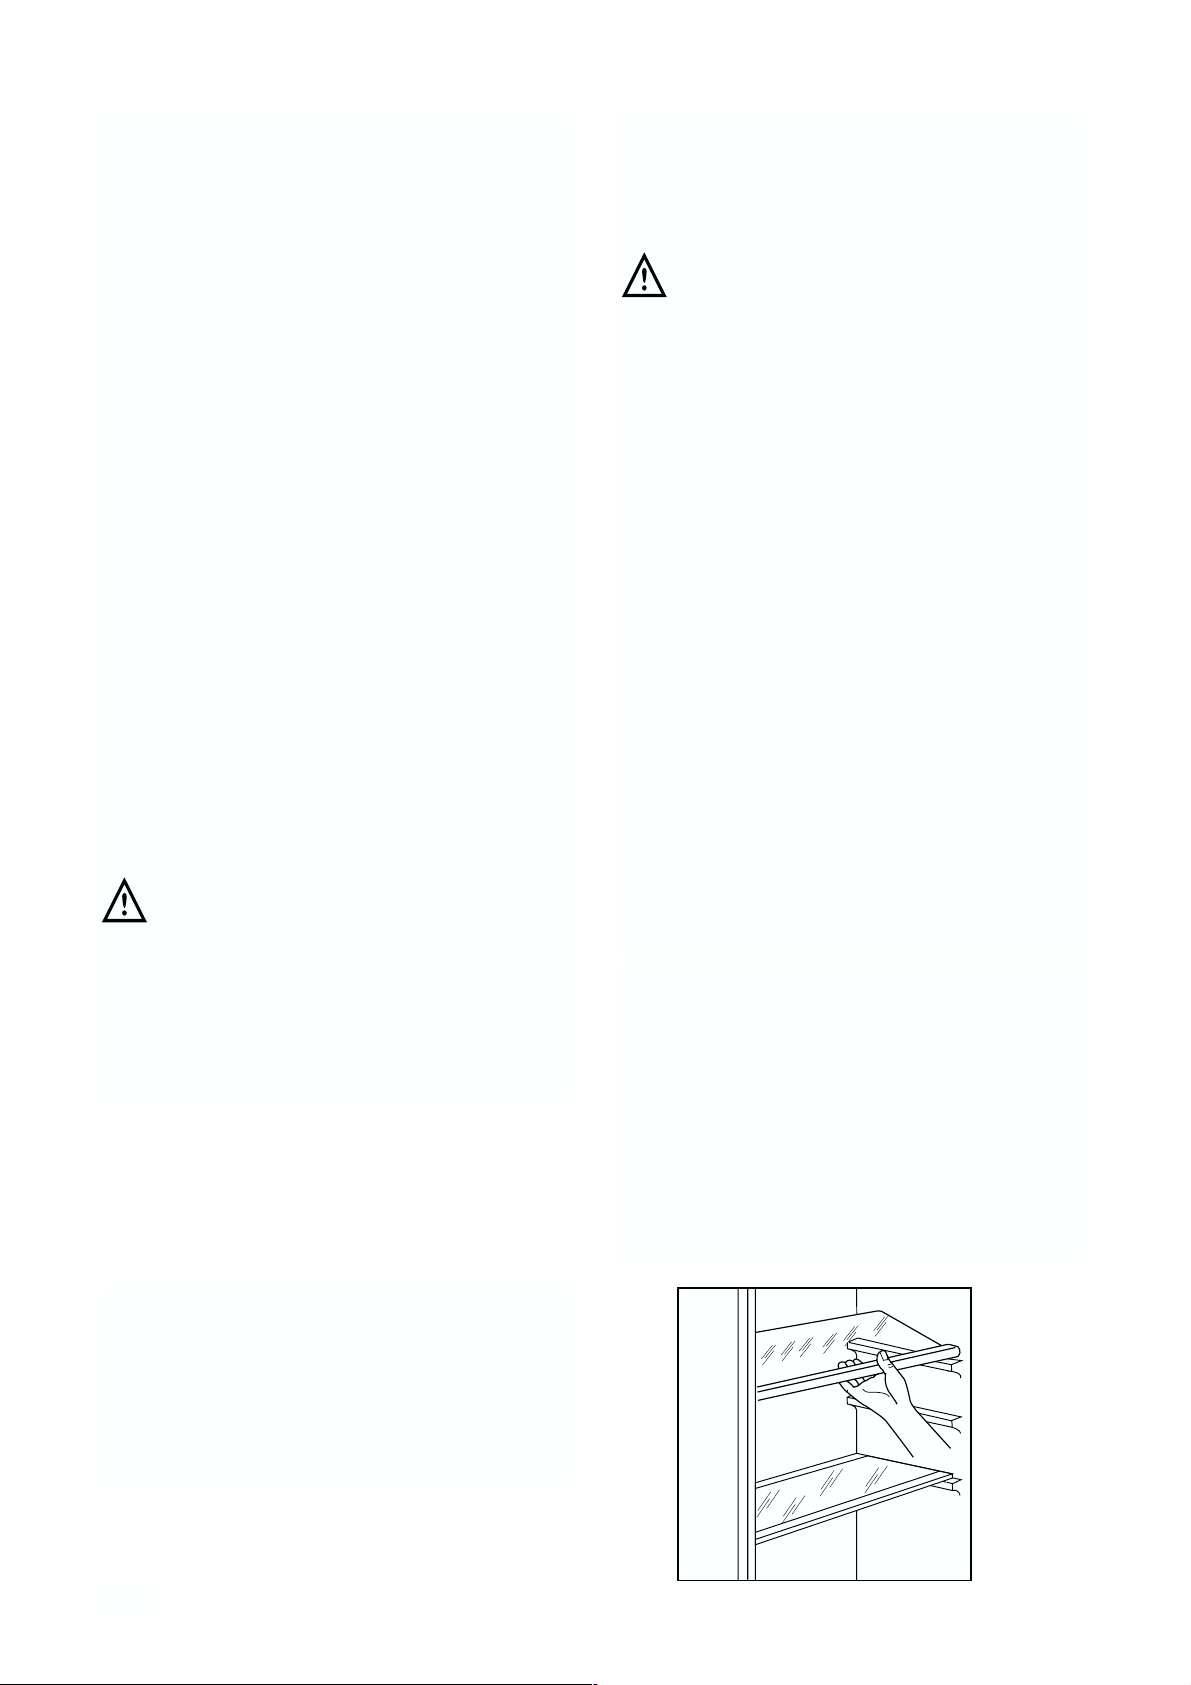
Eléments modulables
Les glissières se trouvant sur les parois de la cuve
vous permettent de positionner les tablettes à différentes hauteurs, selon vos besoins. Pour une
meilleure utilisation de l’espace vous pouvez
superposer les demi-tablettes antérieures aux demitablettes postérieures.
D338
Page 15
15
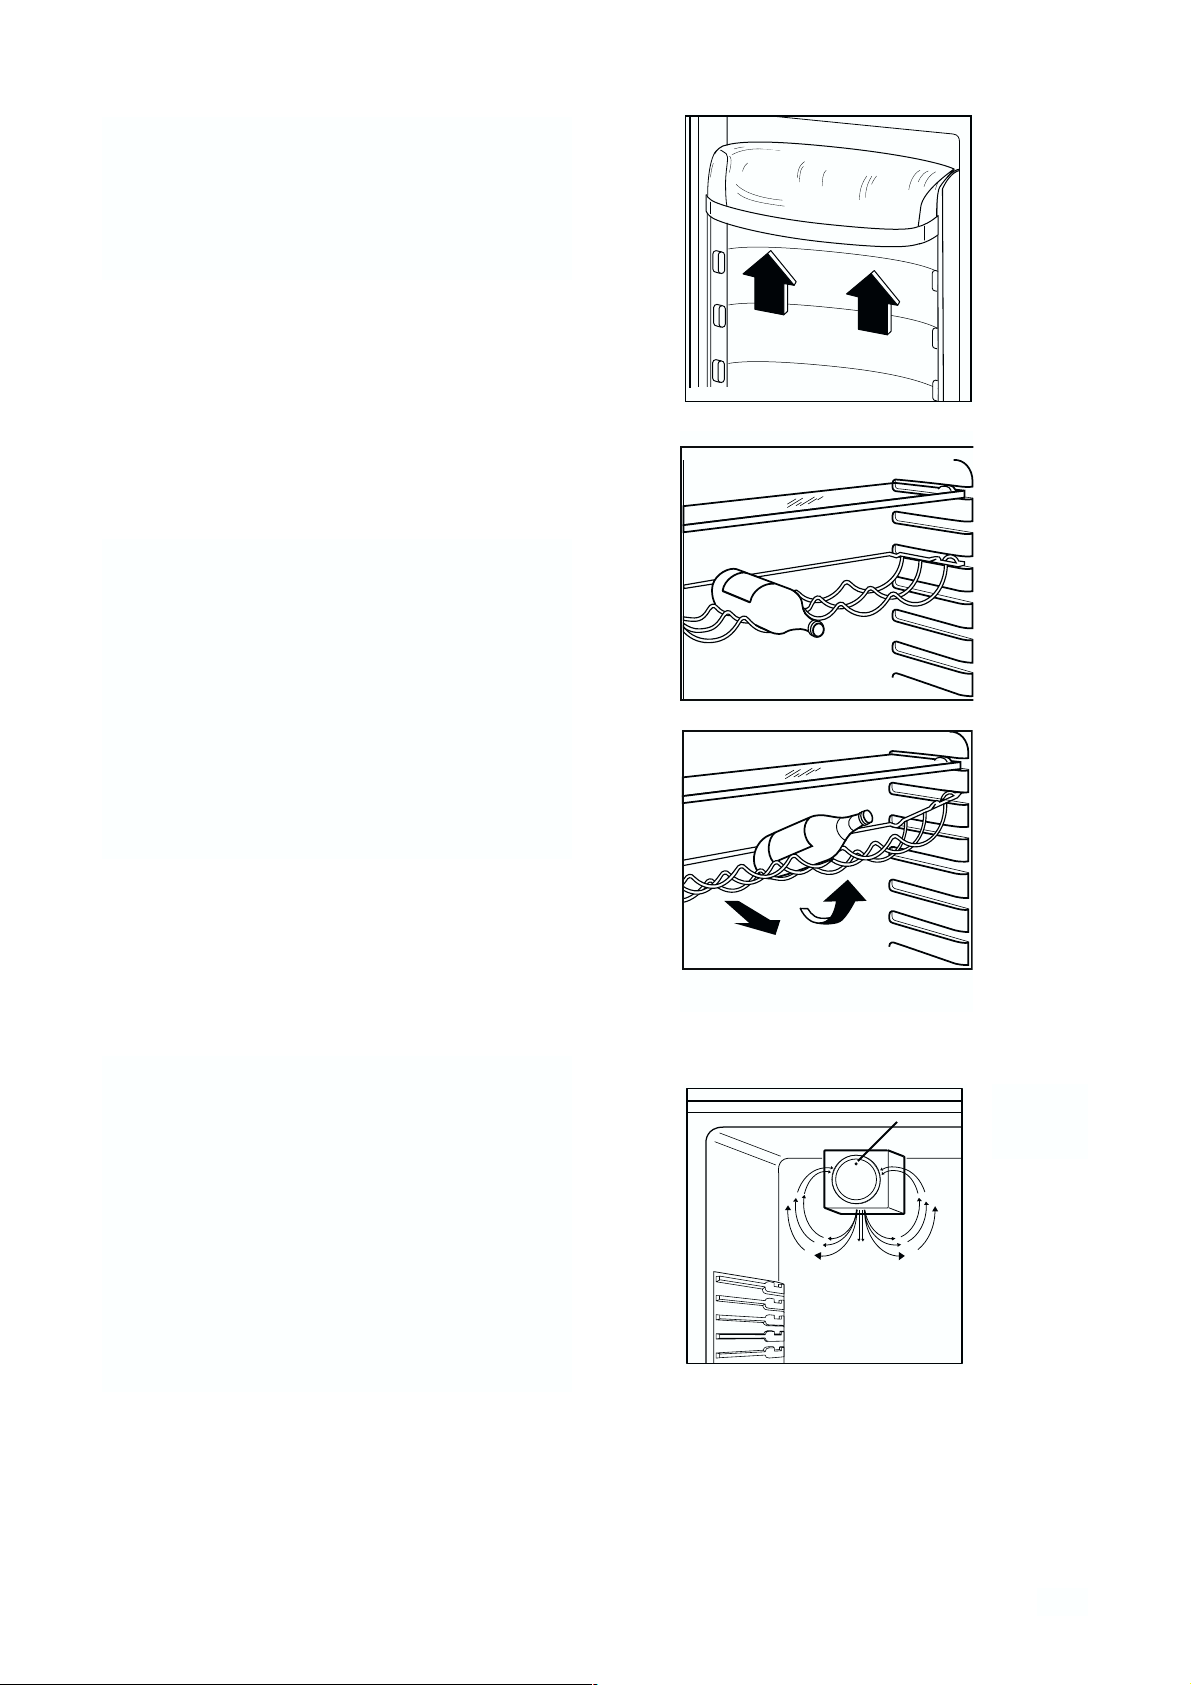
Balconnets
Il est possible de modifier en hauteur des balconnets
sur la contre-porte selon vos besoins et le volume
des denrées à stocker. Pour les enlever, poussez-les
vers le haut.
Clayette porte bouteille
Placez les bouteilles (ouverture vers l’avant) dans
les emplacements prévus de la clayette.
Si la clayette est placée à l’horizontal, ne placez que
des bouteilles non entamées.
Cette clayette porte bouteilles a la possibilité de
s’incliner afin de favoriser le rangement de bouteilles
déjà entamées.
Pour cela, tirez la clayette vers l’avant jusqu’à ce
qu’elle puisse pivoter vers le haut afin de glisser la
clayette dans le support clayette supérieur.
Recirculation de l’air
La cuve du réfrigérateur est dotée d’un ventilateur
spécial D.A.C. (Dynamic Air Cooling) qui s’active en
agissant sur l’interrupteur (I - Panneau de contrôle).
Le voyant vert (voir fig. 1) s’allume pour indiquer que
le ventilateur fonctionne.
Il est recommandé d’utiliser le ventilateur (D.A.C.)
quand la température ambiante dépasse 25°C.
Ce dispositif permet un refroidissement rapide des
aliments et une meilleure uniformité de la
température à l’intérieur de la cuve.
Fig. 1
VOYANT ALLUMEE
Page 16
16
Dégivrage
Le dégivrage du compartiment réfrigérateur
s’effectue automatiquement, à chaque arrêt du
compresseur. L’eau de dégivrage est évacuée dans
un bac situé à l’arrière de l’appareil où elle
s’évapore.
Nous recommandons de nettoyer
périodiquement l’orifice d’écoulement de l’eau
de dégivrage se trouvant dans la partie centrale
de la gouttière du compartiment réfrigérateur
afin d’éviter que l’eau, en débordant, ne coule
sur les denrées stockées dans la cuve. Utilisez à
cet effet le bâtonnet se trouvant dans l’orifice.
Nettoyage intérieur
N'utilisez jamais des objets métalliques pour
nettoyer l'appareil; vous risquez de l'endommager.
A l'occasion d'un dégivrage complet, lavez I'intérieur
avec de l'eau tiède et du bicarbonate, rincez et
séchez soigneusement.
Nettoyage extérieur
Lavez la carrosserie avec de l'eau tiède
savonneuse. Passez de temps en temps un produit
à polir. Dépoussiérez le condenseur situé à l'arrière
de l'appareil à l'aide d'une brosse ou d'un aspirateur.
Une accumulation de poussière risquerait de
diminuer le rendement de l'appareil.
Arrêt prolongé
Lorsque l'appareil doit rester à l'arrêt pendant un
certain temps, prenez les précautions suivantes:
• débranchez la prise de courant;
• videz l'appareil;
• dégivrez-le et nettoyez-le à fond;
• laissez les portes entrouvertes pour faire circuler
de l'air, de façon à éviter les mauvaises odeurs.
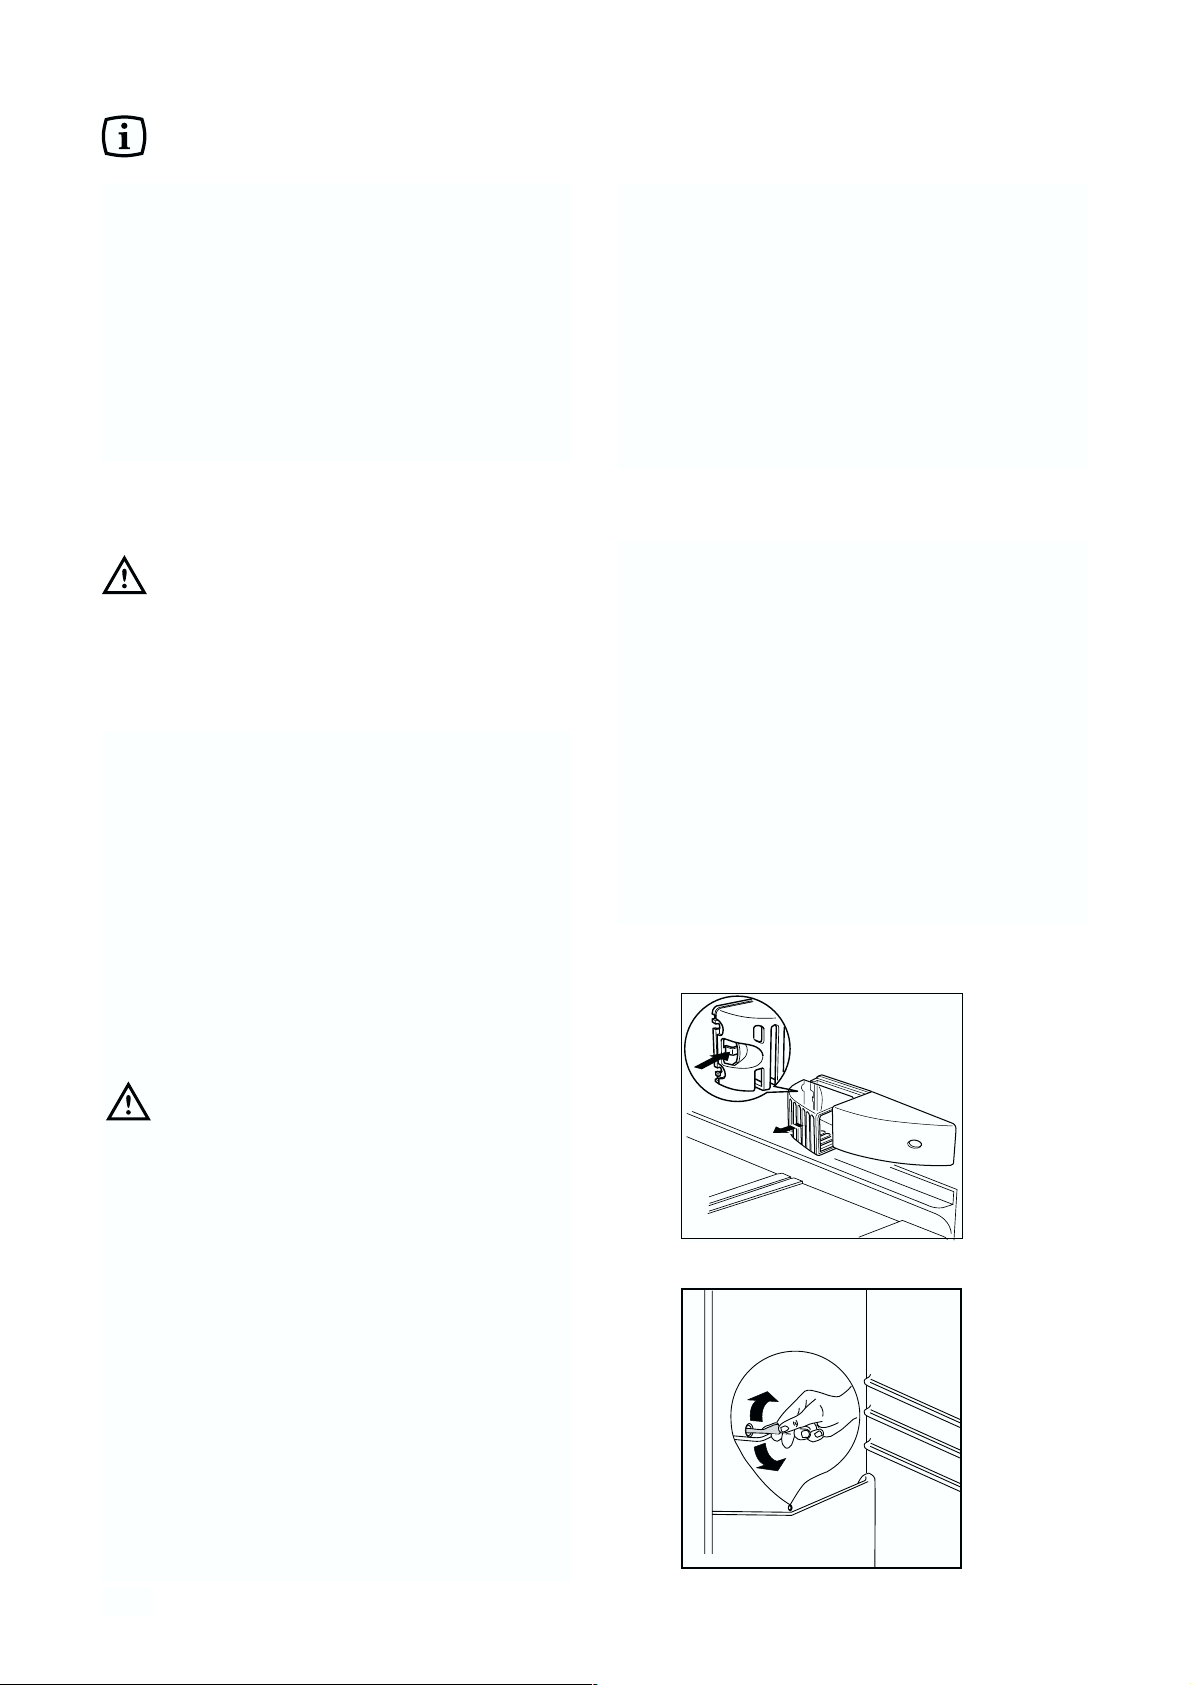
Changement de l’ampoule
Appuyez sur l’enclichetage arrière et en même temps
retirez le couvercle dans le sens de la flèche.
Attention
Remplacez-la par un modèle semblable (La
puissance maximale est indiquée sur le diffuseur).
CONSEILS
Conseils pour la réfrigeration
Où placer les denrées?
Viandes (de toutes sortes): enveloppez-la dans des
sachets en plastique et placez-la sur la tablette en
verre au-dessus du(des) bac(s) à légumes.
La période de conservation est de 1 à 2 jours au
maximum.
Aliments cuits, plats froids, etc.: placez-les, bien
couverts, sur une clayette.
ENTRETIEN
Débranchez l’appareil avant toute
opération.
Attention: Cet appareil contient des hydrocarbures
dans son circuit de réfrigérant; I’entretien et la
recharge ne doivent done être effectués que par du
personnel autorisé.
Fruits et légumes: bac(s) à légumes (une fois
nettoyés).
Beurre et fromage: enveloppez-les soigneusement
dans des feuilles d’aluminium ou de polyéthylène et
mettez-les dans les casiers appropriés.
Lait en bouteille: à placer dans l’un des balconnets
de la contreporte.
Bananes, pommes de terre, oignon et ail ne
doivent pas être placés dans le réfrigérateur,
s’ils ne sont pas conditionnés.
D037
Page 17
17
ANOMALIE DE FONCTIONNEMENT
Si l'appareil marche mal, il faut contrôler
• si la fiche est bien branchée à la prise de courant
et si l'interrupteur est éteint;
• s'il n'y a pas de panne de courant;
• si les commandes sont bien dans la bonne
position;
• s'il y a des traces d'eau au fond du compartiment
et si l'orifice d'écoulement de l'eau de dégivrage
est bouché (voir chapitre “Dégivrage”).
Une fois que tous ces contrôles ont été effectués, si
l'anomalie de fonctionnement continue, adressezvous au Service Après-Vente le plus proche.
Pour que l'intervention soit plus rapide, au
moment de l'appel, il vaut mieux indiquer le code
du modèle et le numéro d'immatriculation, qui se
trouvent sur le certificat de garantie ou sur la
plaque d'immatriculation placée à l'intérieur de
l'appareil, à gauche et en bas.
INSTALLATION
Emplacement
Placez de préférence votre appareil loin d’une
source de chaleur (chauffage, cuisson ou rayons
solaires trop intenses).
Pour l’encastrement rapportez - vous aux
instructions relatives ci-jointes.
Important
L’appareil doit
pouvoir être débranché du secteur; il
est donc nécessaire que la fiche reste accessible
une fois que l’installation est terminée.
INFORMATIONS TECHNIQUES
330
0,397
145
Capacité nette en litres du réfrigérateur
Consommation d’énergie en kWh/24h
Consommation d’énergie en kWh/année
Tous les renseignements techniques sont indiqués sur la plaque signalétique qui se trouve sur le côté gauche
de l’appareil.
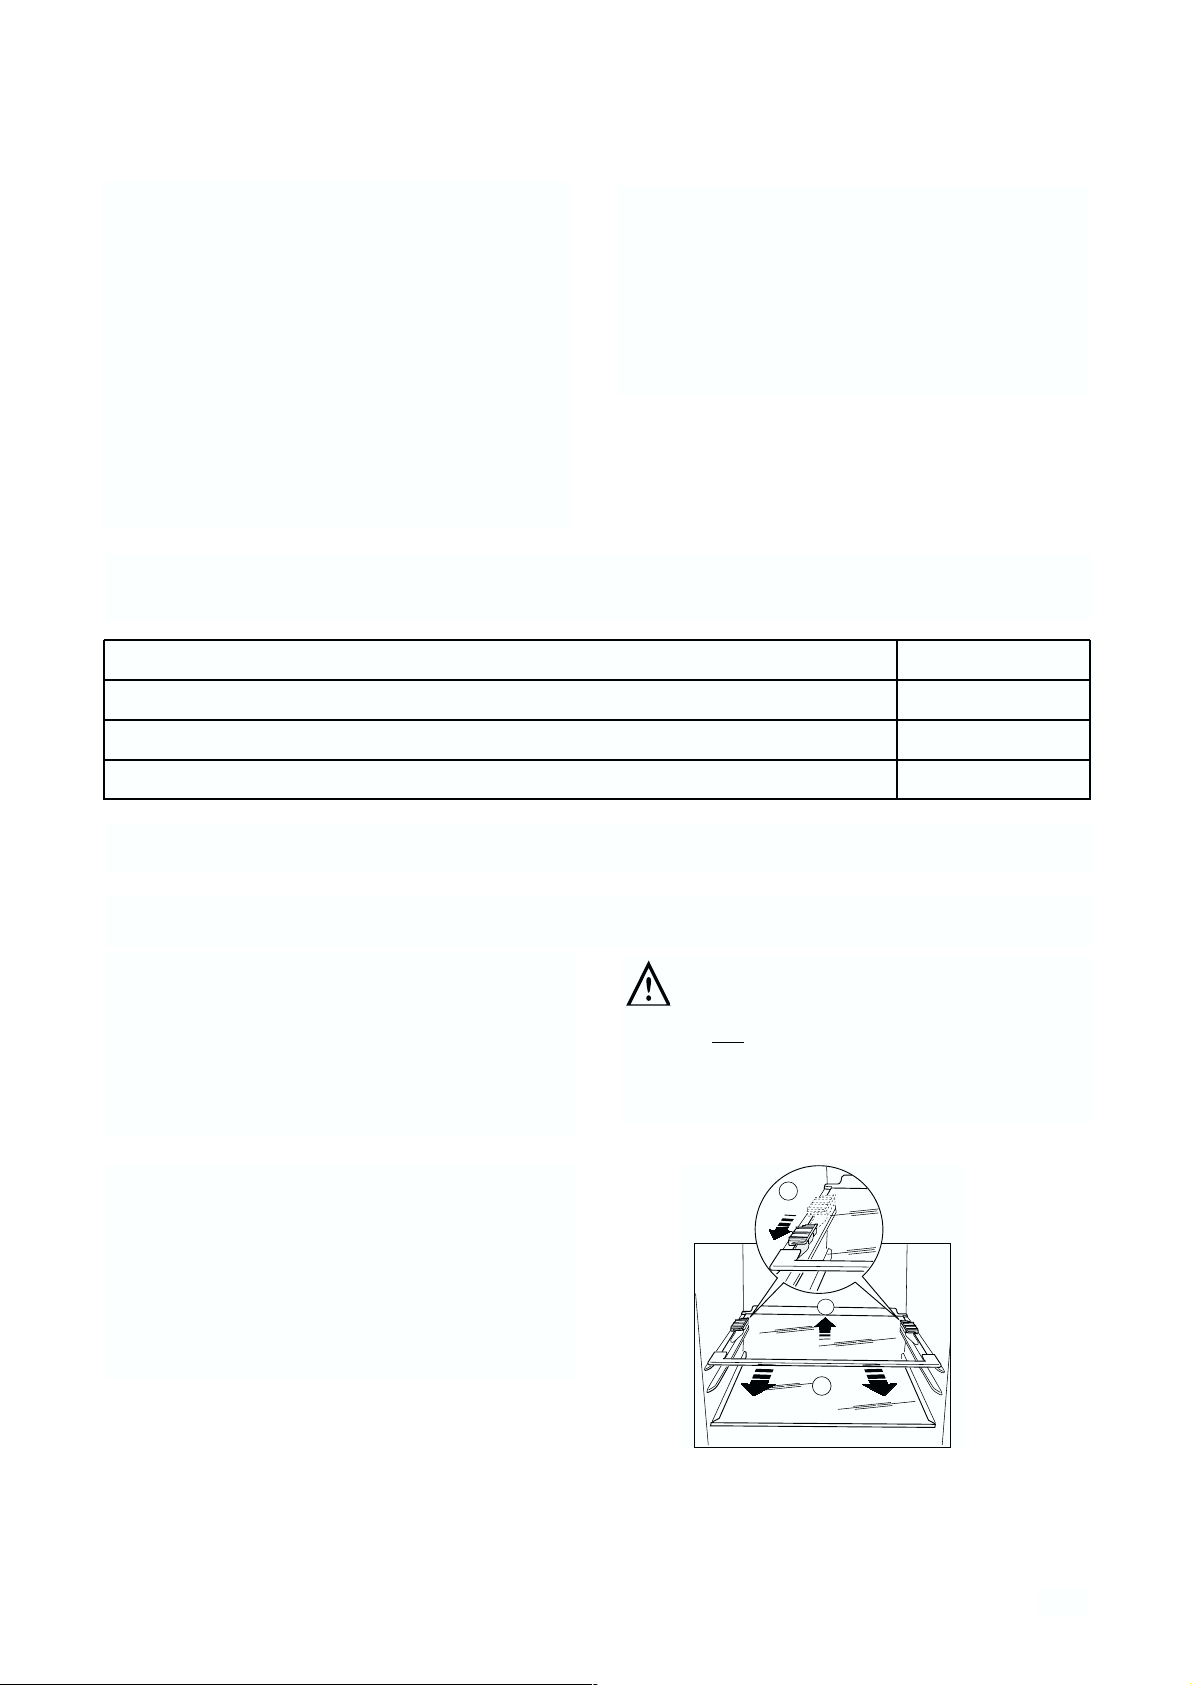
Arrêts pour tablettes
Votre appareil est équipé d’arrêts pour clayettes qui
permettent de les bloquer pendant le transport.
Pour les enlever, procéder de la façon suivante :
déplacez les arrêts dans le sens de la flèche,
soulevez à l’arrière la clayette et poussez-la vers
l’avant jusqu’à elle se dégage. Retirez les arrêts.
A
B
C
Page 18
18
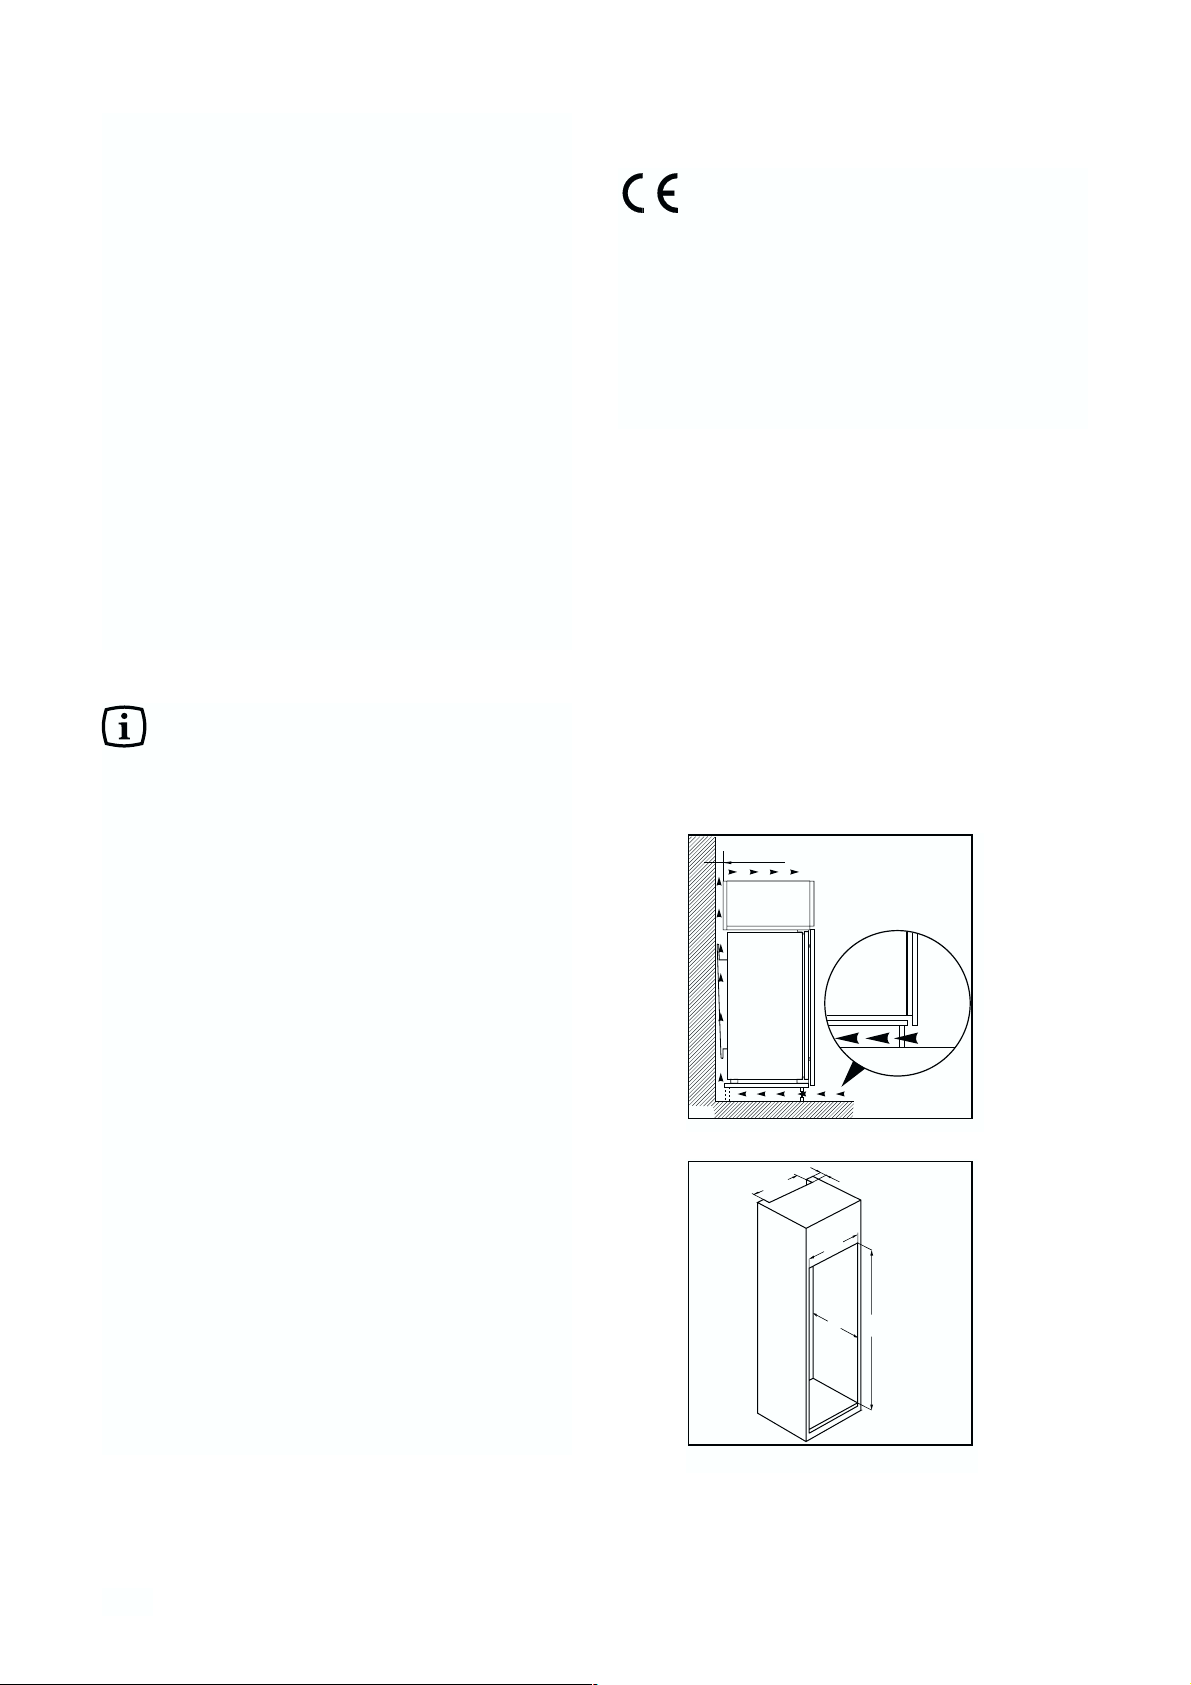
Instructions pour
l’encastrement
Dimensions de la niche
Hauteur (1) 1780 mm
Profondeur (2) 550 mm
Largeur (3) 560 mm
Pour des raisons de sécurité, la ventilation doit être
prévue comme indiqué ci-contre.
Attention: veillez à ne pas obstruer les
ouvertures de ventilation.
Il est également nécessaire que la niche soit
équipée d’un conduit d’aération ayant les mesures
suivantes:
profondeur 50 mm
largeur 540 mm
Branchement électrique
Contrôlez, avant de brancher l’appareil, que le
voltage et la fréquence indiqués sur la plaque
signalétique correspondent à ceux de votre réseau.
Tolérance admise: ±6%.
Pour l’adaptation de l’appareil à des voltages
différents, l’adjonction d’un autotransformateur d’une
puissance adéquate est indispensable.
Il faut absolument brancher l'appareil à une prise
de terre qui marche.
C'est pour cela que la prise du câble d'alimentation
est munie d'un contact prévu exprès. Si la prise de
courant du réseau domestique n'est pas branchée à
la terre, branchez l'appareil à une prise de terre à
part, conformément aux normes en vigueur, en vous
adressant à un technicien spécialisé.
Le fabricant décline toute responsabilité, si cette
norme de prévention des accidents n'est pas
respectée.
Cet appareil est conforme aux Directives
Communautaires suivantes:
- 87/308 CEE du 2.6.87 concernant la
suppression des interférences radio-électriques
- 73/23 CEE 19/02/73 (Basse Tension) et
modifications successives;
- 89/336 CEE 03/05/89 (Compatibilité Electro-
magnétique) et modifications successives.
D567
50 mm
540
min.
200 cm
50
3
2
2
min.
2
200 cm
1
PR01
Page 19
19
AVVERTENZE E CONSIGLI IMPORTANTI
•
Mai riparare l’apparecchiatura da soli. Le
riparazioni effettuate da persone non competenti
possono provocare dei danni. Contattare il
Centro di Assistenza più vicino ed esigere solo
ricambi originali
.
Uso
•
I frigoriferi e/o congelatori domestici sono
destinati unicamente alla conservazione e/o
congelazione degli alimenti.
•
Le migliori prestazioni si hanno con temperature
dell’ambiente comprese tra +18°C e +43°C
(Classe T); + 18°C e +38°C (Classe ST); +16°C
e +32°C (Classe N); +10°C e +32°C (Classe
SN); la classe di appartenenza é riportata sulla
targa matricola ubicata nella cella a fianco del
vano verdura.
Attenzione: al di fuori delle temperature
ambiente indicate dalla classe climatica di
appartenenza di questo prodotto, si devono
osservare le seguenti indicazioni: quando la
temperatura ambiente scende al di sotto del
valore minimo può non essere garantita la
temperatura di conservazione nel vano
congelatore; pertanto si consiglia di consumare
al più presto gli alimenti in esso contenuti .
•
In tutte le apparecchiature ci sono delle superfici
che si coprono di brina. A seconda del modello,
tale brina può essere eliminata automaticamente
(sbrinamento automatico) oppure manualmente.
Non tentare mai di togliere la brina con un
oggetto appuntito, si rischierebbe di danneggiare
irrimediabilmente l’evaporatore. Utilizzare a tale
scopo una paletta in plastica.
•
Non mettere mai nello scompartimento a bassa
temperatura (congelatore o conservatore) bibite
gassate: possono esplodere.
•
Non introdurre mai liquidi o alimenti caldi e non
riempire fino all’orlo i recipienti muniti di
coperchio.
•
Non usare alcun dispositivo meccanico o altro
mezzo artificiale per accelerare il processo di
sbrinamento tranne quelli qui raccomandati.
•
Non usare mai oggetti metallici per pulire
l’apparecchiatura; essa potrebbe venir
danneggiata.
È molto importante che questo libretto istruzioni sia conservato assieme all’apparecchiatura per
qualsiasi futura consultazione. Se l’apparecchiatura dovesse essere venduta o trasferita ad un’altra
persona, assicurarsi che il libretto venga fornito assieme, in modo che il nuovo utente possa essere
messo al corrente del funzionamento della macchina e delle avvertenze relative.
Queste avvertenze sono state redatte per la Vostra sicurezza e per quella degli altri. Vi preghiamo,
dunque, di volerle leggere attentamente prima d’installare e di utilizzare l’apparecchiatura.
Sicurezza generale
•
Qualora questa apparecchiatura, munita di
chiusura magnetica, venisse usata in
sostituzione di una con chiusura a scatto,
consigliamo di rendere quest’ultima inservibile.
Cio’ eviterà che i bambini, giocando, vi
rimangano intrappolati, con grave pericolo per la
loro vita.
•
Togliere la spina dalla presa di corrente prima di
procedere a qualsiasi operazione di pulizia e
manutenzione (come nel caso di sostituzione
della lampadina, sulle apparecchiature che ne
sono provviste).
•
Quest’apparecchiatura è stata progettata per
essere utilizzata da persone adulte. Fare
attenzione, quindi, che i bambini non si avvicinino
con l’intento di giocarvi.
•
È pericoloso modificare o tentare di modificare
le caratteristiche di quest’ apparecchiatura.
•
Questa apparecchiatura contiene idrocarburi nel
circuito refrigerante; pertanto la manutenzione e
la ricarica deve essere effettuata esclusivamente
da personale autorizzato dall’azienda.
•
Prestare la massima cura nella
movimentazione per non dannegiare parti del
circuito refrigerante onde evitare possibili
fuoriuscite di fluido.
•
L’apparecchiatura non deve essere collocata
nelle vicinanze di termosifoni o cucine a gas.
•
Evitate ogni esposizione prolungata
dell’apparecchiatura ai raggi solari.
•
La parte posteriore dell’apparecchiatura deve
ricevere una sufficiente circolazione d’aria e
deve essere evitato qualsiasi danno al
circuito refrigerante.
•
Solo per i congelatori (esclusi incassati): una
collocazione ottimale è la cantina.
•
Non introdurre apparecchi elettrici all’interno
dell’apparecchiatura (ad es. gelatiera)
Assistenza / Riparazioni
•
Ogni eventuale modifica che si rendesse
necessaria all’impianto elettrico domestico, per
poter installare l’apparecchiatura, dovrà essere
eseguita solo da personale abilitato.
Page 20
20
Protezione dell’ambiente
Questa apparecchiatura non contiene, nel
circuito refrigerante e nell’isolamento, gas
refrigeranti nocivi per l’ozono. L’apparecchiatura
non deve essere smaltita con rifiuti urbani e
rottami. Deve essere evitato il danneggiamento
del circuito refrigerante, soprattutto nella parte
posteriore vicino allo scambiatore. Informazioni
sui centri di raccolta vengono forniti dall’autorità
comunale. I materiali usati in questa
apparecchiatura contrassegnati dal simbolo
sono riciclabili.
Smaltimento di apparecchi vecchi
Il simbolo sul prodotto o sulla confezione
indica che il prodotto non deve essere considerato
come un normale rifiuto domestico, ma deve essere
portato nel punto di raccolta appropriato per il
riciclaggio di apparecchiature elettriche ed
elettroniche.
Provvedendo a smaltire questo prodotto in modo
appropriato, si contribuisce a evitare potenziali
conseguenze negative per l'ambiente e per la salute,
che potrebbero derivare da uno smaltimento
inadeguato del prodotto. Per informazioni più
dettagliate sul riciclaggio di questo prodotto,
contattare l'ufficio comunale, il servizio locale di
smaltimento rifiuti o il negozio in cui è stato
acquistato il prodotto.
Installazione
•
Durante il normale funzionamento il
condensatore ed il compressore, che sono posti
sul retro dell’apparecchiatura, si riscaldano
sensibilmente. Assicurarsi quindi che
l’installazione venga eseguita come da istruzioni
riportate sul libretto. Un’aerazione insufficiente
comporterà sicuramente un cattivo
funzionamento e dei danni all’apparecchiatura.
•
Assicurarsi, dopo aver installato
l’apparecchiatura, che essa non appoggi sul cavo
di alimentazione.
Importante: se il cavo di alimentazione si
danneggiasse, dovrà essere sostituito da uno
speciale cavo o assieme disponibili presso il
costruttore o il servizio di assistenza tecnica.
•
Se l’apparecchiatura viene trasportata in
posizione orizzontale è possibile che l’olio
contenuto nel compressore defluisca nel circuito
refrigerante. Lasciare l’apparecchiatura in
posizione verticale almeno 2 ore prima di
metterla in funzione per dar modo all’olio di
refluire nel compressore.
•
L’apparecchiatura non deve essere collocata
nelle vicinanze di termosifoni o cucine a gas.
•
Evitate ogni esposizione prolungata
dell’apparecchiatura ai raggi solari.
•
La parte posteriore dell’apparecchiatura deve
ricevere una sufficiente circolazione d’aria e deve
essere evitato qualsiasi danno al circuito
refrigerante.
INDICE
Avvertenze e consigli importanti . . . . . . . . . . . . . . . . . . . . . . . . . . . . . . . . . . . . . . . . . . . . . . . . . . . . .19
Uso / Pulizia - Pannello di controllo - Funzionamento . . . . . . . . . . . . . . . . . . . . . . . . . . . . . . . . . . . . . . .21
Uso / Refrigerazione dei cibi e delle bevande - Ripiani mobili - Posizionamento delle mensole . . . . . . .22
Uso / Portabottiglie - Ricircolo dell’aria - Consigli / Consigli per la refrigerazione . . . . . . . . . . . . . . . . .23
Manutenzione / Pulizia periodica - Periodi di inattività - Lampada di illuminazione - Sbrinamento . . . . .24
Se qualcosa non va - Dati tecnici - Installazione / Posizionamento - Fermi-Ripiani - . . . . . . . . . . . . .25
Installazione / Collegamento elettrico - Istruzioni per l’incasso integrale . . . . . . . . . . . . . . . . . . . . . . . .26
Garanzia . . . . . . . . . . . . . . . . . . . . . . . . . . . . . . . . . . . . . . . . . . . . . . . . . . . . . . . . . . . . . . . . . . . . . . . . . .35
Page 21
21
Pulizia delle parti interne
Prima dell’uso e del collegamento elettrico pulire
tutte le parti interne con acqua tiepida e sapone
neutro allo scopo di togliere il caratteristico odore di
nuovo indi asciugare accuratamente.
USO
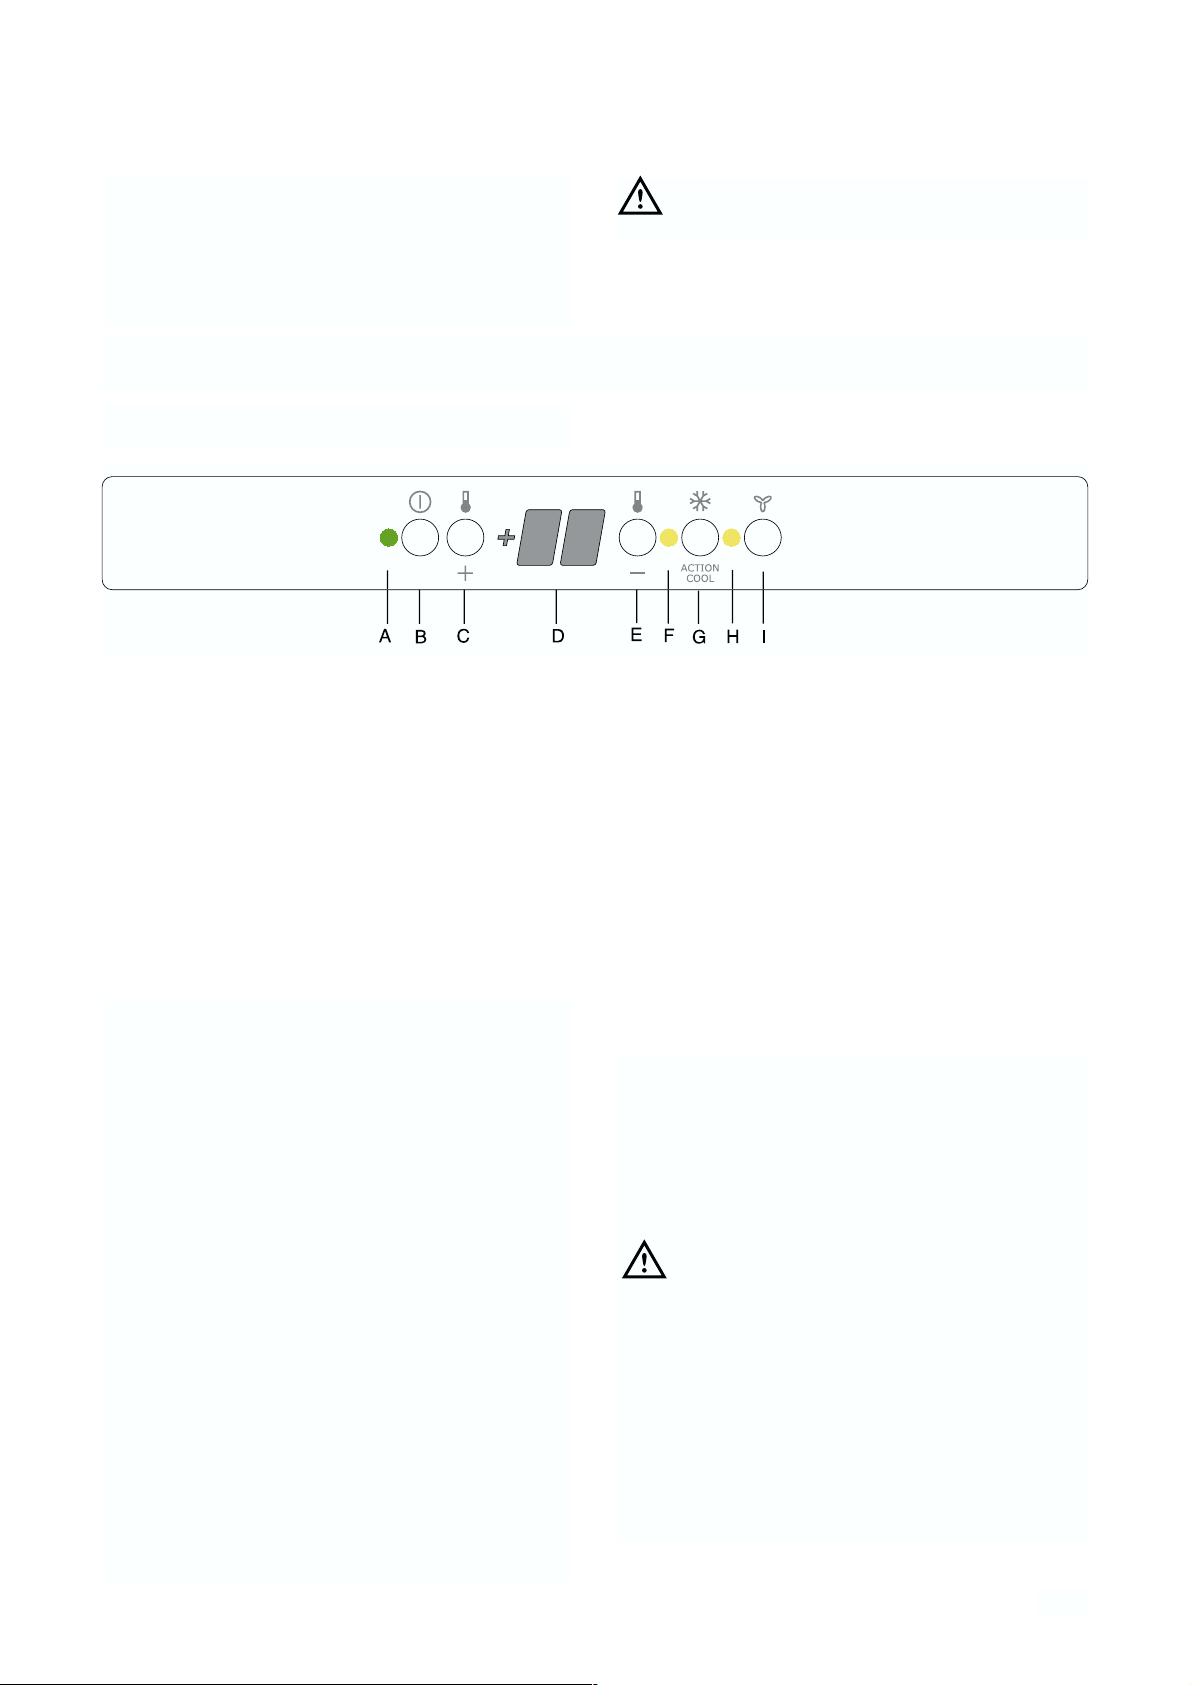
Pannello di controllo
Uso del frigorifero
A. Luce spia di funzionamento verde
B Tasto ACCESO/SPENTO
C Tasto per la regolazione della temperatura
(piú calda)
D Indicatore della temperatura
E Tasto per la regolazione della temperatura
(piú fredda)
F Indicatore Super cooling
G Tasto Super cooling
H Indicatore DAC
I Tasto DAC
F
A. Luce spia di funzionamento
ACCESO/SPENTO
B.Tasto ACCESO/SPENTO
ACCESO: Premere il tasto (B). La luce spia di
funzionamento (A) si illumina.
SPENTO: Tenere premuto il tasto (B) fino a che
la luce spia di funzionamento (A) e
l’indicatore di temperatura si
spengono. (approx. 3 secondi).
C - E.Tasti per la regolazione della
temperatura
La regolazione della temperatura avviene con i tasti C ed
E.
I tasti sono collegati con l’indicatore della temperatura.
Premendo uno dei tasti C o E l’indicatore della
temperatura viene impostatato dalla temperatura reale
(indicatore della temperatura acceso) alla temperatura
nominale (indicatore della temperatura lampeggia).
Premendo nuovamente su uno dei due tasti viene
nuovamente impostata la temperatura nominale. La
temperatura nominale deve essere raggiunta entro 24
ore.
Se non viene premuto nessun tasto, dopo poco
tempo (circa 5 sec.) ritorna automaticamente sulla
temperatura reale.
Attenzione!
Durante il periodo di stabilizzazione nella prima messa
in funzione la temperatura visualizzata può non
corrispondere alla temperatura impostata. Durante
questo periodo é possibile che la temperatura
visualizzata sia inferiore alla temperatura impostata.
D. Indicatore della temperatura
Durante il normale funzionamento l’indicatore
visualizza la temperatura all’interno del frigorifero.
Non usare detersivi nè polveri abrasive
che sono dannose alle finiture.
A. Luce spia di funzionamento verde
B Tasto ACCESO/SPENTO
C Tasto per la regolazione della temperatura
(piú calda)
D Indicatore della temperatura
E Tasto per la regolazione della temperatura
(piú fredda)
F Indicatore Super cooling
G Tasto Super cooling
H Indicatore DAC
I Tasto DAC
ON/OF
Page 22
22
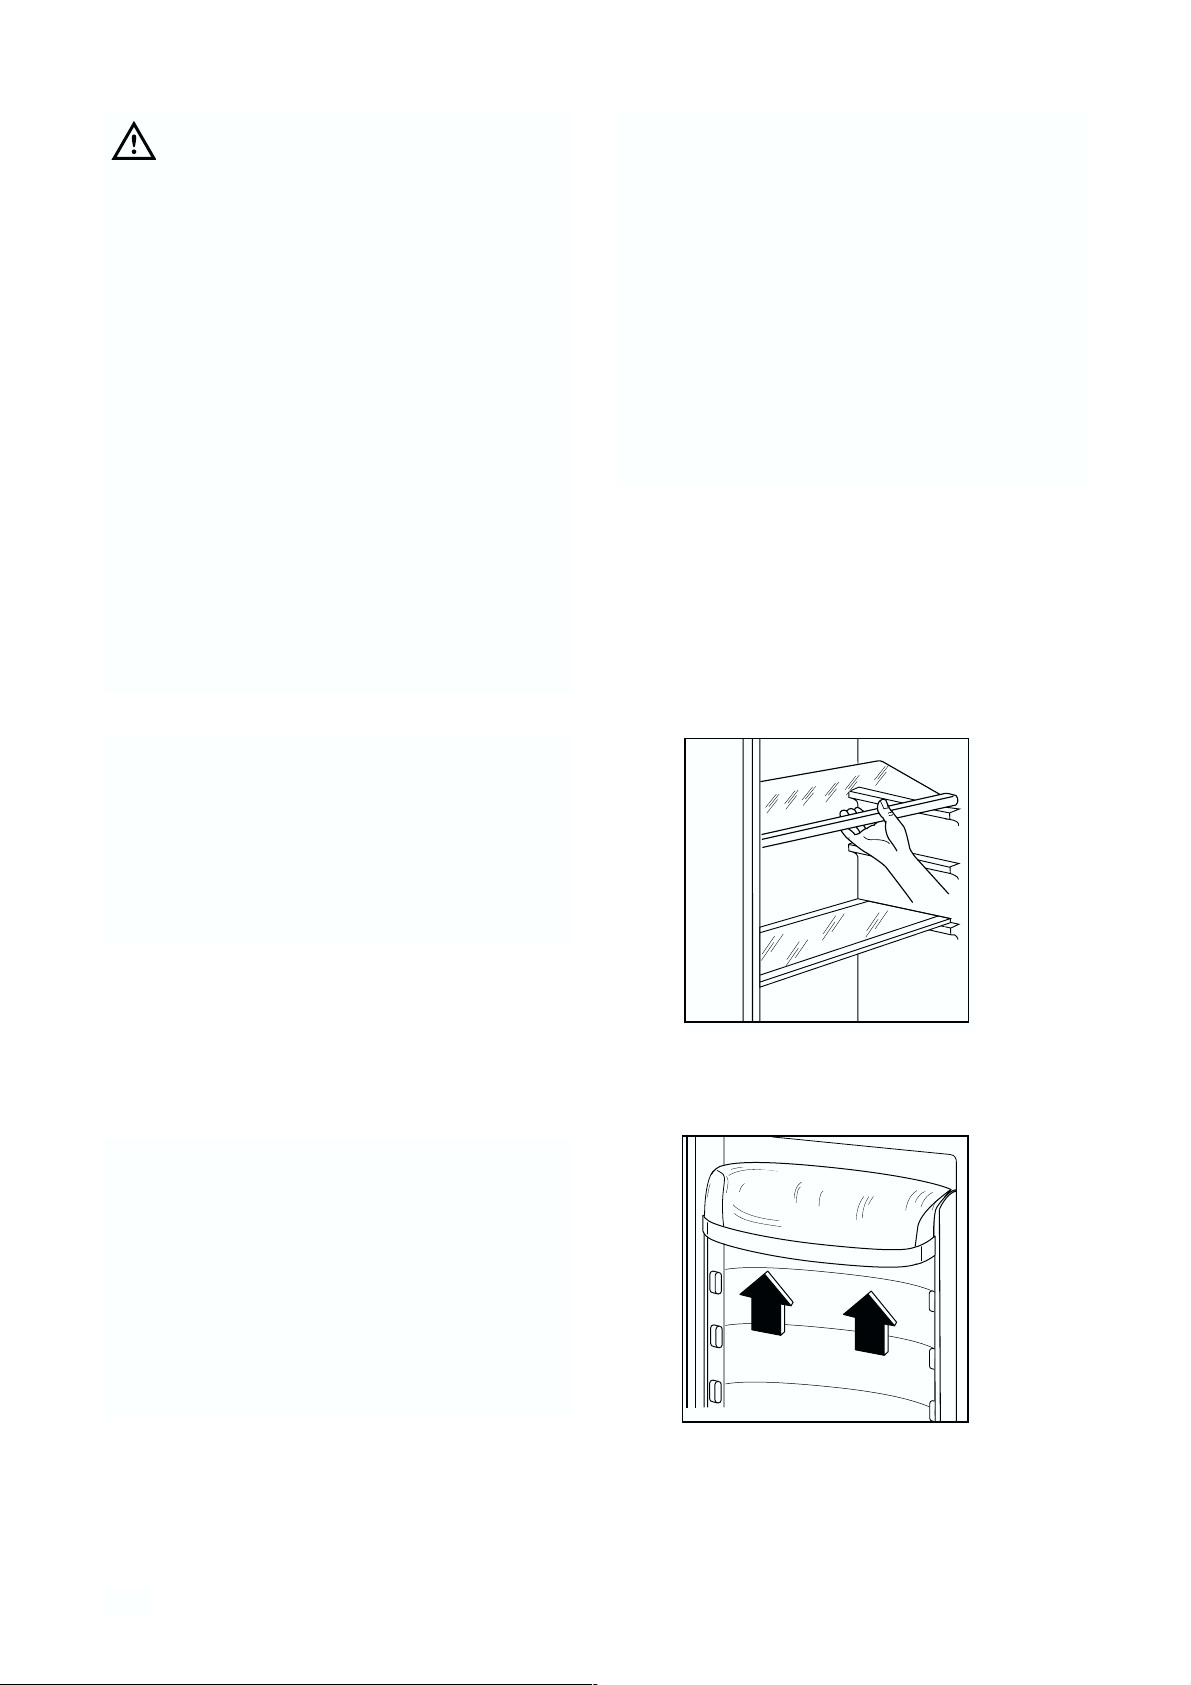
Posizionamento delle mensole
Per permettere lo stoccaggio d’alimenti di diverse
dimensioni, si possono posizionare le mensole ad
altezze differenti.
Operare come segue:
Spingere la mensola nel senso della freccia fino a
quando non si libera e posizionarla all’altezza
desiderata.
Ripiani mobili
Sulle pareti della cella sono ricavate delle guide che
consentono il posizionamento dei ripiani a diverse
altezze, secondo la necessità.
Per un migliore utilizzo dello spazio, i semiripiani
anteriori possono sovrapporsi a quelli posteriori.
Refrigerazione dei cibi e delle bevande
Per utilizzare nel modo migliore lo scomparto
refrigerante è necessario:
• non introdurre nella cella vivande calde o liquidi
in evaporazione;
• coprire o avvolgere gli alimenti, specie se
contengono aromi;
• disporre gli alimenti in modo che l’aria possa
circolare liberamente attorno ad essi.
Attenzione!
Una differenza tra la temperatura visualizzata e la
temperatura impostata e’ normale . Specialmente
quando :
- una nuova impostazione e’ stata selezionata da
poco
- la porta e’ stata lasciata aperta per lungo tempo
- del cibo caldo e’ stato inseritp nel compartimento
F. Luce spia Super cooling
G.Tasto Super cooling
Le massime prestazioni sono ottenute selezionando
la funzione supercooling. Tale funzione e’
raccomandata quando si inseriscono grandi
quantita; di alimenti.
Premere il tasto supercooling button (G). La luce
spia corrispondente (F) si accende.
Dopo circa 6 ore la funzione supercooling si
spegnera’ automaticamente.
D338
Page 23
23
Portabottiglie
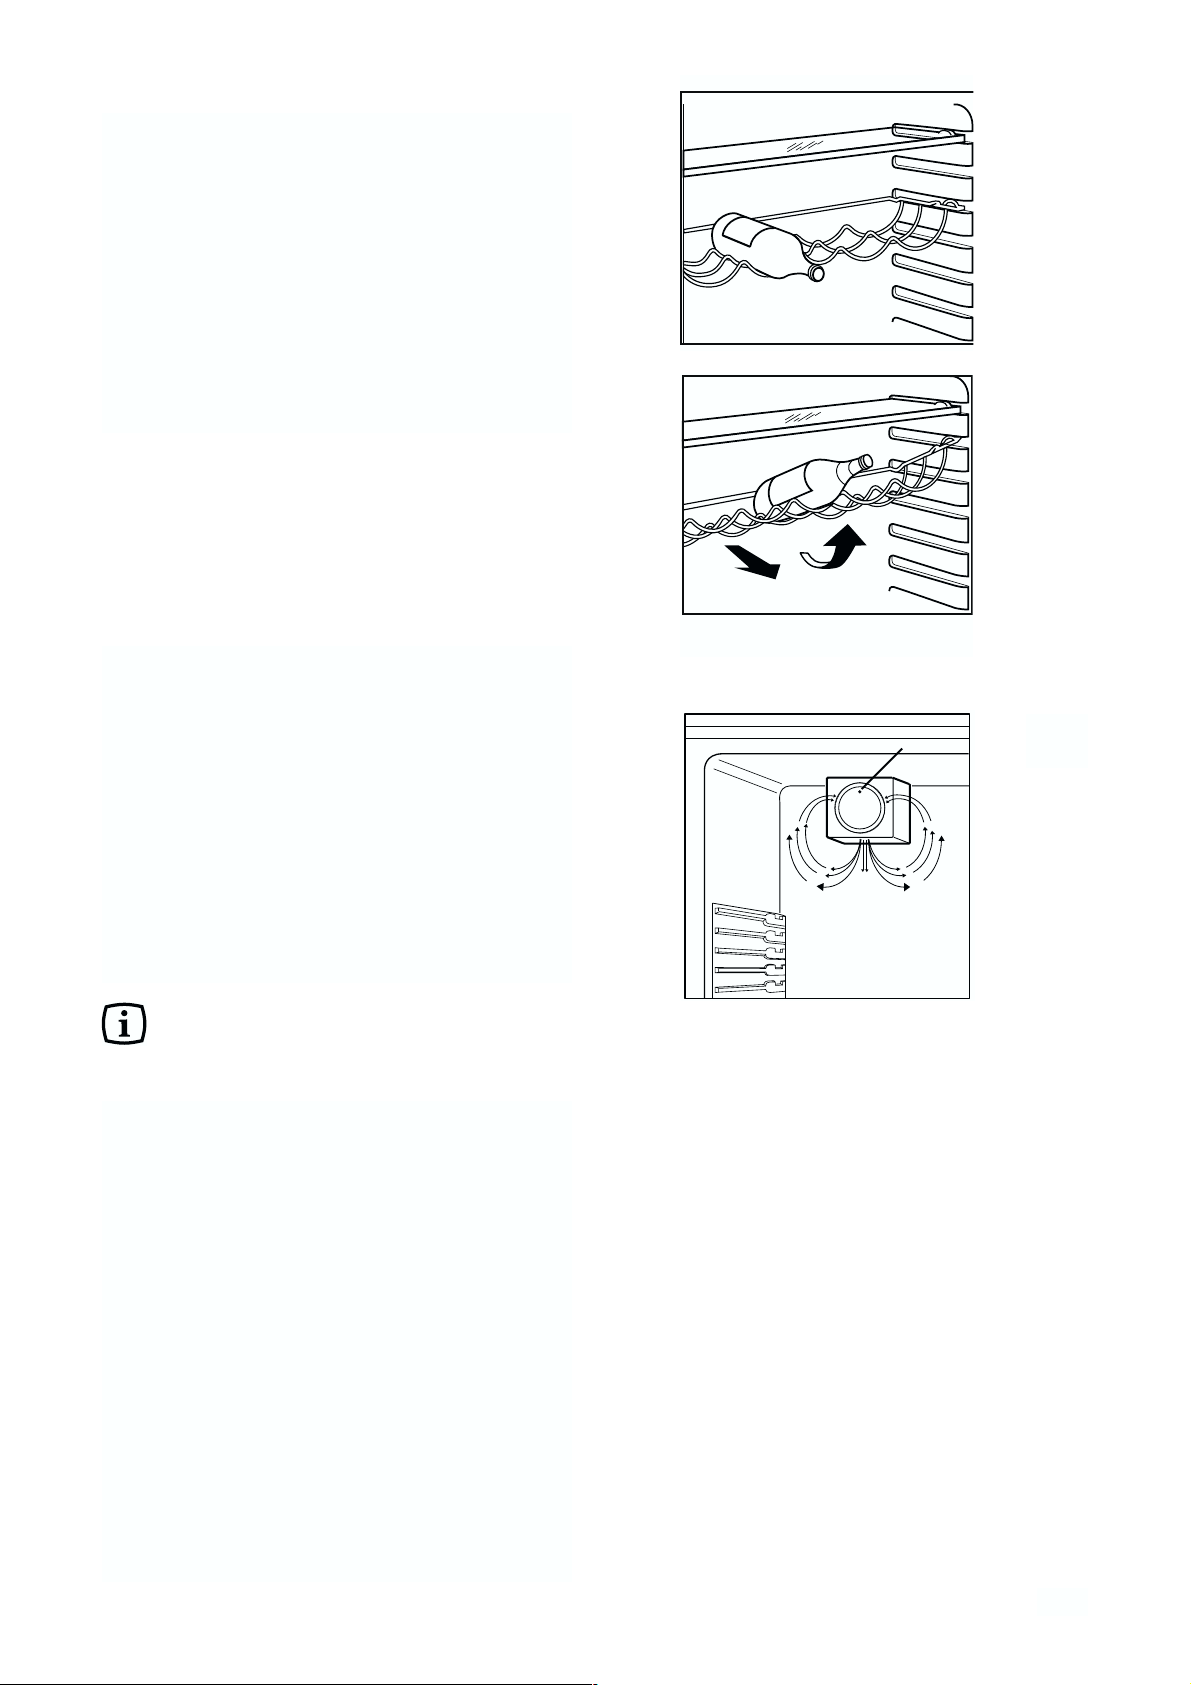
Mettere le bottiglie (con l’apertura verso il davanti )
nel ripiano preposto.
Se il ripiano é situato orizzontalmente mettere solo
bottiglie chiuse.
Questo ripiano portabottiglie ha la possibilità di
essere inclinato al fine di favorire lo stoccaggio di
bottiglie già aperte.
Per ottenere questo risultato tirare il ripiano verso
l’alto in modo che possa girarsi verso l’alto ed
essere posizionato sul ripiano superiore.
Ricircolo dell’aria
Il vano frigorifero é dotato di una speciale ventola
D.A.C. (Dynamic Air Cooling) che viene attivata
agendo sull’interruttore (vedi I -Pannello di
controllo), la spia verde (fig. 1) accesa significa che
la ventola é in funzione.
Si consiglia l’uso della ventola (D.A.C.) quando la
temperatura ambiente supera i 25° C.
Questo dispositivo consente un raffreddamento
veloce dei cibi e una migliore uniformità della
temperatura all’interno del vano.
Fig. 1
CONSIGLI
Consigli per la refrigerazione
Carne (di tutti i tipi): va avvolta in sacchetti di
plastica e posta sul vetro sopra il cassetto verdura.
In questa posizione si potrà conservare per uno
o due giorni al massimo.
Cibi cotti piatti freddi, ecc. devono essere ben
coperti e possono essere disposti su qualsiasi
griglia.
Frutta e verdura: saranno messe, previa pulitura,
nel/ nei cassetto/i previsto/i a tale scopo.
Burro e formaggio devono essere conservati negli
appositi contenitori o avvolti in fogli di plastica o
alluminio per evitare il contatto con l’aria.
Latte in bottiglia: ben chiuse poste nel
portabottiglie.
Banane, patate, cipolla ed aglio, se non sono
confezionati, non vanno messi in frigorifero.
SPIA LUMINOSA
Page 24
24
Sbrinamento
Sull’evaporatore dello scomparto refrigerante la
brina viene eliminata automaticamente ad ogni
arresto del compressore. L’acqua derivante dallo
sbrinamento, tramite un apposito convogliatore,
viene raccolta in una bacinella, posta nella parte
posteriore sopra il compressore, dove evapora.
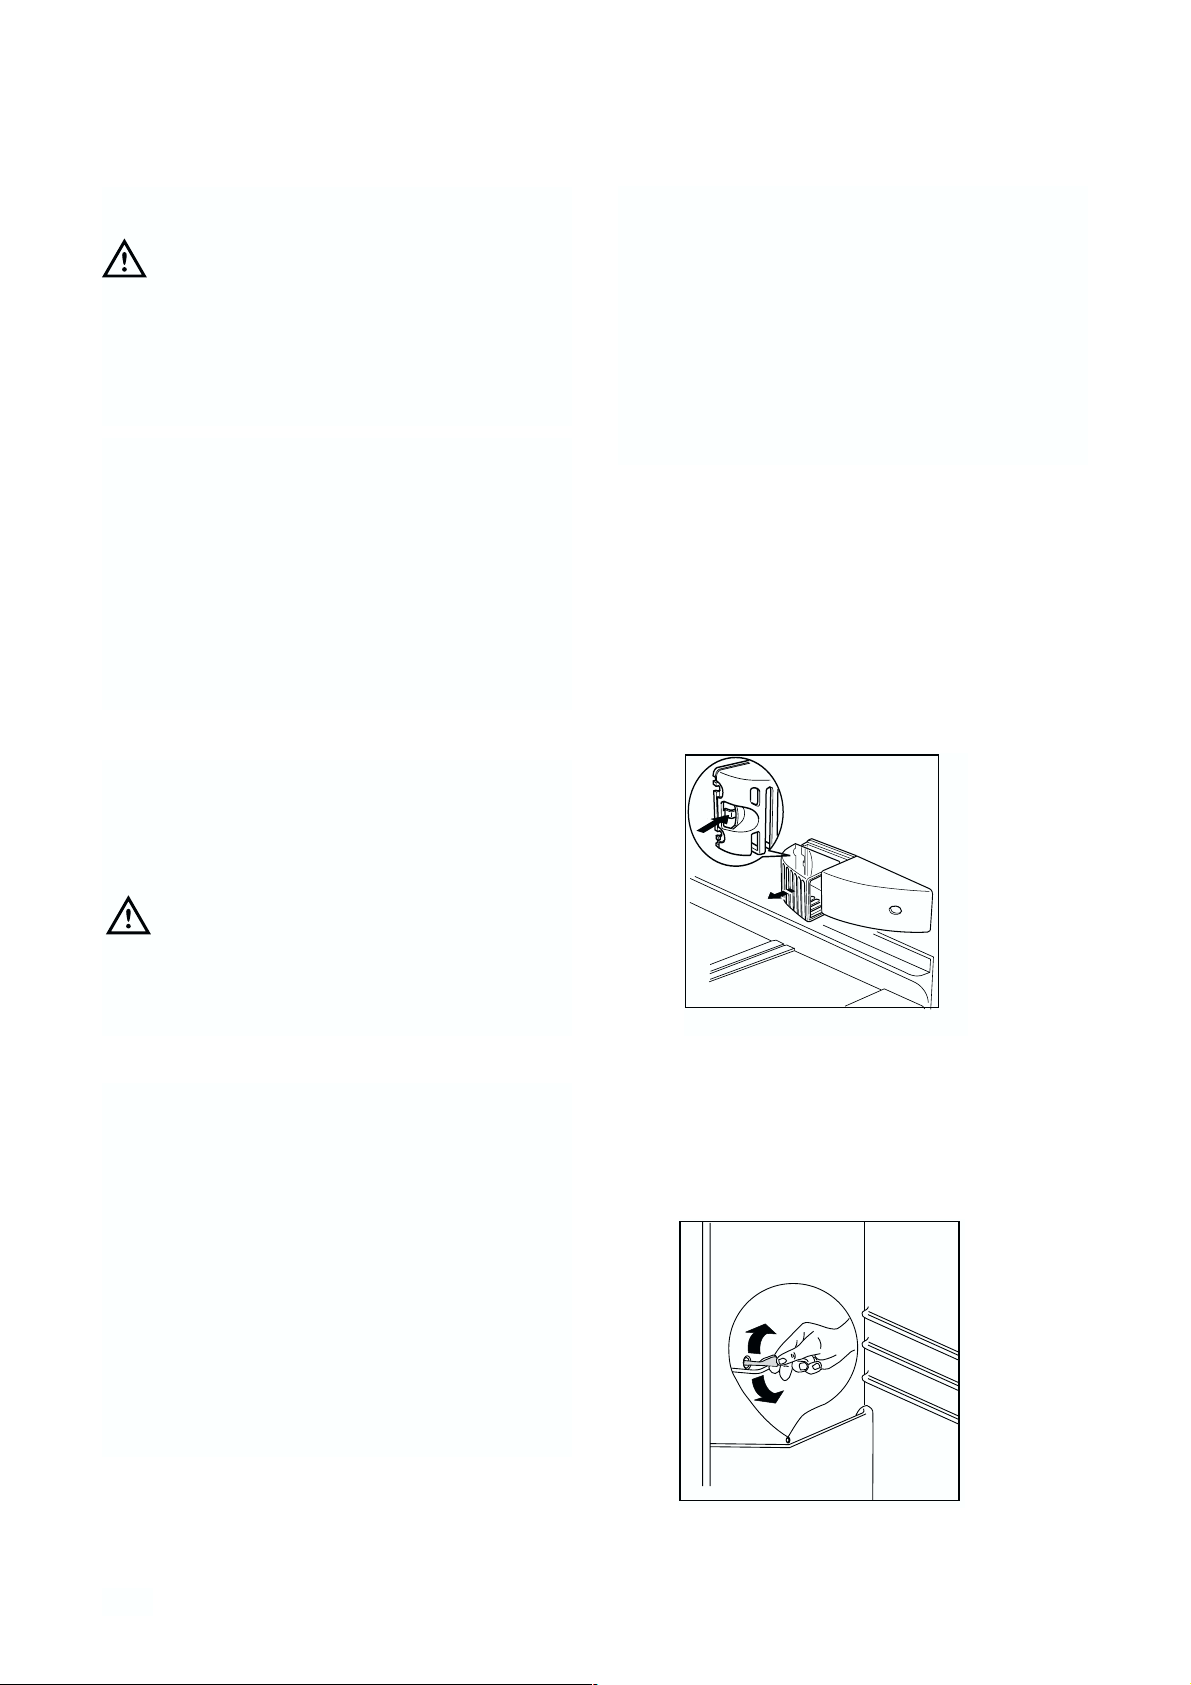
Si raccomanda di pulire periodicamente il foro di
scarico dell’acqua di sbrinamento, posto nella
parte centrale dell’apposito convogliatore dello
scomparto frigorifero, utilizzando l’apposito
«pulitore» che si trova nel foro, per evitare che
l’acqua di sbrinamento cada sui cibi.
MANUTENZIONE
Staccare la spina dalla presa di corrente prima di
eseguire qualsiasi operazione.
Attenzione
Questa apparecchiatura contiene idrocarburi nel
circuito refrigerante; pertanto la manutenzione e
la ricarica devono essere effettuate
esclusivamente da personale autorizzato
dall’azienda.
Pulizia periodica
Non usare mai oggetti metallici per pulire l’apparecchiatura; essa potrebbe venir danneggiata.
Pulire l’interno con acqua tiepida e bicarbonato di
soda. Risciacquare e asciugare accuratamente.
Pulire il condensatore e il motocompressore con una
spazzola o un aspirapolvere. Questa operazione
migliorerà il funzionamento con conseguente
risparmio di energia.
Periodi di inattività
Durante i periodi in cui l’apparecchiatura non è in
funzione osservare le seguenti precauzioni:
• staccare la spina dalla presa di corrente; togliere
tutti gli alimenti;
• sbrinare e pulire l’interno e tutti gli accessori;
• lasciare le porte socchiuse per facilitare la
circolazione di aria all’interno in modo da evitare
la formazione di odori sgradevoli.
Lampada di illuminazione
Per eventuale sostituzione della lampada premere
l’aggancio posteriore e contemporaneamente sfilare il
coperchietto nel senso delle frecce.
Attenzione
Sostituire la lampada con una di pari potenza (la
potenza massima é riportata sul diffusore luce).
D037
Page 25
25
SE QUALCOSA NON VA
Qualora l’apparecchiatura presentasse qualche
disfunzione, è bene controllare:
• che la spina sia ben inserita nella presa di
corrente;
• che non manchi l’energia elettrica
• che la manopola del termostato si trovi in
posizione intermedia.
Inoltre:
• se l’apparecchiatura è eccessivamente rumorosa
verificare che i fianchi non siano a contatto con
mobili o schienali che possono causare rumore o
vibrazioni;
• se vi sono tracce di acqua sul fondo dello
scomparto, verificare che il foro di deflusso
dell’acqua derivante dallo sbrinamento non sia
ostruito.
Dopo le verifiche di cui sopra, se la disfunzione
dovesse permanere, è bene chiamare il Centro di
Assistenza Tecnica più vicino.
Per un sollecito intervento è importante, all’atto
della chiamata, indicare il tipo di difetto, il
modello di apparecchiatura (Mod.), il numero di
prodotto (Prod. No.) e il numero di fabbricazione
(Ser. No.), rilevati dal certificato di garanzia o
dalla targhetta matricola posta all’interno
dell’apparecchiatura.
INSTALLAZIONE
Posizionamento
Collocare l’apparecchiatura lontana da fonti di
calore, quali: termosifoni, stufe da riscaldamento,
esposizione diretta ai raggi solari ecc.
DATI TECNICI
330
0,397
145
Capacità netta in litri del frigorifero
Consumo energetico in kWh/24h
Consumo energetico in kWh/annuo
I dati tecnici sono riportati sulla targhetta matricola posizionata sul lato sinistro interno dell’apparecchiatura.
Attenzione
L’apparecchio deve poter essere scollegato dalla
rete; é quindi necessario che la spina rimanga
accessibile ad installazione avvenuta.
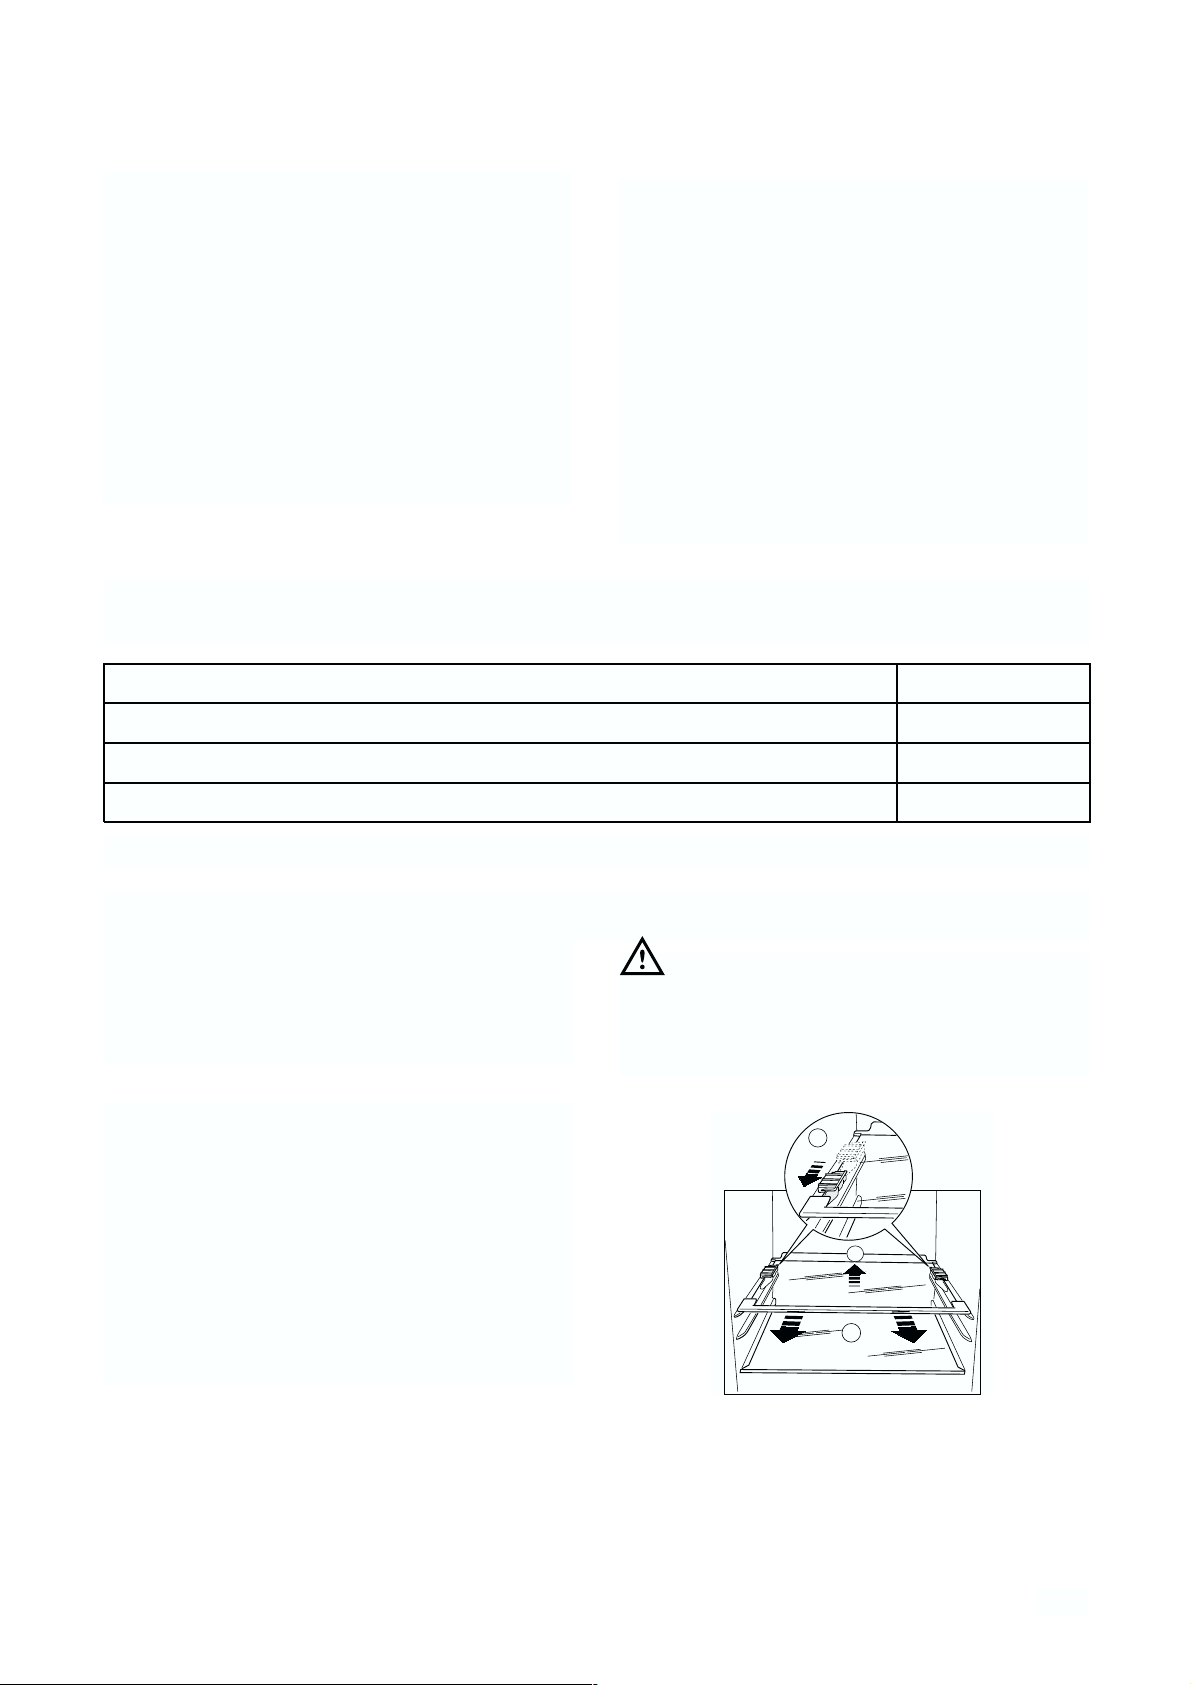
Fermi-Ripiani
La vostra apparecchiatura é dotata di fermi-ripiani
che consentono di bloccare i ripiani durante il
trasporto.
Per rimuoverli operare come segue :
muovere i fermi-ripiani nel senso della freccia ,
rialzare posteriormente il vetro e spingerlo in avanti
fino a quando non si libera e togliere i fermi.
A
B
C
Page 26
26
Istruzioni per l’incasso
integrale
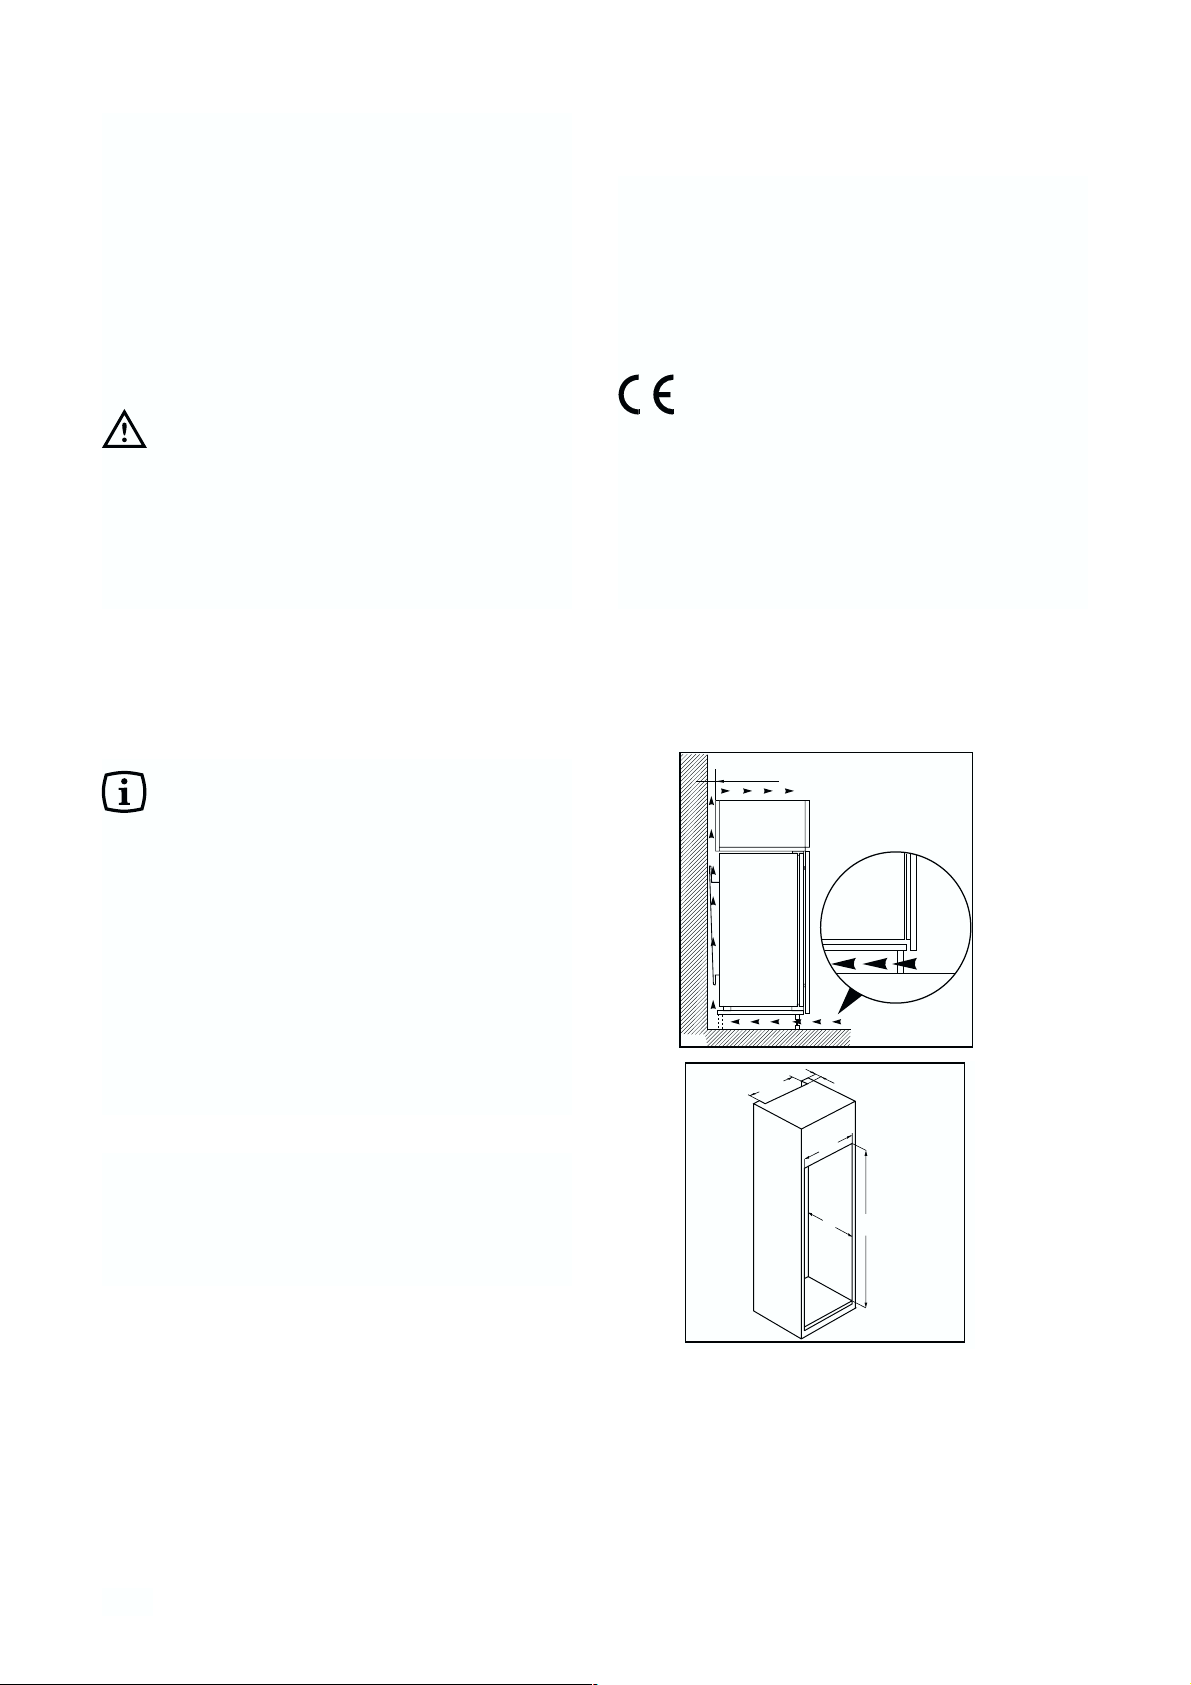
Dimensioni del vano
Altezza 1780 mm
Profondità 550 mm
Larghezza 560 mm
Per motivi si sicurezza la ventilazione deve essere
come indicato in figura.
Attenzione: mantenere le aperture per la
ventilazione libere da ogni ostruzione.
Inoltre é necessario che la nicchia sia provvista di
un camino d’areazione con le seguenti misure:
profondità: 50 mm
larghezza: 540 mm
Collegamento elettrico
Assicurarsi, prima di inserire la spina nella presa
di corrente, che la tensione e la frequenza
riportate sulla targhetta matricola corrispondano
a quelle dell’impianto domestico.
È ammessa una oscillazione di ±6% sulla tensione
nominale.
Per il funzionamento a tensioni diverse si dovrà
utilizzare un autotrasformatore di potenza adeguata.
Importante
E’ indispensabile collegare l’apparecchio ad una
efficiente presa di terra.
A tale scopo la spina del cavo di alimentazione é
dotata dell’apposito contatto. Qualora la presa di
corrente dell’impianto domestico non sia collegata a
terra, allacciare l’apparecchiatura ad un impianto di
terra a parte conformemente alle norme in vigore
consultando in proposito un tecnico specializzato.
La Casa Costruttrice declina ogni responsabilità
qualora questa norma antinfortunistica non
fosse rrispettata.
Questa apparecchiatura è conforme alle
seguenti Direttive Comunitarie
- 87/308/CEE del 2/6/87 relativa alla
soppressione dei disturbi radio.
- 73/23/CEE del 19/02/73 (Bassa Tensione) e
successive modificazioni;
- 89/336/CEE del 03/05/89 (Compatibilità
Elettromagnetica) e successive modificazione
D567
PR01
50 mm
540
min.
200 cm
50
3
2
2
min.
2
200 cm
1
Page 27
27
WARNINGS
It is most important that this instruction book should be retained with the appliance for future
reference. Should the appliance be sold or transferred to another owner, or should you move house
and leave the appliance, always ensure that the book is supplied with the appliance in order that the
new owner can be acquainted with the functioning of the appliance and the relevant warnings.
If this appliance featuring magnetic door seals is to replace an older appliance having a spring lock
(latch) on the door or lid, be sure to make that spring lock unusable before you discard the old
appliance. This will prevent it from becoming a death-trap for a child.
This must be done before the appliance is built intoThese warnings are provided in the interest of
safety.You must read them carefully before installing or using the appliance.
General Safety
• This appliance is designed to be operated by
adults. Children should not be allowed to tamper
with the controls or play with the product.
• It is dangerous to alter the specifications or
modify this product in any way.
• Care must be taken to ensure that the appliance
does not stand on the electrical supply cable.
Important: if the supply cord is damaged, it must
be replaced by a special cord or assembly available from the manufacturer or its service agent.
• Before any cleaning or maintenance work is carried
out, be sure to switch off and unplug the appliance.
• This appliance is heavy. Care should be taken
when moving it
• Ice lollies can cause frost burns if consumed
straight from the appliance.
• Take utmost care when handling your
appliance so as not to cause any damages to
the cooling unit with consequent possible
fluid leakages.
• The appliance must not be located close to
radiators or gas cookers.
• Avoid prolonged exposure of the appliance to
direct sunlight.
• There must be adequate ventilation round the
back of the appliance and any damage to the
refrigerant circuit must be avoided.
• For freezers only (except built-in models): an
ideal location is the cellar or basement.
• Do not use other electrical appliances (such
as ice cream makers) inside of refrigerating
appliances, unless they are approved for this
purpose by the manufacturer.
Service/Repair
• Any electrical work required to install this
appliance should be carried out by a qualified
electrician or competent person
• This product should be serviced by an authorized
Service Centre, and only genuine spare parts
should be used.
• Under no circumstances should you attempt to
repair the appliance yourself. Repairs carried out
by inexperienced persons may cause injury or
more serious malfunctioning. Refer to your local
Service Centre, and always
• This appliance contains hydrocarbons in its
cooling unit; maintenance and recharging must
therefore only be carried out by authorized
technicians.
Use
• The domestic refrigerators and freezers are
designed to be used specifically for the storage
of edible foodstuffs only.
• Best performance is obtained with ambient
temperature between +18°C and +43°C (class T);
+18°C and +38°C (class ST); +16°C and +32°C
(class N); +10°C and +32°C (class SN).The
class of your appliance is shown on its rating
plate.
Warning: when the ambient temperature is not
included within the range indicated for the class
of this appliance, the following instructions must
be observed: when the ambient temperature
drops below the minimum level, the storage
temperature in the freezer compartment cannot
be guaranteed; therefore it is advisable to use the
food stored as soon as possible.
• Frozen food must not be re-frozen once it has
been thawed out.
• Manufacturers’ storage recommendations should
be strictly adhered to. Refer to relevant
instructions.
• The inner lining of the appliance consists of
channels through which the refrigerant passes. If
these should be punctured this would damage the
appliance beyond repair and cause food loss. DO
NOT USE SHARP INSTRUMENTS to scrape off
frost or ice. Frost may be removed by using the
scraper provided. Under no circumstances should
solid ice be forced off the liner. Solid ice should be
allowed to thaw when defrosting the appliance.
Page 28
28
Cleaning the interior
Before using the appliance for the first time, wash
the interior and all internal accessories with lukewarm water and some neutral soap so as to remove
the typical smell of a brand-new product, then dry
thoroughly.
CONTENTS
Warnings . . . . . . . . . . . . . . . . . . . . . . . . . . . . . . . . . . . . . . . . . . . . . . . . . . . . . . . . . . . . . . . . . . . . . . . . . . .27
Use - Cleaning the interior . . . . . . . . . . . . . . . . . . . . . . . . . . . . . . . . . . . . . . . . . . . . . . . . . . . . . . . . . . . . . . . . .28
Use - Control Panel - Temperature setting buttons - Temperature indicator - Super cooling - Operation . . . . . .
- Fresh food refrigeration . . . . . . . . . . . . . . . . . . . . . . . . . . . . . . . . . . . . . . . . . . . . . . . . . . . . . . . . . . . . . . . . . . . . .29
Use - Movable shelves - Positioning the door shelves - Bottle rack . . . . . . . . . . . . . . . . . . . . . . . . . . . . . . . . . . .30
Hints - Air recycling - Hints for refrigeration . . . . . . . . . . . . . . . . . . . . . . . . . . . . . . . . . . . . . . . . . . . . . . . . . . . .31
Maintenance - Periods of non-operation - Periodic cleaning - Interior light - Defrosting . . . . . . . . . . . . . . .32
Customer service and spare parts - Technical Information - Shelf holders . . . . . . . . . . . . . . . . . . . . . . . .33
Installation - Location - Electrical connection - Dimensions of housing . . . . . . . . . . . . . . . . . . . . . . . . . . . .34
Warranty . . . . . . . . . . . . . . . . . . . . . . . . . . . . . . . . . . . . . . . . . . . . . . . . . . . . . . . . . . . . . . . . . . . . . . . . . . . .35
• Do not place carbonated or fizzy drinks in the
freezer as it creates pressure on the container,
which may cause it to explode, resulting in
damage to the appliance.
Installation
• During normal operation, the condenser and
compressor at the back of the appliance heat up
considerably. For safety reasons, minimum
ventilation must be as shown in the relevant Figure.
Attention: keep ventilation openings clear of
obstruction.
• If the appliance is transported horizontally, it is
possible that the oil contained in the compressor
flows in the refrigerant circuit. It is advisable to
wait at least two hours before connecting the
appliance to allow the oil to flow back in the
compressor.
• There are working parts in this product which
heat up. Always ensure that there is adequate
ventilation as a failure to do this will result in
component failure and possible food loss. See
installation instructions.
• Parts which heat up should not be exposed.
Wherever possible the back of the product should
be against a wall.
• If the appliance has been transported
horizontally, it is possible that the oil contained in
the compressor ílows in the refrigerant circuit. It
is advisable to wait at least two hours before
connecting the appliance to allow tl¦e oil to flow
back in the compressor.
Environment Protection
This appliance does not contain gasses which
could damage the ozone layer, in either its
refrigerant circuit or insulation materials.The
appliance shall not be discarded together with
the urban refuse and rubbish. Avoid damaging
the cooling unit, especially at the rear near the
heat exchanger. Information on your local
disposal sites may be obtained from municipal
authorities.The materials used on this appliance
marked by the symbol are recyclable.
Disposal of old Appliances
The symbol on the product or on its packaging
indicates that this product may not be treated as
household waste. Instead it shall be handed over to
the applicable collection point for the recycling of
electrical and electronic equipment. By ensuring this
product is disposed of correctly, you will help prevent
potential negative consequences for the
environment and human health, which could
otherwise be caused by inappropriate waste
handling of this product. For more detailed
information about recycling of this product, please
contact your local city office, your household waste
disposal service or the shop where you purchased
the product.
USE
Do not use detergents or abrasive
powders, as these will damage the finish.
Page 29
29
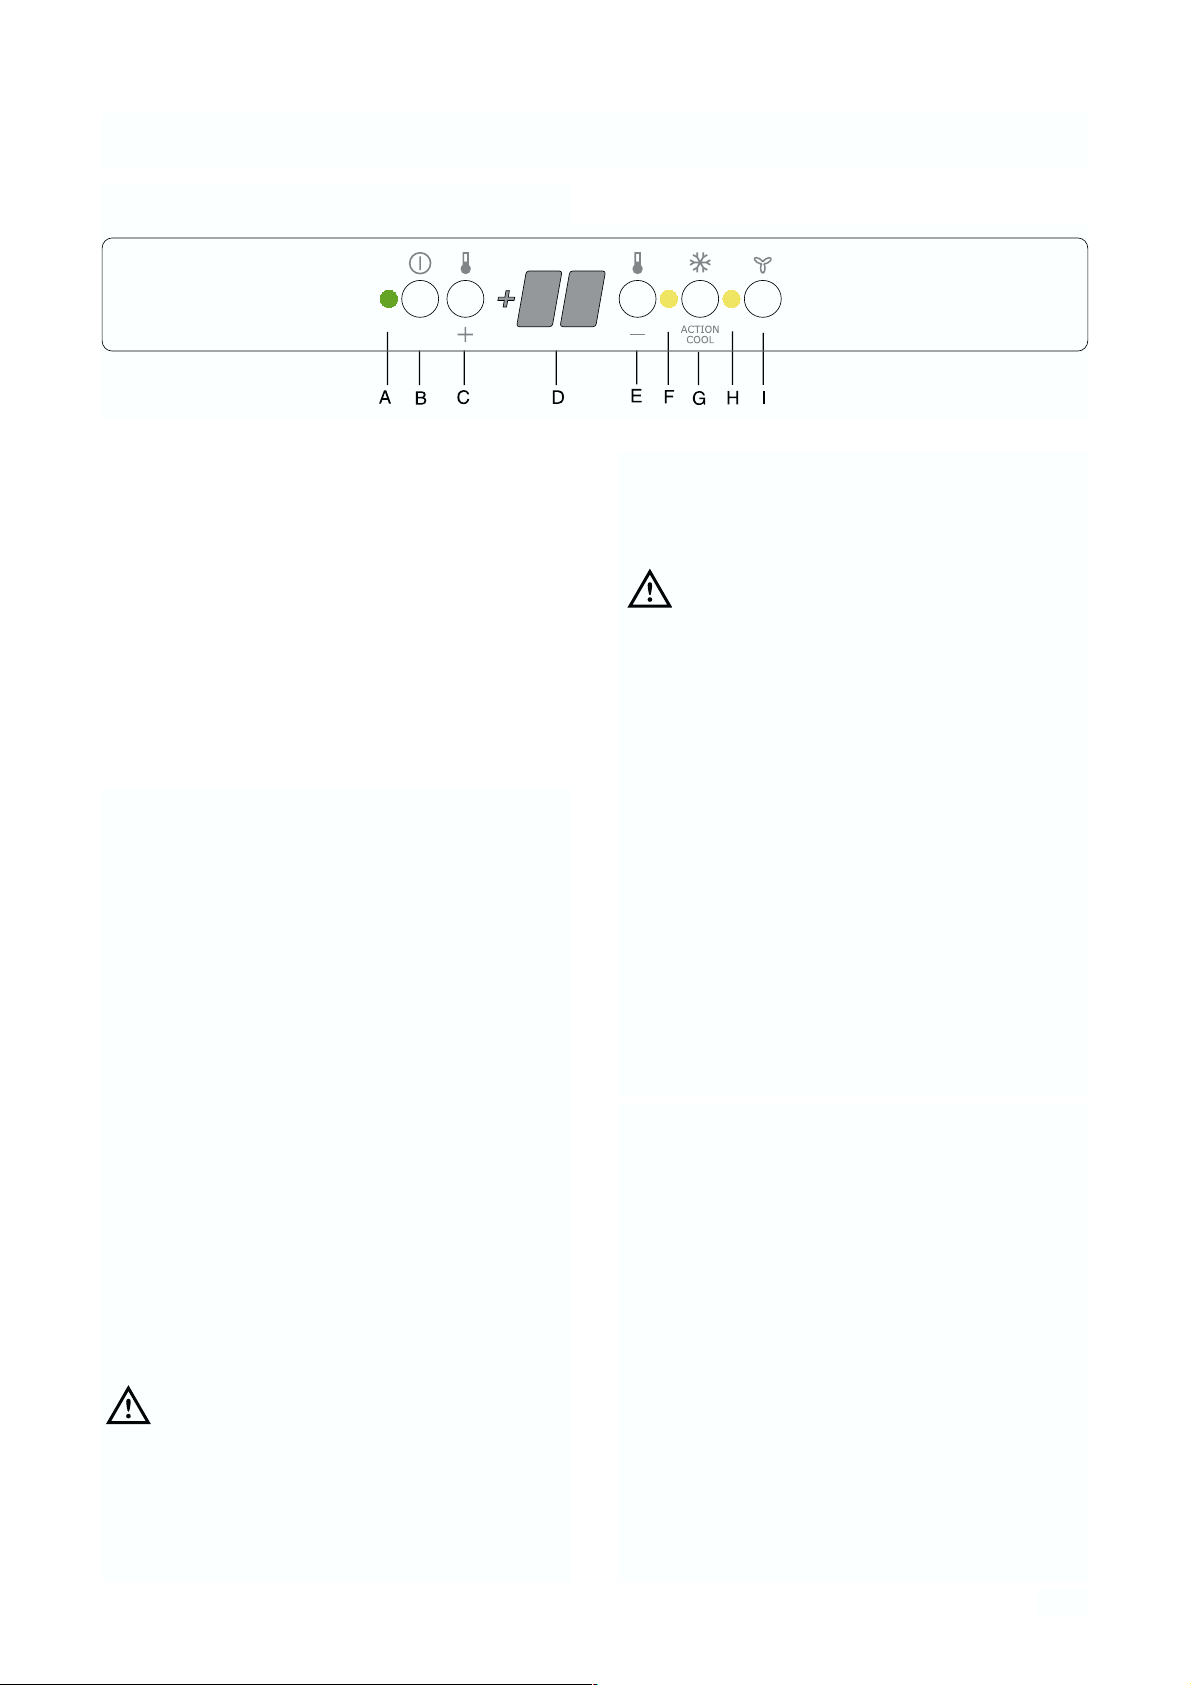
Control Panel
Use of the fridge
A. On/OFF light
B Fridge button ON/OFF
C Temperature setting button (warmest)
D Temperature indicator
E Temperature setting button (coldest)
F Super cooling light
G Super cooling button
H Dynamic Air Cooling light
I Dynamic Air Cooling button
A. Light ON/OFF
B. Button ON/OFF
ON: Press the button (B).The pilot light (A)
switches on.
OFF: Keep press the button (B) until the pilot light
(A) and the temperautre indicator switched off.
C - E.Temperature setting buttons
The temperature can be adjusted between +2°C and
+8°C.
By pressing the button (C or E), the current
temperature setting flashes on the indicator. It is
possible to modify the setting temperature only with
flashed indicator.To set a warmer temperature,
press button (C). To set a colder temperature, press
button (E). The indicator display the newly selected
temperature for a few seconds and then shows
again the inside compartment temperature.
The newly selected-temperature must be reached
after 24 hours.
Attention!
During the stability period by the first starting the
temperature displayed can not correspond to the
setting temperature. During this time it is possible
that the temperature displayed is lower than the
setting temperature.
D.Temperature indicator
During normal functioning the indicator shows the
temperature inside the fridge.
Attention!
Difference between the temperature displayed and
temperature setting is normal. Especially when:
- a new setting has recently been selected
- the door has been left open for a long time
- warm food has been placed in the compartment
F. Super cooling pilot light
G. Super cooling button
The maximum performance is obtained by setting
the supercooling function. It’s recommended when
loading large quantities of food.
Press the supercooling button (G).The relevant pilot
light (F) switches on.
The internal temperature goes down to +2°C.
After about 6 hours the supercooling function
switches off automatically.
Operation
Insert the plug in the power socket. Press the button
ON/OFF (B). The fridge is switched on.
The fridge is pre-set to run at +5°C. This
temperature will be reached in a few hours.
As soon as the appliance is switched on the
temperature indicator (D) shows the current
temperaure inside the fridge.
Fresh food refrigeration
To obtain the best performance:
• do not store warm food or evaporating liquids in
the refrigerator;
• do cover or wrap the food, particularly if it has a
strong flavour.
• Position food so that air can circulate freely round it.
F
ON/OF
Page 30
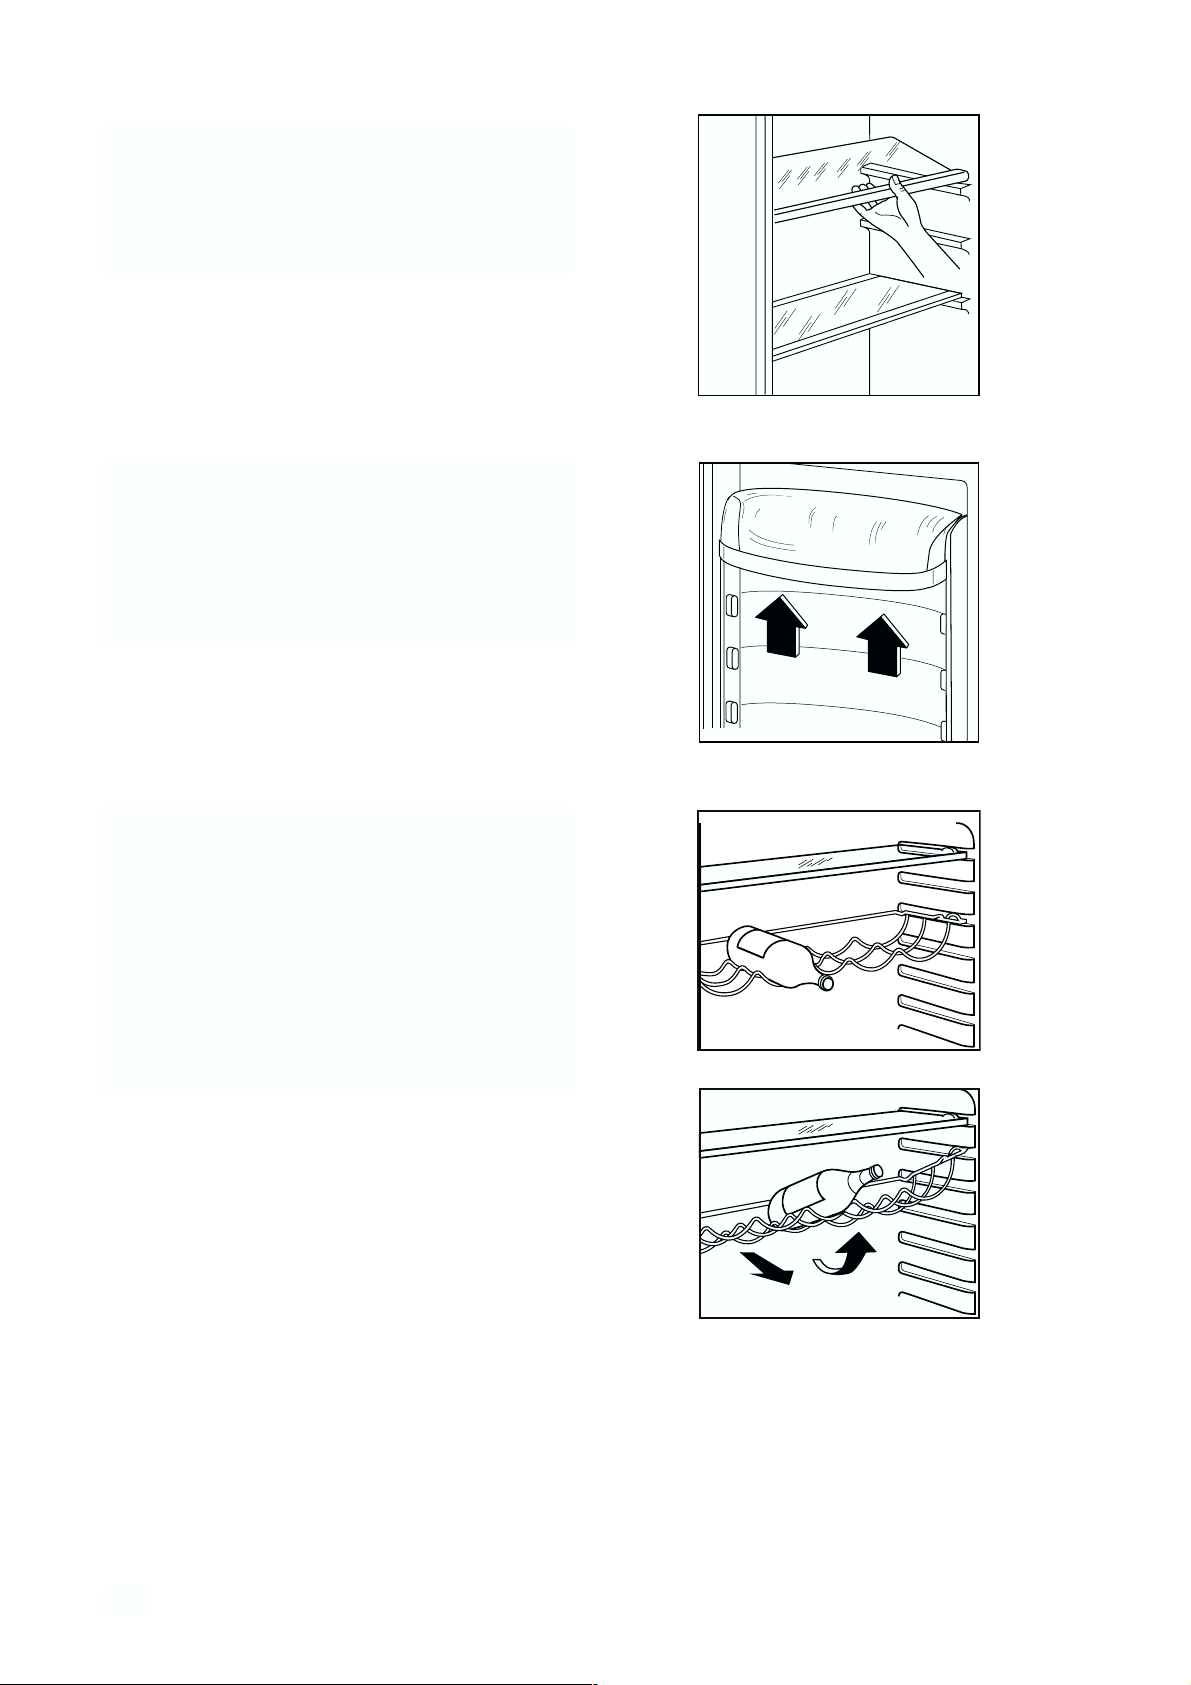
30
Movable shelves
The walls of the refrigerator are equipped with a
series of runners so that the shelves can be
positioned as desired.
Positioning the door shelves
To permit storage of food packages of various sizes,
the door shelves can be placed at different heights.
To make these adjustments proceed as follows:
Gradually pull the shelf in the direction of the arrows
until it comes free, then reposition as required.
Bottle rack
Place bottles in the rack with the bottleneck to the
front.
Important: Only store unopened bottles horizontally.
The bottle rack can be tilted for storing opened
bottles.
To do this pull the bottle rack forward until it can be
tilted upwards, then slide the front support into the
next level up.
D338
Page 31
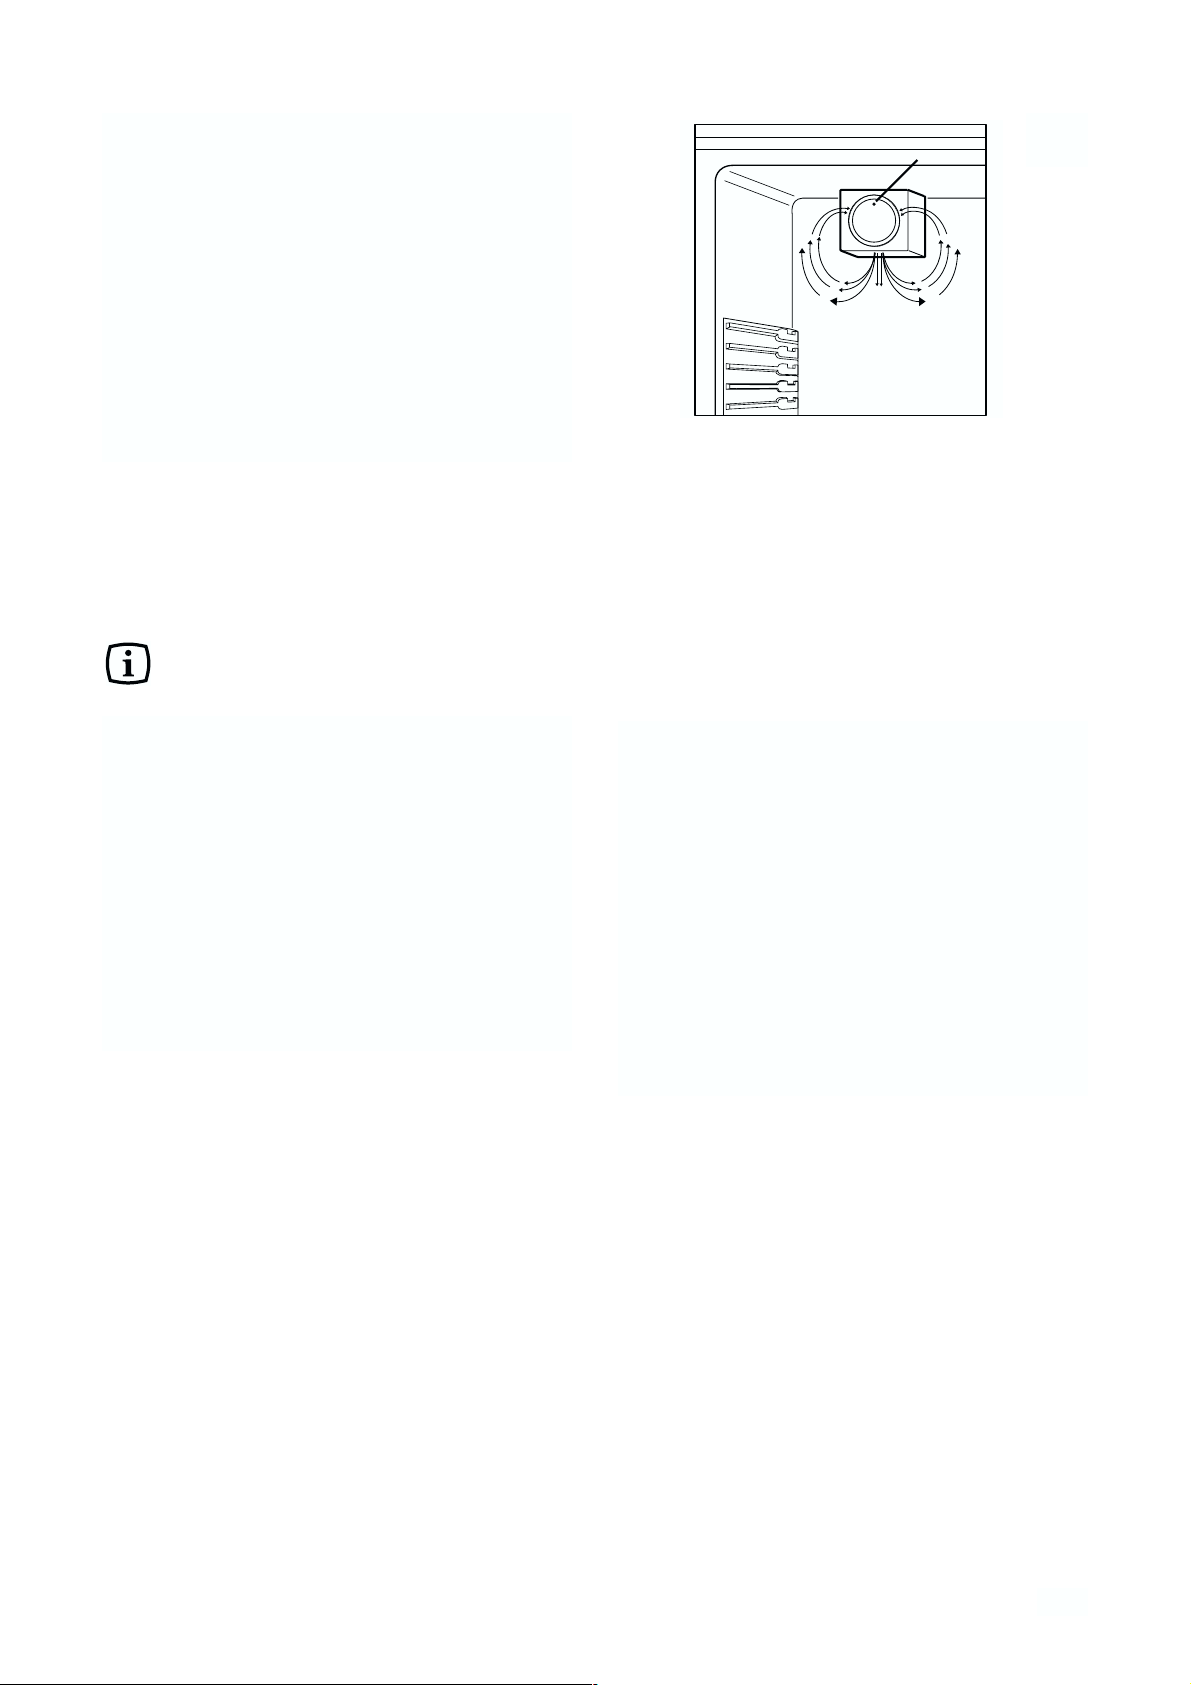
31
HINTS
Hints for refrigeration
Useful hints:
Meat (all types): wrap in polythene bags and place
on the glass shelf above the vegetable drawer.
For safety, store in this way only one or two days
at the most.
Cooked foods, cold dishes, etc..: these should be
covered and may be placed on any shelf.
Fruit and vegetables: these should be thoroughly
cleaned and placed in the special drawer(s)
provided.
Butter and cheese: these should be placed in
special airtight containers or wrapped in aluminium
foil or polythene bags to exclude as much air as
possible.
Milk bottles: these should have a cap and should
be stored in the bottle rack on the door.
Bananas, potatoes, onions and garlic, if not
packed, must not be kept in the refrigerator.
Air recycling
The refrigerator compartment is equipped with a
special D.A.C.(Dynamic Air Cooling) fan which can
be turned on with the button (see I - control panel).
The green light (see fig. 1), when on, means that the
fan is working.
It is suggested that the fan (D.A.C.) be used when
the ambient temperature exceeds 25°C .
This device allows for rapid cooling of foods and a
more uniform temperature in the compartment.
Fig. 1
LIGHT
Page 32
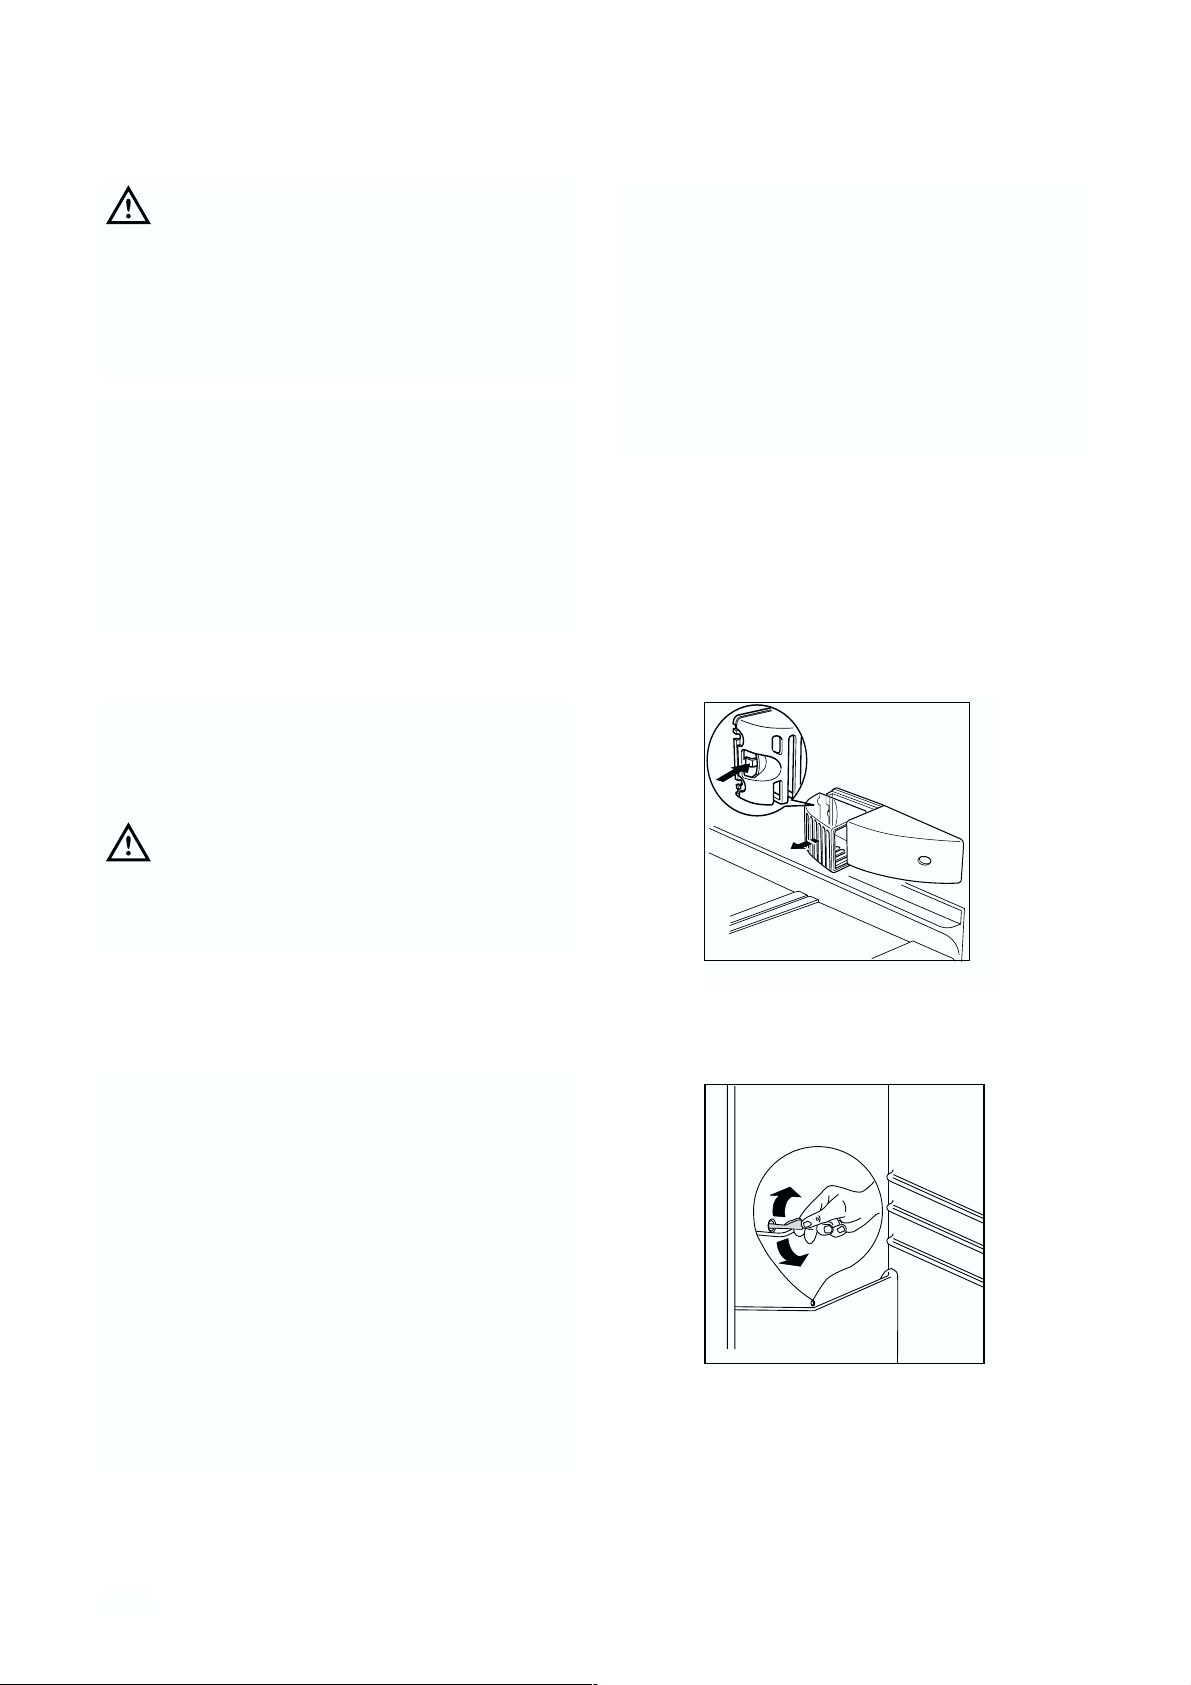
32
MAINTENANCE
Unplug the appliance before carrying out
any maintenance operation.
Warning
This appliance contains hydrocarbons in its cooling
unit; maintenance and recharging must therefore
only be carried out by authorized technicians.
Periodic cleaning
Clean the inside with warm water and bicarbonate of
soda. Rinse and dry thoroughly.
Clean the condenser (black grill) and the
compressor at the back of the appliance with a
brush or a vacuum cleaner.This operstion will
improve the performance of the appliance and save
electricity consumption.
Periods of non-operation
When the appliance is not in use for long periods,
take the following precautions:
• remove the plug from the wall socket;
• remove all food;
• defrost and clean the interior and all accessories;
• leave the door ajar to allow air to circulate to
prevent unpleasant smells.
Defrosting
Frost is automatically eliminated from the evaporator
of the refrigerator compartment every time the motor
compressor stops, during normal use. The defrost
water drains out through a trough into a special
container at the back of the appliance, over the
motor compressor, where it evaporates.
It is important to periodically clean the defrost
water drain hole in the middle of the refrigerator
compartment channel to prevent the water
overflowing and dripping onto the food inside.
Use the special cleaner provided, which you will
find already inserted into the drain hole.
Interior light
If it becomes necessary to replace the lamp, press
on the rear hook and at the same time slide the
cover in the direction indicated by the arrow.
Replace the lamp with one of the same
power (the maximum power is shown on the
light diffuser).
D037
Page 33
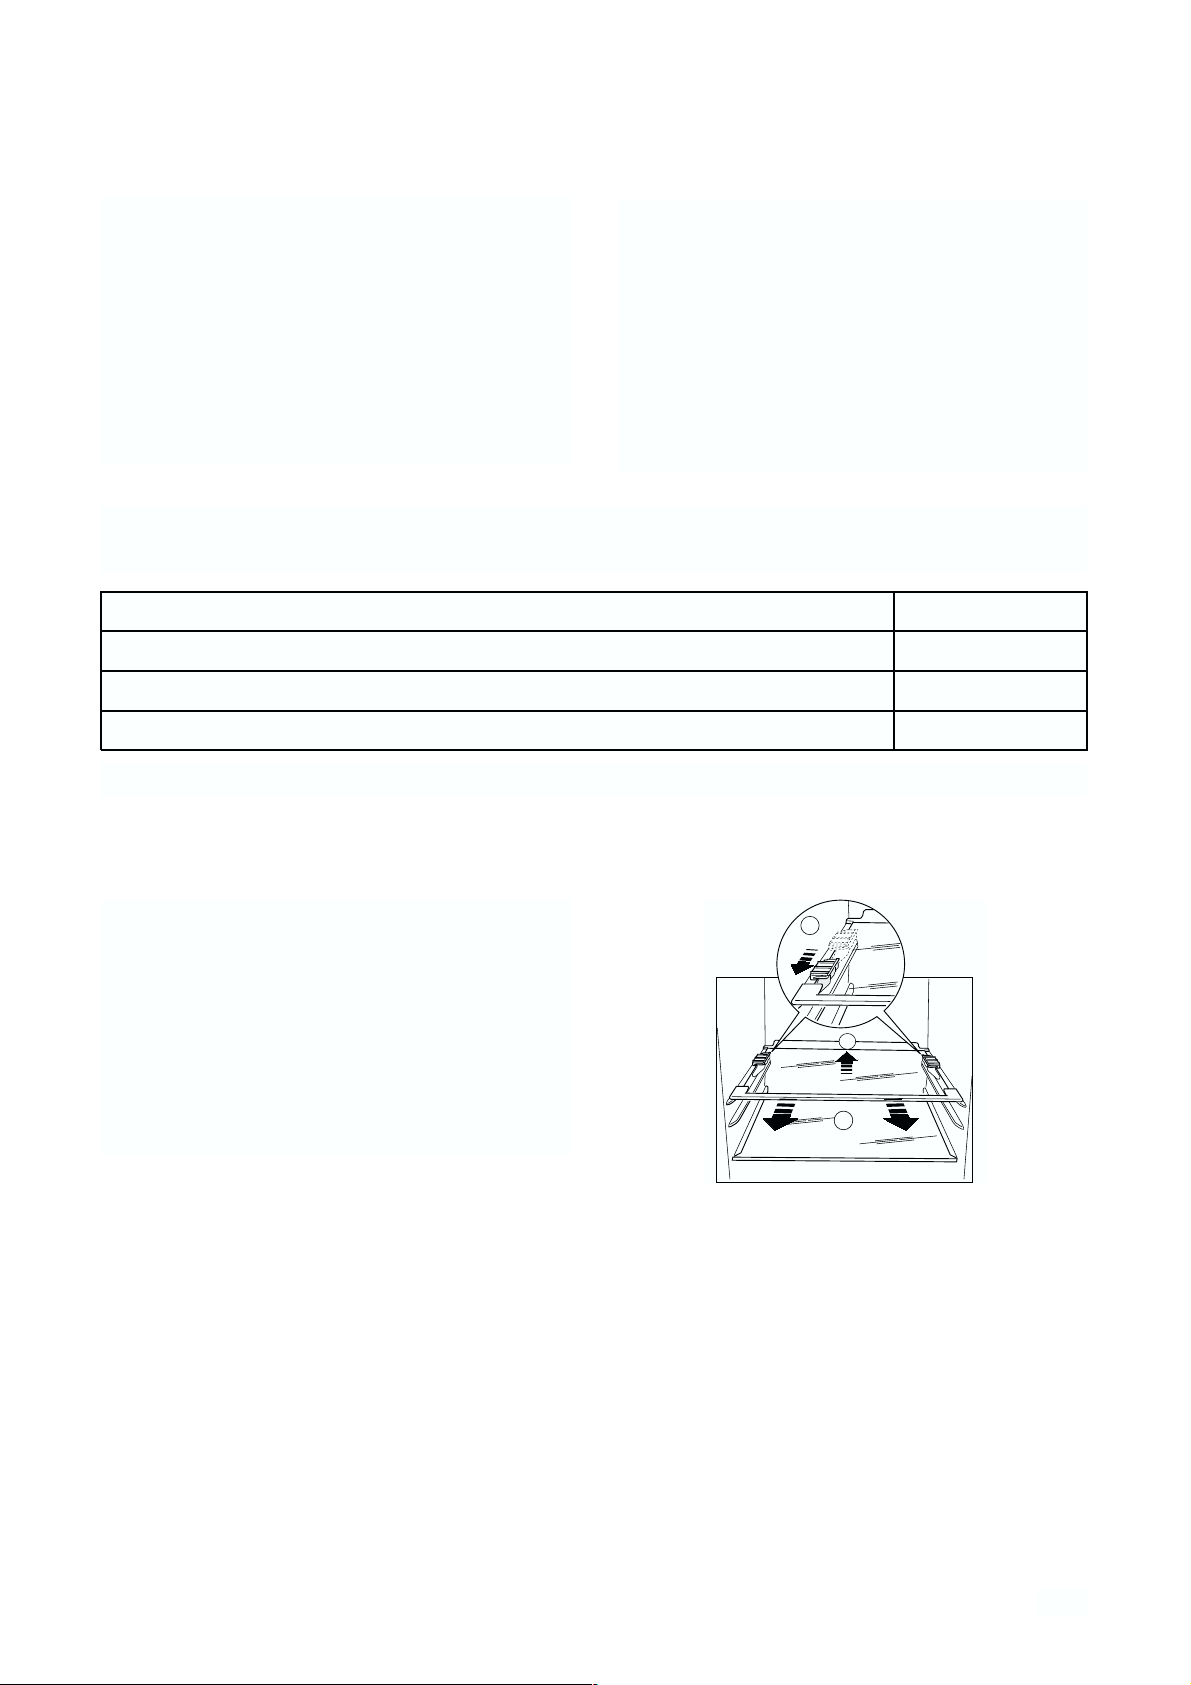
33
CUSTOMER SERVICE AND SPARE PARTS
If the appliance is not functioning properly, check
that:
• the plug is firmly in the wall socket and the mains
power switch is on;
• there is an electricity supply (find out by plugging
in another appliance);
• If there are water drops on the bottom of the
cabinet, check that the defrost water drain
opening is not obstructed (see “Defrosting”
section).
• If your appliance is still not working properly after
making the above checks, contact the nearest
service centre.
To obtain fast service, it is essential that when
you apply for it you specify the model and serial
number of your appliance which can be found on
the guarantee certificate or on the rating plate
located inside the appliance, on the bottom lefthand side.
TECHNICAL INFORMATION
330
0,397
145
Net Fridge Capacity lt.
Energy Consumption kWh/24h
Energy Consumption kWh/year
The technical infomation are situated in the rating plate on the internal left side of the appliance.
Shelf holders
Your appliance is equipped with shelf retainers that
make it possible to secure the shelves during
transportation.
To remove them proceed as follows:
Move the shelf retainers in the direction of the arrow,
raise the shelf from the rear and push it forward until
it is freed and remove the retainers.
A
B
C
Page 34
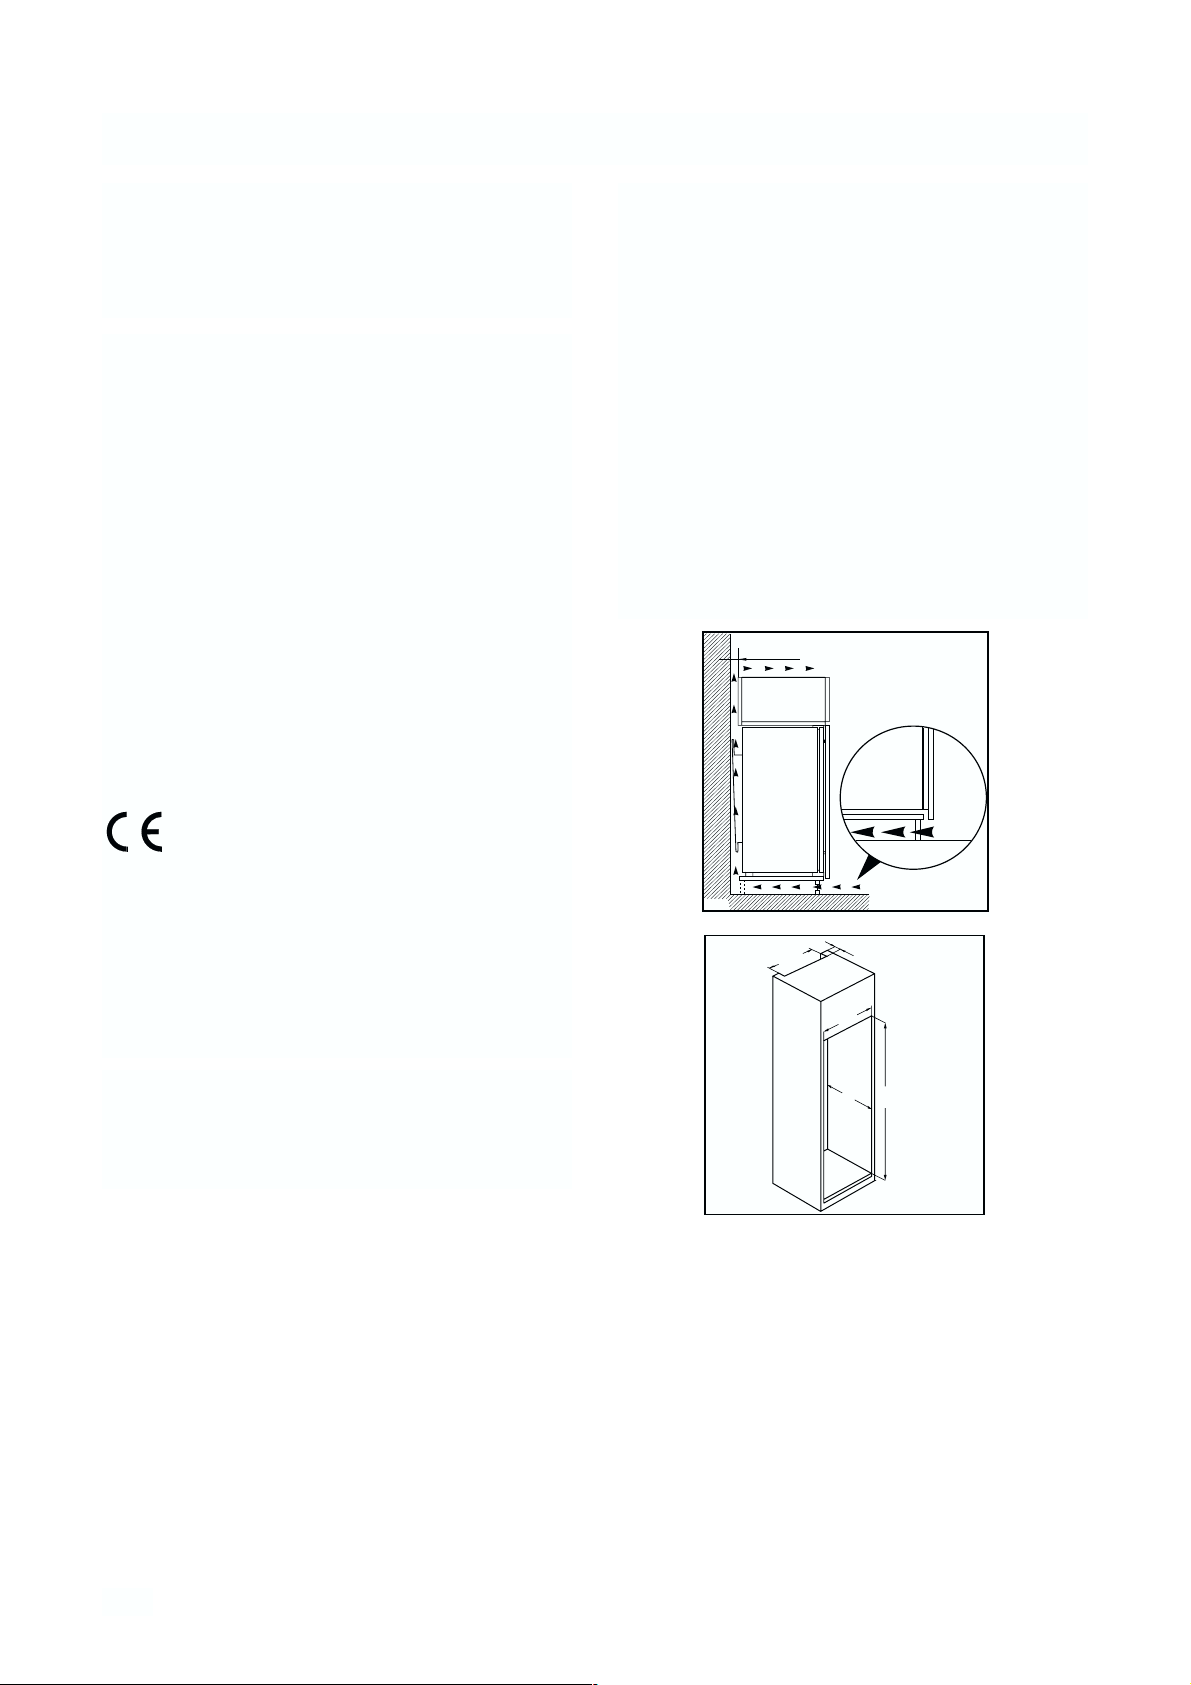
34
ATTENTION!
It must be possible to disconnect the appliance from
the mains power supply; the plug must therefore be
easily accessible after installation.
Dimensions of housing
Height 1780 mm
Depth 550 mm
Width 560 mm
For safety reasons, minimum ventilation must be as
shown in Fig.
Attention: keep ventilation openings clear of
obstruction.
It is necessary that the niche is provided with a
conduct of ventilation having the following
dimensions:
Depth 50 mm
Width 540 mm
INSTALLATION
Location
The appliance should be installed well away from
sources of heat such as radiators, boilers, direct
sunlight etc.
Electrical connection
Before plugging in, ensure that the voltage and
frequency shown on the serial number plate
correspond to your domestic power supply. Voltage
can vary by ±6% of the rated voltage.
For operation with different voltages, a suitably sized
auto-transformer must be used.
The appliance must be earthed.
The power supply cable plug is provided with a
contact for this purpose.
If the domestic power supply socket is not earthed,
connect the appliance to a separate earth in
compliance with current regulations, consulting a
specialist technician.
The Manufacturer declines all responsibility if
the above safety precautions are not observed.
This appliance complies with the following
E.E.C. Directives:
- 87/308 EEC of 2/6/87 relative to radio
interference suppression.
- 73/23 EEC of 19.2.73 (Low Voltage Directive)
and subsequent modifications;
- 89/336 EEC of 3.5.89 (Electromagnetic
Compatibility Directive) and subsequent
modifications.
540
min.
200 cm
50
3
2
min.
2
200 cm
50 mm
D567
PR01
2
1
Page 35
35
Page 36

www. electrolux.com
www. electrolux.ch
 Loading...