

Page 1

HK654079XB
NL
KOOKPLAAT GEBRUIKSAANWIJZING
EN
HOB USER MANUAL
FR
TABLE DE CUISSON NOTICE D'UTILISATION
17
31
2
Page 2
2
VOOR PERFECTE RESULTATEN
Bedankt dat u voor dit AEG product heeft gekozen. Dit apparaat is ontworpen
om vele jaren uitstekend te presteren, met innovatieve technologieën die het
leven gemakkelijker helpen maken – functies die gewone apparaten wellicht niet
hebben. Neem een paar minuten de tijd om het door te lezen zodat u er optimaal
van kunt profiteren.
ACCESSOIRES EN VERBRUIKSARTIKELEN
In de AEG webshop vindt u alles wat u nodig heeft om al uw apparaten van AEG
mooi te houden en perfect te laten functioneren. Ook vindt u hier een groot
aantal accessoires die zijn ontworpen en gebouwd volgens de hoge
kwaliteitsnormen die u verwacht, van speciaal kookgerei tot bestekmandjes en
van flessenhouders tot waszakken…
Bezoek onze webshop op
www.aeg.com/shop
Page 3

INHOUD
Inhoud
4 Veiligheidsinformatie
5 Montage-instructies
8 Beschrijving van het product
9 Bedieningsinstructies
13 Nuttige aanwijzingen en tips
14 Onderhoud en reiniging
15 Problemen oplossen
16 Milieubescherming
3
In deze gebruiksaanwijzing worden de
volgende symbolen gebruikt:
Belangrijke informatie over uw persoonlijke
veiligheid en informatie over het voorkomen
van schade aan het apparaat.
Algemene informatie en tips
Milieu-informatie
Wijzigingen voorbehouden.
Page 4
4 Veiligheidsinformatie
VEILIGHEIDSINFORMATIE
Lees voor uw eigen veiligheid en correcte werking van het apparaat eerst deze handleiding
aandachtig door, alvorens het apparaat te installeren en te gebruiken. Bewaar deze instructies altijd bij het apparaat, ook wanneer u het verplaatst of verkoopt. Gebruikers moeten
volledig op de hoogte zijn van de bediening en veiligheidsfuncties van het apparaat.
Veiligheid van kinderen en kwetsbare mensen
WAARSCHUWING!
Mensen, met inbegrip van kinderen, met beperkte lichamelijke, zintuiglijke of verstandelijke
vermogens of gebrek aan ervaring en kennis, mogen dit apparaat niet gebruiken. Zij moeten
onder toezicht staan of instructies krijgen over het gebruik van dit apparaat van iemand die
verantwoordelijk is voor hun veiligheid.
• Houd alle verpakkingsmaterialen uit de buurt van kinderen. Gevaar voor verstikking of
lichamelijk letsel.
• Houd kinderen tijdens en na het gebruik uit de buurt van het apparaat, totdat het apparaat afgekoeld is.
WAARSCHUWING!
Om te voorkomen dat kleine kinderen of dieren per ongeluk het apparaat inschakelen, adviseren wij de kinderbeveiliging te activeren.
Veiligheid tijdens gebruik
• Verwijder al het verpakkingsmateriaal, stickers en folie van het apparaat voordat u het in
gebruik neemt.
• Zet de kookzones op "uit" na ieder gebruik.
• Gevaar voor brandwonden! Leg geen bestek of deksels op de kookplaat; deze kunnen zeer
heet worden.
WAARSCHUWING!
Brandgevaar! Te hete vetten en oliën kunnen snel in brand vliegen.
Gebruik conform de voorschriften
• Controleer het apparaat altijd tijdens gebruik.
• Dit apparaat is uitsluitend bestemd voor huishoudelijk gebruik!
• Het apparaat mag niet worden gebruikt als werkblad of aanrecht.
• Plaats geen brandbare vloeistoffen, licht ontvlambare materialen of voorwerpen die kunnen smelten (bijv. plastic of aluminium) op of in de buurt van het apparaat.
• Pas op als u het apparaat aansluit in de buurt van een stopcontact. Voorkom contact
tussen de elektrische verbindingen en het apparaat of heet kookgerei. Voorkom dat elektrische verbindingen verstrikt raken.
Voorkomen van schade aan het apparaat
• Als er voorwerpen of pannen op het glaskeramiek vallen, kan het oppervlak beschadigd
raken.
Page 5
Montage-instructies
• Pannen van gietijzer, aluminium of met beschadigde bodems kunnen krassen veroorzaken in het glaskeramiek. Verplaats ze niet over het oppervlak.
• Laat pannen niet droogkoken om beschadiging van de pan en het glaskeramiek te voorkomen.
• Gebruik de kookzones niet met lege pannen of zonder pannen erop.
• Leg geen aluminiumfolie op het apparaat.
WAARSCHUWING!
Als er een scheur in het oppervlak zit, haalt u de stekker uit het stopcontact om elektrische schokken te voorkomen.
MONTAGE-INSTRUCTIES
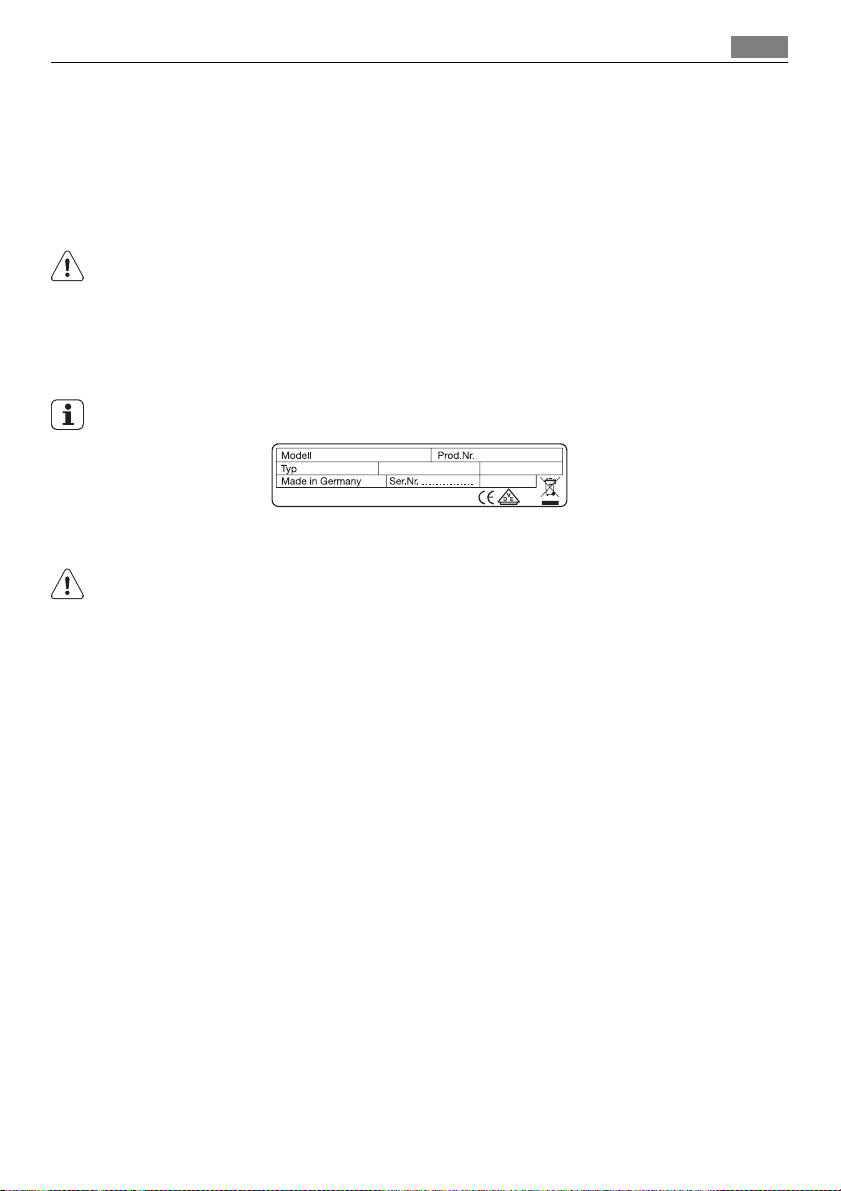
Noteer, voor de installatie, het serienummer (ser. nr.) op het typeplaatje.Het typeplaatje
van het apparaat bevindt zich aan de onderkant van de behuizing.
949 595 071 00
7,1 kW
De veiligheidsinstructies
WAARSCHUWING!
Lees deze zorgvuldig!
58 HAD 56 AO
AEG
HK654079XB
220-240 V 50-60-Hz
5
• Controleer of het apparaat tijdens het transport niet beschadigd is. Sluit geen beschadigd
apparaat aan. Neem indien nodig contact op met de leverancier.
• Alleen een bevoegde onderhoudstechnicus kan dit apparaat installeren, aansluiten of repareren. Gebruik alleen originele reserveonderdelen.
• Inbouwapparaten mogen alleen worden gebruikt nadat zij ingebouwd zijn in geschikte
inbouwunits of werkbladen die aan de normen voldoen.
• Wijzig de specificaties van het product of het product zelf niet. Gevaar voor letsel en
schade aan het apparaat.
• De wetten, voorschriften, richtlijnen en normen die van kracht zijn in het land waar het
apparaat wordt gebruikt, dienen in acht genomen te worden (veiligheidsvoorschriften,
correcte recycling overeenkomstig de voorschriften, veiligheidsvoorschriften met betrekking tot elektrische installaties, enz.)!
• Houd de minimumafstanden naar andere apparaten en units in acht!
• Tijdens de installatie moet een schokbescherming zijn aangebracht, bijv. lades mogen alleen worden aangebracht als er onder het apparaat een beschermende vloer aanwezig is!
• De uitgezaagde oppervlakken van het werkblad moeten beschermd worden tegen vocht
met een geschikte afdichting!
• Het juiste afdichtmiddel moet worden gebruikt om de opening tussen het apparaat en
het werkblad af te dichten!
• Bescherm de onderkant van het apparaat tegen stoom en vocht, bijv. van een afwasautomaat of oven!
Page 6
6 Montage-instructies
• De uitgezaagde oppervlakken van het werkblad moeten beschermd worden tegen vocht
met een geschikte afdichting!
WAARSCHUWING!
Risico van verwonding door elektrische stroom. Volg de instructies voor de elektrische aansluitingen nauwkeurig op.
• De netaansluiting staat onder stroom.
• Schakel de stroomtoevoer naar de netaansluiting uit.
• Garandeer de schokbescherming door een vakkundige inbouw.
• Loszittende en onvakkundig aangebrachte stekkerverbindingen kunnen oververhitting
van de aansluiting veroorzaken.
• Laat de aansluitingen in de klemmen correct installeren door een gekwalificeerde elektricien.
• Zorg ervoor dat het snoer niet wordt belast door trekken.
• In het geval van een eenfase- of tweefase-aansluiting, moet het geschikte netsnoer van
het type H05BB-F Tmax. 90°C (of hoger) worden gebruikt.
• Vervang de beschadigde voedingskabel door een speciale kabel (type H05BB-F Tmax 90°C
of hoger). Neem contact op met een klantenservice bij u in de buurt.
Het apparaat moet met een poolschakelaar op een elektrisch circuit zijn aangesloten, met
een contactopening van minstens 3 mm, zodat het apparaat te allen tijde uitgeschakeld kan
worden.
U moet beschikken over de correcte isolatie-apparaten: stroomonderbrekers, zekeringen
(schroefzekeringen moeten uit de houder worden verwijderd), aardlekschakelaars en contactgevers.
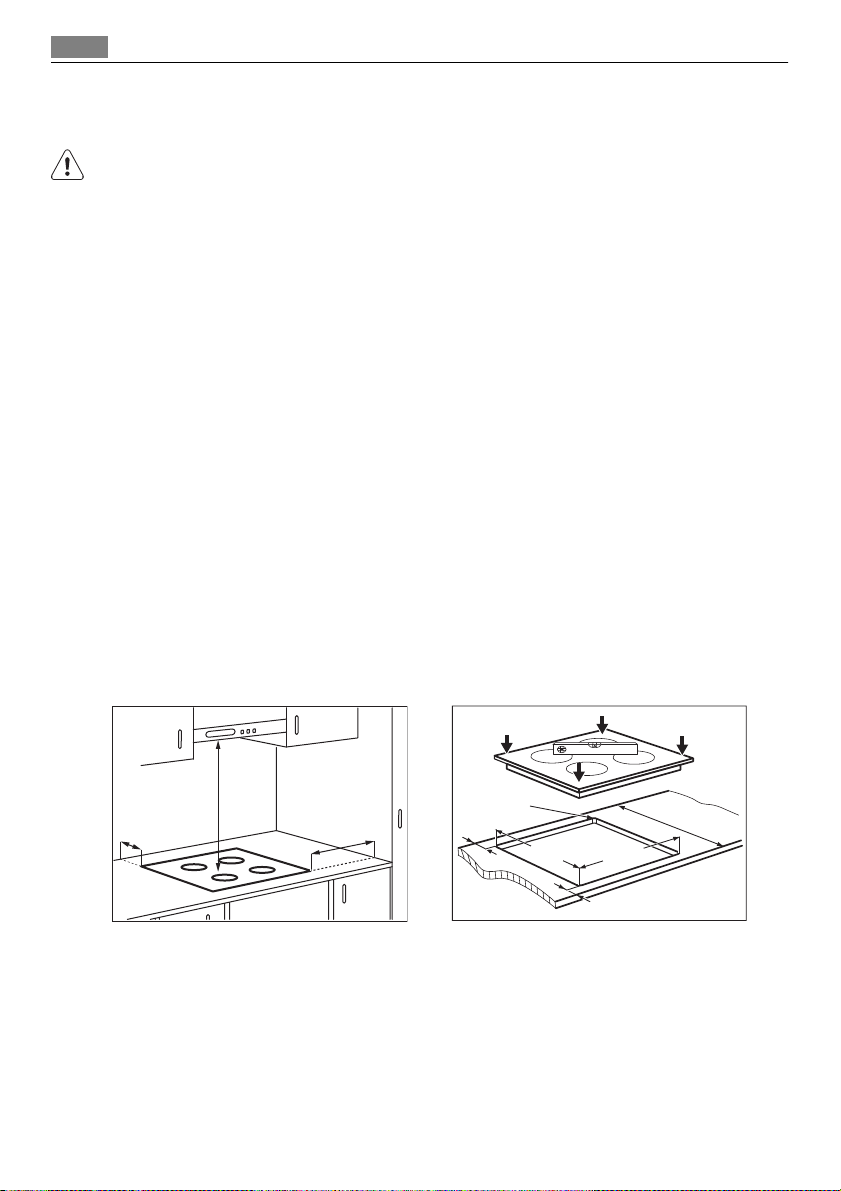
Montage
min.
50mm
min.
500mm
min.
50mm
=
R 5mm
490
600mm
mm
560
+1
mm
+1
=
Page 7
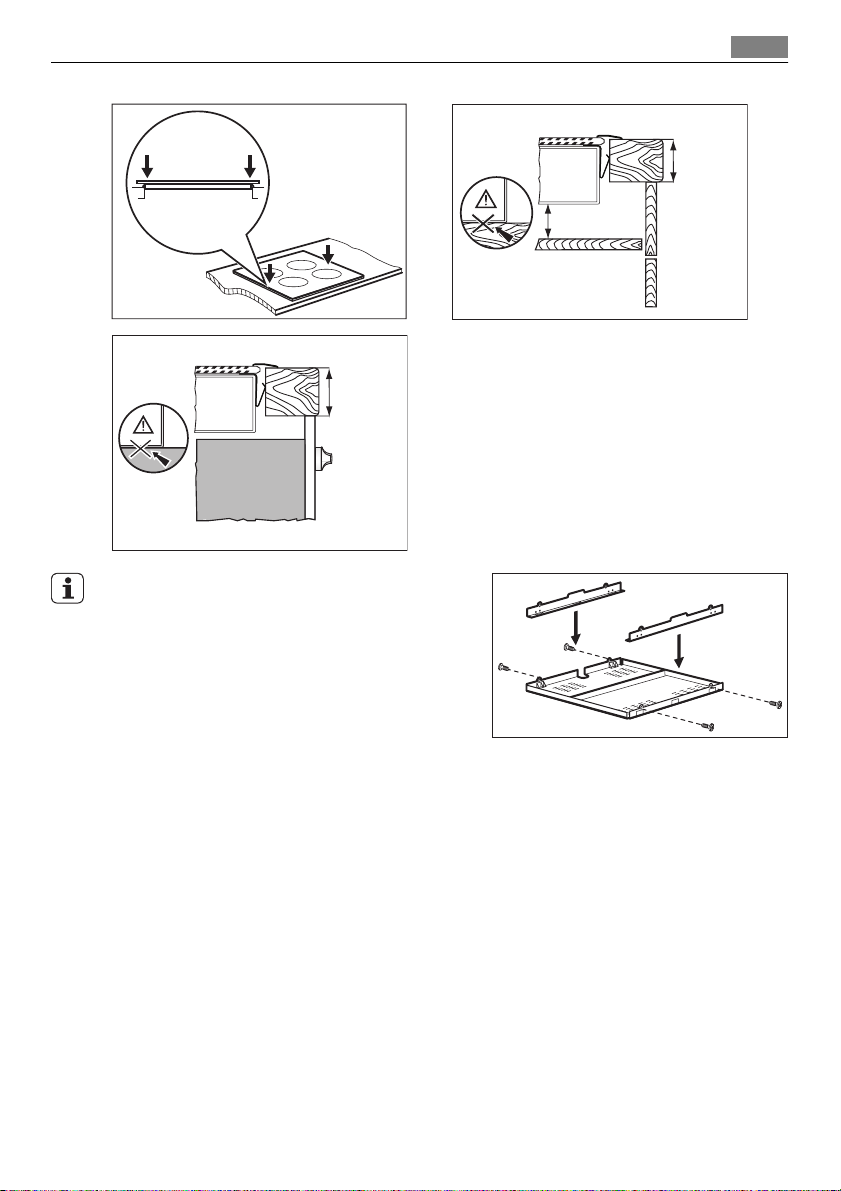
min.
28 mm
Als u een beveiligingsdoos gebruikt (extra toebe-
1)
), de beschermvloer direct onder het ap-
horen
paraat is niet nodig.
U kunt de beveiligingsdoos niet gebruiken als u
het apparaat boven een oven installeert.
Montage-instructies 7
min.
25 mm
min.
20 mm
1) De beveiligingsdoos is als toebehoren niet in elk land verkrijgbaar. Neem contact op met uw plaatselijke leveran-
cier.
Page 8
8 Beschrijving van het product
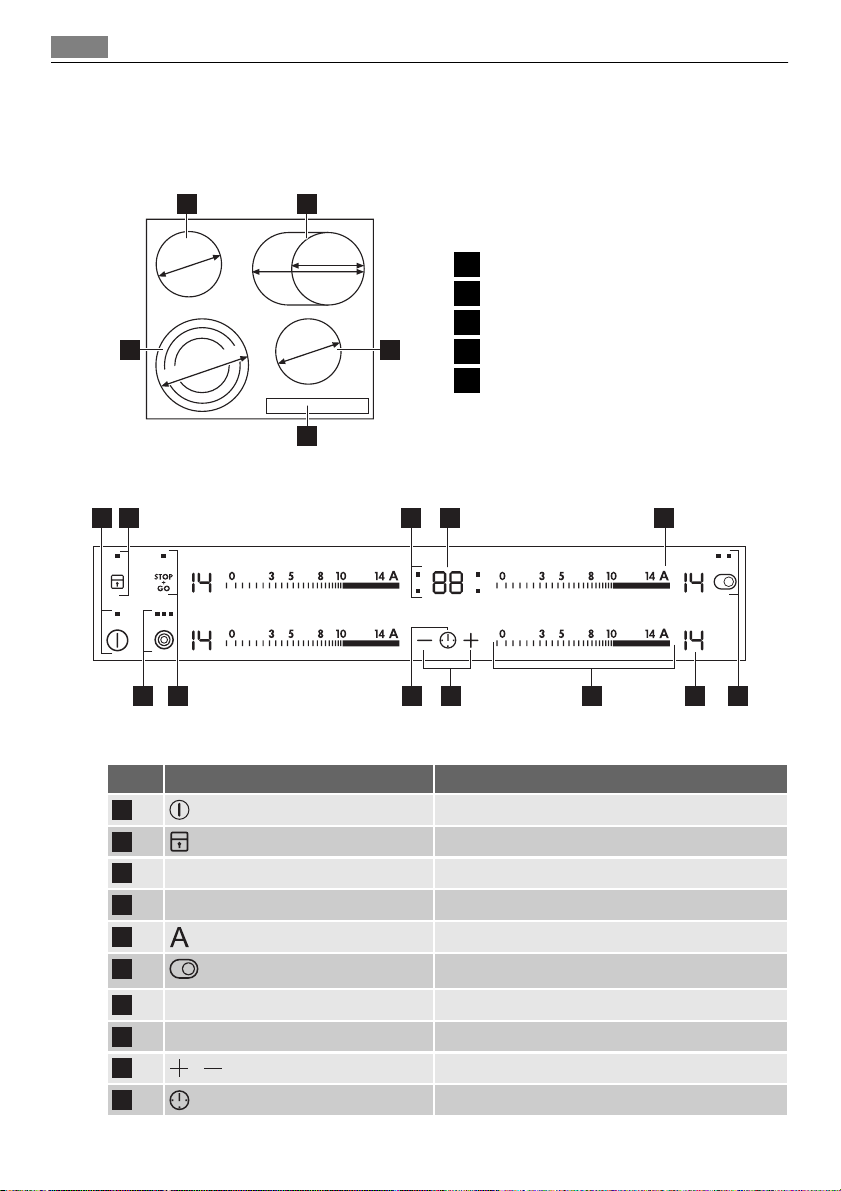
BESCHRIJVING VAN HET PRODUCT
Algemeen overzicht
1 2
145 mm
120/175/210 mm
170 mm
265 mm
145 mm
4
35
Enkele kookzone 1200 W
1
Ovale braadzone 1500/2400 W
2
Enkele kookzone 1200 W
3
Bedieningspaneel
4
Driekringskookzone 800/1600/2300 W
5
Indeling bedieningspaneel
4
3
11
Gebruik de sensorvelden om het apparaat te bedienen. De displays, indicatielampjes en geluiden
tonen welke functies worden gebruikt.
Sensorveld Functie
1
2
Kookzoneweergave van de timer Geeft aan voor welke zone u de tijd instelt
3
Het timerdisplay Geeft de tijd in minuten weer.
4
5
6
910 8
Het apparaat in- en uitschakelen.
Het bedieningspaneel vergrendelen/ontgrendelen.
Functie Automatisch opwarmen inschakelen.
De buitenste ring in- en uitschakelen.
51 2
712 6
Een kookstanddisplay Geeft de kookstand weer.
7
Een bedieningsstrip Kookstand instellen.
8
9
10
/
De tijdsinstellingen verhogen of verlagen.
Kookzone instellen.
Page 9

Sensorveld Functie
11
12
De functie STOP+GO in- en uitschakelen.
De buitenste ring in- en uitschakelen.
Kookstanddisplays
Display Beschrijving
De kookzone is uitgeschakeld.
-
+ cijfer
/ /
De kookzone wordt gebruikt.
De -functie werkt.
De functie Automatisch opwarmen werkt
Er is een storing.
OptiHeat Control (3 staps restwarmte-indicatie): door gaan met ko-
ken / warmhouden / restwarmte.
De functie vergrendeling/kinderbeveiliging werkt.
De functie Automatische uitschakelen is in werking getreden.
OptiHeat Control (3 staps restwarmte-indicatie)
WAARSCHUWING!
/ / Verbrandingsgevaar door restwarmte!
Bedieningsinstructies
9
OptiHeat Control geeft het niveau van de restwarmte aan.
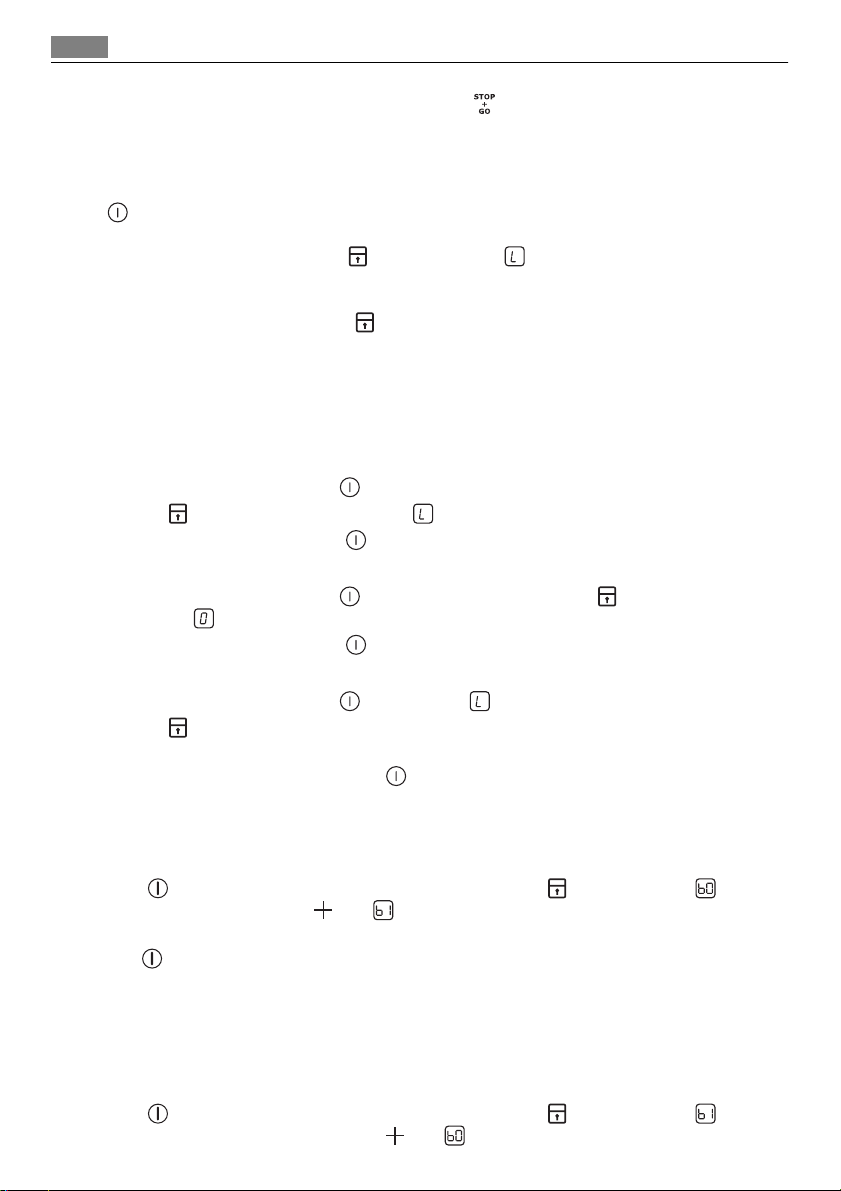
BEDIENINGSINSTRUCTIES
In- en uitschakeling
Raak 1 seconde aan om het apparaat in– of uit te schakelen.
Automatisch uitschakelen
De functie schakelt het apparaat automatisch uit als:
• Alle kookzones uitgeschakeld zijn (
• U de kookstand niet instelt nadat u het apparaat hebt ingeschakeld.
• U iets knoeit of langer dan 10 seconden iets op het bedieningspaneel legt (een pan, een
doek, etc.). Het geluid klinkt enige tijd en het apparaat wordt uitgeschakeld. Verwijder
het voorwerp of reinig het bedieningspaneel.
• U een kookzone niet uitschakelt of de kookstand verandert. Na enige tijd gaat
den en wordt het apparaat uitgeschakeld. Zie de tabel.
).
bran-
Page 10
10 Bedieningsinstructies
De tijden voor Automatisch uitschakelen
Temperatuurin-
, - - - -
stelling
De kookzone
6 uur 5 uur 4 uur 1,5 uur
wordt uitgescha-
keld na
De kookstand
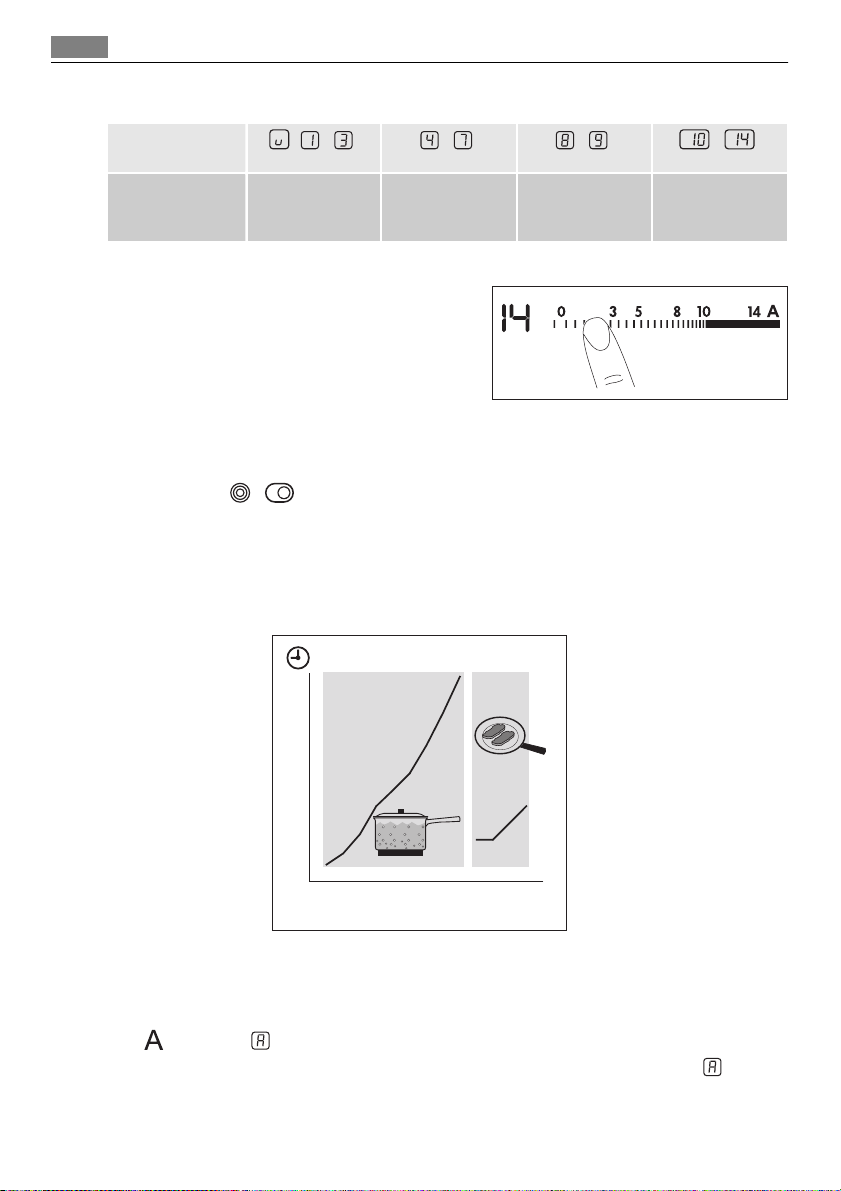
Raak de bedieningsstrip daar aan waar de kookstand zich bevindt. Corrigeer naar links of rechts,
indien nodig. Laat niet los voordat de juiste kookstand is bereikt. Het display toont de kookstand.
In- en uitschakelen van de buitenste ringen
Het verwarmingsvlak kan worden aangepast aan de grootte van het kookgerei.
Raak sensorveld
/ aan om de buitenste ring in te schakelen. Het controlelampje gaat
branden Voor meer buitenste verwarmingskringen hetzelfde sensorveld opnieuw aanraken.
Het bijbehorende controlelampje gaat branden.
Voer de procedure opnieuw uit om de buitenste ring uit te schakelen. Het controlelampje
gaat uit.
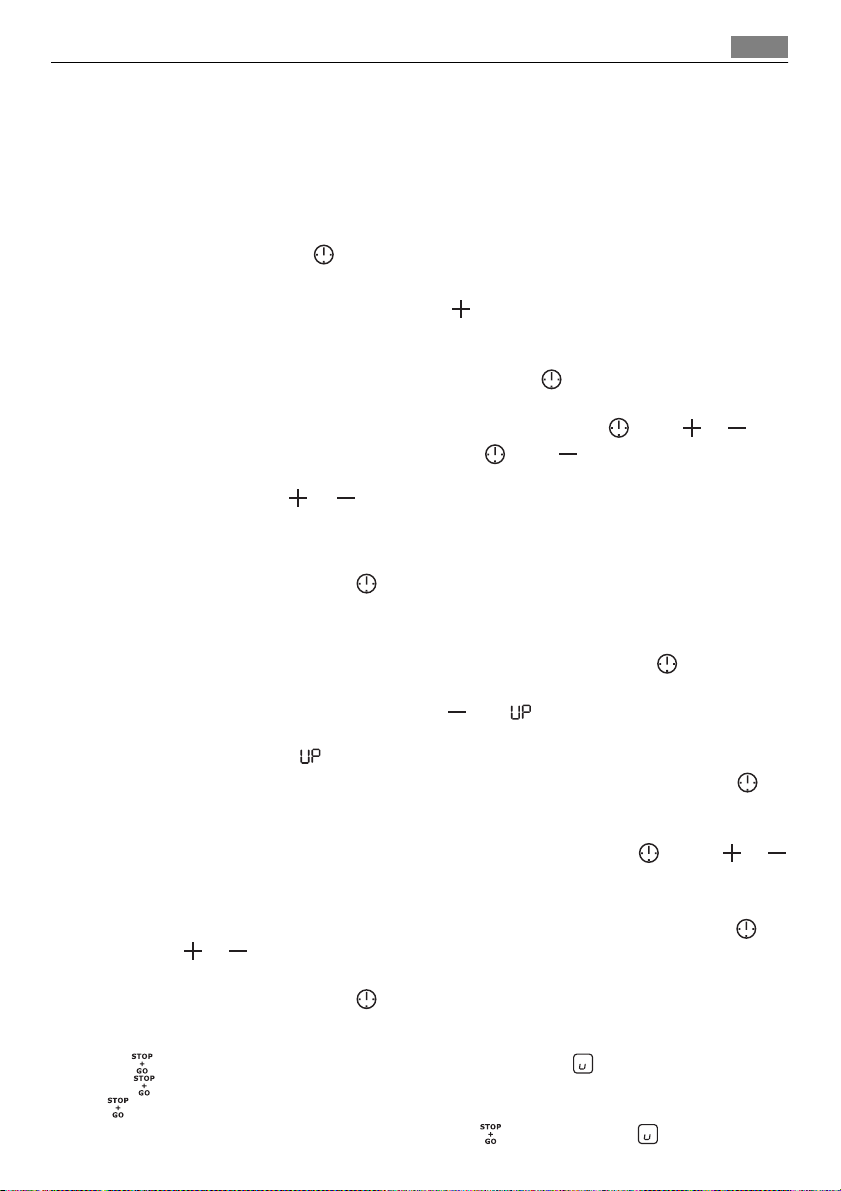
Automatisch opwarmen
12
11
10
9
8
7
6
5
4
3
2
1
0
1234567891011121314
U kunt de gewenste kookstand sneller verkrijgen als u de functie Automatisch opwarmen
inschakelt. Deze functie schakelt even de hoogste kookstand in (zie de afbeelding) en verlaagt dan naar de gewenste kookstand.
De functie Automatisch opwarmen starten voor een kookzone:
aanraken ( verschijnt op de display).
1.
2. Raak meteen de benodigde warmteinstelling aan. Na 3 seconden verschijnt
op het
display.
Wijzig de kookstand om de functie te stoppen.
Page 11
00
Bedieningsinstructies
Timer
Timer met aftelfunctie
Gebruik de timer met aftelfunctie om in te stellen hoe lang de kookzone wordt gebruikt
voor slechts deze ene keer.
Stel de timer met aftelfunctie in nadat de kookzone is geselecteerd.
U kunt de kookstand vóór of na het instellen van de timer selecteren.
• Kookzone instellen:raak
zone brandt.
• De timer met aftelfunctie activeren: Raak
- 99 minuten). Als het lampje van de kookzone langzaam knippert, wordt de tijd
00
afgeteld.
• Resterende tijd weergeven: selecteer de kookzone met
kookzone gaat sneller knipperen. Op het display wordt de resterende tijd weergegeven.
• De timer met aftelfunctie wijzingen:selecteer de kookzone met
• De timer uitschakelen: stel de kookzone in met
terug tot
schakelen kunt u ook
Als de afteltijd verstreken is, klinkt er een geluidssignaal en knippert
wordt uitgeschakeld.
• Het geluid stoppen: aanraken
CountUp Timer (De timer met optelfunctie)
Gebruik CountUp Timer om in de gaten te houden hoelang de kookzone werkt.
• De kookzone instellen (indien er meer dan 1 kookzone actief is):raak
len aan tot het lampje van de gewenste kookzone brandt.
• Voor het inschakelen vanCountUp Timer:
branden. Als het lampje van de kookzone langzaam knippert, wordt de tijd opgeteld. De
display schakelt tussen
• Om in de gaten te houden hoelang de kookzone werkt: stel de kookzone in met
Het indicatielampje van de kookzone gaat snel knipperen. Het display geeft de tijd aan
die de kookzone werkt.
• Voor het uitschakelen van CountUp Timer: stel de kookzone in met
aan voor het inschakelen van de timer. Het indicatielampje van de kookzone gaat uit.
Kookwekker
U kunt de timer als Kookwekker gebruiken als de kookzones uitgeschakeld zijn. Raak
aan. Raak of van de timer aan om de tijd in te stellen. Als de tijd verstreken is, klinkt
er een geluidssignaal en knippert
• Het geluid stoppen: aanraken
. Het indicatielampje van de kookzone gaat uit. Om de kookzone uit te
00
meerdere malen aan tot het lampje van de gewenste kook-
van de timer aan om de tijd in te stellen (
. Het indicatielampje van de
. Raak of aan.
. Raak aan. De resterende tijd telt
en gelijktijdig aanraken.
. De kookzone
door van de timer aan te raken gaat
en getelde tijd (minuten).
.
00
11
meerdere ma-
.
en raak of
STOP+GO
De -functie stelt alle kookzones in op de laagste instelling ( ).
in werking is, kunt u de warmte-instelling niet wijzigen.
Als
stopt de timerfunctie niet.
• Voor het inschakelen van deze functie, raakt u
aan. Het symbool gaat branden.
Page 12
12 Bedieningsinstructies
• Raak voor het uitschakelen van deze functie aan. De kookstand die u eerder hebt
ingesteld, wordt weergegeven.
Slot
Wanneer de kookzones in gebruik zijn, kunt u het bedieningspaneel vergrendelen, maar niet
. Hiermee wordt voorkomen dat de kookstand per ongeluk wordt veranderd.
Stel eerst de kookstand in.
Raak om deze functie te starten
den.
De timer blijft aan.
Raak om deze functie te stoppen
weergegeven.
Als u het apparaat stopt, stopt deze functie ook.
aan. Het symbool verschijnt gedurende vier secon-
aan. De kookstand die u eerder hebt ingesteld, wordt
De kinderbeveiliging
Deze functie voorkomt dat het apparaat onbedoeld wordt gebruikt.
De kinderbeveiliging inschakelen
• Schakel het apparaat in met
• Raak
• Schakel het apparaat uit met
De kinderbeveiliging uitschakelen
• Schakel het apparaat in met
• Schakel het apparaat uit met
De kinderbeveiliging gedurende een kooksessie onderdrukken
• Schakel het apparaat in met
• Raak
• Als u het apparaat uitschakelt met
4 seconden aan. Het symbool gaat branden.
symbool
raat bedienen.
gaat branden.
4 seconden aan. Stel de kookstand in binnen 10 seconden. U kunt het appa-
. Stel geen kookstand in.
.
. Stel geen kookstand in. Raak 4 seconden aan. Het
.
. Het symbool gaat branden.
, treedt de kinderbeveiliging weer in werking.
OffSound Control (In- en uitschakelen van de geluiden)
Uitschakelen van de geluiden
Schakel het apparaat uit.
3 seconden aan. De displays gaan aan en uit. Raak 3 seconden aan. gaat
Raak
aan, het geluid is aan. Raak
Als deze functie is ingeschakeld, kunt u alleen de geluiden horen als:
aanraakt
•u
• de kookwekker af gaat
• de Timer met aftelfunctie gaat af
• als u iets op het bedieningspaneel plaatst.
Inschakelen van de geluiden
Schakel het apparaat uit.
3 seconden aan. De displays gaan aan en uit. Raak 3 seconden aan. gaat
Raak
aan, omdat het geluid uit staat. Raak
aan, gaat aan, het geluid is uit.
aan, gaat aan. Het geluid is aan.
Page 13
Nuttige aanwijzingen en tips 13
NUTTIGE AANWIJZINGEN EN TIPS
Kookgerei
• De bodem van het kookgerei moet zo dik en vlak mogelijk zijn.
• Kookgerei gemaakt van geëmailleerd staal of met aluminium of koperen bodems, kunnen
tot verkleuringen leiden van de glazen keramische kookplaat.
Energie besparen
• Doe indien mogelijk altijd een deksel op de pan.
• Zet de pan op de kookzone voordat u deze inschakelt.
• Schakel voor het einde van de bereidingstijd de kookzones uit, om gebruik te maken van
de restwarmte.
• De bodems van de pannen en kookzones dienen dezelfde afmeting te hebben.
Öko Timer (Eco-timer)
Om energie te besparen schakelt het verwarmingselement van de kookzone eerder uit dan
het signaal van de timer met aftelfunctie klinkt. Het verschil in werkingstijd hangt af van
het niveau van de kookstand en de tijd dat u kookt.
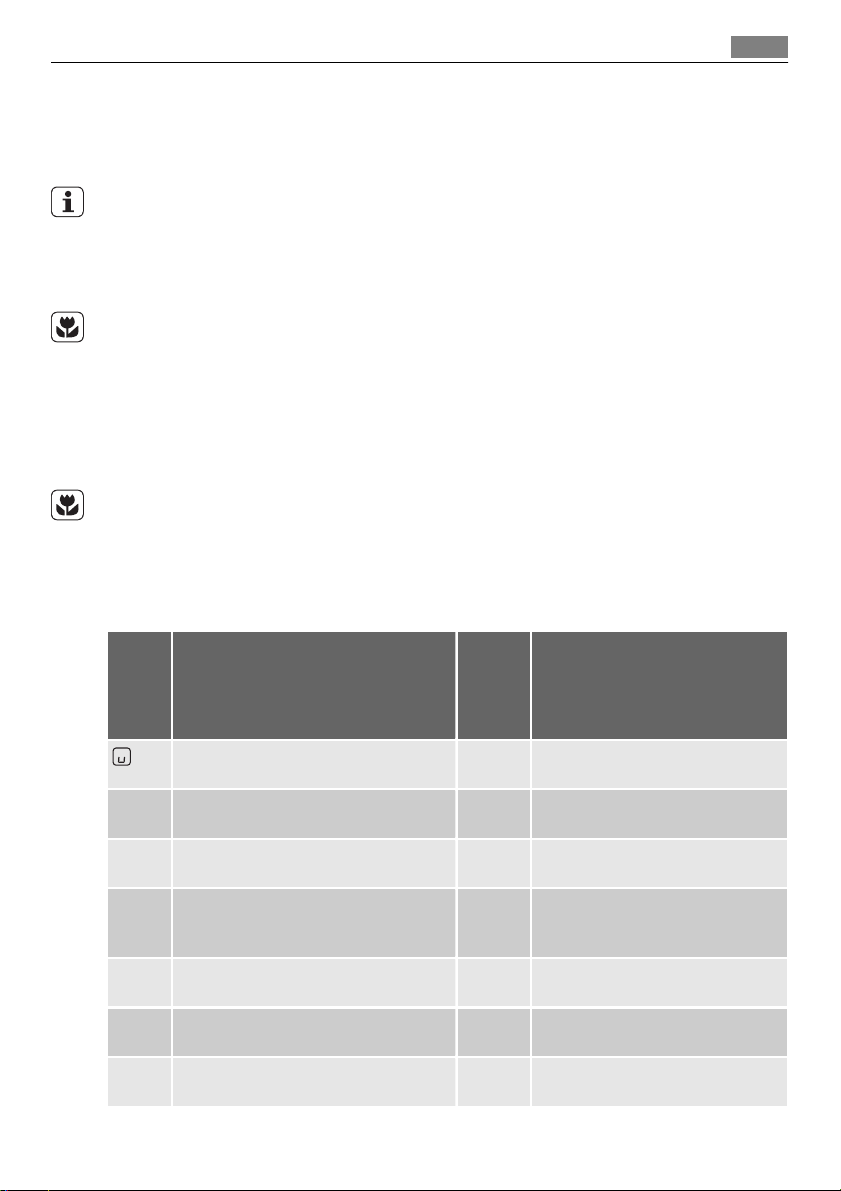
Voorbeelden van kooktoepassingen
De gegevens in de volgende tabel dienen slechts als richtlijn.
Tempera-
tuurin-
stel-
ling
Bereide gerechten warmhouden zoals
1
1-3 Hollandaisesaus, smelten: boter, choco-
1-3 Stollen: luchtige omeletten, gebakken
3-5 Zachtjes aan de kook brengen van rijst
5-7 Stomen van groenten, vis en vlees 20-45
7-9 Aardappelen stomen 20-60
7-9 Bereiden van grotere hoeveelheden
lade, gelatine
eieren
en gerechten op melkbasis, reeds bereide gerechten opwarmen
voedsel, stoofschotels en soepen
Gebruik om: Tijdsin-
stelling
nodig
5-25
min
10-40
min
25-50
min
min
min
60-150
min
Tips
Een deksel op de pan doen
Van tijd tot tijd mengen
Met deksel bereiden
Voeg minimaal twee keer zo veel
vocht toe als rijst, gerechten op
melkbasis regelmatig roeren.
Een paar eetlepels vocht toevoegen.
Gebruik max. ¼ l water voor 750 g
aardappelen.
Tot 3 l vloeistof plus ingrediënten.
Page 14
14 Onderhoud en reiniging
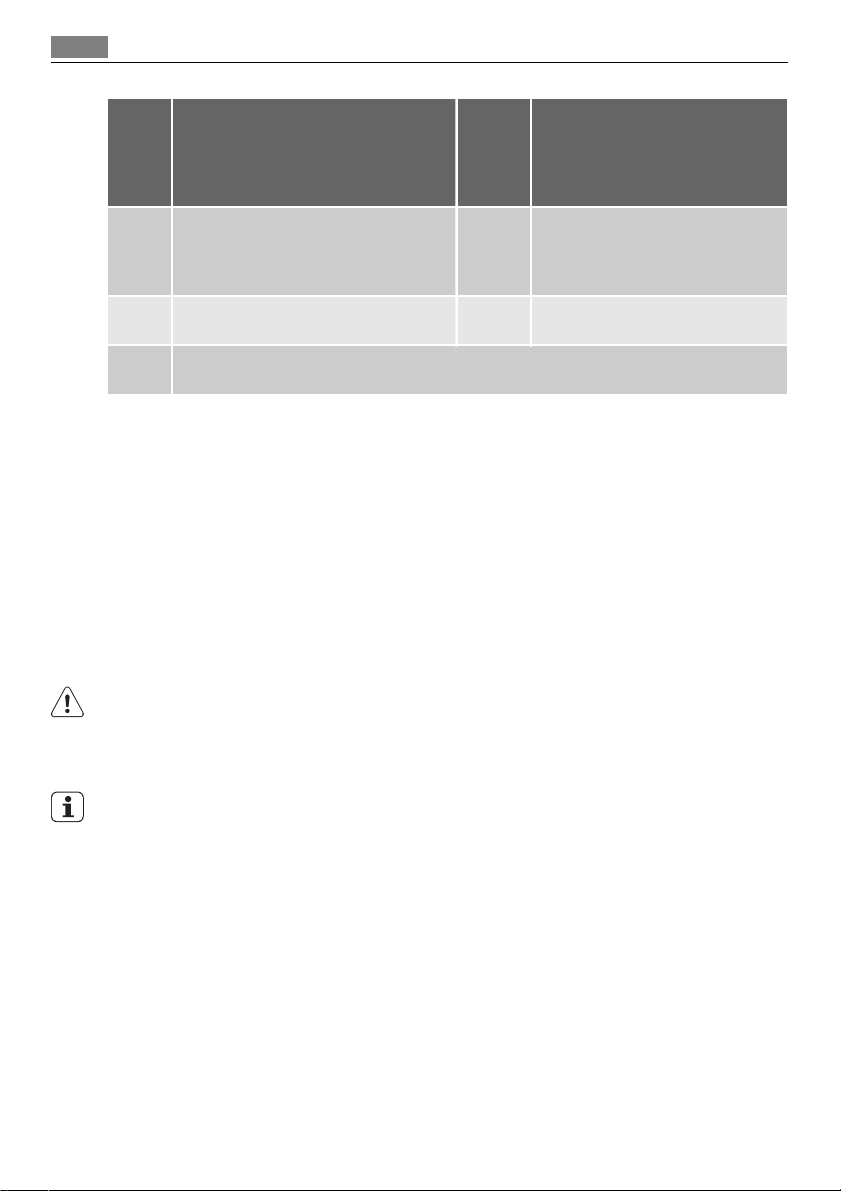
Tempera-
tuurin-
stel-
ling
9-12 Lichtjes braden: kalfsoester, cordon bleu
van kalfsvlees, koteletten, rissoles, worstjes, lever, roux, eieren, pannenkoeken,
donuts
12-13 Door-en-door gebraden, opgebakken
aardappelen, lendenbiefstukken, steaks
14 Aan de kook brengen van grotere hoeveelheden water, pasta koken, aanbraden van vlees
(goulash, stoofvlees), frituren van friet.
Gebruik om: Tijdsin-
stelling
zoals
nodig
5-15
min
Halverwege de bereidingstijd omdraaien.
Halverwege de bereidingstijd omdraaien.
Informatie over acrylamides
Belangrijk! Volgens recente wetenschappelijke informatie kan het intensief bruinen van
levensmiddelen (met name in producten die zetmeel bevatten), een gezondheidsrisico
vormen tengevolge van acrylamides. Om die reden adviseren wij levensmiddelen zoveel
mogelijk bij lage temperaturen gaar te laten worden en de gerechten niet te veel te
bruinen.
ONDERHOUD EN REINIGING
Reinig het apparaat telkens na gebruik
Gebruik altijd kookgerei met een schone bodem.
WAARSCHUWING!
De scherpe voorwerpen en de schuurmiddelen kunnen het apparaat beschadigen.
Het reinigen van het apparaat met een stoom- of hogedrukreiniger is om veiligheidsredenen niettoegestaan.
Tips
Krassen of donkere vlekken in de glaskeramiek hebben geen invloed op de werking van het
apparaat.
Vuil verwijderen:
1. – Verwijder direct:gesmolten plastic, gesmolten folie en suikerhoudende gerechten.
Anders kan het vuil het apparaat beschadigen. Gebruik een speciale schraper voor
de glazen plaat. Plaats de schraper schuin op de glazen plaat en verwijder resten
door het blad over het oppervlak te schuiven.
– Verwijder nadat het apparaat voldoende is afgekoeld: kalk- en waterkringen, vet-
spatten en metaalachtig glanzende verkleuringen. Gebruik een speciaal schoonmaakmiddel voor glaskeramiek of roestvrij staal.
2. Reinig het apparaat met een vochtige doek en een beetje afwasmiddel.
3. Wrijf het apparaat ten slotte droog met een schone doek.
Page 15
Problemen oplossen
PROBLEMEN OPLOSSEN
Probleem Mogelijke oorzaak en oplossing
U kunt het apparaat niet inschakelen of bedienen.
Er klinkt een geluid en het apparaat wordt uitgeschakeld.
Er klinkt een geluid als het apparaat wordt uitgeschakeld.
Het apparaat wordt uitgeschakeld.
De restwarmte-indicator gaat
niet aan.
De automatische opwarmfunctie start niet.
U kunt de buitenste ring niet
inschakelen.
De sensorvelden worden warm. De pan is te groot of staat te dicht bij de bediening. Plaats groter
Er klinkt geen signaal wanneer
u de sensorvelden van het bedieningspaneel aanraakt.
gaat branden.
en een getal gaan branden.
Als u door het volgen van de bovenstaande suggesties het probleem niet kunt oplossen,
dient u contact op te nemen met uw vakhandelaar of de klantenservice. Geef de gegevens
door van het typeplaatje, een driecijferige code voor de glaskeramiek (bevindt zich op de
hoek van het glazen oppervlak) en de foutmelding die wordt weergegeven.
Controleer of u het apparaat op de juiste manier gebruikt hebt. Bij onjuist gebruik van het
apparaat wordt het bezoek van de technicus van de klantenservice of de vakhandelaar in
• Schakel het apparaat opnieuw in en stel de kookstand binnen
10 seconden in.
• U hebt twee of meer sensorvelden tegelijk aangeraakt. Raak
slechts één sensorveld tegelijk aan.
• De kinderbeveiliging of toetsblokkering Stop+Go is actief. Zie
het hoofdstuk Gebruiksaanwijzing.
• Er bevindt zich water of vetspatten op het bedieningspaneel.
Reinig het bedieningspaneel.
U hebt een of meer sensorvelden afgedekt. Verwijder het voorwerp van de sensorvelden.
U hebt iets op de gezet. Verwijder het object van het sensorveld.
De kookzone is niet heet, omdat hij slechts kortstondig is bediend. Als de kookzone heet moet zijn, neem dan contact op met
de klantenservice.
• De kookzone geeft nog steeds restwarmte af. Laat de kookzone
voldoende afkoelen.
• De hoogste kookstand is ingesteld. De hoogste kookstand heeft
hetzelfde vermogen als de automatische opwarmfunctie.
Schakel eerst de binnenste ring in.
kookgerei op de achterste kookzones indien nodig.
De signalen zijn uitgeschakeld. Activeer de signalen (zie In- en
uitschakelen van de geluiden).
De automatische uitschakeling is in werking getreden. Schakel
het apparaat uit en weer in.
Er heeft zich een fout in het apparaat voorgedaan.
Ontkoppel het apparaat enige tijd van de stroomtoevoer. Ontkoppel de zekering uit het elektrische systeem van het huis. Sluit het
apparaat opnieuw aan. Als
contact op met de klantenservice.
weer gaat branden, neem dan
15
Page 16

16 Milieubescherming
rekening gebracht, zelfs tijdens de garantieperiode. De instructies over de klantenservice en
de garantiebepalingen vindt u in het garantieboekje.
MILIEUBESCHERMING
Het symbool op het product of op de verpakking wijst erop dat dit product niet als
huishoudafval mag worden behandeld, maar moet worden afgegeven bij een verzamelpunt
waar elektrische en elektronische apparatuur wordt gerecycled. Als u ervoor zorgt dat dit
product op de juiste manier wordt verwijderd, voorkomt u mogelijke negatieve gevolgen
voor mens en milieu die zich zouden kunnen voordoen in geval van verkeerde
afvalverwerking. Voor gedetailleerdere informatie over het recyclen van dit product, kunt u
contact opnemen met de gemeente, de gemeentereiniging of de winkel waar u het product
hebt gekocht.
Verpakkingsmateriaal
De verpakkingsmaterialen zijn milieuvriendelijk en herbruikbaar De kunststof onderdelen
zijn gemarkeerd, bijv.: >PE<,>PS<, enz. Gooi het verpakkingsmateriaal weg in de juiste afvalcontainer bij uw plaatselijke afvalverwerkingsdienst.
Page 17

FOR PERFECT RESULTS
Thank you for choosing this AEG product. We have created it to give you
impeccable performance for many years, with innovative technologies that help
make life simpler – features you might not find on ordinary appliances. Please
spend a few minutes reading to get the very best from it.
ACCESSORIES AND CONSUMABLES
In the AEG webshop, you’ll find everything you need to keep all your AEG
appliances looking spotless and working perfectly. Along with a wide range of
accessories designed and built to the high quality standards you would expect,
from specialist cookware to cutlery baskets, from bottle holders to delicate
laundry bags…
Visit the webshop at:
www.aeg.com/shop
17
Page 18

18 Contents
CONTENTS
19 Safety information
20 Installation instructions
22 Product description
23 Operating instructions
27 Helpful hints and tips
28 Care and cleaning
28 What to do if…
29 Environment concerns
The following symbols are used in this user
manual:
Important information concerning your
personal safety and information on how to
avoid damaging the appliance.
General information and tips
Environmental information
Subject to change without notice.
Page 19

Safety information
SAFETY INFORMATION
For your safety and correct operation of the appliance, read this manual carefully before
the installation and use. Always keep these instructions with the appliance also if you move
or sell it. The users must fully know the operation and safety functions of the appliance.
Children and vulnerable people safety
WARNING!
Do not let persons, children included, with reduced physical sensory, reduced mental functions or lack of experience and knowledge to use the appliance. They must have supervision
or instruction for the operation of the appliance by a person who is responsible for their
safety.
• Keep all packaging away from children. There is the risk of suffocation or injury.
• Keep the children away from the appliance during and after the operation, until the appliance is cold.
WARNING!
Activate the child safety device to prevent small children and pets from an accidental activation of the appliance.
Safety during operation
• Remove all packaging, stickers and layers from the appliance before the first use.
• Set the cooking zones to "off" after each use.
• The Risk of burns! Do not put cutlery or saucepan lids on the surface that you cook, as
they can become hot.
WARNING!
Fire risk! Too hot fats and oils can occur with ignition very quickly.
19
Correct operation
• Always monitor the appliance during operation.
• The appliance is only for domestic use!
• Do not use the appliance as a work or a storage surface.
• Do not put or keep very flammable liquids and materials, easy fusible objects (made of
plastic or aluminium) on or near the appliance.
• Be careful when you connect the appliance to the near sockets. Do not let the electricity
bonds touch the appliance or hot cookware. Do not let the electricity bonds to tangle.
How to prevent a damage to the appliance
• If the objects or cookware fall on the glass ceramic, the surface can be damaged.
• Cookware made of cast iron, cast aluminium or with damaged bottoms can cause
scratch of the glass ceramic. Do not move them on the surface.
• Do not let cookware boil dry to prevent the damage to cookware and glass.
• Do not use the cooking zones with empty cookware or without cookware.
Page 20

20 Installation instructions
• Do not put the aluminium foil on the appliance.
WARNING!
If there is a crack on the surface, disconnect power supply to prevent the electrical
shock.
INSTALLATION INSTRUCTIONS
Before the installation, note down the serial number (Ser. Nr.) from the rating plate.The
rating plate of the appliance is on its lower casing.
58 HAD 56 AO
AEG
HK654079XB
220-240 V 50-60-Hz
The Safety Instructions
WARNING!
You must read these!
• Make sure that the appliance is not damaged because of transportation. Do not connect
a damaged appliance. If it is necessary, speak to the supplier.
• Only an authorized servicing technician can install, connect or repair this appliance. Use
only original spare parts.
• Only use the built-in appliances after you assemble the appliance into correct built-in
units and work surfaces that align to the standards.
• Do not change the specifications or change this product. Risk of injury and damage to
the appliance.
• Fully obey the laws, ordinances, directives and standards in force in the country where
you use the appliance (safety regulations, recycling regulations, electrical safety rules
etc.)!
• Keep the minimum distances to other appliances and units!
• Install shock protection, for example install the drawers only with a protective floor directly below the appliance!
• Keep safe the cut surfaces of the worktop from moisture with a correct sealant!
• Seal the appliance to the work top with no space between with a correct sealant!
• Keep safe the bottom of the appliance from steam and moisture, e.g. from a dishwasher
or oven!
• Do not install the appliance adjacent to doors and below windows! If not, when you
open the doors or windows they can push off hot cookware from the appliance.
WARNING!
Risk of injury from electrical current. Carefully obey the instructions for electrical connections.
949 595 071 00
7,1 kW
• The electrical mains terminal is live.
• Make electrical mains terminal free of voltage.
Page 21

Installation instructions
• Install correctly to give shock protection.
• Loose and incorrect plug and socket connections can make the terminal become too hot.
• A qualified electrician must install the connections in the clamps correctly.
• Use a strain relief clamp on cable.
• Use the correct mains cable of type H05BB-F Tmax 90°C (or higher) for a single phase or
two phase connection.
• Replace the damaged mains cable with a special cable (type H05BB-F Tmax 90°C; or
higher). Speak to your local Service Centre.
The appliance must have the electrical installation which lets you disconnect the appliance
from the mains at all poles with a contact opening width of minimum 3 mm.
You must have correct devices to isolate: line protecting cut-outs, fuses (screw type fuses
removed from the holder), earth leakage trips and contactors.
Assembly
min.
min.
50mm
500mm
min.
50mm
=
R 5mm
490
mm
560
+1
mm
+1
=
21
600mm
min.
28 mm
min.
25 mm
min.
20 mm
Page 22

22 Product description
If you use a protection box (the additional acces-
2)
), the protective floor directly below the ap-
sory
pliance is not necessary.
You can not use the protection box if you install
the appliance above an oven.
PRODUCT DESCRIPTION
General overview
1 2
145 mm
120/175/210 mm
170 mm
265 mm
145 mm
4
35
Single cooking zone 1200 W
1
Oval zone 1500/2400 W
2
Single cooking zone 1200 W
3
Control panel
4
Triple cooking zone 800/1600/2300 W
5
Control panel layout
4
3
11
Use the sensor fields to operate the appliance. The displays, indicators and sounds tell which
functions operate.
sensor field function
1
2
Cooking zones' indicators of timer It shows for which zone you set the time.
3
The timer display It shows the time in minutes.
4
910 8
It activates and deactivates the appliance.
It locks/unlocks the control panel.
51 2
712 6
2) The protection box accessory may not be available in some countries. Please contact your local supplier.
Page 23

sensor field function
5
6
A heat setting display It shows the heat setting.
7
A control bar To set the heat setting.
8
9
10
11
12
/
Heat setting displays
Display Description
-
+ digit
/ /
Operating instructions
It activates Automatic Heat Up function.
It activates and deactivates the outer ring.
It increases or decreases the time.
It sets the cooking zone.
It activates and deactivates the STOP+GO func-
tion.
It activates and deactivates the outer ring .
The cooking zone is deactivated.
The cooking zone operates.
The function operates.
The Automatic Heat Up function operates
There is a malfunction.
OptiHeat Control (3 step Residual heat indicator) : continue cook /
stay warm / residual heat.
Lock/The Child Safety function operates.
The Automatic Switch Of function operates.
23
OptiHeat Control (3 step Residual heat indicator)
WARNING!
/ / The risk of burns from residual heat!
OptiHeat Control shows the level of the residual heat.
OPERATING INSTRUCTIONS
Activation and deactivation
Touch for 1 second to activate or deactivate the appliance.
Automatic Switch Off
The function deactivates the appliance automatically if:
• All cooking zones are deactivated (
• You do not set the heat setting after you activate the appliance.
).
Page 24

24 Operating instructions
• You spill something or put something on the control panel for more than 10 seconds, (a
pan, a cloth, etc.). The sound operates some time and the appliance deactivates. Remove
the object or clean the control panel.
• You do not deactivate a cooking zone or change the heat setting. After some time,
comes on and the appliance deactivates. See the table.
The times of Automatic Switch Off
The heat setting
The cooking zone
, - - - -
6 hours 5 hours 4 hours 1.5 hours
deactivates after
The heat setting
Touch the control bar at the heat setting. Change
to the left or the right, if it is necessary. Do not
release before you have a correct heat setting. The
display shows the heat setting.
Activation and deactivation of the outer rings
You can adjust the surface you cook to the dimension of the cookware.
To activate the outer ring touch the sensor field
more outer rings touch the same sensor field again. The subsequent indicator comes on.
Do the procedure again to deactivate the outer ring. The indicator goes out.
/ . The indicator comes on. For
Automatic Heat Up
12
11
10
9
8
7
6
5
4
3
2
1
0
1234567891011121314
You can get a necessary heat setting in a shorter time if you activate the Automatic Heat
Up function. This function sets the highest heat setting for some time (see the illustration),
and then decreases to the necessary heat setting.
To start the Automatic Heat Up function for a cooking zone:
1. Touch
2. Immediately touch the necessary heat setting. After 3 seconds
play.
( comes on in the display).
comes on in the dis-
Page 25

00
00
Operating instructions
To stop the function change the heat setting.
Timer
Count Down Timer
Use the Count Down Timer to set how long the cooking zone operates for only this one
time.
Set the Count Down Timer after the selection of the cooking zone.
You can set the heat setting before or after you set the timer.
• To set the cooking zone: touch
cooking zone comes on.
• To activate the Count Down Timer: touch
minutes). When the indicator of the cooking zone start to flash slow, the time counts
down.
• To see the remaining time: set the cooking zone with
zone starts to flash quickly. The display shows the remaining time.
• To change the Count Down Timer: set the cooking zone with
• To deactivate the timer: set the cooking zone with
counts back to
also touch
When the countdown comes to an end, the sound operates and
zone deactivates.
• To stop the sound: touch
CountUp Timer ( The count up timer)
Use the CountUp Timer to monitor how long the cooking zone operates.
• To set the cooking zone (if more than 1 cooking zone operate ) : touch
again until the indicator of a necessary cooking zone comes on.
• To activate the CountUp Timer: touch
of the cooking zone starts to flash slow, the time counts up. The display switches between
• To see how long the cooking zone operates: set the cooking zone with
tor of the cooking zone starts to flash quickly. The display shows the time that the cooking zone operates.
• To deactivate the CountUp Timer: set the cooking zone with
deactivate the timer. The indicator of the cooking zone goes out.
Minute Minder
You can use the timer as a Minute Minder while the cooking zones do not operate. Touch
. Touch or of the timer to set the time. When the time comes to an end, the
sound operates and
• To stop the sound: touch
and counted time (minutes).
. The indicator of the cooking zone goes out. To deactivate you can
and at the same time.
flashes.
00
again and again until the indicator of a necessary
of the timer to set the time ( 00 -
. The indicator of the cooking
. Touch or .
. Touch . The remaining time
flashes. The cooking
of the timer comes on. When the indicator
and touch or to
25
99
again and
. The indica-
STOP+GO
The function sets all cooking zones that operate to the lowest heat setting ( ).
When
operates, you cannot change the heat setting.
Page 26

26 Operating instructions
The function does not stop the timer function.
• To activate this function touch
• To deactivate this function touch
. The symbol comes on.
. The heat setting that you set before comes on.
Lock
When the cooking zones operate, you can lock the control panel, but not . It prevents an
accidental change of the heat setting.
First set the heat setting.
To start this function touch
The Timer stays on.
To stop this function touch
When you stop the appliance, you also stop this function.
. The symbol comes on for 4 seconds.
. The heat setting that you set before comes on.
The child safety device
This function prevents an accidental operation of the appliance.
To activate the child safety device
• Activate the appliance with
• Touch
• Deactivate the appliance with
To deactivate the child safety device
• Activate the appliance with
The symbol
• Deactivate the appliance with
To override the child safety device for only one cooking time
• Activate the appliance with
• Touch
ance.
• When you deactivate the appliance with
for 4 seconds. The symbol comes on.
comes on.
for 4 seconds. Set the heat setting in 10 seconds. You can operate the appli-
. Do not set the heat settings.
.
. Do not set the heat settings. Touch for 4 seconds.
.
. The symbol comes on.
, the child safety device operates again.
OffSound Control (Deactivation and activation of the sounds)
Deactivation of the sounds
Deactivate the appliance.
Touch
comes on, the sound is on. Touch , comes on, the sound is off.
When this function operates, you can hear the sounds only when:
• you touch
• the Minute Minder comes down
• the Count Down Timer comes down
• you put something on the control panel.
Activation of the sounds
Deactivate the appliance.
Touch
comes on, because the sound is off. Touch , comes on. The sound is on.
for 3 seconds. The displays come on and go out. Touch for 3 seconds.
for 3 seconds. The displays come on and go out. Touch for 3 seconds.
Page 27

Helpful hints and tips 27
HELPFUL HINTS AND TIPS
Cookware
• The bottom of the cookware must be as thick and flat as possible.
• Cookware made of enamelled steel and with aluminium or copper bottoms can cause the
color change on the glass-ceramic surface.
Energy saving
• If it is possible, always put the lids on the cookware.
• Put cookware on a cooking zone before you start it.
• Stop the cooking zones before the end of the cooking time to use residual heat.
• The bottom of pans and cooking zones must have the same dimension.
Öko Timer (Eco Timer)
To save the energy, the heater of the cooking zone deactivates before the count down timer
signal. The difference in the operation time is depends of the heat setting level and the time
you cook.
The examples of cooking applications
The data in the table is for guidance only.
Heat
setting
Keep cooked foods warm as nec-
1
1-3 Hollandaise sauce, melt: butter, choco-
1-3 Solidify: fluffy omelettes, baked eggs 10-40
3-5 Simmer rice and milkbased dishes, heat-
5-7 Steam vegetables, fish, meat 20-45
7-9 Steam potatoes 20-60
7-9 Cook larger quantities of food, stews
9-12 Gentle fry: escalope, veal cordon bleu,
late, gelatine
ing up ready-cooked meals
and soups
cutlets, rissoles, sausages, liver, roux,
eggs, pancakes, doughnuts
Use to: Time Hints
essary
5-25
min
min
25-50
min
min
min
60-150
min
as nec-
essary
Put a lid on a cookware.
Mix from time to time.
Cook with a lid on.
Add the minimum two times as
much liquid as rice, mix milk dishes
at some point of the procedure
through.
Add some tablespoons of liquid.
Use max. ¼ l water for 750 g of potatoes.
Up to 3 l liquid plus ingredients.
Turn halfway through.
Page 28

28 Care and cleaning
Heat
setting
12-13 Heavy fry, hash browns, loin steaks,
steaks
14 Boil large quantities of water, cook pasta, sear meat (goulash, pot roast), deep fry chips.
Use to: Time Hints
5-15
min
Turn halfway through.
Information on acrylamides
Important! According to the newest scientific knowledge, if you brown food (specially the
one which contains starch), acrylamides can pose a health risk. Thus, we recommend that
you cook at the lowest temperatures and do not brown food too much.
CARE AND CLEANING
Clean the appliance after each use.
Always use cookware with clean bottom.
WARNING!
The sharp objects and abrasive cleaning agents can cause damage to the appliance.
For your safety, do not clean the appliance with steam cleaners or high-pressure cleaners.
Scratches or dark stains on the glass-ceramic cause no effect on how the appliance operates.
To remove the dirt:
1. – Remove immediately: melted plastic, plastic foil, and food with sugar. If not, the
dirt can cause damage to the appliance. Use a special scraper for the glass . Put the
scraper on the glass surface at an acute angle and move the blade on the surface .
– Remove after the appliance is sufficiently cool: limescale rings , water rings, fat
stains, shiny metallic discolorations. Use a special cleaning agent for glass ceramic
or stainless steel.
2. Clean the appliance with a moist cloth and some detergent.
3. At the end rub the appliance dry with a clean cloth.
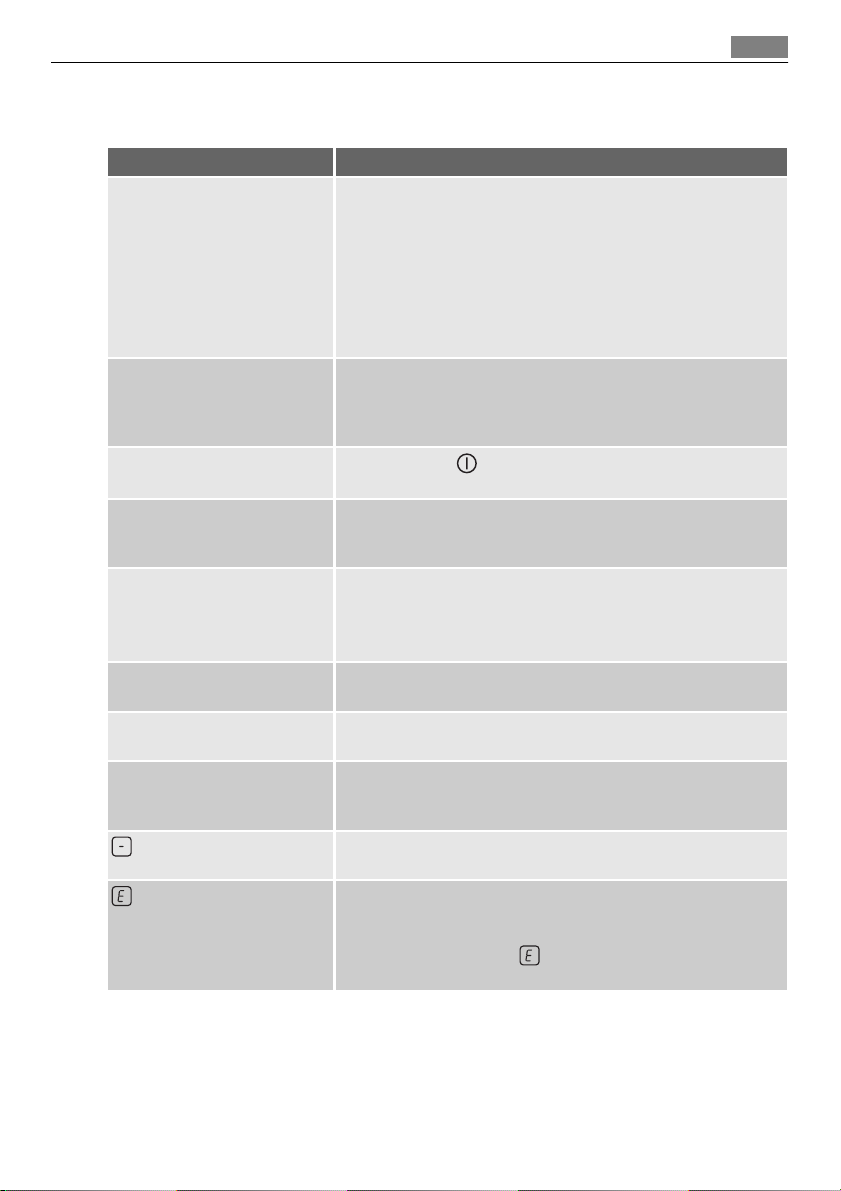
WHAT TO DO IF…
Problem Possible cause and remedy
You cannot activate the appliance or operate it.
• Activate the appliance again and set the heat setting in 10
seconds.
• You touched 2 or more sensor fields at the same time. Only
touch one sensor field.
• The Child Safety Device or the Lock or Stop+Go operates. See
the chapter Operating instructions.
• There is water or fat stains on the control panel. Clean the
control panel.
Page 29

Environment concerns
Problem Possible cause and remedy
A Sound operates and the appliance deactivates.
A sound operates when the appliance is deactivated.
The appliance deactivates.
The residual heat indicator does
not comes on.
The Automatic Heat Up function does not operate.
You cannot activate the outer
ring.
The sensor fields become hot. The cookware is too large or you out it too near to the controls.
There is no signal when you
touch the panel sensor fields.
comes on
and number comes on.
You put something on one or more sensor fields. Remove the object from the sensor fields.
You put something on the . Remove the object from the sensor field.
The cooking zone is not hot because it operated only for a short
time. If the cooking zone should be hot, speak to the service centre.
• There is still residual heat on the cooking zone. Let the cooking
zone become sufficiently cool.
• The highest heat setting is set. The highest heat setting has the
same power as the Automatic Heat Up function.
Activate the inner ring first.
Put large cookware on the rear cooking zones if it is necessary.
The signals are deactivated. Activate the signals (see OffSound
Control).
The Automatic Switch Off operates. Deactivate the appliance and
activate it again.
There is an error in the appliance.
Disconnect the appliance from the electrical supply for some
time. Disconnect the fuse from the electrical system of the house.
Connect again. If
comes on again, speak to the service centre.
29
If you tried the above solutions and cannot repair the problem, speak to your dealer or the
customer service. Give the data from the rating plate, three digit letter code for the glass
ceramic (it is in the corner of the glass surface) and an error message that comes on.
Make sure, you operated the appliance correctly. If not the servicing by a customer service
technician or dealer will not be free of charge, also during the warranty period. The instructions about the customer service and conditions of guarantee are in the guarantee booklet.
ENVIRONMENT CONCERNS
The symbol on the product or on its packaging indicates that this product may not be
treated as household waste. Instead it should be taken to the appropriate collection point
for the recycling of electrical and electronic equipment. By ensuring this product is
disposed of correctly, you will help prevent potential negative consequences for the
environment and human health, which could otherwise be caused by inappropriate waste
handling of this product. For more detailed information about recycling of this product,
please contact your local council, your household waste disposal service or the shop where
you purchased the product.
Page 30

30 Environment concerns
Packaging material
The packaging materials are friendly to the environment and can be recycled. The plastic
components are identified by marking: >PE<,>PS<, etc. Discard the packaging materials as
household waste at the waste disposal facilities in your municipality.
Page 31

POUR DES RÉSULTATS PARFAITS
Merci d'avoir choisi ce produit AEG. Nous l'avons conçu pour qu'il vous offre des
performances irréprochables pour longtemps, en intégrant des technologies
innovantes qui vous simplifient la vie grâce à des caractéristiques que vous ne
trouverez pas forcément sur des appareils ordinaires. Veuillez prendre quelques
instants pour lire cette notice afin d'utiliser au mieux votre appareil.
ACCESSOIRES ET CONSOMMABLES
Dans la boutique en ligne d'AEG, vous trouverez tout ce qu'il vous faut pour que
vos appareils AEG fonctionnent parfaitement. Sans oublier une vaste gamme
d'accessoires conçus et fabriqués selon les critères de qualité les plus élevés qui
soient, des articles de cuisine spécialisés aux range-couverts, des porte-bouteilles
aux sacs à linge délicats...
Visitez la boutique en ligne sur
www.aeg.com/shop
31
Page 32

32 Sommaire
SOMMAIRE
33 Consignes de sécurité
34 Instructions d'installation
37 Description de l'appareil
38 Notice d'utilisation
42 Conseils utiles
43 Entretien et nettoyage
44 En cas d'anomalie de
fonctionnement
45 En matière de protection de
l'environnement
Les symboles suivants sont utilisés dans ce
manuel:
Informations importantes pour votre sécurité
et pour éviter d’abîmer l’appareil.
Informations générales et conseils
Informations écologiques
Sous réserve de modifications.
Page 33

Consignes de sécurité
CONSIGNES DE SÉCURITÉ
Pour votre sécurité et pour garantir une utilisation correcte de l'appareil, lisez attentivement cette notice d'utilisation, ainsi que ses conseils et avertissements, avant d'installer et
d'utiliser l'appareil pour la première fois. Conservez cette notice d'utilisation avec l'appareil,
même si vous veniez à le déplacer ou à le vendre. Pour éviter toute erreur ou accident, veillez à ce que toute personne qui utilise l'appareil connaisse bien son fonctionnement et ses
options de sécurité.
Sécurité des enfants et des personnes vulnérables
AVERTISSEMENT
Cet appareil n'est pas destiné à être utilisé par des enfants ou des personnes dont les capacités physiques, sensorielles ou mentales, ou le manque d'expérience et de connaissance les
empêchent d'utiliser l'appareil sans risque lorsqu'ils sont sans surveillance ou en l'absence
d'instruction d'une personne responsable qui puisse leur assurer une utilisation de l'appareil
sans danger.
• Ne laissez jamais les emballages à la portée des enfants. Risque d'asphyxie ou de blessure !
• Éloignez les enfants de l'appareil pendant et après son fonctionnement, jusqu'à ce que
l'appareil ait refroidi.
AVERTISSEMENT
Activez la sécurité enfants pour empêcher les enfants ou animaux de compagnie d'activer
accidentellement l'appareil.
33
Sécurité d'utilisation
• Retirez tous les emballages, les étiquettes (sauf la plaque signalétique) et les films protecteurs de l'appareil avant de l’utiliser pour la première fois.
• Mettez à l'arrêt les zones de cuisson après chaque utilisation.
• Risque de brûlures ! Ne posez pas de couverts ou de couvercles de casseroles sur le plan
de cuisson. Ils risqueraient de chauffer.
AVERTISSEMENT
Risque d'incendie ! Surveillez attentivement la cuisson lors de friture dans l'huile ou la
graisse : les graisses surchauffées s'enflamment facilement.
Utilisation
• Surveillez toujours l'appareil pendant son fonctionnement.
• Cet appareil est destiné à un usage domestique normal.
• N'utilisez pas l'appareil comme plan de travail ou support.
• Ne posez pas ou ne stockez pas de liquides ou des matériaux inflammables, des objets
susceptibles de fondre (plastique, aluminium) sur ou à proximité de l'appareil.
• Faites attention si vous branchez d'autres appareils électriques à des prises situées à
proximité de la table de cuisson. Contrôlez que les câbles d'alimentation n'entrent pas en
Page 34

34 Instructions d'installation
contact avec les surfaces brûlantes de l'appareil ou les récipients brûlants. Contrôlez que
les câbles ne soient pas enchevêtrés.
Pour éviter d'endommager l'appareil
• Évitez de laisser tomber des objets ou des récipients sur la surface vitrocéramique. Ils risqueraient de l'endommager.
• N'utilisez pas de récipients en fonte ou en aluminium, ni de récipients dont le fond est
endommagé et rugueux. Ils risqueraient de rayer la surface vitrocéramique. Ne les faites
pas glisser sur la surface vitrocéramique.
• Ne faites pas « brûler » les récipients et ne laissez pas leur contenu s'évaporer en totalité.
• Ne faites jamais fonctionner les zones de cuisson avec des plats de cuisson vides ou sans
aucun récipient.
• Ne placez pas du papier aluminium sur l'appareil.
AVERTISSEMENT
Si votre table de cuisson est endommagée (éclat, fêlure,...), débranchez votre appareil
pour éviter tout risque d'électrocution.
INSTRUCTIONS D'INSTALLATION
Avant l'installation, notez le numéro de série (Ser. Nr.) figurant sur la plaque signaléti-
que.La plaque signalétique de l'appareil se trouve sur son boîtier inférieur.
58 HAD 56 AO
AEG
HK654079XB
220-240 V 50-60-Hz
949 595 071 00
7,1 kW
Les consignes de sécurité
AVERTISSEMENT
Lisez-les attentivement !
• Vérifiez si l'appareil n'a pas été endommagé pendant le transport. Ne branchez pas un
appareil endommagé. En cas de nécessité, contactez votre magasin vendeur.
• Les opérations d'installation, de branchement et de réparation sont du ressort exclusif
d'un professionnel qualifié et selon les normes et règles en vigueur. Utilisez exclusivement des pièces d'origine.
• Les appareils encastrables ne peuvent être mis en fonctionnement qu'après avoir été installés dans des meubles et sur des plans de travail homologués et adaptés.
• Ne modifiez pas les caractéristiques ou cet appareil. Risque de blessure corporelle et de
dommage matériel.
• Respectez la législation, la réglementation, les directives et les normes en vigueur dans le
pays où est installé l'appareil (réglementations de sécurité sur le recyclage, consignes de
sécurité électrique et/ou gaz,...)!
• Respectez l'espacement minimal requis par rapport aux autres appareils !
Page 35

Instructions d'installation 35
• La protection contre les contacts accidentels doit être assurée par le montage, par exemple les tiroirs doivent être installés uniquement avec un plancher de protection directement sous l'appareil.
• Pour les protéger de l'humidité, mettez du mastic (joint) adapté sur les surfaces de découpe du plan de travail.
• Scellez l'appareil jusqu'au plan de travail avec un bon joint d'étanchéité en ne laissant
aucun espace !
• Protégez la partie inférieure de l'appareil de la vapeur et de l'humidité émanant, par
exemple, d'un lave-vaisselle ou d'un four !
• Protégez les surfaces de la découpe du plan de travail contre l'humidité avec un joint
d'étanchéité approprié.
AVERTISSEMENT
Risque de dommages dûs au courant électrique. Respectez soigneusement les instructions
pour le raccordement électrique.
• La borne d'alimentation est sous tension.
• Mettez la borne d'alimentation hors tension.
• Installez l'appareil correctement de manière à le protéger contre tout choc électrique.
• Des connexions desserrées ou incorrectes peuvent être à l'origine d'une surchauffe des
bornes.
• Le raccordement électrique ne doit être effectué que par un électricien qualifié.
• Poser un serre-câble anti-traction sur le câble.
• En cas de raccordement monophasé ou biphasé, utilisez impérativement le câble d'alimentation approprié de type H05BB-F Tmax 90°C (ou plus).
• Si le câble d'alimentation est endommagé, il doit être remplacé par un câble spécial (type
H05BB-F Tmax 90 °C ou de calibre supérieur). Contactez votre service après-vente.
Dans le cas d'une installation fixe, le raccordement au réseau doit être effectué par l'intermédiaire d'un interrupteur à coupure omnipolaire ayant une distance d'ouverture des contacts d'au moins 3 mm.
Les dispositifs d'isolement comprennent : des coupe-circuits, des fusibles (les fusibles à visser doivent être retirés du support), un disjoncteur différentiel et des contacteurs.
Montage
min.
50mm
min.
500mm
min.
50mm
=
R 5mm
490
600mm
mm
560
+1
mm
+1
=
Page 36

36 Instructions d'installation
min.
25 mm
min.
20 mm
min.
28 mm
Si vous utilisez une enceinte de protection (accessoire en option
directement sous l'appareil n'est plus nécessaire.
Vous ne pouvez pas utiliser le boîtier de protection si vous installez l'appareil au-dessus d'un
four.
3) L'enceinte de protection n'est pas disponible dans tous les pays. Veuillez contacter votre revendeur local.
3)
), le fond de protection installé
Page 37

DESCRIPTION DE L'APPAREIL
Description de l'appareil
1 2
145 mm
120/175/210 mm
Description du bandeau de commande
170 mm
265 mm
145 mm
4
35
Description de l'appareil 37
Zone de cuisson 1200 W
1
Zone de cuisson ovale 1500/2400 W
2
Zone de cuisson 1200 W
3
Bandeau de commande
4
Zone de cuisson à triple circuit
5
800/1600/2300 W
4
3
51 2
11
910 8
712 6
Les touches sensitives permettent de commander l'appareil. Des voyants et des signaux sonores
confirment l'activation des fonctions sélectionnées.
Touche sensitive Fonction
1
Pour mettre en fonctionnement ou à l'arrêt l’appareil.
2
Pour verrouiller/déverrouiller le bandeau de commande.
Voyants du minuteur des zones de
3
cuisson
Affichage du minuteur Pour afficher la durée en minutes.
4
5
6
Pour afficher la zone à laquelle se réfère la durée
sélectionnée.
Pour activer la fonction de cuisson automatique.
Pour mettre en fonctionnement ou à l'arrêt le cir-
cuit de cuisson extérieur.
Indicateur du niveau de cuisson Pour afficher le niveau de cuisson.
7
Bandeau de commandes Pour régler le niveau de cuisson.
8
Page 38

38 Notice d'utilisation
Touche sensitive Fonction
9
10
11
12
/
Indicateurs du niveau de cuisson
Indicateur Description
La zone de cuisson est à l'arrêt
-
+ chiffre
/ /
La zone de cuisson est en fonctionnement
La fonction est activée.
La fonction Démarrage automatique fonctionne.
Il y a une anomalie.
OptiHeat Control (Voyant de chaleur résiduelle à trois niveaux) : conti-
nuer la cuisson / maintien au chaud / chaleur résiduelle
La fonction Verrouillage/Sécurité Enfant fonctionne.
Le dispositif automatique de commutation de fonction est activé.
Augmentation ou diminution de la durée
Sélection d'une zone de cuisson
Pour activer et désactiver la fonction STOP+GO.
Pour mettre en fonctionnement ou à l'arrêt le cir-
cuit de cuisson extérieur.
OptiHeat Control (3 niveaux de chaleur résiduelle)
AVERTISSEMENT
\ \ La chaleur résiduelle peut être source de brûlures !
OptiHeat Control indique le niveau de chaleur résiduelle.
NOTICE D'UTILISATION
Activation et désactivation
Appuyez sur pendant 1 seconde pour activer ou désactiver l'appareil.
Mise à l'arrêt automatique
La table de cuisson est automatiquement mise à l'arrêt si :
• Toutes les zones de cuisson sont mises à l'arrêt (
• Vous ne réglez pas le niveau de cuisson après avoir mis la table en fonctionnement.
• Vous renversez quelque chose ou mettez quelque chose sur le bandeau de commande
pendant plus de 10 secondes (une casserole, un chiffon, etc). Un signal sonore retentit
pendant un court instant, et la table de cuisson se met à l'arrêt. Enlevez l'objet ou nettoyez le bandeau de commande.
• La zone de cuisson n'est pas mise à l'arrêt ou le niveau de cuisson n'est pas modifié.
Après un certain temps,
s'affiche et la table de cuisson se met à l'arrêt. Voir tableau.
).
Page 39

Notice d'utilisation 39
Les durées d'arrêt automatique
Niveau de cuis-
, - - - -
son
La zone de cuis-
6 heures 5 heures 4 heures 1,5 heure
son se désactive
après
Niveau de cuisson
Appuyez, sur le bandeau de commande, sur le niveau de cuisson souhaité. Modifiez-le au besoin
en appuyant sur une autre position, à droite ou à
gauche. Ne relâchez pas la pression tant que le niveau de cuisson souhaité n’est pas atteint. L'affichage indique le niveau de cuisson.
Activation et désactivation des circuits de cuisson extérieurs
Vous pouvez adapter la surface de cuisson à la dimension du récipient.
Pour activer le circuit de cuisson extérieur, appuyez sur la touche sensitive
voyant s'allume. Pour activer plusieurs circuits de cuisson extérieurs, appuyez de nouveau
sur la même touche sensitive. Le voyant correspondant s'allume.
Répétez la procédure ci-dessus pour désactiver le circuit de cuisson extérieur. Le voyant de
contrôle s’éteint.
Démarrage automatique
/ . Le
12
11
10
9
8
7
6
5
4
3
2
1
0
1234567891011121314
On peut obtenir plus rapidement la température de cuisson choisie en activant la fonction
de démarrage automatique. Cette fonction active la température la plus élevée pendant un
certain temps (voir le diagramme) puis redescend à la température sélectionnée.
Activation de la fonction de démarrage automatique pour une zone de cuisson :
1. Appuyez sur la touche
2. Appuyez immédiatement sur le niveau de cuisson souhaité. Après 3 secondes
( s'allume).
s'affi-
che.
Pour désactiver cette fonction, modifiez le niveau de cuisson.
Page 40

00
00
40 Notice d'utilisation
Minuteur
Minuteur (Décompte du temps)
Utilisez le minuteur pour régler la durée de fonctionnement de la zone de cuisson pour cette cuisson uniquement.
Réglez le minuteur après la sélection de la zone de cuisson.
Le niveau de cuisson peut être défini avant ou après le réglage du minuteur.
• Pour choisir la zone de cuisson : appuyez plusieurs fois sur
teur correspondant s'affiche.
• Pour activer le minuteur en fonction Décompte du temps : appuyez sur
teur pour régler la durée (
commence à clignoter plus lentement, le décompte a commencé.
• Vérification du temps restant : choisissez la zone de cuisson à l'aide de
de la zone de cuisson clignote rapidement. L'écran indique le temps restant.
• Pour modifier le minuteur : choisissez la zone de cuisson à l'aide de
ou .
• Pour désactiver le minuteur : sélectionnez la zone de cuisson à l'aide de la touche
Appuyez sur
zone de cuisson s'éteint. Pour désactiver, vous pouvez aussi appuyer sur
me temps.
Lorsque le décompte du temps est terminé, le signal sonore retentit et
zone de cuisson se met à l'arrêt.
• Pour arrêter le signal sonore : appuyez sur
CountUp Timer (minuteur progressif)
Utiliser la fonction CountUp Timer pour vérifier la durée de fonctionnement de la zone de
cuisson sélectionnée.
• Pour choisir la zone de cuisson (si plusieurs zones de cuisson sont en cours de fonc-
tionnement) : appuyez plusieurs fois sur
s'affiche.
• Pour activer la fonction CountUp Timer : appuyez sur la touche
ce que
teur démarre. L'écran affiche, en alternance,
• Pour vérifier la durée de fonctionnement de la zone de cuisson sélectionnée. sélectionnez la zone de cuisson à l'aide de la touche
commence à clignoter rapidement. L'affichage indique la durée de fonctionnement de la
zone de cuisson sélectionnée.
• Pour désactiver le CountUp Timer : sélectionnez la zone de cuisson avec
ou pour désactiver le minuteur. Le voyant de la zone de cuisson s'éteint.
sur
Minuterie
Vous pouvez utiliser le minuteur comme Minuterie lorsque les zones de cuisson ne sont pas
en fonctionnement. Appuyez sur
régler la durée. Lorsque le décompte du temps est terminé, le signal sonore retentit et
clignote.
• Pour arrêter le signal sonore : appuyez sur
. Le décompte du temps restant s'effectue jusqu'à 00 . Le voyant de la
s'allume. Lorsque le voyant de la zone de cuisson clignote lentement, le minu-
- 99 minutes). Lorsque le voyant de la zone de cuisson
00
jusqu'à ce que l'indicateur correspondant
et le nombre de minutes écoulées.
. Le voyant de la zone de cuisson
. Appuyez sur la touche ou du minuteur pour
jusqu'à ce que l'indica-
du minuteur jusqu'à
du minu-
. Le voyant
. Appuyez sur
.
et en mê-
clignote. La
et appuyez
Page 41

Notice d'utilisation
STOP+GO
La fonction permet de basculer simultanément toutes les zones de cuisson actives en
position de maintien au chaud (
Il n'est désormais plus possible de modifier le niveau de cuisson en cours
La fonction
• Pour activer cette fonction, appuyez sur
• Pour désactiver cette fonction, appuyez sur
me.
n’interrompt pas le minuteur.
).
. Le symbole s'allume.
. Le niveau de cuisson précédent s'allu-
Verrouillage
Pendant l'utilisation des zones de cuisson, vous pouvez verrouiller le bandeau de commande, à l'exception de la touche
de cuisson.
Réglez tout d'abord le niveau de cuisson.
Pour démarrer cette fonction, appuyez sur
Le minuteur reste allumé.
Pour mettre à l'arrêt cette fonction, appuyez sur
me.
Lorsque vous mettez l'appareil à l'arrêt, vous désactivez également cette fonction.
. Ceci empêchera une modification involontaire du niveau
. Le symbole s'allume pendant 4 secondes.
. Le niveau de cuisson précédent s'allu-
Sécurité enfants
Ce dispositif permet d'éviter une utilisation involontaire de l'appareil.
Pour activer le dispositif de sécurité enfants :
• Activez l'appareil avec
• Appuyez sur
• Désactivez l'appareil avec
Pour désactiver le dispositif de sécurité enfants
• Activez l'appareil avec
pendant 4 secondes. Le symbole s'allume.
• Désactivez l'appareil avec
Pour désactiver le dispositif de sécurité enfants pour une seule session de cuisson
• Activez l'appareil avec
• Appuyez sur
qui suivent Vous pouvez utiliser l'appareil.
• Lorsque vous désactivez l'appareil avec
pendant 4 secondes. Le symbole s'allume.
pendant 4 secondes. Réglez le niveau de cuisson dans les 10 secondes
. Ne sélectionnez aucun niveau de cuisson.
.
. Ne sélectionnez aucun niveau de cuisson. Appuyez sur
.
. Le symbole s'allume.
, la sécurité enfants est à nouveau activée.
41
.
OffSound Control (Désactivation et activation des signaux sonores)
Désactivation des signaux sonores
Mettez l'appareil à l'arrêt.
Appuyez sur
pendant 3 secondes. s'allume, le signal sonore est activé. Appuyez sur ,
sur
s'allume, le signal sonore est désactivé.
Lorsque cette fonction est activée, l'appareil émet des signaux sonores uniquement dans les
circonstances suivantes :
pendant 3 secondes. Tous les indicateurs s'allument et s'éteignent. Appuyez
Page 42

42 Conseils utiles
• quand vous appuyez sur
• quand le minuteur arrive en fin de course
• quand le décompte se termine
• quand vous posez un objet sur le bandeau de commande.
Activation des signaux sonores
Mettez l'appareil à l'arrêt.
Appuyez sur
pendant 3 secondes. s'allume, le signal sonore est désactivé. Appuyez sur ,
sur
s'allume. Les signaux sonores sont activés.
pendant 3 secondes. Tous les indicateurs s'allument et s'éteignent. Appuyez
CONSEILS UTILES
Récipients de cuisson
• Le fond du récipient de cuisson doit être lisse, propre et sec, aussi plat et épais que possible avant chaque utilisation.
• Les récipients de cuisson avec un fond en émail, en aluminium ou en cuivre peuvent laisser des traces sur la surface vitrocéramique.
Économie d'énergie
• Si possible, couvrez toujours les récipients de cuisson avec un couvercle pendant la cuisson.
• Déposez toujours le récipient sur la zone de cuisson avant de mettre celle-ci en fonctionnement.
• Mettez à l'arrêt les zones de cuisson avant la fin du temps de cuisson pour utiliser la
chaleur résiduelle.
• Veillez à ce que le fond du plat de cuisson corresponde à la dimension du foyer de cuisson.
Öko Timer (Minuteur Eco)
Pour réaliser des économies d'énergie, la zone de cuisson se désactive automatiquement
avant le signal du minuteur. La différence de temps de fonctionnement dépend du réglage
de la température et de la durée de cuisson.
Les exemples de cuisson
Les valeurs figurant dans le tableau suivant sont fournies à titre indicatif.
Niveau
de
cuis-
son
1
Conserver les aliments cuits au chaud au be-
Utilisation : Durée Conseils
soin
Placer un couvercle sur le plat de
cuisson.
Page 43

Entretien et nettoyage
43
Niveau
de
cuis-
son
1-3 Sauce hollandaise ; faire fondre : beurre,
chocolat, gélatine
1-3 Solidifier : omelettes baveuses, œufs au
plat
3-5 Faire cuire à feu doux le riz et les plats à
base de produits laitiers ; réchauffage
des plats cuisinés
5-7 Faire cuire à la vapeur les légumes, le
poisson, la viande
7-9 Faire cuire des pommes de terre à la va-
peur
7-9 Cuire de grandes quantités d'aliments,
ragoûts et soupes
9-12 Poêler à feu doux : escalopes, cordons
bleus de veau, côtelettes, rissoles, saucisses, foie, roux, œufs, crêpes, beignets
12-13 Poêler à feu vif des pommes de terre
rissolées, côtelettes de filet, steaks
14 Faire bouillir de grandes quantités d'eau, cuire des pâtes, griller la viande (goulasch, bœuf
braisé), cuisson des frites.
Utilisation : Durée Conseils
5-25
min
10-40
min
25-50
min
20-45
min
20-60
min
60-150
min
au besoin
5-15
min
Mélanger de temps en temps.
Couvrir pendant la cuisson.
Ajouter au moins deux fois plus de
liquide que de riz. Remuer car les
aliments à base de lait se séparent
durant la cuisson.
Verser quelques cuillerées de liquide.
Utilisez max. ¼ l d'eau pour 750 g
de pommes de terre.
Ajouter jusqu’à 3 l de liquide, plus
les ingrédients.
Retourner à mi-cuisson.
Retourner à mi-cuisson.
ENTRETIEN ET NETTOYAGE
Nettoyez l'appareil après chaque utilisation.
Utilisez toujours des récipients de cuisson dont le fond est propre.
AVERTISSEMENT
Les objets coupants et les produits de nettoyage abrasifs peuvent endommager l'appareil.
Pour des raisons de sécurité, n'utilisez jamais d'appareil à vapeur ou à haute pression pour
nettoyer la table de cuisson.
Les égratignures ou les taches sombres sur la vitrocéramique n'ont aucune influence sur le
fonctionnement de l'appareil.
Pour enlever les salissures :
1. – Retirez immédiatement : plastique fondu, films plastiques et aliments contenant
du sucre. Sinon, la saleté pourrait endommager l'appareil. Utilisez un racloir spécial
pour la vitre. Tenez le racloir incliné sur la surface vitrée et faites glisser la lame du
racloir pour enlever les salissures.
Page 44

44 En cas d'anomalie de fonctionnement
– Une fois que l'appareil a suffisamment refroidi, enlevez : traces de calcaire et
d'eau, projections de graisse, décolorations métalliques luisantes. Utilisez un agent
de nettoyage pour vitrocéramique ou acier inoxydable.
2. Nettoyez l'appareil à l'aide d'un chiffon humide et d'un peu de détergent.
3. Et enfin, essuyez l'appareil à l'aide d'un chiffon propre.
EN CAS D'ANOMALIE DE FONCTIONNEMENT
Problème Cause possible et solution
Vous ne réussissez pas à mettre
l'appareil en fonctionnement.
Un signal sonore retentit, l'appareil se met automatiquement
à l'arrêt.
Un signal sonore retentit lorsque l'appareil est à l'arrêt.
L'appareil s'arrête.
Le voyant de chaleur résiduelle
ne s'allume pas.
La fonction de démarrage automatique de la cuisson ne
fonctionne pas.
Il est impossible d'activer le circuit de cuisson extérieur.
Les touches sensitives commencent à chauffer.
Aucun signal sonore quand
vous appuyez sur les touches
sensitives.
s'allume.
• Remettez l'appareil en marche et réglez le niveau de cuisson
dans les 10 secondes qui suivent.
• Vous avez effleuré 2 touches sensitives ou plus en même
temps. N'effleurez qu'une seule touche sensitive à la fois.
• La Sécurité enfants ou la fonction Stop+Go est activée. Voir le
chapitre Utilisation de l'appareil.
• Il y a de l'eau ou des projections de graisse sur le bandeau de
commande. Nettoyez le bandeau de commande.
Vous avez recouvert une ou plusieurs zones sensitives. Retirez
l'objet des touches sensitives.
Vous avez posé un objet sur le . Retirez l'objet de la touche
sensitive.
La zone de cuisson n'est pas chaude car elle n'a été activée que
pendant un court laps de temps. Si la zone de cuisson est censée
être chaude, faites appel à votre service après-vente.
• La zone de cuisson est encore chaude. Laissez refroidir la zone
de cuisson.
• Le niveau de cuisson maximum est réglé. Le niveau de cuisson
maximum offre la même puissance que la fonction de démarrage automatique de la cuisson.
Activez le circuit intérieur d'abord.
Le récipient de cuisson est trop grand ou vous l'avez posé trop
près des commandes. Placez les casseroles de grande taille sur les
zones de cuisson arrière, si nécessaire.
Les signaux sont désactivés. Activez les signaux (cf. commande
sans son).
L’arrêt automatique est activé. Mettez l'appareil à l'arrêt puis remettez-le en fonctionnement.
Page 45

En matière de protection de l'environnement
Problème Cause possible et solution
et un chiffre s'affiche.
L'appareil présente une anomalie.
Débranchez l'appareil de l'alimentation électrique pendant quelques minutes. Déconnectez le fusible de l'installation domestique.
Reconnectez-le. Si
après-vente.
s'affiche à nouveau, contactez le service
Si les indications ci-dessus ne vous permettent pas de remédier au problème, veuillez vous
adresser à votre revendeur ou au service après-vente. Veuillez lui fournir les informations
figurant sur la plaque signalétique, la combinaison à 3 lettres et chiffres pour la vitrocéramique (située dans un des coins de la table de cuisson) et le type de message d'erreur qui
s'affiche.
Veillez à faire fonctionner l'appareil correctement. En cas d'erreur de manipulation de la
part de l'utilisateur, le déplacement du technicien du service après-vente ou du magasin
vendeur peut être facturé même en cours de garantie. Les instructions relatives au service
après-vente et aux conditions de garantie figurent dans le livret de garantie.
EN MATIÈRE DE PROTECTION DE L'ENVIRONNEMENT
Le symbole sur le produit ou son emballage indique que ce produit ne peut être traité
comme déchet ménager. Il doit être remis au point de collecte dédié à cet effet (collecte et
recyclage du matériel électrique et électronique).
En procédant à la mise au rebut de l'appareil dans les règles de l’art, nous préservons
l'environnement et notre sécurité, s’assurant ainsi que les déchets seront traités dans des
conditions optimum.
Pour obtenir plus de détails sur le recyclage de ce produit, veuillez prendre contact avec les
services de votre commune ou le magasin où vous avez effectué l'achat.
454647
Emballage
Tous les matériaux d'emballage sont écologiques et recyclables. Les composants en plastique sont identifiables grâce aux sigles : >PE<,>PS<, etc. Veuillez jeter les matériaux d'emballage dans le conteneur approprié du centre de collecte des déchets de votre commune.
Page 46

Page 47

Page 48

www.aeg.com/shop 892934354-C-382011
 Loading...