

Page 1

HC652600EB
NL
TEPPAN YAKI-GRILLPLAAT GEBRUIKSAANWIJZING
EN
TEPPAN YAKI GRILL PLATE USER MANUAL
FR
GRILL TEPPAN YAKI NOTICE D'UTILISATION
DE
TEPPAN YAKI GRILLPLATTE BENUTZERINFORMATION
20
41
60
2
Page 2

2
VOOR PERFECTE RESULTATEN
Bedankt dat u voor dit AEG product heeft gekozen. Dit apparaat is ontworpen
om vele jaren uitstekend te presteren, met innovatieve technologieën die het
leven gemakkelijker helpen maken – functies die gewone apparaten wellicht niet
hebben. Neem een paar minuten de tijd om het door te lezen zodat u er optimaal
van kunt profiteren.
ACCESSOIRES EN VERBRUIKSARTIKELEN
In de AEG webshop vindt u alles wat u nodig heeft om al uw apparaten van AEG
mooi te houden en perfect te laten functioneren. Ook vindt u hier een groot
aantal accessoires die zijn ontworpen en gebouwd volgens de hoge
kwaliteitsnormen die u verwacht, van speciaal kookgerei tot bestekmandjes en
van flessenhouders tot waszakken…
Bezoek onze webshop op
www.aeg.com/shop
Page 3

INHOUD
Inhoud
4 Veiligheidsinformatie
5 Montage-instructies
10 Beschrijving van het product
12 Bedieningsinstructies
15 Nuttige aanwijzingen en tips
17 Onderhoud en reiniging
18 Problemen oplossen
19 Milieubescherming
3
In deze gebruiksaanwijzing worden de
volgende symbolen gebruikt:
Belangrijke informatie over uw persoonlijke
veiligheid en informatie over het voorkomen
van schade aan het apparaat.
Algemene informatie en tips
Milieu-informatie
Wijzigingen voorbehouden
Page 4
4 Veiligheidsinformatie
VEILIGHEIDSINFORMATIE
Lees voor uw eigen veiligheid en correcte werking van het apparaat eerst deze handleiding
aandachtig door, alvorens het apparaat te installeren. Bewaar deze instructies altijd bij het
apparaat, zelfs wanneer u deze verplaatst of verkoopt. Gebruikers moeten volledig op de
hoogte zijn van de bediening en veiligheidsfuncties van het apparaat.
Algemene veiligheid
WAARSCHUWING!
Mensen (met inbegrip van kinderen) met beperkte lichamelijke, zintuiglijke of verstandelijke
vermogens of gebrek aan ervaring en kennis mogen dit apparaat niet gebruiken. Zij moeten
onder toezicht staan of instructies krijgen over het gebruik van dit apparaat van iemand die
verantwoordelijk is voor hun veiligheid.
Veiligheid kinderen
• Dit apparaat is alleen bedoeld voor gebruik door volwassenen. Kinderen moeten in de gaten gehouden worden om te voorkomen dat zij met het apparaat gaan spelen.
• Houd alle verpakkingsmaterialen uit de buurt van kinderen. Gevaar voor verstikking.
• Houd kinderen uit de buurt van het apparaat als het aan staat.
WAARSCHUWING!
Om te voorkomen dat kleine kinderen of dieren per ongeluk het apparaat inschakelen, adviseren wij de kinderbeveiliging te activeren.
Veiligheid tijdens het gebruik
• Verwijder al het verpakkingsmateriaal, stickers en folie van het apparaat, voordat u het in
gebruik neemt.
• Schakel de kookzones na ieder gebruik uit.
• Gevaar voor brandwonden! Leg geen metalen voorwerpen, zoals bestek of deksels op de
kookplaat; deze kunnen zeer heet worden.
• Gebruikers met geïmplanteerde pacemakers moeten hun bovenlichaam op een afstand
van ten minste 30 cm van ingeschakelde inductiekookzones houden.
WAARSCHUWING!
Brandgevaar! Oververhitte vetten en oliën kunnen snel in brand vliegen.
Gebruik conform de voorschriften
• Controleer het apparaat altijd tijdens gebruik.
• Dit apparaat is uitsluitend bedoeld voor huishoudelijk gebruik!
• Het apparaat mag niet worden gebruikt als werkblad of aanrecht.
• Plaats geen brandbare vloeistoffen, licht ontvlambare materialen of voorwerpen die kunnen smelten (bijv. plastic folie, plastic, aluminium) op of in de buurt van het apparaat.
• Pas op als u het apparaat aansluit in de buurt van een stopcontact. Voorkom contact
tussen elektrische verbindingen en het apparaat of heet kookgerei. Voorkom dat elektrische verbindingen verstrikt raken.
Page 5
Montage-instructies 5
Voorkoming van beschadiging van het apparaat
• Het glaskeramische oppervlak kan beschadigd raken als er voorwerpen op vallen.
• Kookgerei dat gemaakt is van gietijzer, aluminium of met beschadigde bodems, kunnen
krassen veroorzaken op de glaskeramische plaat als deze over het oppervlak worden geschoven.
• Laat kookgerei niet droogkoken, om schade aan het kookgerei en het glaskeramische oppervlak te voorkomen.
• Gebruik de kookzones niet met leeg kookgerei of zonder kookgerei erop.
• Leg nooit aluminiumfolie over welk deel van het apparaat ook.
• De ventilatieruimte van 5 mm tussen het werkblad en de voorzijde van het onderliggende apparaat mag niet worden afgedekt.
WAARSCHUWING!
Als er een scheur in het oppervlak zit, haalt u de stekker uit het stopcontact om elektrische schokken te voorkomen.
Speciale aantekeningen voor Teppan Yaki
• U kunt geluiden horen als het apparaat in werking is. Deze geluiden zijn normaal en hebben niets met een defect te maken.
• Als u het apparaat veelvuldig gebruikt, kan er een kleine oneffenheid in het midden van
de kookplaat komen waar de twee zones elkaar raken. Dit is geen defect in de kookplaat
en de werking wordt er niet door beïnvloed. Daarom:
– Plaats geen pannen in het midden van de kookplaat tussen de zones, omdat de onef-
fenheid de pannen instabiel kan maken.
– Bakken op de kookplaat waar de zones elkaar raken kan leiden tot ongelijkmatige brui-
ning (bijv. bij pannenkoeken).
MONTAGE-INSTRUCTIES
Noteer voor de installatie, het serienummer (ser. nr.) op het typeplaatje.Het typeplaatje
van het apparaat bevindt zich aan de onderkant van de behuizing.
Made in Switzerland
220-240V ~50/60Hz
5,6 kW/Leistung ind. 5,6 kW
Typ: 55TEP01AU
PNC: 941 560 808/00
Serie:
HC652600EB
Page 6
6 Montage-instructies
Veiligheidsvoorschrift
WAARSCHUWING!
Lees deze voorschriften zorgvuldig door!
Controleer of het apparaat tijdens het transport niet beschadigd is. Sluit geen beschadigd
apparaat aan. Neem indien nodig contact op met de leverancier.
Alleen een geautoriseerde onderhoudstechnicus kan dit apparaat installeren, aansluiten of
repareren. Gebruik alleen originele reserveonderdelen.
Inbouwapparaten mogen alleen worden gebruikt nadat zij ingebouwd zijn in geschikte inbouwunits of werkbladen die aan de normen voldoen.
Wijzig de specificaties van het product of het product zelf niet. Gevaar voor letsel en schade
aan het apparaat.
De wetten, voorschriften, richtlijnen en normen die van kracht zijn in het land waar het apparaat wordt gebruikt, dienen in acht genomen te worden (veiligheidsvoorschriften, correcte recycling overeenkomstig de voorschriften, veiligheidsvoorschriften met betrekking tot
elektrische installaties, enz.)!
Houd de minimumafstanden naar andere apparaten en units in acht!
Tijdens de installatie moet een antistootbescherming zijn aangebracht, bijv. lades mogen alleen worden aangebracht als er onder het apparaat een beschermende vloer aanwezig is!
De uitgezaagde oppervlakken van het werkblad moeten tegen vocht worden beschermd
met een geschikte afdichting!
Het juiste afdichtmiddel moet worden gebruikt om de opening tussen het apparaat en het
werkblad af te dichten!
Bescherm de onderkant van het apparaat tegen stoom en vocht, bijv. van een afwasmachine of oven!
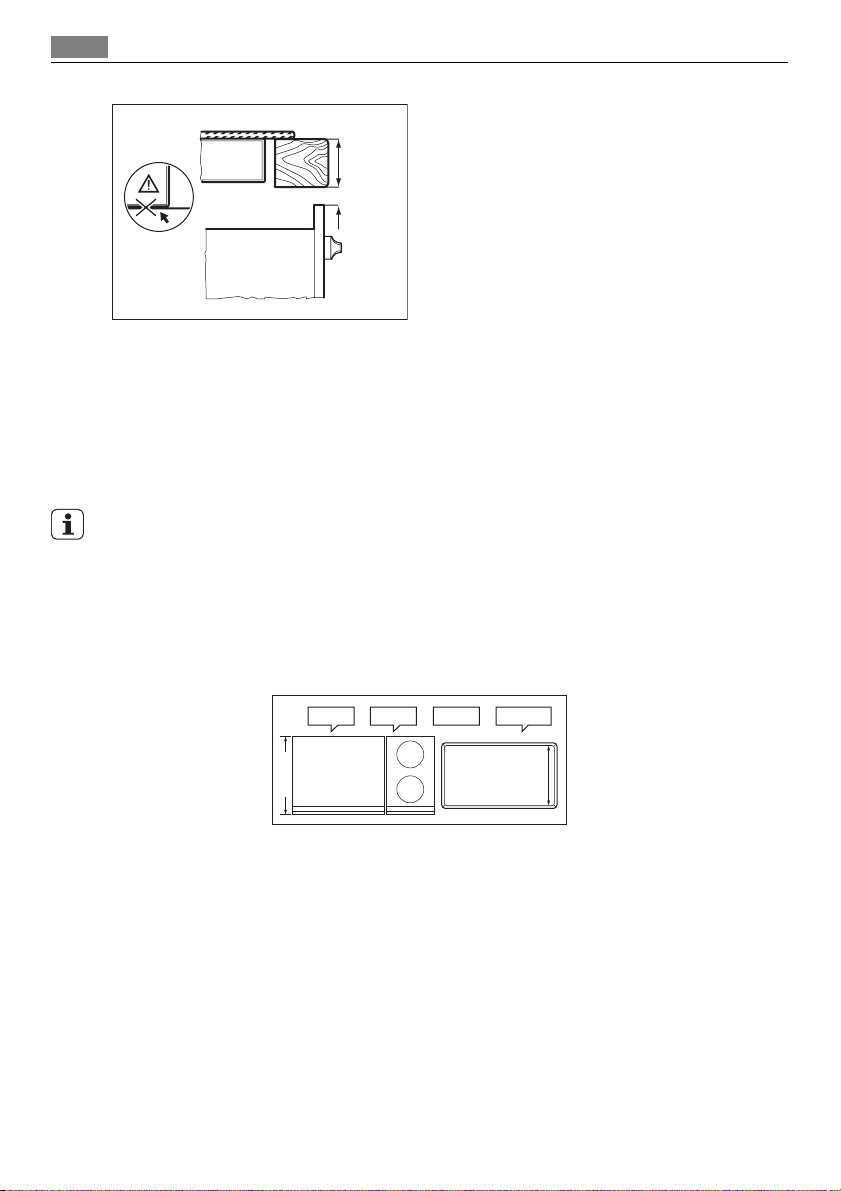
Installeer het apparaat niet naast deuren of onder ramen! Anders kan het hete kookgerei
van de kookplaat worden gestoten, als de deuren of ramen worden geopend.
WAARSCHUWING!
Risico van verwonding door elektrische stroom. Volg de instructies voor de elektrische aansluitingen nauwkeurig op.
• De netaansluiting staat onder stroom.
• Schakel de stroomtoevoer naar de netaansluiting uit.
• Op de juiste wijze installeren om elektrische schokken te voorkomen.
• Loszittende en onvakkundig aangebrachte stekkerverbindingen kunnen oververhitting
van de aansluiting veroorzaken.
• Laat de klemaansluitingen correct installeren door een gekwalificeerde elektricien.
• Zorg ervoor dat het snoer niet wordt belast door trekken.
• In het geval van een eenfase-aansluiting, moet het geschikte netsnoer van het type
H05BB-F Tmax. 90°C (of hoger) worden gebruikt.
• Vervang de beschadigde voedingskabel door een speciale kabel (type H05BB-F Tmax 90°C
of hoger). Neem contact op met onze serviceafdeling.
Het apparaat moet met een poolschakelaar op een elektrisch circuit zijn aangesloten, met
een contactopening van minstens 3 mm, zodat het apparaat te allen tijde uitgeschakeld kan
worden.
Page 7
Montage-instructies 7
U dient te beschikken over de juiste isolatievoorzieningen: stroomonderbrekers, zekeringen
(schroefzekeringen moeten uit de houder worden verwijderd), aardlekschakelaars en contactgevers.
Montage
min.
500mm
min.
50mm
min.
50mm
min.
5mm
=
R 5mm
490
600mm
mm
560
+1
mm
min.
25 mm
min.
20 mm
min.
5 mm
+1
=
Page 8
8 Montage-instructies
min.
38 mm
min.
5 mm
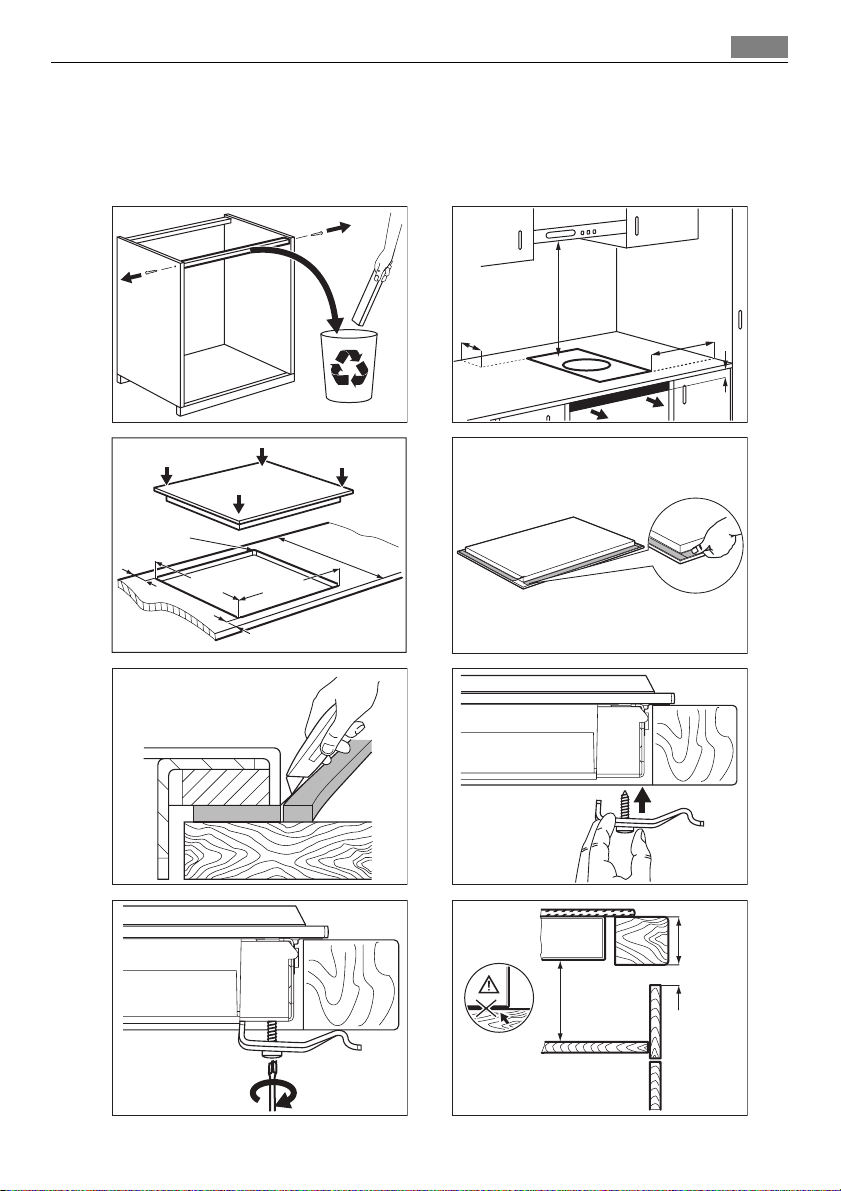
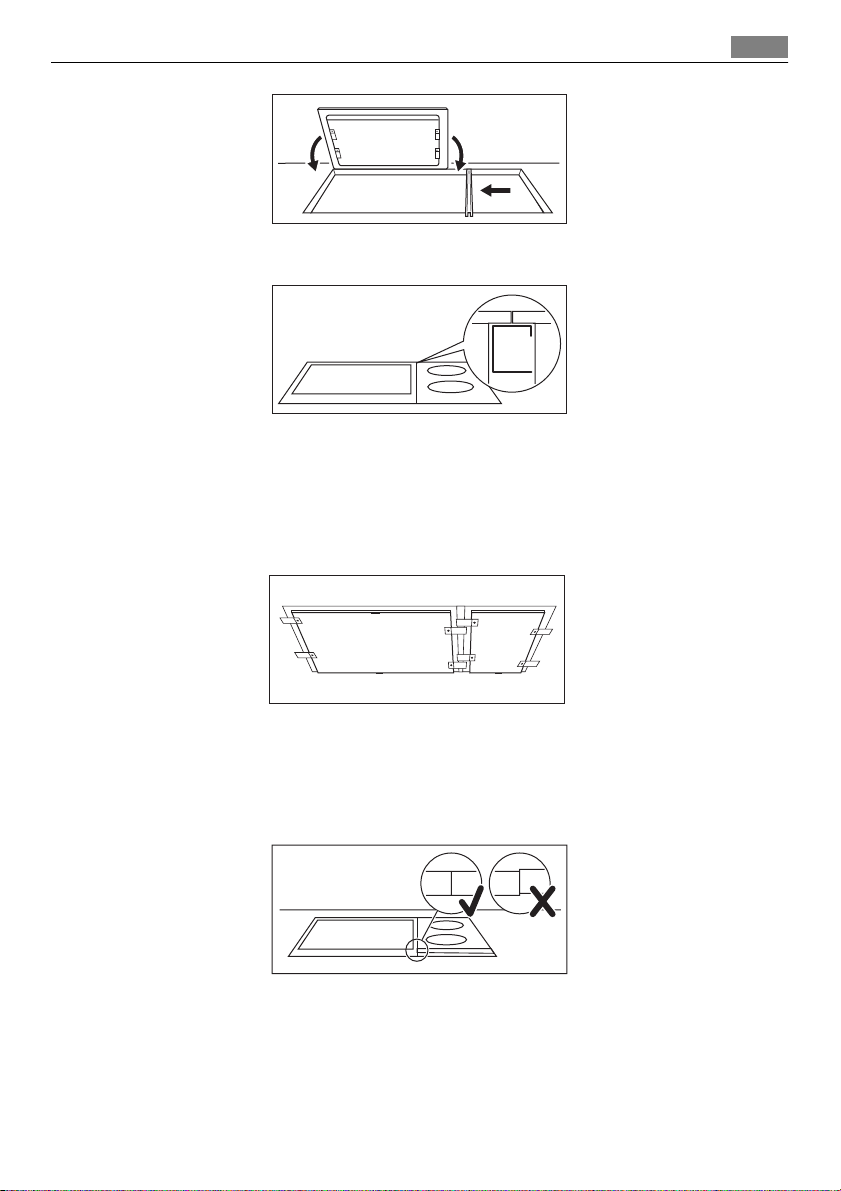
• Dicht het gat tussen het werkblad en het glaskeramiek met siliconen.
• Breng wat sop op de siliconen aan.
• Trek overmatige siliconen eraf met de schraper.
De installatie van meer dan één apparaat
Aanvullende onderdelen:aansluitstang(en), hittebestendig silicone, afdichtstrip met rubbe-
ren vorm.
Gebruik alleen speciaal hittebestendig silicone.
De opening in het werkblad
Afstand vanaf de muur: minimaal 50 mm
Diepte: 490 mm
Breedte: de bij elkaar opgetelde breedtes van alle apparaten die moeten worden ingebouwd,
min 20 mm (zie ook "Overzicht van alle apparaatbreedtes")
Voorbeeld:
+-=
580 mm
360 mm
20 mm 920 mm
520 mm
490 mm
De installatie van meer dan één apparaat
1. Bepaal de afmeting van de opening van het werkblad en zaag het uit.
2. Plaats de apparatuur, één per keer, op een zacht oppervlak zoals een deken met de onderkant omhoog.
3. Trek de afdichtstrip rondom de onderrand van het apparaat langs de buitenrand van
de glazen keramische plaat.
4. Schroef de bevestigingsplaten losjes in de juiste gaten van de beschermende behuizing.
5. Plaats het eerste apparaat in de opening van het werkblad. Plaats de verbindingstang
in de opening van het werkblad en duw de halve breedte omhoog tegen het apparaat.
Page 9
Montage-instructies
6. Draai de bevestigingsplaten/vasthoudgrepen losjes aan van onder het werkblad op de
aansluitstang.
7. Plaats het volgende apparaat in de opening van het werkblad. Zorg dat de voorkant
van de apparaten met elkaar zijn uitgelijnd.
9
8. Draai de schroeven van de bevestigingsplaat/vasthoudgreep aan.
9. Dicht het gat tussen het werkblad en apparaten en tussen de apparaten met siliconen.
10. Breng wat sop op de silicone aan.
11. Duw de rubberen vorm met enige kracht tegen de glazen keramische plaat en beweeg
het langzaam langs de ruimte.
12. Raak het silicone pas weer aan als het is uitgehard. Dit kan een dag duren.
13. Verwijder het silicone dat eruit steekt voorzichtig met een scheermesje.
14. Reinig voorzichtig de glazen keramische plaat.
Page 10
10 Beschrijving van het product
BESCHRIJVING VAN HET PRODUCT
De belangrijkste eigenschappen van uw apparaat
• Het kookoppervlak heeft 2 lagen roestvrij staal met een laag aluminium er tussen. Het
heeft een goede thermale capaciteit die een snelle daling van de temperatuur voorkomt,
bijvoorbeeld als u vlees bereidt uit de koelkast.
• Elke Teppan Yaki-grillplaat is uniek. De plaat wordt handmatig bewerkt en geslepen door
deskundigen. Afwijkingen in het slijppatroon zijn normaal en leiden niet tot functionele
beperkingen. Door frequent gebruik van de grill gaat de plaat er mooier uitzien.
• De groef rond de rand:
– verlaagt de temperatuur op het installatieoppervlak zodat het kookoppervlak geïnstal-
leerd kan worden in verschillende soorten keukenbladen.
– De inkeping van de groef absorbeert gedeeltelijk het uitzetten van het verwarmde
kookoppervlak.
– Kleine voedselresten en vloeistoffen kunnen eenvoudig uit de groef worden verwij-
derd.
• De gewenste temperatuur kan constant worden gehouden met de thermostaat met af-
leesbare temperatuurinstelling. Dit voorkomt oververhitting van het eten en zorgt ervoor
dat voedsel met weinig vet kan worden bereid en de voedingswaarde behouden blijft.
• Het voedsel wordt bereid (verwarmd) direct op het kookoppervlak, met of zonder vet. Het
is ook mogelijk om met pannen te koken.
• De verwarmingstijd, bijv. tot 180 °C, is ongeveer 4 minuten. De afkoeltijd, bijv. van 180 °C
tot 100 °C, is ongeveer 25 minuten, of tot 60 °C ongeveer 60 minuten.
• Het kookoppervlak moet altijd worden voorverwarmd.
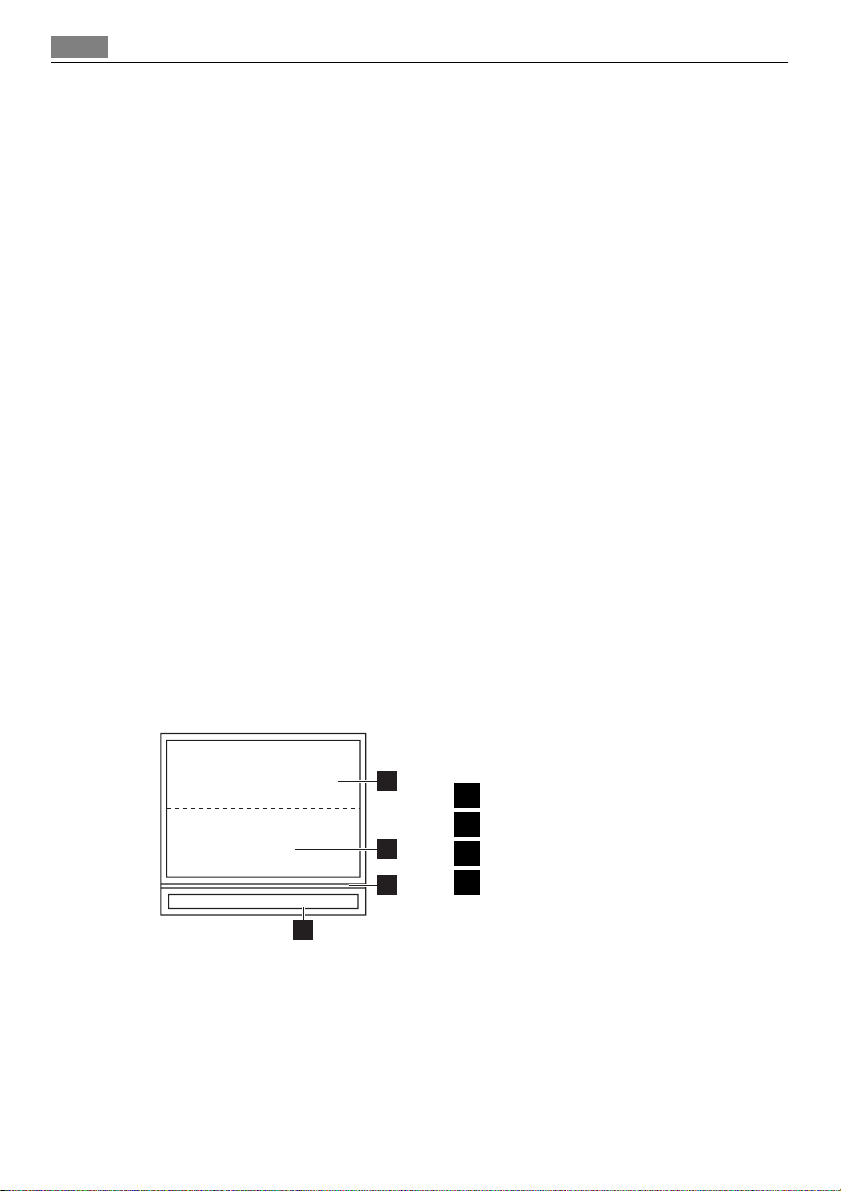
Algemeen overzicht
1
2
3
4
Achterste grilzone 2800W
1
Voorste grilzone 2800W
2
Glazen balk
3
Bedieningspaneel
4
Page 11
Beschrijving van het product 11
Indeling bedieningspaneel
6 75 843
2
1
91012 11
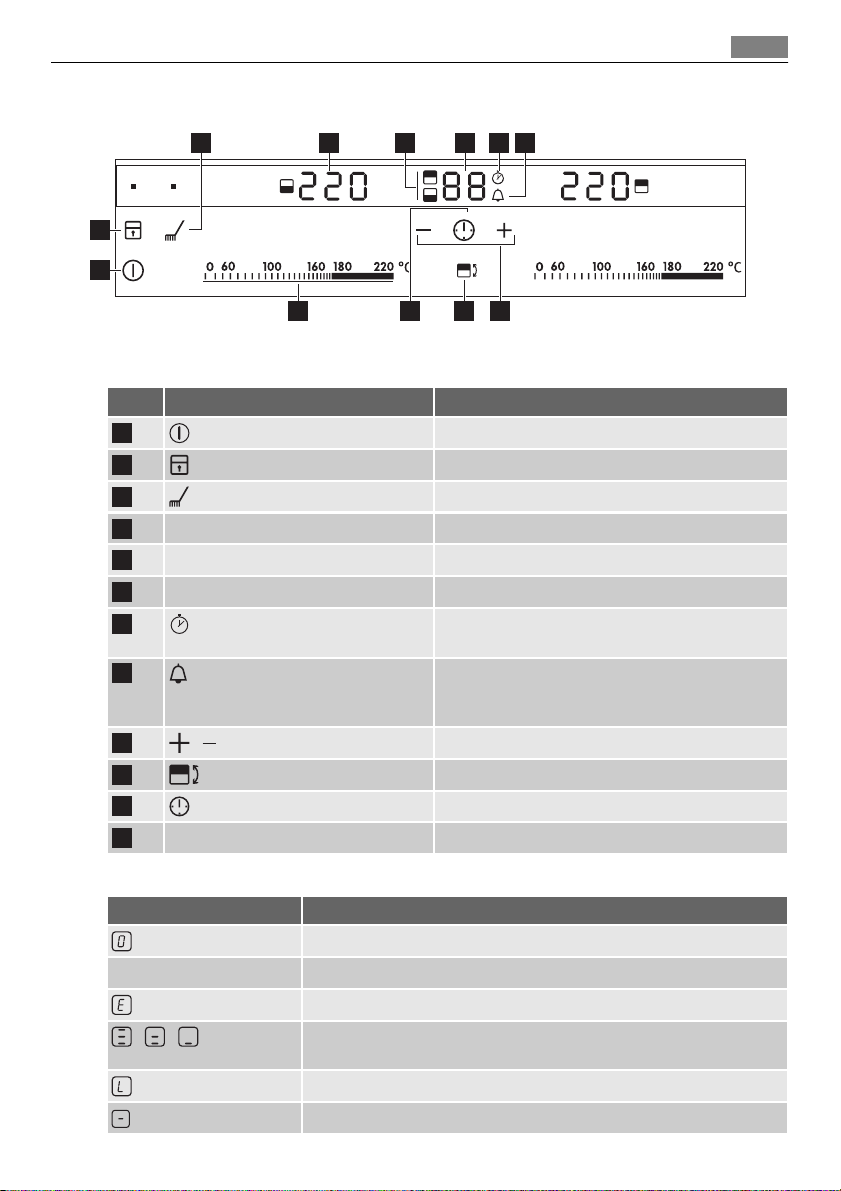
Gebruik de tiptoetsen om het apparaat te bedienen. De displays, indicatielampjes en geluiden
tonen welke functies worden gebruikt.
tiptoets Functie
1
2
3
Temperatuurdisplay Toont de temperatuur.
4
Kookzoneweergave van de timer Geeft aan voor welke grillzones u de tijd instelt
5
Timerdisplay Geeft de tijd in minuten weer.
6
7
8
9
10
11
12
/
Bedieningsstrip Voor het instellen van de temperatuur.
Schakelt het apparaat in en uit.
Het bedieningspaneel vergrendelen/ontgrendelen.
Schakelt de reinigingsfunctie in en uit.
Toont dat de timer met optelfunctie in werking is
(1 tot 59 minuten).
Toont dat de timer met aftelfunctie in werking is
(1 tot 99 minuten) of toont dat de kookwekker in
werking is.
Verhoogt of verlaagt de tijdsinstelling.
Stelt de grillzone in. .
Stelt de timerfuncties in.
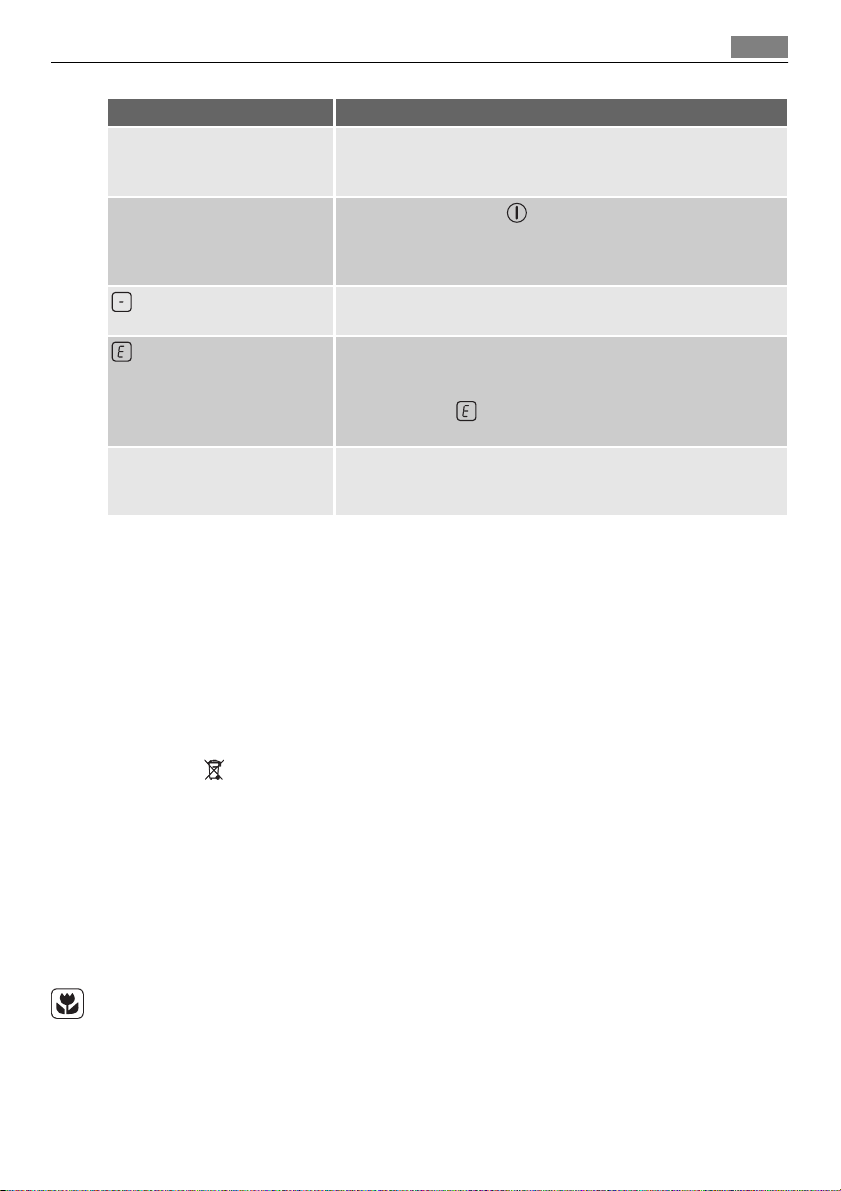
Display
60
Display Beschrijving
De grillzone is uitgeschakeld.
-
220
+ cijfer
/ /
De grillzone wordt gebruikt.
Er is een storing.
3 staps restwarmte-indicatie: door gaan met koken / warmhouden /
restwarmte.
De functie vergrendeling/kinderbeveiliging werkt.
De functie Automatische uitschakelen is in werking getreden.
Page 12
12 Bedieningsinstructies
OptiHeat Control (3-staps restwarmte-indicatie)
WAARSCHUWING!
\ \ Gevaar van brandwonden door restwarmte!
OptiHeat Control geeft het niveau van de restwarmte aan. De inductiekookzones creëren de
voor het koken benodigde warmte direct in de bodem van de pan. Het glaskeramiek wordt
verwarmd door de warmte van de pannen.
BEDIENINGSINSTRUCTIES
In- en uitgeschakeld
Raak gedurende 1 seconde aan om het apparaat in- en uit te schakelen.
Automatisch uitschakelen
De functie schakelt het apparaat automatisch uit als:
• Alle grillzones zijn uitgeschakeld
• U de temperatuur niet instelt nadat u het apparaat hebt ingeschakeld.
• U iets hebt gemorst of iets langer dan 10 seconden op het bedieningspaneel hebt gelegd
(een pan, doek, etc.). Het geluid klinkt enige tijd en het apparaat wordt uitgeschakeld.
Verwijder het voorwerp of reinig het bedieningspaneel.
• U een grillzone niet uitschakelt of de temperatuur verandert. Na 90 minuten gaat
branden en wordt het apparaat uitgeschakeld. Voor het volgende gebruik, dient u de
grillzone in te stellen op
.
.
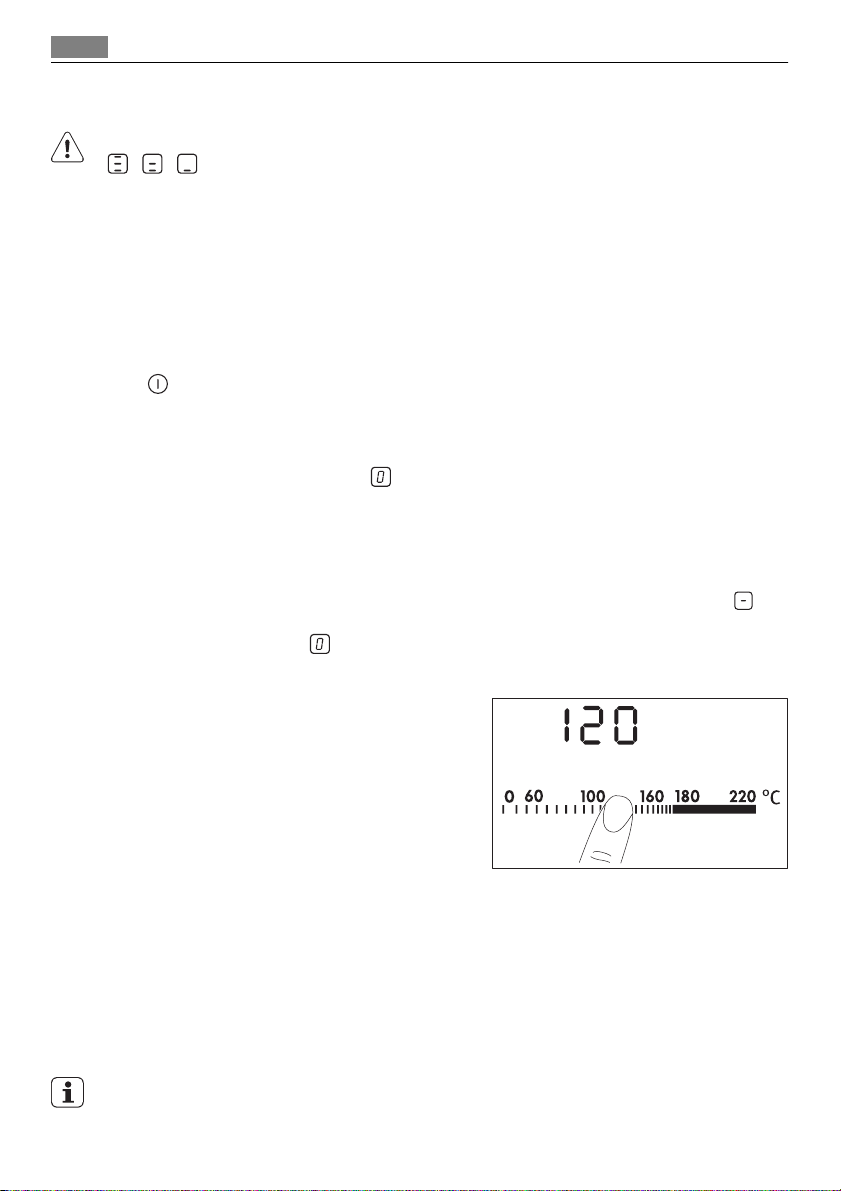
Temperatuurinstelling
Raak de bedieningsstrip daar aan waar de gewenste kookstand zich bevindt. Corrigeer naar links of
rechts, indien nodig Laat niet los voordat de juiste
kookstand is bereikt. Het display toont de kookstand.
Als u de temperatuur instelt, knippert het display tot de grillzone de temperatuur bereikt.
Daarna hoort u een geluid en toont de display de temperatuur.
De timer
De timer met aftelfunctie.
Gebruik de timer met aftelfunctie om in te stellen hoe lang de kookzone deze keer wordt
gebruikt.
Stel de timer met aftelfunctie in nadat de kookzone is geselecteerd.
De selectie van de timerfunctie is mogelijk wanneer de kookzones zijn ingeschakeld en de
kookstand is ingesteld.
Page 13

Bedieningsinstructies
• Kookzone instellen:raak meerdere malen aan tot het lampje van de gewenste kook-
zone brandt.
Wanneer deze functie wordt ingeschakeld, gaat branden.
• De timer met aftelfunctie activeren: raak
- 99 minuten). Als het lampje van de kookzone langzamer gaat knipperen, wordt de
00
tijd afgeteld.
• Resterende tijd weergeven: selecteer de kookzone met
kookzone gaat sneller knipperen. Op het display wordt de resterende tijd weergegeven.
• Om de timer met aftelfunctie te wijzigen:stel de kookzone in met
aan.
• Het uitschakelen van de timer met aftelfunctie: selecteer de kookzone met
aan. De resterende tijd telt af tot 00 . Het indicatielampje van de kookzone gaat uit.
Als de afteltijd van de timer is verstreken, klinkt er een geluidssignaal en knippert
kookzone wordt uitgeschakeld.
• Het geluid uitschakelen: aanraken van
De timer met optelfunctie
Gebruik de timer met optelfunctie om te controleren hoe lang de kookzone wordt gebruikt.
• De selectie van de kookzone (indien er meer dan 1 kookzone actief is):raak
dere malen aan tot het lampje van de gewenste kookzone brandt.
Wanneer deze functie wordt ingeschakeld, gaat branden.
• De timer met optelfunctie activeren:
aan.
Raak
Het symbool
• Om te zien hoe lang de kookzone al werkt:stel de kookzone in met
lampje van de kookzone gaat sneller knipperen. Het display geeft de tijd aan die de kookzone werkt. Het display toont de tijd van de kookzone die langere tijd werkt.
• Het uitschakelen van de timer met optelfunctie: stel de kookzone in met
of aan om de timer uit te schakelen. Het symbool gaat uit en gaat aan.
Wanneer de twee timerfuncties tegelijkertijd in werking zijn, geeft het display eerst de timer
die optelt weer.
gaat uit en gaat branden.
van de timer aan om de tijd in te stellen (
. Het indicatielampje van de
raak of
. Het indicatie-
13
. Raak
. De
00
meer-
en raak
De kookwekker.
U kunt de timer gebruiken als kookwekker als de kookzones niet werken. Raak aan.
Raak
geluidssignaal en knippert
• Het geluid stoppen: aanraken van
of van de timer aan om de tijd in te stellen. Als de tijd verstreken is, klinkt er een
.
00
Slot
U kunt het bedieningspaneel vergrendelen, maar niet . Hiermee wordt voorkomen dat de
kookstand per ongeluk wordt veranderd.
Selecteer eerst de kookstand.
Raak om deze functie te starten
den.
aan. Het symbool gaat gedurende 4 seconden bran-
Page 14
14 Bedieningsinstructies
De timer blijft aan.
Raak om deze functie te stoppen
schijnt.
Als u het apparaat stopt, stopt deze functie ook.
aan. De kookstand die u eerder hebt ingesteld ver-
De kinderbeveiliging
Deze functie voorkomt het ongewenste gebruik van de kookplaat.
Kinderbeveiliging inschakelen
• Schakel de kookplaat in met
• 4 seconden
• Schakel de kookplaat uit met
Kinderbeveiliging uitschakelen
• Schakel de kookplaat in met
symbool
• Schakel de kookplaat uit met
Kinderbeveiliging tijdelijk uitschakelen voor een enkele kooksessie
• Schakel de kookplaat in met
• 4 seconden
inschakelen.
• Wanneer u de kookplaat uitschakelt met
veerd.
aanraken Het symbool gaat branden.
gaat branden.
aanraken Stel de kookstand binnen 10 seconden in. U kunt het apparaat
. Stel de kookstand niet in.
.
. Stel de kookstand niet in. 4 seconden aanraken Het
.
. Het symbool gaat branden.
, wordt de kinderbeveiliging weer geacti-
OffSound Control (In- en uitschakelen van de geluiden)
Uitschakelen van de geluiden
Schakel het apparaat uit.
Raak
aan, het geluid is aan. Raak
Als deze functie is ingeschakeld, kunt u de geluiden alleen horen als:
•u
• de kookwekker af gaat
• de timer af gaat
• als u iets op het bedieningspaneel plaatst.
Inschakelen van de geluiden
Schakel het apparaat uit.
Raak
aan, omdat het geluid uit is. Raak
3 seconden aan. De displays gaan aan en uit. Raak 3 seconden aan. gaat
aan, gaat aan, het geluid is uit.
aanraakt
3 seconden aan. De displays gaan aan en uit. Raak 3 seconden aan. gaat
aan, gaat aan. Het geluid is aan.
Page 15
Nuttige aanwijzingen en tips 15
NUTTIGE AANWIJZINGEN EN TIPS
Eten bereiden met Teppan Yaki
U bereidt het voedsel direct op de grillplaat, met of zonder vet. U kunt ook pannen gebruiken maar de opwarmtijd is langer dan op de glazen keramische kookplaat of op de gaskookplaat.
U kunt bijgerechten zoals sauzen, rijst etc. in potten of pannen bereiden of warmhouden.
Plaats deze direct op de kookplaat.
We raden niet aan om grote hoeveelheden op de grillplaat te koken, voor bijv. spaghetti.
Deze geluiden zijn normaal en hebben niets met een defect te maken.
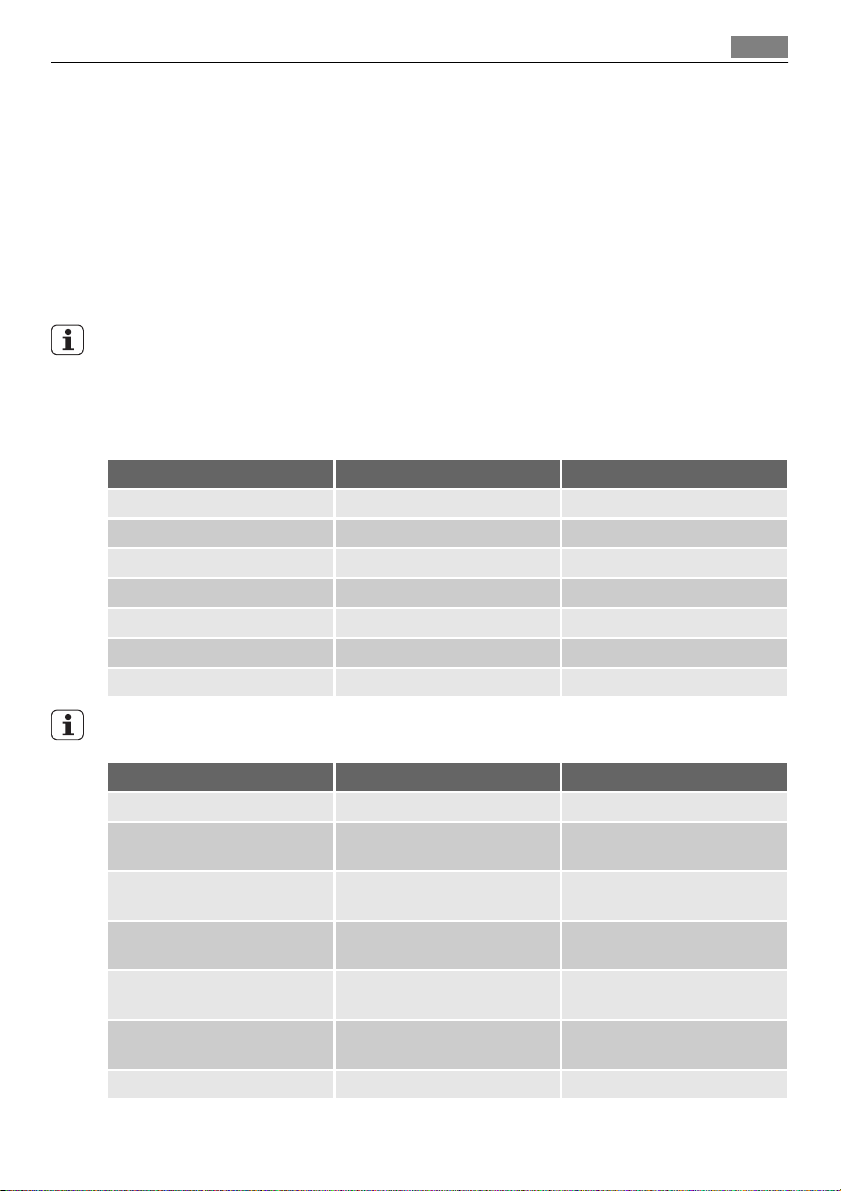
De voorbeelden van kooktoepassingen
Vetten en oliën gebruiken
Als de temperatuur te hoog is, begint het vet te roken (zogenaamde "rookpunt")
Vetten / Olie Max. temperatuur (°C) Rookpunt (°C)
Boter 130 150
Varkensvet 170 200
Rundervet 180 210
Olijfolie 180 200
Zonnebloemolie 200 220
Grondnotenolie 200 235
Kokosolie 200 240
U dient het apparaat altijd voor te verwarmen.
Gerecht Temperatuur (°C) Tijd / Tips
Vis en schaaldieren 140–160 Het apparaat voorverwarmen
Zalmfilets 160 8 minuten, draaien na 4 minu-
Reuzegarnalen (gepeld) 140 6 minuten, draaien na 3 minu-
Haaiensteaks, ongeveer 2,5 cm
dik
Zeetong, Müllerin Art (gebakken in boter)
Scholfilets 140 6 minuten, draaien na 3 minu-
Kalfsvlees 140–180 Het apparaat voorverwarmen
160 10 minuten, draaien na 5 mi-
140 8 minuten, draaien na 4 minu-
ten
ten
nuten
ten, lichte kant eerst
ten
Page 16

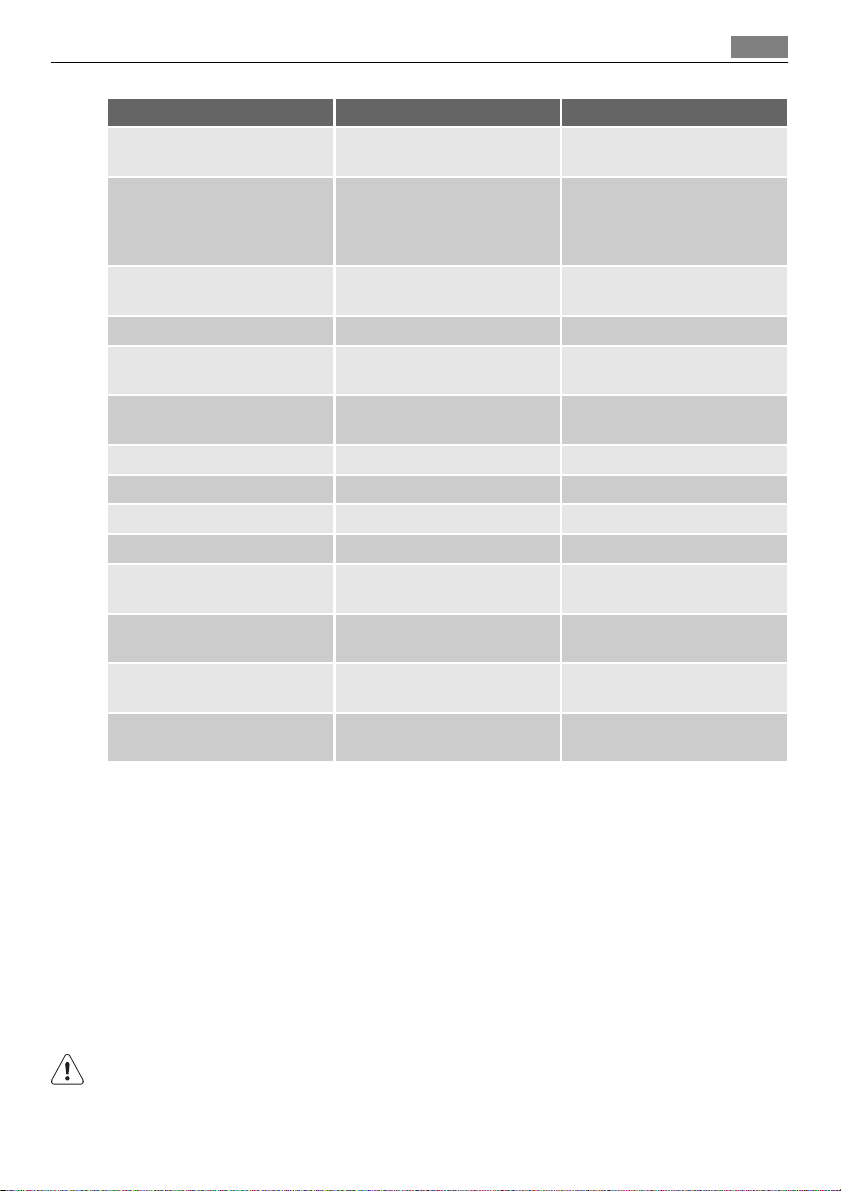
16 Nuttige aanwijzingen en tips
Gerecht Temperatuur (°C) Tijd / Tips
Kalfsbout 180 10 minuten, draaien na 5 mi-
Kalfsmedaillon, 4 cm dik 160 10 minuten, draaien na 5 mi-
Kalfsstuk, 3-4 cm dik 160 6 minuten, draaien na 3 minu-
Kalfslapje, naturel 180 5 minuten, draaien na 2½ mi-
Fricassee van kalf in roomsaus 180 6 minuten, draaien na 3 minu-
Rundsvlees 160–180 Het apparaat voorverwarmen
Biefstuk, erg rood 180 2 minuten, draaien na 1 mi-
rood 180 6 minuten, draaien na 3 minu-
medium 180 8 minuten, draaien na 2 minu-
goed doorbakken 180 8 minuten, draaien na 4 minu-
Hamburger 160 6 - 8 minuten, draaien na 3 - 4
Châteaubriand 160 dan 100 Bak het vlees aan alle kanten
Varkensvlees 160–180 Het apparaat voorverwarmen
Varkensmedaillons 160 8 minuten, draaien na 4 minu-
Varkenslapjes 180 8 minuten, draaien na 4 minu-
Varkensschnitzel 160 6 minuten, draaien na 3 minu-
Spare ribs 160 8-10 minuten, meerdere keren
Varkensfilet 160 6–8 minuten, goed aangebak-
Lamsvlees 160–180 Het apparaat voorverwarmen
nuten
nuten
ten
nuut
ten (de vleesstukken moeten
niet tegen elkaar plakken)
nuut
ten
ten
ten zonder vet neemt de baktijd met 20% toe
minuten
aan in olie (alleen draaien als
het vlees niet aan de pan plakt)
Gedurende 10 minuten afbakken aan één kant (100°C )
ten (afhankelijk van de dikte)
ten
ten
draaien
ken aan alle zijden
Page 17
Onderhoud en reiniging
Gerecht Temperatuur (°C) Tijd / Tips
Lamsbout 180 10 minuten, draaien na 5 mi-
nuten
Lamsfilet 160 10 minuten, draaien na 5 mi-
nuten (het is belangrijk dat de
filets aan alle zijden worden
gebakken)
Lamssteaks 160 6 - 8 minuten, draaien na 3 - 4
minuten
Gevogelte 140–160 Het apparaat voorverwarmen
Kip supreme 140 8 - 10 minuten, draaien na 4 -
5 minuten
Kalkoenreepjes 160 6 minuten, meerdere keren
draaien
Worstjes 160 Het apparaat voorverwarmen
Gebakken ei 140 Het apparaat voorverwarmen
Crepes / Omeletten 140-160 Het apparaat voorverwarmen
Fruit: 140-160 Het apparaat voorverwarmen
Groenten 140-160 10-20 minuten, meerdere ke-
ren draaien
Groenten 140-160 10 - 15 minuten, met deksel op
de pan (halverwege draaien)
Kook de voorgekookte rijst 140-160 10-15 minuten, meerdere ke-
ren draaien
Kook de voorgekookte noodles 140-160 15 - 20 minuten, halverwege
draaien
17
Informatie over acrylamides
Belangrijk! Volgens recente wetenschappelijke informatie kan het intensief bruinen van
levensmiddelen (met name in producten die zetmeel bevatten), een gezondheidsrisico
vormen tengevolge van acrylamides. Om die reden adviseren wij levensmiddelen zoveel
mogelijk bij lage temperaturen gaar te laten worden en de gerechten niet te veel te
bruinen.
ONDERHOUD EN REINIGING
Reinig het apparaat na elk gebruik.
Gebruik altijd kookgerei met een schone bodem.
WAARSCHUWING!
Scherpe voorwerpen en schurende reinigingsmiddelen beschadigen het apparaat.
Het reinigen van het apparaat met een stoomstraal- of hogedrukreiniger is om veiligheidsredenen verboden.
Page 18
18 Problemen oplossen
Reinigingsfunctie
1. Raak aan. Beide zones zijn ingesteld op een temperatuur van 80°C. De display knippert tot de temperatuur 80°C bereik. Het vergrendelt het bedieningspaneel, maar niet
.
2. Als de temperatuur op 80°C komt, klinkt het geluid. Het bedieningspaneel is ingeschakeld.
3. Plaats de ijsklontjes één voor één op de grillzone (u kunt ook koud water gebruiken).
Tegelijkertijd met een spatel de braadresten losmaken en in de geul schuiven tot alle
grove resten zijn verwijderd.
4. Droog het apparaat af met een schone doek.
Reinigen als het apparaat is afgekoeld
1. Laat een geschikte vetoplosser 5 minuten inwerken.
2. Verwijder de braadresten met een spatel.
3. Maak het apparaat schoon met een vochtige doek
4. Droog het apparaat af met een schone doek.
5. Wrijf het apparaat uiteindelijk in met wat vet.
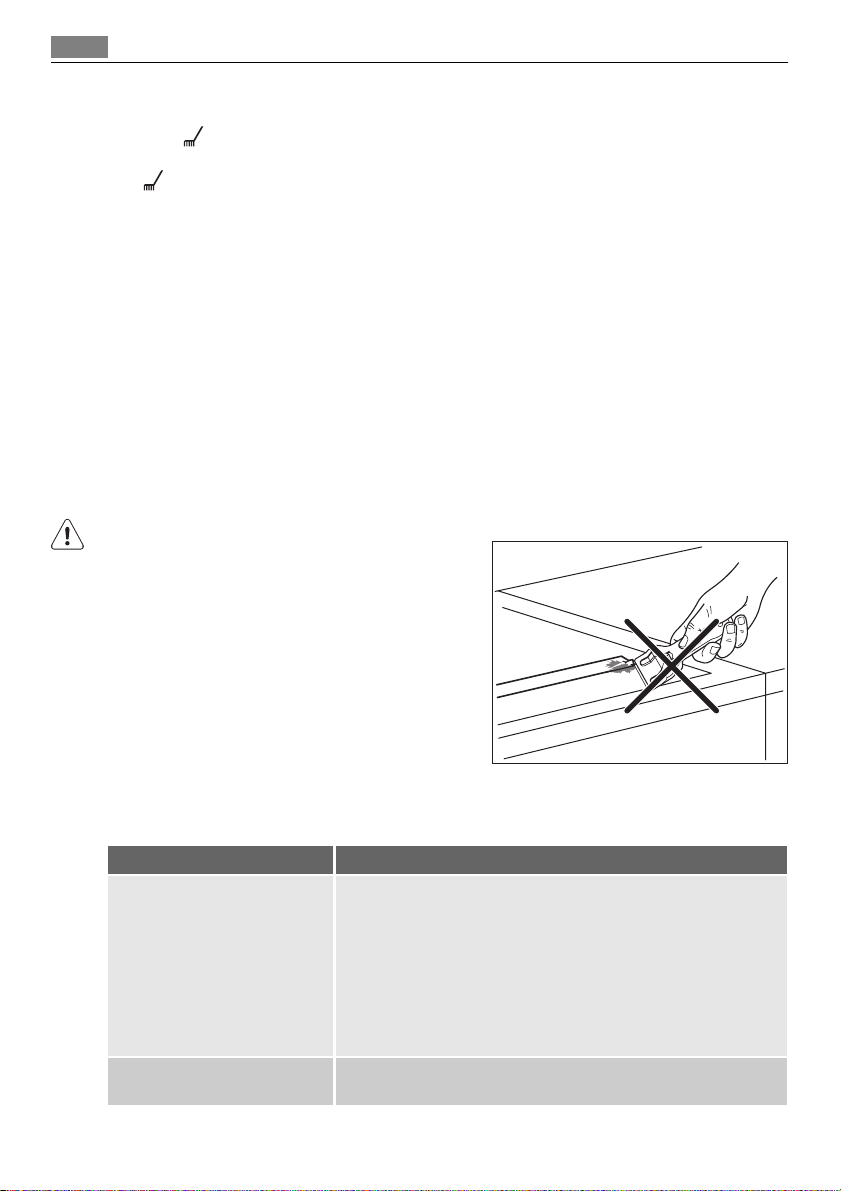
WAARSCHUWING!
• Gebruik geen schraper of scherpe objecten om
de glazen balk, de ruimte ertussen en de glaskeramische plaat mee schoon te maken. De glazen balk is op de glaskeramische plaat bevestigd.
• Plaats geen pannen op de glazen balk.
• Zorg dat de glazen balk niet door pannen
wordt aangeraakt.
PROBLEMEN OPLOSSEN
Probleem Mogelijke oorzaak en oplossing
U kunt het apparaat niet inschakelen of bedienen.
Er klinkt een geluid als het apparaat wordt uitgeschakeld.
• U hebt twee of meer sensorvelden tegelijk aangeraakt. Raak
slechts één sensorveld tegelijk aan.
• Er is water of er zijn vetspatten op het bedieningspaneel. Reinig het bedieningspaneel.
• Schakel het apparaat opnieuw in en stel de kookstand binnen
7 seconden in.
• De kinderbeveiliging of blokkering is ingeschakeld. Zie het
hoofdstuk Bediening van het apparaat.
U hebt een of meer sensorvelden afgedekt. Verwijder het voorwerp van de sensorvelden.
Page 19
Probleem Mogelijke oorzaak en oplossing
De restwarmte-indicator gaat
niet aan.
Er klinkt een geluid en het apparaat schakelt in en weer uit.
Na vijf seconden klinkt er nog
een geluid.
gaat branden
en een getal gaan branden.
Er klinkt geen signaal wanneer
u de sensorvelden van het bedieningspaneel aanraakt.
Milieubescherming
De kookzone is niet heet, omdat hij slechts kortstondig is bediend. Als de kookzone heet moet zijn, neem dan contact op met
de klantenservice.
U heeft iets geplaatst op . Verwijder het object van het sensorveld.
De automatische uitschakeling is in werking getreden. Schakel
het apparaat uit en weer in.
Er heeft zich een fout voorgedaan in het apparaat.
Maak de zekering los in de meterkast om het apparaat gedurende
enige tijd los te koppelen van de elektriciteit. Sluit het apparaat
opnieuw aan. Als
met de klantenservice.
De signalen zijn uitgeschakeld.
Schakel de signalen in (zie Offsound-toets).
weer gaat branden, neem dan contact op
19
Als u door het volgen van de bovenstaande suggesties het probleem niet kunt oplossen,
dient u contact op te nemen met uw vakhandelaar of de klantenservice. Geef de gegevens
door van het typeplaatje, een driecijferige code voor de glaskeramische plaat (bevindt zich
op de hoek van de kookplaat) en de foutmelding die wordt weergegeven.
Bij foutieve bediening van het apparaat wordt het bezoek van de technicus van de klantenservice of de vakhandelaar in rekening gebracht, zelfs tijdens de garantieperiode. De instructies over de klantenservice en de garantiebepalingen vindt u in het garantieboekje.
MILIEUBESCHERMING
Het symbool op het product of op de verpakking wijst erop dat dit product niet als
huishoudafval mag worden behandeld, maar moet worden afgegeven bij een verzamelpunt
waar elektrische en elektronische apparatuur wordt gerecycled. Als u ervoor zorgt dat dit
product op de juiste manier wordt verwijderd, voorkomt u mogelijke negatieve gevolgen
voor mens en milieu die zich zouden kunnen voordoen in geval van verkeerde
afvalverwerking. Voor gedetailleerdere informatie over het recyclen van dit product, kunt u
contact opnemen met de gemeente, de gemeentereiniging of de winkel waar u het product
hebt gekocht.
Verpakkingsmateriaal
De verpakkingsmaterialen zijn milieuvriendelijk en herbruikbaar. De kunststof onderdelen
zijn gemarkeerd, bijv.: >PE<,>PS<, etc. Gooi het verpakkingsmateriaal weg in de juiste afvalcontainer bij uw plaatselijke afvalverwerkingsdienst.
Page 20
20
FOR PERFECT RESULTS
Thank you for choosing this AEG product. We have created it to give you
impeccable performance for many years, with innovative technologies that help
make life simpler – features you might not find on ordinary appliances. Please
spend a few minutes reading to get the very best from it.
ACCESSORIES AND CONSUMABLES
In the AEG webshop, you’ll find everything you need to keep all your AEG
appliances looking spotless and working perfectly. Along with a wide range of
accessories designed and built to the high quality standards you would expect,
from specialist cookware to cutlery baskets, from bottle holders to delicate
laundry bags…
Visit the webshop at:
www.aeg.com/shop
Page 21

CONTENTS
22 Safety information
23 Installation instructions
28 Product description
30 Operating instructions
33 Helpful hints and tips
35 Care and cleaning
36 What to do if…
37 Environment concerns
37 Warranty
Contents
21
The following symbols are used in this user
manual:
Important information concerning your
personal safety and information on how to
avoid damaging the appliance.
General information and tips
Environmental information
Subject to change without notice
Page 22
22 Safety information
SAFETY INFORMATION
For your safety and correct operation of the appliance, read this manual carefully before
installation and use. Always keep these instructions with the appliance even if you move or
sell it. Users must fully know the operation and safety features of the appliance.
General safety
WARNING!
Persons (including children) with reduced physical sensory, mental capabilities or lack of experience and knowledge must not use the appliance. They must have supervision or instruction for the operation of the appliance by a person responsible for their safety.
Child safety
• Only adults can use this appliance. Children must get supervision to make sure that they
do not play with the appliance.
• Keep all packaging away from children. There is a risk of suffocation.
• Keep children away from the appliance when it is on.
WARNING!
Start the child safety device to prevent small children and pets from an accidental activation of the appliance.
Safety during operation
• Remove all packaging, stickers and layers from the appliance before the first use.
• Set the cooking zones to "off" after each use.
• Risk of burns! Do not put metallic objects, for example cutlery or saucepan lids, on the
cooking surface, as they can become hot.
• Users with an implanted pacemaker must keep their upper body minimum 30 cm from
induction cooking zones that are switched on.
WARNING!
Fire danger! Overheated fats and oils can catch fire very quickly.
Correct operation
• Always monitor the appliance during operation.
• Only use the appliance for domestic cooking tasks!
• Do not use the appliance as a work or a storage surface.
• Do not put or keep very flammable liquids and materials, or fusible objects (made of
plastic or aluminium) on or near the appliance.
• Be careful when you connect the appliance to the near sockets. Do not let electricity
bonds touch the appliance or hot cookware. Do not let electricity bonds tangle.
How to prevent a damage to the appliance
• If the objects or cookware fall on the glass ceramic, the surface can be damaged.
Page 23
Installation instructions 23
• Cookware made of cast iron, cast aluminium or with damaged bottoms can scratch the
glass ceramic if you move them on the surface.
• Do not let cookware boil dry to prevent the damage to cookware and glass ceramics.
• Do not use the cooking zones with empty cookware or without cookware.
• Do not cover the parts of the appliance with aluminium foil.
• Do not cover the ventilation space of 5 mm between the worktop and front of the unit
below it.
WARNING!
If there is a crack on the surface, disconnect power supply to prevent the electric shock.
Special notes for the Teppan Yaki
• You can hear noises when the appliance operates. The noises are normal and do not refer
to appliance malfunction.
• If you use the appliance frequently, a small unevenness can form in the middle of the
cooking surface where the 2 zones touch. This is not a defect in the cooking surface and
its operation is not affected. Therefore:
– Do not put cookware in the middle of the cooking surface between the zones, as the
unevenness can make them unsteady.
– Frying on the surface, where the zones touch, can cause in uneven browning (e. g.
with pancakes).
INSTALLATION INSTRUCTIONS
Before the installation, note down the serial number (Ser. Nr.) from the rating plate.The
rating plate of the appliance is on its lower casing.
Made in Switzerland
220-240V ~50/60Hz
5,6 kW/Leistung ind. 5,6 kW
Typ: 55TEP01AU
PNC: 941 560 808/00
Serie:
HC652600EB
Page 24
24 Installation instructions
Safety instructions
WARNING!
You must read these!
Make sure that the appliance is not damaged because of transportation. Do not connect a
damaged appliance. If it is necessary, speak to the supplier.
Only an authorised service technician can install, connect or repair this appliance. Use only
original spare parts.
Only use built-in appliances after you assemble the appliance into correct built-in units and
work surfaces that align to the standards.
Do not change the specifications or modify this product. Risk of injury and damage to the
appliance.
Fully obey the laws, ordinances, directives and standards in force in the country where you
use the appliance (safety regulations, recycling regulations, electrical safety rules etc.)!
Keep the minimum distances to other appliances and units!
Install anti-shock protection, for example install the drawers only with a protective floor
directly below the appliance!
Protect the cut surfaces of the worktop against moisture with a correct sealant!
Seal the appliance to the work top with no space left with a correct sealant!
Protect the bottom of the appliance from steam and moisture, e.g. from a dishwasher or
oven!
Do not install the appliance adjacent to doors and below windows! If not, hot cookware can
be hit off the hob when you open doors or windows.
WARNING!
Risk of injury from electrical current. Carefully obey the instructions for electrical connections.
• The electrical mains terminal is live.
• Make electrical mains terminal free of voltage.
• Install correctly to give anti-shock protection.
• Loose and incorrect plug and socket connections can make the terminal become too hot.
• A qualified electrician must install the clamping connections correctly.
• Use a strain relief clamp on cable.
• Use the correct mains cable of type H05BB-F Tmax 90°C (or higher) for a single-phase.
• Replace the damaged mains cable with a special cable (type H05BB-F Tmax 90°C; or
higher). Speak your local Service Force Centre.
The appliance must have the electrical installation which lets you disconnect the appliance
from the mains at all poles with a contact opening width of minimum 3 mm.
You must have correct isolation devices: line protecting cut-outs, fuses (screw type fuses
removed from the holder), earth leakage trips and contactors.
Page 25

Assembly
min.
50mm
Installation instructions 25
min.
500mm
min.
50mm
min.
5mm
=
R 5mm
490
600mm
mm
560
+1
mm
min.
25 mm
min.
20 mm
min.
5 mm
+1
=
Page 26

26 Installation instructions
min.
38 mm
min.
5 mm
• Seal the gap between the worktop and glass ceramic with silicone.
• Put some soapy water on the silicone.
• Pull off the excess silicone with the scraper.
The installation of more than one appliance
Added parts:connection bar(s), heat resistant silicon, rubber shape, sealing strap.
Only use special a heat - resistant silicon.
The worktop cut out
Distance from the wall : minimum 50 mm
Depth : 490 mm
Width : sum widths of all the appliances to be built-in and subtract 20 mm (see also "Overview of all appliance widths" )
Example :
+-=
580 mm
360 mm
20 mm 920 mm
520 mm
490 mm
The installation of more than one appliance
1. Put down the dimension of the worktop cut out and saw it out.
2. Put the appliances one at time on some soft surface, a blanket for example, with the
bottom side up.
3. Put the seal stripe around the lower edge of the appliance along the outer edge of the
glass ceramic.
4. Loosely screw the fixing plates into the appropriate holes in the protective casing.
5. Put the first appliance in the worktop cut out. Put the connection bar in the worktop
cut out and push up half of the width against the appliance.
Page 27

Installation instructions
6. Loosely turn in fixing plates from below on the worktop and on the connection bar.
7. Put the subsequent appliance in the worktop cut out . Make sure that the front ends
of the appliances are on the same level.
27
8. Tighten the fixing plate / retaining grip screws.
9. Seal the gap between the worktop and appliances and between appliances with sili-
cone.
10. Put some soapy water on the silicon.
11. Press the rubber shape with some strength against the glass ceramic and move it
slowly along the space.
12. Do not touch the silicon until it become hard, it can last about a day.
13. Carefully remove silicon that came out with a shaving blade.
14. Clean glass ceramic fully.
Page 28

28 Product description
PRODUCT DESCRIPTION
The most important features of your appliance
• The cooking surface has 2 layers of stainless steel with a layer of aluminium between
them. It has a good thermal capacity, which prevents a quickly decrease in temperature,
for example, when you prepare meat from the refrigerator.
• Each Teppan Yaki grill surface is unique. Due to their processing, they are handled manually and ground by grinding specialists. Deviations in the grinding pattern are normal
and will not result in any functional limits. The frequent use of the grill makes it look
more valuable.
• The groove around the edge:
– decreases the temperature on the installation surfaces, that the cooking surface can
be installed into different types of kitchen worktops.
– The indentation of the groove absorbs some of the expansion of the heated cooking
surface.
– Minor food remnants and liquids can easily be fed into the groove and removed.
• The desired temperature can be kept constant by the thermostat with a readable temperature setting. This prevents overheating of the food and permits low-fat cooking with
retention of nutritional values.
• The food is prepared (heated) directly on the cooking surface, with or without fat. There
is also the option of cooking with pots or pans.
• The heating time, e.g. to 180 °C, is approx. 4 minutes. The cooling down time, e.g. from
180 °C to 100 °C, is approx. 25 minutes, or to 60 °C approx. 60 minutes.
• The cooking surface must always be preheated.
General overview
1
2
3
4
Rear grilling zone 2800W
1
Front grilling zone 2800W
2
Glass bar
3
Control panel
4
Page 29

Product description 29
Control panel layout
6 75 843
2
1
91012 11
Use the sensor fields to operate the appliance. The displays, indicators and sounds tell which
functions operate.
sensor field function
1
2
3
Temperature display It shows the temperature.
4
Cooking zones' indicators of timer It shows for which of the roasting zones you set
5
Timer display It shows the time in minutes.
6
7
8
9
10
11
12
/
Control bar To set the heat temperature.
It activates and deactivates the appliance.
It locks/unlocks the control panel.
It activates and deactivates the cleaning function.
the time
It shows that the Count Up operates (1 to 59 minutes).
It shows that the Count Down Timer operates (1
to 99 minutes) or shows that Minute Minder operates.
It increases or decreases the time.
It sets the roasting zone. .
It sets the Timer functions.
Displays
60
Display Description
The roasting zone is deactivated.
-
220
+ digit
/ /
The roasting zone operates.
There is a malfunction.
3 step Residual heat indicator: continue cook / stay warm / residual
heat.
Lock / The Child Safety functions operates.
Page 30

30 Operating instructions
Display Description
The Automatic Switch Off function operates.
OptiHeat Control (3 step Residual heat indicator)
WARNING!
\ \ Risk of burns from residual heat!
OptiHeat Control indicates the level of the residual heat. The induction cooking zones make
the heat necessary for cooking directly in the bottom of the cookware. The glass ceramic is
heated by the heat of the cookware.
OPERATING INSTRUCTIONS
On and Off
Touch for 1 second to start or stop the appliance.
Automatic Switch Off
The function deactivates the appliance automatically if:
• All roasting zones are deactivated
• You do not set the temperature after you activate the appliance.
• You spill something or put something on the control panel for more than 10 seconds, (a
pan, a cloth, etc.). The sound operates some time and the appliance deactivates. Remove
the object or clean the control panel.
• You do not deactivate a roasting zone or change the temperature. After 90 minutes
comes on and the appliance deactivates. Before next use, set the roasting zone to .
.
The heat setting
Touch the control bar at the heat setting. Change
to the left or the right, if it is necessary. Do not
release before you have a correct heat setting. The
display shows the heat setting.
If you set the temperature, the display flashes until the roasting zone reaches the temperature. Then a signal sounds and the display shows the temperature.
The Timer
The Count Down Timer.
Use the Count Down Timer to set how long the cooking zone operates for only this one
time.
Set the Count Down Timer after the selection of the cooking zone.
Page 31

Operating instructions 31
The selection of Timer function is possible for cooking zones that are active and the heat
setting is set.
• To set the cooking zone: touch
cooking zone comes on.
When this function is activated,
• To activate the Count Down Timer: touch
minutes). When the indicator of the cooking zone starts to flash slow, the time counts
down.
• To see the remaining time: set the cooking zone with
zone starts to flash quickly. The display shows the remaining time.
• To change the Count Down Timer:set the cooking zone with
• To deactivate the Count Down Time: set the cooking zone with
remaining time counts back to
When the timer countdown comes to an end, the sound operates and
cooking zone deactivates.
• To deactivate the sound: touch
The Count up timer
Use the Count up timer to monitor how long the cooking zone operates.
• The selection of the cooking zone (if more than 1 cooking zone operates) : touch
again and again until the indicator of a necessary cooking zone comes on.
When this function is activated,
• To activate the Count up timer:
Touch
The symbol goes out and comes on.
• To see how long the cooking zone operates:set the cooking zone with
tor of the cooking zone starts to flash quickly. The display shows the time that the zone
operates. The display shows the time of the cooking zone that operates for longer period
of time.
• To deactivate the Count up timer: set the cooking zone with
deactivate the timer. the symbol
When the two Timer functions operate at the same time, the display shows the Count Up
Timer first.
again and again until the indicator of a necessary
comes on.
of the timer to set the time ( 00 -
. The indicator of the cooking
touch or .
. Touch . The
. The indicator of the cooking zone goes out.
00
flashes. The
00
comes on.
and touch or to
goes out and comes on.
99
. The indica-
The Minute minder.
You can use the timer as a minute minder while the cooking zones do not operate. Touch
.
Touch
operates and
• To stop the sound: touch
or of the timer to set the time. When the time comes to an end, the sound
flashes.
00
Page 32

32 Operating instructions
Lock
You can lock the control panel, but not . It prevents an accidental change of the heat
setting.
First set the heat setting.
To start this function touch
The Timer stays on.
To stop this function touch
When you stop the appliance, you also stop this function.
. The symbol comes on for 4 seconds.
. The heat setting that you set before comes on.
The child safety device
This function prevents an accidental operation of the hob.
Starting the child safety device
• Start the hob with
• Touch
• Stop the hob with
Switching off the child safety device
• Start the hob with
• Stop the hob with
Overriding the child safety device for one cooking session
• Start the hob with
• Touch
the hob.
• When you stop the hob with
for 4 seconds. The symbol comes on.
comes on.
for 4 seconds. Set the heat setting in less than 10 seconds. You can operate
. Do not set the heat settings.
.
. Do not set the heat settings. Touch for 4 seconds. The symbol
.
. The symbol comes on.
, the child safety device operates again.
OffSound Control (Deactivation and activation of the sounds)
Deactivation of the sounds
Deactivate the appliance.
Touch
comes on, the sound is on. Touch , comes on, the sound is off.
When this function operates, you can hear the sounds only when:
• you touch
• the Minute Minder comes down
• the Count Down Timer comes down
• you put something on the control panel.
Activation of the sounds
Deactivate the appliance.
Touch
comes on, because the sound is off. Touch , comes on. The sound is on.
for 3 seconds. The displays come on and go out. Touch for 3 seconds.
for 3 seconds. The displays come on and go out. Touch for 3 seconds.
Page 33

Helpful hints and tips 33
HELPFUL HINTS AND TIPS
Preparing food with the Teppan Yaki
You prepare the food directly on the roasting surface, with or without fat. You can also use
pots or pans, but the warm up time is longer then on the glass-ceramic hob or on the gas
gob.
You can cook or keep warm accompaniments, e.g. sauces, rice, etc., in pots or pans. Put
them directly on the cooking surface.
We do not recommend boiling large quantities on the roasting surface, such as, e.g. for spaghetti.
The noises are normal and do not refer to appliance malfunction.
The Examples of cooking applications
Using fats and oils
When the temperature is too high, the fat begins to smoke (so-called “smoking point”)
Fats / Oils Max. temperature (°C) Smoking point (°C)
Butter 130 150
Pork fat 170 200
Beef fat 180 210
Olive oil 180 200
Sunflower oil 200 220
Groundnut oil 200 235
Coconut oil 200 240
Always pre-heat the appliance.
Food to be cooked Temperature (°C) Time / Tips
Fish and shellfish 140–160 Pre-heat the appliance
Salmon fillets 160 8 minutes, turn after 4 minutes
King prawns (without shell) 140 6 minutes, turn after 3 minutes
Shark steaks, approx. 2.5 cm
thick
Sole, Müllerin Art (fried in but-
ter)
Plaice filets 140 6 minutes, turn after 3 minutes
Veal 140–180 Pre-heat the appliance
Veal chop 180 10 minutes, turn after 5 mi-
160 10 minutes, turn after 5 mi-
nutes
140 8 minutes, turn after 4 mi-
nutes, light side first
nutes
Page 34

34 Helpful hints and tips
Food to be cooked Temperature (°C) Time / Tips
Medallions of Veal, 4 cm thick 160 10 minutes, turn after 5 mi-
Veal steaks, 3 - 4 cm thick 160 6 minutes, turn after 3 minutes
Veal escalope, natural 180 5 minutes, turn after 2½ mi-
Veal fricasee in cream sauce 180 6 minutes, turn after 3 minutes
Beef 160–180 Pre-heat the appliance
Beef steak blau, very rare 180 2 minutes, turn after 1 minute
blutig, rare 180 6 minutes, turn after 3 minutes
rosa, medium 180 8 minutes, turn after 2 minutes
durch, well done 180 8 minutes, turn after 4 minutes
Hamburger 160 6 - 8 minutes, turn after 3 - 4
Châteaubriand 160 then 100 Sauté the meat in oil on all
Pork 160–180 Pre-heat the appliance
Medallions of pork 160 8 minutes, turn after 4 minutes
Pork steaks 180 8 minutes, turn after 4 minutes
Pork escalope 160 6 minutes, turn after 3 minutes
Spare ribs 160 8 - 10 minutes, turn several
Pork skewer 160 6 – 8 minutes, sauté well on all
Lamb 160–180 Pre-heat the appliance
Lamb chops 180 10 minutes, turn after 5 mi-
Filet of lamb 160 10 minutes, turn after 5 mi-
Lamb steaks 160 6 - 8 minutes, turn after 3 - 4
nutes
nutes
(the meat strips should not e
stuck to each other)
without fatty substances, the
roasting time increases by approximately 20 %
minutes
sides (turn only when the meat
does not stick to the pan) Finish off on one side for 10 minutes (100°C )
(depending on the thickness)
times
sides
nutes
nutes (important here is that
the filets are fried on all sides)
minutes
Page 35

Care and cleaning
Food to be cooked Temperature (°C) Time / Tips
Poultry 140–160 Pre-heat the appliance
Chicken supreme 140 8 - 10 minutes, turn after 4 - 5
minutes
Turkey breast strips 160 6 minutes, turn several times
Sausages 160 Pre-heat the appliance
Fried egg 140 Pre-heat the appliance
Crepes / Omelettes 140-160 Pre-heat the appliance
Fruits 140-160 Pre-heat the appliance
Vegetables 140-160 10 – 20 minutes, turn several
times
Vegetables 140-160 10 - 15 minutes, under a cook-
ing lid (turn half way through)
Cook the pre-cooked rice 140-160 10 – 15 minutes, turn several
times
Cook the pre-cooked noodles 140-160 15 - 20 minutes, turn half way
through
Information on acrylamides
Important! According to the newest scientific knowledge, if you brown food (specially the
one which contains starch), acrylamides can pose a health risk. Thus, we recommend that
you cook at the lowest temperatures and do not brown food too much.
35
CARE AND CLEANING
Clean the appliance after each use.
Always use cookware with clean bottom.
WARNING!
Sharp objects and abrasive cleaning agents will damage the appliance.
For your safety, do not clean the appliance with steam blasters or high-pressure cleaners.
Cleaning function
1. Touch . Both zones are set to temperature 80°C. The display blinks until temperature reaches 80°C. It locks the control panel, but not
2. When the temperature is 80°C, the sound sounds. The control panel is active.
3. Place the ice cubes onto the roasting zone one after another (you can use also cold
water). At the same time, loosen the roasting leftovers using a spatula and push them
into the trough until all leftovers have been removed.
4. Rub the appliance dry with a clean cloth.
Cleaning when the appliance is cold
1. Allow a suitable fat solvent to react for 5 minutes.
.
Page 36

36 What to do if…
2. Remove the cooking residues using a spatula.
3. Clean the appliance with a moist cloth
4. Rub the appliance dry with a clean cloth.
5. At the end rub the appliance with some fat.
WARNING!
• Do not use the scraper or sharp objects to clean
the glass bar and the space between it and
glass ceramic. Glass bar is attached to the ceramic plate.
• Do not put the pots on the glass bar.
• Make sure that the pans and pots do not touch
the glass bar.
WHAT TO DO IF…
Problem Possible cause and remedy
You cannot activate the appliance or operate it.
A sound operates when the appliance is deactivated.
The residual heat indicator does
not come on.
A sound operates and appliance activates and deactivates
again. After 5 seconds one
more sound operates.
comes on
and number come on.
• You touched 2 or more sensor fields at the same time. Only
• There is water or fat stains on the control panel. Clean the
• Activate the appliance again and set the heat setting in 7 sec-
• The child safety device or the lock operates. See the chapter
You put something on one or more sensor fields. Remove the object from the sensor fields.
The cooking zone is not hot because it operated only for a short
time. If the cooking zone must be hot, speak to the service centre.
You put something . Remove the object from the sensor field.
The Automatic Switch Off operates. Deactivate the appliance and
activate it again.
There is an error in the appliance.
Disconnect the fuse from the electrical system of the house in
order to disconnect the appliance from the electrical supply for
some time. Connect again. If
service centre.
touch one sensor field.
control panel
onds.
Operating the appliance.
comes on again, speak to the
Page 37

Environment concerns 37
Problem Possible cause and remedy
There is no signal when you
touch the panel sensor fields.
If you tried the above solutions and cannot repair the problem, speak to your dealer or the
Customer Care Department. Give the data from the rating plate, three-digit-letter code for
the glass ceramic (it is in the corner of the cooking surface) and an error message that
comes on.
If you operated the appliance incorrectly, the servicing by a customer service technician or
dealer will not be free of charge, even during the warranty period. The instructions about
the customer service and conditions of guarantee are in the guarantee booklet.
The signals are deactivated.
Activate the signals (see OffSound Control ).
ENVIRONMENT CONCERNS
The symbol on the product or on its packaging indicates that this product may not be
treated as household waste. Instead it should be taken to the appropriate collection point
for the recycling of electrical and electronic equipment. By ensuring this product is
disposed of correctly, you will help prevent potential negative consequences for the
environment and human health, which could otherwise be caused by inappropriate waste
handling of this product. For more detailed information about recycling of this product,
please contact your local council, your household waste disposal service or the shop where
you purchased the product.
Packaging material
The packaging materials are friendly to the environment and can be recycled. The plastic
components are identified by marking: >PE<,>PS<, etc. Discard the packaging materials as
household waste at the waste disposal facilities in your municipality.
WARRANTY
FOR SALES IN AUSTRALIA AND NEW ZEALAND
APPLIANCE: AEG BUILT-IN OVEN, COOKTOP, WARMING DRAWER &
DRAWER
This document sets out the terms and conditions of the product warranties for Electrolux Appliances. It is an important document. Please keep it with your proof of purchase
documents in a safe place for future reference should you require service for your Appliance.
1. In this warranty
a) ‘acceptable quality’ as referred to in clause 10 of this warranty has the same
meaning referred to in the ACL;
b) ‘ACL’ means Trade Practices Amendment (Australian Consumer Law) Act (No.2)
2010;
c) ‘Appliance’ means any Electrolux product purchased by you accompanied by this
document;
Page 38

38 Warranty
d) ‘ASC’ means Electrolux’ authorised serviced centres;
e) ‘Electrolux’ means Electrolux Home Products Pty Ltd of 163 O’Riordan Street, Mas-
cot, NSW 2020, ABN 51 004 762 341 in respect of Appliances purchased in Australia and Electrolux (NZ) Limited of 3-5 Niall Burgess Road, Mount Wellington, in
respect of Appliances purchased in New Zealand;
f) ‘major failure’ as referred to in clause 10 of this warranty has the same meaning
referred to in the ACL and includes a situation when an Appliance cannot be repaired or it is uneconomic for Electrolux, at its discretion, to repair an Appliance
during the Warranty Period;
g) ‘Warranty Period’ means:
– where the Appliance is used for personal, domestic or household use (i.e. normal
single family use) as set out in the instruction manual, the Appliance is warranted against manufacturing defects in Australia for 60 months and in New Zealand for 60 months, following the date of original purchase of the Appliance;
– where the Appliance is used for commercial purposes (including being used to
directly assist a business or where the Appliance is used in a multi-family communal or share type environment), the Appliance will then be warranted against
manufacturing defects in Australia for 3 months and in New Zealand for 3
months, following the date of original purchase of the Appliance.
h) ‘you’ means the purchaser of the Appliance not having purchased the Appliance
for re-sale, and ‘your’ has a corresponding meaning.
2. This warranty only applies to Appliances purchased and used in Australia or New Zealand and is in addition to (and does not exclude, restrict, or modify in any way) any
non-excludable statutory warranties in Australia or New Zealand.
3. During the Warranty Period Electrolux or its ASC will, at no extra charge if your Appliance is readily accessible for service, without special equipment and subject to these
terms and conditions, repair or replace any parts which it considers to be defective.
Electrolux or its ASC may use remanufactured parts to repair your Appliance. You
agree that any replaced Appliances or parts become the property of Electrolux. This
warranty does not apply to light globes, batteries, filters or similar perishable parts.
4. Parts and Appliances not supplied by Electrolux are not covered by this warranty.
5. You will bear the cost of transportation, travel and delivery of the Appliance to and
from Electrolux or its ASC. If you reside outside of the service area, you will bear the
cost of:
a) travel of an authorised representative;
b) transportation and delivery of the Appliance to and from Electrolux or its ASC,
In all instances, unless the Appliance is transported by Electrolux or an Electrolux authorised representative, the Appliance is transported at the owner’s cost and risk while
in transit to and from Electrolux or its ASC.
6. Proof of purchase is required before you can make a claim under this warranty.
7. You may not make a claim under this warranty unless the defect claimed is due to
faulty or defective parts or workmanship. Electrolux is not liable in the following situations (which are not exhaustive):
a) the Appliance is damaged by:
Page 39

Warranty
39
– accident
– misuse or abuse, including failure to properly maintain or service
– normal wear and tear
– power surges, electrical storm damage or incorrect power supply
– incomplete or improper installation
– incorrect, improper or inappropriate operation
– insect or vermin infestation
– failure to comply with any additional instructions supplied with the Appliance;
b) the Appliance is modified without authority from Electrolux in writing;
c) the Appliance’s serial number or warranty seal has been removed or defaced;
d) the Appliance was serviced or repaired by anyone other than Electrolux, an au-
thorised repairer or ASC.
8. This warranty, the contract to which it relates and the relationship between you and
Electrolux are governed by the law applicable where the Appliance was purchased.
Where the Appliance was purchased in New Zealand for business purposes the Consumer Guarantee Act does not apply.
9. To the extent permitted by law, Electrolux excludes all warranties and liabilities (other
than as contained in this document) including liability for any loss or damage whether
direct or indirect arising from your purchase, use or non use of the Appliance.
10. For Appliances and services provided by Electrolux in Australia, the Appliances come
with a guarantee by Electrolux that cannot be excluded under the Australian Consumer Law. You are entitled to a replacement or refund for a major failure and for compensation for any other reasonably foreseeable loss or damage. You are also entitled to
have the Appliance repaired or replaced if the Appliance fails to be of acceptable quality and the failure does not amount to a major failure. The benefits to you given by this
warranty are in addition to your other rights and remedies under a law in relation to
the Appliances or services to which the warranty relates.
11. At all times during the Warranty Period, Electrolux shall, at its discretion, determine
whether repair, replacement or refund will apply if an Appliance has a valid warranty
claim applicable to it.
12. For Appliances and services provided by Electrolux in New Zealand, the Appliances
come with a guarantee by Electrolux pursuant to the provisions of the Consumer
Guarantees Act, the Sale of Goods Act and the Fair Trading Act.
13. To enquire about claiming under this warranty, please follow these steps:
a) carefully check the operating instructions, user manual and the terms of this war-
ranty;
b) have the model and serial number of the Appliance available;
c) have the proof of purchase (eg an invoice) available;
d) telephone the numbers shown below.
14. You accept that if you make a warranty claim, Electrolux and its ASC may exchange
information in relation to you to enable Electrolux to meet its obligations under this
warranty.
Page 40

40 Warranty
Important Notice
Before calling for service, please ensure that the steps listed in point 13 above have been
followed.
FOR SERVICE
or to find the address of your
nearest state service centre in
Australia
Please call 13 13 4 9
For the cost of a local call (Australia
only)
FOR SERVICE
or to find the address of your
nearest authorised service centre in New Zealand
Free call 0800 10 66 10
(New Zealand only)
SERVICE AUSTRALIA
ELECTROLUX HOME PRODUCTS
www.electrolux.com.au
SERVICE NEW ZEALAND
ELECTROLUX HOME PRODUCTS
www.electrolux.co.nz
FOR SPARE PARTS
or to find the address of your
nearest state spare parts centre
in Australia
Please call 13 13 50
For the cost of a local call (Australia
only)
FOR SPARE PARTS
or to find the address of your
nearest state spare parts centre
in New Zealand
Free call 0800 10 66 20
(New Zealand only)
Page 41

POUR DES RÉSULTATS PARFAITS
Merci d'avoir choisi ce produit AEG. Nous l'avons conçu pour qu'il vous offre des
performances irréprochables pour longtemps, en intégrant des technologies
innovantes qui vous simplifient la vie grâce à des caractéristiques que vous ne
trouverez pas forcément sur des appareils ordinaires. Veuillez prendre quelques
instants pour lire cette notice afin d'utiliser au mieux votre appareil.
ACCESSOIRES ET CONSOMMABLES
Dans la boutique en ligne d'AEG, vous trouverez tout ce qu'il vous faut pour que
vos appareils AEG fonctionnent parfaitement. Sans oublier une vaste gamme
d'accessoires conçus et fabriqués selon les critères de qualité les plus élevés qui
soient, des articles de cuisine spécialisés aux range-couverts, des porte-bouteilles
aux sacs à linge délicats...
Visitez la boutique en ligne sur
www.aeg.com/shop
41
Page 42

42 Sommaire
SOMMAIRE
43 Consignes de sécurité
44 Instructions d'installation
49 Description de l'appareil
51 Notice d'utilisation
54 Conseils utiles
57 Entretien et nettoyage
58 En cas d'anomalie de
fonctionnement
59 En matière de protection de
l'environnement
Les symboles suivants sont utilisés dans ce
manuel:
Informations importantes pour votre sécurité
et pour éviter d’abîmer l’appareil.
Informations générales et conseils
Informations écologiques
Sous réserve de modifications
Page 43

Consignes de sécurité
CONSIGNES DE SÉCURITÉ
Pour votre sécurité et le bon fonctionnement de l'appareil, lisez attentivement ce manuel
avant l'installation et l'utilisation. Conservez ces instructions à proximité de l'appareil. Les
utilisateurs doivent connaître parfaitement le fonctionnement et les fonctions de sécurité
de l'appareil.
Avertissements importants
AVERTISSEMENT
Cet appareil n'est pas conçu pour être utilisé par des personnes (y compris des enfants)
dont les facultés physiques, sensorielles ou mentales sont réduites, ou qui manquent d'expérience et de connaissances, à moins qu'une personne responsable de leur sécurité ne les
supervise ou leur donne des instructions sur la manière de l'utiliser.
Sécurité des enfants
• Cet appareil a été conçu pour être utilisé par des adultes. Veillez à ce que les enfants n'y
touchent pas et ne l'utilisent pas comme un jouet.
• Ne laissez pas les emballages à portée de main des enfants. Ils pourraient s'asphyxier !
• Tenez les enfants éloignés de l'appareil pendant son fonctionnement.
AVERTISSEMENT
La sécurité enfants empêche l'utilisation accidentelle ou involontaire de l'appareil.
43
Utilisation
• Retirez tous les emballages, les étiquettes et les films protecteurs de l'appareil (sauf la
plaque signalétique) avant de l'utiliser pour la première fois.
• Mettez les zones de cuisson à l'arrêt après chaque utilisation.
• Risque de brûlures ! Ne posez aucun objet contenant du métal, comme par exemple les
couverts ou couvercles de récipients sur la table de cuisson. Ils risqueraient de s'échauffer.
• Les utilisateurs porteurs d'un pacemaker doivent se tenir à une distance d'au moins 30
cm (au niveau du buste) des zones de cuisson à induction mises en fonctionnement.
AVERTISSEMENT
Danger d'incendie ! Surveillez attentivement la cuisson lors de friture dans l'huile ou la
graisse : les graisses surchauffées s'enflamment facilement.
Utilisation
• Surveillez toujours l'appareil pendant son fonctionnement.
• Votre appareil est destiné à un usage domestique normal.
• N'utilisez pas l'appareil comme plan de travail ou support.
• Ne posez pas ou ne stockez pas de liquides ou des matériaux inflammables, des objets
susceptibles de fondre (plastique, aluminium) sur ou à proximité de l'appareil.
• Faites attention si vous branchez d'autres appareils électriques à des prises situées à
proximité de la table de cuisson. Contrôlez que les câbles d'alimentation n'entrent pas en
Page 44

44 Instructions d'installation
contact avec les surfaces brûlantes de l'appareil ou les récipients brûlants. Contrôlez que
les câbles ne soient pas enchevêtrés.
Comment éviter d'endommager l'appareil
• Des objets ou des récipients de cuisson peuvent, en tombant, endommager la surface vi-
trocéramique.
• N'utilisez pas de récipients en fonte, ni de récipients dont le fond est endommagé et ru-
gueux. Ils risqueraient de rayer la table de cuisson.
• Ne faites pas "brûler" les récipients et ne laissez pas le contenu s'évaporer en totalité.
Cela peut entraîner des dégats permanents des récipients et de la table de cuisson.
• Ne placez pas de plats de cuisson vides sur les zones de cuisson et ne mettez pas ces
dernières en fonctionnement sans récipient.
• Ne recouvrez aucune partie de l'appareil à l'aide de feuilles d'aluminium.
• Laissez un espace ouvert de 5 mm sous le plan de travail et à l'avant de l'appareil pour la
ventilation.
AVERTISSEMENT
Si votre table de cuisson est endommagée (éclat, fêlure,...), débranchez votre appareil
pour éviter tout risque d'électrocution.
Indications spéciales pour le Teppan Yaki
• Vous pouvez entendre des bruits pendant que l'appareil fonctionne. Les bruits décrits
sont normaux et ne constituent pas un dysfonctionnement de l'appareil.
• En cas d’utilisation fréquente de l'appareil, sa surface peut devenir légèrement inégale au
milieu, au niveau de la séparation des zones. Cela ne résulte pas d'un défaut de la surface
de gril et n'a aucune incidence sur son fonctionnement. Par conséquent :
– Ne pas poser de plats au milieu de la surface de cuisson entre les deux zones, car la
surface inégale peut les faire vaciller.
– Faire frire des aliments au niveau de la séparation des zones peut engendrer un bru-
nissement inégal (ex. : en faisant des crêpes).
INSTRUCTIONS D'INSTALLATION
Avant d'installer l'appareil, notez le numéro de série qui figure sur la plaque signaléti-
que.La plaque signalétique se trouve sur la partie inférieure de l'appareil.
Made in Switzerland
220-240V ~50/60Hz
5,6 kW/Leistung ind. 5,6 kW
Typ: 55TEP01AU
PNC: 941 560 808/00
Serie:
HC652600EB
Page 45

Instructions d'installation
Avertissement importants
AVERTISSEMENT
Veuillez lire attentivement cette notice d'utilisation ainsi que les recommandations et les
avertissements qu'elle contient avant de procéder à l'installation et à la première utilisation
de l'appareil.
Vérifiez que l'appareil n'a pas été endommagé pendant le transport. Ne branchez jamais un
appareil endommagé. Si nécessaire, contactez le magasin vendeur.
Les opérations d'installation, de branchement et de réparation sont du ressort exclusif d'un
technicien qualifié. En cas d'intervention sur l'appareil, exigez du Service Après-vente des
pièces de rechange certifiées constructeur.
Les appareils encastrables ne peuvent être mis en fonctionnement qu'après avoir été installés dans des meubles et des plans de travail homologués et adaptés.
Ne modifiez pas ou n'essayez pas de modifier vous-même les caractéristiques de cet appareil. Cela représenterait un danger pour vous.
L'installation doit être conforme à la législation, la réglementation, les lignes directrices et
les normes en vigueur dans le pays de résidence (consignes de sécurité électro-techniques
et réglementation, recylage conforme et réglementaire, etc.).
Respectez l'espacement minimal requis par rapport aux autres appareils !
La protection contre les contacts accidentels doit être assurée par le montage, par exemple
les tiroirs doivent être installés uniquement avec un plancher de protection directement
sous l'appareil.
Protégez l'appareil de l'humidité en plaçant un joint d'étanchéité dans les rainures du plan
de travail.
Le joint comble les fentes entre le plan de travail et l'appareil.
Protégez la partie inférieure de l'appareil de la vapeur et de l'humidité émanant, par exemple, d'un lave-vaisselle ou d'un four.
N'installez pas l'appareil à proximité d'une porte ou sous une fenêtre ! Les récipients chauds
sur la table de cuisson risquent de tomber lors de l'ouverture de la porte ou de la fenêtre.
45
AVERTISSEMENT
Le courant électrique peut provoquer des blessures. Les opérations d'installation et de branchement doivent être réalisées par un technicien qualifié.
• La borne d'alimentation est sous tension.
• Mettez la borne d'alimentation hors tension.
• Assurez-vous que l'appareil est correctement installé de manière à éviter tout contact.
• Des connexions desserrées ou incorrectes peuvent être à l'origine d'une surchauffe des
bornes.
• Le raccordement électrique ne doit être effectué que par un électricien qualifié.
• Le câble ne doit pas être tendu.
• En cas de raccordement monophasé, utilisez impérativement le câble d'alimentation ap-
proprié de type H05BB-F Tmax 90 °C (ou plus).
• Si le câble d'alimentation est endommagé, il doit être remplacé par un câble spécial (type
H05BB-F Tmax 90 °C ; ou plus). Veuillez vous adresser au Service Après-vente.
Page 46

46 Instructions d'installation
Dans le cas d'une installation fixe, le raccordement au réseau doit être effectué par l'intermédiaire d'un interrupteur à coupure omnipolaire, ayant une distance d'ouverture des contacts d'au moins 3 mm.
Les dispositifs d'isolement comprennent : des coupe-circuits, des fusibles (les fusibles à visser doivent être retirés du support), des disjoncteurs de mise à la terre et des contacteurs.
Montage
min.
min.
500mm
50mm
min.
50mm
min.
5mm
=
R 5mm
490
600mm
mm
560
+1
mm
+1
=
Page 47

Instructions d'installation
min.
25 mm
47
min.
20 mm
min.
38 mm
min.
5 mm
• Isolez l'espace entre le plan de travail et la vitrocéramique avec du silicone.
• Appliquez de l'eau savonneuse sur le silicone.
• Retirez l'excédent de silicone avec le grattoir.
Installation de plusieurs appareils.
Pièces ajoutées :barre(s) d'accouplement, silicone résistant à la chaleur, forme en caout-
chouc, bride d'étanchéité.
N'utilisez que du silicone spécial résistant à la chaleur.
min.
5 mm
Découpe de la table de travail.
Distance du mur : 50 mm minimum
Profondeur : 490 mm
Largeur : additionnez les largeurs de tous les appareils à encastrer et soustrayez 20 mm
(voir également « Vue d'ensemble de toutes les largeurs d'appareils »)
Exemple :
+-=
580 mm
520 mm
360 mm
20 mm 920 mm
490 mm
Installation de plusieurs appareils.
1. Notez la dimension de découpe de la table de travail et sciez-la.
Page 48

48 Instructions d'installation
2. Posez les appareils, un à la fois, sur une surface souple, une couverture par exemple, le
dessous vers le haut.
3. Placez le joint d'étanchéité autour du bord inférieur de l'appareil le long du bord externe de la surface vitrocéramique.
4. Vissez légèrement les plaques de fixation dans les trous prévus dans le boîtier de protection.
5. Placez le premier appareil dans la découpe de la table de travail. Placez la barre d'accouplement dans la découpe de la surface de travail et appuyez-la contre l'appareil sur
la moitié de la largeur.
6. Tournez légèrement les plaques de fixation de dessous sur la table de travail et sur la
barre de raccordement.
7. Placez l'appareil suivant dans la découpe de la surface de travail. Veillez à ce que
l'avant des appareils soit au même niveau.
8. Serrez la plaque de fixation/les vis de retenue.
9. Isolez l'espace entre le plan de travail et les appareils, et entre les appareils avec du
silicone.
10. Appliquez de l'eau savonneuse sur le silicone.
11. Appuyez fermement la forme en caoutchouc contre la surface vitrocéramique et déplacez-la lentement le long de l'espace.
Page 49

Description de l'appareil
12. Ne touchez pas le silicone tant qu'il n'a pas durci. Cela peut prendre une journée.
13. Enlevez soigneusement le silicone en trop avec une lame de rasoir.
14. Nettoyez soigneusement la surface vitrocéramique.
DESCRIPTION DE L'APPAREIL
Les caractéristiques essentielles de votre appareil
• La surface de cuisson comporte 2 couches en acier inoxydable séparées par une couche
d'aluminium. Elle possède une bonne capacité thermique, qui empêche une baisse rapide
de la température, par exemple lorsque vous préparez de la viande qui sort du réfrigérateur.
• Chaque surface du gril Teppan Yaki est une pièce unique. Son processus de fabrication
impose qu’elle soit nécessairement travaillée à la main et polie par des spécialistes. Les
différences visibles au niveau du polissage son normales et n’ont aucune conséquence
sur le plan fonctionnel. Plus le gril est utilisé, plus il est précieux.
• La rainure autour du bord :
– fait baisser la température sur les surfaces d'installation, de sorte que la surface de
cuisson peut être installée sur différents types de plans de travail.
– La dentelure de la rainure absorbe une partie de l'expansion de la surface de cuisson
chauffée.
– Les restes d'aliments en petite quantité et les liquides tombent dans la rainure et peu-
vent facilement être retirés.
• Il est possible de maintenir la température souhaitée grâce au thermostat, qui affiche la
température. Cela évite de surchauffer les aliments et permet une cuisine faible en matières grasses, où les aliments conservent toutes leurs valeurs nutritionnelles.
• Les aliments sont préparés (chauffés) directement sur la surface de cuisson, avec ou sans
graisse. Il est également possible de cuisiner avec des casseroles.
• Le temps de montée en température, par ex. à 180 °C, est d'environ 4 minutes. Le temps
de refroidissement, par ex. de 180 °C à 100 °C, est d'environ 25 minutes, ou d'environ 60
minutes pour retomber à 60 °C.
• La surface de cuisson doit toujours être préchauffée.
49
Page 50

50 Description de l'appareil
Description de l'appareil
1
2
3
4
Zone arrière du gril 2800 W
1
Zone avant du gril 2800 W
2
Plaque en verre
3
Bandeau de commande
4
Description du bandeau de commande
6 75 843
2
1
91012 11
Les touches sensitives permettent de commander l'appareil. Les voyants et les signaux sonores
confirment l'activation des fonctions sélectionnées.
touche sensitive fonction
1
2
3
Affichage de la température Indique la température.
4
Voyants de minuteur des zones de
5
cuisson
Affichage du minuteur Il affiche la durée en minutes.
6
7
8
9
10
11
/
Elle met en fonctionnement ou à l'arrêt l'appareil.
Elle verrouille ou déverrouille le bandeau de com-
mande.
Elle active ou désactive la fonction de nettoyage.
Indiquent la zone de rôtissage pour laquelle vous
définissez la durée.
Indique que le décompte fonctionne (de 1 à
59 minutes).
Indique que le minuteur fonctionne (de 1 à 99 minutes) ou que la minuterie (sablier) fonctionne.
Il augmente ou diminue la durée.
Définit la zone de rôtissage. .
Règle les fonctions du minuteur.
Page 51

Notice d'utilisation
touche sensitive fonction
Bandeau de commande Pour régler la température.
12
Affichages
Afficheur Description
La zone de rôtissage est désactivée.
-
60
+ chiffre
/ /
220
La zone de rôtissage est en fonctionnement.
Il y a une anomalie.
Voyant de chaleur résiduelle à trois niveaux : continuer la cuisson /
maintien au chaud / chaleur résiduelle
Les fonctions de verrouillage/sécurité enfants sont activées.
Le dispositif d'arrêt de sécurité est activé.
OptiHeat Control (Voyant de chaleur résiduelle - 3 niveaux)
AVERTISSEMENT
/ / La chaleur résiduelle peut être source de brûlures !
OptiHeat Control indique le niveau de chaleur résiduelle. Les foyers de cuisson à induction
génèrent la chaleur nécessaire directement sur le fond des plats de cuisson. La table vitrocéramique est chauffée par la chaleur des récipients.
51
NOTICE D'UTILISATION
Mise en fonctionnement et mise à l'arrêt
Appuyez sur pendant 1 seconde pour mettre l'appareil en fonctionnement ou à l'arrêt.
Mise à l'arrêt automatique
L'appareil est automatiquement mis à l'arrêt si :
• Toutes les zones de rôtissage sont désactivées
• Vous ne réglez pas la température après avoir activé l'appareil.
• Vous avez renversé quelque chose ou placé un objet sur le bandeau de commande pen-
dant plus de 10 secondes (une casserole, un torchon, etc.). Un signal sonore retentit pendant un court instant, et la table de cuisson se désactive. Enlevez l'objet ou nettoyez le
bandeau de commande.
• La zone de rôtissage n'est pas désactivée ou la température n'est pas modifiée. Au bout
de 90 minutes
zone de rôtissage sur
apparaît et l'appareil s'éteint. Avant la prochaine utilisation, réglez la
.
.
Page 52

00
00
52 Notice d'utilisation
Le niveau de cuisson
Appuyez, sur le bandeau de commande, sur le niveau de cuisson souhaité. Corrigez-le au besoin en
effleurant une autre position, à droite ou à gauche. Ne relâchez pas la pression tant que le niveau
de cuisson souhaité n’est pas atteint. L'affichage
indique le niveau de cuisson.
Si vous réglez la température, l'affichage clignote jusqu'à ce que la zone de rôtissage atteigne la température. Un signal sonore retentit alors et l'affichage indique la température.
Minuteur
Minuteur (Compte à rebours)
Utilisez le minuteur pour régler la durée de fonctionnement de la zone de cuisson pendant
une session.
Réglez le minuteur après la sélection de la zone de cuisson.
Il est possible de sélectionner la fonction de minuterie pour les zones de cuisson actives et
dont le niveau de cuisson est réglé.
• Pour choisir la zone de cuisson : appuyez plusieurs fois sur
teur correspondant s'affiche.
Lorsque cette fonction est activée, s'allume.
• Pour activer le minuteur en fonction Décompte du temps : appuyez sur
teur pour régler la durée (
clignote plus lentement, le décompte a commencé.
• Pour savoir combien de temps il reste : paramétrez la zone de cuisson avec
voyant de la zone de cuisson commence à clignoter rapidement. L'afficheur indique le
temps qui reste.
• Pour modifier le minuteur :paramétrez la zone de cuisson avec la touche
• Pour désactiver le minuteur : paramétrez la zone de cuisson avec
temps restant est décompté jusqu'à
clignoter rapidement.
Lorsque le décompte du temps du minuteur est terminé, le signal sonore retentit et
clignote. La zone de cuisson se désactive.
• Pour désactiver le signal sonore : appuyez sur
Minuteur progressif
Utilisez le minuteur progressif pour contrôler la durée de fonctionnement de la zone de
cuisson sélectionnée.
• Pour choisir la zone de cuisson (si plusieurs zones de cuisson sont en cours de fonc-
tionnement) : appuyez plusieurs fois sur
s'affiche.
Lorsque cette fonction est activée, s'allume.
- 99 minutes). Lorsque le voyant de la zone de cuisson
. Le voyant de la zone de cuisson commence à
jusqu'à ce que l'indicateur correspondant
jusqu'à ce que l'indica-
du minu-
. Le
ou .
. Touche . Le
00
Page 53

Notice d'utilisation
• Pour activer le minuteur progressif :
Appuyez sur
Le symbole s'éteint et s'affiche.
• Pour voir comment fonctionne la zone de cuisson :paramétrez la zone de cuisson avec
. Le voyant de la zone de cuisson commence à clignoter rapidement. L'afficheur indi-
que l'heure à laquelle la zone de cuisson fonctionne.
• Pour désactiver le minuteur progressif : choisissez la zone de cuissons à l'aide de
appuyez sur
Lorsque les deux fonctions de minuteur fonctionnent en même temps, l'écran affiche le minuteur progressif en premier.
Minuterie
Vous pouvez utiliser le minuteur comme minuterie lorsque vous n'utilisez pas les zones de
cuisson. Appuyez sur
Appuyez sur la touche
le signal sonore retentit et
• Arrêt du signal sonore : appuyez sur
ou pour désactiver le minuteur. Le symbole s'éteint et s'allume.
.
ou du minuteur pour régler la durée. Une fois le temps écoulé,
clignote.
00
Verrouillage
Vous pouvez verrouiller le bandeau de commande à l'exception de la touche . Ce qui
permet d'éviter une modification involontaire du niveau de cuisson par exemple.
Réglez tout d'abord le niveau de cuisson.
Pour démarrer cette fonction, appuyez sur
Le minuteur reste allumé.
Pour mettre à l'arrêt cette fonction, appuyez sur
me.
Lorsque vous mettez l'appareil à l'arrêt, vous désactivez également cette fonction.
. Le symbole s'allume pendant 4 secondes.
. Le niveau de cuisson précédent s'allu-
53
et
Le dispositif de sécurité enfants
Ce dispositif permet d'éviter une utilisation involontaire de l'appareil.
Activation de la Sécurité enfants
• Mettez la table de cuisson en fonctionnement avec
de cuisson.
• Appuyez sur
• Mettez à l'arrêt la table de cuisson avec
Désactivation de la Sécurité enfants
• Mettez la table de cuisson en fonctionnement avec
de cuisson. Appuyez sur
• Mettez à l'arrêt la table de cuisson avec
Bridage de la sécurité enfants le temps d'une cuisson
• Mettez la table de cuisson en fonctionnement avec
• Appuyez sur
qui suivent. Vous pouvez utiliser la table de cuisson.
pendant 4 secondes. Le symbole s'allume.
.
pendant 4 secondes. Le symbole s'allume.
.
pendant 4 secondes. Réglez le niveau de cuisson dans les 10 secondes
. Ne sélectionnez aucun niveau
. Ne sélectionnez aucun niveau
. Le symbole s'allume.
Page 54

54 Conseils utiles
• Lorsque vous mettez la table de cuisson à l'arrêt avec , la Sécurité enfants est de nou-
veau activée.
OffSound Control (Désactivation et activation des signaux sonores)
Désactivation des signaux sonores
Mettez l'appareil à l'arrêt.
Appuyez sur
pendant 3 secondes. s'allume, le signal sonore est activé. Appuyez sur ,
sur
s'allume, le signal sonore est désactivé.
Lorsque cette fonction est activée, l'appareil émet des signaux sonores uniquement dans les
circonstances suivantes :
• quand vous appuyez sur
• quand le minuteur arrive en fin de course
• quand le décompte se termine
• quand vous posez un objet sur le bandeau de commande.
Activation des signaux sonores
Mettez l'appareil à l'arrêt.
Appuyez sur
pendant 3 secondes. s'allume, le signal sonore est désactivé. Appuyez sur ,
sur
s'allume. Les signaux sonores sont activés.
pendant 3 secondes. Tous les indicateurs s'allument et s'éteignent. Appuyez
pendant 3 secondes. Tous les indicateurs s'allument et s'éteignent. Appuyez
CONSEILS UTILES
Cuisiner avec le Teppan Yaki
On peut préparer des aliments directement sur la surface de rôtissage avec ou sans graisse.
On peut également utiliser des casseroles et des poêles, mais le temps de chauffe sera plus
long sur la table de cuisson en céramique que sur la table de cuisson à gaz.
Vous pouvez cuisiner ou garder au chaud les accompagnements, par ex. les sauces, le riz,
etc., dans des plats ou des casseroles. Placez-les directement sur la surface de cuisson.
Il n’est pas conseillé de faire bouillir de grandes quantités d'eau sur la surface de rôtissage
comme, par exemple, pour faire cuire des spaghetti.
Les bruits décrits sont normaux et ne constituent pas un dysfonctionnement.
Les exemples de cuisson
Utilisation de graisses et d’huiles
Si la température est trop élevée, la graisse se met à fumer (c’est ce qu’on appelle le "point
de fumée")
Graisses / Huiles Température max. (°C) Point de fumée (°C)
Beurre 130 150
Graisse de porc 170 200
Graisse de bovin 180 210
Page 55

Conseils utiles 55
Graisses / Huiles Température max. (°C) Point de fumée (°C)
Huile d'olive 180 200
Huile de tournesol 200 220
Huile d’arachide 200 235
Graisse de noix de coco 200 240
Préchauffez toujours l'appareil.
Nature de la préparation Température (°C) Durée/conseils
Poisson et crustacés 140–160 Préchauffez l'appareil
Darnes de saumon 160 8 minutes, tourner après 4 mi-
Grosses crevettes (décortiquées)
Steaks de veau d'environ 2,5
cm d’épaisseur
Soles meunières 140 8 minutes, tourner après 4 mi-
Filets de carrelet 140 6 minutes, tourner après 3 mi-
Viande de veau 140–180 Préchauffez l'appareil
Côtelette de veau 180 10 minutes, tourner après 5
Médaillon de veau, de 4 cm
d’épaisseur
Steaks de veau de 3 - 4 cm
d’épaisseur
Escalope de veau nature 180 5 minutes, tourner après 2½
Emincé de veau 180 6 minutes, tourner après 3 mi-
Bœuf 160–180 Préchauffez l'appareil
Steak de bœuf bleu, très sai-
gnant
saignant 180 6 minutes, tourner après 3 mi-
à point 180 8 minutes, tourner après 2 mi-
140 6 minutes, tourner après 3 mi-
160 10 minutes, tourner après 5
160 10 minutes, tourner après 5
160 6 minutes, tourner après 3 mi-
180 2 minutes, tourner après 1 mi-
nutes
nutes
minutes
nutes, côté clair en premier
nutes
minutes
minutes
nutes
minutes
nutes (les morceaux de viande
ne doivent pas se toucher)
nute
nutes
nutes
Page 56

56 Conseils utiles
Nature de la préparation Température (°C) Durée/conseils
bien cuit 180 8 minutes, tourner après 4 mi-
Hamburgers 160 6 - 8 minutes, tourner après 3 -
Châteaubriand 160 puis 100 Faire revenir la viande dans de
Porc 160–180 Préchauffez l'appareil
Médaillons de porc 160 8 minutes, tourner après 4 mi-
Échine de porc 180 8 minutes, tourner après 4 mi-
Escalope de porc 160 6 minutes, tourner après 3 mi-
Côtes levées 160 8 - 10 minutes, tourner plu-
Brochettes de porc 160 6 – 8 minutes, bien cuire sur
Agneau 160–180 Préchauffez l'appareil
Côtelettes d’agneau 180 10 minutes, tourner après 5
Filet d’agneau 160 10 minutes, tourner après 5
Pavés d’agneau 160 6 - 8 minutes, tourner après 3 -
Volaille 140–160 Préchauffez l'appareil
Suprême de volaille 140 8 - 10 minutes, tourner après 4
Emincé de dinde 160 6 minutes, tourner plusieurs
Saucisses 160 Préchauffez l'appareil
Œufs au plat 140 Préchauffez l'appareil
Crêpes / Omelettes 140-160 Préchauffez l'appareil
nutes sans matières grasses, les
temps de cuisson augmentent
d'environ 20 %
4 minutes
l'huile sur tous les côtés (tourner uniquement lorsque la
viande n'adhère pas à la poêle)
Terminer la cuisson sur un côté
pendant 10 minutes (100 °C)
nutes (en fonction de l’épaisseur)
nutes
nutes
sieurs fois
tous les côtés
minutes
minutes (l'important ici est que
tous les filets soient frits de
tous les côtés)
4 minutes
- 5 minutes
fois
Page 57

Entretien et nettoyage
Nature de la préparation Température (°C) Durée/conseils
Fruits 140-160 Préchauffez l'appareil
Légumes 140-160 10 - 20 minutes, tourner plu-
Légumes 140-160 10 - 15 minutes, sous une clo-
Faire revenir du riz précuit 140-160 10 - 15 minutes, tourner plu-
Faire revenir des pâtes précuites
140-160 15 - 20 minutes, tourner à mi-
sieurs fois
che de cuisson (tourner à micuisson)
sieurs fois
cuisson
ENTRETIEN ET NETTOYAGE
Nettoyez l'appareil après chaque utilisation.
Utilisez toujours des récipients de cuisson dont le fond est propre et sec, lisse et plat.
AVERTISSEMENT
Les objets tranchants et les produits de nettoyage agressifs ou abrasifs endommagent l'appareil.
Par mesure de sécurité, il est interdit de nettoyer la table de cuisson avec un appareil à jet
de vapeur ou à haute pression.
57
Fonction de nettoyage
1. Appuyez sur . Les deux zones sont réglées sur une température de 80 °C. L'affichage
clignote jusqu'à ce que la température atteigne 80 °C. Il verrouille le bandeau de commande mais pas le
.
2. Quand la température est de 80 °C, le signal sonore retentit. Le bandeau de commande
est actif.
3. Mettez les glaçons un par un sur la zone de rôtissage (vous pouvez également utiliser
de l'eau froide). En même temps, détachez les restes du rôtissage à l'aide d'une spatule
et poussez-les dans le réceptacle jusqu'à ce que tous les restes aient été retirés.
4. Frottez l'appareil avec un chiffon propre jusqu'à ce qu'il soit sec.
Nettoyage lorsque l'appareil est froid
1. Laissez réagir un diluant de graisse pendant 5 minutes.
2. Retirez les résidus de la cuisson à l'aide d'une spatule.
3. Nettoyez l'appareil avec un chiffon humide
4. Frottez l'appareil avec un chiffon propre jusqu'à ce qu'il soit sec.
5. Terminez en frottant l'appareil avec de la graisse.
Page 58

58 En cas d'anomalie de fonctionnement
AVERTISSEMENT
• Ne nettoyez pas la plaque en verre et l'espace
qui sépare celle-ci du vitrocérame avec le grattoir ou des objets pointus. La plaque en verre
est fixée à la plaque en céramique.
• Ne posez pas les casseroles sur la plaque en
verre.
• Veillez à ce que la batterie de cuisine ne soit
pas en contact avec la plaque en verre.
EN CAS D'ANOMALIE DE FONCTIONNEMENT
Problème Cause et solution possibles
Vous ne pouvez pas allumer
l'appareil ou le faire fonctionner.
Un signal sonore retentit lorsque l'appareil est éteint.
Le voyant de chaleur résiduelle
ne s'allume pas.
Un signal sonore retentit et
l'appareil s'allume puis s'éteint.
Au bout de 5 secondes, un autre signal sonore retentit.
s'allume
et un chiffre s'affichent.
Aucun signal sonore ne se fait
entendre lorsque vous appuyez
sur les touches sensitives du
bandeau.
Si les indications ci-dessus ne vous permettent pas de remédier au problème, veuillez vous
adresser à votre magasin vendeur ou au Service Après-vente. Veuillez lui fournir les infor-
• Vous avez appuyé sur plusieurs touches sensitives en même
temps. N'appuyez que sur une seule touche sensitive à la fois.
• Il y a de l'eau ou des taches de graisse sur le bandeau de commande. Nettoyez le bandeau de commande
• Allumez de nouveau l'appareil et réglez le niveau de cuisson en
7 secondes.
• La sécurité enfants ou le verrouillage fonctionne. Reportezvous au chapitre « Utilisation de l'appareil ».
Vous avez posé quelque chose sur une ou plusieurs touches sensitives. Retirez l'objet des touches sensitives.
La zone de cuisson n'est pas chaude parce qu'elle n'a fonctionné
que peu de temps. Si la zone de cuisson devrait être très chaude,
contactez votre service après-vente.
Vous avez posé quelque chose sur . Retirez l'objet de la touche sensitive.
La fonction d'arrêt automatique fonctionne. Éteignez l'appareil
puis allumez-le de nouveau.
Une erreur s'est produite dans l'appareil.
Débranchez le fusible du système électrique de l'habitation afin
de déconnecter l'appareil de l'alimentation électrique pendant
quelque temps. Rebranchez. Si
votre service après-vente.
Les signaux sont désactivés.
Activez les signaux (reportez-vous au chapitre « Commande
son »).
s'allume à nouveau, contactez
Page 59

En matière de protection de l'environnement 59
mations figurant sur la plaque signalétique, la combinaison à 3 lettres et chiffres pour la
vitrocéramique (située dans un des coins de la table de cuisson) et le type de message d'erreur qui s'affiche.
En cas d'erreur de manipulation de la part de l'utilisateur, le déplacement du technicien du
Service Après-vente ou du magasin vendeur peut être facturé même en cours de garantie.
Les instructions relatives au Service Après-vente et aux conditions de garantie figurent dans
le livret de garantie.
EN MATIÈRE DE PROTECTION DE L'ENVIRONNEMENT
Le symbole sur le produit ou son emballage indique que ce produit ne peut être traité
comme déchet ménager. Il doit être remis au point de collecte dédié à cet effet (collecte et
recyclage du matériel électrique et électronique).
En procédant à la mise au rebut de l'appareil dans les règles de l’art, nous préservons
l'environnement et notre sécurité, s’assurant ainsi que les déchets seront traités dans des
conditions optimum.
Pour obtenir plus de détails sur le recyclage de ce produit, veuillez prendre contact avec les
services de votre commune ou le magasin où vous avez effectué l'achat.
Emballage
Tous les matériaux d'emballage sont écologiques et recyclables. Les composants en plastique sont identifiables grâce aux sigles : >PE<,>PS<, etc. Veuillez jeter les matériaux d'emballage dans le conteneur approprié du centre de collecte des déchets de votre commune.
Page 60

60
FÜR PERFEKTE ERGEBNISSE
Danke, dass Sie sich für dieses AEG Produkt entschieden haben. Wir haben es
geschaffen, damit Sie viele Jahre von seiner ausgezeichneten Leistung und den
innovativen Technologien, die Ihnen das Leben erleichtern, profitieren können. Es
ist mit Funktionen ausgestattet, die in gewöhnlichen Geräten nicht vorhanden
sind. Nehmen Sie sich ein paar Minuten Zeit zum Lesen, um seine Vorzüge
kennen zu lernen.
ZUBEHÖR UND VERBRAUCHSMATERIALIEN
Im AEG Webshop finden Sie alles, was Sie für ein makelloses Aussehen und
perfektes Funktionieren Ihrer AEG Geräte benötigen. Wir bieten auch ein
umfangreiches Zubehörsortiment, das Ihre höchsten Qualitätsansprüche erfüllt,
vom Profi-Kochgeschirr bis zu Besteckkörben, von Flaschenhaltern bis hin zu
Wäschebeuteln für empfindliche Wäsche...
Besuchen Sie den Webshop unter
www.aeg.com/shop
Page 61

INHALT
Inhalt
62 Sicherheitshinweise
63 Montageanleitung
68 Gerätebeschreibung
70 Gebrauchsanweisung
73 Praktische Tipps und Hinweise
75 Reinigung und Pflege
76 Was tun, wenn …
77 Umwelttipps
61
In dieser Benutzerinformation werden
folgende Symbole verwendet:
Wichtige Hinweise zur Sicherheit von
Personen und Informationen zur
Vermeidung von Geräteschäden
Allgemeine Hinweise und Ratschläge
Hinweise zum Umweltschutz
Änderungen vorbehalten
Page 62

62 Sicherheitshinweise
SICHERHEITSHINWEISE
Lesen Sie diese Bedienungsanleitung bitte sorgfältig durch, bevor Sie das Gerät anschließen
und benutzen, um Gefahren zu vermeiden und einen korrekten Betrieb des Geräts zu gewährleisten. Bewahren Sie diese Bedienungsanleitung in der Nähe des Geräts auf, auch
wenn Sie dieses anderswo aufstellen. Wenn Sie das Gerät verkaufen, geben Sie dem Käufer
die Bedienungsanleitung mit. Jeder, der dieses Gerät benutzt, sollte mit der Bedienung und
den Sicherheitsmerkmalen vertraut sein.
Allgemeine Sicherheit
WARNUNG!
Erwachsene mit eingeschränkten physischen, sensorischen oder geistigen Fähigkeiten oder
einem Mangel an Wissen und Erfahrung sowie Kinder dürfen dieses Gerät nicht benutzen.
Solche Personen müssen von einer Person beaufsichtigt oder bei der Bedienung des Geräts
angeleitet werden, die für ihre Sicherheit verantwortlich ist.
Sicherheit für Kinder
• Nur Erwachsene dürfen dieses Gerät bedienen. Kinder müssen beaufsichtigt werden, so
dass sie nicht mit dem Gerät spielen können.
• Halten Sie das Verpackungsmaterial von Kindern fern. Andernfalls besteht Erstickungsgefahr.
• Halten Sie Kinder vom Gerät fern, wenn dieses eingeschaltet ist.
WARNUNG!
Aktivieren Sie die Kindersicherung, damit kleine Kinder oder Haustiere das Gerät nicht versehentlich einschalten können.
Sicherheit während des Betriebs
• Entfernen Sie vor dem ersten Gebrauch alle Verpackungsmaterialien, Aufkleber und Auflagen.
• Schalten Sie die Kochzonen nach jedem Gebrauch aus.
• Verbrennungsgefahr! Legen Sie keine Gegenstände aus Metall, zum Beispiel Besteck und
Deckel, auf die Oberfläche des Kochfelds, da diese heiß werden können.
• Träger von implantierten Herzschrittmachern müssen sich mindestens 30 cm von eingeschalteten Kochfeldern fernhalten.
WARNUNG!
Brandgefahr! Überhitztes Öl oder Fett kann sich sehr schnell entzünden.
Bestimmungsgemäße Verwendung
• Lassen Sie das Gerät bei Betrieb nicht unbeaufsichtigt.
• Das Gerät ist ausschließlich zur Verwendung im Haushalt bestimmt!
• Verwenden Sie das Gerät nicht als Arbeits- oder Abstellfläche.
Page 63

Montageanleitung 63
• Stellen Sie entflammbare Flüssigkeiten, entflammbares Material oder Gegenstände, die
schmelzen können (aus Kunststoff oder Alufolie), nicht in der Nähe des Geräts oder auf
dem Gerät ab.
• Gehen Sie beim elektrischen Anschluss des Geräts an eine Anschlussdose sorgsam vor.
Achten Sie darauf, dass elektrische Leitungen weder das Gerät noch heißes Kochgeschirr
berühren können. Achten Sie darauf, dass elektrische Leitungen nicht lose hängen oder
sich verheddern.
Vermeiden von Schäden am Gerät
• Wenn Sie Kochgeschirr oder andere Gegenstände auf das Glaskeramikkochfeld fallen lassen, kann dieses beschädigt werden.
• Kochgeschirr aus Gusseisen, Aluguss oder mit beschädigtem Boden kann die Glaskeramik
beim Verschieben verkratzen.
• Lassen Sie Flüssigkeit im Kochgeschirr nicht vollständig verkochen. Andernfalls kann das
Kochgeschirr oder die Glaskeramik beschädigt werden.
• Verwenden Sie die Kochzonen nicht mit leerem oder ohne Kochgeschirr.
• Decken Sie Geräteteile nicht mit Aluminiumfolie ab.
• Der Lüftungsspalt zwischen Arbeitsfläche und Gerätevorderseite von 5 mm darf nicht
verdeckt sein.
WARNUNG!
Bei Sprüngen in der Oberfläche des Kochfelds schalten Sie die Spannungsversorgung
aus. Andernfalls besteht die Gefahr eines Stromschlags.
Spezielle Hinweise für den Teppan Yaki
• Wenn das Gerät eingeschaltet ist, hören Sie Geräusche. Die Geräusche sind normal und
weisen nicht auf einen Defekt hin.
• Bei häufiger Benutzung des Geräts kann sich in der Mitte des Kochfeld am Berührungspunkt der beiden Zonen eine kleine Unebenheit bilden. Dies ist kein Fehler des Kochfelds
und die Funktion wird dadurch in keiner Weise beeinträchtigt. Daher:
– Stellen Sie kein Kochgeschirr in die Mitte des Kochfeldes zwischen die beiden Zonen,
da es durch die Unebenheit instabil steht.
– Das Braten auf dem Zonenübergang kann zu einer ungleichmäßigen Bräunung führen
(z. B. bei Pfannkuchen).
MONTAGEANLEITUNG
Notieren Sie vor der Montage des Geräts die Seriennummer (Ser. Nr.), die Sie auf dem Typenschild finden.Das Typenschild befindet sich unten am Gehäuse des Geräts.
Made in Switzerland
220-240V ~50/60Hz
5,6 kW/Leistung ind. 5,6 kW
Typ: 55TEP01AU
PNC: 941 560 808/00
Serie:
HC652600EB
Page 64

64 Montageanleitung
Sicherheitshinweise
WARNUNG!
Lesen Sie unbedingt die folgenden Hinweise!
Vergewissern Sie sich, dass das Gerät beim Transport nicht beschädigt wurde. Ein beschädigtes Gerät nicht anschließen. Wenden Sie sich bei Bedarf an den Lieferanten.
Das Gerät darf nur von einem Servicetechniker einer autorisierten Kundendienststelle installiert, angeschlossen oder repariert werden. Verwenden Sie nur Originalersatzteile.
Verwenden Sie Einbaugeräte erst nach dem Einbau in normgerechte, passende Einbauschränke und Arbeitsplatten.
Nehmen Sie weder technische noch anderweitige Modifikationen am Gerät vor. Andernfalls
besteht Verletzungsgefahr und das Gerät könnte beschädigt werden.
Die im Einsatzland des Geräts geltenden Gesetze, Verordnungen, Richtlinien und Normen
(Sicherheits- und Recyclingbestimmungen, elektrotechnische Sicherheitsregeln usw.) sind
unbedingt einzuhalten!
Die Mindestabstände zu anderen Geräten sind einzuhalten!
Der Berührungsschutz muss durch den Einbau gewährleistet sein. Schubladen müssen zum
Beispiel mit einem Schutzboden direkt unter dem Gerät installiert werden!
Die Schnittflächen an der Arbeitsplatte müssen mit einem geeigneten Dichtungsmaterial
vor Feuchtigkeit geschützt werden!
Das Kochfeld muss so eingebaut werden, dass es spaltfrei mit der Arbeitsplatte abschließt.
Dazu ist eine geeignete Dichtung erforderlich!
Das Kochfeld muss so eingebaut werden, dass die Geräteunterseite vor Dampf und Feuchtigkeit, z. B. durch einen Geschirrspüler oder Backofen, geschützt ist!
Das Gerät darf nicht direkt neben Türen oder unter Fenstern installiert werden! Andernfalls
kann heißes Kochgeschirr durch das Öffnen von Türen oder Fenstern vom Kochfeld gestoßen werden.
WARNUNG!
Es besteht Verletzungsgefahr durch Stromschläge. Beachten Sie genau sämtliche Anweisungen zu den elektrischen Anschlüssen.
• An der Netzanschlussklemme liegt Spannung an.
• Die Netzanschlussklemme muss spannungsfrei gemacht werden.
• Der Berührungsschutz muss durch einen fachgerechten Einbau gewährleistet sein.
• Lockere und unsachgemäße Steckverbindungen können die Klemme überhitzen.
• Die Klemmverbindungen müssen von einem Elektroinstallateur fachgerecht ausgeführt
werden.
• Am Kabel ist eine Zugentlastung erforderlich.
• Bei einem einphasigen Anschluss muss das entsprechende Netzkabel des Typs H05BB-F
Tmax 90 °C (oder höher) verwendet werden
• Ein beschädigtes Netzkabel muss durch ein entsprechendes Spezialkabel (Typ H05BB-F
Tmax 90 °C oder höher) ersetzt werden. Wenden Sie sich in einem solchen Fall an Ihren
Kundendienst.
Bei der elektrischen Installation des Geräts ist eine Einrichtung vorzusehen, die es ermöglicht, alle Pole des Geräts mit einer Kontaktöffnungsbreite von mindestens 3 mm von der
Spannungsquelle zu trennen.
Page 65

Montageanleitung 65
Geeignete Trenneinrichtungen sind erforderlich: Überlastschalter, Sicherungen (Schraubsicherungen müssen aus dem Halter entfernt werden können), Fehlerstromschutzschalter
und Schütze.
Montage
min.
500mm
min.
50mm
min.
50mm
min.
5mm
=
R 5mm
490
600mm
mm
560
+1
mm
min.
25 mm
min.
20 mm
min.
5 mm
+1
=
Page 66

66 Montageanleitung
min.
38 mm
min.
5 mm
• Dichten Sie den Spalt zwischen der Arbeitsplatte und der Glaskeramik mit Silikon ab.
• Geben Sie etwas Seifenlauge auf das Silikon.
• Entfernen Sie das überschüssige Silikon mit einem Schaber.
Montage von mehr als einem Gerät
Mitgelieferte Teile:Verbindungsleiste(n), hitzebeständiges Silikon, Gummiprofil, Dichtungs-
streifen.
Verwenden Sie nur spezielles, hitzebeständiges Silikon.
Arbeitsplattenausschnitt
Abstand zur Wand: min. 50 mm
Tiefe: 490 mm
Breite: Addieren Sie die Breiten aller einzubauender Geräte und subtrahieren Sie 20 mm
(siehe auch „Übersicht über alle Gerätebreiten“).
Beispiel:
+-=
580 mm
360 mm
20 mm 920 mm
520 mm
490 mm
Montage von mehr als einem Gerät
1. Legen Sie den Arbeitsplattenausschnitt fest und sägen Sie ihn aus.
2. Legen Sie die Geräte nacheinander mit der Rückseite nach oben auf eine weiche Fläche, zum Beispiel eine Decke.
3. Kleben Sie den Dichtungsstreifen umlaufend auf der Unterseite des Geräts entlang des
äußeren Randes der Glaskeramikscheibe auf.
4. Schrauben Sie die Befestigungsplatten locker in die entsprechenden Öffnungen im
Schutzkasten ein.
5. Setzen Sie das erste Gerät in den Arbeitsplattenausschnitt ein. Setzen Sie die Verbindungsleiste in den Ausschnitt und drücken Sie diese bis zur Hälfte der Breite gegen das
Gerät.
Page 67

Montageanleitung
6. Drehen Sie die Befestigungsplatten locker von unterhalb der Arbeitsplatte und auf der
Verbindungsleiste ein.
7. Setzen Sie das nächste Gerät in den Arbeitsplattenausschnitt ein. Stellen Sie sicher,
dass die Vorderkanten der Geräte auf der gleichen Höhe sind.
67
8. Ziehen Sie die Schrauben der Befestigungsplatte/Haltegreifer an.
9. Dichten Sie den Spalt zwischen der Arbeitsplatte und den Geräten sowie den Spalt
zwischen den Geräten mit Silikon ab.
10. Geben Sie etwas Seifenlauge auf das Silikon.
11. Drücken Sie das Gummiprofil kraftvoll gegen die Glaskeramik und führen Sie es langsam um den Ausschnitt.
12. Berühren Sie das Silikon nicht, bevor es ausgehärtet ist. Dies kann einen Tag dauern.
13. Entfernen Sie das überschüssige Silikon vorsichtig mit einer Rasierklinge.
14. Reinigen Sie die Glaskeramikoberfläche.
Page 68

68 Gerätebeschreibung
GERÄTEBESCHREIBUNG
Die wichtigsten Merkmale Ihres Gerätes
• Die Kochfläche besteht aus zwei Schichten Edelstahl mit einer Aluminiumschicht dazwi-
schen. Es verfügt über eine hohe Wärmekapazität, welche einen schnellen Temperaturabfall verhindert, wenn Sie z.B. Fleisch aus dem Kühlschrank zubereiten möchten.
• Jede Teppan Yaki Grillfläche ist einzigartig. Wegen ihrer Veredelung werden Sie von Hand
bearbeitet und von Schleifern fachmännisch geschliffen. Abweichungen im Schliff-Bild
sind normal und haben keine Funktionseinschränkungen zur Folge. Je mehr der Grill benutzt wird, desto wertvoller sieht er aus.
• Die Nut an den Kanten:
– Reduziert die Temperatur an den Anlageflächen, so dass das die Kochfläche in unter-
schiedliche Küchen-Arbeitsplatten einbaubar ist.
– Die Einbuchtung in der Nut nimmt einen Teil der Ausdehnung der erhitzten Kochzone
auf.
– Kleinere Speiserückstände und Flüssigkeiten können einfach in die Rinne geschoben
und entfernt werden.
• Durch den Thermostat mit ablesbarer Temperatureinstellung wird die gewünschte Tem-
peratur konstant gehalten. Dadurch wird ein Überhitzen der Speisen vermieden und ein
fettarmes, nährstofferhaltendes Garen ermöglicht.
• Die Speisen werden direkt auf der Kochzone, mit oder ohne Fett zubereitet (erhitzt). Es
besteht auch die Möglichkeit, mit Töpfen und Pfannen zu kochen.
• Die Aufheizzeit, z. B. auf 180 °C, beträgt ca. 4 Minuten. Die Abkühlzeit, z. B. von 180 °C
auf 100 °C, beträgt ca. 25 Minuten oder auf 60 °C ca. 60 Minuten.
• Die Kochzone muss immer vorgeheizt werden.
Allgemeine Übersicht
1
2
3
4
Hintere Grillzone 2800 W
1
Vordere Grillzone 2800 W
2
Glasleiste
3
Bedienfeld
4
Page 69

Gerätebeschreibung 69
Bedienfeldanordnung
6 75 843
2
1
91012 11
Bedienen Sie das Gerät über die Sensorfelder. Die Anzeigen, Kontrolllampen und akustischen
Signale informieren Sie über die aktiven Funktionen.
Sensorfeld Funktion
1
2
3
Temperaturanzeige Zeigt die Temperatur an.
4
Kochzonen-Anzeigen des Timers Zeigt an, für welche Kochzonen die Zeit eingestellt
5
Timer-Anzeige Anzeige der Zeit in Minuten.
6
7
8
9
10
11
12
/
Bedienleiste Zum Einstellen der Kochstufe.
Ein- und Ausschalten des Geräts.
Verriegelung/Entriegelung des Bedienfelds.
Ein- und Ausschalten der Reinigungsfunktion.
wurde.
Zeigt an, dass der Garzeitmesser eingeschaltet ist
(1 bis 59 Minuten).
Zeigt an, dass der Kurzzeitmesser (1 bis 99 Minuten) oder der Kurzzeitwecker eingeschaltet ist.
Verlängerung oder Verkürzung der Zeit.
Auswahl der Kochzone. .
Einstellung der Uhrfunktionen.
Anzeigen
60
Display Beschreibung
Die Kochzone ist ausgeschaltet.
-
220
+ Zahl
/ /
Die Kochzone ist eingeschaltet.
Eine Fehlfunktion ist aufgetreten.
3-stufige Restwärmeanzeige: Weitergaren/Warmhalten/Restwärme
Die Sperre/Kindersicherung ist aktiviert.
Die Abschaltautomatik ist in Betrieb.
Page 70

70 Gebrauchsanweisung
OptiHeat Control (Restwärmeanzeige, 3-stufig)
WARNUNG!
\ \ Es besteht Verbrennungsgefahr durch Restwärme!
OptiHeat Control zeigt die Restwärmestufe an. Die Induktionskochzonen erzeugen die erforderliche Hitze zum Kochen direkt im Boden des Kochgeschirrs. Die Glaskeramik wird nur
durch die Wärme des Kochgeschirrs erhitzt.
GEBRAUCHSANWEISUNG
Ein- und Ausschalten
Berühren Sie 1 Sekunde lang , um das Gerät ein- oder auszuschalten.
Abschaltautomatik
Mit dieser Funktion wird das Gerät in folgenden Fällen automatisch ausgeschaltet:
• Alle Kochzonen sind ausgeschaltet
• Nach dem Einschalten des Geräts wird keine Temperatur gewählt.
• Das Bedienfeld ist mehr als 10 Sekunden mit verschütteten Lebensmitteln oder einem
Gegenstand bedeckt (Topf, Tuch usw.). Ein Signal ertönt eine Zeit lang und das Gerät
wird ausgeschaltet. Entfernen Sie den Gegenstand oder reinigen Sie das Bedienfeld.
• Eine Kochzone wurde nicht ausgeschaltet bzw. die Kochstufe nicht geändert. Nach 90
Minuten leuchtet
dem nächsten Gebrauch auf
auf und das Gerät schaltet sich aus. Stellen Sie die Kochzone vor
.
.
Die Kochstufe
Berühren Sie die Einstellskala für die Kochstufe.
Möchten Sie eine andere Kochstufe einstellen, berühren Sie die Skala weiter links oder rechts. Nehmen Sie den Finger erst von der Skala, wenn die
richtige Kochstufe eingestellt ist. Das Display gibt
die eingestellte Kochstufe an.
Nach der Einstellung der Temperatur blinkt das Display, bis die Kochzone die gewünschte
Temperatur erreicht hat. Danach ertönt ein Signalton und das Display zeigt die Temperatur
an.
Der Timer
Die Zeit läuft rückwärts ab.
Mit dem Kurzzeitmesser stellen Sie ein, wie lange eine Kochstelle für einen einzelnen Kochvorgang eingeschaltet bleiben soll.
Wählen Sie erst die Kochstelle aus und stellen Sie dann den Kurzzeitmesser ein.
Die Auswahl der Timerfunktion ist möglich, wenn die Kochstellen eingeschaltet und die
Kochstufen eingestellt sind.
Page 71

Gebrauchsanweisung
• Auswahl der Kochzone:Berühren Sie wiederholt, bis die Anzeige der gewünschten
Kochzone leuchtet.
Wenn diese Funktion in Betrieb ist, wird angezeigt.
• Einschalten des Kurzzeitmessers: Berühren Sie
- 99 Minuten). Wenn die Anzeige der Kochstelle langsam blinkt, wird die Zeit herun-
00
tergezählt.
• So wird die verbleibende Zeit angezeigt: Wählen Sie die Kochzone
der Kochzone blinkt schneller. Das Display zeigt die verbleibende Zeit an.
• Einstellung des Kurzzeitmessers ändern:Wählen Sie die Kochzone mit
oder .
Sie
• Ausschalten des Kurzzeitmessers: Wählen Sie die Kochzone
Die Restzeit wird auf
Nach Ablauf der eingestellten Zeit ertönt ein Signalton und
ausgeschaltet.
• So schalten Sie den Signalton aus: Berühren Sie
Der Garzeitmesser
Verwenden Sie den Garzeitmesser, um festzustellen, wie lange die Kochzone bereits in Betrieb ist.
• Auswahl der Kochzone (wenn mehr als 1 Kochzone eingeschaltet ist):Berühren Sie
wiederholt, bis sich die Anzeige der gewünschten Kochzone einschaltet.
Wenn diese Funktion in Betrieb ist, wird
• Einschalten des Garzeitmessers:
Berühren Sie
Das Symbol erlischt und leuchtet auf.
• So können Sie feststellen, wie lange die Kochzone bereits in Betrieb ist:Stellen Sie die
Kochzone mit
Einschaltdauer der Kochzone an. Das Display zeigt die Einschaltdauer der Kochzone an,
die für längere Zeit benutzt wird.
• Ausschalten des Garzeitmessers: Wählen Sie die Kochzone mit
oder , um den Timer auszuschalten. Das Symbol erlischt und leuchtet auf.
Sie
Wenn zwei Uhrfunktionen gleichzeitig in Betrieb sind, zeigt das Display den Garzeitmesser
zuerst an.
heruntergezählt. Die Anzeige der Kochzone erlischt.
00
ein. Die Anzeige der Kochzone blinkt schneller. Das Display zeigt die
am Timer, um die Zeit einzustellen (
aus. Berühren Sie .
blinkt. Die Kochstelle wird
00
angezeigt.
aus und berühren
aus. Die Anzeige
, berühren
71
Kurzzeitwecker
Wenn die Kochzonen nicht in Betrieb sind, können Sie den Timer als Kurzzeitwecker verwenden. Berühren Sie
Berühren Sie
gelaufen ist, ertönt ein Signal und
• Ausschalten des Signaltons: Berühren Sie
oder des Timers, um die Zeit einzustellen. Wenn die eingestellte Zeit ab-
.
blinkt.
00
Verriegelung
Das Bedienfeld kann mit Ausnahme von verriegelt werden. So wird verhindert, dass die
Kochstufe versehentlich geändert wird.
Page 72

72 Gebrauchsanweisung
Stellen Sie zuerst die Kochstufe ein.
Berühren Sie
zeigt.
Der Timer bleibt eingeschaltet.
Berühren Sie
gestellt.
Diese Funktion wird deaktiviert, sobald das Gerät ausgeschaltet wird.
zum Einstellen der Funktion. Das Symbol wird 4 Sekunden lang ange-
zum Ausschalten der Funktion. Die zuvor ausgewählte Kochstufe wird ein-
Die Kindersicherung
Mit dieser Funktion wird ein versehentliches Bedienen des Kochfelds verhindert.
Aktivieren der Kindersicherung
• Schalten Sie das Kochfeld mit
• Berühren Sie 4 Sekunden lang
• Schalten Sie das Kochfeld mit
Deaktivieren der Kindersicherung
• Schalten Sie das Kochfeld mit
Sekunden lang
• Schalten Sie das Kochfeld mit
Ausschalten der Kindersicherung für einen Kochvorgang
• Schalten Sie das Kochfeld mit
• Berühren Sie 4 Sekunden lang
die Kochstufe ein. Nun können Sie das Kochfeld bedienen.
• Wenn Sie das Kochfeld mit
. Das Symbol leuchtet auf.
ein. Stellen Sie keine Kochstufe ein.
. Das Symbol leuchtet auf.
aus.
ein. Stellen Sie keine Kochstufe ein. Berühren Sie 4
aus.
ein. Das Symbol leuchtet auf.
. Stellen Sie innerhalb von höchstens 10 Sekunden
ausschalten, ist die Kindersicherung wieder aktiviert.
OffSound Control (Aktivierung und Deaktivierung des Signaltons)
Deaktivieren des Signaltons
Schalten Sie das Gerät aus.
Berühren Sie
3 Sekunden lang. leuchtet und der Signalton ist aktiviert. Berühren Sie , leuchtet auf, der Signalton ist deaktiviert.
Haben Sie den Signalton deaktiviert, ertönt er nur in folgenden Fällen:
• Bei der Berührung von
• Bei Ablauf des Kurzzeitweckers.
• Bei Ablauf des Kurzzeitmessers.
• Das Bedienfeld ist bedeckt.
Aktivieren des Signaltons
Schalten Sie das Gerät aus.
Berühren Sie
3 Sekunden lang. leuchtet , da der Signalton deaktiviert ist. Berühren Sie ,
leuchtet. Der Signalton ist aktiviert.
3 Sekunden lang. Die Anzeigen leuchten auf und erlöschen. Berühren Sie
.
3 Sekunden lang. Die Anzeigen leuchten auf und erlöschen. Berühren Sie
Page 73

Praktische Tipps und Hinweise 73
PRAKTISCHE TIPPS UND HINWEISE
Speisenzubereitung mit dem Teppan Yaki
Sie können die Speisen direkt auf der Kochzone mit oder ohne Fett zubereiten. Sie können
aber auch Töpfe und Pfannen verwenden, die Aufheizzeit ist jedoch länger als auf dem
Glaskeramikfeld oder auf dem Gaskochfeld.
Sie können Beilagen, wie z. B. Saucen, Reis usw. in Töpfen oder Pfannen kochen oder warm
halten. Setzen Sie das Kochgeschirr direkt auf die Kochzone.
Es ist nicht empfehlenswert, große Mengen Flüssigkeit auf der Kochzone zum Kochen zu
bringen, wie z. B. Wasser für Spaghetti.
Die Geräusche sind normal und weisen nicht auf einen Defekt hin.
Anwendungsbeispiele zum Kochen
Verwendung von Fetten und Ölen
Wenn die Temperatur zu hoch ist, beginnt das Fett zu rauchen (so genannter „Rauchpunkt“).
Fette / Öle Höchsttemperatur (°C) Rauchpunkt (°C)
Butter 130 150
Schweinefett 170 200
Rinderfett 180 210
Olivenöl 180 200
Sonnenblumenöl 200 220
Erdnussöl 200 235
Kokosfett 200 240
Heizen Sie das Gerät stets vor.
Zu garende Speise Temperatur (°C) Dauer/Tipps
Fisch und Schalentiere 140–160 Gerät vorheizen
Lachsfilets 160 8 Min., nach 4 Min. wenden
Riesengarnelen (ohne Schale) 140 6 Min., nach 3 Min. wenden
Haifischsteaks, ca. 2,5 cm dick 160 10 Min., nach 5 Min. wenden
Seezungen, Müllerin Art 140 8 Min., nach 4 Min. wenden,
Schollenfilets 140 6 Min., nach 3 Min. wenden
Kalbfleisch 140–180 Gerät vorheizen
Kalbskotelett 180 10 Min., nach 5 Min. wenden
Kalbsmedaillons, 4 cm dick 160 10 Min., nach 5 Min. wenden
helle Seite zuerst
Page 74

74 Praktische Tipps und Hinweise
Zu garende Speise Temperatur (°C) Dauer/Tipps
Kalbssteaks, 3–4 cm dick 160 6 Min., nach 3 Min. wenden
Kalbsschnitzel, natur 180 5 Min., nach 2½ Min. wenden
Kalbsgeschnetzeltes 180 6 Min., nach 3 Min. wenden
Rind 160–180 Gerät vorheizen
Beefsteak, sehr rosa 180 2 Min., nach 1 Min. wenden
blutig, rare 180 6 Min., nach 3Min. wenden
rosa, medium 180 8Min., nach 2Min. wenden
durchgebraten, well done 180 8 Min., nach 4 Min. wenden,
Hamburger 160 6–8 Min., nach 3–4 Min. wen-
Châteaubriand 160 und dann 100 Das Fleisch auf allen Seiten in
Schweinefleisch 160–180 Gerät vorheizen
Schweinemedaillons 160 8 Min., nach 4 Min. wenden (je
Schweinshalssteaks 180 8 Min., nach 4 Min. wenden
Schweinsschnitzel 160 6 Min., nach 3 Min. wenden
Rippchen 160 8–10 Min., mehrmals wenden
Schweinefleischspießchen 160 6–8 Min., von allen Seiten gut
Lammfleisch 160–180 Gerät vorheizen
Lammkoteletts 180 10 Min., nach 5 Min. wenden
Lammfilets 160 10 Min., nach 5 Min. wenden
Lammsteaks 160 6–8 Min., nach 3–4 Min. wen-
Geflügel 140–160 Gerät vorheizen
Hähnchen in Rahmsoße 140 8–10 Min., nach 4–5 Min. wen-
Putenbruststreifen 160 6 Min., dabei mehrmals wen-
(die Fleischstreifen dürfen nicht
aneinander haften)
ohne Fettstoffe erhöht sich die
Bratzeit um ca. 20 %
den
Öl anbraten (nur wenden, wenn
das Fleisch nicht an der Pfanne
haftet). Eine Seite 10 Min. (100
°C) durchbraten
nach Dicke)
anbraten
(es ist wichtig, die Filets auf allen Seiten zu braten)
den
den
den
Page 75

Reinigung und Pflege
Zu garende Speise Temperatur (°C) Dauer/Tipps
Würstchen 160 Gerät vorheizen
Spiegeleier 140 Gerät vorheizen
Crepes / Omeletts 140-160 Gerät vorheizen
Früchte 140-160 Gerät vorheizen
Gemüse 140-160 10-20 Min., dabei mehrmals
Gemüse 140-160 10-15 Min., unter einem Deckel
Vorgekochten Reis fertig garen 140-160 10-15 Min., dabei mehrmals
Vorgekochte Nudeln fertig garen
140-160 15-20 Min., nach der Hälfte der
wenden
kochen (nach der Hälfte der
Zeit wenden)
wenden
Zeit wenden
Informationen zu Acrylamiden
Wichtig! Nach neuesten wissenschaftlichen Erkenntnissen kann die Bräunung von
Lebensmitteln, speziell bei stärkehaltigen Produkten, eine gesundheitliche Gefährdung
durch Acrylamid verursachen. Daher empfehlen wir, bei möglichst niedrigen Temperaturen
zu garen und die Speisen nicht zu stark zu bräunen.
75
REINIGUNG UND PFLEGE
Reinigen Sie das Gerät nach jedem Gebrauch.
Achten Sie immer darauf, dass der Boden des Kochgeschirrs sauber ist.
WARNUNG!
Scharfe Gegenstände und scheuernde Reinigungsmittel beschädigen das Gerät.
Reinigen Sie das Gerät aus Sicherheitsgründen nicht mit einem Dampfstrahl- oder Hochdruckreiniger.
Reinigungsfunktion
1. Berühren Sie . Beide Zonen werden auf 80 °C gestellt. Das Display blinkt, bis die
Temperatur von 80 °C erreicht wird. Das Bedienfeld wird verriegelt bis auf
2. Sobald die Temperatur 80 °C erreicht, ertönt ein Signalton. Das Bedienfeld wird entriegelt.
3. Legen Sie einen Eiswürfel nach dem anderen auf die Kochzone (Sie können auch kaltes
Wasser verwenden). Lösen Sie gleichzeitig mit einem Pfannenwender die Bratrückstände und schieben Sie diese in die Rinne, bis die gesamten Rückstände entfernt sind.
4. Reiben Sie das Gerät mit einem sauberen Tuch trocken.
Reinigen des abgekühlten Geräts
1. Lassen Sie einen geeigneten Fettlöser ca. 5 Min. einwirken.
.
Page 76

76 Was tun, wenn …
2. Entfernen Sie Bratrückstände mit dem Pfannenwender.
3. Reinigen Sie das Geräts mit einem feuchten Tuch.
4. Reiben Sie das Gerät mit einem sauberen Tuch trocken.
5. Reiben Sie das Gerät am Ende mit etwas Fett ein.
WARNUNG!
• Verwenden Sie keinen Schaber oder scharfe
Objekte zur Reinigung der Glasleiste und des
Zwischenraums zwischen der Glaskeramik. Die
Glasleiste ist mit der Glaskeramikplatte verbunden.
• Stellen Sie keine Töpfe auf die Glasleiste.
• Stellen Sie sicher, dass die Pfannen und Töpfe
die Glasleiste nicht berühren.
WAS TUN, WENN …
Problem Mögliche Ursache und Abhilfe
Das Gerät kann nicht eingeschaltet oder bedient werden.
Wird das Gerät ausgeschaltet,
ist ein Signalton zu hören.
Die Restwärmeanzeige leuchtet
nicht.
Ein Signal ertönt und das Gerät
schaltet sich ein und wieder
aus. Nach 5 Sekunden ertönt
ein weiteres Signal.
leuchtet auf.
und eine Zahl leuchten auf.
• Zwei oder mehr Sensorfelder wurden gleichzeitig berührt. Berühren Sie nur ein einzelnes Sensorfeld.
• Wasser- oder Fettspritzer befinden sich auf dem Bedienfeld.
Reinigen Sie das Bedienfeld.
• Schalten Sie das Gerät erneut ein und stellen Sie innerhalb von
7 Sekunden die Kochstufe ein.
• Die Kindersicherung oder die Verriegelung ist in Betrieb. Siehe
Kapitel „Bedienung des Geräts“.
Ein oder mehrere Sensorfelder wurden bedeckt. Entfernen Sie den
Gegenstand von den Sensorfeldern.
Die Kochzone ist nicht heiß, da sie nur kurze Zeit in Betrieb war.
Sollte die Kochzone eigentlich heiß sein, wenden Sie sich bitte an
Ihren Kundendienst.
Sie haben bedeckt. Entfernen Sie den Gegenstand vom Sensorfeld.
Die Abschaltautomatik hat ausgelöst. Schalten Sie das Gerät aus
und wieder ein.
Im Gerät ist ein Fehler aufgetreten.
Schalten Sie die Sicherung im Sicherungskasten der Hausinstallation aus, um das Gerät für einige Zeit von der Stromversorgung
zu trennen. Schalten Sie die Sicherung wieder ein. Wenn
neut aufleuchtet, benachrichtigen Sie den Kundendienst.
er-
Page 77

Umwelttipps
Problem Mögliche Ursache und Abhilfe
Es ertönt kein Signalton, wenn
Sie die Sensorfelder des Bedienfelds berühren.
Wenn Sie das Problem mit der oben angegebenen Abhilfemaßnahme nicht beheben können, wenden Sie sich bitte an Ihren Fachhändler oder den Kundendienst. Geben Sie dabei
die Daten auf dem Typenschild, den dreistelligen Code für die Glaskeramik (befindet sich in
der Ecke des Kochfelds) und die angezeigte Fehlermeldung an.
Wenn Sie das Gerät falsch bedient haben, fällt auch während der Garantiezeit für den Besuch eines Kundendiensttechnikers oder Händlers eine Gebühr an. Die Anweisungen zum
Kundendienst und die Garantiebedingungen finden Sie im Garantieheft.
Der Signalton ist ausgeschaltet.
Schalten Sie den Signalton ein (siehe Einschalten des Signaltons).
UMWELTTIPPS
Das Symbol auf dem Produkt oder seiner Verpackung weist darauf hin, dass dieses
Produkt nicht als normaler Haushaltsabfall zu behandeln ist, sondern an einem
Sammelpunkt für das Recycling von elektrischen und elektronischen Geräten abgegeben
werden muss. Durch Ihren Beitrag zum korrekten Entsorgen dieses Produkts schützen Sie
die Umwelt und die Gesundheit Ihrer Mitmenschen. Umwelt und Gesundheit werden durch
falsches Entsorgen gefährdet. Weitere Informationen über das Recycling dieses Produkts
erhalten Sie von Ihrem Rathaus, Ihrer Müllabfuhr oder dem Geschäft, in dem Sie das
Produkt gekauft haben.
777879
Verpackungsmaterial
Die Verpackungsmaterialien sind umweltverträglich und wiederverwertbar. Kunststoffteile
sind mit internationalen Abkürzungen wie z. B. >PE<,>PS< usw. gekennzeichnet. Entsorgen
Sie das Verpackungsmaterial bei den kommunalen Entsorgungsstellen in den dafür vorgesehenen Behältern.
Page 78

Page 79

Page 80

www.aeg.com/shop 892933028-E-272011
 Loading...