

Page 1
DK 9690
DK 9660
HC 5690
X76263MD1
EN USER MANUAL 2
DE GEBRAUCHSANLEITUNG 7
FR MANUEL D’UTILISATION 12
NL GEBRUIKSAANWIJZING 17
ES MANUAL DE USO 22
PT LIVRO DE INSTRUÇÕES PARA UTILI-
ZAÇÃO. 27
IT LIBRETTO DI USO 32
SV ANVÄNDNINGSHANDBOK 37
NO BRUKSVEILEDNING 42
FI KÄYTTÖOHJEET 47
DA BRUGSVEJLEDNING 52
RU
ɊɍɄɈȼɈȾɋɌȼɈ ɉɈ ɗɄɋɉɅɍȺɌȺɐɂɂ 57
ET KASUTUSJUHEND 62
LV LIETOŠANAS PAMƖCƮBA 67
LT NAUDOTOJO VADOVAS 72
UK ȱɇɋɌɊɍɄɐȱə Ɂ ȿɄɋɉɅɍȺɌȺɐȱȲ 77
HU HASZNÁLATI ÚTMUTATÓ 82
CS NÁVOD K POUŽITÍ 87
SK NÁVOD NA POUŽÍVANIE 92
RO MANUAL DE FOLOSIRE 97
PL INSTRUKCJA UĩYTKOWANIA 102
HR KNJIŽICA S UPUTAMA 107
SL NAVODILO ZA UPORABO 112
EL ȅǻǾīǴǼȈ ȋȇdzȈǾȈ 117
TR KULLANIM KITAPÇIöI 122
ɊɔɄɈȼɈȾɋɌȼɈ ɇȺ ɉɈɌɊȿȻɂɌȿɅə 127
BG
KK ɉȺɃȾȺɅȺɇɍɒɕ ɇԜɋԔȺɍɅɕԐɕ 132
MK ɍɉȺɌɋɌȼɈ ɁȺ ɄɈɊɂɋɇɂɄ 137
SQ UDHËZUES PËR PËRDORIMIN 142
SR ɄɈɊɂɋɇɂɑɄɈ ɍɉɍɌɋɌȼɈ 147
156
ZH 䇈ᯢݠ 157
AR
Page 2
EN USER MANUAL
2
www.aeg.com
FOR PERFECT RESULTS
Thank you for choosing this AEG product. We have created it to give you impeccable
performance for many years, with innovative technologies that help make life simpler
– features you might not fi nd on ordinary appliances. Please spend a few minutes reading to
get the very best from it.
Visit our website to:
Get usage advice, brochures, trouble shooter, service information:
www.aeg.com
Register your product for better service:
www.aeg.com/productregistration
Buy Accessories, Consumables and Original spare parts for your appliance:
www.aeg.com/shop
ENVIRONMENT CONCERNS
Recycle the materials with the symbol . Put the packaging in applicable containers to
recycle it. Help protect the environment and human health and to recycle waste of electrical
and electronic appliances. Do not dispose appliances marked with the symbol
household waste. Return the product to your local recycling facility or contact your municipal
offi ce department for household waste or the shop where you purchased this product.
with the
CUSTOMER CARE AND SERVICE
We recommend the use of original spare parts.
When contacting Service, ensure that you have the following data available.
The information can be found on the rating plate. Model, PNC, Serial Number.
Warning / Caution-Safety information.
General information and tips
Environmental information.
Subject to change without notice.
Page 3
ENGLISH
3
1.
SAFETY INSTRUCTIONS
Caution! Closely follow the instructions
set out in this manual. All responsibility,
for any eventual inconveniences,
damages or fires caused by not
complying with the instructions in this
manual, is declined. The extractor hood
has been designed exclusively for
domestic use.
Warning! Do not connect the appliance
to the mains until the installation is fully
complete.
Before any cleaning or maintenance
operation, disconnect hood from
the mains by removing the plug or
disconnecting the mains electrical
supply.
Always wear work gloves for all installation
and maintenance operations.
The appliance is not intended for use by
children or persons with impaired physical,
sensorial or mental faculties, or if lacking
in experience or knowledge, unless they
are under supervision or have been trained
in the use of the appliance by a person
responsible for their safety.
This appliance is designed to be operated
by adults, children should be monitored
to ensure that they do not play with the
appliance. This appliance is designed to be
operated by adults. Children should not be
allowed to tamper with the controls or play
with the appliance.
Never use the hood without effectively
mounted grating!
The hood must NEVER be used as
a support surface unless specifi cally
indicated.
The premises where the appliance is
nstalled must be suffi ciently ventilated,
when the kitchen hood is used together with
other gas combustion devices or other fuels.
The ducting system for this appliance must
not be connected to any existing ventilation
system which is being used for any other
purpose such as discharging exhaust fumes
from appliances burning gas or other fuels.
The fl aming of foods beneath the hood itself
is severely prohibited.
The use of exposed fl ames is detrimental
to the fi lters and may cause a fi re risk,
and must therefore be avoided in all
circumstances.
Any frying must be done with care in order
to make sure that the oil does not overheat
and ignite.
Caution! Accessible parts of the hood
may became hot when used with
cooking appliance.
With regards to the technical and safety
measures to be adopted for fume
discharging it is important to closely follow
the regulations provided by the local
authorities. The hood must be regularly
cleaned on both the inside and outside (AT
LEAST ONCE A MONTH).
This must be completed in accordance
with the maintenance instructions provided
in this manual). Failure to follow the
instructions provided in this user guide
regarding the cleaning of the hood and
fi lters will lead to the risk of fi res.
Do not use or leave the hood without the
lamp correctly mounted due to the possible
risk of electric shocks.
We will not accept any responsibility for
any faults, damage or fi res caused to the
appliance as a result of the non-observance
of the instructions included in this manual.
2. USE
The hood serves to aspirate the fumes and
vapors resulting from cooking.
The attached installation manual indicates
the version to be used depending on the
model you have, the suction version with
external evacuation
internal recirculation
or fi ltering with
.
3. INSTALLATION
The mains power supply must correspond
to the rating indicated on the plate situated
inside the hood. If provided with a plug
connect the hood to a socket in compliance
with current regulations and positioned in
an accessible area, after installation. If it not
fi tted with a plug (direct mains connection)
or if the plug is not located in an accessible
area, after installation, apply a double
pole switch in accordance with standards
which assures the complete disconnection
of the mains under conditions relating to
over-current category III, in accordance with
installation instructions.
Warning! Before re-connecting the
hood circuit to the mains supply and
checking the efficient function, always
check that the mains cable is correctly
assembled.
Page 4

4
www.aeg.com
The hood is provided with a special power
cable ; if the cable is damaged, request
a new one from Technical Service.The
minimum distance between the supporting
surface for the cooking equipment on the
hob and the lowest part of the range hood
must be not less than 50cm from electric
cookers and 65cm from gas or mixed
cookers. If the instructions for installation
for the gas hob specify a greater distance,
this must be adhered to.
4. MAINTENANCE
ATTENTION! Before performing any
maintenance operation, isolate the hood
from the electrical supply by switching off at
the connector and removing the connector
fuse. Or if the appliance has been
connected through a plug and socket, then
the plug must be removed from the socket.
The cooker hood should be cleaned
regularly (at least with the same frequency
with which you carry out maintenance of the
fat fi lters) internally and externally. Clean
using the cloth dampened with neutral liquid
detergent. Do not use abrasive products.
Warning! Failure to carry out the basic
cleaning recommendations of the cooker
hood and replacement of the fi lters may
cause fi re risks. Therefore, we recommend
observing these instructions.
The manufacturer declines all responsibility
for any damage to the motor or any
fi re damage linked to inappropriate
maintenance or failure to observe the above
safety recommendations.
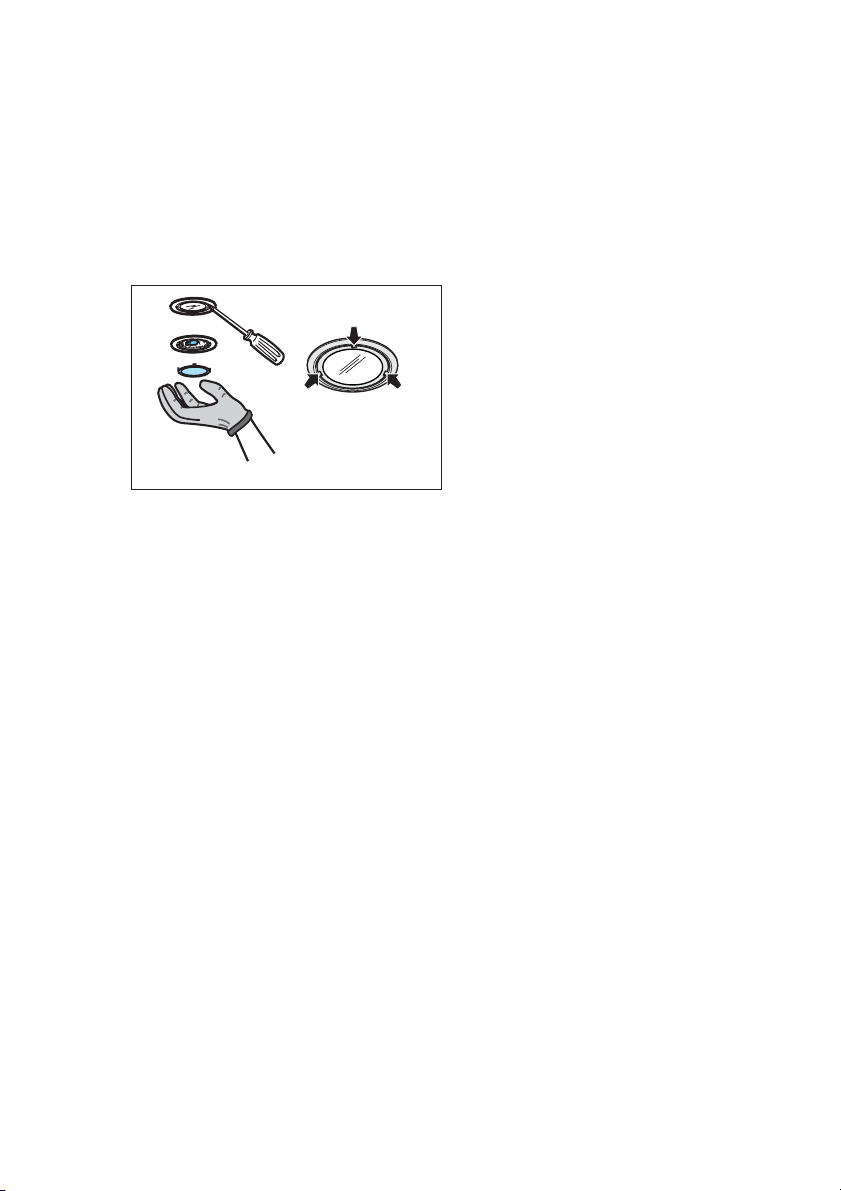
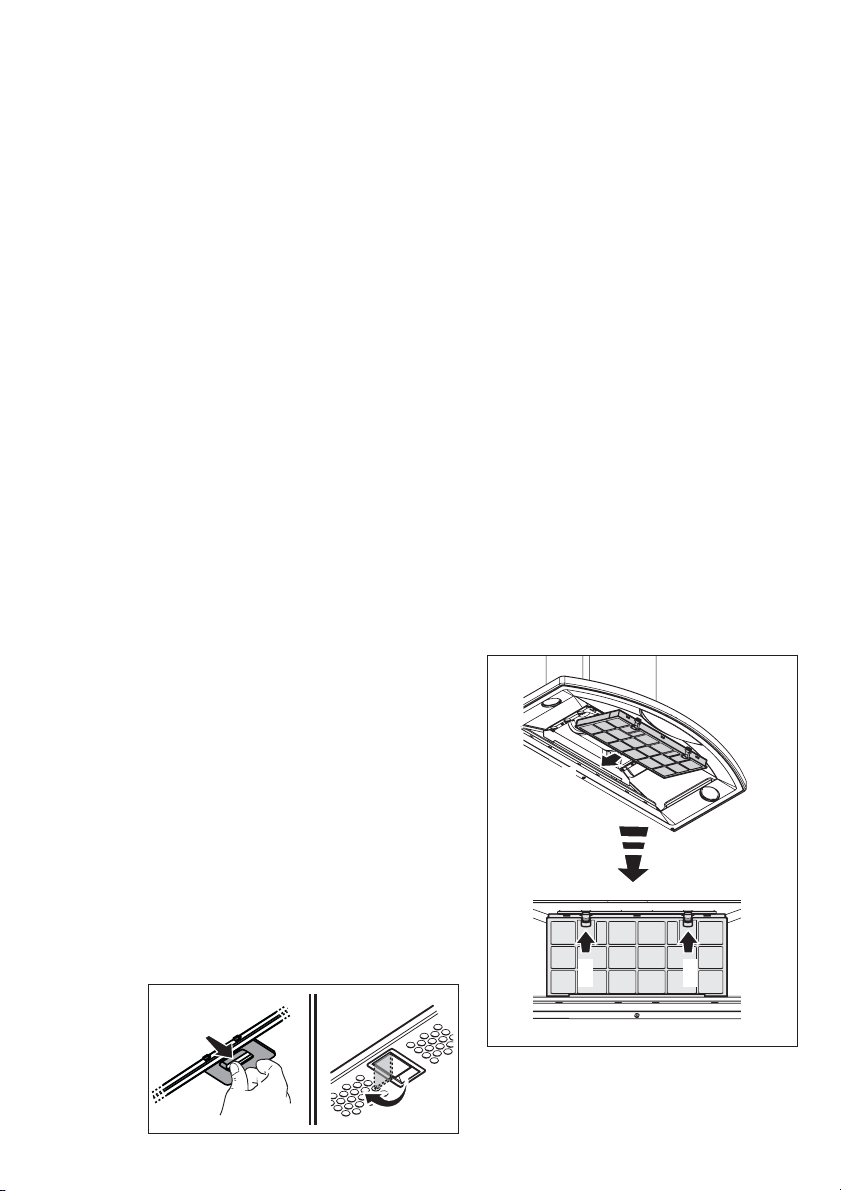
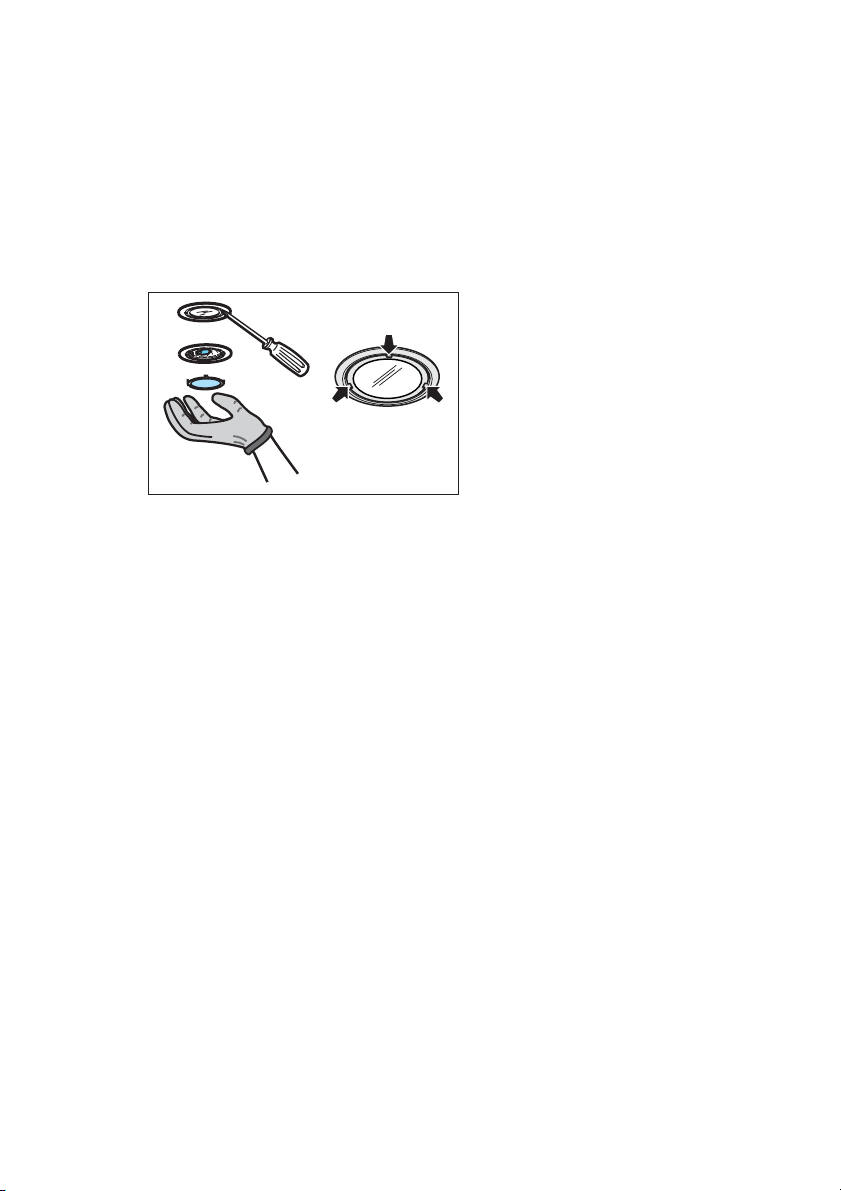
4.2 Charcoal fi lter - Type 150 LONG LIFE
- Washable activated charcoal fi lter
The charcoal fi lter can be washed once
every two months using hot water and a
suitable detergent, or in a dishwasher at
65°C (if the dishwasher is used, select the
full cycle function and leave dishes out).
Eliminate excess water without damaging
the fi lter, then remove the mattress located
inside the plastic frame and put it in the
oven for 10 minutes at 100° C to dry completely. Replace the mattress every 3 years
and when the cloth is damaged.
4.3 Type 60/80 - NON-washable activated
charcoal fi lter
The saturation of the charcoal fi lter occurs
after more or less prolonged use, depending on the type of cooking and the regularity
of cleaning of the grease fi lter.
In any case it is necessary to replace the
cartridge at least every four mounths.
The charcoal fi lter may NOT be washed or
regenerated.
1
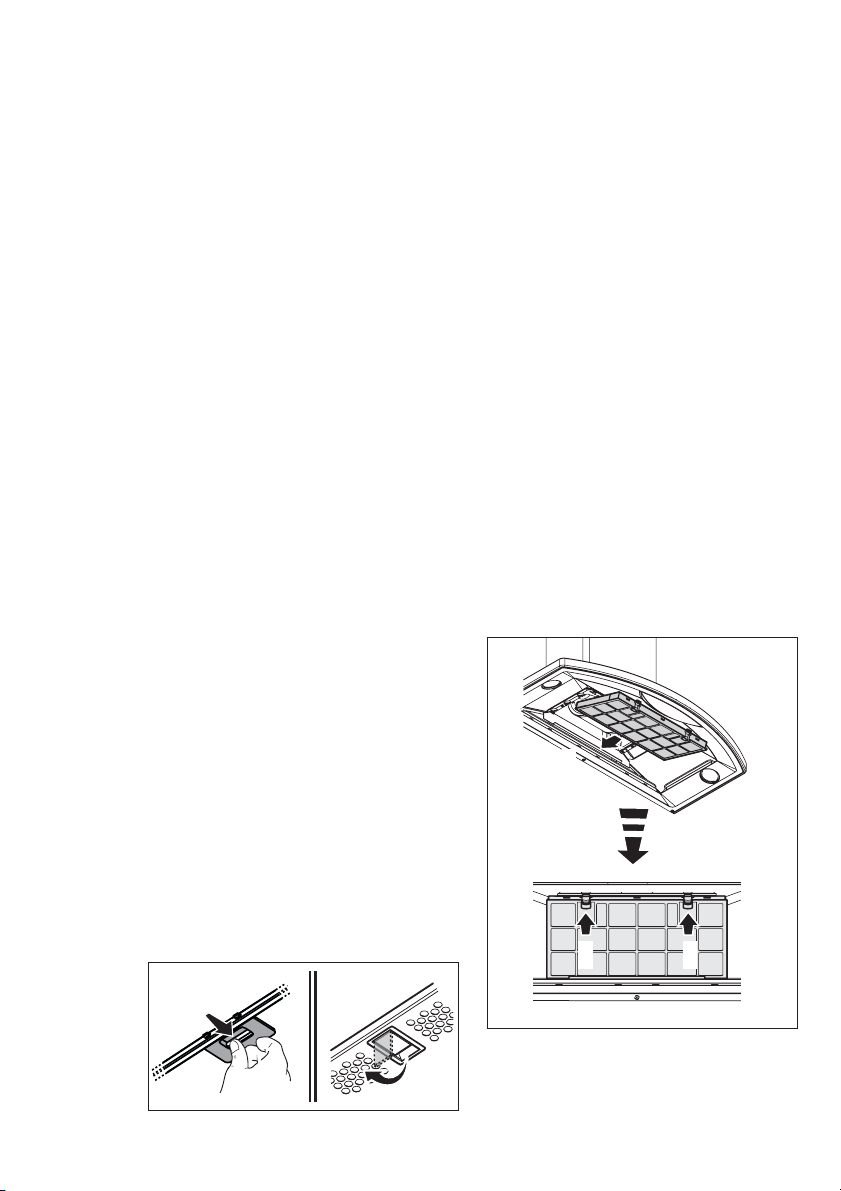
4.1 Grease fi lter - The grease fi lter must
be cleaned once a month using non
aggressive detergents, either by hand or
in the dishwasher, which must be set to a
low temperature and a short cycle. When
washed in a dishwasher, the grease fi lter
may discolour slightly, but this does not
affect its fi ltering capacity.
2 2
Page 5

ENGLISH
5
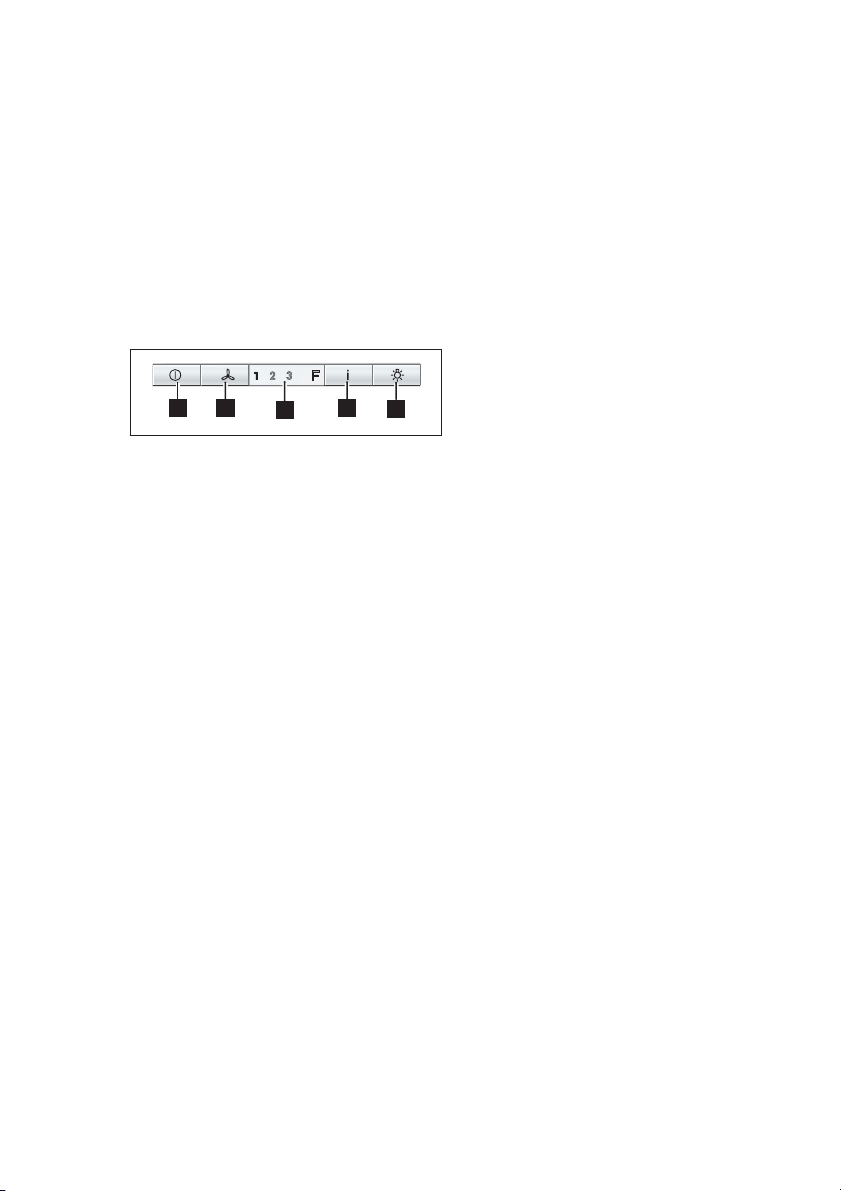
5. CONTROLS
The hood is fi tted with a control panel with
aspiration speed selection control and a
light switch to control cooking area lights.
Use the high suction speed in cases
of concentrated kitchen vapours. It is
recommended that the cooker hood suction
is switched on for 5 minutes prior to cooking
and to leave in operation during cooking
and for another 15 minutes approximately
after terminating cooking.
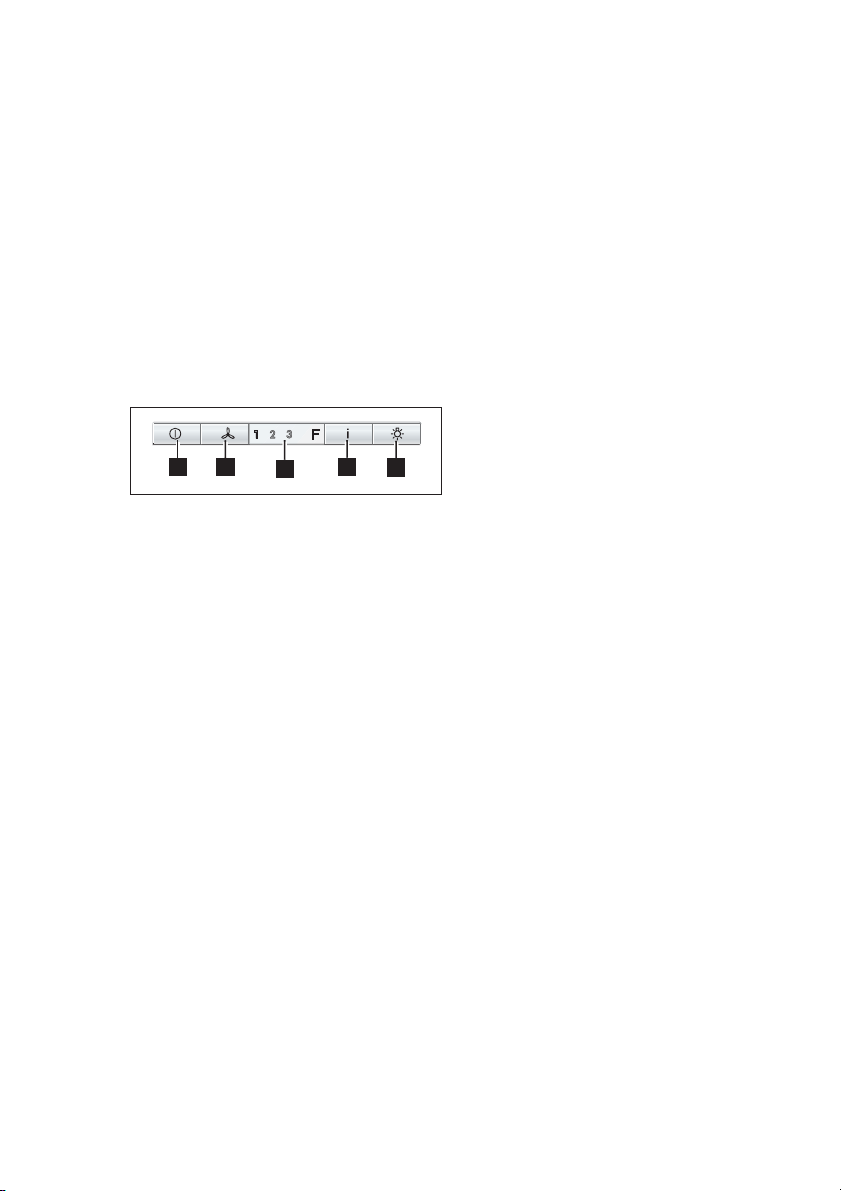
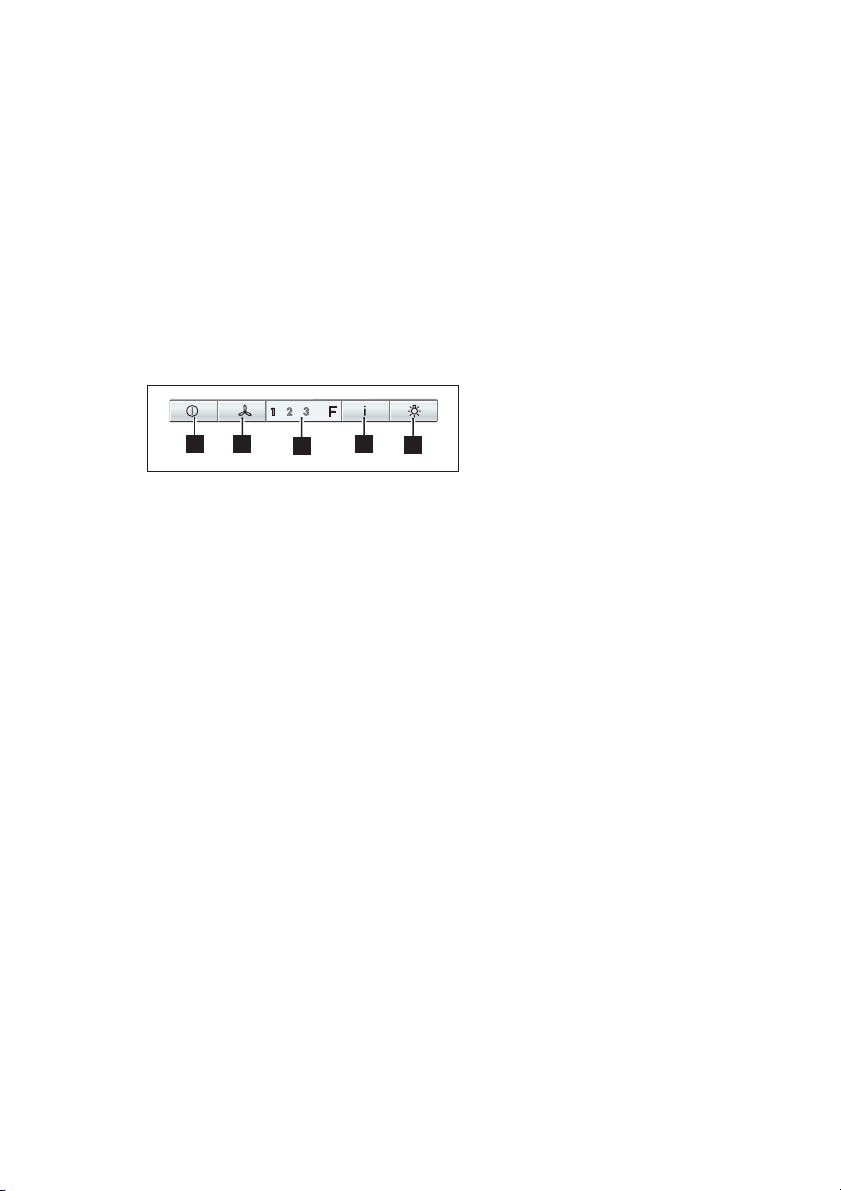
The control switches are located on the
hood’s front panel:
1A
1B
1C
A. OFF – ON push button
Press once or more to obtain the
function desired:
ON: the hood switches on to the last
speed selected.
OFF: all the functions are switched off
except the illumination.
B. Speed selection push button (extraction
power).
Press this push button once or more
to select the most suitable extraction
speed (power) (1-2-3).
C. The display shows the extraction
power selected, signalling the
saturation of the fi lters F.
D. Intensive speed on/off. The Intensive
speed runs for 5 minutes:
If the hood is on when the Intensive
speed is activated, the hood reverts to
previous speed after 5 minutes.
If the hood is off when the Intensive
speed is activated, the hood will be
turned off after 5 minutes.
To interrupt the Intensive speed, press
button A or B.
E. Light ON/OFF
1D
1E
Grease and charcoal fi lter maintenance
indicator
This hood is fi tted with a device that
indicates when maintenace of fi lters should
be done.
If the hood is to be used with a charcoal
fi lter, the saturation
indicator light must be enabled as follows:
Set the hood in “OFF”.
Pressing keys B and D simultaneously for
three seconds, LED F lights up and begins
to fl ash the 1st speed led. After 1 second
the 2nd speed led also fl ashes and the
system emits a sound signal (-Beep-) to
indicate setting taking place.
To remove the charcoal fi lter signal press
push buttons B and D simultaneously for 3
seconds. LED F lights up and begins to
fl ash the 1st speed led (grease fi lter) and
the 2nd speed led. After 1 second, only
the 1st speed led continues to fl ash. The
system emits a sound signal (-Beep-) to
indicate setting taking place.
Grease fi lter LED
The 1st speed led (+ led F) fl ashes, when it
is time to clean the grease fi lter.
Always comply with the maintenance
instructions for the grease fi lter.
Charcoal fi lter LED
The 2nd speed led (+ led F) fl ashes,
when the charcoal fi lter needs to be
cleaned or replaced.
Resetting the saturation indicator
After cleaning or replacing the fi lters, press
button A for 3 seconds until the 1st speed
led or the second speed led stops fl ashing.
The F LED also turns off.
Should the hood or the controls fail to
operate: disconnect the power supply for at
least 5 seconds, then turn the hood back
on again.
Page 6
6
www.aeg.com
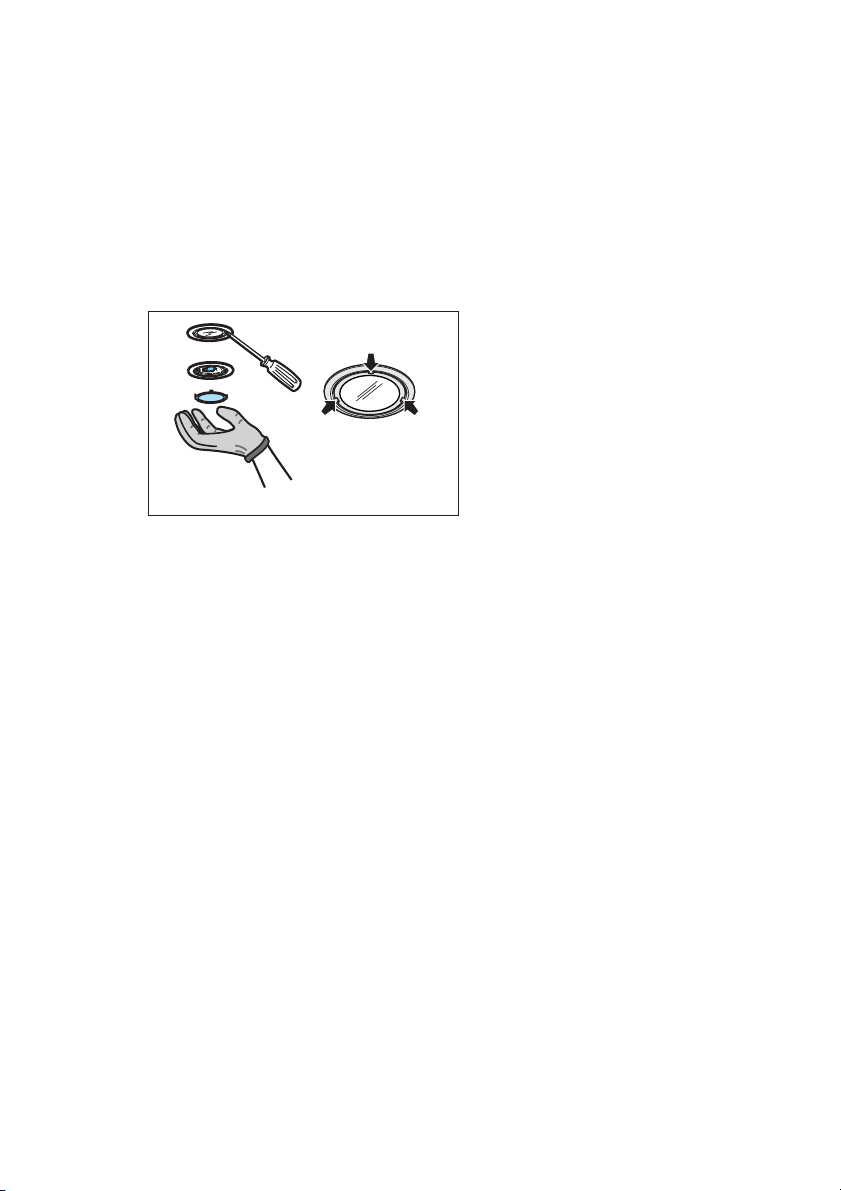
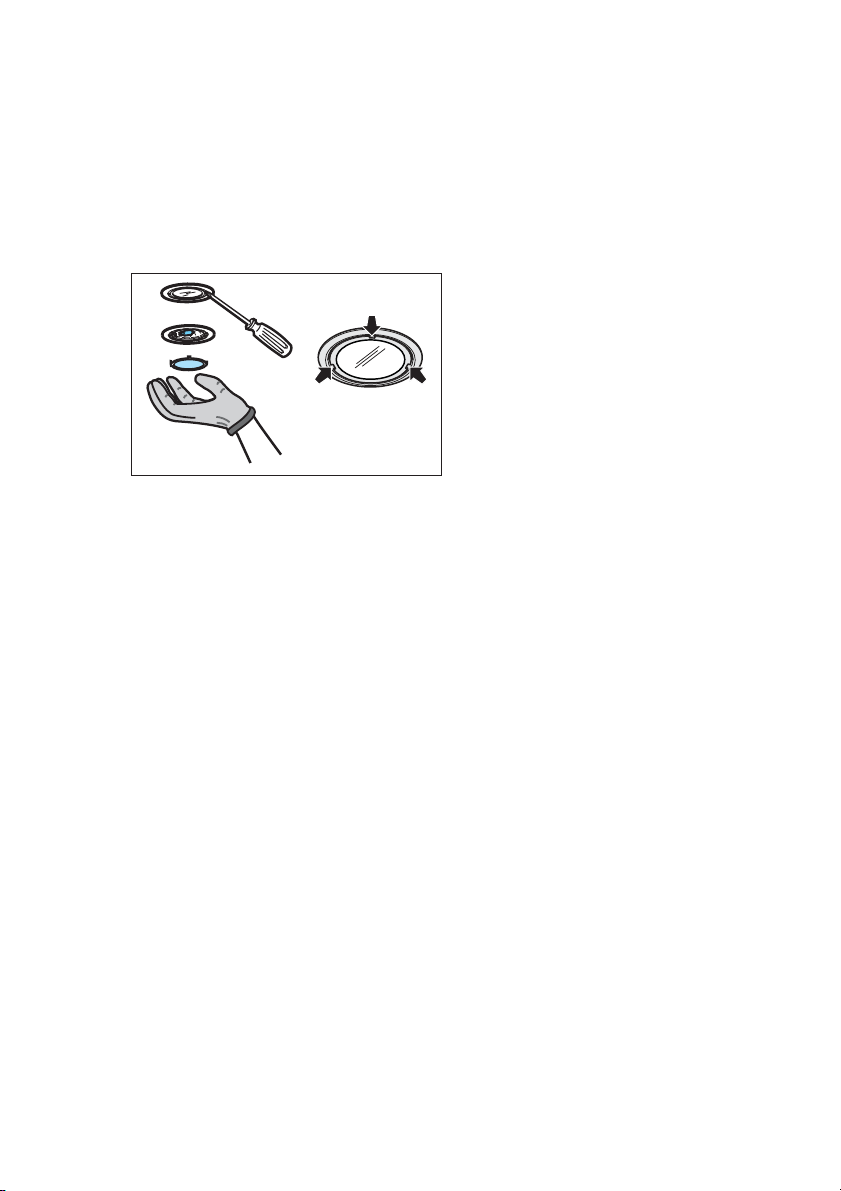
6. LIGHTING
Disconnect the hood from the electricity.
Warning! Prior to touching the light bulbs
ensure they are cooled down.Replace with
a new 12 Volt, 20 Watt (Maximum) halogen
light made for a G-4 base SUITABLE FOR
USE IN OPEN LUMINAIRES. Follow
package directions and do not touch new
light with bare hands.
Page 7

DE GEBRAUCHSANLEITUNG
FÜR PERFEKTE ERGEBNISSE
Danke, dass Sie sich für dieses AEG Produkt entschieden haben. Wir haben es geschaffen,
damit Sie viele Jahre von seiner ausgezeichneten Leistung und den innovativen
Technologien, die Ihnen das Leben erleichtern, profi tieren können. Es ist mit Funktionen
ausgestattet, die in gewöhnlichen Geräten nicht vorhanden sind. Nehmen Sie sich ein paar
Minuten Zeit zum Lesen, um seine Vorzüge kennen zu lernen.
Besuchen Sie uns auf unserer Website, um:
Anwendungshinweise, Prospekte, Fehlerbehebungs- und Service-Informationen zu
erhalten:
www.aeg.com
Ihr erworbenes Produkt zu registrieren, um den besten Service dafür zu
gewährleisten:
www.aeg.com/productregistration
Zubehör, Verbrauchsmaterial und Original-Ersatzteile für Ihr Gerät zu erwerben:
www.aeg.com/shop
UMWELTTIPPS
Recyclen Sie Materialien mit dem Symbol . Entsorgen Sie die Verpackung in den
entsprechenden Recyclingbehältern.
Recyclen Sie zum Umwelt- und Gesundheitsschutz elektrische und elektronische Geräte.
Entsorgen Sie Geräte mit diesem Symbol
Gerät zu Ihrer örtlichen Sammelstelle oder wenden Sie sich an Ihr Gemeindeamt.
DEUTSCH
nicht mit dem Hausmüll. Bringen Sie das
7
REPARATUR- UND KUNDENDIENST
Bitte verwenden Sie ausschließlich Original-Ersatzteile für Ihre Produkte.
Halten Sie folgende Angaben bereit, wenn Sie sich an den Kundendienst wenden
(diese Informationen fi nden Sie auf dem Typenschild): Modell, Produktnummer (PNC),
Seriennummer.
Warnungs-/ Sicherheitshinweise.
Allgemeine Informationen und Empfehlungen.
Informationen zum Umweltschutz.
Änderungen vorbehalten.
Page 8
8
www.aeg.com
1. SICHERHEITSHINWEISE
Vorsicht! Die Instruktionen, die in
diesem Handbuch gegeben werden,
müssen strikt eingehalten werden. Es
wird keinerlei Haftung übernommen
für mögliche Mängel, Schäden oder
Brände der Dunstabzugshaube, die auf
die Nichtbeachtung der Vorschriften
in diesem Handbuch zurückzuführen
sind. Die Dunstabzugshaube ist
ausschliesslich zum Einsatz im privaten
Haushalt vorgesehen.
Achtung! Das Gerät nicht an das
Stromnetz anschließen, solange die
Installation noch nicht abgeschlossen
ist.
Vor Beginn sämtlicher Reinigungs-
oder Wartungsarbeiten muss das
Gerät durch Ziehen des Steckers oder
Betätigen des Hauptschalters der
Wohnung vom Stromnetz getrennt
werden.
Bei allen Installations- und
Instandhaltungsarbeiten immer
Schutzhandschuhe tragen.
Kinder nicht mit dem Gerät spielen lassen.
Erwachsene und Kinder dürfen nie
unbeaufsichtigt das Gerät betreiben,
– wenn sie körperlich oder geistig dazu
nicht in der Lage sind,
– oder wenn ihnen Wissen und Erfahrung
fehlen, das Gerät richtig und sicher zu
bedienen. Die Dunstabzugshaube niemals
ohne korrekt montiertes Gitter in Betrieb
setzen! Die Dunstabzugshaube darf
NIEMALS als Abstellfl äche verwendet
werden, sofern dies nicht ausdrücklich
angegeben wird. Der Raum muss über eine
ausreichende Belüftung verfügen, wenn die
Dunstabzugshaube mit anderen gas- oder
brennstoffbetriebenen Geräten gleichzeitig
verwendet wird. Bei gleichzeitigem Betrieb
der Dunstabzugshaube im Abluftbetrieb
und Feuerstätten darf im Aufstellraum der
Feuerstätte der Unterdruck nicht größer
als 4 Pa (0,04 mbar) sein. Die angesaugte
Luft darf nicht in Rohre geleitet werden, die
für die Ableitung der Abgase von gas- oder
brennstoffbetriebenen Geräten genutzt
werden. Es ist strengstens verboten, unter
der Haube mit offener Flamme zu kochen.
Eine offene Flamme beschädigt die Filter
und kann Brände verursachen, daher ist
dies in jedem Fall zu vermeiden. Das
Frittieren muss unter Aufsicht erfolgen, um
zu vermeiden, dass das überhitzte Öl Feuer
fängt.
Vorsicht!Zugängliche Teile können
beim Gebrauch mit Kochgeräten heiss
werden.
In Bezug auf technische und
Sicherheitsmaßnahmen für die Ableitung
der Abluft sind die Vorschriften der
zuständigen örtlichen Behörden
strengstens einzuhalten. Die Haube muss
regelmäßig innen und außen gereinigt
werden (MINDESTENS EINMAL IM
MONAT, diesbezüglich sind in jedem
Fall die ausdrücklichen Angaben in der
Wartungsanleitung dieses Handbuchs
zu beachten). Eine Nichtbeachtung der
Vorschriften zur Reinigung der Haube
sowie zur Auswechselung und Reinigung
der Filter führt zu Brandgefahr. Um das
Risiko eines Stromschlages zu vermeiden,
darf die Dunstabzugshaube ohne richtig
eingesetzte Lampen nicht betrieben
werden. Es wird keinerlei Haftung
übernommen für Fehler, Schäden
oder Brände des Gerätes, die durch
Nichteinhaltung der in diesem Handbuch
aufgeführten Anweisungen verschuldet
wurden.
2. BEDIENUNG
Der Dunstabzug dient zum Absaugen der
beim Kochen entstehenden Dämpfe.
In dem mitgelieferten Montagehandbuch
ist angegeben, ob Sie Ihre Haube als
Abluftbetreiben.
oder Umluftversion
3. BEFESTIGUNG
Die Netzspannung muss der
Spannung entsprechen, die auf dem
Betriebsdatenschild im Innern der Haube
angegeben ist. Sofern die Haube einen
Netzstecker hat, ist dieser an zugänglicher
Stelle an eine den geltenden Vorschriften
entsprechende Steckdose auch nach der
Montage anzuschließen. Bei einer Haube
ohne Stecker (direkter Netzanschluss) oder
falls der Stecker nicht zugänglich ist, ist ein
normgerechter zweipoliger Schalter auch
nach der Montage anzubringen, der unter
Umständen der Überspannung Kategorie
III entsprechend den Installationsregeln ein
vollständiges Trennen vom Netz garantiert.
Hinweis! Vor der Inbetriebnahme
muss sichergestellt sein, dass
die Netzversorgung (Steckdose)
ordnungsgemäß montiert wurde.
Page 9

DEUTSCH
9
Die Dunstabzugshaube ist mit einem
Spezial-Netzkabel ausgestattet; sollte
das Kabel beschädigt werden, muss beim
Kundendienst Ersatz angefordert werden.
Der Abstand zwischen der Abstellfl äche
auf dem Kochfeld und der Unterseite
der Dunstabzugshaube darf 50cm im
Fall von elektrischen Kochfeldern und
65cm im Fall von Gas- oder kombinierten
Herden nicht unterschreiten.Wenn
die Installationsanweisungen des
Gaskochgeräts einen größeren Abstand
vorgeben, ist dieser zu berücksichtigen.
4. WARTUNG
Hinweis! Vor jeder Reinigung und Pfl ege
ist die Dunstabzugshaube durch Ziehen
des Netzsteckers oder Ausschalten der
Sicherung stromlos zu machen. Die
Dunstabzugshaube muss sowohl innen als
auch außen häufi g gereinigt werden (etwa
in denselben Intervallen, wie die Wartung
der Fettfi lter). Zur Reinigung ein mit
fl üssigem Neutralreiniger getränktes Tuch
verwenden. Keine Produkte verwenden,
die Scheuermittel enthalten. KEINEN
ALKOHOL VERWENDEN!
Hinweis! Nichtbeachtung dieser
Anweisungen zur Reinigung des Gerätes
und zum Wechsel bzw. zur Reinigung
der Filter kann zum Brand führen. Diese
Anweisungen sind unbedingt zu beachten!
Der Hersteller übernimmt keine Haftung
für irgendwelche Schäden am Motor oder
Brandschäden, die auf eine unsachgemäße
Wartung oder Nichteinhaltung der oben
angeführten Sicherheitsvorschriften
zurückzuführen sind.
4.1 Fettfi lter
Der Metallfettfi lter muss einmal monatlich
gewaschen werden. Das kann mit
einem milden Waschmittel von Hand,
oder in der Spülmaschine bei niedriger
Temperatur und Kurzspülgang erfolgen.
Der Metallfettfi lter kann bei der Reinigung
in der Spülmaschine abfärben, was seine
Filtermerkmale jedoch in keiner Weise
beeinträchtigt.
4.2 Aktivkohlefi lter - Type 150 LONG
LIFE - Der waschbare Aktivkohlefi lter
Der Aktivkohlefi lter wird alle zwei Monate in
warmem Wasser und geeigneten Waschmitteln oder in der Spülmaschine bei 65°C
gewaschen (in diesem Fall den ollständigen
Spülzyklus – ohne zusätzliches Geschirr
im Inneren der Geschirrspülmaschine
- einschalten).
Das überschüssige Wasser entfernen, ohne
dabei den Filter zu beschädigen; danach
das Vlies aus dem Plastikrahmen entfernen und dieses bei 100° für 10 Minuten
in den Ofen legen, um es vollständig zu
trocknen. Das Vlies muss alle 3 Jahre ausgewechselt werden und weiterhin jedes Mal
dann, wenn es beschädigt ist.
4.3 Type 60/80 - Der NICHT waschbare
Aktivkohlefi lter
Je nach der Benetzungsdauer des Herdes
und der Häufi gkeit der Reinigung des Fettfi lters tritt nach einer mehr oder weniger
langen Benutzungsdauer die Sättigung des
Aktivkohlefi lters auf. Auf jeden Fall muß
der Filtereinsatz mindestens alle 4 Monate
ausgewechselt werden.
Er kann NICHT gereinigt oder erneut aktiviert werden.
1
2 2
Page 10

10
www.aeg.com
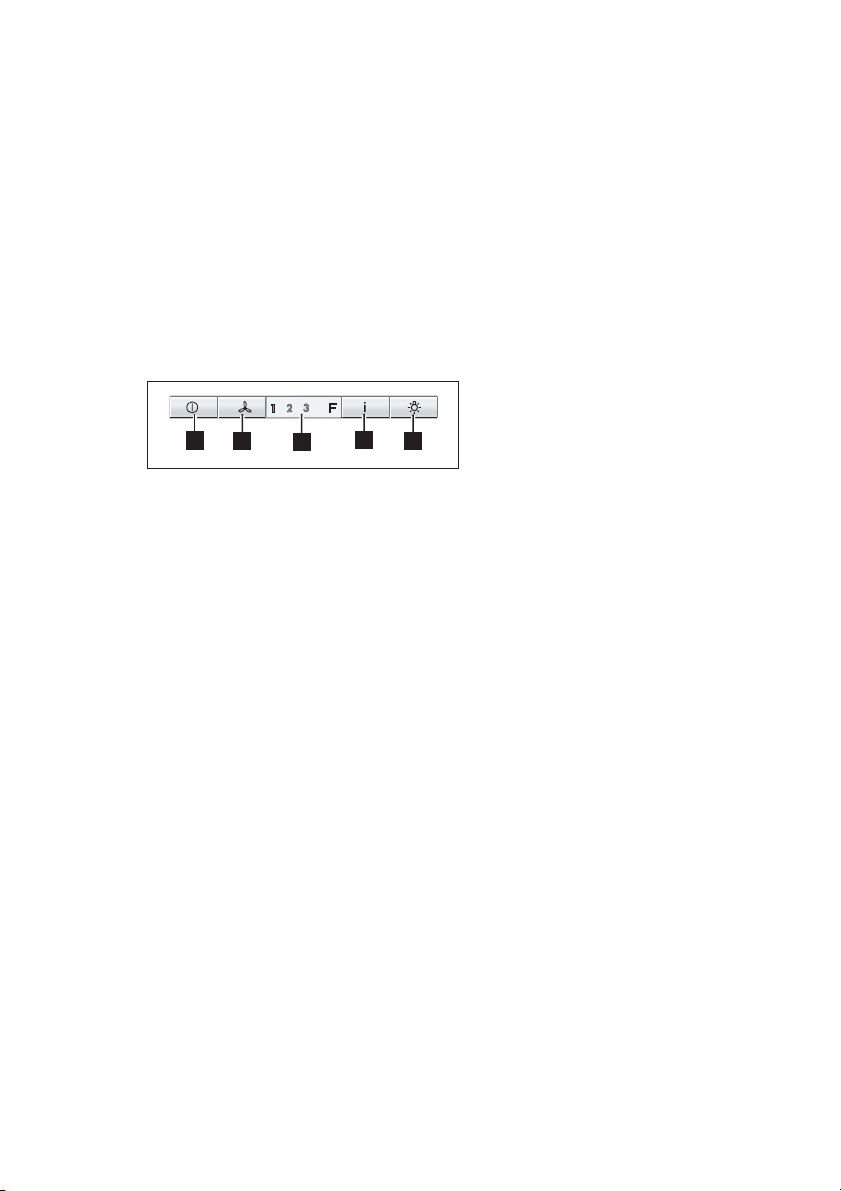
5. BEDIENELEMENTE
Die Dunstabzugshaube ist mit einer
Bedienungsblende ausgestattet, die mit
einer Steuerung für die Ansaugstärke bzw.
-geschwindigkeit, sowie einer Steuerung
zur Einstellung der Arbeitsplatzbeleuchtung
versehen ist.
Bei starker Dampfentwicklung die
höchste Betriebsstufe einschalten. Es
wird empfohlen, die Dunstabzugshaube
schon fünf Minuten vor Beginn des
Kochvorganges einzuschalten und sie nach
dessen Beendigung noch ungefähr 15
Minuten weiterlaufen zu lassen.
Auf der Vorderseite des Gerätes befi nden
sich die Schalter:
1A
1B
1C
A. Taste OFF (Taste ausgeschaltet) - ON
(Taste eingeschaltet)
Ein- oder mehrmals drücken, um die
gewünschte Funktion zu erhalten:
ON (Taste eingeschaltet): die
Haube stellt die zuletzt ausgewählte
Geschwindigkeitsstufe ein.
OFF (Taste ausgeschaltet): sämtliche
Funktionen gesperrt außer der
Beleuchtung.
B. Auswahltaste für Gebläsestufe
(Saugleistung)
Diese Taste ein- oder mehrmals
drücken, um die angemessene
Gebläsestufe (Saugleistung)
(1 - 2 - 3 anzuwählen).
C. Display: zeigt die ausgewählte
Saugleistung an (1-2-3), meldet die
Sättigung der Filter (F).
D. Einschalter Intensivstufe:
Nach 5 Minuten schaltet die
Intensivstufe in die vorher eingestellte
Stufe zurück bzw. schaltet aus, wenn
keine Stufe eingestellt ist. Um die
Intensivstufe vor Ablauf von 5 Minuten
zu beenden, muss Knopf A, B oder D
gedrückt werden.
E. Ausschalter/Einschalter Beleuchtung.
1D
1E
Falls die Dunstabzugshaube oder die
Bedienungselemente nicht funktionieren:
Für mindestens 5 Sekunden die
Stromversorgung der Dunstabzugshaube
unterbrechen und dann die Haube erneut
einschalten.
Kontrollvorrichtung für Fett- und
Aktivkohlefi lter
Die Abzugshaube ist mit einer Vorrichtung
versehen, die meldet, dass die Haube
gewartet werden muss.
Bei einer Abzugshaube mit
Aktivkohlefi lter muss die dazu geeignete
Sättigungsanzeige wie folgt aktiviert
werden:
Die Haube muss auf „AUS“ eingestellt
sein.
Gleichzeitig drei Sekunden lang die
Tasten B und D drücken, die LED F
schaltet sich ein und die LED der 1.
Geschwindigkeitsstufe beginnt zu blinken,
nach 1 Sekunde blinkt auch die LED der
2. Stufe und das System gibt ein Tonsignal
ab (-Beep-) um die erfolgte Einstellung
anzuzeigen.
Um die Kohlefi ltermeldung zu entfernen,
gleichzeitig drei Sekunden lang die Tasten
B und D drücken, die LED F schaltet sich
ein und die LED der 1. Stufe (Fettfi lter)
beginnt zu blinken sowie die LED der 2.
Stufe, nach 1 Sekunde blinkt nur die LED
der 1. Stufe, das System gibt ein Tonsignal
(-Beep-) ab, um die erfolgte Einstellung
anzuzeigen.
LED-Anzeige Fettfi lter
Die LED der 1. (+ LED F). Stufe blinkt,
wenn der Fettfi lter gereinigt werden muss.
Die Wartungsvorschriften der Fettfi lter sind
zu beachten.
LED-Anzeige Aktivkohlefi lter
Die LED der 2. (+ LED F) Stufe blinkt,
wenn der Aktivkohlefi lter regeneriert werden
muss.
Zurückstellen der Sättigungsanzeige
Nach Reinigung oder Austausch des
Fettfi lters die Taste A für 3 Sekunden
gedrückt halten bis die LED der 1. Stufe
oder die LED der 2
. Stufe nicht mehr blinkt.
Auch die LED F schaltet sich aus.
Page 11
6. BELEUCHTUNG
Das gerät vom stromnetz nehmen.
Hinweis! Vor berühren der lampen sich
vergewissern, dass sie abgekühlt sind.
Ausschließlich Halogenlampen zu m12V
-20W max - G4 verwenden und darauf
achten, diese nicht mit den Händen zu
berühren.
DEUTSCH
11
Page 12
FR MANUEL D’UTILISATION
www.aeg.com
12
POUR DES RÉSULTATS PARFAITS
Merci d’avoir choisi ce produit AEG. Nous l’avons conçu pour qu’il vous offre des
performances irréprochables pour longtemps, en intégrant des technologies innovantes qui
vous simplifi ent la vie grâce à des caractéristiques que vous ne trouverez pas forcément
sur des appareils ordinaires. Veuillez prendre quelques instants pour lire cette notice afi n
d’utiliser au mieux votre appareil.
Visitez notre site Internet pour :
Obtenir des conseils d’utilisation, des brochures, de l’aide, des informations :
www.aeg.com
Enregistrer votre produit pour obtenir un meilleur service :
www.aeg.com/productregistration
Acheter des accessoires, consommables et pièces de rechange d’origine pour
votre appareil :
www.aeg.com/shop
EN MATIÈRE DE PROTECTION DE L’ENVIRONNEMENT
Recyclez les matériaux portant le symbole . Déposez les emballages dans les
conteneurs prévus à cet effet. Contribuez à la protection de l’environnement et à votre
sécurité, recyclez vos produits électriques et électroniques. Ne jetez pas les appareils
portant le symbole
centre local de recyclage ou contactez vos services municipaux.
avec les ordures ménagères. Emmenez un tel produit dans votre
SERVICE APRÈS-VENTE
N’utilisez que des pièces de rechange d’origine.
Avant de contacter le service, assurez-vous de disposer des informations suivantes :
Vous trouverez ces informations sur la plaque signalétique. Modèle, PNC, numéro de série.
Avertissement/Attention : consignes de sécurité.
Informations générales et conseils.
Informations en matière de protection de l’environnement.
Sous réserve de modifi cations.
Page 13
FRANÇAIS
13
1. CONSIGNES DE SÉCURITÉ
Attention! Suivre impérativement
les instructions de cette notice.
Le constructeur décline toute
responsabilité pour tous les
inconvénients, dommages ou incendies
provoqués à l’appareil et dûs à la
non observation des instructions de
la présente notice. La hotte a été
conçue exclusivement pour l’usage
domestique.
Avertissement! Ne pas raccorder
l’appareil au circuit électrique avant
que le montage ne soit complètement
terminé.
Avant toute opération de nettoyage
ou d’entretien, débrancher la hotte du
circuit électrique en retirant la prise ou
en coupant l’interrupteur général de
l’habitation.
Munissez-vous de gants de travail avant
d’effectuer toute opération d’installation et
d’entretien.
L’appareil n’est pas destiné à une utilisation
par des enfants ou des personnes à
capacités physiques, sensorielles ou
mentales réduites et sans expérience et
connaissance à moins qu’ils ne soient sous
la supervision ou formés sur l’utilisation de
l’appareil par une personne responsable de
leur sécurité.
Les enfants doivent être surveillés afi n qu’ils
ne jouent pas avec l’appareil.
Ne jamais utiliser la hotte sans que la grille
ne soit montée correctement!
La hotte ne doit JAMAIS être utilisée
comme plan pour déposer quelque chose
sauf si cela est expressément indiqué.
Quand la hotte est utilisée en même temps
que d’autres appareils à combustion de
gaz ou d’autres combustibles, le local doit
disposer d’une ventilation suffi sante.
L’air aspiré ne doit jamais être envoyé
dans un conduit utilisé pour l’évacuation
des fumées produites par des appareils
à combustion de gaz ou d’autres
combustibles.
Il est formellement interdit de faire fl amber
les aliments sous la hotte.
L’utilisation de fl ammes libres peut entraîner
des dégâts aux fi ltres et peut donner lieu à
des incendies, il faut donc les éviter à tout
prix.
La friture d’aliments doit être réalisée sous
contrôle pour éviter que l’huile surchauffée
ne prenne feu.
Attention! Les pièces accessibles
peuvent se réchauffer de façon
importante quand elles sont utilisées
avec des appareils pour la cuisson.
En ce qui concerne les mesures techniques
et de sécurité à adopter pour l’évacuation
des fumées, s’en tenir strictement à ce qui
est prévu dans les règlements des autorités
locales compétentes. La hotte doit être
régulièrement nettoyée, aussi bien à
l’intérieur qu’à l’extérieur (AU MOINS UNE
FOIS PAR MOIS, respecter néanmoins les
instructions relatives à l’entretien fournies
dans ce manuel). La non observation de
ces normes de nettoyage de la hotte et
du changement et nettoyage des fi ltres
comporte des risques d’incendie.
Ne pas utiliser ou laisser la hotte sans que
les ampoules soient correctement placées
pour éviter tout risque de choc électrique.
La société décline toute responsabilité
pour d’éventuels inconvénients, dégâts
ou incendies provoqués par l’appareil
et dérivés de la non observation des
instructions reprises dans ce manuel.
2. UTILISATION
La hotte est utilisée pour aspirer les fumées
et les vapeurs causés par la cuisine.
Le manuel d’installation attaché indique la
version d’utiliser pour votre modèle, soit
la version avec aspiration et évacuation
externe
recirculation interne
ou la version avec fi ltration et
.
3. INSTALLATION
La tension électrique doit correspondre à la
tension reportée sur la plaque signalétique
située à l’intérieur de la hotte. Si une prise
est présente, branchez la hotte dans une
prise murale conforme aux normes en
vigueur et placée dans une zone accessible
également après l’installation. Si aucune
prise n’est présente (raccordement direct
au circuit électrique), ou si la prise ne
se trouve pas dans une zone accessible
également après l’installation, appliquez
un disjoncteur normalisé pour assurer
de débrancher complètement la hotte
du circuit électrique en conditions de
catégorie surtension III, conformément aux
règlementations de montage.
Attention! Avant de rebrancher le
circuit de la hotte à l’alimentation
électrique et d’en vérifier le
fonctionnement correct, contrôlez
toujours que le câble d’alimentation soit
monté correctement.
Page 14
14
www.aeg.com
La hotte est pourvue d’un câble
d’alimentation spécial; en cas de
détérioration du câble, en demander un
neuf au service d’assistance technique.
La distance minimum entre la superfi cie
de support des récipients sur le dispositif
de cuisson et la partie la plus basse de la
hotte de cuisine ne doit pas être inférieure à
50cm dans le cas de cuisinières électriques
et de 65cm dans le cas de cuisinières à gaz
ou mixtes.
Si les instructions d’installation du dispositif
de cuisson au gaz spécifi ent une plus
grande distance, il faut en tenir compte.
4. ENTRETIEN
Attention! Avant toute opération de
nettoyage ou d’entretien, débrancher la
hotte du circuit électrique en enlevant
la prise ou en coupant l’interrupteur
général de l’habitation. La hotte doit être
régulièrement nettoyée à l’intérieur et à
l’extérieur (au moins à la même fréquence
que pour l’entretien des fi ltres à graisse).
Pour le nettoyage, utiliser un chiffon
humidifi é avec un détergent liquide neutre.
Ne pas utiliser de produit contenant des
abrasifs. NE PAS UTILISER D’ALCOOL!
Attention! Il y a risque d’incendie si
vous ne respectez pas les instructions
concernant le nettoyage de l’appareil et le
remplacement ou le nettoyage du fi ltre.
La responsabilité du constructeur ne
peut en aucun cas être engagée dans le
cas d’un endommagement du moteur ou
d’incendie liés à un entretien négligé ou
au non respect des consignes de sécurité
précédemment mentionnées.
4.2 Filtre à charbon actif - Type 150
LONG LIFE - Filtre à charbon actif lavable
Le fi ltre à charbon peut être nettoyé tous
les deux mois avec de l’eau chaude et au
moyen de détergents appropriés ou dans
le lave-vaisselle à 65°C (dans le cas de
lavage dans le lave-vaisselle suivre un
cycle de lavage complet sans vaisselle à
l’intérieur).
Enlever l’eau qui excède en faisant attention de ne pas abîmer le fi ltre, ensuite
enlever le coussinet posé à l’intérieur du
châssis en plastique et le mettre dans le
four pendant 10 minutes à 100°C pour le
sécher défi nitivement. Remplacer le coussinet tous les 3 ans et chaque fois que le
fi ltre sera abîmé.
4.3 Type 60/80 - Filtre à charbon actif
NON lavable
La saturation du charbon actif se constate
aprés un emploi plus ou mois long, selon
la fréquence d’utilisation et la régularité du
nettoyage du fi ltre à graisses. En tout cas, il
est nécessaire de changer le fi ltre aprés, au
maximum, quatre mois.
IL NE PEUT PAS être nettoyé ou régénéré.
1
4.1 Filtre anti-graisse - Le fi ltre antigraisse doit être nettoyé une fois par mois
avec des détergents non agressifs, à la
main ou dans le lave-vaisselle à faibles
températures et cycle rapide. Le lavage
du fi ltre anti-graisse au lave-vaisselle peut
en provoquer la décoloration. Toutefois,
les caractéristiques de fi ltrage ne seront en
aucun cas modifi ées.
2 2
Page 15
FRANÇAIS
15
5. COMMANDES
La hotte est équipée d’un panneau de
contrôle doté d’une commande de vitesse
d’aspiration et d’une commande d’éclairage
du plan de cuisson.
Utiliser la puissance d’aspiration maximum
en cas de concentration très importante
des vapeurs de cuisson. Nous conseillons
d’allumer la hotte 5 minutes avant de
commencer la cuisson et de la faire
fonctionner encore pendant 15 minutes
environ après avoir terminé la cuisson.
Le bandeau de commandes de la hotte se
trouve sur l’avant de l’appareil.
1A
1B
1C
A. Touche ARRET(touche éteinte)
– MARCHE (touche allumée)
Appuyez une ou plusieurs fois pour
obtenir la fonction souhaitée:
MARCHE (touche allumée) : la hotte
fonctionne à la dernière vitesse
sélectionnée.
ARRET (touche éteinte) : toutes les
fonctions sont désactivées à l’exception
de l’éclairage.
B. Touche de sélection de la vitesse
(puissance d’aspiration).
Appuyez sur cette touche une ou
plusieurs fois pour choisir la vitesse
(puissance) d’aspiration la plus
appropriée (1-2-3).
C. Affi cheur: visualise la puissance
d’aspiration sélectionnée (1-2-3),
signale la saturation des fi ltres (F).
D. Touche de vitesse intensive : En
appuyant sur cette touche, la hotte
fonctionne pendant 5 minutes environ
à la vitesse intensive. A l’issue de cette
durée, la hotte fonctionne à la vitesse
initialement sélectionnée ou s’arrête
si aucune vitesse n’est réglée. Pour
mettre à l’arrêt la hotte en vitesse
intensive avant l’écoulement des 5
minutes, appuyez sur la touche A ou B
E. Touche Marche / Arrêt d’éclairage
1D
1E
Coupez l’alimentation de la hotte pendant
au moins 5 secondes puis remettez la hotte
en fonctionnement.
Dispositif de contrôle de saturation du
fi ltre à graisse et du fi ltre à charbon actif
Cette hotte est équipée d’un dispositif
qui indique quand il faut effectuer la
maintenace des fi ltres.
Si la hotte doit être utilisée avec le fi ltre à
charbon, activer l’indicateur approprié de
saturation dans la manière suivante: La
hotte doit être mise à l’ARRET. Appuyez
simultanément sur les touches B et D
pendant trois secondes, l’indicateur
F s’allume et l’indicateur de la 1ère
vitesse commence à clignoter, après 1
seconde l’indicateur de la 2ème vitesse
clignote également et le système émet
un signal sonore (-Beep-) qui indique que
l’activation a été effectuée. Pour enlever la
signalisation du fi ltre à charbon, appuyez
simultanément sur les touches B et D
pendant trois secondes, l’indicateur F
s’allume et l’indicateur de la 1ère vitesse
(fi ltre à graisse) commence à clignoter et
également l’indicateur de la 2ème vitesse,
après 1 seconde, seulement l’indicateur de
la 1ère vitesse clignotera, le système émet
un signal sonore (-Beep -) qui indique que
désactivation a été effectuée.
Voyant de saturation du fi ltre à graisse
L’indicateur de la 1ère (+ l’indicateur F)
vitesse clignote lorsque le fi ltre à graisse
doit être nettoyé. Lisez attentivement les
conseils pour l’entretien du fi ltre à graisse.
Voyant de saturation du fi ltre à charbon
L’indicateur de la 2ème (+ l’indicateur F)
vitesse clignote, lorsque le fi ltre à charbon
doit être nettoyé. Lisez attentivement les
conseils sur le nettoyage du fi ltre à charbon
actif.
Rétablissement de la signalisation de
saturation du fi ltre à graisse et du fi ltre
à charbon
Après avoir nettoyé le fi ltre, appuyez sur
la touche A pendant 3 secondes environ
jusqu’à ce que l’indicateur de la 1ère
vitesse ou l’indicateur de la 2ème vitesse
arrête de clignoter. L’indicateur F s’éteint
également.
Page 16

16
www.aeg.com
6. ÉCLAIRAGE
Débrancher l’appareil du réseau électrique
Attention! Avant de toucher les lampes,
assurez-vous qu’elles soient froides.
Utiliser uniquement des lampes halogènes
12V -20W max - G4 (Adaptée à un système
d’éclairage ouvert), en ayant soin de ne pas
les toucher avec les mains.
Page 17
NL GEBRUIKSAANWIJZING
VOOR PERFECTE RESULTATEN
Bedankt dat u voor dit AEG product heeft gekozen. Dit apparaat is ontworpen om vele jaren
uitstekend te presteren, met innovatieve technologieën die het leven gemakkelijker helpen
maken – functies die gewone apparaten wellicht niet hebben. Neem een paar minuten de
tijd om het door te lezen zodat u er optimaal van kunt profi teren.
Ga naar onze website voor:
Advies over gebruik, brochures, het oplossen van problemen en
onderhoudsinformatie:
www.aeg.com
Registreer uw product voor een betere service:
www.aeg.com/productregistration
Koop accessoires, verbruiksartikelen en originele reserveonderdelen voor uw
apparaat:
www.aeg.com/shop
MILIEUBESCHERMING
NEDERLANDS
17
Recycle de materialen met het symbool . Gooi de verpakking in een geschikte
verzamelcontainer om het te recyclen. Help om het milieu en de volksgezondheid te
beschermen en recycle het afval van elektrische en elektronische apparaten. Gooi
apparaten gemarkeerd met het symbool
product naar het milieustation bij u in de buurt of neem contact op met de gemeente.
KLANTENSERVICE
Wij raden altijd het gebruik van originele onderdelen aan.
Zorg er als u contact opneemt met de klantenservice voor dat u de volgende gegevens bij
de hand hebt.
De informatie staat op het typeplaatje. Model, productnummer, serienummer.
Waarschuwing - Belangrijke veiligheidsinformatie.
Algemene informatie en tips
Milieu-informatie.
Wijzigingen voorbehouden.
niet weg met het huishoudelijk afval. Breng het
Page 18
18
www.aeg.com
1. VEILIGHEIDSVOORSCHRIFTEN
Let op! Zich strikt aan de aanwijzingen
uit deze tekst houden. Iedere
aansprakelijkheid voor eventuele
schade of brand aan het apparaat
veroorzaakt door het niet in acht
nemen van de aanwijzingen in deze
handleiding weergegeven wordt
afgewezen. De wasemkap is uitsluitend
ontworpen voor huishoudelijk gebruik.
Waarschuwing! Het apparaat niet aan
het stroomnet aansluiten voordat de
installatie voltooid is. Koppel, voor ieder
onderhoud, eerst de wasemkap van het
elektriciteitsnet af door de stekker weg
te trekken of door de hoofdschakelaar
van de woning uit te schakelen.
Draag bij alle installatie- en
onderhoudswerkzaamheden
werkhandschoenen.
Dit apparaat mag niet worden gebruikt door
kinderen of door personen met beperkte
sensorische of geestelijke capaciteiten
of met weinig ervaring en onvoldoende
kennis, tenzij dit niet geschiedt onder het
toezicht of volgens de gebruiksaanwijzingen
van een persoon die verantwoordelijk is
voor hun veiligheid. De kinderen moeten
altijd gecontroleerd worden zodat zij niet
met het apparaat spelen. De wasemkap
nooit gebruiken als het rooster niet goed
gemonteerd is!
De wasemkap NOOIT als steunvlak
gebruiken tenzij dit niet uitdrukkelijk
is aangegeven. Altijd voor een goede
ventilatie van de ruimte zorgen als de
wasemkap tegelijkertijd wordt gebruikt
met andere apparaten die gas en andere
brandstoffen toepassen.
De gezogen lucht mag niet afgevoerd
worden in een leiding die gebruikt wordt
voor de afvoer van rook van apparaten die
gas of andere brandstoffen toepassen.
Het is streng verboden met open vlammen
onder de wasemkap te koken.
Het gebruik van open vlammen is schadelijk
voor de fi lters en kan brand veroorzaken,
daarom moet het absoluut vermeden
worden. Het frituren moet geschieden
onder voortdurend toezicht om te
voorkomen dat verhit vet in brand raakt.
Let op! De bereikbare onderdelen
kunnen bijzonder warm worden als
deze tegelijkertijd met kookapparaten
gebruikt worden.
Wat betreft technische- en
veiligheidsmaatregelen voor de rookafvoer
zich strikt houden aan de regelingen
voorzien door de plaatselijke bevoegde
autoriteiten. De wasemkap moet
regelmatig schoongemaakt worden, zowel
binnen als buiten (MINSTENS EENMAAL
PER MAAND, neem in ieder geval hetgeen
in deze handleiding is aangegeven in acht).
Het niet in acht nemen van de
reinigingsnormen van de wasemkap en van
de vervanging en reiniging van de fi lters
kan brandgevaar veroorzaken.
Zorg altijd dat de lampjes in de kap
aanwezig en goed gemonteerd zijn om
het gevaar voor elektrische schokken te
voorkomen.
Iedere aansprakelijkheid voor eventuele
schade aan het apparaat of brand
veroorzaakt door het niet in acht nemen
van de aanwijzingen uit deze handleiding
wordt afgewezen.
2. GEBRUIK
De kap is ontwikkeld om rook en
kookdampen af te zuigen.
In het bijgesloten montageboekje is
aangegeven welke uitvoering mogelijk
is voor het model in Uw bezit: in de
afzuigversie met afvoer naar buiten
in de fi ltrerende versie met luchtcirculatie
.
of
3. HET INSTALLEREN
De netspanning moet corresponderen met
de spanning die vermeld wordt op het etiket
met eigenschappen, aan de binnenkant
van de wasemkap. Als de wasemkap
een stekker heeft, moet deze in een
stopcontact worden gestoken dat voldoet
aan de geldende voorschriften op een, ook
na de installatie, goed bereikbare plaats.
Heeft de kap geen stekker (rechtstreekse
verbinding met het net) of is deze, ook na
de installatie, niet goed te bereiken, dan
moet er een tweepolige schakelaar worden
geplaatst die de volledige ontkoppeling
van het net garandeert in het geval
van een overspanning van klasse III,
in overeenstemming met de installatie
normen.
Attentie! Alvorens de wasemkap weer
aan het voedingsnet aan te sluiten
controleer of deze goed functioneert,
controleer altijd of de voedingskabel
goed gemonteerd is.
Page 19

NEDERLANDS
19
De afzuigkap is voorzien van een speciale
voedingskabel; als de kabel beschadigd
is, vraag de technische dienst voor een
nieuwe kabel. De minimum afstand tussen
het kookvlak van het fornuis en het laagste
deel van de afzuigkap mag niet onder de
50cm liggen, in geval van een elektrisch
fornuis en 65cm, in geval van een gas- of
gemengd fornuis.
Indien in de installatie-aanwijzing van
het gaskooktoestel een grotere afstand
wordt aangegeven moet hiermee rekening
worden gehouden.
4. ONDERHOUD
Attentie! Koppel, voor ieder onderhoud,
eerst de wasemkap van het elektriciteitsnet
af door de stekker weg te trekken of door
de hoofdschakelaar van de woning uit
te schakelen. De kap moet regelmatig
schoon gemaakt worden, zowel binnen als
buiten (tenminste met dezelfde regelmaat
waarmee de vetfi lters gereinigd worden).
Gebruik voor het reinigen een doek die
u vochtig maakt met een beetje neutraal
vloeibaar reinigingsmiddel. Gebruik geen
producten die schuurmiddelen bevatten.
GEEN ALCOHOL GEBRUIKEN!
Attentie! Als u deze aanwijzingen m.b.t.
reiniging van het apparaat en vervanging
resp. reiniging van de fi lters niet opvolgt,
kan dat tot brand leiden. Deze aanwijzingen
beslist opvolgen! De fabrikant is niet
aansprakelijk voor schade aan de motor of
schade t.g.v. brand die het gevolg zijn van
ondeskundig onderhoud of niet opvolgen
van de bovengenoemde veiligheidsvoorsc
hriften.
4.1 Vetfi lter - Het metalen vetfi lter moet
eenmaal per maand worden gereinigd
met neutrale reinigingsmiddelen, met de
hand of in de vaatwasmachine op lage
temperaturen en met een kort programma.
Door hem in de vaatwasmachine te wassen
kan het metalen vetfi lter ontkleuren, maar
dit is niet van invloed op de eigenschappen,
die beslist niet veranderen.
4.2 Type 150 LONG LIFE - Wasbaar
koolstoffi lter
De koolstoffi lter kan om de twee maanden
gewassen worden in warm water en met geschikte wasmiddelen of in de vaatmachine
op 65°C (in het geval van een reiniging in de
vaatmachine voer een volledige wascyclus
uit en zonder vaten).
Verwijder het overtollige water zonder de
fi lter te beschadigen, daarna het matje uit
de plastic structuur verwijderen en om deze
goed te drogen doe het matje in de over voor
10 minuten op 100°C. Vervang het matje om
de 3 jaar en elke keer dat het doek beschadigt is.
4.3 Type 60/80 - NIET wasbaar koolstoffi lter
De verzadiging van de koolstoffi lter vindt
plaats na een min of meer geprolongeerd
gebruik en hangt af van het soort koken en
de regelmaat waarmee de vetfi lter wordt
gewassen. In ieder geval moet de fi lter minstens om de 4 maanden vervangen worden.
Het kan NIET gewassen of opnieuw gebruikt
worden
1
2 2
Page 20
20
www.aeg.com
5. BEDIENINGSELEMENTEN
De kap is voorzien van een
bedieningspaneel met een schakelaar
voor de snelheid van afzuiging en een
schakelaar voor de verlichting van het
fornuis.
In geval van een sterkere dampconcentratie
een hogere zuigkracht gebruiken.
We raden aan de afzuigkap 5 minuten
voordat men begint te koken aan te doen
en deze nog voor ongeveer 15 minuten
nadat men beëindigt heeft aan te laten.
De schakelaars bevinden zich aan de
voorkant van de kap:
1A
1B
1C
A. toets OFF (toets uitgeschakeld) - toets
ON (toets ingeschakeld) Druk op de
toets om de gewenste functie te kiezen:
ON (toets ingeschakeld): de kap stelt
de laatst gekozen stand in
OFF (toets uitgeschakeld): alle
functies zijn uitgeschakeld behalve de
verlichting.
B. toets voor kiezen van de stand
(zuigkracht)
Druk op deze toets totdat de gewenste
stand (vermogen) geselecteerd is (1 - 2
- 3).
C. display: geeft de gekozen zuigkracht
(1-2-3) en geeft de fi lterverzadiging aan
(F).
D. inschakelen intensief-stand:na 5
minuten intensief-stand schakelt de kap
op de eerder ingestelde stand terug
resp. uit, als geen stand is ingesteld.
Om de intensief-stand eerder te
beëindigen, toets A, B of D indrukken.
E. in-/uitschakelen verlichting
Als het apparaat of de bedieningselementen
niet functioneren: minstens 5 seconden de
stroomverzorging naar de kap onderbreken
en dan opnieuw inschakelen.
1D
1E
Controle-inrichting voor vet- en
koolfi lters
Deze kap is voorzien van een inrichting die
aangeeft wanneer de onderhoudsingrepen
uitgevoerd moeten worden.
Indien de kap met een koolstoffi lter gebruikt
wordt de fi lter verzadiging indicatie op de
volgende wijze inschakelen:
De kap moet op “UIT” ingesteld zijn.
Druk tegelijkertijd, 3 seconden lang, op
de toetsen B en D, de LED F gaat aan
en de LED van de 1ste stand begint te
knipperen, na 1 seconden begint ook de
LED van de 2de stand te knipperen en een
geluidssignaal (pieptoon) geeft aan dat de
instelling plaats heeft gehad.
Om de verzadigingsindicatie van het
koolfi lter te verwijderen drukt u tegelijkertijd,
3 seconden lang, op de toetsen B en D,
de LED F gaat aan en de LED van de
1ste stand (vetfi lter) en de LED van de
2de stand beginnen te knipperen, na een
seconde knippert alleen de LED van de
1ste stand, een geluidssignaal (pieptoon)
geeft aan dat de instelling plaats heeft
gehad.
LED-indicatie vetfi lters
De LED van de 1ste stand (+ LED F)
knippert als de vetfi lters moeten worden
gereinigd. Zie hoofdstuk “Onderhoud Metalen vetfi lters”.
LED-indicatie koolfi lter
De LED van de 2de stand (+ LED F)
knippert als het koolfi lter moet worden
gereinigd of vervangen. Zie hoofdstuk
“Onderhoud - Koolfi lter”.
Reset verzadigingsindicatie
Na reinigen of vervangen van de vetfi lters
resp. het koolfi lter toets A 3
seconden ingedrukt houden tot de LED
van
de 1ste stand of die van de
2de stand niet meer knippert. Ook de LED
F gaat uit.
Page 21
6. VERLICHTING
Sluit de stroom af.
Attentie! Alvorens de lampjes aan te raken
controleer eerst of ze koud zijn.
Gebruik alleen halogeenlampjes van 12V
-20W max - G4, en zorg ervoor dat u hen
niet met de blote hand aanraakt.
NEDERLANDS
21
Page 22

ES MANUAL DE USO
www.aeg.com22
PARA OBTENER RESULTADOS PERFECTOS
Gracias por escoger este producto AEG. Lo hemos creado para ofrecerle un rendimiento
impecable durante muchos años, con tecnologías innovadoras que le facilitarán la vida:
características que probablemente no encontrará en electrodomésticos corrientes.
Lea durante algunos minutos este documento para aprovechar al máximo este
electrodoméstico.
Visite nuestro sitio web para:
Obtener consejos, folletos, soluciones a problemas e información de servicio:
www.aeg.com
Registrar su producto para recibir un mejor servicio:
www.aeg.com/productregistration
Adquirir accesorios, artículos de consumo y recambios originales para su aparato:
www.aeg.com/shop
ASPECTOS MEDIOAMBIENTALES
Recicle los materiales con el símbolo . Coloque el material de embalaje en los
contenedores adecuados para su reciclaje.Ayude a proteger el medio ambiente y la salud
pública, así como a reciclar residuos de aparatos eléctricos y electrónicos. No deseche
los aparatos marcados con el símbolo
producto a su centro de reciclaje local o póngase en contacto con su ofi cina municipal.
junto con los residuos domésticos. Lleve el
ATENCIÓN Y SERVICIO AL CLIENTE
Le recomendamos que utilice recambios originales.
Al contactar con el Servicio, cerciórese de tener la siguiente información a mano.
La información se puede encontrar en la placa de características. Modelo, PNC, Número de
serie.
Advertencia - Precaución-Información sobre seguridad.
Información general y consejos
Información medioambiental.
Sujeto a cambios sin previo aviso.
Page 23
ESPAÑOL
23
1. INSTRUCCIONES DE
SEGURIDAD
Precaución! Aténgase estrictamente a
las instrucciones del presente manual.
Se declina cada responsabilidad por
eventuales inconvenientes, daños
o incendios provocados al aparato
originados por la inobservancia
de las instrucciones colocadas en
este manual. La campana ha sido
concebida exclusivamente para un uso
doméstico.
Advertencia! No conectar el aparato a
la red eléctrica hasta que la instalación
fue completada.
Antes de cualquier operación de
limpieza o mantenimento, desenchufar
la campana o el interruptor general de
la casa.
Todas las operaciones de instalación y
mantenimiento se deben realizar utilizando
guantes de trabajo.
El aparato no está destinado para el
uso por parte de los niños o personas
con problemas fi sicos o mentales y sin
experiencia y conocientos a menos que no
sea bajo la supervisión de profesionales
,o por una persona responsable de su
seguridad.
Los niños deben ser controlados para evitar
que jueguen con el aparato.
Nunca utilizar la campana sin la parrilla
correctamente montada!
La campana no debe ser nunca
utilizada como plano de apoyo solo si es
expresamente indicado.
El ambiente debe poseer sufi ciente
ventilación, cuando la campana de cocina
es utilizada conjuntamente con otros
aparatos a gas u otros combustibles.
El aire aspirado no debe ser mezclado
en un conducto para descarga de humo
producidos por aparatos a gas u otros
combustibles.
Es prohibido cocinar alimentos con llama
alta por debajo de la campana.
El uso de las llamas libres puede provocar
daños a los fi ltros y dar lugar a incendios,
por lo tanto evitar en cada caso.
Las frituras deben ser cocinadas bajo
control para evitar que el aceite recalentado
prenda fuego.
Precaución! Las partes accessibles
pueden calentarse cuando se usan
junto a aparatos para la cocción.
En cuanto a las medidas técnicas y de
seguridad adoptar para la descarga de
humo atenerse estrictamente a las reglas
de las autoridades locales.
La campana se debe limpiar siempre
internamente y externamente (COMO
MINIMO UNA VEZ AL MES, respetando las
reglas indicadas en este manual)
No efectuar los consejos de limpieza de la
campana y el cambio de los fi ltros puede
provocar incendios.
No utilice o deje la campana sin las
lámparas correctamente montadas, debido
a riesgos de cortocircuito.
Se declina todo tipo de responsabilidades,
daños o incendios provocados por no leer
atentamente las instrucciones indicadas en
este manual.
2. USO
La campana sirve para aspirar los humos y
vapores derivantes de la cocción. .
En el folleto de instalación adjunto viene
indicada cuál versión es posible utilizar
para el modelo en vuestra posesión entre
la versión aspirante a evacuación externa
o fi ltrante a recírculo interno .
3. INSTALACIÓN
La tensión de red debe corresponder con
tensión indicada en la etiqueta colocada en
el interior de la campana.Si es suministrada
con un enchufe, conectar la campana a
un enchufe conforme a las normas en
vigor y colocarlo en una zona accesible,
aun después de la instalación. Si no es
suministrada con enchufe (conexión directa
a la red) o clavija y no es posible situarla
en un lugar accesible, aun después de la
instalación, colocar un interruptor bipolar
de acuerdo con las normativas, para
asegurarse la desconexión completa a
la red en el caso de la categoria de alta
tensión III, conforme con las reglas de
instalación.
Atención! Antes de reconectar el
circuito de la campana a la red y de
verificar el correcto funcionamiento,
controlar siempre que el cable de red
fue montado correctamente.
Page 24
24
www.aeg.com
La campana está provista de un cable de
alimentación especial; si el cable se daña,
solicite uno nuevo al Servicio de Asistencia
Técnica. La distancia mínima entre la
superfi cie de cocción y la parte más baja
de la campana no debe ser inferior a 50cm
en el caso de cocinas electricas y de 65cm
en el caso de cocinas a gas o mixtas. Si
las instrucciones para la instalación del
dispositivo para cocinar con gas especifi can
una distancia mayor, hay que tenerlo en
consideración.
4. MANTENIMIENTO
¡Atención! Antes de cualquier operación
de limpieza o mantenimiento, retire la
campana de la red eléctrica desconectando
el enchufe o desconectando el interruptor
general de la casa. La campana debe
ser limpiada con frecuencia tanto
externamente como internamente (con la
misma frecuencia con la que se realiza el
mantenimiento de los fi ltros de grasa). Para
la limpieza, utilice un paño impregnado
de detergente líquido neutro. No utilice
productos que contengan abrasivos. ¡NO
UTILICE ALCOHOL!
¡Atención! De no observarse las
instrucciones dadas para limpiar el aparato
y sustituir el fi ltro, puede producirse un
incendio. El fabricante recomienda leerlas
y respetarlas atentamente. El fabricante no
se hace responsable por los daños al motor
o los incendios provocados en el aparato
debido a intervenciones de mantenimiento
incorrectas o al incumplimiento de las
normas de seguridad proporcionadas.
4.2 Filtro al carbón activo - Type 150
LONG LIFE - Filtro al carbón activo
lavable
El fi ltro al carbón puede lavarse cada dos
meses con agua caliente y detergentes
adecuados o en lavavajillas a 65°C ( en
caso de lavado con lavavajillas, realice el
ciclo de lavado completo sin platos en el
interior.). Quite el agua que haya quedado
en el fi ltro sin estropearlo, después quite
el almohadillado situado en el interior del
armazón de plástico y póngalo en el horno
a 100°C durante diez minutos para secarlo
completamente. Cambie el almohadillado
cada 3 años y cada vez que el paño se
estropee.
4.3 Type 60/80 - Filtro al carbón activo
NO lavable
La saturaciòn del carbòn activado ocurre
despuès da mas o menos tiempo de uso
prolongado, dependiendo del tipo de cocina
y de la regularidad de limpieza del fi ltro
de grasa. En cualquier caso es necesario
sustituir el cartucho al menos cada 4
meses.
NO puede lavarse o reciclarse.
1
4.1 Filtro antigrasa - El fi ltro antigrasa
debe limpiarse una vez al mes con
detergentes no agresivos, manualmente o
bien en lavavajillas a bajas temperaturas
y con ciclo breve. Con el lavado en el
lavavajilla el fi ltro antigrasa metálico puede
desteñirse pero sus características de
fi ltrado no cambian absolutamente.
2 2
Page 25
ESPAÑOL
25
5. MANDOS
La campana está dotada de un panel de
mandos con control de las velocidades de
aspiración y control de encendido de la luz
para la iluminación del plano de cocción.
Usar la potencia de aspiraciòn mayor
en caso de particular concentraciòn de
vapores de cocina. Aconcejamos de
encender la aspiraciòn 5 minutos antes de
iniciar a cocinar y dejarla en funciòn por
otros 15 minutos aproximadamente.
Los mandos en el lado frontal del aparato:
1A
1B
1C
A. Tecla OFF (tecla apagado) ON (Tecla
encendido)
Apretar una o más veces para obtener
la función deseada:
ON (tecla encendido ): la campana
imposta la ultima velocidad
seleccionada.
OFF (tecla apagado ): todas las
funciones deshabilitadas ,excepto la
iluminación
B. Tecla de selección de la velocidad
(potencia de aspiración).Apretar esta
tecla una o más veces para elegir la
velocidad (potencia) de aspiración más
adecuada (1 - 2 - 3 ).
C. Pantalla: visualiza la potencia de
aspiración seleccionada (1-2-3), señala
la saturación de los fi ltros (F).
D. Tecla insertado velocidad intensiva.
Una vez insertada,la velocidad
intensiva permanecerá en función por
aproximadamente 5 minutos , luego de
que la campana volverá a la velocidad
precedentemente seleccionada
(de 1 a 3) o inclusive se apaga si
precedentemente no había sido
seleccionada ninguna velocidad. Para
desinsertar el intensivo antes de que
hayan pasado los 5 minutos, apretar la
tecla A o la tecla B .
E. Tecla ON/OFF luz.
1D
1E
En caso en que la campana o los mandos
no funcionen, se aconseja interrumpir
la alimentación por al menos 5
segundos y luego reencender. Esperar
luego 15 segundos y verifi car si la
campana funciona correctamente.
Dispositivo para el control del fi ltro
grasas y al carbón activo.
La campana es provista de un dispositivo
que indica cuándo es necesario ejecutar el
mantenimento.
Si se debe usar la campana con el fi ltro al
carbón, activar el adecuado indicador de
saturación como sigue:
La campana debe ser programada en
“OFF.”
Apretar contemporáneamente las teclas
B y D por tres segundos, el LED F se
enciende e inicia a destellar el led de la 1°
velocidad, después de 1 segundo también
destella el led de las 2° velocidad y el
sistema emite una señal sonora (- Beep -)
para indicar la ejecutada impostación.
Para remover la señal del fi ltro carbón
apretar contemporáneamente las teclas
B y D por tres segundos, el LED F se
enciende e inicia a destellar el led de la
1° velocidad (fi ltro grasas) y el led de la
2° velocidad, después de 1 segundo sólo
destellará el led de la 1° velocidad, el
sistema emite una señal sonora (- Beep -)
para indicar la ejecutada impostación.
LED( 1) señal de saturación fi ltro
grasas.
El destello del led de la velocidad 1 advierte
al operador que los fi ltros grasas tienen
que ser lavados. Leer cuidadosamente las
instrucciones relativas a la manutención
de los fi ltros grasas para la limpieza de los
mismos.
Led (2) señal de saturación fi ltro a
carbones activos
El destello del led de la velocidad 2 advierte
al operador que el fi ltro carbón tiene que
ser lavado o reemplazado.
Leer cuidadosamente las instrucciones
relativas al lavado o sustitución del fi ltro
carbón.
Restablecimiento del indicador de
saturación
Después de haber ejecutado la
manutención de los fi ltros, tener apretada la
tecla A. por 3 segundos hasta que el LED 1
o 2 dejen de destellar.
Page 26
26
www.aeg.com
6. ILUMINACIÓN
Desconecte el aparato de la red elèctrica.
¡Atención! Antes de tocar las lámparas
asegúrese de que esten frías.
Utilizar sólo lámparas halógenas de 12V
-20W max - G4 (Adecuada para su uso en
luminaria abierta) prestando atención en no
tocarlas con las manos.
Page 27

PT LIVRO DE INSTRUÇÕES PARA UTILIZAÇÃO.
PARA RESULTADOS PERFEITOS
Obrigado por escolher este produto AEG. Criámo-lo para lhe oferecer um desempenho
impecável durante vários anos, com tecnologias inovadoras que tornam a sua vida mais
fácil – funcionalidades que poderá não encontrar em aparelhos comuns. Continue a ler
durante alguns minutos para tirar o máximo partido do produto.
Visite o nosso website para:
Resolver problemas e obter conselhos de utilização, catálogos e informações
sobre serviços:
www.aeg.com
Registar o seu produto para benefi ciar de um serviço melhor:
www.aeg.com/productregistration
Adquirir acessórios, consumíveis e peças de substituição originais para o seu
aparelho:
www.aeg.com/shop
PREOCUPAÇÕES AMBIENTAIS
PORTUGUÊS
27
Recicle os materiais que apresentem o símbolo . Coloque a embalagem nos
contentores indicados para reciclagem.
Ajude a proteger o ambiente e a saúde pública através da reciclagem de aparelhos
eléctricos e electrónicos. Não elimine os aparelhos que tenham o símbolo
com os resíduos domésticos. Coloque o produto num ponto de recolha para reciclagem
local ou contacte as suas autoridades municipais.
APOIO AO CLIENTE E ASSISTÊNCIA
Recomendamos a utilização de peças de substituição originais.
Quando contactar a Assistência, certifi que-se de que tem os seguintes dados disponíveis.
A informação encontra-se na placa de características. Modelo, PNC, Número de Série.
Aviso / Cuidado - Informações de segurança.
Informações gerais e sugestões
Informações ambientais.
Sujeito a alterações sem aviso prévio.
juntamente
Page 28
28
www.aeg.com
1. INSTRUÇÕES DE SEGURANÇA
Cuidado! Siga especificamente as
instruções indicadas neste manual.
Declina-se qualquer responsabilidade
por eventuais inconvenientes, danos
ou incêndios provocados ao aparelho,
derivantes da inobservância das
instruções indicadas neste manual.
O exaustor foi projectado para ser
utilizado exclusivamente em ambientes
domésticos.
Advertência! Não conectar o aparelho
à rede elétrica enquanto a instalação
não tiver sido totalmente completada.
Antes de qualquer limpeza ou
manutenção, desligar a coifa da rede
elétrica tirando o pluge da tomada
ou desligando o interruptor geral da
alimentação elétrica.
Para todas as operações de instalação e
manutenção, utilize luvas adequadas para
este tipo de atividade.
O aparelho não é destinado para uso
de crianças ou pessoas com alguma
incapacidade fi sica, motoras, ou mentais
reduzidas, e também à às pessoas sem
experiência ou sem conhecimentos
sufi cientes. Devem ser de ser auxiliadas
por alguém que tenha com conhecimento
e capacidade competência para utilizar
o aparelho. As crianças devem ser
controladas de maneira que não brinquem
com o aparelho. Nunca utilizar a coifa sem
a grelha esteja corretamente montada!
A coifa NUNCA deve ser utilizada como
plano de apoio. Quando a coifa é utilizada
ao mesmo tempo com outros aparelhos a
combustão de gás ou outros combustíveis o
local deve dispor de sufi ciente ventilação.
O ar aspirado não deve ser transportado
por meio de ductos usados para a
descarga dos fumos produzidos por
aparelhos a combustão de gás ou de
outros combustíveis. É severamente
proibido cozinhar alimentos diretamente
na chama sob a coifa. O emprego de
chama livre é danoso para os fi ltros e pode
dar lugar a incêndios, portanto, deve ser
absolutamente evitado. A fritura deve ser
feita sob controlo de modo a evitar que o
óleo superaquecido se incendeie.
Cuidado! As partes externas podem
aquecer-se notávelmente quando forem
usadas com os aparelhos de cocção.
No que diz respeito às medidas técnicas e
de segurança a serem adoptadas para a
descarga dos fumos, ater-se estritamente
a quanto previsto pelos regulamentos das
autoridades competentes locais.
A coifa deve ser limpa frequentemente
tanto interna quanto externamente (AO
MENOS UMA VEZ POR MÊS, respeitando
as instruções de manutenção indicadas
neste manual).
O não atendimento às normas de limpeza
da coifa e de substituição e limpeza dos
fi ltros pode provocar riscos de incêndio.
A coifa não de ser utilizada sem lâmpadas
ou com sua montagem incorreta, pois isto
pode provocar risco de choque elétrico.
Não nos responsabilizamos por eventuais
inconvenientes, danos ou incêndios
provocados ao aparelho, caso as
instruções indicadas neste manual não
sejam seguidas corretamente.
2. USO
O exaustor serve para sugar a fumaça e
vapores da cozinha.
No manual de instalação que acompanha
o aparelho, vem indicado qual versão é
possível utilizar para o modelo no seu
poder entre a versão aspirante com
evacuação ao exterior
com recirculação interna
ou a fi ltragem
.
3. INSTALAÇÃO
A voltagem da rede elétrica deve
corresponder à voltagem indicada na
etiqueta das características situada no
interior da coifa. Se dotada de fi cha,
conectar a coifa a uma tomada em
conformidade com as normas vigentes
posta em zona acessível,mesmo depois
da instalação. Se não dotada de fi cha
(conexão direta à rede) ou a tomada não
se encontra em zona acessível,mesmo
depois da instalação, aplicar um interruptor
bipolar em conformidade com a norma que
assegure a desconexão completa da rede
nas condições da categoria de sobretensão
III, conformemente às regras de instalação.
Atenção! Antes de conectar
novamente o circuito da coifa com
a alimentação elétrica, verificar seu
funcionamento, atentar sempre para
que o cabo de rede esteja montado
corretamente.
Page 29

PORTUGUÊS
29
O exaustor está equipado com um cabo
de alimentação especial; no caso do cabo
fi car danifi cado, efectuar um pedido ao
serviço de assistência técnica. A distância
mínima entre a superfície de suporte dos
recipientes sobre o fogão e a parte mais
baixa da coifa não deve ser inferior a 50cm
no caso de fogões elétricos e 65cm no
caso de fogões a gás ou combinados. Se
as instruções de instalação do fogão a gás
especifi carem uma distância maior, deve-se
levar em conta esta indicação.
4. MANUTENÇÃO
Atenção! Antes de qualquer operação
de limpeza ou manutenção, desconectar
a coifa da rede elétrica tirando o pluge
da tomada ou desligando o interruptor
geral da alimentação elétrica. O exaustor
deve ser limpo frequentemente, interna e
externamente (pelo menos com a mesma
frequência com a qual se efectua a
manutenção dos fi ltros antigorduras).
Para a limpeza use um pano umedecido
com detergentes líquidos neutros. Evite o
uso de produtos contendo abrasivos. NÃO
UTILIZE ÁLCOOL!
Atenção! O não cumprimento das
instruções fornecidas para a limpeza do
aparelho e para a limpeza ou substituição
do fi ltro pode provocar riscos de incêndio.
O fabricante não se responsabiliza por
danos causados ao motor ou decorrentes
de incêndio, provocados por uma
manutenção inadequada ou pelo não
cumprimento das indicações de segurança
citadas neste manual.
4.1 Filtro de gordura
O Filtro de gordura deve ser limpo uma vez
por mês com detergentes não agressivos.
O fi ltro pode ser lavado manualmente
ou em máquina de lavar louça a baixas
temperaturas e com ciclo breve. O fi ltro
metálico para a gordura pode perde cor
com as lavagens na máquina da louça,
mas suas características de fi ltração não
se alteram.
4.2 Type 150 LONG LIFE - Filtro de
carvão acrivolavável
O fi ltro de carvão pode ser lavado de
dois em dois meses em água quente e
detergentes adequados ou em máquina
de lavar louça a 65 °C (para a lavagem
em máquina, utilize o ciclo completo sem
colocar outra loiça na máquina).
Tire a água em excesso tomando cuidado
para não estragar o fi ltro. Em seguida, tire
o pano posto no interior da estrutura de
plástico e deixe-o secar defi nitivamente no
forno durante 10 minutos a 100 °C.
Substitua o pano a cada 3 anos e sempre
que notar sinais de danos no tecido.
4.3 Type 60/80 - Filtro de carvão activo
NÃO lavável
A saturação do fi ltro de carvão activado
se verifi ca após um uso mais ou menos
prolongado em função do tipo de cozinha
e da regularidade da limpeza do fi ltro de
gorduras. Em todo caso, é necessário
substituir o cartucho no máximo cada 4
meses.
NÃO pode ser lavado ou regenerado.
1
2 2
Page 30
30
www.aeg.com
5. COMANDOS
O exaustor é dotado de um painel de
comandos com um controlo de velocidade
de aspiração e um controlo para acender a
luz de iluminação do plano de cozedura.
Usar a potência de aspiração no caso
de uma maior concentração de vapor
de cozimento. Aconselhamos ligar a
aspiração 5 minutos antes de iniciar a
cozinhar e de deixá-la em funcionamento
por aproximadamente 15 minutos após o
término do cozimento.
Os comandos frontais do aparelho:
1A
1B
1C
A. Tecla OFF ( botão desligado) – ON
(botão ligado)
Pressionar uma ou mais vezes para
obter a função desejada:
ON (botão ligado): A coifa defi ne a
ultima velocidade selecionada.
OFF (botão desligado): todas as
funções desativadas exceto a
iluminação.
B. Tecla de seleção de velocidade
(potência de aspiração) pressione-
a de novo e então novamente para
escolher a velocidade (potência) de
aspiração adequada ( 1-2-3 ).
C. Display : Visualiza a potência de
aspiração selecionada ( 1-2-3 ), indica
a saturação dos fi ltros ( F ).
D. Tecla seleção de velocidade intensiva.
Quando selecionada, a velocidade
intensiva terá uma duração de cerca
de 5 minutos, após o processo a coifa
volta a velocidade anteriormente
selecionada ( de 1 a 3) ou então é
desligada se precedentemente não foi
escolhida nenhuma velocidade. Para
desativar a velocidade intensiva antes
que sejam passados os 5 minutos
pressione a tecla A ou a tecla B.
E. Tecla ON/OFF Luz
1D
1E
Dispositivo para o controle de fi ltro de
gordura e para o carvão ativo.
O exaustor vem equipado com um
dispositivo que indica quando será
necessário realizar a manutenção.
Quando for usar o exaustor com o fi ltro de
carvão ativar o indicador de saturação da
seguinte forma:
A coifa deve estar em “OFF”.
Pressione contemporaneamente as teclas
B e D por três segundos, o LED F se
acenderá e iniciará a lampejar o LED da 1°
velocidade, após um segundo lampejará
também o LED velocidade 2 e o sistema
emite um sinal sonoro
(-Beep-) indicando assim a confi guração
bem sucedida.
Para remover a sinalização do fi ltro de
carvão pressionar ao mesmo tempo as
teclas B e D por três segundos, o LED F
se acenderá e iniciará a piscar o LED da 1°
velocidade (fi ltro de gordura) e o LED da
2° velocidade, ao termine de um segundo
lampejará só o LED da velocidade 1, o
sistema emite um sinal sonoro ( -Beep- )
para indicar a conclusão bem sucedida.
Led ( 1 ) sinalização da saturação de
fi ltro de gordura
Quando picar o LED da velocidade 1 é
uma sinal para o operador que os fi ltros de
gordura devem ser lavados.
Leia atentamente as instruções relativas
às manutenções e limpeza dos fi ltros de
gordura.
Led ( 2 ) sinalização de saturação fi ltro
ao carvão ativo.
O piscar do LED da velocidade 2 adverte
ao operador que o fi ltro de carvão deve ser
limpo ou substituído.
Leia atentamente as instruções de limpeza
ou substituição dos fi ltros de carvão.
Restauração do indicador de saturação
Depois de haver concluído a manutenção
dos fi ltros, manter pressionado a tecla
A por 3 segundos até que o LED 1 ou 2
parem de piscar.
Se a coifa ou os comandos não funcionam,
aconselha-se de interromper a alimentação
na rede elétrica pelo menos 5 segundos e
então religar.. Após o termine esperar 15
segundos e verifi car se a coifa funciona
corretamente.
Page 31

6. ILUMINAÇÃO
Desligar o aparelho da rede elétrica;
Atenção! Antes de tocar as lâmpadas,
certifi car-se que estejam frias.
Utilize exclusivamente lâmpadas de
halogéneo de 12V - 20W max - G4,
tomando o cuidado para não as tocar com
as mãos.
PORTUGUÊS
31
Page 32

IT LIBRETTO DI USO
www.aeg.com
32
PER RISULTATI PERFETTI
Grazie per aver scelto di acquistare questo prodotto AEG. Lo abbiamo creato per fornirvi
prestazioni impeccabili per molti anni, grazie a tecnologie innovative che vi semplifi cheranno
la vita - funzioni che non troverete sulle normali apparecchiature. Vi invitiamo a dedicare
qualche minuto alla lettura del presente manuale, per conoscere come trarre il massimo
vantaggio dall’utilizzo della vostra apparecchiatura.
Visitate il nostro sito web per:
ricevere consigli, scaricare i nostri opuscoli, eliminare eventuali anomalie, ottenere
informazioni sull’assistenza:
www.aeg.com
registrare il vostro prodotto e ricevere un servizio migliore:
www.aeg.com/productregistration
acquistare accessori, materiali di consumo e ricambi originali per la vostra
apparecchiatura:
www.aeg.com/shop
CONSIDERAZIONI AMBIENTALI
Riciclare i materiali con il simbolo . Buttare l’imballaggio negli appositi contenitori per il
riciclaggio.
Aiutare a proteggere l’ambiente e la salute umana e a riciclare rifi uti derivanti da
apparecchiature elettriche ed elettroniche. Non smaltire le apparecchiature che riportano il
simbolo
vicino o contattare il comune di residenza.
insieme ai normali rifi uti domestici. Portare il prodotto al punto di riciclaggio più
SERVIZIO CLIENTI E MANUTENZIONE
Consigliamo sempre l’impiego di ricambi originali.
Quando si contatta l’Assistenza, accertarsi di disporre dei seguenti dati.
Le informazioni si trovano sulla targhetta di identifi cazione. Modello, numero
dell’apparecchio (PNC), numero di serie.
Avvertenza / Attenzione - Importanti Informazioni di Sicurezza
Informazioni e suggerimenti generali
Informazioni sull’ambiente.
Con riserva di modifi che
Page 33

ITALIANO
33
1. ISTRUZIONI DI SICUREZZA
Avvertenza! Attenersi strettamente alle
istruzioni riportate in questo manuale.
Si declina ogni responsabilità per
eventuali inconvenienti, danni o incendi
provocati all’apparecchio derivati
dall’inosservanza delle istruzioni
riportate in questo manuale. La cappa è
stata progettata esclusivamente per uso
domestico.
Attenzione! Non collegare
l’apparecchio alla rete elettrica finche
l’installazione non è totalmente
completata.
Prima di qualsiasi operazione di pulizia
o manutenzione, disinserire la cappa
dalla rete elettrica togliendo la spina
o staccando l’interruttore generale
dell’abitazione.
Per tutte le operazioni di installazione e
manutenzione utilizzare guanti da lavoro
L’apparecchio non è destinato all’utilizzo
da parte di bambini o persone con ridotte
capacità fi siche sensoriali o mentali e con
mancata esperienza e conoscenza a meno
che essi non siano sotto la supervisione o
istruiti nell’uso dell’apparecchiatura da una
persona responsabile per la loro sicurezza.
I bambini devono essere controllati affi nché
non giochino con l’apparecchio.
Mai utilizzare la cappa senza griglia
correttamente montata!
La cappa non va MAI utilizzata come
piano di appoggio a meno che non sia
espressamente indicato.
Il locale deve disporre di suffi ciente
ventilazione, quando la cappa da cucina
viene utilizzata contemporaneamente ad
altri apparecchi a combustione di gas o altri
combustibili.
L’aria aspirata non deve essere convogliata
in un condotto usato per lo scarico dei fumi
prodotti da apparecchi a combustione di gas
o di altri combustibili.
E’ severamente vietato fare cibi alla fi amma
sotto la cappa.
L’impiego di fi amma libera è dannoso ai fi ltri
e può dar luogo ad incendi, pertanto deve
essere evitato in ogni caso.
La frittura deve essere fatta sotto controllo
onde evitare che l’olio surriscaldato prenda
fuoco.
Avvertenza!Quando il piano di cottura
è in funzione le parti accessibili della
cappa possono diventare calde.
Per quanto riguarda le misure tecniche
e di sicurezza da adottare per lo scarico
dei fumi attenersi strettamente a quanto
previsto dai regolamenti delle autorità locali
competenti.
La cappa va frequentemente pulita sia
internamente che esternamente (ALMENO
UNA VOLTA AL MESE, rispettare
comunque quanto espressamente indicato
nelle istruzioni di manutenzione riportate in
questo manuale).
L’inosservanza delle norme di pulizia della
cappa e della sostituzione e pulizia dei fi ltri
comporta rischi di incendi.
Non utilizzare o lasciare la cappa priva
di lampade correttamente montate per
possibile rischio di scossa elettrica.
Si declina ogni responsabilità per eventuali
inconvenienti, danni o incendi provocati
all’apparecchio derivati dall’inosservanza
delle istruzioni riportate in questo manuale.
2. USO
La cappa serve per aspirare i fumi e vapori
derivanti dalla cottura.
Nel libretto di installazione allegato è
indicata quale versione è possibile utilizzare
per il modello in Vs. possesso tra la
versione aspirante ad evacuazione esterna
o fi ltrante a ricircolo interno .
3. INSTALLAZIONE
La tensione di rete deve corrispondere
alla tensione riportata sull’etichetta
caratteristiche situata all’interno della
cappa. Se provvista di spina allacciare
la cappa ad una presa conforme alle
norme vigenti posta in zona accessibile
anche dopo l’installazione. Se sprovvista
di spina (collegamento diretto alla rete) o
la spina non è posta in zona accessibile,
anche dopo installazione, applicare un
interruttore bipolare a norma che assicuri
la disconnessione completa della rete nelle
condizioni della categoria di sovratensione
III, conformemente alle regole di
installazione.
Attenzione! Prima di ricollegare il
circuito della cappa all’alimentazione
di rete e di verificarne il corretto
funzionamento, controllare sempre
che il cavo di rete sia stato montato
correttamente.
Page 34

34
www.aeg.com
La cappa è provvista di un cavo
alimentazione speciale; in caso di
danneggiamento del cavo, richiederlo al
servizio assistenza tecnica. La distanza
minima fra la superfi cie di supporto dei
recipienti sul dispositivo di cottura e la
parte più bassa della cappa da cucina deve
essere non inferiore a 50cm in caso di
cucine elettriche e di 65cm in caso di cucine
a gas o miste.
Se le istruzioni di installazione del
dispositivo di cottura a gas specifi cano una
distanza maggiore, bisogna tenerne conto.
4. MANUTENZIONE
Attenzione! Prima di qualsiasi operazione
di pulizia o manutenzione, disinserire
la cappa dalla rete elettrica togliendo
la spina o staccando l’interruttore
generale dell’abitazione. La cappa va
frequentemente pulita (almeno con la
stessa frequenza con cui si esegue
la manutenzione dei fi ltri grassi), sia
internamente che esternamente. Per la
pulizia usare un panno inumidito con
detersivi liquidi neutri.
Evitare l’uso di prodotti contenenti abrasivi.
NON UTILIZZARE ALCOOL!
Attenzione! L’inosservanza delle
norme di pulizia dell’apparecchio e della
sostituzione dei fi ltri comporta rischi di
incendi. Si raccomanda quindi di attenersi
alle istruzioni suggerite. Si declina ogni
responsabilità per eventuali danni al
motore, incendi provocati da un’impropria
manutenzione o dall’inosservanza delle
suddette avvertenze.
4.2 Type 150 LONG LIFE - Filtro ai carboni attivi lavabile
Il fi ltro al carbone può essere lavato ogni due
mesi in acqua calda e detergenti idonei o
in lavastoviglie a 65°C (in caso di lavaggio
in lavastoviglie eseguire il ciclo di lavaggio
completo senza stoviglie all’interno).
Togliere l’acqua in eccesso senza rovinare
il fi ltro, dopodiché togliere il materassino posto all’interno del telaio in plastica e riporlo
nel forno per 10 minuti a 100°C per asciugarlo defi nitivamente.
Sostituire il materassino ogni 3 anni e ogni
volta che il panno risulta danneggiato.
4.3 Type 60/80 - Filtro ai carboni attivi
NON lavabile
La saturazione del fi ltro carbone si verifi ca
dopo un uso più o meno prolungato a seconda del tipo di cucina e della regolarità della
pulizia del fi ltro grassi. In ogni caso è necessario sostituire la cartuccia al massimo ogni
quattro mesi.
NON può essere lavato o rigenerato
1
4.1 Filtro antigrasso - Il fi ltro antigrasso
deve essere pulito una volta al mese con
detergenti non aggressivi, manualmente
oppure in lavastoviglie a basse temperature
ed a ciclo breve. Con il lavaggio in
lavastoviglie il fi ltro antigrasso può scolorirsi
ma le sue caratteristiche di fi ltraggio non
cambiano assolutamente.
2 2
Page 35

ITALIANO
35
5. COMANDI
La cappa è fornita di un pannello
comandi con un controllo delle velocità di
aspirazione ed un controllo di accensione
della luce per l’illuminazione del piano di
cottura.
Usare la velocità maggiore in caso di
particolare concentrazione di vapori
di cucina. Consigliamo di accendere
l’aspirazione 5 minuti prima di iniziare a
cucinare e di lasciarla in funzione a cottura
terminata per altri 15 minuti circa.
I comandi sul lato frontale dell’apparecchio:
1A
1B
1C
A. Tasto OFF (tasto spento) - ON (tasto
acceso)
Premere una o più volte per ottenere la
funzione desiderata:
ON (tasto acceso): la cappa imposta
l’ultima velocità selezionata.
OFF (tasto spento): tutte le funzioni
disabilitate eccetto l’illuminazione.
B. Tasto di selezione della velocità
(potenza di aspirazione)
Premere questo tasto una o più volte
per scegliere la velocità (potenza) di
aspirazione più adatta (1 - 2 - 3 ).
C. Display: visualizza la potenza di
aspirazione selezionata (1-2-3),
segnala la saturazione dei fi ltri (F).
D. Tasto inserimento velocità intensiva.
Una volta inserita, la velocità intensiva
rimarrà in funzione per 5 minuti circa,
dopodiché la cappa ritornerà alla
velocità precedentemente selezionata
(da 1 a 3) o addirittura si spegne
se precedentemente non era stata
selezionata nessuna velocità. Per
disinserire l’intensivo prima che siano
passati i 5 minuti premere il tasto A o
il tasto B.
E. Tasto ON/OFF luce
1D
1E
Nel caso la cappa o i comandi non
funzionino si consiglia di interrompere
l’alimentazione per almeno 5 secondi e
quindi di riaccendere.. Attendere poi 15
secondi e verifi care se la cappa funziona
correttamente.
Segnalazione della saturazione dei fi ltri
La cappa è fornita di un dispositivo che
indica quando è necessario eseguire la
manutenzione.
Se si deve usare la cappa con il fi ltro al
carbone attivare l’apposito indicatore di
saturazione come segue:
La cappa deve essere impostata su “OFF”.
Premere contemporaneamente i tasti B e
D per tre secondi, il LED F si accende ed
inizia a lampeggerà il led della 1^ velocità,
dopo 1 secondo lampeggia anche il il
led della 2^ velocità ed il sistema emette
un segnale sonoro (-Beep-) ad indicare
l’avvenuta impostazione.
Per rimuovere la segnalazione del fi ltro
carbone premere contemporaneamente
i tasti B e D per tre secondi, il LED F si
accende ed inizia a lampeggiare il led della
1^ velocità (fi ltro grassi) e il led della 2^
velocità, dopo 1 secondo lampeggerà solo
il led della 1^ velocità, il sistema emette
un segnale sonoro (-Beep-) ad indicare
l’avvenuta impostazione.
Led (1) di segnalazione saturazione fi ltro
grassi
Il lampeggio del led della velocità 1 avverte
l’operatore che i fi ltri grassi devono essere
lavati.
Leggere attentamente le istruzioni relative
alla manutenzione dei fi ltri grassi per la loro
pulizia.
Led (2) di segnalazione saturazione fi ltro
ai carboni attivi
Il lampeggio del led della velocità 2 avverte
l’operatore che il fi ltro carbone deve essere
lavato o sostituito.
Leggere attentamente le istruzioni relative
al lavaggio o sostituzione del fi ltro carbone.
Ripristino dell’indicatore di saturazione
Dopo aver eseguito la manutenzione dei
fi ltri, tenere premuto il tasto A per 3 secondi
fi no a che il LED 1 o 2 smettono di
lampeggiare.
Page 36

36
www.aeg.com
6. ILLUMINAZIONE
Disinserire l’apparecchio dalla rete elettrica.
Attenzione! Prima di toccare le lampade
sincerarsi che siano fredde.
Utilizzare solo lampade alogene da 12V 20W max - G4, avendo cura di non toccarle
con le mani.
Page 37

SV ANVÄNDNINGSHANDBOK
FÖR PERFEKT RESULTAT
Tack för att du valt denna produkt från AEG. Vi har skapat den så att du ska kunna få felfritt
resultat i många år, med innovativa tekniker som gör livet enklare – funktioner som du inte
skulle hitta hos vanliga produkter. Varsågod att ägna några minuter åt att läsa detta för att
få ut så mycket som möjligt av produkten.
Besök vår webbplats för att:
Få tips om användning, broschyrer, felsökare, serviceinformation:
www.aeg.com
Registrera din produkt för bättre service:
www.aeg.com/productregistration
Köp tillbehör, förbrukningsvaror och originalreservdelar till din produkt:
www.aeg.com/shop
MILJÖSKYDD
SVENSKA
37
Återvinn material med symbolen . Återvinn förpackningen genom att placera den i
lämpligt kärl.
Bidra till att skydda vår miljö och vår hälsa genom att återvinna avfall från elektriska
och elektroniska produkter. Släng inte produkter märkta med symbolen
hushållsavfallet. Lämna in produkten på närmaste återvinningsstation eller kontakta
kommunkontoret.
KUNDTJÄNST OCH SERVICE
Vi rekommenderar att originalreservdelar används.
Ha följande uppgifter till hands när du kontaktar serviceavdelningen.
Informationen fi nns på typskylten. Modell, PNC, serienummer.
Varnings-/viktig säkerhetsinformation.
Allmän information och tips
Miljöinformation.
Vi förbehåller oss rätten till ändringar utan föregående meddelande.
med
Page 38

38
www.aeg.com
1. SÄKERHETSFÖRESKRIFTER
Försiktighet!
i denna manual. Tillverkaren
frånsäger sig allt ansvar för eventuella
funktionsfel, skador eller bränder som
uppstår på apparaten på grund av att
instruktionerna i denna manual inte har
respekterats. Denna köksfläkt är endast
ämnad för privat bruk i hemmet.
Varning! Anslut inte apparaten till
elnätet förrän installationen är helt
slutförd.
Gör alltid fläkten strömlös innan någon
typ av underhållsarbete eller rengöring
inleds genom att dra ur kontakten eller
slå av bostadens huvudströmbrytare.
Använd alltid skyddshandskar vid
installation och underhåll.
Apparaten får inte användas av barn eller
personer med reducerad rörelseförmåga
eller mental kapacitet, eller personer som
saknar erfarenhet och kännedom om
apparaten, såtillvida inte användandet
övervakas eller instruktioner ges av erfaren
person som ansvarar för säkerheten.
Barn får inte lämnas utan uppsikt för att
förhindra att de leker med apparaten.
Fläkten får alridg användas utan att gallret
är korrekt monterat!
Fläkten får ALDRIG användas som
avställningsyta om inte detta är uttryckligen
angivet.
Lokalen skall vara ordentligt ventilerad
när köksfl äkten används tillsammans med
andra apparater vilka matas med gas och
andra typer av bränsle.
Utblåsningsluften får inte ledas in i rökkanal
som används för avledning av rökångor
som kommer från apparater vilka matas
med gas eller andra typer av bränsle.
Det är strängt förbjudet att fl ambera mat
under fl äkten.
Öppna lågor skadar fi ltren och kan orsaka
brand och skall därför undvikas i alla lägen.
Frityrkokning skall ske under uppsikt för att
undvika att överhettad olja fattar eld.
Försiktighet!
tillsammans med spisar och
matlagningsutrustning kan tillgängliga
delar hettas upp avsevärt.
Följ noga instruktionerna
Vid användning
Vad beträffar de tekniska och
säkerhetsåtgärder som skall vidtas för
avledning av utblåsningsluften, skall
de föreskrifter som utfärdats av lokala
myndigheter noga efterlevas.
Rengör fl äkten ofta, såväl utvändigt som
invändigt, (MINST EN GÅNG I MÅNADEN,
och respektera under alla händelser
samtliga underhållsinstruktioner i denna
manual).
Bristande rengöring av fl äkten och fi ltren
samt ett uteblivet byte av fi ltren medför
brandfara.
Använd eller lämna aldrig fl äkten utan
korrekt imonterade lampor för att undvika
risken för elektriska stötar.
Tillverkaren frånsäger sig allt ansvar för
eventuella problem eller bränder som
orsakats av att instruktionerna i denna
manual inte efterlevts.
2. ANVÄNDNING
Fläkten används för att suga ut matos och
ånga. I den bifogade installationshandboken
indikeras de av de två versionerna som är
disponibla på den modell ni är Ägare till.
De disponibla versionerna är de följande:
utsugningsversion med utvändig evakuering
eller fi lterversion med invändig
återcirkulation
.
3. INSTALLATION
Nätspänningen skall motsvara spänningen
som anges på märkplåten som sitter
inne i fl äkten. Om fl äkten är utrustad
med stickkontakt skall denna anslutas till
ett uttag som är lättillgängligt även efter
installationen och som uppfyller gällande
föreskrifter. I det fall fl äkten saknar
stickkontakt (direktanslutning till nätet), eller
om uttaget är placerat på en svåråtkomlig
plats skall en godkänd tvåpolig strömbrytare
installeras som garanterar en fullkomlig
frånkoppling från nätet i samband med
överspänningsklass III, i enlighet med
installationsbestämmelserna.
Varning! kontrollera innan fläktens
krets ansluts med nätspänningen att
den fungerar korrekt och är korrekt
monterad.
Page 39

SVENSKA
39
Fläkten är försedd med en speciell elkabel,
kontakta därför vårt tekniska servicekontor i
det kabeln skadats. Minsta tillåtna avstånd
mellan kokkärlens stödyta på spishällen
och köksfl äktes underkant är 50cm om det
är frågan om en elektrisk spis och 65cm om
det är frågan om gasspis eller kombinerad
gashäll.
Om spishällens instruktioner anger ett
större avstånd skall detta respekteras.
4. UNDERHÅLL
Varning! Gör alltid fl äkten strömlös
innan någon typ av underhållsarbete
eller rengöring inleds genom att slå ifrån
bostadens huvudströmbrytare.
Fläkten skall rengöras ofta, såväl invändigt
som utvändigt (åtminstone med samma
underhållsintervall som för fettfi ltren).
Använd en trasa fuktad med neutrala
rengöringsmedel vid rengöring.
Undvik produkter som innehåller slipmedel.
ANVÄND INTE ALKOHOL!
Varning! Observera att en bristande
rengöring av apparaten och icke utförda
fi lterbyten kan medföra brandrisk. Följ
därför ovanstående instruktioner noga.
Tillverkaren frånsäger sig allt ansvar
för eventuella motorskador, eldsvådor
beroende på ett bristande underhåll eller att
dessa instruktioner inte respekterats.
Observera att en bristande rengöring
av apparaten och fi ltren kan medföra
brandrisk. Följ därför ovanstående
instruktioner noga.
4.2 Kolfi lter - Type 150 LONG LIFE - Ak-
tivt kolfi lter som kan rengöras
Kolfi ltret kan tvättas varannan månad med
varmt vatten och ett lämpligt rengöringsmedel, eller i diskmaskin med 65°C (om fi ltret diskas i diskmaskin skall ett fullständigt
program köras utan annan disk i maskinen).
Avlägsna allt överfl ödigt vatten utan att
skada fi ltret, ta därefter ur dynan som sitter
i plastramen och torka den avslutningsvis i
ugnen med 100°C i 10 minuter.
4.3 Type 60/80 - Aktivt kolfi lter som INTE
kan rengöras
Kolfi ltret mättas efter en mer eller mindre
lång tidsperiod beroende på i vilken
utsträckning fl äkten används, på typen av
matlagning och hur regelbundet fettfi ltren
rengörs. Det är under alla händelser nödvändigt att ersätta kolfi lterpatronen minst
var 4 månad.
Filtret kan INTE rengöras eller återanvändas.
1
4.1 Fettfi lter - Filtret skall rengöras en gång
i månaden, med ett milt rengöringsmedel,
för hand eller i diskmaskin, med låg
temperatur och kort program.
Vi tvätt i diskmaskin kan fettfi ltret av metall
missfärgas utan att detta på något sätt
påverkar fi ltrets uppsugningsförmåga.
2 2
Page 40

40
www.aeg.com
5. KOMMANDON
Fläkten är utrustad med en manöverpanel
med en hastighetskontroll och en
strömbrytare för spishällens belysning.
Använd en högre hastighet om matoset är
mycket koncentrerat. Vi rekommenderar
att starta luftevakueringen 5 minuter innan
matlagningen inleds och låta den fungera i
cirka 15 minuter efter avslutad matlagning.
Manövertangenterna på apparatens front:
1A
1B
1C
A. OFF-tangent (släckt tangent) - ON (tänd
tangent)
Tryck en elller fl era gånger för att
erhålla önskad funktion:
ON (tänd tangent): fl äkten väljer
senaste inställda hastighet.
OFF (släckt tangent): samtliga
funktioner är avaktiverade med
undantag för belysningen.
B. Tangent för val av hastighet
(utsugningseffekt)
Tryck på denna tangent en eller
fl era gånger för att välja lämplig
utsugningshastighet (effekt) (1 - 2 - 3 ).
C. Display: visualiserar den valda
utsugningseffekten (1-2-3), signalerar
fi ltrens mättning (F).
D. Tangent för start av intensivhastighet.
Efter starten fungerar
intensivhastigheten i cirka 5 minuter
varefter fl äkten återgår till den tidigare
valda hastigheten (från 1 till 3) eller
stängs av om ingen hastighet var
inställd. I det fall man önskar avbryta
intensivhastigheten innan 5 minuter
förfl utit trycker man på tangenten A
eller tangenten B.
E. ON/OFF-tangent för belysning
1D
1E
I det fall fl äkten eller manövertangenterna
inte fungerar rekommenderar vi att bryta
strömtillförseln under minst 5 sekunder
och därefter slå på fl äkten igen. Vänta i
15 sekunder för att kontrollera att fl äkten
fungerar korrekt.
Kontrollanordning för fettfi lter och
kolfi lter
Fläkten är utrustad med en anordning som
signalerar när fi ltren kräver underhåll.
I det fall fl äkten skall användas med kolfi ltret
skall den särskilda mättnadsindikatorn
aktiveras enligt följande:
Fläkten skall vara inställd på “OFF”.
Tryck samtidigt på tangenterna B och D
under tre sekunder, Lysdioden F tänds
samtidigt som lysdioden för hastighet 1
börjar blinka, efter 1 sekund börjar även
lysdioden för hastighet 2 blinka och
systemet avger en ljudsignal (-Beep-) vilket
indikerar att inställningen är slutförd.
För att eliminera fettfi ltrets signal, tryck
samtidigt på tangenterna B och D under
tre sekunder, Lysdioden F tänds samtidigt
som lysdioden för hastighet 1 börjar blinka
(fettfi ltret) tillsammans med lysdioden för
hastighet 2, efter 1 sekund blinkar endast
lysdioden för hastighet 1, systemet avger
en ljudsignal (-Beep-) vilket indikerar att
inställningen är slutförd.
Lysdiod (1) signalerar fetttiltrets
mättning
När lysdioden för hastighet 1 blinkar
indikerar detta att operatören måste utföra
en rengöring av fettfi lren.
Läs noga instruktionerna beträffande
underhåll av fettfi ltren och hur dessa
rengörs.
Lysdiod (2) signalerar de aktiva
kolfi ltrets mättning
När lysdioden för hastighet 2 blinkar
indikerar detta att operatören måste utföra
en rengöring eller ett byte av koltiltret.
Läs noga instruktionerna beträffande
rengöring och byte av kollfi ltret.
Återställning av signalen för mättning
Efter att underhållet av fi ltren slutförs skall
tangenten A hållas nedtryckt under 3
sekunder till Lysdioden 1 eller 2 upphör
att blinka.
Page 41

6. BELYSNING
Koppla ur apparaten från elnätet.
Varning! Kontrollera att lamporna har
svalnat innan ni vidrör dem.
Använd endast halogenlampor 12V -20W
max - G4, och var noga med att inte vidröra
lamporna.
SVENSKA
41
Page 42

NO BRUKSVEILEDNING
www.aeg.com
42
FOR PERFEKTE RESULTATER
Takk for at du har valgt dette AEG-produktet. Vi har konstruert det for å gi deg perfekt ytelse
i mange år, med innovativ teknologi som bidrar til å gjøre livet enklere - egenskaper som du
kanskje ikke fi nner i ordinære produkter. Vi vil be deg bruke noen øyeblikk til å lese denne,
for å få mest mulig ut av produktet.
Gå inn på nettstedet vårt for å:
Få råd om bruk, fi nne brosjyrer, feilsøking, serviceinformasjon:
www.aeg.com
Registrere produktet ditt for å få bedre service:
www.aeg.com/productregistration
Kjøpe tilbehør, forbruksvarer og originale reservedeler til produktet ditt:
www.aeg.com/shop
MILJØVERN
Resirkuler materialer som er merket med symbolet . Legg emballasjen i riktige
beholdere for å resirkulere det.
Bidrar til å beskytte miljøet, menneskers helse og for å resirkulere avfall av elektriske og
elektroniske produkter. Ikke kast produkter som er merket med symbolet
husholdningsavfallet. Produktet kan leveres der hvor tilsvarende produkt selges eller på
miljøstasjonen i kommunen. Kontakt kommunen for nærmere opplysninger.
KUNDESTØTTE OG SERVICE
Vi anbefaler at du bruker originale reservedeler.
Når du kontakter serviceavdelingen, må du sørge for å ha følgende data for hånden.
Informasjonen fi nner du på typeskiltet. Modell, PNC (produktnummer), serienummer.
Advarsel/Forsiktig - Sikkerhetsinformasjon.
Generell informasjon og tips
Miljøinformasjon.
Med forbehold om endringer.
sammen med
Page 43

NORSK
43
1.
SIKKERHETSANVISNINGER
Obs! Instruksjonene i denne håndboken
må følges nøye. Produsenten fraskriver
seg ethvert ansvar for eventuelle
uhell, skader eller brann på apparatet
som skyldes at bruksanvisningen
i denne håndboken ikke har blitt
overholdt. Denne ventilatoren er kun til
husholdningsbruk.
Advarsel! Ikke koble apparatet til
strømnettet før installasjonen er helt
fullført.
Før rengjøring eller vedlikehold av
apparatet må ventilatoren kobles fra
strømnettet ved å trekke ut støpselet
eller skru ut sikringen i husets
sikringsskap.
Ved alle installasjonsprosedyrer og alt
vedlikehold av ventilatoren må man bruke
arbeidshansker
Ventilatoren er ikke egnet til å brukes av
barn eller personer med nedsatte fysiske,
mentale eller sensoriske funksjoner, eller
med manglende erfaring og kjennskap,
med mindre disse ikke blir overvåket eller
gitt instruksjoner om bruk av apparatet av
en person som står ansvarlig for deres
sikkerhet.
Barn må overvåkes for å kontrollere at de
ikke leker med apparatet.
Ventilatoren må aldri brukes uten at gitteret
er korrekt montert!
Ventilatoren må ALDRI brukes som
anleggsfl ate, med mindre det er uttrykkelig
angitt.
Rommet må være godt ventilert når
ventilatoren brukes samtidig med andre
apparater som bruker gassforbrenning eller
andre brennstoffer.
Luften som suges opp må ikke føres ut i en
avtrekkskanal for røyk som produseres av
apparater som bruker gassforbrenning eller
andre brennstoffer.
Det er strengt forbudt å lage mat på åpen
ild under ventilatorhetten.
Bruk av åpen ild skader fi ltrene og kan
fremkalle brann, derfor må det absolutt
unngås.
Steking må foregå under kontroll for å
unngå at den overopphetede oljen tar fyr.
Obs! De berørbare delene kan bli
meget varme når de brukes sammen
med kokeapparater.
Når det gjelder de tekniske sikkerhetsforans
taltningene som må anvendes for røykutløp,
må man forholde seg strengt til gjeldende
lokale regelverk. Ventilatoren må rengjøres
ofte både innvendig og utvendig (MINST
EN GANG I MÅNEDEN; uansett må man
følge instruksjonene som er uttrykkelig
angitt i vedlikeholdsanvisningene i denne
håndboken).
Hvis man ikke overholder normene for
rengjøring av ventilatoren og utskiftning
og rengjøring av fi ltrene, vil dette medføre
risiko for brann.
Ventilatoren må alltid ha korrekt monterte
lyspærer, både under bruk og i stand by, for
å unngå risikoen for elektrisk støt.
Produsenten fraskriver seg ethvert ansvar
for eventuelle uhell, skader eller brann på
apparatet som skyldes at bruksanvisningen
i denne håndboken ikke har blitt overholdt.
2. BRUK
Kjøkkenhetten brukes til avtrekk av røyk
og damp fra matlaging. I den vedlagte
installasjonsanvisningen er det angitt
hvilken versjon som kan anvendes på
modellen du eier; versjonen med direkte
avtrekk ut i friluft
med resirkulering av luften
, eller versjonen
.
3. INSTALLASJON
Nettspenningen må være i samsvar med
den elektriske spenningen som angis på
typeskiltet inne i ventilatoren. Hvis det
følger med støpsel, kobles ventilatoren
til en lett tilgjengelig stikkontakt som er
godkjent i henhold til gjeldende normer.
Stikkontakten må være lett tilgjengelig
også etter installasjonen. Hvis det ikke
følger med støpsel (direkte kobling til
strømnettet), eller stikkontakten selv etter
installasjonen ikke er lett tilgjengelig, må
man sette på en godkjent topolet bryter
som garanterer fullstendig frakobling fra
strømnettet i situasjonene som oppstår i
kategorien overspenning III, i henhold til
installasjonsreglene.
Advarsel! Før man kobler ventilatorens
strømkrets til strømnettet og fastslår
at alt fungerer korrekt, må man alltid
kontrollere at strømledningen er korrekt
montert.
Page 44

44
www.aeg.com
Ventilatoren har en spesiell strømledning;
dersom denne skades, skal man henvende
seg til kundeassistansen for kjøp av en ny.
Minimumsavstanden mellom koketoppen
og undersiden av kjøkkenventilatoren
må ikke være på mindre enn 50cm når
det gjelder elektriske kokeplater og 65cm
når det gjelder gassbluss og kombinerte
koketopper.
Dersom bruksanvisningen for et
gasskokeapparat opererer med en større
avstand, må denne overholdes.
4. VEDLIKEHOLD
Advarsel! Før enhver form for rengjøring
eller vedlikehold må ventilatorhetten
frakobles strømnettet ved å dra ut ledningen
eller slå av husets hovedstrømbryter.
Ventilatoren må rengjøres jevnlig, både
innvendig og utvendig (minst så ofte som
man utfører vedlikehold av fettfi ltrene). Til
rengjøring benyttes en klut fuktet med et
nøytralt rengjøringsmiddel.
Unngå bruk av slipende eller etsende
produkter.
Advarsel! Hvis ikke reglene for rengjøring
og utskifting av fi ltrene følges, kan det føre
til brann. Det er derfor meget viktig å følge
denne bruksanvisningen nøye.
Produsenten fraskriver seg ethvert ansvar
for eventuelle skader på motoren, brann
som skyldes manglende vedlikehold eller
andre skader som skyldes at instruksene
over ikke er blitt fulgt.
4.2 Type 150 LONG LIFE - Vaskbart
aktivt kullfi lter
Karbonfi lteret kan vaskes annenhver
måned i varmt vann og med egnede
rengjøringsmidler, eller i oppvaskmaskin
ved 65°C (hvis man vasker det i oppvaskmaskin må det vaskes med full syklus uten
annen oppvask i maskinen).
Ta vekk overfl ødig vann uten å ødelegge
fi lteret, ta deretter ut ”madrassen” inne i
plastikkdekselet og sett den i stekeovnen
ved 100°C i 10 minutter for å tørke den
ordentlig.
Skift ut ”madrassen” hvert 3. år og ellers
hver gang stoffet er skadet.
4.3 Type 60/80 - IKKE vaskbart aktivt
kullfi lter
Kullfi lteret må skiftes ut hver 4. måned ved
middels bruk av ventilatoren, og oftere hvis
ventilatoren brukes mye.
Det kan IKKE vaskes eller benyttes om
igjen
1
4.1 Fettfi lteret
Fettfi lteret må rengjøres en gang i måneden
uten bruk av aggressive rengjøringsmidler,
for hånd eller i oppvaskmaskin ved lav
temperatur og med kort syklus.
Ved vask i oppvaskmaskin kan
fettfi lteret i metall miste fargen, men dets
fi lterkarakteristikker endres absolutt ikke.
2 2
Page 45

NORSK
45
5. KONTROLLER
Viften er utstyrt med et kontrollpanel med
viftehastighetsvalg og en lysbryter for å
kontrollere kokeområdets lys.
Bruk største hastighet ved høy
dampkonsentrasjon på kjøkkenet. Vi
anbefaler å slå på viften 5 minutter før du
begynner å lage mat, og la den fortsette
å virke i enda cirka 15 minutter etter du er
ferdig med matlagingen.
Kommandoknappene på forsiden av
apparatet:
1A
1B
1C
A. OFF-knapp (avknapp) - ON (påknapp)
Trykk en eller fl ere ganger for ønsket
funksjon:
ON (påknapp): ventilatoren aktiveres på
siste innstilte hastighet.
OFF (avknapp): alle funksjoner er
deaktivert, med unntak av belysningen.
B. Knapp for valg av hastighet
(sugestyrke).
Trykk en eller fl ere ganger på denne
knappen for å velge den mest egnede
sugehastigheten (-styrken) (1 - 2 - 3 ).
C. Skjerm: viser den valgte sugestyrken
(1-2-3), og gir signal om at fi ltrene er
mettet (F).
D. Knapp for innstilling av intensiv
hastighet.
Når man har innstilt intensiv hastighet,
vil denne vare i cirka 5 minutter; når
denne tiden er ute, vil ventilatoren gå
tilbake til forrige valgte hastighet (fra
1 til 3), eller slår seg til og med av
hvis det tidligere ikke var valgt noen
hastighet. Trykk på knapp A eller B for
å koble fra den intensive hastigheten
før de 5 minuttene har gått.
E. ON/OFF-knapp for belysning.
1D
1E
Dersom ventilatoren eller
kommandoknappene ikke skulle virke,
anbefaler vi å koble fra strømforsyningen
i minst 5 sekunder og deretter slå på
ventilatoren igjen. Vent så i 15 sekunder og
kontroller om ventilatoren fungerer korrekt.
Anordning for kontroll av fettfi lteret og
kullfi lteret
Kjøkkenhetten er utstyrt med en anordning
som viser når det er nødvendig å utføre
vedlikehold av fi ltrene.
Hvis kjøkkenhetten skal brukes med
kullfi lter, må varsellampen som viser
skittent fi lter aktiveres på følgende måte:
Ventilatoren må stå på “OFF”.
Hold knappene B og D inntrykt samtidig i
tre sekunder; LED-lyset F slås på, og ledlyset som tilsvarer 1. hastighet begynner å
blinke. Etter 1 sekund begynner også ledlyset som tilsvarer 2. hastighet å blinke, og
systemet avgir et lydsignal (-Bip-) for å angi
at innstillingen er utført.
For å deaktivere signalet for kullfi lteret,
skal man holde knappene B og D inntrykt
samtidig i tre sekunder, da vil LED-lyset
F slås på, og led-lysene som tilsvarer
1. hastighet (fettfi lteret) og 2. hastighet
begynner å blinke. Etter 1 sekund blinker
kun led-lyset som tilsvarer 1. hastighet, og
systemet avgir et lydsignal (-Bip-) for å angi
at innstillingen er utført.
Led-lys (1) for signal om mettet fettfi lter
Når led-lyset som tilsvarer hastighet
1 blinker, varsler det brukeren om at
fettfi ltrene må vaskes.
Les nøye instruksjonene om vedlikehold av
fettfi ltrene for å holde dem rene.
Led-lys (2) for signal om mettet kullfi lter
Når led-lyset som tilsvarer hastighet
2 blinker, varsler det brukeren om at
kullfi lteret må vaskes eller skiftes ut.
Les nøye instruksjonene om vasking eller
utskifting av kullfi lteret.
Tilbakestilling av indikatoren for mettet
fi lter
Etter å ha utført vedlikehold av fi ltrene, skal
man holde knappen A inntrykt i 3 sekunder
helt til LED-lys 1 eller 2 slutter å blinke.
Page 46

46
www.aeg.com
6. BELYSNING
Koble ventilatoren fra strømnettet.
Advarsel! Forsikre deg om at lyspæren er
kald før du tar i den.
Bruk bare halogene lyspærer på maks 12V
-20W - G4, og pass på å ikke røre dem
med hendene.
Page 47

FI KÄYTTÖOHJEET
TÄYDELLISTEN TULOSTEN SAAVUTTAMISEKSI
Kiitämme teitä tämän AEG-tuotteen valitsemisesta. Olemme kehittäneet tämän tuotteen
tarjotaksemme teille huipputason suorituskyvyn moneksi vuodeksi. Laitteen innovatiiviset
teknologiat tekevät elämästänne yksinkertaisempaa – kyseisiä ominaisuuksia ei välttämättä
löydy tavallisista laitteista. Käyttäkää muutama minuutti lukemiseen, jotta voitte hyödyntää
laitteen ominaisuudet parhaalla mahdollisella tavalla.
Vieraile verkkosivullamme:
Saadaksesi käyttöön liittyviä neuvoja, esitteitä, vianmääritysohjeita ja huoltoohjeita:
www.aeg.com
Tuotteen rekisteröimiseksi parempaa huoltoa varten:
www.aeg.com/productregistration
Ostaaksesi laitteesi lisävarusteita, kulutusosia ja alkuperäisiä varaosia:
www.aeg.com/shop
YMPÄRISTÖNSUOJELU
SUOMI
47
Kierrätä materiaalit, jotka on merkitty merkillä . Kierrätä pakkaus laittamalla se
asianmukaiseen kierrätysastiaan.
Suojele ympäristöä ja ihmisten terveyttä kierrättämällä sähkö- ja elektroniikkaromut.
Älä hävitä merkillä
paikalliseen kierrätyskeskukseen tai ota yhteyttä paikalliseen viranomaiseen.
merkittyjä kodinkoneita kotitalousjätteen mukana. Palauta tuote
ASIAKASPALVELU JA HUOLTO
Suosittelemme alkuperäisten varaosien käyttöä.
Pidä seuraavat tiedot saatavilla ottaessasi yhteyttä valtuutettuun huoltoliikkeeseen.
Kyseiset tiedot löytyvät laitteen arvokilvestä. Malli, tuotenumero, sarjanumero.
Varoitukset/huomautukset ja turvallisuusohjeet.
Yleisohjeet ja vinkit
Ympäristönsuojeluohjeita.
Oikeus muutoksiin pidätetään ilman erillistä ilmoitusta.
Page 48

48
www.aeg.com
1. TURVALLISUUSOHJEET
Huomio! Noudata käyttöohjetta
huolellisesti. Valmistaja ei vastaa
käyttöohjeen noudattamattajättämises
tä aiheutuneista haitoista, vahingoista
tai tulipaloista. Tuuletin on suunniteltu
ainoastaan kotitalouskäyttöön.
Varoitus! Älä yhdistä laitetta
sähköverkkoon ennenkuin asennus on
täysin valmis.
Irrota laite sähköverkosta aina ennen
puhdistus- tai huoltotoimenpiteitä
, ottamalla töpseli irti seinästä tai
katkaisemalla virta huoneiston
pääkytkimestä.
Käytä asennus- ja huoltotöissä
suojakäsineitä.
Tätä laitetta ei ole tarkoitettu sellaisten
henkilöiden käyttöön (mukaan lukien
lapset), joiden fyysiset, sensoriset tai
henkiset ominaisuudet ovat heikentyneet
eikä sellaisten henkilöiden käyttöön,
joilta puuttuu laitteen käyttökokemus ja
tieto, jollei henkilöiden turvallisuudesta
vastuullinen henkilö anna heille ohjausta tai
ohjeita laitteen käytöstä.
Älä anna lasten leikkiä laitteella.
Älä koskaan käytä laitetta, jos sen ritilää ei
ole asennettu oikealla tavalla!
Tuuletinta ei saa KOSKAAN käyttää
tukipintana, jollei niin ole erikseen mainittu.
Jos liesituuletinta käytetään samaan
aikaan kaasulieden kanssa, huoneeseen on
tultava niin paljon korvausilmaa, ettei synny
alipainetta, joka voi sammuttaa kaasuliekin.
Poistoilmaa ei saa johtaa kaasulla tai
muilla polttoaineilla toimivien laitteiden
savunpoistohormiin.
Tuulettimen alla liekittäminen on
ehdottomasti kielletty.
Avotulen käyttö vahingoittaa suodattimia ja
voi aiheuttaa tulipalon.
Huomio! Kosketuspinnat voivat
kuumentua huomattavasti ruoanlaiton
yhteydessä.
Paistettaessa on valvottava paistoastiaa
jatkuvasti. Ylikuumentunut öljy saattaa olla
palovaarallinen.
Noudata huolellisesti paikallisten
viranomaisten antamia savunpoiston
teknisiä ja turvatoimenpiteitä koskevia
määräyksiä.
Tuuletin on puhdistettava huolellisesti
sekä sisä- että ulkopuolelta (VÄHINTÄÄN
KERRAN KUUKAUDESSA, noudata
kuitenkin tämän käyttöohjeen neuvoja).
Tuulettimen puhdistusta ja suodattimien
vaihtoa ja puhdistusta koskevien
määräysten noudattamattajättäminen voi
aiheuttaa tulipalovaaran.
Älä käytä tuuletinta, jos lamppuja ei
ole asennettu oikein. Siitä voi aiheutua
sähköiskun vaara.
Valmistaja ei vastaa käyttöohjeen
noudattamatta jättämisestä aiheutuneista
haitoista, vahingoista tai tulipaloista.
2. KÄYTTÖ
Tuuletinta käytetään ruoanlaitosta
aiheutuneen savun ja höyryn poistamiseen.
Laitteen mukana tulevasta asennusohjeesta
käy ilmi käytetäänkö hankkimaanne mallia
imukupuversiona ulkoiseen poistoon
vai suodatinversiona sisäiseen kiertoon
.
3. ASENNUS
Verkon jännitteen on oltava sama
kuin tuulettimen sisäpuolella olevassa
tyyppikilvessä ilmoitettu jännite. Jos
laitteessa on pistoke, liitä tuuletin
voimassaolevien normien mukaiseen
pistorasiaan, joka sijaitsee sellaisessa
paikassa, että siihen pääsee käsiksi myös
asennuksen jälkeen. Jos laitteessa ei ole
pistoketta (suora liitos verkkoon) tai pistoke
ei ole sellaisessa paikassa että siihen
pääsee käsiksi myös asennuksen jälkeen,
käytä normien mukaista kaksinapaista
katkaisijaa, jolla varmistetaan että laite
saadaan kokonaan irti sähköverkosta, jos
ylijännite kategoria on III, asennussääntöjen
mukaisesti.
Huomio! Tarkista aina, että
verkkokaapeli on asennettu oikealla
tavalla ennen kuin yhdistät tuulettimen
sähköverkkoon ja tarkistat että se toimii
oikein.
Page 49

SUOMI
49
Tuulettimessa on erityinen sähköjohto; jos
johto rikkoutuu, pyydä uusi johto tekniseltä
tuelta. Lieden keittotason tukipinnan ja
keittiötuulettimen alimman osan välinen
minimietäisyys on oltava vähintään 50cm
sähköliesien osalta ja 65cm kaasu- ja
sekaliesien osalta.
Jos kaasulieden käyttöohjeissa vaaditaan
suurempi etäisyys, on se otettava
huomioon.
4. HUOLTO
Huomio! Irroita laite aina virtalähteestä
ennen puhdistus- tai huoltotoimenpiteitä,
irrota virtajohdon pistoke
verkkovirtapistorasiasta tai katkaise virta
kodin sähköverkosta.
Tuuletin on puhdistettava usein sekä
sisä- etttä ulkopuolelta (vähintään yhtä
usein kuin rasvasuodattimien huolto). Käytä
puhdistukseen neutraalissa nestemäisessä
pesuaineessa kostutettua kangasta.
Vältä hankaavia pesuaineita.
ÄLÄ KÄYTÄ ALKOHOLIPITOISIA
PUHDISTUSAINEITA!
Huomio! Laitteen puhdistusta ja
suodattimien vaihtoa koskevien määräysten
noudattamattajättäminen voi aiheuttaa
tulipalovaaran. On siis suositeltavaa
noudattaa määräyksiä.
Valmistaja ei vastaa mahdollisista vääristä
huoltotoimenpiteistä tai yllämainittujen
normien noudattamattajättämisestä
aiheutuvista moottorivioista tai tulipaloista.
4.2 Hiilisuodatin - Type 150 LONG LIFE
- Pestävä aktiivihiilisuodatin
Hiilisuodatin voidaan pestä kahden kuukauden välein lämpimässä vedessä ja sopivalla
pesuaineella tai astianpesukoneessa 65°C
lämpötilassa (astianpesukoneessa koko
pesuohjelmalla, älä laita samaan pesuun
astioita).
Poista ylimääräinen vesi vahingoittamatta
suodatinta ja laita se kuivumaan 100°C uuniin 10 minuutin ajaksi.
Vaihda levy 3 vuoden välein ja aina kun kangas on rikkoutunut.
4.3 Type 60/80 - Kertakäyttöinen hiilisuodatin
Hiilisuodattimen kyllästys tapahtuu pidem-
män käytön jälkeen riippuen keittiötyypistä
ja rasvasuodattimen puhdistustiheydestä.
Joka tapauksessa suodatin on vaihdettava
vähintään neljän kuukauden välein.
Sitä EI voi pestä eikä käyttää uudestaan
1
4.1 Rasvasuodatin - Rasvasuodatin on
puhdistettava kerran kuukaudessa miedolla
pesuaineella, käsin tai astianpesukoneessa
alhaisella lämpötilalla ja lyhyellä
pesuohjelmalla.
Metallinen rasvasuodatin voi haalistua
astianpesukoneessa, mutta tämä ei vaikuta
sen suodatustehoon millään tavallla.
2 2
Page 50

50
www.aeg.com
5. OHJAIMET
Liesituuletin on varustettu ohjauspaneelilla,
josta voidaan säätää imun nopeuksia ja
kytkeä valo, joka valaisee keittotasoa.
Käytä maksiminopeutta jos keittiössä on
erityisen paljon höyryä. On suositeltavaa
käynnistää tuuletus 5 minuuttia ennen
ruoanlaiton aloittamista ja antaa sen
toimia noin 15 minuuttia ruoanlaiton
lopettamisesta.
Laitteen etuosassa olevat ohjaimet:
1A
1B
1C
A. OFF näppäin (näppäin sammutettu)-
ON (näppäimen valo palaa)
Paina yksi tai kaksi kertaa halutun
toiminnon käynnistämiseksi:
ON (näppäimen valo palaa): tuuletin
käynnistää viimeksi valitun nopeuden.
OFF (näppäin sammutettu): kaikki
toiminnot katkaistu, paitsi valaistus.
B. Imunopeuden (imutehon) valitsin Paina
näppäintä kerran tai useammin ja
valitse sopivin imunopeus (teho) (1-2-
3).
C. Näyttö: näyttää valitun imunopeuden
(1-2-3), ilmoittaa suodattimien
kyllästyksestä (F).
D. Intensiivisen nopeuden valitsin.
Kun intensiivinen nopeus on valittu,
se toimii noin 5 minuuttia, minkä
jälkeen tuuletin palaa aiemmin valitulle
nopeudelle (1-3) tai se jopa sammuu,
jos aiemmin ei ole valittu mitään
nopeutta. Ennen kuin 5 minuuttia
on kulunut, intensiivinen nopeus
sammutetaan painamalla näppäintä A
tai näppäintä B.
E. ON/OFF valonäppäin
1D
1E
Jos tuuletin tai näppäimet eivät toimi, on
suositeltavaa katkaista virta vähintään
5 sekunnin ajaksi ja käynnistää se
uudestaan.. Odota 15 sekuntia ja tarkista
toimiiko tuuletin oikein.
Rasvasuodattimen ja
aktiivihiilisuodattimen ohjauslaite
Tuuletin on varustettu laitteella, joka
ilmoittaa huollon tarpeesta.
Jos tuuletinta täytyy käyttää aktiivihiilisuo
dattimella, aktivoi kyllästyksen merkkivalo
seuraavalla tavalla:
Tuuletin on säädettävä “OFF” asentoon.
Paina yhtäaikaisesti näppäimiä B ja
D kolme sekuntia, LED F syttyy ja 1.
nopeuden led alkaa vilkkua, 1 sekunnin
kuluttua vilkkuu myös 2. nopeuden led ja
järjestelmä ilmoittaa tehdystä säädöstä
äänimerkillä (-PIIP).
Hiilisuodattimen merkkivalo poistetaan
painamalla yhtäaikaisesti näppäimiä
B ja D kolme sekuntia, LED F syttyy
ja 1. nopeuden led (rasvasuodatin) ja
2.nopeuden led alkavat vilkkua, sekunnin
kuluttua vilkkuu ainoastaan 1. nopeuden
led, järjestelmä ilmoittaa tehdystä säädöstä
äänimerkillä (-PIIP-)
Led (1) rasvasuodattimen merkkivalo
Nopeuden 1. vilkkuva led ilmoittaa
käyttäjälle, että rasvasuodattimet on
pestävä.
Lue huolellisesti rasvasuodattimien
puhdistuksesta annetut huolto-ohjeet.
Led (2) aktiivihiilisuodattimen
kyllästyksen merkkivalo
Nopeuden 2. vilkkuva led ilmoittaa
käyttäjälle, että hiilisuodatin on pestävä ja
vaihdettava.
Lue huolellisesti hiilisuodattimen
puhdistuksesta annetut huolto-ohjeet.
Kyllästyksen merkkivalon palautus
Kun suodattimet on huollettu, pidä
näppäintä A alaspainettuna 3 sekuntia
kunnes LED 1 tai 2 lakkaavat vilkkumasta.
Page 51

6. VALAISTUS
Irrota laite sähköverkosta.
Huomio! Tarkista että lamput eivät ole
kuumia ennen kuin kosket niihin.
Käytä ainoastaan max 12V -20W – G4
halogeenilamppuja ja varo koskemasta niitä
käsin.
SUOMI
51
Page 52

DA BRUGSVEJLEDNING
www.aeg.com52
FOR PERFEKTE RESULTATER
Tak fordi du valgte dette produkt fra AEG. Vi har skabt det, så du kan nyde en ulastelig
funktionsevne i mange år med nyskabende teknologi, der gør livet lettere – funktioner, som
du ikke fi nder i almindelige apparater. Brug et par minutter på at læse mere – så du kan få
det bedste ud af det.
Besøg vores websted for at:
Få rådgivning, brochurer, fejlfi nding, serviceinformation:
www.aeg.com
Registrere dit produkt for bedre service:
www.aeg.com/productregistration
Købe tilbehør, forbrugsvarer og originale reservedele til dit apparat:
www.aeg.com/shop
MILJØHENSYN
Genbrug materialer med symbolet . Anbring emballagematerialet i passende beholdere
til genbrug.
Hjælp med at beskytte miljøet og menneskelig sundhed samt at genbruge affald af
elektriske og elektroniske apparater. Kasser ikke apparater, der er mærket med symbolet
, sammen med husholdningsaffaldet. Lever produktet tilbage til din lokale genbrugsplads
eller kontakt din kommune.
PLEJE OG SERVICE
Vi anbefaler brugen af originale reservedele.
Sørg for at have følgende data tilgængelig, når du kontakter service.
Du fi nder oplysningerne på maskinens typeskilt. Model, PNC, Serienummer.
Advarsel /Forsigtig-Sikkerhedsanvisninger.
Generelle oplysninger og gode råd
Miljøoplysninger.
Ret til ændringer uden varsel forbeholdes.
Page 53

DANSK
53
1. SIKKERHEDSANVISNINGER
Bemærk! Overhold venligst alle
instruktioner i denne vejledning.
Fabrikanten frasiger sig ethvert
ansvar for eventuelle fejl, skader eller
brande forårsaget af apparatet, men
afledt af manglende overholdelse af
instruktionerne i denne vejledning.
Emhætten er udelukkende udviklet til
brug i almindelige hjem.
Advarsel! Apparatet må ikke tilsluttes
elnettet før installeringen er helt
tilendebragt.
Før der udføres nogen form for
rengøring eller vedligeholdelse, skal
emhætten afbrydes fra elnettet ved at
trække stikket ud, eller ved at afbryde
hovedafbryderen i hjemmet.
Ved alle installations- og
vedligeholdelsesindgreb skal der bæres
arbejdshandsker.
Apparatet må ikke benyttes af børn, eller
af personer med nedsatte sanseevner
eller mentale færdigheder, eller uden den
nødvendige erfaring og kendskab, med
mindre brugen sker under opsyn eller
vejledning fra en person der har ansvaret
for deres sikkerhed.
Børn skal holdes under opsyn, så de ikke
får mulighed for at lege med emhætten.
Emhætten må aldrig benyttes uden korrekt
monteret rist!
Emhætten må ALDRIG benyttes som
støtteoverfl ade, med mindre dette er
udtrykkeligt tilladt.
Lokalet skal have tilstrækkelig ventilation,
når køkkenemhætten anvendes samtidigt
med andre apparater der forbrænder gas
eller andre brændstoffer.
Den opsugede luft må ikke ledes ind i
rør, der anvendes til udledning af røg fra
apparater med forbrænding af gas eller af
andre brændstoffer.
Det er strengt forbudt at fl ambere under
emhætten.
Brug af åben ild er farligt for fi ltrene og kan
medføre brand, og skal derfor altid undgås.
Friturestegning skal ske under opsyn for at
forhindre, at den overopvarmede olie bryder
i brand.
Bemærk! De tilgængelige dele kan
blive meget varme, når de benyttes
sammen med apparater til madlavning.
Hvad angår de nødvendige tekniske
forholdsregler og sikkerhedskrav for
udledning af røg, skal alle reglementer fra
de lokale myndigheder overholdes uden
undtagelse.
Emhætten skal rengøres ofte, både
indvendigt og udvendigt (MINDST EN
GANG OM MÅNEDEN; overhold under alle
omstændigheder angivelserne i kapitlet om
vedligeholdelse i denne vejledning).
Manglende overholdelse af kravene for
rengøring af emhætten, og for udskiftning
og rengøring af fi ltrene, medfører brandfare.
Emhætten må hverken benyttes eller
efterlades uden korrekt indsatte lyspærer
pga. fare for elektrisk stød.
Fabrikanten fralægger sig ethvert ansvar for
eventuelle fejl, skader eller brand forårsaget
af apparatet, men afl edt af manglende
overholdelse af instruktionerne i denne
vejledning.
2. ANVENDELSE
Emhætten har til opgave at udsuge røg og
damp fra madlavningen. I den medfølgende
vejledning til installering er det anført,
om den købte model kan benyttes i den
sugende udgave med udledning udenfor
eller i den fi ltrerende udgave med
intern recirkulation
.
3. INSTALLERING
Netspændingen skal svare til spændingen
vist på typeskiltet internt i emhætten.
Hvis emhætten er udstyret med et stik,
skal emhætten tilsluttes en let tilgængelig
stikkontakt, der er i overensstemmelse med
de gældende standarder. Stikkontakten
skal også være let tilgængelig efter
installeringen. Hvis emhætten ikke er
udstyret med et stik (direkte tilslutning
til elnettet), eller hvis stikket ikke fi ndes
i et område, der også er let tilgængeligt
efter installeringen, skal der monteres en
topolet afbryderkontakt i overensstemmelse
med standarderne, der sørger for fuld
afbrydelse fra elnettet i tilfælde af
forhold i overspændingskategori III, og
i overensstemmelse med reglerne for
elektriske installationer.
Obs! Undersøg altid, at netkablet er
blevet monteret rigtigt, før emhættens
kredsløb tilsluttes forsyningsnettet og
der udføres kontrol af korrekt funktion.
Page 54

54
www.aeg.com
Emhætten er udstyret med en speciel
forsyningsledning; hvis denne ledning
beskadiges, skal den bestilles hos den
tekniske service. Minimumsafstanden
mellem kogegrejets støtteoverfl ade på
komfuret og den nederste del af emhætten
må ikke være under 50cm ved elektriske
kogeplader, og ikke under 65cm ved
gasblus eller komfurer med både gasblus
og elektriske kogeplader.
Hvis gaskomfurets vejledning angiver en
større afstand, skal dette overholdes.
4. VEDLIGEHOLDELSE
Obs! Inden der udføres nogen form
for rengøring eller vedligeholdelse skal
emhætten afbrydes fra elnettet ved at fjerne
stikket fra stikkontakten, eller ved at afbryde
hjemmets hovedafbryder.
Emhætten skal rengøres jævnligt både på
ydersiden og på indersiden (mindst med
samme frekvens som for vedligeholdelse
af fedtfi ltrene). Ved rengøring skal man
anvende en klud fugtet med neutrale, milde
rengøringsmidler i fl ydende form.
Undgå brug af produkter indeholdende
slibemidler BENYT ALDRIG SPRIT!
Pas på! Manglende overholdelse af
vejledningen til rengøring af apparatet og
udskiftning af fi ltrene medfører brandfare.
Der henstilles således til, at instruktionerne
følges. Fabrikanten frasiger sig ethvert
ansvar for eventuel beskadigelse af
motoren, brande forårsaget af utilstrækkelig
vedligeholdelse af apparatet eller
manglende overholdelse af ovenstående
instruktioner.
4.1 Fedtfi lter
Fedtfi lteret skal rengøres én gang om
måneden med milde rengøringsmidler;
fi lteret kan også vaskes i
opvaskemaskine ved lav temperatur og
på et kort opvaskeprogram. Ved vask i
opvaskemaskinen kan metal-fedtfi lteret
blive misfarvet, men dette vil ikke have
negativ indfl ydelse på dets fi ltrerende
egenskaber.
4.2 Type 150 LONG LIFE - Filter med
aktivt kul der kan vaskes
Kulfi lteret kan vaskes hver anden måned
i varmt vand og egnet vaskemiddel, eller i
opvaskemaskine ved 65°C (vask i opvaskemaskinen skal ske med en fuld cyklus uden
andre køkkengenstande.
Fjern det overskydende vand uden at
ødelægge fi lteret; fjern derefter den lille
madras fra plastrammens inderside og læg
madrassen i ovnen i 10 minutter ved 100°C
for at tørre den helt.
Udskift den lille madras hver 3. år, og når
kluden er beskadiget.
4.3 Type 60/80 - Filter med aktivt kul der
IKKE kan vaskes
Kulfi lteret skal udskiftes hver 4. Måned,
hvis emhætten ikke benyttes intensivt, eller
oftere.
Kulfi lteret kan IKKE vaskes eller genanvendes.
1
2 2
Page 55

DANSK
55
5. BETJENING
Emhætten er udstyret med et
betjeningspanel med mulighed for
regulering af sugestyrken og lys til
oplysning af kogeområdet.
Benyt den højeste hastighed ved stor
dampkoncentration i køkkenet. Det
anbefales, at man tænder udsugningen 5
minutter før påbegyndelse af madlavning,
og at udsugningen efterlades tændt i
yderligere cirka 15 minutter efter afslutning
af madlavningen.
Betjeningsanordninger på apparatets
forside:
1A
1B
1C
A. Tasten OFF (slukket tast) - ON (tændt
tast) Tryk en eller fl ere gange for at få
den ønskede funktion:
ON (tændt tast): emhætten indstiller
den sidst valgte hastighed.
OFF (slukket tast): alle funktioner er
afbrudt, undtagen belysningen.
B. Tast til valg af hastigheden
(udsugningseffekt)
Tryk på denne tast en eller fl ere
gange for at vælge det mest egnede
udsugningshastighed (effekt) (1 - 2 - 3).
C. Display: viser effekten fra den valgte
udsugning (1-2-3), viser mætning af
fi ltrene (F).
D. Tast til tilslutning af den intensive
hastighed.
Når den intensive hastighed er blevet
tilsluttet, vil den være i funktion i cirka
5 minutter, hvorefter emhætten vender
tilbage til hastigheden valgt tidligere (fra
1 til 3), eller emhætten slukker, hvis
der ikke er blevet foretaget noget valg
af hastigheden tidligere. Tryk på tast A
eller tast B for at afbryde den intensive
hastighed før de 5 minutter er udløbet.
E. Tast til ON/OFF lys
Hvis emhætten eller
betjeningsanordningerne ikke fungerer,
anbefales det at afbryde strømforsyningen i
mindst 5 sekunder, og derefter tænde igen.
Vent herefter 15 sekunder, og kontrollér at
emhætten fungerer korrekt.
1D
1E
Anordning til kontrol af fedtfi lteret og
fi lteret med aktivt kul
Emhætten er udstyret med en anordning
der tilkendegiver, når der er behov for
vedligeholdelse.
Hvis emhætten skal benyttes med et aktivt
kulfi lter, skal mætningsviseren tilsluttes på
følgende måde:
Emhætten skal være indstillet på “OFF”.
Tryk samtidigt på tasterne B og D i
tre sekunder; lysdioden F tændes, og
lysdioden for 1. hastighed begynder at
blinke; efter 1 sekund blinker lysdioden for
2. hastighed også, og systemet udsender
et lydsignal (-Bip-) der tilkendegiver, at
indstillingen er blevet udført.
For at fjerne signaler fra kulfi lteret, skal
man trykke samtidigt på tasterne B og D
i tre sekunder; lysdioden F tændes, og
lysdioden for 1. hastighed (fedtfi lter) og
lysdioden for 2. hastighed begynder at
blinke; efter 1 sekund blinker kun lysdioden
for 1. hastighed, og systemet udsender
et lydsignal (-Bip-) der tilkendegiver, at
indstillingen er blevet udført.
Lysdiode (1) til signalering af mættet
fedtfi lter
Blink af lysdioden for 1. hastighed gør
brugeren opmærksom på, at fedtfi ltrene
skal vaskes.
Læs omhyggeligt vejledningen til
vedligeholdelse af fedtfi ltrene for
oplysninger om deres rengøring.
Lysdiode (2) til signalering af mættet
fi lter med aktivt kul
Blink af lysdioden for 2. hastighed gør
brugeren opmærksom på, at fedtfi lteret med
aktivt kul skal vaskes eller udskiftes.
Læs omhyggeligt vejledningen til vask eller
udskiftning af fi lteret med aktivt kul.
Tilbagestilling af mætningsviseren
Efter at have udført vedligeholdelse af
fi ltrene, skal tasten A holdes trykket i 3
sekunder, indtil lysdioden 1 eller 2 holder
op med at blinke.
Page 56

56
www.aeg.com
6. BELYSNING
Afbryd apparatet fra el-nettet.
Pas på! Sørg for at pærerne er kolde før de
berøres.
Benyt kun halogenpærer på 12V -20W max
- G4, og sørg for ikke at røre ved dem med
hænderne.
Page 57

RU
ɊɍɄɈȼɈȾɋɌȼɈ ɉɈ ɗɄɋɉɅɍȺɌȺɐɂɂ
ȾɅə ɂȾȿȺɅɖɇɕɏ ɊȿɁɍɅɖɌȺɌɈȼ
Ȼɥɚɝɨɞɚɪɢɦ ɜɚɫ ɡɚ ɜɵɛɨɪ ɞɚɧɧɨɝɨ ɢɡɞɟɥɢɹ AEG. Ɉɧɨ ɛɭɞɟɬ ɛɟɡɭɩɪɟɱɧɨ ɫɥɭɠɢɬɶ ȼɚɦ
ɞɨɥɝɢɟ ɝɨɞɵ – ɜɟɞɶ ɦɵ ɫɨɡɞɚɥɢ ɟɝɨ, ɩɪɢɡɜɚɜ ɧɚ ɩɨɦɨɳɶ ɢɧɧɨɜɚɰɢɨɧɧɵɟ ɬɟɯɧɨɥɨɝɢɢ,
ɤɨɬɨɪɵɟ ɩɨɦɨɝɚɸɬ ɨɛɥɟɝɱɢɬɶ ɠɢɡɧɶ ɢ ɪɟɚɥɢɡɭɸɬ ɮɭɧɤɰɢɢ, ɤɨɬɨɪɵɯ ɧɟ ɧɚɣɞɟɲɶ ɜ
ɨɛɵɱɧɵɯ ɩɪɢɛɨɪɚɯ. ɉɨɬɪɚɬɶɬɟ ɧɟɫɤɨɥɶɤɨ ɦɢɧɭɬ ɧɚ ɱɬɟɧɢɟ, ɱɬɨɛɵ ɩɨɥɭɱɢɬɶ ɨɬ ɫɜɨɟɣ
ɩɨɤɭɩɤɢ ɦɚɤɫɢɦɭɦ ɩɨɥɶɡɵ.
ɇɚ ɧɚɲɟɦ ɜɟɛ-ɫɚɣɬɟ ȼɵ ɫɦɨɠɟɬɟ:
ɇɚɣɬɢ ɪɟɤɨɦɟɧɞɚɰɢɢ ɩɨ ɢɫɩɨɥɶɡɨɜɚɧɢɸ ɢɡɞɟɥɢɣ, ɪɭɤɨɜɨɞɫɬɜɚ ɩɨ
ɷɤɫɩɥɭɚɬɚɰɢɢ, ɦɚɫɬɟɪ ɭɫɬɪɚɧɟɧɢɹ ɧɟɢɫɩɪɚɜɧɨɫɬɟɣ, ɢɧɮɨɪɦɚɰɢɸ ɨ
ɬɟɯɧɢɱɟɫɤɨɦ ɨɛɫɥɭɠɢɜɚɧɢɢ:
www.aeg.com
Ɂɚɪɟɝɢɫɬɪɢɪɨɜɚɬɶ ɫɜɨɟ ɢɡɞɟɥɢɹ ɞɥɹ ɭɥɭɱɲɟɧɢɹ ɨɛɫɥɭɠɢɜɚɧɢɹ:
www.aeg.com/productregistration
ɉɪɢɨɛɪɟɫɬɢ ɞɨɩɨɥɧɢɬɟɥɶɧɵɟ ɩɪɢɧɚɞɥɟɠɧɨɫɬɢ, ɪɚɫɯɨɞɧɵɟ ɦɚɬɟɪɢɚɥɵ ɢ
ɮɢɪɦɟɧɧɵɟ ɡɚɩɚɫɧɵɟ ɱɚɫɬɢ ɞɥɹ ɫɜɨɟɝɨ ɩɪɢɛɨɪɚ:
www.aeg.com/shop
ɈɏɊȺɇȺ ɈɄɊɍɀȺɘɓȿɃ ɋɊȿȾɕ
PYCCƸɂɃ
57
Ɇɚɬɟɪɢɚɥɵ ɫ ɫɢɦɜɨɥɨɦ ɫɥɟɞɭɟɬ ɫɞɚɜɚɬɶ ɧɚ ɩɟɪɟɪɚɛɨɬɤɭ. ɉɨɥɨɠɢɬɟ ɭɩɚɤɨɜɤɭ ɜ
ɫɨɨɬɜɟɬɫɬɜɭɸɳɢɟ ɤɨɧɬɟɣɧɟɪɵ ɞɥɹ ɫɛɨɪɚ ɜɬɨɪɢɱɧɨɝɨ ɫɵɪɶɹ.
ɉɪɢɧɢɦɚɹ ɭɱɚɫɬɢɟ ɜ ɩɟɪɟɪɚɛɨɬɤɟ ɫɬɚɪɨɝɨ ɷɥɟɤɬɪɨɛɵɬɨɜɨɝɨ ɨɛɨɪɭɞɨɜɚɧɢɹ, ȼɵ
ɩɨɦɨɝɚɟɬɟ ɡɚɳɢɬɢɬɶ ɨɤɪɭɠɚɸɳɭɸ ɫɪɟɞɭ ɢ ɡɞɨɪɨɜɶɟ ɱɟɥɨɜɟɤɚ. ɇɟ ɜɵɛɪɚɫɵɜɚɣɬɟ
ɜɦɟɫɬɟ ɫ ɛɵɬɨɜɵɦɢ ɨɬɯɨɞɚɦɢ ɛɵɬɨɜɭɸ ɬɟɯɧɢɤɭ, ɩɨɦɟɱɟɧɧɭɸ ɫɢɦɜɨɥɨɦ
ɢɡɞɟɥɢɟ ɧɚ ɦɟɫɬɧɨɟ ɩɪɟɞɩɪɢɹɬɢɟ ɩɨ ɩɟɪɟɪɚɛɨɬɤɟ ɜɬɨɪɢɱɧɨɝɨ ɫɵɪɶɹ ɢɥɢ ɨɛɪɚɬɢɬɟɫɶ ɜ
ɫɜɨɟ ɦɭɧɢɰɢɩɚɥɶɧɨɟ ɭɩɪɚɜɥɟɧɢɟ.
ɉɈȾȾȿɊɀɄȺ ɉɈɌɊȿȻɂɌȿɅȿɃ ɂ ɋȿɊȼɂɋɇɈȿ
ɈȻɋɅɍɀɂȼȺɇɂȿ
Ɇɵ ɪɟɤɨɦɟɧɞɭɟɦ ɢɫɩɨɥɶɡɨɜɚɬɶ ɨɪɢɝɢɧɚɥɶɧɵɟ ɡɚɩɱɚɫɬɢ.
ɉɪɢ ɨɛɪɚɳɟɧɢɢ ɜ ɫɟɪɜɢɫ-ɰɟɧɬɪ ɫɥɟɞɭɟɬ ɢɦɟɬɶ ɩɨɞ ɪɭɤɨɣ ɫɥɟɞɭɸɳɭɸ ɢɧɮɨɪɦɚɰɢɸ.
Ⱦɚɧɧɚɹ ɢɧɮɨɪɦɚɰɢɹ ɧɚɯɨɞɢɬɫɹ ɧɚ ɬɚɛɥɢɱɤɟ ɫ ɬɟɯɧɢɱɟɫɤɢɦɢ ɞɚɧɧɵɦɢ. Ɇɨɞɟɥɶ, ɤɨɞ
ɢɡɞɟɥɢɹ (PNC), ɫɟɪɢɣɧɵɣ ɧɨɦɟɪ.
ȼɧɢɦɚɧɢɟ / ȼɚɠɧɵɟ ɫɜɟɞɟɧɢɹ ɩɨ ɬɟɯɧɢɤɟ ɛɟɡɨɩɚɫɧɨɫɬɢ.
Ɉɛɳɚɹ ɢɧɮɨɪɦɚɰɢɹ ɢ ɪɟɤɨɦɟɧɞɚɰɢɢ
ɂɧɮɨɪɦɚɰɢɹ ɩɨ ɨɯɪɚɧɟ ɨɤɪɭɠɚɸɳɟɣ ɫɪɟɞɵ.
ɉɪɚɜɨ ɧɚ ɢɡɦɟɧɟɧɢɹ ɫɨɯɪɚɧɹɟɬɫɹ.
. Ⱦɨɫɬɚɜɶɬɟ
Page 58

58
www.aeg.com
1. ɍɄȺɁȺɇɂə ɉɈ
ȻȿɁɈɉȺɋɇɈɋɌɂ
ȼɧɢɦɚɧɢɟ! ɉɪɨɢɡɜɨɞɢɬɟɥɶ ɫɧɢɦɚɟɬ
ɫ ɫɟɛɹ ɜɫɹɤɭɸ ɨɬɜɟɬɫɬɜɟɧɧɨɫɬɶ
ɡɚ ɧɟɩɨɥɚɞɤɢ, ɭɳɟɪɛ ɢɥɢ ɩɨɠɚɪ,
ɤɨɬɨɪɵɟ ɜɨɡɧɢɤɥɢ ɩɪɢ ɢɫɩɨɥɶɡɨɜɚɧɢɢ
ɩɪɢɛɨɪɚ ɜɫɥɟɞɫɬɜɢɟ ɧɟɫɨɛɥɸɞɟɧɢɹ
ɢɧɫɬɪɭɤɰɢɣ, ɩɪɢɜɟɞɟɧɧɵɯ ɜ
ɞɚɧɧɨɦ ɪɭɤɨɜɨɞɫɬɜɟ. ȼɵɬɹɠɤɚ
ɩɪɟɞɧɚɡɧɚɱɟɧɚ ɢɫɤɥɸɱɢɬɟɥɶɧɨ ɞɥɹ
ɞɨɦɚɲɧɟɝɨ ɢɫɩɨɥɶɡɨɜɚɧɢɹ.
ɉɪɟɞɭɩɪɟɠɞɟɧɢɟ! ɇɟ ɩɨɞɤɥɸɱɚɣɬɟ
ɩɪɢɛɨɪ ɤ ɷɥɟɤɬɪɢɱɟɫɤɨɣ ɫɟɬɢ, ɩɨɤɚ
ɨɩɟɪɚɰɢɢ ɩɨ ɭɫɬɚɧɨɜɤɟ ɩɨɥɧɨɫɬɶɸ ɧɟ
ɡɚɜɟɪɲɟɧɵ.
ɉɪɟɠɞɟ ɱɟɦ ɩɪɢɫɬɭɩɢɬɶ ɤ ɨɩɟɪɚɰɢɹɦ
ɩɨ ɨɱɢɫɬɤɟ ɢɥɢ ɭɯɨɞɭ ɨɬɫɨɟɞɢɧɢɬɟ
ɜɵɬɹɠɤɭ ɨɬ ɫɟɬɢ, ɜɵɧɭɜ ɜɢɥɤɭ ɢɥɢ
ɜɵɤɥɸɱɢɜ ɨɛɳɢɣ ɜɵɤɥɸɱɚɬɟɥɶ
ɷɥɟɤɬɪɢɱɟɫɤɨɣ ɫɟɬɢ.
Ⱦɥɹ ɜɵɩɨɥɧɟɧɢɹ ɜɫɟɯ ɨɩɟɪɚɰɢɣ ɩɨ
ɭɫɬɚɧɨɜɤɟ ɢ ɭɯɨɞɭ ɢɫɩɨɥɶɡɭɣɬɟ ɪɚɛɨɱɢɟ
ɩɟɪɱɚɬɤɢ. Ⱦɟɬɢ ɢɥɢ ɜɡɪɨɫɥɵɟ ɧɟ ɞɨɥɠɧɵ
ɩɨɥɶɡɨɜɚɬɶɫɹ ɜɵɬɹɠɤɨɣ, ɟɫɥɢ ɩɨ
ɫɜɨɟɦɭ ɮɢɡɢɱɟɫɤɨɦɭ ɢɥɢ ɩɫɢɯɢɱɟɫɤɨɦɭ
ɫɨɫɬɨɹɧɢɸ ɧɟ ɜ ɫɨɫɬɨɹɧɢɢ ɷɬɨɝɨ ɞɟɥɚɬɶ,
ɢɥɢ ɟɫɥɢ ɨɧɢ ɧɟ ɨɛɥɚɞɚɸɬ ɡɧɚɧɢɹɦɢ ɢ
ɨɩɵɬɨɦ ɧɟɨɛɯɨɞɢɦɵɦɢ ɞɥɹ ɩɪɚɜɢɥɶɧɨɝɨ
ɢ ɛɟɡɨɩɚɫɧɨɝɨ ɭɩɪɚɜɥɟɧɢɹ ɩɪɢɛɨɪɨɦ.
ɇɟ ɨɫɬɚɜɥɹɣɬɟ ɞɟɬɟɣ ɛɟɡ ɩɪɢɫɦɨɬɪɚ,
ɱɬɨɛɵ ɨɧɢ ɧɟ ɢɝɪɚɥɢ ɫ ɩɪɢɛɨɪɨɦ.
ɇɟ ɢɫɩɨɥɶɡɭɣɬɟ ɜɵɬɹɠɤɭ, ɟɫɥɢ ɪɟɲɟɬɤɚ
ɧɟɩɪɚɜɢɥɶɧɨ ɭɫɬɚɧɨɜɥɟɧɚ! Ʉɚɬɟɝɨɪɢɱɟɫɤɢ
ɡɚɩɪɟɳɚɟɬɫɹ ɢɫɩɨɥɶɡɨɜɚɬɶ ɜɵɬɹɠɤɭ ɜ
ɤɚɱɟɫɬɜɟ ɨɩɨɪɧɨɣ ɩɥɨɫɤɨɫɬɢ, ɟɫɥɢ ɷɬɨ
ɫɩɟɰɢɚɥɶɧɨ ɧɟ ɨɝɨɜɨɪɟɧɨ. Ɉɛɟɫɩɟɱɶɬɟ
ɧɚɞɥɟɠɚɳɢɣ ɜɨɡɞɭɯɨɨɛɦɟɧ ɩɨɦɟɳɟɧɢɹ,
ɤɨɝɞɚ ȼɵ ɢɫɩɨɥɶɡɭɟɬɟ ɜɵɬɹɠɤɭ ɜ
ɤɭɯɧɟ ɨɞɧɨɜɪɟɦɟɧɧɨ ɫ ɞɪɭɝɢɦɢ
ɩɪɢɛɨɪɚɦɢ ɧɚ ɝɚɡɭ ɢɥɢ ɧɚ ɞɪɭɝɨɦ
ɝɨɪɸɱɟɦ. ȼɵɬɹɝɢɜɚɟɦɵɣ ɜɨɡɞɭɯ ɧɟ
ɞɨɥɠɟɧ ɜɵɛɪɚɫɵɜɚɬɶɫɹ ɧɚɪɭɠɭ ɱɟɪɟɡ
ɜɨɡɞɭɯɨɜɨɞ, ɢɫɩɨɥɶɡɭɟɦɵɣ ɞɥɹ ɜɵɛɪɨɫɚ
ɞɵɦɨɜ ɨɬ ɩɪɢɛɨɪɨɜ ɫ ɝɚɡɨɜɵɦ ɫɠɢɝɚɧɢɟɦ
ɢɥɢ ɫ ɩɢɬɚɧɢɟɦ ɞɪɭɝɢɦɢ ɝɨɪɸɱɢɦɢ.
Ʉɚɬɟɝɨɪɢɱɟɫɤɢ ɡɚɩɪɟɳɚɟɬɫɹ ɝɨɬɨɜɢɬɶ
ɛɥɸɞɚ ɧɚɞ ɩɥɚɦɟɧɟɦ, ɩɨɫɤɨɥɶɤɭ
ɫɜɨɛɨɞɧɨɟ ɩɥɚɦɹ ɦɨɠɟɬ ɩɨɜɪɟɞɢɬɶ
ɮɢɥɶɬɪɵ ɢ ɫɬɚɬɶ ɩɪɢɱɢɧɨɣ ɩɨɠɚɪɚ;
ɩɨɷɬɨɦɭ, ɜɨɡɞɟɪɠɢɜɚɣɬɟɫɶ ɨɬ ɷɬɨɝɨ ɜ
ɥɸɛɨɦ ɫɥɭɱɚɟ. ɀɚɪɟɧɶɟ ɜ ɛɨɥɶɲɨɦ
ɤɨɥɢɱɟɫɬɜɟ ɦɚɫɥɚ ɞɨɥɠɧɨ ɩɪɨɢɡɜɨɞɢɬɶɫɹ
ɩɨɞ ɩɨɫɬɨɹɧɧɵɦ ɤɨɧɬɪɨɥɟɦ, ɢɦɟɹ ɜ
ɜɢɞɭ, ɱɬɨ ɩɟɪɟɝɪɟɬɨɟ ɦɚɫɥɨ ɦɨɠɟɬ
ɜɨɫɩɥɚɦɟɧɹɬɶɫɹ.
ȼɧɢɦɚɧɢɟ! ɉɪɢ ɢɫɩɨɥɶɡɨɜɚɧɢɢ
ɜɦɟɫɬɟ ɫ ɩɪɨɱɢɦɢ ɚɩɩɚɪɚɬɚɦɢ ɞɥɹ
ɜɚɪɤɢ, ɨɬɤɪɵɬɵɟ ɱɚɫɬɢ ɩɪɢɛɨɪɚ ɦɨɝɭɬ
ɫɢɥɶɧɨ ɧɚɝɪɟɜɚɬɶɫɹ.
ɑɬɨ ɤɚɫɚɟɬɫɹ ɬɟɯɧɢɱɟɫɤɢɯ ɦɟɪ ɢ
ɭɫɥɨɜɢɣ ɩɨ ɬɟɯɧɢɤɟ ɛɟɡɨɩɚɫɧɨɫɬɢ ɩɪɢ
ɨɬɜɨɞɟ ɞɵɦɨɜ, ɬɨ ɩɪɢɞɟɪɠɢɜɚɣɬɟɫɶ
ɫɬɪɨɝɨ ɩɪɚɜɢɥ, ɩɪɟɞɭɫɦɨɬɪɟɧɧɵɯ
ɪɟɝɥɚɦɟɧɬɨɦ ɦɟɫɬɧɵɯ ɤɨɦɩɟɬɟɧɬɧɵɯ
ɜɥɚɫɬɟɣ. ɉɪɨɢɡɜɨɞɢɬɟ ɩɟɪɢɨɞɢɱɟɫɤɭɸ
ɨɱɢɫɬɤɭ ɜɵɬɹɠɤɢ ɤɚɤ ɜɧɭɬɪɢ, ɬɚɤ ɢ
ɫɧɚɪɭɠɢ (ɉɈ ɄɊȺɃɇȿɃ ɆȿɊȿ, ɊȺɁ
ȼ Ɇȿɋəɐ ɫ ɫɨɛɥɸɞɟɧɢɟɦ ɭɫɥɨɜɢɣ,
ɤɨɬɨɪɵɟ ɫɩɟɰɢɚɥɶɧɨ ɩɪɟɞɭɫɦɨɬɪɟɧɵ ɜ
ɢɧɫɬɪɭɤɰɢɹɯ ɩɨ ɨɛɫɥɭɠɢɜɚɧɢɸ ɞɚɧɧɨɝɨ
ɩɪɢɛɨɪɚ). ɇɟɫɨɛɥɸɞɟɧɢɟ ɢɧɫɬɪɭɤɰɢɣ
ɩɨ ɱɢɫɬɤɟ ɜɵɬɹɠɤɢ ɢ ɩɨ ɡɚɦɟɧɟ ɢ ɱɢɫɬɤɟ
ɮɢɥɶɬɪɨɜ ɦɨɠɟɬ ɫɬɚɬɶ ɩɪɢɱɢɧɨɣ ɩɨɠɚɪɚ.
ɇɟ ɢɫɩɨɥɶɡɭɣɬɟ ɢ ɧɟ ɨɫɬɚɜɥɹɣɬɟ ɜɵɬɹɠɤɭ
ɛɟɡ ɩɪɚɜɢɥɶɧɨ ɭɫɬɚɧɨɜɥɟɧɧɵɯ ɥɚɦɩɨɱɟɤ
ɜ ɫɜɹɡɢ ɫ ɜɨɡɦɨɠɧɵɦ ɪɢɫɤɨɦ ɭɞɚɪɚ
ɷɥɟɤɬɪɢɱɟɫɤɢɦ ɬɨɤɨɦ. Ɇɵ ɫɧɢɦɚɟɦ
ɫ ɫɟɛɹ ɜɫɹɤɭɸ ɨɬɜɟɬɫɬɜɟɧɧɨɫɬɶ ɡɚ
ɧɟɩɨɥɚɞɤɢ, ɭɳɟɪɛ ɢɥɢ ɫɝɨɪɚɧɢɟ ɩɪɢɛɨɪɚ
ɜɫɥɟɞɫɬɜɢɟ ɧɟɫɨɛɥɸɞɟɧɢɹ ɢɧɫɬɪɭɤɰɢɣ,
ɩɪɢɜɟɞɟɧɧɵɯ ɜ ɞɚɧɧɨɦ ɪɭɤɨɜɨɞɫɬɜɟ.
2. ɗɄɋɉɅɍȺɌȺɐɂə
ȼɵɬɹɠɤɚ ɫɥɭɠɢɬ ɞɥɹ ɜɫɚɫɵɜɚɧɢɹ ɞɵɦɨɜ
ɢ ɩɚɪɚ, ɨɛɪɚɡɨɜɵɜɚɸɳɢɯɫɹ ɜɨ ɜɪɟɦɹ
ɩɪɢɝɨɬɨɜɥɟɧɢɹ ɟɞɵ. ȼ ɩɪɢɥɚɝɚɟɦɨɣ
ɢɧɫɬɪɭɤɰɢɢ ɭɤɚɡɵɜɚɟɬɫɹ ɜ ɤɚɤɨɦ
ɢɫɩɨɥɧɟɧɢɢ ɦɨɠɧɨ ɢɫɩɨɥɶɡɨɜɚɬɶ ɜɚɲɭ
ɦɨɞɟɥɶ – ɤɚɤ ɜɵɬɹɠɤɭ ɫ ɜɵɜɨɞɨɦ ɧɚɪɭɠɭ
, ɢɥɢ ɜɵɬɹɠɤɭ ɫ ɜɧɭɬɪɟɧɧɟɣ
ɪɟɰɢɪɤɭɥɹɰɢɟɣ ɜɨɡɞɭɯɚ
.
3. ɍɋɌȺɇɈȼɄȺ
ɇɚɩɪɹɠɟɧɢɟ ɫɟɬɢ ɞɨɥɠɧɨ
ɫɨɨɬɜɟɬɫɬɜɨɜɚɬɶ ɧɚɩɪɹɠɟɧɢɸ,
ɭɤɚɡɚɧɧɨɦɭ ɧɚ ɬɚɛɥɢɱɤɟ ɬɟɯɧɢɱɟɫɤɢɯ
ɞɚɧɧɵɯ, ɤɨɬɨɪɚɹ ɪɚɡɦɟɳɟɧɚ ɜɧɭɬɪɢ
ɩɪɢɛɨɪɚ. ȿɫɥɢ ɜɵɬɹɠɤɚ ɫɧɚɛɠɟɧɚ ɜɢɥɤɨɣ,
ɩɨɞɤɥɸɱɢɬɟ ɜɵɬɹɠɤɭ ɤ ɲɬɟɩɫɟɥɶɧɨɦɭ
ɪɚɡɴɟɦɭ, ɨɬɜɟɱɚɸɳɟɦɭ ɞɟɣɫɬɜɭɸɳɢɦ
ɩɪɚɜɢɥɚɦ, ɤɨɬɨɪɵɣ ɞɨɥɠɟɧ ɛɵɬɶ
ɪɚɫɩɨɥɨɠɟɧ ɜ ɥɟɝɤɨɞɨɫɬɭɩɧɨɦ ɦɟɫɬɟ, ɱɬɨ
ɦɨɠɧɨ ɫɞɟɥɚɬɶ ɢ ɩɨɫɥɟ ɭɫɬɚɧɨɜɤɢ. ȿɫɥɢ
ɠɟ ɜɵɬɹɠɤɚ ɧɟ ɫɧɚɛɠɟɧɚ ɜɢɥɤɨɣ (ɩɪɹɦɨɟ
ɩɨɞɤɥɸɱɟɧɢɹ ɤ ɫɟɬɢ), ɢɥɢ ɲɬɟɩɫɟɥɶɧɵɣ
ɪɚɡɴɟɦ ɧɟ ɪɚɫɩɨɥɨɠɟɧ ɜ ɞɨɫɬɭɩɧɨɦ
ɦɟɫɬɟ, ɬɚɤɠɟ ɢ ɩɨɫɥɟ ɭɫɬɚɧɨɜɤɢ, ɬɨ
ɢɫɩɨɥɶɡɭɣɬɟ ɧɚɞɥɟɠɚɳɢɣ ɞɜɭɯɩɨɥɸɫɧɵɣ
ɜɵɤɥɸɱɚɬɟɥɶ, ɨɛɟɫɩɟɱɢɜɚɸɳɢɣ ɩɨɥɧɨɟ
ɪɚɡɦɵɤɚɧɢɟ ɫɟɬɢ ɩɪɢ ɜɨɡɧɢɤɧɨɜɟɧɢɢ
ɭɫɥɨɜɢɣ ɩɟɪɟɧɚɩɪɹɠɟɧɢɹ 3-ɟɣ ɤɚɬɟɝɨɪɢɢ,
ɜ ɫɨɨɬɜɟɬɫɬɜɢɢ ɫ ɢɧɫɬɪɭɤɰɢɹɦɢ ɩɨ
ɭɫɬɚɧɨɜɤɟ.
ȼɧɢɦɚɧɢɟ! ɩɪɟɠɞɟ ɱɟɦ ɩɨɞɤɥɸɱɢɬɶ ɤ
ɫɟɬɢ ɩɢɬɚɧɢɹ ɷɥɟɤɬɪɢɱɟɫɤɭɸ ɫɢɫɬɟɦɭ
ɜɵɬɹɠɤɢ ɢ ɩɪɨɜɟɪɢɬɶ ɢɫɩɪɚɜɧɨɟ
ɮɭɧɤɰɢɨɧɢɪɨɜɚɧɢɟ ɟɟ ɭɛɟɞɢɬɟɫɶ ɜ
ɬɨɦ, ɱɬɨ ɤɚɛɟɥɶ ɩɢɬɚɧɢɹ ɩɪɚɜɢɥɶɧɨ
ɫɦɨɧɬɢɪɨɜɚɧ.
Page 59

PYCCƸɂɃ
59
ȼɵɬɹɠɤɚ ɢɦɟɟɬ ɫɩɟɰɢɚɥɶɧɵɣ ɤɚɛɟɥɶ
ɷɥɟɤɬɪɨɩɢɬɚɧɢɹ; ɜ ɫɥɭɱɚɟ ɩɨɜɪɟɠɞɟɧɢɹ
ɤɚɛɟɥɹ, ɧɟɨɛɯɨɞɢɦɨ ɡɚɤɚɡɚɬɶ ɟɝɨ ɜ
ɫɥɭɠɛɟ ɩɨ ɬɟɯɧɢɱɟɫɤɨɦɭ ɨɛɫɥɭɠɢɜɚɧɢɸ.
Ɋɚɫɫɬɨɹɧɢɟ ɧɢɠɧɟɣ ɝɪɚɧɢ ɜɵɬɹɠɤɢ
ɧɚɞ ɨɩɨɪɧɨɣ ɩɥɨɫɤɨɫɬɶɸ ɩɨɞ ɫɨɫɭɞɵ
ɧɚ ɤɭɯɨɧɧɨɣ ɩɥɢɬɟ ɞɨɥɠɧɨ ɛɵɬɶ ɧɟ
ɦɟɧɟɟ 50cm – ɞɥɹ ɷɥɟɤɬɪɢɱɟɫɤɢɯ
ɩɥɢɬ, ɢ ɧɟ ɦɟɧɟɟ 65cm ɞɥɹ ɝɚɡɨɜɵɯ
ɢɥɢ ɤɨɦɛɢɧɢɪɨɜɚɧɧɵɯ ɩɥɢɬ. ȿɫɥɢ ɜ
ɢɧɫɬɪɭɤɰɢɹɯ ɩɨ ɭɫɬɚɧɨɜɤɟ ɝɚɡɨɜɨɣ ɩɥɢɬɵ
ɨɝɨɜɨɪɟɧɨ ɛɨɥɶɲɟɟ ɪɚɫɫɬɨɹɧɢɟ, ɬɨ
ɭɱɬɢɬɟ ɷɬɨ.
4. ɍɏɈȾ
ȼɧɢɦɚɧɢɟ! ɉɪɟɠɞɟ ɱɟɦ ɜɵɩɨɥɧɢɬɶ
ɥɸɛɭɸ ɨɩɟɪɚɰɢɸ ɩɨ ɱɢɫɬɤɟ ɢɥɢ
ɬɟɯɧɢɱɟɫɤɨɦɭ ɨɛɫɥɭɠɢɜɚɧɢɸ,
ɨɬɫɨɟɞɢɧɢɬɟ ɜɵɬɹɠɤɭ ɨɬ ɷɥɟɤɬɪɨɫɟɬɢ,
ɨɬɫɨɟɞɢɧɹɹ ɜɢɥɤɭ ɢɥɢ ɝɥɚɜɧɵɣ
ɜɵɤɥɸɱɚɬɟɥɶ ɩɨɦɟɳɟɧɢɹ. ȼɵɬɹɠɤɚ
ɞɨɥɠɧɚ ɩɨɞɜɟɪɝɚɬɶɫɹ ɱɚɫɬɨɣ ɨɱɢɫɬɤɟ
ɤɚɤ ɜɧɭɬɪɢ, ɬɚɤ ɢ ɫɧɚɪɭɠɢ (ɩɨ ɤɪɚɣɧɟɣ
ɦɟɪɟ ɫ ɬɨɣ ɠɟ ɩɟɪɢɨɞɢɱɧɨɫɬɶɸ, ɱɬɨ ɢ
ɭɯɨɞ ɡɚ ɮɢɥɶɬɪɚɦɢ ɞɥɹ ɡɚɞɟɪɠɤɢ ɠɢɪɚ).
Ⱦɥɹ ɱɢɫɬɤɢ ɢɫɩɨɥɶɡɭɣɬɟ ɫɩɟɰɢɚɥɶɧɭɸ
ɬɪɹɩɤɭ, ɫɦɨɱɟɧɧɭɸ ɧɟɣɬɪɚɥɶɧɵɦ ɠɢɞɤɢɦ
ɦɨɸɳɢɦ ɫɪɟɞɫɬɜɨɦ. ɇɟ ɩɪɢɦɟɧɹɣɬɟ
ɫɪɟɞɫɬɜɚ, ɫɨɞɟɪɠɚɳɢɟ ɚɛɪɚɡɢɜɧɵɟ
ɦɚɬɟɪɢɚɥɵ. ɇȿ ɉɊɂɆȿɇəɃɌȿ ɋɉɂɊɌ!
ȼɧɢɦɚɧɢɟ! ɇɟ ɫɨɛɥɸɞɟɧɢɟ ɩɪɚɜɢɥ
ɱɢɫɬɤɢ ɩɪɢɛɨɪɚ ɢ ɡɚɦɟɧɵ ɮɢɥɶɬɪɨɜ
ɦɨɠɟɬ ɩɪɢɜɟɫɬɢ ɤ ɪɢɫɤɭ ɜɨɡɧɢɤɧɨɜɟɧɢɹ
ɩɨɠɚɪɚ. ɉɨɷɬɨɦɭ ɪɟɤɨɦɟɧɞɭɟɦ
ɫɨɛɥɸɞɚɬɶ ɩɪɢɜɟɞɟɧɧɵɟ ɢɧɫɬɪɭɤɰɢɢ.
ɋɧɢɦɚɟɬɫɹ ɥɸɛɚɹ ɨɬɜɟɬɫɬɜɟɧɧɨɫɬɶ ɜ
ɫɜɹɡɢ ɫ ɜɨɡɦɨɠɧɵɦɢ ɩɨɜɪɟɠɞɟɧɢɹɦɢ
ɞɜɢɝɚɬɟɥɹ ɢ ɫ ɩɨɠɚɪɚɦɢ, ɜɨɡɧɢɤɲɢɦɢ
ɜɫɥɟɞɫɬɜɢɟ ɧɟɩɪɚɜɢɥɶɧɨɝɨ ɪɟɦɨɧɬɚ
ɢɥɢ ɧɟɫɨɛɥɸɞɟɧɢɹ ɜɵɲɟɨɩɢɫɚɧɧɵɯ
ɩɪɟɞɭɩɪɟɠɞɟɧɢɣ.
4.1 Ɏɢɥɶɬɪɵ ɡɚɞɟɪɠɤɢ ɠɢɪɚ - Ɏɢɥɶɬɪ
ɫɥɟɞɭɟɬ ɡɚɱɢɳɚɬɶ ɟɠɟɦɟɫɹɱɧɨ
ɧɟɚɝɪɟɫɫɢɜɧɵɦɢ ɦɨɸɳɢɦɢ ɫɪɟɞɫɬɜɚɦɢ,
ɜɪɭɱɧɭɸ ɢɥɢ ɜ ɩɨɫɭɞɨɦɨɟɱɧɨɣ
ɦɚɲɢɧɟ ɩɪɢ ɧɢɡɤɨɣ ɬɟɦɩɟɪɚɬɭɪɟ ɢ
ɷɤɨɧɨɦɢɱɧɨɦ ɰɢɤɥɟ ɦɵɬɶɹ. ɉɪɢ ɦɵɬɶɟ
ɜ ɩɨɫɭɞɨɦɨɟɱɧɨɣ ɦɚɲɢɧɟ ɦɨɠɟɬ ɢɦɟɬɶ
ɦɟɫɬɨ ɧɟɤɨɬɨɪɨɟ ɨɛɟɫɰɜɟɱɢɜɚɧɢɟ
ɮɢɥɶɬɪɚ ɡɚɞɟɪɠɤɢ ɠɢɪɚ, ɧɨ ɟɝɨ
ɮɢɥɶɬɪɭɸɳɚɹ ɯɚɪɚɤɬɟɪɢɫɬɢɤɚ ɨɫɬɚɟɬɫɹ
ɚɛɫɨɥɸɬɧɨ ɧɟɢɡɦɟɧɧɨɣ.
4.2 Type 150 LONG LIFE - Ɇɨɸɳɢɣ
ɭɝɨɥɶɧɵɣ ɮɢɥɶɬɪ
ɍɝɨɥɶɧɵɣ ɮɢɥɶɬɪ ɦɨɠɧɨ ɦɵɬɶ
ɤɚɠɞɵɟ ɞɜɚ ɦɟɫɹɰɚ ɜ ɬɟɩɥɨɣ ɜɨɞɟ ɫ
ɧɚɞɥɟɠɚɳɢɦɢ ɦɨɸɳɢɦɢ ɫɪɟɞɫɬɜɚɦɢ
ɢɥɢ ɜ ɩɨɫɭɞɨɦɨɟɱɧɨɣ ɦɚɲɢɧɟ ɩɪɢ
ɬɟɦɩɟɪɚɬɭɪɟ 65° ɋ (ɜ ɩɨɫɥɟɞɧɟɦ ɫɥɭɱɚɟ,
ɜɵɩɨɥɧɢɬɟ ɩɨɥɧɵɣ ɰɢɤɥ ɦɵɬɶɹ ɛɟɡ
ɩɨɫɭɞɵ ɜɧɭɬɪɢ ɩɨɫɭɞɨɦɨɟɱɧɨɣ ɦɚɲɢɧɵ).
ɍɞɚɥɢɬɟ ɢɡɥɢɲɟɤ ɜɨɞɵ ɨɫɬɨɪɨɠɧɨ, ɱɬɨɛɵ
ɧɟ ɩɨɜɪɟɞɢɬɶ ɮɢɥɶɬɪ, ɡɚɬɟɦ ɫɧɢɦɢɬɟ
ɩɨɞɭɲɤɭ ɢɡ ɩɥɚɫɬɦɚɫɫɨɜɨɣ ɪɚɦɵ ɢ
ɜɵɞɟɪɠɢɜɚɣɬɟ ɟɟ ɜ ɩɟɱɢ ɜ ɬɟɱɟɧɢɟ 10
ɦɢɧɭɬ ɩɪɢ ɬɟɦɩɟɪɚɬɭɪɟ 100° ɋ ɞɥɹ
ɨɛɟɫɩɟɱɟɧɢɹ ɩɨɥɧɨɣ ɜɵɫɭɲɤɢ.
Ɂɚɦɟɧɹɣɬɟ ɩɨɞɭɲɤɭ ɤɚɠɞɵɟ 3 ɝɨɞɚ ɢ ɤɚɤ
ɬɨɥɶɤɨ ɩɨɥɨɬɧɨ ɨɤɚɠɟɬɫɹ ɩɨɜɪɟɠɞɟɧɧɵɦ.
4.3 Type 60/80 - ɇȿ ɦɨɸɳɢɣ ɭɝɨɥɶɧɵɣ
ɮɢɥɶɬɪ
ɇɚɫɵɳɟɧɢɟ ɭɝɨɥɶɧɨɝɨ ɮɢɥɶɬɪɚ
ɩɪɨɢɫɯɨɞɢɬ ɩɨ ɢɫɬɟɱɟɧɢɢ ɛɨɥɟɟ
ɢɥɢ ɦɟɧɟɟ ɞɥɢɬɟɥɶɧɨɝɨ ɩɟɪɢɨɞɚ
ɷɤɫɩɥɭɚɬɚɰɢɢ, ɩɪɟɞɨɩɪɟɞɟɥɹɟɦɨɝɨ ɬɢɩɨɦ
ɤɭɯɧɢ ɢ ɩɟɪɢɨɞɢɱɧɨɫɬɶɸ ɡɚɞɟɪɠɤɢ ɠɢɪɚ.
ȼ ɥɸɛɨɦ ɫɥɭɱɚɟ, ɡɚɦɟɧɹɣɬɟ ɩɚɬɪɨɧ ɩɨ
ɤɪɚɣɧɟɣ ɦɟɪɟ ɱɟɪɟɡ ɤɚɠɞɵɟ 4 ɦɟɫɹɰɚ.
ɍɝɨɥɶɧɵɣ ɮɢɥɶɬɪ ɇȿ ɩɨɞɥɟɠɢɬ ɦɨɣɤɟ
ɢɥɢ ɪɟɝɟɧɟɪɚɰɢɢ.
1
2 2
Page 60

60
www.aeg.com
5. ɈɊȽȺɇɕ ɍɉɊȺȼɅȿɇɂə
ȼɵɬɹɠɤɚ ɨɫɧɚɳɟɧɚ ɳɢɬɨɦ ɭɩɪɚɜɥɟɧɢɹ
ɞɥɹ ɤɨɧɬɪɨɥɹ ɫɤɨɪɨɫɬɢ ɜɵɬɹɠɧɨɝɨ
ɜɟɧɬɢɥɹɬɨɪɚ ɢ ɡɚɠɢɝɚɧɢɹ ɫɜɟɬɚ ɞɥɹ
ɨɫɜɟɳɟɧɢɹ ɪɚɛɨɱɟɣ ɩɨɜɟɪɯɧɨɫɬɢ ɩɥɢɬɵ.
ɉɨɥɶɡɭɣɬɟɫɶ ɢɧɬɟɧɫɢɜɧɵɦ ɪɟɠɢɦɨɦ
ɪɚɛɨɬɵ ɜɵɬɹɠɤɢ ɜ ɫɥɭɱɚɟ ɨɫɨɛɨ ɜɵɫɨɤɨɣ
ɤɨɧɰɟɧɬɪɚɰɢɢ ɤɭɯɨɧɧɵɯ ɢɫɩɚɪɟɧɢɣ.
Ɇɵ ɪɟɤɨɦɟɧɞɭɟɦ ɜɤɥɸɱɢɬɶ ɜɵɬɹɠɤɭ
ɡɚ 5 ɦɢɧɭɬ ɞɨ ɧɚɱɚɥɚ ɩɪɨɰɟɫɫɚ
ɩɪɢɝɨɬɨɜɥɟɧɢɹ ɩɢɳɢ ɢ ɨɫɬɚɜɢɬɶ ɟɟ
ɜɤɥɸɱɟɧɧɨɣ ɜ ɬɟɱɟɧɢɟ 15 ɦɢɧɭɬ ɩɨ
ɨɤɨɧɱɚɧɢɢ ɩɪɨɰɟɫɫɚ.
Ʉɨɦɚɧɞɵ ɧɚ ɮɪɨɧɬɚɥɶɧɨɣ ɫɬɨɪɨɧɟ
ɭɫɬɪɨɣɫɬɜɚ:
1A
1B
1C
A. Ʉɧɨɩɤɚ OFF (ɤɧɨɩɤɚ ɧɟ ɝɨɪɢɬ) – ON
(ɤɧɨɩɤɚ ɝɨɪɢɬ)
ɇɚɠɚɬɶ ɨɞɢɧ ɢɥɢ ɧɟɫɤɨɥɶɤɨ ɪɚɡ ɞɥɹ
ɬɨɝɨ, ɱɬɨɛɵ ɩɨɥɭɱɢɬɶ ɠɟɥɚɟɦɭɸ
ɮɭɧɤɰɢɸ:
ON (ɤɧɨɩɤɚ ɝɨɪɢɬ): ȼɵɬɹɠɤɚ
ɭɫɬɚɧɚɜɥɢɜɚɟɬ ɩɨɫɥɟɞɧɸɸ
ɜɵɛɪɚɧɧɭɸ ɫɤɨɪɨɫɬɶ.
OFF (ɤɧɨɩɤɚ ɜɵɤɥɸɱɟɧɨ): ɜɫɟ
ɮɭɧɤɰɢɢ ɨɬɤɥɸɱɟɧɵ ɤɪɨɦɟ
ɨɫɜɟɳɟɧɢɹ.
B. Ʉɧɨɩɤɚ ɜɵɛɨɪɚ ɫɤɨɪɨɫɬɢ (ɦɨɳɧɨɫɬɢ
ɜɫɚɫɵɜɚɧɢɹ)
ɇɚɠɚɬɶ ɧɚ ɷɬɭ ɤɧɨɩɤɭ ɨɞɢɧ ɢɥɢ
ɧɟɫɤɨɥɶɤɨ ɪɚɡ ɞɥɹ ɜɵɛɨɪɚ ɧɚɢɛɨɥɟɟ
ɩɨɞɯɨɞɹɳɟɣ ɫɤɨɪɨɫɬɢ (ɦɨɳɧɨɫɬɢ)
ɜɫɚɫɵɜɚɧɢɹ (1 – 2 – 3).
C. Ⱦɢɫɩɥɟɣ: ɨɬɨɛɪɚɠɚɟɬ ɜɵɛɪɚɧɧɭɸ
ɦɨɳɧɨɫɬɶ ɜɫɚɫɵɜɚɧɢɹ ( 1 – 2
– 3), ɫɢɝɧɚɥɢɡɢɪɭɟɬ ɨ ɧɚɫɵɳɟɧɢɢ
ɮɢɥɶɬɪɨɜ (F).
D. Ʉɧɨɩɤɚ ɩɨɞɤɥɸɱɟɧɢɹ ɢɧɬɟɧɫɢɜɧɨɣ
ɫɤɨɪɨɫɬɢ.
ɉɨɫɥɟ ɩɨɞɤɥɸɱɟɧɢɹ, ɢɧɬɟɧɫɢɜɧɚɹ
ɫɤɨɪɨɫɬɶ ɨɫɬɚɟɬɫɹ ɜɤɥɸɱɟɧɧɨɣ
ɧɚ ɩɪɨɬɹɠɟɧɢɢ ɨɤɨɥɨ 5 ɦɢɧɭɬ,
ɩɨɫɥɟ ɱɟɝɨ ɜɵɬɹɠɤɚ ɜɨɡɜɪɚɳɚɟɬɫɹ
ɧɚ ɩɪɟɞɜɚɪɢɬɟɥɶɧɨ ɜɵɛɪɚɧɧɭɸ
ɫɤɨɪɨɫɬɶ ( ɨɬ 1 ɞɨ 3), ɢɥɢ ɫɪɚɡɭ
ɠɟ ɨɬɤɥɸɱɚɟɬɫɹ, ɟɫɥɢ ɩɟɪɟɞ
ɷɬɢɦ ɧɟ ɛɵɥɨ ɭɫɬɚɧɨɜɥɟɧɨ ɨɞɧɨɣ
ɢɡ ɫɤɨɪɨɫɬɟɣ ɜɫɚɫɵɜɚɧɢɹ. Ⱦɥɹ
ɨɬɤɥɸɱɟɧɢɹ ɢɧɬɟɧɫɢɜɧɨɣ ɫɤɨɪɨɫɬɢ
ɪɚɧɶɲɟ 5 ɦɢɧɭɬ ɧɚɠɚɬɶ ɧɚ ɤɧɨɩɤɭ Ⱥ
ɢɥɢ ȼ.
1D
1E
E. Ʉɧɨɩɤɚ ON/OFF ɫɜɟɬ
ȿɫɥɢ ɜɵɬɹɠɤɚ ɢɥɢ ɤɨɦɚɧɞɵ ɧɟ
ɪɚɛɨɬɚɸɬ
, ɫɨɜɟɬɭɟɦ ɨɬɤɥɸɱɢɬɶ
ɩɢɬɚɧɢɟ ɯɨɬɹ ɛɵ ɧɚ 5 ɫɟɤɭɧɞ ɢ ɩɨɬɨɦ
ɫɧɨɜɚ ɟɝɨ ɩɨɞɤɥɸɱɢɬɶ. ɉɨɞɨɠɞɚɬɶ
ɟɳɟ 15 ɫɟɤɭɧɞ ɢ ɡɚɬɟɦ ɩɪɨɜɟɪɢɬɶ
ɩɪɚɜɢɥɶɧɨɫɬɶ ɪɚɛɨɬɵ ɜɵɬɹɠɤɢ.
ɍɫɬɪɨɣɫɬɜɨ ɤɨɧɬɪɨɥɹ ɦɟɬɚɥɥɢɱɟɫɤɨɝɨ
ɢ ɭɝɨɥɶɧɨɝɨ ɮɢɥɶɬɪɨɜ.
ȼɵɬɹɠɤɚ ɨɛɨɪɭɞɨɜɚɧɚ ɭɫɬɪɨɣɫɬɜɨɦ,
ɤɨɬɨɪɨɟ ɭɤɚɡɵɜɚɟɬ ɤɨɝɞɚ ɧɟɨɛɯɨɞɢɦɨ
ɜɵɩɨɥɧɢɬɶ ɬɟɯɨɛɫɥɭɠɢɜɚɧɢɟ.
ȿɫɥɢ ɜɵ ɢɫɩɨɥɶɡɭɟɬɟ ɜɵɬɹɠɤɭ ɫ
ɭɝɨɥɶɧɵɦ ɮɢɥɶɬɪɨɦ, ɩɨɞɤɥɸɱɢɬɟ
ɫɨɨɬɜɟɬɫɬɜɭɸɳɢɣ ɢɧɞɢɤɚɬɨɪ ɧɚɫɵɳɟɧɢɹ
ɮɢɥɶɬɪɚ ɫɥɟɞɭɸɳɢɦ ɨɛɪɚɡɨɦ:
ȼɵɬɹɠɤɚ ɞɨɥɠɧɚ ɛɵɬɶ ɭɫɬɚɧɨɜɥɟɧɚ
ɧɚ “OFF”. Ɉɞɧɨɜɪɟɦɟɧɧɨ ɧɚɠɢɦɚɬɶ
ɤɧɨɩɤɢ ȼɢ D ɧɚ ɩɪɨɬɹɠɟɧɢɢ ɬɪɟɯ
ɫɟɤɭɧɞ, ɫɜɟɬɨɞɢɨɞ LED F ɜɤɥɸɱɢɬɫɹ
ɢ ɧɚɱɧɟɬ ɦɢɝɚɬɶ ɫɜɟɬɨɞɢɨɞ 1-ɨɣ
ɫɤɨɪɨɫɬɢ, ɩɨ ɢɫɬɟɱɟɧɢɸ 1 ɫɟɤɭɧɞɵ
ɧɚɱɧɟɬ ɦɢɝɚɬɶ ɬɚɤɠɟ ɢ ɫɜɟɬɨɞɢɨɞ 2-ɨɣ
ɫɤɨɪɨɫɬɢ ɢ ɫɢɫɬɟɦɚ ɢɡɞɚɫɬ ɡɜɭɤɨɜɨɣ
ɫɢɝɧɚɥ (- Ɂɭɦɦɟɪ-) ɭɤɚɡɵɜɚɹ, ɱɬɨ
ɭɫɬɚɧɨɜɤɚ ɜɵɩɨɥɧɟɧɚ. Ⱦɥɹ ɨɬɤɥɸɱɟɧɢɹ
ɫɢɝɧɚɥɢɡɚɰɢɢ ɭɝɨɥɶɧɨɝɨ ɮɢɥɶɬɪɚ ɨɞɧɨɜɪɟɦɟɧɧɨ ɧɚɠɢɦɚɬɶ ɤɧɨɩɤɢ ȼɢ D ɧɚ
ɩɪɨɬɹɠɟɧɢɢ ɬɪɟɯ ɫɟɤɭɧɞ, ɫɜɟɬɨɞɢɨɞ LED
F ɜɤɥɸɱɢɬɫɹ ɢ ɧɚɱɧɟɬ ɦɢɝɚɬɶ ɫɜɟɬɨɞɢɨɞ
1-ɨɣ ɫɤɨɪɨɫɬɢ (ɦɟɬɚɥɥɢɱɟɫɤɢɣ ɮɢɥɶɬɪ) ɢ
ɫɜɟɬɨɞɢɨɞ 2-ɨɣ ɫɤɨɪɨɫɬɢ, ɩɨ ɢɫɬɟɱɟɧɢɢ 1
ɫɟɤɭɧɞɵ ɛɭɞɟɬ ɦɢɝɚɬɶ ɬɨɥɶɤɨ ɫɜɟɬɨɞɢɨɞ
1-ɨɣ ɫɤɨɪɨɫɬɢ, ɫɢɫɬɟɦɚ ɢɡɞɚɫɬ ɡɜɭɤɨɜɨɣ
ɫɢɝɧɚɥ (- Ɂɭɦɦɟɪ-) ɭɤɚɡɵɜɚɹ, ɱɬɨ
ɭɫɬɚɧɨɜɤɚ ɜɵɩɨɥɧɟɧɚ.
ɋɜɟɬɨɞɢɨɞ
(1) ɫɢɝɧɚɥɢɡɚɰɢɢ
ɧɚɫɵɳɟɧɧɨɫɬɢ ɦɟɬɚɥɥɢɱɟɫɤɨɝɨ ɮɢɥɶɬɪɚ
ȿɫɥɢ ɫɜɟɬɨɞɢɨɞ 1 ɫɤɨɪɨɫɬɢ ɦɢɝɚɟɬ
ɷɬɨ ɨɡɧɚɱɚɟɬ, ɱɬɨ ɠɢɪɨɜɵɟ ɮɢɥɶɬɪɵ
ɧɚɞɨ ɩɨɦɵɬɶ. ȼɧɢɦɚɬɟɥɶɧɨ ɢɡɭɱɢɬɶ
ɢɧɫɬɪɭɤɰɢɢ ɩɨ ɨɛɫɥɭɠɢɜɚɧɢɸ ɠɢɪɨɜɵɯ
ɦɟɬɚɥɥɢɱɟɫɤɢɯ ɮɢɥɶɬɪɨɜ ɜ ɱɚɫɬɢ, ɱɬɨ
ɤɚɫɚɟɬɫɹ ɢɯ ɱɢɫɬɤɢ.
ɋɜɟɬɨɞɢɨɞ (2) ɫɢɝɧɚɥɢɡɚɰɢɢ
ɧɚɫɵɳɟɧɧɨɫɬɢ ɭɝɨɥɶɧɨɝɨ ɮɢɥɶɬɪɚ
ȿɫɥɢ ɫɜɟɬɨɞɢɨɞ 2 ɫɤɨɪɨɫɬɢ ɦɢɝɚɟɬ ɷɬɨ
ɨɡɧɚɱɚɟɬ, ɱɬɨ ɭɝɨɥɶɧɵɣ ɮɢɥɶɬɪ ɧɚɞɨ
ɩɨɦɵɬɶ ɢɥɢ ɡɚɦɟɧɢɬɶ. ȼɧɢɦɚɬɟɥɶɧɨ
ɢɡɭɱɢɬɶ ɢɧɫɬɪɭɤɰɢɢ ɩɨ ɨɛɫɥɭɠɢɜɚɧɢɸ
ɭɝɨɥɶɧɨɝɨ ɮɢɥɶɬɪɚ ɜ ɱɚɫɬɢ, ɱɬɨ ɤɚɫɚɟɬɫɹ
ɟɝɨ ɱɢɫɬɤɢ ɢɥɢ ɡɚɦɟɧɵ.
ɋɛɪɨɫ ɢɧɞɢɤɚɬɨɪɚ ɧɚɫɵɳɟɧɧɨɫɬɢ.
ɉɨɫɥɟ ɩɪɨɜɟɞɟɧɢɹ ɨɛɫɥɭɠɢɜɚɧɢɹ
ɮɢɥɶɬɪɨɜ ɞɟɪɠɚɬɶ ɧɚɠɚɬɨɣ ɤɧɨɩɤɭ Ⱥ ɧɚ
ɩɪɨɬɹɠɟɧɢɢ 3 ɫɟɤɭɧɞ ɩɨɤɚ ɫɜɟɬɨɞɢɨɞ
LED 1 ɢɥɢ 2 ɩɟɪɟɫɬɚɧɭɬ ɦɢɝɚɬɶ.
Page 61

6. Ɉɋȼȿɓȿɇɂȿ
Ɉɬɤɥɸɱɢɬɟ ɩɪɢɛɨɪ ɨɬ ɷɥɟɤɬɪɨɫɟɬɢ.
ȼɧɢɦɚɧɢɟ! ɉɪɟɠɞɟ ɱɟɦ ɩɪɢɤɚɫɚɬɶɫɹ ɤ
ɥɚɦɩɚɦ ɭɛɟɞɢɬɟɫɶ ɜ ɬɨɦ, ɱɬɨ ɨɧɢ ɨɫɬɵɥɢ.
ɂɫɩɨɥɶɡɭɣɬɟ ɞɥɹ ɷɬɨɝɨ ɥɢɲɶ ɝɚɥɨɝɟɧɧɵɟ
ɞɚɦɩɵ ɧɚ 12V - 20W ɦɚɤɫ - G4, ɧɟ
ɩɪɢɤɚɫɚɹɫɶ ɤ ɧɢɦ ɪɭɤɚɦɢ.
PYCCƸɂɃ
61
Page 62

ET KASUTUSJUHEND
www.aeg.com62
PARIMATE TULEMUSTE SAAVUTAMISEKS
Täname teid selle AEG toote valimise eest. Lõime toote, mis võimaldab teil aastaid nautida
laitmatuid tulemusi ning lisasime elu lihtsamaks ja kergemaks muutvaid innovaatilisi
tehnoloogiaid – omadusi, mida te tavaliste seadmete juures ei pruugi leida. Leidke mõni
minut aega ning lugege, kuidas seadmega parimaid tulemusi saavutada.
Külastage meie veebisaiti:
Leiate nõuandeid, brošüüre, veaotsingu, teavet teeninduse kohta:
www.aeg.com
Võite registreerida oma toote parema teeninduse saamiseks:
www.aeg.com/productregistration
Saate osta lisaseadmeid, tarvikuid ja originaalvaruosi:
www.aeg.com/shop
JÄÄTMEKÄITLUS
Sümboliga tähistatud materjalid võib ringlusse suunata. Selleks viige pakendid
vastavatesse konteineritesse.
Aidake hoida keskkonda ja inimeste tervist ja suunake elektri- ja elektroonilised jäätmed
ringlusse. Ärge visake sümboliga
hulka. Viige seade kohalikku ringluspunkti või pöörduge abi saamiseks kohalikku
omavalitsusse.
KLIENDITEENINDUS
Soovitame alati kasutada originaalvaruosi.
Teenindusse pöördumisel peaksid teil olema varuks järgmised andmed.
Andmed leiate andmesildilt. Mudel, tootenumber (PNC), seerianumber.
Hoiatus / oluline ohutusinfo.
Üldine informatsioon ja nõuanded
Keskkonnateave.
Jäetakse õigus teha muutusi.
tähistatud seadmeid muude majapidamisjäätmete
Page 63

EESTI
63
1. OHUTUSJUHISED
Ettevaatust! Järgige täpselt käesolevas
juhendis antud juhiseid. Seadme
valmistaja keeldub igasugusest
vastutusest seadmega seotud võimalike
ebameeldivuste, rikete või tulekahjude
eest, mis tulenevad selles juhendis
antud juhiste eiramisest. Õhupuhasti
on projekteeritud ainult koduseks
kasutamiseks.
Hoiatus! Ärge lülitage seadet
elektrivõrku enne, kui paigaldamine on
täiesti lõpetatud.
Enne puhastus- või hooldustööd
lülitage õhupuhasti vooluvõrgust välja,
tõmmates selleks pistiku seinakontaktist
või lülitades voolu pealülitist välja.
Kasutage paigaldus- ja hooldustöödel
kaitsekindaid.
Lapsed, füüsilise, vaimse või meelepuudega
inimesed ja isikud, kellel ei ole seadme
kasutamise kogemust, võivad seadet
kasutada ainult järelevalve all või siis, kui
nende turvalisuse eest vastutav inimene on
õpetanud neid seadet kasutama.
Lastel ei tohi lubada seadmega mängida.
Ärge kasutage õhupuhastit ilma õigesti
paigaldatud võreta.
Õhupuhasti peale ei tohi KUNAGI midagi
toetada, kui seda ei ole eraldi märgitud.
Kui õhupuhastit kasutatakse samaaegselt
teiste, gaasil või muul kütusel töötavate
seadmetega, peab ruum olema piisavalt
ventileeritud.
Seadme torustikku ei tohi ühendada
ventilatsioonisüsteemiga, mida kasutatakse
muul otstarbel, näiteks suitsugaaside
eemaldamiseks seadmetest, milles
kasutatakse majapidamisgaasi või muid
kütuseid.
Lahtise tulega toiduvalmistamine
õhupuhasti all on rangelt keelatud.
Lahtine tuli kahjustab fi ltreid ja võib
põhjustada tulekahju ning seega tuleb seda
igati vältida.
Toidu praadimisel peab olema hoolikas, et
vältida õli ülekuumenemist ja süttimist.
Ettevaatust! Köögiseadmete
kasutamisel võivad õhupuhasti
kokkupuutepinnad märkimisväärselt
soojeneda.
Tuleb järgida eeskirju, mida ametiasutused
on suitsuärastuse tehniliste ja
ohutusmeetmete kohta kehtestanud.
Õhupuhastit peab seest ja väljast
regulaarselt (VÄHEMALT ÜKS
KORD KUUS) puhastama, pidades
kinni käesolevas juhendis toodud
hooldusnõuetest.
Kui käesolevas juhendis õhupuhasti ja
fi ltrite puhastamise kohta sätestatud
nõudeid ei täideta, võib tekkida tulekahju
oht.
Ärge kasutage õhupuhastit ega jätke
seda seisma ilma korralikult paigaldatud
lampideta, sest see põhjustab elektrilöögi
ohu.
Me ei võta vastutust seadme vigastuste ja
kahjustuste eest, mis tekivad käesolevas
juhendis sätestatud nõuete eriramise
tagajärjel.
2. KASUTAMINE
Õhupuhasti eesmärk on eemaldada ruumist
toiduvalmistamisel tekkiv suits ja aur.
Seadme juurde kuuluvas juhendis on
ära näidatud, millist varianti teie mudeli
juures kasutada saab (õhu väljaviiguga
tõmbeversioon
fi ltreeriv versioon
või õhuringlusega
).
3. PAIGALDAMINE
Võrgupinge peab vastama õhupuhasti
sees asuval andmesildil toodud pingele.
Kui õhupuhastil on pistik, ühendage
see kehtivatele eeskirjadele vastavasse
pistikupessa, mis asub ka pärast
õhupuhasti paigaldamist ligipääsetavas
kohas. Kui õhupuhastil pistikut ei ole
(puhasti on otse võrku ühendatud) või kui
pistik ei asu kohas, mis jääks ka pärast
õhupuhasti paigaldamist ligipääsetavaks,
paigaldage nõuetekohane kahepooluseline
lüliti, mis kindlustaks vastavalt
paigalduseeskirjadele III kategooria
liigpinge korral täieliku eraldamise
vooluvõrgust.
Tähelepanu! Enne kui lülitate
õhupuhasti uuesti elektrivõrku ja
kontrollite, kas see töötab korralikult,
kontrollige alati, kas võrgukaabel on
korralikult monteeritud.
Page 64

64
www.aeg.com
Õhupuhastil on spetsiaalne toitekaabel; kui
kaabel on kannatada saanud, pöörduge
tehnoabi poole. Minimaalne vahekaugus
pliidi pinna ja köögi õhupuhasti alumise
ääre vahel ei tohi elektripliidi puhul
olla väiksem kui 50cm ning gaasi- või
kombineeritud pliidi puhul väiksem kui
65cm.
Kui gaasipliidi paigaldusjuhendis nõutakse
suuremat vahekaugust, tuleb seda arvesse
võtta.
4. HOOLDUS
Enne hooldustöid võtke õhupuhasti
vooluvõrgust välja.
Õhupuhastit tuleb sageli (vähemalt
sama tihti, kui hooldatakse rasvafi ltreid)
nii seest kui ka väljast puhastada.
Puhastamiseks kasutage neutraalse vedela
puhastusvahendiga niisutatud lappi.
Vältige abrasiivseid aineid sisaldavaid
vahendeid.
ÄRGE KASUTAGE PUHASTAMISEKS
ALKOHOLI!
Tähelepanu! Seadme puhastamise
ja fi ltrite vahetamise eeskirjade
mittejärgimisega kaasneb tulekahju oht.
Seepärast on soovitatav järgida antud
juhiseid. Me ei võta endale mingit vastutust
ebaõigest käsitsemisest või eespool toodud
ettevaatusabinõude eiramisest tingitud
võimalike mootorikahjustuste ja tulekahjude
eest.
4.2 Type 150 LONG LIFE - Pestav aktiivsöefi lter
Söefi ltrit võib iga kahe kuu tagant pesta
sooja vee ja sobivate puhastusvahenditega või 65 °C juures nõudepesumasinas
(nõudepesumasinas pesemise puhul laske
läbi teha terve pesutsükkel, ilma et masinas
oleks nõusid).
Eemaldage liigne vesi ilma fi ltrit kahjustamata, seejärel võtke välja plastkorpuses
asuv matt ja pange 10 minutiks 100 °C
ahju, et see lõplikult kuivaks.
Vahetage matti iga kolme aasta tagant või
siis, kui riie on katki.
4.3 Type 60/80 - MITTEPESTAV aktiivsöefi lter
Söefi lter küllastub kas lühema või pikema
kasutamise järel olenevalt pliidist ja sellest,
kui korrapäraselt rasvafi ltrit puhastatakse.
Igal juhul tuleb kassett välja vahetada vähemalt iga nelja kuu tagant.
Seda EI TOHI pesta ega taasaktiveerida
1
4.1 Rasvafi lter - Seda tuleb kord kuus
mittesööbivate puhastusvahenditega
puhastada kas käsitsi või
nõudepesumasinas madala temperatuuri ja
lühikese tsükliga.
Nõudepesumasinas pesemisel võib
metallist rasvafi lter värvi muuta, aga tema
fi ltreerimisomadusi ei muuda see vähimalgi
määral.
2 2
Page 65

EESTI
65
5. JUHIKUD
Tulede ja tõmbemootori sisselülitamiseks
kasutada õhupuhasti eesküljel olevaid
lüliteid.
Kui auru kontsentratsioon köögis on eriti
suur, kasutage kõige suuremat kiirust.
Soovitame väljatõmbe sisse lülitada 5
minutit enne söögitegemise algust ning jätta
see pärast söögivalmistamise lõppu veel
umbes 15 minutiks tööle.
Seadme esiküljel olevad juhtseadmed:
1A
1B
1C
A. Sisse- ja väljalülitusnupp (ON-OFF)
Vajutage soovitud funktsiooni
saamiseks üks või mitu korda:
ON („sisse”): õhupuhasti paneb tööle
viimati valitud tõmbekiiruse.
OFF („välja”): kõik funktsioonid on
desaktiveeritud, välja arvatud valgus.
B. Kiiruse (tõmbevõimsuse) valiku nupp
Vajutage seda nuppu sobiva
tõmbekiiruse (-võimsuse) valimiseks
üks või mitu korda (1-2-3).
C. Kuvar: näitab valitud tõmbevõimsust
(1-2-3), annab märku, kui fi ltrid (F) on
küllastunud.
D. Intensiivse tõmbekiiruse käivitamise
nupp.
Kui intensiivne kiirus on sisse lülitatud,
jääb õhupuhasti tööle umbes 5
minutiks. Pärast seda hakkab seade
jälle tööle eelnevalt valitud kiirusel
(1–3) või lülitub välja, kui mingit kiirust
ei olnud valitud. Kui soovite intensiivse
kiiruse enne 5 minuti möödmist välja
lülitada, vajutage nuppu A või nuppu B.
E. Valguse lüliti.
1D
1E
Kui õhupuhasti või selle juhtseadmed ei
tööta, on soovitatav toide vähemalt viieks
sekundiks välja ja siis uuesti sisse lülitada.
Oodake seejärel 15 sekundit ja kontrollige,
kas õhupuhasti töötab korralikult.
Aktiivsöega rasvafi ltri ja aktiivsöega fi ltri
kontrollseade
Õhupuhastil on seade, mis näitab, millal
tuleb hooldustöid teha.
Kui õhupuhastit tuleb kasutada söefi ltriga,
tuleb vastav küllastumisindikaator
aktiveerida järgmiselt:
Õhupuhasti lüliti peab olema asendis
„OFF”.
Vajutage kolme sekundi jooksul korraga
nuppe B ja D, süttib LED F ning 1. kiiruse
märgutuli hakkab vilkuma, ühe sekundi
möödudes hakkab vilkumaka 2. kiiruse
tuli ja süsteem annab helisignaali, mis
tähendab, et süsteem on seadistatud.
Aktiivsöefi ltri signalisatsiooni
mahavõtmiseks vajutage kolme sekundi
jooksul korraga nuppe B ja D, süttib LED
F ning 1. kiiruse (rasvafi lter) ja 2. kiiruse
märgutuled hakkavad vilkuma, ühe sekundi
möödudes jääb vilkuma ainult 1. kiiruse tuli,
süsteem annab helisignaali, mis tähendab,
et süsteem on seadistatud.
Rasvafi ltri küllastumise märgutuli (1)
1. kiiruse märgutule vilkumine hoiatab
töötajat, et rasvafi ltreid tuleb pesta.
Rasvafi ltrite puhastamiseks lugege
tähelepanelikult nende hooldusjuhiseid.
Aktiivsöefi ltri küllastumise märgutuli (2)
2. kiiruse märgutule vilkumine hoiatab
töötajat, et söefi ltrit tuleb pesta või
vahetada.
Lugege tähelepanelikult söefi ltri pesemise
või vahetamise juhiseid.
Küllastumisindikaatori lähtestamine
Filtrite hooldustööde järel hoidke kolme
sekundi vältel all nuppu A, kuni valgusdiood
1 või 2 lakkab vilkumast.
Page 66

66
www.aeg.com
6. VALGUSTUS
Võtke aparaat vooluvõrgust välja.
Tähelepanu! Enne pirnide puudutamist
veenduge, kas need on jahtunud.
Kasutage üksnes 20-vatise võimsusega
(12 V) G4-pirne ning ärge neid käega
puudutage.
Page 67

LV LIETOŠANAS PAMƖCƮBA
LABƖKIEM REZULTƖTIEM
Pateicamies, ka izvƝlƝjƗties AEG produktu. Esam to izveidojuši, lai ilgstoši nodrošinƗtu
nevainojamu veiktspƝju, izmantojot novatoriskas tehnoloƧijas, kas palƯdz vienkƗršot dzƯvi,
– iespƝjas, ko neatradƯsit parastƗs ierƯcƝs. ˪Lnjdzu, veltiet dažas minnjtes, lai izlasƯtu šo
tekstu un gnjtu labƗkus rezultƗtus.
ApmeklƝjiet mnjsu mƗjaslapu:
AtradƯsiet lietošanas padomus, brošnjras, informƗciju par traucƝjumu novƝršanu un
apkopi:
www.aeg.com
ReƧistrƝjiet savu produktu, lai uzlabotu pakalpojumu:
www.aeg.com/productregistration
IegƗdƗjieties ierƯcei oriƧinƗlƗs rezerves daƺas, materiƗlus un piederumus:
www.aeg.com/shop
APLINKOSAUGA
LATVIEŠU
67
Nododiet otrreizƝjai pƗrstrƗdei materiƗlus ar simbol . Ievietojiet iepakojuma materiƗlus
atbilstošos konteineros to otrreizƝjai pƗrstrƗdei.
PalƯdziet aizsargƗt apkƗrtƝjo vidi un cilvƝku veselƯbu, atkƗrtoti pƗrstrƗdƗjot elektrisko un
elektronisko iekƗrtu atkritumus. Neizmetiet ierƯces, kas apzƯmƝtas ar šo simbolu
mƗjsaimniecƯbas atkritumiem. Nododiet izstrƗdƗjumu vietƝjƗ otrreizƝjƗs pƗrstrƗdes punktƗ
vai sazinieties ar vietƝjo pašvaldƯbu.
KLIENTU APKALPOŠANA UN PAKALPOJUMI
IesakƗm izmantot oriƧinƗlƗs rezerves daƺas.
Sazinoties ar apkalpes dienestu, pƗrliecinieties, vai jums ir šƗdi dati.
Šo informƗciju var atrast tehnisko datu plƗksnƯtƝ. Modelis, izstrƗdƗjuma Nr., sƝrijas numurs.
DrošƯbas informƗcija brƯdinƗjumam un piesardzƯbai.
VispƗrƝja informƗcija un padomi
InformƗcija par apkƗrtƝjo vidi.
IzmaiƼu tiesƯbas rezervƝtas.
, kopƗ ar
Page 68

68
www.aeg.com
1. DROŠƮBAS
NORƖDƮJUMI
UzmanƯbu! Stingri sekot instrukcijƗm,
kas atrodas šajƗ rokasgrƗmatƗ.
Netiek uzƼemta jebkƗda atbildƯba par
iespƝjamƗm grnjtƯbƗm, kaitƝjumiem
vai ugunsgrƝkiem, kas var notikt
ierƯcei šƯs rokasgrƗmatas instrukciju
neievƝrošanas gadƯjumƗ. Gaisa
nosnjcƝjs tika projektƝts tikai
izmantošanai mƗjƗs.
BrƯdinƗjums! NepieslƝgt ierƯci pie
elektriskƗ tƯkla, lƯdz ko ierƯkošana nav
pilnƯgi pabeigta.
Pirms jebkuras tƯrƯšanas vai tehniskƗs
apkalpošanas operƗcijas, atslƝgt gaisa
nosnjcƝju no elektriskƗ tƯkla, izƼemot
kontaktdakšu vai atslƝdzot mƗjokƺa
kopƝjo slƝdzi.
IerƯce nav domƗta, lai to izmantotu bƝrni
vai cilvƝki ar nepietiekamƗm fi ziskƗm,
sensoriƗlƗm vai mentƗlƗm spƝjƗm, vai ar
nepietiekošƗm zinƗšanƗm un pieredzi,
izƼemot gadƯjumus, kad tos pieskata vai
ierƯces izmantošanu apmƗca cilv
atbildƯgs par viƼu drošƯbu.
BƝrniem ir jƗbnjt pieskatƯtiem, lai tie
nespƝlƝtos ar ierƯci.
Nekad neizmantot gaisa nosnjcƝju, ja režƧis
nav pareizi ierƯkots!
Gaisa nosnjcƝjs nekad netiek izmantots, kƗ
atbalsta konstrukcija, ja nu tikai tas ir skaidri
norƗdƯts.
TelpƗ ir jƗbnjt pietiekamai ventilƗcijai, kad
gaisa nosnjcƝjs tiek vienlaicƯgi izmantots ar
citƗm ierƯcƝm, kuras darbojas ar gƗzi vai
citƗm degvielƗm.
Iesnjktam gaisam nav jƗbnjt vƝrstam
caurulƝ, kura tiek izmantota gƗzes vai citu
degvielu ierƯþu dnjmu izvadƯšanai.
Ir stingri aizliegts pagatavot Ɲdienus
Ɲ” veidƗ zem gaisa nosnjcƝja.
“fl amb
AtlkƗtƗs uguns izmantošana ir kaitƯga
fi ltriem un var provocƝt ugunsgrƝkus, tƗdƝƺ
no tƗs jebkurƗ gadƯjumƗ ir jƗizvairƗs.
Cepšana ir jƗveic to uzraugot, lai izvairƯtos
no pƗrkarsušƗs eƺƺas degšanas.
UzmanƯbu! PieejamƗs daƺas var
ievƝrojami sasildƯties, kad tiek
izmantotas kopƗ ar ierƯcƝm Ɲdiena
gatavošanai.
Kas attiecas uz tehniskiem un drošƯbas
noteikumiem, lai izvadƯtu dnjmus, tad ir
nepieciešams stingri pieturƝties pie vietƝjo
kompetento autoritƗšu noteikumiem.
Ɲks, kurš ir
Gaisa nosnjcƝjs ir bieži jƗtƯr, gan no
Ɨrpuses, gan no iekšpuses (VISMAZ
VIENU REIZI MƜNESƮ,jebkurƗ
gadƯjumƗ,Ƽemot vƝrƗ to, kas ir skaidri
rakstƯts šƯs rokasgrƗmatas tehniskƗs
apkalpošanas instrukcijƗs).
Gaisa nosnjcƝja tƯrƯšanas, fi ltru
nomainƯšanas un tƯrƯšanas normu
neieverošana provocƝ ugunsgrƝka risku.
Neizmantot vai neatst
bez pareizi ierƯkotƗm spuldzƝm iespƝjamƗ
elektriskƗ trieciena riska dƝƺ.
Tiek noraidƯta jebkura atbildƯba par
iespƝjamiem kaitƝjumiem, neƝrtƯbƗm
vai ugunsgrekiem, kurus provocƝja
ierƯce, gadƯjumƗ kad netika ievƝrotas šƯs
rokasgrƗmatas instrukcijas.
Ɨt gaisa nosnjcƝju
2. NAUDOJIMAS
Gaisa nosnjcƝjs ir domƗts, lai iesnjktu
dnjmus un tvaikus, kurus izraisa Ɲdiena
pagatavošana.
LƯdzi sniegtajƗ instalƗcijas grƗmatiƼƗ ir
uzrƗdƯts kuru versiju ir iespƝjams izmantot
Jnjsu modelim – starp iesnjkšanas versiju ar
izvadƯšanu uz Ɨrpusi
fi ltru ar iekšƝjo apstrƗdi
vai versiju ar
.
3. IERƮKOŠANA
TƯkla spriegumam ir jƗatbilst spriegumam,
kurš ir atzƯmƝts uz Ưpašas etiƷetes, kura
atrodas gaisa nosnjcƝja iekšpusƝ. Ja
nosnjcƝjam ir kontaktdakša, pievienot to
rozetei, kura atbilst pastƗvošiem likumiem
un atrodas pieejamƗ zonƗ arƯ pƝc
installƝšanas.
Ja gaisa nosnjcƝjam nav kontaktdakšas
(tieša pieslƝgšana pie elektriskƗs sistƝmas)
vai arƯ kontaktdakša neatrodas pieejamƗ
zonƗ, arƯ pƝc installƝšanas, pielietot
normƗm atbilstošu bipolƗru slƝdzi, kurš
nodrošina pilnu atslƝgšanu no tƯkla
sprieguma, pƗrslodzes kategorijas III
nosacƯjumos, saskaƼƗ ar ierƯkošanas
likumiem.
UzmanƯbu! pirms pieslƝgt gaisa
nosnjcƝjau pie tƯkla barošanas un pirms
pƗrbaudƯt tƗ pareizu darbošanos,
vienmƝr pƗrbaudƯt ka tƯkla kabelis ir
ierƯkots pareizi.
Page 69

LATVIEŠU
69
Gaisa nosnjcƝjam ir Ưpaša barošanas
caurule; caurules bojašanƗs gadƯjumƗ,
pieprasƯt to tehniskƗs apskalpošanas
servisam. MinimƗlam attƗlumam starp
plƯts virsmu, kur tiek novietoti tilpumi un
viszemƗkƗs gaisa nosnjcƝja daƺas nav
jƗbnjt mazƗkam par 50cm elektriskƗs plƯts
gadƯjumƗ un 65cm gƗzes un kombinƝtas
virtuves gadƯjumƗ.
GadƯjumƗ, ja ierƯkošanas instrukcijƗs gƗzes
ierƯcei tiek precizƝts lielƗks attƗlums, ir
nepieciešams to ievƝrot.
4. APKOPE
Pirms jebkura veida tehniskƗs apkalošanas
darba, atslƝgt gaisa nosnjcƝju no elektrƯbas.
Gaisa nosnjcƝjs ir bieži jƗtƯra (vismaz
tikpat bieži, cik bieži tiek veikta tauku fi ltru
tehniskƗ apkalpošana) gan no Ɨrpuses, gan
no iekšpuses. TƯrƯšanai ir jƗizmanto mitrs
audums, kurš ir samitrinƗts ar neitrƗliem
šƷidriem mazgƗšanas lƯdzekƺiem.
Neizmantot jebkuru abrazƯvus saturošu
produktu.
NEIZMANTOT ALKOHOLU!
UzmanƯbu! IerƯces tƯrƯšanas un fi ltru
nomainƯšanas normu neievƝrošana var vest
pie ugunsgrƝka riskiem. TƗtad ir ietecams
pieturƝties pie ieteiktƗm instrukcijƗm.
Tiek noraidƯta jebukra atbildƯba par
iespƝjamiem dzinƝja bojajumiem,
ugunsgrƝkiem, kas tika provocƝti
neatbistošas tehniskƗs apkalpošanas vai
augstƗk minƝto brƯ
dƝƺ.
dinƗjumu neievƝrošanas
4.2 Type 150 LONG LIFE - AktƯvo ogƺu
fi ltrs ir mazgƗjams
Ogƺu fi ltru var mazgƗt katru otro
mƝnesi karstƗnjdenƯ un ar piemƝrotiem
mazgƗšanas lƯdzekƺiem vai trauku
mazgƗjamƗ mašƯnƗ pie 65°C (trauku
mazgƗjamƗs mašƯnas gadƯjumƗ, veikt pilnu
mazgƗšanas ciklu bez traukiem tajƗ).
NoƼemt pƗrlieku njdeni nebojƗjot fi ltru, pƝc
kƗ noƼemt matrasƯti, kas atrodas plastmasas šasijƗ un novietot to krƗsnƯ uz 10
minnjtƝm pie 100°C, lai to pilnƯbƗ izžƗvƝt.
Noamin
Ưt matrasƯti katru 3.gadu un katru
reizi, kad audums ir bojƗts.
4.3 Type 60/80 - AktƯvo ogƺufi ltrs NAV
mazgƗjams
Ogles fi ltra piesƗtinƗšana notiek pƝc
vairƗk vai mazƗk ilgas izmantošanas,
atkarƯbƗ no virtuves veida un tauku fi ltru
tƯrƯšanas biežuma. JebkurƗ gadƯjumƗ, ir
nepieciešams nomainƯt kartridžu katru
ceturto mƝnesi.
NEVAR bnjt mazgƗts vai atjaunots.
1
4.1 Prettauku fi ltrs - Prettauku fi ltram ir
jƗbnjt tƯrƯtam katru mƝnesi, ar neagresƯviem
lƯdzekƺiem, manuƗli vai trauku mazgƗjamƗ
mašƯnƗ, pie zemas temperatnjras un
izmantojot Ưso ciklu. Ja tas tiek mazgƗts
trauku mazgƗjamƗ mašƯnƗ, prettauku fi ltra
metƗla detaƺas var kƺnjt nespodras, bet
jebkurƗ gadƯjumƗ to spƝjas nemainƗs
2 2
Page 70

70
www.aeg.com
5. VADƮBAS ELEMENTI
izmantot taustus, kuri atrodas uz nosnjcƝja
priekšdaƺas lai ieslƝgtu gaismas un
iesnjkšanas motoru.
Izmantot augstƗku Ɨtrumu Ưpašas virtuves
dnjmu koncentrƗcijas gadƯjumƗ. IesakƗm
ieslƝgt iesnjkšanu 5 minnjtes pirms Ɲdiena
gatavošanas sƗkšanas un neslƝgt to ƗrƗ
vƝl 15 minnjtes pƝc Ɲdiena gatavošanas
pabeigšanas.
Komandas uz ierƯces priekšƝjƗs daƺas:
1A
1B
1C
A. Tausts OFF (izslƝgts tausts) - ON
(ieslƝgts tausts)
Piespiest vienu vai vairƗkas reizes, lai
iegnjtu vƝlamo funkciju:
ON (tausts ieslƝgts): gaisa nosnjcƝjs
uzstƗda pƝdƝjo izvƝlƝto Ɨtrumu.
OFF (izslƝgts tausts): visas funkcijas ir
atslƝgtas, izƼemot apgaismojumu.
B. Ɩtruma izvƝles tausts (iesnjkšanas
jauda)
Piestpiest šo taustu vienu vai vairƗkas
reizes, lai izvƝlƝtos vispiemƝrotƗku
iesnjkšanas Ɨtrumu (jaudu) (1 - 2 - 3 ).
C. Displejs: uzrƗda izvƝlƝto iesnjkšanas
jaudu (1-2-3), paziƼo par fi ltru
aizsprostojumu (F).
D. IntensƯvƗƗtruma ieslƝgšanas tausts.
Kad tas ir ieslƝgts, instensƯvais Ɨtrums
paliks darbƯbƗ aptuveni 5 minnjtes,
pƝc kƗ, gaisa nosnjcƝjs atgriezƯsies uz
agrƗk izvelƝto Ɨtrumu (no 1 uz 3) vai
arƯ izslƝdzas, ja agrƗk netika izvƝlƝts
neviens Ɨtrums. Lai atslƝgtu intensƯvo
pirms ir pagƗjušas 5 minnjtes, piespiest
taustu A vai taustu B.
E. Tausts ON/OFF gaisma
1D
1E
GadƯjumƗ, ja gaisa nosnjcƝjs vai komandas
nedarbojas, tiek ieteikts pƗrtraukt padevi uz
aptuveni 5 sekundƝm un pƝc tam ieslƝgt
no jauna. PƝc tam, uzgaidƯt 15 sekundes
un pƗrbaudƯt, vai gaisa nosnjcƝjs pareizi
darbojas.
IerƯce tauku un akt
Ưvo ogƺufi ltra
pƗrbaudei
Gaisa nosnjcƝjs ir aprƯkots ar ierƯci, kas
norƗda kad ir nepieciešams veikt tehnisko
apkopi.
Ja gaisa nosnjcƝjs tiek izmantots ar ogles
fi ltru, ir jƗiedarbina attiecƯgs piesƗtinƗšanƗs
norƗdƯtƗjs, kƗ tas ir uzrƗdƯts tƗlƗk:
Gaisa nosnjcƝjam ir jƗbnjt uzstƗdƯtam uz
“OFF”.
VienlaicƯgi piespiest taustus B un D uz
trim sekundƝm, LED F ieslƝdzas un sƗk
mirguƺot 1.Ɨtruma led, pƝc 1 sekundes
murguƺos arƯ 2.Ɨtruma led un sistƝ
ma
izdod skaƼas signƗlu (-Beep-), kas uzrƗda
notikušo uzstƗdƯjumu.
Lai noƼemtu ogƺu fi ltra paziƼojumu,
vienlaicƯgi piespiest taustus B un D uz
trim sekundƝm, LED F ieslƝdzas un sƗk
mirguƺot 1.Ɨtruma led (tausku fi ltrs) un
2.Ɨtruma led; pƝc 1 sekundes mirguƺos
tikai 1.Ɨtruma led, sistƝma izdod skaƼas
signƗlu (-Beep-), kas uzrƗda notikušo
uzstƗdƯjumu.
Tauku fi ltra aizsprostošanas paziƼojuma
led (1)
1.Ɨtruma led mirguƺošana brƯdina operatoru,
ka tauku fi ltriem ir jƗbnjt mazgƗtiem.
UzmanƯgi izlasƯt instrukcijas, kas attiecas uz
tauku fi ltru tehnisko apkopi to tƯrƯšanai.
AktƯvo ogƺu aizsprostošanas pazi
Ƽojuma
led (2)
2.Ɨtruma led mirguƺošana brƯdina operatoru,
ka ogƺu fi ltram ir jƗbnjt mazgƗtam vai
nomainƯtam.
UzmanƯgi izlasƯt instrukcijas, kas attiecas uz
ogƺu fi ltra mazgƗšanu vai nomainƯšanu.
Aizsprostojuma indikatora atiestatƯšana
PƝc fi ltru tehniskƗs apkopes veikšanas,
turƝt piespiestu taustu A 3 sekundes lƯdz ko
LED 1 vai 2 nepƗrtrauc mirguƺot.
Page 71

6. APGAISMOJUMS
Atvienot ierƯci no elektriskƗs sistƝmas.
UzmanƯbu! Pirms pieskarties spuldzƝm,
pƗrliecinƗties, ka tƗs ir aukstas.
Izmantot tikai 12V -20W max - G4 halogƝna
spuldzes, uzmanoties lai neaiztiktu tƗs ar
rokƗm.
LATVIEŠU
71
Page 72

LT NAUDOTOJO VADOVAS
www.aeg.com72
PUIKIEMS REZULTATAMS PASIEKTI
Aþinj, kad pasirinkite šƳ AEG gaminƳ. Mes suknjrơme jƳ taip, kad jis nepriekaištingai veiktǐ
daugelƳ metǐ – pasižymintis pažangiomis technologijomis, kurios padeda palengvinti
gyvenimą, jis turi funkcijǐ, kuriǐ galite nerasti Ƴprastuose buitiniuose prietaisuose. Skirkite
kelias minutes perskaityti insktrukciją, kad galơtumơte jƳ maksimaliai panaudoti.
Apsilankykite mnjsǐ interneto svetainơje, kad:
gautumơte naudojimo patarimǐ, brošinjrǐ, trikþiǐ šalinimo, aptarnavimo informacijos:
www.aeg.com
užregistruotumơte savo gaminƳ geresniam aptarnavimui:
www.aeg.com/productregistration
Ƴsigytumơte priedǐ, vartojamǐjǐ prekiǐ ir originaliǐ atsarginiǐ daliǐ savo prietaisui:
www.aeg.com/shop
APLINKOS APSAUGA
Atiduokite perdirbti medžiagas, pažymơtas šiuo ženklu . Išmeskite pakuotĊƳ atitinkamą
atliekǐ surinkimo konteinerƳ, kad ji bnjtǐ perdirbta.
Padơkite saugoti aplinką bei žmoniǐ sveikatą ir surinkti bei perdirbti elektros ir elektronikos
prietaisǐ atliekas. Neišmeskite šiuo ženklu
buitinơmis atliekomis. Atiduokite šƳ gaminƳƳ vietos atliekǐ surinkimo punktą arba susisiekite
su vietnos savivaldybe dơl papildomos informacijos.
pažymơtǐ prietaisǐ kartu su kitomis
KLIENTǏ PRIEŽINjRA IR APTARNAVIMAS
Rekomenduojame naudoti tik originalias atsargines dalis.
Kreipdamiesi Ƴ aptarnavimo centrą, bnjtinai pateikite šią informaciją.
Informacija yra nurodyta techniniǐ duomenǐ plokštelơje. Modelis, PNC, serijos numeris.
Ʋspơjimas / atsargumo ir saugos informacija.
Bendroji informacija ir patarimai
Aplinkosaugos informacija.
Galimi pakeitimai be Ƴspơjimo.
Page 73

LIETUVIŠKAI
73
1. SAUGOS INSTRUKCIJA
Atsargiai! Griežtai laikykitơs
naudojimosi instrukcijǐ. Gamintojas
neprisiima jokios atsakomybơs, jei
montuojant prietaisą buvo nesilaikoma
naudojimosi instrukcijoje nurodytǐ
taisykliǐ ir tokiu bnjdu prietaisas
sugedo, buvo pažeistas ar užsidegơ.
Gaubtas buvo sukurtas naudoti tik
namuose.
Ʋspơjimas! Nejunkite aparato Ƴ elektros
tinklą tol, kol Ƴdiegimas nơra visiškai
užbaigtas.
Prieš bet kokƳ priežinjros ar valymo
veiksmą, reikia išjungti gaubtą iš
elektros srovơs šaltinio, ištraukiant
kištuką iš rozetơs arba išjungiant
jungiklƳ.
Ʋrenginiu nepatariama naudotis vaikams,
žmonơms su fi zine arba protine negalia be
už juos atsakingo asmens priežinjros arba
specialiǐ nurodymǐ.
Vaikams neturi bnjti leidžiama žaisti su
Ƴrenginiu. Nenaudokite gaubto, jei grotelơs
sumontuotos netaisyklingai.
Gaubto niekada nenaudokite kaip atramos,
nebent toks jo naudojimo bnjdas yra
nurodytas kaip galimas.
Patalpa turi bnjti gerai vơdinama, kai
virtuvơs gaubtas yra naudojamas kartu su
kitais dujiniǐƳrenginiais.
Ʋsiurbiamas oras neturi bnjti nukreiptas Ƴ
dnjmtraukƳ, ƳtraukiantƳ garus, išeinanþius iš
dujiniǐ bei kitǐƳrenginiǐ.
Griežtai draudžiama gaminti maistą ant
ugnies po gaubtu.
Atvira ugnis pažeidžia fi ltrus ir gali sukelti
gaisrą, todơl jos reikia griežtai vengti.
Kepant reikia prižinjrơti, kad ƳkaitĊs aliejus
neužsidegtǐ.
Atsargiai! Naudojant kartu su maisto
gaminimo Ƴranga kai kurios detalơs gali
stipriai Ƴkaisti.
Bnjtina laikytis vietos valdžios nustatytǐ
dnjmtraukio techniniǐ bei saugos taisykliǐ.
Gaubtą reikia valyti tiek iš išorơs, tiek iš
vidaus (bent vieną kartą per mơnesƳ arba
taip, kaip nurodyta naudojimo instrukcijǐ
knygelơje).
Gaubto bei fi ltrǐ valymo ir keitimo instrukcijǐ
nesilaikymas didina gaisro pavojaus riziką.
Jei lempos neteisingai Ƴmontuotos ar
jǐ nơra, nenaudokite gaubto, gali Ƴvykti
elektros iškrova.
Ʋmonơ neatsako už Ƴvairius nepatogumus,
žalą arba gaisrą, kilusƳ nesilaikant Ƴrenginio
naudojimo instrukcijǐ, nurodytǐ šioje
knygelơje.
2. IZMANTOŠANA
Gaubtas ištraukia dnjmus ir garus,
susidaranþius gaminant maistą.
Pridedamoje montavimo instrukcijǐ
knygelơje nurodyta, kuri gaubto versija gali
bnjti naudojama Jnjsǐ turimame modelyje,
tai gali bnjti išorinio dnjmǐ ištraukimo ir
pašalinimo Ƴ išorĊƳrenginys
dnjmǐ fi ltravimo ir vidinơs recirkuliacijos
Ƴrenginys
.
arba
3. ƲRENGIMAS
Ʋtampa elektros tinkle turi atitikti Ƴtampą,
nurodytą etiketơje, priklijuotoje gaubto
viduje. Jei yra kištukas, reikia Ƴjungti
gaubtąƳ rozetĊ, atitinkanþią galiojanþius
nuostatus ir esanþią prieinamoje vietoje
net ir po gaubto Ƴdiegimo. Jeigu kištuko
(yra numatytas tiesioginis prijungimas
prie elektros srovơs) arba nơra rozetơs
prieinamoje vietoje net ir po gaubto
Ƴdiegimo, yra naudojamas dvipolis jungiklis,
pagal visas Ƴdiegimo taisykles užtikrinantis
visišką atsijungimą nuo elektros tinklo per
aukštos Ƴtampos atveju.
Dơmesio! Prieš vơl prijungdami
gaubtą prie elektros maitinimo tinklo
ir patikrindami, ar jis tinkamai veikia,
visada Ƴsitikinkite, ar tinklo kabelis
tinkamai Ƴmontuotas.
Page 74

74
www.aeg.com
Prie gaubto pridedamas specialus
maitinimo kabelis. Jei pastebơjote, kad
kabelis yra pažeistas, nedelsiant kreipkitơs
Ƴ techninơs pagalbos centrą dơl kabelio
keitimo.Jei viryklơ elektrinơ, mažiausias
atstumas tarp viryklơs kaitlentơs paviršiaus
ir žemiausios virtuvinio gaubto dalies turi
bnjti 50cm, o jei viryklơ dujinơ ar kombinuota
– 65cmo jei viryklơ dujinơ ar kombinuota.
Jei dujinơs viryklơs Ƴrengimo instrukcijoje
nurodomas didesnis atstumas, bnjtina Ƴ tai
atsižvelgti.
4. PRIEŽINjRA
Dơmesio! Prieš valydami prietaisą, išjunkite
jƳ iš elektros tinklo. Ištraukite kištuką iš
rozetơs arba išjunkite pagrindinƳ namǐ
elektros jungiklƳ.
Gaubtą reikia nuolat valyti (bent jau taip pat
dažnai kaip ir prižinjrint riebalǐ fi ltrus), tiek
iš vidaus, tiek ir iš išorơs. Valymui naudoti
šluostĊ, suvilgytą skystu neutraliu valikliu.
Nenaudokite abrazyviniǐ valymo priemoniǐ.
NENAUDOKITE SPIRITO!
Dơmesio! Netinkamai valant prietaisą bei
nesilaikant fi ltrǐ keitimo normǐ gali kilti
gaisro pavojus. Todơl rekomenduojama
laikytis pateiktǐ nurodymǐ.
Gamintojas neprisiima jokios atsakomybơs
už gaisrą bei galimus variklio gedimus,
kilusius dơl netinkamos priežinjros arba dơl
šiǐ nurodymǐ nesilaikymo.
4.2 Type 150 LONG LIFE - Plaunamas
aktyviosios anglies fi ltras
Anglies fi ltrą galima plauti kas antrą
mơnesƳ šiltu vandeniu specialiai tam
pritaikytais plovikliais arba indaplovơje,
65°C temperatnjroje (jei fi ltrą plaunate
indaplovơje, nustatykite visą plovimo ciklą,
fi ltrą plaukite atskirai nuo kitǐ indǐ).
SusikaupusƳ vandenƳ nupilkite
nepažeisdami fi ltro, tada nuimkite
pagalvơlĊ, esanþią plastmasiniame rơme,
ir 10 minuþiǐ ją džiovinkite orkaitơje,
Ƴkaitintoje iki 100° C.
PagalvơlĊ keiskite kas 3 metus arba
anksþiau, jei pastebơjote, kad audeklas
pažeistas.
4.3 Type 60/80 - Neplaunamas aktyviosios anglies fi ltras
Anglies fi ltras prisipildo naudojant jƳ ilgą
laiką, priklausomai nuo virtuvơs tipo ir
fi ltro valymo reguliarumo. Bet kokiu
riebalǐ
atveju, kapsulĊ reikia keisti mažiausiai kas
keturis mơnesius.
NEGALIMA plauti ar regeneruoti.
1
4.1 Nuo riebalǐ saugantis fi ltras - Turi
bnjti valomas vieną kartą per mơnesƳ
švelniais valikliais, rankiniu bnjdu ar
indaplovơje atitinkamoje temperatnjroje ir
trumpuoju ciklu.
Plaunant metalinƳ nuo riebalǐ saugantƳ fi ltrą
indaplovơje, jis gali prarasti spalvą, bet jo
fi ltravimo savybơs išliks nepakitusios .
2 2
Page 75

LIETUVIŠKAI
75
5. VALDYMAS
Gaubte yra valdymo skydelis su ištraukimo
greiþio parinkimu ir šviesos jungikliu, kuriuo
galima valdyti kepimo ploto šviesas.
Virtuvơje susikaupus dideliam garǐ kiekiui,
naudokite didžiausią greitƳ. Patartina Ƴjungti
ištraukimą prieš 5 minutes pradedant
gaminti, o baigus gaminti palikti veikti dar
apie 15 minuþiǐ.
Valdymo komandos priekinơje prietaiso
dalyje:
1A
1B
1C
A. Mygtukas OFF (išjungimo mygtukas)
- ON (Ƴjungimo mygtukas)
Paspauskite vieną ar kelis kartus, kol
pasirinksite norimą funkciją:
ON (Ƴjungimo mygtukas): gaubte
nustatomas paskutinis pasirinktas
greitis.
OFF (išjungimo mygtukas): visos
funkcijos išjungiamos, išskyrus
apšvietimą.
B. Greiþio pasirinkimo mygtukas (Ƴtraukimo
galingumas).
Norơdami pasirinkti tinkamąƳtraukimo
greitƳ (galingumą)(1 - 2 - 3 ),
paspauskite šƳ mygtuką vieną ar kelis
kartus.
C. Ekranas: rodo pasirinktąƳtraukimo
galingumą (1-2-3), taip pat rodo fi ltrǐ
persipildymą (F).
D. Intensyvaus greiþio nustatymo
mygtukas.
Nustaþius intensyvǐ greitƳ, jis veiks
maždaug 5 minutes, po to gaubtas
vơl ims veikti anksþiau nustatytu
greiþiu (nuo 1 iki 3) arba išsijungs,
jei prieš tai nebuvote pasirinkĊ jokio
greiþio. Norơdami išjungti intensyvǐ
greitƳ anks
þiau, nei praeis 5 minutơs,
paspauskite mygtuką A arba mygtuką
B.
E. Šviesos Ƴjungimo/išjungimo (ON/OFF)
mygtukas
1D
1E
Jei gaubtas ar valdymo komandos
neveikia, rekomenduojama išjungti gaubtą
iš maitinimo tinklo bent 5 sekundơms,
tuomet vơl Ƴjungti. Palaukite 15 sekundžiǐ ir
patikrinkite, ar gaubtas tinkamai veikia.
Riebalǐ fi ltro ir aktyviosios anglies fi ltro
kontrolơs prietaisas
Gaubte yra Ƴtaisas, kuris parodo, kada turi
bnjti atliekama priežinjra.
Jeigu gaubtas turi bnjti naudojamas
su anglies fi ltru, Ƴjunkite specialǐ fi ltro
prisisotinimo indikatoriǐ, kaip nurodyta
žemiau:
Gaubte turi bnjti nustatyta OFF funkcija.
Tuo paþiu metu spauskite mygtukus B ir
D tris sekundes, tuomet Ƴsijungs šviesos
diodas F, taip pat Ƴsijungs ir pradơs mirksơti
1^ greiþio šviesos diodas, po 1 sekundơs
pradơs mirksơti ir 2^ greiþio šviesos diodas,
o sistemoje pasigirs pyptelơjimas, rodantis,
kad nustatyta teisingai.
Norơdami išjungti anglies fi ltro signalą, tuo
paþiu metu spauskite mygtukus B ir D tris
sekundes, tuomet Ƴsijungs šviesos diodas
F, taip pat Ƴsijungs ir pradơs mirksơti 1^
greiþio mygtukas (riebalǐ fi ltro) ir 2^ greiþio
mygtukas, po 1 sekundơs liks mirksơti tik
1^ greiþio mygtukas, o sistemoje pasigirs
pyptelơjimas, rodantis, kad nustatơte
teisingai.
Riebalǐ fi ltro perpildymą rodantis
šviesos diodas (1)
Kai 1 greiþio šviesos diodas ima mirksơti,
reiškia, kad reikia išvalyti riebalǐ fi ltrus.
Norơdami išvalyti fi ltrus, Ʋdơmiai
perskaitykite riebalǐ fi ltro priežinjros
instrukcijas.
Aktyviosios anglies fi ltro perpildymą
rodantis šviesos diodas (2)
Kai 2 greiþio šviesos diodas ima mirksơti,
reiškia, kad reikia išvalyti aktyviosios
anglies fi ltrus.
Ʋdơmiai perskaitykite anglies fi ltro valymo ar
keitimo instrukcijas.
Perpildymo signalo atstatymas
AtlikĊ fi ltrǐ priežinjros darbus, laikykite
nuspaudĊ mygtuką A 3 sekundes, kol 1 ar
2 šviesos diodas nustos mirks
ơti.
Page 76

76
www.aeg.com
6. APŠVIETIMAS
Išjunkite prietaisą iš elektros tinklo.
Dơmesio! Prieš liesdami lempas,
Ƴsitikinkite, kad jos atvơsusios.
Naudokite tik halogenines 12V -20W
(daugiausia) lempas G4, saugokitơs, kad
nepaliestumơte jǐ rankomis.
Page 77

UK ȱɇɋɌɊɍɄɐȱə Ɂ ȿɄɋɉɅɍȺɌȺɐȱȲ
ȾɅə ȼȱȾɆȱɇɇɈȽɈ ɊȿɁɍɅɖɌȺɌɍ
Ⱦɹɤɭɽɦɨ, ɳɨ ɨɛɪɚɥɢ ɰɟɣ ɩɪɢɥɚɞ AEG. Ɇɢ ɫɬɜɨɪɢɥɢ ɣɨɝɨ ɞɥɹ ɛɟɡɞɨɝɚɧɧɨʀ ɪɨɛɨɬɢ
ɩɪɨɬɹɝɨɦ ɛɚɝɚɬɶɨɯ ɪɨɤɿɜ, ɡɚ ɿɧɧɨɜɚɰɿɣɧɢɦɢ ɬɟɯɧɨɥɨɝɿɹɦɢ, ɹɤɿ ɞɨɩɨɦɚɝɚɸɬɶ ɪɨɛɢɬɢ
ɠɢɬɬɹ ɩɪɨɫɬɿɲɢɦ - ɰɿ ɜɥɚɫɬɢɜɨɫɬɿ, ɹɤɿ ɦɨɠɧɚ ɣ ɧɟ ɡɧɚɣɬɢ ɜ ɡɜɢɱɚɣɧɢɯ ɩɪɢɥɚɞɚɯ. Ȼɭɞɶ
ɥɚɫɤɚ, ɩɪɢɞɿɥɿɬɶ ɞɟɤɿɥɶɤɚ ɯɜɢɥɢɧ, ɚɛɢ ɩɪɨɱɢɬɚɬɢ, ɹɤ ɨɬɪɢɦɚɬɢ ɧɚɣɤɪɚɳɟ ɜɿɞ ɰɶɨɝɨ
ɩɪɢɥɚɞɭ.
Ɂɜɟɪɬɚɣɬɟɫɹ ɧɚ ɧɚɲ ɜɟɛ-ɫɚɣɬ:
ɉɨɪɚɞɢ ɡ ɜɢɤɨɪɢɫɬɚɧɧɹ, ɛɪɨɲɭɪɢ, ɿɧɫɬɪɭɤɰɿʀ ɡ ɭɫɭɧɟɧɧɹ ɧɟɫɩɪɚɜɧɨɫɬɟɣ,
ɫɟɪɜɿɫɧɚ ɿɧɮɨɪɦɚɰɿɹ:
www.aeg.com
Ɂɚɪɟɽɫɬɪɭɣɬɟ ɜɢɪɿɛ, ɳɨɛ ɨɬɪɢɦɚɬɢ ɩɨɤɪɚɳɟɧɟ ɨɛɫɥɭɝɨɜɭɜɚɧɧɹ:
www.aeg.com/productregistration
ɉɪɢɞɛɚɧɧɹ ɩɪɢɥɚɞɞɹ, ɜɢɬɪɚɬɧɢɯ ɦɚɬɟɪɿɚɥɿɜ ɬɚ ɨɪɢɝɿɧɚɥɶɧɢɯ ɡɚɩɱɚɫɬɢɧ ɞɥɹ
ɜɚɲɨɝɨ ɩɪɢɥɚɞɭ:
www.aeg.com/shop
ɈɏɈɊɈɇȺ ȾɈȼɄȱɅɅə
ɍɄɊȺȲɇɋɖɄȺ
77
Ɂɞɚɜɚɣɬɟ ɧɚ ɩɨɜɬɨɪɧɭ ɩɟɪɟɪɨɛɤɭ ɦɚɬɟɪɿɚɥɢ, ɩɨɡɧɚɱɟɧɿ ɜɿɞɩɨɜɿɞɧɢɦ ɫɢɦɜɨɥɨɦ .
ȼɢɤɢɞɚɣɬɟ ɭɩɚɤɨɜɤɭ ɭ ɜɿɞɩɨɜɿɞɧɿ ɤɨɧɬɟɣɧɟɪɢ ɞɥɹ ɜɬɨɪɢɧɧɨʀ ɫɢɪɨɜɢɧɢ.
Ⱦɨɩɨɦɨɠɿɬɶ ɡɚɯɢɫɬɢɬɢ ɧɚɜɤɨɥɢɲɧɽ ɫɟɪɟɞɨɜɢɳɟ ɬɚ ɡɞɨɪɨɜ’ɹ ɿɧɲɢɯ ɥɸɞɟɣ ɿ ɡɚɛɟɡɩɟɱɢɬɢ
ɜɬɨɪɢɧɧɭ ɩɟɪɟɪɨɛɤɭ ɟɥɟɤɬɪɢɱɧɢɯ ɿ ɟɥɟɤɬɪɨɧɧɢɯ ɩɪɢɥɚɞɿɜ. ɇɟ ɜɢɤɢɞɚɣɬɟ ɩɪɢɥɚɞɢ,
ɩɨɡɧɚɱɟɧɿ ɜɿɞɩɨɜɿɞɧɢɦ ɫɢɦɜɨɥɨɦ
ɩɪɨɞɭɤɬ ɞɨ ɡɚɜɨɞɭ ɿɡ ɜɬɨɪɢɧɧɨʀ ɩɟɪɟɪɨɛɤɢ ɭ ɜɚɲɿɣ ɦɿɫɰɟɜɨɫɬɿ ɚɛɨ ɡɜɟɪɧɿɬɶɫɹɞɨ
ɦɿɫɰɟɜɢɯ ɦɭɧɿɰɢɩɚɥɶɧɢɯ ɨɪɝɚɧɿɜ ɜɥɚɞɢ.
, ɪɚɡɨɦ ɡ ɿɧɲɢɦ ɞɨɦɚɲɧɿɦ ɫɦɿɬɬɹɦ. ɉɨɜɟɪɧɿɬɶ
ɊɈȻɈɌȺ Ɂ ɄɅȱȯɇɌȺɆɂ ɌȺ ɋȿɊȼȱɋɇȿ
ɈȻɋɅɍȽɈȼɍȼȺɇɇə
Ɋɟɤɨɦɟɧɞɭɽɬɶɫɹ ɜɢɤɨɪɢɫɬɨɜɭɜɚɬɢ ɨɪɢɝɿɧɚɥɶɧɿ ɡɚɩɱɚɫɬɢɧɢ.
ɉɪɢ ɡɜɟɪɬɚɧɧɿ ɞɨ ɫɟɪɜɿɫɧɨɝɨ ɰɟɧɬɪɭ ɧɟɨɛɯɿɞɧɨ ɦɚɬɢ ɧɚɫɬɭɩɧɭ ɿɧɮɨɪɦɚɰɿɸ.
Ȳʀ ɦɨɠɧɚ ɡɧɚɣɬɢ ɧɚ ɬɚɛɥɢɱɰɿ ɡ ɬɟɯɧɿɱɧɢɦɢ ɞɚɧɢɦɢ. Ɇɨɞɟɥɶ, ɧɨɦɟɪ ɜɢɪɨɛɭ, ɫɟɪɿɣɧɢɣ
ɧɨɦɟɪ.
ɍɜɚɝɚ! ȼɚɠɥɢɜɚ ɿɧɮɨɪɦɚɰɿɹ ɡ ɬɟɯɧɿɤɢ ɛɟɡɩɟɤɢ.
Ɂɚɝɚɥɶɧɚ ɿɧɮɨɪɦɚɰɿɹ ɣ ɪɟɤɨɦɟɧɞɚɰɿʀ
ȱɧɮɨɪɦɚɰɿɹ ɳɨɞɨ ɡɚɯɢɫɬɭ ɧɚɜɤɨɥɢɲɧɶɨɝɨ ɫɟɪɟɞɨɜɢɳɚ.
Ⱦɚɧɿ ɦɨɠɭɬɶ ɛɭɬɢ ɡɦɿɧɟɧɿ ɛɟɡ ɩɨɩɟɪɟɞɠɟɧɧɹ.
Page 78

78
www.aeg.com
1. ȱɇɎɈɊɆȺɐȱə Ɂ
ɌȿɏɇȱɄɂ ȻȿɁɉȿɄɂ
Ɉɛɟɪɟɠɧɨ! ɑɿɬɤɨ ɞɨɬɪɢɦɭɜɚɬɢɫɹ
ɩɪɢɜɟɞɟɧɢɯ ɜ ɞɚɧɨɦɭ ɤɟɪɿɜɧɢɰɬɜɿ
ɿɧɫɬɪɭɤɰɿɣ. ȼɢɪɨɛɧɢɤ ɡɧɿɦɚɽ ɡ ɫɟɛɟ
ɜɫɹɤɭ ɜɿɞɩɨɜɿɞɚɥɶɧɿɫɬɶ ɡɚ ɧɟɩɨɥɚɞɤɢ,
ɡɛɢɬɤɢ ɚɛɨ ɩɨɠɚɪ, ɳɨ ɦɨɠɟ ɦɚɬɢ
ɦɿɫɰɟ ɩɪɢ ɜɢɤɨɪɢɫɬɚɧɧɿ ɩɪɢɛɨɪɭ
ɜɧɚɫɥɿɞɨɤ ɧɟɜɢɤɨɧɚɧɧɹ ɿɧɫɬɪɭɤɰɿɣ,
ɩɪɢɜɟɞɟɧɢɯ ɜ ɞɚɧɨɦɭ ɤɟɪɿɜɧɢɰɬɜɿ.
ȼɢɬɹɠɤɚ ɩɪɢɡɧɚɱɟɧɚ ɜɢɤɥɸɱɧɨ ɞɥɹ
ɩɨɛɭɬɨɜɨɝɨ ɜɢɤɨɪɢɫɬɚɧɧɹ.
ɉɨɩɟɪɟɞɠɟɧɧɹ! ɇɟ ɩɿɞ’ɽɞɧɭɜɚɬɢ
ɩɪɢɫɬɪɿɣ ɞɨ ɟɥɟɤɬɪɨɦɟɪɟɠɿ ɩɨɤɢ
ɭɫɬɚɧɨɜɤɚ ɩɨɜɧɿɫɬɸ ɧɟ ɡɚɜɟɪɲɟɧɚ.
ɉɟɪɟɞ ɜɢɤɨɧɚɧɧɹɦ ɛɭɞɶ-ɹɤɨʀ ɨɩɟɪɚɰɿʀ
ɩɨ ɱɢɫɬɰɿ ɚɛɨ ɪɟɦɨɧɬɭ, ɜɿɞɤɥɸɱɢɬɢ
ɤɨɜɩɚɤ ɜɿɞ ɟɥɟɤɬɪɨɦɟɪɟɠɿ, ɜɢɣɦɚɸɱɢ
ɜɢɥɤɭ ɚɛɨ ɜɿɞɤɥɸɱɚɸɱɢ ɨɫɧɨɜɧɢɣ
ɜɢɦɢɤɚɱ ɩɪɢɦɿɳɟɧɧɹ.
Ɉɛɥɚɞɧɚɧɧɹ ɧɟ ɩɪɢɡɧɚɱɟɧɨ ɞɥɹ
ɜɢɤɨɪɢɫɬɚɧɧɹ ɡ ɛɨɤɭ ɞɿɬɟɣ ɚɛɨ ɥɸɞɟɣ ɡ
ɨɛɦɟɠɟɧɢɦɢ ɮɿɡɢɱɧɢɦɢ ɦɨɠɥɢɜɨɫɬɹɦɢ
ɫɩɪɢɣɧɹɬɬɹ ɚɛɨ ɪɨɡɭɦɨɜɢɦɢ ɿ ɡ
ɜɿɞɫɭɬɧɿɫɬɸ ɞɨɫɜɿɞɭ ɿ ɡɧɚɧɶ, ɡɚ ɜɢɧɹɬɤɨɦ
ɜɢɩɚɞɤɿɜ ɤɨɥɢ ɜɨɧɢ ɡɧɚɯɨɞɹɬɶɫɹ ɩɿɞ
ɧɚɝɥɹɞɨɦ ɚɛɨ ɧɚɜɱɟɧɿ ɜɢɤɨɪɢɫɬɨɜɭɜɚɬɢ
ɨɛɥɚɞɧɚɧɧɹ ɥɸɞɢɧɨɸ, ɳɨ ɜɿɞɩɨɜɿɞɚɽ
ɡɚ ʀɯ ɛɟɡɩɟɤɭ. ɇɟ ɞɨɩɭɫɤɚɣɬɟ ɞɿɬɟɣ ɞɨ
ɩɪɢɥɚɞɭ ɛɟɡ ɧɚɝɥɹɞɭ ɨɛɥɚɞɧɚɧɧɹ.
ɇɟ ɜɢɤɨɪɢɫɬɨɜɭɣɬɟ ɜɢɬɹɠɤɭ, ɹɤɳɨ ɪɟɲɿɬɤɚ
ɧɟɩɪɚɜɢɥɶɧɨ ɡɦɨɧɬɨɜɚɧɚ ɜɢɬɹɠɧɢɣ
ɤɨɜɩɚɤ ɛɟɡ ɩɪɚɜɢɥɶɧɨ ɜɦɨɧɬɨɜɚɧɨʀ
ɪɟɲɿɬɤɢ!
ȼɢɬɹɠɤɚ ɧɟ ɩɨɜɢɧɚ ɜɢɤɨɪɢɫɬɨɜɭɜɚɬɢɫɶ ɹɤ
ɨɩɨɪɧɚ ɩɨɜɟɪɯɧɹ, ɥɢɲɟ ɭ ɜɢɩɚɞɤɚɯ ɤɨɥɢ
ɹɫɧɨ ɩɪɨ ɰɟ ɫɤɚɡɚɧɨ.
ȼ ɜɢɩɚɞɤɭ ɜɢɤɨɪɢɫɬɚɧɧɹ ɜɢɬɹɠɤɢ ɪɚɡɨɦ
ɡ ɿɧɲɢɦɢ ɩɪɢɫɬɪɨɹɦɢ ɧɚ ɝɚɡɿ ɚɛɨ ɿɧɲɢɯ
ɝɨɪɸɱɢɯ, ɩɪɢɦɿɳɟɧɧɹ ɦɚɽ ɦɚɬɢ ɞɨɫɬɚɬɧɸ
ɜɟɧɬɢɥɹɰɿɸ. ɉɨɜɿɬɪɹ, ɳɨ ɜɫɦɨɤɬɭɽɬɶɫɹ ɧɟ
ɦɚɽ ɛɭɬɢ ɧɚɩɪɚɜɥɟɧɨ ɜ ɜɢɬɹɠɧɢɣ ɤɚɧɚɥ,
ɹɤɢɣ ɜɢɤɨɪɢɫɬɨɜɭɽɬɶɫɹ ɞɥɹ ɜɢɤɢɞɭ ɞɢɦɿɜ
ɜɿɞ ɪɨɛɨɬɢ ɩɪɢɫɬɪɨʀɜ ɧɚ ɝɚɡɿ ɚɛɨ ɿɧɲɢɯ
ɝɨɪɸɱɢɯ. ɋɭɜɨɪɨ ɡɚɛɨɪɨɧɹɽɬɶɫɹ ɝɨɬɭɜɚɬɢ
ɭɞɚɥɢɬɶ ʀɠɭ ɩɿɞ ɜɨɝɧɟɦ.
ȼɢɤɨɪɢɫɬɚɧɧɹ ɜɿɥɶɧɨɝɨ ɜɨɝɧɸ ɽ
ɲɤɿɞɥɢɜɢɦ ɞɥɹ ɮɿɥɶɬɪɿɜ ɿ ɦɨɠɟ ɜɢɤɥɢɤɚɬɢ
ɩɨɠɟɠɭ, ɨɬɠɟ ɧɟɨɛɯɿɞɧɨ ɭɧɢɤɚɬɢ ɣɨɝɨ
ɜɢɤɨɪɢɫɬɚɧɧɹ ɭ ɛɭɞɶ-ɹɤɨɦɭ ɜɢɩɚɞɤɭ.
ɋɦɚɠɟɧɧɹ ɦɚɽ ɜɿɞɛɭɜɚɬɢɫɹ ɩɿɞ
ɤɨɧɬɪɨɥɟɦ, ɳɨɛ ɭɧɢɤɧɭɬɢ ɡɚɣɦɚɧɧɹ
ɪɨɡɿɝɪɿɬɨʀ ɨɥɿʀ.
Ɉɛɟɪɟɠɧɨ! ȼɿɞɤɪɢɬɿ ɱɚɫɬɢɧɢ
ɦɨɠɭɬɶ ɫɢɥɶɧɨ ɧɚɝɪɿɜɚɬɢɫɹ
ɤɨɥɢ ɜɢɤɨɪɢɫɬɨɜɭɸɬɶɫɹ ɪɚɡɨɦ ɡ
ɩɪɢɥɚɞɚɦɢ ɞɥɹ ɜɚɪɿɧɧɹ.
ɓɨ ɠ ɫɬɨɫɭɽɬɶɫɹ ɜɢɤɨɪɢɫɬɚɧɧɹ ɬɟɯɧɿɱɧɢɯ
ɩɪɚɜɢɥ ɬɚ ɩɪɚɜɢɥ ɛɟɡɩɟɤɢ ɞɥɹ ɜɢɤɢɞɭ
ɞɢɦɿɜ, ɬɨ ɧɟɨɛɯɿɞɧɨ ɱɿɬɤɨ ɞɨɬɪɢɦɭɜɚɬɢɫɶ
ɧɨɪɦɚɬɢɜɿɜ, ɩɟɪɟɞɛɚɱɟɧɢɯ ɦɿɫɰɟɜɢɦɢ
ɿɧɫɬɚɧɰɿɹɦɢ. ɑɢɳɟɧɧɹ ɜɢɬɹɠɤɢ ɦɚɽ
ɪɟɝɭɥɹɪɧɨ ɩɪɨɜɨɞɢɬɢɫɹ, ɹɤ ɜɫɟɪɟɞɢɧɿ,
ɬɚɤ ɿ ɧɚɡɨɜɧɿ (ɇȿ Ɇȿɇɒȿ ɈȾɇɈȽɈ
ɊȺɁɍ ɇȺ Ɇȱɋəɐɖ, ɜ ɛɭɞɶ-ɹɤɨɦɭ ɜɢɩɚɞɤɭ
ɜɢɤɨɧɭɜɚɬɢ ɜɫɿ ɿɧɫɬɪɭɤɰɿʀ, ɳɨ ɨɩɢɫɚɧɿ ɜ
ɰɶɨɦɭ ɤɟɪɿɜɧɢɰɬɜɿ).
ɇɟɞɨɬɪɢɦɚɧɧɹ ɧɨɪɦ ɨɱɢɳɟɧɧɹ ɜɢɬɹɠɤɢ
ɬɚ ɡɚɦɿɧɢ ɿ ɨɱɢɳɟɧɧɹ ɮɿɥɶɬɪɿɜ ɦɨɠɟ
ɜɢɤɥɢɤɚɬɢ ɪɢɡɢɤ ɩɨɠɟɠɿ.
ɧɟ ɜɢɤɨɪɢɫɬɨɜɭɣɬɟ ɿ ɧɟ ɡɚɥɢɲɚɣɬɟ ɛɟɡ
ɜɿɪɧɨ ɜɦɨɧɬɨɜɚɧɢɯ ɥɚɦɩ ɭ ɡɜ’ɹɡɤɭ ɡ
ɦɨɠɥɢɜɢɦ ɪɢɡɢɤɨɦ ɭɞɚɪɭ ɟɥɟɤɬɪɢɱɧɢɦ
ɫɬɪɭɦɨɦ.
ɇɟ ɧɟɫɟɬɶɫɹ ɠɨɞɧɨʀ ɜɿɞɩɨɜɿɞɚɥɶɧɨɫɬɿ
ɡɚ ɧɟɫɩɪɚɜɧɨɫɬɿ, ɭɲɤɨɞɠɟɧɧɹ ɬɚ ɩɨɠɟɠɿ
ɧɚɧɟɫɟɧɿ ɩɪɢɫɬɪɨɸ, ɳɨ ɽ ɧɚɫɥɿɞɤɨɦ
ɧɟɞɨɬɪɢɦɚɧɧɹ ɩɨɪɚɞ, ɩɨɞɚɧɢɯ ɜ ɞɚɧɿɣ
ɿɧɫɬɪɭɤɰɿʀ.
2. ȼɂɄɈɊɂɋɌȺɇɇə
ȼɢɬɹɠɤɚ ɫɥɭɠɢɬɶ ɞɥɹ ɜɫɦɨɤɬɭɜɚɧɧɹ
ɤɿɩɬɹɜɢ ɬɚ ɩɚɪɭ, ɳɨ ɭɬɜɨɪɸɸɬɶɫɹ ɩɿɞ ɱɚɫ
ɩɪɢɝɨɬɭɜɚɧɧɹ ʀɠɿ.
ȼ ɿɧɫɬɪɭɤɰɿʀ, ɳɨ ɞɨɞɚɽɬɶɫɹ ɜɤɚɡɭɽɬɶɫɹ, ɜ
ɹɤɨɦɭ ɜɢɤɨɧɚɧɧɿ ɦɨɠɧɚ ɜɢɤɨɪɢɫɬɨɜɭɜɚɬɢ
ɜɚɲɭ ɦɨɞɟɥɶ - ɹɤ ɜɢɬɹɠɤɭ ɡ ɜɢɜɟɞɟɧɧɹɦ
ɧɚɡɨɜɧɿ
ɜɧɭɬɪɿɲɧɶɨɸ ɪɟɰɢɪɤɭɥɹɰɿɽɸ ɩɨɜɿɬɪɹ
, ɚɛɨ ɹɤ ɜɢɬɹɠɤɭ ɡ
.
3. ȱɇɋɌȺɅəɐȱə
ɇɚɩɪɭɝɚ ɜ ɟɥɟɤɬɪɨɦɟɪɟɠɿ ɦɚɽ
ɜɿɞɩɨɜɿɞɚɬɢ ɜɤɚɡɚɧɢɦ ɯɚɪɚɤɬɟɪɢɫɬɢɤɚɦ
ɧɚ ɟɬɢɤɟɬɰɿ, ɹɤɚ ɡɧɚɯɨɞɢɬɶɫɹ ɜɫɟɪɟɞɢɧɿ
ɜɢɬɹɠɤɢ. əɤɳɨ ɜ ɤɨɦɩɥɟɤɬ ɜɯɨɞɢɬɶ
ɜɢɥɤɚ ɩɿɞ’ɽɞɧɚɧɧɹ ɜ ɟɥɟɤɬɪɨɦɟɪɟɠɭ,
ɬɨ ɫɥɿɞ ɩɿɞ’ɽɞɧɚɬɢ ɜɢɬɹɠɤɭ ɞɨ ɪɨɡɟɬɤɢ,
ɳɨ ɜɿɞɩɨɜɿɞɚɽ ɿɫɧɭɸɱɢɦ ɧɨɪɦɚɦ ɬɚ
ɡɧɚɯɨɞɢɬɶɫɹ ɜ ɞɨɫɬɭɩɧɨɦɭ ɦɿɫɰɿ, ɳɨ
ɦɨɠɧɚ ɜɢɤɨɧɚɬɢ ɣ ɩɿɫɥɹ ɿɧɫɬɚɥɹɰɿʀ. əɤɳɨ
ɠ ɜɢɥɤɚ ɧɟ ɜɯɨɞɢɬɶ ɜ ɤɨɦɩɥɟɤɬ (ɩɪɹɦɟ
ɩɿɞ’ɽɞɧɚɧɧɹ ɜ ɟɥɟɤɬɪɨɦɟɪɟɠɭ), ɚɛɨ
ɪɨɡɟɬɤɚ ɧɟ ɡɧɚɯɨɞɢɬɶɫɹ ɜ ɞɨɫɬɭɩɧɨɦɭ
ɦɿɫɰɿ, ɬɚɤɨɠ ɿ ɩɿɫɥɹ ɿɧɫɬɚɥɹɰɿʀ, ɬɨ ɫɥɿɞ
ɜɦɨɧɬɭɜɚɬɢ ɧɚɥɟɠɧɢɣ ɞɜɨɯ-ɩɨɥɸɫɧɢɣ
ɜɢɦɢɤɚɱ, ɹɤɢɣ ɡɚɛɟɡɩɟɱɢɬɶ ɩɨɜɧɟ
ɜɿɞɤɥɸɱɟɧɧɹ ɜɿɞ ɦɟɪɟɠɿ ɜ ɭɦɨɜɚɯ
ɩɟɪɟɧɚɩɪɭɝɢ III ɤɚɬɟɝɨɪɿʀ, ɜ ɩɨɜɧɿɣ
ɜɿɞɩɨɜɿɞɧɨɫɬɿ ɡ ɩɪɚɜɢɥɚɦɢ ɿɧɫɬɚɥɹɰɿʀ.
ɍɜɚɝɚ! ɩɟɪɟɞ ɬɢɦ ɹɤ ɡɧɨɜɭ ɩɿɞɤɥɸɱɢɬɢ
ɜɢɬɹɠɤɭ ɞɨ ɟɥɟɤɬɪɨɦɟɪɟɠɿ ɿ
ɩɟɪɟɜɿɪɢɬɢ ɩɪɚɜɢɥɶɧɿɫɬɶ ɪɨɛɨɬɢ,
ɡɚɜɠɞɢ ɤɨɧɬɪɨɥɸɣɬɟ ɳɨɛ ɲɧɭɪ
ɦɟɪɟɠɿ ɛɭɜ ɡɦɨɧɬɨɜɚɧɢɣ ɜɿɪɧɨ.
Page 79

ɍɄɊȺȲɇɋɖɄȺ
79
ȼɢɬɹɠɧɢɣ ɤɨɜɩɚɤ ɦɚɽ ɫɩɟɰɿɚɥɶɧɢɣ ɩɪɨɜɿɞ
ɠɢɜɥɟɧɧɹ; ɭ ɜɢɩɚɞɤɭ ɩɨɲɤɨɞɠɟɧɧɹ
ɩɪɨɜɨɞɭ, ɡɚɦɨɜɬɟ ɣɨɝɨ ɭ ɫɥɭɠɛɿ
ɬɟɯɧɿɱɧɨɝɨ ɨɛɫɥɭɝɨɜɭɜɚɧɧɹ.ȼɿɞɫɬɚɧɶ
ɧɢɠɧɶɨʀ ɜɿɞɱɚɫɬɢɧɢ ɜɢɬɹɠɤɢ ɞɨ ɩɨɫɭɞɭ
ɧɚ ɤɭɯɨɧɧɿɣ ɩɥɢɬɿ ɦɚɽ ɛɭɬɢ ɧɟ ɦɟɧɲɟ
50cm, ɭ ɜɢɩɚɞɤɭ ɟɥɟɤɬɪɢɱɧɢɯ ɩɥɢɬ, ɬɚ
65cm, ɭ ɜɢɩɚɞɤɭ ɝɚɡɨɜɢɯ ɬɚ ɤɨɦɛɿɧɨɜɚɧɢɯ
ɩɥɢɬ.
ɇɟɨɛɯɿɞɧɨ ɩɪɢɣɦɚɬɢ ɞɨ ɭɜɚɝɢ ɜɿɞɫɬɚɧɿ,
ɹɤɳɨ ɜɤɚɡɭɸɬɶɫɹ ɜ ɿɧɫɬɪɭɤɰɿʀ ɡ ɿɧɫɬɚɥɹɰɿʀ
ɝɚɡɨɜɨʀ ɩɥɢɬɢ.
4. ɈȻɋɅɍȽɈȼɍȼȺɇɇə
ɍɜɚɝɚ! ɉɟɪɟɞ ɛɭɞɶ-ɹɤɨɸ ɨɩɟɪɚɰɿɽɸ
ɱɢɫɬɤɢ ɱɢ ɨɛɫɥɭɝɨɜɭɜɚɧɧɹ, ɜɿɞ’ɽɞɧɚɣɬɟ
ɜɢɬɹɠɤɭ ɜɿɞ ɟɥɟɤɬɪɨɦɟɪɟɠɿ, ɜɢɬɹɝɭɸɱɢ
ɜɢɥɤɭ ɚɛɨ ɜɿɞɤɥɸɱɚɸɱɢ ɝɨɥɨɜɧɢɣ
ɜɢɦɢɤɚɱ ɠɢɬɥɚ.
ȼɢɬɹɠɤɚ ɦɚɽ ɱɢɫɬɢɬɢɫɶ ɱɚɫɬɨ ɿ ɹɤ ɡɨɜɧɿ
ɬɚɤ ɿ ɜ ɫɟɪɟɞɢɧɿ (ɩɨ ɤɪɚɣɧɿɣ ɦɿɪɿ ɡ ɬɚɤɨɸ ɠ
ɩɟɪɿɨɞɢɱɧɿɫɬɸ ɹɤ ɿ ɞɨɝɥɹɞ ɡɚ ɮɿɥɶɬɪɚɦɢ
ɞɥɹ ɡɚɬɪɢɦɚɧɧɹ ɠɢɪɿɜ). Ⱦɥɹ ɱɢɫɬɤɢ
ɜɢɤɨɪɢɫɬɨɜɭɣɬɟ ɫɩɟɰɿɚɥɶɧɭ ɫɟɪɜɟɬɤɭ,
ɧɚɦɨɱɟɧɭ ɧɟɣɬɪɚɥɶɧɢɦ ɪɿɞɤɢɦ ɦɢɸɱɢɦ
ɡɚɫɨɛɨɦ. ɇɟ ɜɢɤɨɪɢɫɬɨɜɭɣɬɟ ɡɚɫɨɛɢ ɳɨ
ɦɚɸɬɶ ɚɛɪɚɡɢɜɧɿ ɦɚɬɟɪɿɚɥɢ.
ɇȿ ȼɂɄɈɊɂɋɌɈȼɍɃɌȿ ɋɉɂɊɌ!
ɍɜɚɝɚ! ɇɟ ɜɢɤɨɧɚɧɧɹ ɩɪɚɜɢɥ ɱɢɳɟɧɧɹ ɿ
ɡɚɦɿɧɢ ɮɿɥɶɬɪɿɜ ɦɨɠɟ ɩɪɢɜɟɫɬɢ ɞɨ ɪɢɡɢɤɭ
ɜɢɧɢɤɧɟɧɧɹ ɩɨɠɟɠɿ. Ɍɨɦɭ ɪɟɤɨɦɟɧɞɭɽɦɨ
ɞɨɬɪɢɦɭɜɚɬɢɫɶ ɩɪɢɜɟɞɟɧɢɯ ɿɧɫɬɪɭɤɰɿɣ.
Ɂɧɿɦɚɽɬɶɫɹ ɜɫɹɤɚ ɜɿɞɩɨɜɿɞɚɥɶɧɿɫɬɶ ɜ
ɡɜ’ɹɡɤɭ ɡ ɦɨɠɥɢɜɢɦɢ ɭɲɤɨɞɠɟɧɧɹɦɢ
ɞɜɢɝɭɧɚ ɿ ɩɨɠɟɠɚɦɢ, ɳɨ ɜɢɧɢɤɥɢ
ɜɧɚɫɥɿɞɨɤ ɧɟɜɿɪɧɨɝɨ ɪɟɦɨɧɬɭ ɚɛɨ ɧɟ
ɜɢɤɨɧɚɧɧɹ ɜɢɳɟɨɩɢɫɚɧɢɯ ɩɨɩɟɪɟɞɠɟɧɶ.
4.1 Ɏɿɥɶɬɪ ɡɚɬɪɢɦɤɢ ɠɢɪɿɜ
ɉɨɜɢɧɟɧ ɱɢɫɬɢɬɢɫɶ ɨɞɢɧ ɪɚɡ ɧɚ ɦɿɫɹɰɶ
ɧɟ ɫɢɥɶɧɨɞɿɸɱɢɦɢ ɦɢɸɱɢɦɢ ɡɚɫɨɛɚɦɢ,
ɜɪɭɱɧɭ ɚɛɨ ɜ ɩɨɫɭɞɨɦɢɣɧɿɣ ɦɚɲɢɧɿ ɩɪɢ
ɧɢɡɶɤɿɣ ɬɟɦɩɟɪɚɬɭɪɿ ɿ ɡ ɤɨɪɨɬɤɢɦ ɰɢɤɥɨɦ.
ɉɪɢ ɦɢɬɬɿ ɜ ɩɨɫɭɞɨɦɢɣɧɿɣ ɦɚɲɢɧɿ
ɦɟɬɚɥɟɜɢɣ ɮɿɥɶɬɪ ɡɚɬɪɢɦɤɢ ɠɢɪɭ ɦɨɠɟ
ɜɬɪɚɬɢɬɢ ɤɨɥɿɪ, ɚɥɟ ɣɨɝɨ ɯɚɪɚɤɬɟɪɢɫɬɢɤɢ
ɡ ɮɿɥɶɬɪɭɜɚɧɧɹ ɠɨɞɧɢɦ ɱɢɧɨɦ ɧɟ
ɡɦɿɧɹɬɶɫɹ.
4.2 Type 150 LONG LIFE - ȼɭɝɿɥɶɧɢɣ
ɮɿɥɶɬɪ, ɩɿɞɥɹɝɚɽ ɦɢɬɬɸ
ȼɭɝɿɥɶɧɢɣ ɮɿɥɶɬɪ ɦɨɠɧɚ ɦɢɬɢ ɤɨɠɧɿ
ɞɜɚ ɦɿɫɹɰɿ ɜ ɬɟɩɥɿɣ ɜɨɞɿ ɜɿɞɩɨɜɿɞɧɢɦɢ
ɦɢɸɱɢɦɢ ɡɚɫɨɛɚɦɢ, ɚɛɨ ɜ ɩɨɫɭɞɨɦɢɣɧɿɣ
ɦɚɲɢɧɿ ɩɪɢ 65°C (ɜ ɨɫɬɚɧɧɶɨɦɭ ɜɢɩɚɞɤɭ
ɜɢɤɨɧɚɬɢ ɩɨɜɧɢɣ ɰɢɤɥ ɦɢɬɬɹ ɛɟɡ ɩɨɫɭɞɢ
ɜɫɟɪɟɞɢɧɿ ɩɨɫɭɞɨɦɢɣɧɨʀ ɦɚɲɢɧɢ).
Ɉɛɟɪɟɠɧɨ, ɳɨɛ ɧɟ ɩɨɲɤɨɞɢɬɢ ɮɿɥɶɬɪ,
ɡɥɢɬɢ ɧɚɞɥɢɲɤɨɜɭ ɜɨɞɭ, ɩɨɬɿɦ ɜɢɣɧɹɬɢ ɡ
ɩɥɚɫɬɦɚɫɨɜɨʀ ɪɚɦɢ ɩɨɞɭɲɤɭ ɿ ɩɨɬɪɢɦɚɬɢ
ʀʀ ɜ ɩɟɱɿ ɩɪɨɬɹɝɨɦ 10 ɯɜ. ɩɪɢ ɬɟɦɩɟɪɚɬɭɪɿ
100° ɋ ɞɥɹ ɡɚɛɟɡɩɟɱɟɧɧɹ ɩɨɜɧɨɝɨ
ɨɫɭɲɟɧɧɹ.
Ɂɚɦɿɧɹɬɢ ɩɨɞɭɲɤɭ ɤɨɠɧɿ 3 ɪɨɤɢ ɿ
ɤɨɠɧɨɝɨ ɪɚɡɭ, ɤɨɥɢ ɩɨɥɨɬɧɨ ɜɢɹɜɢɬɶɫɹ
ɩɨɲɤɨɞɠɟɧɢɦ.
4.3 Type 60/80 - ȼɭɝɿɥɶɧɢɣ ɮɿɥɶɬɪ, ɇȿ
ɩɿɞɥɹɝɚɽ ɦɢɬɬɸ
ɉɟɪɟɜɿɪɤɚ ɜɭɝɿɥɶɧɨɝɨ ɮɿɥɶɬɪɭ ɧɚ
ɧɚɫɢɱɟɧɧɹ ɩɪɨɜɨɞɢɬɶɫɹ ɩɿɫɥɹ ɛɿɥɶɲ
ɦɟɧɲ ɞɨɜɝɨɝɨ ɩɟɪɿɨɞɭ ɜɢɤɨɪɢɫɬɚɧɧɹ ɜ
ɡɚɥɟɠɧɨɫɬɿ ɜɿɞ ɬɢɩɭ ɤɭɯɧɿ ɿ ɪɟɝɭɥɹɪɧɨɫɬɿ
ɨɱɢɫɬɤɢ ɮɿɥɶɬɪɭ ɠɢɪɿɜ. ɍ ɛɭɞɶ-ɹɤɨɦɭ
ɜɢɩɚɞɤɭ ɧɟɨɛɯɿɞɧɨ ɡɚɦɿɧɹɬɢ ɩɚɬɪɨɧ
ɦɚɤɫɢɦɭɦ ɤɨɠɧɿ ɱɨɬɢɪɢ ɦɿɫɹɰɿ.
ɇȿ ɩɿɞɥɹɝɚɽ ɦɢɬɬɸ ɱɢ ɩɨɧɨɜɥɟɧɧɸ.
1
2 2
Page 80

80
www.aeg.com
5. ȿɅȿɆȿɇɌɂ ɄȿɊɍȼȺɇɇə
ȼɢɬɹɠɤɚ ɨɛɥɚɞɧɚɧɚ ɩɚɧɟɥɥɸ ɤɨɦɚɧɞ
ɡ ɤɨɧɬɪɨɥɟɦ ɲɜɢɞɤɨɫɬɿ ɜɢɬɹɝɭɜɚɧɧɹ
ɬɚ ɤɨɧɬɪɨɥɟɦ ɫɜɿɬɥɚ ɞɥɹ ɨɫɜɿɬɥɟɧɧɹ
ɜɚɪɢɥɶɧɨʀ ɩɨɜɟɪɯɧɿ.
ȼɢɤɨɪɢɫɬɨɜɭɣɬɟ ɿɧɬɟɧɫɢɜɧɭ ɲɜɢɞɤɿɫɬɶ ɭ
ɜɢɩɚɞɤɭ ɨɫɨɛɥɢɜɨ ɜɢɫɨɤɨʀ ɤɨɧɰɟɧɬɪɚɰɿʀ
ɤɭɯɨɧɧɢɯ ɩɚɪɿɜ. Ɋɟɤɨɦɟɧɞɭɽɦɨ ɜɤɥɸɱɢɬɢ
ɜɢɬɹɠɤɭ ɡɚ 5 ɯɜɢɥɢɧ ɞɨ ɩɨɱɚɬɤɭ
ɝɨɬɭɜɚɧɧɹ ʀɠɿ ɿ ɡɚɥɢɲɢɬɢ ɣɨɝɨ ɜɤɥɸɱɟɧɢɦ
ɧɚ ɩɪɨɬɹɡɿ 15 ɯɜɢɥɢɧ ɩɿɫɥɹ ɡɚɤɿɧɱɟɧɧɹ
ɝɨɬɭɜɚɧɧɹ ʀɠɿ.
Ʉɨɦɚɧɞɢ ɧɚ ɮɪɨɧɬɚɥɶɧɿɣ ɫɬɨɪɨɧɿ
ɩɪɢɫɬɪɨɸ:
1A
1B
1C
Ⱥ. Ʉɧɨɩɤɚ OFF (ɤɧɨɩɤɚ ɧɟ ɫɜɿɬɢɬɶɫɹ)
– ON (ɤɧɨɩɤɚ ɫɜɿɬɢɬɶɫɹ)
ɇɚɬɢɫɧɭɬɢ ɨɞɢɧ ɱɢ ɞɟɤɿɥɶɤɚ ɪɚɡɿɜ ɞɥɹ
ɨɬɪɢɦɚɧɧɹ ɛɚɠɚɧɨʀ ɮɭɧɤɰɿʀ:
ON (ɤɧɨɩɤɚ ɫɜɿɬɢɬɶɫɹ): ȼɢɬɹɠɧɢɣ
ɤɨɜɩɚɤ ɜɫɬɚɧɨɜɥɸɽ ɨɫɬɚɧɧɸ ɜɢɛɪɚɧɭ
ɲɜɢɞɤɿɫɬɶ.
OFF (ɤɧɨɩɤɚ ɧɟ ɫɜɿɬɢɬɶɫɹ): ɜɫɿ ɮɭɧɤɰɿʀ
ɜɿɞɤɥɸɱɟɧɿ ɡɚ ɜɢɧɹɬɤɨɦ ɨɫɜɿɬɥɟɧɧɹ.
B. Ʉɧɨɩɤɚ ɜɢɛɨɪɭ ɲɜɢɞɤɨɫɬɿ (ɩɨɬɭɠɧɨɫɬɿ
ɜɫɦɨɤɬɭɜɚɧɧɹ)
ɇɚɬɢɫɧɭɬɢ ɧɚ ɰɸ ɤɧɨɩɤɭ ɨɞɢɧ ɱɢ
ɞɟɤɿɥɶɤɚ ɪɚɡɿɜ ɳɨɛ ɜɢɛɪɚɬɢ ɲɜɢɞɤɿɫɬɶ
(ɩɨɬɭɠɧɿɫɬɶ) ɜɫɦɨɤɬɭɜɚɧɧɹ, ɳɨ
ɧɚɣɛɿɥɶɲ ɩɿɞɯɨɞɢɬɶ (1 - 2 - 3).
C. Ⱦɢɫɩɥɟɣ: ɜɿɞɨɛɪɚɠɚɽ ɨɛɪɚɧɭ
ɩɨɬɭɠɧɿɫɬɶ ɜɫɦɨɤɬɭɜɚɧɧɹ (1 - 2 - 3),
ɫɢɝɧɚɥɿɡɭɽ ɩɪɨ ɧɚɫɢɱɟɧɧɹ ɮɿɥɶɬɪɿɜ
(F).
D. Ʉɧɨɩɤɚ ɩɿɞɤɥɸɱɟɧɧɹ ɿɧɬɟɧɫɢɜɧɨʀ
ɲɜɢɞɤɨɫɬɿ.
ɉɿɫɥɹ ɩɿɞɤɥɸɱɟɧɧɹ, ɿɧɬɟɧɫɢɜɧɚ
ɲɜɢɞɤɿɫɬɶ ɡɚɥɢɲɚɽɬɶɫɹ ɜɤɥɸɱɟɧɨʀ
ɩɪɨɬɹɝɨɦ ɛɥɢɡɶɤɨ 5 ɯɜɢɥɢɧ, ɩɿɫɥɹ
ɱɨɝɨ ɜɢɬɹɠɤɚ ɩɨɜɟɪɬɚɽɬɶɫɹ ɧɚ
ɩɨɩɟɪɟɞɧɶɨ ɨɛɪɚɧɭ ɲɜɢɞɤɿɫɬɶ (ɜɿɞ 1
ɞɨ 3), ɚɛɨ ɜɿɞɪɚɡɭ ɠ ɜɿɞɤɥɸɱɚɽɬɶɫɹ,
ɹɤɳɨ ɩɟɪɟɞ ɰɢɦ ɧɟ ɛɭɥɨ ɜɫɬɚɧɨɜɥɟɧɨ
ɨɞɧɿɽʀ ɡɿ ɲɜɢɞɤɨɫɬɟɣ ɜɫɦɨɤɬɭɜɚɧɧɹ.
Ⱦɥɹ ɜɿɞɤɥɸɱɟɧɧɹ ɿɧɬɟɧɫɢɜɧɨʀ
ɲɜɢɞɤɨɫɬɿ ɪɚɧɿɲɟ 5 ɯɜɢɥɢɧ ɧɚɬɢɫɧɭɬɢ
ɧɚ ɤɧɨɩɤɭ Ⱥɚɛɨȼ.
E. Ʉɧɨɩɤɚ ON/OFF ɫɜɿɬɥɚ
əɤɳɨ ɜɢɬɹɠɧɢɣ ɤɨɜɩɚɤ, ɚɛɨ ɤɨɦɚɧɞɢ ɧɟ
ɩɪɚɰɸɸɬɶ, ɪɚɞɢɦɨ ɜɢɦɤɧɭɬɢ ɠɢɜɥɟɧɧɹ
ɯɨɱɚ ɛ ɧɚ 5
ɫɟɤɭɧɞ ɿ ɩɨɬɿɦ ɡɧɨɜɭ ɣɨɝɨ
1D
1E
ɩɿɞɤɥɸɱɢɬɢ. ɉɨɱɟɤɚɬɢ ɳɟ 15 ɫɟɤɭɧɞ ɿ
ɩɨɬɿɦ ɩɟɪɟɜɿɪɢɬɢ ɩɪɚɜɢɥɶɧɿɫɬɶ ɪɨɛɨɬɢ
ɜɢɬɹɠɧɨɝɨ ɤɨɜɩɚɤɚ.
ɉɪɢɫɬɪɿɣ ɤɨɧɬɪɨɥɸ ɦɟɬɚɥɟɜɨɝɨ ɬɚ
ɜɭɝɿɥɶɧɨɝɨ ɮɿɥɶɬɪɿɜ.
ȼɢɬɹɠɤɚ ɨɛɥɚɞɧɚɧɚ ɩɪɢɫɬɪɨɽɦ, ɹɤɢɣ
ɜɤɚɡɭɽ ɤɨɥɢ ɧɟɨɛɯɿɞɧɨ ɜɢɤɨɧɚɬɢ
ɬɟɯɨɛɫɥɭɝɨɜɭɜɚɧɧɹ.
əɤɳɨ ɜɢ ɜɢɤɨɪɢɫɬɨɜɭɽɬɟ ɜɢɬɹɠɤɭ
ɡ ɜɭɝɿɥɶɧɢɦ ɮɿɥɶɬɪɨɦ, ɩɿɞɤɥɸɱɿɬɶ
ɜɿɞɩɨɜɿɞɧɢɣ ɿɧɞɢɤɚɬɨɪ ɧɚɫɢɱɟɧɧɹ ɮɿɥɶɬɪe
ɧɚɫɬɭɩɧɢɦ ɱɢɧɨɦ:
Ʉɨɜɩɚɤ ɩɨɜɢɧɟɧ ɛɭɬɢ ɜɫɬɚɧɨɜɥɟɧɢɣ ɧɚ
“OFF”. Ɉɞɧɨɱɚɫɧɨ ɧɚɬɢɫɤɚɬɢ ɤɧɨɩɤɢ ȼɿ
D ɩɪɨɬɹɝɨɦ ɬɪɶɨɯ ɫɟɤɭɧɞ, ɫɜɿɬɥɨɞɿɨɞ LED
F ɜɤɥɸɱɢɬɶɫɹ ɿ ɩɨɱɧɟ ɛɥɢɦɚɬɢ ɫɜɿɬɥɨɞɿɨɞ
ɩɟɪɲɨʀ ɲɜɢɞɤɨɫɬɿ, ɩɨ ɡɚɤɿɧɱɟɧɧɸ 1
ɫɟɤɭɧɞɢ ɩɨɱɧɟ ɛɥɢɦɚɬɢ ɬɚɤɨɠ ɿ ɫɜɿɬɥɨɞɿɨɞ
ɞɪɭɝɨʀ ɲɜɢɞɤɨɫɬɿ ɿ ɫɢɫɬɟɦɚ ɜɢɞɚɫɬɶ
ɡɜɭɤɨɜɢɣ ɫɢɝɧɚɥ (- Ɂɭɦɟɪ -), ɜɤɚɡɭɸɱɢ,
ɳɨ ɭɫɬɚɧɨɜɤɚ ɜɢɤɨɧɚɧɚ.
Ⱦɥɹ ɜɿɞɤɥɸɱɟɧɧɹ ɫɢɝɧɚɥɿɡɚɰɿʀ ɜɭɝɿɥɶɧɨɝɨ
ɮɿɥɶɬɪɚ ɨɞɧɨɱɚɫɧɨ ɧɚɬɢɫɤɚɬɢ ɤɧɨɩɤɢ ȼ
ɿ D ɩɪɨɬɹɝɨɦ ɬɪɶɨɯ ɫɟɤɭɧɞ, ɫɜɿɬɥɨɞɿɨɞ
LED F ɜɤɥɸɱɢɬɶɫɹ ɿ ɩɨɱɧɟ ɛɥɢɦɚɬɢ
ɫɜɿɬɥɨɞɿɨɞ 1-ɨʀ ɲɜɢɞɤɨɫɬɿ (ɦɟɬɚɥɟɜɢɣ
ɮɿɥɶɬɪ) ɿ ɫɜɿɬɥɨɞɿɨɞ 2-ɨʀ ɲɜɢɞɤɨɫɬɿ, ɩɿɫɥɹ
ɡɚɤɿɧɱɟɧɧɹ 1 ɫɟɤɭɧɞɢ ɛɭɞɟ ɛɥɢɦɚɬɢ
ɬɿɥɶɤɢ ɫɜɿɬɥɨɞɿɨɞ 1 - ɨʀ ɲɜɢɞɤɨɫɬɿ,
ɫɢɫɬɟɦɚ ɜɢɞɚɫɬɶ ɡɜɭɤɨɜɢɣ ɫɢɝɧɚɥ
(- Ɂɭɦɟɪ-) ɜɤɚɡɭɸɱɢ, ɳɨ ɭɫɬɚɧɨɜɤɚ
ɜɢɤɨɧɚɧɚ..
ɋɜɿɬɥɨɞɿɨɞ (1) ɫɢɝɧɚɥɿɡɚɰɿʀ ɧɚɫɢɱɟɧɨɫɬɿ
ɦɟɬɚɥɟɜɨɝɨ ɮɿɥɶɬɪɚ
əɤɳɨ ɫɜɿɬɥɨɞɿɨɞ ɲɜɢɞɤɨɫɬɿ 1 ɛɥɢɦɚɽ, ɰɟ
ɨɡɧɚɱɚɽ, ɳɨ ɠɢɪɨɜɿ ɦɟɬɚɥɟɜɿ ɮɿɥɶɬɪɢ
ɬɪɟɛɚ ɩɨɦɢɬɢ.
ɍɜɚɠɧɨ ɜɢɜɱɢɬɢ ɿɧɫɬɪɭɤɰɿʀ
ɡ ɨɛɫɥɭɝɨɜɭɜɚɧɧɹ ɠɢɪɨɜɢɯ ɦɟɬɚɥɟɜɢɯ
ɮɿɥɶɬɪɿɜ ɜ ɱɚɫɬɢɧɿ, ɳɨ ɫɬɨɫɭɽɬɶɫɹ ʀɯ
ɱɢɳɟɧɧɹ.
ɋɜɿɬɥɨɞɿɨɞ (2) ɫɢɝɧɚɥɿɡɚɰɿʀ ɧɚɫɢɱɟɧɨɫɬɿ
ɜɭɝɿɥɶɧɨɝɨ ɮɿɥɶɬɪɚ
əɤɳɨ ɫɜɿɬɥɨɞɿɨɞ ɲɜɢɞɤɨɫɬɿ 2 ɛɥɢɦɚɽ,
ɰɟ ɨɡɧɚɱɚɽ, ɳɨ ɮɿɥɶɬɪ ɧɚ ɚɤɬɢɜɨɜɚɧɨɦɭ
ɜɭɝɿɥɥɿ ɬɪɟɛɚ ɩɨɦɢɬɢ ɚɛɨ ɡɚɦɿɧɢɬɢ.
ɍɜɚɠɧɨ ɜɢɜɱɢɬɢ ɿɧɫɬɪɭɤɰɿʀ ɡ
ɨɛɫɥɭɝɨɜɭɜɚɧɧɹ ɜɭɝɿɥɶɧɨɝɨ ɮɿɥɶɬɪɚ ɜ
ɱɚɫɬɢɧɿ, ɳɨ ɫɬɨɫɭɽɬɶɫɹ ɣɨɝɨ ɱɢɳɟɧɧɹ ɚɛɨ
ɡɚɦɿɧɢ.
ȼɫɬɚɧɨɜɥɟɧɧɹ ɧɚ ɧɭɥɶ ɿɧɞɢɤɚɬɨɪɚ
ɧɚɫɢɱɟɧɨɫɬɿ.
ɉɿɫɥɹ ɩɪɨɜɟɞɟɧɧɹ ɨɛɫɥɭɝɨɜɭɜɚɧɧɹ
ɮɿɥɶɬɪɿɜ ɬɪɢɦɚɬɢ ɧɚɬɢɫɧɭɬɨɸ ɤɧɨɩɤɭ Ⱥ
ɩɪɨɬɹɝɨɦ 3 ɫɟɤɭɧɞ ɩɨɤɢ ɫɜɿɬɥɨɞɿɨɞ LED 1
ɚɛɨ 2 ɩɟɪɟɫɬɚɧɭɬɶ ɛɥɢɦɚɬɢ.
Page 81

6. ɈɋȼȱɌɅɘȼȺɅɖɇɂɃ
ɉɊɂɅȺȾ
ȼɿɞɤɥɸɱɢɬɢ ɩɪɢɥɚɞ ɜɿɞ ɟɥɟɤɬɪɨɦɟɪɟɠɿ.
ɍɜɚɝɚ! ɉɟɪɲ ɧɿɠ ɬɨɪɤɚɬɢ ɥɚɦɩɢ
ɧɟɨɛɯɿɞɧɨ ɜɩɟɜɧɢɬɢɫɹ ɳɨ ɜɨɧɢ ɨɯɨɥɨɥɢ.
ȼɢɤɨɪɢɫɬɨɜɭɣɬɟ ɞɥɹ ɰɶɨɝɨ ɥɢɲɟ
ɝɚɥɨɝɟɧɧɿ ɥɚɦɩɢ ɧɚ 12V -20W ɦɚɤɫ - G4,
ɧɟ ɞɨɬɨɪɤɭɸɱɢɫɶ ɞɨ ɧɢɯ ɪɭɤɚɦɢ.
ɍɄɊȺȲɇɋɖɄȺ
81
Page 82

HU HASZNÁLATI ÚTMUTATÓ
www.aeg.com82
AZ ÖN ELÉGEDETTSÉGE ÉRDEKÉBEN
Köszönjük, hogy megvásárolta ezt az AEG készüléket. Termékünk készítésekor egy olyan
beredezést kívántunk létrehozni az Ön számára, amely kifogástalan teljesítményt nyújt
hosszú éveken keresztül, köszönhetĘen az alkalmazott innovatív technológiáknak, amelyek
az életét jelentĘsen megkönnyítik – és amelyeket más készülékeken nem talál meg. Kérjük,
szánjon néhány percet az útmutató végigolvasására, hogy a maximumot hozhassa ki
készülékébĘl.
Látogassa meg a weboldalunkat:
Kezelési tanácsok, kiadványok, hibaelhárító, szerviz információk:
www.aeg.com
További elĘnyökért regisztrálja készülékét:
www.aeg.com/productregistration
KiegészítĘk, segédanyagok és eredeti alkatrészek vásárlása a készülékhez:
www.aeg.com/shop
KÖRNYEZETVÉDELMI TUDNIVALÓK
A következĘ jelzéssel ellátott anyagokat hasznosítsa újra: . Újrahasznosításhoz tegye a
megfelelĘ konténerekbe a csomagolást.
Járuljon hozzá környezetünk és egészségünk védelméhez, és hasznosítsa újra az
elektromos és elektronikus hulladékot. A
a háztartási hulladék közé. Juttassa el a készüléket a helyi újrahasznosító telepre, vagy
lépjen kapcsolatba a hulladékkezelésért felelĘs hivatallal.
tiltó szimbólummal ellátott készüléket ne dobja
VÁSÁRLÓI TÁMOGATÁS ÉS SZERVIZ
Kizárólag eredeti alkatrészek használatát javasoljuk.
Ha készülékével a szervizhez fordul, legyenek kéznél az alábbi adatok.
Ezek az információk az adattáblán olvashatók. Típus, Termékszám, Sorozatszám.
Figyelmeztetés - Biztonsági információk
Általános információk és hasznos tanácsok
Környezetvédelmi információk.
A változtatások jogát fenntartjuk.
Page 83

MAGYAR
83
1. BIZTONSÁGI
ELėÍRÁSOK
Figyelem! Ezen kézikönyv utasításait
szigorúan be kell tartani. Az itt
feltüntetett utasítások be nem
tartásából származó bármilyen hiba, kár
vagy tĦzesettel kapcsolatban a gyártó
felelĘsséget nem vállal. Az elszívó
kizárólag háztartási felhasználásra
készült.
Vigyázat! A készüléket mindaddig ne
kösse be az elektromos hálózatba,
amíg a beszerelést teljesen be nem
fejezte.
Takarítás vagy karbantartás elĘtt
minden esetben kösse ki az elszívót
az elektromos hálózatból a villásdugó
kihúzása vagy a lakás fĘ biztosítékának
lecsapása révén.
Valamennyi üzembe helyezési és
karbantartási mĦvelethez használjon
védĘkesztyĦt.
A készülék nem arra készült, hogy
gyermekek, vagy csökkent fi zikai vagy
értelmi képességekkel rendelkezĘ,
tapasztalatok és ismeretek híján levĘ
emberek használják, hacsak nem a
biztonságukért felelĘs személy felügyelete
alatt, vagy ha ez a személy a készülék
használatát megtanította.
Ügyeljenek a kisgyermekekre, nehogy a
készülékkel játszanak.
Az elszívót a fém zsírszĦrĘ (rács) nélkül
soha ne használja!
A konyhai páraelszívót SOHA nem szabad
lerakó felületnek használni, kivéve, ha
kifejezetten fel van tüntetve ez a lehetĘség.
A helyiségnek elegendĘ szellĘzéssel
kell rendelkeznie, amennyiben a konyhai
elszívót gáz és más tüzelĘanyaggal
mĦködtetett készülékekkel egyidĘben
használják.
Az elszívott levegĘt nem szabad olyan
kéménybe, füstcsĘbe vezetni, amelyet gáz
vagy más tüzelĘanyagok égéstermékeinek
elvezetésére használnak.
Az elszívó alatt szigorúan tilos fl ambírozott
ételeket készíteni. A nyílt láng használata
károsítja a fi ltereket, tĦzveszélyt okozhat,
ezért minden esetben kerülni kell.
BĘ zsiradékban sütni csak ellenĘrzés
mellett szabad, nehogy a túlhevült olaj vagy
zsír meggyulladjon.
Figyelem! FĘzés közben a felszálló
forró levegĘ a készülékházat
felmelegítheti!
A füstelvezetésre vonatkozó mĦszaki
és biztonsági intézkedések tekintetében
szigorúan be kell tartani a helyi illetékes
hatóságok elĘírásait.
Az elszívót gyakran kell tisztogatni,
mind belülrĘl, mind kívülrĘl. (LEGALÁBB
HAVONTA EGYSZER, minden esetben
betartva ezen kézikönyvben kifejezetten
elĘírt karbantartási utasításokat.)
Az elszívó tisztántartására, valamint a
fi lterek cseréjére és tisztítására vonatkozó
elĘírások be nem tartása tĦzveszélyt okoz.
A páraelszívót ne használja szabályosan
beszerelt izzólámpa nélkül, mert áramütés
veszélye léphet fel.
A kézikönyvben szereplĘ utasítások be nem
tartásából következĘ kellemetlenségekért,
károkért vagy tĦzesetekért a gyártó nem
vállal felelĘsséget.
2. HASZNÁLAT
A páraelszívó a fĘzés közben keletkezĘ füst
és pára elszívására szolgál.
A mellékelt beszerelési útmutatóban fel
van tüntetve, hogy a külsĘ kivezetésĦ,
vagy a szĦrt, belsĘ környezetbe
visszaforgatott változat közül melyik
használható az Ön készülékéhez
.
3. FELSZERELÉS
A hálózati feszültségnek azonosnak kell
lennie a konyhai páraelszívó belsejében
elhelyezett mĦszaki adattáblán feltüntetett
feszültséggel. Ha az elszívó rendelkezik
villásdugóval, csatlakoztassa egy
hozzáférhetĘ helyen elhelyezett, az
érvényben lévĘ szabványoknak megfelelĘ
dugaszoló aljzathoz, akár a beszerelést
követĘen is. Ha nem rendelkezik
csatlakozódugóval (közvetlen csatlakozás
a hálózathoz) vagy a dugaszoló aljzat nem
hozzáférhetĘ, szereljen fel egy szabványos,
kétpólusú megszakítót akár a beszerelést
követĘen is, amely III. túláram-kategória
esetén biztosítja a hálózatról való teljes
leválasztását, a telepítési szabályoknak
megfelelĘen.
Figyelem! mielĘtt az elszívó áramkörét
visszaköti a hálózatba és ellenĘrzi,
hogy az elszívó helyesen mĦködike, mindig ellenĘrizze azt is, hogy
a hálózati vezeték beszerelése
szabályos-e.
Page 84

84
www.aeg.com
Az elszívó speciális kábellel rendelkezik,
melynek sérülése esetén cseréjét kérje a
szakszervíz szolgálattól. A fĘzĘkészülék
felülete és a konyhai szagelszívó legalsó
része közötti minimális távolság nem lehet
kisebb, mint 50cm elektromos fĘzĘlap, és
65cm gáz vagy vegyes tüzelésĦ fĘzĘlap
esetén.
Ha a gázfĘzĘlap beszerelési utasításában
ennél nagyobb távolság szerepel, azt
kellfi gyelembe venni.
4. KARBANTARTÁS
Figyelem! Takarítás vagy karbantartás
elĘtt minden esetben kösse ki az elszívót
az elektromos hálózatból a villásdugó
kihúzása vagy a lakás fĘ biztosítékának
lecsapása révén.
Az elszívót gyakran kell tisztítani, mind
belülrĘl, mind kívülrĘl (legalább olyan
gyakran, mint a zsírszĦrĘ fi lterek tisztítását).
A tisztításhoz használjon semleges
folyékony mosószerrel átitatott nedves
ruhát. Kerülje a súrolószert tartalmazó
mosószerek használatát.
NE HASZNÁLJON ALKOHOLT!
Figyelem! Az elszívó tisztán tartására,
valamint a fi lterek cseréjére vonatkozó
elĘírások be nem tartása tĦzveszélyt okoz.
Ezért felhívjuk fi gyelmét, hogy tartsa be az
utasításokat.
A helytelen karbantartás, vagy a fent
említett utasítások be nem tartása miatt a
motorban esetleg bekövetkezĘ károk vagy
tĦzesetek miatt semmiféle felelĘsséget nem
vállalunk.
4.1 ZsírszĦrĘ fi lter
Havonta egyszer nem agresszív
tisztítószerrel, kézzel vagy
mosogatógépben, alacsony hĘfokon és
rövid ciklussal el kell mosogatni.
Mosogatógépben történĘ mosogatás a
zsírszĦrĘ elszínezĘdését okozhatja, de ez
nem változtat hatékonyságán.
4.2 Type 150 LONG LIFE - Mosható aktív
szénfi lter.
A szénfi ltert kéthavonta lehet elmosni meleg vízben és megfelelĘ mosószerrel, vagy
mosogatógépben 65 °C-on (mosogatógépben történĘ mosás esetén teljes mosogatási ciklust végezzen, edények nélkül).
A felesleges vizet a fi lter megrongálása
nélkül távolítsa el, majd vegye ki a
mĦanyag keret belsejében található
matracszerĦ betétet és végleges szárítás
céljából 10 percre tegye a sütĘbe
100°C-on.
A matracszerĦ betétet 3 évenként, valamint
károsodása esetén ki kell cserélni.
4.3 Type 60/80 - NEM Mosható aktív
szénfi lter.
A szénfi lter telítĘdése többé vagy kevésbé
hosszú idĘ alatt történik meg, a tĦzhely típusától és a zsírszĦrĘ tisztogatásának
rendszerességétĘl függĘen. Mindenképpen cserélni kell a betétet legalább négyhavonként.
NEM lehet kimosni vagy regenerálni
1
2 2
Page 85

MAGYAR
85
5. KEZELėSZERVEK
Az elszívó szíváserĘsség-szabályozóval
és fĘzĘlapvilágítás-kapcsolóval ellátott
kezelĘpanellel rendelkezik.
Amikor a konyhában különösen nagy a
párakoncentráció, használja a nagyobb
sebességet. Javasoljuk, hogy fĘzés elĘtt 5
perccel kapcsolja be az elszívót, és a fĘzés
befejezése után 15 percig mĦködtesse
tovább.
A front panel vezérlĘgombjai:
1A
1B
1C
A. OFF gomb (gomb kikapcsolva) - ON
(gomb világít)
A kívánt funkció beállításához nyomja
meg egyszer vagy többször:
ON (gomb világít): laz elszívó a
legutolsó kiválasztott fokozatot állítja
be.
OFF gomb kikapcsolva): minden
funkció kikapcsolva a világítást kivéve.
B. Sebességválasztó gomb (elszívási
erĘsség)
A megfelelĘ (1 - 2 - 3 ) elszívó
sebesség (teljesítmény)
kiválasztásához nyomja meg egyszer,
vagy többször.
C. KijelzĘ: a kiválasztott elszívó
teljesítményt (1-2-3), valamint a szĦrĘk
telítettségi állapotát (F) jelzi.
D. Intenzív sebesség gomb.
Az elsĘ beállításnál az intenzív
sebesség cca 5 percig marad
beállítva, melynek végeztével az
elszívó visszatér az elĘzĘleg választott
sebességre (1 - 3) vagy akár le is
áll, amennyiben elĘzĘleg nem volt
sebesség kiválasztva. Az intenzív
fokozat 5 perces idejének lejárta elĘtti
leállításához nyomja meg az A vagy B
gombokat.
E. Világítás ON/OFF gomb
1D
1E
Amennyiben az elszívó, vagy a
vezérlĘgombok nem mĦködnének,
ajánlatos a készüléket legalább 5
másodpercig lekapcsolni, majd újraindítani.
Várjon ezután 15 másodpercet, majd
ellenĘrizze, hogy megfelelĘen mĦködik-e
az elszívó.
Zsírfi lter és aktív szénszĦrĘ ellenĘrzĘ
kijelzĘ
Az elszívó egy olyan diszpozitívvel
rendelkezik, mely kijelzi, ha szükségessé
válik a fi lterek karbantartását elvégezni.
Ha az elszívót aktív szénszĦrĘs fi lterrel
fogja használni, aktiválnia kell a telítettséget
kijelzĘ fényt, az alábbiak szerint:
Az elszívót állítsa “OFF”
állapotba.
Nyomja meg és tartsa egyszerre lenyomva
a B és D gombokat, az F LED kigyullad
és villogni kesz az 1^ sebesség, majd 1
másodperc múlva a 2^ sebességet jelzĘ
LED is és a rendszer hangjelzéssel
(-Beep-) nyugtázza az új beállítást.
A szénszĦrĘ kijelzés deaktiválásához
nyomja meg egyszerre és tartsa lenyomva
3 másodpercig a B és D gombokat, az
F LED ekkor felgyullad és villogni kezd
az 1^ sebesség kijelzĘ (zsírfi lter) és a
2^ sebességé, majd 1 másodperc múlva
csak az 1^ sebességkijelzĘ, a rendszer
hangjelzéssel (-Beep-) nyugtázza a
beállítás megtörténtét.
Led (1) zsírfi lter telítettség kijelzései
Az 1. sebességi fokozatjelzĘ villogása
fi gyelmeztet a zsírfi lter tisztítás
szükségességére.
Olvassa el fi gyelmesen a zsírfi lter
karbantartási és tisztításii útmutatást.
Led (2) aktív szénfi lter telítettség
kijelzései
Az 2. sebességi fokozatjelzĘ villogása
fi gyelmeztet a szénszĦrĘ mosásának vagy
cseréjének szükségességére.
Olvassa el fi gyelmesen a szénmzĦrĘ
karbantartási és tisztításii útmutatást.
Telítettség kijelzés visszaállítása
A fi lterek karbantartási munkálatainak
végeztével tartsa lenyomva 3 másodpercig
az A gombot, míg az 1-es vagy 2-es LED
villágása meg nem szĦnik.
Page 86

86
www.aeg.com
6. VILÁGÍTÁS
Bármilyen karbantartási munka
megkezdése elĘtt szüntesse meg az
elszívó áramellátását, kösse ki a hálózatból.
Figyelem! MielĘtt a lámpákhoz érne,
gyĘzĘdjön meg róla, hidegek-e.
Csak 12V - 20W max - G4 halogén égĘket
használjon, vigyázzon arra, hogy kézzel ne
érjen hozzájuk.
Page 87

CS NÁVOD K POUŽITÍ
PRO DOKONALÉ VÝSLEDKY
DČkujeme vám, že jste si zvolili výrobek znaþky AEG. Aby vám bezchybnČ sloužil mnoho
let, vyrobili jsme jej s pomocí inovativních technologií, které usnadĖují život, a vybavili jsme
jej funkcemi, které u obyþejných spotĜebiþĤ nenajdete. Staþí vČnovat pár minut þtení a
zjistíte, jak z nČho získat co nejvíce.
Navštivte naše stránky ohlednČ:
Rady ohlednČ používání, brožury, poradce pĜi potížích, servisních informací:
www.aeg.com
Registrace vašeho spotĜebiþe, kterou získáte lepší servis:
www.aeg.com/productregistration
Nákupu pĜíslušenství, spotĜebního materiálu a originálních náhradních dílĤ pro váš
spotĜebiþ:
www.aeg.com/shop
POZNÁMKY K OCHRANċ ŽIVOTNÍHO PROSTěEDÍ
ýEŠTINA
87
Recyklujte materiály oznaþené symbolem . Obaly vyhoćte do pĜíslušných odpadních
kontejnerĤ k recyklaci.
Pomáhejte chránit životní prostĜedí a lidské zdraví a recyklovat elektrické a elektronické
spotĜebiþe urþené k likvidaci. SpotĜebiþe oznaþené pĜíslušným symbolem
spolu s domovním odpadem. SpotĜebiþ odevzdejte v místním sbČrném dvoĜe nebo
kontaktujte místní úĜad.
PÉýE O ZÁKAZNÍKY A SERVIS
Doporuþujeme používat originální náhradní díly.
PĜi kontaktu se servisním stĜediskem se ujistČte, že máte k dispozici následující údaje.
Tyto informace jsou uvedeny na typovém štítku. Model, výrobní þíslo (PNC), sériové þíslo.
UpozornČní / DĤležité bezpeþnostní informace.
Všeobecné informace a rady
Poznámky k ochranČ životního prostĜedí.
ZmČny vyhrazeny.
nelikvidujte
Page 88

88
www.aeg.com
1. BEZPEýNOSTNÍ PO-
KYNY
Pozor! Výrobce odmítá pĜevzít
jakoukoliv odpovČdnost za pĜípadné
závady, škody nebo vznícení digestoĜe,
které byly zpĤsobeny nedodržením
tČchto pĜedpisĤ. DigestoĜ byla
projektována k výluþnČ domácímu
použití.
UpozornČní! Nenapojujte pĜístroj na
elektrickou síĢ, dokud nebyla zcela
dokonþena jeho instalace.
PĜed provedením jakéhokoliv úkonu
þištČní nebo údržby, je tĜeba odpojit
kryt od elektrické sítČ tak, že se odpojí
od zásuvky nebo vypnutím hlavního
vypínaþe obytné jednotky.
PĜi všech instalaþních a údržbových pracích
používejte pracovní rukavice.
PĜístroj není urþen k používání pro dČti
nebo pro osoby se sníženými fyzickými,
smyslovými nebo mentálními schopnostmi,
které s ním nemají zkušenost a neznají
ho. Tyto osoby mĤžou s pĜístrojem
zacházet pouze tehdy, kdy jsou pod
dohledem odborného personálu nebo jsou
speciálnČ vyškoleny k jeho použití osobou
odpovČdnou za jejich bezpeþnost.
DČti musí být pod dohledem, aby si s
pĜístrojem nehrály.
Nikdy nepoužívejte kryt bez správnČ
namontované mĜíže!
Kryt nesmí být NIKDY používán jako
odkládací plocha. MĤže se tak stát pouze
ve specifi cky uvedených pĜípadech.
Místnost musí být vybavena dostateþnou
ventilací, v pĜípadČ, že je kuchyĖský kryt
používán souþasnČ s jinými pĜístroji s
plynovým spalováním nebo spalováním
jinými palivy.
Odsávaný vzduch nesmí být odvádČn do
odvodu používaného pro odpad kouĜĤ
z pĜístrojĤ na plynové spalování nebo
spalování jiných paliv.
Je pĜísnČ zakázáno va
plamenem pod krytem.
Použití otevĜeného plamene je škodlivé pro
fi ltry a mĤže se stát pĜíþinou požárĤ, je tedy
tĜeba se mu vyhnout v každém pĜípadČ.
Smažení je tĜeba provádČt pouze za stálé
kontroly, aby nenastala situace, kdy se olej
pĜehĜeje a dojde k jeho vznícení.
Pozor! PĜístupné þásti se mohou
znaþnČ rozpálit, pokud jsou používány
souþasnČ s varným zaĜízením.
Ĝit jídla s volným
Pokud se týká technických a
bezpeþnostních opatĜení, která je tĜeba
zaujmout pĜi odvádČní kouĜe, je tĜeba úzce
dodržovat normy místních odpovČdných
orgánĤ.
Kryt je tĜeba þasto þistit jak vnitĜnČ, tak z
vnČjšku (ALESPOĕ JEDNOU ZA MċSÍC),
je tĜeba v každém pĜípadČ dodržovat
vše, co je uvedeno v návodu k údržbČ
popsaném v tomto manuálu).
Nedodržování norem þištČní krytu a výmČny
a þištČní fi ltrĤ se mĤže stát pĜíþinou požárĤ.
Nepoužívejte þi nenechávejte digestoĜ bez
ĜádnČ nastavených svíditel a nevystavujte
se tak nebezpeþ
Výrobce se zĜíká jakékoliv odpovČdnosti
za eventuální nepĜíjemnosti, škody nebo
požáry zpĤsobené na pĜístroji, které
jsou následkem nedodržování pokynĤ
uvedených v tomto manuálu.
í elektrického výboje.
2. POUŽITÍ
DigestoĜ slouží k odsávání dýmĤ a par pĜi
vaĜení.
V pĜiložené pĜíruþce je vyznaþeno, v jaké
verzi je možné používat Vám vlastnČný
model, tj. buć v odsávací verzi s vývodem
navenek
recykláží vzduchu
anebo fi ltrující s vnitĜní
.
3. INSTALACE
SíĢové napČtí musí odpovídat napČtí
uvedenému na štítku s charakteristikamii
umístČnému uvnitĜ krytu. Pokud je kryt
vybaven pĜípojkou, staþí jej zapojit do
zásuvky odpovídající stávajícím normám,
která se nachází ve snadno dosažitelném
prostoru i po provedené montáži. Pokud
kryt není vybaven pĜípojkami (pĜímé
pĜipojení k síti) nebo se zásuvka nenachází
ve snadno dosažitelném prostoru i po
provedené montáži , je tĜeba použít
dvojpólový vypínaþ odpovídající normám,
který zaruþí úplné odpojení od sítČ v
podmínkách kategorie pĜepČtí III, v souladu
s pravidly instalace.
Pozor! DĜíve než opČt napojíte obvod
digestoĜe na síĢové napájení a ovČĜíte
správné fungování, zkontrolujte si
vždy, že síĢový kabel byl správnČ
namontován.
Page 89

ýEŠTINA
89
DigestoĜ je vybavena speciálním napájecím
kabelem; v pĜípadČ poškození kabelu
vyžádejte si ho u servisní služby. Minimální
vzdálenost mezi podporou nádoby na varné
ploše a nejnižší þástí digestoĜe nesmí být
menší než 50cm v pĜípadČ elektrických
sporákĤ 65cm v pĜípadČ plynových þi
smíšených sporákĤ.
Pokud návod na instalaci varného zaĜízení
na plyn doporuþují vČtší vzdálenost, je tĜeba
se tímto pokynem Ĝídit.
4. ÚDRŽBA
Pozor! PĜed jakoukoliv operací þištČní þi
údržby odpojte digestoĜ od elektrické sítČ,
vyjmČte zátrþku anebo vypnČte hlavní
spínaþ bytu.
DigestoĜ musí být þasto þištČna, jak uvnitĜ
tak zevnČ (alespoĖ stejnČþasto jako je
provádČna údržba fi ltrĤ proti mastnotám).
Pro þištČní je tĜeba použít látku navlhþenou
denaturovaným líhem anebo neutrálními
tekutými þistícími prostĜedky. Nepouživejte
prostĜedky obsahující brusné látky.
NEPOUŽÍVEJTE ALKOHOL!
Pozor! Nedodržení norem þištČní pĜístroje
a vymČĖování fi ltrĤ by mohlo vést k
požárĤm. Doporuþujeme tedy dodržovat
návod k použití.
Výrobce odmítá jakoukoliv zodpovČdnost
za škody na motoru, požáry zpĤsobené
nesprávnou údržbou þi nedodržením výše
uvedeného upozornČní.
4.2 Type 150 LONG LIFE - Umyvatelný
fi ltr s aktivními uhlíky
Filtr se musí každé 2 mČsíce vyþistit ruþnČ
v teplé vodČ vhodným mycím prostĜedkem
nebo v kuchyĖské myþce pĜi kompletním programu bez pĜítomnosti nádobí. Po vyþištČní
zbavte fi ltr pĜebyteþné vody tak, aby jste jej
nepoškodili. VyjmČte jej z plastového rámu a
dĤkladnČ vysušte pĜi teplotČ 100°C po dobu
10-ti minut v elektrické troubČ.
Filtr s aktivním uhlíkem se musí pĜesto
mČnit každé 3 roky a navíc vždy, když je
poškozen.
4.3 Type 60/80 - NEUMYVATELNÝ fi ltr s
aktivními uhlíky
Saturace fi ltru s uhlíkem nastane po více
þi ménČ dlouhém užití, tj. závisí na typu
kuchynČ a pravidelném þištČní fi ltru proti
mastnotám. V každém pĜípadČ je nutné
nahradit patronu maximálnČ jednou za 4
mČsíce.
NEMģŽE být umýván þi regenerován.
1
4.1 Tukový fi ltr
Tukový fi ltr se musí 1 x do mČsíce vyþistit .
Je možné jej þistit ruþnČ jemným mycím
prostĜedkem nebo v kuchyĖské myþce pĜi
nejnižší teplotČ a kratším programu.
2 2
Page 90
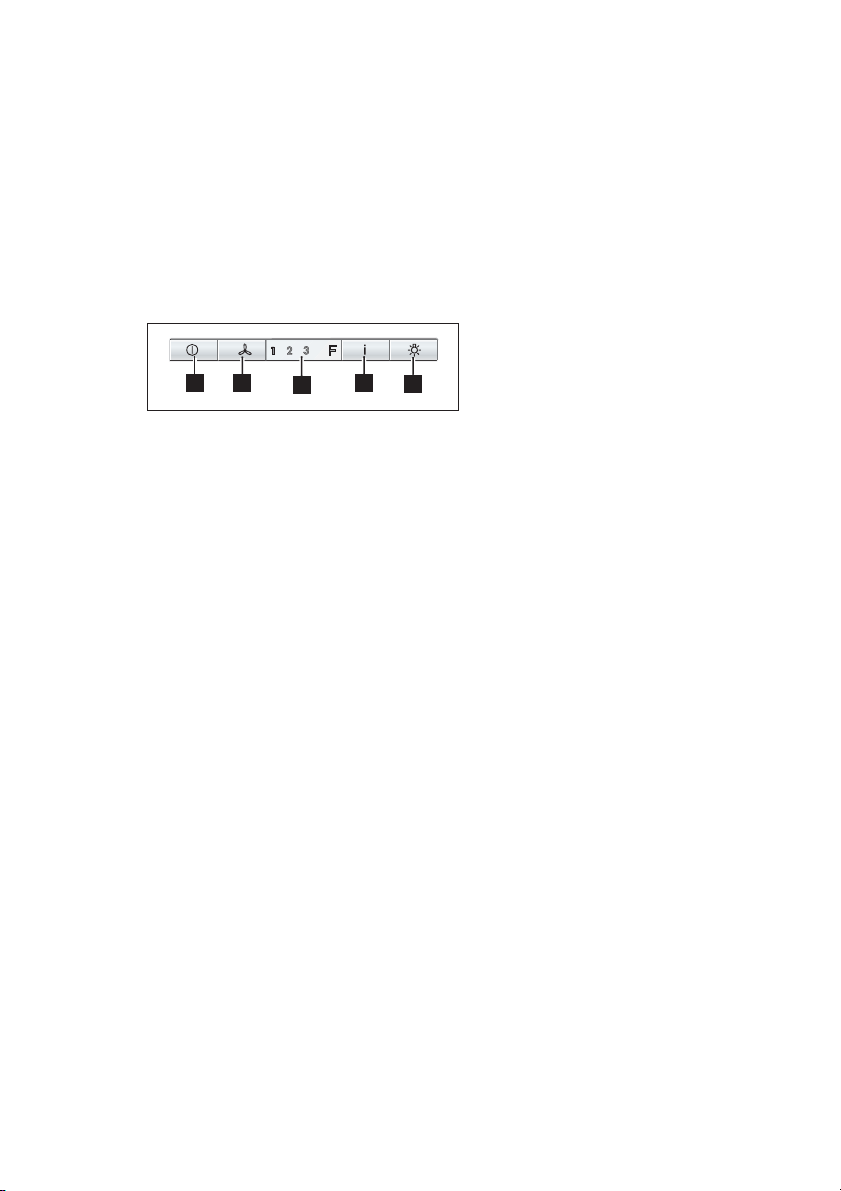
90
www.aeg.com
5. PěÍKAZY
Odsavaþ je vybaven ovládacím panelem s
ovládáním rychlosti odsávání a zapínáním
osvČtlení pracovní plochy.
V pĜípadČ velmi intenzivní koncentrace
kuchyĖských par použijte maximální sací
výkon. Doporuþuje se zapnout digestoĜ 5
minut pĜed zahájením vaĜení a vypnout ji
cca 15 minut po ukonþení vaĜení.
Ovladaþe na þelní stranČ pĜístroje:
1A
1B
1C
A. Tlaþítko OFF (tlaþítko nesvítí) - ON
(tlaþítko svítí)
StisknČte jednou þi vícekrát, abyste
dosáhli zvolené funkce:
ON (tlaþítko svítí): digestoĜ nastaví
poslední zvolenou rychlost.
OFF (tlaþítko nesvítí): všechny funkce
jsou odstaveny s výjimkou osvČtlení.
B. Tlaþítko volby rychlosti (síla odsávání).
StisknČte toto tlaþítko jednou þi vícekrát
ke zvolení nejvhodnČjší rychlosti (síly)
odsávání (1 - 2 - 3 ).
C. Displej: zobrazuje sílu zvoleného
odsávání (1-2-3), hlásí saturování fi ltrĤ
(F).
D. Tlaþítko nastavení intenzívní rychlosti.
Po nastavení intenzívní rchlost bude
fungovat po dobu pĜibližnČ 5 minut
a poté se digestoĜ vrátí do dĜíve
nastavené rychlosti (od 1 do 3) anebo
se dokonce vypne pokud pĜedtím
nebyla zvolena žádná rychlost. K
odstavení intenzivní rychlosti dĜíve
než uplyne 5 minut stisknČte A anebo
tlaþítko B.
E. Tlaþítko ON/OFF svítidlo
1D
1E
V pĜípadČ, že digestoĜ
anebo ovladaþe
nefungují se doporuþuje pĜerušení napájení
proudem po dobu alespoĖ 5 vteĜin a pak
opČt napojit. Vyþkejte pak 15 vteĜin a ovČĜte
si zda digestoĜ funguje správnČ.
ZaĜízení ke kontrole fi ltru proti
mastnotám a fi ltru a s aktivním uhlíkem
DigestoĜ je vybavena zaĜízením, které hlásí,
kdy je tĜeba provést údržbu.
Pokud je nutné použít digestoĜ s uhlíkovým
fi ltrem, uvećte do provozu pĜíslušný
ukazatel saturování a to následujícím
zpĤsobem:
DigestoĜ musí být nastavena do pozice
“OFF”.
StisknČte souþasnČ tlaþítka B a D po dobu
tĜí vteĜin, DIODA F se rozsvítí a zaþne
blikat dioda 1^ rychlosti , po 1 vteĜinČ
bliká i dioda 2^ rychlosti a systém vydá
zvukový signál (-Beep-, který vyznaþí, že
došlo k nastavení.
K odstranČní signalizace fi ltru s uhlíkem
stisknČte souþasnČ tla
þítka B a D po
dobu tĜí vteĜin, DIODA F se rozsvítí a
zaþne blikat dioda 1^ rychlosti (fi ltr proti
mastnotám) a dioda 2^ rychlosti, po
1 vteĜinČ bude blikat pouze dioda 1^
rychlosti, systém vydá zvukový signál (Beep-), který vyznaþí, že došlo k nastavení.
Dioda (1) signalizující saturaci fi ltru proti
mastnotám
Blikání diody rychlosti 1 upozorĖuje
operátora, že fi ltry proti mastnotám musejí
být umyty.
PĜeþtČte si pozornČ návod týkající se
údržby a þištČní fi ltrĤ proti mastnotám.
Led (2) signalizující saturaci fi ltru s
aktivním uhlíkem
Blikání dioody rychlosti 2 upozorĖuje
operátora, že fi ltr s uhlíkem musí být umyt
þi vymČnČn.
PĜeþtČte si pozornČ návod týkající se umytí
þi výmČny fi ltru s uhlíkem.
OpČtné nastavení ukazovatele
saturování
Po provedení údržby fi ltrĤ, stisknČte tlaþítko
A po dobu 3 vteĜin až do okamžiku kdy
DIODY 1 nebo 2 pĜestanou blikat.
Page 91

6. OSVċTLENÍ
Odpojte pĜístroj z elektrické sítČ.
Pozor! DĜíve než se doktnete svítidel si
ovČĜte že vychladla.
Používejte pouze halogenová svítidla o
výkonu 12V - 20W max - G4 a dávejte
pozor, abyste se jich nedotýkali rukama.
ýEŠTINA
91
Page 92

SK NÁVOD NA POUŽÍVANIE
92
www.aeg.com
DOSIAHNITE TIE NAJLEPŠIE VÝSLEDKY
Ćakujeme, že ste si vybrali tento výrobok znaþky AEG. Vyrobili sme ho tak, aby vám
poskytoval dokonalý výkon mnoho rokov, a s inovatívnymi technológiami, ktoré vám uĐahþia
život – to sú vlastnosti, ktoré pri bežných spotrebiþoch þasto nenájdete. Venujte, prosím,
niekoĐko minút preþítaniu si tohto návodu, aby ste svoj spotrebiþ využili þo najlepšie.
Navštívte našu stránku, kde nájdete:
Tipy na používanie, brožúry, riešenie problémov a informácie o údržbe:
www.aeg.com
Zaregistrujte si produkt a využite tak ešte lepší servis:
www.aeg.com/productregistration
Do spotrebiþa si môžete zakúpiĢ príslušenstvo, spotrebný materiál a originálne
náhradné diely:
www.aeg.com/shop
OCHRANA ZIVOTNEHO PROSTREDIA
Materiály oznaþené symbolom odovzdajte na recykláciu. Obal hoćte do príslušných
kontajnerov na recykláciu.
ChráĖte životné prostredie a zdravie Đudí a recyklujte odpad z elektrických a elektronických
spotrebiþov. Nelikvidujte spotrebiþe oznaþené symbolom
domácnosti. Výrobok odovzdajte v miestnom recyklaþnom zariadení alebo sa obráĢte na
obecný alebo mestský úrad.
spolu s odpadom z
STAROSTLIVOSġ A SLUŽBY ZÁKAZNÍKOM
Odporúþame, aby ste používali originálne náhradné diely.
Keć budete kontaktovaĢ servis, nezabudnite si pripraviĢ nasledujúce údaje.
Tieto informácie nájdete na výrobnom štítku. Model, þíslo výrobku, sériové þíslo.
Varovanie/upozornenie – Bezpeþnostné pokyny.
Všeobecné informácie a tipy
Ochrana životného prostredia.
Vyhradzujeme si právo na zmeny bez predchádzajúceho upozornenia.
Page 93

SLOVENýINA
93
1. BEZPEýNOSTNÉ PO-
KYNY
Pozor! Prísne sa dodržiavaĢ návodom
uvedenými v tejto príruþke. Vyhýba
sa každej zodpovednosti za prípadne
nespôsoblivosti, škody alebo nehody
spôsobenè nedodržiavaním návodov
uvedených v tejto príruþke. Odsávaþ
pary bol projektovaný výnimoþne pre
používanie v domácnosti.
Varovanie! NenapojiĢ zariadenie na
elektrickú sieĢ skôr ako inštalácia nie je
celkovo ukonþená.
Skôr ako sa zaþne akákoĐvek þinnosĢ
þistenia alebo údržby, odpojiĢ odsávaþ
pary od elektrickej siete odpojením
zástrþky alebo vypnutím hlavného
vypínaþa bytu.
Pri všetkých inštalaþných a údržbárskych
prácach používajte ochranné pracovné
rukavice. Spotrebiþ nie je urþený na
používanie osobami (vrátane detí) so
zníženými fyzickými, zmyslovými alebo
mentálnymi schopnosĢami alebo s
nedostatkom skúseností a vedomostí,
pokiaĐ im osoba zodpovedná za ich
bezpeþnosĢ neposkytuje dohĐad alebo ich
nepouþila o používaní spotrebiþa.
Deti musia byĢ pod dohĐadom, aby sa
nehrali so zariadením.
NepoužívaĢ NIKDY odsávaþ pary bez
správne namontovanej mriežky!
Odsávaþ pary sa nesmie NIKDY používaĢ
ako oporná plocha, iba za predpokladu, že
je to výslovne urþené.
V prípade, že sa kuchynský odsávaþ
používa súþastne s inými zariadeniami,
ktoré sú v styku s plynom alebo inými
horĐavinami, miestnosĢ musí byĢ zariadená
vhodnou ventiláciou.
Odsávací vzduch nesmie byĢ odvádzaný
do toho istého odvodu, ktorý sa používa
na odvod dymov, ktoré vyluþujú zariadenia
spaĐujúce plyny alebo iné horĐaviny.
Je prísne zakázané pod odsávaþom pary
pripravovaĢ jedlá na plameni.
Použitie voĐného plameĖa poškodzuje fi ltry,
þo može byĢ príþinou vyvolania požiaru,
preto sa ho v každom prípade treba
vyvarovaĢ.
Vyprážanie potravín sa musí vykonávaĢ
pod kontrolou a treba sa vyhnúĢ tomu, aby
prepálený olej zaþal horieĢ.
Pozor! Pri použití spolu s varnými
spotrebiþmi, prístupové þasti sa môžu
znaþne zohriaĢ.
ýo sa týka technických a bezpeþnostných
opatrení schválených pre odvod dymov, je
potrebné dodržiavaĢ sa presne predpismi
stanovenými príslušnými miestnými úradmi.
Odsávaþ pary je potrebné pravidelne þistiĢ
vnútorne aj zvonku (ASPOĕ JEDENKRÁT
ZA MESIAC, akokoĐvek rešpektovaĢ ako je
vyslovene urþené v pouþeniach o údržbe
uvedených v tejto príruþke).
Nedodržiavanie pravidiel týkajúcich sa
þistenia odsávaþa pary a výmeny a þistenia
fi ltrov, vyvoláva nebezpeþenstvo vzniku
požiaru. NepoužívaĢ alebo nenechaĢ
odsávaþ pary bez správne namontovaných
žiaroviek kôli možnému nebezpeþenstvu
elektrického otrasu. Neberú sa do úvahy
žiadne zodpovednosti za prípadné
neprimerannosti, škody a požiare vyvolané
zariadením, pochádzajúce z nedodržiavania
sa návodov uvádzaných v tejto príruþke.
2. POUŽÍVANIE
Odsávaþ pary slúži pre odsávanie dymov a
pár pochádzajúce z varenia.
V priloženej príruþke pre inštaláciu je
uvedené, ktorú verziu je možné používaĢ
pre Váš model medzi odsávacou verziou
s vonkajšou evakuáciou
fi ltraþnou s vnútornou recirkuláciou
alebo
3. MONTÁŽ
Napätie siete musí zodpovedaĢ s napätím
udaným na etikete charakteristiky
umiestnené vo vnútri odsávaþa pary. Ak
je predložená zástrþka, zapojiĢ odsávaþ
pary do rozvodu zhodného so stanovenými
právnymi predpismi na prístupnom území
aj po inštalácii. Ak nie je predložená
zástrþka (priamy spoj so sieĢou), alebo
zástrþka nie je umiestnená na prístupnom
území, aj po inštalácii, pripojiĢ dvojpólový
vypínaþ zhodný s predpismi, ktoré zaruþujú
kompletné odpojenie sa zo siete podĐa
podmienok kategórie nadmierného napätia
III, v zhode s pravidlami inštalácie.
Upozornenie! Pred napojením okruhu
odsávaþa pary do prívodovej elektrickej
siete a pred kontrolou jeho správnej
þinnosti, skontrolovaĢ stále, aby kábel
siete bol správne namontovaný.
.
Page 94

94
www.aeg.com
Odsávaþ pary je vybavený špecialnym
napájacím káblom; v prípade poškodenia
kábla, vyžiadajte is ho u servirne technickej
asistencie. Minimálna vzdialenosĢ medzi
povrchom podstavca pre nádoby na
kuchynskom sporáku a najspodnejšej þasti
kuchynského odsávaþa pary nesmie byĢ
kratšia ako 50cm v prípade elektrického
sporáka a ako 65cm v prípade plynového
alebo kombinovaného sporáka.
Ak návody kuchynského plynového aparátu
uvádzajú väþšiu vzdialenosĢ, je ptrebné s
tým poþítaĢ.
4. ÚDRŽBA
Skôr ako zaþína ktorákoĐvek údržba,
odpojiĢ odsávaþ pary z elektrického
vedenia. Odsávaþ pary sa pravidelne þistí
zvonku aj zvnútra (aspoĖ rovnako þastým
opakovaním ako sa vykonáva údržba
fi ltrov tuku). Na þistenie používaĢ vlhké
plátno s neutrálnymi tekutými þistiacími
prostriedkami.
VyhnúĢ sa používania prostriedkov
obsahujúcich škrabacie látky.
NEPOUŽÍVAġ ALKOHOL!
Upozornenie! Nedodržanie noriem
na þistenie zariadenia a výmenu fi ltrov
predstavuje riziko požiaru. Odporúþa sa
preto dodržiavaĢ uvedené pokyny.
Odmieta sa akákoĐvek zodpovednosĢ
za prípadné škody na motore, požiare
vyvolané nesprávnou údržbou alebo
nedodržaním vyššie uvedených
upozornení.
4.2 Type 150 LONG LIFE - Aktívno uhlíkový fi lter umývateĐný
UhoĐný fi lter môže byĢ umývaný každých
dva mesiacov v teplej vode a spôsobilými
saponátmi alebo v umývaþke za 65°C (
v prípade umývania v umývaþke, uskutoþniĢ
kompletný cyklus bez nádob vo vnútri).
Bez poškodenia fi ltra odstániĢ prebytoþnú
vodu, potom odstrániĢ vankúšik uložený vo
vnútri umelohmotného rámu a vysušiĢ ho
defi nitívne vložením ho do rúry na 10 minút
na 100°C.
VymeniĢ vankúšik každé 3 mesiace
a zakaždým, keć je látka poškodená.
4.3 Type 60/80 - Aktívno uhlíkový fi lter
NIE umývateĐný
NasýteĐnosĢ uhoĐného fi ltru sa odhaĐuje iba
po viac-menej predĐženom použití, na základe typu kuchyne a pravidelnosti þistenia
fi ltra tukov. V každom prípade je nevyhnutné vymeniĢ zásobník maximálne každé štyri
mesiace.
NEMÔŽE byĢ umývaný alebo regenerovaný.
1
4.1 Protitukový fi lter - Musí byĢþistený
jedenkrát za mesiac s nedráždivými
þistiacími prostriedkami, ruþne alebo v
umývaþke riadu s nízkou teplotou a s
krátkym umývacím cyklom.
Umývaním v umývaþke riadu, protitukový
kovový fi lter môže vyblednúĢ, ale jeho
fi ltraþné vlastnosti sa tým vôbec nezmenia.
2 2
Page 95

SLOVENýINA
95
5. OVLÁDAýE
Odsávaþ pary je vybavený ovládacím
panelom s kontrolou odsávacej rýchlosti a s
kontrolou zapínania svietidla na osvetlenie
varnej pracovnej plochy.
V prípade mimoriadného zhromaždenia sa
pary v kuchyni, používaĢ väþšiu rýchlosĢ.
Odporúþame zapnúĢ odsávanie 5 minút
pred zaþatím varenia a nechaĢ ho v chode
ešte približne ćalších 15 minút po ukonþení
varenia.
Ovládacie prvky na þelnej strane prístroja.
1A
1B
1C
A. Tlaþidlo OFF (tlaþidlo vypnuté) - ON
(tlaþidlo zapnuté)
StlaþiĢ jeden alebo viac krát pre
dosiahnutie požadovanej funkcie:
ON (tlaþidlo zapnuté): odstávaþ pary
nastaví rýchlosĢ, ktorá bola naposledy
zvolená.
OFF (tlaþidlo vypnuté): všetky
deaktivované funkcie s výnimkou
osvetlenia.
B. Tlaþidlo výberu rýchlosti (odsávací
výkon)
Stlaþením tohto tlaþidla jeden alebo
viac krát, sa zvolí najvhodnejšia
odsávacia rýchlosĢ (výkon) (1 - 2 - 3 ).
C. Displej: zobrazuje vybraný odsávací
výkon (1-2-3), signalizuje nasýteĐnosĢ
fi ltrov (F).
D. Tlaþidlo zapojenia intenzívnej rýchlosti..
Po zapojení, intenzívna rýchlosĢ
ostane funkþná po dobu asi 5 minút,
poþom odsávaþ pary sa vráti do
predtým zvolenej rýchlosti (od 1 do 3)
alebo dokonca sa vypne, ak predtým
nebola zvolená žiadna rýchlosĢ. Pre
deaktiváciu intenzívnej rýchlosti skôr
ako prejde 5 minút, stlaþiĢ tlaþidlo
A alebo tlaþidlo B.
E. Tlaþidlo ON/OFF osvetlenie
1D
1E
V prípade, ak odsávaþ pary alebo ovládacie
prvky nefungujú, odporúþa sa prerušiĢ
napájanie aspoĖ na 5 sekúnd a potom ho
znovu zapnúĢ. PoþkaĢ potom 15 sekúnd
a overiĢ, þi odsávaþ pary funguje správne.
Zariadenie pre kontrolu tukového fi ltra
afi ltra s aktívnym uhlím
Odsávaþ pary je vybavený zariadením,
ktoré ukazuje, kedy je nevyhnutné vykonaĢ
údržbu.
PokiaĐ je potrebné používaĢ odsávaþ pary
s uhlíkovým fi ltrom, aktivovaĢ príslušný
ukazovateĐ nasýtenosti nasledovne:
Odsávaþ pary musí byĢ nastavený na
“OFF”.
StlaþiĢ súþasne tlaþidla B a D po dobu
troch sekúnd, zasvieti sa kontrolka LED F
a zaþne blikaĢ kontolka led prvej rýchlosti,
po jednej sekunde bude blikaĢ aj kontrolka
led druhej rýchlosti a systém vydá zvukový
signál (-Beep) oznamujúc uskutoþnenie
nastavenia.
Pre odstránenie signalizácie uholného
fi ltra, stlaþiĢ súþasne tlaþidlá B a D po
dobu troch sekúnd, zasvieti sa kontrolka
LED F a zaþne blikaĢ kontrolka led prvej
rýchlosti (tukový fi lter) a kontrolka led
druhej rýchlosti, po 1 sekunde zaþne blikaĢ
len kontrolka led prvej rýchlosti, systém
vydá zvukový signál (-Beep-) oznamujúc
uskutoþnenie nastavenia.
KontrolkaLed (1) signalizácie
nasýteĐnosti tukového fi ltra
Blikanie kontrolky led rýchlosti 1 upozorní
operátora, že tukové fi ltre sa musia umyĢ.
Pozorne si preþítaĢ pokyny prislúhajúce
údržbe tukových fi ltrov a jeho umývaniu.
Kontrolka Led (2) signalizácie
nasýteĐnosti fi ltrov s aktívnym uhlím
Blikanie kontrolky led rýchlosti 2 upozorní
operátora, že uhoĐný fi ter sa musí umyĢ
alebo vymeniĢ.
Pozorne si preþítaĢ pokyny prislúhajúce
umývaniu a výmene uhoĐných fi ltrov.
Opätovná aktivácia ukazovateĐa
nasýteĐnosti
Po vykonaní údržby fi ltra, stlaþiĢ tlaþidlo
A po dobu 3 sekúnd, až kým kontrolka LED
1 a 2 neprestanú blikaĢ .
Page 96

96
www.aeg.com
6. OSVETLENIE
Vypnite odsávaþ z elektrickej siete.
Upozornenie! Skôr ako sa dotknete
žiaroviek, presvedþte sa, že sú chladné.
Používajte len halogénové žiarovky 12V
- 20W, max. - G4, a dbajte pritom, aby ste
sa ich nedotkli rukami.
Page 97

RO MANUAL DE FOLOSIRE
PENTRU REZULTATE PERFECTE
Vă mulĠumim că aĠi ales acest produs AEG. Am creat acest produs pentru a vă oferi
performanĠe impecabile, pentru mulĠi ani, cu tehnologii inovative care fac viaĠa mai simplă
- funcĠii pe care s-ar putea să nu le găsiĠi la aparatele obiúnuite. Vă rugăm să alocaĠi câteva
minute cititului pentru a obĠine ce este mai bun din acest aparat.
VizitaĠi website-ul la:
Aici găsiĠi sfaturi privind utilizarea, broúuri, informaĠii care vă ajută la rezolvarea
unor probleme apărute úi informaĠii despre service:
www.aeg.com
ÎnregistraĠi-vă produsul pentru a benefi cia de servicii mai bune:
www.aeg.com/productregistration
CumpăraĠi accesorii, consumabile úi piese de schimb originale pentru aparatul
dvs.:
www.aeg.com/shop
PROTEJAREA MEDIULUI INCONJURATOR
ROMÂNĂ
97
ReciclaĠi materialele marcate cu simbolul . Pentru a recicla ambalajele, acestea trebuie
puse în containerele corespunzătoare.
AjutaĠi la protejarea mediului úi a sănătăĠii umane úi la reciclarea deúeurilor din aparatele
electrice úi electrocasnice. Nu aruncaĠi aparatele marcate cu acest simbol
cu deúeurile menajere. ReturnaĠi produsul la centrul local de reciclare sau contactaĠi
administraĠia oraúului dvs.
SERVICIUL DE RELAğII CU CLIENğII ùI SERVICE
Vă recomandăm utilizarea pieselor de schimb originale.
Atunci când contactaĠi unitatea de Service, asiguraĠi-vă că aveĠi disponibile următoarele
informaĠii.
InformaĠiile pot fi găsite pe plăcuĠa cu datele tehnice. Model, PNC, Număr de serie.
Avertisment / AtenĠie-InformaĠii privind siguranĠa.
InformaĠii generale úi recomandări
InformaĠii privind mediul înconjurător.
Ne rezervăm dreptul asupra efectuării de modifi cări fără preaviz.
împreună
Page 98

98
www.aeg.com
1. INSTRUCğIUNI PRIVIND
SIGURANğA
AtenĠie! UrmăriĠi îndeaproape
instrucĠiunile conĠinute în acest
manual. Producătorul îúi declină orice
responsabilitate în cazul daunelor
sau incendiilor provocate aparatului úi
derivate dintr-o utilizare incorectăúi din
nerespectarea instrucĠiunilor conĠinute
în acest manual. Hota a fost proiectată
excluziv pentru uz casnic.
Avertizare! Nu conectaĠi aparatul la
reĠeaua electrică până când nu aĠi
terminat de montat toată instalaĠia.
Înainte de orice intervenĠie de curăĠenie
úi întreĠinere, deconectaĠi hota de la
reĠeaua electrică, scoĠând útecherul sau
deconectând întrerupătorul general al
locuinĠei.
Pentru toate operaĠiile de instalare úi
întreĠinere utilizaĠi mănuúi de protecĠie.
Aparatul nu este destinat pentru a fi folosit
de către copii sau persoane cu capacităĠi
fi zice senzoriale úi mentale reduse sau care
nu au experienĠa úi cunoútinĠa adecvată,
numai în cazul în care acestea sunt sub
supraveghere sau le sunt date instrucĠiunile
de folosire a aparaturii de către o persoană
responsabilă cu siguranĠa acestora.
Copiii trebuie să fi e supravegheaĠi pentru a
fi siguri că nu se joacă cu aparatura.
Nu folosiĠi niciodată hota fără montajul
corect al grilei!
Hota nu trebuie folosită NICIODATĂ ca
suprafaĠă de aúezare numai în cazul în care
este indicat în mod specifi c.
Localul trebuie să fi e destul de ventilat,
când hota de bucătărie se foloseúte
împreună cu alte aparate cu combustie de
gaz sau alĠi combustibili.
Aerul aspirat nu trebuie să treacă printr-o
conductă folosită pentru eliminarea fumul
produs de aparatele cu combustie de gaz
sau alĠi combustibili. Este absolut interzis
pregătirea sub hotă a mâncărurilor cu fl amă.
Folosirea flăcării libere poate dăuna fi ltrele
úi poate crea incendii, aúadar trebuie evitată
în orice caz. Friptura trebuie făcută sub
control pentru a evita ca uleiul prea încălzit
să se aprindă.
AtenĠie! PărĠile componente cu care
am putea intra in contact se pot încălzi
considerabil în momentul în care se
folosesc împreună cu aparatura pentru
pregătit mâncarea.
În ceea ce privesc măsurile tehnice úi
de siguranĠă care trebuie să fi e adoptate
pentru evacuarea fumurilor este strict
necesar să respectaĠi regulamentele
în vigoare úi să apelaĠi la autorităĠile
competente locale. Hota trebuie să fi e
curăĠată tot des atât în interior cât úi în
exterior (CEL PUğIN ODATĂ PE LUNĂ,
respectând în mod expresiv toate indicaĠiile
redate în instrucĠiunile de întreĠinere
reproduse în acest manual)
Nerespectarea normelor de curăĠare a hotei
precum úi neînlocuirea sau necurăĠarea
fi ltrelor poate crea la riscuri de incendii.
Nu folosiĠi niciodată hota fără montajul
corect al becurilor pentru a nu crea riscuri
de scurtcircuit. Firma îúi declină orice
responsabilitate pentru eventualele pagube,
daune sau incendii provocate de aparatură
ce provin din nerespectarea instrucĠiunilor
redate în acest manual.
2. UTILIZARE
Hota serveúte la aspirarea gazelor úi
vaporilor rezultaĠi din gătit.
În manualul de instalare ataúat se indică
versiunea care se poate utiliza pentru
modelul achiziĠionat de Dumneavoastră,fi e
versiunea cu aspiraĠie úi evacuare externă
fi e versiunea fi ltrantă cu reciculare
internă
.
3. INSTALAREA
Tensiunea din reĠea trebuie să corespundă
cu tensiunea la care se referă eticheta
situată în interiorul hotei. Dacă este
prevăzută cu útecher conectaĠi hota la
o priză conform cu normele în vigoare,
poziĠionată într-o zona accesibilăúi după
instalare. Dacă nu este prevăzută cu
útecher (conexiunea este direct la reĠea)
sau útecherul nu este poziĠionat într-o
zonă accesibilăúi după instalare, aplicaĠi
un întrerupător bipolar la normă care să
asigure deconectarea completă de la reĠea
în condiĠiile categoriei de supratensiune III,
conform regulilor de instalare.
AtenĠie! înainte de a efectua
conectarea circuitului hotei la
alimentaĠia din reĠea úi de a verifica
funcĠionarea corectă, controlaĠi
totdeauna dacă cablul a fost montat în
mod corect.
Page 99

ROMÂNĂ
99
Hota este prevăzută cu un cablu de
alimentare special; în cazul deteriorării
acestuia, apelaĠi la serviciul de asistenĠă
tehnică. DistanĠa minimă între suprafaĠa
suportului recipientelor pe dispozitivul de
gătit úi partea de jos a hotei nu trebuie să
fi e mai mică de 50cm în cazul maúinilor de
gătit electrice, úi de 65cm în cazul maúinilor
de gătit cu gaz sau mixte.
Dacă instrucĠiiunile dispozitivului de gătit
cu gaz specifi că o distanĠă mai mare, este
necesar săĠineĠi cont de aceasta.
4. ÎNTREğINERE
AtenĠie! Înainte de orice intervenĠie de
curăĠenie úi întreĠinere, deconectaĠi hota
de la reĠeaua electrică, scoĠând útecherul
sau deconectând întrerupătorul general al
locuinĠei.
Hota trebuie curăĠată frecvent (cel puĠin
cu aceeaúi frecvenĠă cu care se curăĠă
fi ltrele anti-grăsime), fi e în interior cât úi în
exterior. Pentru curăĠare folosiĠi un material
îmbibat cu detergenĠi lichizi neutri. EvitaĠi
folosirea produselor pe bază de abrazivi
NU FOLOSIğI ALCOOL!
AtenĠie! Nerespectarea normelor de
curăĠare a hotei úi de înlocuire a fi ltrelor
conduce la potenĠiale riscuri de incendii.
Vă sfătuim să respectaĠi îndeaproape
instrucĠiunile prezente în acest manual.
Producătorul îúi declină orice
responsabilitate în cazul daunelor la motor
sau incendiilor provocate aparatului úi
derivate dintr-o utilizare sau întreĠinere
incorectă precum úi din nerespectarea
instrucĠiunilor conĠinute în acest manual.
4.1 Filtru anti-grăsimi - Trebuie curăĠat
o dată pe lună cu detergenĠi neabrazivi,
manual sau utilizând maúina de spălat
vase, la temperaturi scăzute úi folosind un
program scurt.
Filtrul metalic anti-grăsimi, spălat cu maúina
de spălat vase se poate decolora, dar nu-úi
va pierde caracteristicile de fi ltrare.
4.2 Type 150 LONG LIFE - Filtru cu carbon activ lavabil
Filtrul cu carbon poate fi spălat la fi e-
care două luni cu apă caldăúi detergenĠi
adecvaĠi sau în maúina de spălat vase la
65°C (în cazul spălării în maúina de spălat
vase, efectuaĠi ciclul complet de spălare
fără a introduce vase în interior).
ÎndepărtaĠi excesul de apă fără a deteriora
fi ltrul, apoi scoateĠi tamponul amplasat în
interiorul cadrului de plastic úi aúezaĠi-l în
cuptor timp de 10 minute la 100°C pentru
uscarea defi nitivă.
ÎnlocuiĠi tamponul o dată la 3 ani sau la
deteriorarea Ġesăturii.
4.3 Type 60/80 - Filtru cu carbon activ
NElavabil
SaturaĠia fi ltrului de cărbune depinde de
folosirea mai mult sau mai puĠin prelungită
a tipului de maúina de gătit precum úi de
curăĠarea regulară a fi ltrului pentru grăsime.
În orice caz, cartuúul fi ltrului trebuie înlocuit
cel mult la fi ecare patru luni.
NU-l spălaĠi sau refolosiĠi
1
2 2
Page 100

100
www.aeg.com
5. COMENZI
Hota este dotată cu un panou de comandă,
de la care se modifi că viteza de aspiraĠie úi
se declanúează aprinderea becurilor pentru
iluminarea blatului de aragaz.
Se recomandă o viteza crescută, în special
în cazul unei concentraĠii mari de vapori în
bucătărie. Vă sfătuim să o lăsaĠi să aspire
5 minute înainte de a demara procesul
de coacere úi de a o lăsa în funcĠiune, la
închiderea procesului de coacere, pentru
încă 15 minute (aproximativ).
Comenzile pe latura frontală a aparatului:
1A
1B
1C
A. Tasta OFF (tasta stinsă) - ON (tasta
aprinsă)
ApăsaĠi o dată sau de mai multe ori
pentru a obĠine funcĠia dorită:
ON (tasta aprinsă): hota confi gurează
ultima viteză selectată.
OFF (tasta stinsă): toate funcĠiile
dezactivate cu excepĠia iluminării.
B. Tasta de selectare a vitezei (putere de
aspirare)
ApăsaĠi această tastă o dată sau
de mai multe ori pentru a alege
viteza (puterea) de aspirare mai
corespunzătoare (1 - 2 - 3 ).
C. Display: vizualizează putere de aspirare
selectată (1-2-3), semnalizează
saturaĠia fi ltrelor (F).
D. Tasta introducere viteză intensivă.
După introducere, viteza intensivă va
rămâne în funcĠie timp de aproximativ
5 minute, după care hota va reveni la
viteza anterior selectat
sau se chiar stinge dacă în prealabil nu
fusese selectată nicio viteză. Pentru a
dezactiva viteza intensivă înainte de a
fi trecut cele 5 minute apăsaĠi tasta A
sau tasta B.
E. Tasta ON/OFF lumină
În cazul în care hota sau comenzile nu
funcĠionează se recomandă întreruperea
alimentării timp de cel puĠin 5 secunde úi
apoi reporniĠi.. Apoi aúteptaĠi 15 secunde úi
verifi caĠi dacă hota funcĠionează corect.
Dispozitiv pentru controlul fi ltrului
grăsimi úifi ltrului cu carbon activ
1D
1E
ă (de la 1 la 3)
Această hotă este echipată cu un dispozitiv
care semnalează când este necesară
efectuarea operaĠiunilor de mentenanĠă.
În cazul în care hota este utilizată cu fi ltrul
de carbon, semnalizatorul care indică
saturaĠia acestuia trebuie activat în modul
următor:
Hota trebuie confi gurată pe “OFF”.
ApăsaĠi simultan tastele B úi D timp de trei
secunde, LEDUL F se aprinde úi începe
să pâlpâie ledul vitezei 1, după o secundă
pâlpâie úi ledul vitezei 2 iar sistemul emite
un semnal sonor (-Beep-) pentru a indica
confi gurarea stabilită.
Pentru a elimina semnalizarea fi ltrului cu
carbon apăsaĠi simultan tastele B úi D timp
de trei secunde, LEDUL F se porneúte úi
începe să pâlpâie ledul vitezei 1 (fi ltru de
grăsimi), úi ledul vitezei 2, după o secundă
va pâlpâi doar ledul vitezei 1, sistemul
emite un semnal sonor (-Beep-) pentru a
indica confi gurarea stabilită.
Led (1) de semnalizare saturaĠie fi ltru de
grăsimi
Aprinderea intermitentă a ledului vitezei 1
avertizează operatorul că fi ltrele de grăsimi
trebuie să fi e spălate.
CitiĠi cu atenĠie instrucĠiunile privind
întreĠinerea fi ltrelor gră
simi pentru curăĠarea
acestora.
Led (2) de semnalizare saturaĠie fi ltru cu
carbon activ
Aprinderea intermitentă a ledului vitezei 2
avertizează operatorul că fi ltrul carbon
trebui spălat sau înlocuit.
CitiĠi cu atenĠie instrucĠiunile privind
spălarea sau înlocuirea fi ltrului cu carbon.
Refacerea indicatorului de saturaĠie
După executarea întreĠinerii fi ltrelor, ĠineĠi
apăsată tasta A timp de 3 secunde până
când LEDUL 1 sau 2 încetează să mai
pâlpâie.
 Loading...