

Page 1

Versión en español ..................................... 2
Product Registration................................... 2
Important Safety Instructions..................... 2
First Steps ................................................... 3
Energy Saving Ideas .................................. 4
Setting the Controls .................................... 4
Fresh Food Storage ................................... 5
Care and Cleaning...................................6-7
Automatic Ice Maker................................... 7
Removing the Handles and Doors ............ 8
Avoid Service Checklist......................... 9-11
Normal Operating Sounds ........................11
Warranty .................................................... 12
Service Information (Canada).................. 13
P/N 218481701 (0101)
Page 2
Product Registration
Versión en español
Si desea obtener una copia en español
de este Manual del Usuario, sírvase
escribir a la dirección que se incluye a
continuación. Solicite la P/N 218481800.
Spanish Owner's Guides
Electrolux Home Products
PO Box 212378
Augusta, GA 30907
Record the Model Number and Serial Number of this refrigerator in the space
provided below. These numbers are found on the serial plate located on the ceiling
of the refrigerator compartment.
Model Number: __________________________________________________
Serial Number: ___________________________________________________
Register Your Product
The self-addressed PRODUCT REGISTRATION CARD should be filled in completely,
signed and returned to Electrolux Home Products.
Important Safety
Instructions
Proper Disposal of
Your Refrigerator
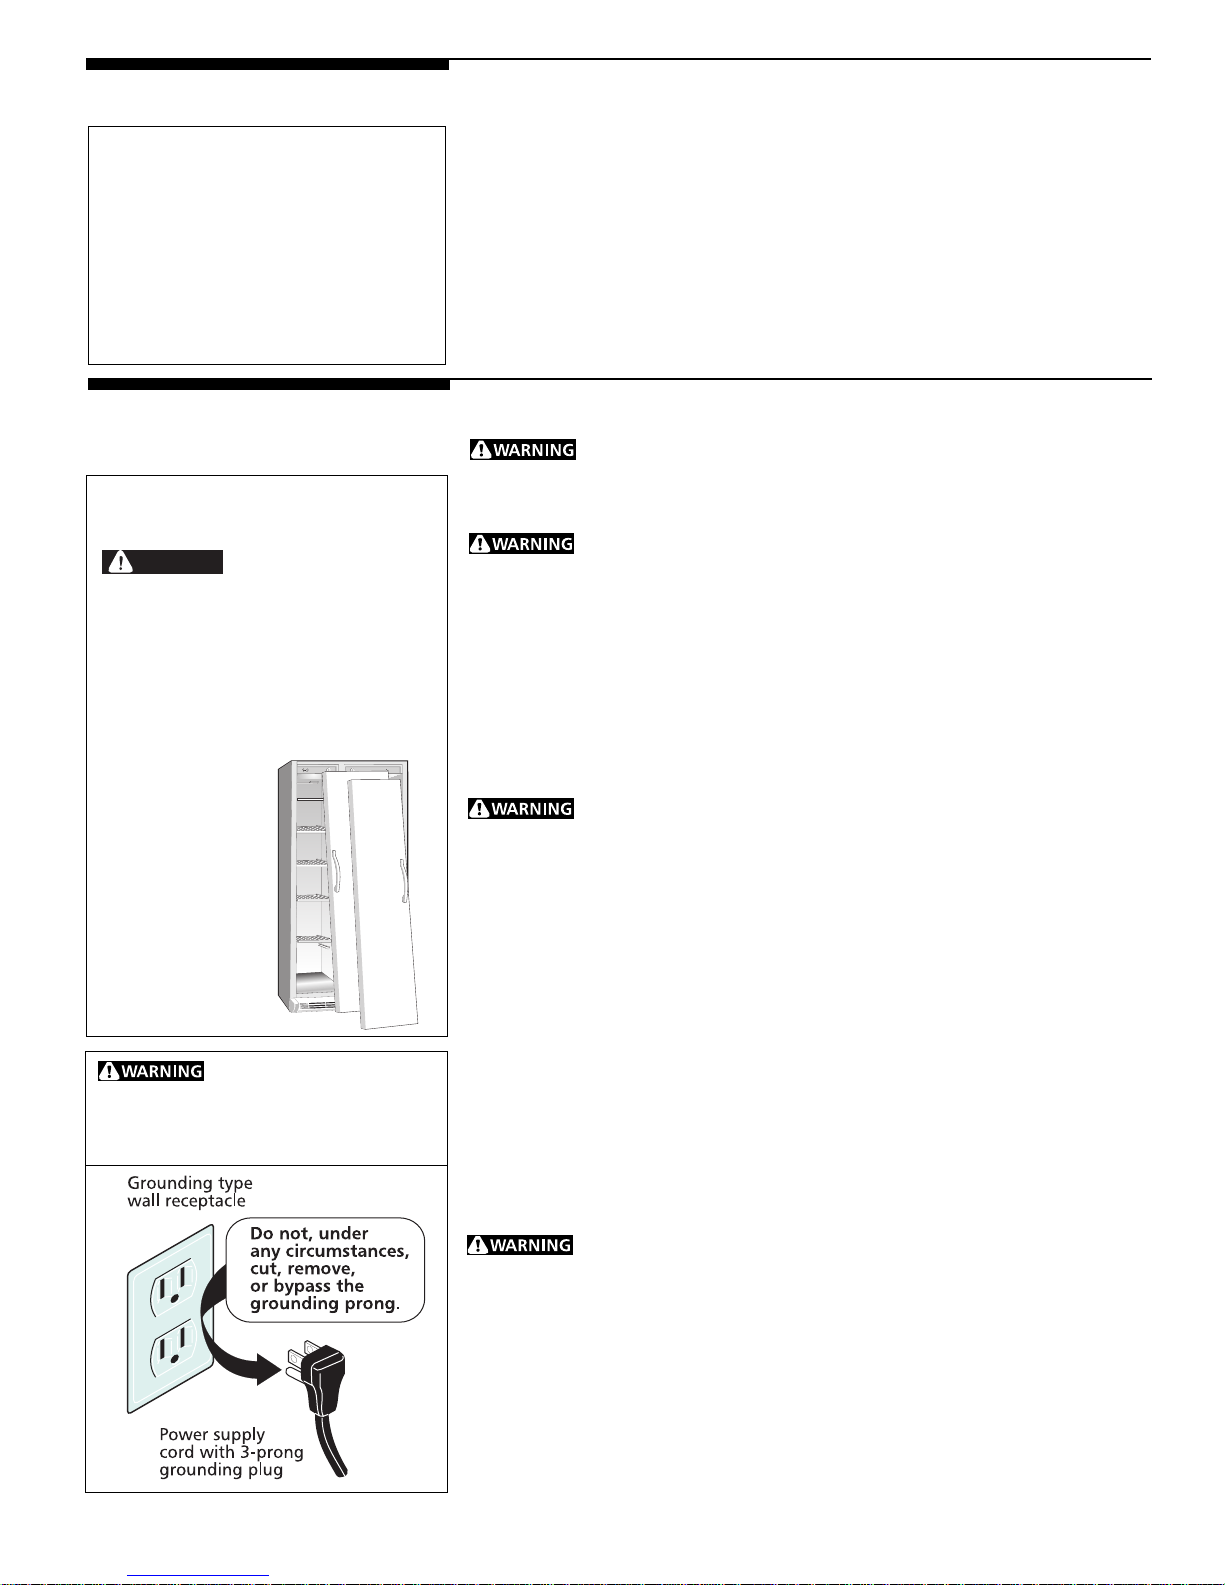
DANGER
Child entrapment and suffocation are
not problems of the past. Junked or
abandoned refrigerators are still
dangerous - even if they will sit for "just
a few days." If you are getting rid of your
old refrigerator, please follow
instructions below to help prevent
accidents.
BEFORE YOU
THROW AWAY
YOUR OLD
REFRIGERATOR
OR FREEZER:
* Take off doors.
* Leave shelves in
place, so
children may
not easily climb
inside.
electric shock. Do not use an extension
cord or an adapter plug. Do not remove
any prong from the power cord.
Risk of child entrapment.
Avoid fire hazard or
Read all instructions before using this refrigerator.
For Your Safety
Do not store or use gasoline or other flammable vapors and liquids in the vicinity
of this or any other appliance. Read product labels for flammability and other warnings.
Child Safety
• Destroy carton, plastic bags, and any exterior wrapping material immediately
after the refrigerator is unpacked. Children should never use these items for play.
Cartons covered with rugs, bedspreads, plastic sheets or stretch wrap may
become airtight chambers and can quickly cause suffocation.
• Remove all staples from the carton. Staples can cause severe cuts and destroy
finishes if they come in contact with other appliances or furniture.
• An empty, discarded ice box, refrigerator or freezer is a very dangerous
attraction to children. Remove the door of any appliance that is not in use,
even if it is being discarded.
Electrical Information
These guidelines must be followed to ensure that safety mechanisms in
the design of this refrigerator will operate properly.
• The refrigerator must be plugged into its own 115 Volt, 60 Hz, AC only
electrical outlet. The power cord of the appliance is equipped with a three-
prong grounding plug for your protection against shock hazards. It must be
plugged directly into a properly grounded three-prong receptacle. The
receptacle must be installed in accordance with local codes and ordinances.
Consult a qualified electrician. DO NOT USE AN EXTENSION CORD OR AN
ADAPTER PLUG.
• If voltage varies by 10 percent or more, performance of your refrigerator may
be affected. Operating the refrigerator with insufficient power can damage the
compressor. Such damage is not covered under your warranty. If you suspect
your voltage is high or low, consult your power company for testing.
• To prevent the refrigerator from being turned off accidentally, do not plug the
unit into an outlet controlled by a wall switch or pull cord.
• Do not pinch, knot, or bend the power cord in any manner.
© 2001 White Consolidated Industries, Inc.
All rights reserved.
Other Precautions
• Never unplug the refrigerator by pulling on the power cord. Always grip the plug
firmly and pull straight out from the receptacle.
• To avoid electrical shock, unplug the refrigerator before cleaning and before
replacing a light bulb. Note: Turning the control to OFF turns off the compressor,
but does not disconnect power to the light bulb or other electrical components.
• Do not operate the refrigerator in the presence of explosive fumes.
• Avoid contact with any moving parts of the automatic ice maker.
2
Page 3
First Steps
This Owner’s Guide provides specific operating instructions for your model. Use the
refrigerator only as instructed in this Owner’s Guide. Before starting the
refrigerator, follow these important first steps:
Location
• Choose a place that is near a grounded electrical outlet. DO NOT use an
extension cord or an adapter plug.
• If possible, place the refrigerator out of direct sunlight and away from the range,
dishwasher or other heat sources.
• The refrigerator must be installed on a floor that is level and strong enough to
support a fully loaded refrigerator.
• Consider water supply availability for the automatic ice maker.
Installation
• Do not install the refrigerator where the temperature will drop below 60°F
(15°C) or rise above 110°F (43°C). The compressor will not be able to maintain
proper temperatures.
• In a recessed installation, allow an extra 1/2 inch (10-15 mm) on each side for
ease of installation.
• If the hinge side of the unit will be placed against a wall, allow a 1 3/4 inch (44
mm) space between the wall and the refrigerator to permit proper door swing.
Door Opening
For best use of the drawers and freezer basket, the refrigerator should be in a
position where both the refrigerator and freezer doors can be opened about 135°.
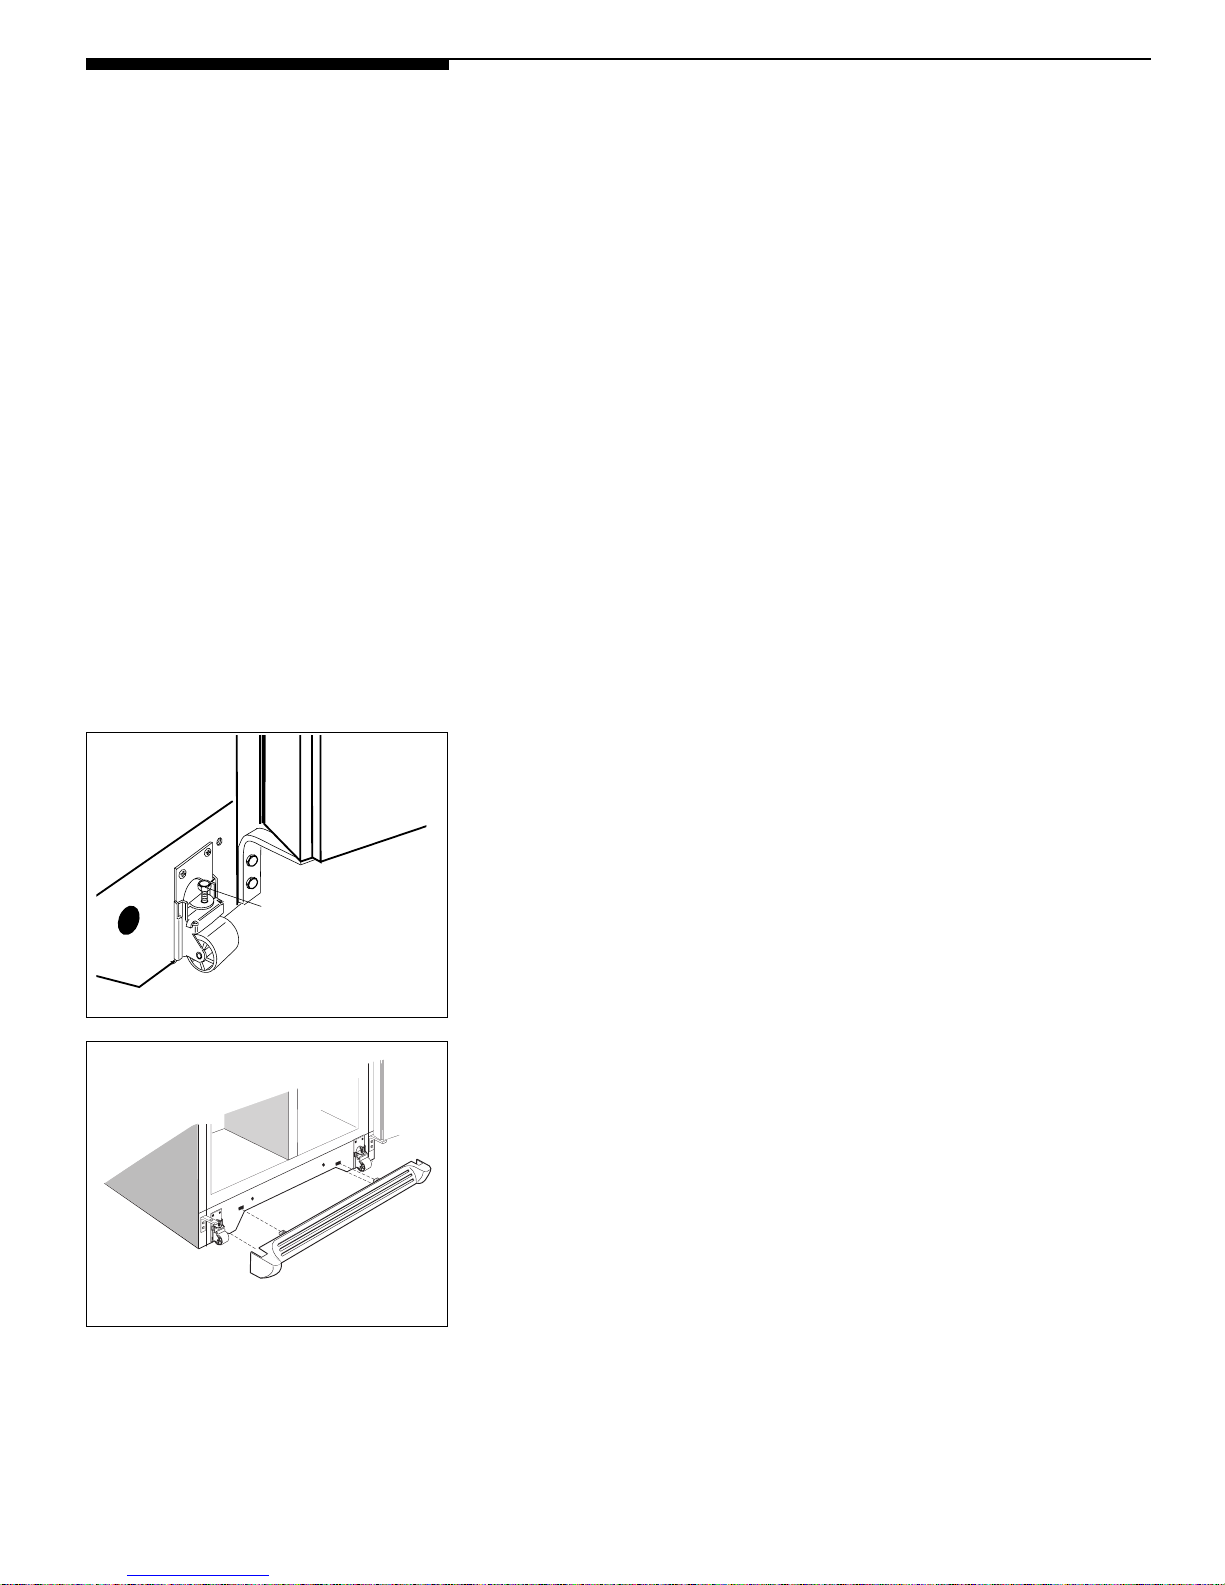
ROLLER ADJUSTING
BOLT
Adjusting front rollers
Replacing Toe Grill
Leveling
• The refrigerator must be leveled with all bottom corners resting firmly on
a solid floor. Adjust front rollers to level cabinet both front-to-rear and side-to-
side. Keep the cabinet as low as possible for stability. Never adjust cabinet rollers
so the front is lower than the rear.
• To adjust the front rollers: Open the refrigerator and freezer doors. Remove
the toe grill by pulling it straight out. Adjust the rollers by turning each roller
adjusting bolt with an adjustable wrench, a socket wrench or a nutdriver until the
refrigerator is level and stable. The rear rollers are not adjustable.
• Check both doors to be sure seals touch cabinet evenly on all four sides.
• If the freezer door is higher than the refrigerator door, raise the right corner and/
or lower the left corner until the doors align across the top of the cabinet.
• If the refrigerator door is higher than the freezer door, raise the left corner and/
or lower the right corner until the doors align across the top of the cabinet.
• To replace the toe grill: Line up tabs with holes and push grill straight on.
Cleaning
• Wash the inside, all removable parts and the outside with mild detergent and
warm water. Wipe dry. DO NOT USE HARSH CLEANERS ON THESE
SURFACES.
• Do not use razor blades or other sharp instruments that can scratch the appliance
surface, when removing adhesive labels. Any glue left from the tape or energy
label can be removed with a mixture of warm water and mild detergent, or,
touch the glue with the sticky side of tape already removed.
• DO NOT REMOVE THE SERIAL PLATE.
3
Page 4
Energy Saving Ideas
• Install the refrigerator in the most cool part of the room, out of direct sunlight and
away from heating ducts or registers. Do not place the refrigerator next to heatproducing appliances such as a range, oven or dishwasher. If this is not possible,
a section of cabinetry or an added layer of insulation between the two appliances
will help the refrigerator operate more efficiently.
• Level the refrigerator so the doors close tightly.
• Refer to this Owner's Guide for the suggested refrigerator settings.
• Periodic cleaning of the condenser will help the refrigerator run more efficiently.
See Outside in the "Care and Cleaning" section.
• Do not overcrowd the refrigerator or block cold air vents. Doing so causes the
refrigerator to run longer and use more energy. Shelves should not be lined with
aluminum foil, wax paper or paper toweling. Liners interfere with cold air
circulation, making the refrigerator less efficient, which could cause food spoilage.
• Cover foods and wipe containers dry before placing them in the refrigerator. This
cuts down on moisture build-up inside the unit.
• Organize the refrigerator to reduce door openings. Remove as many items as
needed at one time and close the door as soon as possible.
Setting the Controls
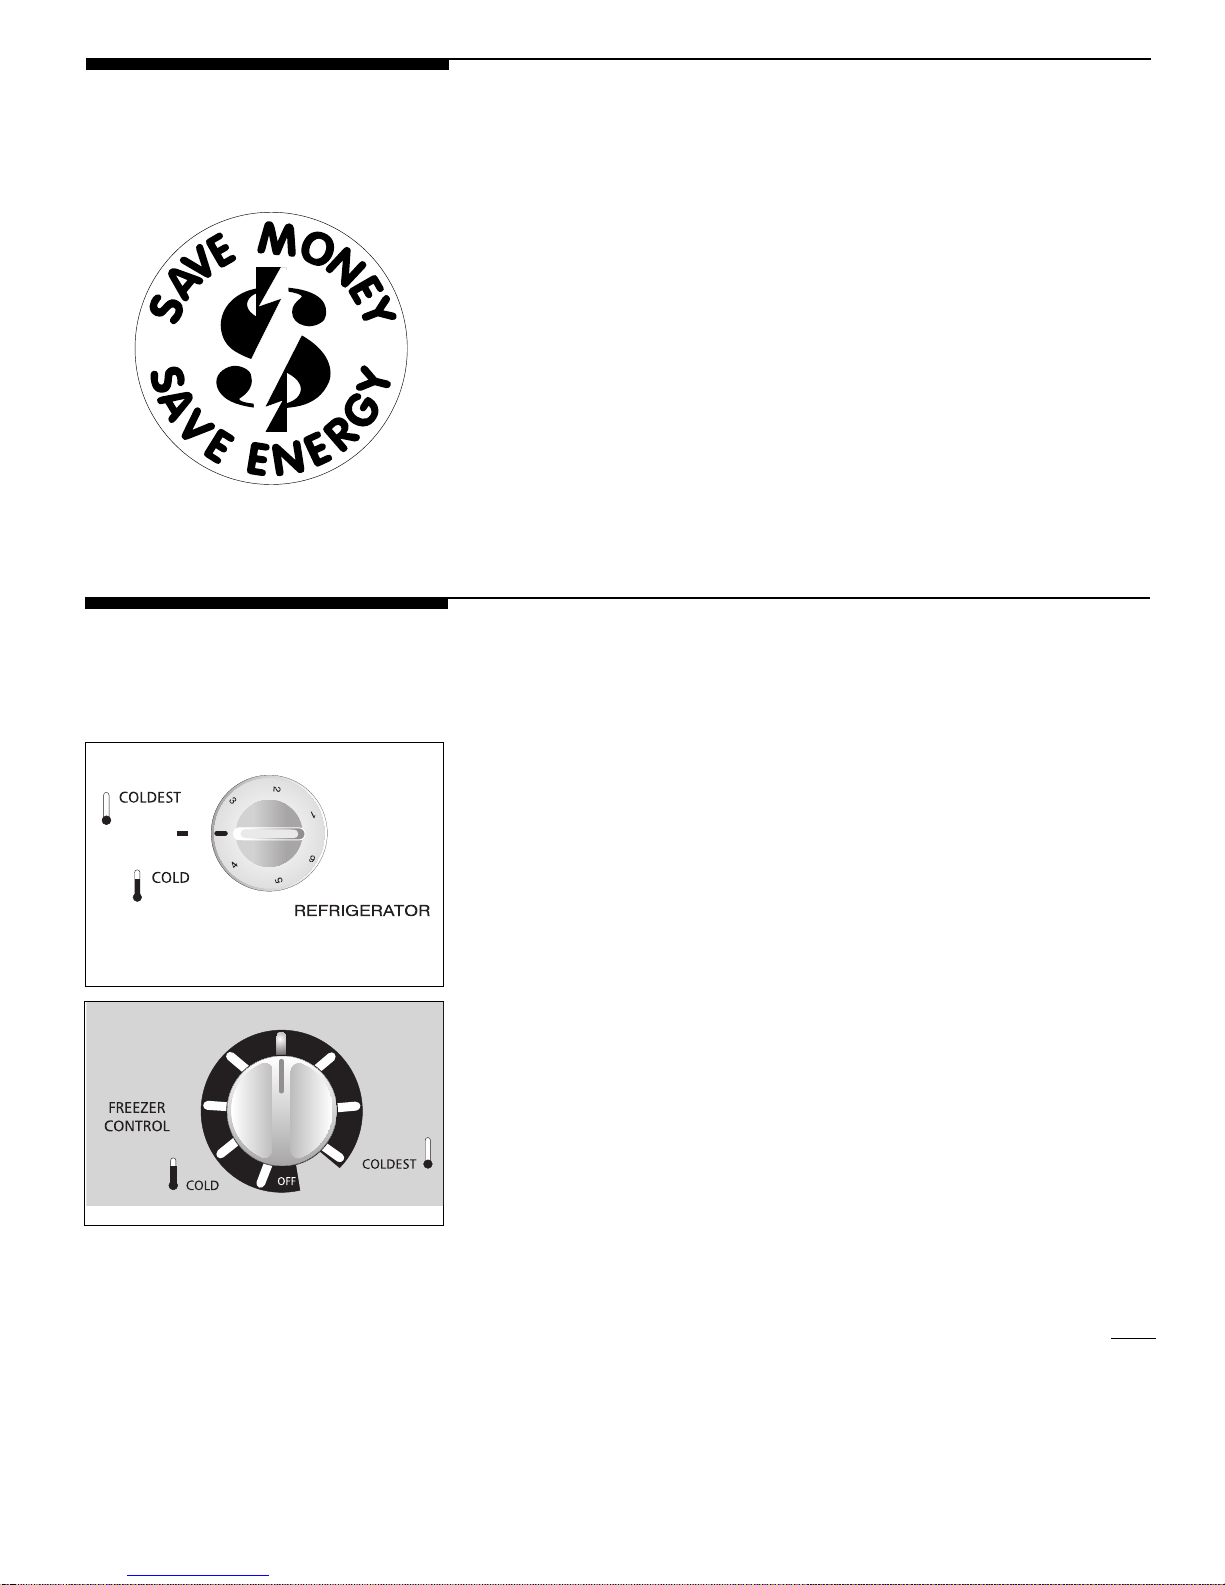
Refrigerator midpoint
Freezer midpoint
Cool Down Period
To ensure safe food storage, allow the refrigerator to operate with the doors closed
for at least 8 to 12 hours before loading with food.
Refrigerator Control
• The refrigerator control should be set at the midpoint of the dial for a trial period
of 24 hours.
• After 24 hours, adjust the control as needed. For colder temperatures, turn the
dial a notch toward COLDEST. For warmer temperatures, turn the dial a notch
toward COLD. Adjust temperatures by one increment at a time. The
C05C0060
temperature will increase or decrease, but not necessarily by 1, 2, or 3
degrees.
Freezer Control
• The freezer control should be set at the midpoint of the dial for a trial period of
C05C0063
24 hours.
• After 24 hours, adjust the control as needed. For colder temperatures, turn the
dial a notch toward COLDEST. For warmer temperatures, turn the dial a notch
toward COLD. Adjust temperatures by one increment at a time. The
temperature will increase or decrease, but not necessarily by 1, 2, or 3
degrees.
Note: When first setting the controls or when changing a setting, wait 24 hours
for the temperature to stabilize before making additional changes.
Turning the freezer control may change temperatures in both compartments. For
example, if the freezer control is turned to a colder setting, the refrigerator control
may have to be adjusted to a warmer one. Turning the refrigerator control will
change only the refrigerator temperature.
IMPORTANT: If the freezer control is turned to OFF, cooling stops in both
compartments.
You may hear the "Frost Free" system working. A fan circulates air in the
refrigerator and freezer compartments. For good circulation and maintenance of
proper cooling temperatures, do not block cold air vents with food items. Water
draining into the defrost water pan and hissing sounds are normal during the
automatic "Frost Free" cycle.
4
Page 5
Fresh Food Storage
Shelf Adjustment
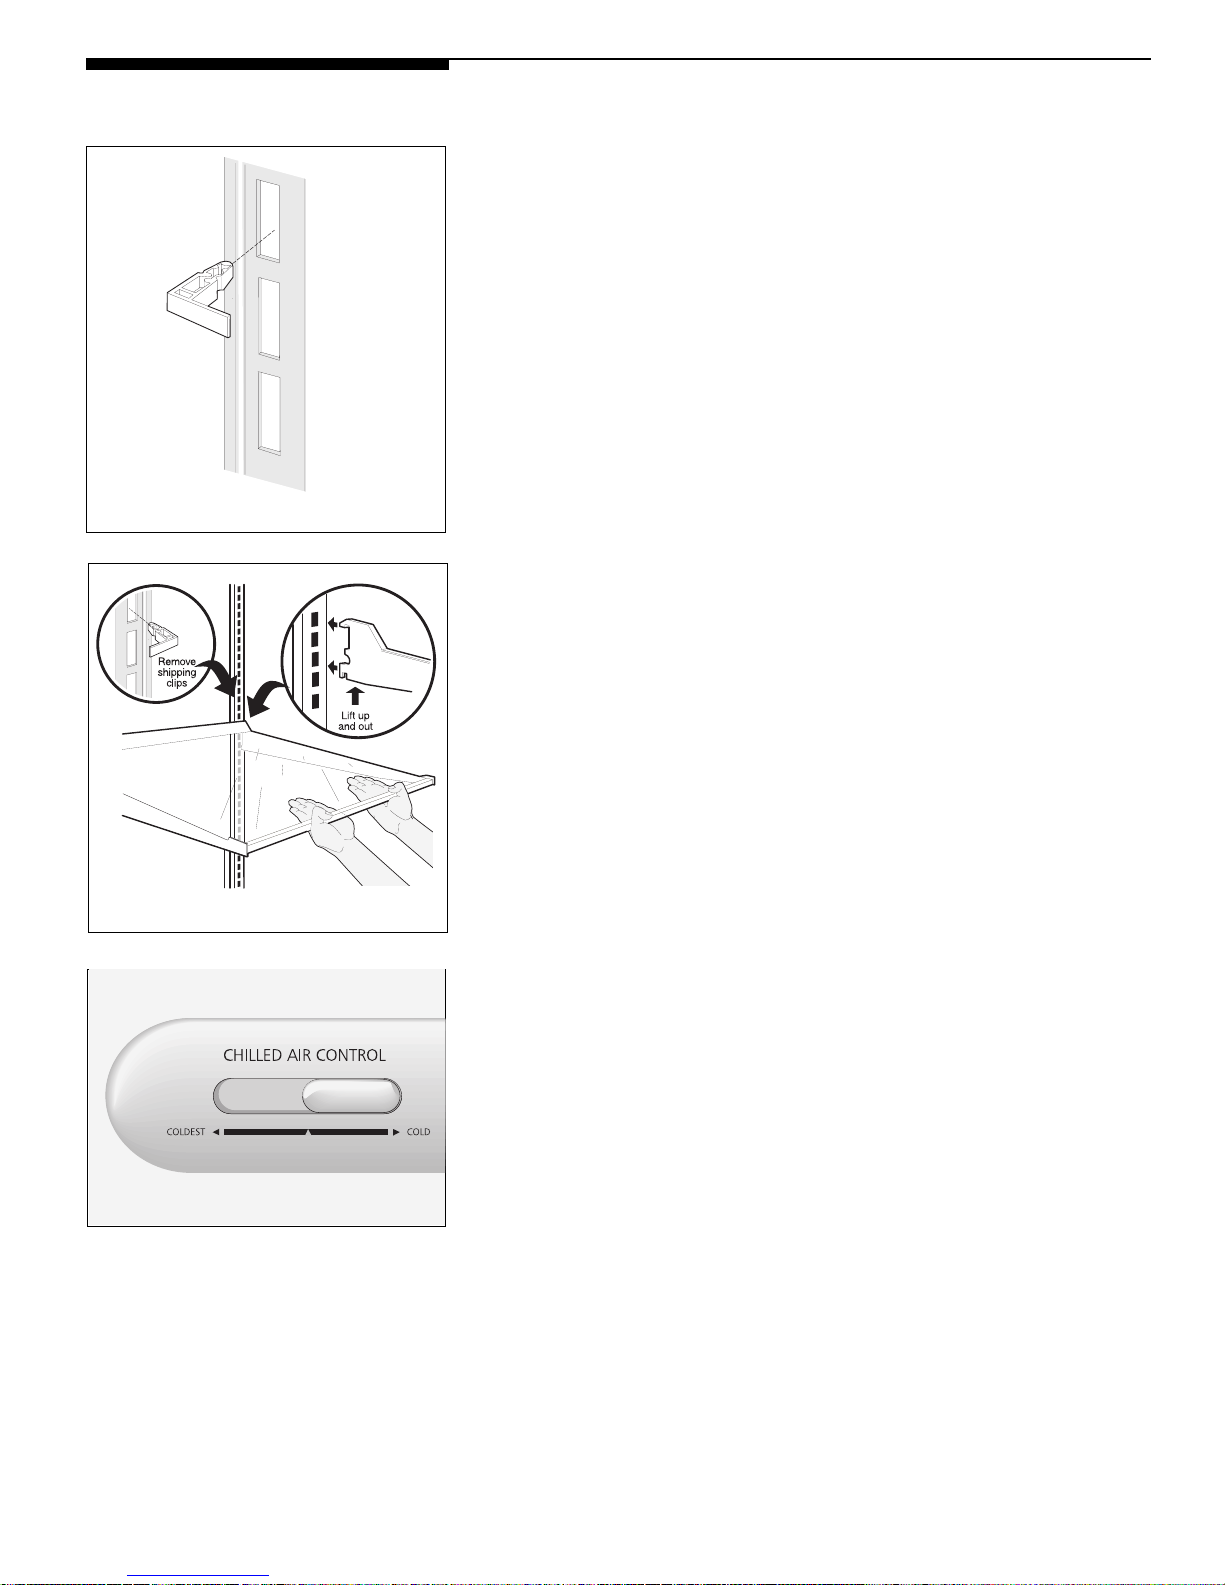
Refrigerator shelves are easily adjusted to suit individual needs. Before adjusting
shelves, remove all food. Remove and discard the shipping clips, wedged into the
cantilever rail above the shelf hook. These clips stabilize the shelves during shipping.
To adjust the cantilever shelves (shelves supported at the rear of the refrigerator), lift
the back of the shelf up and out. Replace shelf by inserting hooks at rear into slots.
Lower and lock into position. Some models have SpillsafeTM glass shelves, which catch
and hold accidental spills.
Door Storage
Door bins and shelves are provided for convenient storage of jars, bottles, and cans.
Items used often are available for quick selection.
The door bins can be moved to suit individual needs. Remove bins by lifting straight
up. Place bins in the desired position and lower over the supports.
Remove shipping clips
Cantilever Shelf
The Dairy compartment is warmer than the general food storage section and is
intended for short term storage of cheese, spreads, or butter.
Crispers
The Crisper drawer, located under the bottom refrigerator shelf, is for storing fruits and
vegetables. Most produce should be washed in clear water and drained before placing
in this drawer. Items with strong odors or high moisture should be wrapped before
storing.
Meat Keeper
The Meat Keeper is located at the bottom of the refrigerator. The temperature in the
compartment can be made colder than the rest of the refrigerator compartment by
sliding the Chilled Air Control knob within the COLDEST or COLD range. Meat will
be partially frozen and may be kept fresh longer than if stored on a refrigerator shelf.
Before placing items in the Meat Keeper, follow these steps to keep the meat fresh:
1. Carefully handle meat with clean hands and always keep the compartment clean.
2. Store meat in its original wrapper. If necessary, overwrap in plastic wrap or foil to
prevent drying. Wrap fish tightly to prevent odor transfer to other foods.
3. If spoilage ever occurs, disinfect the compartment with liquid chlorine bleach
following label directions. Then rinse with a solution of baking soda and water.
Rinse with clear water and dry.
Freezer Basket
A slide-out wire basket (some models have two) hangs below the bottom freezer shelf.
This basket provides easy access to frozen food packages.
5
Page 6
Care and Cleaning
Damp objects stick to cold
metal surfaces. Do not touch refrigerated
surfaces with wet or damp hands.
To avoid damage and help
the refrigerator run as efficiently as possible,
clean the condenser and air vents
periodically.
Keep your refrigerator and freezer clean to prevent odor build-up. Wipe up any spills
immediately and clean both sections at least twice a year. Never use metallic
scouring pads, brushes, abrasive cleaners or strong alkaline solutions on any surface.
Do not wash any removable parts in a dishwasher.
Always unplug the power cord from the wall outlet before cleaning. NOTE:
Turning the refrigerator control to OFF does not disconnect power to the controls, light
bulb, or other electrical components.
Inside
Wash inside surfaces of the refrigerator and freezer with a solution of 2 tablespoons
baking soda in 1 quart warm water. Rinse and dry thoroughly. Be sure to wring excess
water out of sponge or cloth before cleaning around the controls, light bulb or any
electrical parts.
Wash removable parts such as shelves and drawers with baking soda solution or mild
detergent and warm water. DO NOT USE HARSH CLEANERS ON THESE SURFACES.
Rinse and dry thoroughly. Clean the door gaskets with mild suds, rinse with clear
water and wipe dry. Do not use razor blades or other sharp instruments which can
scratch the appliance surface when removing adhesive labels. Any glue left from the
tape or energy label can be removed with a mixture of warm water and mild
detergent, or, touch the residue with the sticky side of tape already removed. DO
NOT REMOVE THE SERIAL PLATE.
Outside
Wash the cabinet and handles with warm water and a mild liquid detergent. Rinse
well and wipe dry with a clean soft cloth. Do not use commercial household cleaners,
ammonia, or alcohol to clean handles.
Remove any dust or dirt from the front of the toe grill using a vacuum cleaner with
its dusting tool attachment. Remove the toe grill by pulling it straight out. While the
grill is removed, vacuum the backside of the grill and wipe with a sudsy cloth or
sponge. Periodically clean the condenser (black tubes and wires beneath the
refrigerator, behind the toe grill). Do not allow lint or dust to accumulate on the coils.
Insert a long handled brush or vacuum attachment between the two coils to bring the
lint forward. To replace the toe grill, line up tabs with holes and push grill straight on.
Use caution when cleaning in the area of the coils. Surfaces there
may be sharp.
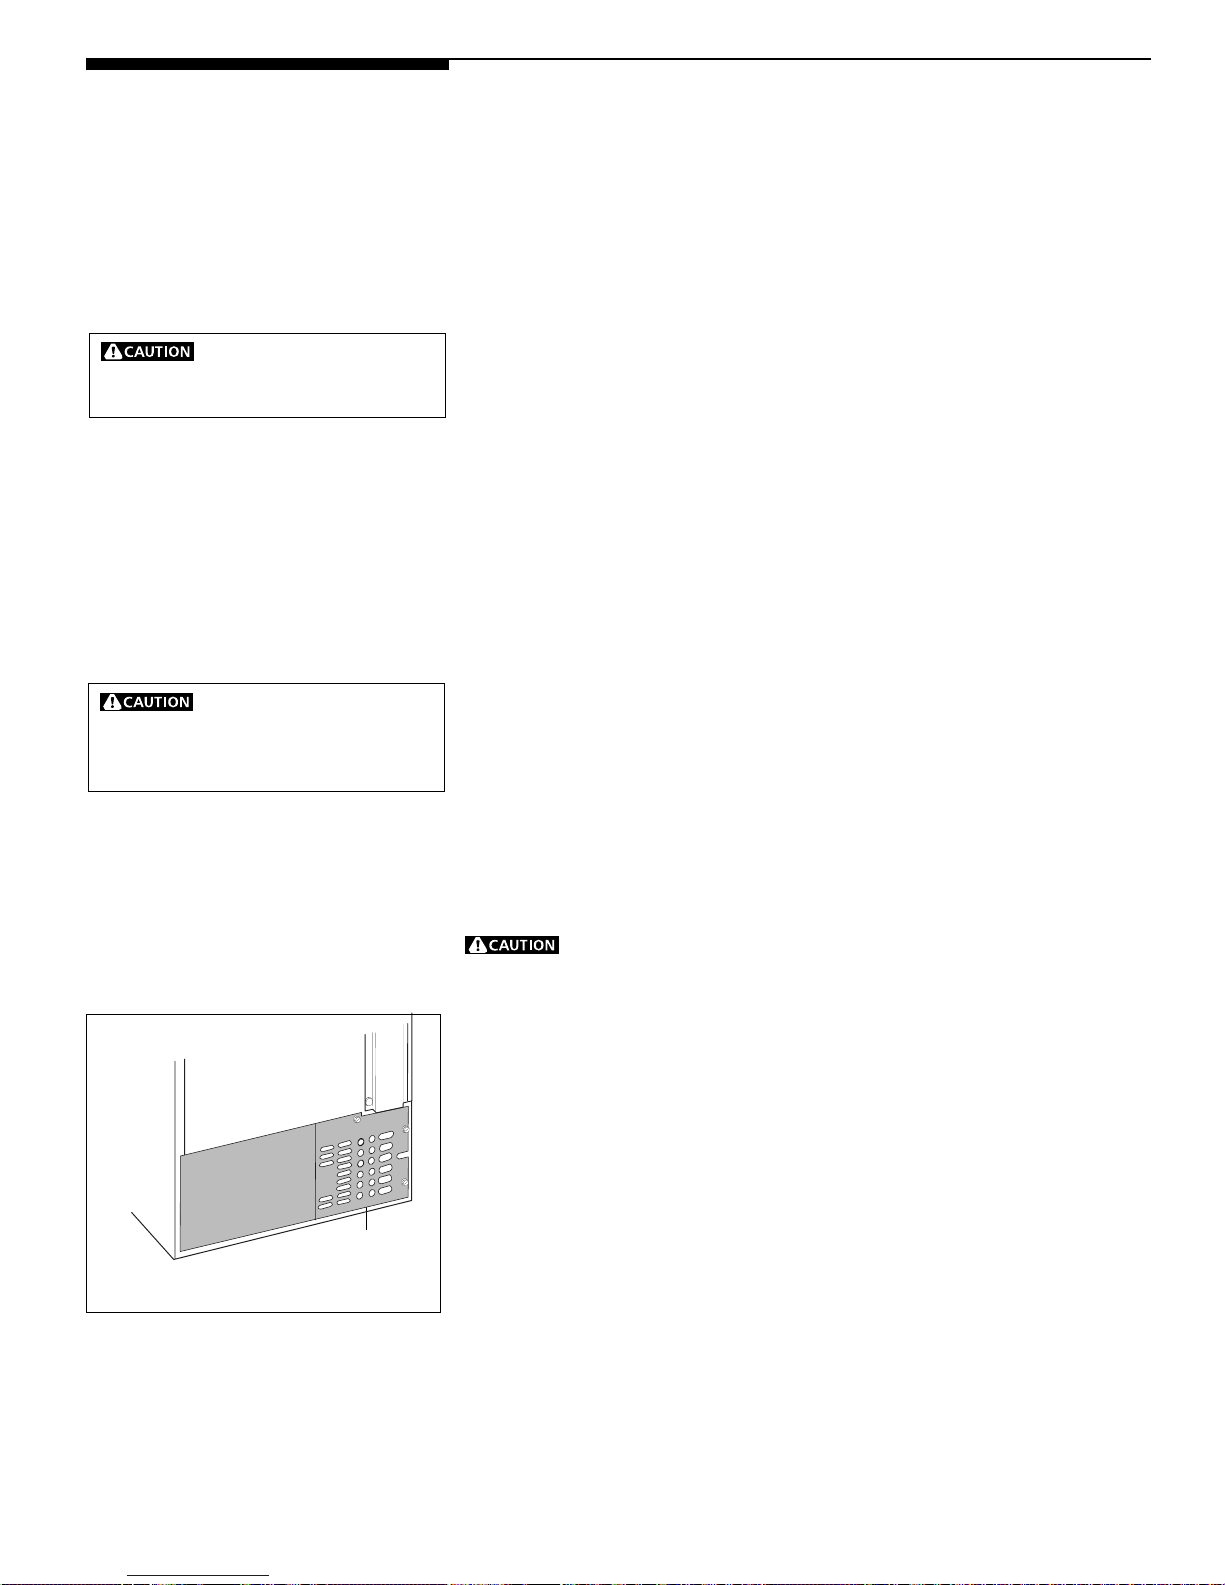
Air Vents
Air Vents on Lower Access Panel
The air vents on the lower access panel at the rear of the refrigerator should be
cleaned periodically. Clean the vents by using a vacuum cleaner with its dusting tool
attachment. When moving the refrigerator, pull straight out. Do not shift the
refrigerator from side to side as this may tear or gouge the floor covering. If the
refrigerator has an automatic ice maker, be careful not to move the refrigerator
beyond plumbing connections.
Replacing the Light Bulb
To replace the light bulb:
1. Unplug the refrigerator.
2. Wear gloves as protection against possible broken glass.
3. Replace old bulb with an appliance bulb of the same wattage.
4. Remember to plug the refrigerator back in.
6
Page 7
Care and Cleaning
(continued)
V acation and Moving Tips
Short vacations: Leave the refrigerator operating during vacations of 3 weeks or
less. Use up all perishable items from the refrigerator section. Wrap and store other
items in the freezer. If the unit has an automatic ice maker, turn off the ice maker,
even if you will be gone just a few days.
Long vacations: Remove all food and ice if you will be gone 1 month or more. Turn
the control to OFF and disconnect the power. If the refrigerator has an automatic
ice maker, turn off the automatic ice maker and turn the water supply valve to the
closed position. Clean the interior thoroughly. Leave both doors open to prevent
odor and mold buildup. Block open if necessary.
Moving: When moving the refrigerator, follow these guidelines to prevent damage:
• Remove all food and other items from both the refrigerator and
freezercompartments. Empty the ice storage bin.
• If a hand truck is used in moving, load the refrigerator from the side.
• Turn front rollers as far up as possible. This will protect them during sliding
or moving.
• The cabinet should be well padded and handled with care. DO NOT DROP.
Automatic Ice Maker
If your refrigerator has an automatic ice maker, it will provide a continuous supply of
ice for normal use. The automatic ice maker is an optional accessory which may be
installed in most models at any time. Call your local dealer for installation.
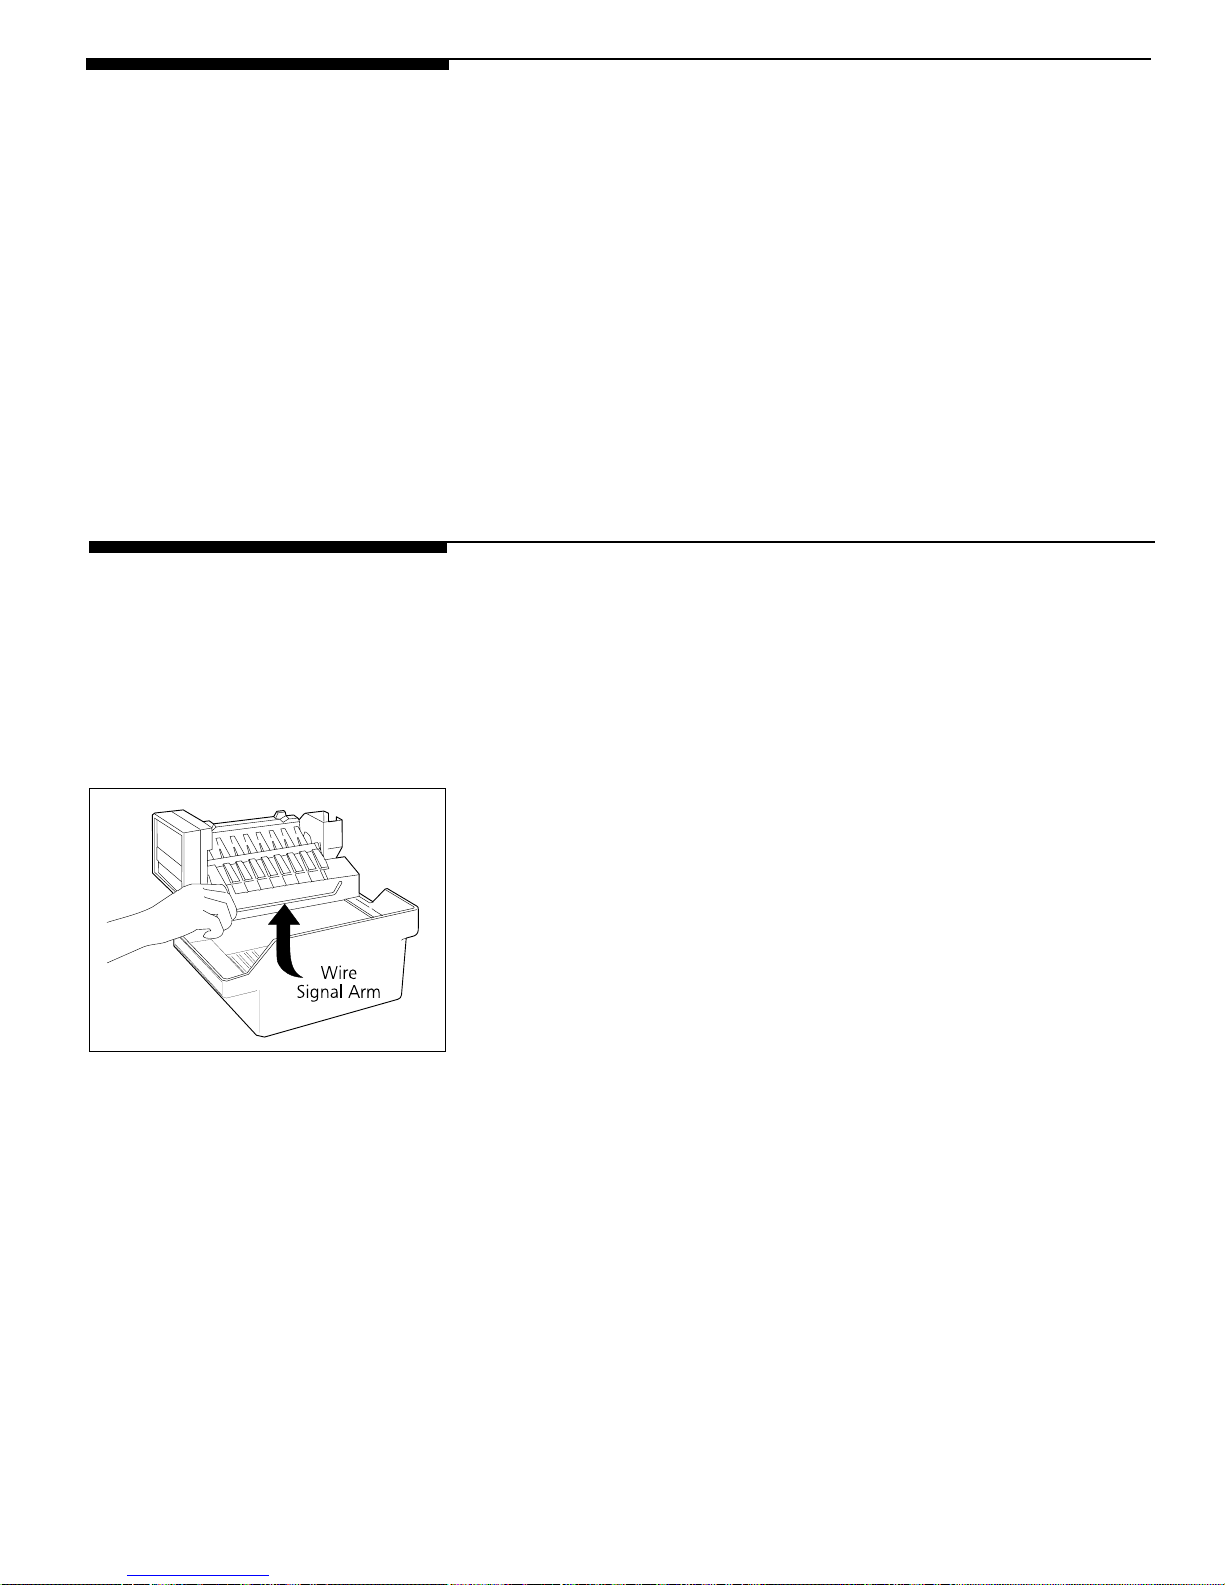
After the plumbing connections have been completed, the water supply valve must
be opened. Place the ice container under the ice maker, pushing it as far back as
possible. Lower the wire signal arm to its "down" or ON position. Because of new
plumbing connections, the first production of ice cubes may be discolored or have an
odd flavor. Throw the ice away until the cubes made are free of discoloration and
taste. Remember, water quality determines your ice quality. It is best to connect the
ice maker to water that is not soft. Softening chemicals can damage the ice maker.
If the ice maker is connected to soft water, ensure the softener is maintained and
working properly.
To stop the ice maker, lift the wire signal arm until it clicks and locks in the "up"
or OFF position. The ice maker turns off automatically when the ice container is full.
If your model has an adjustable freezer shelf, place the shelf so the wire signal arm
will hit the ice when the ice container is full.
Ice Maker Tips
1. Ice stored too long may develop an odd flavor. Empty the container and be sure
the wire signal arm is in its "down" or ON position. The ice maker will then produce
more ice.
2. Occasionally shake the container to keep ice separated.
3. Keep the wire signal arm in its "up" or OFF position until the refrigerator is
connected to the water supply or whenever water supply is turned off.
4. Certain sounds are normal when the ice maker is operating. They are:
Motor operation
Ice being loosened from the tray
Ice being dropped into the container
Running water
Water valve opening and closing
For more information on these operations, see "Normal Operating Sounds."
5. Wash ice container in warm water with mild detergent. Rinse well and dry.
6. Stop the ice maker when cleaning the freezer or for short vacations.
7. If the ice maker will be turned off for a long period of time, turn the water supply
valve to the closed position.
7
Page 8
Removing the Handles
and Doors
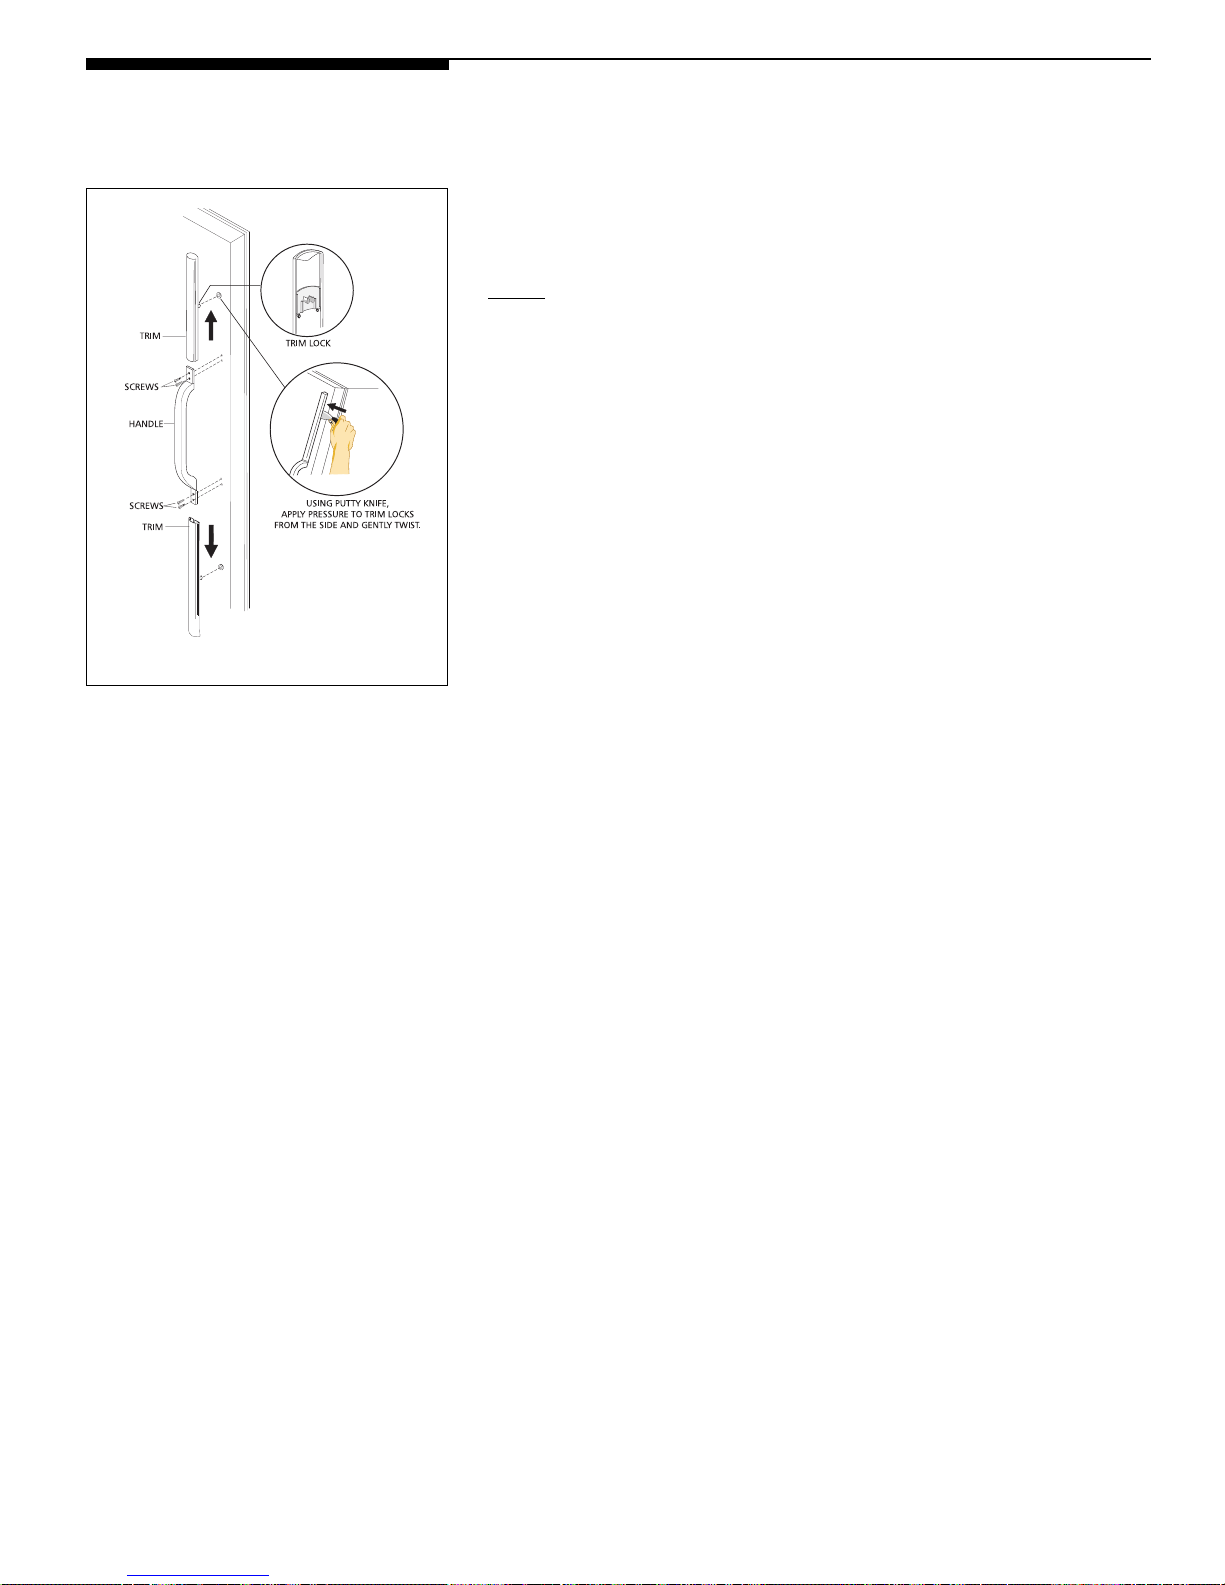
Removing handles and trim
If it is necessary to move refrigerator through narrow doorways, follow
these steps to remove the handles and/or refrigerator and freezer doors.
To Remove Handles:
Full-length Trim
1. Using a putty knife, carefully slide the corner of the blade under the trim. Slide
blade down until you find the trim lock. Carefully manuever the blade against the
trim lock from the side as shown. Note: Pressing down on the trim lock from
above will not release it.
2. Carefully push the putty knife firmly against the trim lock and twist gently. The trim
lock will snap free from the door. (Each trim piece will have two (2) trim locks.)
3. Grasp trim and pull up away from handle using a slight side-to-side motion.
4. Remove screws attaching handle to door.
5. Repeat those steps for each handle end. Keep screws and trim pieces.
6. To replace handles, line up handle with screw holes, insert screws and tighten.
Slide upper and lower trim piecesback on handle ends, and snap trim locks back
into holes on door front.
To Remove Doors
Before removing doors, be sure the freezer control is turned to OFF. Remove all food
from the doors and unplug the refrigerator. Remove the toe grill.
Trace around hinges with a soft lead pencil. This will make it easier to realign the
doors when they are replaced. Completely remove one door before starting removal
of the other, as follows.
1. Open door to door stop position (135°) and remove upper hinge screws. DO NOT
remove upper hinge from door.
2. Carefully lift door off of lower hinge.
3. Remove lower hinge bolts and lower hinge.
Store doors in a safe place until the refrigerator is moved to the desired location. Keep
all hardware for reinstallation.
To Reinstall Handles or Doors
To reinstall, reverse instructions used to remove handles or doors.
8
Page 9
Avoid Service Checklist
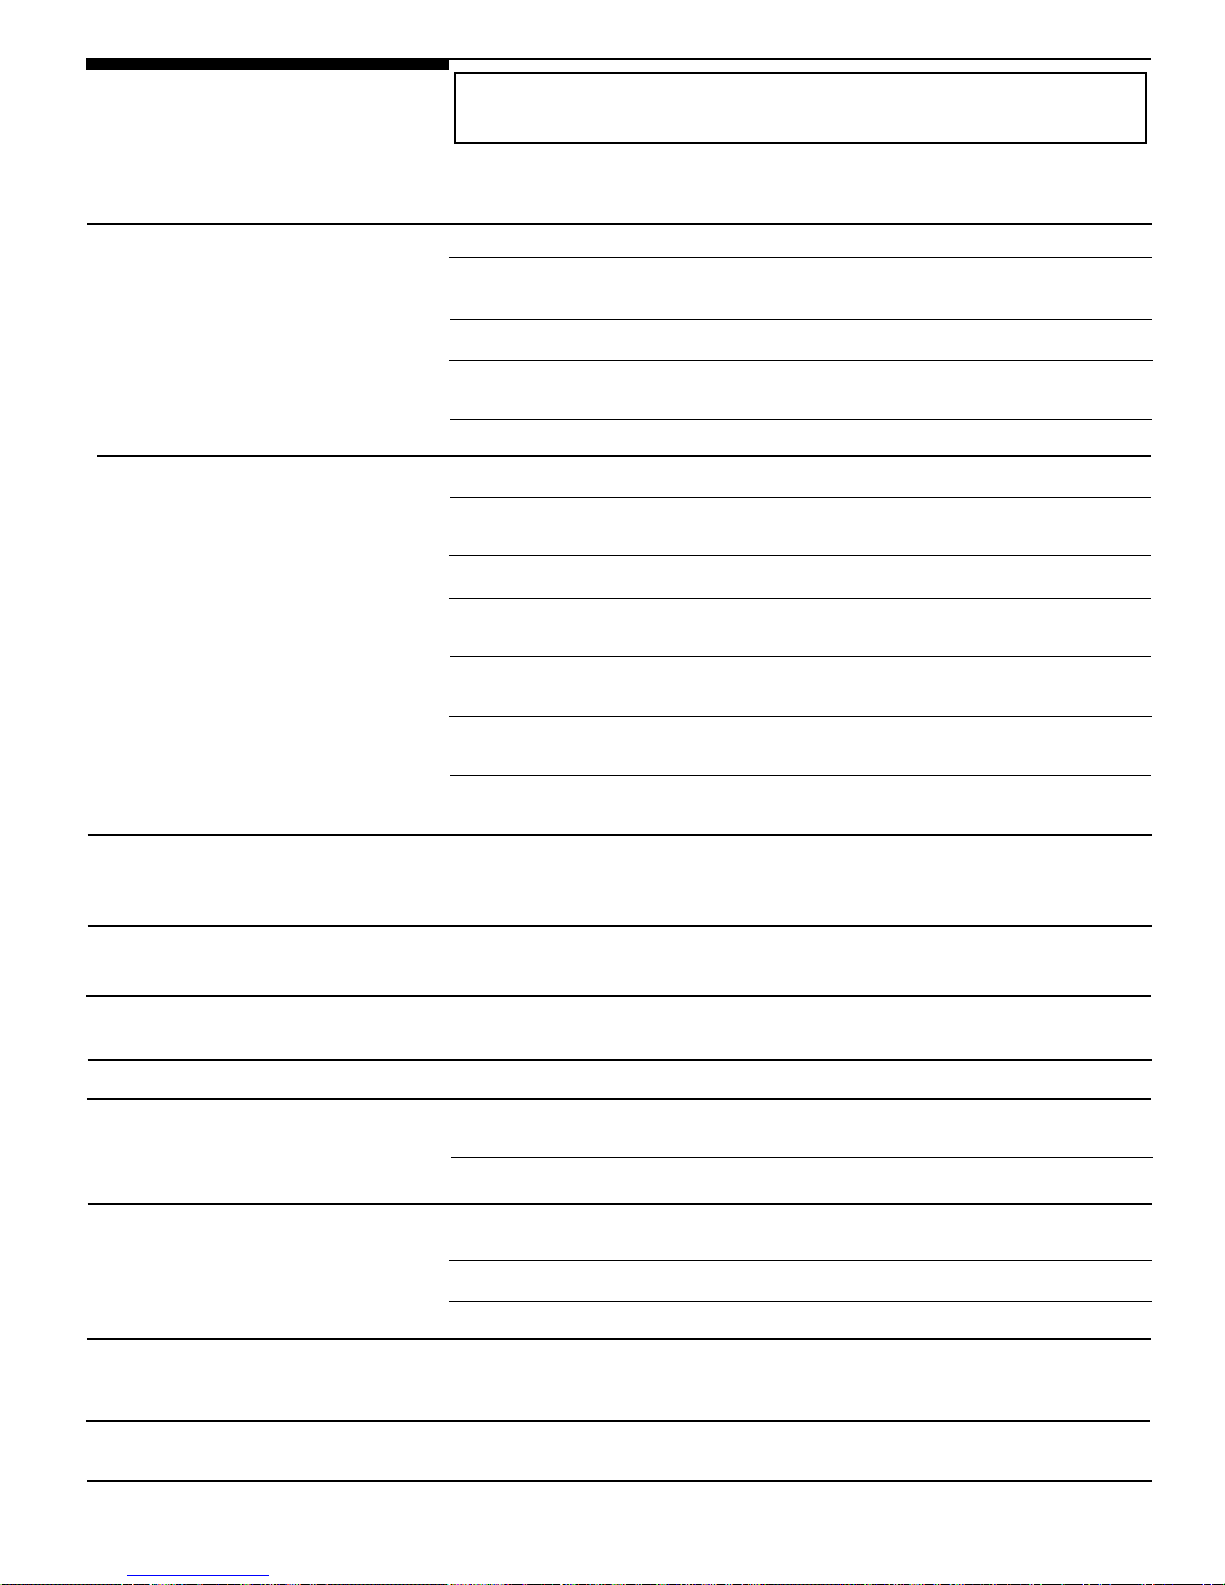
Before calling for service, review this list. It may save you time and expense. This list
includes common occurrences that are not the result of defective workmanship or
materials in this appliance.
OCCURRENCE
RUNNING OF REFRIGERATOR
Refrigerator compressor does not run.
Refrigerator runs too much or too long.
SOLUTION
Freezer control is off. Set freezer control. See Setting the Controls.
Refrigerator is in defrost cycle. This is normal for a fully automatic defrosting refrigerator. The defrost
cycle occurs periodically, lasting about 20 minutes.
Plug at wall outlet is disconnected. Make sure plug is tightly pushed into outlet.
House fuse has blown or circuit breaker has tripped. Check and/or replace fuse with a 15 amp time-
delay fuse. Reset circuit breaker.
Power outage. Check house lights. Call local electric company.
Room or outside weather is hot. It is normal for the refrigerator to work longer under these conditions.
Refrigerator has recently been disconnected for a period of time. It takes about 8-12 hours for the
refrigerator to cool down completely.
Automatic ice maker is operating. Ice maker operation causes refrigerator to run slightly more.
Doors are opened too frequently or too long. Warm air entering the refrigerator causes it to run more.
Open doors less often.
Refrigerator or freezer door may be slightly open. Make sure refrigerator is level. Keep food and
containers from blocking door. See Occurrence section
Refrigerator control is set too cold. Set refrigerator control to a warmer setting until the refrigerator
temperature is satisfactory. Allow 24 hours for the temperature to stabilize.
OPENING/CLOSING OF DOORS/DRAWERS.
Refrigerator compressor goes on and off
frequently.
TEMPERATURES ARE TOO COLD
Temperature in the freezer is too cold and the
refrigerator temperature is satisfactory.
Temperature in the refrigerator is too cold
and the freezer temperature is satisfactory.
Food stored in drawers freezes.
Food stored in Meat Keeper freezes.
TEMPERATURES ARE TOO WARM
Temperature in freezer or refrigerator is
too warm.
Temperature in the freezer is too warm.
Refrigerator or freezer gasket is dirty, worn, cracked, or poorly fitted. Clean or change gasket. Leaks
in door seal will cause refrigerator to run longer in order to maintain desired temperatures.
Thermostat is keeping refrigerator at a constant temperature. This is normal. Refrigerator goes on
and off to keep temperature constant.
Freezer control is set too cold. Set freezer control to a warmer setting until freezer temperature
is satisfactory. Allow 24 hours for the temperature to stabilize. Then, if the refrigerator temperature
is not right, set the refrigerator control to a colder setting.
Refrigerator control is set too cold. Set refrigerator control to a warmer setting. Allow 24 hours for
temperatures to stabilize.
Refrigerator control is set too cold. See solution above.
Meat should be stored at a temperature just below the freezing point of water (32°F, 0°C) for
maximum fresh storage time. It is normal for ice crystals to form due to the moisture content of meat.
Chilled Air Control set too cold. Adjust Chilled Air Control to a lower setting.
Doors are opened too frequently or too long. Warm air enters the refrigerator whenever the door
is opened. Open the door less often.
Door is open slightly. See Occurrence section
Condenser is dirty. Clean condenser. See "Outside" in Care and Cleaning.
Freezer control is set too warm. Set the freezer control to a colder setting until the freezer
temperature is satisfactory. Allow 24 hours for the temperature to stabilize. Then, if the refrigerator
temperature is not right, set the refrigerator control to a warmer setting.
OPENING/CLOSING OF DOORS/DRAWERS.
Temperature in refrigerator is too warm
and freezer temperature is satisfactory.
Temperature in Meat Keepeer is too warm.
Refrigerator control is set too warm. Set the refrigerator control to a colder setting. Allow 24 hours
for the temperature to stabilize.
Chilled Air Control is set too warm. Adjust the Chilled Air Control to a colder setting.
9
Page 10
OCCURRENCE
SOLUTION
WATER/MOISTURE/FROST INSIDE REFRIGERATOR
Moisture collects on inside of refrigerator
Weather is hot and humid, which increases rate of frost buildup and internal sweating. This is normal.
walls.
Door is slightly open. See Occurrence
Door is opened too often or too long. Open door less often.
OPENING/CLOSING OF DOORS/DRAWERS.
Water collects on bottom side of drawer
cover.
Water collects in bottom of drawer.
Vegetables contain and give off moisture. It is not unusual to have moisture on the bottom side of the
cover.
Washed vegetables and fruits drain while in the drawer. Dry items before putting them into drawer.
Water collecting in bottom of drawer is normal.
WATER/MOISTURE/FROST OUTSIDE REFRIGERATOR
Moisture forms on outside of refrigerator or
between doors.
Weather is humid. This is normal in humid weather. When humidity is lower, the moisture should
disappear.
Door is slightly open, causing cold air from inside refrigerator to meet warm air from outside. See
Occurrence section
AUTOMATIC ICE MAKER (some models)
Ice maker is not making any ice.
Ice maker wire signal arm is in "up" or OFF position. Move wire signal arm to "down" or ON position.
Household water line valve is not open. Turn on household water line valve.
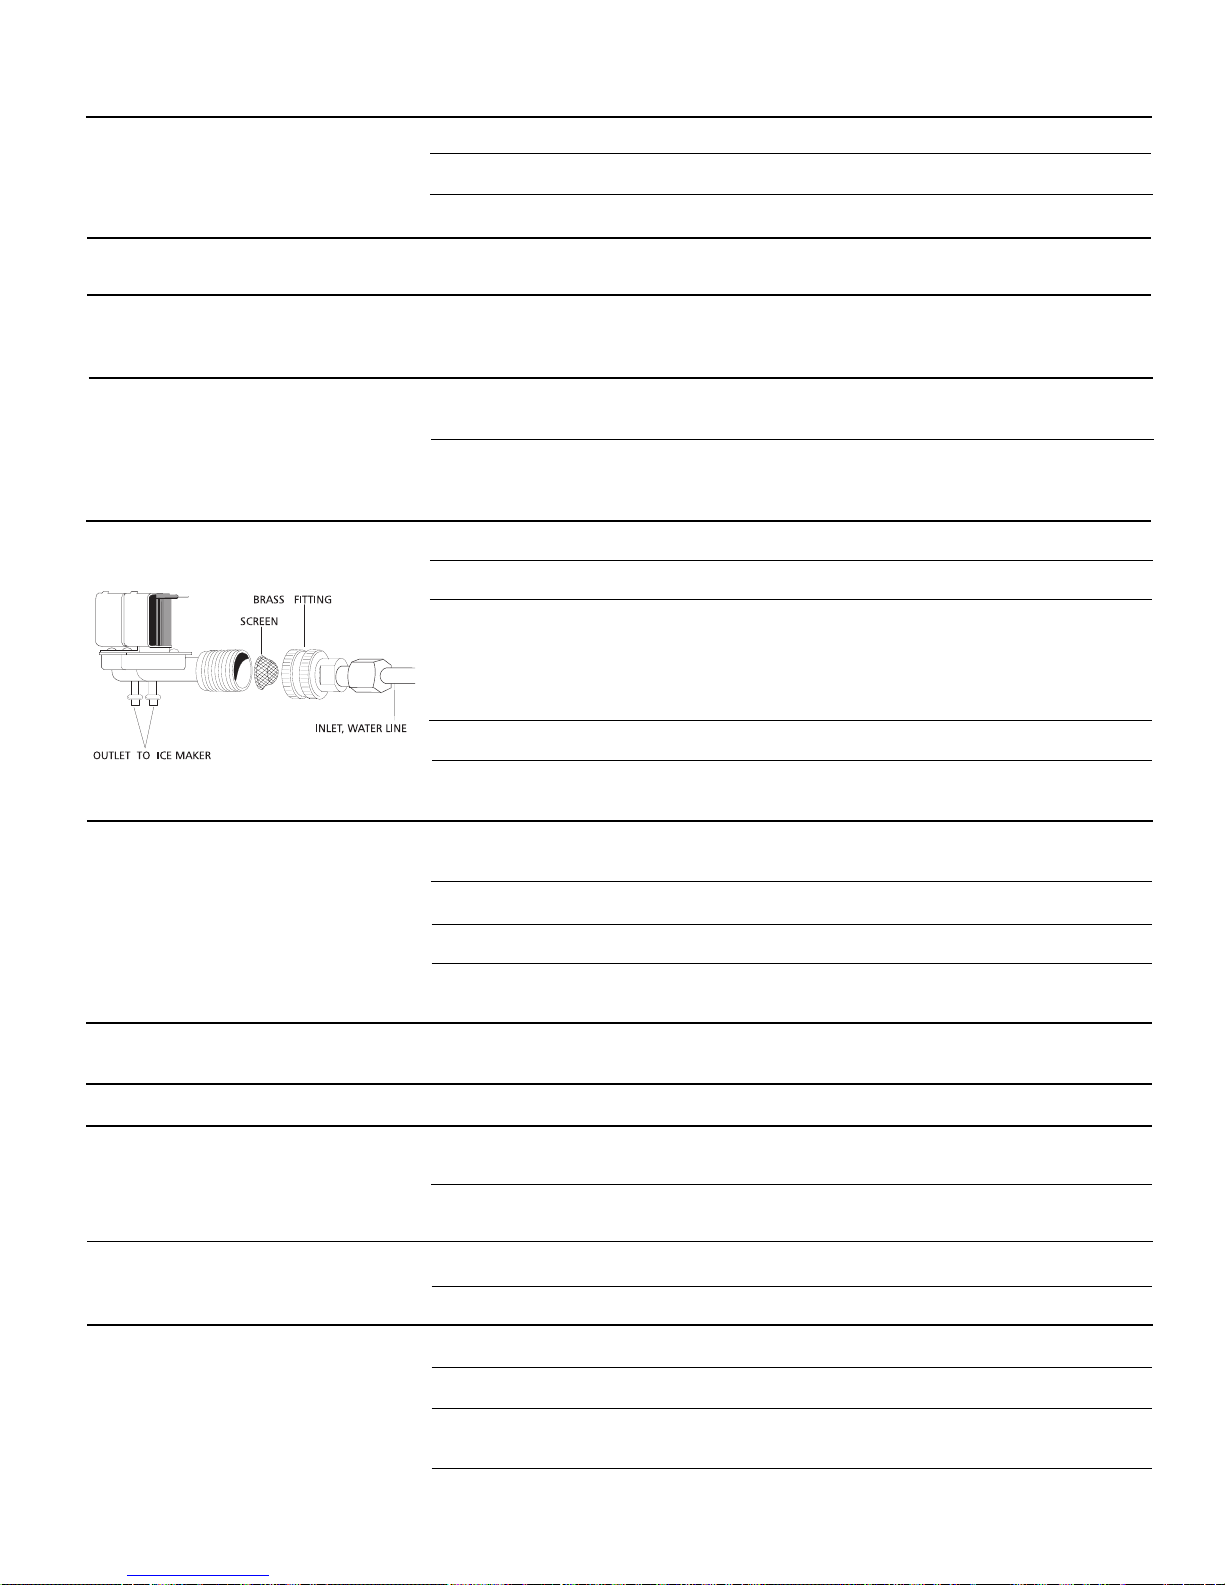
Water supply valve in refrigerator is being blocked by foreign material. Unplug the refrigerator and turn
off water supply. Slide refrigerator out and locate where the water is connected to the valve. Unscrew
the brass fitting and pull out the screen from inside the valve mesh. Clean the screen of foreign material.
Replace screen and brass fitting and turn the water supply on; check for leaks. Plug in refrigerator and
slide into place.
Freezer is not cold enough. See Occurrence section
Saddle valve on cold water pipe is clogged or restricted by foreign material. Turn off household water
line valve. Remove, clean or replace valve.
OPENING/CLOSING OF DOORS/DRAWERS.
TEMPERATURES ARE TOO WARM.
Ice maker is not making enough ice.
Ice Maker will not stop making ice.
Ice maker is not separating the cubes.
Ice has bad odor and taste.
ODORS IN REFRIGERATOR
OPENING/CLOSING OF DOORS/DRAWERS
Door(s) will not close.
Ice maker is producing less ice than you expect. Ice maker should produce approximately
2 1/2 to 4 pounds of ice every 24 hours.
Freezer is not cold enough. See Occurrence section
TEMPERATURES ARE TOO WARM.
Household water line valve is not completely open. Turn on household water line valve.
Water supply valve in refrigerator is being blocked by foreign material. See Occurrence "Ice Maker is
not making any ice" above.
Ice maker wire arm is being held down by some item in the freezer. Remove item, and release arm.
Remove any ice cubes frozen together over arm.
Ice cubes are not being used frequently enough. Remove and shake ice bucket to separate cubes.
Ice has picked up odor or flavor from strong food stored in refrigerator or freezer. Cover foods tightly.
Discard stale ice. Ice maker will produce fresh supply.
Water running to ice maker has poor taste or odor. Add filter to ice maker. Consult a water purifying
company.
Interior needs to be cleaned. Clean interior with sponge, warm water and baking soda.
Food with strong odor is in refrigerator. Cover food tightly.
Door is not designed to swing shut automatically. Close door securely.
Door was closed too hard, causing other door to open slightly. Close both doors gently.
Refrigerator is not level. It rocks on the floor when it is moved slightly. Ensure floor is level and can
adequately support refrigerator. Contact carpenter to correct sagging or sloping floor.
Refrigerator is touching the walls or cabinets. Ensure floor is level and can adequately support
refrigerator. Contact carpenter to correct sagging or sloping floor.
Page 11
OCCURRENCE SOLUTION
OPENING/CLOSING OF DOORS/DRAWERS (Cont.)
Drawers are difficult to move.
LIGHT BULB IS NOT ON
Food is touching shelf on top of drawer. Keep less food in drawer.
Track that drawer slides on is dirty. Clean drawer, rollers, and track.
Light bulb is burned out. See "Replacing the Light Bulb" in Care and Cleaning.
Light switch is stuck. Light switch is located on interior door frame next to the temperature control
in each compartment. Push in plunger to release.
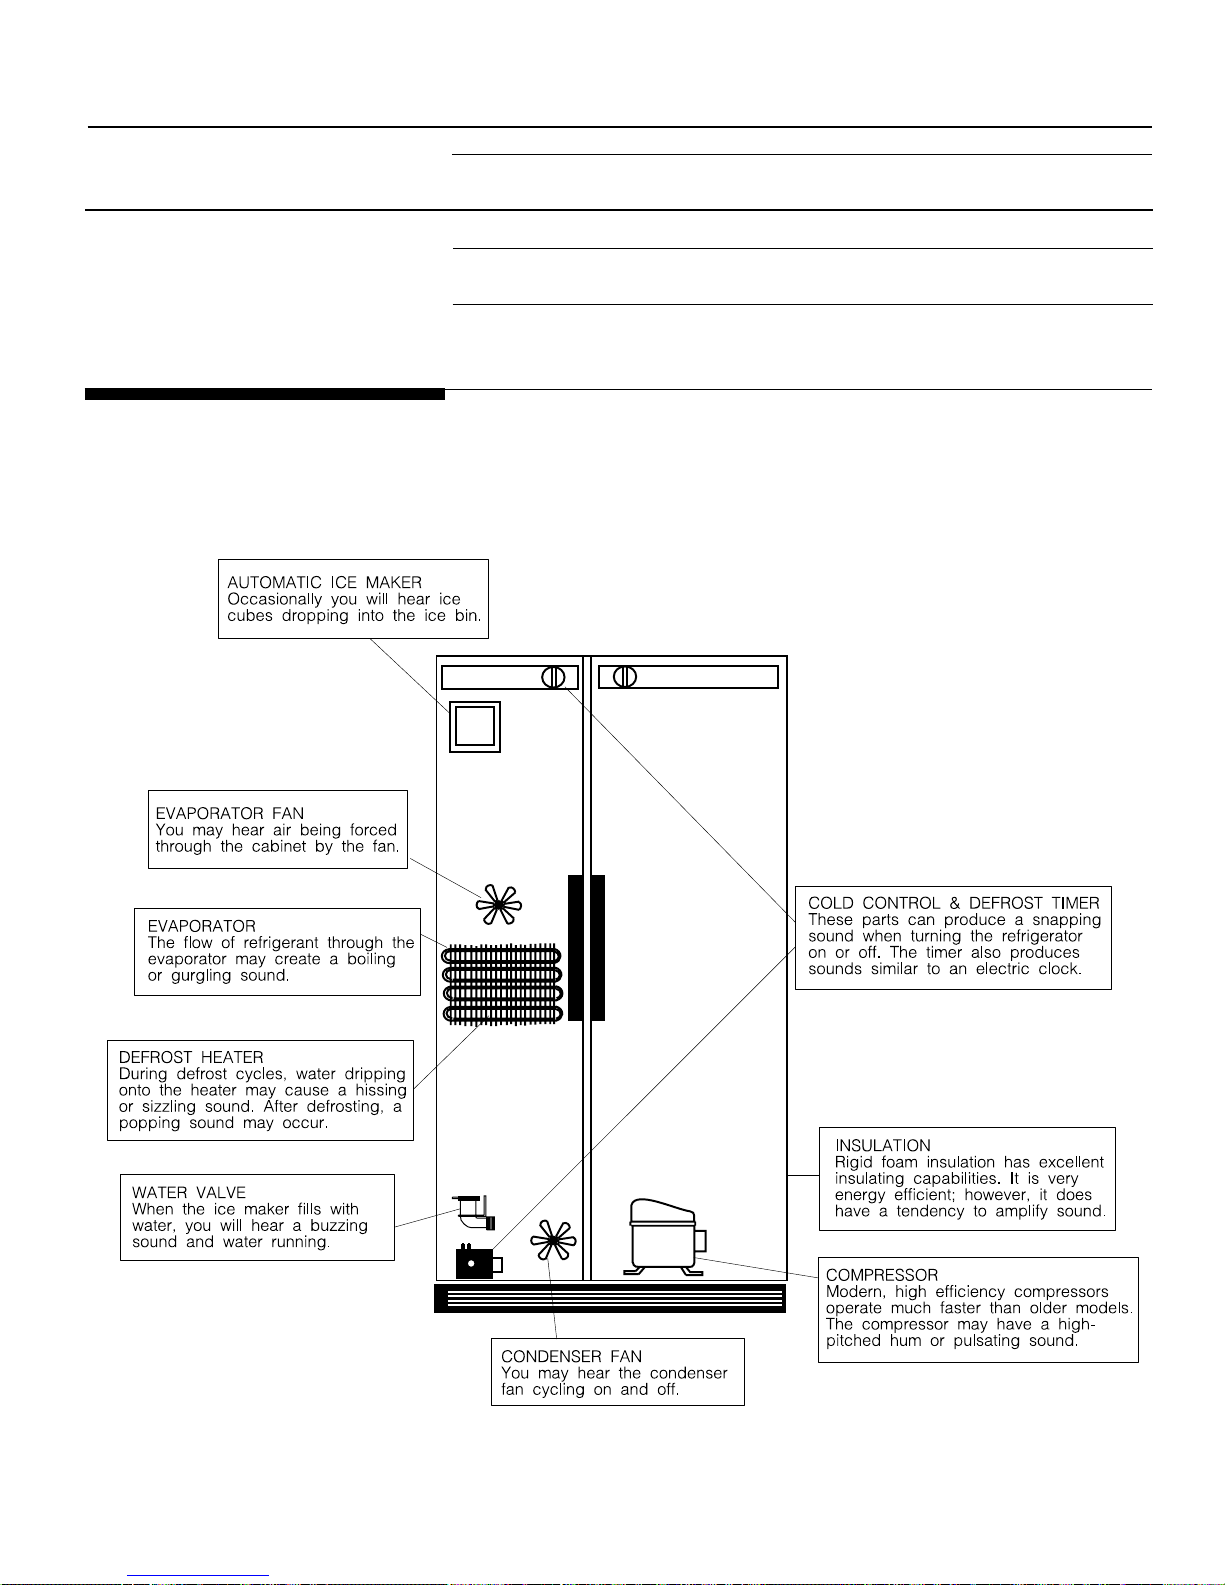
Normal Operating
Sounds
No electric current is reaching refrigerator. See Occurrence section
RUNNING OF REFRIGERATOR.
*
* On models equipped with an Automatic Ice Maker.
Page 12
REFRIGERA TOR W ARRANTY
Your refrigerator is protected by this warranty
WARRANTY
PERIOD
FULL ONE-YEAR
WARRANTY
LIMITED 2ND-5
YEAR WARRANTY
(Cabinet Liner and
Sealed System)
LIMITED
WARRANTY
(Applicable to the
State of Alaska)
TH
One year from original
purchase date
Second through fifth
years from original
purchase date
Time periods listed
above.
ADDITIONAL COVERAGE FOR “THROUGH-THE-DOOR” ICE AND WATER DISPENSER AND/OR ICE ONLY DISPENSER MODELS:
WARRANTY
PERIOD
FULL TWO-YEAR
WARRANTY (Ice and
Water Dispensing
System)
During the second
year from original
purchase date.
In the U.S.A., your appliance is warranted by Electrolux Home Products North America, a division of White Consolidated Industries, Inc. We
authorize no person to change or add to any of our obligations under this warranty. Our obligations for service and parts under this warranty must
be performed by us or an authorized Electrolux Home Products North America servicer. In Canada, your appliance is warranted by WCI Canada, Inc.
THROUGH OUR AUTHORIZED SERVICERS,
Pay all costs for repairing or replacing any parts of this
appliance which prove to be defective in materials or
workmanship. Excludes original and replacement Ice
& Water filter cartridges (if equipped). Original and
replacement cartridges are warranted for 30 days
(parts only).
Repair or replace any parts in the cabinet liner or
Sealed Refrigeration System (compressor, condenser,
evaporator, drier and tubing) which prove to be
defective in materials or workmanship.
All of the provisions of the full warranties above and
the exclusions listed below apply.
THROUGH OUR AUTHORIZED SERVICERS,
Repair or replace, without charge, any part(s) of the
ice and water dispensing system which proves to be
defective in materials or workmanship, and all labor
associated with such repair.
WE WILL:
WE WILL:
THE CONSUMER WILL BE RESPONSIBLE FOR:
Costs of service calls that are listed under
RESPONSIBILITIES OF THE CONSUMER. *
Costs for pick up and delivery of the appliance required because
of service. Costs for labor, parts and transportation other than
with respect to the cabinet liner or Sealed Refrigeration System.
Costs of the technician's travel to the home and any costs for
pick up and delivery of the appliance required because of
service.
THE CONSUMER WILL BE RESPONSIBLE FOR:
Costs for pick up and delivery of the appliance required because
of service. Costs for labor, parts and transportation other than
with respect to the ice and water dispensing system.
NORMAL
*NORMAL
RESPONSIBILITIES
OF THE CONSUMER
This warranty applies only to products in ordinary household use, and the consumer is responsible for the
items listed below:
1. Proper use of the appliance in accordance with instructions provided with the product.
2. Proper installation by an authorized servicer in accordance with instructions provided with the appliance and in
accordance with all local plumbing, electrical and/or gas codes.
3. Proper connection to a grounded power supply of sufficient voltage, replacement of blown fuses, repair of loose
connections or defects in house wiring.
4. Expenses for making the appliance accessible for servicing, such as removal of trim, cupboards, shelves,etc.,
which are not a part of the appliance when it was shipped from the factory.
5. Damages to finish after installation.
6. Replacement of light bulbs and/or fluorescent tubes (on models with these features).
EXCLUSIONS
This warranty does not cover the following:
1. CONSEQUENTIAL OR INCIDENTAL DAMAGES SUCH AS PROPERTY DAMAGE AND INCIDENTAL
EXPENSES RESULTING FROM ANY BREACH OF THIS WRITTEN OR ANY IMPLIED WARRANTY.
NOTE: Some states do not allow the exclusion or limitation of incidental or consequential damages, so this
limitation or exclusion may not apply to you.
2. Service calls which do not involve malfunction or defects in workmanship or material, or for appliances not in
ordinary household use. The consumer shall pay for such service calls.
3. Damages caused by services performed by servicers other than Electrolux Home Products North America or
its authorized servicers; use of parts other than genuine Electrolux Home Products parts; obtained from persons
other than such servicers; or external causes such as abuse, misuse, inadequate power supply or acts of God.
4. Products with original serial numbers that have been removed or altered and cannot be readily determined.
IF YOU NEED
SERVICE
Keep your bill of sale, delivery slip, or some other appropriate payment record. The date on the bill establishes the
warranty period should service be required. If service is performed, it is in your best interest to obtain and keep all
receipts. This written warranty gives you specific legal rights. You may also have other rights that vary from state to
state. Service under this warranty must be obtained by contacting Electrolux Home Products:
This warranty only applies in the 50 states of the U.S.A., Puerto Rico, and Canada. Product features or specifications as described or illustrated
are subject to change without notice. All warranties are made by Electrolux Home Products North America, a division of White Consolidated
Industries, Inc. In Canada, your appliance is warranted by WCI Canada, Inc.
01-U-RE-03 (Rev. 01/2001)
USA
800•944•9044
Electrolux Home Products North America
P.O. Box 212378
Augusta, GA 30917
Canada
866•213•9397
Electrolux Home Products North America
6150 McLaughlin Road
Mississauga, Ontario
L5R 4C2
12
Page 13
Service Information
(Canada)
To avoid unnecessary cost and inconvenience, make a few simple checks before
calling for service. Common occurrences and their solutions can be found in the
Avoid Service Checklist. Be sure you have followed the instructions in this
manual.
If you are unable to locate the cause of a problem, call for service. Insist on
factory service by an authorized ELECTROLUX PARTS AND SERVICE depot.
ELECTROLUX PARTS AND SERVICE
All Electrolux appliances are backed by ELECTROLUX PARTS AND SERVICE, one
of Canada's largest parts and service networks.
The Electrolux reputation means you can enjoy complete professional service
from one of our hundreds of trained technicians across the country.
ELECTROLUX PARTS AND SERVICE
6150 McLaughlin Road
Mississauga, Ontario
L5R 4C2
Place the name, address and telephone number of your service depot in the
spaces below.
Product and feature specifications as described or illustrated are subject
to change without notice.
13
Page 14
Notes
14
Page 15
Notes
 Loading...