

Page 1

FAVORIT 88020I
User manual
Notice d'utilisation
Instrukcja obsługi
Dishwasher
Lave-vaisselle
Zmywarka do naczyń
Page 2
Contents
2
Thank you for choosing one of our high-quality products.
To ensure optimal and regular performance of your appliance please read this
instruction manual carefully. It will enable you to navigate all processes perfectly
and most efficiently. To refer to this manual any time you need to, we recommend
you to keep it in a safe plac e. An d p le as e pass it to any future owner of the appliance.
We wish you much joy with your new appliance.
Contents
Operating instructions 3
Safety information 3
Correct use 3
General safety 3
Child safety 3
Installation 4
Product description 4
Control panel 5
The digital display 6
Function buttons 6
Setting mode 6
First use 7
Set the water softener 7
Setting manually 8
Setting electronically 8
Use of dishwasher salt 9
Use of rinse aid 9
Adjusting the dosage of rinse aid 10
Daily use 11
Load cutlery and dishes 11
The lower basket 12
The cutlery basket 12
The upper basket 14
Adjusting the height of the upper basket
15
Use of detergent 15
Fill with detergent 16
Multi-tab function 17
Activation/deactivation of the Multitab
function 17
Washing programmes 18
Select and start a washing programme 19
Unloading the dishwasher 20
Care and cleaning 21
Cleaning the filters 21
Cleaning the spray arms 22
External cleaning 22
Internal cleaning 22
Prolonged periods of non-operation 22
Frost precautions 22
Moving the machine 23
What to do if… 23
Technical data 24
Hints for test institutes 25
Installation instructions 26
Installation 26
Fixing to the adjacent units 26
Levelling 27
Water connection 27
Water supply connections 27
Water inlet hose with safety valve 27
Water outlet hose connection 28
Electrical connection 29
Environment concerns 29
Packaging material 29
Subject to change without notice
Page 3

Safety information
Operating instructions
Safety information
In the interest of your safety and to ensure the correct use, before installing and first using
the appliance, read this user manual carefully, including its hints and warnings. To avoid
unnecessary mistakes and accidents, it is important to ensure that all people using the
appliance are thoroughly familiar with its operation and safety features. Save these instructions and make sure that they remain with the appliance if it is moved or sold, so that
everyone using it through its life will be properly informed on appliance use and safety.
Correct use
• This dishwasher is only intended for washing household utensils suitable for machine
washing.
• Do not put any solvents in the dishwasher. This could cause an explosion.
• Knives and other items with sharp points must be loaded in the cutlery basket with their
points down or placed in a horizontal position in the upper basket.
• Only use products (detergent, salt and rinse aid) suitable for dishwashers.
• Avoid opening the door whilst the appliance is in operation, hot steam may escape.
• Do not take any dishes out of the dishwasher before the end of the dishwashing cycle.
• After use, isolate the appliance from the power supply and turn off the water supply.
• This product should be serviced only by an authorised service engineer, and only genuine
spare parts should be used.
• Under no circumstances should you attempt to repair the machine yourself. Repairs
carried out by inexperienced persons will cause injury or serious malfunctioning. Contact
your local Service Force Centre. Always insist on genuine spare parts.
3
General safety
• Dishwasher detergents can cause chemical burns to eyes, mouth and throat. Could endanger life! Comply with the safety instructions of the dishwasher detergent manufacturer.
• The water in your dishwasher is not for drinking. Detergent residues may still be present
in your machine.
• Ensure that the door of the dishwasher is always closed when it is not being loaded or
unloaded. In this way you will avoid anybody tripping over the open door and hurting
themselves.
• Do not sit or stand on the open door.
Child safety
• This appliance is designed to be operated by adults. Don’t allow children to use the
dishwasher unsupervised.
• Keep all packaging well away from children. There is risk of suffocation.
• Keep all detergents in a safe place out of children’s reach.
• Keep children well away from the dishwasher when the door is open.
Page 4
Product description
4
Installation
• Check your dishwasher for any transport damage. Never connect a damaged machine.
If your dishwasher is damaged contact your supplier.
• All packaging must be removed before use.
• Any electrical and plumbing work required to install this appliance must be carried out
by a qualified and competent person.
• For safety reasons it is dangerous to alter the specifications or attempt to modify this
product in any way.
• Never use the dishwasher if the electrical supply cable and water hoses are damaged; or
if the control panel, work top or plinth area are damaged such that the inside of the
appliance is freely accessible. Contact your local Service Force centre, in order to avoid
hazard.
• All sides of the dishwasher must never be drilled to prevent damage to hydraulic and
electric components.
WARNING!
For electrical and water connection carefully follow the instructions given in specific paragraphs.
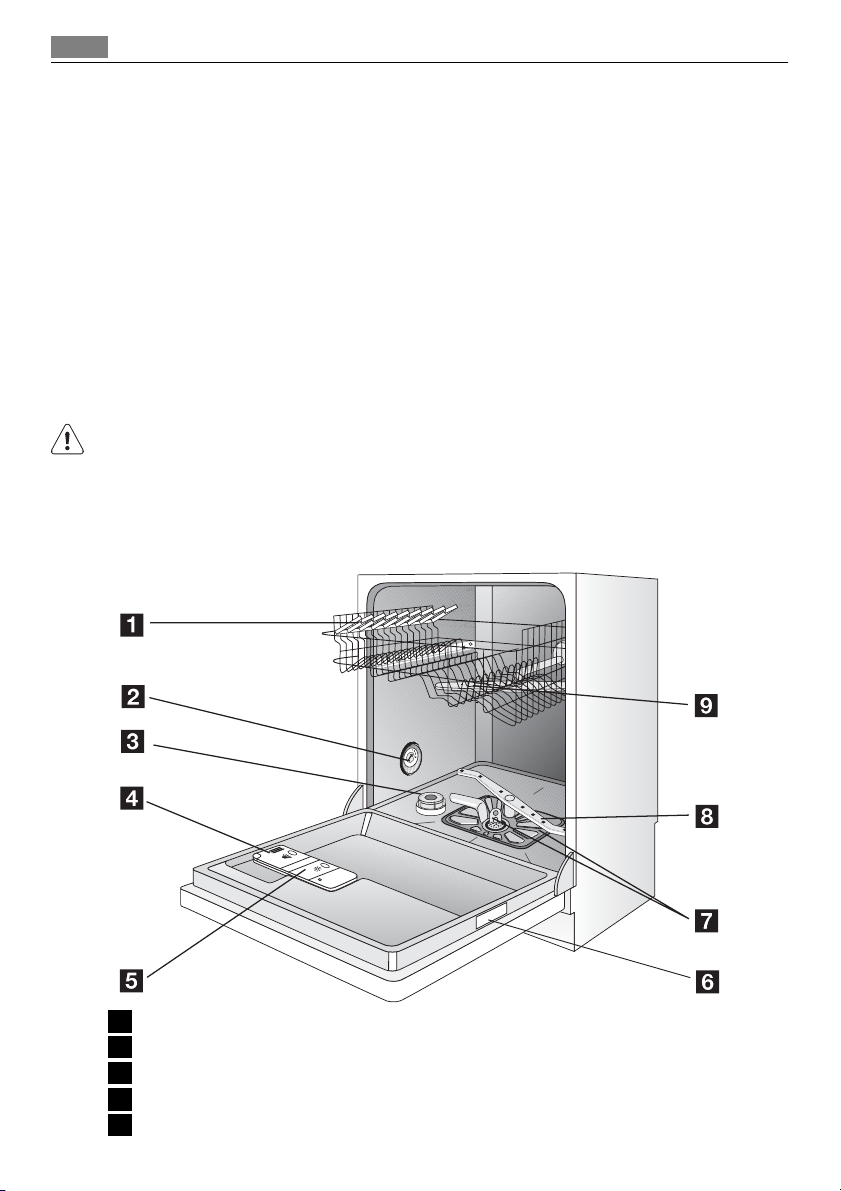
Product description
1 Upper basket
2 Water hardness dial
3 Salt container
4 Detergent dispenser
5 Rinse aid dispenser
Page 5
Control panel
6 Rating plate
7 Filters
8 Lower spray arm
9 Upper spray arm
This dishwasher has an internal light that turns on and off when the opening and closing
of the dishwasher's door occurs.
Internal light is equipped with led lamp CLASS 1 in accordance with EN 60825-1: 1994 +
A1: 2002 + A2: 2001.
In case that this light has to be replaced, please, contact your local Service Force Centre.
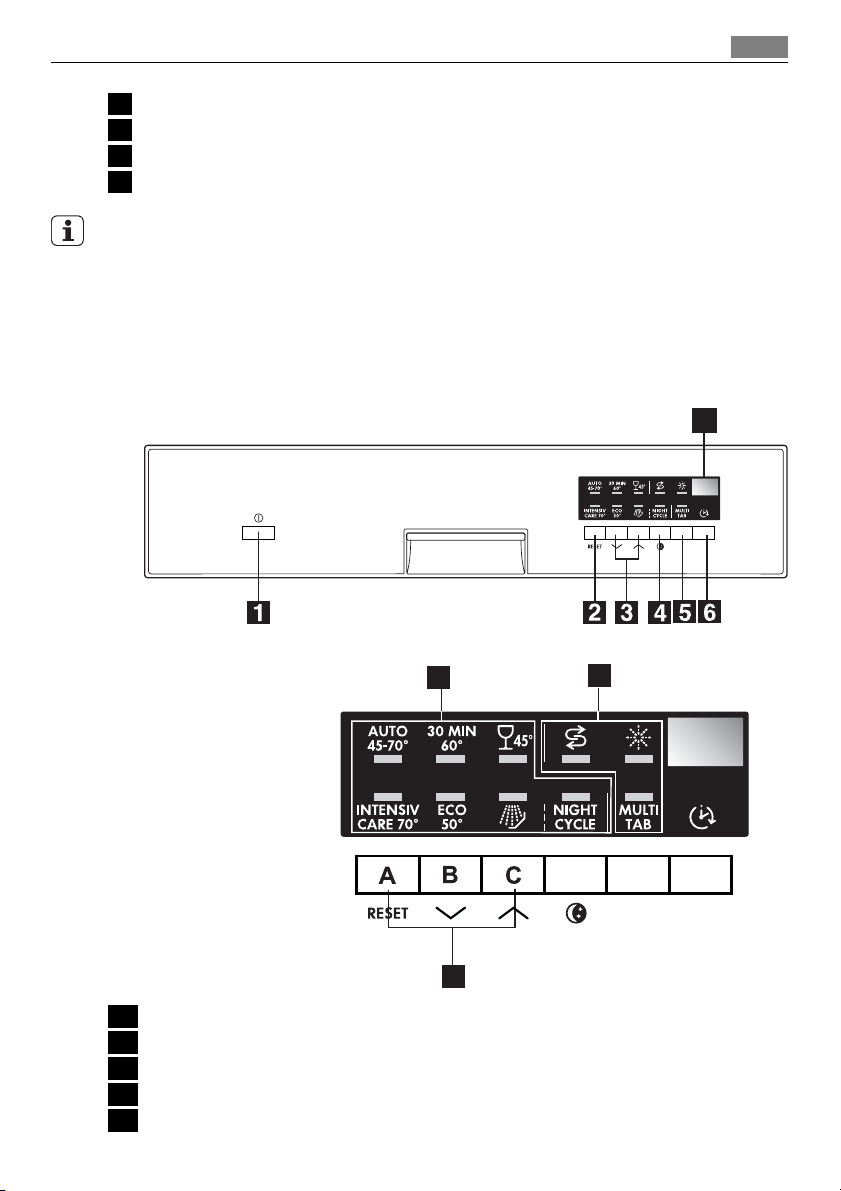
Control panel
5
7
1 On/Off button
2 RESET button
3 Programme selection buttons
4 NIGHT CYCLE button
5 MULTITAB button
10
9
8
Page 6
Control panel
6
6 Delay start button
7 Digital display
8 Function buttons
9 Indicator lights
10 Programme lights
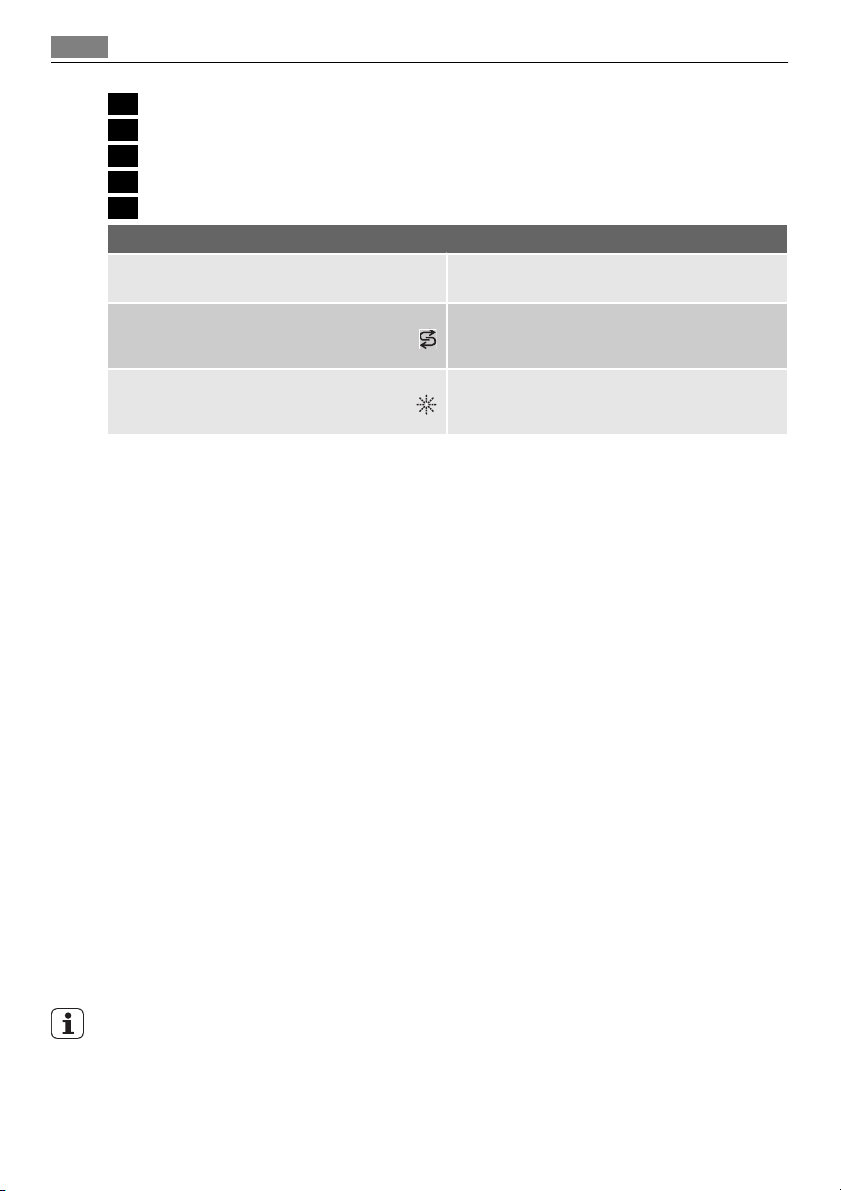
Indicator lights
MULTITAB Indicates the activation/deactivation of the
Salt
MULTITAB function (see MULTITAB function)
Illuminates when the special salt has run out.
1)
Rinse aid
1) The salt and rinse aid indicator lights are never illuminated while a washing programme is running even if filling
with salt and/or rinse aid is necessary.
Illuminates when the rinse aid has run out.
The digital display
The digital display indicates:
• the level of hardness to which the water softener is set,
• the approximate remaining time of the running programme,
• activation/deactivation of the rinse aid dispenser (ONLY with Multitab function active),
• the end of a washing programme (a zero will appear in the digital display),
• the countdown of the delay start,
• fault codes concerning malfunction of the dishwasher.
NIGHT CYCLE button
Night Cycle is a silent washing programme that will not disturb you, even when you sleep.
It can be set at night or in times with a more economical power rate.
During the Night Cycle the pump runs at a very low speed to reach a noise level reduction
of 25% compared to the declaration programme. As a consequence, it has a very long
running time.
Function buttons
The following functions can be set with the help of these buttons:
• setting of the water softener,
• activation/deactivation of the rinse aid dispenser when Multitab function is active.
Setting mode
The appliance is in setting mode when ALL programme lights are illuminated.
Always remember that when performing the following operations:
– selecting a washing programme,
– setting the water softener,
– activating/deactivating the rinse aid,
the appliance MUST be in setting mode.
1)
Page 7
First use
If a programme light is illuminated, the last performed or selected programme is still set.
In this case, to return to setting mode, the programme has to be cancelled.
To cancel a set programme or a programme in progress
Press and hold the RESET button until all the programme lights illuminate. The programme
has been cancelled and the machine is now in setting mode.
First use
Before using your dishwasher for the first time:
• Ensure that the electrical and water connections comply with the installation instructions
• Remove all packaging from inside the appliance
• Set the water softener
• Pour 1 litre of water inside the salt container and then fill with dishwasher salt
• Fill the rinse aid dispenser
If you want to use combi detergent tablets such as: "3 in 1", "4 in 1", "5 in 1" etc... set the
Multitab function (see "Multitab function").
Set the water softener
The dishwasher is equipped with a water softener designed to remove minerals and salts
from the water supply, which would have a detrimental or adverse effect on the operation
of the appliance.
The higher the content of these minerals and salts, the harder your water is. Water hardness
is measured in equivalent scales, German degrees (°dH), French degrees (°TH) and mmol/l
(millimol per litre - international unit for the hardness of water).
The softener should be adjusted according to the hardness of the water in your area. Your
local Water Authority can advise you on the hardness of the water in your area.
The water softener must be set in both ways: manually, using the water hardness dial and
electronically.
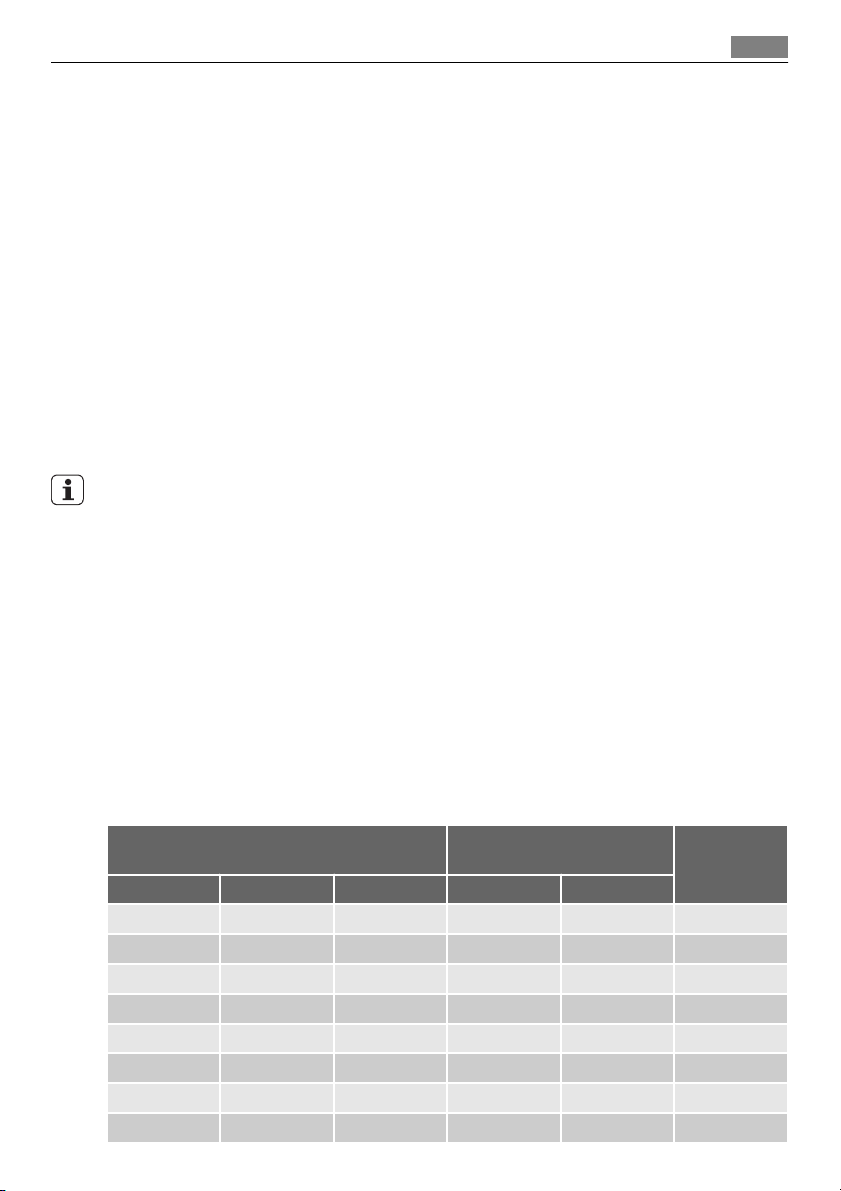
Water hardness Adjusting the water hardness
setting
°dH °TH mmol/l manually electronically
51 - 70 91 - 125 9,1 - 12,5 2 level 10 yes
43 - 50 76 - 90 7,6 - 8,9 2 level 9 yes
37 - 42 65 - 75 6,5 - 7,5 2 level 8 yes
29 - 36 51 - 64 5,1 - 6,4 2 level 7 yes
23 - 28 40 - 50 4,0 - 5,0 2 level 6 yes
19 - 22 33 - 39 3,3 - 3,9 2 level 5 yes
15 - 18 26 - 32 2,6 - 3,2 1 level 4 yes
11 - 14 19 - 25 1,9 - 2,5 1 level 3 yes
7
Use of salt
Page 8
Set the water softener
8
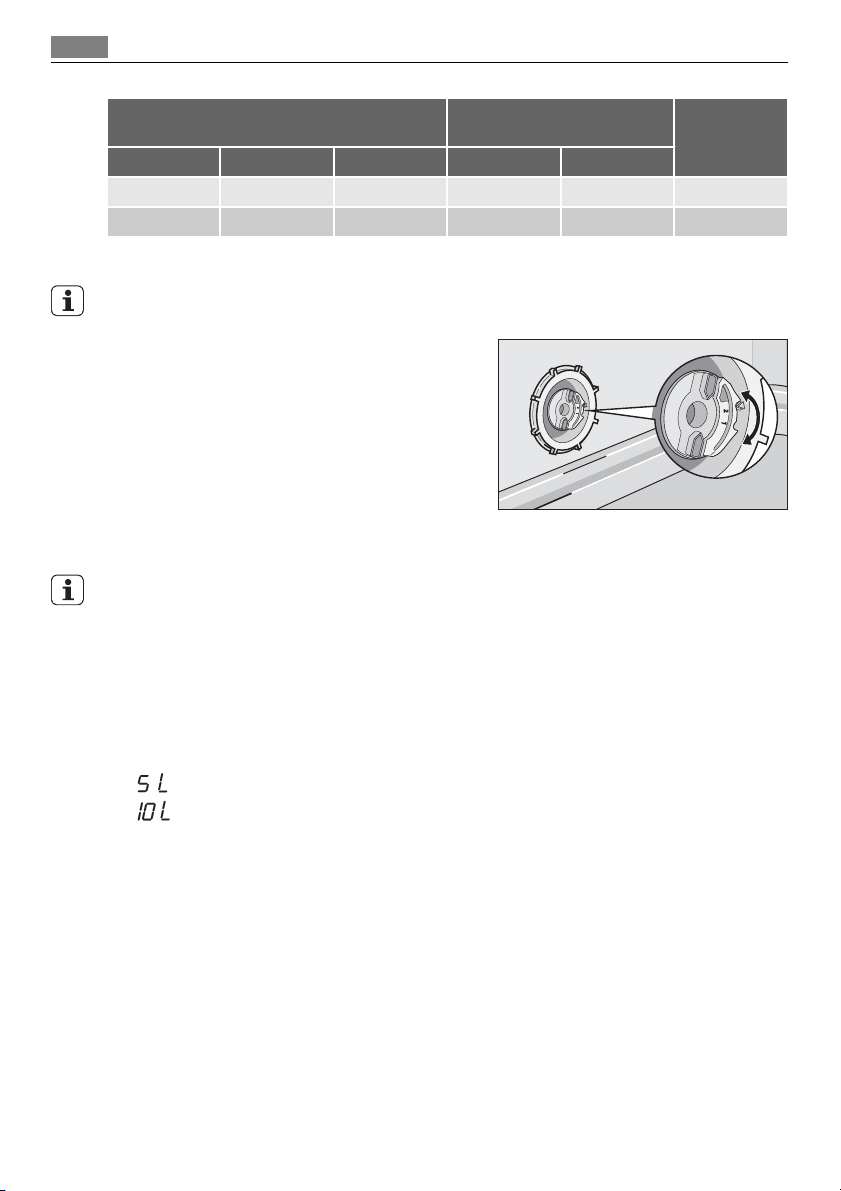
Water hardness Adjusting the water hardness
°dH °TH mmol/l manually electronically
4 - 10 7 - 18 0,7 - 1,8 1 level 2 yes
< 4 < 7 < 0,7 1 level 1 no
setting
Setting manually
The dishwasher is factory set at position 2.
1. Open the dishwasher door.
2. Remove the lower basket from the dishwasher.
3. Turn the water hardness dial to position 1
or 2 (see table).
4. Replace the lower basket.
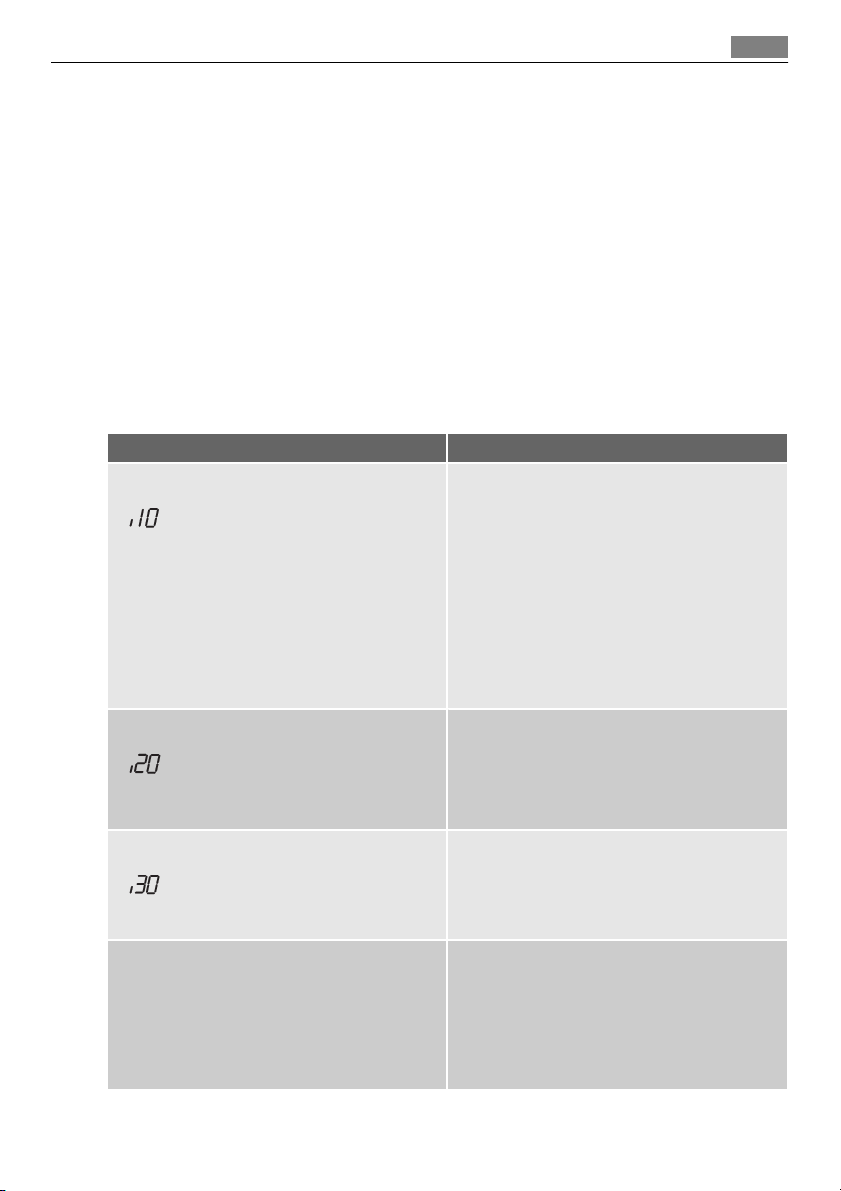
Setting electronically
The dishwasher is factory set at level 5.
1. Press the On/Off button. The dishwasher must be in setting mode.
2.
Press simultaneously and keep pressed buttons B and C, until the lights of buttons A,
B and C start flashing.
3.
Press button A, the lights of buttons B and C turn off while the light of button A goes
on flashing. In the digital display is visible the current level.
Examples:
displayed = level 5
displayed = level 10
4.
To change the level, press button A. Each time the button is pressed the level changes
(for the selection of the new level see the chart).
Examples: if the current level is 5, by pressing button A once, level 6 is selected. if the
current level is 10, by pressing button A once, level 1 is selected.
5. To memorise the operation, switch off the dishwasher by pressing the On/Off button.
Use of salt
Page 9
Use of dishwasher salt
Use of dishwasher salt
WARNING!
Only use salt specifically designed for use in dishwashers. All other types of salt not specifically designed for use in a dishwasher, especially table salt, will damage the water softener. Only fill with salt just before starting one of the complete washing programmes. This
will prevent any grains of salt or salty water, which may have been spilt, remaining on the
bottom of the machine for any period of time, which may cause corrosion.
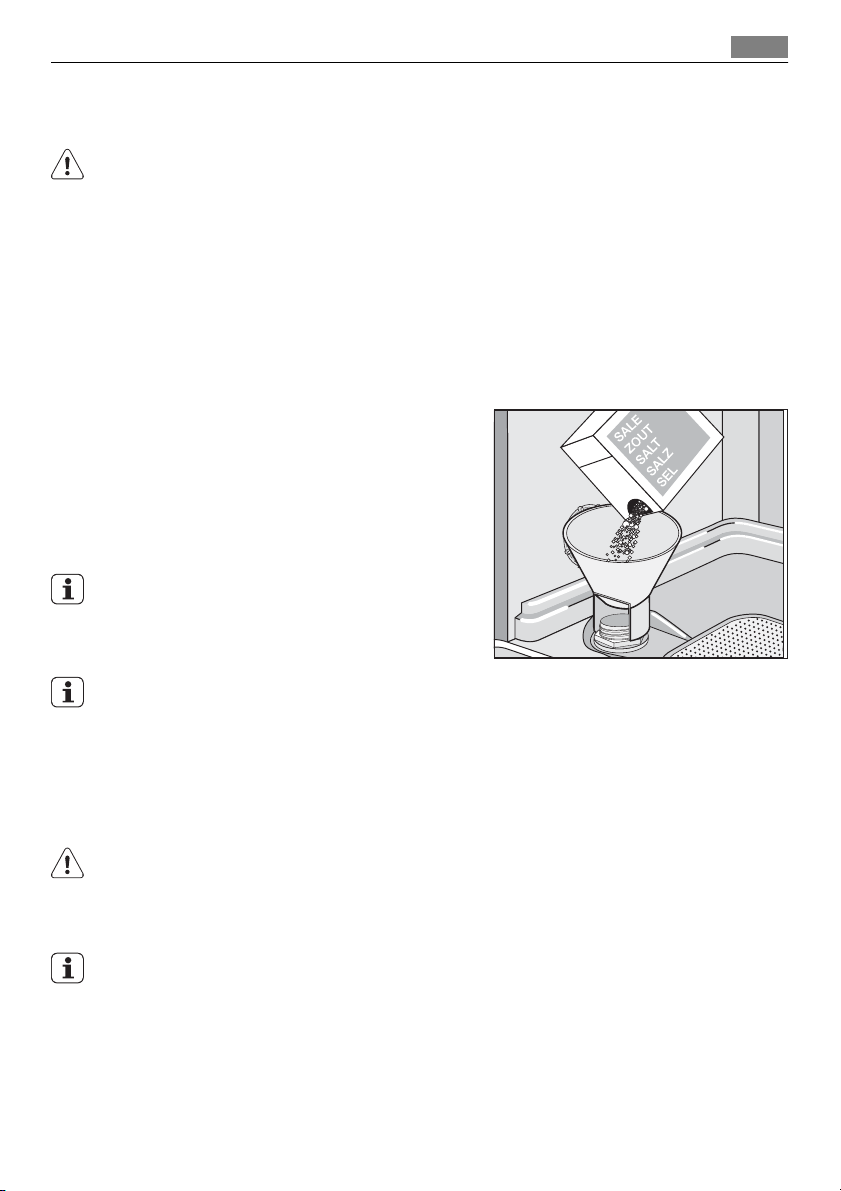
To fill:
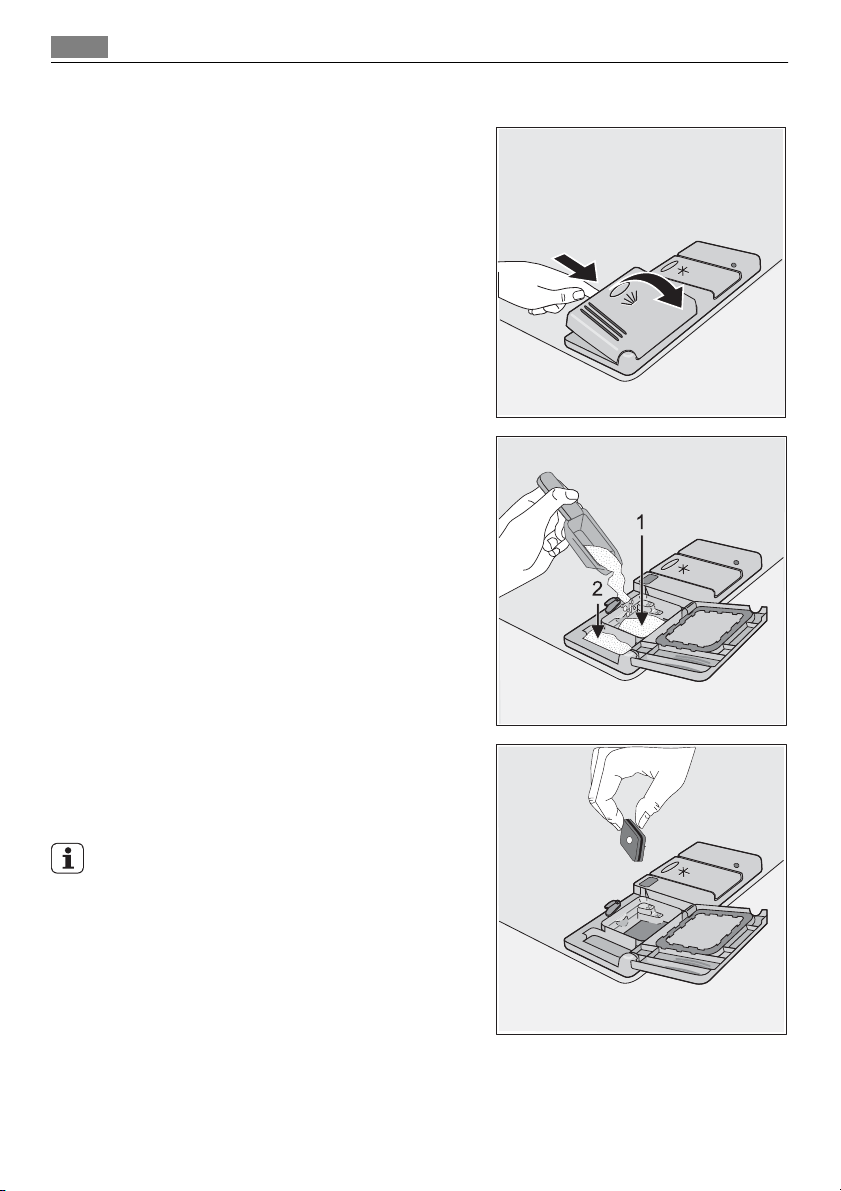
1. Open the door, remove the lower basket and unscrew the cap of the salt container by
turning it anticlockwise.
2.
Pour 1 litre of water inside the container (this is necessary only before filling with
salt for the first time) .
3. Using the funnel provided, pour in the salt
until the container is full.
4. Replace the cap making sure that there is
no trace of salt on the screw thread or on
the gasket.
5. Replace the cap tightly turning it clockwise until it stops with a click.
Do not worry if water overflows from the unit
when filling with salt, this is quite normal.
9
The salt indicator light on the control panel can remain illuminated for 2-6 hours after the
salt has been replenished, assuming the dishwasher remains switched on. If you are using
salts that take longer to dissolve then this can take longer. The function of the machine is
not affected.
Use of rinse aid
WARNING!
Only use branded rinse aid for dishwashers.
Never fill the rinse aid dispenser with any other substances (e.g. dishwasher cleaning agent,
liquid detergent). This would damage the appliance.
Rinse aid ensures thorough rinsing, and spot and streak free drying.
Rinse aid is automatically added during the last rinse.
Page 10
Use of rinse aid
10
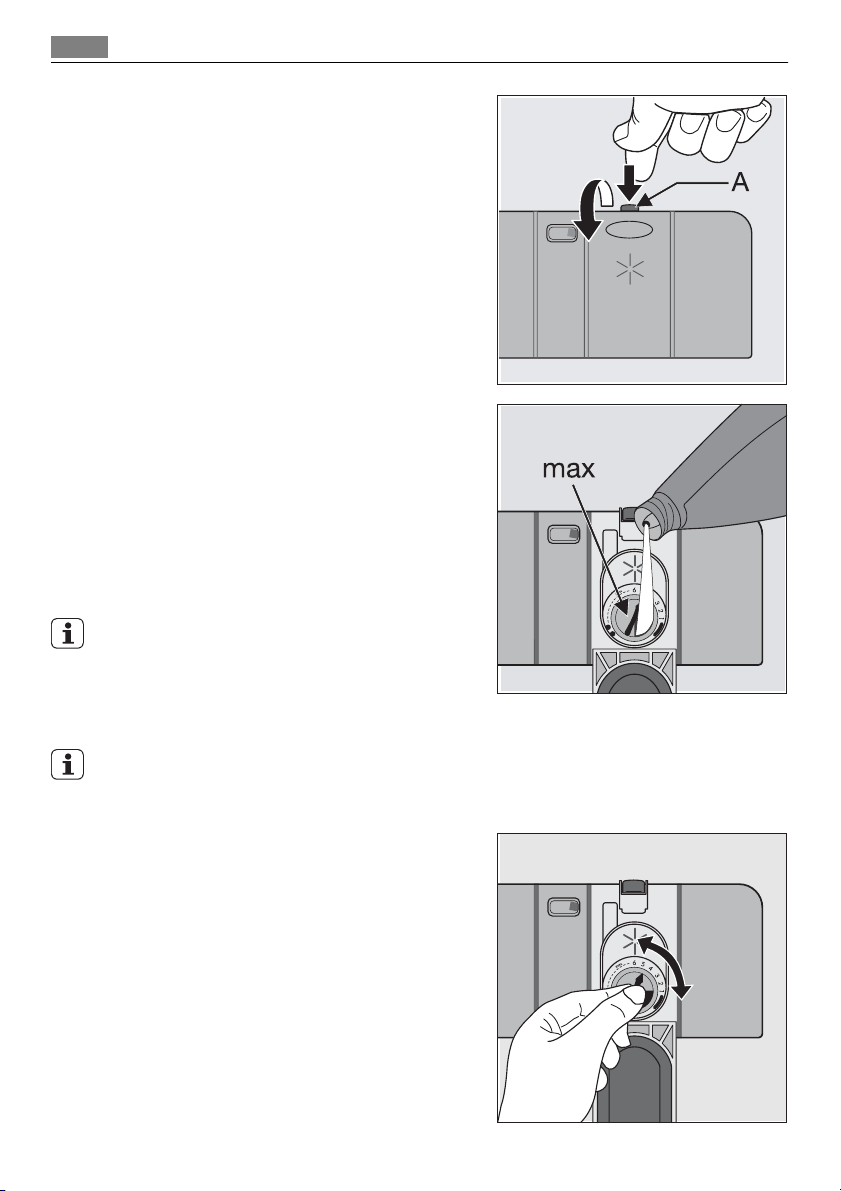
1. Open the container by pressing the release
button (A).
2. Add the rinse aid in the container. The
maximum level for filling is indicated by
"max".
The dispenser holds about 110 ml of rinse
aid, which is sufficient for between 16 and
40 dishwashing cycles, depending upon
the dosage setting.
3. Ensure that the lid is closed after every refill.
Clean up any rinse aid spilt during filling with
an absorbent cloth to avoid excess foaming
during the next wash.
Adjusting the dosage of rinse aid
According to the finish and drying results obtained, adjust the dose of rinse aid by means
of the 6 position selector (position 1= minimum dosage, position 6= maximum dosage).
The dose is factory set in position 4.
Increase the dose if there are drops of water or lime
spots on the dishes after washing.
Reduce it if there are sticky whitish streaks on the
dishes or a bluish film on glassware or knife blades.
Page 11

Daily use
Daily use
• Check if it's necessary to refill with dishwasher salt or rinse aid.
• Load cutlery and dishes into the dishwasher.
• Fill with dishwasher detergent.
• Select a wash programme suitable for the cutlery and dishes.
• Start the wash programme.
Load cutlery and dishes
Sponges, household cloths and any object that can absorb water may not be washed in the
dishwasher.
• Before loading the dishes, you should:
– Remove all left over food and debris.
– Soften remnants of burnt food in pans
• When loading the dishes and cutlery, please note:
– Dishes and cutlery must not impede the rotation of the spray arms.
– Load hollow items such as cups, glasses, pans, etc. with the opening downwards so
that water cannot collect in the container or a deep base.
– Dishes and items of cutlery must not lie inside one another, or cover each other.
– To avoid damage to glasses, they must not touch.
– Lay small objects in the cutlery basket.
• Plastic items and pans with non stick coatings have a tendency to retain water drops;
these items will not dry as well as porcelain and steel items.
• Light items (plastic bowls etc.) must be loaded in the upper basket and arranged so they
do not move.
For washing in the dishwasher the following cutlery and dishes
are not suitable: are of limited suitability:
• Cutlery with wooden, horn, china or motherof-pearls handles.
• Plastic items that are not heat resistant.
• Older cutlery with glued parts that are not
temperature resistant.
• Bonded cutlery items or dishes.
• Pewter or copper items.
• Lead crystal glass.
• Steel items prone to rusting.
• Wooden platters.
• Items made from synthetics fibres.
Open the door and slide out the baskets to load the dishes.
• Only wash stoneware in the dishwasher if it
is specially marked as being dishwasher-safe
by the manufacturer.
• Glazed patterns may fade if machine washed
frequently.
• Silver and aluminium parts have a tendency
to discolour during washing: Residues, e.g.
egg white, egg yolk and mustard often cause
discolouring and staining on silver. Therefore
always clean left-overs from silver immediately, if it is not to be washed straight after
use.
11
Page 12
Load cutlery and dishes
12
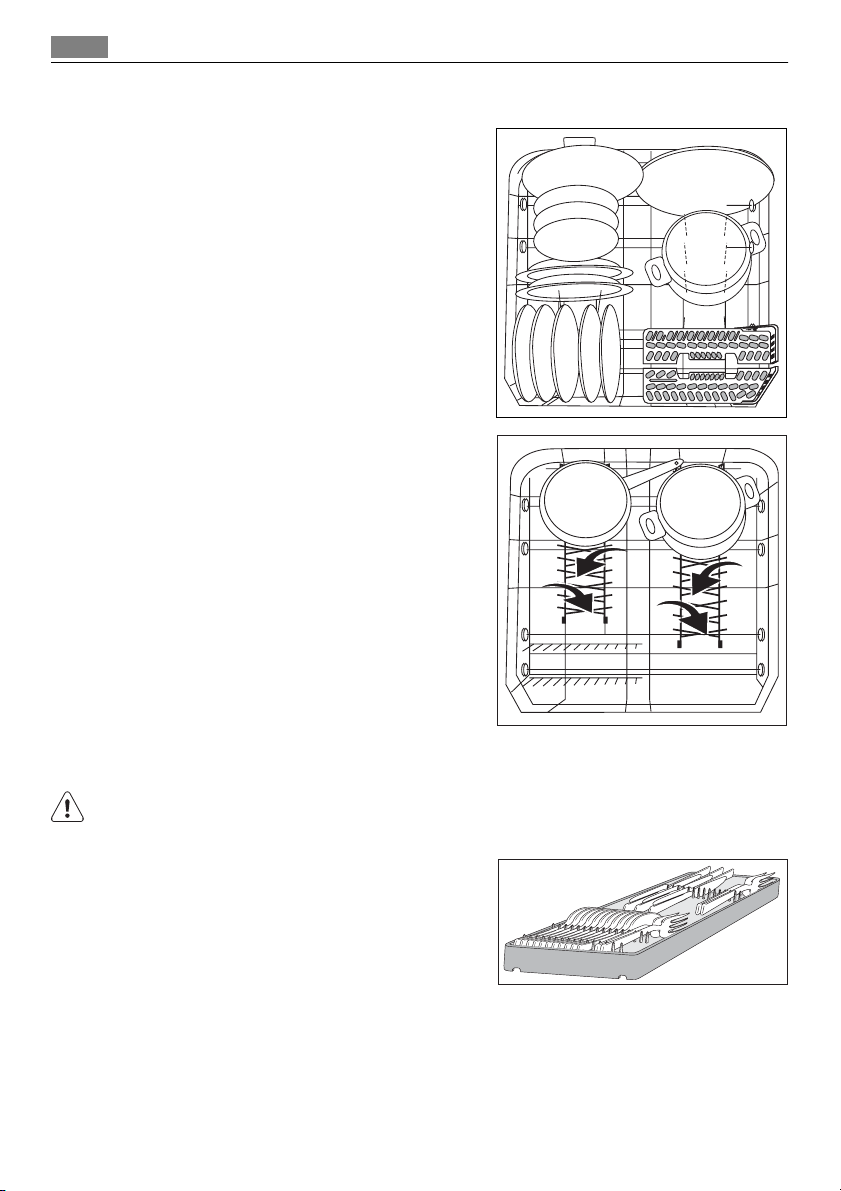
The lower basket
Load larger and heavily soiled dishes and pans in
the lower basket.
To make it easie r to lo ad larger dishes, all rear plate
racks in the lower basket can be folded down.
The cutlery basket
WARNING!
Sharp knives and other items of cutlery with sharp edges must be laid in the cutlery tray
or in the upper basket because of the risk of injury.
Place knives, small spoons and small forks in the
cutlery tray which is in the upper basket. Place
forks and spoons that do not fit in the cutlery tray
in the cutlery basket.
To ensure that all items of cutlery in the cutlery
basket can be reached by the water, you should:
Page 13
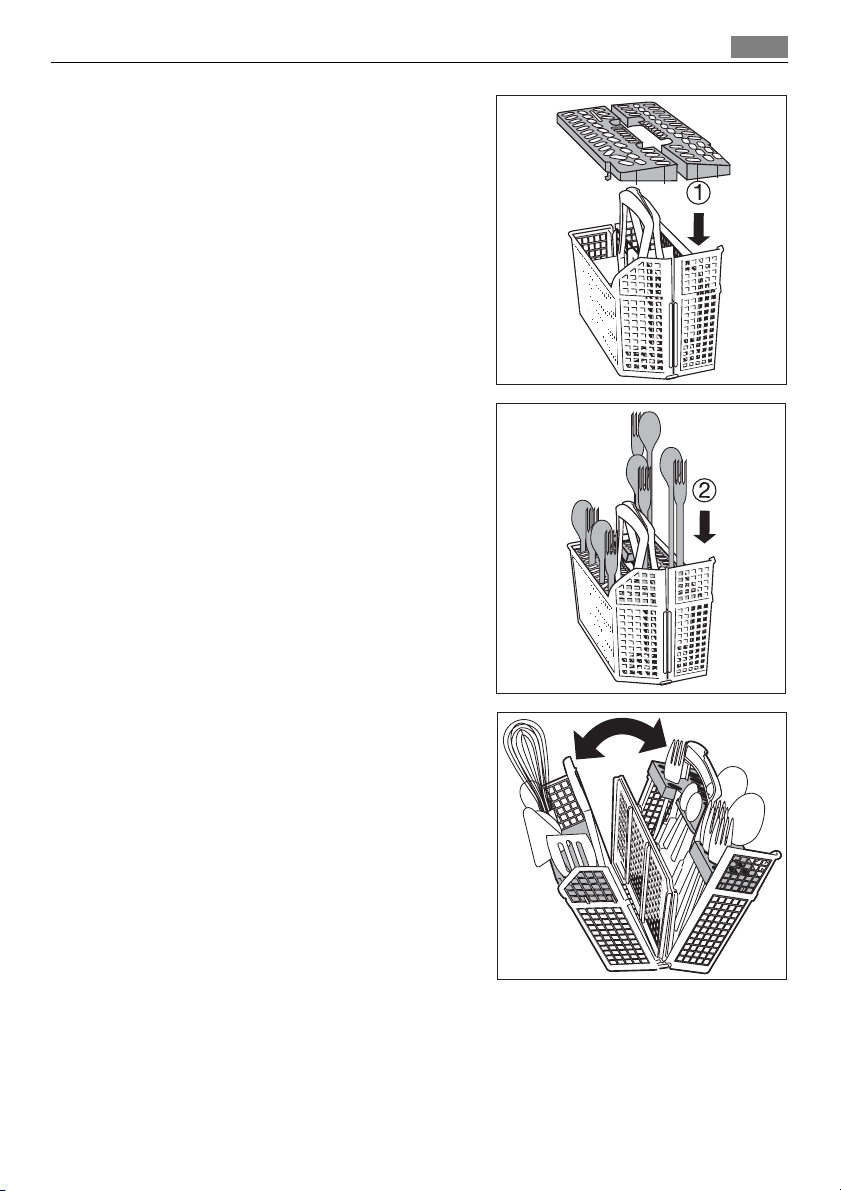
1. Place the grid insert on the cutlery basket.
2. Place forks and spoon in the cutlery basket
with their handles pointing downwards.
For larger utensils, such as whisks, leave off
one half of the cutlery grid.
Load cutlery and dishes
13
The cutlery basket can be opened out.
Always make sure that you put your hand around
both parts of the two-part handle when removing
it from the dishwasher.
1. Place the cutlery basket on a table or work
surface.
2. Open out the two-part handle.
3. Remove cutlery.
Page 14
Load cutlery and dishes
14
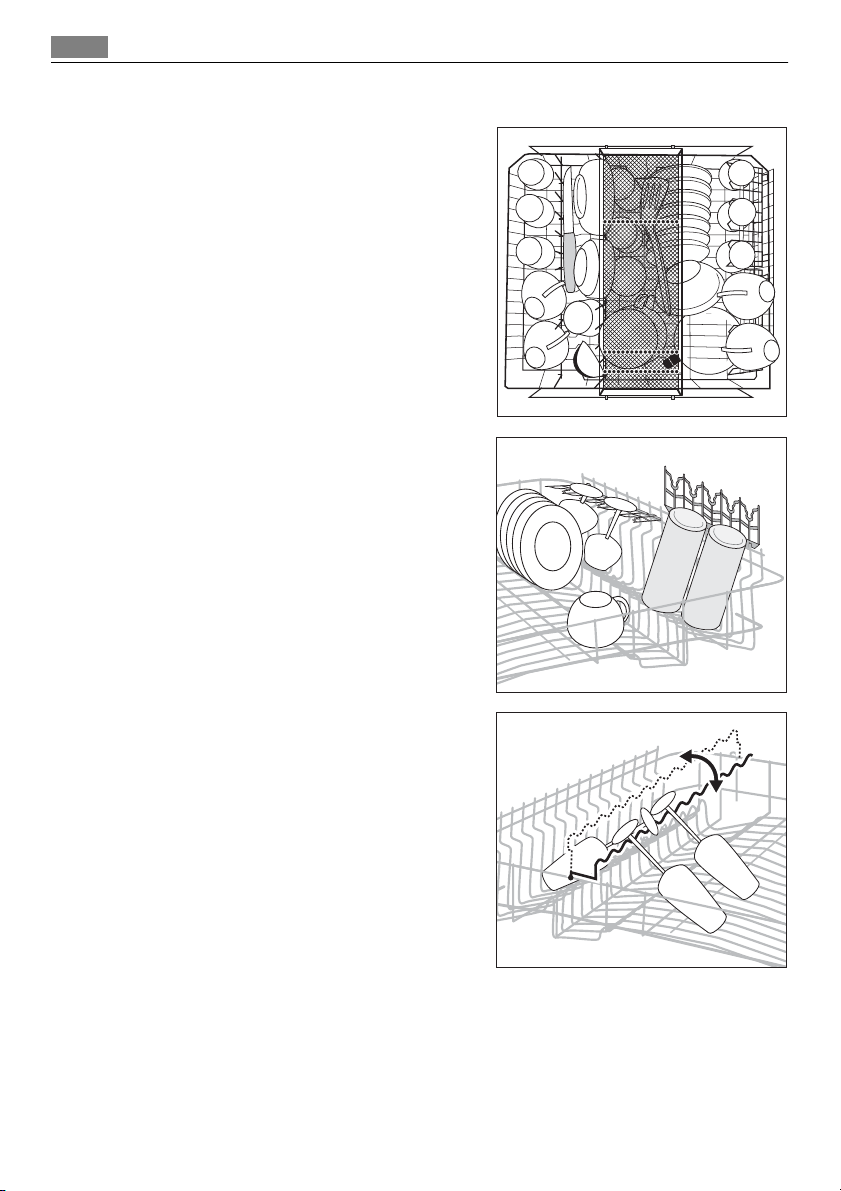
The upper basket
Load smaller, fragile crockery and long, sharp cutlery in the upper basket.
• Arrange items of crockery on and under the
folding cup racks so that they are offset from
each other and water can reach all items.
• The cup racks can be folded up out of the way
for tall crockery items.
• Lay or hang wine and brandy glasses in the
slots in the cup racks.
• For glasses with long stems, fold the glass
rack to the right, otherwise fold it away to
the left.
Page 15
• The row of spikes on the left of the upper
basket is also in two parts and can be folded
away.
Spikes not folded away: place glasses, mugs
etc. in the upper basket.
Spikes folded away: more room for serving
dishes.
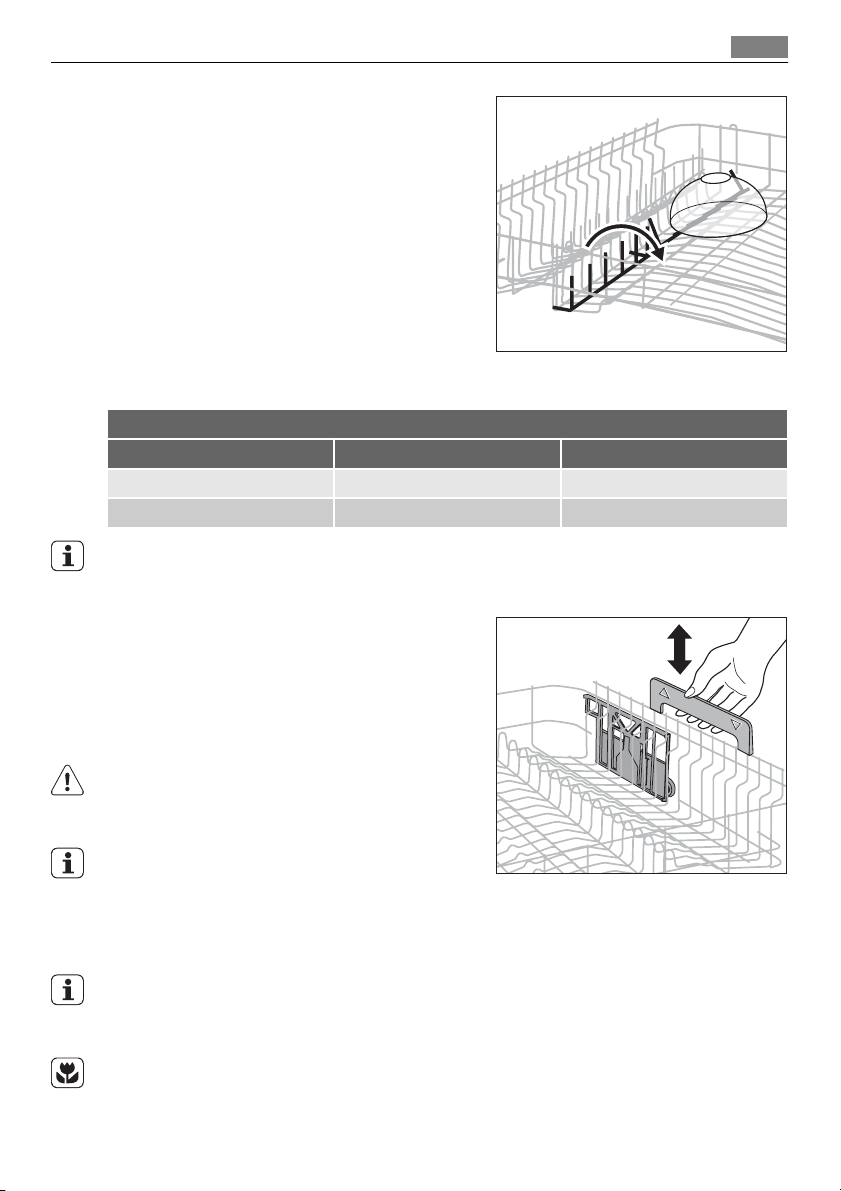
Adjusting the height of the upper basket
Maximum height of the dishes in:
the upper basket the lower basket
With upper basket raised 22 cm 30 cm
With upper basket lowered 24 cm 29 cm
The height of the upper basket can also be adjusted when it is loaded.
Raising / lowering the upper basket:
1. Pull out the upper basket completely.
2. Holding the upper basket by the handle,
raise it as far as it will go and then lower
it vertically.
The upper basket will latch into the lower
or the upper position.
WARNING!
After loading your machine always close the
door, as an open door can be a hazard.
Use of detergent
15
Before closing the door, ensure that the spray
arms can rotate freely.
Use of detergent
Only use detergents specifically designed for use in dishwashers.
Please observe the manufacturer's dosing and storage recommendations as stated on the
detergent packaging.
Using no more than the correct amount of detergent contributes to reducing pollution.
Page 16
Use of detergent
16
Fill with detergent
1. Open the lid.
2. Fill the detergent dispenser (1) with detergent. The marking indicates the dosing
levels:
20 = approximately 20 g of detergent
30 = approximately 30 g of detergent.
3. All programmes with prewash need an additional detergent dose (5/10 g) that must
be placed in the prewash detergent chamber (2).
This detergent will take effect during the
prewash phase.
4. When using detergent tablets, place the
tablet in compartment (1)
5. Close the lid and press until it locks in
place.
Detergent tablets
Detergent tablets from different manufactures dissolve at different rates. For this reason,
some detergent tablets do not attain their full
cleaning power during short washing programmes. Therefore, please use long washing
programmes when using detergent tablets, to
ensure the complete removal of detergent residuals.
Page 17
Multi-tab function
Multi-tab function
This appliance is equipped with the "Multitab function", that allows the use of the "Multitab"
combi detergent tablets.
These products are detergents with a combined cleaning, rinsing and salt functions. They
can also contain other different agents depending on which kind of tablets you choose ("3
in 1", "4 in 1", "5 in 1" etc...).
Check whether these detergents are suitable for your water hardness. See the manufacturers instructions.
This function can be selected with all washing programmes. With the selection of this
function the inflow of rinse aid and salt from each respective supply container is automatically deactivated and also the indicator lights for salt and rinse aid are deactivated.
Select the "Multitab function " before the start of a washing programme.
Once this function is selected (indicator light illuminated) it will remain active also for the
following washing programmes.
With the use of the "Multitab function", the cycle durations may change. In this case, in
the digital display, the indication of the running time of the programme is automatically
updated.
Once the programme is running, the "Multitab function " can NO longer be changed. If you
want to exclude the "Multitab function " you have to cancel the programme setting and
then deactivate the "Multitab function ".
In this case you have to set a washing programme (and desired options) again.
Activation/deactivation of the Multitab function
Press the Multitab button: the corresponding indicator light illuminates. This means that
the function is active.
To deactivate the function press the Multitab button again: the indicator light turns off.
If the drying results are not satisfactory we suggest that you:
1. Fill up the rinse aid dispenser with rinse aid.
2. Activate the rinse aid dispenser.
3. Set the rinse aid dosage to position 2.
• The activation/deactivation of the rinse aid dispenser can only be possible with the
"Multitab function" active.
17
Activation/deactivation of the rinse aid dispenser
1. Press the On/Off button. The dishwasher must be in setting mode.
2.
Press simultaneously buttons B and C, until the lights of buttons A , B, and C start
flashing.
3.
Press button B, the lights of buttons A and C turn off while the light of button B goes
on flashing. The digital display indicates the current setting:
= Rinse aid dispenser deactivated.
= Rinse aid dispenser activated.
4.
To change the setting, press button B again, the digital display indicates the new setting.
5. To memorise the operation, switch off the dishwasher by pressing the On/Off button.
Page 18
Washing programmes
18
If you decide to turn back to the use of standard detergent system we advise that you:
1. Deactivate the "Multitab function".
2. Fill up the salt container and the rinse aid dispenser again.
3. Adjust the water hardness setting to the highest setting and perform 1 normal washing
programme without loading any dishes.
4. Adjust the water hardness setting according to the hardness of the water in your area.
5. Adjust the rinse aid dosage.
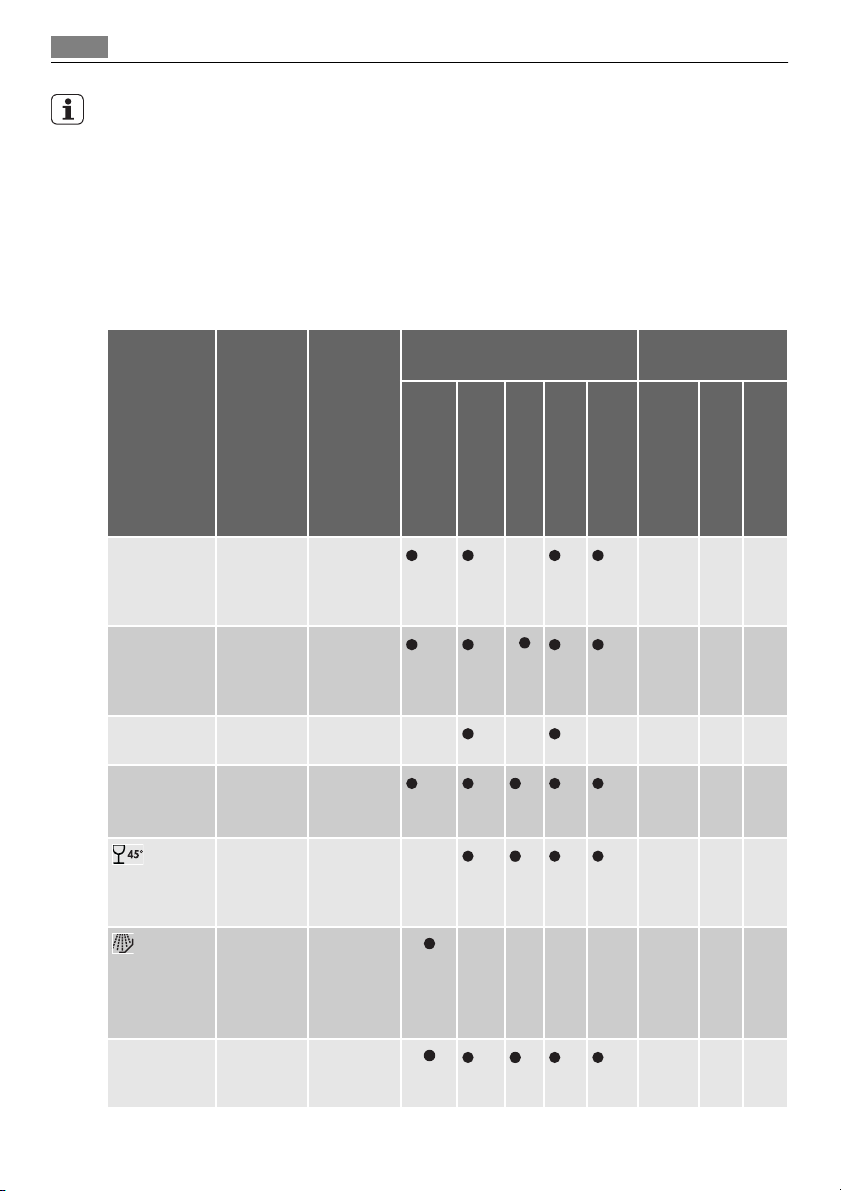
Washing programmes
Programme Degree of
AUTO
3)
45-70°
INTENSIV
CARE 70°
30 MIN 60°
5)
ECO 50°
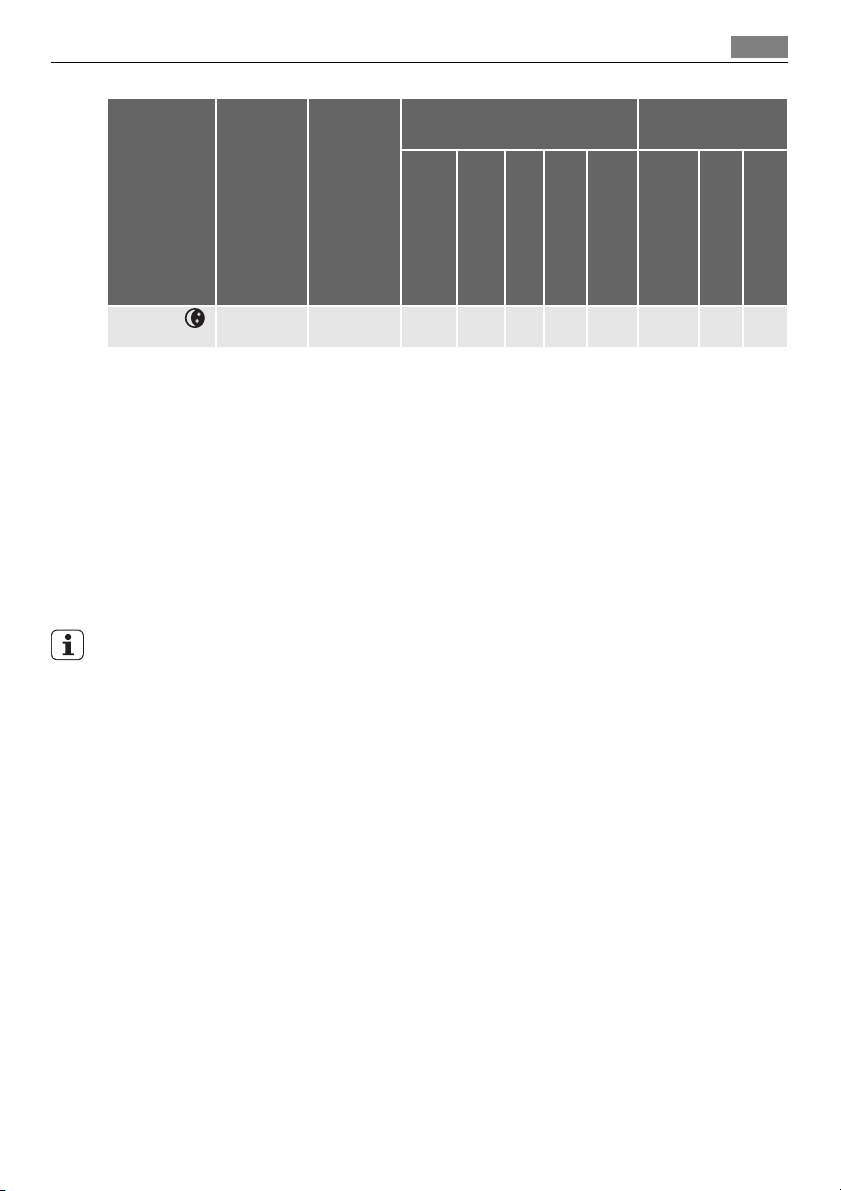
NIGHT CYCLE Normal
soil
Mixed normal and
heavy soil
Heavy soil Crockery,
4)
Light soil Crockery
Normal
soil
Normal
soil
Any Partial load
soil
Type of
load
Crockery,
cutlery,
pots and
pans
cutlery,
pots and
pans
and cutlery
Crockery
and cutlery
Delicate
crockery
and glassware
(to be completed later
in the
6)
day)
Crockery
and cutlery
Programme description Consumption val-
ues
Prewash
Main wash
Intermediate rinse
Final rinse
Drying
Duration (minutes)2)Energy (kWh)
-
1/2x
-
-
-
-
-
-
1)
Water (litres)
12 - 23
1,1 - 1,7
16 - 18
1,5 -1,7
9
0,9
12 - 13
1,0 - 1,1
14 - 15
0,8 -0,9
4
0,1
13 - 14
1.1 - 1.3
Page 19
Select and start a washing programme
19
Programme Degree of
soil
1) The consumption values are intended as a guide and depends on the pressure and the temperature of the water
and also by the variations of the power supply and the amount of dishes.
2) The digital display shows the programme duration.
3) During the Auto washing programme the amount of soil on the dishes is determined by how cloudy the water
is. The programme duration, water and energy consumption levels can vary; this depends upon if the appliance
is fully or partially loaded and if the dishes are lightly or heavily soiled. The temperature of the water is
automatically adjusted between 45° C and 70° C.
4) Ideal for washing a partially loaded dishwasher. This is the perfect daily programme, made to meet the needs
of a family of 4 persons who only wish to load breakfast and dinner crockery and cutlery.
5) Test programme for test institutes.
6) This programme does not require the use of detergent
Type of
load
Programme description Consumption val-
Prewash
Main wash
Intermediate rinse
Drying
Final rinse
Select and start a washing programme
Select the washing programme and delay start with the door slightly opened. The
start of the programme or the countdown of the delay start will occur only after
the closure of the door. Until then it is possible to modify the settings.
2)
Duration (minutes)
ues
1)
Energy (kWh)
Water (litres)
1. Check that the baskets have been loaded correctly and that the spray arms are free to
rotate.
2. Check that the water tap is opened.
3. Press the On/Off button. The dishwasher must be in setting mode.
4. Press one of the two programme buttons to select a washing programme. (see "Washing
programmes" chart).
When a programme is selected the corresponding programme light illuminates and the
programme time flashes on the digital display.
5. Close the dishwasher door, the programme starts automatically.
Setting and starting the programme with delay start
1. After having selected the washing programme, press the delay start button until the
number of hours for the delay start appear in the digital display. The start of the selected
washing programme can be delayed for between 1 and 19 hours.
2. Close the dishwasher door, the countdown starts automatically.
3. The countdown will decrease with steps of 1 hour.
4. The opening of the door will interrupt the countdown. Close the door; the countdown
will continue from the point at which it was interrupted.
5. Once the delay start has elapsed the programme will start automatically.
Page 20
Unloading the dishwasher
20
The selection of the washing programme and delay start can also occur with the door closed.
Keep in mind that in this way, once a washing programme button is pressed you have
ONLY 3 seconds in which you can choose another programme or select a delay start, after
which the selected programme will start automatically.
WARNING!
Interrupt or cancel a washing programme in progress ONLY if it’s absolutely necessary. Attention! Hot steam may escape when the door is opened. Open the door
carefully.
Cancelling a delay start or a washing programme in progress
• Press the RESET button until all the programme lights will illuminate.
• Cancelling a delay start involves also the cancelling of the washing programme set. In
this case you have to set the washing programme again.
• If a new washing programme is to be selected, check that there is detergent in the
detergent dispenser.
Interrupt a washing programme in progress
• Open the dishwasher door; the programme will stop. Close the door; the programme will
start from the point at which it was interrupted.
• Press the On/Off button, all lights will turn off. Press the On/Off button again; the pro-
gramme will start from the point at which it was interrupted.
End of the washing programme
• The dishwasher will automatically stop and an audible signal informs you of the end of
the washing programme.
• The light of the programme just ended will remain on.
• In the digital display appears a zero.
1. Switch off the dishwasher by pressing the On/Off button.
It is recommended to switch off the appliance once the washing programme has ended. If
this is not done, automatically after about 3 minutes from the end of the programme, all
indicator lights will go off. The digital display shows 1 horizontal bar.
This will help to reduce the consumption of energy when you forget or for any reason
cannot switch the appliance off once the programme has ended.
Press any button (except On/Off) and the control panel will show the same situation (indicator lights and digital display) as when the programme ended.
2. Open the dishwasher's door, leave it ajar and wait a few minutes before removing the
dishes; in this way they will be cooler and the drying will be improved.
Unloading the dishwasher
• Hot dishes are sensitive to knocks.
The dishes should therefore be allowed to cool down before removing from the appliance.
• Empty the lower basket first and then the upper one; this will avoid water dripping from
the upper basket onto the dishes in the lower one.
Page 21
Care and cleaning
• Water may appear on the sides and the door of the dishwasher as the stainless steel will
eventually become cooler than the dishes.
CAUTION!
When the washing programme has finished, it is recommended that the dishwasher is
unplugged and the water tap turned off.
Care and cleaning
Cleaning the filters
The filters must be checked and cleaned from time to time. Dirty filters will degrade the
washing result.
WARNING!
Before cleaning the filters ensure that the machine is switched off.
1. Open the door, remove the lower basket.
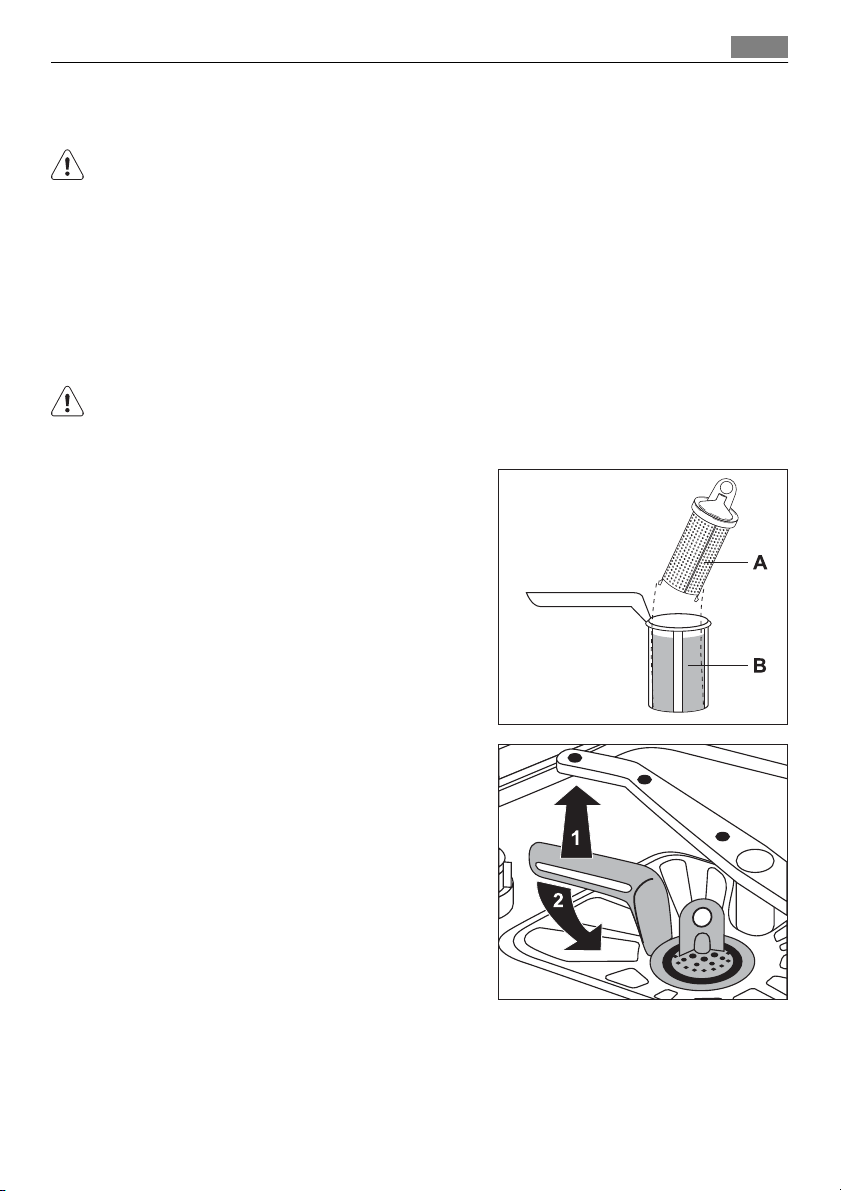
2. The dishwasher filter system comprises a
coarse filter (A), a microfilter (B) and a flat
filter. Unlock the filter system using the
handle on the microfilter, and remove the
filter system.
21
3. Turn the handle about 1/4 a turn anticlockwise and remove the filter system.
4.
Take hold of the coarse filter (A) by the
handle with the hole and remove from the
microfilter (B).
5. Clean all filters thoroughly under running
water.
Page 22
Care and cleaning
22
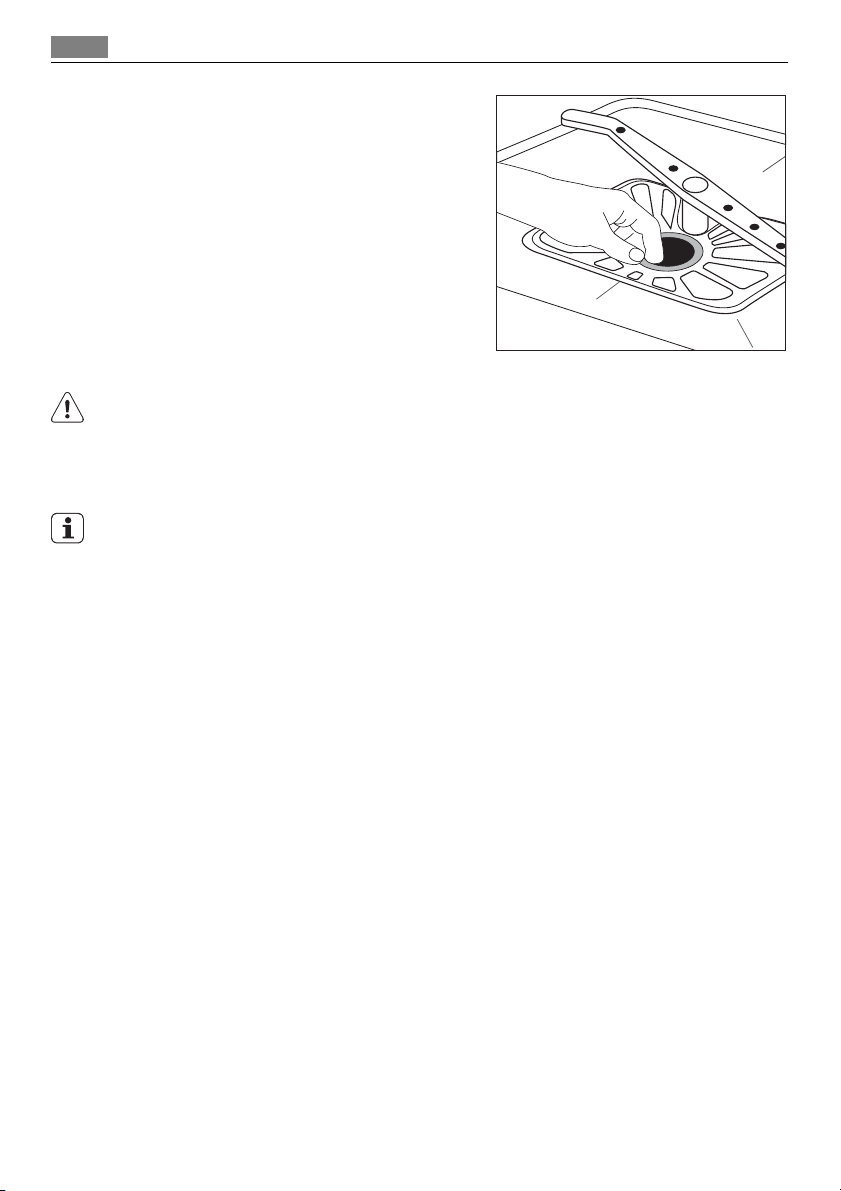
6. Remove the flat filter from the base of the
washing compartment and clean both
faces thoroughly.
7. Put the flat filter back in the base of the
washing compartment and ensure that it
fits perfectly.
8.
Place the coarse filter (A) in the microfilter
(B) and press together.
9. Put the filter combination in place and
lock by turning the handle clockwise to the
stop. During this process ensure that the
flat filter does not protrude above the base
of the washing compartment.
WARNING!
NEVER use the dishwasher without filters. Incorrect repositioning and fitting of the filters
will produce poor washing results and may result in damage to the appliance.
Cleaning the spray arms
NEVER try to remove the spray arms.
If residues of soil have clogged the holes in the spray arms, remove them with a cocktail
stick.
External cleaning
Clean the external surfaces of the machine and control panel with a damp soft cloth. If
necessary use only neutral detergents. Never use abrasive products, scouring pads or solvent
(acetone, trichloroethylene etc....).
Internal cleaning
Ensure that the seals around the door, the detergent and rinse aid dispensers are cleaned
regularly with a damp cloth.
We recommend every 3 months to run the wash programme for heavy soiled dishes using
detergent but without dishes.
Prolonged periods of non-operation
If you are not using the machine for any prolonged period of time you are advised to:
1. Unplug the appliance and then turn off the water.
2. Leave the door ajar to prevent the formation of any unpleasant smells.
3. Leave the inside of the machine clean.
Frost precautions
Avoid placing the machine in a location where the temperature is below 0°C. If this is
unavoidable, empty the machine, close the appliance door, disconnect the water inlet pipe
and empty it.
Page 23
What to do if…
Moving the machine
If you have to move the machine (moving house etc....):
1. Unplug it.
2. Turn the water tap off.
3. Remove the water inlet and discharge hoses.
4. Pull the machine out together with the hoses.
Avoid over tilting the machine during transportation.
What to do if…
The dishwasher will not start or stops during operation. Certain problems are due to the
lack of simple maintenance or oversights, which can be solved with the help of the indications described in the chart, without calling out an engineer.
Switch off the dishwasher and carry out the following suggested corrective actions.
Fault code and malfunction Possible cause and solution
• continuous flashing of the light of the running programme
•
appears in the digital display.
• intermitted audible signal
The dishwasher does not fill with water.
• continuous flashing of the light of the running programme
•
appears in the digital display.
• intermitted audible signal
The dishwasher will not drain.
• continuous flashing of the light of the running programme
•
appears in the digital display.
• intermitted audible signal
Anti-flood device is activated.
The programme does not start. • The dishwasher’s door has not been properly
• The water tap is blocked or furred with limescale.
Clean the water tap.
• The water tap is turned off. Turn the water tap
on.
• The filter (where present) in the threaded hose
fitting at the water inlet valve is blocked.
Clean the filter in the threaded hose.
• The water inlet hose has not been correctly
laid or it is bent or squashed.
Check the water inlet hose connection.
• The sink spigot is blocked.
Clean out the sink spigot.
• The water drain hose has not been correctly
laid or it is bent or squashed.
Check the water drain hose connection.
• Close the water tap and contact your local
Service Force Centre.
closed. Close the door.
• The main plug is not plugged in. Insert the
main plug.
• The fuse has blown out in the household fuse
box.
Replace the fuse.
23
Page 24

Technical data
24
Fault code and malfunction Possible cause and solution
• Delay start has been set.
If dishes are to be washed immediately, cancel
the delay start.
Once these checks have been carried out, switch on the appliance: the programme will
continue from the point at which it was interrupted.
If the malfunction or fault code reappears contact the Service Force Centre.
For other fault codes not described in the above chart, please contact your local Service
Force Centre, quoting the model (Mod.), product number (PNC) and serial number (S.N.).
This information can be found on the rating plate located on the side of the dishwasher
door.
So that you always have these numbers at hand, we recommend you to make a note of
them here:
Mod. : . . . . . . . . . . . . . . . . . . . . . . .
PNC :. . . . . . . . . . . . . . . . . . . . . . . .
S.N. : . . . . . . . . . . . . . . . . . . . . . . . .
The wash results are not satisfactory
The dishes are not clean • The wrong washing programme has been se-
The dishes are wet and dull • Rinse aid was not used.
There are streaks, milky spots or a bluish coating
on glasses and dishes
Water drops have dries onto glasses and dishes • Increase rinse aid dosing.
lected.
• The dishes are arranged in such a way as to
stop water reaching all parts of the surface.
The baskets must not be overloaded.
• The spray arms do not rotate freely due to
incorrect arrangement of the load.
• The filters in the base of the washing compartment are dirty or incorrectly positioned.
• Too little or no detergent has been used.
• Where there are limescales deposits on the
dishes; the salt container is empty or the incorrect level of the water softener has been
set.
• The drain hose connection is not correct.
• The salt container cap is not properly closed.
• The rinse aid dispenser is empty.
• Decrease rinse aid dosing.
• The detergent may be the cause. Contact the
detergent manufacturer’s consumer care line.
If after all these checks, the problem persists, contact your local Service Force Centre.
Technical data
Dimension Width - height - depth (cm) 59,6 x 81,8-89,8 x 57,5
Page 25

Hints for test institutes
25
Electrical connection - Voltage
- Overall power - Fuse
Water supply pressure Minimum - Maximum (MPa) 0,05 - 0,8
Capacity Place settings 12
Information on the electrical connection is given on the rating
plate on the inner edge of the dishwasher's door
Hints for test institutes
Testing in accordance with EN 60704 must be carried out with appliance fully loaded and
using the test programme (see "Washing programmes").
Test in accordance with EN 50242 must be carried out when the salt container and rinse
aid dispenser have been filled with salt and rinse aid respectively and using the test programme (see "Washing programmes").
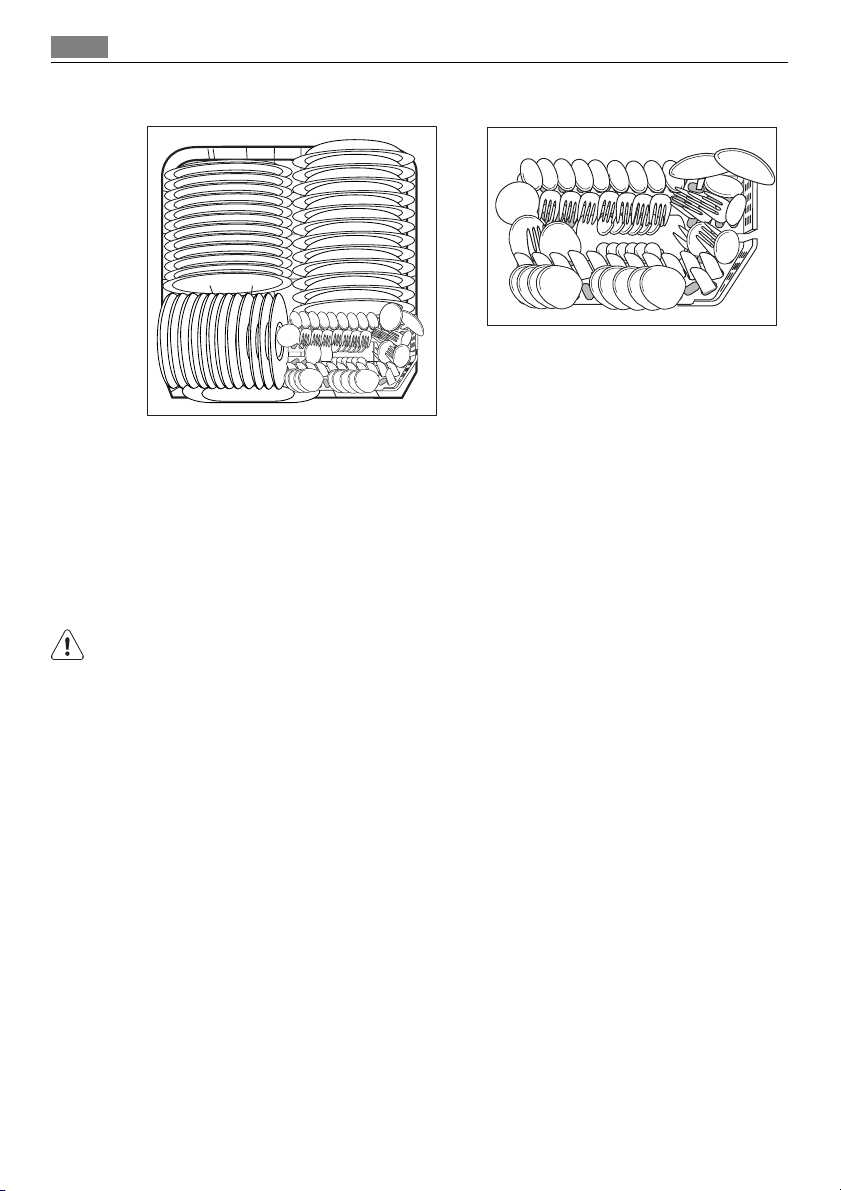
Full load: 12 standard place settings
Amount of detergent required: 5 g + 25 g (Type B)
Rinse aid setting: position 4 (Type III)
Example loading arrangements:
Upper basket
1)
Page 26
Installation
26
Lower basket with cutlery basket Cutlery basket
1) If there are cup racks in place on the lefthand side or the cutlery tray is in place, remove them.
Installation instructions
Installation
WARNING!
Any electrical and/or plumbing work required to install this appliance should be carried out
by a qualified electrician and/or plumber or competent person.
Remove all packaging before positioning the machine.
If possible, position the machine next to a water tap and a drain.
This dishwasher is designed to be fitted under a kitchen counter or work surface.
Attention! Carefully follow the instructions on the enclosed template for building in the
dishwasher and fitting the furniture panel.
No further openings for the venting of the dishwasher are required, but only to let the
water fill and drain hose and power supply cable pass through.
The dishwasher incorporates adjustable feet to allow the adjustment of the height.
During all operations that involve accessibility to internal components the dishwasher has
to be unplugged.
When inserting the machine, ensure that the water inlet hose, the drain hose and the supply
cable are not kinked or squashed.
Fixing to the adjacent units
The dishwasher must be secured against tilting.
Therefore make sure that the counter it is fixed under, is suitably secured to a fixed structure
(adjacent kitchen unites, cabinets, wall).
Page 27

Water connection
Levelling
Good levelling is essential for correct closure and sealing of the door. When the appliance
is correctly levelled, the door will not catch on either side of the cabinet. If the door does
not close correctly, loosen or tighten the adjustable feet until the machine is perfectly level.
Water connection
Water supply connections
This appliance can be connected to either a hot (max. 60°) or cold water supply.
With a hot water supply you can have a significant reduction of energy consumption. This
however, depends on how the hot water is produced. (We suggest alternative sources of
energy that are more environmentally friendly as e.g. solar or photovoltaic panels and
aeolian).
For making the connection itself, the coupling nut fitted to the machine's supply hose is
designed to screw onto a 3/4" gas thread spout or to a purpose made quick-coupling tap
such as the Press-block.
The water pressure must be within the limits given in the "Technical specifications". Your
local Water Authority will advise you on the average mains pressure in your area.
The water inlet hose must not be kinked, crushed, or entangled when it is being connected.
The dishwasher features fill and drain hoses which can be turned either to the left or the
right to suit the installation by means of the locknut.
The locknut must be correctly fitted to avoid water leaks.
(Attention! NOT all models of dishwashers have fill and drain hoses provided with locknut.
In this case, this kind of facility is not possible). If the machine is connected to new pipes
or pipes which have not been used for a long time, you should run the water for a few
minutes before connecting the inlet hose.
DO NOT use connection hoses which have previously been used for an old appliance.
This appliance has been fitted with safety features which will prevent the water used in
the appliance from returning back into the drinking water system. This appliance complies
with the applicable plumbing regulations.
27
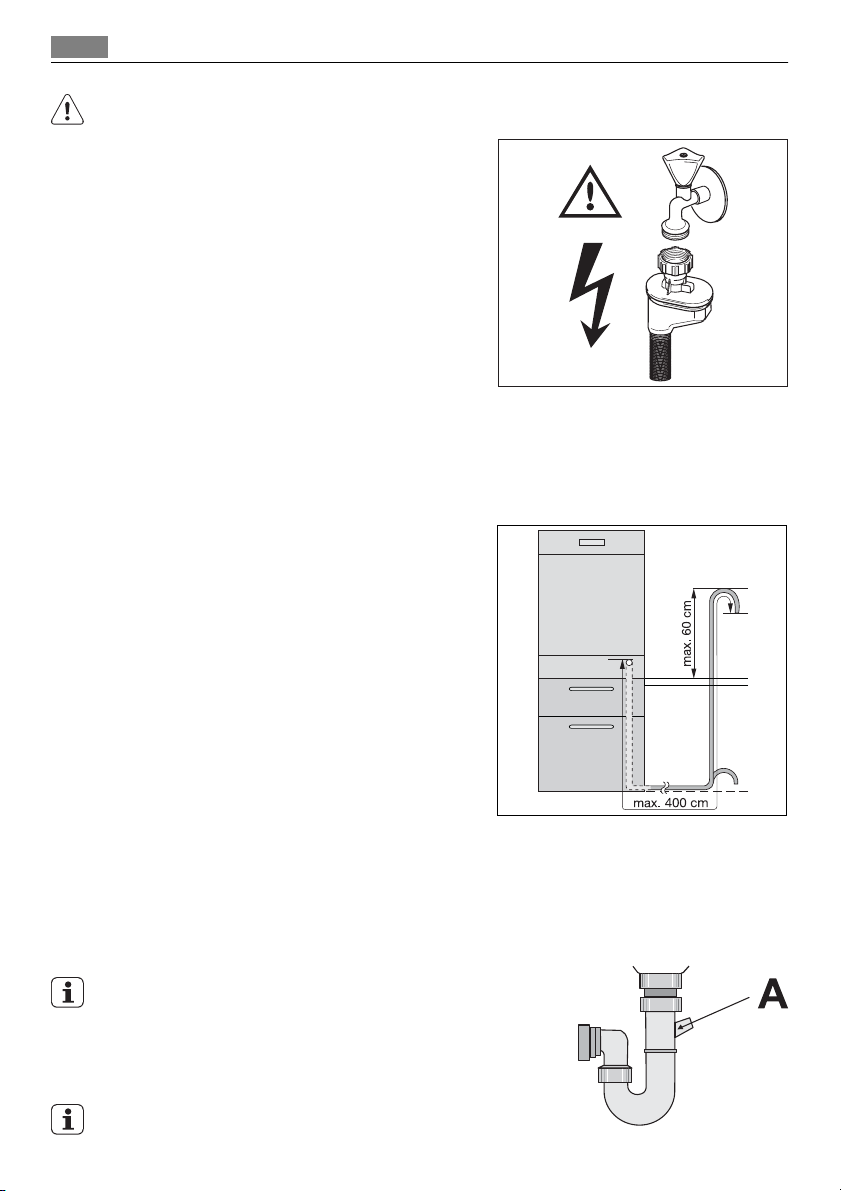
Water inlet hose with safety valve
After connecting the double-walled water inlet hose, the safety valve is next to the tap.
Therefore the water inlet hose is only under pressure while the water is running. If the
water inlet hose starts to leak during this operation, the safety valve cuts off the running
water.
Please take care when installing the water inlet hose:
• The electrical cable for the safety valve is in the double-walled water inlet hose. Do not
immerse the water inlet hose or the safety valve in water.
• If water inlet hose or the safety valve is damaged, remove the mains plug immediately.
• A water inlet hose with safety valve must only be replaced by a specialist or by the Service
Force Centre.
Page 28
Water connection
28
WARNING!
Warning! Dangerous voltage.
Water outlet hose connection
The end of the drain hose can be connected in the following ways:
1. To the sink outlet spigot, securing it to the underside of the work surface. This will
prevent waste water from the sink running into the machine.
2. To a stand pipe provided with vent-hole, minimum internal diameter 4 cm.
The waste connection must be at a maximum
height of 60 cm from the bottom of the dishwasher.
The drain hose can face either to the right or left
of the dishwasher.
Ensure the hose is not bent or squashed as this
could prevent or slow down the discharge of water.
The sink plug must not be in place when the machine is draining as this could cause the water to
syphon back into the machine.
The total length of the drain hose, including any
extension you might add, must be no longer than
4 metres. The internal diameter of the extension
hose must be no smaller than the diameter of the
hose provided.
Likewise the internal diameter of the couplings used for connections to the waste outlet
must be no smaller than the diameter of the hose provided.
When connecting the drain hose to an under sink trap spigot, the entire plastic membrane
(A) must be removed. Failure to remove all the membrane will result in food particles
building up over time eventually blocking the dishwasher drain hose spigot.
Our appliances are supplied with a security device to protect
against the return of dirty water back into the machine. If the
spigot of your sink has a "no return valve" incorporated this
can prevent the correct draining of your dishwasher. We
therefore advise you to remove it.
To avoid water leakage after installation make sure that the
water couplings are tight.
Page 29

Electrical connection
Electrical connection
WARNING!
Safety standards require the appliance to be earthed.
Prior to using the appliance for the first time, ensure that the rated voltage and type of
supply on the rating plate match that of the supply where the appliance is to be installed.
The fuse rating is also to be found on the rating plate.
Always plug the mains plug into a correctly installed shockproof socket. Multi-way plugs,
connectors and extension cables must not be used.
This could constitute a fire hazard through overheating.
If necessary, have the domestic wiring system socket replaced. In case that the electrical
cable has to be replaced, contact your local Service Force centre.
The plug must be accessible after the appliance has been installed.
Never unplug the appliance by pulling on the cable. Always pull the plug.
The manufacturer accepts no liability for failure to observe the above safety precautions.
Environment concerns
The symbol on the product or on its packaging indicates that this product may not be
treated as household waste. Instead it should be taken to the appropriate collection point
for the recycling of electrical and electronic equipment. By ensuring this product is disposed
of correctly, you will help prevent potential negative consequences for the environment
and human health, which could otherwise be caused by inappropriate waste handling of
this product. For more detailed information about recycling of this product, please contact
your local council, your household waste disposal service or the shop where you purchased
the product.
29
Packaging material
The packaging materials are environmentally friendly and can be recycled. The plastic components are identified by markings, e.g. >PE<, >PS<, etc. Please dispose of the packaging
materials in the appropriate container at the community waste disposal facilities.
WARNING!
When a unit is no longer being used:
• Pull the plug out of the socket.
• Cut off the cable and plug and dispose of them.
• Dispose of the door catch. This prevents children from trapping themselves inside and
endangering their lives.
Page 30

Sommaire
30
Nous vous remercions d’avoir choisi l’un de nos produits de qualité.
Afin de garantir une performance optimale et constante de votre appareil, veuillez
lire attentivement cette notice d'utilisation. Il vous permettra d’utiliser
correctement et efficacement toutes les fonctions de l’appareil. Nous vous
recommandons de conserver cette notice à proximité pour une utilisation rapide et
optimale. Si l'appareil devez être vendu ou cédé à une autre personne, assurez-vous
que la notice d'utilisation l'accompagne.
Nous vous souhaitons beaucoup de plaisir avec votre nouvel appareil.
Sommaire
Notice d'utilisation 31
Consignes de sécurité 32
Utilisation 32
Consignes de sécurité 32
Sécurité des enfants 33
Installation 33
Description de l'appareil 34
Bandeau de commande 35
Affichage numérique 36
Touches de fonction 36
Mode programmation 36
Première utilisation 37
Réglage de l'adoucisseur d'eau 37
Réglage manuel 38
Réglage électronique 38
Utilisation du sel régénérant 38
Utilisation du liquide de rinçage 39
Réglage de la dose de liquide de rinçage
40
Utilisation quotidienne 41
Rangement des couverts et de la vaisselle
41
Panier inférieur 42
Panier à couverts 43
Panier supérieur 44
Réglage de la hauteur du panier supérieur
45
Utilisation du produit de lavage 46
Versez le produit de lavage dans le
compartiment correspondant 46
Fonction "Tout en 1" 47
Activation/désactivation de la fonction
Multitab 48
Programmes de lavage 49
Sélection et départ d'un programme de lavage
50
Déchargement du lave-vaisselle 51
Entretien et nettoyage 51
Nettoyage des filtres 51
Nettoyage des bras d'aspersion 53
Nettoyage de la carrosserie 53
Nettoyage interne 53
En cas d'absence prolongée 53
Précautions contre le gel 53
Transport de l'appareil 53
Que faire si… 53
Caractéristiques techniques 55
Conseils pour les organismes de test 56
Instructions d'installation 57
Installation 57
Fixation 57
Mise à niveau 57
Raccordement à l'arrivée d'eau 57
Raccordements à l'arrivée d'eau 57
Tuyau d'arrivée d'eau avec soupape de
sécurité 58
Raccordement du tuyau de vidange 59
Branchement électrique 60
En matière de protection de l'environnement
60
Matériaux d'emballage 60
Sous réserve de modifications
Page 31

Notice d'utilisation
Lors de sa fabrication, cet appareil a été construit selon des normes, directives et/ou décrets
pour une utilisation sur le territoire français.
Pour la sécurité des biens et des personnes ainsi que pour le respect de l’environnement, vous devez d’abord lire impérativement les préconisations suivantes avant
toute utilisation de votre appareil.
AVERTISSEMENT
Pour éviter tout risque de détérioration de l’appareil, transportez-le dans sa position
d’utilisation muni de ses cales de transport (selon modèle). Au déballage de celuici, et pour empêcher des risques d’asphyxie et corporel, tenez les matériaux d’emballage hors de la portée des enfants.
AVERTISSEMENT
Pour éviter tout risque (mobilier, immobilier, corporel,...), l’installation, les raccordements (eau, gaz, électricité, évacuation selon modèle), la mise en service et la
maintenance de votre appareil doivent être effectués par un professionnel qualifié.
AVERTISSEMENT
Votre appareil a été conçu pour être utilisé par des adultes. Il est destiné à un usage
domestique normal. Ne l’utilisez pas à des fins commerciales ou industrielles ou
pour d’autres buts que ceux pour lesquels il a été conçu. Vous éviterez ainsi des
risques matériel et corporel.
31
AVERTISSEMENT
Débranchez votre appareil avant toute opération de nettoyage manuel. N’utilisez
que des produits du commerce non corrosifs ou non inflammables. Toute projection
d’eau ou de vapeur est proscrite pour écarter le risque d’électrocution.
AVERTISSEMENT
Si votre appareil est équipé d’un éclairage, débranchez l’appareil avant de procéder
au changement de l’ampoule (ou du néon, etc.) pour éviter de s’électrocuter.
AVERTISSEMENT
Afin d’empêcher des risques d’explosion et d’incendie, ne placez pas de produits
inflammables ou d’éléments imbibés de produits inflammables à l’intérieur, à proximité ou sur l’appareil.
Page 32

Consignes de sécurité
32
Consignes de sécurité
Pour votre sécurité et pour garantir une utilisation correcte de l'appareil, lisez attentivement
cette notice d'utilisation, ainsi que ses conseils et avertissements, avant d'installer et d'utiliser l'appareil pour la première fois. Pour éviter toute erreur ou accident, veillez à ce que
toute personne qui utilise l'appareil connaisse bien son fonctionnement et ses options de
sécurité. Conservez cette notice avec l'appareil. Si l'appareil devait être vendu ou cédé à
une autre personne, assurez-vous que la notice d'utilisation l'accompagne, afin que le
nouvel utilisateur soit correctement informé du fonctionnement de celui-ci et des avertissements s'y rapportant.
Utilisation
• Votre appareil est destiné à un usage domestique normal. Ne l'utilisez pas à des fins
commerciales ou industrielles ou pour d'autres buts que celui pour lequel il a été conçu.
Ce lave-vaisselle est conçu pour laver la vaisselle et les ustensiles de cuisine pouvant être
lavés en machine.
• N'utilisez pas de solvants dans votre lave-vaisselle. Ceux-ci pourraient provoquer une
explosion.
• Les couteaux et autres ustensiles pointus ou tranchants doivent être placés dans le panier
à couverts avec la pointe vers le bas, ou placez-les en position horizontale dans le panier
supérieur.
• N'utilisez que des produits (sel, produit de lavage, liquide de rinçage) spécifiques pour
lave-vaisselle.
• Évitez d'ouvrir la porte pendant que l'appareil fonctionne : une vapeur brûlante peut s'en
échapper.
• Ne sortez pas la vaisselle du lave-vaisselle avant la fin du cycle de lavage.
• Lorsque le programme est terminé, débranchez l'appareil et fermez le robinet d'arrivée
d'eau.
• Cet appareil ne peut être entretenu et réparé que par un technicien autorisé, exclusivement avec des pièces d'origine.
• N'essayez en aucun cas de réparer le lave-vaisselle vous-même. Les réparations effectuées par du personnel non qualifié peuvent provoquer des blessures ou le mauvais
fonctionnement du lave-vaisselle. Contactez le Service Après-vente. Exigez des pièces
d'origine.
Consignes de sécurité
• Les produits de lavage pour lave-vaisselle peuvent occasionner des brûlures chimiques
au niveau des yeux, de la bouche et de la gorge. Potentiellement dangereux ! Respectez
les instructions de sécurité du fabricant de produit de lavage pour lave-vaisselle.
• L'eau de votre lave-vaisselle n'est pas potable. Des résidus de produit de lavage peuvent
subsister dans votre lave-vaisselle.
• Assurez-vous que la porte du lave-vaisselle est toujours correctement fermée lorsque
vous n'êtes pas occupé à le remplir ou le vider. Vous éviterez ainsi que quelqu'un ne
trébuche sur la porte ouverte et ne se blesse.
• Ne montez pas et ne vous asseyez pas sur la porte ouverte de votre appareil.
Page 33

Consignes de sécurité
Sécurité des enfants
• Cet appareil est conçu pour être utilisé par des adultes. Ne laissez pas des enfants utiliser
le lave-vaisselle sans surveillance.
• Ne laissez pas les emballages à portée des enfants. Ils pourraient s'asphyxier.
• Conservez tous les produits de lavage dans un endroit sûr, hors de portée des enfants.
• Éloignez les enfants à bonne distance de l'appareil lorsque la porte est ouverte.
AVERTISSEMENT
Le produit de lavage pour lave-vaisselle est dangereux!
Le produit de lavage est très corrosif; tout accident provoqué par ce détergent doit impérativement faire l’objet d’un appel à votre centre antipoison régional et à un médecin. Si
quelqu’un a avalé du produit de lavage pour lave-vaisselle, il faut immédiatement contacter
le centre antipoison régional et un médecin. En cas de projection de produit de lavage dans
les yeux, baignez abondamment à l’eau en attendant l’intervention du médecin. Veillez à
ranger ce produit dans un endroit sûr, hors de portée des enfants. Ne laissez jamais la porte
ouverte lorsque l’appareil contient du détergent.
Nous vous recommandons de remplir le réservoir de produit de lavage juste avant de démarrer un programme.
Installation
• Vérifiez que le lave-vaisselle n'a subi aucun dommage au cours du transport. Ne branchez
jamais un appareil endommagé. Si votre lave-vaisselle est endommagé, adressez-vous à
votre revendeur.
• Retirez tous les emballages avant utilisation.
• Les branchements électriques et hydrauliques nécessaires à l'installation de l'appareil ne
doivent être effectués que par un électricien et/ou un plombier qualifié.
• Pour des raisons de sécurité, il est interdit de modifier les spécifications ou de tenter de
modifier l'appareil de quelque façon que ce soit.
• N'utilisez jamais le lave-vaisselle si le câble électrique ou les tuyaux d'eau sont endommagés ; ou si le bandeau de commande, le plan de travail de l'appareil ou le socle sont
endommagés au point que l'intérieur de l'appareil en est accessible. Contactez votre
Service Après-vente pour éviter tout danger.
• Les parois du lave-vaisselle ne doivent jamais être percées, pour éviter d'endommager
les composants hydrauliques et électriques.
AVERTISSEMENT
Avant de procéder aux branchements électriques et hydrauliques, respectez scrupuleusement les instructions fournies dans les paragraphes spécifiques de cette notice.
33
Page 34

Description de l'appareil
34
Description de l'appareil
1 Panier supérieur
2 Sélecteur de dureté de l'eau
3 Réservoir de sel
4 Distributeur de produit de lavage
5 Distributeur de liquide de rinçage
6 Plaque signalétique
7 Filtres
8 Bras d'aspersion inférieur
9 Bras d'aspersion supérieur
Ce lave-vaisselle est doté d'un éclairage intérieur qui s'allume lors de l'ouverture de la porte
et s'éteint lors de la fermeture de celle-ci.
Pour l'éclairage interne, l'appareil est équipé d'un voyant DEL de CLASSE 1 conformément
à la norme EN 60825-1: 1994 + A1: 2002 + A2: 2001.
Si l'ampoule est défectueuse, faites-la remplacer par le Service après-vente.
Page 35

Bandeau de commande
Bandeau de commande
7
35
10
9
8
1 Touche Marche/Arrêt
2 Touche RESET
3 Touches de sélection des programmes
4 Touche NIGHT CYCLE
5 Touche MULTITAB
6 Touche Départ différé
7 Affichage numérique
8 Touches de fonction
9 Voyants
10 Voyants de programme
Voyants
MULTITAB Indique que la fonction MULTITAB est activée/
Sel
désactivée (voir fonction MULTITAB)
Il s'allume quand le réservoir à sel est vide.
1)
Page 36

Bandeau de commande
36
Voyants
Produit rinçage Il s'allume quand le distributeur de liquide de
rinçage est vide.
1) Les voyants des réservoirs à sel et liquide de rinçage ne sont jamais allumés pendant qu'un programme est en
cours, même s'il est nécessaire d'ajouter du sel et/ou du liquide de rinçage.
1)
Affichage numérique
L'affichage numérique indique :
• le niveau de dureté sur lequel est réglé l'adoucisseur d'eau,
• le temps restant (approximatif ) avant la fin du programme,
• l'activation/la désactivation du distributeur de liquide de rinçage (UNIQUEMENT si la
fonction Multitab est activée),
• la fin du programme de lavage (affichage d'un zéro),
• le décompte du départ différé,
• les codes d'anomalie du lave-vaisselle.
Touche NIGHT CYCLE
Night Cycle est un programme très peu bruyant. Il peut être sélectionné la nuit ou aux
heures creuses pour profiter d'un tarif avantageux.
Pendant le Night Cycle, la pompe fonctionne à très faible vitesse pour atteindre une réduction du niveau sonore de 25 % par rapport au programme déclaré. Le programme
économique dure donc plus longtemps.
Touches de fonction
Ces touches servent aussi à régler les fonctions suivantes :
• le réglage de l'adoucisseur d'eau,
• l'activation/la désactivation du distributeur de liquide de rinçage si la fonction Multitab
est activée.
Mode programmation
L'appareil est en mode programmation lorsque TOUS les voyants de programme sont allumés.
Rappelez-vous que pour effectuer une opération quelconque, comme par exemple :
– sélectionner un programme de lavage,
– régler l'adoucisseur d'eau,
– activer/désactiver le distributeur de liquide de rinçage,
l'appareil DOIT être en mode programmation.
Si un voyant de programme est allumé, cela signifie que le dernier programme de lavage
exécuté ou sélectionné est encore en mémoire. Dans un tel cas, pour restaurer le mode
programmation, il sera nécessaire d'annuler le programme.
Page 37

Première utilisation
Pour annuler un programme sélectionné ou en cours
Appuyez et maintenez appuyée la touche RESET jusqu'à ce que tous les voyants de programme s'allument. Le programme est alors annulé et l'appareil se trouve en mode programmation.
Première utilisation
Avant d'utiliser votre lave-vaisselle pour la première fois :
• Assurez-vous que les raccordements électriques et hydrauliques sont conformes aux
instructions d'installation
• Retirez tous les emballages présents à l'intérieur de l'appareil
• Réglez l'adoucisseur d'eau
• Versez 1 l d'eau dans le réservoir à sel, puis approvisionnez en sel
• Remplissez le distributeur de liquide de rinçage
Si vous souhaitez utiliser des pastilles de détergent multifonctions telles que : "3 en 1", "4
en 1", "5 en 1" etc., programmez la fonction Multitab (voir "Fonction Multitab").
Réglage de l'adoucisseur d'eau
Le lave-vaisselle est équipé d'un adoucisseur d'eau conçu pour éliminer les minéraux et les
sels de l'eau d'alimentation susceptibles de nuire au bon fonctionnement de l'appareil.
Plus la teneur en minéraux et en sels est élevée, plus l'eau est dure. La dureté de l'eau est
calculée en échelles équivalentes, degrés allemands (°dH), degrés français (°TH) et mmol/l
(millimol par litre - unité internationale de dureté de l'eau).
L'adoucisseur doit être réglé en fonction du degré de dureté de l'eau de votre région. Renseignez-vous auprès de la Compagnie locale de distribution des eaux pour connaître le
degré de dureté de l'eau de votre zone d'habitation.
L'adoucisseur d'eau doit être réglé des deux façons suivantes : manuellement, à l'aide du
sélecteur de dureté de l'eau, et électroniquement.
Dureté de l'eau Réglage de la dureté de l'eau Utilisation du
°dH °TH mmol/l manuel électronique
51 - 70 91 - 125 9,1 - 12,5 2 niveau 10 oui
43 - 50 76 - 90 7,6 - 8,9 2 niveau 9 oui
37 - 42 65 - 75 6,5 - 7,5 2 niveau 8 oui
29 - 36 51 - 64 5,1 - 6,4 2 niveau 7 oui
23 - 28 40 - 50 4,0 - 5,0 2 niveau 6 oui
19 - 22 33 - 39 3,3 - 3,9 2 niveau 5 oui
15 - 18 26 - 32 2,6 - 3,2 1 niveau 4 oui
11 - 14 19 - 25 1,9 - 2,5 1 niveau 3 oui
4 - 10 7 - 18 0,7 - 1,8 1 niveau 2 oui
37
sel régénérant
Page 38

Utilisation du sel régénérant
38
Dureté de l'eau Réglage de la dureté de l'eau Utilisation du
°dH °TH mmol/l manuel électronique
< 4 < 7 < 0,7 1 niveau 1 non
Réglage manuel
Le lave-vaisselle est réglé d'usine sur la position 2.
1. Ouvrez la porte du lave-vaisselle.
2. Sortez le panier inférieur du lave-vaisselle.
3. Tournez le sélecteur de dureté de l'eau sur
la position 1 ou 2 (voir tableau).
4. Replacez le panier inférieur.
Réglage électronique
Le lave-vaisselle est réglé d'usine sur la position 5.
1. Appuyez sur la touche Marche/Arrêt. Le lave-vaisselle doit se trouver en mode programmation.
2.
Appuyez simultanément sur les touches B et C, et maintenez-les appuyées jusqu'à ce
que les voyants correspondant aux touches A, B et C clignotent.
3.
Appuyez sur la touche A, les voyants correspondant aux touches B et C s'éteignent
tandis que le voyant correspondant à la touche A continue de clignoter. Le niveau réglé
apparaît sur l'affichage numérique.
Exemples :
affiché = niveau 5
affiché = niveau 10
4.
Pour modifier le niveau, appuyez sur la touche A. Chaque pression de la touche détermine le passage au niveau suivant (pour le réglage, reportez-vous au tableau).
Exemples : si le niveau de dureté est réglé sur 5, une pression supplémentaire sur la
touche A, détermine la sélection du niveau 6. si le niveau de dureté est réglé sur 10,
une pression supplémentaire sur la touche A détermine la sélection du niveau 1.
5. Pour mémoriser cette opération, mettez à l'arrêt le lave-vaisselle en appuyant sur la
touche Marche/Arrêt.
sel régénérant
Utilisation du sel régénérant
AVERTISSEMENT
Page 39

Utilisation du liquide de rinçage
Utilisez uniquement du sel spécial pour lave-vaisselle. Tout autre type de sel non spécialement étudié pour être utilisé dans un lave-vaisselle, en particulier le sel de cuisine, peut
endommager l'adoucisseur d'eau. Approvisionnez en sel avant de démarrer un programme
de lavage complet. Vous éviterez ainsi que des grains de sel ou de l'eau salée qui a débordé
n'entre en contact avec le fond de la cuve pendant un laps de temps prolongé, engendrant
de la corrosion.
Pour réapprovisionner :
1. Ouvrez la porte, sortez le panier inférieur et dévissez le bouchon du réservoir à sel en
le tournant dans le sens inverse des aiguilles d'une montre.
2.
Versez 1 l d'eau à l'intérieur du réservoir (cette opération est nécessaire uniquement
lorsque vous remplissez le réservoir pour la première fois) .
3. Versez le sel à l'aide de l'entonnoir, jusqu'à ce que le réservoir soit rempli.
4. Remettez le bouchon en place en
veillant à ce que le filetage et le joint
ne présentent aucune trace de sel.
5. Serrez le bouchon en le tournant
dans le sens des aiguilles d'une montre, jusqu'à ce que vous entendiez un
clic.
Ne vous préoccupez pas si de l'eau déborde du réservoir lorsque vous le remplissez. Cela est parfaitement normal.
39
Assurez-vous qu’il n’y ait pas de dépot de sel à l’extérieur du réservoir. Un résidu
de sel qui stagne sur la cuve pendant un certain temps perce la cuve.
Le voyant du réservoir à sel peut rester allumé pendant 2 à 6 heures après le remplissage,
à condition que le lave-vaisselle reste sous tension. Si vous utilisez un sel peu soluble, il se
peut que cette opération prenne davantage de temps. le fonctionnement de l'appareil n'en
sera pas pour autant entravé.
Utilisation du liquide de rinçage
AVERTISSEMENT
Utilisez exclusivement des liquides de rinçage de marque, spéciaux pour lave-vaisselle.
Ne remplissez jamais le distributeur de liquide de rinçage avec d'autres produits (par ex. un
agent de nettoyage pour lave-vaisselle, un produit de lavage liquide). Cela aurait pour effet
d'endommager la machine.
Le liquide de rinçage assure un rinçage optimal et un séchage sans taches ni striures.
Le liquide de rinçage est automatiquement ajouté au cours du dernier rinçage.
Page 40

Utilisation du liquide de rinçage
40
1. Ouvrez le distributeur en appuyant sur le
levier de fermeture (A).
2. Versez le liquide de rinçage dans la goulotte de remplissage. Le niveau maximum
de remplissage est signalé par "max".
Le distributeur contient environ 110 ml de
liquide de rinçage, quantité suffisante
pour 16 à 40 cycles de lavage, en fonction
du réglage de la dose programmée.
3. Vérifiez que le couvercle est fermé après
chaque remplissage.
Essuyez tout débordement de liquide de rinçage à l'aide de papier absorbant, afin d'éviter
une formation excessive de mousse lors du lavage suivant.
Réglage de la dose de liquide de rinçage
En fonction des résultats de brillance et de séchage obtenus, adaptez le dosage du liquide
de rinçage à l'aide du sélecteur à 6 positions (position 1 = dosage minimum, position 6 =
dosage maximum).
La dose est réglée d'usine sur la position 4.
Page 41

Utilisation quotidienne
Augmentez le dosage si vous constatez la présence
de gouttes d'eau ou de taches de calcaire sur la
vaisselle au terme du lavage.
En revanche, si des rayures blanches sont présentes
sur la vaisselle, ou si les verres et les lames de couteaux sont recouverts d'un film bleuâtre, il convient de réduire le dosage.
Utilisation quotidienne
• Contrôlez le niveau du réservoir de sel et du distributeur de liquide de rinçage.
• Rangez les couverts et la vaisselle dans le lave-vaisselle.
• Versez le produit de lavage dans le compartiment correspondant.
• Sélectionnez un programme adapté au lavage des couverts et de la vaisselle.
• Démarrez le programme.
41
Rangement des couverts et de la vaisselle
Les éponges, les chiffons de nettoyage et tout autre objet absorbant l'eau ne doivent pas
être lavés au lave-vaisselle.
• Avant de charger la vaisselle, veillez à :
– Enlever tous les restes d'aliments.
– Laisser tremper les casseroles au fond desquelles adhèrent des restes d'aliments brûlés
ou attachés
• Lorsque vous chargez la vaisselle et les couverts, veillez à prendre les précautions sui-
vantes :
– La vaisselle et les couverts ne doivent pas entraver la rotation des bras d'aspersion.
– Chargez les articles creux, tels que tasses, verres, casseroles, etc. en les retournant, de
manière à ce que l'eau ne s'accumule pas dans le creux ou dans un fond bombé.
– La vaisselle et les couverts ne doivent pas être insérés les uns dans les autres, ou se
chevaucher.
– Pour éviter que les verres ne se brisent, évitez qu'ils ne se touchent.
– Déposez les petits objets dans le panier à couverts.
• La vaisselle en plastique et les poêles en matériau antiadhésif tendent à retenir les gouttes
d'eau ; ces articles ne seront pas séchés aussi bien que les articles en porcelaine et en
acier.
• Les articles légers (bols en plastique, etc.) doivent être rangés dans le panier supérieur et
disposés de façon à ce qu'ils ne puissent se retourner.
Page 42

Rangement des couverts et de la vaisselle
42
Pour le lavage au lave-vaisselle, les couverts et plats suivants
ne sont pas adaptés : peuvent convenir dans une mesure limitée :
• Couverts à manche en bois, en corne, en porcelaine ou en nacre.
• Articles en plastique non résistant à la chaleur.
• Couverts anciens dont certains éléments sont
collés et ne résistent pas à la température.
• Couverts ou vaisselle présentant des soudures.
• Articles en étain ou en cuivre.
• Verres en cristal au plomb.
• Articles en acier sujets à la rouille.
• Plateaux en bois.
• Articles en fibres synthétiques.
• Lavez au lave-vaisselle uniquement de la vaisselle en faïence garantie lavable en machine
par le fabricant.
• Les décors vernis peuvent se ternir au fil des
lavages.
• Les pièces en argent et en aluminium ont tendance à se décolorer au cours du lavage : les
résidus de blanc d'œuf, de jaune d'œuf et de
moutarde provoquent souvent une décoloration et la formation de taches sur l'argent. Par
conséquent, veillez à toujours éliminer les restes d'aliments de la vaisselle en argent si vous
ne la lavez pas immédiatement après utilisation.
Ouvrez la porte et tirez les paniers vers vous pour y charger la vaisselle.
Panier inférieur
Rangez les casseroles et les grands plats très sales
dans le panier inférieur.
Pour faciliter le rangement des grands plats, vous
pouvez rabattre vers le bas tous les supports d'assiettes arrière du panier inférieur.
Page 43

Rangement des couverts et de la vaisselle
Panier à couverts
AVERTISSEMENT
Les couteaux et autres ustensiles pointus ou tranchants doivent être placés dans le range
couverts ou dans le panier supérieur pour éviter tout risque de blessure.
Placez les couteaux, les petites cuillères et les petites fourchettes dans le range couverts qui se
trouve dans le panier supérieur. Placez dans le range couverts les fourchettes et les cuillères qui ne
peuvent pas être rangées dans le panier à couverts.
Pour que l'eau puisse atteindre tous les ustensiles
qui se trouvent dans le panier à couverts, nous vous conseillons ce qui suit :
1. Placez le séparateur à couverts sur le panier à couverts.
43
2. Disposez les fourchettes et les cuillères
dans le panier à couverts, le manche tourné vers le bas.
Pour les gros ustensiles, comme les fouets,
laissez libre la moitié du séparateur à couverts.
Page 44

Rangement des couverts et de la vaisselle
44
Le panier à couverts est rabattable.
Lorsque vous le sortez, saisissez l'intégralité de la
double poignée avec votre main.
1. Placez le panier à couverts sur une table ou sur
le plan de travail.
2. Ouvrez les deux parties de la poignée.
3. Retirez les couverts.
Panier supérieur
Rangez la petite vaisselle fragile et les couverts
pointus ou coupants dans le panier supérieur.
• Disposez les articles en quinconce au-dessus et
au-dessous des supports pour tasses, de façon
à ce que l'eau puisse atteindre toute la vaisselle.
• Pour la vaisselle de grande dimension, vous
pouvez rabattre les supports pour tasses vers
le haut.
• Couchez ou suspendez les verres à vin et à
dégustation en insérant leur pied dans les
fentes des supports pour tasses.
Page 45

Rangement des couverts et de la vaisselle
• Pour les verres à long pied, rabattez-le sup-
port pour verres vers la droite ou vers la gauche.
• La rangée d'ergots à gauche du panier supé-
rieur peut également être rabattue en deux
parties.
Rangée d'ergots non rabattue : disposez les
verres, tasses, etc. dans le panier supérieur.
Rangée d'ergots rabattue : plus de place pour
les plats.
45
Réglage de la hauteur du panier supérieur
Hauteur maximale de la vaisselle dans :
Panier supérieur Panier inférieur
Avec le panier supérieur relevé 22 cm 30 cm
Avec le panier supérieur abaissé 24 cm 29 cm
Vous pouvez aussi régler la hauteur du panier supérieur lorsque le panier est plein.
Pour relever / abaisser le panier supérieur :
Page 46

Utilisation du produit de lavage
46
1. Tirez complètement le panier supérieur
pour le faire sortir.
2. Tout en le maintenant par la poignée, relevez le panier supérieur le plus possible
puis abaissez-le verticalement.
Le panier supérieur se verrouille dans sa
position la plus haute ou la plus basse.
AVERTISSEMENT
Après avoir chargé l'appareil, veillez à toujours
refermer la porte, car une porte ouverte est
source de danger.
Avant de refermer la porte, assurez-vous que les bras d'aspersion tournent librement.
Utilisation du produit de lavage
Utilisez exclusivement des produits de lavage spécialement conçus pour une utilisation au
lave-vaisselle.
Veuillez respecter le dosage et les consignes de stockage du fabricant figurant sur l'emballage.
En utilisant la quantité de produit de lavage strictement nécessaire, vous contribuerez à la
protection de l'environnement.
Versez le produit de lavage dans le compartiment correspondant
1. Ouvrez le couvercle.
Page 47

2. Versez le produit de lavage dans le distributeur (1). Le repère indique le niveau de
dosage :
20 = environ 20 g de produit de lavage
30 = environ 30 g de produit de lavage.
3. Tous les programmes avec prélavage nécessitent une dose supplémentaire de produit de lavage (5 à 10 g) à placer dans le
compartiment de prélavage (2).
Ce produit de lavage agira au cours de la
phase de prélavage.
4. Si vous utilisez du produit de lavage en
pastilles, placez la pastille dans le compartiment (1)
5. Fermez le couvercle et appuyez jusqu'à ce
qu'il soit verrouillé.
Produit de lavage en pastilles
Les produits de lavage en pastilles de différents
fabricants présentent un taux de dissolution
variable. C'est pourquoi certains produits de
lavage en pastilles n'atteignent pas leur pouvoir de nettoyage optimal au cours des programmes courts. Par conséquent, veuillez sélectionner un programme de lavage long si
vous utilisez des produits de lavage en pastilles, afin d'éliminer complètement les résidus de lessive.
Fonction "Tout en 1"
47
Fonction "Tout en 1"
Cet appareil est doté de la fonction "Multitab ", ce qui vous permet d'utiliser les pastilles
de détergent multifonctions "Multitab".
Ces produits combinent les fonctions de produit de lavage, de liquide de rinçage et de sel
régénérant. Ils peuvent également contenir d'autres substances selon le type de pastille
utilisé ("3 en 1", "4 en 1", "5 en 1", etc.).
Vérifiez que ces produits de lavage sont appropriés au degré de dureté de l'eau d'alimentation. Consultez à cet effet les instructions du fabricant.
Cette fonction peut être sélectionnée avec tous les programmes de lavage. Lorsque cette
fonction est sélectionnée, l'alimentation en liquide de rinçage et en sel à partir des bacs
respectifs est automatiquement désactivée, de même que les voyants correspondant au sel
et au liquide de rinçage.
Sélectionnez la "fonction Multitab " avant de lancer un programme de lavage.
Dès que cette fonction est sélectionnée (le voyant correspondant s'allume), elle restera
également activée pour les programmes de lavage suivants.
Page 48

Fonction "Tout en 1"
48
L'utilisation de la fonction "Multitab ", peut entraîner une modification de la durée du cycle.
Dans ce cas, la durée du programme est automatiquement mise à jour sur l'affichage numérique.
Une fois que le programme a démarré, la fonction "Multitab " NE peut PLUS être modifiée.
Si vous souhaitez annuler la fonction "Multitab" il vous faudra d'abord annuler la sélection
du programme de lavage, puis désactiver la fonction "Multitab ".
Dans ce cas, vous devrez régler à nouveau le programme de lavage (et les options souhaitées).
Activation/désactivation de la fonction Multitab
Appuyez sur la touche Multitab : Le voyant correspondant s'allume. Cela signifie que la
fonction est activée.
Pour désactiver la fonction, appuyez à nouveau sur la touche de fonction Multitab : le
voyant s'éteint.
Si le séchage n'est pas satisfaisant, nous vous suggérons de :
1. Remplir le distributeur de liquide de rinçage.
2. Activer le distributeur de liquide de rinçage.
3. Régler le dosage du liquide de rinçage sur la position 2.
• L'activation/la désactivation du distributeur de liquide de rinçage est possible unique-
ment si la "fonction Multitab" est activée.
Activation/désactivation du distributeur de liquide de rinçage
1. Appuyez sur la touche Marche/Arrêt. Le lave-vaisselle doit se trouver en mode programmation.
2.
Appuyez simultanément sur les touches B et C, jusqu'à ce que les voyants correspondant
aux touches A, B et C clignotent.
3.
Appuyez sur la touche B, les voyants correspondant aux touches A et C s'éteignent
tandis que le voyant correspondant à la touche B continue de clignoter. L'affichage
numérique visualise le réglage actuel :
= Distributeur de liquide de rinçage désactivé.
= Distributeur de liquide de rinçage activé.
4.
Pour modifier un paramètre, appuyez à nouveau sur la touche B, le nouveau paramètre
apparaît sur l'affichage numérique.
5. Pour mémoriser cette opération, mettez à l'arrêt le lave-vaisselle en appuyant sur la
touche Marche/Arrêt.
Si vous souhaitez réutiliser des produits de lavage traditionnels, nous vous recommandons
de :
1. Désactiver la "fonction Multitab".
2. Approvisionner à nouveau le réservoir à sel et le distributeur de liquide de rinçage.
3. Régler la position maximale du degré de dureté de l'eau et d'effectuer 1 programme
normal sans charger l'appareil.
4. Régler ensuite le degré de dureté de l'eau en fonction de la dureté de l'eau de votre
région.
5. Régler la dose de liquide de rinçage.
Page 49

Programmes de lavage
Programmes de lavage
49
Programme Degré de
salissure
AUTO 45-70°3)Normale et
très sale
INTENSIV CA-
Très sale Vaisselle,
RE 70°
Type de
vaisselle
Vaisselle,
couverts,
plats et
casseroles
couverts,
plats et
Description du programme Valeurs de consom-
1)
mation
Prélavage
Lavage
Rinçage intermédiaire
Rinçage final
Séchage
Durée (minutes) 2)Énergie (kWh)
-
1/2x
1,1 - 1,7
-
1,5 -1,7
Eau (litres)
12 - 23
16 - 18
casseroles
30 MIN 60°
5)
ECO 50°
4)
Légèrement sale
Moyennement sale
Moyennement sale
Tous Charge
Vaisselle et
couverts
Vaisselle et
couverts
Vaisselle
délicate et
verres
partielle (à
0,9
9
-
12 - 13
1,0 - 1,1
-
14 - 15
0,8 -0,9
0,1
4
compléter
dans la
journée)
NIGHT CYCLE Moyenne-
ment sale
1) Les valeurs de consommation sont fournies à titre indicatif et varient en fonction de la pression et de la
température de l'eau, des variations dans l'alimentation électrique et de la quantité de vaisselle.
2) La durée du programme de lavage apparaît sur l'affichage numérique.
3) Au cours du programme "Auto", le degré de salissure de la vaisselle est déterminé par le degré de turbidité de
l'eau. La durée du programme, les niveaux de consommation d'eau et d'énergie peuvent varier ; tout dépend
de la charge du lave-vaisselle (pleine ou demi-charge) et du degré de salissure de la vaisselle. La température
de l'eau est automatiquement ajustée entre 45 °C et 70 °C.
4) Idéal pour le lavage d'un lave-vaisselle partiellement chargé. Programme de lavage journalier parfait, adapté
aux besoins d'une famille de 4 personnes qui souhaitent seulement laver la vaisselle et les couverts du dîner et
du petit déjeuner.
5) Programme de test des organismes de contrôle.
6) Ce programme n'utilise pas de produit de lavage
Vaisselle et
couverts
6)
-
13 - 14
1.1 - 1.3
Page 50

Sélection et départ d'un programme de lavage
50
Sélection et départ d'un programme de lavage
Sélectionnez le programme et le départ différé en laissant la porte légèrement ouverte. Le départ du programme ou le décompte du départ différé démarrera uniquement après que vous aurez refermé la porte. Vous pouvez effectuer toutes les
modifications souhaitées jusqu'à ce moment-là.
1. Vérifiez que les paniers ont été chargés correctement et que les bras d'aspersion tour-
nent librement.
2. Assurez-vous que le robinet d'eau est ouvert.
3. Appuyez sur la touche Marche/Arrêt. Le lave-vaisselle doit se trouver en mode pro-
grammation.
4. Pour sélectionner un programme de lavage, appuyez sur l'une des deux touches de
programme. (Voir le tableau des "Programmes de lavage").
Lorsqu'un programme est sélectionné le voyant correspondant s'allume et la durée du
programme clignote sur l'affichage numérique.
5. Fermez la porte du lave-vaisselle, le programme démarre automatiquement.
Réglage et départ du programme avec "départ différé"
1. Après avoir sélectionné le programme de lavage, appuyez sur la touche de départ différé
jusqu'à ce que le nombre d'heures correspondant au départ différé souhaité apparaisse
sur l'affichage numérique. Le départ du programme de lavage peut être différé de 1
heure à 19 heures.
2. Fermez la porte du lave-vaisselle, le décompte démarre automatiquement.
3. Le décompte s'effectue d'heure en heure.
4. L'ouverture de la porte interrompt le décompte. Fermez la porte ; le décompte reprend
là où il a été interrompu.
5. Dès que la durée du départ différé est écoulée, le programme démarre automatique-
ment.
Il vous est possible de sélectionner le programme de lavage et la durée du départ différé
également lorsque la porte est fermée. N'oubliez pas dans ce cas que lorsque la touche d'un
programme de lavage est appuyée, vous disposez de 3 secondes SEULEMENT pour sélectionner un autre programme ou un départ différé, après quoi le programme sélectionné
démarre automatiquement.
AVERTISSEMENT
Interrompez ou annulez un programme en cours UNIQUEMENT si cela s'avère strictement nécessaire. Attention ! Un nuage de vapeur peut s'échapper par la porte du
lave-vaisselle lorsque vous l'ouvrez. Soyez prudent en effectuant cette opération.
Annulation d'un départ différé ou d'un programme en cours
• Appuyez sur la touche RESET jusqu'à ce que tous les voyants de programme s'allument.
• L'annulation d'un départ différé détermine l'annulation du programme de lavage sélec-
tionné. Dans ce cas, vous devez répéter la sélection du programme de lavage.
• Si vous voulez sélectionner un nouveau programme, vérifiez qu'il y a du produit de lavage
dans le distributeur correspondant.
Page 51

Déchargement du lave-vaisselle
Interruption d'un programme en cours
• Ouvrez la porte du lave-vaisselle ; le programme s'arrête. Fermez la porte ; le programme
reprendra là où il a été interrompu.
• Appuyez sur la touche Marche/Arrêt : tous les voyants s'éteignent. Appuyez à nouveau
sur la touche Marche/Arrêt ; le programme reprendra là où il a été interrompu.
Fin du programme de lavage
• Le lave-vaisselle s'arrête automatiquement et un signal sonore vous informe de la fin du
programme.
• Le voyant du programme qui vient de se terminer reste allumé.
• Un zéro apparaît sur l'affichage numérique.
1. Mettez à l'arrêt le lave-vaisselle en appuyant sur la touche Marche/Arrêt.
Dès que le programme est terminé, mettez l'appareil à l'arrêt. Sinon, tous les voyants s'éteignent automatiquement dans les 3 minutes qui suivent la fin du programme. Sur l'affichage
numérique apparaît 1 barre horizontale.
Cela vous aidera à réduire la consommation d'énergie si vous oubliez de le faire ou si, pour
une raison ou une autre, vous ne réussissez pas à mettre l'appareil à l'arrêt à la fin du
programme.
Appuyez sur une touche quelconque (sauf Marche/Arrêt) ; le bandeau de commande affiche
alors la même situation (voyants et affichage numérique) qu'à la fin du programme.
2. Ouvrez la porte du lave-vaisselle, laissez-la entrouverte et attendez quelques minutes
avant de décharger la vaisselle ; cela permet de la laisser refroidir et améliore le processus de séchage.
51
Déchargement du lave-vaisselle
• Les plats encore chauds sont sensibles aux chocs.
C'est pourquoi il est préférable de laisser refroidir la vaisselle avant de la décharger de
la machine.
• Videz en premier lieu le panier inférieur, puis le panier supérieur ; ceci permettra d'éviter
que de l'eau ne s'égoutte du panier supérieur sur la vaisselle du panier inférieur.
• Il se peut que de l'eau soit présente sur les parois externes et sur la porte du lave-vaisselle,
car l'acier inoxydable est en définitive plus froid que les plats.
ATTENTION
Dès que le programme est terminé, débranchez le lave-vaisselle et fermez le robinet d'arrivée
d'eau.
Entretien et nettoyage
Nettoyage des filtres
Contrôlez et nettoyez les filtres très régulièrement. Des filtres non nettoyés réduisent les
performances de lavage.
Page 52

Entretien et nettoyage
52
AVERTISSEMENT
Avant de nettoyez les filtres, assurez-vous que l'appareil est mis à l'arrêt.
1. Ouvrez la porte, sortez le panier inférieur.
2. Le système de filtrage du lave-vaisselle
comporte un filtre grossier ( A ), un microfiltre ( B ) et un filtre plat. Desserrez le
système de filtrage à l'aide de la poignée
du microfiltre et sortez-le.
3. Tournez la poignée dans le sens contraire
des aiguilles d'une montre et effectuez 1/4
de tour pour enlever le système de filtrage.
4.
Saisissez le filtre grossier ( A ) par la poignée annulaire et retirez-le du microfiltre
( B ).
5. Nettoyez minutieusement tous les filtres à
l'eau courante.
6. Retirez le filtre plat du fond de la cuve et
nettoyez minutieusement les deux faces.
7. Réinstallez le filtre plat dans le fond du
compartiment de lavage en veillant à ce
qu'il soit bien installé.
8.
Introduisez le filtre grossier ( A ) dans le
microfiltre ( B ) et appuyez sur les deux
filtres à la fois.
9. Mettez l'ensemble de ces filtres en place
et bloquez-les en tournant la poignée
dans le sens des aiguilles d'une montre
jusqu'à la butée. Au cours de cette opération, contrôlez que le filtre plat ne dépasse
pas du fond de la cuve.
AVERTISSEMENT
N'utilisez jamais le lave-vaisselle sans les filtres. Si les filtres n'ont pas été correctement
réinstallés, les performances de lavage pourront être compromises et l'appareil pourrait
être endommagé.
Page 53

Que faire si…
Nettoyage des bras d'aspersion
Ne retirez JAMAIS les bras d'aspersion.
Si des résidus de salissures ont bouché les orifices des bras d'aspersion, éliminez ceux-ci à
l'aide d'un cure-dent.
Nettoyage de la carrosserie
Nettoyez les surfaces externes de l'appareil, de même que le bandeau de commande, à l'aide
d'un chiffon doux humide. Le cas échéant, utilisez uniquement des produits nettoyants
neutres. N'utilisez en aucun cas de substances abrasives, de tampons métalliques ou de
solvants (acétone, trichloréthylène, etc.).
Nettoyage interne
Essuyez régulièrement les joints situés autour de la porte et des distributeurs de produit de
lavage et de liquide de rinçage à l'aide d'un chiffon humide.
Nous vous conseillons d'effectuer tous les 3 mois un lavage pour vaisselle très sale mais
sans vaisselle et avec produit de lavage.
En cas d'absence prolongée
Si vous n'utilisez pas l'appareil pendant un certain temps, veillez à :
1. Débrancher l'appareil et à fermer le robinet d'arrivée d'eau.
2. Laisser la porte entrouverte pour prévenir la formation d'odeurs désagréables.
3. Nettoyer soigneusement l'intérieur de l'appareil.
53
Précautions contre le gel
Évitez d'installer l'appareil dans un endroit où la température ambiante est inférieure à 0°C.
Si cela n'est pas possible, videz l'appareil, fermez la porte, débranchez le tuyau d'arrivée
d'eau et vidangez.
Transport de l'appareil
Si vous devez transporter l'appareil (en cas de déménagement, etc.) :
1. Retirez la fiche de la prise secteur.
2. Fermez le robinet d'arrivée d'eau.
3. Retirez les tuyaux d'arrivée d'eau et de vidange.
4. Tirez l'appareil hors de sa niche ainsi que les tuyaux.
Évitez d'incliner l'appareil au cours du transport.
Que faire si…
Le lave-vaisselle ne démarre pas ou se met à l'arrêt en cours de programme. Certaines
anomalies de fonctionnement peuvent dépendre d'opérations d'entretien non correctes ou
d'oubli et peuvent être résolues à l'aide des indications fournies dans le tableau, sans faire
appel à un technicien.
Mettez le lave-vaisselle à l'arrêt et effectuez les contrôles que nous vous suggérons ci-après.
Page 54

Que faire si…
54
Code d'erreur et anomalie de fonctionnement Cause possible et solution
• le voyant du programme en cours clignote en
permanence
•
apparaît sur l'affichage numérique.
• répétition du signal sonore
Le lave-vaisselle n'est pas approvisionné en eau.
• le voyant du programme en cours clignote en
permanence
•
apparaît sur l'affichage numérique.
• répétition du signal sonore
Le lave-vaisselle ne vidange pas.
• le voyant du programme en cours clignote en
permanence
•
apparaît sur l'affichage numérique.
• répétition du signal sonore
Le système de sécurité anti-débordement s'est
déclenché.
Le programme ne démarre pas. • La porte du lave-vaisselle n'a pas été fermée
• Le robinet d'arrivée d'eau est obstrué ou incrusté de tartre.
Nettoyez le robinet d'arrivée d'eau.
• Le robinet d'arrivée d'eau est fermé. Ouvrez le
robinet d'arrivée d'eau.
• Le filtre (s'il est présent) situé dans l'embout
à vis du tuyau au niveau de la soupape d'admission est bouché.
Nettoyez le filtre situé dans l'embout à vis du
tuyau.
• Le tuyau d'arrivée d'eau n'a pas été installé
correctement, est plié ou écrasé.
Vérifiez le raccordement du tuyau d'arrivée
d'eau.
• Le robinet de l'évier est bouché.
Nettoyez à fond le robinet de l'évier.
• Le tuyau de vidange n'a pas été installé correctement, est plié ou écrasé.
Vérifiez le raccordement du tuyau de vidange.
• Fermez le robinet d'arrivée d'eau et contactez
le Service Après-vente.
correctement. Fermez la porte.
• La fiche n'est pas branchée. Insérez la fiche
dans la prise secteur.
• Le fusible a grillé dans la boîte à fusibles.
Remplacez le fusible.
• Le départ différé a été réglé.
Si la vaisselle doit être lavée immédiatement,
annulez le départ différé.
Après avoir effectué ces contrôles, mettez l'appareil en marche : Le programme reprendra
là où il a été interrompu.
Si l'anomalie persiste ou que le code d'erreur s'affiche à nouveau, contactez le Service Aprèsvente.
Si des codes d'erreurs non décrits dans le tableau ci-dessus s'affichent, contactez le Service
Après-vente, communiquez le modèle, le numéro de code produit et le numéro de série.
Vous trouverez ces informations sur la plaque signalétique située sur le côté du lave-vaisselle.
Afin de pouvoir disposer à tout moment de ces numéros, nous vous recommandons de les
inscrire ici :
Modèle : . . . . . . . . . . . . . . . . . . . . . . .
Page 55

Caractéristiques techniques
55
N° code produit : . . . . . . . . . . . . . . . . . . . . . . .
N° de série : . . . . . . . . . . . . . . . . . . . . . . . .
Les résultats de lavage sont insatisfaisants
La vaisselle n'est pas propre • Vous n'avez pas sélectionné le programme
La vaisselle est mouillée et terne • Vous n'avez pas utilisé de liquide de rinçage.
Les verres et la vaisselle présentent des rayures,
des taches blanches ou un film bleuâtre
Des gouttes d'eau ont séché sur les verres et la
vaisselle
approprié.
• La vaisselle est disposée de manière telle à
empêcher l'eau d'atteindre toutes les surfaces. Ne surchargez pas les paniers.
• La rotation des bras d'aspersion est entravée
par de la vaisselle mal rangée.
• Les filtres situés dans le fond de la cuve sont
encrassés ou mal installés.
• Vous avez utilisé trop peu de produit de lavage
ou avez oublié d'approvisionner le distributeur de produit de lavage.
• Si des dépôts de tartre sont présents sur la
vaisselle ; cela signifie que le réservoir de sel
est vide ou que vous n'avez pas réglé correctement le niveau de l'adoucisseur d'eau.
• Le raccordement du tuyau de vidange n'a pas
été réalisé correctement.
• Le bouchon du réservoir à sel n'a pas été vissé
correctement.
• Le distributeur de liquide de rinçage est vide.
• Réduisez le dosage du liquide de rinçage.
• Augmentez le dosage du liquide de rinçage.
• Il se peut que le produit de lavage soit en
cause. Contactez le service clientèle du fabricant du produit de lavage.
Si, après avoir effectué tous ces contrôles, le problème persiste, contactez le Service Aprèsvente.
Caractéristiques techniques
Dimensions Largeur x Hauteur x Profondeur
Branchement électrique - Tension - Puissance totale - Fusible
Pression de l'eau d'alimentation
Capacité Couverts 12
(cm)
Les informations concernant le branchement électrique figurent
sur la plaque signalétique apposée sur le bord intérieur de la porte
du lave-vaisselle
Minimum - Maximum (MPa) 0,05 - 0,8
59,6 x 81,8-89,8 x 57,5
Page 56

Conseils pour les organismes de test
56
Conseils pour les organismes de test
Les essais, conformément à la normeEN 60704 doivent être réalisés avec l'appareil à pleine
charge et à l'aide du programme de test (voir "Programmes de lavage").
Les essais, conformément à la norme EN 50242 , doivent être réalisés après avoir approvisionné le réservoir à sel et le distributeur de liquide de rinçage et à l'aide du programme
de test (voir "Programmes de lavage").
Pleine charge : 12 couverts
Quantité de produit de lavage requise : 5 g + 25 g (Type B)
Réglage du dosage du liquide de rinçage : position 4 (Type III)
Exemples de rangements de la vaisselle :
Panier supérieur
1)
Panier inférieur avec panier à couverts Panier à couverts
1) Enlevez, le cas échéant, les supports pour tasses qui se trouvent à gauche, ou le range couverts.
Page 57

Installation
Instructions d'installation
Installation
AVERTISSEMENT
Les branchements électriques et les raccordements hydrauliques nécessaires à l'installation
de l'appareil doivent être réalisés par un électricien qualifié et/ou un plombier ou autre
personne compétente.
Retirez tous les emballages avant d'installer la machine.
Dans la mesure du possible, placez-la à proximité d'un robinet d'arrivée d'eau et d'un dispositif d'évacuation.
Ce lave-vaisselle a été conçu pour être encastré sous un évier ou un plan de travail.
Important ! Pour appliquer le panneau sur la porte et pour encastrer le lave-vaisselle, suivez
attentivement les instructions reportées sur le gabarit fourni avec le matériel.
Il est nécessaire de prévoir un espace pour le passage du câble d'alimentation et des tuyaux
d'alimentation et d'évacuation d'eau, afin qu'ils ne soient pas pliés.
La hauteur du lave-vaisselle peut varier et être ajustée grâce aux pieds réglables.
Avant toute intervention sur le lave-vaisselle, il est nécessaire de débrancher l'appareil.
Lors de l'encastrement de l'appareil, veillez à ce que les tuyaux d'arrivée d'eau, de vidange
et le câble d'alimentation ne soient pas pliés ou écrasés.
Fixation
Le lave-vaisselle doit être assuré contre le renversement.
Veillez donc à ce que les éléments auxquels il est fixé soient bien ancrés à une structure
fixe (mur, meubles adjacents,...).
57
Mise à niveau
Une bonne mise à niveau est indispensable pour une parfaite fermeture et étanchéité de
la porte. Assurez-vous que la porte du lave-vaisselle se ferme correctement sansfrottement
latéraux. Si la porte ne ferme pas correctement, dévissez ou vissez les pieds jusqu'à ce que
l'appareil soit parfaitement de niveau et d'aplomb.
Raccordement à l'arrivée d'eau
Raccordements à l'arrivée d'eau
Cet appareil peut être alimenté en eau chaude (max. 60°) ou en eau froide.
Avec une alimentation en eau chaude, vous pouvez réduire votre consommation d'énergie
électrique de manière spectaculaire. Cela dépend, toutefois, de la manière dont l'eau chaude
est produite. (Nous suggérons d'autres sources d'énergie plus écologiques telles que, par
ex., les panneaux solaires ou panneaux photovoltaïques, et les éoliennes).
Pour réaliser le raccordement proprement dit, l'écrou-raccord installé dans le tuyau d'alimentation de l'appareil doit être vissé sur une goulotte avec filetage "Witworth" pour tuyau
3/4" ou à un robinet à raccord rapide spécialement conçu à cet effet de type "Press-block".
Page 58

Raccordement à l'arrivée d'eau
58
La pression de l'eau doit se situer dans les limites indiquées dans les "Caractéristiques techniques". Pour connaître la pression d'alimentation moyenne de votre région, adressez-vous
à votre Compagnie locale de distribution des eaux.
Veillez à ce que le tuyau d'arrivée d'eau ne soit pas enroulé, écrasé ou enchevêtré lorsque
vous effectuez le raccordement.
Le lave-vaisselle est doté de tuyaux d'alimentation et de vidange pouvant être orientés à
gauche ou à droite selon les besoins de l'installation, à l'aide du contre-écrou.
Il est nécessaire que le contre-écrou soit installé correctement pour éviter toute
fuite d'eau.
(Attention ! Les lave-vaisselle ne sont PAS tous dotés de tuyaux d'alimentation et de vidange
avec contre-écrou. Dans ce cas-ci, cette option n'est pas disponible). Si l'appareil est raccordé au moyen de tuyaux neufs ou de tuyaux ayant peu servi, faites s'écouler l'eau pendant
quelques minutes avant de brancher le tuyau d'arrivée d'eau.
N'utilisez PAS des tuyaux provenant d'un ancien appareil.
Cet appareil est doté de fonctions de sécurité destinées à empêcher que l'eau utilisée dans
l'appareil ne soit réintroduite dans le système d'eau potable. Cet appareil est conforme aux
règlements applicables en matière de tuyauterie.
Tuyau d'arrivée d'eau avec soupape de sécurité
Après avoir raccordé le tuyau d'arrivée d'eau à double paroi, la soupape de sécurité se situe
à proximité du robinet. Par conséquent, le tuyau d'arrivée d'eau est sous pression uniquement lorsque l'eau s'écoule. Si le tuyau d'arrivée d'eau fuit au cours de cette opération, la
soupape de sécurité interrompt l'écoulement de l'eau.
Faites attention au moment d'installer le tuyau d'arrivée d'eau :
• Le fil électrique de la soupape de sécurité est situé à l'intérieur du tuyau d'arrivée d'eau
à double paroi. N'immergez pas le tuyau d'arrivée d'eau ou la soupape de sécurité dans
l'eau.
• Si le tuyau d'arrivée d'eau ou la soupape de sécurité est endommagé, remplacez immédiatement la prise secteur.
• Le remplacement du tuyau d'arrivée d'eau avec soupape de sécurité relève de la compétence exclusive d'un professionnel ou du Service Après-vente.
AVERTISSEMENT
Attention ! Tension dangereuse.
Page 59

Raccordement à l'arrivée d'eau
Raccordement du tuyau de vidange
L'extrémité du tuyau de vidange peut être raccordée de deux façons :
1. Au robinet de sortie de l'évier, en la fixant à la partie inférieure de la surface de travail.
Cela empêchera que les eaux usées de l'évier ne pénètrent dans l'appareil.
2. À une conduite fixe dotée d'une évacuation murale dotée d'une ventilation spéciale,
diamètre intérieur de 4 cm minimum.
Le raccordement de vidange doit être situé à une
hauteur maximale de 60 cm par rapport à la base
du lave-vaisselle.
Le tuyau de vidange peut être orienté à droite ou
à gauche du lave-vaisselle.
Assurez-vous que le tuyau n'est pas courbé ou
écrasé, sous peine d'empêcher ou de ralentir l'évacuation de l'eau.
Le bouchon d'évier ne doit pas être mis en place
lorsque l'appareil évacue l'eau, sous peine de provoquer un effet de siphon et un reflux de l'eau vers
l'appareil.
La longueur totale du tuyau de vidange, y compris
celle de la rallonge (si vous en utilisez une), ne doit
pas dépasser 4 mètres. Le diamètre intérieur de la
rallonge ne doit pas être inférieur au diamètre du tuyau de vidange fourni.
De même que le diamètre intérieur des raccords utilisés pour les branchements ne doit pas
être inférieur au diamètre du tuyau d'évacuation fourni.
Lorsque vous raccordez le tuyau de vidange à un embout du siphon sous l'évier, n'oubliez
pas d'enlever toute la membrane de plastique (A). Si vous oubliez d'enlever toute la
membrane, des particules d'aliments risquent de s'accumuler avec le temps et de boucher
l'embout du tuyau de vidange du lave-vaisselle.
Nos appareils sont équipés d'un dispositif de sécurité empêchant le reflux des eaux usées vers l'appareil. Si le robinet de
votre évier est doté d'un clapet de retenue incorporé, cela
pourrait entraver la vidange correcte de votre lave-vaisselle.
C'est pourquoi nous vous recommandons de le retirer.
59
Pour éviter toute fuite d'eau après l'installation, assurez-vous
que les raccords des tuyauteries d'eau sont bien serrés.
Page 60

Branchement électrique
60
Branchement électrique
AVERTISSEMENT
L'appareil doit être relié à la terre conformément aux normes en vigueur.
Avant d'utiliser l'appareil pour la première fois, vérifiez que la tension nominale et le type
d'alimentation figurant sur la plaque signalétique correspondent aux valeurs d'alimentation
de la pièce où l'appareil doit être installé.
La puissance nominale du fusible figure également sur la plaque signalétique.
Branchez toujours la fiche principale dans une prise correctement installée, protégée contre
les chocs et comportant une borne de mise à la terre. L'appareil ne doit pas être raccordé
à l'aide d'un prolongateur, d'une prise multiple ou d'un raccordement multiple.
Risque d'incendie.
Si nécessaire, remplacez la prise femelle de l'installation électrique de votre habitation. Si
le câble électrique doit être remplacé, contactez le Service Après-vente.
La prise doit rester accessible une fois que l'appareil est installé.
Pour débrancher l'appareil, ne tirez jamais sur le cordon mais tirez toujours la prise.
Le fabricant décline toute responsabilité en cas de non-respect des précautions de sécurité
mentionnées dans ce chapitre.
En matière de protection de l'environnement
Le symbole sur le produit ou son emballage indique que ce produit ne peut être traité
comme déchet ménager. Il doit être remis au point de collecte dédié à cet effet (collecte et
recyclage du matériel électrique et électronique).
En procédant à la mise au rebut de l'appareil dans les règles de l’art, nous préservons
l'environnement et notre sécurité, s’assurant ainsi que les déchets seront traités dans des
conditions optimum.
Pour obtenir plus de détails sur le recyclage de ce produit, veuillez prendre contact avec les
services de votre commune ou le magasin où vous avez effectué l'achat.
Matériaux d'emballage
Les matériaux d'emballage sont conçus dans le respect de l'environnement et sont recyclables. Les composants en plastique sont identifiables grâce aux sigles >PE <, >PS <, etc.
Veuillez jeter les matériaux d'emballage dans le conteneur approprié du centre de collecte
des déchets de votre commune.
AVERTISSEMENT
Si vous n'utilisez plus votre appareil :
• Retirez la fiche de la prise secteur.
• Coupez le câble et la fiche et jetez-les.
• Éliminez le loquet de la porte, cela évitera aux enfants de s'enfermer dans l'appareil et
de mettre ainsi leur vie en danger.
Page 61

Spis treści
Dziękujemy za wybranie jednego z naszych produktów o wysokiej
jakości.
Aby zapewnić optymalne i prawidłowe działanie Państwa urządzenia
prosimy o dokładne przeczytanie niniejszej instrukcji obsługi. Pozwoli to
Państwu na doskonałe i najbardziej wydajne kierowanie wszystkimi
procesami. Zalecamy przechowywanie instrukcji obsługi w
bezpiecznym miejscu, co pozwoli na korzystanie z niej również w
przyszłości. Ponadto prosimy o przekazanie jej przyszłemu
właścicielowi urządzenia.
Życzymy Państwu wiele radości z używania nowego urządzenia.
Spis treści
61
Wskazówki dla użytkownika 62
Informacje dotyczące bezpieczeństwa
62
Prawidłowe użycie 62
Ogólne zasady bezpieczeństwa
63
Bezpieczeństwo dzieci 63
Instalacja 63
Opis urządzenia 64
Panel sterowania 65
Wyświetlacz cyfrowy 66
Przyciski funkcyjne 66
Tryb ustawiania 66
Pierwsze użycie 67
Ustawianie zmiękczacza wody 67
Ustawianie ręczne 68
Ustawianie elektroniczne 68
Wsypywanie soli do zmywarki 69
Wlewanie płynu nabłyszczającego 69
Regulacja dozowania płynu
nabłyszczającego 70
Codzienna eksploatacja 71
Wkładanie sztućców i naczyń 71
Kosz dolny 72
Kosz na sztućce 73
Kosz górny 74
Regulowanie wysokości kosza
górnego 75
Stosowanie detergentu 76
Wsypywanie detergentu 76
117965990-00-072008
Uniwersalna tabletka do zmywarki 77
Włączanie lub wyłączanie funkcji
Multitab 78
Programy zmywania 79
Wybór i uruchamianie programu
zmywania 80
Wyjmowanie naczyń ze zmywarki 82
Konserwacja i czyszczenie 82
Czyszczenie filtrów 82
Czyszczenie ramion spryskujących
83
Czyszczenie zewnętrznych
powierzchni 84
Czyszczenie wnętrza 84
Dłuższe okresy nieużywania
urządzenia 84
Środki ostrożności dotyczące szronu
84
Przenoszenie urządzenia 84
Co zrobić, gdy… 84
Dane techniczne 87
Wskazówki dla ośrodków
przeprowadzających testy 87
Instrukcje instalacji 88
Instalacja 88
Mocowanie do sąsiednich mebli
89
Poziomowanie 89
Podłączenie do sieci wodociągowej 89
Podłączenie do sieci wodociągowej
89
Page 62

62
Informacje dotyczące bezpieczeństwa
Wąż doprowadzający wodę z
zaworem bezpieczeństwa 90
Podłączenie węża spustu wody
Podłączenie do sieci elektrycznej 92
Ochrona środowiska 92
90
Opakowanie 92
Może ulec zmianie bez powiadomienia
Wskazówki dla użytkownika
Informacje dotyczące bezpieczeństwa
W celu zapewnienia bezpieczeństwa użytkownika i bezawaryjnej pracy urzą‐
dzenia przed instalacją i pierwszym użyciem należy uważnie przeczytać in‐
strukcję obsługi, zwracając szczególną uwagę na wskazówki oraz ostrzeżenia.
Wszyscy użytkownicy zmywarki powinni poznać zasady bezpiecznej obsługi
urządzenia. Pozwoli to uniknąć niepotrzebnych pomyłek i wypadków. Prosimy
o zachowanie instrukcji obsługi przez cały czas używania zmywarki oraz prze‐
kazanie jej, w razie odstąpienia lub sprzedaży urządzenia, kolejnemu użyt‐
kownikowi.
Prawidłowe użycie
• Zmywarka jest przeznaczona jedynie do mycia naczyń i przyborów kuchen‐
nych nadających się do mycia w zmywarce.
• Do zmywarki nie wolno wlewać żadnych rozpuszczalników, ponieważ mogą
one spowodować wybuch.
• Noże oraz inne ostre przedmioty należy wkładać do koszyka na sztućce
ostrzami skierowanymi w dół lub układać poziomo w koszu górnym.
• Należy używać produktów (detergentów, soli oraz płynu nabłyszczającego)
przeznaczonych wyłącznie dla zmywarek.
• Nie należy otwierać drzwiczek zmywarki w trakcie pracy. Grozi to wydosta‐
niem się na zewnątrz gorącej pary.
• Nie należy wyjmować ze zmywarki naczyń przed zakończeniem cyklu my‐
cia.
• Po zakończeniu mycia należy odłączyć urządzenie od źródła zasilania i za‐
kręcić zawór wodny.
• Prace konserwacyjne i naprawy urządzenia może wykonywać wyłącznie
uprawniony technik z autoryzowanego zakładu serwisowego. Stosować wy‐
łącznie oryginalne części zamienne.
• Pod żadnym pozorem nie należy próbować samodzielnie naprawiać urzą‐
dzenia. Wykonywanie napraw przez osoby niewykwalifikowane może pro‐
wadzić do obrażeń ciała i poważnych usterek urządzenia. Należy skontak‐
tować się z lokalnym zakładem serwisowym. Stosować wyłącznie oryginal‐
ne części zamienne.
Page 63

Informacje dotyczące bezpieczeństwa
Ogólne zasady bezpieczeństwa
• Detergenty używane w zmywarkach mogą powodować chemiczne oparze‐
nia oczu, ust i gardła. Mogą stanowić zagrożenie dla życia! Należy prze‐
strzegać wskazówek producentów detergentów dotyczących ich bezpiecz‐
nego używania.
• Woda w zmywarce nie nadaje się do picia. W zmywarce mogą pozostawać
resztki detergentu.
• Drzwiczki zmywarki powinny być zawsze zamknięte, za wyjątkiem momentu
wkładania lub wyjmowania naczyń. Pozwala to uniknąć niebezpieczeństwa
potknięcia się o otwarte drzwiczki i doznania obrażeń.
• Nie wolno siadać ani stawać na otwartych drzwiczkach.
Bezpieczeństwo dzieci
• Urządzenie mogą obsługiwać jedynie osoby dorosłe. Nie zezwalać dz ieciom
na obsługiwanie zmywarki bez nadzoru.
• Opakowanie należy przechowywać w miejscu niedostępnym dla dzieci. Ist‐
nieje ryzyko uduszenia.
• Detergenty należy przechowywać w bezpiecznym miejscu niedostępnym
dla dzieci.
• Dzieci nie powinny znajdować się w pobliżu zmywarki, gdy jej drzwi są ot‐
warte.
Instalacja
• Po rozpakowaniu, sprawdzić, czy zmywarka nie została uszkodzona w cza‐
sie transportu. Zabrania się podłączania uszkodzonego urządzenia do za‐
silania. Jeśli zmywarka jest uszkodzona, należy skontaktować się z dostaw‐
cą.
• Przed rozpoczęciem eksploatacji należy zdjąć opakowanie.
• Wszystkie prace elektryczne i hydrauliczne wymagane w celu instalacji
zmywarki muszą być wykonywane przez wykwalifikowaną oraz kompetent‐
ną osobę.
• Ze względów bezpieczeństwa zabrania się dokonywania jakichkolwiek mo‐
dyfikacji lub zmian konstrukcyjnych w urządzeniu.
• Nigdy nie należy używać zmywarki, jeśli przewód elektryczny, węże, panel
sterujący, blat roboczy lub obszar cokołu są uszkodzone w taki sposób, że
wnętrze urządzenia jest łatwo dostępne. Należy skontaktować się z lokal‐
nym zakładem serwisowym, aby uniknąć uszkodzeń.
• Aby uniknąć uszkodzeń części hydraulicznych oraz elektrycznych, nie na‐
leży nawiercać ścianek bocznych urządzenia.
OSTRZEŻENIE!
Podłączenie elektryczne i hydrauliczne należy wykonywać zgodnie z instruk‐
cjami podanymi w odpowiednich rozdziałach.
63
Page 64

64
Opis urządzenia
Opis urządzenia
1 Kosz górny
2 Regulacja ustawienia twardości wody
3 Pojemnik na sól
4 Dozownik detergentu
5 Dozownik płynu nabłyszczającego
6 Tabliczka znamionowa
7 Filtry
8 Dolne ramię spryskujące
9 Górne ramię spryskujące
Zmywarka posiada wewnętrzne oświetlenie, które włącza się i wyłącza przy
otwarciu i zamknięciu jej drzwiczek.
Wewnętrzne oświetlenie składa się z diod klasy 1 zgodnie z normami EN
60825-1: 1994 + A1: 2002 + A2: 2001.
W razie konieczności wymiany żarówki należy skontaktować się z lokalnym
punktem serwisowym.
Page 65

Panel sterowania
Panel sterowania
7
65
10
9
8
1 Przycisk Wł./Wył.
2 RESET Przycisk
3 Przyciski wyboru programów
4 NIGHT CYCLE Przycisk
5 MULTITAB Przycisk
6 Przycisk opóźnienia rozpoczęcia programu
7 Wyświetlacz cyfrowy
8 Przyciski funkcyjne
9 Lampki kontrolne
10 Kontrolki programów
Lampki kontrolne
MULTITAB Oznacza włączenie lub wyłączenie funk‐
cji " MULTITAB" (patrz rozdział " MULTI‐
TAB")
Page 66

66
Panel sterowania
Lampki kontrolne
Sól Zapala się, gdy skończy się specjalna sól.
1)
Płyn nabłyszczający Zapala się, gdy skończy się płyn nabły‐
szczający.
1) Kontrolki soli i płynu nabłyszczającego nie świecą się nigdy podczas trwania programu
zmywania, nawet jeśli konieczne jest uzupełnienie soli lub płynu nabłyszczającego.
1)
Wyświetlacz cyfrowy
Na wyświetlaczu cyfrowym podawane są następujące informacje:
• poziom twardości wody, na który ustawione jest zmiękczanie wody
• szacunkowy czas do zakończenia trwającego programu
• włączenie lub wyłączenie dozownika płynu nabłyszczającego (TYLKO wte‐
dy, gdy włączona jest funkcja Multitab )
• zakończenie programu (na wyświetlaczu cyfrowym pojawi się zero)
• odliczanie do momentu opóźnionego rozpoczęcia programu
• kody błędów dotyczące nieprawidłowości w pracy zmywarki.
NIGHT CYCLE Przycisk
Night Cycle określa cichy program zmywania, który nie będzie przeszkadzał
domownikom nawet w czasie snu. Można go zaprogramować na noc lub na
porę dnia, w której cena energii elektrycznej jest niższa.
W trakcie Night Cycle pompa pracuje na niskich obrotach, co pozwala na re‐
dukcję poziomu hałasu o 25% w porównaniu do normalnej pracy zmywarki na
wybranym programie. Wskutek tego wydłuża się znacznie czas zmywania na‐
czyń.
Przyciski funkcyjne
Za pomocą tych przycisków można ustawić następujące funkcje:
• ustawienie stopnia zmiękczania wody
• włączenie lub wyłączenie dozownika płynu nabłyszczającego, gdy aktywna
jest funkcja Multitab.
Tryb ustawiania
Urządzenie jest w trybie ustawiania, gdy palą się kontrolki WSZYSTKICH pro‐
gramów.
Należy zawsze pamiętać, że podczas wykonywania czynności takich jak:
– wybieranie programu zmywania,
– ustawianie stopnia zmiękczania wody,
– włączanie lub wyłączanie dozownika płynu nabłyszczającego
urządzenie MUSI być w trybie ustawiania.
Jeśli świeci się kontrolka jednego z programów, to wciąż ustawiony jest ostat‐
nio wykonywany lub ustawiony program. W takim przypadku należy anulować
program, aby powrócić do trybu ustawiania.
Page 67

Pierwsze użycie
Anulowanie ustawionego programu lub programu w toku
Nacisnąć i przytrzymać przycisk RESET aż zapalą się kontrolki wszystkich
programów. Program został anulowany i urządzenie jest w trybie ustawiania.
Pierwsze użycie
Przed pierwszym użyciem zmywarki:
• Sprawdzić, czy podłączenia elektryczne i hydrauliczne zostały wykonane
zgodne z instrukcją instalacji.
• Wyjąć wszystkie elementy opakowania z urządzenia.
• Ustawić zmiękczacz wody.
• Wlać 1 litr wody do zbiornika na sól, a następnie wsypać sól przeznaczoną
do zmywarek.
• Wlać płyn nabłyszczający.
Aby stosować detergenty w tabletkach typu: "3 w 1", "4 w 1", "5 w 1" itp...
ustawić funkcję Multitab (patrz "Funkcja Multitab").
Ustawianie zmiękczacza wody
Zmywarka jest wyposażona w system zmiękczania wody, dzięki któremu moż‐
liwe jest usuwanie minerałów i soli z wody doprowadzanej do urządzenia, które
mogą mieć szkodliwy lub negatywny wpływ na działanie zmywarki.
Im wyższa zawartość minerałów i soli, tym twardsza jest woda. Twardość wody
jest mierzona w skali przeliczeniowej, w stopniach niemieckich, stopniach
francuskich lub w mmol/l (milimolach na litr) (milimol na litr -międzynarodowa
jednostka twardości wody).
Zmiękczanie powinno być dopasowane do stopnia twardości wody na danym
obszarze. W lokalnym zakładzie wodociągowym można uzyskać informację
na temat twardości wody.
Zmiękczanie wody można ustawić w dwojaki sposób: ręcznie, przy użyciu tar‐
czy twardości wody oraz elektronicznie.
Twardość wody Regulacja ustawienia
twardości wody
°dH °TH mmol/l Ręczne Elektronicz‐
ne
51 - 70 91 - 125 9,1 - 12,5 2 poziom 10 tak
43 - 50 76 - 90 7,6 - 8,9 2 poziom 9 tak
37 - 42 65 - 75 6,51 - 7,5 2 poziom 8 tak
29 - 36 51 - 64 5,1 - 6,4 2 poziom 7 tak
23 - 28 40 - 50 4,0 - 5,0 2 poziom 6 tak
19 - 22 33 - 39 3,3 - 3,9 2 poziom 5 tak
67
Stosowanie
soli
Page 68

68
Ustawianie zmiękczacza wody
Twardość wody Regulacja ustawienia
°dH °TH mmol/l Ręczne Elektronicz‐
15 - 18 26 - 32 2,61 - 3,2 1 poziom 4 tak
11 - 14 19 - 25 1,9 - 2,5 1 poziom 3 tak
4 - 10 7 - 18 0,71 - 1,8 1 poziom 2 tak
< 4 < 7 < 0,7 1 poziom 1 nie
Ustawianie ręczne
Zmywarka jest fabrycznie ustawiona na pozycję 2.
1. Otworzyć drzwi zmywarki.
2. Wyjąć dolny kosz ze zmywarki.
3. Obrócić tarczę twardości wody i us‐
tawić ją na pozycji 1 lub 2 (patrz ta‐
belka).
4. Włożyć dolny kosz.
Ustawianie elektroniczne
Zmywarka jest fabrycznie ustawiona na poziom 5.
twardości wody
Stosowanie
soli
ne
1. Nacisnąć przycisk . Zmywarka musi być w trybie ustawiania.
2. Wcisnąć równocześnie i przytrzymać przyciski B i C, dopóki kontrolki przy‐
cisków A, B i C nie zaczną migać.
3. Wcisnąć przycisk A, kontrolki przycisków B i C gasną, a kontrolka przycisku
A nadal miga. Na wyświetlaczu cyfrowym pojawi się bieżące ustawienie.
Przykłady:
= poziom 5
= poziom 10
4. Aby zmienić poziom, należy nacisnąć przycisk A. Każde wciśnięcie przy‐
cisku to zmiana o jeden poziom. (Wybór nowego poziomu, patrz tabela.)
Przykłady: Jeśli obecny poziom to 5, wciśnięcie przycisku A jeden raz
zmienia poziom na 6. Jeśli obecny poziom to 10, wciśnięcie przycisku A
jeden raz zmienia poziom na 1.
5. Aby zapamiętać operację, należy wyłączyć zmywarkę wciskając przycisk
Wł./Wył.
Page 69

Wsypywanie soli do zmywarki
Wsypywanie soli do zmywarki
OSTRZEŻENIE!
Należy stosować wyłącznie sól przeznaczoną do zmywarek. Inne rodzaje soli,
a w szczególności sól kuchenna, mogą uszkodzić instalację zmiękczania wody
w zmywarce. Napełniać solą tuż przed rozpoczęciem jednego z pełnych pro‐
gramów zmywania. Dzięki temu zapobiegnie się pozostawaniu soli lub słonej
wody na dnie urządzenia, co mogłoby sprzyjać powstawaniu korozji.
Aby wsypać sól:
1. Otworzyć drzwiczki, wyjąć dolny kosz, zdjąć pokrywę pojemnika na sól
(odkręcić obracając w stronę przeciwną do ruchu wskazówek zegara).
2. Wlać 1 litr wody do pojemnika (jest to konieczne jedynie przed nasypaniem
soli za pierwszym razem).
3. Przy pomocy lejka dostarczonego w
komplecie wsypać sól do pełna.
4. Przed założeniem pokrywy spraw‐
dzić, czy na gwincie lub na uszczel‐
ce nie pozostały resztki soli.
5. Dokręcić pokrywę, obracając ją
zgodnie z ruchem wskazówek ze‐
gara, aż do słyszalnego kliknięcia.
Nie należy się przejmować, jeśli pod‐
czas wsypywania soli z pojemnika na
sól wypływa woda. Jest to zjawisko nor‐
malne.
69
Kontrolka soli na panelu sterowania może pozostać włączona przez 2-6 godzin
po uzupełnieniu soli, przy założeniu, że zmywarka jest przez ten czas włączo‐
na. Jeśli zastosowana sól rozpuszcza się dłużej, czas ten może być dłuższy.
Nie ma to wpływu na pracę urządzenia.
Wlewanie płynu nabłyszczającego
OSTRZEŻENIE!
Stosować jedynie markowe płyny nabłyszczające do zmywarek.
Nigdy nie wlewać do dozownika płynu nabłyszczającego żadnych innych sub‐
stancji (np. środków do czyszczenia zmywarek, detergentów w płynie). Mogą
one uszkodzić urządzenie.
Płyn nabłyszczający zapewnia całkowite wypłukanie naczyń oraz wysuszenie
bez plam i smug.
Płyn nabłyszczający jest dodawany automatycznie podczas ostatniego płuka‐
nia.
Page 70

70
Wlewanie płynu nabłyszczającego
1. Otworzyć pojemnik wciskając przy‐
cisk (A).
2. Wlać płyn nabłyszczający do pojem‐
nika. Maksymalny poziom płynu na‐
błyszczającego w pojemniku ozna‐
czony jest za pomocą "max".
Dozownik ma pojemność ok. 110 ml,
co wystarczy na ok. 16 do 40 pro‐
gramów zmywania, w zależności od
ustawionego poziomu dozowania.
3. Po każdym uzupełnieniu płynu na‐
błyszczającego należy sprawdzić,
czy pokrywa jest zamknięta.
Starannie wytrzeć ściereczką płyn na‐
błyszczający rozlany podczas napełnia‐
nia, aby uniknąć nadmiernego wytwa‐
rzania piany podczas następnego zmywania.
Regulacja dozowania płynu nabłyszczającego
W zależności od wyników zmywania i suszenia należy wyregulować dawkę
płynu nabłyszczającego przy pomocy pokrętła z 6 pozycjami (pozycja 1 - daw‐
ka minimalna, pozycja 6 - dawka maksymalna).
Dawka ustawiona fabrycznie to 4.
Page 71

Codzienna eksploatacja
Jeśli po zmywaniu na naczyniach pozostają
krople wody lub ślady kamienia, należy
zwiększyć dawkę.
Jeśli na szklanych naczyniach i ostrzach
noży pojawiają się białawe klejące smugi
lub niebieskawa warstwa, zmniejszyć daw‐
kę.
Codzienna eksploatacja
• Sprawdzić, czy nie ma konieczności uzupełnienia poziomu soli lub płynu
nabłyszczającego w zmywarce.
• Włożyć naczynia i sztućce do zmywarki.
• Wsypać detergent.
• Wybrać program zmywania odpowiedni do sztućców i naczyń.
• Rozpocząć program zmywania.
71
Wkładanie sztućców i naczyń
W zmywarce nie można zmywać gąbek, ściereczek ani innych przedmiotów,
które absorbują wodę.
• Przed włożeniem naczyń należy:
– Usunąć pozostałości jedzenia i inne resztki.
– Namoczyć resztki przypalonego jedzenia na patelniach.
• Podczas wkładania naczyń i sztućców należy pamiętać, że:
– Naczynia i sztućce nie mogą blokować ramion spryskujących.
– Naczynia wklęsłe, takie jak kubki, szklanki, garnki, itp., należy wkładać
otworem do dołu, aby umożliwić spływanie wody.
– Naczynia i sztućce nie mogą leżeć jedne w drugich i nie mogą się wza‐
jemnie przykrywać.
– Aby uniknąć stłuczenia szkła, przedmioty szklane nie mogą się stykać.
– Małe przedmioty należy wkładać do kosza na sztućce.
• Przedmioty plastikowe oraz patelnie teflonowe mają tendencję do zatrzy‐
mywania kropel wody i nie schną tak dobrze jak porcelana i przedmioty sta‐
lowe.
• Lekkie naczynia (np. miseczki plastikowe itp.) powinny być wkładane do
górnego kosza i tak ustawione, aby nie mogły się przesuwać.
Page 72

72
Wkładanie sztućców i naczyń
Mycie naczyń i sztućców w zmywarce
nie należy zmywać: można zmywać w ograniczonym zakre‐
• Sztućce z rączkami z drewna, rogu, po‐
rcelany, macicy perłowej.
• Przedmioty z plastiku nieodporne na
ciepło.
• Stare sztućce z klejonymi częściami
nieodpornymi na działanie temperatu‐
ry.
• Naczynia i sztućce spiekane.
• Przedmioty ze stopu Pewter lub miedzi.
• Kryształ ołowiowy.
• Przedmioty stalowe nieodporne na
rdzewienie.
• Deski drewniane.
• Przedmioty z włókien syntetycznych.
• Zmywać kamionkę jedynie, jeśli dany
wyrób jest dopuszczony przez produ‐
centa do mycia w zmywarkach.
• Wzory szkliwione mogą blednąć przy
częstym myciu.
• Przedmioty ze srebra i aluminium mają
tendencję do przebarwiania się pod‐
czas mycia. Pozostałości, na przykład
białka czy żółtka jajka, musztardy itp.,
często powodują odbarwienia i plamy
na przedmiotach ze srebra. W związku
z tym, należy natychmiast usuwać
resztki żywności ze srebra, jeśli przed‐
mioty te nie są myte od razu po użyciu.
Otworzyć drzwiczki i wysunąć kosze, aby włożyć naczynia.
Kosz dolny
Większe i bardziej zabrudzone talerze i
garnki należy umieszczać w koszu dolnym.
sie:
Aby ułatwić ułożenie dużych naczyń, moż‐
na złożyć wszystkie uchwyty na talerze
znajdujące się w koszu dolnym.
Page 73

Wkładanie sztućców i naczyń
Kosz na sztućce
OSTRZEŻENIE!
Aby nie dopuścić do ryzyka zranienia, noże i inne ostre sztućce należy wkładać
do tacki na sztućce lub układać w koszu górnym.
Noże, łyżeczki i widelczyki należy wkładać
do tacy na sztućce znajdującej się w gór‐
nym koszu. Widelce i łyżki, które nie pasują
do tacy na sztućce, należy wkładać do ko‐
sza na sztućce.
Aby zapewnić, że wszystkie sztućce w ko‐
szu na sztućce będą miały kontakt z wodą, należy:
1. Umieścić kratkę na koszu na sztuć‐
ce.
73
2. Widelce i łyżki należy umieszczać w
koszu na sztućce uchwytami skiero‐
wanymi do dołu.
Dla większych przyborów kuchen‐
nych, np. ubijaczki do jajek, należy
przeznaczyć połowę kratki kosza na
sztućce.
Page 74

74
Wkładanie sztućców i naczyń
Kosz na sztućce można otworzyć.
Należy zawsze chwycić w dłoń obie części
dwuczęściowego uchwytu, aby wyjąć kosz
ze zmywarki.
1. Położyć kosz na sztućce na stole lub
blacie roboczym.
2. Otworzyć uchwyt dwuczęściowy.
3. Wyjąć sztućce.
Kosz górny
Drobne i delikatne oraz długie i ostre sztuć‐
ce należy umieszczać w koszu górnym.
• Ułożyć naczynia na i pod półkami na fili‐
żanki tak, aby były odsunięte od siebie
oraz woda miała dostęp do wszystkich
naczyń.
• Półki na filiżanki można złożyć, aby
zrobić miejsce dla wyższych naczyń.
• Kieliszki do wina i brandy należy poło‐
żyć lub zawiesić na otworach półek na
filiżanki.
Page 75

• W przypadku kieliszków na wysokich
nóżkach należy ustawić półkę na fili‐
żanki w położeniu prawym, w innym
przypadku w położeniu lewym.
• Rząd kolców z lewej strony kosza gór‐
nego również jest dwuczęściowy i mo‐
że zostać złożony.
Kolce niezłożone: szklanki, kubki itp.,
należy umieszczać w koszu górnym.
Kolce złożone: więcej miejsca na duże
talerze.
Wkładanie sztućców i naczyń
75
Regulowanie wysokości kosza górnego
Maksymalna wysokość naczyń:
kosz górny kosz dolny
Przy podniesionym koszu
górnym
Przy obniżonym koszu
górnym
Wysokość kosza górnego można regulować również, gdy jest załadowany.
Podnoszenie / opuszczanie kosza górnego:
22 cm 30 cm
24 cm 29 cm
Page 76

76
Stosowanie detergentu
1. Całkowicie wysunąć kosz górny.
2. Trzymając kosz górny za uchwyt,
należy go podnieść najwyżej jak to
możliwe, a następnie go obniżyć.
Kosz górny ustawi się w dolnej lub
górnej pozycji.
OSTRZEŻENIE!
Po włożeniu naczyń do urządzenia na‐
leży zawsze zamykać drzwiczki, aby za‐
pobiec ewentualnym wypadkom.
Przed zamknięciem drzwiczek spraw‐
dzić, czy ramiona spryskujące obracają się swobodnie.
Stosowanie detergentu
Stosować jedynie detergenty przeznaczone do zmywarek.
Proszę przestrzegać zaleceń producenta dotyczących dawkowania i przecho‐
wywania podanych na opakowaniu detergentów.
Nie stosować dawek większych niż przepisano. Dzięki temu zmniejsza się za‐
nieczyszczenie środowiska.
Wsypywanie detergentu
1. Otworzyć pokrywę.
Page 77

Uniwersalna tabletka do zmywarki
2. Wsypać proszek do dozownika de‐
tergentu (1). Oznaczenia poziomu
dozowania:
20 = ok. 20 g detergentu
30 = ok. 30 g detergentu.
3. Wszystkie programy z myciem
wstępnym wymagają wsypania do‐
datkowej porcji (5/10 g) detergentu
do przeznaczonej na ten cel prze‐
gródki (2).
Detergent ten będzie zużyty pod‐
czas fazy mycia wstępnego.
4. Stosując detergent w tabletkach, na‐
leży umieścić tabletkę w komorze
(1).
5. Zamknąć pokrywę i docisnąć ją, aż
zaskoczy.
Detergent w tabletkach
Detergenty w tabletkach pochodzące
od różnych producentów rozpuszczają
się w różnym czasie. W związku z tym,
niektóre detergenty w tabletkach nie
osiągają pełnej mocy zmywania pod‐
czas krótkich programów. Dlatego, sto‐
sując detergent w tabletkach, należy ko‐
rzystać z dłuższych programów zmywa‐
nia, aby zapewnić całkowite usunięcie resztek detergentu.
77
Uniwersalna tabletka do zmywarki
Urządzenie jest wyposażone w funkcję "Multitab ", która umożliwia korzystanie
z uniwersalnych złożonych środków do zmywarek w formie tabletek "Multitab".
Tabletki te są detergentami łączącymi w sobie środek zmywający, środek na‐
błyszczający i sól. Mogą one również zawierać inne środki, w zależności od
wybranego rodzaju tabletek ("3 w 1", "4 w 1", "5 w 1", itp...).
Sprawdzić, czy detergenty te są odpowiednie do stopnia twardości wody do‐
prowadzanej do zmywarki. Patrz instrukcja producenta.
Funkcję tę można włączyć we wszystkich programach zmywania. Po włącze‐
niu tej funkcji, automatycznie wyłączony zostanie dopływ płynu nabłyszczają‐
cego oraz soli z dozowników, a kontrolki soli i płynu nabłyszczającego będą
wyłączone.
Funkcję "Multitab" należy włączyć przed uruchomieniem programu zmywania.
Po wybraniu tej funkcji (świeci się odpowiednia kontrolka) będzie ona aktywna
również dla wszystkich kolejnych programów zmywania.
Page 78

78
Uniwersalna tabletka do zmywarki
W czasie korzystania z funkcji "Multitab" długości poszczególnych programów
mogą się zmieniać. W takim przypadku, informacje o czasie trwania programu
będą na bieżąco aktualizowane na wyświetlaczu cyfrowym.
Gdy program jest już włączony, funkcji "Multitab" NIE MOŻNA zmienić. Aby
wyłączyć funkcję "Multitab", należy najpierw anulować ustawiony program i
dopiero wtedy wyłączyć funkcję "Multitab".
W takiej sytuacji należy ponownie ustawić program zmywania (i żądane opcje).
Włączanie lub wyłączanie funkcji Multitab
Nacisnąć przycisk Multitab: Zapali się odpowiednia kontrolka. Oznacza to, że
funkcja jest aktywna.
Aby wyłączyć funkcję, ponownie wcisnąć przycisk Multitab: kontrolka zgaśnie.
Jeśli wyniki suszenia nie są zadowalające, zalecamy:
1. Napełnić dozownik płynu nabłyszczającego.
2. Włączyć dozownik płynu nabłyszczającego.
3. Ustawić dozowanie płynu nabłyszczającego na poziom 2.
• Włączenie lub wyłączenie dozownika płynu nabłyszczającego jest możliwe
jedynie wtedy, gdy włączona jest funkcja "Multitab".
Włączanie lub wyłączanie dozownika płynu nabłyszczającego
1. Wcisnąć przycisk Wł./Wył. Zmywarka musi być w trybie ustawiania.
2. Jednocześnie wcisnąć i przytrzymać przyciski B i C, dopóki kontrolki przy‐
cisków A, B i C nie zaczną migać.
3. Wcisnąć przycisk B. Gasną kontrolki przycisków A i C, a kontrolka przyci‐
sku B nadal miga. Na wyświetlaczu cyfrowym pojawia się bieżące usta‐
wienie:
= Dozownik płynu nabłyszczającego wyłączony.
= Dozownik płynu nabłyszczającego włączony.
4. Aby zmienić ustawienie, ponownie nacisnąć przycisk B. Na wyświetlaczu
cyfrowym pojawi się nowe ustawienie.
5. Aby zapamiętać operację, należy wyłączyć zmywarkę wciskając przycisk
Wł./Wył.
Chcąc zrezygnować z tabletek i zacząć używać oddzielnych środków do zmy‐
warek należy:
1. Wyłączyć funkcję "Multitab".
2. Ponownie napełnić dozowniki soli i płynu nabłyszczającego.
3. Ustawić zmiękczanie wody na najwyższy poziom i przeprowadzić 1 zwykły
program zmywania bez wkładania naczyń.
4. Zmienić ustawienia zmiękczacza wody odpowiednio do twardości wody
podłączonej do zmywarki.
5. Wyregulować dozowanie płynu nabłyszczającego.
Page 79

Programy zmywania
Programy zmywania
79
Program Stopień
zabru‐
dzenia
AUTO
45-70°
3)
Miesza‐
ne: śred‐
nio i silnie
zabru‐
dzone
INTENSIV
CARE 70°
Bardzo
zabru‐
dzone
30 MIN 60°4)Lekko
zabru‐
dzone
5)
ECO 50°
Średnio
zabru‐
dzone
Średnio
zabru‐
dzone
Dowolny Niepełne
NIGHT
CYCLE
Średnio
zabru‐
dzone
Rodzaj
załadun‐
ku
Naczynia
stołowe,
sztućce,
garnki i
patelnie
Naczynia
stołowe,
sztućce,
garnki i
patelnie
Naczynia
stołowe i
sztućce
Naczynia
stołowe i
sztućce
Delikatne
naczynia
i szkło
załado‐
wanie (do
uzupeł‐
nienia w
ciągu
6)
dnia)
Naczynia
stołowe i
sztućce
Opis programu Parametry eks‐
Mycie wstępne
Zmywanie zasadnicze
Płukanie pośrednie
Płukanie końcowe
Suszenie
1/2x
ploatacyjne
1)
Czas trwania (w minutach) 2)Pobór mocy (w kWh)
-
1,1 - 1,7
-
1,5 -1,7
0,9
-
1,0 - 1,1
-
0,8 -0,9
0,1
-
1.1 - 1.3
Woda (w litrach)
12 - 23
16 - 18
9
12 - 13
14 - 15
4
13 - 14
Page 80

80
Wybór i uruchamianie programu zmywania
Program Stopień
zabru‐
dzenia
1) Podane wartości mają jedynie orientacyjny charakter. Zależą one od ciśnienia i temperatury
wody, a także od zmian w napięciu zasilania oraz ilości naczyń.
2) Na wyświetlaczu cyfrowym pojawi się informacja o długości trwania programu.
3) W trakcie programu zmywania "Auto" stopień zabrudzenia naczyń jest określany na podstawie
stopnia zmętnienia wody. Czas trwania programu, pobór wody i energii mogą się różnić w
zależności od stopnia załadowania urządzenia i poziomu zabrudzenia naczyń. Temperatura
wody jest regulowana automatycznie w zakresie od 45°C do 70°C.
4) Idealny do zmywania w przypadku częściowego załadowania zmywarki. Jest to program
doskonale nadający się do codziennego użytku. Został opracowany pod kątem potrzeb
czteroosobowej rodziny, która zmywa tylko naczynia i sztućce po śniadaniu i obiedzie.
5) Program testowy dla ośrodków przeprowadzających testy
6) Ten program nie wymaga stosowania detergentu
Rodzaj
załadun‐
ku
Opis programu Parametry eks‐
ploatacyjne
Mycie wstępne
Zmywanie zasadnicze
Płukanie pośrednie
Płukanie końcowe
Suszenie
Wybór i uruchamianie programu zmywania
1)
2)
Czas trwania (w minutach)
Pobór mocy (w kWh)
Woda (w litrach)
Wybrać program zmywania oraz opóźnienie rozpoczęcia programu przy lekko
uchylonych drzwiach zmywarki. Program lub odliczanie czasu opóźnienia roz‐
poczęcia programu zaczyna się dopiero po zamknięciu drzwi. Do tego mo‐
mentu można zmodyfikować ustawienia.
1. Sprawdzić, czy naczynia włożono do koszy prawidłowo, a ramiona sprys‐
kujące mogą się swobodnie obracać.
2. Sprawdzić, czy zawór wody jest otwarty.
3. Nacisnąć przycisk Wł./Wył. Zmywarka musi być w trybie ustawiania.
4. Aby wybrać program zmywania, należy nacisnąć jeden z przycisków wy‐
boru programów (patrz tabela "Programy zmywania").
Po wyborze programu pali się kontrolka danego programu, a na wyświet‐
laczu cyfrowym pulsuje czas trwania programu.
5. Zamknąć drzwi zmywarki. Program rozpocznie się automatycznie.
Ustawianie i uruchamianie programu z opóźnionym rozpoczęciem
1. Po wybraniu programu zmywania naciskać przycisk opóźniający jego roz‐
poczęcie, dopóki na wyświetlaczu cyfrowym nie pojawią się migające cyfry
Page 81

Wybór i uruchamianie programu zmywania
odpowiadające liczbie godzin opóźnienia. Rozpoczęcie wybranego pro‐
gramu zmywania można opóźnić w zakresie od 1 do 19 godzin.
2. Zamknąć drzwi zmywarki. Odliczanie rozpocznie się automatycznie.
3. W czasie odliczania co godzinę będzie zmniejszać się ustawiona liczba
godzin opóźnienia.
4. Otwarcie drzwi przerywa bieg odliczania. Zamknąć drzwi. Odliczanie bę‐
dzie kontynuowane od momentu przerwania.
5. Po upływie ustawionego czasu opóźnienia nastąpi samoczynne urucho‐
mienie programu.
Wyboru programu zmywania oraz opóźnienia jego rozpoczęcia można doko‐
nać również przy zamkniętych drzwiach. Należy pamiętać, że po wciśnięciu
przycisku zmywania użytkownik ma TYLKO 3 sekundy na wybranie innego
programu lub opóźnienia rozpoczęcia programu, po którym wybrany program
rozpocznie się automatycznie.
OSTRZEŻENIE!
Przerwanie lub anulowanie trwającego programu jest dozwolone JEDYNIE w
razie absolutnej konieczności. Uwaga! Po otwarciu drzwi może wydostać się
gorąca para. Drzwi należy otwierać ostrożnie.
Anulowanie trwającego programu zmywania lub ustawionego
opóźnionego rozpoczęcia programu
• Nacisnąć przycisk RESET aż zapalą się kontrolki wszystkich programów.
• Anulowanie opóźnienia rozpoczęcia programu oznacza również anulowanie
ustawionego programu zmywania. W takim przypadku należy ponownie us‐
tawić program zmywania.
• Jeśli wybrany zostanie nowy program zmywania, sprawdzić, czy w dozow‐
niku jest detergent.
81
Przerwanie trwającego programu zmywania
• Otworzyć drzwi zmywarki. Program zostanie zatrzymany. Zamknąć drzwi.
Program rozpocznie się od momentu, w którym został przerwany.
• Nacisnąć przycisk Wł./Wył. Wyłączą się wszystkie lampki kontrolne. Po‐
nownie nacisnąć przycisk Wł./Wył. Program rozpocznie się od momentu, w
którym został przerwany.
Zakończenie programu zmywania
• Zmywarka zatrzyma się automatycznie, a sygnał dźwiękowy powiadomi
użytkownika o zakończeniu programu zmywania.
• Kontrolka zakończonego programu pozostanie włączona.
• Na wyświetlaczu cyfrowym pojawi się zero.
1. Wyłączyć zmywarkę przyciskiem Wł./Wył.
Page 82

82
Wyjmowanie naczyń ze zmywarki
Po zakończeniu programu zmywania zaleca się wyłączenie urządzenia. Jeśli
to nie nastąpi, po upływie około 3 minut od zakończenia programu wszystkie
kontrolki zgasną samoczynnie. Na wyświetlaczu cyfrowym pojawi się pozioma
linia.
Pozwala to na ograniczenia zużycia energii w przypadku, gdy użytkownik za‐
pomni wyłączyć zmywarkę lub nie wyłączy jej z innego powodu po zakończe‐
niu programu zmywania.
Nacisnąć dowolny przycisk (za wyjątkiem przycisku Wł./Wył.), a panel stero‐
wania (kontrolki oraz wyświetlacz cyfrowy) będzie tak samo wyglądał jak w
momencie zakończenia programu.
2. Otworzyć drzwi zmywarki i pozostawić je otwarte na kilka minut przed wy‐
jęciem naczyń. W ten sposób mogą one nieco ostygnąć i lepiej wyschną.
Wyjmowanie naczyń ze zmywarki
• Gorące naczynia mogą się łatwo stłuc.
Przed ich wyjęciem ze zmywarki należy odczekać, aż ostygną.
• Najpierw wyjmować naczynia z dolnego kosza, a potem z górnego. Dzięki
temu krople wody z górnego kosza nie będą skapywać na naczynia w do‐
lnym koszu.
• Woda może pojawić się na ściankach oraz drzwiczkach zmywarki, ponieważ
stal nierdzewna ochłodzi się do temperatury niższej niż naczynia.
UWAGA!
Po zakończeniu programu mycia zaleca się odłączyć zmywarkę od zasilania i
zakręcić zawór wody.
Konserwacja i czyszczenie
Czyszczenie filtrów
Filtry należy okresowo sprawdzać i czyścić. Brudne filtry sprawiają, że wyniki
zmywania są gorsze.
OSTRZEŻENIE!
Przed rozpoczęciem czyszczenia filtrów, należy upewnić się, czy urządzenie
jest wyłączone.
1. Otworzyć drzwi i wyjąć dolny kosz.
Page 83

2. System filtrów zmywarki składa się z
filtra zgrubnego (A), mikrofiltra (B) i
filtra płaskiego. Odblokować system
filtrów za pomocą rączki na mikrofil‐
trze i wyjąć system filtrów.
3. Przekręcić rączkę o około 1/4 obrotu
w kierunku przeciwnym do ruchu
wskazówek zegara oraz wyjąć sys‐
tem filtrów.
4. Chwycić filtr zgrubny (A) za uchwyt
z otworem oraz wyjąć go z mikrofiltra
(B).
5. Dokładnie przemyć wszystkie filtry
pod bieżącą wodą.
Konserwacja i czyszczenie
83
6. Wyjąć filtr płaski z podstawy komory
zmywania i przemyć go dokładnie z
obu stron.
7. Odpowiednio zamocować filtr płaski
z powrotem na dole komory zmywa‐
nia upewniając się że dobrze pasu‐
je.
8. Włożyć filtr zgrubny (A) do mikrofil‐
tra (B) i docisnąć je razem.
9. Włożyć filtry z powrotem na miejsce
i zablokować je, przekręcając rącz‐
kę. W trakcie wykonywania tej czyn‐
ności, należy dopilnować, aby filtr
płaski nie.
OSTRZEŻENIE!
NIGDY nie należy używać zmywarki bez zamontowanych filtrów. Nieprawid‐
łowe ponowne włożenie i zamocowanie filtrów pogarsza wyniki zmywania oraz
może prowadzić do uszkodzenia urządzenia.
Czyszczenie ramion spryskujących
NIGDY nie wolno wyjmować ramion spryskujących.
Page 84

84
Co zrobić, gdy…
W razie zatkania otworów w ramionach spryskujących przez zanieczyszczenia
należy je usunąć patyczkiem.
Czyszczenie zewnętrznych powierzchni
Oczyścić zewnętrzną powierzchnię urządzenia oraz panel sterowania wilgotną
mokrą ściereczką. W razie potrzeby użyć neutralnego detergentu. Nigdy nie
stosować materiałów ściernych, myjek ani rozpuszczalników (acetonu, trich‐
loroetylenu, itp.).
Czyszczenie wnętrza
Regularnie czyścić uszczelki drzwiowe, dozownik nabłyszczacza oraz dozow‐
nik detergentu mokrą ściereczką.
Zalecamy uruchomienie raz na 3 miesiące programu do mycia bardzo zabru‐
dzonych naczyń, z użyciem detergentu, ale bez wkładania naczyń.
Dłuższe okresy nieużywania urządzenia
W przypadku nieużywania urządzenia przez dłuższy okres należy:
1. Odłączyć urządzenie od zasilania, a następnie zakręcić wodę.
2. Zostawić drzwi otwarte, aby zapobiec tworzeniu się nieprzyjemnych.
3. Pozostawić wnętrze urządzenia w czystym stanie.
Środki ostrożności dotyczące szronu
Należy unikać umieszczania urządzenia w miejscu o temperaturze poniżej
0°C. Jeżeli nie można tego uniknąć, należy je opróżnić, zamknąć drzwi oraz
odłączyć i opróżnić przewód doprowadzenia wody.
Przenoszenie urządzenia
W razie konieczności przeniesienia urządzenia (przeprowadzka, itd.), należy:
1. Wyjąć wtyczkę z gniazdka.
2. Zakręcić zawór wody.
3. Odłączyć węże doprowadzenia i spustu wody.
4. Wyjąć urządzenie wraz z wężami.
Należy unikać przechylania urządzenia podczas transportu.
Co zrobić, gdy…
Zmywarka nie daje się uruchomić lub przestaje działać podczas używania.
Niektóre problemy są wynikiem niedopełnienia prostych czynności konserwa‐
cyjnych lub przeoczeń i można je rozwiązać stosując się do wskazówek pod‐
anych w niniejszej instrukcji, bez konieczności kontaktu z serwisem technicz‐
nym.
Wyłączyć zmywarkę i przeprowadzić następujące zalecane działania korygu‐
jące.
Page 85

Co zrobić, gdy…
Kod błędu i nieprawidłowe działanie Możliwa przyczyna i rozwiązanie
• ciągłe miganie kontrolki trwającego
programu
• Na wyświetlaczu cyfrowym pojawia się
.
• rozlega się przerywany sygnał dźwię‐
kowy
Zmywarka nie napełnia się wodą.
• ciągłe miganie kontrolki trwającego
programu
• Na wyświetlaczu cyfrowym pojawia się
.
• rozlega się przerywany sygnał dźwię‐
kowy
Zmywarka nie może wypompować wody.
• ciągłe miganie kontrolki trwającego
programu
• Na wyświetlaczu cyfrowym pojawia się
.
• rozlega się przerywany sygnał dźwię‐
kowy
Uruchomione zostało zabezpieczenie
przed zalaniem.
Nie można włączyć programu. • Drzwi zmywarki nie zostały prawidłowo
• Zawór wody jest zablokowany lub za‐
tkany osadem kamienia.
Przeczyścić zawór wody.
• Zawór wody jest zamknięty. Odkręcić
zawór wody.
• Filtr (jeżeli występuje) w miejscu pod‐
łączenia węża doprowadzającego wo‐
dę w gwintowanym króćcu zaworu
zmywarki jest zablokowany.
Przeczyścić filtr w gwintowanym króć‐
cu zaworu zmywarki.
• Wąż doprowadzający wodę nie został
prawidłowo poprowadzony, jest zagię‐
ty lub przygnieciony.
Sprawdzić podłączenie węża doprowa‐
dzającego wodę.
• Odpływ jest zablokowany.
Przeczyścić odpływ.
• Wąż spustu wody nie został właściwie
ułożony, jest zagięty lub przygnieciony.
Sprawdzić podłączenie węża spustu
wody.
• Zakręcić zawór wody i skontaktować
się z lokalnym autoryzowanym serwi‐
sem.
zamknięte. Zamknąć drzwi.
• Urządzenie nie zostało podłączone do
zasilania. Włożyć wtyczkę do gniazd‐
ka.
• Przepalony bezpiecznik w domowej in‐
stalacji elektrycznej.
Wymienić bezpiecznik.
• Wybrany został opóźniony start.
W razie potrzeby natychmiastowego
umycia naczyń należy wyłączyć opó‐
źniony start.
85
Po wykonaniu opisanych czynności kontrolnych należy włączyć urządzenie.
Program rozpocznie się od momentu, w którym został przerwany.
W razie ponownego pojawienia się kodu błędu, należy skontaktować się z Au‐
toryzowanym Serwisem.
Page 86

86
Co zrobić, gdy…
W razie pojawienia się innych kodów błędu nieopisanych w powyższej tabeli
należy skontaktować się z Autoryzowanym Serwisem podając model (Mod.),
numer produktu (PNC) oraz numer seryjny (S.N.).
Informacje te można znaleźć na tabliczce znamionowej umieszczonej na bocz‐
nej krawędzi drzwi zmywarki.
Aby zapewnić łatwy dostęp do tych danych, proponujemy ich zapisanie w tym
miejscu:
Model : . . . . . . . . . . . . . . . . . . . . . . .
Nr produktu: . . . . . . . . . . . . . . . . . . . . . . .
Nr seryjny : . . . . . . . . . . . . . . . . . . . . . . . .
Wyniki zmywania są niezadowalające
Naczynia są brudne • Wybrany został niewłaściwy program
Naczynia są wilgotne i matowe • Nie zastosowano płynu nabłyszczają‐
Na szklankach i naczyniach widać smugi,
mleczne plamy lub niebieskawy nalot
Na szklankach i naczyniach widać za‐
schnięte krople wody
zmywania.
• Naczynia były ułożone w sposób unie‐
możliwiający dotarcie wody do wszyst‐
kich części powierzchni naczyń. Nie
należy przeładowywać koszy.
• Ramiona spryskujące nie obracają się
swobodnie z powodu niewłaściwego
ułożenia naczyń.
• Filtry w podstawie komory zmywania
są brudne lub niewłaściwie ustawione.
• Użyto za mało detergentu lub nie użyto
go w ogóle.
• W przypadku kamienia na naczyniach:
pojemnik na sól jest pusty lub wybrano
niewłaściwy poziom zmiękczania wo‐
dy.
• Nieprawidłowe podłączenie węża
spustowego.
• Nieprawidłowe zamknięcie pokrywy
pojemnika na sól.
cego.
• Dozownik płynu nabłyszczającego jest
pusty.
• Zmniejszyć dozowanie płynu nabły‐
szczającego.
• Zwiększyć dozowanie płynu nabły‐
szczającego.
• Przyczyną może być zastosowany de‐
tergent. Należy skontaktować się z
działem obsługi klienta producenta de‐
tergentu.
Jeśli po wykonaniu wszystkich opisanych czynności urządzenie nadal nie jest
sprawne, należy skontaktować się z lokalnym autoryzowanym serwisem.
Page 87

Dane techniczne
Dane techniczne
Wymiary Szer. x wys. x głęb. (w cm) 59,6 x 81,8-89,8 x 57,5
Przyłącze elektryczne -
Napięcie - Moc całkowita Bezpiecznik
Ciśnienie doprowadzanej
wody
Pojemność Liczba kompletów 12
Informacje dotyczące przyłącza elektrycznego znajdują
się na tabliczce znamionowej umieszczonej na bocznej
ściance drzwi zmywarki.
Minimalne - Maksymalne
(w MPa)
0,05 - 0,8
Wskazówki dla ośrodków przeprowadzających testy
Testy na zgodność z normą PN-EN 60704 należy przeprowadzać na całkowi‐
cie załadowanym urządzeniu i przy użyciu programu testowego (patrz "Pro‐
gramy zmywania").
Testy na zgodność z normą EN 50242 należy przeprowadzać po napełnieniu
zbiornika na sól i dozownika płynu nabłyszczającego odpowiednio solą i pły‐
nem nabłyszczającym oraz przy użyciu programu testowego (patrz "Programy
zmywania").
Pełny załadunek: 12 standardowych kompletów
Ilość potrzebnego detergentu: 5 g + 25 g (typ B)
Ustawienia płynu nabłyszczającego: pozycja 4 (typ III)
Przykłady ułożenia naczyń
Kosz górny
1)
87
Page 88

88
Instalacja
Kosz dolny z koszem na sztućce Kosz na sztućce
1) Jeśli z lewej strony znajdują się półki na filiżanki lub zastosowano pojemnik na sztućce, należy
je wyjąć.
Instrukcje instalacji
Instalacja
OSTRZEŻENIE!
Wszelkie prace elektryczne i/lub hydrauliczne wymagane w celu zainstalowa‐
nia urządzenia powinny być wykonywane przez wykwalifikowanego elektryka
i/lub hydraulika albo inną kompetentną osobę.
Przed instalacją urządzenia należy zdjąć opakowanie.
Jeżeli to możliwe, należy umieścić urządzenie obok zaworu wody i spustu.
Ta zmywarka jest przeznaczona do montowania pod blatem kuchennym lub
blatem roboczym.
Uwaga! Należy dokładnie przestrzegać instrukcji zamieszczonych w załączo‐
nym szablonie dotyczącym instalacji zmywarki w zabudowie i montowania
frontu meblowego.
Nie ma potrzeby zapewnienia otworów do wentylacji zmywarki. Jedyne otwory
są wymagane w celu przeprowadzenia węża doprowadzającego i spustowego
wody oraz przewodu zasilającego.
Zmywarka posiada nóżki umożliwiające regulację wysokości.
Podczas wszystkich czynności, w trakcie których osoba je przeprowadzająca
ma dostęp do komponentów wewnętrznych, zmywarka musi być odłączona od
źródła zasilania.
Wkładając urządzenie, należy uważać, aby nie zaplątać i nie zgiąć węży do‐
prowadzenia i spustu wody.
Page 89

Podłączenie do sieci wodociągowej
Mocowanie do sąsiednich mebli
Zmywarkę należy zabezpieczyć przed przechyleniem.
W tym celu należy sprawdzić, czy blat, pod którym jest zainstalowana, jest
odpowiednio przymocowany do stabilnej struktury (sąsiadujących szafek ku‐
chennych lub ściany).
Poziomowanie
Dobre wypoziomowanie jest istotne dla prawidłowego zamykania i uszczel‐
niania drzwi. W przypadku prawidłowego wypoziomowania urządzenia, jego
drzwi nie będą się o nic zahaczały. W razie niemożności prawidłowego za‐
mknięcia drzwi, należy poluzować lub dokręcić regulowane nóżki aż do ideal‐
nego wypoziomowania urządzenia.
Podłączenie do sieci wodociągowej
Podłączenie do sieci wodociągowej
Urządzenie można podłączyć do gorącej (maks. temp. 60°) lub zimnej wody.
Dzięki podłączeniu do gorącej wody można uzyskać znaczne zmniejszenie
zużycia energii elektrycznej. Jednak zależy to od sposobu wytwarzania gorą‐
cej wody. (Zalecamy korzystanie z alternatywnych źródeł energii, które są bar‐
dziej przyjazne dla środowiska jak na przykład energia słoneczna lub energia
wiatru).
Dla samodzielnego podłączenia, nakrętka węża zasilającego została zapro‐
jektowana w ten sposób, aby można ją było połączyć do króćca z gwintem 3/4
cala lub specjalnym szybkozłączem jak na przykład moduł zaciskowy.
Ciśnienie wody musi zmieścić się w przedziale określonym w "Danych tech‐
nicznych". Informacje na temat średniego ciśnienia wody w Państwa miejscu
zamieszkania można uzyskać w miejscowych zakładach wodociągowych.
Przy podłączaniu wąż doprowadzenia wody nie może być zaplątany ani zgnie‐
ciony.
Zmywarka została wyposażona w węże doprowadzenia i spustu wody, które
mogą być przekręcane w lewo lub w prawo za pomocą przeciwnakrętki, za‐
leżnie od wymogów instalacji.
Aby uniknąć przecieków, należy właściwie zamocować przeciwnakrętkę.
(Uwaga! NIE wszystkie modele zmywarek zostały wyposażone w węże do‐
prowadzenia i spustu wody z przeciwnakrętkami. W takim przypadku, podany
wyżej sposób instalacji nie jest możliwy.) Jeżeli urządzenie podłączane jest do
nowych rur lub rur, które nie były przez dłuższy czas używane, przed podłą‐
czeniem węża doprowadzającego wodę, należy odkręcić wodę na kilka minut.
NIE stosować węży używanych poprzednio ze starym urządzeniem.
Urządzenie zostało wyposażone w zabezpieczenia uniemożliwiające powrót
wody używanej w urządzeniu do systemu wody pitnej. Urządzenie spełnia wy‐
mogi odpowiednich przepisów hydraulicznych.
89
Page 90

90
Podłączenie do sieci wodociągowej
Wąż doprowadzający wodę z zaworem bezpieczeństwa
Po podłączeniu węża doprowadzającego wodę o podwójnych ściankach za‐
wór bezpieczeństwa znajduje się obok zaworu wody. Z tego względu, wąż
doprowadzenia wody znajduje się pod ciśnieniem wyłącznie po odkręceniu
wody. Jeżeli podczas wykonywania tej czynności wąż zaczyna przeciekać,
zawór bezpieczeństwa odcina bieżącą wodę.
Podczas instalacji węża doprowadzającego wodę, należy zachować ostroż‐
ność:
• W wężu doprowadzającym wodę z podwójnymi ściankami znajduje się prze‐
wód elektryczny zasilający zawór bezpieczeństwa. Nie zanurzyć węża do‐
prowadzenia wody ani zaworu bezpieczeństwa w wodzie.
• W razie uszkodzenia węża doprowadzenia wody lub zaworu bezpieczeń‐
stwa, natychmiast odłączyć zasilanie.
• Wąż doprowadzający wodę może być wymieniony wyłącznie przez specja‐
listę lub serwisanta z autoryzowanego serwisu.
OSTRZEŻENIE!
Ostrzeżenie! Urządzenie pod napięciem.
Podłączenie węża spustu wody
Końcówkę węża spustowego można podłączyć w następujący sposób:
1. Do króćca na syfonie od zlewu, podczepiając równocześnie wąż tuż pod
powierzchnią blatu kuchennego. Zapobiegnie to cofaniu się wody ze zlewu
do urządzenia.
2. Do rury kanalizacyjnej, o średnicy wewnętrznej nie mniejszej niż 4 cm, po‐
łączonej bezpośrednio z syfonem i bez uszczelnienia.
Page 91

Podłączenie do sieci wodociągowej
91
Podłączenie do instalacji odpływowej musi
znajdować się na wysokości maksymalnie
60 cm od podstawy zmywarki.
Wąż spustowy może zostać skierowany na
prawą lub lewą stronę zmywarki.
Należy dopilnować, aby wąż nie był zgięty
ani zgnieciony, co mogłoby uniemożliwić
lub spowolnić spuszczanie wody.
Zatyczka do zlewu nie może być włożona
podczas spuszczania wody z urządzenia,
ponieważ mogłoby to spowodować ponow‐
ne wprowadzenie wody do urządzenia.
Całkowita długość węża spustowego łącz‐
nie z dołączonym przez użytkownika węż‐
em przedłużającym nie może wynosić więcej niż 4 metry. Średnica wewnętrz‐
na węża przedłużającego nie może być mniejsza niż średnica węża dostar‐
czonego w komplecie.
Ponadto, wewnętrzna średnica węża przedłużającego jak i złączek używanych
do podłączenia spustu wody nie może być mniejsza od wewnętrznej średnicy
węża spustowego zmywarki.
W przypadku podłączenia węża spustowego do syfonu kolankowego należy
całkowicie usunąć plastikową membranę (A). Jeśli membrana nie zostanie
całkowicie usunięta, istnieje ryzyko odkładania się na niej resztek jedzenia, co
z biegiem czasu może doprowadzić do zablokowania odpływu wody ze zmy‐
warki.
Nasze urządzenia zostały wyposażone w zabezpie‐
czenia przed powrotem brudnej wody do urządzenia.
Jeśli w zlewie zamontowano zawór zwrotny może on
uniemożliwić prawidłowe odprowadzanie wody ze
zmywarki. Dlatego zalecamy jego usunięcie.
Po zainstalowaniu sprawdzić szczelność podłącze‐
nia hydraulicznego.
Page 92

92
Podłączenie do sieci elektrycznej
Podłączenie do sieci elektrycznej
OSTRZEŻENIE!
Normy bezpieczeństwa wymagają podłączenia urządzenia do gniazda z prze‐
wodem ochronnym.
Przed pierwszym użyciem urządzenia należy sprawdzić, czy napięcie zna‐
mionowe oraz rodzaj zasilania podane na tabliczce znamionowej odpowiadają
parametrom zasilania w miejscu, w którym urządzenie ma być zainstalowane.
Na tabliczce znamionowej znajdują się informacje dotyczące wartości bez‐
piecznika.
Należy zawsze podłączać urządzenie do prawidłowo zainstalowanego gniazd‐
ka z uziemionym bolcem ochronnym. Nie stosować przedłużaczy ani rozga‐
łęziaczy.
Grozi to niebezpieczeństwem pożaru w wyniku przegrzania.
W razie potrzeby należy wymienić gniazdko sieciowe. W razie potrzeby wy‐
miany przewodu elektrycznego, należy skontaktować się z lokalnym autory‐
zowanym serwisem.
Po zainstalowaniu urządzenia należy zapewnić dostęp do wtyczki.
Nie wyjmować wtyczki z gniazdka ciągnąc za kabel. Zawsze ciągnąć za wtycz‐
kę.
Producent nie bierze na siebie żadnej odpowiedzialności w przypadku nie‐
zastosowania się do powyższych wskazówek bezpieczeństwa.
Ochrona środowiska
Symbol na produkcie lub na opakowaniu oznacza, że tego produktu nie
wolno traktować tak, jak innych odpadów domowych. Należy oddać go do
właściwego punktu skupu surowców wtórnych zajmującego się złomowanym
sprzętem elektrycznym i elektronicznym. Właściwa utylizacja i złomowanie
pomaga w eliminacji niekorzystnego wpływu złomowanych produktów na
środowisko naturalne oraz zdrowie. Aby uzyskać szczegółowe dane
dotyczące możliwości recyklingu niniejszego urządzenia, należy
skontaktować się z lokalnym urzędem miasta, służbami oczyszczania miasta
lub sklepem, w którym produkt został zakupiony.
Opakowanie
Materiały z opakowania są przyjazne dla środowiska i można je poddać recy‐
klingowi. Elementy z tworzyw sztucznych posiadają odpowiednie oznaczenia,
np. >PE <, >PS< itd. Materiały z opakowania należy wyrzucać do odpowied‐
niego pojemnika.
OSTRZEŻENIE!
Jeśli urządzenie nie będzie już używane:
• Wyjąć wtyczkę z gniazdka.
• Odciąć przewód oraz wtyczkę i wyrzucić je.
• Usunąć zamek w drzwiczkach. Dzięki temu można zapobiec niebezpie‐
czeństwu zamknięcia się dzieci wewnątrz urządzenia.
Page 93

939495
Page 94

Page 95

Page 96

www.electrolux.com
www.aeg-electrolux.fr
117965990-00-072008
 Loading...